

Page 1

Bild in der Größe
215x70 mm einfügen
COMAND Operator’s Manual
Page 2

Welcome to COMAND!
Please make yourself familiar with your
COMAND control unit and read the instruc
tions in this manual before operating the
COMAND system. This will help you derive
a greater benefit from the system. Please
also follow the instructions and warnings
contained in this manual. Ignoring them
could result in damage to the vehicle or
personal injury to you or others.
The asterisk* identifies optional equipment. Depending on model, version and
configuration, your COMAND system
equipment may differ. Therefore, you may
find explanations for optional equipment
not installed in your vehicle. If you have
any questions about the operation of any
equipment, your authorized MercedesBenz Center will be glad to demonstrate
the proper procedures.
We continuously strive to improve our product and ask for your understanding that
we reserve the right to make changes in
design and equipment. Therefore, informa
tion, illustrations and descriptions in this
manual might differ from the equipment in
stalled in your vehicle. As such, the information, illustrations and descriptions
contained in this manual may not be reaso
nably relied upon in making any claims
with respect to the actual performance of
the product.
These operating instructions form an integral part of the vehicle and should therefore always be kept inside the vehicle and
passed on to the new owner if the vehicle
is sold.
We extend our best wishes for many miles
of safe, pleasurable driving.
Mercedes-Benz USA, LLC
A DaimlerChrysler Company
-
-
-
Page 3

Introduction . . . . . . . . . . . . . . . . . . . . . 7
Where to find it . . . . . . . . . . . . . . . . . . . 7
Symbols . . . . . . . . . . . . . . . . . . . . . . . . . 8
Operating safety. . . . . . . . . . . . . . . . . . . 9
At a glance . . . . . . . . . . . . . . . . . . . . . 11
Radio operating elements . . . . . . . . . . 12
Single CD operating elements . . . . . . . 14
CD changer operating elements. . . . . . 16
MP3 CD operating elements . . . . . . . . 18
Satellite radio operating elements . . . . 20
Telephone* operating elements. . . . . . 22
Navigation operating elements . . . . . . 24
Service operating elements . . . . . . . . . 26
Multifunction steering wheel . . . . . . . . 28
Selecting the multifunction display 29
Menu system . . . . . . . . . . . . . . . . . . . . 31
Quick reference COMAND . . . . . . . . . . 34
Switching the COMAND
control unit on and off . . . . . . . . . . 34
Volume . . . . . . . . . . . . . . . . . . . . . . 34
Balance. . . . . . . . . . . . . . . . . . . . . . 36
Bass and Treble . . . . . . . . . . . . . . . 37
Sound functions . . . . . . . . . . . . . . . 38
Audio . . . . . . . . . . . . . . . . . . . . . . . . . . 41
Audio menu . . . . . . . . . . . . . . . . . . . . . 42
Opening the Audio menu . . . . . . . . 42
Selecting an audio source . . . . . . . 42
Muting . . . . . . . . . . . . . . . . . . . . . . 42
Radio operation . . . . . . . . . . . . . . . . . . 43
Switching the radio operation on . . 43
Changing the Radio band . . . . . . . . 43
Selecting a station . . . . . . . . . . . . . 45
Memory functions. . . . . . . . . . . . . . 48
CD operation . . . . . . . . . . . . . . . . . . . . 52
General Information on
CD operation . . . . . . . . . . . . . . . . . 52
Tips on caring for your CDs . . . . . . 53
Playback information . . . . . . . . . . . 53
Switching to CD operation . . . . . . . 54
Loading CDs . . . . . . . . . . . . . . . . . . 54
Switching on. . . . . . . . . . . . . . . . . . 57
Selecting a CD (CD changer only). . 58
Track select . . . . . . . . . . . . . . . . . . 59
Fast forward/reverse . . . . . . . . . . . 60
Muting . . . . . . . . . . . . . . . . . . . . . . 61
Playback mode . . . . . . . . . . . . . . . . 61
MP3-CD operation . . . . . . . . . . . . . . . . 63
General Information . . . . . . . . . . . . 63
Contents
Tips on caring for your MP3-CDs . . 64
Tips on creating MP3 CDs . . . . . . . 64
Tips on creating MP3 tracks . . . . . . 66
Tips on copyright . . . . . . . . . . . . . . 66
Switching to MP3-CD operation . . . 67
MP3-CD main menu . . . . . . . . . . . . 68
Selecting a folder . . . . . . . . . . . . . . 69
Selecting a track. . . . . . . . . . . . . . . 69
Fast forward/reverse . . . . . . . . . . . 70
Muting. . . . . . . . . . . . . . . . . . . . . . . 71
Playback mode . . . . . . . . . . . . . . . . 71
MP3 options . . . . . . . . . . . . . . . . . . 72
DVD operation . . . . . . . . . . . . . . . . . . . 75
General information on
DVD operation . . . . . . . . . . . . . . . . 75
DVD playback requirements . . . . . . 76
Switching to DVD operation . . . . . . 76
Loading a DVD . . . . . . . . . . . . . . . . 77
Ejecting a DVD . . . . . . . . . . . . . . . . 78
Soft key display and status bar. . . . 79
Soft key functions. . . . . . . . . . . . . . 80
DVD menu. . . . . . . . . . . . . . . . . . . . 82
Settings menu. . . . . . . . . . . . . . . . . 83
Adjusting brightness, contrast
and color. . . . . . . . . . . . . . . . . . . . . 86
Selecting a movie . . . . . . . . . . . . . . 86
Page 4

Contents
Selecting a scene/chapter . . . . . . . 87
Fast forward/reverse . . . . . . . . . . . 87
Satellite radio . . . . . . . . . . . . . . . . . . . 89
Important notes . . . . . . . . . . . . . . . . . . 90
Subscribing to satellite radio . . . . . 91
Satellite radio operation. . . . . . . . . . . . 92
Switching on . . . . . . . . . . . . . . . . . . 92
Changing the program category . . . 93
Selecting a station . . . . . . . . . . . . . 93
Memory functions. . . . . . . . . . . . . . 95
Displaying information . . . . . . . . . . 96
Displaying service information . . . . 97
Sound settings . . . . . . . . . . . . . . . . 97
Telephone* . . . . . . . . . . . . . . . . . . . . . 99
Important notes . . . . . . . . . . . . . . . . . 100
Telephone operation. . . . . . . . . . . . . . 104
Switching telephone operation on 104
Switching telephone operation off 104
Emergency call “911” . . . . . . . . . . 105
Entering codes . . . . . . . . . . . . . . . 107
Switching to telephone operation 108
Incoming call. . . . . . . . . . . . . . . . . 109
Outgoing calls. . . . . . . . . . . . . . . . 110
Active call . . . . . . . . . . . . . . . . . . . 114
Phone book. . . . . . . . . . . . . . . . . . 116
Saving phone numbers . . . . . . . . . 121
Navigation. . . . . . . . . . . . . . . . . . . . . 125
Important notes . . . . . . . . . . . . . . . . . 126
Navigation DVD. . . . . . . . . . . . . . . 127
Route guidance after the vehicle
has been transported . . . . . . . . . . 128
Trip interruption during route
guidance . . . . . . . . . . . . . . . . . . . . 129
Navigation main menu . . . . . . . . . . . . 130
Activating the Navigation
main menu . . . . . . . . . . . . . . . . . . 130
Setting the route mode. . . . . . . . . 132
Audio settings for the
navigation announcements. . . . . . 133
Saving current position. . . . . . . . . 134
Destination input . . . . . . . . . . . . . . . . 136
Activating the Destination
Entry menu . . . . . . . . . . . . . . . . . . 136
Selecting home address . . . . . . . . 150
Route guidance. . . . . . . . . . . . . . . . . . 151
Starting route guidance . . . . . . . . 151
Route calculation . . . . . . . . . . . . . 151
Recalculating an existing route. . . 151
Voice instructions . . . . . . . . . . . . . 151
Navigation displays . . . . . . . . . . . . 152
Partially digitized areas. . . . . . . . . 155
Off-road and off-map. . . . . . . . . . . 157
Arriving at destination. . . . . . . . . . 159
Cancelling route guidance . . . . . . 159
During route guidance . . . . . . . . . . . . 160
Displaying the soft keys . . . . . . . . 160
Info menu . . . . . . . . . . . . . . . . . . . 160
Via function (soft key via) . . . . . . . 162
Selecting a detour. . . . . . . . . . . . . 163
Stopover function . . . . . . . . . . . . . 165
Saving the current location. . . . . . 167
Defining route guidance displays . 167
Last destinations and
destination memory . . . . . . . . . . . . . . 171
Last destinations memory. . . . . . . 171
Destination memory . . . . . . . . . . . 172
POIs (Points of Interest) . . . . . . . . . . . 176
Entering POIs . . . . . . . . . . . . . . . . 176
Selecting a POI around your
current location. . . . . . . . . . . . . . . 177
Selecting a POI around
another location . . . . . . . . . . . . . . 178
Page 5

Contents
Selecting a POI around a global
destination . . . . . . . . . . . . . . . . . . 179
Selecting a POI on the map . . . . . 180
Software Updates . . . . . . . . . . . . . . . 182
Service . . . . . . . . . . . . . . . . . . . . . . . 183
Service main menu. . . . . . . . . . . . . . . 184
Activating the Service main menu 184
SMS (Mail) . . . . . . . . . . . . . . . . . . . . . 185
SMS Inbox . . . . . . . . . . . . . . . . . . 185
Reading SMS message received. . 187
Saving a sender phone number . . 188
Deleting a SMS message* . . . . . . 191
Address book . . . . . . . . . . . . . . . . . . . 192
Activating the Address
book menu . . . . . . . . . . . . . . . . . . 192
Entries in the address book . . . . . 192
Selecting an entry. . . . . . . . . . . . . 193
Details on an address book entry. 194
Details on a mobile phone
internal memory entry . . . . . . . . . 198
New address book entry. . . . . . . . 201
Deleting an address book entry . . 202
Using an address book entry
in other system modes. . . . . . . . . 203
Tele Aid . . . . . . . . . . . . . . . . . . . . . . . 205
General . . . . . . . . . . . . . . . . . . . . . 205
Emergency call . . . . . . . . . . . . . . . 205
Roadside Assistance. . . . . . . . . . . 206
Information call. . . . . . . . . . . . . . . 207
Remote Door Unlock and
Stolen Vehicle Recovery. . . . . . . . 208
Entering data . . . . . . . . . . . . . . . . . . . 209
Input via selection menu. . . . . . . . 209
Input via 12-button keypad. . . . . . 211
System settings . . . . . . . . . . . . . . . . 213
System settings . . . . . . . . . . . . . . . . . 214
Setting the date/time . . . . . . . . . 214
Switching verification and
notification tones on and off. . . . . 217
Making display settings . . . . . . . . 217
Voice control system* . . . . . . . . . . . . 219
Voice control system* functions . 219
Reset function . . . . . . . . . . . . . . . . . . 220
Glossary . . . . . . . . . . . . . . . . . . . . . . 221
Index . . . . . . . . . . . . . . . . . . . . . . . . . 225
Page 6

6
Page 7

Where to find it
This Operator’s Manual is designed to provide support information for you, the
COMAND
own guide color to provide fast access to
information.
At a glance
Here you will find an overview of
all
components. If you are operating
COMAND
rented or borrowed the vehicle, this is the
chapter you should read first.
Audio
Here you will find all the information on
how to use the radio, CD player (CD,
MP3-CD), CD changer (CD, MP3-CD) and
DVD drive.
operator. Each chapter has its
COMAND control elements and system
for the first time or if you have
Satellite radio
This chapter provides information on how
to select a station and a program category.
Telephone*
Here you can learn in detail about the
many functions of the telephone, how to
initiate an emergency call and use the pho
ne book.
Navigation
This chapter provides detailed information
on the following topics:
Destination input
Route guidance including detour
Last destinations and destination
memory
Introduction
Where to find it
Service
Here you will find all the information about:
SMS
Address book
Tele Aid
System settings
This chapter provides information on how
to adjust COMAND system settings.
Directories
The glossary explains the most important
technical terms.
The table of contents and index directory
will help you quickly locate the information
you need.
POIs
7
Page 8

Introduction
Symbols
Symbols
You will find the following symbols in these
operating instructions:
* The asterisk identifies optional
equipment. Since not all models
have the same standard equip
ment, your COMAND system equipment may deviate from some
descriptions and illustrations.
-
Warning G
Warning notices draw your attention to hazards that may endanger your health or life,
or the health or life of others.
!
Highlights hazards that may result in
damage to your COMAND.
i
Helpful hints or further information you
may find useful.
This symbol points to instructions for
you to follow.
A number of these symbols appearing
in succession indicates a multiple-step
procedure.
The continuation symbol
marks an interrupted proce
dure which will be continued
on the next
page.
( page 9) This symbol tells you where
to look for further information on this subject.
-> This symbol is used in the
glossary. It indicates that
the term immediately follo
wing the symbol is also explained in the glossary.
Display Messages, menu items or
soft key names appearing in
the COMAND color display
are printed in the type
shown here.
-
-
8
Page 9

Operating safety
Introduction
Operating safety
Warning G
Any alterations made to electronic components and the software can cause malfunc
tions.
The radio, amplifier, CD changer, satellite radio, telephone*, navigation module and
voice control system* are interconnected.
When one of the components is not operati
onal or has not been removed/replaced properly, the function of other components may
be impaired.
This condition might seriously impair the
operating safety of your vehicle.
We recommend that you have any service
work on electronic components carried out
only by qualified personnel.
Warning G
In order to avoid distraction which could
lead to an accident, the driver should enter
system settings with the vehicle at a stand
still and operate the system only when road
and traffic conditions permit.
Bear in mind that at a speed of just
-
30 mp/h (approximately 50 km/h), your car
is covering a distance of 44 feet (approxima
tely 14 m) every second.
COMAND supplies you with information to
help you select your route more easily and
guide you conveniently and safely to your
destination. For safety reasons, we encoura
ge the driver to stop the vehicle in a safe
place before answering or placing a call, or
consulting the COMAND screen to read na
vigational maps, instructions, or downloaded information.
While the navigation system provides directional assistance, the driver must remain focused on safe driving behavior, including
attention to traffic and street signs, and
should utilize the system’s audio cues while
driving.
The navigation system does not supply any
information on stop signs, yield signs, traffic
regulations or traffic safety rules. This al
ways remains your personal responsibility
when you drive. DVD maps do not cover all
areas nor all routes within an area.
-
-
-
9
Page 10

10
Page 11

At a glance
Radio operating elements
Single CD operating elements
CD changer operating elements
MP3 CD operating elements
Satellite radio operating elements
Telephone* operating elements
Navigation system operating elements
Service operating elements
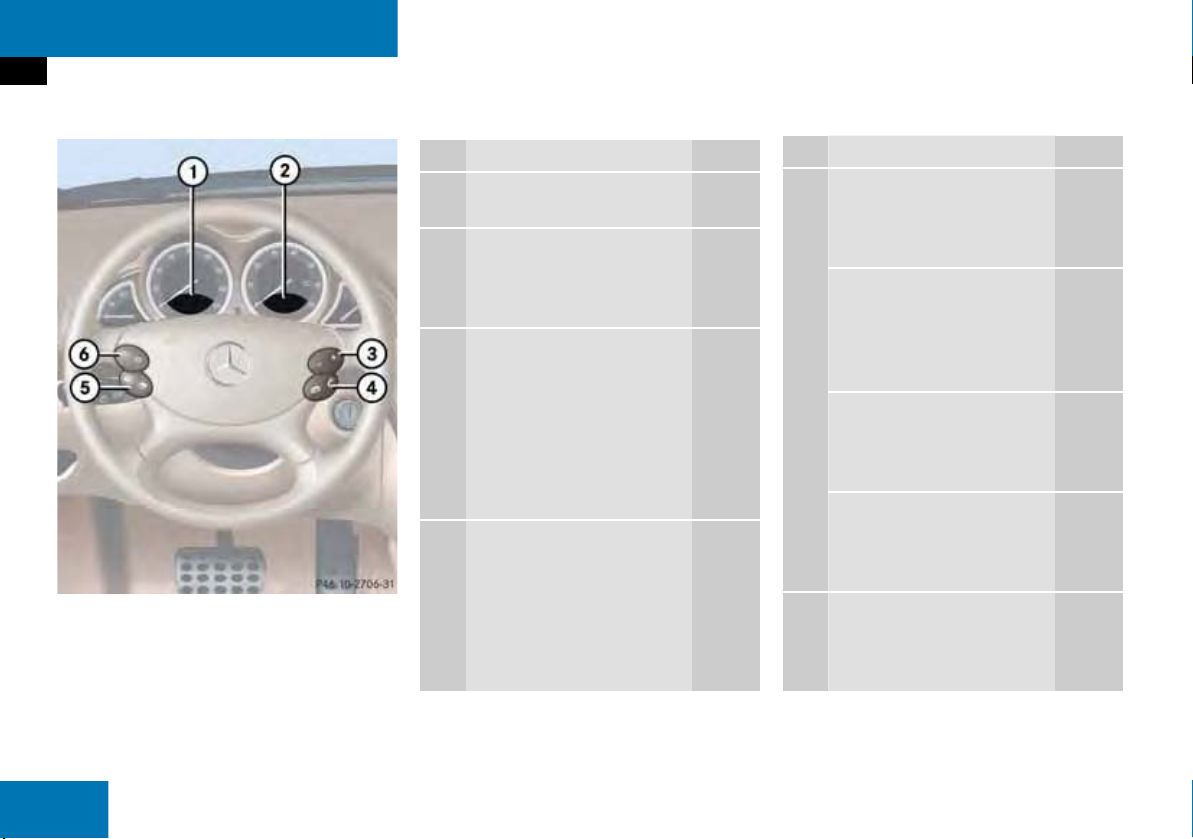
Multifunction steering wheel
Menu system
Quick reference COMAND
11
Page 12
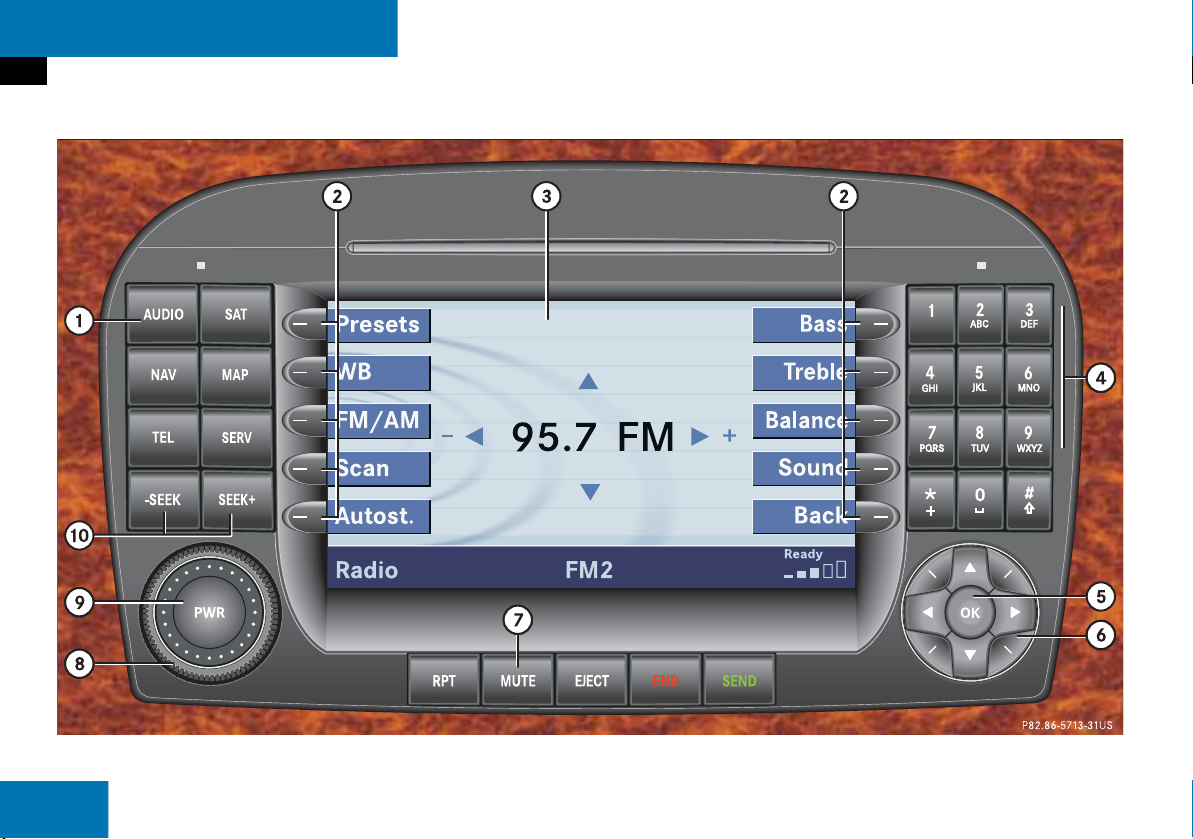
At a glance
Radio operating elements
Radio operating elements
12
Page 13

At a glance
Radio operating elements
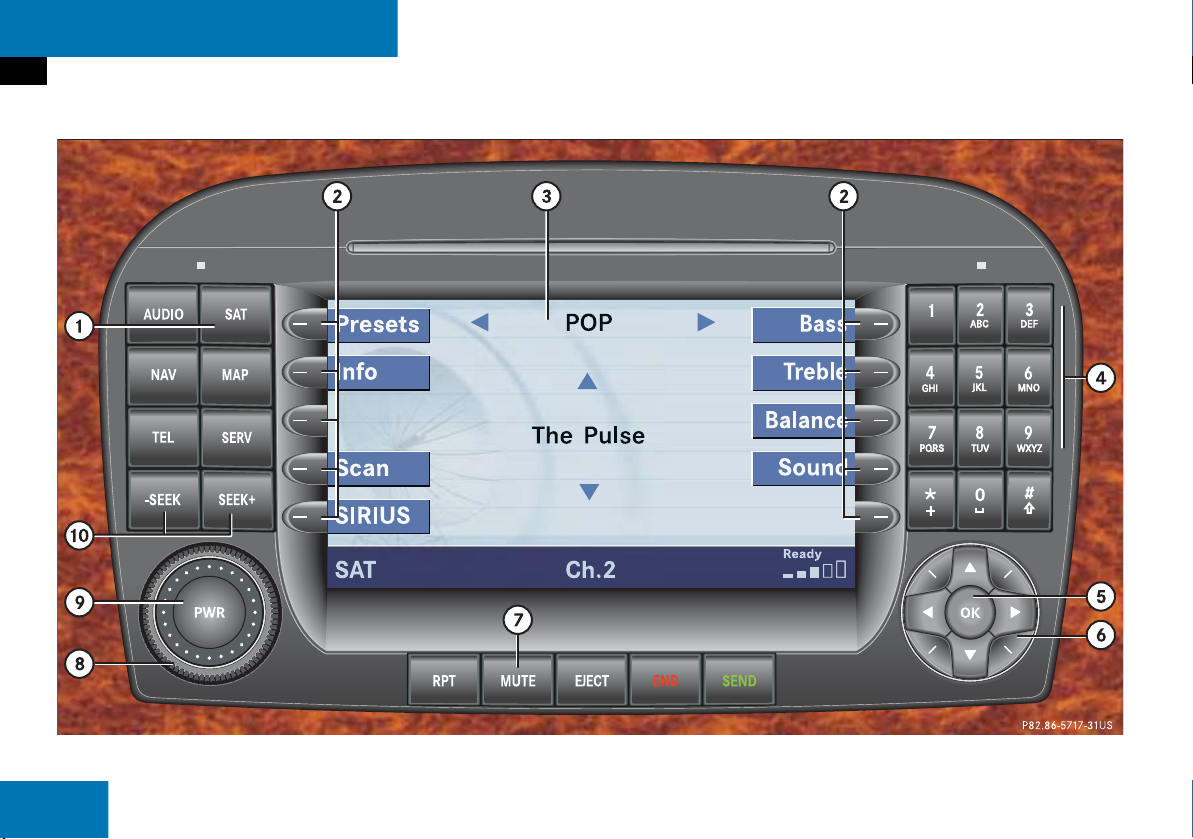
Function Page
1 Audio menu 42
2 Soft keys
(multifunction keys)
3 Color display with Radio
main menu
4 1 - 0, *
Station selection
Saving stations manually
Selecting a station from
the preset memory
5 E Confirm
46
48
50
Function Page
6 H,h,g,G
Function selection
g and G
e.g.
Automatic seek tuning
H and h
e.g. Manual tuning
7 J
Muting 42
8 Volume control 35
9 e Switching on and off 34
a d and D
Automatic seek tuning
Manual tuning
45
45
45
45
13
Page 14
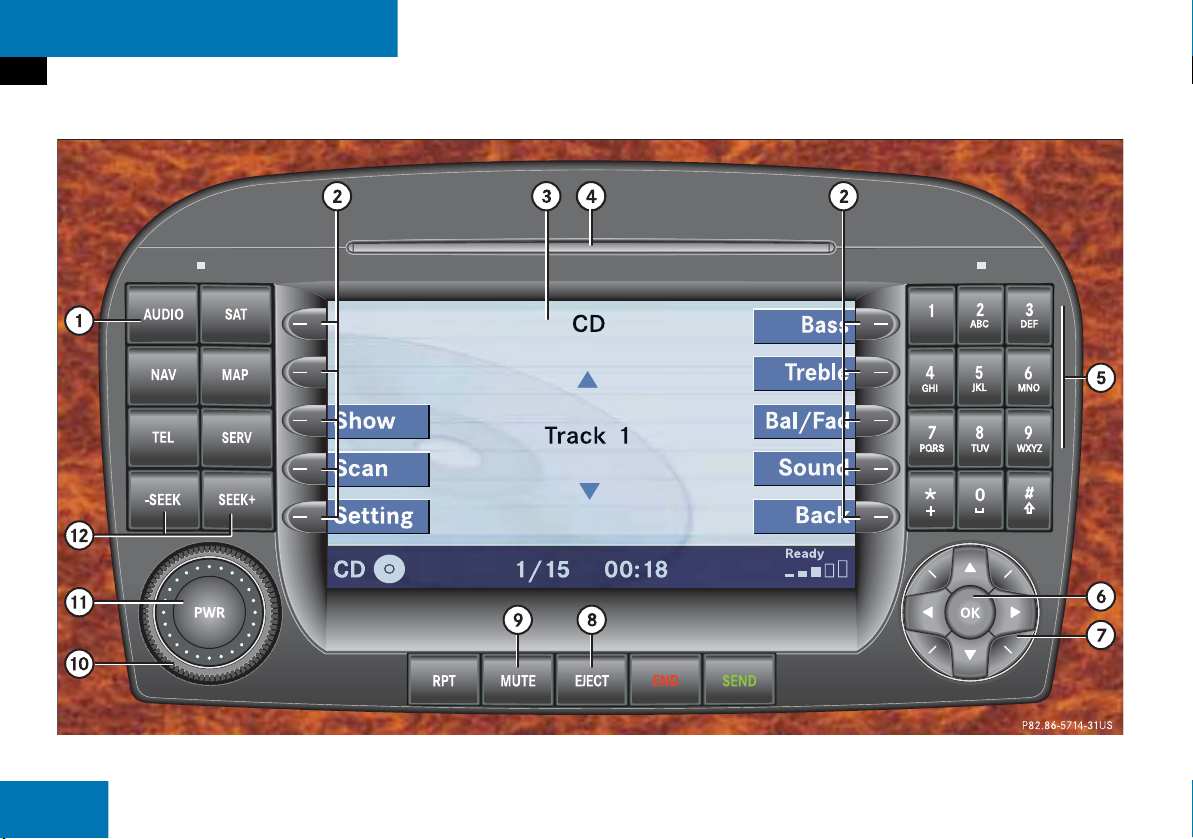
At a glance
Single CD operating elements
Single CD operating elements
14
Page 15

At a glance
Single CD operating elements
Function Page
1 Audio menu 42
2 Soft keys
(multifunction keys)
3 Single CD main menu 55
4 CD/DVD slot
5 1 - 0, *
Track select 59
6 E Confirm
7 g and G
Track select 59
8 CD ejection 55
9 J
Muting 61
Function Page
a Volume control 35
b e Switch on/off 34
c d and D
Track select
Fast forward/reverse
59
60
15
Page 16
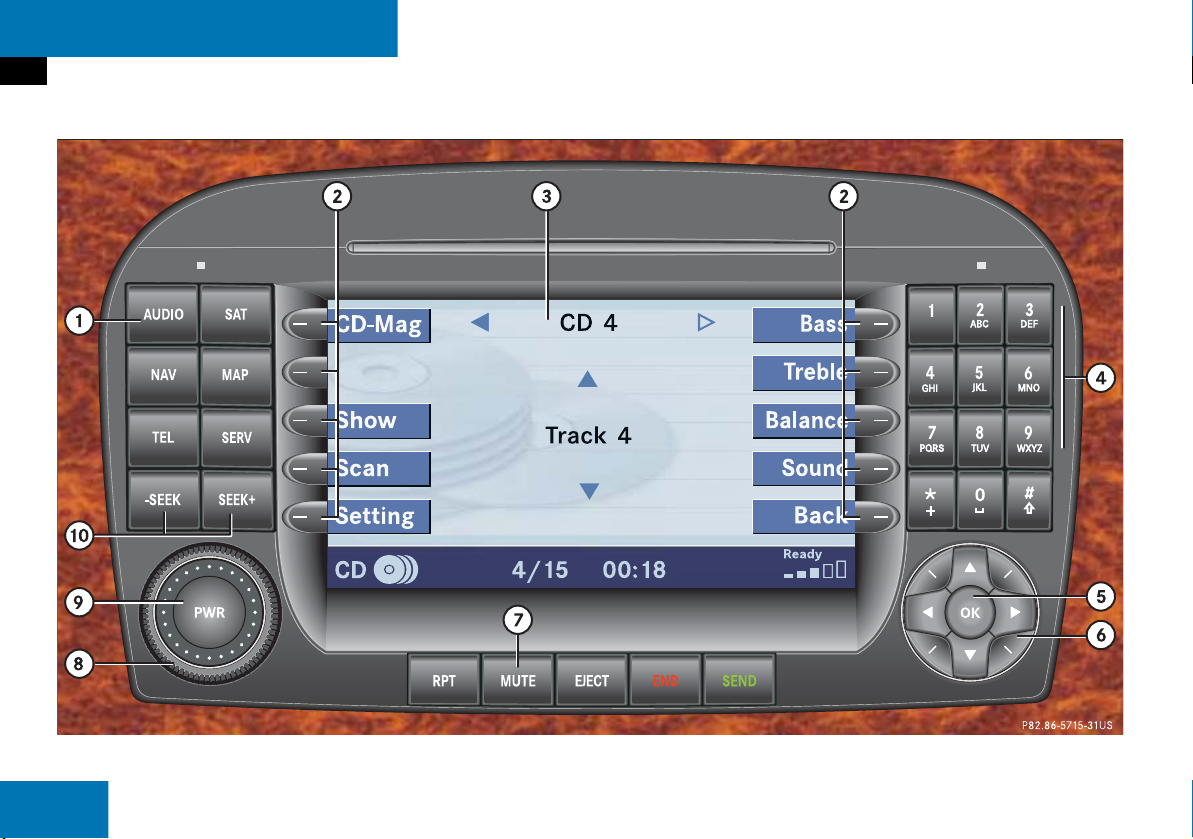
At a glance
CD changer operating elements
CD changer operating elements
16
Page 17

At a glance
CD changer operating elements
The CD changer can accomodate up to 6
audio or MP3 CDs. It is located behind the
driver’s seat.
Ejecting/loading CDs ( page 55).
Function Page
1 Audio menu 42
2 Soft keys
(multifunction keys)
3 CD changer main menu 55
4 1 - 0
Selecting a CD
1 - 0, *
Track select
5 E Confirm
58
59
Function Page
6 H and h
Selecting an audio or MP3
CD
g and G
Track select
7 J
Muting 61
8 Volume control 35
9 e Switch on/off 34
a d and D
Track select
Fast forward/reverse
58
59
59
60
17
Page 18
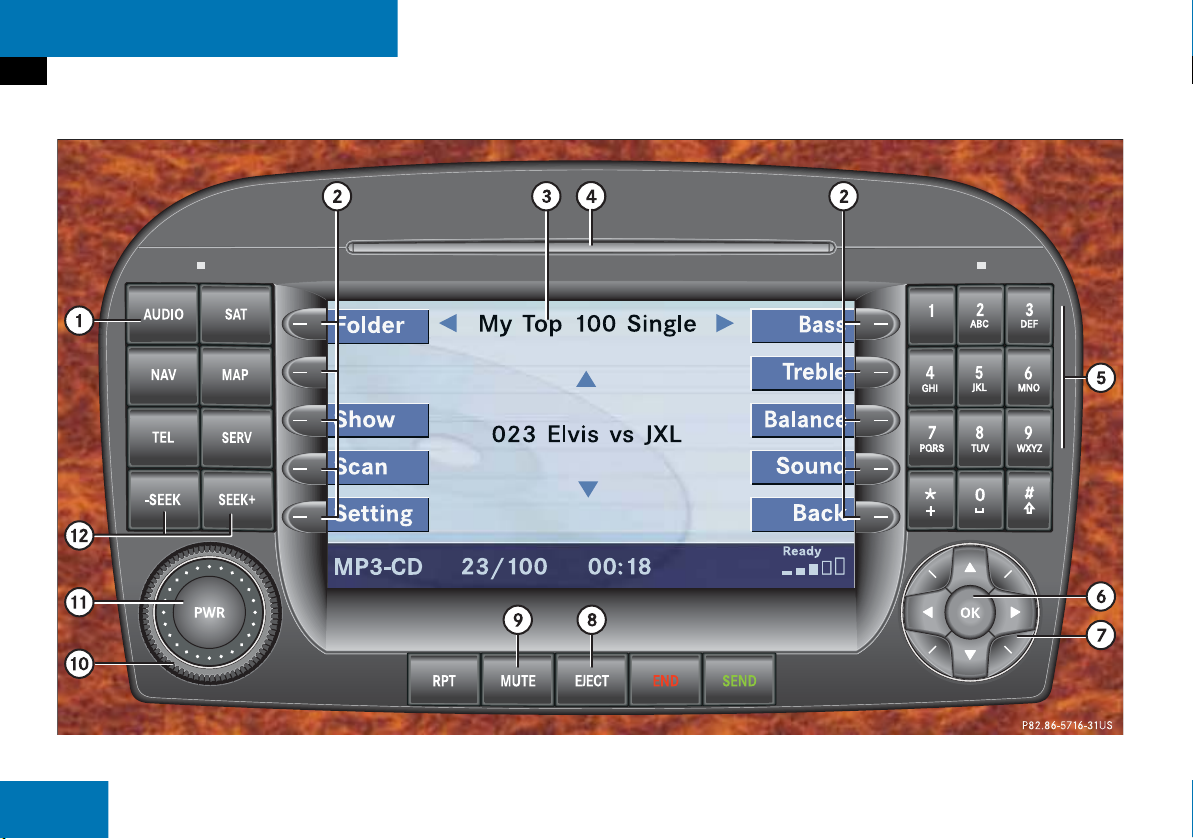
At a glance
MP3 CD operating elements
MP3 CD operating elements
18
Page 19

At a glance
MP3 CD operating elements
Function Page
1 Audio menu 42
2 Soft keys
(multifunction keys)
3 MP3 CD main menu 68
4 CD/DVD slot
5 1 - 0, *
Track select 69
6 E Confirm
7 g and G
Track select 59
8 MP3 CD ejection 68
Function Page
9 J
Muting 71
a Volume control 35
b e Switch on/off 34
c d and D
Skip track
Fast forward/reverse
70
71
19
Page 20
At a glance
Satellite radio operating elements
Satellite radio operating elements
20
Page 21

At a glance
Satellite radio operating elements
Function Page
1 Satellite radio main menu
Switching satellite radio
operation on and off
2 Soft keys
(multifunction keys)
3 Color screen with Satellite
radio main menu
4 1 - 0
Station selection
Saving stations manually
5 E Confirm
6 H,h,g,G
Function selection
92
92
94
95
Function Page
7 J
Muting 93
8 Volume control 35
9 e Switching on and off 34
a d and D
Previous or next channel 93
21
Page 22
At a glance
Telephone* operating elements
Telephone* operating elements
22
Page 23

At a glance
Telephone* operating elements
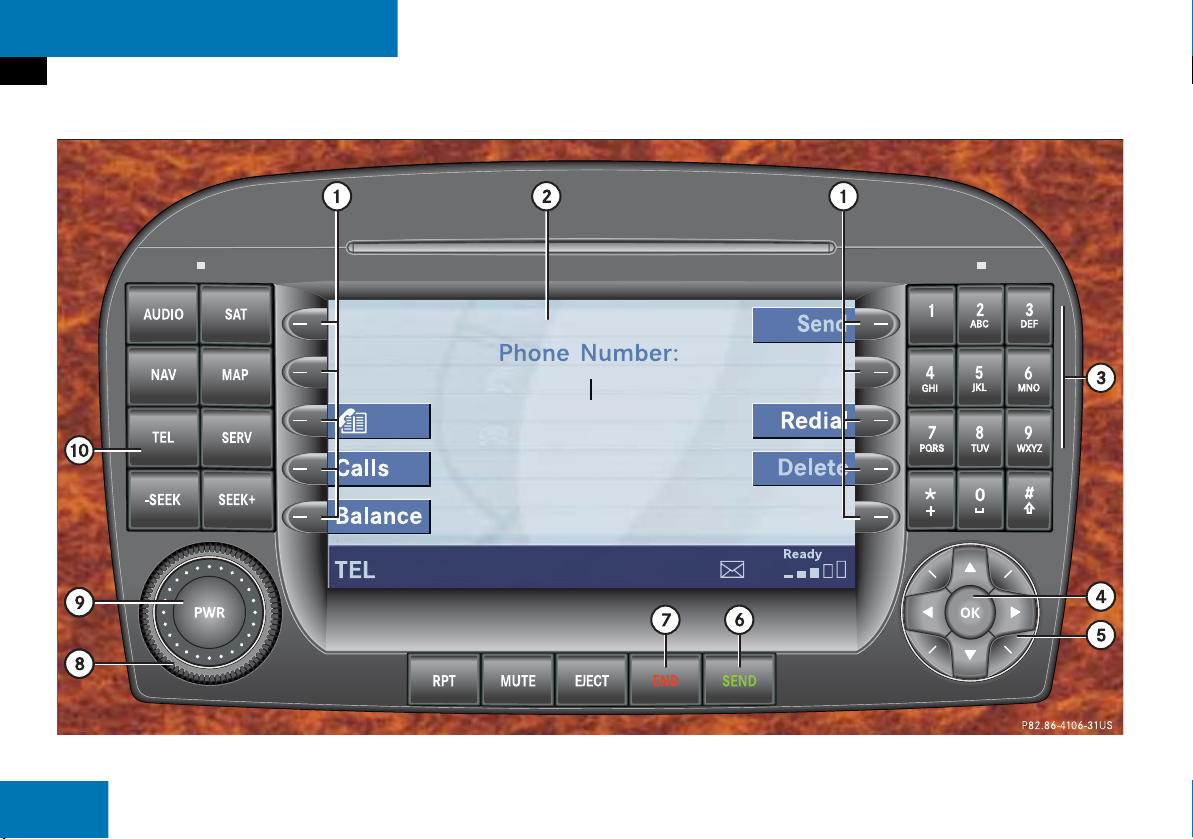
Function Page
1 Soft keys
(multifunction keys)
2 Color screen with
Telephone menu
3 1 - 0
Entering the unlock code
Entering a telephone
number
Speed-dialing
Quick-dialing
107
110
114
114
Function Page
4 E Confirm
5 H,h,g,G,F,f
Function selection
6 k
Accepting a call
Making a call
Redialing
109
111
111
Function Page
7 K
Muting the ringing tone or
ending a call
8 Volume control 35
9 e Switching on and off 34
a a
Telephone menu
Switching telephone
operation on and off
109,
111
108
104
23
Page 24
At a glance
Navigation operating elements
Navigation operating elements
24
Page 25

At a glance
Navigation operating elements
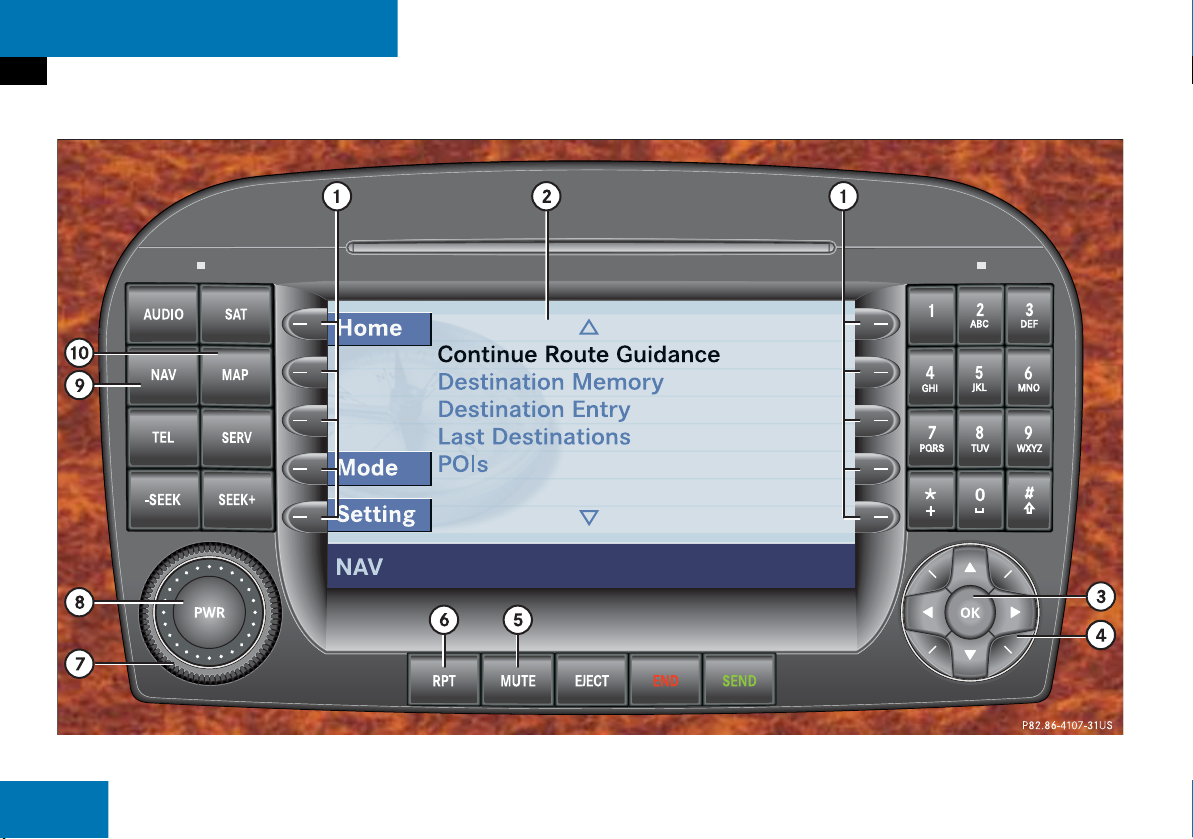
Function Page
1 Soft keys
(multifunction keys)
2 Color screen with
Navigation main menu
3 E Confirm
4 H,h,g,G
F,f
Function selection
5 J
During a voice instruction:
Muting current voice
instruction
Switching off voice
instructions
152
152
Function Page
6 j
Repeating current voice
instruction
Switching on voice
instructions
7 Volume control 35
8 e Switching on and off 34
9 b
Navigation main menu
During route guidance:
Change over to navigation
display
Cancelling route guidance
a c
Switches to map display 152
151
152
130
152
159
25
Page 26
At a glance
Service operating elements
Service operating elements
26
Page 27

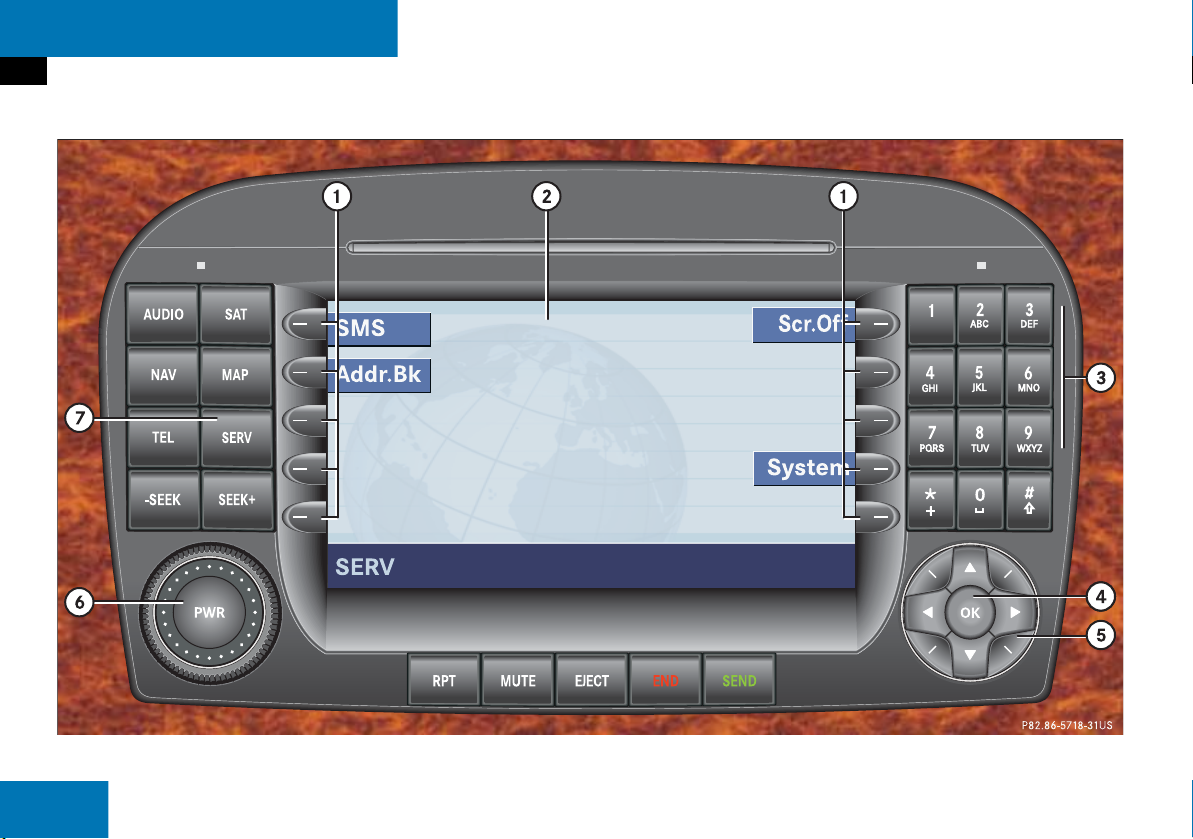
Function Page
1 Soft keys
(multifunction keys)
2 Color screen with Service
main menu
3 1 - 0
Input functions
4 E Confirm
5 H,h,g,G
F,f
Function selection
6 e Switching on and off 34
7 C
Service main menu 184
At a glance
Service operating elements
27
Page 28
At a glance
Multifunction steering wheel
Multifunction steering wheel
Function Page
1,2Multifunction displays
3 Volume setting
ç Volume down
æ Volume up
4 Making calls:
s
Accepting calls,
Redialing
t
Ending or rejecting calls
5 Multifunction display
menu change:
è forward
ÿ back 29
34
34
109
111
110
Function Page
6 Radio mode:
j Next station
k Previous station
Single CD and CD changer
mode:
j Next track
k Previous track
MP3 CD mode:
j Next track
k Previous track
Satellite radio mode
j Next station
k Previous station
Telephone* mode
j Next list entry
k Previous list entry
45
45
59
59
69
69
93
93
112
112
28
Page 29
At a glance
Multifunction steering wheel
Switch the multifunction display to the
respective system if you wish to
operate the system using the buttons
on the multifunction steering wheel.
Selecting the multifunction display
On the multifunction steering wheel,
press è or ÿ repeatedly until
one of the following, Radio, Single CD
or MP3 CD, CD changer, Satellite radio
or Telephone* display appears in the
multifunction display of the instrument
cluster.
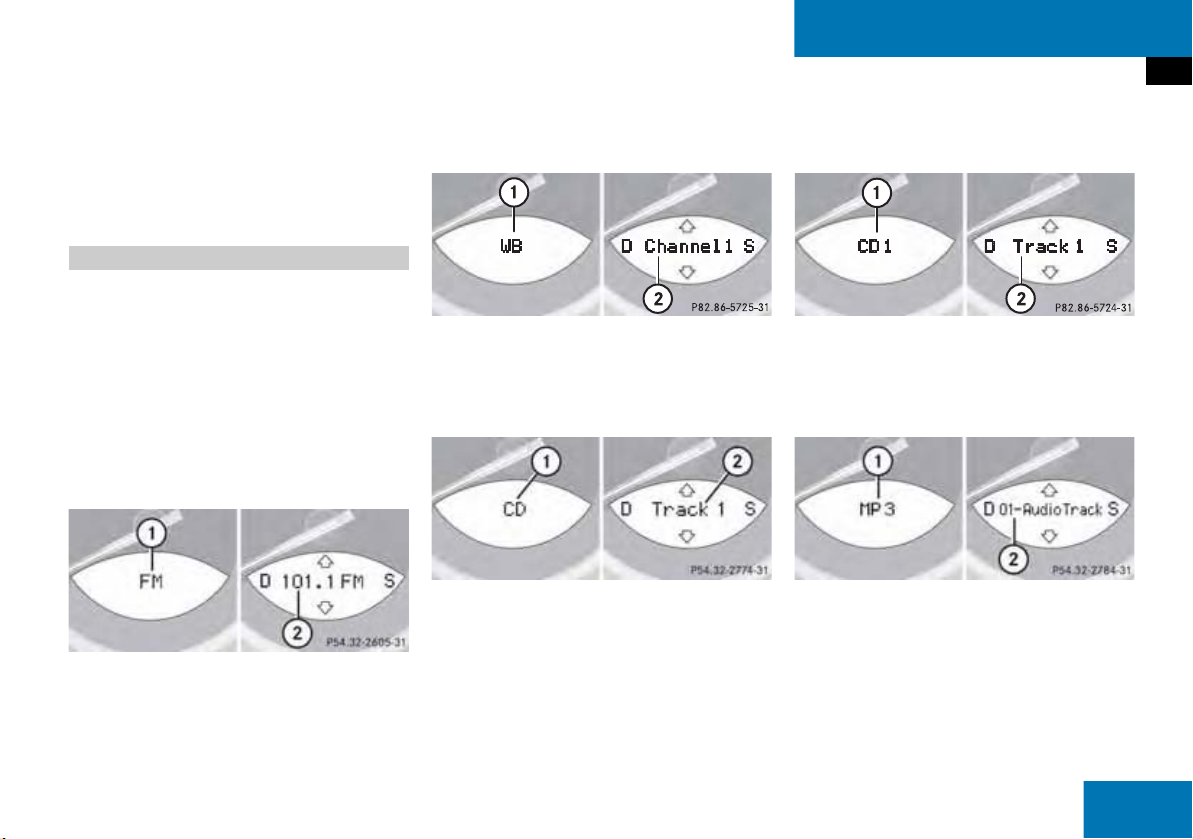
Radio operation
1 Waveband
2 Station frequency
Weather Band operation
1 Weather Band (WB)
2 Channel name
Single CD operation
1 CD mode
2 Current track
CD changer operation
1 CD changer mode
2 Current track
MP3 CD operation
1 MP3 mode
2 Current track
29
Page 30
At a glance
Multifunction steering wheel
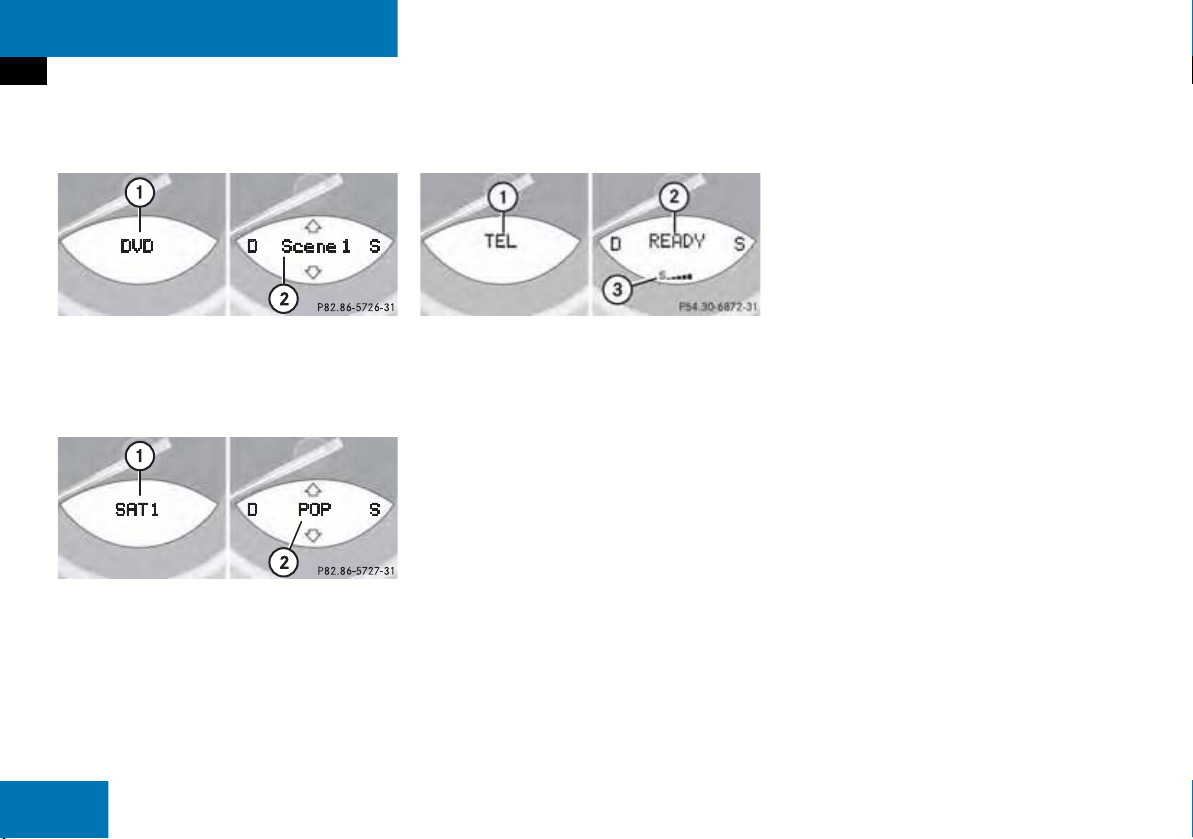
DVD operation
1 DVD mode
2 Current scene
Satellite radio operation
1 SAT mode and preset channel number
2 Program category
Telephone* operation
1 Telephone* mode
2 Phone status
3 Reception strength of the mobile
phone
One of the following will appear:
the main display with the READY
message
a list with either a phone book entry or
one of the last 10 outgoing calls
In order to close the list display,
press t.
This switches to the telephone
main display.
the message Call, if the system
detects an incoming call
call time and name during an active call
30
Page 31

Menu system
The menu system allows for easy
operation of COMAND.
Main menus are provided for the following
main functions:
Audio
(Radio, CD, CDC, MP3-CD, DVD)
Satellite radio
At a glance
Menu system
Telephone* ( page 108):
Press a.
Navigation ( page 130):
Press b.
Service ( page 184):
Press C.
Telephone*
Navigation
Service
Calling up main menus
Audio ( page 42):
Press A.
Satellite radio ( page 92):
Press B.
Menu display
A display may consist of three areas.
Example: FM menu
1 Soft key sections
2 Main area
3 Status bar
The functions currently assigned to the
soft keys are displayed in the soft key
sections 1.
i
A maximum of five soft keys may be
displayed on each side of the main area
2.
31
Page 32

At a glance
Menu system
The main area 2 shows messages and
settings.
You can change the settings by operating
the system.
The status bar 3 is divided into three
areas.
Left side:
The current operating mode is indicated. In
this example: Radio
Center:
The status of the current operating mode
or other selectable functions are indicated.
In this example:
FM = current waveband
9 = memory location of station,
e.g. “9”
Right side:
General status information is indicated
independent of the operating mode.
In this example:
Ready = Telephone* is ready for
operation
= Reception strength of the
mobile phone
Menu functions and submenus
Using the soft keys, functions can be
switched ON or OFF, or submenus can be
called up.
Example: Radio main menu:
The FM/AM soft key switches between
FM and AM band.
The Scan soft key starts/stops the
channel scan.
In some situations, soft keys may not have
any function and are not operational. A
soft key without function appears shaded
out.
32
Page 33

At a glance
Menu system
Example Phone book:
Page v 1 soft key
Exiting from submenus
Use the Back soft key to exit a submenu.
The display switches to the next higher
menu level.
The system will save all changes you have
made. There are exceptions in which
pressing the
the settings being saved. The exceptions
are expressly described on the following
pages.
Back soft key will not result in
33
Page 34

At a glance
Quick reference COMAND
Quick reference COMAND
i
You have the following options to
control the system:
at the COMAND
at the multifunction steering wheel
(refer to vehicle Operator’s Manual)
using the Voice control system*
(refer to separate operating
instructions for further information)
This Operator’s Manual describes the
control at the COMAND.
Unless otherwise indicated, the
descriptions and illustrations refer to
the COMAND.
Switching the COMAND control unit on and off
Switching on
Turn the key in the steering column
lock to position 1 or 2.
or
Press e.
In both cases, the system will activate
the operating mode which was active
when the system was switched off.
i
If the key is not in the steering lock in
position 1 or 2, the system will
automatically stop after around 30
minutes. A warning is displayed prior to
the system switching off.
Switching off
Turn the key in the steering column
lock to position 0 and pull the key out.
or
Press e.
Volume
The volume is adjusted jointly for the
telephone*, the navigation system and the
Voice control system.
The volume setting applies to other
operating modes as well: Radio, CD,
CD changer, MP3-CD and DVD.
When you adjust the volume, the system
will automatically store the setting for the
current operating mode. The volume for
the navigation announcements can only be
changed while an announcement is being
made.
34
Page 35

Adjusting the volume
At a glance
Quick reference COMAND
At the COMAND, turn the rotary control
at the e key.
or
Press J or I on the
multifunction steering wheel.
The volume is turned up or down
depending on the direction of rotation
or the key pressed.
The system remembers the volume
setting when it is switched off.
When the system is switched on again,
the volume may be lower than at the
time when the system was switched
OFF.
This will be the case when the volume
was adjusted to a value outside a
certain range when the system was
switched off.
The automatic volume control feature
adjusts the volume depending on:
vehicle speed
or
ambient noise inside the vehicle
other parameters (e.g. windows open
or closed)
35
Page 36

At a glance
Quick reference COMAND
Common balance settings apply to the
following sytems:
Radio operation
Single CD operation (CD )
CD changer operation (CD )
MP3-CD operation
DVD operation
Satellite radio
Different balance settings can be set for
navigation and telephone*.
The balance settings for navigation
announcements are described at “Audio
settings for the navigation
announcements”
( page 133).
When you change balance settings, the
system will automatically save the settings
for the current operating mode and others.
In Radio, CD, CDC, MP3-CD, DVD or
satellite radio operation:
Press the Balance soft key.
Cross-hairs are displayed. The
horizontal line indicates the balance
setting. You can now make balance
settings.
36
Page 37

At a glance
Quick reference COMAND
Press H or h.
Move the cross-hairs horizontally and
adjust the balance.
Press E or the Back soft key.
or
Wait until the display changes.
The new setting is saved.
Different bass and treble settings are
possible for the following operating
modes:
Radio operation (FM and AM band)
Single CD operation (CD )
CD changer operation (CD )
MP3-CD operation
DVD operation
Satellite radio operation
Navigation operation
The Bass/Treble settings for navigation
announcements are described at “Audio
settings for the navigation
announcements”
( page 133).
When you adjust Bass or Treble, the
system will automatically save the settings
for the current operating mode.
In Radio, CD, CDC, MP3-CD, DVD or
satellite radio operation:
Press the Bass or Treble soft key.
The Bass or Treble menu will appear.
You can now make bass or treble
settings
( page 38).
37
Page 38

At a glance
Quick reference COMAND
Activate the Bass or Treble menu
( page 37).
Press H or h.
Bass or Treble is adjusted.
Press E or the Back soft key.
or
Wait until the display changes.
The new setting is saved.
The sound functions will be available for
the following operating modes.
Radio operation
Single CD operation (CD )
CD changer operation (CD )
MP3-CD operation
DVD operation
Satellite radio operation
The following sound functions are
available:
Factory Setting:
COMAND set the sound functions to
factory setting for the active source
mode.
Default:
COMAND set the sound linear for the
center of the vehicle.
Speech optimized:
Playback optimized for language
comprehensibility.
You can use different sound functions for
the modes mentioned above.
Example:
For CD operation the function
Default, for DVD operation the function
Speech optimized.
38
Page 39

In Radio, CD, CDC, MP3-CD, DVD or
satellite radio operation:
Activate the main menu for the
respective operating mode
( page 31).
Press the Sound soft key.
The Sound menu appears.
At a glance
Quick reference COMAND
Press g or G to select the desired
function.
Press E.
The function is activated.
39
Page 40

40
Page 41

Audio
Audio menu
Radio operation
CD operation
MP3-CD operation
DVD operation
41
Page 42

Audio
Audio menu
Audio menu
In chapter “Audio” you will find detailed
information regarding
Radio operation
CD operation (CD drive, CD changer)
MP3-CD operation
DVD operation
If you have not done so already, please familiarize yourself with these functions by
reading chapter “At a glance”.
Opening the Audio menu Selecting an audio source
Press A.
In the Audio menu, press the soft key
for the desired audio source, e.g.
Radio.
Muting
Switching On
Press J.
The system mutes the active audio
source.
42
Audio menu
If an audio submenu is displayed, press
the
Back soft key until the Audio menu
is displayed.
or
Press A again.
Switching off
Press J again.
or
Press A, B, g or h or any
of the available soft keys for the active
audio source.
Page 43

Radio operation
Radio operation
Switching the radio operation on Changing the Radio band
In the Audio menu, press the Radio
soft key.
The Radio main menu will appear.
Radio main menu
1 Soft key assignment
2 Main area
3 Status bar
The station last tuned in is received.
Switching back to Audio menu
Press the Back soft key.
You can select between FM-, AM- and WBBand.
AM Band
In the FM Radio main menu, press soft
key
FM/AM until “AM” is displayed in
the status bar.
The AM station last tuned to will begin
to play. The frequency will appear in
the display.
Audio
43
Page 44

Audio
Radio operation
Frequency band Frequency range
FM
AM
Weather Band (WB)
In the FM or AM Radio main menu,
press the
An automatic scan is starting and the
COMAND plays and displays the first
strong WB station.
WB soft key.
87.7 - 107.9 FM
530 - 1710 AM
i
With the number keys 1 - 7 it is possible to choose a channel.
Switching back to FM or AM band
Press the FM/AM soft key.
The station last tuned to will begin to
play.
Switching back to Audio menu
Press the Back soft key.
44
Page 45

Audio
Radio operation
Selecting a station
You can use the following functions:
Automatic seek tuning (page 45)
Manual tuning (page 45)
Station selection from the Preset menu
(
page 45)
Station selection via direct frequency
entry (FM, AM) (
Automatic station scan (FM, AM)
(
page 47)
Station selection from the FM/AM
Autostore presets (
page 47)
page 51)
Automatic seek tuning
Press g or h.
or
Press g or G.
FM and AM Bands, Weather Band (WB)
The radio will tune in to the next receivable
station (FM, AM) or channel (WB) with descending/ascending frequency depending
on the direction of seek.
WB
Alternatively, you can select the channel
directly:
Press a number key 1 through 7.
i
The selected channel is not shown in
the status line.
Manual tuning (FM, AM)
Activate the desired wave band
(
page 43).
Press g or h longer than 2 seconds.
The function is active.
or
Press H or h.
The frequency will change by the tuning
increments for the respective
waveband each time one of the buttons
is pressed.
FM Band
The frequency displayed will change in increments of 0.2 MHz.
AM Band
Tuning will take place in increments of
10 kHz.
45
Page 46

Audio
Radio operation
Station selection via number keypad
(presets)
FM and AM Bands
Press one of the number keys, such as
2 briefly.
The radio will tune to the frequency assigned to that memory location. If none
has been set by you, the radio will not
change the station.
i
FM and AM presets are independent
and can only be accessed while in the
corresponding band.
Saving stations for FM and AM
(
page 48).
Station selection via direct frequency
entry (FM, AM)
E.g.: 102.7 MHz in the FM band
Activate the desired waveband
(
page 43).
Press *.
An input line will appear.
Enter the desired frequency with the
number keys within 8 seconds, e.g.
1027 for 102.7 FM.
The station you have selected will
begin to play.
Frequency band Frequency range
FM
AM
87.7 - 107.9 FM
530 - 1710 AM
46
Page 47

Audio
Radio operation
FM, AM band
Entries outside the frequency range are
not possible.
i
If you do not make another entry within
8 seconds, the function will be canceled
and you will listen to the station last tuned to.
Automatic station scan (FM, AM)
The stations in a given waveband (FM, AM)
can be scanned one after the other for 8
seconds each.
The scan function stops automatically
when the first station received has been
scanned twice.
i
Station scan performs two runs. During
the first run, stations with good
reception are played. During the
second run, stations with weaker
reception are played.
Start scan function
Activate the desired wave band
(
page 43).
Press the Scan soft key.
The scan function will begin.
appear in black lettering.
End scan function and play a station
Press the Scan soft key again if you
hear the desired station.
Scan will
47
Page 48

Audio
Radio operation
Memory functions
You can use the following functions:
Saving stations manually (FM, AM)
Saving stations automatically FM, AM
(
page 49)
Selecting a station from the FM/AM
Preset menu (
Selecting a station from the FM/AM
Auto presets (
page 50)
page 51)
Saving stations manually (FM, AM)
In the Radio main menu
Activate the desired waveband
(
page 43).
Press one of the number keys, e.g. 2,
longer than 2 seconds.
You will hear a confirmation beep if the
beep tones option was activated in the
system settings (
page 217).
The radio saves the current station at
the memory preset selected. The memory preset selected will appear in the
status line, e.g. “FM2”.
i
There are 10 presets available (1 9, 0).
An existing entry is overwritten in the
memory list when a new input is given.
On the memory list
Activate the desired waveband
(
page 43).
Press the Presets soft key.
The memory Preset menu will appear.
Use H, h or g, G to highlight
the desired memory preset.
Press E longer than 2 seconds.
The current station will be saved at the
memory preset selected.
You will hear a confirmation beep if the
beep tones option was activated in the
system settings (
page 217).
48
Page 49

Audio
Radio operation
You will see the Radio main menu
automatically after 8 seconds
if you press the Back soft key.
i
There are 2 presets for each of the FM
and AM waveband, standard FM/AM
presets (saving stations manually) and
Auto presets (saving stations automatically).
The standard FM/AM presets are not
affected by the Auto presets. This is a
second option for storing a station range you are currently receiving.
Saving stations automatically (FM, AM)
Activate the desired waveband
(
page 43).
Press the Autost. soft key
.
The autostore presets will appear.
Press E and confirm Reprogram
Autostore
.
The autostore function is active. The
radio stores the 10 stations with the
strongest signal. The station
frequencies available will appear in the
memory list.
i
There are 10 presets available (1 9, 0).
The autostore function assigns the stations to the memory locations in the order of their reception quality.
49
Page 50

Audio
Radio operation
Selecting a station from the preset
menu (FM, AM)
Activate the FM or AM memory
(
page 48).
You can use one of the following two ways
to select a station from the FM/AM
presets
Press the corresponding number key,
e.g. 3, to select the desired station.
or
Use H, h or g, G to highlight a
memory preset in the FM/AM preset
list.
Press E.
In both cases, you will see the Radio
main menu
automatically after 8 seconds
if you press the Back soft key.
The Radio main menu indicating the
memory preset number appears.
50
Page 51

Selecting a station from the FM/AM
autostore presets
Activate the FM or AM autostore presets (
page 49).
Use H, h or g, G to highlight a
memory position.
Press E.
You will see the Radio main menu
automatically after 8 seconds
if you press the Back soft key.
Audio
Radio operation
51
Page 52

Audio
CD operation
CD operation
General Information on CD operation
Warning
In order to avoid distraction which could
lead to an accident, the driver should insert
CDs with the vehicle at a standstill and
operate the audio system only if permitted
by road, weather and traffic conditions.
Bear in mind that at a speed of just 30 mph
(approximately 50 km/h), your car covers a
distance of 44 feet (approximately 14 m)
every second.
G
Warning
The CD drive and CD changer are Class 1 laser products. There is a danger of invisible
laser radiation when you open or damage
the cover.
Do not remove the cover. The CD drive and
the CD changer do not contain any parts
which can be serviced by the user. For safety reasons, have any necessary service work
performed by qualified personnel.
G
i
Only use CDs, which bear the label
shown and that conform to the compact
standard (IEC 60908). You can therefore only use CDs with a maximum
thickness of 1.3 mm.
i
The COMAND CD drive may not be able
to play audio CDs with copy protection
or copied CDs.
!
Use only CDs with a diameter of 12 cm,
do not use 8-cm CDs.
An 8-cm CD adapter may cause damage to the CD changer or to the
COMAND and should not be used.
i
Your CD drive has been designed to
play CDs which correspond to the IEC
60908 standard.
If you insert thicker data carriers, e.g.
ones that have data on both sides (one
side with DVD data, the other side with
audio data), they cannot be ejected
and will damage the drive.
52
Page 53

Audio
CD operation
Tips on caring for your CDs
Avoid touching the CD surface with
your fingers.
Clean the CD with a dry, lint-free cloth.
Wipe them from the inside to the outer
edge. Never wipe the CD in a circular
motion.
Do not use rubbing alcohol or solvents
to clean the CDs.
Do not expose the CDs to heat or direct
sunlight.
Do not write or put stickers on CD.
Playback information
Playback locations for CDs are:
the CD drive in the COMAND
the CD changer.
CD drive
The CD drive in the COMAND can playback
audio CDs and MP3-CDs (
page 63). The
slot of the drive is above the display.
CD changer
The CD changer can accomodate up to 6
audio or MP3-CDs. It is located on the lefthand side behind the driver’s seat.
When playing MP3 CDs in the CD changer,
only the first 99 tracks will be played back
in successive order. After that, playback
will begin with track 1 of the MP3 CD.
Folder selection (
page 69), (page 72)
is not possible.
Multi session CDs include mixed file types
(e.g. MP3 and audio CD) in either successive or random order on the disc. Audio
tracks will be played back first by the CD
changer, followed by MP3 tracks until 99
tracks are reached.
In MP3 mode the CD changer can read
CD-R and CD-RW CDs.
Refer to additional MP3 information:
Permissible file systems (page 64)
Permissible MP3 formats (page 66)
Permissible bit and scan rates
(
page 66)
53
Page 54

Audio
CD operation
Switching to CD operation
Differences regarding the CD mode depending on the audio source are highlighted.
In the Audio menu (page 42), press
the
CD
the
CD changer main menu
soft key (for CD drive) or
CD
soft key (for CD changer).
1 CD changer CD or CD drive CD
2 Current track/number of tracks on the
current CD
3 Elapsed playback time of the current
track
i
The CD-Mag soft key is only assigned
when the CD changer contains at least
one disc.
Loading CDs
Warning
In order to avoid distraction which could
lead to an accident, the driver should insert
CDs with the vehicle at a standstill and
operate the audio system only if permitted
by road, weather and traffic conditions.
Bear in mind that at a speed of just 30 mph
(approximately 50 km/h), your car covers a
distance of 44 feet (approximately 14 m)
every second.
G
i
The COMAND may be unable to
playback audio CDs provided with copy
protection.
54
Page 55

Audio
CD operation
Loading a CD into the CD drive
i
A CD already loaded must be ejected
before inserting a new CD. Inserting a
second CD with another CD still loaded
will cause damage to the CD drive
which is not covered by the MercedesBenz Limited Warranty.
Insert an audio CD into the slot
(
page 16). The CD should be inserted
with the label side up.
The COMAND pulls the CD into the
drive. The display changes.
After that the message
Medium Please Wait
Loading
will appear.
After loading, the CD main menu
(
page 57) will appear. Playback
begins with track 1 of the CD inserted.
Ejecting a CD
With the COMAND switched on, press
l.
The system ejects the CD already loaded.
Remove the CD from the slot.
i
If you do not remove the CD from the
slot within around 15 seconds, the
COMAND will pull the CD into the drive
again.
Insert another audio CD into the slot.
The CD should be inserted with the
label side up.
Ejecting/loading CDs into/from the CD
changer
The CD changer is located behind the
driver’s seat and can accomodate up to 6
audio or MP3-CDs.
1 Release button
2 Storage compartment lid
Press 1 to open 2.
55
Page 56

Audio
CD operation
Open panel cover to access the CD
changer.
Removing the magazine:
Slide the cover of the CD changer
open.
Press the green l button on the
CD changer.
The magazine will slide out.
i
You can also slide out the magazine if
COMAND is switched off.
However, the l button will not
function If the battery is not connected
or drained.
Inserting audio or MP3-CDs into the
magazine:
Pull the disk tray forward until it stops.
Remove any previously inserted CD.
Place a CD in the tray. The CD should
be inserted with the label side up.
Push the CD tray into the magazine
completely.
Repeat these four steps to load more
CDs into the magazine.
Reading the magazine in:
Slide the magazine into the CD changer
until it clicks into place (listen for the
click).
i
When you push the magazine in, the
arrow on the upper side of the
magazine must point in the direction of
the CD changer.
The CD changer reads the magazine.
The message
Please Wait
Slide the cover of the CD changer
Magazine Scan
will appear.
closed.
56
Page 57

Audio
CD operation
Switching on
CD drive
Activate the Audio menu (page 42).
Press the CD soft key
.
The CD main menu is displayed.
CD main menu
If no audio CD has been inserted, the
message
No CD appears.
Load an audio CD into the CD drive
(
page 55).
CD changer
Activate the Audio menu (page 42).
Press the CD soft key
.
The CD changer main menu will
appear.
The CD last played begins to play.
CD changer main menu
If the last played CD is not available, the
next available audio or MP3-CD is played
back.
i
The name of the CD and the track
played are displayed if the information
is available.
No magazine in the CD changer:
The message
Load audio or MP3-CDs into the CD
changer (
No CD in the magazine:
The message
appear.
Load audio or MP3-CDs into the CD
changer (
No Magazine will appear.
page 55).
Magazine Empty will
page 55).
57
Page 58

Audio
CD operation
Selecting a CD (CD changer only)
You can select a audio or MP3-CD:
in the CD list (page 58)
with the number keypad (page 58)
in the Magazine menu (page 58)
In the CD list
i
Selection is possible if the
CD changer has loaded the magazine
and at least two audio or MP3-CDs are
loaded.
The CD list includes all loaded CDs. Only
one list entry is visible at a time.
The entry is displayed above the track
indication. It shows the number or the
name of the CD currently playing.
Use h or H to select another CD
from the list.
After the CD is loaded, it is played
back.
or
Do not change the selection.
Playback of the last played CD is
continued.
With the number keypad
i
The number keys 1 - 6 can be used
for direct selection.
Keys 1 - 6 correspond with
magazine slots 1 to 6
of the CD changer
Press a number key, e.g. 2 to select
the corresponding CD.
The CD is changed. The selected CD is
played back.
In the Magazine menu
Press the CD-Mag soft key.
The Magazine menu is displayed. If the
magazine has not been read in, the
message
Please Wait
Use g or G to select a CD.
Press E.
Magazine Scan
is displayed first.
or
Press one of the number keys 1 to
6.
The CD is changed.
58
Page 59

Audio
CD operation
Track select
You can select a track:
with g or h (page 59)
in the track list (page 59)
with the number keypad (page 59)
with CD track scan (page 60)
With g or h
Activate the CD main menu
(
page 57) or the CD changer main
menu (
page 57).
Next track
Press h.
The next track is played.
Previous track or start of title (if more
than 10 seconds of playing time has
elapsed)
Press g.
Select any desired track
Press g or h as often as
necessary.
In the track list
The track list includes all tracks of the CD
currently played. Just one list entry is
visible at a time which shows the number
of the track currently played.
Press g or G.
The track list with the current, the
previous and the next track is
displayed. The previous or next track is
played.
Use g or G to select another track
from the list.
The selected track is played.
With the number keypad
Activate the CD main menu
(
page 57) or the CD changer main
menu (
page 57).
Press *.
An input line will appear.
E.g.: Track 3
Press 3.
E.g.: Track 12.
Press 1 and 2 in short succession.
Playback begins.
59
Page 60

Audio
CD operation
i
Entries higher than the number of
tracks on the CD are not possible.
During MP3-CD playback
CD drive
You can select the tracks of the
current folder (
CD changer:
You can select the first 99 tracks of
a MP3 CD.
After entering the track number, wait
approx. 3 seconds.
The selected track is played. The CD
main menu is displayed.
CD track scan
The tracks on a CD can be scanned one
after the other for 8 seconds each. The
function will switch off automatically when
the starting track is reached. You can also
manually stop the scan function.
page 69).
Activating
Press the Scan soft key.
Scan will begin.
i
When you start the scan function, the
playback mode
(
page 62) is automatically activated.
Ending the function
Scan search is running.
Press the Scan soft key.
Normal Sequence
or
Press E.
Playback will resume with the desired
track.
Fast forward/reverse
Activate the CD main menu
(
page 57) or the CD changer main
menu (
page 57).
Fast forward
Press and hold h.
Fast reverse
Press and hold g.
Ending the function
Release h or g.
Playback will resume.
60
Page 61

Audio
CD operation
Muting
On
Press J during playback.
The CD operation is muted and the ß
symbol is displayed on the status bar.
Off
Press J again.
Playback will resume.
The ß disappears from the status bar.
i
COMAND will also deactivate muting if
you
select another audio source (e.g.
radio)
change the volume
press either g or h.
Playback mode
The following options are available:
Normal Sequence (page 62)
Track Mix (page 62)
CD Mix (page 62)
Repeat Track (page 62)
Repeat CD (page 62)
Activating playback mode
E.g.:
Mode
Repeat Track
Press the Setting soft key.
The setting menu will appear.
i
If the CD changer is connected, the
playback modes
CD Mix are also available.
Repeat CD and
CD changer setting menu
Use g or G to select the playback
mode
Repeat Track.
Press E.
The mode is activated. Wait a few
seconds for the CD changer main menu
to appear. The activated mode is
displayed on the status bar (except
Normal Sequence).
61
Page 62

Audio
CD operation
Explanation of the playback modes
Normal Sequence
Tracks are played in ascending order
(e.g. 1, 2, 3 and so on). If just one CD is
inserted, the first track is played when
the last one is over.
If more than one CD is available, the
first track of the next CD is played
when the last track of the previous CD
is over. The CDs are changed in normal
order.
Track Mix
Tracks are played in random order. If
more than one CD is available, the next
available CD is played when the current
CD is over. The CDs are changed in
normal order.
CD Mix (CD changer only)
At least 4 tracks of any CD are played
in random order. Then follows the next
available CD. The CDs are changed in
random order.
Repeat Track
The system repeats the current track
until you switch the function off.
Repeat CD (CD changer only)
The system repeats the current CD
until you switch the function off.
62
Page 63

MP3-CD operation
Audio
MP3-CD operation
General Information
Warning
In order to avoid distraction which could
lead to an accident, the driver should insert
CDs with the vehicle at a standstill and
operate the audio system only if permitted
by road, weather and traffic conditions.
Bear in mind that at a speed of just 30 mph
(approximately 50 km/h), your car covers a
distance of 44 feet (approximately 14 m)
every second.
G
Warning
The CD drive and CD changer are Class 1 laser products. There is a danger of invisible
laser radiation when you open or damage
the cover.
Do not remove the cover. The CD drive and
the CD changer do not contain any parts
which can be serviced by the user. For safety reasons, have any necessary service work
performed by qualified personnel.
G
!
Your CD drive has been designed to
play CDs which correspond to the IEC
60908 standard. Therefore only CDs
not exceeding a thickness of 1.3 mm
can be used.
The smallest possible data rate for
MP3-CDs is 56 kB/s.
The COMAND does not play back
MP3-CDs containing files with ISO
9660 Level 3 standard. Such MP3 CDs
contain fragmented files.
63
Page 64

Audio
MP3-CD operation
Tips on caring for your MP3-CDs
Treat MP3-CDs with care to prevent
malfunctions during playback.
Do not scratch, touch or soil your MP3CDs.
Do not attach labels to or write on your
MP3-CDs.
From time to time, clean your MP3-CDs
with a commercially available cleaning
cloth. Never wipe circularly, but in a
straight line from inside to outside.
After use, put your MP3-CDs into the
CD box.
Protect your MP3-CDs from high
temperatures and direct sunlight.
Tips on creating MP3 CDs
i
CDs, software and hardware for writing
audio data to CDs vary widely.
Therefore, we cannot guarantee that
COMAND will be able to play every
user-written CD. Problems may also be
encountered during playback of userwritten CDs with a storage capacity of
more than 700 MB.
Permissible MP3 CDs
In MP3 mode COMAND can read
CD-R and CD-RW
CD+R and CD+RW
DVD+R and DVD+RW
DVD-R and DVD-RW
Permissible file systems
The permitted file system for COMAND is
ISO9660/Joliet for CD media and UDF for
DVD media.
Multi session CDs
With multisession CDs, the content of the
first session determines how COMAND
treats the CD.
For example, if the first session contains
data in audio CD format and the second
session contains data in MP3 format,
COMAND will treat the CD as a
conventional audio CD.
64
Page 65

Audio
MP3-CD operation
File structure
When creating a MP3 CD, you can organize
MP3 tracks into folders. A folder can also
contain additional folders.
A CD may have a maximum of 255 folders
in total.
A maximum of 255 tracks are permissible
per folder.
Mathematically a maximum of 65025
tracks would result. However, this amount
is usually not reached since MP3 requires
approx. 1 MB storage per minute recorded.
Therefore a maximum of 1000 tracks will
be displayed by COMAND.
Track names and folder names
When creating an MP3 CD, you can assign
names to the MP3 tracks and folders.
COMAND uses these names in MP3 mode
for the corresponding display.
Please note the following when assigning
folder and track names:
Track and folder names must contain
at least 1 character.
Track names may contain up to fifty
characters. If a name exceeds this
character limit, COMAND will not be
able to display it in full.
Track names must have the extension
“mp3”.
A period must appear between the
track name and the file extension.
Example of a correct track name:
Track1.mp3
Empty folders or folders containing data
other than MP3 tracks will not be displayed by COMAND.
If MP3 or audio CD files are stored in the
root directory itself, the root directory also
counts as a folder. COMAND will then
display the root directory name as a folder
name.
i
COMAND does not support ID3tags.
65
Page 66

Audio
MP3-CD operation
Tips on creating MP3 tracks
Permissible MP3 formats
COMAND supports the MPEG1
AudioLayer3 format.
i
In everyday speech, this format has
been replaced by the designation
“MP3”.
Permissible bit and scan rates
Fixed and variable bit rates up to 320
kbps
Scan rates from 24 kHz - 48 kHz
i
It is recommended to use MP3 tracks
with a bit rate of 128 kbps or higher
and with a scan rate of 44.1 kHz or
higher. Lower rates may impair quality.
Tips on copyright
The music tracks that you can create for
play back in MP3 mode are generally
copyright-protected under applicable international and national laws.
In many countries, the reproduction of
copyrighted material is not permitted,
even if only for personal use, without the
express prior consent of the copyright
holder.
Please check the current copyright laws
for your country and comply with them.
These restrictions do not apply for example to your own compositions and recordings, or for recordings for which
authorization has been obtained from the
copyright holder.
66
Page 67

Audio
MP3-CD operation
Switching to MP3-CD operation
Activate the MP3-CD main menu
(
page 68).
or
Load an MP3-CD into the COMAND
(
page 67).
CD drive
i
The MP3-CDs are played in the same
drive as normal audio CDs.
The MP3-CD drive is above the display.
Loading an MP3-CD
Warning
In order to avoid distraction which could
lead to an accident, the driver should insert
CDs with the vehicle at a standstill and
operate the audio system only if permitted
by road, weather and traffic conditions.
Warning
Bear in mind that at a speed of just 30 mph
(approximately 50 km/h), your car covers a
distance of 44 feet (approximately 14 m)
every second.
G
G
i
A CD already loaded must be ejected
before inserting a new MP3-CD.
Inserting a second MP3-CD with
another CD still loaded will cause
damage to the CD drive which is not
covered by the Mercedes-Benz Limited
Warranty.
Insert a MP3-CD into the slot
(
page 16). The MP3-CD should be
inserted with the label side up.
The COMAND pulls the MP3-CD into
the drive. The display changes.
67
Page 68

Audio
MP3-CD operation
After that the message Loading
Medium Please Wait
will appear.
After loading, the MP3-CD main menu
(
page 68) will appear. Playback
begins.
Ejecting an MP3-CD
With the COMAND switched on, press
l.
The system ejects the MP3-CD already
loaded.
Remove the MP3-CD from the slot.
i
If you do not remove the MP3-CD from
the slot within around 15 seconds, the
COMAND will pull the MP3-CD into the
drive again.
Insert another MP3-CD into the slot.
The MP3-CD should be inserted with
the label side up.
MP3-CD main menu
Activate the Audio menu (page 42).
Press the MP3-CD soft key
.
or
Load a MP3-CD (page 67).
The MP3-CD main menu will appear.
MP3-CD main menu
1 Current track/number of tracks on the
current MP3-CD
2 Elapsed playback time of the current
track
68
Page 69

Audio
MP3-CD operation
The first line shows the name of the
current folder. At the center you see the
currently played track.
Selecting a folder
Activate the MP3-CD main menu.
(
page 68).
Use H or h to select a folder.
The track list only displays the tracks of
the selected folder.
Playback of the first track of the
selected folder will begin.
Selecting a track
You can select a track:
in the track list (page 69)
with the number keypad (page 69)
with g or h (page 70)
with MP3-CD track scan (page 70)
In the track list
The track list includes all tracks of the
selected folder of the currently played
MP3-CD. Only one list entry is visible at a
time.
Open the MP3-CD main menu
(
page 68).
Press G or g.
The track list is displayed. You will see
up to 3 entries. The track shown in
black is the one currently playing.
Press G.
You move forward through the track
list.
Press g.
You move backward through the track
list.
With the number keypad
The tracks of the current folder are
selected with this function.
Activate the MP3-CD main menu
(
page 68).
In short succession, press button *
and the number key of the desired
track, e.g. 24.
i
If the current folder contains less
tracks, the system will only recognize
the first digit entered and play the ap-
propriate track.
After your entry wait approx. 3
seconds.
The selected track is played. The
MP3-CD main menu will appear.
69
Page 70

Audio
MP3-CD operation
Skip Track
Activate the MP3-CD main menu
(
page 68).
Forward
Press
D.
The next track from the track list is
played.
i
If the last track in a folder is playing,
the first track is selected.
Backward
Press d.
If the track has been playing for more
than approx. 10 seconds, the track is
replayed from the start. If the playing
time is shorter, the previous track is
played.
MP3-CD track scan
The tracks of the current folder can be
scanned one after the other for 8 seconds
each. Subfolders are not considered.
The function will switch off automatically
when the starting is reached.
You can also manually stop the scan
search.
Starting the Scan Search
Activate the MP3-CD main menu
(
page 68).
Press the Scan soft key.
i
When you start the scan search, the
playback mode
(page 72) is automatically activated.
Normal Sequence
Ending the scan function
Scan search is running.
Press the Scan soft key.
or
Press E.
The last scanned track is played back.
Fast forward/reverse
Activate the MP3-CD main menu
(
page 68).
Fast forward
Press and hold h.
Fast reverse
Press and hold g.
Ending the function
Release h or g.
Playback will resume.
70
Page 71

Audio
MP3-CD operation
Muting
On
Press J during playback.
The MP3 CD operation is muted and
the ß symbol is displayed on the
status bar.
Off
Press J again.
Playback will resume.
The ß disappears from the status bar.
i
COMAND will also deactivate muting if
you
select another audio source (e.g.
radio)
change the volume
press either g or h.
Playback mode
The following options are available:
Normal Sequence (page 72)
Folder Mix (page 72)
CD-ROM Mix (page 72)
Repeat Track (page 72)
Repeat Folder (page 72)
Activating playback mode
E.g.:
Option
Normal Sequence
Press the Setting soft key.
The Settings menu is displayed.
Option Symbol
Function active _
Function not active -
Use g or G to select the playback
mode
Normal Sequence.
Press E.
The option is activated. Wait a few
seconds for the MP3-CD main menu to
appear.
71
Page 72

Audio
MP3-CD operation
Explanation of the Playback Options
Normal Sequence
The tracks of the current folder are
played in order on the disc.
If the current folder contains subfolders:
The sub-folders and their tracks are
played in order on the disc.
The current folder does not contain
sub-folders:
The track of the folder next on the disc
is played back.
i
After selection, the following playback
options are displayed on the status bar.
Folder Mix
The tracks of the current folder and its
sub-folders are played in random order.
CD-ROM Mix
All tracks of the MP3-CD are played in
random order.
Repeat Track
The system repeats the current track
until you switch the function off.
Repeat Folder
The system repeats the tracks of the
current folder until you switch the
function off.
MP3 options
Folder
Use the
Folder option to navigate
through the structure of an MP3-CD.
Opening the folder menu
Activate the MP3-CD main menu
(
page 68).
Press the Folder soft key.
The names of the folders on the current
MP3-CD are displayed.
i
Only folders or sub-folders which
contain MP3 tracks are displayed.
72
Page 73

1 Current track/number of tracks on the
current MP3-CD
2 Elapsed playback time of the current
track
Use g or G to select a folder.
i
Folder contains MP3 tracks
Folder contains subfolders
Play soft key is available if a track is
The
selected or the selected folder contains
only MP3 tracks and no subfolders.
Press the Play soft key.
Playback of the highlighted track or the
first track in the selected folder will
begin.
or
Press E.
The list of the tracks in the folder is
displayed. 5 tracks are displayed.
MP3-CD operation
Use g or G to navigate through the
track list.
Press the Play soft key.
or
Press E to play the selected track.
Soft key :
Brings you one level up in the folder
structure.
Audio
73
Page 74

Audio
MP3-CD operation
Displaying title information
Activate the MP3-CD menu main
(
page 68).
Press the Show soft key.
The information on the current track
stored on the MP3-CD is displayed.
74
Page 75

DVD operation
General information on DVD operation
Warning
In order to avoid distraction which could
lead to an accident, the driver should insert
DVDs with the vehicle at a standstill and
operate the audio system only if permitted
by road, weather and traffic conditions.
Bear in mind that at a speed of just 30 mph
(approximately 50 km/h), your car covers a
distance of 44 feet (approximately 14 m)
every second.
G
Warning
The CD/DVD drive is a Class 1 laser products. There is a danger of invisible laser radiation when you open or damage the cover.
Do not remove the cover. The CD/DVD drive
does not contain any parts which can be serviced by the user. For safety reasons, have
any necessary service work performed by
qualified personnel.
i
Your CD/DVD drive has been designed
to play CDs/DVDs which correspond to
the IEC 60908 standard. You can therefore only use CDs with a maximum
thickness of 1.3 mm.
If you insert thicker data carriers, e.g.
ones that have data on both sides (one
side with DVD data, the other side with
audio data), they cannot be ejected and
will damage the drive.
G
Audio
DVD operation
Automatic screen off
!
The COMAND system is capable of
playing DVDs. However, in order to
avoid driver distraction, the video func-
tion is disabled and no images will be
shown on the COMAND screen.
Upon loading a DVD, the following message will appear:
To prevent the driver from being
distracted, the picture is faded
out.
Tips on caring for your DVDs
Treat DVDs with care to prevent
malfunctions during playback.
Do not scratch, touch or soil your
DVDs.
Do not attach labels to or write on your
DVDs.
75
Page 76

Audio
DVD operation
From time to time, clean your DVDs
with a commercially available cleaning
cloth. Never wipe circularly, but in a
straight line from inside to outside.
After use, put your DVDs into the DVD
box.
Protect your DVDs from high
temperatures and direct sunlight.
DVD playback requirements
i
Vendors may offer DVDs which do not
comply with the standards.
Sound, picture and other playback
problems may occur when you play
such DVDs.
The COMAND can playback video
DVDs meeting the following
requirements:
Regional code is set (factory
setting)
NTSC or PAL TV standard
The appropriate information is usually
given either on the DVD or the DVD
box. The factory setting of the
COMAND is regional code 1. The
setting can be changed at an
authorized Mercedes-Benz Center. This
will allow you to playback video DVDs
with other regional codes, as long as
they comply with the NTSC or PAL TV
standard.
i
The COMAND system is capable of
playing DVDs. However, in order to
avoid driver distraction, the video
function is disabled and no images will
be shown on the COMAND screen.
Switching to DVD operation
Load a video DVD into the COMAND
(
page 77).
or
If a DVD is already loaded, open the Audio menu (
DVD soft key.
If the video DVD meets the playback requirements, playback will begin. If available, the DVD menu (
on the DVD will appear.
page 42) and press the
page 82) saved
76
Page 77

Loading a DVD
Warning
In order to avoid distraction which could
lead to an accident, the driver should insert
DVDs with the vehicle at a standstill and
operate the audio system only if permitted
by road, weather and traffic conditions.
Bear in mind that at a speed of just 30 mph
(approximately 50 km/h), your car covers a
distance of 44 feet (approximately 14 m)
every second.
G
i
Your CD/DVD drive has been designed
to play CDs/DVDs which correspond
to the IEC 60908 standard.
If you insert thicker data carriers, e.g.
ones that have data on both sides (one
side with DVD data, the other side with
audio data), they cannot be ejected
and will damage the drive.
i
A DVD already loaded must be ejected
before inserting a new DVD. Inserting a
second DVD with another DVD still
loaded will cause damage to the DVD
drive which is not covered by the
Mercedes-Benz Limited Warranty.
DVD operation
Insert a DVD into the slot (page 16).
The DVD should be inserted with the
label side up.
The COMAND pulls the DVD into the
drive. The display changes.
After that the message
Medium Please Wait
Loading
will appear.
Audio
77
Page 78

Audio
DVD operation
If the video DVD meets the playback
requirements (
page 76), playback
will begin.
If available, the DVD menu (
page 82)
saved on the DVD will appear.
If the video DVD does not have regional
code 1 (
message appears:
Played - Invalid Regional
Code
page 76), the following
DVD Cannot be
.
Further error messages are:
No DVD
No DVD inserted in the slot.
Load a DVD (page 77).
No Valid DVD
Cannot read DVD.
Load a DVD (page 77) which
meets the DVD playback require-
DVD Error
ments (
page 76).
DVD cannot be read or is damaged.
Load another DVD (page 77).
DVD Device Error
The drive may be damaged.
Contact an authorized MercedesBenz Center.
Ejecting a DVD
With the COMAND switched on, press
l.
The system ejects the DVD already loaded. The message
Remove the DVD from the slot.
No DVD will appear.
i
If you do not remove the DVD from the
slot within around 15 seconds, the
COMAND will pull the DVD into the
drive again and close the slot.
Insert another DVD into the slot.
78
Page 79

Audio
DVD operation
Soft key display and status bar
When you start DVD playback, the soft key
displays and the status bar are initially
blanked out.
Displaying the soft keys
In the DVD mode, press any soft key.
The soft keys and the status bar are
displayed.
DVD playback with soft key display and
status bar
The DVD information is displayed at the
center of the status bar.
E.g.:
Ttl. 5 = Track/movie no. 5 is being
played
Sce. 1 = Scene/chapter 1 is being
played
0:00:47 = DVD playing time elapsed
(47 seconds)
The soft keys and the status bar are auto-
matically blanked out again. You can also
blank out the display manually.
To remove the soft key display
Press the
Full Scr. soft key.
79
Page 80

Audio
DVD operation
Soft key functions
i
Depending on the DVD, not all functions are available at any time.
Pause or Play soft key:
Switches the Pause function on or off
(
page 80).
Stop soft key:
Stops the DVD playback (
Full Scr. soft key:
The soft key display disappears
(
page 81).
Menu soft key:
Displays the DVD menu saved on the
DVD, if available (
page 82).
page 81).
Setting soft key:
Displays the DVD settings menu
(
page 83).
Sound soft key:
Brings you to the sound menu, where
you can set:
Balance (page 36)
Bass and Treble (page 37)
Sound functions (page 38)
Bright., Contr. and Color soft
key
s:
Allow you to adjust brightness, contrast and color (
page 86).
i
In order to avoid driver distraction, the
video function is disabled and no
images will be shown on the COMAND
screen. Therefore some of these soft
keys will have no effect.
Pause function
Display the soft keys (page 79).
Press the Pause soft key.
DVD playback is paused. The picture
stands still. The
changes to
To resume playback, press the Play
Pause soft key
Play.
soft key.
Playback of the DVD will resume.
80
Page 81

Audio
DVD operation
Stopping DVD playback
Display the soft keys (page 79).
Press the Stop soft key.
DVD playback stops.
Restarting DVD playback
After playback has stopped, press the
Play soft key again.
The DVD is played from the start.
or
Select a movie (page 86).
i
While DVD playback is stopped, you
can press the
The DVD menu saved on the DVD is displayed, if available (
Displaying full screen
During DVD playback with the soft keys
displayed press the
key.
The soft keys disappear. The full screen
will appear.
Menu soft key.
page 82).
Full Scr. soft
Activating DVD menu
Display the soft keys (page 79).
Press the Menu soft key.
The highest level of the DVD menu is
displayed, if available (
page 82).
Activating Settings menu
Display the soft keys (page 79).
Press the Setting soft key.
The DVD settings menu will appear
(
page 83).
81
Page 82

Audio
DVD operation
DVD menu
The DVD menu is the menu saved on the
DVD. The structure of the menu may vary
depending on the DVD and allows certain
settings or actions.
For example, multilingual DVDs allow the
DVD language to be selected in the menu.
Activating DVD menu
Display the soft keys (page 79).
Press the Menu soft key.
Depending on the DVD, the highest le-
vel of the DVD menu is displayed.
i
In order to avoid driver distraction, the
video function is disabled and no
images will be shown on the COMAND
screen. The message
driver from being distracted,
the picture is faded out
pears.
To prevent
ap-
Remove the soft key display if necessary (
page 79).
The soft keys are automatically removed after a while.
Selecting an item from the DVD menu
Use h, H, g or G to select a
menu item.
Press E.
Your selection is confirmed. The
COMAND will perform the action defined by the menu item selected.
i
If you press g for longer than two
seconds, you may display additional
functions if available. The kind of function depends on the DVD menu.
Going up one level in the menu
A DVD menu may contain several submenus. Submenus may include a menu item
to go up one level in the menu.
Select the appropriate menu item
(
page 82).
82
Page 83

Audio
DVD operation
You can also proceed as follows:
Display the soft keys (page 79).
Press the Menu soft key once or several
times.
With each depression of the soft key
you will move up one or several menu
levels (depending on the DVD) until the
topmost level is reached.
Removing DVD menu
A DVD menu or a submenu may include an
item for closing the DVD menu.
Select the appropriate menu item
(
page 82).
You can also proceed as follows:
Display the soft keys (page 79).
Press the Back soft key.
or
Press the Stop soft key.
DVD playback is stopped and the DVD
menu is opened.
Settings menu
i
In order to avoid driver distraction, the
video function is disabled and no
images will be shown on the COMAND
screen. Although the following menu
will appear, these soft keys will have no
visible effect.
Settings menu
Setting options:
4:3, 16:9 or Zoom soft key:
You can change the aspect ratio
(
page 84).
Lang. soft key:
You can change the DVD language
(
page 84).
Subtitle soft key:
You can display and switch between
the subtitles (
Angle soft key:
page 85).
You can change the camera view
(
page 86).
Activating the Settings menu
Display the soft keys (page 79).
Press the Setting soft key.
The Settings menu will appear.
83
Page 84

Audio
DVD operation
Changing the aspect ratio
The system will automatically select the
appropriate aspect ratio when a DVD is
played back.
You can manually change the aspect ratio
during playback of the DVD. To do this, use
the top left soft key. The soft key changes
each time you press it.
Possible aspect ratios are: 4:3, 16:9 and
Zoom.
The soft key indicates the aspect ratio to
which you will change when you press the
soft key.
Zoom is useful to watch movies in
cinematic aspect ratio. You can use the
function to reduce the width of the black
bars at the top and bottom.
In the Settings menu (page 83),
press the soft key repeatedly until the
desired aspect ratio is set.
Changing the DVD language
i
You can only change the DVD language
if the DVD supports several languages.
Changing the DVD language:
During playback of the DVD, activate
the DVD settings menu (
Press the Lang. soft key.
The language list is displayed. The con-
tent of the list depends on which languages the DVD supports.
page 83)
Use g or G to select a language.
Press E.
The selected language is set.
i
The Lang. soft key has no function if
the Settings menu is activated from
within the DVD menu.
In this case, you need to change the
language in the DVD menu (
if the menu item is available. Or remove
the DVD menu (
press the
page 83) and again
Lang. soft key in the
Settings menu.
Some DVDs allow the language to be
selected additionally or exclusively in
the DVD menu saved on the DVD
(
page 82).
page 82)
84
Page 85

i
The system cannot read languages in
DTS format. If you select such a language, the movie is played without sound.
Displaying and switching between subtitles
i
These functions are available only if the
DVD supports subtitles.
i
When you insert a DVD, subtitles are by
default switched off.
During playback of the DVD, activate
the DVD settings menu (
page 83).
Press the Subtitle soft key.
The subtitles list will appear. The
content of the list depends on the DVD.
Use g or G to select a subtitle.
Press E.
The selected subtitles are used.
or
Use g to select list entry
No subtitles.
Press E.
Subtitling is switched off.
Audio
DVD operation
i
The Subtitle soft key has no function
if the Settings menu is opened from
within the DVD menu. In this case, you
need to change the subtitles in the
DVD menu (
item is available.
Or remove the DVD menu (
and again press the
key in the Settings menu.
Some DVDs allow the subtitling func-
tion to be selected additionally or ex-
clusively in the DVD menu saved on the
DVD (
page 82).
page 82) if the menu
Subtitles soft
page 83)
85
Page 86

Audio
DVD operation
Changing the camera view
i
You can only change the camera view if
several camera views are stored on the
DVD. The number of available
camera views depends on the DVD.
During playback of the DVD, activate
the DVD settings menu (
Press the Angle soft key.
A list of the available camera views will
appear.
Use g or G to select the desired
camera view.
Press E.
The selected camera view is used.
page 83)
i
The Angle soft key cannot be selected
if the Settings menu is activated from
within the DVD menu (
page 82).
In this case, select the camera view in
the DVD menu.
Some DVDs supporting different
camera views don’t offer a switch
option. In this case, select the camera
view in the Settings menu.
Adjusting brightness, contrast and color
i
In order to avoid driver distraction, the
video function is disabled and no
images will be shown on the COMAND
screen. Therefore the following soft
keys will have no visible effect.
Display the soft keys (page 79).
Press the Brightn., Contr. or
Color soft key.
Press h or H.
The respective setting is changed.
Selecting a movie
If several movies are on the DVD, you can
select a movie directly.
Movies can be selected while the DVD is
played back or stopped.
E.g.: Select movie no. 3
Press 3.
The 3rd movie starts after a short
while.
i
Movie selection may also be possible in
the DVD menu saved on the DVD
(
page 82).
86
Page 87

Audio
DVD operation
Selecting a scene/chapter
If the movie is divided into chapters or scenes, you can directly jump to a chapter or
scene or skip them while the movie is
playing. Some DVDs will not allow this in
certain portions of the movie (e.g. during
screen credits, age restriction and/or parental advisories).
Selecting a scene or chapter directly
E.g.: Scene/chapter 5
While the movie is playing, press *.
Press 5.
After a short while playback starts from
the 5th chapter or the 5th scene.
i
Chapter/scene selection may also be
possible in the DVD menu stored on
the DVD (
Scene/chapter skip
Press D or d.
Button D = Next chapter or scene
Button d = Previous chapter or
scene or beginning of scene if scene
has been playing for more than 10
seconds
page 82).
Fast forward/reverse
Keep D or d pressed during DVD
playback.
D = fast forward
d = reverse
Release the button to stop fast forward/
reverse.
87
Page 88

88
Page 89

Satellite radio
Important notes
Satellite radio operation
89
Page 90

Satellite radio
Important notes
Important notes
In chapter “Satellite radio”, you will find
detailed information regarding
selecting a station and a program category
memory functions
sound adjustments
If you have not done so already, please familiarize yourself with these functions by
reading chapter “At a glance”.
i
A subsription to Sirius satellite radio
service provider is required for the satellite radio operation described here.
Contact your authorized MercedesBenz Center for details and availability
for your vehicle.
i
Note that categories and channels
shown in illustrations are dependent on
programming content delivered by the
service provider. Programming content
is subject to change. Therefore, channel
and categories shown in illustrations
and descriptions contained in this manual may differ from the channels and
categories delivered by the service provider.
Satellite radio service may be unavailable or interrupted from time to time
for a variety of reasons, such as environmental or topographic conditions
and other things we can’t control. Service might also not be available in certain places (e.g., in tunnels, parking
garages, or within or next to buildings)
or near other technologies.
i
Sirius Satellite Radio provides approximately 100 channels, so called
streams, of digital-quality radio, among
others music, sports, news, and entertainment commercial-free.
Sirius Satellite Radio uses a fleet of
high-power satellites to broadcast 24
hours per day, coast-to-coast, in the
contiguous U.S.
This diverse, satellite-delivered programming is available for a monthly
subscription fee. For more information
and service availability, call the Sirius
Service Center (
www.siriusradio.com.
page 91) or contact
90
Page 91

Subscribing to satellite radio
i
If the Satellite radio function has not yet
been subscribed to or not subscribed
again, you have to contact the satellite
radio service provider.
Press B to switch to satellite radio
operation.
One of the two following screens will
appear:
the Satellite radio main menu displaying the
the Service information display
Weather channel or
Satellite radio main menu
The Satellite radio main menu displays the
Weather channel. You cannot select any
other station.
Press the SIRIUS soft key to display the
Service information display.
Satellite radio
Important notes
Service information display
1 Phone number of the provider,
(SIRIUS) or “Call Service Provider”
2 The Electronical Serial Number (ESN)
of your satellite receiver
Contact satellite radio service provider
at the telephone number displayed in
the screen.
91
Page 92

Satellite radio
Satellite radio operation
After the connection is made:
Follow the instructions given by the
operator.
The activation process may take up to
10 minutes. If it is successful, you will
see the display with the message
Acquiring Signal... (
followed by the Satellite radio main
menu (
page 92).
page 92)
i
Credit card information may be required for your application.
If a satellite receiver is not installed or
not properly installed:
The message
will appear.
No Satellite Radio
Satellite radio operation
Switching on
See “Subscribing to satellite radio” for important subscription information
(
page 91).
Press B to switch to satellite radio
operation.
When switching to Satellite radio operation, the system may have to acquire
the signal. The signal may also be interrupted from time to time during operation for a variety of reasons
(
page 90) and may have to be reacquired. If so, you will see the above
message on the display.
After the COMAND acquires the
signal, the Satellite radio main menu will
appear. The station last tuned to will begin
to play.
Satellite radio main menu
1 Program category
2 Station name
3 Memory preset selected and channel
number
92
Page 93

Satellite radio
Satellite radio operation
i
You can display 2 in full:
Station information (page 96)
Muting
Press J while listening to the satellite radio.
The symbol R will appear in the symbol
bar.
Press J again to resume listening to
the current station.
The symbol R will have disappeared.
i
Muting will also be canceled if you
switch to an audio source, e.g. normal
radio, or if you alter the volume.
Changing the program category Selecting a station
Satellite radio stations are split up into categories. You can select between various
cat eg or ies su ch as Ne ws , Sp or ts New s a nd
Country Music, if available. The category
list is sorted alphabetically.
Selecting a program category
Use H or h while the Satellite radio
main menu (
page 92) is being
displayed.
The previous or next program category
(alphabetical order) will appear in the
You can use the following functions:
Automatic tuning
Automatic station scan (page 94)
Station selection via direct channel
entry (
page 94)
Station selection from the preset menu
(
page 96)
Automatic tuning
Use G or g while the Satellite radio
main menu is being displayed.
display. The station last tuned in the
new category will begin to play.
or
Press d or D.
The satellite radio will tune in to the nu-
merically previous or next receivable
station in the selected category.
93
Page 94

Satellite radio
Satellite radio operation
Automatic station scan
The stations in the selected category can
be scanned in numerical order for 8 seconds each.
In the Satellite radio main menu, press
the
Scan soft key.
The scan function will begin.
Scan will
appear in black lettering.
Ending scan function and playing a
station
Press the Scan soft key again.
The station selected will appear with
the station name.
Scan will appear in
white lettering again.
Station selection via direct channel
entry
Press *.
Input line will appear.
Enter the number of the channel you
wish to select, e.g. 55.
The channel you have selected will begin to play. The corresponding station
name will appear, if station is available.
i
If the selected channel is not subscribed, the system displays
subscribed
.
If no content is being broadcast on the
selected channel, the system displays
the message
Invalid Channel.
Channel Not
94
Page 95

Satellite radio
Satellite radio operation
Memory functions
i
There are 10 presets available.
You can use the following functions:
Saving stations manually
Selecting a station from the Satellite
preset memory (
Selecting a station by entering the
channel number (
page 96)
page 94)
Saving station manually
In the Satellite radio main menu
Press one of the number keys, e.g. 2,
longer than 2 seconds.
You will hear a confirmation beep if the
beep tones option was activated in the
system settings (
page 217).
The satellite radio saves the current
station at the memory preset selected.
The memory preset selected will appear in the status line, e.g.
SAT2.
On the memory list
In the Satellite radio main menu, press
the
Presets soft key.
The SAT preset memory will appear.
Use G or g to select a memory preset.
Press E longer than 2 seconds.
You will hear a confirmation beep if the
beep tones option was activated in the
system settings (
page 217).
The satellite radio saves the current
station at the memory preset selected.
i
An existing entry is overwritten in the
memory list when a new input is given.
You will see the Satellite radio main menu
automatically after 8 seconds
if you press s.
95
Page 96

Satellite radio
Satellite radio operation
Selecting a station on the memory list
In the Satellite radio main menu, press
the
Presets soft key.
The SAT preset memory will appear.
Use g or G to highlight a memory
preset.
Press E.
The Satellite radio main menu will then
appear automatically after 8 seconds,
indicating the memory preset number
in the status line.
Displaying information
In the Satellite radio main menu, press
the
Info soft key.
The information display will appear.
You will see (if available)
the full station name
additional program information
Press the Back soft key to switch back
to the Satellite radio main menu.
96
Page 97

Displaying service information
You can call the provider service center for
questions or releases, whenever you need.
Press the SIRIUS soft key.
The Service information display will ap-
pear.
1 Phone number of the provider,
(SIRIUS) or “Call Service Provider”
2 The Electronical Serial Number (ESN)
of your SAT tuner
Press the Back soft key to switch back
to the Satellite radio main menu.
Sound settings
Refer to chapter “At a glance” on how to
adjust sound settings.
You can set
the sound Bass/Treble individually
the sound-center (Balance)
select predefined sound optimization
Satellite radio
Satellite radio operation
97
Page 98

98
Page 99

Telephone*
Important notes
Telephone operation
99
Page 100

Telephone*
Important notes
Important notes
In chapter “Telephone”, you will find detailed information regarding the telephone*, including emergency call.
Warning
Some jurisdictions prohibit the driver from
using a mobile phone while driving a vehicle.
Whether or not prohibited by law, for safety
reasons, the driver should not use the mobile phone while the vehicle is in motion. Stop
the vehicle in a safe location before answering or placing a call.
If you nonetheless choose to use the mobile
phone while driving, please use the handsfree device and be sure to pay attention to
the traffic situation at all times. Use the mobile phone
traffic conditions permit.
Never operate radio transmitters equipped
with a built-in or attached antenna (i.e.
without being connected to an external antenna) from inside the vehicle while the engine is running. Doing so could lead to
malfunction of the vehicle’s electronic systems, possibly resulting in an accident and
personal injury.
1
only when road, weather and
G
!
Radio transmitters, such as a portable
telephone or a citizens band unit
should only be used inside the vehicle
if they are connected to a separate exterior antenna that has been approved
by Mercedes-Benz.
100
1 Observe all legal requirements
 Loading...