


Digital – in the vehicle
Familiarize yourself with the con tents of the Operator's Manual directly via the vehicle's multi media system (menu item "Vehi cle information"). Start with the quick guide or broaden your knowledge with practical tips.
Vehicle document wallet
Here you can find comprehen sive information about operating your vehicle and about services and guarantees in printed form.
Digital – on the Internet
You can find the Operator's Man ual on the Mercedes-Benz home page.
Digital – as an app
The Mercedes-Benz Guides app is available free-of-charge in familiar app stores.
Apple® iOS |
AndroidTM |
É16758403037ËÍ
1675840303
Order no. P167 0086 13 Part no. 167 584 03 03 Edition A 2020
GLS
Mercedes-Benz
GLS
Operator's Manual
Mercedes-Benz

Front passenger airbag warning
Example
&WARNING Risk of injury or fatal injuries if the front-passenger airbag is enabled
If the front-passenger front airbag is enabled, a child on the front-passenger seat may be struck by the front-passenger airbag during an accident.
NEVER use a rearward-facing child restraint system on a seat with an ENABLED FRONT AIRBAG, DEATH or SERIOUS INJURY to the CHILD can occur.
Observe the chapter "Children in the vehicle".
Publication details
Internet
Further information about Mercedes-Benz vehi cles and about Daimler AG can be found on the following websites:
http://www.mbusa.com (USA only) http://www.mercedes-benz.ca (Canada only)
Documentation team
©Daimler AG: not to be reprinted, translated or otherwise reproduced, in whole or in part, with out written permission from Daimler AG.
Vehicle manufacturer
Daimler AG Mercedesstrasse 137 70327 Stuttgart Germany
As at 16.07.2018

Welcome to the world of Mercedes-Benz
Before you first drive off, read this Operator's Manual carefully and familiarize yourself with your vehicle. For your own safety and a longer operating lifespan, follow the instructions and warning notices in this Operator's Manual. Disre garding them may lead to damage to the vehicle or personal injury.
Vehicle damage resulting from the disregard of the instructions is not covered by the MercedesBenz Limited Warranty.
The equipment or model designation of your vehicle may vary according to:
RModel
ROrder
RNational version
RAvailability
Mercedes-Benz reserves the right to introduce changes in the following areas:
RDesign
REquipment
The equipment in your vehicle may therefore dif fer from that shown in the descriptions and illus trations.
The following are integral parts of the vehicle:
RDigital Operator's Manual
RPrinted Operator's Manual
RMaintenance Booklet
REquipment-dependent supplements
Keep these documents in the vehicle at all times. If you sell the vehicle, always pass all of the documents on to the new owner.
Mercedes-Benz USA, LLC Mercedes-Benz Canada, Inc. A Daimler Company
1675840303
R Technical features |
1675840303 |
|

2Contents
Symbols ........................................................ |
5 |
At a glance .................................................... |
6 |
Cockpit ........................................................... |
6 |
Overview of warning and indicator lamps ..... |
10 |
Overhead control panel ................................ |
12 |
Door control panel and seat adjustment ....... |
14 |
Control settings in the rear passenger |
|
compartment ................................................ |
16 |
Emergencies and breakdowns ...................... |
18 |
Digital Operator's Manual ......................... |
20 |
Calling up the Digital Operator's Manual ...... |
20 |
General notes ............................................. |
22 |
Protecting the environment .......................... |
22 |
Genuine Mercedes-Benz parts ...................... |
23 |
Operator's Manual ........................................ |
23 |
Service and vehicle operation ....................... |
24 |
Operating safety ........................................... |
25 |
Declaration of conformity for wireless |
|
vehicle components ...................................... |
27 |
Diagnostics connection ................................ |
27 |
Qualified specialist workshop ....................... |
28 |
Correct use of the vehicle ............................ |
28 |
Problems with your vehicle ........................... |
29 |
Reporting safety defects ............................... |
29 |
Limited Warranty .......................................... |
29 |
QR code for rescue card ............................... |
30 |
Data storage ................................................. |
30 |
Copyright ...................................................... |
33 |
Occupant safety ......................................... |
35 |
Restraint system ........................................... |
35 |
Seat belts ..................................................... |
38 |
Airbags ......................................................... |
42 |
PRE-SAFE® system ....................................... |
49 |
Safely transporting children in the vehi |
|
cle ................................................................. |
51 |
Notes on pets in the vehicle ......................... |
67 |
Opening and closing .................................. |
69 |
SmartKey ...................................................... |
69 |
Doors ............................................................ |
73 |
Cargo compartment ..................................... |
77 |
Roller sun blinds ........................................... |
82 |
Side windows ............................................... |
82 |
Sliding sunroof ............................................. |
86 |
Anti-theft protection ..................................... |
93 |
Seats and stowing ..................................... |
95 |
Notes on the correct driver's seat posi |
|
tion ............................................................... |
95 |
Seats ............................................................ |
96 |
Steering wheel ............................................ |
110 |
Easy entry and exit feature .......................... |
111 |
Operating the memory function .................. |
113 |
Stowage areas ............................................. |
114 |
Cup holder .................................................. |
127 |
Ashtray and cigarette lighter ....................... |
129 |
Sockets ....................................................... |
130 |
Wireless charging of the mobile phone |
|
and connection with the exterior antenna .. |
133 |
Installing/removing the floor mats ............. |
135 |
Light and visibility ................................... |
136 |
Exterior lighting .......................................... |
136 |
Interior lighting ............................................ |
141 |
Windshield wiper and windshield washer |
|
system ........................................................ |
143 |
Mirrors ........................................................ |
147 |
Contents 3
Operating the sun visors ............................. |
150 |
Area permeable to radio waves on the |
|
windshield ................................................... |
151 |
Infrared-reflective windshield function ........ |
151 |
Climate control ........................................ |
152 |
Overview of climate control systems .......... |
152 |
Operating the climate control system ......... |
153 |
Driving and parking .................................. |
161 |
Driving ......................................................... |
161 |
DYNAMIC SELECT switch ............................ |
174 |
Automatic transmission .............................. |
176 |
Transfer case .............................................. |
180 |
Function of 4MATIC .................................... |
182 |
Refueling .................................................... |
182 |
Parking ....................................................... |
185 |
Driving and driving safety systems .............. |
194 |
Trailer hitch ................................................ |
270 |
Bicycle rack ................................................ |
275 |
Vehicle towing instructions ......................... |
277 |
Instrument Display and on-board |
|
computer .................................................. |
278 |
Instrument Display overview ....................... |
278 |
Overview of the buttons on the steering |
|
wheel .......................................................... |
279 |
Operating the on-board computer .............. |
280 |
Adjusting the design of the Instrument |
|
Display ........................................................ |
281 |
Showing display content on the instru |
|
ment cluster ............................................... |
282 |
Overview of displays on the multifunc |
|
tion display ................................................. |
283 |
Adjusting the instrument lighting ............... |
284 |
Menus and submenus ................................ |
284 |
Head-up Display .......................................... |
291 |
Voice Control System .............................. |
292 |
Notes on operating safety .......................... |
292 |
Operation ................................................... |
292 |
Using the Voice Control System effec |
|
tively ........................................................... |
295 |
Essential voice commands ......................... |
296 |
MBUX multimedia system ...................... |
308 |
Overview and operation .............................. |
308 |
System settings .......................................... |
343 |
Navigation .................................................. |
354 |
Telephone ................................................... |
394 |
Online and Internet functions ..................... |
422 |
Media ......................................................... |
429 |
Radio .......................................................... |
436 |
Sound ......................................................... |
444 |
MBUX rear tablet ........................................ |
446 |
Maintenance and care ............................. |
449 |
ASSYST PLUS service interval display ........ |
449 |
Engine compartment .................................. |
450 |
Cleaning and care ....................................... |
456 |
Breakdown assistance ............................ |
466 |
Flat tire ....................................................... |
466 |
Battery (vehicle) .......................................... |
471 |
Tow starting or towing away ....................... |
477 |
Electrical fuses ........................................... |
481 |

4Contents
Wheels and tires ...................................... |
484 |
Notes on noise or unusual handling char |
|
acteristics ................................................... |
484 |
Notes on regularly inspecting wheels and |
|
tires ............................................................ |
484 |
Notes on snow chains ................................ |
485 |
Tire pressure .............................................. |
486 |
Loading the vehicle .................................... |
493 |
Tire labeling ................................................ |
497 |
Definition of terms for tires and loading ..... |
502 |
Changing a wheel ....................................... |
505 |
Emergency spare wheel .............................. |
513 |
Collapsible spare wheel .............................. |
514 |
Technical data ........................................... |
517 |
Notes on technical data .............................. |
517 |
Vehicle electronics ...................................... |
517 |
Vehicle identification plate, VIN and |
|
engine number overview ............................. |
519 |
Operating fluids .......................................... |
521 |
Vehicle data ................................................ |
527 |
Trailer hitch ................................................. |
531 |
Display messages and warning/indi |
|
cator lamps .............................................. |
532 |
Display messages ....................................... |
532 |
Warning and indicator lamps ...................... |
580 |
Index ......................................................... |
594 |
Symbols 5
In this Operator's Manual, you will find the fol lowing symbols:
&DANGER Danger due to not observing the warning notices
Warning notices draw your attention to haz ards that may endanger your health or life, or the health or life of others.
#Observe the warning notices.
+ENVIRONMENTAL NOTE Environmental damage due to failure to observe envi ronmental notes
Environmental notes include information on environmentally responsible behavior or envi ronmentally responsible disposal.
# Observe environmental notes.
*NOTE Damage to property due to failure to observe notes on material damage
Notes on material damage inform you of risks which may lead to your vehicle being damaged.
#Observe notes on material damage.
%Useful instructions or further information that could be helpful to you.
XInstruction
(Q page) Further information on a topic
Display Information on the multifunction dis play/media display
+Highest menu level, which is to be selected in the multimedia system
*Corresponding submenus, which are to be selected in the multimedia sys tem
* |
Marks a cause |

6At a glance – Cockpit
Left-hand-drive vehicles

At a glance – Cockpit |
7 |
1 Steering wheel paddle shifters |
→ |
178 |
|
|
|
2 Combination switch |
→ |
137 |
|
|
|
3 DIRECT SELECT lever |
→ |
174 |
|
|
|
4 Media display |
→ |
312 |
|
|
|
5 Climate control systems |
→ |
153 |
|
|
|
6 Hazard warning lamps |
→ |
138 |
|
|
|
7 PASSENGER AIR BAG indicator lamp |
→ |
47 |
|
|
|
8 Glove box |
→ |
116 |
|
|
|
9 Stowage compartment |
→ |
115 |
|
|
|
A Control knob for volume and switching sound |
→ |
308 |
on/off |
|
|
|
|
|
B Calls up navigation |
→ |
354 |
|
|
|
C Button for: |
|
|
|
|
|
Calls up the radio |
→ |
437 |
|
|
|
Calls up media |
→ |
432 |
|
|
|
D Calls up the telephone |
→ |
396 |
|
|
|
EOffroad control panel (vehicles with off-road package)
F Calls up favorites |
→ |
328 |
|
|
|
G Calls up vehicle functions |
→ |
320 |
|
|
|
H Active Parking Assist |
→ |
256 |
|
|
|
I DYNAMIC SELECT switch |
→ |
175 |
|
|
|
J Control elements for the multimedia system |
→ |
312 |
|
|
|
K Start/stop button |
→ |
162 |
|
|
|
L Control panel for the multimedia system |
→ |
279 |
(steering wheel) |
|
|
|
|
|
M Adjusts the steering wheel |
→ |
110 |
|
|
|
N Control panel for: |
|
|
|
|
|
On-board computer |
→ |
279 |
|
|
|
Cruise control or variable limiter |
→ |
208 |
|
|
|
Active Distance Assist DISTRONIC |
→ |
213 |
|
|
|
O Diagnostics connection |
→ |
27 |
|
|
|
P Unlocks the hood |
→ |
450 |
|
|
|

8At a glance – Cockpit
Q Electric parking brake |
→ |
191 |
|
R Light switch |
→ |
136 |
|
|
|
|
|
|
|
10 At a glance – Overview of warning and indicator lamps
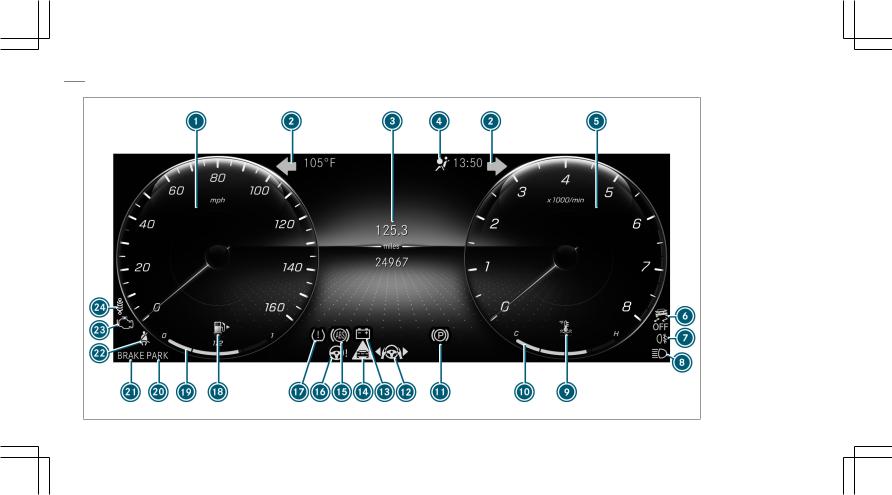
Widescreen Cockpit

At a glance – Overview of warning and indicator lamps 11
1 Speedometer |
→ |
278 |
|
|
|
|
|
2 |
#! Turn signal lights |
→ |
137 |
|
|
|
|
3 Multifunction display |
→ |
283 |
|
|
|
|
|
4 |
6 Restraint system |
→ |
36 |
|
|
|
|
5 Tachometer |
→ |
278 |
|
|
|
|
|
6 |
å ESP® OFF |
→ |
581 |
|
÷ ESP® |
→ |
581 |
7 R Rear fog light |
→ |
137 |
|
|
|
|
|
8 K High beam |
→ |
137 |
|
|
|
|
|
|
L Low beam |
→ |
136 |
|
|
|
|
|
T Parking lights |
→ |
136 |
|
|
|
|
9 |
? Coolant too hot/cold |
→ |
588 |
|
|
|
|
A Coolant temperature display |
→ |
278 |
|
|
|
|
|
B ! Electric parking brake (yellow) |
→ |
581 |
|
|
|
|
|
C ±Active Lane Change Assist |
→ |
217 |
|
|
|
|
|
D # Electrical malfunction |
→ |
588 |
|
|
|
|
|
E · Distance warning |
→ |
587 |
|
|
|
F ! ABS malfunction |
→ |
581 |
|
|
|
G Ð Power-assisted steering malfunction |
→ |
592 |
|
|
|
H h Tire pressure monitor |
→ |
591 |
|
|
|
I 8 Fuel reserve with fuel filler cap location |
→ |
588 |
indicator |
|
|
|
|
|
J Fuel level display |
|
|
|
|
|
K Electric parking brake applied (red) |
→ |
581 |
|
|
|
F USA only |
|
|
|
|
|
! Canada only |
|
|
|
|
|
L Brakes (red) |
→ |
581 |
|
|
|
$ USA only |
|
|
|
|
|
J Canada only |
|
|
|
|
|
M ü Seat belt not fastened |
→ |
586 |
|
|
|
N ; Check Engine |
→ |
588 |
|
|
|
O AIRMATIC/DYNAMIC BODY CONTROL/ |
|
|
ACTIVE BODY CONTROL malfunction |
|
|
|
|
|
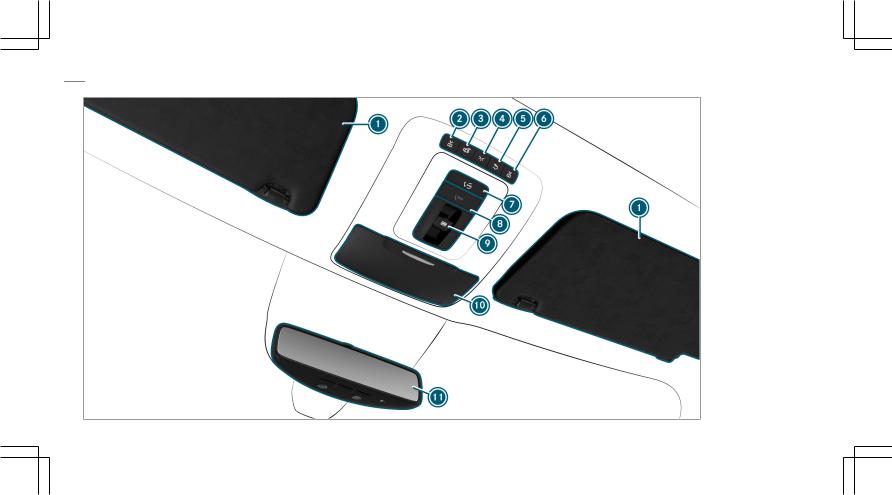
12 At a glance – Overhead control panel

At a glance – Overhead control panel 13
1 Sun visors |
→ |
150 |
|
|
|
2 p Switches the left-hand reading lamp |
→ |
141 |
on/off |
|
|
|
|
|
3 | Switches automatic light control on/off |
→ |
141 |
|
|
|
4 c Switches the front interior lighting |
→ |
141 |
on/off |
|
|
|
|
|
5 u Switches the rear interior lighting |
→ |
141 |
on/off |
|
|
|
|
|
6 p Switches the right-hand reading lamp |
→ |
141 |
on/off |
|
|
|
|
|
7 Service call button (Mercedes me connect) |
→ |
417 |
|
|
|
8 SOS emergency call system (Mercedes-Benz |
→ |
417 |
emergency call system) |
|
|
|
|
|
9 3 Opens/closes the panoramic sliding |
→ |
88 |
sunroof |
|
|
|
|
|
Opens/closes the roller sunblinds |
→ |
88 |
|
|
|
A Eyeglasses compartment (depending on the |
→ |
116 |
vehicle's equipment) |
|
|
|
|
|
B Inside rearview mirror |
→ |
148 |
|
|
|

14 At a glance – Door control panel and seat adjustment

At a glance – Door control panel and seat adjustment 15
1 Opens the door |
→ |
73 |
|
|
|
2 & % Locks/unlocks the vehicle |
→ |
73 |
|
|
|
3 Sets the memory function |
→ |
113 |
|
|
|
4 Adjusts the seats electrically |
→ |
96 |
|
|
|
5 Switches the seat heating on/off |
→ |
107 |
|
|
|
6 Switches the seat ventilation on/off |
→ |
109 |
|
|
|
7 Adjusts the front passenger seat from the |
→ |
98 |
driver's seat |
|
|
|
|
|
8 Extends/retracts the ball neck fully electri |
→ |
271 |
cally |
|
|
|
|
|
9 Opens/closes the tailgate |
→ |
77 |
|
|
|
A W Opens/closes the right side window |
→ |
82 |
|
|
|
B W Opens/closes the rear right side win |
→ |
82 |
dow |
|
|
|
|
|
C Child safety lock for the rear side windows |
→ |
67 |
|
|
|
D W Opens/closes the rear left side window |
→ |
82 |
|
|
|
E W Opens/closes the left side window |
→ |
82 |
|
|
|
F Adjusts and folds the outside mirrors out/in |
→ |
147 |
electrically |
|
|
|
|
|
G Adjusts the 4-way lumbar support |
→ |
99 |
|
|
|
H Seat adjustment using the multimedia system |
→ |
105 |
|
|
|
I Adjusts the head restraints |
→ |
103 |
|
|
|
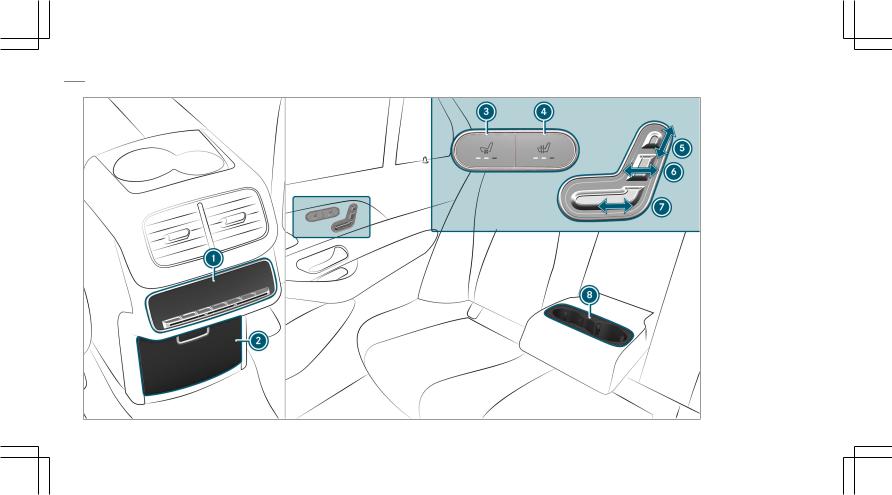
16 At a glance – Control settings in the rear passenger compartment

At a glance – Control settings in the rear passenger compartment 17
1 Climate control rear operating unit |
→ |
153 |
|
|
|
2 Stowage compartment in the center console |
→ |
116 |
|
|
|
230 V socket |
|
|
|
|
|
3 Switches the rear seat ventilation on/off |
→ |
109 |
|
|
|
4 Switches the rear seat heating on/off |
→ |
107 |
|
|
|
5 Adjusts the height of the head restraint |
→ |
107 |
|
|
|
6 Adjusts the seat backrest |
→ |
109 |
|
|
|
7 Sets the seat fore-and-aft position |
→ |
99 |
|
|
|
8 Cup holder |
→ |
127 |
|
|
|
MBUX rear tablet |
→ |
446 |
|
|
|
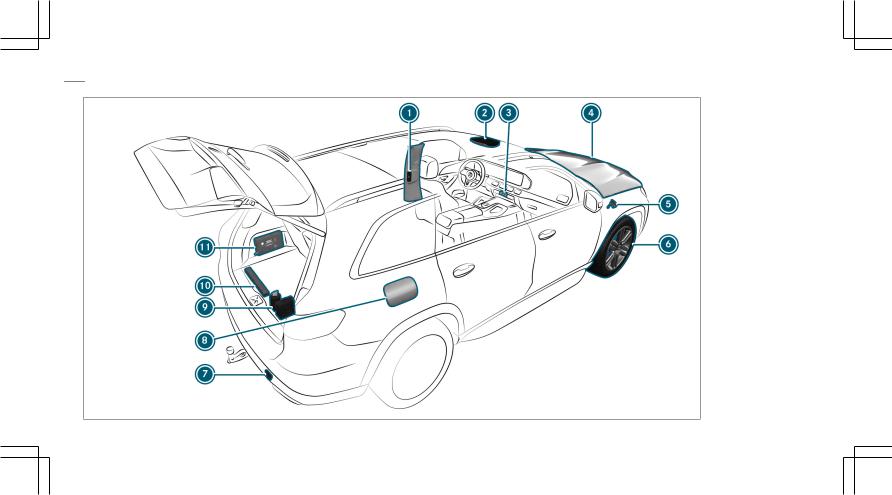
18 At a glance – Emergencies and breakdowns
At a glance – Emergencies and breakdowns 19
What to do in the event of an accident |
|
|
|
|
|
1 QR code for accessing the rescue card |
→ |
30 |
|
|
|
2 Buttons for the SOS emergency call system |
→ |
419 |
and breakdown assistance |
|
|
|
|
|
3 Hazard warning lamps |
→ |
138 |
|
|
|
4 To check and top up operating fluids |
→ |
521 |
|
|
|
Starting assistance |
→ |
475 |
|
|
|
5 To tow-start and tow away |
→ |
478 |
|
|
|
6 Flat tire |
→ |
466 |
|
|
|
7 To tow-start and tow away |
→ |
478 |
|
|
|
8 Fuel filler flap with instruction labels for tire |
→ |
182 |
pressure, fuel type and QR code for accessing |
|
|
the rescue card |
|
|
|
|
|
9 TIREFIT kit |
→ |
467 |
|
|
|
A Warning triangle |
|
|
|
|
|
B First-aid kit |
|
|
|
|
|

20 Digital Operator's Manual
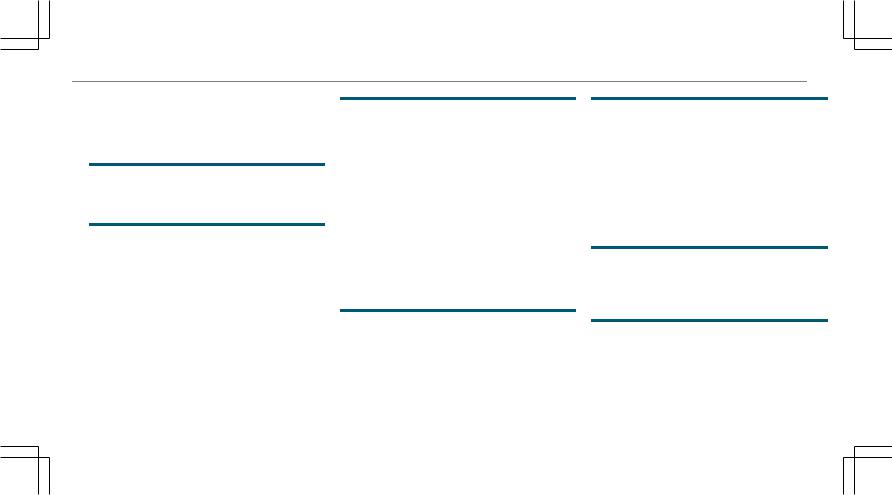
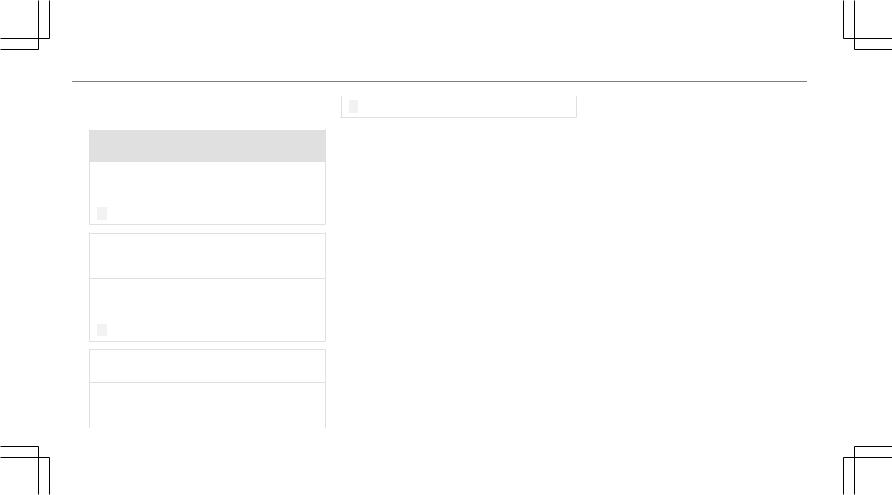
Calling up the Digital Operator's Manual
Multimedia system:
4 © 5 Info 5 Operator's Manual
5 Õ
The Digital Operator's Manual describes the function and operation of:
Rthe vehicle
Rthe multimedia system
#Select one of the following menu items in the Digital Operator's Manual:
RSearch: search for keywords in order to find quick answers to questions about the opera tion of the vehicle.
RQuick start: find the first steps towards set ting up your vehicle.
RTips: find information that prepares you for certain everyday situations with your vehicle.
RMessages: receive additional information about the messages in the instrument dis play.
RBookmarks: gain access to your personally saved bookmarks.
RLanguage: select the language for the Digital Operator's Manual.
1 Back
2 Adds bookmarks
3 Picture
4 Contents section
5 Directions of movement of contents section
6 Menu
Some sections in the Digital Operator's Manual, e.g. warning notes, can be opened and closed.
Additional methods of calling up the Digital Operator's Manual:
Direct access: open the required content in the Digital Operator's Manual by pressing and hold

Digital Operator's Manual 21
ing an entry on the tab bar in the multimedia system:
Instrument Display: call up brief information as display messages in the instrument cluster.
Voice Control System: call up via the voice control system
Global search: call up search results for con tents of the Digital Operator's Manual in the home screen
For safety reasons, the Digital Operator's Man ual is deactivated while driving.
%The Operator's Manual can also be found in the Mercedes-Benz Guides app in all com mon app stores.

22 General notes
Protecting the environment
+ENVIRONMENTAL NOTE Environmental damage due to operating conditions and personal driving style
The pollutant emission of your vehicle is directly related to the way you operate your vehicle.
Help to protect the environment by operating your vehicle in an environmentally responsi ble manner. Please observe the following rec ommendations on operating conditions and personal driving style.
Operating conditions:
#Make sure that the tire pressure is cor rect.
#Do not carry any unnecessary weight (e.g. roof luggage racks once you no longer need them).
#Adhere to the service intervals.
A regularly serviced vehicle will contrib ute to environmental protection.
#Always have maintenance work carried out at a qualified specialist workshop.
Personal driving style:
#Do not depress the accelerator pedal when starting the engine.
#Do not warm up the engine while the vehicle is stationary.
#Drive carefully and maintain a suitable distance from the vehicle in front.
#Avoid frequent, sudden acceleration and braking.
#Change gear in good time and use each gear only up to Ô of its maximum engine speed.
#Switch off the engine in stationary traf fic, e.g. by using the ECO start/stop function.
#Drive fuel-efficiently. Observe the ECO display for a fuel-efficient driving style.
+ENVIRONMENTAL NOTE Environmental pollution caused by irresponsible dis posal of the high-voltage battery
A high-voltage battery contains materials which are harmful to the environment.
#Dispose of defective high-voltage bat teries at a qualified specialist work shop.
Environmental issues and recommendations:
It is recommended that you re-use or recycle materials instead of just disposing of them.
The relevant environmental guidelines and regu lations serve to protect the environment and must be strictly observed.

General notes 23
Genuine Mercedes-Benz parts
+ENVIRONMENTAL NOTE Environmental damage caused by not using recycled reconditioned components
Daimler AG offers recycled reconditioned components and parts with the same quality as new parts. The same entitlement from the Limited Warranty is valid as for new parts.
#Use recycled reconditioned compo nents and parts from Daimler AG.
*NOTE Impairment of the operating effi ciency of the restraint systems from installing accessory parts or from repairs or welding
Airbags and Emergency Tensioning Devices, as well as control units and sensors for the restraint systems, may be installed in the fol lowing areas of your vehicle:
RDoors
RDoor pillars
RDoor sills
RSeats
RCockpit
RInstrument cluster
RCenter console
RLateral roof frame
#Do not install accessory parts such as audio systems in these areas.
#Do not carry out repairs or welding.
#Have aftermarket installation of acces sories carried out at a qualified special ist workshop.
You could jeopardize the operating safety of your vehicle if you use parts, tires and wheels as well as accessories relevant to safety which have not been approved by Mercedes-Benz. Safety-rele vant systems, e.g. the brake system, may mal function. Only use Mercedes-Benz Genuine Parts or parts of equal quality. Only use tires, wheels and accessories that have been specifically approved for your vehicle model.
Mercedes-Benz Genuine Parts are subject to strict quality control. Each part has been spe cially developed, manufactured or selected for Mercedes-Benz vehicles and fine-tuned for them. Therefore, only Mercedes-Benz Genuine Parts should be used.
More than 300,000 different Mercedes-Benz Genuine Parts are available for Mercedes-Benz models.
All authorized Mercedes-Benz Centers maintain a supply of Mercedes-Benz Genuine Parts for necessary service and repair work. In addition, strategically located parts delivery centers pro vide for quick and reliable parts service.
Always specify the vehicle identification number (VIN) (/ page 519) when ordering MercedesBenz Genuine Parts.
Operator's Manual
This Operator's Manual describes all models and all standard and optional equipment available for your vehicle at the time of this Operator's Man ual going to press. Country-specific differences are possible. Note that your vehicle may not be

24 General notes
equipped with all features described. This is also the case for systems and functions relevant to safety. Therefore, the equipment on your vehicle may differ from that in the descriptions and illus trations.
The original purchase agreement for your vehicle contains a list of all of the systems in your vehi cle.
Should you have any questions concerning equipment and operation, please consult an authorized Mercedes-Benz Center.
The Operator's Manual and Maintenance Booklet are important documents and should be kept in the vehicle.
Service and vehicle operation
Vehicle operation outside the USA or Canada
When you are abroad with your vehicle, observe the following points:
Rservice points or replacement parts may not be available immediately.
Runleaded fuel may not be available for vehi cles with a catalytic converter. Leaded fuel may cause damage to the catalytic converter.
Rthe fuel may have an extremely low octane number. Unsuitable fuel can cause engine damage.
Some Mercedes-Benz models are available in Europe through our European Delivery Program. For more information, please consult an author ized Mercedes Benz service center, or write to one of the following address:
in the USA:
Mercedes-Benz USA, LLC European Delivery Department One Mercedes-Benz Drive Sandy Springs, GA 30328
in Canada:
Mercedes-Benz Canada, Inc. European Delivery Department 98 Vanderhoof Avenue Toronto, Ontario M4G 4C9
Maintenance
Your customer advisor confirms the service in the service report.
Roadside Assistance
The Mercedes-Benz Roadside Assistance Pro gram offers technical help in the case of a breakdown. Your calls to the toll-free Roadside Assistance Hotline are answered by our agents 24 hours a day, 365 days a year.
1-800-FOR-MERCedes (1-800-367-6372) (USA) 1-800-387-0100 (Canada)
You can find further information in the Mercedes-Benz Roadside Assistance Program brochure (USA) or the "Roadside Assistance" section in the maintenance and warranty infor mation booklet (Canada). You will find both in the vehicle document wallet.
Change of address or change of ownership
In the event of a change of address, please send us the "Notification of address change" in the

General notes 25
Service and Guarantee booklet or simply call the Mercedes-Benz Customer Assistance Center (USA) on the hotline number 1-800-FOR-MERCedes (1-800-367-6372) or Cus tomer Service (Canada) on 1-800-387-0100. We can then reach you in a timely fashion, if neces sary.
If you sell your Mercedes, please leave all litera ture in the vehicle so that it is available to the next owner. If you have purchased a used vehi cle, please send us the "Notice of Purchase of Used Car" in the Service and Guarantee booklet or simply call the Mercedes-Benz Customer Assistance Center (USA) at the hotline number 1-800-FOR-MERCedes (1-800-367-6372) or Cus tomer Service (Canada) at 1-800-387-0100.
Possible danger due to substances hazard ous to health
In compliance with Proposition 65 ("Prop65"), the following detachable label has been added to each vehicle sold in California:
Operating safety
&WARNING Risk of accident due to mal functions or system failures
If you do not have the prescribed service/ maintenance work or any required repairs carried out, this could result in malfunctions or system failures.
#Always have the prescribed service/ maintenance work as well any required repairs carried out at a qualified spe cialist workshop.
&WARNING Risk of accident and injury as a result of incorrect modifications to electronic component parts
Modification to electronic components, their software or wiring could impair their function and/or the function of other networked com ponent parts. In particular, systems relevant to safety could also be affected.
As a result, they may no longer function as intended and/or endanger the operating safety of the vehicle.
#Never tamper with the wiring and elec tronic component parts or their soft ware.
#You should have all work on electrical and electronic components carried out at a qualified specialist workshop.
Observe the "On-board electronics" section in "Technical data".
26 General notes
&WARNING Risk of fire due to flammable materials on hot parts of the exhaust system
Flammable material such as leaves, grass or twigs may ignite if they come into contact with hot parts of the exhaust system.
#When driving on unpaved roads or offroad, regularly check the vehicle under side.
#Remove trapped plants or other flam mable material.
#If there is damage, consult a qualified specialist workshop immediately.
* NOTE Damage to the vehicle
In the following situations, in particular, there is a risk of damage to the vehicle:
RThe vehicle becomes grounded, e.g. on a high curb or an unpaved road
RThe vehicle is driven too fast over an obstacle, e.g. a curb, speed bump or pot hole
RA heavy object strikes the underbody or chassis components
In situations such as this, the body, the underbody, chassis components, wheels or tires could be damaged without the damage being visible. Components damaged in this way can unexpectedly fail or, in the case of an accident, may not absorb the loads that arise as intended.
If the underbody paneling is damaged, flam mable materials such as leaves, grass or twigs can collect between the underbody and the underbody paneling. These materials may ignite if they come into contact with hot parts on the exhaust system.
#Have the vehicle checked and repaired immediately at a qualified specialist workshop.
or
#If driving safety is impaired while con tinuing your journey, pull over and stop the vehicle immediately in accordance with the traffic conditions, and contact a qualified specialist workshop.
Vehicles with a 48 V on-board electrical sys tem (EQ Boost technology)
&DANGER Risk of fatal injury by touching damaged high-voltage components
Vehicles with a 48 V on-board electrical sys tem contain individual high-voltage compo nents. These high-voltage components are under high voltage.
If you modify component parts of these highvoltage components or touch damaged com ponent parts, you may be electrocuted.
High voltage components may be damaged in an accident, although the damage may not be visible.
#Never perform modifications to compo nent parts of high-voltage components.

General notes 27
#Never touch damaged component parts of high-voltage components.
#Never touch component parts of highvoltage components after an accident.
Vehicles with a 48 V on-board electrical system contain high voltage components. These compo nents are marked with a high voltage label:
All work on high voltage components must be carried out at a qualified specialist workshop.
Declaration of conformity for wireless vehi cle components
USA: "The wireless devices of this vehicle com ply with Part 15 of the FCC Rules. Operation is subject to the following two conditions: 1) These devices may not cause harmful interference, and 2) These devices must accept any interference received, including interference that may cause undesired operation. Changes or modifications not expressly approved by the party responsible for compliance could void the user's authority to operate the equipment."
Canada: "The wireless devices of this vehicle comply with Industry Canada license-exempt RSS standard(s). Operation is subject to the fol lowing two conditions: (1) These devices may not cause interference, and (2) These devices must accept any interference, including interfer ence that may cause undesired operation of the device."
USA: "Wireless charging system for mobile devi ces (model: WMI2 Wireless Mobile Interface): this device complies with Part 18 of the FCC Rules."
The name and address of the responsible party is:
peiker acustic GmbH Max-Planck-Str. 28-32 61381 Friedrichsdorf Germany
Diagnostics connection
The diagnostics connection is only intended for the connection of diagnostic devices at a quali fied specialist workshop.
&WARNING Risk of accident due to con necting devices to the diagnostics con nection
If you connect equipment to a diagnostics connection in the vehicle, it may affect the operation of vehicle systems.
As a result, the operating safety of the vehi cle could be affected.
#Only connect equipment to a diagnos tics connection in the vehicle which is

28 General notes
approved for your vehicle by MercedesBenz.
&WARNING Risk of accident due to objects in the driver's footwell
Objects in the driver's footwell may impede pedal travel or block a depressed pedal.
This jeopardizes the operating and road safety of the vehicle.
#Stow all objects in the vehicle securely so that they cannot get into the driver's footwell.
#Always install the floor mats securely and as prescribed in order to ensure that there is always sufficient room for the pedals.
#Do not use loose floor mats and do not place floor mats on top of one another.
*NOTE Battery discharging from using devices connected to the diagnostics connection
Using devices at the diagnostics connection drains the battery.
#Check the charge level of the battery.
#If the charge level is low, charge the battery, e.g. by driving a considerable distance.
Connecting equipment to the diagnostics con nection can lead to emissions monitoring infor mation being reset, for example. This may lead to the vehicle failing to meet the requirements of the next emissions inspection during the main inspection.
Qualified specialist workshop
An authorized Mercedes-Benz Center is a quali fied specialist workshop. It has the necessary special skills, tools and qualifications to cor rectly carry out the work required on your vehi
cle. This particularly applies to safety-relevant works.
For the following, always have your vehicle checked at an authorized Mercedes-Benz Cen ter:
Rsafety-relevant works
Rservice and maintenance work
Rrepair work
Rmodifications as well as installations and conversions
Rwork on electronic components
Mercedes Benz recommends a Mercedes Benz service center.
Correct use of the vehicle
If you remove any warning stickers, you or others could fail to recognize certain dangers. Leave warning stickers in position.
Observe the following information in particular when driving your vehicle:
R the safety notes in this manual
 Loading...