

Members Mark Gas9670aso Owner's Manual

6 Burner Gas Grill with Sear
& Side Burners
OWNER’S MANUAL
ASSEMBLY AND OPERATING IN STRUC TIONS
SAVE THIS MANUAL FOR FUTURE REFERENCE
Model GAS9670AS / GAS9670ASO
NOTICE TO INSTALLER:
LEAVE THESE INSTRUCTIONS
WITH GRILL OWNER FOR FUTURE
REFERENCE .
WARNING/ADVERTENCIA
HAZARDOUS EXPLOSION MAY RESULT IF THESE WARNINGS
AND INSTRUCTIONS ARE IGNORED. READ AND FOLLOW ALL
WARNINGS AND INSTRUCTIONS IN THIS MANUAL TO AVOID
PERSONAL INJURY, INCLUDING DEATH OR PROPERTY DAMAGE.
IMPORTANT SAFETY
WARNINGS
WE WANT YOU TO ASSEMBLE AND USE YOUR GRILL AS SAFELY AS POSSIBLE.
THE PURPOSE OF THIS SAFETY ALERT SYMBOL
TO POSSIBLE HAZARDS AS YOU ASSEMBLE AND USE YOUR GRILL.
WHEN YOU SEE THE SAFETY ALERT SYMBOL
PAY CLOSE ATTENTION TO THE INFORMATION WHICH FOLLOWS!
READ ALL SAFETY WARNINGS AND INSTRUCTIONS CAREFULLY
BEFORE ASSEMBLING AND OPERATING YOUR GRILL.
DANGER
IF YOU SMELL GAS:
1. Shut off gas to the appliance.
IS TO ATTRACT YOUR ATTENTION
2. Extinguish any open ame.
3. Open lid.
4. If odor continues, keep away from the appliance and immediately call your gas supplier or your
re department.
WARNING
1. Do not store or use gasoline or other ammable liquids or vapors in the vicinity of this or any
other appliance.
2. An LP cylinder not connected for use shall not be stored in the vicinity of this or any other
appliance.
DANGER
a) Do not store a spare LP cylinder under or near this appliance.
b) Never ll the cylinder beyond 80% full.
c) If the information in (a) and (b) is not followed exactly, a re causing death or
serious injury may occur.
1

TABLE OF CONTENTS:
General Warnings . . . . . . . . . . . . . . . . . . . . . . . . . . . . . . . . . . . . . . . . . . . . 3-4
LP Gas Cylinder (Tank) Speci cations and Installation . . . . . . . . . . . . . . . . 4-6
Hose & Regulator Speci cations and Installation . . . . . . . . . . . . . . . . . . . . 6-7
Leak Testing. . . . . . . . . . . . . . . . . . . . . . . . . . . . . . . . . . . . . . . . . . . . . . . . . 7-8
Pre-start Check List . . . . . . . . . . . . . . . . . . . . . . . . . . . . . . . . . . . . . . . . . . . . .9
Lighting Instructions . . . . . . . . . . . . . . . . . . . . . . . . . . . . . . . . . . . . . . . . . . 9-11
Operating the Grill . . . . . . . . . . . . . . . . . . . . . . . . . . . . . . . . . . . . . . . . . . 11-12
Using Other Features of the Grill . . . . . . . . . . . . . . . . . . . . . . . . . . . . . . . . . .12
Proper Care and Maintenance . . . . . . . . . . . . . . . . . . . . . . . . . . . . . . . . . 13-14
Transporting and Storage. . . . . . . . . . . . . . . . . . . . . . . . . . . . . . . . . . . . . . . .15
Trouble Shooting . . . . . . . . . . . . . . . . . . . . . . . . . . . . . . . . . . . . . . . . . . . 16-17
Grill Cooking Tips . . . . . . . . . . . . . . . . . . . . . . . . . . . . . . . . . . . . . . . . . . . . . .17
Assembly Instructions . . . . . . . . . . . . . . . . . . . . . . . . . . . . . . . . . . . . . . . 18-30
Warranty Information . . . . . . . . . . . . . . . . . . . . . . . . . . . . . . . . . . . Back Cover
DANGER: Indicates an imminently hazardous situation which, if not avoided, will result in death or serious injury.
WARNING: Be alert to the possibility of serious bodily injury if the instructions are not followed. Be sure to read and
carefully follow all of the messages.
CAUTION: Indicates a potentially hazardous situation which, if not avoided, may result in minor or moderate injury.
CALIFORNIA PROPOSITION 65 WARNING
WARNING: This product can expose you to chemicals, including carbon monoxide,
which are known to the State of California to cause cancer and birth defects
or other reproductive harm.
For more information go to www.P65Warnings.ca.gov.
WARNING: CONTAINS LEAD. MAY BE HARMFUL
IF EATEN OR CHEWED. COMPLIES WITH FEDERAL
STANDARDS. KEEP OUT OF REACH OF CHILDREN.
FOR COVERS, ACCESSORIES AND OTHER PRODUCTS PLEASE VISIT US ONLINE AT: www.embersgrills.com
2

GENERAL WARNINGS:
WARNING
• Leak test all connections before rst use, even if grill was purchased fully assembled and after each
tank re ll. Check propane tank rubber seal for damage.
• Always check grill and propane tank prior to each use as indicated in “Checking for Leaks” & “PreStart Check List” sections of this manual.
• Never use natural gas in a unit designed for liquid propane gas.
• Flavoring chips must be contained in a metal smoking box to contain ash and prevent res.
• Ensure ames come out of all burner ports at each use. Spiders and insects like to build nests in
burner tubes. Blocked burner tubes can prevent gas ow to burners and could result in a burner tube
re or re beneath grill.
• Never check for leaks using a match or open ame.
• Never use or store gasoline, lighter uid, paint thinner, or other ammable vapors and liquids or
combustible materials in or near your grill.
• DO NOT block ventilation areas in sides, back or cart compartment of grill.
• DO NOT cover cooking grates or other components with aluminum foil, as this blocks ventilation and
damage to grill or personal injury may occur.
• Never place more than 15 pounds on side tables. DO NOT lean on side tables. DO NOT lift grill using
side tables.
• Keep children and pets away from hot grill. DO NOT allow children to use or play near this grill.
• DO NOT leave grill unattended while ON or in use.
• DO NOT allow gas hose to come in contact with hot surfaces. Redirect gas hose if necessary.
• DO NOT allow grease or hot drippings to fall on hose and regulator assembly. If this occurs, turn gas
supply OFF at once. Empty grease tray/cup and clean hose and regulator assembly and inspect for
damage before use.
• Never cook on grill without grease cup/tray in position.
• DO NOT use water on a grease re. Closing lid to extinguish a grease re is not possible. Use type
BC dry chemical re extinguisher or smother with dirt, sand or baking soda.
• DO NOT use while under in uence of drugs or alcohol.
• FOR OUTDOOR USE ONLY. DO NOT operate indoors or in an enclosed area such as a building,
garage, shed or breezeway.
• Position your grill outdoors on a non-combustible level surface in a well ventilated location, a safe
distance 10 ft. (3.1 m) from combustible materials, buildings and overhangs.
• Apartment dwellers: Check with management and follow requirements and re codes for using a
LP gas grill in your apartment complex. Only use outside on ground (not on a balcony, patio, garage,
etc) with a 15 foot (4.6 m) minimum clearance on back and all sides from any wall, structure or
combustible material.
• Maintain a minimum clearance of 36 inches (91 cm) between back and all sides of grill, deck railings,
walls or other combustible material. Not adhering to these clearances may prevent proper ventilation
and can increase risk of a re and/or property damage, which could also result in personal injury. DO
NOT use grill under overhead combustible construction.
• DO NOT use or install this grill in or on a recreational vehicle and/or boat.
• DO NOT build this model grill in any built-in or slide in construction.
• If a bristle brush is used to clean any cooking surfaces, ensure no loose bristles remain on cooking
surfaces prior to grilling as loose bristles may attach to food.
• DO NOT store items in cart that can catch re or damage your grill (such as swimming pool supplies/
chemicals, table cloth, wood chips).
3

• Grill is hot when in use. To avoid burns:
• DO NOT attempt to move the grill.
• Block wheels so grill does not move.
• Wear protective gloves or oven mitts.
• DO NOT touch any hot grill surfaces.
• DO NOT wear loose clothing or allow hair to come in contact with grill.
• Not for commercial use. DO NOT use this grill for anything other than its intended purpose.
USE CAUTION AND COMMON SENSE WHEN OPERATING YOUR GAS GRILL.
FAILURE TO ADHERE TO THE SAFETY WARNINGS AND GUIDELINES IN THIS MANUAL
COULD RESULT IN SEVERE BODILY INJURY OR PROPERTY DAMAGE.
SAVE THIS MANUAL FOR FUTURE REFERENCE.
LP GAS CYLINDER (TANK) SPECIFICATIONS AND INSTALLATION:
WARNING
• ONLY connect this grill to a Type 1 cylinder valve. The Type 1 valve can be identi ed with the
large external threads on the valve outlet.
• DO NOT connect to a propane cylinder exceeding a 20 lb. (9.1 kg) capacity.
• DO NOT connect to a cylinder that uses any other type of valve connection device.
• Inspect the propane tank valve rubber seal for cracks, wear or deterioration prior to use. A
damaged rubber seal can cause a gas leak, possibly resulting in an explosion, re or severe
bodily harm.
• Turn off the cylinder valve when your grill is not in use.
• Handle the tank with care.
• Always secure the cylinder in an upright position.
• Never connect an unregulated LP gas cylinder to your grill.
• DO NOT expose LP gas cylinders to excessive heat or ignition sources.
• DO NOT store a spare LP gas cylinder under or near your grill.
• Allow only quali ed LP gas dealers to ll or repair your LP gas cylinder.
• DO NOT allow the cylinder to be lled beyond 80% capacity.
• Read and follow all warnings and instructions that are on the cylinder and that accompany this
product.
DANGER
• DO NOT store a spare LP gas cylinder (full or empty) under or near your grill. This could cause
excess pressure to be expelled through the vapor relief valve resulting in re, explosion, or
severe personal injury, including death.
• Propane gas is heavier than air and will collect in low areas. Proper ventilation is extremely
important. Keep the ventilation opening(s) of the LP gas cylinder enclosure free and clear from
obstructions and debris.
• DO NOT insert any foreign objects into the cylinder valve outlet as this could damage the
rubber seal. Do not use propane tank with a damaged rubber seal. A damaged rubber seal can
cause a gas leak, possibly resulting in explosion, re, severe bodily harm, or death. Inspect
rubber seal for cracks, wear or deterioration prior to use.
• Always keep cylinder (tank) in upright position during use, transit or storage.
4

LP GAS CYLINDER (TANK) SPECIFICATIONS:
LP gas cylinder (not supplied with this grill)
The LP (Liquid Propane) gas cylinder speci cally designed to be used with this grill must be 12” (30.5 cm)
diameter x 18” (45.7 cm) tall and have a 20 lb. (9.1 kg) capacity incorporating a Type 1 cylinder valve and
an over- lling protection device (OPD).
This grill is designed to t Worthington, Manchester or SMPC brand 20 lb. (9.1 kg) cylinders. Other brand
DOT cylinders may t this grill if cylinder has similar dimensions of top and bottom rings.
The installation of this appliance must be in accordance with:
All applicable local codes, or in the absence of local codes, either:
• National Fuel Gas Code ANSI Z223.1 NFPA 54
• Natural Gas and Propane Installation Code: CAN/CGA B149.1
• Natural Gas Installation Code: CAN/CGA B149.1 (Canada)
• Propane Installation Code: CAN/CGA B149.2 (Canada)
To check your local codes, see your local LP gas dealer or natural gas company.
When purchasing or exchanging a cylinder for your gas grill, it must be constructed and marked in
accordance with speci cations for LP gas cylinders of the U.S. Department of Transportation (DOT) or
the National Standard of Canada, CAN/CSA-B339 Cylinders, Spheres and Tubes for Transportation of
Dangerous Goods; and Commission, as applicable; and provided with a listed over- lling prevention device
(OPD), and provided with a cylinder connection device compatible with connection for outdoor cooking
appliances.
The cylinder must also be equipped with:
• A shut-off valve terminating in a Type 1 gas cylinder valve outlet.
• A Type 1 valve that prevents gas ow until a positive seal is obtained.
• An arrangement for vapor withdrawal.
• A collar to protect cylinder shut-off valve.
• A safety relief device having direct communication with vapor space of the cylinder.
• A listed over- lling prevention device (OPD).
FILLING THE LP GAS CYLINDER (TANK):
WARNING
• Allow only quali ed licensed LP gas dealers to properly ll or repair your LP gas cylinder.
• New tanks should be purged prior to lling; inform LP gas dealer if you are using a new tank.
• DO NOT allow the cylinder to be lled beyond 80% capacity. Over- lled tanks can create a
dangerous condition. Over- lled tanks can build-up pressure and cause the relief valve to expel
propane gas vapors. The vapor is combustible and if it comes in contact with a spark source or
ame an explosion causing severe burns, bodily harm, or death could occur.
• Always use a protective cylinder cap when grill is not connected to cylinder.
• If you exchange a cylinder with a quali ed exchange program, the new cylinder must have
a Type 1 valve and an over- lling prevention device (OPD).
• Inspect the propane tank valve rubber seal for cracks, wear or deterioration prior to use. A
damaged rubber seal can cause a gas leak, possibly resulting in an explosion, re or severe
bodily harm.
5

LP GAS CYLINDER (TANK) RUBBER SEAL INSPECTION:
• Inspect propane tank valve rubber seal for cracks, wear
or deterioration prior to use. A damaged rubber seal can
cause a gas leak, possibly resulting in an explosion, re
or severe bodily harm.
• Inspection should be done each time propane tank is
connected to grill, has been re lled, exchanged or has
not been used for more than 60 days.
• Do not use a propane tank with a damaged rubber
seal. Exchange tank or have rubber seal replaced at a
quali ed propane lling station.
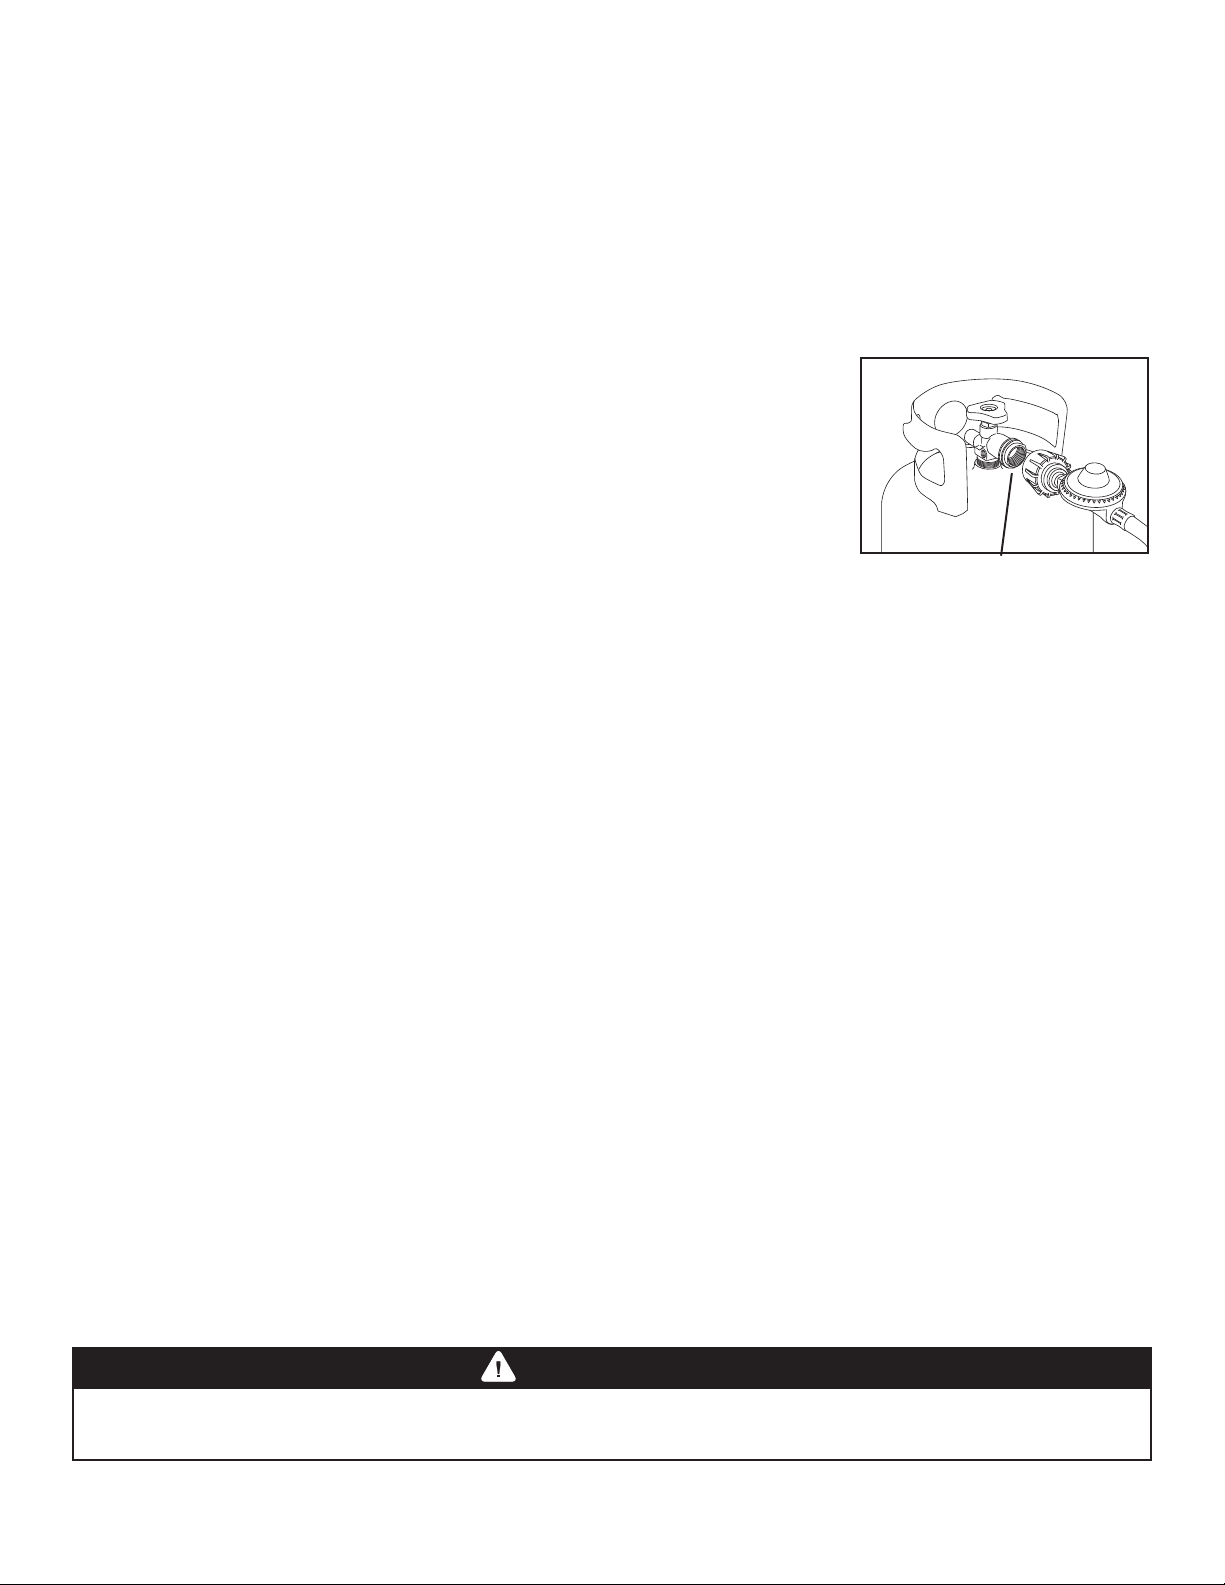
INSTALLING THE LP GAS CYLINDER (TANK) ONTO THE GRILL:
1. Check that the cylinder valve is closed by turning knob clockwise. Inspect cylinder valve rubber seal for
cracks or deterioration. Do not use propane tank with damaged seal as a gas leak may occur.
2. Place cylinder into tank holder in bottom of cabinet.
3. Orient cylinder so valve opening faces right side of the grill.
4. Fully tighten tank retention screw.
GOOD
RUBBER SEAL
DAMAGED
RUBBER SEAL
TANK RETENTION SCREW
HOSE & REGULATOR SPECIFICATIONS AND INSTALLATION:
WARNING
• DO NOT attempt to connect grill, as purchased for LP (propane) gas, to any other fuel supply
source such as a natural ga
3 Embers conversion kit must be purchased and installed for use with natural gas.
• DO NOT use any other pressure regulator/hose assembly other than the one supplied with your
grill. Replacement pressure regulator/hose assembly must be part No 9670-155-9670-0 which can be
obtained by contacting customer service at 855-735-9922.
• DO NOT attempt to adjust or repair a regulator. The regulator is designed to operate at a
maximum output pressure of 11 inches of water column (2.74 kPa).
• Ensure the tank valve is CLOSED prior to connecting the LP gas cylinder to your grill. Turn the
valve knob clockwise to properly close the valve. Read and follow all instructions and warnings
on the supply hose safety tags. Read and follow all warnings in this manual concerning the safe
use of LP gas cylinders and the hose and regulator before connecting cylinder to grill. Read and
follow all warnings on the LP cylinder.
s line. For dual fuel grills that can be converted to natural gas, a
6
HOSE AND REGULATOR:
Your grill is equipped with a Type 1 connection device with the following features:
1. The system will not allow gas ow from cylinder until a positive connection to valve has been made.
Note: The cylinder valve and all grill burner knobs must be turned OFF before any connection is made or
removed.
2. A regulator ow limiting device, when activated, restricts the ow of gas to 10 cubic feet per hour. If the
ow limiting device is activated, perform Regulator Resetting Procedure.
Note: If your grill will not get hot enough to cook, the ow limiting device may have been activated.
CONNECTING HOSE AND REGULATOR:
1. Inspect propane tank valve rubber seal for cracks, wear or deterioration
prior to use. A damaged rubber seal can cause a gas leak, possibly
resulting in an explosion, re or severe bodily harm. Do not use a
propane tank with a damaged rubber seal.
2. Attach or detach regulator to the LP gas cylinder only when cylinder is
at rest in tank holder.
3. Check that the cylinder valve is closed by turning knob clockwise.
4. Check that the grill’s burner control knobs are “OFF”.
5. Visually inspect hose prior to each use for damage, excess wear, or
deterioration. If found, replace hose before using your grill. Only the
manufacturer’s supplied replacement should be used.
6. Remove the protective plastic cap from cylinder valve.
7. Check that the hose does not contain kinks, does not contact sharp edges, and does not contact
surfaces that may become hot during use.
8. Hold regulator and insert the brass nipple into LP cylinder valve outlet. Ensure that the device is
centered properly.
9. Turn large coupling nut clockwise by hand and tighten to a full stop. Take care not to cross thread
coupling nut onto cylinder valve. Do not use tools to tighten connection.
Note: If you are unable to make connection, repeat Steps 7 and 8.
10. Leak check all ttings before lighting your grill. See section on “Leak Testing” in this manual.
Note: To remove regulator from propane tank, turn off tank valve and rotate large coupling nut
counter-clockwise and remove.
Inspect Rubber Seal (see page 6)
REGULATOR RESETTING PROCEDURE:
If your grill will not get hot enough to cook, the ow limiting device may have been activated.
Mini Reset:
Turn ALL burner control knobs to “OFF”, turn off cylinder valve. Wait one minute. Slowly turn cylinder
valve ON and relight grill. If burner ame is higher and grill heats up properly – proceed with cooking.
Full Reset:
Turn ALL burner control knobs to “OFF”, turn off cylinder valve. Disconnect hose and regulator from cylinder.
Wait two minutes, reattach hose and regulator and perform leak test.
LEAK TESTING:
WARNING
• Never use your grill without leak testing all gas connections, hoses and propane tank. Follow
the section on “Leak Testing” in this manual for proper procedures.
7

DANGER
To prevent re or explosion hazard:
• DO NOT smoke or permit ignition sources in the area while conducting a leak test.
• Perform test OUTDOORS in a well ventilated area that is protected from the wind.
• Never perform a leak test with a match or open ame.
• Never perform a leak test while the grill is in use or while grill is still hot.
WHEN TO PERFORM A LEAK TEST:
• After assembling your grill and before lighting for the first time, even if purchased fully assembled.
• Every time LP gas cylinder is refilled, exchanged or if any of the gas components are disconnected or replaced.
• Any time your grill has been moved.
• At least once per year or if your grill has not been used for more than 60 days.
CHECKING FOR LEAKS:
CAUTION: Strong odors, colds, sinus congestion, etc. may prevent the detection of propane by smell.
Use caution and common sense when testing for leaks.
Note: The leak test must be performed in an area that has adequate lighting in order to see if bubbles
are developing and not in a windy or noisy area so larger leaks can be detected by smell or sound.
1. Create a mixture of 50% water and 50% liquid dishwashing soap.
2. Open lid.
3. Ensure all control knobs are set to “OFF”.
4. Turn on gas at cylinder valve. Turn cylinder valve knob counter-clockwise
to full open. If you hear a rushing sound or smell gas, turn gas off.
Tighten any leaking connections. If leak is detected at connection nut
and tightening does not stop leak, reinspect propane tank rubber seal.
5. Apply a soapy water mixture to the following:
Supply tank (cylinder) weld.
A
Back side of connection nut to brass nipple.
B
Connection nut to tank valve.
C
Brass nipple connection into regulator.
D
Regulator connections to gas supply hoses.
E
Gas supply hose connection to side burner valve assembly.
F
Side burner valve stem cap.
G
Hose connection to gas manifold.
H
The full length of gas supply hose.
I
Tank valve to cylinder.
J
Watch For Bub bles
F
E
G
H
I
D
6. Check each place listed (A–J) for growing bubbles, which indicates a
leak. Large leaks may not be detected by bubbles but should produce a
rushing sound or gas smell.
7. Turn off gas supply at cylinder valve.
8. Turn on control knobs to release gas pressure in hose.
9. Turn control knobs “OFF”.
10. Tighten any leaking connections. If leak is detected at connection nut
and tightening does not stop leak, reinspect propane tank rubber seal.
(see page 6)
11. Repeat soapy water test until no leaks are detected.
12. Turn off gas supply at cylinder valve until you are ready to use your grill.
13. Wash off soapy residue with cold water and towel dry.
14. Wait 5 minutes to allow all gas to evacuate area before lighting grill.
WARNING: DO NOT use grill if leaks cannot be stopped. Contact a
qualified gas appliance repair service.
J
C
B
A
8

PRE-START CHECK LIST:
DANGER
Property damage, bodily harm, severe burns, and death could result from failure to follow these
safety steps. These steps should be performed after the grill has been assembled and prior to
each use. DO NOT operate this grill until you have read and understand ALL of the warnings and
instructions in this manual.
• Ensure that the grill is properly assembled.
• Inspect gas supply hose for burns, chaffing, kinks, and proper routing before each use. If it is evident
there is excessive abrasion or wear, or the hose is cut, it must be replaced prior to grill being used.
Replace with hose and regulator Model No. 9670-155-9670-0, which can be obtained by contacting
customer service at 855-735-9922.
• Leak check all gas connections, hose and propane tank. See section on “Leak Testing”.
• Position your grill on a non-combustible level surface in a well ventilated location, a safe distance
10 ft. (3.1 m) from combustible materials, buildings and overhangs.
• Properly place empty grease cup under grease drain hole in bottom of grill to catch grease during use.
• DO NOT block ventilation areas in sides, back or cart compartment of grill.
LIGHTING INSTRUCTIONS:
WARNING
Read, understand and follow all warnings and instructions contained in this manual. DO NOT skip any
of the warnings and instructions contained in the preceding sections of this manual.
Follow the instructions exactly.
1. OPEN THE GRILL LID before attempting to light a burner so that fumes do not accumulate inside
the grill. An explosion could occur if grill lid is down.
2. Check that all burner control knobs and the cylinder valve are turned to the “OFF” position.
3. Turn on the fuel supply by slowly rotating the cylinder valve knob counter-clockwise to full open.
4. DO NOT stand with head, body, or arms over the grill when lighting.
LIGHTING THE MAIN BURNERS:
1. Open lid before lighting burner.
2. Make sure all control knobs are “OFF”.
3. Select burner to be lit. Push and turn control knob to “HIGH”. Press igniter
for 3-5 seconds.
4. If ignition does NOT occur in 5 seconds, turn control knob to “OFF”,
wait 5 minutes to allow gas to dissipate and repeat lighting procedure.
5. To light other burners, follow steps 3-4.
OFF
HIGH
IGNITER
6. If burner does not ignite using igniter, see “Match Lighting the Main
Burners” section.
7. To turn off, turn each control knob clockwise until it locks in the “OFF” position. This does not turn off
the gas ow from the cylinder.
Note: If burner does not light or ame is too low, See “Trouble Shooting” section of the owners manual.
9
 Loading...