

Page 1
Operating Instructions
Bedienungsanleitung
ENGLISHSVENSKASUOMI DANSK NORSK
Page 2

Page 3

Table of contents
Table of contents
1 For your safety ..................................................................................................................... 5
1.1 Symbols used ............................................................................................................ 6
1.2 Proper use ................................................................................................................... 6
1.3 Danger from electric current ............................................................................... 6
1.4 Risk of burns and scalds......................................................................................... 7
1.5 General safety............................................................................................................ 7
2 Overview of the appliance .............................................................................................. 8
2.1 Appliance at a glance ............................................................................................. 8
2.2 Control panel at a glance ....................................................................................10
3 First steps .............................................................................................................................11
3.1 Unpacking the appliance .................................................................................... 11
3.2 Checking the delivery contents ........................................................................ 11
3.3 Installing the appliance ....................................................................................... 12
3.4 Connecting the appliance .................................................................................. 12
3.5 Switching on the appliance for the rst time ..............................................12
4 Basic operation ..................................................................................................................14
4.1 Switching the appliance on and o ................................................................14
4.2 Using the control panel .......................................................................................15
4.3 Navigating in the menu .......................................................................................15
4.4 Filling coee beans into the bean container ...............................................17
4.5 Filling with water ....................................................................................................18
4.6 Adjusting the outlet ..............................................................................................19
4.7 Using milk ................................................................................................................. 20
4.8 Emptying the drip tray and coee grounds container .............................22
5 Preparing beverages .......................................................................................................23
5.1 Preparing Espresso and Café Crème ...............................................................23
5.2 Preparing Cappuccino .........................................................................................24
5.3 Preparing Latte Macchiato .................................................................................24
5.4 Preparing milk foam or warm milk ..................................................................25
5.5 Preparing hot water ..............................................................................................25
5.6 Preparing further beverage specialities with recipes ...............................25
5.7 Changing beverage settings before and during preparation ...............27
5.8 Stopping beverage preparation .......................................................................28
5.9 Preparing two beverages simultaneously ....................................................28
6 Permanently changing beverage settings .............................................................29
6.1 Changing default settings .................................................................................. 29
ENGLISH
3
Page 4

ENGLISH
Table of contents
7 Changing basic settings ................................................................................................. 30
7.1 Setting the language ............................................................................................ 30
7.2 Setting Auto OFF ....................................................................................................30
7.3 Setting energy save mode ..................................................................................31
7.4 Resetting the appliance to the factory settings..........................................31
7.5 Information on the appliance status ..............................................................32
7.6 Setting the grinding neness ............................................................................ 33
8 Care and maintenance ....................................................................................................34
8.1 General cleaning .................................................................................................... 34
8.2 Rinsing the coee system ...................................................................................34
8.3 Removing and cleaning the brewing unit ....................................................35
8.4 Using the "Easy Cleaning" programme ..........................................................36
8.5 Using the "Cleaning milk system" programme ...........................................36
8.6 Using the "Cleaning coee system" programme .......................................38
8.7 Using the "Descaling" programme ..................................................................38
8.8 Setting the water hardness ................................................................................39
8.9 Using a water lter .................................................................................................40
9 Problems ...............................................................................................................................42
10 Transport, storage and disposal .................................................................................43
10.1 Venting the appliance ..........................................................................................43
10.2 Transporting the appliance ................................................................................43
10.3 Disposing of the appliance .................................................................................44
11 Technical data ....................................................................................................................45
4
Page 5
Dear Customer,
Thank you for purchasing the Caeo®Passione® fully automatic coee
maker.
The operating instructions will help you discover the diverse options
oered by the appliance and enjoy your coee to the full.
Read through the operating instructions carefully. This helps avoid personal
injury and material damage. Store the operating instructions carefully. If
you pass on the appliance, include the operating instructions with it.
Melitta accepts no liability for damage caused by failure to observe the
operating instructions.
If you require further information or have any questions on the appliance,
contact Melitta or visit our website at:
www.melitta.de
We hope you enjoy using your appliance.
1 For your safety
The appliance conforms to the following European directives:
ū 2006 / 95 / EC (low voltage),
ū 2004 / 108 / EC (electromagnetic compatibility),
ū 2011 / 65 / EU (RoHS),
ū 2009 / 125 / EC (eco-design / ErP).
The appliance has been built using the latest technology. Nevertheless,
some residual dangers remain.
Observe the safety instructions to avoid dangers. Melitta accepts no liability
for damage caused by failure to observe the safety instructions.
For your safety
ENGLISH
5
Page 6
ENGLISH
For your safety
1.1 Symbols used
The following symbols indicate particular risks in using the appliance or
provide useful tips.
CAUTION
The signal word CAUTION indicates possible injuries.
ATTENTION
The signal word ATTENTION indicates possible damage to the appliance.
Information
The signal word "Information" indicates additional notes and tips on using
the appliance.
1.2 Proper use
The appliance is used to prepare beverages made from
coee beans, and to heat milk and water.
The appliance is intended for use in private households.
Any other use is regarded as improper and may lead to
personal injury and material damage. Melitta accepts no
liability for damage that arises due to improper use of
the appliance.
1.3 Danger from electric current
If the appliance or the power cable is damaged, there is a
risk of fatal electric shock.
Observe the following safety instructions to avoid danger from electric current:
ū Do not use a damaged power cable.
ū A damaged power cable may only be replaced by the
manufacturer, its customer service or its service partner.
ū Do not open any covers rmly screwed onto the appli-
ance housing.
ū Only use the appliance when it is in a technically aw-
less condition.
6
Page 7

ū A defective appliance may only be repaired by an
authorised workshop. Do not repair the appliance
yourself.
ū Do not undertake any changes to the appliance, its
components or its accessories.
ū Do not immerse the appliance in water.
1.4 Risk of burns and scalds
Escaping uids and steam can be very hot. Parts of the
appliance can also become very hot.
Observe the following safety instructions to avoid scalds
and burns:
ū Avoid escaping uids and steam coming into contact
with the skin.
ū Do not touch the nozzles on the outlet during and
immediately after dispensing a beverage. Wait until
the components have cooled down.
1.5 General safety
Observe the following safety instructions to avoid personal injury and material damage:
For your safety
ENGLISH
ū Do not reach into the interior of the appliance during
operation.
ū Keep the appliance and its power cable out of the
reach of children under 8 years of age.
ū This appliance may be used by children over 8 years of
age and by persons with reduced physical, sensory or
mental capabilities or a lack of experience and knowledge if they are supervised or have been instructed in
using the appliance safely and understand the resulting risks.
ū Children must not play with the appliance. Cleaning
and maintenance must not be undertaken by children
younger than 8 years of age. Children over 8 years of
age must be supervised during cleaning and maintenance.
ū Disconnect the appliance from the power supply
when left unsupervised for a long time.
7
Page 8

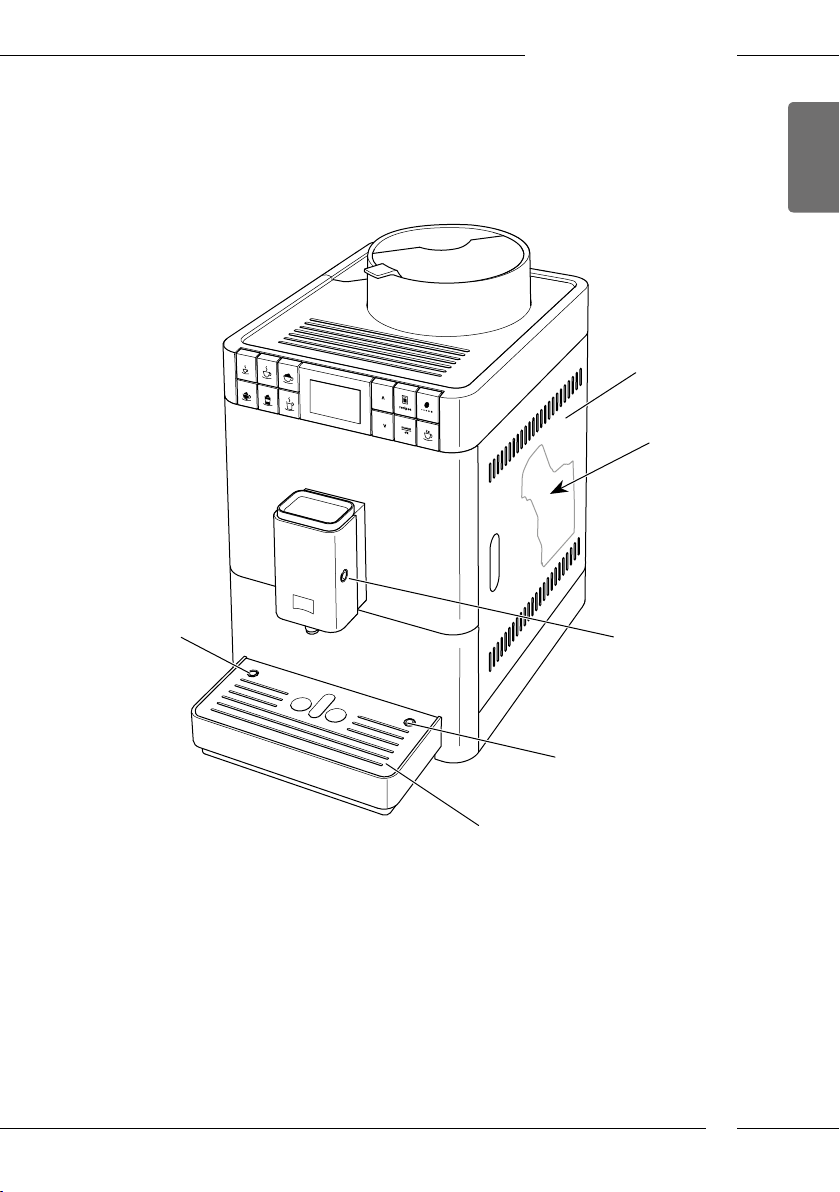
Overview of the appliance
2 Overview of the appliance
ENGLISH
2.1 Appliance at a glance
1
10
9
2
3
4
5
6
7
Fig. 1: Front left of the appliance
1 Water tank with lid 6 Height-adjustable outlet with 2 coee
2 Lid of the bean container 7 Coee grounds container (inner)
3 Bean container 8 Drip tray
4 Cup rest 9 ON/OFF button
5 Control panel 10 "Grinding neness adjustment" lever
8
8
nozzles, 1 milk nozzle,
1 hot water nozzle, cup illumination
(inner)
Page 9
Overview of the appliance
11
12
ENGLISH
16
15
13
14
Fig. 2: Front right of the appliance
11 Cover 14 Milk hose connection at the drip tray
12 Brewing unit (inner) 15 Cup plate
13 Milk hose connection at the
outlet
16 Float
9
Page 10
ENGLISH
Overview of the appliance
2.2 Control panel at a glance
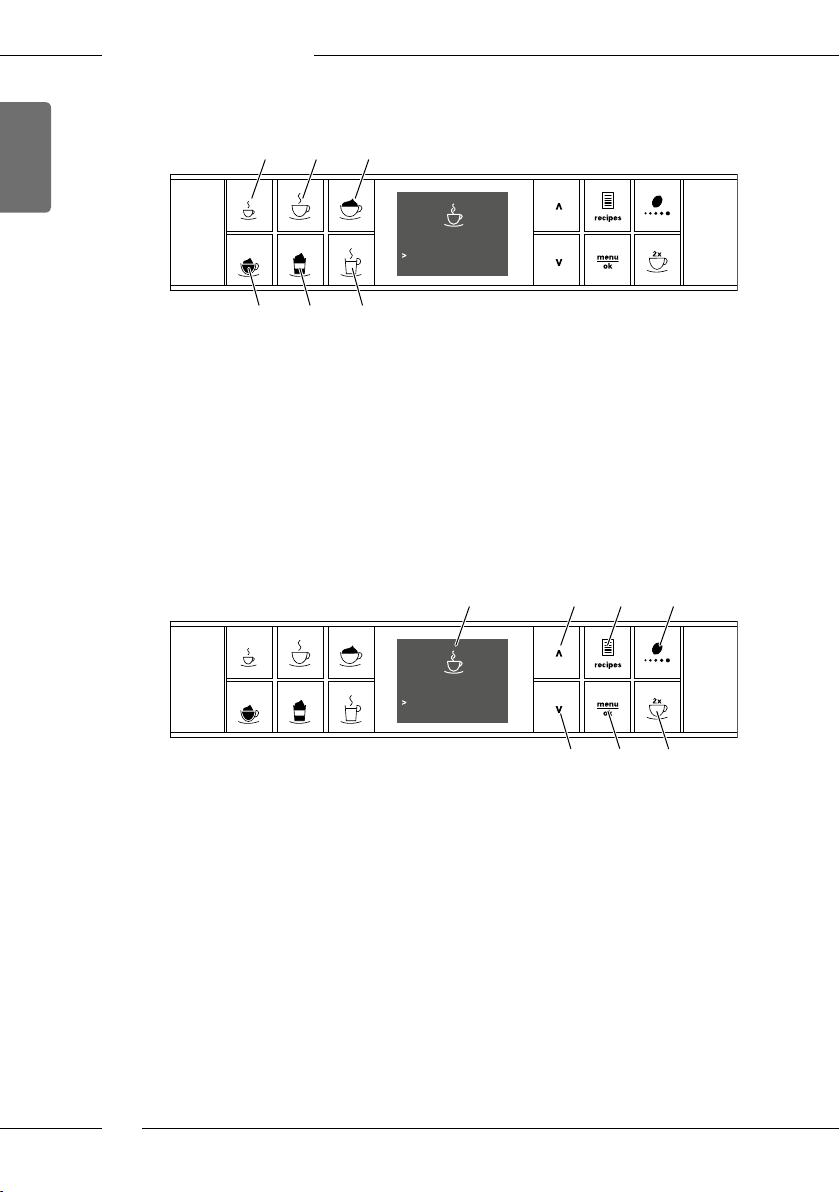
191817
Please select beverage
20 21 22
Fig. 3: Direct keys
Item Designation Function
17 Espresso Preparing Espresso
18 Café Crème Preparing Café Crème
19 Cappuccino Preparing Cappuccino
20 Milk foam/Warm
milk
21 Latte Macchiato Preparing Latte Macchiato
22 Hot water Preparing hot water
Preparing milk foam and warm milk
09:52
23 24 25 26
Fig. 4: Display and buttons
Item Designation Function
23 Display Display of current menus and messages
24 Up arrow
button
25 Recipes Selecting and preparing recipes
26 Coee strength Setting the coee strength
27 Down arrow
button
28 menu/ok Calling up the menu or conrming inputs
29 Two cups Two-cup dispensing
10
09:52
Please select beverage
Example: Ready symbol
Navigating up in the menu
or increasing the quantity
Navigating down in the menu
or reducing amount
27 28 29
Page 11
3 First steps
This chapter describes how to prepare your appliance for use.
3.1 Unpacking the appliance
In addition to the appliance, there are further accessories in the packaging
such as cleaning aids and agents.
CAUTION
Contact with cleaning agents may lead to eye and skin irritation.
Keep the supplied cleaning agents out of the reach of children.
Unpack the appliance. Remove the packaging material, the adhesive
strips and the protective lms from the appliance.
Keep the packaging material for transport and possible return ship-
ments.
Information
The appliance may contain traces of coee and water. The appliance has
been tested in the factory to ensure that it functions perfectly.
3.2 Checking the delivery contents
Check the completeness of delivery using the following list. If parts are
missing, contact your retailer.
ū Screw-in aid for the water lter
ū Long milk hose
ū Cleaning brush
ū Fully automatic coee makers cleaner
ū Milk system cleaning agent
ū Fully automatic coee makers descaling agent
ū Water lter
ū Test strip for determining the water hardness.
Depending on the version, also with a
ū milk container with short milk hose.
First steps
ENGLISH
11
Page 12

ENGLISH
First steps
3.3 Installing the appliance
Observe the following instructions:
ū Do not install the appliance in damp rooms.
ū Install the appliance on a stable, at and dry surface.
ū Do not install the appliance in the vicinity of sinks or the like.
ū Do not install the appliance on hot surfaces.
ū Install the appliance at a sucient distance (approx. 10cm) from the
wall and other objects. The space above the appliance should be at least
20cm.
ū Route the power cable so it cannot be damaged by edges or hot sur-
faces.
3.4 Connecting the appliance
Observe the following instructions:
ū Check that the supply voltage matches the operating voltage specied
in the technical data (see the Technical data on page45 table).
ū Only connect the appliance to a properly installed earthing contact
socket. If in doubt, consult a specialist electrician.
ū The protective contact socket must have a fuse of at least 10 A.
3.5 Switching on the appliance for the rst time
During initial start-up, the language, the time and the water hardness can
be set. The settings can be changed at a later point in time (see chapter 7
Changing basic settings on page30 and chapter 8.8 Setting the water
hardness on page39).
Use the enclosed test strips to determine the water hardness. Observe the
instructions on the test strip packaging and in Table Water hardness range
on page45.
12
Information
ū We recommend pouring away the rst two cups of coee after initial
start-up.
ū If you want to use a water lter, only insert this after starting up for the
rst time.
Page 13

First steps
9
Fig. 5: ON/OFF button
Requirement: The appliance has been installed and connected.
1. Place a vessel beneath the outlet.
2. Press the ON/OFF button.
» The welcome display appears on the appliance.
» The request to carry out the setup appears: Please set up the machine.
3. Conrm with "menu/ok".
» The Language menu appears.
4. Select your language with the arrow buttons. Conrm with "menu/ok".
» The Water hardness menu appears.
5. Select the determined water hardness range with the arrow buttons or
conrm the default value with "menu/ok".
» The request Please rell and insert water tank appears.
6. Remove the water tank. Rinse the water tank out with clean water. Fill
the water tank with fresh water and insert it.
» The appliance heats up and performs automatic rinsing.
» The ready symbol appears on the display.
7. Fill coee beans into the bean container. To do this, read section4.4
Filling coee beans into the bean container on page17.
» As required, a water lter can now be inserted (see section 8.9 Using a
water lter on page40).
ENGLISH
13
Page 14

ENGLISH
Basic operation
4 Basic operation
This chapter describes basic operating steps for using the appliance on a
daily basis.
4.1 Switching the appliance on and o
Before switching on after starting up the appliance for the rst time, read
section3.5 Switching on the appliance for the rst time on page12.
Information
ū When switched on and o, the appliance performs automatic rinsing.
ū During rinsing, rinsing water is also conducted into the drip tray.
Switching on the appliance
1. Place a vessel beneath the outlet.
2. Press the ON/OFF button (9).
» The welcome display appears on the appliance.
» The appliance heats up and performs automatic rinsing.
» The ready symbol appears on the display.
Information
If the appliance was only switched o briey, there is no automatic rinsing
after switching on.
Switching o the appliance
1. Place a vessel beneath the outlet.
2. Press the ON/OFF button (9).
» The appliance performs automatic rinsing.
» The appliance switches o.
Information
ū The appliance switches o automatically when it is not operated for a
long time. Automatic rinsing is also carried out in this case.
ū The o time can be set in the Auto OFF menu, see section 7.2 Setting
Auto OFF on page30.
ū If no beverage has been prepared since switching on or if the water tank
is empty, no rinsing takes place.
14
Page 15
4.2 Using the control panel
The essential programmes can be accessed using the control panel.
Press the required button. Use the following actions to operate the buttons:
Brief press
Briey press a button to select a programme.
Long press
2s
Press a button for longer than 2 seconds to select a second
programme that may be available.
4.3 Navigating in the menu
To set individual beverages and for maintenance and care, call up the menu
on the display and navigate in the menu.
Observe the instructions on the display.
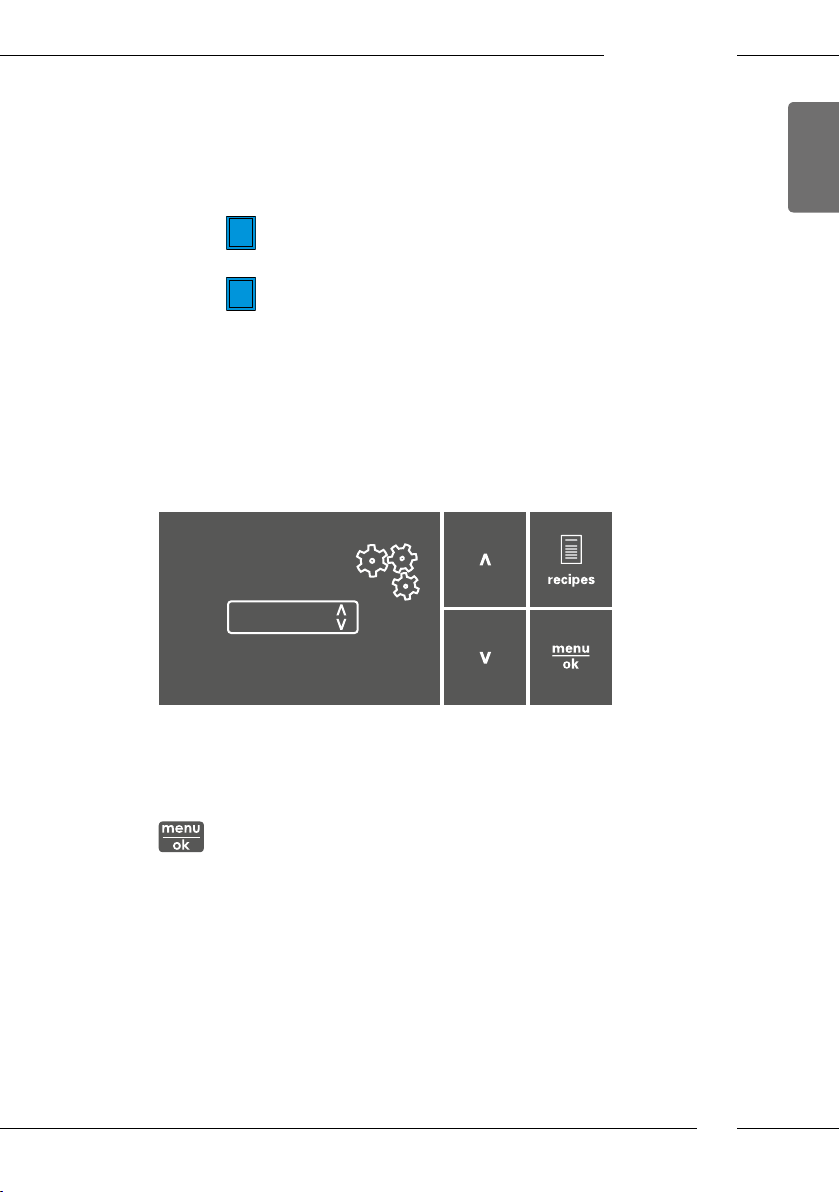
Direct keys
Espresso
Coffee strength
Strong
Confirm with OK:
Basic operation
ENGLISH
Fig. 6: Display (example) and buttons for navigation
Use the following options to navigate in the menu:
Calling up the menu and conrming the selection
Press the "menu/ok" button for longer than 2 seconds to call up the
menu.
Briey press the "menu/ok" button to conrm your selection.
15
Page 16
ENGLISH
Basic operation
Navigating in the menu or changing a numerical value
Press the arrow buttons to navigate down or up in the menu.
Press the arrow buttons to increase or decrease a numerical value.
Press and hold an arrow button to quickly reach the required position or numerical value.
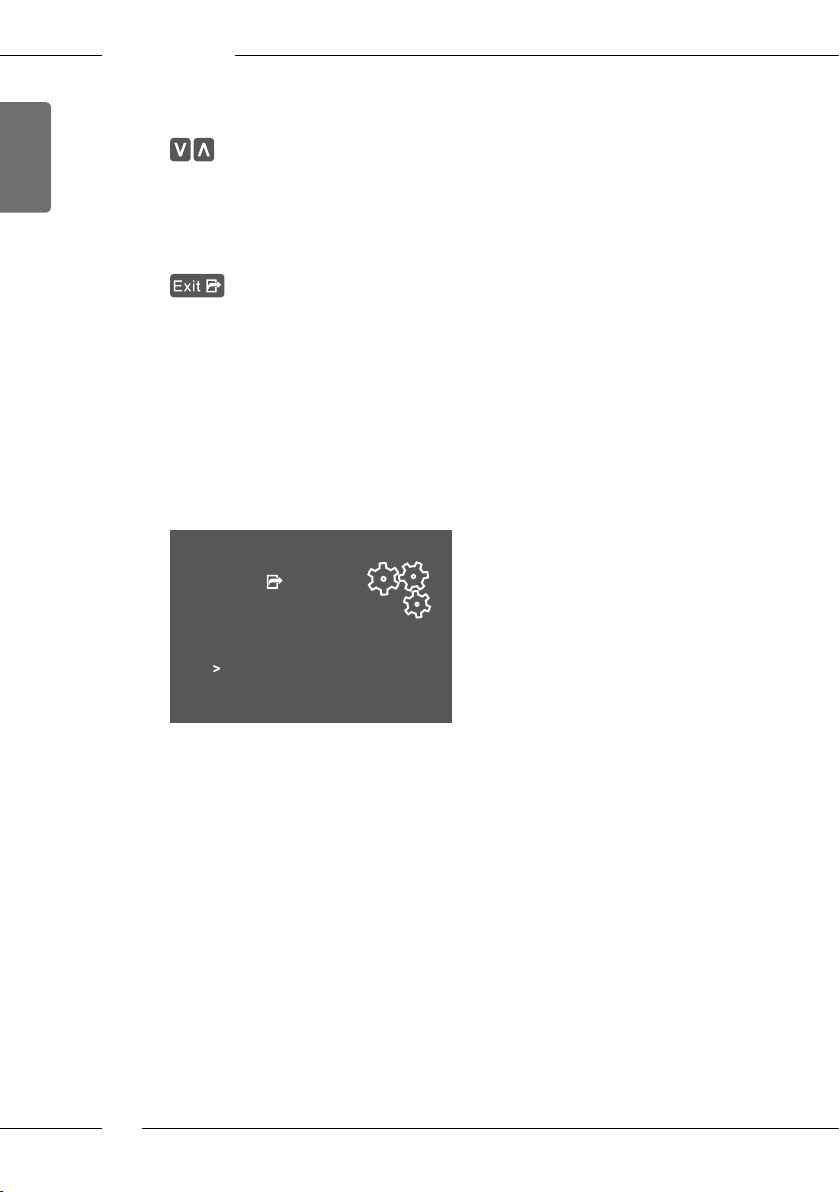
Exiting a menu
Select the Exit command with the arrow buttons and conrm with
"menu/ok" to exit a menu.
Exit submenus that only display information and where no settings
are made with "menu/ok".
Calling up submenus
Certain of the appliance's programmes are reached by calling up several
submenus in succession.
Submenus are always called up in a similar manner. Navigation to the Des-
caling programme is described here as an example.
Care
Exit
Rinsing
Easy cleaning
Cleaning milk system
Cleaning coffee system
Descaling
Filter
Fig. 7: Navigating to the Descaling programme
1. Press the "menu/ok" button for 2 seconds.
» The menu appears on the display.
2. Use the arrow buttons to select Care and conrm with
"menu/ok".
3. Use the arrow buttons to select Descaling and conrm with "menu/ok".
The selection of a programme is always shown in shortened form in these
operating instructions:
Navigate to the Care > Descaling menu.
16
Page 17
4.4 Filling coee beans into the bean container
Roasted coee beans lose their aroma. Only ll the bean container with as
many coee beans as you will consume over the next 3 to 4days.
ATTENTION
The use of unsuitable types of coee can lead to clogging of the grinder.
Do not use freeze-dried or caramelised coee beans.
Do not use any coee powder or instant products.
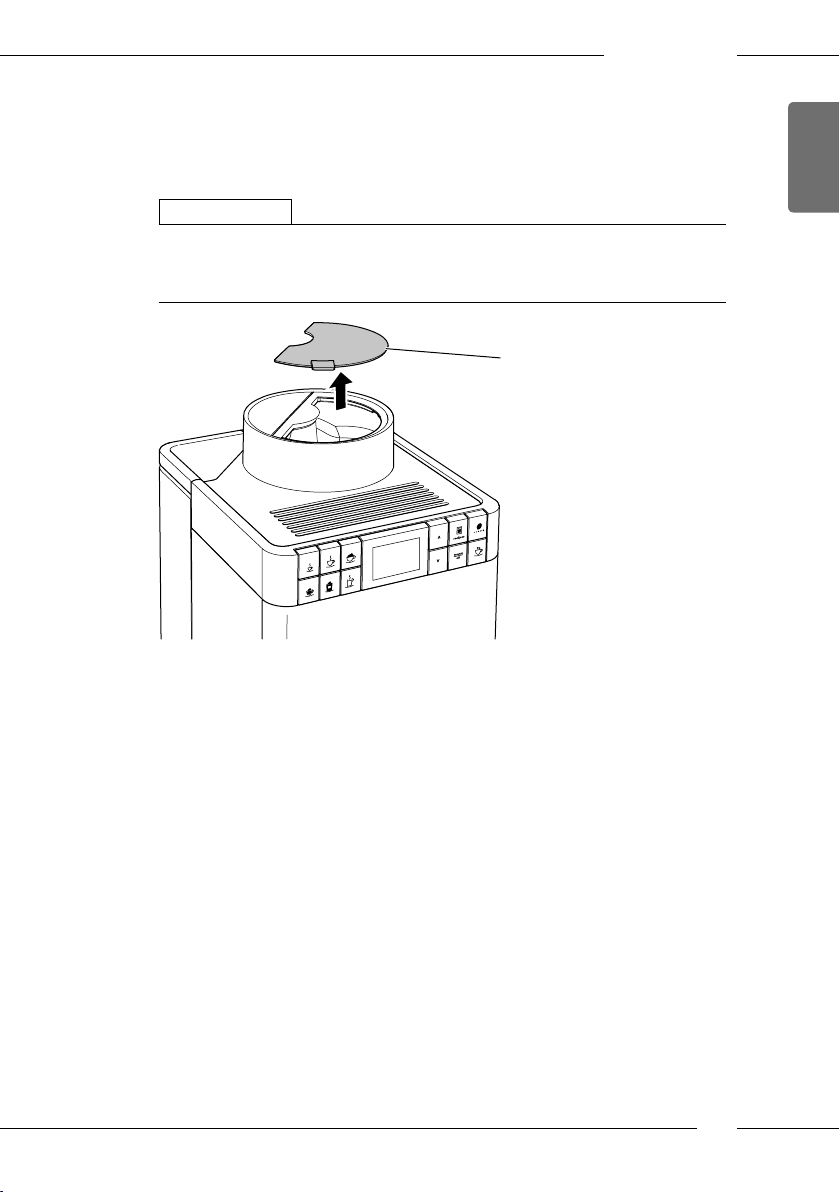
2
Basic operation
ENGLISH
Fig. 8: Opening the lid of the bean container.
1. Open the lid(2) of the bean container.
2. Fill coee beans into the bean container.
3. Close the lid of the bean container.
17
Page 18
ENGLISH
Basic operation
4.5 Filling with water
Only use fresh, cold water without carbon dioxide for optimum coee
enjoyment. Change the water daily.
Information
The quality of the water largely determines the avour of the coee.
Therefore, use a water lter (see section 8.8 Setting the water hardness on
page39 and section 8.9 Using a water lter on page40).
30
1
Fig. 9: Water tank
1. Open the lid of the water tank(30) and pull the water tank(1) upwards
out of the appliance by the handle.
2. Fill the water tank with water.
3. Insert the water tank into the appliance from above and close the lid.
18
Page 19
4.6 Adjusting the outlet
The outlet (6) is height-adjustable. Set the greatest possible distance
between the outlet and the vessel. Depending on the vessel, push the
outlet up or down.
6
Fig. 10: Adjusting the outlet
Basic operation
ENGLISH
19
Page 20
ENGLISH
Basic operation
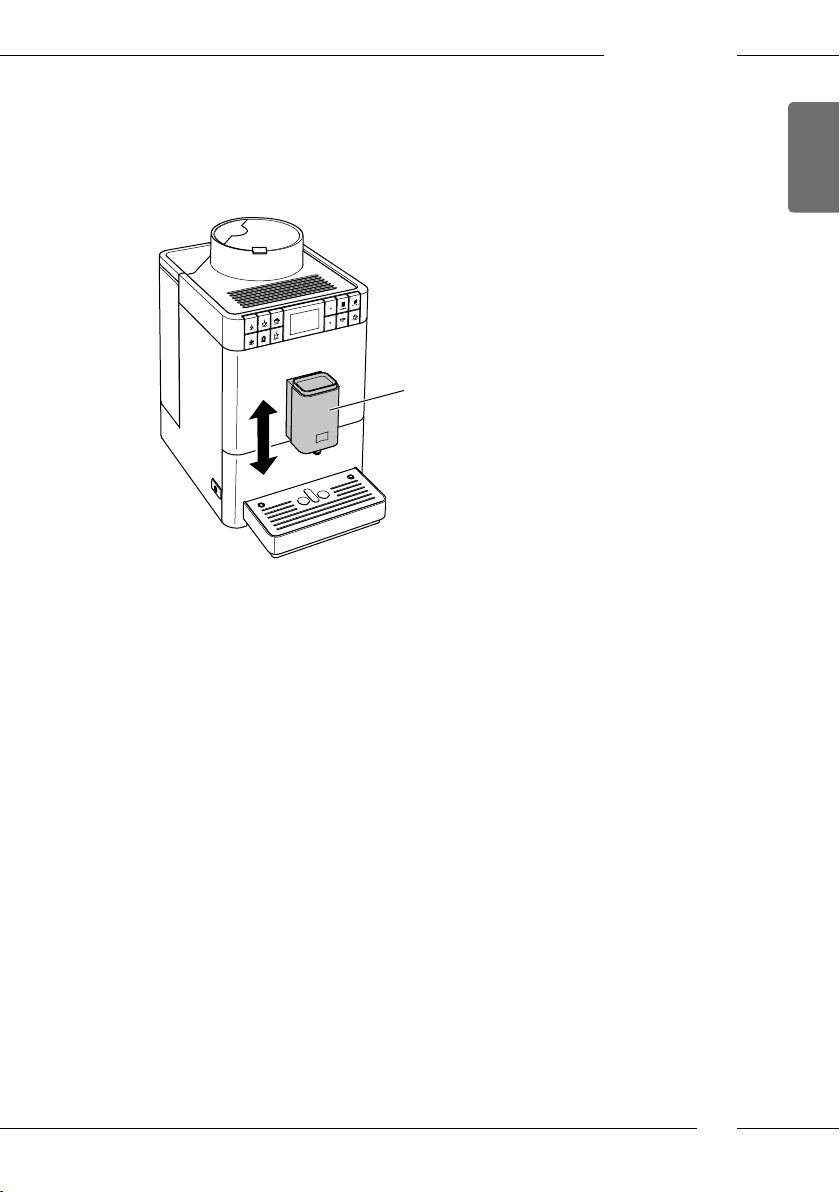
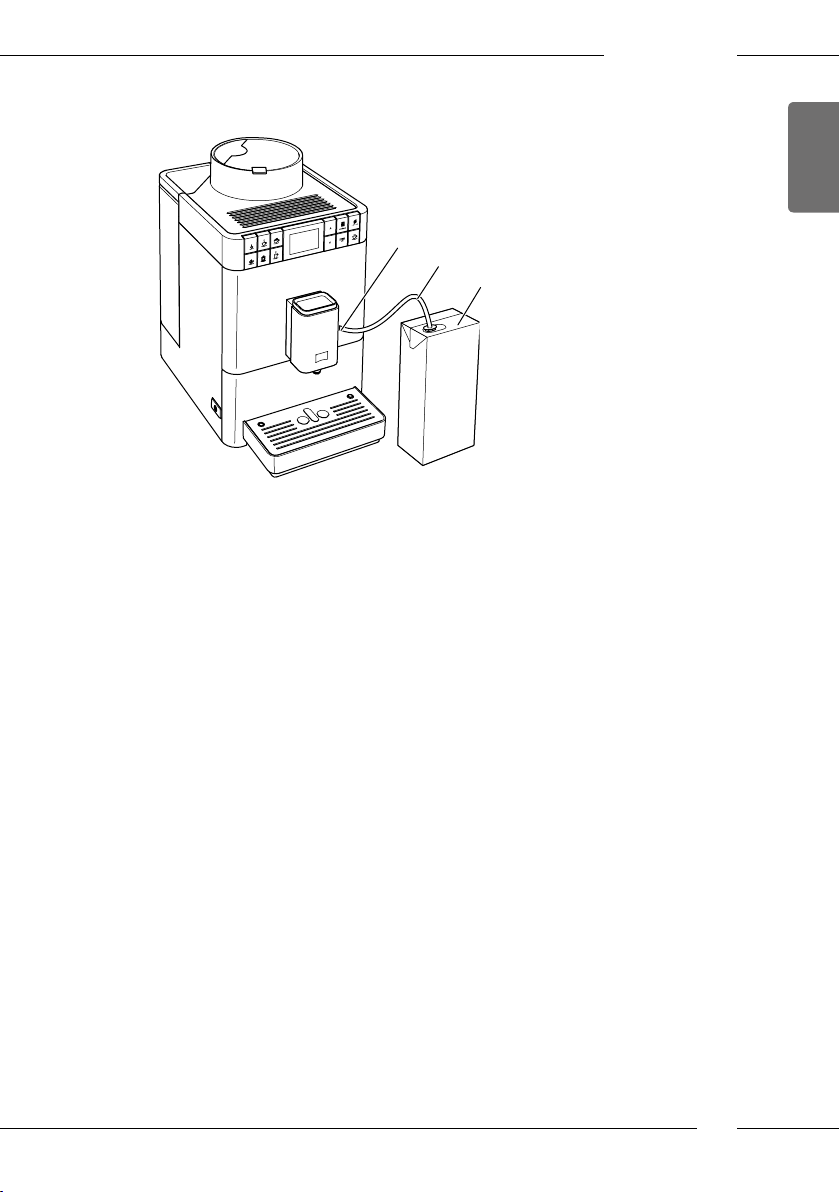
4.7 Using milk
Use cooled milk for optimum coee enjoyment. Depending on the version
of the appliance, use the long milk hose supplied or the milk container
supplied.
Connecting the milk container
A milk container is not available for all versions of the Caeo® Passione®.
13
31
32
Fig. 11: Connected milk container
1. Connect the milk hose(31) to the connection at the outlet(13).
2. Connect the free end of the milk hose to the milk container (32).
Information
Store the lled milk container in the refrigerator.
20
Page 21
Basic operation
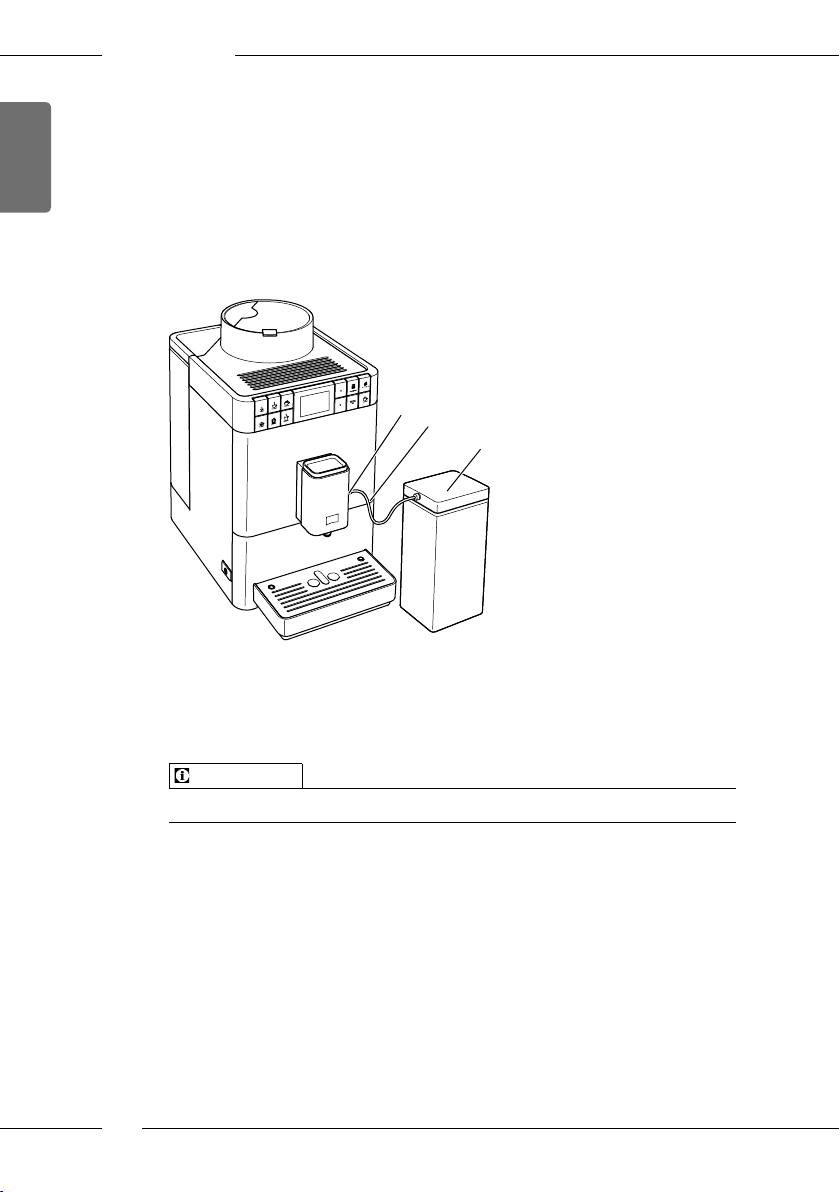
Connecting the milk pack
13
33
34
Fig. 12: Connected commercial milk pack
1. Connect the long milk hose(33) to the connection at the outlet(13).
2. Insert the free end of the milk hose into a commercial milk pack (34).
ENGLISH
21
Page 22
ENGLISH
Basic operation
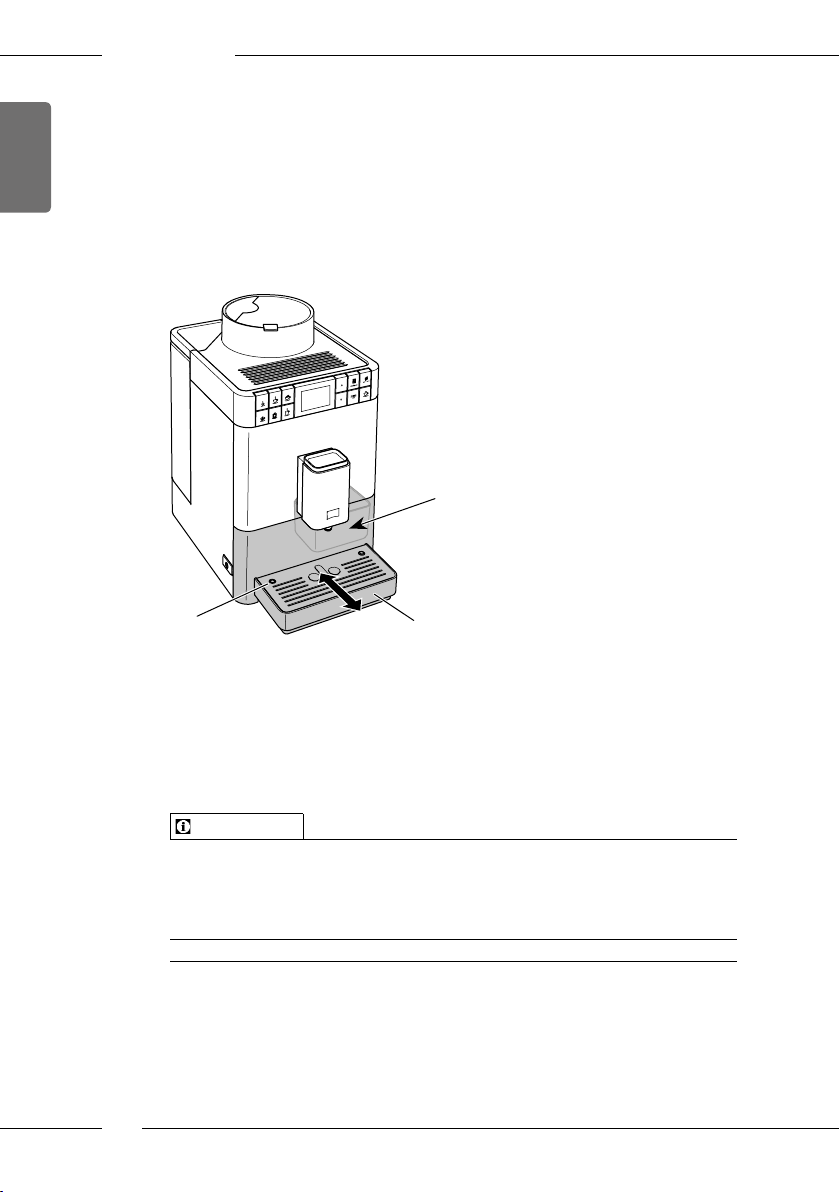
4.8 Emptying the drip tray and coee grounds container
After dispensing several beverages, the drip tray(8) and the coee grounds
container(7) can become full. The projecting oat(16) indicates the current
lling level of the drip tray.
After a specied number of beverage have been dispensed, the appliance
also shows that the drip tray and coee grounds container are full.
Always empty the drip tray and coee grounds container.
7
16
Fig. 13: Emptying the drip tray and coee grounds container
1. Pull the drip tray (8) forwards out of the appliance.
2. Remove the coee grounds container (7) and empty it.
3. Empty the drip tray.
4. Insert the coee grounds container.
5. Push the drip tray into the appliance up to the stop.
Information
If you empty the drip tray and the coee grounds container while the appliance is switched o, the appliance does not register this process. Therefore,
it is possible that you are requested to empty the containers although the
drip tray and the coee grounds container are not yet full.
22
8
Page 23

5 Preparing beverages
There are two options for preparing beverages:
ū Standard dispensing as described below,
ū Selection and preparation of a recipe (see section 5.6 Preparing further
beverage specialities with recipes on page25).
Information
The default settings for standard dispensing or for a recipe can be permanently changed (see section 6.1 Changing default settings on page29).
Note:
ū There should always be sucient water in the water tank. If the lling
level is too low, the appliance requests you to rell it.
ū There should always also be sucient coee beans in the bean con-
tainer. If there are no longer any coee beans present, the appliance
stops the preparation of a coee beverage.
ū The appliance does not indicate a lack of milk.
ū The vessels for the beverages should be suciently large (see Table
Factory settings on page45).
5.1 Preparing Espresso and Café Crème
Requirement: The ready symbol appears on the display.
1. Place a vessel beneath the outlet.
2. Press the "Espresso" or "Café Crème" button.
» The grinding process and beverage dispensing start.
» Beverage dispensing is ended automatically.
3. Remove the vessel.
» The ready symbol appears on the display.
Preparing beverages
ENGLISH
23
Page 24

ENGLISH
Preparing beverages
5.2 Preparing Cappuccino
Requirement: The display shows the ready symbol and milk is connected.
1. Place a vessel beneath the outlet.
2. Press the "Cappuccino" direct key.
» The grinding process and coee dispensing start.
» Coee dispensing is ended automatically.
» Milk dispensing begins.
» Beverage dispensing is ended automatically.
3. Remove the vessel.
» The display shows: Easy Cleaning? (OK for start).
4. You can execute the Easy Cleaning programme or prepare further bev-
erages.
a) Execute the Easy Cleaning programme. To do so, follow the instruc-
tions on the display. Information on this is available in section8.4
Using the "Easy Cleaning" programme on page36.
b) Prepare further beverages and execute the Easy Cleaning programme
later.
» The ready symbol appears on the display.
5.3 Preparing Latte Macchiato
Requirements: The ready symbol appears on the display and milk is con-
nected.
1. Place a vessel beneath the outlet.
2. Press the "Latte Macchiato" direct key.
» Milk dispensing begins.
» Milk dispensing is ended automatically.
» The grinding process and coee dispensing start.
» Beverage dispensing is ended automatically.
3. Remove the vessel.
» The display shows: Easy Cleaning? (OK for start).
4. You can execute the Easy Cleaning programme or prepare further bev-
erages.
a) Execute the Easy Cleaning programme. To do so, follow the instruc-
tions on the display. Information on this is available in section8.4
Using the "Easy Cleaning" programme on page36.
b) Prepare further beverages and execute the Easy Cleaning programme
later.
» The ready symbol appears on the display.
24
Page 25

Preparing beverages
5.4 Preparing milk foam or warm milk
The preparation of milk foam and warm milk is similar.
Requirement: The ready symbol appears on the display and milk is con-
nected.
1. Place a vessel beneath the outlet.
2. Press the "Milk foam/Warm milk" direct key.
a) Milk foam = briey press button
b) Warm milk = press the button for longer (2 seconds)
» Milk dispensing begins.
» Beverage dispensing is ended automatically.
3. Remove the vessel.
» The display shows: Easy Cleaning? (OK for start).
4. You can execute the Easy Cleaning programme or prepare further beverages.
a) Execute the Easy Cleaning programme. To do so, follow the instruc-
tions on the display. Information on this is available in section8.4
Using the "Easy Cleaning" programme on page36.
b) Prepare further beverages and execute the Easy Cleaning programme
later.
» The ready symbol appears on the display.
5.5 Preparing hot water
Requirement: The ready symbol appears on the display.
1. Place a vessel beneath the outlet.
2. Press the "Hot water" direct key.
» Hot water dispensing begins.
» Beverage dispensing is ended automatically.
3. Remove the vessel.
» The ready symbol appears on the display.
ENGLISH
5.6 Preparing further beverage specialities with recipes
In addition to standard dispensing, you can select Recipes for further
beverage specialities in the menu. The following beverage specialities are
available here:
Beverage specialities without milk:
ū Ristretto
ū Lungo
ū Americano
25
Page 26

ENGLISH
Preparing beverages
Beverage specialities with milk:
ū Espresso Macchiato
ū Caè Latte
ū Café au Lait
Preparing Ristretto, Lungo or Americano
The preparation of Ristretto, Lungo und Americano is similar. The selection
of a Ristretto is described as an example.
Requirement: The ready symbol appears on the display.
1. Place a vessel beneath the outlet.
2. Press the "Recipes" button.
» The Recipes menu appears on the display.
3. Use the arrow buttons to select Ristretto.
4. Conrm your selection with "menu/ok".
» The grinding process and beverage dispensing start.
» Beverage dispensing is ended automatically.
5. Remove the vessel.
» The ready symbol appears on the display.
Preparing Espresso Macchiato, Caè Latte or Café au Lait
The preparation of Espresso Macchiato, Caè Latte and Café au Lait is similar. The preparation of an Espresso Macchiato is described as an example.
Requirement: The ready symbol appears on the display and milk is connected.
1. Place a vessel beneath the outlet.
2. Press the "Recipes" button.
» The Recipes menu appears on the display.
3. Use the arrow buttons to select Espresso Macchiato.
4. Conrm your selection with "menu/ok".
» The grinding process and coee dispensing start.
» Coee dispensing is ended automatically.
» Milk dispensing begins.
» Beverage dispensing is ended automatically.
5. Remove the vessel.
» The display shows: Easy Cleaning? (OK for start).
6. You can execute the Easy Cleaning programme or prepare further bev-
erages.
a) Execute the Easy Cleaning programme. To do so, follow the instruc-
tions on the display. Information on this is available in section8.4
Using the "Easy Cleaning" programme on page36.
26
Page 27
Preparing beverages
b) Prepare further beverages and execute the Easy Cleaning programme
later.
» The ready symbol appears on the display.
5.7 Changing beverage settings before and during preparation
Beverage settings can be changed before and during beverage preparation.
Information
The following settings only apply to the current beverage preparation.
Changing beverage settings before preparation
The total beverage amount and the coee strength can be changed before
selecting a beverage.
Before selecting a beverage, use the arrow buttons to set a beverage
amount.
Before selecting a beverage, use the "Coee strength" button to set the
coee strength.
ENGLISH
Information
ū When preparing mixed beverages, the total beverage amount is sub-
divided according to a specied ratio. This applies to mixed beverages
made from coee with milk or hot water.
ū If a beverage is not prepared within 1 minute, the appliance switches to
the default settings.
Changing beverage settings during preparation
The beverage quantity and the coee strength can be changed during
beverage preparation.
27
Page 28
ENGLISH
Preparing beverages
During beverage dispensing, use the arrow buttons to set the relevant
beverage amount.
During the grinding process, use the "Coee strength" button to set the
coee strength.
5.8 Stopping beverage preparation
To stop beverage preparation prematurely, press any direct key.
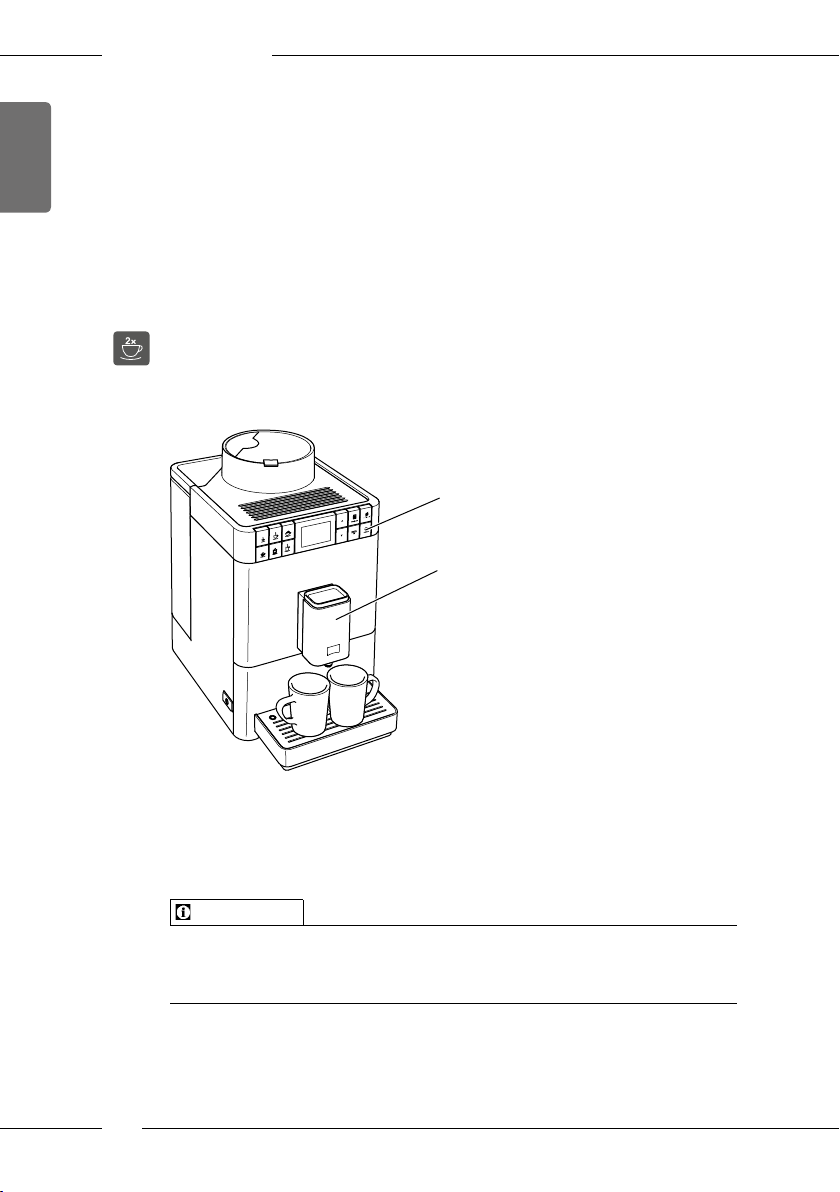
5.9 Preparing two beverages simultaneously
The "Two cups" button is used to prepare two beverages simultaneously.
Two-cup dispensing is only possible with pure coee dispensing, such as
Espresso, Café Crème, Ristretto. Two-cup dispensing is not possible with the
preparation of hot water, hot milk and all mixed beverages.
29
6
Fig. 14: Two-cup dispensing
1. Place two vessels beneath the outlet(6).
2. Press the "Two cups" button(29).
3. Continue as described for preparation of the relevant beverage.
Information
ū The setting only applies to a single beverage that is prepared.
ū If a beverage is not prepared within 1 minute, the appliance switches to
single-cup dispensing.
28
Page 29
Permanently changing beverage settings
6 Permanently changing beverage settings
The appliance oers further options for preparing coee specialities.
Default recipes can be used or the beverage settings can be permanently
changed.
6.1 Changing default settings
Depending on the beverage, the following default settings can be changed:
ū Coee amount: 25 ml to 220 ml
ū Milk amount or milk froth amount: 25 ml to 220 ml
ū Hot water amount: 25 ml to 220 ml
ū Coee strength: Very mild, mild, normal, strong, very strong
ū Temperature: Low, normal, high
Information
Changed default settings remain valid until they are changed again.
Changing the beverage settings is similar for all beverages. Changing the
coee strength for an Espresso is described here as an example.
Direct keys
Espresso
Coffee strength
Strong
Confirm with OK:
ENGLISH
Fig. 15: Setting the coee strength
Requirement: The ready symbol appears on the display.
1. Press the "menu/ok" button for longer than 2 seconds.
» The menu appears on the display.
2. Navigate to the Direct keys > Espresso > Coee strength menu.
3. Use the arrow buttons to select the desired coee strength and conrm
with "menu/ok".
4. Repeatedly select the Exit command to exit the menu.
» The ready symbol appears on the display.
» The newly selected coee strength is used the next time an Espresso is
prepared.
29
Page 30
ENGLISH
Changing basic settings
7 Changing basic settings
Operating steps that change the appliance's basic settings are described in
the following chapter.
7.1 Setting the language
The display text language can be set.
Requirement: The ready symbol appears on the display.
1. Press the "menu/ok" button for longer than 2 seconds.
» The menu appears on the display.
2. Navigate to the Language menu.
3. Use the arrow buttons to select a language and conrm with "menu/ok".
4. Exit the menu with the Exit command.
» The ready symbol appears on the display.
7.2 Setting Auto OFF
If the appliance is not operated for a long time, it switches o automatically
after a specied time. This time can be set in the Auto O menu.
Setting the duration for Auto OFF
Requirement: The ready symbol appears on the display.
1. Press the "menu/ok" button for longer than 2 seconds.
» The menu appears on the display.
2. Navigate to the Auto OFF menu.
3. Use the arrow buttons to select a time and conrm with "menu/ok".
4. Exit the menu with the Exit command.
» The ready symbol appears on the display.
Information
Auto OFF cannot be deactivated completely. After 8 hours without being
operated at the latest, the appliance switches o.
30
Page 31

Changing basic settings
7.3 Setting energy save mode
Energy save mode lowers the heating temperature.
If the appliance is not operated for a long time, it automatically switches to
energy save mode after a specied time. The Press any button prompt then
appears on the display. As soon as you follow the request, the energy save
mode ends.
The period of time until energy save mode is activated is set in the Energy
save mode menu.
Requirement: The ready symbol appears on the display.
1. Press the "menu/ok" button for longer than 2 seconds.
» The menu appears on the display.
2. Navigate to the Energy save mode menu.
3. Use the arrow buttons to select a period of time and conrm with
"menu/ok".
4. Exit the menu with the Exit command.
» The ready symbol appears on the display.
Information
Energy save mode cannot be deactivated completely. After 4 hours without
being operated at the latest, the appliance switches to energy save mode.
ENGLISH
7.4 Resetting the appliance to the factory settings
The appliance can be reset to the factory settings.
Information
If the appliance is reset to the factory settings, all personal settings are lost.
Requirement: The ready symbol appears on the display.
1. Press the "menu/ok" button for longer than 2 seconds.
» The menu appears on the display.
2. Navigate to the System > Factory settings menu.
3. Use the arrow buttons to select Reset and conrm with "menu/ok".
» The ready symbol appears on the display.
31
Page 32

ENGLISH
Changing basic settings
7.5 Information on the appliance status
Information on the appliance status can be accessed via the System > Statistics menu. Press the "menu/ok" button to exit the menu.
The following table provides an overview of the meaning of the information.
Information Meaning
Beverages Number of beverages prepared since starting up.
Descaled Number of descaling processes performed.
Coee system cleaned Number of cleaning processes performed.
Milk system cleaned Number of cleaning processes performed.
Filter changed Number of lter changes performed
The progress bars show the number of beverages that can still be prepared until the appliance requests you to perform cleaning, descaling or to
change the lter.
Software version
Information on the installed software version is obtained via the
System > SW Version menu. Press the "menu/ok" button to exit the menu.
32
Page 33

Changing basic settings
7.6 Setting the grinding neness
The grinding neness of the coee powder inuences the avour of the
coee. The grinding neness has been optimally set prior to delivery. We
recommend adjusting the grinding neness after around 1, 000 beverages
have been dispensed (after around 1 year) at the earliest.
10
ENGLISH
Fig. 16: Lever for setting the grinding neness
1. Remove the water tank.
» The "Grinding neness adjustment" lever(10) is visible on the hous-
ing.
2. Move the lever to the left or right as shown on Fig. 16.
ū To the left = grinding neness ner
ū To the right = grinding neness coarser
3. Re-insert the water tank.
Information
ū If the grinding neness is set ner, the coee avour is stronger.
ū The grinding neness is optimally set when the coee ows evenly out
of the outlet and a ne, dense crema appears.
33
Page 34

ENGLISH
Care and maintenance
8 Care and maintenance
Regular care and maintenance of the appliance ensure the consistent high
quality of your beverages.
8.1 General cleaning
Clean the appliance regularly. Immediately remove external soiling caused
by milk and coee.
ATTENTION
The use of unsuitable cleaning agents can lead to scratched surfaces.
Do not use any abrasive cloths, sponges or cleaning agents.
Requirement: The appliance is switched o.
Clean the outside of the appliance with a soft, damp cloth and normal
washing-up liquid.
Rinse o the drip tray and the coee grounds container. Use a soft, damp
cloth and normal washing up liquid for this.
Clean the bean container with a soft, dry cloth.
The coee grounds container (7), the cup plate (15) and the milk con-
tainer (without lid, milk hose and riser pipe) can be washed in a dishwasher.
8.2 Rinsing the coee system
During rinsing, the nozzles at the outlet and the internal parts of the coee
system are rinsed. As a result, rinsing water from the interior enters the drip
tray.
When switched on and o, the appliance performs automatic rinsing.
Rinsing can also be carried out manually:
Requirement: The ready symbol appears on the display.
1. Place a vessel beneath the outlet.
2. Press the "menu/ok" button for longer than 2 seconds.
» The menu appears on the display.
3. Navigate to the Care > Rinsing menu.
» The appliance performs automatic rinsing.
» The ready symbol appears on the display.
34
Page 35

Care and maintenance
8.3 Removing and cleaning the brewing unit
To avoid damage to the appliance, we recommend cleaning the brewing
unit once a week.
11
Fig. 17: Removing the brewing unit
Requirement: The appliance is switched o.
1. Open the cover(11). To do this, reach into the recess on the right of the
appliance and push the cover o backwards. Take o the cover.
2. Press and hold the red lever(35) on the brewing unit handle(12) and
turn the handle clockwise until it engages at the stop.
3. Pull the brewing unit out of the appliance by the handle.
ENGLISH
12
35
36
Fig. 18: Cleaning the brewing unit
35
Page 36

ENGLISH
Care and maintenance
4. Rinse the brewing unit thoroughly from all sides under running water.
» The brewing unit and the sieve(36) are free of coee remains.
5. Allow the brewing unit to drip dry.
6. Use a soft, dry cloth to remove coee residues from the surfaces inside
the appliance.
7. Insert the brewing unit into the appliance. Press and hold the red lever
on the brewing unit handle and turn the handle counter clockwise until
it engages at the stop.
8. Close the cover. To do this, insert the cover and move the cover forwards
until it engages.
8.4 Using the "Easy Cleaning" programme
The milk system is rinsed using the "Easy Cleaning" programme.
Each time after preparing a beverage with milk, the appliance requests you
to execute the "Easy Cleaning" programme.
The "Easy Cleaning" programme can also be run manually.
Requirement: The ready symbol appears on the display.
1. Place a vessel beneath the outlet.
2. Press the "menu/ok" button for longer than 2 seconds.
» The menu appears on the display.
3. Navigate to the Care > Easy Cleaning menu.
4. Select Start using the arrow buttons and conrm with "menu/ok".
5. Follow the further instructions on the display up to the end of the Easy
Cleaning programme.
» The ready symbol appears on the display.
8.5 Using the "Cleaning milk system" programme
A milk system cleaning agent is required for cleaning the milk system.
To maintain hygiene and avoid damage to the appliance, we recommend
carrying out the cleaning programme once a week.
The cleaning programme takes approximately 3 minutes and should not be
interrupted.
ATTENTION
The use of unsuitable milk system cleaning agents can damage the
appliance.
Only use the Melitta® PERFECT CLEAN Espresso Machines milk system
cleaning agent.
36
Page 37

Care and maintenance
Requirement: The ready symbol appears on the display.
1. Place the coee grounds container (7) or a vessel with a capacity of at
least 0.7 litres beneath the outlet.
2. Press the "menu/ok" button for longer than 2 seconds.
» The menu appears on the display.
3. Navigate to the Care > Cleaning milk system menu.
4. Select Start using the arrow buttons and conrm with "menu/ok".
5. Follow the further instructions on the display up to the end of the clean-
ing programme.
» The ready symbol appears on the display.
Cleaning the milk unit
In addition, we recommend cleaning the milk unit, the milk hose and the
milk container regularly (depending on the model).
ENGLISH
38
37
Fig. 19: Removing the milk unit
Proceed as follows to remove the milk unit:
Requirement: The milk hose is removed from the appliance.
1. Pull o the cover (37) forwards from the outlet.
2. Press the milk unit (38) downwards and remove it.
3. Dismantle the milk unit into three parts as shown above.
4. Clean the individual parts with warm water. Use the enclosed cleaning
brush, a soft, damp cloth and normal washing-up liquid.
Installation is carried out as described in reverse order.
37
Page 38

ENGLISH
Care and maintenance
8.6 Using the "Cleaning coee system" programme
The "Cleaning coee system" programme is used to remove residues and
coee oil residues using fully automatic coee maker cleaning agents.
To avoid damage to the appliance, we recommend carrying out the cleaning programme every 2 months or as requested by the appliance.
The cleaning programme takes approximately 10 minutes and should not
be interrupted.
CAUTION
Contact with fully automatic coee maker cleaning agent can lead to eye
and skin irritation.
Observe the processing instructions on the packaging of the fully auto-
matic coee maker cleaning agent.
ATTENTION
The use of unsuitable fully automatic coee maker cleaning agent can
damage the appliance.
Only use the Melitta® PERFECT CLEAN Espresso Machines cleaning
tablets.
Requirement: The ready symbol appears on the display.
1. Press the "menu/ok" button for longer than 2 seconds.
» The menu appears on the display.
2. Navigate to the Care > Coee system cleaning menu.
3. Select Start using the arrow buttons and conrm with "menu/ok".
4. Follow the further instructions on the display up to the end of the clean-
ing programme.
» The ready symbol appears on the display.
8.7 Using the "Descaling" programme
The "Descaling" programme is used to remove limescale deposits in the
interior of the appliance with fully automatic coee maker descaling agents.
To avoid damage to the appliance, we recommend carrying out the descaling programme every 3 months or as requested by the appliance.
The descaling programme takes approximately 25 minutes and should not
be interrupted.
38
Page 39

Care and maintenance
CAUTION
Contact with fully automatic coee maker descaling agent can lead to
eye and skin irritation.
Observe the processing instructions on the packaging of the fully auto-
matic coee maker descaling agent.
ATTENTION
The use of unsuitable descaling agent can damage the appliance.
Only use the Melitta® ANTI CALC Espresso Machines liquid descaling
agent.
ATTENTION
A water lter may be damaged if it is screwed in during the descaling
programme.
Remove the water lter when the appliance requests you to do so.
Place the water lter into a vessel lled with tap water during the desca-
ling programme.
The water lter can be reinserted and reused when the descaling pro-
gramme is complete.
Requirement: The ready symbol appears on the display.
1. Press the "menu/ok" button for longer than 2 seconds.
» The menu appears on the display.
2. Navigate to the Care > Descaling menu.
3. Select Start using the arrow buttons and conrm with "menu/ok".
4. Follow the further instructions on the display up to the end of the desca-
ling programme.
» The ready symbol appears on the display.
ENGLISH
8.8 Setting the water hardness
Setting the water hardness regulates how frequently you are requested to
descale the appliance. The harder the water, the more frequently the appliance has to be descaled.
Information
The water hardness cannot be set if you use a water lter. The water hardness is automatically set to 1 = soft (see section8.9 Using a water lter on
page40).
39
Page 40

ENGLISH
Care and maintenance
Determine the water hardness with the enclosed test strip. Observe the
instructions on the test strip packaging and in Table Water hardness range
on page45.
Requirement: The ready symbol appears on the display.
1. Press the "menu/ok" button for longer than 2 seconds.
» The menu appears on the display.
2. Navigate to the Water hardness menu using the arrow buttons.
3. Use the arrow buttons to select the water hardness range and conrm
with "menu/ok".
4. Exit the menu with the Exit command.
» The ready symbol appears on the display.
8.9 Using a water lter
The use of a water lter extends the service life of the appliance and the
appliance has to be descaled less frequently. The water lter contained in
the scope of delivery lters calcium and other pollutants out of the water.
39
40
1
41
Fig. 20: Screwing/Unscrewing the water lter
40
Page 41

Care and maintenance
The water lter(40) is screwed in and unscrewed from the thread (41) on
the base of the water tank(1) using the screwing aid(39).
Inserting the water lter
Information
Place the water lter into a vessel lled with fresh tap water for a few
minutes before inserting it.
Requirement: The ready symbol appears on the display.
1. Press the "menu/ok" button for longer than 2 seconds.
» The menu appears on the display.
2. Navigate to the Care > Filter > Insert lter menu.
3. Select Start using the arrow buttons and conrm with "menu/ok".
4. Follow the further instructions on the display.
» The water hardness is automatically set to Soft.
» The ready symbol appears on the display.
Changing the water lter
Change the water lter when the appliance requests you to do so.
Requirement: The ready symbol appears on the display.
1. Press the "menu/ok" button for longer than 2 seconds.
» The menu appears on the display.
2. Navigate to the Care > Filter > Change lter menu.
3. Select Start using the arrow buttons and conrm with "menu/ok".
4. Follow the further instructions on the display.
» The ready symbol appears on the display.
ENGLISH
41
Page 42

ENGLISH
Problems
Removing the water lter
The water lter should not be left standing dry for a long period of time.
When it is not used for a long time, we recommend storing the water lter
in a vessel lled with tap water in the refrigerator.
Remove the water lter as follows:
Requirement: The ready symbol appears on the display.
1. Press the "menu/ok" button for longer than 2 seconds.
» The menu appears on the display.
2. Navigate to the Care > Filter > Remove lter menu.
3. Select Start using the arrow buttons and conrm with "menu/ok".
4. Follow the further instructions on the display.
» The water hardness is automatically reset to the previous setting.
» The ready symbol appears on the display.
5. Re-adjust the water hardness if necessary, (see section 8.8 Setting the
water hardness on page39).
9 Problems
If the actions listed below fail to rectify the problems or other problems not
listed here occur, contact our hotline (local rate).
United Kingdom: +44 (0)800/ 0288 002
42
Problem Cause Action
Coee only emerges
in drips from the
outlet.
Coee does not ow. Water tank not lled
Fill beans appears on
the display although
the bean container
is full.
Grinding neness
too ne.
Appliance soiled. Clean the brewing unit (see sec-
Appliance is covered
inside with limescale.
or inserted incorrectly.
Brewing unit
clogged.
Coee beans do
not drop into the
grinder.
Set a coarser grinding neness (see
section 7.6 one page33).
tion8.3 one page35).
Run the cleaning programme (see
section8.6 one page38).
Descale the appliance (see sec-
tion 8.7 one page38).
Fill the water tank and ensure it is
positioned correctly (see section4.5 one page18).
Clean the brewing unit (see sec-
tion 8.3 one page35).
Press a direct key.
Tap lightly on the bean container.
Clean the bean container.
Coee beans too oily. Use dierent
coee beans.
Page 43

Transport, storage and disposal
Problem Cause Action
Loud grinder noise. Foreign object in the
Brewing unit cannot
be inserted after
removing.
System error appears
on the display.
grinder.
Handle for the
locking mechanism
of the brewing unit
is not in the correct
position.
Drive is not in the
correct position.
Software problem. Switch the appliance o and
Contact the hotline.
Check that the handle for the
locking mechanism is correctly
engaged (see section8.3 one
page35).
Press and hold the "Coee
strength" button. Also press the
ON/OFF button. The appliance
initialises. Release buttons again.
on again (see section4.1 one
page14).
Contact the hotline.
10 Transport, storage and disposal
10.1 Venting the appliance
We recommend venting the appliance when it is not used for a long period,
prior to transport and when there is a risk of frost.
During venting, residual water is removed from the appliance.
Requirement: The ready symbol appears on the display.
1. Place a vessel beneath the outlet.
2. Press the "menu/ok" button for longer than 2 seconds.
» The menu appears on the display.
3. Navigate to the System > Venting menu.
4. Select Start using the arrow buttons and conrm with "menu/ok".
5. Follow the further instructions on the display.
» The appliance switches o.
ENGLISH
10.2 Transporting the appliance
ATTENTION
Freezing residual water can damage the appliance.
Prevent the appliance from being exposed to temperatures below 0°C.
Information
Transport the appliance in the original packaging. This avoids damage in
transit.
43
Page 44

ENGLISH
Transport, storage and disposal
Before transporting the appliance, carry out the following activities:
1. Vent the appliance (see section10.1 Venting the appliance on page43).
2. Empty the drip tray and the coee grounds container.
3. Empty the water tank.
4. Empty the bean container.
5. Clean the appliance (see section 8.1 General cleaning on page34).
6. Secure loose parts (cup plate, etc.) with suitable adhesive tape.
7. Package the appliance.
10.3 Disposing of the appliance
Appliances marked with this symbol are subject to the European Directive
2002 / 96 / EC for WEEE (Waste Electrical and Electronic Equipment).
Electrical appliances do not belong in domestic waste.
Dispose of the appliance in an environmentally friendly manner via
suitable collection systems.
44
Page 45

11 Technical data
Technical data
Technical data
Operating voltage 220 V to 240 V, 50 Hz
Power consumption Maximum 1450 W
Pump pressure Static, max. 15 bar
Dimensions
Width
Height
Depth
Capacity
Bean container
Water tank
Quantity of beverage
dispensed
Weight (empty) 8.5 kg
Ambient conditions
Temperature
Relative humidity
Water hardness range °d °e °f
Soft 0 to 10 0 to 13 0 to 18
Medium 10 to 15 13 to 19 18 to 27
Hard 15 to 20 19 to 25 27 to 36
Very hard >20 >25 >36
253 mm
390 mm
380 mm
125 g
1.2 l
25 ml to 220 ml
10 °C to 32 °C
30 % to 80 % (non-condensing)
ENGLISH
Factory settings
Espresso Beverage quantity 40 ml
Coee strength Strong
Brewing temperature Normal
Café Crème Beverage quantity 120 ml
Coee strength Strong
Brewing temperature Normal
Cappuccino Beverage quantity 130 ml
Coee strength Strong
Brewing temperature Normal
45
Page 46

ENGLISH
Technical data
Factory settings
Latte Macchiato Beverage quantity 190 ml
Coee strength Strong
Brewing temperature Normal
Milk Foam amount 180 ml
Milk amount 180 ml
Hot water Beverage quantity 180 ml
46
Page 47

Innehållsförteckning
Innehållsförteckning
1 Säkerhetsinformation .....................................................................................................49
1.1 Symboler i bruksanvisningen ............................................................................50
1.2 Avsedd användning ..............................................................................................50
1.3 Fara på grund av elektrisk ström ......................................................................50
1.4 Risk för bränn- och skållskador ......................................................................... 51
1.5 Allmän säkerhet ...................................................................................................... 51
2 Översikt ................................................................................................................................. 52
2.1 Översikt över maskinen ....................................................................................... 52
2.2 Översikt över manöverpanelen ........................................................................54
3 Komma igång ..................................................................................................................... 55
3.1 Packa ut maskinen ................................................................................................. 55
3.2 Kontrollera leveransomfånget ..........................................................................55
3.3 Placering ...................................................................................................................56
3.4 Anslutning ................................................................................................................ 56
3.5 Sätta på maskinen första gången .................................................................... 56
4 Grundläggande användning .......................................................................................58
4.1 Sätta på och stänga av maskinen.....................................................................58
4.2 Hantera manöverpanelen ...................................................................................59
4.3 Navigera i menyn ...................................................................................................59
4.4 Fylla på kaebönor i bönbehållaren ...............................................................61
4.5 Fylla på vatten .........................................................................................................62
4.6 Ställa in utloppet .................................................................................................... 63
4.7 Använda mjölk ........................................................................................................64
4.8 Tömma droppskålen och kaesumpbehållaren .........................................66
5 Tillreda drycker ..................................................................................................................67
5.1 Tillreda espresso eller café crème ....................................................................67
5.2 Tillreda cappuccino ...............................................................................................67
5.3 Tillreda latte macchiato .......................................................................................68
5.4 Tillreda mjölkskum eller varm mjölk ...............................................................68
5.5 Tillreda hett vatten ................................................................................................69
5.6 Tillreda ytterligare specialiteter med recept ................................................69
5.7 Ändra dryckinställningar före och under tillredning ................................ 70
5.8 Avbryta tillredning ................................................................................................71
5.9 Tillreda två drycker samtidigt ............................................................................ 71
6 Ändra dryckinställningar varaktigt ........................................................................... 73
6.1 Ändra förinställningar ..........................................................................................73
SVENSKA
47
Page 48

Innehållsförteckning
7 Ändra grundinställningar .............................................................................................74
7.1 Ställa in språk ........................................................................................................... 74
7.2 Ställa in automatisk avstängning .....................................................................74
7.3 Ställa in energisparläge .......................................................................................76
7.4 Återställa maskinen till fabriksinställningar ................................................. 76
7.5 Information om maskinstatus ........................................................................... 77
7.6 Ställa in malningsgrad..........................................................................................78
8 Skötsel och underhåll .....................................................................................................79
SVENSKA
8.1 Allmän rengöring ................................................................................................... 79
8.2 Spola rent kaesystemet .....................................................................................79
8.3 Ta ut och rengöra bryggenheten ..................................................................... 80
8.4 Använda programmet "Easy Cleaning" ..........................................................81
8.5 Använda programmet "Rengöring mjölksystem" ......................................82
8.6 Använda programmet "Rengöring kaesystem" .......................................83
8.7 Använda programmet "Avkalkning" ............................................................... 84
8.8 Ställa in vattenhårdhet.........................................................................................85
8.9 Använda vattenlter .............................................................................................86
9 Åtgärder vid fel ..................................................................................................................88
10 Transport, lagring och avfallshantering .................................................................89
10.1 Avlufta maskinen ................................................................................................... 89
10.2 Transport ...................................................................................................................89
10.3 Avfallshantering .....................................................................................................90
11 Tekniska data ...................................................................................................................... 90
48
Page 49

Säkerhetsinformation
Bästa kund!
Gratulerar till köpet av din helautomatiska kaemaskin Caeo®Passione®.
Bruksanvisningen hjälper dig att lära känna kaemaskinens många
funktioner så att du kan njuta av en rad olika kaespecialiteter.
Läs igenom bruksanvisningen uppmärksamt. På så sätt undviker du
personskador och materiella skador. Förvara bruksanvisningen med
omsorg. Om kaemaskinen byter ägare ska den här bruksanvisningen
medfölja.
Melitta ansvarar inte för skador som uppstår på grund av att
bruksanvisningen inte följs.
Om du behöver mer information eller har frågor om kaemaskinen,
kontakta Melitta eller besök vår hemsida:
www.melitta.se
Vi önskar dig mycket nöje med din kaemaskin.
1 Säkerhetsinformation
Maskinen uppfyller kraven enligt följande EG-direktiv:
ū 2006 / 95 / EG (lågspänning)
ū 2004 / 108 / EG (elektromagnetisk kompatibilitet)
ū 2011 / 65 / EU (begränsning av användningen av vissa farliga ämnen i
elektriska och elektroniska produkter)
ū 2009 / 125 / EG (ekodesign av energirelaterade produkter)
Maskinen har tillverkats enligt den senaste tekniken, men det nns
ändå vissa risker du behöver vara uppmärksam på. Dennoch gibt es
Restgefahren.
Följ säkerhetsinformationen för att undvika risker. Melitta ansvarar inte för
skador som uppstår på grund av att säkerhetsinformationen inte följs.
SVENSKA
49
Page 50

Säkerhetsinformation
1.1 Symboler i bruksanvisningen
Följande symboler informerar om risker vid hantering av maskinen eller ger
praktiska anvisningar.
VARNING
Avsnitt med den här symbolen upplyser om möjliga risker för personskador.
SVENSKA
VAR FÖRSIKTIG
Avsnitt med den här symbolen innehåller information om möjliga risker för
att maskinen kan skadas.
Information
Avsnitt med den här symbolen innehåller ytterligare anvisningar och tips
för hantering av maskinen.
1.2 Avsedd användning
Maskinen är avsedd för tillredning av kaedrycker
genom kaebönor samt för värmning av mjölk och
vatten.
Maskinen ska användas i privathushåll.
All annan användning gäller som ej avsedd och kan leda
till personskador och materiella skador. Melitta ansvarar
inte för skador som uppstår vid ej avsedd användning av
maskinen.
1.3 Fara på grund av elektrisk ström
Om maskinen eller nätkabeln är skadad föreligger
livsfara på grund av risk för elektrisk stöt.
Följ nedanstående säkerhetsinformation för att undvika
risker genom elektrisk ström:
50
ū Använd inte nätkabeln om den är skadad.
ū En skadad nätkabel får endast bytas ut av tillverkaren,
dess kundtjänst eller dess servicepartner.
ū Öppna inga fastskruvade lock på maskinens hölje.
ū Maskinen får användas endast om den är tekniskt
felfri.
Page 51

Säkerhetsinformation
ū Defekt maskin får endast repareras av en auktoriserad
verkstad. Reparera inte maskinen själv.
ū Utför inga ändringar på maskinen, dess komponenter
eller tillbehör.
ū Sänk inte ned maskinen i vatten.
1.4 Risk för bränn- och skållskador
Vätska och ånga från maskinen kan vara mycket het.
Även delar av maskinen kan bli mycket heta.
Följ nedanstående säkerhetsinformation för att undvika
bränn- och skållskador:
ū Undvik hudkontakt med vätska och ånga från
maskinen.
ū Vidrör inga munstycken vid utloppet när en dryck
håller på att tillredas eller direkt därefter. Vänta tills
komponenterna har svalnat.
1.5 Allmän säkerhet
Följ nedanstående säkerhetsinformation för att undvika
personskador och materiella skador:
ū Vidrör aldrig maskinens invändiga delar under
pågående användning.
ū Barn under 8 år får inte komma i kontakt med
maskinen och dess nätkabel.
ū Maskinen får användas av barn från 8 år samt av
personer med nedsatt fysisk, sensorisk eller psykisk
förmåga eller personer som inte har erfarenhet och
kunskaper om hur maskinen ska hanteras, förutsatt att
de är under uppsikt eller informeras om hur maskinen
ska användas på ett säkert sätt och förstår vilka risker
som föreligger.
ū Barn får inte leka med maskinen. Rengöring och
underhåll får inte utföras av barn under 8 år. Barn över
8 år måste hållas under uppsikt vid rengöring och
underhåll.
ū Dra ut nätkabeln ur eluttaget om maskinen inte är
under uppsikt en längre tid.
SVENSKA
51
Page 52

Översikt
2 Översikt
2.1 Översikt över maskinen
2
1
SVENSKA
10
3
4
5
6
9
Bild 1: Kaemaskinens framsida från vänster
1 Vattenbehållare med lock 6 Utlopp som kan ställas in i höjdled med
2 Lock på bönbehållaren 7 Behållare för kaesump (på insidan)
3 Bönbehållare 8 Droppskål
4 Avställningsyta för koppar 9 PÅ/AV-knapp
5 Manöverpanel 10 Spak för inställning av malningsgrad (på
52
7
8
2 munstycken för kae, 1 munstycke för
mjölk, 1munstycke för hett vatten samt
koppbelysning
insidan)
Page 53

11
12
Översikt
SVENSKA
16
15
13
14
Bild 2: Kaemaskinens framsida från höger
11 Skydd 14 Anslutning för mjölkslang på
12 Bryggenhet (på insidan) 15 Spillbricka
13 Anslutning för mjölkslangen på
utloppet
droppskålen
16 Flottör
53
Page 54

Översikt
2.2 Översikt över manöverpanelen
191817
09:52
Välj dryck
SVENSKA
20 21 22
Bild 3: Snabbknappar
Pos. Beteckning Funktion
17 Espresso Tillreda espresso
18 Café crème Tillreda café crème
19 Cappuccino Tillreda cappuccino
20 Mjölkskum/varm
Tillreda mjölkskum och varm mjölk
mjölk
21 Latte macchiato Tillreda latte macchiato
22 Hett vatten Tillreda hett vatten
23 24 25 26
09:52
Välj dryck
27 28 29
Bild 4: Display och manöverknappar
Pos. Beteckning Funktion
23 Display Indikerar aktuella menyer och meddelanden
24 Pilknapp
uppåt
25 Recept Välja recept och tillreda
26 Kaestyrka Ställa in kaestyrka
27 Pilknapp
nedåt
28 menu/ok Öppna meny eller bekräfta inmatningar
29 Två koppar Tillreda två koppar
Exempel: vänteläge
Navigera uppåt i menyn
eller öka mängden
Navigera nedåt i menyn
eller minska mängden
54
Page 55

3 Komma igång
I det här kapitlet beskrivs hur du förbereder din maskin för användning.
3.1 Packa ut maskinen
Utöver maskinen innehåller förpackningen tillbehör som till exempel
rengöringsutrustning och rengöringsmedel.
Komma igång
VARNING
Kontakt med rengöringsmedel kan irritera ögon och hud.
Förvara medföljande rengöringsmedel utom räckhåll för barn.
Packa ut maskinen. Ta bort förpackningsmaterial, klisterremsor och
skyddsfolier från maskinen.
Spara förpackningsemballaget så att det kan användas vid transporter
eller vid en eventuell retur.
Information
Det kan nnas spår av kae och vatten i maskinen. Det beror på att
maskinen funktionstestats på fabriken.
3.2 Kontrollera leveransomfånget
Kontrollera med hjälp av nedanstående lista att leveransen är komplett.
Kontakta din återförsäljare om komponenter fattas.
ū Inskruvningsverktyg för vattenltret
ū Lång mjölkslang
ū Rengöringsborste
ū Rengöringsmedel för helautomatiska kaemaskiner
ū Rengöringsmedel för mjölksystem
ū Avkalkningsmedel för helautomatiska kaemaskiner
ū Vattenlter
ū Testremsa för bestämning av vattenhårdhet
Beroende på modell tillkommer även:
ū Mjölkbehållare med kort mjölkslang
SVENSKA
55
Page 56

Komma igång
3.3 Placering
Beakta följande anvisningar:
ū Maskinen får inte placeras i fuktiga utrymmen.
ū Placera maskinen på ett stabilt, jämnt och torrt underlag.
ū Placera inte maskinen i närheten av en diskho eller liknande.
ū Placera inte maskinen på heta underlag.
ū Kaemaskinen ska stå på ett tillräckligt avstånd på ungefär 10 cm från
väggen och andra föremål. Avståndet upptill ska vara minst 20cm.
SVENSKA
ū Dra nätkabeln så att den inte kan skadas genom kanter eller heta ytor.
3.4 Anslutning
Beakta följande anvisningar:
ū Kontrollera att den driftspänning som anges under Tekniska data
stämmer överens med nätspänningen (se tabellTekniska data på
sidan90).
ū Anslut endast maskinen till ett korrekt installerat, jordat uttag. Kontakta
en elektriker om du är osäker.
ū Det jordade uttaget måste ha en säkring på minst 10 A.
3.5 Sätta på maskinen första gången
Vid den första idrifttagningen kan du ställa in språk och vattenhårdhet.
Du kan ändra inställningarna vid ett senare tillfälle (se kapitel7 Ändra
grundinställningar på sidan74 och kapitel8.8 Ställa in vattenhårdhet på
sidan85).
Använd den medföljande testremsan för att bestämma vattenhårdhet.
Beakta anvisningarna på testremsans förpackning och tabellen Intervall för
vattenhårdhet på sidan90.
56
Information
ū Första gången du använder maskinen rekommenderar vi att du häller ut
de första två kopparna kae.
ū Om du vill använda ett vattenlter ska du sätt in det efter den första
idrifttagningen.
Page 57

Komma igång
9
Bild 5: PÅ/AV-knapp
Förutsättning: Maskinen är uppställd och ansluten.
1. Sätt ett kärl under utloppet.
2. Tryck på PÅ/AV-knappen.
» Ett hälsningsmeddelande visas på displayen.
» Du uppmanas sedan att utföra inställningar: Please set up the machine.
3. Bekräfta genom att trycka på "menu/ok".
» Menyn Language visas.
4. Välj språk med pilknapparna. Bekräfta genom att trycka på "menu/ok".
» Menyn Vattenhårdhet visas.
5. Välj intervall för uppmätt vattenhårdhet med pilknapparna eller bekräfta
det förinställda värdet med "menu/ok".
» Meddelandet Fyll på och sätt in vattenbehållaren visas.
6. Ta ut vattenbehållaren. Skölj ur den med klart vatten. Fyll
vattenbehållaren med rent vatten och sätt in den.
» Maskinen värms upp och utför en automatisk spolning.
» På displayen visas vänteläge.
7. Fyll på kaebönor i bönbehållaren. Läs anvisningarna i kapitel 4.4 Fylla
på kaebönor i bönbehållaren på sidan61.
» Vid behov kan du nu sätta in ett vattenlter (se kapitel 8.9 Använda
vattenlter på sidan86).
SVENSKA
57
Page 58

Grundläggande användning
4 Grundläggande användning
I det här kapitlet beskrivs grundläggande funktioner för daglig användning
av maskinen.
4.1 Sätta på och stänga av maskinen
Innan du sätter på maskinen för första gången, läs kapitel 3.5 Sätta på
maskinen första gången på sidan56.
SVENSKA
Information
ū Vid påsättning och avstängning utför maskinen en automatisk spolning.
ū Vid spolningen leds spolvattnet till droppskålen.
Sätta på maskinen
1. Sätt ett kärl under utloppet.
2. Tryck på PÅ/AV-knappen(9).
» Hälsningsmeddelandet visas på displayen.
» Maskinen värms upp och utför en automatisk spolning.
» På displayen visas vänteläge.
Information
Om maskinen bara varit avstängd under en kort tid, utförs ingen automatisk
spolning när du sätter på den igen.
Stänga av maskinen
1. Sätt ett kärl under utloppet.
2. Tryck på PÅ/AV-knappen(9).
» Maskinen utför en automatisk spolning.
» Maskinen stängs av.
Information
ū Maskinen stängs av automatiskt när den inte används under en längre
tid. Även i detta fall utförs en automatisk spolning.
ū Avstängningstiden kan du ställa in i menyn Auto AV, se kapitel7.2 Ställa
in automatisk avstängning på sidan74.
ū Om ingen dryck tillretts sedan maskinen satts på eller vattenbehållaren
är tom, utförs ingen spolning.
58
Page 59

Grundläggande användning
4.2 Hantera manöverpanelen
De viktigaste programmen nns på manöverpanelen.
Tryck på önskad knapp. Så här använder du manöverpanelen:
Tryck kort
Tryck kort på en manöverknapp för att välja ett program.
Tryck länge
2s
Tryck in en manöverknapp i längre än 2 sekunder för att
välja ett andra program, om det nns ett.
4.3 Navigera i menyn
För att ställa in individuella drycker och för underhåll och skötsel måste du
öppna menyn på displayen och navigera i menyn.
Beakta anvisningarna på displayen.
Snabbknappar
Espresso
Kaffestyrka
Stark
Bekräfta med OK
SVENSKA
Bild 6: Display (exempel) och manöverknappar för navigering
Så här navigerar du i menyn:
Öppna meny och bekräfta val
Tryck på knappen "menu/ok" i längre än 2 sekunder för att öppna
menyn.
Tryck kort på knappen "menu/ok" för att bekräfta ditt val.
59
Page 60

Grundläggande användning
Navigera i menyn eller ändra värde
Tryck på pilknapparna för att navigera uppåt eller nedåt i menyn.
Tryck på pilknapparna för att höja eller sänka ett värde.
Håll en pilknapp intryckt för att snabbt nå önskad position eller
önskat värde.
Lämna menyn
Välj kommandot Exit med pilknapparna och bekräfta med
SVENSKA
"menu/ok" för att lämna en meny.
Med "menu/ok" lämnar du undermenyer som enbart visar
information och som du inte gör några inställningar i.
Visa undermenyer
Vissa program når du genom att öppna era undermenyer i rad.
Undermenyer öppnas alltid på samma sätt. Som exempel beskrivs här
navigering till programmet Avkalkning.
Skötsel
Exit
Spolning
Easy Cleaning
Rengöring mjölksystem
Rengöring kaffesystem
Avkalkning
Filter
Bild 7: Navigera till programmet Avkalkning
1. Tryck på knappen "menu/ok" i 2 sekunder.
» Menyn visas på displayen.
2. Välj kommandot Skötsel med pilknapparna och bekräfta med "menu/ok".
3. Välj kommandot Avkalkning med pilknapparna och bekräfta med
"menu/ok".
Val av program återges i den här bruksanvisningen alltid i förkortad form:
Navigera till menyn Skötsel > Avkalkning.
60
Page 61

Grundläggande användning
4.4 Fylla på kaebönor i bönbehållaren
Rostade bönor tappar arom efter en tid. Fyll bara på bönbehållaren med så
mycket kae bönor som går åt under de närmaste 3–4dagarna.
VAR FÖRSIKTIG
Vid användning av ej lämpliga kaesorter kan kvarnen sättas igen.
Använd inga frystorkade eller karamelliserade kaebönor.
Använd inte kaepulver eller snabbkaeprodukter.
2
SVENSKA
Bild 8: Öppna locket på bönbehållaren
1. Öppna locket(2) på bönbehållaren.
2. Fyll på kaebönor i bönbehållaren.
3. Stäng locket på bönbehållaren.
61
Page 62

Grundläggande användning
4.5 Fylla på vatten
För optimal kaesmak, använd endast färskt, kallt vatten utan kolsyra. Byt
vatten dagligen.
Information
Kaesmaken är mycket beroende av vattenkvaliteten. Använd därför
vattenlter från Melitta (se kapitel8.8 Ställa in vattenhårdhet på sidan85
SVENSKA
och kapitel8.9 Använda vattenlter på sidan86).
30
1
Bild 9: Vattenbehållare
1. Öppna locket till vattenbehållaren(30) och dra upp vattenbehållaren(1)
ur maskinen i handtaget.
2. Fyll vattenbehållaren med vatten.
3. Sätt i vattenbehållaren ovanifrån i maskinen och stäng locket.
62
Page 63

Grundläggande användning
4.6 Ställa in utloppet
Utloppet(6) kan ställas in i höjdled. Ställ in ett så litet avstånd som möjligt
mellan utloppet och koppen. Beroende på koppens höjd dras utloppet
uppåt eller nedåt.
6
Bild 10: Ställa in utloppet
SVENSKA
63
Page 64

Grundläggande användning
4.7 Använda mjölk
Använd kall mjölk för optimal kaesmak. Beroende på maskinmodell
kan du antingen använda den medföljande långa mjölkslangen eller den
medföljande mjölkbehållaren.
Ansluta mjölkbehållaren
En mjölkbehållare ingår endast vid vissa modeller av Caeo® Passione®.
SVENSKA
13
31
32
Bild 11: Ansluten mjölkbehållare
1. Anslut mjölkslangen(31) till anslutningen på utloppet(13).
2. Anslut mjölkslangens fria ände till mjölkbehållaren(32).
Information
Förvara den fyllda mjölkbehållaren i kylskåpet.
64
Page 65

Grundläggande användning
Ansluta mjölkförpackning
13
33
34
Bild 12: Ansluten mjölkförpackning
1. Anslut den långa mjölkslangen(33) till anslutningen på utloppet(13).
2. Sätt mjölkslangens fria ände i en vanlig mjölkförpackning(34).
SVENSKA
65
Page 66

Grundläggande användning
4.8 Tömma droppskålen och kaesumpbehållaren
Efter era drycktillredningar kan droppskålen(8) och
kaesumpbehållaren(7) vara fulla. Flöttören(16) indikerar nivån i
droppskålen.
Även maskinen indikerar efter ett visst antal drycktillredningar att
droppskålen och kaesumpbehållaren är fulla.
Töm alltid droppskålen och kaesumpbehållaren.
SVENSKA
7
16
8
Bild 13: Tömma droppskålen och kaesumpbehållaren
1. Dra ut droppskålen(8) ur maskinen.
2. Ta ut kaesumpbehållaren(7) och töm den.
3. Töm droppskålen.
4. Sätt in kaesumpbehållaren.
5. Skjut in droppskålen i maskinen ända tills det tar stopp.
Information
Om du tömmer droppskålen och kaesumpbehållaren när maskinen är
avstängd, registreras det inte av maskinen. Det kan därför hända att du
uppmanas tömma droppskålen och kaesumpbehållaren, trots att de inte
är fulla än.
66
Page 67

5 Tillreda drycker
Det nns två möjligheter för tillredning av drycker:
ū Standardtillredning enligt beskrivningen nedan
ū Val av recept och tillredning med recept (se kapitel 5.6 Tillreda ytterligare
specialiteter med recept på sidan69).
Information
ū Du kan varaktigt ändra förinställningarna för standardtillagning eller för
ett recept (se kapitel 6.1 Ändra förinställningar på sidan73).
Tänk på att:
ū Det ska alltid nnas tillräckligt med vatten i vattenbehållaren. När nivån
är för låg uppmanas du att fylla på.
ū Även i bönbehållaren ska det alltid nnas tillräckligt med kaebönor. Om
det inte nns några kaebönor kvar, avbryter maskinen tillredningen av
en kaedryck.
ū Maskinen indikerar inte när det saknas mjölk.
ū Använd tillräckligt stora koppar för de olika dryckerna (se tabell
Fabriksinställningar på sidan90).
5.1 Tillreda espresso eller café crème
Förutsättning: Displayen visar vänteläge.
1. Sätt en kopp under utloppet.
2. Tryck på snabbknappen "Espresso" eller "Café crème".
» Malningen och upphällningen av drycken startas.
» Upphällningen av drycken avslutas automatiskt.
3. Ta ut koppen.
» På displayen visas vänteläge.
Tillreda drycker
SVENSKA
5.2 Tillreda cappuccino
Förutsättningar: Displayen visar vänteläge och mjölk har anslutits.
1. Sätt en kopp under utloppet.
2. Tryck på snabbknappen "Cappuccino".
» Malningen och upphällningen av kaet startas.
» Upphällningen av kaet avslutas automatiskt.
» Upphällningen av mjölken påbörjas.
» Upphällningen av drycken avslutas automatiskt.
3. Ta ut koppen.
» På displayen visas Easy Cleaning? (OK för start).
4. Du kan utföra programmet Easy Cleaning eller tillreda er drycker.
67
Page 68

Tillreda drycker
a) Utför programmet Easy Cleaning. Följ därvid anvisningarna
på displayen. Information om detta nns i kapitel8.4 Använda
programmet "Easy Cleaning" på sidan81.
b) Tillred er drycker och utför programmet Easy Cleaning vid ett senare
tillfälle.
» På displayen visas vänteläge.
5.3 Tillreda latte macchiato
SVENSKA
Förutsättningar: Displayen visar vänteläge och mjölk har anslutits.
1. Sätt en kopp under utloppet.
2. Tryck på snabbknappen "LatteMacchiato".
» Upphällningen av mjölken påbörjas.
» Upphällningen av mjölk avslutas automatiskt.
» Malningen och upphällningen av kaet startas.
» Upphällningen av drycken avslutas automatiskt.
3. Ta ut koppen.
» På displayen visas Easy Cleaning? (OK för start).
4. Du kan utföra programmet Easy Cleaning eller tillreda er drycker.
a) Utför programmet Easy Cleaning. Följ därvid anvisningarna
på displayen. Information om detta nns i kapitel8.4 Använda
programmet "Easy Cleaning" på sidan81.
b) Tillred er drycker och utför programmet Easy Cleaning vid ett senare
tillfälle.
» På displayen visas vänteläge.
5.4 Tillreda mjölkskum eller varm mjölk
Tillredning av mjölkskum och varm mjölk fungerar på liknande sätt.
Förutsättningar: Displayen visar vänteläge och mjölk har anslutits.
1. Sätt en kopp under utloppet.
2. Tryck på snabbknappen "Mjölkskum/varm mjölk".
a) Mjölkskum = Tryck kort på knappen.
b) Varm mjölk = Håll knappen intryckt (2 sekunder).
» Upphällningen av mjölken påbörjas.
» Upphällningen av drycken avslutas automatiskt.
3. Ta ut koppen.
» På displayen visas Easy Cleaning? (OK för start).
4. Du kan utföra programmet Easy Cleaning eller tillreda er drycker.
a) Utför programmet Easy Cleaning. Följ därvid anvisningarna
på displayen. Information om detta nns i kapitel8.4 Använda
programmet "Easy Cleaning" på sidan81.
68
Page 69

b) Tillred er drycker och utför programmet Easy Cleaning vid ett senare
tillfälle.
» På displayen visas vänteläge.
5.5 Tillreda hett vatten
Förutsättning: Displayen visar vänteläge.
1. Sätt en kopp under utloppet.
2. Tryck på snabbknappen "Hett vatten".
» Upphällningen av hett vatten påbörjas.
» Upphällningen av drycken avslutas automatiskt.
3. Ta ut koppen.
» På displayen visas vänteläge.
5.6 Tillreda ytterligare specialiteter med recept
Utöver standardtillredning kan du även välja andra dryckspecialiteter i
menyn Recept. Följande dryckspecialiteter står till förfogande:
Dryckspecialiteter utan mjölk:
ū Ristretto
ū Lungo
ū Americano
Dryckspecialiteter med mjölk:
ū Espresso Macchiato
ū Caè Latte
ū Café au Lait
Tillreda drycker
SVENSKA
Tillreda ristretto, lungo eller americano
Tillredningen av ristretto, lungo och americano går till på liknande sätt. Här
beskrivs hur du tillreder en ristretto.
Förutsättning: Displayen visar vänteläge.
1. Sätt en kopp under utloppet.
2. Tryck på manöverknappen "Recept".
» Menyn Recept visas på displayen.
3. Välj Ristretto med pilknapparna.
4. Bekräfta ditt val med "menu/ok".
» Malningen och upphällningen av drycken startas.
» Upphällningen av drycken avslutas automatiskt.
5. Ta ut koppen.
» På displayen visas vänteläge.
69
Page 70

Tillreda drycker
Tillreda espresso macchiato, caè latte eller café au lait
Tillredningen av espresso macchiato, caè latte och café au lait går till på
liknande sätt. Här beskrivs hur du tillreder en espresso macchiato.
Förutsättningar: Displayen visar vänteläge och mjölk har anslutits.
1. Sätt en kopp under utloppet.
2. Tryck på manöverknappen "Recept".
» Menyn Recept visas på displayen.
SVENSKA
3. Välj Espresso Macchiato med pilknapparna.
4. Bekräfta ditt val med "menu/ok".
» Malningen och upphällningen av kaet startas.
» Upphällningen av kaet avslutas automatiskt.
» Upphällningen av mjölken påbörjas.
» Upphällningen av drycken avslutas automatiskt.
5. Ta ut koppen.
» På displayen visas Easy Cleaning? (OK för start).
6. Du kan utföra programmet Easy Cleaning eller tillreda er drycker.
a) Utför programmet Easy Cleaning. Följ därvid anvisningarna
på displayen. Information om detta nns i kapitel8.4 Använda
programmet "Easy Cleaning" på sidan81.
b) Tillred er drycker och utför programmet Easy Cleaning vid ett senare
tillfälle.
» På displayen visas vänteläge.
5.7 Ändra dryckinställningar före och under tillredning
Du kan ändra dryckinställningar före och under pågående tillredning.
Information
Följande inställningar gäller endast för aktuell drycktillredning.
Ändra dryckinställningar före tillredning
Du kan ändra total dryckmängd och kaestyrka innan du har valt en dryck.
70
Page 71

Välj dryckmängd med pilknapparna innan du väljer dryck.
Välj kaestyrka med manöverknappen "Kaestyrka" innan du väljer
dryck.
Information
ū Vid tillredning av blanddrycker delas total dryckmängd upp enligt
angivet förhållande mellan mängden kae och mängden mjölk. Detta
gäller för blanddrycker av kae med mjölk eller hett vatten.
ū Om du inte tillreder någon dryck inom 1 minut, återgår maskinen till
standardinställningarna.
Ändra dryckinställningar under tillredning
Du kan ändra dryckmängd och kaestyrka under pågående tillredning.
Ställ in respektive dryckmängd med pilknapparna under upphällningen
av en dryck.
Välj kaestyrka med manöverknappen "Kaestyrka" under malningen.
5.8 Avbryta tillredning
Om du vill avbryta drycktillredningen i förtid, tryck på valfri snabbknapp
igen.
Tillreda drycker
SVENSKA
5.9 Tillreda två drycker samtidigt
Med manöverknappen "Två koppar" tillreder du två drycker samtidigt.
Tillredning av två koppar är endast möjlig vid ren kaetillredning som till
exempel espresso, café crème och ristretto. Vid tillredning av hett vatten,
het mjölk eller blanddryck går det inte att tillreda två koppar samtidigt.
71
Page 72

Tillreda drycker
29
6
SVENSKA
Bild 14: Tillreda två koppar
1. Sätt två koppar under utloppet (6).
2. Tryck på manöverknappen "Två koppar"(29).
3. Fortsätt enligt anvisningarna för respektive drycktillredning.
Information
ū Inställningen gäller endast för en enskild drycktillredning.
ū Om du inte tillreder någon dryck inom 1 minut, återgår maskinen till
tillredning av en kopp.
72
Page 73

Ändra dryckinställningar varaktigt
6 Ändra dryckinställningar varaktigt
Maskinen erbjuder dig er möjligheter att tillreda kaespecialiteter. Du kan
använda förinställda recept eller ändra dryckinställningarna varaktigt.
6.1 Ändra förinställningar
Beroende på dryck kan du ändra följande förinställningar:
ū Kaemängd: 25-220 ml
ū Mjölkmängd eller mjölkskumsmängd: 25-220 ml
ū Mängd hett vatten: 25-220 ml
ū Kaestyrka: mycket mild, mild, normal, stark, mycket stark
ū Temperatur: låg, normal, hög
Information
Ändrade förinställningar gäller tills de ändras igen.
Dryckinställningar ändras på liknande sätt oavsett dryck. Här beskrivs hur
kaestyrkan ändras för en espresso.
SVENSKA
73
Page 74

Ändra grundinställningar
Snabbknappar
Espresso
Kaffestyrka
Stark
Bekräfta med OK
SVENSKA
Bild 15: Ställa in kaestyrka
Förutsättning: Displayen visar vänteläge.
1. Tryck på manöverknappen "menu/ok" i längre än 2 sekunder.
» Menyn visas på displayen.
2. Navigera till menyn Snabbknappar > Espresso > Kaestyrka.
3. Välj önskad kaestyrka med pilknapparna och bekräfta med "menu/ok".
4. Välj kommandot Exit era gånger för att lämna menyn.
» På displayen visas vänteläge.
» I fortsättningen används vald kaestyrka vid tillredning av en espresso.
7 Ändra grundinställningar
I följande kapitel beskrivs åtgärder som ändrar maskinens
grundinställningar.
7.1 Ställa in språk
Du kan ställa in vilket språk displaytexterna ska visas på.
Förutsättning: Displayen visar vänteläge.
1. Tryck på manöverknappen "menu/ok" i längre än 2 sekunder.
» Menyn visas på displayen.
2. Navigera till menyn Språk.
3. Välj språk med pilknapparna och bekräfta med "menu/ok".
4. Lämna menyn med kommandot Exit.
» På displayen visas vänteläge.
7.2 Ställa in automatisk avstängning
När du inte använt maskinen under en längre tid, stängs den av
automatiskt. I menyn Auto AV kan du ställa in hur lång tid som ska gå innan
avstängning.
74
Page 75

Ändra grundinställningar
Ställa in tid för automatisk avstängning
Förutsättning: Displayen visar vänteläge.
1. Tryck på manöverknappen "menu/ok" i längre än 2 sekunder.
» Menyn visas på displayen.
2. Navigera till menyn Auto AV.
3. Välj en tid med pilknapparna och bekräfta med "menu/ok".
4. Lämna menyn med kommandot Exit.
» På displayen visas vänteläge.
Information
Automatisk avstängning kan inte inaktiveras komplett. Senast efter
8timmar utan manövrering stängs maskinen av automatiskt.
SVENSKA
75
Page 76

Ändra grundinställningar
7.3 Ställa in energisparläge
I energisparläget sänks uppvärmningstemperaturen.
När du inte använt maskinen under en längre tid, stängs den av automatiskt
efter en angiven tid. På displayen visas meddelandet Tryck på valfri knapp.
När du tryckt på en valfri knapp avslutas energisparläget.
I menyn Energisparläge ställer du in efter vilken tid energisparläget ska
aktiveras.
SVENSKA
Förutsättning: Displayen visar vänteläge.
1. Tryck på knappen "menu/ok" i längre än 2 sekunder.
» Menyn visas på displayen.
2. Navigera till menyn Energisparläge.
3. Välj en tid med pilknapparna och bekräfta med "menu/ok".
4. Lämna menyn med kommandot Exit.
» På displayen visas vänteläge.
Information
Energisparläget kan inte inaktiveras komplett. Senast efter 4 timmar utan
manövrering övergår maskinen till energisparläge.
7.4 Återställa maskinen till fabriksinställningar
Du kan återställa maskinen till fabriksinställningarna.
Information
Om du återställer maskinen till fabriksinställningarna, går alla personliga
inställningar förlorade.
Förutsättning: Displayen visar vänteläge.
1. Tryck på knappen "menu/ok" i längre än 2 sekunder.
» Menyn visas på displayen.
2. Navigera till menyn System > Fabriksinställningar.
3. Välj Återställ med pilknapparna och bekräfta med "menu/ok".
» På displayen visas vänteläge.
76
Page 77

Ändra grundinställningar
7.5 Information om maskinstatus
Information om maskinstatus visas under menyn System > Statistik. Tryck på
knappen "menu/ok" för att lämna menyn.
Nedanstående tabell ger dig en överblick över informationens betydelse.
Information Betydelse
Bryggningar Antal drycker som tillretts sedan idrifttagning
Avkalkning Antal utförda avkalkningar
Rengöring kaesystem Antal genomförda rengöringar
Rengöring mjölksystem Antal genomförda rengöringar
Filterbyte Antal genomförda lterbyten
Förloppsindikatorn visar antalet återstående tillredningar tills maskinen
uppmanar till rengöring, avkalkning eller lterbyte.
Programvaruversion
Information om installerad programvaruversion visas under menyn
System > Programversion. Tryck på knappen "menu/ok" för att lämna menyn.
SVENSKA
77
Page 78

Ändra grundinställningar
7.6 Ställa in malningsgrad
Kaepulvrets malningsgrad påverkar kaesmaken. Malningsgraden är
optimalt inställd vid leverans. Vi rekommenderar att justera malningsgraden
tidigast efter ca 1 000 kaetillredningar (ca1år).
SVENSKA
Bild 16: Spak för inställning av malningsgrad
1. Ta ut vattenbehållaren.
» På höljet ser du nu spaken för inställning av malningsgrad(10).
2. Skjut spaken åt vänster eller höger enligt Bild 16.
ū Åt vänster = nare malningsgrad
ū Åt höger = grövre malningsgrad
3. Sätt tillbaka vattenbehållaren.
10
78
Information
ū Om du ställer in nare malningsgrad blir kaesmaken starkare.
ū Malningsgraden är optimalt inställd när kaet passerar utloppet jämnt
fördelat och en n, tät crema bildas.
Page 79

Skötsel och underhåll
8 Skötsel och underhåll
Genom regelbunden skötsel och underhåll av maskinen säkerställer du
konstant hög kvalitet på dina drycker.
8.1 Allmän rengöring
Rengör maskinen regelbundet. Avlägsna genast rester av mjölk och kae på
utsidan.
VAR FÖRSIKTIG
Användning av olämpliga rengöringsmedel kan leda till att ytorna får
repor.
Använd inga skurtrasor, skursvampar eller skurmedel som kan orsaka
repor.
Förutsättning: Maskinen är avstängd.
Rengör maskinen på utsidan med en mjuk, fuktig trasa och ett
standarddiskmedel.
Skölj av droppskålen och kaesumpbehållaren. Använd därvid en mjuk,
fuktig trasa och vanligt diskmedel.
Rengör bönbehållaren med en mjuk, torr trasa.
Kaesumpbehållaren (7), spillbrickan (15) och mjölkbehållaren (utan
lock, mjölkslang och stigrör) kan diskas i diskmaskin.
SVENSKA
8.2 Spola rent kaesystemet
Vid spolningen spolas munstyckena på utloppet och kaesystemets
invändiga komponenter. På så sätt hamnar även spolvattnet från insidan i
droppskålen.
Vid påsättning och avstängning utför maskinen en automatisk spolning.
Du kan även utföra spolningen manuellt:
Förutsättning: Displayen visar vänteläge.
1. Sätt ett kärl under utloppet.
2. Tryck på knappen "menu/ok" i längre än 2 sekunder.
» Menyn visas på displayen.
3. Navigera till menyn Skötsel > Spolning.
» Maskinen utför en automatisk spolning.
» På displayen visas vänteläge.
79
Page 80

Skötsel och underhåll
8.3 Ta ut och rengöra bryggenheten
För att undvika skador på maskinen rekommenderar vi att rengöra
bryggenheten en gång i veckan.
11
12
SVENSKA
35
Bild 17: Ta ut bryggenheten
Förutsättning: Maskinen är avstängd.
1. Öppna skyddet(11). För att göra detta, greppa i fördjupningen på
maskinens högra sida och skjut skyddet bakåt. Ta bort skyddet.
2. Tryck in och håll fast den röda spaken(35) på bryggenhetens
handtag(12) och vrid handtaget medurs tills det hakar fast vid anslaget.
80
Page 81

Skötsel och underhåll
3. Dra ut bryggenheten ur maskinen i handtaget.
36
Bild 18: Rengöra bryggenheten
4. Skölj grundligt av bryggenheten under rinnande vatten.
» Bryggenheten och silen(36) är rena från kaerester.
5. Låt bryggenheten droppa av.
6. Ta bort kaerester från ytorna på insidan av maskinen med en mjuk, torr
trasa.
7. Sätt in bryggenheten i maskinen. Tryck in och håll fast den röda spaken
på bryggenhetens handtag och vrid handtaget moturs tills det hakar
fast vid anslaget.
8. Sätt tillbaka skyddet. För att göra detta, sätt in skyddet och skjut det
framåt tills det snäpps fast.
SVENSKA
8.4 Använda programmet "Easy Cleaning"
Med programmet "Easy Cleaning" spolas mjölksystemet.
När en dryck tillretts med mjölk uppmanas du att utföra programmet Easy
Cleaning.
Du kan även utföra Easy Cleaning manuellt.
Förutsättning: Displayen visar vänteläge.
1. Sätt ett kärl under utloppet.
2. Tryck på knappen "menu/ok" i längre än 2 sekunder.
» Menyn visas på displayen.
81
Page 82

Skötsel och underhåll
3. Navigera till menyn Skötsel > Easy Cleaning.
4. Välj Start med pilknapparna och bekräfta med "menu/ok".
5. Följ ytterligare anvisningar på displayen tills programmet EasyCleaning
har avslutats.
» På displayen visas vänteläge.
8.5 Använda programmet "Rengöring mjölksystem"
SVENSKA
För att rengöra mjölksystemet behövs ett särskilt rengöringsmedel för
mjölksystem.
För att hålla god hygien och undvika skador på maskinen rekommenderar
vi att utföra rengöringsprogrammet en gång i veckan.
Rengöringsprogrammet tar ungefär 3 minuter och ska inte avbrytas.
VAR FÖRSIKTIG
Användning av olämpliga rengöringsmedel på mjölksystemet kan leda
till skador på maskinen.
Använd uteslutande rengöringsmedlet Melitta® PERFECT CLEAN
Espresso Machines för mjölksystem.
Förutsättning: Displayen visar vänteläge.
1. Ställ kaesumpbehållaren (7) eller ett kärl som rymmer minst 0,7liter
under utloppet.
2. Tryck på knappen "menu/ok" i längre än 2 sekunder.
» Menyn visas på displayen.
3. Navigera till menyn Skötsel > Rengöring mjölksystem.
4. Välj Start med pilknapparna och bekräfta med "menu/ok".
5. Följ ytterligare anvisningar på displayen tills rengöringsprogrammet har
avslutats.
» På displayen visas vänteläge.
82
Page 83

Skötsel och underhåll
Rengöra mjölkenheten
Vi rekommenderar dessutom att regelbundet rengöra mjölkenheten, alltså
mjölkslangen och mjölkbehållaren (beroende på modell).
38
37
Bild 19: Demontera mjölkenheten
Gå tillväga enligt följande för att demontera mjölkenheten:
Förutsättning: Mjölkslangen har tagits bort från maskinen.
1. Dra skyddet (37) framåt från utloppet.
2. Tryck ned mjölkenheten (38) och ta ut den.
3. Ta isär mjölkenheten i tre delar enligt bilden ovan.
4. Rengör enskilda komponenter med varmt vatten. Använd medföljande
rengöringsborste, en mjuk, fuktig trasa och vanligt diskmedel.
Montering sker i omvänd ordningsföljd.
SVENSKA
8.6 Använda programmet "Rengöring kaesystem"
Under programmet "Rengöra kaesystem" avlägsnas smuts och rester av
kaeolja med hjälp av rengöringsmedel för helautomatiska kaemaskiner.
För att undvika skador på maskinen rekommenderar vi att utföra
rengöringsprogrammet en gång varannan månad – eller när maskinen
uppmanar dig att göra så.
Rengöringsprogrammet tar ungefär 10 minuter och ska inte avbrytas.
83
Page 84

Skötsel och underhåll
VARNING
Kontakt med rengöringsmedlet för helautomatiska kaemaskiner kan
irritera ögon och hud.
Följ anvisningarna på rengöringsmedlets förpackning.
VAR FÖRSIKTIG
Användning av olämpliga rengöringsmedel för helautomatiska
SVENSKA
kaemaskiner kan leda till skador på maskinen.
Använd uteslutande rengöringstabletterna Melitta® PERFECT CLEAN
Espresso Machines.
Förutsättning: Displayen visar vänteläge.
1. Tryck på knappen "menu/ok" i längre än 2 sekunder.
» Menyn visas på displayen.
2. Navigera till menyn Skötsel > Rengöring kaesystem.
3. Välj Start med pilknapparna och bekräfta med "menu/ok".
4. Följ ytterligare anvisningar på displayen tills rengöringsprogrammet har
avslutats.
» På displayen visas vänteläge.
8.7 Använda programmet "Avkalkning"
Med avkalkningsprogrammet avlägsnas kalkavlagringar på insidan av
maskinen med avkalkningsmedel för helautomatiska kaemaskiner.
För att undvika skador på maskinen rekommenderar vi att utföra
avkalkningsprogrammet en gång var tredje månad – eller när maskinen
uppmanar dig att göra så.
Avkalkningsprogrammet tar ungefär 25 minuter och ska inte avbrytas.
VARNING
Kontakt med avkalkningsmedlet för helautomatiska kaemaskiner kan
irritera ögon och hud.
Följ anvisningarna på avkalkningsmedlets förpackning.
VAR FÖRSIKTIG
Användning av olämpliga avkalkningsmedel kan leda till skador på
maskinen.
Använd uteslutande det ytande avkalkningsmedlet Melitta® ANTI CALC
Espresso Machines.
84
Page 85

Skötsel och underhåll
VAR FÖRSIKTIG
Ett fastskruvat vattenlter kan skadas under avkalkningsprogrammet.
Ta ut vattenltret när maskinen uppmanar dig till det.
Lägg vattenltret i en behållare med kranvatten under
avkalkningsprogrammet.
När avkalkningsprogrammet avslutats kan du sätta in vattenltret och
använda det igen.
Förutsättning: Displayen visar vänteläge.
1. Tryck på knappen "menu/ok" i längre än 2 sekunder.
» Menyn visas på displayen.
2. Navigera till menyn Skötsel > Avkalkning.
3. Välj Start med pilknapparna och bekräfta med "menu/ok".
4. Följ ytterligare anvisningar på displayen tills avkalkningsprogrammet har
avslutats.
» På displayen visas vänteläge.
8.8 Ställa in vattenhårdhet
Genom att ställa in vattenhårdhet reglerar du hur ofta maskinen uppmanar
dig att avkalka. Ju hårdare vatten, desto oftare behöver maskinen avkalkas.
Information
Om du använder ett vattenlter kan du inte ställa in vattenhårdhet.
Vattenhårdheten är automatiskt inställd på "1" som motsvarar Mjukt (se
kapitel8.9 Använda vattenlter på sidan86).
Bestäm vattenhårdhet med den medföljande testremsan. Beakta
anvisningarna på testremsans förpackning och tabellen Intervall för
vattenhårdhet på sidan90.
Förutsättning: Displayen visar vänteläge.
1. Tryck på knappen "menu/ok" i längre än 2 sekunder.
» Menyn visas på displayen.
2. Navigera med pilknapparna till menyn Vattenhårdhet.
3. Välj intervall för vattenhårdhet med pilknapparna och bekräfta med
"menu/ok".
4. Lämna menyn med kommandot Exit.
» På displayen visas vänteläge.
SVENSKA
85
Page 86

Skötsel och underhåll
8.9 Använda vattenlter
Genom att använda ett vattenlter förlängs maskinens livslängd och du
behöver inte avkalka maskinen lika ofta. Det vattenlter som medföljer
ltrerar bort kalk och andra föroreningar från vattnet.
39
SVENSKA
40
1
41
Bild 20: Skruva fast eller lossa vattenltret
Vattenltret(40) skruvas fast i eller lossas från gängan(41) i botten på
vattenbehållaren(1) med hjälp av inskruvningsverktyget(39) .
Sätta in vattenlter
Information
Lägg vattenltret i en behållare med färskt kranvatten i några minuter innan
du sätter in det.
86
Page 87

Skötsel och underhåll
Förutsättning: Displayen visar vänteläge.
1. Tryck på knappen "menu/ok" i längre än 2 sekunder.
» Menyn visas på displayen.
2. Navigera till menyn Skötsel > Filter > Sätta in lter.
3. Välj Start med pilknapparna och bekräfta med "menu/ok".
4. Följ vidare anvisningar på displayen.
» Vattenhårdheten är automatiskt inställd på Mjukt.
» På displayen visas vänteläge.
Byta vattenlter
Byt vattenlter när maskinen uppmanar dig till det.
Förutsättning: Displayen visar vänteläge.
1. Tryck på knappen "menu/ok" i längre än 2 sekunder.
» Menyn visas på displayen.
2. Navigera till menyn Skötsel > Filter > Byt lter.
3. Välj Start med pilknapparna och bekräfta med "menu/ok".
4. Följ vidare anvisningar på displayen.
» På displayen visas vänteläge.
Ta bort vattenlter
Vattenltret ska inte vara torrt under en längre tid. Vi rekommenderar att
förvara vattenltret i en behållare med kranvatten i kylskåpet om ltret inte
ska användas under en längre tid.
Ta ut vattenltret enligt följande:
Förutsättning: Displayen visar vänteläge.
1. Tryck på knappen "menu/ok" i längre än 2 sekunder.
» Menyn visas på displayen.
2. Navigera till menyn Skötsel > Filter > Ta bort lter.
3. Välj Start med pilknapparna och bekräfta med "menu/ok".
4. Följ vidare anvisningar på displayen.
» Vattenhårdheten återställs automatiskt till föregående inställning.
» På displayen visas vänteläge.
5. Ställ vid behov in vattenhårdheten på nytt, (se kapitel 8.8 Ställa in
vattenhårdhet på sidan85).
SVENSKA
87
Page 88

Åtgärder vid fel
9 Åtgärder vid fel
Om felet kvarstår efter nedanstående åtgärder eller om andra fel inträar
som inte nämns här, ring Melittas kundtjänst:
Melitta kundtjänst Sverige:
+46 (0)20 / 43 51 77
Fel Orsak Åtgärd
SVENSKA
Kaet kommer bara
droppvis.
Det kommer inget
kae alls.
Fyll på bönor visas på
displayen, trots att
bönbehållaren är full.
Kvarnen låter mycket
högt.
Det går inte att
sätta tillbaka
bryggenheten efter
att den tagits ut.
Systemfel indikeras
på displayen.
För n malningsgrad. Ställ in grövre malningsgrad (se
Maskinen är smutsig. Rengör bryggenheten (se
Maskinen är
igenkalkad.
Inget vatten i
vattenbehållaren
eller
vattenbehållaren är
felaktigt insatt.
Bryggenheten är
igensatt.
Kaebönorna faller
inte ner i kvarnen.
Det nns främmande
föremål i kvarnen.
Handtaget
för xering av
bryggenheten är inte
i rätt läge.
Drivmekanismen står
inte i rätt läge.
Programvarufel. Stäng av och sätt på maskinen igen
kapitel7.6 på sidan78).
kapitel8.3 på sidan80).
Utför rengöringsprogrammet (se
kapitel8.6 på sidan83).
Avkalka maskinen (se kapitel8.7 på
sidan84).
Fyll på vattenbehållaren och
kontrollera att den sitter rätt (se
kapitel4.5 på sidan62).
Rengör bryggenheten (se
kapitel8.3 på sidan80).
Tryck på en snabbknapp.
Knacka lätt på bönbehållaren.
Rengör bönbehållaren.
Kaebönorna är för oljiga. Använd
en annan sorts kaebönor.
Ring Melittas kundtjänst.
Kontrollera om handtaget för
xering är rätt ihakat (se kapitel8.3
på sidan80).
Tryck in knappen "Kaestyrka" och
håll den intryckt. Tryck samtidigt på
PÅ/AV-knappen. Maskinen utför en
initiering. Släpp knapparna.
(se kapitel4.1 på sidan58).
Ring Melittas kundtjänst.
88
Page 89

Transport, lagring och avfallshantering
10 Transport, lagring och avfallshantering
10.1 Avlufta maskinen
Vi rekommenderar att avlufta maskinen när den inte ska användas under en
längre tid, när den ska transporteras eller vid risk för frost.
Vid avluftning avlägsnas kvarvarande vatten från maskinen.
Förutsättning: Displayen visar vänteläge.
1. Sätt ett kärl under utloppet.
2. Tryck på knappen "menu/ok" i längre än 2 sekunder.
» Menyn visas på displayen.
3. Navigera till menyn System > Avluftning.
4. Välj Start med pilknapparna och bekräfta med "menu/ok".
5. Följ vidare anvisningar på displayen.
» Maskinen stängs av.
10.2 Transport
VAR FÖRSIKTIG
Kvarvarande vatten som fryser till is kan leda till att maskinen skadas.
Undvik att utsätta maskinen för temperaturer under 0°C.
SVENSKA
Information
Transportera maskinen i originalförpackningen. På så sätt undviks
transportskador.
Utför följande åtgärder innan maskinen transporteras:
1. Avlufta maskinen (se kapitel10.1 Avlufta maskinen på sidan89).
2. Töm droppskålen och kaesumpbehållaren.
3. Töm vattenbehållaren.
4. Töm bönbehållaren.
5. Rengör maskinen (se kapitel8.1 Allmän rengöring på sidan79).
6. Fixera lösa delar (spillbricka m.m.) med lämplig tejp.
7. Förpacka maskinen.
89
Page 90

Tekniska data
10.3 Avfallshantering
Maskiner märkta med den här symbolen omfattas av EG-direktivet
2002 / 96 / EG för WEEE (avfall som utgörs av eller innehåller elektriska eller
elektroniska produkter).
Elektroniska maskiner ska inte slängas som hushållsavfall.
Lämna in maskinen till en återvinningsstation för miljövänlig
avfallshantering.
SVENSKA
11 Tekniska data
Tekniska data
Driftspänning 220-240 V, 50 Hz
Eektförbrukning Maximalt 1450 W
Pumptryck Statiskt maximalt 15 bar
Mått
Bredd
Höjd
Djup
Kapacitet
Bönbehållare
Vattenbehållare
Mängd av en
drycktillredning
Vikt (tom) 8,5 kg
Omgivande förhållanden
Temperatur
Relativ luftfuktighet
253 mm
390 mm
380 mm
125 g
1,2 l
25-220 ml
10-32 °C
30-80 % (ej kondenserande)
90
Intervall för vattenhårdhet °dH °eH °fH
Mjukt 0-10 0-13 0-18
Medel 10-15 13-19 18-27
Hårt 15-20 19-25 27-36
Mycket hårt >20 >25 >36
Fabriksinställningar
Espresso Dryckmängd 40 ml
Kaestyrka Stark
Bryggtemperatur Normal
Page 91

Fabriksinställningar
Café crème Dryckmängd 120 ml
Kaestyrka Stark
Bryggtemperatur Normal
Cappuccino Dryckmängd 130 ml
Kaestyrka Stark
Bryggtemperatur Normal
Latte macchiato Dryckmängd 190 ml
Kaestyrka Stark
Bryggtemperatur Normal
Mjölk Skummängd 180 ml
Mjölkmängd 180 ml
Hett vatten Dryckmängd 180 ml
Tekniska data
SVENSKA
91
Page 92

SVENSKA
92
Page 93

Innhold
Innhold
1 For din sikkerhet ...............................................................................................................95
1.1 Anvendte symboler ...............................................................................................96
1.2 Korrekt bruk ............................................................................................................. 96
1.3 Fare på grunn av elektrisk strøm ...................................................................... 96
1.4 Fare for brannskader og skolding ....................................................................97
1.5 Generell sikkerhet .................................................................................................. 97
2 Oversikt over apparatet .................................................................................................98
2.1 Apparatet i et overblikk .......................................................................................98
2.2 Betjeningsfeltet i et overblikk..........................................................................100
3 De første trinn ..................................................................................................................101
3.1 Utpakking av apparatet .....................................................................................101
3.2 Testing av leveransen .........................................................................................101
3.3 Oppstilling av apparatet ....................................................................................102
3.4 Tilkopling av apparatet ......................................................................................102
3.5 Første gangs innkopling av apparatet .........................................................102
4 Grunnleggende om betjening ..................................................................................104
4.1 Slå av og på apparatet ........................................................................................104
4.2 Håndtering av betjeningsfeltet.......................................................................105
4.3 Navigering i menyen ..........................................................................................105
4.4 Fylle kaebønner i bønnebeholderen..........................................................107
4.5 Fylle på vann ..........................................................................................................108
4.6 Stille inn utløpet ...................................................................................................109
4.7 Bruk av melk...........................................................................................................110
4.8 Tømme dryppskål og kaegrutbeholder ....................................................112
5 Tilberede drikker .............................................................................................................113
5.1 Tilberede espresso eller café crème ..............................................................113
5.2 Tilberede cappuccino .........................................................................................113
5.3 Tilberede latte macchiato .................................................................................114
5.4 Tilberede melkeskum og varm melk.............................................................114
5.5 Tilberede varmt vann .........................................................................................115
5.6 Tilberede andre drikkspesialiteter med oppskrifter ................................115
5.7 Endre drikkinnstillinger før og under tilberedelsen ................................117
5.8 Avbryte drikktilberedelse ..................................................................................118
5.9 Tilberede to drikker samtidig ..........................................................................118
6 Endre drikkinnstillinger permanent .......................................................................119
6.1 Endre forinnstillinger ..........................................................................................119
NORSK
93
Page 94

NORSK
Innhold
7 Endre grunninnstillinger .............................................................................................120
7.1 Stille inn språk .......................................................................................................120
7.2 Stille inn automatisk utkopling .......................................................................120
7.3 Stille inn energisparemodus ............................................................................121
7.4 Tilbakestille apparatet til fabrikkinnstillingene.........................................121
7.5 Informasjon om apparatstatus ........................................................................122
7.6 Stille inn malegrad ...............................................................................................123
8 Pleie og vedlikehold ......................................................................................................124
8.1 Generell rengjøring .............................................................................................124
8.2 Skylle kaesystemet ...........................................................................................124
8.3 Demontere og rengjøre kokegruppe ...........................................................125
8.4 Bruke programmet „Easy Cleaning“ ..............................................................126
8.5 Bruke programmet „Rengjøre melkesystemet“ ........................................126
8.6 Bruke programmet „Rengjøre kaesystemet“ ...........................................128
8.7 Bruke programmet „Avkalking“ ......................................................................129
8.8 Stille inn vannhardhet ........................................................................................130
8.9 Bruke vannlter ....................................................................................................131
9 Feil .........................................................................................................................................133
10 Transport, lagring og avfallsbehandling ..............................................................134
10.1 Dampe ut apparatet ...........................................................................................134
10.2 Transportere apparatet ......................................................................................134
10.3 Kassering av apparatet.......................................................................................135
11 Tekniske data ....................................................................................................................135
94
Page 95

Kjære kunde,
Mange takk for at du har bestemt deg for den helautomatiske
kaemaskinen Caeo®Passione®.
Bruksanvisningen hjelper deg med å bli kjent med apparatet og oppleve
den høyeste kaenytelse.
Les nøye gjennom denne bruksanvisningen. Dermed unngår du skade
på personer og utstyr. Oppbevar bruksanvisningen omhyggelig. Hvis du
leverer apparatet videre, må du også levere bruksanvisningen med den.
For skader som oppstår på grunn av at bruksanvisningen ikke følges
aksepterer Melitta ikke noe garantiansvar.
Hvis du trenger mer informasjon eller har spørsmål om apparatet, bes du
henvende deg til Melitta eller oppsøk oss på internett på:
www.melitta.de
Vi ønsker deg mye glede med apparatet ditt.
1 For din sikkerhet
Apparatet svarer til de følgende europeiske direktiver:
ū 2006 / 95 / EU (Lavspenning),
ū 2004 / 108 / EU (Elektromagnetisk kompatibilitet),
ū 2011 / 65 / EU (RoHS),
ū 2009 / 125 / EU (Økodesign / ErP).
Apparatet er produsert etter dagens tekniske standard. Likevel består
fortsatt farerisiko.
For å hindre fare, må du følge sikkerhetsanvisningene. For skader som
oppstår på grunn av at sikkerhetsanvisningene ikke følges aksepterer
Melitta ikke noe garantiansvar.
For din sikkerhet
NORSK
95
Page 96

NORSK
For din sikkerhet
1.1 Anvendte symboler
Følgende symboler gjør deg oppmerksom på spesielle farer under omgang
med apparatet eller gir deg nyttige merknader.
FORSIKTIG
Signalordet FORSIKTIG gjør deg oppmerksom på mulig personskade.
MERK
Signalordet MERK gjør deg oppmerksom på mulig skade på apparatet.
Informasjon
Signalordet Informasjon gjør deg oppmerksom på ekstra merknader og tips
under omgang med apparatet.
1.2 Korrekt bruk
Apparatet brukes til tilberedelse av kaedrikker av
kaebønner og til oppvarming av melk og vann.
Apparatet er beregnet til bruk i private husholdninger.
All annen bruk regnes som ikke korrekt og kan føre til
skade på person og utstyr. Melitta tar ikke ansvar for
skader som oppstår av ikke korrekt bruk av apparatet.
1.3 Fare på grunn av elektrisk strøm
Hvis apparatet eller strømkabelen er skadet, er det
livsfare på grunn av strømstøt.
Overhold de følgende sikkerhetsanvisningene for å
unngå farer på grunn av elektrisk strøm.
ū Bruk ikke skadet strømkabel.
ū En skadet strømkabel kan utelukkende byttes av
produsenten, dennes kundeservice eller deres
servicepartner.
ū Åpne ikke noen fast tilskrudde tildekninger på huset
til apparatet.
ū Bruk apparatet bare hvis det er i teknisk feilfri tilstand.
ū Et defekt apparat skal utelukkende repareres av et
autorisert verksted. Reparer ikke apparatet selv.
96
Page 97

ū Foreta ingen endringer på apparatet, dets
bestanddeler og tilbehøret.
ū Dypp ikke apparatet ned i vann.
1.4 Fare for brannskader og skolding
Væsker og damper som strømmer ut kan være svært
varme. Deler av apparatet blir likeledes svært varme.
Overhold de følgende sikkerhetsanvisningene for å
unngå skolding og brannsår.
ū Unngå hudkontakt med væsker og damp som
strømmer ut.
ū Berør ikke dysene og utløpet under og like etter en
drikktilberedning. Vent til komponentene er avkjølt.
1.5 Generell sikkerhet
Overhold de følgende sikkerhetsanvisningene for å
unngå skader på personer og utstyr.
ū Grip ikke inn i innsiden av apparatet under driften.
ū Hold apparatet og dets strømkabel unna barn under
8 år.
ū Dette apparatet kan brukes av barn fra 8 år samt
personer med redusert fysisk, sensorisk elller mentalt
evnenivå eller mangel på erfaring og kunnskaper
hvis de er under tilsyn eller opplæres i trygg bruk av
apparatet og forstår farene som kan oppstå av det.
ū Barn må ikke leke med apparatet. Rengjøring og
vedlikehold skal ikke utføres av barn under 8 år. Barn
over 8 år må være under tilsyn under rengjøringen og
vedlikeholdet.
ū Skill apparatet fra strømforsyningen hvis det er uten
tilsyn over lengre tid.
For din sikkerhet
NORSK
97
Page 98

NORSK
Oversikt over apparatet
2 Oversikt over apparatet
2.1 Apparatet i et overblikk
2
1
10
3
4
5
6
9
Bilde 1: Apparatet fra venstre foran
1 Vanntank med lokk 6 Høydejusterbart utløp med
2 Lokk til bønnebeholderen 7 Kaegrutbeholder (innvendig)
3 Bønnebeholder 8 Dryppskål
4 Koppate 9 "På-/Av"-knapp
5 Betjeningsfelt 10 Spaken "Malningsgradjustering"
98
7
8
2 kaedyser, 1 melkedyse,
1 varmtvannsdyse, kopplys
(innvendig)
Page 99

Oversikt over apparatet
11
16
15
13
14
Bilde 2: Apparatet fra høyre foran
11 Tildekning 14 Tilkopling av melkeslangen til
12 Kokegruppe (innvendig) 15 Koppeplate
13 Kopling av melkeslangen til
utløpet.
dryppskålen
16 Flottør
12
NORSK
99
Page 100

NORSK
Oversikt over apparatet
2.2 Betjeningsfeltet i et overblikk
191817
09:52
Vennligst velg drikk
20 21 22
Bilde 3: Uttaksknapper
Pos. Betegnelse Funksjon
17 Espresso Tilberede espresso
18 Café Crème Tilberede café crème
19 Cappuccino Tilberede cappuccino
20 Melkeskum/
varm melk
21 Latte Macchiato Tilberede latte macchiato
22 Varmt vann Tilberede varmt vann
Tilberede melkeskum og varm melk
23 24 25 26
Bilde 4: Display og betjeningsknapper
Pos. Betegnelse Funksjon
23 Display Visning av aktuelle menyer og meldinger
24 Pilknapp
oppover
25 Oppskrifter Velge og tilberede oppskrifter
26 Kaestyrke Innstilling av kaestyrke
27 Pilknapp
nedover
28 menu/ok Kalle opp menyen eller bekrefte inndata
29 To kopper Uttak av to kopper
100
09:52
Vennligst velg drikk
Eksempel: Klarvisning
Navigere oppover i menyen,
eller øke mengde
Navigere nedover i menyen,
eller redusere mengde
27 28 29
 Loading...