

Melag Vacuklav 41-B, Vacuklav 43-B User manual

User Manual
Autoclave
Vacuklav®41-B
®
Vacuklav
43-B
Dear doctor,
We thank you for your confidence demonstrated by the purchase of this autoclave.
Over 55 years ago, MELAG began as a medium-sized family-run enterprise to specialise in the
manufacture of sterilization equipment for medical practices. In the meantime our company has grown
into one of the world's leading producers of sterilization equipment. Verification of it success has been
the sale of more than 410,000 MELAG units worldwide, attesting to the high quality of our sterilizers,
which are exclusively made in Germany.
This autoclave has also been manufactured and tested according to the most stringent quality criteria.
Nevertheless, please read the Operating Instructions carefully before the initial start-up of the device.
The long-term serviceability and the retention of value of your autoclave depend primarily on the
careful preparation of the instruments and the regular maintenance of the device.
MELAG - General Management and employees

r
For physicians, physician's assistants, and service personnel
Please read this User Manual before you start operation of the autoclave. The
instructions contain important safety precautions. .Make sure to keep the Use
Manual near to the autoclave. The instructions are a part of the product.
User Manual Vacuklav®41-B and Vacuklav®43-B
MELAG Medical Technology Berlin
Valid for Vacuklav
as of software version 2.4x
st
1
edition September 2006
Responsible for the contents: Engineering Department
MELAG Medical Technology
E-mail: info@melag.de
©2006-2009 MELAG Berlin
Document: BA_2_GB_41B_43B.doc/ Revision: 3 – 09/0187
Subjects to technical changes
®
41-B, Vacuklav®43-B
Geneststraße 7–10
10829 Berlin
Germany
www.melag.de
r
r
Foreword
Device name
User Manual The User Manual contains important safety instructions and information
Avoid dangers
Thank you for deciding to buy this premium class MELAG autoclave.
This User Manual describes both the autoclaves Vacuklav
Vacuklav®43-B. They are identical except for their chamber depth and
device depth.
The device name "autoclave" is used in this User Manual to designate the
steam sterilizers Vacuklav
which you need to operate the autoclave. Read these instructions carefully
and thoroughly in proper sequence.
Please read all the safety instructions attentively before using the autoclave.
About this manual
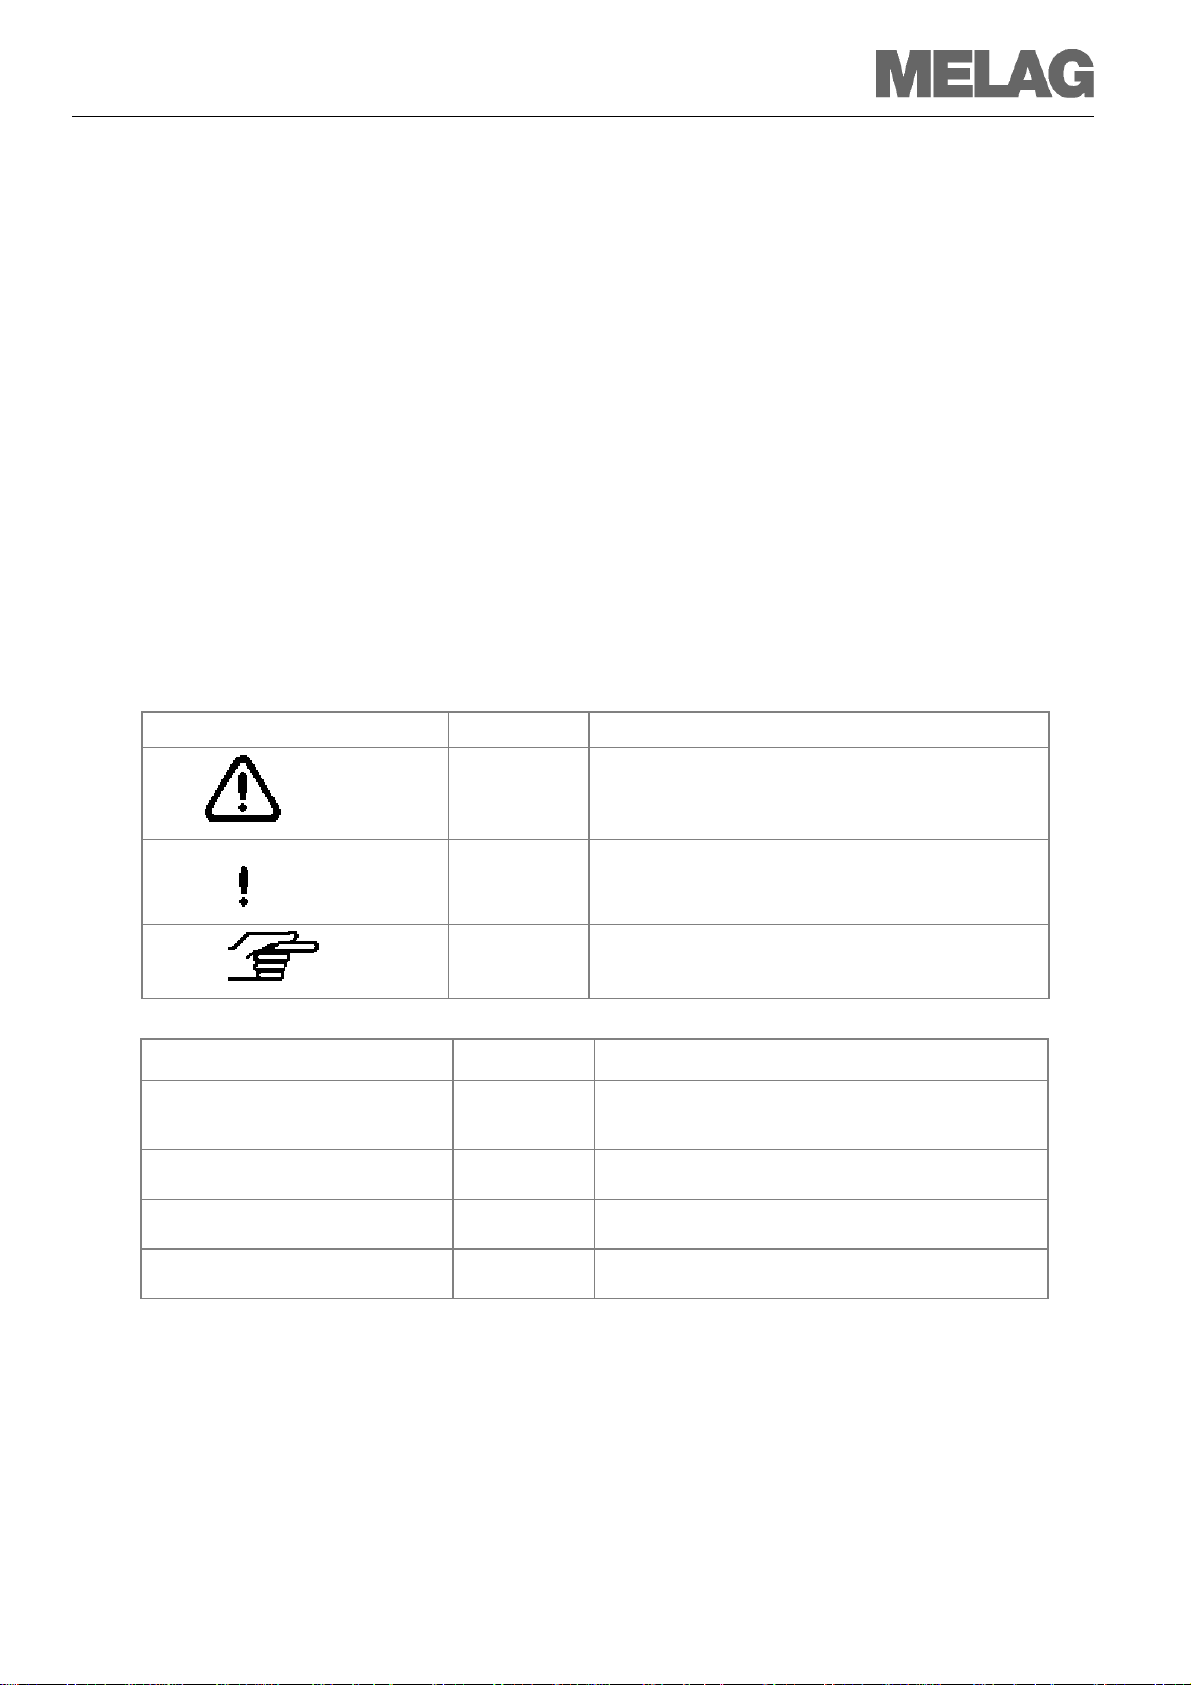
Symbol
Dange
Meaning Explanation
Risk to health
Indicates a dangerous situation which if not avoided
could entail slight to life-threatening injuries.
®
41-B and Vacuklav®43-B.
®
41-B and
Observe
Attention
Notice
Table 1: Meaning of the symbols used in this User Manual
Example of emphasis Meaning Explanation
→Double jacket steam
generato
Universal program
Chapter 6 – Logging
Figure 1/(5)
Table 2: Meaning of the emphasized text within this User Manual
without fail
Important
information
Glossary entry Words or phrases marked with an arrow are explained
Software
citation
Cross-reference Reference to another text section within this User
Cross-reference Reference to a detail in a figure – in the example, to
Indicates a dangerous situation which if not avoided
could entail damage to the instruments, the practice
equipment or the autoclave.
Indicates important information.
in the glossary. The glossary is listed alphabetically. It
can be found at the end of this manual.
Words or phrases appearing on the →display of the
autoclave are marked as software citations.
Manual.
Part No. 5 in Figure 1.


r
r
g
e
d
Safety instructions
To operate the autoclave, pay attention to the following safety instructions
Dange
Instruction
Mains cable and power plug
→Double-jacket steam
generato
Setting up, installation,
commissionin
Preparation and sterilization
of textiles and instruments
Program termination
Removal of the items to b
sterilize
Maintenance
Carrying the autoclave
Errors
given below and in the individual chapters of this User Manual.
■ Do not sterilize any liquids with this autoclave.
■ Never damage or change the mains cable or power plug.
■ Never operate the autoclave if the mains cable or power plug are
damaged.
■ Never pull on the mains cable to take it out of the socket. Always take
hold of the power plug itself.
■ The autoclave remains under pressure after being switched off.
Check the pressure display of the manometer located on the
autoclave lower front side.
■ Only have the autoclave set up, installed, and commissioned by
people →authorized by MELAG.
■ Only operate the autoclave in areas which are not subject to
explosion hazards.
■ The electric connections and connections for feed water and used
water may only be completed by a specialist technician.
■ Follow the instructions of the textile and instrument manufacturers for
preparing and sterilizing textiles and instruments.
■ Observe the relevant standards and directives for the preparation and
sterilization of textiles and instruments, e.g. →RKI [Robert Koch
Institute] and →DGSV [German Society for Sterile Supply].
■ Only use wrapping materials and systems which are suitable for
steam sterilization according to the manufacturer's information.
■ Take heed that when opening the door after terminating a running
program, hot water steam can escape out of the chamber, depending
on when the program was terminated.
■ Depending on the time of the program termination, the load might not
be sterile. Observe the clear instructions shown on the →display of
the autoclave. If necessary, sterilize the affected →objects after
rewrapping.
■ Never open the door by force.
■ Use a tray lifter to remove the tray. Never touch the →sterilized items,
the chamber or the door with unprotected hands. The parts are hot.
■ Check the wrapping of the sterilized objects for damage when
removing them from the autoclave. If a wrapping is damaged, wrap
the object again and re-sterilize it.
■ Have the maintenance done only by →authorized persons.
■ Comply with the predetermined maintenance intervals.
■ Two people are necessary to carry the autoclave.
■ Use a suitable carrying strap to transport the autoclave.
■ If repeated error messages occur while operating the autoclave, turn
the device off.
■ Only have the autoclave repaired by →authorized persons.

Safety instructions
Contents
Chapter 1 – Performance Specification.............. 3
Proper use.............................................................. 3
User benefit ............................................................ 3
Overview of sterilization programs.......................... 5
Chapter 2 – Device Description........................... 6
Scope of delivery .................................................... 6
Equipment views .................................................... 7
Effective capacity.................................................... 8
Mountings for the load ............................................ 8
Switch on autoclave................................................ 9
After switching on ................................................... 9
Control panel ........................................................ 10
Acoustical signals ................................................. 12
Overview of menus and symbols.......................... 13
Supply with feed water ......................................... 14
Close the door ...................................................... 14
Chapter 3 – Initial commissioning .................... 15
Conditions for setting up, installing and
commissioning...................................................... 15
Set-up location requirements................................ 15
Connections required ........................................... 16
Prerequisites for initial commissioning.................. 17
Installation and installation report ......................... 17
Chapter 4 – Sterilization..................................... 18
Setting date and time............................................ 34
Determine format for program log files ................. 34
Reading log files correctly .................................... 35
Finding logs .......................................................... 37
Chapter 6 – Maintenance ................................... 38
Cleaning ............................................................... 38
Avoid formation of spots ....................................... 39
Use qualitatively high-grade feed water................ 39
Oil door spindle..................................................... 40
Maintenance ......................................................... 40
Chapter 7 – Operating pauses........................... 41
Sterilization frequency .......................................... 41
Pause times.......................................................... 41
Decommissioning ................................................. 42
Transport .............................................................. 42
Re-commissioning after change of locality ........... 43
Chapter 8 – Function test................................... 44
Automatic function test ......................................... 44
Manual function test ............................................. 44
Testing in daily operation...................................... 44
Vacuum test.......................................................... 44
Bowie & Dick test.................................................. 45
Validation.............................................................. 45
Create prerequisites ............................................. 18
Prepare items to be sterilized ............................... 18
Load the autoclave ............................................... 20
Select program ..................................................... 22
Start program........................................................ 23
Program is running ............................................... 23
Sterilization phase is finished ............................... 25
Drying phase ........................................................ 26
Program is finished............................................... 26
Display batch number........................................... 26
Remove sterilized items ....................................... 26
Storage of sterilized items .................................... 27
Chapter 5 – Logging........................................... 28
Batch documentation............................................ 28
Plug in and remove CF card................................. 29
Automatic immediate log output ........................... 31
Subsequent output of stored logs ......................... 32
Use log printer as output medium......................... 33
Using the PC as output medium........................... 34
Chapter 9 – Errors .............................................. 46
A warning is not an error ...................................... 46
Messages ............................................................. 46
Warning messages............................................... 46
Error messages .................................................... 46
Before you call...................................................... 47
Bad drying results................................................. 50
Glossary.............................................................. 51
Appendix A – Accessories................................. 54
Appendix B – Symbols on the autoclave ......... 55

r
r
Chapter 1 – Performance Specification
In this chapter you learn
under which conditions and for which purpose you should use this autoclave
what benefit you can achieve by using this autoclave
which sterilization programs you can use
Proper use
Application area The autoclave is intended for use in the medical field, e.g. in general
physician and dental practices.
Sterilization tasks According to →DIN EN 13060 this autoclave is considered a Class B
sterilizer. It is suited as a universal autoclave for demanding sterilization
tasks. For instance, you can sterilize narrow-bore instruments and
transmission instruments – wrapped or unwrapped – and larger quantities
of textiles.
Dange
Attention
Universal use The autoclave sterilizes on the basis of the →fractionated vacuum
Large quantities
Small time expenditure
No pause times
Overheating protection
Clean feed wate
Observe the following instructions for using the autoclave:
■ Do not sterilize any liquids with this autoclave. It is not approved for
the sterilization of liquids.
In case of non-observance, the consequences could be →delayed boiling,
damage to the autoclave and burns.
■ Use the autoclave only for the intended purposes outlined in the
related technical documents and only in connection with the devices
and components recommended by MELAG.
■ The sterilization of instruments and textiles with this autoclave, like the
foregoing instrument sterilization, is only to be done by competent
personnel.
■ Only use instruments, wrappings and textiles which are suitable for
steam sterilization according to the manufacturer's information.
In case of non-observance the consequences can entail damage to the
autoclave and/or to the →items to be sterilized.
User benefit
method. This ensures the complete and effective wetting or penetration of
the →items to be sterilized with saturated steam. This method makes it
possible to sterilize all kinds of loads which occur in a physician's medical
practice.
To generate the sterilization steam, the autoclave uses a →double jacket
steam generator. Once heated up, it provides permanent steam. The walls
of the →sterilization chamber thus have a defined temperature. The
sterilization chamber is protected from overheating and you can
consecutively sterilize large quantities of instruments or textiles very
rapidly and achieve excellent drying results.
The autoclave works with a one-way feed water system. This means that it
uses fresh purified →feed water for every sterilization run. The quality of
the feed water is constantly monitored via integrated →conductivity
3

Chapter 1 – Performance Specification
y
d
d
g
y
k
measurement. This prevents stains on instruments and soiling of the
autoclave, assuming the instruments have been carefully prepared.
Automatic feed water suppl
Optimal drying for wrappe
items to be sterilize
Optimized total operatin
High degree of safety b
extensive safety devices
Additional function chec
Effective batch
documentation
The supply with purified →feed water for the steam production is
automatically provided from an internal supply tank or a water treatment
unit (e.g. MELAdem® 40, MELAdem
®
47).
The →items to be sterilized are dried by the →vacuum. (→vacuum
drying). This way you achieve optimal drying results for wrapped objects
as well.
The autoclave works with an →electronic parameter control. This way the
time
autoclave optimizes the total operating time of a program depending on
the load.
The autoclave checks the pressure and temperature in the sterilization
chamber at all times and does not permit the door to be opened in case of
overpressure in the chamber. The motor-operated automatic door lock
opens the door by slowly turning the locking spindle and holds the door
while it opens. Pressure compensation takes place even if there is any
difference in pressure until the door is completely opened.
The quantity and quality of the →feed water is checked.
A →process evaluation system is integrated in the electronics of the
autoclave. During a program it compares such process parameters as
temperatures, times and pressures with each other. It monitors the
parameters with respect to their limit values at activation and control and
guarantees a safe and successful sterilization.
A monitoring system checks the device components of the autoclave with
respect to their functional reliability and their plausible interaction.
If one or more parameters exceed defined limits, the autoclave issues
warnings or error messages, and if necessary aborts the program. In the
event of an automatic program abort, observe the information on the
display.
You can conduct an additional function check at any time with the help of
test programs.
Use the vacuum test to check the autoclave for leaks in the steam system.
Use the →Bowie & Dick test to check whether there is sufficient steam
penetration for porous material to be sterilized (e.g. textiles).
The autoclave has an internal log memory. All data of the completed
sterilization programs are automatically stored here.
You can read out the internal log memory immediately after the end of the
program, or at a later time. You determine whether the logged data are
issued to one or several different output media (e.g. log printer
MELAprint
®
42, MELAflash CF card, computer).
4

Chapter 1 – Performance Specification
Type tests
Program type as per
→DIN EN 13060
→Dynamic pressure test of the
sterilization chamber
→Air leak X X X X X
→Empty chamber test X X X X X
→Solid load X X X X X
→Porous partial load X X X
→Porous full load X X X
→Hollow body B X X X X X
→Hollow body A X X X X
→Simple wrapping X X X X
→Multiple wrapping X X X
Drying →solid load X X X X X
Drying →porous load X X X
Sterilization temperature 134 ˚C 134 ˚C 134 ˚C 121 ˚C 134 ˚C
Sterilization pressure 2 bar 2 bar 2 bar 1 bar 2 bar
Sterilization time 5.5 minutes 3.5 minutes 3.5 minutes 20.5 minutes 20.5 minutes
X = Conformity with all applicable sections of the standard →DIN EN 13060
Table 3: Overview of sterilization programs
Overview of sterilization programs
UniversalProgram
Type B Type B Type S Type B Type B
X X X X X
QuickProgram B
QuickProgram S
GentleProgram
PrionProgram
5

y
Chapter 2 – Device Description
In this chapter you learn
which components are included in the standard scope of delivery
which components the autoclave contains
what safety devices the autoclave has
how the operating elements are designed and how you should use them
how the menus of the user interface are structured
which acoustical signals the autoclave emits
what kind of water supply the autoclave needs
Standard scope of delivery
Optionall
Scope of delivery
®
Vacuklav
User Manual
Technical Manual
Record of installation and setting up
Warranty certificate
Pressure device directive certificate
Manufacturer’s inspection report
1 Mounting for trays or cassettes
1 hose for draining the internal storage tank
1 Tray lifter
1 Allen wrench for emergency opening of the door
1 Torx wrench to remove the carrying strap
Trays
Standard tray cassette and lifter
Additional tray mounts
MELAflash CF card
MELAflash CF card reader
41-B or Vacuklav®43-B
6
Chapter 2 – Device Description
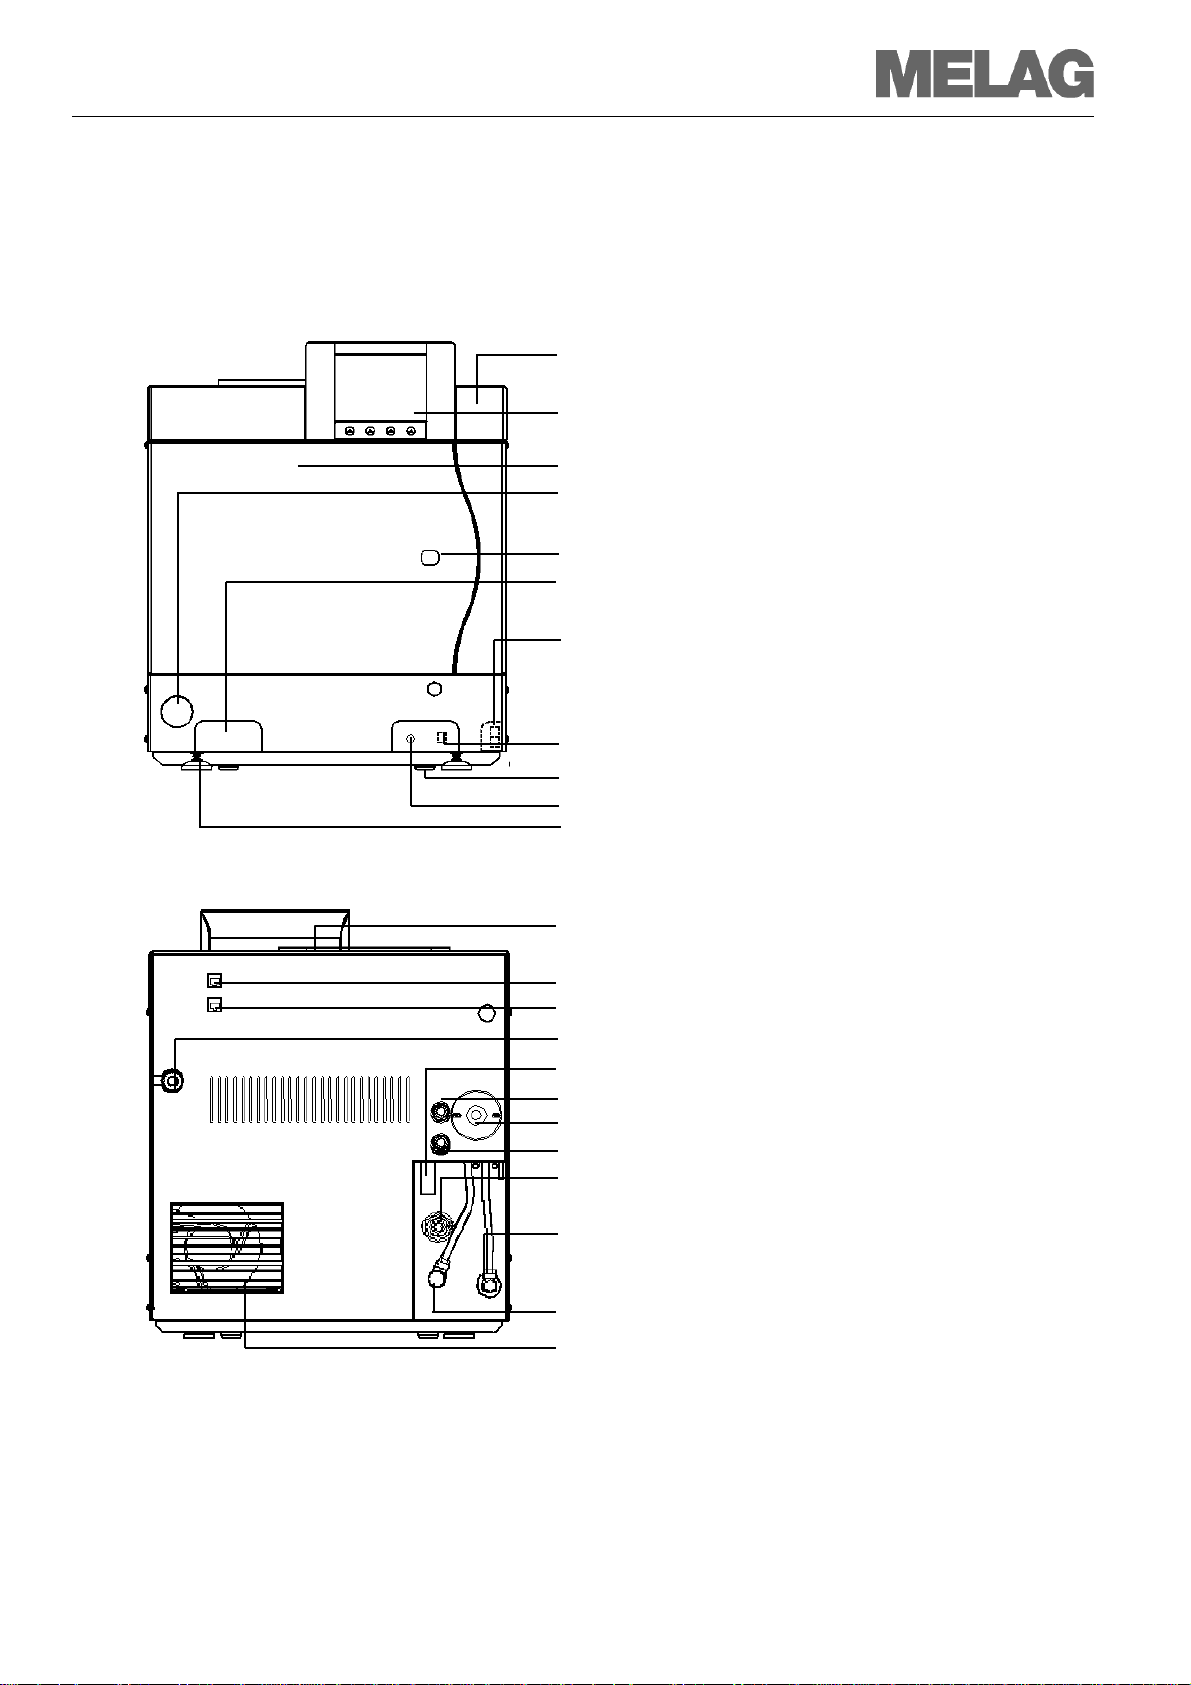
Front view
<
Equipment views
(1)
(2)
(3)
(4)
(5)
(6)
(7)
(8)
(9)
(10)
(11)
Protective cap for slot of the →CF card
Control panel
Door (pivots opens to the left)
Protective cap for manometer to display the pressure of
the →double jacket-steam generator
Cap for emergency opening of the door
Draining hose covering of the supply tank
Mains switch (concealed, accessible from the side)
Ethernet-1 data connection*
Back foot of the unit (fixed)
Reset button overheating protection*
Front foot of the unit (adjustable)
*behind covering
Rear view
Figure 1: Front and rear view
Tank filler cap
(12)
Ethernet-2 data connection
(13)
Ethernet-3 data connection* (can be retrofitted)
(14)
Power cable
(15)
Emergency overflow
(16)
Safety valve, chamber
(17)
Sterile filter
(18)
Safety valve, double jacket
(19)
One-way drain
(20)
Purified feed water inlet (for MELAdem®; swivelling
threaded fitting for hose 8x1, alternatively straight)
(21)
Connection pressure discharge
(22)
(23)
Cooler
7
Chapter 2 – Device Description
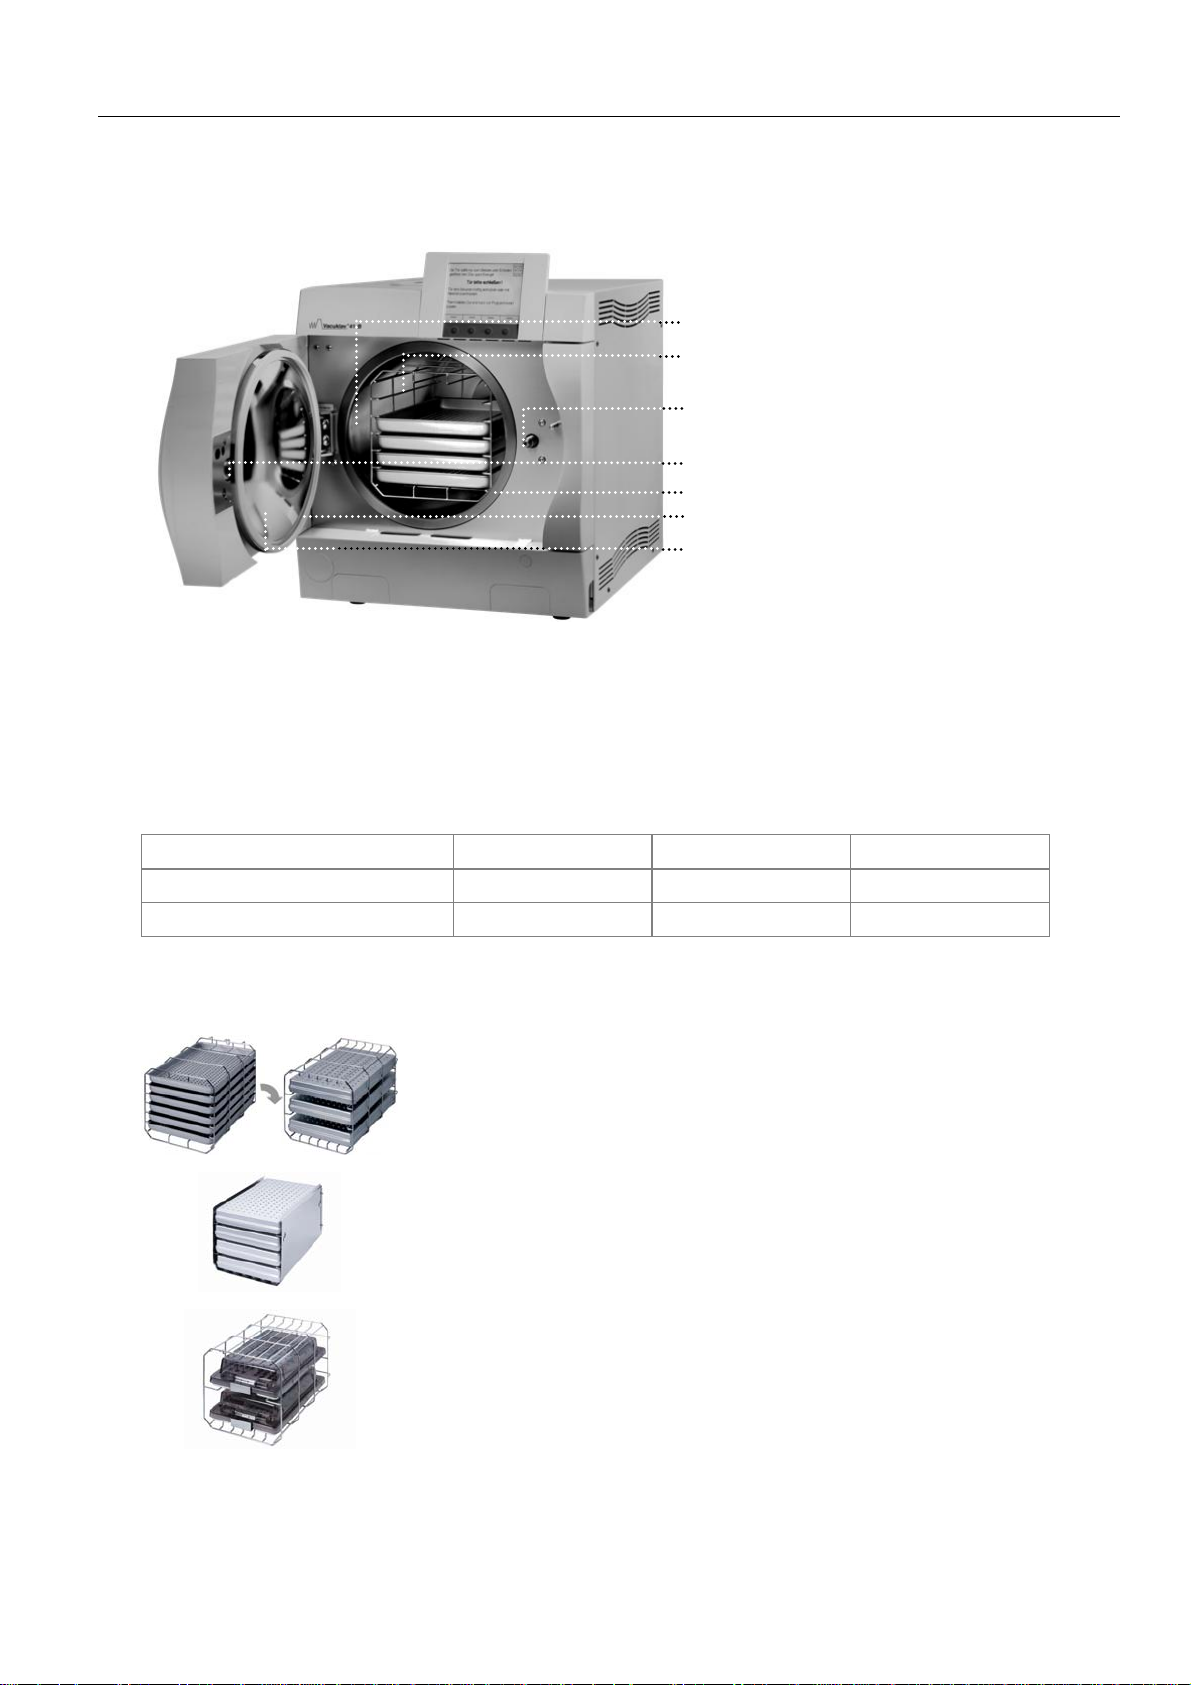
Interior view
Figure 2: Interior view
Chamber
(1)
Mounting to hold the load
(2)
Door spindle
(3)
Threaded bushing
(4)
Chamber sealing surface
(5)
Door seal
(6)
Door plate
(7)
Effective capacity
The autoclaves Vacuklav®41-B and Vacuklav®43-B differ only with respect
to the respective depth of the units. As a result, their effective capacities
are different.
Vacuklav®41-B 25 cm 35 cm 18 litters
Vacuklav®43-B 25 cm 45 cm 22 litters
Table 4: Dimensions of the effective capacity (usable space)
Diameter Depth Volume
Mountings for the load
The autoclave is always delivered with a mounting to hold trays or
cassettes.
The mounting (C) is standard and can hold either six trays or three
standard tray cassettes rotated by 90˚.
Figure 3: CMounting C
Figure 4: Mounting B
The mounting (B) can hold four standard tray cassettes or four trays.
The mounting (D) can hold two high cassettes (e.g. for implants) or four
trays rotated by 90°.
Figure 5: Mounting D
8

Chapter 2 – Device Description
r
e
Dange
Switch on autoclave
Observe the following precautionary measures when handling the mains
cable and power plug:
■ Never splice or modify the mains cable.
■ Never bend or twist the mains cable.
■ Never pull on the mains cable to take it out of the socket. Always take
hold of the power plug itself.
■ Never place any heavy objects on the mains cable.
■ Never run the mains cable over places where it could be squeezed
(e.g. doors or windows).
■ Do not run the mains cable along a heat source.
■ Do not use any nails, staples or similar objects to fixate a cable.
■ If the mains cable or the power plug is damaged, turn off the
autoclave. Mains cables or power plugs may only be replaced by
→authorized persons.
If these points are not observed, the cable or plug can be damaged and/or
a fire or electrical shock might occur. Serious injuries could be the
consequence.
Plug power plug into th
socket
Switch on mains Turn the mains switch on to power the autoclave (page 7, Figure 1/(7))
Preparation time After the autoclave was switched on at the mains switch (page 7, Figure
If the autoclave is still not connected to the supply mains, plug the power
plug into the socket.
After switching on
On the →display you see the start screen Welcome. The →software of the
autoclave is →initialized and its device components are checked.
The level of the →feed water in the →double jacket steam generator is
automatically checked and if necessary maintained by the feed procedure
(feed pump runs). The feed water is preheated for generating steam.
1/(7)), it requires a →heating-up period for the initial preheating of the
→double jacket-steam generator. For normal operation, this time is
Vacuklav®41-B 9 minutes
Vacuklav®43-B 13 minutes
The main menu appears on the →display. As soon as the device is
switched on, the default program selection is Universal-Program.
9

Chapter 2 – Device Description
Control panel
The control panel consists of a display and four membrane keys. The
→display can show 320 x 240 pixels.
(1)
Key 1 – serves primarily for navigation
(2)
Key 2 – serves primarily for navigation
(3)
Key 3 – serves primarily for selecting options
(4)
Key 4 – serves primarily for selecting options
(5)
General display areas
(6)
Key1 Key2 Key3 Key4
Figure 6: Control panel
Key settings You operate the autoclave by pressing the membrane keys. The keys are
differently allocated with functions depending on the operating situation
(soft keys). You can see the current key settings in the display field directly
above a key.
Area for displaying the current allocation of the respective
membrane key directly underneath.
Area with membrane keyboard
(7)
Use key 1 and 2 primarily to navigate within the menu. These keys are
forthwith called "navigation keys".
Keys 1 and 2 can also be used to select additional functions.
Use keys 3 and 4 to select the option displayed directly above this key.
Hot keys Certain →hot keys are defined for individual functions. There are hot keys
for which you are notified on the →display, and other hot keys which are
hidden. These are not shown on the display.
Several of the important hot keys are given below:
10

Chapter 2 – Device Description
y
y
Current operating situation Hot keys Function/explanation
After the operator has terminated the
program
Briefly simultaneously
press key 1
Opens the door after a program termination
(see page 25, Manually terminate program)
(CONFIRM) and key 3
(OPEN)
DOCU Menu/Logging list Press each one of the
keys 1 to 4
Immediately before starting a
program
Immediately before starting a
program
Press key 1 for longer
than one second
Press key 4 (START)
for longer than one
second
In all menus and displays Briefly press key 2 and
3 simultaneously
Sort the list:
Key 1 – by →batch
Key 2 – by date
Key 3 – by program
Key 4 – by success
(see page 33, Logging list
Additional drying (see page 23, Additional
drying
Pre-selection start time (see page 23)
Running program Press key 3
Table 5: Important Hot Keys
Acoustical signals When you press a key, your entry is confirmed by a short acoustical
signal.
Time dela
There can be a very brief time delay between pressing a key and the
corresponding display.
Buffered entr
Despite this time delay you can press the keys quickly after one another,
once you've gained a certain routine with the autoclave. The autoclave has
an input buffer. This buffer registers which key was pressed in what
sequence, and implements the corresponding functions.
Diverse messages
Diverse messages are issued in the right upper corner of the →display.
Several examples are shown below.
Messages
Messages are marked by an envelope icon. Such information supports
you in the operation of the autoclave. Messages are not error messages or
warning messages.
Warning messages
Warning messages help you to ensure a smooth operation and to
recognize undesirable conditions. Warning messages are not error
messages.
Status display;
Display automatically returns to the previously
displayed screen after 30 seconds.
Displays details to the currently running program
11

Chapter 2 – Device Description
Error messages
Reverse (selected) display You can only start programs or change settings if these are marked as
Error messages indicate an error or a malfunction.
selected, indicated by reverse display (highlighted).
Example:
not marked (normal display)
marked (reverse display)
Acoustical signals
The autoclave emits acoustical signals. The signals are meant to catch
your attention and serve as sources of information. The time interval
between two signals is 0.5 seconds.
Signal Meaning
1 x 0.1 seconds Confirms the correct pressing of a key
1 x 0.5 seconds Warning or communication
2 x 0.5 seconds Door is open (sounds every 30 seconds)
3 x 0.5 seconds Attention, program abort or end of abort reached
5 x 0.5 seconds Program successfully finished
8 x 0.5 seconds Program for unwrapped instruments has been started
10 x 0.5 seconds Fault
Table 6: Overview of acoustical signals
12

Chapter 2 – Device Description
Overview of menus and symbols
Menus Symbols
Main menu
├ Universal-Program
├ Quick-Program B
├ Quick-Program S
├ Gentle-Program
├ Prion-Program
├
SPECIAL menu
│ ├ Vacuum test
│ ├ Bowie & Dick test
│ ├ Conductivity measurement
│ ├ Draining
│ ├
│ │ ├ Output of stored logs on
│ │ └ ├ Logging list
│ │ ├ Last log
│ │ ├ Daily log file
│ │ ├ Log files of the week
│ │ ├ Log files of the month
│ │ ├ All program logs
│ │ ├ Last error log
│ │ ├ Error logs for the day
│ │ ├ Error logs for the week
│ │ ├ Error logs for the month
│ │ ├ All error logs
│ │ ├ Legend log file
│ │ ├ Status log
│ │ ├ System log
│ │ └ CF card formatting
│ └ Return to Main Menu
├ SETUP menu
│ ├ Water supply
│ ├ Automatic logging
│ │ ├ CF card
│ │ ├ Computer
│ │ ├ MELAprint
│ │ ├ Immediate output
│ │ ├ Batch format
│ │ └ LAN TCP/IP FTP
│ │ │ └
│ │ └ Graphic logs
│ │ └
│ ├ Date
│ ├ Display contrast
│ ├ Language
│ ├ Energy-saving mode
│ └ DIAGNOSIS+SERVICE…
│ └
└
INFO Menu
└ (many important information texts)
Table 7: Overview of menus and symbols
DOCU menu
Universal-Program
Quick-Program B
Quick-Program S
Gentle-Program
Prion-Program
SPECIAL Menu
Vacuum test
Bowie & Dick test
Conductivity measurement
Draining double jacket
DOCU menu
Return to Main Menu
SETUP menu
INFO menu
Additional drying
Message
Warning message
Error message
Diagnosis and Service
DEMO Mode
13

Chapter 2 – Device Description
l
k
k
5
r
t
7
r
Feed water with interna
storage tan
Internal supply tan
Distilling unit MELAdest
Feed water with wate
treatment uni
Water treatment units
MELAdem
®
MELAdem®4
Notice
Supply with feed water
The autoclave requires →demineralized or →distilled →feed water for
generating steam. The feed water supply is provided either with the
internal supply tank or with a water treatment unit (e.g. MELAdem
MELAdem
If you employ the internal supply tank for the feed water supply, you must
fill it manually from time to time. Employ only water available on the market
according to →VDE 0510 as →feed water.
The internal supply tank holds maximum 5 liters. This quantity of →feed
water suffices for up to 7 sterilizations.
®
6
With the MELAdest®65 distilling unit, you can produce →feed water in the
practice cost effectively.
A water treatment unit is connected to the drinking water grid. It produces
the →feed water required for generating the steam for the autoclave. The
purified feed water connection for the autoclave is directly connected to
the water treatment unit.
If you use a water treatment unit, then there is always sufficient feed water
available. You no longer need to fill the water storage tank.
The water treatment units MELAdem®40 and MELAdem
40 and
optimal purified feed water quality for the autoclave. The selection of the
respective unit depends on the number of sterilizations per day and the
respective loads. Every MELAG autoclave can be supplemented with a
water treatment unit.
Please first consult with MELAG if you would like to use water treatment
units from other manufacturers.
®
47). The autoclave automatically sucks in the feed water.
®
47 produce the
®
40 /
Close the door
When closing the door of the autoclave, observe the following instructions:
Attention
If you don't observe this instruction, you may impair the functional
Locked doo
Notice
■ Do not press the door too hesitantly against the autoclave housing.
■ Hold the door pressed closed for at least 3 seconds.
■ Under no circumstances should you slam the door shut.
reliability of the door lock mechanism.
The autoclave has an automatic motor-driven door lock with threaded
spindle.
In order to lock the door, press it tightly closed.
The door locks pressure-proof once the program is started.
Inputs at the →display of the autoclave are only possible when the
autoclave door is locked.
Leave the door open only for loading and unloading the autoclave. If you
keep the door closed, you will save energy.
14
 Loading...