

MELAG Vacuklav 31 User Manual

We reserve the right to make technical modifications without prior notice.
User Manual
for the
Vacuklav 31
Autoclave
Dear Doctor:
Thank you very much for the trust which you have shown by purchasing this autoclave.
For nearly 50 years now, MELAG — a medium-sized family-owned and -operated busi-
ness — has specialized in the production of sterilization equipment for medical practice.
During this period, MELAG has succeeded in becoming a leading manufacturer of sterilization equipment. More than 300,000 MELAG units sold throughout the world testify to
the exceptional quality of our sterilizers.
As all other MELAG products, this autoclave was manufactured and tested according to
strict quality criteria. Before placing this unit into operation, please carefully read this User
Manual. The long-term functional effectiveness and the preservation of the value of your
autoclave will primarily depend on careful preparation of instruments before sterilization,
and on proper care of the unit.
The staff and management of MELAG

Page 2
The functional effectiveness and the preserva-
tion of value of this unit depend on:
1. Proper preparation of the instruments to be sterilized
2. Proper care of the autoclave
3. The use of sufficiently pure distilled / demineralized
water
1 Description of the unit......................................................................................................................................4
1.1 Views
of the unit........................................................................................................................................4
1.1.1 Front view
...........................................................................................................................................4
1.1.2 Elements on the front panel (front film scale).....................................................................................5
1.1.3 View of rear
........................................................................................................................................5
1.2 Tec
hnical data...........................................................................................................................................6
1.3 Elec
tronic parameter control system ........................................................................................................6
1.4 Programs for sterilization / disinfection
.....................................................................................................6
1.5 Drying
........................................................................................................................................................6
1.6 Printout of operational records
..................................................................................................................6
1.7 Preheating
.................................................................................................................................................6
1.8 Automatic
water feed................................................................................................................................6
2 Introductory information
...................................................................................................................................7
2.1 Preparation of the instruments
..................................................................................................................7
2.2 Drag-in rust and its effects
........................................................................................................................7
2.3 Maintenance of the Vacuklav
®
31.............................................................................................................8
2.3.1 Cleaning .............................................................................................................................................8
2.3.2 Us
e of distilled or demineralized water ..............................................................................................8
2.4 Functional testing of the autoclave
.........................................................................................................10
2.4.1 Continuous monitoring
.....................................................................................................................10
2.4.2 Periodic
testing (every six months) ..................................................................................................10
2.4.3 Maintenance / service of the autoclave
............................................................................................10
3 Installation and initial startup
.........................................................................................................................11
3.1 Setting up the autoc
lave .........................................................................................................................11
3.1.1 Transport ribbons
.............................................................................................................................11
3.1.2 Leveling the autoc
lave......................................................................................................................11
3.2 Elec
trical power.......................................................................................................................................11
3.3 Connection of the condensate container
................................................................................................12
3.3.1 Connection from the autoclave to the condensate container
...........................................................13
3.3.2 Option: connection from condensate container to a building drain
.................................................13
3.4 Setting the c
lock......................................................................................................................................13
3.5 Filling of the water storage tank
..............................................................................................................14
3.5.1 Manual filling
.....................................................................................................................................14
3.5.2 Automatic
water refill........................................................................................................................14
3.5.3 Connection of the MELAdem
®
45 reverse-osmosis system to the autoclave..................................15
3.5.4 Connection of the MELAdem
®
45 reverse-osmosis system to the Vacuklav® 31.............................18
3.5.5 Quality checking of the water...........................................................................................................18
3.6 Vac
uum test............................................................................................................................................19
3.7 Tes
t run...................................................................................................................................................19
3.8 Interfac
ing a printer.................................................................................................................................20
3.9 VDE s
tipulations......................................................................................................................................20
3.10 Safety ins
tructions.................................................................................................................................20
4 Instructions for all sterilization procedures
....................................................................................................21
4.1 Power supply...........................................................................................................................................21
4.2 Selecting the preheating function
...........................................................................................................21
4.3 Monitoring of the water supply
................................................................................................................21
4.4 Loading the autoclave
.............................................................................................................................21

User Manual for the Vacuklav® 31
Page 3
4.5 Closing the autoclave door .....................................................................................................................21
4.6 Selecting the program.............................................................................................................................22
4.7 Starting
....................................................................................................................................................22
4.8 Air removal by subatmospheric pulsing
..................................................................................................22
4.9 Heat-up
...................................................................................................................................................22
4.10 Sterilization sequence
...........................................................................................................................22
4.11 Pres
sure release...................................................................................................................................23
4.12 Drying and removing the sterilized items
..............................................................................................23
4.13 Supplementary drying
...........................................................................................................................23
4.14 Ventilation
.............................................................................................................................................23
4.15 Opening the door
..................................................................................................................................23
4.16 Printout of sterilization records
.............................................................................................................24
4.17 Sterilization frequency / waiting period
.................................................................................................25
4.18 Termination of the program owing to a malfunction
.............................................................................25
4.19 Manual program termination
.................................................................................................................25
4.20 Dis
infection............................................................................................................................................26
5 Taking the autoclave out of operation / transport / placing the autoclave back into operation
.....................26
6 Malfunctions
...................................................................................................................................................27
6.1 Malfunctions without error display
..........................................................................................................27
6.1.1 Display of the operational state
........................................................................................................27
6.1.2 A program does not start
..................................................................................................................27
6.2 Malfunc
tions with error display ...............................................................................................................28
7 Appendix
........................................................................................................................................................30
7.1 Additional technical data
.........................................................................................................................30
7.1.1 Dimensions and mass
......................................................................................................................30
7.1.2 Operational times
.............................................................................................................................30
7.1.3 Electrical connections / consumption of power and water
...............................................................30
7.1.4 Loading limits....................................................................................................................................31
8 Ins
tructions on drying ....................................................................................................................................32
8.1 The drying process in sterilization containers
.........................................................................................32
8.2 Textiles
....................................................................................................................................................33
8.3 Ins
truments .............................................................................................................................................34
8.4 Loading the autoclave
.............................................................................................................................34
8.5 Loading containers with soft sterilization packing material
.....................................................................34
8.6 Loading of sterilization containers
..........................................................................................................35
8.7 Sterilization containers for instruments
...................................................................................................35
8.8 Removing the sterilized items
.................................................................................................................36
8.9 Enhancement of the drying process
.......................................................................................................36
Page 4
1 Description of the unit
1.1 Views of the unit ________________________________________________________
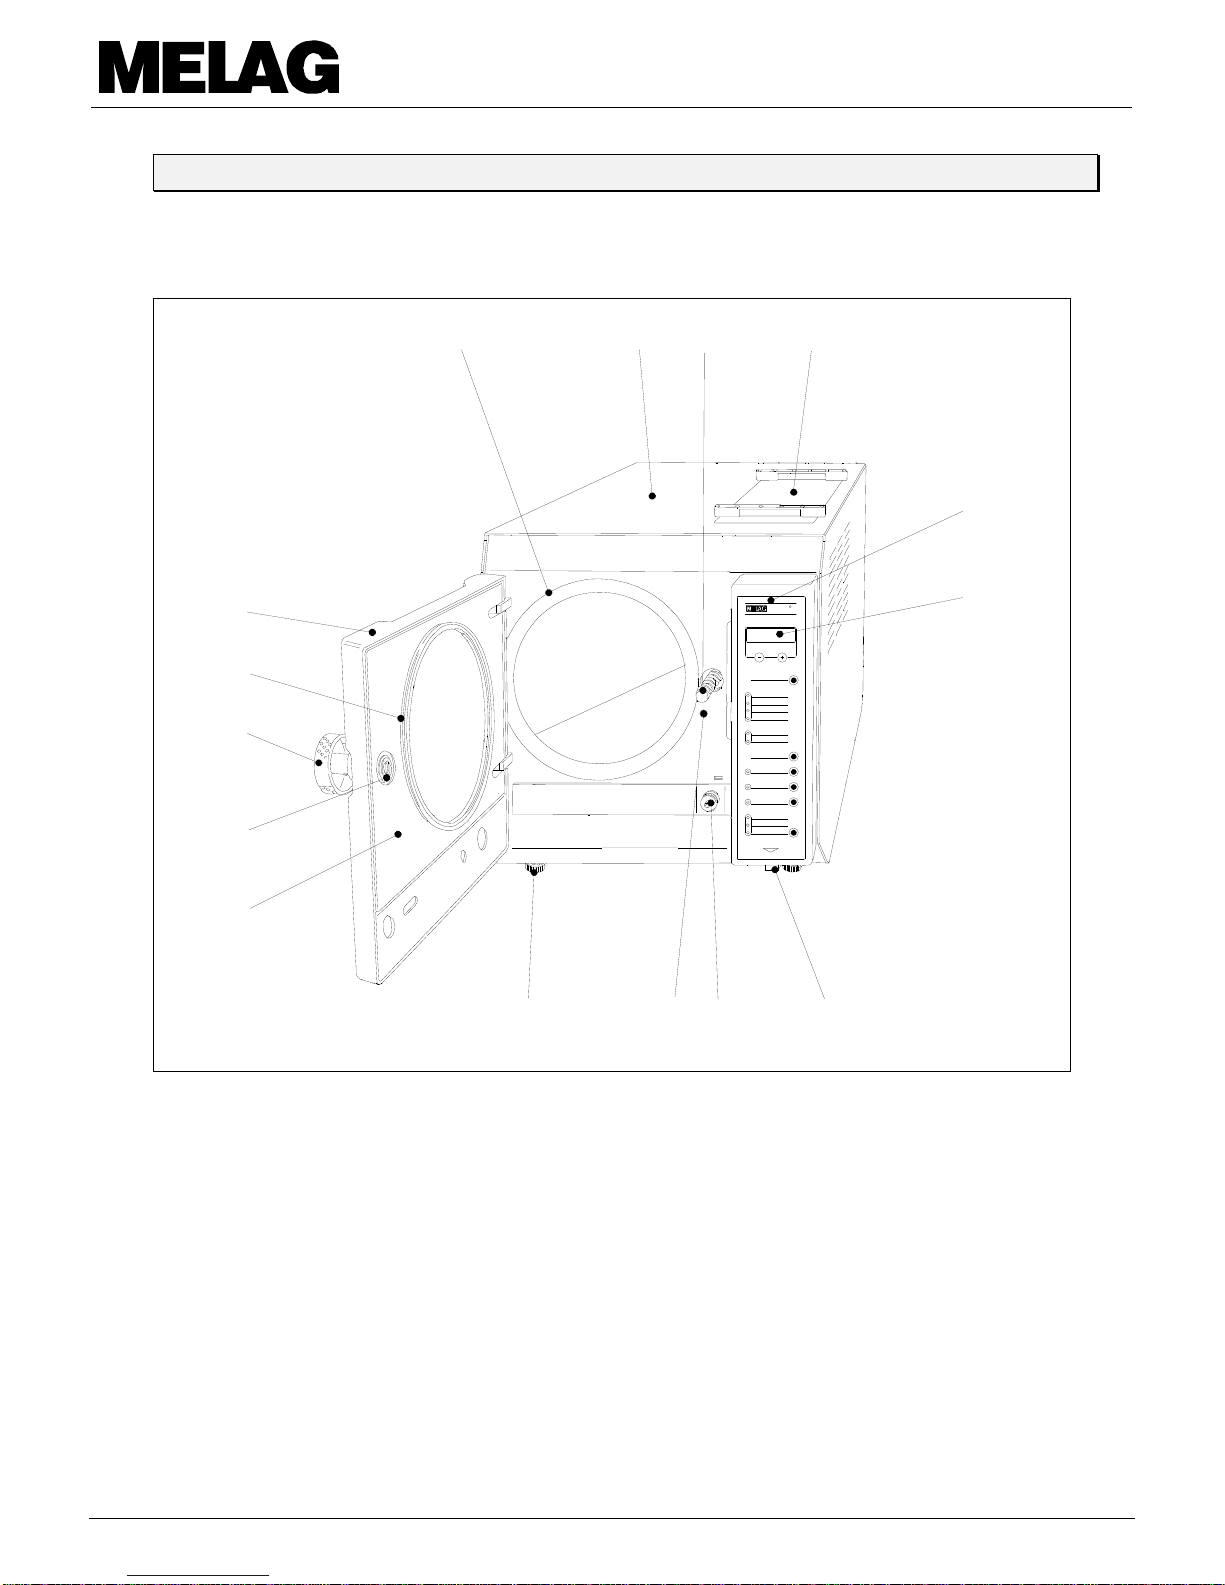
1.1.1 Front view __________________________________________________________________________
1 Adjustable foot of the unit 9 Door cover
2 Tap for draining the water storage tank 10 Door gasket
3 Display 11 Twist door handle
4 Front panel with front film scale 12 Door-locking nut
5 Enclosure cover above the water storage tank 13 Door
6 Door-locking spindle 14 Door contact
7 Housing 15 Power switch
8 Pressure chamber
3
4
152
1
1
4
13
12
11
10
9
8765
VacuklavR 31
Programmwahl
Instrumente verpackt
Instrumente unverpackt
Textilien
Desinfektion
Bowie & Dick Test
Vakuum Test
Vorwärmung
Zusatztrocknen
Drucken
Wasser
Tür offen
Störung löschen
Netzschalter
Start/Stop
Entleerung
User Manual for the Vacuklav® 31
Page 5
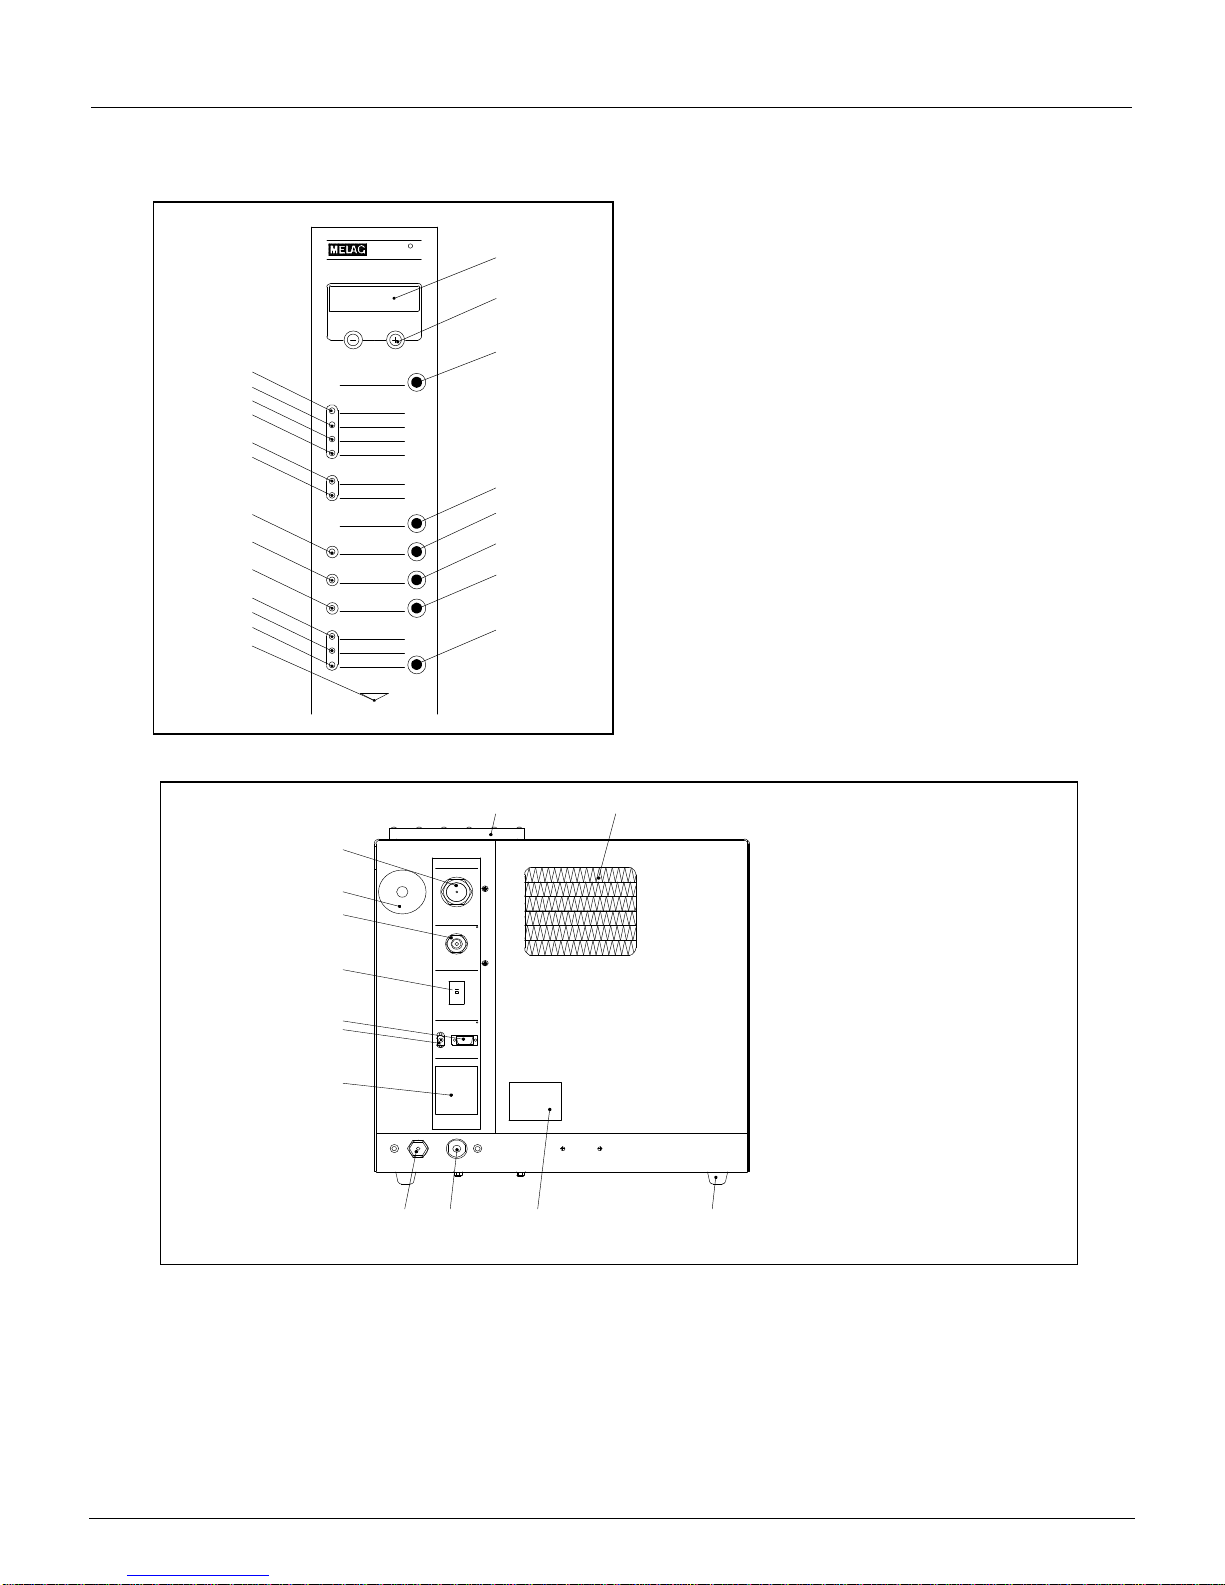
1.1.2 Elements on the front panel (front film scale) ____________________________________________
3 Display
17 "+" and "-" selector buttons
18 Button for program selection
19 Button for start/stop
20 Button for preheating
21 Button for supplementary drying
22 Button for printing
23 Button for error acknowledgment
24 Program signal lamp for sterilization of
wrapped instruments
25 Program signal lamp for sterilization of un-
wrapped instruments
26 Program signal lamp for textiles
27 Program signal lamp for disinfection
28 Program signal lamp for Bowie & Dick test
29 Program signal lamp for vacuum test
30 Signal lamp for preheating
31 Signal lamp for supplementary drying
32 Signal lamp for printing
33 Signal lamp for water
34 Signal lamp for door open
35 Signal lamp for error
36 Arrow pointing to power switch
1.1.3 View of rear _________________________________________________________________________
38 Sterile filter 74 Data interface for printer
39 Connection for water feed (1/4") 75 Printer power socket
40 Cooler 76 Socket for control unit for external water refilling
43
One-way system drain for pipe, diam.
a8x1
77 Power cable
68 Connection for overflow, 3/4" 78 Rating plate
72 Skid rest 79 Foot of the unit
73 Jack for connection of the water-level switch of
the condensate container
Netzschal
t
Zusat ztrocknun
Instrum ente
Instrum ente
D esinf ektio
Bowie & Dic
k
Vakuum
Start
/
Sto
V o rw ärm u n
gSt
öru n
g
Programmwah
l
D r ucke
n
W asse
r
T ür offen
Text ilien
31
R
Vacukl a
v
3
17
18
19
20
21
22
23
24
25
26
27
28
29
30
31
32
33
34
35
36
Über lau
f
NachspeisuMELAdem
R
NiveauschaltAbwasserta
n
Druckeran schlMELprintA
R
Magnetve
n
220V/0,
Nachs
p
eis
u
MELA
G
Vacuklav
72
40
68
38
39
73
74
75
76
43
77
78
79

Page 6
1.2 Technical data __________________________________________________________
Dimensions of sterilization compartment (diameter depth)
:
23 cm 33 cm
Power ratings : 2500 W / 230V AC / 10.9A / 50 ... 60Hz
Sterilization pressures and temperatures : 2 bar / 134°C
1 bar / 120°C
Disinfection pressure and temperature : 0.25 bar / 105°C
Maximum sterilization load : 4 kg of instruments / 1.5kg of textiles
Please consult the appendix for additional technical data
1.3 Electronic parameter control system _______________________________________
The application of a microprocessor in the Vacuklav® 31 implements an electronic parameter control system
(EPS) which continuously monitors the pressure, temperature, and time for the programs. This system
makes it possible to optimize the total operating times in accordance with the sterilizing load and with the
temperature of the unit. The electronic parameter system of the process for limit temperatures, limit pressures, and time sequences enhances the safety / reliability of the sterilization and disinfection results.
1.4 Programs for sterilization / disinfection_____________________________________
The Vacuklav® 31 offers two sterilization programs at temperatures of 134°C for wrapped and unwrapped
instruments, one sterilization program for textiles and rubber articles at 120°C, and one disinfection program
at 105°C. In addition, the operator can at any time also acknowledge that the autoclave is functioning properly by using the test program for steam penetration (the Bowie & Dick Test Program), as well as a test program for determining leaks (the Vacuum Test Program).
1.5 Drying_________________________________________________________________
The Vacuklav® 31 features a vacuum final-drying function which is integrated into the program sequence. It
ensures excellent drying results within a short drying period. This optional supplementary drying enables the
operator to extend the standard drying time in order to achieve satisfactory results for especially difficult drying tasks (for example, with multi-layer-wrapped instruments).
1.6 Printout of operational records ____________________________________________
If the operator connects the MELAprint®40 dot matrix printer to the Vacuklav® 31, it is possible to print out a
report of each sterilization or disinfection process, together with the process-relevant parameters. This option enables the user to document the fact that sterilization has been properly performed. If malfunctions
occur during the course of the sterilization sequence, and if these malfunctions endanger the thoroughness
of the sterilization function, the interfaced printer MELAprint
®
40 will describe these events with a defined
error characteristic.
1.7 Preheating _____________________________________________________________
By pressing the button for preheating [20], the cold autoclave chamber will be preheated as follows: (1) To
120°C if the operator has
not made a program selection (2) To the program-specific temperature if the op-
erator has
selected a program (this second possibility does not apply if the vacuum test is selected) (3)
This function ensures that the autoclave chamber will be maintained at the proper temperature between
sterilization cycles. This preheating function shortens the sterilization cycle times and significantly reduces
the formation of condensate.
1.8 Automatic water feed ____________________________________________________
A water treatment system (for example, the MELAdem® 45) can be directly connected to the Vacuklav® 31 to
make sterilization work simpler, and to ensure constantly uniform water quality. Such a water treatment
system automatically replenishes the water storage tank with demineralized water.

User Manual for the Vacuklav® 31
Page 7
2 Introductory information
2.1 Preparation of the instruments ____________________________________________
MELAG - nonrusting materials
All parts of the Vacuklav
®
31 which come into contact with steam are made of non-rusting materials. The
autoclave chamber, the water storage tank, and the chamber door are all made of stainless steel. The
steam hoses are made of Teflon, and threaded fittings and solenoid valves are made of brass.
Drag-in rust
The use of nonrusting materials excludes the formation of rust caused by the components of the autoclave.
In cases in which rust forms on parts of the autoclave or on the instruments being sterilized, tests have consistently revealed that the rust has been dragged in from other sources. In other words: the rust originates
from the instruments which have been placed in the autoclave. It must also be pointed out here that rust
can also form on stainless-steel instruments made by leading manufacturers. Such rust can be caused, for
example, by the improper treatment of such instruments with chemical cleaning or disinfecting agents during
preparation for sterilization.
Preparation of the objects or material to be sterilized
The above example of dragged-in rust shows the importance of proper preparation of the objects or material
to be sterilized. The operator must by all means observe the operating instructions.
Before sterilization, the operator must clean and maintain (for example, by oiling) handpieces and contra
angles according to the instructions provided by the manufacturer. The remaining instruments must be disinfected and cleaned immediately after use, in a disinfection and/or cleaning solution, in accordance with
specific national regulations and the instructions issued by the manufacturers. Important: Be sure to use
the correct concentration of disinfection and/or cleaning solution, and carefully observe the periods of time
required for disinfecting the instruments. The MELAG company recommends the use of cleaning aids such
as ultrasonic devices, cleaning and maintenance equipment for handpieces and contra angles, as well as
thermo disinfecting systems.
It is absolutely essential that the instruments to be sterilized are thoroughly cleaned before sterilization, in
order to prevent contamination from being separated from the instruments during sterilization and from clogging the filters and the valves of the autoclave. It is important that a brush be used for cleaning of the locks,
links, and hinges of instruments before sterilization. Also make sure to use a brush under running water to
thoroughly remove any cleaning and disinfecting agents from the instruments before they are placed in the
autoclave. Important: Make sure that absolutely no remnants of chemical substances in the form of cleaning and disinfecting agents are allowed to enter the autoclave on the instruments being sterilized: if such
substances enter the autoclave, they would cause corrosion there. After preliminary brushing and cleaning
under running water, perform a final rinse of the instruments with demineralized water, and dry off the instruments thoroughly.
Also do not fail to oil turbines and handpieces in accordance with the instructions provided by the manufacturers of such instruments. Such treatment is required to ensure long life of these components.
Brand-new instruments
The above-described cleaning procedures are also required for brand-new instruments. Such instruments
often still carry extremely small amounts of oil, grease, and soiling from the manufacturing process.
Important: Make sure to carefully follow all instructions provided by the manufacturers of instruments for
preparation of their products for first-time sterilization and for subsequent sterilization.
2.2 Drag-in rust and its effects _______________________________________________
It has already been explained that the non-rusting materials used in the autoclave cannot cause rust to form
in the unit itself. Any rust which forms in the autoclave is therefore "drag-in rust." This is rust which is carried into the autoclave by instruments or other metal objects which have rusted — if they consist of simple
steel and their electroplated (chrome) surface is damaged, or even if they may have been manufactured
from stainless steel. It is often enough to have only one single rusty instrument to get rust on the other instruments and on parts of the autoclave, where it leads to material destruction through corrosion. In the
event that drag-in rust causes damage in this manner, it must be removed from the damaged instruments,

Page 8
from the autoclave chamber, and from tray racks by means of mild cleaning agents especially made for
stainless steel (for example, the German product Sidol™ or an equivalent).
Warning: Do not use steel wool or steel-wire brushes to remove such rust. Remove soiled spots by means
of a damp, non-raveling cloth, or a cloth moistened with methylated alcohol or other forms of alcohol.
2.3 Maintenance of the Vacuklav® 31 __________________________________________
2.3.1 Cleaning ___________________________________________________________________________
At least once a week, it is necessary to clean the tray rack, the chamber, and the surface contacted by the
door gasket. The trays and the tray rack must be pulled out of the chamber toward the operator. Then wipe
out the chamber with a soft cloth or a sponge. Do not use metal (mechanical) cooking-pot cleaners or steel
brushes for this work. To clean off stubborn spots, the MELAG company recommends the use of cleaning
agents especially made for stainless steel (for example, the German product Sidol™ or an equivalent). Cau-
tion: When using such agents, make sure that they do not enter the pipes which lead off from the autoclave
chamber. Do not use cleaning agents which contain chlorine, and do not use alkaline substances.
Check the door gasket once a week for damages, and clean it with mild liquid cleaning agents.
The door-locking spindle must be regularly lubricated with silicone grease to ensure that the door can
be easily locked and unlocked.
Inspect the water storage tank once a week for soiling or fouling. If visible coating or deposits are discov-
ered in the water storage tank, drain the water out of the tank by opening the drain tap [2]. Then clean the
water storage tank (for example, by using a small brush, with hot water and a grease-cutting additive. Or
use a non-raveling cloth soaked in alcohol. Then thoroughly rinse out the water storage tank with water, and
fill up with new distilled or demineralized water.
You can clean the outside enclosure parts of the autoclave with commercial, mild liquid cleaning agents, or
with alcohol.
2.3.2 Use of distilled or demineralized water __________________________________________________
Quality requirements
For steam sterilization, it is necessary to use distilled water (aqua dest) or fully demineralized water (aqua
dem).
Use only water which satisfies requirements in accordance with the European CEN standard EN 285. The
table below contains the relevant data.
For operation of the Vacuklav
®
31, it is also possible to use battery water which must strictly observe the
following: conductivity upon production 10 µS/cm*; conductivity when used 30 S/cm*; pH identical to
the values in EN 285; and evaporation residues equivalent to those set forth in EN 285.
Where to purchase the water
Battery water which satisfies the above mentioned quality is available in most countries at low prices in large
drugstores, auto-supply shops, supermarkets, and do-it-yourself stores. If the purchased water does not
conform to the standards set forth above, and in the following table,it could cause calcium deposits to form in
the steam lines and in the valves of the autoclave, and could therefore impair the functioning of the unit.
Aggressive water (i.e., with a pH of < 5 or > 7) can also damage the Vacuklav
®
31. The automatic warning
system of the Vacuklav
®
31 may not detect such aggressive water: it will sound an alarm or report a fault
only if the conductivity of the water is too high.
Formation of spots on the instruments
The extent to which spots are left on the sterilized instruments will depend on the quality of the medium used
to generate the steam.
User Manual for the Vacuklav® 31
Page 9
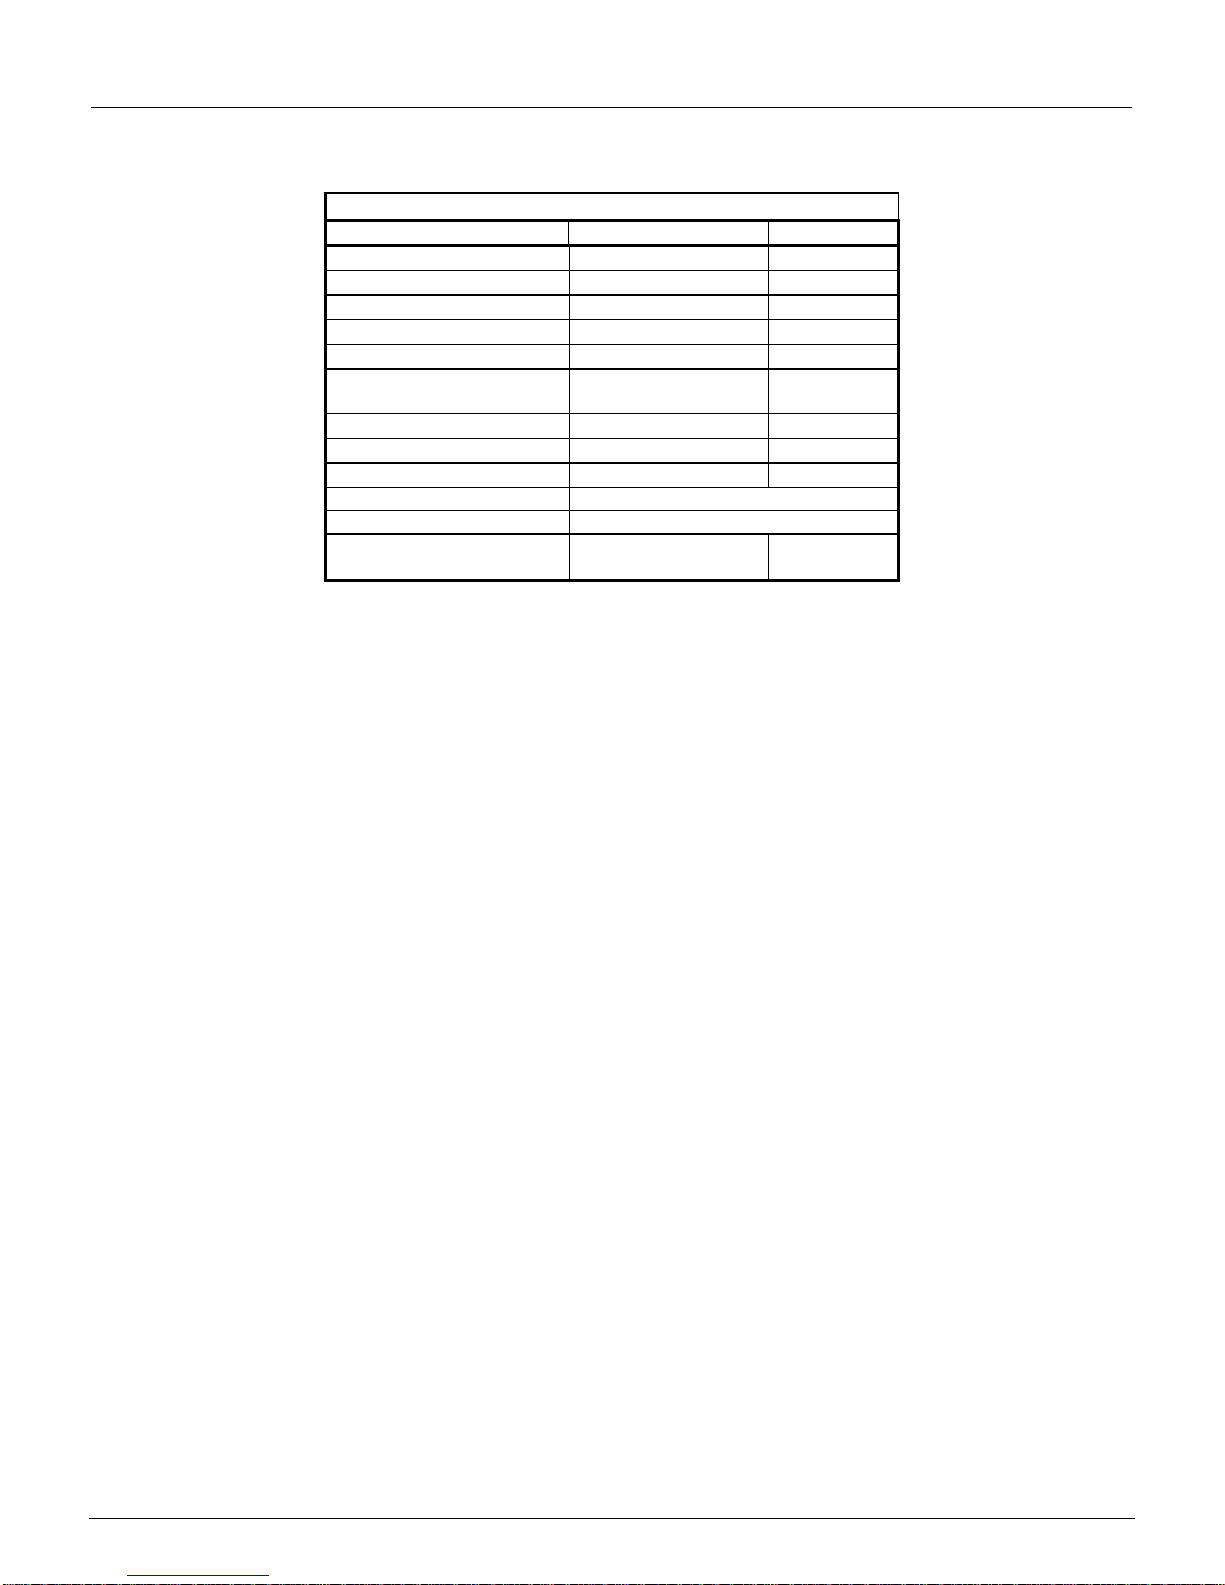
Stipulations for water quality according to CEN standard DIN EN 285:
Table B.1: Contaminants in condensate and feed water
Condensate Feed water
Evaporation residue
1.0 mg/kg 10 mg/l
Silicium oxide, SiO2
0.1 mg/kg 1 mg/l
Iron
0.1 mg/kg 0.2 mg/l
Cadmium
0.005 mg/kg 0.005 mg/l
Lead
0.05 mg/kg 0.05 mg/l
Rest of heavy metals except iron, cadium, and lead
0.1 mg/kg 0.1 mg/l
Chlorides (Cl)
0.1 mg/kg 2 mg/l
Phosphates (P2O5)
0.1 mg/kg 0.5 mg/l
Conductivity at 20°C
3 µS/cm * 15 S/cm *
pH (degree of acidity) 5 ... 7
Appearance Colorless; clean; without sediment
Hardness ( of ions of alkaline earth)
0.02 mmol/l 0.02 mmol/l
* S/cm = micro-Siemens per centimeter

Page 10
2.4 Functional testing of the autoclave_________________________________________
2.4.1 Continuous monitoring _______________________________________________________________
The operator of the autoclave can monitor the effectiveness of the sterilization or disinfection processes by
checking the values displayed on the autoclave itself, or by reading the log output by the printer. The user
can assume that the sterilization or disinfection process has been satisfactorily carried out if the following
conditions are met:
1. The parameters of pressure and temperature (which depend on the program executed) agree with the
display on the autoclave
2. The sterilization or disinfection time was correct as stipulated.
The parameter control system of the Vacuklav
®
31 automatically monitors whether these conditions are in
fact met. If they are not in range, the Vacuklav
®
31 will issue an error report.
In addition, the operator can install a printer which outputs a printout log, with a list of the process-relevant
parameters for each program.
2.4.2 Periodic testing (every six months) _____________________________________________________
German DIN 58 946, Part 8, Section 3.2, recommends as follows:
"Periodic testing is conducted at regular intervals (e.g., every six months) at the site of installation and opera-
tion. The purpose of this periodic testing is to verify that a small-size sterilization unit satisfactorily carries
out sterilization when it is used according to the operating instructions."
The operator can request test spores from hygiene institutes and government medical testing offices. These
institutions send test spores as requested, analyze them when they are returned after sterilization, and confirm the results of sterilization on an official test log.
Spore tests to confirm the effectiveness of sterilization of an autoclave provide valid results only in conjunction with the sterilization programs of the Vacuklav® 31.
When conducting a spore test, the operator must absolutely and strictly observe sterile working conditions.
For example: the spore packets may not after sterilization be placed back into the envelopes from which
they were taken before the process. Contaminated tweezers may also not touch the spore samples. Otherwise, the spore substance will be recontaminated. The MELAG company therefore recommends that the
tweezers be sterilized together with the spore sample. The positive sample which is not sterilized must be
kept separate from the sterilized sample.
2.4.3 Maintenance / service of the autoclave __________________________________________________
The functional effectiveness and the long service life of the autoclave will depend on periodic service / maintenance of the unit.
The MELAG company recommends that annual service of the Vacuklav
®
31 be performed: but only by
trained customer-service technicians and in accordance with the Vacuklav
®
31 Maintenance Worksheet.
This annual service consists of a visual inspection and a functional test. Such annual service not only includes testing of all equipment components and electrical elements, but also requires the replace of worn
parts.
If the Vacuklav
®
31 is operated in conjunction with a MELAdem®45 reverse-osmosis system, then the ME-
LAdem
®
45 must be serviced at intervals of not longer than six months. If the Vacuklav® 31 is operated in
conjunction with water-treatment systems manufactured by other companies (OEM), the service instructions
of these OEM companies must be strictly observed.
For information concerning these service operations, please get in touch with your specialist dealer, or with
the MELAG Customer Service Department.

User Manual for the Vacuklav® 31
Page 11
3 Installation and initial startup
3.1 Setting up the autoclave__________________________________________________
3.1.1 Transport ribbons____________________________________________________________________
The autoclave must be lifted out of the transport carton by using the transport ribbons. When the unit has
been taken out of the carton, remove the ribbons from the enclosure by unscrewing the two screws for each
ribbon, removing the ribbons, and screwing the screws back into the enclosure.
3.1.2 Leveling the autoclave _______________________________________________________________
The first step to ensure proper functioning of the autoclave is to use a spirit level (carpenter's level) to correctly align the unit. The spirit level must first be held up flush against the flange of the chamber to ensure
that the entire unit is vertical. Then the front feet of the autoclave [1] must be unscrewed five
(5) turns in
order that the autoclave slants slightly toward the rear.
3.2 Electrical power_________________________________________________________
The power cable of the autoclave must be plugged into a 230-V socket. The installed load is 2500 W, and
the unit requires a 16-A fuse. To avoid electrical overloads, the autoclave should be connected to its own
separate circuit.
Switch on the autoclave using the power switch [15] under the enclosure of the operating panel [4]. The display [3] shows the momentary time as well as the pressure and the temperature of the chamber. The signal
lamp for water [33] lights up.
 Loading...