

Megasat SAT IP Server 2 User Manual
Stand: 1.0 November 2014 // Technical changes, misprints and errors reserved.
Megasat Werke GmbH
|
Industriestraße 4a
|
D-97618 Niederlauer
|
www.megasat.tv
|
info@megasat.tv
user manual
SAT>IP Server 2

Content
02 03
Safety Instructions
ENGLISH ENGLISH
Safety Instructions...................................................................................................... 03
1. Introduction ......................................................................................................... 04
2. Connection & How to access ................................................................... 05
3. Login / Logout ..................................................................................................... 08
4. System Settings ................................................................................................. 09
4.1 Network Settings ............................................................................... 10
4.1.1 Wired .................................................................................................. 11
4.1.2 Wireless ............................................................................................. 12
4.2 LNB Settings ........................................................................................... 15
4.2.1 LNB Einstellung ............................................................................16
4.2.2 Quad ...................................................................................................17
4.2.3 Quattro ..............................................................................................18
4.2.4 Unicable ...........................................................................................19
4.2.5 Jess.......................................................................................................20
4.2.6 DiSEqC ...............................................................................................21
4.2.7 USALS .................................................................................................27
4.3 Import Settings ................................................................................... 28
4.4 Export Settings .................................................................................... 29
5. System Status
5.1 Tuner Status ................................................................................................. 30
6. Tuner
6.1 Tuner settings ............................................................................................. 32
6.2 Tuner test ...................................................................................................... 34
7. Software Update
7.1 USB ....................................................................................................................35
7.2 OND..................................................................................................................42
7.3 WebUI .............................................................................................................. 48
8. Admin
8.1 SW Version .................................................................................................... 51
8.2 Language ...................................................................................................... 51
8.3 Change Password ....................................................................................51
8.4 Restart ............................................................................................................. 51
9. Specicatons ........................................................................................................ 52
Please read the manual thoroughly before operating the equipment. In case of incorrect
or improper handling, the warranty becomes void.
Power supply: Before start please check the correct operation voltage of the
power point. The operating voltage of this device is AC 100 ~
240 V, 50/60 Hz.
Overload: Do not overload a wall outlet, extension cord or adapter, neither
use damaged power cord or touch it with wet hand as this may
result in electric shock.
Liquid: The device shall not be exposed to dripping or splashing water,
and that no objects filled with liquids, such as base, shall be
placed on the apparatus.
Ventilation: Keep the slots on top of the device uncover to allow sufficient
airflow to the unit. Do not put the receiver on soft furnishings or
carpets. Do not expose the receiver to direct light or do not
place it near a heater or in humid conditions. Do not stack other
electronic equipments on top of the receiver.
Risk of ssuocation: Do not let children play with films or other packaging
components, there is a risk of suffocation.
Cleaning: Plug out the device from the wall outlet before cleaning. Clean
the device by a soft cloth or mild solution of washing-up liquid
(no solvents).
Connection: Disconnect the device from the mains when you connect it to
satellite LNB or disconnect it from LNB. Failure would possibly
cause damage to the LNB.
Location: Put the device indoor in order to avoid lightening, raining or
sunlight.
Uncover: Do not remove the cover, to reduce the risk of electric shock.
Contact qualified and licensed service personnel to repair the
receiver, or contact your dealer.
1. Introduction
04
05ENGLISH ENGLISH
2. Connection & How to access
SAT>IP Server 2 allows free satellite live TV/Radio programs to be received & distributed
to SAT>IP Client compliant devices like smart phones, tablet pc‘s and notebook pc‘s &
other client devices over Wired/Wireless home network in both unicast/multicast mode
of transmission. SAT>IP Server 2 is equipped with four satellite tuners, so users can watch
4 x different frequency simultaneously & with same frequency 8 x different users can
watch simultaneously.
SAT>IP Server 2 device must be connected to same home network in which the Client
devices which are connected to.
SAT-IP Server Features:
• Fully compliant with SAT>IP Specification version 1.2
• Streaming Live SD/HD TV & Radio programs to 4 compatible Clients over LAN/WLAN
• Support MPEG2/MPEG4 TS & PS over IP in both Unicast and Multicast
• Support Unicable, JESS, DiSEqC1.0, DiSEqC 1.2 and USALS
• Firmware update over USB stick or online over the network
• Web UI based device configuration and management (password protected)
Supported Client devices:
• SAT-IP supporting devices (IP 100, .....)
• iOS devices (iPad, iPod, iPhone), Android tablets and smart phones using Elgato
applications
• DLNA/UPnP compatible PC software applications e.g.VLC Player, DVB Viewer
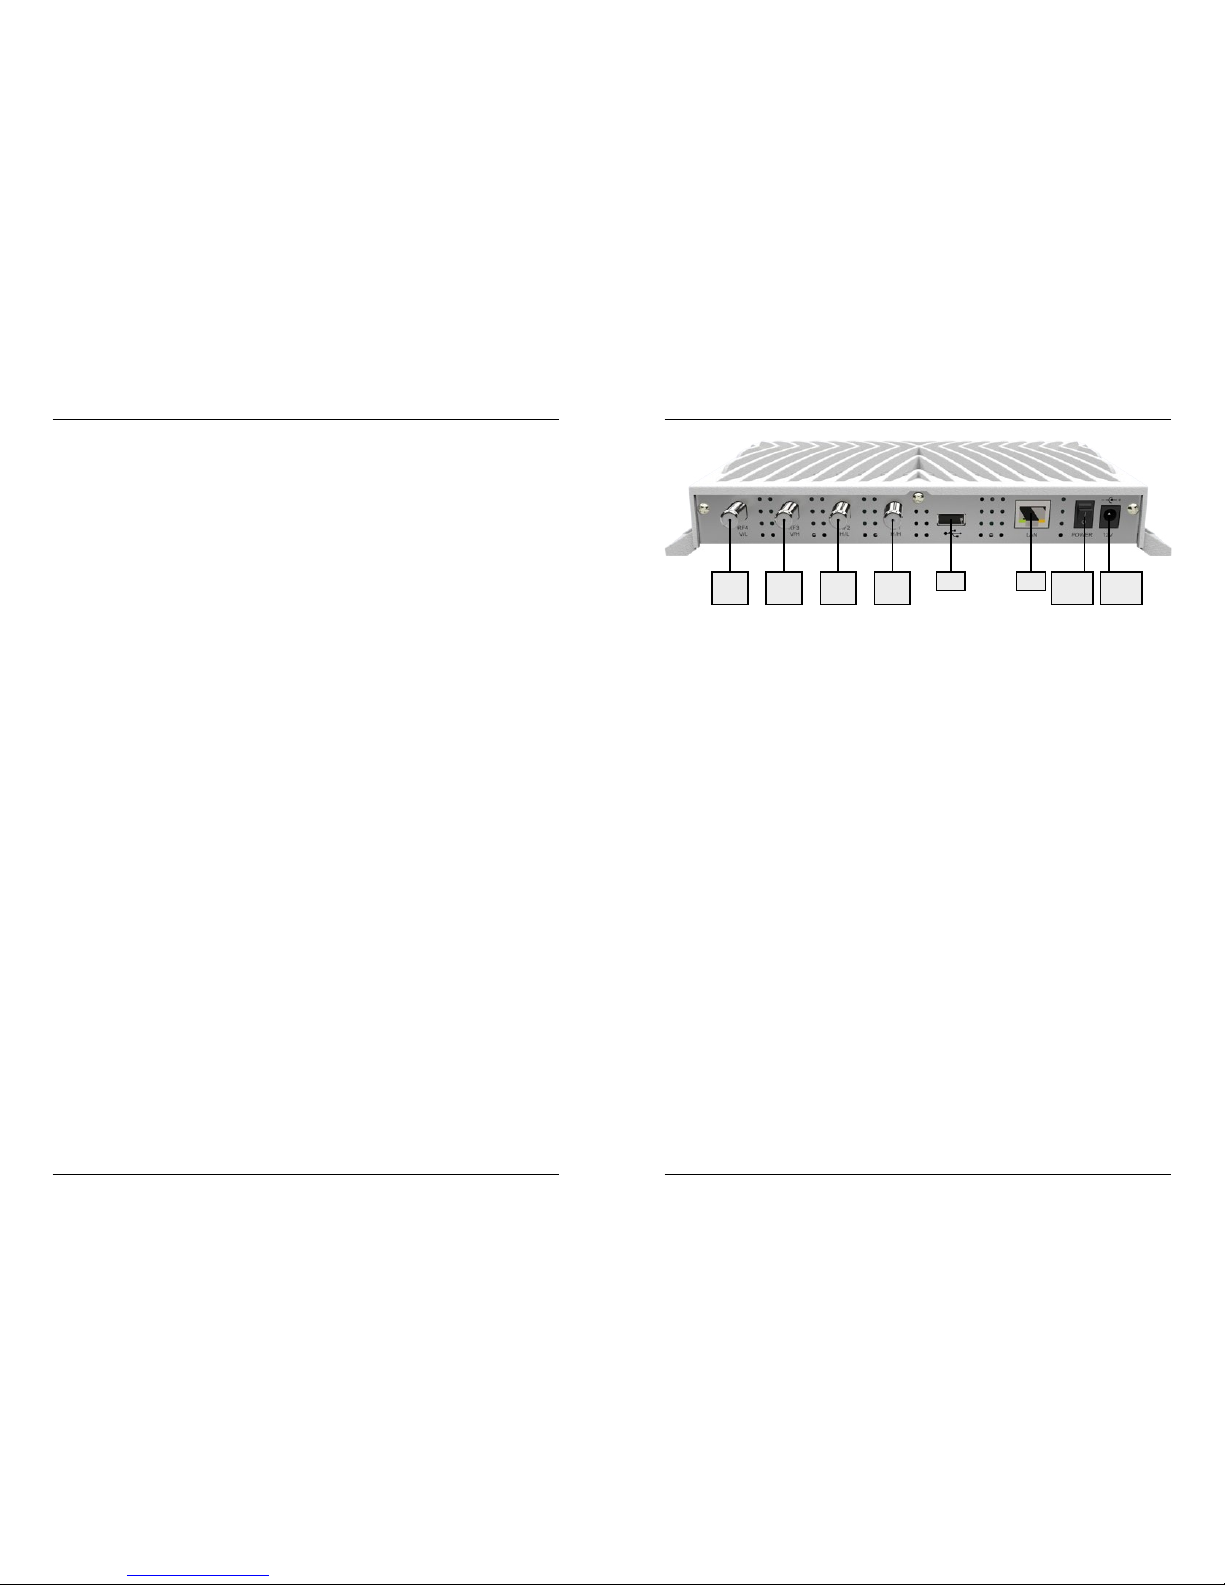
USB LAN Power
supply
Power
switch
VL
(RF 4)VH(RF 3)HL(RF 2)HH(RF 1)
Connection with a Universal LNB (z.B. Single, Twin or Quad LNB)
Single LNB = RF1
Twin LNB = RF1 + RF2
Quad LNB = RF1 + RF2 + RF3 + RF4 (The order is not important)
Connection with a Quattro LNB
The device must be connected to the appropriate connector on the Quattro LNB, please
make sure the correct ports on the LNB:
Tuner RF1 = Horizontal High (HH)
Tuner RF2 = Horizontal Low (HL)
Tuner RF3 = Vertical High (VH)
Tuner RF4 = Vertical Low (VL)
Connection with a Unicable LNB
Unicable LNB = RF1
Note that a change must be made in the web configurator. The respective settings, see
page 19.
Connection with a Jess LNB
Unicable LNB = RF1
Note that a change must be made in the web configurator. The respective settings, see
page 20.
Connection with a DiSEqC controlled device
Depending on the connection used, please refer to the corresponding DiSEqC settings.
The respective settings, refer to page 21.
Connection with a Motor (USALS)
Motor (USALS) = R F1
Note that a change must be made in the web configurator. The respective settings, see
page 25.
2. Connection & How to access
06
07DEUTSCH DEUTSCH
2. Connection & How to access
Identify the IP address
Turn on the server. The server connects to the network and receives
own IP address automatically. You can also assign the server in your network a static IP
address with DHCP.
To access the web configurator, it is necessary the IP address
to identify the device. This can be found in the following manner:
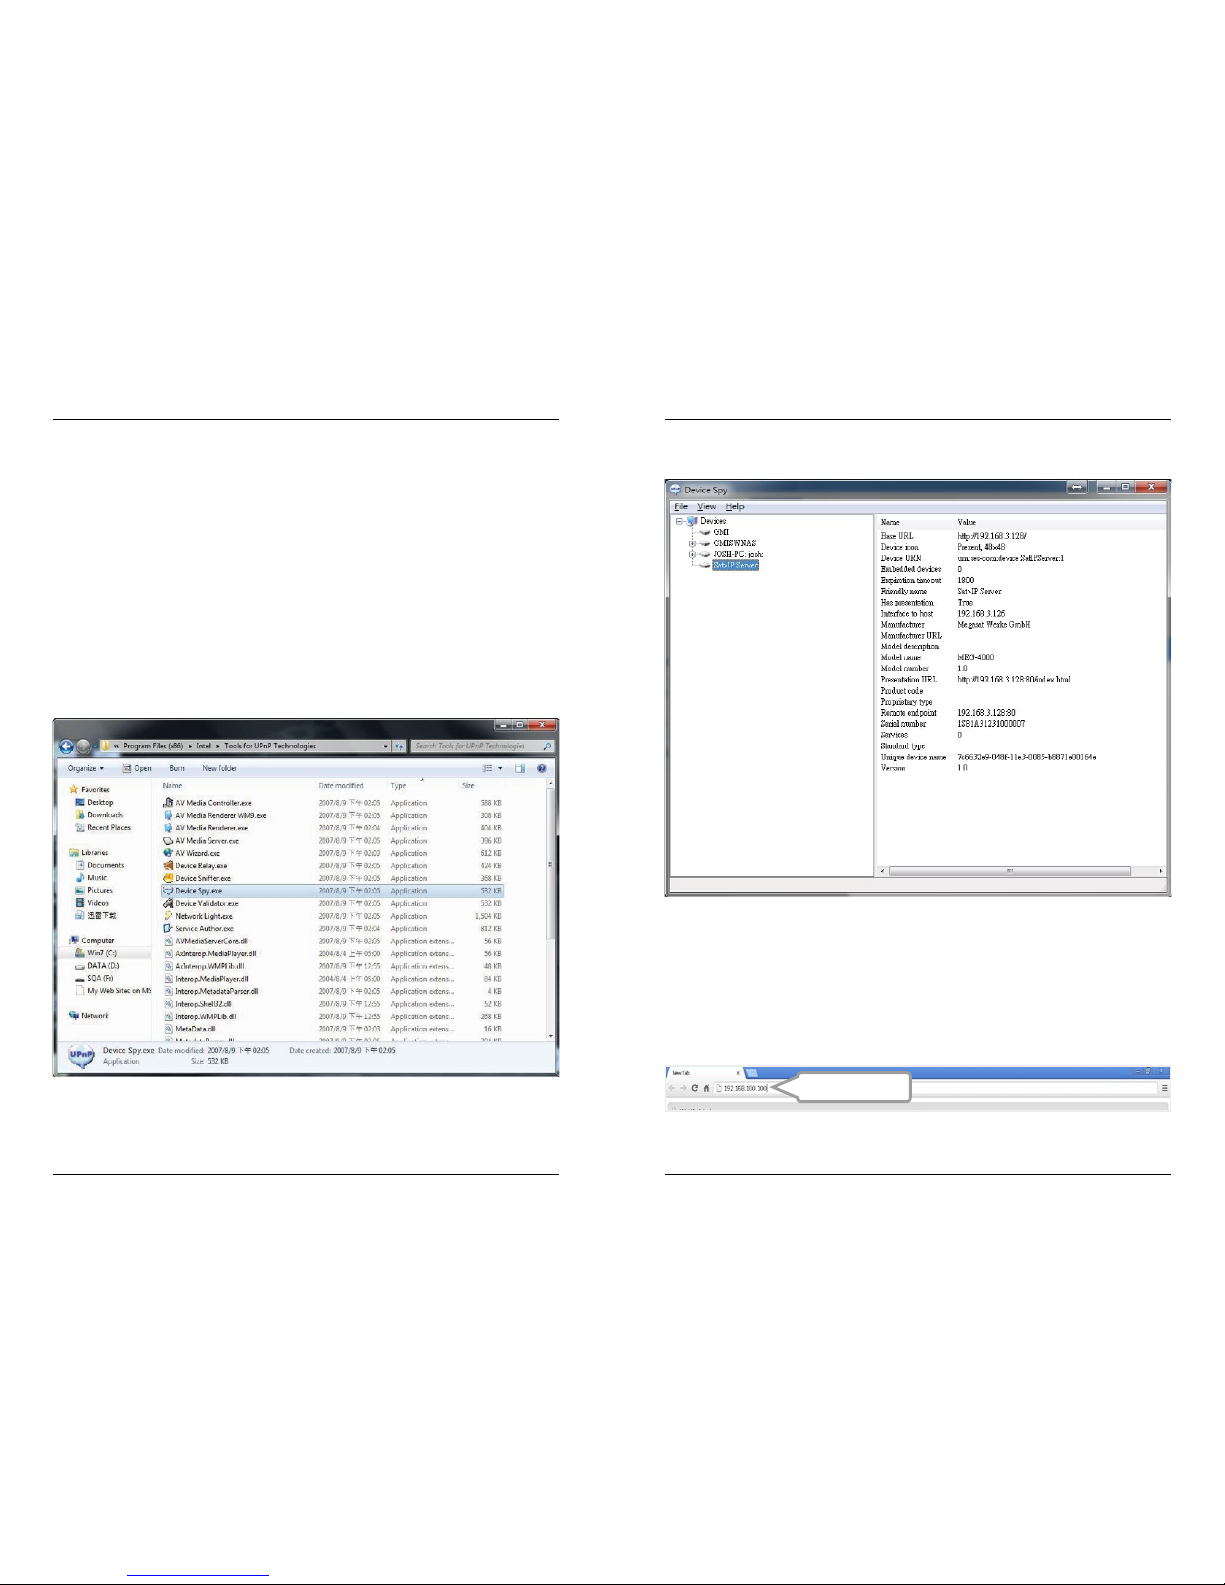
The Megasat SAT> IP Server 2 supports UPnP technology that experienced it
Users allows the IP address to identify a free UPnP tool (eg Intel Developer Tools for UPnP
Technologies).
• Download the appropriate software on the PC and install it.
• Open the „Device Spy“ from the Start menu.
Open a web browser (Recommended: Google Chrome or Opera) and enter the server‘s
IP address. You can find the assigned IP address in the configuration menu of the Internet
router.
192.168.3.128
Conguration
The server can be configured with a PC that is located in the same network. The configuration is done through a web browser with which you have to log in to access the user
interface of the server.
• Select in the list of „UPnP Devices“ to „Megasat SAT> IP Server 2“, and read the corresponding „Base URL“ from (for example 192.168.2.100)
4. System Settings
08
09ENGLISH ENGLISH
3. Login / Logout
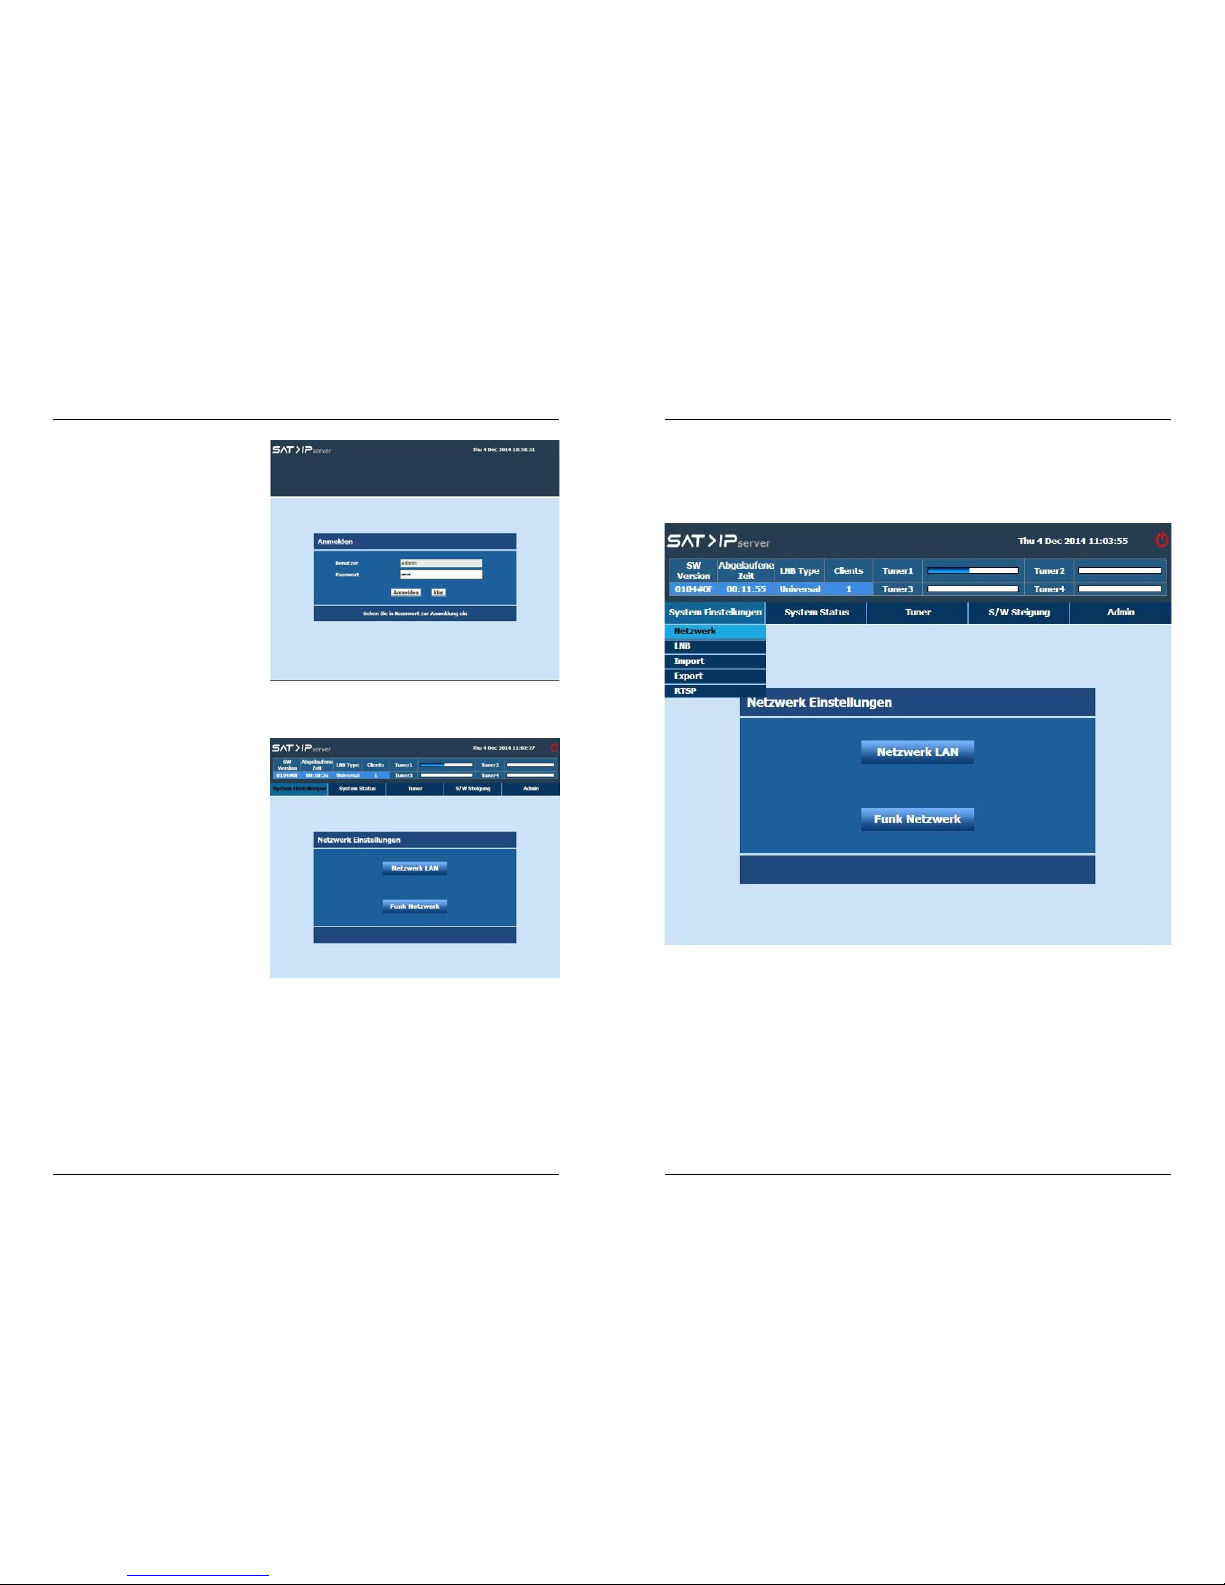
Login
Once the browser was successfully connected to Server, then the
„Login“ page will be displayed.
The default user name for server is
„admin“ and password is „admin“.
Enter the Password and click the
„Login“ button. The server page
will be displayed on the screen.
We have restricted the password
length to be minimum of 8 characters and maximum 16 characters.
Logout
To log out, click on „Logout“ icon
place at right top corner.
Select „Yes“ from the confirmation
to log out from the Server page.
Click „System Settings->Network Settings“ from the server page.
Server box supports the below network mode of interfaces.
• Wired Network
• Wireless Network
4. System Settings
10
11ENGLISH ENGLISH
4. System Settings
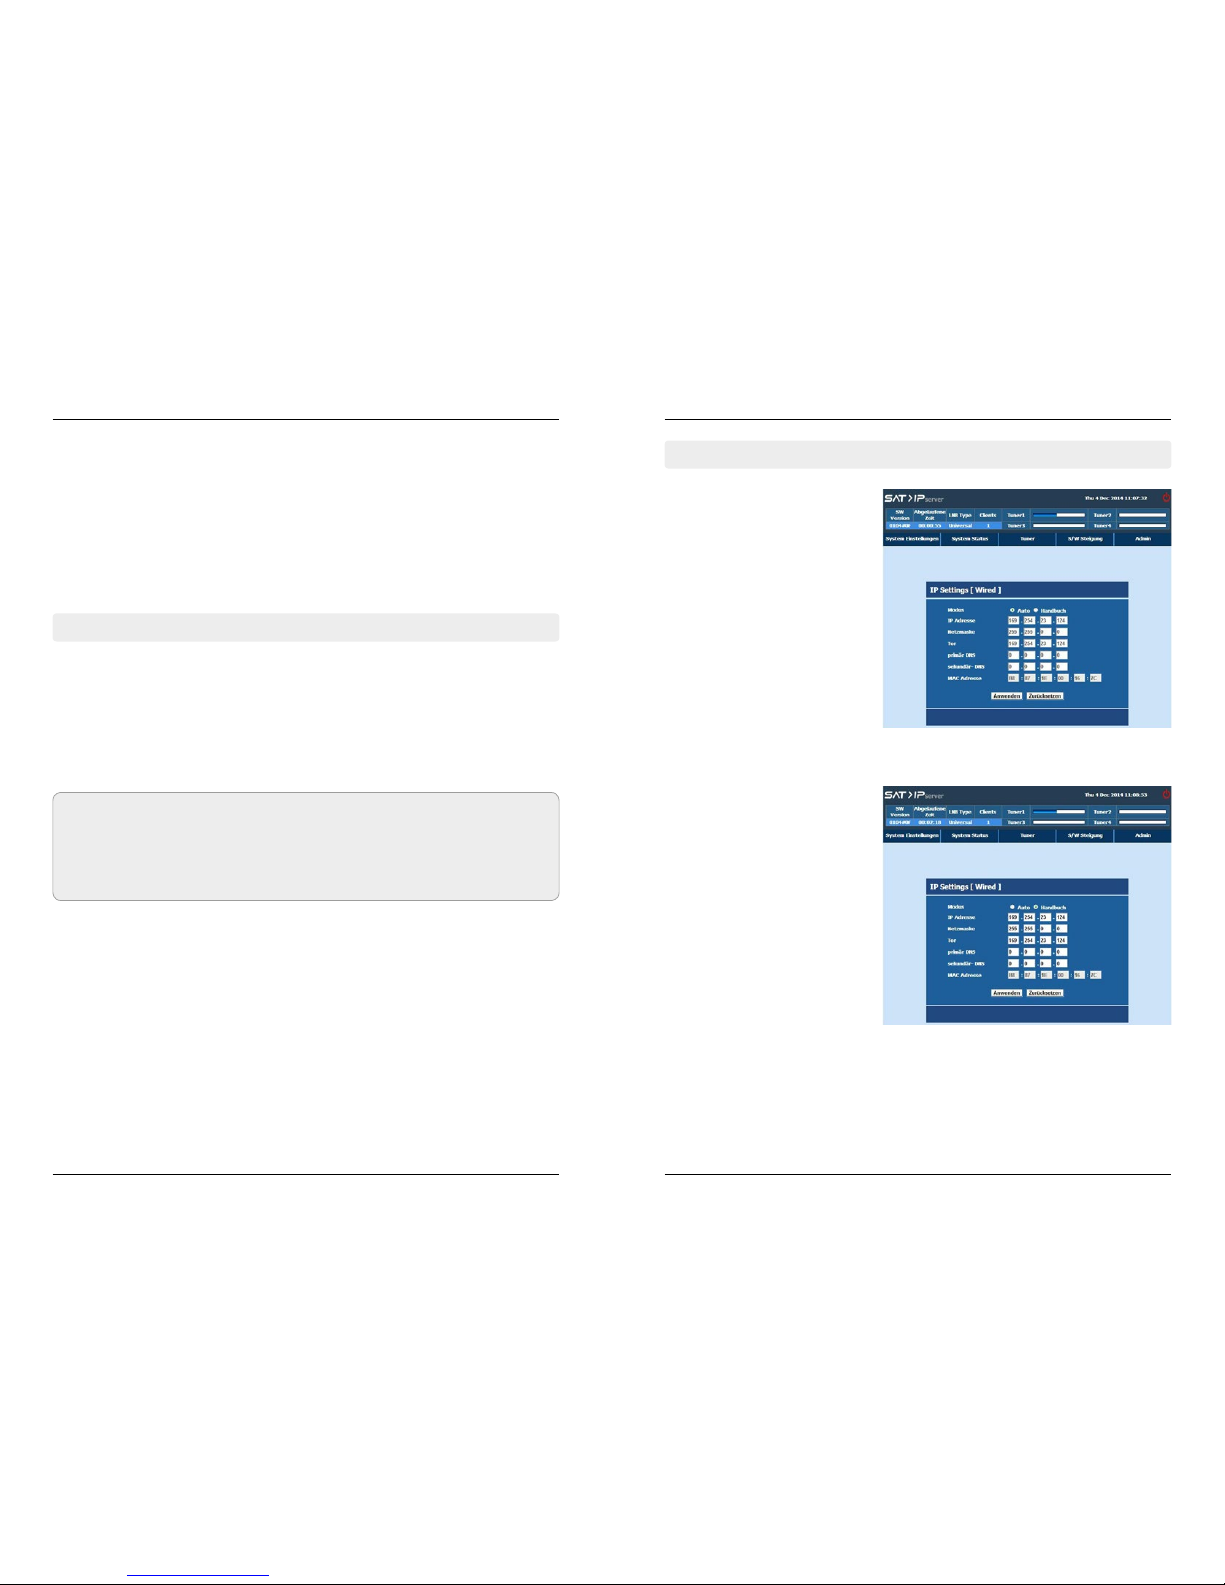
4.1.1 Wired
By default the Server box is in
DHCP mode.
Server acquires IP address from
DHCP server & listed the information on the screen.
Server box failed to find DHCP server then it will automatically move
to Auto-IP mode & allocate IP address in 169.x.x.x range.
User can configure the IP settings
by „Manual“ mode also. In manual
mode user can enter/edit the IP
settings. IP configuration can be
edited from this dialog.
After complete the IP configuration, click „Apply“ for save.
Wired Network
Server box supports the below IP mode of configurations in Wired network,
• DHCP (Managed Network)
• AUTO IP (Unmanaged network)
• Manual (User IP configuration)
Wireless Network
Server box supports the below IP mode of configurations in Wireless network.
• Auto
• Manual
4.1 Network Settings
Note:
1. By default the Server box is in DHCP mode.
2. Server box failed to find DHCP server then it will automatically move to Auto-IP
mode & allocate IP address in 169.x.x.x range.
Click „System Setting“ from the Server page.
Topics covered under Admin are listed below:
• Network Settings
• LNB Settings
• Import Settings
• Export Settings
4. System Settings
12
13ENGLISH ENGLISH
4. System Settings
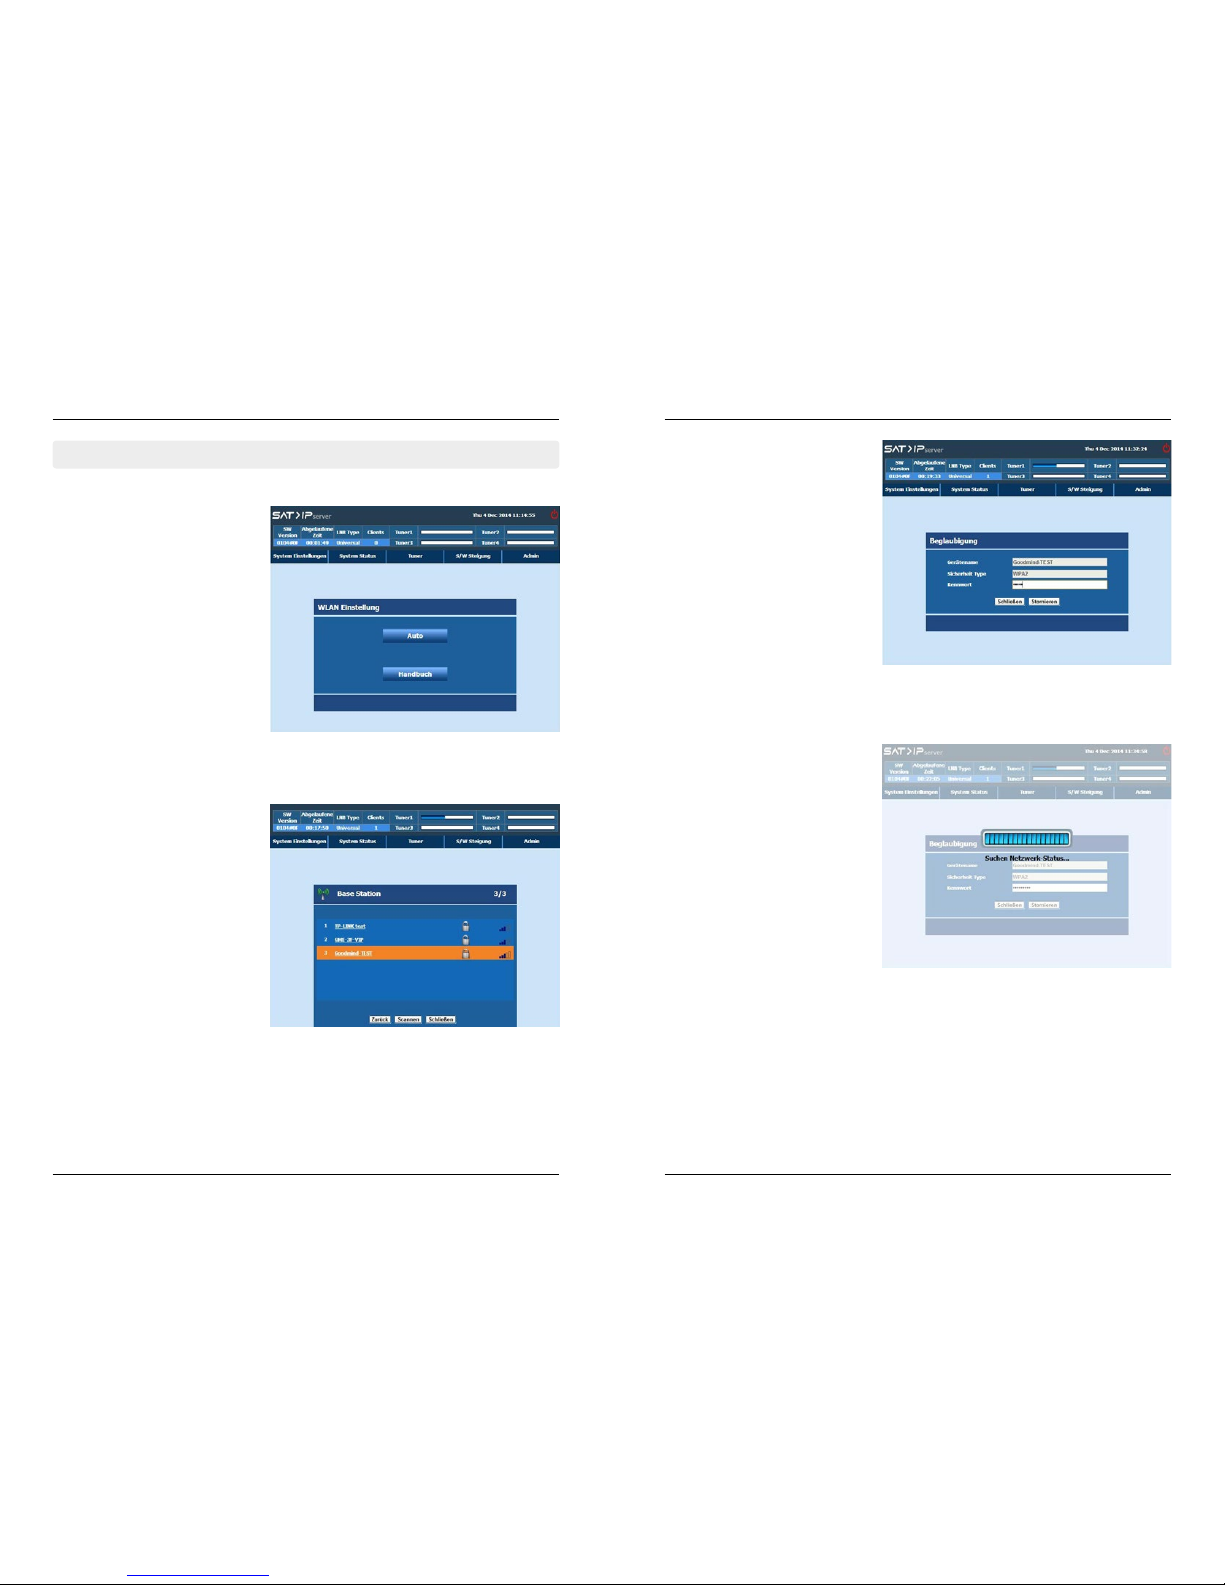
4.1.2 Wireless
Wireless option can be configure
by Auto (or) Manual.
Password request screen will be
displayed if user select WPA secure system available WiFi router.
Using keypad user should enter
the valid WPA key.
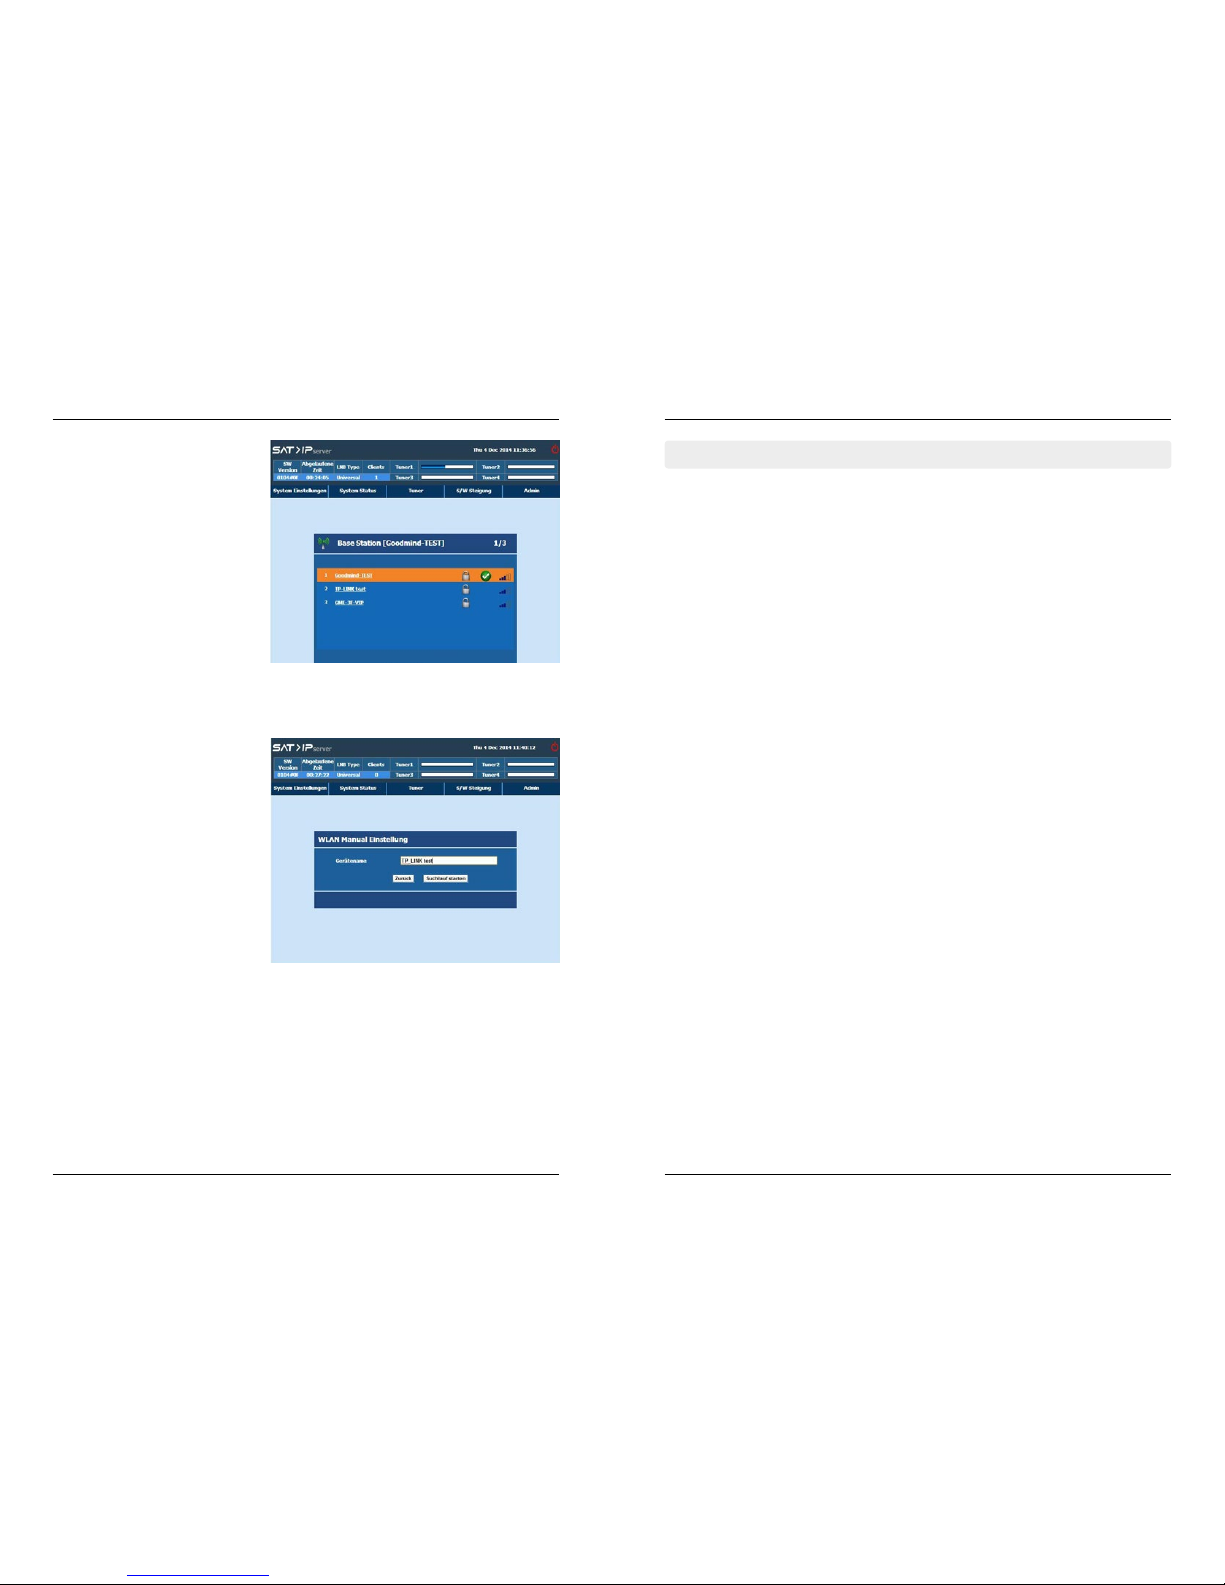
A warning pop-up is displayed
if the password is invalid or the
Receiver is unable to connect to
the network.
In the event that the warning
pop-up is displayed, pressing any
key causes the network list to be
re-displayed with the same network in focus.
Enter valid password and select
„Connect“ button; the wireless
network will be connected successfully.
If user selects „Auto“, WiFi routers
which is available nearby can be
discovered automatically & listed.
# Network name (SSID): Name of
the network. Network name will
be truncated with ellipsis (…) if
the network name exceeds more
than 15 characters.
# Signal Quality: Signal icon displayed with different colors based
on the reception quality.
# Lock: Lock icon will be displayed
if the connection mode is secure. Supported security modes are
WPA, WPA2, WEP-64 bit, WEP-128
bit.
4. System Settings
14
15ENGLISH ENGLISH
4. System Settings
The Green color tick icon is displayed if WiFi Router is connected without any problem. All WiFi
network settings are stored in the
system memory.
Select the type of LNB that is connected to Satellite input of your box based on your
satellite installation. Topics covered under are listed below:
Quad
Select „Quad“ when a Quad LNB, Octo LNB or Universal multiswitch is connected to your
Server box.
Quattro (Quattro LNB)
Select „Quattro“ when a Quattro LNB is connected to your Server box directly.
Unicable (Unicable LNB or Unicable multiswitch)
Select „Unicable“ when a Unicable switch is connected to your Server box
JESS
Select „Jess“ when a Jess switch is connected to your Server box.
DiSEqC1.2
Select „DiSEqC“ when a DiSEqC1.2 motor is connected to your Server box.
USALS
Select „USALS“ when a USALS motor is connected to your Server box.
How to Access?
Click „LNB Setting“ from the Server page.
Wireless can be configured by Manually. To connect the Box to WiFi
router user need to provide the
Device information.
If users pressing OK key the base
station will be opened. Further
procedure will be same as explained for Auto mode.
4.2 LNB Settings
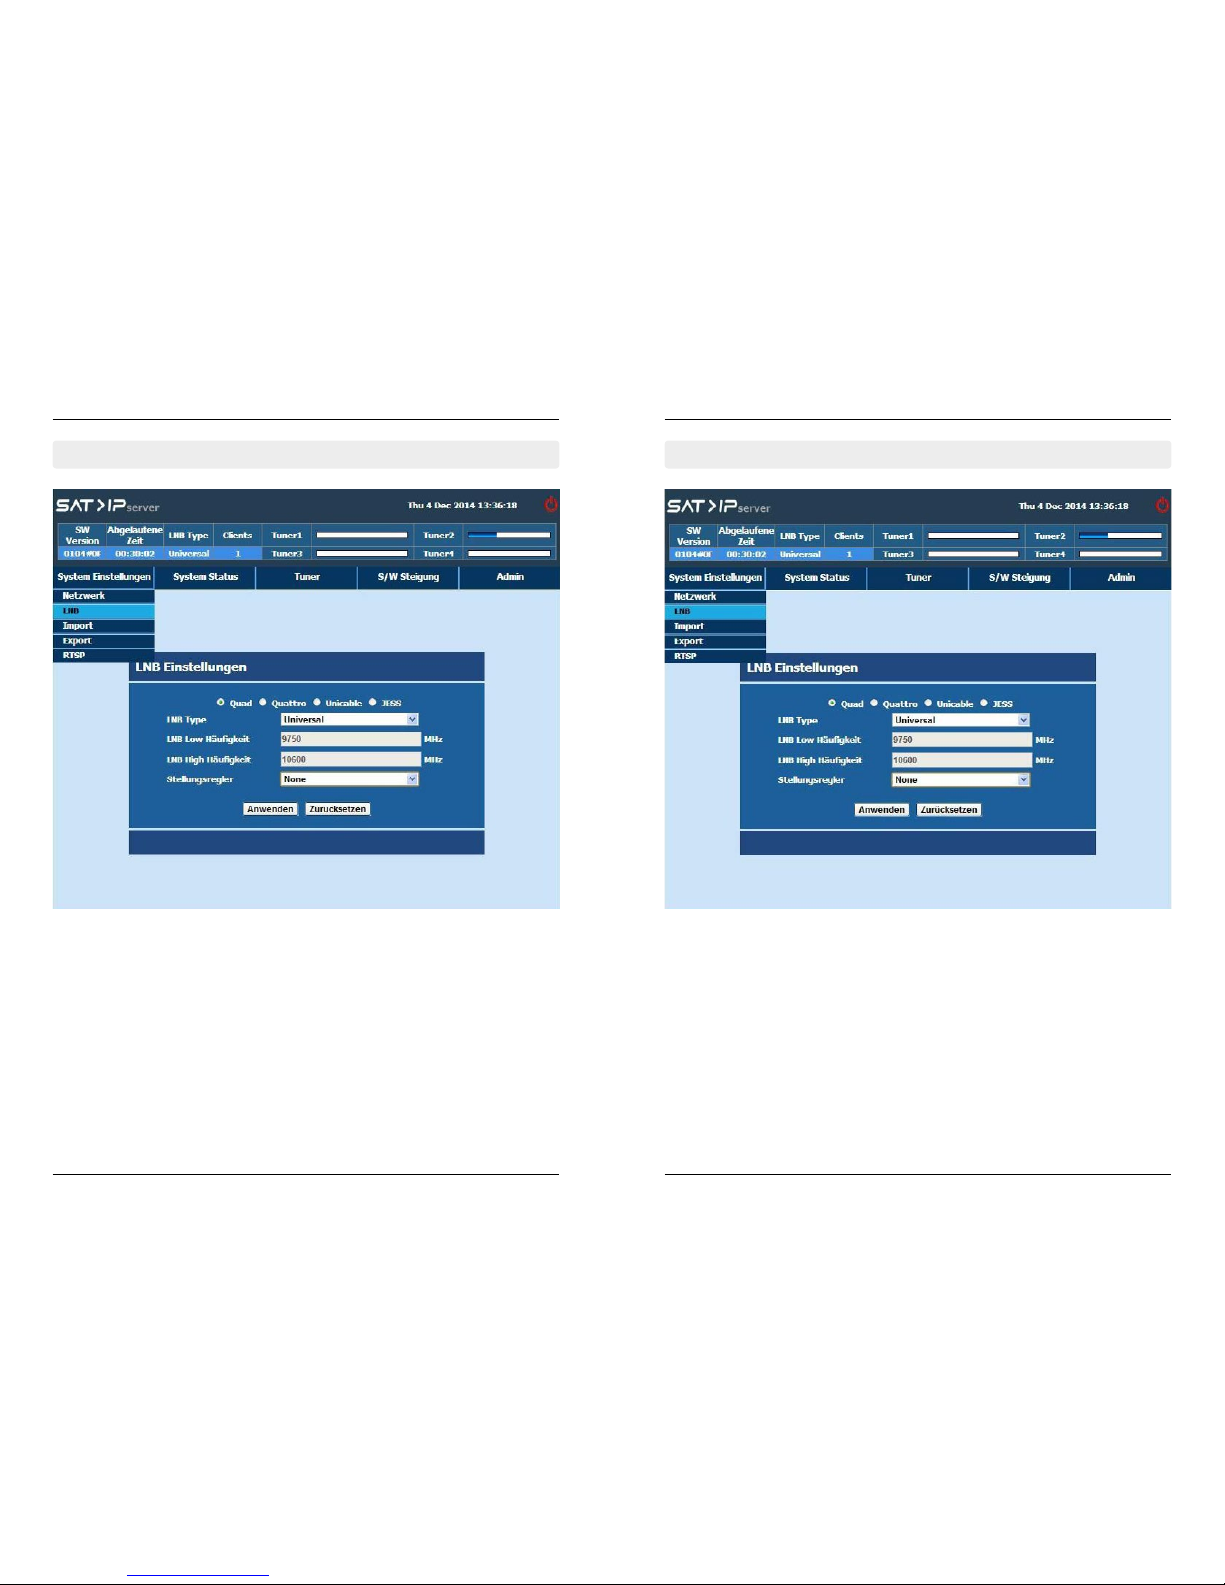
4.2.1 LNB Settings 4.2.2 Quad
4. System Settings
16
17ENGLISH ENGLISH
4. System Settings
To configure the below settings from the LNB settings menu.
• LNB Mode - Quad / Quarto / Unicable / Jess
• LNB Type - Universal / C band / Ku band / Extended C band / User
• LNB Low Frequency
• LNB High Frequency
• Positioner - None / DiSEqC / USALS
Configure the settings and click on „Apply“ button for save.
Satellite reception system consists of a Quad LNB. Connect the 4 outputs of the LNB to
the inputs 1... 4 of the Server box via suitable SAT antenna cables.
Similar to all Tuners.
• Horizontally polarised, high band 11.70-12.75 GHz („horizontal high“)
• Horizontally polarised, low band 10.70-11.70 GHz („horizontal low“)
• Vertical polarised, high band 11.70-12.75 GHz („vertical high“)
• Vertical polarised, low band 10.70-11.70 GHz („vertical low“)
 Loading...