

Page 1

F
LLAATT
F
P
P
NEELL
AAN
T
T
V
V
U
SSEER
U
© 2007 All rights reserved.
Trademarks:
Manufactured under license by Dolby Laboratories.
‘Dolby’, ‘Pro Logic’ and the Double D symbol are trademarks of Dolby Laboratories.
The “HD ready” Logo is a trademark of EICTA.
HDMI, the HDMI Logo and High-Definition Multimedia Interface are
trade marks or registered trade marks of HDMI Licensing LLC.
Additional trademarks are the property of their respective owners.
make no warranty of any kind with regard to this material, including, but
We
not limited to, the implied warranties of merchantability and fitness for a particular purpose.
We
will not be liable for errors contained herein or for incidental or consequential damages in connection with the furnishing, per-
formance, or use of this material.
We assume no responsibility for the use or reliability of its software on equipment that is not furnished by our company.
This document contains proprietary information that is protected by copyright. All rights are reserved. No part of this document may
be photocopied, reproduced, or translated to another language without the prior written consent of our company.
The information in this document is subject to change without notice.
Medion AG, Am Zehnthof 77, 45307 Essen, Germany
BDA00105300
R
’
’
SS
M
AANNUUAAL
M
L
Page 2

C
OONNTTEENNT
C
1. SAFETY AND PRECAUTIONS 1
Operating Safety.................................................................................................. 1
Precautions ......................................................................................................... 3
Recycling and Disposal..........................................................................................4
2. INTRODUCTION 5
Service ............................................................................................................... 5
Performance Characteristics................................................................................... 6
3. CONTROL ELEMENTS AND SIDE CONNECTIONS 7
4. BACK OF THE DEVICE AND CONNECTIONS 8
T
Repair........................................................................................................... 2
Point of use ................................................................................................... 2
Environmental conditions................................................................................. 2
Connecting .................................................................................................... 3
Standards/Electro-Magnetic Compatibility .......................................................... 3
Batteries and Proper Treatment........................................................................ 4
5. REMOTE CONTROL 9
Summary of Control buttons................................................................................ 10
6. APSAS FIRST TIME INSTALLATION 11
7. GENERAL CONTROLS & ADJUSTMENT 13
Turning the display On and Off............................................................................. 13
Calling up Menus and operating the on-screen control ............................................. 13
Continue switching channels ................................................................................ 14
Switching between the TV and Sources of External Signals....................................... 14
Volume Control .................................................................................................. 14
Using Volume Control.................................................................................... 14
Using Mute .................................................................................................. 14
Picture (Contrast, Colour, Brightness, etc.) ............................................................ 14
Additional picture settings ................................................................................... 16
Sound (Balance, Equalizer, etc.)........................................................................... 17
8. TV MODE ADJUSTMENT 19
Adjusting TV settings .......................................................................................... 19
Program table .............................................................................................. 19
Delete a program ......................................................................................... 19
Moving and sorting channels .......................................................................... 20
Changing the names of channels .................................................................... 20
Setting channels manually ............................................................................. 21
Manual addition of channels................................................................................. 23
Add new channels automatically........................................................................... 23
ii
Page 3

9. TELETEXT 24
To operate Teletext ............................................................................................ 24
Teletext Page Selection ....................................................................................... 24
Select Teletext display functions........................................................................... 24
Useful features for Teletext.................................................................................. 25
10. CONNECTING EXTERNAL DEVICES 26
Connection of an external device to the Scart socket............................................... 26
Connecting a video recorder to the aerial socket..................................................... 26
Connecting a PC or a Source of Multimedia Video.................................................... 26
Connecting a decoder ......................................................................................... 26
Connecting a camera recorder.............................................................................. 26
Settings for external devices (Picture, Sound, Name, etc.) ....................................... 27
AV Menu settings ............................................................................................... 27
11. VGA, HDMI AND YUV 29
Connection........................................................................................................ 29
Settings in the VGA PC, HDMI and YUV Modes........................................................ 29
12. COMFORT FUNCTIONS 31
Picture in Picture (PIP) ........................................................................................ 31
Multi-Image (Station Overview) – Green button...................................................... 31
English Deutsch Français Italiano Español Nederlands Português Dansk Magyar
Child lock.......................................................................................................... 31
Sleep Timer....................................................................................................... 32
Swap Function ................................................................................................... 33
Establish swap channel (Preferred channel)...................................................... 33
Reverting to the Factory Setting........................................................................... 33
Switching On Mode............................................................................................. 34
Settings for all channels ...................................................................................... 34
Time display TIME........................................................................................ 35
Switch picture format - ARC................................................................................. 35
Switch picture presets - APC ................................................................................ 35
Freeze Frame function – Yellow button .................................................................. 35
Games.............................................................................................................. 35
13. WALL INSTALLATION 36
Installation Instructions....................................................................................... 36
14. TROUBLESHOOTING 37
15. OTHER QUESTIONS 38
Do you require additional Support?....................................................................... 38
Warranty .......................................................................................................... 38
Duplication of the Instructions for Use / Technical Data............................................ 38
iii
Page 4

iv
Page 5

.
S
11.
Please read through this section carefully and follow the instructions to maximize the reliable
operation and lifetime of your display. Always keep these instructions handy and close by your
display. Keep the instructions and the packaging so that if you sell or give away your display
you can supply them to the new owner.
AAFFEETTYY AANNDD
S
P
RREECCAAUUTTIIOONNS
P
S
OPERATING SAFETY
• The TV device must not be subjected to drips or sprayed water on any account.
• Do not allow children to play unattended with electrical equipment. Children may not
always correctly recognize danger.
• This display is intended for personal use only. It not intended for commercial use in a
heavy industry environment. Operation under extreme environmental conditions can
lead to damage to your device.
• An injury hazard exists when the display breaks. Wear protective gloves to pack the bro-
ken parts and send them into your service center for proper disposal. Then wash your
hands with soap, because it is possible for chemicals to escape.
• Never exert pressure on the display. This could break the monitor.
• Do not touch the display with your fingers or with sharp objects to avoid damage.
• Never open the housing of the display! When the housing is open there is a
danger of injury from electric shock!
• Do not insert any objects through the slots and openings of the monitor. This may
lead to an electrical short-circuit or even fire resulting in damage to your display.
• Slots and openings in the display are for ventilation purpose. Do not cover
these openings - the ventilation must not be impeded by covering the
ventilation openings with objects such as newspapers, tablecloths or curtains,
etc. (overheating and a danger of fire!).
English Deutsch Français Italiano Español Nederlands Português Dansk Magyar
• The danger of possible hearing damage will exist because of volume at the head-
phones that is too high. Reduce the volume of the headphones before you put them
on.
Attention! The device has sharp edges and corners that can cause injury, because of
its construction!
• Ensure sufficient stability of the device.
• Do not allow the corners of the device to jut out beyond the edges of furniture.
• Never bring your eyes close to the corners of the device. Be especially careful if you
are bending down over the device!
.
S
AAFFEETTYY AANNDD
11.
S
P
RREECCAAUUTTIIOONNS
P
S
1
Page 6

Turn the device off immediately, or do not switch it on in the first place, detach the
mains plug and contact customer service, if …
• ... the mains cable or the mains plug is worn or damaged. Have the defective cable
replaced by original parts. Such a cable must not be replaced under any circumstances.
• ... the housing of the device has been damaged, or fluids have penetrated it. Have
the device checked by customer service first. Otherwise, it may not be possible to
operate the device safely. Danger to life arising from an electrical shock can occur!
REPAIR
• Leave all repairs of your display to authorized and qualified personnel only.
• Should a repair be necessary, please contact one of our authorized service partners only.
POINT OF USE
• In the first hours of operation, new devices may produce a typical, unavoidable but com-
pletely harmless noise, which will diminish increasingly in the course of time. We recommend you to ventilate the room regularly, in order to counteract the formation of
smells. We have made sure during the development of this product that the applicable
limits have been clearly not exceeded.
• Keep your display and all units connected to it away from moisture and avoid dust, heat
and direct sunlight. Failure to observe these instructions can lead to malfunctions or damage to the display.
• Do not operate your device in the open air, because external influences, such as rain,
snow, etc. could damage the device.
• Do not place any containers filled with liquid (vases or similar) on the TV. The con-
tainer could tip over and the liquid could impair electrical safety.
• Do not place any open sources of fire (candles or similar objects) close to or on the
device.
• Pay attention to sufficiently large distances in the wall unit. Maintain a minimum dis-
tance of 10 cm around the device for sufficient ventilation.
• Place and operate all units on a stable, level and vibration-free surface in order to
avoid the display from falling.
• Avoid dazzle, reflections, extreme light/dark contrast in order to save your eyes
and ensure a pleasant, ergonometric work station.
• The optimum viewing distance is 5 times the screen diagonal.
ENVIRONMENTAL CONDITIONS
• The display can be operated most reliably at ambient temperatures between +41°F and +95°F
(5° C to 35° C) and at a relative humidity between 20% and 85% (without condensation).
• When switched off, the monitor can be stored most reliably between +14°F and +140°F (-
10° C - +60° C), up to the maximum height of 39,000 ft (12,000 m) above sea level at a
relative humidity between 10% and 85% (without condensation).
• After transporting your display please wait until it has assumed the ambient temperature
before connecting and switching it on. Extremely high variations in the temperature or
humidity may result in condensation forming on the inside of the display which could
cause an electrical short-circuit.
• Unplug the cable during thunderstorm and make especially sure to remove the antenna
cables.
2
E
NNGGLLIISSH
E
H
Page 7

CONNECTING
Observe the following instructions to connect your display properly:
POWER SUPPLY
• Operate your display only with grounded outlets with AC 220V-240V~ 50 Hz. If you are not
sure about the power supply at your location, check with your power company.
• Use only power connection cable provided.
• For additional safety we recommend use of a surge protector to protect your display from
damage resulting from voltage surges or lightning.
• To remove the display from the power supply, disconnect the plug from the AC outlet.
• The mains switch installed does not detach the TV from the mains supply completely.
• The power outlet must be in the vicinity of your display and within reach of the power
cables. DO NOT stretch the power cables tightly to reach a power outlet.
• If you use an extension cable, ensure that it fulfils the VDE requirements. Please ask
your electrician.
• You should arrange the display cables in a manner that no one can trip over or step on
them.
• To avoid damage of cable do not place any objects or furniture on the cable.
STANDARDS/ELECTRO-MAGNETIC COMPATIBILITY
Your display fulfils the requirements for electro-magnetic compatibility and electrical safety
specified in the following standards:
EN 55013, EN 55020, EN 60065, EN 61000-3-2, EN 61000-3-3
• Provide a space of at least three feet from high-frequency and magnetic sources of
interference (television sets, loudspeakers, mobile telephones, etc.) in order to avoid
malfunctions.
English Deutsch Français Italiano Español Nederlands Português Dansk Magyar
• The failure of individual or groups of luminous points can arise in rare cases, in spite of
the most up-to-date manufacture, because of the highly complex technology.
PRECAUTIONS
Caution! There are no parts which can be serviced or cleaned inside of the monitor
housing.
You can increase the life of your display by taking the following precautions:
• Before cleaning always disconnect the power line and all connection cables.
• Do not use any solvents, caustic or gaseous cleaning agents.
• Clean the display with a soft, lent-free cloth.
• Ensure that no water droplets remain on the screen. Water can cause permanent disco-
louration.
• Do not expose the screen to bright sunlight or ultraviolet radiation.
• Please keep the packaging material safely and use it exclusively to transport the monitor.
.
S
AAFFEETTYY AANNDD
11.
S
P
RREECCAAUUTTIIOONNS
P
S
3
Page 8

RECYCLING AND DISPOSAL
This appliance and its packaging was produced mostly from materials which can be disposed
of in an environmentally friendly manner and be professionally recycled.
After its use the TV will be taken back and recycled or use will be made of its useful material, if it is returned in a condition corresponding to its intended use. Parts not usable will be
properly disposed of.
Should you have any questions concerning the disposal please contact your dealer or our
service.
Device
At the end of its life, the appliance must not be disposed of in household rubbish. Enquire
about the options for environmentally-friendly disposal.
BATTERIES AND PROPER TREATMENT
Batteries may contain combustible materials. By misuse, this may cause battery leakage,
heat, explosion or ignition, bringing about injury or damage to the device. Please ob-
serve strictly the following matters:
• KEEP CHILDREN AWAY from batteries.
If by any chance, the batteries are swallowed, consult a doctor immediately.
• DO NOT CHARGE batteries (except rechargeable batteries).
• DO NOT FORCIBLY DISCHARGE batteries.
• DO NOT SHORT-CIRCUIT batteries.
• DO NOT HEAT or DISPOSE OFF IN FIRE.
• DO NOT DISASSEMBLE or DEFORM batteries.
Your hands and fingers may be injured, or the liquid of the battery may get into your
eyes or adhere to your skin. If this happens, rinse with a large quantity of water immediately and consult a doctor.
• DO NOT expose batteries to strong impact by dropping or throwing the batteries.
• DO NOT reverse the positive (+) and negative (-) terminals to avoid short-circuit.
• DO NOT MIX used and new or different types of batteries together.
Your equipment may not operate properly.
In addition, the battery exhausted first may be excessively drained (over-discharged).
• REMOVE PROMPTLY the used batteries from the device.
• REPLACE ALL BATTERIES with new batteries of the same type at the same time.
• INSULATE THE TERMINAL parts of batteries with tape while disposal or storage
Batteries
Do not dispose of used batteries in the household rubbish! They must be deposited at a col-
lection point for used batteries.
4
NNGGLLIISSH
H
E
E
Page 9

.
I
NNTTRROODDUUCCTTIIOONN
22.
I
Thank you for purchasing our Multi-display. We thank you for your confidence in our products and are pleased to greet you as a new customer. We focused on great features, ease of
use and reliability in manufacturing your display.
SERVICE
Service and support will be available every time you use your new monitor. Contact us, we
will be glad to help you. This manual contains a separate chapter on the subject of 14. Troubleshooting on page 37.
English Deutsch Français Italiano Español Nederlands Português Dansk Magyar
.
I
NNTTRROODDUUCCTTIIOON
22.
I
N
5
Page 10

PERFORMANCE CHARACTERISTICS
Advantages in relation to CRT (cathode ray tube) displays:
¾ Less space required
¾ Lower weight
¾ Power savings
¾ Low radiation
Features
¾ High resolution display
¾ On Screen Display (OSD) – Graphic operating surface
¾ 499 channel slots, 3 AV settings, HDMI, YUV and VGA Modes
¾ Multi-standard PAL, SECAM, NTSC
¾ “HD ready” - HDTV compatible
¾ The following connections are available:
- Tuner connection
- SCART/AV1 (Video, S-Video, RGB, YCrCb, YPrPb)
- SCART/AV2 (Video, S-Video, RGB, YCrCb, YPrPb)
- Front AV.SV (Video/S-Video and Audio In)
- Headphones
- Analogue and digital multimedia input (VGA and HDMI connection)
- Audio-in for VGA and HDMI
- YUV (components) input
- Audio In for YUV
- Line Out
¾ Easy to operate remote
¾ Easy to operate Picture Menu system
¾ Automatic APSAS installation system (Automatic Program Search And Sort)
¾ TOP/FLOF Teletext function with 2,100 page memory and multi-page text
¾ Completely digital picture improvements:
- Dynamic noise reduction
- Comb filter
- Perfect Clear
- Image sharpness
- CTI
¾ Dual-tuner PIP: PIP from two different signal sources
¾ Freeze frame and multi-image (station overview)
¾ Full picture format independent of the signal source
¾ Headphones socket for screened listening pleasure
¾ Integrated 2-way loudspeaker system with 4 loudspeakers
¾ Decoder function
¾ Intelligent Swap Function
¾ Sleep Timer
¾ Child Lock
¾ Plug and Play: automatic recognition of your operating system
¾ Four games: Brixx, Anaconda, Scramble and Outer Space
6
E
NNGGLLIISSH
E
H
Page 11

.
C
33.
The buttons on the device control the basic functioning of the TV, including the On-Screen
Menu. You will reach the advanced functions through the remote.
• Detailed view of front and side:
Note: Please read chapter “10. Connecting External Devices” on page 26 for further information about operating external device.
OONNTTRROOLL
C
E
LLEEMMEENNTTSS AANNDD
E
S
S
IIDDEE
C
OONNNNEECCTTIIOONNS
C
Operating display
A blue light indicates that the devices
has been turned on but is in the readiness mode.
The light will shine yellow when the
device has been switched on.
Sensor window
Point the remote to this region of the
screen.
Control elements & side connections
The side connections and some of the
control elements are located on the side
of the device.
Power:
Switches the TV on or into Readiness Mode
P+/P- Program +/-
Setting buttons in the Screen Menu
\+/\- Volume +/-
Setting buttons in the Screen Menu
MENU button
EXIT button
AV.SV input
Headphones output
S
English Deutsch Français Italiano Español Nederlands Português Dansk Magyar
33.
.
C
OONNTTRROOLL
C
E
LLEEMMEENNTTSS AANNDD
E
S
C
IIDDEE
S
OONNNNEECCTTIIOONNS
C
S
7
Page 12
.
B
44.
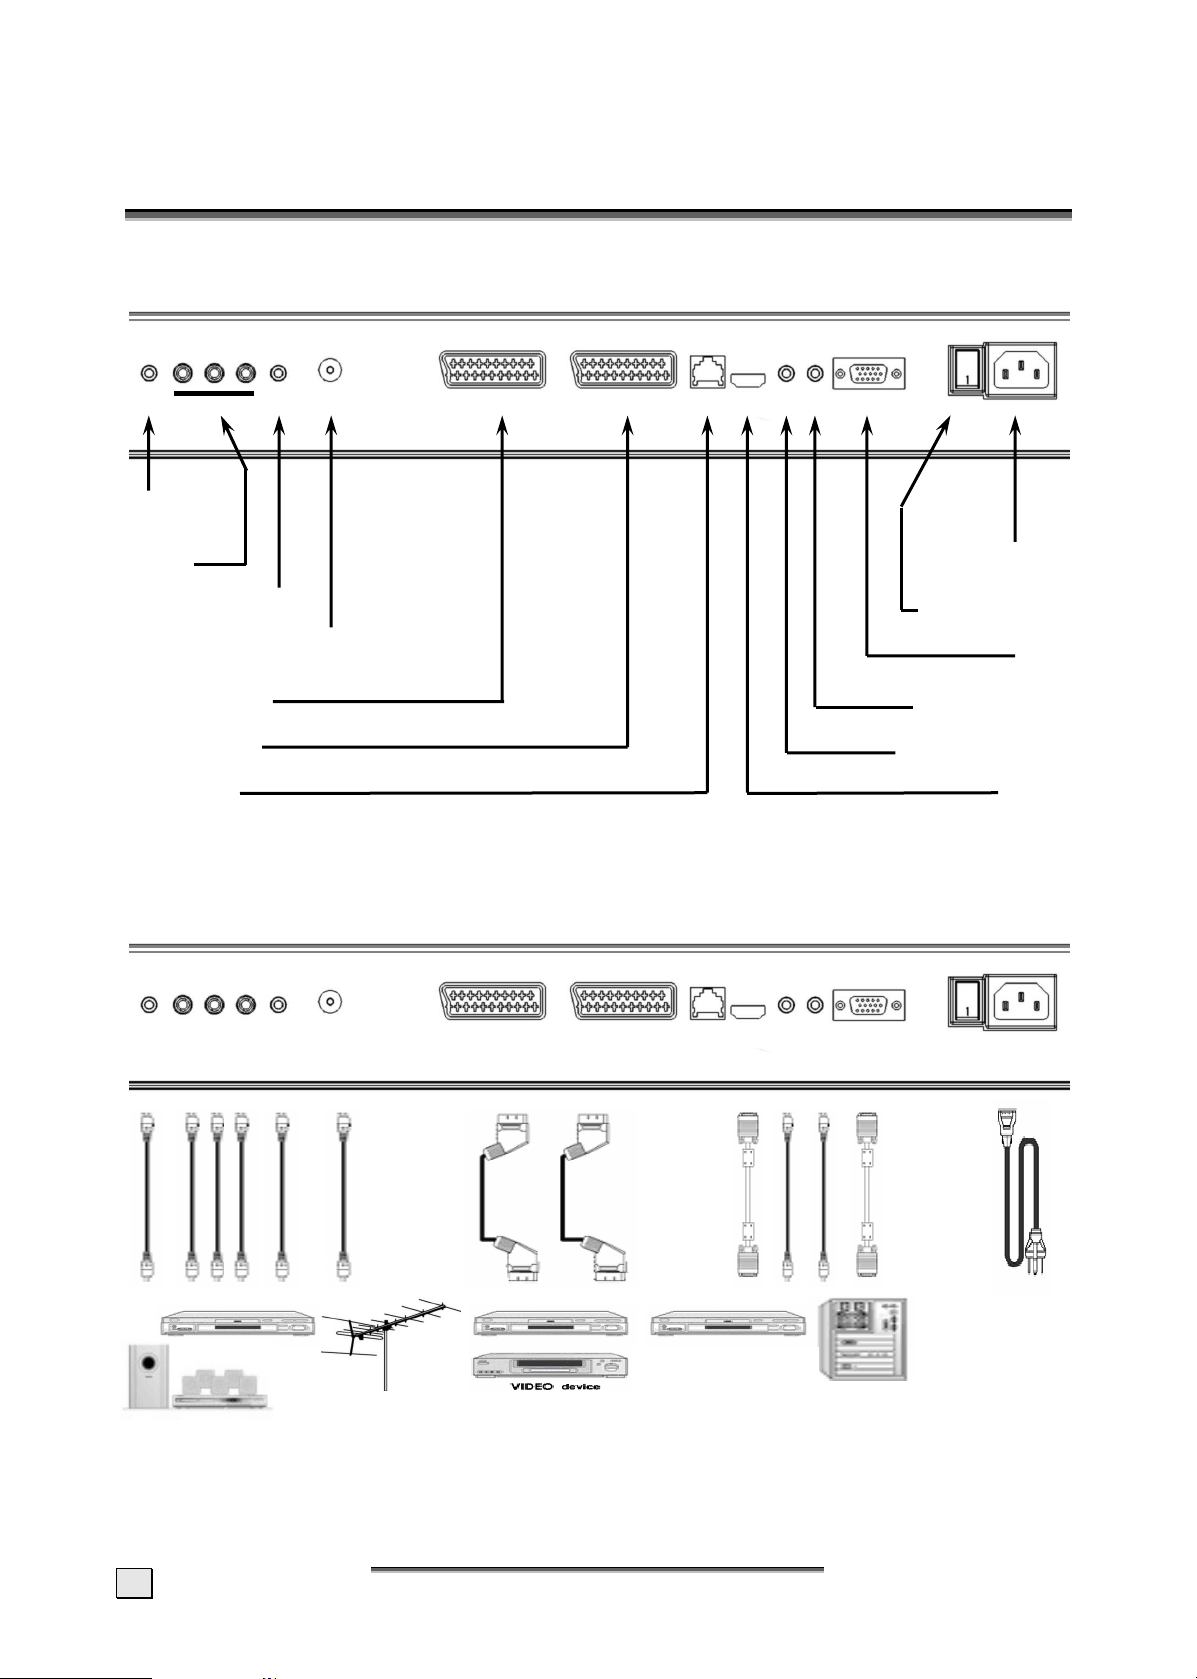
• View from diagonally below
Information: The service socket is exclusively intended for our authorized service partners.
Improper use can lead to damage to your TV device.
Note: Please read chapter „10. Connecting External Devices“on page 26 for further information about operating external devices.
AACCKK OOFF TTHHEE
B
Line Out
YUV
YUV Audio IN
Aerial connection
Scart/AV1
Scart/AV2
Service
D
EEVVIICCEE AANNDD
D
C
OONNNNEECCTTIIOONNS
C
S
Mains plug
Mains switch
VGA
VGA Audio IN
HDMI Audio IN
HDMI
8
E
NNGGLLIISSH
E
H
Page 13

.
R
55.
This is for a remote that is suitable for your TV; you will find the relevant button identification and arrangement on the following page:
EEMMOOTTEE
R
• Open the battery compartment of the remote by removing the cover.
• Insert Micro / AAA type batteries into the battery compartment on the back of the re-
mote. Pay attention to the polarity of the batteries (marked on the base of the battery
compartment) at the same time.
C
OONNTTRROOLL
C
English Deutsch Français Italiano Español Nederlands Português Dansk Magyar
55.
.
R
R
EEMMOOTTEE
C
OONNTTRROOL
C
L
9
Page 14

SUMMARY OF CONTROL BUTTONS
Device on or switch to Readiness Mode
POWER
Selecting the Signal Source
1 – 9, TV Switch to the TV mode.
PC Switches between VGA PC, YUV and HDMI
AV.SV Switches to video mode or S-video mode
SCART 1 Switches to SCART 1
SCART 2 Switches to SCART 2
0 Switches between VGA PC, HDMI, YUV, AV.SV, SCART/AV 1 and SCART/AV 2
Menu Setting
MENU/ENTER Display the main on-screen menu or enter the next menu.
ST P+/P- Press to select the item you want to adjust in the OSD menu.
VOL -/+, WX Press to decrease or increase the value in the OSD control bar.
EXIT One level back in the Menu.
Changing Channels
ST P+/P- Press P+ or P- to change programs in TV mode.
0-9 To select programs directly in TV mode.
RTN Press to return to the previous program.
Sound Control
VOL -/+, WX Press to turn up or turn down the volume.
MUTE
SOUND Press to change directly to the Sound Menu
Teletext Control
TELETEXT
INDEX
STOP
INTERRUPT
REVEAL
EXPAND
ST P+/P- Press P+ or P- to use Page Catching
PIP Control
ON/OFF Press to watch one of the video sources on Sub-display, whilst in OC mode. Press again to
PIP SOURCE, ST Selects the source of the PIP Window.
POSITION To shift the PIP Window.
SIZE Sets the size of the PIP Window.
Other Functions
RST, RESET Reset the original factory setting, such as Contrast and Colour.
YELLOW BUTTON Press to switch freeze frame function on and off
GREEN BUTTON Press to switch multi-image (station overview) on and off
RED BUTTON Press to call up the Picture Menu
BLUE BUTTON Press to call up the Sound Menu
ARC
APC
DISPLAY Displays the current signal source, program number and sound options.
SLEEP Press to select a preset time interval for automatic power off.
TIME
Switches the device on or into Operating Mode alternately
Press to switch the sound on or off.
Press to show the Teletext Service. Press again to return to TV viewing.
Press to show the list of Teletext contents.
Press to stop the automatic page change.
Press to switch to TV while waiting for the next page.
Press to display concealed information, such as solutions of riddles or a quiz.
Press to enlarge the top half or bottom half of the Teletext page.
turn off the Sub-display.
Changes the format.
Adjusts the backlight in three levels.
Press to display the digital or the analog clock alternately and switch off
10
E
NNGGLLIISSH
E
H
Page 15
.
66.
AAPPSSAAS
Your TV device has the APSAS (Automatic Program Search And Sort) automatic installation
system and a graphic OSD (On Screen Display) operating surface. Both systems will make
the initial installation and the operation of your device in future easier for you.
1. After removing the display packaging, ensure the product is installed in a safe and
well ventilated position.
2. Insert two AAA type batteries into battery compartment on the rear of the remote
control.
3. Connect the external 75 Ohm aerial cable and the electricity cable to the relevant connections and make sure that the mains switch on the back is switched
on.
4. The initial Installation Menu will appear when you switch on your TV for the first
time by pressing the POWER button on the remote. Carry out the following settings and use the STWX P+/P-, VOL+/- and MENU buttons to control the
menus.
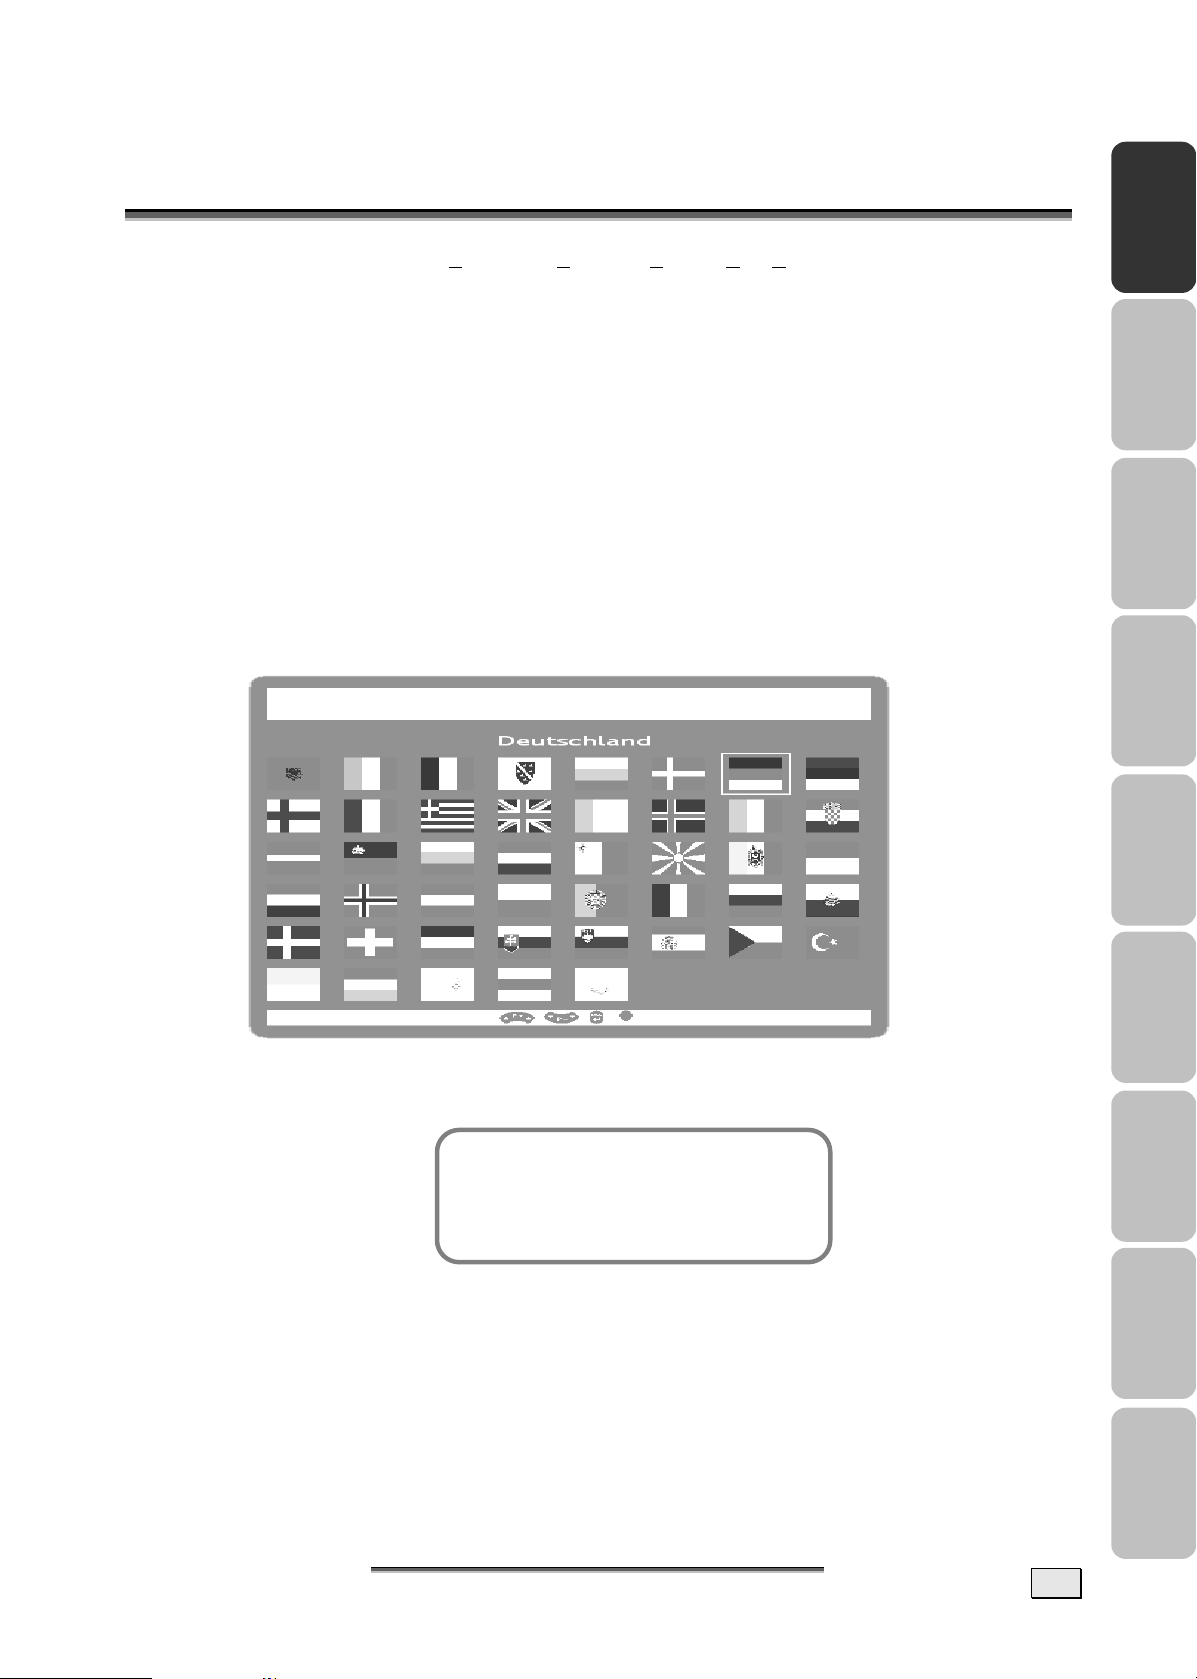
5. The flags of all locations for which the TV is suitable will appear on your screen.
S
F
IIRRSSTT
F
T
T
IIMMEE
I
NNSSTTAALLLLAATTIIOON
I
N
English Deutsch Français Italiano Español Nederlands Português Dansk Magyar
6. Please select the flag of the location where you are with the STWX P+/P-,
VOL+/- setting buttons and confirm your selection with the MENU button. The
Menu will appear after you have made your selection.
1. Location select Germany
2. Language German
3. Start Cancel/Continue
7. The location will have been set in accordance with your flag selection. You can
return to the flag selection at the Location Select Menu Point, if you want to
correct the country setting again.
8. The language of the country suitable to the selected location will have been
preset automatically. However, you can select any other Menu language at the
Language Menu Point.
.
66.
AAPPSSAAS
New installation
F
F
IIRRSSTT
T
IIMMEE
T
S
I
NNSSTTAALLLLAATTIIOON
I
N
11
Page 16

9. Please go to the Start Menu Point with the assistance of the ST P+/P- setting but-
tons, after you have selected your preferred language.
The automatic initial setting is started by selecting ‘Further’ by means of MENU and
the ST P+/P- buttons. During this, the device will automatically search for all the
television channels that can be received at your location, and sort them and store
them according to your entries concerning the location and the language. The following Menu will appear at the same time:
Frequency
Channel type
Last station
Found so far
Automatical Search
Cancel
10. This Menu simply has a display function to inform you about the progress of the
initial installation. However, press the MENU button if you want to cancel the
station search. No television channels will, however, be stored in this case. You
will reach the start of the initial installation again if you switch the device off
and on again.
11. The program table will appear on the screen after the initial sound setting has
finished. You can move, rename, delete and add channels, or carry out fine adjustments in the program table (you will find details about this in „Program table“ from Page 19).
SCART1 TV.........
SCART2 TV.........
AV.SV TV.........
VGA PC TV.........
HDMI TV.........
YUV TV.........
TV 1 ARD TV.........
TV 2 ZDF TV.........
TV 3 …… TV.........
Program table
• Delete • Move • Edit
12. Press EXIT to reach the TV Mode directly, if you do not want to carry out any
changes to the automatically stored and sorted channels.
12
E
E
NNGGLLIISSH
H
Page 17

77.
.
G
G
EENNEERRAALL
C
OONNTTRROOLLSS
C
&
A
DDJJUUSSTTMMEENNT
&
A
T
TURNING THE DISPLAY ON AND OFF
The mains switch of the TV is located on the back of the device. The device moves to Readiness Mode if this switch is switched on.
The operating display will shine blue in the readiness mode. The device can be switched to
the normal operating mode by means of the POWER button on the remote.
The operating display will shine yellow in the normal operating mode. The device can be
switched back to readiness mode by means of the POWER button on the remote or on the
device.
Please wait 15 seconds before operating the mains switch again if you switch the device off
with the mains switch.
Note: The energy consumption of the TV reduced to the minimum necessary in Readiness
Mode. No energy is consumed, but there is no complete detachment from the mains, if the
mains switch of the TV is switched off!
CALLING UP MENUS AND OPERATING THE ON-SCREEN CONTROL
Your TV device has a graphic OSD (On Screen Display) operating surface, which will make
the operation and management of your TV device easier for you.
1. Press the MENU button when the device is switched on. The Main Menu will appear on
the screen then.
English Deutsch Français Italiano Español Nederlands Português Dansk Magyar
Main Menu
1. Picture
2. Sound
3. Program table
4. Installation
5. Child lock
6. Sleeptimer
7. Swap function
8. Games
2. You navigate through the Menus with the ST P+/P- buttons. Press the MENU button
when the cursor is on the required Menu Point. This will activate that Menu Point.
3. The Menu Points can be called up and activated directly by means of the Number buttons.
4. A selection window will appear or the Setting / Entry Mode will be switched on when a
sub-menu is activated, according to the Menu Point.
5. You can leave the relevant Menus, sub-menus, selection window or the Setting / Entry
Mode again by pressing EXIT.
6. The buttons that each function in the respective Menu has are displayed in the last line of
the Menu.
7. Functions that cannot be selected in a particular additional status of the device are pre-
sented in grey type.
77.
.
G
G
EENNEERRAALL
C
OONNTTRROOLLSS
C
&
A
DDJJUUSSTTMMEENNT
&
A
T
13
Page 18

CONTINUE SWITCHING CHANNELS
You have three different possibilities to switch through the channels available:
1. Through direct entry of the channel number:
You will call up the channel directly through the 0-9 buttons. You can enter the following
digit within 2 seconds after entering the first digit, in order to call up multi-digit channel
numbers.
2. You switch through the channels running by pressing the ST P+/P- buttons briefly.
3. A list of channels, within which you are able to change the ST P+/P- buttons, is dis-
played by pressing these buttons for a longer time. This list of channels can also be displayed directly by pressing the DISPLAY button.
SWITCHING BETWEEN THE TV AND SOURCES OF EXTERNAL SIGNALS
Switch on connected devices (video recorder, DVD player, PC, SAT receiver, etc.) and press
the relevant button on the remote:
¾ Press the TV button to switch to TV mode.
¾ Press the PC Button to switch alternately between the VGA PC, YUV and the HDMI
mode.
¾ Press the AV.SV button to switch to video mode.
¾ Press the SCART 1 or SCART 2 Button, to select the SCART/AV1 or SCART/AV2 in-
put.
The Scart sockets have automatic recognition whether the connected device has been
switched on (provided that this is supported by the connected device). In most cases,
switching over to the Scart inputs used takes place automatically through this and does not
have to be selected manually.
VOLUME CONTROL
USING VOLUME CONTROL
Press WX VOL-/VOL+ button to turn up or turn down the sound volume.
USING MUTE
At any time, you can temporarily turn off the sound by pressing the MUTE button.
1. Press the MUTE
2. Press the MUTE
previous level.
button and the sound cuts off.
again or WX VOL-/VOL+ button to turn the sound back to the
PICTURE (CONTRAST, COLOUR, BRIGHTNESS, ETC.)
Your TV device offers you the possibility of establishing individual values for the picture settings according to your preference, in the case of the TV and AV settings.
For example, lower brightness and contrast values are used for the PC Mode than for other
types of operation. Apart from this, there is the possibility of selecting optimized factory
presets for contrast and brightness (EVENING, DAYTIME).
Variation 1: Press the RED button to reach the Picture Menu directly.
Variation 2: Press the MENU button to call up the Main Menu, set the cursor on PICTURE by
means of the ST P+/P- buttons and call up the appropriate Menu by means
of the MENU button.
14
E
NNGGLLIISSH
E
H
Page 19

1. Preset
Picture
2. Contrast
3. Colour
4. Brightness
5. Format
6. Tint
7. Settings VGA HDMI YUV
8. Continue Picture
1. Preset:
Here, you can choose between the optimal factory presets or manual contrast and
brightness setting. The selection is made with the WX VOL-/VOL+ buttons or through a
menu by means of MENU. The preset can also be selected outside the Picture Menu by
means of the APC button.
¾ DAYTIME:
Here, the contrast of the picture is increased, to achieve an optimum presentation of
the picture in daylight or in the case of night scenes.
¾ EVENING:
The contrast of the picture is reduced here. An attractive picture arises through this,
particularly in the evening, when there is little surrounding light.
¾ MANUAL:
You can establish contrast and brightness yourself, to adjust the picture to your requirements.
English Deutsch Français Italiano Español Nederlands Português Dansk Magyar
2. You can adjust the contrast, brightness and colour values with the WX VOL-/VOL+ buttons, depending on the preset. Contrast and brightness are only available if the PRESET
Menu Point has been set at MANUAL.
3. Format:
The required picture format can be set with the WX VOL-/VOL+ buttons. This setting
can also be carried out directly outside the Picture Menu with the ARC button.
¾ AUTO: The device selects the picture setting suitable to the channel transmitted at
the time independently and adjusts it continuously to the channel in this mode.
¾ 4:3: This setting sets the side ratios of the picture at 4:3 for traditional television
programs. Black bars appear on both sides of the screen.
¾ PANORAMA: Adjusts a 4:3 video source to the 16:9 ratio, where the corners of the
picture are mainly stretched. This reduces distortion in the center of the picture.
¾ CINEMA: Some DVD films or Cinemascope broadcasts do not fill the upper and lower
edges of the screen. The Cinema function stretches the height, to fill the screen.
¾ WIDE PICTURE 16:9: 16:9 broadcasts are reproduced without distortion. 4:3 video
sources are stretched evenly to fill the screen. Distortion arises both in the centre
and at the corners of the picture here.
4. Tint:
The colour impression can be changed for NTSC images (e.g. video cassettes from the
USA) with the WX
5. Settings VGA, Settings HDMI and Settings YUV:
VOL-/VOL+ buttons.
This point can only be selected in the VGA PC, HDMI and YUV Mode in each case. See
chapter “11. VGA, HDMI and YUV“ on page 29 for a more detailed explanation.
77.
.
G
G
EENNEERRAALL
C
OONNTTRROOLLSS
C
&
A
DDJJUUSSTTMMEENNT
&
A
T
15
Page 20

ADDITIONAL PICTURE SETTINGS
Move the cursor to ADDITIONAL PICTURE SETTINGS with the ST P+/P- buttons and press
the MENU button.
1. Noise reduction
2. Sharpness
3. Comb filter
4. Colour registration
5. Backlight
6. White balance
7. Perfect Clear
8. Antiflicker
9. Picture ratio 4:3
Continue Picture
Further fine adjustments in relation to the impression made by the picture can be carried
out in this Menu.
1. Noise Reduction:
The picture quality can be improved, in the case of grainy pictures with this function. The
AUTOMATIC/OFF/WEAK/MEDIUM/LOUD settings can be selected through a menu with the
WX VOL-/VOL+ buttons or the MENU button.
The device will adjust the noise reduction automatically to the reception quality at the
AUTOMATIC setting. The MEDIUM and LOUD settings should only be selected in the case
of a heavily distorted picture, because jerky movements can arise if the picture content
is moving fast. This setting can be set individually for each channel slot.
2. Sharpness:
The picture sharpness can be adjusted to your personal requirements with the WX VOL-
/VOL+ buttons. You reach the Settings Mode by pressing the MENU button. The menu
is faded out, in order to be able to assess the picture, and the setting can be carried out
through a setting bar. This setting can be set individually for each channel slot.
3. Comb Filter:
Disruptive wave lines in check patters in the picture content can be avoided by activating
this function.
4. Colour Registration:
This function serves to even out differences arising between the coloured parts of the
picture and the picture contours.
The setting can take place in the Menu with the WX VOL-/VOL+ buttons. You also reach
the Settings Mode, by pressing the MENU button. The menu is faded out and it is possible to carry out the setting through a setting bar. This setting can be established individually for each channel slot.
5. Backlight (Only active in the case of LCD TV devices – not in the case of plasma TVs):
The brightness of the background lighting of the TV can be controlled with this function.
You can choose between the WEAK/ MEDIUM/ NORMAL/ FULL settings through one menu
with the WX VOL-/VOL+ buttons or the MENU button.
6. White Balance:
You can adjust the whiteness impression to your requirements in three stages with the
WX VOL-/VOL+ buttons.
7. Perfect Clear:
You can activate a special digital Picture Improvement Mode with the WX VOL-/VOL+
buttons under this Point.
16
E
NNGGLLIISSH
E
H
Page 21

8. Antiflicker (only active in the case of Plasma-TVs– not in the case of LCD-TV-devices):
Disruptive, large-surface flickering can be reduced by activating this function. However,
quick movements will become less sharp and jerky through this.
9. Picture ratio 4:3:
You can set the colour of the stripes next to the picture in the 4:3 format with this function. You will be able to choose between the BLACK/DARK/LIGHT/WHITE settings with
the WX VOL+/VOL- buttons or the MENU button by means of a list of choices.
SOUND (BALANCE, EQUALIZER, ETC.)
Different settings in relation to the sound reproduction of your TV can be made in this Menu.
Variation 1: Press the BLUE button to reach the Sound Menu directly.
Variation 2: Press the MENU button to call up the Main Menu, set the cursor on SOUND by
means of the ST P+/P- buttons and call up the associated Menu by means of
the MENU button.
1. Volume:
This Point corresponds to the volume setting, which can also be regulated directly outside the Menu with the WX VOL-/VOL+ buttons.
Sound
1. Volume
2. Balance
3. Equalizer
4. Preset
5. Headphone
6. Surround
7. Audio channel
8. Automatic Volume
9. Loudness
English Deutsch Français Italiano Español Nederlands Português Dansk Magyar
2. Balance:
Differences in volume between the left and the right loudspeaker can be evened out
here, managed around an optimum sound impression, if your viewing position in front of
the TV is not central.
3. Equalizer:
You can increase or reduce individual frequencies of the sound reproduction at this Point,
as you can in the case of your stereo equipment. It is only possible to select this Menu
Point if the PRESET Menu Point is set at MANUAL. Set the Selection Bar at EQUALIZER by
means of the ST P+/P- buttons and press the MENU button.
Equalizer
1. Preset
2. Basic settings
3. 120 Hz
4. 200 Hz
5. 500 Hz
6. 1200 Hz
7. 3000 Hz
8. 7500 Hz
9. 12000 Hz
¾ You can choose between POP/ CLASSIC/ LANGUAGE/ JAZZ/ FLAT Equalizer pre-
settings under PRESET. The selection is made either through the WX VOL-/VOL+
buttons or through a Menu that can be reached through the MENU button.
Each Equalizer preset corresponds to a particular predetermined setting in relation to
increasing or lowering the individual frequencies to achieve particular sound effects.
77.
.
G
G
EENNEERRAALL
C
OONNTTRROOLLSS
C
&
A
DDJJUUSSTTMMEENNT
&
A
T
17
Page 22

The individual frequencies cannot be changed and are thus presented as grey, if one
of the presets previously listed has been selected.
¾ You will be able to set the sound reproduction of your TV for the frequencies given
according to your personal perceptions, if the MANUAL setting under PRESET is selected. Move the Selection Bar to the relevant frequency with the ST P+/P- buttons
and carry out the setting by means of the WX VOL-/VOL+ buttons.
¾ You can return to the preset basic values by calling up the basic settings, if you are
not satisfied with your changes. To do this, set the Selection Bar on BASIC SETTINGS
with the ST P+/P- buttons and press the MENU button.
4. Preset:
Fast selection for the equalizer presets – see Equalizer
5. Headphones:
You can adjust the volume, bass and treble settings for headphones under this Point.
Move the Selection Bar to HEADPHONES with the ST P+/P- buttons and call up the
relevant Menu by pressing the MENU button. The values can be changed by means of
the WX VOL-/VOL+ buttons.
Headphone
1. Volume
2. Bass
3. Treble
6. Surround Sound:
The different NORMAL/WIDE/CINEMA surround sound settings can be selected through a
Menu by means of the WX VOL-/VOL+ buttons or by pressing the MENU button.
Note: Cinema Surround is a technology certified by Dolby Laboratories, which creates a
virtual surround sound experience with only two loudspeakers through the use of Dolby
Pro Logic.
Cinema Surround reproduces all original multi-channel audio information and gives the
listener the impression of being surrounded by additional loudspeakers
7. Audio Channel:
You can select the audio channel with this function. For example, it offers the possibility
of choosing between two languages in the case of dual language broadcasts.
You can choose between the STEREO/ MONO/ DUAL SOUND A/ DUAL SOUND B/ MONO C
settings either with the WX VOL-/VOL+ buttons or through a Menu, accessible by
means of the MENU button, after you have set the Selection Bar at AUDIO CHANNEL
with the ST P+/P- buttons.
The sound channels that can be selected are dependant on the broadcast that you are
watching at the time. Settings that cannot be selected are represented in grey. The setting that you make in this Menu will be set back after a channel slot change.
If you want a long-term change to the audio channel on one station (e.g. you want to
always receive the second language of one station), make this setting in the PROGRAM
EDIT Menu – see chapter “Setting channels manually” on page 21. You will also find a
more description in relation to the possible settings in this section.
8. Automatic Volume:
The volume of your TV will be regulated automatically after this function has been activated, so that loud sound passages (e.g. during advertising breaks) are no longer disruptive.
9. Loudness:
You can switch a volume-dependant sound adjustment on or off under this Point.
18
E
E
NNGGLLIISSH
H
Page 23

88.
.
TTV
V
M
M
OODDEE
A
DDJJUUSSTTMMEENNT
A
T
ADJUSTING TV SETTINGS
1. Switch the TV device to the TV Mode with the 1 - 9 buttons on the remote.
2. Press the Menu key and select TV on the screen menu.
Main Menu
1. Picture
2. Sound
3. Program table
4. Installation
5. Child lock
6. Sleeptimer
7. Swap function
8. Games
3. Select the PROGRAM TABLE Menu Point with the ST P+/P- buttons and press the
MENU button.
English Deutsch Français Italiano Español Nederlands Português Dansk Magyar
PROGRAM TABLE
The program table indicates the names and numbers of the channels. You can change program names, edit, delete, add or move programs or carry out fine adjustments in this list.
SCART1 TV.........
SCART2 TV.........
AV.SV TV.........
VGA PC TV.........
HDMI TV.........
YUV TV.........
TV 1 ARD TV.........
TV 2 ZDF TV.........
TV 3 …… TV.........
• Delete • Move • Edit
Note: The SCART1, SCART2, AV.SV, VGA PC, HDMI and YUV channels cannot be deleted or
shifted.
Program table
DELETE A PROGRAM
1. Go to the program in the program table that you want to delete with the help of the
STWX P+/P-, VOL+/- buttons.
2. Press the RED button to call up the delete function directly or call up an Edit Functions
Menu with the MENU function and select DELETE.
3. Now, you will reach the security query. Select DELETE with the assistance of the ST
P+/P- buttons and carry the action out directly with the MENU button or by pressing
the RED button again.
.
88.
TTV
M
M
OODDEE
A
DDJJUUSSTTMMEENNT
A
V
T
19
Page 24

MOVING AND SORTING CHANNELS
1. Go to the channel slot in the program table that you would like to move or sort with the
assistance of the STWX P+/P-, VOL+/- buttons.
2. Press the GREEN button to call up the sorting function directly or call up an Edit Functions Menu with the MENU function and select MOVE.
3. The respective channel will now be marked in colour.
4. Move the channel to the channel slot that you require with the assistance of the STWX
P+/P-, VOL+/- buttons.
5.
Store the changes that you have carried out by pressing the GREEN or the MENU button
again.
CHANGING THE NAMES OF CHANNELS
1. Go to the channel slot that you would like to edit with the help of the STWX P+/P-,
VOL+/- buttons.
2. Either press the YELLOW button to call up the processing function directly or call up an
Edit Functions Menu with the MENU function and select EDIT.
3. The screen will now display the Program Edit, AV Edit, SETTINGS VGA, SETTINGS HDMI
or SETTINGS YUV menu:
Program edit
1. Frequency input
2. Tuning
3. Channel grid
4. Channel type
5. Channel number
6. Change name
7. TV-Standard
8. Colour standard
9. Audio channel
10. Adjustment
11. Decoder
1. Change name
2. Colour standard
3. Adjustment
Settings VGA HDMI YUV
1. Mode
2. Change name
3. Input
4. Horizontal position
...
AV edit
4. Go to the CHANGE NAME Menu Point with the assistance of the ST P+/P- buttons and
press the MENU button.
5. Now, you can select the letters required with the ST P+/P- buttons. You will reach the
next position with the WX VOL-/VOL+ buttons (each channel name can be 8 symbols
long). You will leave the name selection with the MENU or EXIT button.
6. Press the EXIT button and confirm that you would like to store the changes that you
have carried out with YES.
20
E
E
NNGGLLIISSH
H
Page 25

SETTING CHANNELS MANUALLY
1. Go to the channel slot in the program table that you would like to edit with the assistance of the STWX P+/P-, VOL+/- buttons.
2. Either press the YELLOW button to call up the processing function directly or call up an
Edit Functions Menu with the MENU function and select EDIT.
3. Now the screen will display the PROGRAM EDIT or AV EDIT Menu:
1. Frequency input
2. Tuning
3. Channel grid
4. Channel type
5. Channel number
6. Change name
7. TV-standard
8. Colour standard
9. Audio channel
10. Adjustment
11. Decoder
Program edit
1. Change name
2. Colour standard
3. Adjustment
AV edit
English Deutsch Français Italiano Español Nederlands Português Dansk Magyar
4. Frequency entry:
Here, you can change the reception frequency or enter it directly. Position the Selection
Bar at FREQUENCY ENTRY with the ST P+/P- buttons. Now, you will be able to change
the reception frequency with the WX VOL-/VOL+ buttons.
At the same time, attention should be paid that that the display bar of the 2nd TUNING
Menu Point is positioned in the center, because the station is set optimally then.
You can also enter the reception frequency directly with the number buttons by pressing
the MENU button. You will leave direct sound entry again with the MENU button.
5. Channel grid:
The channel grid can be changed with the MENU button (Menu) or the WX VOL-/VOL+
buttons. The channel grid represents the setting of the channels to the frequencies available and can vary according to the location (e. g. CCIR in Germany differs from the setting necessary in France).
6. Channel type:
The channel type can be changed with the MENU button (Menu) or the WX VOL-/VOL+
buttons. It is possible to select between channels and special channels or special channels in individual states (e.g. C1 in France), depending on the setting of the channel grid.
7. Channel number:
You can enter the channel number of the channel slot that you require directly here. You
can increase or decrease the current sound channel number with the WX VOL-/VOL+
buttons. A cursor will appear and you will be able to enter the channel number directly
with the number buttons when you press the MENU button.
8. TV Standard:
The TV standard can be changed with the MENU button (menu) or the WX
VOL-/VOL+
buttons. Settings related to the transmission norm (location-dependant) of a station can
be made here.
.
88.
TTV
M
M
OODDEE
A
DDJJUUSSTTMMEENNT
A
V
T
21
Page 26

9. Colour Standard:
The colour standard can be changed with the MENU button (menu) or the WX VOL-
/VOL+ buttons. Changes to the colour norm of a station can be made here.
10. Audio channel:
The preferred audio channel can be selected with the MENU button (Menu) or the WX
VOL-/VOL+ buttons. The device selects the optimum sound setting in accordance with
the NICAM priority (a digital sound norm used by some stations) before stereo or mono,
independently the AUTOMATIC position. Setting it to MONO can sometimes be advantageous in the case of audio problems on a stereo station. The second language on a dual
language station can be selected with DUAL SOUND B. The MONO C setting is only relevant to NICAM stations that broadcast in several languages.
11. Adjustment:
The ADJUSTMENT Menu Point on this channel slot should be positioned at VCR, to avoid
picture distortion (conversion to fast time constants), if you want to operate a video recorder through an HF channel slot (connection with aerial cable) or through an AV channel (connection with Scart cable). The setting can be made by means of the MENU button (Menu) or the WX VOL-/VOL+ buttons.
12. Decoder:
This setting is important for the operation of a decoder on the SCART/AV2 socket, in order to be able to receive encrypted stations. The setting can be made by means of the
MENU button (Menu) or the WX VOL-/VOL+ buttons.
The OFF setting usually means normal television operation without a decoder. The decoded picture signal is presented automatically at all other settings. The difference between the decoder settings consists of whether the respective station decrypts the sound
additionally or not. The following Table is intended to explain the connections.
Decoder Setting Station/Sound Sta-
tion/Picture
Off Decrypted Decrypted TV TV
Sound Output
Source
Picture Presen-
tation of
External/Internal
Sound
External Sound Analog Encrypted
Internal Sound Analog Decrypted
Analog Encrypted
Nicam Decrypted
Nicam Encrypted
Nicam Decrypted
Encrypted Analog Decoder
NICAM TV
Encrypted Analog Decoder
NICAM Decoder
Encrypted Analog TV
Nicam TV
Decoder
Decoder
Decoder
Note: Read the instructions for use of your decoder or ask the provider of the encrypted
channel for the correct setting.
13. Press the EXIT button and confirm that you want to store the changes carried out with
YES.
Note: The settings described above are only necessary in exceptional cases (manual setting
of a new station, connection of a decoder, etc.). The automatic APSAS station search carries
out most of the settings independently.
22
E
NNGGLLIISSH
E
H
Page 27

MANUAL ADDITION OF CHANNELS
1. Go to the first empty channel slot following the channel slots already stored in the program table with the STWX P+/P-, VOL+/- buttons. Press the MENU button and select
the NEW TV signal source.
2. Now enter the channel type and subsequently the channel number or the relevant frequency. Check the remaining settings for correctness in relation to the required station(see chapter „Setting channels manually“from page 21).
3. Press the EXIT button and confirm that you want to store the changes carried out with
YES.
ADD NEW CHANNELS AUTOMATICALLY
This function is very useful if the range of channels in your reception area (e.g. on the cable
network) is increased. An automatic station search, which will store all channels newly added
since the last station search, is started.
1. Press the MENU button to reach the Main Menu.
2. Select the INSTALLATION Point with the ST P+/P- buttons and press the MENU button
again.
English Deutsch Français Italiano Español Nederlands Português Dansk Magyar
Installation
1. Select Location
2. Language
3. New installation
4. Search new programs
5. AV Settings
6. Switch on
7. Setting of all programs
8. Basic settings
9. Start logo
10. Service
3. Select the SEARCH FOR NEW CHANNELS Menu Point with the ST P+/P- buttons, press
the MENU button and select START. The AUTOMATIC STATION SEARCH Menu will now
appear on the screen:
Frequency
Channel type
Last station
Found so far
Automatical Search
Cancel
4. This Menu serves to display the progress of the station search so far. You can cancel the
station search at any time with the MENU or the EXIT button. No new stations will be
stored in this case.
5. You will reach the program table when the station search has finished, as following the
initial installation. New channels will have been added following the channels already
available. Please refer to chapter „Program table“ on Page 19, if you want to change the
sorting or the names.
.
88.
TTV
M
M
OODDEE
A
DDJJUUSSTTMMEENNT
A
V
T
23
Page 28

.
T
99.
Teletext is a free service that is broadcast by the majority of television stations and offers
current information in relation to news, the weather, television programs, share prices, subtitles and other subjects. Your TV offers many useful functions for operating Teletext and
multi-page text, storing sub-pages or fast navigation.
EELLEETTEEXXT
T
T
TO OPERATE TELETEXT
1. Select a TV station on which Teletext is being transmitted.
2. Press the TELETEXT button once to appear the Teletext screen.
3. Press the TELETEXT button again to switch off Teletext. The previous program reap-
pears.
TELETEXT PAGE SELECTION
1. Enter the required Teletext page as a three digit numbers.
2. The selected page number is displayed at the top left corner of the screen. The
Teletext page counter searches until the selected page number is located, so that the
desired page is displayed on the screen.
3. Fastext movement by the 4 coloured buttons.
Four subject-heading pages can be selected quickly by pressing the corresponding
coloured button Red, Green, Yellow, or Blue on the remote control handset. The
function of the respective Colour button is displayed at the lower edge of the picture
(e. g. +/-, to turn on page forward/back or the title of the Teletext block to be
reached).
4. Fast navigation with Page Catching:
This function enables the fast selection of page numbers displayed on the current
Teletext page. Navigate to the page number that interests you with the ST P+/P-
buttons (a flashing cursor appears at the same time) and press the MENU button to
call it up.
5. Some Teletext pages also contain sub-pages that are displayed at the lower edge of
the picture. You can turn between the sub-pages forward and back by pressing the
POSITION/SIZE buttons.
SELECT TELETEXT DISPLAY FUNCTIONS
Your TV offers you several possibilities of presenting several Teletext pages or the television
picture and Teletext clearly at the same time.
1. Multi-page text:
This function presents several interconnected Teletext pages on one screen. Press the
DISPLAY button. You will receive one large and two small display windows. The main
page will be presented in the large picture; the associated, following sub-pages or those
pages that can be selected quickly by pressing the YELLOW or BLUE buttons are presented in the small pictures. Press the DISPLAY button again to return to the normal,
full Teletext picture.
24
E
NNGGLLIISSH
E
H
Page 29

2. Split Screen:
Press the PIP ON/OFF button (= divided screen), to display the current television picture as split screen, in addition to Teletext.
3. Television picture in Multi-Page Text:
The television picture in the upper field of the two small Teletext pictures will be presented in Multi-Page Mode by pressing the PIP ON/OFF button again.
4. Teletext as Picture in Picture:
The television picture is presented as a full picture and the current Teletext page is presented as a small picture in the picture inserted into the upper right screen area, by
pressing the PIP ON/OFF button again.
USEFUL FEATURES FOR TELETEXT
INDEX
¾ Press this button to select the index page that displays the list of Teletext contents.
STOP
The Teletext page you have selected may contain more information than what is on the
screen; the rest of the information will be displayed after a period of time on a sub-page.
¾ Press STOP button to stop the automatic page change. The STOP symbol will be dis-
played at the top left-hand corner on the screen and the automatic page change will
be stopped.
¾ Press STOP button again to continue.
English Deutsch Français Italiano Español Nederlands Português Dansk Magyar
INTERRUPT
In the Teletext mode, pressing INTERRUPT button will switch the screen to the TV mode
while waiting for the next text page.
¾ Select required page number in Teletext mode.
¾ Press INTERRUPT button to switch to TV mode while waiting for the text page. The
upper and lower row of the videotext page information is displayed for 6 seconds, before it disappears.
¾ When the required text page is found, the page number is displayed in a black box in
the upper left corner.
¾ Press INTERRUPT button again to revert to Teletext mode.
REVEAL
¾ Press this button once to display concealed information, such as solutions of riddles,
puzzles, or a quiz.
¾ Press this button again to conceal the revealed answers.
EXPAND
Select double height text.
¾ Press this button to enlarge the top half of the page.
¾ Press this button again to enlarge the bottom half of the page.
¾ Press this button once more to return to the normal display.
99.
.
T
EELLEETTEEXXT
T
T
25
Page 30

1100.
.
C
OONNNNEECCTTIINNGG
C
E
XXTTEERRNNAALL
E
D
EEVVIICCEES
D
S
CONNECTION OF AN EXTERNAL DEVICE TO THE SCART SOCKET
Please connect the SCART/AV1 or the SCART/AV2 socket of the TV to the device to be connected with a EURO AV cable (Scart cable), to connect a video recorder, a DVD player, a
SAT receiver or similar to one of the two Scart sockets of your TV, for example.
Note: Please pay attention to the instruction for use of the device to be connected.
CONNECTING A VIDEO RECORDER TO THE AERIAL SOCKET
Please connect the aerial input of the TV to the aerial output of your video recorder by
means of an aerial cable, to connect a video recorder to the aerial socket of your TV. Please
connect your domestic aerial to the aerial output of your video recorder.
You can choose any channel slot on the TV to represent the picture and sound signals of
your video recorder. The selected channel slot must be coordinated with the station frequency of the aerial output of your video recorder to achieve this (usually between channels
30 and 40) – see chapter „Setting channels manually“ on Page 21.
You should set the ‘10th ADJUSTMENT’ Menu Point in the PROGRAM EDIT Menu to VCR after
carrying out the tuning, to avoid picture distortion.
Note: Please pay attention to the instructions for use of your video recorder.
CONNECTING A PC OR A SOURCE OF MULTIMEDIA VIDEO
Your TV device can present both analog and digital multimedia input signals and offers you the
possibility of connecting a source of video with DVI, HDMI or components/YUV output (a DVD
player, for example).
To do this, connect the VGA, HDMI or YUV socket of the TV device to the video adapter of your
PC or your source of video. Digital acoustic signals are usually contained in the HDMI signal
and do not have to be connected as well.
Connect the line output of your PC or the source of video to the respective Audio In input
(black jack socket next to the VGA, HDMI or YUV input on the back of the device), in order to
transmit analog acoustic signals on the TV device. You may have to use an appropriate
adapter or adapter cable for the connection.
Note: Please pay attention to the instructions for using your PC and the sound and video
display adapter or your source of video and the technical data of your TV device, in order to
select the necessary sound settings and the settings for the resolution and the vertical scanning frequency.
CONNECTING A DECODER
You need a decoder to be able to receive encrypted channels. Please connect it to the
SCART/AV2 socket of your TV by means of a EURO AV cable (Scart cable).
Please refer to the chapter “Setting channels manually” on page 21 for advanced settings in
relation to decoder operation.
Note: Please pay attention to the instructions for use of your decoder.
CONNECTING A CAMERA RECORDER
Connect the device to the front AV.SV socket of your TV with a commercially available cable
(cinch cable and/or S-video cable), in accordance with the coloured cable and socket identification, to connect a camera recorder.
Note: Please pay attention to the instructions for use of your camera recorder.
26
E
E
NNGGLLIISSH
H
Page 31

SETTINGS FOR EXTERNAL DEVICES (PICTURE, SOUND, NAME, ETC.)
Please refer to the Chapters „Picture (Contrast, Colour, Brightness, etc.)“ on Page 14 and
„Additional picture settings“ on Page 16, to change the picture for AV settings. The functions
described in these Chapters also apply to the AV positions.
You will find more precise descriptions in chapter „Sound (Balance, Equalizer, etc.)“ on page
17, if you want to adjust the sound. The points described there also apply to the AV settings.
You will find more precise descriptions in Chapters „Changing the names of channels“ and
„Setting channels manually“ on Pages 20 and 21, if you want to adjust the channel names or
the channel settings.
AV MENU SETTINGS
Types of input signal, the source for the output signal, a volume offset to the basic volume
for the Scart1, Scart2, and AV.SV settings and the type of acoustic signal for the HDMI Mode
can be established in this menu.
1. Press the MENU button to reach the Main Menu.
2. Select the INSTALLATION Menu Point with the ST P+/P- buttons and press the MENU
button again.
English Deutsch Français Italiano Español Nederlands Português Dansk Magyar
3. Position the Selection Bar on AV SETTINGS Menu Point by means of the ST P+/P- buttons and press the MENU button again. This will take you to the following Menu:
1. AV1 Signal type
2. AV1 Video Out
3. AV1 Volume Offset
4. AV2 Signal type
5. AV2 Video Out
6. AV2 Volume Offset
7. AV.SV Signal type
8. AV.SV Volume Offset
9. HDMI Audio Input
AV Settings
4. AV 1 Signal type:
You can choose between different settings for the signal type supplied by an external device attached to the SCART/AV 1 socket with the WX VOL-/VOL+ buttons or by pressing
the MENU button (Menu). Please always bear in mind that your external device must
also supply the respective signal type to achieve perfect pictures.
Note: Please pay attention to the instructions for use of the connected device.
¾ VIDEO/RGB AUTO:
FBAS (e. g. Video recorder) and RGB signals (e. g. playing console) can be represented at this setting, if this function is supported, automatically recognized and presented by the device connected.
S-VIDEO:
¾
Serves to connect S-VIDEO signals. In the case of this signal type, the picture and
the colour signals are separate, in order to avoid disruptive wave lines in checked
¾
patterns.
RGB:
Serves to connect sources of RGB signal sources (e. g. playing console) that do not
support automatic recognition.
1100.
.
C
OONNNNEECCTTIINNGG
C
E
XXTTEERRNNAALL
E
D
D
EEVVIICCEES
S
27
Page 32

¾ YCrCb:
A YcrCb signal that is the output of a many DVD players can be represented at this
setting. It will be recognized automatically whether the pictures are transmitted in
the line interlaced or full picture (progressive) process.
¾ YPrPb:
A YprPb signal that is the output of a many DVD players can be represented at this
setting. It will be recognized automatically whether the pictures are transmitted in
the line interlaced or full picture (progressive) process.
5. AV1 Video Output:
You can choose between different settings for the output signal emitted at the SCART/AV
1 socket with the WX VOL-/VOL+ buttons or by pressing the MENU button (Menu).
Note: No signals can be emitted in the Readiness Mode!
¾ AUTO:
The pictures and sounds presented by the device are output at the SCART/AV 1
socket (exception: The device is at the SCART 1 AV setting).
¾ TV:
The signal received through the aerial is always output at the SCART/AV 1 socket
your TV is operated at one AV setting).
(even if
¾ AV2 (Copy Mode):
The picture and sound signal coming from the SCART/AV 2 socket is emitted at the
SCART/AV 1 socket, independently of the mode (TV, PC, etc.) in which the TV is operating. This function is very useful for transferring from one external device to another.
¾ AV.SV (Copy Mode):
The same function as under the AV2 setting, with the difference that the picture and
sound signals are emitted from the front AV.SV input, through the Cinch sockets to
the SCART/AV 1 socket (e. g. to transfer from a video camera to a video recorder).
6. AV1 Volume Offset:
You can establish a volume offset (shifting – quieter or louder) for the sound input signals at the SCART/AV 1 socket, in comparison to the basic volume of your device, with
the WX VOL-/VOL+ buttons.
7. AV2 Signal Type/ AV2 Video Output/ AV2 Volume Offset:
The settings and functions for the AV position described above also apply to the AV2 position.
8. AV.SV Signal type:
You can choose whether the picture signal of your external device (e.g. camera) is processed by the video input (yellow) or by the S-video input (4-pole black socket) with the
WX VOL-/VOL+ buttons or by pressing the MENU button (Menu). In both cases, the
sound signal is processed by the red and white cinch socket.
9. AV.SV Volume Offset:
You can establish a volume offset (shifting – quieter or louder) for the sound input signals at the cinch sockets at the front AV.SV input, in comparison to the basic volume of
your device, with the WX VOL-/VOL+ buttons.
10. Audio input (only active in the HDMI mode):
It is possible to choose between the DIGITAL/ANALOG settings with the WX VOL+/VOL-
buttons or by pressing the MENU button.
¾ DIGITAL: Your device will transmit the digital sound contained in the HDMI signal.
¾ ANALOG: The acoustic signal from the analog HDMI Audio In socket will be transmit-
ted.
11. You leave the Menu with the EXIT button.
28
E
E
NNGGLLIISSH
H
Page 33

1111.
.
VVGGAA,
,
HHDDMMI
I
AANNDD
YYUUVV
CONNECTION
Your TV device can present both analog and digital multimedia input signals and offers you the
possibility of connecting a source of video with DVI, HDMI or components/YUV output (a DVD
player, for example).
To do this, connect the VGA, HDMI or YUV socket of the TV device to the video adapter of your
PC or your source of video. Digital acoustic signals are usually contained in the HDMI signal
and do not have to be connected as well.
Connect the line output of your PC or the source of video to the respective Audio In input
(black jack socket next to the VGA, HDMI or YUV input on the back of the device), in order to
transmit analog acoustic signals on the TV device. You may have to use an appropriate
adapter or adapter cable for the connection.
Note: Please pay attention to the instructions for using your PC and the sound and video
display adapter or your source of video and the technical data of your TV device, in order to
select the necessary sound settings and the settings for the resolution and the vertical scanning frequency.
SETTINGS IN THE VGA PC, HDMI AND YUV MODES
Press the PC button, possibly several times, in order to switch to the VGA PC, HDMI or YUV
mode. All picture and sound settings will function exactly as in the TV mode.
Press the MENU button, in order to reach the Main Menu, select the PICTURE SETTINGS
Menu point and press the MENU button again. Move the selection bars to SETTINGS VGA
HDMI YUV with the ST P+/P- buttons and press the MENU button again. You will reach
the respective menu for the SETTINGS VGA, SETTINGS HDMI OR SETTINGS YUV:
English Deutsch Français Italiano Español Nederlands Português Dansk Magyar
Settings VGA HDMI YUV
1. Mode
2. Change name
3. Input
4. Horizontal position
5. Width
6. Vertical position
7. Phase
8. Frequency
9. Audio input
1. Mode:
This point shows whether a signal is positioned at the selected input socket of the device.
It will not be possible to reach the settings for the picture presentation (represented in
grey) as long as NO SIGNAL is displayed.
2. Change name:
A name can be given to the selected mode. Press the MENU button, in order to reach the
entry mode. You will now be able to choose the symbols with the ST P+/P- buttons
and to change the position with the WX VOL+/VOL- buttons. You will leave the entry
mode again by means of the MENU or the EXIT button.
3. Input:
It is possible to choose between the AUTO/PC/VIDEO settings with the WX VOL+/VOL-
buttons or by means of a selection list, which can be reached by pressing the MENU button.
1111.
.
VVGGAA,
,
HHDDMMI
I
AANNDD
YYUUVV
29
Page 34

¾ AUTO:
Your device will recognise the type of signal at the respective entry socket automatically.
¾ PC:
your device will expect an input signal from the video adapter of your PC at the respective input socket in this setting. Please pay attention to the correct selection and
setting of the output of your video adapter.
¾ VIDEO:
Your TV device will be expecting an input signal from a source of video at the respective input socket in this setting. Please pay attention to the correct selection and setting of the output of your source of video.
Note: The TV device is equipped with an automatic and complex function of recognising
the type and source of the signal. However, incorrect recognition can occur because of
the different tolerances of the source of your signal. Use the manual settings for the input in this case.
4. Horizontal position:
You can change the horizontal position of the picture from the respective input socket
with the WX VOL+/VOL- buttons.
5. Width:
You can change the width of the picture from the respective input socket with the WX
VOL+/VOL- buttons.
6. Vertical position:
You can change the vertical position of the picture from the respective input socket with
the WX VOL+/VOL- buttons.
7. Pixel phase:
You can optimise the presentation of text on the TV device (e.g. in the case of shaking
letters) and compensate for possible faults in the picture (disturbance in the picture or
wavy lines) with the WX VOL+/VOL- buttons.
8. Frequency:
Possible faults in the picture (disturbance in the picture or wavy lines) can be compensated for with the WX VOL+/VOL- buttons. This setting should only be changed in the
case of problems.
9. Audio input (only active in the PC HDMI mode, not in the PC VGA mode):
It is possible to choose between the DIGITAL/ANALOG settings with the WX VOL+/VOL- but-
tons or through a list of choices, which can be reached by pressing the MENU button.
¾ DIGITAL: Your TV device will reproduce the digital sound present in the HDMI signal.
¾ ANALOG: The sound signal from the analogue Audio In socket will be reproduced.
Note: The digital HDMI signal usually consists of image and sound. However, it can definitely occur that your PC or your source of video does not transmit the sound information
by means of an HDMI signal or DVI signals are reproduced through a so-called DVI-HDMI
adapter. In this case, you will have to make the audio signal available through the analogue HDMI Audio In socket of your TV device and switch the audio input to the ANALOG
setting.
10. You leave the Menu with the EXIT button.
Note: The device is provided with standardized pre-settings for the above setting values.
Nevertheless, manual adjustment of the settings values may be necessary, to achieve undisrupted reproduction and complete reproduction, because of deviating signals of your video
adapter or your video source!
30
E
NNGGLLIISSH
E
H
Page 35

1122.
.
C
OOMMFFOORRTT
C
F
UUNNCCTTIIOONNS
F
S
PICTURE IN PICTURE (PIP)
You can use the PIP function to display two programs at the same time.
1. Press the PIP ON/OFF button on the remote. Channel slot 1 will be displayed as a small
picture when you call up the PIP function for the first time, after switching the TV on.
2. You will now be able to have the required channel slot or AV setting (SCART 1, PC, AV,
SV, etc.) displayed in the small picture with the PIP SOURCE ST-buttons. The PIP
channel viewed most recently will be displayed if you switch off the PIP function and
switch it on again later.
3. The large and the small picture can be exchanged by pressing the PIP ON/OFF button
for about 2 seconds, if the small picture has already been displayed.
4. You can choose the corner of the large picture in which the small picture should be displayed with the PIP POSITION button.
5. You can select 3 different sizes for the small picture with the PIP SIZE button.
Note: Not all signal combinations of large and small pictures are necessary. In these cases,
the OSD channel display shows ‘NoPIP’.
English Deutsch Français Italiano Español Nederlands Português Dansk Magyar
MULTI-IMAGE (STATION OVERVIEW) – GREEN BUTTON
You will be able to call up the Multi-Image Function by pressing the GREEN button in the TV
mode. This function will displays an overview of 12 channels each time.
The channel selected – indicated by a frame - will be reproduced with running image and
sound; the other channels will be regularly updated.
You will be able to move the frame and change to other channels with the aid of the
STWX P+/P-, VOL+/- buttons. You will be able to switch to the previous or subsequent
12 channels by moving the frame beyond the screen edge.
Operate the MENU button, in order to represent the selected channel as a complete image.
CHILD LOCK
You can block all the functions of the device with the Child Lock. The entry of a PIN will be
required automatically when the device is switched on again, if the Child Lock has been activated and the device has been switched off.
The picture and the sound will not be switched on and the operation of the device will not be
permitted until a PIN number has been entered.
1122.
.
C
C
OOMMFFOORRTT
F
UUNNCCTTIIOONNS
F
S
31
Page 36

1. Press the MENU button. The Main Menu will be displayed.
Main Menu
1. Picture
2. Sound
3. Program table
4. Installation
5. Child lock
6. Sleeptimer
7. Swap function
8. Games
2. Move the Selection Bar to the CHILD LOCK Menu Point with the ST P+/P- buttons and
press the MENU button to call up the sub-menu.
1. PIN xxxx
2. Child lock On/Off
Child lock
3. Press the MENU button and then enter a single digit number = your PIN number. The
CHILD LOCK Point cannot be selected as long as no PIN number has been entered; the
Point cannot be selected and is represented as grey.
4. The CHILD LOCK can be switched on under the relevant Menu Point after entering your
PIN number. You will have to call up the CHILD LOCK Menu again and set the CHILD
LOCK to OFF after entering your PIN number, in order to switch off the Child Lock again
later.
SLEEP TIMER
The Sleep Timer switches the device into the Readiness Mode automatically according to the
period of time selected by you.
Variation 1: Press the SLEEP button to reach the Sleep Timer Menu directly.
Variation 2: Press the MENU button to call up the Main Menu, position the Selection Bar on
Sleep Timer by means of the ST P+/P- buttons and call up the relevant Menu
by means of the MENU button.
1. Sleeptimer
2. Current counter in minutes:
You can set the switching off time in steps of 5 MIN./10 MIN./15 MIN./30 MIN./1 HOUR/2
HOURS/OFF by operating the SLEEP button or the WX VOL-/VOL+ buttons, or call up this
Menu by pressing the MENU button. The OFF setting means that the Sleep Timer is
switched off.
You can check how many minutes still remain until switching off at any time in the
CURRENT COUNTER line by calling up the Sleep Timer Menu again.
Sleeptimer
32
E
NNGGLLIISSH
E
H
Page 37

SWAP FUNCTION
The Swap Function enables you to change between two channels positioned separately or to
switch back to a preferred channel fast. For example, if you want to switch channels during
an advertising break, you can switch back quickly at any time, by pressing the RTN button,
to see whether the advertising break has already finished and your desired program is continuing. Each further operation of the RTN button will lead to a switch between the channel
most recently viewed and your preferred channel.
ESTABLISH SWAP CHANNEL (PREFERRED CHANNEL)
Variation 1: Press the MENU button to call up the Main Menu. Position the Selection Bar on
SWAP FUNCTION by means of the ST P+/P- buttons and press the MENU
button again. You can choose between MANUAL/ 3 MIN/ 5 MIN/ 10 MIN settings
with the WX VOL-/VOL+ buttons or through a Menu that can be reached by
means of the MENU button.
The Swap Channel must be defined in accordance with Variation 2 in the case of
the MANUAL setting. The channel viewed is automatically defined as the Swap
Channel after the period has expired whenever a period of time is set.
SWAP CH will be faded in into the left upper corner. Now, you will be able to select any other channel slot and switch between the channel viewed and your
Swap Channel by pressing the RTN button for a short time. The channel that is
your preferred channel will be displayed for 4 seconds at each channel change.
Variation 2: Press on the channel slot to which you want to revert quickly as long as the
RTN button appears, until SWAP CH OSD is faded in. You will now have established your preferred channel manually.
However, if a period of time has been set in the SWAP FUNCTION Menu, your
preferred channel will change automatically with your television viewing.
English Deutsch Français Italiano Español Nederlands Português Dansk Magyar
REVERTING TO THE FACTORY SETTING
This function sets all settings of the TV, such as brightness, colour, contrast, sharpness and
white balance, etc. back again to the status of delivery from the factory.
1. Press the MENU button to reach the Main Menu.
2. Select the INSTALLATION Point with the ST P+/P- buttons and press the MENU button
again.
3. Select the FACTORY SETTINGS Point with the ST P+/P- buttons and press the MENU
button again. Now, select SET and confirm this selection with the MENU button.
Note: You can set most important picture and sound (brightness, colour, contrast, volume)
settings back to the factory settings by pressing the RST, RESET button for a longer period.
1122.
.
C
C
OOMMFFOORRTT
F
UUNNCCTTIIOONNS
F
S
33
Page 38

SWITCHING ON MODE
You can establish your preferred Operating Mode of the TV after switching it on with this
setting.
1. Press the MENU button to reach the Main Menu.
2. Select the INSTALLATION Menu Point with the ST P+/P- buttons and press the MENU
button again.
3. Move the selection bars to the SWITCH ON WITH Menu point with the ST P+/P- but-
tons.
You will now be able to choose between the VGA/CHANNEL 1/LAST CHANNEL
/AV/INSTALLATION types of operation by means of the WX VOL+/VOL- buttons or by
pressing the MENU-button (selection list).
¾ VGA: Switching on in the VGA PC Mode
¾ CHANNEL 1: Switching on with channel position 1
¾ LAST CHANNEL: Switching on with the last channel viewed
¾ AV: Switching on with the last mode used for external devices
¾ INSTALLATION: Switch on as at the status of the initial installation – see chapter „6.
APSAS First Time Installation“on page 11.
SETTINGS FOR ALL CHANNELS
1. Press the MENU button to reach the Main Menu.
2. Select the INSTALLATION Menu Point with the ST P+/P- buttons and press the MENU
button again.
3. Select the SETTING ALL CHANNELS Menu Point with the ST P+/P- buttons and press
the MENU button again.
Settings of all programs
1. Sharpness setting
2. Noise reduction setting
3. Decoder setting
4. Sharpness Setting:
This function sets the sharpness setting for all channels. You can choose between set-
tings 0-3 through a Menu by pressing the MENU button. There is a more detailed de-
scription of this function in chapter „Additional picture settings“ on page 16.
5. Noise Reduction Setting:
This function sets the noise reduction setting for all channels. You can choose between
the AUTOMATIC/ OFF/ WEAK/ MEDIUM/ LOUD settings through a Menu by pressing the
MENU button.
You will find a more detailed description of the settings in chapter „Additional picture settings“ on page 16.
6. Decoder Setting:
This function sets the decoder function for all channels. You can choose between the
OFF/ EXTERNAL/ INTERNAL SOUND/ EXTERNAL SOUND/ INTERNAL SOUND settings
through a Menu by pressing the MENU button.
You will find a more detailed description of the settings in chapter „Setting channels
manually“ on page 21.
34
E
NNGGLLIISSH
E
H
Page 39

TIME DISPLAY TIME
In TV Mode, the time will be displayed by pressing this button.
Press the TIME button while your TV is transmitting a television channel with Teletext
transmission. The current time will be displayed in the form of a digital clock in the right
upper corner of the screen.
The display will switch to an analog clock if the TIME button is pressed again. The time display will disappear as soon as the TIME button is pressed a third time.
SWITCH PICTURE FORMAT - ARC
You can change the representation of the picture format of your TV quickly with the ARC
button. You will find a more detailed description in relation to the possible picture formats in
chapter „Picture (Contrast, Colour, Brightness, etc.)“ on page 14.
SWITCH PICTURE PRESETS - APC
You can choose between the possible DAYTIME/EVENING/MANUAL presets quickly with the
APC Button. You will find a more detailed description in relation to these presets in chapter
„Picture (Contrast, Colour, Brightness, etc.)“ on page 14.
English Deutsch Français Italiano Español Nederlands Português Dansk Magyar
FREEZE FRAME FUNCTION – YELLOW BUTTON
You can freeze the picture at any time by pressing the YELLOW button (apart from in the
VGA, HDMI or YUV mode). Operate the YELLOW button again, in order to allow the picture
to continue.
GAMES
Your TV is equipped with four games and an associated high score list.
Move to the game that you would like to play with the aid of the ST P+/P- buttons and
press the MENU button to call up the game.
The control of the games functions with the STWX P+/P-, VOL+/- buttons. Special functions (e.g. shooting) can be called up with the MENU button.
Games
Highscores
Brixx
Anaconda
Scramble
Outer Space
You will be requested to enter your score in the High Score List after ending the game, provided that you have achieved a new high score. Now, you will be able to select the letters
required with the ST P+/P- buttons. You will reach the next position with the
WX VOL-/VOL+ buttons. You will leave the name entry with MENU or EXIT button.
You can end the games early by pressing the EXIT button.
.
1122.
C
OOMMFFOORRTT
C
F
UUNNCCTTIIOONNS
F
S
35
Page 40

.
W
1133.
Your TV device is ready for wall installation by means of a standard wall unit.
Pay attention to the following safety information and descriptions for this under all circum-
stances and contact our Service or consult a qualified electrician in the case of questions.
View of the back: View from diagonally below:
W
• Make sure that the TV device is switched off and that the mains cable
AALLLL
I
NNSSTTAALLLLAATTIIOON
I
• Your TV device must only be installed on vertical walls.
• Test whether the carrying capacity of the wall is suitable for 4 times
the weight of the TV device (see the technical data) before the
installation.
and all other connection cables are detached before the installation.
• At least two people are necessary to install the device.
N
Screwing-on points
for the wall holder
Attachment screws
(Hexagon socket) for the base
INSTALLATION INSTRUCTIONS
1. Place the TV device onto a stable and non-scratch pad with the screen facing downwards.
2. Loosen the attachments screws for the base and remove them.
3. Follow the Operating Instructions for the wall unit for the further steps of installing the
wall unit on the device and on the wall.
Information: Please keep the uninstalled screws and the stand for a potential later disassembly.
36
E
E
NNGGLLIISSH
H
Page 41

1144.
.
T
RROOUUBBLLEESSHHOOOOTTIINNG
T
G
Many times, problems have simple causes. We would like to give you some tips to solve
some common problems. Should these tips not help, please call us!
There is no picture or sound.
Make sure the AC adapter is properly inserted in the power outlet.
Make sure the input mode is set to correctly.
Make sure the main power switch of the main unit is on.
There is no picture. There is no picture from AV.
Make sure the Contrast/Brightness is properly adjusted.
Make sure all external devices are connected properly.
Check that the correct AV setting has been selected.
There is no sound.
Make sure the volume is not set to minimum.
Make sure the sound is not set to mute.
Make sure that headphones are not connected.
There is no picture or sound, just noise.
The reception may be weak. Make sure the aerial is not disconnected.
Picture is not clear.
The reception may be weak.
Make sure the aerial is not disconnected.
The picture is too bright or too dark.
Check the settings of contrast / brightness / Backlight in the menu picture settings.
Remote control does not work.
Check the batteries in the remote control are not flat.
Make sure the remote sensor window is not under strong lighting.
Switch the device on and on again with the main switch on the back of the device.
The picture is not sharp.
The reception may be weak.
Make sure the aerial is not disconnected.
Check the settings of the picture sharpness and the noise reduction in the Picture Menu.
The picture jitters.
The reception may be weak.
Make sure the aerial is not disconnected.
The picture is doubled or tripled.
Make sure the aerial is facing the right direction.
There may be reflected electric waves from mountains or buildings.
The picture is spotted.
There may be interference from automobiles, trains, high voltage lines, neon light, etc.
There may be interference between the antenna cable and power cable. Try moving them further apart.
There are stripes on the screen or colours fade.
Is the unit receiving interference from other devices? Transmission antennas of radio broadcasting station and
transmission antennas of amateur radio and cellular phones may also cause interference.
Place the unit as far apart as possible from device that may cause possible interference.
The Child lock cannot be deactivated.
Enter 1973 as the PIN number. The devices should be fully functioning again with this.
English Deutsch Français Italiano Español Nederlands Português Dansk Magyar
.
T
RROOUUBBLLEESSHHOOOOTTIINNG
1144.
T
G
37
Page 42

1155.
.
O
TTHHEERR
O
Q
UUEESSTTIIOONNSS
Q
DO YOU REQUIRE ADDITIONAL SUPPORT?
If the suggestions in the above section have not solved your problem, please contact the
hotline. We will try and help you over the telephone. However, before you contact your
Technology Center, please keep the following information available:
- What additional peripheral devices are you using?
- What messages are appearing on the screen?
- During which operational step did the problem arise?
- How does your computer configuration look, if you have connected a PC to the device?
- What software were you using when the error occurred, if you have connected a PC to the
device?
- What steps have you already taken to solve the problem?
- Give us your Customer Number, if you have already received one.
WARRANTY
We warrant to our customers that this product is free from defects in materials and workmanship as follows: for a determined period from the date of
original purchase, defective parts or a defective product returned to a repair facility or an Authorized Service Facility ("ASF") for such product, as applicable, and proven to be defective upon inspection, will be exchanged for new or comparable rebuilt parts, or a refurbished product, as determined by the
repair facility or the ASF.
Limited warranty repair or replacement shall not extend the original limited warranty period of the defective product. This limited warranty does not cover
any supplies or accessories, including but not limited to: software, blank media, user-installed drives, etc.
EXCLUSIONS: this limited warranty does not apply, and you will have no remedy hereunder with respect to (a) products that have been modified, opened,
repaired or otherwise altered, except by an ASF, (b) products that have been damaged or destroyed after delivery to the customer, (c) any third party
software, interfaces, parts, supplies, peripherals or other products or any defects resulting from use of the product in connection with such third party
products, (d) defects resulting from improper or inadequate maintenance, calibration or site preparation, (e) defects resulting from any misuse, abuse,
accident, neglect, negligence or any use other than in accordance with the handling or operating instructions provided, (f) defects resulting from exposure
to unusual physical or electrical stress or from any operation other than in accordance with the published environmental specifications for the product.
TO THE EXTENT ALLOWED UNDER APPLICABLE LAW, THE ABOVE WARRANTIES ARE EXCLUSIVE AND NO OTHER WARRANTY OR CONDITION, WHETHER
WRITTEN OR ORAL, IS EXPRESSED OR IMPLIED AND WE SPECIFICALLY DISCLAIM ANY IMPLIED WARRANTIES, INCLUDING ANY IMPLIED WARRANTY OF
MERCHANTABILITY OR FITNESS FOR A PARTICULAR PURPOSE AND NO IMPLIED WARRANTY APPLIES TO THE PRODUCT AFTER THE APPLICABLE PERIOD
OF THE EXPRESS LIMITED WARRANTY STATED ABOVE. Some countries, states or provinces do not allow exclusions or limitations on the duration of an
implied warranty, so the above limitation or exclusion might not apply to you. This limited warranty gives you specific legal rights and you might also have
other rights that vary from country to country, state to state, or province to province.
Our limited warranty is valid in any country or locality where we have a support presence for this product and where we have marketed this product. The
level of warranty service you receive may vary according to local standards. We will not alter form, fit or function of the product to make it operate in a
country for which it was never intended to function.
TO THE EXTENT ALLOWED UNDER APPLICABLE LAW, THE REMEDIES IN THIS LIMITED WARRANTY STATEMENT ARE YOUR SOLE AND EXCLUSIVE
REMEDIES. EXCEPT AS INDICATED ABOVE, IN NO EVENT WILL OUR COMPANY OR ITS SUPPLIERS BE LIABLE FOR LOSS OF DATA OR FOR INDIRECT,
SPECIAL, INCIDENTAL, CONSEQUENTIAL (INCLUDING LOST PROFIT OR DATA), OR OTHER DAMAGE, WHETHER BASED IN CONTRACT, TORT, OR
OTHERWISE. IN NO EVENT SHALL RECOVERY OF ANY KIND AGAINST OUR COMPANY BE GREATER IN AMOUNT THAN THE PURCHASE PRICE OF THE
PRODUCT SOLD BY US WHICH CAUSED THE ALLEGED DAMAGE. WITHOUT LIMITING THE FOREGOING, YOU ASSUME ALL RISK AND LIABILITY FOR LOSS,
DAMAGE OR INJURY TO YOU AND YOUR PROPERTY AND TO OTHERS AND THEIR PROPERTY ARISING OUT OF USE OR MISUSE OF, OR INABILITY TO USE
THE PRODUCT NOT CAUSED DIRECTLY BY THE NEGLIGENCE OF OUR COMPANY. Some countries, states or provinces do not allow the exclusion or limitation of incidental or consequential damages, so the above limitation or exclusion may not apply to you.
THE WARRANTY TERMS CONTAINED IN THIS STATEMENT, EXCEPT AS LAWFULLY PERMITTED, DO NOT EXCLUDE, RESTRICT OR MODIFY AND ARE IN
ADDITION TO THE MANDATORY STATUTORY RIGHTS APPLICABLE TO THE SALE OF THIS PRODUCT TO YOU.
Please note the following:
Be sure to keep your purchase receipt in a safe place. Our company, at its option, may require a copy of the receipt to validate the
warranty period effective date (i.e. date of purchase). Warranty liability only applies to material or factory faults. It does not apply
to damage due to breakage, for example, a crack in the housing. Our service includes unit exchange or send-in repair:
Unit Exchange
In locations where Unit Exchange is available, we will send you a replacement unit. You must return the defective unit to our company (using the shipping carton that the new one came in.)
Send-In Repairs
In locations where Send-In Repair Service is available, repair service can be obtained by shipping your unit to the Repair Center.
The unit will be repaired and returned to you.
For either Unit Exchange or Send-In Repairs, you must have an authorized RMA number from our support before shipping your
defective product.
Replacement products may be either new or equivalent in performance to new. Replacement or repaired products may contain
remanufactured parts equivalent to new in performance or may have been subject to incidental use.
Out-of-Warranty Support
In addition to providing free technical support during the warranty period, We are also available to support your product after the
warranty period has ended. This out-of-warranty support will be provided on a fee basis.
DUPLICATION OF THE INSTRUCTIONS FOR USE / TECHNICAL DATA
The documents contain legally protected information. All rights reserved. Duplication in a mechanical, electronic or
any other form is forbidden without the written authorization of the manufacturer.
38
E
E
NNGGLLIISSH
H
Page 43

F
LLAATT
F
P
P
NEELL
AAN
T
T
V
V
G
EEBBRRAAUUCCHHSSAANNWWEEIISSUUNNG
G
Copyright © 2007
Alle Rechte vorbehalten.
Dieses Handbuch ist urheberrechtlich geschützt.
Hergestellt unter Lizenz von Dolby Laboratories.
„Dolby“, „Pro Logic“ und das Doppel-D-Symbol sind Warenzeichen von Dolby Laboratories.
Das „HD ready“ Logo ist ein Warenzeichen von EICTA.
HDMI, das HDMI Logo und High-Definition Multimedia Interface sind
Warenzeichen oder eingetragene Warenzeichen von HDMI Licensing LLC.
Weitere Warenzeichen sind Eigentum ihrer jeweiligen Besitzer.
Technische und optische Änderungen sowie Druckfehler vorbehalten.
Medion AG, Am Zehnthof 77, 45307 Essen, Germany
BDA00105300
G
Page 44

I
NNHHAALLT
I
1. SICHERHEIT, WARTUNG, AUßERBETRIEBNAHME 1
Betriebssicherheit .................................................................................................. 1
Wartung ............................................................................................................... 3
Recycling und Entsorgung ....................................................................................... 4
2. EINFÜHRUNG 5
Hinweise zu dieser Anleitung ................................................................................... 5
Leistungsmerkmale ................................................................................................ 6
3. STEUERELEMENTE UND SEITENANSCHLÜSSE 7
T
Reparatur...................................................................................................... 2
Aufstellort ..................................................................................................... 2
Vorgesehene Umgebung.................................................................................. 2
Anschließen ................................................................................................... 3
Normen / Elektromagnetische Verträglichkeit ..................................................... 3
Umgang mit Batterien ..................................................................................... 4
Unsere Zielgruppe .......................................................................................... 5
Die Qualität ................................................................................................... 5
Der Service ................................................................................................... 5
4. GERÄTERÜCKSEITE UND ANSCHLÜSSE 8
5. FERNBEDIENUNG 9
Zusammenfassung der Steuerelemente................................................................... 10
6. APSAS - DIE ERSTE EINRICHTUNG 11
7. ALLGEMEINE STEUERUNG UND EINSTELLUNGEN 13
Ein- und Ausschalten des TV-Gerätes...................................................................... 13
Aufrufen der Menüs und Bedienung der On-Screen Steuerung.................................... 13
Weiterschalten von Programmen............................................................................ 14
Zwischen TV und externen Signalquellen umschalten ................................................ 14
Lautstärkeregelung .............................................................................................. 14
Bedienung der Lautstärkeregelung.................................................................. 14
Stummschaltung .......................................................................................... 14
Bildeinstellungen (Kontrast, Farbe, Helligkeit, etc.)................................................... 14
Weitere Bildeinstellungen...................................................................................... 16
Toneinstellungen (Balance, Equalizer, etc.).............................................................. 17
8. TV-MODUS 19
Programmeinstellungen anpassen .......................................................................... 19
Programmtabelle.......................................................................................... 19
Löschen von Programmen.............................................................................. 19
Verschieben und Sortieren von Programmen .................................................... 20
Name von Programmen Ändern ...................................................................... 20
Manuelle Einstellung von Programmen............................................................. 21
Manuelles Hinzufügen von Programmen .................................................................. 23
Neue Programme automatisch hinzufügen............................................................... 23
ii
Page 45

9. TELETEXT 24
Die Bedienung des Teletexts.................................................................................. 24
Teletext Seiten auswählen..................................................................................... 24
Teletext Anzeigefunktionen auswählen.................................................................... 24
Nützliche Teletext Eigenschaften............................................................................ 25
10. ANSCHLIEßEN VON EXTERNEN GERÄTEN 26
Anschluss eines externen Gerätes an die Scartbuchse ............................................... 26
Anschluss eines Videorecorders an die Antennenbuchse............................................. 26
Anschluss eines PCs oder einer Multimedia-Videoquelle ............................................. 26
Anschluss eines Decoders ..................................................................................... 26
Anschluss eines Kamerarecorders........................................................................... 26
Einstellungen für externe Geräte (Bild, Ton, Name, etc.) ........................................... 27
Menü AV Einstellungen ......................................................................................... 27
11. VGA, HDMI UND YUV 29
Anschluss ........................................................................................................... 29
Einstellungen im VGA PC, HDMI und YUV Modus....................................................... 29
English Deutsch Français Italiano Español Nederlands Português Dansk Magyar
12. KOMFORTFUNKTIONEN 31
Bild im Bild/Picture in Picture (PIP)......................................................................... 31
Multipicture (Senderübersicht) – Farbtaste Grün....................................................... 31
Kindersicherung................................................................................................... 31
Sleeptimer.......................................................................................................... 32
Swap-Funktion .................................................................................................... 33
Swap-Programm festlegen (Vozugsprogramm) ................................................. 33
Auf Werkseinstellung zurücksetzen......................................................................... 33
Einschaltmodus ................................................................................................... 34
Einstellungen für alle Programme........................................................................... 34
Zeitanzeige TIME............................................................................................ 35
Bildformat umschalten - ARC................................................................................. 35
Bildvoreinstellungen umschalten - APC.................................................................... 35
Standbildfunktion – Farbtaste Gelb......................................................................... 35
Spiele ................................................................................................................ 35
13. WANDMONTAGE 36
Montageanleitung ................................................................................................ 36
14. PROBLEMBEHEBUNG 37
15. SONSTIGES 38
Benötigen Sie weitere Unterstützung?..................................................................... 38
Garantiebedingungen ........................................................................................... 38
Haftpflichtbeschränkung ....................................................................................... 38
Vervielfältigung Gebrauchsanweisung ..................................................................... 38
iii
Page 46

iv
Page 47

.
S
11.
Bitte lesen Sie diese Gebrauchsanweisung und zugehörigen Technischen Daten aufmerksam
durch und befolgen Sie alle angeführten Hinweise. So gewährleisten Sie einen zuverlässigen
Betrieb und eine lange Lebensdauer Ihres TV-Gerätes. Halten Sie diese Anweisung stets
griffbereit in der Nähe Ihres TV-Gerätes. Bewahren Sie die Gebrauchsanweisung und die
Technischen Daten gut auf, um sie bei einer Veräußerung des TV-Gerätes dem neuen Besitzer weiter geben zu können.
IICCHHEERRHHEEIIT
S
T
,
W
,
W
AARRTTUUNNG
G
,
A
UUßßEERRBBEETTRRIIEEBBNNAAHHMME
,
A
E
BETRIEBSSICHERHEIT
• Öffnen Sie niemals das Gehäuse des TV-Gerätes (elektrischer Schlag,
Kurzschluss und Brandgefahr)!
• Schlitze und Öffnungen des TV-Gerätes dienen der Belüftung. Decken Sie
• Das TV-Gerät darf keinesfalls Tropf- und Spritzwasser ausgesetzt werden!
• Lassen Sie Kinder nicht unbeaufsichtigt an elektrischen Geräten spielen. Kinder kön-
nen mögliche Gefahren nicht immer richtig erkennen.
• Das TV-Geräte ist nicht für den Betrieb in einem Unternehmen der Schwerindustrie
vorgesehen. Der Betrieb unter extremen Umgebungsbedingungen kann die Beschädigung
Ihres Gerätes zur Folge haben.
• Es besteht Verletzungsgefahr, wenn das Display bricht. Packen Sie mit Schutzhand-
schuhen die geborstenen Teile ein und senden Sie diese zur fachgerechten Entsorgung an
Ihr Service Center. Waschen Sie anschließend Ihre Hände mit Seife, da nicht auszuschließen
ist, dass Chemikalien austreten können.
• Üben Sie keinen Druck auf das Display aus. Es besteht die Gefahr, dass der Bildschirm bricht.
• Berühren Sie das Display nicht mit den Fingern oder mit scharfen, spitzen, kantigen
Gegenständen, um Beschädigungen zu vermeiden.
• Durch zu hohe Lautstärken am Kopfhörer besteht die Gefahr eines möglichen Hör-
schadens. Reduzieren Sie die Lautstärke des Kopfhörers, bevor Sie sich diesen auf-
setzen.
• Führen Sie keine Gegenstände durch die Schlitze und Öffnungen ins
Innere des TV-Gerätes (elektrischer Schlag, Kurzschluss und
Brandgefahr)!
diese Öffnungen nicht ab - die Belüftung darf nicht durch Bedecken
der Lüftungsöffnungen mit Gegenständen wie Zeitschriften, Tischdecken,
Vorhänge usw. behindert werden. (Überhitzung, Brandgefahr)!
English Deutsch Français Italiano Español Nederlands Português Dansk Magyar
Achtung! Das Gerät verfügt auf Grund seiner Bauart über spitze Kanten und Ecken die
Verletzungen hervorrufen können!
• Sorgen Sie für ausreichende Standsicherheit des Gerätes.
• Lassen Sie die Ecken des Gerätes nicht über Möbelkanten hinausragen.
• Kommen Sie mit Ihren Augen niemals in die Nähe der Ecken des Gerätes. Achten
Sie besonders darauf, wenn Sie sich über dem Gerät niederbeugen!
.
11.
S
S
IICCHHEERRHHEEIIT
T
,
W
,
W
AARRTTUUNNG
G
,
A
UUßßEERRBBEETTRRIIEEBBNNAAHHMME
,
A
E
1
Page 48

Schalten Sie das Gerät sofort aus bzw. erst gar nicht ein, ziehen Sie den Netzstecker
und wenden Sie sich an den Kundendienst wenn...
• ... das Netzkabel- oder der Netzstecker angeschmort oder beschädigt sind. Lassen Sie das
defekte Netzkabel gegen Originalteile austauschen. Auf keinen Fall dürfen diese repariert werden.
• ... das Gehäuse des Gerätes beschädigt ist, oder Flüssigkeiten hineingelaufen sind. Lassen
Sie das Gerät erst vom Kundendienst überprüfen. Andernfalls kann es sein, dass das Gerät nicht
sicher betrieben werden kann. Es kann Lebensgefahr durch elektrischen Schlag bestehen!
REPARATUR
• Überlassen Sie die Reparatur Ihres TV-Gerätes ausschließlich qualifiziertem Fach-
personal.
• Im Falle einer notwendigen Reparatur wenden Sie sich bitte ausschließlich an unsere au-
torisierten Servicepartner.
AUFSTELLORT
• Neue Geräte können in den ersten Betriebsstunden einen typischen, unvermeidlichen a-
ber völlig ungefährlichen Geruch abgeben, der im Laufe der Zeit immer mehr abnimmt. Um der Geruchsbildung entgegenzuwirken, empfehlen wir Ihnen, den Raum
regelmäßig zu lüften. Wir haben bei der Entwicklung dieses Produktes Sorge dafür getragen, dass geltende Grenzwerte deutlich unterschritten werden.
• Halten Sie Ihr TV-Gerät und alle angeschlossenen Geräte von Feuchtigkeit fern und ver-
meiden Sie Staub, Hitze und direkte Sonneneinstrahlung. Das Nichtbeachten dieser
Hinweise kann zu Störungen oder zur Beschädigung des TV-Gerätes führen.
• Betreiben Sie Ihr Gerät nicht im Freien, da äußere Einflüsse, wie Regen, Schnee etc.
das Gerät beschädigen könnten.
• Stellen Sie keine mit Flüssigkeit gefüllten Gefäße (Vasen oder ähnliches) auf das Gerät.
Das Gefäß kann umkippen und die Flüssigkeit kann die elektrische Sicherheit beeinträchtigen.
• Stellen Sie keine offenen Brandquellen (Kerzen oder ähnliches) in die Nähe oder
das Gerät.
• Achten Sie auf genügend große Abstände in der Schrankwand. Halten Sie einen Min-
destabstand von 10 cm rund um das TV-Gerät zur ausreichenden Belüftung ein.
• Stellen und betreiben Sie alle Komponenten auf einer stabilen, ebenen und vibrations-
freien Unterlage, um Stürze des TV-Gerätes zu vermeiden.
• Vermeiden Sie Blendwirkungen, Spiegelungen und zu starke Hell-Dunkel-
Kontraste, um Ihre Augen zu schonen.
• Der optimale Betrachtungsabstand beträgt 5 Mal die Bildschirmdiagonale.
auf
VORGESEHENE UMGEBUNG
• Das TV-Gerät kann bei einer Umgebungstemperatur von +5° C bis +35° C und bei einer re-
lativen Luftfeuchtigkeit von 20% - 80% (nicht kondensierend) betrieben werden.
• Im ausgeschalteten Zustand kann das TV-Gerät bei -10° C bis +60° C gelagert werden.
• Warten Sie nach einem Transport des TV-Gerätes solange mit der Inbetriebnahme, bis das
Gerät die Umgebungstemperatur angenommen hat. Bei großen Temperatur- oder
Feuchtigkeitsschwankungen kann es durch Kondensation zur Feuchtigkeitsbildung in-
nerhalb des TV-Gerätes kommen, die einen elektrischen Kurzschluss verursachen kann.
• Ziehen Sie während eines Unwetters oder wenn das Gerät für längere Zeit nicht benutzt
wird den Stecker aus der Steckdose und das Antennenkabel aus der Antennenbuchse.
2
D
D
EEUUTTSSCCH
H
Page 49

ANSCHLIEßEN
Beachten Sie nachfolgende Hinweise, um Ihr Gerät ordnungsgemäß anzuschließen:
STROMVERSORGUNG
• Betreiben Sie das Gerät nur an geerdeten Steckdosen mit AC 220V-240V~ 50 Hz. Wenn
Sie sich der Stromversorgung am Aufstellort nicht sicher sind, fragen Sie bei Ihrem Energieversorger nach.
• Benutzen Sie nur das beiliegende Netzanschlusskabel.
• Wir empfehlen zur zusätzlichen Sicherheit die Verwendung eines Überspannungsschut-
zes, um Ihr TV-Gerät vor Beschädigung durch Spannungsspitzen oder Blitzschlag aus
dem Stromnetz zu schützen.
• Um die Stromversorgung zu Ihrem Gerät zu unterbrechen, ziehen Sie den Netzste-
cker aus der Steckdose.
• Die Steckdose muss sich in der Nähe des Gerätes befinden und leicht erreichbar sein.
• Der eingebaute Netzschalter trennt das TV-Gerät nicht vollständig vom Stromnetz.
• Sollten Sie ein Verlängerungskabel einsetzen, achten Sie darauf, dass dieses den VDE-
Anforderungen entspricht. Fragen Sie ggf. Ihren Elektroinstallateur.
• Verlegen Sie die Kabel so, dass niemand darauf treten oder darüber stolpern kann.
• Stellen Sie keine Gegenstände auf die Kabel, da diese sonst beschädigt werden könn-
ten.
NORMEN / ELEKTROMAGNETISCHE VERTRÄGLICHKEIT
Das TV-Gerät erfüllt die Anforderungen der elektromagnetischen Kompatibilität und elektrischen Sicherheit der folgenden Bestimmungen:
English Deutsch Français Italiano Español Nederlands Português Dansk Magyar
EN 55013 - EN 55020 - EN 60065
EN 61000-3-2, EN 61000-3-3
• Wahren Sie mindestens einen Meter Abstand von hochfrequenten und magnetischen
Störquellen (anderes Fernsehgerät, Lautsprecherboxen, Mobiltelefon usw.) um Funkti-
onsstörungen und Datenverlust zu vermeiden.
• Trotz modernster Fertigung kann es auf Grund der hochkomplexen Technik in seltenen
Fällen zu Ausfällen von einzelnen oder mehreren Leuchtpunkten kommen.
WARTUNG
Die Lebensdauer des TV-Gerätes können Sie durch folgende Maßnahmen verlängern:
Achtung! Es befinden sich keine zu wartenden oder zu reinigenden Teile innerhalb
des Gehäuses.
• Ziehen Sie vor dem Reinigen immer den Netzstecker und alle Verbindungskabel.
• Verwenden Sie keine Lösungsmittel, ätzende oder gasförmige Reinigungsmittel.
• Reinigen Sie das TV-Gerät mit einem weichen, fusselfreien Tuch.
• Achten Sie darauf, dass keine Wassertröpfchen auf dem TV-Gerät zurückbleiben. Wasser
kann dauerhafte Verfärbungen verursachen.
• Setzen Sie das TV-Gerät weder grellem Sonnenlicht, noch ultravioletter Strahlung
aus.
• Bitte bewahren Sie das Verpackungsmaterial gut auf und benutzen Sie ausschließlich die-
ses, um das TV-Gerät zu transportieren.
11.
.
S
S
IICCHHEERRHHEEIIT
T
,
W
,
W
AARRTTUUNNG
G
,
A
UUßßEERRBBEETTRRIIEEBBNNAAHHMME
,
A
E
3
Page 50

RECYCLING UND ENTSORGUNG
Dieses Gerät und seine Verpackung wurden weitestgehend aus Materialien hergestellt, die
umweltschonend entsorgt und einem fachgerechten Recycling zugeführt werden können.
Nach seinem Gebrauch wird das Gerät zurückgenommen, um es einer Wiederverwendung
bzw. wertstofflichen Verwertung zuzuführen, soweit es in einem Zustand zurückgegeben
wird, der dem bestimmungsgemäßen Gebrauch entspricht. Nicht verwertbare Geräteteile
werden sachgemäß entsorgt.
Wenn Sie Fragen zur Entsorgung haben, wenden Sie sich bitte an Ihre Verkaufsstelle oder
an unseren Service.
Gerät
Werfen Sie das Gerät am Ende seiner Lebenszeit keinesfalls in den normalen Hausmüll. Erkundigen Sie sich nach Möglichkeiten einer umweltgerechten Entsorgung.
UMGANG MIT BATTERIEN
Batterien können brennbare Stoffe enthalten. Bei unsachgemäßer Behandlung können Batterien auslaufen, sich stark erhitzen, entzünden oder gar explodieren, was Schäden für
Ihr Gerät und ihre Gesundheit zur Folge haben könnte.
Bitte befolgen Sie unbedingt folgende Hinweise:
• Halten Sie Kinder von Batterien fern.
Sollten versehentlich Batterien verschluckt worden sein, melden Sie dies bitte sofort Ihrem Arzt.
• Laden Sie niemals Batterien (es sei denn, dies ist ausdrücklich angegeben).
• Entladen Sie die Batterien niemals durch hohe Leistungsabgabe.
• Schließen Sie die Batterien niemals kurz.
• Vermeiden Sie Hitze und werfen Sie die Batterien nicht ins Feuer.
• Zerlegen oder verformen Sie die Batterien nicht.
Ihre Hände oder Finger könnten verletzt werden oder Batterieflüssigkeit könnte in Ihre Augen oder auf Ihre Haut gelangen. Sollte dies passieren, spülen Sie die entsprechenden Stellen mit einer großen Menge klaren Wassers und informieren Sie umgehend Ihren Arzt.
• Vermeiden Sie starke Stöße und Erschütterungen.
• Vertauschen Sie niemals die Polarität.
Achten Sie darauf, dass die Pole Plus (+) und Minus (-) korrekt eingesetzt sind, um Kurzschlüsse zu vermeiden.
• Vermischen Sie keine neuen und alten Batterien oder Batterien unterschiedlichen
Typs. Dies könnte bei Ihrem Gerät zu Fehlfunktionen führen. Darüber hinaus würde sich
die schwächere Batterie zu stark entladen.
• Entfernen Sie verbrauchte Batterien sofort aus dem Gerät.
• Entfernen Sie die Batterien aus Ihrem Gerät, wenn dieses über einen längeren Zeit-
raum nicht benutzt wird.
• Ersetzen Sie alle verbrauchten Batterien in einem Gerät gleichzeitig mit neuen Batte-
rien des gleichen Typs.
• Isolieren Sie die Kontakte der Batterien mit einem Klebestreifen, wenn Sie Batterien
lagern oder entsorgen wollen.
Batterien
Verbrauchte Batterien gehören nicht in den Hausmüll! Sie müssen bei einer Sammelstelle für
Altbatterien abgegeben werden.
4
D
D
EEUUTTSSCCH
H
Page 51

22.
.
E
IINNFFÜÜHHRRUUNNG
E
G
HINWEISE ZU DIESER ANLEITUNG
Wir haben diese Gebrauchsanweisung so gegliedert, dass Sie jederzeit über das Inhaltsverzeichnis die benötigten Informationen themenbezogen nachlesen können. Die Technischen
Daten und der Lieferumfang befinden sich in einem eigenen, zugehörigen Dokument.
Ziel dieser Gebrauchsanweisung ist es, Ihnen die Bedienung Ihres TV-Gerätes in leicht verständlicher Sprache nahe zu bringen.
UNSERE ZIELGRUPPE
Die Gebrauchsanweisung richtet sich an Erstanwender sowie an fortgeschrittene Benutzer. Ungeachtet der möglichen professionellen Nutzung, ist das TV-Gerät für den Betrieb in einem Privathaushalt konzipiert.
DIE QUALITÄT
Wir haben bei der Wahl der Komponenten unser Augenmerk auf hohe Funktionalität, einfache Handhabung, Sicherheit und Zuverlässigkeit gelegt. Durch ein ausgewogenes Konzept
können wir Ihnen ein zukunftsweisendes TV-Gerät präsentieren, der Ihnen viel Freude bereiten wird.
Wir bedanken uns für Ihr Vertrauen in unsere Produkte und freuen uns, Sie als neuen Kunden begrüßen zu können.
English Deutsch Français Italiano Español Nederlands Português Dansk Magyar
DER SERVICE
Durch individuelle Kundenbetreuung unterstützen wir Sie bei Ihrer täglichen Arbeit.
Nehmen Sie mit uns Kontakt auf, wir freuen uns, Ihnen helfen zu dürfen. Sie finden in dieser
Gebrauchsanweisung ein gesondertes Kapitel zum Thema Problembehebung auf Seite 37.
.
E
IINNFFÜÜHHRRUUNNG
22.
E
G
5
Page 52

LEISTUNGSMERKMALE
Vorteile gegenüber Röhren-TVs
¾ Platzeinsparung
¾ geringeres Gewicht
¾ Stromersparnis
¾ strahlungsarm
Eigenschaften
¾ Hochauflösendes Display
¾ On Screen Display (OSD) – Graphische Bedieneroberfläche
¾ 499 Programmplätze, 3 AV-Stellungen, HDMI, YUV und VGA-Modus
¾ Multistandard PAL, SECAM, NTSC
¾ „HD ready“ – HDTV kompatibel
¾ Folgende Anschlüsse sind vorhanden:
- Tuneranschluss
- SCART/AV1 (Video, S-Video, RGB, YCrCb, YPrPb)
- SCART/AV2 (Video, S-Video, RGB, YCrCb, YPrPb)
- AV.SV (Video/S-Video und Audio In)
- Kopfhörer
- Analoger und digitaler Multimedia-Eingang (VGA und HDMI-Anschluss)
- Audio-In für VGA und HDMI
- YUV (Componenten) Eingang
- Audio-In für YUV
- Lineout
¾ Einfach zu bedienende Fernbedienung
¾ Einfach zu bedienendes Bildschirmmenüsystem
¾ Vollautomatisches Installationssystem APSAS (A
¾ TOP/FLOF-Teletextfunktion mit 2.100 Seitenspeicher und Multipage-Text
¾ Volldigitale Bildverbesserungen:
- dynamische Rauschreduktion
- Kammfilter
- Perfect Clear
- Bildschärfe
- CTI
¾ 2-Tuner-PIP: Bild-in-Bild von zwei verschiedenen Signalquellen
¾ Standbild und Multipicture (Senderübersicht)
¾ Vollbildformat unabhängig von der Signalquelle
¾ Kopfhörerbuchse für abgeschirmtes Hörvergnügen
¾ Integriertes Lautsprechersystem mit 4 Lautsprechern
¾ Decoderfunktion
¾ Intelligente Swap-Funktion
¾ Sleeptimer
¾ Kindersicherung
¾ Plug and Play: automatische Erkennung von Ihrem Betriebssystem
¾ Vier Spiele: Brixx, Anaconda, Scramble, Outer Space
utomatic Program Search And Sort)
6
D
EEUUTTSSCCH
D
H
Page 53

.
S
33.
Die Tasten am Gerät steuern die Basisfunktionen des TV-Gerätes einschließlich des
On-Screen Menüs. Die erweiterten Funktionen erreichen Sie über die Fernbedienung.
• Detailansicht Front und Seite:
Hinweis: Für weitere Informationen zum Betrieb von externen Geräten, lesen Sie bitte das
Kapitel „10. ANSCHLIEßEN VON EXTERNEN GERÄTE“ auf Seite 26.
TTEEUUEERREELLEEMMEENNTTEE UUNNDD
S
S
EEIITTEENNAANNSSCCHHLLÜÜSSSSE
S
Betriebsanzeige
Ein blaues Licht deutet an, dass das
Gerät eingeschaltet ist, sich aber im
Bereitschaftsmodus befindet.
Wenn das Gerät eingeschaltet ist,
leuchtet das Licht gelb.
Sensorfenster
Richten Sie die Fernbedienung auf diese
Region des Bildschirms.
Steuerelemente & Seitenanschlüsse
An der Geräteseite befinden sich die
Seitenanschlüsse und ein Teil der
Steuerelemente.
Power
schaltet das Gerät ein oder in den Bereitschaftsmodus
P+/P- Programm +/-
Richtungstasten im Bildschirm-Menü
\+/\- Lautstärke +/-
Richtungstasten im Bildschirm-Menü
MENU Taste
EXIT Taste
AV.SV-Eingang
Kopfhörerausgang
E
English Deutsch Français Italiano Español Nederlands Português Dansk Magyar
.
S
TTEEUUEERREELLEEMMEENNTTEE UUNNDD
33.
S
S
EEIITTEENNAANNSSCCHHLLÜÜSSSSE
S
E
7
Page 54

.
G
44.
• Ansicht von schräg unten:
Hinweis: Die Service-Buchse ist ausschließlich für unsere autorisierten Servicepartner vorgesehen. Die unsachgemäße Verwendung kann zur Beschädigung Ihres TV-Gerätes führen!
Hinweis: Für weitere Informationen zum Betrieb von externen Geräten, lesen Sie bitte das
Kapitel „10. ANSCHLIEßEN VON EXTERNEN GERÄTE“ auf Seite 26.
EERRÄÄTTEERRÜÜCCKKSSEEIITTEE UUNNDD
G
Line Out
YUV
YUV Audio IN
Antennenanschluss
Scart/AV1
Scart/AV2
Service
A
NNSSCCHHLLÜÜSSSSE
A
E
Netzstecker
Netzschalter
VGA
VGA Audio IN
HDMI Audio IN
HDMI
8
D
EEUUTTSSCCH
D
H
Page 55

.
F
55.
Dies ist die für Ihr TV-Gerät passende Fernbedienung, die entsprechende Tastenkennzeichnung und Belegung finden Sie auf der nächsten Seite:
EERRNNBBEEDDIIEENNUUNNG
F
• Öffnen Sie das Batteriefach der Fernbedienung indem Sie den Deckel abnehmen
• Legen Sie die Batterien vom Typ Micro / AAA ins Batteriefach auf der Rückseite der Fern-
bedienung ein. Beachten Sie dabei die Polung der Batterien (im Batteriefachboden markiert).
G
English Deutsch Français Italiano Español Nederlands Português Dansk Magyar
.
F
EERRNNBBEEDDIIEENNUUNNG
55.
F
G
9
Page 56

ZUSAMMENFASSUNG DER STEUERELEMENTE
Gerät ein- oder in Bereitschaftsmodus schalten
POWER
Signalquelle auswählen
1 – 9, TV Schaltet in den TV Modus
PC Schaltet zwischen VGA PC, YUV und HDMI um
AV.SV Schaltet in den Video- oder S-Video Modus (siehe Menü AV Einstellungen ab Seite 27)
SCART 1 Schaltet in den SCART/AV 1-Modus
SCART 2 Schaltet in den SCART/AV 2-Modus
0 Schaltet zwischen VGA PC, HDMI, YUV, AV.SV, SCART/AV 1, SCART/AV 2 um
Menüeinstellung
MENU/ENTER Zeigt das Hauptmenü an oder geht zum nächsten Menü
ST P+/P- Drücken, um den einzustellenden Punkt im OSD–Menü auszuwählen
VOL -/+, WX Drücken, um den Wert in der OSD-Balkenanzeige zu verringern oder zu erhöhen
EXIT Das Menü verlassen
Kanalwechsel
ST P+/P- Drücken, um im TV-Modus das Programm zu wechseln
0-9 Drücken, um Programme im TV-Modus direkt auszuwählen.
RTN Drücken, um zwischen Vorzugsprogramm und letztem Programm zu wechseln
Audiosteuerung
VOL -/+, WX Drücken, um die Lautstärke zu erhöhen / zu verringern
MUTE
SOUND Drücken, um direkt ins Menü Toneinstellungen zu wechseln
Teletextsteuerung
TELETEXT
INDEX
STOP
INTERRUPT
REVEAL
EXPAND
ST P-/P+ Drücken Sie P- oder P+ um Page Catching anzuwenden
PIP Steuerung
ON/OFF Ein-/Ausschalten des PIP-Fensters, wechselt das Groß- und Kleinbild bei längerer Betätigung
PIP SOURCE, ST Wählt die Quelle des PIP-Fensters aus
POSITION
SIZE Größeneinstellung des PIP-Fensters (groß, mittel, klein)
Andere Funktionen
RST, RESET Stellt bei längerer Betätigung die wichtigsten Fabrikseinstellungen der Bild- und Toneinstel-
GELBE TASTE Drücken, um Standbild ein- und auszuschalten
GRÜNE TASTE Drücken, um Multipicture (Senderübersicht) ein- und auszuschalten
ROTE TASTE Drücken, um das Menü Bildeinstellungen aufzurufen
BLAUE TASTE Drücken, um das Menü Toneinstellungen aufzurufen
ARC Schnelleinstellung des Bildformates (Auto, 4:3, Panorama, Breitbild 16:9, Cinema)
APC Stellt die Bildeinstellung auf „Am Tag“ oder „Am Abend“ oder „Manuell“ ein
DISPLAY Anzeige der Programm-Nr, des Sendernamens, des Bildformats und Aufruf der Programmliste
SLEEP Drücken, um direkt in das Sleeptimer-Menü zu gelangen
TIME
Schaltet das Gerät wechselweise ein oder in den Bereitschaftsmodus
Drücken, um den Ton ein- oder auszuschalten
Drücken, um den Teletextdienst ein oder auszuschalten.
Drücken, um auf die Indexseite des Teletexts zu gehen
Drücken, um den automatischen Seitenwechsel zu verhindern
Drücken, um während des Seitenaufbaus zum TV-Modus zu schalten
Drücken, um verborgene Informationen wie etwa Rätsel oder Quiz freizugeben
Drücken, um die obere oder untere Hälfte der Teletextseite zu vergrößern
Zum Verschieben des PIP-Fensters: Oben links → oben rechts → unten rechts → unten links
→ wiederholen
lungen (Helligkeit, Kontrast, Farbe, Lautstärke) wieder her
Drücken, um im Wechsel die digitale oder analoge Uhr anzuzeigen und auszuschalten
10
D
EEUUTTSSCCH
D
H
Page 57

.
66.
AAPPSSAAS
Ihr TV-Gerät verfügt über das automatische Installationssystem APSAS (Automatic Program
earch And Sort) und eine graphische Bedieneroberfläche OSD (On Screen Display). Beide
S
Systeme erleichtern Ihnen die Erstinstallation und in weiterer Folge die Bedienung Ihres
Gerätes.
1. Nachdem Sie das TV-Gerät ausgepackt haben, stellen Sie das Produkt an einem sicheren
und gut gelüfteten Ort auf.
2. Legen Sie die Batterien vom Typ Micro / AAA ins Batteriefach auf der Rückseite der Fern-
bedienung ein.
3. Schließen Sie das externe 75 Ohm Antennenkabel und das Stromkabel an die jeweiligen
Anschlüsse an und vergewissern Sie sich, dass der Netzschalter auf der Rückseite eingeschaltet ist.
4. Wenn Sie Ihr TV-Gerät zum ersten Mal einschalten in dem Sie die POWER-Taste auf der
Fernbedienung drücken, dann erscheint das Menü für die Erstinstallation. Führen Sie die
folgenden Anweisungen aus und verwenden Sie die Tasten STWX P+/P-, VOL+/- und
MENU um die Menüs zu steuern.
5. Auf Ihrem Bildschirm erscheinen die Flaggen aller Standorte, für die dieses TV-Gerät ge-
eignet ist.
S
-
D
IIEE EERRSSTTEE
-
D
E
IINNRRIICCHHTTUUNNG
E
G
English Deutsch Français Italiano Español Nederlands Português Dansk Magyar
6. Bitte wählen Sie mit den Richtungstasten STWX P+/P-, VOL+/- die Flagge des Stand-
ortes aus, an welchem Sie sich befinden und bestätigen Sie Ihre Auswahl mit der MENU-
Taste. Nach der Auswahl des Standortes erscheint das Menü
7. Der Standort wurde entsprechend Ihrer Flaggenauswahl gesetzt. Sollten Sie die Län-
dereinstellung nochmals korrigieren wollen, können Sie beim Menüpunkt „Standort auswählen“ zur Flaggenauswahl zurückkehren.
1. Standort auswählen Deutschland
2. Sprache auswählen Deutsch
3. Starten Abbrechen/Weiter
66.
Neuinstallation
.
AAPPSSAAS
S
-
D
-
D
IIEE EERRSSTTEE
E
IINNRRIICCHHTTUUNNG
E
G
11
Page 58

8. Die zum ausgewählten Standort passende Landessprache wurde automatisch voreinge-
stellte. Sie können jedoch auch jede andere Menüsprache beim Menüpunkt „Sprache
wählen“ auswählen.
9. Nachdem Sie Ihre bevorzugte Sprache gewählt haben, gehen Sie bitte mit Hilfe der Rich-
tungstasten ST P+/P- auf den Menüpunkt „Starten“.
Durch Anwahl von „Weiter“ mittels MENU und ST P+/P- Tasten wird die automatische
Ersteinrichtung gestartet. Das Gerät wird dabei alle an ihrem Standort empfangbaren
Fernsehprogramme automatisch suchen, entsprechend Ihrer Eingaben von Standort und
Sprache sortieren und abspeichern. Dabei erscheint folgendes Menü:
Frequenz
Automatischer Suchlauf
Kanaltype
Letzter Sender
Bisher gefunden
Abbrechen
10. Dieses Menü hat eine reine Anzeigefunktion um Sie über den Fortschritt der Erstinstalla-
tion zu informieren. Sollten Sie den Suchlauf jedoch abbrechen wollen, dann drücken Sie
die MENU-Taste. In diesem Fall werden jedoch keine Fernsehprogramme gespeichert.
Wenn Sie das Gerät aus- und wieder einschalten, gelangen Sie wieder zum Beginn der
Erstinstallation.
11. Nachdem die Ersteinrichtung beendet ist, erscheint die Programmtabelle auf dem Bild-
schirm. In der Programmtabelle können Sie Programme verschieben, umbenennen, löschen und einfügen bzw. Feineinstellungen durchführen (Einzelheiten hierzu finden Sie
in „Programmtabelle“ ab Seite 19).
SCART1 TV.........
SCART2 TV.........
AV.SV TV.........
VGA PC TV.........
HDMI TV.........
YUV TV.........
TV 1 ARD TV.........
TV 2 ZDF TV.........
TV 3 …… TV.........
• Löschen • Verschieben • Bearbeiten
Programmtabelle
12. Falls Sie keine Änderungen an den automatisch gespeicherten und sortierten Program-
men durchführen wollen, drücken Sie EXIT um direkt in den TV-Modus zu gelangen.
12
D
EEUUTTSSCCH
D
H
Page 59

77.
.
A
LLLLGGEEMMEEIINNEE
A
S
TTEEUUEERRUUNNGG UUNNDD
S
E
IINNSSTTEELLLLUUNNGGEEN
E
N
EIN- UND AUSSCHALTEN DES TV-GERÄTES
Auf der Geräterückseite befindet sich der Netzschalter des TV-Gerätes. Wenn dieser Schalter eingeschaltet wird, geht das Gerät in den sogenannten Bereitschaftsmodus.
Im Bereitschaftsmodus leuchtet die Betriebsanzeige blau. Mittels POWER-Taste auf der
Fernbedienung oder am Gerät kann das Gerät in den normalen Betriebsmodus geschaltet
werden.
Im normalen Betriebsmodus leuchtet die Betriebsanzeige gelb. Mittels POWER-Taste auf
der Fernbedienung oder am Gerät kann das Gerät wieder in den Bereitschaftsmodus geschaltet werden.
Wenn Sie das Gerät mit dem Netzschalter ausschalten, warten Sie bitte mindestens 15 Sekunden bevor Sie den Netzschalter wieder betätigen.
Hinweis: Im Bereitschaftsmodus wird der Energieverbrauch des TV-Gerätes auf ein notwendiges Minimum reduziert! Wenn der Netzschalter des TV-Gerätes ausgeschaltet ist, wird
keine Energie verbraucht, allerdings ist keine vollständige Netztrennung gegeben!
AUFRUFEN DER MENÜS UND BEDIENUNG DER ON-SCREEN STEUERUNG
Ihr TV-Gerät verfügt über eine graphische Bedieneroberfläche OSD (On Screen Display), die
Ihnen die Bedienung und Steuerung Ihres TV-Gerätes erleichtert.
English Deutsch Français Italiano Español Nederlands Português Dansk Magyar
1. Wenn das Gerät eingeschaltet ist, drücken Sie auf die MENU-Taste. Dann erscheint das
Hauptmenü auf dem Bildschirm.
2. Mit den Tasten ST P+/P- navigieren Sie durch Menüs. Drücken Sie wenn der Cursor auf
dem gewünschten Menüpunkt steht die MENU-Taste. Dadurch wird der Menüpunkt aktiviert.
3. Mittels der Ziffern-Tasten können die Menüpunkte direkt aufgerufen und aktiviert wer-
den.
4. Je nach Menüpunkt erscheint bei Aktivierung ein Untermenü, ein Auswahlfenster oder der
Einstell-/Eingabemodus wird eingeschaltet.
5. Durch Drücken von EXIT können Sie die jeweiligen Menüs, Untermenüs, Auswahlfenster
und den Einstell-/Eingabemodus wieder verlassen.
1. Bildeinstellungen
2. Toneinstellungen
3. Programmtabelle
4. Installation
5. Kindersicherung
6. Sleeptimer
7. Swapfunktion
8. Spiele
Hauptmenü
6. In der letzten Zeile der Menüs werden jeweils die Tasten angezeigt, die eine Funktion im
jeweiligen Menü besitzen.
7. Funktionen die in einem bestimmten Zustand des Gerätes nicht anwählbar sind, werden
in grauer Schrift dargestellt.
77.
.
A
LLLLGGEEMMEEIINNEE
A
S
TTEEUUEERRUUNNGG UUNNDD
S
E
IINNSSTTEELLLLUUNNGGEEN
E
N
13
Page 60

WEITERSCHALTEN VON PROGRAMMEN
Um durch die vorhandenen Programme zu schalten, haben Sie drei verschiedene Möglichkeiten:
1. Durch Direkteingabe der Programm-Nummer:
Über die Tasten 0-9 rufen Sie das Programm direkt auf. Um mehrstellige Programmnummern aufzurufen, können Sie innerhalb von ca. 2 Sekunden nach Eingeben der ersten Ziffer die nachfolgenden Ziffern eingeben.
2. Durch kurzes Drücken der ST P+/P- Tasten schalten Sie durch die laufenden Programme.
3. Durch längeres Drücken der ST P+/P- Tasten wird eine Programmliste angezeigt, in-
nerhalb der Sie auch mit den ST P+/P- Tasten umschalten können. Durch Drücken der
DISPLAY-Taste kann diese Programmliste auch direkt angezeigt werden.
ZWISCHEN TV UND EXTERNEN SIGNALQUELLEN UMSCHALTEN
Schalten Sie die angeschlossenen externen Geräte (Videorecorder, DVD-Player, PC, SATReceiver, etc.) ein und drücken Sie die entsprechende Taste auf der Fernbedienung:
Drücken Sie die TV-Taste, um in den TV-Modus zu schalten.
Drücken Sie die PC-Taste, um wechselweise in den VGA PC, YUV oder HDMI-Modus
zu schalten.
Drücken Sie die AV.SV Taste, um den AV.SV-Eingang auszuwählen.
Drücken Sie die Tasten SCART 1 oder SCART 2, um den SCART/AV1 bzw.
SCART/AV2-Eingang auszuwählen.
Die Scart-Buchsen verfügen (sofern dies vom angeschlossenen Gerät unterstützt wird) über
eine automatische Erkennung, ob das angeschlossenes Gerät eingeschaltet wurde. Dadurch
wird in den meisten Fällen die Umschaltung auf den verwendeten Scart-Eingänge automatisch erfolgen und muss nicht manuell ausgewählt werden.
LAUTSTÄRKEREGELUNG
BEDIENUNG DER LAUTSTÄRKEREGELUNG
Drücken Sie die Tasten WX VOL-/VOL+, um die Lautstärke zu verringern oder zu erhöhen.
STUMMSCHALTUNG
Sie können den Ton zu jeder Zeit ausschalten, in dem Sie auf die Taste MUTE drücken.
1. Drücken Sie die Taste MUTE
2. Drücken Sie die Taste MUTE noch einmal oder die WX VOL-/VOL+ Tasten und der
Ton wird mit der vorherigen Lautstärke wieder eingeschaltet.
und der Ton wird abgeschaltet.
BILDEINSTELLUNGEN (KONTRAST, FARBE, HELLIGKEIT, ETC.)
Ihr TV-Gerät bietet Ihnen die Möglichkeit für den TV- und die AV-Stellungen individuelle
Werte für die Bildeinstellungen nach Ihrem Geschmack festzulegen.
So zum Beispiel verwendet man für den PC-Modus üblicherweise niedrigere Werte für Helligkeit
und Kontrast als für die anderen Betriebsarten. Darüber hinaus besteht die Möglichkeit optimierte Werksvoreinstellungen für Kontrast und Helligkeit zu wählen (AM ABEND, AM TAG).
Variante 1: Drücken Sie die ROT-Taste um direkt in das Bildeinstellungen-Menü zu gelangen.
14
D
EEUUTTSSCCH
D
H
Page 61

Variante 2: Drücken Sie die MENU-Taste um das Hauptmenü aufzurufen, stellen Sie mit-
tels der ST P+/P- Tasten den Cursor auf BILDEINSTELLUNGEN und rufen Sie
das zugehörige Menü mittels der MENU-Taste auf.
1. Voreinstellung
2. Kontrast
3. Farbe
4. Helligkeit
5. Format
6. Tint
7. Einstellungen VGA HDMI YUV
8. Weitere Bildeinstellungen
Bildeinstellungen
1. Voreinstellung:
Hier können Sie zwischen optimalen Werksvoreinstellungen oder manueller Einstellung
für Kontrast und Helligkeit wählen. Die Auswahl erfolgt mit den WX VOL+/VOL-Tasten
oder mittels MENU über eine Auswahlliste. Die Voreinstellung kann auch außerhalb des
Bildmenüs mittels der APC-Taste ausgewählt werden.
¾ AM TAG:
Hier wird der Kontrast des Bildes erhöht um eine optimale Darstellung des Bildes bei
Tageslicht oder bei Nachtszenen zu erreichen.
¾ AM ABEND:
Hier wird der Kontrast des Bildes reduziert. Dadurch entsteht vor allem am Abend bei
wenig Umgebungslicht ein angenehmer Bildeindruck.
¾ MANUELL:
Sie können Kontrast und Helligkeit selbst festlegen um das Bild gemäß ihren Wünschen
anzupassen.
English Deutsch Français Italiano Español Nederlands Português Dansk Magyar
2. Abhängig von der Voreinstellung können Sie die Werte für Kontrast, Helligkeit und Farbe
mit den WX VOL+/VOL- Tasten anpassen. Kontrast und Helligkeit sind nur veränderbar,
wenn der Menüpunkt VOREINSTELLUNG auf MANUELL eingestellt wurde.
3. Format:
Mit den WX VOL+/VOL- Tasten kann das gewünschte Bildformat eingestellt werden. Diese
Einstellung kann auch außerhalb des Bildmenüs direkt mit der ARC-Taste durchgeführt werden.
¾ AUTO: In diesem Modus wählt das Gerät selbständig die zum jeweiligen übertrage-
nen Programm passende Bildeinstellung aus und passt diese laufend an das Programm an.
¾ 4:3: Diese Einstellung stellt das Seitenverhältnis des Bildes auf 4:3 für traditionelle Fern-
sehprogramme ein. Es erscheinen schwarze Balken auf beiden Seiten des Bildschirms.
¾ PANORAMA: Passt eine 4:3 Videoquelle auf ein 16:9 Verhältnis an, wobei vor allem die
Ecken des Bildes gedehnt werden. Dies verringert entstehende Verzerrungen in der Mitte
des Bildes.
¾ CINEMA: Manche DVD-Filme bzw. Cinemascope Sendungen füllen den oberen und
unteren Rand des Bildschirms nicht aus. Die Funktion Cinema dehnt die Höhe, um
den Bildschirm zu füllen.
¾ BREITBILD 16:9: 16:9 Sendungen werden unverzerrt wiedergegeben. 4:3 Videoquel-
le werden gleichmäßig gedehnt, um den Bildschirm zu füllen. Hier kommt es sowohl
in der Mitte als auch in den Ecken des Bildes zu Verzerrungen.
4. Tint:
Mit den WX VOL+/VOL- Tasten kann für NTSC-Bilder (z. B. Videokassetten aus den
USA) der Farbeindruck verändert werden.
5. Einstellungen VGA, Einstellungen HDMI, Einstellungen YUV:
Dieser Punkt ist jeweils nur im VGA PC, HDMI und YUV-Modus anwählbar. Nähere Erklärungen siehe Kapitel „11. VGA, HDMI und YUV“ auf Seite 29.
.
A
LLLLGGEEMMEEIINNEE
77.
A
S
TTEEUUEERRUUNNGG UUNNDD
S
E
IINNSSTTEELLLLUUNNGGEEN
E
N
15
Page 62

WEITERE BILDEINSTELLUNGEN
Bewegen Sie mit den ST P+/P- Tasten den Cursor auf WEITERE BILDEINSTELLUNGEN
und drücken Sie die MENU-Taste.
In diesem Menü können weitere Feineinstellungen für den Bildeindruck vorgenommen werden.
1. Rauschreduktion:
Mit dieser Funktion kann bei verrauschten Bildern die Bildqualität verbessert werden. Es
können mit den WX VOL+/VOL- Tasten oder der MENU-Taste über eine Auswahlliste
die Stellungen AUTOMATISCH/AUS/SCHWACH/MITTEL/STARK ausgewählt werden.
Auf Stellung AUTOMATISCH wird die Rauschreduktion vom Gerät selbstständig an die
Empfangsqualität angepasst. Stellungen MITTEL und STARK sollten nur bei stark verrauschten Bildern ausgewählt werden, da es bei schnell bewegten Bildinhalten zu ruckartigen Bewegungen kommen kann. Diese Einstellung kann für jeden Programmplatz individuell festgelegt werden.
Weitere Bildeinstellungen
1. Rauschreduktion
2. Schärfe
3. Kammfilter
4. Farbdeckung
5. Backlight
6. Weissbalance
7. Perfect Clear
8. Antiflicker
2. Schärfe:
Mit den WX VOL+/VOL- Tasten kann die Bildschärfe ihren persönlichen Wünschen an-
gepasst werden. Durch Drücken der MENU-Taste gelangt man in den Einstellmodus. Das
Menü wird ausgeblendet um das Bild beurteilen zu können und über einen Einstellbalken
kann die Einstellung vorgenommen werden. Diese Einstellung kann für jeden Programmplatz individuell festgelegt werden.
3. Kammfilter:
Durch das Aktivieren dieser Funktion können störende Wellenlinien in karierten Mustern
im Bildinhalt vermieden werden.
4. Farbdeckung:
Diese Funktion dient dazu, um auftretende Unterschiede zwischen den farbige Bildanteilen und den Bildkonturen auszugleichen.
Die Einstellung kann im Menü mit den WX VOL+/VOL- Tasten erfolgen. Durch Drücken
der MENU-Taste gelangt man auch in den Einstellmodus. Das Menü wird ausgeblendet
und über einen Einstellbalken kann die Einstellung vorgenommen werden. Diese Einstellung kann für jeden Programmplatz individuell festgelegt werden.
5. Backlight (nur bei LCD-TV Geräten aktiv – nicht bei Plasma-TVs):
Mit dieser Funktion kann die Helligkeit der Hintergrundbeleuchtung des TV-Gerätes gesteuert werden. Es kann mit den WX VOL+/VOL- Tasten oder der MENU-Taste über eine
Auswahlliste zwischen den Stellungen SCHWACH/MITTEL/NORMAL/VOLL gewählt werden.
6. Weissbalance:
Mit den WX VOL+/VOL- Tasten können Sie den Weiß-Eindruck in 3 Stufen ihren Wün-
schen anpassen.
7. Perfect Clear:
Unter diesem Punkt können Sie mit den WX VOL+/VOL- Tasten einen speziellen, digita-
len Bildverbesserungsmodus aktivieren.
16
D
EEUUTTSSCCH
D
H
Page 63

8. Antiflicker (nur bei Plasma-TVs aktiv – nicht bei LCD-TV-Geräten):
Durch das Aktivieren dieser Funktion kann störendes Großflächenflackern reduziert werden. Allerdings werden schnelle Bewegungen dadurch unschärfer und ruckelnd.
9. Rahmen 4:3:
Mit dieser Funktion können Sie die Farbe der Streifen neben dem Bild im Format 4:3 einstellen. Sie können mit den WX VOL+/VOL- Tasten oder der MENU-Taste über eine Auswahlliste zwischen den Stellungen SCHWARZ/DUNKEL/HELL/WEISS wählen.
TONEINSTELLUNGEN (BALANCE, EQUALIZER, ETC.)
In diesem Menü können verschiedene Einstellungen bezüglich der Tonwiedergabe ihres TVGerätes vorgenommen werden.
Variante 1: Drücken Sie die BLAU-Taste um direkt in das Toneinstellungen-Menü zu gelangen.
Variante 2: Drücken Sie die MENU-Taste um das Hauptmenü aufzurufen, stellen Sie mit-
tels der ST P+/P- Tasten den Cursor auf TONEINSTELLUNGEN und rufen Sie
das zugehörige Menü mittels der MENU-Taste auf.
Toneinstellungen
1. Lautstärke
2. Balance
3. Equalizer
4. Voreinstellung
5. Kopfhörer
6. Surround
7. Tonkanal
8. Automatische Lautstärke
1. Lautstärke:
Dieser Punkt entspricht der Lautstärkeeinstellung, die auch außerhalb des Menüs direkt
mit den WX VOL+/VOL- Tasten steuerbar ist.
English Deutsch Français Italiano Español Nederlands Português Dansk Magyar
2. Balance:
Hier können Lautstärkeunterschiede zwischen linkem und rechtem Lautsprecher ausgeglichen werden, falls ihre Betrachtungsposition nicht zentral vor dem TV-Gerät sein sollte, um einen optimalen Klangeindruck zu erzielen.
3. Equalizer:
Wie bei ihrer Stereoanlage können Sie unter diesem Punkt einzelne Frequenzen der Tonwiedergabe verstärken bzw. abschwächen. Dieser Menüpunkt ist nur anwählbar, wenn
der Menüpunkt VOREINSTELLUNG auf MANUELL eingestellt ist. Stellen sie den Auswahlbalken mittels der ST P+/P- Tasten auf EQUALIZER und drücken Sie die MENU-Taste.
1. Voreinstellungen
2. Grundeinstellungen
3. 120 Hz
4. 200 Hz
5. 500 Hz
6. 1200 Hz
7. 3000 Hz
8. 7500 Hz
9. 12000 Hz
Equalizer
¾ Unter VOREINSTELLUNG kann zwischen den Equalizer-Voreinstellungen
POP/CLASSIC/SPRACHE/JAZZ/FLAT gewählt werden. Die Auswahl erfolgt entweder über die WX VOL+/VOL- Tasten oder über eine Auswahlliste erreichbar über die
MENU-Taste. Jede Equalizer-Voreinstellung entspricht einer bestimmten vorgegebenen
Einstellung bezüglich der Anhebung bzw. Abschwächung der einzelnen Frequenzen um
bestimmte Klangeffekte zu erzielen. Wurde eine der zuvor angeführten Voreinstellungen ausgewählt sind die einzelnen Frequenzen nicht veränderbar.
.
A
LLLLGGEEMMEEIINNEE
77.
A
S
TTEEUUEERRUUNNGG UUNNDD
S
E
IINNSSTTEELLLLUUNNGGEEN
E
N
17
Page 64

¾ Wird unter VOREINSTELLUNG die Einstellung MANUELL ausgewählt, so können Sie
die Tonwiedergabe ihres TV-Gerätes für die angegebenen Frequenzen nach Ihrem
persönlichen Empfinden einstellen. Bewegen Sie den Auswahlbalken mit den
ST P+/P- Tasten auf die jeweilige Frequenz und führen Sie die Einstellung mittels
der WX VOL+/VOL- Tasten durch.
¾ Sollten Sie mit ihren Veränderungen nicht zufrieden sein, können Sie durch Aufruf
der Grundeinstellungen zu voreingestellten Grundwerten zurückkehren. Hierzu stellen
Sie den Auswahlbalken mit den ST P+/P- Tasten auf GRUNDEINSTELLUNGEN und
drücken die MENU-Taste.
4. Voreinstellung:
Schnellauswahl für die Equalizervoreinstellungen – siehe Equalizer
5. Kopfhörer:
Unter diesem Punkt können Sie die Lautstärke-, Bässe- und Höheneinstellungen für den
Kopfhörer anpassen. Bewegen Sie den Auswahlbalken mit den ST P+/P- Tasten auf
KOPFHÖRER und rufen Sie das zugehörige Menü durch Drücken der MENU-Taste auf.
Mittels der WX VOL+/VOL- Tasten können die Werte verändert werden.
1. Lautstärke
2. Bass
3. Höhen
Kopfhörermenü
6. Surround:
Die verschiedenen Raumklangstellungen NORMAL/BREIT/CINEMA können mittels der
WX VOL+/VOL- Tasten oder durch Drücken der MENU-Taste über eine Auswahlliste
angewählt werden.
Hinweis: Cinema Surround ist eine von Dolby Laboratories zertifizierte Technologie, die
durch Verwendung von Dolby Pro Logic ein virtuelles Raumklang-Erlebnis mit nur zwei
Lautsprechern erzeugt.
Cinema Surround gibt alle originalen Mehrkanal-Audioinformationen wieder und vermittelt dem Zuhörer den Eindruck, von zusätzlichen Lautsprechern umgeben zu sein.
7. Tonkanal:
Mit dieser Funktion können Sie den Tonkanal wählen. Zum Beispiel bietet dies die Möglichkeit bei zweisprachigen Sendungen zwischen den beiden Sprachen auszuwählen.
Nachdem Sie den Auswahlbalken mit den ST P+/P- Tasten auf TONKANAL gestellt ha-
ben, können Sie entweder mit den WX VOL+/VOL- Tasten oder über eine Auswahlliste,
erreichbar mittels der MENU-Taste, zwischen den Einstellungen STEREO/MONO/
ZWEITON A/ZWEITON B/ MONO C wählen.
Die anwählbaren Tonkanäle sind abhängig von der Sendung, die Sie gerade sehen. Nicht
anwählbare Stellungen werden grau dargestellt. Die Einstellung, die Sie in diesem Menü
vornehmen, wird nach einem Programmplatzwechsel wieder zurückgesetzt.
Sollten Sie auf einem Sender eine dauerhafte Änderung des Tonkanals wünschen (z. B.
Sie wollen immer die zweite Sprache eines bestimmten Senders empfangen), nehmen
Sie diese Einstellung im Menü PROGRAMME BEARBEITEN vor – siehe Kapitel „Manuelle
Einstellung von Programmen“ auf Seite 21. In diesem Abschnitt finden Sie auch eine genauere Beschreibung bezüglich der möglichen Einstellungen.
8. Automatische Lautstärke:
Nach Aktivierung dieser Funktion wird die Lautstärke ihres TV-Gerätes automatisch geregelt, so dass laute Tonpassagen (z. B. bei Werbeunterbrechungen) nicht mehr störend
wirken.
9. Loudness:
Unter diesem Punkt können Sie eine lautstärkenabhängige Klangregelung ein- bzw. ausschalten.
18
EEUUTTSSCCH
H
D
D
Page 65

88.
.
TTVV--M
M
S
OODDUUS
PROGRAMMEINSTELLUNGEN ANPASSEN
1. Schalten Sie mit den Tasten 1 – 9 auf der Fernbedienung das TV-Gerät in den „TV“-
Modus.
2. Drücken Sie auf die MENU-Taste und das Hauptmenü erscheint auf dem Bildschirm.
Mit den ST P+/P- Tasten wählen Sie den Menüpunkt PROGRAMMTABELLE aus und drü-
3.
cken die MENU-Taste.
1. Bildeinstellungen
2. Toneinstellungen
3. Programmtabelle
4. Installation
5. Kindersicherung
6. Sleeptimer
7. Swapfunktion
8. Spiele
Hauptmenü
English Deutsch Français Italiano Español Nederlands Português Dansk Magyar
PROGRAMMTABELLE
Die Programmtabelle zeigt die Programmnummern und –namen an. In dieser Liste können
Sie Programmnamen ändern, Programme bearbeiten, löschen, hinzufügen, verschieben oder
Feineinstellungen vornehmen.
SCART1 TV.........
SCART2 TV.........
AV.SV TV.........
VGA PC TV.........
HDMI TV.........
YUV TV.........
TV 1 ARD TV.........
TV 2 ZDF TV.........
TV 3 …… TV.........
• Löschen • Verschieben • Bearbeiten
Programmtabelle
Hinweis: Die Programme SCART1, SCART2, AV.SV, VGA PC, HDMI und YUV können nicht
gelöscht oder verschoben werden.
LÖSCHEN VON PROGRAMMEN
1. Gehen Sie in der Programmtabelle mit Hilfe der STWX P+/P-/Vol+/Vol- Tasten zu
dem Programm, das Sie löschen möchten.
2. Drücken Sie die ROT Taste für den Direktaufruf der Löschfunktion oder rufen Sie mit der
MENU-Taste eine Auswahlliste an Editierfunktionen auf und wählen Sie LÖSCHEN aus.
3. Sie gelangen nun zu einer Sicherheitsabfrage. Wählen Sie mit Hilfe der ST P+/P- Tas-
ten LÖSCHEN aus und führen Sie dies mit der MENU-Taste oder durch nochmaliges Drücken der ROT Taste direkt aus.
88.
.
TTVV--M
M
OODDUUS
S
19
Page 66

VERSCHIEBEN UND SORTIEREN VON PROGRAMMEN
1. Gehen Sie in der Programmtabelle mit Hilfe der STWX P+/P-/Vol+/Vol- Tasten zu
dem Programmplatz, den Sie verschieben oder umsortieren möchten.
2. Drücken Sie die GRÜN Taste für den Direktaufruf der Sortierfunktion oder rufen Sie mit
der MENU-Taste eine Auswahlliste an Editierfunktionen auf und wählen Sie
VERSCHIEBEN aus.
3. Das entsprechende Programm erscheint nun farbig markiert.
4. Verschieben Sie das Programm mit Hilfe der STWX P+/P-/Vol+/Vol- Tasten auf den
von Ihnen gewünschten Programmplatz.
5. Speichern Sie die durchgeführten Änderungen durch erneutes Drücken der GRÜN oder
der MENU-Taste.
NAME VON PROGRAMMEN ÄNDERN
1. Gehen Sie in der Programmtabelle mit Hilfe der STWX P+/P-/Vol+/Vol- Tasten zu
dem Programmplatz, den Sie bearbeiten möchten.
2. Drücken Sie entweder die GELB Taste für den Direktaufruf der Bearbeitungsfunktion o-
der rufen Sie mit der MENU-Taste eine Auswahlliste an Editierfunktionen auf und wählen
Sie BEARBEITEN aus.
3. Der Bildschirm zeigt nun das Menü PROGRAMM BEARBEITEN, AV BEARBEITEN oder
EINSTELLUNGEN VGA, EINSTELLUNGEN HDMI oder EINSTELLUNGEN YUV:
Programm bearbeiten
1. Frequenzeingabe
2. Abstimmung
3. Kanalraster
4. Kanaltype
5. Kanalnummer
6. Name ändern
7. TV-Standard
8. Farb-Standard
9. Tonkanal
10. Regelung
11. Decoder
1. Name ändern
2. Farb-Standard
3. Regelung
Einstellungen VGA HDMI YUV
1. Modus
2. Name ändern
3. Eingang
4. Horizontale Position
...
AV bearbeiten
4. Gehen Sie mit Hilfe der ST P+/P- Tasten zum Menüpunkt NAME ÄNDERN und drücken
Sie die MENU-Taste.
5. Sie können nun mit den Tasten ST P+/P- den gewünschten Buchstaben auswählen. Mit
den Tasten WX VOL+/VOL- gelangen Sie zur nächsten Position (jeder Programmname
kann 8 Zeichen lang sein). Mit der MENU- oder EXIT-Taste verlassen Sie die Na-
mensauswahl.
6. Drücken Sie die EXIT-Taste und bestätigen Sie, dass Sie die durchgeführten Änderungen
speichern möchten mit JA.
20
D
D
EEUUTTSSCCH
H
Page 67

MANUELLE EINSTELLUNG VON PROGRAMMEN
1. Gehen Sie in der Programmtabelle mit Hilfe der STWX P+/P-/Vol+/Vol- Tasten zu
dem Programmplatz, den Sie bearbeiten möchten.
2. Drücken Sie entweder die GELB Taste für den Direktaufruf der Bearbeitungsfunktion o-
der rufen Sie mit der MENU-Taste eine Auswahlliste an Editierfunktionen auf und wählen
Sie BEARBEITEN aus.
3. Der Bildschirm zeigt nun das Menü PROGRAMM BEARBEITEN oder AV BEARBEITEN:
Programm bearbeiten
1. Frequenzeingabe
2. Abstimmung
3. Kanalraster
4. Kanaltype
5. Kanalnummer
6. Name ändern
7. TV-Standard
8. Farb-Standard
9. Tonkanal
10. Regelung
11. Decoder
1. Name ändern
2. Farb-Standard
3. Regelung
AV bearbeiten
English Deutsch Français Italiano Español Nederlands Português Dansk Magyar
4. Frequenzeingabe:
Hier kann die Empfangsfrequenz verändert oder direkt eingegeben werden. Stellen Sie
den Auswahlbalken mit den ST P+/P- Tasten auf FREQUENZEINGABE. Sie können nun
mit den WX VOL+/VOL- Tasten die Empfangsfrequenz verändern.
Dabei sollte darauf geachtet werden, dass der Anzeigebalken des Menüpunktes
2. ABSTIMMUNG in der Mitte steht, da dann der Sender optimal eingestellt ist.
Durch Drücken der MENU–Taste können Sie die Empfangsfrequenz auch direkt mit den
Zifferntasten eingeben. Mit der MENU-Taste verlassen Sie die Direkteingabe wieder.
5. Kanalraster:
Mit der MENU-Taste(Auswahlliste) oder den WX VOL+/VOL- Tasten kann das Kanalras-
ter verändert werden. Das Kanalraster stellt eine Einteilung der Kanäle auf die zur Verfügung stehenden Frequenzen dar und kann je nach Standort variieren (z. B. CCIR in
Deutschland unterscheidet sich von der notwendigen Einstellung in Frankreich)
6. Kanaltype:
Mit der MENU-Taste (Auswahlliste) oder den WX VOL+/VOL- Tasten kann die Kanalty-
pe verändert werden. Abhängig von der Einstellung des Kanalrasters kann hier zwischen
Kanälen und Sonderkanälen bzw. speziellen Kanälen in einzelnen Staaten ausgewählt
werden (z. B. C1 in Frankreich).
7. Kanalnummer:
Hier können Sie direkt die Kanalnummer des von ihnen auf diesem Programmplatz gewünschten Programms eingeben. Mit den WX VOL+/VOL- Tasten können Sie die mo-
mentane Kanalnummer erhöhen und verringern. Wenn Sie die MENU-Taste drücken, erscheint ein Cursor und Sie können mit den Zifferntasten direkt die Kanalnummer eingeben.
8. TV-Standard:
Mit der MENU-Taste (Auswahlliste) oder den WX VOL+/VOL- Tasten kann der TV-
Standard verändert werden. Hier können Einstellungen bezüglich der Übertragungsnorm
(standortabhängig) eines Senders vorgenommen werden.
.
88.
TTVV--M
M
OODDUUS
S
21
Page 68

9. Farb-Standard:
Mit der MENU-Taste (Auswahlliste) oder den WX VOL+/VOL- Tasten kann der Farb-
standard verändert werden. Hier können Einstellungen bezüglich der Farbnorm eines
Senders vorgenommen werden.
10. Tonkanal:
Mit der MENU-Taste (Auswahlliste) oder den WX VOL+/VOL- Tasten kann der bevor-
zugte Tonkanal gewählt werden. In Stellung AUTOMATISCH wählt das Gerät selbstständig die optimale Toneinstellung entsprechend der Priorität NICAM (eine von manchen
Sendern verwendete digitale Tonnorm) vor Stereo vor Mono aus. Die Umstellung auf
MONO kann manchmal bei Tonproblemen auf einem Stereosender von Vorteil sein. Mit
ZWEITON B kann auf einem zweisprachigen Sender die zweite Sprache ausgewählt werden. Die Einstellung MONO C ist nur für NICAM-Sender, die mehrere Sprachen senden,
relevant.
11. Regelung:
Wenn Sie einen Videorecorder über einen HF-Programmplatz (Anschluss mit Antennenkabel) oder über ein AV-Programm (Anschluss mit Scart-Kabel) betreiben möchten, sollte
der Menüpunkt REGELUNG auf diesem Programmplatz auf VCR gestellt werden um störende Bildverzerrungen zu vermeiden (Umstellung auf schnelle Zeitkonstante). Die Einstellung kann mittels der MENU-Taste (Auswahlliste) oder den WX VOL+/VOL- Tasten
vorgenommen werden.
12. Decoder:
Diese Einstellung ist wichtig für den Betrieb eines Decoders an der SCART/AV2-Buchse
um verschlüsselte Sender empfangen zu können. Die Einstellung kann mittels der
MENU-Taste (Auswahlliste) oder den WX VOL+/VOL- Tasten vorgenommen werden.
Die Einstellung AUS bedeutet normaler Fernsehbetrieb ohne Decoder. Auf allen anderen
Stellungen wird automatisch das decodierte Bildsignal des Decoders dargestellt. Der Unterschied zwischen den Decoderstellungen besteht darin ob der jeweilige Sender den Ton
zusätzlich verschlüsselt oder nicht. Die folgende Tabelle soll die Zusammenhänge erläutern.
Decodereinstellung Sender/Ton Sender/Bild Tonausgabe
Quelle
Aus Uncodiert uncodiert TV TV
Ton Extern/Intern Analog codiert
Nicam uncodiert
Ton Extern Analog codiert
Nicam codiert
Ton Intern Analog uncodiert
Nicam uncodiert
codiert Analog Decoder
NICAM TV
codiert Analog Decoder
NICAM Decoder
codiert Analog TV
Nicam TV
Bilddarstellung
von
Decoder
Decoder
Decoder
Hinweis: Für die richtige Einstellung lesen Sie die Gebrauchsanweisung Ihres Decoders
oder fragen Sie den Anbieter des verschlüsselten Programms.
13. Drücken Sie die EXIT-Taste und bestätigen Sie, dass Sie die durchgeführten Änderungen
speichern möchten mit JA.
Hinweis: Die zuvor beschriebenen Einstellungen sind nur in Ausnahmefällen notwendig
(manuelles Einstellen eines neuen Senders, Anschluss eines Decoders, usw.). Der automatische Suchlauf APSAS führt die meisten Einstellungen selbsttätig durch.
22
D
EEUUTTSSCCH
D
H
Page 69

MANUELLES HINZUFÜGEN VON PROGRAMMEN
1. Gehen Sie mit den STWX P+/P-/Vol+/Vol- Tasten auf den ersten leeren Programm-
platz nach den bereits gespeicherten Programmplätzen in der Programmtabelle. Drücken
Sie die MENU-Taste und wählen Sie die Signalquelle NEU-TV aus.
2. Geben Sie nun den Kanaltyp und anschließend die Kanalnummer oder die entsprechende
Frequenz ein. Überprüfen Sie die restlichen Einstellungen auf ihre Korrektheit bezüglich
des gewünschten Senders (siehe Kapitel „Manuelle Einstellung von Programmen“ ab Seite 21)
3. Drücken Sie die EXIT-Taste und bestätigen Sie, dass Sie die durchgeführten Änderungen
speichern möchten mit JA.
NEUE PROGRAMME AUTOMATISCH HINZUFÜGEN
Diese Funktion ist sehr nützlich, wenn das Programmangebot in ihrem Empfangsgebiet (z.B.
am Kabelnetz) erweitert wird. Es wird ein automatischer Suchlauf gestartet, der alle neu
hinzu gekommenen Programme seit dem letzten Suchlauf speichert.
1. Drücken Sie die MENU-Taste um in das Hauptmenü zu gelangen.
2. Wählen Sie mit den ST P+/P- Tasten den Punkt INSTALLATION aus und drücken Sie
erneut die MENU-Taste.
Installation
1. Standort auswählen
2. Sprache
3. Neuinstallation
4. Neue Programme suchen
5. AV Einstellungen
6. Einschalten mit
7. Einstellung aller Programme
8. Werkseinstellungen
9. Startlogo
10. Service
English Deutsch Français Italiano Español Nederlands Português Dansk Magyar
3. Wählen Sie mit ST P+/P- Tasten den Menüpunkt NEUE PROGRAMME SUCHEN und drü-
cken Sie die MENU-Taste und wählen Sie STARTEN aus. Auf dem Bildschirm erscheint
nun das Menü AUTOMATISCHER SUCHLAUF:
Frequenz
Kanaltype
Letzter Sender
Bisher gefunden
Automatischer Suchlauf
Abbrechen
4. Dieses Menü dient zur Anzeige des bisherigen Fortschritts des Suchlaufs. Sie können den
Suchlauf jederzeit mit der MENU- oder der EXIT-Taste abbrechen. In diesem Fall werden keine neuen Sender gespeichert.
5. Wenn der Suchlauf fertig ist, gelangen Sie wie nach der Erstinstallation in die Programm-
tabelle. Neue Programme wurden im Anschluss an die bereits vorhandenen Programme
angefügt. Sollten Sie die Sortierung oder Namen ändern wollen, sehen Sie bitte im Kapi-
88.
.
TTVV--M
M
OODDUUS
S
23
tel „Programmtabelle“ auf Seite 19 nach.
Page 70

.
T
99.
Teletext ist ein kostenloses Service, das von den meisten Fernsehstationen ausgestrahlt wird
und aktuelle Informationen bezüglich Nachrichten, Wetter, Fernsehprogrammen, Aktienkursen, Untertiteln und anderen Themen bietet. Ihr TV-Gerät bietet viele nützliche Funktionen
für die Bedienung des Teletexts sowie Multipage-Text, Unterseitenspeicherung oder schnelle
Navigation.
EELLEETTEEXXT
T
T
DIE BEDIENUNG DES TELETEXTS
1. Wählen Sie einen Fernsehsender, der Teletext ausstrahlt.
2. Drücken Sie die
zuzeigen.
3. Durch nochmaliges Drücken der TELETEXT-Taste oder der EXIT-Taste schalten Sie
den Teletextmodus wieder aus. Das Gerät wechselt wieder in den TV-Modus.
TELETEXT-Taste einmal um die Basis-/Indexseite des Teletexts an-
TELETEXT SEITEN AUSWÄHLEN
1. Geben Sie die gewünschte Teletextseite als dreistellige Nummer direkt mit den Ziffern-
tasten ein.
2. Die gewählte Seitenzahl wird in der linken oberen Ecke des Bildschirms angezeigt. Der
Teletextzähler sucht solange, bis die gewählte Seitennummer gefunden ist, so dass die
gewünschte Seite angezeigt werden kann.
3. Schnellnavigation mit den 4 farbigen Tasten:
Durch Drücken der Tasten ROT, GRÜN, GELB und BLAU auf der Fernbedienung können
spezielle Seiten schnell ausgewählt werden. Die Funktion der jeweiligen Farbtaste wird
am unteren Bildrand angezeigt (z. B. +/- um eine Seite höher/niedriger zu blättern oder
der Titel des erreichbaren Teletextblocks)
4. Schnellnavigation mit Page Catching:
Diese Funktion ermöglicht die Schnellauswahl von in der aktuellen Teletextseite angezeigten Seitennummern. Navigieren Sie mit den ST P+/P- Tasten auf die für Sie inte-
ressante Seitennummer (ein blinkender Cursor erscheint dabei) und drücken Sie zum
Aufrufen die MENU-Taste.
5. Manche Teletextseiten beinhalten auch Unterseiten, die am unteren Bildrand angezeigt
werden. Durch Drücken der POSITION/SIZE Tasten können Sie zwischen den Unterseiten hin- und herblättern.
TELETEXT ANZEIGEFUNKTIONEN AUSWÄHLEN
Ihr TV-Gerät bietet ihnen mehrere Möglichkeiten mehrere Teletextseiten gleichzeitig bzw.
das Fernsehbild und den Teletext gleichzeitig übersichtlich darzustellen.
1. Multipage-Text:
Diese Funktion stellt mehrere zusammenhängende Teletextseiten auf einem Bildschirm
dar. Drücken Sie die DISPLAY-Taste. Sie erhalten ein großes und zwei kleine Anzeigefenster. Im großen Bild wird die Hauptseite dargestellt, in den kleinen Bildern die dazugehörenden, folgenden Unterseiten oder jene Seiten, die sich durch Drücken der Tasten
GELB bzw. BLAU schnell auswählen lassen. Um zum normalen Teletext-Vollbild zurückzukehren drücken Sie wieder die DISPLAY-Taste.
24
D
EEUUTTSSCCH
D
H
Page 71

2. Split Screen:
Um zusätzlich zum Teletext das aktuelle Fernsehbild als „Split Screen“ anzuzeigen, drücken Sie die PIP ON/OFF -Taste (= der Bildschirm wird geteilt).
3. Fernsehbild im Multipage-Text:
Durch erneutes Drücken der PIP ON/OFF -Taste wird das Fernsehbild im oberen Feld
der beiden kleinen Teletext-Bilder im Multipage-Modus dargestellt.
4. Teletext als Bild im Bild:
Durch erneutes Drücken der PIP ON/OFF -Taste wird das Fernsehbild als Vollbild dargestellt und die aktuelle Teletextseite als kleines Bild im Bild im oberen, rechten Bildschirmbereich eingeblendet.
NÜTZLICHE TELETEXT EIGENSCHAFTEN
INDEX
¾ Mit dieser Taste wählen Sie die Indexseite aus, die eine Liste des Teletextinhalts ent-
hält.
STOP
Die Teletextseite, die Sie gewählt haben, enthält möglicherweise mehr Informationen als auf
einen Bildschirm passen. In diesem Fall wird die Information auf mehrere Unterseiten aufgeteilt. Die Unterseiten werden in regelmäßigen Zeitabständen weitergeblättert.
¾ Drücken Sie die STOP-Taste, um einen automatischen Seitenwechsel zu verhindern.
Das Symbol STOP wird in der linken oberen Ecke des Bildschirms angezeigt und der
automatische Seitenwechsel ist unterbrochen.
¾ Drücken Sie erneut auf die STOP-Taste um den automatischen Seitenwechsel wieder
zuzulassen.
English Deutsch Français Italiano Español Nederlands Português Dansk Magyar
INTERRUPT
Wenn Sie im Teletextmodus die INTERRUPT-Taste drücken, dann schaltet das TV-Gerät die
Teletextanzeige in den Hintergrund. Damit können Sie Wartezeiten bis zur Anzeige der gewünschten Seite überbrücken.
¾ Wählen Sie die gewünschte Seitennummer im Teletextmodus.
¾ Drücken Sie die INTERRUPT-Taste um zum TV-Modus zu schalten, während Sie auf
die Teletextseite warten. In der linken oberen Ecke erscheint ein Feld mit der gesuchten Seitennummer und 3 Bindestriche die rotieren, solange gesucht wird.
¾ Sobald die gewünschte Seite gefunden ist, erscheint die Seitenzahl anstatt der
Bindestriche.
¾ Drücken Sie nun erneut die INTERRUPT-Taste, um die gewünschte Seite anzuzeigen.
REVEAL
¾ Um verborgene Information, wie z. B. die Lösungen von Rätseln, Puzzle oder Quiz
anzuzeigen, drücken Sie einmal auf die REVEAL-Taste.
¾ Nochmaliges Drücken der REVEAL-Taste verbirgt die Antworten wieder.
EXPAND
Diese Funktion zeigt die Teletextinformation in doppelter Größe an.
¾ Drücken Sie die EXPAND-Taste, um die obere Hälfte der Seite zu vergrößern.
¾ Drücken Sie erneut die EXPAND-Taste um die untere Hälfte der Seite vergrößert an-
zuzeigen.
¾ Nochmaliges Drücken der EXPAND-Taste zeigt den Teletext wieder in normaler Größe.
99.
.
T
EELLEETTEEXXT
T
T
25
Page 72

1100.
.
A
NNSSCCHHLLIIEEßßEENN VVOONN EEXXTTEERRNNEENN
A
G
EERRÄÄTTEEN
G
N
ANSCHLUSS EINES EXTERNEN GERÄTES AN DIE SCARTBUCHSE
Um z. B. einen Videorecorder, einen DVD-Player, einen SAT-Receiver oder ähnliches an eine
der beiden Scartbuchsen ihres TV-Gerätes anzuschließen, verbinden Sie bitte die SCART/AV1oder die SCART/AV2-Buchse des TV-Gerätes über ein EURO-AV-Kabel (Scartkabel) mit ihrem
anzuschließenden Gerät.
Hinweis: Beachten Sie bitte die Gebrauchsanweisung des anzuschließenden Gerätes.
ANSCHLUSS EINES VIDEORECORDERS AN DIE ANTENNENBUCHSE
Um einen Videorecorder an die Antennenbuchse ihres TV-Gerätes anzuschließen, verbinden
Sie bitte den Antenneneingang des TV-Gerätes mittels eines Antennenkabels mit dem Antennenausgang ihres Videorecorders. Ihre Hausantenne schließen Sie bitte an den Antenneneingang ihres Videorecorders an.
Sie können einen beliebigen Programmplatz am TV-Gerät wählen um die Bild- und Tonsignale
ihres Videorecorders darzustellen. Hierzu muss der gewählte Programmplatz auf die Sendefrequenz des Antenneausgangs ihres Videorecorders abgestimmt werden (üblicherweise zwischen
Kanal 30 und 40) – siehe Kapitel „Manuelle Einstellung von Programmen“ auf Seite 21.
Nach Durchführung der Abstimmung sollten Sie den Menüpunkt „10. REGELUNG“ im Menü
PROGRAMME BEARBEITEN auf VCR stellen um Bildverzerrungen zu vermeiden.
Hinweis: Beachten Sie bitte die Gebrauchsanweisung Ihres Videorecorders.
ANSCHLUSS EINES PCS ODER EINER MULTIMEDIA-VIDEOQUELLE
Ihr TV-Gerät kann sowohl analoge als auch digitale Multimedia-Eingangssignale darstellen und
bietet Ihnen die Möglichkeit einen PC oder eine Videoquelle mit DVI-, HDMI- oder Komponenten/YUV-Ausgang (zum Beispiel einen DVD-Player) anzuschließen.
Verbinden Sie dafür die VGA-, HDMI- oder YUV-Buchse des TV-Gerätes mit der Grafikkarte
ihres PCs oder mit ihrer Videoquelle. Im HDMI-Signal sind üblicherweise digitale Tonsignale
beinhaltet und müssen nicht extra verbunden werden.
Um analoge Tonsignale am TV-Gerät wiederzugeben, verbinden Sie den Line-Ausgang ihres
PCs oder den Audioausgang ihrer Videoquelle mit dem jeweiligen Audio In-Eingang (schwarze
Klinkenbuchse neben dem VGA-, HDMI- oder YUV-Eingang an der Geräterückseite). Eventuell
müssen Sie für die Verbindungen entsprechende Adapter oder Adapterkabel verwenden.
Hinweis: Beachten Sie bitte die Gebrauchsanweisung Ihres PCs und der Sound- und Grafikkarte oder ihrer Videoquelle sowie die Technischen Daten Ihres TV-Gerätes um die notwendigen Toneinstellungen und Einstellungen für Auflösung und Bildwiederholrate auszuwählen.
ANSCHLUSS EINES DECODERS
Um verschlüsselte Programme empfangen zu können, brauchen Sie einen Decoder. Diesen
verbinden Sie bitte über ein EURO-AV-Kabel (Scartkabel) mit der SCART/AV2-Buchse ihres
TV-Gerätes. Für weitere Einstellungen bezüglich Decoderbetrieb lesen Sie bitte im Kapitel
„Manuelle Einstellung von Programmen“ auf Seite 21 nach.
Hinweis: Beachten Sie bitte die Gebrauchsanweisung Ihres Decoders.
ANSCHLUSS EINES KAMERARECORDERS
Um einen Kamerarecorder anzuschließen verbinden Sie das Gerät mit einem handelsüblichen
Kabel (Cinchkabel und/oder S-Video-Kabel) mit der AV.SV Buchse Ihres TV-Gerätes entsprechend der farblichen Kabel- und Buchsenkennzeichnung.
Hinweis: Beachten Sie bitte die Gebrauchsanweisung Ihres Kamerarecorders.
26
D
EEUUTTSSCCH
D
H
Page 73

EINSTELLUNGEN FÜR EXTERNE GERÄTE (BILD, TON, NAME, ETC.)
Um Bildeinstellungen für AV-Stellungen zu verändern, lesen Sie bitte in den Kapiteln
„BILDEINSTELLUNGEN (KONTRAST, FARBE, HELLIGKEIT, ETC.)“ auf Seite 14 und „WEITERE
BILDEINSTELLUNGEN“ auf Seite 16 nach. Die in diesen Kapiteln beschriebenen Funktionen
sind auch für die AV-Stellungen gültig.
Wenn Sie Toneinstellungen anpassen wollen, finden Sie nähere Beschreibungen im Kapitel
„TONEINSTELLUNGEN (BALANCE, EQUALIZER, ETC.)“ auf Seite 17. Dort beschriebene Punkte gelten auch für die AV-Stellungen.
Wenn Sie den Programmnamen oder Programmeinstellungen anpassen wollen, finden Sie
nähere Beschreibungen in den Kapiteln „NAME VON PROGRAMMEN ÄNDERN“ und
„MANUELLE EINSTELLUNG VON PROGRAMMEN“ auf den Seiten 20 und 21.
MENÜ AV EINSTELLUNGEN
In diesem Menü können Eingangssignalart, die Quelle für das Ausgangssignal sowie ein
Lautstärke-Offset gegenüber der Basislautstärke für die AV-Stellungen Scart1, Scart2, und
AV.SV und die Tonsignalart für den HDMI Modus festgelegt werden.
1. Drücken Sie die MENU-Taste um in das Hauptmenü zu gelangen.
English Deutsch Français Italiano Español Nederlands Português Dansk Magyar
2. Wählen Sie mit den ST P+/P- Tasten den Menüpunkt INSTALLATION aus und drücken
Sie erneut die MENU-Taste.
3. Stellen Sie mittels der ST P+/P- Tasten den Auswahlbalken auf den Menüpunkt AV
EINSTELLUNGEN und drücken Sie erneut die MENU-Taste. Dies führt Sie zu folgendem
Menü:
1. AV1 Signalart
2. AV1 Video Ausgang
3. AV1 Lautstärke Offset
4. AV2 Signalart
5. AV2 Video Ausgang
6. AV2 Lautstärke Offset
7. AV.SV Signalart
8. AV.SV Lautstärke Offset
9. HDMI Audioeingang
AV Einstellungen
4. AV1 Signalart:
Mit den WX VOL+/VOL- Tasten oder durch Drücken der MENU-Taste (Auswahlliste)
können Sie zwischen verschiedenen Einstellungen für die Signalart wählen, die ein an die
SCART/AV 1-Buchse angeschlossenes, externes Gerät liefert. Denken sie bitte immer
daran, dass ihr externes Gerät, die jeweilige Signalart auch liefern muss um einwandfreie
Bilder zu erreichen.
Hinweis: Beachten Sie die Gebrauchsanweisung des angeschlossenen Gerätes.
¾ VIDEO/RGB AUTO:
In dieser Einstellung können FBAS- (z. B. Videorecorder) und RGB-Signale (z. B.
Spielkonsole) dargestellt werden. RGB-Signale werden, sofern diese Funktion vom
angeschlossenen Gerät unterstützt wird, automatisch erkannt und dargestellt.
S-VIDEO:
¾
Dient zum Anschluss von S-VIDEO-Signalen. Bei dieser Signalart sind das Bild- und
das Farbsignal getrennt, um störende Wellenlinien in karierten Mustern zu vermeiden.
¾ RGB:
Dient zum Anschluss von RGB-Signalquellen (z. B. Spielkonsole) die eine automatische Erkennung nicht unterstützen.
.
A
NNSSCCHHLLIIEEßßEENN VVOONN EEXXTTEERRNNEENN
1100.
A
G
G
EERRÄÄTTEEN
N
27
Page 74

¾ YCrCb:
In dieser Einstellung kann ein YCrCb-Signal, das von vielen DVD-Playern ausgegeben
wird, dargestellt werden. Es wird automatisch erkannt ob die Bilder im Zeilensprung(interlaced) oder Vollbildverfahren (progressiv) übertragen werden.
¾ YPrPb:
In dieser Einstellung kann ein YPrPb-Signal, das von vielen DVD-Playern ausgegeben
wird, dargestellt werden. Es wird automatisch erkannt ob die Bilder im Zeilensprung(interlaced) oder Vollbildverfahren (progressiv) übertragen werden.
5. AV1 Video Ausgang:
Mit den WX VOL+/VOL- Tasten oder durch Drücken der MENU-Taste (Auswahlliste)
können Sie zwischen verschiedenen Einstellungen für das Ausgabesignal wählen, das an
der SCART/AV 1-Buchse ausgegeben wird.
Hinweis: Im Bereitschaftsmodus werden keine Signale ausgegeben!
¾ AUTO:
Die vom Gerät dargestellten Bilder und Töne werden an der SCART/AV 1-Buchse
ausgegeben (Ausnahme: Gerät befindet sich in der AV-Stellung SCART 1).
¾ TV:
Es wird immer (auch wenn ihr TV-Gerät in einer AV-Stellung betrieben wird) das über
die Antenne empfangene Signal an der SCART/AV 1-Buchse ausgegeben.
¾ AV2 (Copy-Modus):
Unabhängig vom Modus (TV, PC usw.) in dem sich ihr TV-Gerät befindet, wird an der
SCART/AV 1-Buchse das von der SCART/AV 2-Buchse kommende Bild- und Tonsignal
ausgegeben. Diese Funktion ist sehr nützlich um von einem externen Gerät auf ein
anderes zu überspielen.
¾ AV.SV (Copy-Modus):
Die gleiche Funktion wie unter Einstellung AV2 mit dem Unterschied, dass die Bildund Tonsignale von den Cinchbuchsen vom AV.SV-Eingang an der SCART/AV 1Buchse ausgegeben werden (z. B. um von einer Videokamera auf einen Videorecorder zu überspielen).
6.
AV1 Lautstärke Offset:
Mit den WX VOL+/VOL- Tasten können sie einen Lautstärke Offset (Verschiebung – lei-
ser oder lauter) gegenüber der Basislautstärke ihres Gerätes für die Toneingangssignale
an der SCART/AV 1-Buchse festlegen.
7. AV2 Signalart/AV2 Video Ausgang/AV2 Lautstärke Offset:
Die zuvor beschriebenen Einstellungen und Funktionen für die AV1-Stellung gelten auch
für die AV2-Stellung.
8.
AV.SV Signalart:
Mit den WX VOL+/VOL- Tasten oder durch Drücken der MENU-Taste (Auswahlliste)
können Sie wählen ob das Bildsignal ihres externen Gerätes (z. B. Kamera) vom Videoeingang (gelb) oder vom S-Video-Eingang (4-polige schwarze Buchse) verarbeitet wird.
Das Tonsignal wird in beiden Fällen von der roten und weißen Cinchbuchse verarbeitet.
9.
AV.SV Lautstärke Offset:
Mit den WX VOL+/VOL- Tasten können sie einen Lautstärke Offset (Verschiebung – leiser oder lauter) gegenüber der Basislautstärke ihres Gerätes für die Toneingangssignale
an den Cinchbuchsen am AV.SV-Eingang festlegen.
10. Audioeingang (nur im HDMI-Modus aktiv):
Mit den WX VOL+/VOL- Tasten oder durch Drücken der MENU-Taste, kann zwischen
den Einstellungen DIGITAL/ANALOG gewählt werden.
¾ DIGITAL: Ihr Gerät gibt den digitalen Ton, der sich im HDMI-Signal befindet, wieder.
¾ ANALOG: Das Tonsignal von der analogen HDMI AudioIn Buchse wird wiedergegeben.
11. Mit der EXIT-Taste verlassen Sie das Menü.
28
D
EEUUTTSSCCH
D
H
Page 75

1111.
.
VVGGAA,
,
HHDDMMI
I
UUNNDD
YYUUVV
ANSCHLUSS
Ihr TV-Gerät kann sowohl analoge als auch digitale Multimedia-Eingangssignale darstellen und
bietet Ihnen die Möglichkeit einen PC oder eine Videoquelle mit DVI-, HDMI- oder Komponenten/YUV-Ausgang (zum Beispiel einen DVD-Player) anzuschließen.
Verbinden Sie dafür die VGA-, HDMI- oder YUV-Buchse des TV-Gerätes mit der Grafikkarte
ihres PCs oder mit ihrer Videoquelle. Im HDMI-Signal sind üblicherweise digitale Tonsignale
beinhaltet und müssen nicht extra verbunden werden.
Um analoge Tonsignale am TV-Gerät wiederzugeben, verbinden Sie den Line-Ausgang ihres
PCs oder den Audioausgang ihrer Videoquelle mit dem jeweiligen Audio In-Eingang (schwarze
Klinkenbuchse neben dem VGA-, HDMI- oder YUV-Eingang an der Geräterückseite). Eventuell
müssen Sie für die Verbindungen entsprechende Adapter oder Adapterkabel verwenden.
Hinweis: Beachten Sie bitte die Gebrauchsanweisung Ihres PCs und der Sound- und Grafikkarte oder ihrer Videoquelle sowie die Technischen Daten Ihres TV-Gerätes um die notwendigen Toneinstellungen und Einstellungen für Auflösung und Bildwiederholrate auszuwählen.
EINSTELLUNGEN IM VGA PC, HDMI UND YUV MODUS
Drücken Sie die PC-Taste eventuell mehrmals, um in den VGA PC, HDMI oder YUV-Modus zu
schalten. Sämtliche Bild- und Toneinstellungen funktionieren genauso wie im TV-Modus.
Drücken Sie die MENU-Taste um in das Hauptmenü zu gelangen und wählen Sie den Menüpunkt BILDEINSTELLUNGEN aus und drücken Sie erneut die MENU-Taste. Bewegen Sie den
Auswahlbalken mit den ST P+/P- Tasten auf den Punkt EINSTELLUNGEN VGA HDMI YUV
und drücken Sie nochmals die MENU-Taste. Sie gelangen zum jeweiligen Menü für die
EINSTELLUNGEN VGA, EINSTELLUNGEN HDMI oder EINSTELLUNGEN YUV:
1. Modus:
Dieser Punkt zeigt ob ein Signal an der gewählten Eingangsbuchse des Gerätes anliegt.
Solange KEIN SIGNAL angezeigt wird, sind die Einstellungen für die Bilddarstellung nicht
erreichbar (grau dargestellt).
Einstellungen VGA HDMI YUV
1. Modus
2. Name ändern
3. Eingang
4. Horizontale Position
5. Breite
6. Vertikale Position
7. Pixelphase
8. Frequenz
9. Audioeingang
English Deutsch Français Italiano Español Nederlands Português Dansk Magyar
2. Name ändern:
Es kann ein Name für den gewählten Modus vergeben werden. Drücken Sie die MENU-
Taste, um in den Eingabemodus zu gelangen. Sie können nun mit den ST P+/P- Tasten
die Zeichen auswählen und mit den WX VOL+/VOL- Tasten die Position wechseln. Mit-
tels der MENU- oder der EXIT-Taste verlassen Sie den Eingabemodus wieder.
3. Eingang:
Mit den WX VOL+/VOL- Tasten oder über eine Auswahlliste, erreichbar durch Drücken
der MENU-Taste, kann zwischen den Einstellungen AUTO/PC/VIDEO gewählt werden.
.
1111.
VVGGAA,
,
HHDDMMI
I
UUNNDD
YYUUVV
29
Page 76

¾ AUTO:
Ihr Gerät erkennt automatisch die Signalart an der jeweiligen Eingangsbuchse.
¾ PC:
In dieser Einstellung erwartet ihr Gerät ein Eingangssignal von der Grafikkarte ihres
PCs an der jeweiligen Eingangsbuchse. Bitte achten Sie auf die richtige Wahl und Einstellung des Ausganges ihrer Grafikkarte.
¾ VIDEO:
In dieser Einstellung erwartet ihr TV-Gerät ein Eingangssignal von einer Videoquelle
an der jeweiligen Eingangsbuchse. Bitte achten Sie auf die richtige Wahl und Einstellung des Ausganges ihrer Videoquelle.
Hinweis: Der TV-Gerät ist mit einer automatischen und komplexen Erkennung der Signalart und Signalquelle ausgestattet. Allerdings kann es durch verschiedene Toleranzen
ihrer Signalquelle zu Fehlerkennungen kommen. In diesem Fall verwenden Sie die manuellen Einstellungen für den Eingang.
4. Horizontale Position:
Mit den WX VOL+/VOL- Tasten können Sie die horizontale Position des Bildes von der je-
weiligen Eingangbuchse verändern.
5. Breite:
Mit den WX VOL+/VOL- Tasten können Sie die Breite des Bildes von der jeweiligen Ein-
gangbuchse verändern.
6. Vertikale Position:
Mit den WX VOL+/VOL- Tasten können Sie die vertikale Position des Bildes von der je-
weiligen Eingangbuchse verändern.
7. Pixelphase:
Mit den WX VOL+/VOL- Tasten können Sie die Darstellung von Texten am TV-Gerät op-
timieren (z. B. im Falle von zitternden Buchstaben) und eventuelle Bildstörungen (Unruhe im Bild bzw. Wellenlinien) ausgleichen.
8. Frequenz:
Mit den WX VOL+/VOL- Tasten können eventuelle Bildstörungen (Unruhe im Bild bzw.
Wellenlinien) ausgeglichen werden. Diese Einstellung sollte nur im Falle von Problemen
verändert werden.
9. Audioeingang (nur im HDMI-Modus aktiv):
Mit den WX VOL+/VOL- Tasten oder über eine Auswahlliste, erreichbar durch Drücken
der MENU-Taste, kann zwischen den Einstellungen DIGITAL/ANALOG gewählt werden.
¾ DIGITAL:
Ihr TV-Gerät gibt den digitalen Ton, der sich im HDMI-Signal befindet, wieder.
¾ ANALOG:
Das Tonsignal von der analogen HDMI AudioIn Buchse wird wiedergegeben.
Hinweis: Üblicherweise besteht das digitale HDMI-Signal aus Bild und Ton. Es kann aber
durchaus vorkommen, dass Ihr PC oder Ihre Videoquelle die Toninformationen nicht mittels HDMI-Signal überträgt oder DVI-Signale über einen sogenannten DVI-HDMI-Adapter
wiedergegeben werden sollen. In diesem Fall müssen Sie das Audiosignal über die analoge HDMI AudioIn-Buchse Ihrem TV-Gerät zur Verfügung stellen und den Audioeingang
auf die Stellung ANALOG schalten.
10. Mit der EXIT-Taste verlassen Sie das Menü.
Hinweis: Das Gerät ist mit normgerechten Voreinstellungen für die obigen Einstellwerte
versehen. Allerdings kann durch abweichende Signale ihrer Grafikkarte oder ihrer Videoquelle die manuelle Verstellung der Einstellwerte notwendig sein, um eine ungestörte Wiedergabe und vollständige Darstellung zu erreichen!
30
D
EEUUTTSSCCH
D
H
Page 77

1122.
.
K
OOMMFFOORRTTFFUUNNKKTTIIOONNEEN
K
N
BILD IM BILD/PICTURE IN PICTURE (PIP)
Sie können die Bild im Bild/PIP-Funktion verwenden, um zwei Programme gleichzeitig anzuzeigen.
1. Drücken Sie die PIP ON/OFF-Taste auf der Fernbedienung. Wenn Sie die Bild im Bild-
Funktion zum ersten Mal nach dem Einschalten des TV-Geräts aufrufen, wird der Programmplatz 1 als Kleinbild angezeigt.
2. Mit den PIP SOURCE ST-Tasten können Sie nun den gewünschten Programmplatz oder
auch die gewünschte AV-Stellung (SCART 1, SCART 2, AV.SV usw.) im Kleinbild anzeigen
lassen. Sollten Sie die Bild im Bild-Funktion ausschalten und später wieder einschalten
wird das zuletzt gesehene PIP-Programm angezeigt.
3. Bei bereits eingeblendetem Kleinbild kann durch ca. 2 Sekunden langes Drücken der PIP
ON/OFF -Taste das Groß- und Kleinbild getauscht werden.
4. Mit der PIP POSITION –Taste können Sie wählen, in welcher Ecke des Großbildes das
Kleinbild angezeigt werden soll.
5. Mit der PIP SIZE-Taste können Sie 3 verschiedene Größen für das Kleinbild wählen.
English Deutsch Français Italiano Español Nederlands Português Dansk Magyar
Hinweis: Es sind nicht alle Signalkombinationen von Groß- und Kleinbild möglich. In diesen
Fällen zeigt die OSD-Programmanzeige „NoPIP“ an.
MULTIPICTURE (SENDERÜBERSICHT) – FARBTASTE GRÜN
Durch Drücken der Taste GRÜN im TV-Modus können Sie die Multipicture-Funktion aufrufen. Diese Funktion zeigt eine Übersicht von jeweils 12 Programmen.
Das ausgewählte Programm – gekennzeichnet durch einen Rahmen - wird mit laufendem
Bild und Ton wiedergegeben, die anderen Programme werden regelmäßig aktualisiert.
Mit Hilfe der STWX P+/P-/Vol+/Vol- Tasten können Sie einen Rahmen bewegen und so
zu den anderen Programmen wechseln. Durch Bewegen des Rahmens über den Bildschirmrand hinaus, können Sie auf die vorherigen oder nachfolgende 12 Programme umschalten.
Um das ausgewählte Programm als Vollbild darzustellen, betätigen Sie die MENÜ Taste.
KINDERSICHERUNG
Mit der Kindersicherung können Sie alle Funktionen des Gerätes sperren. Wird die Kindersicherung aktiviert und das Gerät danach ausgeschaltet, wird beim neuerlichen Einschalten
automatisch die Eingabe einer Geheimzahl verlangt.
Erst nach Eingabe der Geheimzahl wird das Bild und der Ton eingeschaltet und die Bedienung des Gerätes zugelassen.
.
K
OOMMFFOORRTTFFUUNNKKTTIIOONNEEN
1122.
K
N
31
Page 78

p
1. Drücken Sie auf die MENU-Taste. Das Hauptmenü wird angezeigt.
1. Bildeinstellungen
2. Toneinstellungen
3. Programmtabelle
4. Installation
5. Kindersicherung
6. Sleeptimer
7. Swapfunktion
8. S
Hauptmenü
iele
2. Mit den ST P+/P-Tasten bewegen Sie den Auswahlbalken auf den Menüpunkt
KINDERSICHERUNG und drücken die MENU-Taste, um das Untermenü aufzurufen.
1. Geheimzahl xxxx
2. Kindersicherung An/Aus
Kindersicherung
3. Drücken Sie die MENU-Taste und geben Sie danach eine vierstellige Zahl ein = Ihre Ge-
heimzahl. Solange keine Geheimzahl eingegeben ist, kann der Punkt KINDERSICHERUNG
nicht angewählt werden und wird grau dargestellt.
4. Nach Eingabe ihrer Geheimzahl kann unter dem Menüpunkt KINDERSICHERUNG diese
eingeschaltet werden. Um später die Kindersicherung wieder auszuschalten müssen Sie
wieder das Menü KINDERSICHERUNG aufrufen und nach Eingabe Ihrer Geheimzahl den
Menüpunkt KINDERSICHERUNG auf AUS stellen.
SLEEPTIMER
Der Sleeptimer schaltet das Gerät nach der von Ihnen gewählten Zeitspanne automatisch in
den Bereitschaftsmodus.
Variante 1: Drücken Sie die SLEEP-Taste um direkt in das Sleeptimer Menü zu gelangen.
Variante 2: Drücken Sie die MENU-Taste um das Hauptmenü aufzurufen, stellen Sie mittels
der ST P+/P- Tasten den Auswahlbalken auf Sleeptimer und rufen Sie das zugehörige Menü mittels der MENU-Taste auf.
1. Sleeptimer
2. Aktueller Zähler in min.:
Sleeptimer
Durch das Betätigen der SLEEP-Taste oder der WX VOL+/VOL- Tasten können Sie die
Ausschaltzeit in den Schritten 5 MIN./10 MIN./15 MIN./30 MIN./1 STUNDE/2 STUNDEN/AUS
einstellen oder durch Drücken der MENU-Taste diese Auswahlliste aufrufen. Die Einstellung
AUS bedeutet, dass der Sleeptimer ausgeschaltet ist.
Sie können jederzeit durch erneuten Aufruf des Sleeptimer-Menüs in der Zeile AKTUELLER
ZÄHLER nachsehen wie viele Minuten noch bis zum Ausschalten bleiben.
32
D
D
EEUUTTSSCCH
H
Page 79

SWAP-FUNKTION
Die Swap-Funktion ermöglicht ein schnelles Wechseln zwischen zwei auseinanderliegenden
Programmen bzw. ein Zurückschalten auf ein Vorzugsprogramm. Wenn Sie zum Beispiel
während einer Werbeunterbrechung das Programm umschalten möchten, können Sie durch
Drücken der RTN-Taste jederzeit schnell zurückschalten um zu sehen ob die Werbeunterbrechung bereits zu Ende ist und ihr Wunschprogramm weiterläuft. Jede weitere Betätigung
der RTN-Taste führt zu einem Wechsel zwischen dem zuletzt gesehenen Programm und
Ihrem Vorzugsprogramm.
SWAP-PROGRAMM FESTLEGEN (VOZUGSPROGRAMM)
Variante 1: Drücken Sie die MENU-Taste um das Hauptmenü aufzurufen. Stellen Sie den
Auswahlbalken mittels der ST P+/P- Tasten auf SWAPFUNKTION und drücken
Sie nochmals die MENU-Taste. Mit den WX VOL+/VOL- Tasten oder über eine
Auswahlliste, erreichbar mittels der MENU-Taste, können Sie zwischen den Einstellungen MANUELL/3 MIN/5 MIN/10 MIN wählen.
Bei der Einstellung MANUELL muss das Swap-Programm gemäß Variante 2 definiert werden. Bei jeder Einstellung einer Zeitspanne wird das gesehene Programm automatisch nach Verstreichen dieser Zeit als Swap-Programm definiert.
English Deutsch Français Italiano Español Nederlands Português Dansk Magyar
In der linken oberen Ecke wird SWAP-PRG eingeblendet. Nun können Sie beliebige andere Programmplätze anwählen und durch kurzes Drücken der RTN-
Taste zwischen dem gesehenen Programm und ihrem Swap-Programm wechseln. Bei jedem Programmwechsel wird für ca. 4 Sekunden angezeigt, welches
Programm Ihr Vorzugsprogramm ist.
Variante 2: Drücken Sie auf dem Programmplatz, zu dem Sie schnell zurückwechseln wol-
len, solange die RTN-Taste bis die OSD-Einblendung SWAP-PRG erscheint. Sie
haben nun Ihr Vorzugsprogramm manuell festgelegt.
Wenn im Menü SWAPFUNKTION allerdings eine Zeitdauer eingestellt ist, ändert
sich Ihr Vorzugsprogramm automatisch mit Ihrem Fernsehverhalten.
AUF WERKSEINSTELLUNG ZURÜCKSETZEN
Diese Funktion setzt alle Einstellungen des TV-Geräts wie Helligkeit, Farbe, Kontrast, Schärfe, Weißbalance, etc. wieder auf den Stand der Werksauslieferung zurück.
1. Drücken Sie die MENU-Taste um in das Hauptmenü zu gelangen.
2. Wählen Sie mit den ST P+/P- Tasten den Punkt INSTALLATION aus und drücken Sie
erneut die MENU-Taste.
3. Wählen Sie mit ST P+/P- Tasten den Punkt WERKSEINSTELLUNGEN und drücken Sie
erneut die MENU-Taste. Wählen Sie nun SETZEN und bestätigen Sie diese Auswahl mit
der MENU-Taste.
Hinweis: Durch längeres Drücken der RST-, RESET-Taste können Sie direkt die wichtigsten
Bild- und Toneinstellungen (Helligkeit, Farbe, Kontrast, Lautstärke) auf Fabrikseinstellungen
zurücksetzen.
.
K
OOMMFFOORRTTFFUUNNKKTTIIOONNEEN
1122.
K
N
33
Page 80

EINSCHALTMODUS
Mit dieser Einstellung können Sie Ihren bevorzugen Betriebsmodus des TV-Geräts nach dem
Einschalten festlegen.
1. Drücken Sie die MENU-Taste um in das Hauptmenü zu gelangen.
2. Wählen Sie mit ST P+/P- Tasten den Menüpunkt INSTALLATION aus und drücken Sie
erneut die MENU-Taste.
3. Bewegen Sie den Auswahlbalken mit den ST P+/P- Tasten auf den Menüpunkt
EINSCHALTEN MIT.
Sie können nun mittels der WX VOL+/VOL- Taste oder durch Drücken der MENU-Taste
(Auswahlliste) zwischen den Betriebsarten VGA/PROG 1/LETZTES PRG/AV/INSTALLATION
wählen.
¾ VGA: Einschalten im VGA PC Modus
¾ PROG 1: Einschalten mit Programmplatz 1
¾ LETZTES PRG: Einschalten mit dem zuletzt gesehenen Programm
¾ AV: Einschalten mit dem zuletzt benutzten Modus für externe Geräte
¾ INSTALLATION: Einschalten wie im Zustand der Erstinstallation – siehe
Kapitel „6. APSAS - DIE ERSTE EINRICHTUNG“ auf Seite 11.
EINSTELLUNGEN FÜR ALLE PROGRAMME
1. Drücken Sie die MENU-Taste um in das Hauptmenü zu gelangen.
2. Wählen Sie mit den ST P+/P- Tasten den Menüpunkt INSTALLATION aus und drücken
Sie erneut die MENU-Taste.
3. Wählen Sie mit den ST P+/P- Tasten den Menüpunkt EINSTELLUNG ALLER
PROGRAMME und drücken Sie erneut die MENU-Taste.
Einstellung aller Programme
1. Schärfe setzen
2. Rauschreduktion setzen
3. Decoder setzen
4. Schärfe setzen:
Diese Funktion setzt für alle Programme die Schärfeeinstellung. Sie können durch Drücken der MENU-Taste über eine Auswahlliste zwischen den Stellungen 0-3 wählen.
Eine nähere Beschreibung dieser Funktion finden Sie im Kapitel „WEITERE
BILDEINSTELLUNGEN“ auf Seite 16.
5. Rauschreduktion setzen:
Diese Funktion setzt für alle Programme die Rauschreduktionseinstellung. Sie können
durch Drücken der MENU-Taste über eine Auswahlliste zwischen den Stellungen
AUTOMATISCH/AUS/SCHWACH/MITTEL/STARK wählen.
Eine nähere Beschreibung der Einstellungen finden Sie im Kapitel „WEITERE
BILDEINSTELLUNGEN“ auf Seite 16.
6. Decoder setzen:
Diese Funktion setzt die Decoder-Funktion für alle Programme. Sie können durch Drücken der MENU-Taste über eine Auswahlliste zwischen den Stellungen AUS/TON
EXTERN-INTERN/TON EXTERN/TON INTERN wählen.
Eine nähere Beschreibung der Einstellungen finden Sie im Kapitel „MANUELLE
EINSTELLUNG VON PROGRAMMEN“ auf Seite 21.
34
D
D
EEUUTTSSCCH
H
Page 81

p
ZEITANZEIGE TIME
Im TV-Modus wird durch Drücken dieser Taste die Zeit angezeigt.
Drücken Sie auf die TIME-Taste, während ihr TV-Gerät ein Fernsehprogramm mit Teletext-
übertragung wiedergibt. Die aktuelle Zeit wird in der rechten oberen Ecke des Bildschirms in
Form einer Digitaluhr angezeigt.
Bei erneutem Drücken der TIME-Taste wechselt die Anzeige zu einer Analoguhr. Sobald Sie
die TIME-Taste ein drittes Mal drücken, verschwindet die Zeitanzeige wieder.
BILDFORMAT UMSCHALTEN - ARC
Mit der ARC-Taste können Sie schnell die Darstellung des Bildformates ihres TV-Geräts ändern. Eine nähere Beschreibung bezüglich der möglichen Bildformate finden Sie im Kapitel
„BILDEINSTELLUNGEN (KONTRAST, FARBE, HELLIGKEIT, ETC.)“ auf Seite 14.
BILDVOREINSTELLUNGEN UMSCHALTEN - APC
Mit der APC-Taste können Sie schnell zwischen den möglichen Voreinstellungen AM TAG/AM
ABEND/MANUELL wählen. Eine nähere Beschreibung bezüglich dieser Voreinstellungen finden Sie im Kapitel „BILDEINSTELLUNGEN (KONTRAST, FARBE, HELLIGKEIT, ETC.)“ auf
Seite 14.
STANDBILDFUNKTION – FARBTASTE GELB
Durch Drücken der Taste GELB können Sie das Bild jederzeit (außer im VGA,HDMI und
YUV-Mode) einfrieren. Um das Bild weiterlaufen zu lassen, betätigen Sie die Taste GELB
erneut.
English Deutsch Français Italiano Español Nederlands Português Dansk Magyar
SPIELE
Ihr TV-Gerät ist mit vier Spielen und einer zugehörigen Highscoreliste ausgestattet.
Gehen Sie mit Hilfe der ST P+/P- Tasten zu dem Spiel, dass Sie spielen möchten und drü-
cken Sie die MENU-Taste, um das Spiel aufzurufen.
Die Steuerung der Spiele funktioniert mit den Tasten STWX P+/P-/Vol+/Vol-. Sonder-
funktionen (z.B. Schiessen) können mit der MENU-Taste aufgrufen werden.
Nach Beendigung des Spieles, werden Sie – sofern Sie einen neuen Highscore geschafft haben - zur Eingabe in die Highscore-Liste aufgefordert. Sie können nun mit den Tasten ST
P+/P- den gewünschten Buchstaben auswählen. Mit den Tasten WX VOL+/VOL- gelangen
Sie zur nächsten Position. Mit der MENU- oder EXIT-Taste verlassen Sie die Namenseingabe.
Durch Drücken der EXIT-Taste können Sie die Spiele vorzeitig beenden.
Spiele
Highscores
Brixx
Anaconda
Scramble
Outer S
ace
.
K
OOMMFFOORRTTFFUUNNKKTTIIOONNEEN
1122.
K
N
35
Page 82

.
W
1133.
Ihr TV-Gerät ist zur Wandmontage mittels handelsüblicher Wandhalter vorbereitet!
Beachten Sie dafür unbedingt die folgenden Sicherheitshinweise und Beschreibungen und
wenden Sie sich bei Fragen an unseren Service oder ziehen Sie einen qualifizierten Monteur
zu Rate!
• Vergewissern Sie sich vor der Montage, dass das TV-Gerät ausgeschaltet ist
Ansicht Rückseite: Ansicht von schräg unten:
AANNDDMMOONNTTAAGGE
W
• Ihr TV-Gerät darf nur an senkrechten Wänden montiert werden!
• Prüfen Sie vor der Montage, ob die Tragfähigkeit der Wand für das
4 fache Gewicht des TV-Gerätes (siehe Technische Daten) geeignet ist!
und dass das Netzkabel sowie alle anderen Anschlusskabel ausgesteckt
sind!
• Für die Montage sind zumindest zwei Personen notwendig!
E
Anschraubpunkte
für den Wandhalter
Befestigungsschrauben
(Innensechskant) für den Standfuß
MONTAGEANLEITUNG
1. Legen Sie das TV-Gerät mit dem Bildschirm nach unten auf eine stabile und kratzfeste
Unterlage.
2. Lösen Sie die Befestigungsschrauben für den Standfuß und entfernen Sie diesen.
3. Folgen Sie der Bedienungsanleitung des Wandhalters für die weiteren Montageschritte
des Wandhalters am Gerät und an der Wand!
Hinweis: Bitte bewahren Sie die demontierten Schrauben und den Standfuß für eine eventuell spätere Rückmontage auf!
36
D
D
EEUUTTSSCCH
H
Page 83

1144.
.
P
RROOBBLLEEMMBBEEHHEEBBUUNNG
P
G
Fehlfunktionen können manchmal banale Ursachen haben, aber manchmal auch von defekten Komponenten ausgehen. Wir möchten Ihnen hiermit einen Leitfaden an die Hand geben,
um das Problem zu lösen. Wenn die hier aufgeführten Maßnahmen keinen Erfolg bringen,
helfen wir Ihnen gerne weiter. Rufen Sie uns an!
Es erscheint kein Bild und es ist kein Ton zu hören.
Überprüfen Sie, ob das Netzkabel richtig an der Steckdose und am Gerät angeschlossen ist.
Überprüfen Sie, ob der Signalempfang auf TV eingestellt ist.
Kontrollieren Sie, ob der Hauptschalter des Geräts auf der Geräterückseite eingeschaltet ist.
Es erscheint kein Bild. Es erscheint kein Bild von AV.
Überprüfen Sie, ob Kontrast / Helligkeit korrekt eingestellt sind.
Überprüfen Sie, ob alle externen Geräte korrekt angeschlossen sind.
Überprüfen Sie, ob die richtige AV-Stellung angewählt ist.
Es ist kein Ton zu hören.
Vergewissern Sie sich, das die Lautstärke nicht auf Minimum steht.
Vergewissern Sie sich, das die Stummschaltung nicht aktiviert ist.
Es gibt kein Bild oder keinen Ton. Es sind aber Geräusche zu hören.
Der Empfang ist möglicherweise schlecht. Kontrollieren Sie, ob die Antenne angeschlossen ist.
Das Bild ist nicht deutlich.
Der Empfang ist möglicherweise schlecht.
Kontrollieren Sie, ob die Antenne angeschlossen ist.
Das Bild ist zu hell oder zu dunkel.
Überprüfen Sie die Einstellungen von Kontrast / Helligkeit / Backlight im Menü Bildeinstellungen.
Die Fernbedienung funktioniert nicht.
Überprüfen Sie, ob die Batterien in der Fernbedienung geladen und richtig eingelegt sind.
Vergewissern Sie sich, dass das Sensorfenster nicht starker Lichteinstrahlung ausgesetzt ist.
Schalten Sie das Gerät mit dem Hauptschalter an der Rückseite des Gerätes aus und wieder ein.
Das Bild ist nicht scharf.
Der Empfang ist möglicherweise schlecht.
Kontrollieren Sie, ob die Antenne angeschlossen ist.
Überprüfen Sie die Einstellungen der Bildschärfe und Rauschreduktion im Menü Bildeinstellungen.
Es erscheint ein Doppel- oder Dreifachbild.
Kontrollieren Sie, ob die Antenne richtig ausgerichtet ist.
Es gibt möglicherweise von Bergen oder Gebäuden reflektierte Wellen.
Das Bild ist gepunktet.
Es liegen möglicherweise Interferenzen von Autos, Zügen, Leitungen, Neonleuchten, etc. vor.
Es besteht möglicherweise eine Interferenz zwischen dem Antennen- und Stromkabel. Versuchen Sie sie
weiter auseinander zu legen.
Es erscheinen Streifen am Bildschirm oder die Farben verblassen.
Liegt eine Interferenz von einem anderen Gerät vor?
Übertragungsantennen von Radiostationen oder Antennen von Funkamateuren und tragbare Telefone können auch
Interferenzen verursachen.
Betreiben Sie das Gerät so weit weg wie möglich von dem Gerät, das die Interferenz möglicherweise verur-
sacht.
Die Kindersicherung lässt sich nicht deaktivieren
Geben Sie als Geheimzahl 1973 ein. Damit sollte das Gerät wieder voll funktionsfähig sein.
English Deutsch Français Italiano Español Nederlands Português Dansk Magyar
.
P
RROOBBLLEEMMBBEEHHEEBBUUNNG
1144.
P
G
37
Page 84

1155.
.
S
OONNSSTTIIGGEES
S
S
BENÖTIGEN SIE WEITERE UNTERSTÜTZUNG?
Wenn die Vorschläge in den vorangegangenen Abschnitten ihr Problem nicht behoben haben,
nehmen Sie bitte Kontakt mit uns auf. Sie würden uns sehr helfen, wenn Sie uns folgende
Informationen zur Verfügung stellen:
- Was für zusätzliche Peripheriegeräte nutzen Sie?
- Welche Meldungen erscheinen auf dem Bildschirm?
- Bei welchem Bedienungsschritt ist das Problem aufgetreten?
- Wie sieht Ihre Rechnerkonfiguration aus falls Sie einen PC an das Gerät angeschlossen ha-
ben?
- Welche Software haben Sie beim Auftreten des Fehlers verwendet falls Sie einen PC an das
Gerät angeschlossen haben
- Welche Schritte haben Sie zur Lösung des Problems bereits unternommen?
- Wenn Sie bereits eine Kundennummer erhalten haben, teilen Sie uns diese mit.
GARANTIEBEDINGUNGEN
Die Empfangsquittung gilt als Beleg für den Erstkauf und sollte gut aufbewahrt werden. Sie wird für die Inanspruchnahme von Garantieleistungen benötigt. Ihre gesetzlichen Rechte werden durch diese Garantiebedingungen nicht
eingeschränkt. Wird das Produkt an einen anderen Benutzer weitergegeben, so hat dieser für den Rest der Garantiezeit Anspruch auf Garantieleistungen.
Der Kaufbeleg sowie diese Erklärung sollten bei der Weitergabe in seinen Besitz übergehen. Wir garantieren, dass
dieses Gerät in einem funktionsfähigen Zustand ist und in technischer Hinsicht mit den Beschreibungen in der beigefügten Dokumentation übereinstimmt.
Die verbleibende Garantiefrist geht bei Vorlage des Kaufbelegs von Originalteilen auf die entsprechenden Ersatzteile
über. Wenn Sie dieses Gerät zur Inanspruchnahme von Garantieleistungen einreichen, müssen Sie zuvor sämtliche
Programme, Daten und herausnehmbare Speichermedien entfernen. Produkte, die ohne Zubehör eingeschickt werden, werden ohne Zubehör ersetzt.
Die Gewährleistungspflicht gilt nicht für den Fall, dass das Problem durch einen Unfall, eine Katastrophe, Vandalismus, Missbrauch, unsachgemäße Benutzung, Missachtung der Sicherheits- und Wartungsvorschriften, Veränderung
durch Software, Viren bzw. ein anderes Gerät oder Zubehör, oder durch sonstige nicht von uns genehmigte Modifikationen verursacht wurde. Diese eingeschränkte Garantieerklärung ersetzt alle anderen Garantien ausdrücklicher
oder impliziter Natur.
Dies schließt die Garantie der Verkaufbarkeit oder der Eignung für einen bestimmten Zweck ein, beschränkt sich
jedoch nicht darauf. In einigen Ländern ist der Ausschluss impliziter Garantien gesetzlich nicht zulässig. In diesem
Falle ist die Gültigkeit aller ausdrücklichen und impliziten Garantien auf die Garantieperiode beschränkt.
Mit Ablauf dieser Periode verlieren sämtliche Garantien ihre Gültigkeit. In einigen Ländern ist eine Begrenzung der
Gültigkeitsdauer impliziter Garantien gesetzlich nicht zulässig, so dass die obige Einschränkung nicht in Kraft tritt.
Falls Sie bezüglich dieser Garantiebedingungen Fragen haben, wenden Sie sich an uns.
HAFTPFLICHTBESCHRÄNKUNG
Die Inhalte dieser Gebrauchsanweisung und der Technischen Daten unterliegen unangekündigten Änderungen, die
dem technischen Fortschritt Rechnung tragen. Hersteller und Vertrieb können keine Verantwortung für Schäden, die
als Folge von Fehlern oder Auslassungen, der in diesen Dokumenten bereitgestellten Informationen entstanden
sind, übernehmen. Wir haften unter keinen Umständen für:
1. Von dritter Seite gegen Sie erhobene Forderungen aufgrund von Verlusten oder Beschädigungen.
2. Verlust oder Beschädigung Ihrer Aufzeichnungen oder Daten.
3. Ökonomische Folgeschäden (einschließlich verlorener Gewinne oder Einsparungen) oder Begleitschäden, auch
in dem Fall, dass wir über die Möglichkeit solcher Schäden informiert worden sind.
In einigen Ländern ist der Ausschluss oder die Begrenzung von Begleit- oder Folgeschäden gesetzlich nicht zulässig,
so dass die obige Einschränkung nicht in Kraft tritt.
VERVIELFÄLTIGUNG GEBRAUCHSANWEISUNG
Die Dokumente enthalten gesetzlich geschützte Informationen. Alle Rechte vorbehalten. Vervielfältigung in mechanischer, elektronischer und jeder anderen Form ohne die schriftliche Genehmigung des Herstellers ist verboten.
38
D
D
EEUUTTSSCCH
H
Page 85

E
C
RAA
C
E
T
T
R
EELLEEVVIISSEEU
N
N
P
LLAATT
P
U
R
R
M
OODDEE D
M
Copyright © 2007
Tous droits réservés.
Le présent manuel est protégé par le droit d'auteur.
Fabriqué sous licence de Dolby Laboratories.
« Dolby », « Pro Logic » et le symbole « DD » sont des marques déposées de Dolby Laboratories.
"HD ready" est une marque déposée de l’entreprise EICTA.
HDMI, le logo HDMI et High-Definition Multimedia Interface sont
des marques commerciales ou des marques déposées de HDMI Licensing LLC.
Les autres marques déposées sont la propriété de leurs détenteurs respectifs.
Sous réserve de modifications techniques.
Medion AG, Am Zehnthof 77, 45307 Essen, Germany
BDA00105300
'
D
EEMMPPLLOOI
'
I
Page 86

C
OONNTTEENNU
C
1. SECURITE ET MAINTENANCE 1
Sécurité de fonctionnement ....................................................................................... 1
Entretien................................................................................................................. 3
Recyclage et élimination............................................................................................ 4
2. INTRODUCTION 5
Remarques concernant le présent mode d'emploi ......................................................... 5
Caractéristiques ....................................................................................................... 6
3. ÉLEMENTS DE COMMANDE ET BRANCHEMENTS LATERAUX 7
U
Réparation..................................................................................................... 2
Lieu d'implantation ......................................................................................... 2
Température ambiante.................................................................................... 2
Raccordement................................................................................................ 3
Normes / compatibilité électromagnétique.......................................................... 3
Consignes de sécurité relatives à l'utilisation des piles ......................................... 4
Notre groupe cible .......................................................................................... 5
La qualité ...................................................................................................... 5
Service .........................................................................................................5
4. ARRIERE DE L’APPAREIL ET BRANCHEMENTS 8
5. TELECOMMANDE 9
Résumé des Touches de Commande......................................................................... 10
6. APSAS PREMIERE INSTALLATION 11
7. COMMANDES GENERALES & REGLAGES 13
Allumer et Eteindre l'écran ...................................................................................... 13
Invoquer des menus et utiliser des commandes à l'écran ............................................ 13
Parcourir les programmes ....................................................................................... 14
Basculer entre des sources de signaux TV et externes................................................. 14
Contrôle du Volume................................................................................................ 14
Utiliser le Contrôle du Volume ........................................................................ 14
Utiliser la fonction Mute................................................................................. 14
Image (contraste, couleur, luminosité, etc.) .............................................................. 14
Autres paramètres d'image...................................................................................... 16
Audio (balance, égaliseur, etc.)................................................................................ 17
8. REGLAGES DU MODE TV 19
Les réglages TV ..................................................................................................... 19
Tableau des programmes............................................................................... 19
Effacer une chaîne........................................................................................ 19
Déplacer et trier des programmes................................................................... 20
Modifier le nom des programmes .................................................................... 20
Régler manuellement des programmes ............................................................ 21
Ajouter manuellement des programmes .................................................................... 23
Ajouter automatiquement de nouveaux programmes .................................................. 23
ii
Page 87

9. TELETEXTE 24
Visualiser le Teletexte............................................................................................. 24
Sélection d'une Page Télétexte................................................................................. 24
Sélectionner les fonctions d'affichage du télétexte ...................................................... 24
Fonctions utiles du Télétexte.................................................................................... 25
10. BRANCHER DES APPAREILS EXTERNES 26
Branchement d'un appareil externe à la prise Scart (péritel) ........................................ 26
Branchement d'un magnétoscope à la prise antenne................................................... 26
Branchement d’un PC ou d’une source vidéo Multimédia.............................................. 26
Branchement d'un caméscope.................................................................................. 26
Branchement d'un décodeur .................................................................................... 26
Réglages d’appareils externes (image, son, nom, etc.)................................................ 27
Menu Paramètres AV .............................................................................................. 27
11. VGA, HDMI ET YUV 29
Branchement......................................................................................................... 29
Réglages dans les modes PC VGA, HDMI et YUV......................................................... 29
English Deutsch Français Italiano Español Nederlands Português Dansk Magyar
12. FONCTIONS DE CONFORT 31
Image dans l'image/Picture in Picture (PIP) ............................................................... 31
Multipicture (aperçu des programmes) – Touche verte................................................ 31
Verrouillage enfants................................................................................................ 31
Minuterie............................................................................................................... 32
Fonction Swap (fonction d'échange) ......................................................................... 33
Définir un programme Swap (programme préféré) ............................................ 33
Restaurer les réglages d'usine.................................................................................. 33
Mode Allumage ...................................................................................................... 34
Configuration de tous les programmes ...................................................................... 34
Affichage de l'heure TIME .................................................................................. 35
Changer le format de l'image - ARC.......................................................................... 35
Changer les préréglages de l'image - APC.................................................................. 35
Fonction Arrêt sur image – Touche jaune .................................................................. 35
Jeux ..................................................................................................................... 35
13. MONTAGE MURAL 36
Consignes de montage............................................................................................ 36
14. LOCALISATION DE LA CAUSE 37
15. DIVERS 38
Avez-vous besoin d'une assistance supplémentaire ? .................................................. 38
Conditions de garantie ............................................................................................ 38
Limitation de la responsabilité.................................................................................. 38
Reproduction Mode d’emploi/Données techniques...................................................... 38
.
S
ÉÉCCUURRIITTÉÉ EETT MMAAIINNTTEENNAANNCCE
11.
S
E
iii
Page 88

iv
Page 89

.
S
11.
Veuillez lire ce chapitre attentivement et respectez toutes les consignes et remarques indiquées. Ainsi, vous assurez un fonctionnement fiable et une longue durée de vie de votre
écran. Gardez ce mode d'emploi toujours à la portée de la main, à proximité de votre écran.
Conservez le mode d'emploi afin de pouvoir le remettre, en cas de vente de votre écran, au
nouveau propriétaire.
EECCUURRIITTEE EETT MMAAIINNTTEENNAANNCCE
S
E
SECURITE DE FONCTIONNEMENT
• N'ouvrez jamais le boîtier de l'écran ! Ceci pourrait donner lieu à un court-
circuit électrique ou même entraîner du feu.
• N'introduisez pas d'objets par les fentes et ouvertures à l'intérieur de l'écran.
Ceci pourrait donner lieu à un court-circuit électrique ou même à du feu, ce qui entraîne l'endommagement de votre écran.
• Les fentes et les ouvertures de l'écran servent à l'aération. Ne recouvrez
pas ces ouvertures étant donné que sinon, une surchauffe pourrait se produire. Les orifices d'aération ne doivent pas être recouverts par des objets (revues, nappes, rideaux, etc.) : cela gênerait la ventilation (surchauffe,
risque d’incendie) !
• Le téléviseur ne doit en aucun cas être exposé aux gouttes et projections d’eau !
• Ne laissez pas jouer les enfants sans surveillance avec les appareils électriques. Les
enfants ne sont pas toujours en mesure de reconnaître un danger éventuel.
• L'écran n'est pas prévu pour le fonctionnement dans une entreprise industrielle.
L’utilisation de votre appareil dans des conditions environnementales extrêmes risque
d’engendrer des dommages.
• Il y a risque de blessure lorsque l'affichage casse. Emballez les parties cassées en por-
tant des gants de protection et envoyez-les à votre Service Centre afin d'assurer l'élimi-
nation adéquate. Lavez ensuite vos mains au savon étant donné qu'il ne peut pas être exclu
que des produits chimiques sont dégagés.
• N'exercez pas de pression sur l'affichage. L'écran risque de casser.
• Ne touchez pas l'affichage aux doigts ou avec des objets à arêtes vives afin d'éviter des
endommagements.
• L’utilisation du casque avec un volume sonore trop élevé peut entraîner des trou-
bles auditifs. Réduisez le volume du casque avant de le mettre en place.
English Deutsch Français Italiano Español Nederlands Português Dansk Magyar
Attention ! De par sa conception, l’appareil dispose d’arêtes vives et de coins pointus
susceptibles de provoquer des blessures !
• Veillez à ce que l’appareil soit installé en toute sécurité.
• Veillez à ce que les coins de l’appareil ne surplombent pas le bord des meubles.
• N’approchez jamais vos yeux des coins de l’appareil. Soyez particulièrement prudent
lorsque vous vous penchez en direction de l’appareil !
.
S
ÉÉCCUURRIITTÉÉ EETT MMAAIINNTTEENNAANNCCE
11.
S
E
1
Page 90

Arrêtez immédiatement l'appareil ou bien ne l'allumez pas, débranchez la prise de
courant et adressez-vous au service clientèle, si …
• ... le câble électrique ou la prise de courant est usé ou endommagé. Remplacez le
câble électrique défectueux par des pièces de rechange. Vous ne devez en aucun cas les
réparer.
• ... le boîtier de l’appareil est endommagé ou si du liquide s'y est introduit. Faites
d'abord vérifier l'appareil par le service clientèle. Sans cela, l’appareil risque de ne plus
pouvoir être utilisé en toute sécurité. Il pourrait y avoir des risques d’électrocution
mortelle !
REPARATION
• La réparation de votre écran doit uniquement être réalisé par un personnel spécialisé
qualifié.
• Lorsqu'une réparation est nécessaire, veuillez vous adresser exclusivement à nos partenai-
res de service autorisés.
LIEU D'IMPLANTATION
• Durant les première heures d’utilisation, les nouveaux appareils peuvent dégager une
odeur typique mais totalement inoffensive s’estompant progressivement au fil du
temps. Pour combattre la formation d’odeur, nous vous conseillons d’aérer réguliè-
rement la pièce. Lors du développement de ce produit, nous avons tout mis en œuvre
pour que les taux restent largement inférieurs aux taux limites en vigueur.
• Tenez votre écran et tous les appareils raccordés à l'écart de l'humidité et évitez la poussière,
la chaleur et le rayonnement direct du soleil. Le non-respect de ces remarques risque d'entraîner des perturbations ou l'endommagement de l'écran.
• N’utilisez pas votre appareil à l’extérieur : selon les conditions météorologiques (par
ex. la pluie, la neige), vous risqueriez d’endommager l’appareil.
• Ne posez aucun récipient rempli de liquide (vases, etc.) sur la TV. Le récipient pour-
rait se renverser et le liquide porter atteinte à la sécurité électrique.
• Ne placez pas de source potentielle d'incendie (une bougie allumée par ex.) à
proximité ou sur l’appareil.
• Veillez à assurer un espace suffisamment grand dans l’armoire de rangement. Respec-
tez un espace minimal de 10 cm tout autour de l’appareil pour permettre une aération suffisante.
• Placez et utilisez tous les composants sur une surface stable, plane et exempte de vibrations
afin d'éviter que l'écran tombe.
• Evitez des effets éblouissants, des réflexions, des contrastes clairs/sombres trop
forts afin de ménager vos yeux et d'assurer une ergonomie agréable du poste de travail.
• La distance de visionnage optimale est égale à 5 fois la diagonale de l’écran.
TEMPERATURE AMBIANTE
• L'écran peut être exploité à une température ambiante de 5° C à 35° C et une humidité re-
lative de l'air de 20% à 85% (pas de condensation).
• A l'état hors circuit, l'écran peut être stocké à -10° C à 60° C.
• Après un transport de l'écran, ne réalisez la mise en service que lorsque l'appareil a pris
la température ambiante.
En cas de fluctuations de température ou d'humidité élevées, la condensation risque
de donner lieu à la formation d'humidité à l'intérieur de l'écran susceptible d'entraîner un
court-circuit électrique.
2
F
RRAANNÇÇAAIIS
F
S
Page 91

RACCORDEMENT
Veuillez tenir compte des consignes suivantes afin de raccorder votre écran correctement :
ALIMENTATION EN COURANT
• Raccordez l'écran uniquement à une prise de courant mise à la terre de
AC 220V-240V~ 50 Hz. Lorsque vous n'êtes pas sûr en ce qui concerne l'alimentation
en courant au lieu d'implantation, demandez votre service d'électricité.
• Utilisez uniquement le câble d'alimentation électrique fourni.
• Pour une sécurité supplémentaire, nous vous recommandons d'utiliser une protection
contre les surtensions afin de protéger votre écran contre l'endommagement dû aux
pointes de tension ou aux coups de foudre venant du réseau de courant.
• Afin d'interrompre l'alimentation en courant de votre écran, débranchez la fiche secteur
de la prise de courant.
• La prise de courant doit se trouver à proximité de votre écran et doit être facilement
accessible.
• L’interrupteur d'alimentation électrique intégré n'isole pas complètement la TV du réseau
électrique.
• Lorsque vous utilisez une rallonge, veillez à ce que celle-ci corresponde aux exigences
VDE. Le cas échéant, demandez votre installateur d'électricité.
• Poser les câbles de sorte que personne ne peut marcher dessus ou trébucher.
• Ne posez pas d'objets sur les câbles étant donné que sinon, ceux-ci risquent d'être
endommagés.
NORMES / COMPATIBILITE ELECTROMAGNETIQUE
L'écran remplit les exigences de la compatibilité électromagnétique et de la sécurité électrique des dispositions et règlements suivants :
English Deutsch Français Italiano Español Nederlands Português Dansk Magyar
EN 55013, EN 55020, EN 60065, EN 61000-3-2, EN 61000-3-3
• Gardez une distance d'un mètre au minimum par rapport aux sources perturbatrices
magnétiques et à fréquence élevée (téléviseur, enceintes acoustiques, téléphone mo-
bile, etc.) afin d'éviter des dérangements de fonctionnement et des pertes de données.
• La fabrication de ce produit met en oeuvre les techniques les plus modernes. Toutefois,
en raison de la complexité de ces techniques, il peut arriver, dans des cas très rares,
qu’un ou plusieurs points lumineux fassent défaut.
ENTRETIEN
La durée de vie de l'écran peut être prolongée en prenant les mesures suivantes :
Attention ! Aucune pièce devant être entretenue ou nettoyée ne se trouve à l'intérieur
du boîtier de l'écran.
• Avant le nettoyage, débranchez toujours la fiche secteur et tous les câbles de liaison.
• N'utilisez pas de solvants, de produits de nettoyage caustiques ou gazeux.
• Nettoyez l'écran au moyen d'un chiffon doux non pelucheux.
• Veillez à ce qu'aucune goutte d'eau ne demeure sur l'écran. L'eau risque de donner lieu à
des décolorations durables.
• Ne soumettez pas l'écran ni à la lumière de soleil éblouissante ni au rayonnement ul-
traviolet.
• Conservez précieusement le matériel d'emballage et utilisez-le exclusivement pour transporter le
moniteur.
.
S
ÉÉCCUURRIITTÉÉ EETT MMAAIINNTTEENNAANNCCE
11.
S
E
3
Page 92

RECYCLAGE ET ELIMINATION
Cet appareil ainsi que son emballage ont été réalisés autant que possible dans des matériaux qui, une fois éliminés, ne nuisent pas à l’environnement et qui permettent un recyclage
approprié.
En fin d’utilisation, l’appareil est repris pour être réutilisé et recyclé (pour certains composants) pour peu que son état puisse le permettre.
Les composants non recyclables sont éliminés de manière appropriée.
Si vous avez des questions concernant l’élimination, veuillez contacter votre point de vente
ou notre service après-vente.
Appareil
Lorsque l’appareil arrive en fin de vie, ne le jetez jamais dans une poubelle classique. Infor-
mez-vous des possibilités d’élimination écologique.
CONSIGNES DE SECURITE RELATIVES A L'UTILISATION DES PILES
Les piles peuvent contenir des matériaux inflammables. En cas de mauvaise manipulation,
les piles peuvent couler, chauffer fortement, s'enflammer voire exploser, ce qui peut
endommager votre appareil et porter atteinte à votre santé.
Il est impératif que vous respectiez les consignes suivantes :
• Conservez les piles hors de portée des enfants.
En cas d'ingestion accidentelle d'une pile, consultez immédiatement votre médecin.
• Ne chargez jamais des piles (à moins que cela ne soit indiqué expressément).
• Ne déchargez jamais les piles en utilisant une
puissance de sortie élevée.
• Ne court-circuitez jamais les piles.
• Évitez la chaleur et ne jetez pas les piles au feu.
• Ne démontez pas et ne déformez pas les piles.
Vous risqueriez de vous blesser vos mains ou vos doigts, et vos yeux ou votre peau pourrait
entrer en contact avec le liquide des piles. Si cela devait arriver, rincez abondamment les zones concernées à l'eau claire et consultez immédiatement votre médecin.
• Évitez les coups et les fortes secousses.
• N'intervertissez jamais la polarité.
Veillez à ce que les pôles Plus (+) et Moins (-) soient correctement positionnés afin d'éviter les
courts-circuits.
• N'utilisez pas ensemble des piles neuves et usagées ou bien des piles de types diffé-
rents.
Cela pourrait engendrer un dysfonctionnement de votre appareil. En outre, la pile la plus faible
se déchargerait trop rapidement.
• Retirez immédiatement les piles usagées de l'appareil.
• Retirez les piles en cas d'inutilisation prolongée de votre appareil.
• Remplacez simultanément toutes les piles usagées d'un appareil par de nouvelles
piles de même type.
• Si vous souhaitez stocker ou éliminer des piles, isolez leurs contacts à l'aide de ru-
ban adhésif.
Piles
Les piles usagées ne sont pas des déchets domestiques ! Elles doivent être déposées dans
un lieu de collecte de piles usagées.
4
F
RRAANNÇÇAAIIS
F
S
Page 93

.
I
NNTTRROODDUUCCTTIIOONN
22.
I
REMARQUES CONCERNANT LE PRESENT MODE D'EMPLOI
Nous avons structuré le mode d'emploi de sorte que vous pouvez lire les informations requises concernant un certain sujet en consultant la table des matières.
L'objectif de ce mode d'emploi est de vous expliquer la commande du écran couleur en des
termes faciles à comprendre.
NOTRE GROUPE CIBLE
Ce mode d'emploi s'adresse aux premiers utilisateurs ainsi qu'aux utilisateurs déjà expérimentés.
LA QUALITE
Lors du choix des composants, nous avons porté notre attention à une fonctionnalité élevée, à
une manipulation facile et à une sécurité et fiabilité élevées. Grâce à ce concept de matériel et
de logiciel, nous pouvons vous présenter un écran couleur fait pour l'avenir qui vous procurera
beaucoup de plaisir lors du travail et pendant les loisirs.
Nous vous remercions pour votre confiance en nos produits et nous nous réjouissons de
pouvoir vous accueillir en tant que nouveau client.
SERVICE
Grâce à l'encadrement individuel des clients, nous vous assistons lors de votre travail quotidien.
Contactez-nous, nous sommes heureux de pouvoir vous aider.
Ce manuel contient un chapitre séparé concernant le service après-vente commençant à la
page 37.
English Deutsch Français Italiano Español Nederlands Português Dansk Magyar
.
I
NNTTRROODDUUCCTTIIOON
22.
I
N
5
Page 94

CARACTERISTIQUES
Avantages par rapport aux écrans à tube image
¾ Gain de place
¾ Poids plus faible
¾ Economie de courant
¾ Pauvre en radiations.
Propriétés
¾ Affichage haute-résolution
¾ On Screen Display (OSD) – Interface utilisateur graphique
¾ 499 emplacements de programmes, 3 positions AV, modes HDMI, YUV et VGA
¾ Multistandard PAL, SECAM, NTSC
¾ “HD ready” - compatible HDTV
¾ Les branchements suivants sont disponibles :
- Branchement tuner
- SCART (Péritel)/AV1 (Vidéo, S-Vidéo, RVB, YCrCb, YPrPb)
- SCART (Péritel)/AV2 (Vidéo, S-Vidéo, RVB, YCrCb, YPrPb)
- AV.SV (entrées Vidéo/S-Vidéo et Audio)
- Casque
- entrée multimédia analogique et numérique (prise VGA et HDMI)
- entrée audio pour VGA et HDMI
- Entrée YUV (composante)
- Entrée Audio pour YUV
- Sortie ligne
¾ Télécommande facile d’utilisation
¾ Système de menu à l’écran facile d’utilisation
¾ Système d’installation APSAS totalement automatique (A
nd Sort)
A
¾ Fonction télétexte TOP/FLOF avec mémoire de 2 100 pages et texte multipage
¾ Améliorations numériques de l’image :
- Réduction du bruit dynamique
- Filtre-peigne
- Perfect Clear
- Netteté de l'image
- CTI
¾ Double tuner PIP : image dans l’image de deux signaux différents
¾ Arrêt sur image et Multipicture (aperçu des programmes)
¾ Format plein écran indépendant de la source du signal
¾ Prise casque pour une écoute isolée
¾ Système de haut-parleur intégré avec 4 haut-parleurs
¾ Fonction décodeur
¾ Fonction Swap (basculer entre 2 programmes) intelligente
¾ Minuterie
¾ Verrouillage enfants
¾ Plug and Play : reconnaissance automatique de votre système d’exploitation
¾ Quatre jeux : Brixx, Anaconda, Scramble, Outer Space
utomatic Program Search
6
F
RRAANNÇÇAAIIS
F
S
Page 95

.
É
33.
Les touches sur l’appareil gèrent les fonctions de base de la TV ainsi que du menu à l’écran.
Utilisez la télécommande pour accéder aux fonctions avancées.
• Détail de la vue frontale et latérale :
Remarque : pour plus d’informations concernant le fonctionnement d’appareils externes,
veuillez lire le chapitre "10. Brancher des appareils externes" à la page 26.
LLEEMMEENNTTSS DDEE CCOOMMMMAANNDDEE EETT BBRRAANNCCHHEEMMEENNTTSS LLAATTEERRAAUUX
É
Témoin de fonctionnement
Une lumière bleue indique que
l’appareil est allumé mais qu’il se
trouve en mode Veille.
Lorsque l’appareil est allumé, la lumière
devient jaune.
Fenêtre du détecteur
Dirigez la télécommande vers cette
zone de l’écran.
Éléments de commande & branchements latéraux
Vous trouverez sur les côtés de l’appareil
des branchements et une partie des éléments de commande.
Power
allume la TV ou active le mode Veille
P+/P- Programme +/-
Touches directionnelles pour le menu à l’écran
\+/\- Volume +/-
Touches directionnelles pour le menu à l’écran
Touche MENU
Touche EXIT
Entrée AV.SV
Sortie casque
X
English Deutsch Français Italiano Español Nederlands Português Dansk Magyar
É
.
LLÉÉMMEENNTTSS DDEE CCOOMMMMAANNDDEE EETT BBRRAANNCCHHEEMMEENNTTSS
É
33.
X
LLAATTÉÉRRAAUUX
7
Page 96

.
A
44.
• Vue inférieure en diagonale :
Remarque : la prise Service est destinée uniquement à nos partenaires autorisés. Une utilisation inappropriée peut détériorer votre téléviseur !
Remarque : pour plus d’informations concernant le fonctionnement d'appareils externes,
veuillez lire le chapitre „10. Brancher des appareils externes“ à la page 26.
RRRRIIEERREE DDEE L
A
Sortie ligne
YUV
Entrée audio YUV
Branchement antenne
Scart/AV1
Scart/AV2
Service
L
’
AAPPPPAARREEIILL EETT BBRRAANNCCHHEEMMEENNTTS
’
S
Prise de courant
Branchement réseau
VGA
Entrée audio VGA
Entrée audio HDMI
HDMI
8
F
RRAANNÇÇAAIIS
F
S
Page 97

.
T
55.
Les éléments suivants concernent la télécommande adaptée à votre TV, vous trouverez les
caractéristiques et la répartition des touches correspondantes à la page suivante :
EELLEECCOOMMMMAANNDDEE
T
• Ouvrez le compartiment des piles de la télécommande en enlevant le couvercle.
• Insérez des piles de type Micro / AAA dans le compartiment, à l’arrière de la télécom-
mande. Veillez à respecter la polarité des piles (indiquée au fond du compartiment des piles).
English Deutsch Français Italiano Español Nederlands Português Dansk Magyar
.
T
ÉÉLLÉÉCCOOMMMMAANNDDE
55.
T
E
9
Page 98

RESUME DES TOUCHES DE COMMANDE
Appareil allumé ou en mode Veille
POWER
Sélectionner la source de signaux
1 – 9, TV Passer en mode TV.
PC Bascule entre VGA PC, YUV et HDMI
AV.SV Passe en mode Vidéo ou S-vidéo
SCART 1 Passe sur le port SCART 1
SCART 2 Passe sur le port SCART 2
0 Bascule entre PC VGA, HDMI, YUV, AV.SV, SCART/AV 1, SCART/AV 2
Menu
MENU/ENTER Afficher le menu principal à l'écran ou confirme le menu.
ST P+/P- Sélectionner l'élément du menu OSD que vous voulez régler.
VOL -/+, WX Augmenter ou diminuer la valeur de la barre de contrôle OSD.
EXIT Quitter le menu.
Changer de chaîne
ST P+/P- Appuyer sur P- ou P+ pour changer de chaîne en mode TV.
0-9 Sélectionner directement une chaîne en mode TV.
RTN Revenir à la chaîne précédente.
Contrôle du son
VOL -/+, WX Augmenter ou diminuer le volume.
MUTE
SOUND Appuyer pour passer directement dans le menu Audio
Télétexte
TELETEXT
INDEX
STOP
INTERRUPT
REVEAL
EXPAND
ST P+/P- Appuyer sur P+ ou P- pour utiliser Page Catching
Contrôle PIP
ON/OFF
PIP SOURCE, ST Sélectionne la source de la fenêtre d’incrustation d’image.
POSITION Sert à déplacer la fenêtre d’incrustation d’image
SIZE Réglage de la taille de la fenêtre d’incrustation d’image.
Autres fonctions
RST, RESET Restaurer la configuration d'origine, comme la luminosité, le contraste et les couleurs.
TOUCHE JAUNE Appuyer pour activer et désactiver l'arrêt sur image
TOUCHE VERTE Appuyer pour activer et désactiver la fonction Multipicture (aperçu des programmes)
TOUCHE ROUGE Appuyer pour invoquer le menu Image
TOUCHE BLEUE Appuyer pour invoquer le menu Audio
ARC Changement de format.
APC Réglage du rétro-éclairage sur trois niveaux.
DISPLAY Indique la source actuelle du signal, le numéro du programme et les options du son.
SLEEP Appuyez sur cette touche pour sélectionner un intervalle de temps prédéterminé pour l'arrêt
TIME
L'appareil passe tour à tour du mode Fonctionnement au mode Veille
Interrompre ou rétablir le son.
Appuyez pour afficher le Service Télétexte. Ré appuyez pour repasser en mode TV.
Appuyez pour afficher le contenu du télétexte.
Appuyez pour désactiver le changement de page automatique.
Appuyez pour regarder la TV en attendant la page texte suivante.
Appuyez pour afficher des informations cachées, comme la réponse d'une énigme ou d'une
question.
Appuyez pour agrandir la moitié inférieure ou supérieure de la page télétexte.
Appuyez sur cette touche pour regarder l'une des sources vidéos en image incrustée quand
vous êtes en mode PC. Ré appuyez pour désincruster l'image.
automatique.
Appuyer pour afficher et arrêter alternativement l'horloge numérique ou analogique
10
F
RRAANNÇÇAAIIS
F
S
Page 99

.
66.
AAPPSSAAS
Votre téléviseur dispose du système d'installation automatique APSAS (Automatic Program
earch And Sort) ainsi que d'une interface utilisateur graphique OSD (On Screen Display).
S
Les deux systèmes facilitent la première installation, puis l'utilisation de votre appareil.
1. Après avoir déballé l'écran, assurez-vous qu'il soit installé à un endroit sûr et bien ventilé.
2. Placez deux piles de type AAA dans le compartiment prévu à cet effet situé à l'arrière de
la télécommande.
3. Raccordez le câble antenne externe 75 Ohms et le câble électrique aux branchements
respectifs et veillez à ce que l'interrupteur d'alimentation électrique situé à l'arrière soit
sur Marche.
4. Si vous allumez votre TV pour la première fois en appuyant sur la touche POWER de la
télécommande, le menu relatif à la première installation s’affiche. Exécutez les instructions suivantes et utilisez les touches STWX P+/P-, VOL+/- et MENU pour commander les menus.
5. Sur l'écran apparaissent les drapeaux de tous les sites adaptés à cette TV.
S
P
RREEMMIIEERREE
P
I
NNSSTTAALLLLAATTIIOON
I
N
English Deutsch Français Italiano Español Nederlands Português Dansk Magyar
6. À l'aide des touches directionnelles STWX P+/P-, VOL+/-, sélectionnez le drapeau
correspondant à l'endroit auquel vous vous trouvez et confirmez votre choix avec la touche MENU. Le lieu une fois sélectionné, le menu suivant apparaît
1. Sélectionner un lieu France
2. Langue Français
3. Démarrer Annuler/Suivant
7. Le lieu indiqué correspond au drapeau que vous avez choisi. Si vous souhaitez corriger
le réglage du pays, vous pouvez réaccéder à la sélection des drapeaux avec le point de
menu "Sélectionner un lieu".
8. La langue nationale correspondant au lieu sélectionné a été automatiquement préréglée.
Mais vous pouvez aussi sélectionner n'importe quelle autre langue de menu figurant
sous le point de menu "Langue".
.
66.
AAPPSSAAS
Nouvelle installation
S
P
P
RREEMMIIÈÈRREE
I
NNSSTTAALLLLAATTIIOON
I
N
11
Page 100

9. Une fois que vous avez choisi votre langue, allez sur le point de menu "Démarrer" à
pp
l'aide des touches directionnelles ST P+/P-.
En sélectionnant "Suivant" à l'aide du MENU et des touches ST P+/P-, vous lancez le
premier démarrage automatique. L'appareil recherche alors automatiquement tous les
programmes télévisés réception nables dans votre secteur, puis les trie et les enregistre
en fonction de la région et de la langue que vous avez indiquées. Le menu suivant s'affiche alors :
Fréquence
Type de canal
Dernier émetteur
Trouvé jusqu'à présent
Recherche automatique
Annuler
10. La fonction de ce menu est purement informationnelle : il vous tient au courant de la
progression de la première installation. Si vous désirez interrompre la recherche, appuyez alors sur la touche MENU. Dans ce cas de figure, aucun programme télévisé ne
sera enregistré. Si vous éteignez puis rallumez l'appareil, vous revenez au début du
premier réglage.
11. Le premier réglage une fois terminé, le tableau des programmes apparaît sur l'écran.
Le tableau des programmes vous permet de déplacer, renommer, supprimer et ajouter
des programmes ou de réaliser des réglages fins (pour plus de détails, consultez la
partie „Tableau des programmes“ à partir de la page 19).
SCART1 TV.........
SCART2 TV.........
AV.SV TV.........
VGA PC TV.........
HDMI TV.........
YUV TV.........
TV 1 TF1 TV.........
TV 2 M6 TV.........
TV 3 …… TV.........
• Su
Tableau des programmes
rimer • Déplacer •Éditer
12. Si vous ne voulez pas modifier les programmes enregistrés et triés automatiquement,
appuyez sur EXIT pour accéder directement au mode TV.
12
F
RRAANNÇÇAAIIS
F
S
 Loading...