


065 001 057 390
INSTRUCTION MANUAL
MD 30021
20” LCD DVD TV
065001057390 20" LCD LOCDVT ING 8/9/06 11:41 Page 1

2
WHAT TO DO FOR SAFETY OF YOUR TV . . . . . . . . . . . . . . . . . . . . . . . . . . . . . . . . . . . . . . . . . . . . . . . . . . . . . . . . . . . . .3
WHICH PART OF YOUR TV PERFORMS WHAT FUNCTION . . . . . . . . . . . . . . . . . . . . . . . . . . . . . . . . . . . . . . . . . . . . . . .5
REMOTE CONTROL . . . . . . . . . . . . . . . . . . . . . . . . . . . . . . . . . . . . . . . . . . . . . . . . . . . . . . . . . . . . . . . . . . . . . . . . . . . . . .6
AERIAL CONNECTION . . . . . . . . . . . . . . . . . . . . . . . . . . . . . . . . . . . . . . . . . . . . . . . . . . . . . . . . . . . . . . . . . . . . . . . . . . . .8
VCR, DVD, COMPUTER AND DECODER CONNECTIONS . . . . . . . . . . . . . . . . . . . . . . . . . . . . . . . . . . . . . . . . . . . . . . . .9
AUDIO/VIDEO CONNECTIONS . . . . . . . . . . . . . . . . . . . . . . . . . . . . . . . . . . . . . . . . . . . . . . . . . . . . . . . . . . . . . . . . . . . .10
TV FUNCTIONS . . . . . . . . . . . . . . . . . . . . . . . . . . . . . . . . . . . . . . . . . . . . . . . . . . . . . . . . . . . . . . . . . . . . . . . . . . . . . . . . .11
SETUP . . . . . . . . . . . . . . . . . . . . . . . . . . . . . . . . . . . . . . . . . . . . . . . . . . . . . . . . . . . . . . . . . . . . . . . . . . . . . . . . . . . . . . . .13
TV FUNCTIONS (MENUS) . . . . . . . . . . . . . . . . . . . . . . . . . . . . . . . . . . . . . . . . . . . . . . . . . . . . . . . . . . . . . . . . . . . . . . . . .15
VOLUME ADJUSTMENT MENU, EQUALIZER, HEADPHONE . . . . . . . . . . . . . . . . . . . . . . . . . . . . . . . . . . . . . . . . . . . . .15
PICTURE SETTINGS MENU, PROGRAM TABLE . . . . . . . . . . . . . . . . . . . . . . . . . . . . . . . . . . . . . . . . . . . . . . . . . . . . . . . . .16
SETTINGS MENU . . . . . . . . . . . . . . . . . . . . . . . . . . . . . . . . . . . . . . . . . . . . . . . . . . . . . . . . . . . . . . . . . . . . . . . . . . . . . . .17
PROGRAM SETTINGS . . . . . . . . . . . . . . . . . . . . . . . . . . . . . . . . . . . . . . . . . . . . . . . . . . . . . . . . . . . . . . . . . . . . . . . . . . . .18
EXTERNAL DEVICE MODES . . . . . . . . . . . . . . . . . . . . . . . . . . . . . . . . . . . . . . . . . . . . . . . . . . . . . . . . . . . . . . . . . . . . . . . .21
TELETEXT . . . . . . . . . . . . . . . . . . . . . . . . . . . . . . . . . . . . . . . . . . . . . . . . . . . . . . . . . . . . . . . . . . . . . . . . . . . . . . . . . . . . . .22
DVD PLAYER . . . . . . . . . . . . . . . . . . . . . . . . . . . . . . . . . . . . . . . . . . . . . . . . . . . . . . . . . . . . . . . . . . . . . . . . . . . . . . . . . . .24
REMOTE CONTROL (DVD FUNCTIONS) . . . . . . . . . . . . . . . . . . . . . . . . . . . . . . . . . . . . . . . . . . . . . . . . . . . . . . . . . . . . .25
PLAYING DVD’s . . . . . . . . . . . . . . . . . . . . . . . . . . . . . . . . . . . . . . . . . . . . . . . . . . . . . . . . . . . . . . . . . . . . . . . . . . . . . . . .26
DVD SETTINGS . . . . . . . . . . . . . . . . . . . . . . . . . . . . . . . . . . . . . . . . . . . . . . . . . . . . . . . . . . . . . . . . . . . . . . . . . . . . . . . . .27
BASIC FUNCTIONS . . . . . . . . . . . . . . . . . . . . . . . . . . . . . . . . . . . . . . . . . . . . . . . . . . . . . . . . . . . . . . . . . . . . . . . . . . . . . .31
PICTURE PLAYBACK . . . . . . . . . . . . . . . . . . . . . . . . . . . . . . . . . . . . . . . . . . . . . . . . . . . . . . . . . . . . . . . . . . . . . . . . . . . . .34
DIVX PLAYBACK . . . . . . . . . . . . . . . . . . . . . . . . . . . . . . . . . . . . . . . . . . . . . . . . . . . . . . . . . . . . . . . . . . . . . . . . . . . . . . . .35
TROUBLESHOOTING . . . . . . . . . . . . . . . . . . . . . . . . . . . . . . . . . . . . . . . . . . . . . . . . . . . . . . . . . . . . . . . . . . . . . . . . . . . .36
TECHNICAL SPECIFICATIONS . . . . . . . . . . . . . . . . . . . . . . . . . . . . . . . . . . . . . . . . . . . . . . . . . . . . . . . . . . . . . . . . . . . . . .38
CONTENTS
065001057390 20" LCD LOCDVT ING 8/9/06 11:41 Page 2

DEAR USER
3
This is an excellent selection. Your new LCD TV will provide happiness to your home. But before using, or even
setting it, please read this guide carefully and keep for future reference.
FFuunnccttiioonnss ooff yyoouurr TTVV sseett
* Their equipment is an LCD TV with inserted DVD Player.
* You can adjust all commands related to video and audio, by means of the on screen menus (On Screen Display)
* You can save up to 100 channels in the VHF, UHF and S bands
* Thanks to the automatic channel search, you can find the required channel easily, save and name it (ATS)
* The falling asleep mechanism makes the automatic switching of the equipment off for you possible after a
preselectable time interval.
* Access safety device/safety device for children
065001057390 20" LCD LOCDVT ING 8/9/06 11:41 Page 3

SAFETY INFORMATION (continued)
4
PPOOWWEERR SSOOUURRCCEE
You should only plug this TV into a 230-V AC 50Hz mains
supply.
MMAAIINNSS AANNDD OOTTHHEERR LLEEAADDSS
Position the mains supply lead and other leads so that they
are not likely to be walked on, pinched by things or placed
on or against them. Pay particular attention to leads where
they enter a power socket and at the point where they come
out of the TV.
MMOOIISSTTUURREE AANNDD WWAATTEERR
Do not use the TV in a humid or damp area. The equipment
must not be exposed to dripping or splashing, as this may be
extremely dangerous. Objects filled with liquids, such as vases,
must not be placed on this equipment.
NNOO NNAAKKEEDD FFLLAAMMEESS
Naked flame sources, such as lighted candles, must not be
placed near this equipment, or on top of it.
CCLLEEAANNIINNGG
Always unplug the TV before cleaning it. Do not use liquid or
aerosol cleaners. Clean your TV with a soft damp cloth.
BBAATTTTEERRYY DDIISSPPOOSSAALL
Your attention is drawn to the environmental aspects of infrared
remote control battery disposal.
Please dispose of depleted batteries responsibly and ensure you
follow the battery manufacturers disposal instructions.
VVEENNTTIILLAATTIIOONN
The slots and openings on the TV are for ventilation.
Please ensure that there is enough space to allow for adequate
ventilation around the TV (at least 10cm).
Do not block or cover these holes as overheating could occur.
RREEPPLLAACCEEMMEENNTT PPAARRTTSS
The person carrying out the job must use parts that are specified
by the manufacturer or have the same specifications as the
original parts. The use of other parts may cause fire, electric
shock or other hazards.
SSEERRVVIICCIINNGG
Ensure the person carrying out repairs to your TV is qualified to
do so.
PPlleeaassee rreeffeerr ttoo sseeppaarraattee sseerrvviiccee iinnffoorrmmaattiioonn ssuupppplliieedd wwiitthh
tthhiiss pprroodduucctt..
Never remove the cover yourself, there are
dangerous voltages inside and you could receive an electric
shock.
LLIIGGHHTTNNIINNGG
In the event of a lightning storm, unplug your TV from the wall
socket.
Always unplug the TV if going away on holiday.
065001057390 20" LCD LOCDVT ING 8/9/06 11:41 Page 4
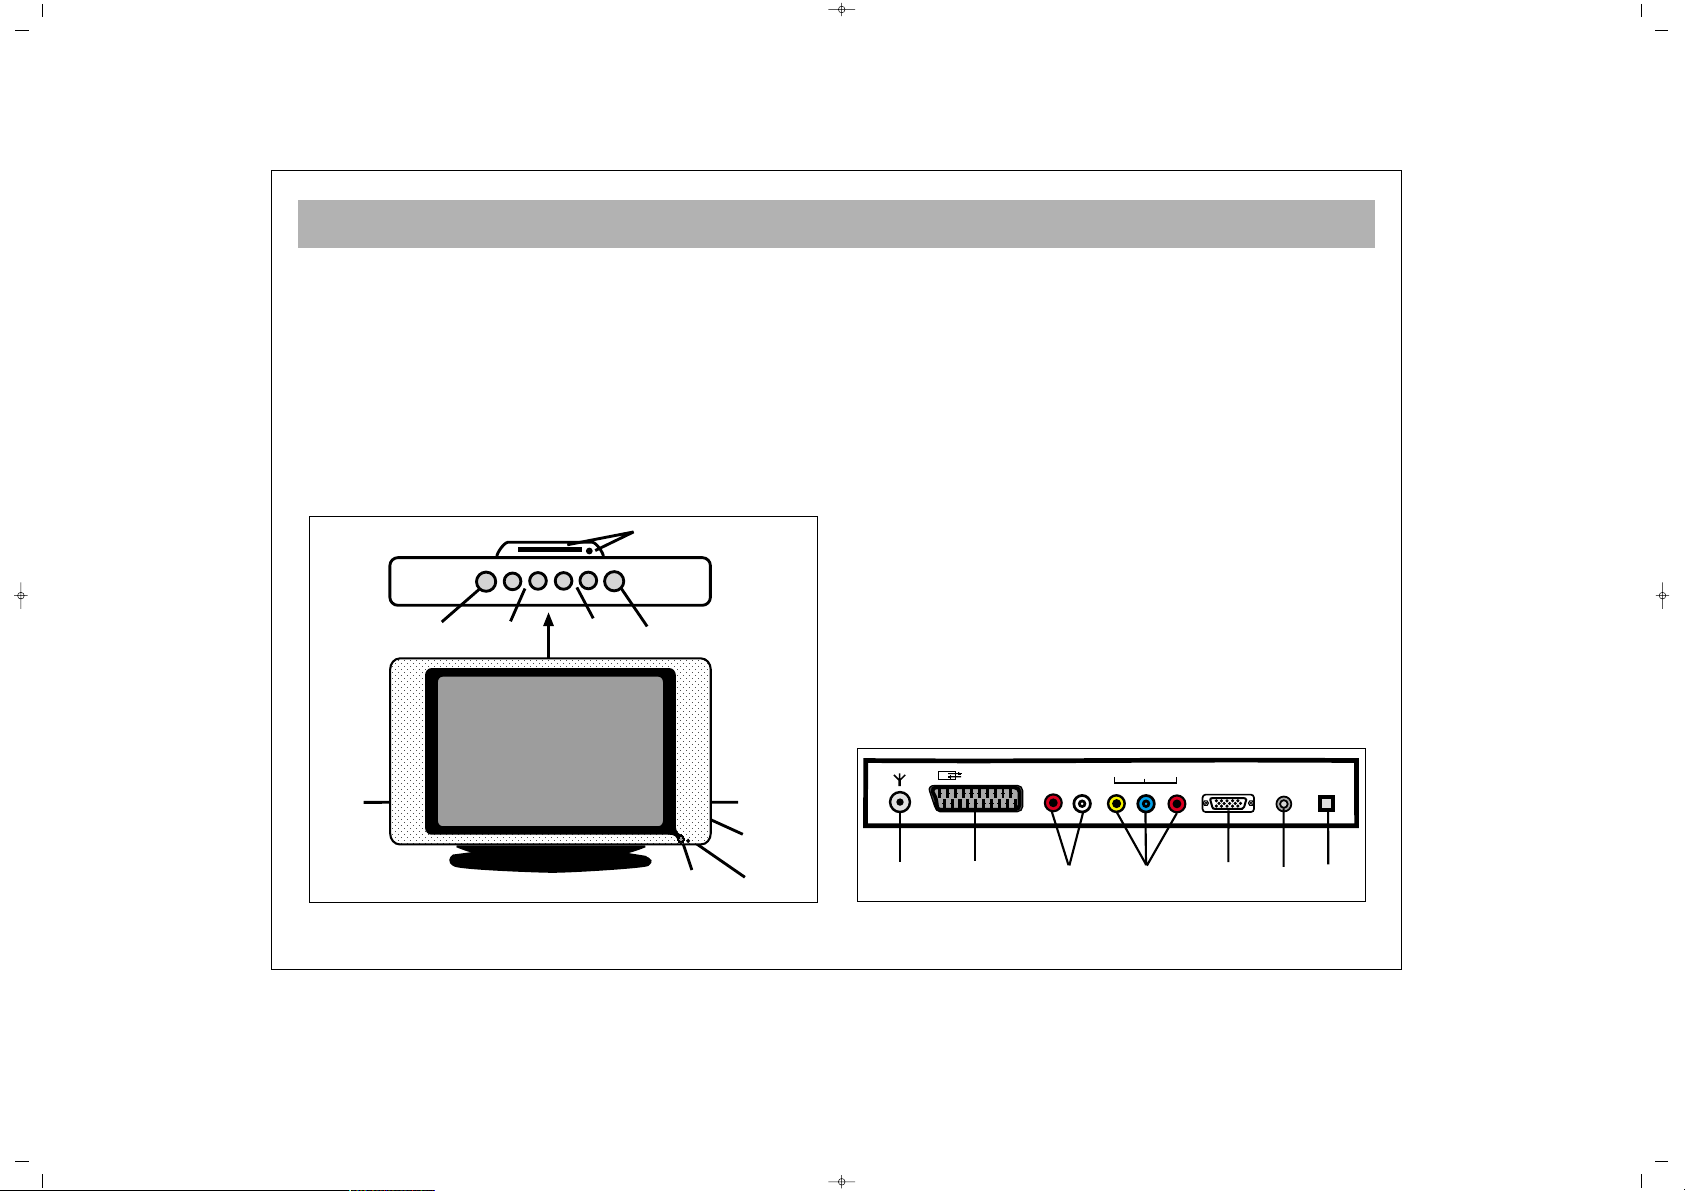
WHICH PART OF YOUR TV PERFORMS WHAT FUNCTION
5
FFRROONNTT ::
11
DVD Eject and DVD Tray
22
Remote control sensor
33
Speaker(s)
44
P+ / – Program up and down buttons
55
e + / – Volume up and down buttons
66
Menu button
77
Source Button
88
Standby button
99
Headphone in / AV in / S-Video in
BBAACCKK ::
1100
Aerial in
1111
“Scart in” (Using this entry, you can connect to your TV
such devices as computer, decoder and VCR)
1122
Component Audio in (L+R)
1133
Component YPbPr input
1144
PC input
1155
PC Audio in
1166
DC 12V in
DC 12V
EURO AV
Y
PC INPUT
PC
AUDIO IN
RL
AUDIO IN
Pb Pr
IN
10
11 12 13 14
15 16
1
2
4
5
8
6
7
9
33
P–
P+
MENU
V+V–
SOURCE
065001057390 20" LCD LOCDVT ING 8/9/06 11:41 Page 5
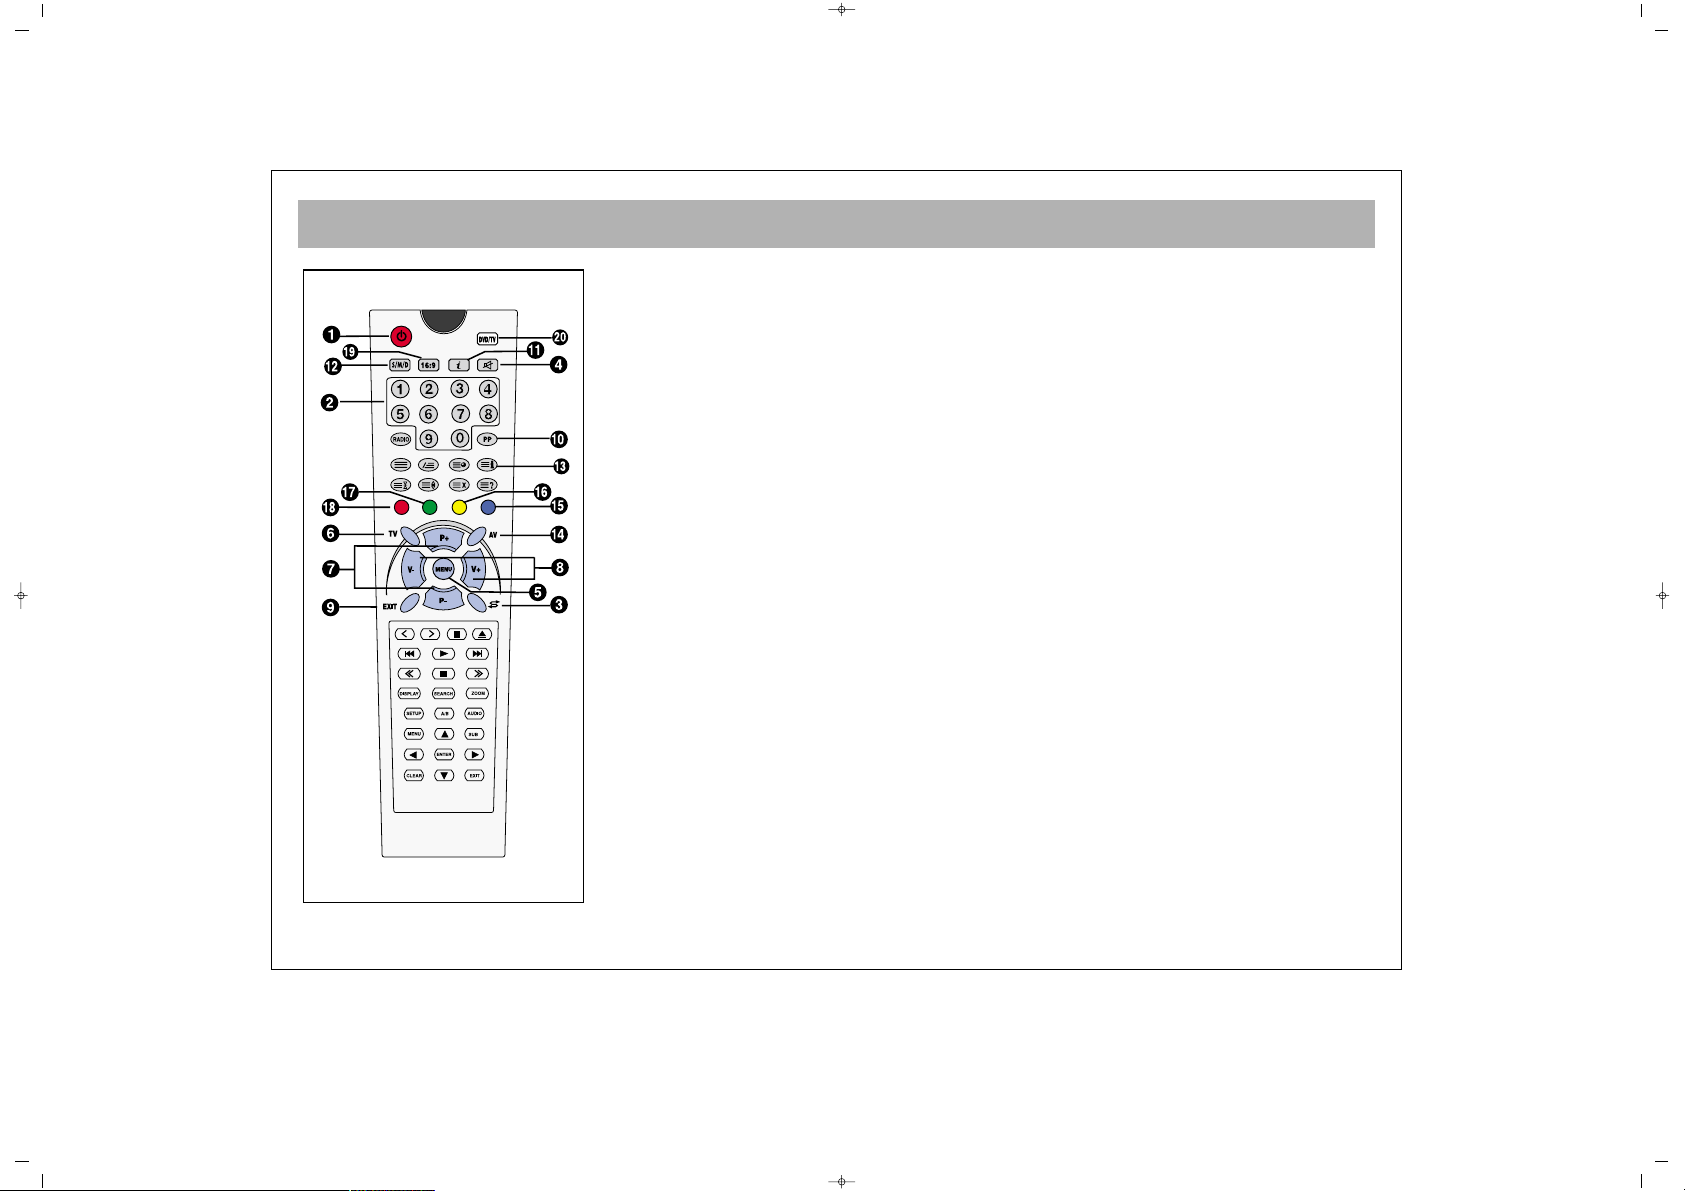
REMOTE CONTROL
6
1. Switching off (stand-by button)
2. Direct program selection buttons
3. Swap button
4. Mute button
5. Main Menu Button
6. TV button (to shift to TV from AV)
7. Program ± in TV setting, Teletext page ± in teletext setting, menu ± in menu setting
8. Volume ± and menu setting button
9. Menu leave button (EXIT or TV button leaves from the menu)
10. User normalization button
11. Status button (i)
12. Volume setting button DUAL I, DUAL II, Stereo, Mono
(DUAL I, II, ST/MONO) (Memory Button in Mono Models)
13. To reach Setup Menu
14. AV Button
15. (Blue button) incred.stereo/mono-normal Audio select
16. (Yellow button)
17. (Green button) Picture preliminary values
18. (Red button) Volume preliminary values
19. Picture format selection (In some models)
20. DVD/TV Button.
Switches between TV and DVD pictures.
NNoottee::
Please refer to separate remote control descriptions in the DVD and TELETEXT
sections.
065001057390 20" LCD LOCDVT ING 8/9/06 11:41 Page 6
REMOTE CONTROL
7
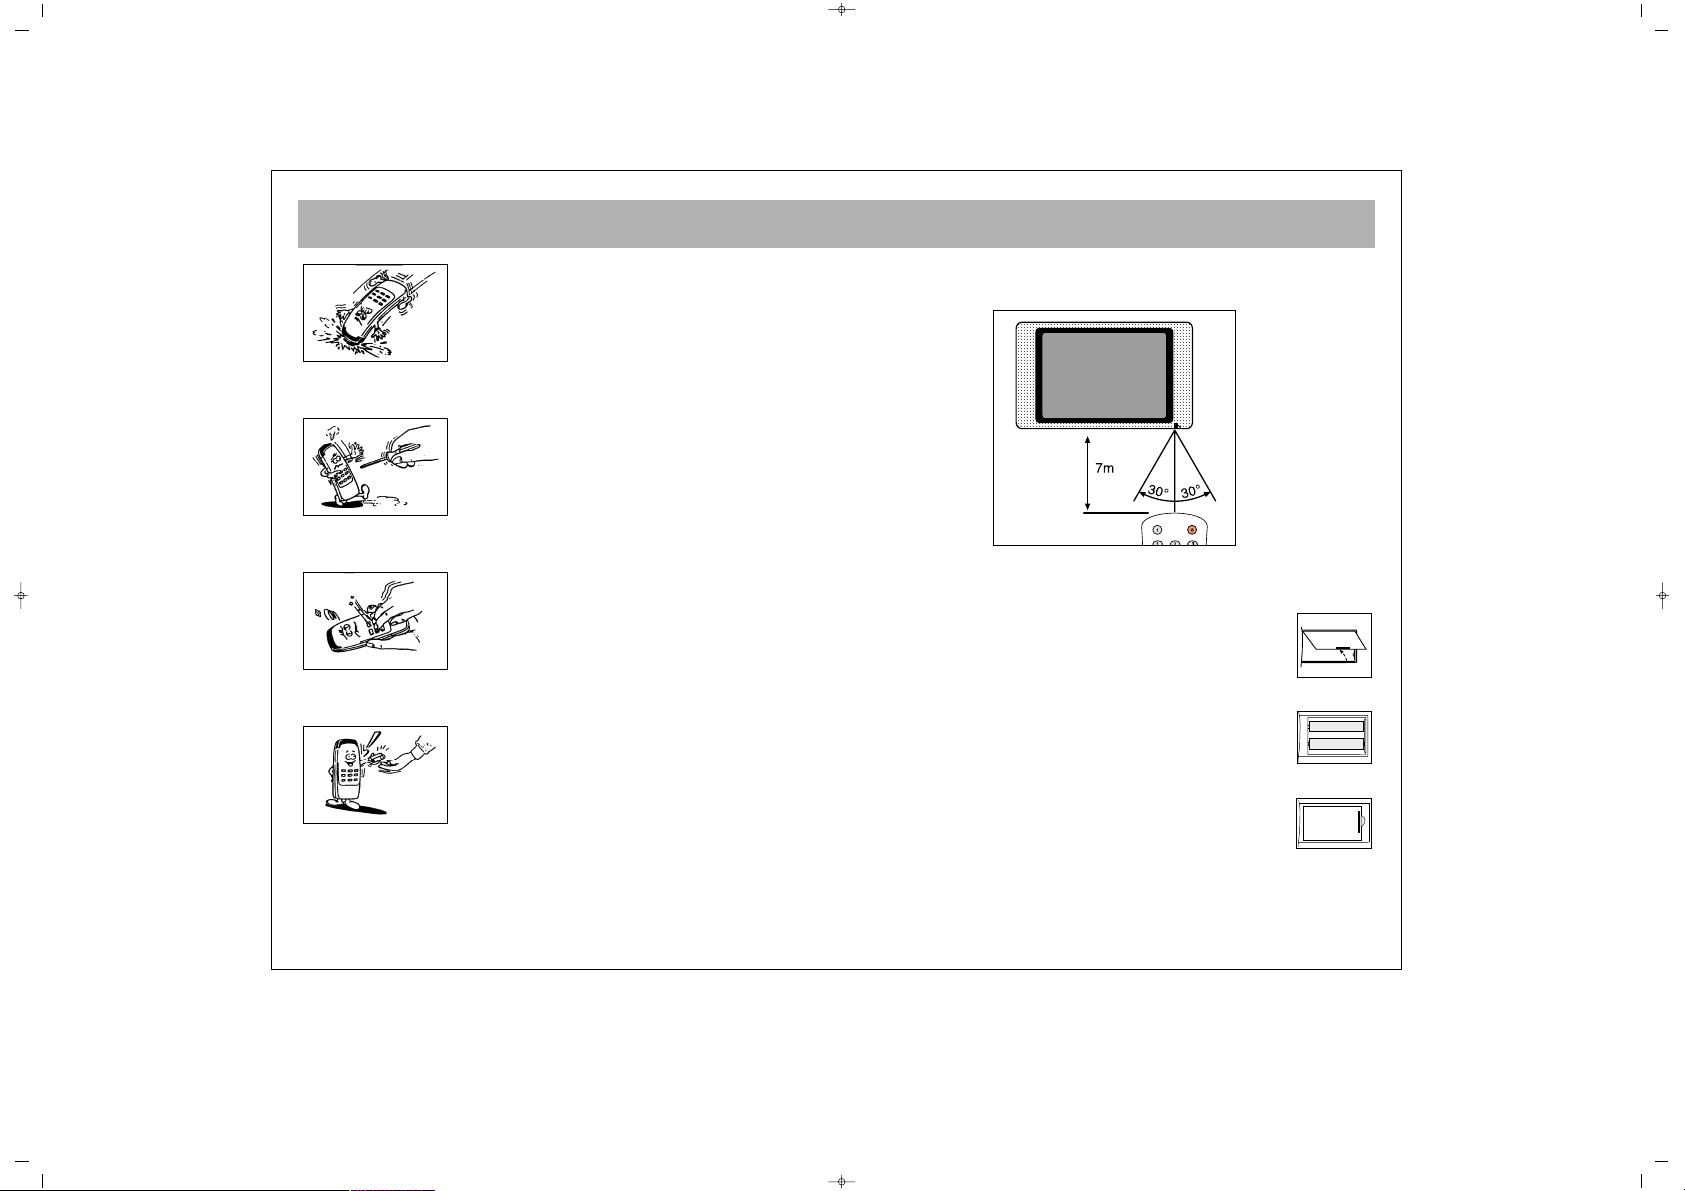
Never drop your Remote Control.
Do not attempt to open your Remote Control.
Do not press any 2 buttons on Remote Control.
simultaneously
If you do not use your Remote Control. for a long time,
remove the batteries.
NNoottee::
Your Remote Control controls your TV at 7 meters far
and 30 degrees of an angle
.
BBAATTTTEERRYY IINNSSEERRTTIIOONN ((11..55VV AAAAAA xx 22 ppiieecceess))
• Remove battery cover
• Place the batteries properly.
• Close the cover.
065001057390 20" LCD LOCDVT ING 8/9/06 11:41 Page 7
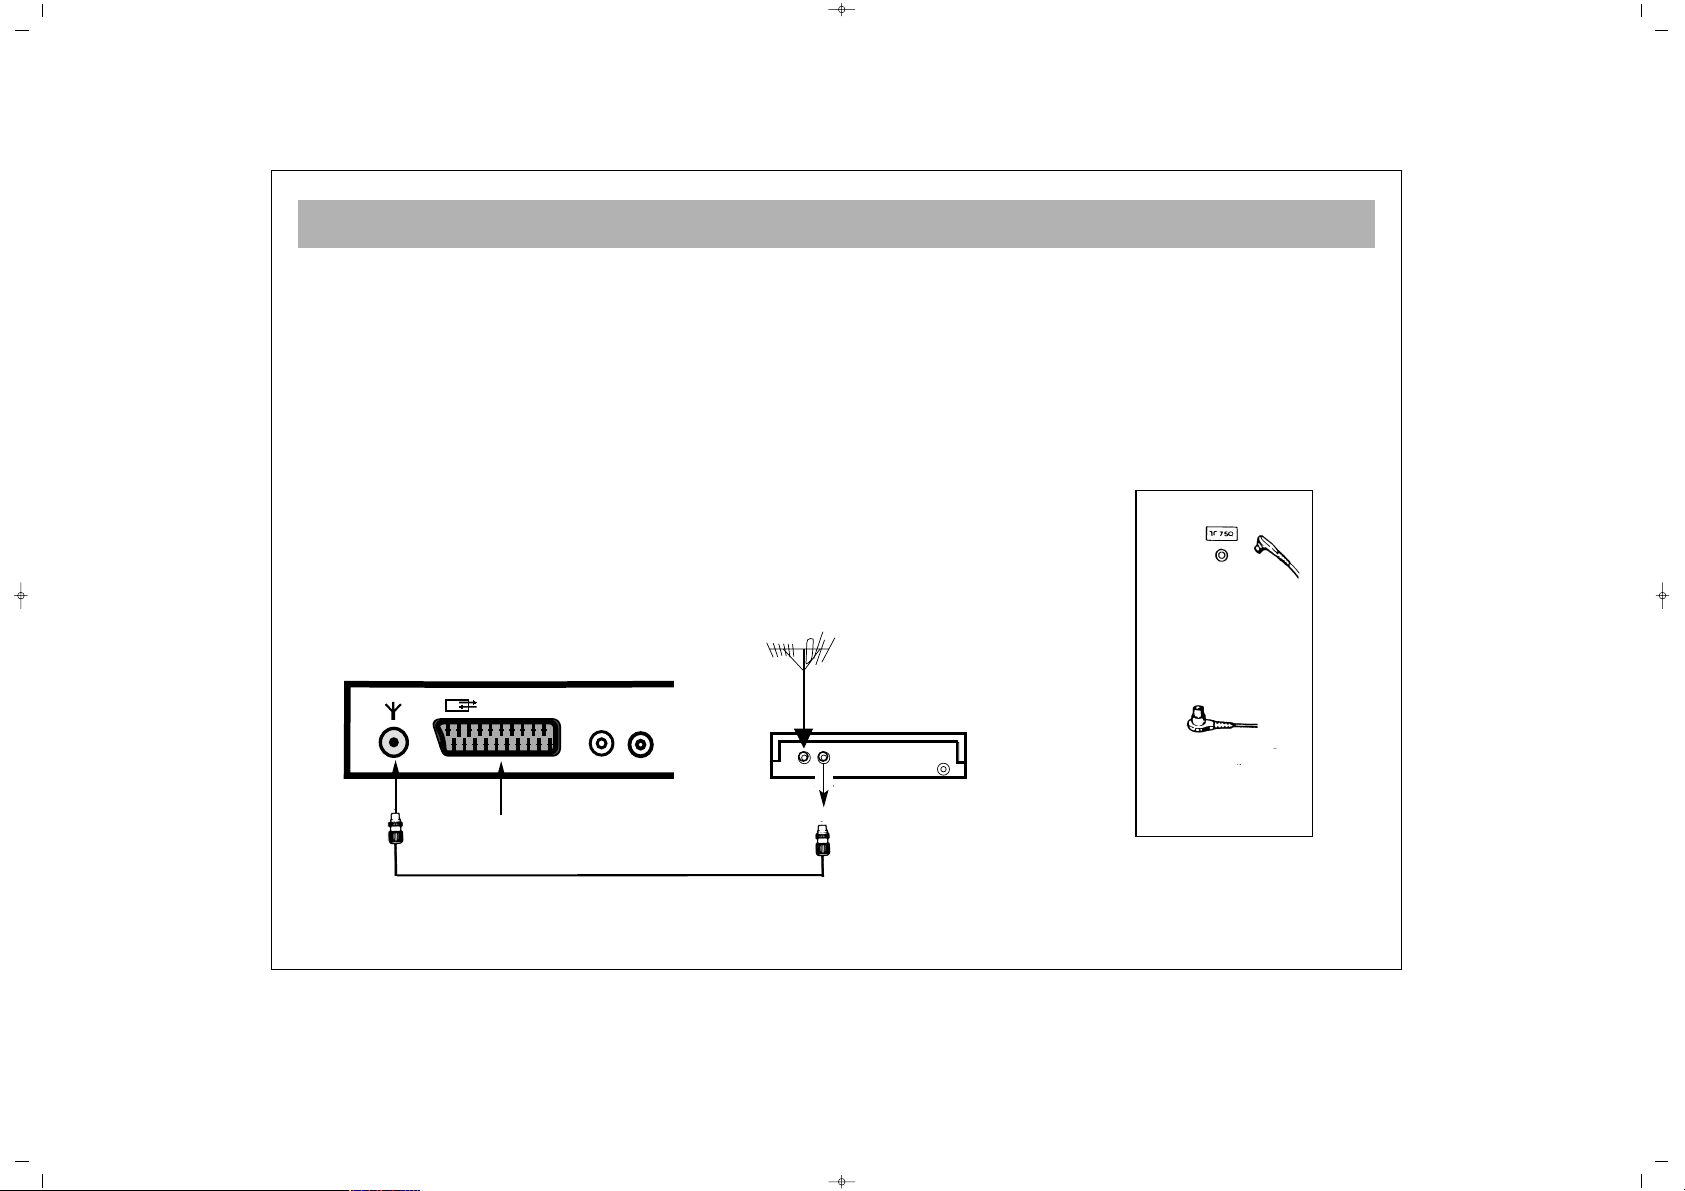
AERIAL CONNECTION
8
OOUUTTDDOOOORR AAEERRIIAALL CCOONNNNEECCTTIIOONN
Optimum good picture and colour reception requires a good outdoor aerial.
Using a coaxial cable (75 ohm Fig A-2) for a aerial, connect the plug (refer to Fig.
A-1) into the aerial input of the set.
Alternatively you may connect the aerial via a video recorder by using the video
recorder Rf Input and Rf Output connections as shown.
AERIAL Socket
(Fig.A-1)
Coaxial cable(75 ohm)
Fig. A-2
Back cover
AERIAL Connection with video recorder
RF input
RF output
Aerial input
Scart socket
065001057390 20" LCD LOCDVT ING 8/9/06 11:41 Page 8
EURO AV
AUDIO IN
RL

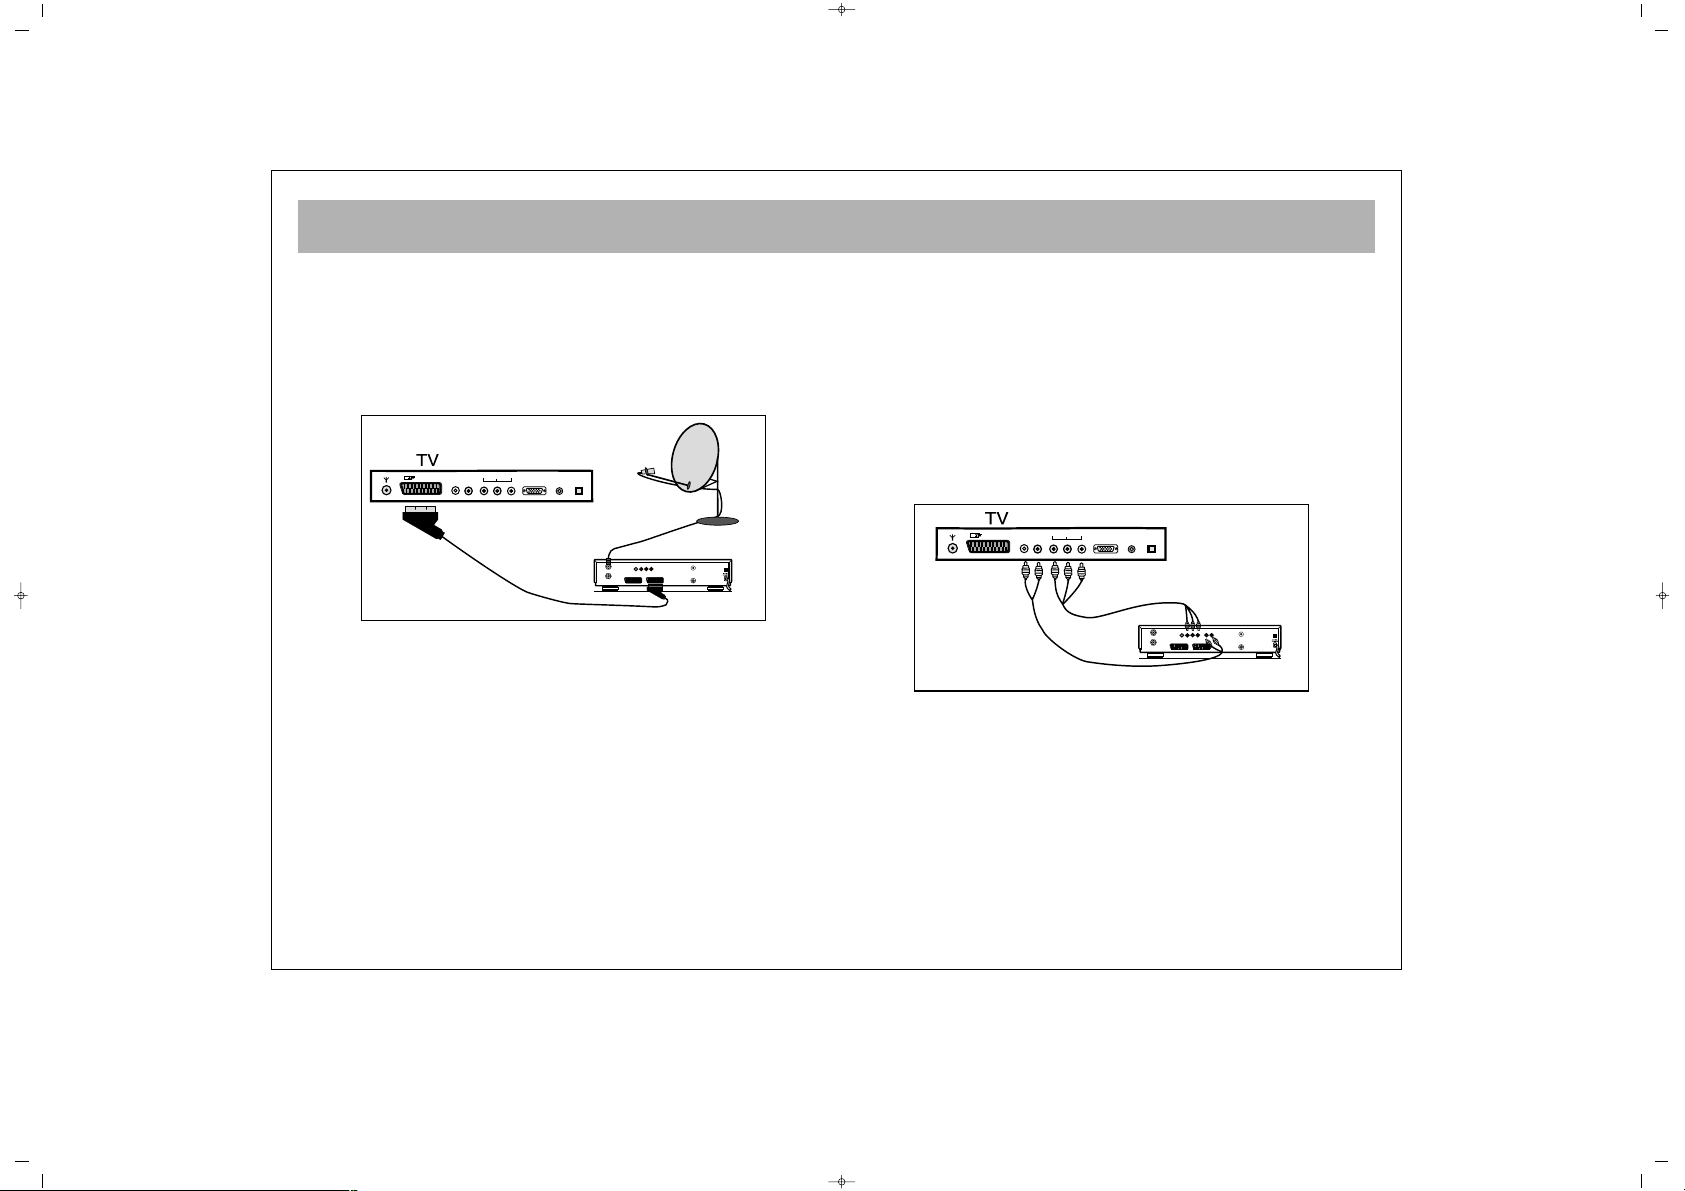
VCR, DVD, SATELLITE DECODER AND COMPUTER CONNECTIONS
9
EEUURROO--SSCCAARRTT SSOOCCKKEETT
A Video Cassette Recorder, DVD Player, Games Console or Satellite Decoder may be connected to the scart socket with an
appropriate connecting cable. Select programme mode AV to access the signal being received through the SCART Socket.
VVCCRR OOPPEERRAATTIIOONN BBYY UUSSIINNGG TTHHEE
RRFF OOUUTT
• Alternatively to connect a VCR to your
LCD TV using the RF sockets, connect
a coaxial cable from the RF Out socket
of the VCR to the aerial input socket of
your TV. Then connect the coaxial cable
from your TV aerial to the RF In socket
of the VCR.
• Select programme no. 0 on your LCD
TV.
• Insert a video tape into the VCR and
press the “play” key.
• Use the instructions under “Program
Settings” (See pages 23/24) to search
and store the VCR’s RF Output channel
in Channel 0 on your LCD TV.
NNoottee::
Not all VCRs necessarily have this
facility.
VVCCRR AANNDD DDVVDD PPLLAAYYEERR
OOPPEERRAATTIIOONN BBYY UUSSIINNGG TTHHEE
EEUURROO--SSCCAARRTT SSOOCCKKEETT
• Connect the SCART socket on your
VCR or DVD Player to the SCART
Socket on your LCD TV
• Select AV Channel on your LCD TV by
pressing the AV selection key on your
remote control handset.
• Press the PLAY key on your VCR or
DVD Player
• The advantage of this connection is a
superior quality of picture and sound
during play back.
PPCC CCOONNNNEECCTTIIOONN
You may use your LCD TV as a PC
monitor by connecting the VGA cable of
your PC into the LCD TV’s PC socket.
Supported PC resolutions:
VGA 640 x 480
AC230V~
50Hz/30W
AC230V~
50Hz/30W
To “RF IN”
Coaxial cable
From “RF OUT”
Aerial
To aerial socket
To “RF IN”
To “EURO SCART”(VCR)
To “EURO SCART”(TV)
065001057390 20" LCD LOCDVT ING 8/9/06 11:41 Page 9
EURO AV
AUDIO IN
RL
TV
Y
Pb Pr
RL
EURO AV
AUDIO IN
EURO AV
AUDIO IN
TV
RL
PC INPUT
IN
AUDIO IN
PC
DC 12V
PC
AUDIO/VIDEO CONNECTIONS
10
aa)) WWiitthh SSCCAARRTT CCoonnnneeccttoorr
• Connect the SCART socket on the receiver to the SCART socket
on your LCD TV using the appropriate SCART connecting cable.
• Select AV Channel on your LCD TV by pressing the AV
selection key on your remote control handset. Your LCD TV will
now display the signal from your Satellite or Cable Receiver.
bb)) CCoommppoonneenntt YYPPbbPPrr iinnppuutt::
• If your Video Source has a YPbPr component video output, you
can connect this to your LCD TV’s YPbPr input using 3-Way chinch
cable by refering connector colours. This method will carry the
image to your LCD TV.
• For audio connection use a 2-Way AV connecting lead to
connect left and right audio outputs to your LCD TV’s left and
right audio inputs.
• Select YPbPr Channel on your LCD TV by pressing AV
selection key on your Remote Control handset.
L
DC 12V
EURO AV
Y
PC INPUT
PC
AUDIO IN
RL
AUDIO IN
Pb Pr
IN
DECODER SCART TV SCART
OUT
SVSH V L R
TV
AERIAL
DISH
LNB
AUDIO OUT
RL
DC 12V
EURO AV
Y
PC INPUT
PC
AUDIO IN
RL
AUDIO IN
Pb Pr
IN
DECODER SCART TV SCART
OUT
SVSH V L R
TV
AERIAL
DISH
LNB
RECEIVER
065001057390 20" LCD LOCDVT ING 8/9/06 11:41 Page 10
TV FUNCTIONS
11
11.. OOPPEERRAATTIIOONN
aa.. SSwwiittcchhiinngg oonn tthhee TTVV
Plug the power cable of the TV set into the wall outlet.
* Your set works on 12V DC power. For this purpose, use the
adapter provided within your TV set.
bb..SSttaanndd--BByy MMooddee
While your TV is at stand-by mode, you can operate your TV
using one of the program selection buttons on the RC (0 to 9)
or the P± on the TV set
22.. SSWWIITTCCHHIINNGG OOFFFF
aa.. SSwwiittcchhiinngg OOFFFF tthhee TTVV
When you want to switch off the TV completely,
remove the power cable from the wall outlet.
bb.. SSttaannddbbyy MMooddee
To close your TV, for a start time, use stand by button
which is on the remote control or on TV.
NNoottee:: RRCC mmeeaannss RReemmoottee CCoonnttrroolllleerr
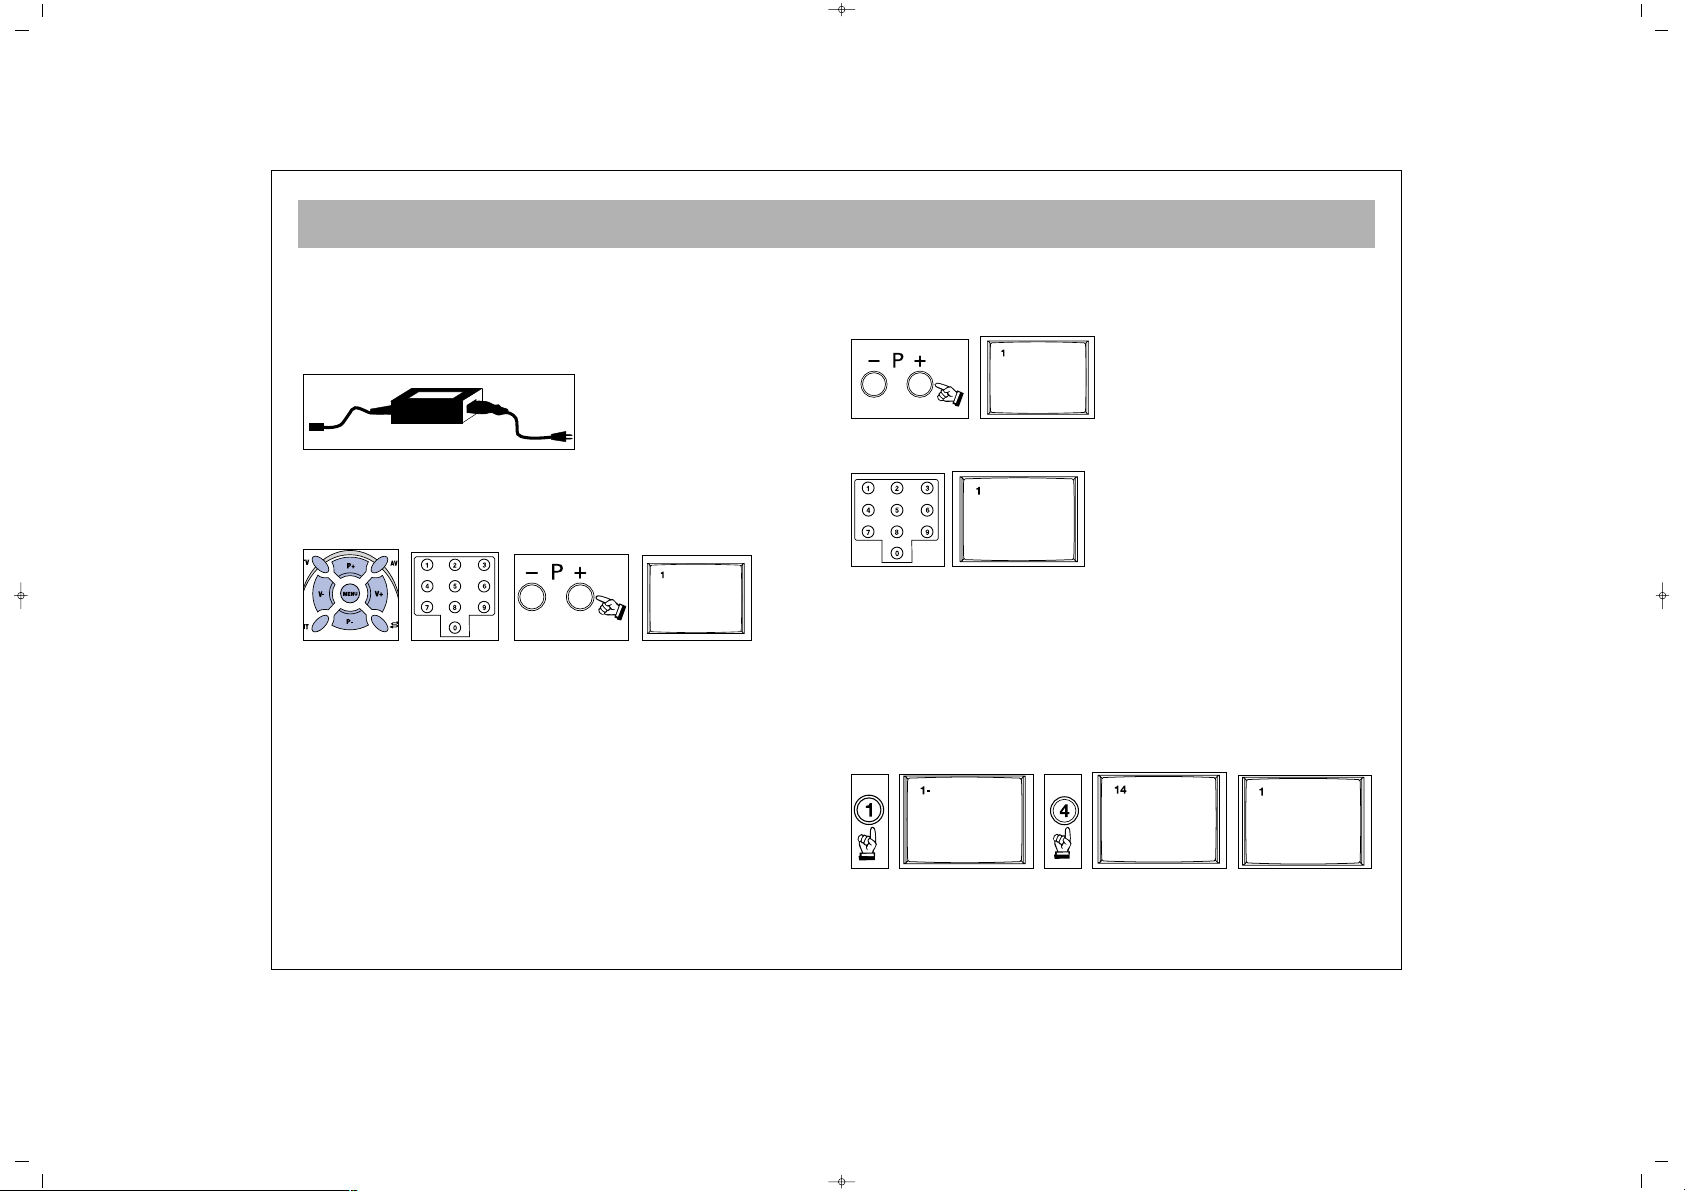
11.. PPRROOGGRRAAMM NNUUMMBBEERR SSEELLEECCTTIIOONN
* You can select the program you want by increasing
the program number pressing the P± button.
* Select the program no. 0 – 9 with the single number
keys (0-9) on the Remote control.
* To select a “double digit” number, simply press the
two required digits consecutively, within a short time.
EExxaammppllee::
To shift to the program No. 14, first press 1
button. In this case, the "1-" message appears on the left
corner of the screen. If you keep the button pressed,
you shift to the program No.1. As long as this message
appears on the screen (3 seconds) without pressing 4,
the TV shifts to the program No. 1
065001057390 20" LCD LOCDVT ING 8/9/06 11:41 Page 11
TV FUNCTIONS
12
22.. MMUUTTEE
In order to mute the sound immediately, press the Mute
button on the RC. Pressing this button again will allow
you to hear the sound before pressing Mute.
33.. SSTTAATTUUSS BBuuttttoonn::
( ) Shows the program number,
volume level and audio system info for 3 seconds on
the screen
44.. PPPP BBuuttttoonn::
With this button you can see which preset
picture value
has been adjusted to you TV.
55.. SSWWAAPP BBuuttttoonn::
Provides swapping to the previously
watched channel
66.. SSMMDD BBuuttttoonn::
MMoonnoo::
This button is not operative on TVs or mono
broadcastings
SStteerreeoo::
This button is used to select mono or DUAL
volume outputs in TV sets
77.. AAVV BBuuttttoonn::
In order to select the AV Mode, press the AV
button on the RC. To come back to the TV mode again,
enter the program number or press TV button. As long as
there is a menu on the screen, you cannot take your TV
set to AV mode. While on AV Mode, you cannot enter
into the Program Table menu. In the AV mode, you can
watch the external devices connected through the scart
(Video, DVD, VCD etc.). Each time you press the AV
button, the modes that you can connect to your device
are displayed.
88..AAUUTTOOMMAATTIICC SSHHUUTT OOFFFF..
If the Tv receives no signal for 5 minutes it will
automatically switch to Stand - By. This feature is not
enabled in AV mode.
99.. MMeennuu BBuuttttoonn::
When you press this button you can
reach the main menu. Pressing menu while navigating
the sub-menus will return you to the main / preceding
menu.
1100.. TTVV ((EEXXIITT)) BBuuttttoonn::
Provides exit from the menus
1111..1166::99 BBuuttttoonn::
This is used to change the screen
format from Normal, Auto, Compress, Expand.
1122.. AAUUTTOO ZZAAPP::
Pressing P± button for 3 to 4 seconds and
releasing will cause automatic channel search. On the
upper right corner "Auto Zap" appears.
1133..
RReedd BBuuttttoonn::
You can select the equalizer values by
using the red button. The "Personal" value stores the
adjustments which you can make on your apparatus.
1144..
GGrreeeenn BBuuttttoonn::
You can select the preset "Picture"
values by using the green button. The "Personal" value
stores the adjustments which you can make on your
apparatus.
065001057390 20" LCD LOCDVT ING 8/9/06 11:41 Page 12

SETUP
13
If you assemble your apparatus according to the
explanations from the preview pages "Automatic Search"
(Welcome) will appear on the screen. At this menu;
1- Use "P+/P-" button for "Country" option and choose the
country's abbreviation with "V+/V-" button.
2- Use "P+/P-" button for "Language" option and adjust
the menu language with "V+/V-" button.
3- Use "P+/P-" button for "Auto store" and initiate the
automatic search with the "V+" button. Please do not press
any button during automatic search. Your apparatus will
find the channels and record the memory automatically.
If "Welcome" menu does not appear you can search the
channels as below:
1- Press "Menu" button
2- Use "P+/P-" to highlight setting icon and enter the menu
with "V+" button.
3- Choose "Language" option with "P+/P-" button and
adjust you rdesired menu language with "V+/V-" button.
4- Use "P+/P-" button for "Country" option and choose the
country's abbreviation with "V+/V-" button.
5- Press "MENU" button to return to the main menu.
6- Use "P+/P-" button to highlight "Program Settings" and
enter the menu with "V+" button.
7- Use "P+/P-" button to highlight "Auto store" and start the
search with the "V+" button. Do not press any button
during the automatic search. Your apparatus will find the
channels and record the memory automatically.
Program nr. 2
Program name
System standard Europe
Autostore
Frequency 182.25 MHz
Fine tune
Source OSD Off
Language English
Country GB
Child lock
Timers
Teletext lang Pan European
Country GB
Language English
Autostore
065001057390 20" LCD LOCDVT ING 8/9/06 11:41 Page 13

SETUP
14
NNoottee::
It is unlikely, the channels will be stored in the
correct order. When changing the channels, the program
being received will be displayed below the channel
number in the top left hand corner.
Use P+,P-,V+,V- for changing the menu language and the
manual adjustments processes at Program adjustments
Menu.
Use P+,P-,V+,V- for changing the order of the program,
naming the program, deleting the program and skipping
process at Program table Menu. These processes had been
mentioned at further pages.
Leave this menu pressing “TV” button.
065001057390 20" LCD LOCDVT ING 8/9/06 11:41 Page 14

TV FUNCTIONS (MENUS)
15
MMaaiinn MMeennuu::
To access this menu, press menu button.
You can choose an option in the main menu using P±
buttons and activate the options pressing V± buttons.
11.. VVOOLLUUMMEE AADDJJUUSSTTMMEENNTT MMEENNUU
Highlight volume icon and press V+/- to access volume
adjustment menu. In this menu, volume settings are
selected using P± buttons and can be changed using
V± buttons.
VVoolluummee::
The TV set's volume can be adjusted
BBaallaannccee::
The balance between left and right channel
outputs is shown
BBaassss::
The user can adjust the bass level at this option
TTrreebbllee::
The user can adjust the treble at this option
Stereo models have AVL property. This is not shown on the
menus. This is for automatic volume limitation, i.e. it
keeps the volume level at the optimum level when shifting
from one channel to another. Because of this, the volume
comes after the display in case a channel is shifted.
EEqquuaalliizzeerr::
You can enter the Equalizer menu with the" V+" button
while you are in the Equalizer line. When you are in
this menu you can select (personal, voice, Music,
theatre) one of the equalizer adjustments with the "P+,
P-" buttons. For the personal equalizer settings P±, V±
buttons.
HHeeaaddpphhoonnee::
When a headphone is inserted, no volume comes from
the speakers. The volume is only through the
headphones. Using the volume menu, headphone can
be set. You can change the volume as
Mono/Stereo/Dual using the S/M/D button.
Personal
100 300 1k 3k 8k
Volume
Balance
Bass
Treble
Equalizer
065001057390 20" LCD LOCDVT ING 8/9/06 11:41 Page 15

TV FUNCTIONS (MENUS)
16
22.. PPIICCTTUURREE SSEETTTTIINNGGSS MMEENNUU
Using the MENU button, you can access to picture
settings menu. In the picture settings menu, you can
alter many parameters related to display. Brightness,
Contrast, Colour, Sharpness, Dyn. Skin tone and White
tone settings can be made according to your
requirements. Using the P± buttons on the RC, highlight
the option you want to set and change the setting value
or the option pressing the V± buttons.
The changes are automatically memorized.
If you press MENU button, you can access to former menu,
while you can leave all menus if you press TV button.
33.. PPRROOGGRRAAMM TTAABBLLEE ::
Using menu buttons, you can
access to program table.
The channel number and name in the program table
appear in different colors. You can access to other
channels using P± and V± buttons in the program table.
33..11..
Blue button is for naming. When pressing the blue
button in the current channel, a small box appears.
The character can be changed pressing P± buttons. You
can access to the following or previous characters using
V± buttons. When the naming is over, press the blue
button again to memorize.
33..22..
You can move by pressing the green button. Access
the channel you want to move pressing P± and V±.
Press green button to access move option. Use P+/- and
V+/- buttons to select channel to move to and press the
green button.
(The moved program is inserted between the others,
increasing the number of the following programs by
one)
1
2
3
4
5
6
7
8
9
10
11
12
Name
Move
Delete
Skip
Brightness
Contrast
Colour
Sharpness Normal
Dyn. skin tone Off
White tone Normal
065001057390 20" LCD LOCDVT ING 8/9/06 11:41 Page 16

TV FUNCTIONS (MENUS)
17
33..33..
Red button is for deletion. Access the channel you
want to delete pressing P± and V+ buttons and press
the red button. On the right side of the menu, the
channel number appears with a red button. Pressing
the red button once more will delete the channel. The
following channel will replace the deleted one.
33..44..
You can skip a channel when using P+/- to change
channels during regular use. The channel to be skipped
must be selected in the program table using P+/-. Then
press yellow.After you leave the program table; if you
use the buttons "P+, P-" for passing the channels, the
channels which you skip with these buttons cannot be
seen. You can access to that channel using numbers,
the number of the channel appears in a different colour
(blue). To cancel the skip function, you can press
yellow button on the channel, again in the prog. table.
44.. SSEETTTTIINNGGSS MMEENNUU::
In this menu;
44..11.. SSoouurrccee OOSSDD::
The source OSD option can be
adjusted as Open / Closed. It provides continuous
display of the current channel.
44..22.. LLaanngguuaaggee::
Using this option, you can change the
language in the menus.
44..33..CCoouunnttrryy::
Your apparatus finds the channel and
choose the system according to the determined country
during the automatic search. For this reason it is
essential to enter the right code of the country.
Please do not forget to choose the country's
abbreviation with "V+/V-" button. ( if you do not have a
country name choose another country which has the
same system).
44..44.. CChhiilldd LLoocckk::
In this menu "Lock and lock code"
appears. When the Lock function is on with by using
the V+ button, a password will be asked when the TV
Source OSD Off
Language English
Country GB
Child lock
Timers
Teletext lang Pan European
065001057390 20" LCD LOCDVT ING 8/9/06 11:41 Page 17

TV FUNCTIONS (MENUS)
18
set is switched on from the standby position and will
operate if the password is correctly entered. To change
the password, you can enter a 4 digit number in the
password line, between "0000" and "9999". Press menu
to exit. New code is automatically memorised.
NNoottee:: IIff yyoouu ffoorrggeett tthhee ppaasssswwoorrdd,, ttyyppee 44771111
This is the default password.
44..55.. TTiimmeerrss::
In this menu, Sleep timer, Reminder timer, OFF
timer, Switch timer and the Switch program are shown.
44..55..11.. SSlleeeepp TTiimmeerr::
You can adjust the Sleep timer
functions between 5 to 120 minutes with the V+/buttons.
NNoottee::
User may lock individual channels. Refer to lock
on Page 24.
When the time is over, Your TV will close
automatically.
The closing time can be increased or reduced with 5
minutes intervals. At the end of the adjusted period,
you will see the last 60 seconds count down on the
screen.
You can leave this menu pressing TV button.
44..55..22.. RReemmiinnddeerr TTiimmeerr::
You can adjust the recall period
between 5 to 120 minutes with the V+ button. At the
end of the set period, a warning message appears on
the screen. Pressing any button, this message will
disappear. Reminder time may be increased or
decreased by 5 minutes steps.
44..55..33.. OOFFFF TTiimmeerr::
You can set the switching off time.
NNoottee::
Check from the RT clock menu. if the time is
correct. Refer to 4.8 RT clock.
44..55..44.. SSwwiittcchh pprrooggrraamm::
After setting the switch time in
the switch option. Use P+- to highlight switch timer.
Use keypad to set switch time. The TV set switches to
the set program when the time comes. When your TV
set is in Stand by position, it is switched on at the
adjusted time to the selected program. When the switch
is to be set to AV mode, press the AV button in the
switch Program option. The other modes are displayed
in order.
Sleep timer Off
Reminder timer Off
Off timer - -:- Switch timer - -:- Switch program 5
Lock Off
Lock code 1111
065001057390 20" LCD LOCDVT ING 8/9/06 11:41 Page 18

TV FUNCTIONS (MENUS)
19
44..66.. TTeelleetteexxtt LLaanngguuaaggee::
You can set the teletext
language depending on the teletext received by your
TV set.
NNoottee::
For U.K. the setting is Pan European. This is the
default.
44..77.. TTeelleetteexxtt EE//WW::
This selects the characters peculiar to
Eastern Europe and Western Europe countries for
teletext
44..88.. RRTT CClloocckk::
The clock is adjusted as "24 hours, 12
hours or closed". In the lower line, the current time is
adjusted.
NNoottee::
RT clock menu may not appear in the initial.
Main menu list when menu is first pressed. P- must be
pressed to navigate down the menu and make RT clock
menu appear.
55.. PPRROOGGRRAAMM SSEETTTTIINNGGSS
In the program settings menu are the options "Prog.
No., Channel Name, System, Sound System, Auto
Prog., Frequency, Fine Tuning, AFC, Skip and Lock".
PPrrooggrraamm nnrr..::
Shows the number of the current channel.
The Prog. No. can be changed using V± and numbers.
PPrrooggrraamm nnaammee::
The name of the current channel
appears. Press V± to enter the channel name. You can
change the character using P± buttons. You can access
the following and previous characters using V±. When
the naming is over, you can leave from there using V±.
SSyysstteemm SSttaannddaarrtt::
You can choose the country!s system
standard with the "V+/V-". ( The European countries
except France ; can choose the "Europe" option)
AAuuttoo SSttoorree::
This provides automatic finding of the
programs. When the search begins, the message "Busy"
is displayed. When the transaction is over, the "Busy"
Program nr. 2
Program name
System standard Europe
Autostore
Frequency 182.25 MHz
Fine tune
Clock Off
Time 01:22
Country GB
Child Lock
Timers
Teletext lang. Pan European
Teletext E / W West
RT Clock
065001057390 20" LCD LOCDVT ING 8/9/06 11:41 Page 19

TV FUNCTIONS (MENUS)
20
message disappears. After the Auto store is over, it
displays until the found program numbers.
FFoorr eexxaammppllee::
If there are 50 programs in the Auto Store,
it hides after 50. When P+ is pressed in the 50th
program, it proceeds to PC instead of 51.
FFrreeqquueennccyy::
In the frequency option, the frequency of
the current channel is displayed. You can change the
frequency using V± or numerical buttons.
FFiinnee TTuunnee::
You can fine tune the channels pressing V±
AAFFCC::
This operates ON/OFF. When ON, Its follows or
corrects the possible small frequency distortions in the
channels.
LLoocckk::
This provides locking of the current channel.
When the locked channel is accessed, a password is
asked. If the password is entered correctly ( the password
which is entered at the option of child lock), the channel
appears. After entering the password, the channel
appears.
To remove child lock enter the locked channel and
access program settings (last icon in main menu). Use
P+/- to highlight lock and V+ to switch lock off.
SSttoorree::
You can save the adjustments.
NNoottee::
The Child Lock should be On in order for this
lock to be functional.
AFC On
Lock Off
Store
065001057390 20" LCD LOCDVT ING 8/9/06 11:41 Page 20

EXTERNAL DEVICE MODES
21
NNoott aallll mmeennuuss aappppeeaarr iinn tthhee eexxtteerrnnaall ddeevviiccee mmooddeess,, tthheessee
ccaann bbee ddiiffffeerreenntt ffrroomm TTVV mmeennuuss..
FFoorr eexxaammppllee::
YYPPbbPPrr mmooddee
In this mode, some of the menus are closed. Volume,
Picture and Settings menus are operative
There is no change in the
VVoolluummee MMeennuu
IInn tthhee PPiiccttuurree mmeennuu,,
the "dyn.skin tone" has been removed.
Info options have been added.
IInnffoo::
The information on the display resolution appears
The options related to text have been removed in the
settings menu.
PPCC mmooddee
Some of the menus have been closed in this menu. Sound,
Picture and Settings menus are preserved.
TToo tthhee SSoouunndd MMeennuu,,
the Audio option is added. When the
Audio is On, you can hear the sound of your computer
from the TV speakers. When it is off, you cannot hear
your computer's voice from your TVs speakers.
IInn tthhee PPiiccttuurree MMeennuu,,
"dyn.skin tone" option has been
removed. Position, Video noise, Auto adjust, Information,
Factory and Color temp options have been added.
PPoossiittiioonn::
Adjust horizontal and vertical position of the
picture.
VViiddeeoo NNooiissee::
In the video noise, there are "Phase and
Clock" options. Using these options, you can make the
display more clear.
AAuuttoo AAddjjuusstt::
Adjusts the picture clearness automatically
IInnffoo::
The information on the display resolution appears
FFaaccttoorryy::
Provides restoration of the picture settings to
factory settings.
CCoolloouurr tteemmpp::
Sets the picture heat. When USER is
selected, the message "White tone RGB" appears at the
lower part. The user can do the adjustments.
The text related options have been removed in the settings
menu.
065001057390 20" LCD LOCDVT ING 8/9/06 11:41 Page 21

TELETEXT
22
TTEELLEETTEEXXTT MMOODDEE
If the channel you are watching has a teletext
broadcasting, you can perform various transactions by
shifting to teletext mode using the below described
buttons:
11.. TTeelleetteexxtt
: Provides shifting to teletext
broadcasting in the current channel
22.. TTVV ::
Used for shifting to TV broadcasting while you
are in Teletext mode
33.. RReevveeaall // CCoonncceeaall ((RReessppoonnddiinngg))
: Provides
displaying or re-saving of some information hidden in
the teletext broadcasting while in teletext mode
44.. TTeelleetteexxtt TTiimmeerr ((CCaalllliinngg tthhee ssuubbppaaggeess))
: While in
TV mode, this mode displays the timer of your TV set
on the upper right corner of the screen. In the Teletext
mode, this is used for a direct access to the subpages of
the current page.
FFoorr EExxaammppllee::
You are in the teletext page No. 500. If the
message 1/9 appears. Pressing teletext timer button in
this case, the
SS -- -- -- --
marks will replace the teletext page
number. Using the number 0 to 9 on the RC, you can
access the subpage you would like to view. For instance,
if you want to access the second subpage, press the
numbers 0, 0, 0, 2.
.
11..
Teletext key
22..
TV key
33..
Reveal/Conceal
(answering) key
44..
Teletext timer (calling
sub pages) key
55..
Cancel (updating) key
66..
Size (page expanding)
key
77..
Mix (viewing TV and
Teletext information
together) key
88..
Hold (holding sub
page) key
99..
Index (main page) key
1100..
Colour (red, green,
yellow, blue) keys
065001057390 20" LCD LOCDVT ING 8/9/06 11:41 Page 22

TELETEXT
23
55.. CCaanncceell ((UUppddaattiinngg))
: While in teletext mode,
pressing this button will bring TV broadcasting, but
teletext is still active and if a new page number is
entered, page search will continue. When the required
page comes, a message for page number is displayed.
Pressing this button once more, the teletext page
66.. SSiizzee ((PPaaggee eexxppaannddiinngg))
: This button is used for
displaying the current teletext page in 3 different
formats. This converts the display in normal size, upper
half doubled or lower half doubled format
77.. MMiixx ((SSiimmuullttaanneeoouuss TTVV aanndd TTEELLEETTEEXXTT bbrrooaaddccaassttiinngg))
: This provides simultaneous broadcasting of the
current channel and the related teletext data. Pressing
the mix button again will shift the TV to normal teletext
mode.
88.. HHoolldd ((HHoollddiinngg ssuubb ppaaggee))
: If a teletext page has
subpages, such subpages are displayed from time to
time. In such a case, this button is pressed to hold that
page continuously on the screen. When the page is
held pressing "HOLD", the HOLD script appears on the
upper left corner of the screen. Pressing this button
again will release the page from the hold position.
99.. IInnddeexx ((HHoommee PPaaggee))
: This button provides
direct access to the teletext index page
1100)) CCoolloouurr KKeeyyss ((RREEDD//GGRREEEENN//YYEELLLLOOWW//BBLLUUEE))
You can scan the teletext information more easily using these
four colour text buttons.
EEXXAAMMPPLLEE::
TTVV GGUUIIDDEE SSPPOORRTTSS NNEEWWSS WWEEAATTHHEERR
The above given information are given for instance.
The color may change depending on the searched
page.
Press
RREEDD
button to
receive TV
information
Press
GGRREEEENN
key to receive
Sports
Information
Press
YYEELLLLOOWW
key
to receive the
news
Press
BBLLUUEE
key to receive
weather
forecast
065001057390 20" LCD LOCDVT ING 8/9/06 11:41 Page 23

DVD PLAYER
24
YOUR DVD PLAYER OFFERS EXCELLENT PICTURE AND SOUND QUALITY THANKS TO ITS DIGITAL AUDIO AND
DIGITAL VIDEO SYSTEMS.
AMONG ITS FEATURES ARE;
- LANGUAGE SELECTION ,
- SUBTITLE SELECTION ,
- ABILITY TO PLAY DVD,
- SLOW AND FAST MOTION DISPLAY IN VARIOUS SPEEDS,
- VIEWING FROM DIFFERENT CAMERA ANGLES (IF THIS FEATURE IS INCLUDED ON THE DISC)
065001057390 20" LCD LOCDVT ING 8/9/06 11:41 Page 24

REMOTE CONTROL (DVD FUNCTIONS)
25
11.. PPOOWWEERR bbuuttttoonn
For putting the unit on stand-by.
22.. EEJJEECCTT bbuuttttoonn
To open and close the CD tray.
33.. MMUUTTEE bbuuttttoonn
To turn off the sound completely
44.. ZZOOOOMM bbuuttttoonn
To enlarge the picture.
55.. RReevveerrssee SSLLOOWW bbuuttttoonnss
To slow reverse play the movie
66.. CCLLEEAARR bbuuttttoonn
To clear the entries done in the menus.
77.. SSEEAARRCCHH bbuuttttoonn
To jump to a desired position on CD.
88.. FFoorrwwaarrdd SSLLOOWW bbuuttttoonnss
To slow forward play the movie
99.. AA--BB bbuuttttoonn
To designate the interval that will be
repeated.
1100.. EEXXIITT bbuuttttoonn
To exit the DVD player menu.
1111.. MMEENNUU bbuuttttoonn
To display disk menus.
1122.. SSEETTUUPP bbuuttttoonn
To enter and exit the DVD set-up menus.
1133.. AARRRROOWW bbuuttttoonnss
To navigate up/down, left/right in menu.
1144.. SSUUBB bbuuttttoonn
To change subtitle language.
1155.. AAUUDDIIOO bbuuttttoonn
To change spoken language.
1166.. DDIISSPPLLAAYY bbuuttttoonn
To get information about the playing DVD.
1177..
No Function
1188.. NNuummbbeerr bbuuttttoonnss
To enter selections in menus.
1199.. SSKKIIPP bbuuttttoonnss
To skip to sections.
2200.. PPAAUUSSEE bbuuttttoonn
To pause.
2211.. SSTTOOPP bbuuttttoonn
To stop the disc playing.
2222.. PPLLAAYY bbuuttttoonn
To play the disc or re-start from pause.
2233.. FFAASSTT bbuuttttoonnss
To fast forward or fast reverse play the
movie.
2244.. EENNTTEERR bbuuttttoonn
To confirm choices in the menus.
2255.. DDVVDD // TTVV bbuuttttoonn
Switches between TV and DVD pictures.
065001057390 20" LCD LOCDVT ING 8/9/06 11:41 Page 25

PLAYING DVD’s
26
11..
Press the “DVD/TV” button on the remote handset to
switch your TV to DVD mode. The DVD logo should appear.
22..
To open the tray, press “EJECT”.
33..
Place the Side of DVD which data is processed.
44..
Press “PLAY” to close the tray and start the playback of the
disc.
55..
Depending on the type of DVD entered, a disc menu may
be displayed first. You can navigate through this menu by
using the “ARROW” and “ENTER” buttons. There is usually a
menu item for playing the movie.
66..
You can pause the playback of the movie by pressing the
“PAUSE” button. To restart playback press the “PLAY” button.
77..
You can stop the movie by pressing the “STOP” button. If
“PLAY” is then pressed, the movie will start from where it was
last stopped. To stop the playback completely so it wont start
again from where it was stopped, the “STOP” button must be
pressed twice.
SSKKIIPP::
You can skip chapters either forwards or
backwards by using the SKIP buttons.
FFAASSTT::
You can watch the film in five levels of
fast motion in either direction by using the
“FAST” buttons.
** PPllaaccee tthhee SSiiddee ooff DDVVDD wwhhiicchh ddaattaa iiss pprroocceesssseedd..
065001057390 20" LCD LOCDVT ING 8/9/06 11:41 Page 26

DVD SETTINGS
27
DDVVDD SSEETTUUPP
You can access to the setup menu pressing the SETUP
button. You can surf in the menus pressing DVD OK buttons
and confirm the setting by pressing ENTER. Pressing SETUP
button again, you will leave the Settings menu.
SSYYSSTTEEMM SSEETTTTIINNGGSS
TTVV SSYYSSTTEEMM::
The video format can be selected from here.
The choices are PAL, NTSC or AUTO.
TTVV TTYYPPEE::
"Selecting (4:3 format) 16:9 format in your TV set,
the picture entirely covers the screen but you cannot see the
entire picture on the screen.
For a film shoot in 16:9 format
* When you choose one of the formats of 4:3 (4:3 format),
you can watch the entire picture with a black band on the
upper and lower parts.
** Selecting (4:3 format) 16:9 format in your TV set, the
picture entirely covers the screen but you cannot see the
entire picture on the screen
PPAASSSSWWOORRDD::
For the DVD contents level (Parental Lock)
restriction, you should assign a 4 digit numerical password.
Factory default password is "8357". While the lock is off, no
change could be made in the "Parental Lock" function.
SYSTEM SETUP
– – – –
TV SYSTEM
TV TYPE
PASSWORD
RATING
DIVX [R] VOD
RESUME
DEFAULT
SYSTEM SETUP
4:3PS
4:3LB
16:9
TV SYSTEM
TV TYPE
PASSWORD
RATING
DIVX [R] VOD
RESUME
DEFAULT
SYSTEM SETUP
TV SYSTEM NTSC
TV TYPE PAL
PASSWORD AUTO
RATING
DIVX [R] VOD
RESUME
DEFAULT
065001057390 20" LCD LOCDVT ING 8/9/06 11:41 Page 27

DVD SETTINGS
28
RRAATTIINNGG::
Playing DVDs can be restricted depending on the
age of users. Parental lock functions provides the parents
with the opportunity to assign a disc playing limit. The films
at or below the selected level can be played. While doing
this selection, the "password" should be open. After making
the change, re-enter the numerical password in the
"password" line again and close the password in order to
prevent other users' altering the password.
DDIIVVXX [[RR]] RReeggiissttrraattiioonn::
Please use the Registration code to
register this player with the DivX (R)
Video On Demand format. To learn more go to
www.divx.com/vod
RREESSUUMMEE
When you close and restart the played film, this
function provides beginning from the stopped part.
DDEEFFAAUULLTT
If you confirm the OK option at this function by
pressing ENTER, the set returns to factory set values.
SYSTEM SETUP
RESTORE
TV SYSTEM
TV TYPE
PASSWORD
RATING
DIVX [R] VOD
RESUME
DEFAULT
SYSTEM SETUP
OFF
ON
TV SYSTEM
TV TYPE
PASSWORD
RATING
DIVX [R] VOD
RESUME
DEFAULT
SYSTEM SETUP
REGISTER CODE
Z27UCXUA
TV SYSTEM
TV TYPE
PASSWORD
RATING
DIVX [R] VOD
RESUME
DEFAULT
SYSTEM SETUP
1 G
2
3 PG
4 PG 13
5
6 R
7 NC-17
8
TV SYSTEM
TV TYPE
PASSWORD
RATING
DIVX [R] VOD
RESUME
DEFAULT
065001057390 20" LCD LOCDVT ING 8/9/06 11:41 Page 28

DVD SETTINGS
29
LLAANNGGUUAAGGEE SSEETTTTIINNGGSS
OOSSDD LLAANNGGUUAAGGEE::
You can change the menu language of
your set.
AAUUDDIIOO LLaanngguuaaggee::
You can select the language of the DVD
films played on your set.
SSuubbttiittllee LLaanngguuaaggee::
You can select the subtitle language of the
DVD films
MMeennuu LLaanngguuaaggee::
You can select the menu language of the
DVD films played on your set.
((TThhiiss iiss aavvaaiillaabbllee iiff ssoouunndd,, ssuubbttiittllee aanndd mmeennuu llaanngguuaaggee
ooppttiioonnss aarree aavvaaiillaabbllee oonn tthhee ddiisskk))
LANGUAGE SETUP
OSD LANGUAGE
AUDIO LANG
SUBTITLE LANG
MENU LANG
ENGLISH
GERMAN
SPANISH
FRENCH
ITALIAN
TURKISH
DUTCH
LANGUAGE SETUP
OSD LANGUAGE
AUDIO LANG
SUBTITLE LANG
MENU LANG
ENGLISH
GERMAN
SPANISH
FRENCH
ITALIAN
TURKISH
DUTCH
OFF
LANGUAGE SETUP
ENGLISH
GERMAN
SPANISH
FRENCH
ITALIAN
TURKISH
DUTCH
OSD LANGUAGE
AUDIO LANG
SUBTITLE LANG
MENU LANG
LANGUAGE SETUP
ENGLISH
GERMAN
SPANISH
FRENCH
ITALIAN
TURKISH
DUTCH
OSD LANGUAGE
AUDIO LANG
SUBTITLE LANG
MENU LANG
065001057390 20" LCD LOCDVT ING 8/9/06 11:41 Page 29

DVD SETTINGS
30
SSOOUUNNDD SSEETTTTIINNGGSS
DDOOWWNNMMIIXX::
At this point there are some settings you should
do when you connect the analog DVD audio outlets of your
set to an equipment:
AUDIO SETUP
LT/RT
STEREO
VSS
DOWNMIX
AUDIO OUT
065001057390 20" LCD LOCDVT ING 8/9/06 11:41 Page 30

BASIC FUNCTIONS
31
ZZOOOOMM MMOODDEE::
You can enlarge the display on the screen by pressing the Zoom
button on the remote handset. The zoom feature has six levels
(2x, 3x, 4x (zooming in). Not all zoom modes are possible on
all discs. If the zoom mode is not applicable to the disc then the
particular zoom option will be skipped and return you to
normal viewing. During zoom mode you can pan around the
screen using the arrow buttons.
DDIISSPPLLAAYY::
By pressing “DISPLAY” you can change what time
is displayed. The choices are TITLE, TITLE REMAIN,
CHAPTER ELAPSED, CHAPTER REMAIN.
SSUUBBTTIITTLLEE..
Pressing the “SUBTITLE” button changes the
language of the subtitles. Every subsequent press of this
subtitle button will change the language until there are no
more languages to display. After this point is reached, the
subtitles will be turned OFF.
AAUUDDIIOO::
pressing the AUDIO button will change the current
audio language. This feature is dependant on the audio
language tracks that are recorded on the disc.
MMUUTTEE::
With this button you can instantly turn off the sound
from the TV/DVD. To restore the sound, press the “MUTE”
button once again.
DDIISSCC MMEENNUU::
The “MENU” button on the remote handset
will enable you to access the Disc Menu. Usually in this
menu you can access information regarding movie sections,
directors, production stories etc. Sometimes there is no exit
that can be found to leave the menu. If this is the case then
you can press the EXIT button.
065001057390 20" LCD LOCDVT ING 8/9/06 11:41 Page 31

BASIC FUNCTIONS
32
SSEEAARRCCHH MMEENNUU::
When the “SEARCH” button is pressed, the playing movie is
displayed ‘picture in picture’ style in the top half of the
screen while the bottom half displays data from the Disc. Use
the UP and DOWN arrow keys to select the criteria you wish
to search by and press “ENTER” to be able to change the
value (e.g. selecting a different chapter).
TTIITTLLEE::
The requested title can be selected directly.
CCHHAAPPTTEERR::
The requested chapter can be selected directly.
AAUUDDIIOO::
The audio type can be selected (dependant on disc).
AANNGGLLEE::
Different angles can be selected if recorded on the disc.
TTTT TTiimmee::
The requested title time can be entered directly.
CCHH TTIIMMEE::
The requested chapter time can be entered directly.
RREEPPEEAATT::
Chapter, Title or All Disc repeat can be selected
from here.
TTIIMMEE DDIISSPP::
The time display format can be changed from here.
FFOORR YYOOUURR KKNNOOWWLLEEDDGGEE::
In certain situations, the DVD player is unable to carry out
specific instructions. If you issue a command to the DVD
player and it is unable to carry out that function, a
““ØØ””
icon
will be displayed on the screen.
Play control keys (Play, Stop, Skip, Pause etc) will not
function while in the DVD Player Set Menu. This menu must
be exited before these buttons will become active again.
Dolby Digital AC-3 is the latest audio compression system that
has been developed by Dolby Laboratories. Your DVD player
has a special decoder to decode this signal. If you connect an
appropriate AC-3 decoding amplifier (as described on page
24) then you will get full 6channel cinema quality audio.
PCM is an acronym for Pulse Code Modulation. It is one of the
audio technologies within this DVD player along with AC-3.
This player is a Region “2i” player only. If any DVD’s from
any other regions (2) are tried, “INVALID AREA” will be
displayed on the screen. Please ensure that you play only
region “2” DVD’s.
Menu
Title 01/07
Chapter 04/28
Audio 5.1CH English
Subtitle Off
Title:01 Chapter: 03 0:13:19
065001057390 20" LCD LOCDVT ING 8/9/06 11:41 Page 32

BASIC FUNCTIONS
33
PPllaayyiinngg aann aauuddiioo CCDD
With the Disc tray OPEN, place a music CD onto the tray
with the label facing uppermost.
Press EJECT to close the tray. There will be a short delay
while the DVD Player identifies the disc. PLAY will appear
briefly on the screen and the CD will automatically begin
playing from the first track.The current track number and the
number of tracks will be displayed on the screen.
While the DVD Player is playing a music CD there are
several functions you can use.
•• PPLLAAYY
Press this button to start play.
•• SSTTOOPP
Press this button to stop play. To start the disc
play from the beginning, press PLAY.
•• PPAAUUSSEE
This function stops play, to start play again
press the PAUSE button again or PLAY.
•• FFAASSTT FFOORRWWAARRDD AANNDD BBAACCKKWWAARRDD
Press these buttons to search forward or backwards. There
are four speeds and each press of the button increases the
speed as shown by the number next to the icon on the
screen. This function is useful when you are searching a
small area of play. Press PLAY to resume normal playback.
•• SSKKIIPP FFOORRWWAARRDD AANNDD BBAACCKKWWAARRDD
Press these buttons to skip to the start of the next track or the
start of the previous track.
•• MMUUTTEE
Press the MUTE button to silence the play, press
again to restore the sound.
•• NNUUMMBBEERR
The number buttons on the remote control panel allow you
to select a track directly. Input the track number and press
PLAY to start play.
•• DDIISSPPLLAAYY
Press DISPLAY on the Remote Control repeatedly during play
to show the remaining and elapsed single and total time
information on the current CD.
PPllaayyiinngg aa MMPP33 ddiisscc
Once the MP3 disc is inserted there will be a short delay
while the DVD Player identifies the disc.
A disc menu containing all the folders on the disc will be
displayed on the screen. Press the PM button to change
between play list, folder and file list views. File list displays
all the files on the disc without the folder divisions.
Use the DVD arrow keys to navigate between tracks and
press the ENTER button to begin playback.
FFAASSTT::
You can search through an MP3 track
with the speed search buttons in either
direction. Each subsequent press will change
the speed at which the track is searched. The
choices are 2x, 4x, 8x, 16x and 32x. To return
to normal speed playback, press the “ENTER”button
065001057390 20" LCD LOCDVT ING 8/9/06 11:41 Page 33

VCD, CD, MP3 CD / PICTURE PLAYBACK
34
DDVVDD UUSSIINNGG VVCCDD
You can apply the DVD operation process to VCD, too.
Some of the menus can not be accessed, some buttons of the
remote control will be deactivated, because VCD does not
contain all the functions that DVD has.
UUSSIINNGG AAUUDDIIOO CCDD::
During using audio CD some of the
buttons will be inactive. Placing and playing CD is as other
CDs'. To take out CD tray press [ ], to initiate playing
press PLAY [ ], to pause press PAUSE [ ], to stop press
STOP [ ], to skip press SKIP [ ]. Usage of menu
functions are some as the other CDs.
UUSSIINNGG MMPP33 CCDD::
While using MP3 Disc, MP3 file list will be
displayed on your TV screen. To take out CD tray press
[ ], to initiate playing press PLAY [ ], to pause press
PAUSE [ ], to stop press STOP [ ], to skip press SKIP
[ ]. You can select desired MP3 track directly by using
numerical buttons (0-9). Usage of menu functions are some
as the other CDs.
JJPPEEGG FFiilleess
The JPEG format (developed by the Joint Photographic Experts
Group) is currently the most popular format for compressing and
saving image files. It uses high efficiency compression data to
compress images up to 15 - 20 times. The JPEG format is
supported by most current image processing software and is
suitable for photo image storage.
WWAARRNNIINNGG::
For protection, your player could be blocked if you attempt
to play a disc which is damaged or scratched.
In this case you should switch off the player and switch on it
again.
NNoottee::
When you don’t activate any function for a while when your
set is in DVD mode, screen saver activates.
After pressing any button DVD Logo appears on the screen
again. This process is also in use for Audio CD and MP3 CD
playing.
065001057390 20" LCD LOCDVT ING 8/9/06 11:41 Page 34

DIVX PLAYBACK
35
DDIIVVXX PPLLAAYYBBAACCKK
When your apparatus loads the DIVXCD, folder menu will be on
the screen. You can start your desired film by using DVD
navigation buttons and later on by pressing the “ENTER” button.
The usage of the buttons which are ont he remote control is same
as the usage of DVD. Meanwile the bottons which does not
support disk concept will not work on the remote control. Some
functions will work as above:
SSEEAARRCCHH::
If there is more than one film on the disc, you can
make the selection of the film by using the “Search” button. Press
“Search” button and enter the number of the film that you prefer
to watch on yhe line which displays ont he screen. Afterwards
use ‘Enter” button for confirmation. The choosen film will begin.
Your apparatus supports the formats of DivX, Xvid and subtitle
formats which are mentioned below
Please prefer to buy discs which are compatible with these
formats.
065001057390 20" LCD LOCDVT ING 8/9/06 11:41 Page 35

TROUBLESHOOTING GUIDE
36
If there is a problem with the picture or the sound, you can fix them by first comparing with the “failure symptom” and then executing the
“check and adjustment” suggestions. If the problem cannot be fixed, you must contact the
aauutthhoorriizzeedd sseerrvviiccee..
SSyymmppttoomm
No power. Led not lit
No picture “screen
black” led lit.
No picture, screen lit,
noisy picture
Weak “Ghosting” picture
No picture on AV
No Colour
Poor, noisy colour.
Scrambled Teletext
PPoossssiibbllee FFaauulltt
No power to the Tv
Tv not switched On
Set in standby.
Brightness turned down.
Tv switched to AV
Set not tuned in
Aerial not connected.
Poor signal
AV source not connected or
turned on.
Colour control not set
Set may need fine tuning.
Poor Signal.
RReemmeeddyy
Check all connections ensuring the connector to the mains
socket is firmly engaged
Turn Tv on with On/Off button
Press P+ or P- buttons or numeric button on the R/C
Adjust brightness
Select “TV” or press a numeric button on R/C.
do fine tuning
Connect aerial and check connections
If using an indoor aerial have an external aerial fitted.
External aerial damaged.
Check AV leads to Euro socket and ensure AV source is
turned on.
Adjust colour control using the RC
Do fine tuning for a more clear picture
Teletext needs a good signal. Have the aerial checked.
065001057390 20" LCD LOCDVT ING 8/9/06 11:41 Page 36

TROUBLESHOOTING (continued)
37
DVD player does not The presence of moisture or condensation can affect the laser focusing of the DVD Player. If there is
play disc. any possibility of condensation (eg if the set has been moved from a cold to a warm environment) then
the TV must be left in Standby mode for 1-2 hours to allow condensation to evaporate.
Parts of the picture or the
whole picture freezes up. Ensure that there is no damage to the disc you are trying to play.
The disc may be dirty. Clean the disc. Never clean the disc in a radial motion. This will create thin
scratches that run along the data paths greatly increasing the likelihood of damage to the disc. Always
clean from the inside out using a soft lint free cloth.
Ensure that you have inserted the disc with the label side uppermost.
The optical pick-up assembly may be dirty. Specialist lens cleaners are available for DVD lenses.
Manual lens cleaning should only be carried out by qualified personnel, never attempt this yourself.
The DVD Player will only play discs with regionality coding "2". Imported discs with a coding other than "2"
will not play in this machine. This is not a fault.
The remote handset Replace the batteries. Depleted batteries will shorten the range of the remote and are more likely to
does not operate – leak.
Ensure there is nothing blocking the path between the remote and the remote sensor (e.g. DVD drawer,
coffee table etc.).
The remote control sensor may act strangely if placed in strong light. Try to position the TV away from
strong sources of light (e.g. a window)
Erratic Operation – DVD players are extremely sensitive to electromagnetic radiation (such as that caused by other
electronic equipment, ignitions, microwave ovens etc.). If your player locks up, turn off the power at
the mains and re-connect after 10 seconds. This should re-boot the DVD player’s software and normal
operation should return.
If this happens regularly, try and find the source of the electromagnetic radiation and move it away
from the TV/DVD player.
I’m Lost – The DVD player settings can be returned to their original factory default settings. This should clear any
settings that have been made and proper operation should return. See "DVD Settings" - "Defaults".
065001057390 20" LCD LOCDVT ING 8/9/06 11:41 Page 37

TECHNICAL SPECIFICATIONS
38
Screen Size
2200””
Standard Size 51 cm
Power Consumption 55
Operating Voltage AC 230V ~50Hz ( by adapter 12V DC)
TV System MULTI SYSTEM / NTSC PLAYBACK
Band VHF 1 Band 2 - 4
VHF III Band 5 - 12
UHF Band 21-69
S Band S1-S41
Aerial Input 75 ohm
Program Capacity 100 + AV
Picture Panel TFT LCD Panel 640 x 480 resolution
Sound Output rms 2 x 2 W
065001057390 20" LCD LOCDVT ING 8/9/06 11:41 Page 38

065001057390 20" LCD LOCDVT ING 8/9/06 11:41 Page 39
 Loading...