

Page 1
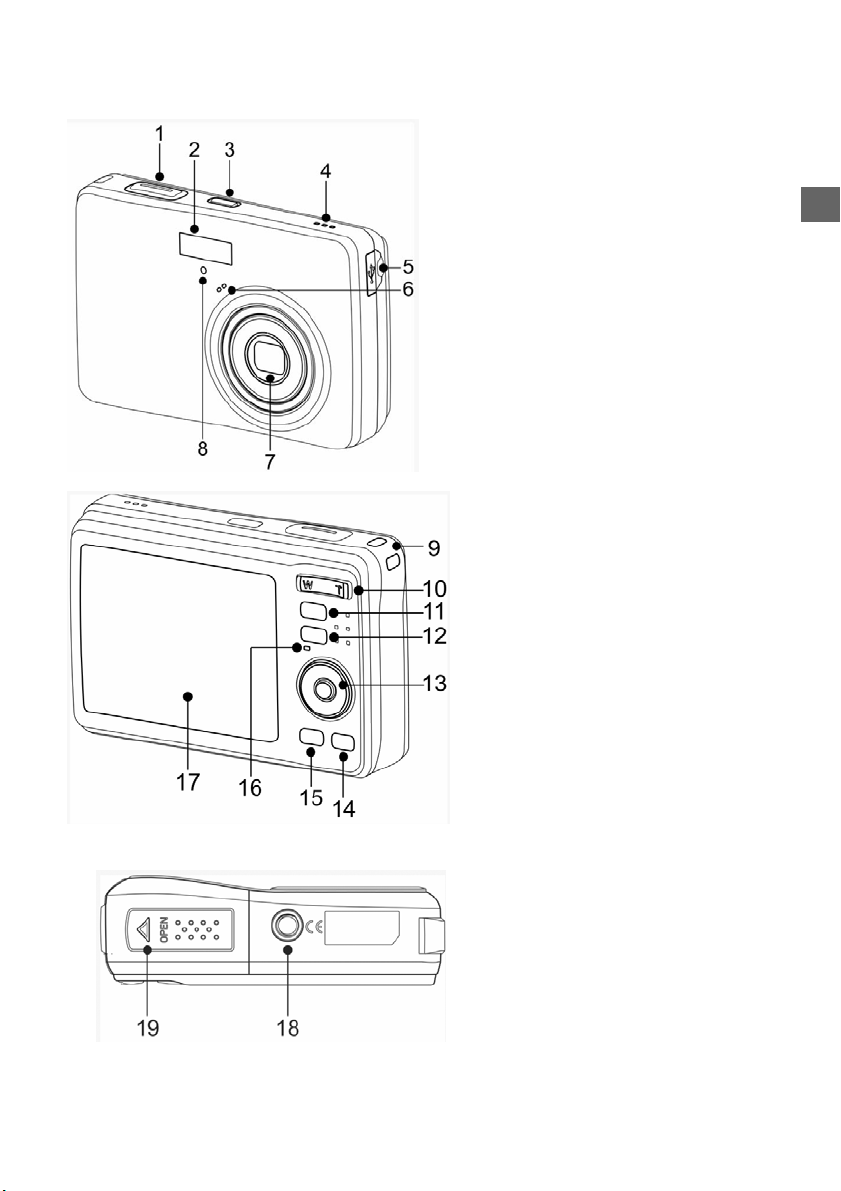
1. Auslöser
2. Blitz
3. Netztaste
4. Lautsprecher
5. USB-Port /Video-Ausgang
6. Mikrofon
7. Objektiv
8. Selbstauslöserleuchte
9. LCD-Anzeige
10. Betriebsleuchte
11. Zoom Taste
12. Schlaufe
13. Wiedergabemodus-Taste
14. MENÜ-Taste
15. 5-Funkionstasten
y Blitz
y Makro –Taste
y SET/DISP-Taste
16. Kameramodus-Taste
17. Löschen
DE
18. Stativanschluss
19. Batteriedeckel und
Speicherkartenfach
y Der Speicherkarteneinschub
befindet sich unter der
Batteriefachabdeckung neben
dem Batteriefach
.
1
Page 2
DE
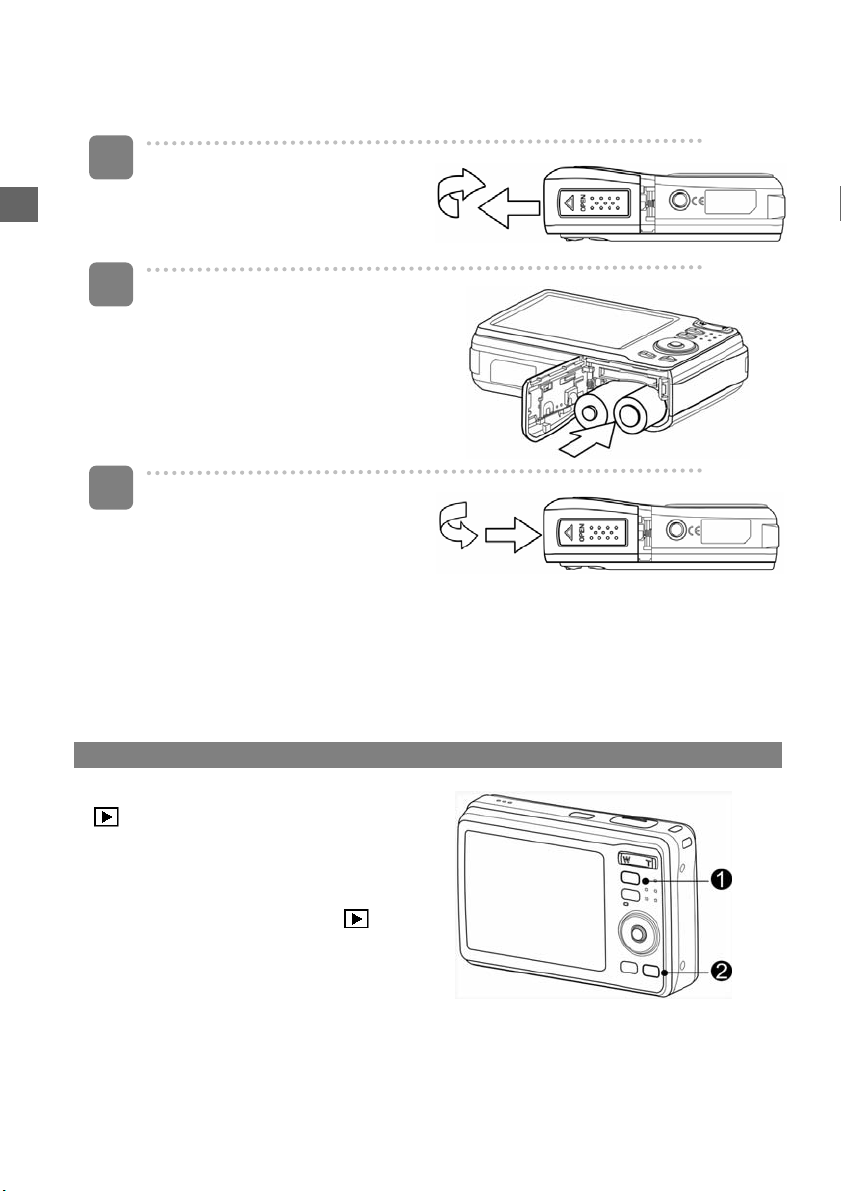
Einlegen der Batterien
1
Öffnen Sie die
Batteriefachabdeckung.
y Schieben Sie den
Batteriefachdeckel in Pfeilrichtung.
2
Legen Sie die Batterien ein.
y Legen Sie zwei AA-Alkalibatterien
mit den positiven (+) und negativen
(-) Polen jeweils wie im Batteriefach
angezeigt ein.
3
Schließen Sie die
Batteriefachabdeckung
Modus ändern
Im Aufnahmemodus können Sie Bilder und Sprache aufnehmen.Im Wiedergabemodus
können Sie die aufgenommenen Daten wiedergeben, löschen und bearbeiten. Sie
Zwischen Aufnahmemodus und Wiedergabemodus umschalten
Im Aufnahmemodus drücken Sie die Taste
(n) , um in den Wiedergabemodus
umzuschalten.
Im Wiedergabemodus drücken Sie die
Taste MODE (o) oder die Taste
um in den zuvor verwendeten
Aufnahmemodus umzuschalten.
(n),
2
Page 3
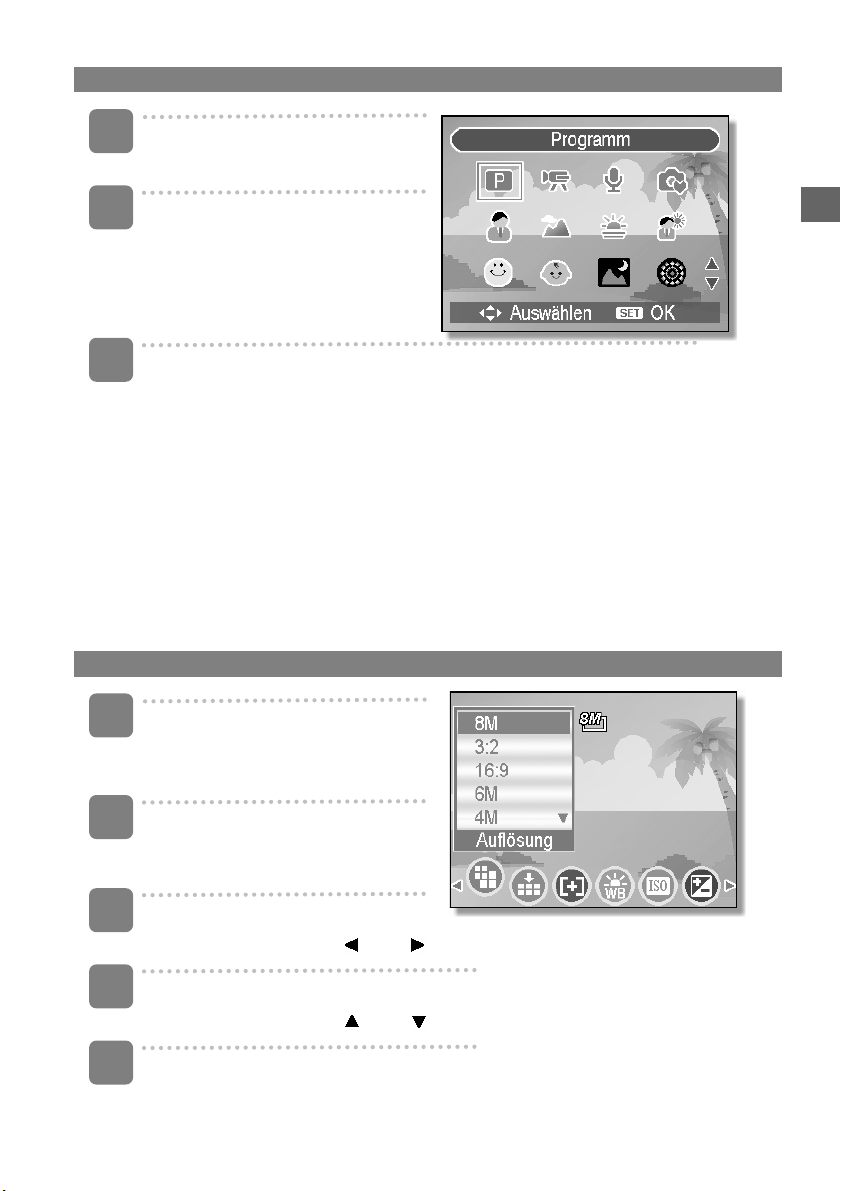
Aufnahmemodus wählen
1
Stellen Sie die Kamera in den
Aufnahmemodus.
2
Zeigen Sie die Modusauswahl an.
y Drücken Sie die Taste MODE
(o) , um den
Motivmodusbildschirm
aufzurufen.
3
Aufnahmemodus wählen.
y Verwenden Sie die Pfeiltasten, um einen gewünschten Motivmodus
auszuwählen und drücken Sie die Taste SET, um die Einstellung zu bestätigen.
Verwendung der Menüs
Wenn ein Menü angezeigt wird, nehmen Sie die gewünschten Einstellungen mit der
Vierwegschalter und der SET-Taste vor.
Aufnahmemenü
1
Schalten Sie die Kamera ein und
rufen Sie den Aufnahmemodus
auf.
DE
2
Öffnen Sie das Aufnahmemenü.
y Drücken Sie die Taste MENU,
um das Menü aufzurufen.
3
Wählen Sie ein Element.
y Drücken Sie die Taste
4
Ändern Sie die Einstellung.
y Drücken Sie die Taste
5
Drücken Sie die Taste MENU oder SET, um die Einstellung zu speichern und
das Menü zu schließen.
oder , um einen Menüpunkt auszuwählen.
oder , um eine Einstellung zu ändern.
3
Page 4
DE
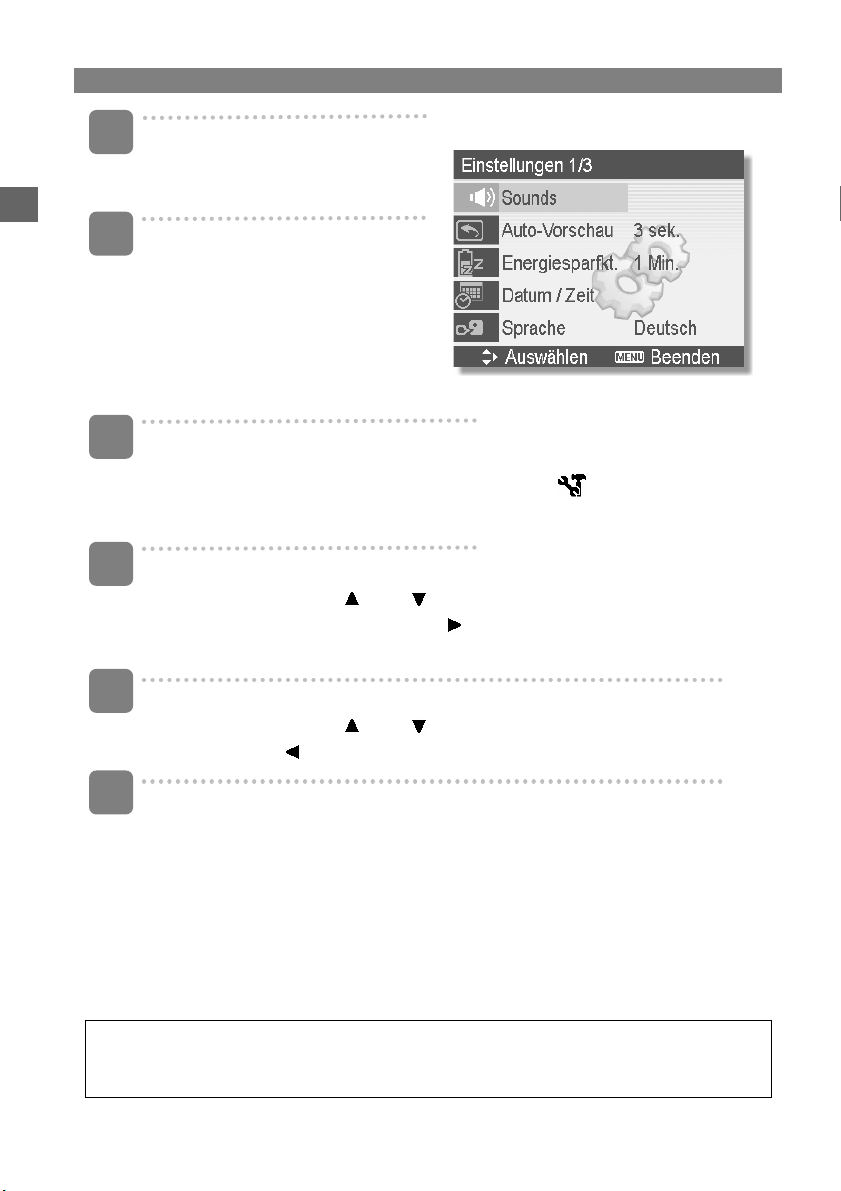
Setup-Menü
1
Schalten Sie die Kamera ein und
rufen Sie den Aufnahme- oder den
Wiedergabemodus auf.
2
Öffnen Sie das Aufnahme- oder
Wiedergabemenü mit der
MENU-Taste.
y Das angezeigte Menü hängt
davon ab, ob Sie sich im
Aufnahmemodus oder im
Wiedergabemodus befinden.
3
Öffnen Sie das Einrichtungsmenü.
y Wählen Sie Einrichtung mit dem Vierwegschalter (
das Einrichtungsmenü mit der SET-Taste.
4
Wählen Sie ein Element.
y Drücken Sie die Taste
drücken Sie anschließend die Taste
aufzurufen.
5
Ändern Sie die Einstellung.
y Drücken Sie die Taste
Sie die Taste
6
Drücken Sie die Taste MENU, um das Menü zu schließen.
oder , um einen Menüpunkt auszuwählen und
oder SET, um das Untermenü
oder , um eine Option auszuwählen und drücken
oder SET, um die Einstellung zu übernehmen.
), öffnen Sie danach
~ Wenn Sie mit Windows 98/98SE arbeiten, klicken Sie mit der rechten Maustaste auf
die Programmdatei „DSC-Treiber“ oder „DSC-Bedienungsanleitung“ auf der
CD-ROM.
4
Page 5

1. Shutter Button
2. Flash
3. Power Button
4. Speaker
5. USB/AV Terminal
6. Microphone
7. Lens
8. Self-timer Lamp
,
9. Strap Ring
10. Zoom Button
11. Playback Button
12. Menu Button
13. Four-way Control
y Flash Button
y Macro Button
y SET / DISP Button
14. Mode Button
15. ASM / Delete Button
16. Operation Lamp
17. LCD Monitor
EN
18. Tripod Socket
19. Battery Cover
y The memory card slot is located
beneath the battery cover, adjacent
to the battery compartment.
1
Page 6

EN
Inserting the Batteries
1
Open the battery cover.
y Slide the battery cover in the
direction indicated by the arrow.
2
Insert the batteries.
y Insert two AA-size batteries with
the positive (+) and negative (-)
poles matching the directions
indicated inside the battery room.
3
Close the battery cover.
Changing the Mode
You can record images and voices in the REC mode. And using the PLAYBACK mode to
replay, delete, or edit images on the LCD monitor.
Switching between REC mode and PLAYBACK mode
In REC mode, press the PLAYBACK button
(n) to switch to the PLAY mode.
In PLAY mode, press the PLAYBACK (n) or
the MODE (o) button to switch to the REC
mode.
2
Page 7

Selecting the REC mode
1
Set the camera to the REC mode
2
Launch the mode palette.
y Press the MODE button (o) to
show the scene mode palette.
3
Select a mode.
y Use the four-way control to
select a desired mode and press
the SET button to confirm the
setting.
Using the Menus
When a menu is displayed, the four-way control and the SET button are used to make the
desired settings.
REC menu
1
Turn the power on, and set the
camera to the REC mode.
EN
2
Open the REC menu.
y Press the MENU button to
display the menu.
3
Select an item.
Press
4
Change the setting.
Press
5
Press the MENU or the SET button to save the settings and close the menu.
or to select a menu item.
or to change the setting.
3
Page 8

EN
Setup menu
1
Turn the power on, and set the
camera to the REC or PLA Y BACK
mode.
2
Press the MENU button to open
the REC or PLAYBACK menu.
y The menu displays depends on
whether you are in the REC
mode or the PLAY- BACK
mode.
3
Open the Setup menu.
y Press four-way control to select SETUP (
display the Setup menu.
4
Select an item.
y Press
launch the submenu.
5
Change the setting.
y Press
the setting.
6
Press the MENU button to close the menu.
or to select a menu item and then press or the SET button to
or to select an option and press or the SET button to apply
) and then press the SET button to
4
Page 9

1. Interrupteur d'alimentation
2. Flash
3. Déclencheur
4. Haut-parleur
5. Port USB / Prise sortie vidéo
6. Micro
7. Objectif
8. Lampe du retardateur
9. Attache de la lanière
10. Bouton zoom
11. Mode lecture bouton
12. Bouton MENU
13. Boutons multifunction
quadridirectionnel
y Bouton Flash
y Bouton Macro
y Bouton DISP/SET
14. Bouton mode de caméra
15. Bouton Effacer/ASM
16. Indicateur de marche
17. Ecran LCD
FR
18. Prise pour trépied
19. Capot batterie
y L'emplacement de la carte
mémoire est situé en dessous du
couvercle des piles, adjacent au
compartiment des piles.
1
Page 10

Insertion des piles
1
Faire glisser le couvercle des piles
pour ouvrir.
y Glissez le couvercle des piles
dans le sens indiqué par la flèche.
FR
2
Insérez les piles.
y Insérer deux piles alcalines de
type AA avec les pôles positifs (+)
et négatifs (-) correspondants aux
instructions à l'intérieur du
compartiment des piles.
3
Faire glisser le couvercle des piles
pour fermer.
Changer le mode
Vous pouvez enregistrer des images et des voix dans le mode ENR. Et utiliser le mode
LECTURE pour relire, supprimer ou éditer les images sur le moniteur LCD.
Basculer entre le mode ENR et le mode LECTURE
En mode Enregistrement, Appuyez sur le
bouton
Revue.
(n) pour basculer au mode
En mode Revue, ppuyez sur le bouton MODE
(o)ou
Enregistrement précédemment utilisé.
(n) pour basculer au mode
2
Page 11

Sélectionner le mode ENR
1
Réglez l'appareil sur le mode
Enregistrement.
2
Lancer la palette de modes
y Appuyez sur le bouton MODE (o)
pour afficher l'écran Mode de
scène.
3
Sélectionner un mode.
y Utilisez le bouton directionnel pour
sélectionner un mode de scène
désiré et appuyez sur le bouton
SET pour confirmer le réglage.
Utiliser les Menus
Lorsqu'un menu est affiché, la commande directionnelle et le bouton REGLER sont utilisés pour
effectuer les réglages désirés.
REC menu
FR
1
Mettez sous tension, et réglez
l'appareil photo sur le mode ENR.
2
Ouvrez le menu ENR.
y Appuyez sur le bouton MENU pour
afficher le menu.
3
Sélectionnez un élément.
y Appuyez sur ou pour
sélectionner un élément de menu.
4
Changez le paramètre.
y Appuyez sur
5
Appuyez sur le bouton MENU ou SET pour sauvegarder les réglages et fermer le
menu.
ou pour changer le réglage.
3
Page 12

FR
Menu Configuration
1
Mettez sous tension, et réglez l'appareil
photo sur le mode ENR ou LECTURE.
2
Appuyez sur le bouton MENU pour ouvrir
le ENR ou LECTURE.
y L'affichage de menu dépend de si vous
êtes en mode Enregistrement ou en
mode Revue.
3
Ouvrez le menu configuration.
y Appuyez sur la commande directionnelle to select SETUP (
the SET button to display the Setup menu.
4
Sélectionnez un élément.
y Appuyez sur
bouton SET pour appliquer le réglage.
5
Changez le paramètre.
y Appuyez sur
bouton SET pour appliquer le réglage.
6
Appuyez sur le bouton MENU pour fermer le menu.
ou pour sélectionner une option et appuyez sur ou sur le
ou pour sélectionner une option et appuyez sur ou sur le
) and then press
~ Lorsque l'O/S est Windows 98/98SE, utilisez le clic droit de la souris sur le fichier
programme nommé "DSC driver (Pilote DSC)" ou "DSC User manual (Mode d'emploi
DSC)" situé sur le CD-ROM.
4
 Loading...