

Page 1

Notes on these Operating Instructions
The operating instructions and installation guidelines have been organized so that subjectrelated information can be easily found using the contents list.
Note
You will find comprehensive Operating Instructions for navigation on
relevant CDs/DVDs and at the online help of the device.
The section "Frequently Asked Questions" contains answers to questions that are frequently addressed to our customer service department.
English
Document Your Navigation Unit
It is important to record the details of your Navigation Unit and the purchase thereof. In
the event you require warranty support you may be asked for this information. The serial
number can be found on the back of the device:
Serial Number ....................................................................................
Password ....................................................................................
Information note ....................................................................................
SuperPIN ....................................................................................
UUID ....................................................................................
Date of Purchase ....................................................................................
Place of Purchase ....................................................................................
Please record the serial number into any appropriate guarantee documents.
You will enter your own password and information note using the Security Function.
The SuperPIN and the UUID will be provided following the activation of the Security Func-
tion. See Page 17.
Français
Page 2

Quality
The components used have been selected to provide a product that has a high level of
functionality and is user friendly, safe and reliable. A well-balanced hardware and software
design allows us to offer you a technologically advanced navigation system, which is both
practical and enjoyable to use.
Service
Our customer care is there to provide support and assistance whenever you have questions or are experiencing problems.
This manual contains a section specific to Customer Service starting on page 41.
Copyright © 2010, version 27/04/2010. All rights reserved. Microsoft®, MS-DOS®, and Windows are
registered trademarks of Microsoft Corporation in the U.S. and other countries. Pentium
tered trademark of Intel Corporation. The names of actual companies and products mentioned herein
may be the trademarks of their respective owners. Information in this document is subject to change
without notice
.
®
is a regis-
-ii-
Page 3

Contents
Safety and Maintenance .................................................................................. 1
Safety Instructions ......................................................................................................... 1
Data Security ................................................................................................................. 1
Operating Environment ................................................................................................. 2
Repair ............................................................................................................................ 2
Ambient temperature .................................................................................................... 2
Electromagnetic Compatibility ...................................................................................... 3
Connection ................................................................................................................... 3
Power supply through Car Adapter ............................................................................ 3
Cabling ......................................................................................................................... 3
Information about the Regulatory Compliance according to R&TTE .............................. 3
Battery Operation .......................................................................................................... 4
Maintenance ................................................................................................................. 4
Care of the Display ........................................................................................................ 4
Recycling and Disposal .................................................................................................. 5
Transport ...................................................................................................................... 5
Supplied Items .............................................................................................................. 6
Views ............................................................................................................... 7
Front Components ........................................................................................................ 7
Back Components ......................................................................................................... 8
Bottom Components ..................................................................................................... 9
Right Components ...................................................................................................... 10
Initial Set up .................................................................................................. 11
I. Charging the Battery ................................................................................................ 11
II. Power Supply .......................................................................................................... 12
Car Adapter .............................................................................................................. 12
Alternative possibility of charging the battery ........................................................... 12
III. Switching on the Device ......................................................................................... 13
IV. Installing the Navigation Software .......................................................................... 15
General Operating Instructions ..................................................................... 16
Switching on/off the device ......................................................................................... 16
Security ......................................................................................................... 17
Storing the password and the information note .......................................................... 17
Making settings ........................................................................................................... 18
SuperPIN and UUID ..................................................................................................... 19
English
Français
- iii -
Page 4

Making subsequent settings ........................................................................................ 20
Password Request ....................................................................................................... 21
Resetting the Navigation System ................................................................................. 22
Reset ........................................................................................................................... 22
Switching the Device off Completely / Hard Reset ....................................................... 23
Navigation ..................................................................................................... 24
Safety Instructions for Navigation ................................................................................ 24
General Instructions ................................................................................................. 24
Notes for Use in a Vehicle ......................................................................................... 25
Aerial Orientation ........................................................................................................ 26
I. Mounting the Car Holder ......................................................................................... 26
II. Attaching the Navigation System ............................................................................. 27
III. Connecting the Car Adapter ................................................................................ 28
IV. Starting the Navigation Software ............................................................................ 29
Warning function for traffic monitoring points ............................................................ 30
MP3 Player (optional) ................................................................................... 33
Overview of the Main Screen ....................................................................................... 33
Select a Title and Move it into the List of Favourites ..................................................... 34
List of Favourites ...................................................................................................... 35
List of the established bookmarks ................................................................................ 35
Picture Viewer (optional) .............................................................................. 36
Operating the Picture Viewer ....................................................................................... 36
Main Screen ................................................................................................................ 36
Full Image View........................................................................................................ 37
Travel Guide (optional) ................................................................................. 39
Alarm Clock (waking function) (optional) .................................................... 41
Overview of the main screen ....................................................................................... 41
Description of the Interfaces ........................................................................................ 42
Setting the System Time ........................................................................................... 43
Selecting an Alarm Signal ......................................................................................... 44
Setting the Volume .................................................................................................. 45
Snooze Function ...................................................................................................... 46
Ending the Alarm Clock Application ......................................................................... 46
Sudoku (optional) ......................................................................................... 47
Main Screen ................................................................................................................ 47
Description of the switch fields .................................................................................... 48
Overview of the game field.......................................................................................... 49
Description of the control buttons ........................................................................... 49
-iv-
Page 5

FAQ ................................................................................................................ 50
Customer Service ........................................................................................... 51
Faults and Possible Causes .......................................................................................... 51
Additional Support ...................................................................................................... 51
Appendix ....................................................................................................... 52
Special CleanUp Function............................................................................................ 52
Synchronisation with the PC ........................................................................................ 55
I. Installing Microsoft® ActiveSync® ............................................................................ 55
II. Connecting with the PC ........................................................................................... 56
Mass Storage mode .................................................................................................. 57
ActiveSync®-Mode..................................................................................................... 57
Alternative possibility of charging the battery ........................................................... 57
III. Working with Microsoft® ActiveSync® .................................................................... 58
GPS (Global Positioning System) ................................................................... 59
TMC (Traffic Message Channel) (optional) .................................................... 60
TMCpro / Trafficmaster (optional) ............................................................................... 60
Trafficmaster (optional) ............................................................................................... 60
Installing the External TMC Receiver /
Connecting the TMC Diplole Aerial (optional) ......................................................... 61
Working with Memory Cards ......................................................................... 62
Inserting Memory Cards .............................................................................................. 62
Removing Memory Cards ............................................................................................ 62
Accessing Memory Cards ......................................................................................... 62
Data Exchange via Card Reader ................................................................................ 63
Additional Card Material .............................................................................................. 63
Transfer of card material to a memory card .............................................................. 63
Alternate method of installing Navigation Software (using a memory card) ............ 64
Transferring Installation Files and Map Material to the Internal Memory .................. 64
Specifications ................................................................................................ 65
Model Overview ............................................................................................. 66
FCC Compliance Statement ........................................................................................ 67
Conditions of Warranty for the United Kingdom ........................................... 68
Index ............................................................................................................. 74
English
Français
-v-
Page 6

Page 7

Safety and Maintenance
Safety Instructions
Please read this section carefully and follow all the instructions provided. This will help
ensure reliable operation and prolong the life of your appliance.
Keep the packaging and the user instructions for future reference or enquiries at a later
date. If you pass the article on to another person, you should pass on these instructions.
Never allow children to play with electrical equipment unsupervised.
Keep the packaging materials, such as plastic bags away from children as there is a
danger of suffocation.
Never open up the housing of the appliance or the power adapter. These contain
no user-serviceable parts. If the housing is opened there is a danger of electric
shock.
Please operate your navigation system with an approved power supply only.
Do not place any objects on the appliance and do not exert any pressure on the
display. Otherwise there is a danger that the screen will break.
To avoid damage, do not touch the screen with sharp objects. We recommend us-
ing only the stylus provided or finger when using the touch-screen functionality of
the product.
There is a risk of injury if the display breaks. If this should occur, use protective
gloves to pack the broken parts and contact customer support to arrange for disposal. Then wash your hands with soap, since there is a possibility that chemicals
may have escaped.
Remove the power adapter from the outlet, switch the appliance off immediately, or do
not switch it on, and contact Customer Service.
If the housing of the appliance or the power pack becomes damaged or liquid may
have leaked into it the components must be checked by Customer Service in order
to avoid damage!
English
Français
Data Security
Every time your data is updated or modified backup copies should be made on an
external storage medium. The supplier assumes NO liability for data loss or damage
to data storage units, and no claims can be accepted for damages resulting from
the loss of data or for consequential damages.
Page 8

Operating Environment
Failure to follow these instructions may lead to your appliance being damaged. In cases
where products are damaged as a result of misuse or neglect the associated guarantee will
be considered void.
Keep your navigation System and all connected devices away from moisture and
avoid exposure to dust, heat and direct sunlight, especially in the car.
Make sure you prevent your appliance from getting wet, e.g. from rain and hail, at
all times. Please note that moisture can even build up inside a protective pouch as a
result of condensation.
Avoid heavy vibrations and shaking.
Please note the device should be installed vertically, this will ensure that the device
remains secure within its holder.
Repair
Please contact our Service Centre if you encounter technical problems with your
appliance.
In the event a repair becomes necessary, please use Medion authorised Service
Partners. The address can be found on the back of your guarantee card or online at
www.medion.co.uk
Ambient temperature
The appliance will operate effectively at an ambient temperature of between +32°F
and +95°F (0° C and 35° C) and at a relative humidity of between 10% and 90%
(non-condensing).
In the powered down state the appliance can be stored at between -4°F and
+140°F (-20° C + to 60° C).
Store the appliance in a safe location, away from high temperatures (e.g. when
parking or from direct sunlight).
-2-
Page 9

Electromagnetic Compatibility
When connecting additional or other components the “Electromagnetic Compati-
bility Directive” (EMC) must be adhered to. Please note that only screened cable
(maximum 10ft) should be used with this appliance.
For optimal performance, maintain a distance of at least 10 ft. from sources of high-
frequency and magnetic interference (televisions, loudspeaker systems, mobile
telephones etc.).This will help to avoid malfunctions and loss of data.
Electronic devices emit electromagnetic waves during operation.
These emissions are harmless, but can interfere with other devices operated in close
proximity.
While our devices are tested and optimised for electromagnetic compliance in our
laboratories, interference during operation may still occur in the device itself and
with other devices in its proximity.
Should such interference occur, try to eliminate it by adjusting the positions of and
the distances between the devices.
Before driving, please ensure that the electronic systems of the car are working
properly.
English
Connection
When connecting your appliance it is important to observe the following instructions:
Power supply through Car Adapter
The car adapter should only be connected to the lighter socket of a car
(car battery = DC 12V , truck battery = DC 24V ). If you are in any doubt about
the power source in your car, please contact your car manufacturer.
Cabling
Arrange cables so that they do not cause unnecessary obstruction or risk of entan-
glement or snaring. E.g. ensure that the cables cannot be tread on, or tripped over.
Do not place any items on the cable.
Information about the Regulatory Compliance according
to R&TTE
The company declares that this device is in compliance with the essential requirements
and other relevant provisions of Directive 1999/5/EC. Complete declarations of conformity
are available under www.medion.com/conformity
.
Français
-3-
Page 10

Battery Operation
Your appliance is powered by an integrated battery. In order to prolong the life and efficiency of your battery and ensure safe operation, follow the instructions below:
Batteries cannot withstand excessive heat. Take care to avoid overheating of appli-
ance and the integrated battery. Failure to comply with this instruction may lead to
damage to or, even explosion of the battery.
Only use an original power pack (optional) to charge the battery or the car adapter
from the optional navigation kit.
The batteries are special category waste. When disposing of the appliance en-
sure that this is done correctly. Contact Customer Service for more details.
Maintenance
Warning
There are no user-serviceable parts which require cleaning inside the housing of the appliance.
You can prolong the life of the appliance by taking the following simple steps:
Always remove the power plug and all connecting cables before cleaning.
Clean the appliance only with a damp, lint-free cloth.
Do not use solvents, caustic or gaseous cleaners.
Care of the Display
Avoid scratching the display surface as this may be easily damaged. We recommend
using a display protection film (mylar) to prevent scratching of the screen. Please
contact your nearest dealer for this accessory.
The plastic on the display at delivery is purely for protection during transportation!
Ensure that no traces of water remain on the screen. Water can cause irreversible
discoloration.
Use only a soft, lint-free cloth to clean the screen.
Do not expose the screen to strong sunlight or ultraviolet radiation.
-4-
Page 11

Recycling and Disposal
The device and its packaging are recyclable.
English
Device
At the end of its life, the appliance must not be disposed of in household rubbish. Consult
your local waste disposal company to enquire about environmentally-friendly options for
disposal.
Packaging
To avoid damage during transport, the appliance was supplied in protective packaging.
The majority of packaging is manufactured from materials which can be disposed of in an
environmentally friendly manner and be recycled professionally.
Transport
When transporting the appliance please follow the instructions below:
After transporting the appliance wait until the unit has acclimatised and adjust to
surrounding conditions (e.g. room temperature and humidity) prior to use. In the
event of large fluctuations in temperature or humidity, condensation or moisture
may form inside the appliance. This can cause an electrical short-circuit.
In order to protect the appliance from dirt, knocks and scratching, please use an
appropriate protective case.
Before travelling ensure that you are aware of the power and communications pro-
visions at your destination. Before travelling obtain any power or communications
adapters that may be required for the operation of your device.
When shipping your appliance we recommend using the original packaging. If the
original packaging isn’t available please contact customer service for advice.
When passing through baggage control at airports, it is recommended that you
pass the appliance and all magnetic storage media (external hard drives) through
the X-ray system (the machine on which your bags are placed). Avoid the magnetic
detector (the structure through which you yourself pass) or the magnetic wand
(the hand device that the security staff use), since this may corrupt your data.
Français
-5-
Page 12

Supplied Items
Please check the condition of items supplied and check for missing items using the list
below. If you find your package to be incomplete, please forward to us all claims for missing items within 14 days from the date of purchase.
The package should include the following:
Navigation system
Power cable for cigarette lighter
Car holder and cradle
USB cable
CDs/DVDs with navigation software
Instruction manual and warranty card
Optional
Memory card
TMC dipole antenna
External TMC receiver
Earphones
Protective case
-6-
Page 13
Views
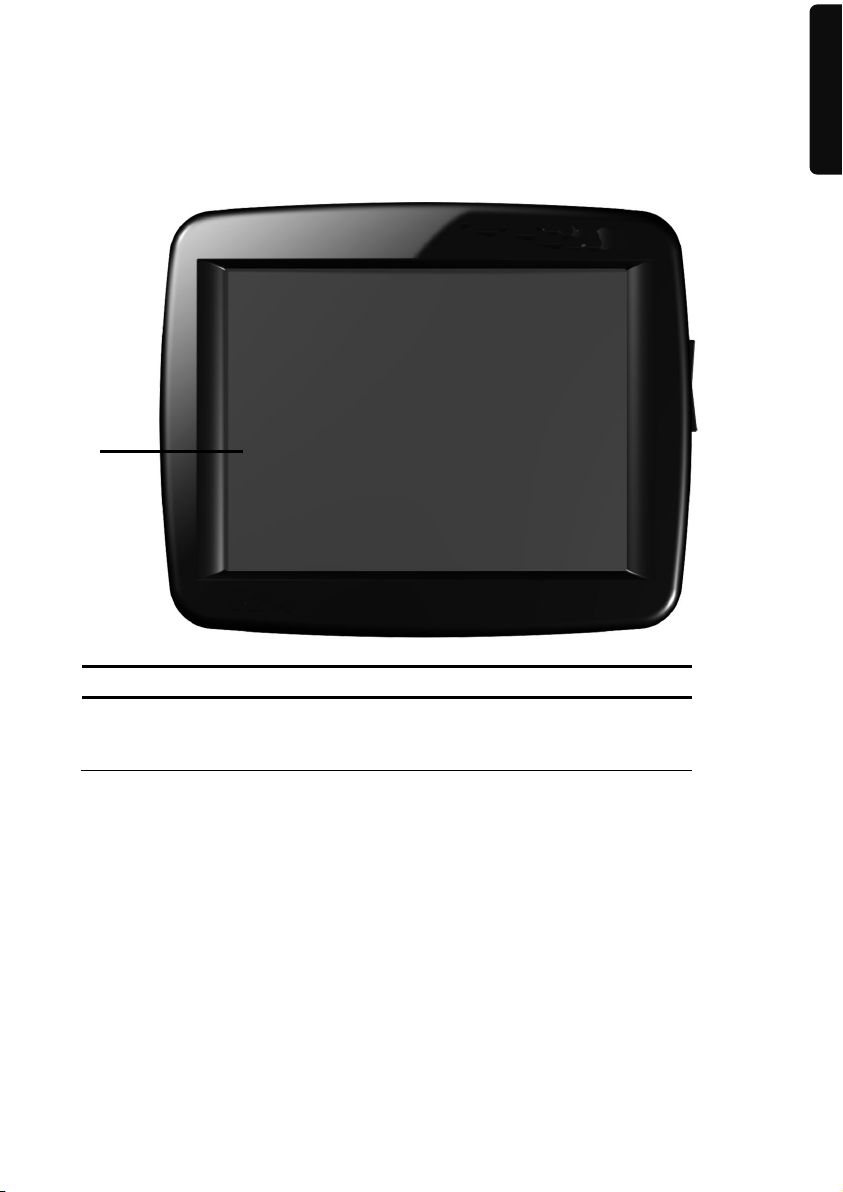
Front Components
Ref Component Description
Touch Screen Displays the output of your appliance. Tap on
the screen with your finger, a stylus or a "blunt"
tip to select menu commands or enter data.
English
Français
-7-
Page 14
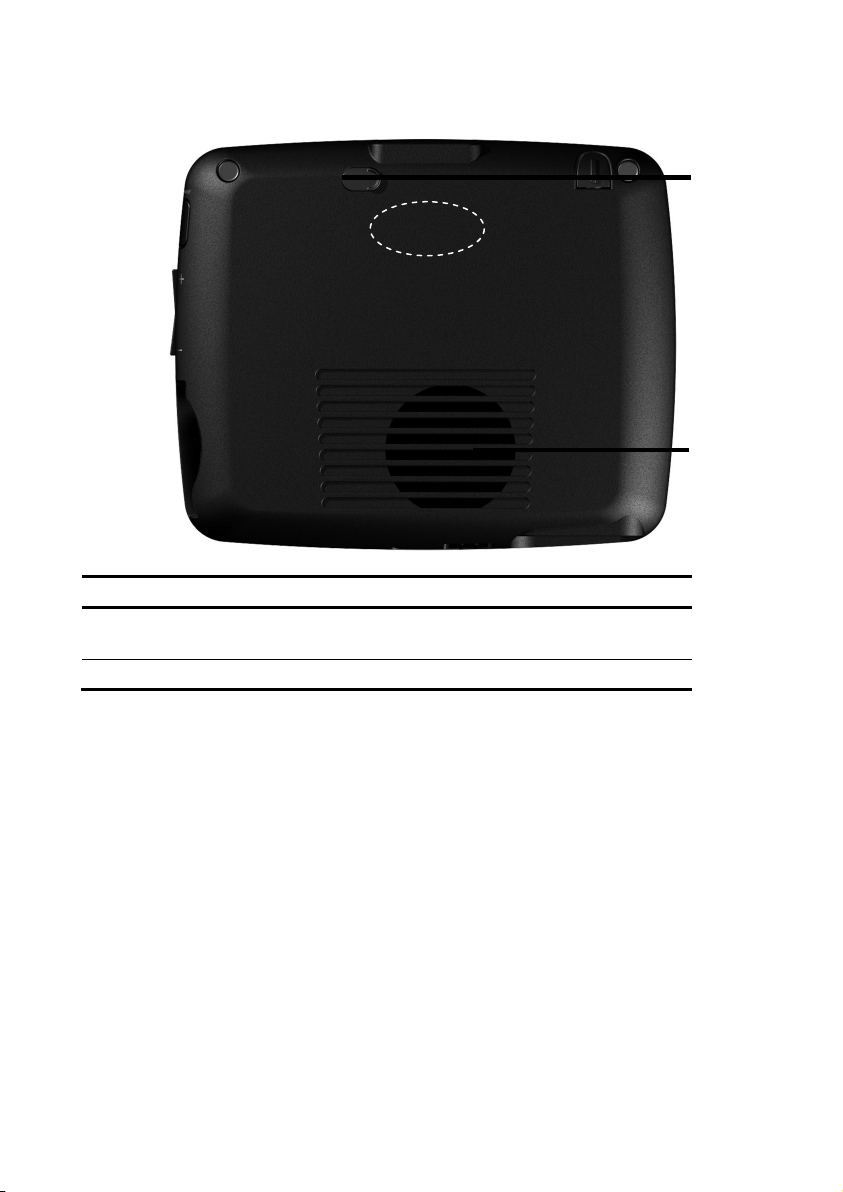
Back Components
Ref Component Description
External
aerial connection
Loudspeaker Plays back language statements and warnings.
Connection for an optional second aerial.
GPS
Antenna
-8-
Page 15
e
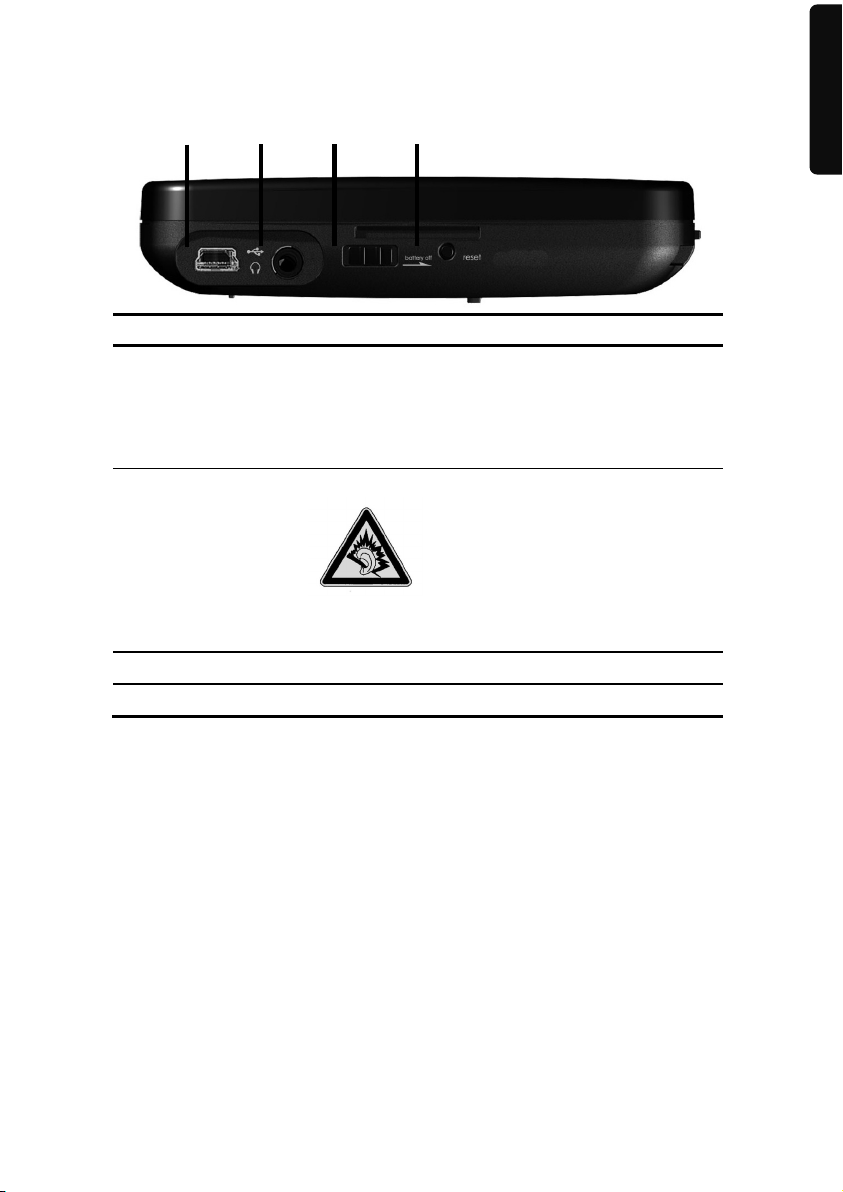
Bottom Components
Ref Component Description
Mini-USB-
Connector
Earphones Connects to a pair of stereo earphones
Main switch Switches the device completely off (Hard Reset).
Reset button Restarts your appliance
Connection to external power supply as well as
connection for connecting to a PC by means of the
USB cable (for data matching)
You also have the possibility to connect an external
TMC receiver here (only for Model E3132)
You also have the possibility to connect a TMC dipole antenna here. (only for Model E3232)
Using this appliance at full volum
for extended periods of time may
cause damage to the hearing capacity of the listener.
English
Français
-9-
Page 16
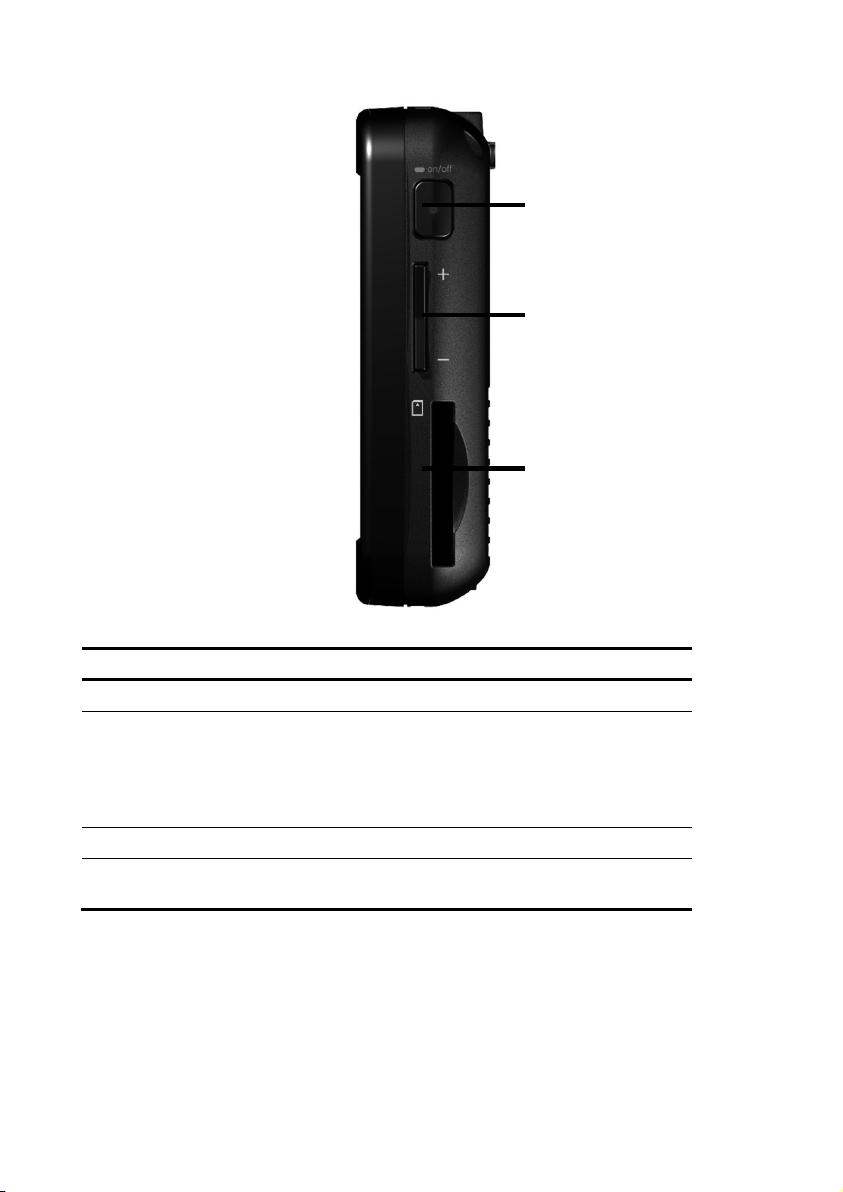
Right Components
Ref Component Description
On-/ Off button Switches the device on or off by pressing it briefly.
Battery Charge
Indicator
Volume Control
Memory card
insertion slot
The LED will shine orange during the charging
process. It will shine green when the accumulator is
completely charged. (The LED will also shine as
green under certain circumstances, if the OFF
mode has been set from On to Off.)
Accepts an optional memory card for removable
storage.
-10-
Page 17

Initial Set up
The following is a step by step guide to assist in the initial Set-up of the navigation system.
Start by removing the protective plastic from the display.
I. Charging the Battery
The battery of your navigation system can be charged in the following ways:
Using the supplied car adapter or
using a suitable USB cable.
Attention!
It may be necessary to initially charge the battery for a considerable period
of time prior to commencing and running through the initial installation,
this is dependent on the level of charge held at the time by the internal
battery.
Attention!
The device can only be charged if the main switch (see P. 9) is set to ON.
Please observe the following notes relating to the battery:
The charging status display LED will flash orange until the navigation system is
charged. If possible, do not interrupt the charging process until the
battery is fully charged. This may take a few hours. The charging status LED will
shine constant green if the battery has a high level of charge. Leave the device
charging for 20 further minutes, to ensure the battery is fully charged.
The navigation system can be used during the charging process, but the power
supply must not be interrupted during initial set-up.
Leave the external power supply connected to the navigation system for around 24
hours, so that the backup battery also charges-up fully.
The external power supply can remain connected; this is recommended for conti-
nuous operation. However, the mains adapter (optional) must remain switched on
whenever it is connected to the navigation system.
Even after a power source has been connected to the device it may take several mi-
nutes until the device is once again ready to operate again, this occurs if the charging state of the battery is exceptionally low. The battery will continue to be charged
if the power supply is connected and the device is switched off.
The Reset button can be pressed without the charging process being interrupted af-
terwards if the Main switch is set to ON and the device has not been switched on,
when a charging cable is connected.
English
Français
-11-
Page 18
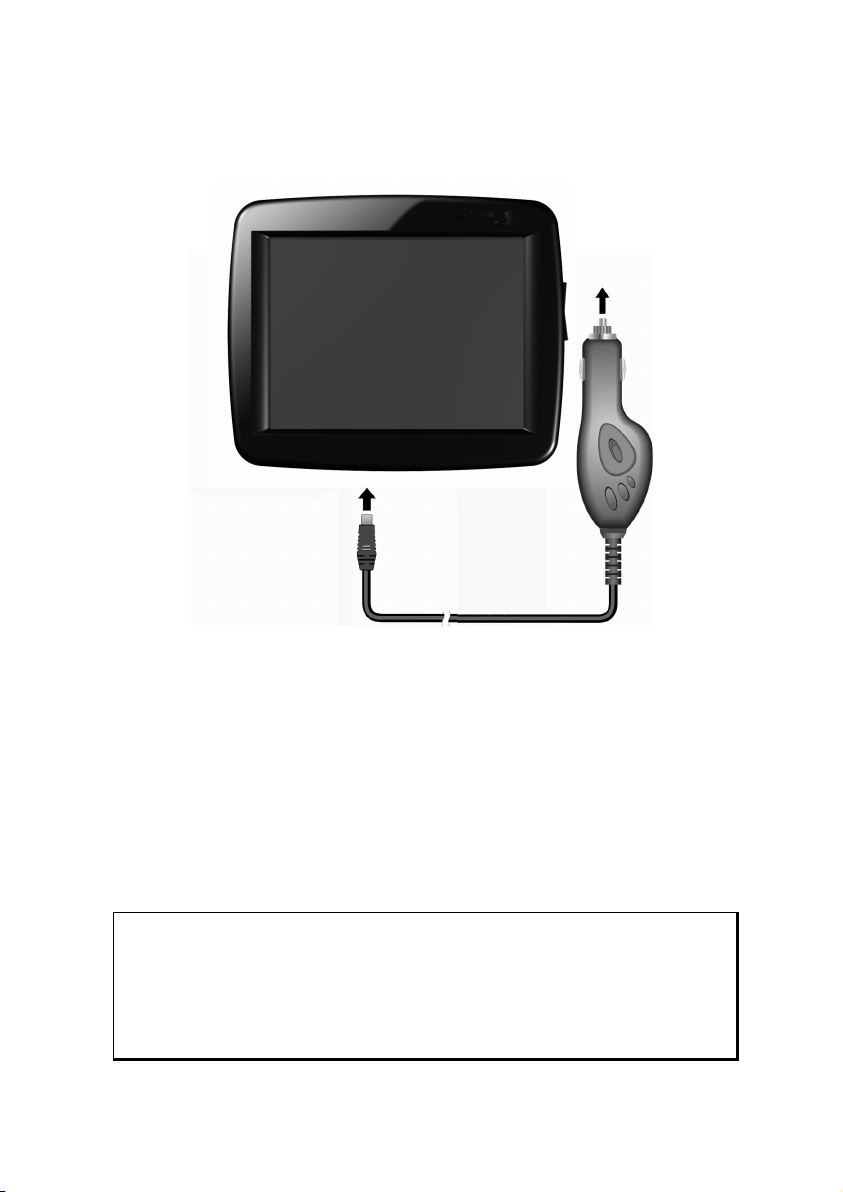
II. Power Supply
Car Adapter
(similar picture)
1. Plug the jack () of the connection cable into the corresponding receptor at the
bottom of your navigation system.
2. Insert the power adapter () into the cigar lighter socket ensuring, that it will not
lose contact while driving. This could cause a malfunction.
Alternative possibility of charging the battery
The battery will charge as soon as you connect your navigation device to a switched-on PC
or notebook by means of a USB cable. No additional software or updates is required for
your PC to perform this function. Do not interrupt the charging process if possible during
the initial charge.
Note
The brightness will be adjusted downwards, if necessary, if a USB connection is being set up when the device is switched on.
It is recommended to set the device to the stand-by mode, in order to
shorten the charging time by USB.
-12-
Page 19
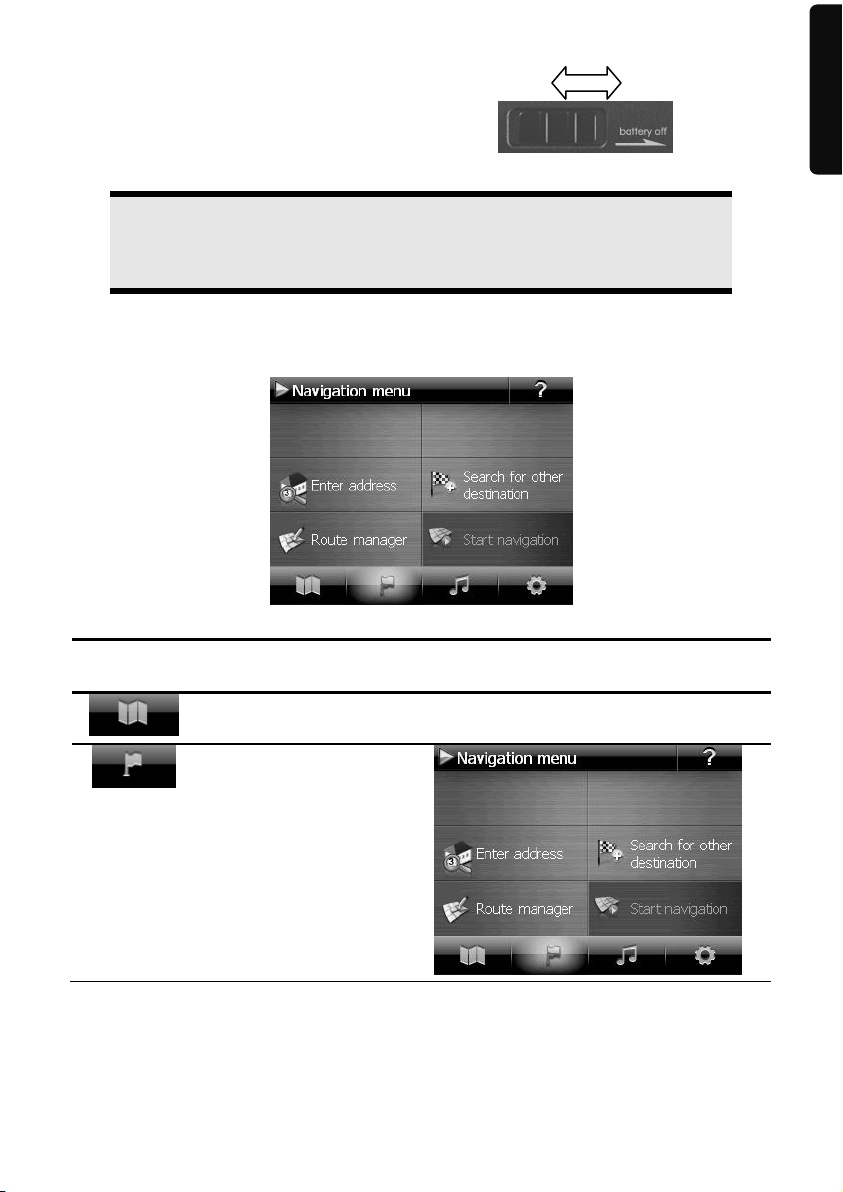
III. Switching on the Device
Push the Main switch of the device to the ON position and then
press the On/Off switch (see P. 10)..
Attention!
Always leave the main switch in the ON position, unless you want to carry
out a new reinstallation. If the main switch is in the OFF position, all data
will be deleted in the temporary memory.
The navigation system will start the first setting up automatically. Select the language that
you require first. The brand logo will appear and your device will display the entry screen
after a few seconds.
Button Description Main Screen
English
Français
Menu
Viewing maps
Navigation menu
-13-
Page 20
Other applications
Settings
Note
You will not be able to select the Navigation menu or the settings if the
navigation software does not find any map files in the device or on a
memory device. Then the ‘Other applications’ menu will appear automatically.
Note
Brief pressure on the on/off button will be enough to switch the device
on or off, provided that your navigation system is connected to an external
source of electricity or is running in battery operation (standby mode).
You can adjust the period of operation to suit your needs using the
Settings button on the main screen of your device. Your device is delivered in a status in which it will not switch off independently.
Press and hold the On/Off key (> 3 sec.), to completely switch off the
device.
No data will be lost as data is stored in the internal memory. The starting
process will only last slightly longer.
Your navigation system will use a low amount of electricity and the batteries will be discharged, even when in standby mode.
-14-
Page 21

IV. Installing the Navigation Software
The final installation of the navigation software will take place automatically from the internal memory, during the initial set up, if your device has already been equipped with the
basic data of the navigation software at the factory. Follow the instructions on the screen.
An optional memory card must always be inserted in the device while the navigation system is being used.
It will be necessary to carry out a Reset to restart the navigation system if the memory card
has been removed (see page 22).
Please also read the chapter Navigation starting on page 24.
English
Français
-15-
Page 22
General Operating Instructions
Switching on/off the device
Your device will be in its normal operating state after the initial set up. You can activate
and deactivate your device with the On-/Off switch.
1. To start your navigation system press briefly the On-/Off switch .
Note
Your device is delivered in a status in which it will not switch off independently. You can adjust the period of operation to suit your needs using the
Settings button on the main screen of your device.
Your navigation system will use a low amount of electricity and the batteries will be discharged, even when it is in the standby mode.
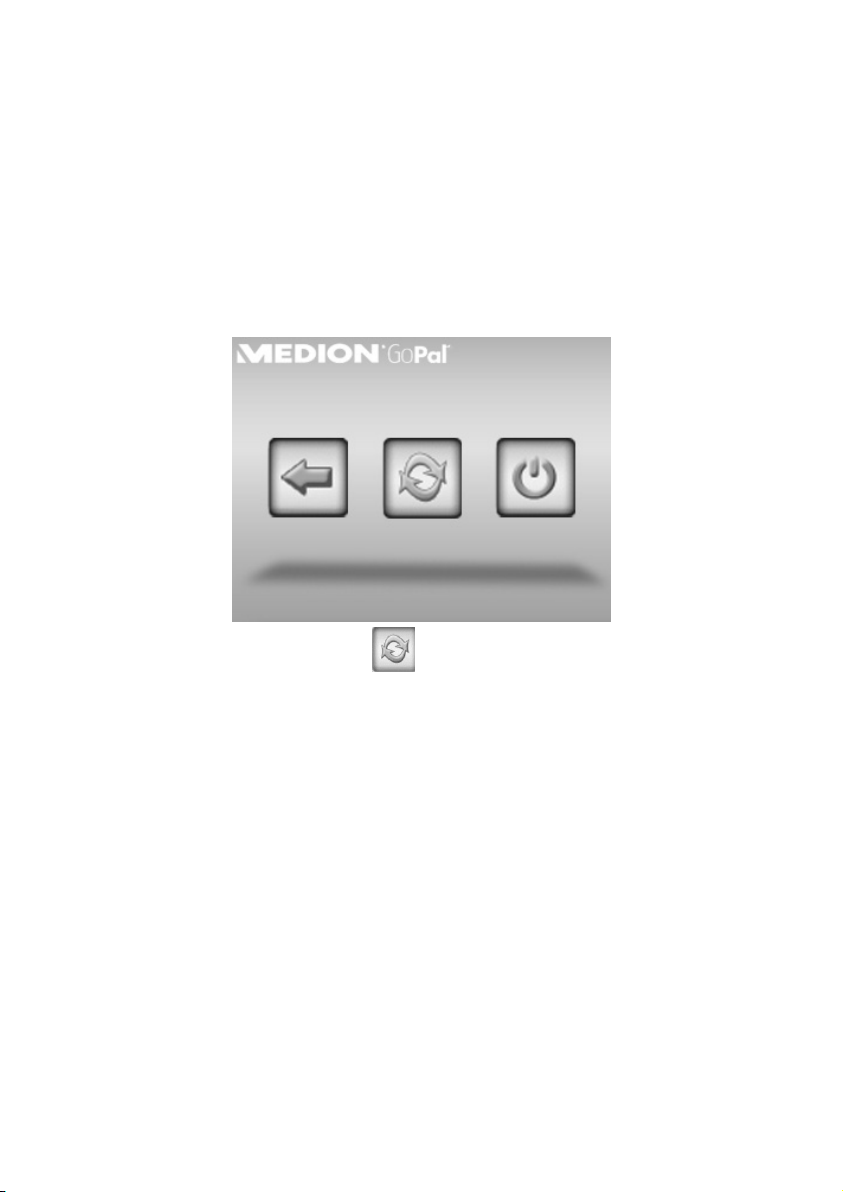
2. To switch off your navigation system briefly press the On-/Off switch .
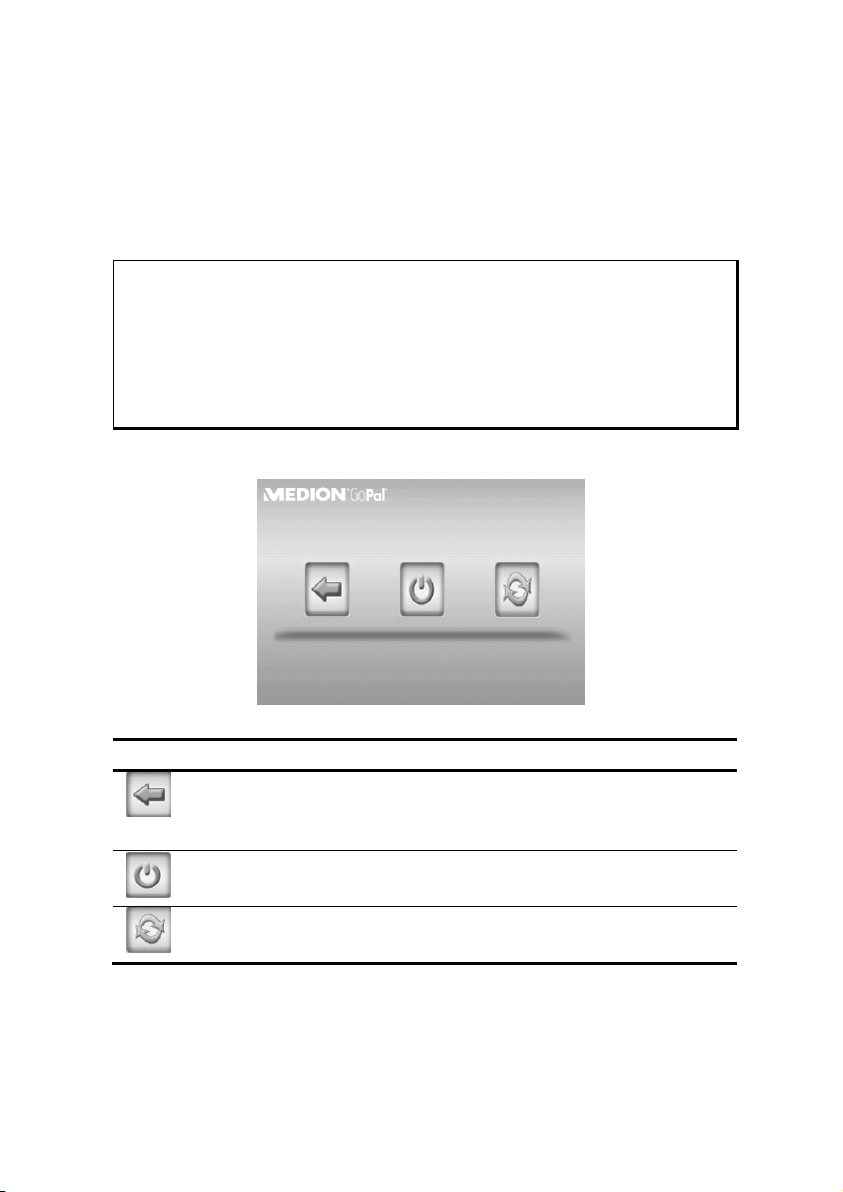
The following screen will appear:
You have three possible choices:
Button Description
Cancel/Back
Return to previous view with this key, if you have accidently called
up this screen.
Standby Mode (Energy saving mode)
The device will go into Standby Mode if this key is clicked.
Reset
You can carry out a reset by clicking this key.
The device will go into the Standby mode automatically after a few seconds if you do not
want to select any of these three possibilities.
For further settings within the Standby mode also see the chapter on “Special CleanUp
Function”, page 52, point 8.
-16-
Page 23
This display will also appear after the delay period of a few seconds has expired, if you
have activated the DC AutoSuspend Comfort Function.
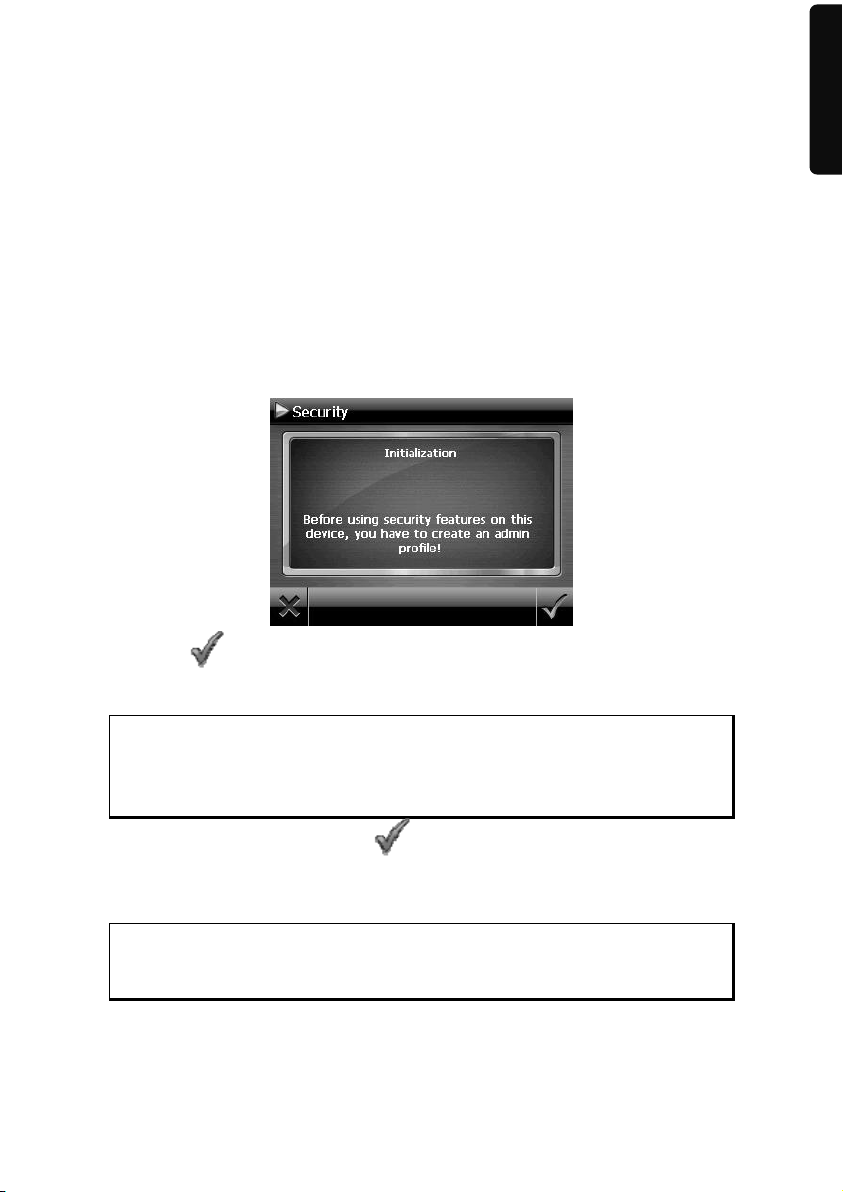
Security
You have the possibility of protecting your device against external access by means of this
function. Some one-off settings will have to be made before you will be able to use this
function. Proceed as follows to do this:
Storing the password and the information note
1. Go to Settings and then to Device settings by means of the main display.
2. Click on Security, in order to start the respective function. The following display
will appear:
English
Français
3. Click on
4. A keyboard will appear. Enter a password with it.
Note
The password must consist of at least 4 symbols. Use a combination of
letters (A – Z) and numbers (0 - 9). Keep the password in a safe place.
5. Confirm the password with the symbol after you have entered it.
6. Enter the password in the second field to reconfirm it and in order to avoid potential careless mistakes.
Note
The password will be displayed in the form of small stars (****).
7. An additional text field will appear after you have entered the password. Enter an
information note here that will serve as a support for remembering your password.
You will be able to call up this information if you have forgotten or mislaid the
password.
, in order to enter a password.
-17-
Page 24
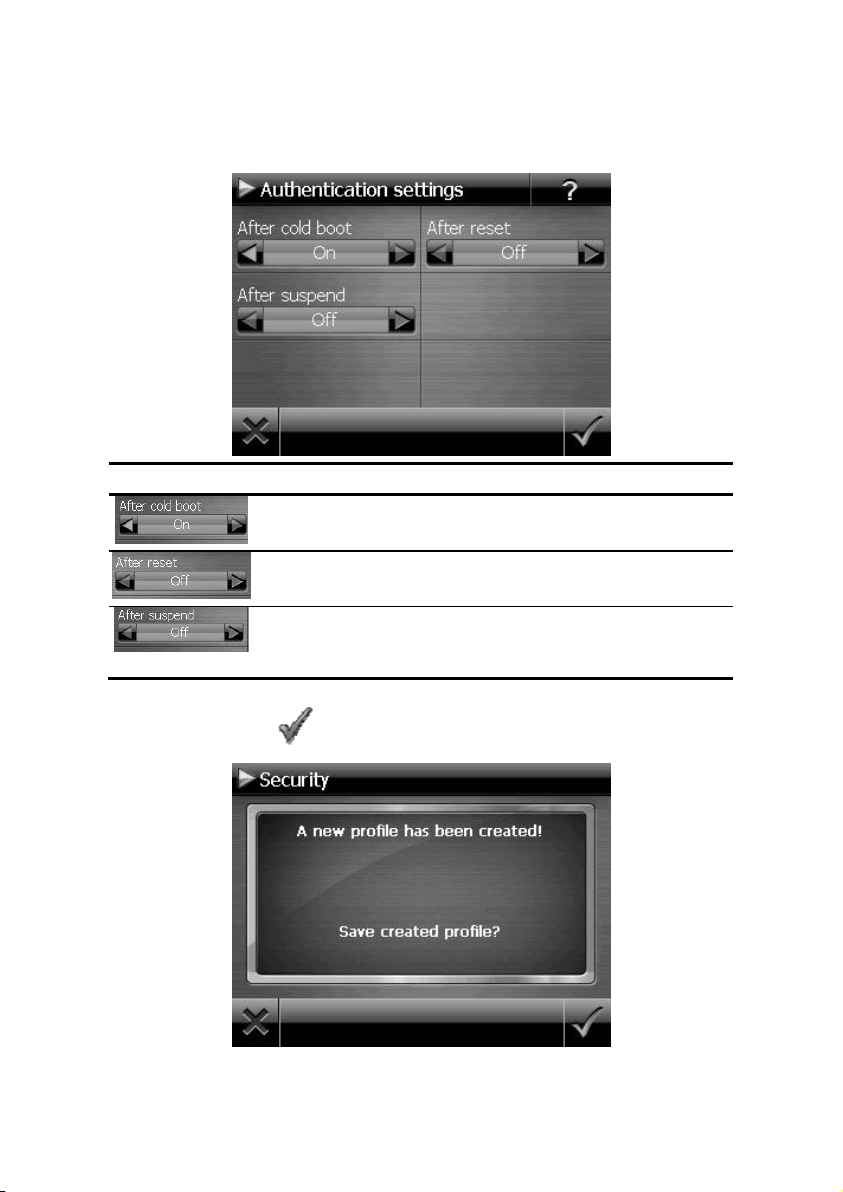
Making settings
The following selection window, through which you will make the settings for the Security
Function, will appear after you have entered the password and the information note
successfully.
Button Description
Set here whether the device should request the password
after a hard reset.
Set here whether the device should request the password
after a restart.
Set here whether the device should request the password
after the device has been switched on from the Standby
mode.
Confirm your settings with during the set-up. The following screen will appear:
-18-
Page 25

SuperPIN and UUID
The SuperPIN and the UUID (Universally Unique IDentifier = definite device identification) will appear on the display after you have confirmed the settings.
Note
Record this data in your Operating Instructions (see Page 1) and keep
them in a safe place.
You will need this information if you have entered the password incorrectly 3 times. The navigation device can then only be released with this
information.
English
Français
-19-
Page 26
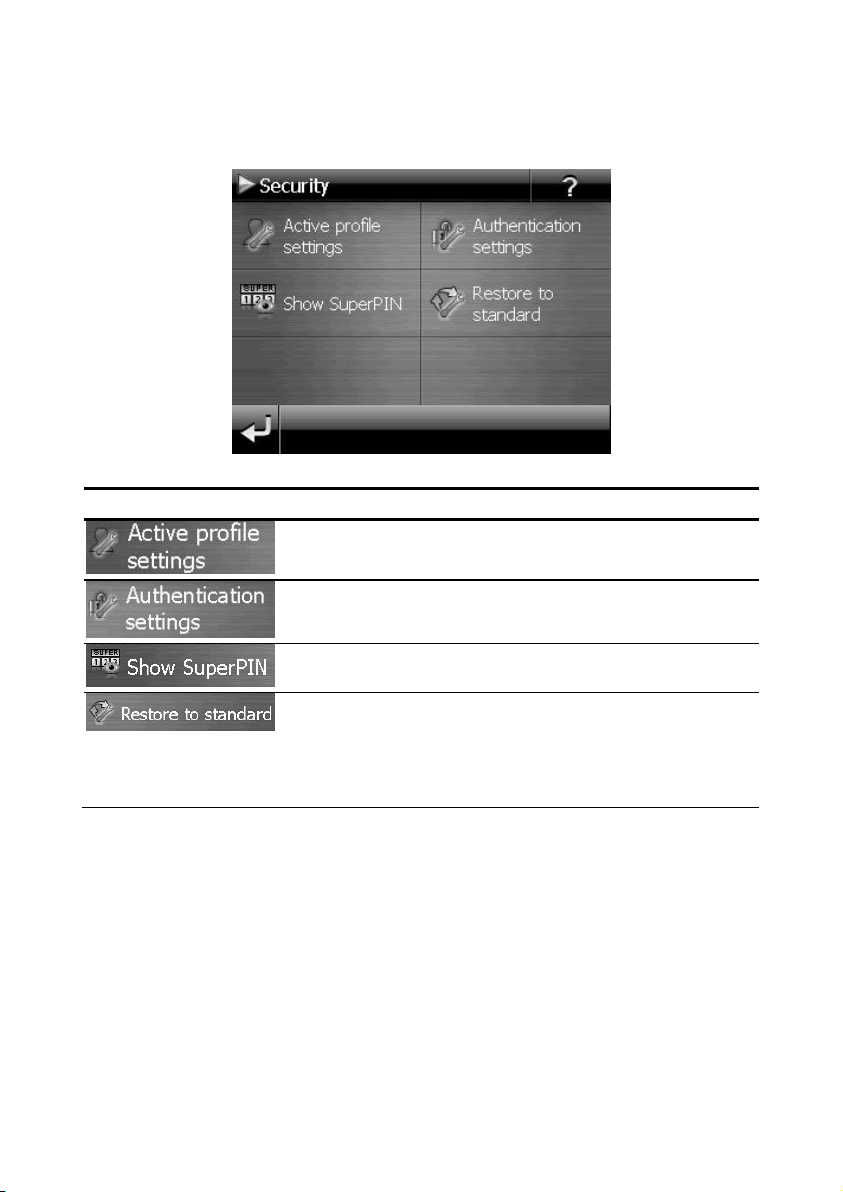
Making subsequent settings
Start the Security Function if you have already entered a password and would like to make
a subsequent setting or to change the password. The following display will appear:
Button Description
Change the password or the information text.
Authentication settings(see Page 18, Making settings)
Display SuperPIN and UUID (see Page 19)
Reverses the complete security function. All security settings and passwords will have been deleted after this function has been carried out. You will have to enter and confirm your password again to be able to carry out the security function.
-20-
Page 27

Password Request
A password request will appear at the restarting of the device, according to the setting, if
you have established a password by means of the Security Function.
1. Enter the password stored by you by means of the keyboard.
Note
The password will be displayed in the form of small stars (****).
2. Click on the question symbol to have the information note displayed, if you have
forgotten the password and need the Help setting.
English
Français
3. Click on
to confirm the entry.
Note
You will have to enter the SuperPIN if you have entered the password
incorrectly 3 times. Contact your Service Center, giving the UUID, if you
have also mislaid it. The UUID will be faded out in the lower display.
-21-
Page 28
Resetting the Navigation System
You can reset your navigation system if it is no longer reacting or working properly.
This option restarts the navigation system, without reinstallation being necessary. A reset is
often used in order to reorganise the memory. In doing so all programs that are running
are interrupted and the working memory is reinitialised.
You can carry out two different Reset procedures with your device.
Reset
The following screen will appear if you press the On/Off switch for a short time:
If you want to carry out a Reset, tap on
You will find further information in the chapter “Switching on/off the device”, page 16.
.
-22-
Page 29

Switching the Device off Completely / Hard Reset
Attention!
A hard reset will delete all data in the temporary memory.
Your navigation system will normally be in the Standby Mode, if you have switched it off
by pressing the on/off button briefly. In addition, the system can be switched off completely; the consumption of energy can be kept as low as possible through this. All the
data in the temporary memory will be lost if the device is switched off completely (hard reset).
To switch your navigation system off completely:
1. Press the Reset button when the device is switched on. The device will switch off.
2. Press the ON/OFF switch to switch the device on.
A reinstallation will not be necessary after a hard reset if your device has already been
equipped with the basic data of the navigation software in the permanent memory.
You will be able switch the Main switch on and off briefly as an alternative, if the device is
not connected to a charging cable. Then start the device with the On/Off switch.
English
Français
-23-
Page 30

Navigation
Safety Instructions for Navigation
The bundled product CD/DVD contains a comprehensive instruction manual.
General Instructions
Do not adjust or configure the navigation system whilst driving, this is to protect
yourself and others from accidents!
In the event that you do not understand the voice instruction or if you are in any
doubt about what to do at the next intersection, then the map or arrow displayed
on the screen will provide you with a quick orientation. Only look at the display
when it is safe to do so and driving conditions allow!
Legal remark
The use of devices that warn for traffic monitoring systems (like „speed
traps”) is prohibited in some countries, like Germany, Ireland and Switzerland. Please obtain information about the legal situation and apply the
waning function only where allowed. We cannot be held liable for damages caused by the use of the warning function.
Attention!
The road layout and driving rules take precedence over the instructions of
the navigation system. Only follow the instructions when circumstances
and driving rules permit it! The navigation system will guide you to your
destination even when you have to deviate from your planned route.
The direction statements of the navigation system given do not release the driver
of the vehicle from his or her duty of care or personal responsibility.
Plan routes before you leave. If you want to plan a new route whilst on the road
pull over and stop driving.
In order to receive the GPS signal correctly, keep away from metal objects as they
may hinder reception. Attach the navigation system onto the inside of the windscreen or near the windscreen with the suction cup. Try out different positions in
your vehicle in order to find the best reception.
-24-
Page 31

Notes for Use in a Vehicle
Take care that the holder does not present any risk to safety, even in the case of an
accident, when installing it.
Take care that the cable does not impede any safety components.
The display of your navigation system may show “light reflections”. Please take
care of not being “blinded” during operation.
Do not mount the components within the operating range of any airbags.
Check the secure adherence of the suction cup at regular intervals.
The power plug will consume power, even if no device is connected. Remove it
when not in use to avoid draining the car battery.
Check all safety equipment in your car after installation.
Note
Do not leave your navigation software in the vehicle when you leave it
unattended. You should also uninstall the holder for security reasons.
English
Français
-25-
Page 32

Aerial Orientation
The aerial must have unrestricted access to the sky to receive GPS satellite signals. Place the
aerial as horizontally as possible for this reason. Try out aerial and installation possibilities
in the vehicle if the reception is inadequate.
I. Mounting the Car Holder
Attention!
Only fix the holder for the navigation system to the windscreen, if it does
not impede the view.
Snap-in lever
(similar picture)
Note
Your navigation device can also be equipped with a different but similar
vehicle attachment as an alternative, according to the version.
-26-
Page 33

Note
Clean the windscreen thoroughly with a glass cleaner. Warm the disk and
the nipple slightly at temperatures below 15° C.
Place the holder with the suction head directly onto the wind screen and press the lever on
the suction head downwards. The sucker will attach itself to the background firmly.
II. Attaching the Navigation
System
1. Connect the car adapter and, if necessary, the TMC aerial to your navigation system and insert the memory
card.
2. Place the device below in the centre of
the holder.
3. Press it gently backwards until it engages audibly.
4. Place the holder on the fixing catches
of the car holder.
5. Now, push the unit to the side until it
engages audibly.
6. Now you will be able to place the
complete unit on the cleaned windscreen or the suction plate.
English
Français
-27-
Page 34

III. Connecting the Car Adapter
(similar picture)
1. Plug the jack () of the connection cable into the corresponding receptor at the
bottom of your navigation system.
2. Insert the power adapter () into the cigar lighter socket ensuring, that it will
not lose contact while driving. This could cause a malfunction.
Note
Remove the power adapter from the cigarette lighter socket when ending a trip or when parking the car for a extended period of time. Otherwise the car battery could be drained. In this case use the power switch
to turn off the navigation system.
-28-
Page 35

IV. Starting the Navigation Software
Note
Your memory card will always have to be inserted into the device during
the use of the navigation system, if the card contains (additional) mapping
material.
It will be necessary to carry out a reset to restart the navigation system if
the memory card has been removed while the system was being used (see
page 22). According to the navigation system the reset is carried out
automatically.
1. Switch on your navigation system.
2. The Navigation software will start automatically or after tapping on the naviga-
tion control button on the main screen, according to the version.
3. Tap on Navigation on the screen for entering the destination. Enter the destina-
tion address. Confirm your entry by clicking the
gation. After a short time, if the satellite reception is adequate you will receive
augmented language statements.
Further information regarding the navigation software can be found in the comprehen-
sive manual on your navigation CD/DVD. This is a pdf-file you can read and print with
Acrobat Reader.
Note
The GPS-receiver will require some minutes for initialisation when deployed for the first time. Even when GPS signal reception is indicated the
navigation could be imprecise. In all future instances it will take about 3060 seconds until a correct GPS-signal is available, sufficient “sight” of the
satellite is a prerequisite.
symbol to start the navi-
English
Français
-29-
Page 36

Warning function for traffic monitoring points
The following display will appear if the warning function for traffic monitoring points
(optional) has been installed:
Confirm with
monitoring points.
Click on the Configure special functions interface in the Settings Menu, in order to configure the warning function.
, if you want to use navigation with the warning function for traffic
-30-
Page 37

Click on POI-Warner here, in order to make the settings for the ‘radar fixes’::
Here, you have the option of having the traffic monitoring points represented on a map or
faded out. You can also set whether you would like to be informed by acoustic signals
before reaching a traffic monitoring point.
English
Français
Acoustic information about a traffic monitoring point will be given by a warning sound
approx. 15 seconds before it is reached. Then, another double warning sound will be
given approx. 7 seconds before it is reached. Four warning sounds will give information
that the speed is too high. In addition, the distance to a monitoring point will be indicated
by a bar indicating closeness.
-31-
Page 38

Sample view if map presentation has been activated:
Note
Please pay attention to the fact that traffic monitoring points are not preset
in all countries.
* Legal remark
The use of devices that warn about traffic monitoring systems (like “speed
traps”) is prohibited in some countries, i. e. Germany, Ireland and Switzerland. Please obtain information about the legal situation and apply the
warning function only where allowed. We cannot be held liable for damages caused by the warning function.
-32-
Page 39

MP3 Player (optional)
Depending on the software equipment your navigation system is equipped with a
MP3- Player. Start the MP3 player from the menu by tapping the ‘MP3 Player’ switch
area. All the MP3 files located on a memory card can be taken into a List of Favourites and
will be available for replay. (The memory card must not be write-protected in this case.)
Overview of the Main Screen
Button Description
Reduces the screen brightness to a minimum, to save electricity.
Determine/add bookmarks.
Increase or decrease the volume.
or
or
The display in the upper right corner of the screen will show the
current level of the volume.
Break off action / back to the previous menu
Move to the previous or next file. It will be possible to skip
backwards or forwards within the title playing while it is being
played.
Play the playback.
Stop the playback.
Opens the List of Favourites.
Displays the files stored on the flash disk and/or on the memory
card.
You will make the settings of the MP3 player here.
English
Français
-33-
Page 40

Select a Title and Move it into the List of Favourites
Tap on and select the title that you would like to move into the List of Favourites, in
order to select a title.
will have three possibilities of marking the title here:
Tap on
Tap on in order to mark all titles currently in view.
Tap on
The selected titles will be indicated by a
Tap on
the List of Favourites until then.
Tap the file required and select the requisite title, in order to select a title in the subdirectories.
The
, in order to confirm your selection. The titles marked will not be moved into
symbol will be shown if not all the titles in a directory have not been selected.
in order to mark all the titles, including all sub-directories.
to delete all marks within a directory.
.
-34-
Page 41

List of Favourites
You will reach the List of Favourites by tapping on the :
English
You will delete all titles with
You will delete individual titles with .
Confirm with
, in order to take over the new selection into the List of Favourites.
.
List of the established bookmarks
You will reach the list of the established bookmarks by clicking on the symbol :
You will delete all bookmarks with the
You will delete an individual bookmark with the
symbol.
symbol.
Français
Operation with the
symbol to take over a new selection into the list of bookmarks.
-35-
Page 42

Picture Viewer (optional)
Depending on the software equipment your navigation system is equipped with a
Picture Viewer.
You can view the jpg format images on your memory card on your navigation system,
with the Picture Viewer. All the images on the memory card will be available immediately.
Operating the Picture Viewer
Start the Picture Viewer from the menu Other Applications by tapping on the Picture
Viewer button. Alternatively, the Picture Viewer can also be started from the navigation
software itself.
Main Screen
Fig.: Miniature view
Move the miniature view to the left or to the right with the arrow keys. Tap on a specific
images to display it in the Full Image Mode.
Return to the start in miniature view by tapping on
You can end the application by tapping on the symbol.
Start the slide show by tapping the
symbol.
-36-
.
Page 43

Full Image View
Fig.: Full image view without service strip
Tap in the lower area of the screen in the full image view, in order to activate the service
strip:
English
Français
Fig.: Full image view with service strip
Button Description
Previous picture
Turn it clockwise by 90°
in stages
Fade in grid
Start the slide show
Pause the slide show
Turn it counter-clockwise by 90° in stages
Next picture
-37-
Page 44

You will return to the miniature view by tapping in the centre of the image.
The image displayed will be subdivided into 6 fields by tapping on the symbol (fade
in grid).
Fig.: Full image mode with grid
Tap on a square in the grid to zoom in on that area of the picture:
Fig.: Zoom-in Mode
Tap on the centre of the image to go back to viewing the full picture.
-38-
Page 45

Travel Guide (optional)
Depending on the software equipment your navigation system is equipped with a Travel
Guide.
The Travel Guide will supply general information about the different areas of individual
towns and cities or regions in Europe, such as sights, restaurants, culture and travel information. Start the Travel Guide from the menu Other Applications by tapping on the
Travel Guide button. Alternatively, the Travel Guide can also be started from the navigation software itself. Select the country initially, then the town or city (or the region).
Then, select the category.
Fig. 1 Fig. 2
English
Français
Fig. 3 Fig. 4
Abb. 5 Abb. 6
-39-
Page 46

Fig. 7
Confirm with
, if you want to navigate to the destination displayed. The ad-
dress will then be available to the navigation software as the destination.
Button Description
Previous image
Shows the address of the selected category
Shows the available images in the selected category.
Tap on this control button to navigate directly to the selected
address.
Note
The possible selections within the Travel Guide can vary according to the
software available.
-40-
Page 47

Alarm Clock (waking function) (optional)
Depending on the software equipment your navigation system is equipped with a
Alarm Clock/waking function.
Start this function from the menu Other Applications by tapping on the Alarm Clock
button.
The waking function can work when the device is switched off (Standby Mode / Power
Saving Mode) as well as a reminder during the current navigation.
Overview of the main screen
English
Français
This view will appear if you have not yet set up a waking time. Enter an alarm time in the
24-hour format and confirm your entry with
.
-41-
Page 48

Description of the Interfaces
Button Description
Current system time
Setting-up mode (Setting volumes, system time and
alarm)
Night mode (Standby mode)
Reset/deactivate the waking function
Setting the alarm time
Delete the entry
Confirmation interface
Increase the volume / Reduce the volume
Back to the previous menu
Close the application
-42-
Page 49

Setting the System Time
The display of the current time will be located in the upper right corner of the screen. You
can adjust it as follows:
English
1. Tap on
2. Tap on
in the main screen. The following screen will appear:
to change the time setting.
Français
Note
The system time is updated by GPS reception. Pay attention to the time
zone settings.
-43-
Page 50

Selecting an Alarm Signal
1. To select an alarm signal touch the symbol.
2. Select the desired alarm sound and confirm the selection with .
3. Tap on the corresponding file in the Memory Card directory if you would like to se-
lect an alarm tone from the storage card and confirm again with .
4. Select the desired alarm sound and confirm with
5. The selected alarm signal is marked by a
6. Close the application with
.
-44-
.
Page 51

Setting the Volume
You can adjust the volume of the alarm signal by tapping on the interface.
Note
The volume configured here only relates to the alarm signal and will not
change the volume of the language output of the navigation system or
other functions of the system.
English
Français
-45-
Page 52

Snooze Function
You will have the possibility of making the waking signal repeat at regular intervals by
means of the Snooze function, once it has sounded at the alarm time set.
3. Tap on
4. To be wakened again at the same time on the following day tap on the button.
5. Tap on
to activate the Snooze function.
Current
system time
Waking time set
to return to the screen before the alarm signal started.
Ending the Alarm Clock Application
1. Tap on to deactivate the alarm time set.
2. You will find yourself in the Setting-up mode.
3. Tap on
in order to leave the application. An alarm time is not set.
-46-
Page 53

Sudoku (optional)
Depending on the software equipment your navigation system is equipped with the game
Sudoku.
Start the game from the menu Other Applications by tapping on the Sudoku switch field.
Sudoku is a number puzzle. The puzzle area is square and subdivided into nine sections.
Each section consists of 9 smaller squares.
When playing Sudoku, the aim is to fill all the 81 number fields using the numbers 1-9.
Each number must only appear once in each section at the same time. Each number must
only appear once in each row and column.
Some number fields will already have been populated prior to the start of the game.
Main Screen
English
Français
-47-
Page 54

Description of the switch fields
Button Description
Start the game
You will receive notes about a solution by tapping on
this control button. Tap on the control button again to
hide the notes about a solution.
You will receive the solutions of the number fields by
tapping on this control button. Tap on the control
button again to hide the solutions.
A new Sudoku will be opened by tapping on this control button.
Settings
You have the following possibilities in the Settings
menu:
The current game will be
stored by tapping on this
control button.
You will load a game
that you have started
onto the screen by tapping on this control
button.
Delete a stored game
status.
You can set the level of
difficulty here.
Back to the current
game.
-48-
Page 55

Overview of the game field
Description of the control buttons
Button
Description
Strip of numbers to be entered
Strip for the selection of the numbers to be entered in
the number fields. The selected number will stand out
and it will now be possible to enter it into a number
field.
Entry mode
First, tap on the number in the strip of numbers to be
entered that should appear in particular number field
and then on the corresponding number field.
Deletion mode
Tap on the number to be deleted.
Leave the application by means of this.
English
Français
-49-
Page 56

FAQ
Where can I find more information on the navigation
system?
Detailed operating instructions for navigation can be found on the
corresponding CD/DVD, which accompany your navigation system.
Also use the additional Help functions that are available with a single
touch of a button (usually F1 on the PC), or by selecting the Help
option, as additional assistance. These aids will be provided to you
while you are using the computer or the device.
What do I need the accompanied CD/DVD for?
The CD/DVD contains:
the ActiveSync
gation system and the PC.
Additional programs (optional).
This User manual in digital form.
®
program for balancing data between the navi-
digital maps
PC-application for rapidly resetting the data material
Manual of the navigation software
The navigation system is no longer responding. What should I do?
Carry out a reset (see page 22).
How can I adjust the lighting?
Under Settings.
-50-
Page 57

Customer Service
Faults and Possible Causes
The navigation system no longer reacts or is behaving atypically.
Carry out a reset (see page 22).
The navigation system is recognised only as a guest by ActiveSync®.
See information on page 56.
The GPS receiver cannot be initialised or found.
If a GPS signal continues not to be reported on the screen, in spite of the correct installation of the system, this can be caused by the following factors:
Sufficient satellite reception is not possible.
Solution:
Change the position of your navigation system and ensure that unrestricted
“sight” of the aerial is not impaired.
No language statements can be heard.
Check the volume setting.
Additional Support
If the suggestions in the above section have not solved your problem, please contact our
customer service hotline. However, before you contact your customer service hotline,
please have the following information available:
How is your navigation unit configured?
What additional peripherals do you use?
What messages, if any, appear on your screen?
What software were you using when the error occurred?
What steps have you already undertaken to solve the problem?
If you have been given a customer number previously, please give this number to
the technician.
English
Français
-51-
Page 58

Appendix
Special CleanUp Function
The CleanUp function serves the targeted deletion of data, without using a PC.
Note
Please use this function very carefully, because it is possible for data to be
deleted that can only be entered again manually afterwards.
The CleanUp function is activated when the ‘o’ is pressed in the Gopal lettering of the
Main Menu, immediately after the start tone following a reset.
The CleanUp function offers different options:
1. Remove Installation Only
Removes the software installed from the ‘My Flash Disk’
memory [= part of the permanent memory in which the executable parts of the navigation
software will be located following the initial alignment (\My Flash Disk\Navigation)].
2. Remove MAP Only
Removes the digital maps from the ‘My Flash Disk’ memory (\My Flash
Disk\MapRegions).
3. Remove Preload Only
Removes the data needed for the installation of the navigation software from the permanent memory (\My Flash Disk\Install).
4. Remove All
Deletes the whole contents of the ‘My Flash Disk’ memory. It will not be necessary to
recalibrate the screen after this function has been carried out.
5. Factoryreset
Sets the device back to the delivery status in the case of an intact main installation.
-52-
Page 59

6. Format Flash
Formats the internal ‘My Flash Disk’ memory. This formatting can be necessary in the case
of a prolonged removal of errors. It will be necessary to recalibrate the screen after the
formatting function has been carried out. All data will be deleted from the internal ‘My
Flash Disk’ memory irrevocably.
7. GPS Factory Reset
Performs a factory reset of the GPS receiver. When using the GPS function after having
performed a factory reset, the GPS receiver must orientate itself again. This process may
take a while.
8. DC AutoSuspend
You can select here when your navigation system should go into Standby mode automatically after the withdrawal of the external power supply. For example, this function is useful
in the case of vehicles where the cigarette lighter also switches off when the ignition is
switched off.
The AutoSuspend function will be activated several seconds after the discontinuation of
the external power supply and the Standby display will appear for the time set (see
Page 16).
The DC AutoSuspend function will be deactivated again if the power has been reconnected within the total period (in the case that the engine has been switched off for a short
time, for example). Otherwise, the navigation system will go into the Standby mode after
the expiry of the time set.
Set the required time by clicking on it and confirm your selection with OK.
English
Français
Note
This function is deactivated and can be set individually in the status at
delivery and after a hard reset (see Page 22)
-53-
Page 60

Exit
Leaving the CleanUp function and restarting the device (like reset).
Note
The deletion of the data must be confirmed before the action actually takes
place. To do this, press on YES. There will be a corresponding report if the
data to be deleted is no longer available.
Please read the “Transferring Installation Files and Map Material to
the Internal Memory“ chapter on Page 64, in order to recreate the files
(installation files and map material) in the internal memory.
-54-
Page 61

Synchronisation with the PC
I. Installing Microsoft® ActiveSync®
In order to transfer data between your PC and your navigation system you need the Microsoft® ActiveSync® program.
The cost of the navigation system includes a license for this program which can be found
on the CD/DVD.
Hinweis
You will not need the ActiveSync® communications software, if you are a
user of the Windows Vista® / Windows ® 7 operating system. The system
files necessary for the simple data transfer are already integrated into your
operating system.
Attention!
Important files can be overwritten or changed during the installation of
software. You should create a hard disk backup, in order to be able to have
access to the original files in the case of possible problems following the
installation.
You must have administrator rights to install the software under Windows® 2000 or XP.
Important
You should not connect the navigation system to your computer yet.
English
Français
1. Insert the CD/DVD and wait until the program starts automatically.
Note
If it does not function, the Auto Run function is probably deactivated. The
Setup program on the CD/DVD must be started, to start installation
manually.
2. Choose the language, click then Install ActiveSync® and follow the instructions on
the screen.
Note
When installing the GoPal Assistant, ActiveSync® will be installed automatically.
-55-
Page 62

II. Connecting with the PC
1. Press the On/Off button to start your navigation system.
2. Connect the USB cable to your navigation system.
3. Push the USB connector into a free USB port on your computer.
4. The following screen will appear after the navigation system has been connected:
Mass storage mode
Note
The ActivSync® mode will be loaded automatically after a few seconds, if
no mode has been selected.
5. Select the desired mode:
ActiveSync mode
-56-
Page 63

Mass Storage mode
You will be able to use your navigation device as a detachable device (e.g. a USB stick) in
the Mass Storage mode. Two drives, the internal memory of the navigation system itself
and the (optional) memory card, if it has been inserted into the device, will be connected
to do this.
Note
No further entries can be made on the device at the same time if you are in
this mode. Use the ‘Remove hardware safely’ function of your operating
system to protect yourself against data loss. Now, remove the cable from
your navigation system.
The Hardware Installation Assistant will now recognize a new device and will install a suitable driver. This can take several minutes.
ActiveSync®-Mode
Repeat the attempt to connect, if it has failed the first time, if you have selected the ActiveSync® mode.
Follow the instructions on your screen. The program will now set up a partnership between your PC and navigation system.
Note
The navigation system must have been recognized when setting up the
ActiveSync® mode, in order to be able to work with the GoPal Assistant.
English
Français
Alternative possibility of charging the battery
The battery will charge as soon as you connect your navigation device to a switched-on PC
or notebook by means of a USB cable (optional). No type of software or driver installation
will be necessary for this. Do not interrupt the charging process if possible during the
initial charge.
-57-
Page 64

III. Working with Microsoft® ActiveSync®
ActiveSync® will be started automatically if you connect your navigation system to the PC.
The program will check whether the device is one with which a partnership has been entered. If this is the case, the changes that have taken place on the PC and on the navigation
system since the last synchronisation will be compared and adjusted to each other. You
will be able to define exactly which data will have priority during the synchronisation in
the settings of the ActiveSync
ton), in order to become familiar with the effects of the respective settings. A restricted
Guest Access, with which you will be able to exchange data, for example, will become
active automatically if the navigation system has not been recognised as a partner. If this is
the case, although the process concerns the registered partner device, separate your navigation system from the PC and switch it off and on again. Now connect your navigation
system to the PC, to restart the recognition process. Repeat the process and, restart your
PC in addition, if your device continues to be recognised as a guest.
Note
Make sure that you always connect your navigation system to your PC
with the same USB connection, otherwise your PC will allocate an
additional ID and reinstall the device.
®
Program. Call up the Help of the Program (with the F1 But-
-58-
Page 65

GPS (Global Positioning System)
GPS is a satellite-backed system for determining your position. With the help of 24 satellites revolving around the earth, it is possible to determine your position on earth with the
accuracy of a few meters. The satellite signals are received by the antenna of the built-in
GPS receiver, which must have a "line of sight" to at least 4 of these.
Note
When the line of sight is interrupted (e.g. in tunnels, between houses, in
woods or also in vehicles with metal-coated windows) it is not possible to
determine the position. The satellite reception however automatically picks
up again as soon as the obstacle has been passed and the line of sight is reestablished. Moving slowly (e.g. slow walking) also limits the accuracy of
the navigation.
The GPS receiver consumes additional power. This is especially of concern when running
on batteries. To conserve power do not turn on the GPS receiver unnecessarily. Also terminate the navigation software if it is not needed or satellite reception is not possible for a
longer period. You can also switch the device off by means of the On/Off switch if you
experience a short interruption in your journey, pressing the same switch again will reactivate a restart. The GPS receiver will also be reactivated at the same time, if the navigation
software is still active. There may be a delay for the position to be updated again, this is
dependent on the reception situation.
Note
Please note that your appliance is preset to not shut down automatically
after a few minutes without activity. You can change this preset in the
Settings mode. If the GPS receiver has not been active for some hours, it
must orientate itself again. This process may take a while.
English
Français
-59-
Page 66

TMC (Traffic Message Channel) (optional)
The Traffic Message Channel (TMC) is a digital radio data service that functions in a similar way to RDS and is used to transmit disruptions to traffic to a suitable reception device.
The traffic information is continuously transmitted across FM.
The user is less dependent on the half-hourly broadcast traffic information, because the
signal is continuously transmitted. Apart from this, important information, as in the case of
an accident in the road ahead, can be passed on immediately.
The transmission is planned for the whole of Europe and is already offered by radio transmitters in many countries. The precision of the TMC messages can deviate greatly according to the country. At time of printing a TMC service is not available in Ireland.
The evaluation of TMC messages is not supported by every type of navigation software.
Enquire whether your system supports TMC before the possible purchase of a TMC receiver.
In Austria, the TMC traffic messages are made available by the TMCplus service. TMCplus
stands for an even faster and more efficient passing on of traffic messages. It is a cooperation between ASFINAG and the Hitradio Ö3 radio broadcaster.
TMCpro / Trafficmaster (optional)
TMCpro (a service of T-Systems Traffic GmbH) mainly uses an automatic system to record
the traffic situation, while the normal TMC relies on information from the police, ADAC
and reports of traffic jams. Sensors on autobahn bridges, strips of sensors set into the carriageway and a large number of vehicles equipped with ‘Floating Car Data’ technology
quickly supply a precise and more current image of the traffic situation on German autobahns, including predictions of possibilities.
Your navigation system will support both services and is set for the reception of both of
them in the status at delivery.
Trafficmaster (optional)
The Trafficmaster is a premium TMC service for the UK. It is supported by a network of
7,500 sensors constantly monitoring traffic flow over 8,000 miles of motorways and Aroads.
-60-
Page 67

Installing the External TMC Receiver / Connecting the TMC
Diplole Aerial (optional)
Installing the External TMC
Receiver
1. Connect the mini-USB plug to the
mini-USB connection of your device.
2. Connect the projecting antenna to
the TMC receiver and attach that
antenna with the aid of the suckers,
at the edge of your windscreen, for
example.
3. Connect the TMC receiver to the
car adapter cable after you have attached the TMC receiver to your
navigation system.
Connecting the TMC Angled
Aerial
A TMC receiver is integrated into your
navigation system, to receive traffic information. However, reception will only be
guaranteed if the TMC angled aerial supplied with the device has been connected.
1. Plug the jack plug of the TMC angled aerial into the earphones con-
nection on the lower side of your
navigation system.
2. Attach the aerial, on the edge or
your windscreen, for example, with
the help of the sucker.
3. Place the aerial so that a distance of
approx. 10 cm from the metal frame
of the screen is maintained.
(similar picture)
English
Français
-61-
Page 68

Working with Memory Cards
Your navigation system supports SD memory cards.
Inserting Memory Cards
1. Carefully take the optional memory card out of its packing (if included). Take care
not to touch or dirty the contacts.
2. Insert the memory card carefully into the card bay with contacts pointing forward.
The card must lock easily.
Removing Memory Cards
Note
Only remove the memory card if the navigation software has been closed
and the device has been switched off by means of the On/Off button beforehand. Otherwise you will risk a loss of data.
1. To remove the card press lightly onto the upper edge until it ejects.
2. Pull the card out without touching the contacts.
3. Store the memory card in the packaging or in another safe location.
Note
Memory cards are very fragile. Take care not to dirty the contacts and not
to force the card.
Accessing Memory Cards
The appliance only supports memory cards in the FAT16/32 file format. If you
insert a card prepared with a different format (e.g. in cameras, MP3 players),
your navigation system may not recognise it and will ask you to format it
again.
Attention!
Formatting the memory card irretrievably wipes out all data.
-62-
Page 69

Data Exchange via Card Reader
If you wish to copy large quantities of data (MP3 files, navigation maps) to the memory
card, these can also be stored directly to the memory card.
Many computers already have memory card devices. Insert the card into your computer
and copy the data directly to the card.
Because of the direct access you can achieve a much higher transfer rate compared to
using ActiveSync®.
Additional Card Material
Your navigation system is already equipped with digitalised map material in the internal
memory and/or memory card at the factory. Depending on the configuration, additional
maps may be included on your navigation CD/DVD. You will be able to transfer these
cards to a memory card immediately. It is recommended that you use an external card
reader (see also page 63). The GoPal Assistant supplied with the device enables a simple
and individual compilation of the map material to be transferred.
Depending on the amount of map data on the navigation CD/DVD, memory cards with
capacities of 256 MB, 512 MB, 1.024 MB or more may be required.
You can obtain additional memory cards in specialist stores.
Transfer of card material to a memory card
The transfer of additional card material to a memory card can take place through Explorer
on your PC via the following steps:
1. Insert the CD/DVD with the card material required.
2. Start your workstation and select your CD/DVD Drive.
3. Copy the file with the .psf ending out of the Directory of the region that you re-
quire to the MapRegions Directory on your memory card, from the CD/DVD.
You can transfer several files with map material to your memory card, depending on the
capacity of the memory card.
If you have copied digitized maps of several countries or country groups onto your memory card, you will be required to select the desired map in the navigation
application of your device.
English
Français
-63-
Page 70

Alternate method of installing Navigation Software (using a
memory card)
The software for your navigation system can be installed directly from a memory card.
The pre-installed software may have to be uninstalled beforehand (see special Clean Up
function, Page 52).
You will be requested to install the navigation software during the initial adjustment.
Please proceed as follows:
1. Remove the memory card from the packaging carefully. Ensure the contacts are not
touched or soiled.
2. Push the memory card into the SD slot until it engages.
3. Click on OK, in order to install the application.
The main screen, through which you will now be able to carry out the navigation settings,
will appear after all data has been copied to your navigation system.
Transferring Installation Files and Map Material to the Internal
Memory
Note
The navigation system must be connected to a computer by means of
ActiveSync® for the transfer of the data.
Your device has an internal, permanent memory, which is located in the \My Flash Disk
directory.
You will be able to make this directory, and others, visible with ActiveSync
the Search option. Directories and files can be manipulated as in Windows Explorer.
The required directory must have been stored, in order to make the installation files and
the map material for the device available.
Deposit the INSTALL directory for the installation files at (\My Flash Disk\INSTALL). Deposit
the map material in the MapRegions directory (\My Flash Disk\MapRegions). Please pay
attention to the modes of lettering given above when naming the directories.
Pay attention to the fact that sufficient drive capacity must be available, if you have stored
additional data on your navigation device. Remove files not needed if sufficient drive capacity is not available.
®
, by means of
-64-
Page 71

Specifications
Parameter Information
Power supply
Power supply cable for a cigarette
lighter
Input
Output
Battery Li-Polymer, 3.7 V
Earphones
Memory card type
USB interface
Dimensions
Weight incl. battery
Temperatures
Humidity (without condensation)
IC-AMMUB-DL/IC-AMMUB-DL-G
(Semdicar)
12-24V DC, 625mA max., Sicherung
F1A/250V
5V / 1A (max.)
Stereo earphones (3.5 mm)
SD
USB 1.1
approx. 95 mm x 77 mm x 21 mm
approx. 145 g (without packaging)
Operating
Storage
10 – 90 %
+41 °F – +95° F
(+5° C - +35° C)
+32 °F – +140 °F
-0° C - +60° C
English
Français
-65-
Page 72

Model Overview
Model
E3132
E3232
= Equipment available
= Equipment not available
TMC via
external
TMC
receiver (
via mini
USB)
TMC via
integrated
TMC
receiver and
TMC dipole
antenna
-66-
Page 73

FCC Compliance Statement
This equipment has been tested and found to comply with the limits for a Class B digital
device, pursuant to Part 15 of FCC Rules. These limits are designed to provide reasonable
protection against harmful interference in a residential installation. This equipment generates, uses, and can radiate radio frequency energy and, if not installed and used in accordance with the instructions, may cause harmful interference to radio communications.
However, there is no guarantee that interference will not occur in a particular installation.
If this equipment does cause harmful interference to radio or television reception, which
can be determined by turning the equipment off and on, the user is encouraged to try to
correct the interference by one or more of the following measures:
Reorient or relocate the receiving antenna.
Increase the separation between the equipment and receiver.
Connect the equipment into an outlet on a circuit different from that to which the
receiver is connected.
Consult the dealer or an experienced technician for help.
Changes or modifications not expressly approved by the party responsible for compliance
could void the user’s authority to operate the equipment. Shielded interface cables, if any,
must be used in order to comply with the emission limits.
English
Français
-67-
Page 74

Conditions of Warranty for the United Kingdom
Restricted Warranty
I. General Conditions of Warranty
1. General
This warranty covers defects relating to workmanship and manufacture in MEDION products. The period during which this warranty is valid and during which claims against the
warranty can be made to MEDION must be in accordance with the following terms in
order to be considered eligible:
Is effective from the date of purchase or receipt of the MEDION product from an
authorised seller of MEDION products; and
expires at the end of the warranty period specified on the warranty card provided
with the product.
For the warranty to be valid, you must:
provide suitable evidence of purchase, a copy of the original purchase receipt from
an authorised seller of MEDION products is preferred; or
register your product within 28 days of purchase either online at
www.MEDION.co.uk
included with the product.
Please keep the original purchase receipt and the warranty card in a safe place. MEDION
and its authorised sellers reserve the right to refuse a repair under warranty or a warranty
confirmation if a proof of purchase [or registration of purchase] cannot be established, or
has not been, submitted.
When it is necessary to return your product for repair please ensure that your product is
suitably packed for transportation.
Provided that your product is still within warranty (please check the duration of the warranty period as described above) and is eligible for repair or replacement under the terms
of the warranty, to return your product, please telephone MEDION on the service hotline
number. You will be sent a pre-paid transportation box suitable for returning your product
to MEDION. PLEASE MAKE SURE THAT YOU HAVE A BACKUP COPY OF ALL DATA ON THE
PRODUCT BEFORE RETURNING THE PRODUCT TO MEDION. MEDION shall bear the costs
of postage and packaging for returning the product and the transportation risk. However,
if following examination of the defective product in question, MEDION, in its reasonable
opinion, considers that the defect has been caused by:
or by completing and returning the pre-paid registration card
-68-
Page 75

your operating and/or using the product other than as instructed in the accompa-
nying documentation;
damage caused in transit as a result of your negligence in packaging of the prod-
uct; and/or
otherwise than in accordance with the terms of this warranty;
This warranty shall be void and you may be required by MEDION to reimburse MEDION
for the reasonable costs of postage and packaging before MEDION will return the product
to you. If so and you would still like MEDION to repair or replace the product, MEDION
may do so but you will be charged MEDION’s standard rates for repair and replacement
for this service.
Before returning the product, please contact MEDION via the service hotline or via the
internet (www.MEDION.co.uk). You will receive a reference number (RMA No.) on the
warranty card. Please mark the outside of your package to ensure that this reference number is clearly visible. Please submit a letter containing as much detailed information as
possible and, a full description of the defect or fault.
This should include:
a description of the fault;
when it occurred, how long it has been evident and how frequently it occurs;
any errors message(s) displayed when using the product;
a description of the circumstance(s) and conditions in which the fault occurs; and
whether it is an intermittent or persistent fault;
This will greatly assist MEDION in identifying the defect, when submitted together with the
defective product.
Unless otherwise instructed by a MEDION representative in all cases, the product must be
returned complete with all parts which were included with the original product. Incomplete contents of the returned package may lead to a delay in the repair or replacement.
MEDION does not accept any liability for any additionally submitted material(s) which
were not supplied with the original MEDION product.
This warranty does not affect your statutory rights in any way and is subject to the applicable legal statutes of the country where the product was sold to you by an authorised
MEDION seller.
English
Français
-69-
Page 76

2. Scope
Subject to any exclusions set out within this warranty, where there is a defect in your
MEDION product covered by this warranty, MEDION will repair or replace the MEDION
product. The decision whether to repair or replace the product will be made solely at the
discretion of MEDION. MEDION may, in its own discretion, replace the product returned
for repair under warranty with a replacement product that is either identical or, in the
event that such product(s) are no longer available, a product of equal or superior specification and quality.
No warranty is given for batteries or rechargeable batteries or for consumable materials
subject to wear and tear, i.e. for parts which have to be replaced periodically during the
normal use of the product, such as video-projector lamp.
Non critical failures that fall within industry specified tolerances e.g. noise, LCD pixels are
not covered by this warranty. Please consult the appropriate section in your user or instruction manual for this product for exact specifications and tolerances.
To the extent which is permitted under law, MEDION will accept no liability for burnt-in
images on plasma or LCD products as a result of normal wear and tear during the operation of the product. Please refer to your user or instruction manual for this product for
detailed operating instructions for your plasma or LCD product.
The warranty does not cover errors relating to the playback of data media in an incompatible format or created with unsuitable software.
If it is found during repair or assessment that the defect concerned is not covered under
warranty, MEDION reserves the right to invoice you for all reasonable costs incurred by
MEDION. These costs will be in relation to the return of the product, including reasonable
administration costs, plus reasonable costs for materials used and labour provided when
repairing or replacing the product. This is subject to MEDION providing you with an estimate for carrying out such work prior to costs being incurred and that you have accepted
the estimate.
You are entitled to seek independent advice or consultation relating to your product or
any of MEDION’s findings. MEDION will not be liable for any costs incurred to you when
doing so.
-70-
Page 77

3. Exclusion from warranty
To the extent permitted by law, this warranty shall be void in the event that defects or loss
caused by:
a. failure and damage resulting from the operation of the product in an environment
other than that recommended in the accompanying user or instruction manual
(e.g. in direct sunlight or in a damp room);
b. accidental damage;
c. use other than in accordance with the accompanying user or instruction manual;
d. modifications, conversions, expansions, maintenance and/or repairs made to the
MEDION product by unauthorised repairers or use of unauthorised third party
parts;
e. negligence;
f. virus attack or software errors; or
g. improper transportation or packaging during return of the product.
This warranty will also be considered void if labels or serial numbers of the product or of a
component of the product are modified or made illegible.
To the extent permitted by law, MEDION shall; only be responsible for losses which are a
reasonably foreseeable consequence of the relevant defect in the product; MEDION will
not be responsible for any costs incurred in relation to software configuration; economic
loss; loss of opportunity; loss of income; or loss of data or software arising out of its repair
or replacement of a MEDION product under this warranty.
English
Français
4. Service Hotline
Before returning the product to MEDION you must contact us using the service hotline or
via the internet (www.MEDION.co.uk). You will receive further instructions for making
your claim under warranty when you call.
The service hotline is available on 362 days in the year, including Sundays and bank holidays but excluding Christmas day, New Years Day and Easter day. The service hotline is
subject to [national rate] telephone call charges. These charges are subject to change. The
price of your call will be stated at the beginning of the call.
-71-
Page 78

II. Special warranty conditions for MEDION PC, notebook,
pocket PC (PDA) and navigation devices (PNA)
The following terms apply to MEDION PC, notebook, desktop, pocket PC and laptop
products and optional items included with such products. If one of these items has a fault,
you also have a warranty claim for its repair or replacement, from MEDION. The warranty
covers the costs of materials and labour for repairing or replacing the defective MEDION
product or the optional item in question.
Hardware connected to your product that was not produced or marketed by MEDION can
invalidate the warranty if MEDION can reasonably demonstrate that damage to the
MEDION product or of the optional item included with the delivery was caused by such
hardware. You are entitled to seek independent advice or consultation relating to your
product or any of MEDION’s findings. MEDION will not be liable for any costs incurred to
you when doing so.
This warranty is restricted in relation to any pre-installed operating system as well as to
application programme software that is included with the MEDION product in question.
This warranty is restricted as follows:
For pre-installed operating system as well as to application programme software included
in the MEDION product, MEDION only guarantees the data media (e.g. the diskettes and
CD-ROMs) upon which this software is delivered and warrants that such data media shall
be free from material and processing defects for a period of 90 days from the date of purchase of the MEDION product from an authorised seller of MEDION. MEDION will replace
defective data media free of charge.
Any claims in respect of defective pre-installed operating system as well as to application
programme software are hereby expressly excluded and you should contact the relevant
licensor or copyright owner of the defective software in question. MEDION does not guarantee that any software supplied with MEDION products will function without interruption, will be free from errors or that it will fulfil your requirements. MEDION does not
guarantee the 100% accuracy of the maps provided with the Navigation device.
It may be necessary to delete all data in the product in order to repair the MEDION product. PLEASE MAKE SURE THAT YOU HAVE A BACKUP COPY OF ALL DATA ON THE
PRODUCT BEFORE RETURNING THE PRODUCT TO MEDION. To the extent permitted by
law, MEDION excludes all liability for loss of data and MEDION recommends in all cases
that you back up all data on your MEDION product before returning the product to
MEDION.
-72-
Page 79

III. Special warranty conditions for repair on site or replacement on site
If a claim for repair or replacement on site is included within the terms of the warranty card
provided with the product, the special warranty conditions for repair or replacement of
your MEDION product on site apply.
The following provisions must be made by you for carrying out repairs or replacements on
site:
MEDION or its authorised personnel must have unrestricted, safe and immediate
access to the products.
Telecommunication facilities required by MEDION or its authorised personnel for
proper execution of your order, for testing and diagnostic purposes and for reme-
dying faults are provided by you at your own expense.
You are responsible yourself for restoring the application software after the repair
services have been carried out by MEDION or its authorised personnel.
You must take all other necessary steps to enable MEDION or its authorised per-
sonnel to carry out your order properly.
You are responsible yourself for connecting and configuring any existing external
peripheral products after MEDION or its authorised personnel have carried out their
repairs.
The free cancellation period for repairs or replacements on site is 24 hours, thereaf-
ter our reasonable costs resulting from late or missing cancellation shall be invoiced
at your expense.
English
Français
Liability limitations
The contents of this manual are subject to unannounced changes caused by technical
progress. Manufacturer and sales shall not be responsible for any damages which have
been caused as a result of omissions or errors in the information provided in this manual.
Under no circumstances shall we be liable for any of the following:
1. Claims made against you by third parties based on loss or damage.
2. Loss or damage to your blanks, recordings or data.
3. Economic follow-on damage (including lost profit or savings) or associated dam-
age even in the case that we have been informed of the possibilities of this type of
damage.
In some countries the exclusion or limitation of accompanying or follow-on damage is not
legally accepted so that the above limitations do not come into force.
-73-
Page 80

Index
A
Accessing Memory cards .................... 62
Additional card material ...................... 63
Aerial Orientation ............................... 26
AlarmClock (Wake up function)
Ending the application .................... 46
Selecting an alarm signal ................ 44
Setting the system time .................. 43
Setting the volume ......................... 45
Snooze function.............................. 46
AlarmClock (Wakeup function)
Interfaces ........................................ 42
Main screen .................................... 41
Alternative installation of the
navigation software from a
memory card .................................. 64
Ambient temperature ........................... 2
Auto run ............................................. 55
Auto start ............................................ 55
B
Battery charge indicator ...................... 10
Battery Operation ................................. 4
C
Cabling ................................................. 3
Card reader ......................................... 63
Care of the Display ............................... 4
CleanUp ....................................... 16, 52
Contents .............................................. iii
Copyright ............................................. ii
Customer Service ................................ 51
D
Data exchange .................................... 63
Data Security ........................................ 1
DC AutoSuspend ................................ 53
E
Earphones............................................. 9
Electromagnetic Compatibility .............. 3
EMC ..................................................... 3
External aerial connection ..................... 8
F
FAQ .................................................... 50
FCC Compliance Statement ............... 67
G
GPS .................................................... 59
H
Hard Reset .......................................... 23
Hotline ............................................... 51
I
Initial set up
Charging the battery ...................... 11
Installing the navigation software .. 15
Power supply ................................. 12
Switching on the device ................. 13
L
Liability limitations ............................. 73
Loudspeaker ........................................ 8
M
Memory cards .................................... 62
Microsoft
Mini-USB-Anschluss ............................. 9
Mini-USB-Connector ............................ 9
Mounting the car holder .................... 26
MP3 Player
N
Navigation
Note ...................................................... i
O
Operating
Operating Environment ....................... 2
®
ActiveSync® ........................ 55
List of favourites ............................. 35
Bookmarks ..................................... 35
Attaching the navigation system .... 27
Autoadapter anschließen ............... 12
Mounting the car holder ................ 26
Safety instructions .......................... 24
Starting the navigation software ..... 29
Switching on/off the device ............ 16
-74-
Page 81

P
Password ............................................ 17
Picture Viewer
Main screen .................................... 36
Operation ....................................... 36
R
R&TTE .................................................. 3
Recycling and Disposal ......................... 5
Repair ................................................... 2
Reset ................................................... 22
Resetting the navigation system
Hard Reset ...................................... 22
Soft Reset ........................................ 22
S
Safety and Maintenance ....................... 1
Safety instructions
Navigation ...................................... 24
Connection ....................................... 3
Ambient temperature ....................... 2
Data security ..................................... 1
Operating environment .................... 2
Repair ............................................... 2
Cabling ............................................. 3
Battery operation .............................. 4
Maintencance ................................... 4
Care of the display ............................ 4
Transport .......................................... 5
Security .............................................. 17
Serial Number ........................................ i
Service .................................................. ii
Faults and possible causes .............. 51
Hotline ............................................ 51
Specifications ...................................... 65
Standards
FCC Compliance Statement ........... 67
R&TTE .............................................. 3
Starting the navigation software ........ 29
Sudoku
Description of the switch fields ....... 49
Main screen ................................... 47
SuperPIN ...................................... 19, 20
Supplied Items ..................................... 6
Synchronisation with the PC .............. 55
T
TMC ................................................... 60
TMCPro .............................................. 60
Touch Screen ....................................... 7
Transfer of card material to a
memory card ................................. 63
Transferring Installation Files and
Map Material to the Internal
Memory ......................................... 64
Transport ............................................. 5
Travel Guide ...................................... 39
U
UUID ............................................ 19, 20
V
Views
Back components ............................. 8
Bottom components ........................ 9
Front components ........................... 7
W
Warranty ............................................ 68
English
Français
-75-
Page 82

-76-
Page 83

Recommandations concernant le présent mode d'emploi
Nous avons organisé ce mode d'emploi par thèmes, de manière à ce que vous puissiez
toujours trouver facilement les informations que vous recherchez.
Remarque
Vous trouverez un mode d'emploi détaillé concernant la navigation sur
le CD/DVD ainsi que dans l'aide en ligne de l'appareil.
Consultez le chapitre « Questions fréquemment posées » pour obtenir des réponses aux
questions qui sont souvent posées à notre service après-vente.
Le but de ce mode d'emploi est de vous expliquer le fonctionnement de votre appareil de
manière parfaitement compréhensible.
Identification
Pour conserver la preuve de l'origine de votre appareil, notez ici les informations
suivantes :
Numéro de série .....................................................................................................
Mot de passe ...........................................................................................................
Aide-mémoire..........................................................................................................
SuperPIN .................................................................................................................
UUID .......................................................................................................................
Date d'achat ............................................................................................................
Lieu d'achat.............................................................................................................
Vous trouverez le numéro de série au dos de votre appareil. Notez également ce numéro
sur votre carte de garantie.
Introduisez le mot de passe et l'aide-mémoire via la fonction Security. Le SuperPIN et
l'UUID vous sont donnés après l'activation de la fonction Security. Voir page 18.
English
Français
Page 84

La qualité
Lors du choix des composants, nous avons fait particulièrement attention à la
fonctionnalité, la simplicité d'utilisation, la sécurité et la fiabilité. Grâce à un concept
matériel et logiciel équilibré, nous pouvons maintenant vous présenter un appareil
innovant qui vous procurera beaucoup de plaisir aussi bien dans votre travail que dans vos
loisirs. Nous vous remercions de la confiance que vous accordez à notre produit et nous
sommes heureux de vous accueillir comme nouveau client.
Le service
Dans le cadre de notre service après-vente personnalisé, nous vous soutenons dans votre
travail quotidien. Contactez-nous et nous nous ferons un plaisir de vous aider de notre
mieux. En page 52 du présent manuel, vous trouverez le chapitre consacré au service
après-vente.
Reproduction du présent mode d'emploi
Le présent mode d'emploi contient des informations légalement protégées. Tous droits
réservés. La reproduction mécanique, électronique ou par n'importe quel autre moyen est
interdite sans autorisation écrite du fabricant.
ii
Page 85

Sommaire
Sécurité et entretien..................................................................................... 1
Consignes de sécurité..................................................................................................1
Sauvegarde des données.............................................................................................1
Conditions d'utilisation ...............................................................................................2
Réparations .................................................................................................................2
Température ambiante................................................................................................2
Compatibilité électromagnétique................................................................................3
Raccordement .............................................................................................................3
Alimentation électrique via l'adaptateur voiture.......................................................3
Câblage.......................................................................................................................3
Information sur la conformité R&TTE...........................................................................4
Fonctionnement sur accu............................................................................................4
Entretien......................................................................................................................4
Entretien de l'écran .....................................................................................................5
Recyclage ....................................................................................................................5
Transport ....................................................................................................................6
Contenu de l'emballage..............................................................................................7
Les différentes vues....................................................................................... 8
Vue de face..................................................................................................................8
Vue arrière...................................................................................................................9
Vue de dessous..........................................................................................................10
Côté droit..................................................................................................................11
Configuration initiale................................................................................. 12
I. Charger l'accu........................................................................................................12
II. Alimentation électrique .........................................................................................13
L'adaptateur voiture...............................................................................................13
Possibilité alternative de chargement de l'accu ......................................................13
III. Démarrer l'appareil ..............................................................................................14
IV. Installer le logiciel de navigation...........................................................................16
Utilisation................................................................................................... 17
Allumer et éteindre....................................................................................................17
Sécurité ...................................................................................................... 18
Définir le mot de passe et l'aide-mémoire..................................................................18
Effectuer des réglages................................................................................................19
English
Français
iii
Page 86

SuperPIN et UUID......................................................................................................20
Effectuer des réglages ultérieurs ................................................................................21
Demande du mot de passe........................................................................................22
Réinitialiser la navigation GPS ................................................................... 23
Soft Reset (redémarrage) ...........................................................................................23
Arrêt complet/hard reset ...........................................................................................24
Navigation .................................................................................................. 25
Consignes pour la navigation....................................................................................25
Consignes de sécurité pour la navigation...............................................................25
Consignes de sécurité pour une utilisation dans un véhicule..................................26
Orientation de l'antenne ...........................................................................................27
I. Monter la fixation voiture .......................................................................................27
II. Fixer le système de navigation GPS ........................................................................28
III. Brancher l'adaptateur voiture ...............................................................................29
IV. Démarrer le logiciel de navigation ........................................................................30
Informations relatives à la surveillance du trafic........................................ 31
Lecteur MP3 (en option)............................................................................. 34
Présentation de l’écran principal ...............................................................................34
Sélection de titres et insertion dans la liste des favoris................................................35
Liste des favoris ......................................................................................................36
Liste des signets définis..............................................................................................36
Picture Viewer (en option)......................................................................... 37
Utilisation de Picture Viewer ......................................................................................37
Présentation de l'écran principal ...............................................................................37
Affichage plein écran..............................................................................................38
Travel Guide (en option) ............................................................................ 40
Alarm Clock (fonction réveil) (en option) .................................................. 42
Aperçu de l'écran principal........................................................................................42
Description des boutons............................................................................................43
Réglage de l'heure du système...............................................................................44
Sélection d'une sonnerie........................................................................................45
Réglage du volume ................................................................................................46
Fonction Snooze ....................................................................................................47
Quitter Alarm Clock ...............................................................................................47
Sudoku (en option) .................................................................................... 48
Aperçu de l'écran principal........................................................................................48
Aperçu de la zone de jeu ...........................................................................................50
iv
Page 87

Description des boutons............................................................................................50
Questions fréquemment posées.................................................................. 51
Service après-vente..................................................................................... 52
Pannes et causes possibles ........................................................................................52
Vous avez besoin d'une aide supplémentaire ?..........................................................52
Appendice .................................................................................................. 53
Fonction spéciale CleanUp (interface en anglais).......................................................53
Synchronisation avec le PC ......................................................................... 56
I. Installer Microsoft® ActiveSync®................................................................................56
II. Raccorder l'appareil à un PC..................................................................................57
Mode Mémoire de masse.......................................................................................57
Mode ActiveSync®...................................................................................................58
Possibilité alternative de chargement de l'accu ......................................................58
III. Travailler avec Microsoft® ActiveSync®....................................................................58
GPS (Global Positioning System) ................................................................ 59
TMC (Traffic Message Channel) .................................................................. 60
TMCPro (en option) ..................................................................................................60
Raccorder un récepteur TMC externe / Raccorder une antenne FM (en option) .....61
Manipuler les cartes mémoire .................................................................... 62
Installer la carte mémoire ..........................................................................................62
Retirer la carte mémoire ............................................................................................62
Pour accéder à la carte mémoire ............................................................................62
Échange de données via un lecteur de cartes .........................................................63
Autres cartes..............................................................................................................63
Transférer une carte sur une carte mémoire ..............................................................63
Autre méthode d'installation du logiciel de navigation à partir d'une carte
mémoire ................................................................................................................64
Transfert de fichiers d'installation et de cartes dans la mémoire interne .................64
Données techniques.................................................................................... 65
Présentation du modèle ............................................................................. 65
Conditions de garantie pour la France........................................................ 66
Conditions de garantie pour la Belgie ........................................................ 72
Conditions de garantie pour le Luxembourg .............................................. 77
Index .......................................................................................................... 83
English
Français
v
Page 88

Copyright © 2010, version 26/04/2010
Tous droits réservés.
Tous droits d'auteur du présent mode d'emploi réservés.
®
Le Copyright est la propriété de la société Medion
.
Marques déposées :
®
MS-DOS
Pentium
et Windows® sont des marques déposées de Microsoft®.
®
est une marque déposée d'Intel®.
Les autres marques déposées sont la propriété de leurs titulaires respectifs.
Sous réserve de modifications techniques et visuelles ainsi que d'erreurs d'impression.
vi
Page 89

Sécurité et entretien
Consignes de sécurité
Veuillez lire attentivement ce chapitre et respecter toutes les consignes de sécurité y
figurant. Vous garantirez ainsi le fonctionnement fiable et la longévité de votre appareil.
Conservez soigneusement l'emballage et le mode d'emploi de l'appareil de manière à
pouvoir les remettre au nouveau propriétaire en cas de vente de l'appareil.
• Ne laissez pas les enfants jouer sans surveillance avec des appareils électriques. Les
enfants ne sont pas toujours conscients des dangers possibles.
• Conservez les emballages, p. ex. les sacs en plastique, hors de la portée des
enfants : ils pourraient s'étouffer !
• N'ouvrez jamais le boîtier de l'appareil ou des accessoires : ils ne contiennent
aucune pièce à nettoyer ! L'ouverture du boîtier peut entraîner un danger de mort
par électrocution.
• N’utilisez votre système de navigation qu’avec l’alimentation électrique autorisée.
• Ne déposez aucun objet sur l'appareil et n'exercez aucune pression sur l'écran, cela
pourrait le briser.
• Afin d'éviter tout dommage, n'utilisez pas d'objet pointu sur l'écran. Utilisez par
exemple un crayon à pointe émoussée. Dans la plupart des cas, vous pouvez
commander l'appareil à l'aide de votre index.
• Un écran brisé peut entraîner des risques de blessures. Le cas échéant, portez des
gants de protection pour ramasser les bris de verre et envoyez ces derniers au
service après-vente. Lavez-vous ensuite soigneusement les mains avec du savon, car
il est possible que vous soyez entré en contact avec des produits chimiques.
Coupez l'alimentation électrique, débranchez immédiatement l'appareil (ou ne l'allumez
pas du tout) et adressez-vous au service après-vente si :
• le boîtier de l'appareil ou de l'un des accessoires est endommagé ou si du liquide a
pénétré à l'intérieur. Faites tout d'abord examiner les pièces par le service aprèsvente afin d'éviter tout dommage !
English
Français
Sauvegarde des données
• Après chaque mise à jour de vos données, effectuez une copie de sauvegarde sur
un support externe (CD-R). Le fabricant ne peut être tenu pour responsable
d'une perte de données et de ses éventuelles conséquences.
Page 90

Conditions d'utilisation
Le non-respect des consignes de sécurité suivantes peut entraîner des dysfonctionnements
ou la détérioration de l'appareil. La garantie est alors annulée.
• Conservez votre appareil ainsi que tous les périphériques et accessoires à l'abri de
l'humidité. Évitez de les exposer à la poussière, la chaleur et la lumière directe du
soleil.
• Protégez impérativement votre appareil de l'humidité, en cas de pluie ou de grêle
par exemple. Attention : de l'humidité peut également se former dans un étui de
protection par l'intermédiaire de la condensation.
• Évitez les fortes vibrations et les secousses qui peuvent par exemple se produire
lorsque vous roulez sur un terrain accidenté.
• Veillez à ce que l'appareil ne se détache pas de son support p. ex. lors d'un
freinage. Montez l'appareil le plus verticalement possible.
Réparations
• Les adaptations et mises à niveau de votre appareil doivent être exclusivement
confiées à un personnel professionnel et qualifié.
• Si une réparation s'avère nécessaire, veuillez vous adressez exclusivement à notre
service après-vente agréé. L'adresse figure sur votre coupon de garantie.
Température ambiante
• L'appareil peut être utilisé à des températures ambiantes comprises entre +5° C et
+35° C et dans des conditions d'humidité comprises entre 10 % et 90 % (sans
condensation).
• Quand il est éteint, l'appareil résiste à des températures comprises entre 0° C et
+60° C.
• L'appareil doit être stocké en toute sécurité. Évitez les températures élevées (p. ex.
en stationnement ou par les rayons directs du soleil).
2
Français
Page 91

Compatibilité électromagnétique
• Les directives concernant la compatibilité électromagnétique doivent être
respectées lors du raccordement de l'appareil et d'autres composants. Veuillez en
outre noter que seuls des câbles blindés (de 3 mètres max.) peuvent être utilisés
pour les connexions avec les systèmes externes.
• Conservez une distance d'au moins un mètre par rapport aux sources de
perturbations magnétiques ou hautes fréquences (téléviseurs, haut-parleurs,
téléphones mobiles, etc.) pour éviter d'éventuels dysfonctionnements ou pertes de
données.
• En cours d'utilisation, les appareils électroniques produisent des rayons
électromagnétiques. Ces rayons sont sans danger, mais peuvent perturber d'autres
appareils utilisés à proximité. La compatibilité électromagnétique de nos appareils
est testée et optimisée en laboratoire. Toutefois, des perturbations de
fonctionnement affectant l'appareil ainsi que l'électronique environnante ne sont
pas totalement exclues. Si vous êtes confronté à ce problème, tentez de le résoudre
en modifiant le positionnement et la distance entre les différents appareils. Il est
particulièrement important de vérifier le parfait fonctionnement de l'électronique
de votre véhicule avant de démarrer.
Raccordement
Veuillez respecter les recommandations suivantes pour brancher correctement votre
appareil.
Alimentation électrique via l'adaptateur voiture
• Utilisez uniquement l'adaptateur voiture sur l'allume-cigare d'un véhicule (batterie
voiture = DC 12V ou batterie camion = 24 V ). Si vous n'êtes pas sûr de
l'alimentation électrique de votre véhicule, renseignez-vous auprès de votre
constructeur automobile.
English
Français
Câblage
• Disposez les câbles de telle sorte que personne ne puisse marcher ou trébucher
dessus.
• Ne posez aucun objet sur les câbles pour éviter de les endommager.
• N'employez pas la force pour raccorder câbles et connecteurs et faites attention à
l'orientation correcte des connecteurs.
• Veillez à ce qu'aucune force importante, p. ex. latérale, ne soit exercée sur les
connecteurs. Cela pourrait causer des dommages sur et à l'intérieur de votre
appareil.
• Ne tordez ni ne pliez fortement les câbles pour éviter tout risque de court-circuit ou
de rupture de câble.
Sécurité et entretien
3
Page 92

Information sur la conformité R&TTE
Cet appareil est conforme aux exigences de la directive sur les équipements hertziens et les
équipements terminaux de télécommunication (1999/5/CE). Vous pouvez obtenir les
déclarations de conformité complètes à l'adresse www.medion.com/conformity
.
Fonctionnement sur accu
Votre appareil fonctionne avec un accu intégré. Afin de prolonger la durée de vie et les
performances de l'accu ainsi que d'assurer un fonctionnement en toute sécurité, veuillez
respecter les recommandations suivantes :
• L'accu ne supporte pas la chaleur. Évitez tout risque de surchauffe de votre appareil
et donc de l'accu. Le non-respect de cette recommandation peut provoquer des
dommages et, dans certaines circonstances, causer une explosion de l'accu.
• Pour le chargement de l'accu, utilisez uniquement les sources d'alimentation
fournies.
•
L'accu constitue un déchet toxique. Pour jeter l'accu de votre appareil,
veuillez respecter les dispositions appropriées de recyclage des déchets. Contactez
votre service après-vente, qui vous informera à ce sujet.
Entretien
Attention !
Le boîtier de votre appareil ne contient aucune pièce à entretenir ou à
nettoyer.
Vous pouvez prolonger la durée de vie de votre appareil en respectant les consignes
suivantes :
• Débranchez toujours la fiche d'alimentation en courant et tous les autres câbles de
connexion avant de procéder au nettoyage.
• Nettoyez votre appareil uniquement avec un chiffon légèrement humide et non
pelucheux.
• N'utilisez pas de solvants ni de produits nettoyants acides ou gazeux.
4
Français
Page 93

Entretien de l'écran
• Évitez de salir ou de griffer la surface de l'écran qui s'abîme facilement. Nous
recommandons l'utilisation de films de protection pour écran afin de prévenir les
rayures et les salissures. Vous trouverez cet accessoire chez votre revendeur
spécialisé.
• Veillez notamment à ne pas laisser de gouttes d'eau sécher sur l'écran. L'eau peut
entraîner une décoloration permanente.
• Nettoyez votre appareil uniquement avec un chiffon doux et non pelucheux.
• N'exposez pas l'écran à la lumière du soleil ou à des rayonnements ultraviolets.
Recyclage
L'appareil et son emballage sont recyclables.
Appareil
Lorsque l'appareil arrive en fin de vie, ne le jetez jamais dans une poubelle classique.
Informez-vous des possibilités de recyclage écologique.
Emballage
Les différents emballages usagés sont recyclables et doivent donc par principe être
recyclés.
English
Français
Sécurité et entretien
5
Page 94

Transport
Veuillez respecter les recommandations suivantes pour transporter votre appareil.
• Après avoir transporté l'appareil, attendez que celui-ci soit à température ambiante
avant de l'allumer.
• En cas de fortes variations de température ou d'humidité, la condensation peut
provoquer une accumulation d'humidité dans l'appareil, qui peut entraîner un
court-circuit électrique.
• Utilisez un étui de protection pour protéger l'appareil de la saleté, de l'humidité,
des secousses et des griffures.
• Pour l'expédition de votre appareil, utilisez toujours l'emballage en carton original
et demandez conseil à votre entreprise de transport ou à notre service après-vente.
• Avant tout voyage, renseignez-vous sur l'alimentation électrique et les moyens de
communication en vigueur sur le lieu de destination. Avant tout départ en voyage,
procurez-vous au besoin les adaptateurs nécessaires pour le courant ou la
communication.
• Lors du contrôle de vos bagages à main dans un aéroport, il est recommandé de
faire passer l'appareil et tous les supports de stockage magnétiques (p. ex. disques
durs externes) aux rayons X (le dispositif sur lequel vous déposez vos sacs). Évitez le
détecteur magnétique (le portique sous lequel vous devez passer) et le bâton
magnétique (l'appareil portatif utilisé par le personnel de la sécurité), qui
pourraient éventuellement détruire vos données.
6
Français
Page 95

Contenu de l'emballage
Veuillez vérifier que le contenu de la livraison est complet et, si ce n'est pas le cas, nous
prévenir dans un délai de 15 jours suivant l'achat. Avec l'appareil que vous venez
d'acheter, vous recevez :
• Système de navigation
• Câble d'alimentation électrique pour allume-cigare
• Fixation voiture
• Câble USB
• CD/DVD comportant le logiciel de navigation, les cartes digitalisées, ActiveSync
application PC pour un rétablissement rapide du matériel de données
• Le présent mode d'emploi et la carte de garantie
En option
• Carte mémoire
• Antenne FM externe pour recevoir le TMC
• Récepteur TMC externe
• Écouteurs
• Étui de protection
English
Français
®
,
Sécurité et entretien
7
Page 96

Les différentes vues
Vue de face
n
N° Composants Description
n
Touch Screen Édite les données de l'appareil. Pour
8
sélectionner des commandes de menu ou
entrer des données, appuyez sur l'écran avec le
stylet adapté « émoussé ».
Attention !
Ne touchez pas l'écran avec des objets
anguleux ou pointus afin d'éviter de l'abîmer.
Utilisez par exemple un crayon à pointe
émoussée. Dans la plupart des cas, vous pouvez
commander l'appareil à l'aide de votre index.
Français
Page 97

Vue arrière
N° Composants Description
n
Branchement
antenne externe
o
Haut-parleur Restitue des instructions vocales et des
Branchement pour une deuxième antenne
facultative.
avertissements.
English
n
Français
o
Les différentes vues
9
Page 98

Vue de dessous
N° Composants Description
Branchement
n
USB Mini
Écouteurs Prise pour écouteurs
o
Bouton
p
principal
Bouton Reset Orifice de réinitialisation (Soft-Reset, voir page 23).
q
n
o p q
Anschluss zur externen Stromversorgung und
Branchement pour l'alimentation électrique externe
et le raccordement avec un PC via le câble USB
(pour la synchronisation des données).
En option, vous pouvez aussi brancher un récepteur
TMC externe (seulement avec le modèle E3132)
À pleine puissance, l'écoute
prolongée avec des écouteurs
peut endommager l'oreille de
l'utilisateur.
En option, vous pouvez aussi brancher une antenne
FM externe pour recevoir le TMC (seulement avec le
modèle E3232)
Sépare complètement l’appareil de la batterie
(Hard Reset)
10
Français
Page 99

Côté droit
N° Composants Description
Bouton de
n
marche/arrêt
Témoin de
chargement
Volume +/-
o
Emplacement
p
de carte
mémoire
English
n
Français
o
p
Une pression du bouton met en marche ou arrête
l’appareil (mode standby).
Au cours du chargement, le témoin de chargement
orange clignote. Il est vert lorsque l'accu est
complètement chargé. (Le LED peut également
s’allumer en vert lorsque l’interrupteur principal
est en mode ARRÊT (OFF) et que l’appareil passe du
mode marche au mode arrêt.)
Connecteur pouvant accueillir une carte mémoire
en option.
Les différentes vues
11
Page 100

Configuration initiale
Nous allons maintenant vous guider pas à pas à travers la configuration initiale de votre
système de navigation GPS. Retirez tout d'abord la feuille de protection de l'écran.
I. Charger l'accu
Vous pouvez charger l'accu de votre système de navigation :
• avec un adaptateur voiture ou
• un câble USB.
Attention !
Selon l'état de chargement de l'accu inséré, il peut être nécessaire de
charger d'abord l'appareil pendant quelque temps avant de pouvoir
procéder à la première installation.
Attention !
L’appareil ne peut être chargé que si l’interrupteur principal
(voir p. 10) est en position MARCHE (ON).
Lorsque vous manipulez l'accu, veuillez tenir compte des points suivants :
• Le témoin de chargement orange clignote jusqu'à ce que l'appareil soit chargé.
Évitez d'interrompre le processus de chargement avant que l'accu ne soit
complètement chargé. Cela peut prendre plusieurs heures. Le témoin de
chargement de l'accu vert clignote lorsque l'accu atteint un niveau de charge
élevé. Laissez le câble de recharge branché encore 20 minutes pour atteindre la
capacité de charge complète.
• Vous pouvez travailler avec l'appareil pendant le processus de chargement, mais
l'alimentation en courant ne doit pas être interrompue lors de la configuration
initiale.
• L'appareil doit être constamment relié à l'alimentation électrique externe afin de
permettre le chargement complet de l'accu intégré.
• Vous pouvez laisser l'alimentation électrique externe branchée, ce qui est très
pratique pour le fonctionnement continu. Remarque : l'adaptateur voiture
consomme de l'énergie même lorsqu'il n'est pas en train de charger l'accu du
système de navigation.
• Si l'accu est très faible, l'appareil peut nécessiter plusieurs minutes après le
branchement sur une source d'alimentation externe avant d'être de nouveau prêt à
fonctionner.
• Si, lorsque le câble de chargement est branché, l’interrupteur principal est position
ON et que l’appareil n’est pas allumé, la touche de réinitialisation (Reset) peut être
utilisée sans que le chargement soit interrompu.
12
Français
 Loading...