

Page 1

Page 2

General guide..............................................................................
Introduction.................................................................................
Care of your keyboard................................................................
Power supply................................................................................
-Using batteries
-Using the AC adaptor
Connections.................................................................................
-The headphones jack
-The sustain jack.
-The Aux. Out jack
-The MIDI IN/OUT,/THRU jacks
Play demo songs..........................................................................
Basic operation...........................................................................
-Selecting & playing voices
-Sustain voice effect
-Pitch bend
-Digital Signal Processor (DSP)
Auto-accompaniment..................................................................
-Selecting a style
-Playing the selected style
-Changing the tempo
-Using auto-accompaniment
-Variations
-To use synchro start the accompaniment
-To start the accompaniment with introductory pattern
-To stop the accompaniment with ending phrase
-Playing the metronome
-Changing the accompaniment split point
-Accompaniment track control
-One touch setting
Overall keyboard control.............................................................
Specifications.............................................................................
Appendix A : Chord table...........................................................
Appendix B : Single finger chord chart.......................................
Appendix C : Demo songs list....................................................
-Listen to a particularly demo song
-Play along with the demo song
-Change the keyboard octave
-Play the drumpads
-Adjust the pitch of the keyboard voice
-Tune the keyboard
-Set the stereo pan position
-Select the MIDI channel
-Set the beat level
-Split the keyboard
-Memorize panel settings
-Touch response keyboard
-Record & playback
2
3
3
3
5
6
7
13
17
18
19
20
10
CONTENT
Page 3

2
General Guide
POWER SWITCH
MASTER VOLUME
MIXER CONTROL
- RHYTHM
- BASS
- OC
- LOWER
- UPPER
MODE
DUAL
LCD DISPLAY
PITCH BEND
TEMPO +/ACCOMPANIMENT CONTROL
- START/STOP
- SYNC
- INTRO/ENDING
- FILL IN TO NORMAL
- FILL IN TO VARIATION
OTS
WRITE
VOICE/STYLE/SONG
SELECT
PIANO
METRONOME
OCTAVE +/NUMERIC KEYPAD
RECORD (REC/PLAY)
DSP
SUSTAIN
TOUCH
MELODY OFF
DEMO ALL
1. FRONT CABINET
2. BACK CABINET JACK
MIDI IN/OUT/THRU JACKS
SUSTAIN JACK
AUX.OUT JACK
HEADPHONES JACK
DC 12V JACK
3. LCD DISPLAY
NORMAL
FINGERED
S.FINGER
SPLIT
TEMPO
BEAT
METRONOME
VOLUME
DSP
CHORD
STYLE
LOWER/VOICE 1/
VOICE 2
VOICE
STYLE
SONG
SPLIT PT.
MIDI CHAN.
PAN
TUNE
X'SPOSER
BEAT
PERCUS
BASS CLEF
TREBLE CLEF
KEYBOARD
1
11
12
Page 4

Introduction
Thank you for purchasing the electronic keyboard. This keyboard provides you with the
following features and functions:
136 PCM voices + Drum and Percussion Sounds
100 Styles
100 Demo Songs with playing along feature
Auto Accompaniment with Normal, Fingered and Single Finger control modes
One Touch Setting
Record and Playback
MIDI compatibility
Care of your keyboard
Your keyboard will give you years of playing pleasure if you follow the simple rules below:
Do not expose the keyboard to the high temperature, direct sunlight, and excessive
dust places
Avoid physical shocks caused by dropping, bumping, or placing heavy objects on the
keyboard.
Never use cleaners such as alcohol or thinner to clean the keyboard.
Always turn power off when making any connections.
Power Supply
This keyboard can be powered by current from a standard household wall outlet (by using
the specified AC adaptor) or by batteries. Always turn off the keyboard when you are not
using it.
Using batteries
Always turn off the keyboard before loading or replacing batteries.
To load batteries:
1. Remove the battery compartment cover.
O
P
E
N
2. Load six "D size" (SUM-1 or R20) batteries into the battery compartment, being careful to
follow the polarity markings on the cabinet.
3. Replace the compartment cover, make sure that it locks firmly in place.
3
Page 5

Important battery information:
Any of the following symptoms indicate low battery power. Replace batteries as soon as
possible whenever any of the following occurs.
Dim, difficult to read display.
Abnormally low speaker/headphone volume.
Distortion of sound output.
Sudden power failure when playing at high volume.
Abnormal rhythm or demo song plays.
Dimming of the display when playing at high volume.
Cautions:
Improper handling of batteries can cause them to burst and leak, which creates the danger
of personal injury or damage of the keyboard. Be sure to note the following precautions:
Never mix batteries of different types.
Never mix old batteries with the new ones.
Replace batteries as soon as possible after any sign of running out.
Remove the batteries from the keyboard when not using for an extended period of
time.
Using the AC adaptor
Use only the specified AC adaptor for this keyboard. The adaptor shall be 12V DC
output, 2200mA, and center positive type. Turn off the keyboard before you connect the
adaptor into the AC wall outlet and the cord into the unit.
DC 12V
Cautions:
Use only the specified AC adaptor. Use of another type of adaptor creates the danger
of fire and electronic shock.
For safety sake, unplug the AC adaptor from the wall outlet when leaving the keyboard
unattended for a long time
4
Page 6
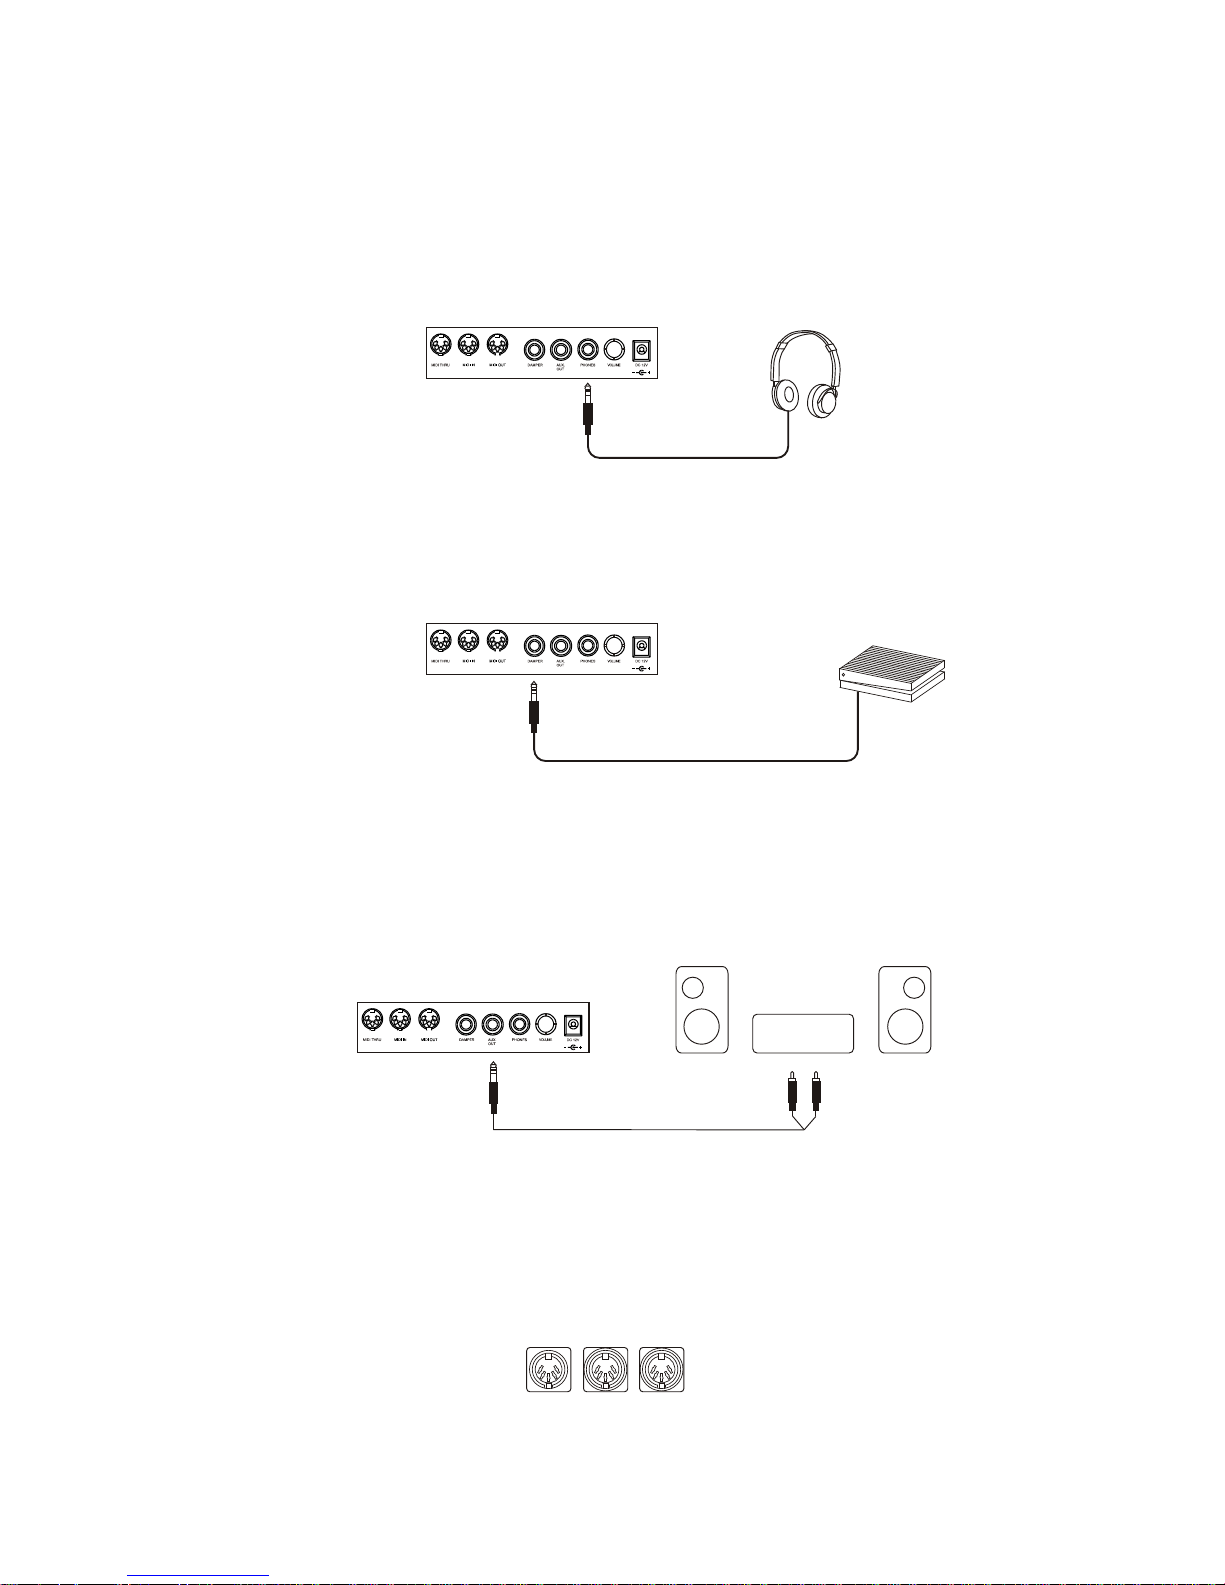
Connections
The headphones jack
A standard pair of stereo headphones can be plugged in PHONES jack for private practice
or late night playing. The internal speaker system is automatically shut off when the
headphones are plugged into the PHONES jack.
The sustain jack
An optional foot switch can be plugged into the SUSTAIN jack for sustain control. The
foot switch functions like the pedal on a piano-press for sustain, release for normal sound.
The AUX.OUT jack
The AUX.OUT jack delivers the output of the keyboard for the connection to an external
amplifier. Using audio cord, plug into AUX.OUT jack located on the rear panel. Then plug the
other end of the cord into LINE IN or AUX.IN of the amplifier.
Stereo
System
The MIDI IN, OUT, THRU jacks
The MIDI IN connector receives MIDI data from an external MIDI device. The MIDI OUT
connector transmits MIDI data generated by the keyboard to an external MIDI device. The
MIDI THRU connector transmits MIDI data from an external MIDI device to another external
MIDI device.
MIDI OUT MIDI IN MIDI THRU
5
Page 7

6
Play demo songs
A selection of 100 demo songs come built-in for your listening pleasure or play along fun.
They will give you a good idea of what your keyboard can do.
1. Turn the power ON by pressing the [POWER] switch.
2. Adjust the volume to a appropriate level by turning the [VOLUME] switch.
Press the [DEMO ALL] button . The keyboard starts to play the demo songs. While the
keyboard is playing the demo song, you can press the [-/OFF] or [+/ON] button to step to the
next demo song in the corresponding direction . Press the [DEMO ALL] button again to stop
the play.
3.
Listen to a particular demo song
1. Select the SONG mode by pressing the [VOICE/STYLE/SONG] button.
2. Use the NUMBER buttons to input the two-digit number of a demo song.
For example, to select 35 input 3 and then 5.
Page 8

7
Press the [START/STOP] button to start playing the demo song. The song will play in
endless loop, re-starting after it reaches the end. Press the [START/STOP] button again to
stop the play.
3.
Play along with the demo song
1. While the keyboard is playing the demo song, you can press the [MELODY OFF] button to
cut off the melody part of the demo song.
2. Use the [TEMPO] buttons to adjust the tempo of the selected demo song.
3. Pressing the [MELODY OFF] button again, the melody part of the demo song comes back.
Basic Operation
Selecting & playing voices
The keyboard has 136 PCM voices and percussion kits that you can select and play on the
keyboard. Before you select a voice, make sure you have selected VOICE mode. Press the
[VOICE/STYLE/ONG] button to select the VOICE mode.
The [-/OFF] and [+/ON] buttons:
When the VOICE mode is selected, these buttons step up or down through the voices list.Press
these buttons briefly to step to the next voice in the corresponding direction, or hold the button
to scroll rapidly through the voices in the corresponding direction. The selected voice number
shows in the display.
Page 9
8
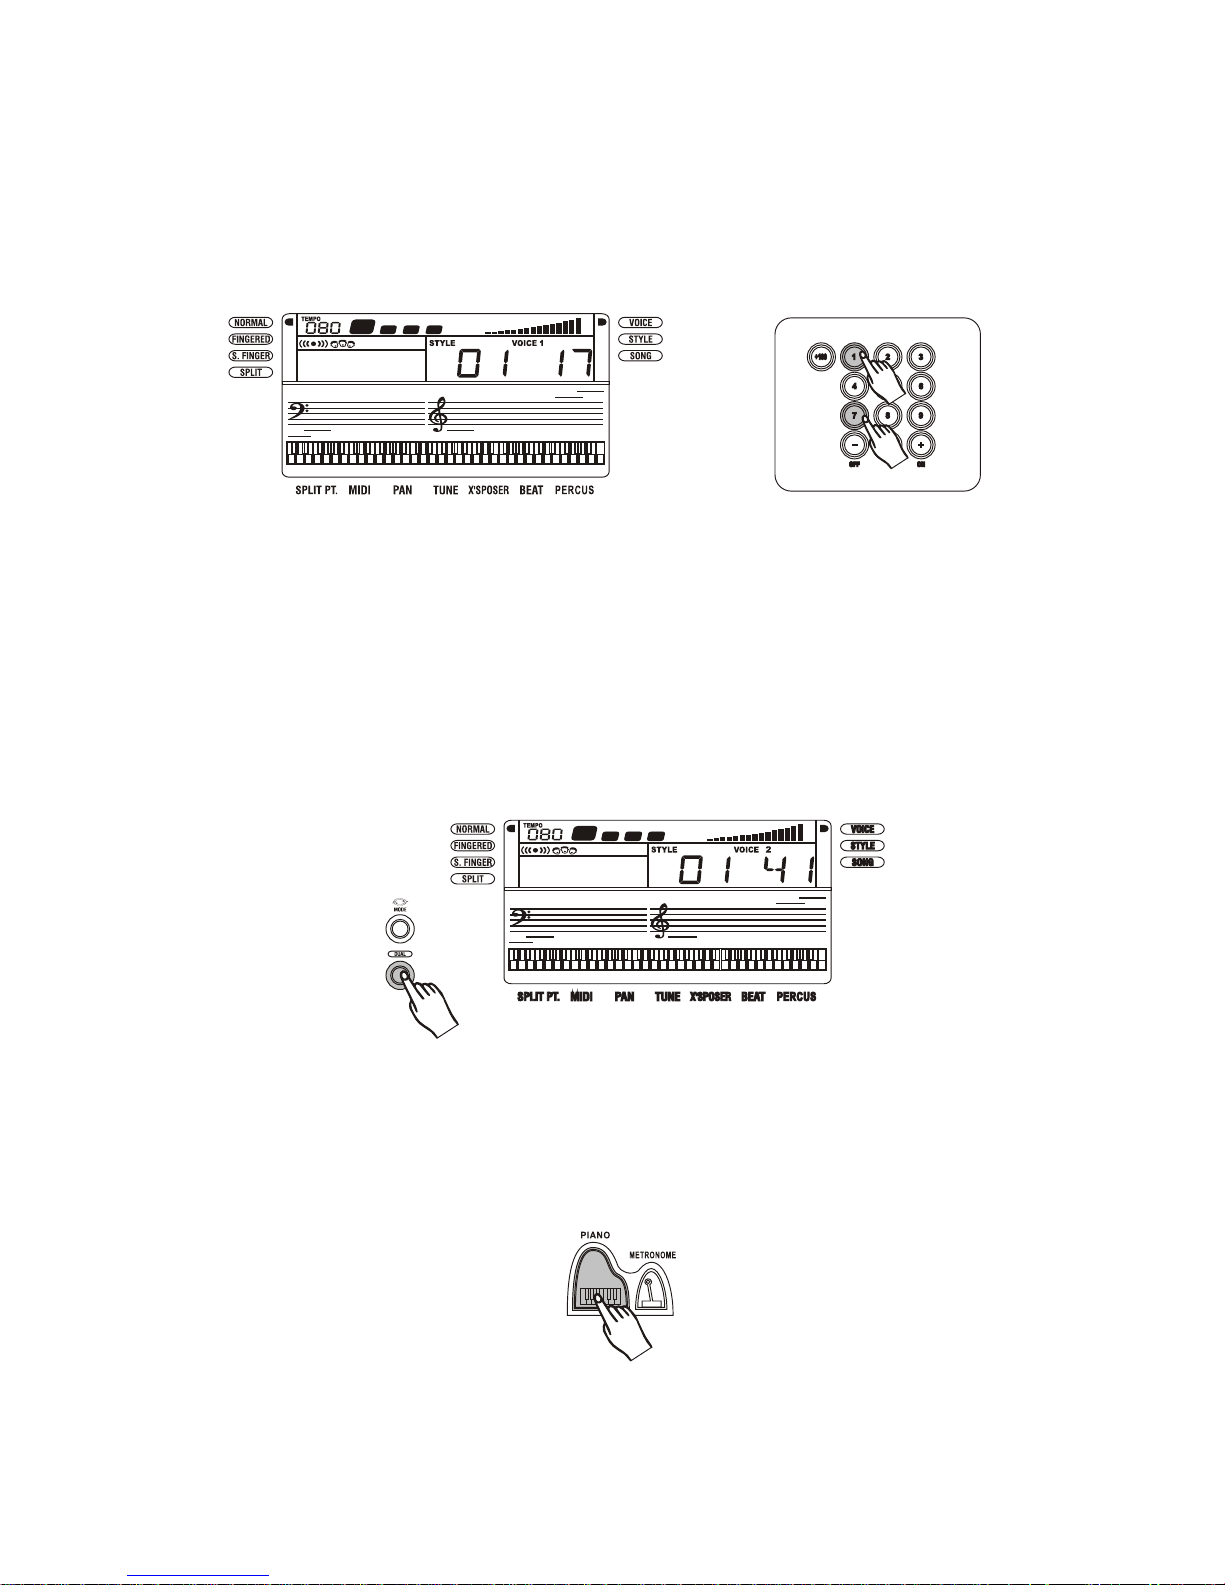
The number buttons:
The number buttons can be used to directly enter the number of the desired voice, thereby
immediately selecting that voice without having to step through a number of other voices.
Two-digit voice number are selected simply by entering the two digits in sequence--e.g. to
select voice number 17, briefly press the [1] button and then the [7] button.
Three digit voice number are entered by first pressing the [+100] button, then press the
remaining two digits in sequence.
11
22
Dual voice:
To create a dual voice effect, use the number buttons to input the first voice digits. Pressing the
[DUAL] button, a word VOICE 2 appears in the display. Then input the selected second voice
digits. Press the [DUAL] button again to turn this function off, and a word VOICE 1 appears in the
display.
Instant select Piano voice:
You can select the piano voices immediately by pressing the [PIANO] button. Press the [PIANO]
button again to return to the previously selected voice.
Page 10

Sustain voice effect
You can add a sustain voice effect to the overall of the sound simply by pressing the [SUSTAIN]
button. Press the [SUSTAIN] button again to turn this function off.
Pitch Bend
The [PITCH BEND] buttons allow the pitch of the notes played on the keyboard to be bend
up or down-press and hold either the [PITCH BEND UP] or [PITCH BEND DOWN] button.
PITCH BEND UP
PITCH BEND DOWN
9
Digital Signal Processor (DSP)
The Digital Signal Processor (DSP) consist of two units (Reverb and Chorus) which process the
Performances with Reverb and Chorus effects. To turn on/off the DSP, simply press the DSP button.
The Reverb and Chorus icon
Page 11

Auto-Accompaniment
Selecting a style
The keyboard has 100 different auto-accompaniment styles that can be used to provide fullyorchestrated accompaniment. Its sophisticated Auto Accompaniment system can provide automated
bass and chord backing that is perfectly matched to the selected accompaniment style. Before you
select a style, make sure you have selected STYLE mode. Press the [VOICE/STYLE/SONG]
button to select the STYLE mode.
The [-/OFF] and [+/ON] buttons:
When the STYLE mode is selected, these buttons step up or down through the styles list. Press
these buttons briefly to step to the next style in the corresponding direction, or hold the button
to scroll rapidly through the styles in the corresponding direction. The selected style number shows
in the display.
The number buttons:
The number buttons can be used to directly enter the number of the desired style, thereby
immediately selecting that style without having to step through a number of other styles.
To select a style simply enter the two digits in sequence--e.g. to select style number 15, briefly
press the [1] button and then the [5] button.
Playing the selected style
1. Press the [START/STOP] button to start playing of the style.
2. Press the [START/STOP] button again to stop the play.
Changing the tempo
You can speed up or down the tempo simply by pressing the [TEMPO] buttons. Pressing the
two buttons simultaneously, it returns to its original default.
11
2
10
Page 12

Using Auto Accompaniment
1. Set the MODE to FINGERED or SINGLE FINGER mode by using the [MODE] button.
2. Select the NORMAL or VARIATION accompaniment pattern by pressing the [FILL-IN/
NORMAL] or [FILL-IN/VARIATION] button.
3. Press the [START/STOP] button to start play of the currently selected style.
4. Play a chord. The actual procedure you should use play a chord depends on the current MODE
selected. Refer to the following appendix for details on the chord play.
FINGERED..............................Appendix A
SINGLE FINGER....................Appendix B
FINGERED SINGLE FINGER
4. To stop Auto accompaniment play, press the [START/STOP] button again.
Variations
While playback:
Each styles has two accompaniment patterns, NORMAL and VARIATION. The NORMAL and
VARIATION accompaniment patterns can be selected at any time during playback by pressing
the corresponding button. Whenever you press the [FILL-IN/NORMAL] or [FILL-IN/VARIATION]
button during playback, the keyboard will generate an appropriate fill in pattern which will smoothly
connect the current pattern to the selected pattern even if it is the same pattern.
To use synchro start the accompaniment
1. Press the [SYNC] button to put the keyboard into synchro start standby.
2. Play a chord on the accompaniment keyboard and the style pattern starts to play auto mati cally.
11
Page 13

To start the accompaniment with introductory pattern
1. Press the [INTRO/ENDING] button to put the keyboard into introduction start standby.
2. Press the [START/STOP] button, and then play a chord on the accompaniment keyboard.
The keyboard plays an introductory pattern and then the selected auto-accompaniment.
To stop the accompaniment with ending phrase
While the keyboard is playing the auto-accompaniment, you press the [INTRO/ENDING]
button The keyboard will play an ending phrase and then stop the play.
Playing the metronome
You can play the metronome simply by pressing the [METRONOME] button. To stop the
play, press the [METRONOME] button again.
Note:
While the keyboard is playing the metronome, you can select other style playing simply by
entering the two-digit number of the style. (Make sure the keyboard is in STYLE mode.)
Changing the accompaniment split point
Press the [SELECT] button as many time as necessary until the arrowhead in the display appears
above at SPLIT PT. Then press the key you want to assign as the split point. The key number of
the key you press shows in the display.
SPLIT PT.
12
Page 14

Accompaniment track control
The keyboard has 5 accompaniment tracks--RHYTHM, BASS, ORCHESTRATION,
LOWER, VOICE, UPPER VOICE. You can use the buttons at the MIXER section to control the
volume level of each track.
When you press the INCREASE VOLUME and DECREASE VOLUME buttons simultaneously, the
keyboard will shut down the volume of the selected accompaniment track. Press the two buttons
simultaneously again to turn the accompaniment track volume on.
One Touch Setting
One Touch Setting lets you instantly select the appropriate panel settings suitable for the current
style. Each style (100 styles) contains four variations. This means that you can freely use 400
different panel settings.
1. Press the [OTS] button.
2. Press the [START/STOP] button to play the selected style. While playing the style, you can
press the one of the ONE TOUCH SETTING buttons--[M1], [M2], [M3], [M4] to select the
appropriate settings.
3. Press the [OTS] button again to turn this function off.
Overall keyboard control
Change the keyboard octave
Shift the keyboard voice up or down by one or two octaves by pressing the OCTAVE buttons.
INCREASE VOLUME
DECREASE VOLUME
13
Page 15

Play the drumpads
Press the [SELECT] button as many times as necessary until the arrowhead appears at the
above of PERCUS. Then press the [+/ON] button. The six MEMORY/DRUM PADS will be fun-
ctioned as the drumpads. To turn this function off, repeat the above procedure then press the [-/OFF]
button.
Adjust the pitch of the keyboard voice
Press the [SELECT] button as many times as necessary until the arrowhead appears at the
above of X'SPOSER. Then press the [+/ON] or [-/OFF] buttons to adjust the pitch of the keyboard
in steps of half tones in the corresponding direction.
Tune the keyboard
Press the [SELECT] button as many times as necessary until the arrowhead appears at the
above of TUNE. Then press the [+/ON] or [-/OFF] buttons to change the tuning setting of the
keyboard.
Press the [SELECT] button as many times as necessary until the arrowhead appears at the above
of PAN . Then press the [+/ON] or [-/OFF] buttons to set the stereo pan position.
Set the stereo pan position
14
Page 16

Select the MIDI channel
Press the [SELECT] button as many times as necessary until the arrowhead appears at the above
of MIDI. Then press the [+/ON] or [-/OFF] buttons to select the MIDI channel.
Set the beat level
Press the [SELECT] button as many times as necessary until the arrowhead appears
above the BEAT. Then press the [+/ON] or [-/OFF] buttons to set the beat level.
Split the keyboard
Press the [SELECT] button as many times as necessary until the arrowhead appears next to
SPLIT. The keyboard splits into lower voice and upper voice. In this mode, you can select the lower
voice.
15
Page 17

Memorize panel settings
The keyboard has 6 memory pads which can be used to memorize the control-panel setups.
You can press one of the MEMORY/DRUM pads to recall the setups at any time. Make sure that
you have turn off the PERCUS function.
Register the settings:
When you have finished the settings, you press and hold the [WRITE] button, then press one of
the MEMORY/DRUM pads. Any data that was previously in the selected location is erased and
replace by the new settings.
Note:
When you turn off the keyboard, the setting will be erased.
Touch Response keyboard
You can press the [TOUCH] button to turn the touch response keyboard function on or off.
Record & playback
You can record your performance simply by pressing the [RECORD] button. When you finish the
record, press the [RECORD] button again. Press the [PLAY] button, the keyboard playback of your
performance. When you do it again, the previously record will be erased.
16
Page 18

Specifications
Keys:
Voices:
Polyphony:
Styles:
Modes:
Styles control:
DEMO song:
Overall control:
Other controls:
Connectors:
Weight:
Dimensions:
61 keys with Touch Response
136 PCM voices + percussion sounds
64 note (max.)
100 styles
Normal, Single Finger, Fingered, Split
Sync, Intro/Ending, FILL IN , Metronome
100 demo songs
Tune, Pan, Split, Octave Shift, Melody off, Pitch Bend,
Mixer, Transposer
Record & Playback, One touch setting
DC 12V, AUX.OUT, SUSTAIN, PHONES, MIDI IN/
OUT/THRU ports
5.65 kg
964 X 347 X 133 mm
Insert Music Stand
The keyboard is supplied with a music stand that can be mounted on the instrument by
inserting the two pegs protruding from the bottom edge of the music stand into the two
holes located above the front panel. To remove the music stand, lift it up and out.
17
Page 19

Appendix A
Chord Table
C C D D E F
MAJOR
(C)
MINOR
(Cm)
DIMINISHED
(Cm)
AUGMENTED
(Caug)
SEVENTH SUSPENDED FOURTH
(Csus4)
SIXTH
(C6)
MINOR SIXTH
(Cm6)
SEVENTH
(C7)
MINOR SEVENTH
(Cm7)
MAJOR SEVENTH
(Cm7)
MINOR SEVENTH
FLATTED FIFTH
(Cm7 )
SEVENTH SUSPENDED FOURTH
(C7sus4)
SEVENTH FLATTED
FIFTH
(C7 )
MAJOR ADD NINTH
(CM(9))
MINOR ADD NINTH
(Cm(9))
F G G A A B
MAJOR
(C)
MINOR
(Cm)
DIMINISHED
(Cm)
AUGMENTED
(Caug)
SEVENTH SUSPENDED FOURTH
(Csus4)
SIXTH
(C6)
MINOR SIXTH
(Cm6)
SEVENTH
(C7)
MINOR SEVENTH
(Cm7)
MAJOR SEVENTH
(Cm7)
MINOR SEVENTH
FLATTED FIFTH
(Cm7 )
SEVENTH SUSPENDED FOURTH
(C7sus4)
SEVENTH FLATTED
FIFTH
(C7 )
MAJOR ADD NINTH
(CM(9))
MINOR ADD NINTH
(Cm(9))
18
Page 20

Appendix B
Single Finger Chord Chart
F /G
#
F m/G m
#
F 7/G 7
#
F m7 /G m 7
#
G G7 Gm7
G /A G m /A m G 7/A 7 G m7/A m7
A Am A7 Am7
A /B A m/B m A 7/B 7 A m7/B m7
B Bm B7 Bm7
Gm
C Cm C7 Cm7
C 7/D 7
C /D
Dm D7 Dm7
E Em E7 Em7
F Fm F7 Fm7
D
C m/D m
C m7/D m7
D E
D m/E m D 7/E 7 D m7/E m7
19
Page 21

Appendix C
Demo Songs List
20
52
53
54
55
56
57
58
59
60
61
62
63
64
65
66
67
68
69
70
71
72
73
74
75
76
77
78
79
80
81
82
83
84
85
86
87
88
89
90
91
92
93
94
95
96
97
98
99
100
END OF THE WORLD
HOUSE OF RISING SUN
OLD FOLKS AT HOME
WONDERLAND BY LAND
THE BLUE-BELLS OF SCOTLAND
OVER THE RAINBOW
BEAUTIFUL DREAMER
IT'S BEEN A LONG, LONG TIME
EDELWEISS
DREAMING OF HOME AND MOTHER
DER DEITCHER'S DOG
YOU ARE MY SUNSHINE
SILENT NIGHT
AMAZING GRACE
FIVE HUNDRED MILES
HAPPY NEW YEAR
IT'S BEGINNING TO LOOK A LOT
LIKE CHRISTMAS
ALL KIND OF MY EVERYTHING
JEANIE WITH THE LIGHT BROWN HAIR
MY BONNIE
SONG OF THE PEARLFISHER
SUMMER PALACE
THE STAGE COACH
LONG, LONG AGO
ANNIE LAURIE
KILLING ME SOFTLY WITH HIS SONG
LOVE IS BLUE
LAST ROSE OF SUMMER
THE OLD KING COLE
CHRYSANF
MAPLE LEAF RAG
JUNE SAMBA
FUNK
I CAN......
SEA SHORE
GUITAR & SAXPHONE
THE HIP-HOP'S NIGHT
COUNT DOWN
BLUE LUNCH
COBWEB
WINE
JAZZ OLD MAN
DARK EYES
CARLOS
REGGAE
THE STING
SOUTH MUD BAY
GIVE YOU A ROSE
FLOWING RILL
01
02
03
04
05
06
07
08
09
10
11
12
13
14
15
16
17
18
19
20
21
22
23
24
25
26
27
28
29
30
31
32
33
34
35
36
37
38
39
40
41
42
43
44
45
46
47
48
49
50
51
SERENATA
SERENADA
RONDEAU
FROHLICHER LANDMAN
NOCTURNE
PIZZICATO POLKA
INACTION
CANON
ALAIF
THE SONG OF ROSE
DIE FORELLE
NOCTURNE
SYMPHONE NO.94 SUPRISE
HEIPENPOSLEIN
AIR ON THE G-STRING
DANCE DE MIRLITONS
LONDON DERRY AIR
IMPROMPTU
JESUS, SAVIOUR PILOT ME
2-PARK INVENTION#13 IN A MINOR
SWANLAKE
TURKISH MARCH
LIEDER OHNE WORTE OP.2 NO.6
O SOLE MIO
JOY TO THE WORLD
OTOHEK
RED RIVER VALLEY
THE SIDEWAY
SKIP TO MY SIDE
THE RED SARAFAN
DANCE OF RUSSIA
KATIOLLIA
TENNESSEE WALTZ
WALTZ OF STARLIGHT
GWINE TO RUN ALL NIGHT
OLD BLACK JOE
THE COLT IS TAKING A WALK
COUNTRY
JAMBALAYA
SUSANNA
BRIDGE
THE SONG OF SEASON
BATTLE HYMNE OF THE REPUBLIC
THE OLD GRAY MARE
AMERICAN PATROL
IN THE RAIN
SIPPIN CIDER THROUGH A STRAW
HAW-TREE
ON LONDON BRIDGE
ARE YOU LONESOME TONIGHT
ONLY YOU
 Loading...