

Page 1
Aw_DP370_Manual_G07_161223.pdf 1 17/1/4 14:34
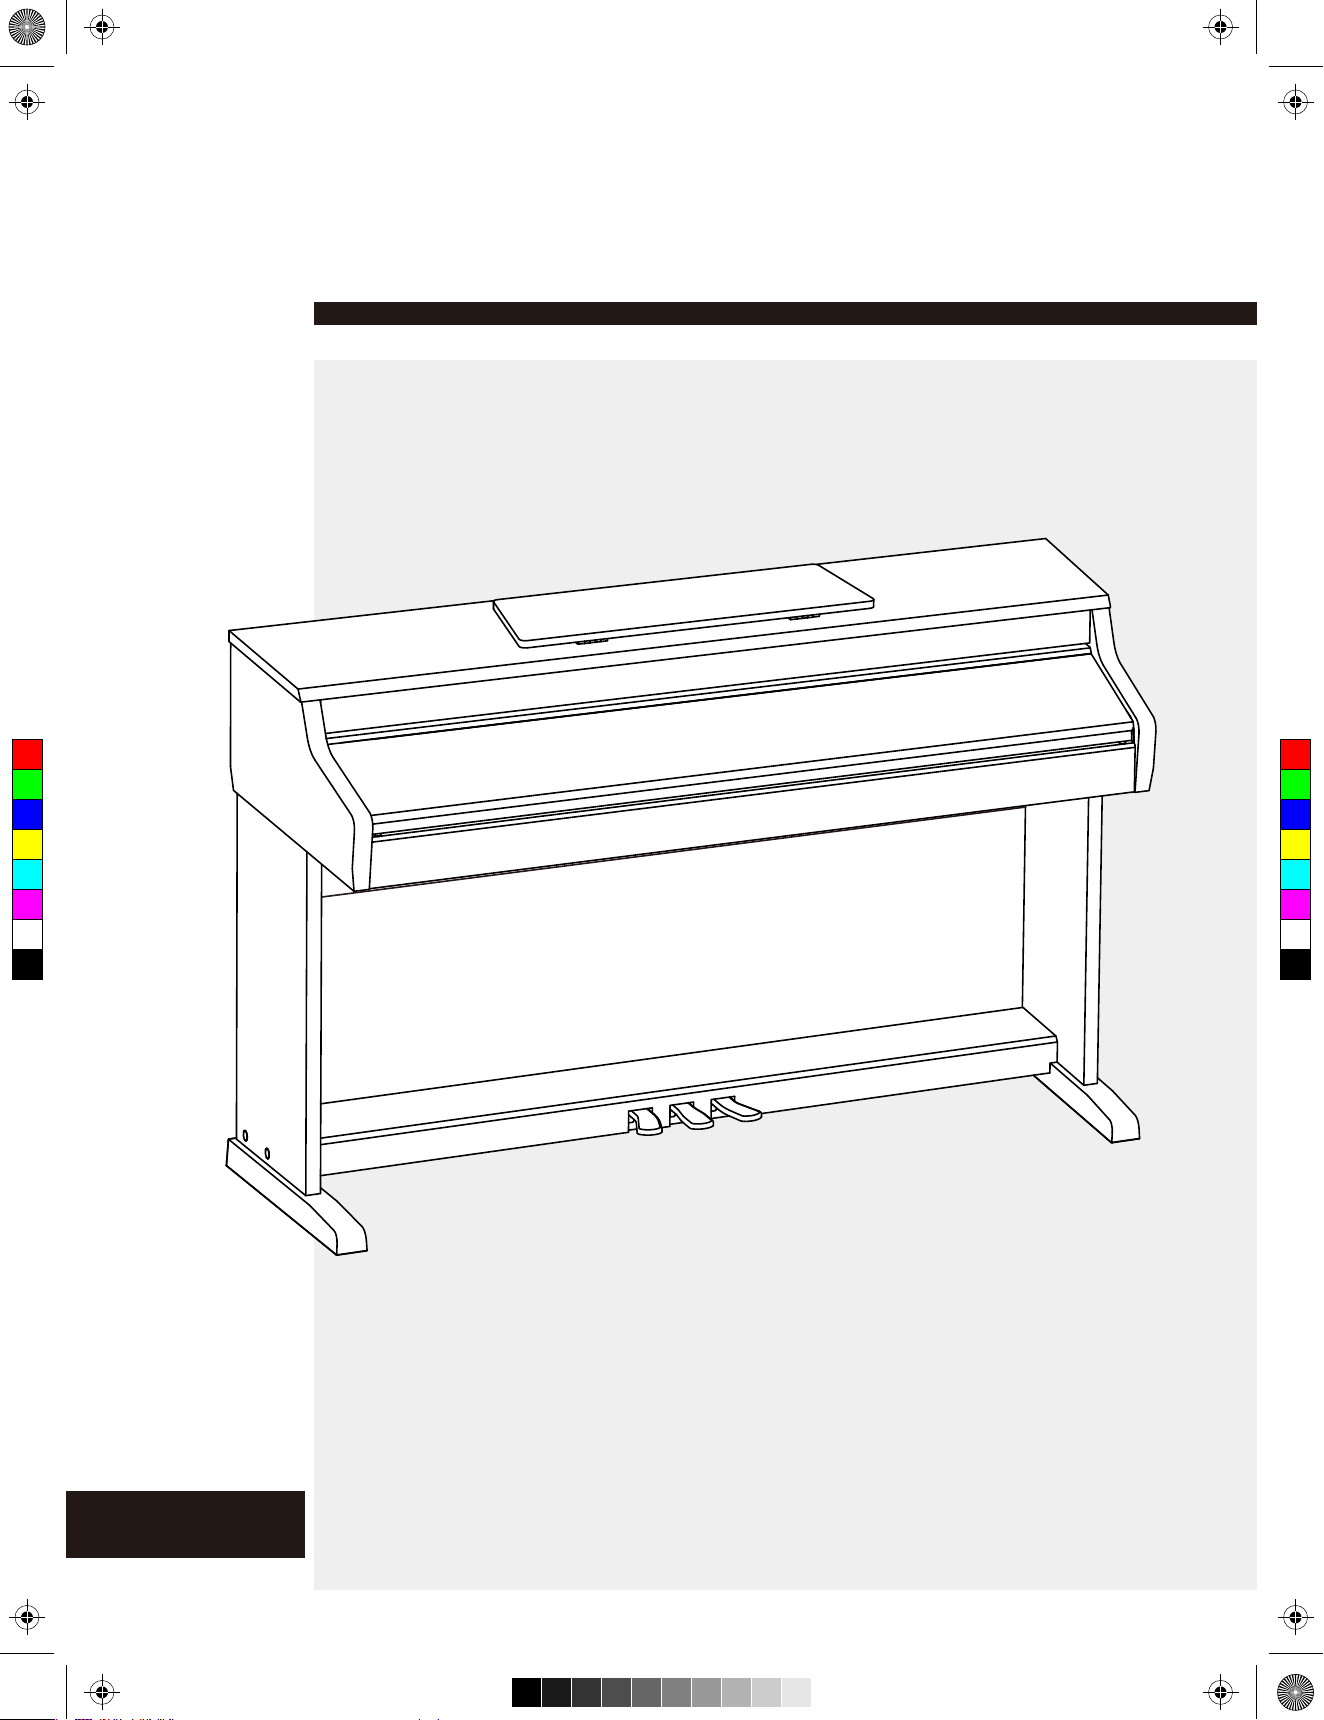
DIGITAL PIANO
C
M
Y
CM
MY
CY
CMY
K
Owner’s Manual
Page 2
Aw_DP370_Manual_G07_161223.pdf 2 17/1/4 14:34
INFORMATION FOR YOUR SAFETY!
THE FCC REGULATION WARNING (for USA)
This equipment has been tested and found to comply with
PLEASE READ CAREFULLY BEFORE PROCEEDING
PRECAUTIONS
the limits for a Class B digital device, pursuant to Part 15 of
the FCC Rules.
Please keep this manual in a safe place for future reference.
These limits are designed to provide reasonable protection
against harmful interference in a residential installation. This
equipment generates, uses, and can radiate radio frequency
energy and, if not installed and used in accordance with the
Power Supply
When removing the electric plug from an outlet, always hold
the plug itself and not the cord.
instructions, may cause harmful interference to radio
communications. However, there is no guarantee that
interference will not occur in a particular installation.
If this equipment does cause harmful interference to radio or
Do not connect the instrument to an electrical outlet using a
multiple-connector or an AC outlet of voltage other than that
for which your instrument is intended.
television reception, which can be determined by turning the
equipment off and on, the user is encouraged to try to
correct the interference by one or more of the following
measures:
Reorient or relocate the receiving antenna.
Increase the separation between the equipment and
receiver.
Connect the equipment into an outlet on a circuit
Remove the electric plug from the outlet when the
instrument is not to be used for extended periods of time, or
during electrical storms.
Connections
Before connecting the instrument to other devices, turn off
the power to all units. This will help prevent malfunction and
/ or damage to other devices.
different from that to which the receiver is connected.
Consult the dealer or an experienced radio/TV technician
C
M
Y
CM
MY
CY
CMY
K
for help.
Unauthorized changes or modification to this system can
void the user's authority to operate this equipment.
CAUTION
The normal function of the product may be disturbed by
Strong Electro Magnetic Interference. If so, simply reset
the product to resume normal operation by following the
owner's manual. In case the function could not resume,
please use the product in other location.
Location
Do not expose the instrument to the following conditions to
avoid deformation, discoloration, or more serious damage:
Direct sunlight
Extreme temperature or humidity
Excessive dusty or dirty location
Strong vibrations or shocks
Close to magnetic fields
Interference with other electrical devices
Radios and televisions placed nearby may experience
reception interference. Operate this unit at a suitable
distance from radios and televisions.
Cleaning
Clean only with a soft, dry cloth.
Do not use paint thinners, solvents, cleaning fluids, or
chemical-impregnated wiping cloths.
Handling
Do not apply excessive force to the switches or controls.
Do not let paper, metallic, or other objects into the
instrument. If this happens, remove the electric plug from
the outlet. Then have the instrument inspected by qualified
service personnel.
Disconnect all cables before moving the instrument.
2
Page 3
Aw_DP370_Manual_G07_161223.pdf 3 17/1/4 14:34
Contents
Panel & Display Description
Front Panel............................................................................4
LCD Display...........................................................................4
Rear Panel............................................................................5
DSP Effect...........................................................................21
Reverb Type........................................................................21
Reverb Level........................................................................21
Chorus Type........................................................................21
Chorus Level.......................................................................21
Setup
Setup Guide..........................................................................6
MIDI IN................................................................................21
MIDI OUT.............................................................................22
Touch...................................................................................22
Connections
Power Jack............................................................................9
Language............................................................................22
PowerOff.............................................................................22
Connecting a pair of Headphones.........................................9
Connecting an Audio Equipment...........................................9
Connecting an MP3/CD Player.............................................9
Connecting a Computer......................................................10
Connecting external MIDI devices.......................................10
Adjusting the Master Volume......................................11
Register Memory
Registering the Panel Setting..............................................23
Recalling the Registered Panel Settings.............................23
Selecting a Registration Bank.............................................23
Song Recording
Start Recording...................................................................24
Adjusting the Voice Brilliance....................................11
Stop Recording...................................................................25
Playback Recording............................................................25
Playing the Demo Song................................................11
C
M
Y
CM
MY
CY
CMY
K
Playing Voices
Playing Voices.....................................................................12
Playing two voices simultaneously-DUAL...........................12
Playing Different Voices with Both hands-LOWER.............12
Twinova.............................................................................13
Auto Accompaniment
Play Auto Accompaniment(rhythm track only).....................13
Play Auto Accompaniment(all tracks)..................................13
Accompaniment Sections....................................................14
Playing Different Accompaniment Sections.........................14
Accompaniment Volume.....................................................15
Chord Fingering..................................................................15
Tempo.................................................................................16
Delete User Song................................................................25
Song
Listening to the songs.........................................................26
Song Control.......................................................................26
Practice the song................................................................26
Restore Factory Setting...............................................26
Connecting USB Flash Drive
USB Flash Drive Operation.................................................27
Play......................................................................................27
Save....................................................................................28
Load....................................................................................28
Delete..................................................................................29
Format.................................................................................29
Keyboard and ASCII Character Relative Table...................29
One Touch Setting...............................................................16
Metronome..........................................................................16
MIDI
What's MIDI?.......................................................................30
Mixer..................................................................................17
MIDI Terminals.....................................................................30
Downloading Data from the Computer................................30
Other Functions
Tune....................................................................................18
Transpose...........................................................................18
Split Point............................................................................19
Beat Type............................................................................19
Beat Volume........................................................................19
Harmony Switch..................................................................19
Harmony Type.....................................................................19
Scale Switch........................................................................21
Scale Type...........................................................................21
Scale Root...........................................................................21
EQ Type...............................................................................21
Troubleshooting.............................................................31
Specifications.................................................................31
Appendices
Voice List.............................................................................32
Style List..............................................................................37
Song List.............................................................................39
Chord List............................................................................41
MIDI Implementation Chart .................................................42
Scale Tuning System...........................................................43
3
Page 4
Aw_DP370_Manual_G07_161223.pdf 4 17/1/4 14:34
Panel & Display Description
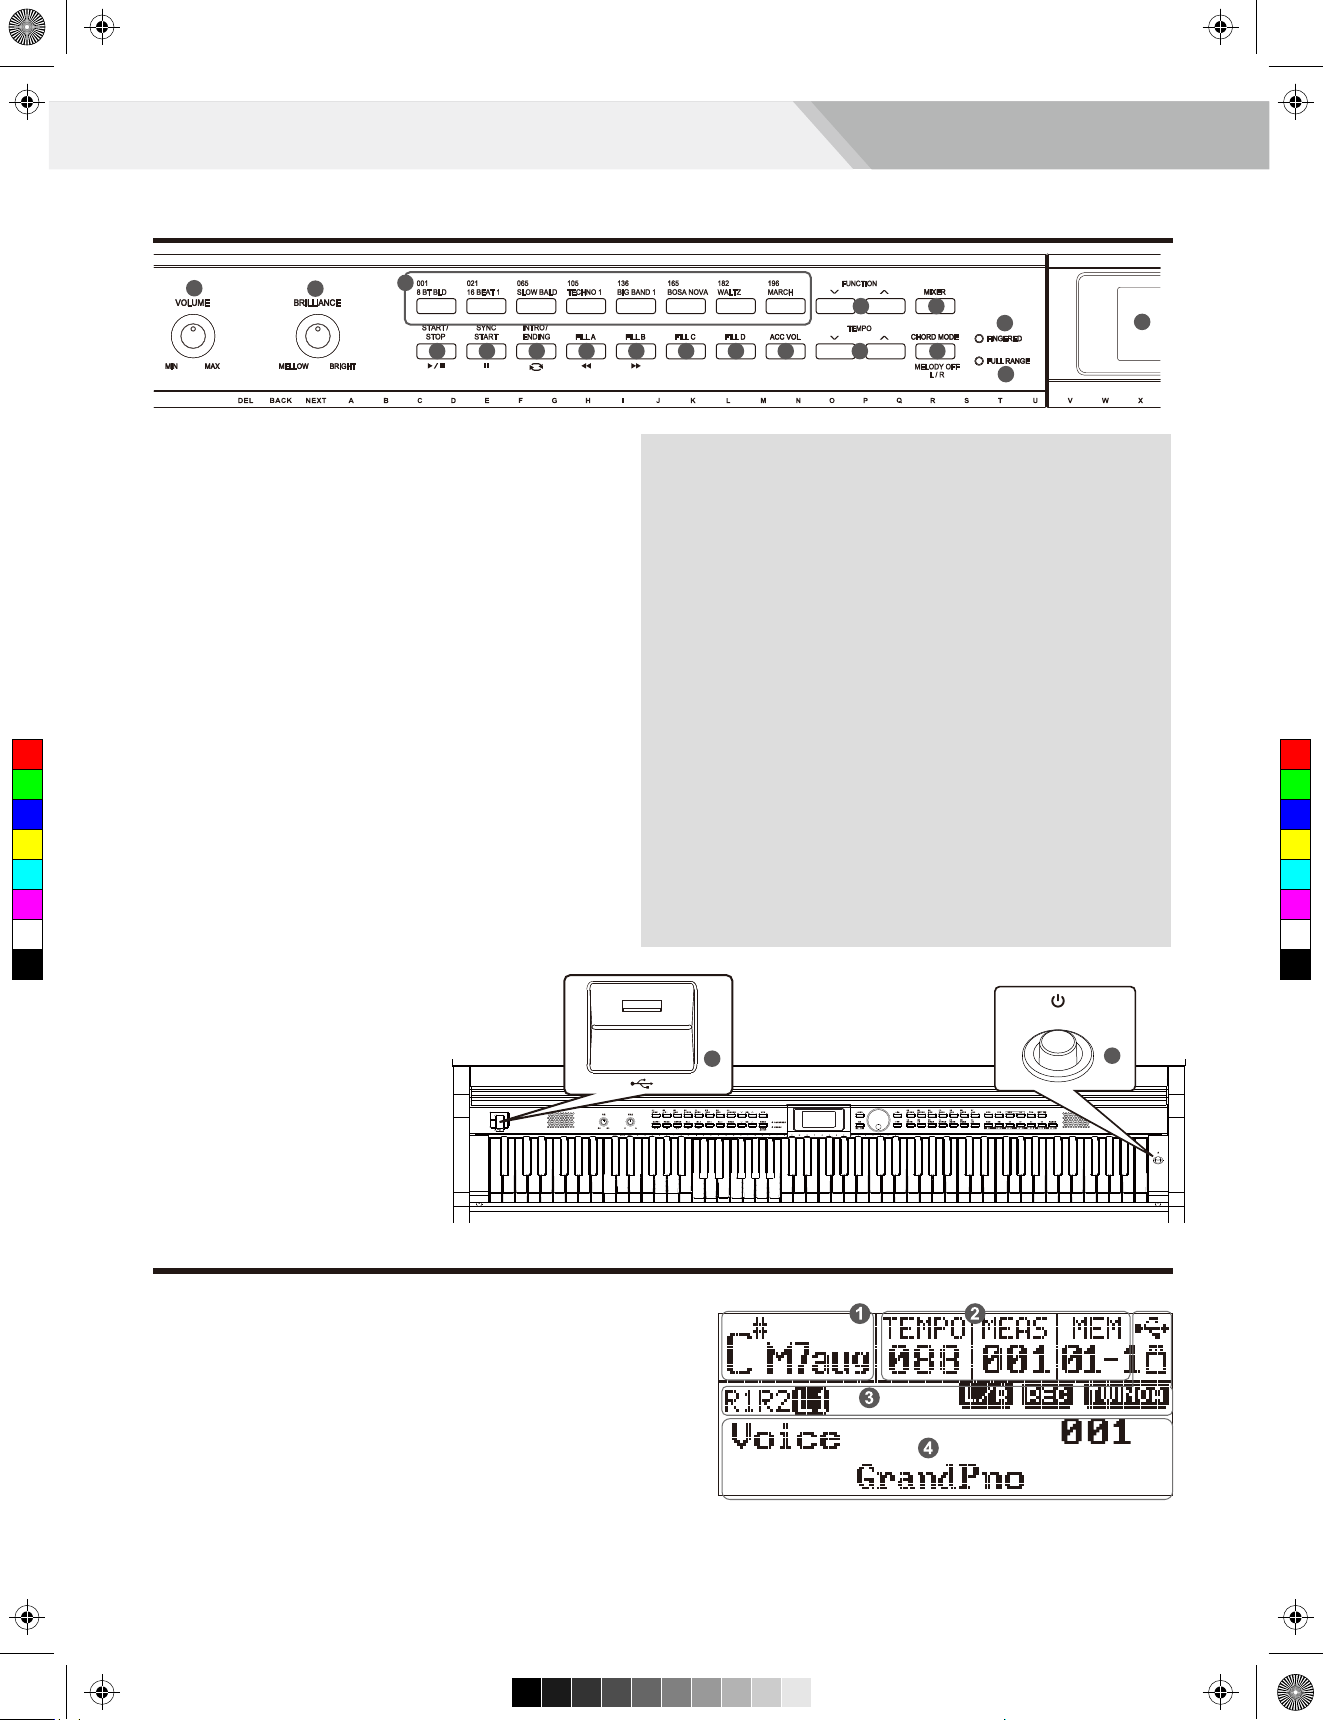
Front Panel
1
2
4
5
7
9 12 13
8
10 11
14 15
6
17
19
16
18
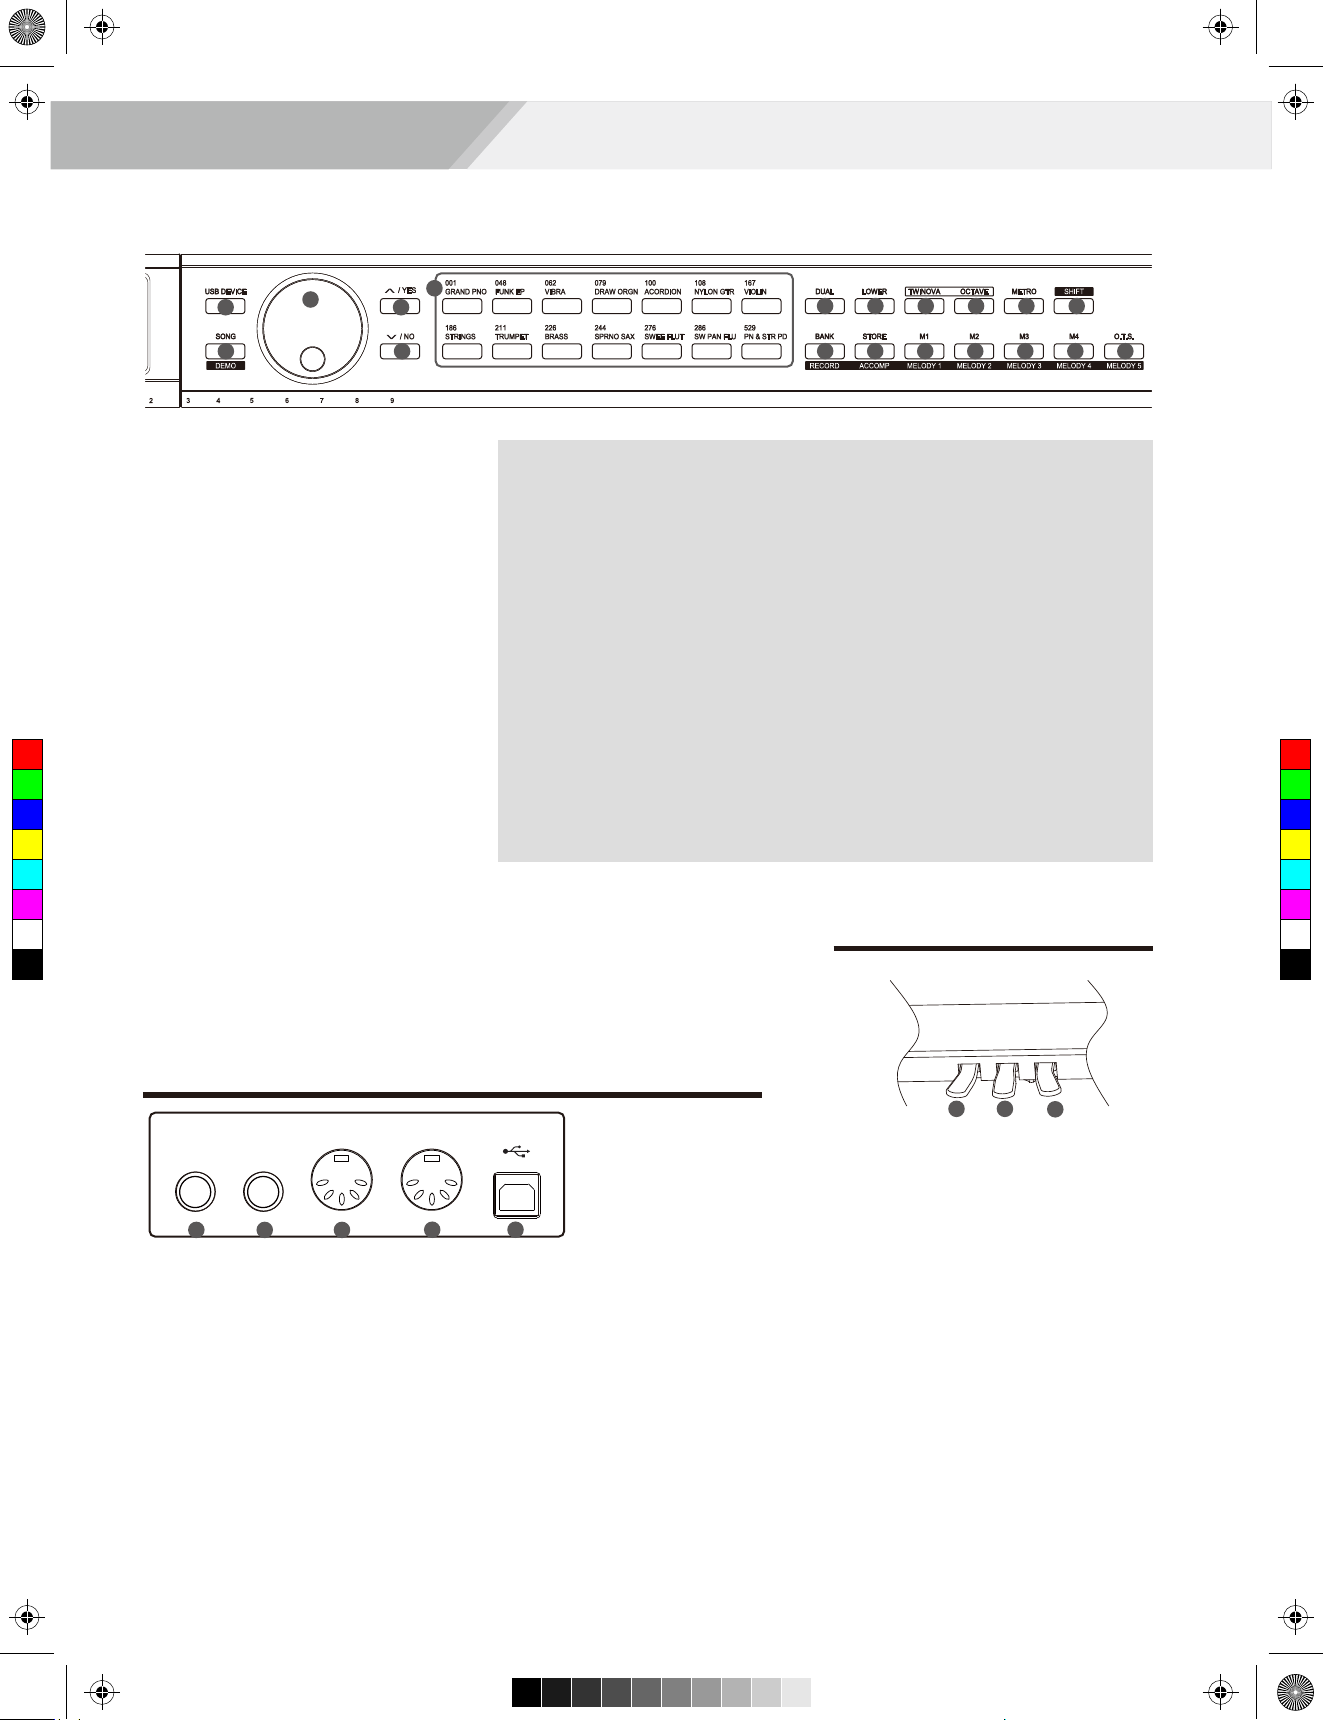
1. [VOLUME] Knob
Adjust master volume
2. [BRILLIANCE] Knob
Adjust voice brilliance
3. USB device socket
Insert a USB flash drive
12. [FILL C] button
A Fill-in C plays
13. [FILL D] button
A Fill-in D plays
C
M
Y
CM
MY
CY
CMY
K
14. [ACC VOL] button
Adjust ACCOMP volume
15. [TEMPO+/-] button
Adjust the current tempo
17. A.B.C. MODE lamp
Indicate A.B.C. mode status:
on or off
When [SHIFT] key pressed
4. Style button
Enter the style mode
When [SHIFT] key released
4. Style direct button
Select a direct style
5. [FUNCTION+/-] button
Enter function menu
6. [MIXER] button
Enter mixer menu
SONG MODE:
7. [START/STOP] button
Start or stop playing the song
8. [PAUSE] button
Pause the playing song
or start it
9. [REPEAT A/B] button
Set the beginning and the
end for a loop section of a
selected song
10. [REW] button
Rewind the song
11. [FF] button
Fast forward the song
16. [MELODY OFF L/R] button
Use to mute/activate left or
right-hand part, allowing each
part to be practiced separately
STYLE MODE:
7. [START/STOP] button
Start or stop playing the
style
8. [SYNC START] button
Turn the Sync Start on
and off
9. [INTRO/ENDING] button
Play the Intro or Ending
10. [FILL A] button
A Fill-in A plays
11. [FILL B] button
A Fill-in B plays
16. [CHORD MODE] button
Choose chord mode
18. FULL RANGE MODE lamp
Show if the full range mode is
on or off
19. LCD
Show all the parameters related
to the current operation
音量 明亮度
001
8 拍民谣
启动 / 停止 同步启动 前奏 / 尾奏 插入 A 插入 B 插入 C 插入 D 伴奏音量
暗 亮最小 最大
3
001
048
062
079
100
108
016
055
095
154
172
203
186
16 拍 1
慢民谣
电子舞曲 1
波沙诺瓦
华尔兹
进行曲
中国民乐摇滚
调音台
功能
速度 和弦模式
自动低音和弦模式
全键盘模式
旋律关闭
左手/右手
/
原声大钢琴
是
186
/
弦乐合奏
否
示范曲
167
放克电钢琴
颤音琴
手摇风琴
手风琴
尼龙吉他
小提琴USB设备 双音色
下音色歌曲双钢琴
八度 节拍器
211小号226
244
276
286
624
铜管合奏
高音萨克斯
甜蜜长笛
甜蜜排箫
二胡
切换
记忆库 存储 M1 M2 M3 M4 单触键设置
录音 伴奏音轨 旋律音轨 1 旋律音轨 2 旋律音轨 3 旋律音轨 4 旋律音轨 5
39
39. [POWER] button
Turn the power on or off
LCD
1. Chord display area
Display chord information.
2. Instant message area
Display the current tempo, measure, memory/O.T.S setting.
3. Status display area
Display the status of function, USB drive, USB, etc.
4. System message display area
Display important messages related to the current operation.
I.e. in voice mode, it displays the voice name and number.
4
Page 5
RECORD
Aw_DP370_Manual_G07_161223.pdf 5 17/1/4 14:34
Panel & Display Description
20
21
22
20. [USB DEVICE] button
Enter USB DEVICE menu
22. Data dial
Increase and decrease the value
23. [+/YES] button
Increase the value
24. [-/NO] button
Decrease the value
26. [DUAL] button
C
M
Y
CM
MY
CY
CMY
K
Turn the Voice R2 on and off
27. [LOWER] button
Turn the Voice L1 on and off
28. [TWINOVA] button
Turn the TWINOVA on and off
29. [OCTAVE] button
Set octave in TWINOVA mode
30. [METRO] button
Turn the metronome on and off
25
23
24
When [SHIFT] key pressed
21. [DEMO] button
Enter demo mode and play
2726 28 29 30 31
32 33 34 35 36 37 38
When [SHIFT] key released
21. [SONG] button
Enter song mode and play songs
demo songs
25. Voice direct button
25. [VOICE] button
Select a direct voice
Enter the voice mode
32. [BANK] button
32. [RECORD] button
Select a bank to store settings
Enter record mode
33. [STORE] button
33. [ACCOMP] button
Register the current panel settings
Select the accomp track to
record
34~37.M1~M4 button
Recall the registered panel settings
34~38. MELODY 1-5 button
Select the melody1-5 track
to record
38. [O.T.S] button
Turn one touch setting on and off
Pedal
31. [SHIFT] button
Press and hold it to access
secondary functions of other
buttons
Rear Panel
AUX IN MIDI IN MIDI OUTAUX OUT USB
40 41 42
40. AUX IN jack
41. AUX OUT jack
42. MIDI IN jack
43. MIDI OUT jack
44. USB jack
43 44
47
46
45
45. Soft Pedal
When you step on the soft pedal, all notes
played on the keyboard will have a softer
effect.
46. Sostenuto Pedal
When you step on the sostenuto pedal, the
notes played before you step on the pedal
would have a sustain effect.
47. Sustain Pedal
When you step on the sustain pedal, all
notes played on the keyboard will have a
longer sustain. It also supports the
half-pedal operation. Performing with the
sustain pedal will achieve a smoothly effect.
5
Page 6
Aw_DP370_Manual_G07_161223.pdf 6 17/1/4 14:34
Setup
This section contains information about setting up your instrument and preparing to play. Please go through this section
carefully before turning the power on.
Setup Guide
Before you proceeding to assemble the stand, get a Philip's
screwdriver (not supplied).
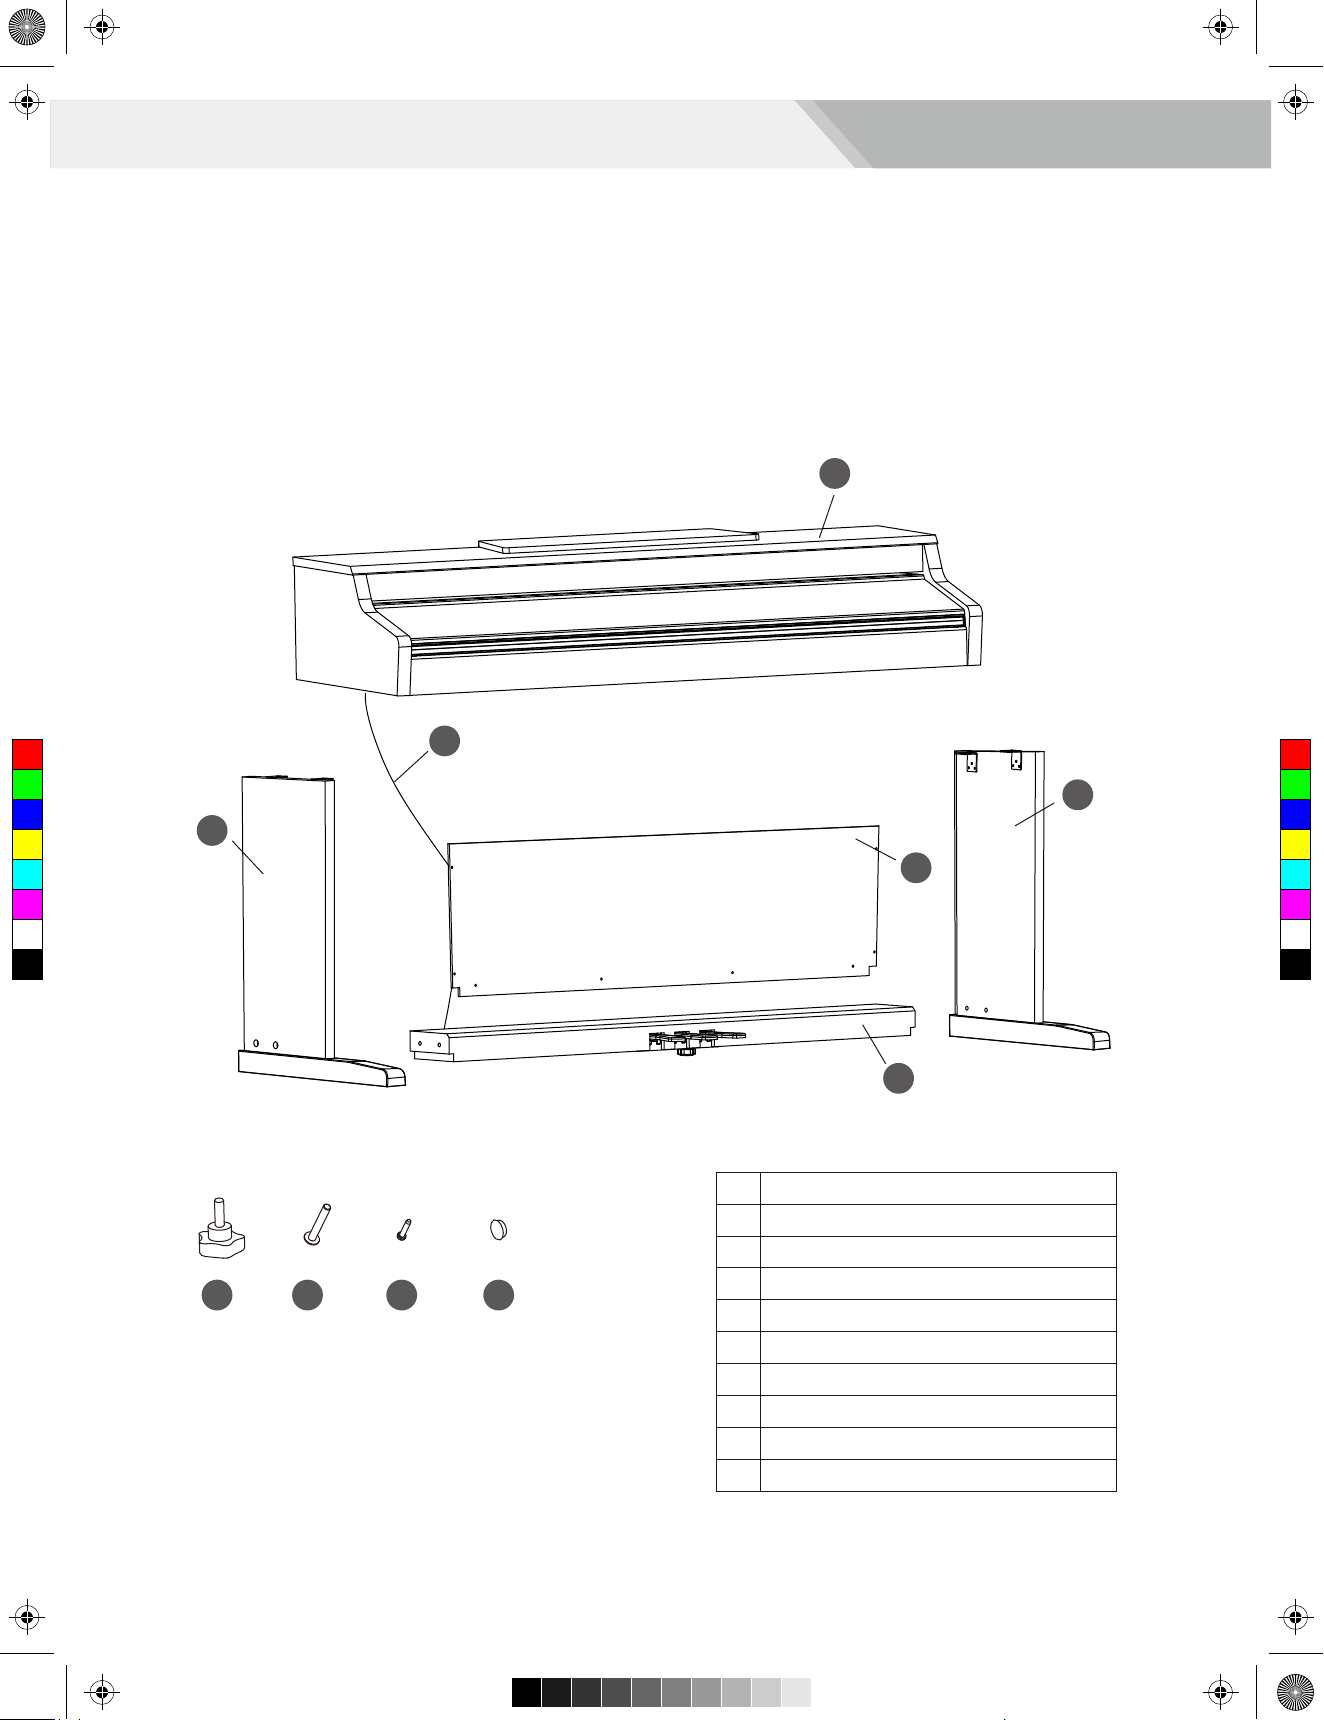
Make sure you have the following parts, which are supplied into
package.
1
C
M
Y
CM
MY
CY
CMY
K
2
6
3
5
4
1
Piano body
2
Left leg component
3
Right leg component
4
7 9
8
10
Foot pedal
5
Rear board
6
Foot pedal cable
7
Hand screws (4pcs)
8
Screws M6x45 (4pcs)
9
Tapping screw 4x15 (8pcs)
10
Screw caps (4pcs)
6
Page 7
Aw_DP370_Manual_G07_161223.pdf 7 17/1/4 14:34
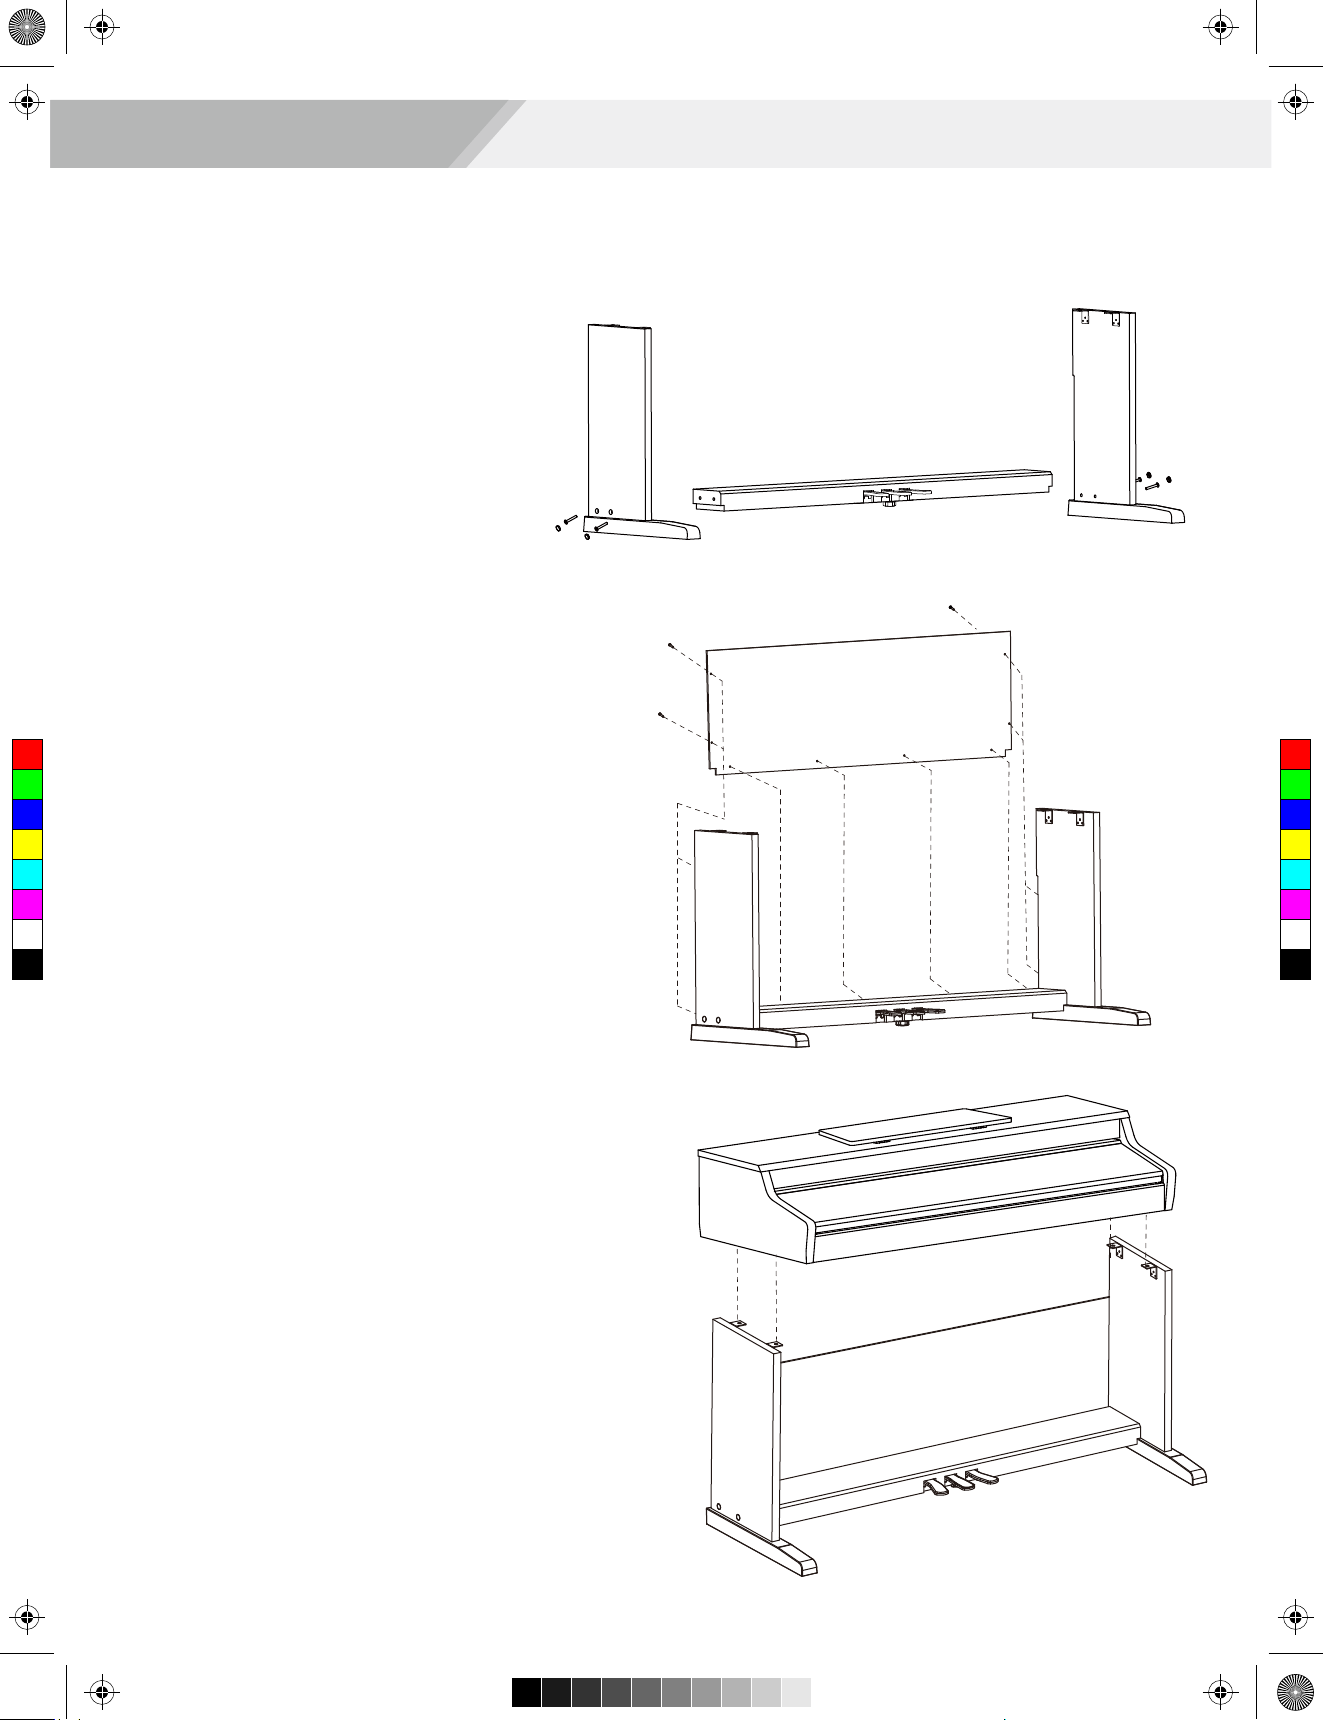
A. Put the foot pedal unit (4) in between the left and right leg
components (2&3) use 4 pieces of screws (8) (2 on each
side) to stable the legs onto the foot pedal unit. (Make sure
the direction of the placement is correct before screwing)
Setup
B. Use 8 pieces screw (9), make the rear board fixed on the
footpedal unit (4) and right leg component (3), the left leg
component (2) finished in part B on the previous page.
C
M
Y
CM
MY
CY
CMY
K
C. Put the piano body (1) on the top of the assembly finished in
part B, use 4 pieces of hand screws (7) to stable afterward.
7
Page 8
Aw_DP370_Manual_G07_161223.pdf 8 17/1/4 14:34
Setup
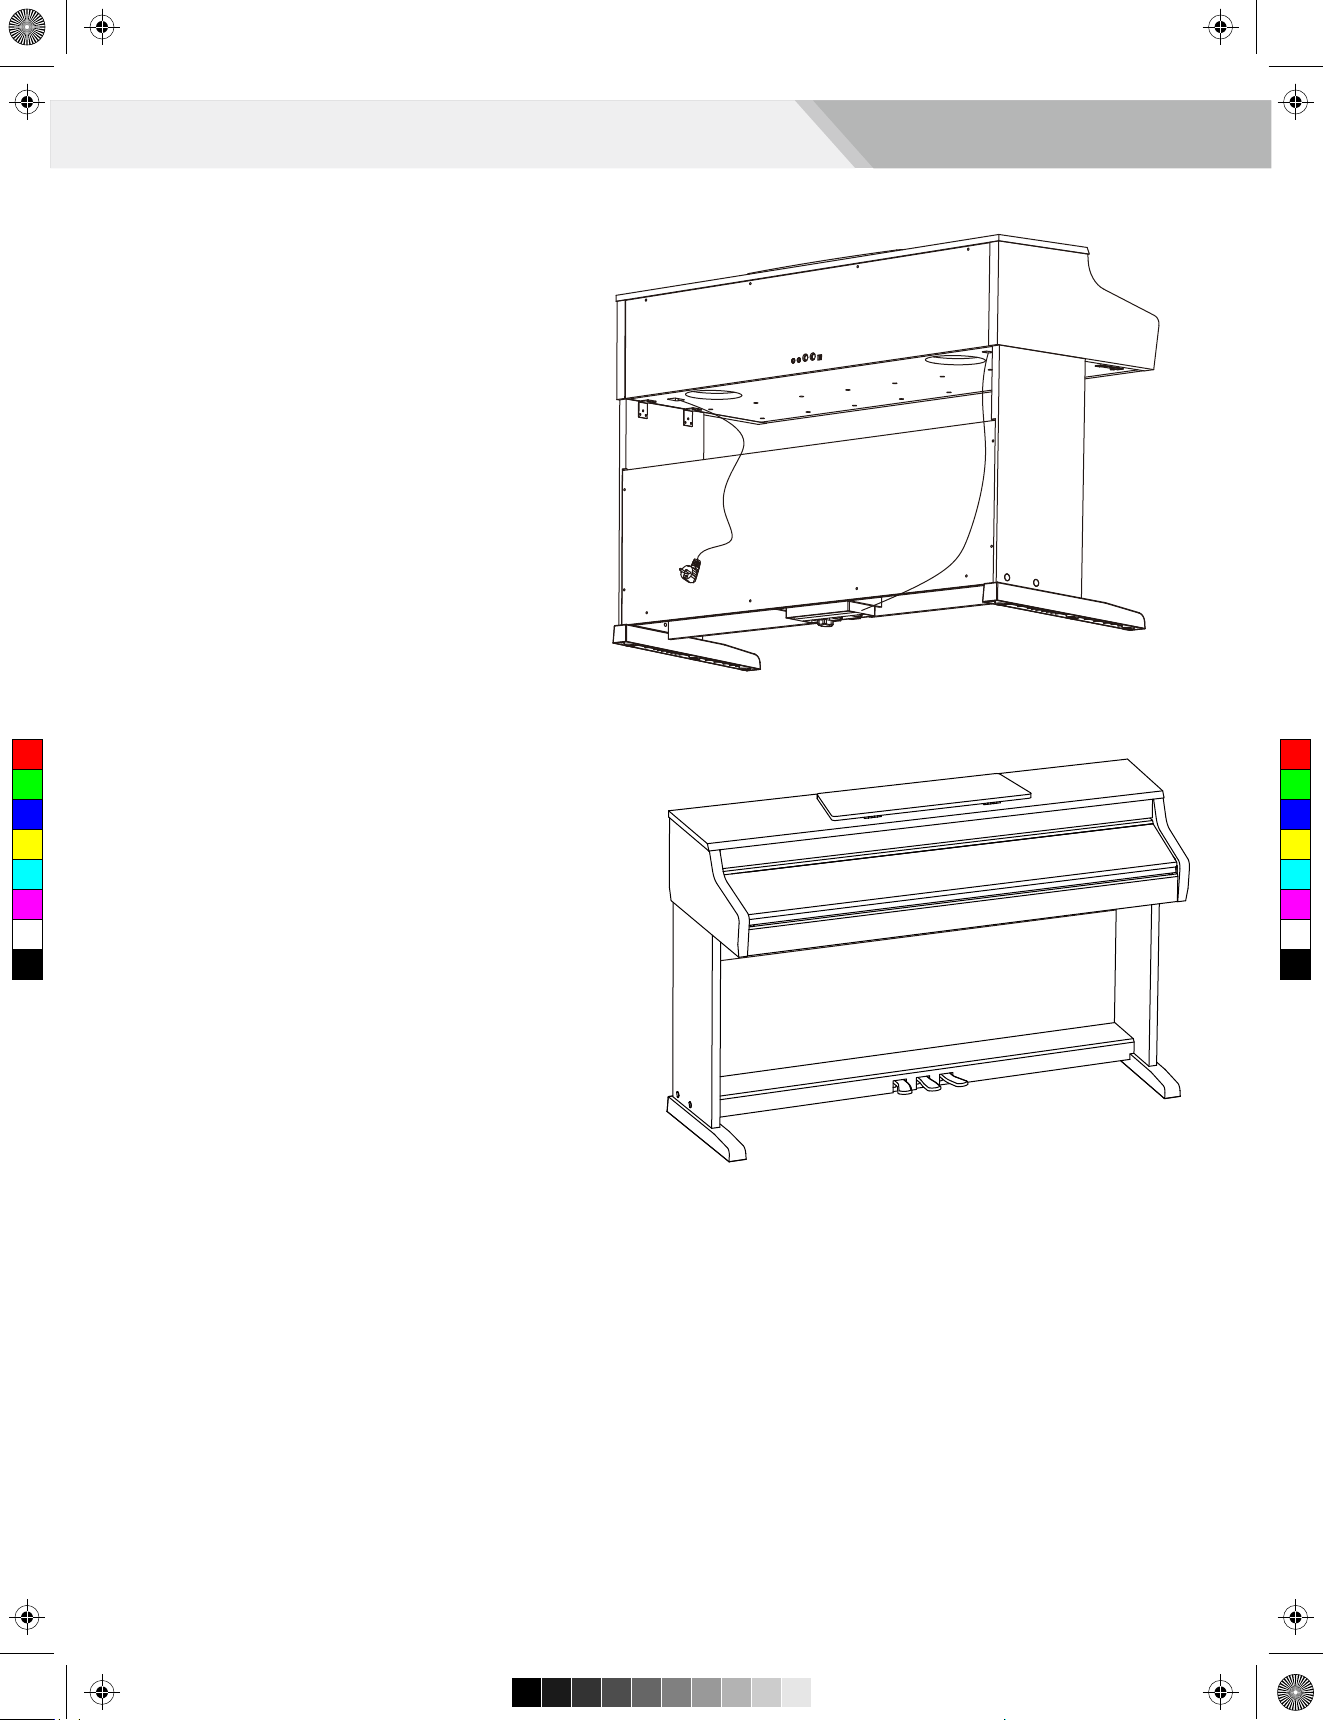
D. After the initial set-up, connect pedal cable (6) with the foot
pedal to the bottom-panel pedal jack.
C
M
Y
CM
MY
CY
CMY
K
E. Installation is completed now.
Play the piano and enjoy the perfect performance.
8
Page 9
Aw_DP370_Manual_G07_161223.pdf 9 17/1/4 14:34
Connections
Power Jack
Power Supply
VOLUME
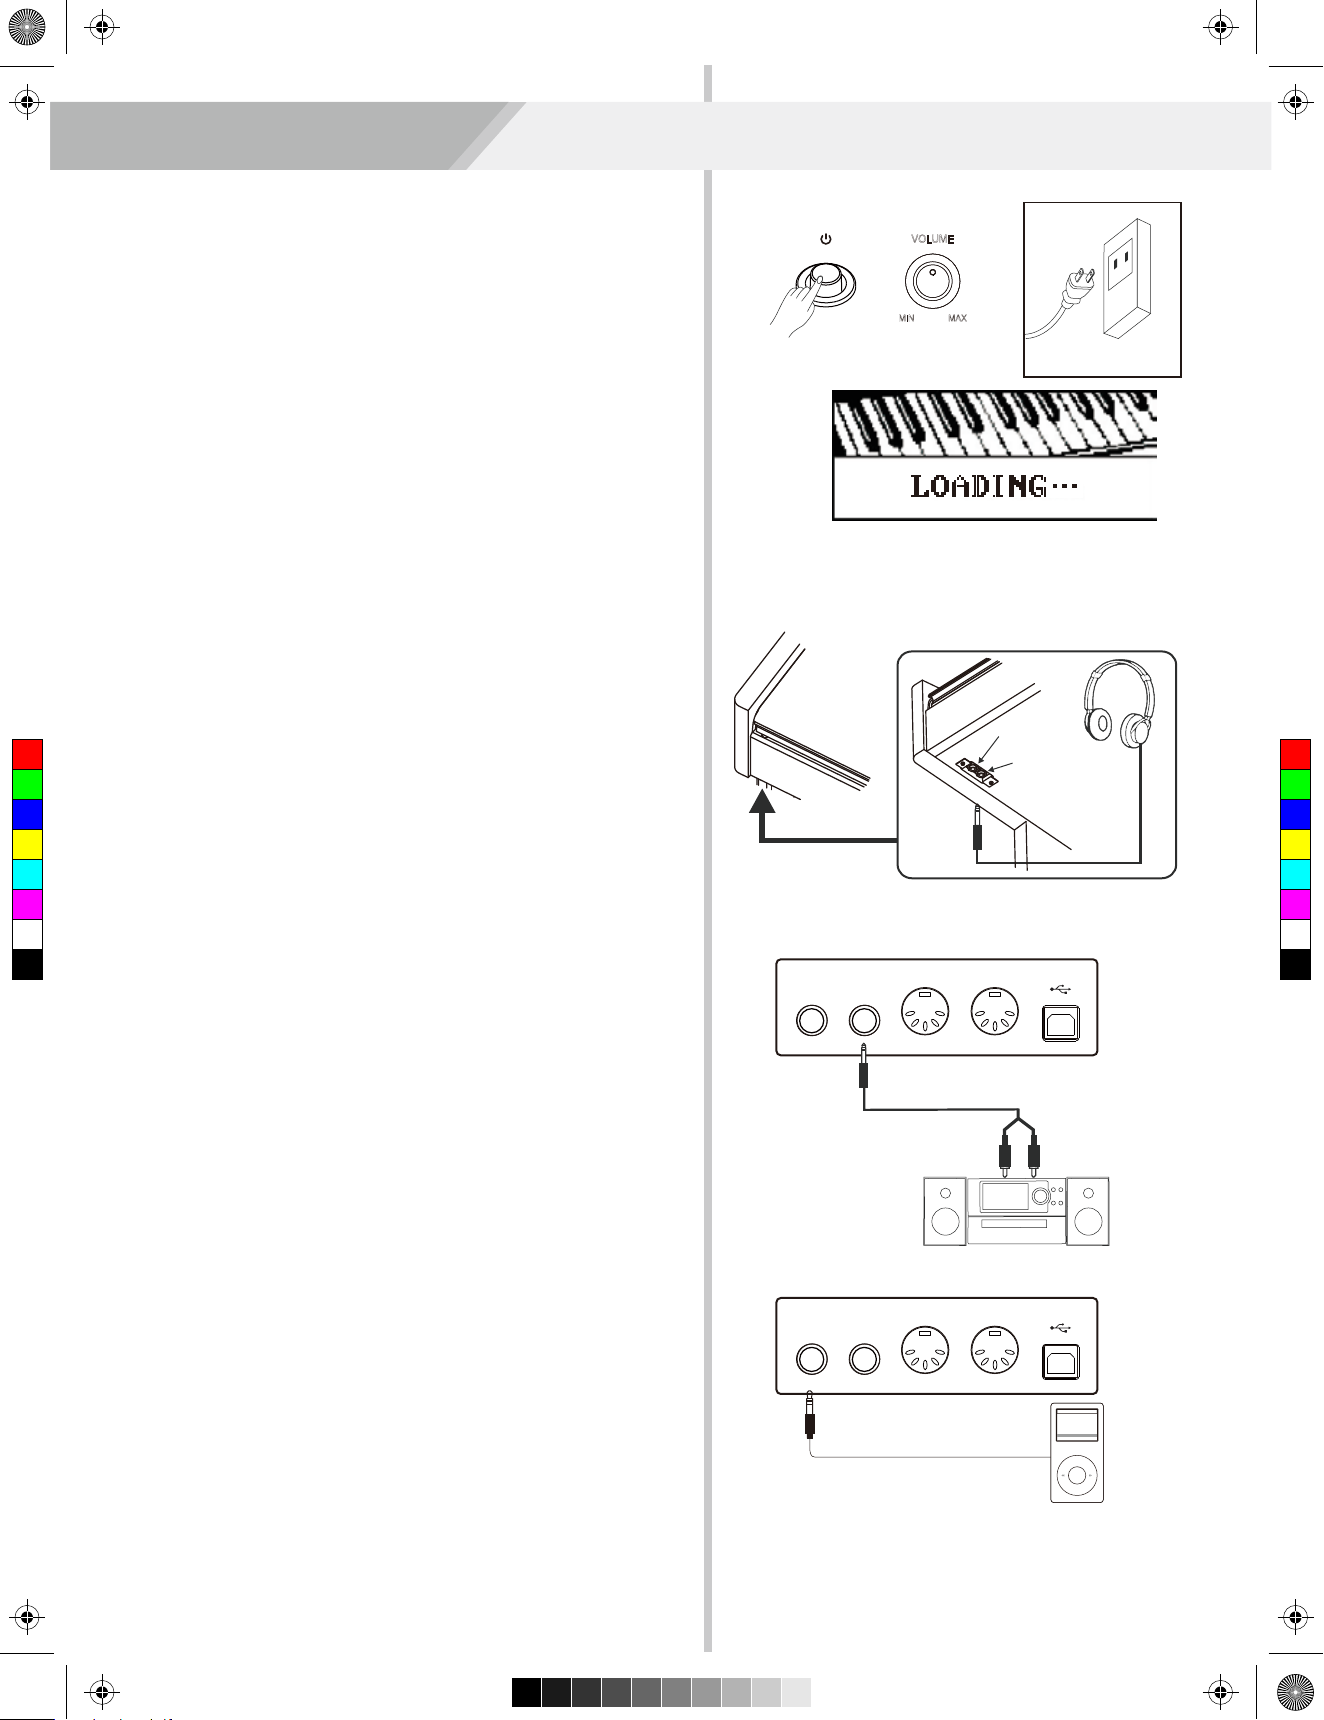
1. Make sure that the piano is turned off. Before you switch the
piano on or off , turn down the volume of piano and any
connected audio equipments first.
MIN MAX
2. Connect the power cable to the AC outlet.
3. Press the [POWER] button, the LCD will display “LOADING...”,
which indicates the piano has powered on.
4. If you are ready to turn off the piano, press the [POWER] button
again.
Notes:
1. The piano will be automatically shut down in about 30 minutes if it
is not used.
2. When the keyboard is not in use or during thunderstorm, please
disconnect the power for safety purpose.
Connecting a pair of Headphones
A standard pair of stereo headphones can be plugged in here for
private practice or late-night playing.
C
M
Y
CM
MY
CY
CMY
K
Jack1: when a pair of headphones is plugged into the jack 1, the
sound can be heard from both headphones and speakers of
the instrument.
Jack2: when a pair of headphones is plugged into the jack 2,the
internal stereo speaker system is automatically shut off. The
sound can only be heard from headphones.
Note:
To avoid the risk of hearing loss when using headphones, please
do not play the piano with a high volume level for a long time.
AUX IN MIDI IN MIDI OUTAUX OUT USB
Jack1
Jack2
Connecting an Audio Equipment
The rear-panel AUX.OUT jack delivers the output of the instrument
for connection to a keyboard amplifier, a mixing console, or tape
recorder. Use an audio cord to plug into the AUX.OUT jack located
on the rear panel then plug the other end of the cord into AUX.IN of
the amplifier.
Note:
To avoid damaging the speakers, please ensure that the volume
has been set to the minimum level before connecting the power
and other devices.
Connecting an MP3/CD Player
Connect the audio output of an MP3/CD player or other audio
source to the stereo AUX.IN jack on the rear panel.
The input signal is mixed with the piano signal, allowing you
to play along.
AUX IN MIDI IN MIDI OUTAUX OUT USB
9
Page 10
Aw_DP370_Manual_G07_161223.pdf 10 17/1/4 14:34
Connections
Connecting a Computer
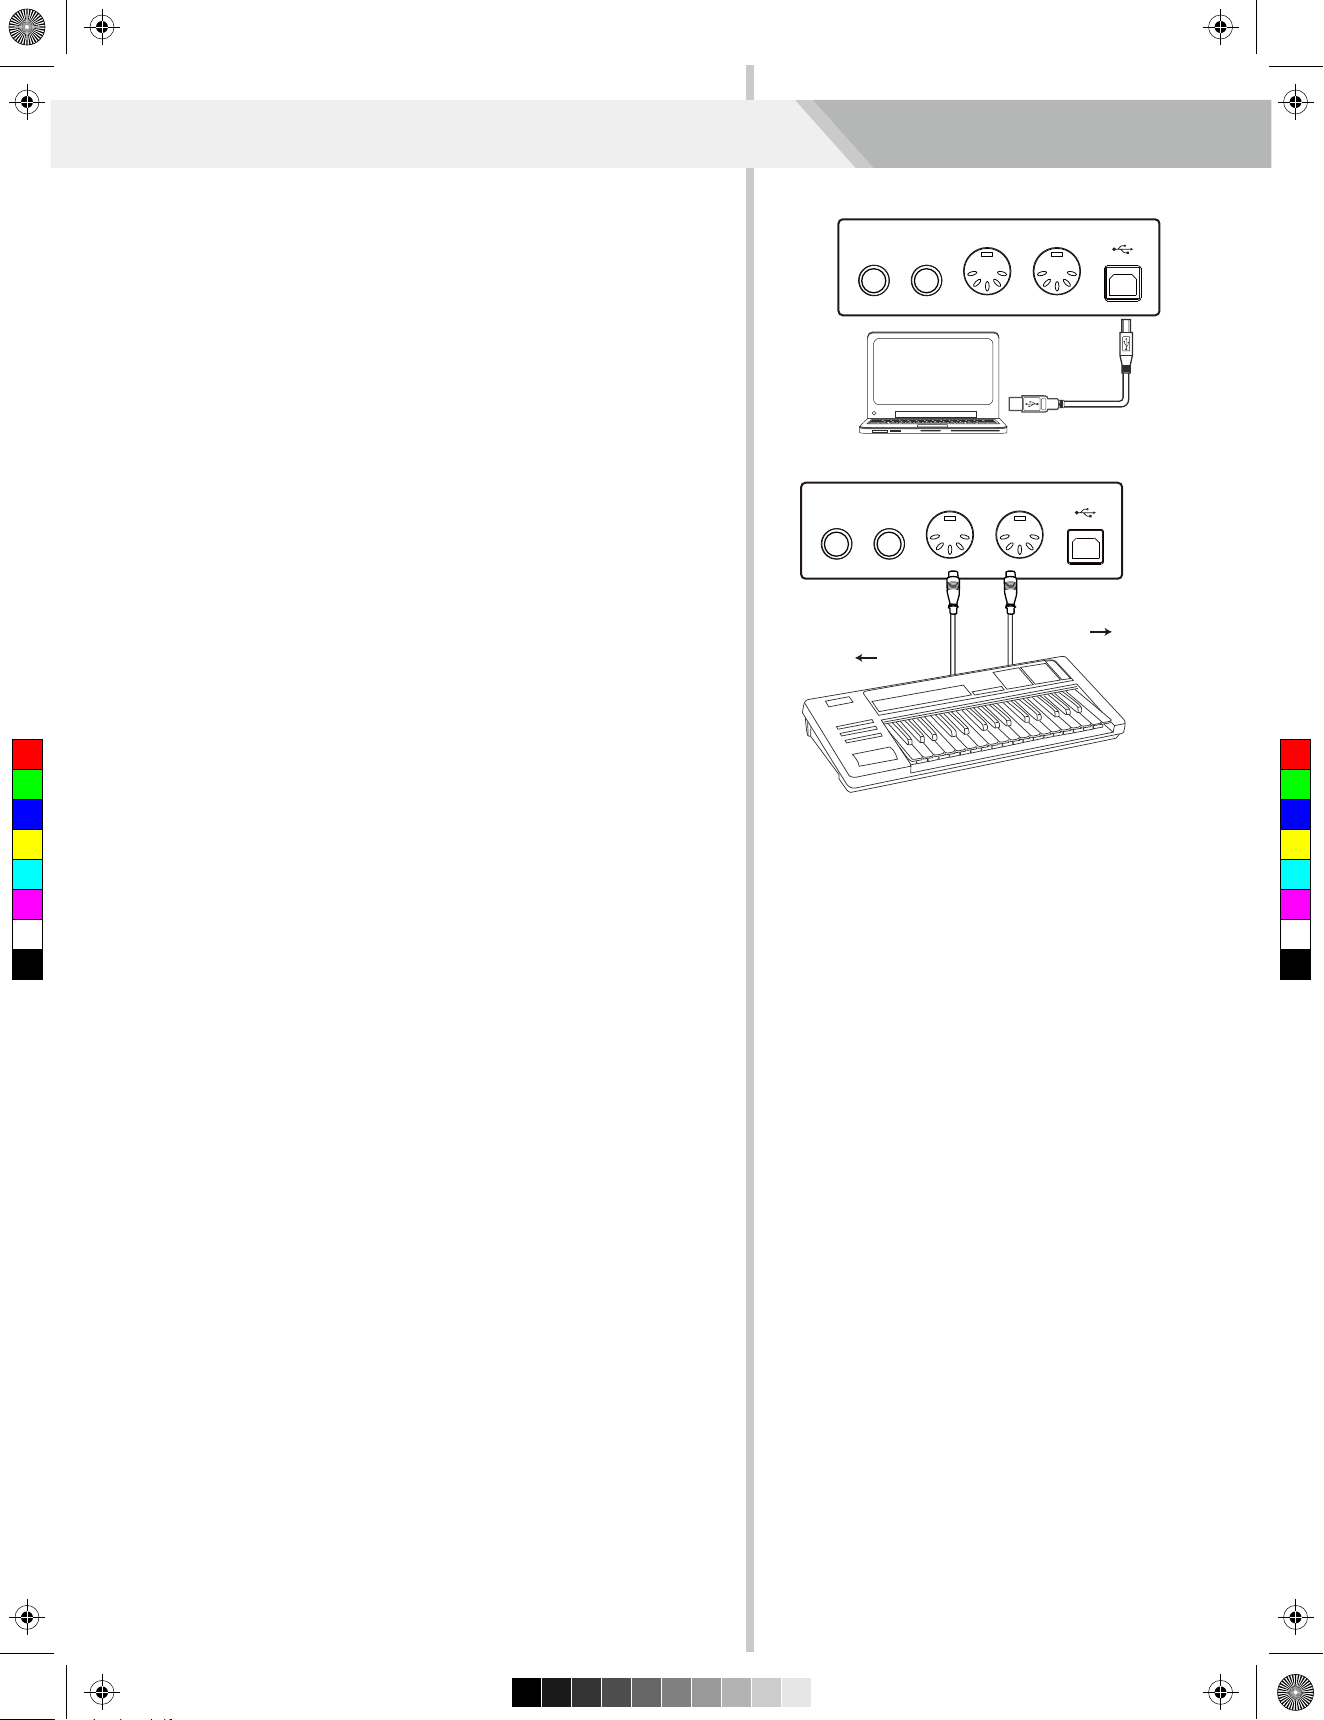
You can use the USB Connector to receive MIDI messages from
AUX IN MIDI IN MIDI OUTAUX OUT USB
computer or transmit MIDI messages to computer.
You can use a commercially available MIDI interface to connect the
piano to the computer via the MIDI connectors.
Note:
Do not set the USB device to be input and output simultaneously
when setting the software on PC. Otherwise the sound will be
overlapped when playing the keyboard.
AUX IN MIDI IN MIDI OUTAUX OUT USB
Connecting external MIDI devices
You can use standard MIDI cables to connect external MIDI
devices.
MIDI IN: Receive MIDI message from an external MIDI device.
MIDI OUT: Transmits MIDI message generated by the instrument.
MIDI THRU: Simply relays the MIDI message received at MIDI IN.
MIDI OUTMIDI IN
Note:
To avoid damages, please be sure to turn off the power switches
before you disconnect the related devices from the keyboard.
C
M
Y
CM
MY
CY
CMY
K
MIDI OUT MIDI IN
10
Page 11
Aw_DP370_Manual_G07_161223.pdf 11 17/1/4 14:34
Adjusting the Master Volume
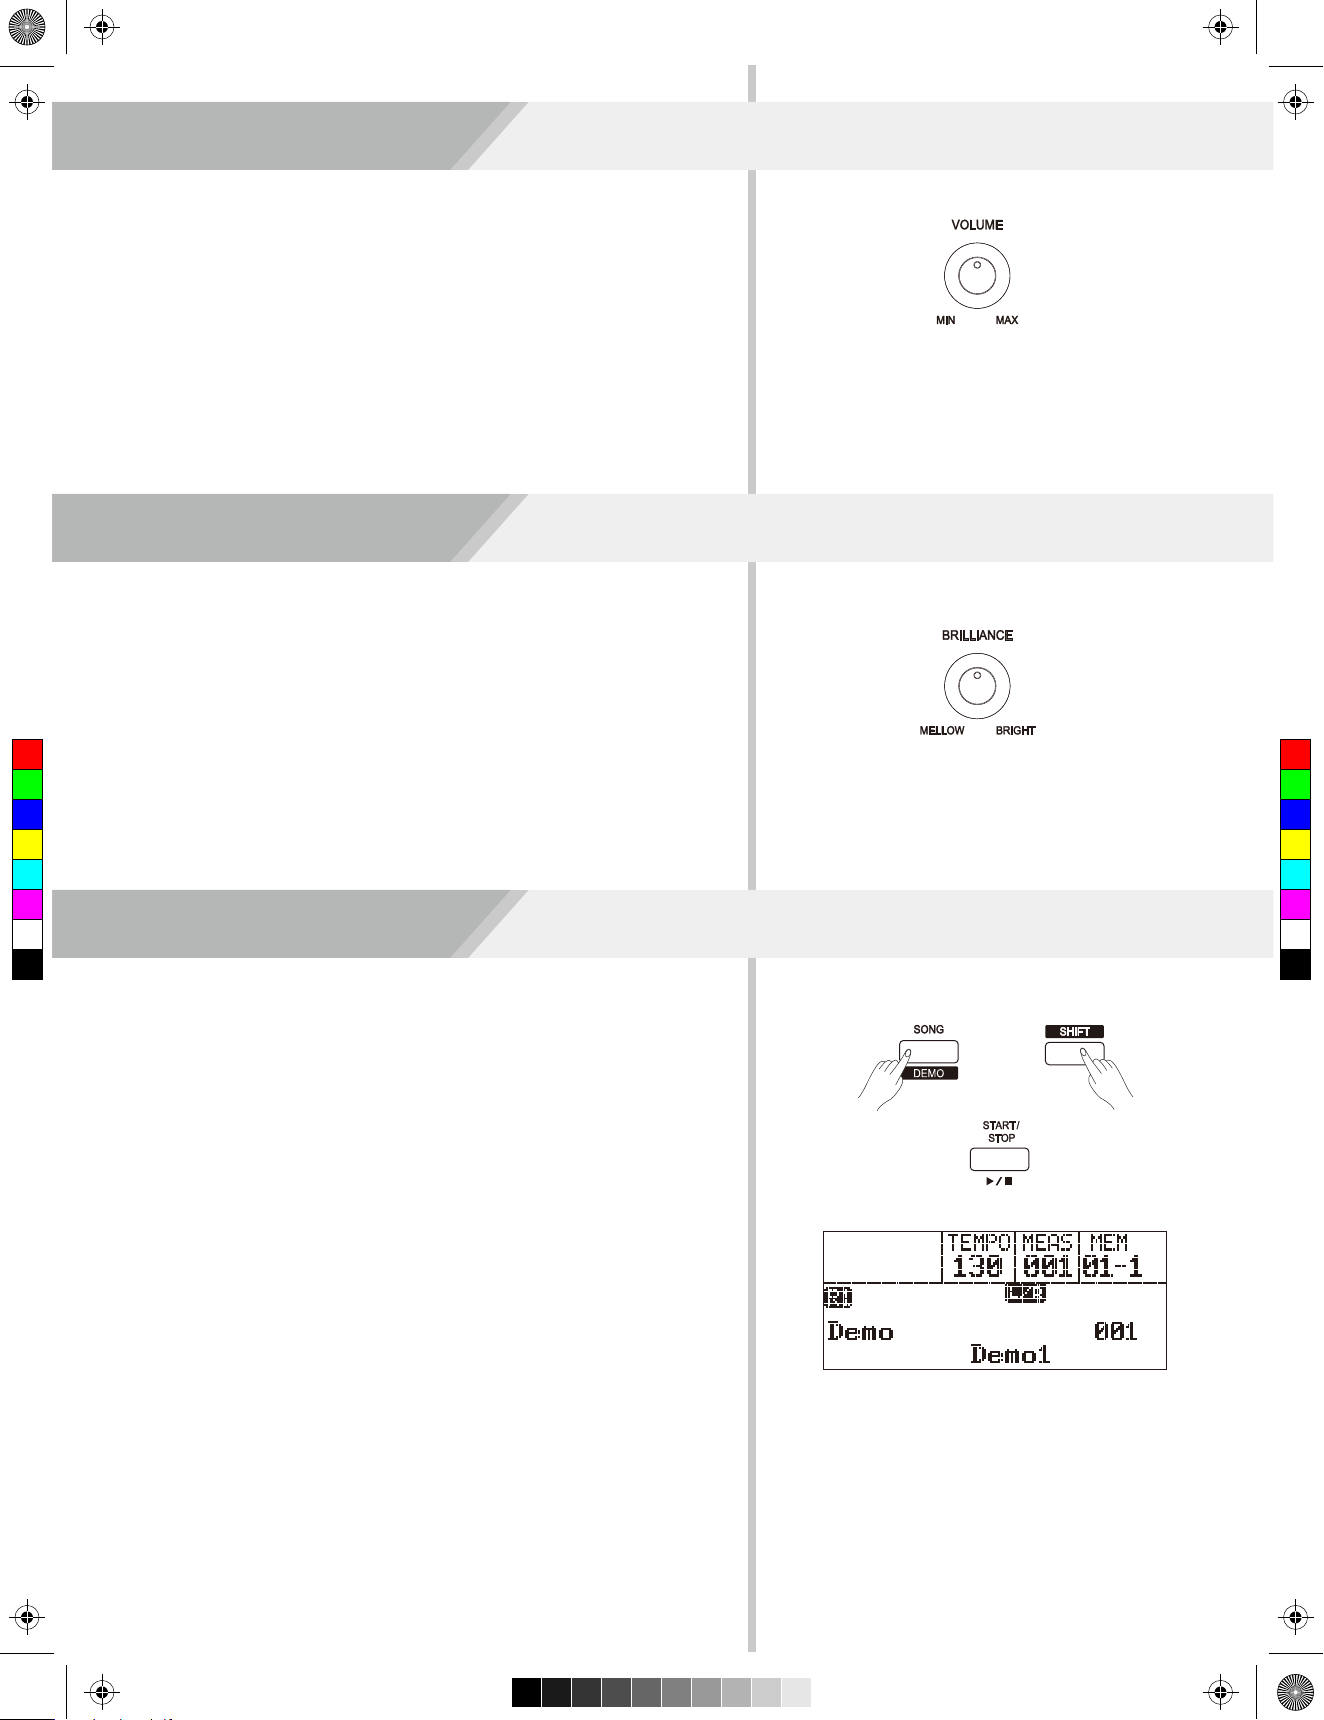
Rotate the [VOLUME] knob to right, the volume increases and vice
versa.
Adjusting the Voice Brilliance
Slide the [BRILLIANCE] knob to right, the voice sounds brighter
and vice versa. You can change the piano brilliance as you wish.
C
M
Y
CM
MY
CY
CMY
K
The instrument features 5 wonderful demos. Please refer to Demo List.
1. Holding down the [SHIFT] button, then press the [DEMO] button to
start the demo song playing, and the LCD will display the number
and name of the demo.
2. Beats Flashing
During demo playback, the LED indicator of [START/STOP] will flash
with the current tempo, red for strong beat and green for weak beat.
3. You can use the data dial, [+/YES] / [-/NO]button to select a demo
song.
Playing the Demo Song
4. Holding down the [SHIFT] button, then press the [demo] button or
press the [START/STOP] button directly to stop playing and exit the
demo mode.
Note:
1. In demo mode, only the following button functions will be available:
[DEMO], [START/STOP], [ TEMPO+/-], [+/YES], [-/NO], Data dial,
[VOLUME], [BRILLIANCE], and [POWER].
All other buttons and the keyboard function will become invalid.
2. In recording, style or song mode, the LED indicator of
[START/STOP] will flash with the current tempo.
11
Page 12
Aw_DP370_Manual_G07_161223.pdf 12 17/1/4 14:34
Playing Voices
The instrument features 600 exceptionally realistic voices. Please
refer to Voices List.
Playing Voices
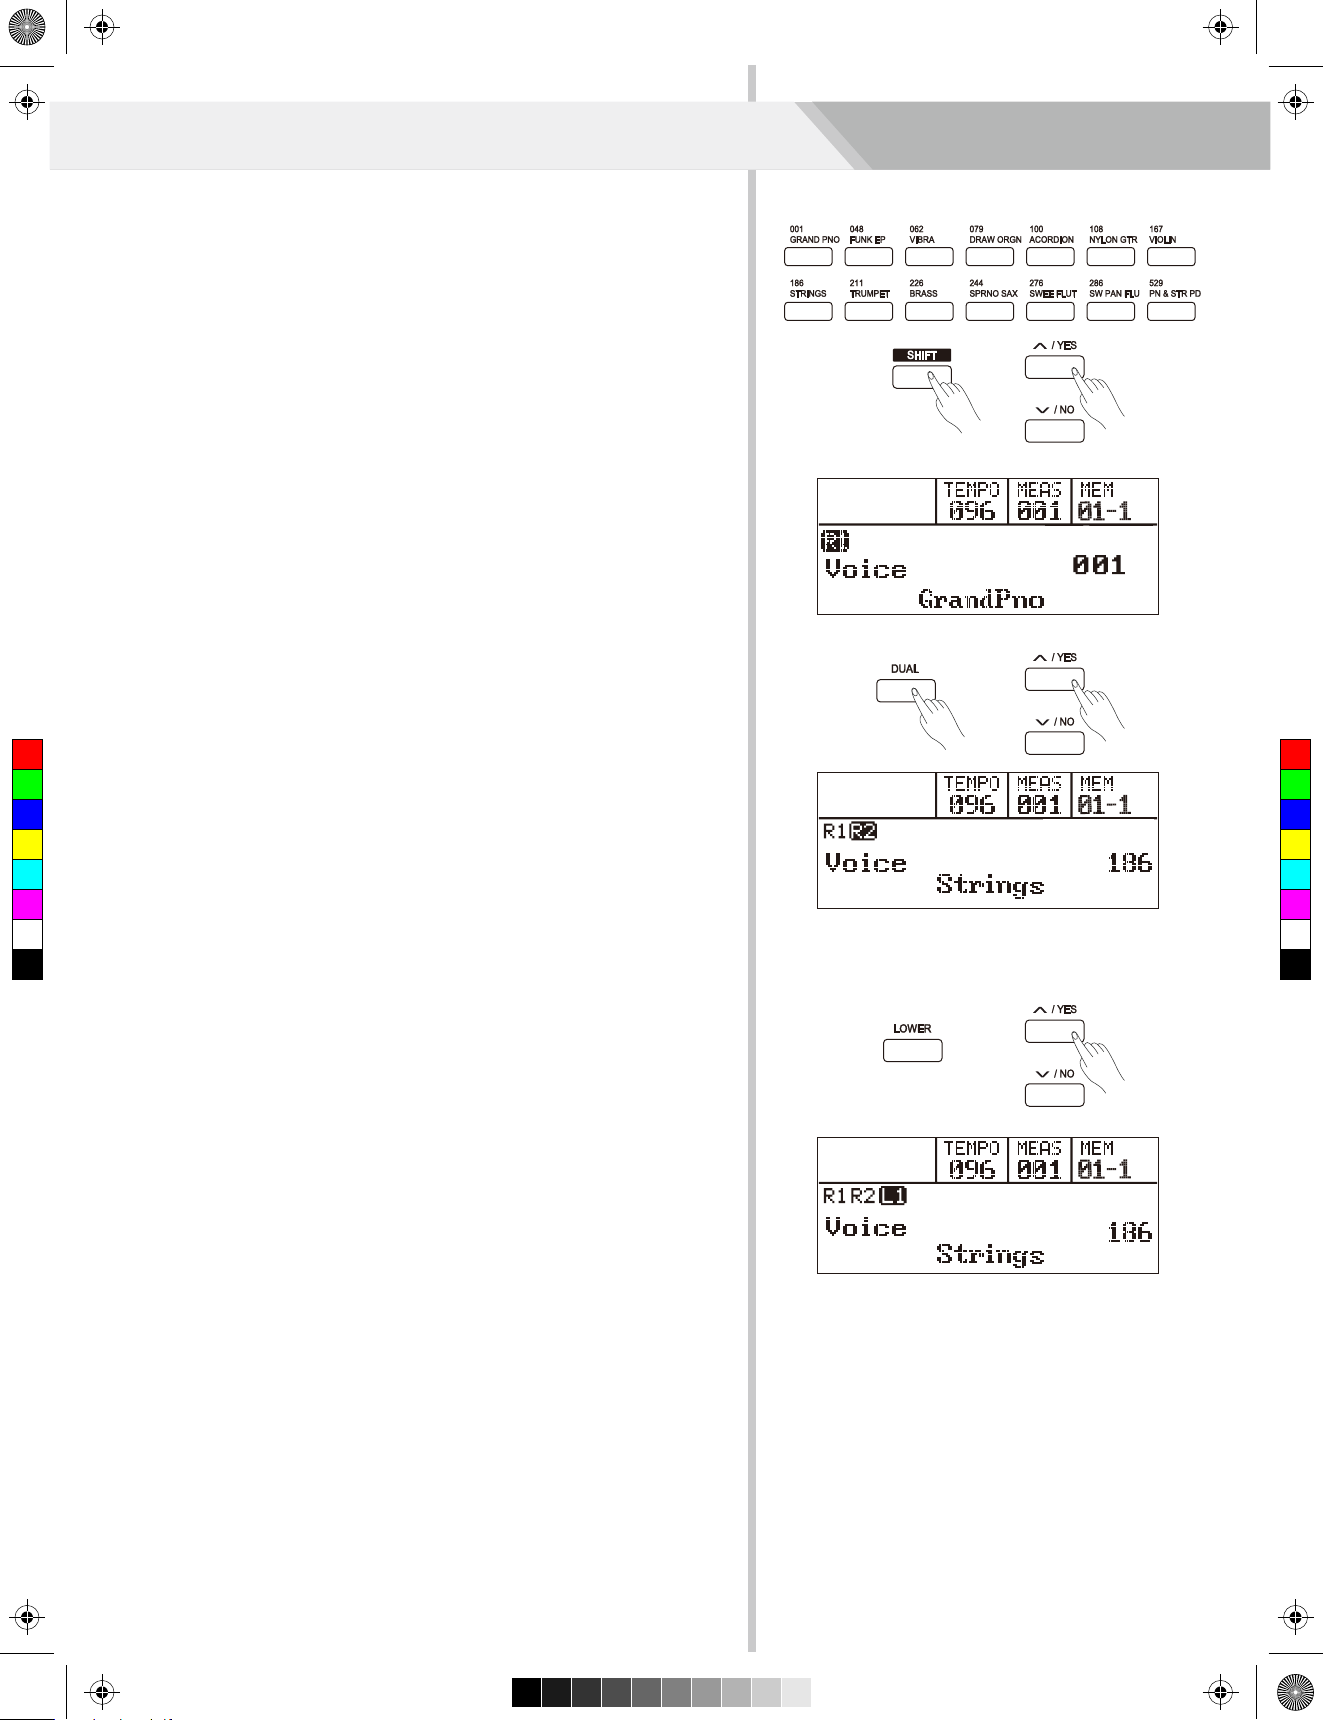
1. In idle status, holding down the [SHIFT] button, then press one of
the voice direct button to enter the voice mode. LCD will display
the name and number of the current voice and highlights “R1”.
2. Use the data dial, [+/YES]/ [-/NO] button to select the voice you
want to play. You can also use the voice direct button to select a
voice.
3. You can play the keyboard and listen to the wonderful voice.
Note:
When the Dual and Lower functions are on, hold down [SHIFT]
button, then press one of the voice select buttons to shift the voice
source between R1, R2 and L1. The selected one will be highlighted
on LCD.
Playing two voices simultaneously-DUAL
1. In idle mode, press [DUAL] button to turn on dual voice. LCD
displays current voice name and number, and highlights “R2”.
C
M
Y
CM
MY
CY
CMY
K
2. When “R2” is highlighted, use the data dial, the [+/YES], [-/NO]
button or voice direct button to select the dual voice you want to
play.
3. Play the keyboard, you will hear two different voices sounded
simultaneously in a layer. It seems like two instruments playing at
the same time.
Note:
When the keyboard has been split, only the right hand area will play
the dual voice.
Play Different Voices with Both
hands-LOWER
1. In idle mode, press [LOWER] button to turn on lower voice. The
keyboard is split into two independent areas, which have different
voices. LCD displays the left hand voice name and number, and
highlights “L1”.
2. When “L1” is highlighted, use the data dial, the [+/YES], [-/NO]
button or voice direct button to select the lower voice you want to
play.
3. Play the keyboard with both hands, and you will hear two different
voices from the two areas.
Note:
The right hand voice does not change when you change lower voice.
Split Point
The Point on the keyboard that separates voice L1 and voice R1/R2 is
called the "split point". The split point is set to F#3/G3 at the factory
setting. However you can set this to any key you want. Please refer to
KeySplit setting for split point.
12
Page 13
Aw_DP370_Manual_G07_161223.pdf 13 17/1/4 14:34
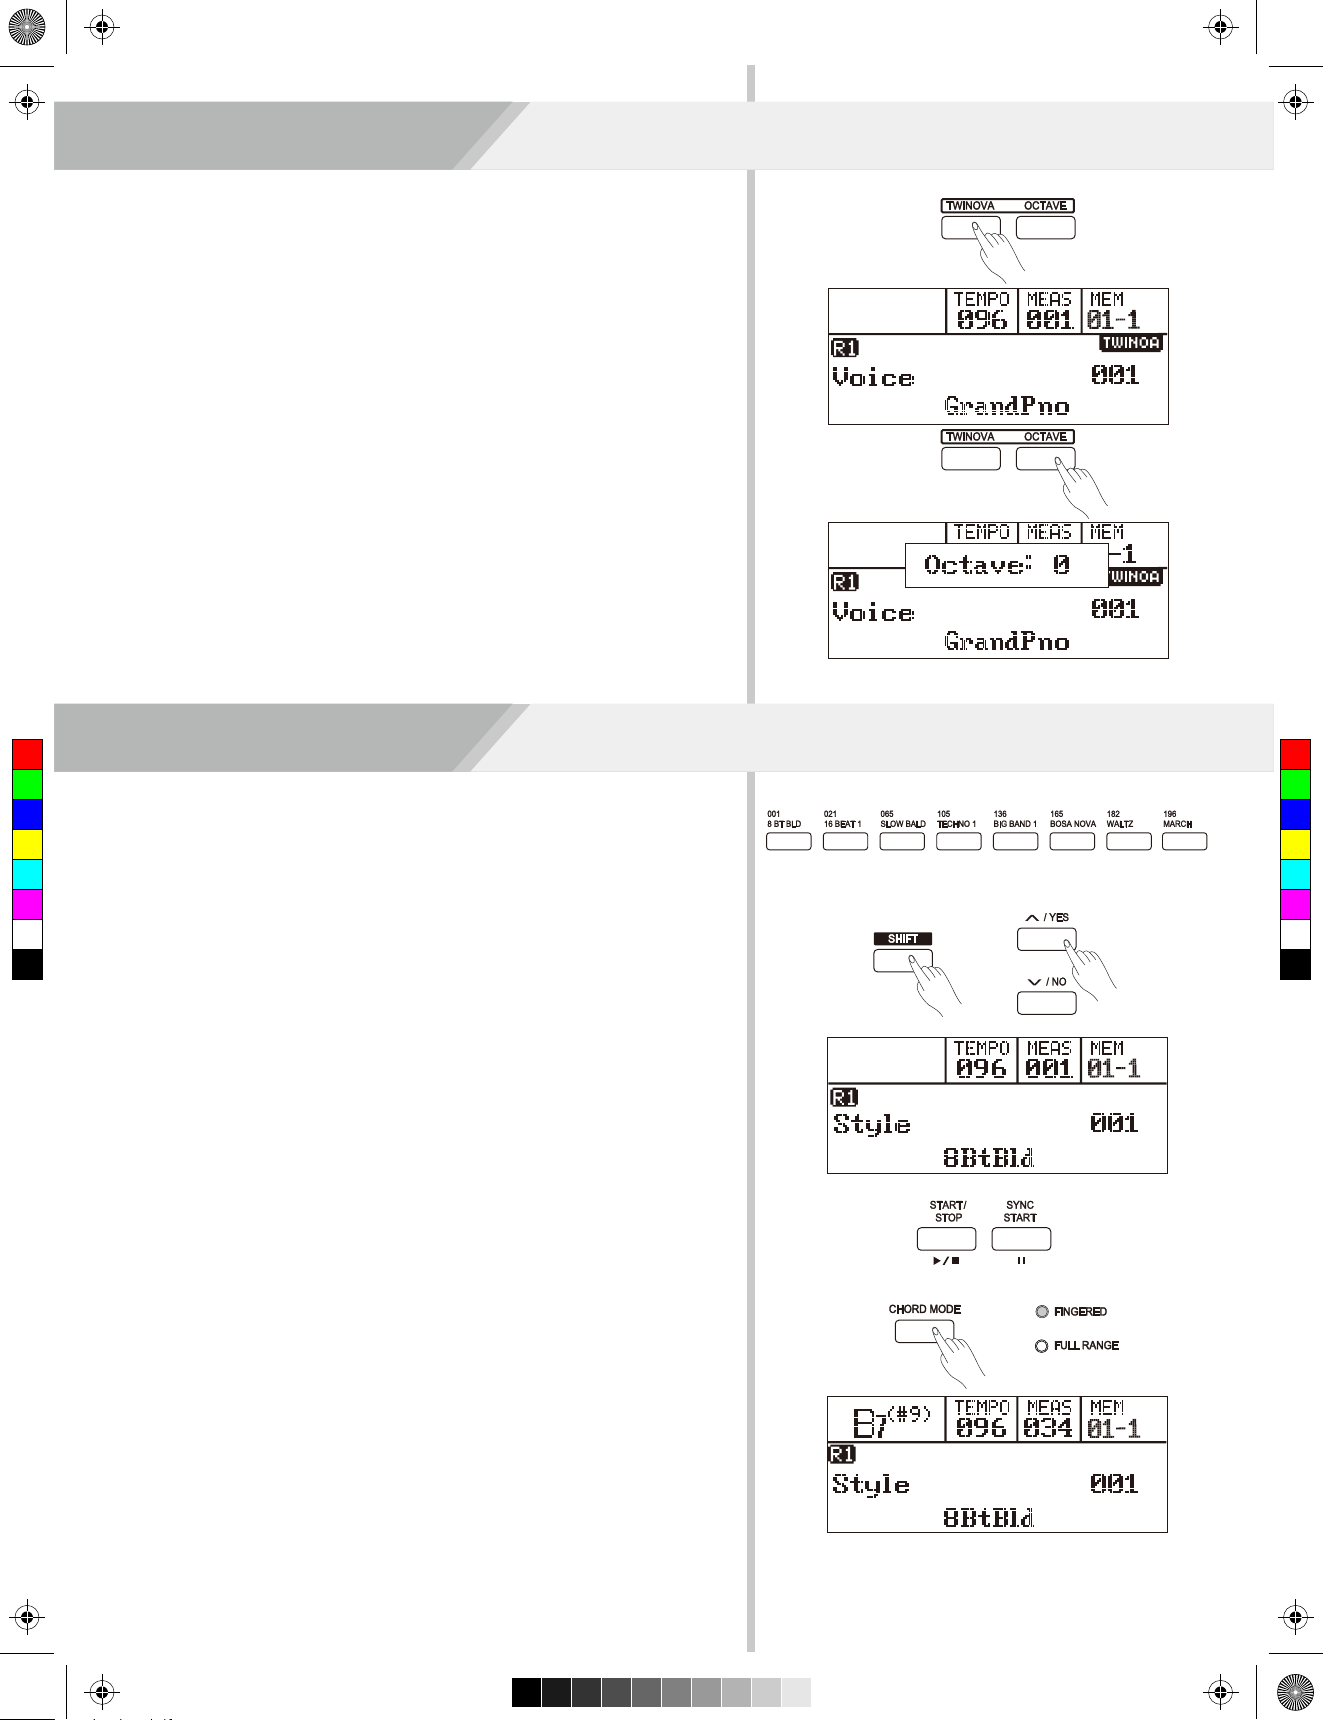
The twinova mode splits the keyboard into two independent areas,
which have the same pitch and voice, for the convenience of
one-to-one teaching.
1. In idle mode, press [TWINOVA] button to turn on twinova. LCD
highlights “TWINOA”. In twinova mode, dual voice and lower
voice are unavailable. The default split point is E3 (32). Press
[TWINOVA] button again you can exit twinova.
2. In twinova mode, the default voice of right hand and left hand is the
upper voice you select before entering twinova mode. Use the data
dial, the [+/YES], [-/NO] button or the voice direct button to choose
voice.
3. In twinova mode, press [OCTAVE] button, LCD temporarily displays
the octave value of twinova. Now you can use the data dial, the
[+/YES], [-/NO] button to set octave value of twinova. The range of
octave is -1 to 1.
Note:
1. In the song playing mode, the twinova is invalid.
2. Please refer to Split Point setting to set the split point.
Twinova
C
M
Y
CM
MY
CY
CMY
K
The auto accompaniment feature puts a full backing band at your
fingertips. To use it, all you have to do is to play the chords with your
left hand using your selected accompaniment style, and then the
accompaniment will automatically play along, instantly following the
chords you play. With auto accompaniment, even a solo performer can
enjoy playing with the backing of an entire band or orchestra.
This keyboard features 240 (including 10 user styles: 231-240) styles
in a variety of musical genres. Try to select some of the different styles
(refer to Style List) and enjoy the auto accompaniment.
Auto Accompaniment
Play Auto Accompaniment(rhythm track
only)
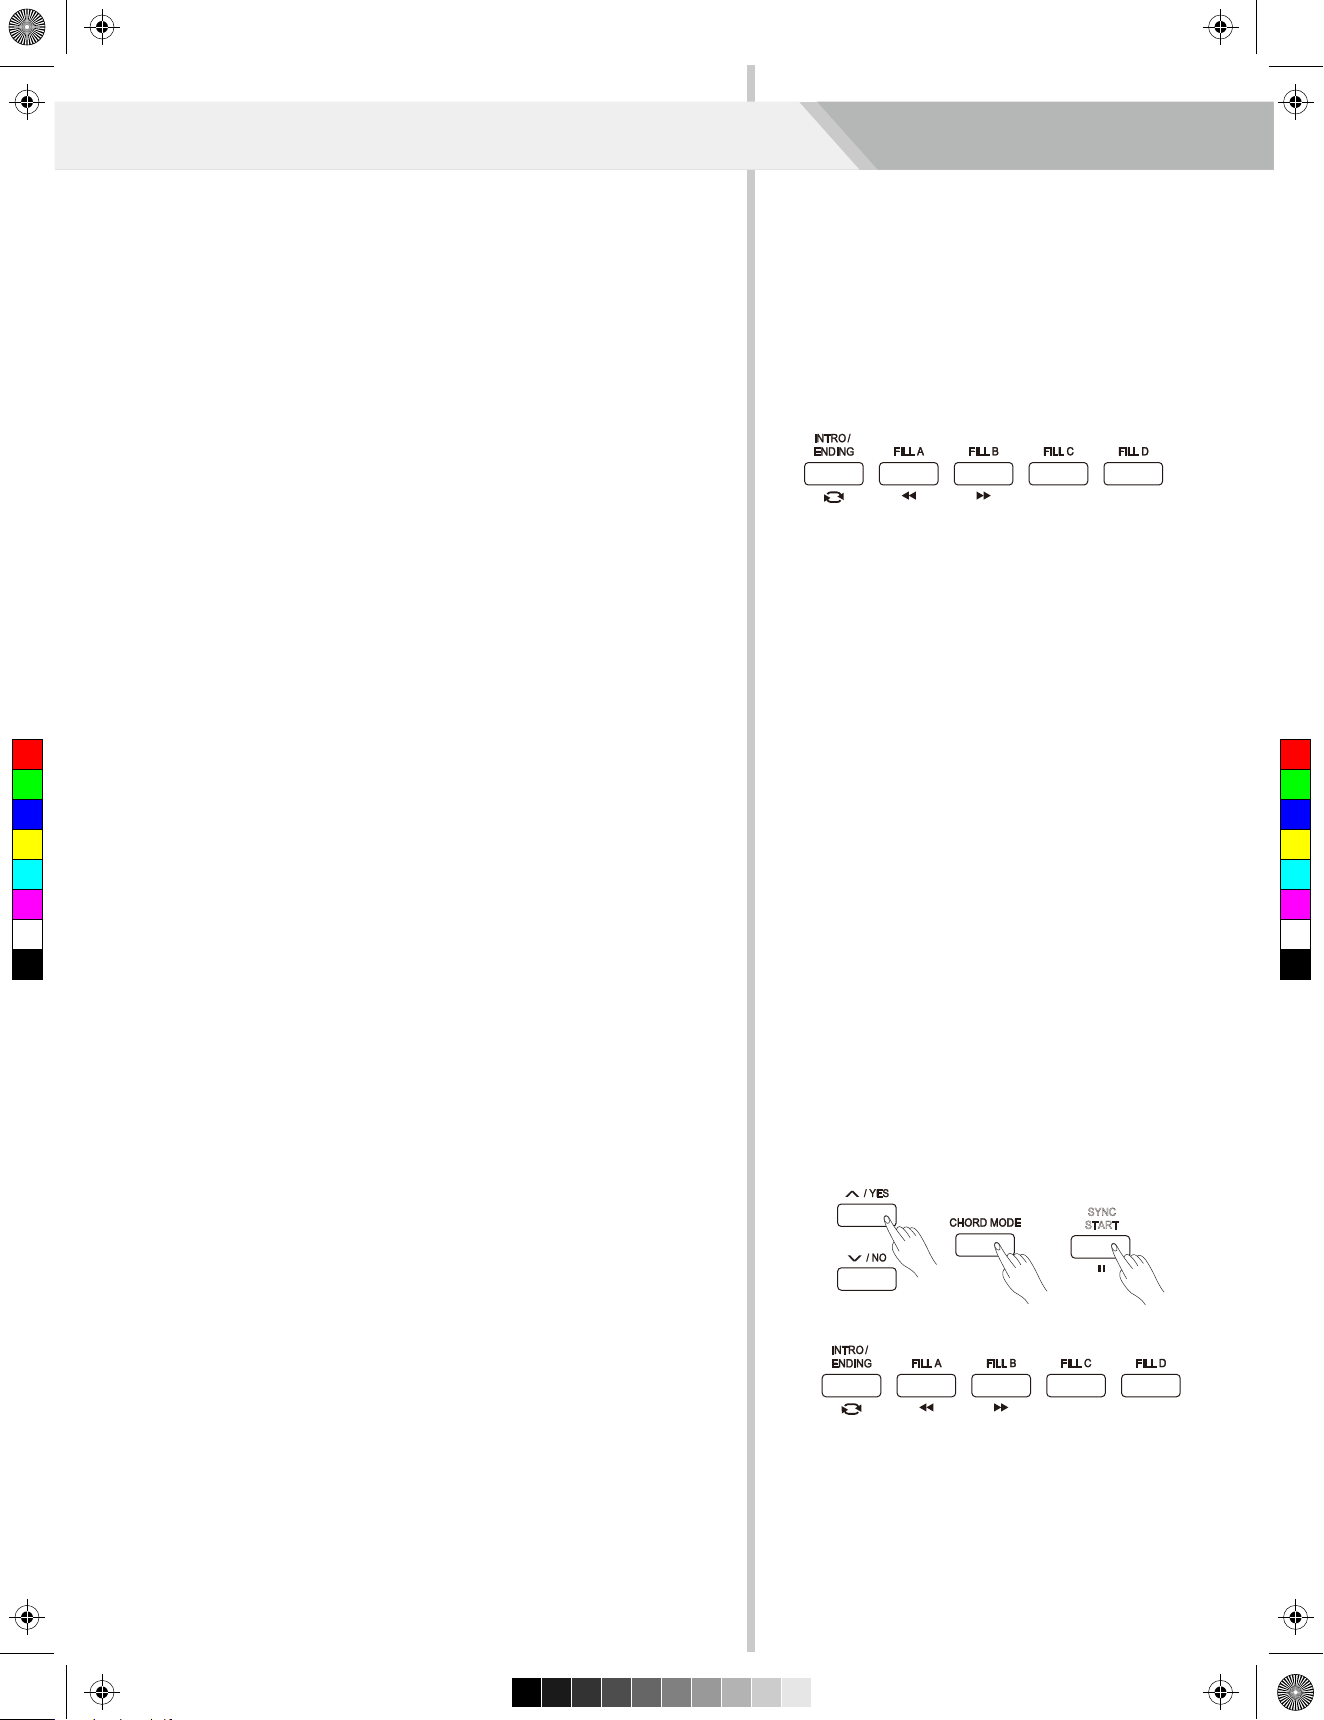
1. In idle mode, when pressing [SHIFT] button, press any of the style
direct button to enter the style mode. LCD displays the name and
number of the current style.
2. Use the data dial, the [+/YES], [-/NO] button or the style direct
button to choose style.
3. Press the [START/STOP] button to start the rhythm tracks of the
auto accompaniment. Also you can press [SYNC START] and then
play any key to start the rhythm tracks of the auto accompaniment.
Play Auto Accompaniment(all tracks)
1. In style mode, press [CHORD MODE] button to enter “auto bass
chord” (A.B.C.)mode. The “FINGERED” LED on the panel will light
up. The keyboard is split into two areas. Play chords in the left hand
area.
Press [CHORD MODE] button again to enter “full range” mode. The
“FULL RANGE” LED on the panel will light up. You can play chords
over the entire keyboard in normal fingering.
13
Page 14
Aw_DP370_Manual_G07_161223.pdf 14 17/1/4 14:34
Auto Accompaniment
2. Press [SYNC START] button , and then play a chord in the chord
area to start auto accompaniment of all tracks. When you change
a chord, the accompaniment automatically changes.
Alternatively, press [START/STOP] button to start auto accompani ment of rhythm track, then play a chord in the chord area. It will start
auto accompaniment of all tracks
Accompaniment Sections
There are various types of Auto Accompaniment sections that allow
you to vary the arrangement of the accompaniment to match the song
you are playing.
They are: Intro, Main (A,B,C,D), Fill (A, B,C,D), and Ending.
By switching among them during your performance you can easily
produce the dynamic elements of a professional sounding
arrangement in your performance.
INTRO Section
The intro is an opening section of the song. When the intro pattern
finished, the system will automatically shift to the main section.
MAIN Section
The main is an important section of the song. And it plays an accompaniment pattern and repeat infinitely until another section's button is
pressed.
C
M
Y
CM
MY
CY
CMY
K
FILL IN Section
Auto fill in function automatically adds a fill to your performance. When
the fill-in is finished, accompaniment shifts to the Main section
(A,B,C,D).
ENDING Section
Ending is used for the ending of the song. When the ending is
finished, accompaniment automatically stops. The length of the ending
differs depending on the selected style.
Note:
During style playback, hold down one of the FILL [A]-[D] buttons, and
the selected fill-in pattern will play continuously until the button is
released.
When style stops, press one of the FILL [A]-[D] buttons to select a
main section. The corresponding LED will light up.
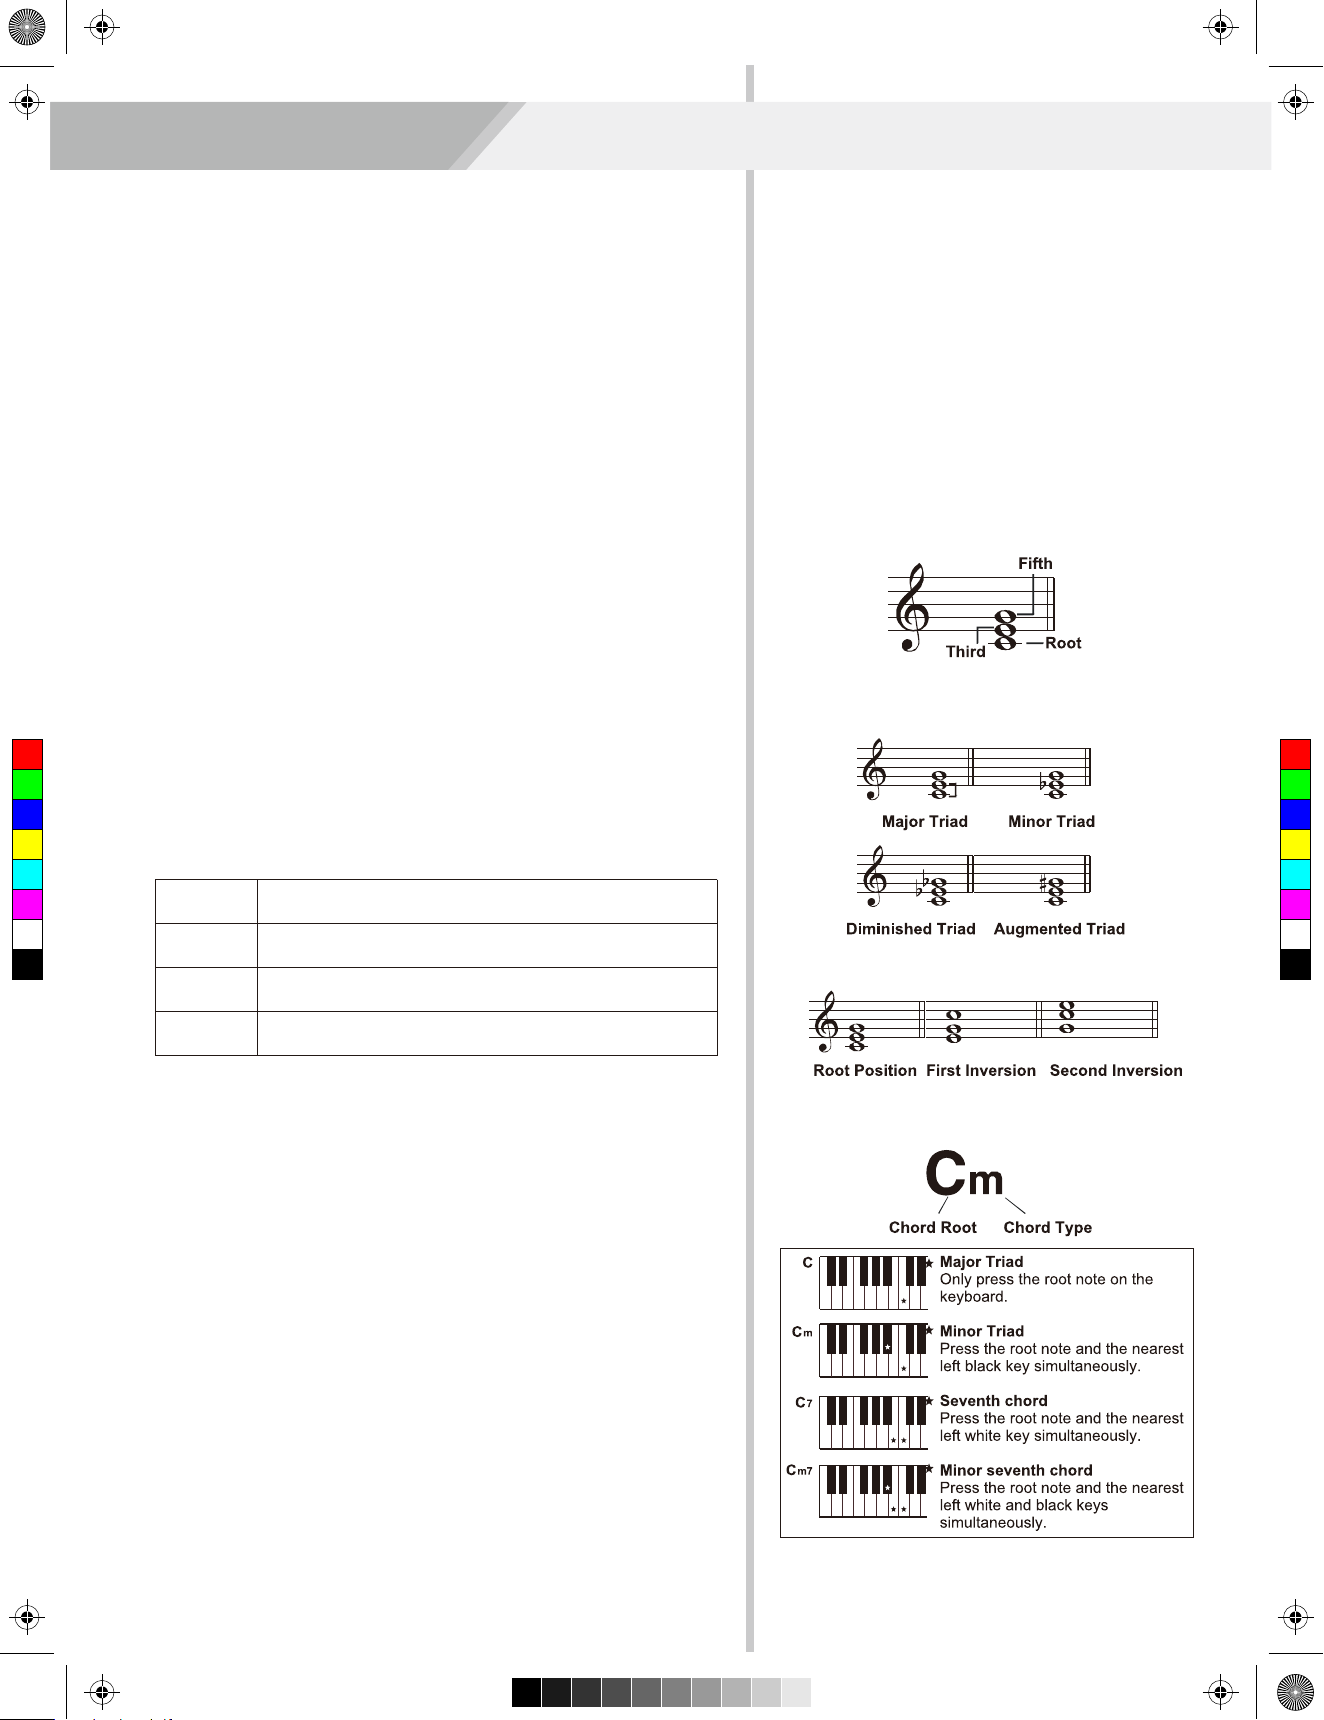
Playing Different Accompaniment Sections
1. Press style direct button or use the data dial, [+/YES]/[-/NO] button
to choose style.
SYNC
START
2. Press [CHORD MODE] button to enter A.B.C. (auto bass chord)
mode.
3. Press [SYNC START] button.
4. Press [FILL A] button.
5. Press the [INTRO/ENDING] button. Now “A” LED flashes on panel,
the style is ready to play.
6. It will start the accompaniment as soon as you start playing in
Chord section. When the playback of the intro is finished, it
automatically leads into Main A section.
14
Page 15
Aw_DP370_Manual_G07_161223.pdf 15 17/1/4 14:34
7. Press the [FILL B] / [FILLDC] / [FILL D] button. A fill-in plays,
automatically followed by the Main B/C/D section.
8. Press the [INTRO/ENDING] again will lead it into the Ending
Section. When the ending is finished, the auto accompaniment
automatically stops.
Accompaniment Volume
This function is used to change the volume of all tracks of accompaniment.
Press [ACC VOL] button, the LCD will display ACCOMP volume (from
0 to 127). At this time, you can use the data dial, or [+/YES]/[-/NO]
button to adjust accomp volume.
Chord Fingering
How the chords are played or indicated with your left hand (in the
auto accompaniment section of the keyboard) is referred to as
"fingering". There are 2 types of fingerings as described below.
Auto Accompaniment
Chord Basics
A chord, in music, is any harmonic set of three or more notes that is
heard as if sounding simultaneously. The most frequently encountered
C
M
Y
CM
MY
CY
CMY
K
chords are triads. A triad is a set of three notes that can be stacked in
thirds. When stacked in thirds, the triad's members, from lowest
pitched tone to highest, are called: the Root, the Third, and the Fifth.
Triad Type
There are following basic triad types:
Major Triad
A root with a major third added above and a perfect fifth
will consist as a “Major Triad”.
Minor Triad
A root with a minor third added above and a perfect fifth
will consist as a “Minor Triad”.
Augmented
Triad
Diminished
Triad
A root with a major third added above and an
augmented fifth will consist as an “Augmented Triad”.
A root with a minor third added above and a diminished
fifth will consist as a “Diminished Triad”.
Chord Inversion
We define this chord its root is not in the bass (i.e., is not the lowest
note) as an inversion chord. When the root is in the bass, we call the
chord: root-position chord. If we put the Third and Fifth in the root
position, then it forms “Inversion”, we call this chord “Inversion Chord”.
See the following major triad and its inverted chord.
Chord Name
The chord name contains two parts content: Chord root and Chord
type.
Single Finger
Single-finger makes it simple to produce major, seventh, minor and
minor seventh chords by pressing a minimum number of keys on the
auto accompaniment section.
15
Page 16
Aw_DP370_Manual_G07_161223.pdf 16 17/1/4 14:34
Auto Accompaniment
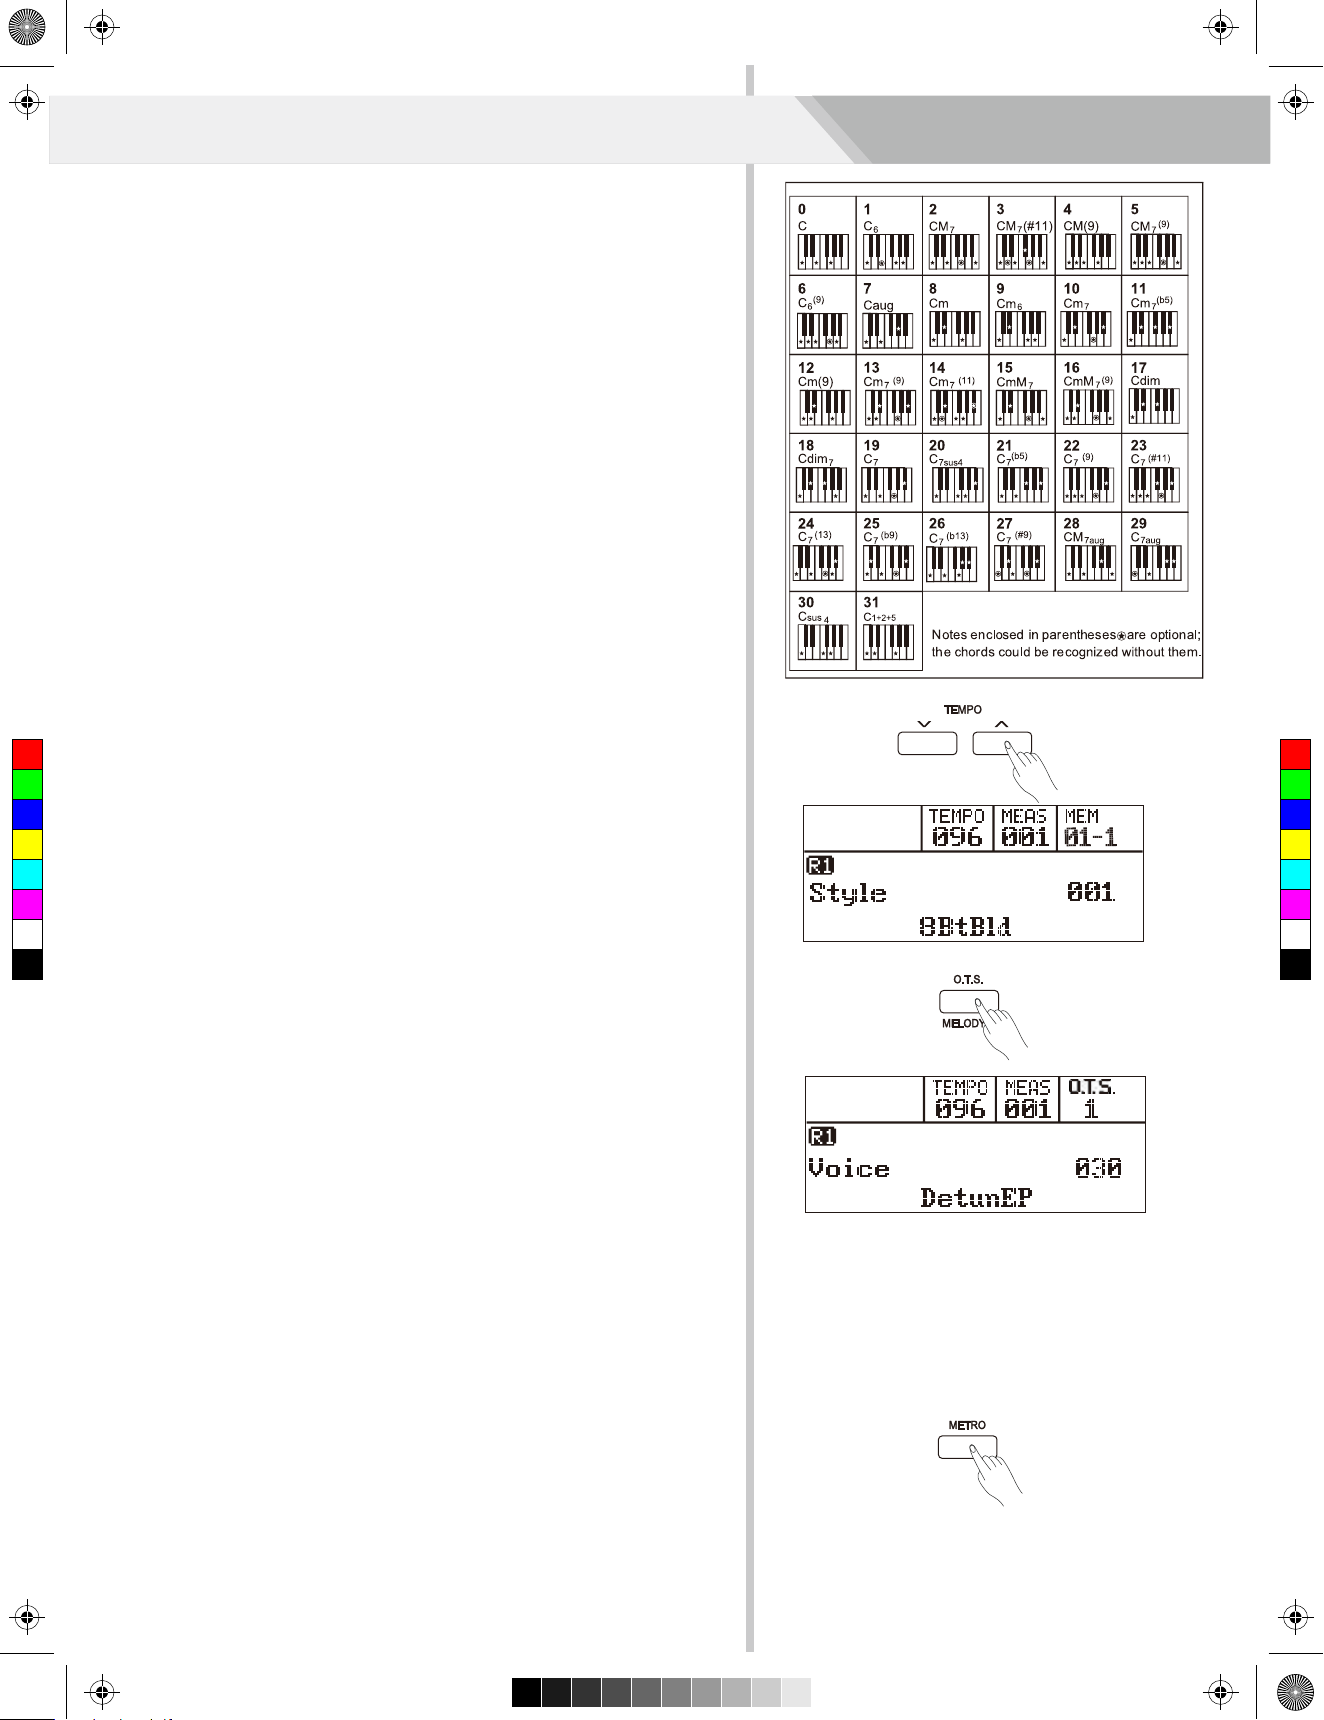
Multi-finger
Multi-finger allows you to play chords in normal fingering. Try playing
the 32 chord types in C scale as listed on the right.
Note:
In full range mode, the entire keyboard will only recognize chords
played in normal fingering.
Tempo
Each style of the instrument has been set with a default or standard
tempo, however, this can be changed by using the [TEMPO+]/
[TEMPO-] buttons.
1. Use the [TEMPO+] or [TEMPO-] button to change the tempo. While
the tempo data is flashing, use the data dial also can change the
tempo.
2. Press the [TEMPO+]/[TEMPO-] buttons simultaneously to restore
C
M
Y
CM
MY
CY
CMY
K
the default tempo setting.
One Touch Setting
When One Touch Setting is switched on, you can instantly recall all
auto accompaniment related settings including voices selection and
digital effects simply with a single touch of a button.
1. Press the [O.T.S.] button to turn on the One Touch Setting for
current style.
2. Press one of the one touch setting buttons [M1]-[M4]. Various panel
settings (such as voice, effect, etc.) that match the selected style
can be instantly recalled with just a single button press.
Auto accompaniment is automatically turned on during O.T.S mode.
3. Play the keyboard.
One Touch Setting parameter list:
Part ON/OFF (VOICER1, R2, L1)
Voice Change (VOICER1, R2, L1)
Voice Volume (VOICER1, R2, L1)
Voice Reverb Level (VOICER1, R2, L1)
Voice Chorus Level (VOICER1, R2, L1)
Metronome
Using metronome helps you with beat that guides your playing by
preset tempo.
1. Turn on the metronome
Press the [METRO] button to turn the metronome on.
2. Turn off the metronome
Press the [METRO] button again to turn the metronome off.
3. Metronome beat type setting
Please refer to beat type setting.
Note:
The metronome will respond in the next beat if it is turn on when the
accompaniment is playing.
When recording, metronome beats cannot be recorded.
16
Page 17
Aw_DP370_Manual_G07_161223.pdf 17 17/1/4 14:34
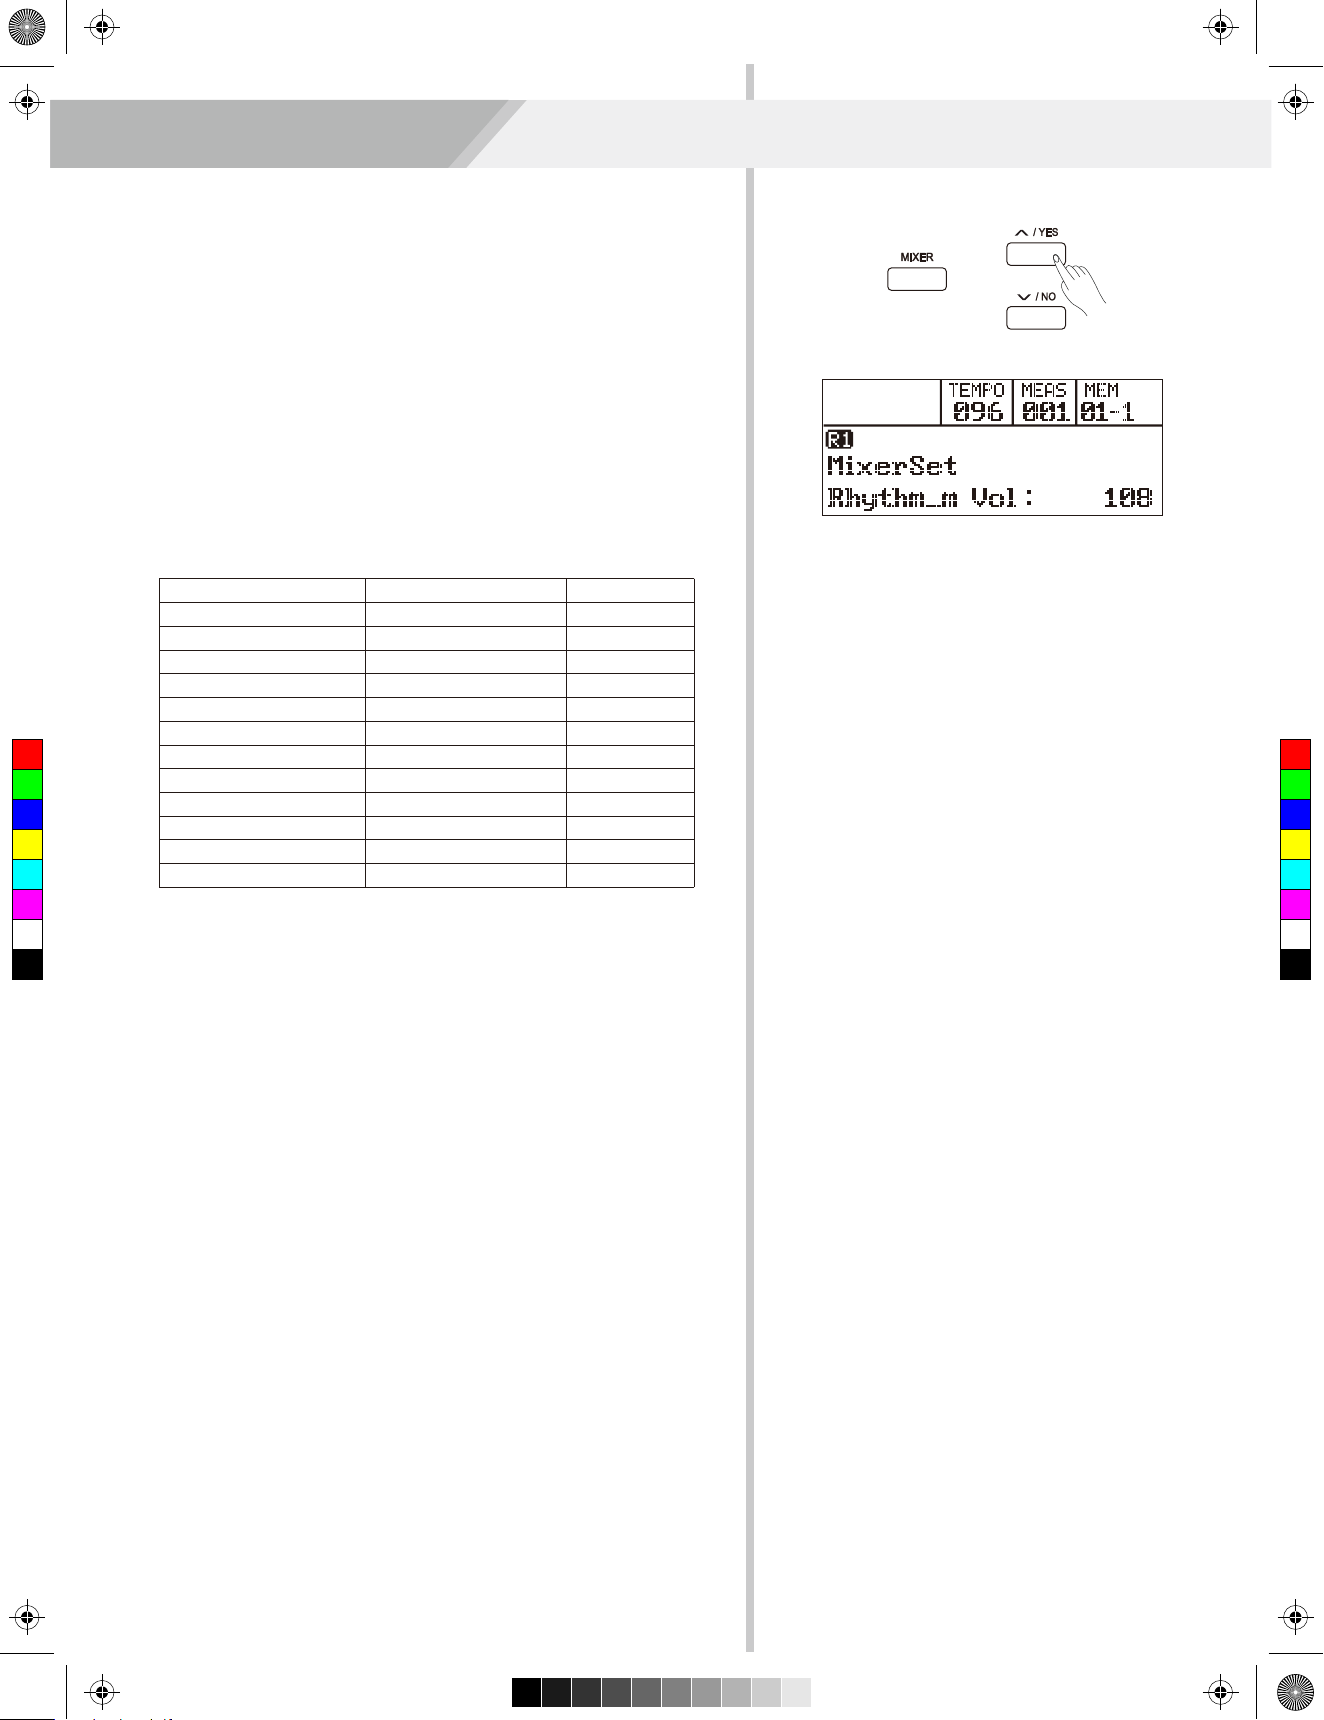
Mixer function adjusts separately the volume of different tracks.
1. Press the [MIXER] button.
Now you have entered the menu of mixer. Press the [MIXER] button
repeatedly to select a track to change its volume.
2. To adjust the selected volume setting, please use the data dial or
the [+/YES]/[-/NO] button.
Press [+/YES] and [-/NO] button simultaneously to turn off a track
volume.
Press[+/YES]and[-/NO] button simultaneously again to turn on a
track volume.
The option and parameters are as follows:
Mixer
Option
Rhythm slave volume
Rhythm master volume
Bass volume
Chord 1 volume
Chord 2 volume
Chord 3 volume
C
M
Y
CM
MY
CY
CMY
K
Phrase 1 volume
Phrase 2 volume
Voice R1 volume
Voice R2 volume
Voice L volume
Disk volume
LCD display
Slave Rhythm:
Master Rhythm:
Bass:
Chord1:
Chord2:
Chord3:
Phrase1:
Phrase2:
Upper1:
Upper2:
Lower:
Disk Vol:
xxx
xxx
xxx
xxx
xxx
xxx
xxx
xxx
xxx
xxx
xxx
xxx
Range
0 - 127
0 - 127
0 - 127
0 - 127
0 - 127
0 - 127
0 - 127
0 - 127
0 - 127
0 - 127
0 - 127
0 - 127
17
Page 18
Aw_DP370_Manual_G07_161223.pdf 18 17/1/4 14:34
Other Functions
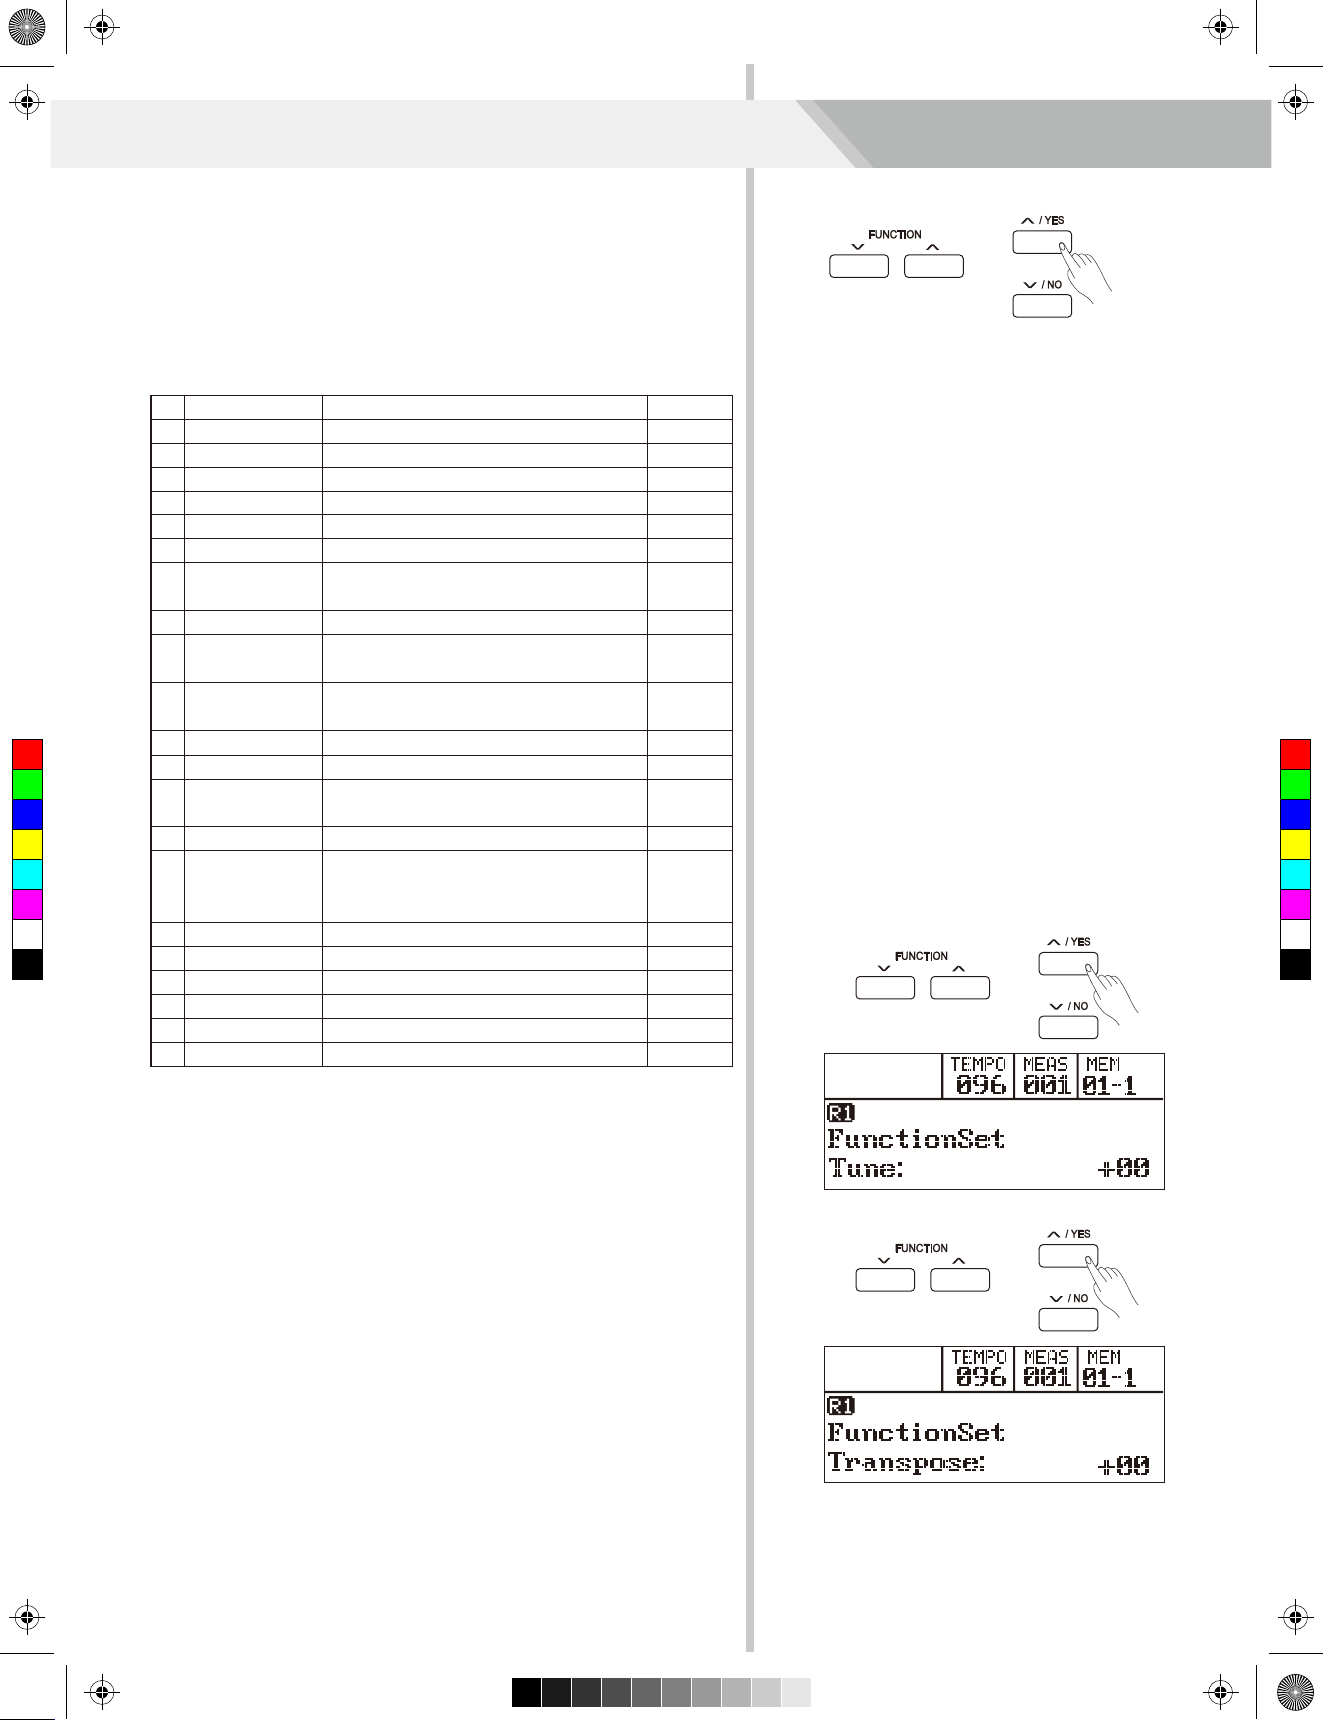
Press [FUNCTION+/-] button to enter function menu. The default
option of the menu is "Tune". When you enter the menu next time,
you will find the option is the same as last time. Use [FUNCTION+/-]
button to select the option to set. Use [+/YES]/[-/NO] or data dial to
set parameter of the current menu.
The option and parameters are as follows:
Option
No.
Tune
1
Transpose
2
Split Point
3
Beat Type
4
Beat Volume
5
Harmony Switch
6
Harmony Type
7
Range
-50~+50
-12~+12
1~88
0,2~9
0~127
OFF,ON
Duet, 1+5, Octave, CtryDuet, Trio,
Default
+00
+00
034
004
090
OFF
Duet
Block, 4Close1, 4Close2, 4Open
Scale Switch
8
Scale type
9
OFF,ON
Pythagor, Major, Minor, MeanTone,
OFF
Pythagor
Werckmei, Kirnberg
Scale Root
10
C,C#,D,D#,E,F,F#,G,G#,
C
A,A#,B
EQ type
C
M
Y
CM
MY
CY
CMY
K
11
DSP Effect
12
Reverb Type
13
Reverb Level
14
Chorus Type
15
Chorus Level
16
MIDI IN
17
MIDI OUT
18
Touch
19
Language
20
Power Off
21
Reset, Pop, Rock, Class, Jazz, Dance
OFF,ON
Room1, Room2, Room3, Hall1, Hall2,
Church, Delay, PanDelay
0~127
Chorus1, Chorus2, GM Chrs1, GM
Chrs2, Flanger1, Flanger2,Rotary1,
Rotary2
0~127
1~16,ALL
1~16
OFF,1,2,3
中文,English
OFF,30,60
Reset
ON
Hall2
070
Chorus1
000
ALL
001
002
English
030
Tune
This function sets the pitch of entire keyboard in 2-cent increments.
1. Press [FUNCTION+/-] button to select tune menu. LCD displays
“Tune: xxx ”. Use [+/YES]/[-/NO] or data dial to change tune value.
Its range is from -50 to 50.
2. Press [+/YES] and [-/NO] simultaneously will set the tune value to
its default setting:000.
Transpose
Transpose function allows the overall pitch of the instrument to be
transposed up or down by a maximum of one octave in semitone
steps.
1. Press [FUNCTION+/-] button to select transpose menu. LCD
displays “Transpose: xxx”. Use [+/YES]/[-/NO] or data dial to
change transpose value. The max transpose is±12 semitones.
2. Press [+/YES]/[-/NO] simultaneously will set the transpose value to
its default setting:000.
18
Page 19
Aw_DP370_Manual_G07_161223.pdf 19 17/1/4 14:34
SplitPoint
This function sets the point that separates the entire keyboard to two
sections.
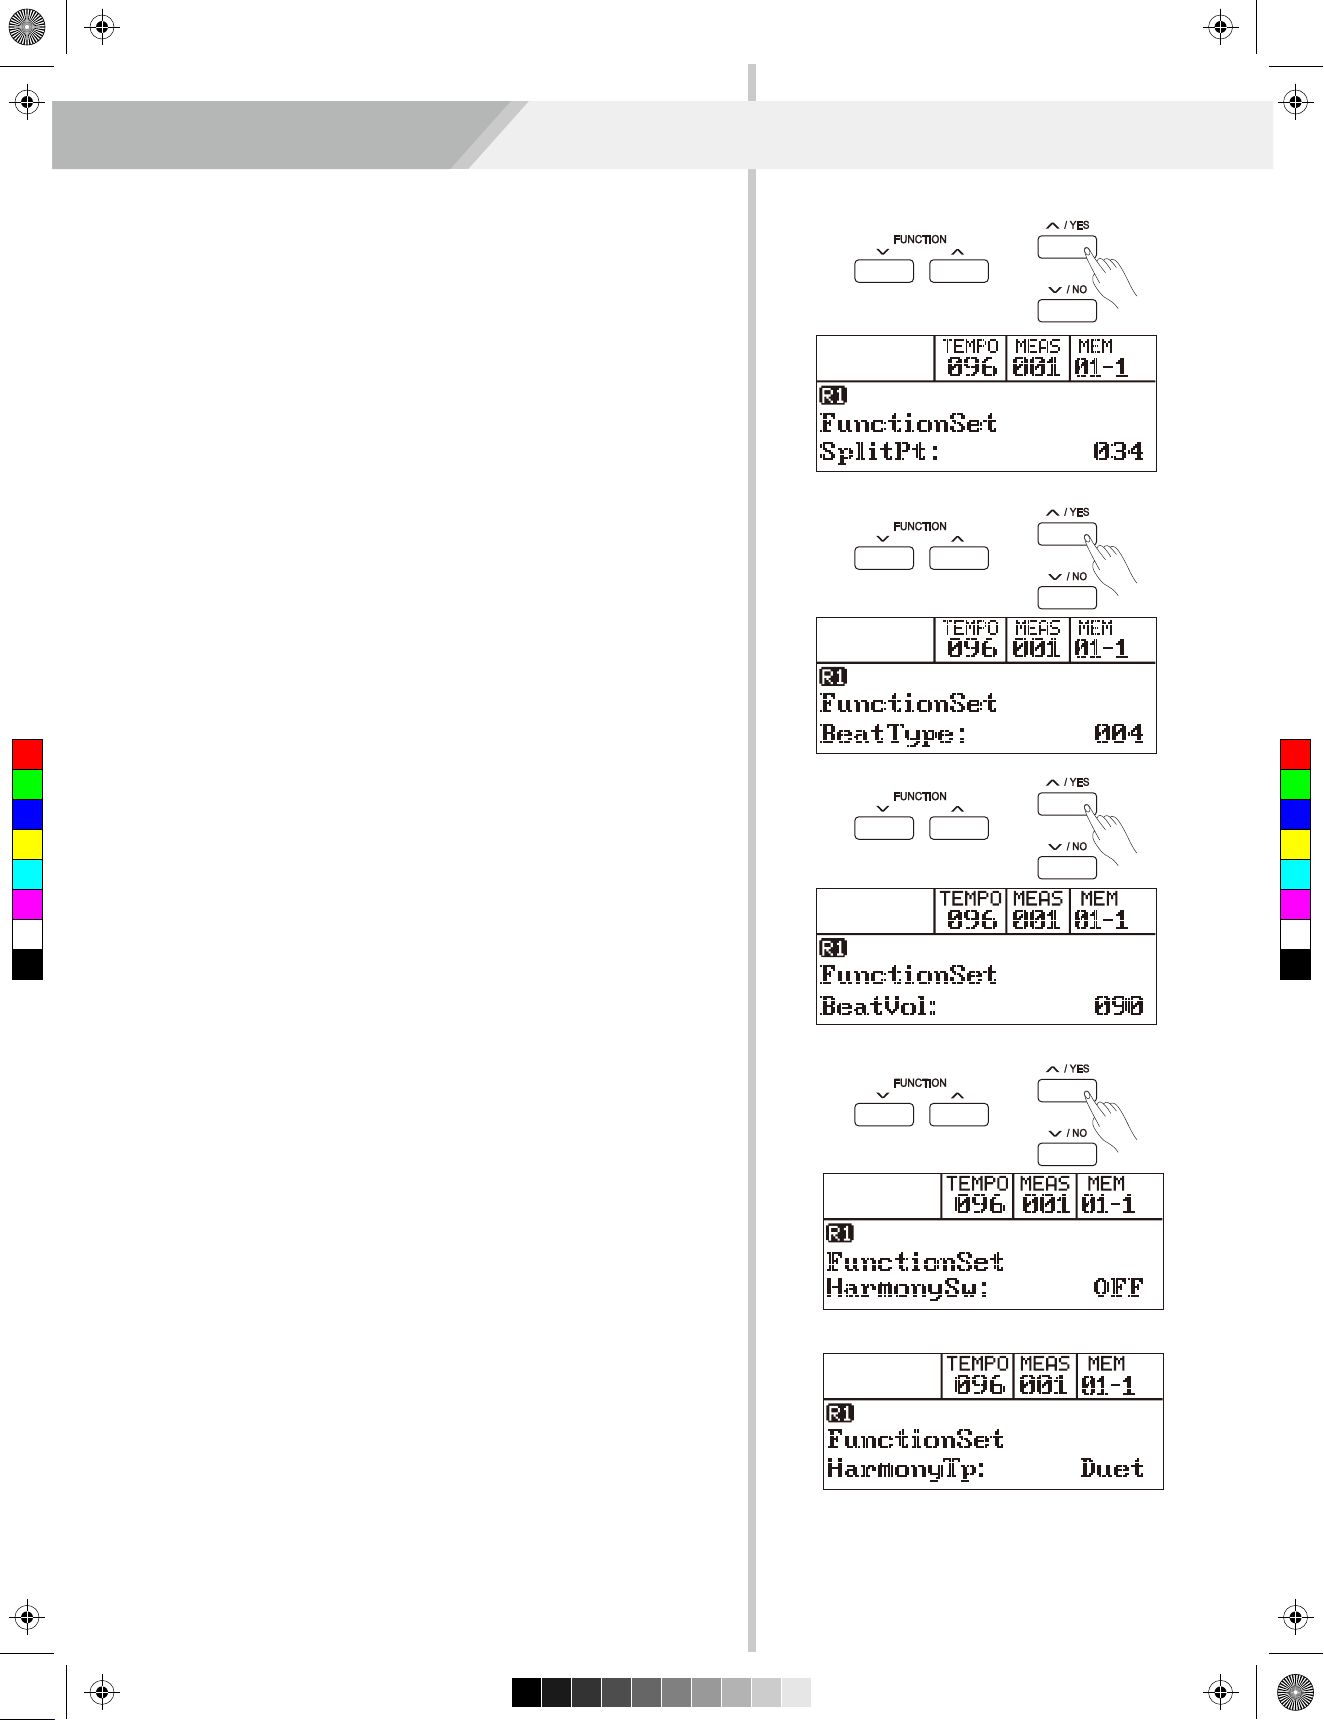
1. Press [FUNCTION+/-] button to select SplitPoint menu. LCD
displays “SplitPt: xxx”. Use [+/YES]/[-/NO] or data dial to change
SplitPoint value. The range of keyspilit: 1~88.
2. Press [+/YES] and [-/NO] simultaneously will set the SplitPoint value
to its default setting: F#3(34).
Note:
When twinova is on, the range of keysplit is C3~C6(28~64). Press
[+/YES] and [-/NO] simultaneously will set the SplitPoint value to its
default setting: E3(32).
Beat Type
1. Press [FUNCTION+/-] button to select BeatType menu. LCD
displays “BeatType: xxx”. Use [+/YES]/[-/NO] or data dial to change
beat type. The range of beat type: 0, 2~9.
Other Functions
2. Press [+/YES] and [-/NO] simultaneously will set the beat type value
to its default setting: 4.
C
M
Y
CM
MY
CY
CMY
K
Beat Volume
1. Press [FUNCTION+/-] button to select beat volume menu. LCD
displays “BeatVol: xxx”. Use [+/YES]/[-/NO] or data dial to change
beat volume. The range of beat volume: 0~127.
2. Press [+/YES] and [-/NO] simultaneously will set the beat volume
value to its default setting: 090.
Harmony Switch
1. Press [FUNCTION+/-] button to select harmony switch menu. LCD
displays “HarmonySw: xxx”. Use [+/YES]/[-/NO] or data dial to
change harmony switch status: OFF,ON.
2. Press [+/YES] and [-/NO] simultaneously will set harmony switch to
default setting: OFF.
Playing with harmony:
Turn on the A.B.C function, then play a chord in the left hand area.
When you play in the right hand area, it will automatically add a
harmony effect to the notes.
Harmony types “1+5” and “octave” are always available, while the rest
are effective only when A.B.C is on.
Harmony Type
You can add a variety of harmony notes to the keys you played in the
right-hand section.
1. Press [FUNCTION+/-] button to select harmony type menu. LCD
displays “HarmonyTp: xxx”. Use [+/YES]/[-/NO] or data dial to
change harmony type.
19
Page 20
Aw_DP370_Manual_G07_161223.pdf 20 17/1/4 14:34
Other Functions
There are 9 harmony types built into this instrument.
Parameter
Duet
1+5
Octave
Country Duet
Trio
Block
4 Close 1
4 Close 2
4 Open
2. Press [+/YES] and [-/NO] simultaneously will set harmony type to
default setting: Duet.
Scale Switch
The equal temperament (has only one tuning method, and is suitable
for keyboard instrument) is commonly used in modern music, based
on this temperament method to make your own composition and
performance. Especially for piano, equal temperament is widely used
and taken for granted. But people used several other scales to
compose and perform before adopting the equal temperament.
LCD Display
Duet
1+5
Octave
CtryDuet
Trio
Block
4Close1
4Close2
4Open
C
M
Y
CM
MY
CY
CMY
K
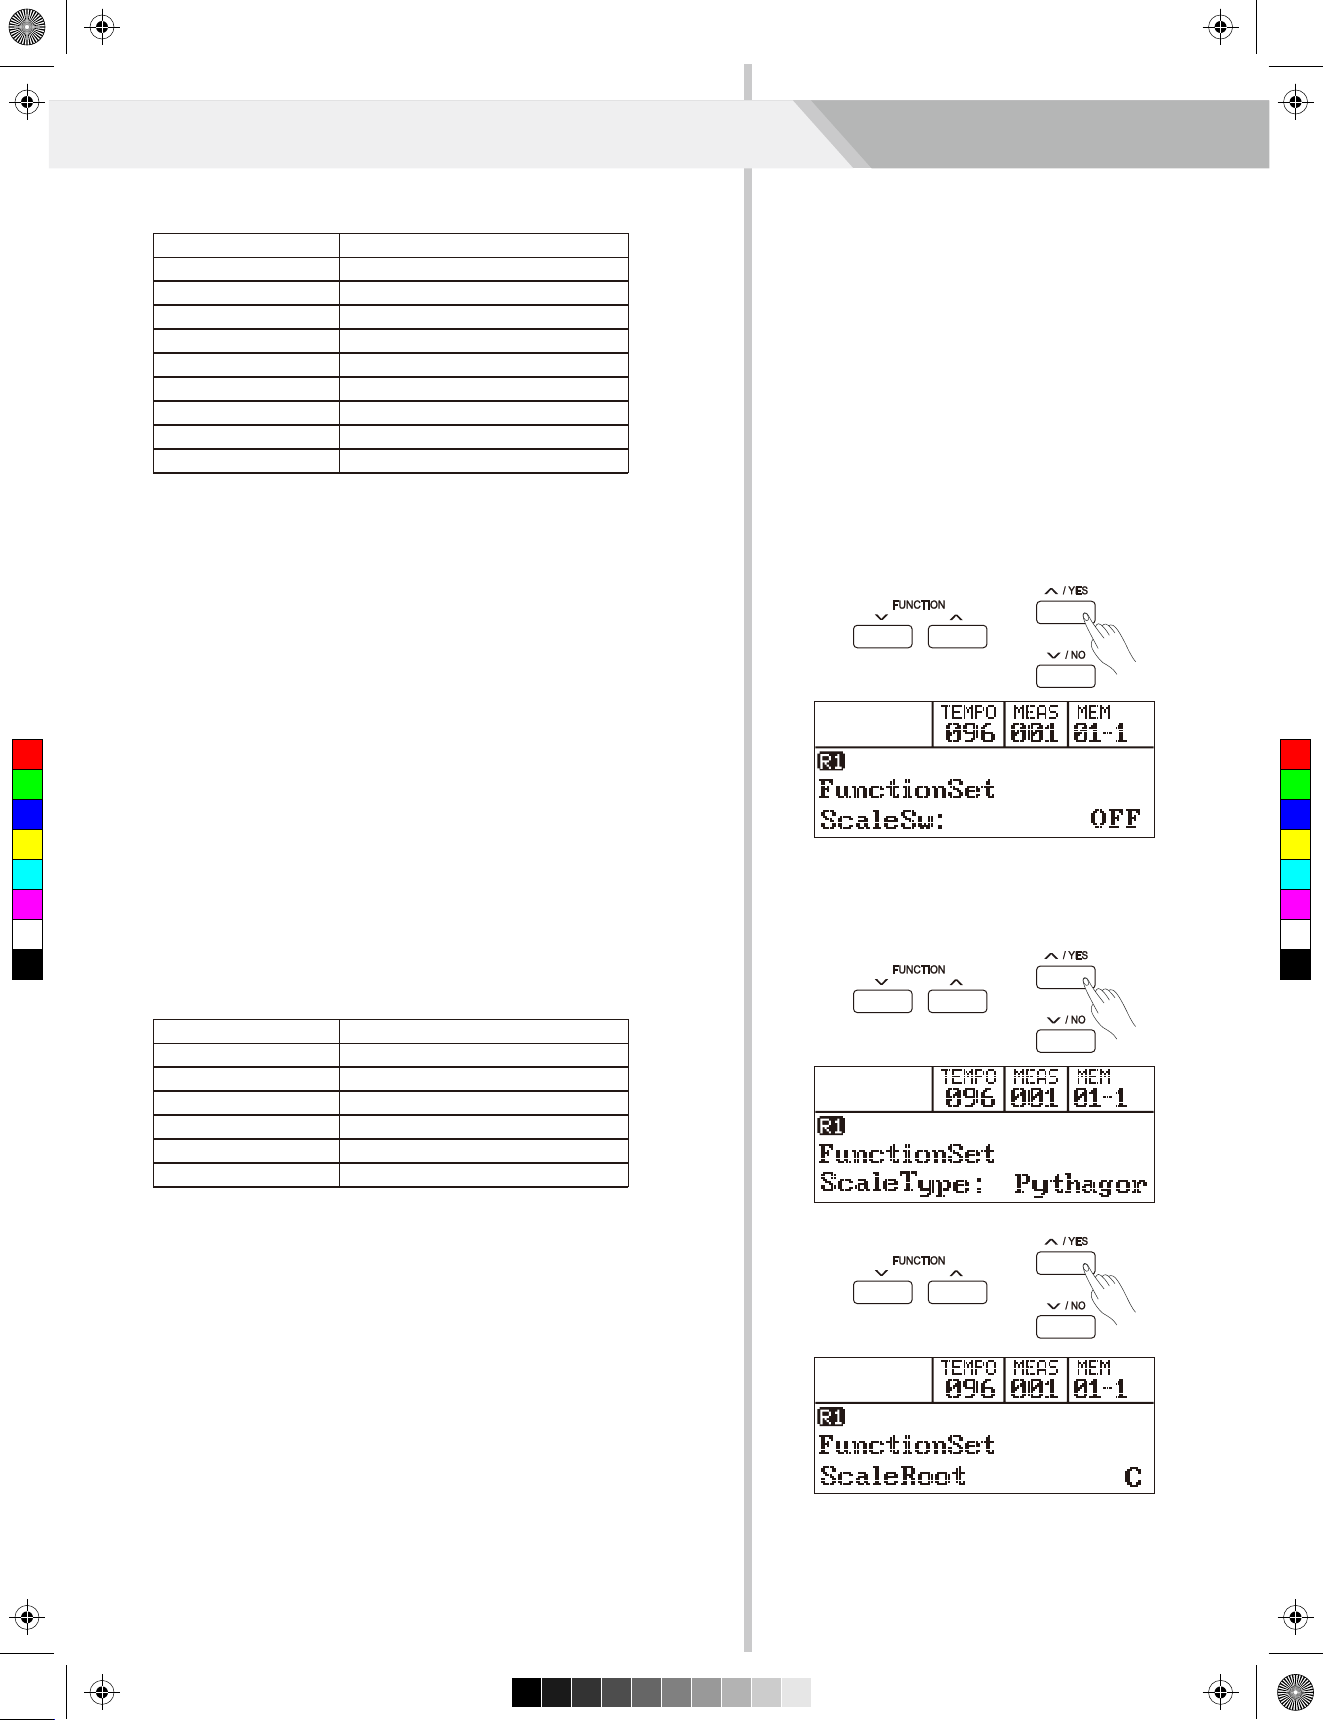
1. Press [FUNCTION+/-] button to select scale switch menu. LCD
displays “ScaleSw: xxx”. Use [+/YES]/[-/NO] or data dial to change
Scale switch status: OFF, ON.
2. Press [+/YES] and [-/NO] simultaneously will set scale switch to
default setting: OFF.
Scale Type
1. Press [FUNCTION+/-] button to select scale type menu.
LCD displays “ScaleType: xxx”. Use [+/YES]/[-/NO] or data dial to
change scale type.
There are 6 scale types built into this instrument.
Parameter
Pythagorean
Pure Major
Pure Minor
Meantone
Werkmeister
Kirnberger
LCD Display
Pythagor
Major
Minor
MeanTone
Werckmei
Kirnberg
2. Press [+/YES] and [-/NO] simultaneously will set scale type to
default setting: Pythagor.
Scale Root
1. Press [FUNCTION+/-] button to select scale root menu.
LCD displays “ScaleRoot: xxx”. Use [+/YES]/[-/NO] or data dial to
change scale root: C, C#, D, D#, E, F, F#, G, G#, A, A#, B.
2. Press [+/YES] and [-/NO] simultaneously will set scale root to
default setting: C.
20
Page 21
Aw_DP370_Manual_G07_161223.pdf 21 17/1/4 14:34
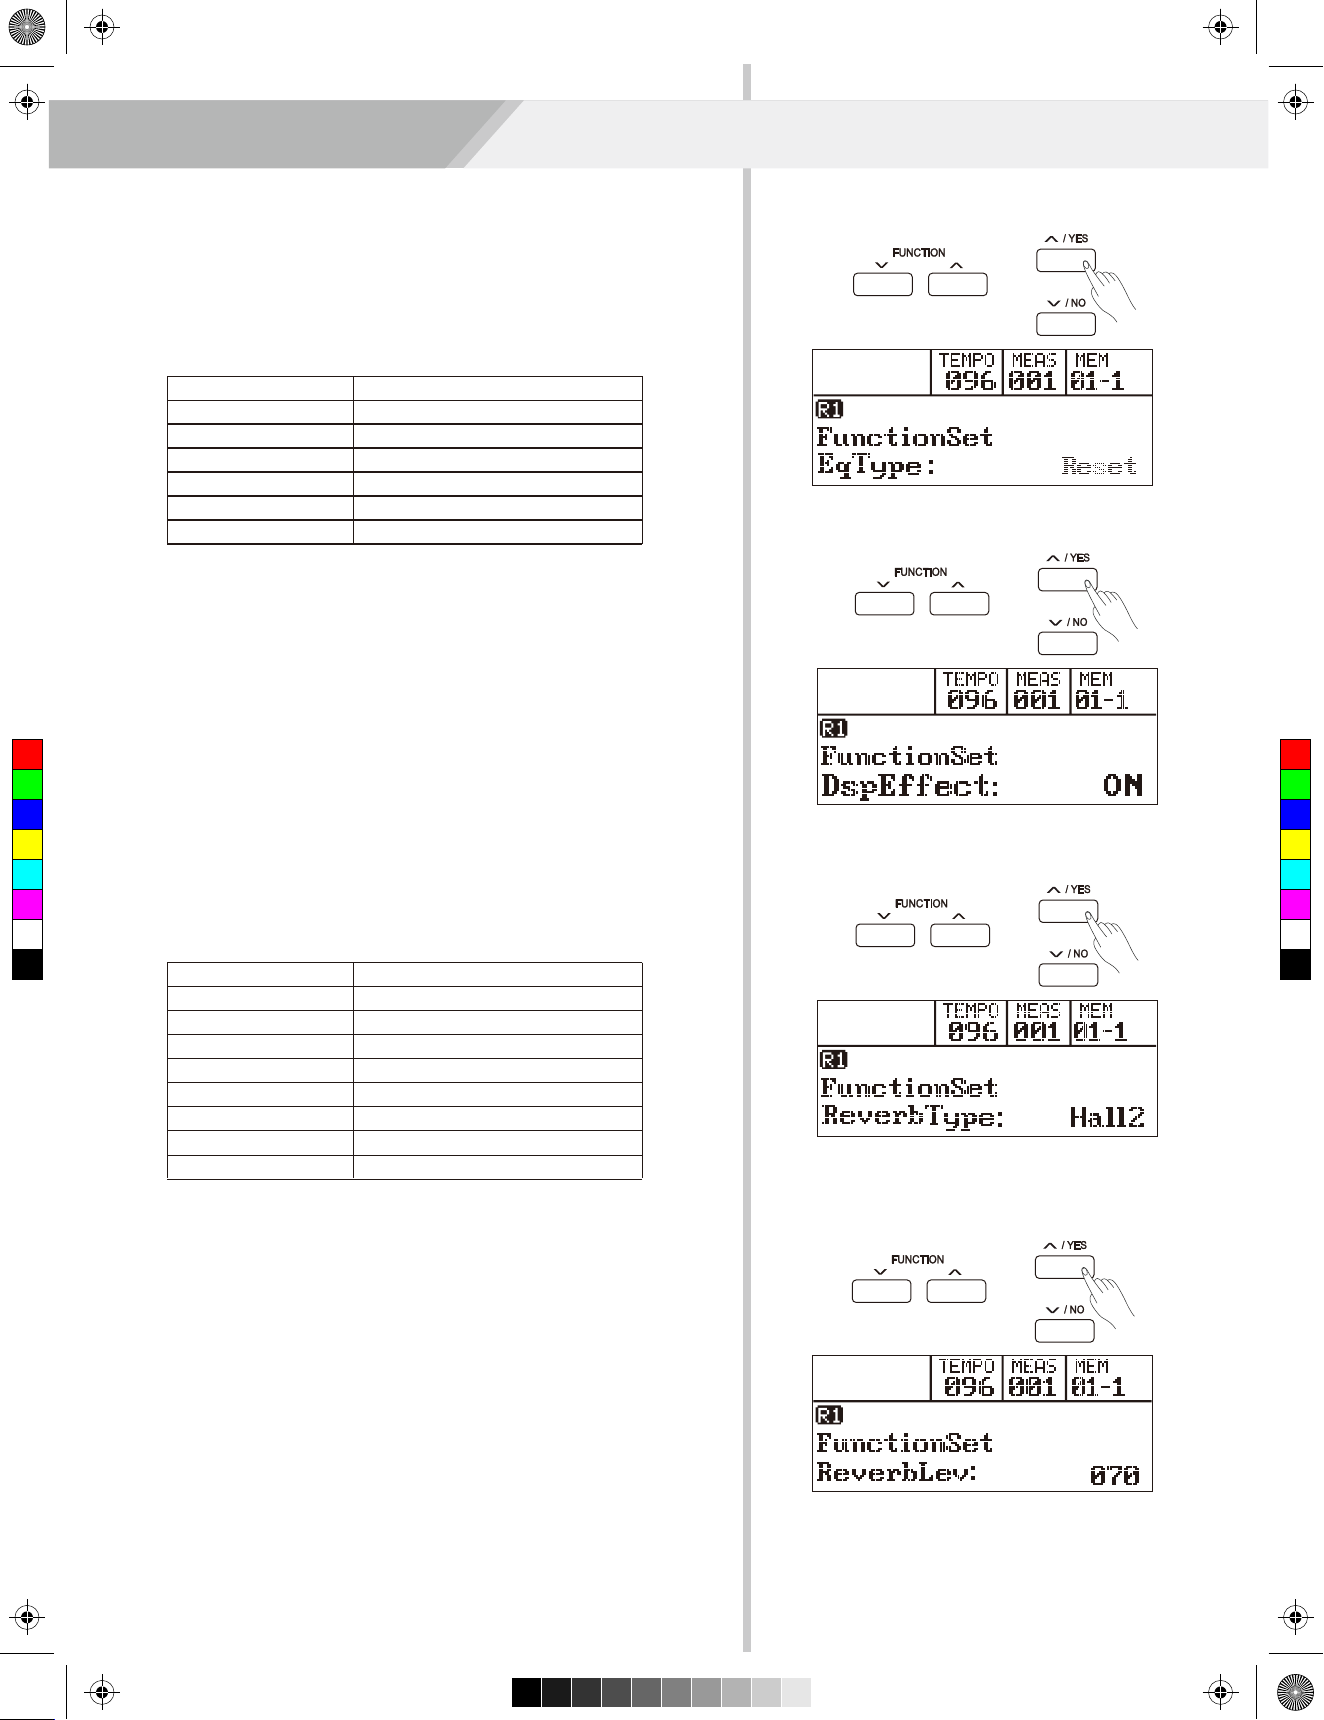
EQ Type
EQ function can control the gain of different frequency band. And
different gain settings produce different sound field effects.
1. Press [FUNCTION+/-] button to select EQ type menu.
LCD displays “EqType: xxx”. Use [+/YES]/[-/NO] or data dial to
change EQ type.
There are 6 EQ types built into this instrument.
Parameter
Reset
Pop
Rock
Class
Jazz
Dance
2. Press [+/YES] and [-/NO] simultaneously will set EQ type to default
setting: Reset.
LCD Display
Reset
Pop
Rock
Class
Jazz
Dance
Other Functions
DSP Effect
1. Press [FUNCTION+/-] button to select DSP effect menu. LCD
displays “DspEffect: xxx”. Use [+/YES]/[-/NO] or data dial to change
C
M
Y
CM
MY
CY
CMY
K
DSP switch status: OFF, ON.
2. Press [+/YES] and [-/NO] simultaneously will set DSP switch to
default setting: ON.
Reverb Type
1. Press [FUNCTION+/-] button to select reverb type menu.
LCD displays “ReverbType: xxx”. Use [+/YES]/[-/NO] or data dial to
change reverb type.
There are 8 reverb types built into this instrument.
Parameter
Room 1
Room 2
Room 3
Hall 1
Hall 2
Church
Delay
Pan Delay
2. Press [+/YES] and [-/NO] simultaneously will set reverb type to
default setting: Hall2.
LCD Display
Room1
Room2
Room3
Hall1
Hall2
Church
Delay
PanDelay
Reverb Level
1. Press [FUNCTION+/-] button to select reverb level menu.
LCD displays “ReverbLev: xxx”. Use [+/YES]/[-/NO] or data dial to
change reverb level.
The range of reverb level: 0~127.
2. Press [+/YES] and [-/NO] simultaneously will set reverb level to
default: 070.
21
Page 22
Aw_DP370_Manual_G07_161223.pdf 22 17/1/4 14:34
Other Functions
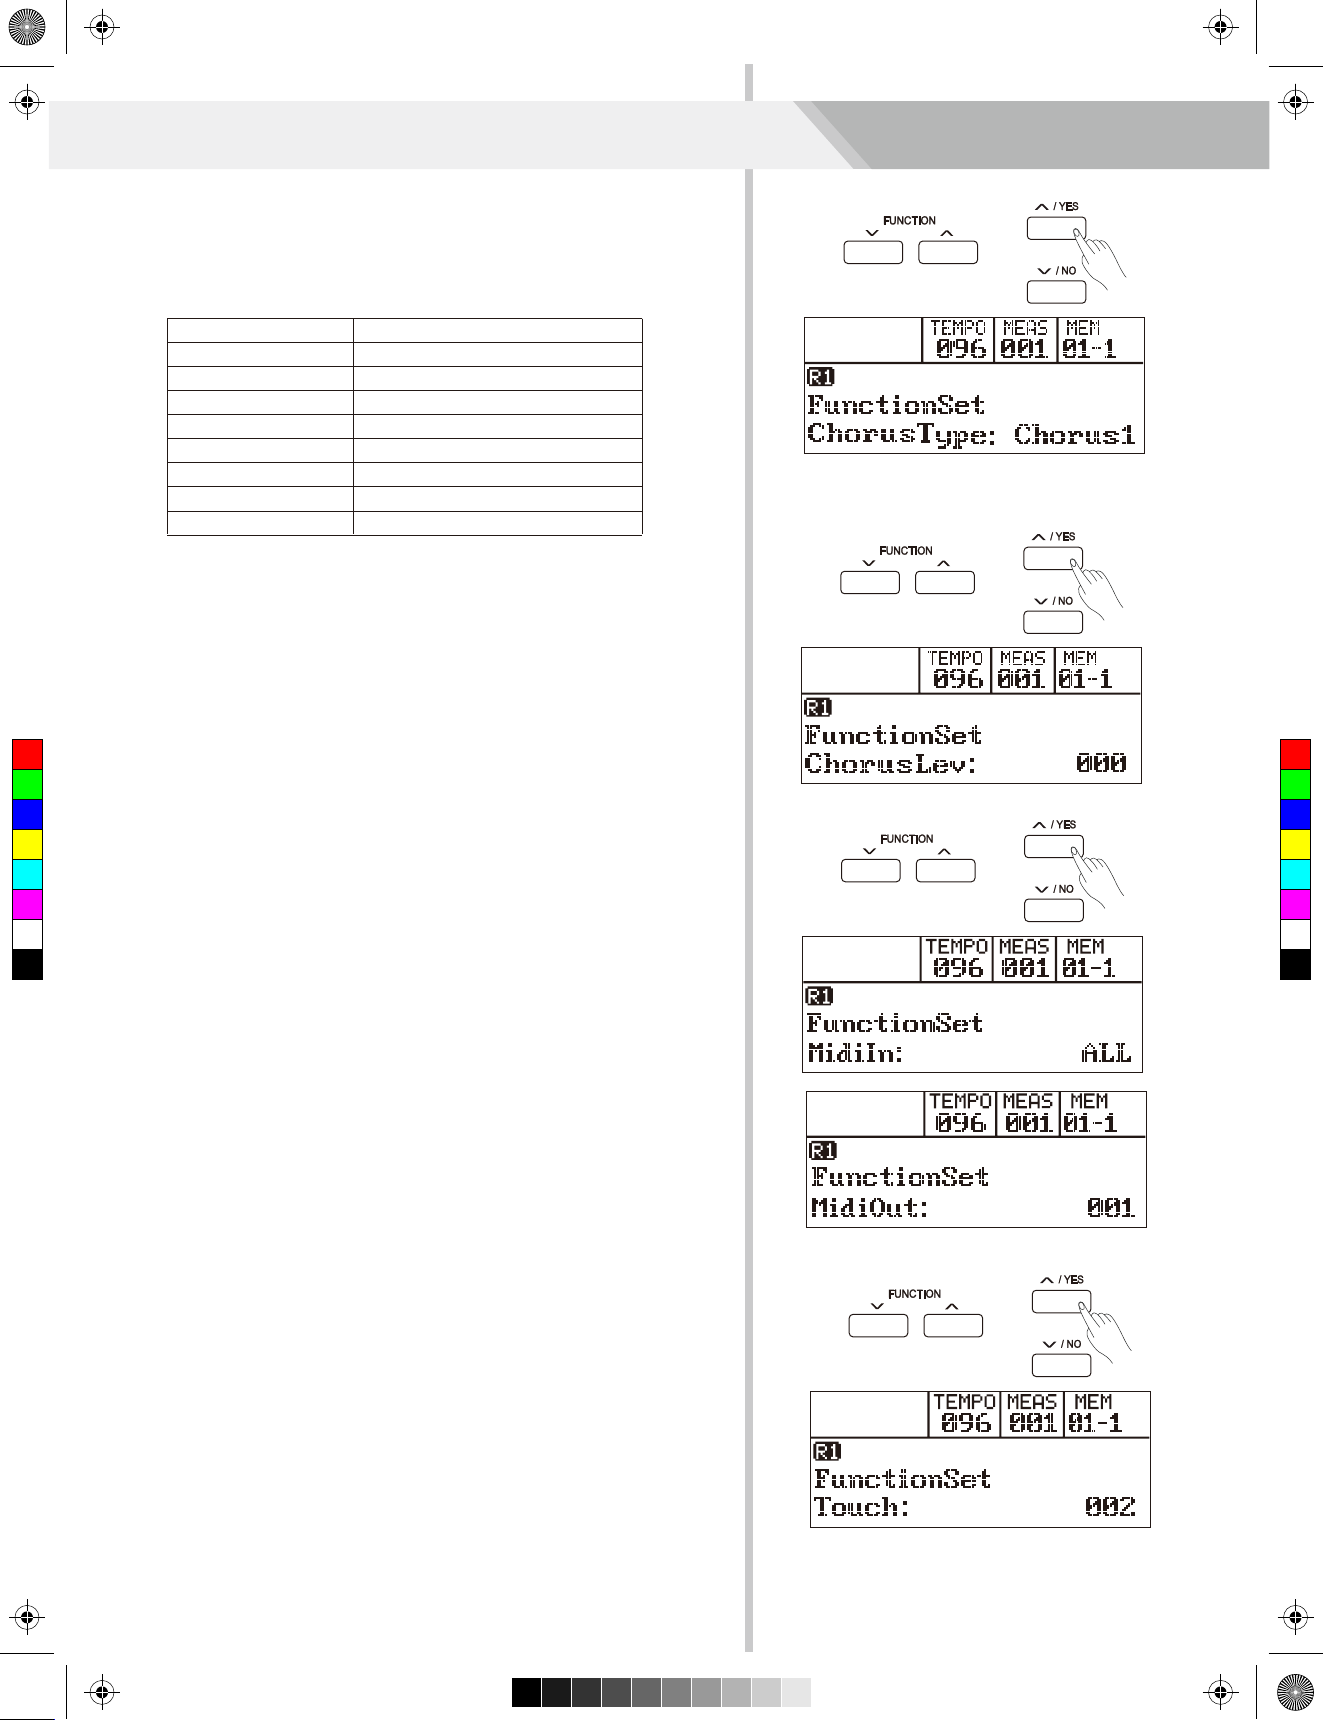
Chorus Type
1. Press [FUNCTION+/-] button to select chorus type menu.
LCD displays “ChorusType: xxx”. Use [+/YES]/[-/NO] or data dial to
change chorus type.
There are 8 chorus types built into this instrument.
Parameter
Chorus 1
Chorus 2
GM Chorus 1
GM Chorus 2
Flanger 1
Flanger 2
Rotary 1
Rotary 2
LCD Display
Chorus1
Chorus2
GM Chrs1
GM Chrs2
Flanger1
Flanger2
Rotary1
Rotary2
2. Press [+/YES] and [-/NO] simultaneously will set chorus type to
default setting: Chorus1.
Chorus Level
1. Press [FUNCTION+/-] button to select chorus level menu.
LCD displays “ChorusLev: xxx”. Use [+/YES]/[-/NO] or data dial to
C
M
Y
CM
MY
CY
CMY
K
change chorus level.
The range of chorus level: 0~127.
2. Press [+/YES] and [-/NO] simultaneously will set chorus level to
default: 000.
MIDI IN
1. Press [FUNCTION+/-] button to select MIDI IN menu. LCD displays
“MidiIn: xxx”. Use [+/YES]/[-/NO] or data dial to change MIDI IN
channel:1~16,ALL.
2. Press [+/YES] and [-/NO] simultaneously will set MIDI IN channel to
default setting: ALL.
MIDI OUT
1. Press [FUNCTION+/-] button to select MIDI OUT menu. LCD
displays “MidiOut: xxx”. Use [+/YES]/[-/NO] or data dial to change
MIDI OUT channel:1~16.
2. Press [+/YES] and [-/NO] simultaneously will set MIDI OUT channel
to default setting: 001.
Touch
The keyboard is equipped with a touch response feature that lets you
dynamically and expressively controls the level of the voice with your
playing strength just as on an acoustic instrument.
1. Press [FUNCTION+/-] button to select touch menu. LCD displays
“Touch: xxx”. Use [+/YES]/[-/NO] or data dial to change touch type:
OFF, 1(soft), 2(normal), 3(hard).
2. Press [+/YES] and [-/NO] simultaneously will set touch value to
default setting: 2(normal).
22
Page 23
Aw_DP370_Manual_G07_161223.pdf 23 17/1/4 14:34
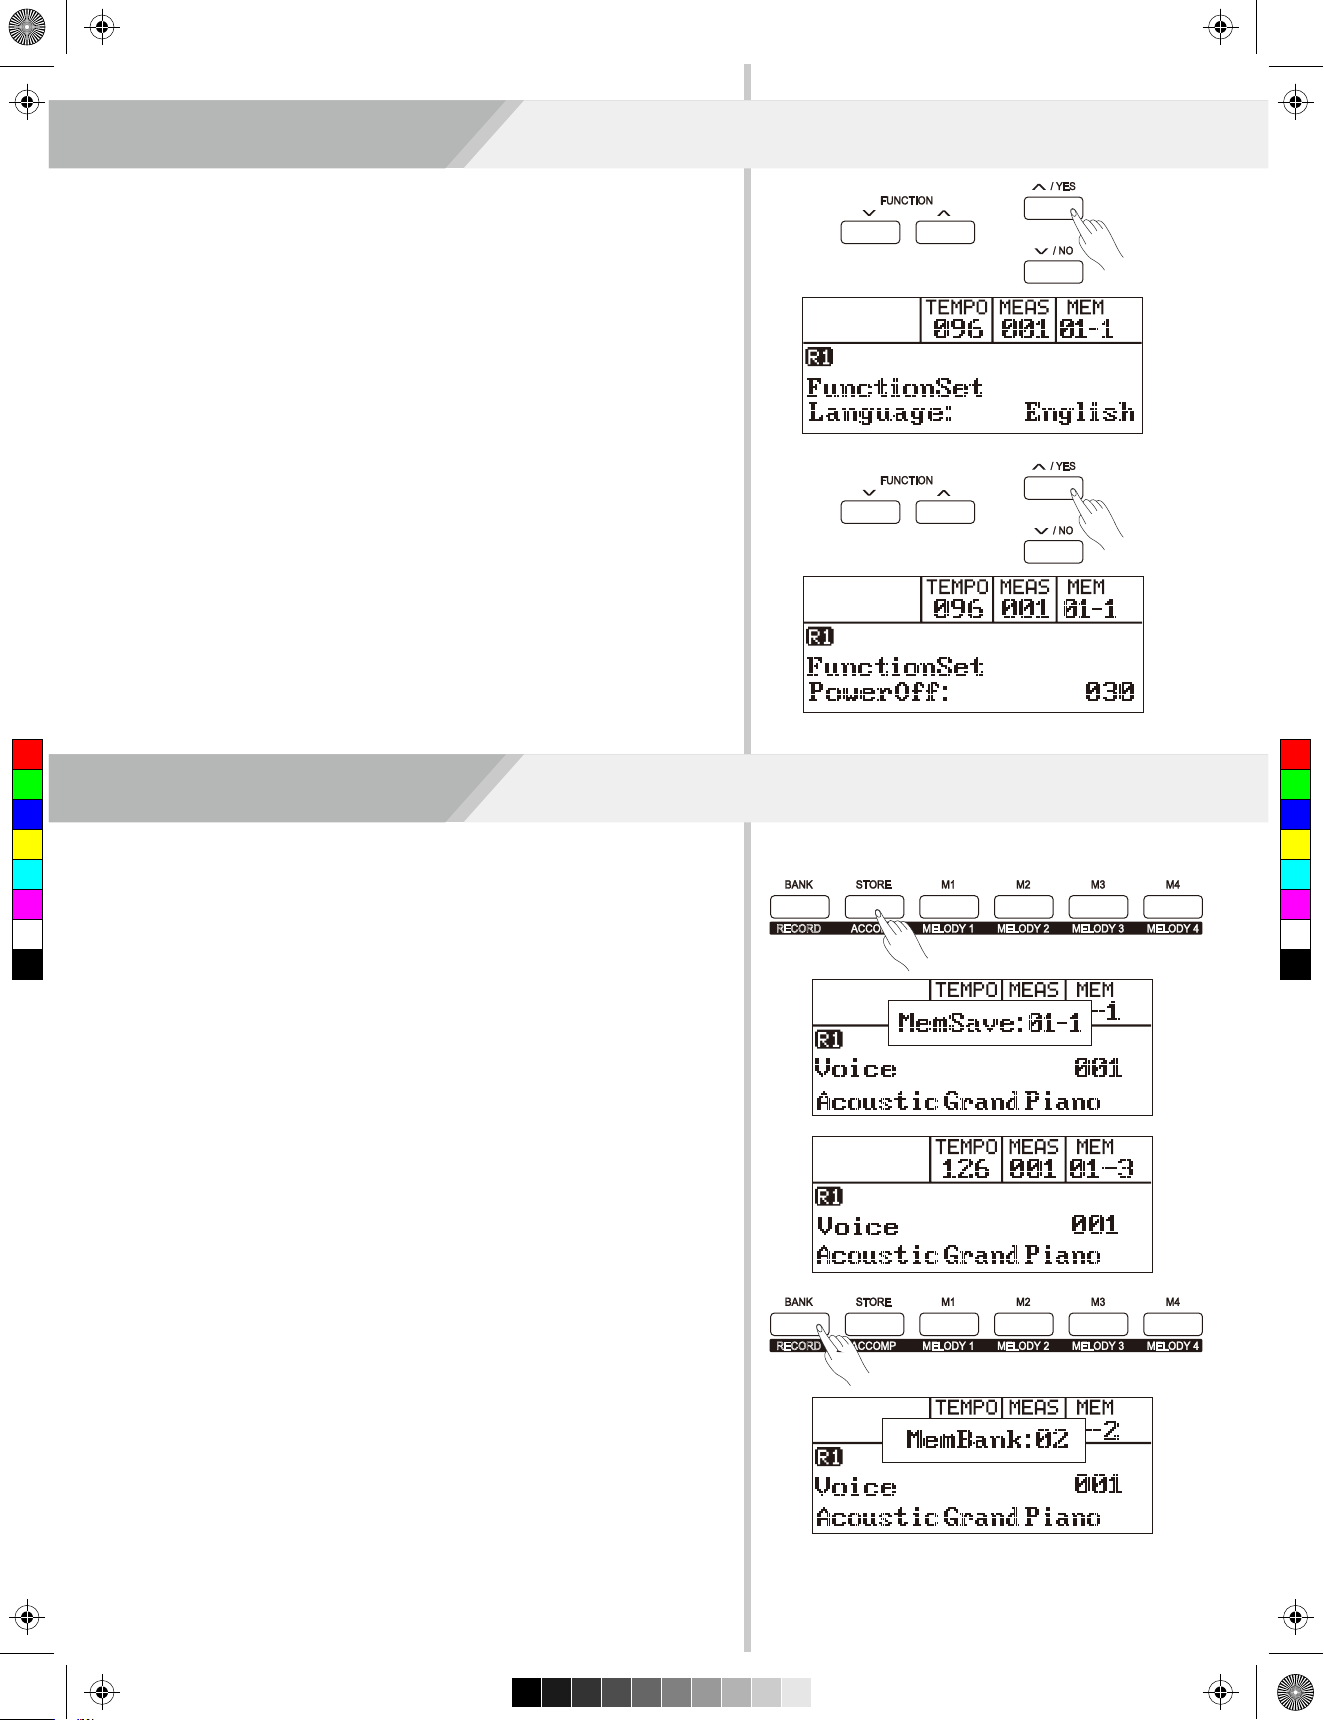
Language
This function is used to set the system language.
1. Press [FUNCTION+/-] button to select language menu. LCD
displays “Language: xxx”. Use [+/YES]/[-/NO] or data dial to
change language: 中文,English
2. The language setting will not be lost after power off.
PowerOff
This function is used to set the time of automatic shutdown.
1. Press [FUNCTION+/-] button to select power off menu. LCD
displays “PowerOff: xxx”. Use [+/YES]/[-/NO] or data dial to
change time value: OFF, 030, 060
2. Press [+/YES] and [-/NO] simultaneously, the time will be restore
default: 030 minutes
Other Functions
C
M
Y
CM
MY
CY
CMY
K
The keyboard is an instrument with a variety of controls and functions,
the Registration Memory feature can make your performance more
easily and efficiently. It allows you to save virtually all panel settings to
a Registration Memory setting, and you can instantly recall custom
panel settings by pressing a single button.
Registering the Panel Setting
1. There are 24 memory banks, each bank has 4 memories (M1-M4).
2. While holding the [STORE] button, press one of the REGISTRA TION MEMORY buttons: [M1] - [M4]. Notice that the new settings
will replace the previous memory data.
Register Memory
RECORD
126
Recalling the Registered Panel Settings
Press one of the MEMORY buttons [M1] - [M4] to recall a panel
setting.
For example, press [M3] and LCD shows “01-3”. It will recall a setting
from memory 3 of bank 1.
Note:
Registration data cannot be recalled when the One Touch Setting
function is on.
RECORD
Selecting a Registration Bank
1. Press the [BANK] button. There are 24 banks at all and each bank
has 4 memories(M1-M4). Press the [BANK] button, the LCD
displays “MemBank” .
2. Select a bank. Use the data Ddal, [+/YES] or [-/NO] button to select
a bank from 1 to 24.
126 001
23
Page 24
Aw_DP370_Manual_G07_161223.pdf 24 17/1/4 14:34
Song Recording
With the easy-to-use song recording features, you can record your
own keyboard performances as a user song. 10 user songs can be
recorded with 6 tracks (1 ACCOMP track, 5 MELODY tracks) each.
The accomp track records the accompaniment for a user song, while
the melody tracks record melodies for a user song.
An accomp track and a melody track can be recorded independently
or together, however, you can not record two melody tracks at the
same time.
You can play back the accomp track and melody tracks together. The
saved data will not be lost after power off.
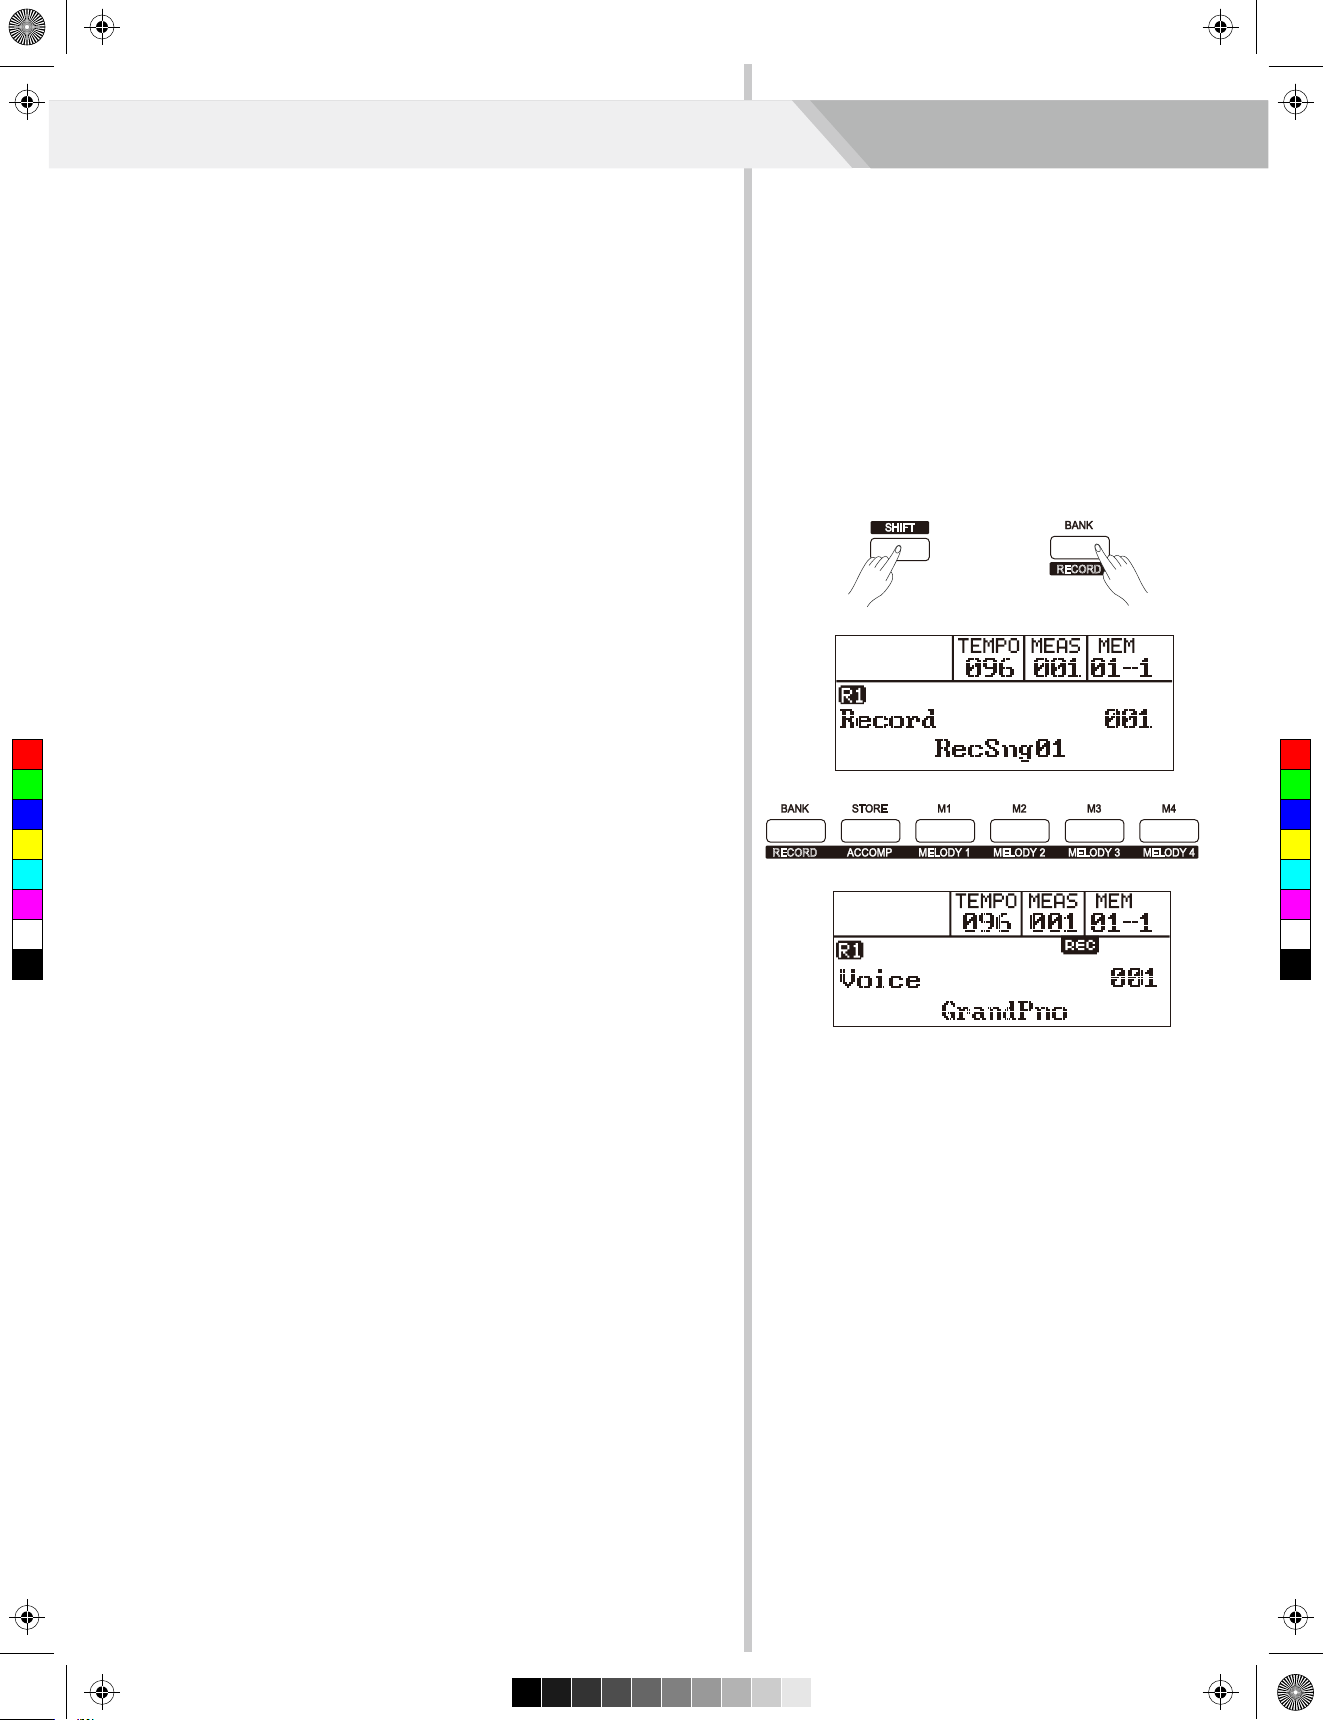
Start Recording
Before recording starts, you will need to select a user song to which
your recording will be saved.
1. Holding down [SHIFT] button, then press [RECORD] button to enter
RECORD
the user song selection interface. The LCD displays “RecSong1”
and sequence number. 10 user songs can be recorded. Press
[+/YES] / [-/NO] button to select the user song you want.
2. Hold down [SHIFT] button, then press [RECORD] button again to
enter the recording standby mode. “REC” appears on LCD, and the
[START/STOP] LED on the panel lights up.
C
M
Y
CM
MY
CY
CMY
K
It will automatically select an empty track to record your perfor mance. LED of the selected track (ACCOMP, MELODY1 MELODY 5) will flash on the panel.
3. In recording standby mode, you can select your desired voice, style
and tempo.
Hold down [SHIFT] button, then Press [Accomp] or [Melody1] [Melody 5] to select a different track. LED of the selected track will
light up on the panel.
An accomp track and a MELODY track can be recorded together,
but it cannot record two melody tracks simultaneously.
RECORD
4. Press [START/STOP] button or play the keyboard to start recording.
The [RECORD] LED will light up.
When the accomp track is selected and A.B.C is on, recording will
start as soon as you play a chord in the left hand area.
Note:
Style can only be recorded in “Accomp” track.
Track indicators on the left of LCD usually shows one of three states:
blinking, light up, light off. Press the track buttons repeatedly to shift
between different states.
Blinking: the track is selected for recording. All existing data will be
over-written.
Light up: the track has data and will play back the data during
recording.
Light off: the track either has no data or is under recording and
cannot play back.
In recording standby mode, the keyboard will automatically select the
empty track next to the occupied track. For example, if “Melody 1” is
occupied, “Melody 2” will be selected as the record track. When all 6
tracks have been recorded and a specific track needs to be revised,
press the button of that track and start recording. The original data will
be replaced.
24
Page 25
Aw_DP370_Manual_G07_161223.pdf 25 17/1/4 14:34
Stop Recording
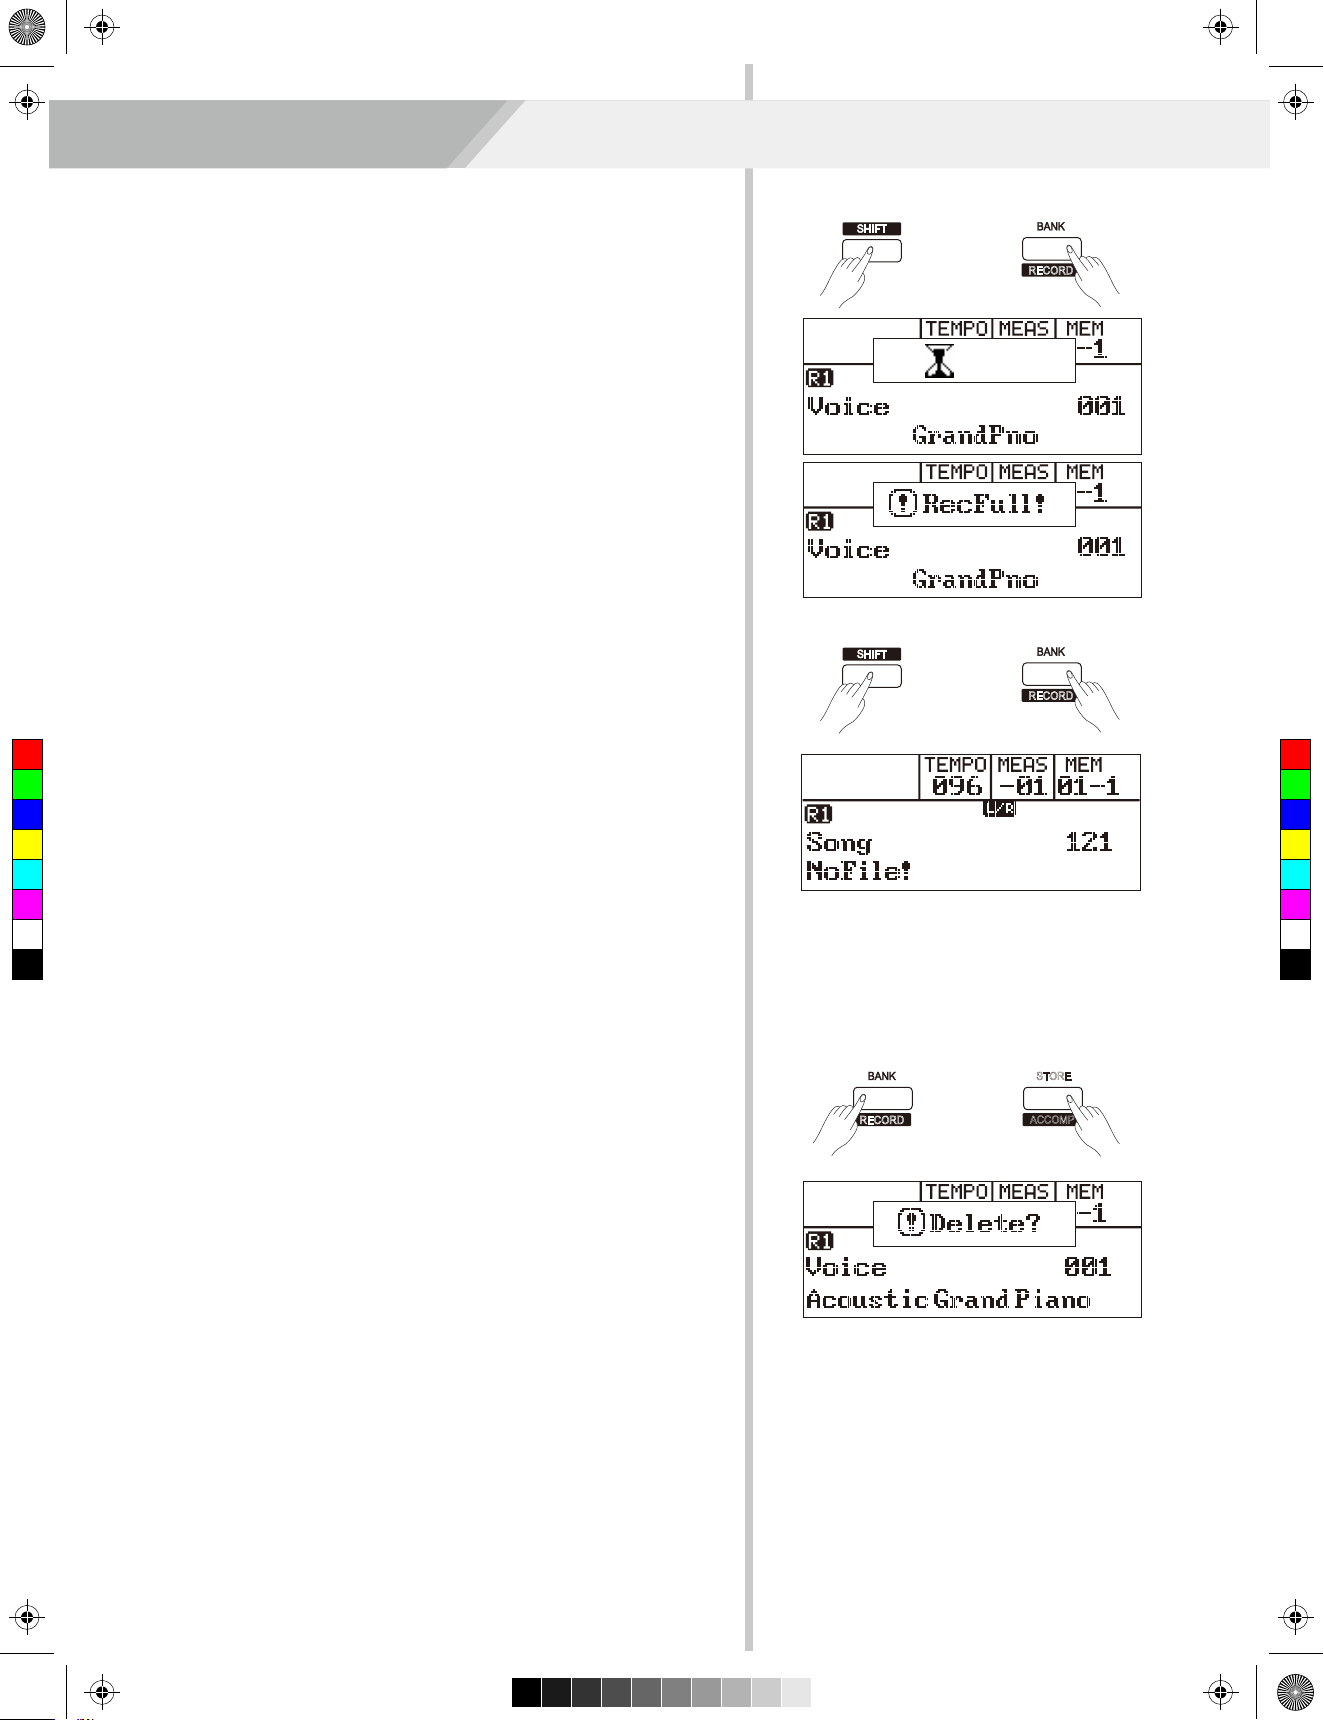
1. When recording is in process, holding down [SHIFT] button then
press the [RECORD] button to stop recording.
2. When recording is in process, if the memory is full, the recording will
stop and save automatically, the LCD displays “RecFull”.
3. If you are recording a style, the recording will stop automatically
when the ending of the rhythm finishes.
Song Recording
RECORD
095 001
......
095 001
Playback Recording
1. When recording is in process, holding down [STORE] button then
press the [RECORD] button, it will stop recording and enter the
C
M
Y
CM
MY
CY
CMY
K
song mode, and the current recorded song will play automatically in
circle.
2. Press the [SONG] button to enter the song mode and it will play all
songs circularly. Use the data dial, [+/YES] or [-/NO] button to select
a song, there are 130 songs in all, including 10 user songs
(121-130). If there is no data in the selected user song, it will display
“Nofile” and stop playing. Alternatively, when the playback stops,
you can select a user song and then press [PLAY/STOP] button to
play the song in a loop.
RECORD
Delete User Song
1. Pressing and holding [RECORD] and [STORE] button together and
turn power on simultaneously, all user songs will be erased.
2. In the recording standby mode, holding down [SHIFT] button
then press the [RECORD] button for two second, the LCD will
display “Delete?”. And holding down [SHIFT] button then press the
[Accomp] (or [Melody1] to[Melody 5]) button to select the track you
want to delete. The track selected will light up. If all tracks light up, it
will delete the user song after confirmation.
RECORD
095 001
STORE
ACCOMP
3. Press [+/YES] to confirm and the recorded data in this track will be
erased. Press [-/NO] to quit this step, and go back to recording
standby mode.
25
Page 26
Aw_DP370_Manual_G07_161223.pdf 26 17/1/4 14:34
Song
The piano has 130 songs in all, including 10 user songs.
Listening to the songs
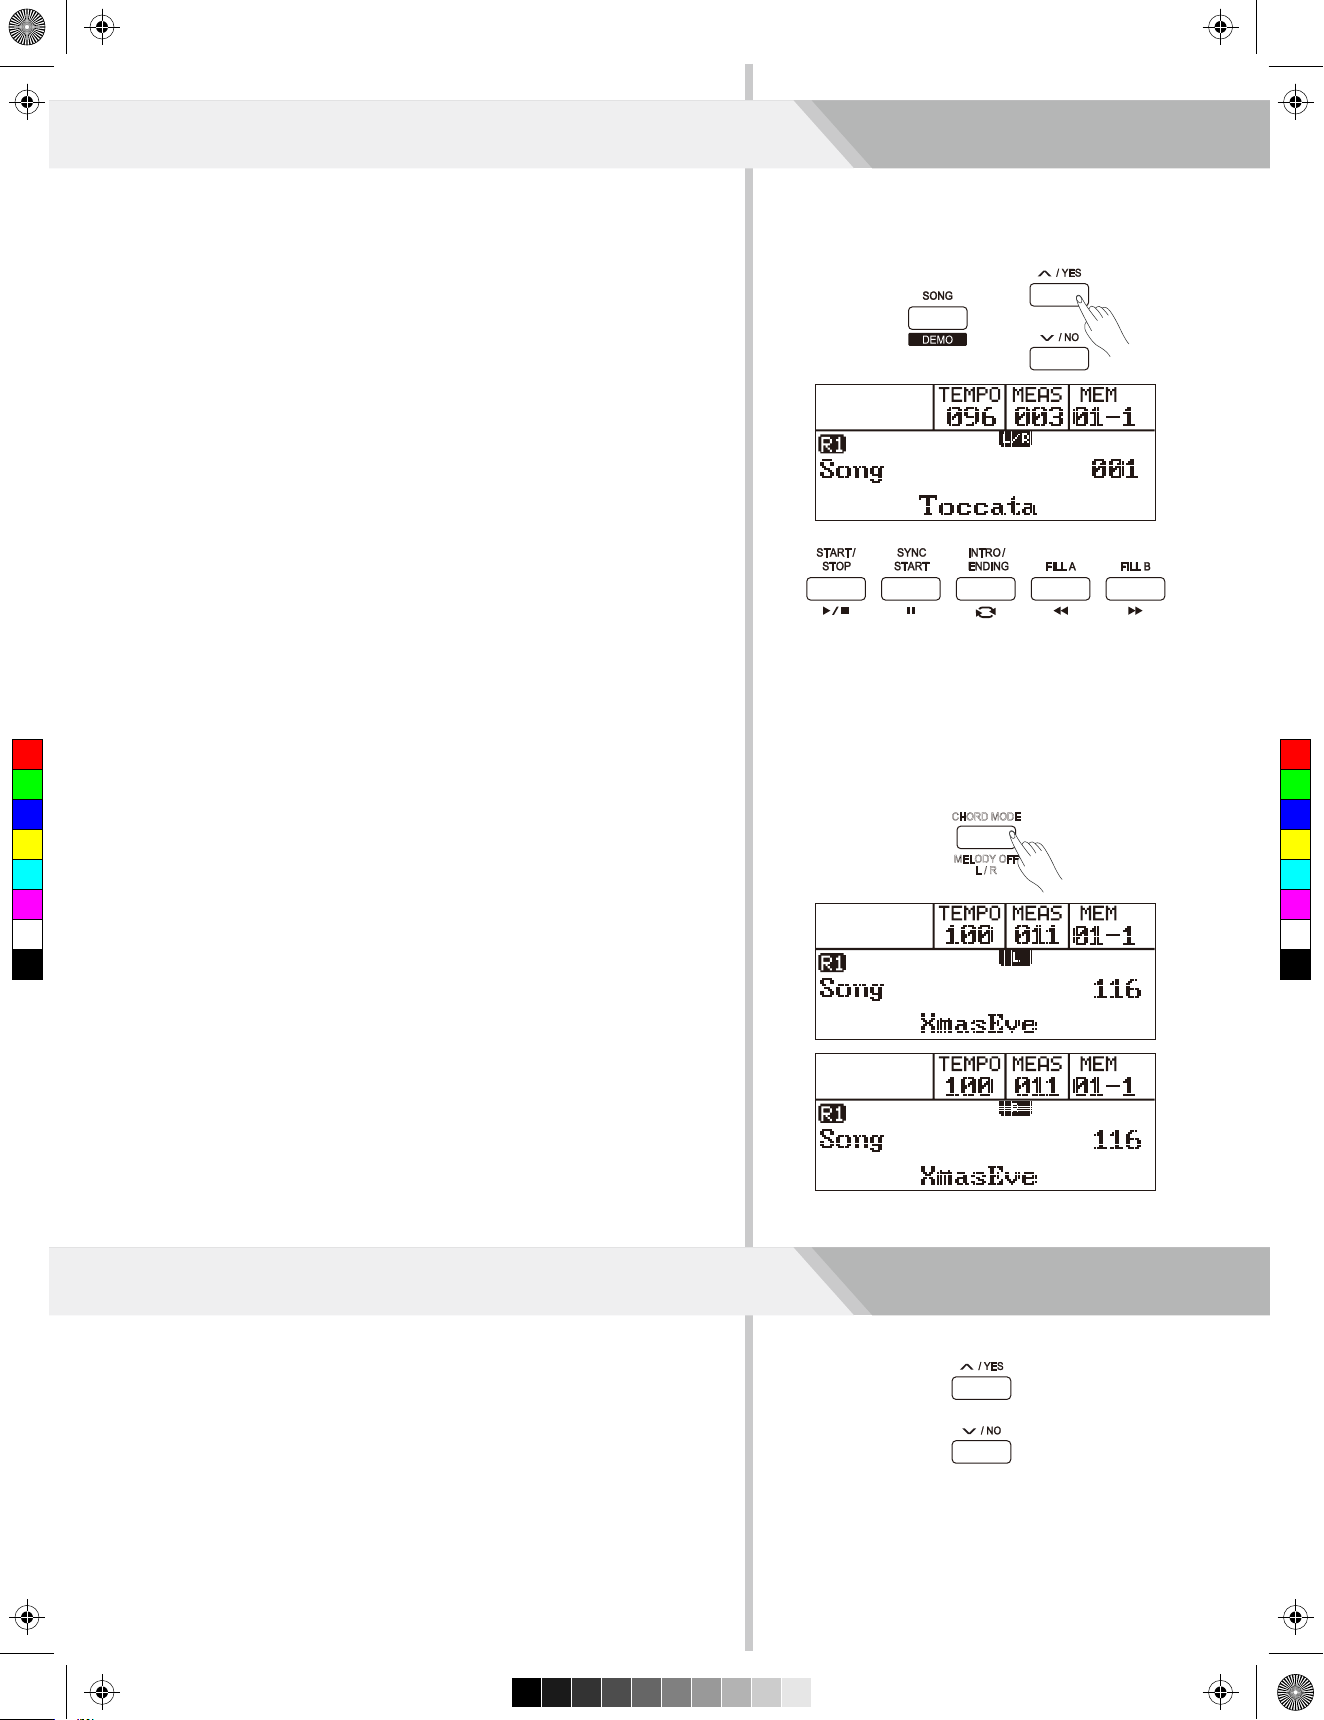
1. Press the [SONG] button to enter the song mode and it will play all
songs circularly.
2. Use the data dial, [+/YES] or [-/NO] button to select a song.
3. Once you start playing a song by pressing [START/STOP] button, it
will play current song repeatedly.
4. When playback stops, press [STYLE] or [VOICE] button to exit song
mode.
Song Control
1. Introductory beat
Before song starts playing, it has the introductory beat, the measure
starts from negative value. It begins to play song when the measure
goes to 1.
2. REW, FF and PAUSE
When the song is playing:
Press the [FF] button to fast forward the song.
C
M
Y
CM
MY
CY
CMY
K
Press the [REW] button to rewind the song (base on the measure).
Press the [PAUSE] button to pause the playing song.
3. Song Repeat
During song playback, press [REPEAT A/B] button to set the
beginning for a loop section of the current song, then press it again
to set the loop end. During loop playback, press [REPEAT A/B]
button to quit the loop and go back to song playback.
Practice the song
In song mode, press [MELODY OFF L/R] button to turn on/off the left
CHORD MODE
MELODY OFF
L / R
or right hand part, so as to practise each part separately.
A lit “L” on LCD indicates only the left hand melody will play and the
right hand part will be muted, so you can practise the right hand
melody.
In the same way, a lit “R” on LCD means you can practise the left hand
part along with the right hand melody.
Restore Factory Setting
Pressing and holding [+/YES] and [-/NO] button together and then turn
the power on, the piano would be restored to factory setting. It will
delete all the user data: user styles, user songs, registered memory.
The process will last about 8 seconds, after which the piano will start
up normally.
26
Page 27
Aw_DP370_Manual_G07_161223.pdf 27 17/1/4 14:34
Connecting USB Flash Drive
The piano recognizes USB flash drives, sizing from 16M to 32G in the
format of FAT16 or FAT32.
We recommend to format the USB flash drive on the piano before
using. Do not edit the backup files saved in the USB flash drive.
USB Flash Drive Operation
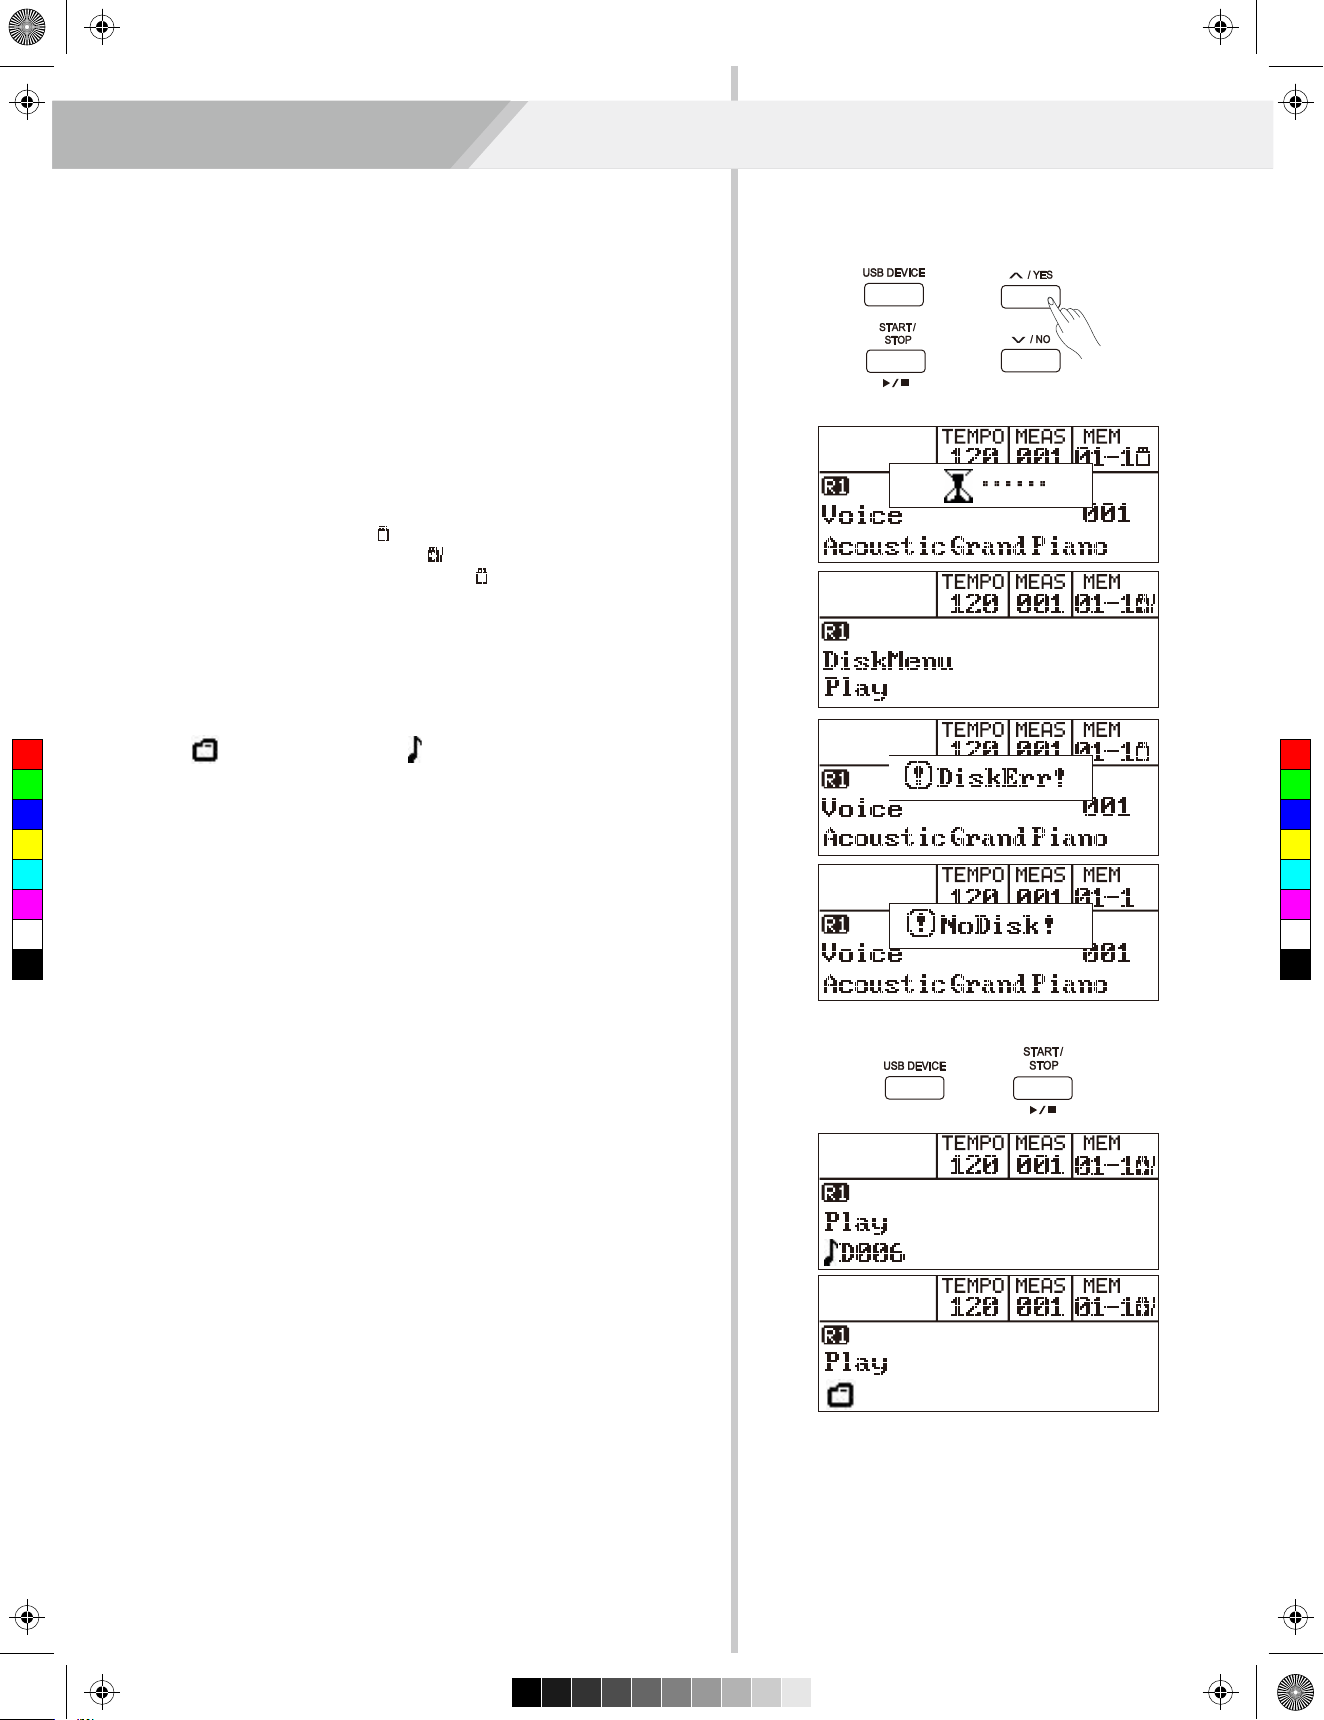
1. The function buttons related to USB Flash Drive are: [USB
DEVICE], [+/YES], [-/NO], [START/STOP] and the data dial.
2. Press [USB DEVICE] button to enter USB mode, and press it again
can quit that mode.
3. If the USB Flash Drive has been inserted before pressing [USB
DEVICE] button, the LCD displays a waiting notice, the upper right
corner of LCD displays icon . If initialization succeeds, LCD
displays “Play”, the icon becomes . If initialization failed, the LCD
displays “DiskErr”, and the icon remains . If USB Flash Drive is
not inserted, the LCD displays “NoDisk”, the upper right corner of
LCD does not display USB Flash Drive icon.
4. In USB mode, use data dial to select menu, press [+/YES] button to
proceed, press [-/NO] to go back.
5. In USB mode, it can read a maximum of 512 files in one folder.
C
M
Y
CM
MY
CY
CMY
K
Icon represents folder, icon represents file.
6. In USB mode, press [USB DEVICE], voice direct button, style direct
button can exit USB device mode.
7. Press [MIXER] button can change the volume when playing MIDI
file.
8. Loading, Save and Delete operating are intended for the file in
“MMKD” folder.
Note:
The “MMKD” folder will be generated automatically when user data is
saved to the USB flash drive.
Play
1. Press [USB DEVICE] button to enter USB mode. Then use data dial
to select “Play” menu.
2. Press [+/YES] button, LCD will display the name of MIDI files and
sub directories in the root of the USB Flash Drive.
3. If you choose a sub-directory, press [+/YES] button to open the
folder, press [-/NO] to return to the root directory. If LCD displays
“..”, pressing [+/YES] button will return to the previous directory.
4. Use data dial to select a midi MIDI file, press [START/STOP] button
to play it repeatedly. Press [+/YES] button to play all files in the
current directory circularly. Press [START/STOP]button again to
stop playing,
..
27
Page 28
Aw_DP370_Manual_G07_161223.pdf 28 17/1/4 14:35
Connecting USB Flash Drive
Save
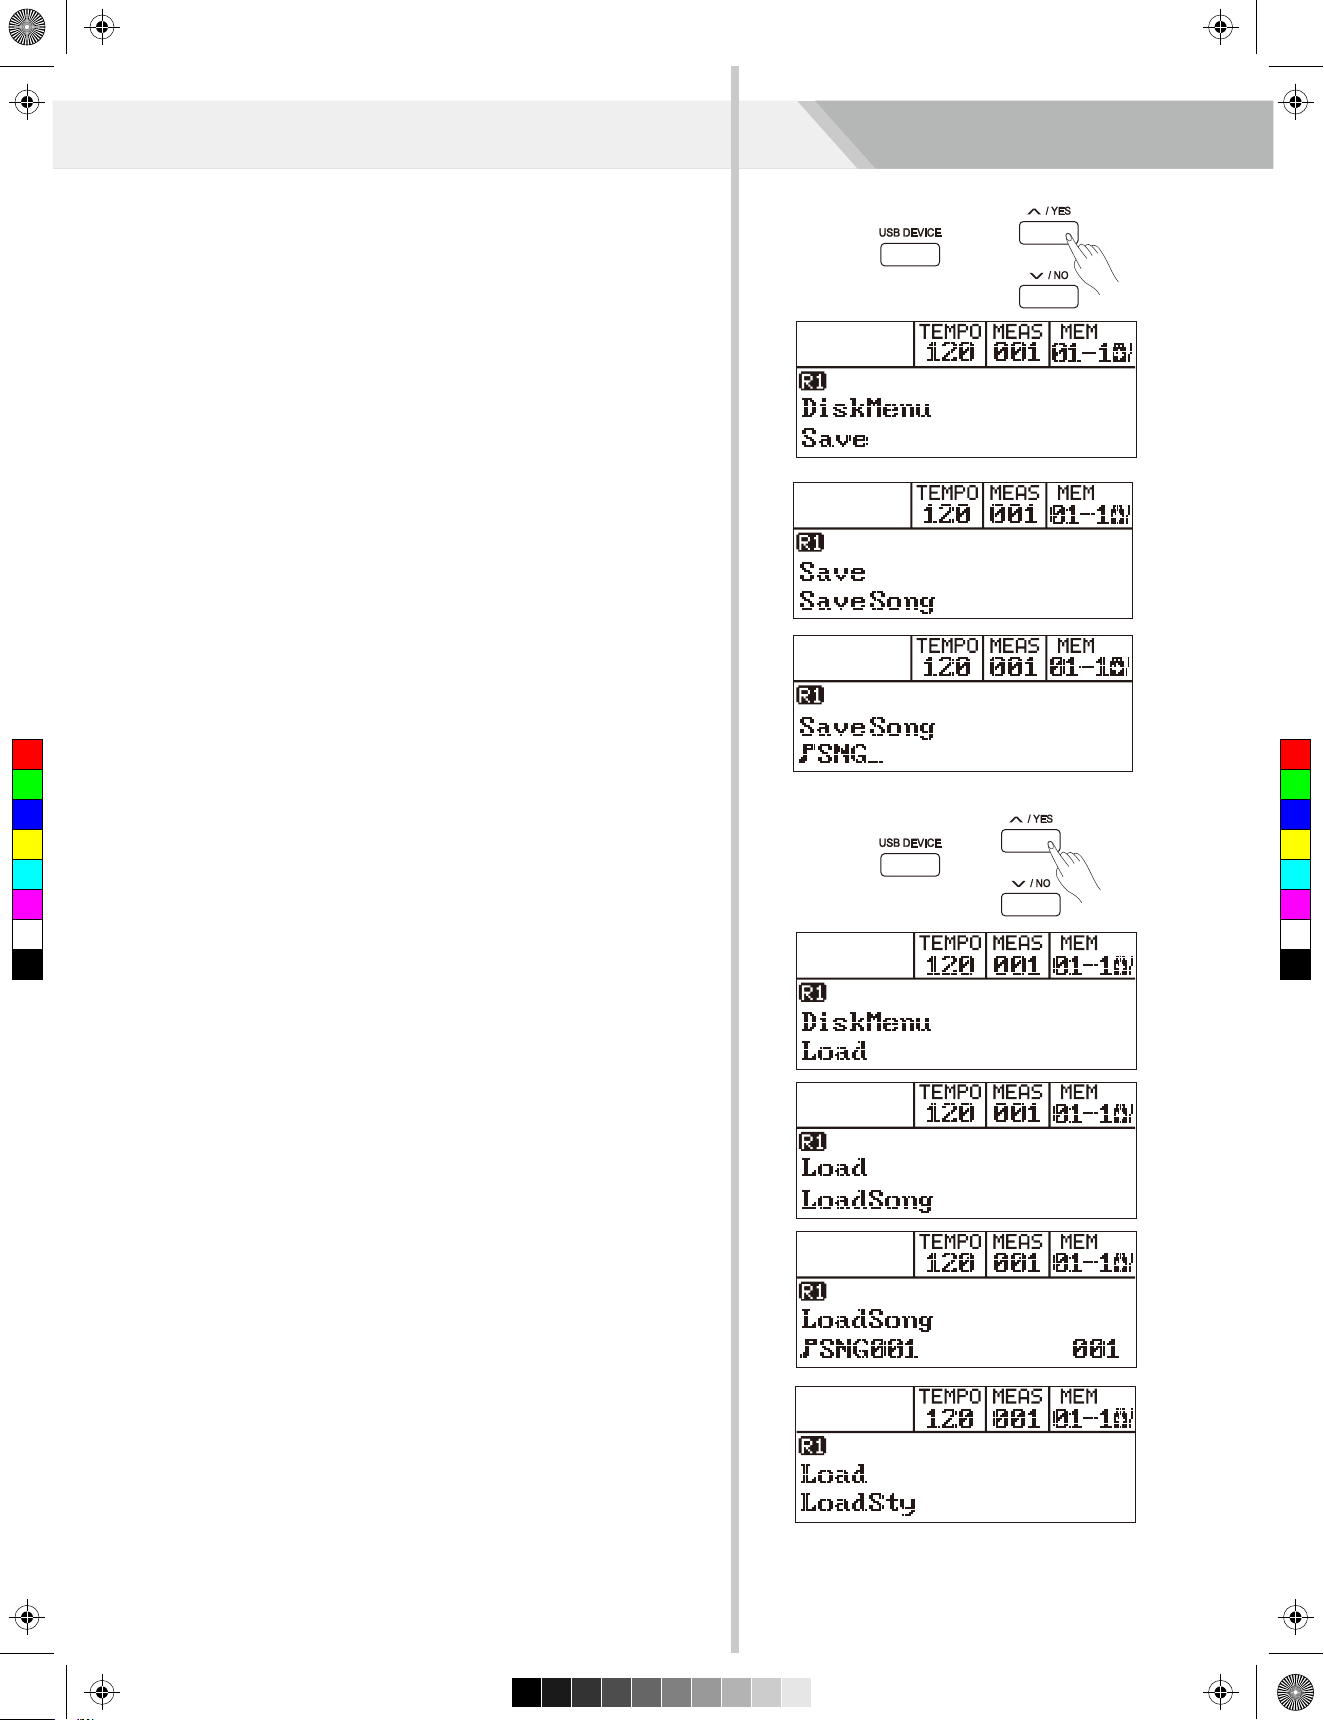
1. Press [USB DEVICE] button to enter USB mode. Then use data dial
to select “Save”.
2. Press [+/YES] to enter “Save” sub menu. It includes “SaveSong”,
“SaveSty”, “SaveMem”. Use [+/YES], [-/NO]button or data dial to
select one.
Save user song:
1. Select the menu “SaveSong” sub menu and press [+/YES] button,
LCD displays the user song name and number. Use the data dial to
select the file to save.
2. After selected the user song, press [+/YES]. The LCD prompts to
enter file name “SNG_”. Now use keyboard to enter 8 character file
name.
3. After entering the file name, press [+/YES]. The LCD prompts to
confirm the operation: “Sure?”. Press [+/YES] again to save the file.
Press [-/NO] to cancel the operation.
4. If the name you enter is the same with the song name in USB Flash
Drive, the LCD prompts “SameName!”. You need to enter a different
C
M
Y
CM
MY
CY
CMY
K
name to save file.
Follow the steps above to save a user style or a user memory.
Load
1. Press [USB DEVICE] button to enter USB mode. Then use data
dial to select “Load” menu.
2. Press [+/YES] to enter “load” submenu. Load submenu are
displayed on LCD, it includes “LoadSong”, “LoadSty”, “LoadMem”.
Use [+/YES], [-/NO]button or data dial to select one.
Load Song:
1. Select the menu “LoadSong” and press [+/YES] button, LCD
displays the MIDI files(*.midi) in the MMKD\SONG directory of USB
Flash Drive. Use the data dial to select the file to load.
2. After selected the midi file, press [+/YES]button , and then use the
data dial to select user song number.
3. After selected the song number, press [+/YES] button, and the LCD
displays “Sure?”. Press [+/YES] again to confirm the loading
operation. Press [-/NO] to cancel the that operation.
Load Style
1. Select the menu “LoadSty” and press [+/YES] button, LCD displays
the style files(*.sty) in the MMKD\STYLE directory of USB Flash
Drive. Use the data dial to select the file to load.
2. After selected the style file, press [+/YES] button, and then use the
data dial to select user style number.
3. After selected the user style number, press [+/YES] button, and the
LCD displays “Sure?”. Press [+/YES] again to confirm the loading
operation. Press [-/NO] to cancel the that operation.
28
Page 29
Aw_DP370_Manual_G07_161223.pdf 29 17/1/4 14:35
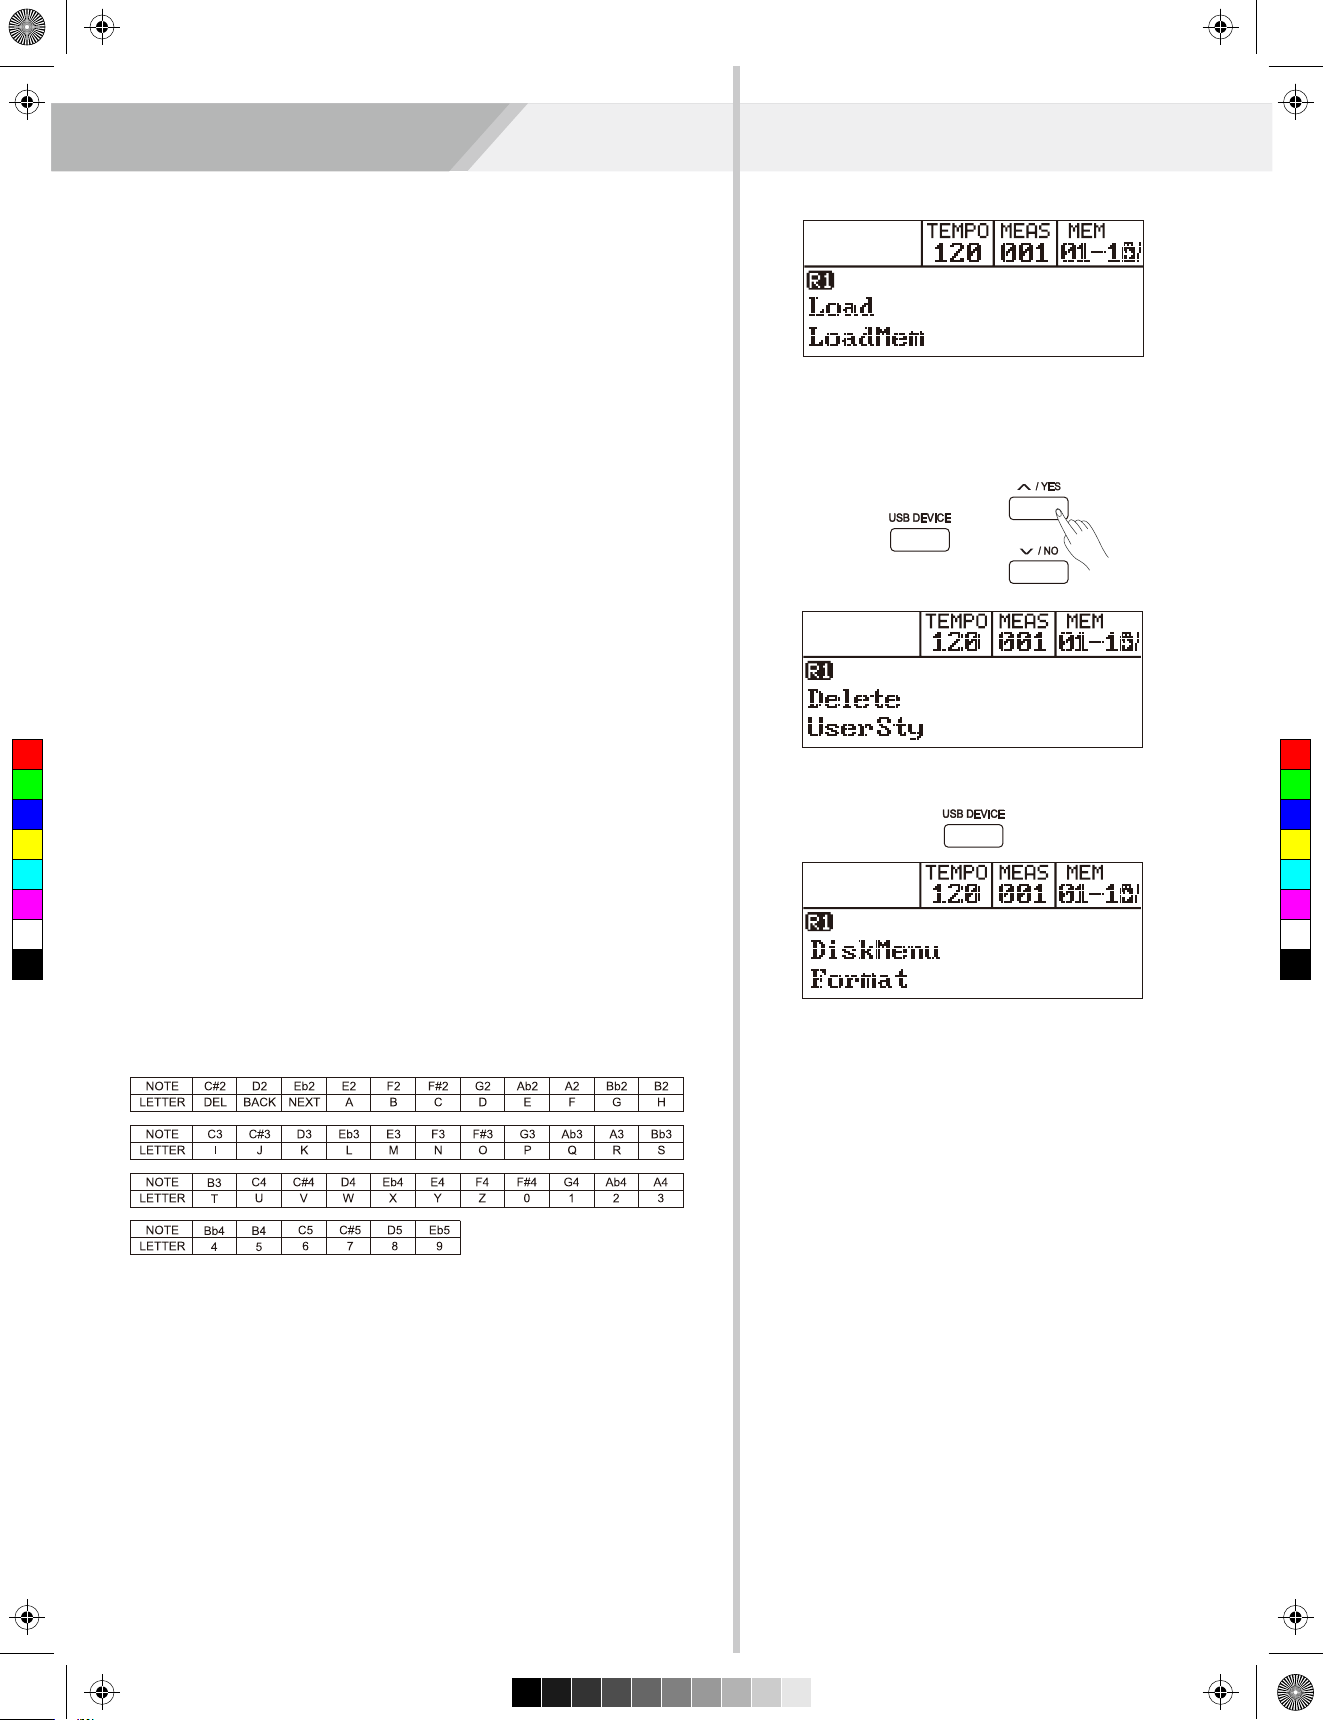
Load Memory
1. Select the menu “LoadMem” and press [+/YES] button, LCD
displays the memory files(*.mem) in the MMKD\MEMORY directory
of USB Flash Drive. Use the data dial to select the file to load.
2. After selected the memory file, press [+/YES] button, and then use
the data dial to select user memory number.
3. After selected the user memory number, press [+/YES] button, and
the LCD displays “Sure?”. Press [+/YES] again to confirm the
loading operation. Press [-/NO] to cancel the that operation.
Delete
1. Press [USB DEVICE] button to enter USB mode. Then use data dial
to select “Delete”.
2. Press [+/YES] to enter “Delete” sub menu. It includes “UserSong”,
“UserSty”, “UserMem”. Use [+/YES], [-/NO] button or data dial to
select one.
Connecting USB Flash Drive
3. After selected file type to delete, press [+/YES] to enter the corre sponding menu.
4. After selected the file to delete, press [+/YES], and the LCD displays
C
M
Y
CM
MY
CY
CMY
K
“Sure?”. Press [+/YES] to confirm, and press [-/NO] to cancel the
operation.
Format
1. Press [USB DEVICE] button to enter USB mode. Then use data dial
to select “Format”.
2. Press [+/YES] to confirm. LCD displays “Sure?”, then press [+/YES]
to format, press [-/NO] to cancel operation.
Note:
Formation will delete all data in USB Flash Drive!
Keyboard and ASCII Character Relative Table
29
Page 30
Aw_DP370_Manual_G07_161223.pdf 30 17/1/4 14:35
MIDI
By using the MIDI functions you can expand your musical possibilities.
This section explains what MIDI is, and what it can do, as well as how
you can use MIDI on your instrument.
What's MIDI?
MIDI (short for Musical Instrument Digital Interface) allows a wide
variety of electronic musical instruments, computers and other related
devices to connect and communicate with one another. MIDI carries
event messages that specify notation, pitch and velocity, control
signals for parameters such as volume, vibrato, audio panning, and
program change information to change the voice selections.
The instrument can output the real-time playback information via MIDI
messages and control external MIDI devices. The instrument can also
accept incoming MIDI messages and generate sound accordingly.
AUX IN MIDI IN MIDI OUTAUX OUT USB
AUX IN MIDI IN MIDI OUTAUX OUT USB
MIDI Terminals
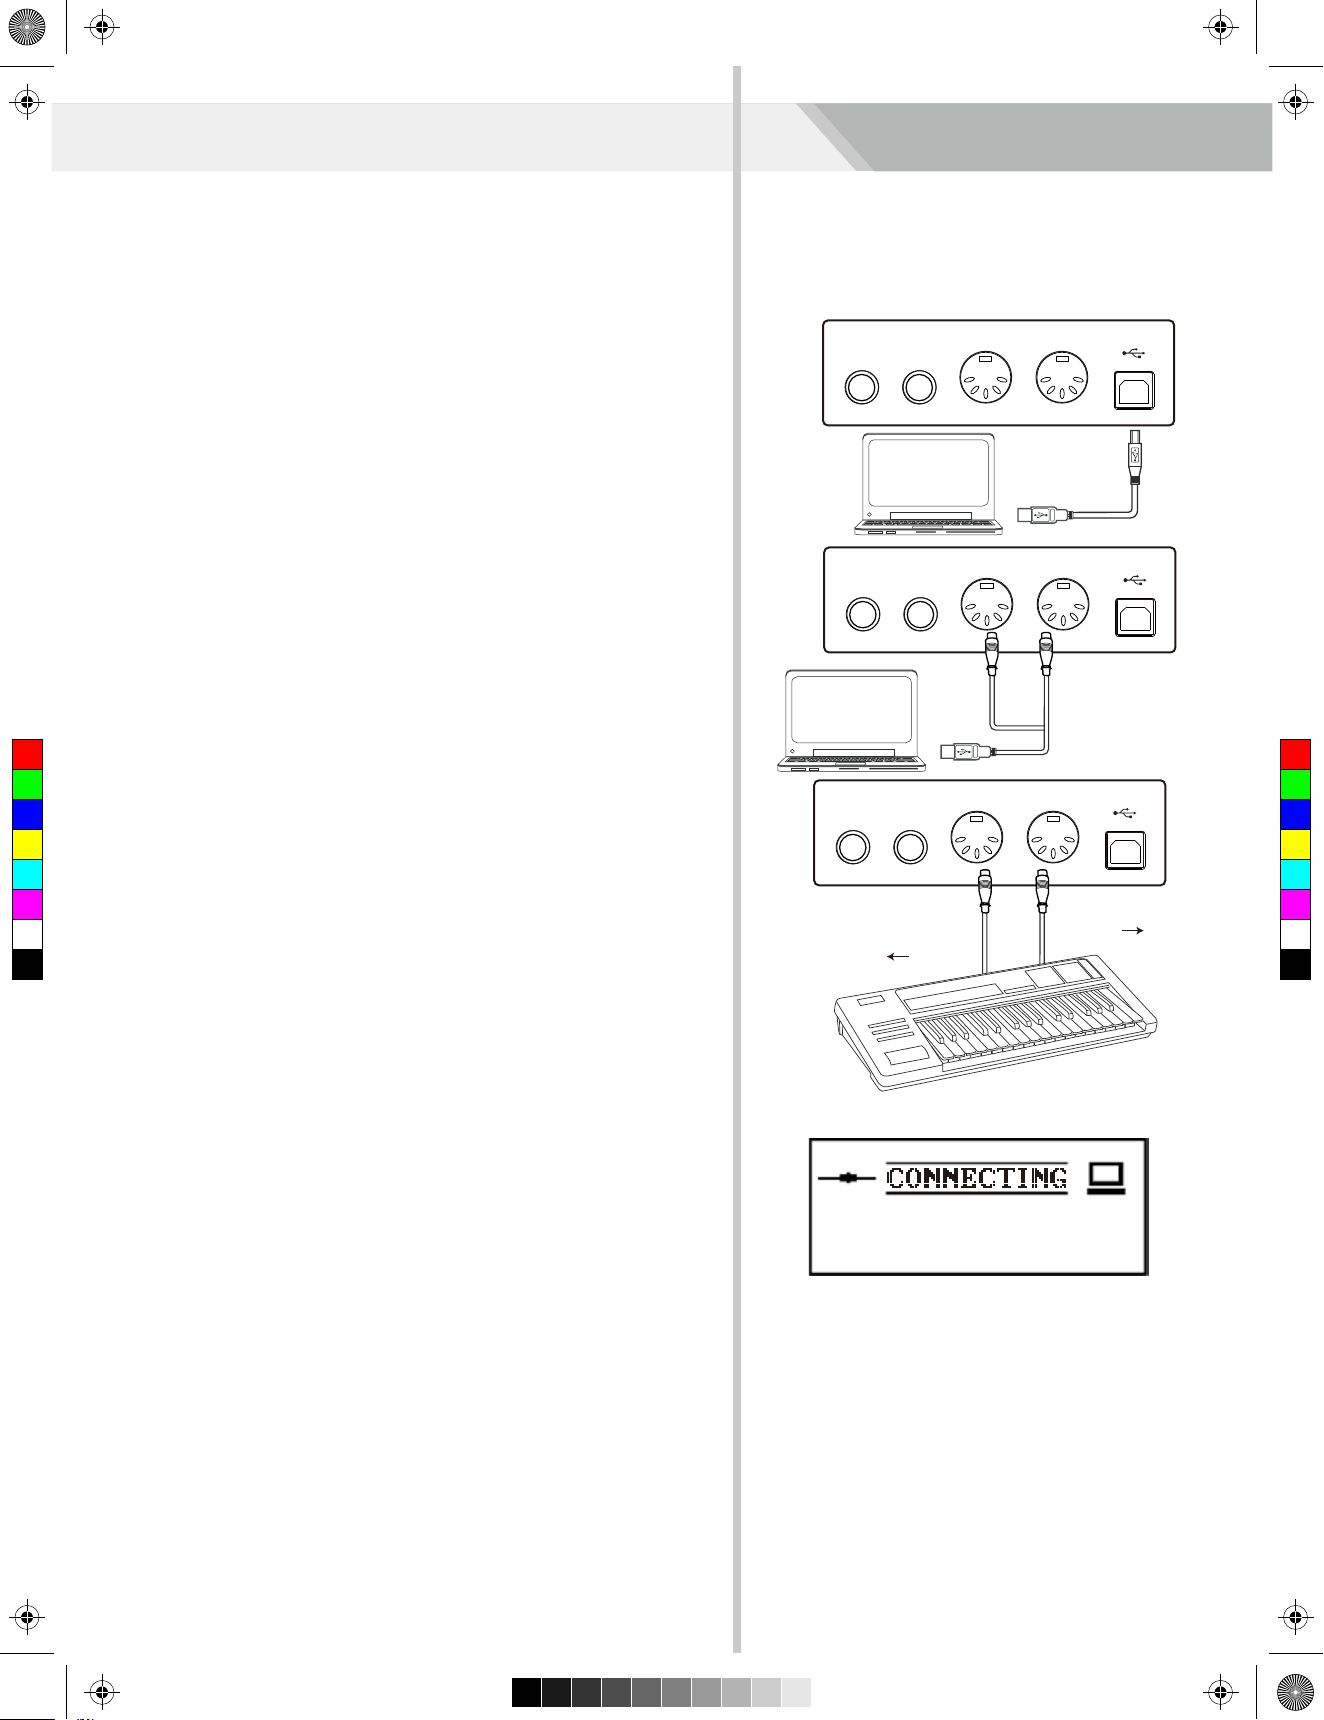
Connect the piano with external MIDI devices with a standard MIDI
cable for the exchange of MIDI data.
MIDI IN: Receives MIDI data from a computer.
MIDI OUT: Transmits MIDI data from the piano to an external MIDI
C
M
Y
CM
MY
CY
CMY
K
device.
MIDI THRU PORT: You can use MIDI cable to link the MIDI THRU port
to other MIDI instrument MIDI IN port. The message that the MIDI IN
port receives will be auto sent to the MIDI THRU port, so that one MIDI
instrument can control many MIDI instrument at the same time.
Connect the MIDI OUT of other Device to the MIDI IN jack on the rear
panel, this instrument will work as a sound module.
Connect the MIDI IN of other Device to the MIDI OUT jack on the rear
panel. this instrument will work as a MIDI controller.
AUX IN MIDI IN MIDI OUTAUX OUT USB
MIDI OUT MIDI IN
MIDI OUTMIDI IN
Downloading Data from the Computer
Connect a standard USB cable between the rear-panel of the USB
jack of the instrument and the USB jack on your computer.
Power on the instrument first, and then open the PCSUITE software in
your computer, the “CONNECTING” will be displayed on LCD. The
PCSUITE will connect successfully with the instrument.
You can download 10 SMF MIDI files to the keyboard as user songs or
upload the user songs.
You can upload user styles to the computer as a backup or download
them to the keyboard.
You can upload memory files to the computer as a backup or download them to the keyboard.
Please refer to software operation instructions for detail operating
methods.
30
Page 31
Aw_DP370_Manual_G07_161223.pdf 31 17/1/4 14:35
Troubleshooting
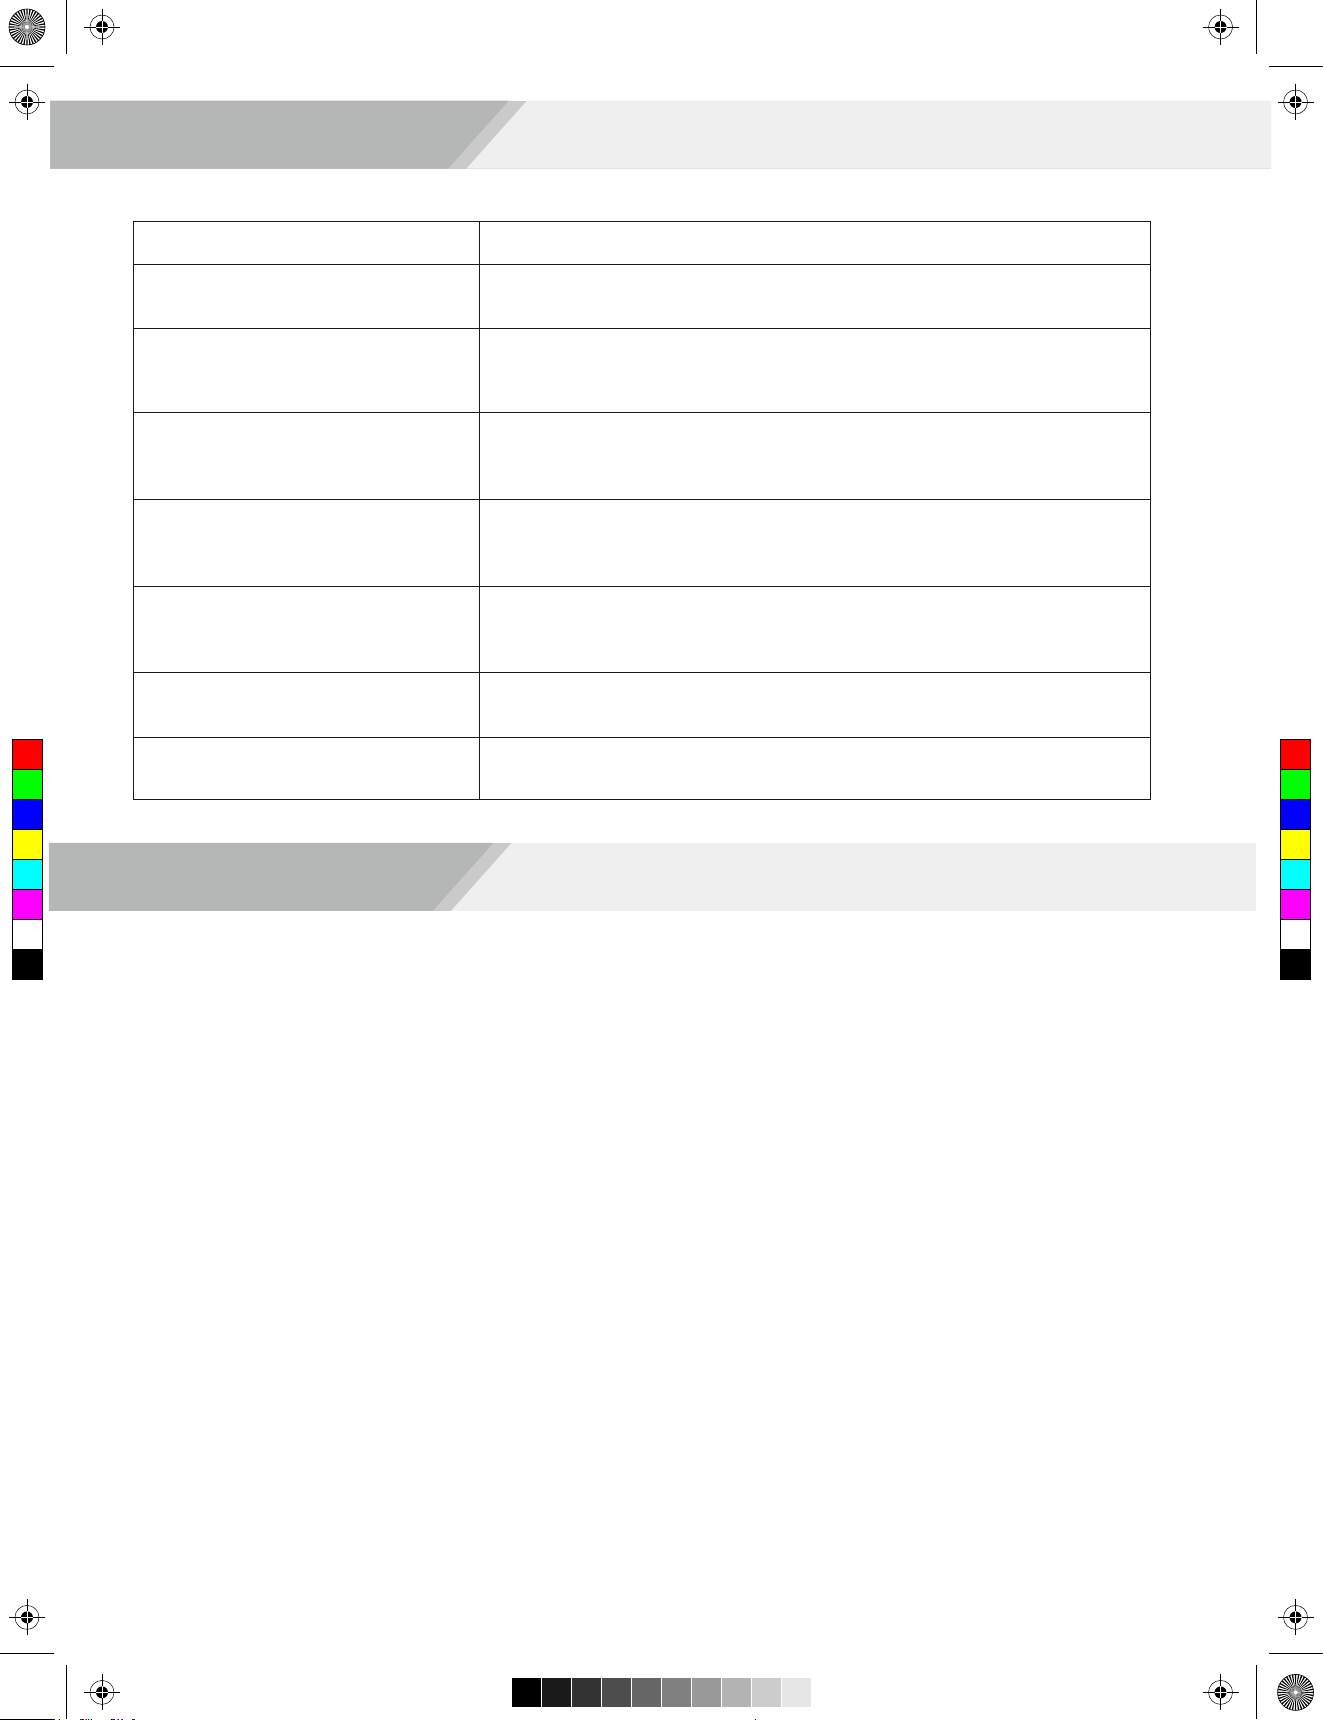
Problem
The speakers produce a pop sound
Possible Cause and Solution
This is normal and is no cause for alarm.
whenever the power is turned ON or OFF.
No sound when the keyboard is played.
Make sure the master volume is set to an appropriate level. Check if headphones
are plugged into Jack 2. The R1/R2/L voice volume (Mixer) settings could be set
too low. Make sure the voice volumes are set at appropriate levels.
When using a mobile phone, noise is
produced.
Using a mobile phone in close proximity to the instrument may produce interference. To prevent this, turn off the mobile phone or use it further away from the
instrument.
The auto accompaniment does not play
back even Sync is in standby condition
and a key is pressed.
Certain notes sound at wrong pitch.
You may be trying to start accompaniment by playing a key in the right-hand range
of the keyboard. To start the accompaniment with Sync Start, make sure to play a
key in the left-hand range of the keyboard.
Make sure that the tuning value is set to 0. Press and hold the [+/YES] and [-/NO]
buttons at the same time, then turning the power on will set INSTRUMENT to
default.
The Harmony function does not operate.
Please make sure the Harmony function is on. And Harmony cannot be turned on
when a drum kit is selected for the voice R1.
C
M
Y
CM
MY
CY
CMY
K
After connecting with the computer,
the piano is not recognized.
LCD Display
Multi-functional LCD
Please check if the USB cable is being connected firmly, or try connecting another
USB port of the computer,without the need to install another driver on the PC.
Specifications
Record Function
Record, Accomp, Melody 1-5
Keyboard
88 Hammer-Action Keys
Polyphony
128
Voice
600
Song
120 preset songs, 10 user songs
Style
230 preset styles, 10 user styles
Demo
5
Control button
Power Switch, Volume knob, Brilliance knob, Styles, Tempo+/-,
Acc Vol, Mixer, Function+/-, Start/Stop, Sync Start, Intro/
Ending, Fill A, Fill B, Fill C Fill D, Chord Mode, Voices, Dual,
Lower, USB Device, Metro, Twinova, Octave, Song, Bank,
Store, M1-M4, O.T.S., Shift, Demo, +/Yes, -/No, Data dial,
Melody off L/R
Memory
96
Connectors
PHONES (2 standard. ¼” phone),AUX IN, AUX OUT
USB-MIDI, MIDI IN/OUT, USB Device Jack
Pedals (Sustain, Soft, Sostenuto)
Power Supply
AC 220~240V, 50Hz
Speaker
HIGH 8Ω 10W X2
LOW 6Ω 40W X2
Dimensions
1375(L) x 543(W) x 905(H)
Weight
52kg
* All specifications and appearances are subject to change
without notice.
31
Page 32
Aw_DP370_Manual_G07_161223.pdf 32 17/1/4 14:35
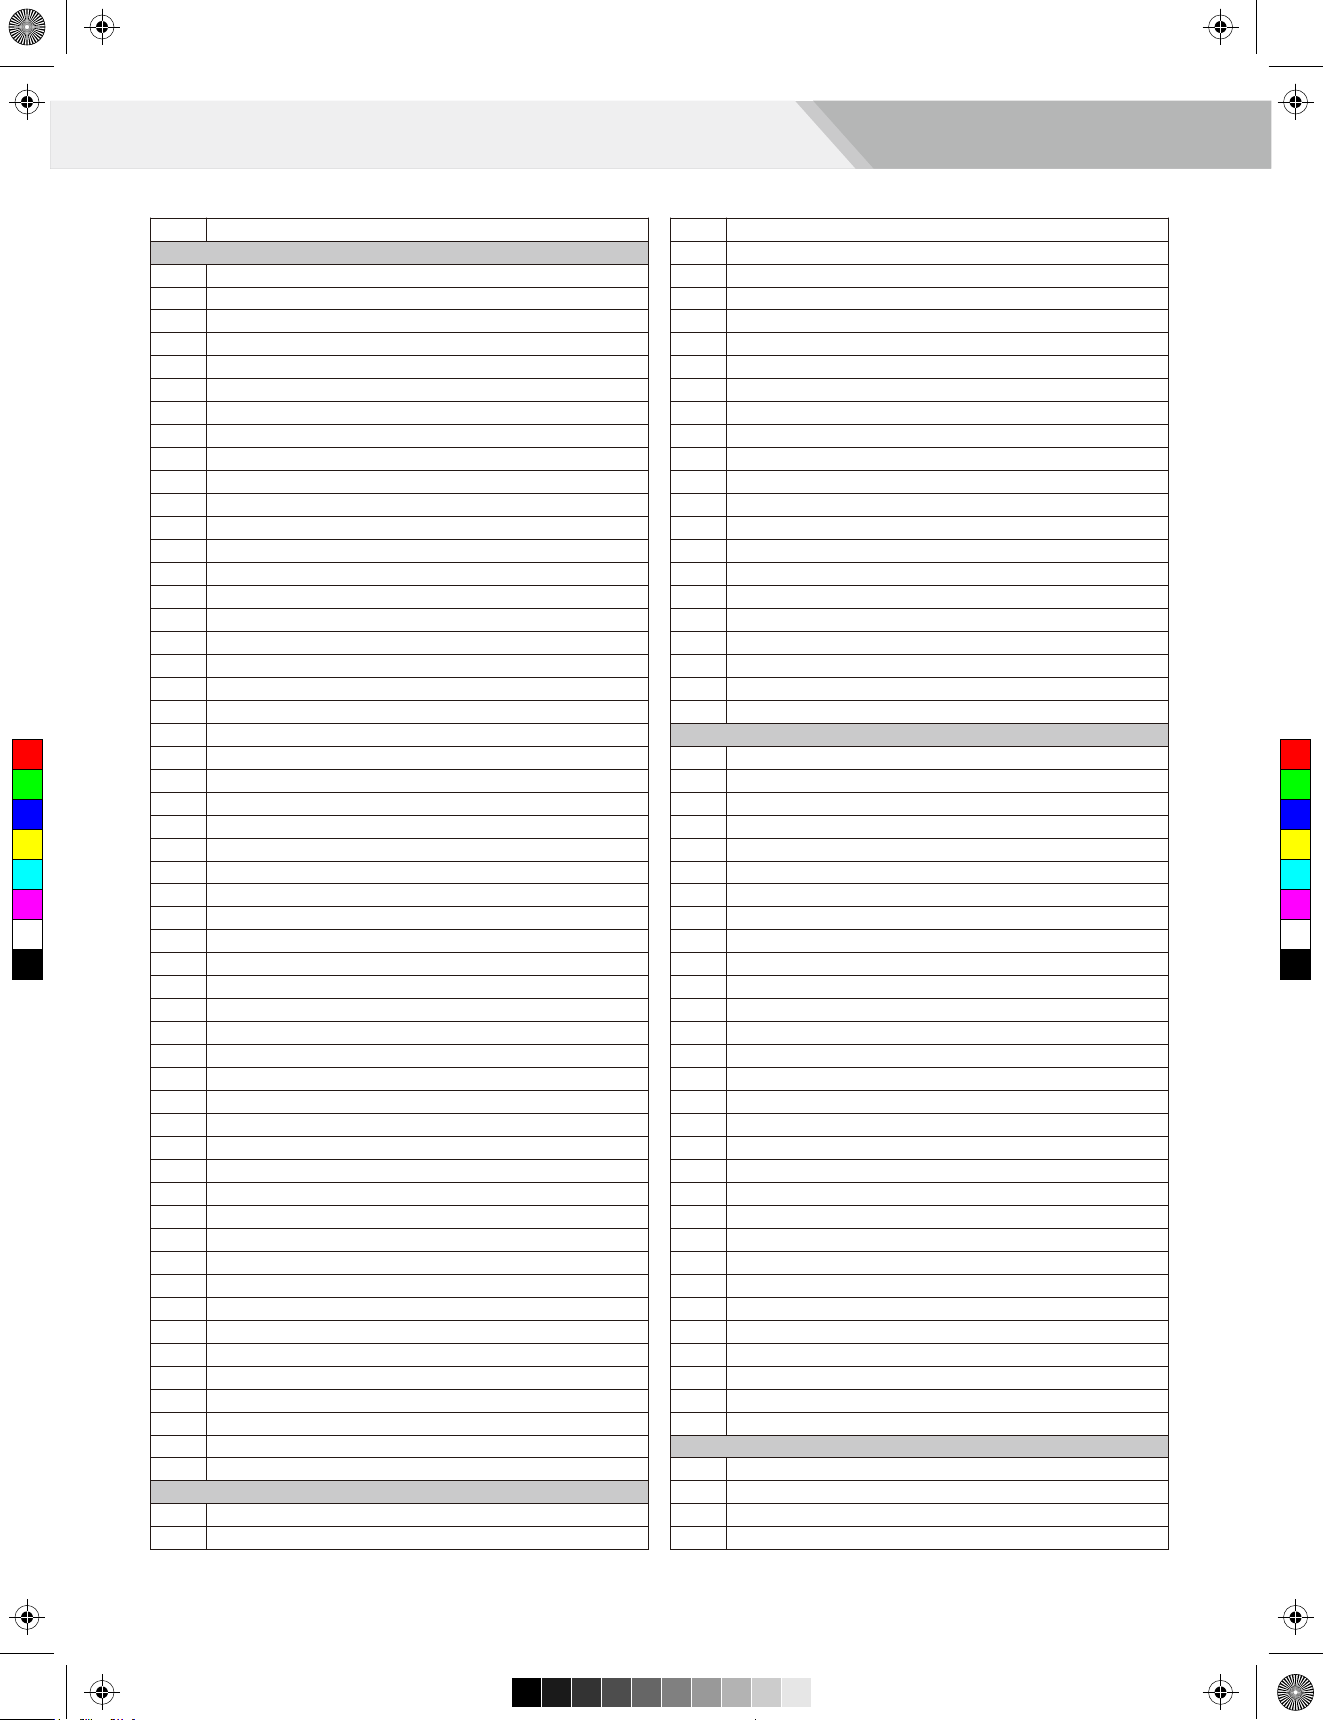
Voice List
Full Name
No.
Piano
Acoustic Grand Piano
1
Acoustic Grand Piano 2
2
Acoustic Grand Piano 3
3
Acoustic Grand Piano (wide)
4
Acoustic Grand Piano (dark)
5
Bright Acoustic Piano
6
Bright Acoustic Piano 2
7
Bright Acoustic Piano 3
8
Bright Acoustic Piano (wide)
9
Electric Grand Piano
10
Electric Grand Piano 2
11
Electric Grand Piano (wide)
12
Electric Grand Piano (dark)
13
Honky Tonk Piano
14
Honky Tonk Piano 2
15
Honky Tonk Piano (wide)
16
Honky Tonk Piano (dark)
17
Harpsichord
18
Harpsichord 2
19
Harpsichord (octave mix)
20
Harpsichord (wide)
C
M
Y
CM
MY
CY
CMY
K
21
Harpsichord (with key off)
22
Octave Grand Piano
23
Octave Grand Piano 2
24
Piano & Strings
25
Piano & Pad
26
Piano & Choir
27
Piano & EP
28
Piano & Vibraphone
29
Detuned Electric Piano
30
Detuned Electric Piano 2
31
Electric Piano
32
Electric Piano 2
33
Electric Piano 3
34
Electric Piano 4
35
Electric Piano 1 (velocity mix)
36
Electric Piano 2 (velocity mix)
37
60's Electric Piano
38
EP Legend
39
Phase EP
40
Clavi
41
Clavi 2
42
Phase Clavi
43
Wah Clavi
44
Pulse Clavi
45
Dream EP
46
Tremolo EP
47
Funk EP
48
Warm EP
49
Choir EP
50
Wah EP
51
Modern EP
52
EP Pad
53
Chromatic Percussion
Celesta
54
Celesta 2
55
Celesta 3
56
Glockenspie
57
Glockenspiel 2
58
Music Box
59
Music Box 2
60
Music Box 3
61
Vibraphone
62
Vibraphone 2
63
Vibraphone (wide)
64
Marimba
65
Marimba 2
66
Marimba (wide)
67
Xylophone
68
Xylophone 2
69
Xylophone 3
70
Tubular Bells
71
Tubular Bells 2
72
Church Bell
73
Carillon
74
Dulcimer
75
Dulcimer 2
76
Santur
77
Organ
Italian 60's Organ
78
Drawbar Organ
79
Drawbar Organ 2
80
Detuned Drawbar Organ
81
Drawbar Organ 3
82
Detuned Percussive Organ
83
Percussive Organ
84
Percussive Organ 2
85
70's Percussive Organ
86
Percussive Organ 3
87
Rock Organ
88
Rock Organ 2
89
Rock Organ 3
90
Church Organ
91
Church Organ 2
92
Church Organ 3
93
Church Organ (octave mix)
94
Detuned Church Organ
95
Reed Organ
96
Reed Organ 2
97
Rotary Organ
98
Puff Organ
99
Accordion
100
Accordion 2
101
Accordion 3
102
Harmonica
103
Harmonica 2
104
Harmonica 3
105
Tango Accordion
106
Tango Accordion 2
107
Guitar
Acoustic Guitar (nylon)
108
Acoustic Guitar (nylon) 2
109
Acoustic Guitar (nylon) 3
110
Acoustic Guitar (nylon + key off)
111
32
Page 33
Aw_DP370_Manual_G07_161223.pdf 33 17/1/4 14:35
Voice List
Ukulele
112
Acoustic Guitar (steel)
113
Acoustic Guitar (steel) 2
114
12-Strings Guitar
115
Mandolin
116
Mandolin 2
117
Steel Guitar with Body Sound
118
Electric Guitar (jazz)
119
Electric Guitar (jazz) 2
120
Electric Guitar (pedal steel)
121
Electric Guitar (clean)
122
Electric Guitar (clean) 2
123
Electric Guitar (detuned clean)
124
Mid Tone Guitar
125
Electric Guitar (muted)
126
Electric Guitar (muted) 2
127
Electric Guitar (funky cutting)
128
Electric Guitar (muted velo-sw)
129
Jazz Man
130
Overdriven Guitar
131
Overdriven Guitar 2
132
Guitar Pinch
133
Distortion Guitar
C
M
Y
CM
MY
CY
CMY
K
134
Distortion Guitar 2
135
Distortion Guitar (with feedback)
136
Guitar Feedback
137
Distorted Rhythm Guitar
138
Guitar Harmonics
139
Guitar Harmonics 2
140
Velocity Nylon Guitar
141
Bass
Acoustic Bass
142
Acoustic Bass 2
143
Wah Bass
144
Electric Bass (finger)
145
Finger Slap Bass
146
Electric Bass (pick)
147
Electric Bass (pick) 2
148
Fretless Bass
149
Fretless Bass 2
150
Slap Bass
151
Slap Bass 2
152
Slap Bass 3
153
Slap Bass 4
154
Synth Bass
155
Synth Bass 2
156
Synth Bass 3
157
Synth Bass 4
158
Warm Synth Bass
159
Rsonance SynBass
160
Clavi Bass
161
Hammer
162
Attack Bass
163
Synth Bass (rubber)
164
Synth Bass (rubber) 2
165
Attack Pulse
166
Strings & Orchestral
Violin
167
Violin 2
168
Violin (slow attack)
169
Viola
170
Viola 2
171
Cello
172
Cello 2
173
Contrabass
174
Contrabass 2
175
Tremolo Strings
176
Tremolo Strings 2
177
Tremolo Strings 3
178
Pizzicato Strings
179
Pizzicato Strings 2
180
Orchestral Harp
181
Orchestral Harp 2
182
Yang Chin
183
Timpani
184
Timpani 2
185
String Ensembles
186
String Ensembles 2
187
String Ensembles 3
188
String Ensembles 4
189
Strings & Brass
190
60's Strings
191
Synth Strings
192
Synth Strings 2
193
Synth Strings 3
194
Synth Strings 4
195
Synth Strings 5
196
Choir Aahs
197
Choir Aahs 2
198
Choir Aahs 3
199
Voice Oohs
200
Voice Oohs 2
201
Humming
202
Anlong Voice
203
Synth Voice
204
Synth Voice 2
205
Orchestra Hit
206
Orchestra Hit 2
207
Bass Hit Plus
208
6th Hit
209
Euro Hit
210
Brass
Trumpet
211
Trumpet 2
212
Dark Trumpet
213
Trombone
214
Trombone 2
215
Trombone 3
216
Bright Trombone
217
Tuba
218
Tuba 2
219
Muted Trumpet
220
Muted Trumpet 2
221
Muted Trumpet 3
222
French Horn
223
French Horn 2
224
French Horn 3
225
33
Page 34
Aw_DP370_Manual_G07_161223.pdf 34 17/1/4 14:35
Voice List
Brass Section
226
Brass Section 2
227
Brass Section 3
228
Synth Brass
229
Synth Brass 2
230
Synth Brass 3
231
Synth Brass 4
232
Synth Brass 5
233
Synth Brass 6
234
Synth Brass 7
235
Synth Brass 8
236
Analog Synth Brass
237
Analog Synth Brass 2
238
Analog Synth Brass 3
239
Jump Brass
240
Jump Brass 2
241
Funny
242
Funny 2
243
Reed
Soprano Sax
244
Soprano Sax 2
245
Soprano Sax 3
246
Alto Sax
C
M
Y
CM
MY
CY
CMY
K
247
248
249
250
251
252
253
254
255
256
257
258
259
260
261
262
263
264
265
266
267
268
269
270
271
Alto Sax 2
Alto Sax 3
Tenor Sax
Tenor Sax 2
Tenor Sax 3
Baritone Sax
Baritone Sax 2
Baritone Sax 3
Oboe
Oboe 2
Oboe 3
2 Oboes
English Horn
English Horn 2
English Horn 3
2 English Horns
Bassoon
Bassoon 2
Bassoon 3
2 Bassoons
Clarinet
Clarinet 2
Clarinet 3
2 Clarinets
Pipe
Piccolo
272
Piccolo 2
273
Piccolo 3
274
2 Piccolos
275
Sweet Flute
276
Flute
277
Flute 2
278
Flute 3
279
2 Flutes
280
Recorder
281
Recorder 2
282
2 Recorders
283
Pan Flute
284
Pan Flute 2
285
Sweet Pan Flute
286
Blown Bottle
287
Blown Bottle 2
288
Shakuhachi
289
Shakuhachi 2
290
Whistle
291
Whistle 2
292
Ocarina
293
Ocarina 2
294
Synth Lead
Lead 1 (square)
295
Lead 1a (square) 2
296
Lead 1 (square) 3
297
Lead 1b (sine)
298
Lead 2 (sawtooth)
299
Lead 2a (sawtooth) 2
300
Lead 2 (sawtooth) 3
301
Lead 2b (saw + pulse)
302
Lead 2c (double sawtooth)
303
Lead 2d (sequenced analog)
304
Lead 2d (sequenced analog) 2
305
Wavy Sawtooth
306
Bauble Lead
307
Super Analog
308
Lead 3 (calliope)
309
Lead 3 (calliope) 2
310
Lead 4 (chiff)
311
Lead 4 (chiff) 2
312
Lead 4 (chiff) 3
313
Lead 5 (charang)
314
Lead 5 (charang) 2
315
Lead 5 (charang) 3
316
Lead 5 (charang) 4
317
Lead 5a (wire lead)
318
Lead 5a (wire lead) 2
319
Lead 6 (voice)
320
Lead 6 (voice) 2
321
Lead 7 (fifths)
322
Lead 7 (fifths) 2
323
Lead 8 (bass + lead)
324
Lead 8 (bass + lead) 2
325
Lead 8 (bass + lead) 3
326
Lead 8a (soft wrl)
327
Massiness
328
Square
329
Slow Square Lead
330
Sine Solo
331
Square Lead 4
332
Thick Square
333
2Oscillators Lead
334
Wavy Sawtooth 2
335
Analog Lead
336
Big Lead
337
Fat Lead
338
34
Page 35
Aw_DP370_Manual_G07_161223.pdf 35 17/1/4 14:35
Voice List
PWM 4th
339
Delayed Lead
340
Delayed Lead 2
341
Fifth Lead
342
Corrie
343
Quint
344
Synth Pad
Pad 1 (new age)
345
Pad 1 (new age) 2
346
Pad 2 (warm)
347
Pad 2 (warm) 2
348
Pad 2a (sine pad)
349
Pad 3 (polysynth)
350
Pad 3 (polysynth) 2
351
Pad 3 (polysynth) 3
352
Pad 3 (polysynth) 4
353
Pad 4 (choir)
354
Pad 4 (choir) 2
355
Pad 4a (itopia)
356
Pad 5 (bowed)
357
Pad 5 (bowed) 2
358
Pad 6 (metallic)
359
Pad 6 (metallic) 2
360
Pad 7 (halo)
C
M
Y
CM
MY
CY
CMY
K
361
Pad 7 (halo) 2
362
Pad 8 (sweep)
363
Pad 8 (sweep) 2
364
Pad 8 (sweep) 3
365
Pan Pad
366
Pan Pad 2
367
Dipolar Pad
368
PWM Pad
369
Warmly Pad
370
Horn Pad
371
Click Pad
372
Analog Pad
373
80's Poly Pad
374
PWM 4th Soft
375
Synth Calliope Soft
376
Soft Vox
377
5th SawWave
378
5th Lead Soft
379
Slow Square
380
New Year Pad
381
Space Voice
382
Rising
383
Congregate
384
Synth SFX
FX 1 (rain)
385
FX 1 (rain) 2
386
FX 2 (soundtrack)
387
FX 2 (soundtrack) 2
388
Prelude
389
FX 3 (crystal)
390
FX 3 (crystal) 2
391
FX 3a (synth mallet)
392
FX 4 (atmosphere)
393
FX 4 (atmosphere) 2
394
Warm Air
395
FX 5 (brightness)
396
Smog
397
FX 6 (goblins)
398
FX 6 (goblins) 2
399
Choir Bell
400
Choir Bell 2
401
FX 7 (echoes)
402
FX 7 (echoes) 2
403
FX 7b (echo pan)
404
FX 7a (echo bell)
405
FX 7a (echo bell) 2
406
FX 7a (echo bell) 3
407
FX 8 (sci-fi)
408
FX 8 (sci-fi) 2
409
Ethnic Misc.
Sitar
410
Sitar 2
411
Banjo
412
Banjo 2
413
Shamisen
414
Shamisen 2
415
Koto
416
Koto 2
417
Taisho Koto
418
Kalimba
419
Kalimba 2
420
Bag Pipe
421
Bag Pipe 2
422
Fiddle
423
Fiddle 2
424
Fiddle 3
425
Shanai
426
Shanai 2
427
Percussive
Tinkle Bell
428
Agogo
429
Steel Drums
430
Woodblock
431
Castanets
432
Taiko Drum
433
Concert Bass Drum
434
Acoustic Bass Drum
435
Jazz Kick
436
Side Stick
437
Analog Rim Shot
438
Acoustic Snare
439
Jazz Snare
440
Brush Tap
441
Concert SD
442
Hand Clap
443
Tom
444
Brush Tom
445
Closed Hi-hat
446
Analog Closed Hi-hat
447
Pedal Hi-hat
448
Open Hi-hat
449
Crash Cymbal
450
Analog Cymbal
451
Ride Cymbal
452
China Cymbal
453
Ride Bell
454
Tambourine
455
Splash Cymbal
456
Cowbell
457
Analog Cowbell
458
High Bongo
459
Low Bongo
460
Mute Hi Conga
461
Open Hi Conga
462
Low Conga
463
Analog Hi Conga
464
Analog Mid Conga
465
Analog Low Conga
466
High Timbale
467
Low Timbale
468
Cabasa
469
Maracas
470
Analog Maracas
471
Short Guiro
472
Long Guiro
473
Claves
474
Mute Cuica
475
Open Cuica
476
Mute Triangle
477
Open Triangle
478
Shaker
479
Mute Surdo
480
Open Surdo
481
Melodic Tom
482
Melodic Tom 2
483
Synth Drum
484
Rhythm Box Tom
485
Electric Drum
486
Reverse Cymbal
487
SFX
Guitar Fret Noise
488
Guitar Cutting Noise
489
Acoustic Bass String Slap
490
Breath Noise
491
Flute Key Click
492
Seashore
493
Rain
494
Thunder
495
Wind
496
Stream
497
Bubble
498
Bird Tweet
499
Bird Tweet 2
500
Dog
501
Horse Gallop
502
Telephone Ring
503
Telephone Ring 2
504
Door Creaking
505
Door
506
Scratch
507
35
Page 36
Aw_DP370_Manual_G07_161223.pdf 36 17/1/4 14:35
Voice List
Wind Chime
508
Helicopter
509
Car Engine
510
Car Stop
511
Car Pass
512
Car Crash
513
Siren
514
Train
515
Jetplane
516
Starship
517
Burst Noise
518
Applause
519
Laughing
520
Screaming
521
Punch
522
Heart Beat
523
Footsteps
524
Gunshot
525
Machine Gun
526
Lasergun
527
Explosion
528
Combined Voice
Stereo Piano & Strings Pad
529
Stereo Piano & Choir
C
M
Y
CM
MY
CY
CMY
K
530
Stereo Piano & Synth Strings
531
Stereo Piano & Warm Pad
532
Stereo Piano & Soft EP
533
FM Electric Piano
534
Digital Piano
535
E.Piano & Strings
536
E.Piano & Acoustic Guitar
537
E.Piano & Vibraphone
538
E.Piano 2 & Pad
539
E.Piano 2 & Strings
540
Harpsichord & Stereo Strings
541
Music Box & Stereo Strings
542
Vibraphone & Stereo Strings
543
Vibraphone Octave
544
Vibraphone & Marimba & Kalimba
545
Marimba & Kalimba
546
Marimba Delay
547
Xylophone Octave
548
Organ & Stereo Strings
549
Stereo Organ & Piano
550
Rock Organ & Strings
551
Church Organ & Choir
552
Church Organ & Strings
553
Acoustic Guitar & Flute
554
Acoustic Guitar & Clavi
555
24 String Guitar
556
Steel Guitar & Warm Pad
557
Stereo Strings & Horn
558
Orchestra
559
Full Strings
560
Full Strings 2
561
Symphonic
562
Stereo Choir & Strings
563
Stereo Choir & Steel Guitar
564
3 Trumpet Loose
565
Trombone & Stereo Strings
566
3 Trombones Loose
567
3 Muted Trumpets Loose
568
Club Brass
569
Brass & Woodwinds
570
Woodwinds & Strings
571
Section Woods Small
572
Pan Flute & Strings Pad
573
Koto & Shamisen
574
Flute & Clarinet
575
Flute & Oboe
576
Flute & Bassoon
577
Flute & Oboe & Clarinet
578
Flute & Clarinet & Bassoon
579
Flute & Oboe & Bassoon
580
Flute Octave
581
Flute & Oboe Octave
582
Flute & Clarinet Octave
583
Oboe & Bassoon
584
Oboe & Clarinet
585
Oboe & Clarinet & Bassoon
586
Oboe Octave
587
Oboe & Clarinet Octave
588
Oboe & Bassoon Octave
589
Clarinet & Bassoon
590
Clarinet & Oboe Octave
591
Drums
Standard Set
592
Room Set
593
Power Set
594
Electronic Set
595
Analog Set
596
Jazz Set
597
Brush Set
598
Orchestra Set
599
SFX Set
600
36
Page 37
Aw_DP370_Manual_G07_161223.pdf 37 17/1/4 14:35
Style List
Name
NO.
8 BEAT
8Beat Ballad
1
8Beat Piano
2
8Beat 1
3
Guitar Pop 1
4
8Beat Hip Hop
5
8Beat Blues Rock
6
8Beat Pop
7
Pop Funk 1
8
Rhythm&Beat 1
9
8Beat Disco 1
10
8Beat Rock
11
Guitar Pop 2
12
8Beat 2
13
Sweet Beat
14
8Beat Dance
15
8Beat Disco 2
16
Pop Funk 2
17
8Beat 3
18
60's 8Beat
19
Rhythm&Beat 2
20
16 BEAT
16Beat 1
C
M
Y
CM
MY
CY
CMY
K
21
16Beat Funk 1
22
16Beat Ballad 1
23
16Beat R&B
24
Pop 16Beat 1
25
16Beat Funk 2
26
16Beat Dance
27
Pop 16Beat 2
28
16Beat 2
29
Pop 16Beat 3
30
Pop 16Beat 4
31
Modern 16Beat
32
16Beat Hot
33
16Beat Modern
34
16Beat Funk 3
35
16Beat 3
36
Cool Beat
37
16Beat Ballad 2
38
16Beat 4
39
Pop Shuffle
40
POP & BALLAD
Pop Rock 1
41
Pop Dance 1
42
Pop Fusion
43
Analog Night 1
44
6/8 Pop
45
Brit. Pop 1
46
Brit. Pop 2
47
Pop Hit
48
Fusion Shuffle
49
Analog Night 2
50
Guitar Pop 3
51
Pop Beat
52
Soft Beat
53
60's Pop
54
55
Sting Latin
56
R&B Ballad 1
57
Guitar Ballad
58
Ballad Rock
59
Piano Pop
60
Soft Ballad
61
Natural Ballad
62
Love Ballad
63
Easy Ballad
64
Miami Folk
65
Slow Ballad
66
Folk Ballad
67
Pop Ballad 1
68
Pop Ballad 2
69
EP Ballad
70
New R&B Ballad
ROCK
71
Rock
72
New Wave
73
Ska
74
Pop Rock 2
75
Slow Rock
76
70's Rock&Roll
77
Folk Rock
78
Soft Rock
79
Old Rock
80
Easy Rock
81
New Shuffle
82
Rock Hip Hop
83
Rock&Roll 1
84
Rock Shuffle
85
Rock&Roll 2
BALLROOM
86
Tango 1
87
Spain Matador
88
Twist 1
89
Twist 2
90
Big Band Fox
91
Tango 2
92
Slow Fox
93
Slow Waltz 1
94
Swing Fox
95
Salsa 1
96
Cha Cha 1
97
Cha Cha 2
98
Beguine 1
99
Beguine 2
100
Rumba 1
101
Samba 1
102
Samba 2
103
Jive
104
Fox Trot
DANCE
105
Techno 1
106
Hip Hop 1
107
House 1
108
Down Beat
109
Progressive
110
Rap 1
111
Disco
112
Soft Disco
113
70's Disco
114
Club Dance
115
Euro Dance
116
Garage
SOUL & FUNK
117
Funk 1
118
Classic Funk
119
Jay R&B
120
Gospel Swing
121
Gospel
122
Funk 2
123
Electric Funk
124
Groove Funk
125
Rubber Funk
126
Cool Funky
127
Jazz Funk
128
Groove
129
Soul
130
Hip Hop Soul
131
Hip Hop Beat
132
R&B
133
Soul Beat
134
British Soul Pop
135
Latin Jazz 1
136
Big Band 1
137
Dixieland 1
138
Guitar Swing 1
139
Broadway Big Band
140
Swing
141
Latin Jazz 2
142
Fusion
143
Acid Jazz
144
Cool Jazz Ballad
145
Swing Shuffle
146
Big Band Medium
147
Dixieland 2
148
Acoustic Jazz
149
Guitar Swing 2
150
Ragtime
151
Modern Jazz Ballad
152
Swing Ballad
153
Orchestra Swing
COUNTRY
154
Country Pop 1
155
Bluegrass 1
156
8Beat Country
157
Modern Country
158
Country Pop 2
159
Bluegrass 2
160
2/4 Country
161
Country Quick Steps
162
Country Folk
163
Country Shuffle
LATIN&LATIN DANCE
164
Samba 3
37
Page 38
Aw_DP370_Manual_G07_161223.pdf 38 17/1/4 14:35
Style List
Bossa Nova
165
Latin
166
New Reggae
167
Reggae Dance
168
Paso Doble
169
Lite Bossa
170
Latin Rock
171
Beguine 3
172
Slow Bolero
173
Disco Samba
174
Mambo
175
Meneito
176
Rumba 2
177
Rumba 3
178
Tikitikita
179
Lambada
180
Pop Cha Cha 1
181
220
221
222
223
224
225
226
227
228
229
230
Jazz 1
Jazz 2
Piano Rock
Blues 1
Piano Beat
Piano Bar
Pop 1
Pop 2
Ballad 1
Ballad 2
6/8 Ballad
WALTZ&TRADITIONAL
Waltz
182
Old Waltz
183
English Waltz
184
German Waltz
185
Italian Mazurka
186
Mexico Waltz
C
M
Y
CM
MY
CY
CMY
K
187
Vienna Waltz
188
Slow Waltz 2
189
Jazz Waltz
190
Polka
191
6/8 March
192
German Polka
193
Party Polka
194
Army March
195
March
196
US March
197
Musette
198
French Musette
199
Mazurka
200
WORLD
Enka Ballad
201
Laendler
202
Hawaiian
203
Sirtake
204
Dangdut
205
6/8 Flipper
206
New Age
207
Tarantella
208
Scottish
209
Norteno
210
PIANIST
Pianist 1
211
Pianist 2
212
Pianist 3
213
March 1
214
March 2
215
Pop Waltz
216
Slow Waltz
217
Pop Bossa
218
Jazz Pub
219
38
Page 39
Aw_DP370_Manual_G07_161223.pdf 39 17/1/4 14:35
Song List
Name
No.
FOLK & COUNTRY
Toccata
1
Carry Me Back To Old Virginny
2
El Condor Pasa
3
Traumerei
4
Aloha Oe
5
Greensleeves
6
Home Sweet Home
7
Heidenroslein
8
Long Long Ago
9
Die Lorelei
10
Over The Waves
11
My Darling Clementine
12
Gwine To Run All Night
13
Symphony No.6 "Pathetic"
14
Oh! Susanna
15
Prelude Op.28 No.15
16
The House Of The Rising Sun
17
Menuet
18
GOLDEN & POP
Valse Des Fleurs
19
Fruhlingsstimmen
20
Frohlicher Landmann
C
M
Y
CM
MY
CY
CMY
K
21
Are You Lonesome Tonight?
22
Toy Symphony
23
Auld Lang Syne
24
Ave Maria
25
Tales Of Hoffman
26
La Donne Mobile
27
Serenata
28
Bridal March
29
Can't Help Fallin' In Love
30
Chanson Du Toreador
31
Danny Boy
32
Ich Liebe Dich
33
Wiegenlied 2
34
Spanish Serenade
35
Piano Concerto
36
Piano Concerto 2
37
Madame Butterfly
38
Invitation To The Dance
39
Wiegenlied 3
40
Jingle Bells
41
Joy To The World
42
La Paloma
43
My Bonnie
44
La Reine De Saba
45
La Cucaracha
46
Little Brown Jug
47
Battle Hymne Of The Republic
48
Yellow Rose Of Texas
49
The Wabash Cannon Ball
50
Annie Laurie
51
Turkish March
52
An Die Musik
53
Lieder Ohne Worte Op.62 No.6
54
LCD Name
Toccata
Virginny
ElCondor
Traumere
AlohaOe
Sleeves
SwetHome
Heidenro
LongAgo
Lorelei
OverWave
Clemtine
Gwine
Sympony6
Susanna
Prelude
RiseSun
Menuet
Fleurs
Fruhling
Landmann
Lonesome
ToySymph
LangSyne
AveMaria
Hoffman
DoneMble
Serenata
Bridal
InLove
Toreador
DannyBoy
LieDich
Wieglid2
Serenade
Concerto
Concrto2
Madame
ToDance
Wieglid3
JingBell
JoyWorld
LaPaloma
MyBonnie
Saba
Cucarach
BrownJug
BatlHyme
YellRose
CannBall
AnnieLa
Turkish
Musik
Lieder
55
Red River Valley
56
Die Forelle
57
Symphony No. 94 "Suprise"
58
Polonaise
59
Rondeau
60
Moments Musicaux
61
Silent Night
62
Moldau
63
Summertime
64
Dreaming Of Home And Mother
65
Ring Ring De Banjo
66
Der Lindenbaum
67
Zigeunerweisen
68
The Maiden's Prayer
69
Fur Elise
70
Der Freischutz
71
Maria! Mari!
CLASSICAL
72
Waves Of The Danube
73
Santa Lucia
74
Solveig's Song
75
Piano Sonatan No. 8 In C Minor (Pathetique)
76
Brahms Waltz
77
Aida
78
Carmen-Prelude
79
L'Arlesienne
80
Uungarische Tanz
81
Mazurka
82
Pizzicato Polka
83
Menuett
84
Rigoletto
85
Serenade
86
Song Without Words
87
Swan
88
The Dying Swan
89
Swan Lake Valse
90
The Happy Farmer
91
The Sleeping Beauty
92
La Traviata
93
Wiegenlied
94
Mov. 2 Adagio Non Troppo Piano Sonata
No. 9 In D
95
Piano Sonata No. 11 In A
96
Prelude In C
97
Chinese Dance
98
Emperor Waltz
99
March Militaire
100
Symphony No. 40
PIANO
101
Hanon Piano Fingering 1
102
Hanon Piano Fingering 2
103
Hanon Piano Fingering 3
104
Hanon Piano Fingering 4
105
Hanon Piano Fingering 5
106
Basic Tutorial Beyer Piano 12
107
Basic Tutorial Beyer Piano 13
108
Basic Tutorial Beyer Piano 14
RedRiver
Forelle
No. 94
Polonais
Rondeau
Musicaux
SltNight
Moldau
Summer
Dreaming
DeBanjo
DerLinde
Zigeuner
Prayer
FurElise
DerFreis
Maria!
Danube
SantaLuc
Solveig
Patheque
BrmsWltz
Aida
Carmen
L'Arlesi
Uungaris
Mazurka
Polka
Menuett
Rigoleto
Serenade
SongNoWd
Swan
DyingSwn
SwnWalse
HpFarmer
SleepBty
LaTravia
Wiegenli
Sonata9
Sonata11
Prelude
ChDance
Emperor
Militair
Symphony
Hanon1
Hanon2
Hanon3
Hanon4
Hanon5
Beyer12
Beyer13
Beyer14
39
Page 40
Aw_DP370_Manual_G07_161223.pdf 40 17/1/4 14:35
Song List
Basic Tutorial Beyer Piano 15
109
Basic Tutorial Beyer Piano 18
110
Cuckoo
111
Basic Tutorial Beyer Piano 21
112
Basic Tutorial Beyer Piano 29
113
Butterfly
114
Basic Tutorial Beyer Piano 45
115
Christmas Eve
116
Basic Tutorial Beyer Piano 50
117
Basic Tutorial Beyer Piano 52
118
Basic Tutorial Beyer Piano 55
119
Basic Tutorial Beyer Piano 59
120
Beyer15
Beyer18
Cuckoo
Beyer21
Beyer29
Buterfly
Beyer45
XmasEve
Beyer50
Beyer52
Beyer55
Beyer59
DEMO
Demo1
1
Demo2
2
Bossa Nova
3
Fusion
4
Jazz
5
C
M
Y
CM
MY
CY
CMY
K
Demo1
Demo2
Bossa Nova
Fusion
Jazz
40
Page 41
Aw_DP370_Manual_G07_161223.pdf 41 17/1/4 14:35
Chord List
Chord name [abbreviation]
Major [M]
Sixth [6]
Major seventh [M7]
Major seventh add sharp eleventh [M7(#11)]
Major seventh add sharp eleventh (9)]
Major seventh ninth [M7(9)]
Sixth ninth [6(9)]
Augmented [aug]
Minor [m]
Minor sixth [m6]
Minor seventh [m7]
Minor seventh flatted fifth [m7b5]
Minor add ninth [m(9)]
Minor seventh ninth [m7(9)]
Minor seventh eleventh [m7(11)]
Minor major seventh [mM7]
Minor major seventh ninth [mM7(9)]
Diminished [dim]
Diminished seventh [dim7]
Seventh [7]
C
M
Y
CM
MY
CY
CMY
K
Seventh suspended fourth [7sus4]
Seventh flatted fifth [7b5]
Seventh ninth [7(9)]
Seventh add sharp eleventh [7(#11)]
Seventh add thirteenth [7(13)]
Seventh flatted ninth [7(b9)]
Seventh add flatted thirteenth [7(b13)]
Seventh sharp ninth [7(#9)]
Major seventh augmented [M7aug]
Seventh augmented [7aug]
Suspended fourth [sus4]
One plus two plus five [sus2]
Normal Voicing (For root C)
1+3+5
1+(3)+5+6
1+3+(5)+7
1+(2)+3+#4+(5)+7
1+2+3+5
1+2+3+(5)+7
1+2+3+(5)+6
1+3+#5
1+b3+5
1+b3+5+6
1+b3+(5)+b7
1+b3+b5+b7
1+2+b3+5
1+2+b3+(5)+b7
1+(2)+b3+4+5+(b7)
1+b3+(5)+7
1+2+b3+(5)+7
1+b3+b5
1+b3+b5+6
1+3+(5)+b7
1+4+5+b7
1+3+b5+b7
1+2+3+(5)+b7
1+2+3+#4+(5)+b7 or 1+(2)+3+#4+5+b7
1+ 3+(5)+6+b7 or 2+ 3+5+6+b7
1+b2+3+(5)+b7
1+3+5+b6+b7
(1)+#2+3+(5)+b7
1+3+#5+7
(1)+3+#5+b7
1+4+5
1+2+5
Chord
C
C6
CM7
CM7(#11)
C(9)
CM7(9)
C6(9)
Caug
Cm
Cm6
Cm7
Cm7b5
Cm(9)
Cm7(9)
Cm7(11)
CmM7
CmM7(9)
Cdim
Cdim7
C7
C7sus4
C7b5
C7(9)
C7(#11)
C7(13)
C7(b9)
C7(b13)
C7(#9)
CM7aug
C7aug
Csus4
C/Csus2
Display
C
C6
CM7
CM7(#11)
CM(9)
CM7(9)
C6(9)
Caug
Cm
Cm6
Cm7
Cm7(b5)
Cm(9)
Cm7(9)
Cm7(11)
CmM7
CmM7(9)
Cdim
Cdim7
C7
C7sus4
C7(b5)
C7(9)
C7(#11)
C7(13)
C7(b9)
C7(b13)
C7(#9)
CM7aug
C7aug
Csus4
C
41
Page 42
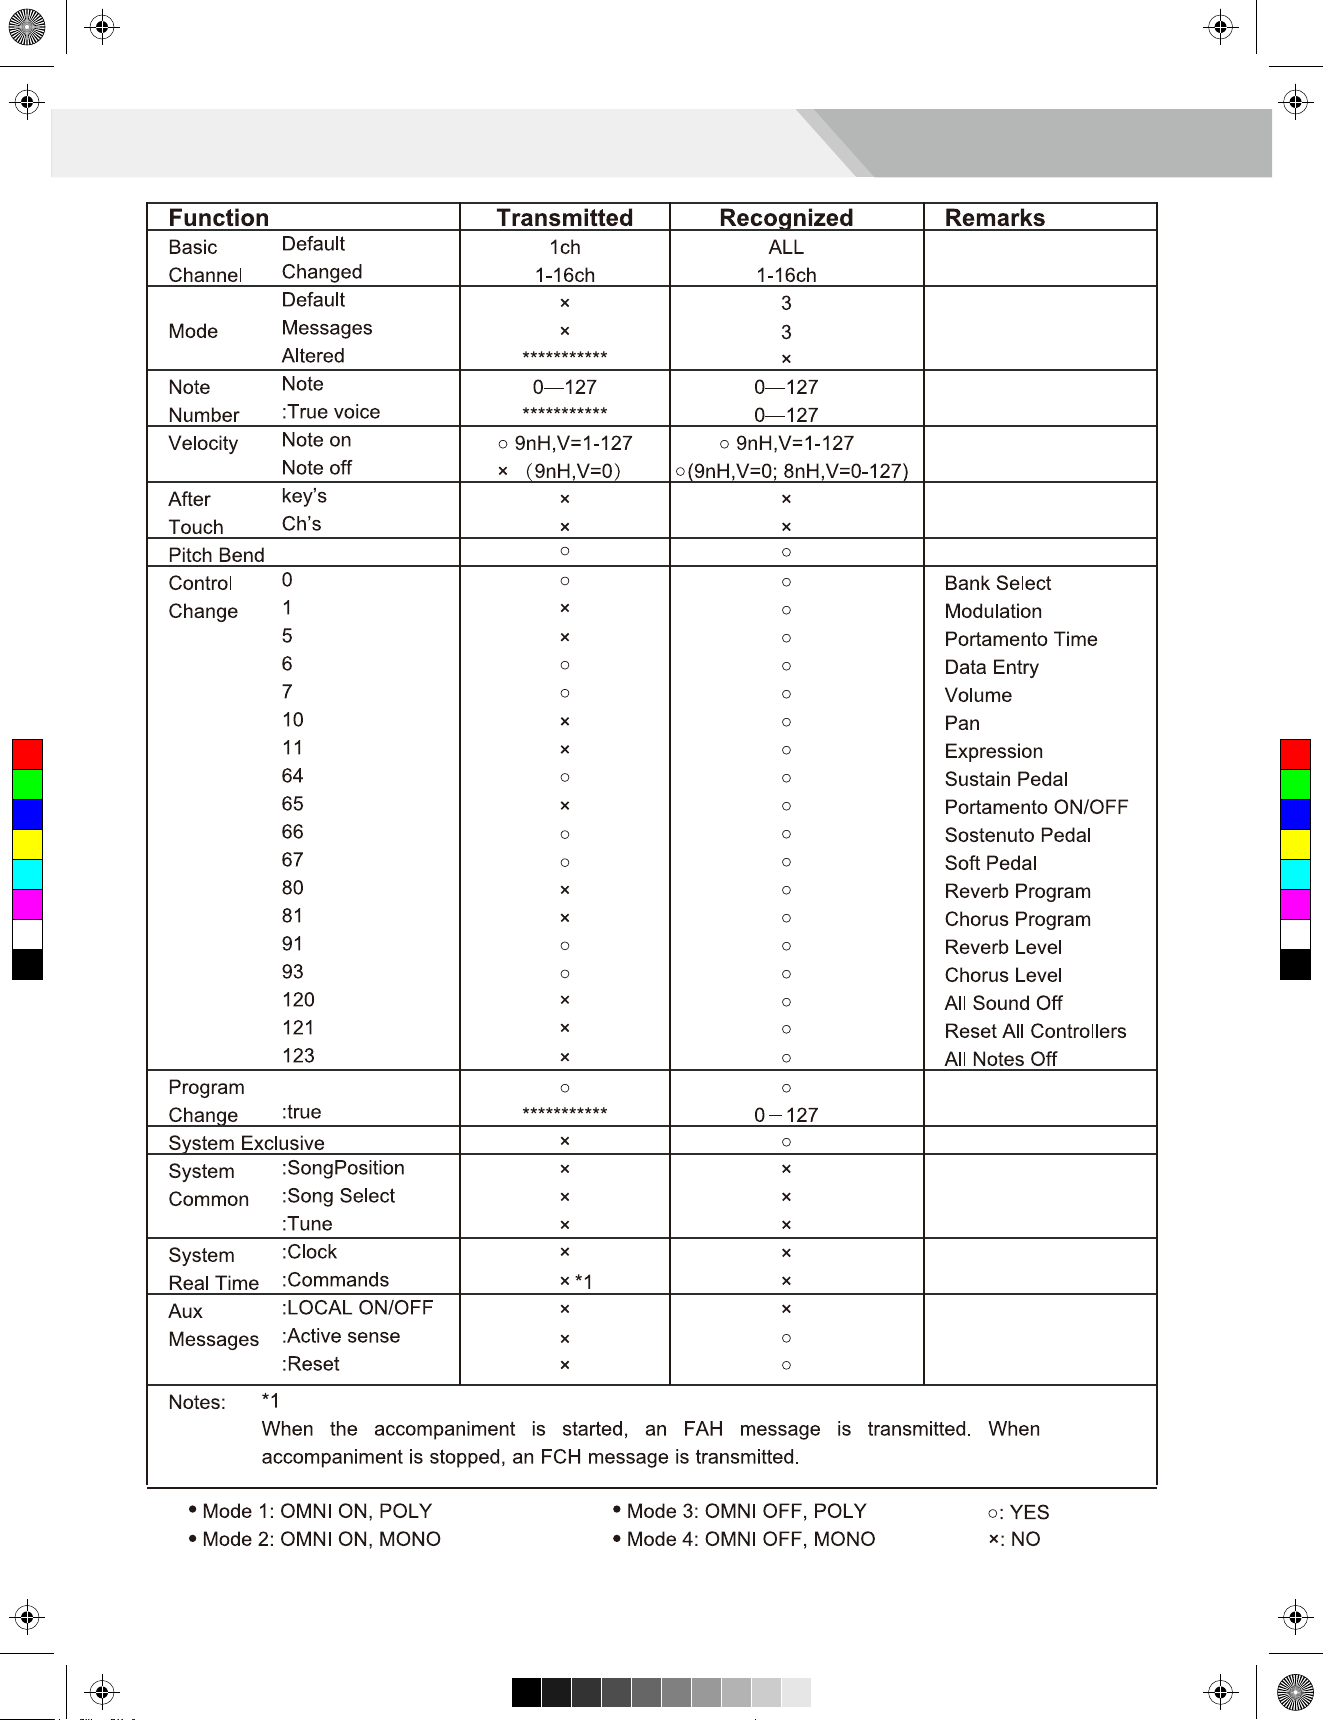
Aw_DP370_Manual_G07_161223.pdf 42 17/1/4 14:35
MIDI Implementation Chart
C
M
Y
CM
MY
CY
CMY
K
42
Page 43
Aw_DP370_Manual_G07_161223.pdf 43 17/1/4 14:35
Scale tuning system
A tuning system is the system used to define which tones, or pitches, to use when playing music. In other words, it is the choice
of number and spacing of frequency values used. The equal temperament (has only one tuning method, and is suitable for
keyboard) is the common musical scale used at present, used for the tuning of pianos and other instruments of relatively fixed
scale. One of the advantages of the equal tempered scale is that it is the same in any musical "key", so that compositions may
be freely transposed up or down without changing the musical intervals.
Especially for piano, equal temperament is widely used and taken for granted. But people used several other scales to compose
and perform before adopting the equal temperament. This piano has been equipped with 6 scale tuning systems, you can select
one to reappearing its matched chord of the melody at that time.
Characteristics of Different Scale Tuning Systems
Pythagorean
The Pythagorean tuning, named after the ancient mathematician and philosopher Pythagoras, is based on a stack of intervals
called perfect fifths. It is particularly well suited to music which treats fifths as consonances, and thirds as dissonances.
Pure Major & Pure Minor
In music, just intonation (sometimes abbreviated as JI) or pure intonation is any musical tuning in which the frequencies of notes
are related by ratios of small whole numbers. Any interval tuned in this way is called a pure or just interval. And the major scale
which consisted of just intonations especially for this triad chords: Root, Third, Fifth are sounded extremely harmony. The just
intonation must be the most natural temperament.
Meantone
C
M
Y
CM
MY
CY
CMY
K
The Meantone System is a musical temperament which is close to just intonation. Used to tuning pipe organ in 16th century
Europe. These musical scales which based on the Pythagorean System, minus quarter of common comma for once, are
extremely approaching just intonation. So, use this system to create musical scales are sound beautiful and pure, just like a
perfect triad chord.
Werckmeister
The Werkmeister was named after Andreas Werckmeister, and this scale was created as an improvement on the Pythagorean
scale. This tuning collapse comma maxima, created by Pythagorean, into four perfect fifths, the rest fifths still remain their
Pythagorean scale characteristics. Werkmeister Tuning can tune scale from harmonic to melodic by increasing tone number,
making each tonality sound distinct, this is the important gist for classicists and romanticism tonality music to name the tone
name.
Kirnberger
Kirnberger temperament is an irregular temperament developed in the second half of the 18th century by Johann Kirnberger
and regarded as an improved version of Meantone temperament. It makes possible to switch different tunes freely when
performing.
Twelve-tone equal temperament
In twelve-tone equal temperament, which divides the octave into 12 equal parts, the width of a semitone , i.e. the frequency ratio
of the interval between two adjacent notes, is the twelfth root of two. There is minute difference of the same amount between
each two intervals.
43
Page 44
Aw_DP370_Manual_G07_161223.pdf 44 17/1/4 14:35
C
M
Y
CM
MY
CY
CMY
K
DP370_G07
 Loading...