

Medeli Dd638 Owner’s Manual
AW_DD638DX_manual_G02_180621.pdf 1 18-6-21 13:16
UP
MENU CLICK COACH
MASTER
F1
F2 F3
DOWN
EXIT
AUX IN
C
M
Y
CM
MY
CY
CMY
K
PHONES
VOLUME
CLICK
KICK SNARE TOM 1 TOM 2 TOM 3 TOM 4
iKIT
SONG KIT
HI-HAT CRASH 1 CRASH 2 RIDE KIT SONG
AW_DD638DX_manual_G02_180621.pdf 2 18-6-21 13:16
INFORMATION FOR YOUR SAFETY!
THE FCC REGULATION WARNING (for USA)
This equipment has been tested and found to comply with
PLEASE READ CAREFULLY BEFORE PROCEEDING
PRECAUTIONS
the limits for a Class B digital device, pursuant to Part 15 of
the FCC Rules.
Please keep this manual in a safe place for future reference.
These limits are designed to provide reasonable protection
against harmful interference in a residential installation. This
equipment generates, uses, and can radiate radio frequency
energy and, if not installed and used in accordance with the
Power Supply
Please connect the designated AC adaptor to an AC outlet
of the correct voltage.
instructions, may cause harmful interference to radio
communications. However, there is no guarantee that
interference will not occur in a particular installation.
Do not connect it to an AC outlet of voltage other than that
for which your instrument is intended.
If this equipment does cause harmful interference to radio or
television reception, which can be determined by turning the
equipment off and on, the user is encouraged to try to
Unplug the AC power adaptor when not using the instru-
ment, or during electrical storms.
correct the interference by one or more of the following
measures:
Connections
Before connecting the instrument to other devices, turn off
Reorient or relocate the receiving antenna.
Increase the separation between the equipment and
the power to all units. This will help prevent malfunction and
/ or damage to other devices.
receiver.
Connect the equipment into an outlet on a circuit
different from that to which the receiver is connected.
Consult the dealer or an experienced radio/TV technician
C
M
Y
CM
MY
CY
CMY
K
for help.
Unauthorized changes or modification to this system can
void the user's authority to operate this equipment.
CAUTION
The normal function of the product may be disturbed by
Strong Electro Magnetic Interference. If so, simply reset
the product to resume normal operation by following the
owner's manual. In case the function could not resume,
please use the product in other location.
Location
Do not expose the instrument to the following conditions to
avoid deformation, discoloration, or more serious damage:
Direct sunlight
Extreme temperature or humidity
Excessive dusty or dirty location
Strong vibrations or shocks
Close to magnetic fields
Interference with other electrical devices
Radios and televisions placed nearby may experience
reception interference. Operate this unit at a suitable
distance from radios and televisions.
Cleaning
Clean only with a soft, dry cloth.Do not use paint thinners,
solvents, cleaning fluids, or chemical-impregnated wiping
cloths.
Handling
Do not apply excessive force to the switches or controls.
Do not let paper, metallic, or other objects into the instru-
ment. If this happens, remove the electric plug from the
outlet. Then have the instrument inspected by qualified
service personnel.
Disconnect all cables before moving the instrument.
2
AW_DD638DX_manual_G02_180621.pdf 3 18-6-21 13:16
Contents
Main Features.........................................................4
Recording
MIDI Recording and MP3 Recording.....................17
Panel & Display Description
Front Panel...............................................................5
Prepare and Start Recording.................................17
Rename and Save MIDI Recording.......................18
Rear Panel...............................................................6
LCD Display.............................................................6
Setup
Connecting the Pads and Pedals.............................7
Coach
Quiet Count............................................................19
Beat Check.............................................................20
Change Up.............................................................20
Getting Ready to Play
Setting up the Power Supply....................................8
Turning on the Power...............................................8
Turning off the power................................................8
Restore Factory Settings..........................................8
USB Memory
Song Folder............................................................22
Load Voice.............................................................22
Format USB Memory..............................................23
Quick Play
Drum Kits and Voices...............................................9
C
M
Y
CM
MY
CY
CMY
K
Selecting a Drum Kit................................................9
Selecting a Voice......................................................9
Playing Techniques..................................................9
Drum Kit
Preset, User and iKit Drum Kits..............................11
Selecting a Drum Kit...............................................11
Editing Kit Parameters...........................................12
Editing Kit Effect.....................................................12
REVERB..........................................................13
Volume Sliders.....................................................24
Settings
Trigger Settings......................................................25
Master Compress...................................................26
MIDI Setup.............................................................27
Auto Power Off.......................................................27
Factory Reset.........................................................28
Specifications.......................................................29
EQ....................................................................14
Saving a User Kit...................................................14
Appendices
Drum Kit List...........................................................30
Click
Turning the Click on or off......................................15
Editing Click Parameters........................................15
iKit List....................................................................30
Drum Voice List......................................................31
Song List................................................................36
GM Drum Kit List....................................................37
Song
Playing Preset Songs.............................................16
Playing USB Songs................................................16
Playing Along with a Song......................................17
GM Melody Voice List............................................39
MIDI Implementation Chart....................................40
Prompt Messages..................................................41
3
AW_DD638DX_manual_G02_180621.pdf 4 18-6-21 13:16
Main Features
PURE DRUM Technology
No matter playing the pads with soft stroke or forceful passion grooves, with this
new technology, all performances can show up extremely wide range of velocity
dynamics. Perfectly express the various changes of acoustic drums, all of these let
you enjoy the real delicate nuances, capture the unique characteristics of acoustic
drum kit from the PURE DRUM!
PURE DRUM - Bringing Natural and Realistic Voices to Your Performance!
This unique PURE DRUM technology greatly improves sound quality for digital drums, bringing a more
natural and realistic feel to your ears. No matter playing stroke roll or striking pads with velocity dynamics,
all these will let you enjoy the delicate nuances and natural voice, capture the unique characteristics of
acoustic drum kit.
iKit – Playing with Super Delicate Sensitivity
This black technology makes digital drums reach a new height. The improved dynamics and sensitivity
replicates every nuance of an acoustic drum and gives you a more natural feel of any subtle change in
velocity dynamics.
C
M
Y
CM
MY
CY
CMY
K
Playing and Recording along with Song Playback
You can freely play the digital drum while playing back songs (MIDI, WAV and MP3 format) stored on a USB
flash drive. Or play along with background music transmitted from AUX IN, and record your performance in
real time and save it to a USB flash drive.
Downloading Your Favorite Voices to the Module
By using the USB flash drive function, you can transmit your favorite wave samples (achieved from the
internet or sound source software) to the module and use them as internal voices, giving your drum voices
unlimited possibility. Try and experience this exciting feature.
4
AW_DD638DX_manual_G02_180621.pdf 5 18-6-21 13:16
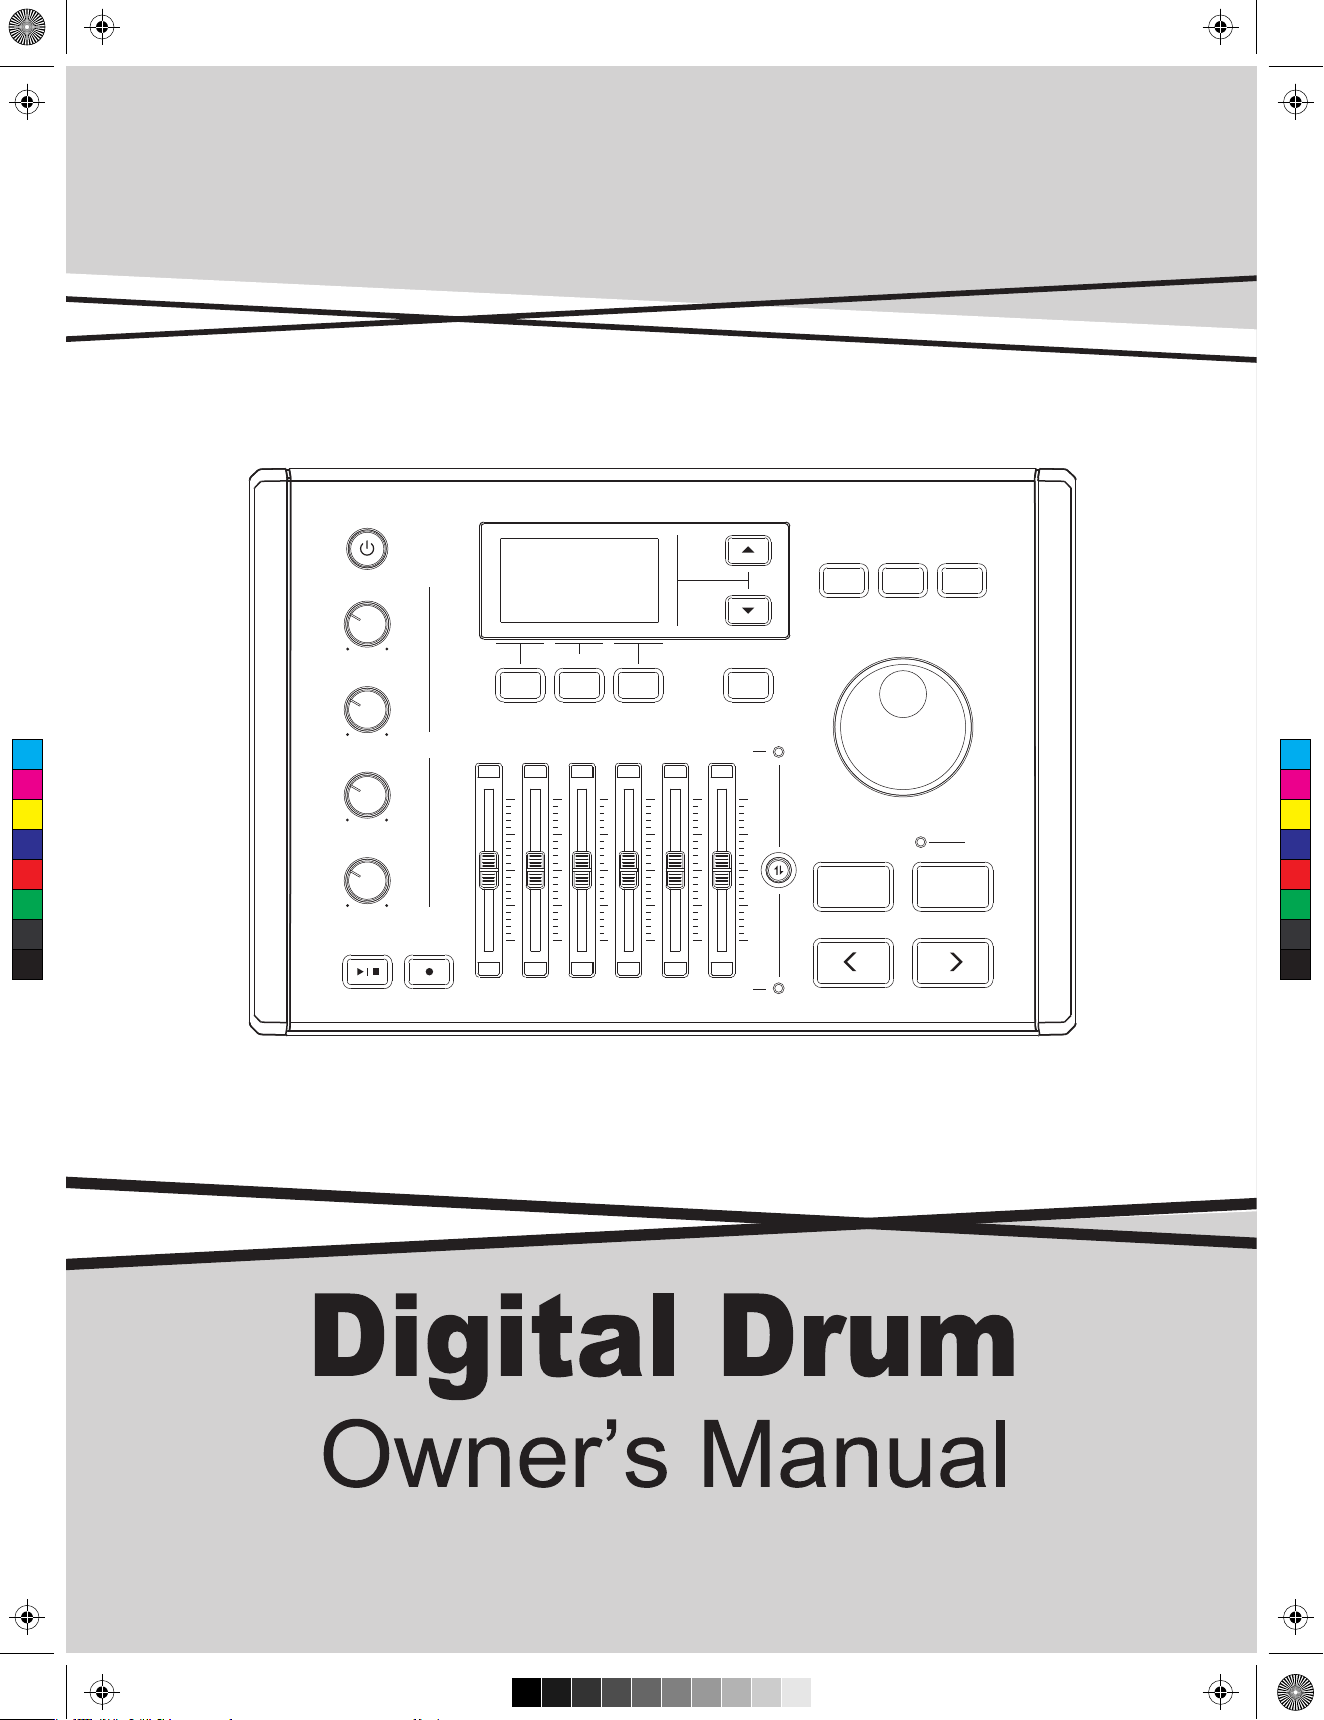
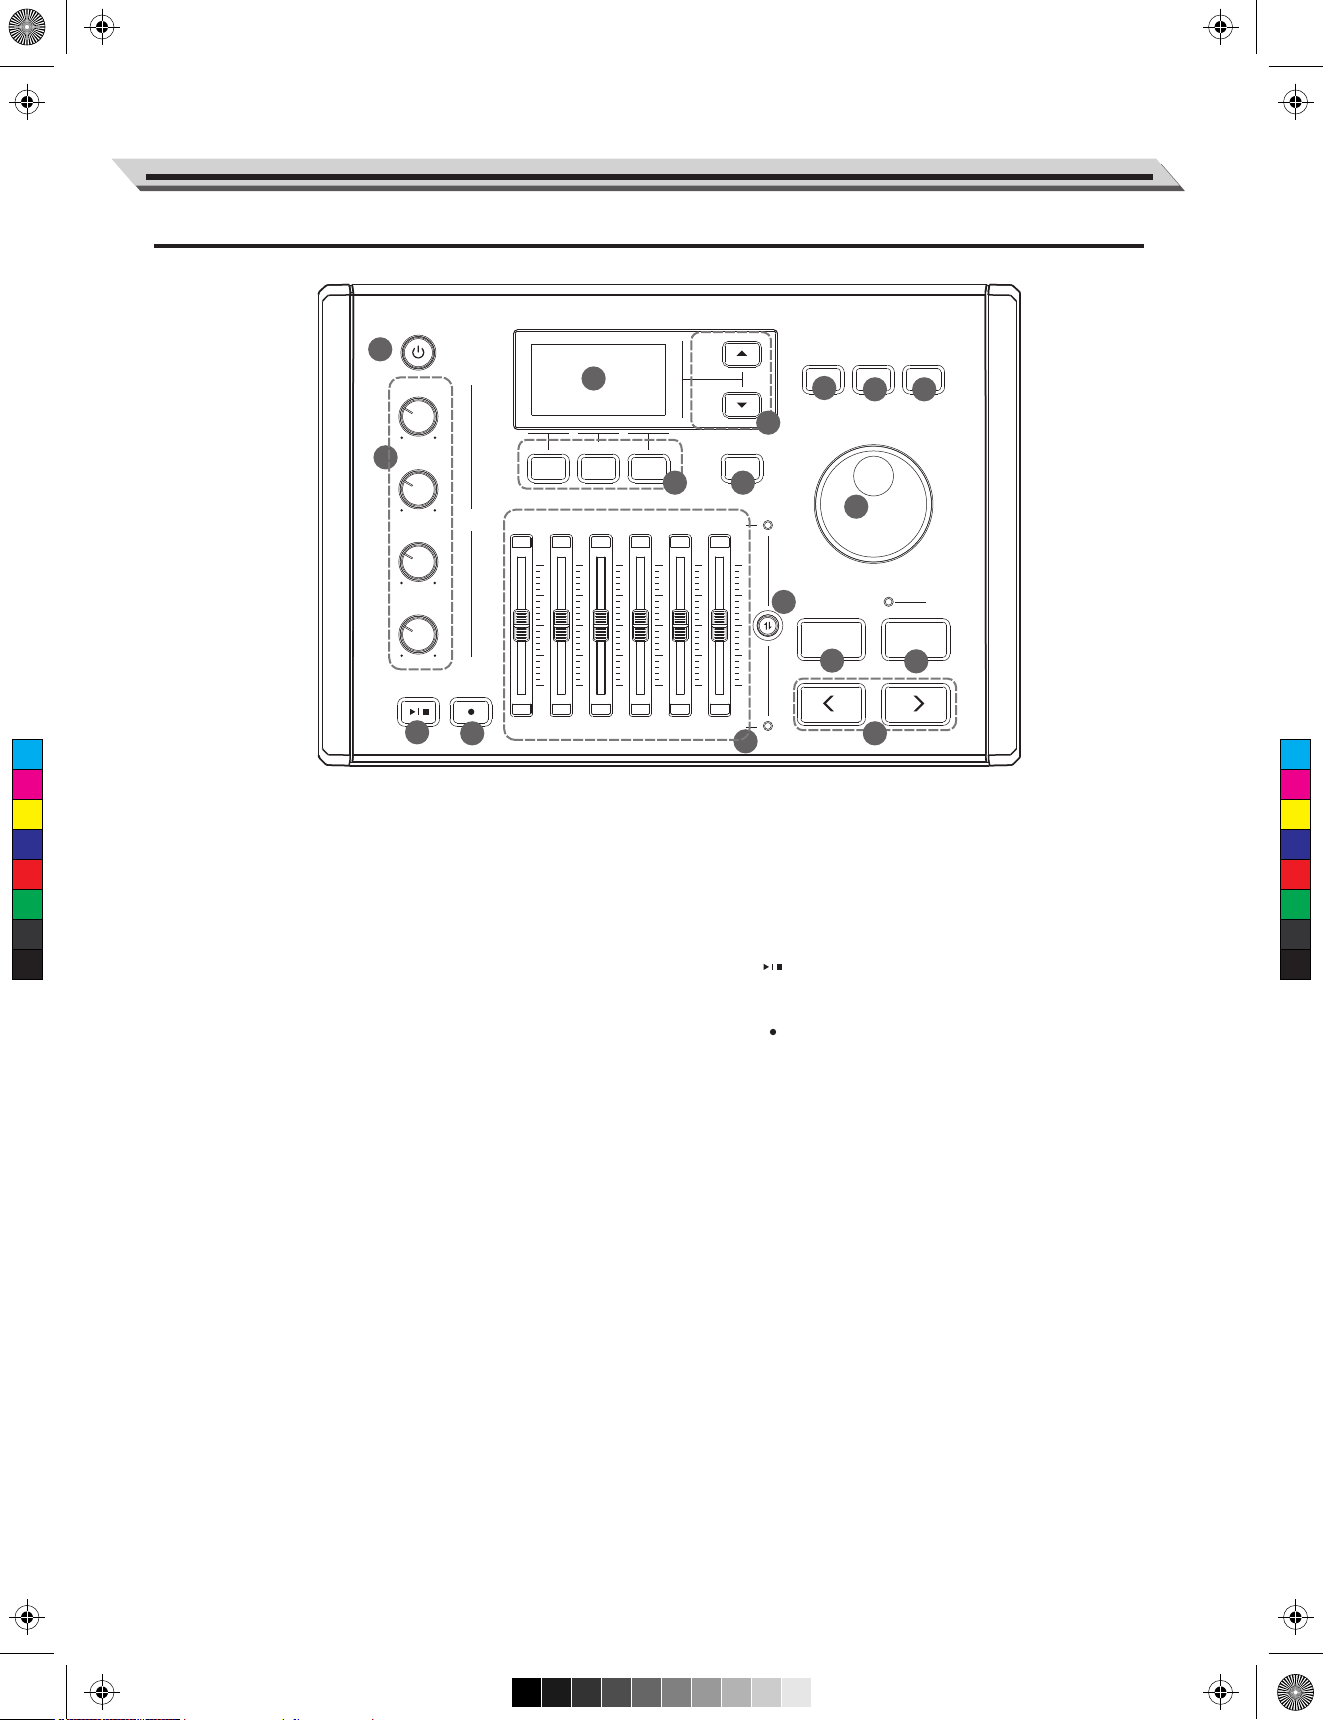
Front Panel
Panel & Display Description
1
MASTER
3
UP
DOWN
MENU CLICK COACH
7
8
9
5
F2 F3
AUX IN
2
F1
4
VOLUME
PHONES
CLICK
11
C
M
Y
CM
MY
CY
CMY
K
1. [POWER] Button
Turn the power on or off.
2. [MASTER] Knob
Adjust the output volume.
[AUX IN] Knob
Adjust the audio input volume.
[PHONES] Knob
Adjust the phones volume.
[CLICK] Knob
Adjust the click volume.
KICK SNARE TOM 1 TOM 2 TOM 3 TOM 4
HI-HAT CRASH 1 CRASH 2 RIDE KIT SONG
12
EXIT
6
10
14
SONG KIT
15
13
9. [COACH] Button
Press to enter coach mode.
10. Data Dial
Rotate to adjust the selected parameter.
11. [ ] Button
Press to start/stop playing a song.
12. [ ] Button
Press to enter record mode.
17
iKIT
16
3. LCD Display
Display the name and parameter settings of Kits,
Voices and Songs etc.
4. [F1] ~ [F3] Buttons
Press to execute a related function shown on LCD.
5. [∧]/[∨] Buttons
Press to move the cursor to select a parameter on LCD.
6. [EXIT] Button
Press to return to previous menu.
7. [MENU] Button
In kit mode: press to enter KIT menu.
In song mode: press to enter SONG menu.
8. [CLICK] Button
Press to start/stop the click; edit the click setting.
13. Volume Sliders
Adjust the related trigger volume, kit volume and
song volume.
14. Volume Slider Control Button
Press to toggle between the upper and lower
group of parameters.
15. [SONG] Button
Press to enter song mode.
16. [KIT] Button
Press to enter kit mode.
17. [<]/[>] Buttons
Press to select a drum kit or edit parameters
(to increase/decrease the value).
5
AW_DD638DX_manual_G02_180621.pdf 6 18-6-21 13:16
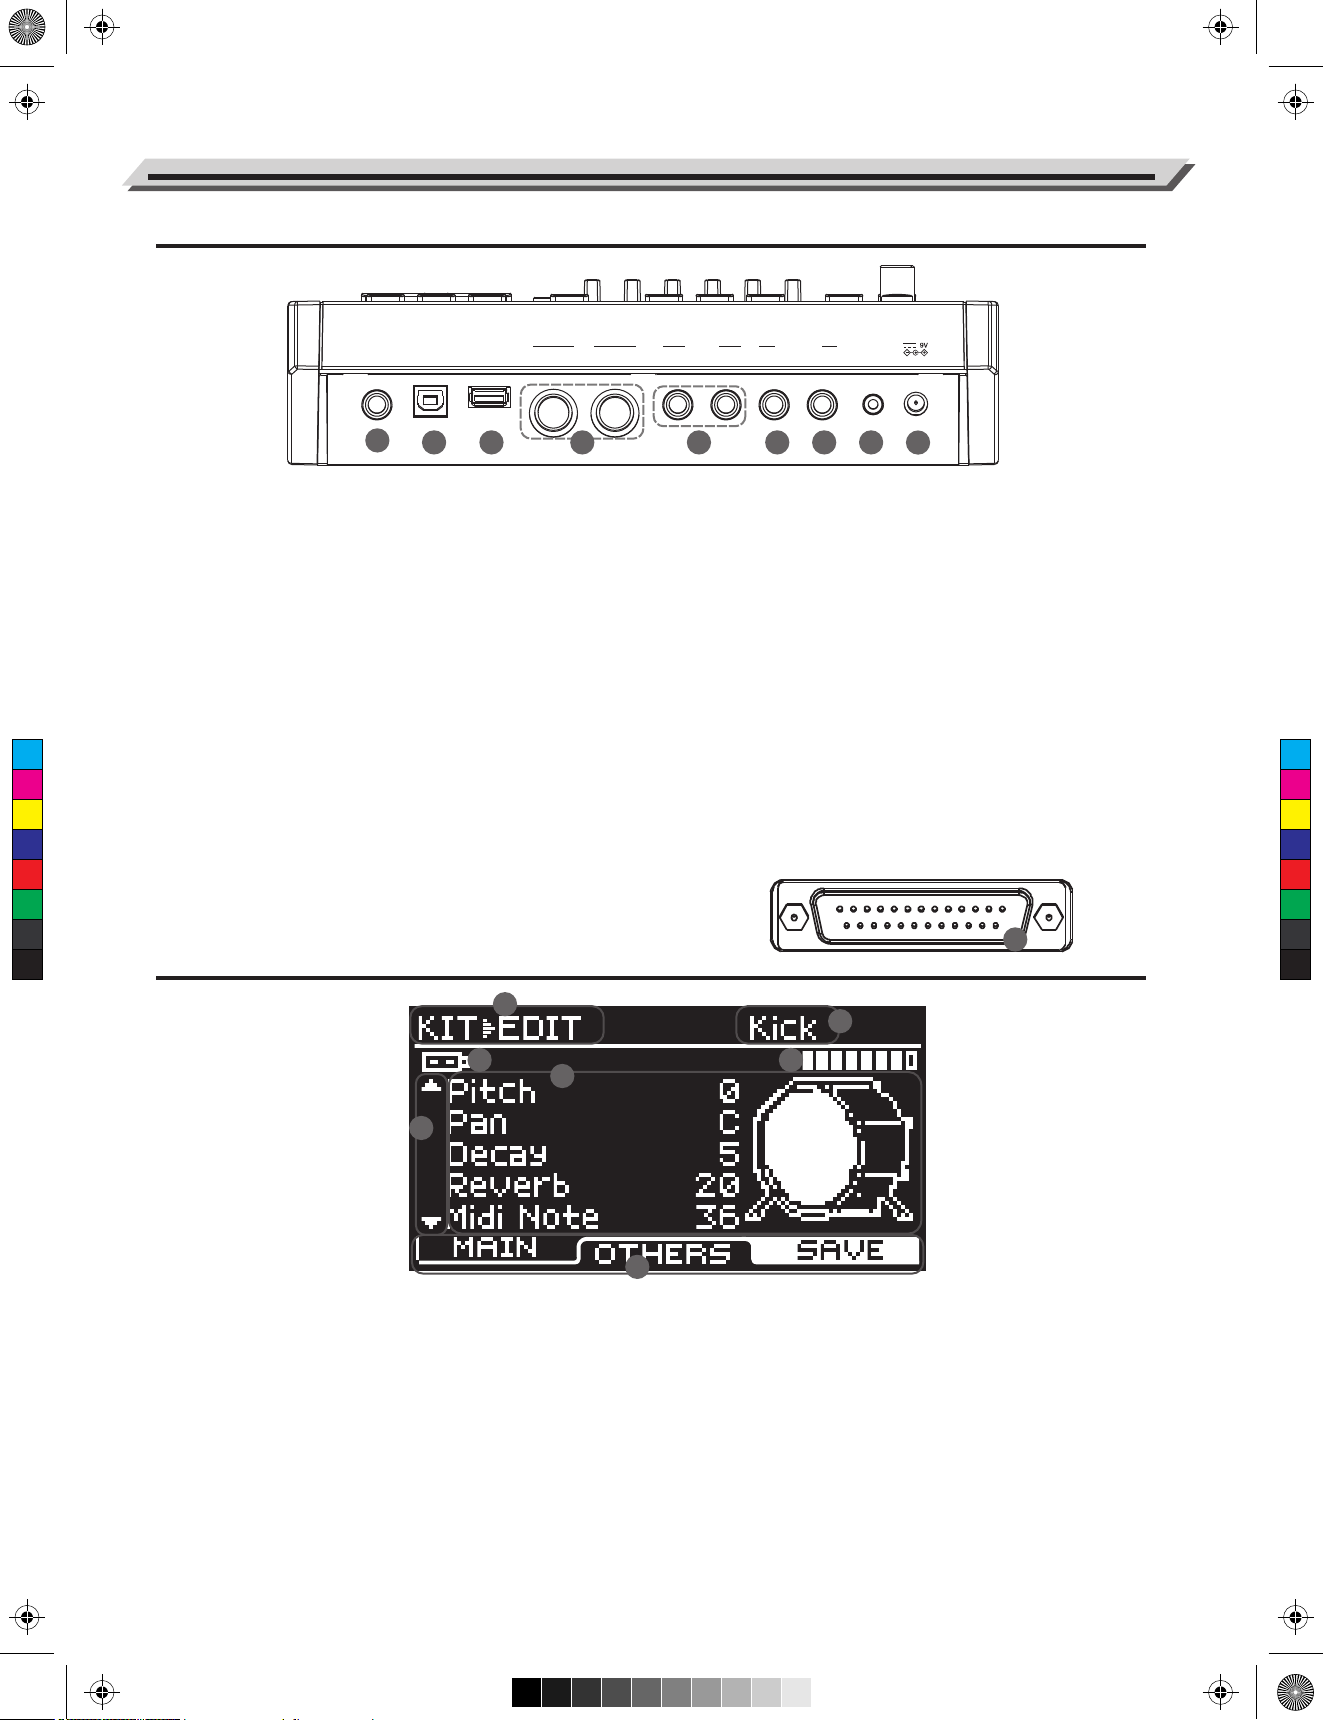
Panel & Display Description
Rear Panel
PHONES USB MIDI USB MEMORY OUT
19 20 23 24 25 262221
18
MIDI
IN R L/MONO
18. PHONES jack (1/4”)
Connect a pair of stereo headphones to detect all output
OUTPUT
TRIGGER IN
TOM 4 CRASH 2 AUX IN
23. TOM 4 jack (1/4”)
Connect an additional Tom 4.
sounds.
24. CRASH 2 jack (1/4”)
19. USB MIDI jack
Connect an additional Crash 2.
Connect to PC and transmit MIDI data.
25. AUX IN jack (1/8”)
20. USB MEMORY jack
Connect a USB flash drive. You can play back songs stored
on the flash drive or transmit wave files to the module.
21. MIDI jacks (IN, OUT/THRU)
C
M
Y
CM
MY
CY
CMY
K
Connect an external MIDI sequencer to receive or transmit
MIDI data.
22. OUTPUT jacks (L/MONO, R)(2 x1/4”)
Connect to an audio system or amplifier. Use the L/MONO
and R jacks for stereo output or just the L/MONO jack for
mono output.
LCD Display
Connect an external audio player, such as an MP3.
Music from the external player will be transmitted to
the module, and you can play along.
26. DC IN jack
Connect the specified power adaptor.
27. TRIGGER INPUT jack
Insert the dedicated trigger cables here, to connect
the pads and pedals.
27
1
4
6
5
1. Menu
Display the current menu, such as “KIT”, “SONG” and
“COACH” etc.
2. Trigger Pad Name
Display the selected trigger pad name, such as “Kick”,
“Snare Head” and “Snare Rim” etc.
3. Velocity of Pad Strike
Display the velocity (force) at which the pad is struck.
6
2
3
7
4. External Device
Indicate a USB flash drive is correctly connected.
5. Prompt to Move Cursor Up/Down
Prompt to press the [∧]/[∨] buttons to view more
parameters.
6. Detailed Parameters
Display detailed parameter settings.
7. [F1]/[F2]/[F3] Indicators
Display functions of the [F1] ~ [F3] buttons.
AW_DD638DX_manual_G02_180621.pdf 7 18-6-21 13:16
Setup
Caution!
To prevent electric shock and damage to the device, make sure the power is switched OFF
on the drum and all related device before making any connection.
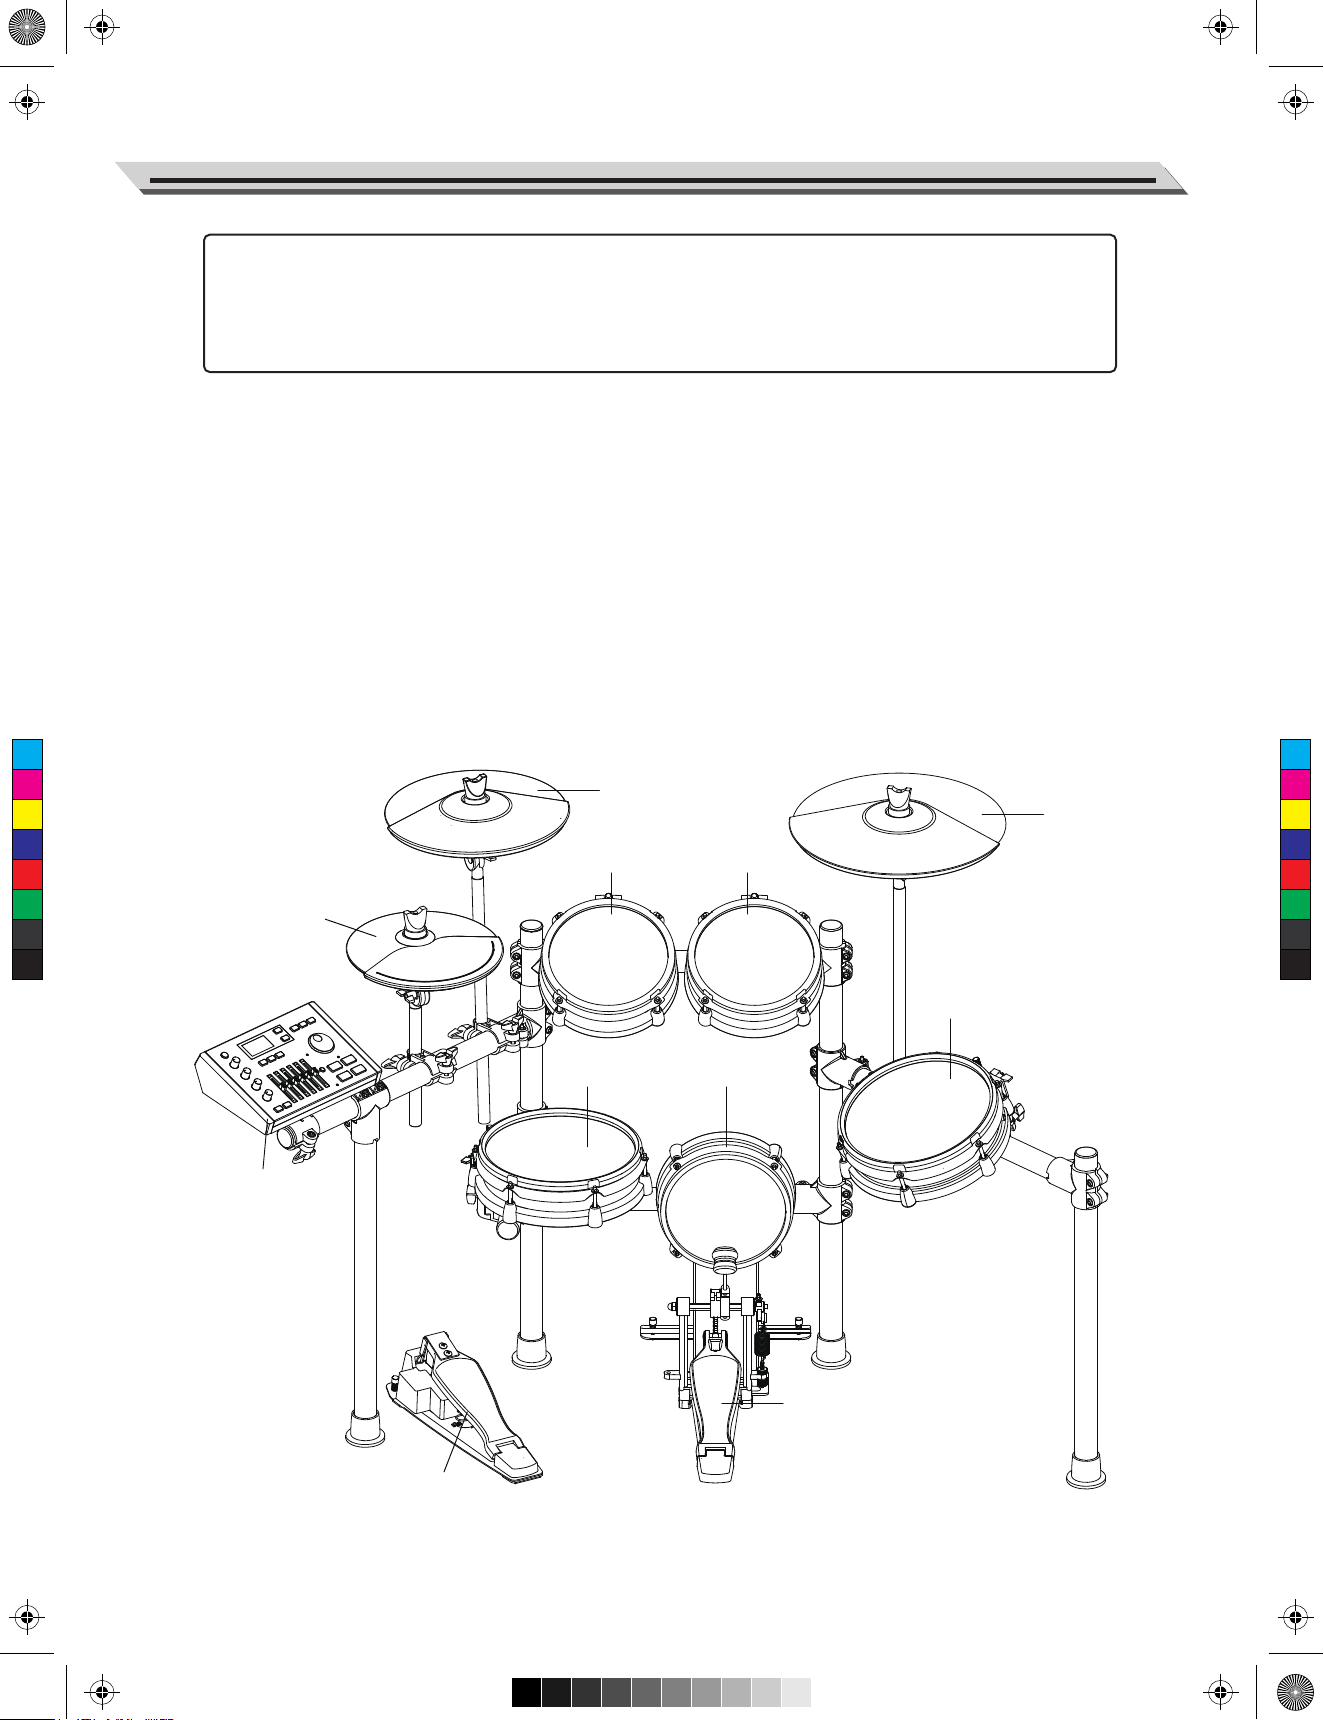
Connecting the Pads and the Pedals
Standard configuration:
KICK, SNARE (dual-zone trigger), TOM 1~3 (dual-zone trigger), CRASH (dual-zone trigger with choke), RIDE
(triple-zone trigger with choke), HI-HAT (dual-zone trigger), PEDAL(HI-HAT).
Note:
1. Use the cables provided to connect the pads to the trigger input jack on the rear panel of the module, make
sure each pad is connected to its corresponding trigger input jack.
2. For details on assembling the drum stand, attaching the digital drum and connecting the pads, please refer
to the
Setup manual .
C
M
Y
CM
MY
CY
CMY
K
Hi-Hat
Crash
Tom 1
Ride
Tom 2
Tom 3
Snare
Kick
Drum Module
Pedal(Hi-hat)
Pedal(Kick)
7
AW_DD638DX_manual_G02_180621.pdf 8 18-6-21 13:16
Getting Ready to Play
Setting up the Power Supply
1. Connect the power adaptor to the DC IN jack on the rear panel.
2. Plug the other end of the power cord to an appropriate AC outlet.
Note:
1. Please use the specified power adaptor.
2. Even when the module is turned off, electricity is still flowing to the
module at minimum level. Please unplug the module when it is not in
use for a long time.
Turning on the Power
Make sure you have completed all necessary connections (triggers,
audio device and so on). Then turn the volume level of all the devices
to minimum.
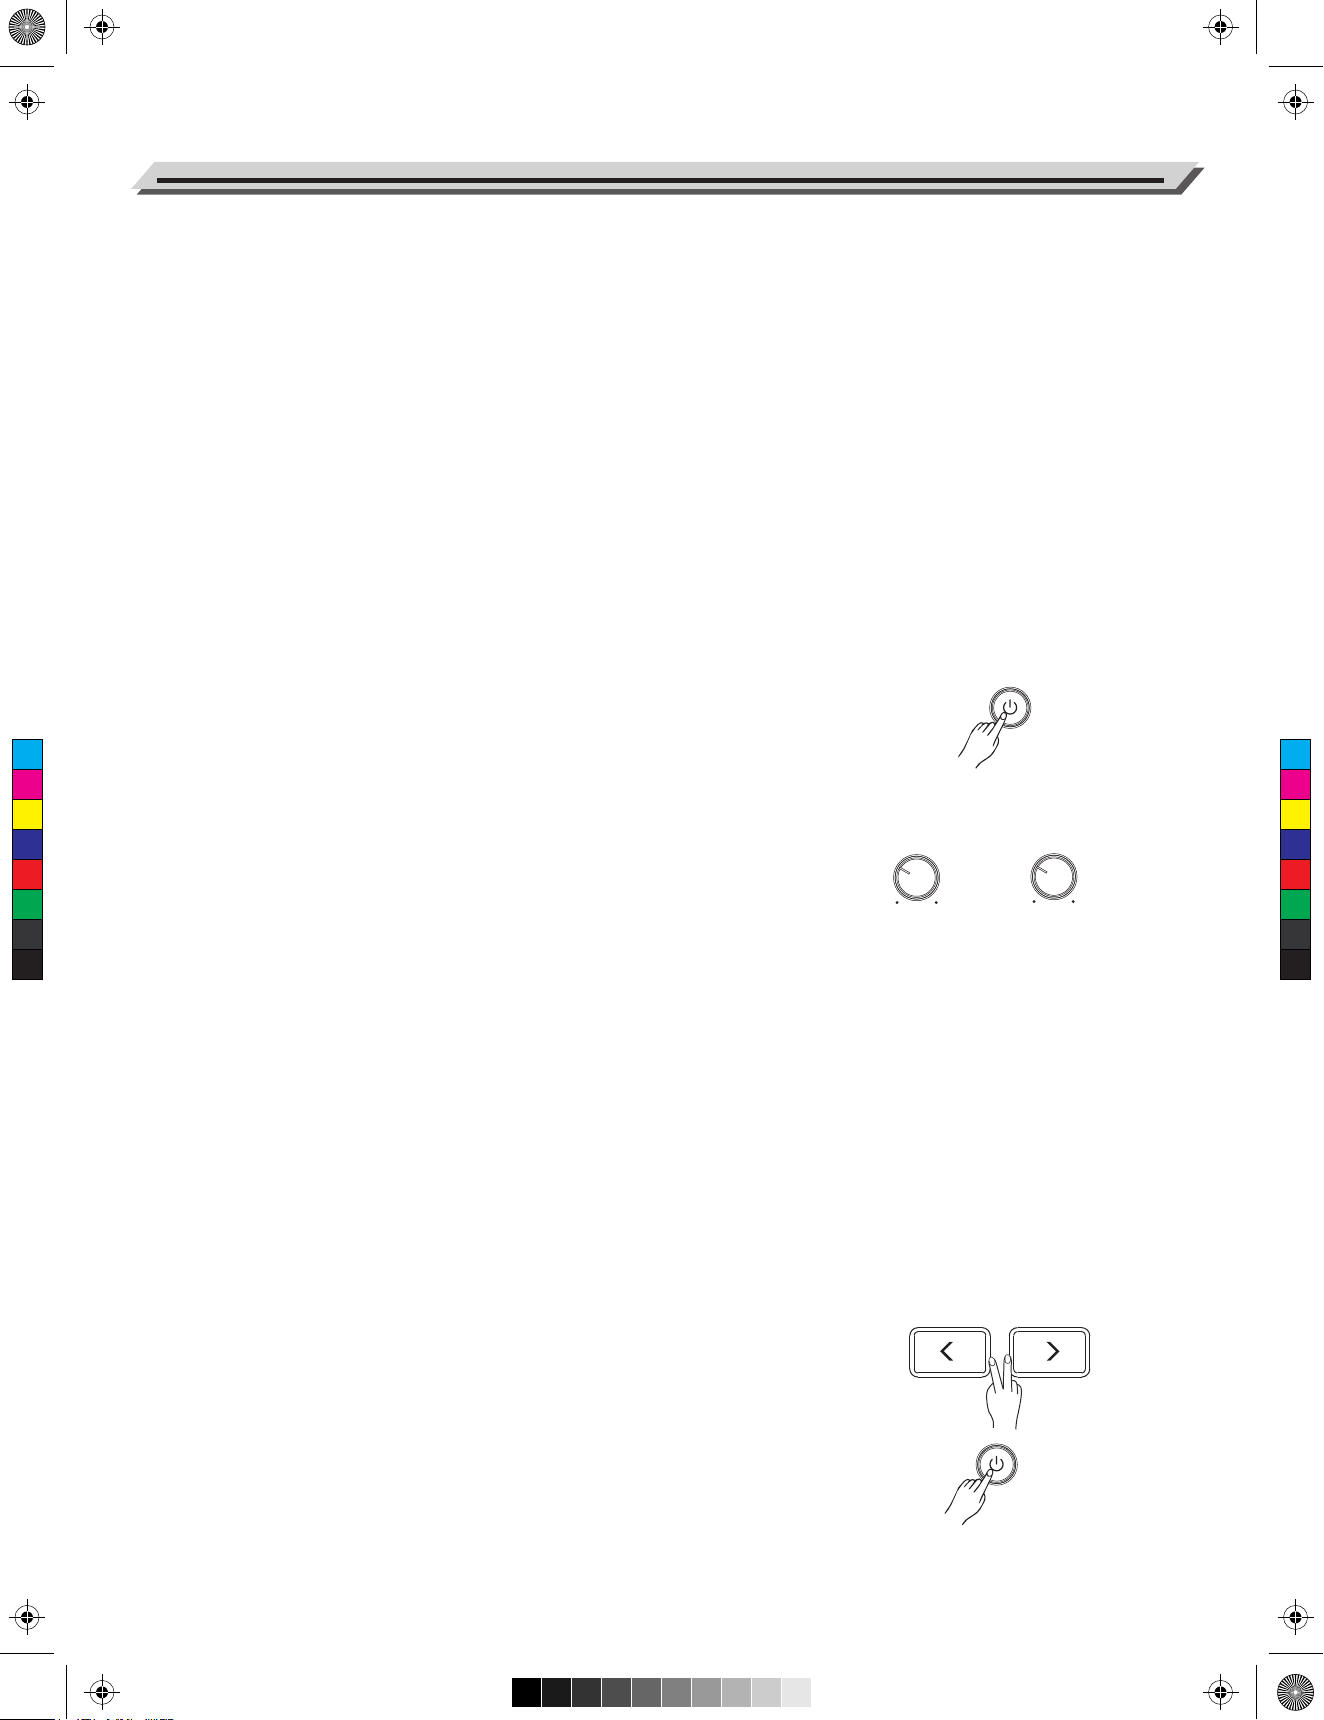
1. Turn all the volume knobs to minimum before turning on the power.
2. Press the [POWER] button, the display is lit, indicating the module is
C
M
Y
CM
MY
CY
CMY
K
turned on.
3. Turn on the connected amplifier or audio device, or listen with
headphones.
4. Adjust the [MASTER]/[PHONES] knobs clockwise while striking the
pads, until you get an appropriate volume level.
Turning off the power
MASTER
PHONES
1. Turn the volume level of the module and the connected audio device
to minimum.
2. Turn off the connected device.
3. Press the [POWER] button until the display becomes unlit.
Auto Power Off
In order to save energy, the module will automatically shut down after
30 minutes if it is not in use (playing, striking, button pressing, etc.) You
can enable or disable this function as desired. Please refer to Option.
Restore Factory Settings
Follow the operation below to reset the module to factory settings.
1. Press and hold [<] and [>] buttons, then press the [POWER] button
to turn on the power.
2. The LCD will display “Factory Resetting…”. When factory reset is
finished, the display will return to KIT menu.
The following parameters will restore factory settings: Trigger, MIDI
Setup, Option, Master Compress, User Kits and User Songs.
8
AW_DD638DX_manual_G02_180621.pdf 9 18-6-21 13:16
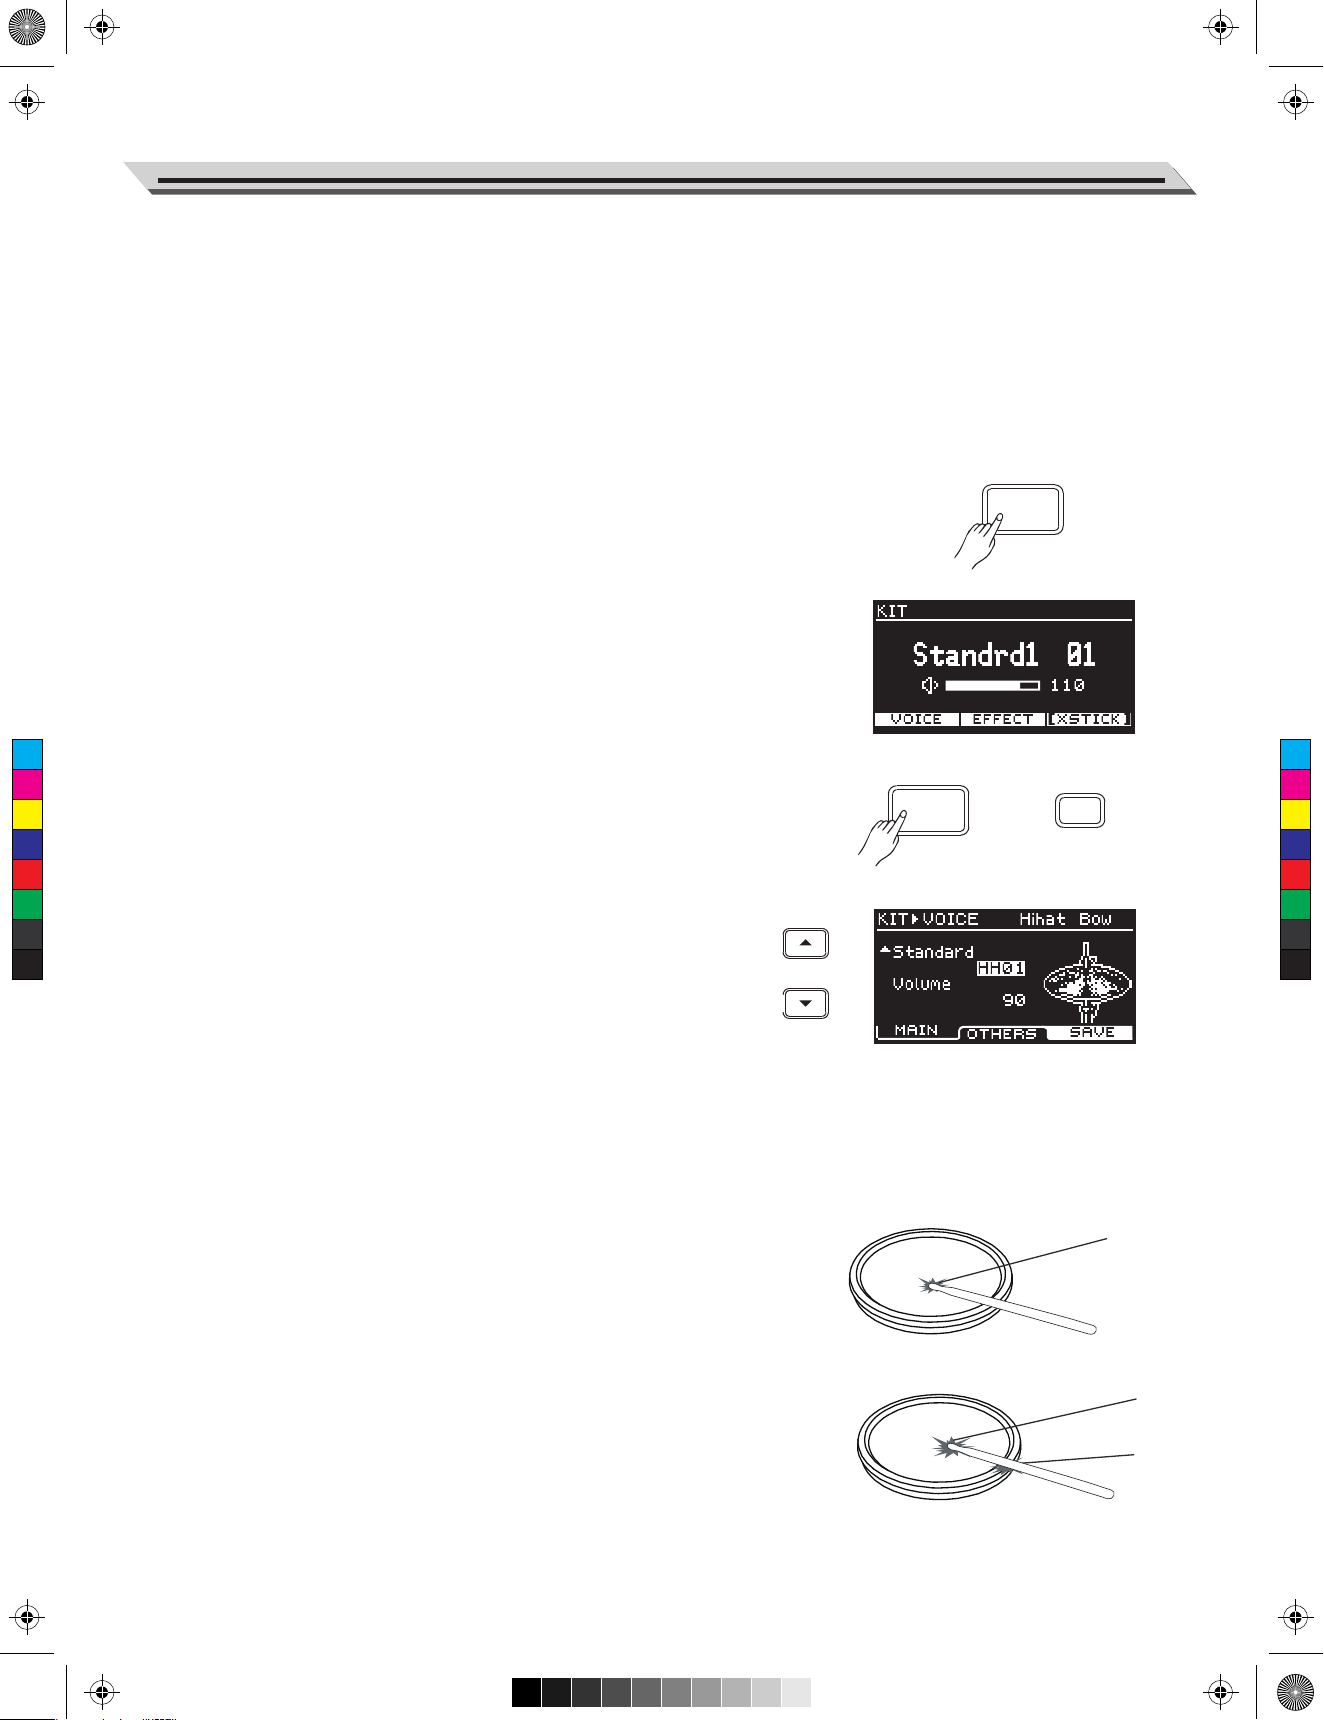
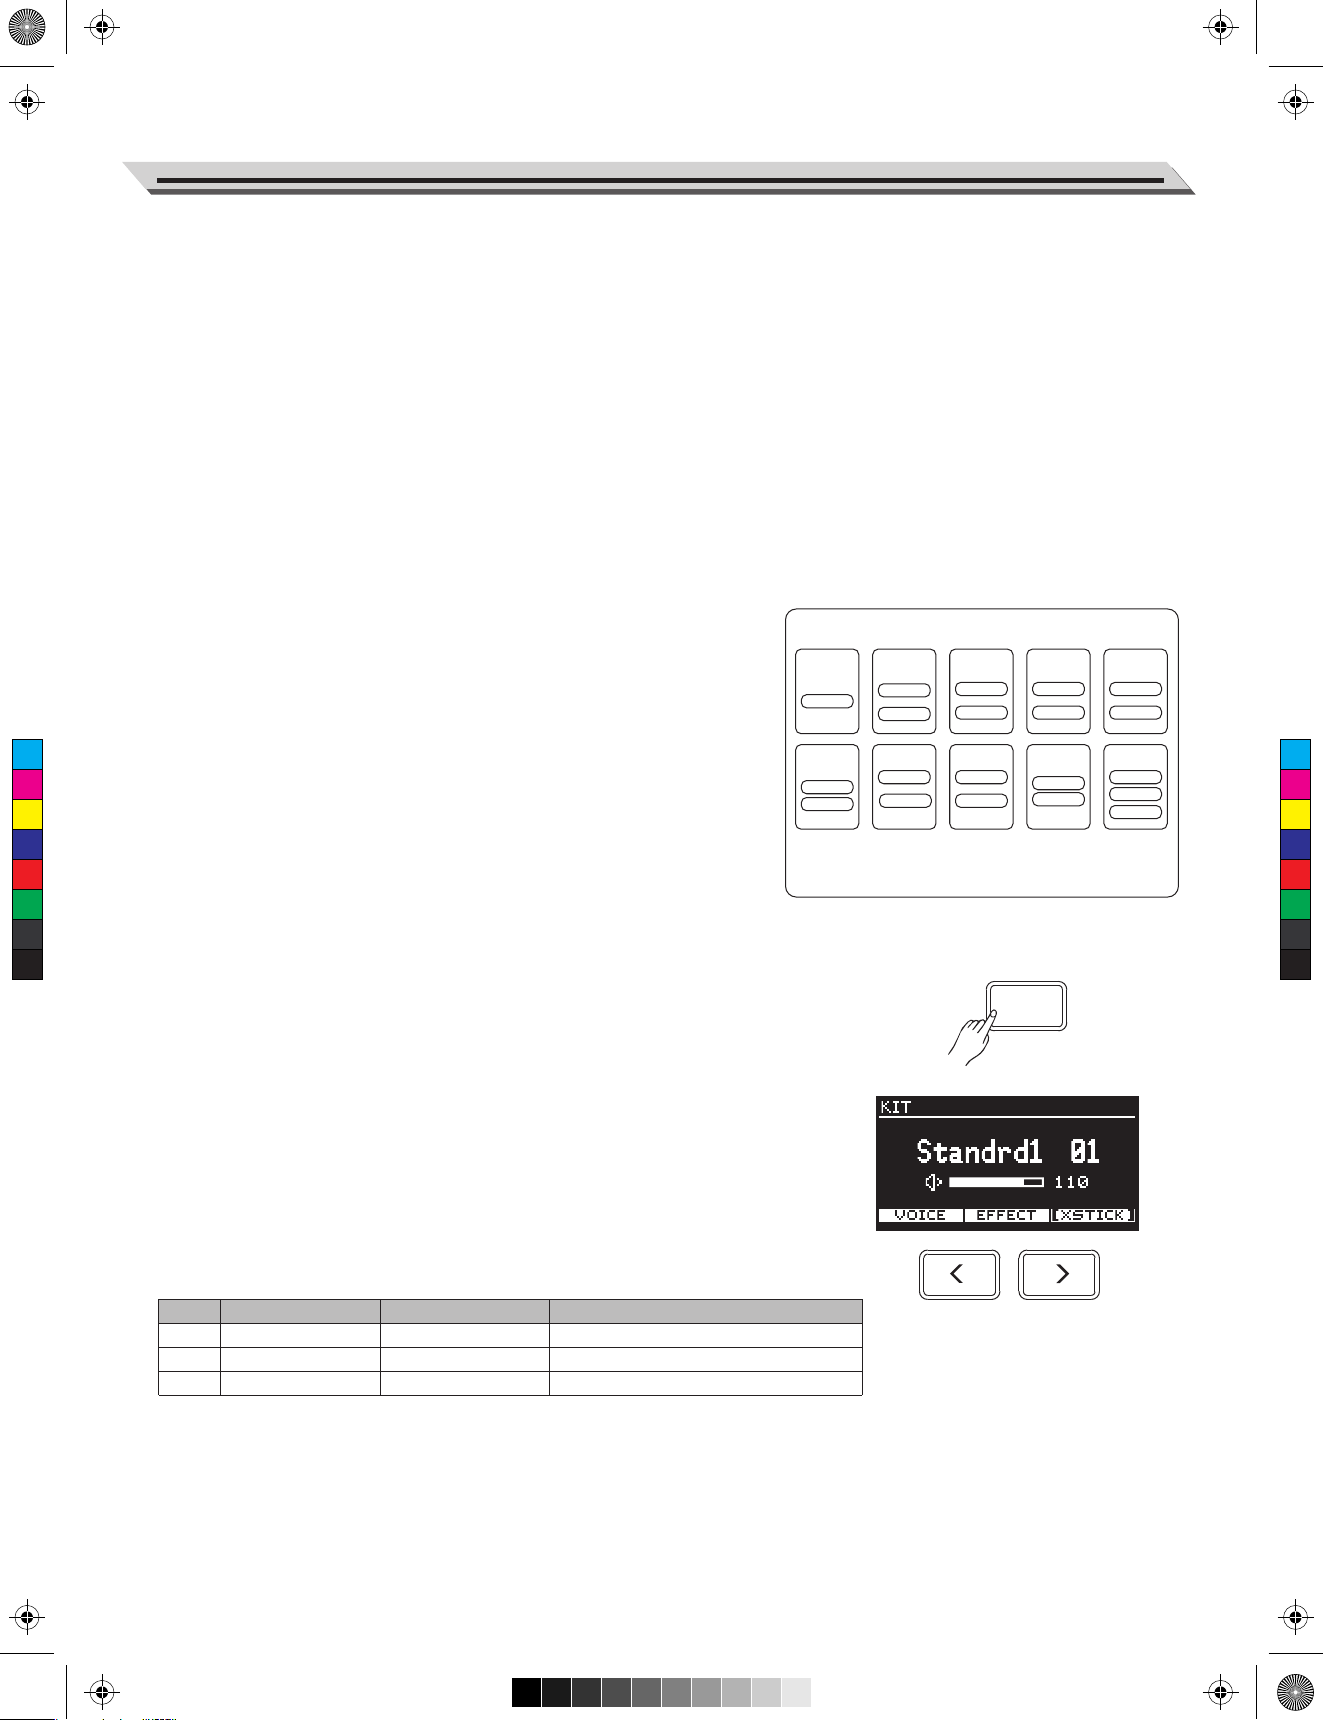
Drum Kits and Voices
A drum kit is the voices combination of all pads and cymbals. An
acoustic drum has only one fixed kit and it’s unchangeable. However, a
digital drum is preset with various voices of different styles and some
characterized voices of similar styles, allowing you to combine different
voices and make as many drum kits as you like. (Please refer to Drum
Kit List and Drum Voice List)
Selecting a Drum Kit
1. Press the [KIT] button to enter KIT menu. The “KIT” indicator
appears on LCD.
2. Press the [∧]/[∨] buttons to select an item to edit. Then use the
data dial or [<]/[>] buttons to select a desired drum kit and adjust the
kit volume.
Quick Play
KIT
Selecting a Voice
C
M
Y
CM
MY
CY
CMY
K
Strike the pads and enjoy the ensemble sound effect. You can also
change the voice setting for each pad as desired.
1. Press the [KIT] button to enter KIT menu. Then press the [F1
(VOICE)] button to enter VOICE menu.
2. Strike the pad that you want to edit. The LCD will display the pad
name.
3. Press the [∧]/[∨] buttons to select an item to edit. Then use the
data dial or [<]/[>] buttons to select a desired voice and adjust
relevant settings.
F1
KIT
Playing Techniques
This section introduces various performing techniques to make your
performance more professional. Similar to an acoustic drum kit, the
digital drum responds differently to various playing techniques and
dynamics. All the pads are velocity sensitive. And some voices change
timbre depending on the striking force.
Pad
The snare drum can detect head shot, rim shot and cross stick. The
tom drum pad can respond head and rim shot.
Head
Connect the Power supply jack
Head Shot
Strike only the head of the pad.
Rim Shot
Strike the head and the rim of the pad simultaneously. Or strike only the
rim of the pad.
Head
Rim
9
AW_DD638DX_manual_G02_180621.pdf 10 18-6-21 13:16
Quick Play
Cross Stick (X Stick)
When X-STICK is in use, strike the snare rim slightly and it will respond
X-STICK effect. However, if you strike the snare rim with force, it will
respond Rim Shot.
Cymbal
Cymbal Bow Shot
Strike the middle area of the cymbal.
Cymbal Edge Shot
Strike the edge area of the cymbal.
Rim
Bow
Edge
Cymbal Bell Shot
Strike the Ride bell area of the cymbal.
C
M
Y
CM
MY
CY
CMY
K
Choke Play
Both Ride and Crash cymbals have cymbal choke.
Choking the crash/ride edge with the hand immediately after hitting the
crash/ride will mute the crash/ride sound.
Bell
Choke
Hi-Hat
Hi-Hat Pedal Change
Press down the pedal to different positions, the pad voice will change
along when striking the Hi-Hat pad. This is similar to an acoustic drum.
Open Hi-Hat
Strike the Hi-Hat pad without pressing the pedal.
Closed Hi-Hat
Strike the Hi-Hat pad with the pedal pressed completely down.
Hi-Hat Pedal
Press down the hi-hat control pedal to create a foot-close sound without
having to strike the hi-hat pad.
Splash
Play the hi-hat with the pedal fully pressed and then instantly releasing
it.
10
AW_DD638DX_manual_G02_180621.pdf 11 18-6-21 13:16
Preset, User and iKit Drum Kits
Preset drum kit: kits that are preset on the module. Changes of kit
parameters cannot be saved to a preset drum kit.
User drum kit: kits parameters are changeable and can be saved on
the module.
iKit drum kit: unique kits of this digital drum. The iKit feature will
dramatically enhance the sensitivity of the snare when you play with
low velocity.
The module provides 99 drum kits, including 50 preset drum kits
(no.1~50), 49 user drum kits (no. 51~99). In addition, there are 5
individual iKit drum kits for iKit feature.
Drum Kit
Notes:
The structure of a drum kit:
1. In iKit mode, it affects only the sensitivity of the snare when you play
with low velocity. You can play the other triggers as in a normal drum
kit.
2. In iKit mode, these parameters of snare head are not changeable:
voice, pitch and decay etc. But you can adjust the other parameters
as desired.
C
M
Y
CM
MY
CY
CMY
K
3. In iKit mode, the Trigger menu is not available. Trigger parameters
are not editable.
4. In iKit mode, it requires proper grounding when connecting devices
to the AUXIN and OUTPUT jacks.
You can edit the parameters of a drum kit, and then save it to a user
drum kit. Please refer to Drum Kit List for details.
Selecting a Drum Kit
1. Press the [KIT] button to enter KIT menu. The LCD displays the
KIT xx
KICK
Head
TOM4
(Option)
Head
Rim
Drum kit setting: kit volume, Reverb, EQ.
Voice setting: Volume, Pan, Head tuning, Reverb, Decay,
Pad Song and so on.
SNARE
Head
Rim
HI-HAT
Head
TOM1
Head
Rim
CRASH1
Head
EdgeEdge
KIT
TOM2
Head
Rim
CRASH2
(Option)
Head
Edge
TOM3
Head
Rim
RIDE
Head
Bell
Edge
current kit number and kit volume.
Press the [KIT] button again to enter iKIT menu. Pressing the [KIT]
button will toggle between KIT menu and iKIT menu.
2. In KIT/iKIT menu, use the [<]/[>] buttons or the data dial to select a
desired drum kit.
3. In KIT/iKIT menu, press the [∨] button to select the volume item,
then use the[<]/[>] buttons or the data dial to adjust the volume.
Functions of [F1]~[F3] buttons in KIT/iKIT menu:
Button
[F1]
[F2]
[F3]
Parameter on LCD
VOICE
EFFECT
XSTICK
Parameter Name
Voices in current kit
Drum kit effect
Cross stick
After entering the relevant sub-menu, use the [∧]/[∨] buttons to select
a parameter to edit, then use the data dial or [<]/[>] buttons to adjust the
settings.
Description
Edit voice parameters.
Edit drum kit effects, only for kit mode
Switch cross stick on or off.
11
AW_DD638DX_manual_G02_180621.pdf 12 18-6-21 13:16
Drum Kit
Edit the Kit Parameters
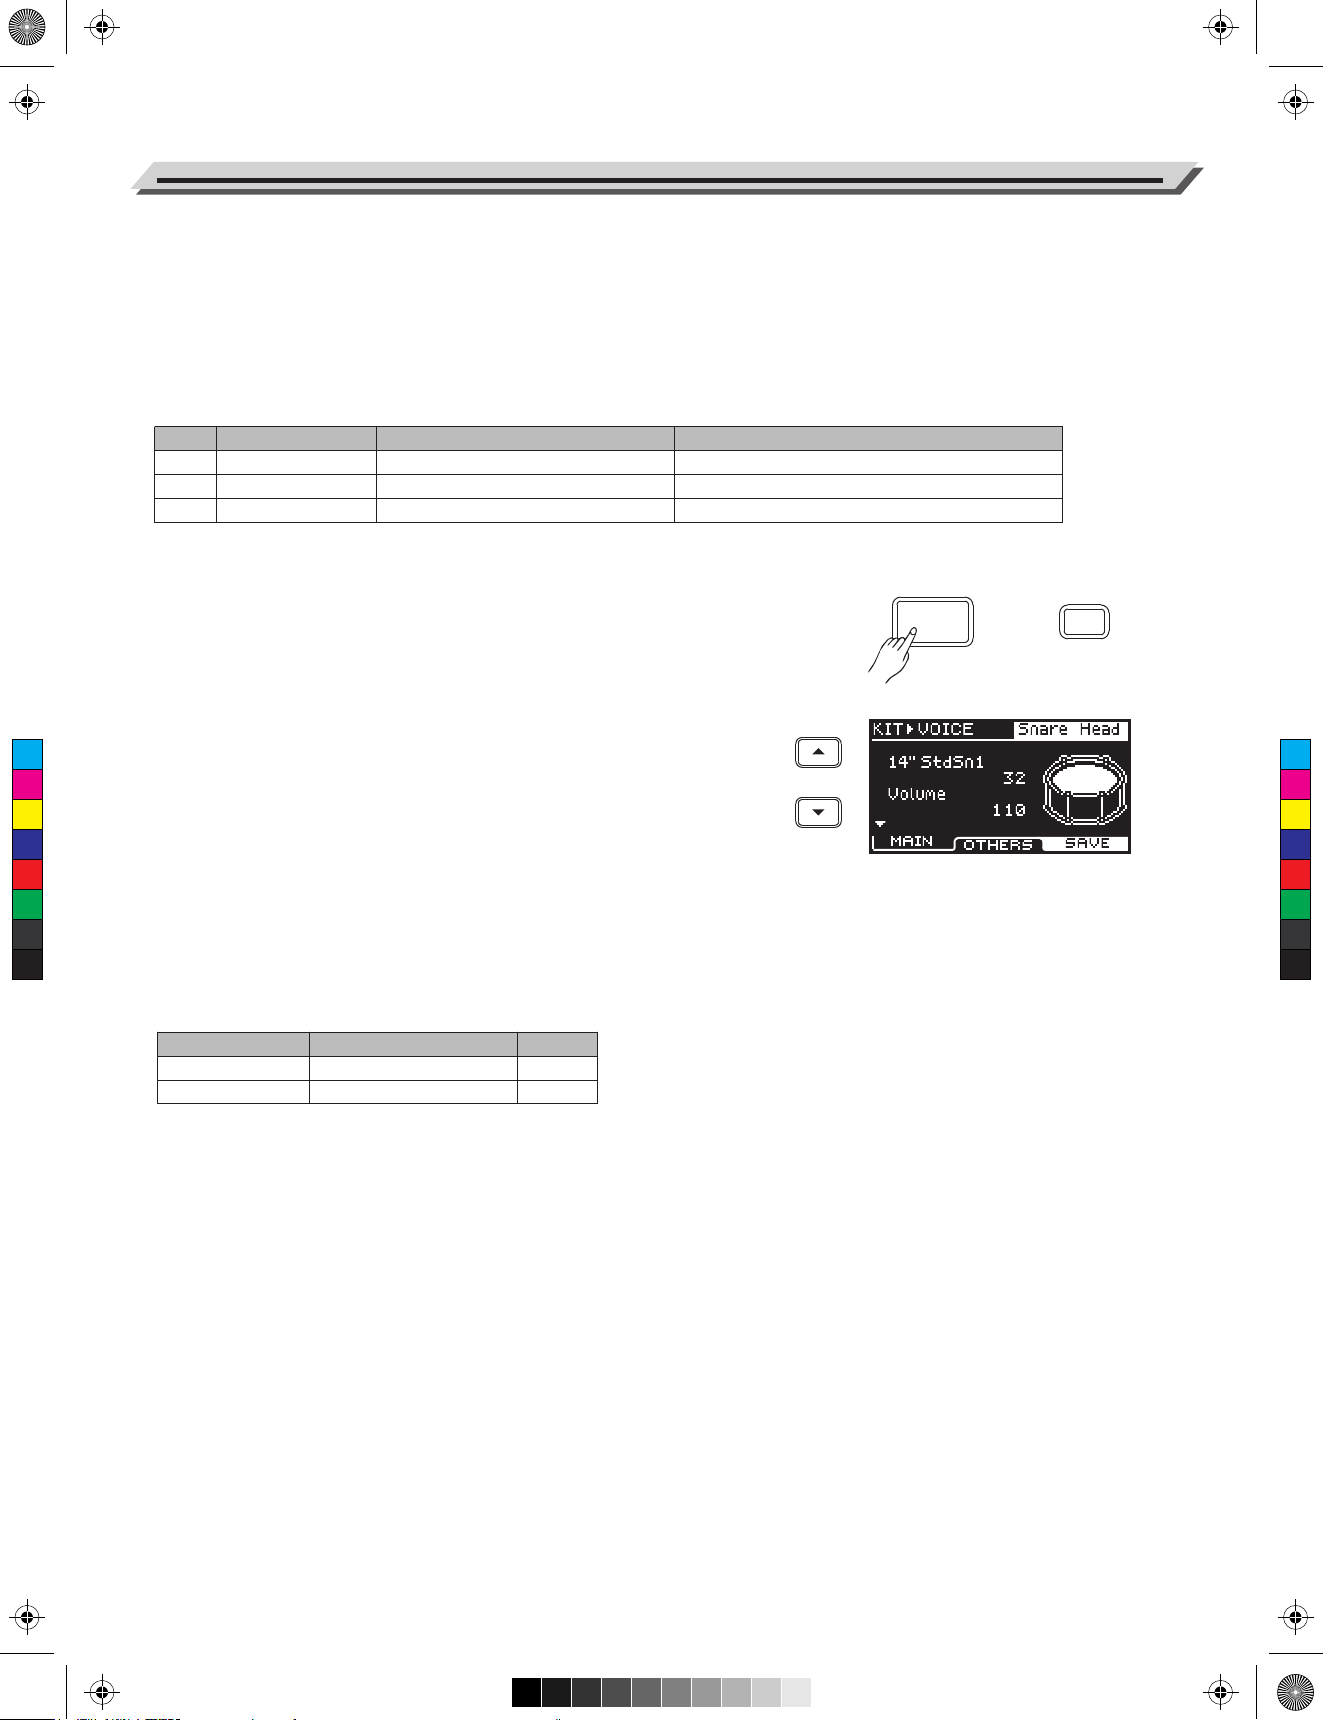
1. Press the [KIT] button to enter KIT menu, then press the [F1(VOICE)]
to enter VOICE menu.
2. When editing voice and effect parameters, save it to a user kit after
editing, otherwise, the edited data will be lost when you select a
different drum kit or power off the module.
Functions of [F1]~[F3] buttons in KIT-VOICE menu:
Button
[F1]
[F2]
[F3]
Parameter on LCD
MAIN
OTHERS
SAVE
Parameter Name
Main parameters in voice menu
Common parameters in voice menu
Save kit
Description
Edit important and frequently used parameters.
Edit other parameters of voice.
Save the settings to a user kit.
Editing Main Parameters
1.Press the [KIT] button, then press [F1 (VOICE)] to enter VOICE
KIT
F1
menu.
2. Select a trigger pad.
Strike the pad that you want to edit. The LCD will display the
C
M
Y
CM
MY
CY
CMY
K
selected pad name.
You can also use the [∧]/[∨] buttons to select the pad item, then
use the data dial or [<]/[>] buttons to select a pad name.
3. Select a voice.
Press the [∧]/[∨] buttons to select the voice item, then use the data
dial or [<]/[>] buttons to select a desired voice.
4. Adjust the volume.
Press the [∧]/[∨] buttons to select the volume item, then use the
data dial or [<]/[>] buttons to adjust the volume.
5. Parameters and their range:
Voice Parameter
Number
Volume
Description
Select a voice.
Adjust the voice volume.
Range
1~650
0~127
Notes:
1. For voice details, please refer to the Drum Voice List.
2. The indicator “▼” on LCD means you can use the [∨] button to
move the cursor downwards to select a parameter. In the same way,
the indicator “▲” on LCD suggests that you can use the [∧] button to
move the cursor upwards to select a parameter.
12
AW_DD638DX_manual_G02_180621.pdf 13 18-6-21 13:16
Drum Kit
Editing Other Parameters
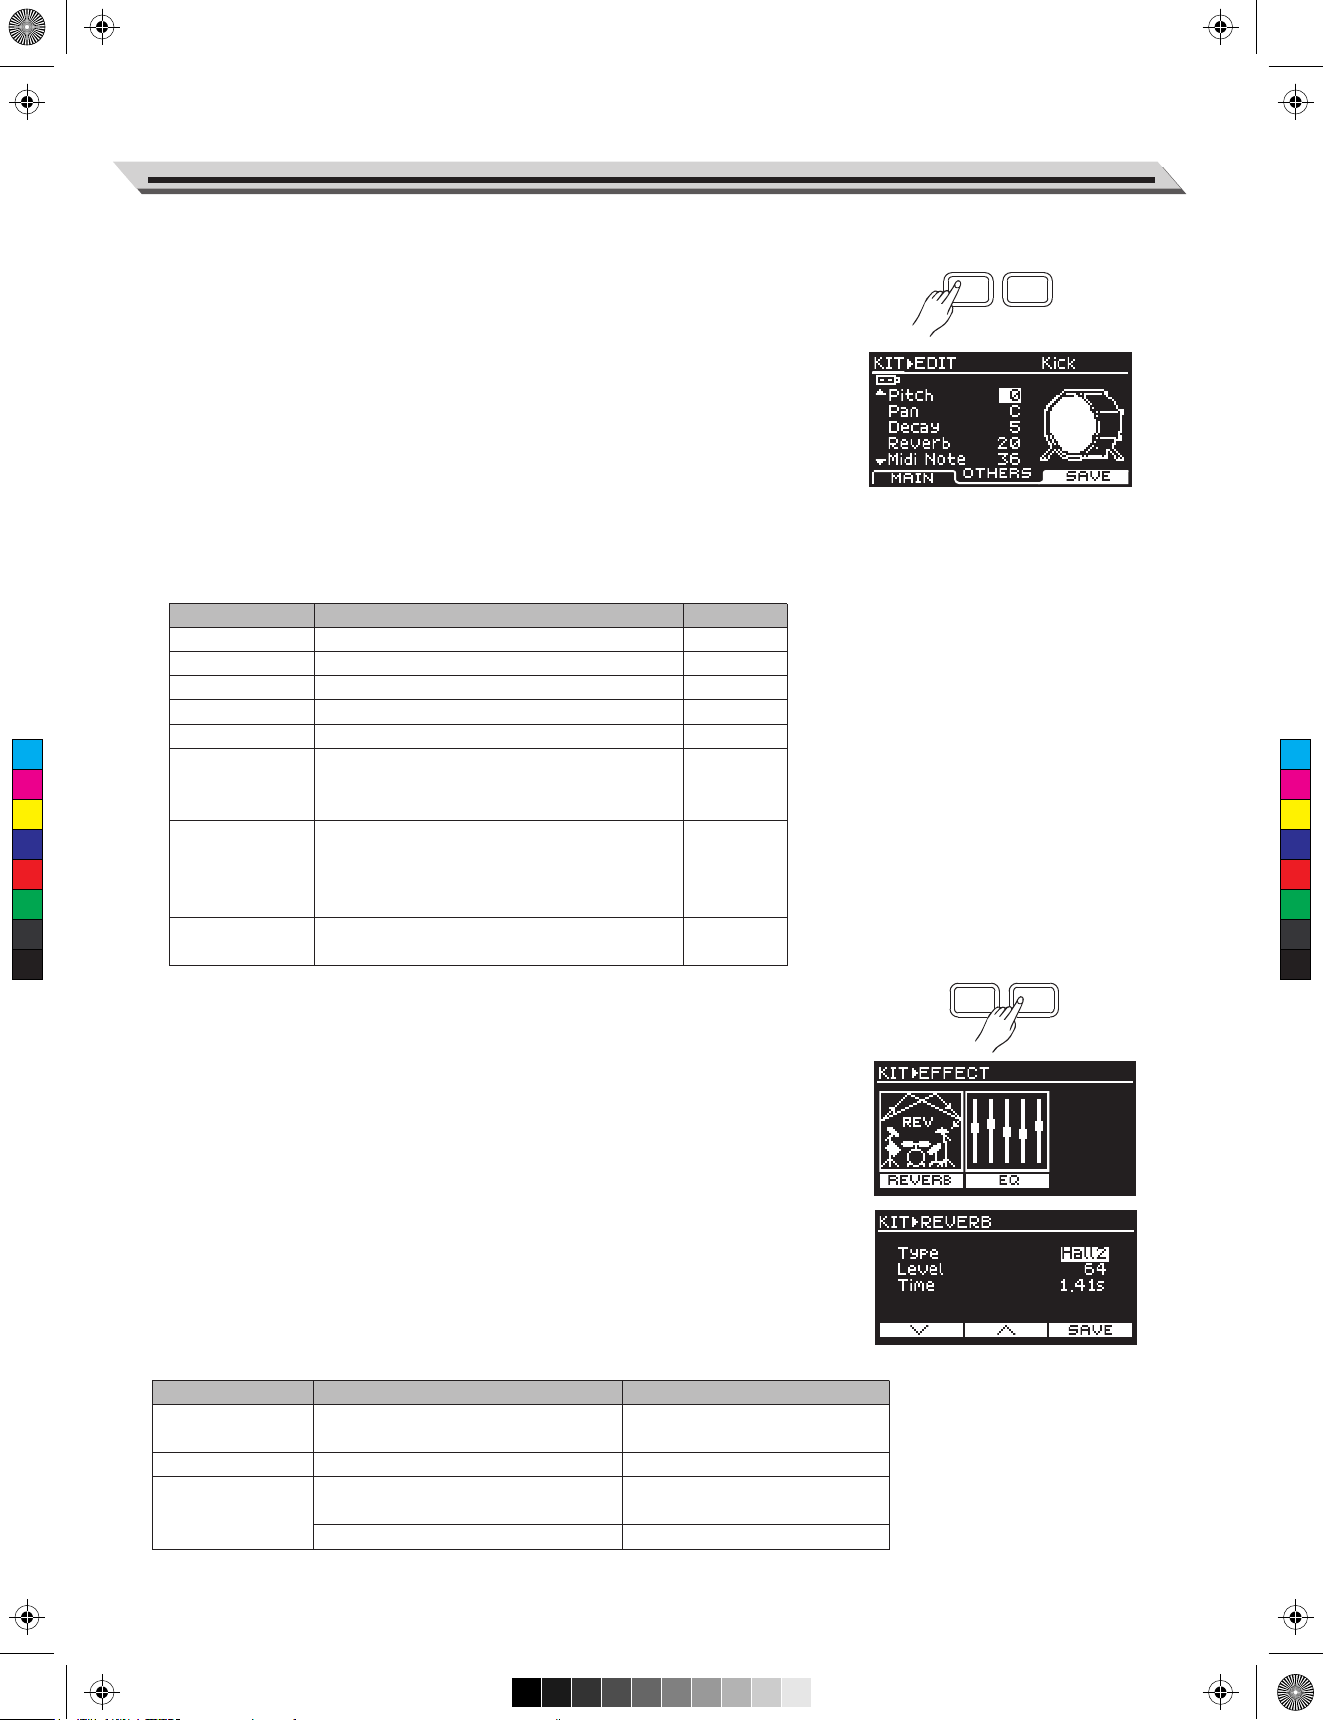
1. Press the [KIT] button, then press [F1 (VOICE)], and then press [F2
F1 F2
(OTHERS)] to enter KIT-EDIT menu.
2. Select a trigger pad.
Strike the pad that you want to edit. The LCD will display the
selected pad name.
You can also use the [∧]/[∨] buttons to select the pad item, then
use the data dial or [<]/[>] buttons to select a pad name.
3. Select a parameter to edit.
Press the [∧]/[∨] buttons to select a parameter, then use the data
dial or [<]/[>] buttons to change the setting.
4. Parameters and their range:
Voice Parameter
Pitch
Pan
Decay
Reverb
Midi Note
C
M
Y
CM
MY
CY
CMY
K
Pad Ptn
Min Velocity
Strainer
Description
Pitch.
Pan
Decay
Reverb level
MIDI notes transmitted from MIDI OUT.
Select a song for pad pattern; the selected
song will play back when you hit the pad.
Selecting “OFF” will disable this function.
Set the minimum velocity. When the pad is
struck at a smaller velocity, it will respond the
minimum velocity. A high values will produce
a loud sound even if the pad is hit softly.
Switch the strainer effect on or off. Only for
snare pad voices that contain strainer effect.
Range
-8~+8
L8~C~R8
0~5
0~127
0~127
OFF,1~100
1~127
--,OFF,ON
F1 F2
Editing Kit Effect
1. Press the [KIT] button, then press [F2 (EFFECT)] to enter EFFECT
menu.
2. The EFFECT menu contains two effects: REVERB and EQ. Use the
[F1]/[F2] buttons to select.
REVERB
1.
Press the [KIT] button, then press [F2 (EFFECT)], and then press
[F1 (REVERB)] to enter REVERB menu.
2. Press the [∧]/[∨] buttons or [F1]/[F2] buttons to select a parameter,
then use the data dial or [<]/[>] buttons to change the setting.
3. Parameters and their range:
Reverb Parameter
Type
Level
Time
Description
Reverb type
Reverb level
Reverb time for Room1, Room2,
Room3, Hall1, Hall2, Church
Reverb time for Delay and Pan Delay
Range
Room1, Room2, Room3, Hall1,
Hall2, Church, Delay, Pan Delay
0~127
0.30~12.00s
0~325ms
13
 Loading...