

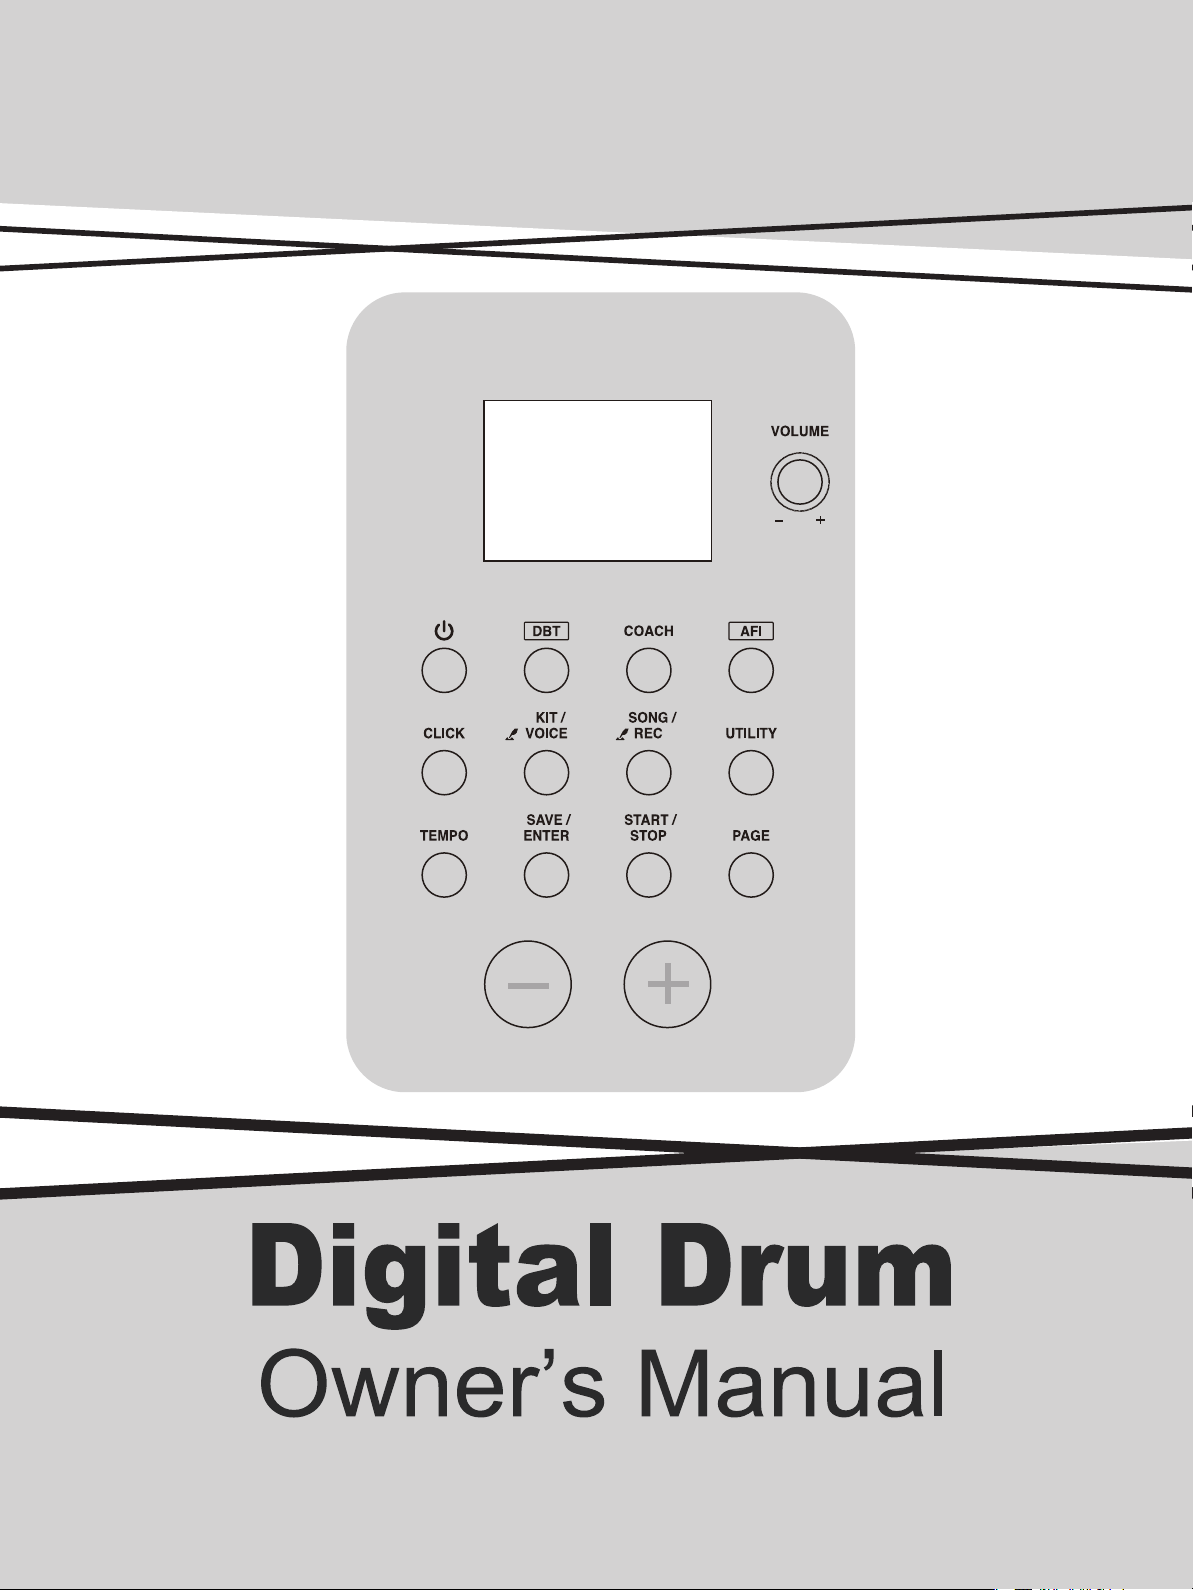
Medeli Dd620 Owner’s Manual
INFORMATION FOR YOUR SAFETY!
THE FCC REGULATION WARNING (for USA)
This equipment has been tested and found to comply with
the limits for a Class B digital device, pursuant to Part 15 of
the FCC Rules.
These limits are designed to provide reasonable protection
against harmful interference in a residential installation. This
equipment generates, uses, and can radiate radio frequency
energy and, if not installed and used in accordance with the
instructions, may cause harmful interference to radio
communications. However, there is no guarantee that
interference will not occur in a particular installation.
If this equipment does cause harmful interference to radio or
television reception, which can be determined by turning the
equipment off and on, the user is encouraged to try to
correct the interference by one or more of the following
measures:
Reorient or relocate the receiving antenna.
Increase the separation between the equipment and
receiver.
Connect the equipment into an outlet on a circuit different
from that to which the receiver is connected.
Consult the dealer or an experienced radio/TV technician
for help.
Unauthorized changes or modification to this system can
void the user's authority to operate this equipment.
PRECAUTIONS
PLEASE READ CAREFULLY BEFORE PROCEEDING
Please keep this manual in a safe place for future reference.
Power Supply
Please connect the designated AC adaptor to an AC outlet
of the correct voltage.
Do not connect it to an AC outlet of voltage other than that
for which your instrument is intended.
Unplug the AC power adaptor when not using the
instrument, or during electrical storms.
Connections
Before connecting the instrument to other devices, turn off
the power to all units. This will help prevent malfunction and
/ or damage to other devices.
Location
Do not expose the instrument to the following conditions to
avoid deformation, discoloration, or more serious damage:
Direct sunlight
Extreme temperature or humidity
Excessive dusty or dirty location
Strong vibrations or shocks
Close to magnetic fields
Interference with other electrical devices
Radios and televisions placed nearby may experience
reception interference. Operate this unit at a suitable
distance from radios and televisions.
CAUTION
The normal function of the product may be disturbed
by Strong Electro Magnetic Interference. If so, simply
reset the product to resume normal operation by
following the owner's manual. In case the function
could not resume, please use the product in other
location.
2
Cleaning
Clean only with a soft, dry cloth.
Do not use paint thinners, solvents, cleaning fluids, or
chemical-impregnated wiping cloths.
Handling
Do not apply excessive force to the switches or controls.
Do not let paper, metallic, or other objects into the
instrument. If this happens, remove the electric plug from
the outlet. Then have the instrument inspected by qualified
service personnel.
Disconnect all cables before moving the instrument.

Connects
Main Features.............................................................4
Panel & Display Description
Front Panel...................................................................5
Side Panel (Connecting)..............................................6
LCD Display..................................................................7
Setup
Connecting Pads and Pedals.......................................8
Getting Ready to Play
Setting Up the Power Supply........................................9
Turning the Power On/Off.............................................9
Quick Play
Drum Kits and Voices.................................................10
Playing Techniques.....................................................10
Auto Fill In(AFI)
Turn the AFI Function On/ Off.....................................16
Rules of AFI trigger.....................................................16
Coach
About Coach Mode.....................................................17
Coach Mode Control..................................................17
Qut Cnt (Quiet Count)................................................17
Change Up.................................................................18
Beat Check.................................................................19
DBT (Double Bass Trigger)
Turn the DBT Function On..........................................20
Tempo........................................................................20
Utility Mode (Utility)
The Drum Pad Trigger Settings..................................21
The Drum Module Settings.........................................22
Select a Preset Drum Kit and Create a User Drum
Kit
About the Preset and User Drum Kit..........................12
Edit the Drum Kit Parameters.....................................12
Edit the Voice Parameters..........................................12
Save User Drum Kit....................................................13
Playing Along with a Song
Playing Along with a Song..........................................14
Metronome.................................................................14
Record
Preparing Record.......................................................15
Start / Stop Recording................................................15
Download AFI Midi Styles from a Computer...........23
Troubleshooting.......................................................24
Prompt Messages.....................................................24
Specifications...........................................................24
Appendix
Drum Kit List...............................................................25
Drum Voice List ..........................................................26
Song List....................................................................28
GM Drum Kit List........................................................29
GM Melody Voice List.................................................30
MIDI Implementation Chart........................................31
3

Main Features
Bring the Professional Experience to Your Performance
Natural and Realistic Voices
This digital drum has equipped with all new voices, which vastly improved sound quality and will reach a super natural and
realistic sense for your ears. No matter playing the stroke roll or striking pads with velocity dynamic, all of these let you enjoy
delicate nuances and natural voice, capture the unique characteristics of acoustic drum kit.
Fashionable Appearance
Compact, elegant appearance, only occupy a little place when fold it up. Except for a perfect learning assistant, it also can be
exquisite furniture decorated in your house.
Interesting AFI Function
There is an interesting way to suddenly become a master drummer. AFI means the auto fill in function, use this function you
can play a professional cool solo without any difficulties. What’s more, you can download your own AFI style solos to your
module through specified user software.
Amazing DBT Function
Easy to achieve double bass pedal techniques here. The frequency is adjustable.
Scientific COACH Practicing
Provide three coach modes with dozens of common beat practice. Automatically score function intuitively reflects practice
condition.
USB MIDI Output
This digital drum equipped with an USB MIDI output, it is available to connect with smart devices, such as an iPad, through a
Camera kit.
4
Front Panel
Panel Description
15
1
2 3
6 7 8
10 11 12 13
1. [VOLUME] Knob
Adjust the phone volume level.
Note:
Rotate the [VOLUME] knob anticlockwise to the minimum
position before power on.
2. [POWER] Button
Press this button to power on/ off the module.
3. [DBT] (DOUBLE BASS TRIGGER) Button
Turn DBT function on/ off.
*Turn DBT function on. It can generate two or three
continuous kick sounds when you step on the bass drum
only once. Easy to achieve double bass pedal techniques.
4. [COACH] Button
Enter learning mode.
5. [AFI] (AUTO FILL IN) button
Turn AFI function on/ off.
*Turn AFI function on when play a song. Strike specified
AFI trigger to play intro/ ending or fill drum solos without
striking a pad.
6. [CLICK] Button
Start/Stop the metronome; enter the metronome
parameter setting mode.
4
14
7. [KIT/VOICE] Button
Shortly press: enter drum kit mode.
Press and hold: enter voice mode.
8. [SONG/REC] Button
Shortly press: enter the song mode.
Press and hold: enter the quick record mode.
9. [UTILITY] Button
Enter the utility mode.
10. [TEMPO] Button
Adjust the tempo value.
11. [SAVE/ENTER] Button
Save the drum kit / pad settings.
12. [START/STOP] Button
Start / Stop playing songs.
13. [PAGE] Button
Switch between the settings of different functions.
14. [+]/ [-] Button
Gradually increasing or decreasing the value of settings.
15. LCD Display
Shows the name and parameter settings of Kit, Voice,
Song and so on.
5
9
5
Panel Description
Side Panel (Connecting)
Note:
To prevent malfunction and equipment failure, always turn down the volume, and turn off all the units before making any
connections.
16 18 19
16. USB MIDI Terminal
Connect the PC/USB host with audio devices.
Note:
Only transmit MIDI data.
17. AUX IN jack (1/8”)
For connecting an extra audio player, for example, MP3
and so on via a stereo plug. You can enjoy playing the
drum along with your favorite songs.
17
20
18. AFI Terminal
Connect the AFI trigger.
19. PHONES jack (1/8”)
Connect stereo headphones here.
20. DC IN jack
Connect the AC adaptor here. Plug the AC adaptor cable
into the DC IN jack.
6
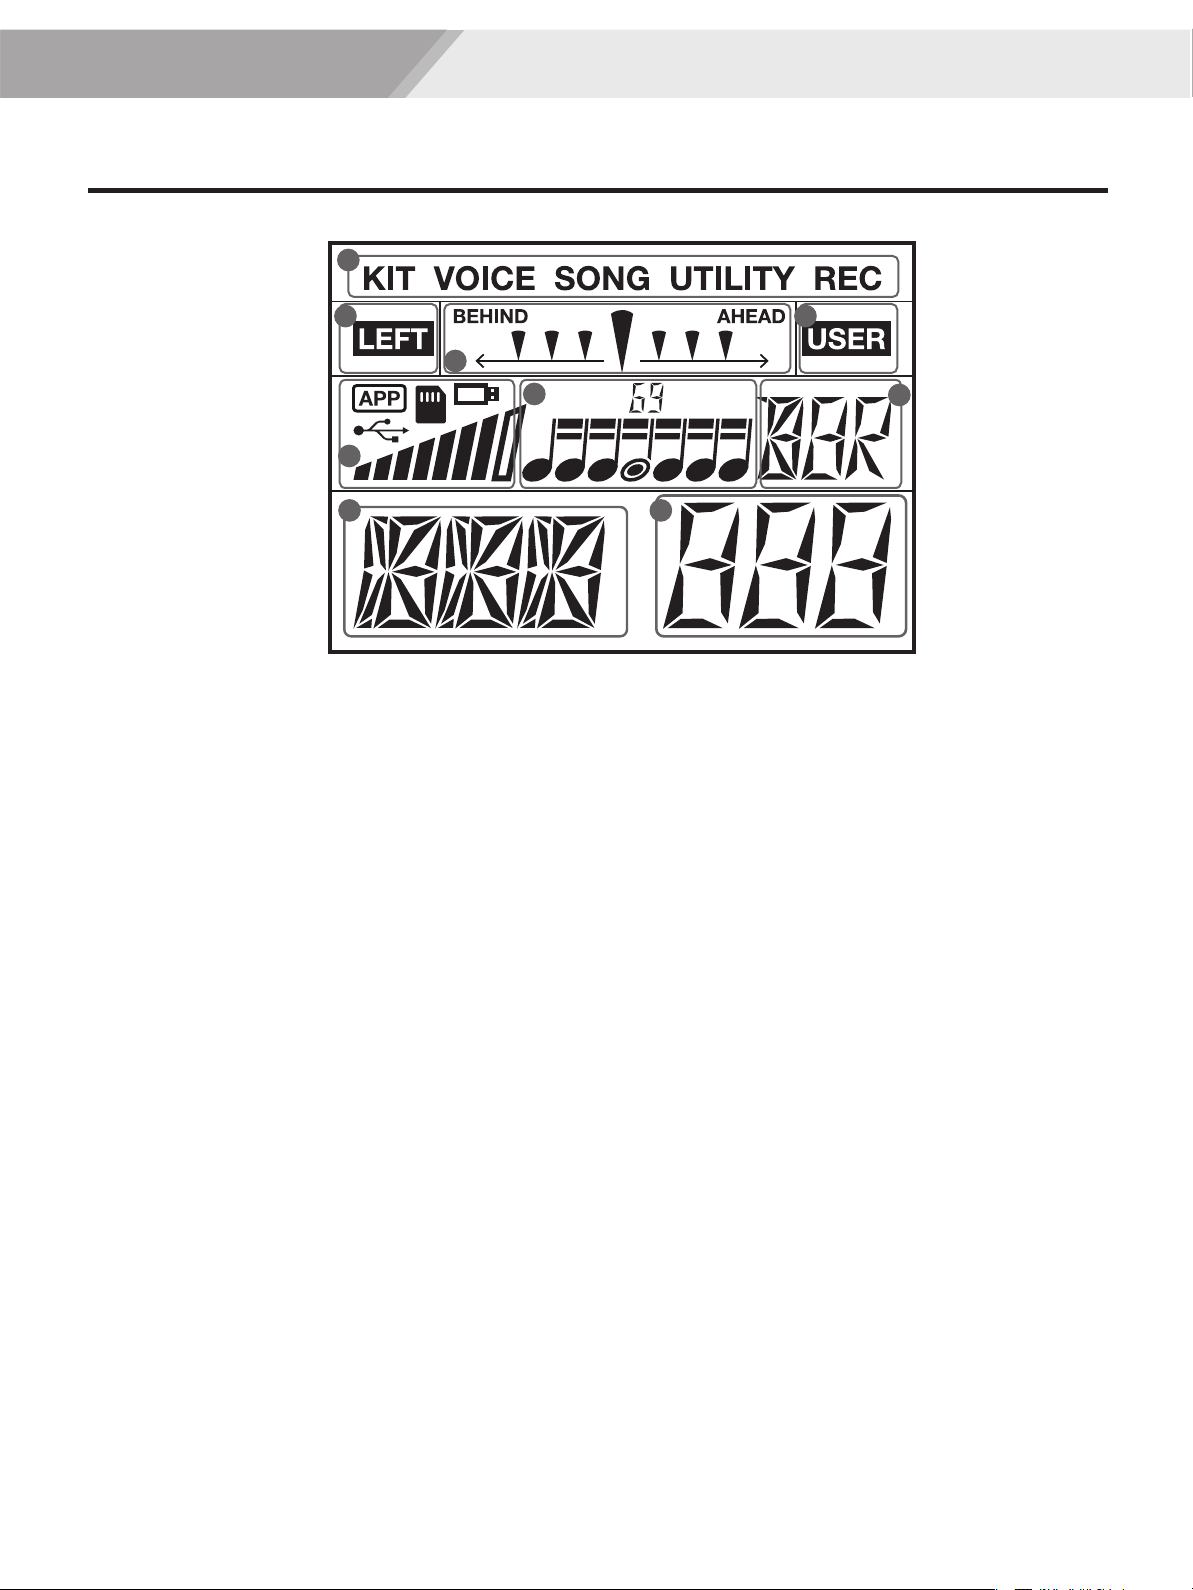
LCD Display
1
3 3
2
2
4
6 7
Panel Description
5
1. Mode
Display the current mode, such as KIT, VOICE, SONG,
and UTILITY and so on.
2. Coach Mode
Display current beat accuracy and rhythm type.
3. The Second Level Mode
When the mode is turned on, the LCD displays current
mode.
4. External Device and Strike Strength
Display the connected external device and current
striking strength.
5. Pad Name
Display the current selected pad name.
6. Parameter Type
Display current parameter type, for instance, Volume,
Curve and so on.
7. Parameter Value
Display the value which corresponding to the parameter
or the number of Song/Kit/Voice.
7
Setup
Caution!
To prevent electric shock and damage to drum module or other devices, always turn off the power of all devices
before making any connections.
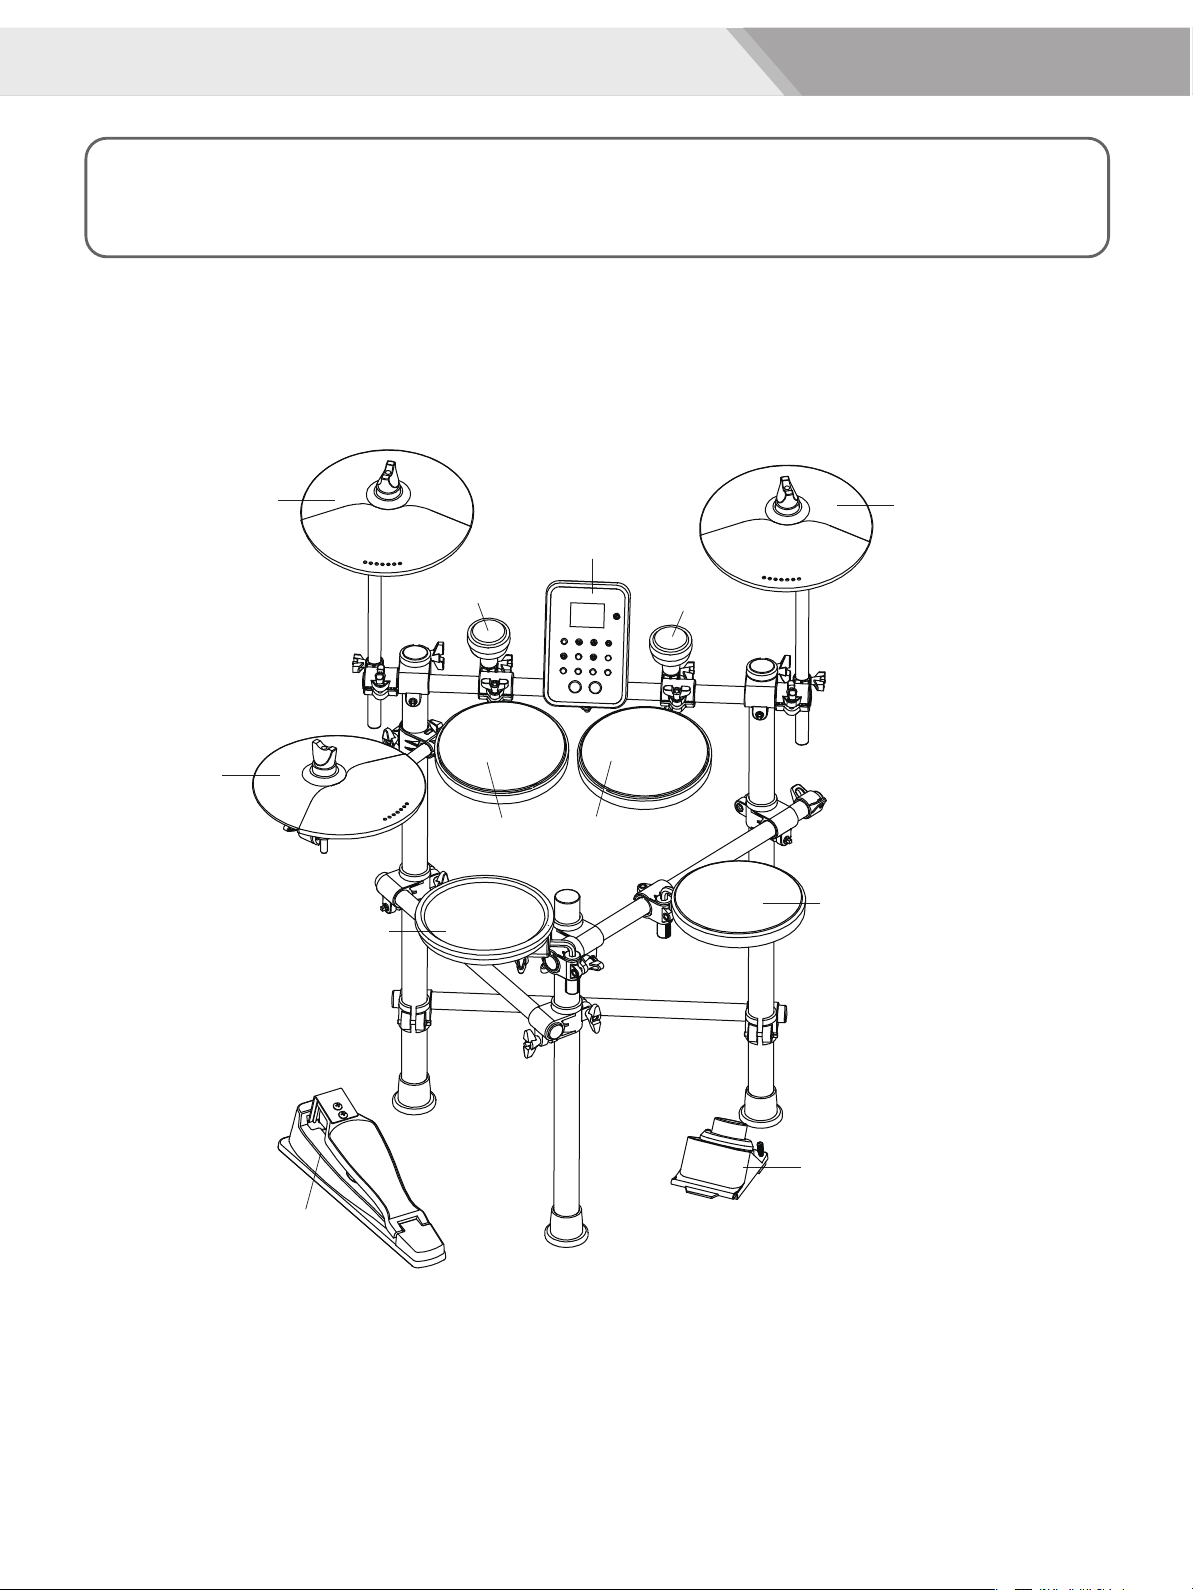
Connecting Pads and Pedals
Standard configuration: KICK, SNARE (Double trigger), TOM 1~3, CRASH 1 (Choke), RIDE (Choke), HI-HAT,
HI-HAT CONTROL PEDAL, AFI Triggers.
Hi-Hat
Crash
Snare
AFI Trigger
Tom1
Drum Module
Ride
AFI Trigger
Tom2
Tom3
Kick
Hi-Hat Control
Note:
1. Using the cables provided, connect each Trigger input jack on the rear panel of the module, and make sure
each pad is connected to its corresponding trigger input jack.
2. For details on assembling the drum stand, attaching the digital drum and connecting pads, refer to the
Installation Manual description.
8
Getting Ready to Play
Setting up the Power Supply
1. Connect the DC plug of the AC power adaptor to the DC IN jack on
the rear panel.
2. Connect the other end of the power cord to the AC outlet.
Note:
1. Only use the voltage specified as correct for the drum module.
2. Even when the module is turned off, electricity is still flowing to the
module at the minimum level. When you are not using the drum
module for a long time, make sure to unplug the AC power adaptor
from the wall AC outlet.
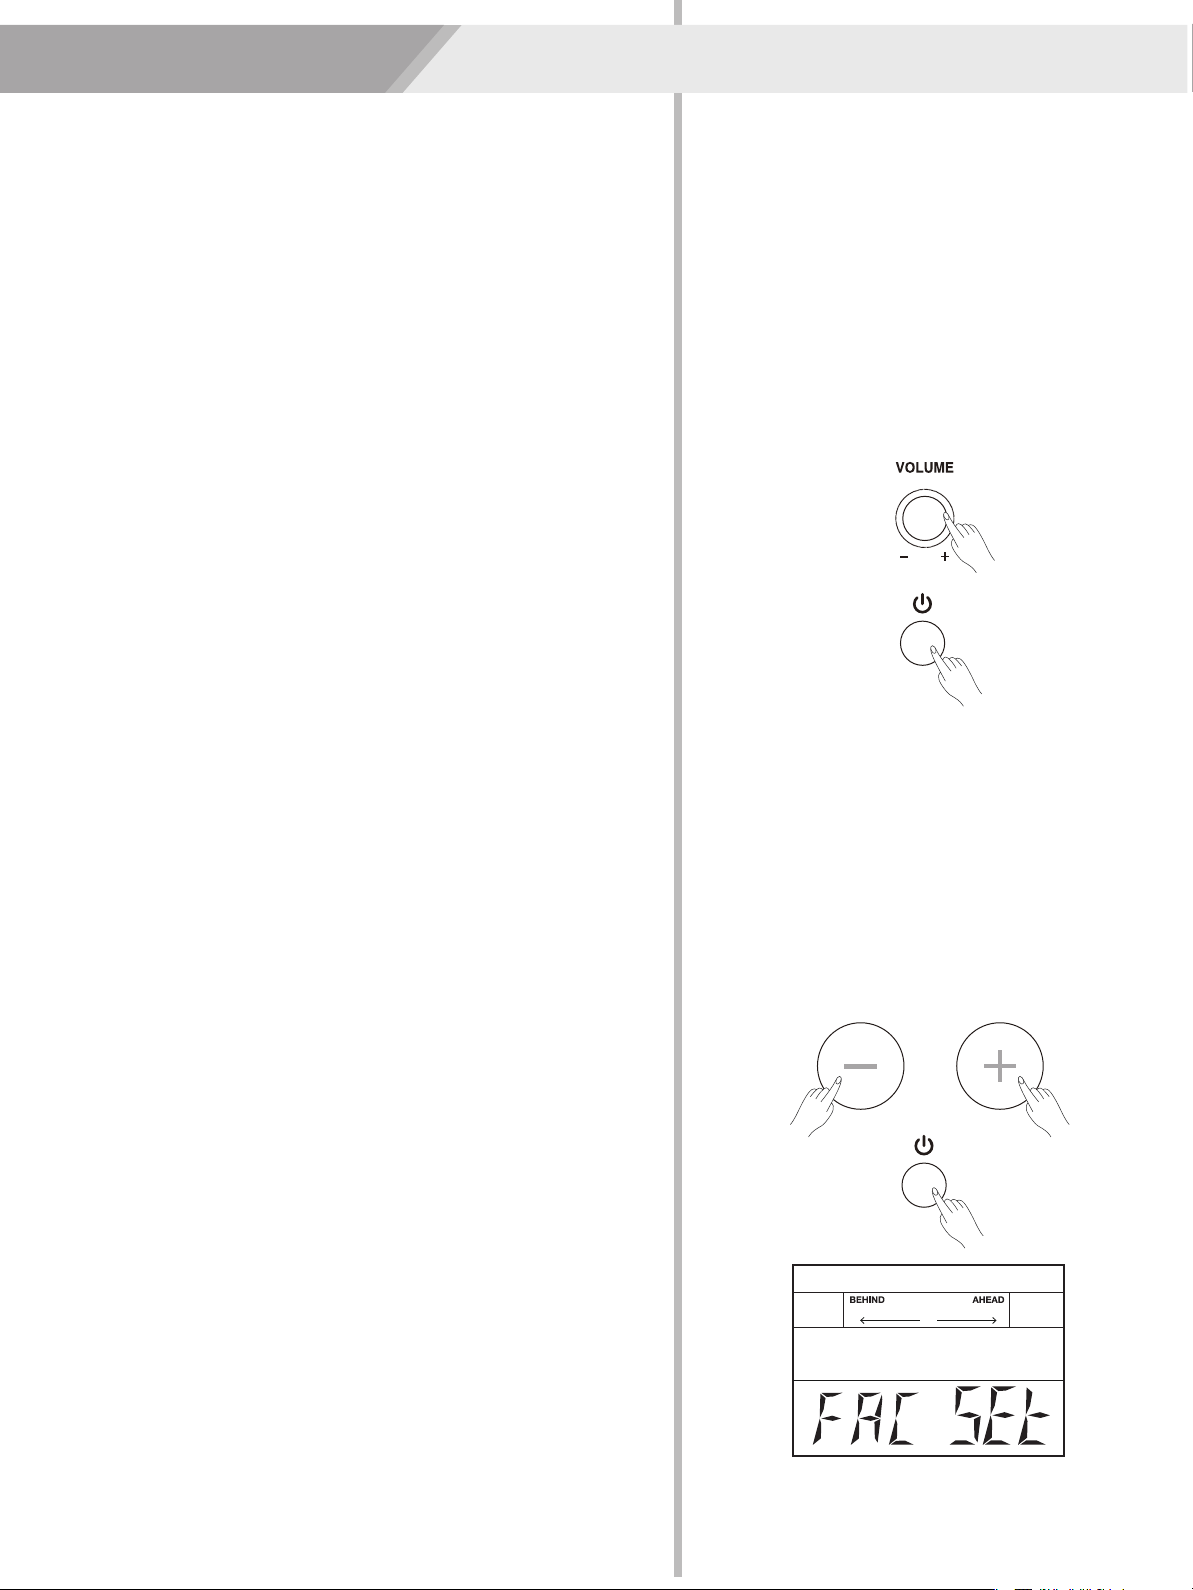
Turning the Power On/Off
Turning the power on
1. Please make sure that the volume has been adjusted minimize.
2. Press the [POWER] button.
3. Listen through the headphone.
4. Striking the pads and adjust the volume by slowly turning the
[VOLUME] knob toward the right direction. Keep turning until you
get an appropriate value.
Note:
1. Make sure that you have made all necessary connections right
(trigger, audio and so on), turn down all volume controls of the
module and other audio equipments.
Turning the power off
1. Minimize the volume of the module and connected audio devices.
2. Turn the connected external audio device off.
3. Press the [POWER] button again.
Note:
The drum module automatically saves all current settings before it
turns off, you can also restore the factory setting by the following steps:
a) Press the [+] and [-] buttons simultaneously.
b) Press the [POWER] button.
c) When the LCD displays “FAC SET”, it indicates the factory setting is
finished.
About the Auto Power Off Function
To prevent unnecessary power consumption, this function automatically
turns the power off if no buttons or keys are operated for
approximately 30 minutes. If desired, you can disable or enable this
function. Refer to Utility Settings.
9
Quick Play
Drum Kits and Voices
An acoustic drum has only a fixed kit, but the digital has a lot. It is a
particular characteristic of digital drum.
The structure of a drum kit is shown on the right:
Drum Kits and Voices
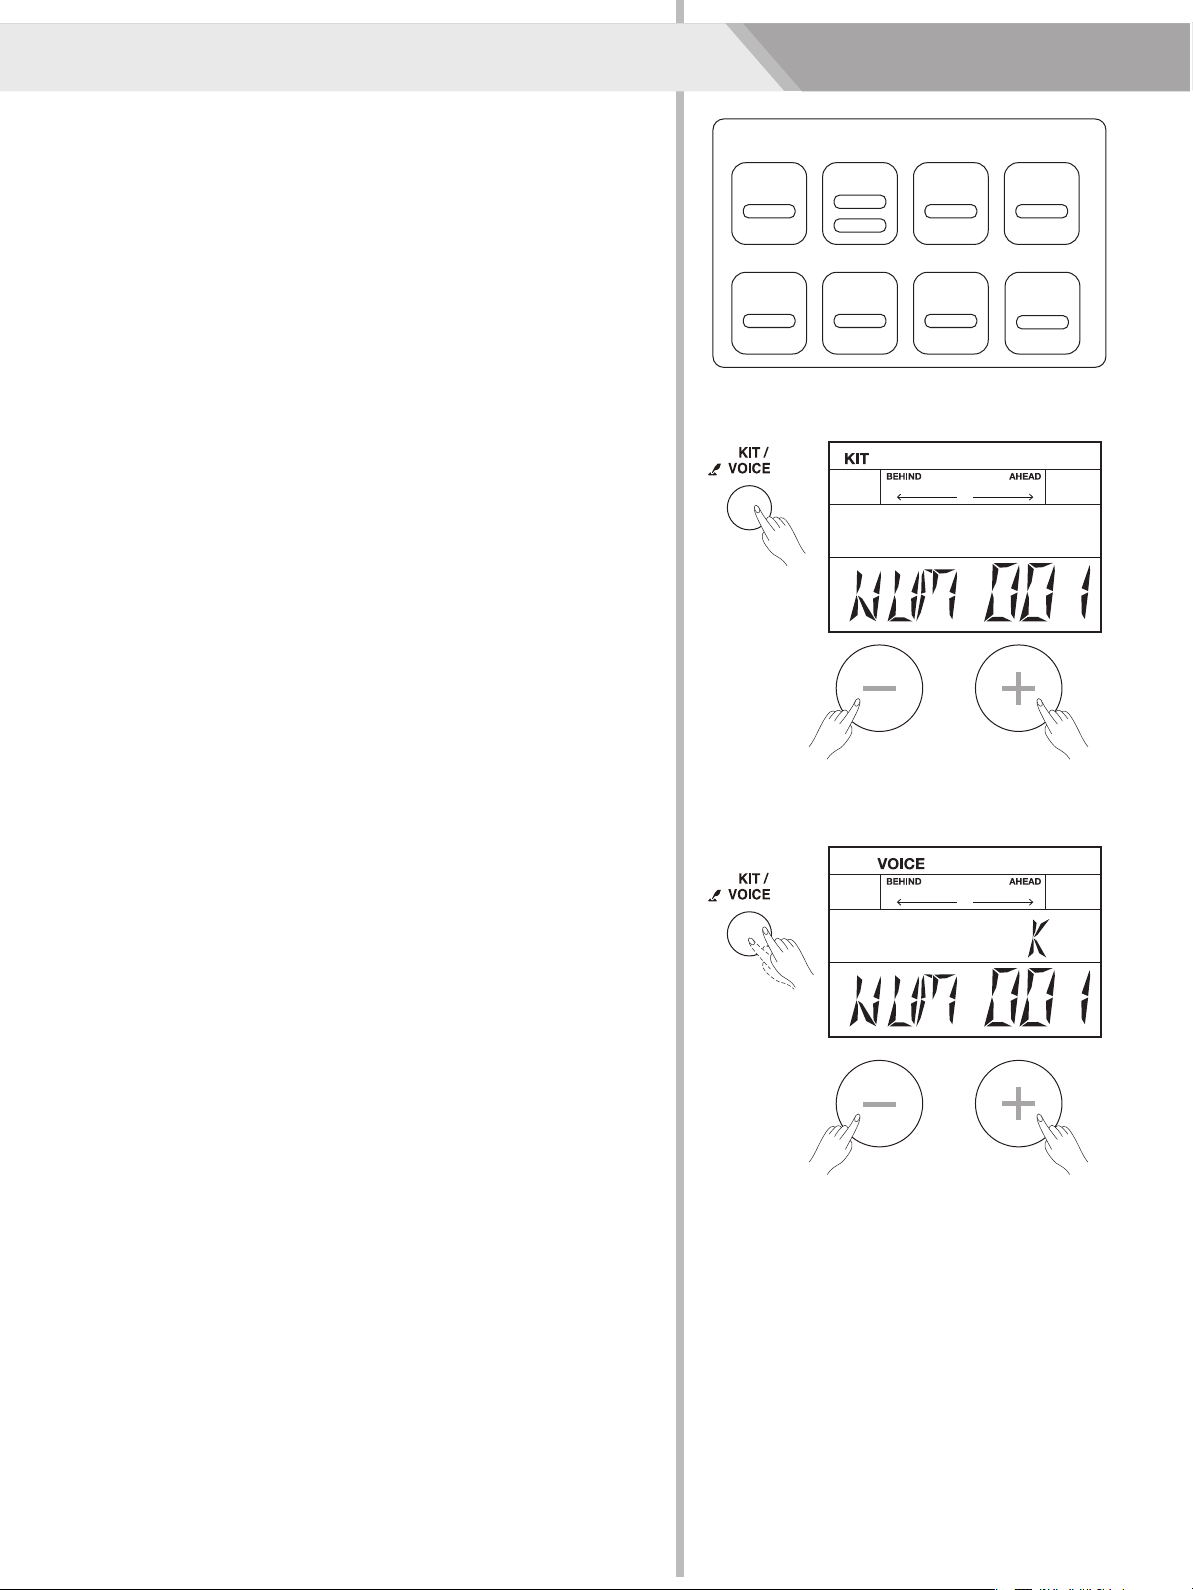
1. Shortly press the [KIT/ VOICE] button, enter the drum kit menu.
The screen is shown on the right:
2. Press the [+]/ [-] button to select your desired drum kit. (Refer to
Drum Kit List)
KIT xx
KICK
Head
TOM3
Head
SNARE
Head
Rim
HI-HAT
Head
TOM1 TOM2
Head Head
CRASH
Head
RIDE
Head
Selecting a voice
While striking the pads, you can enjoy the ensemble sound effect. If
you are not satisfied with the voice of any pads, change the voice as
you want.
1. Press the [KIT/ VOICE] button for 2 seconds to enter the voice
menu.
The screen displayed is shown on the right:
2. Strike the pad you want.
The screen will display the name of current pad.
3. While striking the pad, press the [+] / [-] button until you get an
appropriate voice for your pads. (Refer to Voice List)
10
 Loading...