

Page 1
Operation and Maintenance Manual OM 135
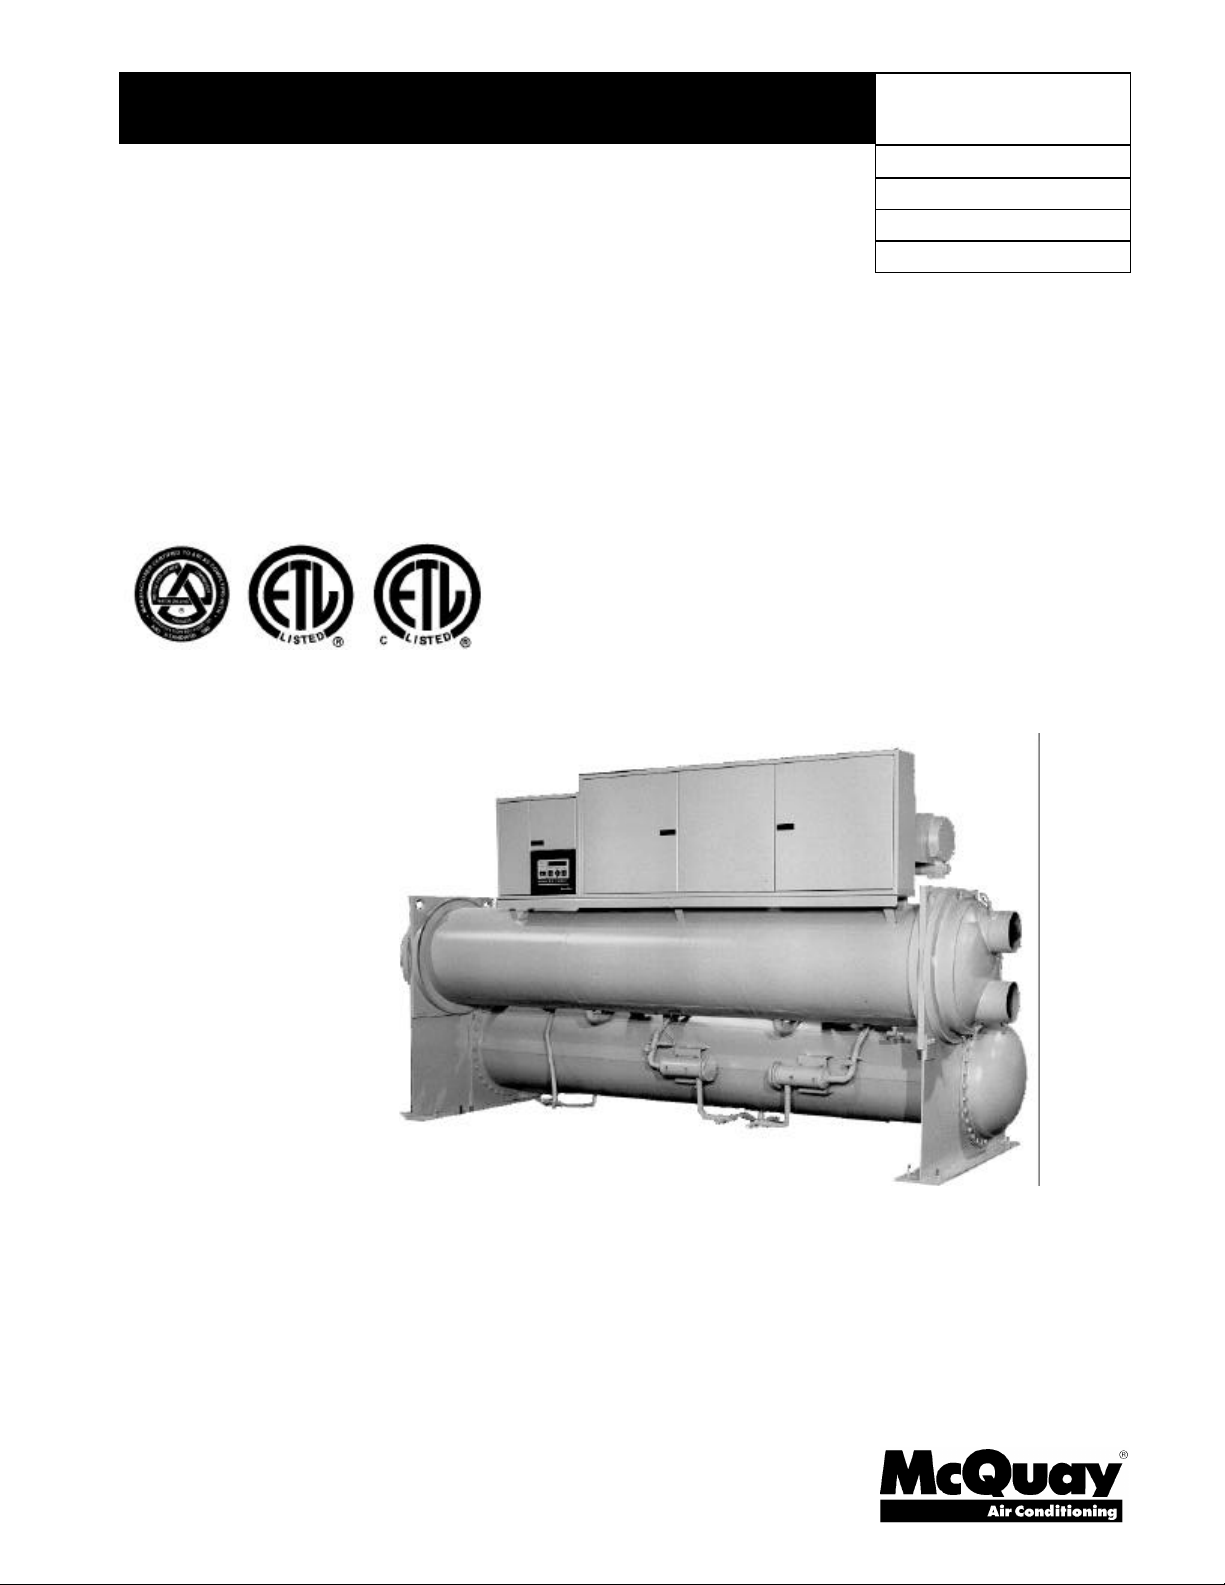
PFS 155C through 315C
Operation and Maintenance Manual
50 and 60 Hertz
Refrigerant R-22 and Refrigerant R-410A
Group: Chiller
Part Number: 629956Y
Effective: November 1997
Supersedes: None
© 1997 McQuay International
Page 2

Table of Contents
Unit Layout and Principles of Operation....................................................................3
Control Center....................................................................................................................................................3
Sequence of Operation......................................................................................................................................3
Start-up and Shutdown................................................................................................5
Pre Start-up.........................................................................................................................................................5
Start-up ................................................................................................................................................................5
Temporary Shutdown........................................................................................................................................6
Start-up After Temporary Shutdown ..............................................................................................................6
Extended Shutdown...........................................................................................................................................6
Start-up After Extended Shutdown.................................................................................................................6
System Maintenance ..................................................................................................7
General.................................................................................................................................................................7
Lubrication System............................................................................................................................................7
Compressor Maintenance.................................................................................................................................7
Electrical Terminals ............................................................................................................................................8
Refrigerant Sightglass.......................................................................................................................................8
Lead-Lag..............................................................................................................................................................8
Crankcase Heaters .............................................................................................................................................9
Service.........................................................................................................................9
Compressor Solenoids......................................................................................................................................9
Filter-Dryers......................................................................................................................................................10
Pump-down.......................................................................................................................................................10
Liquid Injection Line Solenoid Valves ..........................................................................................................11
Electronic Expansion Valve.............................................................................................................................11
Electronic Expansion Valve Operation..........................................................................................................11
Evaporator.........................................................................................................................................................12
Condenser.........................................................................................................................................................12
Refrigerant Charging.......................................................................................................................................12
Liquid Presence Sensor ...................................................................................................................................13
High Condenser Pressure Control .................................................................................................................13
Mechanical High Pressure Safety Control...................................................................................................13
Compressor Motor Protection.......................................................................................................................13
Phase/Voltage Monitor ....................................................................................................................................14
Controls, Settings, and Functions.............................................................................15
200 Series MicroTech Control Panel.............................................................................................................15
Control Panel Layout.......................................................................................................................................16
Component Description..................................................................................................................................17
Keypad / Display Operation...........................................................................................................................22
Menu Structure ................................................................................................................................................26
MicroTech Menus.....................................................................................................27
Troubleshooting Chart ..............................................................................................43
Maintenance Schedules............................................................................................45
"McQuay" is a registered trademarks of McQuay International
"Illustrations cover the general appearance of McQuay International products at the time of publication and we reserve the right to make changes in design and
2 PFS 155C - 315C OM 135
1997 McQuay International
construction at anytime without notice"
Page 3

Unit Layout and Principles of Operation
Control Center
All electrical controls are enclosed in a control center with keylocked, hinged access doors. The
control center is composed of two separate compartments, MicroTech Controller and shelf-mounted
starter.
The MicroTech control panel contains a model 280 microprocessor based controller which provides all
monitoring and control functions required for the safe, efficient operation of the chiller. The operator
can monitor all operating conditions by using the panel’s built in 4-line by 40-character keypad /
display or by using an IBM compatible computer running McQuay Monitor software. In addition to
providing all normal operating controls, the MicroTech controller monitors all safety devices on the
unit and will take corrective action if the chiller is operating outside of it’s normal design conditions. If
a fault condition develops, the controller will shut the system down and activate an alarm output.
Important operating conditions at the time an alarm condition occurs are retained in the controller’s
memory to aid in troubleshooting and fault analysis.
The system is protected by a simple password scheme which only allows access by authorized
personnel. A valid password must be entered into the panel keypad by the operator before any
setpoints may be altered.
Sequence of Operation
The following sequence of operation is typical for McQuay models PFSXXXC screw water chillers.
The sequence may vary depending on the software revision or various options that may be installed
on the chiller.
Off conditions
With power supplied to the unit, 115 VAC power is applied through the circuit breaker (CB) to the
primary of the 24V control circuit transformer and Output Board Relays. The compressor heater (HTR)
is energized through the normally closed contacts on the starter. Note: Before start-up, the
compressor heater must be on for at least 12 hours to insure there is not any liquid refrigerant in the
compressors. The 115V / 24V transformer provides power to the MicroTech controller, two 24V center
tapped transformers and related components. With 24V power applied, the controller will check the
position of the front panel system switch. If the switch is in the “Stop” position the chiller will remain
off and the display will indicate the operating mode to be OFF: System Sw. (Be certain the individual
compressor switches inside the top right door are in the “on” position. These switches may be used
to lock out a specific compressor.) If the system switch is in the “Auto” position the controller will
then check the remote start/stop switch. If the remote start stop input is open, the chiller will be OFF:
RemoteSw. The chiller may also be commanded off via communications from a separate
communicating panel such as the Chiller System Controller Panel or an Open Protocol interface. The
display will show OFF: RemoteComm if this operating mode is in effect. If an alarm condition exists
which prevents normal operation, the chiller will be disabled and the display will indicate OFF: Alarm.
If the control mode on the keypad is set to “Manual Unit Off,” the chiller will be disabled and the unit
status will display OFF: Manual Mode. Assuming none of the above stop conditions are true, the
controller will examine the internal time schedule to determine whether the chiller should be permitted
to start. The operating mode will be OFF: TimeClock if the time schedule indicates time remaining in
an “off” time period.
Ice Mode Operation
For operations requiring ice mode feature, logic in MicroTech must be programmed to adjust the
operating parameters for the specific application . Refer to the control section of this manual for
additional information.
OM 135 PFS 155C - 315C 3
Page 4

Alarm
The alarm light on the MicroTech control panel will be illuminated when any alarm condition exists.
Unless the alarm condition affects both compressors, the remaining compressor will operate as
required. Refer to the control section of this manual for additional information.
Start-up
If none of the above “off” conditions are true, the MicroTech controller will initiate a start sequence
and energize the chilled water pump output relay. If flow is not proven within 15 seconds, the alarm
output will be turned on and the keypad display will be No Evap Flow. When evap flow is confirmed,
the controller will sample the chilled water temperature and compare it against the Leaving Chilled
Water Setpoint and the Start-up Delta Temperature, which have been programmed into the controller’s
memory. If the leaving chilled water temperature is above the Leaving Chilled Water Setpoint plus the
adjustable Start-up Delta Temperature (which is defined outside of the control band), the controller
will then start the condenser pump. The same time and alarm conditions exist for the condenser flow.
The compressor with the lowest number of starts will be the lead compressor. The controller will open
the electronic expansion valves to regulate the pressure difference between the evaporator and the
condenser by pulling the evaporator pressure low once the compressor starts. The controller will start
the lead compressor and energize the compressor suction injection and motor cooling solenoid valves.
Liquid injection is energized through the auxiliary starter contacts. The lead compressor will increase
capacity by staging up according to the chilled water leaving evap setpoint. The lead compressor will
stage to 100% capacity before starting the lag compressor. If additional cooling capacity is required,
the controller will energize the lag compressor and stage it up according to setpoint. The compressors
capacity control solenoids will automatically be controlled as required to meet the cooling needs of
the system.
The electronic expansion valves are operated by the MicroTech controller through adaptive control
strategies (use of different system temperatures and pressures) to maintain desired refrigerant control
to the evaporator at all conditions.
Condenser Control
The condenser pump will be started in conjunction with the above logic to provide condenser water
flow. The minimum entering condenser water temperature for full load air conditioning duty shall be
65°F with nominal cooling tower water flow of 3 GPM. When condenser water temperatures are lower
and or chiller load is less than 100%, the condenser water flow or entering condenser water
temperature must be controlled to maintain satisfactory operating refrigerant pressures. The
MicroTech controller can control condenser water entering temperature by a condenser water bypass
valve based upon entering condenser water temperature. It can also control condenser water flow by
a flow control valve based upon condenser pressure. When using a flow control valve, a minimum
water flow through the condenser must be maintained. This minimum water flow is based upon
system conditions and can vary with each installation.
Shutdown
As the system chilled water requirements lessen, the compressors will be unloaded. As the system
load continues to drop, the lag compressor (compressor with the most run hours) will be stopped. A
continuing load reduction will start the hot gas option or the chiller can shut down on the shut down
delta setpoint below the control band.
Hot gas control will allow the unit to maintain minimum operating parameters if proper condenser
control is available. This type of control is standard and selectable from the keypad. If hot gas
control is not selected, the unit will shut down on the shut down delta setpoint. This feature can be
used to minimize chiller run time under light load conditions.
The condenser water pump will be stopped upon chiller shutdown and the chilled water pump output
relay will remain energized until the time schedule’s “on” time expires, the remote stop switch is
opened, the system switch is moved to the stop position, or a separate communications panel such as
the Chiller System Controller or an Open Protocol interface disables the chiller.
4 PFS 155C - 315C OM 135
Page 5

Start-up and Shutdown
To ensure correct compressor rotation, field power supply leads must be properly phased
before start-up. A phase monitor protects the compressors after proper phasing has been
confirmed.
Pre Start-up
1. With all electric disconnects open, check all screw or lug type electrical connections to be sure
they are tight.
2. Check voltage of the unit power supply and verify voltage is within 10% of nameplate rating.
Voltage unbalance between phases must be within 3% of nameplate rating.
3. Make certain all auxiliary control equipment is operative and an adequate cooling load is available
for startup.
4. Check all compressor valve connections for tightness to avoid refrigerant loss at start-up. Open
the compressor suction and discharge shutoff valves. Open the liquid line shutoff valves until
backseated. Always replace valve seal caps.
5. Turn compressor circuit breakers to “off” position until ready to start unit. Place main power and
control disconnect switches in “on” position. This will energize compressor heaters. Wait at
least 12 hours before starting unit.
CAUTION
Note: Evaporator and condenser water should be chemically treated.
6. Vent air from the evaporator and condenser system piping. Open all water flow valves and start
chilled water and condenser water pumps. Check all piping for leaks. Flush the evaporator and
condenser water system piping to obtain clean, non-corrosive water in the chiller water circuits.
Start-up
1. Ensure compressor suction and discharge shutoff valves are fully open. Always replace valve
seal caps.
2. Ensure manual liquid line shutoff valves at the outlet of the condenser and liquid line dryer are
open.
3. Start the auxiliary equipment for the installation by turning on the time clock or remote on/off
switch or both.
4. Turn on both compressor switches. (Located under the top door.)
5. Under menu 7 of the keypad place the unit into the automatic mode. Place the front panel switch
into the auto position. Make the remote start / stop input.
6. Superheat is factory adjusted to maintain between 1° and 10°F (1° and 7°C).
OM 135 PFS 155C - 315C 5
Page 6
Temporary Shutdown
CAUTION
To prevent evaporator freeze-up, continue chilled water flow to the unit for 5 minutes after the
compressors have stopped.
If all power is turned off to the unit the compressor heaters will become inoperable. Once power is
resumed to the unit it is important that the compressor heaters are energized a minimum of 12 hours.
Failure to do so could damage the compressors due to excessive accumulation of liquid in the
compressor.
CAUTION
The unit must not be cycled off by using the evaporator pump or the disconnect switch. A
start / stop input is required.
Start-up After Temporary Shutdown
1. Ensure compressor heaters have been energized for at least 12 hours
2. Start the chilled water pump.
3. Place unit control switch in “auto” position.
4. Observe unit operation until the system has stabilized.
5. Record unit operating conditions.
Extended Shutdown
1. Place control panel switches in "stop" position.
2. After compressors have shut down and electronic expansion valves have closed, turn off chilled
water pump.
3. Turn off all power to the unit and to the chilled water and condenser water pumps.
4. Tag all opened disconnect switches to warn against accidental startup before completing
compressor checks.
5. If the unit is shut down during winter and glycol is not used in the system, drain all water from
unit evaporator, condenser and all water piping . Do not leave the vessels or piping open to the
atmosphere over the shutdown period.
Start-up After Extended Shutdown
1. Inspect all equipment to ensure a satisfactory operating condition.
2. Clean cooling tower. Remove all debris that has collected near the tower.
3. Place compressor suction and discharge valves in the fully open position. Always replace valve
seal caps.
4. Open manual liquid line shutoff valves.
5. Make certain that circuit breakers are in the "off" position.
6. Make certain control panel rocker switches are in "stop" position.
7. Place main power and control circuit disconnects in ”on” position.
8. Allow the crankcase heaters to operate for a least 12 hours.
6 PFS 155C - 315C OM 135
Page 7

9. Start chilled water and condenser water pumps and vent air from the water piping as well as the
evaporator and condenser water sides. Start the auxiliary equipment for the installation by
making the remote start / stop input.
10. Check resets of all safety controls.
11. Place unit circuit breakers in “on" position.
12. Place control panel switch in "auto" position.
13. After running the unit for a short time, verify there is no flashing in the refrigerant sightglass.
System Maintenance
General
Check the liquid line sightglasses and take condensing and suction pressure readings. Using the
MicroTech keypad, ensure the unit has normal superheat and subcooling readings.
The refrigerant temperatures and pressures (Menu 5 on MicroTech) allows the operator to determine if
the chiller is performing properly. Record these values in a chiller log daily. The values will change as
the load, condenser temperature and evaporator temperature vary. The operator should be able to
correlate displayed information to varying load conditions.
Lubrication System
Compressor Maintenance
The semi-hermetic compressor does not require an oil separator, oil heaters or pumps, so yearly
maintenance is not normally required. However, vibration is an excellent check for proper mechanical
operation. Excessive compressor vibration indicates maintenance may be required and contributes to
a decrease in unit performance and efficiency. Using a vibration analyzer, check compressor at or
shortly after start-up and again on an annual basis. When performing the test the maintain the load as
closely as possible to the load of the original test.
The compressor is checked at the factory for minimum vibration of 0.14”/second (3.56mm/
second) at 3500 rpm (2917 rpm).
The compressor is supplied with a lifetime oil filter. If a visual inspection shows possible
restriction, then replace filter.
OM 135 PFS 155C - 315C 7
Page 8

Electrical Terminals
WARNING
Electric shock hazard. Turn off all power before continuing with following service.
Re-tightened all electrical power terminals for compressors every six months (normal heating and
cooling of the wire may loosen connection).
Refrigerant Sightglass
Observe the refrigerant sightglasses weekly. A clear glass of liquid indicates that there is adequate
refrigerant charge in the system. Bubbling refrigerant in the sightglass, during stable run conditions,
indicates the system may be short of refrigerant charge. Refrigerant gas flashing in the sightglass
indicates an excessive pressure drop in the liquid line, possibly due to a clogged filter-dryer or a
restriction in the liquid line. If subcooling is low add charge to clear the sightglass. If subcooling is
normal 10° to 15°F (6° to 13°C), at full load, and flashing is visible in the sightglass check pressure
drop across the filter dryer.
An element inside the sightglass indicates the moisture condition corresponding to a given element
color. If the sightglass does not indicate a dry condition after about 12 hours of operation, pump
down the unit and change filter-dryers.
Lead-Lag
McQuay PFS water cooled chillers alternate the sequence in which the compressors start to balance
the number of starts and run hours. Lead-lag of the compressors is accomplished automatically by the
MicroTech controller.
When in the auto mode the compressor with the fewest number of starts will be started first. If
both compressors are operating and a stage down to one compressor is required, the compressor with
the most operating hours will cycle off first. The operator may override the MicroTech controller, and
manually select the lead compressor as #1 or #2.
8 PFS 155C - 315C OM 135
Page 9

Service
Crankcase Heaters
The compressors are equipped with crankcase heaters. Crankcase heaters keep the temperature in the
crankcase high enough to prevent refrigerant from migrating to the crankcase and condensing in the
oil during the off-cycle.
Turn on power to the heaters for at least 12 hours before the compressors are started. The
crankcase temperature should be at least 80°F (26.7°C) before the system is started minimizing
lubrication problems of liquid slugging .
Disconnect all power before doing any service inside the unit.
CAUTION
Service on this equipment is to be performed by qualified refrigeration personnel familiar with
equipment operation, maintenance, correct servicing procedures, and the safety hazard
inherent to this work. Causes for repeated tripping of safety controls must be investigated and
corrected.
Compressor Solenoids
The PFS unit screw compressors are equipped with three solenoids to control compressor capacity.
The solenoids are controlled by MicroTech outputs (see unit wiring diagrams). The solenoids are
energized at various compressor load conditions as indicated in Table 1.
Table 1, Solenoid status
Compressor Unloading Solenoid Staus
Percent Compressor Top Bottom Front Bottom Rear
Loading Solenoid Solenoid Solenoid
100 Energized Off Energized
75 Energized Energized Off
50 Off Off Energized
25 Off Energized Off
Location of the solenoids is as follows:
• The top solenoid is on top of the compressor near the discharge end.
• The bottom solenoids are on the lower side of the compressor on the opposite end from the
terminal box. The bottom front solenoid is the one closest to the discharge end of the
compressor. The bottom rear solenoid is the one closest to the motor end of the compressor.
If the compressor is not loading properly check the solenoids to see if they are energized. A complete
check will include a check of the MicroTech output, the wiring to the solenoid and the solenoid coil
itself.
OM 135 PFS 155C - 315C 9
Page 10

Filter-Dryers
Change the filter-dryer every scheduled service maintenance of the unit, or when any one of the
following conditions occur:
• Excessive pressure drop is read across the filter-dryer (The maximum recommended pressure drop
across the filter-dryer is shown in Table 2.
Table 2, Filter-dryer pressure drop
Maximum recommended pressure
drop
Percent Circuit Loading PSIG (kPa)
100 10 (69)
75 8 (55.2)
50 5 (34.5)
25 4 (27.6)
• When bubbles occur in the sightglass with normal subcooling
• A partially clogged filter causes a trip on the no liquid run sensor.
• Moisture indicating liquid line sightglass indicates excess moisture.
Pump-down
Note: Pump-down the unit before changing filter-dryer cores, replacing solenoid valves (except
solenoid valve coils), or to change expansion valve.
Unit condensers are sized to hold the entire refrigerant charge. Use method (A) or (B) below to pumpdown the unit.
A. Unit pump-down using the compressor.
1. Go to MicroTech menu number 16.
2. Select “Manual Pump-down”
3. Choose “YES”.
B. Unit Pump-down using a refrigerant transfer pump.
1. Stop the unit by opening the remote start / stop input.
CAUTION
Do not close any liquid line shutoff valves while unit is in operation. Liquid injection and
suction injection must be available at all times.
2. Close all liquid line shutoff valves at the condenser liquid line outlets.
3. When the compressor shuts off, close the discharge line ball valve in each compressor
circuit.
4. Connect a refrigerant transfer pump between the service valve on the evaporator and the
service valve on the top of condenser. Pump all remaining refrigerant out of evaporator,
compressors, and liquid line.
5. Complete pump-down according to EPA refrigerant guidelines before opening the circuit.
6. Servicing of the components may now continue.
10 PFS 155C - 315C OM 135
Page 11

WARNING
The discharge housing of the component contains internal discharge side check
valves. If these valves are tight seating, then this housing will contain high pressure
refrigerant captured between these check valves and the discharge line shutoff valve.
The MicroTech high pressure transducer should reflect this pressure. Be careful when
servicing the discharge housing.
Liquid Injection Line Solenoid Valves
The solenoid valves that shut off refrigerant flow during a power failure, do not normally require any
maintenance.
The solenoid coil can be checked to see that the stem is magnetized when energized by touching a
screwdriver to the top of the stem. If there is no magnetization either the coil is bad or there is no
power to the coil. The solenoid coil may be removed from the valve body without opening the
refrigerant piping. For personal safety shutoff and lockout the unit power.
The coil can then be removed from the valve body by simply removing a nut or snap-ring located at
the top of the coil. The coil can then be slipped off its mounting stud for replacement. Be sure to
replace the coil on its mounting stud before re-applying power.
Liquid injection is required during compressor operation to seal and cool the screw. A liquid injection
sensor is installed on the compressor to assure that liquid injection occurs whenever the compressor
is running. A failure of the liquid injection solenoid valve to open will cause the compressor to shut
down due to lack of liquid injection. The liquid injection solenoid valve only closes when the
compressor stops.
Electronic Expansion Valve
The expansion valve is responsible for allowing the proper amount of refrigerant to enter the
evaporator to match the cooling load. It does this by maintaining a constant superheat. (Superheat is
the difference between refrigerant temperature of the vapor as it leaves the evaporator and the
saturation temperature corresponding to the evaporator pressure).
All PFS chillers are factory set for the proper superheat. The superheat is controlled through adaptive
control strategies by the MicroTech controller and is not adjustable.
The expansion valve does not normally require maintenance, but if it requires replacement, follow the
same steps used to change a filter-dryer.
If the problem can be traced to the electric motor only, it can be unscrewed from the valve body
without removing the valve but only after pumping the unit down.
Electronic Expansion Valve Operation
There are three colored indicator LEDs (green, red, yellow) located in the control panel on the
electronic expansion valve (EXV) board. When the control panel is first powered the microprocessor
will automatically step the valve to the fully closed (shut) position and the indicator lights on the EXV
will blink in sequence. The valve can also be heard closing as it goes through the steps. The valve
will take approximately 14 seconds to go from a full open position to a full closed position.
The position of the valve can be viewed at any time by is using the MicroTech keypad through menu
3 (circuit pressures). There are a total of 760 steps between closed and full open.
OM 135 PFS 155C - 315C 11
Page 12

A feature of the electronic expansion valve is a maximum operating pressure setting (MOP). This
setting limits the load on the compressor during start-up periods where high return evaporator water
temperatures may be present. The valve will limit the maximum suction pressure at start-up to
approximately 85 psig (586 kPa). The valve will close to a point necessary to maintain the 85 psig (586
kPa). During this time the superheat will rise above 12°F (6.7°C) and not drop below 12°F (6.7°C) until
the suction pressure drops below 85 psig (586 kPa). The valve will maintain evaporator pressure close
to 85 psig (586 kPa) until the evaporator water temperature decreases to approximately 55°-60°F (12.8°-
15.6°C).
The valve remains closed at start and opens as the pressure between the condenser and evaporator
rises to control at a pressure ratio that assures good liquid feed to the compressors. At the end of the
cooling cycle the valve closes, partially pumping down the evporator. The valve closes at the rate of
approximately 55 steps per second, or from full open to full closed in approximately 14 seconds.
Evaporator
The evaporator is a flooded, shell-and-tube type with water flowing through the tubes and refrigerant
flowing through the shell over the tubes. Normally no service work is required on the evaporator.
When a tube must be replaced, the old tube can be removed and replaced. Follow the requirements
set forth by the EPA for the pumpdown and recovery of refrigerant.
Condenser
The condenser is a shell-and-tube type with water flowing through the tubes and refrigerant in the
shell. External finned condenser tubes are rolled into steel tube sheets. Integral subcoolers are
incorporated on all units. All condensers are equipped with two relief valves and a shutoff valve.
Either end on the condenser can be easily removed in the field.
Refrigerant Charging
PFS water-cooled screw chillers are shipped with a full operating charge of refrigerant. If a unit must
be field charged, follow these recommendations.
PFS water-cooled screw chillers are more sensitive to undercharging than to overcharging.
Therefore, it is preferable to be slightly overcharged rather than undercharged on a circuit. The
optimum charge is the charge that allows the unit to run with a solid stream of liquid in the liquid line
at all operating conditions. When the liquid line temperature does not drop with the addition of 5-10
lb. (2.3-4.5 kg) of charge then the subcooler is nearly full and proper charge has been reached. If the
liquid line temperature does not drop and the discharge pressure goes up 3-5 psig (21-35 kPa) as 5-10
lb. (2.3-4.5 kg) of refrigerant is added the correct maximum charge has been reached.
Unit charging can be done at any steady load condition. Unit must be allowed to run 5 minutes or
longer.
Note: As the unit changes load the subcooling will vary but should recover within several
minutes and should never show below 6°F (3.4°C) subcooling at any steady state run
condition. Subcooling will vary somewhat with evaporator leaving water temperature and
suction superheat. As the evaporator superheat goes lower the subcooling will drop slightly.
Excessive refrigerant losses can also leak oil from the system. When adding charge, add four
percent oil by weight. Use PLANETELF ACD 68AW oil.
A refrigerant leak in the unit could be very small and have little effect on system operation or
could be severe enough to cause the unit to shut down on a safety trip.
1. If the unit is slightly undercharged the unit will show bubbles in the sightglass. Recharge the
unit as described in the following charging procedure.
12 PFS 155C - 315C OM 135
Page 13

2. If the unit is moderately undercharged the unit will most likely trip on freeze protection. Recharge
the unit as described in the following charging procedure.
3. If the unit is severely undercharged the unit will trip off due to lack of liquid injection. In this case
either remove the remaining charge by means of a proper reclamation system and recharge the
unit with the proper amount of refrigerant as is stamped on the unit nameplate, or add refrigerant
through the suction valve back seat port on the compressor. Feed liquid into the suction valve
when the compressor is running. If the unit is severely undercharged the unit may nuisance trip
during this charging procedure. If this happens close off the refrigerant from the tank and restart
the unit. Once the unit has enough charge so that it does not trip out continue with the charging
procedure below.
Procedure to charge a moderately undercharged PFS unit:
Note: Refrigerant can be satisfactorily added at less than full load conditions (preferably above
50% unit load and steady state). Condensing temperature should be reasonably high and
characteristic of normal cooling tower type operation. Saturated suction temperatures should
also be at a value not higher than the design leaving chilled water temperature.
1. Connect a refrigerant drum to the service valve on evaporator -- OR -- to the backseat port on the
suction service valve on compressor.
2. Open refrigerant drum adding a "weighed-in" amount -- OR -- charge refrigerant during operation
of the compressor(s) until liquid line and liquid injection line sightglasses are clear.
Liquid Presence Sensor
Each compressor is equipped with a liquid sensor to assure that liquid flows to the compressor for
cooling and sealing during operation. The sensor will shutdown the compressor if liquid is not
sensed and discharge superheat increases over 5°F. At start-up the liquid sensor checks for excessive
liquid in the compressor and will delay (adjustable delay time of five minutes) start until the
compressor heater transfers the liquid out of the compressor and into the condenser. A liquid trip by
the sensor will produce an alarm message on the MicroTech display.
High Condenser Pressure Control
MicroTech is also supplied with high pressure transducers on each compressor. Although the main
purpose of the high pressure transducer is to maintain proper head pressure control, another purpose
is to convey a signal to the MicroTech control to stop the compressor in the event of an excessive rise
in discharge pressure. If the high condenser pressure control trips, the MicroTech must be manually
reset.
Mechanical High Pressure Safety Control
The high pressure safety control is a single pole pressure activated switch that opens on a pressure
rise. When the switch opens, the control relay circuit is de-energized stopping the compressors.
The control is mounted on the compressor ahead of the discharge shut off valve.
Compressor Motor Protection
The compressors are supplied with two types of motor protection.
Repeat overload trips under normal operation may indicate wiring or compressor motor problems. The
overloads are manual reset and must be reset at the overload as well as through MicroTech.
Also, the compressors have a solid-state Guardistor™ circuit which provides motor over temperature
protection. The Guardistor™ circuit has automatic reset but must also be reset through MicroTech.
OM 135 PFS 155C - 315C 13
Page 14

Phase/Voltage Monitor
The phase/voltage monitor provides protection against three-phase electrical motor loss due to power
failure conditions, phase loss, and phase reversal. Whenever any of these conditions occur, a contact
opens which de-energizes the starter.
CAUTION
Incorrect phase rotation will damage the compressor.
When proper power is restored, contacts close and MicroTech enables compressors for operation.
When three-phase power has been applied, the output relay should close and the “run light” should
come on. If the output relay does not close, perform the following tests.
1. Check the voltages between L1 - L2, L1 - L3 and L2 - L3. These voltages should be approximately
equal and within +6% of the rated three-phase line-to-line voltage.
2. If these voltages are extremely low or widely unbalanced check the power system to determine the
cause of the problem.
3. If the voltages are good, using a phase tester, verify that phases are in A, B and C sequence for
L1, L2 and L3. Correct rotation is required for compressor operation. If required to do so by
phase sequence, turn off the power and interchange any two of the supply power leads at the
disconnect.
4. Turn on the power. The output relay should now close after the appropriate delay.
14 PFS 155C - 315C OM 135
Page 15

Controls, Settings, and Functions
200 Series MicroTech Control Panel
General Description
The MicroTech control panel contains a model 280 microprocessor based controller which provides all
monitoring and control functions required for the safe, efficient operation of the chiller. The operator
can monitor all operating conditions by using the panel’s built
in 4-line by 40-character keypad / display or by using an IBM
compatible computer running McQuay Monitor software.
In addition to providing all normal operating controls, the
MicroTech controller monitors all safety devices on the
unit and will take corrective action if the chiller is
operating outside of it’s normal design conditions. If a fault
condition develops, the controller will shut the system down
and activate an alarm output. Important operating
conditions at the time an alarm condition occurs are retained
in the controller’s memory to aid in troubleshooting and fault
analysis.
The system is protected by a password scheme which only allows access by authorized personnel. A
password must be entered into the panel keypad by the operator before any setpoints may be altered.
Features of the Control Panel
• Control of leaving chilled water within an
adjustable control band.
• Readout of all temperature and pressure
readings.
• Automatic control of evaporator and condenser
pumps.
• Control of up to 2 stages of cooling tower fans
• Control of modulating cooling tower bypass valve.
• Control of modulating condenser water flow
valve.
• Panel mounted 12 key keypad plus 6 Quick
Access function keys. Operator can log chiller
operating conditions from a single keypad/display
instead of reading gauges, thermometers, pots,
etc. The display is a backlit, 4 line by 40
character LCD type for easy viewing in all lighting
conditions.
• Two levels of security protection against
unauthorized changing of setpoints and other
control parameters.
• Complete fault diagnostics to inform operators of
fault conditions in plain language. All faults are
time and date stamped so there is no guessing of
when the fault condition occurred. In addition, the
operating conditions that existed just before
shutdown can be recalled to aid in isolating the
cause of the problem.
• Five previous faults are available from the
display.
• Soft Loading feature reduces electrical
• Adjustable load pull-down rate reduces
undershoot during loop pulldown.
• Easy integration into building automation systems
via separate 4-20mAdc signals for chilled water
reset and demand limiting.
• Internal time-clock for on/off scheduling. The time
clock accommodates a 7 day schedule plus
holiday, 1 start and stop per day, and 14 holidays
with programmable duration.
• Communications capabilities for remote
monitoring, changing of setpoints, trend logging,
remote reset, alarm and event detection, via IBMPC running McQuay MicroTechtm software.
• Manual control mode allows the service
technician to command the unit to different
operating states. Useful for system checkout.
• Building Automation System communication
capability via McQuay’s Open Protocol strategy to
over 10 major BAS manufacturers.
• Service Test mode for troubleshooting controller
hardware.
• Keypad programmable alarm contacts for
normally open or normally closed.
• Pressure transducers for direct reading of
system pressures.
• Pre-emptive control of low evaporator pressure
conditions to take corrective action before a fault
trip.
• Pre-emptive control of high discharge
temperature.
OM 135 PFS 155C - 315C 15
Page 16

consumption and peak demand charges during
loop pulldown.
• Hot gas low load control
Control Panel Layout
Figure 1, Major Component Locations
High
High
Press.
Press.
Relay
Relay
AOX
EXV
Board
Transformer T4
ModemLow Voltage Wireway
Output
Board
MCB 280
ADI
Board
Low Voltage Wireway
Terminal Block
High Voltage Wireway
Low Voltage Wireway
Terminal
Block
Transformer
Circuit Breaker
Transformer T3
Signal
Converter
Guardister
Board
Signal
Converter
Guardister
Board
Low Voltage Wireway
16 PFS 155C - 315C OM 135
Page 17

Component Description
Microprocessor Control Board (MCB1)
The Model 280 Microprocessor Control Board contains the electronic hardware and software required
to monitor and control the unit. It receives input from the
ADI Board and sends commands to the Output Board to
maintain the unit's optimum operating mode for the current
conditions. Status lights are mounted on the control board
to indicate the operating condition of the microprocessor.
OM 135 PFS 155C - 315C 17
Page 18

Status LED’s
There are three status LED’s located on the model 280 controller which will indicate the
microprocessor’s operating condition. When power is first applied to the control panel, the red reset
LED will illuminate for approximately 3 seconds. During this time,
RUNNING
RESET
ACTIVE
green
red
amber
CPU
STATUS
OUTPUT 0
If the reset LED stays on or the running LED fails to illuminate, disconnect the controller power
by opening circuit breaker CB-1 and re-check the field wiring. Observe the controller’s LED’s while reconnecting power by closing CB-1. If the green running LED still does not turn on, a hardware failure
exists or the control software is corrupted. Downloading new control software or replacing the 280
controller should correct the problem.
With the controller powered up and the green running LED illuminated, the backlit panel on the
display module will be illuminated and the unit status menu will be visible. If the display text looks
faded or appears as “blocks” the contrast control needs to be adjusted. Watch the display and
adjusting the contrast control with a small flat-blade screwdriver until the best setting is determined.
Figure 2, Contrast adjustment
the microprocessor is checking the control software and
performing internal hardware tests. When these tests are
complete the reset LED will turn off and the green running LED
will illuminate indicating the controller’s circuitry and software are
operating correctly. The amber output 0 active LED is associated
with the external alarm output. This LED may or may not be
illuminated at this time based on the setpoints under menu 23.
KDI BOARD
(back side)
Contrast
Adjustment
Power
Wiring
Ribbon
Cable
The MicroTech controller contains factory installed default setpoints which will be appropriate for
most common installations. Step through all of the unit’s setpoints by using the keypad / display and
adjust them as required to meet the specific job requirements. Any faults appearing on the display
should be cleared at this time by pressing the clear key.
18 PFS 155C - 315C OM 135
Page 19

Digital Output Board
The Output Board contains up to 24 solid state relays which are used to control the compressor,
cooling tower fans, solenoid valves and alarm annunciation. It receives control signals from the
Microprocessor Control Board through a 50 conductor ribbon cable.
Figure 3, Digital output board
Analog / Digital Input Board (ADI)
The ADI Board provides low voltage power for the temperature and pressure sensors. It also
provides optical isolation between the Microprocessor Control Board and all 24V switch inputs.
LED's are furnished on the board to give a visual indication of the status of all digital inputs. All
analog and digital signals from sensors, transducers and switches are received by the ADI Board and
then sent to the Microprocessor Control Board for interpretation.
Figure 4, ADI board
OM 135 PFS 155C - 315C 19
Page 20

Analog Output Board (AOX)
The AOX board converts control instructions from the Microprocessor Control Board’s expansion
bus into an analog control signal suitable for driving a cooling tower bypass valve. Each AOX board
is factory set via jumper to provide an output signal range of 0 - 10 VDC. An additional output on the
AOX board provides an analog signal that is proportional to compressor motor current.
Figure 5, AOX board
Signal Converter Board
The AC current signal generated by the starter is converted by the signal converter board into a 0-5
VDC signal that is directly proportional to the chiller amp draw. The amp draw signal is sent to the
ADI board for conditioning and then to the M280 controller.
Figure 6, Signal converter board
TB1 TB2
20 PFS 155C - 315C OM 135
Page 21

Guardistor Board
The Guardistor board monitors the motor winding temperature through the embedded Guardistor
sensors. If the motor temperature rises to an unsafe level, the board will signal the M280 controller
and the chiller will be shut down.
Figure 7, Guardistor board
Power Transformers
Transformers T2,T3 and T4 provide operating power to the MicroTech controller and it’s associated
components. T2 is a conventional ferrite core transformer that converts 120VAC from the control
transformer into 24VAC. T3 and T4 are transformers that convert 24VAC from T2 into a center-tapped
18VAC.
Keypad / Display
The Keypad/Display is the primary operator interface to the unit. All operating conditions, system
alarms and setpoints can be monitored from this display and all adjustable setpoints can be modified
from this keyboard if the operator has entered a valid operator password.
OM 135 PFS 155C - 315C 21
Page 22

Figure 8, Keyboard / Display
3.Refrig Temps/Press
12:55 Mar-01-95
Saturated Evap=50.70F/46.2psi
Suct Line= 53.10F Liq Line= 87.10F
Saturated Cond=90.80F/105.9psi
Alarm
MENU - ITEM ACTION
Prev.
Menu
Chiller
Setup
Prev.
Item
Next
Item
Next
Menu
Setup
Options
+
Incr.
Decr.
-
Refrig.
Temp’s
Pres’s
Help
Clear
Enter
=
Alarm
History
Stop
Auto
QUICK ACCESS
CATEGORY
Status
Control
Water
Set-
points
Alarm
Switch
Motor
Data
Figure 9, Example of a typical MicroTech display screen indicating Item lines and fields
Menu line
Item line 1
Item line 2
Item line 3
Screen
Field One
Field Two
Previous screen indicator
Next screen indicator
Keypad / Display Operation
General Description
The MicroTech keypad consists of eighteen pressure sensitive membrane switches used to step
through, access, and manipulate the information in the MicroTech controller. The selected
information is presented on a four line by forty character backlit LCD display.
The information stored in the MicroTech controller can be accessed through the keypad by following
the tree-like structure of menus and menu items. The keypad keys are divided into four groups with
four or more keys in each to ease navigation through the available menus and items.
Figure 10, Category group
The keys in this
group provide quick
access to strategic
menus throughout
the menu treestructure. This
reduces the need to
step through all the
menus, one by one,
in order to reach the
desired information.
22 PFS 155C - 315C OM 135
Page 23

Status Key
Menus and menu items in this category provide information on the MicroTech operating conditions
and the chiller operating conditions. The entries under each menu item in this category provide
information only and are not changeable through the MicroTech keypad.
Pressing the "STATUS" key at any time shifts the display to Menu #1 which is the first menu of
the STATUS category.
Control Key
Menus and menu items in this category provide for the adjustment of all the unit control parameters.
These include capacity control, pump control and cooling tower control parameters as well as time
schedules and alarm limits. The entries under these menu items are changeable through the
MicroTech keypad.
Pressing the "CONTROL" key at any time shifts the display to Menu #7 which is the first menu of
the CONTROL category.
Alarm Key
Menus and menu items in this category provide information regarding current and previous fault
conditions along with the operating temperatures and pressures at the time the fault occurred.
Pressing the "ALARM" key at any time shifts the display to Menu #20 which is the first menu of
the ALARM category.
The keys in this
group are used to
scroll through the
various menus and
items presented on
the controller’s
display. A menu
contains a specific
group of items.
Switch Key
Pressing the "SWITCH" key at any time toggles the display between the current menu
(status/control) item and the related menu (control/status) item somewhere else in the tree-structure.
This allows checking actual conditions against setpoints. Pressing the “SWITCH” key the second
time takes the operator back to the original menu item. For example, if this key is pressed while the
current menu item is menu item 2B (Leaving Evaporator =), the display shifts to menu item 8B (Local
Evaporator Setpoint =). This provides for easy review of actual versus setpoint values.
Figure 11, Menu - Item Group
Prev.
Item
Prev.
Menu
Next
Menu
Next
Item
Note: When Menu #1 is currently in the display (the first menu in the menu tree-structure),
pressing "PREV." causes an "beginning of menus" message to appear in the display.
Previous Menu
Pressing "PREV." shifts the display to the previous menu.
OM 135 PFS 155C - 315C 23
Page 24

The keys in this
group are for making
changes to unit
control parameters
or for clearing fault
conditions.
Next Menu
Pressing "NEXT" shifts the display to the next menu.
Note: When the first item in a menu is currently in the display, pressing "PREV." causes an
"beginning of items" message to appear in the display.
Previous Item
Pressing "PREV." shifts the display to the previous group of items within a menu.
Note: When the last item in a menu is currently in the display, pressing "NEXT" causes and
"end of items" message to appear in the display
Next Item
Pressing "NEXT" shifts the display to the next group of items in a menu.
Figure 12, Action Group
+
Incr.
Decr.
-
Help
Clear
Enter
=
Note: Before a change to a parameter can be made or before a fault can be cleared, the
display prompts the user with an "Enter Password" message. At this point, the password
must be entered before the user can continue with the action.
Increment (+)
When changing the value of a menu item entry, pressing "INCR. +" shifts the selected menu item to
the next higher value or next available selection.
Decrement (-)
When changing the value of a menu item entry, pressing "DECR.-" shifts the selected menu item to
the next lower value or previous available selection.
Enter (=)
Once a change has been made to a desired value, pressing "ENTER =" locks in the new value.
Note: The cause of a fault should always be determined and corrected before clearing the fault
through the keypad.
Help / Clear
Pressing "ALARMS" followed by "CLEAR" clears the current fault. Also, when a change is made to
a menu item, pressing "CLEAR" returns the display to the original value as long as "ENTER" has not
yet been pressed.
24 PFS 155C - 315C OM 135
Page 25

The Quick Access
keys provide a fast
shortcut directly into
the most frequently
used MicroTech
menus.
Keypad Password
When changing any menu item entry (+ or - key), the user is prompted to enter a valid password. The
change will not be allowed until the correct password is entered. The password is always four
successive presses of the “Enter” key.
Once this has been done, the user can make changes to menu item entries. After entering the
correct password, the controller will allow a 5 minute time period during which the operator may make
any necessary setpoint adjustments. Any keypad activity will reset the timer for the full 5 minutes so
the password only needs to be entered once per session. After 5 minutes of inactivity, the password
access time will expire providing protection against unauthorized users.
Figure 13, Quick Access Group
Display Format
The information stored in the MicroTech controller tree structure can be viewed directly on the control
panel’s 4 line by 40 character display. The currently selected MENU is shown on the top line along
with the current date and time. Up to six menu items may be shown on the lower three lines of the
display. Alarm menus may have an additional field on line 1.
Either U.S. Customary or S.I. engineering units may be displayed by installing the appropriate
controller software.
U.S. Customary Units:
Temperature = º F (Fahrenheit)
Pressure = Psi (Pound per sq. inch)
Psig
Psid
S.I. Units:
Temperature = º C (Centigrade)
Pressure = kPa (Kilo Pascals)
kPag
kPda
OM 135 PFS 155C - 315C 25
Page 26

Menu Structure
Displaying Setpoints
To view setpoints or operating conditions press the ‘Prev Menu’ or ‘Next Menu’ key until menu of
interest appears. (Remember pressing a key in the Category group goes to the first menu of that
group) To view additional setpoints or conditions under the menu selected press the ‘Prev Item’ or
‘Next Item’ key.
Changing Setpoints
Setpoints / values that can be modified are under the control and alarm categories. Once the menu is
selected, the setpoint / value can be changed by pressing the ‘+ incr.’ or ‘- decr.’ key. The display
screen will change and in place of the date and time the term “Enter Password:” will be displayed. The
operator must enter the appropriate password by pressing the correct four keys in sequence. The
display will indicate “Password Verified:” or “Invalid Password:” in place of the time and date. When
the correct password is entered, the term”<Change Values Mode>“ is displayed in place of the time
and date. The first value on the display that can be changed will flash on and off. Pressing the
‘Next/Prev Menu’ or ‘Next/Prev Item’ keys will select the next setpoint / value on the screen that can
be changed. Pressing the ‘+ incr.’ or ‘- decr.’ key will change the numeric value or select the next
option. When the correct value or option is flashing, press the ‘enter =‘ key to store it into memory.
Pressing the “Enter” key a second time or pressing “Clear”. Screens and menus cannot be changed
while in the Change Values Mode. (The term “Enter Password” will not be displayed unless there has
not been any keypad activity for five minutes.)
Display Screen
The display screen is divided into lines and fields. The top line will indicate the menu number and a
menu description on the left side, and the time and date on the right side. The time and date will be
replaced with directions when modifying setpoints and values.
The first line normally will have two fields except when viewing alarms then there is a third field. Line
2 and line 3 have two fields. Different menus will have varying amounts of information and not all the
fields will be used.
When selecting new menus using the 'next menu' and 'prev menu' keys, the display is considered
screen one. If additional screens are available, there will be an arrow pointing down in the last block in
the right hand screen corner. To obtain additional information available under a specific menu, press
the 'next item' and 'prev item' keys. This will toggle between the available screens displaying the
various setpoints and values. Most menus will have only one screen. The range of information that
can be displayed in a field is extensive and the next section will show all possible field names,
setpoints and values.
26 PFS 155C - 315C OM 135
Page 27

MicroTech Menus
Menu 1, Unit Status
Press the "STATUS" key under the Category Group and the information in Menu 1 (Unit Status) will be displayed.
Information displayed in menus 1 -6 indicates current operating conditions and cannot be reset from the display keypad.
Menu 1 has two screens. Screen 1,Line 1 contains the unit operating status. Line 2, field 1 indicates the entering
evaporator water temperature and line 2, field 2 indicates the entering condenser water temperature. Line 3, field 1
indicates the leaving evaporator water temperature and line 3, field 2 indicates the leaving condenser water temperature.
Screen 2, Line 1 shows the interstage timer settings. Pressing the switch key will toggle between this menu and Menu 13
(Timers).
Screen Line Display Field Range
1 1 AllSystemsOff 1 AllSystemsOff
2 Ent Evap=xx.xoF 1
Ent Cond=xx.xoF 2
3 Lvg Evap=xx.xoF 1
Lvg Cond=xx.xoF 2
2 1 IntrStgTmr: xxx 1
Item
OM 135 PFS 155C - 315C 27
Page 28

Menu 2, Comp#1 Status
Press the "NEXT MENU" key and Menu 2 will be displayed. This menu has two screens.
Screen 1, Line 1 indicates if the unit is running or off on alarm. Line 2, field 1 indicates the actual motor amps as
measured by a current transformer on one phase of the compressor wiring. Line 2, field 2 indicates the number of
compressor starts. Line 3, field 1 indicates the total compressor operating hours.
Press the “NEXT ITEM” key and screen 2 will be displayed. Screen 2, line 1 indicates suction line temperature.
Line 1, field 2 indicates the refrigerant temperature after it leaves the compressor and before entering the condenser.
Line 2, field 1 indicates suction superheat. This value is determined by subtracting the saturated evaporator temperature
from the suction line temperature. Line 2, field 2 indicates the discharge refrigerant superheat. This temperature is
determined by subtracting the refrigerant saturated condenser temperature from the refrigerant discharge temperature.
Screen Line Display Field Range
1 OffAlarm 1
1 2 Motor Amps = x% 1
Starts = 2
3 Compr Hours 1
1 Suction Line = x °F 1
Discharge = x °F 2
2 2 Suct Suprht = x °F 1
Dsch Suprht = x °F 2
Item
Menu 3, Comp#2 Status
Press the "NEXT MENU" key and Menu 3 will be displayed. This menu has two screens.
Screen 1, Line 1 indicates if the unit is running or off on alarm. Line 2, field 1 indicates the actual motor amps as
measured by a current transformer on one phase of the compressor wiring. Line 2, field 2 indicates the number of
compressor starts. Line 3, field 1 indicates the total compressor operating hours.
Press the “NEXT ITEM” key and screen 2 will be displayed. Screen 2, line 1 indicates suction line temperature.
Line 1, field 2 indicates the refrigerant temperature after it leaves the compressor and before entering the condenser.
Line 2, field 1 indicates suction superheat. This value is determined by subtracting the saturated evaporator temperature
from the suction line temperature. Line 2, field 2 indicates the discharge refrigerant superheat. This temperature is
determined by subtracting the refrigerant saturated condenser temperature from the refrigerant discharge temperature.
Screen Line Display Field Range
1 OffAlarm 1
1 2 Motor Amps = x% 1
2 Starts = 2
3 Compr Hours 1
1 Suction Line = x °F 1
1 Discharge = x °F 2
2 2 Suct Suprht = x °F 1
2 Dsch Suprht = x °F 2
Item
28 PFS 155C - 315C OM 135
Page 29

Menu 4, Water Temps/Flow
Press the "NEXT MENU" key and Menu 4 will be displayed. This menu has two screens.
Screen 1, line 1, field 1 indicates the entering evaporator water temperature and line 1, field 2 indicates entering
condenser water temperature. Line 2, field 1 indicates the leaving evaporator water temperature and line 2, field 2
indicates the leaving condenser water temperature. Line 3, field 1 indicates the evaporator delta temperature. This is the
difference between the entering and leaving water temperature and indicates the 'load' on the chiller and the performance
of the chiller. Line 3, field 2 indicates the condenser delta temperature.
Press the "NEXT ITEM" key and screen 2 will display additional information. Line 1, field 1 will indicate the entering
heat recovery temperature. (This is an optional operating parameter and it will display a value only if the optional heat
recovery sensors are installed.) Line 1, field 2 will indicate the flow rate through the evaporator in gallons per minute
(gpm). (This is an option and the optional flow meter must be installed in the piping system.) Line 2, field 1 indicates the
leaving heat recovery water temperature (optional). Line 2, field 2 indicates the condenser water flow in gallons per
minute (optional). Line 3, filed 1 indicates the delta temperature of the heat recovery system (optional). The delta
temperature of the heat recovery system multiplied by the water flow rate and a special factor would provide the amount
of heat recovered in Btu's.
Screen Line Display Field Range
1 1 Ent Evap=xx.xoF 1
2 (*) 1 Evap Flow=xxxxgpm 1
* Requires optional flow transducers field installed in piping by others.
Ent Cond=xx.xoF 2
2 Lvg Evap=xx.xoF 1
Lvg Cond=xx.xoF 2
3 Delta T=xx.xoF 1
Delta T=xx.xoF 2
1
Cond Flow=xxxxgpm
2
Evap Pumps
2
Cond Pumps
Item
2
1
2
Menu 5, Refrig Temps/Press
Press the "NEXT MENU" key and Menu 5 will be displayed.
Screen 1, line 1, field 1 indicates the saturated evaporator refrigerant pressure and temperature. The evaporator pressure
is measured using a pressure transducer and the associated temperature is calculated using refrigerant tables stored in
the computer memory. Line 2, field 1 indicates the saturated condenser refrigerant pressure and temperature. The
condenser pressure is measured using a pressure transducer and the associated temperature is calculated. Line 3, field 1
indicates the suction line temperature. This is measured with a thermister in the inlet suction pipe before the inlet guide
vanes at the compressor. Line 3, field 2 indicates the liquid line temperature and is measured with a thermister in the
liquid line leaving the condenser.
Screen Line Display Field Range
1 Saturated Evap= x psi / x °F 1
2 Saturated Cond= x psi / x °F 1
1 3 CondSubCool = x ° 1
LiquidLine = °F 2
1 Saturated Cond= x psi 1
2 Liquid Line = x psi 1
2 3 Filter DP= x psi 1
LiqSubCool = x °F 2
1 Cond Apprch = x°F 1
WaterPresRatio= 2
3 2 Evap apprch = x°F 1
RefrgPresRatio= 2
3 Lift Press = x psi 1
Item
Table continued on next page
OM 135 PFS 155C - 315C 29
Page 30

Menu 5, Refrig Temps/Press (continued)
Screen Line Display Field Range
1 CondSubCool= x°F 1
EXV Postion= 2
2 LeadSuperHt= x°F 1
4 EXV Control = 2
3 SuprHeatSpt = °F 1
EXV Start = 2
1 Compressor #1
2 Suct Line = x °F 1
5 Discharge = x °F 2
3 SuctSuprHt = x °F 1
DischSuprHt = x °F 2
1 Compressor #2
2 Suct Line = x °F 1
6 Discharge = x °F 2
3 SuctSuprHt = x °F 1
DischSuprHt = x °F 2
Item
Menu 6, Tower Status
Press the "NEXT MENU" key and Menu 6 will be displayed.
Screen 1, line 1, field 1 indicates the current cooling tower stage in operation. This is optional and will be valid only if
the chiller is controlling the cooling tower fans. Line 2, field 1 indicates the entering condenser water temperature. line
3, field 1 indicates the cooling tower by-pass valve position. This is optional and will be valid only if a cooling tower
valve is controlled by the chiller. Screen 2, line 1, field 1 indicates the outdoor air temperature. This is optional and will
be valid if an out door thermister is installed. Pressing the switch key will toggle between this menu and Menu 19
(Chiller Setup).
Screen Line Display Field Range
1 1 Cooling Tower Stage=x 1 1-2
2 Entering Condenser Water
Temp=xx.xoF
3 Coolg Tower Bypass Valve
Pos=xxx%
2 (*) 1 Outdoor Air=xx.xoF 1
* Requires optional Outdoor Air Sensor field installed by others.
Item
0-100%
30 PFS 155C - 315C OM 135
Page 31

Control Menu Description
Menu 7, Control Mode
Press the "CONTROL" key under the 'Category Group' and Menu 7 will be displayed. Menus 7 through 18 are the
control menus. All control setpoints and value selections are entered into the MicroTech from these menus. The
default setpoint is indicated under the display column and the range of setpoints or values are indicated in the range
column.
CAUTION
Improper setpoints or values can cause erratic chiller operation and damage to the chiller. Be careful whenever
changing setpoints or values.
This menu is password protected and requires the operator password. The operational mode selected will control the
chiller as described below until the value is changed.
Screen Line Display Field Range
1 1 Mode= 1 Manual Off
Man Cmpr Load= x Stgs 2
2 Comp #1 Mode 1
Comp #1 Stage= x stgs 2
3 Comp #2 Mode 1
Comp #2 Stage= x stgs 2
Manual Off - This mode causes the chiller to stop. If the unit is operating, it will go through a controlled shutdown and
remain off. If the unit is off, it will remain off.
Item
Automatic
Manual Enable
Service Testing
Automatic - This mode allows the chiller to operate according to it's internal MicroTech setpoints. Chiller operation will
start if the remote start/stop input is made, internal time clock calling for operation and front panel switch set to the auto
position.
Manual Enable - This mode allows the chiller to operate if the front panel switch is set to auto. The MicroTech will
ignore the remote start/stop input and the internal time clock schedule.
Service Testing - This mode shuts down the chiller and the chiller is in the manual off mode. Menu 17 (Service Testing)
allows the service technician to check the individual outputs and calibrate the selected transducers.
OM 135 PFS 155C - 315C 31
Page 32

Menu 8, Lvg Evap Spts
Press the "NEXT MENU" key and Menu 8 will be displayed. This menu is password protected and requires the
operator password.
Screen Line Diaplay Field Range
1 1 Spt Source=x 1 Local
Active Spt=xx.xoF 2
2 ChWT Spt = x °F 1
CondWT Spt = x °F 2
1 Control Band = x °F 1
2 2 Startup DT = x °F 1
3 Shutdn DT = x °F 1
1 ChW Reset = 1 No Reset
Reset Signal = 2
3 2 Return Spt = x °F 1
No Reset@Oat = x °F 2
3 Max Reset = x °F 1
Max Reset @OaT = x °F 2
1 CondW Reset = 1 No Reset
4 Signal = x mA 2
2 Return Spt = x °F 1
No Reset @OaT = x °F 2
3 Min Reset = x °F 1
Min Reset@OaT = x °F 2
Item
Network
Return
4-20mA
Network
Ice
OAT
Return
4-20mA
Network
Ice
OAT
Spt Source= The value selected determines the source for the setpoint.
Local - Will allow the chiller to use it's internal setpoint selected in this menu screen 1, line 2 (local spt). Local is also the
selection if a master/slave arrangement exists between two 200 series controllers for the purpose of lead/lag control and
load balance control.
Network -Will control the chiller from a remote panel such as a Chiller System Controller (CSQ). A network implies two
or more 200 series controllers connected to a level 1 device.
Active Spt= This is a status value and cannot be changed. Active spt indicates the current setpoint (factoring in any
reset signals) that is controlling the chiller and can be used to determine if the chiller is maintaining leaving chilled water
temperature setpoint.
Control Band= This is the actual chilled water leaving temperature for the chiller to maintain if there is not a network.
This is the default value used to control the chiller if a network communication failure occurs.
Startup Dt= This value is added to the active spt setpoint. When the chiller is waiting for load and the water circulating
through the evaporator exceeds the active spt plus the startup dt, the chiller will start operation. Example: active spt =
44, startup dt = 10, the chiller will start when the water temperature exceeds 54. The startup dt along with the shutdn dt
can be used to reduce cycling of the chiller.
Shutdn Dt= This value is subtracted from the active spt. When the leaving chilled water temperature reaches this
calculated value, the chiller will shutdown. Example: active spt = 44, shutdn dt = 4, the chiller will shutdown when the
water temperature leaving the evaporator is less than 40. The shutdn dt along with the startup dt can be used to reduce
cycling of the chiller.
Chw Reset= There are several methods that can be selected to reset the leaving evaporator chilled water temperature.
No Reset - This does not provide any reset and is the default value.
32 PFS 155C - 315C OM 135
Page 33

Return - This measures the evaporator return water temperature and as the return comes back cooler (indicating cooling
load is reduced) the leaving water temperature is increased. This reduces motor amps and provides an operational cost
savings.
4-2OmA - This is an optional input to the MicroTech. This input is usually from a building automation system.
As the input changes from 4 to 20 mA, the leaving chilled water temperature is increased from local spt (in a linear
manner) until the max Lvg spt is reached. When the spt source is set to network, the 4-20 mA input is supplied to the
master MicroTech control. The master will issue reset instructions to the slave MicroTech. Upon network
communication failure the slave unit will revert back to local spt control. Network failure on a dual machine will require
immediate attention.
Oat - The leaving water temperature setpoint is increased as the outside air temperature decreases. The leaving water
temperature setpoint will be reset upward from the local spt to the max Ivg spt (in a linear manner) between the max reset
and no reset values. The outside air temperature can be used to determine when the building load will decrease because
of cooler outside air temperatures. Since the building load is reduced the leaving evaporator water temperature can be
increased providing reduced operational costs.
Ice - This option allows the chiller to operate at temperatures that are required by ice banks. Ice option requires an
external 24 Vac input to change the chiller from regular operation to ice operation. The local spt should be set to equal
the ice temperature plus the shutdn dt. The max Lvg spt would determine the normal or day operating temperature. All
refrigerant setpoints must be adjusted according to the operating temperatures and pressures.
Return Spt= This value will control the MicroTech if the chw reset option was set to return. When the return water
temperature reaches return spt the leaving evaporator water temperature will be increased to maintain the return spt.
The leaving water temperature will not exceed the max Lvg spt.
Reset Signal= The actual value of the external reset signal.
Max Reset At - A value must be entered if oat was selected as the chw reset option. Select an outside air temperature at
which the maximum reset will occur.
Menu 9, Stage Limiting
Press the "NEXT MENU" key and Menu 9 will be displayed. Menu 9 has two screens. This menu is password
protected and requires the operator password.
Screen Line Display Field Range
1 Demand Limiting = xxx 1 No
1 Demand Limit = x Stgs 2
2 Dmd Signal = x mA 1
Network Limit = x % 2
3 Pulldn Rate= x° /m 1
1 Soft Load = xx 1
2 SoftLoad Max Stg = x 2
2 SoftLoad Remain Time = x Min 1
3 SoftLoad Max Timer = xx min 1
Item
Yes
Demand Limit - Allows the MicroTech to control chiller motor amperage based on a remote 4-20 mA signal supplied by
a building automation system input. The 4-20 mA signal limits the capacity of the chiller and saves electrical demand
charges.
Menu 10, Set Time/Date
Screen Line Display Field Range
1 1 Time Day Month and Year 1
Item
OM 135 PFS 155C - 315C 33
Page 34

Menu 11, Schedule
Press the "NEXT MENU" key and Menu 10 will be displayed. This menu is pass word protected and requires the
operator password.
Screen Line Display Field Range
1 Override=0.00Hr 1 00.00-63.75
Mon 2 00:00-23:59
1 2 NMP Schedule =x 1 1-32
Tue 00:00-23:59 2 00:00-23:59
3 Sun 1 00:00-23:59
Wed 2 00:00-23:59
1 Thu 1 00:00-23:59
2 Hol 2 00:00-23:59
2 Fri 1 00:00-23:59
3 Sat 1 00:00-23:59
Item
Override= This allows the operator (manual input) to input a time value that the MicroTech will ignore the normal or
holiday start/stop schedule. This timed override will start when the value is entered.
NMP Schedule= Network schedules can be provided through a network master panel when the Mode is set to
auto:network. If a master/slave arrangement is active, the master panel will control the schedule. The slave unit should
be programmed the same as the master to have consistent operation should the network communications fail.
Sun through Fri - The start time (first value) and stop time for each day of the week should be entered. The default
value (00:00-23:59) allows the chiller to operate continuously.
Hol - The time entered at this menu will control the chiller run time for the holiday dates entered in Menu 11 (holiday
date).
Menu 12, Holiday Date
Press the "NEXT MENU" key and Menu 12 will be displayed. This menu is password protected and requires the
operator password. The month, day and number of days in the holiday is selected
Screen Line Display Field Range
1 1 #1=N/A-00 00 Day(s) 1 Jan-Dec
#4=N/A-00 00 Day(s) 1 Jan-Dec
2 #2=N/A-00 00 Day(s) 1 Jan-Dec
#5=N/A-00 00 Day(s) 1 Jan-Dec
3 #3=N/A-00 00 Day(s) 1 Jan-Dec
#6=N/A-00 00 Day(s) 1 Jan-Dec
Item
2 00-31
3 00-31
2 00-31
3 00-31
2 00-31
3 00-31
2 00-31
3 00-31
2 00-31
3 00-31
2 00-31
3 00-31
Menu continued on next page.
34 PFS 155C - 315C OM 135
Page 35

Menu 12, Holiday Date (continued)
Screen Line Display Field Range
2 1 #7=N/A-00 00 Day(s) 1 Jan-Dec
#10=N/A-00 00 Day(s) 1 Jan-Dec
2 #8=N/A-00 00 Day(s) 1 Jan-Dec
#11=N/A-00 00 Day(s) 1 Jan-Dec
3 #9=N/A-00 00 Day(s) 1 Jan-Dec
#12=N/A-00 00 Day(s) 1 Jan-Dec
3 1 #13=N/A-00 00 Day(s) 1 Jan-Dec
2 #14=N/A-00 00 Day(s) 1 Jan-Dec
Item
2 00-31
3 00-31
2 00-31
3 00-31
2 00-31
3 00-31
2 00-31
3 00-31
2 00-31
3 00-31
2 00-31
3 00-31
2 00-31
3 00-31
2 00-31
3 00-31
Menu 13, Timers
Press the "NEXT MENU" key and Menu 13 will be displayed. This menu is password protected and requires the
operator password.
Screen Line Display Field Range
1 1 Start-Start= xMin 1 15-60 Min
Intrstg UpTmr = x Sec 2
2 Evap Recirc=30Sec 1 15Sec-5 Min
Intrstg DnTmr= x sec 2
3 Stop-Start = x min 1 3-20 Min
FloodWaitTmr= x se 2
2 1 IntrstgTmr: xx sec 1
Item
Start-Start= This value determines the minimum time between chiller starts. The chiller must run the time selected
before it will start again. If the chiller runs less than the time selected the timer will have to time out before another start
is allowed. This is to eliminate chiller cycling that could damage the motor by starting to frequently.
Evap Recirc= This value determines the time the chilled water pump must run before the start sequence is started. This
value insures that the chilled water system has an adequate load to start the chiller. It also insures that the chilled water
pump has time to establish constant flow in the system to prevent nuisance water flow switch trips.
Stop-Start= This value is similar to the Start-Start already described. This time ensures that there is adequate time
between stop to start for the chiller to become stable or pressures to equalize. This can also be used to minimize short
cycling.
OM 135 PFS 155C - 315C 35
Page 36

Menu 14, Cooling Tower
Press the "NEXT MENU" key and Menu 14 will be displayed. This menu is password protected and requires the
operator password.
Screen Line Display Field Range
1 1 Tower Control=Yes 1 Yes-No
Tower Stages=2 2 1-2
2 StageUp Time=2Min 1 1-60 Min
StageDn Time=5Min 2 1-60 Min
3 Stage Differential=3.0 oF 1 1-10oF
2 1 Stage #1 On=70.0oF 1 40-120oF
Stage #4 On=85.0oF 2 40-120oF
2 Stage #2 On=75.0oF 1 40-120oF
3 Stage #3 On=80.0oF 1 40-120oF
Item
Tower Control= Set this value to 'yes' for fan staging control or bypass valve control and 'no' if condenser water
temperature is not controlled by the MicroTech.
Tower Stages= This value will determine how the MicroTech calculates the time to increase or decrease the cooling
tower controlling sequence. The number of stages refers to cooling tower fans or to bypass valve control.
Stageup Time= This value will delay the MicroTech from starting the staging control. This can be used to provide
specific system control requirements.
Stagedn Time= This value will delay the MicroTech from staging down for the time specified. This can be used to
provide specific system control requirements.
Stage Differential= This value is the control band for the fan staging control logic. This value must be exceeded to
stage up or down.
Stage #1 On= This value determines when the first stage control will start. This value plus 1/2 the stage differential
determines the control point value. This value is active on stage up and stage down.
Stage #2-4 On= Same as Stage #1 On=.
Menu 15, Clg Tower Valve
Press the "NEXT MENU" key and Menu 15 will be displayed. This menu is password protected and requires the
operator password.
Screen Line Display Field Range
1 1 Valve Control=None 1 None
2 Valve Spt=65.0 oF 1 40-99.5oF
Valve Deadb=2.0oF 2 1.0-10.0oF
3 Min Position=20% 1 0-50%
Max Position=80% 2 50-100%
2 1 Valve Type=NC 1 NC to Tower
2 Mod Limit=7.5oF 1 4.0-25.0oF
Sample Time=15Sec 2 1Sec-15Min
3 Max Change=4% 1 1-20%
PA Time=47.0Min 2 1.0 60.0 Min
3 1 Min Start Pos=0% 1 0-100%
Max Start Position=100% 2 0-100%
2 Min Pos At=60oF 1 0-99.5oF
Max Pos At=90oF 2 0-99.5oF
Item
Valve Setpoint
Stage Setpoint
NO to Tower
Valve Control= A value must be selected telling the MicroTech which type of control will be used for the tower valve. If
none is selected, the remaining values are not required for tower control.
Valve Spt= This value is the water temperature the MicroTech will maintain by modulating the tower valve.
Valve Deadb= This value is the control dead band that is used in the MicroTech when calculating control actions.
36 PFS 155C - 315C OM 135
Page 37

Min Position= This value is used in calculating when the valve position will change. The default values should be
adequate for most applications.
Max Position= This value is used in calculating when the valve position will change. The default values should be
adequate for most applications.
Valve Type= This value indicates the type of output (increasing or decreasing voltage) supplied to the control valve
controller. If the valve requires a 0-10 Vdc to open select the 'N/C' valve. The 'N/0' selection would provide a 0 Vdc for
valve to be open and a 10 Vdc for the valve to be fully closed.
Mod Limit= This value is used in MicroTech calculations and can increase or decrease the controller sensitivity.
Sample Time= This value determines how frequently the MicroTech looks at the water temperature entering the
condenser.
Max Change= The value limits the amount the valve position can change at one time.
PA Time= This value will reduce control point overshoot and produce quicker response to load variations.
Min Start Pos= This value will control the minimum position of the valve during pre-start at a pre-selected (Min Pos
At=) outside air temperature.
Max Start Pos= This value will control the maximum position of the valve during pre-start at a pre-selected (Max Pos
At=) outside air temperature.
Min Pos At= The outside air temperature associated with the Min Start Pos=.
Max Pos At= The outside air temperature associated with the Max Start Pos=.
Menu 16, Alarm Setpoints
Press the "NEXT MENU" key and Menu 16 will be displayed. This menu is password protected and requires the service
password. These values are set by the start up technician. Changing these values could cause compressor damage.
The menu can be monitored and setpoints compared to actual operating conditions.
Screen Line Display Field Range
1 1 High Condenser Press-Shutdown.. 400psi 1 240-480psi
2 High Condenser Press-Unload.... 300psi 1 240-480psi
3 High Condenser Press Hold...... 270psi 1 240-480psi
2 1 High Discharge Temp-Shutdown... 150.0o F 1
2 Low Evaporator Press-Unload.... 57.0psi 1 10.0-45.0psi
3 Low Evaporator Press-Shutdown.. 54.0psi 1 10.0-45.0psi
3 1 Motor Current Threshold.. 10% 1 1-20%
2 Evap Water Freeze................ 34.0o F 1 -9 - 45o F
3 Cond Water Freeze................ 34.0o F 1 -9 - 45o F
4 1 High Discharge Superheat Shutdn 50.0 °F 1
2 ……..during compressor start 70.0°F 1
Item
Menu 17, Setpoint Options
Press the "NEXT MENU" key and Menu 17 will be displayed. This menu is password protected and requires the service
password.
Screen Line Display Field Range
1 Manual EXV=Off 1 Off-On
1 EXV Steps=0 2 -100 - 100
Timers=Normal 1 Normal
EXV CurPos = 2
1 Hot Gas Bypass=30% 1 20-70%
2 HotGas Timr = x min 2
2 Low Load = x °F 1
Lo Load Tmr = x min 2
3 Manual Pumpdown = No 1
PumpDn EvapP = x psi 2
3 1 Evap Offset=x.x psi 2 1-20Min
PmpDn SuperHt=40oF 2 0-100oF
2 Cond Offset=0.0psi 1 -9.9 - 15.0psi
OM 135 PFS 155C - 315C 37
Item
Page 38

3 LiqL Offset 1 -9.9 - 15.0psi
38 PFS 155C - 315C OM 135
Page 39

Menu 18, Service Testing
Press the "NEXT MENU" key and Menu 18 will be displayed. This menu is pass word protected and requires the
service password.
Screen Line Display Field Range
1 1 Output #0=Off 1 Off-On
EXV Position=0 2 0-999
2 Output #1=Off 1 Off-On
Output #5=Off 2 Off-On
3 Output #2=Off 1 Off-On
2 1 Output #6=Off 1 Off-On
Output #9=Off 2 Off-On
2 Output #7=Off 1 Off-On
Output #10=Off 2 Off-On
3 Output #8=Off 1 Off-On
Output #11=Off 2 Off-On
3 1 Output #12=Off 1 Off-On
Output #15=Off 2 Off-On
2 Output #13=Off 1 Off-On
Output #16=Off 2 Off-On
3 Output #14=Off 1 Off-On
Output #17=Off 2 Off-On
4 1 Output #18=Off 1 Off-On
Output #21=Off 2 Off-On
2 Output #19=Off 1 Off-On
Output #22=Off 2 Off-On
3 Output #20=Off 1 Off-On
Output #23=Off 2 Off-On
5 1 DI #0-7=00000000 1
2 DI #8-15=00000000 1
3 DI #16-23=00000000 1
6 1 Voltage = 0.00 Vdc 1
AI #23=0 2
2 AI #21 =0 1
3 AI #22 =0 1
Item
Menu 19, Chiller Setup
Press the "NEXT MENU" key and Menu 19 will be displayed. This menu is password protected and requires the
operator password. Changing the values in this menu can cause network communications failure.
Screen Line Display Field Range
1 1 Config=L2-TTY-Slave 1 L1-TTY-Mastr
IDENT=FLU2E-01-I 2
2 Port A Baud =9600 1 1200
Chiller Only 2 Only
Item
L1-TTY-TTY
L2-Mastr-Slv
L2-TTY-Slave
L3-TTY-Slave
2400
9600
/Templifier
Menu continued on next page
OM 135 PFS 155C - 315C 39
Page 40

Menu 19, Chiller Setup, (continued)
Screen Line Display Field Range
3 Unit Type=PFS315 1 PES075
Low Temperature=No 2 No-Yes
2 1 OaT Sensor=None 1 None
Alarm=closed 2
2 Evap gpm sensor= No 1
Cond gpm Sensor= no 2
3 Evap Full Gpm=6500 1 0-65535
Cond Full Gpm=6500 2 0-65535
3 1 Ambient Lockout = No 1
Item
PES095
PES105
PFS155
PFS170
PFS180
PFS200
PFS210
PFS235
PFS260
PFS275
PFS285
PFS300
PFS315
Local
Remote
Config= This defines the network communication link, com port type and MicroTech controller level. The first field
indicates the controller's network hierarchy. The second field indicates Port A's protocol. TTY is equal to the RS232
type and Master/Slave is equal to the IRS 485 type.
Unit Type= This value is the chiller unit model number. The MicroTech has different look up tables depending on the
type of chiller.
Ident= This is the MicroTech software identification.
Port A Baud= This value defines the communication baud rate for port A. This is critical if there is a network. (Port A
baud rate must be set to 9600 on the master unit.)
Full Load Amp= This value must match the compressor label value indicating the RLAs of the chiller unit. Several
control and safety functions reference this value.
Low Temperature= This value selects the operational mode of the unit. If 'ice' is selected, the MicroTech default values
have to be reset to match the system requirements for an "Ice" application.
Evap Gpm Sensor= Optional. This value defines if a flow sensor is present for the MicroTech to monitor.
Evap Full Gpm= This value defines the full flow capabilities of the evaporator flow sensor. The MicroTech scales the
value linearly between 4 and 20 milliamp input or 0 to 10 Vdc input.
Ambient Lockout= This value determines (according to the outside air temperature) the point that no chiller operation is
needed.
Cond Gpm Sensor= Optional. This value defines if a flow sensor is present for the MicroTech to monitor.
Cond Full Gpm= This value defines the full flow capabilities of the condenser flow sensor. The MicroTech scales the
value linearly between 4 and 20 milliamp input or 0 to 10 Vdc input.
40 PFS 155C - 315C OM 135
Page 41

Alarm Menus Description
Press the "ALARM" key under the 'Category Group' and Menu 20 will be displayed. Menus 20 through 24 are the alarm
menus.
This menu is a display and does not require a password. The values displayed indicate the current alarm and the
conditions at the time the alarm reported.
Menu 20, Comp 1 CurrAlarm
Screen Line Display Field Range
1 1 No Active Alarms 1 Alarm Status Table
At 0:00 2 00:23:59
On N/A-00 3 Jan-Dec /01-31
2 Ent Evap=xxx.x o F 1
Ent Cond=xxx.x o F 2
3 Lvg Evap=xxx.x o F 1
Lvg Cond=xxx.x o F 2
2 1 Evap=xx.xpsi 1
Cond Aprch=xxx.xo F 2
2 Cond=xxx.xpsi 1
Discharge=xxx.x o F 2
3 Evap Aprch=xxx.x o F 1
Dsch Suprht=xxx.x o F 2
3 1 Suct Suprhtxxx.x o F 1
Evap Flow= 0gpm 2
2 Subcool=xxx.x o F 1
Cond Flow=xxxxgpm 2
3 EXV Position= 0 1
Motor Current = x% 2
4 1 Suct Suprht 00o F 1
2 SubCool= x °F 1
3 EXV Position= 1
Item
Menu 21, Comp2 CurrAlarm
Screen Line Display Field Range
1 1 No Active Alarms 1 Alarm Status Table
At 0:00 2 00:23:59
On N/A-00 3 Jan-Dec /01-31
2 Ent Evap=xxx.x o F 1
Ent Cond=xxx.x o F 2
3 Lvg Evap=xxx.x o F 1
Lvg Cond=xxx.x o F 2
2 1 Evap=xx.xpsi 1
Cond Aprch=xxx.xo F 2
2 Cond=xxx.xpsi 1
Discharge=xxx.x o F 2
3 Evap Aprch=xxx.x o F 1
Dsch Suprht=xxx.x o F 2
3 1 Suct Suprhtxxx.x o F 1
Evap Flow= 0gpm 2
2 Subcool=xxx.x o F 1
Cond Flow=xxxxgpm 2
3 EXV Position= 0 1
Motor Current = x% 2
4 1 Suct Suprht 00o F 1
2 SubCool= x °F 1
3 EXV Position= 1
Item
OM 135 PFS 155C - 315C 41
Page 42

Menu 22, Comp1 Alarm Log
Press the "NEXT MENU" key and menu 2 (Alarm Buffer #1) will be displayed. Menu 22 has two screens. This menu is
a display and does not require a password. This is the first of ten alarm buffers. The information displayed can provide
trouble shooting information.
Screen Line Display Field Range
1 1 Alarm Buffer #1 1
2 Alarm Buffer #2 1
3 Alarm Buffer #3 1
2 1 Alarm Buffer #4 1
2 Alarm Buffer #5 1
Item
Menu 23, Comp2 Alarm Log
Screen Line Display Field Range
1 1 Alarm Buffer #1 1
2 Alarm Buffer #2 1
3 Alarm Buffer #3 1
2 1 Alarm Buffer #4 1
2 Alarm Buffer #5 1
Item
Menu 24, Message Board
Screen Line Display Field Range
1 <no Message>
Item
42 PFS 155C - 315C OM 135
Page 43

Troubleshooting Chart
PROBLEM POSSIBLE CAUSES POSSIBLE CORRECTIVE STEPS
Compressor will not nun 1. Main power switch open 1. Close switch
2. Unit S1 system switch open 2. Check unit status on MicroTech display. Close switch.
3. Circuit switch PSI PS2 in pumpdown position. 3. Check circuit status on MicroTech display Close switch
4. Evaporator flow switch not closed. 4. Check unit status on MicroTech display Close switch.
5. Circuit t breakers open 5. Close circuit breakers
6. Fuse b own or circuit breakers tripped 6. Check electrical circuits and motor windings for shorts or
7. Unit phase voltage monitor not satisfied 7. Check unit power wiring to unit for correct phasing.
8. Compressor overload tripped 8. Overloads are manual reset. Reset overload at button on
9. Defective compressor contactor or contactor coil 9. Check wiring Repair or replace contactor
10. System shut down by safety devices 10. Determine type and cause of shutdown and correct
11. No cooling required 11. Check control settings. Wait until unit calls for cooling
12. Motor electrical trouble 12. See 6 7 8 above.
13. Loose wiring 13. Check circuits for voltage at required points. Tighten all
grounds. Investigate for possible overloading. Check
for loose or corroded connections Reset breakers or
replace fuses after fault s corrected.
Check voltage
overload. Clear alarm on MicroTech.
problem before attempting to restart.
power wiring terminals
Compressor Noisy or Vibrating 1. Compressor internal problem'. 1. Contact McQuayService.
Compressor Overload Relay
Tnpped or Circuit Breaker Trip or
Fuses Blown
Compressor Will Not Load or
Unload
Compressor Liquid Injection
Protection Trip
2. Liquid injection not adequate. 2. Check to assure Iiquid line sightplass is fulI during
3. Low voltage during high load condition. 3. Check supply voltage for excessive voltage drop
4. Loose power wiring. 4. Check and tighten all connections.
5. Power line fault causing an unbalanced voltage 5. Check supply voltage
6. Defective or grounded wiring in the motor. 6. Check motor and replace if defective.
7. High discharge pressure 7. See Corrective Steps for high discharge pressure
1. Defective capacity control solenoids 1. Check solenoids for proper operas on
2. Unloader mechanism defective. 2. Replace.
3. Liquid injection solenoid did not open at start 3. Check and replace Iiquid injection solenoid
4. Inadequate liquid to liquid injection at start due to a
clogged filter-dryer or low charge
5. Inadequate liquid to liquid injection during run 5. Check liquid injection line sightglass If flashing check
steady operation
4. Check liquid inject on line sightglass. If flashing check
filter-dryer and unit charge
filter-dryer and unit charge Discharge pressure too low
Troubleshooting chart continued on next page
OM 135 PFS 155C - 315C 43
Page 44

PROBLEM POSSIBLE CAUSES POSSIBLE CORRECTIVE STEPS
High Discharge Pressure 1. Discharge shutoff valve partially closed 1. Open shutoff valve.
2. Noncondensables in the system 2. Purge the noncondensables from the condenser coil after
shutdown
3. Condenser water insufficient or temperature too high 3. Read temperature control or water regulating valve
Investigate ways to increase water supply
4. Fouled condenser tubes (water cooled condenser. 4. Clean. Dirty tube and fin surface (cooling tower)
5. System overcharged with refrigerant 5. Check for excessive subcooling above 30°F (-1 °C).
Remove excess charge.
6. Cooling tower is undersized. 6. Check cooling tower rating tables against the operation
7. High ambient conditions. 7. Check cooling tower rating tables against the operation
8. Air restrict on at cooling tower. 8. Remove obstructions near unit
Low Discharge Pressure 9. Cooling tower too large. 9. Check cooling tower rating tables
10. Faulty cooling tower temperature regulation 10. Check cooling tower control operation
11. Suction shutoff valve partially closed. 11. Open valve.
12. insufficient refrigerant in system. 12. Check for leaks. Repair and add charge.
13. Low suction pressure. 13. See corrective Steps for low suction pressure.
14. Low ambient condition. 14. Check cooling tower control operation
15. Compressor operating unloaded. 15. See corrective Steps for failure to load
Low Suction Pressure 16. Inadequate refrigerant charge quantity 16. Check liquid line sightglass Check unit for leaks.
17. Inadequate liquid to liquid injection at star 17. Repair and recharge to clear sightglass
18. Clogged liquid line filter dryer 18. Check pressure drop across filter dryer Replace cores.
19. Expansion valve malfunctioning. 19. Check expansion valve superheat and valve opening
position Replace valve only if certain valve is not working.
20. insufficient water flow to evaporator 20. Check water pressure drop across the evaporator and
adjust gpm
21. Water temperature leaving evaporator is too low. 21. Adjust water temperature to higher value.
22. Evaporator tubes fouled. 22. Inspect by removing water piping Clean chemically
23. Evaporator head ring gasket slippage 23. Low suction pressure and low superheat both present may
indicate an internal problem Consult factory.
High Suction Pressure 24. Excessive load - high water temperature 24. Reduce load or add additional equipment.
25. Superheat is too low. 25. Check superheat on MicroTech display. Check suction
line sensor installation and sensor.
44 PFS 155C - 315C OM 135
Page 45

Maintenance Schedules
I. COMPRESSOR
A. P erformance Evaluation (log condition and analysis)# O
B. Motor
• Measure winding insulation resistance using a megohmmeter X
• Ampere balance (within 10%) X
• Terminal check (tight connections, porcelain clean) X
• Motor cooling (check DC voltage across GDR coils)# X
C. Lubrication System
• Oil line temperatures (no abnormal temperature drop)# O
• Oil appearance (clear color, quantity, as viewed through
sightglass)#
• Oil filter change X
D. Compressor capacity change #
• Compressor loads
• Lower leaving chilled water temp. control X
• Record motor amps X
• Compressor unloads
• Raise leaving chilled water temp. control X
• Record motor amps X
• Reset leaving chilled water control to design
• Observe water temp. And record amps X
E. Internal compressor check X
O
II. CONTROLS
A. Operating controls
• Check water temp. Setpoints against operating temps. X
• Check panel is clean and dry X
• Verify motor overload control setpoints X
• Verify wiring terminations are tight X
• Check contactor contacts (replace if required) X
• Check MicroTech service test X
B. Protective controls (test operation of)
• Alarm relay (if connected) X
• Pump interlocks X
• Guardistor relays X
• High pressure switches X
III. WATER-COOLED CONDENSER
A. Performance evaluation (include water press. drop)# O
B. Test water quality X
C. Clean condenser tubes X
D. Eddy current test --tube wall thickness X
E. Seasonal protection X
KEY:
O = performed by in-house personnel
X = performed by qualified HVAC service personnel
# = Test to be performed with compressor circuit in operation
OM 135 PFS 155C - 315C 45
Page 46

IV. EVAPORATOR
A. Performance evaluation (include water press. drop)# O
B. Test water quality X
C. Clean evaporator tubes X
D. Eddy current test --tube wall thickness X
E. Seasonal protection X
V. EXPANSION VALVES
A. Performance evaluation (observe superheat)# X
VI. COMPRESSOR - CHILLER UNIT
A. Performance evaluation O
B. Leak test:
• Compressor fittings and terminal X
• Pipe fittings X
• Oil pump line fittings X
• Vessel relief valves X
C. Check sightglasses and press. Drop across filter/dryer X
D. General appearance:
• Paint O
• Insulation O
VII. STARTERS
A. Examine contactors (hardware and operation) X
B. Verify overload setting and trip X
C. Test electrical connections X
D. Pump down controls (verify operation) X
VIII. OPTIONAL CONTROLS
A. Hot gas bypass controls (verify operation) X
B. Liquid injection controls (verify operation) X
C. Pump down control (verify operation) X
KEY:
O = performed by in-house personnel
X = performed by qualified HVAC service personnel
# = Test to be performed with compressor circuit in operation
Note: Some motors use power factor correction capacitors and others use a surge capacitor. In all cases,
capacitors must be disconnected from the circuit to obtain a useful megohmmeter reading. Failure to disconnect
capacitors will result in low readings. Only qualified electrical technicians should perform service.
46 PFS 155C - 315C OM 135
Page 47

Notes
OM 135 PFS 155C - 315C 47
Page 48

Notes
48 PFS 155C - 315C OM 135
Page 49

Notes
OM 135 PFS 155C - 315C 49
Page 50

Post Office Box 2510 Staunton, Virginia 24402-2510 USA 540.248.0711
 Loading...