

Page 1

Installation and Maintenance Manual
Air-Cooled Scroll Compressor Chiller
AGZ 026BS/BH through 130BS/BH, Packaged
AGZ 026BB/BM through 130BB/BM, Remote Evaporator
60 Hertz, R-22, R-407c
IMM A GZ -7
Group: Chiller
Part Number: 331374001
Effective: February 2005
Supercedes: IOMM A GZ -6
Page 2

y
Table of Contents
Introduction.......................................3
General Description......................................3
Inspection.....................................................3
Nomenclature...............................................3
Installation......................................... 4
Handling.......................................................4
Location........................................................5
Vibration Isolators......................................12
Ambient Air T emperature Limitations........15
Water Piping...............................................17
Flow Switch................................................19
Water Connections......................................20
System Water Volume Considerations........20
Variable Speed Pumping ............................20
Glycol Solutions.........................................20
Operating/Standby Limits...........................24
Evaporator Flow and Pressure Drop Water Flow
Limitations..................................................24
Wind Baffles and Hail Guards....................26
Optional Features............................28
Controls......................................................28
BAS Interface.............................................28
Remote Operator Interface Panel...............29
Physical Data ...................................31
Startup..............................................59
Pre Start-up................................................ 59
Start-Up ..................................................... 59
Shutdown................................................... 60
Water Piping Checkout.............................. 60
Refrigerant Piping Checkout...................... 60
Electrical Check Out.................................. 61
Component Operation.....................61
Hot Gas Bypass (Optional)........................ 61
VFD Low Ambient Control (Optional) ...... 62
Filter-Driers............................................... 62
System A djustment.................................... 62
Liquid Line Sight Glass............................. 62
Refrigerant Charging ................................. 62
Thermostatic Expansion Valve .................. 63
Crankcase Heaters ..................................... 63
Evaporator ................................................. 63
Phase Voltage Monitor (Optional)............. 63
Unit Maintenance.............................64
Preventive Maintenance Schedule............. 65
Service...............................................66
Liquid Line Solenoid Valve ....................... 66
Evaporator ................................................. 67
Refrigerant Charging ................................. 67
Electrical Data, Standard Ambient 36
Electrical Data High Ambient........46
Dimensional Data............................ 54
Warranty Statement ........................68
AGZ Troubleshooting Chart...........69
R-407C Units.................................... 57
Manufactured in an ISO Certified facilit
"McQuay" is a registered trademark of McQuay International
Illustrations and data cover McQuay International products at the time of publication and we reserve the right to
make changes in design and construction at anytime without notice.
2 AGZ 026B through 130B IMM AGZ-7
©2004 McQuay International
Page 3

Introduction
General Description
McQuay Air-Cooled Global Water Chillers are complete, self-contained automatic
refrigerating units. Every unit is completely assembled, factory wired, charged, and
tested. Each unit consists of twin air-cooled condensers with integral subcooler
sections, two tandem or triple scroll compressors, brazed-plate or replaceable tube,
dual circuit shell-and-tube evaporator, and complete refrigerant piping. Liquid line
components include manual liquid line shutoff valves, sight-glass/moisture indicators,
solenoid valves, and thermal expansion valves. Other features include compressor
crankcase heaters, an evaporator heater for chilled water freeze protection, limited
pumpdown during “on” or “off” periods, automatic compressor lead-lag to alternate the
compressor starting sequence, and sequenced starting of compressors.
The electrical control center includes all equipment protection and operating controls
necessary for dependable automatic operation. Condenser fan motors are protected in
all three phases and started by their own three-pole contactors.
Manuals
This manual covers the installation, maintenance and service for dual circuit, AGZ,
scroll compressor chillers. Operating information is contained in the operating manual
OM AGZ-1.
Inspection
Check all items carefully against the bill of lading. Inspect all units for damage upon
arrival. Report shipping damage and file a claim with the carrier. Check the unit
nameplate before unloading, making certain it agrees with the power supply available.
McQuay is not responsible for physical damage after the unit leaves the factory.
Note: Unit shipping and operating weights are available in the Physical Data
tables beginning on page 31.
Nomenclature
A G Z - XXX B S
Scroll Compressor
Air-Cooled
Global
Application
S= Standard Ambient, Packaged
M= Standard Ambient, Remote
H= High Ambient, Packaged
B= High Ambient, Remote
Design Vintage
IMM AGZ-7 AGZ 026B through 130B 3
Model Size
(Nominal Tons)
Page 4
Installation
Note: Installation is to be performed by qualified personnel who are familiar
with local codes and regulations.
WARNING
Sharp edges on unit and coil surfaces are a potential hazard to personal safety.
Avoid contact with them.
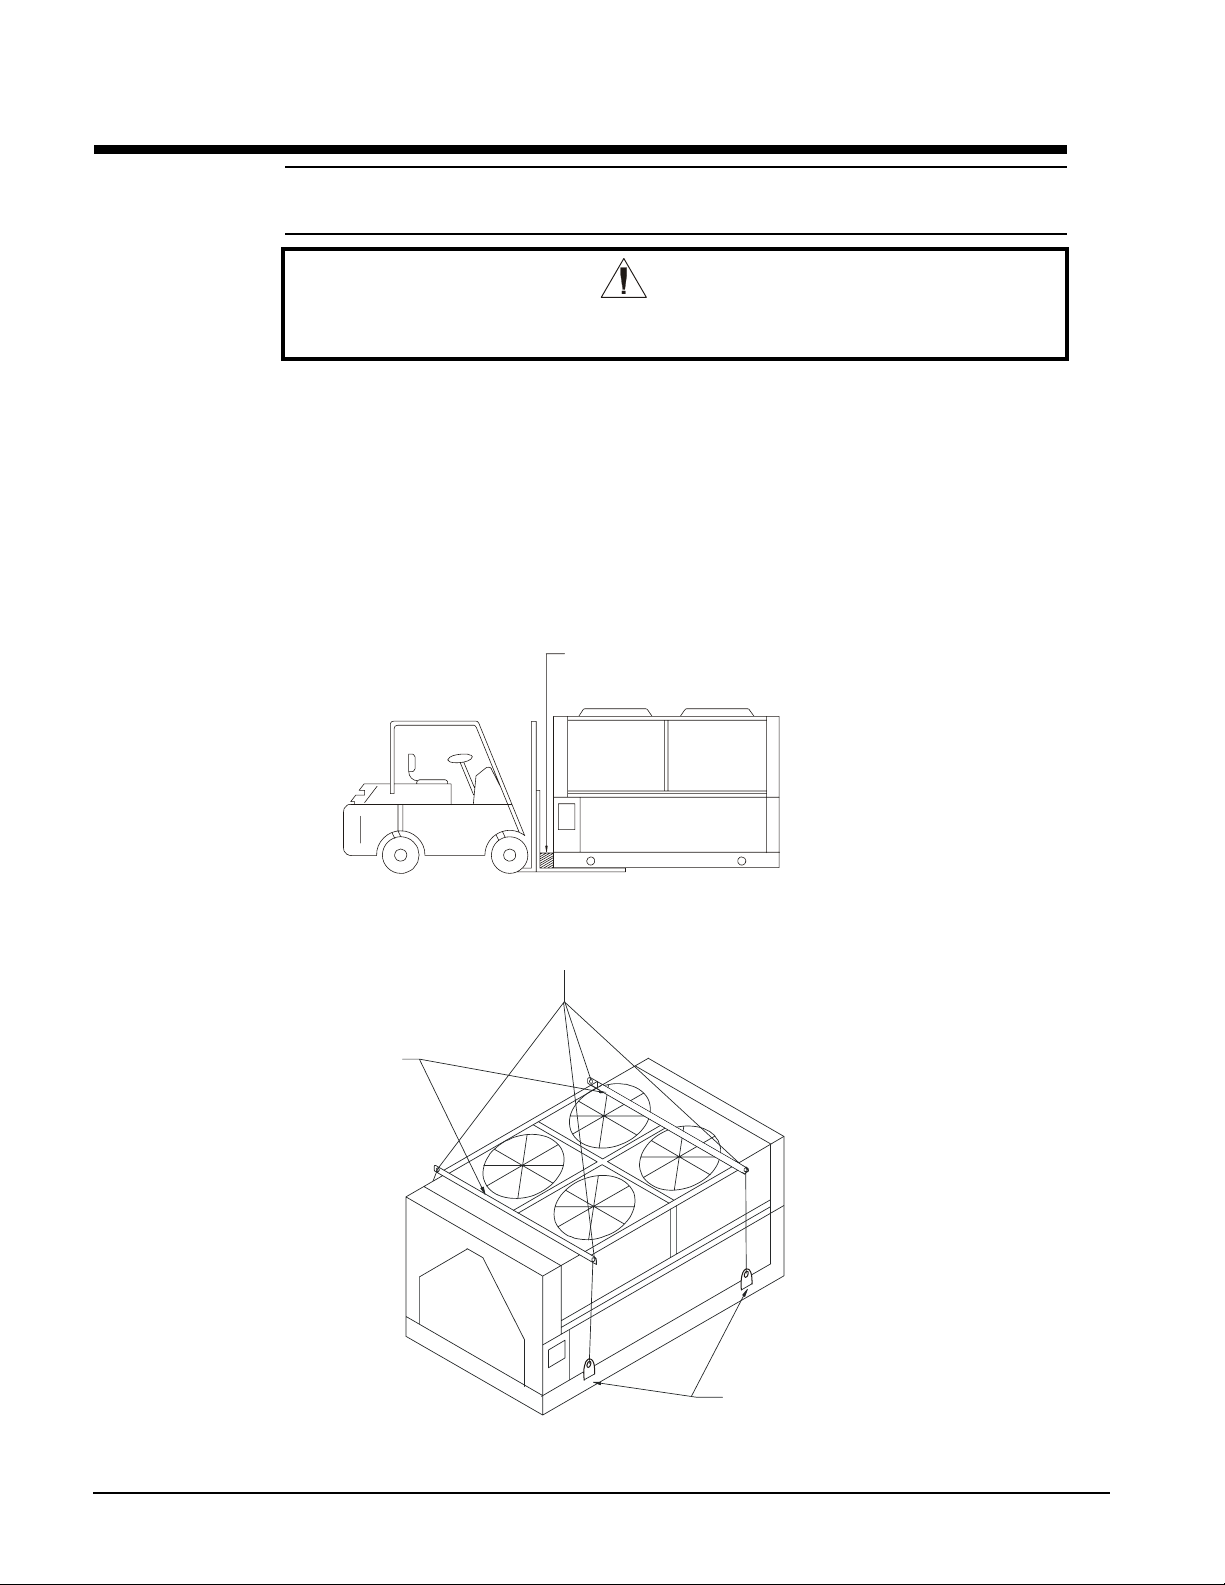
Handling
Be careful to avoid rough handling of the unit. Do not push or pull the unit from
anything other than the base. Block the pushing vehicle away from the unit to prevent
damage to the sheet metal cabinet and end frame (see Figure 1).
To lift the unit, 2 1/2" (64mm) diameter lifting tabs are provided on the base of the
unit. Arrange spreader bars and cables to prevent damage to the condenser coils or
cabinet (see Figure 2).
Figure 1, Suggested Pushing Arrangement
Blocking is required
across full width
Figure 2, Suggested Lifting Arrangement
Number of fans may vary
from this diagram. The lifting
Spreader bars
Spreader bars
required
required
(use caution)
(use caution)
method will remain the same.
All rigging locations
must be used.
4 AGZ 026B through 130B IMM AGZ-7
Page 5

Location
A
A
Unit Placement
Figure 3, Clearances
AGZ units are for outdoor applications and
can be mounted either on a roof or at ground
level. For roof mounted applications, install
the unit on a steel channel or I-beam frame to
support the unit above the roof. For ground
level applications, install the unit on a
4 FT. (1220mm)
CLEARANCE FOR
SERVICE ACCESS
substantial base that will not settle. A onepiece concrete slab with footings extended
below the frost line is recommended. Be sure
the foundation is level within 1/2" (13mm)
over its length and width. The foundation
must be strong enough to support the weights
listed in the Physical Data Tables beginning on page 31.
Table 1, Recommended Minimum Clearances
Model Size
026B – 070B
075B – 130B
Coil Side “A”
ft (m)
4 (1.2) 8 (2.4) 6 (1.8) 4 (1.2) 4 (1.2)
6 (1.8) 12 (3.6) 8 (2.4) 4 (1.2) 4 (1.2)
“B”
ft (m)
“C”
ft (m)
End Opposite
Controls ft (m)
Clearances
Do not block the flow of air to and
from the condenser coil. Restricting
airflow or allowing air recirculation
will result in a decrease in unit
performance and efficiency because
discharge pressures are increased.
There must be no obstruction above
the unit that would deflect discharge
air downward where it could be
recirculated back to the inlet of the
condenser coil. The condenser fans
are propeller type and will not
operate with ductwork.
Install the unit with enough side
clearance for air to enter the coil and
for servicing. Provide service access
to the evaporator, compressors,
electrical control panel and piping
components.
Do not allow debris to accumulate
near the unit where it could be drawn
into the condenser coil. Keep
condenser coils and fan discharge
free of snow or other obstructions to
permit adequate airflow for proper
operation.
AIR FLOW
The recommended minimum side clearance be tw een two units
is dimension “B’ in table on this page.
AIR FLOW
The unit must not be installed in a pit or encl osure that is
deeper or taller than the height of the unit unless extra space
is provided. The minimum clearance on each
side of the unit is dimension “C” in tabl e on this page.
SEE ATTACHED TABLE
DIMENSION “A”
SEE ATTACHED TABLE
DIMENSION “A”
Control Panel End
AIR
DISCHARGE
AIR FLOW
“B”
AIR
DISCHARGE
“C” “C”
ft. (m)
4 FT. (1220)
CLEARANCE FOR
SERVICE ACCESS
AIR
DISCHARGE
IR FLOW
IR FLOW
IMM AGZ-7 AGZ 026B through 130B 5
Page 6

Restricted Air Flow
General
The clearances required for design-life operation of AGZ air-cooled condensers are
described in the previous section. Occasionally, these clearances cannot be maintained
due to site restrictions such as units being too close together or a fence or wall
restricting airflow, or both.
Fortunately, the McQuay AGZ chillers have several features that can mitigate the
problems attributable to restricted airflow.
• The condenser section is shaped as shown Figure 4. This allows inlet air for these
coils to come in from either side. A vertical coil and its adjacent angled coil are
manifolded together to serve one refrigerant circuit.
• The MicroTech II™ control is proactive in response to “off-design conditions”. In
the case of single or compounded influences restricting airflow to the unit, the
microprocessor will act to keep the compressor(s) running (possibly at reduced
capacity) rather than allowing a shut-off on high discharge pressure.
• The MicroTech II™ control can be programmed to sequence the compressors in the
most advantageous way. For example, in the diagram shown below, it might be
desirable to program circuit #1 to be the lag circuit (last circuit to reach full load)
during periods of high ambient temperatures.
Figure 4, Coil and Fan Arrangement
Building
Circuit #1 Circuit #2
NOTE: Models AGZ 026 to 035 do not have an interior slanted coil.
The following sections discuss the most common situations of condenser air restriction
and give capacity and power adjustment factors for each. Note that in unusually severe
conditions, the MicroTech II™ controller would adjust the unit operation to remain
online until a less severe condition is reached.
6 AGZ 026B through 130B IMM AGZ-7
Page 7

Case 1, Building or Wall on One Side of One Unit
A
The existence of a screening wall or the wall of a building in close proximity to an air-cooled
chiller is common in both rooftop and ground level applications. Hot air recirculation on the
coils adjoining the wall will increase compressor discharge pressure, decreasing capacity and
increasing power consumption. Only the compressor(s) connected to these coils will be
affected. Circuits opposite the wall are unaffected.
When close to a wall, it is desirable to place chillers on the north or east side of them. It is
also desirable to have prevailing winds blowing parallel to the unit’s long axis. The worst
case is to have wind blowing hot discharge air into the wall.
Figure 5, Unit Adjacent to Wall
H
Figure 6, Adjustment Factors
3.0
2.0
1.0
.5
D
GZ
075-130
4.5 ft.
(1.4m)
6 ft.
(1.8m)
8 ft.
(2.4m)
AGZ
026-070
3.5 ft.
(1.0m)
4 ft.
(1.2m)
6 ft.
(1.8m)
4.0
3.0
2.0
AGZ
6 ft.
8 ft.
AGZ
026-070
3.5 ft.
(1.0m)
4 ft.
(1.2m)
6 ft.
(1.8m)
075-130
4.5 ft.
(1.4m)
(1.8m)
(2.4m)
0
0
IMM AGZ-7 AGZ 026B through 130B 7
Page 8

Case 2, Two Units Side By Side
A
A
A
A
Two or more units sited side by side are common. If spaced closer than 12 feet (3.7 meters) or
8 feet (2.5meters) depending on size, it is necessary to adjust the performance of each unit;
circuits adjoining each other are affected. NOTE: This case applies only to two units side by
side. See Case 3 for three or more parallel units. If one of the two units also has a wall
adjoining it, see Case 1. Add the two adjustment factors together and apply to the unit located
between the wall and the other unit.
Mounting units end to end will not necessitate adjusting performance. Depending on the
actual arrangement, sufficient space must be left between the units for access to the control
panel door opening and/or evaporator tube removal. See “Clearance” section of this guide for
requirements for specific units.
Figure 7, Two Units Side by Side
Figure 8, Adjustment Factor
3.0
2.0
1.0
0
GZ 075-130
GZ 026-070
9
(2.7)
6.5
(2.0)
10
(3.0)
7
(2.1)
11
(3.3)
7.5
(2.2)
12
(3.6)
8
(2.4)
GZ 075-130
GZ 026-070
6.0
4.0
2.0
0
9
(2.7)
6.5
(2.0)
10
(3.0)
7
(2.1)
11
(3.3)
7.5
(2.2)
12
(3.6)
8
(2.4)
8 AGZ 026B through 130B IMM AGZ-7
Page 9

Case 3, Three or More Units Side By Side
A
A
A
A
When three or more units are side by side, the outside chillers (1 and 3 in this case) are
influenced by the middle unit only on their inside circuits. Their adjustment factors will be the
same as Case 2. All inside units (only number 2 in this case) are influenced on both sides and
must be adjusted by the factors shown below.
Figure 9, Three or More Units
GZ 075-130
GZ 026-070
Chiller 1 Chiller 2 Chiller 3
Figure 10, Adjustment Factor
4.0
3.0
2.0
1.0
0
15
(4.6)
11
(3.3)
16
(4.9)
12
(3.7)
17
(5.2)
13
(4.0)
18
(5.5)
14
(4.3)
GZ 075-130
GZ 026-070
8.0
6.0
4.0
2.0
0
15
(4.6)
11
(3.3)
16
(4.9)
12
(3.7)
17
(5.2)
13
(4.0)
18
(5.5)
14
(4.3)
IMM AGZ-7 AGZ 026B through 130B 9
Page 10

Case 4, Open Screening Walls
Decorative screening walls are often used to help conceal a unit either on grade or on a rooftop.
These walls should be designed such that the combination of their open area and distance from
the unit do not require performance adjustment. It is assumed that the wall height is equal to or
less than the unit height when mounted on its base support. This is usually satisfactory for
concealment. If the wall height is greater than the unit height, see Case 5, Pit Installation.
The distance from the ends of the unit to the end walls should be sufficient for service, opening
control panel doors, and pulling evaporator tubes, as applicable.
If each side wall is a different distance from the unit, the distances can be averaged providing
either wall is not less than 8 feet (2.4 meters) from the unit. For example, do not average 4 feet
and 20 feet to equal 12 feet.
Figure 11, Open Screening Walls
Figure 12, Wall Free Area vs Distance
AGZ
026-070
4
(1.2)
3.5
(1.0)
3.0
(0.9)
2.5
(0.7)
AGZ
075-130
6
(1.8)
5
(2.0)
4
(1.2)
3
(0.9)
01020304050
10 AGZ 026B through 130B IMM AGZ-7
Page 11

Case 5, Pit/Solid Wall Installation
Pit installations can cause operating problems and great care should be exercised if they are
to be used on an installation. Recirculation and restriction can both occur. A solid wall
surrounding a unit is substantially the same as a pit and the data presented here should be
used.
Steel grating is sometimes used to cover a pit to prevent accidental falls or trips into the pit.
The grating material and installation design must be strong enough to prevent such accidents,
yet provide abundant open area or serious recirculation problems will occur. Have any pit
installation reviewed by McQuay application engineers prior to installation to make sure it
has sufficient air-flow characteristics. The installation design engineer must approve the
work to avoid the risk of accident.
Figure 13, Pit Installati on
Figure 14, Adjustment Factor
D=4
(1.4)
D=6
(1.8)
D=5
(2.0)
D=8
(2.4)
075-130
D=10
AGZ
026-070
AGZ
075-130
AGZ
(3.1)
AGZ
026-070
D=7
(2.1)
D=4
(1.4)
D=6
(1.8)
D=5
(2.0)
D=8
(2.4)
AGZ
075-130
D=10
(3.1)
AGZ
026-070
D=7
(2.1)
AGZ
026-070
AGZ
075-130
IMM AGZ-7 AGZ 026B through 130B 11
Page 12

Sound Isolation
The low sound level of the AGZ chiller is suitable for most applications. When additional
sound reduction is necessary, locate the unit away from sound sensitive areas. Avoid
locations beneath windows or between structures where normal operating sounds may be
objectionable. Reduce structurally transmitted sound by isolating water lines, electrical
conduit and the unit itself. Use wall sleeves and rubber isolated piping hangers to reduce
transmission of water or pump noise into occupied spaces. Use flexible electrical conduit to
isolate sound transmission through electrical conduit. Spring isolators are effective in
reducing the low amplitude sound generated by scroll compressors and for unit isolation in
sound sensitive areas.
Vibration Isolators
Vibration isolators are recommended for all roof-mounted installations or wherever
vibration transmission is a consideration. Table 2 lists isolator loads for all unit sizes.
Neoprene-in-Shear Dimensions
Color Code L W H B C D
Gray 5.5 3.37 1.75 0.5 4.12 0.56
Black, Red 6.25 4.62 1.62 0.5 5.0 0.56
Spring Isolator Dimensions
Figure 15 shows isolator locations. See Dimensional Data starting on page 36 for detailed
mounting hole locations.
Isolators are also recommended for slab installations, primarily to keep the unit base from
resting its entire length directly on the slab.
Isolator Installation
The unit should be initially installed on shims or blocks at the listed free height. When all
piping, wiring, flushing, charging, etc. is completed, adjust the springs upward to load
them and to provide clearance to remove the shims or blocks.
Installation of spring isolators requires flexible piping connections and at least three feet of
conduit flex tie-ins. Piping and conduit must be supported independently of the unit.
Figure 15, Isolator Locations
4 or 6 FAN UNIT 8 FAN UNIT
CONTROL
PANEL
12 AGZ 026B through 130B IMM AGZ-7
34
CONTROL
PANEL
12
45
12
6
3
Page 13
Table 2, AGZ-BS/BH, Isolator Loads At Each Mounting Location (With Aluminum Fins)
Unit
Size
026B 4 1281 580 941 426 1020 462 748 339 - - - - 3990 1807 72 32
030B 4 1297 588 952 431 1032 467 759 344 - - - - 4040 1830 72 32
035B 4 1283 581 942 427 1069 484 786 356 - - - - 4080 1848 72 32
040B 4 1360 616 940 426 1082 490 748 339 - - - - 4130 1871 72 32
045B 4 1377 624 952 431 1148 520 793 359 - - - - 4270 1934 72 32
050B 4 1384 627 1016 460 1153 522 847 384 - - - - 4400 1993 119 54
055B 4 1391 630 1085 492 1159 525 905 410 - - - - 4540 2057 119 54
060B 4 1410 639 1099 498 1175 532 916 415 - - - - 4600 2084 142 65
065B 4 1382 626 1214 550 1205 546 1059 480 - - - - 4860 2202 142 65
070B 4 1419 643 1246 564 1238 561 1087 492 - - - - 4990 2260 217 99
075B 6 1854 840 1411 639 1854 840 1411 639 - - - - 6530 2958 217 99
085B 6 1942 880 1479 670 1856 841 1413 640 - - - - 6690 3031 217 99
090B 6 1975 895 1450 657 1975 895 1450 657 - - - - 6850 3103 217 99
100B 8 1464 663 1341 607 1219 552 1400 634 1282 581 1164 527 7870 3565 289 131
110B 8 1513 685 1358 615 1204 545 1513 685 1358 615 1204 545 8150 3692 289 131
120B 8 1656 750 1486 673 1317 597 1582 717 1420 643 1259 570 8720 3950 289 131
130B 8 1714 776 1508 683 1303 590 1714 776 1508 683 1303 590 9050 4100 289 131
No.
of
Fans
1 2 3 4 5 6 Total Unit
lb kg lb kg lb kg lb kg lb kg lb kg lb kg lb. kg
NOTE (1): Additional weight for copper coils is per mounting location.
(1) Copper
Fin Add
Table 3, Isolator Kit Numbers
AGZ
Model
Spring Kit
Part No.
R-I-S Kit
Part No.
026, 030
035
330349603 330349603 330349605 330349606 330349607 330349609 330349612 330349613 330349614
330349702 330349703 330349704 330349704 330349705 330349706 330349707 330349708 330349709
040, 045
050
055 060 065, 070
075, 085
090
100 110 120,130
Table 4, Isolator Locations
AGZ-B, Chillers
Operating Weight. Neoprene-In-Shear Mountings Spring-Flex Mountings
Unit
Size
026B
030B
035B
040B
045B
050B
055B
060B
065B
070B
075B
085B
090B
100B
110B
120B
130B
NOTES:
1. Neoprene-in-shear isolators: Gray=RP-3 Gray, Black=RP-4 Black, Red=RP-4 Red.
lbs kg
3990 1807
4040 1830
4080 1848
4130 1871
4270 1934
4400 1993
4540 2057
4600 2084
4860 2202
4990 2260
6530 2958
6690 3031
6850 3103
7870 3565
8150 3692
8720 3950
9050 4100
1 2 3 4 5 6 1 2 3 4 5 6
Black Gray Gray Gray - - Orange Purple Purple Red - Black Gray Gray Gray - - Orange Purple Purple Red - Black Gray Gray Gray - - Orange Purple Purple Red - Black Gray Black Gray - - Orange Purple Purple Red - Black Gray Black Gray - - Orange Purple Purple Red - Black Gray Black Gray - - Orange Purple Purple Red - Black Black Black Gray - - Orange Purple Purple Purple - Black Black Black Gray - - Orange Purple Orange Purple - Black Black Black Black - - Orange Orange Orange Purple - Black Black Black Black - - Orange Orange Orange Purple - -
Red Black Red Black - - Gray Orange Gray Orange - Red Black Red Black - - Gray Orange Gray Orange - Red Black Red Black - - Gray Orange Gray Orange - -
Black Black Black Black Black Black Orange Orange Orange Orange Orange Orange
Red Black Black Red Black Black Green Orange Orange Green Orange Orange
Red Red Black Red Red Black Green Green Orange Green Green Orange
Red Red Black Red Red Black Green Green Orange Green Green Orange
IMM AGZ-7 AGZ 026B through 130B 13
Page 14

Table 5, AGZ BM/BB, Isolator Loads At Each Mounting Location (With
Aluminum Fins)
AGZ-
BM/BB
Model
AGZ 026
AGZ 030
AGZ 035
AGZ 040
AGZ 045
AGZ 050
AGZ 055
AGZ 060
AGZ 065
AGZ 070
NOTE (1): Additional weight for copper coils is per mounting location.
Shipping
lbs 3550 3600 1227 901 849 623 3600 72
kg 1608 1631 556 408 385 282 1631 32
lbs 3550 3600 1227 901 849 623 3600 72
kg 1608 1631 556 408 385 282 1631 32
lbs 3550 3600 1227 901 849 623 3600 72
kg 1608 1631 556 408 385 282 1631 32
lbs 3550 3610 1261 872 873 604 3610 72
kg 1608 1635 571 395 395 274 1635 32
lbs 3590 3650 1275 881 883 611 3650 72
kg 1626 1653 578 399 400 277 1653 32
lbs 3730 3800 1295 951 896 658 3800 119
kg 1690 1721 587 431 406 298 1721 54
lbs 3780 3850 1303 1016 860 671 3850 119
kg 1712 1744 590 460 390 304 1744 54
lbs 3820 4040 1367 1066 903 704 4040 142
kg 1730 1830 619 483 409 319 1830 65
lbs 3970 4070 1305 1146 862 757 4070 142
kg 1798 1844 591 519 390 343 1844 65
lbs 4080 4180 1278 1192 885 825 4180 217
kg 1848 1894 579 540 401 374 1894 99
Wt
Operating.
Wt
Loc. 1 Loc. 2 Loc. 3 Loc. 4 Total
(1) Add’l for
Copper Fins
Table 6, Isolator Loads At Each Mounting Location (With Aluminum Fins)
AGZ-
BM/BB
Model
AGZ 075
AGZ 085
AGZ 090
AGZ 100
AGZ 110
AGZ 120
AGZ 130
NOTE (1): Additional weight for copper coils is per mounting location.
Shipping
lbs 5510 5630 1649 1166 1649 1166 - - 5630 217
kg 2496 2550 747 528 747 528 - - 2550 99
lbs 5670 5790 1734 1227 1657 1172 - - 5790 217
kg 2569 2623 786 556 751 531 - - 2623 99
lbs 5830 5950 1770 1205 1770 1205 - - 5950 217
kg 2641 2695 802 546 802 546 - - 2695 99
lbs 6820 6970 1323 1188 1053 1265 1135 1006 6970 289
kg 3089 3157 599 538 477 573 514 456 3157 131
lbs 7080 7230 1396 1205 1014 1396 1205 1014 7230 289
kg 3207 3275 632 546 459 632 546 459 3275 131
lbs 7360 7480 1477 1275 1073 1411 1218 1026 7480 289
kg 3334 3388 669 578 486 639 552 465 3388 131
lbs 7640 7760 1555 1293 1032 1555 1293 1032 7760 289
kg 3461 3515 704 586 467 704 586 467 3515 131
Wt.
Operating
Wt.
Loc 1 Loc 2 Loc 3 Loc 4 Loc 5 Loc 6 TOTAL
(1) Add’l for
Copper Fins
Table 7, Isolator Kit Part Numbers
AGZ-BM Model 026 - 035 040 - 060 065 070 075 - 090 100, 110 120, 130
Spring Kit Part No.
R-I-S Kit Part No.
330349601 330349602 330349603 330349604 330349608 330349610 330349611
330349701 330349701 330349703 330349703 330349706 330349707 330349708
14 AGZ 026B through 130B IMM AGZ-7
Page 15

Table 8,AGZ BM/BB, Isolator Locations
ACZ-BS, AGZ-BM Less Evaporator Units
AGZ-
BM/BB
Model
026
030
035
040
045
050
055
060
065
070
075
085
090
100
110
120
130
NOTE (1): Position #4 is a CP-1, single spring isolator for A CZ 030 to 065 and AGZ 026 to 060. All
Operating
Weight
lbs kg 1 2 3 4 5 6 1 2 3 4 (1) 5 6
3600 1631 Black Gray Gray Green - - Orange Purple Red Orange
3600 1631 Black Gray Gray Green - - Orange Purple Red Orange - 3600 1631 Black Gray Gray Green - - Orange Purple Red Orange - 3610 1635 Black Gray Gray Green - - Orange Purple Purple Orange - 3650 1653 Black Gray Gray Green - - Orange Purple Purple Orange - 3800 1721 Black Gray Gray Green - - Orange Purple Purple Orange - 3850 1744 Black Gray Gray Green - - Orange Purple Purple Orange - 4040 1830 Black Gray Gray Green - - Orange Purple Purple Orange - 4070 1844 Black Black Gray Gray - - Orange Purple Purple Red - 4180 1894 Black Black Gray Gray - - Orange Orange Purple Red - 5630 2550 Red Black Red Black - - Green Orange Green Orange - 5790 2623 Red Black Red Black - - Green Orange Green Orange - 5950 2695 Red Black Red Black - - Green Orange Green Orange - 6970 3157 Black Black Black Black Black Black Orange Orange Purple Orange Orange Purple
7230 3275 Black Black Black Black Black Black Orange Orange Purple Orange Orange Purple
7480 3388 Red Black Black Red Black Black Green Orange Purple Green Orange Purple
7760 3515 Red Black Black Red Black Black Green Orange Purple Green Orange Purple
others are CP-2, two
Neoprene-In-Shear Mountings Spring-Flex Mountings
spring.
Ambient Air Temperature Limitations
Standard/High A mbient Panels
Models AGZ-B (26 to 130 tons, two circuit) have electrical data and subsequent field wiring
requirements that are tailored to individual applications.
There are many installations where the expected summer ambient air temperatures will be at
105°F (40.1°C) or less, resulting in smaller unit electrical requirements compared to operation at
106°F (41.1) and above. In these lower temperature cases, there can be considerable installation
cost savings by using smaller and more appropriate electrical service.
Therefore, the AGZ electrical data is divided into two classifications based on the design
ambient temperature where the unit will operate. Standard Ambient unit electrical data (BS and
BM models) is for operation in ambient temperatures of 105°F (40.1°C) or less. Units with the
High Ambient designation (BH and BB models) are for use above 105°F (40.1°C) to 125°F
(51.7°C).
The AGZ-B units for high ambient operation require the addition of the High Ambient Control
Panel Option, which includes the addition of a small fan with a filter in the air intake to cool the
control panel, and a unit nameplate that lists the larger electrical requirements.
All units with the optional VFD low ambient fan control automatically include the High
Ambient Control Panel Option. Operation of the VFD generates a quantity of panel heat best
removed by use of a control panel fan.
IMM AGZ-7 AGZ 026B through 130B 15
Page 16

Winter Operation Temperatures
0°F to 34°F 35°F and Above
Fan Control Optional VFD (1) Standard FanTrol (2)
Design Ambient Air T emperature
Electrical Data (3)
≤105°F >106°F ≤105°F >106°F
Standard
Ambient
High
Ambient
Standard
Ambient
High
Ambient
Panel Fan Required (4) Yes Yes No Yes
Model Designator (5)
Packaged BS BH BS BH
Remote Evaporator BM BB BM BB
NOTES
1. VF D is variable spe ed, fan control through the Micro Tech Ii controller.
2. FanTrol is fan cycling off discharge pressure.
3. Standard Ambient electrical data begins on page 36, High Ambient data begins on page 46.
4. The VFD option automatically includes the factory-installed panel fan and filter set
5. The designator is the last two characters in the model number, i.e. AGZ 100BS.
Panel Ratings
Voltage
208-230
240
380-460
575
Standard
Standard Options
Panel
Optional
VFD
High Short Circuit
Panel (kA)
High Interrupt Panel w/
Disconnect Swt. (kA)
35 5 120 120
35 5 100 100
35 5 65 65
5 5 25 25
Water Flow Limitations, Constant Flow
The evaporator flow rates and pressure drops shown on page 25 are for full load design
purposes. The maximum flow rate and pressure drop are based on a 6-degree
temperature drop. Avoid higher flow rates with resulting lower temperature drops to
prevent potential control problems resulting from very small control bands and limited
start up/shut off temperature changes.
The minimum flow and pressure drop is based on a full load evaporator temperature
drop of 16-degrees.
Evaporator flow rates below the minimum values can result in laminar flow causing
freeze-up problems, scaling and poor control. Flow rates above the maximum values
will result in unacceptable pressure drops and can cause excessive erosion, potentially
leading to failure.
Water Flow Limitations, Variable Flow
The full load, minimum flow limitation for constant flow is not to be confused with the
part load minimum flow rate that must be maintained for chillers operating in primary
variable flow pumping systems. As chiller capacity drops, the flow rate for this
pumping system will reduce proportionally. See the following table for the part load
minimum flow rates.
Other design practices for variable flow systems requiring a range of evaporator flow
rates can be found below.
16 AGZ 026B through 130B IMM AGZ-7
Page 17

These minimum flow rates assume that flow will be reduced proportionally to the
cooling load.
Table 9, Minimum Part Load Flow Rates
AGZ Model 010 013 017 020 025 029 034 026 030 035 040 045
Minimum Part
Load Flow (GPM)
AGZ Model 050 055 060 065 070 075 085 090 100 110 120 130
Minimum Part
Load Flow (GPM)
10 13 15 20 22 27 33 26 29 32 37 41
45 50 55 59 63 71 119 128 146 161 180 194
Variable Speed Pumping
Variable water flow involves changing the water flow through the evaporator as the
load changes. McQuay chillers are designed for this duty provided that the rate of
change in water flow is slow and the minimum and ma xi mum fl o w r at es f or t he ves s el
are not exceeded.
The recommended maximum change in water flow is 10 percent of the change per
minute.
The water flow through the vessel must remain above the values listed on Table 9. If
flow drops below the minimum allowable, large reductions in heat transfer can occur.
Water Piping
Local authorities can supply the installer with the proper building and safety codes
required for safe and proper installation.
Install piping with minimum bends and changes in elevation to minimize pressure drop.
The following issues must be considered when designing and installing water piping:
1. Vibration eliminators to reduce vibration and noise transmission to the building.
2. Shutoff valves are required to isolate the unit from the piping during unit servicing.
3. Manual or automatic air vent valves at the high points of the system. Drains must
be installed at the lowest points in the system.
4. Adequate water pressure must be maintained (expansion tank or regulating valve).
5. Temperature and pressure indicators located at the unit are required to aid in unit
servicing.
6. A strainer or other means of removing foreign matter from the water before it
enters the pump must
prevent cavitation at the pump inlet (consult pump manufacturer for
recommendations). The use of a strainer will prolong pump life and keep system
performance up.
7. Flush the system water piping thoroughly before making connections to the unit
evaporator. Be sure to install a strainer (40-mesh for models AGZ 010 through 070
and 20-mesh for AGZ 075 through 130) in the return water line before the inlet to
the chiller. Design the water piping so the chilled water circulating pump
discharges into the evaporator inlet.
8. The unit’s evaporator has a thermostat and heater to prevent freeze-up down to 20°F (-29°C). The heating cable can be wired to a separate 115V supply circuit.
As shipped from the factory, the heating cable is wired to the control circuit. All
water piping to the unit must also be protected to prevent freezing.
be installed. Place the strainer far enough upstream to
IMM AGZ-7 AGZ 026B through 130B 17
Page 18

CAUTION
If separate disconnect is used for the 115V supply to the evaporator heating
cable, mark the disconnect clearly to ensure the disconnect is not accidentally
shut off during cold seasons causing a possible damaging evaporator freeze-up.
9. If the unit is used as a replacement chiller, flush the system thoroughly before unit
installation. Regular water analysis and chemical water treatment for the
evaporator loop is recommended immediately at equipment start-up.
10. The total water volume in the system should be sufficient to prevent frequent “onoff” cycling. Turnover rate should not be less than 4 minutes for normal variable
cooling loads.
11. When glycol is added to the water system for freeze protection, the refrigerant
suction pressure will be lower, cooling performance less, and water side pressure
drop greater. If the percentage of glycol is high, or if propylene is used instead of
ethylene glycol, the added pressure drop and loss of performance could be
substantial. When Glycol or Ice are selected as Unit Mode, the MicroTech II will
automatically reset the available range for the Leaving Water Temperature,
Freezestat and Evaporator Pressure settings.
12. Reset the freezestat setting to approximately 4 to 5 degrees F (2.3 to 2.8 degrees C)
below the leaving chilled water setpoint temperature. See the section titled
“Glycol Solutions” for additional information concerning glycol.
13. Perform a preliminary leak check before insulating the piping and filling the
system.
14. Piping insulation should include a vapor barrier to prevent condensation and
possible damage to the building structure.
Figure 16, AGZ 075 – AGZ 130, Typical Field Evaporator Water Piping
THERMOWELL
T
INLET
T
18 AGZ 026B through 130B IMM AGZ-7
Page 19

Figure 17, AGZ 026 - AGZ 070, Typical Field Evaporator Water Piping
Air
T
Inlet
Outlet
T
Thermowell
Vent
P
Drain
Vibration
Eliminators
40-Mesh
Strainer
Isolation
Valves
Flow
Switch
NOTE: Outdoor piping must be protected if freezing temperatures are a possibility.
Flow Switch
Mount a water flow switch in the leaving water line to shut down the unit when water
flow is interrupted. A flow switch is an equipment protection control and should never
be used to cycle a unit.
A “paddle” type flow switch is available from McQuay (part number 017503300).
Certain minimum flow rates are required to close the switch and are listed in Table 10
on page 19.
Installation should be as shown in Figure 18. Connect the normally open contacts of
the flow switch in the unit control center at terminals 44 and 61. There is also a set of
normally closed contacts on the switch that can be used for an indicator light or an
alarm to indicate when a “no flow” condition exists. Freeze protect any flow switch
that is installed outdoors. Manufacturer’s instructions included with the switch should
be followed.
NOTE: Differential pressure switches are not recommended for outdoor installation.
They can freeze and not indicate a no-flow condition.
Table 10, Flow Switch Minimum/Maximum Flow Rat es
Nominal Pipe Size
Inches (mm)
2 (50.8) 13.7 (51.8) 105 (397.4)
2 1/2 (63.50 17.9 (67.8) 149 (564.0)
3 (76.20 24.2 (91.6) 230 (870.6)
4 (101.6) 35.3 (134.0) 397 (1502.7)
5 (127.0) 48.6 (184.0) 654 (2475.4)
6 (152.4) 60.3 (228.0) 900 (3406.5)
Note: See pressure drop table on page 21 for minimum and maxim um flow through the evaporator.
Minimum Required Flow To
Activate Switch - gpm (l/m)
Maximum Safe Flow Rate
gpm (l/m)
Figure 18, Flow Switch Instal lation
Flow direction marked on switch
1" (25mm) NPT flow switch
connection
Tee
IMM AGZ-7 AGZ 026B through 130B 19
Page 20

Water Connections
T
D
Bring water piping to the evaporator through the side between the vertical supports.
Provide taps for the connection of pressure gauges and thermometers in the inlet and
outlet lines. Check the inlet and outlet labels on the unit against the certified drawings
supplied on the job and be sure the water piping is hooked up correctly. Contact the
McQuay sales office if any discrepancies exist.
System Water Volume Considerations
All chillers need adequate time to recognize a load change, respond to the change and
stabilize without short cycling the compressor. The water volume in the system and the
size of the piping loop is a critical consideration. Good engineering practice is to have
a minimum water volume of four times the flow rate (GPM) for comfort cooling
applications. For process applications where the load can change quickly, contact the
local McQuay sales office for recommendations. A water storage tank (provided by
others) may be required to increase the system water volume in some systems.
Since there are many other factors that can influence performance, systems can
successfully operate below these suggestions. However, as the water volume decreases
below these suggestions, the possibility of problems increases. We believe that these
guidelines should be an industry standard and not just recommendations from McQuay.
Variable Speed Pumping
Variable water flow involves reducing the water flow through the evaporator as the
load decreases. McQuay chillers are designed for this duty provided that the rate of
change in water flow is not greater than 10 percent of the change per minute.
The water flow through the vessel must remain above the values shown on Table 9 on
page 17. If flow drops below the minimum allowable, large reductions in heat transfer
can occur.
Glycol Solutions
The use of a glycol/water mixture in the evaporator to prevent freezing will reduce
system capacity and efficiency, as well as increase pressure drop. The system capacity,
required glycol solution flow rate, and pressure drop with glycol may be calculated
using the following formulas and tables.
1. Capacity – Multiply the capacity based on water by the Capacity correction factor
from Table 11 through Table 14.
2. Flow – Multiply the water evaporator flow by the Flow correction factor from
Table 11 through Table 14 to determine the increased evaporator flow due to
glycol.
If the flow is unknown, it can be calculated from the following equation:
)(24
×
=
CapacitykW
elta
18.4
−×
For Metric Applications
(gpm) Flow Glycol FactorCorrectionFlow
– Use the following equation for metric applications:
=
(l/s) Flow Glycol
3. Pressure drop -- Multiply the water pressure drop from page 25 by Pressure Drop
correction factor from Table 11 through Table 14. High concentrations of
propylene glycol at low temperatures may cause unacceptably high pressure drops.
4. Power -- Multiply the water system power by Power correction factor from Table
11 through Table 14.
glycolCapacityTons
TDelta
−
×
×
FactorCorrectionFlow
)
20 AGZ 026B through 130B IMM AGZ-7
Page 21

Test coolant with a clean, accurate glycol solution hydrometer (similar to that found in
service stations) to determine the freezing point. Obtain percent glycol from the
freezing point table below. It is recommended that a minimum of 25% solution by
weight be used for protection against corrosion or that additional compatible inhibitors
be added.
Concentrations above 35 percent do not provide any additional burst protection and
should be carefully considered before using.
CAUTION
Do not use an automotive grade antifreeze. Industrial grade glycols must be
used. Automotive antifreeze contains inhibitors which will cause plating on the
copper tubes within the chiller evaporator. The type and handling of glycol used
must be consistent with local codes.
Table 11, Et hyl ene Glycol Factors for Models AGZ 026B to 070B
% E.G.
10 26 -3.3 0.998 0.998 1.036 1.097
20 18 -7.8 0.993 0.997 1.060 1.226
30 7 -13.9 0.987 0.995 1.092 1.369
40 -7 -21.7 0.980 0.992 1.132 1.557
50
Freeze Point
o
F
-28 -33.3 0.973 0.991 1.182 1.791
o
C
Capacity Power Flow PD
Table 12, Propylene Glycol Factors for Models AGZ 026B to 070B
% P.G.
10 26 -3.3 0.995 0.997 1.016 1.100
20 19 -7.2 0.987 0.995 1.032 1.211
30 9 -12.8 0.978 0.992 1.057 1.380
40 -5 -20.6 0.964 0.987 1.092 1.703
50
Freeze Point
o
F
-27 -32.8 0.952 0.983 1.140 2.251
o
C
Capacity Power Flow PD
Table 13, Ethylene Glycol Factors for Models AGZ 075B to 130B
% E.G.
10 26 -3.3 0.994 0.998 1.038 1.101
20 18 -7.8 0.982 0.995 1.063 1.224
30 7 -13.9 0.970 0.992 1.095 1.358
40 -7 -21.7 0.955 0.987 1.134 1.536
50
Freeze Point
o
F
-28 -33.3 0.939 0.983 1.184 1.755
o
C
Capacity Power Flow PD
Table 14, Propylene Glycol Factors for Models AGZ 075B to 130B
% P.G.
10 26 -3.3 0.988 0.996 1.019 1.097
20 19 -7.2 0.972 0.992 1.035 1.201
30 9 -12.8 0.951 0.987 1.059 1.351
40 -5 -20.6 0.926 0.979 1.095 1.598
50
Freeze Point
o
F
-27 -32.8 0.906 0.974 1.142 2.039
o
C
Capacity Power Flow PD
IMM AGZ-7 AGZ 026B through 130B 21
Page 22

Altitude Correction Factors
Performance tables are based at sea level. Elevations other than sea level affect the performance of
the unit. The decreased air density will reduce condenser capacity consequently reducing the unit's
performance. For performance at elevations other than sea level, refer to Table 15 or Table 16.
Evaporator Temperature Drop Factors
Performance tables are based on a 10-degree F (5-degree C) temperature drop through the
evaporator. Adjustment factors for applications with temperature ranges from 6 to 16-degree F (3.3
to 8.9-degree C) are in Table 15 or Table 16.
Temperature drops outside this 6 to 16-degree F (3.3 to 8.9-degree C) range can affect the control
system's capability to maintain acceptable control and are not recommended.
The maximum water temperature that can be circulated through the evaporator in a non-operating
mode is 100°F (37.8°C).
Fouling Factor
Performance tables are based on water with a fouling factor of
As fouling is increased, performance decreases. For performance at other than 0.0001 (0.0176)
fouling factor, refer to Table 15 or Table 16.
Foreign matter in the chilled water system will adversely affect the heat transfer capability of
the evaporator and could increase the pressure drop and reduce the water flow. Maintain
proper water treatment to provide optimum unit operation.
22
)/0176.0(/0001.0
kWCmorBTUFhrft °×°×× per ARI 550/590-98.
Table 15, Capacity and Power Derates, Models AGZ 026B to 070B
Fouling Factor
Altitude
Sea
Level
2000 feet
610 meters
4000 feet
1220 meters
6000 feet
1830 meters
Chilled Water
Delta T
°F °C Cap. Power Cap. Power Cap. Power Cap. Power
6 3.3 0.978 0.993 0.975 0.991 0.963 0.987 0.940 0.980
8 4.4 0.989 0.996 0.986 0.994 0.973 0.990 0.950 0.983
10 5.6 1.000 1.000 0.996 0.999 0.984 0.994 0.961 0.987
12 6.7 1.009 1.003 1.005 1.001 0.993 0.997 0.969 0.990
14 7.7 1.018 1.004 1.014 1.003 1.002 0.999 0.978 0.991
16 8.9 1.025 1.007 1.021 1.006 1.009 1.001 0.985 0.994
6 3.3 0.977 1.001 0.973 1.000 0.961 0.996 0.938 0.989
8 4.4 0.987 1.006 0.984 1.004 0.971 1.000 0.948 0.993
10 5.6 0.998 1.009 0.995 1.007 0.982 1.003 0.959 0.996
12 6.7 1.007 1.011 1.004 1.010 0.991 1.006 0.967 0.998
14 7.7 1.014 1.014 1.011 1.013 0.998 1.009 0.974 1.001
16 8.9 1.022 1.016 1.018 1.014 1.005 1.010 0.981 1.003
6 3.3 0.973 1.011 0.970 1.010 0.957 1.006 0.935 0.998
8 4.4 0.984 1.014 0.980 1.013 0.968 1.009 0.945 1.001
10 5.6 0.995 1.019 0.991 1.017 0.979 1.013 0.955 1.005
12 6.7 1.004 1.021 1.000 1.020 0.987 1.016 0.964 1.008
14 7.7 1.011 1.024 1.007 1.023 0.994 1.018 0.971 1.011
16 8.9 1.018 1.027 1.014 1.026 1.002 1.021 0.978 1.014
6 3.3 0.969 1.021 0.966 1.020 0.954 1.016 0.931 1.008
8 4.4 0.980 1.026 0.977 1.024 0.964 1.020 0.942 1.013
10 5.6 0.989 1.029 0.986 1.027 0.973 1.023 0.950 1.015
12 6.7 0.998 1.033 0.995 1.031 0.982 1.027 0.959 1.020
14 7.7 1.007 1.036 1.004 1.034 0.991 1.030 0.967 1.022
16 8.9 1.014 1.037 1.011 1.036 0.998 1.031 0.974 1.024
0.0001 (0.0176) 0.00025 (0.044) 0.00075 (0.132) 0.00175 (0.308)
22 AGZ 026B through 130B IMM AGZ-7
Page 23

Table 16, Capacity and Power Derates, Models AGZ 075B to 130B
Fouling Factor
Altitude
Sea
Level
2000 feet
610 meters
4000 feet
1220 meters
6000 feet
1830 meters
Chilled Water
Delta T
°F °C Cap. Power Cap. Power Cap. Power Cap. Power
6 3.3 0.990 0.997 0.976 0.994 0.937 0.983 0.868 0.964
8 4.4 0.994 0.998 0.981 0.995 0.942 0.984 0.872 0.965
10 5.6 1.000 1.000 0.987 0.996 0.947 0.986 0.877 0.967
12 6.7 1.005 1.001 0.991 0.997 0.951 0.986 0.881 0.968
14 7.7 1.009 1.002 0.995 0.998 0.955 0.987 0.884 0.968
16 8.9 1.013 1.004 1.000 1.000 0.960 0.989 0.889 0.970
6 3.3 0.987 1.005 0.974 1.002 0.934 0.991 0.865 0.972
8 4.4 0.992 1.006 0.979 1.003 0.940 0.992 0.870 0.973
10 5.6 0.997 1.008 0.984 1.004 0.944 0.994 0.875 0.975
12 6.7 1.002 1.009 0.989 1.005 0.949 0.994 0.879 0.975
14 7.7 1.007 1.011 0.993 1.007 0.953 0.996 0.883 0.977
16 8.9 1.011 1.012 0.998 1.008 0.958 0.997 0.887 0.978
6 3.3 0.985 1.014 0.972 1.010 0.933 0.999 0.864 0.980
8 4.4 0.991 1.015 0.977 1.012 0.938 1.001 0.869 0.981
10 5.6 0.995 1.016 0.982 1.013 0.943 1.002 0.873 0.982
12 6.7 1.000 1.018 0.987 1.014 0.947 1.003 0.877 0.984
14 6.8 1.005 1.019 0.991 1.015 0.951 1.004 0.881 0.985
16 8.9 1.009 1.021 0.995 1.017 0.955 1.006 0.884 0.987
6 3.3 0.982 1.023 0.969 1.020 0.930 1.009 0.861 0.989
8 4.4 0.988 1.025 0.975 1.022 0.935 1.010 0.866 0.991
10 5.6 0.992 1.026 0.979 1.022 0.940 1.011 0.870 0.992
12 6.7 0.997 1.028 0.984 1.024 0.944 1.013 0.875 0.994
14 7.7 1.002 1.029 0.989 1.025 0.949 1.014 0.879 0.995
16 8.9 1.006 1.031 0.992 1.027 0.952 1.016 0.882 0.996
0.0001 (0.0176) 0.00025 (0.044) 0.00075 (0.132) 0.00175 (0.308)
Evaporator Freeze Protection
Evaporator freeze-up can be a concern in the application of air-cooled water chillers. To
protect against freeze-up, insulation and an electric heater cable are furnished with the unit.
This protects the evaporator down to -20°F (-29°C) ambient air temperature. Although the
evaporator is equipped with freeze protection, it does not protect water piping external to the
unit or the evaporator itself if there is a power failure or heater cable burnout. Consider the
following recommendations for additional protection.
1. If the unit will not be operated during the winter, drain evaporator and chilled water piping
and flush with glycol. Drain and vent connections are provided on the evaporator to ease
draining.
2. Add a glycol solution to the chilled water system to provide freeze protection. Freeze
point should be approximately ten degrees below minimum design ambient temperature.
3. The addition of thermostatically controlled heat and insulation to exposed piping.
4. Continuous circulation of water through the chilled water piping and evaporator.
The evaporator heater cable is factory wired to the 115-volt circuit in the control box. This power
should be supplied from a separate source, but it can be supplied from the control circuit.
Operation of the heater cable is automatic through the ambient sensing thermostat that energizes
the evaporator heater cable for protection against freeze-up. Unless the evaporator is drained in the
winter, the disconnect switch to the evaporator heater must not be open.
IMM AGZ-7 AGZ 026B through 130B 23
Page 24

Operating/Standby Limits
Maximum standby ambient air temperature, 130°F (55°C)
Maximum operating ambient air temperature
Standard Ambient Unit, 105°F (40.6°C) and below, Models BS and BM
High Ambient Unit, above 105°F (40.6°C) to 125°F 51.7°C), Models BH and BB
Minimum operating ambient temperature (standard), 35°F (2°C)
Minimum operating temperature (with optional low-ambient control), 0°F (-18°C)
Leaving chilled water temperature, 40°F to 60°F (4.4°C to 15.6°C)
Leaving chilled fluid temperatures (with anti-freeze), 20°F to 60°F (-7°C to 16°C)
Design chilled water Delta-T range, 6 degrees F to 16 degrees F (3.3 degrees C to 8.9
degrees C)
Part load minimum flow for variable flow systems; varies with unit size, see below
Maximum operating inlet fluid temperature, 76°F (24°C)
Maximum non-operating inlet fluid temperature, 100°F (38°C)
Electric power supply, see page 52
Evaporator Flow and Pressure Drop Water Flow
Limitations
The evaporator flow rates and pressure drops shown on page 25 are for full load,
constant flow design purposes.
See the page 16 for the part load minimum flow rates. Other design practices for
variable flow systems requiring a range of evaporator flow rates can be found on page
20.
24 AGZ 026B through 130B IMM AGZ-7
Page 25

Figure 19, AGZ 026B – 130B, Evaporator Pressure Drop
040
045
050
055
026-030
065-070
035
075-085-090
120-130
060
100-110
AGZ Unit
Model
026B 41 1.6 2.6 4.7 65 3.9 4.1 11.6 109 10.4 6.9 30.9
030B 45 1.9 2.9 5.7 72 4.7 4.6 14.1 121 12.7 7.6 37.8
035B 50 1.9 3.1 5.6 80 4.6 5.0 13.8 133 12.4 8.4 36.9
040B 58 1.9 3.6 5.7 92 4.7 5.8 14.0 154 12.6 9.7 37.5
045B 64 1.8 4.0 5.4 102 4.5 6.4 13.4 170 12.1 10.7 35.9
050B 71 1.8 4.4 5.4 113 4.5 7.1 13.3 188 12.0 11.9 35.7
055B 78 1.8 4.9 5.3 125 4.4 7.9 13.0 209 11.7 13.2 34.8
060B 86 1.7 5.4 5.2 137 4.3 8.6 12.8 228 11.5 14.4 34.2
065B 92 1.6 5.8 4.9 147 4.1 9.3 12.1 246 10.9 15.5 32.5
070B 98 1.9 6.2 5.6 157 4.6 9.9 13.7 262 12.3 16.5 36.8
075B 111 5.6 7.0 16.5 177 12.5 11.2 37.4 295 30.4 18.6 90.7
085B 119 6.3 7.5 18.9 191 14.3 12.1 42.7 318 34.8 20.1 103.6
090B 128 7.2 8.1 21.4 205 16.2 12.9 48.4 342 39.4 21.6 117.3
100B 146 2.6 9.2 7.7 234 6.1 14.8 18.2 390 15.5 24.6 46.2
110B 161 3.1 10.2 9.2 258 7.3 16.3 21.7 430 18.5 27.1 55.1
120B 180 3.5 11.3 10.4 288 8.9 18.1 26.5 479 24.6 30.2 73.4
130B 194 4.1 12.2 12.1 311 10.4 19.6 30.9 518 28.7 32.7 85.6
NOTE: Minimum and maxim um flows provide a Delta-T for each unit size within a 6 - 16°F range for proper control.
Inch-Pound S.I. Inch-Pound S.I. Inch-Pound S.I.
gpm DP ft. lps DP kpa gpm DP ft. lps DP kpa gpm DP ft. lps DP kpa
IMM AGZ-7 AGZ 026B through 130B 25
Minimum Nominal Maximum
Page 26

Wind Baffles and Hail Guards
G
A
.
Protection against negative effects from wind and protection against fin damage from hail
can be achieved from two separate options from McQuay. Factory or field installed louvers
are available as well as the box-type enclosures described below.
Wind Baffles/Hail Guards are a field installed option that are used to stabilize unit operation
in high wind areas and to assist in operation at low ambient temperatures. Figure 20 is a
sketch of a typical panel assembly on an AGZ unit. The actual number of panels and parts
will vary by model size. The parts are shown in the table below and referenced by balloon
numbers.
Figure 20, Installation Sequence
Rib Att achment (First)
RIB FLANGES ON THE END
MUST POINT TO CENTER
OF COIL TO HAVE A FINISHED
LOOK. INTERIOR RIB FLANGES
CAN POINT IN ANY DIRECTION.
U
I
I
R
E
N
T
T
C
V
O
I
L
C
L
A
Front Panel Attachment (Second)
PLACE FRONT "A" AND
FASTEN TO BOTH SIDES
C
O
L
I
C
I
A
L
V
E
R
U
T
N
T
I
C
B
2
A
1
3
Top Panel Attachment (Last)
ATTACH TOP "A" AT HORIZONTAL COIL CHANNEL FIRST.
THIS WILL SQUARE THE PANEL.
OVERLAP THE FRONT PANEL FLANGE.
A
C
I
T
U
R
N
E
T
V
I
O
L
I
C
L
ATTACH ALL RIBS TO
COIL VERTICAL CHANNELS.
E
D
PLACE FRONT "B" BY LAPPIN
OVER "A" AND REPEAT
ATTACHMENT PROCEDURE.
E
D
C
B
A
ATTACH LEFT SIDE SECOND.
LAP PANEL "B" OVER PANEL "A"
ND REPEAT ATTACHMENT PROCEDURE
26 AGZ 026B through 130B IMM AGZ-7
Page 27

Table 17, Packing List
L
O
t
Description Part Number Bubble Number
Vertical Support Rib 074758501 1
Top Cover 330409401 2
¼ - 20 x ½” Screw (Place in Poly Bag) 046093807
Front Panel 330409501 3
Figure 21, Components
Top Panel, Install Last
Overlap the Front panel
T
REAR (AGAINST UNIT)
VERTICAL SUPPORT RIB TOP COVER FRONT PANE
P
Front Panel, Install Second
Rib, Install Firs
IMM AGZ-7 AGZ 026B through 130B 27
Page 28

Optional Features
Controls
Hot Gas Bypass
Hot gas bypass permits unit operation down to 10% of full load capacity. This option
includes a factory-mounted hot gas bypass valve, solenoid valve, and manual shutoff
valve for each circuit. See page 61 for further information.
Head Pressure Control
Optional fan VFD control allows unit operation down to 0°F (-18°C). (Not available
on 380 volt, 60 Hertz units.)
Water Flow Switch
(P/N 017503300) A water flow switch is available for field installation in the chilled
water piping to avoid evaporator freeze-up under low or no flow conditions. Terminals
are provided in the unit control center for field hook-up of the water flow switch. If
this option is not ordered with the unit, then a field supplied water flow switch must be
installed.
Alarm Bell
Bell for field installation and wiring to the control panel to provide remote indication
of unit alarm condition. See Field Wiring Diagram for connection locations.
BAS Interface
Optional Protocol Selectability™, connection to the chiller for all building automation
systems (BAS) protocols will be at the unit controller. An interface module, depending
on the protocol being used, may have been factory-installed in the unit controller (or it
can be field installed).
Protocols Supported
Table 18, Standard Protocol Data
Protocol Physical Layer Data Rate Controller Other
BACnet®/IP or
BACnet/Ethernet
BACnet MSTP RS-485
LONWORKS®
Modbus RTU RS-485 or RS-232
The interface kits on the MicroTech II controller are as follows:
• BACnet Kit P/N 350147404: BACnet/IP, BACnet MS/TP, or BACnet Ethernet
• LONWORKS Kit P/N 350147401: LonTalk (FTT-10A)
• Modbus: Modbus RTU
Optional Protocol Selectability BAS interfaces. The locations and interconnection
requirements for the various standard protocols are found in their respective
installation manuals.
Ethernet 10 Base-T 10 Megabits/sec
9600, 19200 or
38400 bits/sec
FTT-10A 78kbits/sec
9600 or 19200
bits/sec
MicroTech II
MicroTech II
MicroTech II
MicroTech II
Reference ED 15062
Reference ED 15062
Reference ED 15062
Reference ED 15063
Modbus IM 743 L
ONWORKS IM 735 BACnet IM 736
Referenced documents may be obtained from the local McQuay sales office, from the
local McQuayService office, or from the McQuay Technical Response Center, located
in Staunton, Virginia (540-248-0711).
28 AGZ 026B through 130B IMM AGZ-7
Page 29

These documents can also be found on www.mcquay.com under Product Information >
(chiller type) > Control Integration.
®™ The following are trademarks or registered trademarks of their respective
companies: BACnet from the American Society of Heating, Refrigerating and AirConditioning Engineers, Inc., LonTalk, LONMARK and LONWORKS from Echelon
Corporation, and Modbus and Modbus RTU from Schneider Electric.
Remote Operator Interface Panel
The box containing the optional remote interface panel will have installation
instructions, IOM- MT II Remote, in it. The manual is also available for downloading
from www.mcquay.com.
Unit
Vibration Isolators
Spring or rubber-in-shear vibration isolators are available for field installation to
reduce vibration transmission through the unit base. See page 12 for detailed
information on their installation.
Protective Base Guards
Optional factory-installed, vinyl-coated welded wire base guards provide all-around
lower unit protection on ground level installations. Coil guards are standard.
Copper Fin Condenser Coils
Copper fin condenser coils are available as an option on all models.
Black Fin Coils
Aluminum fin stock precoated with a phenolic coating with 1000 hour salt spray
resistance (ASTM B117-90).
Coated Fins
Copper or aluminum fins coated with ElectroFin® baked epoxy protective coating with
3000+ hour salt spray resistance (ASTM B117-90).
Evaporator Insulation
Double insulation thickness (total of 1½ inches) for high humidity areas or low fluid
temperatures.
Sound Reduction
Acoustical blankets are factory-installed on each compressor.
Hail and Wind Guards
A field-mounted option that is shipped as a kit including panels, fasteners, and
instructions. See page 26 for further information.
Louvers
Upper and/or lower, factory mounted or field installed louver panels that protect from
hail damage, help stabilize operation in high wind conditions and provide a uniform,
enhanced appearance.
Shut-off Valves
Factory-mounted suction and discharge shut-off valves, liquid line shutoff valve is
standard.
IMM AGZ-7 AGZ 026B through 130B 29
Page 30

Electrical
Multi-Point Electrical Connection
Provides a power connection to each of the unit’s two electrical circuits.
Disconnect Switch with Through-the-Door Handle
A factory or field-installed option for service use, nonfused disconnect switch
(mounted inside the power section of the control box) with a through-the-door handle
is available with single and multi-point power supply.
Phase Loss/Voltage Protection
Phase loss with under/over voltage protection and multiple LED indication of fault
type is available as a factory-installed option to guard against compressor motor
burnout.
Convenience Outlet
10.0 amp, 115-volt outlet located in control panel to provide power for servicing unit.
Ground Fault Protection
Protects equipment from damage from line-to-ground fault currents less than those
required for conductor protection.
High Short Circuit Current Protection
Provides control panel protection against short circuit currents per the following table:
Voltage 208 240 460 600
Current (kA) 120 100 65 25
High Ambient Control Panel
Consists of exhaust fan with rain hood, two inlet screens with filters, necessary
controls and wiring to allow operation to 125°F. The option can be factory or field
installed as a kit.:
• It is automatically included on any unit with the fan VFD (low ambient option)
• It is required on any unit operating above 105°F (40.1°C).
30 AGZ 026B through 130B IMM AGZ-7
Page 31

Physical Data
AGZ-BS/BH
Table 19, AGZ 026BS/BH through 035BS/BH
PHYSICAL DATA
BASIC DATA
Unit Capacity @ ARI (1), Tons (kW) 27.2 (95.4) 30.2 (106.3) 33.2 (117.2)
Number Of Refrigerant Circuits 2 2 2
Unit Operating Charge, R-22, Lbs. 22 22 22 27 27 27
Unit Operating Charge, R-22, (kg) 10 10 10 12 12 12
Cabinet Dimensions, LxWxH, In. 94.4 x 88.0 x 100.4 94.4 x 88.0 x 100.4 94.4 x 88.0 x 100.4
Cabinet Dimensions, LxWxH, (mm) 2398 x 2235 x 2550 2398 x 2235 x 2550 2398 x 2235 x 2550
Unit Operating Weight, Lb (kg) 3990 (1811) 4040 (1834) 4080 (1852)
Unit Shipping Wei ght, Lb (kg) 39501793) 3990 (1811) 4030 (1830)
Add'l Weight If Copper Finned Coils, Lb (kg) 284 (129) 284 (129) 284 (129)
COMPRESSORS
Type Tandem Scrolls Tandem Scrolls Tandem Scrolls
Nominal tonnage of each Com pressor 7.5 7.5 7.5 9. 0 9.0 9.0
Number Of Compressors per Circuit 2 2 2 2 2 2
Oil Charge Per Compressor, Oz. 140 140 140 140 140 140
Oil Charge Per Compressor, (g) (496) (496) (496) (496) (496) (496)
CAPACITY REDUCTION STEPS - PERCENT OF COMPRESSOR DISPLACEMENT
Staging, 4 Stages, Circuit #1 in Lead 0-25-50-75-100 0-23-50-73-100 0-25-50-75-100
Staging, 4 Stages, Circuit #2 in Lead 0-25-50-75-100 0-27-50-77-100 0-25-50-75-100
CONDENSERS - HIGH EFFICIENCY FIN AND TUBE TYPE WITH INTEGRAL SUBCOOLING
Coil Face Area Sq. Ft. 26.3 26.3 26.3 26.3 26.3 26.3
Coil Face Area, (M2) 2.4 2.4 2.4 2.4 2.4 2.4
Finned Height x Finned Length, In. 50x75.6 50x75.6 50x75.6 50x75.6 50x75.6 50x75.6
Finned Height x Finned Length, (mm)
Fins Per Inch x Rows Deep 16 x 3 16 x 3 16 x 3 16 x 3 16 x 3 16 x 3
Pumpdown Capacity, 90% Full Lbs . (kg) 49 (22) 49 (22) 49 (22) 49 (22) 49 (22) 49 (22)
Maximum Relief Valve Pressure Setting,
psig (kPa)
CONDENSER FANS - DIRECT DRIVE PROPELLER TYPE
Number Of Fans - Fan Diameter, In. (mm) 4 – 30 (762) 4 – 30 (762) 4 – 30 (762)
Number Of Motors - HP (kW) (2) 4 – 1.5 4 – 1.5 4 – 1.5
Fan And Motor RPM, 60Hz 1140 1140 1140
60 Hz Fan Tip Speed, FPM (M/Sec) 8950 (4224) 8950 (4224) 8950 (4224)
60 Hz Total Unit Airflow, CFM (M3/sec) 24,316 (11,478) 24,316 (11,478) 24,316 (11,478)
EVAPORATOR - BRAZED PLATE-TO-PLATE
Number of Evaporators 1 1 1
Number of Refrigerant Circuits 2 2 2
Water Volume, Gallons, (L) 4.3 (16.4) 5.0 (18.9) 5.7 (21.4)
Maximum Water P ressure, psig (kPa) 363 (2503) 363 (2503) 363 (2503)
Max. Refrig. Working Pressure, psig (kPa) 450 (3102) 450 (3102) 450 (3102)
Water Inlet / Outlet Victaulic Conn. In. (mm) 3 (76) 3 (76) 3 (76)
Drain - NPT int, In. (mm) Field Fi el d Field
Vent - NPT int, In. (mm) Field Field Field
NOTES:
1. Nominal c apacit y bas ed on 95°F ambient air and 54°F/44°F water range.
2. Except for 380V/60 & 575V/60, HP = 2.0
AGZ MODEL NUMBER
026B 030B 035B
Ckt.1 Ckt.2 Ckt.1 Ckt.2 Ckt.1 Ckt.2
1270 x
1920
450
(3103)
1270 x
1920
450
(3103)
1270 x
1920
450
(3103)
1270 x
1920
450
(3103)
1270 x
1920
450
(3103)
1270 x
1920
450
(3103)
IMM AGZ-7 AGZ 026B through 130B 31
Page 32

Table 20, AGZ 040BS/BH through 055BS/BH
PHYSICAL DATA
BASIC DATA
Unit Capacity @ ARI Conditions (1), Tons (kW) 38.5 (135.5) 42.5 (149.6) 47. 0 (165. 4) 52.2 (183.7)
Number Of Refrigerant Circuits 2 2 2 2
Unit Operating Charge, R-22, lbs. 31 31 38 38 38 38 46 46
Unit Operating Charge, R-22, (kg) (14) (14) (17) (17) (17) (17) (21) (21)
Cabinet Dimensions, LxWxH, in. 94.4 x 88.0 x 100.4 94.4 x 88.0 x 100.4 94.4 x 88.0 x 100.4 94.4 x 88.0 x 100.4
Cabinet Dimensions, LxWxH, (mm)
Unit Operating Weight, Lbs. (kg) 4130 (1875) 4270 (1939) 4400 (1998) 4540 (2061)
Unit Shipping Wei ght, Lbs. (kg) 4070 (1848) 4210 (1911) 4330 (1966) 4460 (2025)
Add'l Weight If Copper Finned Coils, lbs. (kg) 288 (130) 288 (130) 476 (216) 476 (216)
COMPRESSORS
Type Tandem Scrolls Tandem Scrolls Tandem S crolls Tandem Scrolls
Nominal tonnage of each Compressor 10.0 10.0 10.0 13.0 13.0 13.0 13.0 15.0
Number Of Compressors per Ci rcuit 2 2 2 2 2 2 2 2
Oil Charge Per Compressor, oz. 140 140 140 140 140 140 140 140
Oil Charge Per Compressor, (g) (496) (496) (496) (496) (496) (496) (496) (496)
CAPACITY REDUCTION STEPS - PERCE NT OF COMPRESSOR DISPLACEMENT
Staging, 4 Stages, Circuit #1 in Lead 0-25-50-75-100 0-22-50-46-100 0-25-50-75-100 0-25-50-75-100
Staging, 4 Stages, Circuit #2 in Lead 0-25-50-75-100 0-28-50-85-100 0-25-50-75-100 0-25-50-75-100
CONDENSERS - HIGH EFFICIENCY FIN AND TUBE TYPE WITH INTEGRAL SUBCOOLING
Coil Face Area, sq. ft. 44.1 44.1 44.1 44.1 44.1 44.1 44.1 44.1
Coil Face Area , sq. m 4.1 4.1 4.1 4.1 4.1 4.1 4.1 4.1
Finned Height x Finned Length, in. 42x75.6 42x75.6 42x75.6 42x75.6 42x75.6 42x75.6 42x75.6 42x75.6
Finned Height x Finned Length, (mm)
Fins Per Inch x Rows Deep 16 x 2 16 x 2 16 x 2 16 x 2 16 x 3 16 x 3 16 x 3 16 x 3
Pumpdown Capacity, 90% Full Lbs . (kg) 60 (27) 60 (27) 60(27) 60(27) 82 (37) 82 (37) 82 (37) 82 (37)
Maximum Relief Valve Pressure Setting, psig (kPa)
CONDENSER FANS - DIRECT DRIVE PROPELLER TYPE
Number Of Fans - Fan Diameter, in. (mm) 4 – 30 (762) 4 – 30 (762) 4 – 30 (762) 4 – 30 (762)
Number Of Motors - HP (kW) (2) 4 – 1.5 4 – 1.5 4 – 1.5 4 – 1.5
Fan And Motor RPM, 60Hz 1140 1140 1140 1140
60 Hz Fan Tip Speed, FPM (m/sec) 8950 (4224) 8950 (4224) 8950 (4224) 8950 (4224)
60 Hz Total Unit Airflow, CFM (m3/sec) 39,600 (18,692) 39,600 (18, 692) 39,600 (18,692) 39,600 (18,692)
EVAPORAT OR - BRAZED PLATE-TO-PLATE
Number of Evaporators 1 1 1 1
Number of Refrigerant Circuits 2 2 2 2
Water Volume, Gallons, (L) 6.3 (23.9) 7.2 (27.3) 8.1 (30.7) 9.2 (34.9)
Maximum Water P ressure, psig (kPa) 363 (2503) 363 (2503) 363 (2503) 363 (2503)
Maximum Refrigerant Working Pressure, psig (kP a) 450 (3102) 450 (3102) 450 (3102) 450 (3102)
Water Inlet / Outlet Victaulic Connections, in. (mm) 3 (76) 3 (76) 3 (76) 3 (76)
Drain - NPT int, in. (mm ) Field Field Field Field
Vent - NPT int, in. (mm) Field Field Field Field
NOTES
1. Nominal c apacit y bas ed on 95°F ambient air and 54°F/44°F water range.
2. Except for 380V/60 & 575V/60, HP = 2.0
040B 045B 050B 055B
Ckt.1 Ckt.1 Ckt.2 Ckt.1 Ckt.2 Ckt.1 Ckt.2 Ckt.2
2398 x 2235 x
2550
1067 x
1920
450
(3103)
1067 x
1920
450
(3103)
AGZ MODEL NUMBER
2398 x 2235 x
2550
1067 x
1920
450
(3103)
1067 x
1920
450
(3103)
2398 x 2235 x
2550
1067 x
1920
450
(3103)
1067 x
1920
(3103)
450
2398 x 2235 x
2550
1067 x
1920
450
(3103)
1067 x
1920
(3103)
450
32 AGZ 026B through 130B IMM AGZ-7
Page 33

Table 21, AGZ 060BS/BH through 070BS/BH
PHYSICAL DATA
BASIC DATA
Unit Capacity @ ARI Conditions (1), Tons (kW) 57.1 (201.0) 61.4 (215.5) 65. 5 (230.0)
Number Of Refrigerant Circuits 2 2 2
Unit Operating Charge, R-22, lbs. 46 46 52 59 59 59
Unit Operating Charge, R-22, (kg) (21) (21) (24) (27) (27) (27)
Cabinet Dimensions, LxWxH, in. 94.4 x 88.0 x 100.4 94.4 x 88.0 x 100.4 94.4 x 88.0 x 100.4
Cabinet Dimensions, LxWxH, (mm)
Unit Operating Weight, Lbs. (kg) 4600 4860 4990
Unit Shipping Wei ght, Lbs. (kg) 4520 4760 4890
Add'l Weight If Copper Finned Coils, lbs. (kg) 476 (216) 568 (258) 568 (258)
COMPRESSORS
Type Tandem Scrolls Tandem Scrolls Tandem Scrolls
Nominal tonnage of each Com pressor 15.0 15.0 15.0 15 / 20 15 / 20 15 / 20
Number Of Compressors per Circuit 2 2 2 2 2 2
Oil Charge Per Compressor, oz. 140 140 140 140 /148 140 /148 140 /148
Oil Charge Per Compressor, (g) (496) (496) (496) 496/ 525 496/ 525 496/ 525
CAPACITY REDUCTION STEPS - PERCENT OF COMPRESSOR DISPLACEMENT
Staging, 4 Stages, Circuit #1 in Lead 0-25-50-75-100 0-23-46-77-100 0-25-50-75-100
Staging, 4 Stages, Circuit #2 in Lead 0-25-50-75-100 0-31-46-69-100 0-25-50-75-100
CONDENSERS - HIGH EFFICIENCY FIN AND TUBE TYPE WITH INTEGRAL SUBCOOLING
Coil Face Area, sq. ft. 44.1 44.1 52.6 52.6 52.6 52.6
Coil Face Area, (m2) 4.1 4.1 4.9 4.9 4.9 4.9
Finned Height x Finned Length, in. 42x75.6 42x75.6 50x75.6 50x75.6 50x75.6 50x75.6
Finned Height x Finned Length, (mm)
Fins Per Inch x Rows Deep 16 x 3 16 x 3 16 x 3 16 x 3 16 x 3 16 x 3
Pumpdown Capacity, 90% Full Lbs . (kg) 82 (37) 82 (37) 98 (44) 98 (44) 98 (44) 98 (44)
Maximum Relief Valve Pressure Setting, psig (kPa)
CONDENSER FANS - DIRECT DRIVE PROPELL ER TYPE
Number Of Fans - Fan Diameter, in. (mm) 4 – 30 (762) 4 – 30 (762) 4 – 30 (762)
Number Of Motors - HP (kW) (2) 4 – 1.5 4 – 2.0 4 – 2.0
Fan And Motor RPM, 60Hz 1140 1140 1140
60 Hz Fan Tip Speed, FPM (m/sec) 8950 (4224) 8950 (4224) 8950 (4224)
60 Hz Total Unit Airflow, CFM (m3/sec) 37,228 (17,572 43,452 (20,510) 43,452 (20,510)
EVAPORAT OR - BRAZED PLATE-TO-PLATE
Number of Evaporators 1 1 1
Number of Refrigerant Circuits 2 2 2
Water Volume, Gallons, (L) 9.2 (34.9) 11.2 (42.5) 11.2 (42.5)
Maximum Water Pressure, psig (kPa) 363 (2503) 363 (2503) 363 (2503)
Maximum Refrigerant Working Pressure, psig (kP a ) 450 (3102) 450 (3102) 450 (3102)
Water Inlet / Outlet Victaulic Connections, in. (mm) 3 (76) 3 (76) 3 (76)
Drain - NPT int, in. (mm ) Field Field Field
Vent - NPT int, in. (mm) Field Field Field
NOTES
1. Nominal capacity based on 95°F ambient ai r and 54° F/44°F water range.
2. Except for 380V/60 & 575V/60 for AGZ 060, HP = 2.0
060B 065B 070B
Ckt.1 Ckt.2 Ckt.1 Ckt.2 Ckt.1 Ckt.2
2398 x 2235 x
2550
1067 x
1920
450
(3103)
AGZ MODEL NUMBER
2398 x 2235 x
2550
1067 x
1920
450
(3103)
1270 x
1920
450
(3103)
1270 x
1920
450
(3103)
2398 x 2235 x
2550
1270 x
1920
450
(3103)
1270 x
1920
(3103)
450
IMM AGZ-7 AGZ 026B through 130B 33
Page 34

Table 22, AGZ 075BS/BH through 090BS/BH
PHYSICAL DATA
BASIC DATA
Unit Capacity @ ARI Conditions (1), Tons (kW) 73.7 (259.4) 79.6 (280.2) 85.5 (301.0)
Number Of Refrigerant Circuits 2 2 2
Unit Operating Charge, R-22, lbs. 59 59 59 69 69 69
Unit Operating Charge, R-22, (kg) (27) (27) (27 (31) (31) (31)
Cabinet Dimensions, LxWxH, in. 134.9 x 88.0 x 100.4 134.9 x 88.0 x 100.4 134.9 x 88.0 x 100.4
Cabinet Dimensions, LxWxH, (mm) 3426 x 2235 x 2550 3426 x 2235 x 2550 3426 x 2235 x 2550
Unit Operating Weight, Lbs. (kg) 6530 (2958) 6690 (3031) 6850 (3103)
Unit Shipping Wei ght, Lbs. (kg) 6320 (2863) 6480 (2935) 6640 (3008)
Add'l Weight If Copper Finned Coils, lbs. (kg) 870 (395) 870 (395) 870 (395)
COMPRESSORS
Type Tandem Scrolls Tandem Scrolls Tandem Scrolls
Nominal tonnage of each Compressor 20.0 20.0 20.0 25.0 25.0 25.0
Number Of Compressors per Ci rcuit 2 2 2 2 2 2
Oil Charge Per Compressor, oz. 148 148 148 200 200 200
Oil Charge Per Compressor, (g) (525) (525) (525) (709) (709) (709)
CAPACITY REDUCTION STEPS - PERCE NT OF COMPRESSOR DISPLACEMENT
Staging, 4 Stages, Circuit #1 in Lead 0-25-50-75-100 0-22-50-72-100 0-25-50-75-100
Staging, 4 Stages, Circuit #2 in Lead 0-25-50-75-100 0-28-50-78-100 0-25-50-75-100
CONDENSERS - HIGH EFFICIENCY FIN AND TUBE TYPE WITH INTEGRAL SUBCOOLING
Coil Face Area, sq. ft. 78.8 78.8 78.8 78.8 78.8 78.8
Coil Face Area, (m2) 7.3 7.3 7.3 7.3 7.3 7.3
Finned Height x Finned Length, in. 50 x113.4 50 x113.4 50 x113.4 50 x113.4 50 x113.4 50 x113.4
Finned Height x Finned Length, (mm)
Fins Per Inch x Rows Deep 16 x 3 16 x 3 16 x 3 16 x 3 16 x 3 16 x 3
Pumpdown Capacity, 90% Full Lbs . (kg) 147 (67) 147 (67) 147 (67) 147 (67) 147 (67) 147 (67)
Maximum Relief Valve Pressure Setting, psig (kPa)
CONDENSER FANS - DIRECT DRIVE PROPELL E R TYPE
Number Of Fans - Fan Diameter, in. (mm) 6 – 30 (762) 6 – 30 (762) 6 – 30 (762)
Number Of Motors - HP (kW) 6 – 2.0 6 – 2.0 6 – 2.0
Fan And Motor RPM, 60Hz 1140 1140 1140
60 Hz Fan Tip Speed, FPM (m/sec) 8950 (4224) 8950 (4224) 8950 (4224)
60 Hz Total Unit Airflow, CFM (m3/sec) 65,178 (30,765) 65,178 (30,765) 65,178 (30,765)
EVAPORAT OR - SHELL AND TUBE
Number of Evaporators 1 1 1
Number of Refrigerant Circuits 2 2 2
Diameter, in. - Length, ft. 14.0 x 5.2 14.0 x 5.2 14.0 x 5.2
Diameter, (mm) – Length, (mm) 356 x 1585 356 x 1585 356 x 1585
Water Volume, Gallons, (L) 25 (95) 25 (95) 25 (95)
Maximum Water P ressure, psig (kPa) 152 (1047) 152 (1047) 152 (1047)
Maximum Refrigerant Working Pressure, psig (kP a) 300 (2066) 300 (2066) 300 (2066)
Water Inlet / Outlet Victaulic Connections, in. (mm) 5 (127) 5 (127) 5 (127)
Drain - NPT int, in. (mm) 0.5 (12.7) 0.5 (12.7) 0.5 (12.7)
Vent - NPT int, in. (m m) 0.5 (12.7) 0.5 (12.7) 0.5 (12.7)
NOTE:
1. Nominal c apacit y bas ed on 95°F ambient air and 54°F/44°F water range.
075B 085B 090B
Ckt.1 Ckt.2 Ckt.1 Ckt.2 Ckt.1 Ckt.2
1270 x
2880
450
(3103)
AGZ MODEL NUMBER
1270 x
2880
450
(3103)
1270 x
2880
450
(3103)
1270 x
2880
450
(3103)
1270 x
2880
450
(3103)
1270 x
2880
450
(3103)
34 AGZ 026B through 130B IMM AGZ-7
Page 35

Table 5, AGZ 100BS/BH through 130BS/BH
PHYSICAL DATA
BASIC DATA
Unit Capacity @ ARI Conditions (1), Tons (kW) 97.6 (342.6) 107.5 (378.4) 119.8 (421.7) 129.4 (455.5)
Number Of Refrigerant Circuits 2 2 2 2
Unit Operating Charge, R-22, lbs. 76 86 86 86 86 104 104 104
Unit Operating Charge, R-22, (kg) (35) (39) (39) (39) (39) (47) (47) (47)
Cabinet Dimensions, LxWxH, in. 173.1 x 88.0 x 100.4 173.1 x 88.0 x 100.4 173.1 x 88.0 x 100.4 173.1 x 88.0 x 100.4
Cabinet Dimensions, LxWxH, (mm) 4397 x 2235 x 2550 4397 x 2235 x 2550 4397 x 2235 x 2550 4397 x 2235 x 2550
Unit Operating Weight, Lbs. (kg) 7870 (3565) 8150 (3692) 8720 (3950) 9050 (4100)
Unit Shipping Wei ght, Lbs. (kg) 7580 (3434) 7860 (3561) 8380 (3796) 8710 (3946)
Add'l Weight If Copper Finned Coils, lbs. (kg) 1155 (524) 1155 (524) 1155 (524) 1155 (524)
COMPRESSORS
Type Trio Scrolls Trio Scrolls Trio Scrolls Trio Scrolls
Nominal tonnage of each Compressor 15.0 20.0 20.0 20.0 20.0 25.0 25.0 25.0
Number Of Compressors per Ci rcuit 3 3 3 3 3 3 3 3
Oil Charge Per Compressor, oz. 140 148 148 148 148 200 200 200
Oil Charge Per Compressor, (g) (496) (525) (525) (525) (525) (709) (709) (709)
CAPACITY REDUCTION STEPS - PERCENT OF COMPRESSOR DISPLACEMENT
Staging, 6 Stages, Circuit #1 in Lead 0-14-33-48-67-81-100 0-17-33-50-67-83-100 0-15-33-48-67-81-100 0-17-33-50-67-83-100
Staging, 6 Stages, Circuit #2 in Lead 0-19-33-52-67-86-100 0-17-33-50-67-83-100 0-19-33-52-67-86-100 0-17-33-50-67-83-100
CONDENSERS - HIGH EFFICIENCY FIN AND TUBE TYPE WITH INTEGRAL SUBCOOLING
Coil Face Area, sq. ft. 105.3 105.3 105.3 105.3 105.3 105.3 105.3 105.3
Coil Face Area, (m2) 9.8 9.8 9.8 9.8 9.8 9.8 9.8 9.8
Finned Height x Finned Length, in. 50 x151.6 50 x151.6 50 x151.6 50 x151.6 50 x151.6 50 x151.6 50 x151.6 50 x151.6
Finned Height x Finned Length, (mm)
Fins Per Inch x Rows Deep 16 x 3 16 x 3 16 x 3 16 x 3 16 x 3 16 x 3 16 x 3 16 x 3
Pumpdown Capacity, 90% Full Lbs . (kg) 196 (89) 196 (89) 196 (89) 196 (89) 196 (89) 196 (89) 196 (89) 196 (89)
Maximum Relief Valve Press ure Setting, psig
(kPa)
CONDENSER FANS - DIRECT DRIVE PROPELLER TYPE
Number Of Fans - Fan Diameter, in. (mm) 8 – 30 (762) 8 – 30 (762) 8 – 30 (762) 8 – 30 (762)
Number Of Motors - HP (kW) 8 – 2.0 8 – 2.0 8 – 2.0 8 – 2. 0
Fan And Motor RPM, 60Hz 1140 1140 1140 1140
60 Hz Fan Tip Speed, FPM (m/sec) 8950 (4224) 8950 (4224) 8950 (4224) 8950 (4224)
60 Hz Total Unit Airflow, CFM (m3/sec) 86,904 (41,020) 86, 904 (41, 020) 86,904 (41,020) 86,904 (41,020)
EVAPORAT OR - SHELL AND TUBE
Number of Evaporators 1 1 1 1,
Number of Refrigerant Circuits 2 2 2 2
Diameter, in. - Length, ft. 12.8 x 7.9 12.8 x 7.9 14.0 x 8.0 14.0 x 8.0
Diameter, (mm) – Length, (mm) 324 x 2408 324 x 2408 356 x 2438 356 x 2438
Water Volume, Gallons, (L) 34 (127) 34 (127) 40 (150) 40 (150)
Maximum Water P ressure, psig (kPa) 152 (1047) 152 (1047) 152 (1047) 152 (1047)
Maximum Refrigerant Working Pressure, psig
(kPa)
Water Inlet / Outlet Victaulic Connections, in.
(mm)
Drain - NPT int, in. (mm) 0.5 (12.7) 0.5 (12.7) 0.5 (12.7) 0.5 (12.7)
Vent - NPT int, in. (mm) 0.5 (12.7) 0.5 (12.7) 0.5 (12.7) 0. 5 (12. 7)
100B 110B 120B 130B
Ckt.1 Ckt.2 Ckt.1 Ckt.2 Ckt.1 Ckt.2 Ckt.1 Ckt.2
1270 x
3851
450
(3103)
1270 x
3851
450
(3103)
300 (2066) 300 (2066) 300 (2066) 300 (2066)
5 (127) 5 (127) 5 (127) 5 (127)
AGZ MODEL NUMBER
1270 x
3851
450
(3103)
1270 x
3851
450
(3103)
1270 x
3851
450
(3103)
1270 x
3851
450
(3103)
1270 x
3851
450
(3103)
1270 x
3851
450
(3103)
NOTE:
1. Nominal capacity based on 95°F ambient air and 54°F/44° F water range.
IMM AGZ-7 AGZ 026B through 130B 35
Page 36

Electrical Data, Standard Ambient
Table 23, AGZ 026BM/BS – 070BM/BS, Electrical Data, Single Point
(105°F and below)
AGZ Unit
Size
026B
030B
035B
040B
045B
050B
055B
060B
065B
070B
NOTES:
1. Units operating in ambient temperatures of 95°F (35°C) and above must use the
2. All Elec trical Data notes are on page 52.
3. Conduit hubs are not provi ded.
Volts
Maximum Fuse or HACR Breaker si ze.
Minimum
Circuit
Ampacity
(MCA)
208 133 3 1/0 150 150
230 126 3 #1 150 150
380 80 3 #4 90 90
460 68 3 #4 80 80
575 52 3 #6 60 60
208 146 3 1/0 175 175
230 143 3 1/0 175 175
380 88 3 #3 100 100
460 74 3 #4 80 90
575 58 3 #6 70 70
208 158 3 2/0 175 175
230 150 3 1/0 175 175
380 96 3 #3 110 110
460 79 3 #4 90 90
575 64 3 #6 70 70
208 167 3 2/0 200 200
230 167 3 2/0 200 200
380 113 3 #2 125 125
460 81 3 #4 90 90
575 70 3 #4 80 80
208 184 3 3/0 225 225
230 184 3 3/0 225 225
380 121 3 #1 125 125
460 94 3 #3 110 110
575 78 3 #4 90 90
208 199 3 3/0 225 225
230 199 3 3/0 225 225
380 127 3 #1 150 150
460 104 3 #2 125 125
575 86 3 #3 100 100
208 221 3 4/0 250 250
230 214 3 4/0 250 250
380 145 3 1/0 175 175
460 108 3 #2 125 125
575 96 3 #3 110 110
208 248 3 250 300 300
230 228 3 4/0 250 250
380 156 3 2/0 175 175
460 112 3 #2 150 150
575 105 3 #2 125 125
208 281 3 300 350 350
230 281 3 300 350 350
380 162 3 2/0 200 200
460 124 3 #1 150 150
575 109 3 #2 125 125
208 301 3 350 350 350
230 301 3 350 350 350
380 168 3 2/0 200 200
460 130 3 #1 150 150
575 112 3 #2 125 125
Power Supply
Field Wire
Quantity
Wire
Gauge
75C
Recomm’d.
Fuse
Or HACR
Breaker
Size
Max. Fuse
Or HACR
Breaker
Size
36 AGZ 026B through 130B IMM AGZ-7
Page 37

Table 24, AGZ 026BM/BS – 070BM/BS, Compressor and Fan Motor Amps, Single and
Multi-Point (105°F and below ))
AGZ
Unit
Volts
Size
026B
030B
035B
040B
045B
050B
055B
060B
065B
070B
All Electrical Dat a notes are on page 52.
No. 1 No. 3 No. 5 No. 2 No. 4 No. 6
208 25.7 25.7 - 25.7 25.7 - 5.8 4 23.3 189 189 - 189 189 230 24.2 24.2 - 24.2 24.2 - 5.8 4 26.1 189 189 - 189 189 380 14.9 14.9 - 14.9 14.9 - 4.1 4 20.0 112 112 - 112 112 460 13.4 13.4 - 13.4 13.4 - 2.8 4 13.0 99 99 - 99 99 575 9.3 9.3 - 9.3 9.3 - 3.0 4 14.0 74 74 - 74 74 -
208 25.7 25.7 - 31.8 31.8 - 5.8 4 23.3 189 189 - 232 232 230 24.2 24.2 - 31.8 31.8 - 5.8 4 26.1 189 189 - 232 232 380 14.9 14.9 - 18.6 18.6 - 4.1 4 20.0 112 112 - 144 144 460 13.4 13.4 - 16.0 16.0 - 2.8 4 13.0 99 99 - 125 125 575 9.3 9.3 - 12.2 12.2 - 3.0 4 14.0 74 74 - 100 100 -
208 31.8 31.8 - 31.8 31.8 - 5.8 4 23.3 232 232 - 232 232 230 29.9 29.9 - 29.9 29.9 - 5.8 4 26.1 232 232 - 232 232 380 18.6 18.6 - 18.6 18.6 - 4.1 4 20.0 144 144 - 144 144 460 16.0 16.0 - 16.0 16.0 - 2.8 4 13.0 125 125 - 125 125 575 12.2 12.2 - 12.2 12.2 - 3.0 4 14.0 100 100 - 100 100 -
208 33.8 33.8 - 33.8 33.8 - 5.8 4 23.3 278 278 - 278 278 230 33.8 33.8 - 33.8 33.8 - 5.8 4 26.1 278 278 - 278 278 380 22.8 22.8 - 22.8 22.8 - 4.1 4 20.0 151 151 - 151 151 460 16.5 16.5 - 16.5 16.5 - 2.8 4 13.0 127 127 - 127 127 575 13.7 13.7 - 13.7 13.7 - 3.0 4 14.0 100 100 - 100 100 -
208 33.8 33.8 - 41.4 41.4 - 5.8 4 23.3 278 278 - 350 350 230 33.8 33.8 - 41.4 41.4 - 5.8 4 26.1 278 278 - 350 350 380 22.8 22.8 - 26.0 26.0 - 4.1 4 20.0 151 151 - 195 195 460 16.5 16.5 - 21.8 21.8 - 2.8 4 13.0 127 127 - 158 158 575 13.7 13.7 - 17.3 17.3 - 3.0 4 14.0 100 100 - 125 125 -
208 41.4 41.4 - 41.4 41.4 - 5.8 4 23.3 350 350 - 350 350 230 41.4 41.4 - 41.4 41.4 - 5.8 4 26.1 350 350 - 350 350 380 26.0 26.0 - 26.0 26.0 - 4.1 4 20.0 195 195 - 195 195 460 21.8 21.8 - 21.8 21.8 - 2.8 4 13.0 158 158 - 158 158 575 17.3 17.3 - 17.3 17.3 - 3.0 4 14.0 125 125 - 125 125 -
208 41.0 41.0 - 51.3 51.3 - 5.8 4 23.3 350 350 - 425 425 230 41.0 41.0 - 48.1 48.1 - 5.8 4 26.1 350 350 - 425 425 380 26.0 26.0 - 33.8 33.8 - 4.1 4 20.0 195 195 - 239 239 460 21.8 21.8 - 23.7 23.7 - 2.8 4 13.0 158 158 - 187 187 575 17.3 17.3 - 21.8 21.8 - 3.0 4 14.0 125 125 - 148 148 -
208 52.8 52.8 - 52.8 52.8 - 5.8 4 23.3 425 425 - 425 425 230 48.1 48.1 - 48.1 48.1 - 5.8 4 26.1 425 425 - 425 425 380 32.7 32.7 - 32.7 32.7 - 4.1 4 20.0 239 239 - 239 239 460 23.7 23.7 - 23.7 23.7 - 2.8 4 13.0 187 187 - 187 187 575 21.8 21.8 - 21.8 21.8 - 3.0 4 14.0 148 148 - 148 148 -
208 52.8 52.8 - 52.8 73.1 - 7.8 4 31.7 425 425 - 425 505 230 52.8 52.8 - 52.8 73.1 - 7.8 4 35.6 425 425 - 425 505 380 32.7 32.7 - 32.7 38.2 - 4.1 4 20.0 239 239 - 239 280 460 23.7 23.7 - 23.7 30.1 - 3.6 4 17.8 187 187 - 187 225 575 21.8 21.8 - 21.8 25.2 - 3.0 4 14.0 148 148 - 148 180 -
208 52.8 73.1 - 52.8 73.1 - 7.8 4 31.7 425 505 - 425 505 230 52.8 73.1 - 52.8 73.1 - 7.8 4 35.6 425 505 - 425 505 380 32.7 38.2 - 32.7 38.2 - 4.1 4 20.0 239 280 - 239 280 460 23.7 30.1 - 23.7 30.1 - 3.6 4 17.8 187 225 - 187 225 575 21.8 25.2 - 21.8 25.2 - 3.0 4 14.0 148 180 - 148 180 -
Rated Load Amps Locked Rotor Amps
Compressors Compressors
F.L.Amps
Fan
Motors
(Each)
No. Of
Fan
Motors
Fan
Motors
(Each)
Across-The-Line
No.1 No. 3 No. 5 No.2 No.4 No. 6
IMM AGZ-7 AGZ 026B through 130B 37
Page 38

Table 25, AGZ 026 BM/BS – 070BM/BS, Field Wiring, Single Point
(105°F and below)
Wiring to Standard
Amps
Power Block
Connector Wire
(Copper Wire Only)
AGZ
Unit
Size
026B
030B
035B
040B
045B
050B
055B
060B
065B
070B
All Electrical Dat a notes are on page 52.
Volts
208 175 14 GA – 2/0 225 # 4 - 300 kcmil
230 175 14 GA – 2/0 225 # 4 - 300 kcmil
380 175 14 GA – 2/0 150 # 4 - 300 kcmil
460 175 14 GA – 2/0 150 # 4 - 300 kcmil
575 175 14 GA – 2/0 150 # 4 - 300 kcmil
208 380 #4 – 500kcmil 225 # 4 - 300 kc mil
230 380 #4 – 500kcmil 225 # 4 - 300 kc mil
380 175 14 GA – 2/0 150 # 4 - 300 kcmil
460 175 14 GA – 2/0 150 # 4 - 300 kcmil
575 175 14 GA – 2/0 150 # 4 - 300 kcmil
208 380 #4 – 500kcmil 225 # 4 - 300 kc mil
230 380 #4 – 500kcmil 225 # 4 - 300 kc mil
380 175 14 GA – 2/0 150 # 4 - 300 kcmil
460 175 14 GA – 2/0 150 # 4 - 300 kcmil
575 175 14 GA – 2/0 150 # 4 - 300 kcmil
208 380 #4 – 500kcmil 225 # 4 - 300 kc mil
230 380 #4 – 500kcmil 225 # 4 - 300 kc mil
380 175 14 GA – 2/0 150 # 4 - 300 kcmil
460 175 14 GA – 2/0 150 # 4 - 300 kcmil
575 175 14 GA – 2/0 150 # 4 - 300 kcmil
208 380 #4 – 500kcmil 225 # 4 - 300 kc mil
230 380 #4 – 500kcmil 225 # 4 - 300 kc mil
380 175 14 GA – 2/0 150 # 4 - 300 kcmil
460 175 14 GA – 2/0 150 # 4 - 300 kcmil
575 175 14 GA – 2/0 150 # 4 - 300 kcmil
208 380 #4 – 500kcmil 250 #6 - 350 kcmi l
230 380 #4 – 500kcmil 250 #6 - 350 kcmi l
380 175 14 GA – 2/0 150 # 4 - 300 kcmil
460 175 14 GA – 2/0 150 # 4 - 300 kcmil
575 175 14 GA – 2/0 150 # 4 - 300 kcmil
208 380 #4 – 500kcmil 400 250 kcmil -500 kcmil
230 380 #4 – 500kcmil 400 250 kcmil -500 kcmil
380 175 14 GA – 2/0 250 #6 - 350 kcmil
460 175 14 GA – 2/0 150 # 4 - 300 kcmil
575 175 14 GA – 2/0 150 # 4 - 300 kcmil
208 380 #4 – 500kcmil 400 250 kcmil -500 kcmil
230 380 #4 – 500kcmil 400 250 kcmil -500 kcmil
380 380 #4 – 500kcmil 250 #6 - 350 kcmi l
460 175 14 GA – 2/0 150 # 4 - 300 kcmil
575 175 14 GA – 2/0 150 # 4 - 300 kcmil
208 380 #4 – 500kcmil 400 250 kcmil -500 kcmil
230 380 #4 – 500kcmil 400 250 kcmil -500 kcmil
380 380 #4 – 500kcmil 250 #6 - 350 kcmi l
460 175 14 GA – 2/0 250 # 4 - 300 kcmil
575 175 14 GA – 2/0 150 # 4 - 300 kcmil
208 380 #4 – 500kcmil 400 250 kcmil -500 kcmil
230 380 #4 – 500kcmil 400 250 kcmil -500 kcmil
380 380 #4 – 500kcmil 250 #6 - 350 kcmi l
460 380 #4 – 500kcmil 250 # 4 - 300 kc mil
575 175 14 GA – 2/0 150 # 4 - 300 kcmil
Terminal
Range
Wiring to Optional
Non-Fused Disconnect Switch
Disconnect
Size
Connector Wire
Range
(Copper Wire Only)
38 AGZ 026B through 130B IMM AGZ-7
Page 39

Table 26, AGZ 075BM/BS – 130BM/BS, Electrical Wiring,
Single Point (105°F and below)
AGZ Unit
Size
075B
085B
090B
100B
110B
120B
130B
NOTES:
1. Units operating in am bient tem peratures of 95° F (35°C) and above must use the Maximum
2. All Electri cal Data notes are on page 52.
3. (2) indicates that two conduits are required.
4. Conduit hubs are not suppli ed.
Volts
Fuse or HACR Breaker size.
Minimum
Circuit
Ampacity
(MCA)
208 358 6 4/0 400 400
230 358 6 4/0 400 400
380 187 3 3/0 225 225
460 150 3 1/0 175 175
575 125 3 #1 150 150
208 380 6 250 450 450
230 380 6 250 450 450
380 219 3 250 250 250
460 171 3 2/0 200 200
575 136 3 1/0 150 150
208 414 6 300 500 500
230 414 6 300 500 500
380 248 3 250 300 300
460 188 3 3/0 225 225
575 146 3 1/0 175 175
208 463 6 350 500 500
230 463 6 300 500 500
380 260 3 300 300 300
460 199 3 3/0 225 225
575 171 3 2/0 175 175
208 528 6 - (2) 300 600 600
230 528 6 - (2) 300 600 600
380 282 3 300 300 300
460 220 3 4/0 250 250
575 182 3 3/0 200 200
208 613 6 - (2) 350 700 700
230 613 6 - (2) 350 700 700
380 323 3 400 350 350
460 248 3 250 250 250
575 198 3 3/0 225 225
208 613 6 - (2) 350 700 700
230 613 6 - (2) 350 700 700
380 361 6 4/0 400 400
460 273 3 300 300 300
575 212 3 4/0 225 225
Power Supply M ax. Fuse
Field Wire
Quantity
Wire
Gauge
75C
Recomm’d.
Fuse
Or HACR
Breaker
Size
Or HACR
Breaker
Size
IMM AGZ-7 AGZ 026B through 130B 39
Page 40

Table 27, AGZ 075BM/BS – 130BM/BS, Compressor and Fan Motor Amps, Single and
Multi-Point (105°F and below )
Rated Load Amps Locked Rotor Amps
AGZ
Unit
Volts
Size
075B
085B
090B
100B
110B
120B
130B
All Electrical Dat a notes are on page 52.
No. 1 No. 3 No. 5 No. 2 No. 4 No. 6
208 73.1 73.1 - 73.1 73.1 - 7.8 6 31.7 505 505 - 505 505 230 73.1 73.1 - 73.1 73.1 - 7.8 6 35.6 505 505 - 505 505 380 38.2 38.2 - 38.2 38.2 - 4.1 6 20.0 280 280 - 280 280 460 30.1 30.1 - 30.1 30.1 - 3.6 6 17.8 225 225 - 225 225 575 25.2 25.2 - 25.2 25.2 - 3.0 6 14.0 180 180 - 180 180 -
208 73.1 73.1 - 83.3 83.3 - 7.8 6 31.7 505 505 - 500 500 230 73.1 73.1 - 83.3 83.3 - 7.8 6 35.6 505 505 - 500 500 380 38.2 38.2 - 52.5 52.5 - 4.1 6 20.0 280 280 - 305 305 460 30.1 30.1 - 39.0 39.0 - 3.6 6 17.8 225 225 - 250 250 575 25.2 25.2 - 30.0 30.0 - 3.0 6 14.0 180 180 - 198 198 -
208 86.4 86.4 - 86.4 86.4 - 7.8 6 31.7 500 500 - 500 500 230 86.4 86.4 - 86.4 86.4 - 7.8 6 35.6 500 500 - 500 500 380 52.5 52.5 - 52.5 52.5 - 4.1 6 20.0 305 305 - 305 305 460 39.0 39.0 - 39.0 39.0 - 3.6 6 17.8 250 250 - 250 250 575 30.0 30.0 - 30.0 30.0 - 3.0 6 14.0 198 198 - 198 198 -
208 52.8 52.8 52.8 74.5 74.5 74.5 7.8 8 31.7 425 425 425 505 505 505
230 52.8 52.8 52.8 74.5 74.5 74.5 7.8 8 35.6 425 425 425 505 505 505
380 32.7 32.7 32.7 39.8 39.8 39.8 4.1 8 20.0 239 239 239 280 280 280
460 23.7 23.7 23.7 30.6 30.6 30.6 3.6 8 17.8 187 187 187 225 225 225
575 21.8 21.8 21.8 25.2 25.2 25.2 3.0 8 14.0 148 148 148 180 180 180
208 74.5 74.5 74.5 74.5 74.5 74.5 7.8 8 31.7 505 505 505 505 505 505
230 74.5 74.5 74.5 74.5 74.5 74.5 7.8 8 35.6 505 505 505 505 505 505
380 39.8 39.8 39.8 39.8 39.8 39.8 4.1 8 20.0 280 280 280 280 280 280
460 30.6 30.6 30.6 30.6 30.6 30.6 3.6 8 17.8 225 225 225 225 225 225
575 25.2 25.2 25.2 25.2 25.2 25.2 3.0 8 14.0 180 180 180 180 180 180
208 87.9 87.9 87.9 88.0 88.0 88.0 7.8 8 31.7 505 505 505 500 500 500
230 87.9 87.9 87.9 88.0 88.0 88.0 7.8 8 35.6 505 505 505 500 500 500
380 39.8 39.8 39.8 52.5 52.5 52.5 4.1 8 20.0 280 280 280 305 305 305
460 30.6 30.6 30.6 39.0 39.0 39.0 3.6 8 17.8 225 225 225 250 250 250
575 25.2 25.2 25.2 30.0 30.0 30.0 3.0 8 14.0 180 180 180 198 198 198
208 88.0 88.0 88.0 88.0 88.0 88.0 7.8 8 31.7 500 500 500 500 500 500
230 88.0 88.0 88.0 88.0 88.0 88.0 7.8 8 35.6 500 500 500 500 500 500
380 52.5 52.5 52.5 52.5 52.5 52.5 4.1 8 20.0 305 305 305 305 305 305
460 39.0 39.0 39.0 39.0 39.0 39.0 3.6 8 17.8 250 250 250 250 250 250
575 30.0 30.0 30.0 30.0 30.0 30.0 3.0 8 14.0 198 198 198 198 198 198
Compressors Compressors
F.L.
Amps
Fan
Motors
(Each)
No. Of
Fan
Motors
Fan
Motors
(Each)
Across-The-Line
No.1 No. 3 No. 5 No.2 No.4 No. 6
40 AGZ 026B through 130B IMM AGZ-7
Page 41

Table 28, AGZ 075BM/BS - 130BM/BS, Field Wiring, Single Point
(105°F and below)
Wiring to Standard
Amps
Power Block
Connector Wire
Range
(Copper Wire Only)
AGZ
Unit
Size
075B
085B
090B
100B
110B
120B
130B
All Electrical Dat a notes are on page 52.
Volts
208 760 2 GA – 500kcmil 600 (2) 250 kcmil -500 kcmil
230 760 2 GA – 500kcmil 600 (2) 250 kcmil -500 kcmil
380 380 #4 – 500kcmil 250 #6 - 350 kcmil
460 380 #4 – 500kcmil 250 #6 - 350 kcmil
575 380 #4 – 500kcmil 250 #6 - 350 kcmil
208 760 2 GA – 500kcmil 600 (2) 250 kcmil -500 kcmil
230 760 2 GA – 500kcmil 600 (2) 250 kcmil -500 kcmil
380 380 #4 – 500kcmil 400 250 kcm i l -500 kcmil
460 380 #4 – 500kcmil 250 #6 - 350 kcmil
575 380 #4 – 500kcmil 250 #6 - 350 kcmil
208 760 2 GA – 500kcmil 600 (2) 250 kcmil -500 kcmil
230 760 2 GA – 500kcmil 600 (2) 250 kcmil -500 kcmil
380 380 #4 – 500kcmil 400 250 kcm i l -500 kcmil
460 380 #4 – 500kcmil 250 #6 - 350 kcmil
575 380 #4 – 500kcmil 250 #6 - 350 kcmil
208 760 2 GA – 500kcmil 600 (2) 250 kcmil -500 kcmil
230 760 2 GA – 500kcmil 600 (2) 250 kcmil -500 kcmil
380 380 #4 – 500kcmil 400 250 kcm i l -500 kcmil
460 380 #4 – 500kcmil 400 250 kcm i l -500 kcmil
575 380 #4 – 500kcmil 250 #6 - 350 kcmil
208 760 2 GA – 500kcmil 800 (2) 250 kcmil -500 kcmil
230 760 2 GA – 500kcmil 800 (2) 250 kcmil -500 kcmil
380 380 #4 – 500kcmil 400 250 kcm i l -500 kcmil
460 380 #4 – 500kcmil 400 (2) 3/0-250 kcmil
575 380 #4 – 500kcmil 400 (2) 3/0-250 kcmil
208 760 2 GA – 500kcmil 800 (2) 250 kcmil -500 kcmil
230 760 2 GA – 500kcmil 800 (2) 250 kcmil -500 kcmil
380 380 #4 – 500kcmil 400 250 kcm i l -500 kcmil
460 380 #4 – 500kcmil 400 250 kcm i l -500 kcmil
575 380 #4 – 500kcmil 400 (2) 3/0-250 kcmil
208 760 2 GA – 500kcmil 800 (2) 250 kcmil -500 kcmil
230 760 2 GA – 500kcmil 800 (2) 250 kcmil -500 kcmil
380 760 2 GA – 500kcmil 600 (2) 3/0-250 kcmil
460 380 #4 – 500kcmil 400 250 kcm i l -500 kcmil
575 380 #4 – 500kcmil 400 (2) 3/0-250 kcmil
Terminal
Disconnect
Wiring to Optional
Non-Fused Disconnect Switch
Size
Connector Wire Range
(Copper Wire Only)
IMM AGZ-7 AGZ 026B through 130B 41
Page 42

Table 29, AGZ 026BM/BS – 070BM/BS, Electrical Data, Multi - Point
(105°F and below)
Electrical Circuit #1 Electrical Circuit #2
Wire
Gauge
Recomm’d
Fuse
or HACR
Breaker
Size
Max. Fuse
or HACR
Breaker
Size
Minimum
Circuit
Ampacity
(MCA)
Qty
Wire
Gauge
AGZ
Unit
Size
026B
030B
035B
040B
045B
050B
055B
060B
065B
070B
NOTES:
1. All Elec trical Data not es are on page 52.
2. Conduit hubs are not s upplied.
Minimum
Volts
208 70 3 #4 80 90 70 3 #4 80 90
230 66 3 #4 80 90 66 3 #4 80 90
380 42 3 #8 50 50 42 3 #8 50 50
460 36 3 #8 45 45 36 3 #8 45 45
575 27 3 #10 35 35 27 3 #10 35 35
208 70 3 #4 80 90 83 3 #4 100 110
230 66 3 #4 80 90 83 3 #4 100 100
380 42 3 #8 50 50 50 3 #8 60 60
460 36 3 #8 45 45 42 3 #8 50 50
575 27 3 #10 35 35 34 3 #10 40 45
208 83 3 #4 100 110 83 3 #4 100 110
230 79 3 #4 100 100 79 3 #4 100 100
380 50 3 #8 60 60 50 3 #8 60 60
460 42 3 #8 50 50 42 3 #8 50 50
575 34 3 #10 40 45 34 3 #10 40 45
208 88 3 #3 110 110 88 3 #3 110 110
230 88 3 #3 110 100 88 3 #3 110 100
380 60 3 #6 70 80 60 3 #6 70 80
460 43 3 #8 50 50 43 3 #8 50 50
575 37 3 #8 45 50 37 3 #8 45 50
208 88 3 #3 110 110 105 3 #2 125 125
230 88 3 #3 110 110 105 3 #2 125 125
380 60 3 #6 70 80 67 3 #4 80 80
460 43 3 #8 50 50 55 3 #6 70 70
575 37 3 #8 45 50 45 3 #8 50 60
208 105 3 #2 125 125 105 3 #2 125 125
230 105 3 #2 125 125 105 3 #2 125 125
380 67 3 #4 80 80 67 3 #4 80 80
460 55 3 #6 70 70 55 3 #6 70 70
575 45 3 #8 50 60 45 3 #8 50 60
208 105 3 #2 125 125 120 3 #1 150 150
230 105 3 #2 125 125 120 3 #1 150 150
380 67 3 #4 80 80 82 3 #3 100 110
460 55 3 #6 70 70 59 3 #6 70 80
575 45 3 #8 50 60 55 3 #6 70 70
208 120 3 #1 150 150 120 3 #1 150 150
230 120 3 #1 150 150 120 3 #1 150 150
380 82 3 #3 100 110 82 3 #3 100 110
460 59 3 #6 70 80 59 3 #6 70 80
575 55 3 #6 70 70 55 3 #6 70 70
208 135 3 1/0 175 175 160 3 2/0 200 225
230 135 3 1/0 175 175 160 3 2/0 200 225
380 82 3 #4 100 110 89 3 #3 110 125
460 61 3 #6 70 80 69 3 #4 90 100
575 55 3 #6 70 70 59 3 #6 70 80
208 160 3 2/0 200 225 160 3 2/0 200 225
230 160 3 2/0 200 225 160 3 2/0 200 225
380 89 3 #3 110 125 89 3 #3 110 125
460 69 3 #4 90 100 69 3 #4 90 100
575 59 3 #6 70 80 59 3 #6 70 80
Circuit
Ampacity
(MCA)
Power Supply Power Supply
Field Wire Field Wire
Qty
Recomm’d
Fuse
or HACR
Breaker
Size
Max.
Fuse
or HACR
Breaker
Size
42 AGZ 026B through 130B IMM AGZ-7
Page 43

Table 30, AGZ 026BM/BS - 070BM/BS, Field Wiring, Multi- Poi nt
(105°F and below)
Wiring to Standard
AGZ
Unit
Size
026B
030B
035B
040B
045B
050B
055B
060B
065B
070B
All Electrical Dat a notes are on page 52.
Volts
208 175 175 14 GA – 2/0 14 GA – 2/0 150 150 #14 - 1/0 #14 - 1/0
230 175 175 14 GA – 2/0 14 GA – 2/0 150 150 #14 - 1/0 #14 - 1/0
380 175 175 14 GA – 2/0 14 GA – 2/0 150 150 #14 - 1/0 #14 - 1/0
460 175 175 14 GA – 2/0 14 GA – 2/0 150 150 #14 - 1/0 #14 - 1/0
575 175 175 14 GA – 2/0 14 GA – 2/0 150 150 #14 - 1/0 #14 - 1/0
208 380 380 #4 – 500 kcmil #4 – 500 kcmil 225 225 #4 – 300 kcmil #4 – 300 kcmil
230 380 380 #4 – 500 kcmil #4 – 500 kcmil 225 225 #4 – 300 kcmil #4 – 300 kcmil
380 175 175 14 GA – 2/0 14 GA – 2/0 150 150 #14 - 1/0 #14 - 1/0
460 175 175 14 GA – 2/0 14 GA – 2/0 150 150 #14 - 1/0 #14 - 1/0
575 175 175 14 GA – 2/0 14 GA – 2/0 150 150 #14 - 1/0 #14 - 1/0
Terminal
Amps
Cir #1 Cir #2 Cir #1 Cir #2 Cir #1 Cir #2 Cir #1 Cir #2
Power Block
Connector Wire Range
(Copper Wire Only)
Disconnect Size
Wiring to Optional
Non-Fused Disconnect Switch
Connector Wire Range
(Copper Wire Only)
IMM AGZ-7 AGZ 026B through 130B 43
Page 44

Table 31, AGZ 075BM/BS - 130BM/BS, Field Wiring Data (105°F and below)
Wiring to Standard
AGZ
Unit
Size
075B
085B
090B
100B
110B
120B
130B
All Electrical Dat a notes are on page 52.
Volts
208 380 380 #4 – 500 kcmil #4 – 500 kcmil 250 250 #4 – 300 kcmil #4 – 300 kcmi l
230 380 380 #4 – 500 kcmil #4 – 500 kcmil 250 250 #4 – 300 kcmil #4 – 300 kcmi l
380 175 175 14 GA – 2/0 14 GA – 2/0 250 250 #4 – 300 k cmil #4 – 300 kcmil
460 175 175 14 GA – 2/0 14 GA – 2/0 150 150 #14 - 1/0 #14 - 1/0
575 175 175 14 GA – 2/0 14 GA – 2/0 150 150 #14 - 1/0 #14 - 1/0
208 380 380 #4 – 500 kcmil #4 – 500 kcmil 250 400 #4 – 300 kcmil 250 – 500 kcmil
230 380 380 #4 – 500 kcmil #4 – 500 kcmil 250 400 #4 – 300 kcmil 250 – 500 kcmil
380 175 175 14 GA – 2/0 14 GA – 2/0 150 250 #14 - 1/0 #4 – 300 kcmil
460 175 175 14 GA – 2/0 14 GA – 2/0 150 250 #14 - 1/0 #4 – 300 kcmil
575 175 175 14 GA – 2/0 14 GA – 2/0 150 150 #14 - 1/0 #14 - 1/0
208 380 380 #4 – 500 kcmil #4 – 500 kcmil 400 400 250 – 500 k cmil 250 – 500 kcmil
230 380 380 #4 – 500 kcmil #4 – 500 kcmil 400 400 250 – 500 k cmil 250 – 500 kcmil
380 380 380 #4 – 500 kcmil #4 – 500 kcmil 250 250 #4 – 300 kcmil #4 – 300 kcmi l
460 380 380 #4 – 500 kcmil #4 – 500 kcmil 250 250 #4 – 300 kcmil #4 – 300 kcmi l
575 175 175 14 GA – 2/0 14 GA – 2/0 150 150 #14 - 1/0 #14 - 1/0
208 380 380 #4 – 500 kcmil #4 – 500 kcmil 400 400 250 – 500 k cmil 250 – 500 kcmil
230 380 380 #4 – 500 kcmil #4 – 500 kcmil 400 400 250 – 500 k cmil 250 – 500 kcmil
380 380 380 #4 – 500 kcmil #4 – 500 kcmil 250 250 #4 – 300 kcmil #4 – 300 kcmi l
460 380 380
575 175 175 14 GA – 2/0 14 GA – 2/0 150 150 #14 - 1/0 #14 - 1/0
208 380 380 #4 – 500 kcmil #4 – 500 kcmil 400 400 250 – 500 k cmil 250 – 500 kcmil
230 380 380 #4 – 500 kcmil #4 – 500 kcmil 400 400 250 – 500 k cmil 250 – 500 kcmil
380 380 380 #4 – 500 kcmil #4 – 500 kcmil 250 250 #4 – 300 kcmil #4 – 300 kcmi l
460 380 380 #4 – 500 kcmil #4 – 500 kcmil 250 250 #4 – 300 kcmil #4 – 300 kcmi l
575 175 175 14 GA – 2/0 14 GA – 2/0 150 150 #14 - 1/0 #14 - 1/0
Terminal
Amps
Cir #1 Cir #2 Cir #1 Cir #2 Ci r #1 Cir #2 Cir #1 Cir #2
Power Block
Connector Wire Range
(Copper Wire Only)
#4 – 500
kcmil14
Disconnect Size
#4 – 500 kcmil14 250 250 #4 – 300 kcmil #4 – 300 kcmil
Wiring to Optional
Non-Fused Disconnect Switch
Connector Wire Range
(Copper Wire Only)
44 AGZ 026B through 130B IMM AGZ-7
Page 45

Table 32, AGZ 065BM/BS - 130BM/BS, Electrical Data, Mult i -Point
V
(105°F and below)
Electrical Circuit #1 Electrical Circuit #2
Power
AGZ
Unit
Size
075B
085B
090B
100B
110B
120B
130B
NOTES:
1. All Elec trical Data not es are on page 52.
2. Conduit hubs are not s upplied.
Minimum
olts
Circuit
Ampacity
(MCA)
208 188 3 3/0 225 250 188 3 3/0 225 250
230 188 3 3/0 225 250 188 3 3/0 225 250
380 98 3 #3 110 125 98 3 #3 110 125
460 79 3 #4 90 110 79 3 #4 90 110
575 66 3 #4 80 90 66 3 #4 80 90
208 188 3 3/0 225 250 218 3 4/0 250 300
230 188 3 3/0 225 250 218 3 4/0 250 250
380 98 3 #3 110 125 130 3 #1 150 175
460 79 3 #4 90 110 99 3 #3 125 125
575 66 3 #4 80 90 77 3 #4 90 100
208 218 3 4/0 250 300 218 3 4/0 250 300
230 218 3 4/0 250 250 218 3 4/0 250 250
380 130 3 #1 150 175 130 3 #1 150 175
460 99 3 #3 125 125 99 3 #3 125 125
575 77 3 #4 90 100 77 3 #4 90 100
208 203 3 4/0 250 250 273 3 300 300 300
230 203 3 3/0 225 225 273 3 300 300 300
380 123 3 #1 150 150 146 3 1/0 175 200
460 92 3 #3 110 110 114 3 #1 150 175
575 83 3 #4 100 100 94 3 #3 110 125
208 273 3 300 300 300 273 3 300 300 300
230 273 3 300 300 300 273 3 300 300 300
380 146 3 1/0 175 175 146 3 1/0 175 175
460 114 3 #1 125 125 114 3 #1 125 125
575 94 3 #3 110 110 94 3 #3 110 110
208 317 3 300 400 400 317 3 400 400 400
230 317 3 300 400 400 318 3 400 400 400
380 146 3 1/0 175 175 187 3 2/0 225 225
460 114 3 #1 125 125 141 3 1/0 175 175
575 94 3 #3 110 110 110 3 #2 125 125
208 317 3 400 400 400 317 3 400 400 400
230 318 3 400 400 400 318 3 400 400 400
380 187 3 2/0 225 225 187 3 2/0 225 225
460 141 3 1/0 175 175 141 3 1/0 175 175
575 110 3 #2 125 125 110 3 #2 125 125
Supply
Field Wire Field Wire
Gauge
Qty
Wire
75C
Recomm’d
Fuse
or HACR
Breaker
Size
Max. Fuse
or HACR
Breaker
Size
Minimum
Circuit
Ampacity
(MCA)
Power
Supply
Qty
Recomm’d
Wire
Gauge
75C
Fuse
or HACR
Breaker
Size
Max.
Fuse
or HACR
Breaker
Size
IMM AGZ-7 AGZ 026B through 130B 45
Page 46

Electrical Data High Ambient
Table 33, AGZ 026BB/BH – 070BB/BH, Electrical Data,
Single Point (Above 105
AGZ Unit
Size
026B
030B
035B
040B
045B
050B
055B
060B
065B
070B
NOTES:
1. Units operating in am bient tem peratures above 95°F (35°C)
2. All Electri cal Data notes are on page 52.
3. Conduit hubs are not provided.
Volts
must use the Maximum Fuse or HACR Breaker s ize.
Minimum
Circuit
Ampacity
(MCA)
208 147 3 1/0 175 175
230 133 3 1/0 150 150
380 80 3 #4 90 90
460 68 3 #4 80 80
575 53 3 #6 60 60
208 158 3 2/0 175 175
230 144 3 1/0 175 175
380 88 3 #3 100 100
460 74 3 #4 90 90
575 59 3 #6 70 70
208 168 3 2/0 200 200
230 155 3 2/0 175 175
380 96 3 #3 110 110
460 80 3 #4 90 90
575 64 3 #6 70 70
208 187 3 3/0 200 200
230 167 3 2/0 200 200
380 113 3 #2 125 125
460 84 3 #4 90 90
575 70 3 #4 80 80
208 207 3 4/0 225 225
230 188 3 3/0 225 225
380 123 3 #1 125 125
460 94 3 #3 110 110
575 78 3 #4 90 90
208 226 3 4/0 225 225
230 207 3 3/0 225 225
380 132 3 1/0 150 150
460 104 3 #2 125 125
575 86 3 #3 100 100
208 249 3 250 250 250
230 229 3 4/0 250 250
380 147 3 1/0 175 175
460 115 3 #2 125 125
575 96 3 #3 110 110
208 270 3 300 300 300
230 248 3 250 250 250
380 160 3 2/0 175 175
460 124 3 #1 150 150
575 105 3 #2 125 125
208 303 3 350 350 350
230 282 3 300 350 350
380 164 3 2/0 200 200
460 138 3 1/0 175 175
575 115 3 #2 125 125
208 323 3 400 400 400
230 304 3 350 350 350
380 172 3 2/0 200 200
460 150 3 1/0 175 175
575 123 3 #1 150 150
Power Supply
Field Wire
Quantity
°
F to 125°F)
Recomm’d.
Wire
Gauge
75C
Or HACR
Breaker
Fuse
Size
Max. Fuse
Or HACR
Breaker
Size
46 AGZ 026B through 130B IMM AGZ-7
Page 47

Table 34, AGZ 026BB/BH – 070BB/BH, Compressor and Fan Motor Amps, Single and
°
Multi-Point (Above 105
Rated Load Amps Locked Rotor Amps
AGZ
Unit
Volts
Size
026B
030B
035B
040B
045B
050B
055B
060B
065B
070B
All Electrical Dat a notes are on page 52.
No. 1 No. 3 No. 5 No. 2 No. 4 No. 6
208 29.0 29.0 - 29.0 29.0 - 5.8 4 23.3 189 189 - 189 189 230 25.7 25.7 - 25.7 25.7 - 5.8 4 26.1 189 189 - 189 189 380 14.9 14.9 - 14.9 14.9 - 4.1 4 20.0 112 112 - 112 112 460 13.4 13.4 - 13.4 13.4 - 2.8 4 13.0 99 99 - 99 99 575 9.5 9.5 - 9.5 9.5 - 3.0 4 14.0 74 74 - 74 74 -
208 29.0 29.0 - 34.0 34.0 - 5.8 4 23.3 189 189 - 232 232 230 25.7 25.7 - 30.9 30.9 - 5.8 4 26.1 189 189 - 232 232 380 14.9 14.9 - 18.6 18.6 - 4.1 4 20.0 112 112 - 144 144 460 13.4 13.4 - 16.2 16.2 - 2.8 4 13.0 99 99 - 125 125 575 9.5 9.5 - 12.2 12.2 - 3.0 4 14.0 74 74 - 100 100 -
208 34.0 34.0 - 34.0 34.0 - 5.8 4 23.3 232 232 - 232 232 230 30.9 30.9 - 30.9 30.9 - 5.8 4 26.1 232 232 - 232 232 380 18.6 18.6 - 18.6 18.6 - 4.1 4 20.0 144 144 - 144 144 460 16.2 16.2 - 16.2 16.2 - 2.8 4 13.0 125 125 - 125 125 575 12.2 12.2 - 12.2 12.2 - 3.0 4 14.0 100 100 - 100 100 -
208 38.5 38.5 - 38.5 38.5 - 5.8 4 23.3 278 278 - 278 278 230 33.8 33.8 - 33.8 33.8 - 5.8 4 26.1 278 278 - 278 278 380 22.8 22.8 - 22.8 22.8 - 4.1 4 20.0 151 151 - 151 151 460 17.0 17.0 - 17.0 17.0 - 2.8 4 13.0 127 127 - 127 127 575 13.7 13.7 - 13.7 13.7 - 3.0 4 14.0 100 100 - 100 100 -
208 38.5 38.5 - 47.6 47.6 - 5.8 4 23.3 278 278 - 350 350 230 33.8 33.8 - 43.3 43.3 - 5.8 4 26.1 278 278 - 350 350 380 22.8 22.8 - 27.2 27.2 - 4.1 4 20.0 151 151 - 195 195 460 17.0 17.0 - 21.8 21.8 - 2.8 4 13.0 127 127 - 158 158 575 13.7 13.7 - 17.3 17.3 - 3.0 4 14.0 100 100 - 125 125 -
208 47.6 47.6 - 47.6 47.6 - 5.8 4 23.3 350 350 - 350 350 230 43.3 43.3 - 43.3 43.3 - 5.8 4 26.1 350 350 - 350 350 380 27.2 27.2 - 27.2 27.2 - 4.1 4 20.0 195 195 - 195 195 460 21.8 21.8 - 21.8 21.8 - 2.8 4 13.0 158 158 - 158 158 575 17.3 17.3 - 17.3 17.3 - 3.0 4 14.0 125 125 - 125 125 -
208 47.6 47.6 - 58.1 58.1 - 5.8 4 23.3 350 350 - 425 425 230 43.3 43.3 - 52.8 52.8 - 5.8 4 26.1 350 350 - 425 425 380 27.2 27.2 - 33.8 33.8 - 4.1 4 20.0 195 195 - 239 239 460 21.8 21.8 - 26.5 26.5 - 2.8 4 13.0 158 158 - 187 187 575 17.3 17.3 - 21.8 21.8 - 3.0 4 14.0 125 125 - 148 148 -
208 58.1 58.1 - 58.1 58.1 - 5.8 4 23.3 425 425 - 425 425 230 52.8 52.8 - 52.8 52.8 - 5.8 4 26.1 425 425 - 425 425 380 33.8 33.8 - 33.8 33.8 - 4.1 4 20.0 239 239 - 239 239 460 26.5 26.5 - 26.5 26.5 - 2.8 4 13.0 187 187 - 187 187 575 21.8 21.8 - 21.8 21.8 - 3.0 4 14.0 148 148 - 148 148 -
208 58.1 58.1 - 58.1 78.0 - 7.8 4 31.7 425 425 - 425 505 230 52.8 52.8 - 52.8 74.1 - 7.8 4 35.6 425 425 - 425 505 380 32.7 32.7 - 32.7 39.8 - 4.1 4 20.0 239 239 - 239 280 460 25.5 25.5 25.5 37.5 - 3.6 4 17.8 187 187 - 187 225 575 21.8 21.8 - 21.8 29.9 - 3.0 4 14.0 148 148 - 148 180 -
208 58.1 78.0 - 58.1 78.0 - 7.8 4 31.7 425 505 - 425 505 230 52.8 74.1 - 52.8 74.1 - 7.8 4 35.6 425 505 - 425 505 380 32.7 39.8 - 32.7 39.8 - 4.1 4 20.0 239 280 - 239 280 460 25.5 37.5 - 25.5 37.5 - 3.6 4 17.8 187 225 - 187 225 575 21.8 29.9 - 21.8 29.9 - 3.0 4 14.0 148 180 - 148 180 -
Compressors Compressors
F to 125°F))
F.L.Amps
Fan
Motors
(Each)
No.
of
Fan
Motors
R.L.Amps
Fan
Motors
(Each)
Across-The-Line
No.1 No. 3 No. 5 No.2 No.4 No. 6
IMM AGZ-7 AGZ 026B through 130B 47
Page 48

Table 35, AGZ 026BB/BH - 070BB/BH, Electrical Data, Multi -Point (Above 105°F
°
Circuit
Ampacity
(MCA)
F)
Electrical Circuit #1 Electrical Circuit #2
Power Supply Power Supply
Field Wire Field Wire
Qty
Wire
Gauge
75C
Recomm’d
Fuse
or HACR
Breaker
Size
Max. Fuse
or HACR
Breaker
Size
Minimum
Circuit
Ampacity
(MCA)
Qty
Wire
Gauge
75C
Recomm’d
Fuse
or HACR
Breaker
Size
Max.
Fuse
or HACR
Breaker
Size
to 125
AGZ
Unit
Size
026B
030B
035B
040B
045B
050B
055B
060B
070B
NOTES:
1. All Electric al Data notes are on page 52.
2. Conduit hubs are not supplied.
Minimum
Volts
208 77 3 #4 90 100 77 3 #4 90 100
230 70 3 #4 80 90 70 3 #4 80 90
380 42 3 #8 50 50 40 3 #8 50 50
460 36 3 #8 45 45 36 3 #8 45 45
575 27 3 #10 35 35 27 3 #10 35 35
208 77 3 #4 90 100 88 3 #3 100 110
230 70 3 #4 80 90 81 3 #4 100 110
380 42 3 #8 50 50 50 3 #8 60 60
460 36 3 #8 45 45 42 3 #8 50 50
575 27 3 #10 35 35 34 3 #10 45 45
208 88 3 #3 100 110 88 3 #3 100 110
230 81 3 #4 100 110 81 3 #4 100 110
380 50 3 #8 60 60 50 3 #8 60 60
460 42 3 #8 50 50 42 3 #8 50 50
575 34 3 #10 45 45 34 3 #10 45 45
208 98 3 #3 125 125 98 3 #3 125 125
230 88 3 #3 110 110 88 3 #3 110 110
380 60 3 #6 70 80 60 3 #6 70 80
460 44 3 #8 50 60 44 3 #8 50 60
575 37 3 #8 45 50 37 3 #8 45 50
208 98 3 #3 125 125 119 3 #1 150 150
230 88 3 #3 110 110 109 3 #2 125 150
380 60 3 #6 70 80 70 3 #4 80 90
460 44 3 #8 50 60 55 3 #6 70 70
575 37 3 #8 45 50 45 3 #8 60 60
208 119 3 #1 150 150 119 3 #1 150 150
230 109 3 #2 125 150 109 3 #2 125 150
380 70 3 #4 80 90 70 3 #4 80 90
460 55 3 #6 70 70 55 3 #6 70 70
575 45 3 #8 60 60 45 3 #8 60 60
208 119 3 #1 150 150 142 3 1/0 175 200
230 109 3 #2 125 150 130 3 #1 175 175
380 70 3 #4 80 90 84 3 #4 100 110
460 55 3 #6 70 70 65 3 #4 80 90
575 45 3 #8 60 60 55 3 #6 70 70
208 142 3 1/0 175 200 142 3 1/0 175 200
230 130 3 #1 175 175 130 3 #1 175 175
380 84 3 #4 100 110 84 3 #4 100 110
460 65 3 #4 80 90 65 3 #4 80 90
575 55 3 #6 70 70 55 3 #6 70 70
208 146 3 1/0 175 200 171 3 2/0 225 225
230 134 3 1/0 175 175 161 3 2/0 200 225
380 82 3 #4 100 110 91 3 #3 110 125
460 67 3 #6 80 90 80 3 #4 100 110
575 55 3 #6 70 70 65 3 #6 90 90
48 AGZ 026B through 130B IMM AGZ-7
Page 49

Table 36, AGZ 075BB/BH – 130BB/BH, Electrical Data, Single Point
(Above 105
AGZ Unit
Size
075B
085B
090B
100B
110B
120B
130B
NOTES:
1. Units operating in am bient tem peratures of 95°F (35° C) and above
2. All Electri cal Data notes are on page 52.
3. (2) in column with wire qty. i ndicates t hat two conduits are requi red.
4. Conduit hubs are not suppli ed.
Volts
must use the Maximum Fuse or HACR Breaker s ize.
Minimum
Ampacity
208 378 6 250 450 450
230 362 6 4/0 400 400
380 194 3 3/0 225 225
460 187 3 3/0 225 225
575 145 3 1/0 175 175
208 398 6 250 450 450
230 382 6 250 450 450
380 234 3 250 250 250
460 200 3 4/0 225 225
575 151 3 1/0 175 175
208 416 6 300 500 500
230 401 6 350 450 450
380 270 3 300 300 300
460 211 3 4/0 250 250
575 157 3 2/0 175 175
208 522 6 400 600 600
230 462 6 350 500 500
380 273 3 300 300 300
460 230 3 4/0 250 250
575 187 3 3/0 200 200
208 612 6 - (2) 350 700 700
230 526 6 - (2) 300 600 600
380 307 3 350 350 350
460 263 3 300 300 300
575 211 3 4/0 225 225
208 612 6 - (2) 350 700 700
230 571 6 - (2) 350 600 600
380 352 6 - (2) 4/0 400 400
460 286 3 350 300 300
575 219 3 4/0 250 250
208 613 6 - (2) 350 700 700
230 613 6 - (2) 350 700 700
380 393 6 250 450 450
460 307 3 350 350 350
575 228 3 250 250 250
Circuit
(MCA)
°
F to 125°F)
Power Supply M ax. Fuse
Field Wire
Quantity
Wire
Gauge
75C
Recomm’d.
Fuse
Or HACR
Breaker
Size
Or HACR
Breaker
Size
IMM AGZ-7 AGZ 026B through 130B 49
Page 50

Table 37, AGZ 075BB/BH – 130BB/BH, Compressor and Fan Motor Amps, Single and
°
Multi-Point (Above 105
AGZ
Unit
Volts
Size
075B
085B
090B
100B
110B
120B
130B
All Electrical Dat a notes are on page 52.
No. 1 No. 3 No. 5 No. 2 No. 4 No. 6
208 78.0 78.0 78.0 78.0 - 7.8 6 31.7 505 505 - 505 505 230 74.1 74.1 - 74.1 74.1 - 7.8 6 35.6 505 505 - 505 505 380 39.8 39.8 - 39.8 39.8 - 4.1 6 20.0 280 280 - 280 280 460 38.8 38.8 - 38.8 38.8 - 3.6 6 17.8 225 225 - 225 225 575 29.9 29.9 - 29.9 29.9 - 3.0 6 14.0 180 180 - 180 180 -
208 78.0 78.0 - 86.9 86.9 - 7.8 6 31.7 505 505 - 500 500 230 74.1 74.1 - 83.3 83.3 - 7.8 6 35.6 505 505 - 500 500 380 39.8 39.8 - 57.6 57.6 - 4.1 6 20.0 280 280 - 305 305 460 38.8 38.8 - 44.5 44.5 - 3.6 6 17.8 225 225 - 250 250 575 29.9 29.9 - 32.5 32.5 - 3.0 6 14.0 180 180 - 198 198 -
208 86.9 86.9 - 86.9 86.9 - 7.8 6 31.7 500 500 - 500 500 230 83.3 83.3 - 83.3 83.3 - 7.8 6 35.6 500 500 - 500 500 380 57.6 57.6 - 57.6 57.6 - 4.1 6 20.0 305 305 - 305 305 460 44.5 44.5 44.5 44.5 - 3.6 6 17.8 250 250 - 250 250 575 32.5 32.5 - 32.5 32.5 - 3.0 6 14.0 198 198 - 198 198 -
208 58.1 58.1 58.1 87.9 87.9 87.9 7.8 8 31.7 425 425 425 505 505 505
230 52.8 52.8 52.8 74.2 74.2 74.2 7.8 8 35.6 425 425 425 505 505 505
380 32.7 32.7 32.7 43.8 43.8 43.8 4.1 8 20.0 239 239 239 280 280 280
460 25.5 25.5 25.5 37.5 37.5 37.5 3.6 8 17.8 187 187 187 225 225 225
575 21.8 21.8 21.8 29.9 29.9 29.9 3.0 8 14.0 148 148 148 180 180 180
208 87.9 87.9 87.9 87.9 87.9 87.9 7.8 8 31.7 505 505 505 505 505 505
230 74.2 74.2 74.2 74.2 74.2 74.2 7.8 8 35.6 505 505 505 505 505 505
380 43.8 43.8 43.8 43.8 43.8 43.8 4.1 8 20.0 280 280 280 280 280 280
460 37.5 37.5 37.5 37.5 37.5 37.5 3.6 8 17.8 225 225 225 225 225 225
575 29.9 29.9 29.9 29.9 29.9 29.9 3.0 8 14.0 180 180 180 180 180 180
208 87.9 87.9 87.9 88.0 88.0 88.0 7.8 8 31.7 505 505 505 500 500 500
230 74.2 74.2 74.2 88.0 88.0 88.0 7.8 8 35.6 505 505 505 500 500 500
380 43.8 43.8 43.8 57.6 57.6 57.6 4.1 8 20.0 280 280 280 305 305 305
460 37.5 37.5 37.5 44.5 44.5 44.5 3.6 8 17.8 225 225 225 250 250 250
575 29.9 29.9 29.9 32.5 32.5 32.5 3.0 8 14.0 180 180 180 198 198 198
208 88.0 88.0 88.0 88.0 88.0 88.0 7.8 8 31.7 500 500 500 500 500 500
230 88.0 88.0 88.0 88.0 88.0 88.0 7.8 8 35.6 500 500 500 500 500 500
380 57.6 57.6 57.6 57.6 57.6 57.6 4.1 8 20.0 305 305 305 305 305 305
460 44.5 44.5 44.5 44.5 44.5 44.5 3.6 8 17.8 250 250 250 250 250 250
575 32.5 32.5 32.5 32.5 32.5 32.5 3.0 8 14.0 198 198 198 198 198 198
Compressors Compressors
Rated Load Amps Locked Rotor Amps
F to 125°F)
F.L.Amps
Fan
Motors
(Each)
No.
of
Fan
Motors
R.L.Amps
Fan
Motors
(Each)
Across-The-Line
No.1 No. 3 No. 5 No.2 No.4 No. 6
50 AGZ 026B through 130B IMM AGZ-7
Page 51

Table 38, AGZ 075BB/BH – 130BB/BH, Electrical Data, Multi-Point
V
(Above 105
AGZ
Unit
Size
075B
085B
090B
100B
110B
120B
130B
NOTES:
1. All Elec trical Data notes are on page 52.
2. Conduit hubs are not supplied.
Minimum
olts
Circuit
Ampacity
(MCA)
208 199 3 3/0 225 250 199 3 3/0 225 250
230 190 3 3/0 225 250 190 3 3/0 225 250
380 102 3 #2 125 125 102 3 #2 125 125
460 99 3 #3 110 125 99 3 #3 110 125
575 76 3 #4 90 100 76 3 #4 90 100
208 199 3 3/0 225 250 219 3 4/0 250 300
230 190 3 3/0 225 250 211 3 4/0 250 250
380 102 3 #2 125 125 142 3 1/0 175 175
460 99 3 #3 110 125 111 3 #2 125 150
575 76 3 #4 90 100 83 3 #3 100 110
208 219 3 4/0 250 300 219 3 4/0 250 300
230 211 3 4/0 250 250 211 3 4/0 250 250
380 142 3 1/0 175 175 142 3 1/0 175 175
460 111 3 #2 125 150 111 3 #2 125 150
575 83 3 #3 100 110 83 3 #3 100 110
208 220 3 4/0 250 250 317 3 400 350 400
230 203 3 4/0 225 250 272 3 300 300 300
380 123 3 #1 150 150 159 3 2/0 175 200
460 101 3 #2 110 125 136 3 1/0 150 175
575 83 3 #4 100 100 109 3 #2 125 125
208 317 3 400 350 400 317 3 400 350 400
230 272 3 300 300 300 272 3 300 300 300
380 159 3 2/0 175 200 159 3 2/0 175 200
460 136 3 1/0 150 175 136 3 1/0 150 175
575 109 3 #2 125 125 109 3 #2 125 125
208 317 3 400 400 400 317 3 400 400 400
230 272 3 300 300 300 317 3 400 400 400
380 159 3 2/0 200 200 204 3 4/0 250 250
460 136 3 1/0 175 175 159 3 2/0 200 200
575 109 3 #2 125 125 118 3 #1 150 150
208 317 3 400 400 400 317 3 400 400 400
230 317 3 400 400 400 317 3 400 400 400
380 204 3 4/0 250 250 204 3 4/0 250 250
460 159 3 2/0 200 200 159 3 2/0 200 200
575 118 3 #1 150 150 118 3 #1 150 150
°
F to 125°F)
Electrical Circuit #1 Electrical Circuit #2
Power
Supply
Field Wire Field Wire
Gauge
Qty
Wire
75C
Recomm’d
Fuse
or HACR
Breaker
Size
Max. Fuse
or HACR
Breaker
Size
Minimum
Circuit
Ampacity
(MCA)
Power
Supply
Qty
Wire
Gauge
75C
Recomm’d
or HACR
Fuse
Breaker
Size
Max.
Fuse
or HACR
Breaker
Size
IMM AGZ-7 AGZ 026B through 130B 51
Page 52

Notes for “Electrical Data Single- and Multi-Point” Power:
1. Unit wire size ampacity (MCA) is equal to 125% of the largest compressormotor RLA plus 100% of RLA of all other loads in the circuit including the
control transformer.
2. The control transformer is furnished and no separate 115V power is
required. For both single- and multi-point power connections, the control
transformer is in circuit #1 with control power wired from there to circuit
#2. In multi-point power, disconnecting power to circuit will disconnect all
control power to the unit.
3. If a separate 115V power supply is used for the control circuit, then the
wire sizing amps is 10 amps for all unit sizes.
4. Recommended power lead wire sizes for 3 conductors per conduit are
based on 100% conductor ampacity in accordance with NEC. Voltage drop
has not been included. Therefore, it is recommended that power leads be
kept short. All terminal block connections must be made with copper (type
THW) wire.
5. “Recommended Fuse Sizes” are selected at approximately 150% to 175%
of the largest compressor RLA, plus 100% of all other loads in the circuit.
6. “Maximum Fuse or HACR breaker size” is selected at approximately 225%
of the largest compressor RLA, plus 100% of all other loads in the circuit.
7. The recommended power lead wire sizes are based on an ambient temperature
of 86°F (30°C). Ampacity correction factors must be applied for other ambient
temperatures. Refer to the National Electrical Code Handbook.
8. Must be electrically grounded according to national and local electrical codes.
Voltage Limitations:
1. Within ± 10 percent of nameplate rating
2. Voltage phase unbalance not to exceed 2% with a resultant current unbalance of 6
to 10 times the voltage unbalance per NEMA MG-1, 1998 Standard.
Notes for “Compressor and Condenser Fan Amp Draw”:
1. Compressor RLA values are for wiring sizing purposes only but do not
reflect normal operating current draw at rated capacity.
Notes for “Field Wiring Data”
1. Requires a single disconnect to supply electrical power to the unit. This
power supply must either be fused or use an HACR type circuit breaker.
2. All field wiring to unit power block or optional non-fused disconnect
switch must be copper.
3. All field wire size values given in table apply to 75°C rated wire per NEC.
Circuit Breakers (AGZ 026 to 130)
Factory installed circuit breakers are standard on units with single point power supply
only. This option provides unit installed compressor short circuit protection and makes
servicing easier.
Connection Type Power Block
Single Point (Standard) Std Opt. Std Opt
Multi-Point (Optional) Std Opt. Not Avail. Opt.
Disconnect
Swt.
Circuit
Breakers
High Short
Circuit Current
52 AGZ 026B through 130B IMM AGZ-7
Page 53

Figure 22, AGZ 026B – AGZ 130B, Typical Field Wiring
A
A
A
A
3 PHASE
POWER
DISCONNECT
(BY OTHERS)
UNIT MAIN
TERMINAL BLOCK
GND LUG
TO COMPRESSOR(S)
AND FAN MO TORS
NOTE: ALL FIELD WIRING TO BE
INSTALLED AS NEC CLASS 1
WIRING SYSTEM WITH CONDUCTOR
RATED 600 VOLTS
FIELD SUPPLIED
REMOTE STOP SWITCH
(BY OTHERS)
ICE MODE SWITCH
(BY OTHERS)
ALARM BELL
OPTION
CHW FLOW SWITCH
---MANDATORY–(BY OTHERS)
OPTION
N
120VAC
CONTROL POWER
FACTORY SUPPLIED ALARM
FIELD WIRED
ALARM BELL RELAY
TIME
CLOCK
NOR. OPEN PUMP AUX.
CONTACTS (OPTIONAL)
4-20MA FOR
EVAP. WATE R RESET
(BY OTHERS )
FUSED CONTROL
CIRCUIT TRANSFORMER
DISCONNECT
(BY OTHERS)
10A
FUSE
(BY OTHERS)
CHW PUMP RELAY
120 VAC 1. 0 AMP MAX
OFF
UTO
ON
MANUAL
OFF
UTO
ON
MANUAL
+
-
(BY OTHERS)
120 VAC
CONTROLLER
TB1
TB2
TB1-20
1
2
35
33
34
CONTROL
CIRCUIT
FUSE
120 VAC
N
120 VAC
32
GND
IF REMOTE STOP
52
72
43
83
54
CONTROL IS USED,
585
REMOVE LEAD 585
FROM TERM. 52
TO 72.
BELL
12
LARM BELL OPTION
LARM BELL
RELAY
COM NO
74
44
61
68
69
4-20MA FOR
DEMAND LIMIT
(BY OTHERS)
DWG. 330423101 REV.0A
+
-
LESS EVAPORATOR ONLY
LIQUID LINE #1 SOLENOID
24 VAC 1.5 AMP MAX
LIQUID LINE #2 SOLENOID
24 VAC 1.5 AMP MAX
70
71
GND
91
93
92
93
24 VAC
N
24 VAC
N
IMM AGZ-7 AGZ 026B through 130B 53
Page 54

Dimensional Data
(
)
(
)
(
)
(
)
(
)
)
Figure 23, Dimensions, AGZ 026BS – 070BS Packaged Chiller
ISOLATOR LOCATIONS ON BOTTOM OF RAIL
13.31
(338.07)
67.76 (1721.10)
COMPRESSOR
CIRCUIT #2
EVAPORATOR
55.65 (1413.51)
COMPRESSOR
CIRCUIT #1
13.31
(338.07)
2.00
(50.8)
2.00
(50.8)
33.52
(851.41)
8.80
(223.52)
19.94
(506.48)
Unit Size
AGZ 026BS
AGZ 030BS
AGZ 035BS
AGZ 040BS
AGZ 045BS
AGZ 050BS
AGZ 055BS
AGZ 060BS
AGZ 065BS
AGZ 070BS
CONTROL PANEL
CONTROL
PANEL
FIELD CONTROL
CONNECTION
Y
EVAP
INLET
94.38 (2397.25)
EVAP
OUTLET
Z
19.94
506.48
88.00 (2235.20
6.38
162.05
X
Center of Gravity - Inches (mm) Weights – Lbs (kg)
X Y Z
39 (991) 40 (1016) 42 (1067) 3 3950 (1792) 3990 (1810)
39 (991) 40 (1016) 42 (1067) 3 3990 (1810) 4040 (1833)
40 (1016) 40 (1016) 42 (1067) 3 4030 (1828) 4080 (1851)
39 (991) 39 (991) 41 (1041) 3 4070 (1846) 4130 (1873)
40 (1016) 38 (965) 41 (1041) 3 4210 (1910) 4270 (1937)
40 (1016) 39 (991) 42 (1067) 3 4330 (1964) 4400 (1996)
40 (1016) 39 (991) 43 (1092) 3 4460 (2023) 4540 (2059)
40 (1016) 39 (991) 43 (1092) 3 4520 (2050) 4600 (2087)
41 (1041) 40 (1016) 45 (1143) 3 4760 (2159) 4860 (2204)
41 (1041) 41 (1041) 45 (1143) 3 4890 (2218) 4990 (2263)
Evap Inlet &
Outlet
Victaulic in.
Shipping Weight Operating Weight
14.33
363.98
POWER ENTRY
POINT
0.875 KNOCK OUT
43.75
1111.25
DWG # 3305195
100.40
2550.16
54 AGZ 026B through 130B IMM AGZ-7
Page 55

Figure 24, AGZ 075BS - 090BS Packaged Chiller
12.4
(315)
14.3
(364)
ISOLATOR LOCATIONS ON BOTTOM OF RAIL
EVAPORATOR
INLET
OUTLET
60.0 (1525)
110.1 (2797)
COMPRESSORS CIRC. #2
COMPRESSORS CIRC. #1
12.
(315)
2.0
(51)
2.0
(51)
CONTROL
PANEL
FIELD CONTROL
CONNECTION
CONTROL
PANEL
POWER ENTRY
POINT
0.875 KNOCK OUT
100.4
(2550)
15.5
(392)
AGZ 075BS
AGZ 085BS
AGZ 090BS
28.5 (724)
Unit Size
Y
28.5
(724)
134.9 (3426)
Center of Gravity Inches (mm) Weights Lbs. (kg)
X Y Z
Z
Evap Inlet &
Outlet Victaulic
in.
Shipping Weight Operating Weight
88.0 (2235)
6.4
(162)
X
43.8
(1111)
14.4
(364)
Dwg. # 3305023
44 (1118) 42 (1067) 60 (1524) 5 6320 (2867) 6530 (2962)
43 (1092) 40 (1016) 60 (1524) 5 6480 (2939) 6690 (3035)
44 (1118) 39 (991) 59 (1499) 5 6640 (3012) 6850 (3107)
IMM AGZ-7 AGZ 026B through 130B 55
Page 56

Figure 25, AGZ 100BS - 130BS Packaged Chiller
(
)
)
(
)
33.7
(855)
16.2
(410)
ISOLATOR LOCATIONS ON BOTTOM OF RAIL
67.8 (1721)
EVAPORATOR
OUTLET
"A"
"C"
INLET
"A"
173.1 (4396)
67.8 (1721)
COMPRESSORS CIRC. #2
Z
12.4 (315)
2.0
(51)
2.0
(51)
COMPRESSORS CIRC. #1
CONTROL
PANEL
FIELD CONTROL
CONNECTION
Y
24.0
(610)
CONTROL
PANEL
6.4 (162)
88.0 (2235
POWER ENTRY POINT
0.875 KNOCK OUTS
100.4
2550
43.8
1111
14.4 (365)
X
Dwg. # 3305024
"B"
25.2
(641)
24.0
(610)
Unit Size
AGZ 100BS
AGZ 110BS
AGZ 120BS
AGZ 130BS
Evap Inlet
& Outlet
Victaulic
“A” in.
5
5
8
8
Evaporator Water
Connections
Inches (mm)
B C X Y Z
Center of Gravity
Inches (mm)
Weights
Lbs. (kg)
Shipping
Weight
Operating
Weight
14.8 (375.9) 93. 5 (2374. 9) 43 (1092) 43 (1092) 76 (1930) 7580 (3438) 7870 (3570)
14. 8 (375.9) 93.5 (2374.9) 44 (1118) 43 (1092) 75 (1905) 7860 (3565) 8150 (3697)
15.3 (388.6) 92. 4 (2346. 9) 43 (1092) 40 (1016) 75 (1905) 8380 (3801) 8720 (3955)
15.3 (388.6) 92. 4 (2346. 9) 44 (1118) 38 (965) 74 (1880) 8710 (3951) 9050 (4105)
56 AGZ 026B through 130B IMM AGZ-7
Page 57

R-407C Units
AGZ chillers are available with R-407C refrigerant as non-ARI certified units. R-407C is a
zeotropic blend of three compounds, and as such exhibits the characteristic of glide. It does
not behave as one substance like R-22 does. Glide is the difference (in degrees F) between
the beginning and end phase-change process in either the evaporator or condenser. During
these processes, different ratios of the refrigerant’s components change phase from the
beginning to the end of the process. The following functions, conditions and settings will
differ from units charged with R-22.
1. Polyolester lubricants are used instead of mineral oil.
2. The saturated pressure/temperature relationship
3. Control and alarm settings
4. Charging procedures
1. Lubrication. The units are factory-charged with polyoester (POE) lubricant and one of
2. Pressure/temperature relat i o n s h i p . See Figure 26 on page 58 for the saturated pressure-
the following lubricants must be used if lubricant is to be added to the system:
Copeland Ultra 22 CC
Mobil EAL™ Arctic 22 CC
ICI EMKARATE RL RL™ 32CF
POEs are very hygroscopic and will quickly absorb moisture if exposed to air. Pump the
lubricant into the unit through a closed transfer system. Avoid overcharging the unit.
temperature chart. Due to refrigerant glide, use the following procedures for superheat
and subcooling measurement.
To determine superheat, only vapor must be present at the point of measurement, no
liquid. Use the temperature reading, the pressure reading and the Saturated P/T Chart. If
the pressure is measured at 78 psig, the chart shows the saturated vapor
50.6°F. If the temperature is measured at 60°F, the superheat is 9.4 degrees F.
To determine subcooling, only liquid must be present, no vapor. Use the temperature
reading, the pressure reading and the Saturated P/T Chart. If the pressure is measured at
250 psig, the chart shows the saturated liquid
temperature is measured at 98°F, the subcooling is 10.2 degrees F.
The P/T relationship between R-407C and R-22 is similar enough to allow the use of R-22
expansion valves. The valves may be marked as “R-22’ or “R-22/R-407C”.
3. Control and alarm settings. The software that controls the operation of the unit is
factory-set for operation with R-407C, taking into account that the pressure/temperature
relationship differs from R-22. The software functionality is the same for either
refrigerant.
4. Charging procedure. The units are factory-charged with R-407C. Use the following
procedure if recharging in the field is necessary:
Whether topping off a charge or replacing the circuit’s entire charge, always remove the
refrigerant from the charging vessel as a liquid. Many of the cylinders for the newer
refrigerants have a dip tube so that liquid is drawn off when the cylinder is in the upright
position. Do not vapor charge out of a cylinder unless the entire contents will be charged
into the system.
temperature to be 108.2°F. If the
temperature to be
With the system in a 250-micron or lower vacuum, liquid can be charged into the
high side. Initially charge about 80 percent of the system total charge.
IMM AGZ-7 AGZ 026B through 130B 57
Page 58

Start the system and observe operation. Use standard charging procedures (liquid
only) to top off the charge.
It may be necessary to add refrigerant through the compressor suction. Because the
refrigerant leaving the cylinder must be a liquid, exercise care to avoid damage to
the compressor. A sight glass can be connected between the charging hose and the
compressor. It can be adjusted to have liquid leave the cylinder and vapor enter the
compressor.
Figure 26, R-407C Saturated Pressure/Temperature Chart
Pressure
(PSIG)
20 -10.7 1.5 150 74.8 84.9
22 -8.2 4.0 155 76.8 86.8
24 -5.7 6.4 160 78.7 88.7
26 -3.4 8.7 165 80.6 90.5
28 -1.1 11.0 170 82.5 92.3
30 1.1 13.1 175 84.3 94.0
32 3.2 15.2 180 86.1 95.8
34 5.3 17.2 185 87.8 97.5
36 7.3 19.2 190 89.6 99.1
38 9.2 21.0 195 91.3 100.7
40 11.1 22.9 200 92.9 102.3
42 12.9 24.7 205 94.6 103.9
44 14.7 26.4 210 96.2 105.4
46 16.4 28.1 215 97.7 107.0
48 18.1 29.7 220 99.3 108.4
50 19.7 31.3 225 100.8 109.9
52 21.3 32.9 230 102.3 111.4
54 22.9 34.4 235 103.8 112.8
56 24.4 35.9 240 105.3 114.2
58 25.9 37.4 245 106.7 115.6
60 27.4 38.8 250 108.2 116.9
62 28.8 40.2 255 109.6 118.2
64 30.2 41.6 260 111.0 119.6
66 31.6 43.0 265 112.3 120.9
68 33.0 44.3 270 113.7 122.1
70 34.3 45.6 275 115.0 123.4
72 35.6 46.9 280 116.3 124.7
74 36.9 48.1 285 117.6 125.9
76 38.2 49.3 290 118.9 127.1
78 39.4 50.6 295 120.2 128.3
80 40.6 51.8 300 121.4 129.5
82 41.9 52.9 305 122.7 130.7
84 43.0 54.1 310 123.9 131.8
86 44.2 55.2 315 125.1 133.0
88 45.4 56.3 320 126.3 134.1
90 46.5 57.4 325 127.5 135.2
92 47.6 58.5 330 128.7 136.3
94 48.7 59.6 335 129.8 137.4
96 49.8 60.7 340 131.0 138.5
98 50.9 61.7 345 132.1 139.6
100 51.9 62.7 350 133.2 140.6
105 54.5 65.2 355 134.3 141.7
110 57.0 67.7 360 135.4 142.7
115 59.5 70.0 365 136.5 143.7
120 61.8 72.3 370 137.6 144.7
125 64.1 74.6 375 138.7 145.7
130 66.4 76.7 380 139.8 146.7
135 68.5 78.8 385 140.8 147.7
140 70.7 80.9 390 141.8 148.7
145 72.8 82.9 395 142.9 149.6
Liquid Temp
(°F)
Vapor Temp
(°F)
Pressure
(PSIG)
Liquid Temp
(°F)
Vapor Temp
(°F)
58 AGZ 026B through 130B IMM AGZ-7
Page 59

Startup
Pre Start-up
The chiller must be inspected to ensure no components became loose or damaged
during shipping or installation.
Start-Up
Refer to the MicroTech II Controller information in the operating manual OM AGZ-1
to become familiar with unit operation before starting the chiller.
There should be adequate building load (at least 50 percent of the unit full load
capacity) to properly check the operation of the chiller refrigerant circuits.
Be prepared to record all operating parameters required by the “Compressorized
Equipment Warranty Form”. Return this information within 10 working days to
McQuay International as instructed on the form to obtain full warranty benefits.
1. Verify chilled water flow.
2. Verify remote start / stop or time clock (if installed) has requested the chiller to
start.
3. Set the chilled water setpoint to the required temperature. (The system water
temperature must be greater than the total of the leaving water temperature setpoint
plus one-half the control band before the MicroTech II controller will stage on
cooling.)
4. Set the Evap Delta T and the Start Delta T as a starting point.
5. Put both pumpdown switches (PS1 and PS2) to the ON position.
6. Put system switch (S1) to ON position.
Switch
PS1, PS2,
Pumpdown
Switches
S1,
System Switch
Circuits will operate in the
normal automatic mode
Unit will operate in the
normal automatic mode
ON OFF
7. There may be a delay of 2 minutes after closing S1. The time delay is due to the
compressor inherent motor protection or the Stage Up Timer counting. This should
only occur on initial start-up or when power to the chiller has been turned off and
back on. More than one compressor will not start at the same time.
8. After the chiller has been operating for a period of time and has become stable,
check the following:
S Compressor oil level. (Some scroll compressors do not have oil sight glasses.)
S Refrigerant sight glass for flashing
S Rotation of condenser fans
9. Complete the “Compressorized Equipment Warranty Form”.
Switch Position
Circuit will go through the
normal pumpdown cycle and
shut off.
Unit will shut off immediately
without pumping down
(emergency stop)
IMM AGZ-7 AGZ 026B through 130B 59
Page 60

Shutdown
Temporary
1. Put both circuit switches to the OFF position (Pumpdown and Stop).
2. After compressors have stopped, put System Switch (S1) to OFF (emergency stop).
3. Turn off chilled water pump. Chilled water pump to operate while compressors are
pumping down.
To start the chiller after a temporary shutdown, follow the start-up instructions.
Extended
1. Front seat both condenser liquid line service valves.
2. Put both circuit switches to the OFF position (Pumpdown and Stop position).
3. After the compressors have stopped, put System Switch (S1) to the OFF position
(emergency stop).
4. Front seat both refrigerant circuit discharge valves (if applicable).
5. If chilled water system is not drained, maintain power to the evaporator heater to
prevent freezing. Maintain heat tracing on the chilled water lines.
6. Drain evaporator and water piping to prevent freezing.
7. If electrical power to the unit is on, the compressor crankcase heaters will keep the
liquid refrigerant out of the compressor oil. This will minimize start-up time when
putting the unit back into service. The evaporator heater will be able to function.
8. If electrical power is off, make provisions to power the evaporator heater (if chilled
water system is not drained). Tag all opened electrical disconnect switches to warn
against start-up before the refrigerant valves are in the correct operating position.
At start-up, electrical power must be on for 24 hours before starting the chiller.
To start the chiller after an extended shutdown, follow the prestart-up and start-up
instructions.
Water Piping Checkout
1. Check the pump operation and vent all air from the system.
2. Circulate evaporator water, checking for proper system pressure and evaporator
pressure drop. Compare the pressure drop to the evaporator water pressure drop
curve.
3. Clean all water strainers before placing the chiller into service.
Refrigerant Piping Checkout
1. Check all exposed brazed joints for evidence of leaks. Joints may have been
damaged during shipping or when the unit was installed.
2. Check that all refrigerant valves are either opened or closed as required for proper
operation of the chiller.
3. A thorough leak test must be done using an approved electronic leak detector.
Check all valve stem packing for leaks. Replace all refrigerant valve caps and
tighten.
4. Check all refrigerant lines to insure that they will not vibrate against each other or
against other chiller components and are properly supported.
5. Check all flare connections and all refrigerant threaded connectors.
6. Look for any signs of refrigerant leaks around the condenser coils and for damage
during shipping or installation.
7. Leak detector is applied externally to refrigerant joints at the factory. Do not
confuse this residue with an oil leak.
8. Connect refrigerant service gauges to each refrigerant circuit before starting unit.
60 AGZ 026B through 130B IMM AGZ-7
Page 61

Electrical Check Out
CAUTION
Electrical power must be applied to the compressor crankcase heaters 24 hours
before starting unit to drive off refrigerant from the oil.
1. Open all electrical disconnects and check all power wiring connections. Start at
the power block and check all connections through all components to and including
the compressor terminals. These should be checked again after 3 months of
operation and at least yearly thereafter.
2. Check all control wiring by pulling on the wire at the spade connections and
tighten all screw connections. Check plug-in relays for proper seating and to
insure retaining clips are installed.
3. Put System Switch (S1) to the Emergency Stop position.
4. Put both circuit #1 & #2 switches to the Pumpdown and Stop position.
5. Apply power to the unit. The panel Alarm Light will stay on until S1 is closed.
Ignore the Alarm Light for the check out period. If you have the optional Alarm
Bell, you may wish to disconnect it.
6. Check at the power block or disconnect for the proper voltage and proper voltage
between phases. Check power for proper phasing using a phase sequence meter
before starting unit.
7. Check for 120Vac at the optional control transformer and at TB-2 terminal #1 and
the neutral block (NB).
8. Check between TB-2 terminal #7 and NB for 120Vac supply for transformer #2.
9. Check between TB-2 terminal #2 and NB for 120Vac control voltage. This
supplies the compressor crank case heaters.
10. Check between TB-3 terminal #17 and #27 for 24Vac control voltage.
Component Operation
Hot Gas Bypass (Optional)
This option allows the system to operate at lower loads without excessive on/off
compressor cycling. The hot gas bypass option is required to be on both refrigerant
circuits because of the lead / lag feature of the controller.
This option allows passage of discharge gas into the evaporator inlet (between the TX
valve and the evaporator) which generates a false load to supplement the actual chilled
water or air handler load.
Note: The hot gas bypass valve cannot generate a 100% false load.
The pressure regulating valve is a Sporlan SHGBE-8 and factory set to begin opening
at 69 psig and can be changed by changing the pressure setting. The adjustment range
is 0 to 100 psig. To raise the pressure setting, remove the cap on the bulb and turn the
adjustment screw clockwise. To lower the setting, turn the screw counterclockwise. Do
not force the adjustment beyond the range it is designed for, as this will damage the
adjustment assembly. The regulating valve opening point can be determined by slowly
reducing the system load while observing the suction pressure. When the bypass valve
starts to open, the refrigerant line on the evaporator side of the valve will begin to feel
warm to the touch.
IMM AGZ-7 AGZ 026B through 130B 61
Page 62

The bypass valve includes a solenoid valve that is controlled by the MicroTech II
controller. It is active when the first stage of cooling on a circuit is active.
WARNING
The hot gas line may become hot enough to cause injury.
Be careful during valve checkout.
VFD Low Ambient Control (Optional)
The optional VFD fan control is used for unit operation below 35°F (2°C) down to a
mini mum o f 0 °F (-17°C). The control looks at the saturated discharge temperature and
varies the fan speed to hold the temperature (pressure) at the “target” temperature.
This temperature is established as an input to a setpoint screen labeled “Sat Condenser
Temp Target”.
Filter-Driers
Each refrigerant circuit is furnished with a full flow filter drier (AGZ 026 – 070) or a
replaceable core type filter-drier (AGZ 075 – 130). The core assembly of the
replaceable core drier consists of a filter core held tightly in the shell in a manner that
allows full flow without bypass.
Pressure drop across the filter drier at full load conditions must not exceed 10 psig at
full load. See page 66 for maximum pressure drop at other load points. Replace the
filter drier if the pressure drop exceeds maximum.
WARNING
Pump out refrigerant before removing end flange for replacement of core(s) to
remove liquid refrigerant and lower pressure to prevent accidental blow off of
cover. EPA recovery regulations apply to this procedure.
A condenser liquid line service valve is provided for isolating the charge in the
condenser, but also serves as the point from which the liquid line can be pumped out.
With the line free of refrigerant, the filter-drier core(s) can be easily replaced.
System A djustment
To maintain peak performance at full load operation, the system superheat and liquid
subcooling may require adjustment. Read the following subsections closely to
determine if adjustment is required.
Liquid Line Sight Glass
The color of the moisture indicator is an indication of the dryness of the system and is
extremely important when the system has been serviced. Immediately after the system
has been opened for service, the element may indicate a wet condition. It is
recommended that the equipment operate for about 12 hours to allow the system to
reach equilibrium before deciding if the system requires a change of drier cores.
Bubbles in the sight glass at constant full load indicates a shortage of refrigerant, a
plugged filter-drier, or a restriction in the li quid line. However, it is not unusual to see
bubbles in the sight glass during changing load conditions.
Refrigerant Charging
Liquid line subcooling at the liquid shut-off valve should be between 15 and 20 degrees
F at full load. If the unit is at steady full load operation and bubbles are visible in the
sight glass, then check liquid subcooling.
62 AGZ 026B through 130B IMM AGZ-7
Page 63

Thermostatic Expansion Valve
The expansion valve performs one specific function. It keeps the evaporator supplied
with the proper amount of refrigerant to satisfy the load conditions.
The sensing bulb of the expansion valve is installed in the closest straight run of
suction line from the evaporator. The bulb is held on by clamps around the suction line
and is insulated to reduce the effect of surrounding ambient temperatures. In case the
bulb must be removed, simply slit the insulation on each side of the bulb, remove the
clamps and then remove the capillary tubing that runs along the suction line from the
valve. The power element is removable from the valve body.
NOTE: Before adjusting superheat, chec k that unit charge is corr ect and liquid line sight
glass is full with no bubbles and that the circuit is operating under stable, full load
conditions.
The suction superheat for the suction leaving the evaporator is set at the factory for 8 to
12 degrees F at full load. To have full rated unit performance, the superheat must be
about 8 degrees F at 95°F outdoor ambient temperature.
Crankcase Heaters
The scroll compressors are equipped with externally mounted band heaters located at
the oil sump level. The function of the heater is to keep the temperature in the
crankcase high enough to prevent refrigerant from migrating to the crankcase and
condensing in the oil during off-cycle.
Power must be supplied to the heaters 24 hours before starting the compressors.
Evaporator
Models AGZ 026 through 070
The evaporator is a compact, high efficiency, single or dual circuit, brazed plate-toplate type heat exchanger consisting of parallel stainless steel plates.
The evaporator is protected with an electric resistance heater and insulated with 3/4"
(19mm) thick closed-cell polyurethane insulation. This combination provides freeze
protection down to -20°F (-29°C) ambient air temperature.
The water side working pressure is 363 psig (2503 kPa). Evaporators are designed and
constructed according to, and listed by, Underwriters Laboratories (UL).
Models AGZ 075 through 130
The evaporator is direct expansion, shell-and-tube type with water flowing in the
baffled shell side and refrigerant flowing through the tubes. Two independent
refrigerant circuits within the evaporator serve the unit's dual refrigerant circuits.
The evaporator is wrapped with an electric resistance heater cable and insulated with
3/4" (19mm) thick vinyl nitrate polymer sheet insulation, protecting against water
freeze-up at ambient air temperatures to -20°F (-29°C). An ambient air thermostat
controls the heater cable. The fitted and glued-in-place insulation has a K factor of
0.28 Btu in/hr ft
The refrigerant (tube) side maximum working pressure is 300 psig (2068 kPa). The
water side working pressure is 152 psig (1048 kPa). Each evaporator is designed,
constructed, inspected, and stamped according to the requirements of the ASME Boiler
and Pressure Vessel Code. Double thickness insulation is available as an option.
2
°F at 75°F.
Phase Voltage Monitor (Optional)
Factory settings are as follows: Trip Delay Time, 2 seconds
Voltage Setting, set at nameplate voltage. Restart Delay Time, 60 seconds
IMM AGZ-7 AGZ 026B through 130B 63
Page 64

Unit Maintenance
General
On initial start-up and periodically during operation, it will be necessary to perform
certain routine service checks. Among these are checking the liquid line sight glasses,
taking condensing and suction pressure readings, and checking to see that the unit has
normal superheat and subcooling readings. A recommended maintenance schedule is
located at the end of this section.
Compressor Maintenance
The scroll compressors are fully hermetic and require no maintenance other than
checking oil level.
Lubrication
No routine lubrication is required on AGZ units. The fan motor bearings are
permanently lubricated and no further lubrication is required. Excessive fan motor
bearing noise is an indication of a potential bearing failure.
Compressor oil should be standard refrigeration mineral oil such as Suniso 3GS.
Electrical Terminals
Electric shock hazard. Turn off all power before continuing with following
WARNING
service.
Condensers
The condensers are air-cooled and constructed of 3/8" (9.5mm) O.D. internally finned
copper tubes bonded in a staggered pattern into louvered aluminum fins. Maintenance
consists primarily of the routine removal of dirt and debris from the outside surface of
the fins and repairing any fin damage. McQuay recommends the use of foaming coil
cleaners available at most air conditioning supply outlets. Use caution when applying
such cleaners as they can contain potentially harmful chemicals. Care should be taken
not to damage the fins during cleaning. The coils should be thoroughly rinsed to
remove any cleaner residue.
If the service technician determines that the refrigerant circuit contains
noncondensables, recovery can be required, strictly following Clean Air Act
regulations governing refrigerant discharge to the atmosphere. The Schrader purge
valve is located on the vertical coil headers on both sides of the unit at the end opposite
the control box. Decorative panels cover the condenser coils and must be removed for
servicing. Recover with the unit off, after a shutdown of 15 minutes or longer, to allow
air to collect at the top of the coil. Restart and run the unit for a brief period. If
necessary, shut the unit off and repeat the procedure. Follow accepted environmentally
sound practices when removing refrigerant from the unit.
Optional High Ambient Control Panel
Consists of exhaust fan with rain hood, two inlet screens with filters, necessary
controls and wiring to allow operation to 125°F (52°C). The option can be factory or
field installed as a kit. Must be used for:
• It must be supplied on units operating at ambient temperatures above 105°F (40°C).
• It is automatically included on units with fan VFD (low ambient option).
• Check inlet filters periodically and clean as required. Verify that the fan is
operational.
64 AGZ 026B through 130B IMM AGZ-7
Page 65

Liquid Line Sight Glass
The refrigerant sight glasses should be observed periodically. (A weekly observation
should be adequate.) A clear glass of liquid indicates that there is subcooled refrigerant
charge in the system. Bubbling refrigerant in the sight glass, during stable run
conditions, indicates that the system can be short of refrigerant charge. Refrigerant gas
flashing in the sight glass could also indicate an excessive pressure drop in the liquid
line, possibly due to a clogged filter-drier or a restriction elsewhere in the liquid line.
See Table 39 for maximum allowable pressure drops. If subcooling is low, add charge
to clear the sight glass. If subcooling is normal (15 to 20 degrees F) and flashing is
visible in the sight glass, check the pressure drop across the filter-drier. Subcooling
should be checked at full load with 70°F (21.1°C) outdoor air temperature, stable
conditions, and all fans running.
An element inside the sight glass indicates the moisture condition corresponding to a
given element color. If the sight glass does not indicate a dry condition after about 12
hours of operation, the circuit should be pumped down and the filter-drier changed or
verify moisture content by performing an acid test on the compressor oil.
Preventive Maintenance Schedule
OPERATION WEEKLY
General
Complete unit log and review (Note 3) X
Visually inspect unit for loose or damaged components X
Inspect thermal insulation for integrity X
Clean and paint as required X
Electrical
Check terminals for tightness, tighten as necessary X
Clean control panel interior X
Visually inspect components for signs of overheating X
Verify compressor heater operation X
Test and calibrate equipment protection and operating controls X
Megger compressor motor * X
Refrigeration
Leak test X
Check sight glasses for clear flow X
Check filter-drier pressure drop (see manual for spec) X
Perform compressor vibration test X
Acid test oil sample X
Condenser (air-cooled)
Clean condenser coils (Note 4) X
Check fan blades for tightness on shaft (Note 5) X
Check fans for loose rivets and cracks X
Check coil fins for damage X
MONTHLY
(Note 1)
Notes:
1. Monthly operations include all weekly operations.
2. Annual (or spring start-up) operations incl udes all weekly and monthly operations.
3. Log readings can be taken d aily for a higher leve l of unit observation.
4. Coil cleaning can be required more frequently in areas with a high level of airborne particles.
5. Be sure fan motors are electrically locked out.
* Never Megger motors while they are in a vacuum.
ANNUAL
(Note 2)
IMM AGZ-7 AGZ 026B through 130B 65
Page 66

Service
WARNING
Service on this equipment is to be performed by qualified refrigeration
personnel familiar with equipment operation, maintenance, correct servicing
procedures, and the safety hazards inherent in this work. Causes for repeated
tripping of equipment protection controls must be investigated and corr ected.
Disconnect all power before doing any service inside the unit.
Anyone servicing this equipment must comply with the requirements set forth
by the EPA in regards to refrigerant reclamation and venting.
Filter-Driers
A replacement of the filter-drier is recommended any time excessive pressure drop is
read across the filter-drier and/or when bubbles occur in the sight glass with normal
subcooling. The maximum recommended pressure drops across the filter-drier are as
follows:
Table 39, Filter-Drier Pressure Drop
PERCENT CIRCUIT
LOADING (%)
100% 10 (69)
75% 8 (55.2)
50% 5 (34.5)
25% 4 (27.6)
MAXIMUM RECOMMENDED PRESSURE
DROP ACROSS FILTER DRIER PSIG (KPA)
The filter-drier should also be changed if the moisture indicating liquid line sight glass
indicates excess moisture in the system.
During the first few months of operation the filter-drier replacement can be necessary if
the pressure drop across the filter-drier exceeds the values listed in the paragraph
above. Any residual particles from the condenser tubing, compressor and
miscellaneous components are swept by the refrigerant into the liquid line and are
caught by the filter-drier.
Liquid Line Solenoid Valve
The liquid line solenoid valves that shut off refrigerant flow in the event of a power
failure do not normally require any maintenance. The solenoids can, however, require
replacement of the solenoid coil or of the entire valve assembly.
The solenoid coil can be checked to see that the stem is magnetized when energized by
touching a screwdriver to the top of the stem. If there is no magnetization, either the
coil is bad or there is no power to the coil.
The solenoid coil can be removed from the valve body without opening the refrigerant
piping after pumpdown. For personal safety, shut off and lock out the unit power.
The coil can then be removed from the valve body by simply removing a nut or snapring located at the top of the coil. The coil can then be slipped off its mounting stud for
replacement.
To replace the entire solenoid valve follow the steps involved when changing a filterdrier.
66 AGZ 026B through 130B IMM AGZ-7
Page 67

Evaporator
The evaporators are the direct expansion, shell-and-tube type with refrigerant flowing
through the tubes and water flowing through the shell over the tubes or stainless steel
brazed-plate type. The tubes are internally finned to provide extended surface as well
as turbulent flow of refrigeration through the tubes. Other than cleaning and testing, no
service work should be required on the evaporator.
Refrigerant Charging
AGZ air-cooled chillers are shipped factory charged with a full operating charge of
refrigerant but there can be times that a unit must be recharged at the job site. Follow
these recommendations when field charging. Refer to the unit operating charge found
in the Physical Data Tables.
Unit charging can be done at any steady load condition (preferably at 75 to 100% load)
and at any outdoor temperature (preferably higher than 70°F (21.1°C). Unit must be
allowed to run 5 minutes or longer so that the condenser fan staging is stabilized at
normal operating discharge pressure. For best results, charge with two or more
condenser fans operating on each refrigerant circuit.
The AGZ units have a condenser coil design with approximately 15% of the coil tubes
located in a subcooler section of the coil to achieve liquid cooling to within 5°F (3°C)
of the outdoor air temperature when all condenser fans are operating. This is equal to
15°F to 20°F (8.3°C to 11.1°C) subcooling below the saturated condensing temperature
when the pressure is read at the liquid valve between the condenser coil and the liquid
line filter-drier. Once the subcooler is filled, extra charge will not lower the liquid
temperature and does not help system capacity or efficiency.
One of the following three scenarios will be experienced with an undercharged
unit:
1. If the unit is slightly undercharged, the unit will show bubbles in the sight glass.
Recharge the unit as described in the charging procedure below.
2. If the unit is moderately undercharged, it will normally trip on freeze protection.
Recharge the unit as described in the charging procedure below. However,
freezestat trips can also be an indication of low flow or poor heat transfer due to
tube fouling. Anti-freeze solutions can also cause freezestat trips.
3. If the unit is severely undercharged, the unit will trip due to lack of liquid flow to
the expansion valve. In this case either remove the remaining charge by means of a
proper reclamation system and recharge the unit with the proper amount of
refrigerant as stamped on the unit nameplate, or add refrigerant through the suction
valve on the compressor. If the unit is severely undercharged, the unit can nuisance
trip during this charging procedure. If this happens, operate the unit at minimum
load, adding charge until the sight glass is clear. Once the unit has enough charge
so that it does not trip out, continue with step 2 of the charging procedure below.
IMM AGZ-7 AGZ 026B through 130B 67
Page 68

Procedure to charge a moderately undercharged AGZ unit:
1. If a unit is low on refrigerant, you must first determine the cause before attempting
to recharge the unit. Locate and repair any refrigerant leak. Evidence of oil is a
good indicator of leakage, however, oil may not be visible at all leaks. Liquid leak
detector fluids work well to show bubbles at medium size leaks but electronic leak
detectors can be needed to locate small leaks.
2. Add the charge to the system through the suction shutoff valve or through the
Schrader fitting on the tube entering the evaporator between the compressor and
the evaporator head.
3. The charge can be added at any load condition between 25-100% load per circuit
but at least two fans should be operating per refrigerant circuit, if possible. The
suction superheat should be in the 8 to 12 degree F (4.4°C-6.6°C) range.
4. Add sufficient charge to clear the liquid line sight glass and until all flashing stops
in the sight glass.
5. Check the unit subcooling value by reading the liquid line pressure and
temperature at the liquid line near the filter-drier. The subcooling values should be
between 15 and 20 degrees F (8.3 and 11.1 degrees C).
6. With outdoor temperatures above 60°F (15.6°C), all condenser fans should be
operating and the liquid line temperature should be within 5°F to 10°F (2.8°C to
5.6°C) of the outdoor air temperature. At 25-50% load, the liquid line temperature
should be within 5°F (2.8°C) of outdoor air temperature with all fans on. At 75100% load the liquid line temperature should be within 10°F (5.6°C) of outdoor air
temperature with all fans on.
7. Overcharging of refrigerant will raise the compressor discharge pressure due to
filling of the condenser tubes with excess refrigerant.
Warranty Statement
Limited Warranty
Consult your local McQuay Representative for warranty details. Refer to Form 93343285Y. To find your local McQuay Representative, go to www.mcquay.com.
68 AGZ 026B through 130B IMM AGZ-7
Page 69

AGZ Troubleshooting Chart
PROBLEM POSSIBLE CAUSES POSSIBLE CORRECTIVE STEPS
1. Main switch. 1. Close switch.
2. Fuse blown. circuit breakers open
Compressor Will
Not Run
Compressor
Noisy Or Vibrat ing
High Discharge
Pressure
Low Discharge
Pressure
High Suction
Pressure
Low Suction
Pressure
Compressor Will
Not Stage Up
Compressor
Staging Intervals
Too Short
3. Thermal overloads tripped
4. Defective contactor or coil. 4. Repair or replace
5. System shutdown by equipment protection devices
6. No cooling required 6. None. Wait until unit c alls f or c ooling.
7. Liquid line solenoid will not open 7. Repair or replace solenoid c oil. Check wiring.
8. Motor electrical trouble 8. Check motor for opens, shorts, or burnout.
9. Loose wiring
1. Low or no refrigerant charge
2. Compressor running in reverse
3. Improper piping support on suction or discharge
4. Worn compressor isolator bus hing
5. Worn Compressor
1. Noncondensables in system
2. System overcharged with refrigerant 2. Remove excess, check liquid subcooling.
3. Optional discharge shutoff valve partially closed 3. Open valve.
4. FanTrol wiring not correct 4. Check FanTrol wiring.
5. Fan not running 5. Check electrical circuit, Check fan m ot or.
6. Dirty condenser coil
7. Air recirculation
1. Refrigerant flood back 1. Correct.
2. Wind blowing into coil at low ambient
3. Faulty condenser temperature regulation 3. Check condenser control operation.
4. Insufficient refrigerant in system
5. Low suction pressure
6. Only one compressor operating
1. Excessive water temperature 1. Check control settings.
2. Excessive load 2. Reduce load or add additional equipment .
3. Expansion valve overfeeding 3. Check remote bulb. Regulate s uperheat .
4. Compressors running in reverse 4. Check for proper phas ing.
1. Rapid load swings 1. Stabilize load.
2. Lack of refrigerant
3. Clogged liquid line filter drier 3. Check pressure drop across filter drier. Replace.
4. Expansion valve malfunctioning 4. Check and reset for proper superheat.
5. Condensing temperature too low
6. Compressor will not unload
7. Insufficient water flow 7. Adjust flow.
8. Evaporator head ring gasket slippage
9. Evaporator dirty
10. Rapid load swings
1. Defective capacity control 1. Replace.
2. Faulty thermostat stage or broken wire 2. Replace.
3. Stages not set for application 3. Res et t herm os t at s et t ing f or applic at ion.
1. Thermostat control band not set properly 1. Set c ont rol band wider.
2. Faulty water temperature sensor 2. Replace.
3. Insufficient water flow
4. Rapid load swings
2. Check electrical circuits and motor windings for
shorts or grounds. Invest igat e f or pos s ible
overloading. Replace fuse or reset breakers af t er
fault is corrected. Check for loose or c orroded
connections.
3. Overloads are auto-reset. Check unit closely when
unit comes back on line. Allow time for auto-reset.
5. Determine type and cause of shutdown and correct
it before resetting equipment protection s witch.
9. Check all wire junctions. Tighten all terminal
screws.
1. Repair and recharge
2. Check unit and compressor for correct phasing
3. Relocate, add, or remove hangers
4. Replace
5. Replace
1. Extract the noncondensables with approved
procedures.
6. Clean coil.
7. Correct.
2. Shield coil from direct wind, Wind guards are
available.
4. Check for leaks. Repair and add charge.
5. See corrective steps for Low Suction Pressure.
6. See corrective steps for Compress or Will Not Stage
Up.
2. Check for leaks, repair, add charge. Check liquid
sight glass.
5. Check means for regulating condenser
temperature.
6. See corrective steps for Compressor Staging
Intervals Too Low.
8. Take pressure drop across vessel and cont ac t
factory to obtain design pressure drop for that
vessel.
9. Clean chemically.
10. Stabilize load.
3. Adjust flow.
4. Stabilize load.
IMM AGZ-7 AGZ 026B through 130B 69
Page 70

PROBLEM POSSIBLE CAUSES POSSIBLE CORRECTIVE STEPS
1. Oil hang-up in piping 1. Review refrigerant piping and correct.
2. Low oil level 2. Check and add oil.
Compressor Oil
Level Too High
Or Too Low
Compressor
Loses Oil
Motor Overload
Relays or Circuit
Breakers Open
Compressor
Thermal
Protection Switch
Open
3. Loose fitting on oil line 3. Check and tighten system.
4. Level too high 4. Adjust thermal expansion valv e.
5. Insufficient water flow - Level too high 5. Adj us t f low.
6. Excessive liquid in crankcase - Lev el t oo high
7. Short cycling
1. Lack of refrigerant 1. Check for leaks and repair. Add ref rigerant
2. Suction superheat too high 2. Adjust s uperheat .
3. Crankcase heater burnout 3. Replace crankcase heater.
1. Low voltage during high load conditions 1. Check supply voltage for excessive line drop.
2. Defective or grounded wiring in motor 2. Replace compressor motor.
3. Loose power wiring or burnt contactors
4. High condenser temperature
5. Power line fault causing unbalanced voltage
1. Operating beyond design conditions
2. Discharge valve partially shut
3. Blown compressor internal gasket 3. Replace gasket.
4. Voltage range or imbalance 4. Check and correct.
5. High superheat
6. Compressor bearing failure
6. Check crankcase heater. Reset expansion v alve
for higher superheat. Check liquid line solenoid
valve operation.
7. Stabilize load or increase staging interval.
3. Check all connections and tighten.
4. See corrective steps for High Discharge Pres s ure.
5. Check supply voltage. Notify power company. Do
not start until fault is corrected..
1. Add facilities so conditions are within allowable
limits.
2. Open valve.
5. Adjust to correct superheat.
6. Replace compressor .
70 AGZ 026B through 130B IMM AGZ-7
Page 71

Page 72

This document contains the most current pr oduct information as of this printing. For the most up-todate product information, please go to www.mcquay.com.
Post Office 2510, Staunton, Virginia 24402 USA
• (800) 432-1342 • www.mcquay.com IMM AGZ-7 (2/05)
 Loading...