

Page 1

McDATA 4314
Fibre Channel Switch Module
Installation Guide
P/N 59140-00
REV A
Page 2

Record of Revisions and Updates
Revision Date Description
59140-00 A 5/2005 Initial release of manual
Copyright © 2005 McDATA Corporation. All rights reserved.
Printed April 2005
First Edition
No part of this publication may be reproduced or distributed in any form or by any means, or stored in a database or
retrieval system, without the prior written consent of McDATA Corporation.
The information contained in this document is subject to change without notice. McDATA Corporation assumes no
responsibility for any errors that may appear.
All computer software programs, including but not limited to microcode, described in this document are furnished
under a license, and may be used or copied only in accordance with the terms of such license.
McDATA either owns or has the right to license the computer software programs described in this document.
McDATA Corporation retains all rights, title and interest in the computer software programs.
McDATA Corporation makes no warranties, expressed or implied, by operation of law or otherwise, relating to this
document, the products or the computer software programs described herein. McDATA CORPORATION DISCLAIMS
ALL IMPLIED WARRANTIES OF MERCHANTIBILITY AND FITNESS FOR A PARTICULAR PURPOSE. In no event
shall McDATA Corporation be liable for (a) incidental, indirect, special, or consequential damages or (b) any damages
whatsoever resulting from the loss of use, data or profits, arising out of this document, even if advised of the possibility
of such damages.
©2004 McDATA Corporation. All rights reserved. McDATA, the McDATA logo, McDATA Eclipse, Fabricenter,
HotCAT, Intrepid, Multi-Capable Storage Network Solutions, Networking the World's Business Data, nScale, nView,
OPENready, SANavigator, SANpilot, SANtegrity, SANvergence, SecureConnect and Sphereon are trademarks or
registered trademarks of McDATA Corporation. OEM and Reseller logos are the property of such parties and are
reprinted with limited use permission. All other trademarks are the property of their respective companies. All
specifications subject to change.
ii
McDATA 4314 Fibre Channel Switch Module Installation Guide
Page 3

Contents
Preface........................................................................................................................................ xi
Who Should Use this Manual......................................................................... xi
How to Use this Manual.................................................................................. xi
Related Documentation ................................................................................... xi
Chapter 1 General Description
Switch Module Controls and LEDs ............................................................. 1-2
Maintenance Button................................................................................ 1-2
Resetting a Switch ............................................................................ 1-2
Placing the Switch in Maintenance Mode .................................... 1-2
Switch Module LEDs .............................................................................. 1-3
Identifier LED (Green)..................................................................... 1-3
Input Power LED (Green)............................................................... 1-3
System Fault LED (Amber)............................................................. 1-3
Fibre Channel Ports........................................................................................ 1-3
External Port LEDs.................................................................................. 1-4
Port Logged-In LED (Green) .......................................................... 1-5
Port Activity LED (Green) .............................................................. 1-5
Transceivers.............................................................................................. 1-5
Port Types................................................................................................. 1-6
Ethernet Port ................................................................................................... 1-6
Switch Module Management........................................................................ 1-7
EFCM BASIC............................................................................................ 1-7
McDATA Embedded Web Server.......................................................... 1-7
Command Line Interface........................................................................ 1-8
Simple Network Management Protocol............................................... 1-8
File Transfer Protocol .............................................................................. 1-8
Chapter 2 Planning
Devices ............................................................................................................. 2-1
Device Access.................................................................................................. 2-2
Soft Zones ................................................................................................. 2-2
Access Control List Hard Zones............................................................ 2-3
Contents
iii
Page 4

Contents
Performance .................................................................................................... 2-4
Distance..................................................................................................... 2-4
Bandwidth ................................................................................................ 2-4
Latency...................................................................................................... 2-5
Multiple Chassis Fabrics................................................................................ 2-6
Optimizing Device Performance........................................................... 2-6
Domain ID, Principal Priority, and Domain ID Lock......................... 2-7
Switch Module Services................................................................................. 2-8
Fabric Security................................................................................................. 2-9
Connection Security .............................................................................. 2-10
Device Security .......................................................................................2-11
User Account Security .......................................................................... 2-12
Fabric Management...................................................................................... 2-12
Chapter 3 Installation
Site Requirements........................................................................................... 3-1
Fabric Management Workstation.......................................................... 3-1
Environmental Conditions..................................................................... 3-3
Installing a Switch .......................................................................................... 3-3
Install SFP Transceivers .......................................................................... 3-3
Mount the Switch Module in the Server Chassis................................ 3-4
Connect the Management Workstation to the Switch Module......... 3-5
Install EFCM BASIC................................................................................ 3-6
Start EFCM BASIC .................................................................................. 3-7
Configure the Switch Module ............................................................... 3-8
Cable Devices to the Switch................................................................... 3-9
Install Firmware............................................................................................ 3-10
Using EFCM BASIC to Install Firmware ........................................... 3-10
Using the CLI to Install Firmware ...................................................... 3-10
Chapter 4 Troubleshooting
Input Power LED Is Extinguished ............................................................... 4-1
System Fault LED is Illuminated.................................................................. 4-1
Logged-In LED Indications........................................................................... 4-2
E_Port Isolation........................................................................................ 4-2
Excessive Port Errors .............................................................................. 4-3
Recovering a Switch Module ........................................................................ 4-4
Maintenance – Exit.................................................................................. 4-5
Maintenance – Image Unpack ............................................................... 4-6
Maintenance – Reset Network Config.................................................. 4-6
Maintenance – Reset User Accounts to Default.................................. 4-6
Maintenance – Copy Log Files .............................................................. 4-6
Maintenance – Remove Switch Config ................................................ 4-6
Maintenance – Remake Filesystem....................................................... 4-7
Maintenance – Reset Switch .................................................................. 4-7
Maintenance – Update Boot Loader ..................................................... 4-7
Appendix A Specifications
Fabric Specifications...................................................................................... A-1
Maintainability Specifications .....................................................................A-2
Fabric Management Specifications .............................................................A-3
iv
McDATA 4314 Fibre Channel Switch Module Installation Guide
Page 5

Dimensional Specifications .......................................................................... A-3
Electrical Specifications ................................................................................ A-3
Environmental Specifications ...................................................................... A-4
Regulatory Certifications..............................................................................A-5
Glossary .....................................................................................................................................g-1
Index............................................................................................................................................. i-1
Contents
Contents
v
Page 6

Contents
vi
McDATA 4314 Fibre Channel Switch Module Installation Guide
Page 7

Figures
1-1 McDATA 4314 Switch Module ................................................................................... 1-1
1-2 Switch Module Controls and LEDS ........................................................................... 1-2
1-3 Switch Module LEDs.................................................................................................... 1-3
1-4 Fibre Channel Ports ...................................................................................................... 1-4
1-5 Internal Port/Server Blade Mapping......................................................................... 1-4
1-6 External Port LEDs ....................................................................................................... 1-5
1-7 Ethernet Port.................................................................................................................. 1-7
3-1 Mounting the Switch Module in the Server Chassis ............................................... 3-4
3-2 Ethernet Cable Connections ........................................................................................3-5
4-1 Logged-In LED.............................................................................................................. 4-2
Figures
vii
Page 8

Figures
viii
McDATA 4314 Fibre Channel Switch Module Installation Guide
Page 9

Tables
2-1 Zoning Database Limits ............................................................................................... 2-2
2-2 Port-to-Port Latency ..................................................................................................... 2-5
3-1 Workstation Requirements.......................................................................................... 3-1
3-2 Management Workstation Requirements ................................................................. 3-2
A-1 Fabric Specifications ....................................................................................................A-1
A-2 Maintainability Specifications.................................................................................... A-2
A-3 Fabric Management Specifications ............................................................................ A-3
A-4 Dimensional Specifications.........................................................................................A-3
A-5 Electrical Specifications ............................................................................................... A-3
A-6 Environmental Specifications.....................................................................................A-4
A-7 Regulatory Certifications ............................................................................................A-5
Ta bl es
ix
Page 10

Tables
x
McDATA 4314 Fibre Channel Switch Module Installation Guide
Page 11

This manual describes the features and installation of the McDATA 4314
switch module, firmware version 5.2.
Who Should Use this Manual
This manual introduces users to the switch module and explains its
installation and service. It is intended for users who are responsible for
installing and servicing network equipment.
Preface
How to Use this Manual
This publication is organized as follows:
• Chapter 1 is an overview of the switch module. It describes the ports and
indicator LEDs.
• Chapter 2 describes the factors to consider when planning a fabric.
• Chapter 3 explains how to install and configure the switch.
• Chapter 4 describes the diagnostic methods and troubleshooting
procedures.
• Appendix A lists the switch module specifications.
A glossary and an index are also provided.
Related Documentation
Other publications that provide additional information about the McDATA
4314 switch module are:
• McDATA 4314 Product Information Guide, publication number, 59141-00.
• McDATA 4314 Quick Start Guide, publication number 50499-00.
• EFCM Basic Management Guide, publication number 59139-00.
• McDATA 4314 Command Line Interface Guide, publication number
59142-00.
• Fibre Channel-Arbitrated Loop (FC-AL-2) Rev. 6.8.
Preface
xi
Page 12

Preface
• Fibre Channel-10-bit Interface Rev. 2.3.
• Definitions of Managed Objects for the Fabric Element in Fibre Channel
Standard (draft-ietf-ipfc-fabric-element-mib-04.txt).
The Fibre Channel Standards are available from:
Global Engineering Documents, 15 Inverness Way East, Englewood, CO
80112-5776 Phone: (800) 854-7179 or (303) 397-7956
Fax: (303) 397-2740.
xii
McDATA 4314 Fibre Channel Switch Module Installation Guide
Page 13
General Description
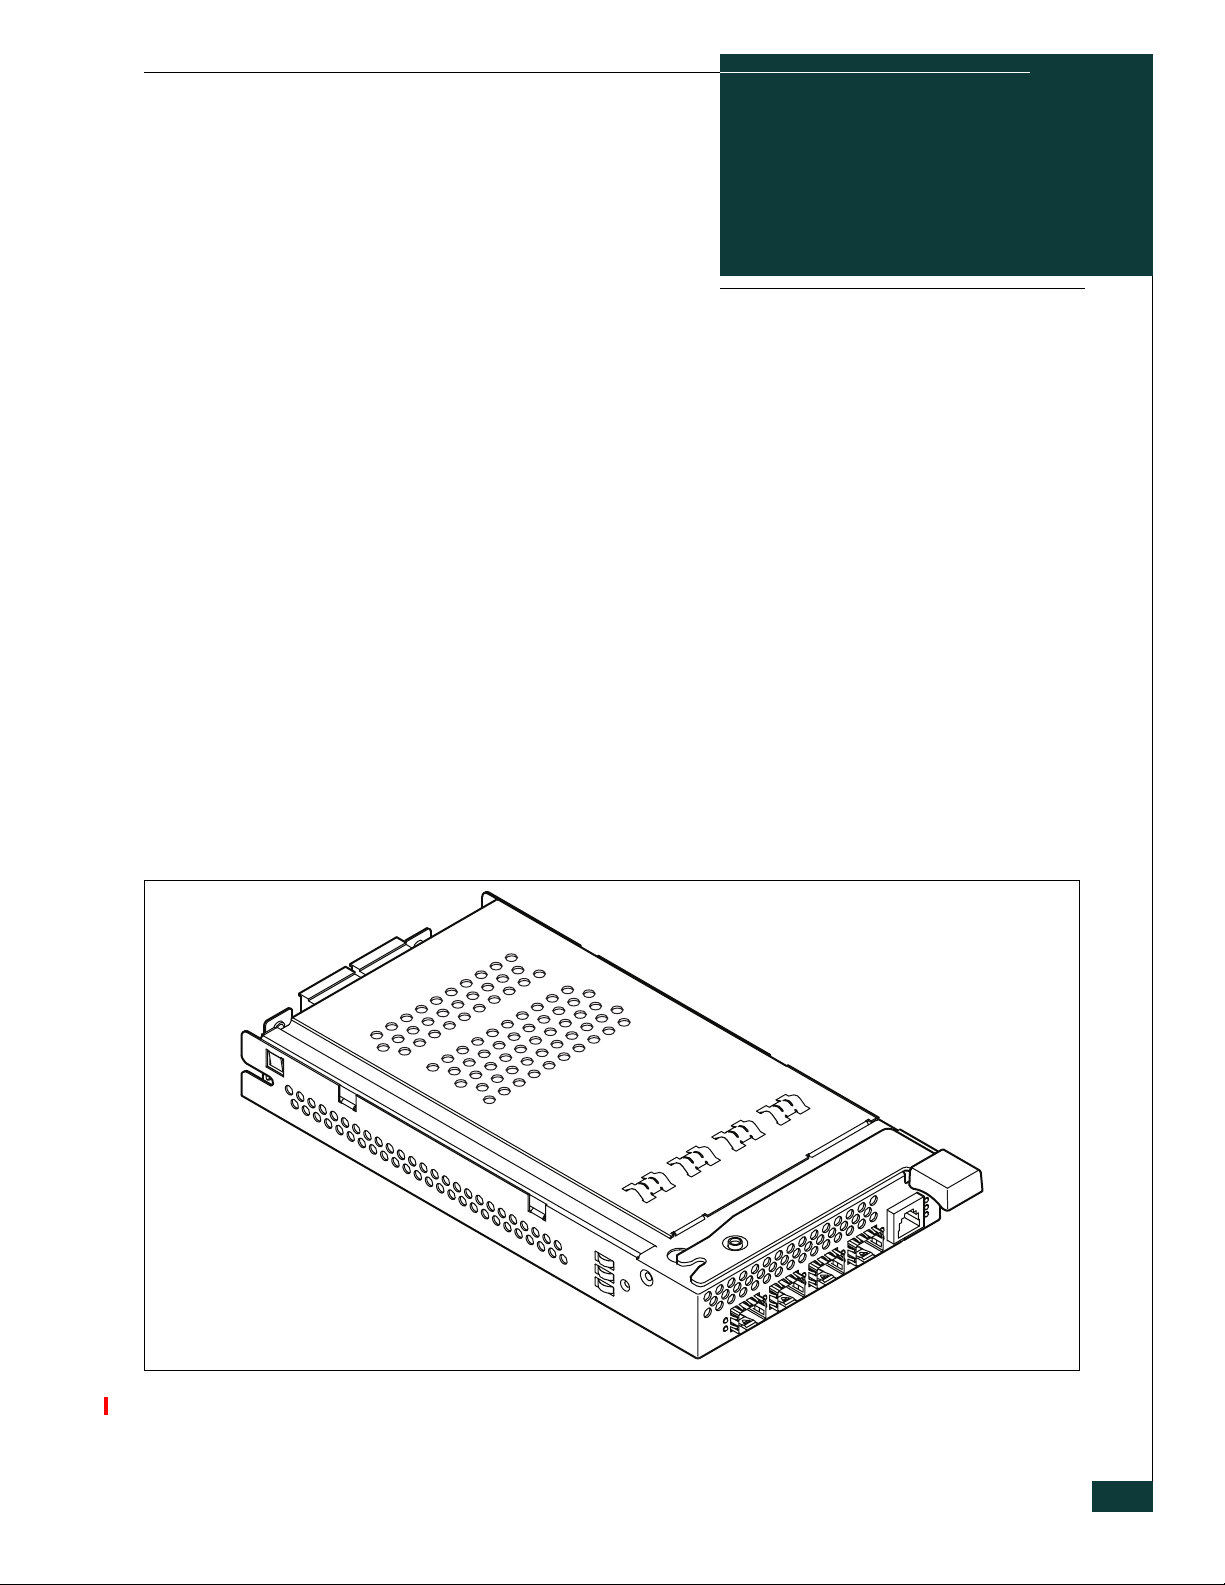
This section describes the features and capabilities of the McDATA 4314 Fibre
Channel Switch Module in a server blade chassis. The following topics are
described:
• Switch Module Controls and LEDs
• Fibre Channel Ports
• Ethernet Port
1
• Switch Module Management
Fabrics are managed with the EFCM BASIC™ switch management
application (version 5.02) and the Command Line Interface (CLI). Refer to the
EFCM Basic Management Guide for information about using the EFCM BASIC
application. Refer to the McDATA 4314 Command Line Interface Guide for more
information about the command line interface.
Figure 1-1. McDATA 4314 Switch Module
General Description
1-1
Page 14
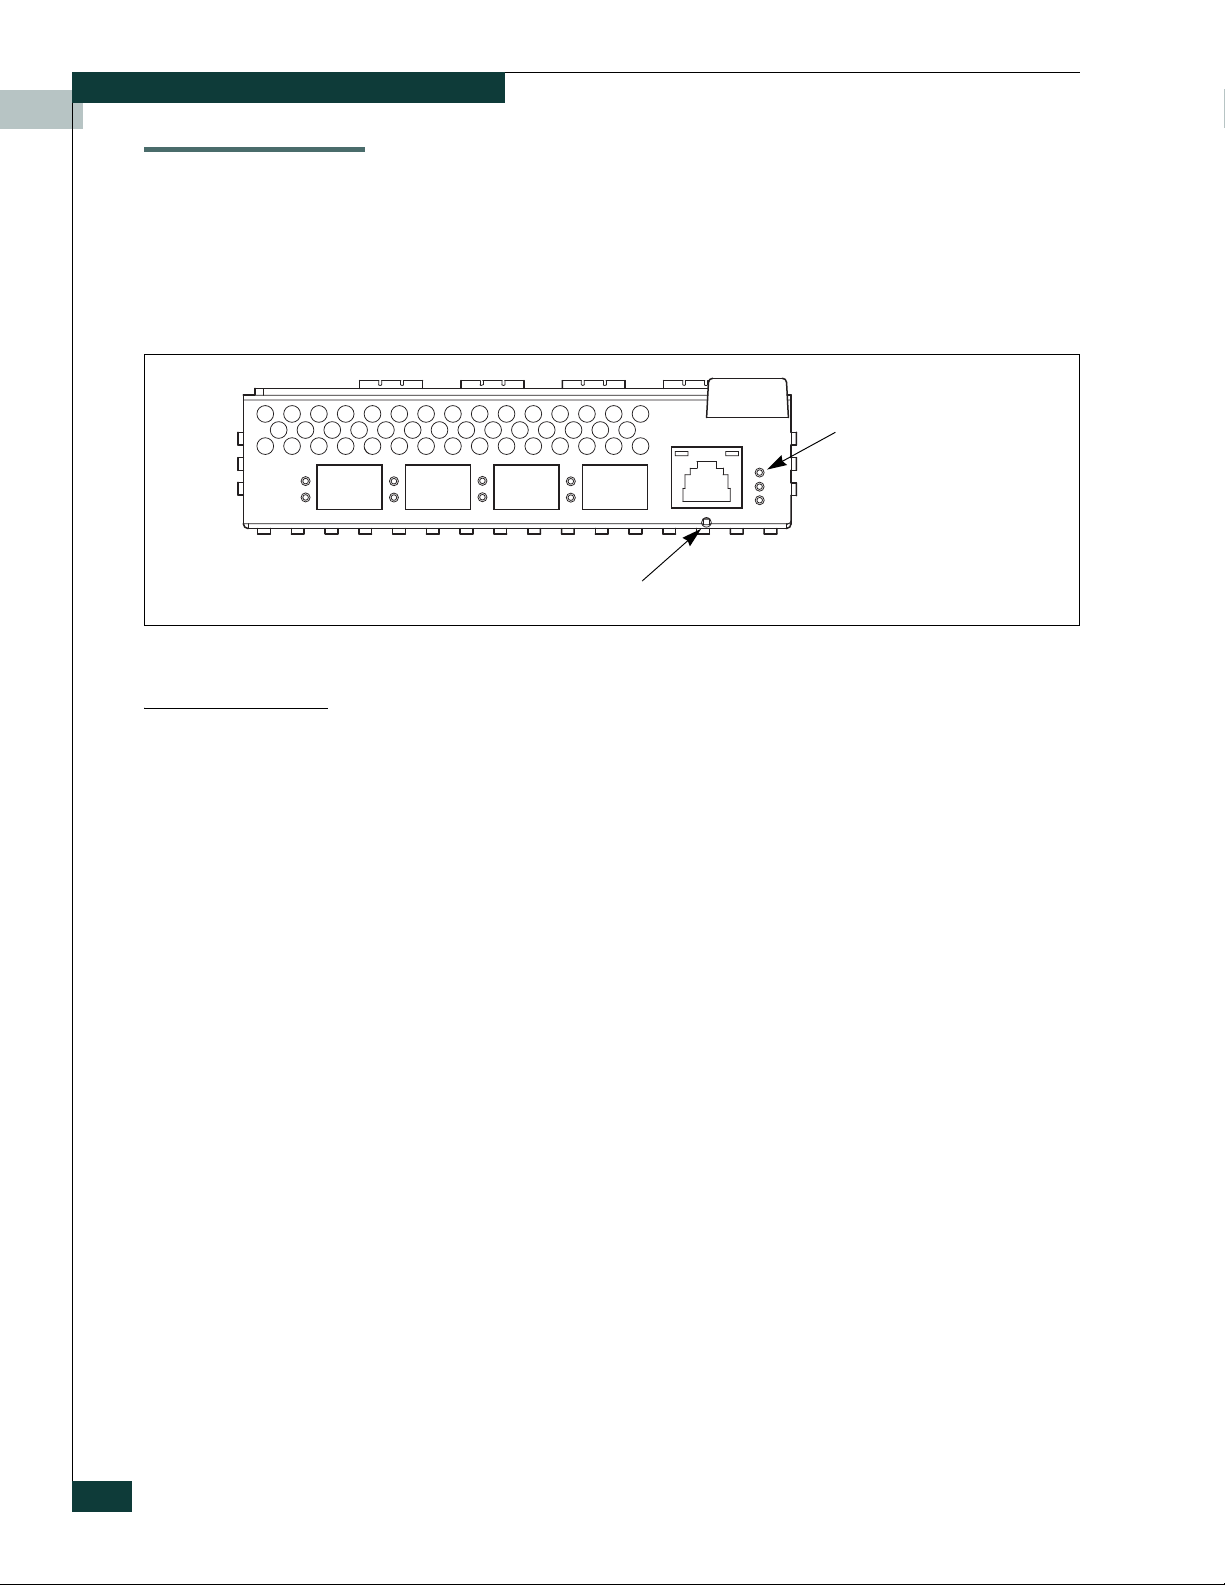
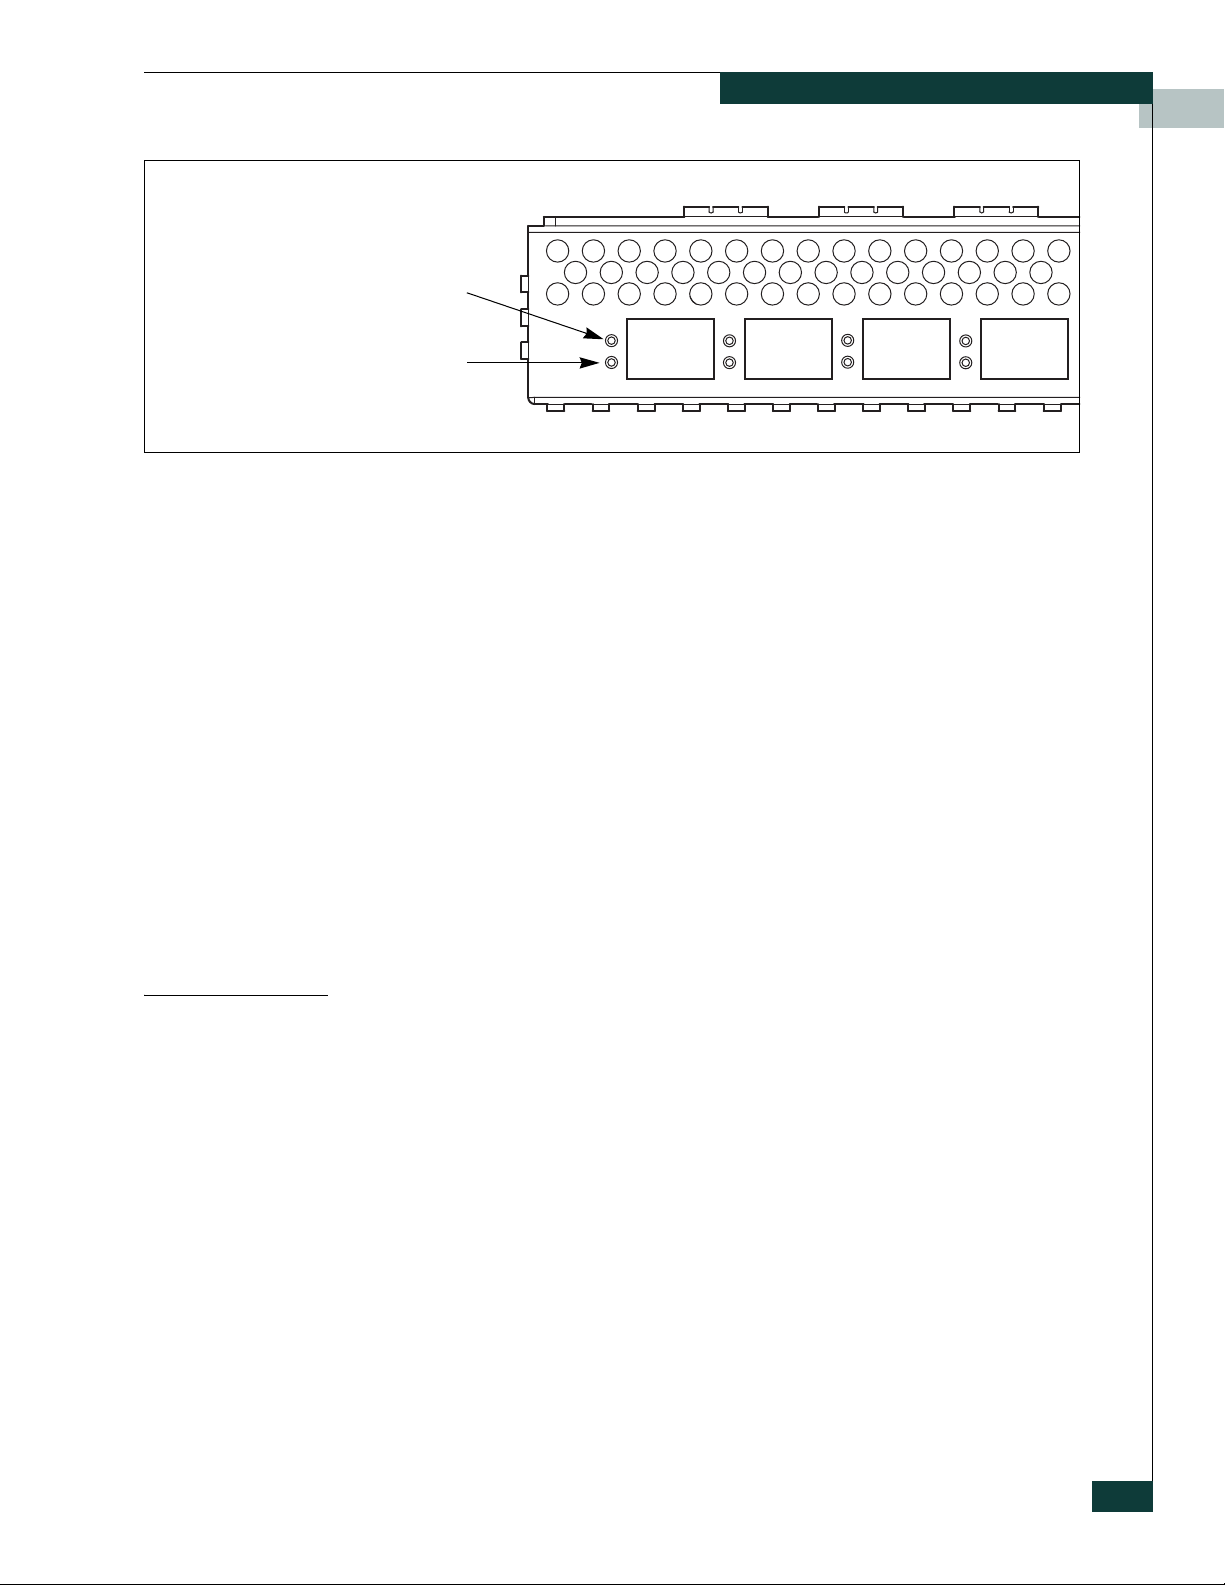
Switch Module Controls and LEDs
Switch Module Controls and LEDs
The switch module LEDs provide information about the switch module’s
operational status. These LEDS include the Identifier LED, System Fault LED,
and Input Power LED. The Maintenance button shown in Figure 1-2 is the
only switch module control and is used to reset a switch module or to recover
a disabled switch module.
Maintenance
Button
Switch Module
LEDS
Maintenance Button
The Maintenance button is a dual-function momentary switch on the front
panel. Its purpose is to reset the switch module or to place the switch module
in maintenance mode. Maintenance mode sets the IP address to 10.0.0.1 and
provides access to the switch module for maintenance purposes when flash
memory or the resident configuration file is corrupted. Refer to “Recovering a
Switch Module” on page 4-4 for more information about using maintenance
mode.
Resetting a Switch
To reset the switch module, use a pointed tool to momentarily press and
release (less than 2 seconds) the Maintenance button. The switch module will
respond as follows:
1. All switch module LEDs will illuminate, then the System Fault LED
extinguishes leaving only the Input Power LED illuminated.
2. After approximately 1 minute, the power-on self test (POST) begins.
3. When the POST is complete, the Input Power LED is illuminated.
Placing the Switch in Maintenance Mode
To place the switch module in maintenance mode, do the following:
1. Isolate the switch module from the fabric.
2. Press and hold the Maintenance button with a pointed tool for 2–4
seconds.
3. After a few seconds, the POST begins illuminating all switch module
LEDs.
4. When the POST is complete, the switch module LEDs extinguish.
Figure 1-2. Switch Module Controls and LEDS
1-2
McDATA 4314 Fibre Channel Switch Module Installation Guide
Page 15
Switch Module LEDs
Fibre Channel Ports
To exit maintenance mode and return to normal operation, momentarily press
and release the Maintenance button to reset the switch module.
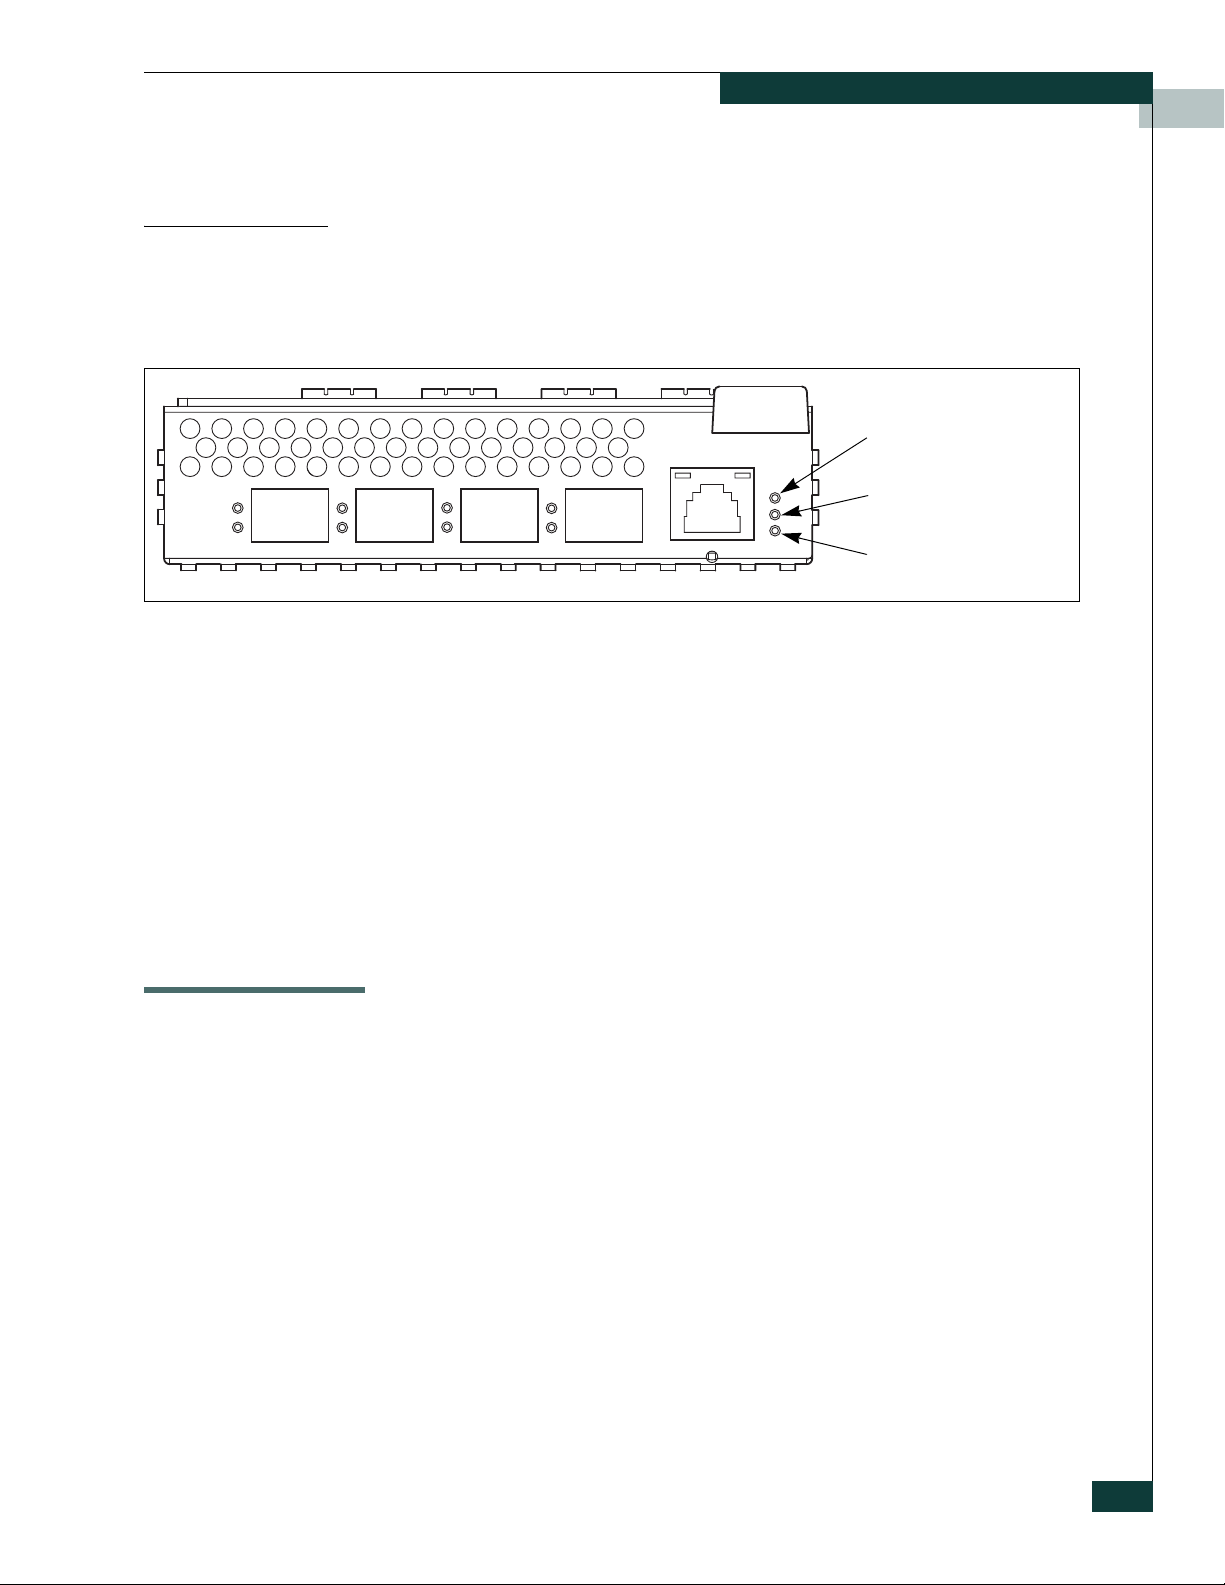
The switch module LEDs shown in Figure 1-3 provide status information
about switch module operation. Refer to “External Port LEDs” on page 1-4 for
information about port LEDs.
Identifier LED
(Green)
System Fault LED
(Amber)
Input Power LED
(Green)
Figure 1-3. Switch Module LEDs
Identifier LED (Green)
Input Power LED (Green)
System Fault LED (Amber)
Fibre Channel Ports
The Identifier LED identifies a specific switch module through the server
blade interface.
The Input Power LED indicates the voltage status at the switch module logic
circuitry. During normal operation, this LED illuminates to indicate that the
switch module logic circuitry is receiving the proper DC voltages. When the
switch module is in maintenance mode, this LED is extinguished.
The System Fault LED illuminates to indicate an over temperature condition
or a Power on Self Test (POST) error.
The switch module has 4 external Fibre Channel ports through which to
connect to devices or other switches and 10 internal ports connecting to the
server midplane. Each of the external Fibre Channel ports is served by a Small
Form-Factor Pluggable (SFP) optical transceiver and is capable of 1-Gbps or
2-Gbps transmission. SFPs are hot-pluggable. External ports can self-discover
both the port type and transmission speed when connected to public devices
or other switches. The internal ports operate at 2-Gbps.
The external ports are named Ext0, Ext1, Ext2, Ext3 and are numbered 10–13
as shown in Figure 1-4. The external port LEDs are located to the left their
respective ports and provide port login and activity status information.
General Description
1-3
Page 16
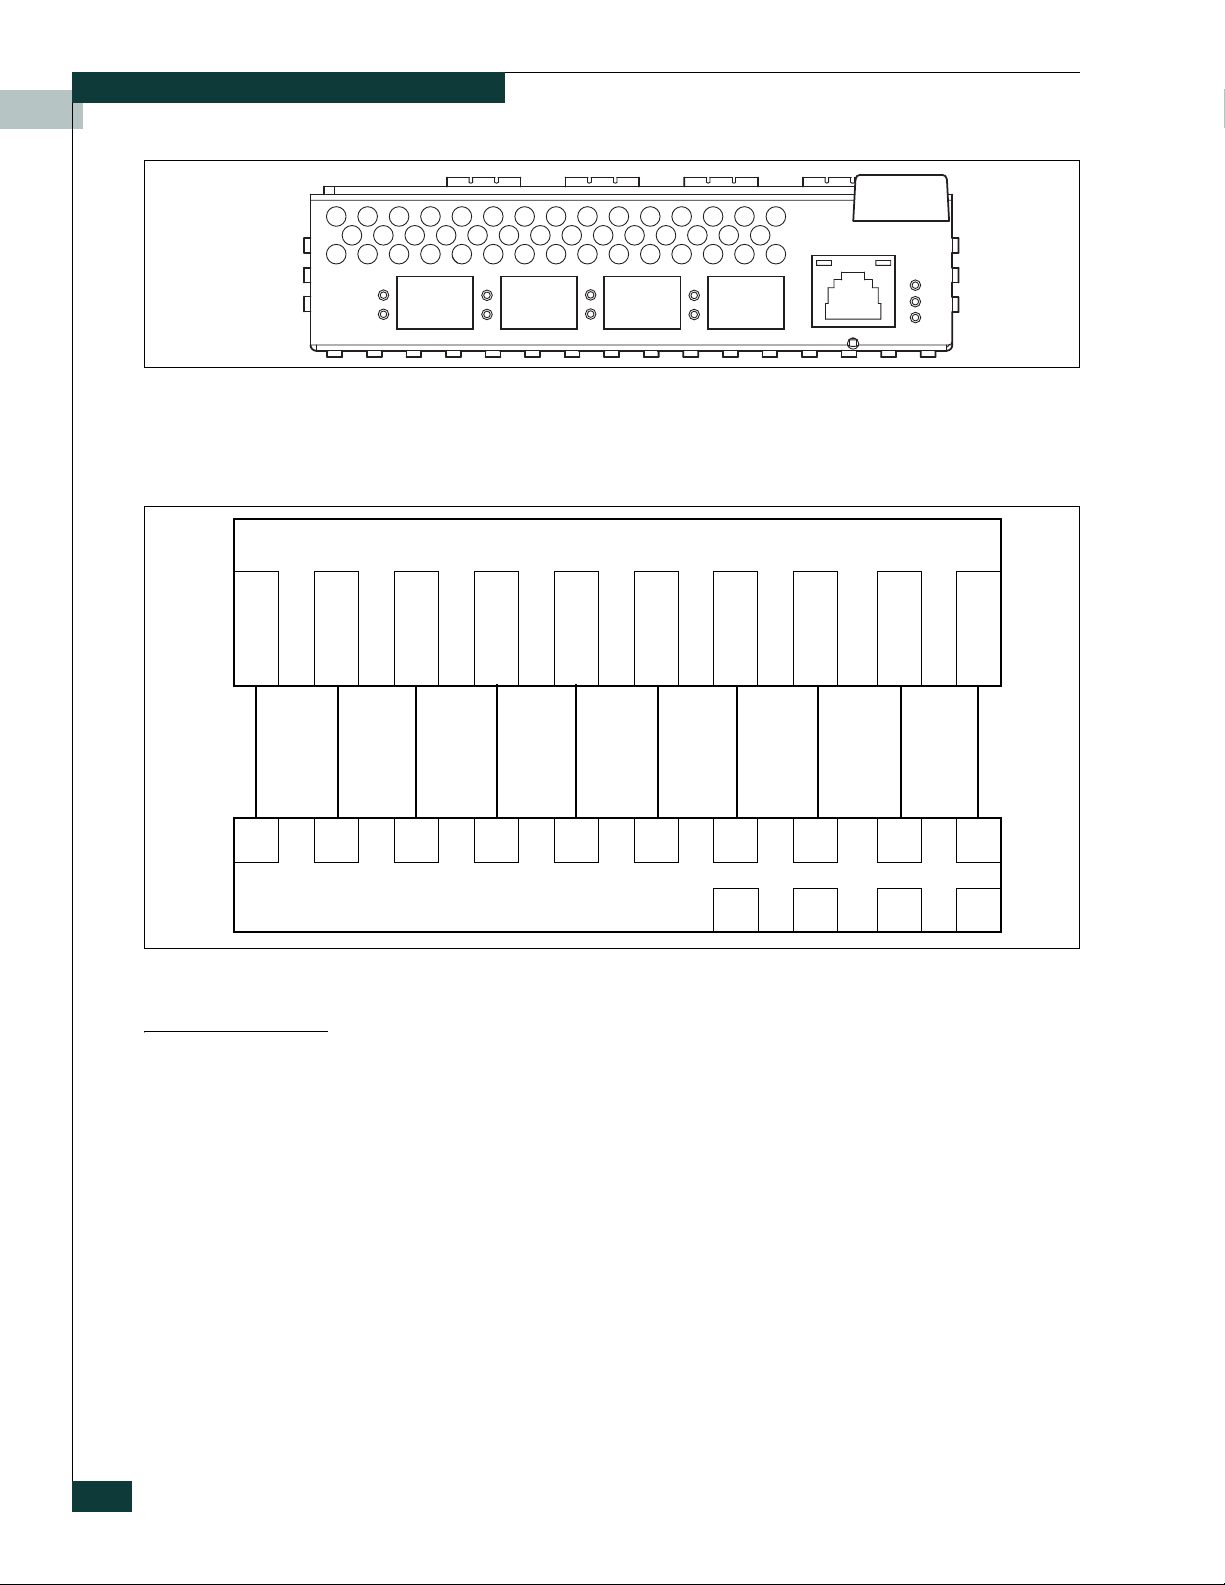
Fibre Channel Ports
Server Blades
10 11 12 13
Figure 1-4. Fibre Channel Ports
Internal ports are named Int0–Int9 and numbered 0–9. The port numbers 0–9
correspond to server blades 1–10 as shown in Figure 1-5.
123456
01234567 89
Switch Module Ports
External Port LEDs
78 910
10 11 12
Figure 1-5. Internal Port/Server Blade Mapping
13
Each external port has its own Logged-In LED (L) and Activity LED (A) as
shown in Figure 1-6.
1-4
McDATA 4314 Fibre Channel Switch Module Installation Guide
Page 17
Logged-In
LED (Green)
Fibre Channel Ports
Activity LED
(Green)
Port Logged-In LED (Green)
Port Activity LED (Green)
10 11 12 13
Figure 1-6. External Port LEDs
The Logged-in LED indicates the logged-in or initialization status of the
connected devices. After successful completion of the POST, the switch
module extinguishes all Logged-In LEDs. Following a successful loop
initialization or port login, the switch module illuminates the corresponding
logged-in LED. This shows that the port is properly connected and able to
communicate with its attached devices. The Logged-In LED remains
illuminated as long as the port is initialized or logged in. If the port
connection is broken or an error occurs that disables the port, the Logged-In
LED will flash. Refer to “Logged-In LED Indications” on page 4-2 for more
information about the Logged-In LED.
The Activity LED indicates that data is passing through the port. Each frame
that the port transmits or receives causes this LED to illuminate for 50
milliseconds. This makes it possible to observe the transmission of a single
frame. When extending credits, the Activity LED for a donor port will reflect
the traffic of the recipient port. Refer to “Distance” on page 2-4 for more
information about extended credits and donor ports.
Transceivers
Switch modules support SFP optical transceivers for the Fibre Channel ports.
A transceiver converts electrical signals to and from optical laser signals to
transmit and receive data. Duplex fiber optic cables plug into the transceivers
which then connect to the devices. A Fibre Channel port is capable of
transmitting at 1-Gbps or 2-Gbps; however, the transceiver must also be
capable of delivering at these rates.
The SFP transceivers are hot pluggable. This means that you can remove or
install a transceiver while the switch module is operating without harming
the switch module or the transceiver. However, communication with the
connected device will be interrupted. Refer to “Install SFP Transceivers” on
page 3-3 for information about installing and removing SFP optical
transceivers.
General Description
1-5
Page 18

Ethernet Port
Port Types
Switch modules support generic ports (G_Port, GL_Port), fabric ports
(F_Port, FL_Port), and expansion ports (E_Port). Switch modules come from
the factory with all Fibre Channel ports configured as GL_Ports. Generic,
fabric, and expansion ports function as follows:
• A GL_Port self-configures as an FL_Port when connected to a public loop
device, as an F_Port when connected to a single public device, or as an
E_Port when connected to another switch. If the device is a single device
on a loop, the GL_Port will attempt to configure first as an F_Port, then if
that fails, as an FL_Port.
• A G_Port self-configures as an F_Port when connected to a single public
device, or as an E_Port when connected to another switch.
• An FL_Port supports a loop of up to 126 public devices. An FL_Port can
also configure itself during the fabric login process as an F_Port when
connected to a single public device (N_Port).
• An F_Port supports a single public device.
E_Ports enable you to expand the fabric by connecting switch modules with
other switches. Switch modules self-discover all inter-switch connections.
Refer to “Multiple Chassis Fabrics” on page 2-6 for more information about
multiple chassis fabrics. Refer to the EFCM Basic Management Guide for
information about defining port types.
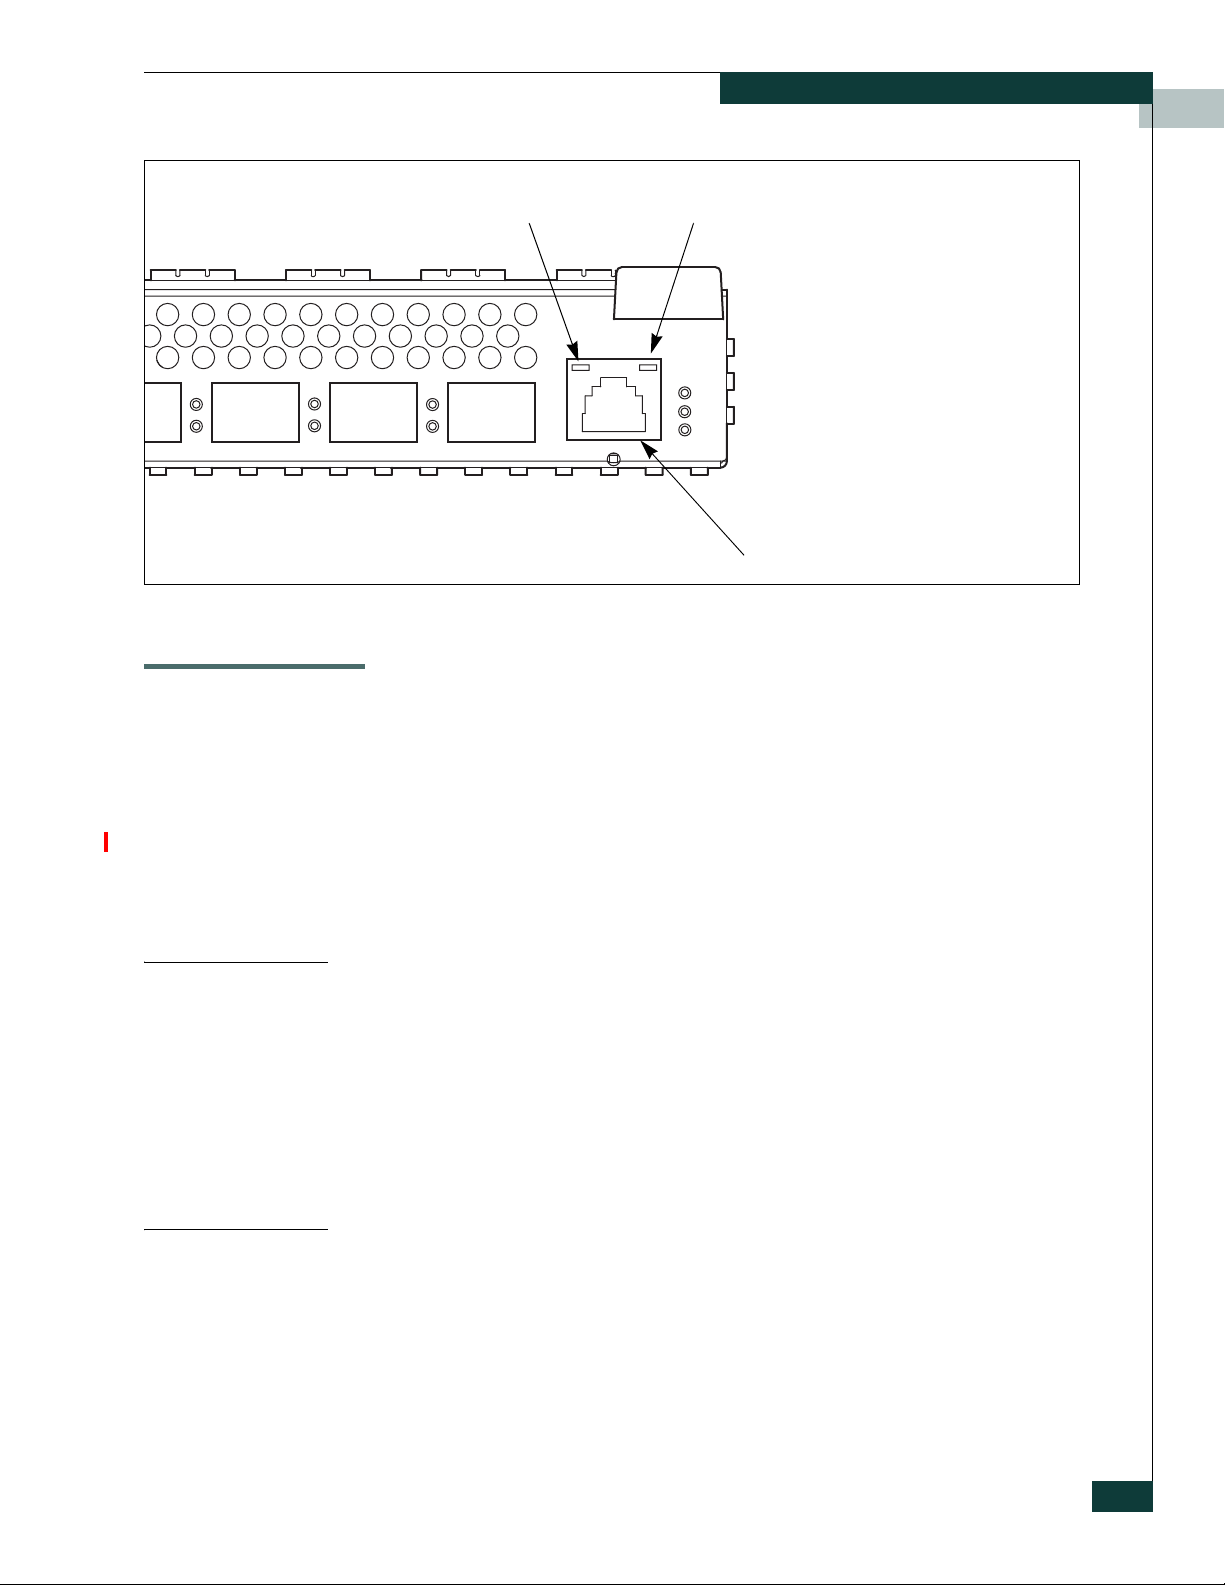
Ethernet Port
The Ethernet port shown in Figure 1-7 is an RJ-45 connector that provides a
connection to a management workstation through a 10/100 Base-T Ethernet
cable. A management workstation can be a Windows® or a Linux®
workstation that is used to configure and manage the switch fabric. You can
manage the switch module over an Ethernet connection using EFCM BASIC,
the Command Line Interface (CLI), or SNMP. The switch through which the
fabric is managed is called the fabric management switch.
The Ethernet port has two LEDs: the Link Status LED (green) and the Activity
LED (green). The Link Status LED illuminates continuously when an Ethernet
connection has been established. The Activity LED illuminates when data is
being transmitted or received over the Ethernet connection.
1-6
McDATA 4314 Fibre Channel Switch Module Installation Guide
Page 19
Switch Module Management
Activity LED
(Green)
Switch Module Management
The switch supports the following management tools:
• EFCM BASIC
Link Status LED
(Green)
RJ-45 Ethernet Port
Figure 1-7. Ethernet Port
• McDATA Embedded Web Server
• Command Line Interface
• Simple Network Management Protocol
• File Transfer Protocol
EFCM BASIC
EFCM BASIC is a workstation-based Java® application that provides a
graphical user interface for fabric management. This includes Performance
Viewer which graphs port performance. EFCM BASIC can run on a Windows
or Linux workstation. A management workstation connects to the fabric
through the Ethernet port of one or more switch modules and can provide
in-band management for all other switches in the fabric. Refer to the EFCM
Basic Management Guide for information about the EFCM BASIC application
and its use.
McDATA Embedded Web Server
To make switch management less dependent on a particular workstation,
each switch contains a web server. One instance of the web server can be run
at a time by opening the switch IP address with an internet browser. The
switch comes from the factory with the McDATA Embedded Wed Server
enabled, but you can disable it using the EFCM BASIC application or the
command line interface. Refer to the EFCM Basic Management Guide for
information about disabling the embedded GUI service using the EFCM
General Description
1-7
Page 20

Switch Module Management
BASIC application. Refer to the McDATA 4314 Command Line Interface Guide
for information about disabling the embedded GUI service using the Set
Setup Services command.
The web server possesses the same features as the EFCM BASIC application
with the following exceptions:
• Extended Credits wizard
•Zoning Wizard
• Performance Viewer
• Condensed online help
Command Line Interface
The command line interface (CLI) provides monitoring and configuration
functions by which the administrator can manage the fabric and its switches.
The CLI is available over an Ethernet connection. Refer to McDATA 4314
Command Line Interface Guide for more information.
Simple Network Management Protocol
SNMP provides monitoring and trap functions for the fabric. The switch
module firmware supports SNMP versions 1 and 2, the Fibre Alliance
Management Information Base (FA-MIB) version 4.0, and the Fabric Element
Management Information Base (FE-MIB) RFC 2837. Traps can be formatted
using SNMP version 1 or 2.
File Transfer Protocol
FTP provides the command line interface for exchanging files between the
switch module and the management workstation. These files include
firmware image files, configuration files, and log files. Refer to the McDATA
4314 Command Line Interface Guide for an example of using FTP to transfer
configuration backup files.
1-8
McDATA 4314 Fibre Channel Switch Module Installation Guide
Page 21

Consider the following when planning a fabric:
• Devices
• Device Access
• Performance
• Multiple Chassis Fabrics
2
Planning
Devices
• Switch Module Services
• Fabric Security
• Fabric Management
When planning a fabric, consider the number of public devices and the
anticipated demand. This will determine the number of ports that are needed
and in turn the number of switches.
The switch module uses SFP optical transceivers, but the device host bus
adapters you are using may not. Consider whether the device adapters use
SFP or Gigabit Interface Converters (GBIC) transceivers, and choose fiber
optic cables accordingly. Use LC-type cable connectors for SFP transceivers
and SC-type cable connectors for GBIC transceivers. Also consider the
transmission speed compatibility of your devices, HBAs, switches, and SFPs.
Consider the distribution of targets and initiators. An F_Port supports a
single public device. An FL_Port can support up to 126 public devices in an
arbitrated loop.
Planning
2-1
Page 22

Device Access
Device Access
Consider device access needs within the fabric. Access is controlled by the use
of zones and zone sets. Some zoning strategies include the following:
• Group devices by operating system.
• Separate devices that have no need to communicate with other devices in
the fabric or have classified data.
• Separate devices into department, administrative, or other functional
group.
• Reserve a path and its bandwidth from one port to another.
A zone is a named group of devices that can communicate with each other.
Membership in a zone can be defined by switch module domain ID and port
number, port Fibre Channel address, or by device worldwide name (WWN).
Devices can communicate only with devices within the same zone. The
switch module supports both hard and soft zones. A zone can be a member of
more than one zone set. Several zone sets can be defined for a fabric, but only
one zone set can be active at one time. The active zone set determines the
current fabric zoning.
A zoning database is maintained on each switch module consisting of all
inactive zone sets, the active zone set, all zones, aliases, and their
membership. Tab le 2- 1 describes the zoning database limits, excluding the
active zone set. Refer to the EFCM Basic Management Guide for more
information about zoning.
Table 2-1. Zoning Database Limits
Limit Description
MaxZoneSets Maximum number of zone sets (256).
MaxZones Maximum number of zones (2000).
MaxAliases Maximum number of aliases (2500).
MaxTotalMembers Maximum number of zone and alias members (10000) that can be
stored in the switch module’s zoning database.
MaxZonesInZoneSets Maximum number of zones that are components of zone sets
MaxMembersPerZone Maximum number of members in a zone (2000)
MaxMembersPerAlias Maximum number of members in an alias (2000)
(2000), excluding the orphan zone set, that can be stored in the
switch module’s zoning database. Each instance of a zone in a
zone set counts toward this maximum.
2-2
Soft Zones
Soft zoning divides the fabric for purposes of controlling device discovery.
Devices in the same soft zone automatically discover and communicate freely
with all other members of the same zone. The soft zone boundary is not
McDATA 4314 Fibre Channel Switch Module Installation Guide
Page 23

secure; traffic across soft zones can occur if addressed correctly. The following
rules apply to soft zones:
• Soft zones that include members from multiple switches need not include
the ports of the inter-switch links.
• Soft zone boundaries yield to ACL zone boundaries.
• Soft zones can overlap; that is, a port can be a member of more than one
soft zone.
• Membership can be defined by Fibre Channel address, domain ID and
port number, or port worldwide name.
• Soft zoning supports FL_Ports and F_Ports.
Access Control List Hard Zones
Access Control List (ACL) zoning divides the fabric for purposes of
controlling discovery and inbound traffic. ACL zoning is a type of hard
zoning that is hardware enforced. This type of zoning is useful for controlling
access to certain devices without totally isolating them from the fabric.
Members can communicate with each other and transmit outside the ACL
zone, but cannot receive inbound traffic from outside the zone. The following
rules apply to ACL zones:
Device Access
• The ACL zone boundary is secure against inbound traffic.
• ACL zones can overlap; that is, a port can be a member of more than one
ACL zone.
• ACL zones that include members from multiple switches need not
include the ports of the inter-switch links.
• ACL zone boundaries supersede soft zone boundaries.
• Membership can be defined only by domain ID and port number. A
switch module port can be a member of multiple ACL zones whose
combined membership does not exceed 64.
Planning
2-3
Page 24

Performance
Performance
Distance
The switch module supports class 2 and class 3 Fibre Channel service with a
maximum frame size of 2148 bytes at transmission rates of 1-Gbps or 2-Gbps.
An external port adapts its transmission speed to match that of the device to
which it is connected prior to login when the connected device powers up.
Related performance characteristics include the following:
• Distance
• Bandwidth
• Latency
Consider the physical distribution of devices and switches in the fabric.
Choose SFP transceivers that are compatible with the cable type, distance,
Fibre Channel revision level, and the device host bus adapter. Refer to
Specifications for more information about cable types and transceivers.
Each Fibre Channel port is supported by a data buffer with a 16 credit
capacity; that is, 16 maximum sized frames. For fibre optic cables, this enables
full bandwidth over the following approximate distances:
Bandwidth
• 26 kilometers at 1-Gbps (0.6 credits/Km)
• 13 kilometers at 2-Gbps (1.2 credits/Km)
Beyond these distances, however, there is some loss of efficiency because the
transmitting port must wait for an acknowledgement before sending the next
frame.
Longer distances can be spanned at full bandwidth by extending credits to
G_Ports, F_Ports, and E_Ports. Each port can donate 15 credits to a pool from
which a recipient port can borrow. The recipient port also loses a credit in the
process. For example, you can configure a recipient port to borrow 15 credits
from one donor port for a total of 30 credits (15+15=30). This will support
communication over the following approximate distances:
• 50 Km at 1-Gbps (30÷0.6)
• 25 Km at 2-Gbps (30÷1.2)
You can configure recipient and donor ports using the EFCM BASIC
application or the Set Config command. Refer to the McDATA 4314 Command
Line Interface Guide for information about the Set Config command.
Bandwidth is a measure of the volume of data that can be transmitted at a
given transmission rate. A Fibre Channel port can transmit or receive at
nominal rates of 1-Gbps or 2-Gbps depending on the device to which it is
connected. This corresponds to actual bandwidth values of 106 MB and 212
MB. Multiple source ports can transmit to the same destination port if the
destination bandwidth is greater than or equal to the combined source
bandwidth. For example, two 1-Gbps source ports can transmit to one 2-Gbps
destination port. Similarly, one source port can feed multiple destination
2-4
McDATA 4314 Fibre Channel Switch Module Installation Guide
Page 25

Latency
Performance
ports if the combined destination bandwidth is greater than or equal to the
source bandwidth.
In multiple chassis fabrics, each link between chassis contributes 106 or 212
MB of bandwidth between those chassis depending on the speed of the link.
When additional bandwidth is needed between devices, increase the number
of links between the connecting switches. The switch module guarantees
in-order-delivery with any number of links between chassis.
Latency is a measure of how fast a frame travels from one port to another. The
factors that affect latency include transmission rate and the
source/destination port relationship as shown in Tab le 2 -2 .
Table 2-2. Port-to-Port Latency
Destination Rate
Gbps 1 2
1
2
Source Rate
1
Based on minimum frame size of 36 bytes. Latency increases for larger frame sizes.
< 0.6 µsec
< 0.5 µsec < 0.4 µsec
< 0.8 µsec
1
Planning
2-5
Page 26

Multiple Chassis Fabrics
Multiple Chassis Fabrics
Optimizing Device Performance
By connecting switches together you can expand the number of available
ports for devices. Each switch in the fabric is identified by a unique domain
ID, and the fabric can automatically resolve domain ID conflicts. Because the
Fibre Channel ports are self-configuring, you can connect switches together in
a wide variety of topologies.
When choosing a topology for a multiple chassis fabric, you should also
consider the locality of your server and storage devices and the performance
requirements of your application. Storage applications such as video
distribution, medical record storage/retrieval or real-time data acquisition
can have specific latency or bandwidth requirements.
The switch module provides the lowest latency of any product in its class.
Refer to “Performance” on page 2-4 for information about latency. However,
the highest performance is achieved on Fibre Channel switches by keeping
traffic within a single switch instead of relying on ISLs. Therefore, for optimal
device performance, place devices on the same switch module under the
following conditions:
• Heavy I/O traffic between specific server and storage devices.
• Distinct speed mismatch between devices
2-6
McDATA 4314 Fibre Channel Switch Module Installation Guide
Page 27

Domain ID, Principal Priority, and Domain ID Lock
The following switch configuration settings affect multiple chassis fabrics:
•Domain ID
• Principal priority
•Domain ID lock
The domain ID is a unique number from 1–239 that identifies each switch in a
fabric. The principal priority is a number (1–255) that determines the
principal switch which manages domain ID assignments for the fabric. The
switch with the highest principal priority (1 is high, 255 is low) becomes the
principal switch. If the principal priority is the same for all switches in a
fabric, the switch with the lowest WWN becomes the principal switch.
The domain ID lock allows (False) or prevents (True) the reassignment of the
domain ID on that switch. Switches come from the factory with the domain
ID set to 1, the domain ID lock set to False, and the principal priority set to
254. Refer to the EFCM Basic Management Guide for information about
changing the domain ID and domain ID lock using EFCM BASIC. Refer to the
Set Config command in the McDATA 4314 Command Line Interface Guide for
information about changing the default domain ID, domain ID lock, and
principal priority parameters.
Multiple Chassis Fabrics
An unresolved domain ID conflict means that the switch with the higher
WWN will isolate as a separate fabric, and the Logged-In LEDs on both
switches will flash green to show the affected ports. If you connect a new
switch to an existing fabric with its domain ID unlocked, and a domain ID
conflict occurs, the new switch will isolate as a separate fabric. However, you
can remedy this by resetting the new switch or taking it offline then back
online. The principal switch will reassign the domain ID and the switch will
join the fabric.
NOTE: Domain ID reassignment is not reflected in zoning that is defined by domain
ID/port number pair or Fibre Channel address. You must reconfigure zones that are
affected by domain ID reassignment. To prevent zoning definitions from becoming
invalid under these conditions, lock the domain IDs using EFCM BASIC or the Set
Config Switch command.
Planning
2-7
Page 28

Switch Module Services
Switch Module Services
You can configure your switch module to suit the demands of your
environment by enabling or disabling a variety of switch services. Familiarize
yourself with the following switch services and determine which ones you
need:
• Te ln et : Provides for the management of the switch over a Telnet
connection. Disabling this service is not recommended. The default is
enabled.
• Secure Shell (SSH): Provides for secure remote connections to the switch
using SSH. Your workstation must also use an SSH client. The default is
disabled.
• Switch Management: Provides for out-of-band management of the
switch with EFCM BASIC, SNMP, and CIM. If this service is disabled, the
switch can only be managed inband or through the serial port. The
default is enabled.
• Inband Management: Provides for the management of the switch over an
inter-switch link using EFCM BASIC, SNMP, or management server. If
you disable inband management, you can no longer communicate with
that switch by means other than a direct Ethernet or serial connection.The
default is enabled.
• Secure Socket Layer (SSL): Provides for secure SSL connections for
EFCM BASIC, the McDATA Embedded Web Server, and the CIM. This
service must be enabled to authenticate users through a RADIUS server
when using EFCM BASIC. To enable secure SSL connections, you must
first synchronize the date and time on the switch and workstation.
Enabling SSL automatically creates a security certificate on the switch.
The default is enabled.
• Embedded GUI: Provides for access to the McDATA Embedded Web
Server. The web server enables you to point at a switch with an internet
browser and run EFCM BASIC through the browser. The default is
enabled.
• Simple Network Management Protocol (SNMP): Provides for the
management of the switch through third-party applications that use the
Simple Network Management Protocol (SNMP). Security consists of a
read community string and a write community string that serve as
passwords that control read and write access to the switch. These strings
are set at the factory to these well-known defaults and should be changed
if SNMP is to be enabled. Otherwise, you risk unwanted access to the
switch. The default is enabled.
2-8
McDATA 4314 Fibre Channel Switch Module Installation Guide
Page 29

Fabric Security
Fabric Security
• Network Time Protocol (NTP): Provides for the synchronizing of switch
and workstation dates and times with an NTP server. This helps to
prevent invalid SSL certificates and timestamp confusion in the event log.
The default is disabled.
• Common Information Model (CIM): Provides for the management of the
switch through third-party applications that use CIM. The default is
enabled.
• File Transfer Protocol (FTP): Provides for transferring files rapidly
between the workstation and the switch using FTP. The default is enabled.
• Management Server (MS): Enables or disables the management of the
switch through third-party applications that use GS-3 Management
Server. The default is disabled.
An effective security profile begins with a security policy that states the
requirements. A threat analysis is needed to define the plan of action followed
by an implementation that meets the security policy requirements. Internet
portals, such as remote access and E-mail, usually present the greatest threats.
Fabric security should also be considered in defining the security policy.
Most fabrics are located at a single site and are protected by physical security,
such as key-code locked computer rooms. For these cases, security methods
such as user passwords for equipment and zoning for controlling device
access, are satisfactory.
Fabric security is needed when security policy requirements are more
demanding: for example, when fabrics span multiple locations and
traditional physical protection is insufficient to protect the IT infrastructure.
Another benefit of fabric security is that it creates a structure that helps
prevent unintended changes to the fabric.
Fabric security consists of the following:
• Connection Security
• Device Security
• User Account Security
Planning
2-9
Page 30

Fabric Security
Connection Security
Connection security provides an encrypted data path for switch management
methods. The switch supports the Secure Shell (SSH) protocol for the
command line interface and the Secure Socket Layer (SSL) protocol for
management applications such as EFCM BASIC and Common Information
Module (CIM).
The SSL handshake process between the workstation and the switch involves
the exchanging of certificates. These certificates contain the public and private
keys that define the encryption. When the SSL service is enabled, a certificate
is automatically created on the switch. The workstation validates the switch
certificate by comparing the workstation date and time to the switch
certificate creation date and time. For this reason, it is important to
synchronize the workstation and switch with the same date, time, and time
zone. The switch certificate is valid 24 hours before its creation date and 365
days after its creation date. If the certificate should become invalid, refer to
the Create command in the McDATA 4314 Command Line Interface Guide for
information about creating a certificate.
Consider your requirements for connection security: for the command line
interface (SSH), management applications such as EFCM BASIC (SSL), or
both. If SSL connection security is required, also consider using the Network
Time Protocol (NTP) to synchronize workstations and switches.
• Refer to System keyword of the Set Setup command in the McDATA 4314
Command Line Interface Guide for information about enabling the NTP
client on the switch and configuring the NTP server.
• Refer to the Set command in the McDATA 4314 Command Line Interface
Guide for information about setting the time zone.
2-10
McDATA 4314 Fibre Channel Switch Module Installation Guide
Page 31

Device Security
Fabric Security
NOTE: Device security is available only with the McDATA SANtegrity Enhanced
Product Features Enabled (PFE) key. Refer to EFCM Basic Management Guide for
information about installing a PFE key. For additional McDATA PFE keys, please
contact your McDATA representative or visit the web site at www.mcdata.com.
Device security provides for the authorization and authentication of devices
that you attach to a switch. You can configure a switch with a group of
devices against which the switch authorizes new attachments by devices,
other switches, or devices issuing management server commands. Device
security is configured through the use of security sets and groups. A group is
a list of device worldwide names that are authorized to attach to a switch.
There are three types of groups: one for other switches (ISL), another for
devices (port), and a third for devices issuing management server commands
(MS). A security set is a set of up to three groups with no more than one of
each group type. The security configuration is made up of all security sets on
the switch. The security database has the following limits:
• Maximum number of security sets is 4.
• Maximum number of groups is 16.
• Maximum number of members in a group is 1000.
• Maximum total number of group members is 1000.
In addition to authorization, the switch can be configured to require
authentication to validate the identity of the connecting switch, device, or
host. Authentication can be performed locally using the switch’s security
database, or remotely using a Remote Dial-In User Service (RADIUS) server
such as Microsoft® RADIUS. With a RADIUS server, the security database for
the entire fabric resides on the server. In this way, the security database can be
managed centrally, rather than on each switch module. You can configure up
to five RADIUS servers to provide failover.
You can configure the RADIUS server to authenticate just the switch module
or both the switch module and the initiator device if the device supports
authentication. When using a RADIUS server, every switch in the fabric must
have a network connection. A RADIUS server can also be configured to
authenticate user accounts as described in “User Account Security” on
page 2-12. A secure connection is required to authenticate user logins with a
RADIUS server. Refer to “Connection Security” on page 2-10 for more
information.
Consider the devices, switches, and management agents and evaluate the
need for authorization and authentication. Also consider whether the security
database is to distributed on the switches or centralized on a RADIUS server
and how many servers to configure.
Planning
2-11
Page 32

Fabric Management
User Account Security
User account security consists of the administration of account names,
passwords, expiration date, and authority level. If an account has Admin
authority, all management tasks can be performed by that account in both
EFCM BASIC™ and the Telnet command line interface. Otherwise only
monitoring tasks are available. The default account name, Admin, is the only
account that can create or change account names and passwords. Account
names and passwords are always required when connecting to a switch.
Authentication of the user account and password can be performed locally
using the switch’s user account database or it can be done remotely using a
RADIUS server such as Microsoft® RADIUS. Authenticating user logins on a
RADIUS server requires a secure management connection to the switch. Refer
to “Connection Security” on page 2-10 for information about securing the
management connection. A RADIUS server can also be used to authenticate
devices and other switches as described in “Device Security” on page 2-11.
Consider your management needs and determine the number of user
accounts, their authority needs, and expiration dates. Also consider the
advantages of centralizing user administration and authentication on a
RADIUS server.
NOTE: If the same user account exists on a switch and its RADIUS server, that user
can login with either password, but the authority and account expiration will always
come from the switch database.
Fabric Management
The EFCM BASIC application and CLI execute on a management workstation
that provides for the configuration, control, and maintenance of multiple
fabrics. Supported platforms include Windows and Linux. The application
can be installed and executed on the workstation, or you can run the
McDATA Embedded Web Server that is resident on the switch.
Consider how many fabrics will be managed, how many management
workstations are needed, and whether the fabrics will be managed with the
CLI, EFCM BASIC, or the web server.
A switch supports a combined maximum of 19 logins reserved as follows:
• 4 logins or sessions for internal applications such as management server
• 9 high priority Telnet sessions
• 6 logins or sessions for EFCM BASIC inband and out-of-band logins, and
and SNMP
Telnet logins. Additional logins will be refused.
2-12
McDATA 4314 Fibre Channel Switch Module Installation Guide
Page 33

Site Requirements
3
Installation
This section describes how to install and configure the McDATA 4314 switch
module. It also describes how to load new firmware and how to recover a
disabled switch module.
Consider the following items when installing a McDATA 4314 switch module
switch:
• Fabric Management Workstation
• Environmental Conditions
Fabric Management Workstation
The requirements for fabric management workstations running EFCM BASIC
are described in Tabl e 3 -2 :
Table 3-1. Workstation Requirements
Component Requirement
Operating System
Memory 256 MB or more
Disk Space 150 MB per installation
Processor 500 MHz or faster
Hardware CD-ROM drive,
Internet Browser Microsoft® Internet Explorer® 5.0 and later
• Windows 2000/2003
• Linux® Red Hat® EL 3.x, 4.x
RJ-45 Ethernet port
Netscape Navigator® 4.72 and later
Mozilla™ 1.02 and later
Java 2 Runtime Environment to support the McDATA
Embedded Web Server.
Installation
3-1
Page 34

Site Requirements
Table 3-2. Management Workstation Requirements
Operating System
• Windows 2000/2003
• Linux® Red Hat® EL 3.x, 4.x
Memory 256 MB or more
Disk Space 150 MB per installation
Processor 500 MHz or faster
Hardware CD-ROM drive,
RJ-45 Ethernet port
Internet Browser Microsoft® Internet Explorer® 5.0 and later
Netscape Navigator® 4.72 and later
Mozilla™ 1.02 and later
Java 2 Runtime Environment to support the McDATA Embedded Web Server.
Telnet workstations require an RJ-45 Ethernet port and an operating system
with a Telnet client.
3-2
McDATA 4314 Fibre Channel Switch Module Installation Guide
Page 35

Environmental Conditions
Consider the factors that affect the climate in your facility such as equipment
heat dissipation and ventilation. The switch requires the following operating
conditions:
• Operating temperature range: 5 – 40°C (41 – 104°F)
•Relative humidity: 5 – 90%, non-condensing
Installing a Switch
Installing a McDATA 4314 switch module involves the following steps:
1. Install SFP transceivers.
2. Insert the switch module in the server chassis.
3. Connect the management workstation to the switch module.
4. Install the EFCM BASIC application.
5. Configure the switch module.
6. Cable devices to the switch module.
Installing a Switch
Install SFP Transceivers
The switch module has been validated with transceivers that support a
variety of interconnection media. To install a transceiver, insert the
transceiver into the port and gently press until it snaps in place. To remove a
transceiver, gently press the transceiver into the port to release the tension,
then pull on the release tab or lever and remove the transceiver. Different
transceiver manufacturers have different release mechanisms. Consult the
documentation for your transceiver.
NOTE: The transceiver will fit only one way. If the transceiver does not install under
gentle pressure, flip it over and try again.
Installation
3-3
Page 36

Installing a Switch
Mount the Switch Module in the Server Chassis
McDATA 4314 switch modules are installed in server chassis I/O slots 3 and 4
as shown in Figure 3-1. For a single switch module installation, use slot 4. Do
not attempt to install the McDATA 4314 switch module in any other I/O slots.
Switch Module
in I/O Slot 4
Switch Module
in I/O Slot 3
Figure 3-1. Mounting the Switch Module in the Server Chassis
To insert the McDATA 4314 switch module, do the following:
1. Verify that chassis I/O slots 3 and 4 are empty.
2. Gripping from the top and bottom of the release latch, gently squeeze the
latch to free the insertion arm.
3. Swing the insertion arm out (away from the chassis) until it is completely
open.
4. Slide the switch module into the open I/O slot.
5. Push the insertion arm gently toward the chassis until it is completely
closed and the switch module is firmly seated.
CAUTION
Do not force the arm closed. Doing so could cause damage. Instead, if the
switch module does not close easily, gently remove the switch module and
reinsert it.
When energized, the switch module responds in the following sequence:
1. The switch module LEDs (Identifier, Input Power, System Fault)
illuminate followed by all port Logged-In LEDs.
2. After a couple seconds the System Fault LED is extinguished while the
Input Power LED remains illuminated.
3-4
McDATA 4314 Fibre Channel Switch Module Installation Guide
Page 37

3. After approximately one minute, the POST executes.
4. After about another minute, the POST is complete, all LEDs are
extinguished except the Input Power LED. The Input Power LED remains
illuminated indicating that the switch logic circuitry is receiving DC
voltage. If not, contact your authorized maintenance provider.
Connect the Management Workstation to the Switch Module
Connect the management workstation to the switch module in the following
ways:
• Indirect Ethernet connection from the management workstation to the
switch module RJ-45 Ethernet connector through an Ethernet switch or a
hub. This requires a 10/100 Base-T straight cable as shown in Figure 3-2.
With this method, you can manage the switch module with the EFCM
BASIC application or Command Line Interface.
• Direct Ethernet connection from the management workstation to the
switch module RJ-45 Ethernet connector. This requires a 10/100 Base-T
cross-over cable as shown in Figure 3-2. With this method, you can
manage the switch module with the EFCM BASIC application or
Command Line Interface.
Installing a Switch
Indirect Ethernet
RJ-45 Connection
81
8
7
6
5
4
3
2
1
Figure 3-2. Ethernet Cable Connections
8
7
6
5
4
3
2
1
Direct Ethernet
RJ-45 Connection
81
8
7
6
5
4
3
2
8
7
6
5
4
3
2
1
1
The default IP address of a new switch module is 10.0.0.1. Many management
workstations are not configured to communicate with the 10.0.0 subnet. Use
the EFCM BASIC Configuration Wizard to set the IP address of a new switch
without re-configuring the management workstation.
To establish an Ethernet connection, do the following:
1. Connect a 10/100 Base-T cross-over cable from an RJ-45 port on the
management workstation directly to the RJ-45 Ethernet port; or a 10/100
Base-T straight cable indirectly over an Ethernet network.
2. Open a command line window.
Installation
3-5
Page 38

Installing a Switch
Install EFCM BASIC
3. Open a Telnet session by entering the following command with the switch
IP address. The default IP address is 10.0.0.1
telnet 10.0.0.1
4. Log in to the switch. The default account name and password are (admin,
password).
Switch Login: admin
Password: ********
You can install EFCM BASIC on a Windows or Linux workstation. To install
the EFCM BASIC application, do the following:
For a Windows platform:
1. Close all programs currently running, and insert the EFCM BASIC
Installation Disk into the management workstation CD-ROM drive.
2. In the upper left corner of the product introduction screen, click
Management Software.
3. Locate your platform in the table and click Install.
If the product introduction screen does not open in step 2, open the CD with
Windows Explorer and run the installation program with the following path:
data\files\Management_Software\Windows\Windows_5.02.x.xx.exe
For a Linux platform:
Open the CD and run the installation program with the following path:
data/files/Management_Software/Linux/Linux_5.02.xx.xx.bin
If there is no CD-ROM icon, do the following:
1. Open an xterm or other terminal window.
2. Mount the CD-ROM. From a shell prompt, enter the following:
mount /mnt/cdrom
3. Change directory to the location of the install program:
cd /mnt/cdrom/data/files/Management_Software/Linux
3-6
McDATA 4314 Fibre Channel Switch Module Installation Guide
Page 39

Start EFCM BASIC
Installing a Switch
To start the EFCM BASIC application for the first time, do the following:
NOTE: After the switch is operational, you can also open the McDATA Embedded
Web Server, by entering the switch IP address in an internet browser. If your
workstation does not have the Java 2 Run Time Environment program, you will be
prompted to download it.
1. Start the EFCM BASIC using one of the following methods:
• For Windows, double-click the EFCM BASIC shortcut, or select EFCM
BASIC from Start menu, depending on how you installed the EFCM
BASIC application. From a command line, you can enter the
EFCM_BASIC command:
<install_directory> EFCM_BASIC.exe
• For Linux, enter the EFCM_BASIC command:
<install_directory>./EFCM_BASIC
2. In the Initial Start dialog, click the Open Configuration Wizard button.
When you power up the switch, the Configuration Wizard will recognize
the switch and lead you through the configuration process.
Installation
3-7
Page 40

Installing a Switch
Configure the Switch Module
You can configure the switch using the EFCM BASIC application or the
command line interface. To configure the switch using EFCM BASIC, click the
Open Configuration Wizard radio button in the Initial Start dialog, then click
the Proceed button. The Configuration wizard explains and prompts you for
the following configuration information:
• Archive template file
• Switch domain ID (1–-239)
• Domain ID Lock (Locked/Unlocked)
• Switch name
• Permanent IP address
• Permanent subnet mask
• Permanent gateway address
• Permanent network discovery method
• Date and time
• Admin account password
• Create a configuration archive?
NOTE: Refer to the Reset command in the McDATA 4314 Command Line Interface
Guide for information about configuration default values.
3-8
McDATA 4314 Fibre Channel Switch Module Installation Guide
Page 41

To configure the switch using the command line interface, do the following:
1. Open a Telnet session with the default switch IP address and log in to the
2. Open an admin session and enter the Set Setup System command. Enter
3. Open a Config Edit session and use the Set Config command to modify
Cable Devices to the Switch
Connect cables to the SFP transceivers and their corresponding devices, and
then energize the devices. Device host bus adapters can have SFP (or SFF)
transceivers or GigaBit Interface Converters (GBIC). LC-type duplex fiber
optic cable connectors are designed for SFP transceivers, while SC-type
connectors are designed for GBICs. Duplex cable connectors are keyed to
ensure proper orientation. Choose the fiber optic cable with the connector
combination that matches the device host bus adapter.
Installing a Switch
switch with default account name and password (admin/password).
telnet 10.0.0.1
Switch Login: admin
Password: *******
the values you want for switch IP address (Eth0NetworkAddress) and the
network mask (Eth0NetworkMask). Refer to the McDATA 4314 Command
Line Interface Guide for more information about this command.
DFCSM #> admin start
DFCSM (admin) #> set setup system
the switch configuration. Refer to the McDATA 4314 Command Line
Interface Guide for more information about these commands.
GL_Ports self configure as FL_Ports when connected to loop of public devices
or F_Ports when connected to a single device. G_Ports self configure as
F_Ports when connected to single public devices. Both GL_Ports and G_Ports
self configure as E_Ports when connected to another switch.
Installation
3-9
Page 42

Install Firmware
Install Firmware
The switch module comes with current firmware installed. You can upgrade
the firmware from the management workstation as new firmware becomes
available. You can use the EFCM BASIC application or the CLI to install new
firmware.
You can load and activate version 5.2 firmware on an operating switch
without disrupting data traffic or having to re-initialize attached devices. If
you attempt to perform a non-disruptive activation without satisfying the
following conditions, the switch will perform a disruptive activation
• The current firmware version is a 5.2 version that precedes the upgrade
version.
• No changes are being made to switches in the fabric including powering
up, powering down, disconnecting or connecting ISLs, and switch
configuration changes.
• No port in the fabric is in the diagnostic state.
• No zoning changes are being made in the fabric.
• No changes are being made to attached devices including powering up,
powering down, disconnecting, connecting, and HBA configuration
changes.
Ports that are stable when the non-disruptive activation begins, then change
states, will be reset. When the non-disruptive activation is complete, EFCM
BASIC sessions reconnect automatically. However, Telnet sessions must be
restarted manually.
Using EFCM BASIC to Install Firmware
To install firmware using EFCM BASIC, do the following:
1. Select a switch module in the topology display and double-click to open
the Faceplate display. Open the Switch menu and select Load Firmware.
2. In the Firmware Upload window, click the Select button to browse and
select the firmware file to be uploaded.
3. Click the Start button to begin the firmware load process. You will be
shown a message warning you that the switch will be reset to activate the
firmware.
4. Click the OK button to continue firmware installation or click the Cancel
button to cancel the firmware installation. EFCM BASIC will attempt a
hot reset, if possible, to activate the firmware without disrupting data
traffic. During a non-disruptive activation, all Logged-In LEDs are
extinguished for several seconds. If a non-disruptive activation is not
possible, EFCM BASIC gives you the opportunity to reset the switch
module and perform a disruptive activation.
Using the CLI to Install Firmware
3-10
McDATA 4314 Fibre Channel Switch Module Installation Guide
To install firmware using the CLI when a File Transfer Protocol (FTP) server is
present on the management workstation, use the Firmware Install command.
Page 43

Install Firmware
Refer to the McDATA 4314 Command Line Interface Guide for information about
this command.
1. Enter the following command to download the firmware from a remote
host to the switch, install the firmware, then reset the switch to activate
the firmware. If possible, a non-disruptive activation will be performed.
DFCSM (admin) #> firmware install
Warning: Installing new firmware requires a switch reset. A
stable fabric is required to successfully activate the
firmware on a switch without disrupting traffic. Therefore,
before continuing with this action, ensure there are no
administrative changes in progress anywhere in the fabric.
Continuing with this action will terminate all management
sessions, including any Telnet sessions. When the firmware
activation is complete, you may log in to the switch again.
Do you want to continue? [y/n]: y
Press 'q' and the ENTER key to abort this command.
2. Enter your account name on the remote host and the IP address of the
remote host. When prompted for the source file name, enter the path for
the firmware image file.
User Account : johndoe
IP Address : 10.20.20.200
Source Filename : 5.2.x.xx.xx_mpc
3. When prompted to install the new firmware, enter Yes to continue or No
to cancel. If possible, a non-disruptive activation will be performed. This
is the last opportunity to cancel.
About to install image. Do you want to continue? [y/n] y
Connected to 10.20.20.200 (10.20.20.200).
220 localhost.localdomain FTP server (Version wu-2.6.1-18)
ready.
4. Enter the password for your account name. The firmware will now be
downloaded from the remote host to the switch module, installed, and
activated.
331 Password required for johndoe.
Password:******
230 User johndoe logged in.
Installation
3-11
Page 44

Install Firmware
3-12
McDATA 4314 Fibre Channel Switch Module Installation Guide
Page 45

Troubleshooting
Diagnostic information about the switch is available through the switch
module LEDs and the external port LEDs. Diagnostic information is also
available through the EFCM BASIC and CLI event logs and error displays.
The switch performs a series of tests as part of its power-up procedure. The
POST diagnostic program performs the following tests:
• Checksum tests on the boot firmware in PROM and the switch firmware
in flash memory
4
• Internal data loopback test on all ports
• Access and integrity test on the ASIC
During the POST, the switch logs any errors encountered. Some POST errors
are critical, others are not. The switch uses the System Fault LED and the
Logged-In LED to indicate switch and port status. A critical error disables the
switch so that it will not operate. A non-critical error allows the switch to
operate, but disables the ports that have errors.
Input Power LED Is Extinguished
The Input Power LED illuminates to indicate that the switch logic circuitry is
receiving proper voltages. If the Input Power LED is extinguished, contact
your authorized maintenance provider.
System Fault LED is Illuminated
The System Fault LED illuminates to indicate that the switch module logic
circuitry is overheating or that a POST error has occurred. If the System Fault
LED illuminates, contact your authorized maintenance provider.
Troubleshooting
4-1
Page 46
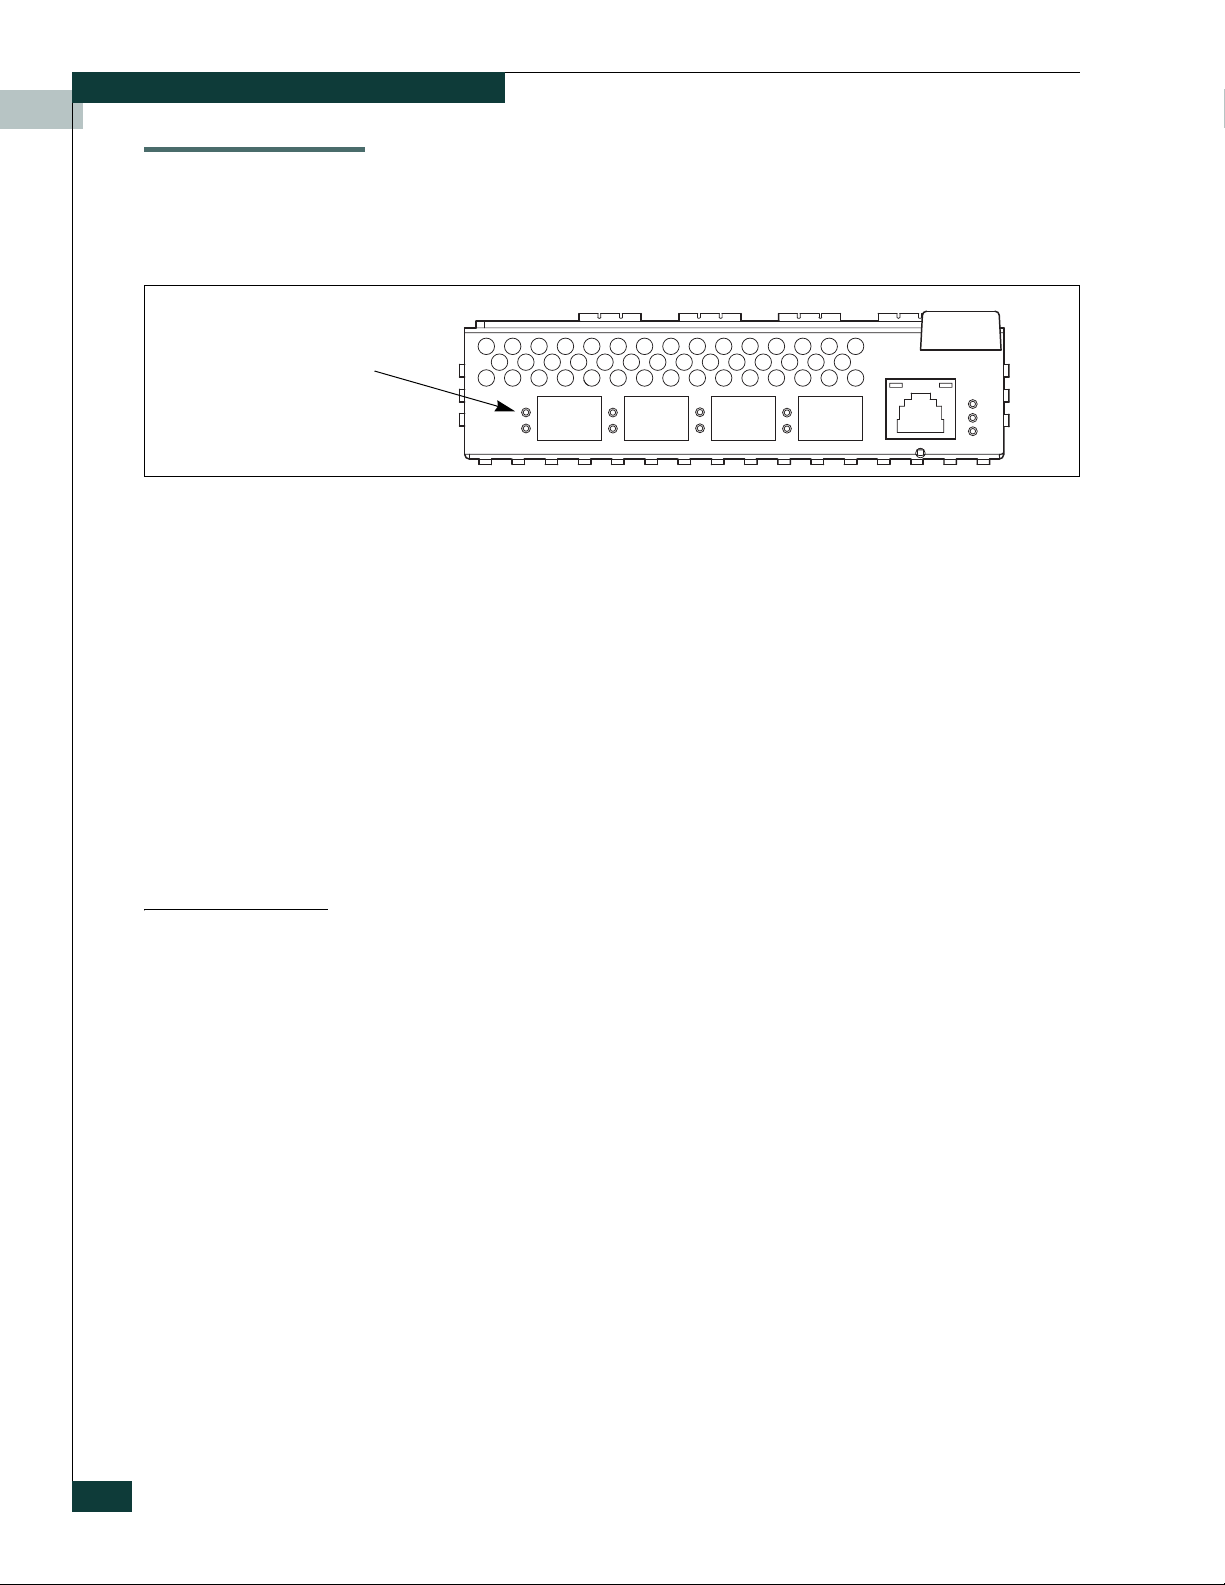
Logged-In LED Indications
Logged-In LED Indications
Logged-In LED
Port diagnostics are indicated by the Logged-In LED for each port as shown
in Figure 4-1.
Figure 4-1. Logged-In LED
The Logged-In LED has three indications:
• Continuous illumination: A device is logged in to the port.
• Flashing once per second: A device is logging in to the port.
• Flashing twice per second: The port is down, offline, or an error has
occurred.
E_Port Isolation
If a Logged-In LED is flashing twice per second, review the event browser for
alarm messages regarding the affected port. You can also inspect the alarm
log using the Show Alarm command. If there is an error, alarm messages may
point to one or more of the following conditions:
• E_Port Isolation
• Excessive Port Errors
A Logged-In LED error indication is often the result of E_Port isolation. An
isolated E_Port is indicated by a red link in the EFCM BASIC topology
display. E_Port isolation can be caused by the following:
• Security failure
• FL_Port is connected to another switch
•Conflicting domain IDs
• Conflicting timeout values
• Conflicting zone membership between active zone sets
Refer to the EFCM Basic Management Guide for information about how to
change domain IDs, timeout values, and edit zoning.
Review the event browser and do the following to diagnose and correct an
isolated E_Port:
4-2
1. Does the event browser show an alarm about an invalid attach on the
affected port?
McDATA 4314 Fibre Channel Switch Module Installation Guide
Page 47

Logged-In LED Indications
• Yes - Review the ISL group in the active security set to ensure that the
membership includes the necessary ports and that the secrets on all
switches are correct.
•No - Continue.
2. Does the event browser show a repeating alarm about an unsupported
E_Port command on the affected port?
• Yes - The port is configured as an FL_Port and connected to another
switch. Correct the port connection or the port type.
•No - Continue.
3. Display the fabric domain IDs using the Show Domains command or the
Switch data tab in the EFCM BASIC topology display. Are all domain IDs
in the fabric unique?
•Yes - Continue.
• No - Correct the domain IDs on the offending switches using the Set
Config Switch command or the EFCM BASIC Switch Properties
window. Reset the port. If the condition remains, continue.
4. Compare the RA_TOV and ED_TOV timeout values for all switches in the
fabric using the Show Config Switch command or the Switch data tab of
the EFCM BASIC topology display. Is each timeout value the same on
every switch?
•Yes - Continue.
• No - Correct the timeout values on the offending switches using the
Set Config Switch command or the EFCM BASIC Switch Properties
dialog. Reset the port. If the condition remains, continue.
5. Display the active zone set on each switch using the Zoning Active
command or the Active Zoneset tab of the EFCM BASIC topology display.
Compare the zone membership between the two active zone sets. Are
they the same?
• Yes - Contact your authorized maintenance provider.
• No - Deactivate one of the active zone sets or edit the conflicting zones
so that their membership is the same. Reset the port. If the condition
remains, contact your authorized maintenance provider.
Excessive Port Errors
NOTE: This can be caused by merging two fabrics whose active zone sets have two
zones with the same name, but different membership.
The switch can monitor a set of port errors and generates alarms based on
user-defined sample windows and thresholds. These port errors include the
following:
•CRC errors
• Decode errors
• ISL connection count
•Login errors
• Logout errors
• Loss-of-signal errors
Troubleshooting
4-3
Page 48

Recovering a Switch Module
Port threshold alarm monitoring is disabled by default. Refer to the EFCM
Basic Management Guide for information about managing port threshold
alarms.
If the count for any of these errors exceeds the rising trigger for three
consecutive sample windows, the switch generates an alarm and disables the
affected port, changing its operational state to “down”. Port errors can be
caused by the following:
• Triggers are too low or the sample window is too small
• Faulty Fibre Channel port cable
• Faulty SFP
• Faulty port
• Fault device or HBA
Review the event browser to determine if excessive port errors are
responsible for disabling the port. Look for a message that mentions one of
the monitored error types indicating that the port has been disabled, then do
the following:
1. Examine the alarm configuration for the associated error using the Show
Config Threshold command or the EFCM BASIC application. Refer to the
McDATA 4314 Command Line Interface Guide for information about this
command. Are the thresholds and sample window correct?
•Yes - Continue
• No - Correct the alarm configuration. If the condition remains,
continue.
2. Reset the port, then perform an external port loopback test to validate the
port and the SFP. Refer to the EFCM Basic Management Guide for
information about testing ports. Does the port pass the test?
•Yes - Continue
• No - Replace the SFP and repeat the test. If the port does not pass the
test, contact your authorized maintenance provider. Otherwise
continue.
3. Replace the Fibre Channel port cable. Is the problem corrected?
•Yes - Complete.
•No - Continue.
4. Inspect the device to which the affected port is connected and confirm
that the device and its HBA are working properly. Make repairs and
corrections as needed. If the condition remains, contact your authorized
maintenance provider.
Recovering a Switch Module
A switch can become inoperable or unmanageable for the following reasons:
• Firmware becomes corrupt
•IP address is lost
• Switch configuration becomes corrupt
4-4
McDATA 4314 Fibre Channel Switch Module Installation Guide
Page 49

Recovering a Switch Module
• Forgotten password
In these specific cases, you can recover the switch using maintenance mode.
Maintenance mode temporarily returns the switch IP address to 10.0.0.1 and
provides opportunities to do the following:
• Unpack a firmware image file
• Restore the network configuration parameters to the default values
• Remove all user accounts and restore the Admin account name password
to the default.
• Copy the log file
• Restore factory defaults for all but user accounts and zoning
• Restore all switch configuration parameters to the factory default values
• Reset the switch
• Update the system boot loader
To recover a switch, do the following:
1. Place the switch in maintenance mode. Press and hold the Maintenance
button with a pointed tool for 2–7 seconds.
2. Allow one minute for the switch to complete its tests. When the switch is
in maintenance mode, all switch module LEDs are extinguished.
3. Establish a Telnet session with the switch using the maintenance mode IP
address 10.0.0.1.
4. Enter the maintenance mode account name and password (prom, prom),
and press the Enter key.
Switch login: prom
Password:xxxx
5. The maintenance menu displays several recovery options. To select a
switch recovery option, press the corresponding number (displayed in
option: field) on the keyboard and press the Enter key.
0) Exit
1) Image Unpack
2) Reset Network Config
3) Reset User Accounts to Default
4) Copy Log Files
5) Remove Switch Config
6) Remake Filesystem
7) Reset Switch
8) Update Boot Loader
Option:
These options and their use are described in the following subsections.
Maintenance – Exit
This option closes the current login session. To log in again, enter the
maintenance mode account name and password (prom, prom). To return to
normal operation, momentarily press and release the Maintenance button or
power cycle the switch module.
Troubleshooting
4-5
Page 50

Recovering a Switch Module
Maintenance – Image Unpack
This option unpacks and installs new firmware when the current firmware
has become corrupt. Before using this option, you must load the new
firmware image file onto the switch. The steps to install new firmware using
this option are as follows:
1. Place the switch in maintenance mode. Refer to the procedure for
maintenance mode in “Recovering a Switch Module” on page 4-4.
2. Use the Image command to load a new firmware image file onto the
switch. Refer to the McDATA 4314 Command Line Interface Guide for an
example of using the Image command. Close the FTP session.
3. Establish a Telnet session with the switch using the default IP address
10.0.0.1.
telnet 10.0.0.1
4. Enter the maintenance mode account name and password (prom, prom),
and press the Enter key.
Switch login: prom
Password:xxxx
5. Select option 1 from the maintenance menu. When prompted for a file
name prompt, enter the firmware image file name.
Image filename: filename
Unpacking ’filename’, please wait...
Unpackage successful.
6. Select option 7 to reset the switch and exit maintenance mode.
Maintenance – Reset Network Config
This option resets the network properties to the factory default values and
saves them on the switch. Refer to the Reset command in the McDATA 4314
Command Line Interface Guide for the default network configuration values.
Maintenance – Reset User Accounts to Default
This option restores the password for the Admin account name to the default
(password) and removes all other user accounts from the switch.
Maintenance – Copy Log Files
This option copies all log file buffers to a file on the switch named logfile. You
can use FTP to download this file to the management workstation. You must
download the logfile before resetting the switch.
Maintenance – Remove Switch Config
This option deletes all configurations from the switch except the default
configuration. This restores switch configuration parameters to the factory
defaults except for user accounts and zoning. Refer to Reset command in the
McDATA 4314 Command Line Interface Guide for factory default values.
4-6
McDATA 4314 Fibre Channel Switch Module Installation Guide
Page 51

Maintenance – Remake Filesystem
In the event of a loss of power, the switch configuration may become corrupt.
The file system on which the configuration is stored must be re-created. This
option resets the switch to the factory default values including user accounts
and zoning. Refer to the Reset command in the McDATA 4314 Command Line
Interface Guide for the factory default values.
CAUTION
If you choose the Remake Filesystem option, you will lose all changes
made to the fabric configuration that involve that switch, such as password
and zoning changes. You must then restore the switch from an archived
configuration or reconfigure the portions of the fabric that involve the
switch.
Maintenance – Reset Switch
This option closes the Telnet session, exits maintenance mode and reboots the
switch using the current switch configuration. All unpacked firmware image
files that reside on the switch are deleted.
Recovering a Switch Module
Maintenance – Update Boot Loader
This option updates the system boot loader which loads the Linux kernel into
memory. Use this option only at the direction of your authorized maintenance
provider.
Troubleshooting
4-7
Page 52

Recovering a Switch Module
Notes
4-8
McDATA 4314 Fibre Channel Switch Module Installation Guide
Page 53

This appendix contains the specifications for the McDATA 4314 switch
module. Refer to Chapter 1 for the location of all connections, switches,
controls, and components.
Fabric Specifications
Table A-1. Fabric Specifications
A
Specifications
Specification Description
Fibre Channel Protocols ............................... FC-PH Rev. 4.3
FC-PH-2
FC-PH-3
FC-AL Rev 4.6
FC-AL-2 Rev 7.0
FC-FLA
FC-GS
FC-GS-2
FC-GS-3
FC-FG
FC-Tape
FC-VI
FC-SW-2
Fibre Channel Element MIB RFC 2837
Fibre Alliance MIB Version 4.0
Fibre Channel Classes of Service ................ Classes 2 and 3
Modes of Operation ...................................... Fibre Channel Classes 2 and 3,
connectionless
Port Types ..................................................... G_Port, GL_Port
F_Port, FL_Port
E_Port
Port Characteristics....................................... All ports are auto-discovering and
self-configuring.
Number of Fibre Channel Ports .................... 4 external 1-Gbps/2-Gbps ports
10 internal 1-Gbps/2-Gbps ports
Specifications
A-1
Page 54

Maintainability Specifications
Table A-1. Fabric Specifications (Continued)
Specification Description
Scalability...................................................... Maximum 239 switches depending on
configuration
Maximum User Ports .................................... > 475,000 ports depending on configuration
Buffer Credits ................................................ 16 buffer credits per port, ASIC embedded
memory
Media Type.................................................... SFP optical transceiver, hot-pluggable
Fabric Port Speed ......................................... 1.0625 or 2.125 Gbps
Maximum Frame Size ................................... 2148 bytes (2112 byte payload)
System Processor......................................... 200 MHz Motorola® 8245 PowerPc®
Fabric Latency (intra-switch)
1-Gbps to 1-Gbps .........................................
2-Gbps to 2-Gbps .........................................
< 0.6 µsec
< 0.4 µsec
Bandwidth
Point-to-Point ................................................
Aggregate (single switch)..............................
Maintainability Specifications
Table A-2. Maintainability Specifications
Specification Description
Diagnostics ................................................... Power-On Self Test (POST) tests all
User Interface ............................................... LED indicators
106 MB, Full Duplex @ 1-Gbps
212 MB, Full Duplex @ 2-Gbps
Up to 8.5 GB, Full Duplex
functional components except SFP
transceivers. Port tests include online,
internal, and external tests.
A-2
McDATA 4314 Fibre Channel Switch Module Installation Guide
Page 55

Fabric Management Specifications
Table A-3. Fabric Management Specifications
Specification Description
Management Methods .................................. EFCM BASIC Graphical User Interface
Ethernet Connection ..................................... RJ-45 connector; 10/100 BASE-T cable
Switch Agent ................................................. Allows a network management station to
Fabric Management Specifications
Command Line Interface
GS-3 Management Server
SNMP
FTP
obtain configuration values, traffic
information, and failure data pertaining to
the Fibre Channels using SNMP through the
Ethernet interface.
Dimensional Specifications
Table A-4. Dimensional Specifications
Specification Description
Width.............................................................
Height............................................................
Depth ............................................................
Weight........................................................... 1.94 lbs. (0.88 Kg)
Electrical Specifications
Table A-5. Electrical Specifications
Specification Description
Operating voltage.......................................... 5 VDC; 12 VDC
Power source loading (maximum)................. 100 mA at 5 VDC
Heat Output (maximum)................................ 40 watts
9.89” (251.2 mm)
1.27” (32.2 mm)
5.11” (129.8 mm)
3.33 A at 12 VDC
Circuit Protection........................................... Internally fused
Specifications
A-3
Page 56

Environmental Specifications
Environmental Specifications
Table A-6. Environmental Specifications
Specification Description
Temperature
• Operating ..............................................
• Non-operating .......................................
5 to 40°C (41 to 104°F)
-40 to 70°C (-40 to 158°F)
Humidity
• Operating ..............................................
• Non-operating .......................................
5% to 90%, non-condensing
5% to 93%, non-condensing
Altitude
• Operating ..............................................
• Non-operating .......................................
0 to 3048m (0 to 10,000 feet)
0 to 15,240m (0 to 50,000 feet)
Vibration
• Operating ..............................................
• Non-operating .......................................
Shock
• Operating ..............................................
• Non-operating .......................................
IEC 68-2
5-500 Hz, random, 0.21 G rms, 10 minutes
5-500 Hz, random, 2.09 G rms, 10 minutes
IEC 68-2
4 g, 11ms, 20 repetitions
30g, 292 ips, 3 repetitions, 3 axis
A-4
McDATA 4314 Fibre Channel Switch Module Installation Guide
Page 57

Regulatory Certifications
Table A-7. Regulatory Certifications
Certification Description
Safety Standards .......................................... UL60950:2000
Emissions Standards .................................... FCC Part 15B Class A
Voltage Fluctuations...................................... EN 61000-3-3
Harmonics..................................................... EN 61000-3-2
Immunity ....................................................... EN 55024:1998
Regulatory Certifications
CSA 22.2 No. 60950-00 (Canada)
EN60950:2000 (EC)
CB Scheme-IEC 60950:1999
ICES-03 Issue 3
VCCI Class A ITE
CISPR 22, Class A
EN 55022, Class A
Marking ......................................................... FCC Part 15
UL
(United States)
US
(United States)
TUV
US
cUL (Canada)
cTUV (Canada)
TUV Europe (Germany)
VCCI
CE
Specifications
A-5
Page 58

Regulatory Certifications
Notes
A-6
McDATA 4314 Fibre Channel Switch Module Installation Guide
Page 59

A
g-
Glossary
Access Control List
Zone
Active Zone Set The zone set that defines the current zoning for the fabric.
Active Firmware The firmware image on the switch that is in use.
Activity LED A port LED that indicates when frames are entering or leaving the port.
Administrative State State that determines the operating state of the port, I/O blade, or switch. The
Alarm A message generated by the switch that specifically requests attention.
Alias A named set of ports or devices. An alias is not a zone, and can not have a
AL_PA Arbitrated Loop Physical Address
Arbitrated Loop A Fibre Channel topology where ports use arbitration to establish a
Access Control List zoning divides the fabric for purposes of controlling
discovery and inbound traffic.
configured administrative state is stored in the switch configuration. The
configured administrative state can be temporarily overridden using the
command line interface.
Alarms are generated by several switch processes. Some alarms can be
configured.
zone or another alias as a member.
point-to-point circuit.
Arbitrated Loop
Physical Address
(AL_PA)
ASIC Application Specific Integrated Circuit. A chip designed for a specific
Auto Save Zoning parameter that determines whether changes to the active zone set that
A unique one-byte value assigned during loop initialization to each NL_Port
on a loop.
applications, such as a transmission protocol or a computer.
a switch receives from other switches in the fabric will be saved to permanent
memory on that switch.
Glossary
g--1
Page 60

B
BootP Boot Strap Protocol. A type of network server.
Buffer Credit A measure of port buffer capacity equal to one frame.
C
Cascade Topology A fabric in which the switches are connected in series. If you connect the last
switch back to the first switch, you create a cascade-with-a-loop topology.
Class 2 Service A service which multiplexes frames at frame boundaries to or from one or
more N_Ports wit h acknowledgment provided.
Chassis Hop A measure of fabric latency represented by the ISL that any frame crosses
when travelling from one switch to another. A frame that travels from one
switch to another over an ISL experiences one chassis hop.
Class 3 Service A service which multiplexes frames at frame boundaries to or from one or
more N_Ports without acknowledgment.
Configured Zone Sets The zone sets stored on a switch excluding the active zone set.
D
Default Visibility Zoning parameter that determines the level of communication among
ports/devices when there is no active zone set.
Device Security A component of fabric security that provides for the authorization and
authentication of devices that attach to a switch through the use of groups
and security sets.
Domain ID User defined number that identifies the switch in the fabric.
E
EFCM BASIC Switch management application.
Event Log Log of messages describing events that occur in the fabric.
Expansion Port E_Port that connects to another FC-SW-2 compliant switch.
F
g--2
Fabric Database The set of fabrics that have been opened during a EFCM BASIC session.
McDATA 4314 Fibre Channel Switch Module Installation Guide
Page 61

Fabric Device
Management Inter-
face
An interface by which device host bus adapters can be managed through the
fabric.
Fabric Management
Switch
Fabric Name User defined name associated with the file that contains user list data for the
Fabric Port An F_Port or FL_Port.
Fabric Security The functions that provide security for fabric users and devices including
Fabric Services A component of fabric security that provides for the control of inband
Fabric View File A file containing a set of fabrics that were opened and saved during a
FDMI See Fabric Device Management Interface.
Flash Memory Memory on the switch that contains the chassis control firmware.
Frame Data unit consisting of a start-of-frame (SOF) delimiter, header, data payload,
FRU Field Replaceable Unit
The switch through which the fabric is managed.
fabric.
user account security, and fabric services.
management and SNMP on a switch.
previous EFCM BASIC session.
CRC, and an end-of-frame (EOF) delimiter.
G
Group A list of device worldwide names that are authorized to attach to a switch.
There are three group types: one for other switches (ISL), another for devices
(port), and a third for devices issuing management server commands (MS).
I
Inactive Firmware The firmware image on the switch that is not in use.
Inband Management The ability to manage a switch through another switch over an inter-switch
link.
Initiator The device that initiates a data exchange with a target device.
In-Order-Delivery A feature that requires that frames be received in the same order in which
they were sent.
Input Power LED A chassis LED that indicates that the switch logic circuitry is receiving proper
DC voltages.
Glossary
g--3
Page 62

Inter-Switch Link The connection between two switches using E_Ports.
IP Internet Protocol
L
LIP Loop Initialization Primitive sequence
Logged-In LED A port LED that indicates device login or loop initialization status.
M
Maintenance Button Momentary button on the switch used to reset the switch or place the switch
in maintenance mode.
Maintenance Mode Maintenance mode sets the IP address to 10.0.0.1 and provides access to the
switch for maintenance purposes.
Management Infor-
mation Base
Management
Workstation
Mesh Topology A fabric in which each chassis has at least one port directly connected to each
MIB Management Information Base
Multistage Topology A fabric in which two or more edge switches connect to one or more core
A set of guidelines and definitions for SNMP functions.
PC workstation that manages the fabric through the fabric management
switch.
other chassis in the fabric.
switches.
N
Network Time Protocol A network protocol that enables a client to synchronize its time with a server.
NL_Port Node Loop Port. A Fibre Channel device port that supports arbitrated loop
protocol.
N_Port Node Port. A Fibre Channel device port in a point-to-point or fabric
connection.
g--4
NTP Network Time Protocol
McDATA 4314 Fibre Channel Switch Module Installation Guide
Page 63

P
Pending Firmware The firmware image that will be activated upon the next switch reset.
POST Power-On Self Test
Power-On Self Test Diagnostics that the switch chassis performs at start up.
Principal Switch The switch in the fabric that manages domain ID assignments.
S
Simple Network
Management
Protocol
Security Set A set of up to three groups with no more than one of each group type: ISL,
SFP Small Form-Factor Pluggable.
Small Form-Factor
Pluggable
SNMP Simple Network Management Protocol
Soft Zone Soft zoning divides the fabric for purposes of controlling discovery. Members
Target A storage device that responds to an initiator device.
An application protocol that manages and monitors network communications
and functions. It also controls the Management Information Base (MIB).
Port, or MS. The active security set defines the device security for a switch.
A transceiver device, smaller than a GigaBit Interface Converter, that plugs
into the Fibre Channel port.
of the same soft zone automatically discover and communicate freely with all
other members of the same zone.
T
U
User Account An object stored on a switch that consists of an account name, password,
authority level, and expiration date.
User Account Security A component of fabric security that provides for the administration and
authentication of account names, passwords, expiration dates, and authority
level.
V
VCCI Voluntary Control Council for Interference
Glossary
g--5
Page 64

Voluntary Control
Council for Interfer-
ence
W
A consortium of Japanese electronics industry associations that have
established voluntary standards for controlling electromagnetic interference
(EMI).
Worldwide Name
(WWN)
WWN Wor l dw i de N ame
A unique 64-bit address assigned to a device by the device manufacturer.
Z
Zone A set of ports or devices grouped together to control the exchange of
information.
Zone Set A set of zones grouped together. The active zone set defines the zoning for a
fabric.
Zoning Database The set of zone sets, zones, and aliases stored on a switch.
g--6
McDATA 4314 Fibre Channel Switch Module Installation Guide
Page 65

i-
Index
Numerics
10/100 Base-T straight cable 3-5
A
Access Control List zone 2-3
account name
Activity LED 1-5, 1-6
altitude A-4
authorization
4-5
2-11
B
bandwidth 2-4, A-2
boot loader 4-7
browser 3-1, 3-2
buffer credit
2-4, A-2
C
cable
10/100 Base-T 3-5
10/100 Base-T crossover 3-5
fibre optic
certificate
chassis
marking
shock A-4
vibration
classes of service
command line interface
Common Information Model
configuration
file system error
remove
restore default
credits
2-4, A-2
critical error
2-1
2-10
A-5
A-4
A-1
1-8
2-9
1-2
4-6
4-6
4-1
D
device
access
2-2
authentication
2-11
authorization
cabling 3-9
description
performance 2-6
security 2-11
diagnostics
dimensions A-3
disk space 3-1, 3-2
distance
domain ID
donor port 2-4
2-4
conflict 4-3
description
lock 2-7
2-11
2-1
A-2
2-7
E
E_Port 1-6, 4-2
EFCM BASIC
description
Linux install 3-6
start
Windows install
emissions standards A-5
environmental
conditions
specifications A-4
Ethernet
connection
direct connection
indirect connection
port
extended credits
external ports
1-7
3-7
3-6
3-3
3-5
3-5
3-5
1-6
2-4
1-3
F
F_Port 1-6
fabric
management
management switch
management workstation
point-to-point bandwidth
2-12, A-3
1-6
3-1
A-2
Index
i-1
Page 66

Index
port 1-6
security 2-9
factory defaults 4-6
fiber optic cable
Fibre Channel
ports 1-3
protocols
File Transfer Protocol
description
service 2-9
firmware
install with CLI
install with EFCM BASIC 3-10
unpack image 4-6
FL_Port
flash memory 1-2
frame size A-2
FRU - See Field Replaceable Unit
FTP - See File Transfer Protocol
1-6
2-1
A-1
1-8
3-10
G
G_Port 1-6
GBIC - See GigaBit Interface Converter
generic ports
Gigabit Interface Converter 2-1
GL_Port 1-6
1-6
H
harmonics A-5
HBA - See Host Bus Adapter
heat output
host bus adapter 2-1
humidity
A-3
3-3, A-4
I
Identifier LED 1-2, 1-3
immunity
inband management 2-8
Input Power LED
installation
internal port 1-4
internet browser
A-5
1-2, 4-1
3-3
3-1, 3-2
L
latency 2-5, A-2
LED
Activity 1-5, 1-6
Identifier
Input Power
Link Status
Logged-In
System Fault
Link Status LED
log file
Logged-In LED
login limit
1-3
1-3, 4-1
1-6
1-5, 4-2
1-3, 4-1
1-6
4-6
1-5, 4-2
2-12
M
maintainability A-2
maintenance
4-5
exit
menu 4-5
mode 1-2, 4-5
maintenance button
management
2-9
server
workstation 1-6
management workstation 3-5
marking
McDATA Embedded Web Server 1-7, 2-8
media type A-2
memory
multiple chassis fabrics
A-5
1-2
flash
workstation 3-1, 3-2
1-2, 4-5
2-6
N
name server zone 2-2
Network Time Protocol 2-9
non-critical error 4-1
NTP - See Network Time Protocol
O
operating systems 3-1, 3-2
P
password
file reset 4-6
maintenance mode 4-5
restore default
performance
device 2-6
2-4
switch
planning
port
POST - See Power On Self Test
power
power on self test
2-1
buffer credits
characteristics
diagnostics 4-2
Ethernet
external
1-6
fabric
Fibre Channel
generic
internal
1-4
LEDs
maximum number of ports/users
number of
A-2
speed
1-6, A-1
types
consumption
source loading
4-6
2-4
A-1
1-6
1-3
1-3
1-6
1-4
A-2
A-1
A-3
A-3
3-5, 4-1
i-2
i-McDATA 4314 Fibre Channel Switch Module Installation Guide
Page 67

Index
principal
priority 2-7
switch 2-7
processor
3-1, 3-2
R
RADIUS - See Remote Dial-In User Service.
recovering a switch
regulatory certifications
remake filesystem 4-7
Remote Dial-In Service
authentication
Remote Dial-In User Service
description 2-11
4-4
A-5
2-12
S
safety standards A-5
scalability
Secure Shell
Secure Socket Layer 2-8
security
server blade
SFP - See Small Form-Factor Pluggable
shock A-4
Simple Network Management Protocol
site requirements
small form-factor pluggable 1-5
SNMP See - Simple Network Management Protocol
soft zone
SSH - See Secure Shell
SSL - See Secure Socket Layer
switch module
System Fault LED 1-2, 1-3, 4-1
system processor
A-2
description 2-10
2-8
service
certificate
connection 2-10
database limits 2-11
device
fabric 2-9
user account 2-12
2-10
2-11
1-4
description
service 2-8
1-8
3-1
2-2
configuration
controls
1-2, 1-3
LEDs
management
management service
recovery
reset
1-2, 4-7
services
specifications
3-8
1-2
1-7
4-4
2-8
A-1
A-2
2-8
timeout value
transceiver 1-5
transmission rate 2-4
4-3
U
user
account security
interface
A-2
2-12
V
vibration A-4
voltage
fluctuations
operating A-3
A-5
W
web server 2-8
description
workstation
connection 3-5
requirements
worldwide name 2-2
WWN - See Worldwide Name
1-7
3-1
Z
zone
access control list
conflict 4-3
definition 2-2
name server
zone set definition 2-2
zoning
database
limits 2-2
2-2
2-3
2-2
T
Te ln et 2-8
temperature range
3-3, A-4
Index
i-3
Page 68

Index
i-4
i-McDATA 4314 Fibre Channel Switch Module Installation Guide
 Loading...