

McCulloch Pro-Mac 5000, Pro Mac 5000i Owner's Manual

MMECULLOCH”
cHIPPER/sHREDDER
Pro-Mac 5000
Pro Mac 5000i
.,
(=) OWNER’S MANUAL
,
READ CAREFULLY-
419
●
●
●
WARNING: TO REDUCE THE ?QTENT’fAt- FOR ANY INJURY, COMPLY WITH THE FOLLOWING SAFETY
I&
~screws, nuts, bolts and all other fasteners are properly
~NING: This unit is equipped with an Inlomal ccrmbustion engine and should not be used on or near any unimproved lo~osl-covered.bnrsh-
red or ~rnss+nmrod fond unfess the ongkwr’sexhaust sys!om Is equippd wih a
tpark amoster IS used, II should bo maintained
e
ml laws apply O(I Irxk,ral lands A spmk wrcskr for the mulllcr is
lNSTRUCTfONS. FAILURE TO COMpf-Y WITH THE lNSTRUCllONS MAY RESULT IN PERSONAL INJURY.
TRAINING
Read this owrmr”s manual carefully in fis entirey before
attempting to assemble or operate this machine. Be
completely familiar with the controls and the proper use of
thl.s machine before operai~ it. Keep this manual in a
safe pface for future and rqular reference or for ordering
replacement parts.
Children must never be allowed to operate this
equipment.
No one shoufd operate this unit while intoxicated or while
tafdng medication that imps.ks the senses or reactions.
This equipment shoukf never.be operated in the vicinity of
children, pets or other persons.
Never run your machine in an enclosed area as the
exhaust from the engine contains carbon monoxide,
ydich Is an pcfdess, tasteless and deadly poisonous gas.
Never place your hands or any part of your bocfy or
cbthing inside the”feeding chamber, discharge chute, or
near any moving part while the machine or engine is
running.
If it’ Is necessary for any reason to irrsp&t or repair the
feeding chambers of any part of the macf&e where a
moving part can cqme in co”ntact with your body or
cbthirrg, stop the machine, aflow it to COOI,disconnect the
spark plug wire from the spark plug and move it away from
the spark plug before attempting such inspection or
repair.
PREPARATION
Wear safety gogglos, work gfoves and shoes while
operating the chipper/shredder. Do not wear loose
cbthing or jowcdry.
Operate chippor/shreddcrr only on a level surface.
Do not operate the chipper/shredder on a paved or gravel
surface.
Before starting the chlpperlshredder, check that all
sekxrrcrd. Replaco all damaged or unreadable warning
and oporaling decals.
Check fuel Iovel bolore starting engine. Gasoline is highly
flammable; handle with care. Use only an approved
cOntalnor.
Do not fill fuel tank indoors, when engine Is running, or
until engine is allowed to cool. Do not smoke.
Reinstall fuel cap on tank and fuel container. Wipe the unit
clqan of any spilled fuel.
OPERATION
Beforo starling IIIC machine, operators shall make certain
that Iho
When Iectiiflg m[iteriai in!o this equipmenl, be extremely
carolul th;II
foroign objoc[z aro
damago to thomxhinc coufd result.
cu[tinq charnbor is empty.
piocor, of metal, rocks, bottles. cans or other
not incluctod. Personal injury or
in offoctiw working order by the opcrakx.
SIaIc 01California tile above Is required by law (Section 4442 of the CafifornicrPUMCResources Code) Orhcr sratcwmay tmvc similar laws.
available throw)h your nearest engine mJhoIIzw_I:I:tvIcu deah:f
2
ff the cutting mechanism strikes any foreign object or n
your machine should start making an unusual noise or
vibration, immediately stop the engine, disconnect the
spark plug wire from the spark plug and move it away from
the spark plug. Aflow the machine to stop and take the
following steps:
InSped for damage.
Repface or repair Wy damaged parts.
Check for any hose parts and tghten to assure continued
safe operat.mn.
The engine must be kept clean of debris and other
accumulations.
Do not allow an accumulation of processed materiaf to
build up in the discharge area as this will prevent proper
discharge and can resutt in kick-bad from feed opening. -
Never pl~e your hands or any other part of your bbdy or
cfothing inside the feeding chamber,” discharge chute or
near any moving part while the engine is running.
Keep all guards and deflectors in place and in good
worfdng cxmditiirr to assure c%ntinued safe operatiin.
Always stand clear of the discharge area wheri operating
this machine.
Keep your face and body back from the feed opening to
avo”d accidental bunco bad of any material..
Do not over-reach. Keep proper balance and footing at all
times.
The engine governor, settings on your machine must not
be altered, changed, or tarripered with. The governor
controls the maximum safe ‘operating speeds and
protods the engine and all moving parts from damage
caused by over-speed. Authorized service personnel
slpuld perform these adjustments if a problem exist.
Do not trans~rt machine while engine is running.
Do not operate engine it air cleaner or cover directly over
carburetor air intake is removed, except for adjustment.
Removaf of such parts cmufd create a fire hazard. .
If chippkhreddor becomes cfogged the operator must
shut-off .e,ngirre, and discxrnnect spark plug before clearing
debris. . .
MA1tiNANCE AND STORAGE
When this equipment is stopped for servicing, inspectio~
storage or to change an accmssory, make sure the spark
plug wire is discmneded from the spark plug and moved
away from the spark plug. Tho machine should be
allowed to c@ down before making such inspection.
adjustments, service, elc. Maintain your machine with
caro and keep it clean Ior tho best and continuod safe
operat’km. Authorized sorwco shall be soughl if a problem
oxisls.
Do not uso flammablo solutionc 10clwrII the air Iiller.
When not in use, your machmo chould t.m stored out of
tho roach of chikfron. Keep
roach an opon tlamo or spark. For kJIXJpurior.ts of storagoo
Iho ‘Sloraao- section of lhi~ rnanu;d.
rofcr to
spark arrosfor meeting apphmbfo local or LIJIC laws (if any),
whoro ga$olino fumes will nof
. . . .,
421
SAFETYRULES
::
,.
ABLE OF CONTENTS
ASSEMBLY
OPERATION
Maintenance .............................................................9
..............................................................
.................................................
..................................................................
................................................................
4-5
6-8
2
3
STORAGE
SERVtCE& ADJUSTMENTS
TROUBLESHOOTING
REPAIR PARTS .......................................................l5.23
ACCESSORIES
.....................................................................
.....................- .........-..11 -13
.................................................l4
......................................................
24-29
10
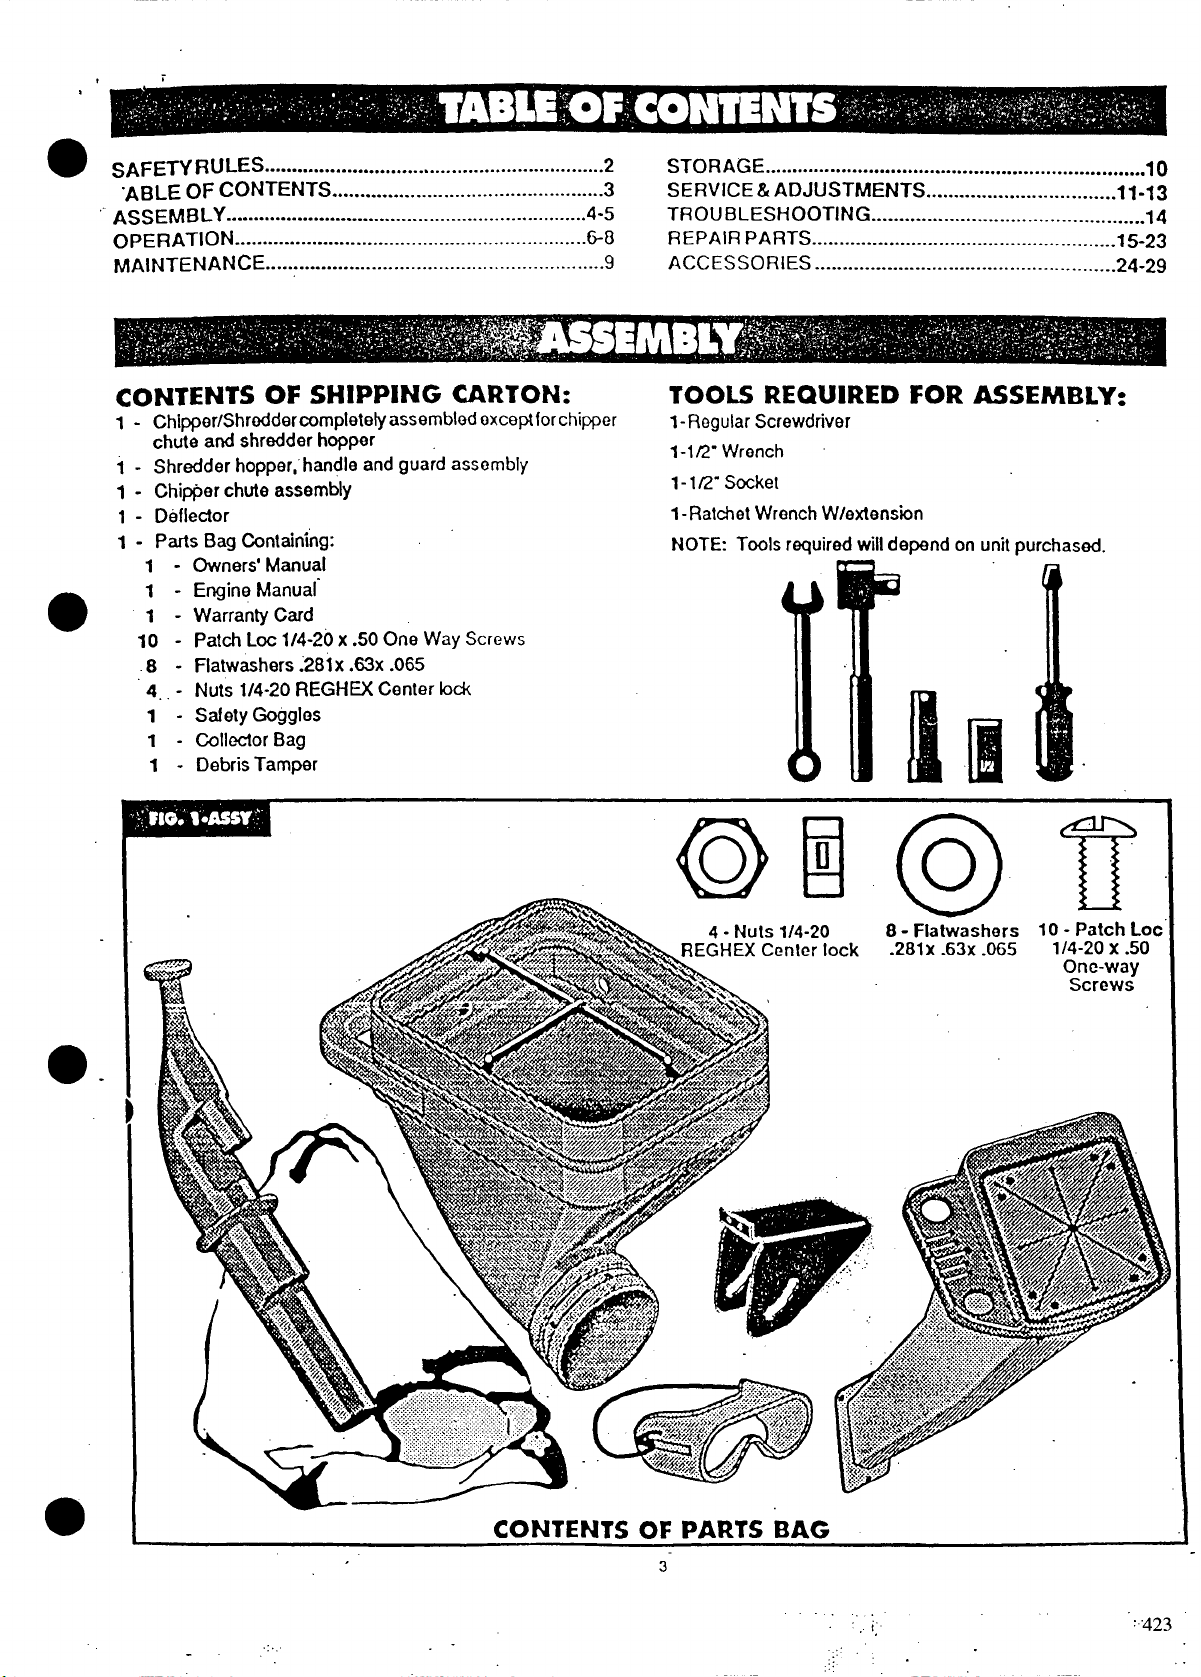
CONTENTS OF SHIPPING CARTON:
Chlppor/Shredder completely assembled oxceptfor chipper
1-
chute and shredder hopper
Shredder hopper,’ handle and guard assembly
i-
Chip@r chute assembly
1-
Deflector
1-
Parts Bag Containing:
1-
- Owners’ Manual
1
- Engine Manual
1
Warranty Card
-
1
- Patch Loc 114-20x .50 One Way Screws
10
- Flatwashers ;281x .63x .065
.8
Nuts 1/4-20 REGHEX Center lock
4,. -
-
Safety Goggles
1
Callector Bag
-
1
-
Debris Tamper
1
TOOLS REQUIRED FOR JWSEMBLY:
I-Regular Screwdriver
1-1Q- Wrench
lR. Socket
11-Ratchet Wrench W/extens.km
NOTE: Tools required will depend on unit purchased.
[
Ii
K!i
CONTENTS OF PARTS BAG
3
. .
.
.:,.
i;
.,. ,
“423

.. . .
●
●
A
There are rotating cutting blades Inside the Chipper/
Shredder housing that will cause serious Injury. DO
NOToperate machlneunless Chipper Chute and Shred-
der Hopper are securely installed.
DANGER
A
TEP 1: UNPACKING AND CHECKING
ONTENTS
Locate and remove Chipper Chute/Shredder Hopper
assembfy and debris tarnper from carton.
Locate qnd,remove parts bag.
Cutafl”fourcorners of carton from top to bottom and lay flat.
Remove bracket from support and cut nylon ties from axle.
Pull the ChipperX3tiredder off of the pallet.
Pmpafy &+ose of discarded ””&rton and pallet.
Compare cxmter$s with the contents of parts bag. If any
partsare missing or damaged, contact your local service
dealer or @l for factory service.
.
m 2: IIwmu SHREDDER iiOpPER
Rotate Shredder/Hopper tube upward to Ialched Posilion.
Wfih Shredder Hopper handle (iom B) pointing away from
the engine and the rectangular opening “facing upward,
posltiinthe round opening of the Shredder Hoppor (item A)
over the round steel chute tube (item D) (See FIG. 2ASSY).
AfIgntopholelnthe Shredder Hopper rmck with tho top hole
In the steel chute tube.
\
● Assemble six (6) l/4-20x .50 screws, provided inpartsbag,
through aligned holes. Do not tighten.
. Position Hopper in position level with the unit and tighten all
six (6) screws securely.
STEP 3: INSTALLCHIPPER CHUTE
● Remove flatwashors and locking nuts (item B) from the
three (3) threaded studs (See FIG.
● Position Chipper Chule assembly (ilem A) in opening in
housing and over the thr~o (3) threaded studs. Place vshaped bottom fip of Chipper Chuto into oporjng first and
raise Chipper Chute unlil remaining two (2) sluds” are
through the top holes.
● Assombfoflaf washers and locking nuts to three (3) threaded
studs and faston securely. -
3-ASSY). ~~
. .
‘4
425
●
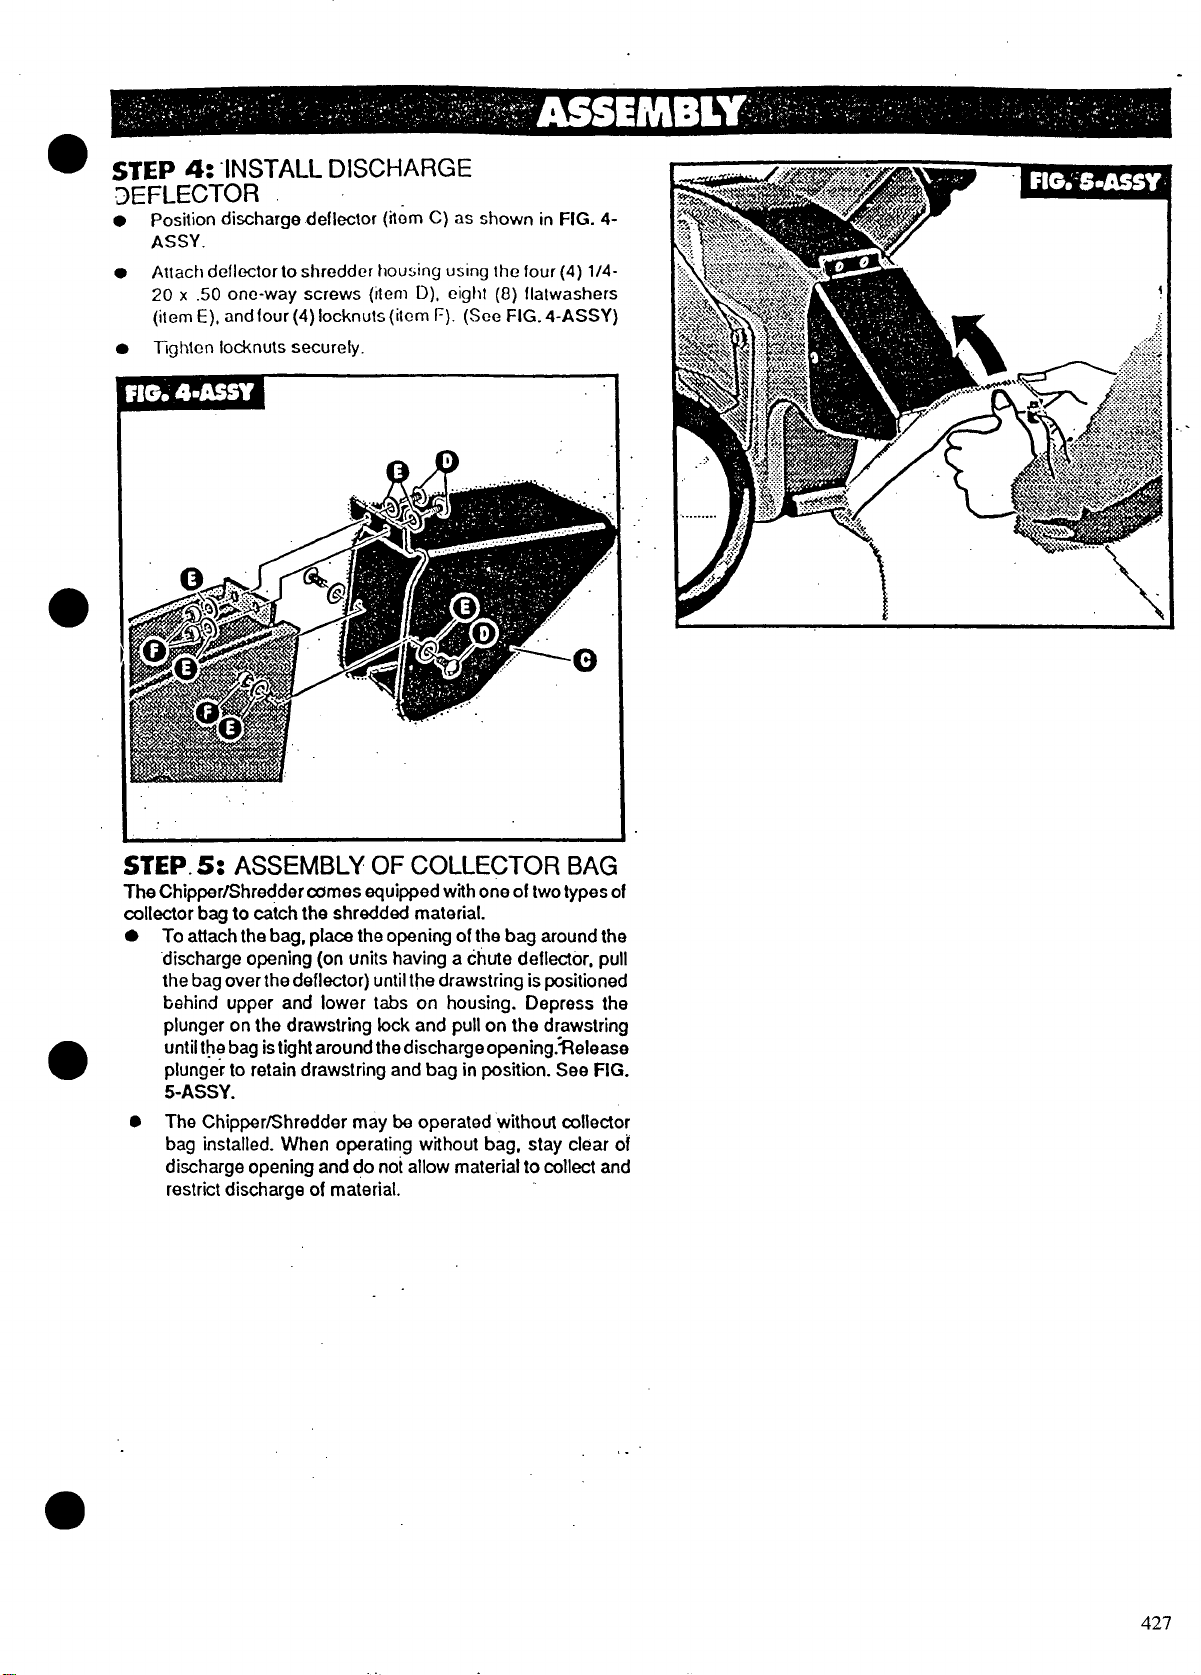
STEP 4: “INSTALLDISCHARGE
3EFLECTOR
● Position discharge deflector (item C) as shown in FIG. 4-
ASSY.
● Attach deflector to shredder housing using
20
x .50 one-way screws (item D), cighf (!3) !Ialwashers
(item E), and four (4) locknuts (ilem F). (See FIG. 4-ASSY)
TQhtcn locknuts securely.
●
the four (4) l/4-
43D’
●
STEP. 5: ASSEMBLY OF COLLECTOR BAG
The Chipper/Shredder comes equipped with one of two types of
collector bag to catch the shredded material.
. To attach the bag, place the opening of the bag around the
‘discharge opening (on units having a chute deflector, pull
the bag over the deflector) until the drawstring is positioned
behind upper and lower tabs on housing. Depress the
plunger on the drawstring fock and pull on the d~awstring
until the bag istight around the discharge opening.Tielease
plunger to retain drawstring and bag in position. See FIG.
5-ASSY.
● The Chipper/Shredder may be operated “without coflector
bag installed. When operating without bag, stay clear of
discharge opening and do not allow materiaf to collect and
restrict discharge of material.
,.’
427
.,
.,
,.
.-
,..:,.,.....
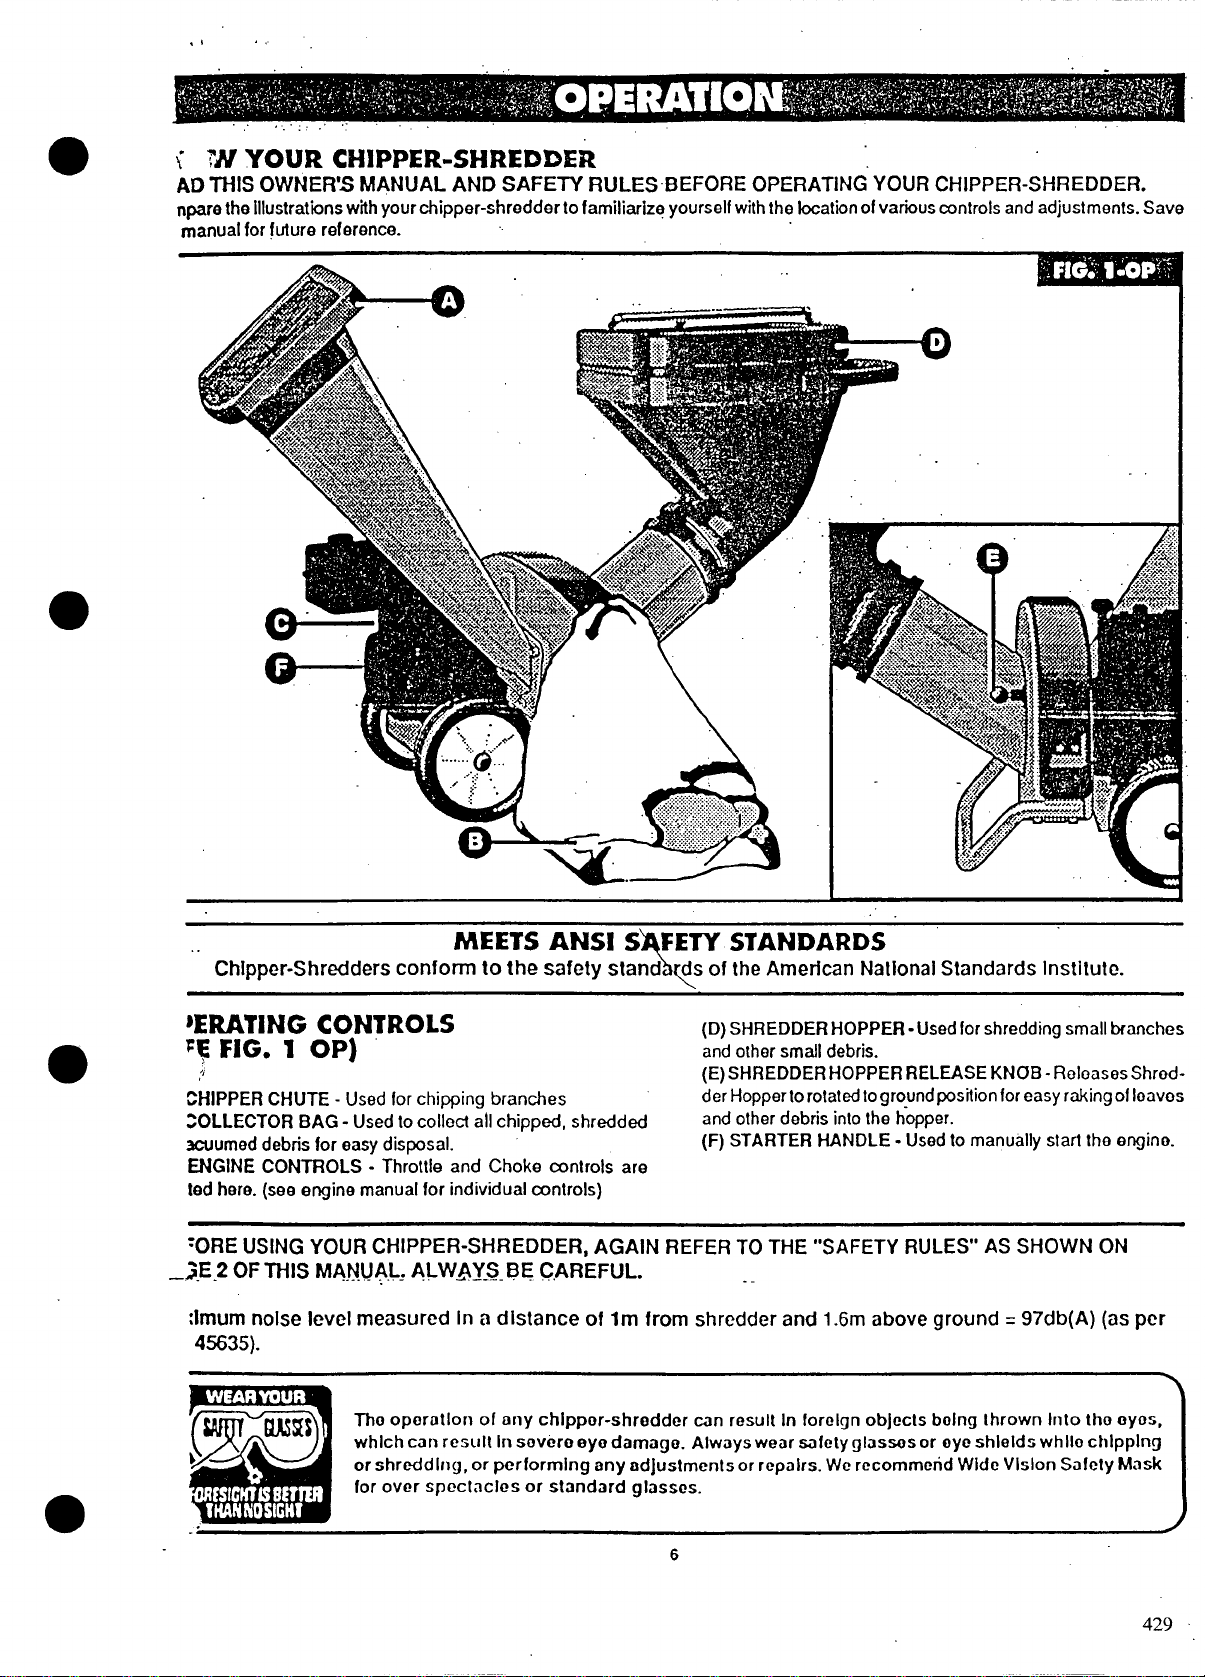
f W YOUR CHIPPER-SHREDDER
AD THISOWNER’S
nparethe lllustrat”~ns with your tiipper-shredder to familiarize yourself with the focation of various controls and adjust ments. Save
manual for future reference.
MANUAL AND SAFETY RULES BEFORE OPERATING” YOUR CHIPPER-SHREDDER.
MEETS ANSI S FETY STANDARDS
Chlpper-Shredders conform to the safety stand Qs of the Amerfcan National Standards fnstitute.
}ERATING coN’fRoLs
F~ EIGO 1 OP)
,/;
CHIPPER CHUTE - Used for chipping branches
COLLECTOR BAG - Used to colloct all chipped, shredded
xwumed debris for easy disposaf.
ENGINE CONTROLS - Throttfe and Choke controls are
ted here. (see engine manual for individual controls)
‘ORE USING YOUR CHIPPER-SHREDDER, AGAIN REFER TO THE “SAFETY RULES” AS SHOWN ON
_;-E2 OF THIS MA.NUA.L, ALW~~.S. BE C,AREFUL.
:Imum noise level measured In a distance of Im from shredder and 1.6m above ground= 97db(A) (as per
45635).
\
(D) SHREDDER HOPPER -Used for shredding small branches
and other smafl debris.
(E) SHREDDER HOPPER RELEASE KNOB -Rofoases Shrodder Hopper to rotat ed10ground position for easy raking of Ioavos
and other debris inlo the hopper.
(F) STARTER HANDLE - Used to manuaffy start the engino.
-.
6
429
● ’
BEFORE STARTING
1- place
!?
-. —
3. Insure
A
BE
sTANDING NEAR THE CHIPPER-SHREDDER WHILE
STARTING OR OPERATING.
[
A
THE CHIPPEIVSHREDDER IS SHIPPED WITHOUT
GASOL!NE IN THE FUEL TANK AND VERY LMLE OIL
IN -THE ENGINE CRANKCASE DO NOT OPERATE
ENGINE UNllL CRANKCASE HAS BEEN FILLED WITH
VIDED WITH THE MACHINE.
the shredder on a“firm, Ievol surface.
Service Ongino with gasolino and oil as instrucfod in the
scparale engino manual packed with your shredder.
spark plug wire is attached to spark plug.
DANGER
SURE NO ONE OTHER THAN THE OPERATOR IS
A
WARNING ~
OIL AS SPEC!FIED IN THE ENGINE MANUAL PRO-
A
.,
,.
HOW To USE YOUR
CHIPPER-SHREDDER:
The ChipporC3hrcddor k do:.qned for three (3) difforont moth
ods of operation
‘A
THECHIPPER-SHREDDER DISCHARGESMATERIALS
WITH CONSIDERABLE VELOCITY. KEEP AWAY FROM
THEAREAAROUNDTHE DISCHARGE ALWAYS STOP
THE ENGINE AND DISCONNECT THE SPARK PLUG
W!RE WHEN REMOVING OR AITACHING THE BAG
WHEN CHANGING CONTAINERS OR WHEN REMOV-
ING THE SHREDDED MATERIAL
GIASSES AND GLOVES WHENEVER USING YOUR
CHIPPER-SHREDDER.
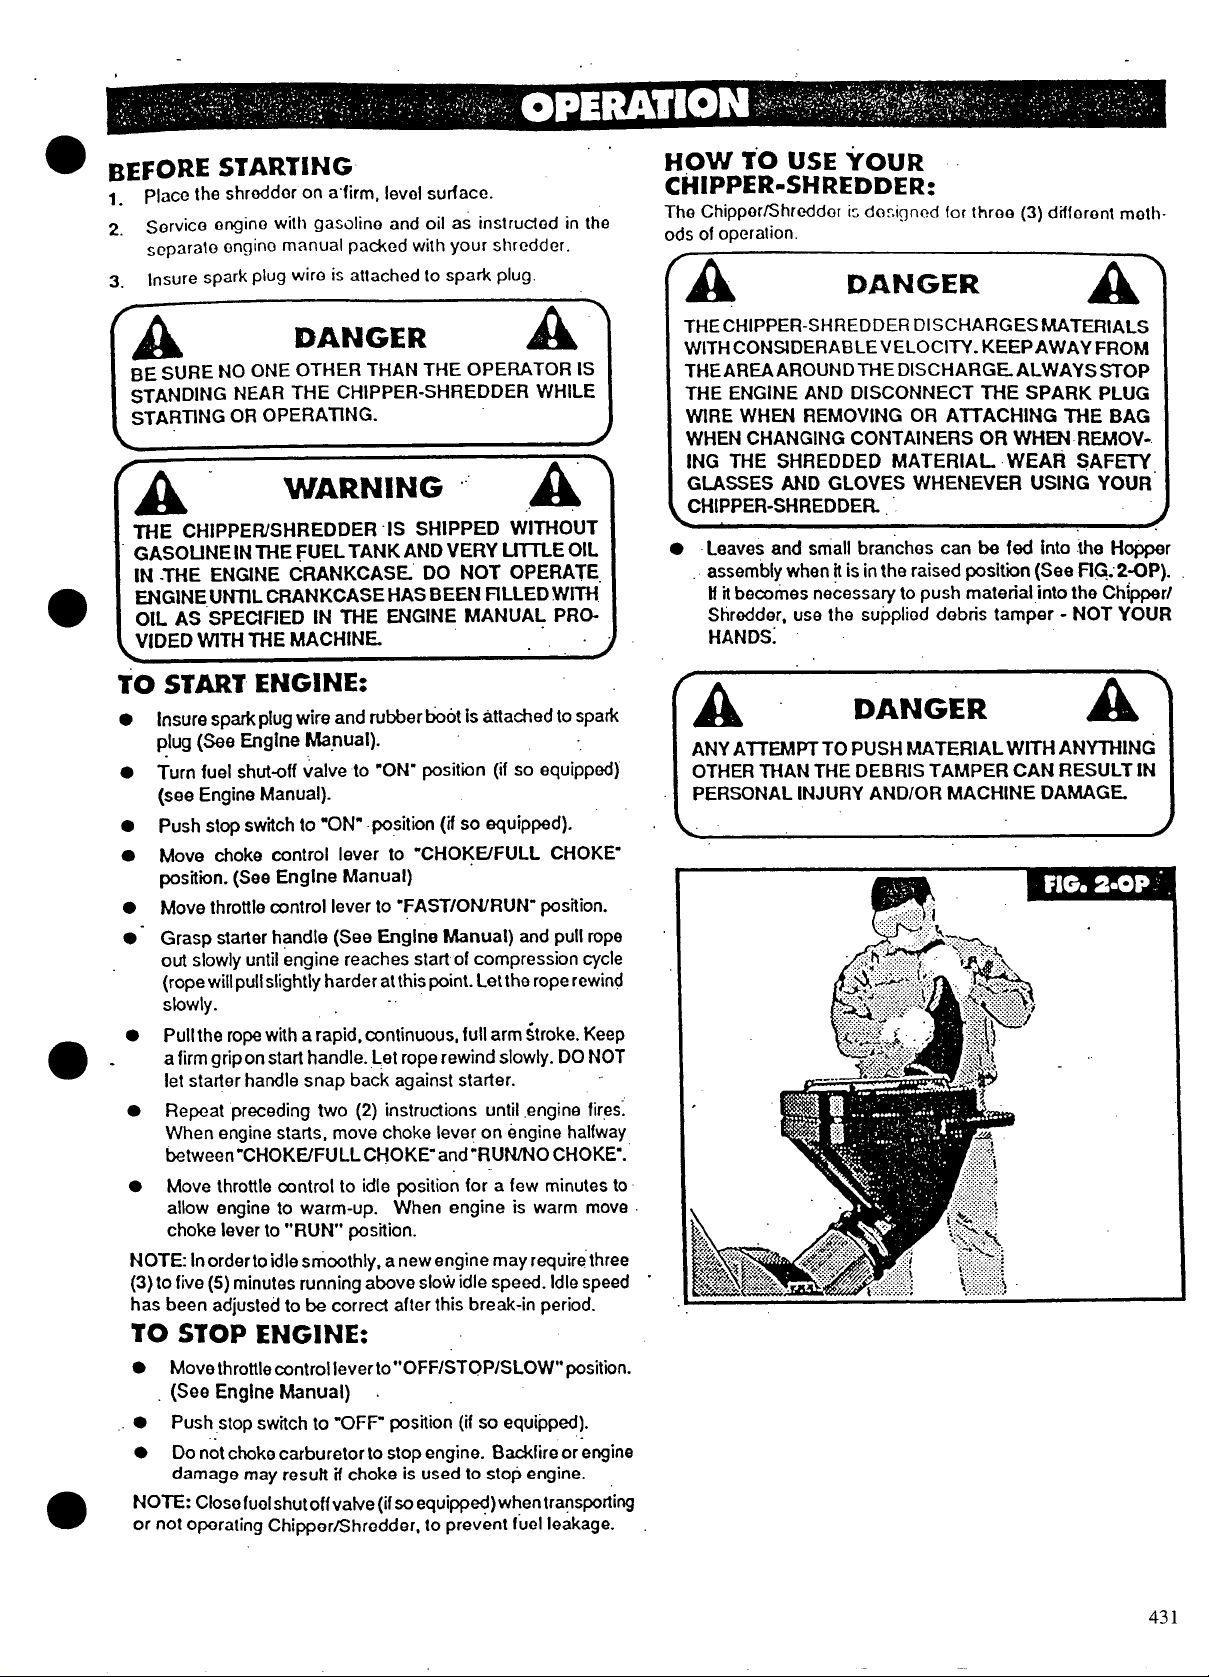
● Leaves and small branches can be fed into the Hewer
assembly when !! is in the raised
Itit
becomes necessary to push material into the Ctipper/
Shredder, use the supplied debris tamper - NOT YOUR
HANDS:
DANGER
A’
WEAR SAFETY
positiin (See FfG:2-6P).
d
TO START ENGINE:
●
Insure spark plug wire and rubber boot is attached to spark
plug (See Engine Manual).
●
Turn fuel shut-off valve to “ON” position (if so equipped)
(see Engine Manual).
Push stop switch to “ON” pq:ition (if so equipped).
Move choke control lever to “CHOKf3FULL CHOKI?
positiin. (See Engine Manual)
Move throttle control lever to ‘FAST/OWRUN” position.
Grasp starter handle (See
out slowly until engine reaches start of compression cycle
(rope will pull slightly harder at this point. Let the rope rewind
slowly.
Pull the rope with a rapid, continuous, full arm ~troke. Keep
a firm grip on start handle. Let rope rewind slowly. DO NOT
let starter handle snap back against starter. ~~
●
Repeat preceding two (2) instructions until engine fires;
When engine starts, move choke lever on engine halfway
between ”CHOKE/FULLCHOKF and”RUN/NO CHOK15.
●
Move throttle control to idle rm.ition for a few minutes to
allow engine to warm-up. When engine is warm move
choke lever to “RUN’* position.
NOTE Inorderto idle srncmthly, a new engine mayrequirethree
(3) to five (5) minutes running above slow idle speed. Idle speed
has been adjusted to be correct after this break-in period.
Engine Manual) and pull rope
.
TO STOP ENGINE:
.
Move throttle ~ntrol lever to”* OFF/STOP/SLOW” position.
(See Engine Manual) .
. Push stop switch to ‘OFF” position (if so equipped).
. Do not choke carburetor to stop engine. Backfire or engine
damage may resuft if choke is used to stop engine.
NOTE: Close fuel shutoff va~e (if so equipp+) when transporting
flOt operating Chipper/Shredder, to prevent fuel leakage.
or
(A
ANY AITEMPTTO PUSH MATERIAL WITH ANYTHING
OTHER THAN THE DEBRIS TAMPER CAN RESULT IN
PERSONAL INJURY AND/OR MACHINE DAMAGE.
DANGER
..,.,.,.,.,,.,:.
m“i
A
.
431
, “A
i
DO NOT DEPOSIT MATERIAL LARGER THAN 1/2’” DlAMETER IN THE HOPPER ASSEMBLY. ANY MATERIAL
HEAVfER THAN 1/2”’ SHOULD BE FED INTO THE Cti[P-
PER CHUTE.
I
WARNING
A“
r
A
MAKE CERTAIN THE CHIPPER CHUTE GUARD IS IN
PLACE. SHOULD THE CHIPPER CHUTE
COME WORN OR TORN, REPLAcE BEFORE CONTINU-
ING USE.
DANGER
A’
GUARD BE-
AI \l /
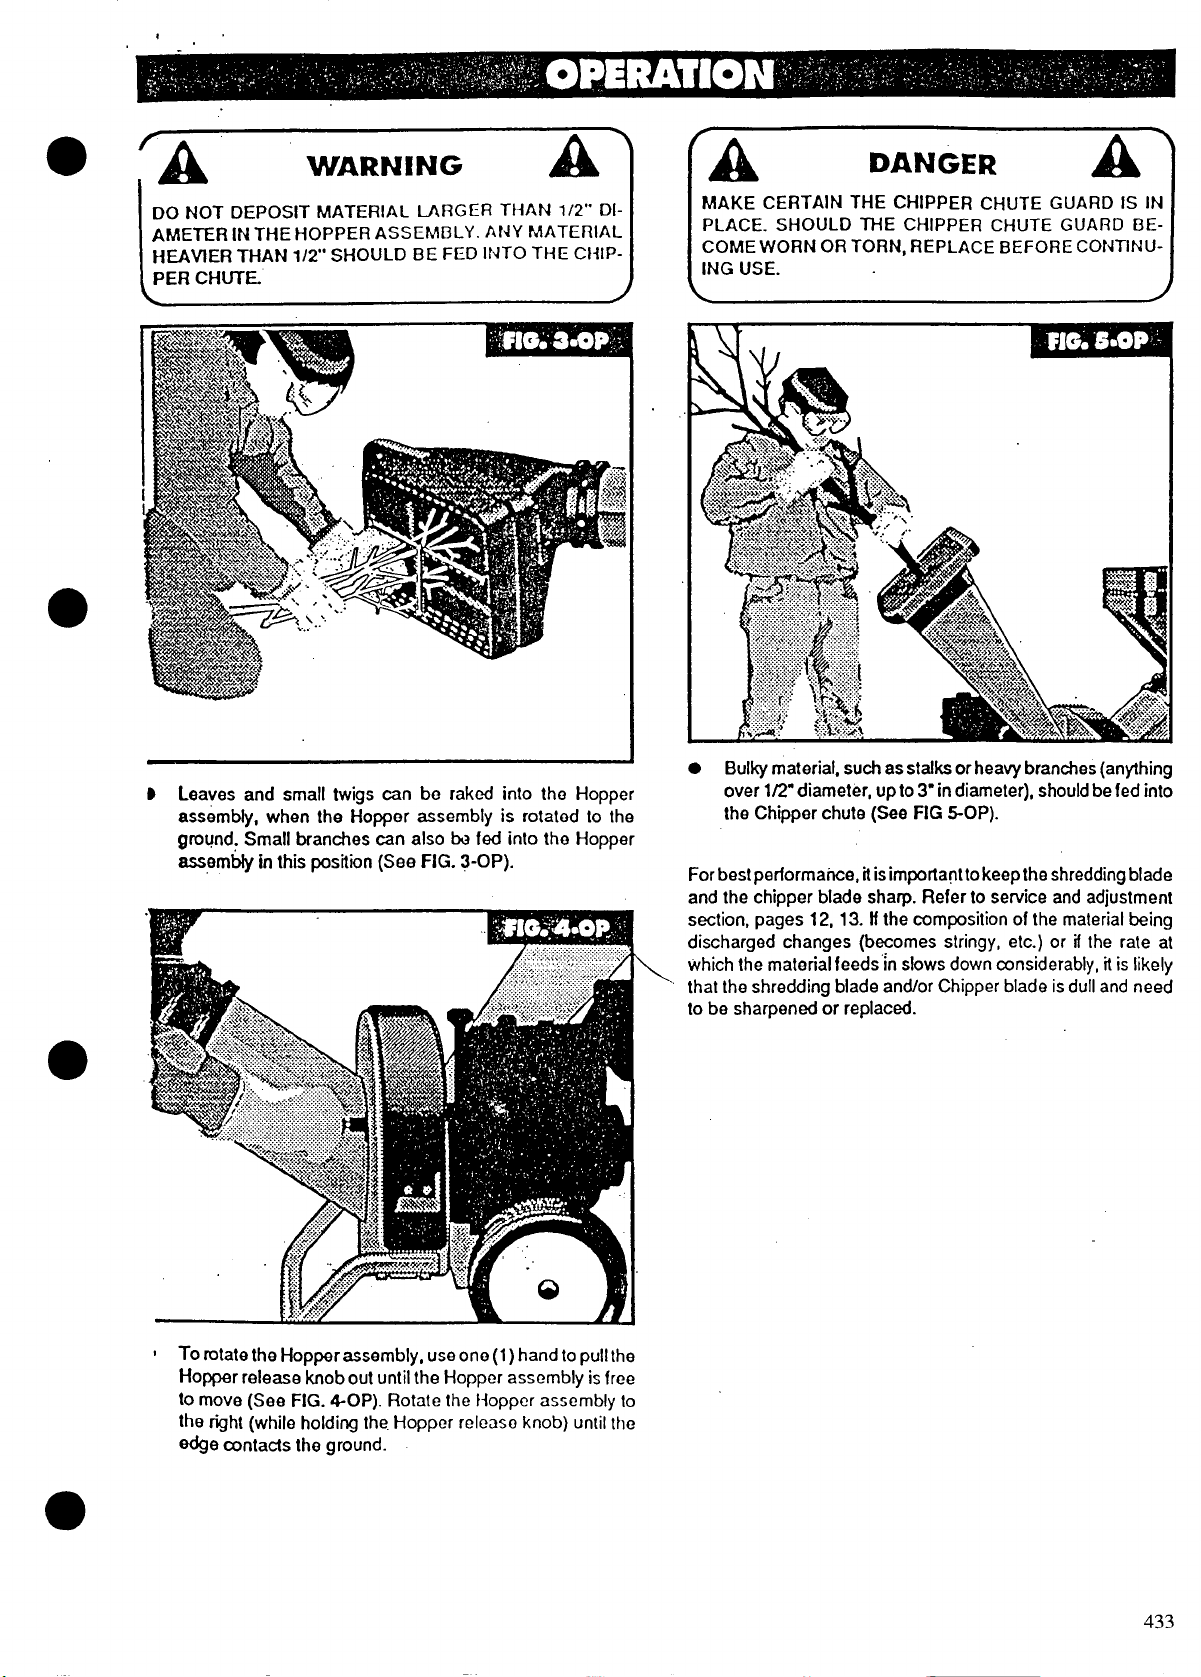
D Leaves and small twigs can be raked into thG Hoppe
assembly, when the Hopper assembly is rotatod to th,
ground: Small branches can also be fed into the
zu+crmbfy in this position (See FIG. 3-OP).
Hoppe
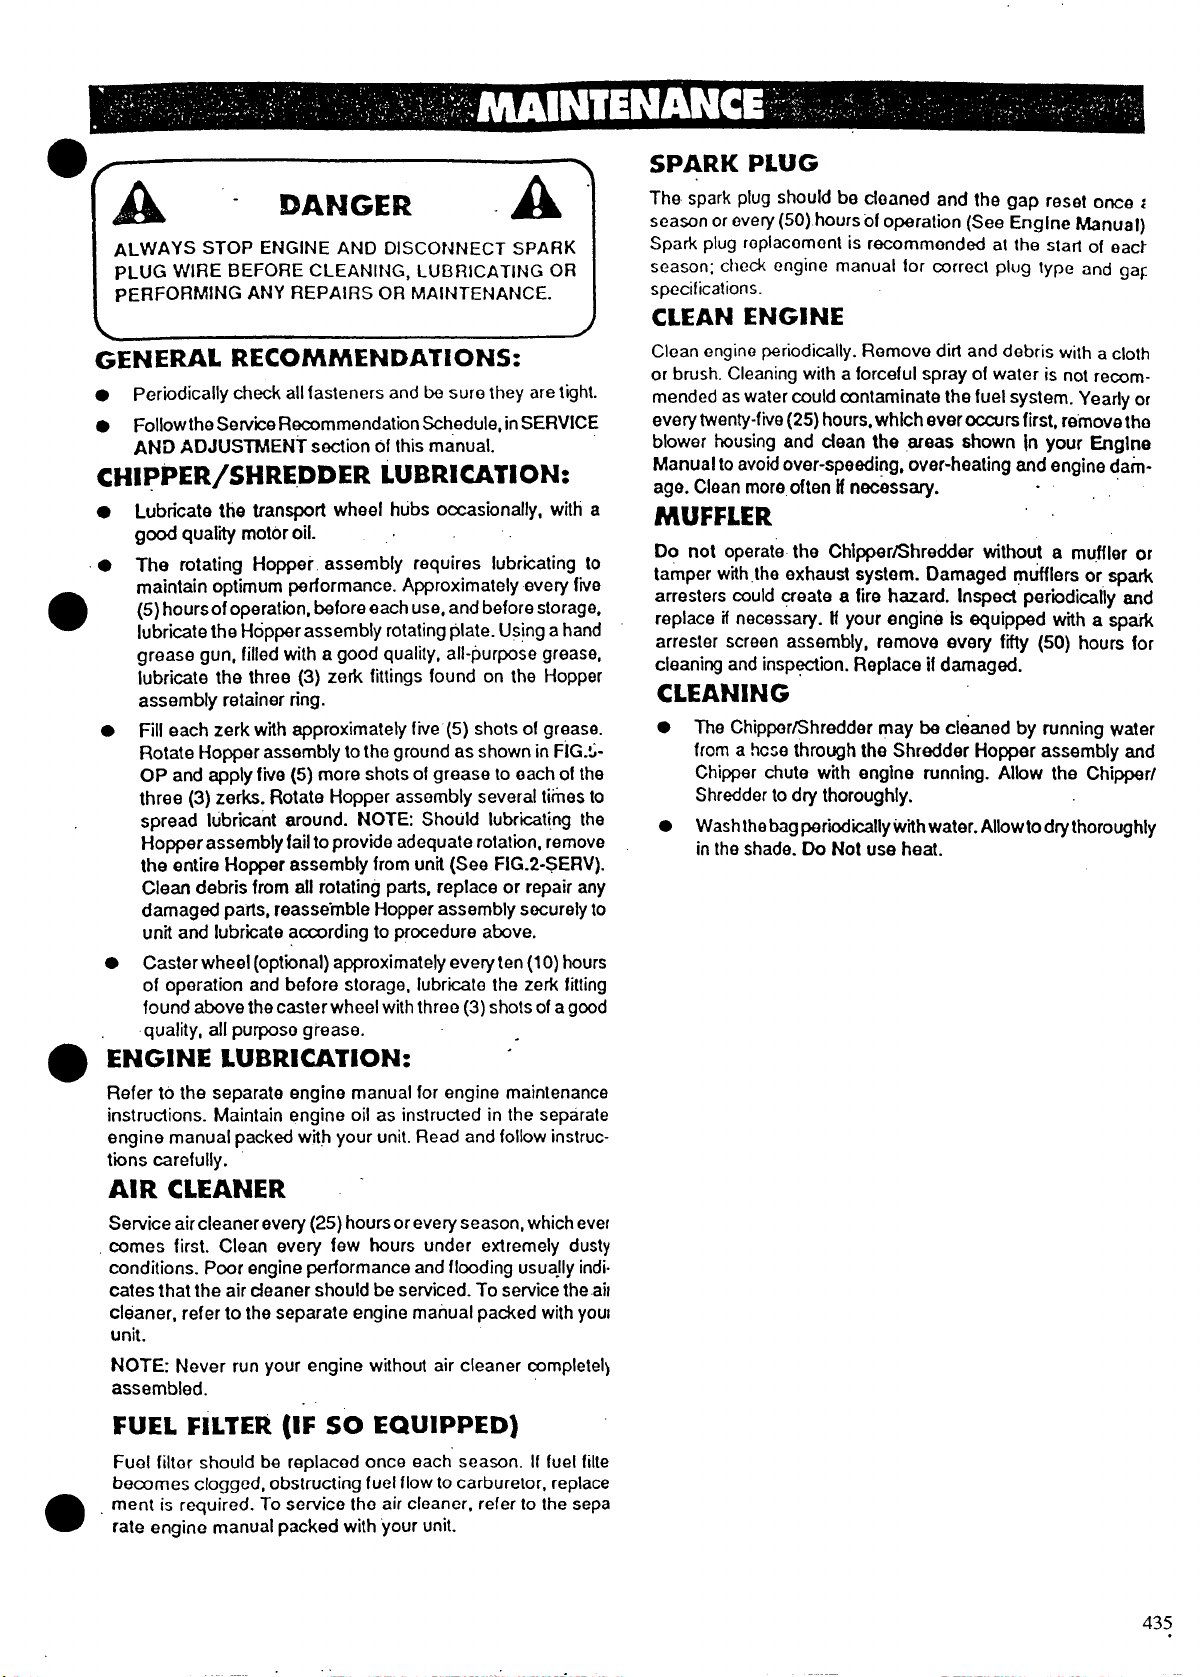
Bulky material, such as stalks or heavy branches (anything
●
over 1/2” diameter, up to 3“ in diameter), should be fed into
the Chipper chute (See
For best performance, itisimportant tokeepthe shredding blade
and the chipper blade sharp. Refer to service and adjustment
section, pages 12, 13. If the composition of the material being
discharged changes (becomes stringy, etc.) or il the rate at
which the material feeds’~n slows down considerably, it is likely
that the shredding blade and/or Chipper blade is dull and need
to be sharpened or replaced.
FIG 5-OP).
‘ To rotate the Hopper assembly, use one (1 ) hand to pullth
Hopper release knob out until the Hopper assembly is fre
to move (See FIG. 4-OP). Rotate the Hopper assembly t
the right (while holding the Hopper
edge contacts the ground.
releaso knob) until th
433
—
●
LA
ALWAYS STOP ENGINE AND DISCONNECT SPARK
PLUG WIRE BEFORE CLEANING, LUBRICATING OR
PERFORMING
GENERAL RECOMMENDA’fiONS:
.
Periodically check all fasteners and be sure they are tight.
● Follow the Service Recommendation Schedule, in SERVICE
AND ADJUSTMENT
CHIPPER/SHREDDER LUBRICATION:
Lubricate the transport wheel hubs occasionally, with a
good quafii motor oil.
The rotating Hopper assembly requires lubricating 10
maintain optimum performance. Approximately every fiie
(5) hours of operation, before each use, and before storage,
Iubriite the Hopporassembly rotating plate. Using a hand
grease gun, filled with a good quality, all-purpose grease,
lubricate the three (3) zerk fittings found on the Hopper
assembly retainer ring.
Fill each zerk with approximately five
Rotate Hopper assembly to the ground as shown in FIG.!! OP and apply five (5) more shots of grease to each of the
three (3) zerks. Rotate Hopper assembly several times to
spread lubricant around. NOTE: Should Iubr”kati.ng the
Hopper assembly fail to provide adequate rotat”mn, remove
the entire Hopper assembly from unit (See FIG.2-SERV).
Clean debris from all rotating parts, repface or repair any
damaged parts, reassemble Hopper assembly securely to
unit and lubricate according to procedure above.
Caster wheel (optional) approximately every ten (1O)hours
of operation and befo~e storage, lubricate-the ze~ fitting
found above the caster wheel with three (3) shots of a good
quality, all purposo grease.
●
ENGINE LUBR1CATION: ‘“
Refer to the separate engine manual for engine maintenance
instructions. Maintain engine oil as instructed in the separate
engine manual packed with your unit. Read and follow instructions carefully.
AIR CLEANER -
Service aircleanerevery (25) hours or every season, which eve!
comes first. Clean every few hours under extremely dusty
conditions. Poor engine performance and flooding usua.fly indi.
cates that the air cleaner should be setviced. To service the ail
cleaner, refer to the separate engine mairual packed with youl
unit.
NOTE Never run your engine without air cleaner completel~
assembled.
- DANGER
ANY REPAIRS OR MAINTENANCE.
section of this manual.
(5) shots of grease.
A)
SPARK PLUG
The. spark plug should be cfoaned and the gap reset once ;
season or every (50) hours of operation (See Engine Manuaf)
Spark plug roplacomonl is recommended at the starl of eat}
season; check engine manuat for correct pkrg type and
specifications.
ga~
CLEAN ENGINE
Clean engino periodically. Remove dirt and debris with a cloth
or brush. Cleaning with a forceful spray of water is not remm.
mended as water could contaminate the fuel system. Yearfy or
every twenty-five (25) hours, which ever occurs first, re’movethe
blower housing and dean the ,@reas shown in your Engine
Manual to avoid over-speeding, over-heating end engine damage. Clean more often if necessary.
,,
MUFFLER
Do not operate the Chipper/Shredder Withoq a muffler or
tamper with the exhaust system. Damaged mufflers or spark
arresters could geate
replace if necessary. If your engine is equipped with a spark
arrester screen assembly, remove every ffiy (50) hours for
cleaning and insp~ion. Replace if damaged.
a fire hazard. Inspect periidk.aily and
CLEANING
. The
● Wash !hebag periodicatlywtih water. Allow to dry thoroughly
Chipper/Shredder may be cleaned by running water
from a hcce through the Shredder Hopper assembly and
Chipper chute with engine running. Allow the Chipper/
Shredder to dry thoroughly.
in the shade. Do Not use heat.
●
FUEL FILTER (IF SO EQUIPPED)
Fuel filter should be rcrplacod once each season. If fuel filte
becomes clogged, obstructing fuel flow to carburetor, replace
ment is required. To service tho air cleaner, refer to the sepa
rate engine manual packed with ‘your unit.
435
.
 Loading...