

Mazda 6 2019 Owner's Manual

A Word to Mazda Owners
Thank you for choosing a Mazda. We at Mazda design and build vehicles with complete
customer satisfaction in mind.
To help ensure enjoyable and trouble-free operation of your Mazda, read this manual
carefully and follow its recommendations.
An Authorized Mazda Dealer knows your vehicle best. So when maintenance or service is
necessary, that's the place to go.
Our nationwide network of Mazda professionals is dedicated to providing you with the best
possible service.
We assure you that all of us at Mazda have an ongoing interest in your motoring pleasure
and in your full satisfaction with your Mazda product.
Mazda Motor Corporation
HIROSHIMA, JAPAN
Important Notes About This Manual
Keep this manual in the glove compartment as a handy reference for the safe and enjoyable use of your Mazda.
Should you resell the vehicle, leave this manual with it for the next owner.
All specifications and descriptions are accurate at the time of printing. Because improvement is a constant goal
at Mazda, we reserve the right to make changes in specifications at any time without notice and without obliga‐
tion.
Air Conditioner and the Environment
Your Mazda's genuine air conditioner is filled with a refrigerant that has been found not to damage the earth's
ozone layer. If the air conditioner does not operate properly, consult an Authorized Mazda Dealer.
Perchlorate
Certain components of this vehicle such as [air bag modules, seat belt pretensioners, lithium batteries,…] may
contain Perchlorate Material-- Special handling may apply for service or vehicle end of life disposal. See
www.dtsc.ca.gov/hazardouswaste/perchlorate.
Please be aware that this manual applies to all models, equipment and options. As a result, you may find
some explanations for equipment not installed on your vehicle.
©2019 Mazda Motor Corporation
January 2019 (Print1)

How to Use This Manual
We want to help you get the most driving
pleasure from your vehicle. Your owner's
manual, when read from cover to cover,
can do that in many ways.
Illustrations complement the words of the
manual to best explain how to enjoy your
Mazda. By reading your manual, you can
find out about the features, important
safety information, and driving under
various road conditions.
The symbol below in this manual means
“Do not do this” or “Do not let this
happen”.
Index: A good place to start is the Index,
an alphabetical listing of all information in
your manual.
You'll find several WARNINGs,
CAUTIONs, and NOTEs in the manual.
NOTE
A NOTE provides in formation and
sometimes suggests how to make better
use of your vehicle.
The following symbol, located on some
parts of the vehicle, indicates that this
manual contains information related to the
part.
Please refer to the manual for a detailed
explanation.
WARNING
A WARNING indicates a situation in which
serious injury or death could result if the
warning is ignored.
CAUTION
A CAUTION indicates a situation in which
bodily injury or damage to your vehicle, or
both, could result if the caution is ignored.

Table of Contents
Pictorial Index
Interior, exterior views and part identification of your Mazda.
Essential Safety Equipment
Important information about safety equipment, including seats, seat belt
system, child-restraint systems and SRS air bags.
Before Driving
Use of various features, including keys, doors, mirrors and windows.
When Driving
Information concerning safe driving and stopping.
Interior Features
Use of various features for ride comfort, including air-conditioning and
audio system.
Maintenance and Care
How to keep your Mazda in top condition.
If Trouble Arises
Helpful information on what to do if a problem arises with the vehicle.
1
2
3
4
5
6
7
Customer Information and Reporting Safety Defects
Important consumer information including warranties and add-on
equipment.
Specifications
Technical information about your Mazda.
Index
8
9
10


1
Pictorial Index
Interior, exterior views and part identification of your Mazda.
Interior Overview..............................1-2
Interior Equipment (View A)........1-2
Interior Equipment (View B)........1-3
Interior Equipment (View C)........1-4
Interior Equipment (View D)........1-5
Interior Equipment (View E)........1-6
Exterior Overview.............................1-7
Front............................................. 1-7
Rear...............................................1-8
1-1

Pictorial Index
Interior Overview
Interior Equipment (View A)
① Lighting control.....................................................................................................page 4-74
② Turn and lane-change signal..................................................................................page 4-79
③ Audio control switches............................................................................................page 5-9
④ INFO switch....................................................................................... page 4-14, 4-31, 4-51
⑤ Cruise control switches........................................................................... page 4-148, 4-215
⑥ Wiper and washer lever.........................................................................................page 4-80
⑦ DSC OFF switch.................................................................................................page 4-108
⑧ Lane-keep Assist System (LAS) & Lane Departure Warning System (LDWS) OFF
switch.................................................................................................................. page 4-164
⑨ Parking sensor switch.........................................................................................page 4-236
⑩ 360° View Monitor switch..................................................................................page 4-183
⑪ Outside mirror switch............................................................................................page 3-24
⑫ Door-lock switch...................................................................................................page 3-14
⑬ Power window switches........................................................................................page 3-29
⑭ Power window lock switch................................................................................... page 3-29
⑮ Door-lock knob..................................................................................................... page 3-14
1-2
The equipment and installation position varies by vehicle

Pictorial Index
Interior Overview
Interior Equipment (View B)
① Dashboard illumination knob............................................................. page 4-19, 4-35, 4-50
② Active driving display........................................................................................... page 4-59
③ Instrument cluster..................................................................................................page 4-12
④ Push button start......................................................................................................page 4-4
⑤ Hazard warning flasher switch..............................................................................page 4-85
⑥ Audio.....................................................................................................................page 5-13
⑦ Seat warmer switches............................................................................................page 2-19
⑧ Glove compartment...............................................................................................page 5-93
⑨ Climate control system............................................................................................page 5-2
⑩ Rear window defogger switch...............................................................................page 4-83
⑪ Seat ventilation switches.......................................................................................page 2-20
⑫ Heated steering wheel switch................................................................................page 2-21
⑬ Horn.......................................................................................................................page 4-85
⑭ Lock release lever................................................................................................... page 2-5
⑮ Hood release handle.............................................................................................. page 6-20
⑯ Remote fuel-filler lid release.................................................................................page 3-22
⑰ Trunk release button..............................................................................................page 3-16
The equipment and installation position varies by vehicle
1-3

Pictorial Index
Interior Overview
Interior Equipment (View C)
① Head restraint........................................................................................................ page 2-17
② Seat belt.................................................................................................................page 2-22
③ Courtesy lights...................................................................................................... page 5-84
④ Bottle holder..........................................................................................................page 5-91
⑤ Overhead lights..................................................................................................... page 5-84
⑥ Overhead console.................................................................................................. page 5-92
⑦ Moonroof switch................................................................................................... page 3-32
⑧ Vanity mirror.........................................................................................................page 5-83
⑨ Sunvisor.................................................................................................................page 5-83
⑩ Rearview mirror.................................................................................................... page 3-26
⑪ Vent......................................................................................................................... page 5-3
⑫ Shift lever/Selector lever............................................................................. page 4-62, 4-64
⑬ Drive selection switch.........................................................................................page 4-112
⑭ Commander switch................................................................................................page 5-13
⑮ Electric Parking Brake (EPB) switch....................................................................page 4-95
⑯ AUTOHOLD switch...........................................................................................page 4-101
⑰ Cup holder.............................................................................................................page 5-90
⑱ Front seat.................................................................................................................page 2-5
1-4
The equipment and installation position varies by vehicle

Pictorial Index
Interior Overview
Interior Equipment (View D)
① Seat belt.................................................................................................................page 2-22
② Head restraint........................................................................................................ page 2-17
③ USB power outlet..................................................................................................page 5-89
④ Armrest box...........................................................................................................page 5-93
⑤ Child safety locks..................................................................................................page 3-15
⑥ Seat warmer switches............................................................................................page 2-19
⑦ Cup holder.............................................................................................................page 5-90
⑧ Rear coat hook.......................................................................................................page 5-94
⑨ Rear map lights..................................................................................................... page 5-84
⑩ Courtesy lights...................................................................................................... page 5-84
⑪ Door-lock knob..................................................................................................... page 3-14
⑫ Power window switch........................................................................................... page 3-29
⑬ Center console.......................................................................................................page 5-93
⑭ External input terminal..........................................................................................page 5-10
⑮ Accessory socket...................................................................................................page 5-88
⑯ Vent......................................................................................................................... page 5-3
⑰ Bottle holder..........................................................................................................page 5-91
⑱ Rear seat................................................................................................................ page 2-15
⑲ Armrest..................................................................................................................page 2-16
⑳ ISOFIX lower anchors (Mexico)/LATCH lower anchors (Except Mexico).........page 2-47
The equipment and installation position varies by vehicle
1-5

Pictorial Index
Interior Overview
Interior Equipment (View E)
① Remote handles..................................................................................................... page 2-15
② Trunk light.............................................................................................................page 5-84
1-6
The equipment and installation position varies by vehicle

Pictorial Index
Exterior Overview
Front
① Windshield wiper blades....................................................................................... page 6-30
② Moonroof...............................................................................................................page 3-32
③ Window................................................................................................................. page 3-29
④ Fuel-filler lid......................................................................................................... page 3-22
⑤ Request switch...................................................................................................... page 3-12
⑥ Door.......................................................................................................................page 3-10
The equipment and installation position varies by vehicle
1-7

Pictorial Index
Exterior Overview
Rear
① Trunk Lid...............................................................................................................page 3-16
② Outside mirror....................................................................................................... page 3-24
③ Request switch...................................................................................................... page 3-12
④ Electric trunk lid opener........................................................................................page 3-16
1-8
The equipment and installation position varies by vehicle

2
Essential Safety Equipment
Important information about safety equipment, including seats, seat
belt system, child-restraint systems and SRS air bags.
Seats....................................................2-2
Seat Precautions............................2-2
Front Seat......................................2-5
Rear Seat.....................................2-15
Head Restraints...........................2-17
Seat Warmer/Seat Ventilation/Heated
Steering Wheel.................................2-19
Seat Warmer
Seat Ventilation
Heated Steering Wheel
Seat Belt Systems.............................2-22
Seat Belt Precautions..................2-22
Seat Belt......................................2-25
Seat Belt Warning Systems.........2-26
Front Seat Belt Pretensioner and
Load Limiting Systems...............2-26
Seat Belt Extender......................2-28
Child Restraint................................ 2-30
Child-Restraint Precautions........2-30
Child-Restraint System
Installation..................................2-35
Child-Restraint System Suitability
for Various Seat Positions
Table........................................... 2-37
Installing Child-Restraint
Systems.......................................2-40
*
..............................2-19
*
.........................2-20
*
............. 2-21
SRS Air Bags....................................2-52
Supplemental Restraint System
(SRS) Precautions.......................2-52
Supplemental Restraint System
Components................................2-58
How the SRS Air Bags Work..... 2-60
SRS Air Bag Deployment
Criteria........................................2-64
Limitations to SRS Air Bag........2-65
Front Passenger Occupant
Classification System
Constant Monitoring...................2-71
*
................2-67
*Some models.
2-1

Essential Safety Equipment
Seats
Seat Precautions
WARNING
Make sure the adjustable components of a seat are locked in place:
Adjustable seats and seatbacks that are not securely locked are dangerous. In a sudden stop
or collision, the seat or seatback could move, causing injury. Make sure the adjustable
components of the seat are locked in place by attempting to slide the seat forward and
backward and rocking the seatback.
Never allow children to adjust a seat:
Allowing children to adjust a seat is dangerous as it could result in serious injury if a child's
hands or feet become caught in the seat.
Do not drive with the seatback unlocked:
All of the seatbacks play an important role in your protection in a vehicle. Leaving the
seatback unlocked is dangerous as it can allow passengers to be ejected or thrown around
and baggage to strike occupants in a sudden stop or collision, resulting in severe injury. After
adjusting the seatback at any time, even when there are no other passengers, rock the
seatback to make sure it is locked in place.
Adjust a seat only when the vehicle is stopped:
If the seat is adjusted while the vehicle is being driven, the seating posture may become
unstable and the seat could move unexpectedly resulting in injury.
Do not modify or replace the front seats:
Modifying or replacing the front seats such as replacing the upholstery or loosening any bolts
is dangerous. The front seats contain air bag components essential to the supplemental
restraint system. Such modications could damage the supplemental restraint system and
result in serious injury. Consult an Authorized Mazda Dealer if there is any need to remove or
reinstall the front seats.
Do not drive with damaged front seats:
Driving with damaged front seats, such as seat cushions torn or damaged down to the
urethane, is dangerous. A collision, even one not strong enough to
damage the front seats which contain essential air bag components. If there was a
subsequent collision, an air bag may not deploy which could lead to injuries. Always have an
Authorized Mazda Dealer inspect the front seats, front seat belt pretensioners and air bags
after a collision.
the air bags, could
inate
2-2

Essential Safety Equipment
Seats
Do not drive with either front seats reclined:
Sitting in a reclined position while the vehicle is moving is dangerous because you do not get
the full protection from seat belts. During sudden braking or a collision, you can slide under
the lap belt and suer serious internal injuries. For maximum protection, sit well back and
upright.
Do not place an object such as a cushion between the seatback and your back:
Putting an object such as a cushion between the seatback and your back is dangerous
because you will be unable to maintain a safe driving posture and the seat belt cannot
function at its full capacity in a collision, which could result in a serious accident, injury or
death.
Do not place objects under the seat:
The object could get stuck and cause the seat to not be xed securely, and result in an
accident.
Do not stack cargo higher than the seatbacks:
Stacking luggage or other cargo higher than the seatbacks is dangerous. During sudden
braking or a collision, objects can y around and become projectiles that may hit and injure
passengers.
Make sure luggage and cargo is secured before driving:
Not securing cargo while driving is dangerous as it could move or be crushed during sudden
braking or a collision and cause injury.
Never allow a passenger to sit or stand on the folded seatback while the vehicle is moving:
Driving with a passenger on the folded seatback is dangerous. Allowing a child to sit up on
the folded seatback while the vehicle is moving is particularly dangerous. In a sudden stop or
even a minor collision, a child not in a proper seat or child-restraint system and seat belt could
be thrown forward, back or even out of the vehicle resulting in serious injuries or death. The
child in the baggage area could be thrown into other occupants and cause serious injury.
Never give the car keys to children and do not allow them to play in the vehicle:
Playing with the folding rear seats is dangerous. Once the seatbacks are back up, a child in
the trunk would not be able to get out the way they had entered. If you have small children,
keep the seatbacks locked.
2-3

Essential Safety Equipment
Seats
Always leave your car locked and keep the car keys safely away from children:
Leaving your car unlocked or the keys in reach of children is dangerous. Children who nd
their way into the trunk through an unlocked rear seatback or an open trunk can become
accidentally locked in the trunk. This could result in death or brain damage from heat
prostration, particularly in the summer. Always lock the doors and the trunk, and as an added
measure, keep the rear seatbacks locked, whether you have children in your home or not.
CAUTION
When operating a seat, be careful not to put your hands or ngers near the moving parts of
the seat or on the side trim to prevent injury.
When moving the seats, make sure there is no cargo in the surrounding area. If the cargo
gets caught it could damage the cargo.
(Manual Seat)
When moving the seats forward and rearward or returning a rear-reclined seatback to its
upright position, make sure you hold onto the seatback with your hand while operating. If
the seatback is not held, the seat will move suddenly and could cause injury.
When inserting your hand under the seat to clean the cabin or pick up something you
dropped under the seat, be careful not to hurt yourself. If you contact the moving parts of
the seat rail or seat frame, it could result in injury.
NOTE
When returning a rear seat to its original position, place the seat belt in its normal
position. Verify that the seat belt pulls out and re tr ac ts.
(Power Seat)
The seat-bottom power adjustment is operated by moto rs . Avoid extended operation
because excessive use can damage the motors.
To prevent the battery from runnin g do wn, avoid using the power adjustment when the
engine is stopped. The adjuster uses a large amount of electrical power.
Do not use the switch to make more than one adjustment at a time.
2-4

Essential Safety Equipment
Seats
Front Seat
Adjusting the Driver's Seat
▼
Using the driving position set up procedure recommended by Mazda allows you to maintain
a relaxed posture, drive the vehicle for longer periods without feeling tired, and make quick
operations naturally.
Also, you can be assured of a clear view in the forward direction to help you drive more
safely and comfortably.
The adjustments for the driving position recommended by Mazda are done using the
following procedures.
1. Moving the steering wheel and seat to their default positions.
2. Adjusting the seatback angle.
3. Adjusting the seat position forward and back.
4. Adjusting the seat height.
5. Adjusting the steering wheel position.
6. Adjusting the head restraint position.
Power operation
Seat Slide
(Manual Seat)
To move a seat forward or backward, raise the lever and slide the seat to the desired position
and release the lever.
2-5

Essential Safety Equipment
Seats
Make sure the lever returns to its original position and the seat is locked in place by
attempting to push it forward and backward.
(Power Seat)
To slide the seat, move the slide lifter switch on the outside of the seat to the front or back
and hold it. Release the switch at the desired position.
Height Adjustment
(Manual Seat)
To adjust the seat height, move the lever up or down.
(Power Seat)
To adjust the seat height, move the slide lifter switch up or down.
Height Adjustment for Front Edge of Seat Bottom (Power Seat)
To adjust the front height of the seat bottom, raise or lower the front of the slide lifter
switch.
Seat Recline
(Manual Seat)
To change the seatback angle, lean forward slightly while raising the lever. Then lean back
to the desired position and release the lever.
Make sure the lever returns to its original position and the seatback is locked in place by
attempting to push it forward and backward.
(Power Seat)
To change the seatback angle, press the front or rear side of the reclining switch. Release the
switch at the desired position.
Lumbar Support Adjustment
(Manual Seat)
To increase the seat firmness, move the lever downward. Move the lever upward to decrease
firmness.
(Power Seat)
To increase the seat firmness, press and hold the front part of the switch to the desired
position, then release it.
Press the rear part of the switch to decrease firmness.
*
2-6
*Some models.
Essential Safety Equipment
Seats
Before making adjustments to the driving position recommended by Mazda
Before making adjustments, move the steering wheel and seat to their default positions.
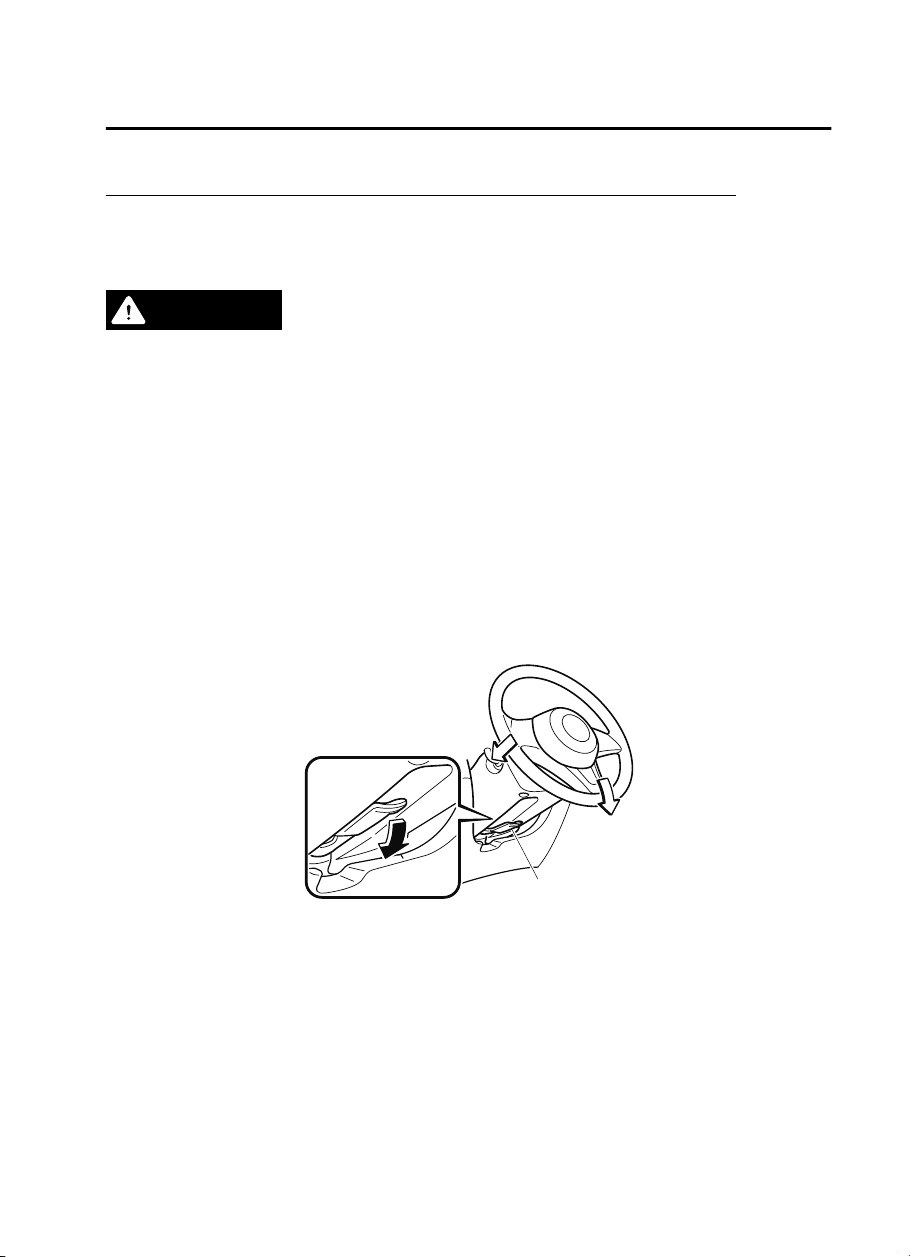
How to move the steering wheel to its default position
WARNING
Never adjust the steering wheel while the vehicle is moving:
Adjusting the steering wheel while the vehicle is moving is dangerous. Moving it can very
easily cause the driver to abruptly turn to the left or right. This can lead to loss of control or an
accident.
After adjusting the steering wheel position, make sure it is securely locked by trying to move it
up and down:
Driving with the steering wheel not securely locked in position is dangerous. If the steering
wheel moves unexpectedly while driving, you could lose control of the steering resulting in an
accident.
Lower the lever, move the steering wheel to the lowest position, and then push it down and
all the way back.
Lock release lever
How to move a driver’s seat to its default position
1. Slide the seat all the way back.
2. Lower the seat to its lowest height.
3. Sit squarely in the seat and rest your back against the seatback.
2-7
Essential Safety Equipment
Seats
Seat adjustment procedure for the driving position recommended by Mazda
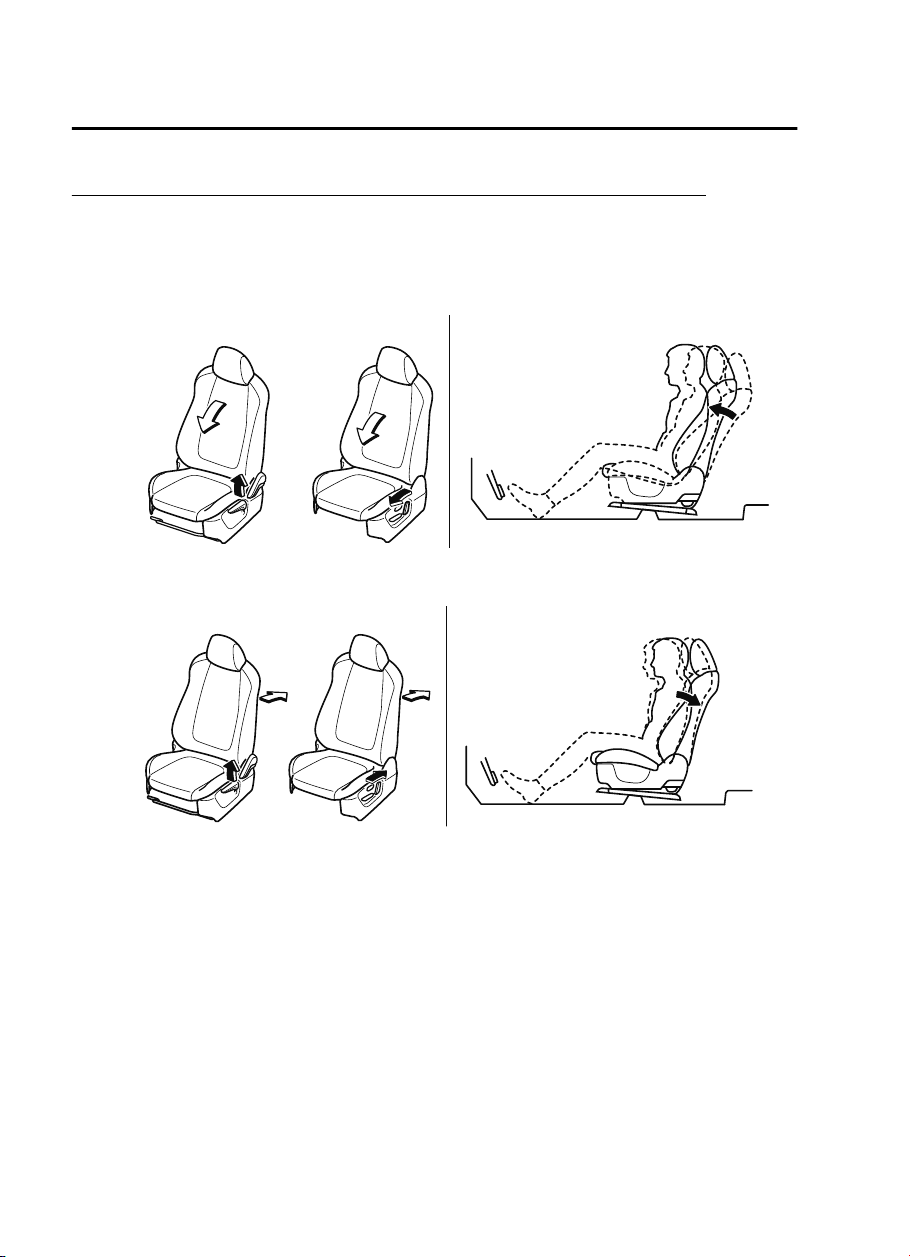
Adjusting the seatback angle (reclining)
Adjust the seatback to the angle providing a comfortable seated posture.
1. With your posture slightly slouched, move the seatback forward to the angle where your
waist feels slightly cramped.
Manual Seat Power Seat
2. Move the seatback backward to a comfortable seated posture without any feeling of
cramping in your waist.
Manual Seat Power Seat
Adjusting the seat position forward and back (sliding)
Adjust the seat to the position best for operating the accelerator and brake pedals.
1. Place your left foot on the footrest, your right foot between the accelerator and brake
pedals, and position your heel to the position allowing easy switching between the
pedals.
2-8

Essential Safety Equipment
Seats
2. With your heel set on the floor, set your right foot on the brake pedal and move the seat
forward as far as possible until you feel a slight cramping in your ankle.
Manual Seat Power Seat
3. With your right foot set on the brake pedal, move the seat back until you no longer feel
cramping in your ankle.
4. With your heel set on the floor, make sure you can move your foot between the brake
pedal and accelerator pedal smoothly.
5. Depress the accelerator pedal completely with your heel set on the floor and make sure
that your ankle does not feel over-stretched.
Manual Seat Power Seat
Adjusting the seat height
Adjust the seat height to a position where you have a clear forward view and you can drive
the vehicle easily.
1. With your back resting against the seatback, raise the seat to the height where you can
see the rear edge area of the hood surface from the windshield.
2-9

Essential Safety Equipment
Seats
With the manual seat, if you raise the seat height, the seat moves forward. Adjust the
seat forward or back again.
Manual Seat Power Seat
Adjusting the steering wheel position
Adjust the steering wheel to the position where it can be operated easily and the gauges can
be viewed easily.
1. With your back resting against the seatback, extend both arms, place them on the top of
the steering wheel, and pull the steering wheel towards you to the position of your
wrists.
2. Adjust the steering wheel height so that the gauges can be viewed easily.
3. Raise the lever to securely lock the steering wheel.
Adjusting the head restraint position
To prevent shock to the head and neck, adjust the head restraints to their correct positions.
2-10

Refer to Height Adjustment on page 2-17.
Essential Safety Equipment
Seats
Driving Position Memory
▼
*
The desired driving position can be called
up after programming the position.
The following driving positions can be
programmed.
Driver’s seat position (seat slide, height
adjustment, front edge of seat bottom,
seat recline)
Refer to Adjusting the Driver's Seat on
page 2-5.
Active driving display (display position,
brightness level, display information)
Refer to Active Driving Display on page
4-59.
CAUTION
Do not place ngers or hands around the
bottom of the seat while the seat memory
function is operating. The seat moves
automatically while the seat memory
function is operating and ngers or hands
could get pinched and injured.
SET button
1
2
NOTE
Lumbar support adjustment cannot be
programmed.
A driving position can be progr ammed
to the buttons on the side of the seat and
the key in use for driving the vehicle.
If the vehicle has been serviced and the
battery cables disconnected, the
programmed seat positions will have
been erased. Re-program the seat
positions.
Programming
1. Make sure the parking brake is on.
2. (Automatic transaxle)
Make sure the selector lever is in the P
position.
3. Start the engine.
4. Adjust the seat and the active driving
display to the desired driving position.
5. Press the SET button on the seat until a
beep sound is heard 1 time.
6. Perform one of the following settings
within 5 seconds of completing step 5
above:
Programming using a button on
the side of the seat
Press the button you want to
program, either button 1 or 2, until a
beep sound is heard 1 time.
Programming using the key
Press the key
button until a beep
sound is heard 1 time.
A driving position can be programmed or
operated using the buttons on the side of
the seat or the key.
NOTE
If a beep sound is heard 3 times, the
operation is canceled.
*Some models.
2-11

Essential Safety Equipment
Seats
To move the driving position to a
programmed position
(Using a button on the side of the seat)
1. Make sure the parking brake is on.
2. (Automatic transaxle)
Make sure the selector lever is in the P
position.
3. Start the engine.
4. Press the programming button for the
driving position you want to call up
(button 1 or 2).
5. A beep sound is heard when the
driving position adjustment is
completed.
NOTE
If the driving position movement is not
changed, only the beep sounds.
A seat position can be called up even
with the engine not running.
The driving position adjustment is
canceled in the following cases:
Any of the seat adjustment swit c hes is
operated.
The SET button is pressed.
Programming button 1 or 2 is pressed.
The key button or button is
operated.
The vehicle starts moving.
The active driving display is adjusted.
(Using a programmed key)
1. Unlock the doors by pressing a request
switch or the key
button.
2. After unlocking the doors, the seat
position adjustment begins within 40
seconds of opening the driver's door,
and a beep sounds when the operation
is finished.
3. Make sure the parking brake is on.
4. (Automatic transaxle)
Make sure the selector lever is in the P
position.
5. Start the engine.
6. The active driving display adjustment
begins.
NOTE
If there is no driving position movement,
a beep is not heard.
The driving position adjustment is
canceled in the following cases:
Any of the seat adjustment switches is
operated.
The SET button is pressed.
Programming button 1 or 2 is pressed.
The key button or button is
operated.
The vehicle starts moving.
The active driving display is adjusted.
Erasing programmed driving positions
(Erasing the driving positions
programmed to the key)
1. Switch the ignition OFF.
2. Press the SET button on the side of the
seat until a beep sound is heard 1 time.
3. After the beep sounds, press the key
button within 5 seconds until a beep
sound is heard 1 time.
2-12
NOTE
If a beep sound is heard 3 times, the
operation is canceled.

Adjusting the Front Passenger's Seat
▼
Power operation
Essential Safety Equipment
Seats
Seat Slide
(Manual Seat)
To move a seat forward or backward, raise the lever and slide the seat to the desired position
and release the lever.
Make sure the lever returns to its original position and the seat is locked in place by
attempting to push it forward and backward.
(Power Seat)
To slide the seat, move the slide lifter switch on the outside of the seat to the front or back
and hold it. Release the switch at the desired position.
Height Adjustment
(Manual Seat)
To adjust the seat height, move the lever up or down.
(Power Seat)
To adjust the seat height, move the slide lifter switch up or down.
Seat Recline
(Manual Seat)
To change the seatback angle, lean forward slightly while raising the lever. Then lean back
to the desired position and release the lever.
Make sure the lever returns to its original position and the seatback is locked in place by
attempting to push it forward and backward.
2-13

Essential Safety Equipment
Seats
(Power Seat)
To change the seatback angle, press the front or rear side of the reclining switch. Release the
switch at the desired position.
2-14

Essential Safety Equipment
Seats
Rear Seat
By lowering the rear seatbacks the luggage
compartment space can be expanded.
WARNING
Do not drive the vehicle with occupants on
folded down seatbacks or in the luggage
compartment.
Putting occupants in the luggage
compartment is dangerous because seat
belts cannot be fastened which could lead
to serious injury or death during sudden
braking or a collision.
Do not allow children to play inside the
vehicle with the seatbacks lowered.
Allowing children to play in the vehicle
with the seatbacks folded down is
dangerous. If a child enters the luggage
compartment and the seatbacks were
raised back up, the child may become
trapped in the luggage compartment
which could lead to an accident.
Tightly secure cargo in the luggage
compartment when it is transported with
the seatbacks folded down.
Driving without tightly securing cargo and
luggage is dangerous as it could move and
become an obstruction to driving during
emergency braking or a collision resulting
in an unexpected accident.
When transporting cargo, do not allow the
cargo to exceed the height of the
seatbacks.
Transporting cargo stacked higher than
the seatbacks is dangerous as visibility to
the rear and sides of the vehicle is reduced
which could interfere with driving
operations and lead to an accident.
Lowering the seatbacks
CAUTION
Check the position of a front seat before
folding a rear seatback.
Depending on the position of a front seat, it
may not be possible to fold a rear seatback
all the way down because it may hit the
seatback of the front seat which could
scratch or damage the front seat or its
pocket. Lower or remove the head restraint
on the rear outboard seat if necessary.
1. (With rear seat warmer)
Turn the rear seat warmer switch off.
Refer to Seat Warmer on page 2-19.
2. Open the trunk lid and pull the lever of
the seatback you want to fold down.
3. Open a rear door and fold the rear seat
forward.
2-15
Essential Safety Equipment
Seats
To return the seatback to its upright
position:
WARNING
When returning a seatback to its upright
position, make sure the 3-point seat belt is
not caught in the seatback and the 3-point
seat belt is not twisted.
If the seat belt is used while it is twisted and
caught in the seatback, the seat belt
cannot function at its full capacity, which
could cause serious injury or death.
Press the seatback rearward and lock it in
place. After returning the seatback to its
upright position, make sure it is securely
locked.
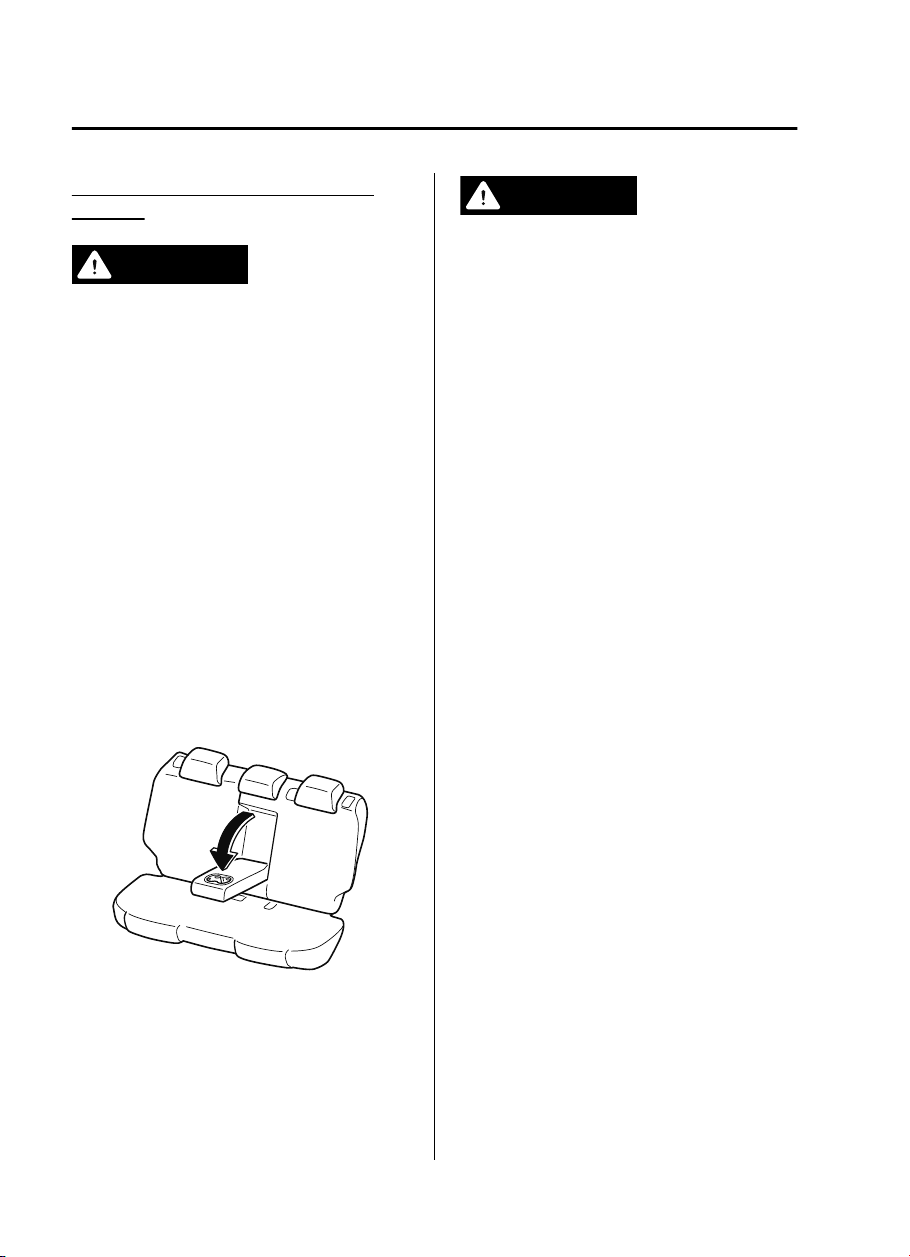
Armrest
▼
The rear armrest in the center of the rear
seatback can be used (no occupant in the
center seat) or placed upright.
WARNING
Never put your hands and
the moving parts of the seat and armrest:
Putting your hands and
moving parts of the seat and armrest is
dangerous as they could get injured.
ngers
ng ers
around the
around
2-16

Essential Safety Equipment
Seats
Head Restraints
Your vehicle is equipped with head
restraints on all outboard seats and the rear
center seat. The head restraints are
intended to help protect you and the
passengers from neck injury.
WARNING
Always drive with the head restraints
installed when seats are being used and
make sure they are properly adjusted:
Driving with the head restraints adjusted
too low or removed is dangerous. With no
support behind your head, your neck could
be seriously injured in a collision.
Height Adjustment
▼
Adjust the head restraint so that the center
is even with the top of the passenger's
ears.
Front seats
Rear outboard seats
Rear center seat
To raise a head restraint, pull it up to the
desired position.
To lower the head restraint, press the
stop-catch release, then push the head
restraint down.
2-17
Essential Safety Equipment
Seats
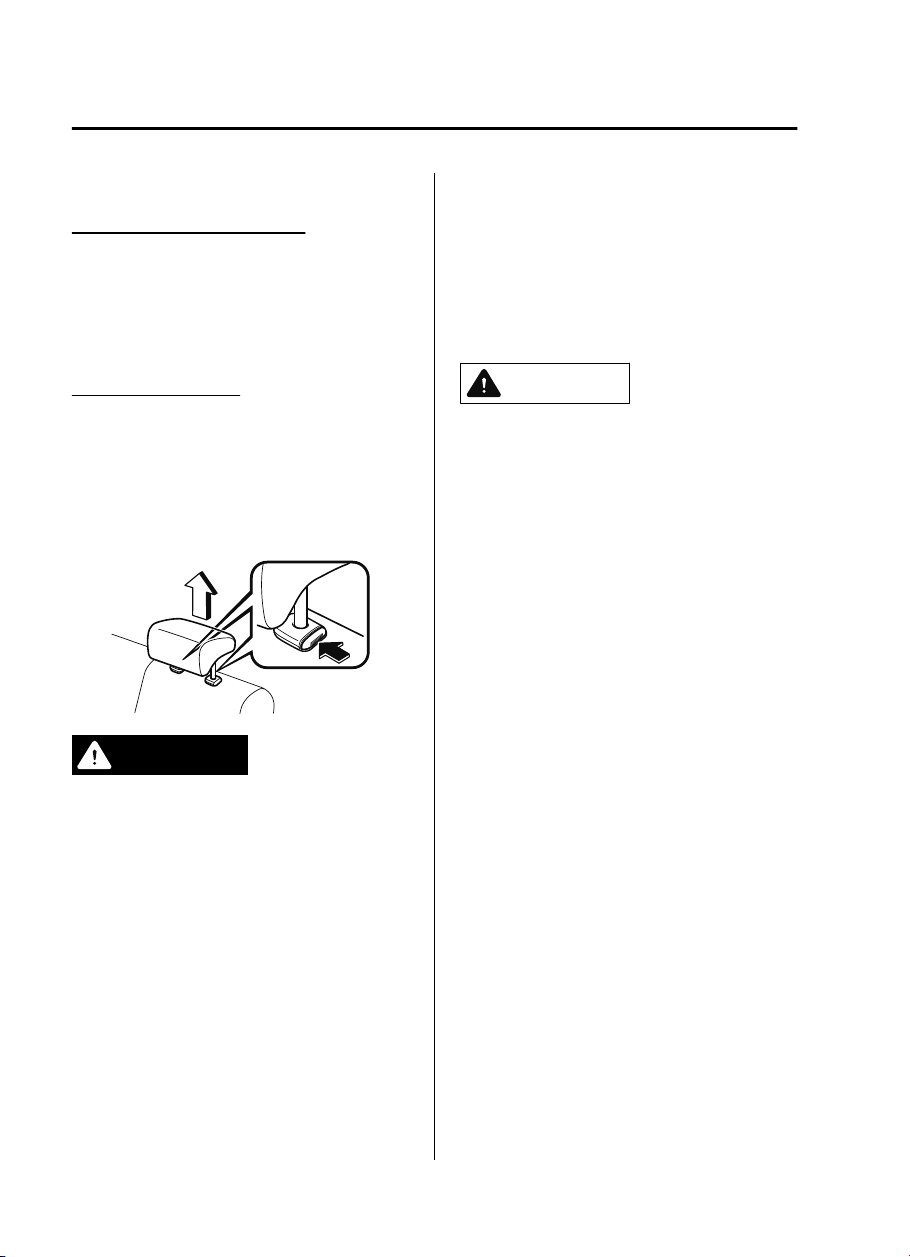
Removal/Installation
▼
Front seats/Rear center seat
To remove the head restraint, pull it up
while pressing the stop-catch.
To install the head restraint, insert the legs
into the holes while pressing the
stop-catch.
Rear outboard seats
To remove the head restraint, pull it up
while pressing both stop-catches.
To install the head restraint, insert the legs
into the holes while pressing both
stop-catches.
WARNING
After installing a head restraint, try lifting it
to make sure that it does not pull out:
Driving with an unsecured head restraint is
dangerous as the eectiveness of the head
restraint will be compromised which could
cause it to unexpectedly detach from the
seat.
CAUTION
When installing a head restraint, make
sure that it is installed correctly with the
front of the head restraint facing
forward. If the head restraint is installed
incorrectly, it could detach from the seat
during a collision and result in injury.
The head restraints on each of the front
and rear seats are specialized to each
seat. Do not switch around the head
restraint positions. If a head restraint is
not installed to its correct seat position,
the eectiveness of the head restraint
during a collision will be compromised
which could cause injury.
Always drive with the head restraints
installed when seats are being used and
make sure they are properly installed:
Driving with the head restraints not
installed is dangerous. With no support
behind your head, your neck could be
seriously injured in a collision.
2-18
 Loading...