

Page 1

Satellite Radio Kit
OWNER’S MANUAL. . . . . . . . . . . . . . . . . . . . . . . . . . . 1~17
Mazda3
Page 2

CONTENTS
PRECAUTION . . . . . . . . . . . . . . . . . . . . . . . . . . . . . . . . . . . . . . . . . . . . . . . . . . . . . . . . . . . . . . 2
WHAT IS SIRIUS SATELLITE RADIO?. . . . . . . . . . . . . . . . . . . . . . . . . . . . . . . . . . . . . . . . . . . 3
HOW TO SUBSCRIBE TO SIRIUS SATELLITE RADIO. . . . . . . . . . . . . . . . . . . . . . . . . . . . . . 3
SIRIUS SATELLITE RADIO ACTIVATION . . . . . . . . . . . . . . . . . . . . . . . . . . . . . . . . . . . . . . . . 4
DIGITAL DISPLAY. . . . . . . . . . . . . . . . . . . . . . . . . . . . . . . . . . . . . . . . . . . . . . . . . . . . . . . . . . . 4
SIRIUS OPERATION
BUTTONS. . . . . . . . . . . . . . . . . . . . . . . . . . . . . . . . . . . . . . . . . . . . . . . . . . . . . . . . . . . . . . 5
SELECTING SIRIUS RADIO MODE
SELECTING RECEIVING CHANNEL . . . . . . . . . . . . . . . . . . . . . . . . . . . . . . . . . . . . . . . . 6
UNSIGNED CHANNEL
INVALID CHANNEL . . . . . . . . . . . . . . . . . . . . . . . . . . . . . . . . . . . . . . . . . . . . . . . . . . . . . . 7
STORING PRESET CHANNELS . . . . . . . . . . . . . . . . . . . . . . . . . . . . . . . . . . . . . . . . . . . . 8
CALLING PRESET CHANNEL. . . . . . . . . . . . . . . . . . . . . . . . . . . . . . . . . . . . . . . . . . . . . . 8
CATEGORY MODE ON/OFF
CATEGORY CHANGE
SELECTING CHANNEL IN THE CATEGORY. . . . . . . . . . . . . . . . . . . . . . . . . . . . . . . . . . 9
CALLING THE PRESET CHANNEL DURING THE CATEGORY MODE . . . . . . . . . . . . . 9
DISPLAYING CHANNEL NUMBER,
CHANNEL, CATEGORY, ARTIST, AND SONG TITLES . . . . . . . . . . . . . . . . . . . . . . . . 10
DISPLAYING THE SIRIUS ID (ESN) . . . . . . . . . . . . . . . . . . . . . . . . . . . . . . . . . . . . . . . . 11
LOCKING INDIVIDUAL CHANNEL . . . . . . . . . . . . . . . . . . . . . . . . . . . . . . . . . . . . . . . . . 12
LOCK CANCELLATION . . . . . . . . . . . . . . . . . . . . . . . . . . . . . . . . . . . . . . . . . . . . . . . . . . 13
RE-SETTING CHANNEL LOCK. . . . . . . . . . . . . . . . . . . . . . . . . . . . . . . . . . . . . . . . . . . . 14
RE-SETTING ID CODE . . . . . . . . . . . . . . . . . . . . . . . . . . . . . . . . . . . . . . . . . . . . . . . . . . 15
ERROR SIGNS . . . . . . . . . . . . . . . . . . . . . . . . . . . . . . . . . . . . . . . . . . . . . . . . . . . . . . . . . . . . 16
SPECIFICATION . . . . . . . . . . . . . . . . . . . . . . . . . . . . . . . . . . . . . . . . . . . . . . . . . . . . . . . . . . . 17
. . . . . . . . . . . . . . . . . . . . . . . . . . . . . . . . . . . . . . . . . . . . . . . . . . . . . 7
. . . . . . . . . . . . . . . . . . . . . . . . . . . . . . . . . . . . . . . . . . . . . . . . . . . . . 9
. . . . . . . . . . . . . . . . . . . . . . . . . . . . . . . . . . . . . . . . . . 6
. . . . . . . . . . . . . . . . . . . . . . . . . . . . . . . . . . . . . . . . . . . . . . . . 9
NOTE
This equipment has been tested and found to comply with the limits for a Class B digital device, pursuant to
Part 15 of the FCC Rules. These limits are designed to provide reasonable protection against harmful interference in a residential installation. This equipment generates, uses, and can radiate radio frequency
energy and, If not installed and used in accordance with the instructions, may cause harmful interference to
radio communications. However, there is no guarantee that interference will not occur in a particular installation. If this equipment does cause harmful interference to radio or television reception, which can be
determined by turning the equipment off and on, the user is encouraged to try to correct the interference by
one or more of the following measures:
– Increase the separation between the equipment and receiver.
–
Connect the equipment into an outlet on a circuit different from that to which the receiver is connected.
– Consult the dealer or an experienced radio/TV technician for help.
-1-
Page 3

Satellite Radio Kit QUICK TIPS
SELECTING SIRIUS RADIO MODE (SAT button)
When the SAT button is pressed, it will play the last selected SIRIUS channel.
Every time the SAT button is pressed, the band is changed over in the order shown below.
Note
• SR1, SR2 and SR3 can be stored 6 stations in each bank for convenient
access to your favorite stations.
SELECTING CHANNEL (SEEK/TRACK/APC button)
<Using SEEK/TRACK/APC button>
SR1 SR2 SR3
• When the SEEK/TRACK/APC button is pressed (UP or DOWN) for less than 0.5 seconds, it
will seek the next valid channel. Invalid channel (a channel that is not broadcasting) will be
skipped.
• When the SEEK/TRACK/APC button is pressed (UP or DOWN) for more than 0.5 seconds, it
will seek the next valid channel. Keeping the button depressed, it will continue seeking
channels every 0.3 seconds.
<Using TUNE knob>
When the channel number is displayed, turning the TUNE knob allows you to select the desired
channel.
STORING PRESET CHANNELS
(Preset (1-6) buttons or DISP button)
Channels can be stored with either a “channel number” or “text” display. (Note that in “text”
display, the clock will not display.)
Press the DISP button to select the channel number or desired text (e.g. channel title) display
mode.
Select the channel that you desire to store.
Press a preset button (1-6) for 1.5 seconds or more.
The storing process is complete after the channel number or text blinks.
CALLING PRESET CHANNEL (Preset (1-6) buttons)
Press a preset button (1-6) for less than 1.5 seconds.
E-1
Page 4

CATEGORY MODE ON/OFF (SCAN button)
<To turn on>
Press the SCAN button and release it. Category titles are indicated by only short names only.
<To turn off>
Press the SCAN button again and release it.
CATEGORY CHANGE (TUNE knob)
When the category mode is ON, turn the TUNE knob and select the desired category.
At this time, it will automatically select the category and the first (smallest number) channel within
the category is received. When the highest (or lowest) category is reached, scrolling will continue
with the lowest (highest) category.
SELECTING CHANNEL IN THE CATEGORY
(SEEK/TRACK/APC button)
Pressing the SEEK/TRACK/APC button or steering remote controls (up or down) for 1.5 seconds
or more to move the channel number up or down within the selected category.
CALLING THE PRESET CHANNEL DURING THE
CATEGORY MODE (Preset (1-6) buttons or SAT button)
Pressing a preset button (1-6) will exit the Category mode and play the selected channel.
Note: Pressing the SAT button during Category mode will exit the Category mode and play the
last channel listened to.
DISPLAYING CHANNEL NUMBER, CHANNEL, CATEGORY,
ARTIST, AND SONG TITLES (DISP button, TUNE knob)
Each time the DISP button is briefly pressed (1.5 seconds or less) during SIRIUS reception, the
display of the text data is changed over in the order shown below.
• When in category mode, CATEGORY TITLE is not called. (If the DISP button is
• 8 characters are displayed on 1 screen.
• By turning the TUNE knob counterclockwise, it is possible to return the title 1
CHANNEL NUMBER CHANNEL TITLE CATEGORY TITLE
SONG TITLE ARTIST TITLE
Notes
pressed when CHANNEL TITLE is displayed, ARTIST TITLE is called.)
character each.
E-2
Page 5

PRECAUTION
• This unit is designed to operate on 12 volts DC, NEGATIVE ground electrical systems only.
• When fuse replacement is necessary, use only Vehicle’s owners manual recommended fuse. Do not replace with a higher rated fuse.
If the fuse blows often, carefully check all electrical connections for any short circuits and have your
car's voltage regulator checked also.
• Do not install the unit where it will be exposed to direct sunlight or hot air discharged from the car heater.
• Do not expose the unit to water or moisture.
• This unit should not be adjusted or repaired by anyone except qualified service personnel.
If servicing is required, return the unit to an authorized mobile audio dealer.
• Use of controls or adjustments or performance of procedures other than those specified herein may
result in hazardous radiation exposure.
• Changes or modifications not expressly approved by the manufacturer for compliance may void the user's
authority to operate this equipment.
• Keep the area around the antenna of the Satellite Radio free. The wave reception might be impaired by a
roof rack (trunk rack in case of Miata) and loaded luggage. For reception of satellite waves a cone above
with an angle of at least 45 degrees and for terrestrial radio waves a cone with an angle of at least 0 - 10
degrees from the horizontal line should be free.
• Temperature Consideration
The unit may not operate correctly in extremely hot or cold temperatures. Avoid exposing the unit to
extremely high or low temperatures.
• Safety
For safer driving, keep the volume at a moderate level to enable you to hear outside sounds (such as
emergency vehicle sirens).
• Cleaning the unit
Clean the unit with a soft, dry cloth. Stains should be removed by wiping the surfaces with a soft cloth
immersed in lukewarm water and wrung dry. Never use strong chemicals or solvents. These will damage
the finish of the unit.
• Servicing
Should a problem develop, do not open the unit or try to repair it yourself. If servicing is required, bring
the unit to an Authorized Service Center.
-2-
Page 6

WHAT IS SIRIUS SATELLITE RADIO?
Sirius is radio the way it was meant to be: Up to 100 new channels of digital quality programming delivered
to listeners coast to coast via satellite. That means 50 channels of completely commercial-free music. Plus
up to 50 more channels of news, sports, and entertainment from names like CNBC, Discovery, SCI-FI
Channel, A&E, House of Blues, E!, NPR, Speedvision and ESPN.
Sirius is live, dynamic entertainment, completely focused on listeners. Every minute of every day of every
week will be different. All 50 commercial-free music channels are created in-house and hosted by DJs who
know and love the music. Do you like Reggae? How about Classic Rock or New Rock? Sirius has an array
of choices spanning a vast range of musical tastes including the hits of the 50's, 60's, 70's, & 80's as well as
Jazz, Country, Blues, Pop, Rap, R&B, Bluegrass, Alternative, Classical, Heavy Metal, Dance and many
others...
From its state-of-the-art, digital broadcasting facility in Rockefeller Center, New York City, Sirius will deliver
the broadest, deepest mix of radio entertainment from coast to coast.
Sirius will bring you music and entertainment programming that is simply not available on traditional radio in
any market across the country. It's radio like you've never heard before.
Go Get Sirius and Listen Up! For more information, visit siriusradio.com.
Sirius satellite radio is the service which can be contracted and received in the United States. (Except Alaska
and Hawaii)
HOW TO SUBSCRIBE TO
SIRIUS SATELLITE RADIO
Once the system is installed you must first subscribe to the Sirius Radio service to activate the system.
The Sirius Radio service uses an ID code to identify your radio. This code is needed to subscribe to Sirius
Radio, and if needed, is also used to report any problems should there be any in the future. Listeners can
subscribe by the way as follows:
• visiting SIRIUS on the web at www sirius.com
• contracting Sirius customer care 24 hours a day, 7days a week,
• calling (888) 539-7474
• by e-mail at : custome[email protected]
• writing to : Sirius Satellite Radio
1221 Avenue of the Americas
New York, NY 10020
Attention: Customer Care
Customers should have their Sirius Radio ID ready; for details.
*Note your ESN# shound have been recorded in the last page of this manual at time of Install.
If it is not ,refference “DISPLAYING THE SIRIUS ID (ESN)” for details to retrieve.(Page 11)
-3-
Page 7

SIRIUS SATELLITE RADIO ACTIVATION
For activation and subscription information call toll free 1.888.539.SIRI (7474). A SIRIUS Customer Care
representative will take the necessary information and walk you through the activation process. Or you can
visit Sirius online at WWW.siriusradio.com and click on the “Join” button.
When you call the SIRIUS Customers Care number you have two options available.
(1) Full package “Allows access to all SIRIUS content except pay per view”
(2) Family package “Allows access to certain channels. Please see web site www.sirius.com for details.”
Please have the following information ready when attempting to activate your service:
• SIRIUS ID (ESN*)
• Valid Credit Card information (type, number, expiration date, etc)
• Product Serial Number
• Vehicle Identification Number (VIN)
*ESN: Electronic Serial Number
Notes
• When you call attention to SIRIUS call center, you should make it a state receiving 184
channels.
On air activation is completed after the procedure, in most cases from 10 seconds to 10
•
minutes.
• VIN / SIRIUS ID (ESN*) / SERIAL No. are printed on the back cover label of the manual.
When you are ready to receive the on air activation signal you will be instructed to turn on your receiver.
Once the signal is sent from the national studio it May take up to 10 minutes to be received by your unit.
DIGITAL DISPLAY
All operations of the satellite radio kit are displayed on the audio unit.
CHANNEL NUMBER, CHANNEL TITLE, CATEGORY TITLE,
ARTIST TITLE, SONG TITLE, ID CODE, PRESET CHANNEL
NUMBER, BANK NUMBER, ERROR SIGNS, CLOCK
-4-
Page 8
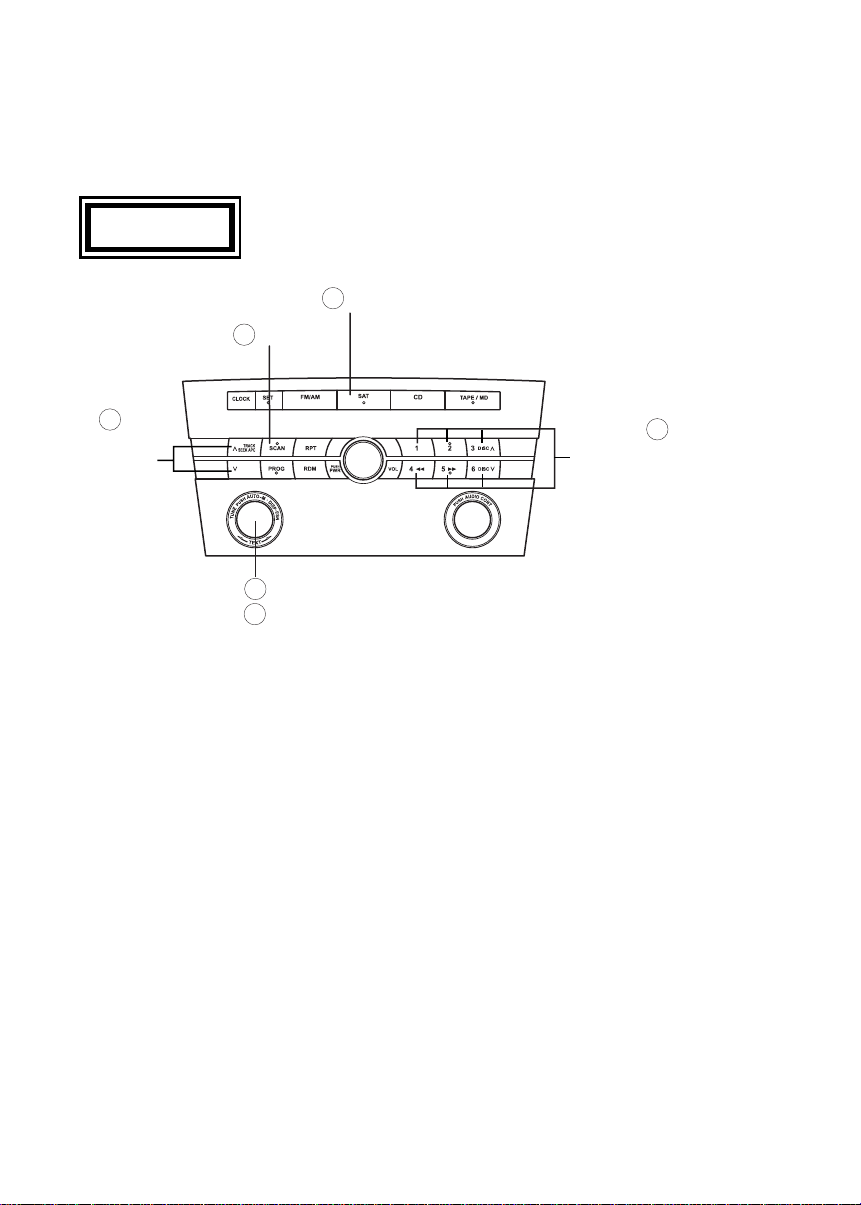
SIRIUS OPERATION
All operations of the satellite radio kit are conducted by means of the audio unit.
BUTTONS
Mazda 3
1
SAT
5
SCAN
2
SEEK
TRACK
APC
4
DISP/ESN
6
TUNE/TEXT
3
PRESET BUTTON,
CHANGE OF ID CODE,
CHANNEL LOCK
-5-
Page 9

* The number next to the title indicates the button number illustrated on page 5.
SELECTING SIRIUS RADIO MODE .................................. ➀
When the SAT button c is pressed during ACC ON, it will play last channel of SIRIUS in use before the mode
was switched over to another mode or the power was turned off.
When the SAT button c is pressed in a mode other than the SIRIUS mode, the last channel of SIRIUS is
received.
Every time the SAT button c is pressed the bank is changed over in the order shown below.
SR1 SR2 SR3
<Operation in the initial state>
It may take some time to start up the equipment when the equipment is in the initial state, when there is a
change in the user's contract condition, or when the SIRIUS channel map is changed. If it takes some time
to start up the equipment, [SR + (bank number) + UPDATING] appears.
When information on all channel maps is obtained and the equipment is ready to receive a channel, the
equipment receives channel “184.”
You come to hear 184ch "Preview" after [UPDATING] on and off light indication continued in the first
reception after opening Satellite Radio Kit for about 3 minutes. (Some geographical areas may take longer.)
[UPDATING] was finished normally, as for the reception of 184ch after the second, a sound is audible in
about 12 seconds.
When the SIRIUS mode is switched to another mode, or when the power is turned off, the present channel
at which a signal is being received is stored as the last channel.
SELECTING RECEIVING CHANNEL ........................... ➁, ➅
<By SEEK/TRACK/APC button>
• When pressed for less than 0.5 seconds
When the SEEK/TRACK/APC button (UP or DOWN) d is pressed for less than 0.5 seconds, it will start
searching for next valid channel from when the button is released.
At this time, any invalid channel (a channel that is not broadcasting) is automatically skipped based on the
channel map information.
When it is reached the highest numbered valid channel, the lowest numbered valid channel is selected
next.
• When pressed for 0.5 seconds or more
When the SEEK/TRACK/APC button (UP or DOWN) d is kept pressed for 0.5 seconds or more, next
higher (lower) valid channel is selected after 0.5 seconds. After this, it will keep selecting next valid
channel per 0.3 seconds until the button is released.
When it has reached the highest numbered valid channel, it will continue searching from the lowest
numbered valid channel and it goes up.
<By TUNE knob>
When the channel number is displayed, turning the TUNE knob h allows you to select the desired receiving
channel.
• Turn the knob clockwise : Channel Up
• Turn the knob counterclockwise : Channel Down
-6-
Page 10
UNSIGNED CHANNEL
When the selected station is an unsigned channel, the display shows that it is not signed up.
[CALL + 888] and [539 + SIRI] are alternately flashed.
Notes
• When the contract is canceled, all of the channels including channel 184 appear as noncontracted.
<How to clear the message>
Press any one of the FM/AM, CD, MD/TAPE, SAT, SEEK or preset buttons (1-6).
INVALID CHANNEL
When selected channel is not broadcasting, [SR + (bank number) + INVALID] are displayed for 1 second,
[SR + (bank number) + CHANNEL] are displayed for 1 second, and then it returns to the former valid channel.
Note
• If the last channel selected has become unavailable at startup, the above indication is displayed until any button is pressed.
<How to clear the message>
1. Press any one of the FM/AM, CD, MD/TAPE, SAT or preset buttons (1-6).
2. Wait for 2 seconds.
-7-
Page 11

STORING PRESET CHANNELS.................................. ➂, ➃
<Storing with “channel number” display>
(1) Press the DISP button f to select the channel number display mode.
Select the channel that you desire to store. At this point, the following is displayed:
[SR + (bank number) + (channel number)]
(2) Keep pressing the preset button (1-6) e for 1.5 seconds or more.
Storing process is completed after the channel number is blinked. Then, [SR + (bank number)] are
displayed and you will hear beep sound at the same time.
(3) [SR + (bank number) + (preset number) + CH + (channel number)] are displayed.
<Storing with “text” display (e.g. channel title)>
(1) Press the DISP button f to select desired text display mode (e.g. channel title).
Select the channel that you desire to store. At this point, the following is displayed:
[SR + (bank number) + (selected text (e.g. channel title))]
(2) Keep pressing the preset button for 1.5 seconds or more.
Storing process is completed after the text (e.g. channel title) is blinked. Then, [SR + (bank number)] are
displayed and you will hear beep sound at the same time.
(3) [SR + (bank number) + (preset number) + CH + (channel number)] are displayed.
(4) 3 seconds later, it returns to normal display. [SR + (bank number) + (text (e.g. channel title))]
CALLING PRESET CHANNEL.................................... ➂
Press and release the preset button (1-6) e for less than 1.5 seconds.
When the preset button is pressed during the text mode, a last channel of the pressed preset button is called
(e.g. if the last channel listened to was SR1 of preset button “1” before the mode was switched over to
another mode or the power was turned off, SR1 is called when preset button “1” is pressed). At this time, its
channel number is displayed first for 3 second and then its text is displayed.
Note
• In the initial setting, all channels are preset to 184.
-8-
Page 12

CATEGORY MODE ON/OFF ....................................... ➄
<ON>
Press the SCAN button g and release it.
[CATEGORY ON] appears and then, [SR + (bank number) + (category title)] appears.
Category titles are indicated by only short names.
When the channel being received does not belong to the category indicated, it is switched to the lowest
channel in the category “POP.”
<OFF>
(Turning OFF (releasing) the category mode)
When in category mode, press the SCAN button g and release it.
[CATEGORY OFF] appears and then [SR + (bank number) + (channel number)] appears.
When the category mode is indicated in text, the channel number appears for 1 second after turning OFF the
category mode. The equipment then returns to the text mode.
CATEGORY CHANGE................................................ ➅
When the category mode is ON, turn the TUNE knob h and select the desired category.
• Turn the knob clockwise : Scroll categories upward
• Turn the knob counterclockwise : Scroll categories downward
At this time, the first (smallest-number) channel within the category indicated is received.
When the highest (or lowest) category is reached, scrolling will continue with the lowest (highest) category.
SELECTING CHANNEL IN THE CATEGORY ................ ➁
Pressing the SEEK/TRACK/APC button (UP or DOWN) d or steering remote controller for 1.5 seconds or
more moves the channel number up/down in the present category.
At this time, the display first shows channel number and then [CALL + 888] and [539 + SIRI] alternately, artist
name, etc.
It returns to category title display 3 seconds after a sound is emitted.
(Except when [CALL + 888] and [539 + SIRI] alternately is displayed.)
The category title remains displayed until any button is pressed.
<When the PRESET button is pressed in the category mode>
When a PRESET button (1-6) e is pressed in the [CATEGORY ON] mode, the service channel CH will be
changed. When the button pressed [CATEGORY OFF] is displayed for 2 seconds and the mode is switched
to [CATEGORY OFF] mode. (The same applies when pressing the SAT button.)
CALLING THE PRESET CHANNEL DURING
THE CATEGORY MODE
When the preset buttons (1-6) e or SAT button c is pressed during category mode, it is switched to a preset
channel or if not set.
............................................. ➀, ➂
-9-
Page 13
DISPLAYING CHANNEL NUMBER, CHANNEL, CATEGORY,
ARTIST, AND SONG TITLES...................................... ➃, ➅
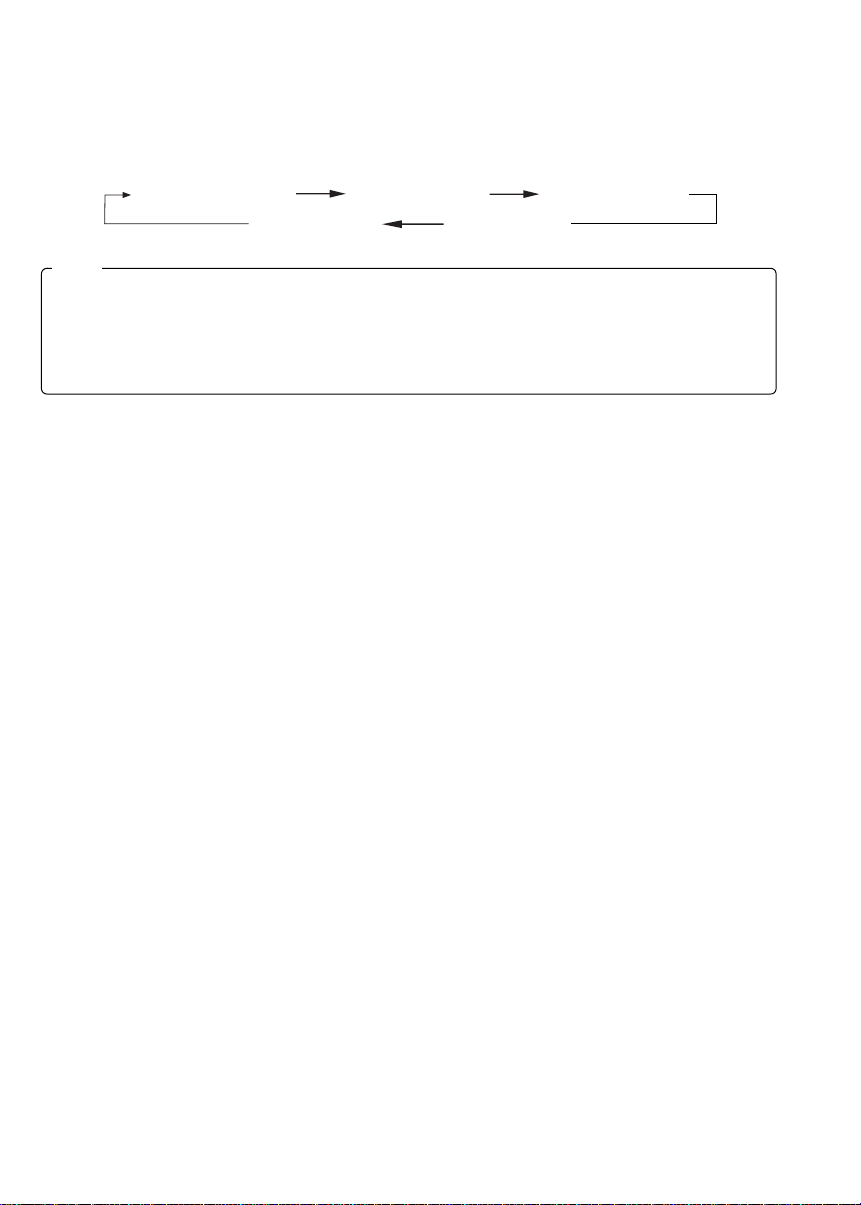
Each time the DISP button f is briefly pressed (1.5 seconds or less) during SIRIUS reception, the display
of the text data is changed over in the order shown below.
CHANNEL NUMBER
SONG TITLE
CHANNEL TITLE
ARTIST TITLE
CATEGORY TITLE
Notes
• When in category mode, CATEGORY TITLE is not called. (If the DISP button is pressed
when CHANNEL TITLE is displayed, ARTIST TITLE is called.)
• 8 characters are displayed on 1 screen.
By turning the TUNE knob counterclockwise, it is possible to return the title 1 character
•
each.
<Channel number display>
• When the DISP button f is briefly pressed (1.5 seconds or less) at the time of song title display mode,
it is changed over to the channel number display mode.
<Channel title display>
• When the DISP button f is briefly pressed (1.5 seconds or less) at the time of channel number display
mode, it is changed over to the channel title display mode.
• There are short (8 fixed characters) and long names for the channel title.
• The long name title is displayed first, and 3 seconds later the short name is displayed. In case where
there is no short name, the long name is displayed.
• When there are more than 8 characters in the channel title, by turning the TUNE knob h clockwise, it
is possible to forward the title 1 character each to display the last character of the title.
• While the short name is displayed, turning the TUNE knob h switches to the long name.
• After 3 seconds when you scroll the long name, it will automatically return t o display the first part of
the long name. Another 3 seconds later, the short name appears.
• If there is no channel title, [No TITLE] is displayed and the channel number is displayed 3 seconds
later.
<Category title display>
• When the DISP button f is briefly pressed (1.5 seconds or less) at the time of channel title display
mode, it is changed over to the category title display mode.
• There are short (8 fixed characters) and long names for the categ ory title.
• The long name title is displayed first, and 3 seconds later the short name is displayed. In case where
there is no short name, the long name is displayed.
• When there are more than 8 characters in the category title, by turning the TUNE knob h clockwise,
it is possible to forward the title 1 character each to display the last character of the title.
• While the short name is displayed, turning the TUNE knob h switches to the long name.
• After 3 seconds when you scroll the long name, it will automatically return t o display the first part of
the long name. Another 3 seconds later, the short name appears.
• If there is no category title, [No CATEGORY] is displayed and the channel number is displayed 3
seconds later.
-10-
Page 14

<Artist title display>
• When the DISP button f is briefly pressed (1.5 seconds or less) at the time of category t itle display
mode, it is changed over to the artist title display mode.
• When there are more than 8 characters in the artist title, by turning the TUNE knob h clockwise, it is
possible to forward the title 1 character each to display the last character of the title.
• After 3 seconds when you scroll the long name, it will automatically return to display the first part of
the long name. Another 3 seconds later, the short name appears.
• If there is no artist title, [No ARTIST] is displayed and the channel number is displayed 3 seconds later.
<Song title display>
• When the DISP button f is briefly pressed (1.5 seconds or less) at the time of artist title display mode,
it is changed over to the song title display mode.
• When there are more than 8 characters in the song title, by turning the TUNE knob h clockwise, it is
possible to forward the title for 1 character each to display the last character of the title.
• After 3 seconds when you scroll the long name, it will automatically return to display the first part of
the long name. Another 3 seconds later, the short name appears.
• If there is no song title, [No SONG] is displayed and then the channel number is displayed 3 seconds
later.
DISPLAYING THE SIRIUS ID (ESN)............................. ➃, ➅
When the DISP button f is long-pressed (1.5 seconds or more) and released, 12 digit Electronic Serial
Number (ESN) of the SIRIUS receiver is displayed.
[SR + (bank number) + (first 8 digits of SIRIUS ID (ESN))] are displayed.
4 digits after the 8 digits are displayed by turning the TUNE knob h clockwise.
While the last four digits of the 12-digit SIRIUS ID (ESN) are displayed, turning the TUNE knob h displays
the first 8 digits of SIRIUS ID (ESN).
<How to clear the message>
1. Turn off the ACC
2. Turn off the POWER
3. Press any one of the FM/AM, CD, MD/TAPE, SAT, CLOCK, ESN, SCAN or preset buttons (1-6).
4. Insert or play a Disk.
When SIRIUS ID (ESN) is not written in
[ESN + FAIL] is displayed. You need to input SIRIUS ID (ESN) to use SIRIUS.
-11-
Page 15
LOCKING INDIVIDUAL CHANNEL............................... ➁, ➂, ➄
If a channel is locked, the channel is muted.
Setting condition : SAT mode
Step (1) Setting of lock channel
1. Select a channel to be locked by pressing the SEEK/TRACK/APC button d.
Example: Select channel 100
Step (2) Registered ID code input preparation
2. First press the SCAN button g, then press “6” button e, hold both button for 1.5 seconds.
3. [ENTER PIN] appears for 2 seconds which indicates that it is in code input mode.
4. [SR1 ----] appears which indicates that it is ready to input code.
Step (3) Registered ID code input
5. With 1-4 buttons e, input the registered ID code.
(Example: When the registered ID code is “2323”, input “2323”. At this time, [SR1 2323] is displayed.)
Step (4) Registered ID code input determination
6. Determine the inputted code by pressing the SCAN button g briefly.
7. When it does not match with the registered code, [SR1 Err] is displayed and then it returns to [SR1 ----].
8. When it matches with the registered code, [SR1 LOCK] appears for 3 seconds which indicates that the
code input is completed.
9. [SR1 LOCK 100] appears which indicates that the parental lock is activated. At this time, mute is on and
no sound is heard.
<How to clear the message>
• Press any of the FM/AM, SAT, CD, MD/TAPE, CLOCK, TEXT, POWER buttons.
• Turn ACC off or insert CD, MD, or cassette.
Notes
• The locked channel can be selected.
If an ID code is not inputted for 10 seconds, [Err] is displayed and it returns to the former
•
display.
• Buttons used for input of the ID code shall be 1, 2, 3, 4 and SCAN buttons. Buttons 5 and
6 cannot be used.
-12-
Page 16
LOCK CANCELLATION ............................................. ➁, ➂, ➄
Setting condition : SAT mode
Step (1) Selecting a channel to release lock
1. Select a channel to be unlocked by pressing the SEEK/TRACK/APC button d.
Example: Select the locked channel 100. At this time, [SR1 LOCK 100] is displayed.
Step (2) Registered ID code input preparation
2. First press the SCAN button g, then press "6" button e, hold both button together for 1.5 seconds.
3. [ENTER PIN] appears which indicates that it is in code input mode.
4. [SR1 ----] appears which indicates that it is ready to input code.
Step (3) Registered ID code input
5. With 1-4 buttons e, input the registered ID code.
Example: When the registered ID code is “2323”, input “2323”. At this time, [SR1 2323] is displayed.
Step (4) Registered ID code input determination
6. Determine the inputted code by pressing the SCAN button g briefly.
7. When it does not match with the registered code, [SR1 Err] is displayed and then it returns to [SR1 ----].
8. When it matches with the registered code, mute is canceled and [SR1 UNLOCK] is displayed.
9. [SR1 100] appears which indicates that the code input is completed, and it returns to the channel
display.
<How to clear the message>
• Press any of the FM/AM, SAT, CD, MD/TAPE, CLOCK, TEXT, POWER buttons.
• Turn ACC off or insert CD, MD, or cassette.
Notes
• If an ID code is not inputted for 10 seconds, [Err] is displayed and it returns to the former
display.
•
Buttons used for input of the ID code shall be 1, 2, 3, 4 and SCAN buttons. Buttons 5 and
6 cannot be used.
-13-
Page 17
RE-SETTING CHANNEL LOCK................................... ➂, ➄
Setting condition : SAT mode
Step (1) Registered ID code input
1. First press the SCAN button g, then press "5" button e, hold both button together for 1.5 seconds.
2. [ENTER PIN] appears for 2 seconds which indicates that it is in code input mode.
3. [SR1 ----] appears which indicates that it is ready to input code.
4. With 1-4 buttons e, input the registered ID code.
(Example: When the registered ID code is “2323”, input “2323”. At this time, [SR1 2323] is displayed.)
Step (2) Collation with the registered ID code
5. Determine the inputted code by pressing the SCAN button g briefly.
6. When it does not match with the previously registered code, [SR1 Err] is displayed and then it returns to
the [SR1 ----] display.
7. When it matches with the previously registered code, [ENTER PIN] appears again and it is in code input
mode.
8. [SR1 ----] appears and it is ready to input the new ID code.
Step (3) New ID code input
9. With 1-4 buttons e, input a new code.
(Example: When “1234” is inputted as the new code, [SR1 1234] is displayed.)
Step (4) New ID code input determination
10. Determine the inputted new ID code by pressing the SCAN button g briefly.
11. [PIN CHANGED] appears for 3 seconds which indicates that the new ID code input is completed.
12. It returns to the former display.
<How to clear the message>
• Press any of the FM/AM, SAT, CD, MD/TAPE, CLOCK, TEXT, POWER buttons.
• Turn ACC off or insert CD, MD, or cassette.
Notes
• If a number is not inputted for 10 seconds, [Err] is displayed and it returns to the former
display.
Buttons used for input of the ID code shall be 1, 2, 3, 4 and SCAN buttons. Buttons 5 and
•
6 cannot be used.
-14-
Page 18
RE-SETTING ID CODE.............................................. ➂, ➄
When forgetting the registered ID code, return the ID code to the default [0000].
Setting condition : SAT mode
Step (1) Master code input preparation
1. First press the SCAN button g, then press "4" button e, hold both button together for 1.5 seconds.
2. [ENTER PIN] appears for 2 seconds which indicates that it is in code input mode.
3. [SR1 ----] appears which indicates that it is ready to input code.
Step (2) Master code input
4. With 1-4 buttons e, input the master code [0913].
[SR1 0913] is displayed after inputting the code.
(The master code is already set at the time of factory shipment.)
Step (3) Master code input determination
5. Determine the inputted master code by pressing the SCAN button g briefly.
6. [PIN CLEARED] appears which indicates that the master code input is completed.
7. The ID code is set to the default [0000] and the initialization process is completed.
8. It returns to the former display.
<How to clear the message>
• Press any of the FM/AM, SAT, CD, MD/TAPE, CLOCK, TEXT, POWER buttons.
• Turn ACC off or insert CD, MD, or cassette.
Notes
• When a numeric value other than the master code [0913] is inputted and the SCAN button
is pressed, [SR1 Err] is displayed and then it returns to the [SR1 ----] display again.
If a number is not inputted for 10 seconds, [Err] is displayed and it returns to the former
•
display.
Buttons used for input of the ID code shall be 1, 2, 3, 4 and SCAN buttons. Buttons 5 and
•
6 cannot be used.
-15-
Page 19
ERROR SIGNS
1) Depending on the condition (as large trees, buildings, tunnels etc.) and special weather conditions, the
reception of SIRIUS radio waves may be decreased or temporarily interrupted.
In this case the display [ACQUIRING] may appear.
2) In case of an antenna malfunction, [ANTENNA + FAIL] are displayed.
Check the antenna, antenna cable and DLP antenna connector.
<How to clear the message>
1. When the FM/AM, CD or MD/TAPE button is pressed.
2. When the weather conditions have been improved.
3. When an antenna connection failure has been restored.
Note
• When a broken DLP* unit is replaced with a new unit, cancel the license for the broken
unit and make sure to carry out new registration for the replaced unit. If the license for the
broken unit is not canceled, you will be charged a reception fee for both units.
*DLP: Down Link Processor (SIRIUS Satellite Radio Module)
-16-
Page 20
SPECIFICATION
DIGITAL RADIO SECTION
• Frequency Range . . . . . . . . . . . . . . . . . . . . . . . . . . . . 2320 MHz - 2332.5 MHz (Bandwidth 12.5 MHz)
• TDM1 (fc). . . . . . . . . . . . . . . . . . . . . . . . . . . . . . . . . . . . . . . . . . . . . . . . . . . . . . . . . . . . . 2322.293 MHz
• TDM2 (fc). . . . . . . . . . . . . . . . . . . . . . . . . . . . . . . . . . . . . . . . . . . . . . . . . . . . . . . . . . . . . 2330.207 MHz
• COFDM (fc) . . . . . . . . . . . . . . . . . . . . . . . . . . . . . . . . . . . . . . . . . . . . . . . . . . . . . . . . . . . . 2326.25 MHz
AUDIO SECTION
• Output level . . . . . . . . . . . . . . . . . . . . . . . . . . . . . . . . . . . . . . . . . . . . . . . . 425 mV ± 100 mV (DC14.4 V)
• Channel Balance . . . . . . . . . . . . . . . . . . . . . . . . . . . . . . . . . . . . . . . . . . . . . . . . . . . . . . . . . . . . . . . ±2 dB
• Distortion 1kHz with 20kHz LPF . . . . . . . . . . . . . . . . . . . . . . . . . . . . . . . . . . . . . . . . . . . . . . .under 0.2%
• Frequency Response. . . . . . . . . . . . . . . . . . . . . . . . . . . . . . . . . . . . . . . . . . . . . . . . . . . . 20 Hz-14.8 kHz
GENERAL
• Operating Voltage . . . . . . . . . . . . . . . . . . . . . . . . . . . . . . . . . . . . . . . . . . . . . . . . . . . . . . . . . . . DC14.4 V
• Dimensions (W×H×D) . . . . . . . . . . . . . . . . . . . . . . . . . . . . . . . . . . . . . . . . . . . . . 170×40×107 (120) mm
• Weight . . . . . . . . . . . . . . . . . . . . . . . . . . . . . . . . . . . . . . . . . . . . . . . . . . . . . . . . . . . . . . . . . . . . . . . 560 g
-17-
Page 21
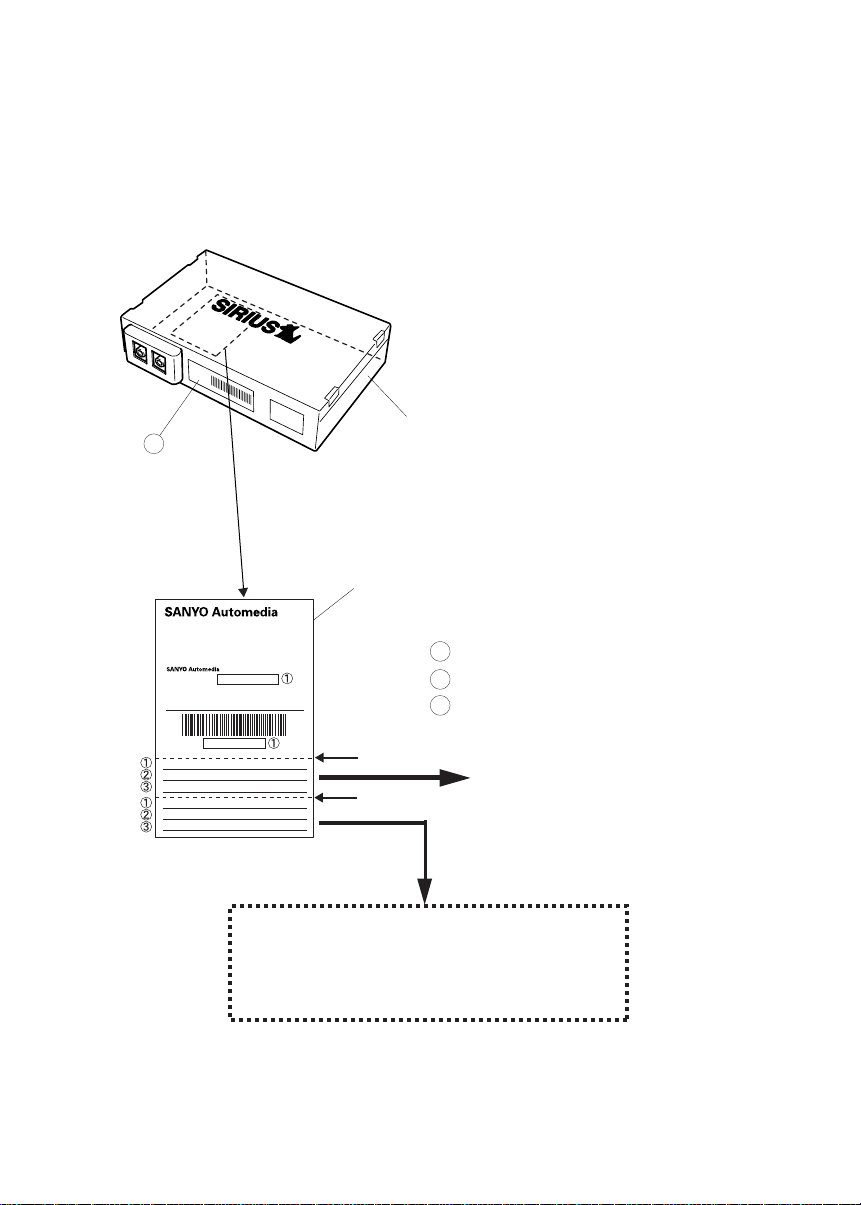
• Tear off the lower part of the rating label on the bottom of DLP* unit and affix one of them in
the position indicated below and submit the other one to the manager of installation
department.
• If there is nothing written in the SIRIUS ID (ESN) space of the label, write down the 12-digit
number printed in the label next to the DLP* unit connector.
• Do not fail to submit the record.
*DLP : Down Link Processor (SIRIUS Satellite Radio Module)
DLP unit
2
Rating label
MODEL NO. 14790651
PART NO. 0000 81 Z01
TDM1 : 2322.293MHz
TDM2 : 2330.207MHz
CDFDM : 2326.250MHz
DC 12 VOLTS NEGATIVE GROUND
SERIAL
THIS DEVICE COMPLITES WITH PART 15 OF THE
FCC RULES, OPERATION IS SUBJECT TO THE
CONDITION THAT THIS DEVICE DOES NOT CAUBE
MARHFUL INTEAFENCE.
MADE IN MALAYSIA
Sdn, Bhd
NO.
SERIAL No.
1
SIRIUS ID (ESN)
2
VIN
3
SERIAL NO.
ESN
VIN
SERIAL NO.
ESN
VIN
Tear off
Tear off
Affix
Submit to the manager of installation
department
-18-
Page 22

Printed in Malaysia
1ED 6P10A 19500
REV.0
 Loading...