

Page 1

Quick Start Guide
MAXTOR SHARED STORAGE™II
Page 2

Quick Start Guide
MAXTOR SHARED ST
CCoonntteenntts
English . . . . . . . . . . . . . . . . . . . . . . . . . . . . . . . . . . . . . . . . . .2
Français . . . . . . . . . . . . . . . . . . . . . . . . . . . . . . . . . . . . . . . . . .6
Deutsch . . . . . . . . . . . . . . . . . . . . . . . . . . . . . . . . . . . . . . . . .10
Italiano . . . . . . . . . . . . . . . . . . . . . . . . . . . . . . . . . . . . . . . . .14
Español . . . . . . . . . . . . . . . . . . . . . . . . . . . . . . . . . . . . . . . . .18
Nederlands . . . . . . . . . . . . . . . . . . . . . . . . . . . . . . . . . . . . . .22
Dansk . . . . . . . . . . . . . . . . . . . . . . . . . . . . . . . . . . . . . . . . . .26
Português . . . . . . . . . . . . . . . . . . . . . . . . . . . . . . . . . . . . . . .30
Suomi . . . . . . . . . . . . . . . . . . . . . . . . . . . . . . . . . . . . . . . . . .34
Polski . . . . . . . . . . . . . . . . . . . . . . . . . . . . . . . . . . . . . . . . . . .38
усский
English Warranty . . . . . . . . . . . . . . . . . . . . . . . . . . . . . . . . .46
Garantie (en français) . . . . . . . . . . . . . . . . . . . . . . . . . . . . .48
Deutsche
s
. . . . . . . . . . . . . . . . . . . . . . . . . . . . . . . . . . . . . . . .42
antieerklärung . . . . . . . . . . . . . . . . . . . . . . .50
Gar
ORAGE
™
II
Page 3
Windows 2000 and Windows XP Installation
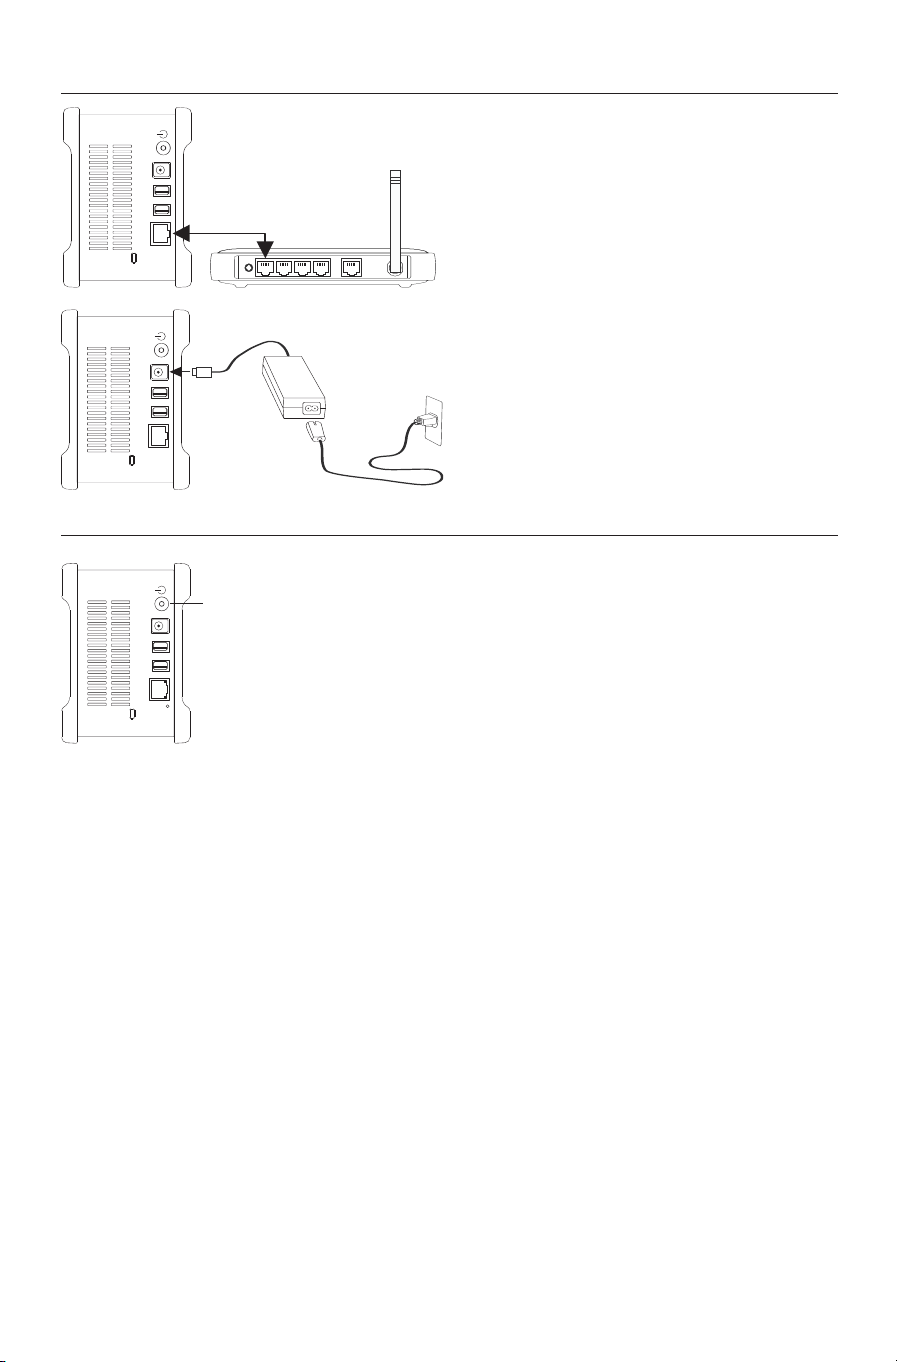
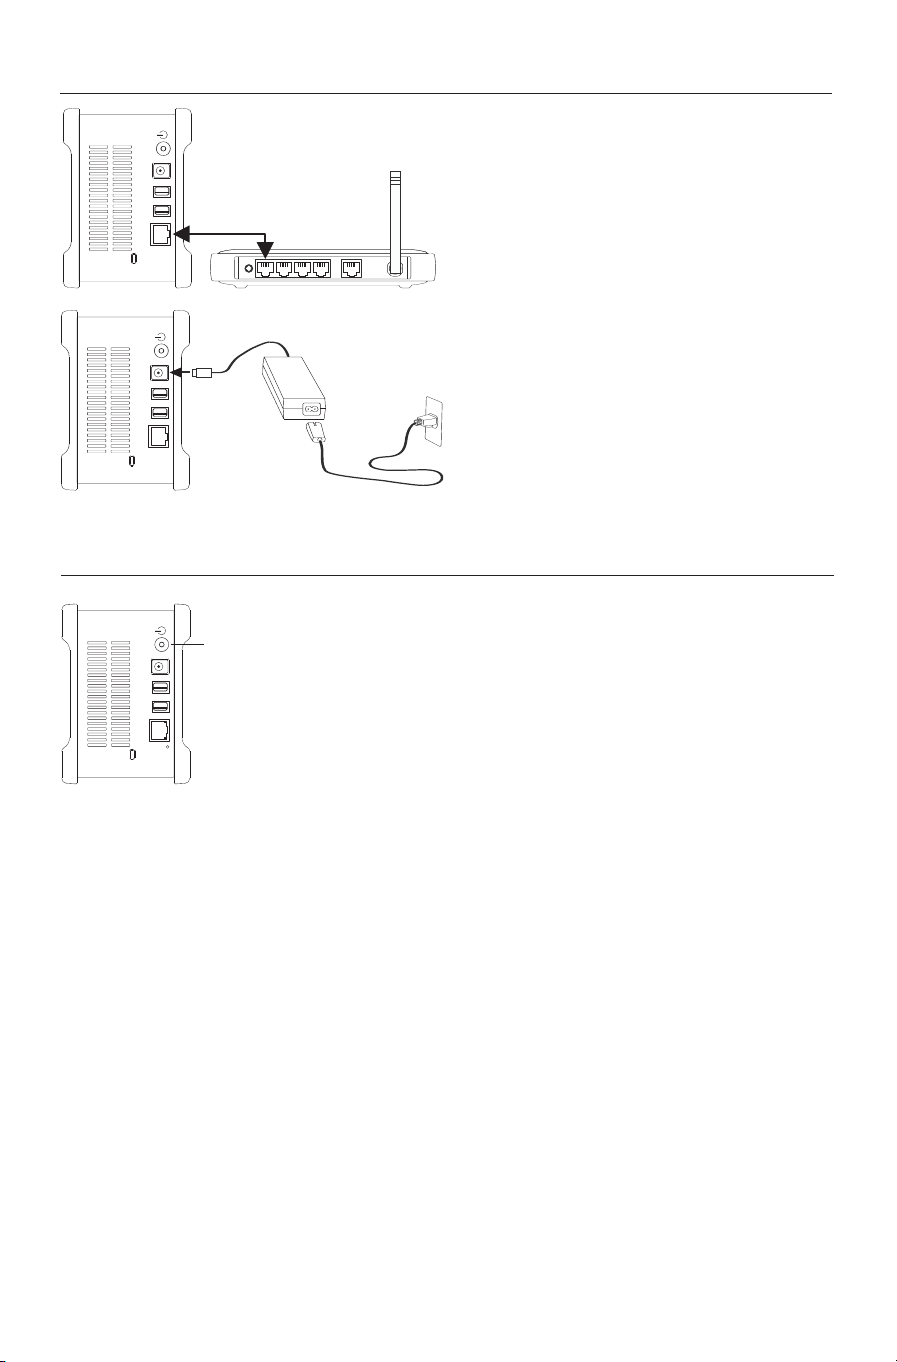
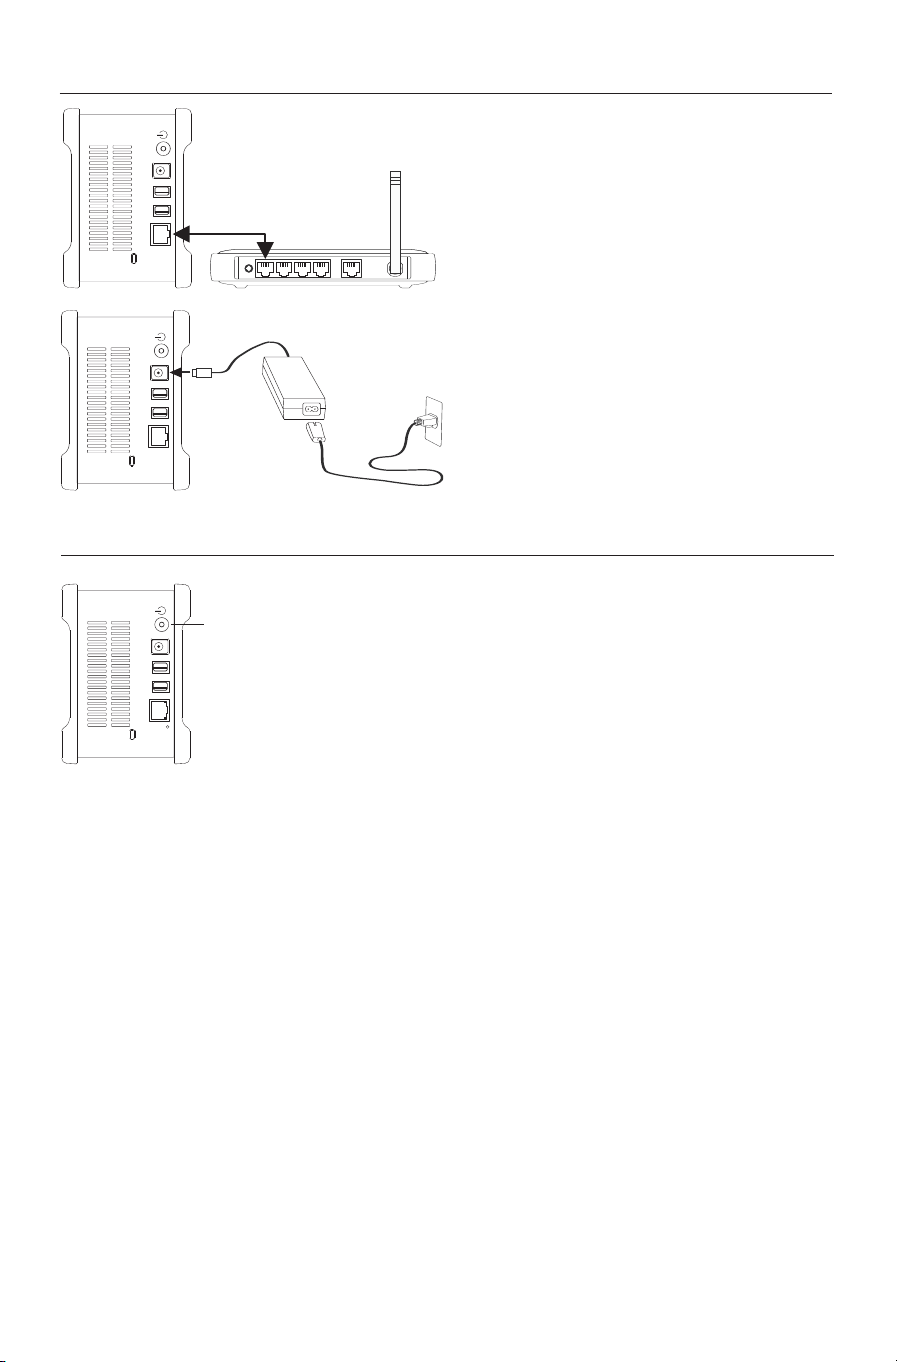
Step 1. Connect Your Drive
C
onnect the Ethernet Cable
1. Plug one end of the supplied Ethernet cable
into your network, router or switch.
2
. Plug the other end of the Ethernet cable
into the Ethernet port on your Shared
Storage II drive.
Connecting the Power
1. Plug the round female connector from the
power adapter into the drive’s power
connector.
2. Plug the two-pin female connector on the
power cord into the power adapter.
3. Plug the standard electrical plug from the
power adapter into your power source.
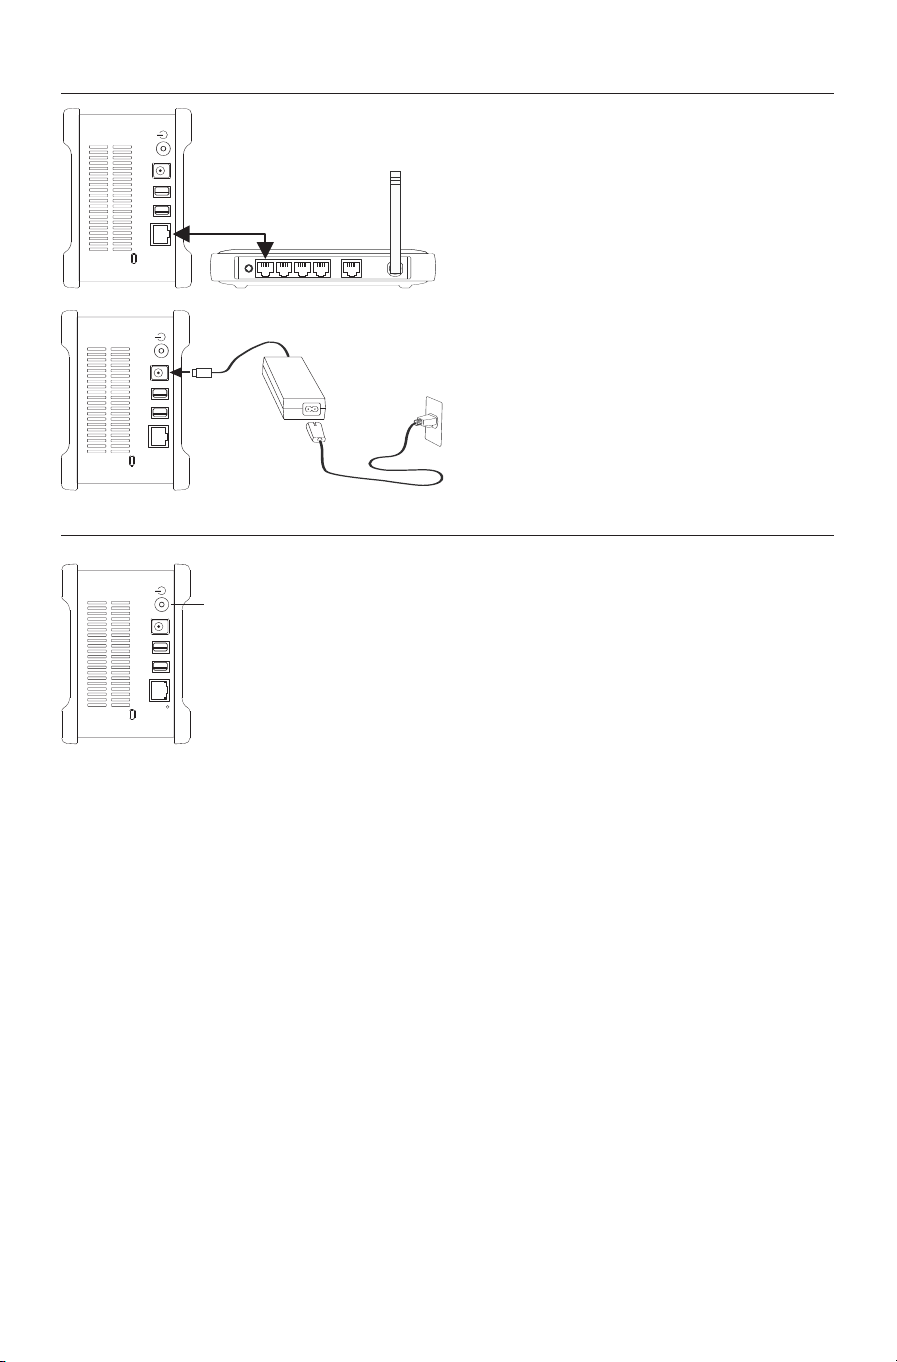
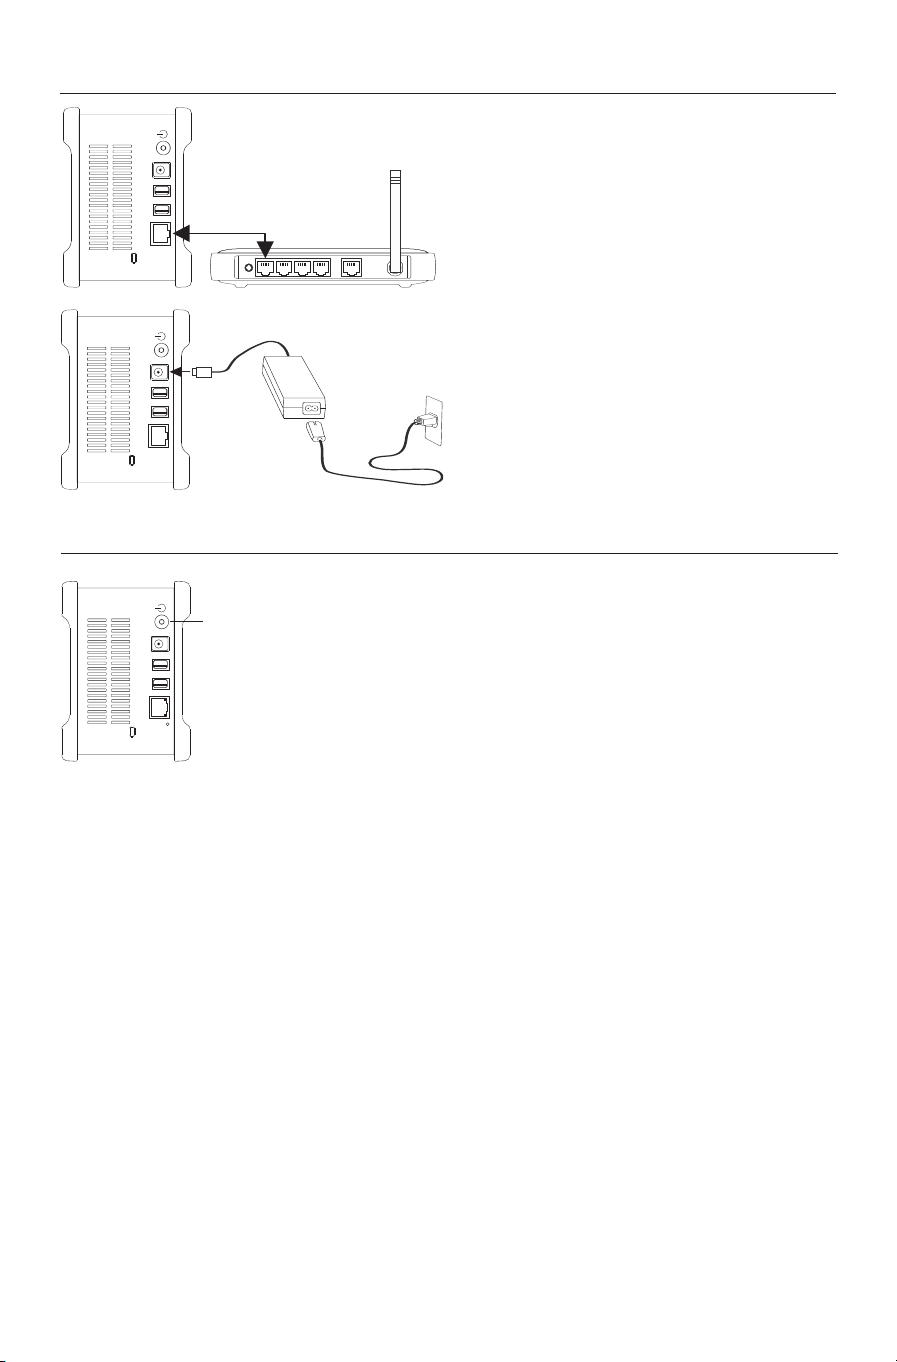
Step 2. Power up Your Drive
Power Button
1. Press the round black button on the back
panel of your Maxtor Shared Storage II
drive. The green LED (light) with illuminate
in the center of the power button.
2. Your drive will now start. The start up
process can take up to one minute to
complete.
NNoottee:
:
Refer to the Maxtor Shared Stor
User’s Guide for more information on the
power/status LED definitions.
age II
ENGLISH
2
Page 4

Step 3. Set up Your Drive
Includes:
– Maxtor EasyManage
™
Software
– Maxtor Backup
™
Software
– Maxtor Shared Storage II
User Guide (English)
©
2006 Maxtor Corporation and its Licensors. Maxtor and the stylized
M
axtor logo are registered trademarks,and Maxtor Shared Storage,
M
axtor EasyManage, and Maxtor Backup are trademarks of
Maxtor Corporation. U.S. patents 5,150,473 and 5,966,730.
Other patents pending. Other trademarks are the property
o
f their respective holders. All rights reserved.
0
6/06 PN: 20337500
WINDOWS
English
Français
Deutsch
Español
Italiano
MACINTOSH
English
Français
Deutsch
Installation Software
Maxtor Shared Storage
™
II
Logiciel d’installation, Installationssoftware,
Software di installazione, Installationsprogram,
Software de instalación, Installatiesoftware,
A
sennusohjelma, Software de Instalação,
1
. Insert the
SSeelleecctt aa llaanngguuaagge
MMaaxxttoorr SShhaarreedd SSttoorraaggee IIII IInnssttaallllaattiioonn SSooffttwwaarree CCD
e
and click
2. From the main menu, click
YYees
3. Click
s
when prompted to continue. The software will prepare
OOK
K
.
IInnssttaallll SSooffttwwaarre
e
.
D
.
to install.
NNeexxt
4. From the Welcome screen, click
t
. Follow the on-screen
prompts to complete the installation.
FFiinniissh
5. When the installation is complete, click
h
to restart your PC.
6. Upon restart, Maxtor EasyManager searches for Shared Storage
drives on your network. When found, you will see the Network ID
number and IP address for the located drive(s). For example:
MSS-000338 (192.168.0.5).
NNoottee:
:
If a message appears stating that “No shared Storage drives
were found” select the
CClliicckk hheerre
e
button for more information and
a link for troubleshooting tips.
7. Once detected, a window displays informing you that your Shared
Storage II drive has no security password set for the administrative
MMaannaagge
e
function. To set a password for the drive, click
. This will
launch the Web User Interface (Web UI). Follow the on-screen
prompts in your browser to configure your Shared Storage drive.
When finished, close your browser to return to the EasyManager’s
8.
HHoomme
e
Settings screen, and then click the
button.
9. When the Home screen appears, click on the
aaccccoouunnt
t
button.
10. Choose an account type (
oorr BBuussiinneesss
s
), provide the necessary information and click
PPuubblliicc AAccccoouunnt
PPrriivvaattee AAccccoouunntt // HHoomme
t
or
CCrreeaattee aa uusseer
r
CCrreeaatte
e
e
.
The EasyManage™ software will now create the new user account
and the appropriate folders for the account. When finished, a desktop shortcut will appear for this user’s shar
ENGLISH
3
e.
Page 5
Macintosh OS X Installation
Step 1. Connect Your Drive
C
onnect the Ethernet Cable
1. Plug one end of the supplied Ethernet cable
into your network, router or switch.
2
. Plug the other end of the Ethernet cable
into the Ethernet port on your Shared
Storage II drive.
Connecting the Power
1. Plug the round female connector from the
power adapter into the drive’s power
connector.
2. Plug the two-pin female connector on the
power cord into the power adapter.
3. Plug the standard electrical plug from the
power adapter into your power source.
Step 2. Power up Your Drive
Power Button
1. Press the round black button on the back
panel of your Maxtor Shared Storage II
drive. The green LED (light) with illuminate
in the center of the power button.
2. Your drive will now start. The start up
process can take up to one minute to
complete.
NNoottee:
:
Refer to the Maxtor Shared Stor
User’s Guide for more information on the
power/status LED definitions.
age II
ENGLISH
4
Page 6

Step 3. Set up Your Drive
I
ncludes:
– Maxtor EasyManage
™
Software
– Maxtor Backup
™
Software
– Maxtor Shared Storage II
User Guide (English)
© 2006 Maxtor Corporation and its Licensors. Maxtor and the stylized
Maxtor logo are registered trademarks,and Maxtor Shared Storage,
M
axtor EasyManage, and Maxtor Backup are trademarks of
M
axtor Corporation. U.S. patents 5,150,473 and 5,966,730.
O
ther patents pending. Other trademarks are the property
of their respective holders. All rights reserved.
06/06 PN: 20337500
WINDOWS
English
Français
Deutsch
Español
Italiano
M
ACINTOSH
English
Français
Deutsch
Installation Software
Maxtor Shared Storage
™
II
Logiciel d’installation, Installationssoftware,
Software di installazione, Installationsprogram,
S
oftware de instalación, Installatiesoftware,
A
sennusohjelma, Software de Instalação,
1. Insert the
double-click the
EEaassyyMMaannaaggee PPaacckkaagge
2. From the
3. Review the
MMaaxxttoorr SShhaarreedd SSttoorraaggee IIII IInnssttaallllaattiioonn SSooffttwwaarree CCD
IInnssttaallll CCD
WWeellccoomme
LLiicceennssee AAggrreeeemmeennt
D
e
.
e
screen, click
icon. Double-click the
CCoonnttiinnuue
e
t
and click
CCoonnttiinnuue
To accept the terms of the license agreement click
4. Select a
IInnssttaalll
click
ddeessttiinnaattiioon
n
to install the EasyManage software and then
l
.
MMaaxxttoor
.
e
to proceed.
AAggrreee
D
and
r
e
.
5. You will be notified that the installation requires a system restart.
CCoonnttiinnuuee iinnssttaallllaattiioon
Click
6. When the installation is complete, click
7. Upon restart, double-click
n
.
EEaassyyMMaannaagge
RReessttaarrt
t
.
e
located on your desktop.
EasyManage searches for Shared Storage Drives on your network.
When found, you will see the Network ID number and IP address
for the located drive(s). For example:
MSS-000338 (192.168.0.5).
Highlight the Shared Storage Drive you wish to configure and click
SSeelleecctt DDrriivve
NNoottee:
e
.
:
If no Shared Storage Drives were found, click
HHeellp
p
for more
information and troubleshooting tips.
age Administrator Password window
8. The EasyManage - Shared St
will appear, all
owing you to set administrative security on the
Shared Storage II drive. Click
and set an administrative passw
or
YYees
s
to launch the Web User Interface
ord.
9. When finished, close your browser to return to the EasyManage
screen.
+
+
10. When the main menu appears, click on the Plus (
) icon of the
EasyManage screen to create a new user account.
11. Choose an account type (
NNeexxt
click
12. Select a Folder Type (
t
.
HHoomme
PPuubblliicc AAccccoouunnt
BBuussiinneesss
e
,
t
or
NNoonne
s
or
PPrriivvaattee AAccccoouunnt
e
). The EasyManage
t
) and
software will now create your new user account and the appropriate
olders for the account.
f
13. Enter a
NNoottee:
:
Macint
NNaamme
e
for the new account and click
or EasyManage softwar
Maxt
er in order for each user to take advantage of a
omput
osh c
e mus
CCrreeaatte
t be ins
e
.
ed on each
all
t
Personal folder.
ENGLISH
5
Page 7

Installation pour Windows 2000 et Windows XP
Étape 1. Connexion du disque
C
onnexion du câble Ethernet
1. Branchez une extrémité du câble Ethernet
fourni sur le commutateur ou le routeur de
votre réseau.
2. Branchez l’autre extrémité du câble dans
le port Ethernet de votre disque Shared
Storage II.
Connexion de l’alimentation
1. Branchez le connecteur rond de type
femelle de l’adaptateur dans la prise
d’alimentation du disque.
2. Branchez le connecteur femelle à deux
broches du câble d’alimentation
à l’adaptateur.
3. Branchez la prise électrique standard de
l’adaptateur à une source d’alimentation.
Étape 2. Mise sous tension du disque
Interrupteur d'alimentation
1. Appuyez sur le bouton noir rond qui se trouve
à l’arrière de votre disque Maxtor Shared
Storage II. La DEL (lumière) verte s’allume
au centre du bouton d’alimentation.
2. Le cycle de démarrage de votre disque
commence. Ce cycle peut prendre jusqu’à
une minute.
RReemmaarrqquuee :
d’utilisation du Maxtor Shared Storage II
pour de plus amples informations sur les
significations des couleurs de la DEL
d’aliment
:
reportez-vous au guide
ation/état.
FRANÇAIS
6
Page 8

Étape 3. Configuration du disque
Includes:
– Maxtor EasyManage
™
Software
– Maxtor Backup
™
Software
– Maxtor Shared Storage II
User Guide (English)
©
2006 Maxtor Corporation and its Licensors. Maxtor and the stylized
M
axtor logo are registered trademarks,and Maxtor Shared Storage,
M
axtor EasyManage, and Maxtor Backup are trademarks of
Maxtor Corporation. U.S. patents 5,150,473 and 5,966,730.
Other patents pending. Other trademarks are the property
o
f their respective holders. All rights reserved.
0
6/06 PN: 20337500
WINDOWS
English
Français
Deutsch
Español
Italiano
MACINTOSH
English
Français
Deutsch
Installation Software
Maxtor Shared Storage
™
II
Logiciel d’installation, Installationssoftware,
Software di installazione, Installationsprogram,
Software de instalación, Installatiesoftware,
A
sennusohjelma, Software de Instalação,
1
. Insérez le
SSttoorraaggee III
CCDD--RROOMM dduu llooggiicciieell dd’’iinnssttaallllaattiioonn ddee MMaaxxttoorr SShhaarreed
SSéélleeccttiioonnnneezz uunnee llaanngguue
I
.
e
et cliquez sur
2. À partir du menu principal, cliquez sur
OOuui
3. Cliquez sur
i
lorsque vous y êtes invité pour continuer.
OOK
IInnssttaalllleerrllee llooggiicciieel
d
K
.
l
.
Le logiciel prépare l’installation.
SSuuiivvaannt
4. Sur l’écran de bienvenue, cliquez sur
t
. Suivez les invites à
l’écran pour terminer l’installation.
5. Une fois l’installation terminée, chiquez sur
TTeerrmmiinneer
r
pour
redémarrer votre ordinateur.
6. Après le redémarrage, le Maxtor EasyManage recherche les disques
Shared Storage sur votre réseau. Lorsque le logiciel trouve un disque,
l’identifiant réseau et l’adresse IP du ou des disques détectés
s’affichent. Par exemple :
RReemmaarrqquuee :
:
si le message “Aucun disque Shared Storage n’a été
trouvé” apparaît, cliquez sur le bouton
d’informations ainsi qu’un lien vers les c
MSS-000338 (192.168.0.5)
CClliiqquueezz iicci
i
pour obtenir plus
onseils de dépannage.
.
7. Une fois le ou les disque(s) détecté(s), une fenêtre s’ouvre et vous
informe que votre disque Shared Storage II ne dispose pas d’un mot
de passe sécurisé pour la fonction d’administration. Pour définir un
GGéérreer
r
mot de passe pour le disque, cliquez sur
. L’interface utilisateur
Web s’ouvre. Suivez les invites à l’écran dans votre navigateur pour
configurer votre disque Shared Storage.
8. Une f
ois terminé, fermez le navigateur pour retourner à l’écran
de configur
PPeerrssoonnnneel
ation de EasyManage puis cliquez sur l
l
.
e bouton
CCrrééeerr uun
9. Lorsque l’écran Personnel apparaît, cliquez sur le bouton
ccoommppttee uuttiilliissaatteeuur
10. Sélectionnez un type de compte (
PPeerrssoonnnneel
puis cliquez sur
eau compte utilisateur ainsi que les dossiers correspondants
nouv
PPrrooffeessssiioonnnneel
l
ou
CCrrééeer
r
.
CCoommppttee ppuubblliic
l
), saisissez les informations requises
r
. Le logiciel EasyManage™ crée alors un
CCoommppttee pprriivvéé /
c
ou
n
/
à ce compte. Une fois l’opération terminée, un raccourci pour ce
nouveau compte apparaît sur le bureau.
FRANÇAIS
7
Page 9
Installation pour Macintosh OS X
Étape 1. Connexion du disque
C
onnexion du câble Ethernet
1. Branchez une extrémité du câble Ethernet
fourni sur le commutateur ou le routeur de
votre réseau.
2. Branchez l’autre extrémité du câble dans
le port Ethernet de votre disque Shared
Storage II.
Connexion de l’alimentation
1. Branchez le connecteur rond de type
femelle de l’adaptateur dans la prise
d’alimentation du disque.
2. Branchez le connecteur femelle à deux
broches du câble d’alimentation
à l’adaptateur.
3. Branchez la prise électrique standard de
l’adaptateur à une source d’alimentation.
Étape 2. Mise sous tension du disque
Interrupteur d'alimentation
1. Appuyez sur le bouton noir rond qui se trouve
à l’arrière de votre disque Maxtor Shared
Storage II. La DEL (lumière) verte s’allume
au centre du bouton d’alimentation.
2. Le cycle de démarrage de votre disque
commence. Ce cycle peut prendre jusqu’à
une minute.
RReemmaarrqquuee :
d’utilisation du Maxtor Shared Storage II
pour de plus amples informations sur les
significations des couleurs de la DEL
d’aliment
:
reportez-vous au guide
ation/état.
FRANÇAIS
8
Page 10

Étape 3. Configuration du disque
Includes:
– Maxtor EasyManage
™
Software
– Maxtor Backup
™
Software
– Maxtor Shared Storage II
User Guide (English)
© 2006 Maxtor Corporation and its Licensors. Maxtor and the stylized
Maxtor logo are registered trademarks,and Maxtor Shared Storage,
M
axtor EasyManage, and Maxtor Backup are trademarks of
M
axtor Corporation. U.S. patents 5,150,473 and 5,966,730.
O
ther patents pending. Other trademarks are the property
of their respective holders. All rights reserved.
06/06 PN: 20337500
WINDOWS
English
Français
Deutsch
Español
Italiano
MACINTOSH
English
Français
Deutsch
Installation Software
Maxtor Shared Storage
™
II
L
ogiciel d’installation, Installationssoftware,
S
oftware di installazione, Installationsprogram,
S
oftware de instalación, Installatiesoftware,
A
sennusohjelma, Software de Instalação,
1. Insérez le
SSttoorraaggee III
D
ouble-cliquez sur
2. Sur
3. Lisez le
CCDD--RROOMM dduu llooggiicciieell dd’’iinnssttaallllaattiioonn ddee MMaaxxttoorr SShhaarreed
I
et double-cliquez sur l’icône du
llee ppaacckk MMaaxxttoorr EEaassyyMMaannaagge
ll’’ééccrraann ddee bbiieennvveennuue
ccoonnttrraatt ddee lliicceenncce
e
, cliquez sur
e
et cliquez sur
CCoonnttiinnuueer
les conditions du contrat de licence, cliquez sur
4. Sélectionnez un emplacement de
logiciel EasyManage puis cliquez sur
ddeessttiinnaattiioon
IInnssttaalllleer
CCDD--RROOMM dd’’iinnssttaallllaattiioon
e
.
r
.
CCoonnttiinnuueer
r
. Pour accepter
AAcccceepptteer
n
pour l’installation du
r
.
d
n
r
.
5. Un message vous avertit qu’il faut redémarrer le système. Cliquez
CCoonnttiinnuueerr ll’’iinnssttaallllaattiioon
sur
6. Lorsque l’installation est terminée, cliquez sur
7. Une fois le redémarrage effectué, double-cliquez sur
n
.
RReeddéémmaarrrreer
r
.
EEaassyyMMaannaagge
qui se trouve sur le bureau. EasyManage recherche alors les disques
Shared Storage sur votre réseau. Lorsque le logiciel trouve un disque,
l’identifiant réseau et l’adr
s’affichent. Par exemple :
surbrillanc
et cliquez sur
RReemmaarrqquuee :
cliquez sur
e le disque Shared Storage que vous souhaitez configurer
SSéélleeccttiioonnnneerr llee ddiissqquue
:
si le logiciel ne trouve aucun disque Shared Storage,
AAiidde
e
pour obtenir plus d’informations ainsi que des
se IP du ou des disques dét
es
MSS-000338 (192.168.0.5)
e
.
ectés
. Mettez en
conseils de dépannage.
8. La fenêtre du mot de passe administrateur de EasyManage - Shared
Storage apparaît. Elle vous permet de configurer une sécurité
OOuui
d’adminis
ation sur le disque Shared Storage II. Cliquez sur
tr
i
afin de lancer l’interface utilisateur Web et de définir un mot de
passe d’administration.
.
e
9. Une f
ois terminé, fermez votre navigateur afin de retourner à
l’écran de EasyManage.
+
10. Lorsque le menu principal s’affiche, cliquez sur l’icône Plus (
+
) de
l’écran EasyManage pour créer un nouveau compte utilisateur.
11. Sélectionnez un type de compte (
SSuuiivvaannt
et cliquez sur
t
.
12. Sélectionnez un type de dossier (
AAuuccuun
n
ogiciel EasyManage cr
). Le l
CCoommppttee ppuubblliic
PPeerrssoonnnneel
ée al
l
,
ors votre nouveau compte
CCoommppttee pprriivvé
c
ou
PPrrooffeessssiioonnnneel
é
)
l
ou
utilisateur ainsi que les dossiers correspondants au compte.
13. Entrez un
RReemmaarrqquuee :
NNoom
m
pour le nouveau compte et cliquez sur
:
ogiciel Maxtor EasyManage doit être installé sur
e l
l
CCrrééeer
r
.
chaque ordinateur Macintosh afin que chaque utilisateur puisse
bénéficier d’un dossier personnel.
FRANÇAIS
9
Page 11
Installation unter Windows 2000 und Windows XP
Schritt 1 - Festplatte anschließen
E
thernetkabel anschließen
1. Schließen Sie ein Ende des mitgelieferten
Ethernetkabels an Ihren Netzwerk-Router
oder Switch an.
2. Stecken Sie das andere Ende des
Ethernetkabels in den Ethernetanschluss
Ihrer Shared Storage II-Festplatte.
Stromversorgung anschließen
1. Stecken Sie den runden Stecker des
Netzteils in den Netzanschluss der
Festplatte.
2. Verbinden Sie den 2-Stift-Stecker am
Stromkabel mit dem Netzadapter.
3. Schließen Sie den Netzstecker des
Netzadapters an die Stromversorgung an.
Schritt 2 - Festplatte einschalten
Ein-/Ausschalttaste
1. Drücken Sie auf die runde schwarze Taste an
der Rückseite der Maxtor Shared Storage
II-Festplatte. Die LED des Netzschalters
leuchtet grün.
2. Die Festplatte fährt hoch. Das Hochfahren
kann bis zu einer Minute dauern.
HHiinnwweeiiss:
:
Erläuterungen der Betriebs/Statusanzeige finden Sie im Maxtor Shared
Storage II-Benutzerhandbuch.
DEUTSCH
10
Page 12

Schritt 3 - Festplatte einrichten
Includes:
– Maxtor EasyManage
™
Software
– Maxtor Backup
™
Software
– Maxtor Shared Storage II
User Guide (English)
©
2006 Maxtor Corporation and its Licensors. Maxtor and the stylized
M
axtor logo are registered trademarks,and Maxtor Shared Storage,
M
axtor EasyManage, and Maxtor Backup are trademarks of
Maxtor Corporation. U.S. patents 5,150,473 and 5,966,730.
Other patents pending. Other trademarks are the property
o
f their respective holders. All rights reserved.
0
6/06 PN: 20337500
WINDOWS
English
Français
Deutsch
Español
Italiano
MACINTOSH
English
Français
Deutsch
Installation Software
Maxtor Shared Storage
™
II
Logiciel d’installation, Installationssoftware,
Software di installazione, Installationsprogram,
Software de instalación, Installatiesoftware,
A
sennusohjelma, Software de Instalação,
1
. Legen Sie die
IInnssttaallllaattiioonnssssooffttwwaarree eeiin
S
ie auf „
MMaaxxttoorr SShhaarreedd SSttoorraaggee IIII--CCDD--RROOMM mmiitt ddeer
WWäähhlleenn SSiiee IIhhrree SSpprraacchhe
n
.
OOK
K
“
.
2. Klicken Sie im Hauptmenü auf „
JJa
3. Klicken Sie auf „
a
”, um den Vorgang fortzusetzen. Die Installation
SSooffttwwaarree iinnssttaalllliieerreen
r
e
und klicken
n
“.
wird vorbereitet.
WWeeiitteer
4. Klicken Sie im Startbildschirm auf „
r
“. Folgen Sie den
Bildschirmanweisungen, um die Installation abzuschließen.
5. Klicken Sie nach Abschluss der Installation auf „
FFeerrttiigg sstteelllleen
n
“,
um den Computer neu zu starten.
6. Nach dem Neustart sucht der Maxtor EasyManage nach Shared
Storage-Festplatten in Ihrem Netzwerk. Alle gefundenen
Festplatten werden mit ihrer Netzwerkkennung und IP-Adresse
angezeigt. Zum Beispiel:
HHiinnwweeiiss:
:
Falls die Meldung „Keine Shared Storage-Festplatten
gefunden“ erscheint, klicken Sie auf „
MSS-000338 (192.168.0.5)
KKlliicckkeenn SSiiee hhiieer
.
r
“, um weitere
Informationen und einen Link mit Tipps zur Fehlersuche
anzuzeigen.
7. Sobald eine Shared Storage II-Festplatte erkannt wurde, wird ein
Fenster angezeigt, in dem Sie darüber informiert werden, dass für
die administrativen Funktionen Ihrer Shared Storage II-Festplatte
kein Sicherheitskennwort festgelegt wurde. Klicken Sie auf
VVeerrwwaalltteen
„
n
“, um ein Kennwort für die Festplatte festzulegen.
Daraufhin startet die Weboberfläche. Folgen Sie den
Bildschirmanweisungen in Ihrem Browser zur Konfiguration
der Shared Storage-Festplatte.
Schließen Sie anschließend Ihren Browser, um zu den EasyManage
8.
-Einstellungen zurückzukehren, und klicken Sie auf die
HHoomme
Schaltfläche „
9. Klicken Sie auf der Hauptseite auf „
Wählen Sie eine Kontoart („
10.
PPrriivvaatt ooddeerr GGeesscchhääfft
„
ein und klicken Sie auf „
e
“.
BBeennuuttzzeerrkkoonnttoo eerrsstteelllleen
ÖÖffffeennttlliicchheess KKoonntto
t
“), geben Sie die erforderlichen Informationen
AAnnlleeggeen
n
“. Die EasyManage-Software
PPrriivvaatteess KKoonntto
o
“, „
n
“.
o
“,
erstellt daraufhin Ihr neues Benutzerkonto und entsprechende
öffentliche und private Ordner. Anschließend wird auf dem Desktop
eine Verknüpfung für die Freigabe dieses Benutzers angezeigt.
DEUTSCH
11
Page 13
Installation unter Macintosh OS X
Schritt 1 - Festplatte anschließen
E
1. Schließen Sie ein Ende des mitgelieferten
2. Stecken Sie das andere Ende des
Stromversorgung anschließen
1. Stecken Sie den runden Stecker des
2. Verbinden Sie den 2-Stift-Stecker am
3. Schließen Sie den Netzstecker des
Schritt 2 - Festplatte einschalten
thernetkabel anschließen
Ethernetkabels an Ihren Netzwerk-Router
oder Switch an.
Ethernetkabels in den Ethernetanschluss
Ihrer Shared Storage II-Festplatte.
Netzteils in den Netzanschluss der
Festplatte.
Stromkabel mit dem Netzadapter.
Netzadapters an die Stromversorgung an.
Ein-/Ausschalttaste
1. Drücken Sie auf die runde schwarze Taste
an der Rückseite der Maxtor Shared Storage
II-Festplatte. Die LED des Netzschalters
leuchtet grün.
2. Die Festplatte fährt hoch. Das Hochfahren
kann bis zu einer Minute dauern.
HHiinnwweeiiss:
:
Erläuterungen der Betriebs/Statusanzeige finden Sie im Maxtor Shared
Storage II-Benutzerhandbuch.
DEUTSCH
12
Page 14

Schritt 3 - Festplatte einrichten
Includes:
– Maxtor EasyManage
™
Software
– Maxtor Backup
™
Software
– Maxtor Shared Storage II
User Guide (English)
© 2006 Maxtor Corporation and its Licensors. Maxtor and the stylized
Maxtor logo are registered trademarks,and Maxtor Shared Storage,
M
axtor EasyManage, and Maxtor Backup are trademarks of
M
axtor Corporation. U.S. patents 5,150,473 and 5,966,730.
O
ther patents pending. Other trademarks are the property
of their respective holders. All rights reserved.
06/06 PN: 20337500
WINDOWS
English
Français
Deutsch
Español
Italiano
MACINTOSH
English
Français
Deutsch
Installation Software
Maxtor Shared Storage
™
II
L
ogiciel d’installation, Installationssoftware,
S
oftware di installazione, Installationsprogram,
S
oftware de instalación, Installatiesoftware,
A
sennusohjelma, Software de Instalação,
1. Legen Sie die
IInnssttaallllaattiioonnssssooffttwwaarree eeiin
f
ür die
EEaassyyMMaannaaggee--PPaakkeet
MMaaxxttoorr SShhaarreedd SSttoorraaggee IIII--CCDD--RROOMM mmiitt ddeer
n
, und doppelklicken Sie auf das Symbol
IInnssttaallllaattiioonnss--CCDD--RROOM
t
.
M
.
Doppelklicken Sie auf das
2. Klicken Sie im Startbildschirm auf „
3. Lesen Sie die
WWeeiitteer
„
klicken Sie auf „
4. Geben Sie einen
LLiizzeennzzvveerreeiinnbbaarruunngg dduurrcch
r
“. Wenn Sie die Bedingungen der Vereinbarung akzeptieren,
AAkkzzeeppttiieerreen
ZZiieellppffaad
n
“.
d
für die Installation der EasyManage-
Software ein, und klicken Sie auf „
WWeeiitteer
r
“.
h
, und klicken Sie auf
IInnssttaalllliieerreen
n
“.
r
MMaaxxttoor
5. Eine Meldung weist Sie darauf hin, dass zum Abschließen der
Installation ein System-Neustart nötig ist. Klicken Sie auf
IInnssttaallllaattiioonn ffoorrttsseettzzeen
„
6. Klick
en Sie nach F
7. Doppelklicken Sie auf Ihrem Deskt
EEaassyyMMaannaagge
„
e
“. EasyManage sucht nun nach Shared Storage-
n
“.
tellung der Installation auf „
ertigs
op nach dem Neus
NNeeuussttaarrt
tart auf
Festplatten in Ihrem Netzwerk. Alle gefundenen Festplatten
werden mit ihrer Netzwerkkennung und IP-Adres
Zum Beispiel:
konfigurier
FFeessttppllaattttee aauusswwäähhlleen
„
HHiinnwweeiiss:
klicken Sie auf „
MSS-000338 (192.168.0.5)
ende Shared Storage-Festplatte, und klicken Sie auf
:
Falls keine Shared Storage-Festplatten gefunden wurden,
HHiillffe
n
“.
e
“, um weitere Informationen und Tipps zur
. Markieren Sie die zu
se angezeigt.
Fehlersuche zu erhalten.
r
t
“.
8. Das Fenster „EasyManage - Administratorkennwort für Shared
Storage“ wird eingeblendet. Hier können Sie administrative
Sicherheitseins
vornehmen. Klicken Sie auf „
tellungen auf der Shared Storage II-Festplatte
JJa
a
“, um die Weboberfläche zu starten
und ein Administratorkennwort festzulegen.
9. Schließen Sie anschließend Ihren Browser, um zum EasyManageBildschirm zurückzukehren.
+
+
10. Klicken Sie im Hauptmenü auf das Plus (
)-Symbol des EasyManage-
Bildschirms, um ein neues Benutzerkonto zu erstellen.
Wählen Sie eine Kontoart („
11.
KKoonntto
o
“), und klicken Sie auf „
ÖÖffffeennttlliicchheess KKoonntto
12. Wählen Sie einen Ordnertyp („
Die EasyManage-Softwar
e er
o
WWeeiitteer
r
“.
PPrriivvaat
tellt daraufhin Ihr neues
s
t
“, „
GGeesscchhääfft
“ oder „
t
“ oder „
PPrriivvaattees
KKeeiinneer
s
r
“).
Benutzerkonto und entsprechende öffentliche und private Ordner.
NNaammeen
13. Geben Sie einen
AAnnlleeggeen
auf „
HHiinnwweeiiss:
Macint
Benutzer einen priv
n
“.
:
Die Maxtor EasyManage-Software muss auf jedem
osh-Comput
DEUTSCH
n
für das neue Konto ein, und klicken Sie
alliert werden, damit jeder
t
er im Netzw
erk ins
aten Ordner erhält.
13
Page 15

Installazione (Windows 2000 e Windows XP)
Fase 1. Collegamento dell'unità
C
ollegamento del cavo Ethernet
1. Collegare un'estremità del cavo Ethernet
alla rete, al router o allo switch.
2
. Inserire l'altro connettore del cavo
Ethernet nella porta Ethernet dell'unità
Shared Storage II.
Alimentazione
1. Collegare il connettore femmina rotondo
dell’alimentatore al connettore di
alimentazione dell’unità.
2. Inserire il connettore femmina a due pin
del cavo di alimentazione nell'alimentatore.
3. Inserire la spina standard dell'alimentatore
nella presa di alimentazione.
Fase 2. Accensione dell'unità
Pulsante di alimentazione
1. Premere il pulsante nero rotondo posto sul
pannello posteriore dell'unità Maxtor
Shared Storage II. Il LED verde (la spia) si
illuminerà nella parte centrale del pulsante
di alimentazione.
2. L'unità si accende. La durata del processo
di avvio può raggiungere 1 minuto.
NNoottaa:
:
per ulteriori informazioni sulle
definizioni di alimentazione e stato del LED,
consultare la Guida ut
Storage II.
ente di Maxtor Shared
ITALIANO
14
Page 16

Fase 3. Installazione dell'unità
Includes:
– Maxtor EasyManage
™
Software
– Maxtor Backup
™
Software
– Maxtor Shared Storage II
User Guide (English)
©
2006 Maxtor Corporation and its Licensors. Maxtor and the stylized
M
axtor logo are registered trademarks,and Maxtor Shared Storage,
M
axtor EasyManage, and Maxtor Backup are trademarks of
Maxtor Corporation. U.S. patents 5,150,473 and 5,966,730.
Other patents pending. Other trademarks are the property
o
f their respective holders. All rights reserved.
0
6/06 PN: 20337500
WINDOWS
English
Français
Deutsch
Español
Italiano
MACINTOSH
English
Français
Deutsch
Installation Software
Maxtor Shared Storage
™
II
Logiciel d’installation, Installationssoftware,
Software di installazione, Installationsprogram,
Software de instalación, Installatiesoftware,
A
sennusohjelma, Software de Instalação,
1
. Inserire il
SSeelleezziioonnaarree llaa lliinngguua
CCDD ddii iinnssttaallllaazziioonnee ddii MMaaxxttoorr SShhaarreedd SSttoorraaggee III
a
desiderata e fare clic su
2. Nel menu principale, fare clic su
3. Quando richiesto, fare clic su
YYees
OOK
K
IInnssttaallll SSooffttwwaarree
s
(Sì) per continuare. Verrà avviato
I
.
.
(Installa software).
il processo di installazione del software.
4. Nella finestra di benvenuto, fare clic su
NNeexxtt
(Avanti). Seguire le
istruzioni visualizzate per completare l’installazione.
5. Una volta completata l'installazione, fare clic su
FFiinniisshh
(Fine) per
riavviare il PC.
6. Al riavvio del sistema, in Maxtor EasyManage™ verrà avviata la
ricerca di unità Shared Storage sulla rete. Terminata la ricerca,
verranno visualizzati numero di ID di rete e indirizzo IP.
Ad esempio:
NNoottaa:
:
MSS-000338 (192.168.0.5)
.
se il sistema visualizza un messaggio in cui viene notificato
che non è stato possibile individuare unità Shared Storage,
selezionare il pulsante
CClliicckk hheerree
(Fai clic qui), quindi un
collegamento per suggerimenti sulla risoluzione del problema.
7. Una volta rilevato, il sistema visualizza una finestra in cui viene
notificato che l'unità Shared Storage II non dispone di alcuna
password di protezione impostata per la funzione amministrativa.
Per impostare una password, fare clic su
MMaannaaggee
(Gestisci). Verrà
avviata l'interfaccia utente Web. Seguire le istruzioni visualizzate
nel browser per configurare l'unità Shared Storage.
8. Al t
ermine, chiuder
e il browser per tornare alla schermata
delle impostazioni di EasyManage, quindi fare clic sul pulsante
HHoommee
(Pagina Iniziale).
9. Una volta visualizzata la schermata della Pagina Iniziale, fare clic
sul pulsante
CCrreeaa aaccccoouunntt uutteenntte
10. Scegliere il tipo di account (
BBuussiinneesss
fare clic su
s
[aziendale]), fornire le informazioni necessarie, quindi
CCrreeaattee
ea). In EasyManage™ vengono creati il nuovo
(Cr
e
.
PPuubbbblliicco
PPeerrssoonnaallee//HHoomme
o
o
e
[casa] o
account utente e tutte le cartelle relative all'account. Al termine,
viene creata un'icona del collegamento alla condivisione utente
sul desktop.
ITALIANO
15
Page 17

Installazione (Macintosh OS X)
Fase 1. Collegamento dell'unità
C
ollegamento del cavo Ethernet
1. Collegare un'estremità del cavo Ethernet
alla rete, al router o allo switch.
2
. Inserire l'altro connettore del cavo
Ethernet nella porta Ethernet dell'unità
Shared Storage II.
Alimentazione
1. Collegare il connettore femmina rotondo
dell’alimentatore al connettore di
alimentazione dell’unità.
2. Inserire il connettore femmina a due pin
del cavo di alimentazione nell'alimentatore.
3. Inserire la spina standard dell'alimentatore
nella presa di alimentazione.
Fase 2. Accensione dell'unità
Pulsante di alimentazione
1. Premere il pulsante nero rotondo posto sul
pannello posteriore dell'unità Maxtor
Shared Storage II. Il LED verde (la spia) si
illuminerà nella parte centrale del pulsante
di alimentazione.
2. L'unità si accende. La durata del processo
di avvio può raggiungere 1 minuto.
NNoottaa:
:
per ulteriori informazioni sulle
definizioni di alimentazione e stato del LED,
consultare la Guida ut
Storage II.
ente di Maxtor Shared
ITALIANO
16
Page 18

Fase 3. Installazione dell'unità
Includes:
– Maxtor EasyManage
™
Software
– Maxtor Backup
™
Software
– Maxtor Shared Storage II
User Guide (English)
© 2006 Maxtor Corporation and its Licensors. Maxtor and the stylized
Maxtor logo are registered trademarks,and Maxtor Shared Storage,
M
axtor EasyManage, and Maxtor Backup are trademarks of
M
axtor Corporation. U.S. patents 5,150,473 and 5,966,730.
O
ther patents pending. Other trademarks are the property
of their respective holders. All rights reserved.
06/06 PN: 20337500
WINDOWS
English
Français
Deutsch
Español
Italiano
MACINTOSH
English
Français
Deutsch
Installation Software
Maxtor Shared Storage
™
II
L
ogiciel d’installation, Installationssoftware,
S
oftware di installazione, Installationsprogram,
S
oftware de instalación, Installatiesoftware,
A
sennusohjelma, Software de Instalação,
1. Inserire il
CCDD ddii iinnssttaallllaazziioonnee ddii MMaaxxttoorr SShhaarreedd SSttoorraaggee III
doppio clic sull’icona di
MMaaxxttoorr EEaassyyMMaannaaggee PPaacckkaagge
2. Nella finestra di
bbeennvveennuutto
3. Per continuare, leggere il
CCoonnttiinnuua
AAggrreeee
(Accetto).
CCoonnttiinnuuee
a
. Per accettare i termini del contratto di licenza,
(Continua).
fare clic su
fare clic su
SSeelleezziioonnaarree uunnaa ddeessttiinnaazziioonne
4.
fare clic su
iinnssttaallllaazziioonnee ddeell CCD
e
.
o
, fare clic su
LLiicceennssee AAggrreeeemmeenntt
e
per l’installazione di EasyManage e
D
. Fare doppio clic su
CCoonnttiinnuuee
(Contratto di licenza) e
I
e fare
(Continua).
5. Il sistema visualizza una notifica in cui viene richiesto di riavviare il
sistema. Fare clic su
6. Al termine del processo di installazione, fare clic su
7. Al riavvio del sistema, fare doppio clic sull'icona
CCoonnttiinnuuee iinnssttaallllaattiioonn
(Continua installazione).
RReessttaarrtt
(Riavvia).
EEaassyyMMaannaagge
e
posta
sul desktop. Verrà avviata la ricerca di unità Shared Storage sulla
erca, verranno visualizzati numero di ID di rete
rete. Terminat
e indirizzo IP. Ad esempio:
a la ric
MSS-000338 (192.168.0.5)
. Selezionare
l’unità Shared Storage che si desidera configurare e fare clic su
SSeelleecctt DDrriivvee
NNoottaa:
clic su
(Seleziona unità).
:
se non è stata individuata alcuna unità Shared Storage, fare
HHeellpp
(Guida) per maggiori informazioni e suggerimenti sulla
risoluzione del problema.
8. Verrà visualizzata la finestra EasyManage - Shared Storage
Administrator Password (EasyManage: password amministratore di
orage), che consentirà di stabilire una protezione a livello di
ed St
Shar
YYees
amministratore per l’unità Shared Storage II. Fare clic su
s
(Sì)
per avviare l’interfaccia utente Web e impostare una password
atore.
amminis
tr
9. Al termine, chiudere il browser e tornare alla schermata EasyManage.
+
10. Una volta visualizzato il menu principale, fare clic sull'icona Plus (
+
)
della schermata EasyManage per creare un nuovo account utente.
11. Scegliere il tipo di account (
PPuubbbblliicco
12. Selezionare il tipo di cartelle da utilizzare (
NNoonne
[aziendali] o
eati il nuo
cr
13. Inserire un
e
[Nessuna delle due]). In EasyManage vengono
o account utente e tutte le cartelle relative all'account.
v
NNaammee
(Nome) per il nuovo account e fare clic su
o
PPrriivvaatto
o
o
).
HHoomme
e
[casa],
BBuussiinneesss
CCrreeaatte
s
e
(Crea).
NNoottaa::
affinché a ciascun ut
e venga attribuita una cartella
ent
personale, è necessario installare prima Maxtor EasyManage per
poter usufruire di una cartella personale.
ITALIANO
17
Page 19

Instalación en Windows 2000 y Windows XP
Paso 1: Conexión de la unidad
C
onexión del cable Ethernet
1. Enchufe un extremo del cable Ethernet
suministrado al enrutador o conmutador
de red.
2. Enchufe el otro extremo del cable Ethernet
al puerto Ethernet de su unidad Shared
Storage II.
Conexión del suministro eléctrico
1. Enchufe el conector hembra redondeado
del adaptador de corriente al conector de
alimentación de la unidad.
2. Enchufe el conector hembra de dos clavijas
del cable de alimentación al adaptador de
corriente.
3. Conecte el enchufe eléctrico estándar del
adaptador de corriente a la red eléctrica.
Paso 2: Encendido de la unidad
Botón de encendido
1. Pulse el botón negro redondeado situado
en el panel posterior de la unidad Maxtor
Shared Storage II. Se iluminará el indicador
luminoso verde situado en el centro del
botón de encendido.
2. A continuación, se iniciará la unidad. El
proceso de inicio puede tardar hasta un
minuto en completarse.
NNoottaa::
Consulte la Guía del usuario de
Maxtor Shared Storage II para obtener más
información sobre las definiciones de los
adores luminosos de encendido/estado.
indic
ESPAÑOL
18
Page 20

Paso 3: Configuración de la unidad
Includes:
– Maxtor EasyManage
™
Software
– Maxtor Backup
™
Software
– Maxtor Shared Storage II
User Guide (English)
©
2006 Maxtor Corporation and its Licensors. Maxtor and the stylized
M
axtor logo are registered trademarks,and Maxtor Shared Storage,
M
axtor EasyManage, and Maxtor Backup are trademarks of
Maxtor Corporation. U.S. patents 5,150,473 and 5,966,730.
Other patents pending. Other trademarks are the property
o
f their respective holders. All rights reserved.
0
6/06 PN: 20337500
WINDOWS
English
Français
Deutsch
Español
Italiano
MACINTOSH
English
Français
Deutsch
Installation Software
Maxtor Shared Storage
™
II
Logiciel d’installation, Installationssoftware,
Software di installazione, Installationsprogram,
Software de instalación, Installatiesoftware,
A
sennusohjelma, Software de Instalação,
1
. Introduzca el
SShhaarreedd SSttoorraaggee III
CCDD--RROOMM ddeell ssooffttwwaarree ddee iinnssttaallaacciióónn ddee MMaaxxttoor
SSeelleecccciioonnee uunn iiddiioomma
I
.
2. En el menú principal, haga clic en
3. Cuando se le pida, haga clic en
a
y haga clic en
IInnssttaallll SSooffttwwaarre
YYees
s
(Sí) para continuar. El software
e
(Instalar el software).
OOK
K
(Aceptar).
r
se preparará para proceder con la instalación.
NNeexxt
4. En la pantalla de bienvenida, haga clic en
t
(Siguiente). Siga los
mensajes que aparecen en pantalla para completar la instalación.
FFiinniissh
5. Cuando la instalación se haya completado, haga clic en
h
(Finalizar) para reiniciar el equipo.
6. Una vez reiniciado el equipo, Maxtor EasyManage realiza una
búsqueda de unidades Shared Storage en su red. Cuando las haya
encontrado, observará el número de identificación de red y la
dirección IP de las unidades localizadas. Por ejemplo:
MSS-000338 (192.168.0.5)
NNoottaa:
:
Si aparece un mensaje indicando que no se ha encontrado
ninguna unidad Shared Storage (“No Shared St
found”), pulse el botón
.
CClliicckk hheerre
orage drives were
e
(Hacer clic aquí) para obtener
más información y visualizar un enlace a las instrucciones acerca
de la resolución de problemas.
7. Una vez detectada la unidad Shared Storage II, aparece una ventana
donde se le informa de que la unidad no tiene configurada una
contraseña de seguridad para la función administrativa. Para
MMaannaagge
configurar una contraseña para la unidad, haga clic en
e
(Gestionar). Se iniciará entonces la interfaz de usuario Web. Siga
las instrucciones que aparecen en la pantalla del explorador para
configurar la unidad Shared Storage.
Cuando haya terminado, cierre el expl
8.
orador y regrese a la pantalla
de configuración de EasyManage; a continuación, haga clic en el
HHoomme
botón
e
(Inicio).
9. Cuando aparezca la pantalla Home (Inicio), haga clic en el botón
CCrreeaattee aa uusseerr aaccccoouunnt
10. Seleccione un tipo de cuenta (
PPrriivvaattee AAccccoouunnt
t
(Crear una cuenta de usuario).
PPuubblliicc AAccccoouunnt
t
(Cuenta privada),
HHoomme
t
(Cuenta pública) o
e
(Personal) o
BBuussiinneesss
s
(Profesional)), introduzca la información necesaria y haga clic en
CCrreeaatte
e
(Crear). El software EasyManage™ creará la nueva cuenta
de usuario y las carpetas apropiadas para la misma. Cuando el
proceso haya finalizado, aparecerá un acceso directo en el escritorio
para este recurso compartido del usuario.
ESPAÑOL
19
Page 21

Instalación en Macintosh OS X
Paso 1: Conexión de la unidad
C
onexión del cable Ethernet
1. Enchufe un extremo del cable Ethernet
suministrado al enrutador o conmutador
de red.
2. Enchufe el otro extremo del cable Ethernet
al puerto Ethernet de su unidad Shared
Storage II.
Conexión del suministro eléctrico
1. Enchufe el conector hembra redondeado
del adaptador de corriente al conector de
alimentación de la unidad.
2. Enchufe el conector hembra de dos clavijas
del cable de alimentación al adaptador de
corriente.
3. Conecte el enchufe eléctrico estándar del
adaptador de corriente a la red eléctrica.
Paso 2: Encendido de la unidad
Botón de encendido
1. Pulse el botón negro redondeado situado
en el panel posterior de la unidad Maxtor
Shared Storage II. Se iluminará el indicador
luminoso verde situado en el centro del
botón de encendido.
2. A continuación, se iniciará la unidad. El
proceso de inicio puede tardar hasta un
minuto en completarse.
NNoottaa::
Consulte la Guía del usuario de
Maxtor Shared Storage II para obtener más
información sobre las definiciones de los
adores luminosos de encendido/estado.
indic
ESPAÑOL
20
Page 22

Paso 3: Configuración de la unidad
Includes:
– Maxtor EasyManage
™
Software
– Maxtor Backup
™
Software
– Maxtor Shared Storage II
User Guide (English)
© 2006 Maxtor Corporation and its Licensors. Maxtor and the stylized
Maxtor logo are registered trademarks,and Maxtor Shared Storage,
M
axtor EasyManage, and Maxtor Backup are trademarks of
M
axtor Corporation. U.S. patents 5,150,473 and 5,966,730.
O
ther patents pending. Other trademarks are the property
of their respective holders. All rights reserved.
06/06 PN: 20337500
WINDOWS
English
Français
Deutsch
Español
Italiano
MACINTOSH
English
Français
Deutsch
Installation Software
Maxtor Shared Storage
™
II
L
ogiciel d’installation, Installationssoftware,
S
oftware di installazione, Installationsprogram,
S
oftware de instalación, Installatiesoftware,
A
sennusohjelma, Software de Instalação,
1. Introduzca el
SSttoorraaggee III
H
aga doble clic en el
2. En la
3. Revise el
CCoonnttiinnuue
AAggrreee
en
4. Seleccione el
y haga clic en
CCDD--RROOMM ddeell ssooffttwwaarree ddee iinnssttaallaacciióónn ddee MMaaxxttoorr SShhaarreed
I
y haga doble clic en el icono del
ppaaqquueetteeMMaaxxttoorr EEaassyyMMaannaagge
ppaannttaallllaa ddee bbiieennvveenniidda
LLiicceennssee AAggrreeeemmeennt
e
(Continuar) para proceder con la configuración. Haga clic
e
(Aceptar) para aceptar los términos del contrato.
ddeessttiinno
IInnssttaalll
a
, haga clic en
t
(Contrato de licencia) y haga clic en
o
donde desea instalar el software EasyManage
l
(Instalar).
CCDD--RROOMM ddee iinnssttaallaacciióón
e
.
CCoonnttiinnuue
e
(Continuar).
5. Se le informará de que es necesario reiniciar el sistema para
completar la instalación. Haga clic en
CCoonnttiinnuuee iinnssttaallllaattiioon
n
(Continuar la instalación).
6. Cuando la instalación se haya completado, haga clic en
RReessttaarrt
(Reiniciar).
7. Una vez reiniciado el sis
EEaassyyMMaannaagge
e
, situado en el escritorio. EasyManage realiza una
búsqueda de unidades Shar
tema, haga dobl
ed Storage en su red. Cuando las haya
e clic en el icono de
encontrado, observará el número de identificación de red y la
dirección IP de las unidades localizadas. Por ejemplo:
(192.168.0.5)
y haga clic en
NNoottaa:
HHeellp
en
. Resalte la unidad Shar
SSeelleecctt DDrriivve
:
Si no se encontró ninguna unidad Shared Storage, haga clic
p
(Ayuda) para obtener más información e instrucciones
e
(Seleccionar unidad).
ed Storage que desee configurar
MSS-000338
acerca de la resolución de problemas.
d
n
.
t
8. Aparecerá la ventana EasyManage - Shared Storage Administrator
Password (EasyManage: Contraseña de administrador de Shared
age), que le permitirá configurar la seguridad administrativa de
or
St
YYees
la unidad Shared Storage II. Haga clic en
s
(Sí) para iniciar la
interfaz de usuario Web y configurar una contraseña administrativa.
9. Cuando haya terminado, cierre el explorador para regresar a la
pantalla EasyManage.
10. Cuando aparezca el menú principal, haga clic en el icono del signo
+
+
), situado en la pantalla EasyManage, para crear una nueva
Más (
a de usuario.
cuent
11. Seleccione un tipo de cuenta (
PPrriivvaattee AAccccoouunnt
cione un tipo de carpeta (
ec
Sel
12.
(Profesional) o
t
(Cuenta privada)) y haga clic en
NNoonne
e
(Ninguna)). El software EasyManage creará la
PPuubblliicc AAccccoouunnt
HHoomme
e
(P
t
(Cuenta pública) o
NNeexxt
BBuussiinneesss
sonal),
er
t
(Siguiente).
s
nueva cuenta de usuario y las carpetas apropiadas para la misma.
NNaamme
oduzca un nombre (
Intr
13.
CCrreeaatte
e
(Crear).
NNoottaa:
:
El softwar
denador Macintosh para que los usuarios puedan disponer de
or
una carpeta personal.
e Maxt
ESPAÑOL
21
e
) par
a la nue
va cuenta y haga clic en
or EasyManage se debe ins
alar en c
t
ada
Page 23

Installatie op Windows 2000 en Windows XP
Stap 1. De harde schijf aansluiten
D
e Ethernetkabel aansluiten
1. Sluit het ene uiteinde van de meegeleverde
Ethernetkabel aan op het netwerk, de
router of de switch.
2. Steek het andere uiteinde van de
Ethernetkabel in de Ethernetpoort van
de Shared Storage II.
De stroom aansluiten
1. Steek de ronde vrouwelijke connector van
de stroomadapter in de stroomaansluiting
op de harde schijf.
2. Steek de 2-pin vrouwelijke connector van
het netsnoer in de stroomadapter.
3. Steek de stroomstekker van de
stroomadapter in het stopcontact.
Stap 2. De harde schijf aanzetten
Aan-/uitknop
1. Druk op de ronde zwarte knop aan de
achterzijde van de Maxtor Shared Storage II
harde schijf. De groene LED (lampje) in het
midden van de knop gaat branden.
2. De harde schijf wordt nu gestart. Het
opstartproces kan een minuut in beslag
nemen.
OOppmmeerrkkiinngg:
van de Maxtor Shared St
informatie over de betek
stroom- en statuslampjes.
:
Zie de gebruikershandleiding
orage II voor meer
enis van de
NEDERLANDS
22
Page 24

Stap 3. De harde schijf instellen
Includes:
– Maxtor EasyManage
™
Software
– Maxtor Backup
™
Software
– Maxtor Shared Storage II
User Guide (English)
©
2006 Maxtor Corporation and its Licensors. Maxtor and the stylized
M
axtor logo are registered trademarks,and Maxtor Shared Storage,
M
axtor EasyManage, and Maxtor Backup are trademarks of
Maxtor Corporation. U.S. patents 5,150,473 and 5,966,730.
Other patents pending. Other trademarks are the property
o
f their respective holders. All rights reserved.
0
6/06 PN: 20337500
WINDOWS
English
Français
Deutsch
Español
Italiano
MACINTOSH
English
Français
Deutsch
Installation Software
Maxtor Shared Storage
™
II
Logiciel d’installation, Installationssoftware,
Software di installazione, Installationsprogram,
Software de instalación, Installatiesoftware,
A
sennusohjelma, Software de Instalação,
1
. Plaats de
SSeelleecctteeeerr eeeenn ttaaaal
2. Klik in het hoofdmenu op
3. Klik op
ccdd mmeett iinnssttaallllaattiieessooffttwwaarree vvoooorr ddee MMaaxxttoorr SShhaarreedd SSttoorraaggee III
l
en klik op
JJa
a
om door te gaan. De installatie van de software wordt
OOK
K
.
IInnssttaallll SSooffttwwaarre
e
[Software installeren].
voorbereid.
NNeexxt
4. Klik in het welkomstscherm op
t
[Volgende]. Volg de aanwijzingen
op het scherm om de installatie te voltooien.
FFiinniissh
5. Zodra de installatie voltooid is, klikt u op
h
[Voltooien] om de
pc opnieuw op te starten.
6. Als de pc opnieuw opgestart is, zoekt de Maxtor EasyManage op
het netwerk naar Shared Storage harde schijven. Zodra deze
is/zijn gevonden, worden het Netwerk-ID nummer en het IP-adres
van de gevonden schijf/schijven weergegeven. Bijvoorbeeld:
MSS-000338 (192.168.0.5)
OOppmmeerrkkiinngg:
:
Als het bericht “No Shared Storage drives were found”
[Geen Shared Storage harde schijv
klikt u op de knop
.
CClliicckk hheerre
en gevonden] wordt weergegeven,
e
[Klik hier] voor meer informatie en
een link naar tips voor het oplossen van problemen.
7. Zodra de harde schijf is gevonden, wordt er een venster geopend
met de melding dat er op uw Shared Storage II geen beveiligingswachtwoord ten behoeve van beheer is ingesteld. Als u een
wachtwoord voor de harde schijf wilt instellen, klikt u op
MMaannaagge
[Beheren]. De Web User Interface (Web GI - Webgebruikersinterface)
wordt geopend. Volg de aanwijzingen in de browser om de Shared
Storage te configureren.
I
.
e
8. Zodra de configuratie voltooid is, sluit u de browser en keert u terug
naar het scherm met ins
u op de knop
HHoomme
9. Zodra het scherm Home is geopend, klikt u op de knop
uusseerr aaccccoouunnt
Kies een accounttype (
10.
t
[Een gebruikersaccount maken].
account of Persoonlijk account]
Zakelijk]), verstrek de gevraagde gegevens en klik op
tellingen van EasyManage. Vervolgens klikt
e
.
PPuubblliicc AAccccoouunnt
PPrriivvaattee AAccccoouunnt
t
of
//HHoommee ofBBuussiinneesss
s
CCrreeaattee a
t
[Openbaar
[Privé of
CCrreeaatte
a
e
[Maken]. De EasyManage™-software maakt nu uw nieuwe
gebruikersaccount en de bijbehorende mappen voor deze account
aan. Zodra dit gebeurd is, wordt er een snelkoppeling op het
bureaublad weergegeven.
NEDERLANDS
23
Page 25

Installatie op Macintosh OS X
Stap 1. De harde schijf aansluiten
D
e Ethernetkabel aansluiten
1. Sluit het ene uiteinde van de meegeleverde
Ethernetkabel aan op het netwerk, de
router of de switch.
2. Steek het andere uiteinde van de
Ethernetkabel in de Ethernetpoort van
de Shared Storage II.
De stroom aansluiten
1. Steek de ronde vrouwelijke connector van
de stroomadapter in de stroomaansluiting
op de harde schijf.
2. Steek de 2-pin vrouwelijke connector van
het netsnoer in de stroomadapter.
3. Steek de stroomstekker van de
stroomadapter in het stopcontact.
Stap 2. De harde schijf aanzetten
Aan-/uitknop
1. Druk op de ronde zwarte knop aan de
achterzijde van de Maxtor Shared Storage II
harde schijf. De groene LED (lampje) in het
midden van de knop gaat branden.
2. De harde schijf wordt nu gestart. Het
opstartproces kan een minuut in beslag
nemen.
OOppmmeerrkkiinngg:
van de Maxtor Shared St
informatie over de betek
stroom- en statuslampjes.
:
Zie de gebruikershandleiding
orage II voor meer
enis van de
NEDERLANDS
24
Page 26

Stap 3. De harde schijf instellen
Includes:
– Maxtor EasyManage
™
Software
– Maxtor Backup
™
Software
– Maxtor Shared Storage II
User Guide (English)
© 2006 Maxtor Corporation and its Licensors. Maxtor and the stylized
Maxtor logo are registered trademarks,and Maxtor Shared Storage,
M
axtor EasyManage, and Maxtor Backup are trademarks of
M
axtor Corporation. U.S. patents 5,150,473 and 5,966,730.
O
ther patents pending. Other trademarks are the property
of their respective holders. All rights reserved.
06/06 PN: 20337500
WINDOWS
English
Français
Deutsch
Español
Italiano
MACINTOSH
English
Français
Deutsch
Installation Software
Maxtor Shared Storage
™
II
L
ogiciel d’installation, Installationssoftware,
S
oftware di installazione, Installationsprogram,
S
oftware de instalación, Installatiesoftware,
A
sennusohjelma, Software de Instalação,
1. Plaats de
SSttoorraaggee III
i
nstalleren]. Dubbelklik op het
2. Klik in het
3. Lees de
ccdd mmeett ddee iinnssttaallllaattiieessooffttwwaarree vvoooorr ddee MMaaxxttoorr SShhaarreed
I
en dubbelklik op het pictogram
wweellkkoommssttsscchheerrm
lliicceennttiieeoovveerreeeennkkoommsst
IInnssttaallll CCD
MMaaxxttoorr EEaassyyMMaannaaggee PPaacckkaagge
CCoonnttiinnuue
m
op
t
en klik op
e
[Doorgaan].
CCoonnttiinnuue
D
[Cd
e
[Doorgaan].
d
e
.
Als u de voorwaarden van de licentieovereenkomst accepteert,
AAggrreee
klikt u op
4. Selecteer de
installeren, en klik op
e
[Akkoord].
ddooeellllooccaattiie
e
waar u de EasyManage-software wilt
IInnssttaalll
l
[Installeren].
5. U krijgt een melding dat het systeem opnieuw gestart moet worden.
CCoonnttiinnuuee iinnssttaallllaattiioon
Klik op
6. Zodra de installatie is voltooid, klikt u op
7. Na het herstarten van de computer dubbelklikt u op
n
[Doorgaan met installatie].
RReessttaarrt
t
[Opnieuw starten].
EEaassyyMMaannaagge
e
op het bureaublad. EasyManage zoekt de Shared Storage harde
schijven op uw netwerk. Zodra deze is/zijn ge
vonden, w
orden het
Netwerk-ID nummer en het IP-adres van de gevonden schijf/schijven
weergegeven. Bijvoorbeeld:
MSS-000338 (192.168.0.5)
Shared Storage-schijf die u wilt configureren, en klik op
DDrriivve
e
[Schijf selecteren].
OOppmmeerrkkiinngg:
voor meer informatie en tips voor het opl
:
Als er geen Shared Storage is gevonden, klikt u op
sen van problemen.
os
. Mark
SSeelleecct
eer de
t
HHeellp
8. Het venster EasyManage - Shared Storage Administrator Password
[Beheerderwachtwoord voor Shared Storage] wordt geopend zodat
YYees
veiliging op de Shared Storage II kunt instellen. Klik op
u be
s
[Ja]
om de Web User Interface te starten en een beheerderwachtwoord
in te stellen.
p
9. Zodr
a u gereed bent, sluit u de browser en gaat u terug naar het
scherm EasyManage.
+
10. Als het hoofdmenu is geopend, klikt u op het pictogram Plus (
+
)
in het scherm EasyManage om een nieuwe gebruikersaccount aan
te maken.
11. Kies een accounttype (
AAccccoouunnt
t
[Persoonlijk account]) en klik op
eer Folder Type (
ect
Sel
12.
PPuubblliicc AAccccoouunnt
HHoomme
BBuussiinneesss
e
,
t
[Openbaar account] of
NNeexxt
t
[Volgende].
NNoonne
s
of
e
) [Maptype (Priv
PPrriivvaatte
é,
e
Zakelijk of Geen)]. De EasyManage-software maakt nu uw nieuwe
gebruikersaccount en de bijbehorende mappen voor deze account aan.
13.
oer een
V
NNaamme
e
[Naam] v
oor de nieuw
count in en klik op
e ac
CCrreeaatte
e
[Maken].
OOppmmeerrkkiinngg:
ieder
:
Uitsluitend als de Maxtor EasyManage-software op
e Macint
osh computer is geïnstalleerd, kan iedere gebruiker
gebruikmaken van een persoonlijke map.
NEDERLANDS
25
Page 27

Installation under Windows 2000 og Windows XP
Trin 1. Tilslut drevet
T
ilslutning af Ethernet-kablet
1. Slut den ene ende af det medfølgende
Ethernet-kabel til et netværk, en router
eller en switch.
2. Sæt den anden ende af Ethernet-kablet i
Ethernet-stikket på Shared Storage II-drevet.
Tilslutning af strøm
1. Sæt det runde hunstik fra strømadapteren
i drevets strømstik.
2. Sæt netledningens tobenede hunstik i
strømadapteren.
3. Sæt strømadapterens normale hanstik i
strømkilden.
Trin 2. Tænd drevet
Strømknap
1. Tryk på den runde, sort knap på bagsiden
af Maxtor Shared Storage II-drevet. Den
grønne lampe i midten af strømknappen
lyser.
2. Drevet starter. Startprocessen kan vare i op
til et minut.
BBeemmæærrkk!
Shared Storage II for at få flere oplysninger
om strøm/statuslampens betydning.
!
Se brugervejledningen til Maxtor
DANSK
26
Page 28

Trin 3. Konfigurer drevet
Includes:
– Maxtor EasyManage
™
Software
– Maxtor Backup
™
Software
– Maxtor Shared Storage II
User Guide (English)
©
2006 Maxtor Corporation and its Licensors. Maxtor and the stylized
M
axtor logo are registered trademarks,and Maxtor Shared Storage,
M
axtor EasyManage, and Maxtor Backup are trademarks of
Maxtor Corporation. U.S. patents 5,150,473 and 5,966,730.
Other patents pending. Other trademarks are the property
o
f their respective holders. All rights reserved.
0
6/06 PN: 20337500
WINDOWS
English
Français
Deutsch
Español
Italiano
MACINTOSH
English
Français
Deutsch
Installation Software
Maxtor Shared Storage
™
II
Logiciel d’installation, Installationssoftware,
Software di installazione, Installationsprogram,
Software de instalación, Installatiesoftware,
A
sennusohjelma, Software de Instalação,
1
. Isæt
ccdd''eenn mmeedd MMaaxxttoorr SShhaarreedd SSttoorraaggee IIII IInnssttaallllaattiioonn SSooffttwwaarre
Vælg et sprog, og klik på
2. Klik på
3. Klik på
IInnssttaallll SSooffttwwaarre
YYees
s
(Ja), når du bliver spurgt, om du vil forsætte.
OOK
K
.
e
(Installer software) i hovedmenuen.
e
.
Programmet gør klar til installation.
NNeexxt
4. Klik på
t
(Næste) på velkomstskærmbilledet. Følg vejledningen
på skærmen for at gennemføre installationen.
FFiinniissh
5. Klik på
h
(Udfør) for at genstarte pc'en, når installationen
er færdig.
6. Efter genstarten søger Maxtor EasyManage efter Shared Storagedrev på netværket. Når de er fundet, vises de fundne drevs
netværks-id og IP-adresse, f.eks.:
BBeemmæærrkk!
!
Hvis der vises en meddelelse om, at der ikke blev fundet
nogen Shared Storage-drev, skal du vælge knappen
MSS-000338 (192.168.0.5)
CClliicckk hheerre
.
e
(Klik
her) for at få flere oplysninger og et link til tip om fejlfinding.
7. Når et drev er fundet, vises et vindue, som fortæller, at funktionen
til administrationen af Shared Storage II-drevet ikke er beskyttet
MMaannaagge
e
med en adgangskode. Klik på
(Administrer) for at angive en
adgangskode til drevet. Derved startes den webbaserede brugergrænsefalde (Web UI). Følg vejledningen på skærmen i browseren
for at konfigurere Shared Storage-drevet.
8. Luk browseren, når du er færdig, for at vende tilbage til skærmen
Settings (indstillinger) i EasyManage, og klik der
HHoomme
e
(Hjem).
efter på knappen
9. Klik på knappen
CCrreeaattee aa uusseerr aaccccoouunnt
t
(Opret en brugerkonto),
når skærmbilledet Home (Hjem) vises.
10. Vælg en kontotype (
AAccccoouunntt // HHoomme
e
or
PPuubblliicc AAccccoouunnt
BBuussiinneesss
s
(Privat konto / hjemme- eller
t
(Offentlig konto) eller
PPrriivvaatte
e
forretningsbrug)), angiv de nødvendige oplysninger, og klik på
CCrreeaatte
e
(Opret). Programmet EasyManage™ opretter den nye
onto og passende mapper til kontoen. Bagefter vises en
brugerk
genvej til brugerens share på skrivebordet.
DANSK
27
Page 29

Macintosh OS X-installation
Trin 1. Tilslut drevet
T
ilslutning af Ethernet-kablet
1. Slut den ene ende af det medfølgende
Ethernet-kabel til et netværk, en router
eller en switch.
2. Sæt den anden ende af Ethernet-kablet i
Ethernet-stikket på Shared Storage II-drevet.
Tilslutning af strøm
1. Sæt det runde hunstik fra strømadapteren
i drevets strømstik.
2. Sæt netledningens tobenede hunstik i
strømadapteren.
3. Sæt strømadapterens normale hanstik i
strømkilden.
Trin 2. Tænd drevet
Strømknap
1. Tryk på den runde, sort knap på bagsiden
af Maxtor Shared Storage II-drevet. Den
grønne lampe i midten af strømknappen
lyser.
2. Drevet starter. Startprocessen kan vare i op
til et minut.
BBeemmæærrkk!
Shared Storage II for at få flere oplysninger
om strøm/statuslampens betydning.
!
Se brugervejledningen til Maxtor
DANSK
28
Page 30

Trin 3. Konfigurer drevet
Includes:
– Maxtor EasyManage
™
Software
– Maxtor Backup
™
Software
– Maxtor Shared Storage II
User Guide (English)
© 2006 Maxtor Corporation and its Licensors. Maxtor and the stylized
Maxtor logo are registered trademarks,and Maxtor Shared Storage,
M
axtor EasyManage, and Maxtor Backup are trademarks of
M
axtor Corporation. U.S. patents 5,150,473 and 5,966,730.
O
ther patents pending. Other trademarks are the property
of their respective holders. All rights reserved.
06/06 PN: 20337500
WINDOWS
English
Français
Deutsch
Español
Italiano
MACINTOSH
English
Français
Deutsch
Installation Software
Maxtor Shared Storage
™
II
L
ogiciel d’installation, Installationssoftware,
S
oftware di installazione, Installationsprogram,
S
oftware de instalación, Installatiesoftware,
A
sennusohjelma, Software de Instalação,
1. Isæt
ccdd''eenn MMaaxxttoorr SShhaarreedd SSttoorraaggee IIII IInnssttaallllaattiioonn SSooffttwwaarre
dobbeltklik på ikonet
MMaaxxttoorr EEaassyyMMaannaaggee PPaacckkaagge
CCoonnttiinnuue
e
2. Klik på
3. Læs
lliicceennssaaffttaalleen
Klik på
4. Vælg
ddeessttiinnaattiioonneen
og klik på
AAggrreee
(Fortsæt) på velkomstskærmbilledet.
n
, og klik på
e
(Accepterer) for at acceptere licensaftalens vilkår.
n
, hvor softwaren til EasyManage skal installeres,
IInnssttaalll
l
(Installer).
IInnssttaallll CCD
e
.
CCoonnttiinnuue
D
(Installations-cd). Dobbeltklik på
e
(Fortsæt) for at fortsætte.
e
, og
5. Du får besked om, at installationen kræver, at systemet genstartes.
CCoonnttiinnuuee iinnssttaallllaattiioon
Klik på
6. Klik på
RReessttaarrt
7. Dobbeltklik på
t
(Genstart), når installationen er færdig.
EEaassyyMMaannaagge
n
(Fortsæt installationen).
e
på skrivebordet efter genstarten.
EasyManage søger efter Shared Storage-drev på netværket. Når de
er fundet, vises de fundne drevs netværks-id og IP-adresse, f.eks.:
MSS-000338 (192.168.0.5)
konfigurere, og klik på
BBeemmæærrkk!
!
Klik på
fejlfinding, hvis der ikk
SSeelleecctt DDrriivve
HHeellp
p
(Hjælp) for at få flere oplysninger og tip til
e findes nogen Shar
. Marker det Shared Storage-dr
e
(Vælg drev).
ed Storage-drev.
ev, du vil
8. Vinduet EasyManage - Shared Storage Administrator Password
(Administratoradgangskode til Shared Storage) vises. Her kan du
vælge administrationssikkerhed for Shared Storage-drevet. Klik på
YYees
s
(Ja) for at starte den webbaserede brugergrænseflade og vælge
administrators adgangskode.
9. Luk browseren, og vend tilbage til skærmbilledet EasyManage, når
du er færdig.
+
+
10. Klik på ikonet plus (
) på skærmen EasyManage, når hovedmenuen
vises, for at oprette en ny brugerkonto.
11. Vælg en passende kontotype (
NNeexxt
t
(Næste).
HHoomme
12. Vælg en mappetype (
e
(Privat),
ooffffeennttlliigg
BBuussiinneesss
eller
pprriivvaatt kkoonntto
s
o
), og klik på
(Arbejde) eller
NNoonne
e
(Ingen)). Programmet EasyManage opretter den nye brugerkonto og
passende mapper til kontoen.
13. Angiv
BBeemmæærrkk!
nnaavvnneet
t
på kontoen, og klik på
!
ammet Maxtor EasyManage skal installeres på alle
ogr
Pr
CCrreeaatte
e
(Opret).
Macintosh-computere, som skal kunne anvende en personlig
mappe.
DANSK
29
Page 31

Instalação Windows 2000 e Windows XP
Passo 1. Ligar a unidade
L
igar o cabo Ethernet
1. Ligue uma extremidade do cabo Ethernet
fornecido ao router ou switch da sua rede.
2
. Ligue a outra extremidade do cabo Ethernet
à porta Ethernet da sua Unidade Shared
Storage II.
Ligar a alimentação eléctrica
1. Ligue a ficha fêmea redonda do transformador
de corrente à tomada de alimentação da
unidade.
2. Ligue a ficha fêmea de dois pinos do cabo
de alimentação ao transformador.
3. Ligue a ficha eléctrica standard do cabo do
transformador a uma tomada de corrente
eléctrica.
Passo 2. Ligar a alimentação da unidade
Botão de alimentação
1. Prima o botão preto redondo no painel da
retaguarda da sua Unidade Maxtor Shared
Storage II. O LED (luz) verde ilumina-se no
centro do botão de alimentação.
2. A unidade inicia-se então. O processo de
iniciação poderá demorar até um minuto
a ser concluído.
NNoottaa:
:
Consulte o Guia do Utilizador do
Maxtor Shared Stor
informações sobre as definições dos LEDs
de alimentação/estado.
age II para mais
PORTUGUÊS
30
Page 32

Passo 3. Configurar a unidade
Includes:
– Maxtor EasyManage
™
Software
– Maxtor Backup
™
Software
– Maxtor Shared Storage II
User Guide (English)
©
2006 Maxtor Corporation and its Licensors. Maxtor and the stylized
M
axtor logo are registered trademarks,and Maxtor Shared Storage,
M
axtor EasyManage, and Maxtor Backup are trademarks of
Maxtor Corporation. U.S. patents 5,150,473 and 5,966,730.
Other patents pending. Other trademarks are the property
o
f their respective holders. All rights reserved.
0
6/06 PN: 20337500
WINDOWS
English
Français
Deutsch
Español
Italiano
MACINTOSH
English
Français
Deutsch
Installation Software
Maxtor Shared Storage
™
II
Logiciel d’installation, Installationssoftware,
Software di installazione, Installationsprogram,
Software de instalación, Installatiesoftware,
A
sennusohjelma, Software de Instalação,
1
. Insira o
CCDD MMaaxxttoorr SShhaarreedd SSttoorraaggee IIII IInnssttaallllaattiioonn SSooffttwwaarre
(Software de instalação do Maxtor Shared Storage II).
uumm iiddiioomma
a
e
faça clique em
OOK
K
.
2. A partir do menu principal, faça clique em
IInnssttaallll SSooffttwwaarre
e
SSeelleecccciioonne
e
e
(Instalar software).
YYees
3. Quando lhe for perguntado se tem a certeza, faça clique em
s
(Sim) para prosseguir. O software prepara a instalação.
NNeexxt
4. A partir do ecrã Welcome (Boas-vindas), faça clique em
t
(Seguinte). Siga as instruções apresentadas no ecrã para concluir
a instalação.
FFiinniissh
5. Quando a instalação estiver concluída, faça clique em
h
(Concluir) para reiniciar o seu PC.
6. Após o reinício, o Maxtor EasyManage procura as Unidades Shared
Storage existentes da sua rede. Ao encontrar, indicará o número de
ID da rede e o endereço IP da(s) unidade(s) localizada(s). Por
exemplo:
NNoottaa:
MSS-000338 (192.168.0.5)
:
Se aparecer uma mensagem a informar “No shared Storage
.
drives were found” (Não foi encontrada nenhuma Unidade Shared
Storage), seleccione o botão
CClliicckk hheerre
e
(Faça clique aqui), para
mais informações e para um link para sugestões de resolução de
problemas.
7. Quando detectado, aparece uma janela a informar que a sua Unidade
Shared Storage II não tem uma palavra-passe de segurança definida
para a função administrativa. Para definir uma palavra-passe para
MMaannaagge
a unidade, faça clique em
e
(Gerir). Isto lança a Interface do
Utilizador da Web (IU da Web). Siga as mensagens que aparecem
no ecrã para c
onfigurar a sua Unidade Shared Storage.
8. Quando concluído, feche o browser para voltar para o ecrã Settings
HHoomme
(Definições) do EasyManage e faç
a clique no botão
e
(Página
inicial).
9. Quando aparecer o ecrã Home (Página inicial), faça clique no botão
CCrreeaattee aa uusseerr aaccccoouunnt
10. Escolha um tipo de conta [
AAccccoouunnt
t
(Conta privada)
t
(Criar uma conta de utilizador).
PPuubblliicc AAccccoouunnt
// HHoomme
e
t
(Conta pública) ou
(Doméstica) ou
BBuussiinneesss
s
PPrriivvaatte
e
(Profissional)], forneça a informação necessária e faça clique em
CCrreeaatte
e
(Criar). O software EasyManage™ cria então a sua nova
conta de utilizador e as pastas apropriadas para a conta. Quando
concluído, aparece um atalho no ambiente de trabalho para esta
partilha de utilizador.
PORTUGUÊS
31
Page 33

Instalação Macintosh OS X
Passo 1. Ligar a unidade
L
igar o cabo Ethernet
1. Ligue uma extremidade do cabo Ethernet
fornecido ao router ou switch da sua rede.
2
. Ligue a outra extremidade do cabo Ethernet
à porta Ethernet da sua Unidade Shared
Storage II.
Ligar a alimentação eléctrica
1. Ligue a ficha fêmea redonda do transformador
de corrente à tomada de alimentação da
unidade.
2. Ligue a ficha fêmea de dois pinos do cabo
de alimentação ao transformador.
3. Ligue a ficha eléctrica standard do cabo do
transformador a uma tomada de corrente
eléctrica.
Passo 2. Ligar a alimentação da unidade
Botão de alimentação
1. Prima o botão preto redondo no painel da
retaguarda da sua Unidade Maxtor Shared
Storage II. O LED (luz) verde ilumina-se no
centro do botão de alimentação.
2. A unidade inicia-se então. O processo de
iniciação poderá demorar até um minuto
a ser concluído.
NNoottaa:
:
Consulte o Guia do Utilizador do
Maxtor Shared Stor
informações sobre as definições dos LEDs
de alimentação/estado.
age II para mais
PORTUGUÊS
32
Page 34

Passo 3. Configurar a unidade
Includes:
– Maxtor EasyManage
™
Software
– Maxtor Backup
™
Software
– Maxtor Shared Storage II
User Guide (English)
© 2006 Maxtor Corporation and its Licensors. Maxtor and the stylized
Maxtor logo are registered trademarks,and Maxtor Shared Storage,
M
axtor EasyManage, and Maxtor Backup are trademarks of
M
axtor Corporation. U.S. patents 5,150,473 and 5,966,730.
O
ther patents pending. Other trademarks are the property
of their respective holders. All rights reserved.
06/06 PN: 20337500
WINDOWS
English
Français
Deutsch
Español
Italiano
MACINTOSH
English
Français
Deutsch
Installation Software
Maxtor Shared Storage
™
II
L
ogiciel d’installation, Installationssoftware,
S
oftware di installazione, Installationsprogram,
S
oftware de instalación, Installatiesoftware,
A
sennusohjelma, Software de Instalação,
1. Insira o
CCDD MMaaxxttoorr SShhaarreedd SSttoorraaggee IIII IInnssttaallllaattiioonn SSooffttwwaarre
e
(Software de instalação do Maxtor Shared Storage II) e faça duplo
clique no ícone
IInnssttaallll CCD
MMaaxxttoorr EEaassyyMMaannaaggee PPaacckkaagge
2. A partir do ecrã
WWeellccoomme
D
(CD de instalação). Faça duplo clique em
e
.
e
(Boas-vindas), faça clique em
CCoonnttiinnuue
e
(Continuar).
3. Leia o
LLiicceennssee AAggrreeeemmeennt
CCoonnttiinnuue
e
(Continuar) para prosseguir. Para aceitar os termos do
acordo de licença, faça clique em
4. Seleccione um
llooccaall ddee ddeessttiinno
EasyManage e faça clique em
t
(Acordo de licença) e faça clique em
AAggrreee
e
(Aceito).
o
para instalar o software
IInnssttaalll
l
(Instalar).
5. Será notificado de que a instalação necessita de um reinício do sistema.
Faça clique em
CCoonnttiinnuuee iinnssttaallllaattiioon
6. Quando a instalação estiver concluída, faça clique em
7. Após o reinício, faça duplo clique em
n
(Continuar instalação).
RReessttaarrt
EEaassyyMMaannaagge
e
, localizado no seu
t
(Reiniciar).
ambiente de trabalho. O EasyManage procura as Unidades Shared
Storage existentes na sua rede. Ao encontrar, indicará o número de
ID da rede e o endereço IP da(s) unidade(s) localizada(s). Por exemplo:
MSS-000338 (192.168.0.5)
Storage que deseja configurar e faça clique em
. Ponha em destaque a Unidade Shared
SSeelleecctt DDrriivve
e
(Seleccionar unidade).
NNoottaa::
Se não for encontrada nenhuma Unidade Shared Storage,
HHeellp
faça clique em
p
(Ajuda) para mais informações e sugestões de
resolução de problemas.
8. Aparece então a janela EasyManage - Shared Storage Administrator
Password (EasyManage - Palavra-passe de administrador de
Shared Storage), que lhe permite definir a segurança administrativa
YYees
s
na Unidade Shared Storage II. Faça clique em
(Sim) para lançar
a Web User Interface (Interface do utilizador da Web) e definir uma
palavra-passe administr
ativa.
9. Quando concluído, feche o seu browser para voltar para o ecrã
EasyManage.
+
+
10. Quando o menu principal aparecer, faça clique no símbolo (
) do
ecrã EasyManage para criar uma nova conta de utilizador.
11. Escolha um tipo de conta [
AAccccoouunnt
t
(Conta privada)] e faça clique em
PPuubblliicc AAccccoouunnt
t
12. Seleccione um Folder Type (Tipo de pasta) [
BBuussiinneesss
s
(Profissional) ou
NNoonne
e
(Nenhuma)]. O software
(Conta pública) ou
NNeexxt
t
(Seguinte).
HHoomme
e
(Doméstica),
PPrriivvaatte
e
EasyManage cria então a sua nova conta de utilizador e as pastas
apropriadas para a conta.
NNaamme
13. Introduza um
CCrreeaatte
e
(Criar).
NNoottaa::
Para que cada utilizador possa tirar partido de uma pasta
e
(Nome) para a nova conta e faça clique em
Pessoal, o software Maxtor EasyManage deve ser instalado em
cada um dos computadores Macintosh.
PORTUGUÊS
33
Page 35

Asennus Windows 2000- ja Windows XP -käyttöjärjestelmiin
Vaihe 1. Kiintolevyn liittäminen
E
thernet-kaapelin liittäminen
1. Kiinnitä laitteen mukana toimitettu
Ethernet-kaapeli verkon pistorasiaan,
reitittimeen tai kytkimeen.
2. Liitä Ethernet-kaapelin toinen pää Shared
Storage II -kiintolevyn Ethernet-liitäntään.
Virran kytkeminen
1. Työnnä verkkolaitteen pyöreä naarasliitin
kiintolevyn virtaliittimeen.
2. Kiinnitä virtajohdon kaksipiikkinen
naarasliitin verkkolaitteeseen.
3. Työnnä verkkolaitteen sähköpistoke
torasiaan.
pis
Vaihe 2. Kiintolevyn virran kytkeminen
Virtapainike
1. Paina Maxtor Shared Storage II -kiintolevyn
takaosassa olevaa mustaa pyöreää
painiketta. Virtapainikkeeseen syttyy
vihreä valo.
2. Kiintolevy käynnistyy. Käynnistyminen voi
kestää minuutin.
HHuuoommaauuttuuss:
-käyttöoppaassa on lisätietoja tilaa
ilmaisevista merkkivaloista.
:
Maxtor Shared Storage II
SUOMI
34
Page 36

Vaihe 3. Kiintolevyn asentaminen
Includes:
– Maxtor EasyManage
™
Software
– Maxtor Backup
™
Software
– Maxtor Shared Storage II
User Guide (English)
©
2006 Maxtor Corporation and its Licensors. Maxtor and the stylized
M
axtor logo are registered trademarks,and Maxtor Shared Storage,
M
axtor EasyManage, and Maxtor Backup are trademarks of
Maxtor Corporation. U.S. patents 5,150,473 and 5,966,730.
Other patents pending. Other trademarks are the property
o
f their respective holders. All rights reserved.
0
6/06 PN: 20337500
WINDOWS
English
Français
Deutsch
Español
Italiano
MACINTOSH
English
Français
Deutsch
Installation Software
Maxtor Shared Storage
™
II
Logiciel d’installation, Installationssoftware,
Software di installazione, Installationsprogram,
Software de instalación, Installatiesoftware,
A
sennusohjelma, Software de Instalação,
1
. Aseta
2. Valitse päävalikosta
MMaaxxttoorr SShhaarreedd SSttoorraaggee IIII --aasseennnnuusslleevvyy CCDD--aasseemmaaaan
OOK
K
kieli ja napsauta sitten
-painiketta.
IInnssttaallll SSooffttwwaarre
e
(Asenna ohjelmisto).
3. Kun ohjelma kehottaa jatkamaan, valitse
YYees
s
(Kyllä). Ohjelma ryhtyy
n
.
Valitse
valmistelemaan asennusta.
NNeexxt
4. Näyttöön tulee Welcome (Tervetuloa) -ikkuna. Valitse
t
(Seuraava). Asenna ohjelmisto noudattamalla näyttöön tulevia
ohjeita.
5. Kun asennus on valmis, käynnistä tietokone uudelleen valitsemalla
FFiinniissh
h
(Valmis).
6. Kun järjestelmä käynnistyy uudelleen, Maxtor EasyManage
etsii verkossa olevat Shared Storage -kiintolevyt. Kun kiintolevy
löytyy, sen verkkotunnus ja IP-osoite tulevat näkyviin. Esimerkki:
MSS-000338 (192.168.0.5)
HHuuoommaauuttuuss:
:
Jos näyttöön tulee viesti, jossa ilmoitetaan, että Shared
Storage -kiintolevyjä ei löydy, napsauta
.
CClliicckk hheerre
e
(Napsauta tätä)
-painiketta. Näyttöön tulee lisätietoja sekä linkki vianmääritysohjeisiin.
7. Kun ohjelmisto on löytänyt kiintolevyt, näyttöön tulee ikkuna, jossa
ilmoitetaan, että Shared Storage II -kiintolevylle ei ole määritetty
järjestelmänvalvojan salasanaa. Määritä kiintolevyn salasana
MMaannaagge
valitsemalla
e
(Hallinta). Näyttöön avautuu www-käyttöliittymä.
Määritä Shared Storage -kiintolevyn asetukset noudattamalla
näyttöön tulevia ohjeita.
8. Kun asetukset on määritetty, palaa EasyManage-ohjelman
HHoomme
asetusikkunaan sulkemalla selain. Napsauta sitten
(Koti) -painik
etta.
9. Kun näyttöön tulee Home (Koti) -ikkuna, napsauta
aaccccoouunnt
t
(Luo käyttäjätili) -painiketta.
10. Valitse tilin tyypiksi
(Yksityinen tili)
// HHoomme
tiedot ja valitse sitten
PPuubblliicc AAccccoouunnt
e
(Koti) t
CCrreeaatte
t
(Julkinen tili) tai
BBuussiinneesss
ai
e
(Luo). EasyManage™ -ohjelmisto luo
s
ritys). Anna tarvittavat
(Y
e
CCrreeaattee aa uusseer
PPrriivvaattee AAccccoouunnt
r
t
uuden käyttäjätilin ja tiliin liittyvät kansiot. Kun tämä on tehty,
työpöydälle tulee käyttäjän jaetun kansion pikakuvake.
SUOMI
35
Page 37

Asennus Macintosh OS X -käyttöjärjestelmään
Vaihe 1. Kovalevyn liittäminen
E
thernet-kaapelin liittäminen
1. Kiinnitä laitteen mukana toimitettu
Ethernet-kaapeli verkon pistorasiaan,
reitittimeen tai kytkimeen.
2. Liitä Ethernet-kaapelin toinen pää Shared
Storage II -kovalevyn Ethernet-liitäntään.
Virran kytkeminen
1. Työnnä verkkolaitteen pyöreä naarasliitin
kovalevyn virtaliittimeen.
2. Kiinnitä virtajohdon kaksipiikkinen
naarasliitin verkkolaitteeseen.
3. Työnnä verkkolaitteen sähköpistoke
torasiaan.
pis
Vaihe 2. Kovalevyn virran kytkeminen
Virtapainike
1. Paina Maxtor Shared Storage II -kovalevyn
takaosassa olevaa mustaa pyöreää
painiketta. Virtapainikkeeseen syttyy
vihreä valo.
2. Kovalevy käynnistyy. Käynnistyminen voi
kestää minuutin.
HHuuoommaauuttuuss:
-käyttöoppaassa on lisätietoja tilaa
ilmaisevista merkkivaloista.
:
Maxtor Shared Storage II
SUOMI
36
Page 38

Vaihe 3. Kovalevyn asentaminen
Includes:
– Maxtor EasyManage
™
Software
– Maxtor Backup
™
Software
– Maxtor Shared Storage II
User Guide (English)
© 2006 Maxtor Corporation and its Licensors. Maxtor and the stylized
Maxtor logo are registered trademarks,and Maxtor Shared Storage,
M
axtor EasyManage, and Maxtor Backup are trademarks of
M
axtor Corporation. U.S. patents 5,150,473 and 5,966,730.
O
ther patents pending. Other trademarks are the property
of their respective holders. All rights reserved.
06/06 PN: 20337500
WINDOWS
English
Français
Deutsch
Español
Italiano
MACINTOSH
English
Français
Deutsch
Installation Software
Maxtor Shared Storage
™
II
L
ogiciel d’installation, Installationssoftware,
S
oftware di installazione, Installationsprogram,
S
oftware de instalación, Installatiesoftware,
A
sennusohjelma, Software de Instalação,
1. Aseta
2. Näyttöön tulee
MMaaxxttoorr SShhaarreedd SSttoorraaggee IIII --aasseennnnuusslleevvyy CCDD--aasseemmaaaan
kaksoisosoita
aasseennnnuusslleevvyynn ssyymmbboolliia
EEaassyyMMaannaaggee --aasseennnnuussppaakkeettttiia
WWeellccoomme
e
(Tervetuloa) -ikkuna. Valitse
a
. Kaksoisosoita
a
.
MMaaxxttoor
CCoonnttiinnuue
(Jatka).
3. Lue
LLiicceennssee AAggrreeeemmeennt
t
(käyttöoikeussopimus) ja valitse
CCoonnttiinnuue
(Jatka). Hyväksy käyttöoikeussopimuksen ehdot valitsemalla
(Hyväksyn).
4. Valitse EasyManage-ohjelmiston
IInnssttaalll
l
(Asenna).
aasseennnnuusskkoohhdde
e
ja valitse sitten
5. Näkyviin tulee viesti, jossa ilmoitetaan, että järjestelmä on
käynnistettävä uudelleen, jotta asennus voidaan suorittaa loppuun.
CCoonnttiinnuuee iinnssttaallllaattiioon
Valitse
6. Kun asennus on v
almis, v
7. Kun järjestelmä käynnis
EEaassyyMMaannaagge
olevaa
ed Storage -kovalevyt. Kun ohjelmisto löytää kovalevyn, sen
Shar
e
verkkotunnus ja IP-osoite tulevat näkyviin. Esimerkki:
(192.168.0.5)
. Korosta Shared Storage -kovalevy, jonka asetukset
haluat määrittää. Valitse sitt
HHuuoommaauuttuuss:
:
Jos Shared Storage -k
n
(Jatka asennusta).
RReessttaarrt
alitse
tyy uudell
t
(Käynnistä uudell
een, kaksoisosoit
een).
a työpöydällä
-symbolia. EasyManage etsii verkossa olevat
MSS-000338
SSeelleecctt DDrriivve
en
e
(Valitse k
ovalevy).
ovalevyjä ei löydy, katso
lisätietoja ja vianmääritysohjeita valitsemalla Help (Ohje).
n
ja
r
e
e
AAggrreee
e
8. EasyManage – Shared Storage Administrator Password
orage -järjestelmänvalvojan salasana)
(EasyManage – Shar
ed St
-ikkuna tulee näyttöön. Tässä ikkunassa voit määrittää Shared
Storage II -kovalevyn järjestelmänvalvojan suojaustoiminnot.
tä www-käyttöliittymä ja määritä järjes
Käynnis
YYees
salasana valitsemalla
s
(Kyllä).
telmänvalvojan
9. Kun olet valmis, palaa EasyManage-ikkunaan sulkemalla selain.
10. Kun päävalikko tulee näyttöön, luo uusi käyttäjätili osoittamalla
+
EasyManage-ikkunan plussymbolia (
11. Valitse tilin tyypiksi
PPuubblliicc AAccccoouunnt
(Yksityinen tili). Valitse sitten
alitse kansion tyypiksi
V
12.
HHoomme
e
+
).
t
(Julkinen tili) tai
NNeexxt
t
(Seuraava).
BBuussiinneesss
(Koti),
s
ritys) t
(Y
PPrriivvaattee AAccccoouunnt
NNoonne
e
ai
t
(Ei mikään). EasyManage-ohjelmisto luo uuden käyttäjätilin ja tiliin
liittyvät kansiot.
13.
a uuden tilin nimi
Kirjoit
NNaamme
e
(Nimi) -k
oht
aan. V
alitse sitten
CCrreeaatte
e
(Luo).
HHuuoommaauuttuuss:
kansiot
:
Jotta kaikki käyttäjät voivat käyttää henkilökohtaista
or EasyManage -ohjelmisto on asennettava jokaiseen
a, Maxt
Macintosh-tietokoneeseen.
SUOMI
37
Page 39

Instalacja w systemach Windows 2000 i Windows XP
Krok 1. Podłącz dysk
P
odłączanie kabla Ethernet
1. Jeden koniec dostarczonego kabla Ethernet
podłącz do sieci, routera lub przełącznika.
2. Drugi koniec kabla Ethernet podłącz do portu
thernet dysku Shared Storage II.
E
Podłączanie zasilania
1. Podłącz okrągłe żeńskie złącze zasilacza do
złącza zasilania dysku.
2. Podłącz do zasilacza dwupinowe żeńskie
złącze przewodu zasilania.
3. Podłącz do gniazda zasilania standardową
wtyczkę kabla zasilania.
Krok 2. Włącz zasilanie dysku
Przycisk zasilania
1. Naciśnij okrągły czarny przycisk na panelu
tylnym dysku Maxtor Shared Storage II.
Na środku przycisku zasilania zaświeci się
zielona dioda LED (lampka).
2. Dysk zostanie uruchomiony. Proces
uruchamiania może potrwać około jednej
minuty.
Uwaga: Więcej informacji o znaczeniu diod
LED zasilania/stanu zawiera Podręcznik
użytkownika dysku Maxtor Shared Storage II.
POLSKI
38
Page 40

Krok 3. Skonfiguruj dysk
Includes:
– Maxtor EasyManage
™
Software
– Maxtor Backup
™
Software
– Maxtor Shared Storage II
User Guide (English)
©
2006 Maxtor Corporation and its Licensors. Maxtor and the stylized
M
axtor logo are registered trademarks,and Maxtor Shared Storage,
M
axtor EasyManage, and Maxtor Backup are trademarks of
Maxtor Corporation. U.S. patents 5,150,473 and 5,966,730.
Other patents pending. Other trademarks are the property
o
f their respective holders. All rights reserved.
0
6/06 PN: 20337500
WINDOWS
English
Français
Deutsch
Español
Italiano
MACINTOSH
English
Français
Deutsch
Installation Software
Maxtor Shared Storage
™
II
Logiciel d’installation, Installationssoftware,
Software di installazione, Installationsprogram,
Software de instalación, Installatiesoftware,
A
sennusohjelma, Software de Instalação,
1. Włóż instalacyjny dysk CD z oprogramowaniem dysku Maxtor
Shared Storage II
. Wybierz język i kliknij przycisk OK.
2. W głównym menu kliknij opcję
Install Software (Zainstaluj
oprogramowanie).
3. Po wyświetleniu monitu kliknij przycisk Yes (Tak), aby kontynuować.
Oprogramowanie zostanie przygotowane do instalacji.
4. Na ekranie powitalnym kliknij przycisk Next (Dalej). Aby ukończyć
proces instalacji, postępuj zgodnie z instrukcjami wyświetlanymi na
ekranie.
5. Po zakończeniu instalacji kliknij przycisk
Finish (Zakończ), aby
ponownie uruchomić komputer PC.
6. Po ponownym uruchomieniu komputera program Maxtor EasyManage
wyszuka dyski Shared Storage dostępne w sieci. Po znalezieniu
widoczne będą identyfikatory sieciowe oraz adresy IP wykrytych
dysków. Na przykład:
MSS-000338 (192.168.0.5)
.
Uwaga: Jeśli zostanie wyświetlony komunikat „No Shared Storage
drives were found” (Nie znaleziono dysków Shared Storage), kliknij
przycisk
Click here (Kliknij tutaj), aby uzyskać więcej informacji oraz
łącze do wskazówek umożliwiających rozwiązywanie problemów.
7. Po wykryciu dysku zostanie wyświetlone okno z informacją, że dla
funkcji administracyjnych dysku Shared Storage II nie ustawiono
hasła zabezpieczającego. Aby ustawić hasło dla dysku, kliknij przycisk
Manage (Zarządzanie). Zostanie uruchomiony oparty na sieci Web
interfejs użytkownika. Aby skonfigurować dysk Shared Storage,
postępuj zgodnie z instrukcjami wyświetlanymi w oknie przeglądarki.
8. Po zakończeniu zamknij przeglądarkę i wróć do ekranu Settings
(Ustawienia) programu EasyManage, a następnie kliknij przycisk
Home (Domowe).
9. Gdy zostanie wyświetlony ekran Home (Domowe), kliknij przycisk
Create a user account (Utwórz konto użytkownika).
10. Wybierz typ konta —
Account
(Konto prywatne), Home (Domowe) lub Business
Public Account (Konto publiczne) lub Private
(Służbowe), a następnie wprowadź niezbędne dane i kliknij przycisk
Create (Utwórz). Oprogramowanie EasyManage™ utworzy nowe
konto użytkownika wraz z odpowiednimi folderami. Po zakończeniu
na pulpicie zostanie utworzony skrót dla zasobu udostępnionego tego
użytkownika.
POLSKI
39
Page 41

Instalacja w systemie Macintosh OS X
Krok 1. Podłącz dysk
P
odłączanie kabla Ethernet
1. Jeden koniec dostarczonego kabla Ethernet
podłącz do sieci, routera lub przełącznika.
2. Drugi koniec kabla Ethernet podłącz do portu
thernet dysku Shared Storage II.
E
Podłączanie zasilania
1. Podłącz okrągłe żeńskie złącze zasilacza do
złącza zasilania dysku.
2. Podłącz do zasilacza dwupinowe żeńskie
złącze przewodu zasilania.
3. Podłącz do gniazda zasilania standardową
wtyczkę kabla zasilania.
Krok 2. Włącz zasilanie dysku
Przycisk zasilania
1. Naciśnij okrągły czarny przycisk na panelu
tylnym dysku Maxtor Shared Storage II.
Na środku przycisku zasilania zaświeci się
zielona dioda LED (lampka).
2. Dysk zostanie uruchomiony. Proces
uruchamiania może potrwać około jednej
minuty.
Uwaga: Więcej informacji o znaczeniu diod
LED zasilania/stanu zawiera Podręcznik
użytkownika dysku Maxtor Shared Storage II.
POLSKI
40
Page 42

Krok 3. Skonfiguruj dysk
Includes:
– Maxtor EasyManage
™
Software
– Maxtor Backup
™
Software
– Maxtor Shared Storage II
User Guide (English)
© 2006 Maxtor Corporation and its Licensors. Maxtor and the stylized
Maxtor logo are registered trademarks,and Maxtor Shared Storage,
M
axtor EasyManage, and Maxtor Backup are trademarks of
M
axtor Corporation. U.S. patents 5,150,473 and 5,966,730.
O
ther patents pending. Other trademarks are the property
of their respective holders. All rights reserved.
06/06 PN: 20337500
WINDOWS
English
Français
Deutsch
Español
Italiano
MACINTOSH
English
Français
Deutsch
Installation Software
Maxtor Shared Storage
™
II
L
ogiciel d’installation, Installationssoftware,
S
oftware di installazione, Installationsprogram,
S
oftware de instalación, Installatiesoftware,
A
sennusohjelma, Software de Instalação,
1. Włóż instalacyjny dysk CD z oprogramowaniem dysku Maxtor
Shared Storage II
dysk CD). Kliknij dwukrotnie opcję
(Pakiet Maxtor EasyManage).
ekranie powitalnym kliknij przycisk Continue (Kontynuuj).
2. Na
i kliknij dwukrotnie ikonę Install CD (Instalacyjny
Maxtor EasyManage Package
3. Przeczytaj
umowę licencyjną i kliknij przycisk Continue (Kontynuuj),
aby kontynuować. Aby zaakceptować warunki umowy licencyjnej,
kliknij przycisk
4. Wybierz
oprogramowanie EasyManage i kliknij przycisk
Agree (Zgadzam się).
lokalizację docelową, w której ma zostać zainstalowane
Install (Zainstaluj).
5. Zostanie wyświetlone powiadomienie, że proces instalacji wymaga
ponownego uruchomienia systemu. Kliknij przycisk
installation
6. Po zakończeniu instalacji kliknij przycisk
(Kontynuuj instalację).
Restart (Uruchom ponownie).
Continue
7. Po ponownym uruchomieniu komputera kliknij dwukrotnie ikonę programu EasyManage znajdującą się na pulpicie. Program EasyManage
wyszuka dyski Shared Storage dostępne w sieci. Po znalezieniu
widoczne będą identyfikatory sieciowe oraz adresy IP wykrytych
dysków. Na przykład:
MSS-000338 (192.168.0.5)
Shared Storage, który chcesz skonfigurować i kliknij przycisk
Drive
(Wybierz dysk).
. Podświetl dysk
Select
Uwaga: Jeśli nie znaleziono żadnych dysków Shared Storage, kliknij
przycisk
Help (Pomoc), aby uzyskać więcej informacji oraz wskazówki
umożliwiające rozwiązywanie problemów.
8. Zostanie wyświetlone okno programu EasyManage — Shared Storage
Administrator Password (Hasło administratora dysków Shared Storage),
które umożliwia skonfigurowanie zabezpieczeń administracyjnych na
dysku Shared Storage II. Kliknij przycisk
Yes (Tak), aby uruchomić
oparty na sieci Web interfejs użytkownika i ustawić hasło administratora.
9. Po zakończeniu zamknij przeglądarkę i wróć do ekranu programu
EasyManage.
10. Po wyświetleniu menu głównego kliknij przycisk dodawania (
+) na
ekranie programu EasyManage, aby utworzyć nowe konto użytkownika.
11. Wybierz typ konta — Public Account (Konto publiczne) lub Private
Account
Wybierz typ folderu —
12.
(Konto prywatne), a następnie kliknij przycisk Next (Dalej).
Home (Domowe), Business (Służbowe) lub
None (Brak). Oprogramowanie EasyManage utworzy nowe konto
użytkownika wraz z odpowiednimi folderami.
13. W polu Name (Nazwa) wprowadź nazwę nowego konta i kliknij przycisk
Create (Utwórz).
Uwaga: Oprogramowanie Maxtor EasyManage musi być zainstalowane
na każdym komputerze Macintosh, aby każdy użytkownik mógł
korzystać z folderu osobistego.
POLSKI
41
Page 43

Установка в О Windows 2000 и Windows XP
аг 1. одключение накопителя
одключение кабеля Ethernet
1. одключите один конец прилагаемого к
накопителю кабеля Ethernet к локальной сети,
коммутатору или маршрутизатору.
2. одключите другой конец кабеля Ethernet к порту
Ethernet накопителя Shared Storage II.
одключение питания
1. одключите гнездовой разъем блока питания к
разъему питания накопителя.
2. одключите гнездовой разъем кабеля питания с
двумя контактами к блоку питания.
3. одключите стандартный электрический
штепсель блока питания к розетке электросети.
аг 2. ключение питания накопителя
нопка включения питания
1. ажмите черную круглую кнопку на задней
панели накопителя Maxtor Shared Storage II.
агорается зеленый светодиодный индикатор в
центре кнопки включения питания.
2. акопитель включен. роцедура запуска
накопителя занимает не более минуты.
римечание. одробнее о светодиодных
индикаторах питания/состояния см. руководство
по эксплуатации Maxtor Shared Storage II.
У
42
Page 44

аг 3. астройка накопителя
Includes:
– Maxtor EasyManage
™
Software
– Maxtor Backup
™
Software
– Maxtor Shared Storage II
User Guide (English)
©
2006 Maxtor Corporation and its Licensors. Maxtor and the stylized
M
axtor logo are registered trademarks,and Maxtor Shared Storage,
M
axtor EasyManage, and Maxtor Backup are trademarks of
Maxtor Corporation. U.S. patents 5,150,473 and 5,966,730.
Other patents pending. Other trademarks are the property
o
f their respective holders. All rights reserved.
0
6/06 PN: 20337500
WINDOWS
English
Français
Deutsch
Español
Italiano
MACINTOSH
English
Français
Deutsch
Installation Software
Maxtor Shared Storage
™
II
Logiciel d’installation, Installationssoftware,
Software di installazione, Installationsprogram,
Software de instalación, Installatiesoftware,
A
sennusohjelma, Software de Instalação,
1
. ставьте компакт-диск с установочным программным обеспечением
Maxtor Shared Storage II
. ыберите язык и нажмите OK.
2. главном меню нажмите
Install Software (Установить программное
обеспечение).
3. ответ на запрос о продолжении нажмите
Yes (а). рограммное
обеспечение выполняет подготовку к установке.
4. окне приветствия нажмите
Next (алее). ля завершения установки
следуйте инструкциям на экране.
5. о завершении установки нажмите
Finish (отово) для перезагрузки
компьютера.
6. ри перезагрузке приложение Maxtor EasyManage выполняет поиск
накопителей Shared Storage в сети. случае обнаружения накопителей на
экране появляются сетевые идентификаторы и IP-адреса найденных
накопителей. апример:
MSS-000338 (192.168.0.5).
римечание. сли отображается сообщение "No shared Storage drives
were found" (акопители Shared Storage не найдены), для получения
дополнительной информации и ссылки на советы по устранению
неполадок выберите кнопку
Click here (ажать).
7. случае обнаружения отображается окно с сообщением о том, что
в накопителе Shared Storage II не установлен пароль для защиты
административных функций. ля установки пароля накопителя нажмите
Manage (Управление). ри этом запускается Web-интерфейс пользователя.
ля настройки накопителя Shared Storage следуйте инструкциям,
отображаемым в браузере на экране.
8. о окончании настройки закройте браузер для возврата на экран
параметров приложения EasyManage и нажмите кнопку
Home
( начало).
9. огда отобразится начальный экран, нажмите кнопку
Create a user account
(оздать учетную запись пользователя).
10. ыберите тип учетной записи:
(астная)/ Home (омашняя) или Business (
сведения и нажмите
Create (оздать). рограмма EasyManage™ создаст
Public Account (Общая), Private Account
абочая), введите необходимые
учетную запись нового пользователя и соответствующие папки для этой
учетной записи. о окончании для этого пользователя появляется ярлык на
рабочем столе.
У
43
Page 45

Установка Macintosh OS X
аг 1. одключение накопителя
одключение кабеля Ethernet
1. одключите один конец прилагаемого к
накопителю кабеля Ethernet к локальной сети,
коммутатору или маршрутизатору.
2. одключите другой конец кабеля Ethernet к порту
Ethernet накопителя Shared Storage II.
одключение питания
1. одключите гнездовой разъем блока питания к
разъему питания накопителя.
2. одключите гнездовой разъем кабеля питания с
двумя контактами к блоку питания.
3. одключите стандартный электрический
штепсель блока питания к розетке электросети.
аг 2. ключение питания накопителя
нопка включения питания
1. ажмите черную круглую кнопку на задней
панели накопителя Maxtor Shared Storage II.
агорается зеленый светодиодный индикатор в
центре кнопки включения питания.
2. акопитель включен. роцедура запуска
накопителя занимает не более минуты.
римечание. одробнее о светодиодных
индикаторах питания/состояния см. руководство
по эксплуатации Maxtor Shared Storage II.
У
44
Page 46

аг 3. астройка накопителя
Includes:
– Maxtor EasyManage
™
Software
– Maxtor Backup
™
Software
– Maxtor Shared Storage II
User Guide (English)
© 2006 Maxtor Corporation and its Licensors. Maxtor and the stylized
Maxtor logo are registered trademarks,and Maxtor Shared Storage,
M
axtor EasyManage, and Maxtor Backup are trademarks of
M
axtor Corporation. U.S. patents 5,150,473 and 5,966,730.
O
ther patents pending. Other trademarks are the property
of their respective holders. All rights reserved.
06/06 PN: 20337500
WINDOWS
English
Français
Deutsch
Español
Italiano
MACINTOSH
English
Français
Deutsch
Installation Software
Maxtor Shared Storage
™
II
L
ogiciel d’installation, Installationssoftware,
S
oftware di installazione, Installationsprogram,
S
oftware de instalación, Installatiesoftware,
A
sennusohjelma, Software de Instalação,
1. ставьте компакт-диск с установочным программным обеспечением
Maxtor Shared Storage II в дисковод и дважды щелкните мышью на
значке установочного компакт-диска. важды щелкните мышью на
пакете Maxtor EasyManage.
2. окне
приветствия нажмите Continue (родолжить).
3. Ознакомьтесь с лицензионным соглашением и для продолжения
нажмите кнопку Continue (родолжить). ля подтверждения своего
согласия с положениями лицензионного соглашения нажмите Agree
(ринимаю).
4. ыберите местоположение для установки программного обеспечения
EasyManage и нажмите Install (Установить).
5. ыводится уведомление о необходимости перезагрузки системы для
продолжения установки. ажмите кнопку Continue installation (родолжить
установку).
6. о завершении установки нажмите Restart (ерезагрузка).
7. осле перезагрузки дважды щелкните на значке EasyManage, расположенном
на рабочем столе. рограмма EasyManage выполняет поиск накопителей
Shared Storage в локальной сети. случае обнаружения накопителей на
экране появляются сетевые идентификаторы и IP-адреса найденных
накопителей. апример:
Shared Storage для настройки и нажмите
MSS-000338 (192.168.0.5). ыделите накопитель
Select Drive (ыбрать накопитель).
римечание. сли накопители Shared Storage не найдены, нажмите Help
(правка) для получения дополнительной информация и советов по
устранению неполадок.
8. а экране появляется окно EasyManage - Shared Storage Administrator
Password (ыстрый запуск – пароль администратора), позволяющее
настроить параметры безопасности накопителя Shared Storage II.
ажмите
Yes (а) для запуска web-интерфейса пользователя и задайте
пароль администратора.
9. о завершении закройте браузер для возврата на экран EasyManage.
10. осле появления главного меню нажмите значок "плюс" (
+) на экране
EasyManage для создания новой учетной записи пользователя.
11. ыберите тип учетной записи: Public Account (Общая) или Private Account
(астная), затем нажмите Next (алее).
12. ыберите тип папки (Home (ом), Business (абота) или None (ет)).
рограмма EasyManage создаст учетную запись нового пользователя и
тветствующие папки для э
соо
13. ведите имя новой учетной записи в поле
той учетной записи.
Name (мя) и нажмите Create
(оздать).
римечание. ля того, чтобы каждый по
льзователь смог воспо
льзоваться
преимуществами персональной папки, программное обеспечение Maxtor
становить на каждом к
одимо у
EasyManage необ
х
У
45
омпьютере Macintosh.
Page 47

Limited Warranty Statement
MMaaxxttoorr''ss wwaarrrraannttyy oobblliiggaattiioonnss aarree lliimmiitteedd ttoo tthhee tteerrmmss sseett ffoorrtthh bbeellooww.
Please note that Maxtor reserves the right to update from time to time the warranty terms provided for new purchases of Maxtor products,
and to establish the effective date of those updated warranty terms. Please refer to www.maxtor.com for the then current form of
L
imited Warranty Statement for Maxtor brand products.
Please note that Maxtor products are distributed outside the United States and Canada through local authorized distributors and
r
esellers (“Resellers”). These Resellers generally offer a consumer warranty, and associated warranty services, to consumer
p
urchasers. Maxtor recommends that consumers in these jurisdictions first contact the Reseller from whom they purchased the
M
axtor product for all issues with regard to product defects and the applicable product warranty.
M
axtor warrants to the original consumer purchaser (“you”) that new Maxtor disk drive products (“New Products”) will be free from
d
efects in material and workmanship for the Standard Warranty Period for the relevant New Product. The Standard Warranty Period
f
or the various New Products marketed by Maxtor and for the geographies in which they are sold is detailed on www.maxtor.com.
T
he warranty period on replacements for New Products is the remainder of the warranty on the original New Product or 90 days from
t
he date of shipment of the replacement product, whichever is longer.
I
n addition to the New Products, Maxtor may from time to time sell refurbished disk drive products which are not new and which have
been reconditioned to Maxtor’s standards for refurbished products (“Refurbished Products”). Unless a warranty period (“Refurbished
Warranty Period”) is designated by Maxtor for the specific Refurbished Product either on www.maxtor.com or on the product packaging
(as applied by Maxtor), Refurbished Products are provided strictly on an “AS IS” basis and Maxtor disclaims any and all warranties or
conditions whatsoever for Refurbished Products.
To the extent that Maxtor so designates a warranty period for the Refurbished Product, Maxtor warrants to the original consumer
purchaser that the Refurbished Product will be free from defects in material and workmanship for the associated Refurbished
Warranty Period.
New Products and Refurbished Products are together referred to as “Products.” The start of the Standard Warranty Period or
Refurbished Warranty Period (together referred to as the “Warranty Period”), as the case may be, is the documented date of your
purchase of the Product from Maxtor or Maxtor’s authorized reseller. In the absence of a documented purchase date, the start of the
Warranty Period will be deemed the date of original shipment by Maxtor from its point of new or refurbish manufacture, as the case
may be, to Maxtor’s customer.
e manufactur
oducts ar
The Pr
If you discover a defect in material or workmanship during the Warranty Period, and Maxtor agrees that the defect exists, Maxtor will,
at its option, repair or replace the Product at no charge to you, provided it is returned during the applicable Warranty Period, with
transportation charges prepaid, to the facility designated by Maxtor. The Product must be properly packaged in Maxtor or Maxtorapproved packaging, with the Return Material Authorization clearly displayed on the outside of the packaging, to obtain warranty service.
Products that fail within the first 30 days after purchase will be replaced with a new Product. Maxtor may require proper proof of purchase
documentation prior to issuing the replacement Product.
If Maxtor elects to repair a Product, Maxtor owns all parts removed from the repaired Product. Maxtor uses new and reconditioned
parts made by v
Products may, at Maxtor's option, include an equal or better model or features.
or has no responsibility whatsoever with regard to any content or data on returned Products.
Maxt
To request warranty service and before returning a Product to Maxtor, please contact the Maxtor Service Center. Refer to the Maxtor
Installation Guide or www.maxtor.com for your online guide to find the appropriate telephone number for obtaining customer assistance
within your jurisdiction and the proper address for shipping authorized returns. Once the Maxtor Service Center determines that a
repair is required, Maxtor will issue an RMA number. A copy of your receipt or bill of sale bearing the name and location of Maxtor’s
authorized reseller and the Maxtor serial number and model number of the Product in which the defect has been reported may be
required as a proof of your purchase for warranty service. Note that, as an alternative, Maxtor offers an online warranty return option
for certain Products through www.maxtor.com.
You are responsible for saving or backing up data contained in any Product returned to Maxtor in conjunction with warranty or any
other servic
loss or disclosure of, such data.
This limit
name or logo affixed to them. Maxtor does not warrant any product that is not manufactured by, for, or with permission from Maxtor,
or which is not otherwise distributed by Maxtor under the Maxtor brand.
arious manufacturer
es. Maxtor shall have no responsibility for such data whatsoever and shall have no liability arising out of any damage to, or
ed warranty applies only to the Maxtor products that can be identified by the original, unaltered Maxtor trademark, trade
ed from parts and components that are new or equivalent to new in accordance with industry standards.
onjunction with warr
s in c
.
anty repairs and replacement Products. Repair parts or replacement
ENGLISH
46
Page 48

T
his warranty does not cover any of the following conditions:
–
Abuse, unreasonable use, mistreatment, or neglect
–
Unusual physical or electrical stress or power fluctuations
– Damage caused during installation of the Product
– Damage or capacity/performance/operational resetting caused by the equipment or system with which the Product is used
–
Damage caused by modification or repair not made or authorized by Maxtor
–
Products whose Maxtor Serial Number and/or Material Number label have been removed, torn or defaced
–
Damage caused by use of non-Maxtor packaging
–
Damage caused by improper or improperly used packaging
– Damage caused by lack of ESD protection
– Products that are determined to be stolen.
Further, this limited warranty is void if the Product cover, or any label or seal on the Product, is removed or damaged.
Maxtor owns all parts removed from the repaired Products. Maxtor uses new and reconditioned parts in performing warranty repairs
and building replacement products.
FAILURE TO COMPLETE AND RETURN ANY MAXTOR PRODUCT REGISTRATION FORM WILL NOT DIMINISH YOUR WARRANTY RIGHTS.
Certain Products include software or firmware as a component (“Software”). Maxtor or its suppliers retain all rights of ownership in
such Software and any use of the Software is subject to the license agreement provided by Maxtor accompanying such Software. If no
l
icense is provided by Maxtor, you are granted the limited right to use the Software as required for the operation of the Product and no
o
ther rights are granted whatsoever. Certain Software is licensed under the GNU General Public License Agreement (“GPL Software”).
E
XCEPT AS OTHERWISE PROVIDED BY MAXTOR IN A WRITTEN LICENSE AGREEMENT, SOFTWARE IS OFFERED “AS IS” AND MAXTOR
G
RANTS NO WARRANTIES OF ANY KIND, EXPRESS OR IMPLIED, BY STATUTE, COMMUNICATIONS OR OTHERWISE WITH REGARD TO
T
HE SOFTWARE. MAXTOR SPECIFICALLY DISCLAIMS ANY IMPLIED WARRANTIES OF MERCHANTABILITY, FITNESS FOR A PARTICULAR
P
URPOSE OR NONINFRINGEMENT WITH RESPECT TO THE SOFTWARE. Please note that Maxtor makes the source code for the GPL
software
available through www.maxtor.com.
TO THE MAXIMUM EXTENT PERMITTED BY LAW, THIS WARRANTY AND THE REMEDIES SET FORTH ABOVE ARE EXCLUSIVE AND IN
LIEU OF ALL O
HEREIN, MAXT
WARRANTIES AND CONDITIONS AS TO THE PRODUCTS, SERVICES, OR ANY OTHER MATTER WHATSOEVER. IN PARTICULAR, BUT
WITHOUT LIMITING THE GENERALITY OF THE FOREGOING, MAXT
WARRANTIES AND CONDITIONS OF SATISFACTORY QUALITY, MERCHANTABILITY, FITNESS FOR A PARTICULAR PURPOSE, PERFORMANCE
IN A SKILLFUL AND WORKMANLIKE MANNER, AND NON-INFRINGEMENT OF THIRD PARTY RIGHTS OR ANY OTHER WARRANTY
ARISING FROM A COURSE OF DEALING OR USA
NO WARRANTY TO YOU WITH REGARD TO, PRODUCTS ORIGINALLY SOLD AS AN INTEGRATED COMPONENT OF A SYSTEM NOT SUPPLIED
BY MAXTOR, OR PRODUCTS PROVIDED UNDER A THIRD PARTY LEASING OR SERVICE ARRANGEMENT. No Maxtor distributor, reseller,
dealer, agent or employee is authorized to make any modification, extension or addition to this warranty.
MAXTOR IS NOT RESPONSIBLE OR LIABLE FOR ANY INDIRECT, UNFORESEEABLE, SPECIAL, INCIDENTAL OR CONSEQUENTIAL DAMAGES
HOWEVER CAUSED AND WHETHER OR NOT MAXTOR WAS ADVISED OF THE POSSIBILITY OF SUCH DAMAGES, INCLUDING BUT NOT
LIMITED TO, COSTS OF PROCUREMENT OF SUBSTITUTE GOODS, LOSS OF DATA OR PROGRAMS, LOST PROFITS, DOWNTIME, GOODWILL,
DAMAGE OR REPLACEMENT OF EQUIPMENT AND PROPERTY, AND ANY COSTS OF RECOVERING, PROGRAMMING OR REPRODUCING
ANY PROGRAM OR DATA STORED IN OR USED WITH MAXTOR PRODUCTS OR ANY OTHER DAMAGES ARISING OUT OF THE PURCHASE,
USE OR PERFORMANCE OF THE PRODUCT. Maxtor is not, and cannot be, responsible for any losses or damages arising out of any loss
of, or any inability to access, data as a result from the failure of a Product, and accordingly you bear this risk. The allocation of risk
under this limitation of liability is reflected in the purchase price of the Product. This limitation of liability, however, will not apply to
claims for death or personal injury caused by the negligence of Maxtor or its associated companies, officers, representatives or agents.
Some jurisdictions do not allow the e
conditions or warranties, so the above limitations or exclusions may not apply to you. This warranty gives you specific legal rights, and
you may also have other rights that vary from jurisdiction to jurisdiction. By way of example, if a Product is purchased from Maxtor or
Maxt
at www.maxtor.com.
Please note that you are expressly not permitted to use the Products in conjunction with the operation of nuclear facilities, aircraft
navigation, aircraft communication, aircraft flight control, aircraft air traffic control systems, weapons devices or systems, or in any
vices or systems in which a malfunction (including, without limitation, software related delay or failure) would result in foreseeable
de
risk of injury or death to the operator of the device or system, or to others.
This Statement of Limited Warranty shall be exclusively interpreted in accordance with the English language with the meaning of its
terms. Should any provisions of this Limited Warranty be declared invalid by any court of competent jurisdiction, the balance of this
Limited Warranty will remain in full force and effect. In addition, should a translation of this Limited Warranty deviate from the English
language version, only the English language version shall apply and be binding.
THERS, WHETHER ORAL OR WRITTEN, EXPRES
OR SPECIFICALLY DISCLAIMS TO THE MAXIMUM EXTENT PERMITTED BY LAW ANY AND ALL REPRESENTATIONS,
GE OF TRADE. THIS LIMITED W
xclusion or limitation of incidental or consequential damages or exclusions of implied or deemed
or's authorized r
eseller by you in Europe, Africa or the Middle East, you may have additional warranty rights which are explained
SED, IMPLIED OR STATUT
OR SPECIFIC
ORY. OTHER THAN AS EXPRESSLY SET FORTH
Y DISCLAIMS ANY AND ALL IMPLIED OR DEEMED
ALL
ARRANTY DOES NOT APPLY TO, AND MAXTOR MAKES
ENGLISH
47
Page 49

Déclaration de garantie limitée
LLeess oobblliiggaattiioonnss ddee llaa ggaarraannttiiee MMaaxxttoorr ssee lliimmiitteenntt aauuxx ccoonnddiittiioonnss ééttaabblliieess ccii--aapprrèèss..
Veuillez noter que Maxtor se réserve le droit de mettre à jour, de temps à autre, les conditions de garantie offertes pour de nouveaux
achats de produits Maxtor et de déterminer la date d’entrée en vigueur de ces mises à jour. Reportez-vous au site Internet
w
ww.maxtor.fr pour obtenir le formulaire actualisé de Déclaration de garantie limitée des produits de marque Maxtor.
Veuillez noter que les produits Maxtor sont vendus par des distributeurs et revendeurs locaux agréés en dehors des États-Unis et du
C
anada (“Revendeurs”). Ces revendeurs offrent généralement aux acheteurs consommateurs une garantie ainsi que les services
a
ssociés. Dans ces juridictions, Maxtor recommande que les consommateurs contactent en premier le revendeur auprès duquel ils
o
nt acheté le produit Maxtor pour tous les problèmes concernant les défauts de ce produit ainsi que la garantie applicable.
M
axtor garantit à l’acheteur consommateur d’origine (“vous”) que les nouveaux disques durs Maxtor (“Produits”) sont exempts de
d
éfauts matériels et de main-d’œuvre pour la période standard de garantie du Produit en question. La période standard de garantie
p
our les Nouveaux Produits commercialisés par Maxtor ainsi que les géographies dans lesquelles ils sont vendus est détaillée sur
w
ww.maxtor.fr.
L
a période de garantie de remplacement des Nouveaux Produits correspond au nombre de jours restants sur la garantie d’origine ou
e
st de 90 jours à partir de la date d’expédition du produit de remplacement, la garantie la plus longue s’appliquant.
En plus des Nouveaux Produits, il se peut que Maxtor vende de temps à autre des disques durs remis à neuf afin de correspondre aux
normes Maxtor concernant les produits remis à neuf (“Produits remis à neuf”). À moins qu’une période de garantie (“Période de garantie
des Produits remis à neuf”) soit désignée par Maxtor pour les Produits remis à neuf, sur le site www.maxtor.com ou sur l’emballage du
produit (comme appliqué par Maxtor), les Produits remis à neuf sont fournis uniquement “TELS QUELS” et Maxtor rejette toute
garantie ou condition pour les Produits remis à neuf.
Dans la mesure où Maxtor désignerait une période de garantie pour les Produits remis à neuf, Maxtor garantit à l’acheteur consommateur
d’origine que les Produits remis à neuf seront dépourvus de tout défaut matériel et de main-d’œuvre pour la période de garantie des
produits remis à neuf.
Les Nouveaux Produits et les Produits remis à neuf sont désignés par l’appellation “Produits”. Le début de la période standard de garantie
ou de la période de garantie pour les produits remis à neuf (appelées toutes les deux “Période de garantie”) est la date apparaissant
sur le ticket d’achat du Produit auprès de Maxtor ou d’un revendeur agréé Maxtor. En l’absence d’une preuve attestant de cette date,
le début de la période de garantie sera considéré comme étant la date à laquelle Maxtor a expédié le produit (neuf ou remis à neuf)
depuis son point de fabrication jusqu’au client Maxtor.
Les Produits sont fabriqués à partir de pièces et composants neufs ou équivalents au neuf conformément aux standards de l’industrie.
Si vous découvrez un défaut au niveau du matériel ou de la main-d’œuvre au cours de la période de garantie et que Maxtor reconnaît
que ce défaut existe, Maxtor s’engage, à sa discrétion, à réparer ou remplacer le Produit sans frais pour vous, à condition qu’il soit
retourné pendant la période de garantie, à l’unité désignée par Maxtor et avec frais de transport payés à l’avance. Pour bénéficier du
service prévu par la garantie, le Produit doit être correctement conditionné dans un emballage Maxtor ou autorisé par Maxtor, avec
l’autorisation de retour de matériel (Return Material Authorization ou RMA) clairement apposée à l’extérieur du paquet. Les produits
tombant en panne dans les 30 premiers jours suivant l’achat seront remplacés par un nouveau Produit. Maxtor peut exiger une preuve
d’achat adéquate avant de fournir le Produit de remplacement.
Si Maxtor choisit de réparer un Produit, toutes les pièces retirées du Produit réparé appartiennent à Maxtor. Maxtor utilise des pièces
neuves et remises à neuf f
dans le c
Maxt
Maxtor ne saurait en aucun cas être tenu responsable du contenu ou des données présents sur les Produits retournés.
Pour solliciter le service prévu par la garantie et avant de renvoyer un Produit à Maxtor, veuillez contacter le centre de services aprèsvente de Maxtor. Reportez-vous au guide d’installation Maxtor ou au guide en ligne www.maxtor.fr pour trouver le numéro de téléphone
correspondant à l’assistance client dans votre région, ainsi que l’adresse appropriée pour expédier les retours autorisés. Une fois que
le centre de services après-vente de Maxtor a établi qu’une réparation était nécessaire, Maxtor émet un numéro d’autorisation de
retour de matériel. Une copie de votre reçu ou ticket de caisse portant le nom et le lieu du revendeur agréé Maxtor, ainsi que le numéro
de série et numéro de modèl
pour l
de la gar
Il est de votre responsabilité de faire une copie de sauvegarde ou de sauvegarder les informations contenues dans tout Produit
et
r
saur
Cette garantie limitée ne s’applique qu’aux produits Maxtor identifiables par la marque de fabrique, le nom de marque ou le logo Maxtor
qui y sont apposés. Maxtor ne garantit aucun produit qui n’est pas fabriqué par, pour ou avec la permission de Maxtor, ou qui ne soit
pas dis
e de la gar
adr
or, inclure un modèle ou des caractéristiques équivalents ou supérieurs.
e service de garantie. Notez que Maxtor propose également, pour certains Produits, une option de retour en ligne dans le cadre
antie, via l
ourné à Maxt
ait être tenu responsable de tout dommage, toute perte ou divulgation survenant à ces données.
or dans l
tribué par Maxt
abriquées par différ
antie. Les pièces de rechange ou les Produits de remplacement pourront, en fonction des disponibilités de
e de Produit Maxtor pour lequel le défaut a été signalé pourront être demandés comme preuve d’achat
e Internet www.maxtor.fr.
e sit
e de la gar
adr
e c
or sous la mar
antie ou de t
que Maxtor.
abricants conjoint
ents f
out autr
e service. Maxtor n’est en aucun cas responsable de ces données et ne
ec les Produits de remplacement et les réparations
ement av
FRANÇAIS
48
Page 50

C
ette garantie ne couvre aucune des conditions suivantes :
–
Utilisation abusive, anormale, incorrecte ou négligence
–
Les traitements inhabituels, les contraintes imposées au niveau électrique ou les variations de tension
– Les dommages causés pendant l’installation du Produit
– Les dommages ou la reconfiguration de capacité/performance/opérationnelle causés par l’équipement ou le système avec lequel le
Produit est utilisé
–
Les dommages causés par une modification ou une réparation non effectuée ou autorisée par Maxtor
–
Les produits dont le numéro de série Maxtor et/ou le numéro de matériel a été effacé ou rendu illisible
–
Les dommages causés par l’utilisation d’un emballage non agréé par Maxtor
–
Les dommages causés par un emballage inadéquat ou utilisé de façon inadéquate
– Les dommages causés par un manque de protection contre les décharges électrostatiques
– Les produits qui ont été volés
En outre, cette garantie limitée est annulée si le couvercle du Produit, ou toute étiquette ou cachet sur le Produit, est enlevé ou endommagé.
Toutes les pièces retirées des Produits réparés appartiennent à Maxtor. Maxtor utilise des pièces neuves et remises à neuf pour les
réparations et la fourniture de produits de remplacement dans le cadre de la garantie.
LE MANQUEMENT AU REMPLISSAGE ET AU RETOUR DU FORMULAIRE D’INSCRIPTION DE TOUT PRODUIT MAXTOR NE DIMINUERA
PAS VOS DROITS À LA GARANTIE.
C
ertains Produits comprennent des composants tels que des logiciels ou micrologiciels (“Logiciels”). Maxtor et ses fournisseurs
co
nservent tous les droits de propriété et l’utilisation de ces logiciels est soumise à l’accord de la licence fourni par Maxtor avec les
logiciels. Si Maxtor ne fournit aucune licence, vous avez l’autorisation limitée d’utiliser les logiciels selon les besoins du fonctionnement
du Produit, mais ne disposez toutefois d’aucun autre droit. Certains logiciels sont cédés sous licence conformément à la licence GPL
dans le cadre du projet GNU (“Logiciel GPL”). LE LOGICIEL EST OFFERT “TEL QUEL” SAUF AUTREMENT MENTIONNÉ PAR MAXTOR
DA
DÉFINIE PAR LES NORMES, LA CORRESPONDA
GARANTIE DE QUALITÉ MARCHANDE, D’APTITUDE À UN EMPLOI PARTICULIER OU DE NON-CONTREFAÇON DU LOGICIEL. Veuillez
pr
DANS LES LIMITES PRÉVUES PAR LA LOI, CETTE GARANTIE ET LES RECOURS ÉTABLIS CI-DESSUS SONT EXCLUSIFS ET REMPLACENT
TOUT AUTRE RECOURS OU GARANTIE ORAUX OU ÉCRITS, EXPRIMÉS, TACITES OU LÉGAUX. EN DEHORS DE CE QUI EST EXPRESSÉMENT
ÉTABLI, MAXTOR REJETTE SPÉCIFIQUEMENT ET DANS LES LIMITES PRÉVUES PAR LA LOI TOUTE RESPONSABILITÉ, GARANTIE OU
CONDITION, EN CE QUI CONCERNE LES PRODUITS, LES SERVICES OU QUELQU’AUTRE SUJET QUE CE SOIT. EN PARTICULIER, MAIS
SANS SE LIMITER À LA GÉNÉRALITÉ DE CE QUI PRÉCÈDE, MAXTOR REJETTE SPÉCIFIQUEMENT TOUTE GARANTIE OU CONDITION
IMPLICITE OU RÉPUTÉE DE QUALITÉ SATISFAISANTE, DE QUALITÉ MARCHANDE, D’APTITUDE À UN EMPLOI PARTICULIER, DE
FONCTIONNEMENT SELON LES RÈGLES DE L’ART ET DE NON-VIOLATION DES DROITS D’UN TIERS OU TOUTE AUTRE GARANTIE
PROVENANT D’UN EMPLOI OU D’UN USAGE COMMERCIAL. CETTE GARANTIE LIMITÉE NE S’APPLIQUE PAS À DES PRODUITS VENDUS
À L’ORIGINE COMME COMPOSANT INTÉGRÉ D’UN SYSTÈME NON FOURNI PAR MAXTOR, NI À DES PRODUITS FOURNIS PAR LE BIAIS
D’UN ARRANGEMENT DE LOCATION OU DE SERVICE TIERS ET MAXTOR NE VOUS PROPOSE AUCUNE GARANTIE À CE SUJET. Aucun
distributeur, revendeur, agent ou employé de Maxtor n’est autorisé à modifier, allonger ou compléter cette garantie.
MAXTOR NE SAURAIT ÊTRE TENU RESPONSABLE DES DOMMAGES INDIRECTS, IMPRÉVISIBLES, SPÉCIAUX, ACCESSOIRES OU
CONSÉCUTIFS QUELLE QUE SOIT LA MANIÈRE DONT ILS ONT ÉTÉ C
D’OCCURRENCE OU NON, Y COMPRIS, MAIS SANS S’Y LIMITER, LES COÛTS D’
REMPLACEMENT, LA PERTE DE DONNÉES OU DE PROGRAMMES, LA PERTE DE BÉNÉFICES, LES PÉRIODES D’IMPRODUCTIVITÉ, LA
DÉPRÉCIA
COÛTS DE RÉCUPÉRATION DE DONNÉES, DE PROGRAMMATION OU DE REPRODUCTION DE TOUT PROGRAMME OU TOUTE DONNÉE
MÉMORISÉE DANS OU UTILISÉE AVEC LES PRODUITS MAXTOR OU TOUT AUTRE DOMMAGE SURVENANT SUITE A L’ACHAT, L’UTILISATION
OU LE FONCTIONNEMENT DU PRODUIT
ou de tout dommage survenu à des données suite à une perte, ni de toute impossibilité à l’accès de ces données suite à la défaillance
d’un Produit, et il est entendu que vous supportez ce risque en conséquence. L’affectation du risque dans le cadre de cette limite de
gar
remboursement pour décès ou préjudice corporel causé par la négligence de Maxtor ou ses sociétés, son personnel, ses commerciaux
ou agents affiliés.
Certaines juridictions ne permettent pas l’exclusion ou la limitation de dommages accidentels ou consécutifs ou les exclusions de
conditions ou garanties implicites ou réputées. Il est donc possible que les limitations ou exclusions ci-dessus ne vous concernent pas.
Cette garantie vous confère des droits spécifiques. Vous pouvez également avoir d’autres droits, qui varient selon les juridictions. Par
e
vous pouvez disposer de droits de garantie supplémentaires qui sont détaillés sur le site Internet www.maxtor.fr
Notez qu’il vous est expressément interdit d’utiliser les Produits Maxtor en conjonction avec des installations nucléaires, de navigation
aérienne, des systèmes de communication aérienne, de contrôle des vols aériens, de contrôle du trafic aérien, des dispositifs ou systèmes
d’armement, ou tout dispositif ou système dans lequel un dysfonctionnement (y compris, mais sans s’y limiter, un retard ou une
déf
du système, ou pour un tiers.
Cette déclaration de garantie limitée ser
termes. Dans l’éventualité où une cour de juridiction compétente déclarerait une (des) clause(s) de cette garantie limitée invalide(s),
le reste de la garantie limitée conserverait toute son autorité et son plein effet. En outre, si une traduction de cette garantie limitée
introduisait une modification du sens, seul
CCORD DE LICENCE ÉCRIT, ET MAXTOR N’OFFRE AUCUNE GARANTIE D’AUCUNE SORTE, EXPRESSÉMENT OU IMPLICITEMENT,
NS UN A
otre disposition le code source pour le logiciel GPL sur le site www.maxtor.fr.
e note que Maxt
endr
or met à v
TION DE L’IMAGE, LES DOMMAGES OU LE REMPLA
t reflété dans le prix d’achat du Produit. Cette limite de responsabilité, toutefois, ne s’appliquera pas à des demandes de
antie es
e, si vous avez acheté un Produit auprès de Maxtor ou l’un de ses revendeurs agréés en Europe, en Afrique ou au Moyen-Orient,
empl
x
NCE OU RELATIVEMENT AU LOGICIEL. MAXTOR REJETTE SPÉCIFIQUEMENT TOUTE
AUSÉS, ET QUE MAXT
APPROVISIONNEMENT DES MARCHANDISES DE
OR AIT ÉTÉ PRÉVENU DE LEUR
CEMENT D’ÉQUIPEMENT ET DE PROPRIÉTÉ, AINSI QUE TOUS LES
or n’est pas responsable, et ne saurait être tenu responsable de toute perte de données
. Maxt
POSSIBILITÉ
aillance liée due au logiciel) pourrait causer un risque prévisible de blessure ou d’accident mortel pour l’opérateur du dispositif ou
étée conformément à la langue anglaise avec la signification de ses
erpr
ement int
clusiv
x
a e
or.
e la v
er
sion en anglais s
’appliquer
ait et engager
ait Maxt
FRANÇAIS
49
Page 51

Garantieerklärung
DDiiee GGaarraannttiieevveerrppfflliicchhttuunnggeenn vvoonn MMaaxxttoorr bbeesscchhrräännkkeenn ssiicchh aauuff ffoollggeennddee BBeeddiinngguunnggeenn::
Beachten Sie bitte, dass sich Maxtor das Recht vorbehält, die Garantiebedingungen für Neukäufe von Maxtor-Produkten von Zeit zu
Zeit zu ändern und den Tag des Inkrafttretens dieser aktualisierten Garantiebedingungen festzulegen. Die jeweils aktuelle Form der
E
rklärung über beschränkte Garantiepflicht für Markenprodukte von Maxtor finden Sie unter www.maxtor.de.
Bitte beachten Sie, dass Maxtor-Produkte außerhalb der USA und Kanada über autorisierte Vertriebspartner und Vertragshändler vor
O
rt (nachstehend bezeichnet als „Vertragshändler“) vertrieben werden. Diese Vertragshändler gewähren den Endkunden/Käufern für
g
ewöhnlich eine Kundengarantie sowie zugehörige Garantieleistungen. Für sämtliche Belange mit Hinblick auf Produktfehler und die
j
eweilige Produktgarantie empfiehlt Maxtor den Kunden in diesen Ländern, sich zunächst an den Vertragshändler zu wenden, über
d
en Sie das Maxtor-Produkt bezogen haben.
M
axtor garantiert dem ursprünglichen Endkunden/Käufer („Ihnen“), dass neue Festplatten von Maxtor („neue Produkte“) während der
S
tandard-Garantiedauer des betreffenden Produkts frei von Material- und Verarbeitungsfehlern sind. Die Standard-Garantiedauer für
d
ie verschiedenen von Maxtor vertriebenen neuen Produkte sowie für die geografischen Regionen, in denen die Produkte verkauft werden,
können Sie unter www.maxtor.de einsehen.
D
er Garantiezeitraum für die als Ersatz für neue Produkte gelieferten Festplatten entspricht dem verbleibenden Zeitraum der Garantie
auf das Originalprodukt oder 90 Tagen ab dem Versanddatum des Ersatzprodukts, je nachdem, welcher Zeitraum länger ist.
Zusätzlich zu neuen Produkten verkauft Maxtor von Zeit zu Zeit überholte Festplattenprodukte, die nicht neu sind, aber so aufgearbeitet
wurden, dass sie Maxtors Standards für überholte Produkte („überholte Produkte“) erfüllen. Falls Maxtor nicht entweder auf
www.maxtor.de oder auf der Produktverpackung (nur die von Maxtor verwendete) ausdrücklich eine Garantiedauer für ein bestimmtes
überholtes Produkt („Garantiedauer für überholte Produkte“) angibt, werden überholte Produkte grundsätzlich „WIE BESEHEN“
geliefert und Maxtor lehnt jegliche Garantie, Bedingung oder sonstige Vertragsbestimmmung für überholte Produkte ab.
Für den Fall, dass Maxtor eine Garantiedauer für das überholte Produkt angibt, garantiert Maxtor dem ursprünglichen
Endkunden/Käufer, dass das überholte Produkt für die angegebene Garantiedauer für überholte Produkte frei von Material- und
arbeitungsf
Ver
Neue Produkte und überholte Produkte werden in der Bezeichnung „Produkte“ zusammengefasst. Die Standard-Garantiedauer
beziehungsweise die Garantiedauer für überholte Produkte (zusammengefasst in der Bezeichnung „Garantiedauer“) beginnt mit dem
dokumentierten Erwerb Ihres Produkts von Maxtor oder einem autorisierten Maxtor-Vertragshändler. Sollte das Kaufdatum nicht
belegt werden können, tritt die Garantiedauer ab dem Tag in Kraft, an dem Maxtor das Produkt vom Ort seiner ursprünglichen
Produktion beziehungsweise Überholung an den Maxtor-Kunden ausgeliefert hat.
Die Produkte werden aus Teilen und Komponenten gefertigt, die nach branchenüblichen Normen als neu oder neuwertig gelten.
Wenn Sie während der Garantiefrist einen Material- oder Verarbeitungsfehler feststellen und Maxtor diesen Fehler bestätigt, wird Maxtor
nach eigenem Ermessen das Produkt für Sie kostenfrei reparieren oder ersetzen, vorausgesetzt, es wird während der zutreffenden
Garantiefrist unter Zahlung der Transportkosten an die von Maxtor angegebene Adresse zurückgesendet. Das Produkt muss in der
Originalverpackung von Maxtor oder einer gleichwertigen, von Maxtor akzeptierten Verpackung zurückgesendet werden; die
Rückgabenummer (Return Material Authorization oder RMA) muss deutlich sichtbar auf der Verpackung angebracht sein, um die
Garantieleistung in Anspruch nehmen zu können. Produkte, die während der ersten 30 Tage nach dem Kauf ausfallen, werden durch
ein Neuprodukt ausgetauscht. Maxtor kann vor der Herausgabe des Austauschprodukts einen ordnungsgemäßen Kaufbeleg verlangen.
Wenn Maxtor sich für die Repar
Eigentum von Maxt
von verschiedenen Herstellern produzierte Teile. Reparaturteile oder Austauschprodukte können nach Ermessen von Maxtor gleiche
oder bes
Maxtor ist in keiner Weise für irgendwelche Inhalte oder Daten auf den zurückgesendeten Produkten verantwortlich.
Wenden Sie sich vor Inanspruchnahme von Garantieleistungen und vor Rücksendung eines Produkts an Maxtor an das Maxtor Service
Center. Die Telefonnummer für den Kundendienst für Ihr Land sowie die Adresse für genehmigte Rücksendungen finden Sie entweder
in der Installationsanleitung von Maxtor oder online unter www.maxtor.de. Sobald das Maxtor Service Center bestätigt, dass eine
Reparatur erforderlich ist, stellt Maxtor eine RMA-Nummer aus. Bei Inanspruchnahme von Garantieleistungen ist als Kaufbeleg eine
Quittung oder Rechnung mit dem Namen und der Anschrift des Maxtor-V
Modellnummer des Pr
odukt
Pr
Sie allein sind für das Speichern oder Sichern von in einem Produkt enthaltenen Daten verantwortlich, das wegen einer
Inanspruchnahme der Gar
erantwortung oder die Haftung für Schäden, den Verlust oder die Offenlegung von diesen Daten.
V
Diese eingeschränkte Garantie gilt nur für Produkte von Maxtor, die anhand des unversehrten Maxtor-Originalwarenzeichens,
Handelsnamens oder Logos als Produkte von Maxtor identifiziert werden können. Maxtor leistet keine Garantie für Produkte, die nicht
on Maxt
v
ehlern ist.
atur eines Pr
or verwendet in Zusammenhang mit Garantiereparaturen und Austauschprodukten neue und überholte,
. Maxt
or über
e Modelle oder Leistungsmerkmale beinhalt
ser
odukts erforderlich, bei dem der Fehler festgestellt wurde. Beachten Sie bitte, dass Maxtor für bestimmte
er www.maxtor.de alternativ eine Online-Garantierückgabeoption anbietet.
e unt
antie- oder sons
or oder mit Erlaubnis v
on Maxtor hergestellt wurden, oder nicht von Maxtor unter der Maxtor-Marke vertrieben werden.
odukts entscheidet, gehen all
en.
tungen an Maxt
eis
tigen Diens
tl
e aus dem reparierten Pr
ertragshändlers und der Maxtor-Seriennummer sowie der
or zurück
gesendet wir
odukt entf
or übernimmt keinerlei
d. Maxt
ernten Teile in das
DEUTSCH
50
Page 52

Diese Garantie schließt Folgendes aus:
– Missbrauch, unsachgemäßer Gebrauch, falsche Handhabung oder Fahrlässigkeit
– Außergewöhnliche physische oder elektrische Beanspruchungen sowie Stromschwankungen
– Beschädigung beim Einbau des Produkts
–
Beschädigung oder Rücksetzung von Kapazität/Leistung/Betrieb durch die Ausstattung oder das System, mit dem das Produkt genutzt wird
– Beschädigung durch Änderungen oder Reparaturen, die nicht von Maxtor durchgeführt oder genehmigt wurden
– Produkte, deren Maxtor-Seriennummern- und/oder Materialnummernschild entfernt,
zerrissen oder verunstaltet wurde
– Beschädigung durch Verwendung einer Verpackung, die nicht von Maxtor stammt
– Beschädigung durch ungeeignete Verpackung oder deren unsachgemäße Verwendung
– Beschädigung durch mangelhaften Schutz gegen elektrostatische Entladung
– Produkte, die als gestohlen gemeldet wurden
Darüber hinaus verfällt diese eingeschränkte Garantie, wenn die Produktabdeckung oder das Kennzeichen bzw. das Siegel auf dem Produkt entfernt oder beschädigt ist.
Das Eigentumsrecht für alle aus reparierten Produkten ausgebauten Teile geht auf Maxtor über. Maxtor verwendet bei Garantiereparaturen und
bei der Fertigung von Ersatzprodukten neue sowie aufgearbeitete Teile.
UNTERLASSEN DER RÜCKSENDUNG DES AUSGEFÜLLTEN FORMULARS ZUR REGISTRIERUNG EINES MAXTOR-PRODUKTS HAT KEINE
AUSWIRKUNGEN AUF IHRE GARANTIEANSPRÜCHE.
Bestimmte Produkte enthalten Software oder Firmware als eine Komponente („Software“). Maxtor oder seine Lieferanten behalten alle
Eigentumsrechte an einer solchen Software und jegliche Nutzung der Software unterliegt den Bedingungen der zutreffenden Lizenzvereinbarung,
die Maxtor der Software beigefügt hat. Wenn Maxtor keine Lizenzvereinbarung beigefügt hat, erhalten Sie das eingeschränkte Recht zur Nutzung
der Software wie zum Betrieb des Produkts erforderlich. Es werden keine anderen Rechte jeglicher Art erteilt. In bestimmten Fällen unterliegt
Software der Allgemeinen Öffentlichen GNU-Lizenz (GPL-Software). AUSSER VON MAXTOR ANDERS IN EINER SCHRIFTLICHEN LIZENZVEREINBARUNG ANGEGEBEN, WIRD DIE SOFTWARE „WIE BESEHEN“ ZUR VERFÜGUNG GESTELLT UND MAXTOR ÜBERNIMMT KEINERLEI GARANTIEN,
WEDER AUSDRÜCKLICHER NOCH STILLSCHWEIGENDER ODER GESETZLICHER ART ODER IRGENDEINER ANDEREN ART FÜR DIESE SOFTWA
INSBESONDERE SCHLIESST MAXTOR JEGLICHE INDIREKTE GARANTIE FÜR MARKTGÄNGIGKEIT UND EIGNUNG FÜR EINEN BESTIMMTEN ZWECK
ODER NICHTVERLETZUNG VON RECHTEN IN BEZUG AUF DIE SOFTWARE AUS. Bitte beachten Sie, dass Maxtor den Quelltext für die GPL-Software
unter www.maxtor.de zur Verfügung stellt.
SOWEIT GESETZLICH ZULÄSSIG, GELTEN DIE OBEN AUFGEFÜHRTE GARANTIE UND DIE DARAUS RESULTIERENDEN ANSPRÜCHE AUSSCHLIESSLICH UND ANSTELLE ALLER ANDEREN GARANTIEN, DIE ENTWEDER MÜNDLICH ODER SCHRIFTLICH, AUSDRÜCKLICH ODER
STILLSCHWEIGEND VEREINBART WURDEN ODER DIE GESETZLICH VORGESCHRIEBEN SIND. MAXTOR SCHLIESST, SOWEIT GESETZLICH
ZULÄSSIG, INSBESONDERE ALLE ZUSICHERUNGEN, GARANTIEN UND BEDINGUNGEN FÜR PRODUKTE, DIENSTLEISTUNGEN ODER ANDERE
ANGELEGENHEITEN JEDWEDER ART AUS. INSBESONDERE SCHLIESST MAXTOR, OHNE DIE ALLGEMEINGÜLTIGKEIT DES VORSTEHENDEN
DAMIT EINZUSCHRÄNKEN, JEGLICHE INDIREKTE ODER ANGENOMMENE GARANTIE ODER ZUSICHERUNG FÜR ZUFRIEDENSTELLENDE
QUALITÄT, MARKTGÄNGIGKEIT, EIGNUNG FÜR EINEN BESTIMMTEN ZWECK, FACHMÄNNISCHE LEISTUNG UND NICHTVERLETZUNG DER
RECHTE DRITTER ODER ANDERE GARANTIEN AUS, DIE SICH AUS EINEM GESCHÄFT ODER HANDEL ERGEBEN. DIESE EINGESCHRÄNKTE
GARANTIE VON MAXTOR FINDET UNTER KEINEN UMSTÄNDEN ANWENDUNG AUF PRODUKTE, DIE URSPRÜNGLICH ALS INTEGRIERTE
BAUTEILE EINES SYSTEMS VERKAUFT WURDEN, DAS NICHT VON MAXTOR BEIGESTELLT WURDE, ODER AUF PRODUKTE, DIE VON DRITTEN
ÜBER EIN LEASING- ODER DIENSTLEISTUNGSABKOMMEN BEREITGESTELLT WURDEN. Kein Vertriebspartner, Zwischen- und Einzelhändler,
Vertreter oder Mitarbeiter von Maxtor ist berechtigt, irgendwelche Änderungen, Erweiterungen oder Zusätze an dieser Garantie vorzunehmen.
MAXTOR KANN NICHT FÜR INDIREKTE, UNV
SATZPFLICHTIG GEMACHT WERDEN, UNABHÄNGIG DAVON, WIE DIESE EINGETRETEN SIND UND OB MAXTOR AUF DIE MÖGLICHKEIT SOLCHER
SCHÄDEN HINGEWIESEN WURDE, EINSCHLIESSLICH - ABER NICHT BESCHRÄNKT AUF - BESCHAFFUNGSKOSTEN FÜR ERSATZWAREN, VERL
VON DATEN ODER PROGRAMMEN, GEWINNAUSFALL, AUSFALLZEIT, VERLUST VON ANSEHEN, SCHÄDEN ODER AUSTAUSCH VON AUSRÜSTUNG
ODER EIGENTUM SOWIE SONSTIGE KOSTEN FÜR DIE WIEDERHERSTELLUNG, PROGRAMMIERUNG ODER NEUERSTELLUNG EINES PROGRAMMS
ODER VON DATEN, DIE AUF MAXTOR-PRODUKTEN GESPEICHERT ODER IN VERBINDUNG MIT DIESEN PRODUKTEN GENUTZT WERDEN. GLEICHES
GILT FÜR JEDWEDE SCHÄDEN, DIE AUFGRUND ODER IN FOLGE DES ERWERBS, DER VERWENDUNG ODER DER LEISTUNG DES PRODUKTS
ENTSTEHEN. Maxtor kann im Falle eines Versagens des Produkts unter keinen Umständen haftbar gemacht werden für den Verlust und Schaden
von Daten noch für die Unfähigkeit, auf Daten zugreifen zu können. Hierfür tragen einzig und allein Sie die Verantwortung. Die Risikozuweisung
entsprechend dem vorliegenden Haftungsausschluss spiegelt sich im Einkaufspreis des Produkts wider. Dieser Haftungsausschluss gilt nicht für
Ansprüche, die mit Todesfällen und Personenschäden zusammenhängen, die durch Fahrlässigkeit von Maxtor oder die durch mit Maxtor verbundene
Unternehmen, leitende Mitarbeiter, Vertreter oder Handelsvertreter verursacht wurden.
en oder Gerichtsbezirk
In einigen St
Folgeschäden bzw. der Ausschluss angenommener Bedingungen oder stillschweigender Garantien nicht zulässig. Daher treffen die oben genannten
Beschränkungen und Ausschlüsse auf Sie möglicherweise nicht zu. Diese Garantie verleiht Ihnen spezifische gesetzlich festgelegte Rechte, und
Sie haben möglicherweise weitere Rechte, die je nach der geltenden Gesetzgebung variieren können. Wenn zum Beispiel ein Produkt von Maxtor
dir
zusätzliche Garantieansprüche geltend machen. Weitere Informationen finden Sie unter www.maxtor.de.
Beacht
Flugzeugnavigation und -kommunikation oder der Flugleitung zu verwenden, sowie mit Anlagen zur Luftverkehrskontrolle, mit Waffen oder
Waffensystemen, oder in jedweden Geräten oder Systemen, in denen eine Fehlfunktion (einschließlich und ohne Einschränkung auf Software-bedingte
Verzögerung oder Fehlfunktion) ein absehbares Risiko der Verletzung oder des Todes des Betreibers des Geräts bzw. des Systems oder anderer
Personen zur Folge hätte.
Der Umfang dieser Garantiebeschränkung und die Bedeutung ihrer einzelnen Begriffe richten sich ausschließlich nach der Originalfassung in
englischer Sprache. Für den Fall, dass eine Bestimmung dieser Erklärung über beschränkte Garantiepflicht von einem zuständigen Gericht als
rechtswidrig angesehen wird, bleiben die verbleibenden Bestimmungen dieser Erklärung über beschränkte Garantiepflicht in vollem Umfang
wirksam. Sollte eine Übersetzung dieser Erklärung über beschränkte Garantiepflicht von der englischen Fassung abweichen, soll nur die englische
Sprachversion zutreffen und bindend sein.
aat
ekt oder einem aut
e, das
en Sie bitt
en Maxtor-Vertragshändler in Europa, Afrika oder dem Nahen Osten erworben wurde, können Sie unter Umständen
orisiert
s es Ihnen ausdrücklich unt
ORHERSEHBARE, SPEZIELLE, ZUFÄLLIGE SCHÄDEN ODER FOLGESCHÄDEN SCHADENER-
en ist der Ausschluss oder die Beschränkung von Schadenersatz für beiläufig entstandene Schäden oder
ersagt ist, die Produkte im Zusammenhang mit dem Betrieb kerntechnischer Anlagen, der
RE.
UST
DEUTSCH
51
Page 53

Page 54

© 2006 Maxtor Corporation. All rights reserved. Changes are periodically made to the information herein which will be incorporated in revised
editions of this publication. Maxtor may make changes or improvements to the product(s) described in this publication at any time and without
notice. Maxtor is a registered trademark of Maxtor Corporation. All other brands or products are trademarks or registered trademarks of their
respective holders. Maxtor Corporation, 500 McCarthy Blvd., Milpitas, California 95035 USA
PN: 20343000
 Loading...