

Page 1

User’s Guide
TURBO EDITION
MAXTOR ONETOUCH
™
III
Page 2

MAXTOR ONETOUCH III TURBO EDITION USER’S GUIDE
Contents
Macintosh Installation
Introduction
. . . . . . . . . . . . . . . . . . . . . . . . . . . . . . . . . . . . . . . . . . . . . . . . . 1
About this Guide . . . . . . . . . . . . . . . . . . . . . . . . . . . . . . . . . . . . . . . . . . . . 1
Components . . . . . . . . . . . . . . . . . . . . . . . . . . . . . . . . . . . . . . . . . . . . . . . 2
Included in Package . . . . . . . . . . . . . . . . . . . . . . . . . . . . . . . . . . . . . . . . . 2
System Requirements . . . . . . . . . . . . . . . . . . . . . . . . . . . . . . . . . . . . . . . 2
Interface Requirements . . . . . . . . . . . . . . . . . . . . . . . . . . . . . . . . . . . . . . 2
Handling Precautions . . . . . . . . . . . . . . . . . . . . . . . . . . . . . . . . . . . . . . . . 3
Maxtor Product Support . . . . . . . . . . . . . . . . . . . . . . . . . . . . . . . . . . . . . . 3
Installing the OneTouch III
. . . . . . . . . . . . . . . . . . . . . . . . . . . . . . . . . 4
Step 1 - Install the Software . . . . . . . . . . . . . . . . . . . . . . . . . . . . . . . . . . .4
Step 2 - Connect the Drive . . . . . . . . . . . . . . . . . . . . . . . . . . . . . . . . . . . . .6
Step 3 - Setup the Drive . . . . . . . . . . . . . . . . . . . . . . . . . . . . . . . . . . . . . . . 8
Using the OneTouch III
. . . . . . . . . . . . . . . . . . . . . . . . . . . . . . . . . . . . .14
Maxtor OneTouch Manager . . . . . . . . . . . . . . . . . . . . . . . . . . . . . . . . . . 14
OneTouch Button. . . . . . . . . . . . . . . . . . . . . . . . . . . . . . . . . . . . . . . . . . . 22
Security . . . . . . . . . . . . . . . . . . . . . . . . . . . . . . . . . . . . . . . . . . . . . . . . . . 23
Erase Drive . . . . . . . . . . . . . . . . . . . . . . . . . . . . . . . . . . . . . . . . . . . . . . . 25
Sync . . . . . . . . . . . . . . . . . . . . . . . . . . . . . . . . . . . . . . . . . . . . . . . . . . . . . 26
RAID Settings. . . . . . . . . . . . . . . . . . . . . . . . . . . . . . . . . . . . . . . . . . . . . . 29
Naming Your OneTouch III . . . . . . . . . . . . . . . . . . . . . . . . . . . . . . . . . . . 32
Storing Audio . . . . . . . . . . . . . . . . . . . . . . . . . . . . . . . . . . . . . . . . . . . . . . 32
Editing Video . . . . . . . . . . . . . . . . . . . . . . . . . . . . . . . . . . . . . . . . . . . . . . 32
Playing Games. . . . . . . . . . . . . . . . . . . . . . . . . . . . . . . . . . . . . . . . . . . . . 32
Installing Applications . . . . . . . . . . . . . . . . . . . . . . . . . . . . . . . . . . . . . . 32
Connecting and Disconnecting Your OneTouch III . . . . . . . . . . . . . . . . 32
Security Lock. . . . . . . . . . . . . . . . . . . . . . . . . . . . . . . . . . . . . . . . . . . . . . 32
© 2006 Maxtor Corporation. All rights reserved. Changes are periodically made to the information herein which will be incorporated in revised editions of this publication. Maxtor may make changes or improvements to the product(s)
described in this publication at any time and without notice. Maxtor is a registered trademark of Maxtor Corporation. All other brands or products are trademarks or registered trademarks of their respective holders. Maxtor
Corporation, 500 McCarthy Blvd., Milpitas, California 95035 USA
Windows Installation
Introduction
. . . . . . . . . . . . . . . . . . . . . . . . . . . . . . . . . . . . . . . . . . . . . . . . 33
About this Guide . . . . . . . . . . . . . . . . . . . . . . . . . . . . . . . . . . . . . . . . . . . . 33
Components . . . . . . . . . . . . . . . . . . . . . . . . . . . . . . . . . . . . . . . . . . . . . . . 33
Included in Package. . . . . . . . . . . . . . . . . . . . . . . . . . . . . . . . . . . . . . . . . 34
System Requirements . . . . . . . . . . . . . . . . . . . . . . . . . . . . . . . . . . . . . . . 34
Interface Requirements . . . . . . . . . . . . . . . . . . . . . . . . . . . . . . . . . . . . . 34
Handling Precautions . . . . . . . . . . . . . . . . . . . . . . . . . . . . . . . . . . . . . . . 35
Maxtor Product Support . . . . . . . . . . . . . . . . . . . . . . . . . . . . . . . . . . . . . 35
Installing the OneTouch III
. . . . . . . . . . . . . . . . . . . . . . . . . . . . . . . . 36
Step 1 - Install the Software . . . . . . . . . . . . . . . . . . . . . . . . . . . . . . . . . . 36
Step 2 - Connect the Drive . . . . . . . . . . . . . . . . . . . . . . . . . . . . . . . . . . . 41
Step 3 - Setup the Drive. . . . . . . . . . . . . . . . . . . . . . . . . . . . . . . . . . . . . . 43
Using the OneTouch III
. . . . . . . . . . . . . . . . . . . . . . . . . . . . . . . . . . . . 45
Retrospect Express HD . . . . . . . . . . . . . . . . . . . . . . . . . . . . . . . . . . . . . . 45
Restoring from Your Backup. . . . . . . . . . . . . . . . . . . . . . . . . . . . . . . . . . 53
Maxtor OneTouch Manager. . . . . . . . . . . . . . . . . . . . . . . . . . . . . . . . . . . 59
Maxtor OneTouch Utilities. . . . . . . . . . . . . . . . . . . . . . . . . . . . . . . . . . . . 59
Security Settings . . . . . . . . . . . . . . . . . . . . . . . . . . . . . . . . . . . . . . . . . . . 64
RAID Settings . . . . . . . . . . . . . . . . . . . . . . . . . . . . . . . . . . . . . . . . . . . . . . 71
Backup and Restore. . . . . . . . . . . . . . . . . . . . . . . . . . . . . . . . . . . . . . . . . 72
Naming Your OneTouch III. . . . . . . . . . . . . . . . . . . . . . . . . . . . . . . . . . . . 78
Storing Audio . . . . . . . . . . . . . . . . . . . . . . . . . . . . . . . . . . . . . . . . . . . . . . 78
Editing Video. . . . . . . . . . . . . . . . . . . . . . . . . . . . . . . . . . . . . . . . . . . . . . . 78
Playing Games . . . . . . . . . . . . . . . . . . . . . . . . . . . . . . . . . . . . . . . . . . . . . 78
Installing Applications . . . . . . . . . . . . . . . . . . . . . . . . . . . . . . . . . . . . . . . 78
Connecting and Disconnecting Your OneTouch III . . . . . . . . . . . . . . . . 78
Security Lock . . . . . . . . . . . . . . . . . . . . . . . . . . . . . . . . . . . . . . . . . . . . . . 79
Page 3

PAGE 1
MAXTOR ONETOUCH III TURBO EDITION MACINTOSH INSTALLATION
Introduction
Thank you for selecting a Maxtor product.
The new Maxtor OneTouch
TM
III, Turbo Edition, is the high performance, large capacity external storage solution designed
for creative professionals needing the disk-striping speed of
RAID 0 for intensive disk-access applications or the security
of RAID 1 for automatically mirroring data.
The OneTouch III Turbo Edition comes preformatted for Mac and
can boot the Mac operating system directly from the Turbo drive.
It also features award-winning Maxtor OneTouch™ backup, data
synchronization between two or more computers, cool operation
and modular design for easy stacking.
This user’s guide will help you setup your drive and includes
helpful tips for performing backups and getting the most out of
your new Maxtor OneTouch III, Turbo Edition.
The Maxtor OneTouch III, Turbo Edition, features:
– RAID 0 disk striping
– RAID 1 automatic data mirroring
–Triple interfaces: FireWire 800, FireWire 400
,
and USB 2.0
– Maxtor OneTouch™ button - the simple way to backup
your files
– EMC
®
Retrospect
®
Express software
– Maxtor DriveLock™ security feature password-protects
the contents in case of loss or unauthorized use
– Boot your Mac operating system directly from the drive
– Synchronization of data between 2 or more computers
– Simple Maxtor user interface for drive management,
security and backup scheduling.
The Maxtor OneTouch Manager features include:
– Security settings to password-protect your critical data
–Power management features to conserve energy when
your Maxtor OneTouch III isn’t being used
– Diagnostic utilities to check the health of your Maxtor
OneTouch III, Turbo Edition
– Customizing the OneTouch button to open a frequently-
used program
– Using Retrospect Express to back up and restore data.
About this Guide
The following symbols and conventions are used in this guide:
Bold Used for menu, command, and keyboard selections you make and
screens you will see.
Italics
Used for emphasis and to identify new terms, which may also be
defined in the Glossary.
Helpful information about a particular topic.
Important information to prevent problems and ensure that you are
successful in using the drive.
Page 4
PAGE
2
MAXTOR ONETOUCH III TURBO EDITION MACINTOSH INSTALLATION
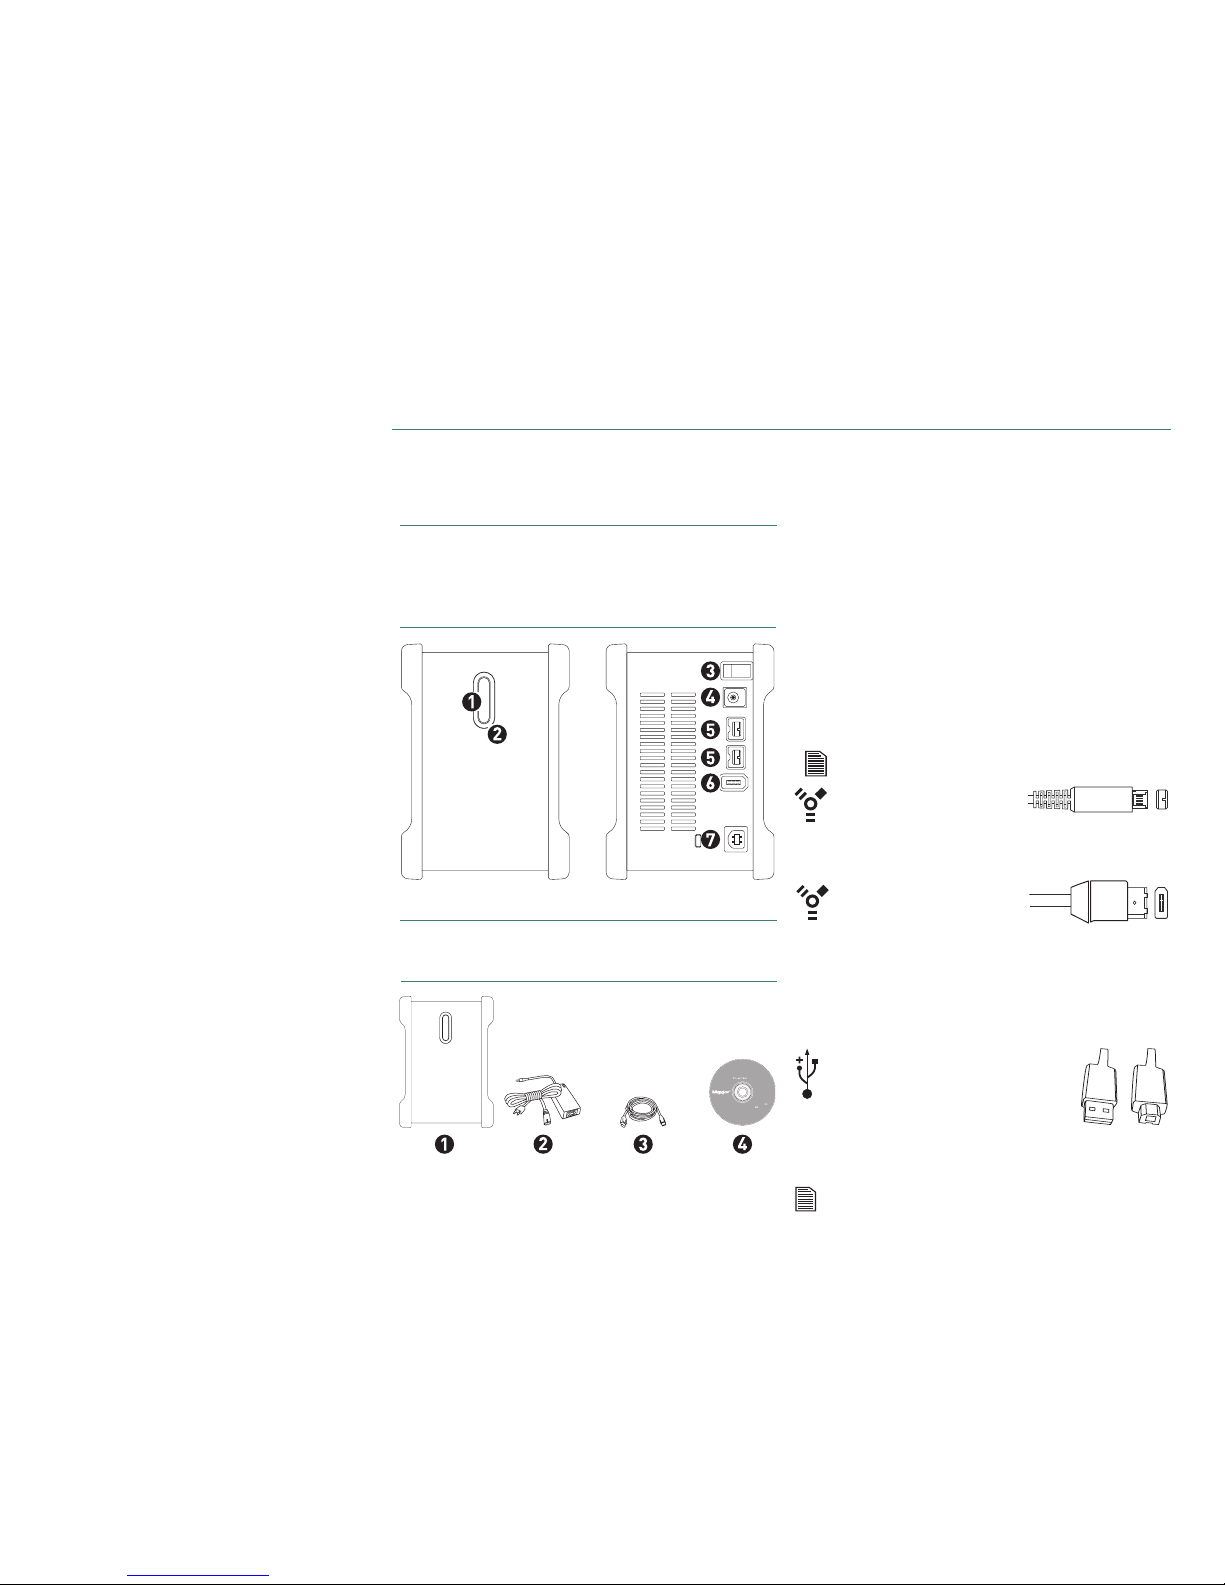
Components
Before installing, review the solution features in Figure 1.
FIGURE 1 SOLUTION FEATURES
1. OneTouch Button
2. Status Light
3. Power Switch
4. Power Connector
5. FireWire 800 Port
6. FireWire 400 Port
7. USB 2.0 Port
FIGURE 2 INCLUDED IN PACKAGE
1. Backup Solution
2. Power Adapter
3. FireWire 800 Cable
4. Quick Start CD
System Requirements
– FireWire 800 requires Mac OS X 10.2.8 or higher and
FireWire 800 (9-pin) equipped computer
– Apple G4 processor or greater
– Mac OS X (10.2.8 or later)
– 128MB RAM (256 recommended) or more as required
by operating system
– Internet connection (for system updates)
– CD-ROM drive
Interface Requirements
– FireWire 800 or FireWire 400 port
– USB 2.0 or 1.1 port
USB 1.1 is slower than USB 2 or FireWire.
Includes:
– EMC
®
Retrospect®
Express HD (Win)
– EMC
®
Retrospect®
Express (Mac)
– Maxtor OneTouch Drivers
– Maxtor OneTouch Manager
– Maxtor OneTouch
User Guide (English)
© 2005 Maxtor Corporation and its Licensors. Maxtor and the stylized
Maxtor logo are registered trademarks, and Maxtor OneTouch is
a trademark, of Maxtor Corporation. EMC and Retrospect are
registered trademarks of EMC Corporation. U.S. patents
5,150,473 and 5,966,730. Other patents pending. Other
trademarks are the property of their respective
holders. All rights reserved.10/05 PN: 20310900
WINDOWS
English
Français
Deutsch
Español
Italiano
MACINTOSH
English
Français
Deutsch
Installation Software
Maxtor OneTouch
™
III
Logiciel d’installation, Installationssoftware,
Software di installazione, Installationsprogram,
Software de instalación, Installatiesoftware,
Asennusohjelma, Software de Instalação,
FireWire 400 6-pin to 6-pin
FireWire 400 (1394a) cable.
A FireWire 400 cable is not included with this kit but can be purchased from your local computer store.
Many laptop computers, have a smaller 4-pin FireWire port requiring a special
4-pin to 6-pin FireWire cable. This is not included, but can be purchased from
your local computer store.
USB 2.0 A’ to B’ USB cable.
A USB 2.0 cable is not included with
this kit but can be purchased from
your local computer store.
The ‘A’ connector, typically, plugs into your computer and the ‘B’
connector plugs into your drive. If your computer has a different type of USB connection, you
can purchase the correct type of cable from your local computer store.
‘A’ ‘B ’
Though this model has both USB and FireWire interfaces,
it is only possible to use one interface at a time.
FireWire 800 9-pin to 9-pin
FireWire 800 (1394b) cable.
A FireWire 800 cable is included with this kit.
Page 5

PAGE 3
MAXTOR ONETOUCH III TURBO EDITION MACINTOSH INSTALLATION
Handling Precautions
Please handle your new Maxtor OneTouch III with care!
Follow the precautions listed here or you could damage your
drive and void the product warranty. Review the Maxtor Limited
Warranty for more information.
Follow these precautions to prevent data loss
–
Do not bump, move or drop the drive while in operation.
– Do not remove the interface cable or power cord
without first disconnecting the drive properly through
the operating system.
– Do not set any liquids or drinks on or near the drive.
Liquids will damage the internal electronics.
– Do not open the drive enclosure. This can cause loss of
data and will void the product warranty.
Maxtor Product Support
Maxtor Corporation provides a comprehensive product
support section on its web site, including the latest software
drivers, product specifications, a complete troubleshooting
section, and the Maxtor Knowledge Base.
Maxtor USA Support
Visit www.maxtorkb.com for the following information:
– Search the Hard Drive Knowledge Base
We store all resolved problems and FAQ’s in our
knowledge base. Search by product, category,
keywords, or phrases.
– My Stuff
Login to modify or view your FAQ update
notifications or update your personal profile.
– Most Popular Help Topics
Top five most frequently asked questions.
– Software Download
Download installation and diagnostic programs
for your hard drive or external storage device.
Maxtor Worldwide Support
Visit www.maxtor.com and click worldwide support or
contact us for product support outside of the USA.
Page 6
PAGE
4
MAXTOR ONETOUCH III TURBO EDITION MACINTOSH INSTALLATION
Installing the OneTouch III
NOTE: Please install the Maxtor OneTouch software before
connecting the OneTouch III drive to your computer. You must
first install this software in order to use the OneTouch button
and other OneTouch III features.
Step 1 – Install the Software
1. Turn on your computer.
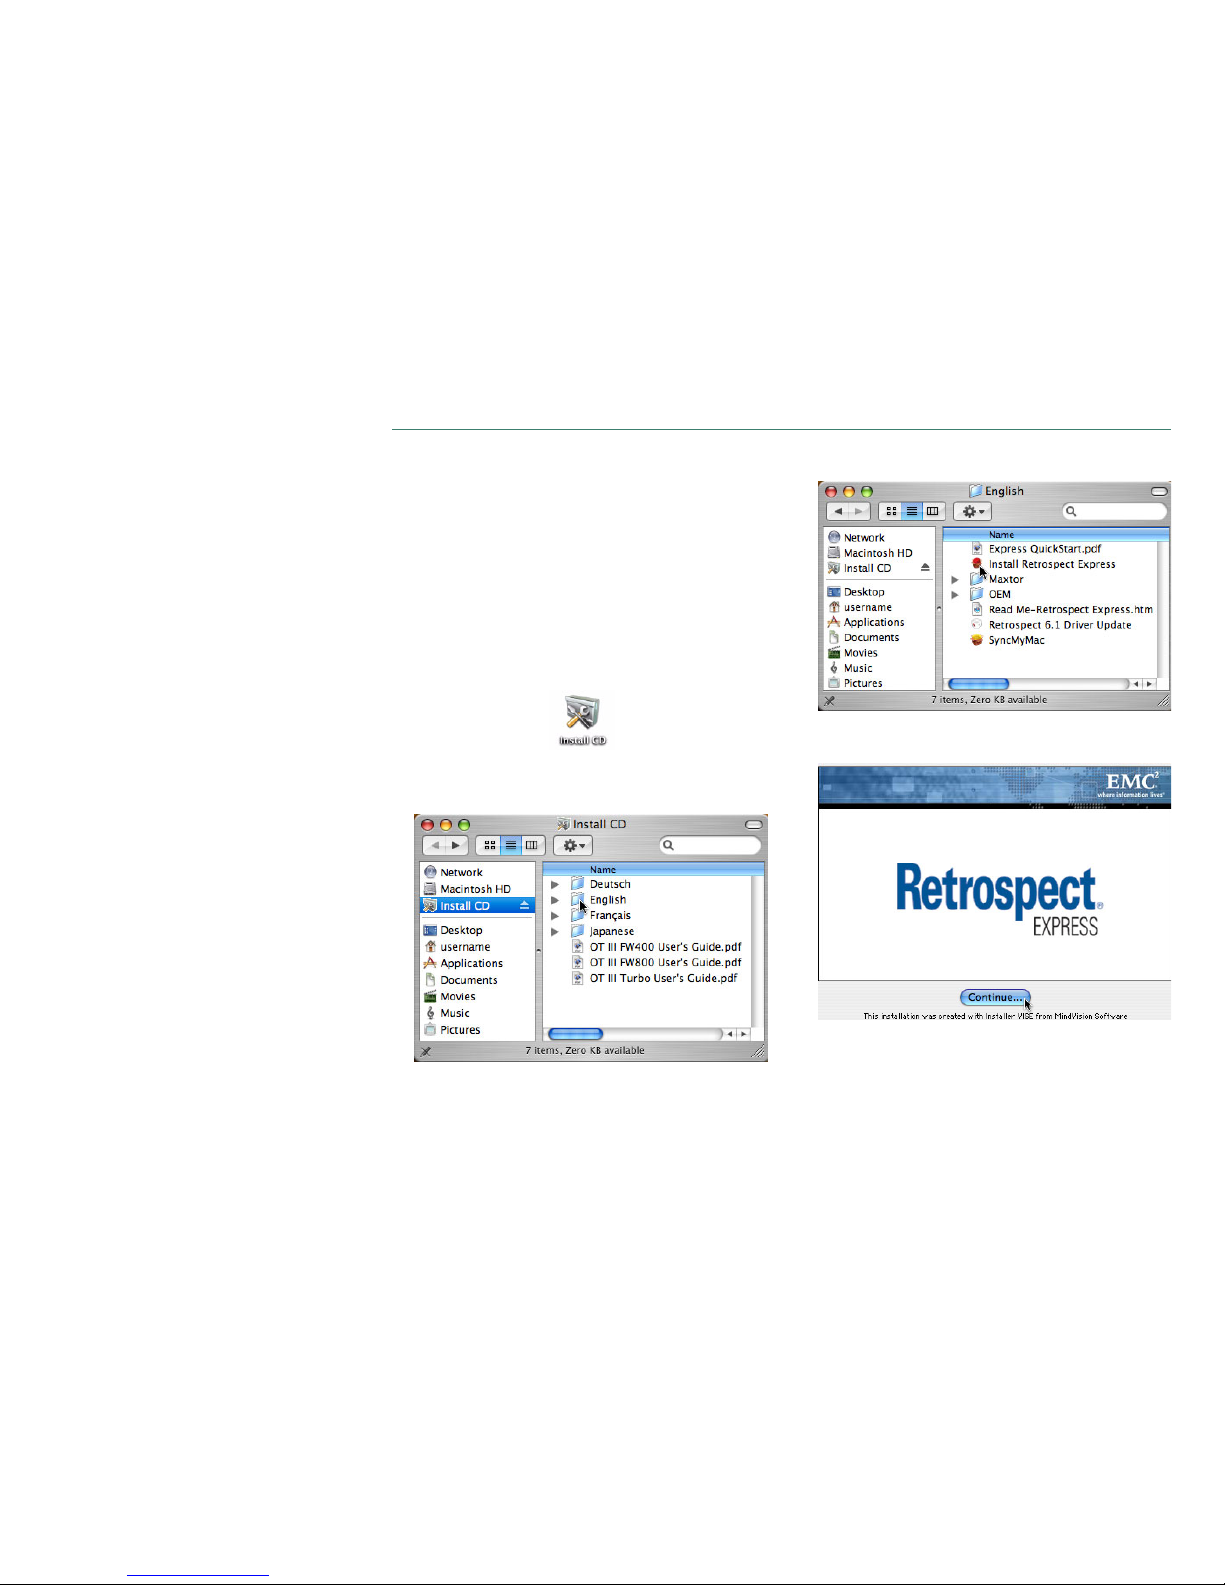
2. Insert the Maxtor Installation CD into your CD-ROM drive.
After a few seconds, the Install CD icon will appear on
your desktop.
Double-click this icon to get started
3. Select your language .
4. Double-click Install Retrospect Express .
5. If prompted, enter your Username and Password to
authenticate.
Click Continue .
Page 7
PAGE 5
MAXTOR ONETOUCH III TURBO EDITION MACINTOSH INSTALLATION
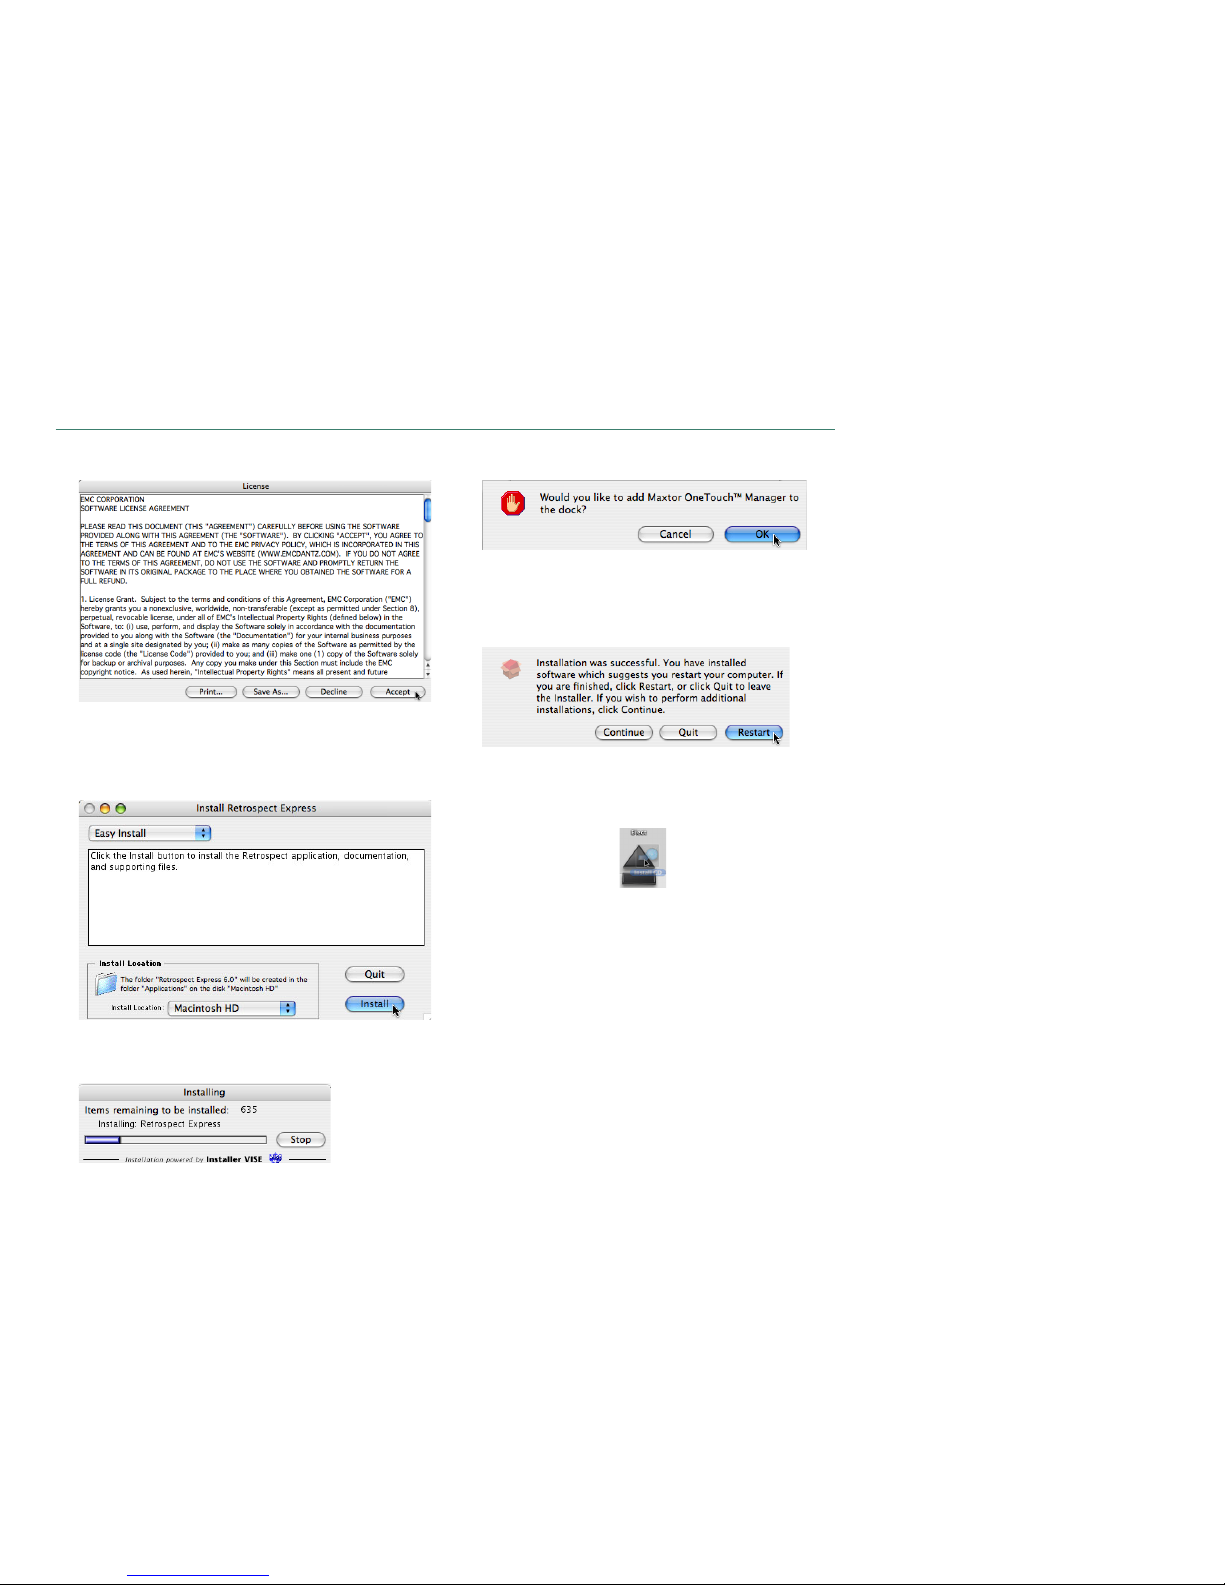
6. The License Agreement screen will appear.
After reading the License Agreement, click Accept .
7. The Install Retrospect Express screen will appear.
Maintain the Easy Install and Install Location as their
default settings.
When you are ready, click Install .
8. The Setup Status window will appear briefly.
9. During the installation, you will see the following:
Click OK to add the OneTouch Manager to your Mac’s dock
or click Cancel if you wish not to do so.
10. When finished, you will be notified that the installation
was successful.
Click Restart .
11. After restart, eject the Maxtor Install CD from your
computer.
12. Proceed to Step 2 – Connect the Drive.
Page 8
PAGE
6
MAXTOR ONETOUCH III TURBO EDITION MACINTOSH INSTALLATION
Step 2 – Connect the Drive
The Maxtor OneTouch III connects to your computer using either
a FireWire or USB interface. Make sure you know which interface is available on your computer.
Please install the software BEFORE you connect the drive.
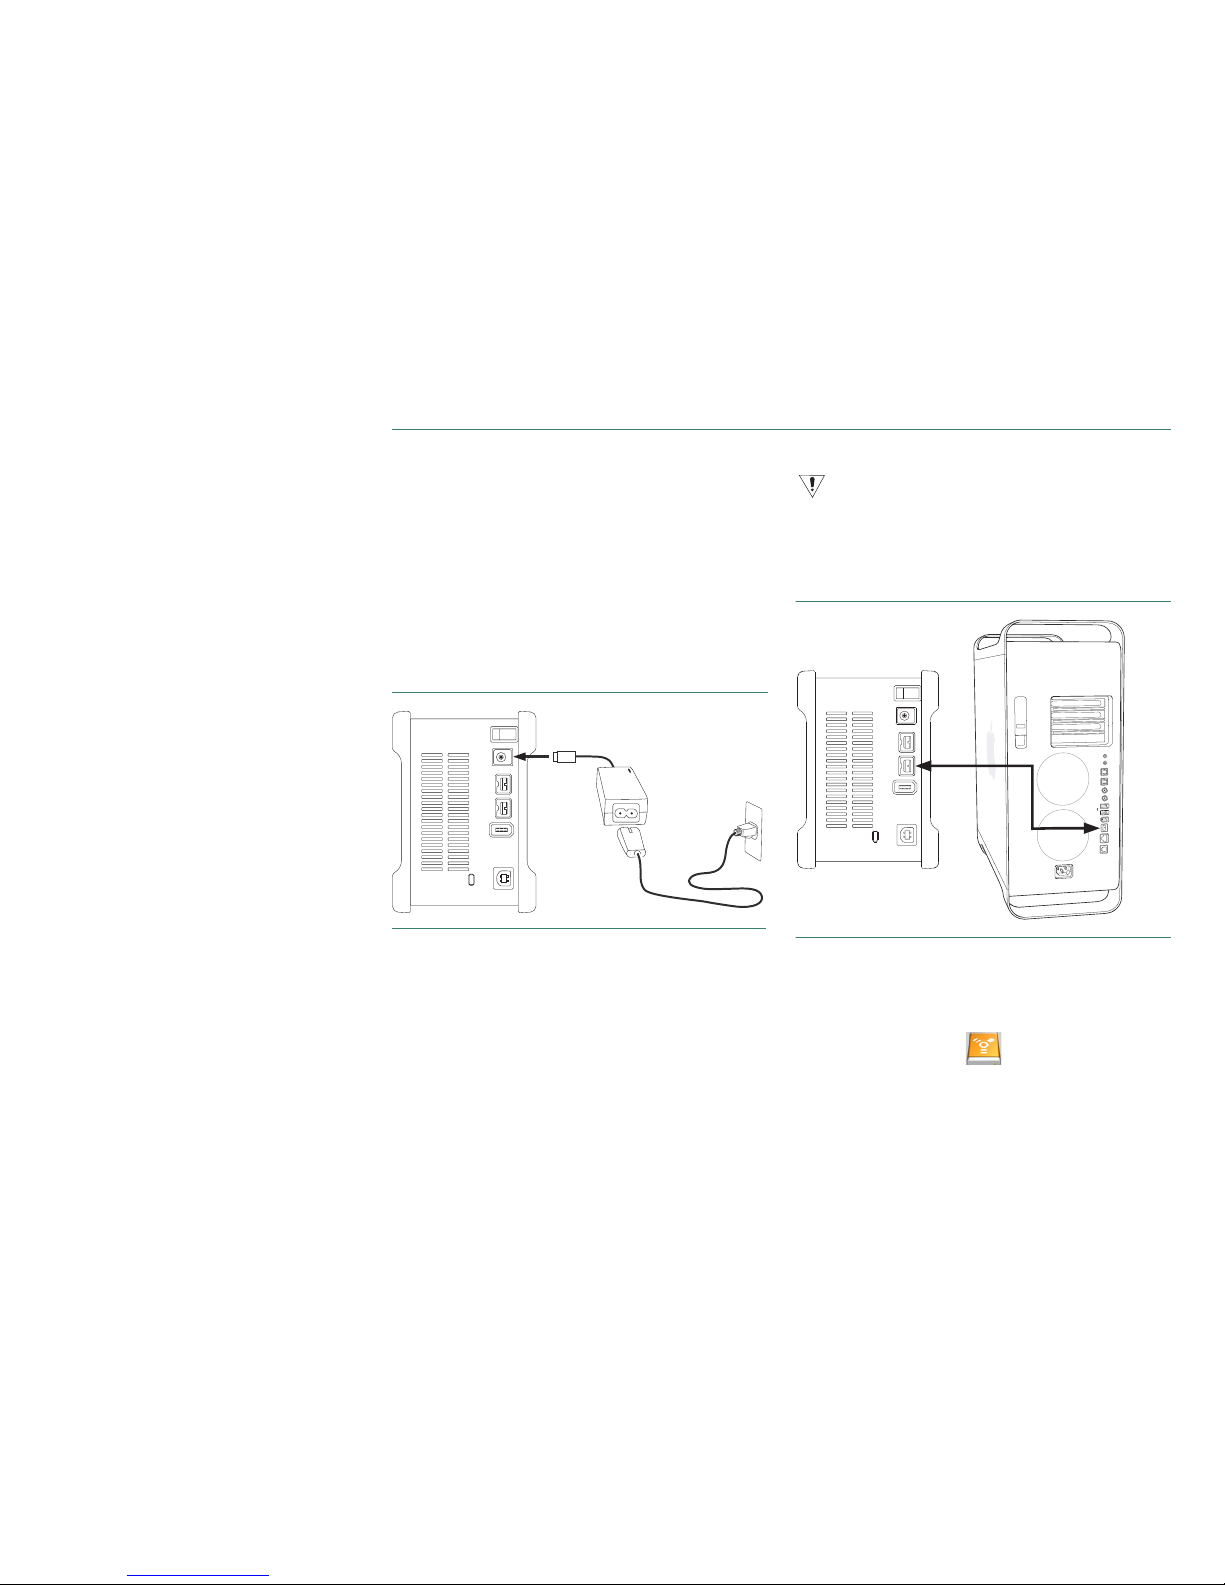
Connecting the Power
1. Plug the round female connector from the power adapter
into the drive’s power connector.
2. Plug the two-pin female connector on the power cord
into the power adapter.
FIGURE 3 CONNECTING THE POWER
3. Plug the standard electrical plug from the power adapter
into your power source.
4. Turn on the Maxtor OneTouch III using the power switch
on the back of the drive. The light on the front of the drive
should illuminate.
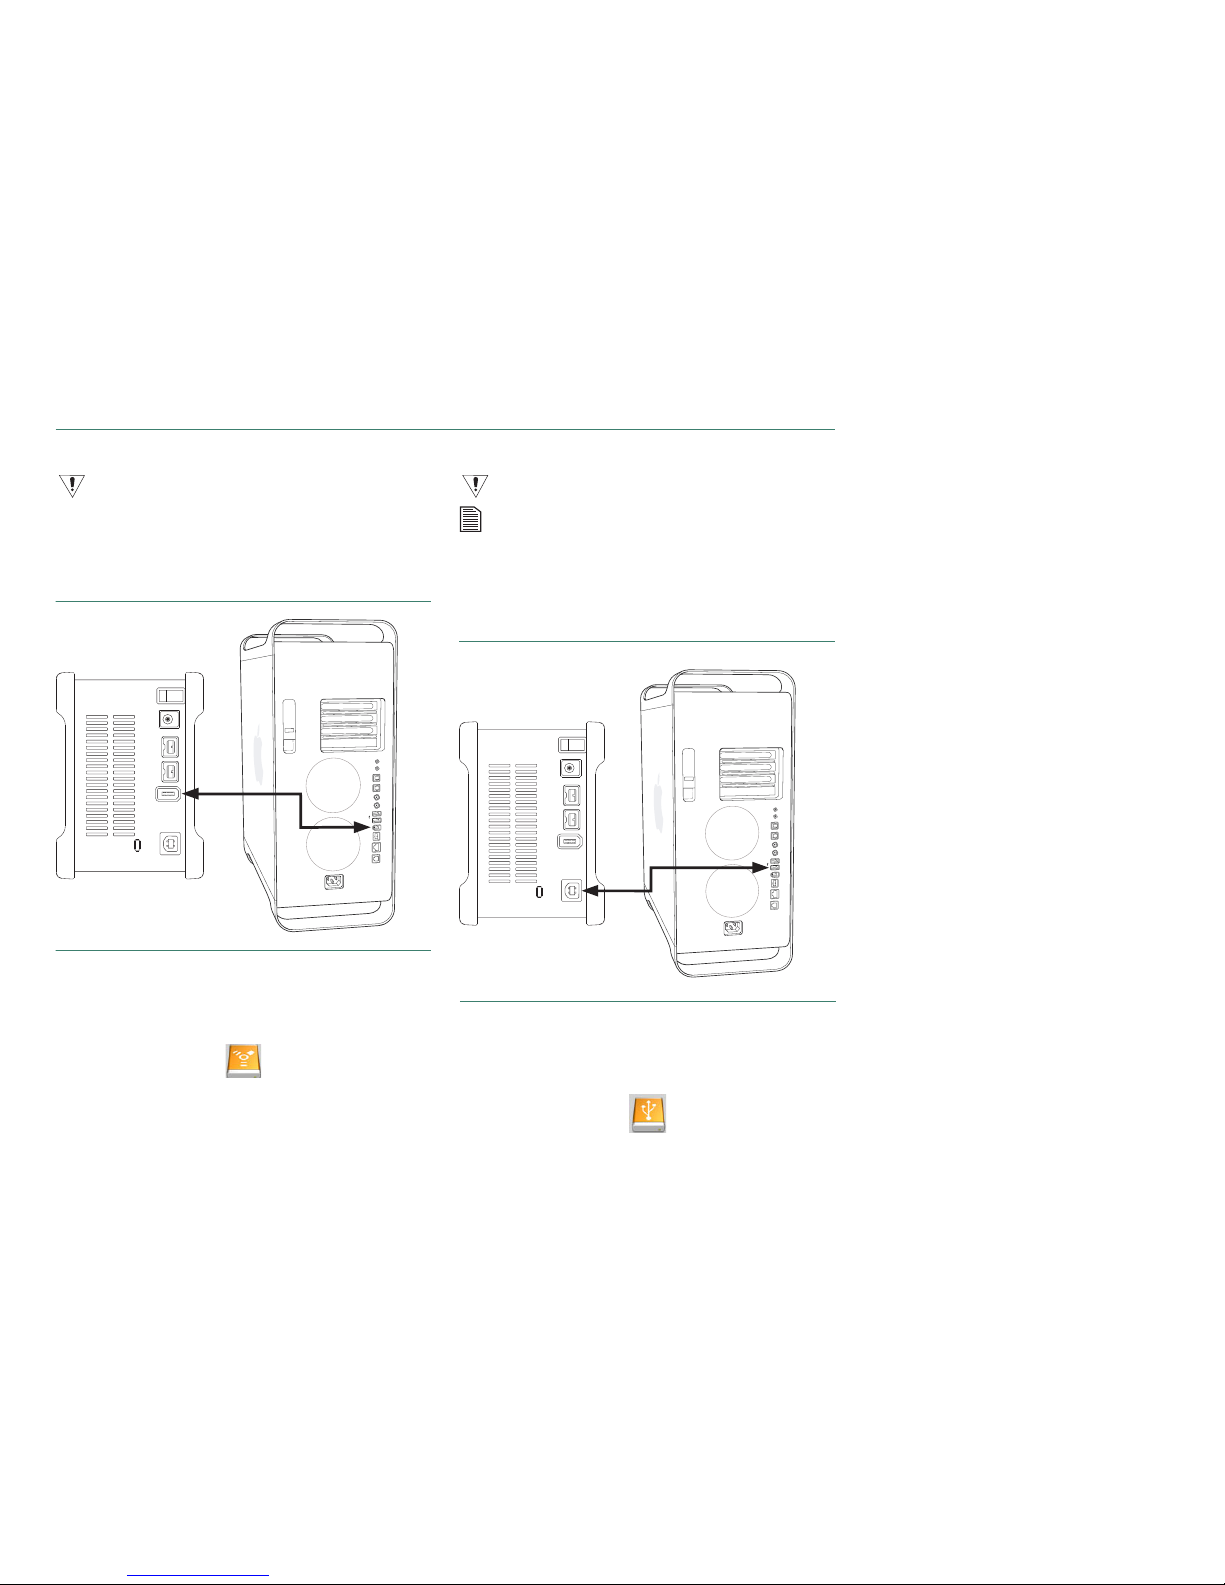
Connecting with a FireWire 800 Cable
Do not plug a FireWire cable into the drive when a USB cable is already connected
to the drive. This drive will only operate with one interface at a time.
1. Plug one end of the FireWire cable into an available
FireWire 800 port on your computer or to any other
FireWire 800 device that is connected to your computer.
FIGURE 4 CONNECTING TO A FIREWIRE 800 PORT
2. Plug the other end of the FireWire 800 cable into an
available FireWire 800 port on the back of the drive.
Once connected to your system, the Maxtor OneTouch III
will mount on the desktop.
3. Proceed to Step 3 – Setup the Drive.
Page 9
PAGE 7
MAXTOR ONETOUCH III TURBO EDITION MACINTOSH INSTALLATION
Connecting with a FireWire 400 Cable
Do not plug a FireWire cable into the drive when a USB cable is already connected
to the drive. This drive will only operate with one interface at a time.
1. Plug one end of the FireWire cable into an available
FireWire 400 port on your computer or to any other
FireWire 400 device that is connected to your computer.
FIGURE 5 CONNECTING TO A FIREWIRE 400 PORT
2. Plug the other end of the FireWire 400 cable into the
FireWire 400 port on the back of the drive.
Once connected to your system, the Maxtor OneTouch III
will mount on the desktop.
3. Proceed to Step 3 – Setup the Drive.
Connecting with a USB Cable
Do not plug a USB cable into the drive when a FireWire cable is already connected
to the drive. This drive will only operate with one interface at a time.
The Maxtor OneTouch button, Power management, and OneTouch Settings utility
program are not supported for USB on the Macintosh. You may, however, use your
drive as external storage and utilize the Retrospect software to maintain backup
copies of your files and complete system.
1. Plug the larger end of the USB cable into an available USB
port on your computer.
FIGURE 6 CONNECTING TO A USB PORT
2. Plug the smaller end of the USB cable into the USB port
on the back of the drive.
Once connected to your system, the Maxtor OneTouch III
will mount on the desktop.
3. Proceed to Step 3 – Setup the Drive.
Page 10

PAGE
8
MAXTOR ONETOUCH III TURBO EDITION MACINTOSH INSTALLATION
Step 3 - Setup the Drive
The Maxtor OneTouch III is shipped with a Macintosh File
Structure. No partitioning or format preparation is necessary if
you want the drive to remain as a striped (RAID 0) volume.
NOTE: If you want to configure the OneTouch III, Turbo Edition
with a mirrored (RAID 1) volume, please go to the RAID Settings
section to initially prepare the drive.
Setting Up Bootable Backup with the OneTouch Button
The following steps will provide you with a complete bootable
backup of your Macintosh computer.
NOTE: Bootable backup works with FireWire only.
When finished, you will have a backup of your entire computer,
as well as the ability to start up your computer from your Maxtor
OneTouch III drive.
Before you begin, make sure the Maxtor Install CD is NOT in your
CD-ROM drive.
The bootable backup option requires either using the entire
OneTouch III drive for the backup copy or creating a dedicated
disk partition for the backup copy. If you wish to store any files on
the OneTouch III drive that are not included on the system drive
you plan to copy, they must be stored in another partition on the
OneTouch III drive.
Prepare Your Maxtor OneTouch III
1. Select your system drive in the Finder and select Get Info
from the File menu. Write down its capacity, it is listed
here as “Capacity: xxx.xx GB”. Open the Apple Disk Utility
program (located in the Applications/ Utilities folder)
2. Select your Maxtor OneTouch III drive in the list and click
on the Partition tab.
3. The following step will erase everything that currently exists
on your Maxtor OneTouch III drive. Check your drive carefully
to make sure there are no files on it you wish to keep.
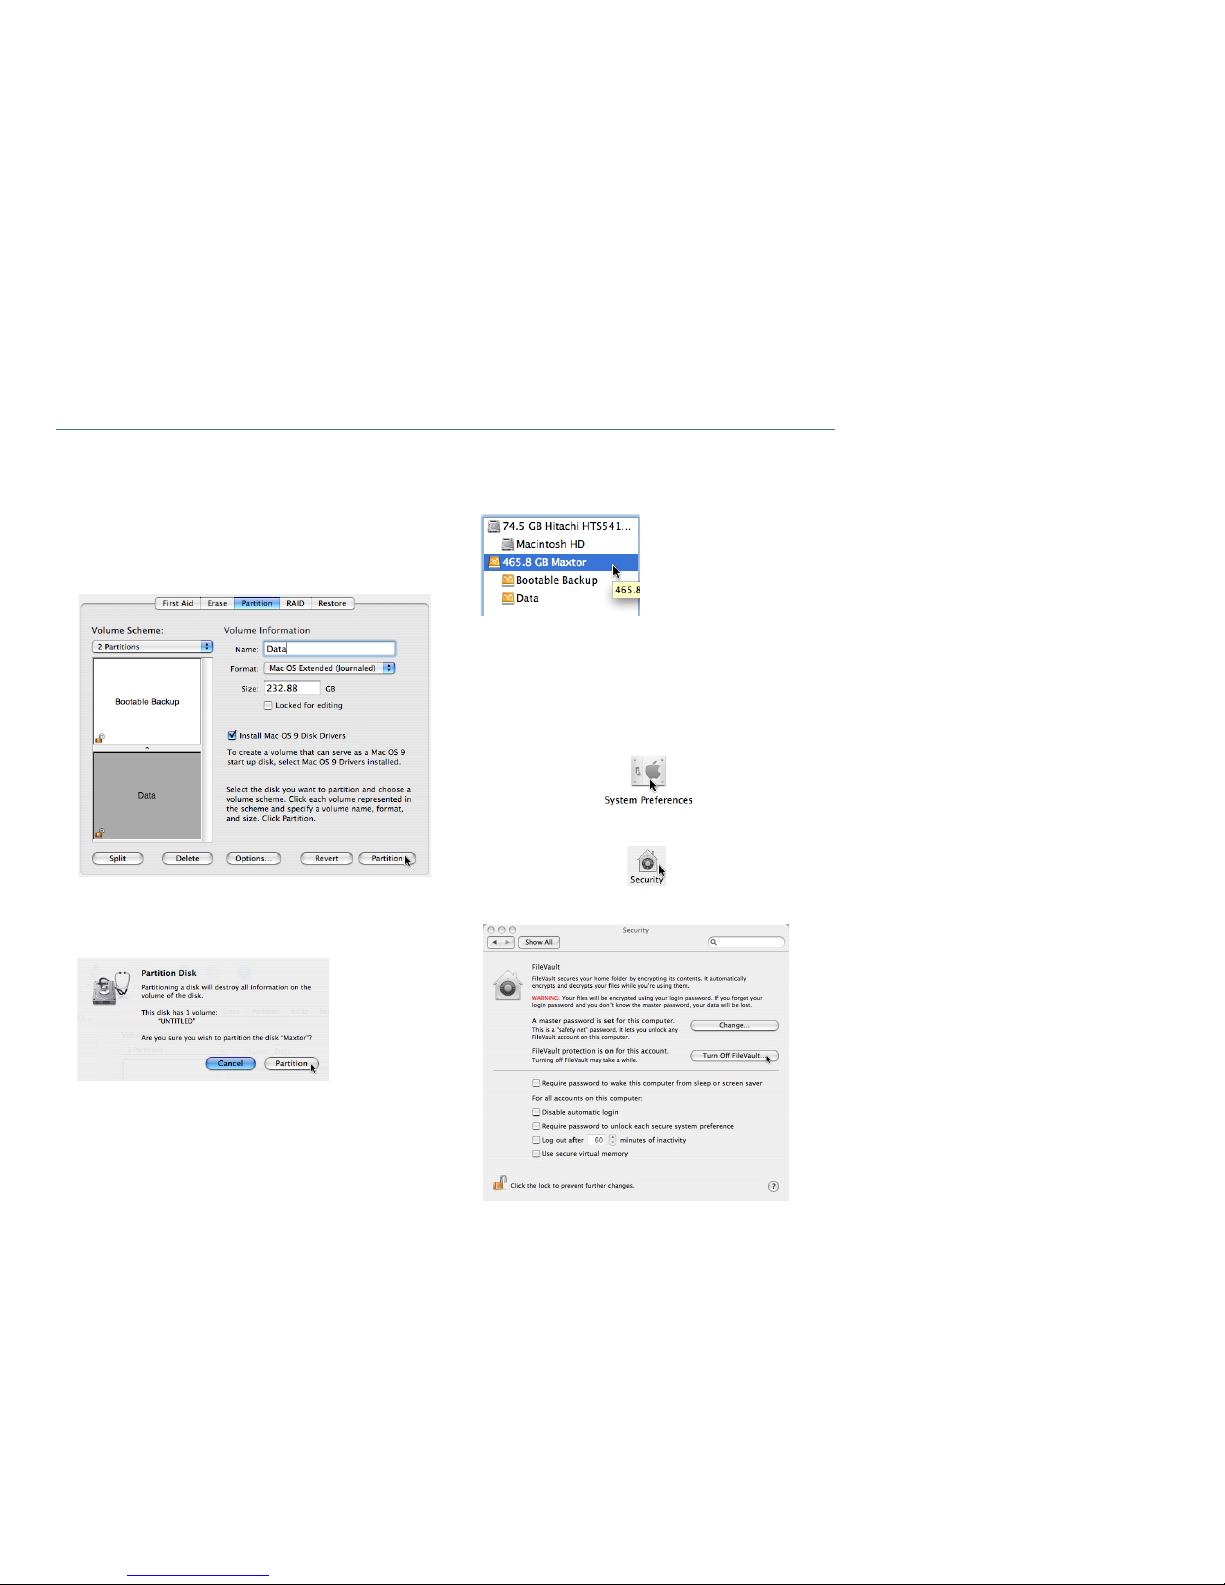
4. Click on the Volume Scheme pull-down menu and select
two partitions .
Page 11
PAGE 9
MAXTOR ONETOUCH III TURBO EDITION MACINTOSH INSTALLATION
5. Select the first partition in this list and type in the capacity
of your system drive (you checked in step #1 above or more
if your OneTouch III’s capacity allows it) to the Size field. In
the Name field, enter the name Bootable Backup .
The remaining space will be allocated to a second
partition that can be used for general storage. Enter the
name Data .
6. When finished, click the Partition button.
7. A warning message will appear. Click the Partition button
when you are ready.
After the partitioning process is completed, Quit the Apple
Disk Utility . You should now see the two partitions as drive
volumes on your Desktop.
Prior to creating a bootable backup, you need to disable
FileVaulting and adjust the Ownership settings for the
OneTouch III drive.
To Disable FileVaulting
1. Open System Preferences . This is usually located in
the System Dock .
The System Preferences window is displayed.
2. Click on Security .
Page 12
PAGE
10
MAXTOR ONETOUCH III TURBO EDITION MACINTOSH INSTALLATION
3. Click the Turn Off FileVaulting button, then quit System
Preferences .
To Adjust Permissions
1. Select the “ Maxtor Bootable Backup ” drive. Then from
the Finder , select File and Get Info .
2. From the drive's Info window, click Ownership &
Permissions .
3. Remove the check from Ignore ownership on this volume .
Type in your password and close the info window.
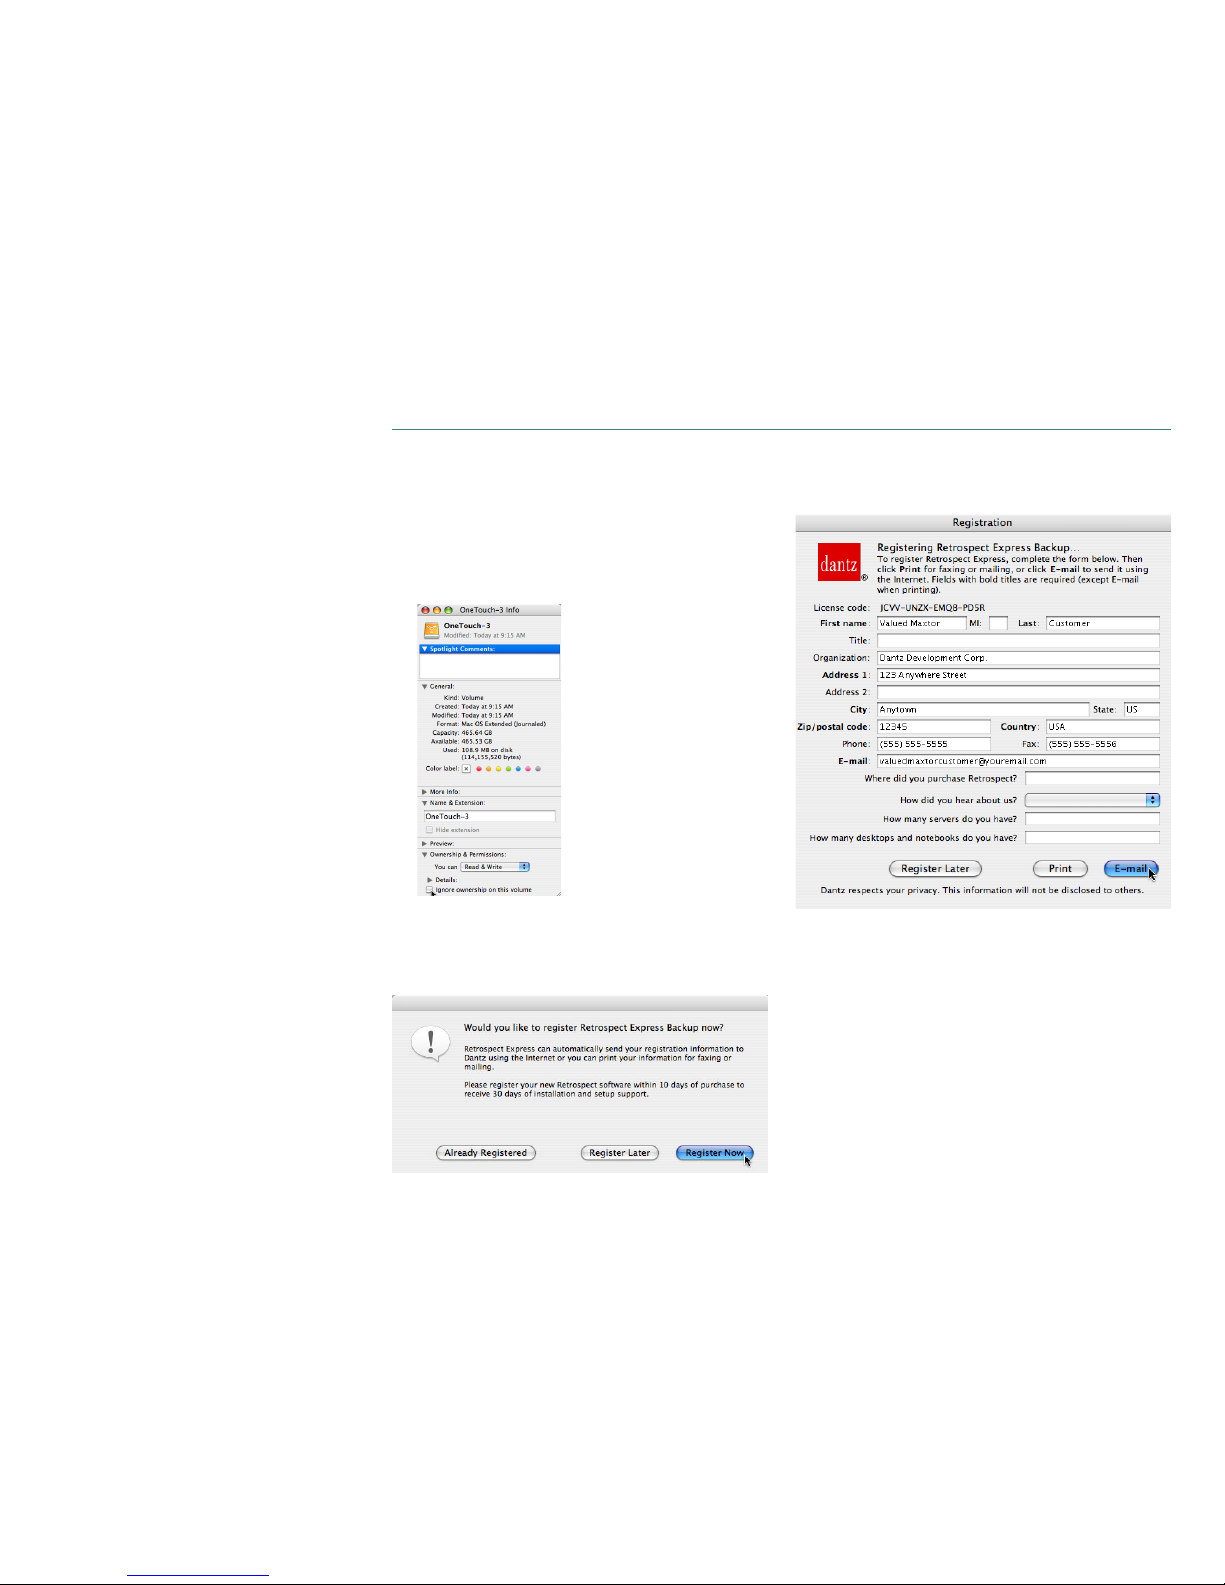
OneTouch Button Setup
Press the OneTouch button . You will see the following:
Click Register Now .
NOTE: Click Register Later to perform this task at a different
time or click Already Registered if you have done so with a
previous product or have installed this software more than once.
Enter the appropriate information in the form provided.
– If you have an Internet connection, click E-mail
– Click Print to create a hard copy of this form
– Click Register Later if you wish to continue without
registering.
Page 13
PAGE 11
MAXTOR ONETOUCH III TURBO EDITION MACINTOSH INSTALLATION
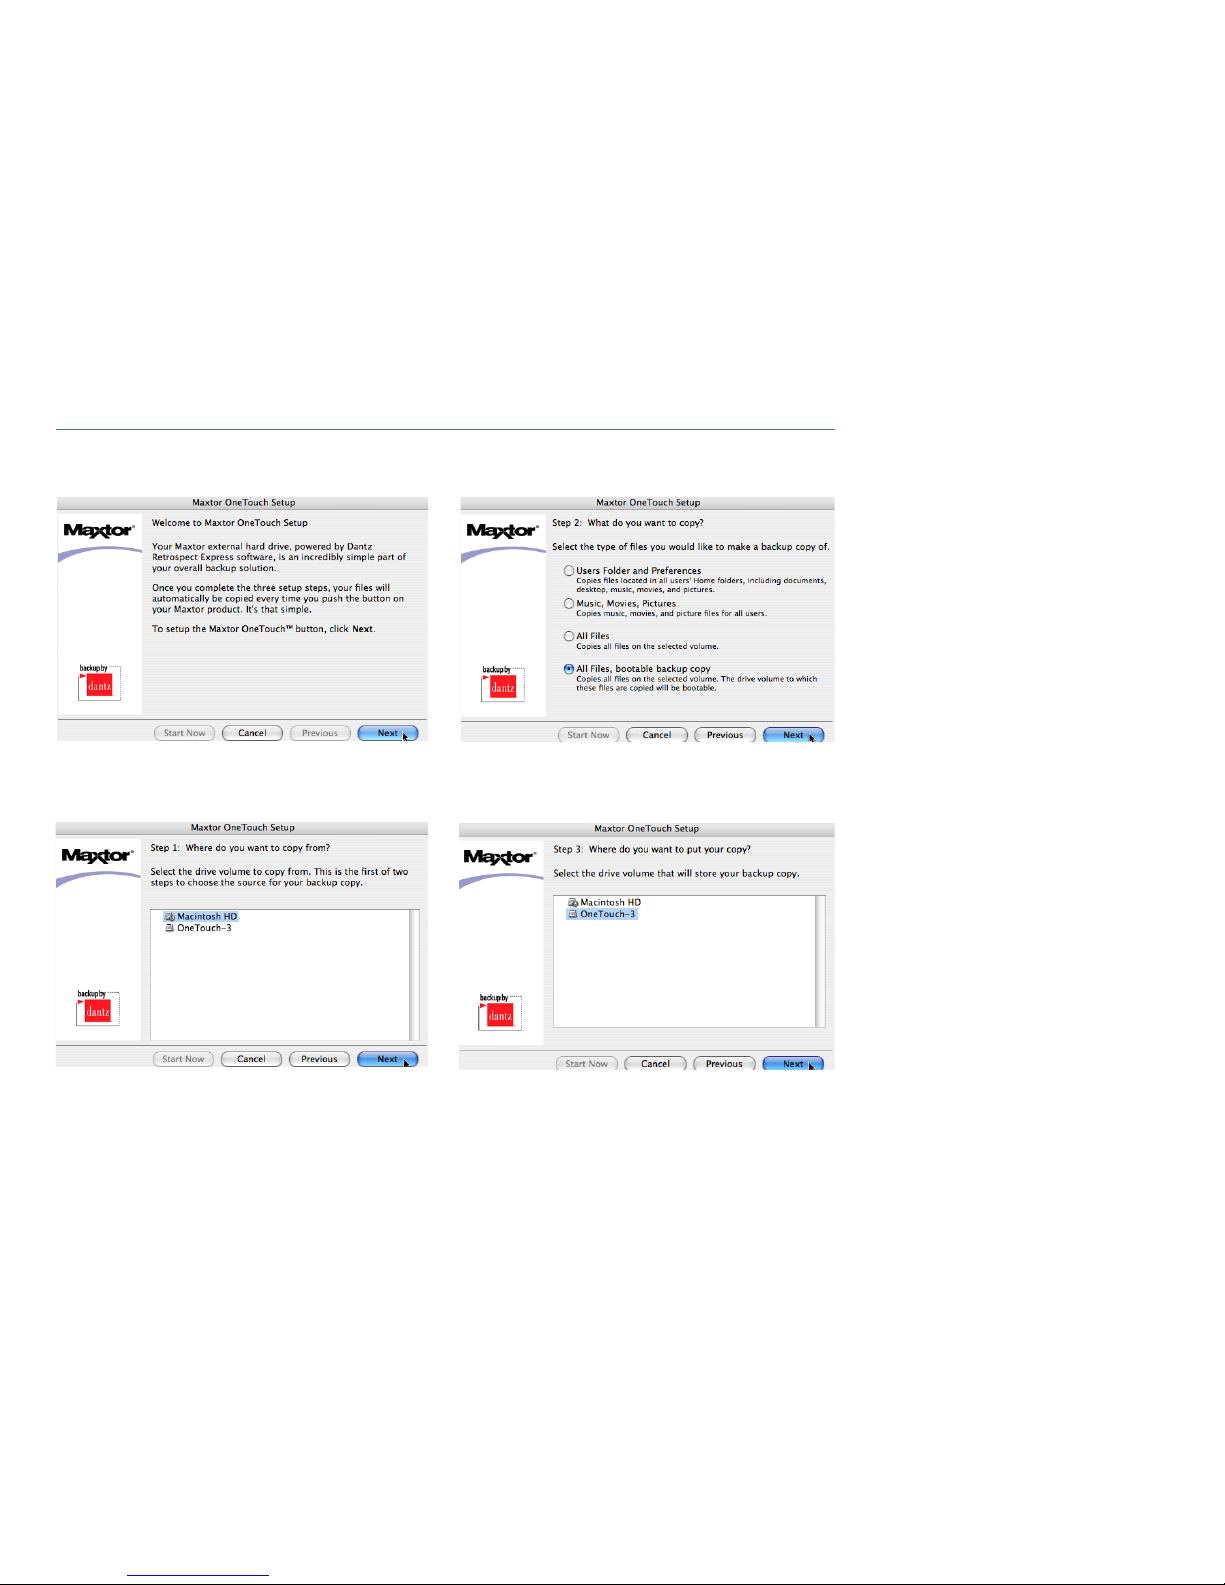
Once the registration information has been completed, press the
OneTouch button . The Maxtor OneTouch Setup opens.
Click Next .
Step 1: Where do you want to copy from? Select your Macintosh
boot volume (usually called Macintosh HD).
Click Next .
Step 2: What do you want to copy? Click the All Files, bootable
backup copy .
Click Next .
Step 3: Where do you want to put your backup copy? Select the
volume/volumename associated to the OneTouch III .
Click Next .
Page 14
PAGE
12
MAXTOR ONETOUCH III TURBO EDITION MACINTOSH INSTALLATION
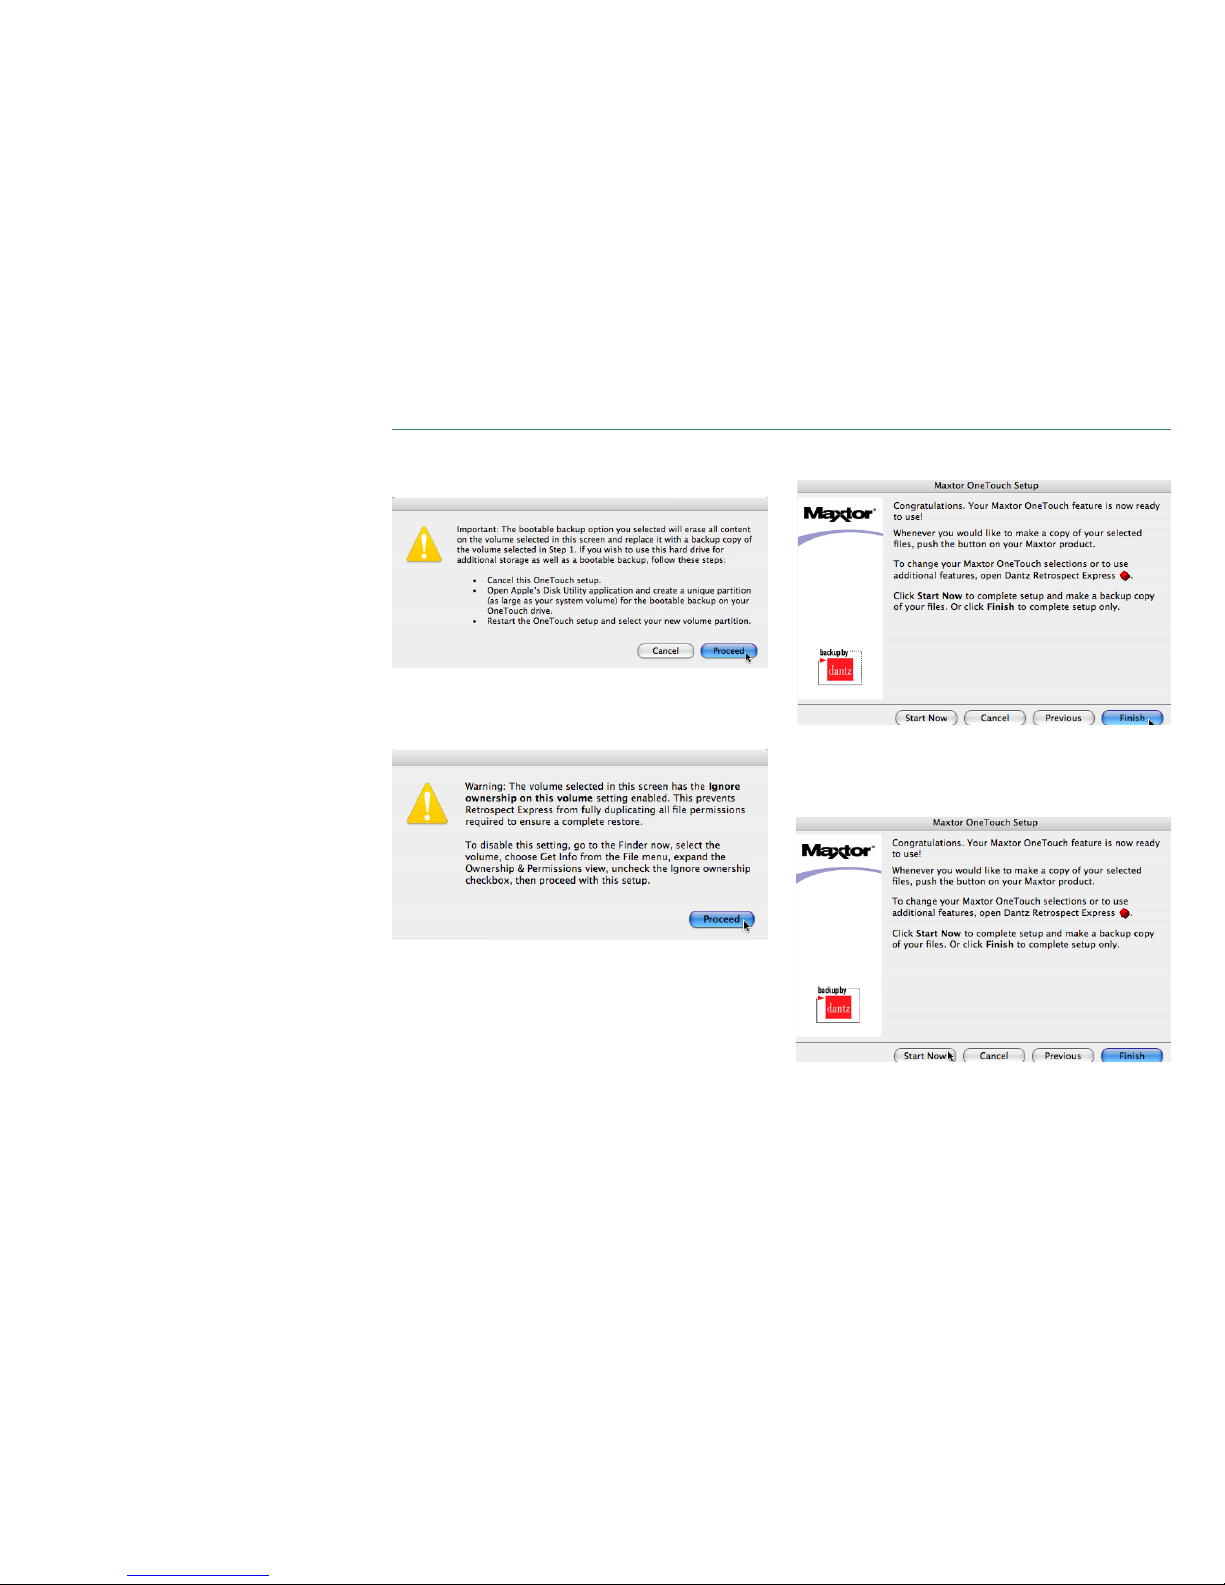
A warning will open – recommending a partitioning scheme for
the OneTouch III.
Click Proceed .
A second warning will appear – informing you that the Ignore
Ownership & Permissions needs to be disabled.
Click Proceed .
A congratulations screen is displayed.
Click Finish to close the setup program,
or
Click Start Now to immediately start the backup.
Page 15
PAGE 13
MAXTOR ONETOUCH III TURBO EDITION MACINTOSH INSTALLATION
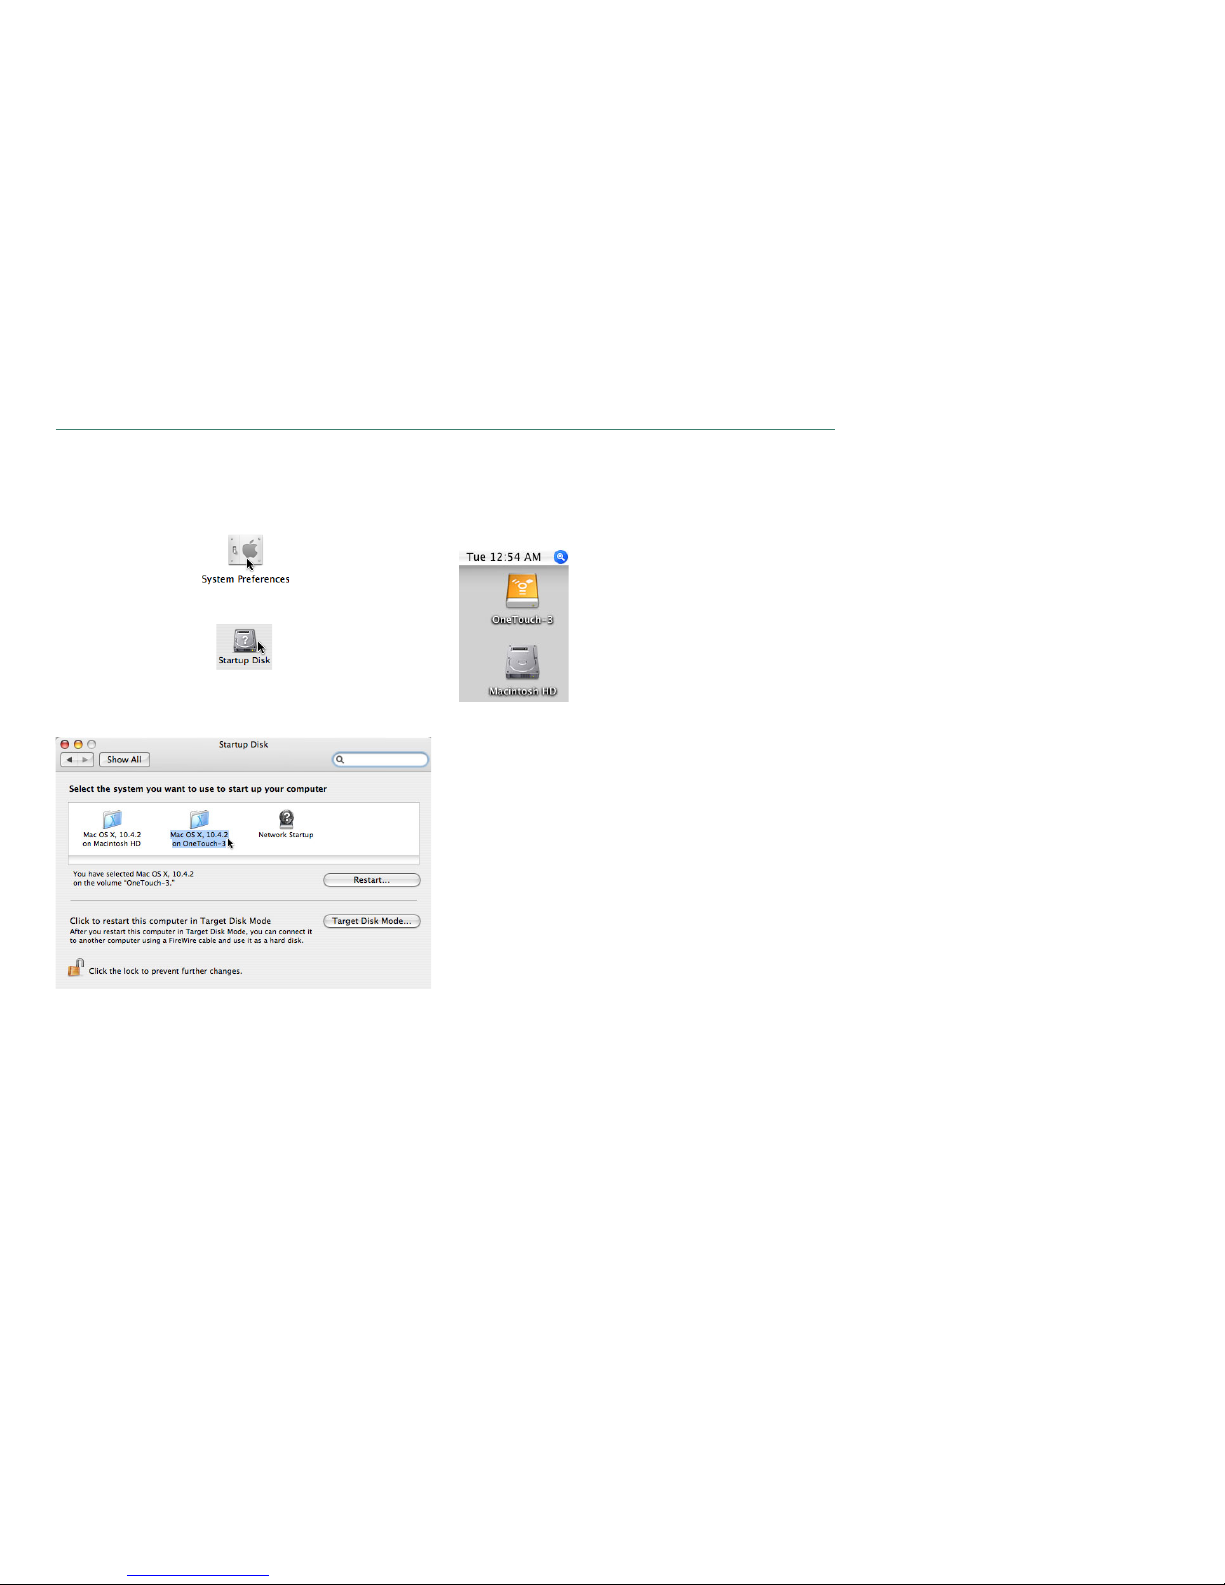
When finished, you will have a copy of your Mac OS and all
applications and data on the OneTouch III. To boot from your
OneTouch III , access System Preferences - usually located in
the System Dock .
The System Preferences window is displayed.
Click Startup Disk .
The following is displayed:
Select the volume associated with the OneTouch III and click
Restart .
Click Restart once again when asked to confirm your choice. The
system will then reboot.
After restart, you will notice that the system is now booted from
the OneTouch III.
Page 16
PAGE
14
MAXTOR ONETOUCH III TURBO EDITION MACINTOSH INSTALLATION
Using the OneTouch III
Once installed, you can use your new Maxtor OneTouch III in the
same way you use the other drives on your computer. Some of
the basic ways you can use your new drive are:
–Move or copy files or folders from your other drives,
CD-ROMs, or other storage devices.
– Within virtually any application, save files to and open
files from the new drive.
–Store video files, games, spreadsheets, and other
commonly used files.
–Store copies of important files from your desktop or
laptop computer.
In this chapter, you can learn how to use the advanced features
of the Maxtor OneTouch III, including:
– Sync and System Rollback
–Power management features
– Security settings
– Diagnostic utilities
– Customizing the OneTouch button
– Using Retrospect Express to back up and restore data.
Maxtor OneTouch Manager
Your Maxtor OneTouch III includes a utility that allows you to:
– Find out more information about your drive
– Customize your OneTouch button to open a different
application or synchronize folders
– Control power management settings for your drive
– Enable password security to restrict access to your
Maxtor OneTouch III drive
– Run diagnostic tests to troubleshoot potential hardware
problems with your Maxtor OneTouch III drive.
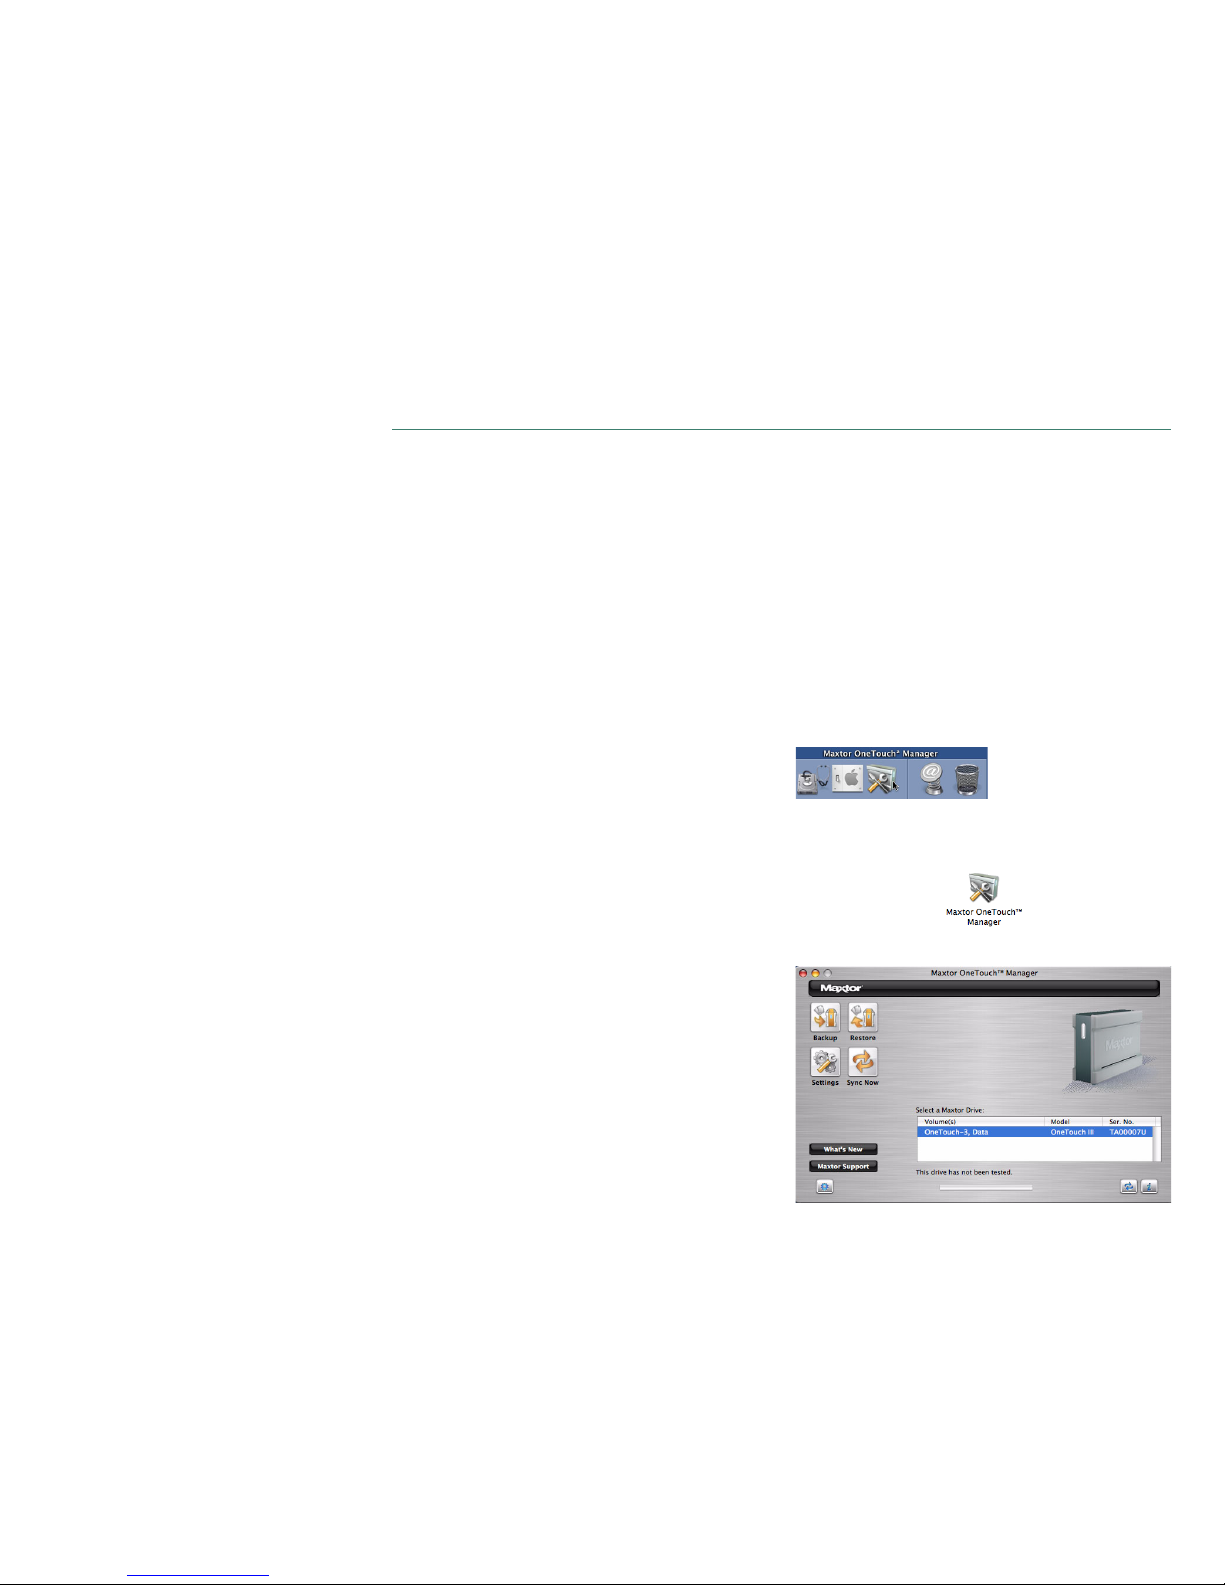
Opening the OneTouch Manager Utility
Click on Maxtor OneTouch Manager located in your dock.
NOTE: If you did not opt for icon placement in your dock during
the installation, go to the Applications folder on your Macintosh
and open the Maxtor OneTouch Manager.
The Maxtor OneTouch Manager window will appear.
Page 17
PAGE 15
MAXTOR ONETOUCH III TURBO EDITION MACINTOSH INSTALLATION
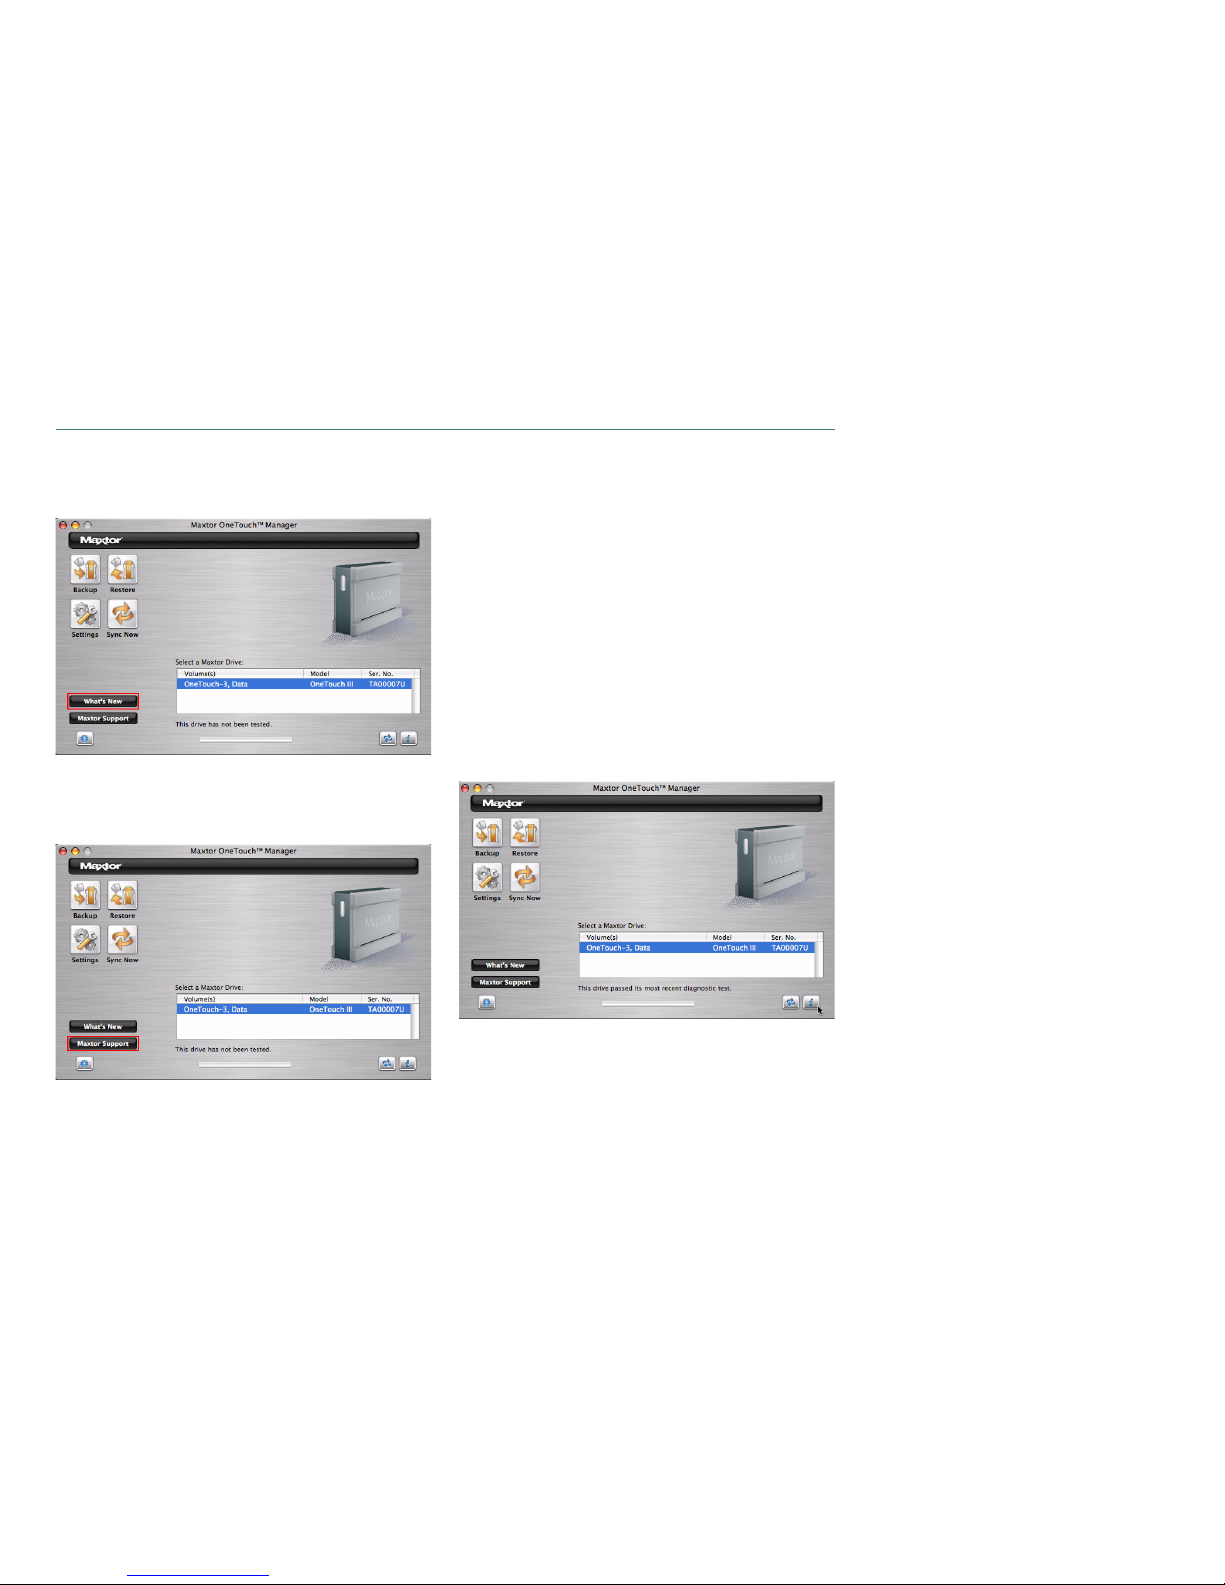
Features
What’s New – click this and you’ll travel to Maxtor’s website
where you can learn more about the OneTouch III’s new features.
Maxtor Support - whoever thought that they could be just one
click away from online technical support? By clicking on the
Maxtor Support button, you will be transported to Maxtor's
Knowledge Base.
Other Features
Drive Information – displays drive volume information, free
space available, serial number and firmware revision of the
drive.
Diagnostics – checks the health of your OneTouch III drive.
Backup – launches Retrospect Express Directory.
Restore – launches Retrospect Express Directory.
Settings – allows you to customize the OneTouch button, tune
performance, and apply password security.
Sync Now – allows you to synchronize folders from your Mac to
the OneTouch III.
Drive Information
This tool displays the selected OneTouch III’s volume
information, free space available, serial number and firmware
revision of the drive.
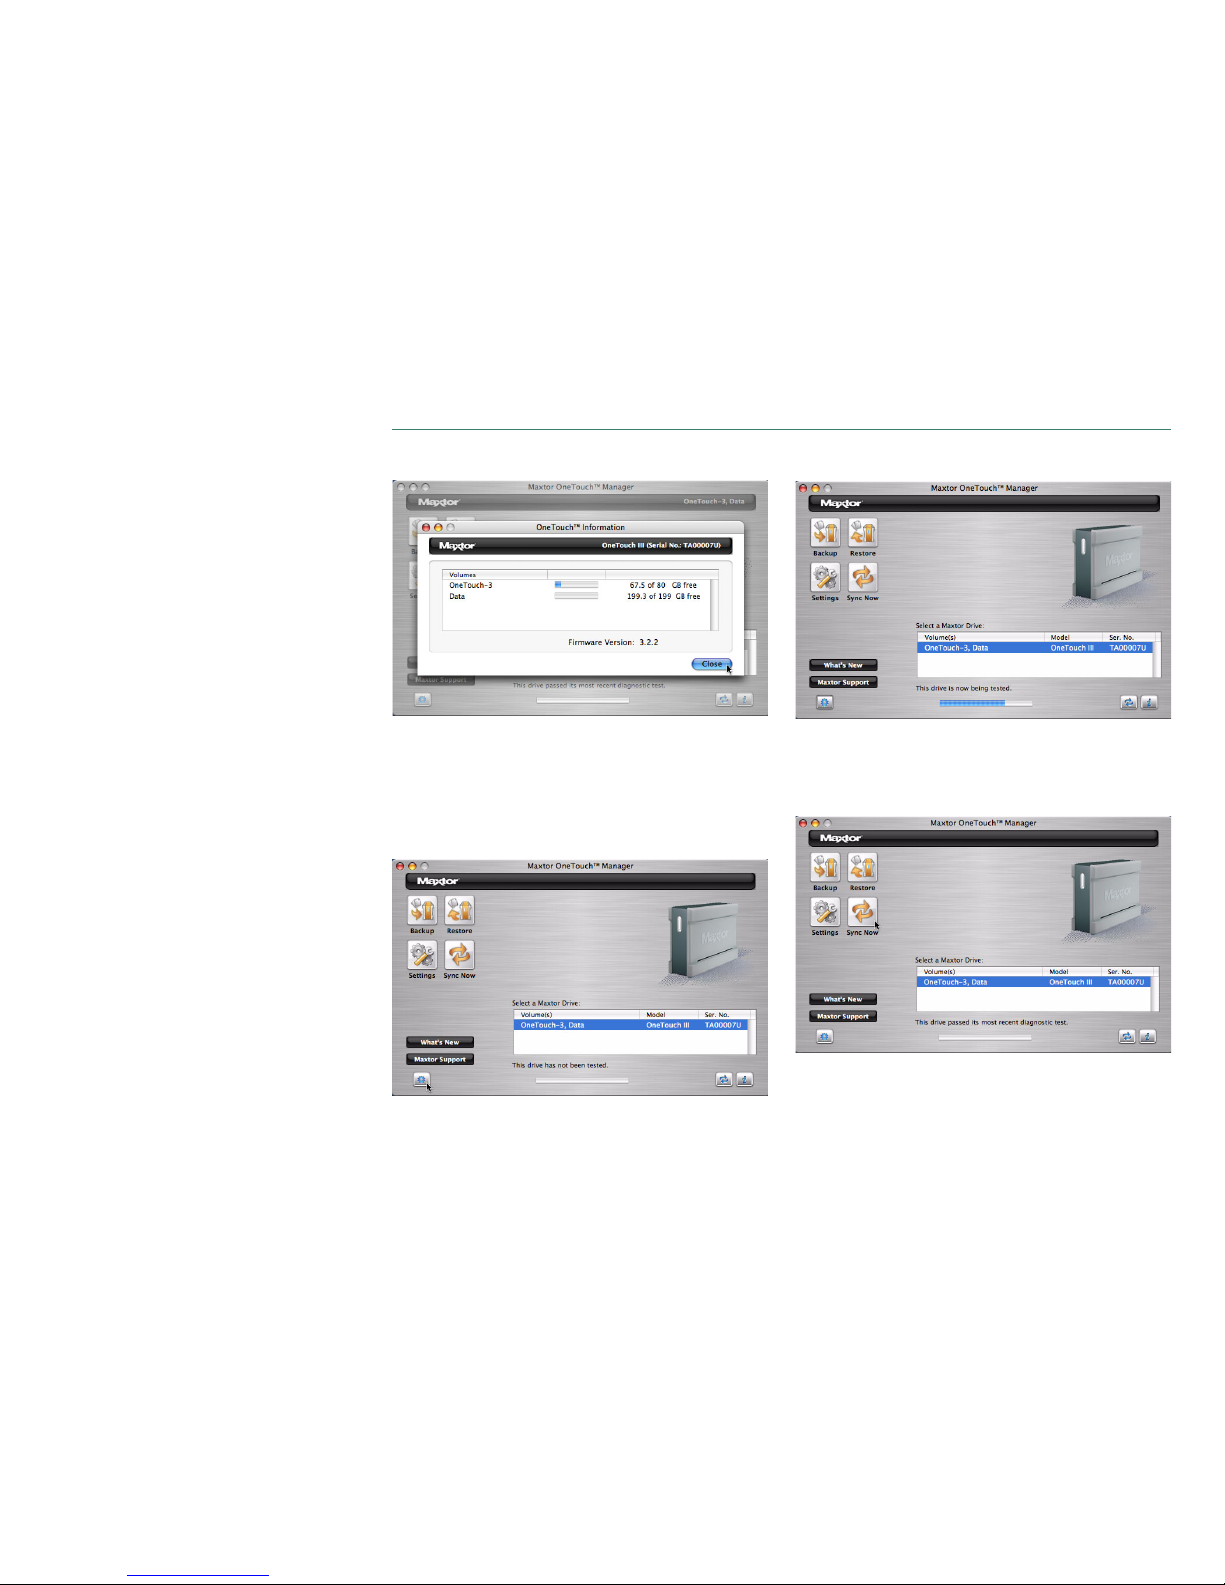
Click the Information icon.
Page 18
PAGE 16
MAXTOR ONETOUCH III TURBO EDITION MACINTOSH INSTALLATION
You will see the following:
Click Close when finished to return the OneTouch Manager’s
main window.
Diagnostic
If you suspect there may be problems with your Maxtor
OneTouch III drive, you can run the diagnostic test.
Click the Diagnostics button.
The diagnostic test will launch immediately.
A status bar will appear as well as the notification, “The drive is
now being tested.”
When finished, a message will appear indicating “The drive
passed its most recent diagnostic test.”
If the test finds your drive to be defective, it will display a Return
Material Authorization (RMA) diagnostic code you will use to
return your drive for replacement under warranty.
Page 19
PAGE 17
MAXTOR ONETOUCH III TURBO EDITION MACINTOSH INSTALLATION
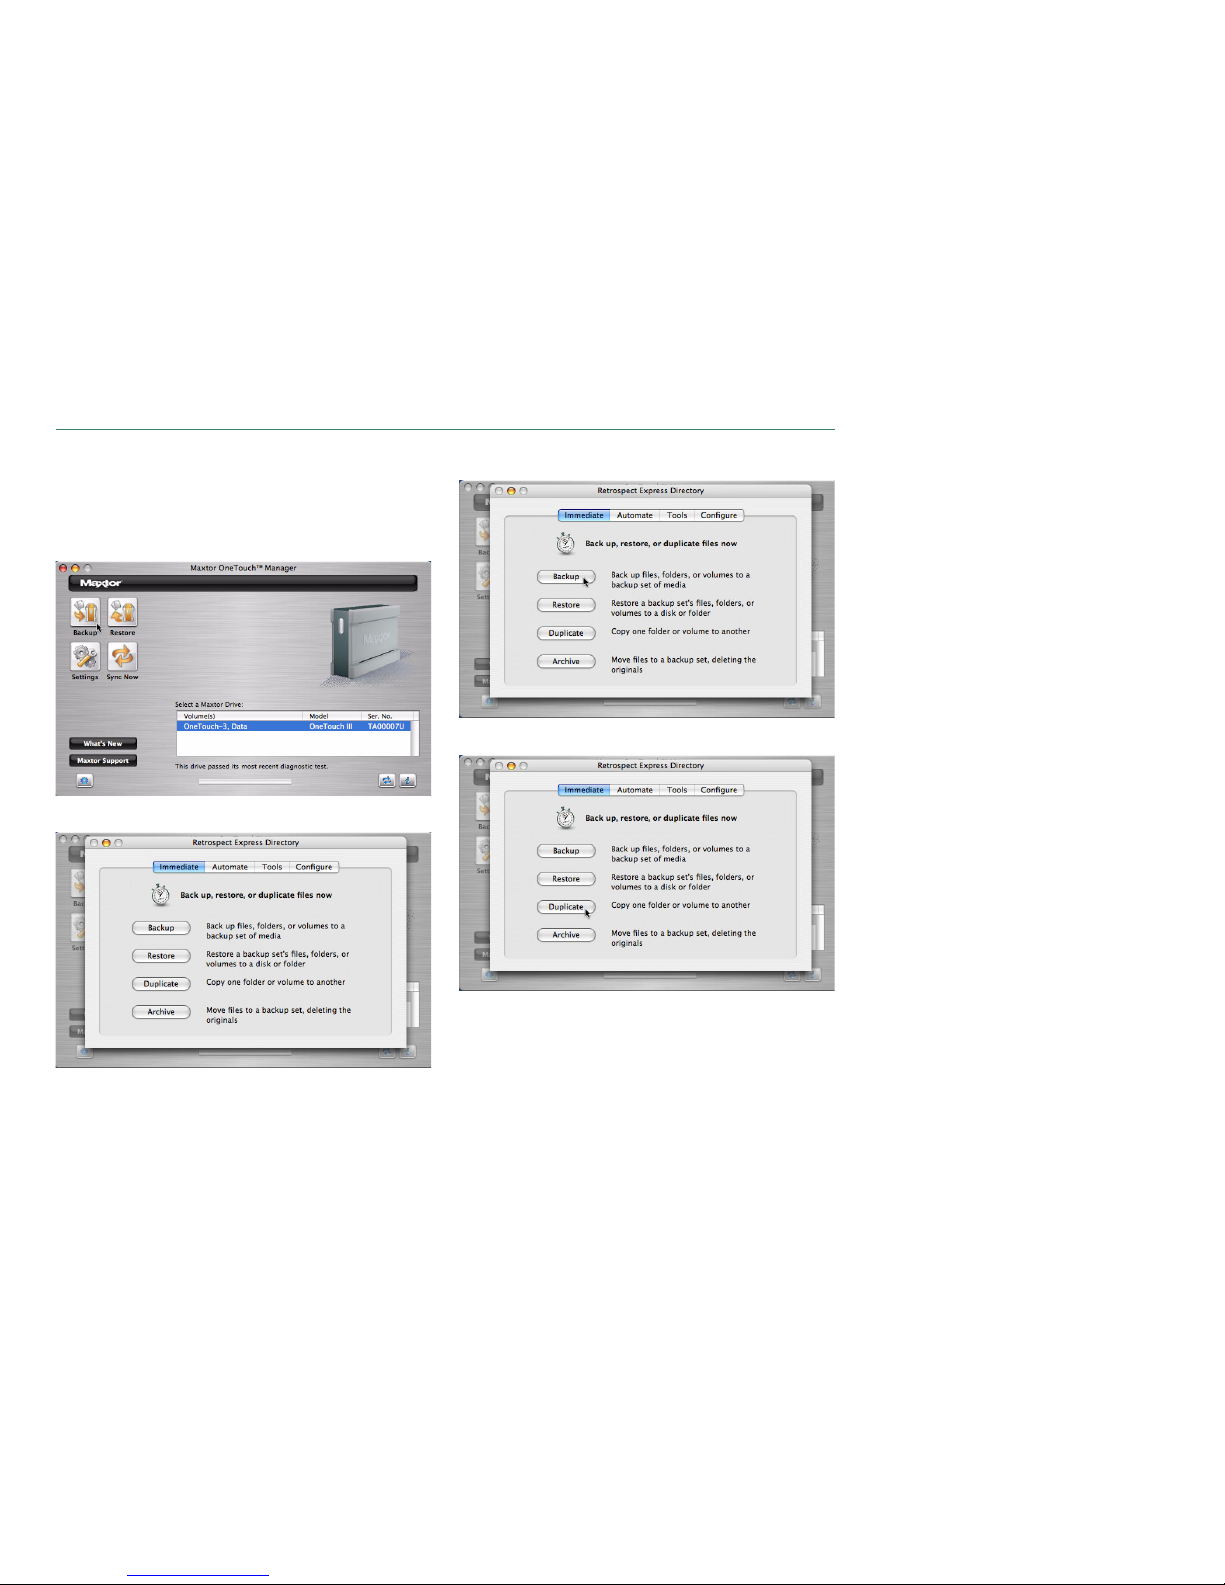
Backup
This feature launches the Retrospect Express Directory. From
there you can use Retrospect to create Backup and Duplicate
scripts.
Click the Backup button.
This will launch the Retrospect Express Directory.
Click on Backup to create a Backup Script.
Click on Duplicate to create a Duplicate Script.
NOTE: It is recommended that you store all Backup and
Duplicate scripts created to a volume other than that where your
Bootable Backup Copy is stored. Failure to do so may result in
lost data. Please go to Maxtor’s Knowledge Base for more information regarding the creation of Backup and Duplicate scripts.
Page 20

PAGE 18
MAXTOR ONETOUCH III TURBO EDITION MACINTOSH INSTALLATION
Restore
This feature launches the Retrospect Express Directory. From
there you can restore data from Backup and Duplicate scripts
created other than the Bootable Backup Copy created earlier.
Click the Restore button.
This will launch the Retrospect Express Directory.
Click Restore to restore from a backup set’s folder or volumes to
a disk or folder.
NOTE: Please go to Maxtor’s Knowledge Base for more
information regarding the restoration of Backup and Duplicate
scripts.
Disaster Recovery
In the event of disk failure or data corruption, you can restore
your system from your OneTouch III.
Connect the OneTouch III containing the bootable back to your
Mac and apply its power.
Turn on your Mac and immediately press and hold the Option
Key.
A screen will display showing bootable volume available. Click
on the OneTouch III’s bootable backup volume and click the
right arrow. The system will then boot from your external drive.
If prompted, authenticate with your Username and Password.
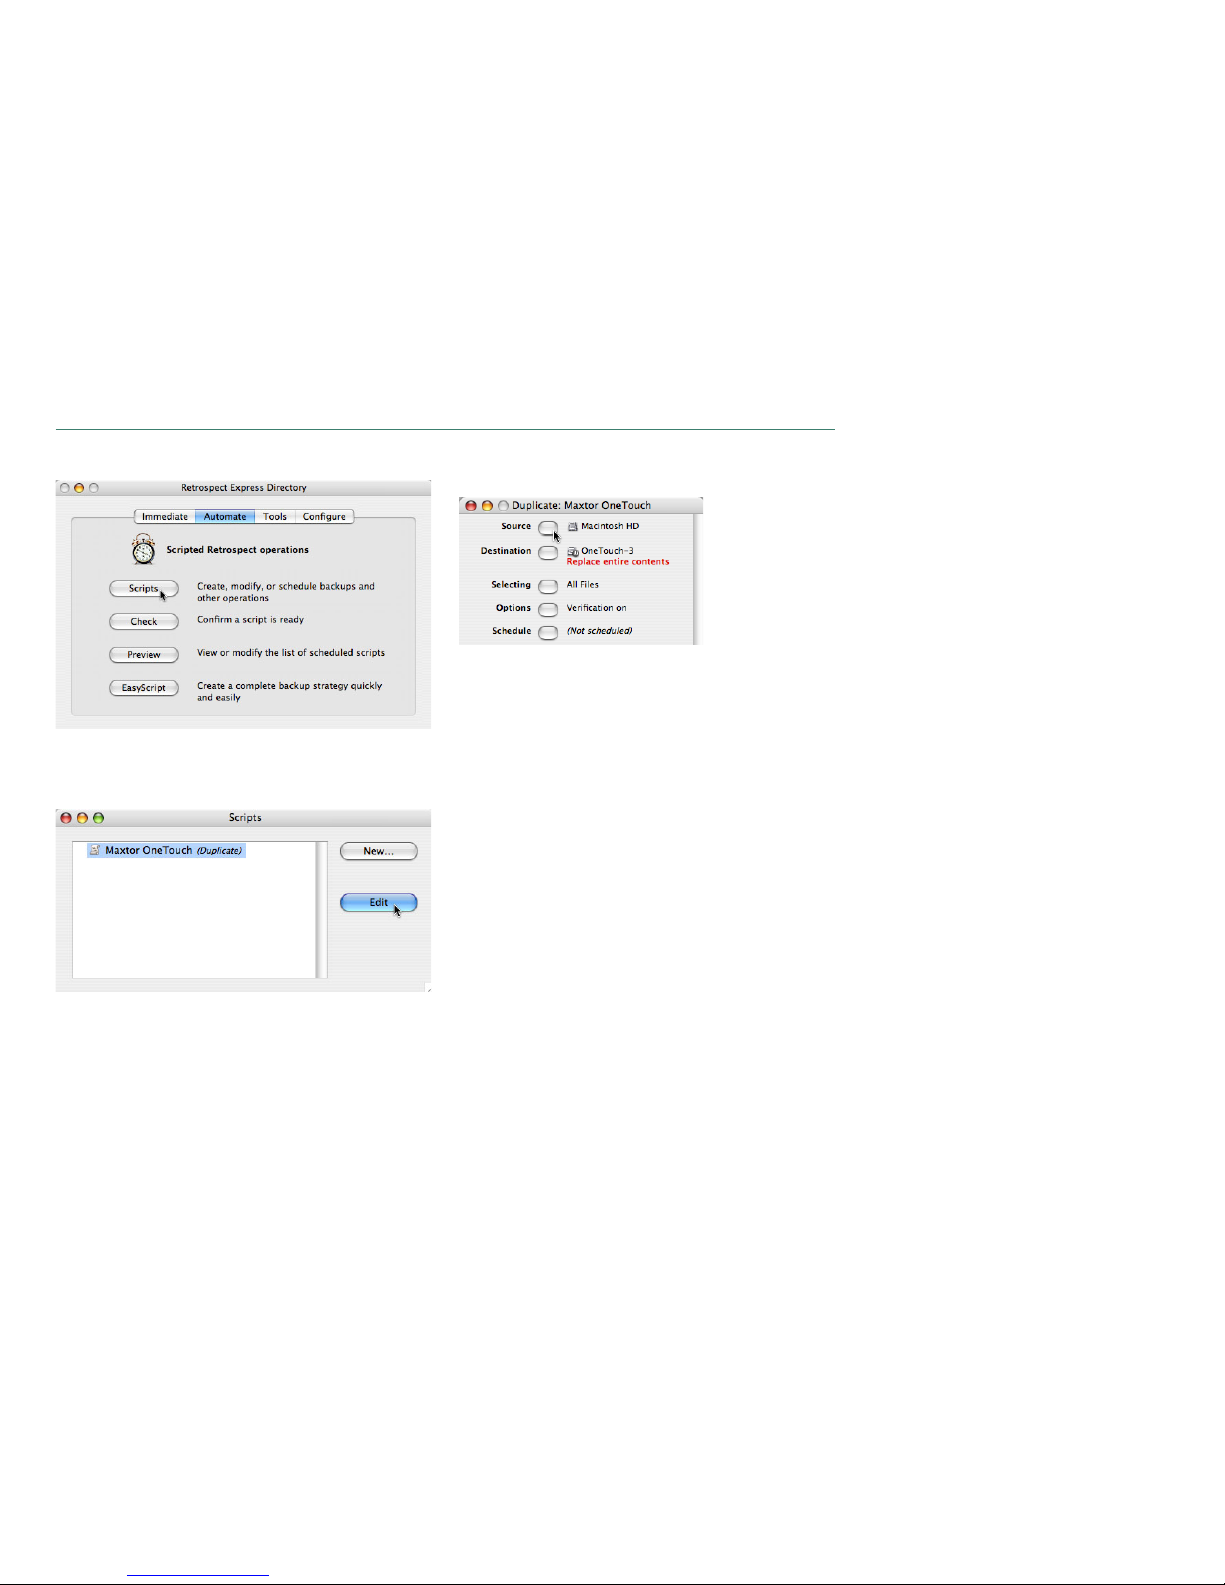
Click the Automate tab.
Page 21
PAGE 19
MAXTOR ONETOUCH III TURBO EDITION MACINTOSH INSTALLATION
The Scripted Retrospect operations window is displayed.
Click the Scripts button.
The Scripts window appears. Select the Maxtor OneTouch
(Duplicate) script.
Click Edit. A Script window will appear showing the
configuration about the bootable backup script.
Click Source.
Page 22
PAGE 20
MAXTOR ONETOUCH III TURBO EDITION MACINTOSH INSTALLATION
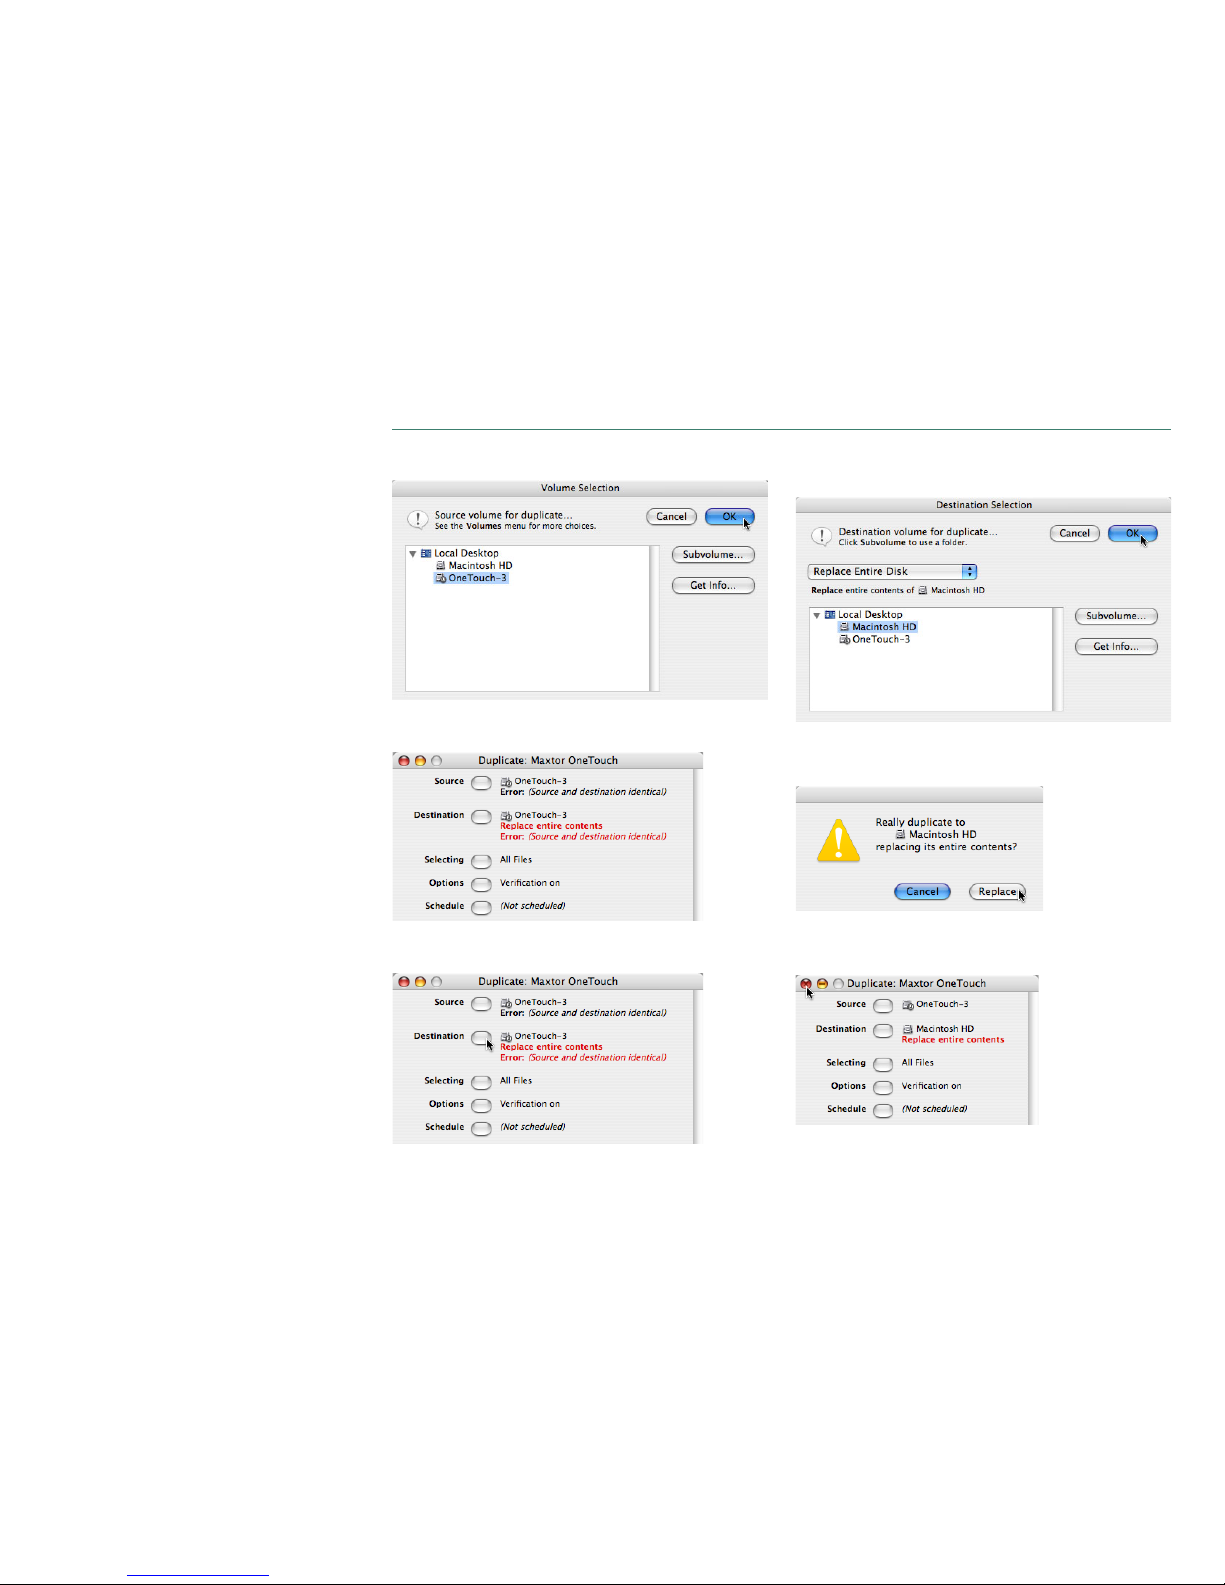
Select your external drive as the Source and click OK.
You will see the following window indicating that the
Source and Destination are the same.
This is temporary and will be corrected in the next step.
Click the Destination button.
You will see the following. Choose the internal drive as the
Destination.
Click OK.
You will be asked to confirm your change.
Click Replace.
Close the Script Window.
Page 23
PAGE 21
MAXTOR ONETOUCH III TURBO EDITION MACINTOSH INSTALLATION
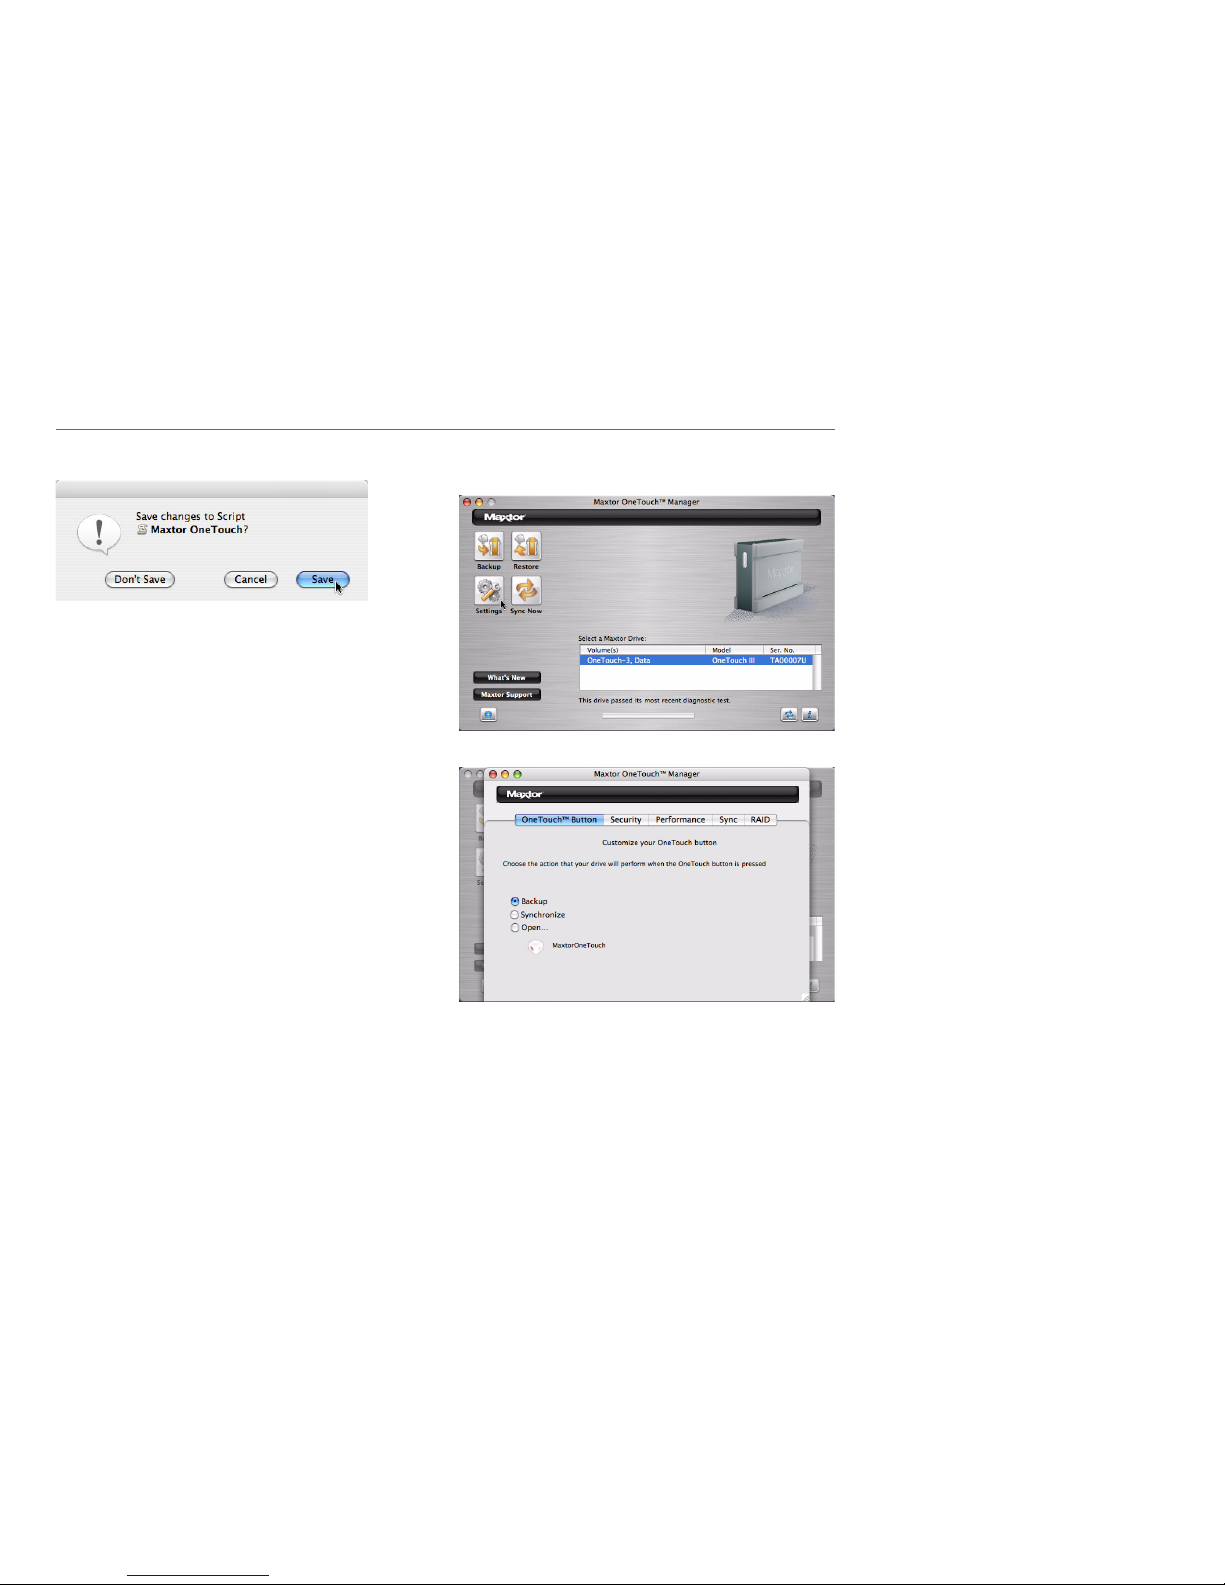
You will be asked to save the changes to your script.
Click Save.
Press the OneTouch button to restore your OS, applications and
data to your internal drive.
Once the Restore process is complete, use Apple System
Preferences to change your Startup Disk to boot from the
internal disk.
NOTE: After returning to the internal drive as the boot disk,
access Retrospect Express and edit the Maxtor OneTouch script.
Change the Source to the Internal Disk and the Destination to
the OneTouch III.
Settings
Click on the Settings button.
You will see the following:
The Settings tool allows you customize the OneTouch button,
tune performance, and apply password security to your OneTouch III.
Page 24

PAGE 22
MAXTOR ONETOUCH III TURBO EDITION MACINTOSH INSTALLATION
OneTouch Button
By default, pressing the OneTouch button will launch Retrospect
to perform your Backup (e.g. Bootable Backup Copy) to the OneTouch III. However, you can customize the OneTouch button so
that it will open an application or file of your choice or synchronize data between folders configured through the Sync feature.
To Synchronize Folders with the Touch of a Button:
NOTE: This option will only work if you have already setup the
Sync feature.
Click the Synchronize button.
Close the OneTouch Manager.
Press the OneTouch button. Your selected folders will
automatically synchronize from your internal drive to the
OneTouch III.
To Open an Application
1. Click on the Open button.
2. Browse your Mac and select the application you wish to
associate with the OneTouch button. In this example,
Calculator was chosen.
Click Set Action.
You will see the following:
Close the OneTouch Manager.
Press the OneTouch button and your selected application
will open.
To return to default settings:
Click the Backup button.
Close the OneTouch Manager.
Press the OneTouch button. Your Maxtor OneTouch script
will launch.
Page 25
PAGE 23
MAXTOR ONETOUCH III TURBO EDITION MACINTOSH INSTALLATION
Security
You can set a password for your Maxtor OneTouch III drive. Every
time your drive is on and connected to your computer, including
when you start or restart your computer, or when you turn off
your drive and turn it back on, you will need to enter your password or the answer to your secret question, which you set up
when you create your password, in order to use your drive.
If you have forgotten your password, you can attempt to re-enter
it or to recover it, by answering your secret question. You are
allowed 5 attempts before you must turn off your drive and turn
it back on, at which point you can try an additional 5 times.
If you are not able to recover your password, the only other way
to unlock the drive is to erase all of its contents.
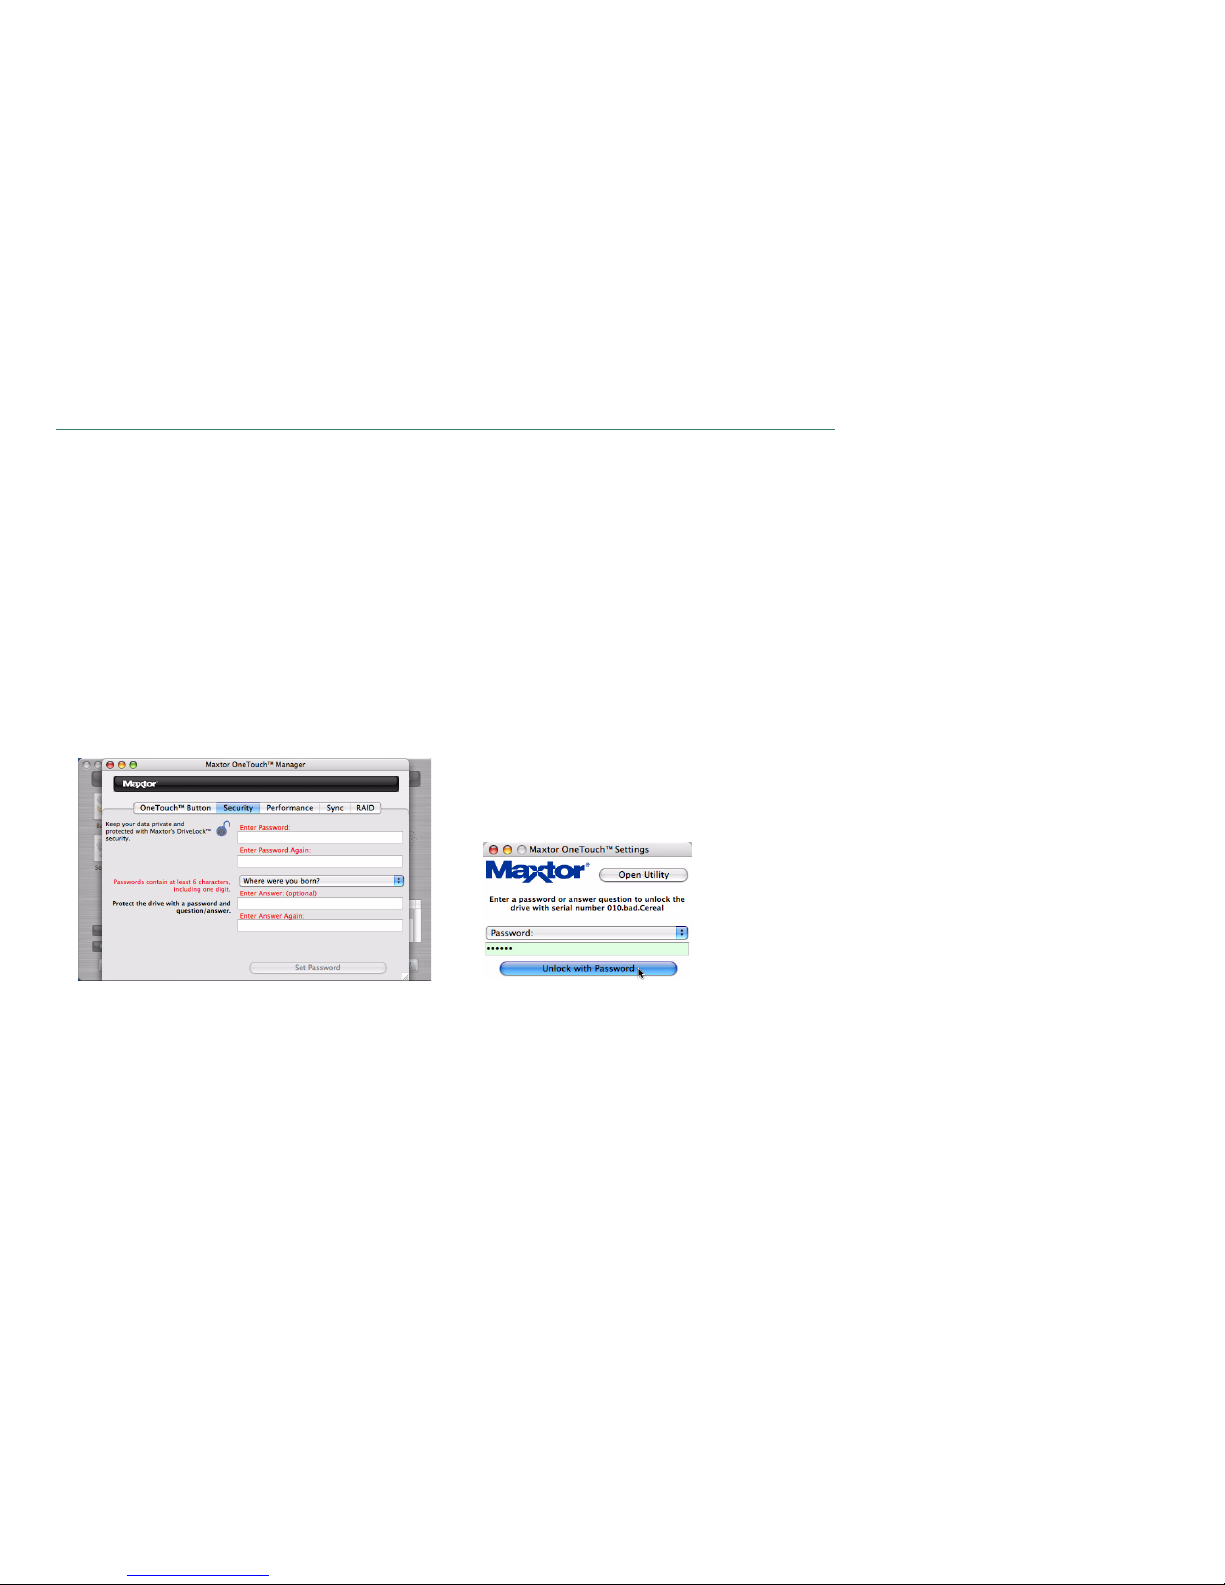
Setting your Password
1. Click Security. You will see the following:
2. Enter and re-enter a Password.
Your password must contain at least six characters and
one digit.
For further security, you may also choose a secret
question (from the list provided) and type in the answer.
If you do not want to choose a secret question and
answer, go to step 5.
3. Choose a Secret Question.
4. Enter and re-enter an answer to the question.
5. Click Set Password or Set Password and Q/A, if you chose
a secret question and answer.
You will return to the original security screen. Close the
Maxtor OneTouch Manager.
Upon system restart with the OneTouch III connected/
powered on,
or
If the OneTouch III is power cycled. You will be prompted
to authenticate. Type in your password for the OneTouch
III or in the example below (if applied), type in the answer
to the question to unlock the drive.
Page 26

PAGE 24
MAXTOR ONETOUCH III TURBO EDITION MACINTOSH INSTALLATION
Changing your Password
1. Click Security.
2. Enter your current Password.
or
Enter the answer to the question.
3. Enter and re-enter a New Password.
You may also choose a secret question (from the list
provided) and type in the answer.
If you do not want to choose a secret question and
answer, go to step 5.
4. Choose a Secret Question.
5. Enter and re-enter an answer to the question.
6. Click Change Password and Q/A.
You will return to the original security screen. Close the
Maxtor OneTouch Manager.
Disable Security
If you decide you want to disable the password you created,
follow these steps:
1. Open the Maxtor OneTouch Manager utility and click
Security or click Open Utility from the Maxtor screen that
asks you for your password.
2. Enter your Password.
3. Click Disable Security.
You will return to the original security screen. Close the
Maxtor OneTouch Manager.
The default setting for the Security setting is disabled.
NOTE: See Set Password if you ever wish to re-enable
password security in the future.
Page 27

PAGE 25
MAXTOR ONETOUCH III TURBO EDITION MACINTOSH INSTALLATION
Erase Drive
If all attempts to recover your password fail and you need to
erase your drive, follow these steps:
1. Click Security.
2. Click Password Unknown.
3. Click Erase Drive.
The Authenticate window will open.
4. Enter the Name and Password for your computer and
click OK.
A window will appear, asking you to confirm “...that you
intend to destroy all data on this drive.”
5. Type the 5-digit number and click Erase Drive.
6. The Erase procedure will begin.
7. When completed, a message will appear stating that the
drive is erased.
Click OK.
8. Remove and reapply power to the drive.
9. When the erase process is complete, a window will
appear with the message that the disk is unreadable.
10. Click Initialize.
The Apple Disk Utility will open. Do not turn off your
computer or your drive during the erase or formatting
process.
Page 28

PAGE 26
MAXTOR ONETOUCH III TURBO EDITION MACINTOSH INSTALLATION
Sync
The Sync feature will allow you to synchronize folders between
your internal disk and your OneTouch III. After this feature is
enabled, you can connect the OneTouch III to another Macintosh
computer running the OneTouch Manager software and
synchronize the files/folders from the OneTouch III to this
other Macintosh.
1. Click the Sync tab. You will see the following:
Click the add (+) button located in the lower left corner.
2. You will be asked to select your Sync-My-Mac Source.
In this example, the user's iTunes folder was selected.
After making your selection, click the Add Sync button.
3. The following is displayed:
NOTE: Repeat steps 1-3 to add more that one (1) folder in
your Sync-My-Mac Source list.
Once all folders have been selected, click the Save Snyc
Set button.
4. You will be asked to select a destination for your Sync Set.
Select the OneTouch III volume to save your Sync Set and
click the Set Destination button.
Page 29

PAGE 27
MAXTOR ONETOUCH III TURBO EDITION MACINTOSH INSTALLATION
5. You will return to the main Sync screen.
Click Sync Now.
6. You will be prompted with the following:
Click OK.
NOTE: If this screen does not appear,
click on the SyncMyMac icon located in the dock.
7. The synchronization process starts.
8. When finished, click OK.
9. Close the OneTouch Manager.
You may select a local disk on your computer to store
folders that were originally copied to your OneTouch III
using Sync on another computer.
Every time you move your OneTouch III between
computers, Sync will automatically compare the folders
on your OneTouch III to the ones on your computer to look
for files that have changed. If any files have changed, it
will ask you if you would like to replace the older files with
the newer versions.
To Verify the Contents of Your Sync Set
1. Open the volume containing your Sync Set in the Finder.
2. Browse to the MaxSync folder.
3. You will see the contents of your Sync Set.
Page 30

PAGE 28
MAXTOR ONETOUCH III TURBO EDITION MACINTOSH INSTALLATION
Sync Set File Structure
Your synchronized folders reside in your selected volume in a
folder called MaxSync. Within this folder, there are two (2)
subfolders:
– Tilde (~) Folder – Contains your synchronized files/
folders on the OneTouch III drive.
– OT_MS_W Folder – Contains data that was not properly
synchronized to the OneTouch III drive. This can be
caused by a system interruption. In the event that you
see the following window:
click OK to synchronize this data.
To Manually Sync Folders
There are three (3) ways to manually sync folders:
Using the OneTouch Manager Screen
Launch the OneTouch Manager and click Sync Now.
Using the Sync Screen
Click the Sync button then click the Sync Now button.
Using the OneTouch Button on Your OneTouch III
Refer to “OneTouch Button” earlier in this section for additional
information. You only need to perform this customization once.
WARNING: It is recommended that you store all Sync Backups
created to a volume other than that where your Bootable Backup
Copy is stored. Failure to do so may result in lost data. Please go
to Maxtor’s Knowledge Base for more information regarding the
creation of Backup and Duplicate scripts.
Page 31

PAGE 29
MAXTOR ONETOUCH III TURBO EDITION MACINTOSH INSTALLATION
Editing Your Sync Set
Removing Folders from your Sync Set.
1. Click the Sync tab. You will see the following:
Click the minus (-) button located in the lower left corner.
or
If you wish to reverse your choice, click Revert to add the
folder back to your Sync Set.
2. When changes have been made, click Sync Now to
synchronize your folders from your Mac to the OneTouch
III drive.
When you delete an item from the Sync list, it is automatically deleted from the OneTouch III drive’s MaxSync
directory. The original files/folders will remain on your
Macintosh system.
RAID Settings
By default, your OneTouch III Turbo Edition is configured as a
striped (RAID 0) volume. In this configuration, the OneTouch III
software combines the capacity of both enclosed hard drives –
giving you one large, fast disk. However, if one drive fails, you
will lose all data stored.
To protect your data, you can mirror (RAID 1) the drives in
your OneTouch III Turbo Edition. This configuration provides
you with a backup of your data. In the event of a single disk
failure, your data is secured on the second drive.
The only drawback to a RAID 1 is the loss of disk space. A
RAID 1 configuration will decrease the overall capacity of your
OneTouch III Turbo Edition by 50%.
1. Launch the OneTouch Manager and click on the
Settings button.
Page 32

PAGE 30
MAXTOR ONETOUCH III TURBO EDITION MACINTOSH INSTALLATION
2. You will see the following:
Click the RAID tab.
3. The RAID Settings window is displayed.
To Configure a RAID 1 Volume
1. Click on the RAID 1 for Safety button.
NOTE: The space reported will vary depending on the
capacity of your OneTouch III, Turbo Edition.
WARNING: Changing the RAID configuration will erase
all data on your OneTouch III, Turbo Edition. Maxtor
recommends that you backup any/all data on the
OneTouch III before proceeding.
2. To continue, click Erase.
3. You will see the following:
Type the number displayed in the left field (in this
example, the number is 27024- although this number is
random and will vary on your system) in the right field
provided.
Page 33

PAGE 31
MAXTOR ONETOUCH III TURBO EDITION MACINTOSH INSTALLATION
Once you have entered the number, click the Erase Drive
button.
4. If prompted,
type your User Name and Password to authenticate, then
click OK to proceed.
5. Your OneTouch III, Turbo Edition will temporarily
disconnect from the system.
Click OK to continue.
This process will take approximately 30 – 60 seconds,
depending on the capacity of the OneTouch III, your
Macintosh OS version, and the interface cable connecting
the OneTouch III, Turbo Edition to your Macintosh.
6. Once the RAID has been set, you will see the following:
Click Initialize to proceed.
7. Once initialized, launch the Apple Disk Utility to format
the volume.
Once formatted, your OneTouch III, Turbo Edition is setup
as a mirrored RAID 1 volume.
Page 34

PAGE 32
MAXTOR ONETOUCH III TURBO EDITION MACINTOSH INSTALLATION
Naming Your OneTouch III
Your untitled Maxtor OneTouch III drive appears in the same way
as other drives on your desktop. Follow these steps to name the
drive.
1. On your desktop, click the name of the new drive’s icon.
The text will be to highlighted.
2. Enter a name (for example “Maxtor”) for your Maxtor
OneTouch III and press Return.
Storing Audio
Using your computer as an audio jukebox is a very popular
application. This allows you to store and play thousands of
your favorite songs. You can also create and manage an audio
library from your Maxtor OneTouch III.
Editing Video
Using a computer to capture and edit video recorded with a digital camcorder is quickly becoming popular. Digital video files are
typically very large, using about 13 GB per hour of video content.
Maxtor recommends connecting your drive using the FireWire
interface for optimal results.
Playing Games
CD-ROM-based games typically run faster when they are on a
hard drive rather than running from the CD. You can use your
Maxtor OneTouch III to store and play CD-ROM games.
Installing Applications
You may install and run applications from your drive like other
drives on your system. If you connect the drive to your system
using a USB 1.1 interface, the data transfer rate is approximately
1 MB per second. Because of this, installing applications on a
drive using the USB 1.1 interface is not recommended.
Many applications installed on your drive will only run on the
computer where the application was installed. If you move your
drive to another computer, the application may not function.
Once the drive is reconnected to the computer the application
was originally installed, the application will function properly.
Connecting and Disconnecting the OneTouch III
The FireWire and USB interfaces allow you to hot swap your
Maxtor OneTouch III; that is, connect and disconnect the drive
while the computer and your drive are turned on.
To connect the OneTouch III to your computer
1. Make sure your Maxtor OneTouch III is turned on and the
light is illuminated. Connecting your computer to a drive
that is not powered on can cause your computer to behave
erratically or freeze.
2. Plug the FireWire or USB cable into your Maxtor OneTouch
III and your computer. After a moment, the computer will
recognize that your drive is connected and the drive icon
will appear on your Macintosh desktop.
To disconnect the OneTouch III from your computer
From the desktop, drag your Maxtor OneTouch III icon
to the Trash. The drive will disappear from the desktop. Disconnect your Maxtor OneTouch III from the
computer.
Security Lock
Your new Maxtor OneTouch III includes a security locking slot on
the back of the drive. The slot is compatible with most security
locking cables.
Security Lock
Page 35

PAGE 33
MAXTOR ONETOUCH III TURBO EDITION WINDOWS INSTALLATION
Introduction
Thank you for selecting a Maxtor product. The new Maxtor
OneTouch
TM
III, Turbo Edition, is the high performance, large
capacity external storage solution designed for creative
professionals needing the disk-striping speed of RAID 0 for
intensive disk-access applications or the security of RAID 1
for automatically mirroring data.
The OneTouch III, Turbo Edition, also features award-winning
Maxtor OneTouch™ backup, data synchronization between
two or more computers, cool operation and modular design
for easy stacking.
This user’s guide will help you setup your drive and includes
helpful tips for performing backups and getting the most out
of your new Maxtor OneTouch III, Turbo Edition.
The Maxtor OneTouch III, Turbo Edition, features:
– RAID 0 disk striping
– RAID 1 automatic data mirroring
–Triple interfaces: FireWire 800, FireWire 400
,
and USB 2.0
– Maxtor OneTouch™ button - the simple way to backup files
– EMC
®
Retrospect
®
Express HD software
– Maxtor DriveLock™ security feature password-protects
the contents in case of loss or unauthorized use
– System Rollback – rolls back your PC system settings
to a better point in time while keeping data current
– Data synchronization between 2 or more computers.
The Maxtor OneTouch Manager features include:
– Security settings to password-protect your critical data
–Power management features to conserve energy when
your Maxtor OneTouch III isn’t being used
– Diagnostic utilities to check the health of your Maxtor
OneTouch III, Turbo Edition
About this Guide
The following symbols and conventions are used in this guide:
Components
Before installing, review the solution features in Figure 1.
FIGURE 1 SOLUTION FEATURES
1. OneTouch Button
2. Status Light
3. Power Switch
4. Power Connector
5. FireWire 800 Port
6. FireWire 400 Port
7. USB 2.0 Port
Bold Used for menu, command, and keyboard selections you make and
screens you will see.
Italics
Used for emphasis and to identify new terms.
Helpful information about a particular topic.
Important information to prevent problems and ensure that you are
successful in using the drive.
Page 36

PAGE
34
MAXTOR ONETOUCH III TURBO EDITION WINDOWS INSTALLATION
FIGURE 2 INCLUDED IN PACKAGE
1. Backup Solution
2. Power Adapter
3. FireWire 800 Cable
4. Quick Start CD
System Requirements
– FireWire 800 requires Windows 2000 or XP operating
system and FireWire 800 (9-pin) equipped computer
–Pentium III, 500 Mhz equivalent processor or higher
– Windows
®
2000 Professional, XP Professional, or
XP Home Edition
– 128MB RAM (256 recommended) or more as required
by operating system
– Internet connection (for system updates)
– CD-ROM drive
Interface Requirements
– FireWire 400, IEEE 1394, i.LINK or FireWire 800, IEEE
1394, i.LINK port
– USB 2.0 or 1.1 port
All references to Windows 2000 actually refer specifically to Windows 2000
Professional. Retrospect Express does not work with the Server editions of these
operating systems.
USB 1.1 is slower than USB 2 or FireWire.
Includes:
– EMC
®
Retrospect®
Express HD (Win)
– EMC
®
Retrospect®
Express (Mac)
– Maxtor OneTouch Drivers
– Maxtor OneTouch Manager
– Maxtor OneTouch
User Guide (English)
© 2005 Maxtor Corporation and its Licensors. Maxtor and the stylized
Maxtor logo are registered trademarks, and Maxtor OneTouch is
a trademark, of Maxtor Corporation. EMC and Retrospect are
registered trademarks of EMC Corporation. U.S. patents
5,150,473 and 5,966,730. Other patents pending. Other
trademarks are the property of their respective
holders. All rights reserved.10/05 PN: 20310900
WINDOWS
English
Français
Deutsch
Español
Italiano
MACINTOSH
English
Français
Deutsch
Installation Software
Maxtor OneTouch™ III
Logiciel d’installation, Installationssoftware,
Software di installazione, Installationsprogram,
Software de instalación, Installatiesoftware,
Asennusohjelma, Software de Instalação,
FireWire 400 6-pin to 6-pin
FireWire 400 (1394a) cable.
A FireWire 400 cable is not included with this kit but can be
purchased from your local computer store.
Many laptop computers, have a smaller 4-pin FireWire port requiring a special
4-pin to 6-pin FireWire cable. This is not included, but can be purchased from
your local computer store.
USB 2.0 ‘A’ to ‘B’ USB cable.
A USB 2.0 cable is not included with
this kit but can be purchased from
your local computer store.
The ‘A’ connector, typically, plugs into your computer and the ‘B’ connector plugs into your
drive. If your computer has a different type of USB connection, you can purchase the correct
type of cable from your local computer store.
‘A’ ‘B ’
Though this model has both USB and FireWire interfaces,
it is only possible to use one interface at a time.
FireWire 800 9-pin to 9-pin
FireWire 800 (1394b) cable.
A FireWire 800 cable is included with this kit.
Page 37

PAGE 35
MAXTOR ONETOUCH III TURBO EDITION WINDOWS INSTALLATION
Handling Precautions
Please handle your new Maxtor OneTouch III with care!
Follow the precautions listed here or you could damage your
drive and void the product warranty. Review the Maxtor Limited
Warranty for more information.
Follow these Precautions to Prevent Data Loss
–
Do not bump, move or drop the drive while in operation.
– Do not remove the interface cable or power cord
without first disconnecting the drive properly through
the operating system.
– Do not set any liquids or drinks on or near the drive.
Liquids will damage the internal electronics.
– Do not open the drive enclosure. This can cause loss of
data and will void the product warranty.
Maxtor Product Support
Maxtor Corporation provides a comprehensive product
support section on its web site, including the latest software
drivers, product specifications, a complete troubleshooting
section, and the Maxtor Knowledge Base.
Maxtor USA Support
Visit www.maxtorkb.com for the following information:
– Search the Hard Drive Knowledge Base
We store all resolved problems and FAQ’s in our
knowledge base. Search by product, category,
keywords, or phrases.
– My Stuff
Login to modify or view your FAQ update
notifications or update your personal profile.
– Most Popular Help Topics
Top five most frequently asked questions.
– Software Download
Download installation and diagnostic programs
for your hard drive or external storage device.
Maxtor Worldwide Support
Visit www.maxtor.com and click worldwide support or
contact us for product support outside of the USA.
Page 38

PAGE
36
MAXTOR ONETOUCH III TURBO EDITION WINDOWS INSTALLATION
Installing the OneTouch III
NOTE: Please install the Maxtor OneTouch software before
connecting the OneTouch III drive to your computer. You must
first install this software in order to use the OneTouch button
and other OneTouch III features.
Step 1 – Install the Software
If you receive a message that you do not have sufficient
privileges to complete the installation, you may not have the
Administrative Privileges required to install the software.
To determine if you have these rights:
– Click the Windows Start button and choose Control Panel .
– Double click the User Accounts icon.
– If your account Logon is displayed at the bottom of this
window with the description: Computer Administrator,
you have the correct administrative privileges to install
and run this software. If your system shows another type
of account status, contact your IT/Systems Administrator
for further assistance.
1. Turn on your computer.
2. Insert the Maxtor Installation CD into your CD-ROM drive.
After a few seconds, the Maxtor Select Language screen
will open.
If, for some reason, the Maxtor screen does not appear:
– Click the Windows Start button and then click Run .
– Click Browse and find the drive named Install CD .
– Open Install CD , open Launch and click OK .
The Select Language screen will appear (same screen as
shown in step 1).
3. Select your language . The main menu will appear next.
Page 39

PAGE 37
MAXTOR ONETOUCH III TURBO EDITION WINDOWS INSTALLATION
4. Select Install Software .
5. The InstallShield welcome screen will open.
Click Next .
6. The License Agreement screen will appear.
After reading the License Agreement, click Yes .
7. The Choose Destination Location screen will appear. In
the Destination Folder section of the screen, you can see
where the Maxtor software will be installed. If you wish to
change this, click Browse and choose a new location .
When you are ready, click Next .
Page 40

PAGE
38
MAXTOR ONETOUCH III TURBO EDITION WINDOWS INSTALLATION
8. The Setup Status window will appear.
9. The InstallShield Wizard Complete window will appear.
Click Finish .
10. The Retrospect Express HD Installshield Wizard will
appear automatically.
11. You may see a message that the Microsoft.NET software
will be installed on your computer.
No intervention is necessary during this process.
Page 41

PAGE 39
MAXTOR ONETOUCH III TURBO EDITION WINDOWS INSTALLATION
12. The Retrospect Express HD welcome screen will appear.
Click Next .
13. The License Agreement screen will appear. After reading
the agreement, select “ I accept... ”
and click Next .
14. The Customer Information screen will appear. Enter your
User Name and Organization . Make your choice and
Click Next .
15. The Setup Type screen will appear.
Choose the Recommended option to install all of the
Retrospect Software. Make your choice and click Next .
Page 42

PAGE
40
MAXTOR ONETOUCH III TURBO EDITION WINDOWS INSTALLATION
16. The Ready to Install screen appears.
Click Install .
17. After the software is installed on your computer, the
message “InstallShield Wizard Completed” will appear.
Click Finish .
18. A message appears asking you to restart.
Follow the on-screen directions to restart your computer.
19. The Welcome to Maxtor OneTouch Setup screen will
appear and a Maxtor OneTouch shortcut icon will appear
on your desktop.
20. Eject the Maxtor Install CD from your computer.
21. Proceed to Step 2 – Connect the Drive.
Page 43

PAGE 41
MAXTOR ONETOUCH III TURBO EDITION WINDOWS INSTALLATION
Step 2 – Connect the Drive
The Maxtor OneTouch III connects to your computer using
either a FireWire or USB interface. Make sure you know
which interface is available on your computer.
Please install the software BEFORE you connect the drive.
Connecting the Power
1. Plug the round female connector from the power adapter
into the drive’s power connector.
2. Plug the two-pin female connector on the power cord
into the power adapter.
FIGURE 3 CONNECTING THE POWER
3. Plug the standard electrical plug from the power adapter
into your power source.
4. Turn on the Maxtor OneTouch III using the power switch
on the back of the drive. The light on the front of the drive
should illuminate.
Connecting with a FireWire 800 Cable
Do not plug a FireWire cable into the drive when a USB cable is already connected
to the drive. This drive will only operate with one interface at a time.
1. Plug one end of the FireWire cable into an available
FireWire 800 port on your computer or to any other
FireWire 800 device that is connected to your computer.
FIGURE 4 CONNECTING TO A FIREWIRE 800 PORT
2. Plug the other end of the FireWire 800 cable into an
available FireWire 800 port on the back of the drive.
3. Proceed to Step 3 – Setup the Drive.
Page 44

PAGE
42
MAXTOR ONETOUCH III TURBO EDITION WINDOWS INSTALLATION
Connecting with a FireWire 400 Cable
Do not plug a FireWire cable into the drive when a USB cable is already connected
to the drive. This drive will only operate with one interface at a time.
1. Plug one end of the FireWire cable into an available
FireWire 400 port on your computer or to any other
FireWire 400 device that is connected to your computer.
FIGURE 5 CONNECTING TO A FIREWIRE 400 PORT
2. Plug the other end of the FireWire 400 cable into the
FireWire 400 port on the back of the drive.
3. Proceed to Step 3 – Setup the Drive.
Connecting with a USB Cable
Do not plug a USB cable into the drive when a FireWire cable is already connected
to the drive. This drive will only operate with one interface at a time.
1. Plug the larger end of the USB cable into an available USB
port on your computer.
FIGURE 6 CONNECTING TO A USB PORT
2. Plug the smaller end of the USB cable into the USB port
on the back of the drive.
3. Proceed to Step 3 – Setup the Drive.
Page 45

PAGE 43
MAXTOR ONETOUCH III TURBO EDITION WINDOWS INSTALLATION
Step 3 - Setup the Drive
1. If the Welcome to Maxtor OneTouch Setup screen is still
visible, click Cancel to close it. Your computer may
require a restart to complete the hardware installation.
2. The Maxtor OneTouch III FireWire 800 drive is shipped with a
Macintosh file system. The Windows XP and Windows 2000
operating systems use an NTFS file structure. Your drive
must be re-formatted for the NTFS file system in order to
work properly with your Windows operating system. The
Format Drive window will appear and you will have the
opportunity to format your drive with the NTFS file system.
This is necessary for Windows 2000 and XP users.
3. Click Format .
Your new drive will appear in the same way as your other drives,
with a letter assigned to it by the operating system. The assigned
letter will vary depending upon the number of other drives
connected to your computer.
4. Push the OneTouch button . The Retrospect registration
screen will appear.
Page 46

PAGE
44
MAXTOR ONETOUCH III TURBO EDITION WINDOWS INSTALLATION
5. To register immediately, enter your information in the
registration form provided and click Register .
If you do not wish to register now, click Register Later .
If you have already registered, click Already Registered .
In order to register, you must be connected to the
internet.
By registering, you will have the option of receiving
product updates, special offers, and important
information about other data storage solutions from
Maxtor.
6. Once you’ve made your selection, the Retrospect Welcome
screen will appear, displaying the automatic backup settings
for your computer. Retrospect Express HD will back up all
the files on your computer to your Maxtor OneTouch III drive
every day at 10 PM.
7. If you would like to start your first backup immediately,
Click Backup Now .
8. To close Retrospect Express HD, click the ‘ X ’ located at
the upper right corner of the window.
You can back up manually, at any time, by pressing the
button on the front of your drive.
Your hardware and software installation is now complete. See
“Using the OneTouch III” on the following page for information about using your drive and using Retrospect Express HD.
Page 47

PAGE 45
MAXTOR ONETOUCH III TURBO EDITION WINDOWS INSTALLATION
Using the OneTouch III
Retrospect Express HD
Understanding Restore Points
The first step to backing your files is to create a restore point.
A restore point is simply a snapshot of your files based on a
specific date in time. It contains all the files and folders you
select to back up, as they exist at the time that you back up.
A restore point can be anything from a few files and folders to
every file on your computer. Each time you back up,
Retrospect Express HD adds a new restore point to your
backup drive; thereby preserving copies of backed-up files
and folders from multiple points in time. If there is not
enough free disk space to add a new restore point, Retrospect
Express HD automatically deletes older restore points to
make room for new ones.
You can restore individual files and folders from any restore
point back to your computer. You can also restore your entire
computer to its state at the time a restore point was created.
Once you set up a backup, you can start it at any time by
pressing the button on your Maxtor OneTouch III. You can also
schedule backups to take place automatically on specific days
of the week.
In the “Restoring your computer” section, later in this
chapter, we will show you how to restore all the files on your
computer in the event that your system is damaged or
completely erased.
Opening Retrospect Express HD
You can open Retrospect Express HD from either the
Start Menu :
– Start ➔ Programs ➔ EMC Retrospect ➔ Retrospect
Express HD 1.1 From the System Tray
or
– Right-click the red Retrospect Express HD icon.
Running an Immediate Backup
Though comprehensive backups can be scheduled to run at
predetermined times, you can launch them at any time by
doing one of the following:
– Press the OneTouch button - this will launch your backup
immediately
– Right-click on the Retrospect icon located in the System
Tray and select Back up now from the pop-up menu.
– Open Retrospect Express HD and click Back up now .
Page 48

PAGE
46
MAXTOR ONETOUCH III TURBO EDITION WINDOWS INSTALLATION
Comprehensive Backups vs. Duplicates
Retrospect Express HD can perform both backups and
duplicates. Select “ Comprehensive Backup ” to set up or
modify your backup settings. Select “ Duplicate ” to set up or
modify your duplicate settings.
– Comprehensive Backup: Backing up your computer on a
regular basis is the best way to protect your files. When
you back up, Retrospect Express HD creates a restore
point and saves it on your Maxtor drive. A restore point
contains all the files and folders you selected to back up,
as they existed at the time of the backup.
Each time you back up, Retrospect Express HD adds a new
restore point to the drive; thereby preserving copies of backed
up files and folders from multiple points in time. If there is
not enough free disk space to add a new restore point,
Retrospect Express HD automatically deletes older restore
points to make room for the new one.
You can restore individual files and folders from any restore
point back to your computer. You can also restore your entire
computer to its state at the time a restore point was created.
Once you set up a backup, you can initiate it at any time by
pressing the OneTouch button on your Maxtor drive. You can
also schedule backups to run automatically on specified days
of the week.
– Duplicate: When you duplicate, Retrospect Express HD
copies the selected files and folders from your computer to
the “Retrospect Duplicates” folder on your Maxtor drive.
Each time you duplicate, Retrospect Express HD replaces the
entire contents of “Retrospect Duplicates”. The only files and
folders available are those from the most recent duplicate. If
you modified a file since the last duplicate, the older version
will be lost. If you deleted a file from your computer, it will be
deleted from your Maxtor drive when you duplicate.
Duplicates are saved in the standard Windows file format, so
you can view and interact with them just like any other file
(using Windows Explorer, for example).
Once you set up a duplicate, you can initiate it at any time by
pressing the OneTouch button on your Maxtor drive. You
cannot schedule duplicates to run automatically.
Comprehensive Backups
There are three (3) types of comprehensive backups:
– My Entire Computer
– Let me choose specific files and folders
– Let me choose files by type.
Comprehensive Backups - My Entire Computer
This option provides you with the capability to backup your
entire PC to a Restore Point. This is the default
comprehensive backup setting. In the future, after using
other Comprehensive Backup/Duplicate options, you may
return to using this option. Here is its setup procedure:
1. Launch Retrospect Express HD .
2. The main menu opens.
Click Setup .
Page 49

PAGE 47
MAXTOR ONETOUCH III TURBO EDITION WINDOWS INSTALLATION
3. Select the type of backup – click on the Comprehensive
Backup button.
Click Next .
4. A screen will display asking you what you would like to
back up. Click the My Entire Computer button.
Click Next .
5. Select the disk(s) you want to save your backup to; this
would be the OneTouch III. Click the checkbox that
corresponds with your Maxtor OneTouch III.
Click Next .
6. Select the
days and the time that you wish to schedule
automatic backups to run.
Click Finish.
Page 50

PAGE 48
MAXTOR ONETOUCH III TURBO EDITION WINDOWS INSTALLATION
7. You will return to the Retrospect Express HD main menu.
8. Retrospect Express HD will now backup your entire
computer at the scheduled date and time.
Comprehensive Backups – Let Me Choose Specific Files
and Folders
This option provides you with the capability to backup your
entire computer to a Restore Point. This is the default
comprehensive backup setting. In the future, after using
other Comprehensive Backup/Duplicate options, you may
return to using this option. Here is its setup procedure:
1. Launch Retrospect Express HD.
2. The main menu opens.
Click Setup.
3. Select the type of backup – click on the Comprehensive
Backup button.
Click Next.
4. A screen will display asking you what you would like to
back up. Click the Let me choose specific files and
folders button.
Click Next.
Page 51

PAGE 49
MAXTOR ONETOUCH III TURBO EDITION WINDOWS INSTALLATION
5. You will see the following:
6. Place a check in the boxes associated with folders you
wish to backup.
Click Next.
7. Select the disk(s) you want to save your backup to; this
would be the OneTouch III. Click the checkbox that
corresponds with your Maxtor OneTouch III.
Click Next.
8. Select the days and the time that you wish to schedule
automatic backups to run.
Click Finish.
9. You will return to the Retrospect Express HD main menu.
Retrospect Express HD will now backup your selected
files at the scheduled date and time.
Duplicates – Let Me Choose Files and Folders
1. Launch Retrospect Express HD.
2. The main menu opens.
Click Setup.
Page 52

PAGE 50
MAXTOR ONETOUCH III TURBO EDITION WINDOWS INSTALLATION
3. Select the type of backup – click on the Duplicate button.
Click Next.
4. A screen will display asking you what you would like to
duplicate. Click the Let me choose files by type button.
Click Next.
5. You will see the following:
By default all boxes are checked.
6. Uncheck the boxes you do not wish to backup.
Click Next.
7. Select the disk(s) you want to save your backup to; this
would be the OneTouch III. Click the checkbox that
corresponds with your Maxtor OneTouch III.
Click Finish.
Page 53

PAGE 51
MAXTOR ONETOUCH III TURBO EDITION WINDOWS INSTALLATION
8. You will return to the Retrospect Express HD main menu.
Retrospect Express HD will now duplicate your selected
files on demand as needed.
Revising Your Backup Settings
1. Open Retrospect Express HD.
2. The Welcome Screen will appear. It should identify when
the next scheduled backup is to take place.
Click Setup to make changes to your backup.
3. Click Comprehensive Backup.
Click Next.
4. A screen will display asking you what you would like to
back up. For this example, click the My Entire Computer
button.
Click Next.
5. Select the disk you want to save to – the OneTouch III.
Page 54

PAGE 52
MAXTOR ONETOUCH III TURBO EDITION WINDOWS INSTALLATION
Optional:
You can allocate how much of the OneTouch III you wish to
use for your backup(s). To do this:
Click on the words “all available.”
This will launch a drop-down menu. Click on the triangle
to open the menu.
Select from the options and click Next.
Select the days and the time that you wish to schedule
automatic backups to run.
By default, your comprehensive backup will run daily at
10:00 PM.
6. Change the days of the week or the starting time of your
backup.
Click Finish.
Page 55

PAGE 53
MAXTOR ONETOUCH III TURBO EDITION WINDOWS INSTALLATION
7. If available disk space was adjusted, disk space will be
reclaimed.
8. You will then return to the main Retrospect Express
window where your changes will be displayed and will go
into effect at your next backup.
Restoring from Your Backup
At times, your critical data may be corrupted. Fortunately,
Retrospect Express HD provides you with the ability to restore
your crucial files. The following procedure will walk you
through the steps to restore your Entire Computer.
Prerequisites:
–A prepared (partitioned/formatted) hard disk
– Installation of your Operating System including all
previous loaded Service packs and critical updates
– Installation of EMC Retrospect Express HD.
Procedure:
1. Open Retrospect Express HD.
2. The Welcome Screen will appear – with the next
scheduled backup displayed.
3. Click Restore.
Page 56

PAGE 54
MAXTOR ONETOUCH III TURBO EDITION WINDOWS INSTALLATION
4. From the Select window, click the Restore button.
Click Next.
5. Select a restore point from which you wish to recover your
data.
Click Next.
6. Retrospect Express HD will now scan your computer.
Place a check in each box containing data you wish to
restore. Use the search field to find specific files.
Click Next.
7. You will now be asked where you wish to restore your files
to. You have two options:
Their original location,
or
the following location: Desktop\My Documents\My
Restored Files\Restore 1 (default)
.
Make your choice and click Restore.
8. You will be asked to confirm that you want to overwrite
the disk
Check the Overwrite entire disk box and click Restore.
Page 57

PAGE 55
MAXTOR ONETOUCH III TURBO EDITION WINDOWS INSTALLATION
9. When prompted, click Yes to proceed.
10. At this point, the restore will begin.
11. When finished, you will be prompted to restart your
computer.
Click OK.
12. Upon reboot, the Retrospect Helper will launch and
perform various tasks. No user intervention is necessary.
13. When finished, you will be prompted to restart again.
Click OK. Your system has been restored.
Understanding the Restore Points Window
The restore points window shows a calendar with the date in
bold for the days that restore points were created. It will also
list all the restore points in ascending order in a list box.
When you select a date on the calendar, the list of restore
points will automatically scroll to show all those that are
associated with that specific date. The latest backup on that
date will be highlighted. The drive for the restore point will
also be shown. A green icon will appear before the date if the
backup was successful, a yellow icon if the backup succeeded
with some non-fatal errors, and a red icon if the backup failed.
If you manually cancel a backup, it is considered a fatal error.
Page 58

PAGE 56
MAXTOR ONETOUCH III TURBO EDITION WINDOWS INSTALLATION
If the restore point has a yellow or red icon, you can rightclick the restore point to show the operation log, which will
show you more information about the error.
Locking, Viewing Logs and Deleting Restore Points
Locking Restore Points
Retrospect Express HD's Grooming Technology manages
your restore points by automatically adding the latest restore
points and removing the oldest. However, there may be times
that you do not want certain restore points removed from your
system. In order to prevent restore points from being deleted,
you must lock them.
1. Open Retrospect Express.
2. Click Restore.
3. Highlight a restore point that you wish to use to lock your
data and click Lock located in the upper right corner of
the restore point screen.
4. To unlock a restore point, simply repeat this procedure
and the restore point will be unlocked when you click
Lock again.
Viewing Restore Point Logs
There may be times that you want to see what may be causing
problems with various restore points. You can accomplish this
through viewing a restore point log.
1. Open Retrospect Express HD.
2. Click Restore.
3. Highlight a restore point that you wish to use to view and
click the View Log button located in the upper right corner
of the restore point screen.
Log Contents:
Page 59

PAGE 57
MAXTOR ONETOUCH III TURBO EDITION WINDOWS INSTALLATION
Deleting Restore Points
Retrospect Express HD provides you with the ability to
manually delete restore points. To manually delete a restore
to point.
1. Open Retrospect Express HD.
2. Click Restore.
3. Highlight a restore point that you want to remove and
click the delete button (the red X) located in the upper
right corner of the Restore window.
4. You will be prompted to confirm that you want to delete
the restore point.
Click OK.
5. When a restore point is deleted, Retrospect Express HD
will reclaim the disk space. This process can take a long
time. Do not turn off your computer until the process is
complete.
Restore Files in a Duplicate
Restoring files from a Duplicate is as easy as copy and paste.
1. Access your Maxtor OneTouch III.
2. Double-click on the Retrospect Duplicates folder.
Page 60

PAGE 58
MAXTOR ONETOUCH III TURBO EDITION WINDOWS INSTALLATION
3. Locate the folders you need to restore to your system. To
do this, simply highlight them and drag them to your
computer.
The System Tray Menu
The Retrospect Express icon located in the System Tray can
provide the following:
–Provide information about the Retrospect Express Software
– Launch Retrospect Express HD
–Perform an immediate Backup or Duplicate of your PC
–Turn On/Off the Automatic Backup feature
– Exit.
Automatic Backup
This feature will launch scheduled Comprehensive Backups
of your computer. By default, the Automatic Backups option is
turned On.
To Turn Off Automatic Backup
This can be done two ways:
Launch Retrospect Express HD and click the Off button in the
lower right of the Welcome screen.
Right-click the Retrospect Express HD System Tray icon and
click on Automatic Backup to remove the checkmark - turns
it off.
Page 61

PAGE 59
MAXTOR ONETOUCH III TURBO EDITION WINDOWS INSTALLATION
To Turn On Automatic Backup
This can be done two ways:
Launch Retrospect Express HD and click the On button in the
lower right of the Welcome screen.
Right-click the Retrospect Express HD System Tray icon and
click Automatic Backup to add the checkmark - turns it on.
NOTE: When your Retrospect is set to run Duplicates,
Automatic Backup is disabled.
Maxtor OneTouch Manager
You can access the OneTouch Manager by double-clicking its
desktop shortcut.
This launches the OneTouch Manager.
NOTE: Serial Number entries will be populated with your
Maxtor OneTouch III’s information.
The OneTouch Manager program contains a myriad of utilities
that help you protect your data. Along with Retrospect
Express HD, the OneTouch Manager provides the following:
–Access to Maxtor’s Web-based support
– Security through Maxtor’s DriveLock and System Rollback
– File Sync
–Access to Retrospect Express HD via Backup and Restore
– Disk diagnostics to monitor the health of you OneTouch III
– OneTouch settings control the DriveLock feature, including
Power Management, and OneTouch button customization.
Page 62

PAGE 60
MAXTOR ONETOUCH III TURBO EDITION WINDOWS INSTALLATION
Other Options
What’s New – Click this and you’ll travel to Maxtor’s website
where you can find out all about the OneTouch III’s new
features.
Maxtor Support - By clicking the Maxtor Support button, you
will be transported to Maxtor's Knowledge Base.
Maxtor OneTouch Utilities
The Settings Utilities contains many features that allow you
to adjust and down times, adjust performance, said password
level security, and customize your OneTouch button. Press
the SETTINGS button to access these utilities.
Adjust Power Setting
This feature allows you to spin down your Maxtor OneTouch III
during times of inactivity. By default, the OneTouch III's spin
down time is 1 hour. To adjust the setting:
1. Click the Settings button. This will open the Settings for
My Maxtor OneTouch menu.
2. Click the Adjust Power Setting button.
3. You will see the following:
4. Click the triangle to display options located in the dropdown menu.
Page 63

PAGE 61
MAXTOR ONETOUCH III TURBO EDITION WINDOWS INSTALLATION
5. Select one of the available options.
Click Apply.
6. You will be notified that the Power Setting has been adjusted.
Click OK.
7. At any time, you can return to the Adjust Power Setting
menu and adjust the spin down time to meet your needs.
For example, if you wish to return the drive back to its
original default setting, you can access the Adjust Power
Setting menu.
Click Default.
8. Click Apply followed by OK and your Maxtor OneTouch III's
power settings will return back to its original spin down
time of 1 hour.
Page 64

PAGE 62
MAXTOR ONETOUCH III TURBO EDITION WINDOWS INSTALLATION
Customizing the OneTouch Button
This feature allows you to change the way that the OneTouch
button responds when you press it. By default, Retrospect
Express HD launches when you press the OneTouch button.
To Customize Your OneTouch Settings:
1. Click the Settings button. This will open the Settings for
My Maxtor OneTouch menu.
2. Click the Customize OneTouch button.
3. You will see the following menu:
Note that the Maxtor OneTouch button is set by default to
launch a backup.
4. To associate the button so that it launches an application,
click the Application button.
Click Browse.
5. Browse your computer and select an application that you
would like to associate with the OneTouch button.
In this example, the Windows Calculator program is
shown.
6. After the name of the application has populated the
Browse field,
Click Apply.
Page 65

PAGE 63
MAXTOR ONETOUCH III TURBO EDITION WINDOWS INSTALLATION
7. You will be notified that the OneTouch button settings
have been customized.
Click OK.
You can also customize the OneTouch button so that when
pressed, you will launch the Maxtor Sync program. To do this:
1. Click the Settings button. This will open the Settings for
My Maxtor OneTouch menu.
2. Click the Customize OneTouch button.
3. You will see the following menu:
Note that the Maxtor OneTouch button is set by default to
launch a backup.
4. To associate the button so that it launches an application,
click the Synchronize folders using Sync button.
Click Apply.
5. You will be notified that the OneTouch button settings
have been customized.
Click OK.
Page 66

PAGE 64
MAXTOR ONETOUCH III TURBO EDITION WINDOWS INSTALLATION
Security Settings
This feature allows you to password-protect your Maxtor
OneTouch III so that in the event that the drive is lost or
stolen, no one will be able to access its data unless they
provide either the password or if added, the answer that you
provided to a secret question.
Set Password
1. Click the Settings button. This will open the Settings for
My Maxtor OneTouch menu.
2. Click the Adjust Security Setting button.
3. In the fields provided, enter a password and re-enter your
password. The password must be at least six or more
characters in length and include at least one digit (for
example “abcdef” would not be a valid password;
“abcde1” would be a valid password.”
Optional but Recommended
You can also provide an answer to a secret question for
greater protection in the advent that your password gets lost
or stolen.
4. Click the Choose a Question drop-down menu.
Select a question. In this case, “Where were you born?”
was selected.
5. Enter the Answer to the secret question and re-type the
answer to the secret question.
Click Apply.
Page 67

PAGE 65
MAXTOR ONETOUCH III TURBO EDITION WINDOWS INSTALLATION
6. You will be prompted with the following:
Click Confirm.
7. You'll be notified that a password has been set on the
OneTouch III.
Click OK.
8. From now on, every time you restart your computer and
the OneTouch III is attached, or when you turn off your
drive and turn it back on, you will be prompted to enter
your password
or provide the answer to the secret
question.
9. If the proper information is entered, you will see the
following:
Click OK and your Maxtor OneTouch III will be accessible.
Page 68

PAGE 66
MAXTOR ONETOUCH III TURBO EDITION WINDOWS INSTALLATION
Change Password
1. Click the Settings button. This will open the Settings for
My Maxtor OneTouch menu.
2. Click the Adjust Security Setting button.
3. You will see the following:
Click Change Password.
4. Enter your current Password or click the Secret button to
see the following:
Click Next.
5. Create a new password following steps 3 - 7 in Set
Password.
Disable Security
1. Click the Settings button. This will open the Settings for
My Maxtor OneTouch menu.
2. Click the Adjust Security Setting button.
Page 69

PAGE 67
MAXTOR ONETOUCH III TURBO EDITION WINDOWS INSTALLATION
3. You will see the following:
Click Disable Security.
4. You will be prompted to enter your password.
Click OK or you can click the Secret button and provide
the answer to the secret question.
5. You will be informed that security has been disabled on
your Maxtor OneTouch III.
Click OK.
You can always re-create a password on the OneTouch III.
Refer to the Set Password procedure for more information.
Unlock Drive
Though not widely used, the Unlock Drive feature can be
accessed without having to turn off your OneTouch III or
restarting your computer. To use this option:
1. Click the Settings button. This will open the Settings for
My Maxtor OneTouch menu.
2. Click the Adjust Security Setting button.
3. You will see the following:
Click Unlock Maxtor OneTouch.
Page 70

PAGE 68
MAXTOR ONETOUCH III TURBO EDITION WINDOWS INSTALLATION
4. You will be prompted to enter your password.
Click OK.
5. Or you can click the Secret button and provide the answer
to the secret question.
Click OK.
6. You will be informed that your Maxtor OneTouch III has
been unlocked.
Click OK.
Page 71

PAGE 69
MAXTOR ONETOUCH III TURBO EDITION WINDOWS INSTALLATION
Erase Drive
If you have forgotten your password, you can attempt to reenter it or to recover it by answering a question that you setup
originally when you created your password. You are allowed 5
attempts before you must turn off your drive and turn it back
on, to try again at which point you can try an additional 5
times.
If you are not able to recover your password, the only other
way to unlock the drive is to erase all of its contents.
1. Click the Settings button. This will open the Settings for
My Maxtor OneTouch menu.
2. Click the Adjust Security Setting button.
You will see the following:
Click Erase Maxtor OneTouch.
3. You will see the following warning:
WARNING: The Erase Drive feature is Data Destructive!
Click Confirm to proceed.
4. You will be prompted with the following:
Page 72

PAGE 70
MAXTOR ONETOUCH III TURBO EDITION WINDOWS INSTALLATION
Click Yes to start the Erase process.
NOTE: This process can take up to 3 hours to complete.
5. When finished, you will be notified that the drive is erased.
Click OK.
6. Remove and reapply power to your Maxtor OneTouch III.
Upon doing so, you will be prompted to Format the drive.
NOTE: Refer to Formatting Procedures for more
information.
Page 73

PAGE 71
MAXTOR ONETOUCH III TURBO EDITION WINDOWS INSTALLATION
RAID Settings
By default, your OneTouch III, Turbo Edition is configured as a
striped (RAID 0) volume. In this configuration, the OneTouch
III software combines the capacity of both enclosed hard
drives – giving you one large, fast disk. However, if one drive
fails, you will lose all data stored.
To protect your data, you can mirror (RAID 1) the drives in
your OneTouch III Turbo Edition. This configuration provides
you with a backup of your data. In the event of a single disk
failure, your data is secured on the second drive. The only
drawback to a RAID 1 is the loss of disk space. A RAID 1
configuration will decrease the overall capacity of your
OneTouch III, Turbo Edition by 50%.
1. Launch the OneTouch Manager and click the Settings button.
2. Click the RAID Settings button.
3. The RAID Settings window is displayed.
To Configure a RAID 1 Volume on the OneTouch III
1. Click the RAID 1 – Redundancy button.
WARNING: Setting up this RAID configuration will erase
all data on your OneTouch III. Maxtor recommends that
you backup any/all data on the OneTouch III before
proceeding.
Click Next.
2. You will see the following:
Click the Continue button.
3. The progress window appears.
Click OK to proceed. Your OneTouch III, Turbo Edition will
be configured as a mirrored (RAID 1) volume. This process
will take 30 – 60 seconds, depending on the capacity of the
OneTouch III.
Page 74

PAGE 72
MAXTOR ONETOUCH III TURBO EDITION WINDOWS INSTALLATION
4. When finished, you will be prompted to format your
OneTouch III.
Once formatted, your OneTouch III, Turbo Edition is setup.
Backup and Restore
The Backup and Restore features of the Maxtor OneTouch
Manager program are shortcuts that enable you to access
Retrospect Press HD from the OneTouch Manager interface.
Accessing Backup
The Backup option can access Retrospect Express HD so you
can edit your backup settings. You can also launch a backup
from here as well.
1. Click the Backup button.
Click Edit My Backup Settings.
2. This will launch Retrospect Express HD and take you to its
Welcome screen.
Click Setup to make changes.
Page 75

PAGE 73
MAXTOR ONETOUCH III TURBO EDITION WINDOWS INSTALLATION
3. You can also launch a backup from the screen.
Click Back Up Now.
A timer will open from your system tray notifying you that
Retrospect Backup will begin in 20 seconds.
When it reaches zero (0), the backup will start.
Accessing Restore
The OneTouch Manager’s Restore option provides a quick
path to Retrospect Express HD’s Restore menu.
1. Click Restore.
You will see the following:
This screen notifies you that Retrospect Express is
currently running and cannot be launched from this
window. If it is closed, you will see the following window:
From here, you can select a Restore Point and proceed
with the rest of the restore process.
Page 76

PAGE 74
MAXTOR ONETOUCH III TURBO EDITION WINDOWS INSTALLATION
Sync
You may select one or more folders on your computer to sync
to your OneTouch. Whenever a file changes in one of the
folders on your computer, it can be automatically copied to an
identical folder on your OneTouch. You may select folders on
one local disk (C: or D: for example) and any folders within
your My Documents folder. You can sync folders between
multiple computers. This makes it convenient for you to move
files between a computer at work and a computer at home.
Click the Sync button.
You will see the following:
Click Set Folders.
Check the folders that you wish to sync between your
computer and the OneTouch III.
Click Apply.
To Edit Sync Settings
Click the Sync button.
You will see the following:
Select other folders that you wish to Sync with your
Maxtor OneTouch III and click Apply.
Page 77

PAGE 75
MAXTOR ONETOUCH III TURBO EDITION WINDOWS INSTALLATION
Checking the Status of Your Sync
Click the Sync button.
You will see the following:
Click Sync Status.
The status of your last Sync will be displayed.
Click OK.
Automatic Sync
The Automatic Sync feature can be turned on or off. By
default, this setting is On.
To turn Automatic Sync Off
Click the Sync button then click the Off button in the
upper right corner of the Sync screen.
Automatic Sync is now Off.
Page 78

PAGE 76
MAXTOR ONETOUCH III TURBO EDITION WINDOWS INSTALLATION
To turn Automatic Sync On
Click the On button located in the upper right corner of
the Sync screen.
Automatic Sync is now On.
To Sync Files Between Multiple Computers
1. Sync your files from your original computer to your
Maxtor OneTouch III.
2. Disconnect your Maxtor OneTouch III.
3. Connect your OneTouch to the destination computer. The
Sync Settings screen will appear.
4. Select the local disk on the destination computer to store
the synchronized folders from your OneTouch.
Every time you move your Maxtor OneTouch III between
computers, Sync will automatically compare the folders on
your Maxtor OneTouch III to the ones on your computer to
look for files that have changed. If any files have changed, it
will ask you if you would like to replace the older files with
their newer versions.
To Manually Sync Folders
There are two (2) ways to do this:
Using the Sync Screen
1. Click the Sync button.
2. Click Sync Now.
Using the Button on your Maxtor OneTouch III
See Customizing the OneTouch Button for more information.
Page 79

PAGE 77
MAXTOR ONETOUCH III TURBO EDITION WINDOWS INSTALLATION
Rollback
You can use rollback to undo changes to your computer and
restore its software and settings to a previous state, based on
a date in the past called a “Restore Point.” Think of a restore
point as a snapshot of your system.
It's good to create a restore point if you are about to make a
major change to your system, like installing new software or
making major changes to your computer's settings.
Rolling your computer back to a previous restore point will
not cause you to lose any of your current work, like
documents, email or web browser bookmarks.
Creating a Restore Point
You may either create a restore point manually or set a
regular time for a restore point to be created automatically.
Rolling Back Your System
You may select a date in the past and a restore point to
restore. During the rollback process, your computer will shut
down. When your computer reboots, the rollback will be
complete.
Undoing a System Rollback
If, after you roll back your system, you decide that you want to
go back to your previous system state, you may undo the rollback you just completed.
Page 80

PAGE 78
MAXTOR ONETOUCH III TURBO EDITION WINDOWS INSTALLATION
Naming Your OneTouch III
Your untitled Maxtor OneTouch III drive appears in the same
way as your other drives, with a new drive letter assigned by
the operating system. The assigned letter will vary depending
upon the number of other drives connected to your computer.
Make a note of this drive letter. Its a good idea to name your
new drive so it’s easy to identify later when you use it for
backing up your files.
1. Open the My Computer icon.
2. Right-click your Maxtor OneTouch III icon and select
Properties. The Properties window will open.
3. In the Label section at the top of the window, enter a
name. For example: “Maxtor.”
Storing Audio
Using your computer as an audio jukebox is a very popular
application. This allows you to store and play thousands of
your favorite songs. You can also create and manage an audio
library from your Maxtor OneTouch III.
Editing Video
Using a computer to capture and edit video recorded with a
digital camcorder is quickly becoming popular. Digital video
files are typically very large, using about 13 GB per hour of
video content. Maxtor recommends connecting your drive
using the FireWire interface for optimal results.
Playing Games
CD-ROM-based games typically run faster when they are on a
hard drive rather than running from the CD. You can use your
Maxtor OneTouch III to store and play CD-ROM games.
Installing Applications
You may install and run applications from your drive like other
drives on your system. If you connect the drive to your system
using a USB 1.1 interface, the data transfer rate is approximately
1 MB per second. Because of this, installing applications on a
drive using the USB 1.1 interface is not recommended.
Many applications installed on your drive will only run on the
computer where the application was installed. If you move your
drive to another computer, the application may not function.
Once the drive is reconnected to the computer the application
was originally installed, the application will function properly.
Connecting and Disconnecting Your OneTouch III
The FireWire and USB interfaces allow you to hot swap your
Maxtor OneTouch III; that is, connect and disconnect the drive
while the computer and your drive are turned on.
To connect the OneTouch III to your computer
1. Make sure your Maxtor OneTouch III is turned on and the
light is illuminated. Connecting your computer to a drive
that is not powered on can cause your computer to behave
erratically or freeze.
2. Plug the FireWire or USB cable into your Maxtor
OneTouch III and your computer.
To disconnect the OneTouch III from your computer
1. Double-click the Windows Unplug or Eject Hardware icon
in your system icon tray. A list of device choices appears.
2. Select your Maxtor OneTouch III and
follow the on-screen directions to
eject the drive. The system will
display a
message saying that you
can safely remove the drive.
3. Disconnect your Maxtor OneTouch III from your computer.
Your system may not allow you to disconnect the drive. In
this case, you may need to close all open applications and
documents or shut down your system completely to
disconnect the drive safely.
WARNING: Removing the Maxtor OneTouch III from your
computer without disconnecting it properly through the
operating system can result in lost or damaged files.
Page 81

PAGE 79
MAXTOR ONETOUCH III TURBO EDITION WINDOWS INSTALLATION
Security Lock
Your new Maxtor OneTouch III includes a security locking slot
on the back of the drive. The slot is compatible with most
security locking cables.
Security Lock
Page 82

PN: 20315803
 Loading...