

Page 1

DiamondMax™ 1750
87000A8, 86480A8, 85250A6
84320A5, 83500A4, 83240A4
82560A3, 81750A2
Part #1370/C
All material contained herein Copyright © 1997 Maxtor Corporation.
CrystalMax™, CrystalMax™ 1080, DiamondMax™, DiamondMax™
1750 and MaxFax™ are trademarks of Maxtor Corporation. No Quibble
Service is a registered trademark of Maxtor Corporation. Other brands or
products are trademarks or registered trademarks of their respective holders.
Contents and specifications subject to change without notice. All rights
reserved. Printed in the U.S.A. 6/97
Corporate Headquarters
510 Cottonwood Drive
Milpitas, California 95035
Tel: 408-432-1700
Fax: 408-432-4510
Research and Development
Engineering Center
2190 Miller Drive
Longmont, Colorado 80501
Tel: 303-651-6000
Fax: 303-678-2165
®
Page 2

Revisions Manual No. 1370
REV EC NO. SECTION DESCRIPTION DATE
A 78444 All Initial release 04/15/97
B 78512 2 - 4 Model number changed from 85120A6 to 85250A6; track, flux and
recording density specifications modified; tracks per surface and sectors
per drive increased; logical head count changed from 16 to 15.
C 78533 2, 3, 5 and 7 Removed all reference to Ultra DMA support; non-operational shock
specification upgraded from 150 Gs to 200 Gs; noted lower power
consumption specifications.
05/30/97
06/10/97
Page 3

Before You Begin
Thank you for your interest in the Maxtor DiamondMax™ 1750 AT hard disk drives. This manual provides technical
information for OEM engineers and systems integrators regarding the installation and use of the 87000A8, 86480A8,
85250A6, 84320A5, 83500A4, 83240A4, 82560A3 and 81750A2.
Drive repair should be performed only at an authorized repair center. For repair information, contact the
Maxtor Customer Service Center at 800-2MAXTOR or 408-432-1700.
Before unpacking the hard drive, please review Sections 1 through 4.
CAUTION
Maxtor DiamondMax 1750 hard drives are precision products. Failure to
follow these precautions and guidelines outlined here may lead to
product failure, damage and invalidation of all warranties.
1
2
3
4
5
BEFORE unpacking or handling a drive, take all proper electro-static discharge (ESD)
precautions, including personnel and equipment grounding. Stand-alone drives are
sensitive to ESD damage.
BEFORE removing drives from their packing material, allow them to reach room
temperature.
During handling, NEVER drop, jar, or bump a drive.
Once a drive is removed from the Maxtor shipping container, IMMEDIATELY secure the
drive through its mounting holes within a chassis. Otherwise, store the drive on a padded,
grounded, antistatic surface.
NEVER switch DC power onto the drive by plugging an electrically live DC source cable
into the drive's connector. NEVER connect a live bus to the drive's interface connector.
Please do not remove or cover up Maxtor factory-installed drive labels.
They contain information required should the drive ever need repair.
Page 4

DIAMONDMAX 1750 PRODUCT MANUAL
Contents
Section 1 — Introduction
Maxtor Corporation 1 - 1
Products 1 - 1
Support 1 - 1
Manual Organization 1 - 1
Abbreviations 1 - 1
Conventions 1 - 2
Key Words 1 - 2
Numbering 1 - 2
Signal Conventions 1 - 2
Section 2 — Product Description
The 87000A8, 86480A8, 85250A6, 84320A5, 83500A4, 2 - 1
83240A4, 82560A3 and 81750A2
Product Features 2 - 2
Functional/Interface 2 - 2
Zone Density Recording 2 - 2
Read/Write Multiple Mode 2 - 2
Multi-word DMA (EISA Type B) - Mode 2 2 - 2
Sector Address Translation 2 - 2
Logical Block Addressing 2 - 2
Defect Management Zone 2 - 3
On-the-Fly Hardware Error Correction Code (ECC) 2 - 3
Software ECC Correction 2 - 3
Automatic Head Park and Lock Operation 2 - 3
Cache Management 2 - 3
Buffer Segmentation 2 - 3
Read-Ahead Mode 2 - 3
Automatic Write Reallocation (AWR) 2 - 3
Write Cache Stacking 2 - 3
Major HDA Components 2 - 4
Drive Mechanism 2 - 4
Rotary Actuator 2 - 4
Read/Write Electronics 2 - 4
Read/Write Heads and Media 2 - 4
Air Filtration System 2 - 4
Microprocessor 2 - 4
Subsystem Configuration 2 - 5
Dual Drive Support 2 - 5
Cable Select Option 2 - 5
Jumper Location/Configuration 2 - 5
4092 Cylinder Limitation 2 - 5
Section 3 — Product Specifications
Configuration 3 - 1
Performance 3 - 1
Physical Dimensions 3 - 2
Power Requirements 3 - 3
Power Mode Definitions 3 - 3
Environmental 3 - 3
Shock and Vibration 3 - 4
Reliability and Maintenance 3 - 4
Data Reliability 3 - 4
iv
Page 5

DIAMONDMAX 1750 PRODUCT MANUAL
Acoustic Noise 3 - 4
EPA Energy Star Compliance 3 - 4
EMC/EMI 3 - 5
Standard Test Methods 3 - 5
Safety Regulatory Compliance 3 - 5
Section 4 — Handling and Installation
Pre-formatted Drive 4 - 1
Important Notice 4 - 1
Hard Drive Handling Precautions 4 - 1
Electro-Static Discharge (ESD) 4 - 1
Unpacking and Inspection 4 - 2
Repacking 4 - 3
Physical Installation 4 - 3
Drive Jumper Settings 4 - 4
Mounting Drive in System 4 - 4
Attaching IDE Interface and Power Cables 4 - 6
Attaching System Cables 4 - 7
System Setup 4 - 8
Hard Drive Preparation 4 - 10
Section 5 — AT Interface Description
Interface Connector 5 - 1
Pin Description Summary 5 - 1
Pin Description Table 5 - 2
PIO Timing 5 - 3
DMA Timing 5 - 4
Section 6 — Host Software Interface
Task File Registers 6 - 1
Data Register 6 - 1
Error Register 6 - 1
Features Register 6 - 1
Sector Count Register 6 - 2
Sector Number Register 6 - 2
Cylinder Number Registers 6 - 2
Device/Head Register 6 - 2
Status Register 6 - 2
Command Register 6 - 3
Read Commands 6 - 3
Write Commands 6 - 3
Mode Set/Check Commands 6 - 3
Power Mode Commands 6 - 3
Initialization Commands 6 - 3
Seek, Format, and Diagnostic Commands 6 - 3
S.M.A.R.T. Commands 6 - 3
Summary 6 - 4
Control Diagnostic Registers 6 - 5
Alternate Status Register 6 - 5
Device Control Register 6 - 5
Digital Input Register 6 - 5
Reset and Interrupt Handling 6 - 6
v
Page 6

DIAMONDMAX 1750 PRODUCT MANUAL
Section 7 — Interface Commands
Command Summary 7 - 1
Read Commands 7 - 2
Read Sector(s) 7 - 2
Read Verify Sector(s) 7 - 2
Read Sector Buffer 7 - 2
Read DMA 7 - 3
Read Multiple 7 - 3
Set Multiple 7 - 3
Write Commands 7 - 4
Write Sector(s) 7 - 4
Write Verify Sector(s) 7 - 4
Write Sector Buffer 7 - 4
Write DMA 7 - 5
Write Multiple 7 - 5
Set Feature Commands 7 - 5
Set Features Mode 7 - 5
Power Mode Commands 7 - 7
Standby Immediate 7 - 7
Idle Immediate 7 - 7
Standby 7 - 7
Idle 7 - 7
Check Power Mode 7 - 7
Set Sleep Mode 7 - 7
Default Power-on Condition 7 - 7
Initialization Commands 7 - 9
Identify Drive 7 - 9
Initialize Drive Parameters 7 - 12
Seek, Format, and Diagnostic Commands 7 - 13
S.M.A.R.T. Command Set 7 - 14
Section 8 — Service and Support
Service Policy 8 - 1
No Quibble Service 8 - 1
Support 8 - 1
Glossary
Glossary GL - 1
vi
Page 7

DIAMONDMAX 1750 PRODUCT MANUAL
Figures
Figure Title Page
2 - 1 PCBA Jumper Locations and Configuration 2 - 6
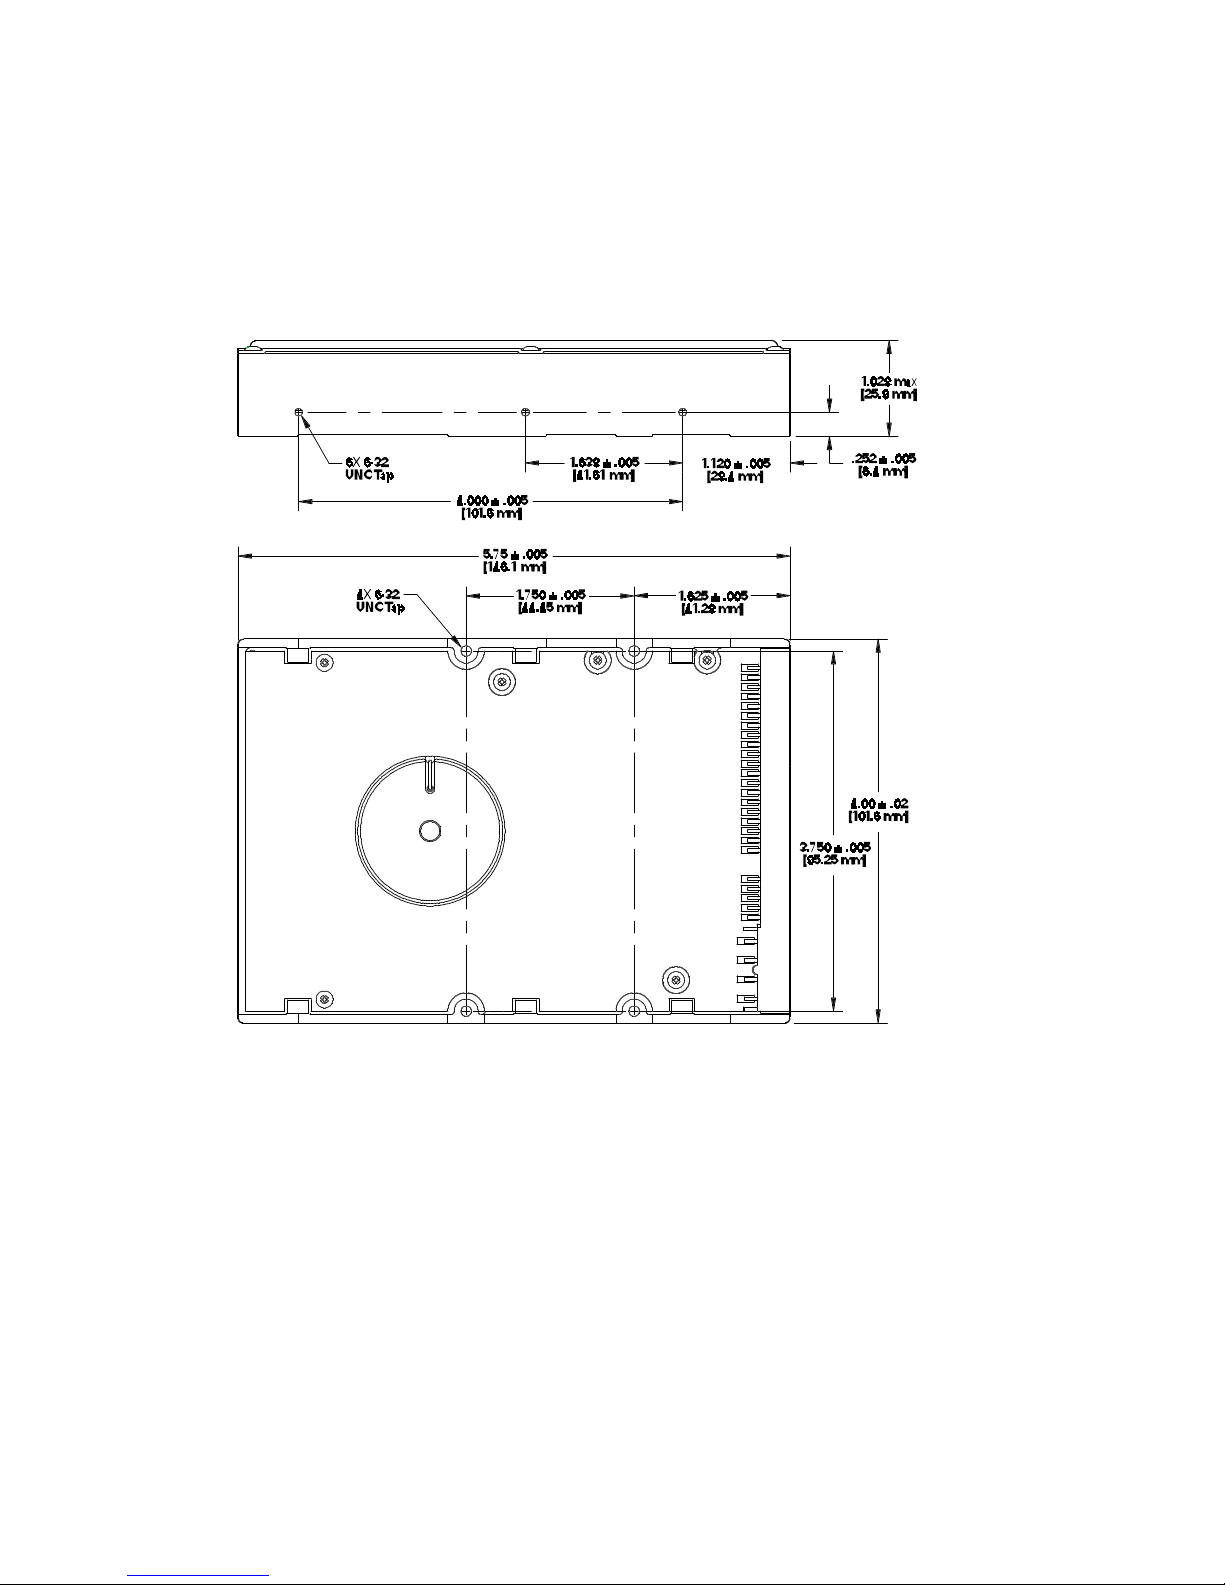
3 - 1 Outline and Mounting Dimensions 3 - 2
4 - 1 Multi-pack Shipping Container 4 - 2
4 - 2 Single-pack Shipping Container (Option A) 4 - 3
4 - 3 Single-pack Shipping Container (Option B) 4 - 3
4 - 4 Master/Slave Jumper Detail 4 - 4
4 - 5 5.25-inch Mounting Brackets/Slider Rails 4 - 4
4 - 6 5.25-inch Installation 4 - 5
4 - 7 3.5-inch Installation 4 - 5
4 - 8 IDE Interface and Power Cabling Detail 4 - 6
4 - 9 System Interface Card Cabling 4 - 7
4 - 10 System Mother Board Cabling 4 - 7
4 - 11 J46 (4092 Cylinder Limitation) Detail 4 - 9
5 - 1 Data Connector 5 - 1
5 - 2 PIO Data Transfer to/from Device 5 - 3
5 - 3 Multi-word DMA Data Transfer 5 - 4
vii
Page 8
DIAMONDMAX 1750 – INTRODUCTION
SECTION 1
Introduction
Maxtor Corporation
Maxtor Corporation has been providing high-quality computer storage products since 1982. Along the way, we’ve seen many
changes in data storage needs. Not long ago, only a handful of specific users needed more than a couple hundred megabytes of
storage. Today, downloading from the Internet and CD-ROMs, multimedia, networking and advanced office applications are
driving storage needs even higher. Even home PC applications need capacities measured in gigabytes, not megabytes.
Products
Maxtor’s products meet those demanding storage capacity requirements with room to spare. They feature proven
compatibility and reliability. While DiamondMax™ 1750 is the latest addition to our family of high performance
desktop hard drives, the CrystalMax™ and CrystalMax™ 1080 series hard drives deliver industry-leading capacity and
value for most PC applications.
Support
No matter which capacity, all Maxtor hard drives are supported by our commitment to total customer satisfaction and our
No Quibble
you in touch with either technical support or customer service. We’ll provide you the information you need quickly,
accurately and in the form you prefer – a fax, a downloaded file or a conversation with a representative.
®
Service guarantee. One call – or a visit to our home page on the Internet (http://www.maxtor.com) – puts
Manual Organization
This hard disk drive reference manual is organized in the following method:
❏ Section 1 – Introduction
❏ Section 2 – Description
❏ Section 3 – Specifications
❏ Section 4 – Installation
❏ Section 5 – AT Interface
❏ Section 6 – Host Software Interface
❏ Section 7 – Interface Commands
❏ Section 8 – Service and Support
❏ Appendix – Glossary
Abbreviations
ABBRV DESCRIPTION ABBRV DESCRIPTI ON
ATA AT attachment MB megabyte
bpi bits per inch Mbits/sec megabits per second
CHS cylinder - head - sector MB/sec megabytes per second
db decibels MHz megahertz
dBA decibels, A weighted ms millisecond
DMA direct memo ry access MSB mos t signifi cant bit
ECC error correction code mV millivolts
fci flux changes per inch ns nanoseconds
G acceleration PIO programmed input/output
GB gigabyte RPM revolutions per minute
Hz hertz tpi tracks per inch
KB kilobyte µsec microsecond
LBA logical block address V volts
LSB least significant bit W watts
mA milliampe res
1 – 8
Page 9

DIAMONDMAX 1750 – INTRODUCTION
Conventions
If there is a conflict between text and tables, the table shall be accepted as being correct.
Key Words
The names of abbreviations, commands, fields and acronyms used as signal names are in all uppercase type (e.g.,
IDENTIFY DRIVE). Fields containing only one bit are usually referred to as the “name” bit instead of the “name” field.
Names of drive registers begin with a capital letter (e.g., Cylinder High register).
Numbering
Numbers that are not followed by a lowercase “b” or “h” are decimal values. Numbers that are followed by a lowercase
“b” (e.g., 01b) are binary values. Numbers that are followed by a lowercase “h” (e.g., 3Ah) are hexadecimal values.
Signal Conventions
Signal names are shown in all uppercase type.
All signals are either high active or low active signals. A dash character (-) at the end of a signal name indicates that the
signal is low active. A low active signal is true when it is below ViL and is false when it is above ViH. A signal without a
dash at the end indicates that the signal is high active. A high active signal is true when it is above ViH and is false when it
is below ViL.
When a signal is asserted, it means the signal is driven by an active circuit to its true state.
When a signal is negated, it means the signal is driven by an active circuit to its false state.
When a signal is released, it means the signal is not actively driven to any state. Some signals have bias circuitry that pull the
signal to either a true or false state when no signal driver is actively asserting or negating the signal. These instances are
noted under the description of the signal.
1 – 9
Page 10

PRODUCT DESCRIPTION
SECTION 2
Product Description
Maxtor DiamondMax™ 1750 AT disk drives are 1-inch high, 3.5-inch diameter random access storage devices which
incorporate an on-board Enhanced IDE/ATA controller. High capacity is achieved by a balanced combination of high areal
recording density and the latest data encoding and servo techniques.
Maxtor's latest advancements in electronic packaging and integration methods have lowered the drive's power consumption and
increased its reliability. Advanced magneto-resistive read/write heads, an state-of-the-art head/disk assembly using an integrated
motor/spindle design allow up to four disks in a 3.5-inch package.
Exceptionally high data transfer rates and sub 10 ms access times make these performance series disk drives especially well-suited
to high speed desktop and server applications.
DiamondMax 1750 Key Features
ANSI ATA-4 compliant PIO Mode 4 interface (Enhanced IDE)
256 KB buffer with multi-adaptive cache manager
< 10 ms seek time
Zone density and I.D.-less recording
High reliability with
Outstanding shock resistance at 200 Gs
High durability with 50K constant start/stop cycles
Advanced multi-burst on-the-fly Error Correction Code (ECC)
Extended data integrity with ECC protected data and fault tolerant servo synchronization fields
Supports EPA Energy Star Standards (Green PC Friendly) with ATA powering savings commands
Auto park and lock actuator mechanism
Low power consumption
S.M.A.R.T. Capability
>
500,000 hour MTBF
Note: Maxtor defines one megabyte as 106 or one million bytes and one gigabyte as 109 or one billion bytes.
2 – 10
Page 11
PRODUCT DESCRIPTION
Product Features
Functional / Interface
Maxtor DiamondMax™ 1750 hard drives contain all necessary mechanical and electronic parts to interpret control signals and
commands from an AT-compatible host computer. See Section 3, Product Specifications, for complete drive specifications.
Zone Density Recording
The disk capacity is increased with bit density management – common with Zone Density Recording. Each disk surface is
divided into 16 circumferential zones. All tracks within a given zone contain a constant number of data sectors. The
number of data sectors per track varies in different zones; the outermost zone contains the largest number of data sectors
and the innermost contains the fewest.
Read/Write Multiple Mode
This mode is implemented per ANSI ATA/ATAPI-4 specification. Read/Write Multiple allows the host to transfer a set
number of sectors without an interrupt request between them, reducing transfer process overhead and improving host
performance.
Multi-word DMA (EISA Type B) - Mode 2
Supports multi-word Direct Memory Access (DMA) EISA Type B mode transfers.
Sector Address Translation
All DiamondMax 1750 drives feature a universal translate mode. In an AT/EISA-class system, the drive may be
configured to any specified combination of cylinders, heads and sectors (within the range of the drive's formatted capacity).
DiamondMax 1750 drives power-up in a translate mode:
MODEL CYLIN DER S HEADS SECTORS CAPACITY
87000A8 14,475 15 63 7,000 MB
86480A8 13,392 15 63 6,480 MB
85250A6 10,856 15 63 5,250 MB
84320A5 8,928 15 63 4,320 MB
83500A4 7,237 15 63 3,500 MB
83240A4 6,696 15 63 3,240 MB
82560A3 5,292 15 63 2,560 MB
81750A2 3,618 15 63 1,750 MB
Logical Block Addressing
The Logical Block Address (LBA) mode can only be utilized in systems that support this form of translation. The cylinder,
head and sector geometry of the drive, as presented to the host, differs from the actual physical geometry.
The host AT computer may access a drive of set parameters: number of cylinders, heads and sectors per track, plus
cylinder, head and sector addresses. However, the drive can’t use these host parameters directly because of zoned recording
techniques. The drive translates the host parameters to a set of logical internal addresses for data access. The host drive
geometry parameters are mapped into an LBA based on this formula:
L BA = (HSCA - 1) + HHDA x HSPT + HNHD x HSPT x HCYA (1 )
where HSCA = Host Sector Address, HHDA = Host Head Address, HCYA = Host Cylinder Address, HNHD = Host Number of Heads
= (HSCA - 1) + HSPT x (HHDA + HNHD x HCYA) (2 )
HSPT = Host Sectors per Track
The LBA is checked for violating the drive capacity. If it does not, the LBA is converted to physical drive cylinder, head
and sector values. The physical address is then used to access the data stored on the disk and other drive related operations.
2 – 11
Page 12

PRODUCT DESCRIPTION
Defect Management Zone (DMZ)
Each drive model has a fixed number of spare sectors per drive, all of which are located at the end of the drive. Upon
detection of a bad sector that has been reassigned, the next sequential sector is used.
For example, if sector 3 is flagged, data that would have been stored there is “pushed down” and recorded in sector 4.
Sector 4 then effectively becomes sector 3, as sequential sectors are “pushed down” across the entire drive. The first spare
sector makes up for the loss of sector 3, and so maintains the sequential order of data. This push down method assures
maximum performance.
On-the-Fly Hardware Error Correction Code (ECC)
10 bits, single burst, guaranteed
Software ECC Correction
64 bits, single burst, guaranteed; 28 bits, double bursts, guaranteed
Automatic Park and Lock Operation
Immediately following power down, dynamic braking of the spinning disks delays momentarily allowing the read/write
heads to move to an inner mechanical stop. A small fixed magnet holds the rotary actuator in place as the disk spins down.
The rotary actuator is released only when power is again applied.
Cache Management
Buffer Segmentation
The data buffer is organized into two segments: the data buffer and the micro controller scratch pad. The data buffer is
dynamically allocated for read and write data depending on the commands received. A variable number
of read and write buffers may exist at the same time.
Read-Ahead Mode
Normally, this mode is active. Following a read request, disk read-ahead begins on the first sector and continues
sequentially until the allocated buffer is full. If a read request is received during the read-ahead operation, the buffer is
examined to determine if the request is in the cache. If a cache hit occurs, read-ahead mode continues without
interruption and the host transfer begins immediately.
Automatic Write Reallocation (AWR)
This feature is part of the write cache and reduces the risk of data loss during deferred write operations. If a disk error
occurs during the disk write process, the disk task stops and the suspect sector is reallocated to a pool of alternate sectors
located at the end of the drive. Following reallocation, the disk write task continues until it is complete.
Write Cache Stacking
Normally, this mode is active. Write cache mode accepts the host write data into the buffer until the buffer is full or the
host transfer is complete. A command complete interrupt is generated at the end of the transfer.
A disk write task begins to store the host data to disk. Host write commands continue to be accepted and data transferred to
the buffer until either the write command stack is full or the data buffer is full. The drive may reorder write commands to
optimize drive throughput.
2 – 12
Page 13

PRODUCT DESCRIPTION
Major HDA Components
Drive Mechanism
A brush-less DC direct drive motor rotates the spindle at 5,200 RPM (±0.1%). The dynamically balanced motor/spindle
assembly ensures minimal mechanical run-out to the disks. A dynamic brake provides a fast stop to the spindle motor upon
power removal. The speed tolerance includes motor performance and motor circuit tolerances.
Rotary Actuator
All DiamondMax™ 1750 drives employ a rotary voice coil actuator which consists of a moving coil, an actuator arm
assembly and stationary magnets. The actuator moves on a low-mass, low-friction center shaft. The low friction contributes
to fast access times and low power consumption.
Read/Write Electronics
An integrated circuit mounted within the sealed head disk assembly (near the read/write heads) provides up to eight head
selection (depending on the model), read pre-amplification and write drive circuitry.
Read/Write Heads and Media
Low mass, low force magneto-resistive read/write heads record data on 3.5-inch diameter disks. Maxtor uses a sputtered
thin film medium on all disks for DiamondMax 1750 drives.
Air Filtration System
All DiamondMax 1750 drives are assembled in a Class 100 controlled environment. Over the life of the drive, a 0.1
micron filter and breather filter located within the sealed head disk assembly (HDA) maintain a clean environment to the
heads and disks. DiamondMax 1750 drives are designed to operate in a typical office setting with minimum environmental
control.
Microprocessor
The microprocessor controls the following functions for the drive electronics:
Command execution
Cache management
Data correction and error recovery
Diagnostic execution
Data sequencing
Head positioning (including error recovery)
Host interface
Index detection
Spin speed control
Seeks
Servo
2 – 13
Page 14
PRODUCT DESCRIPTION
Subsystem Configuration
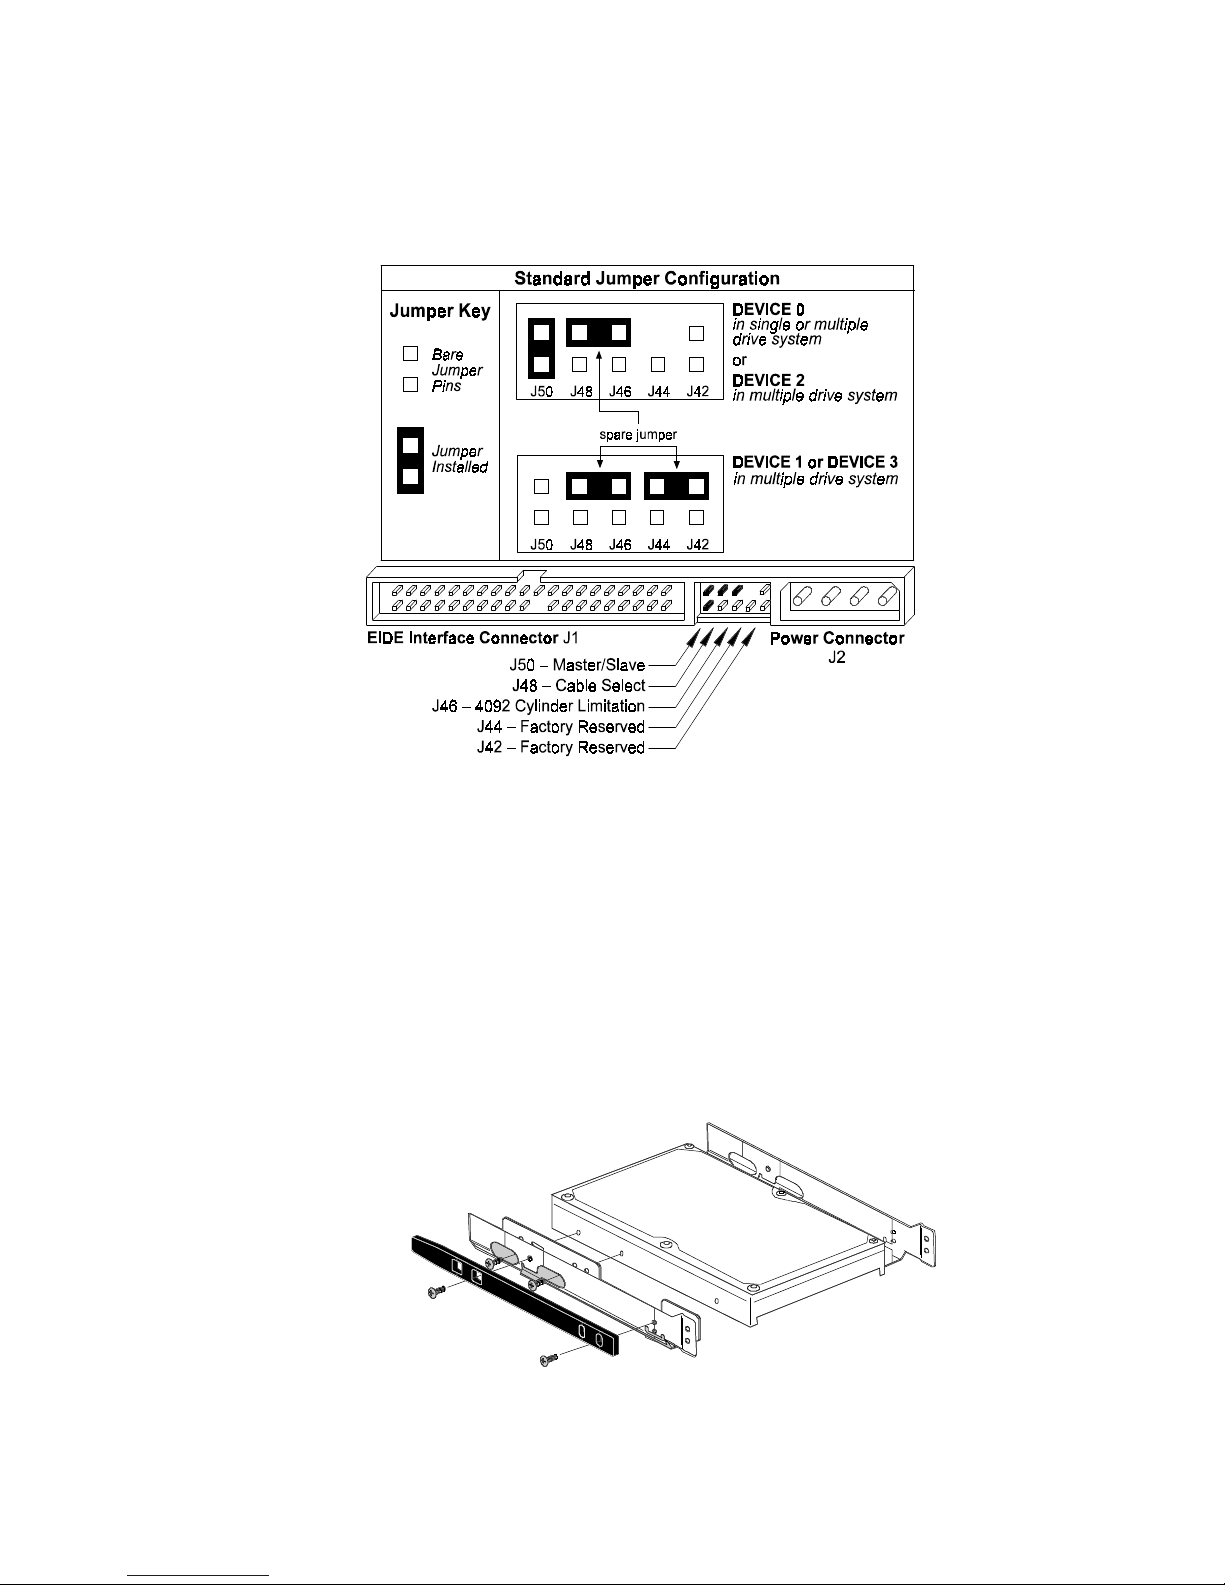
Dual Drive Support
Two drives may be accessed via a common interface cable, using the same range of I/O addresses. The drives are
jumpered as device 0 or 1 (Master/Slave), and are selected by the drive select bit in the Device/Head register of the task
file.
All Task File registers are written in parallel to both drives. The interface processor on each drive decides whether a
command written to it should be executed; this depends on the type of command and which drive is selected. Only the
drive selected executes the command and activates the data bus in response to host I/O reads; the drive not selected
remains inactive.
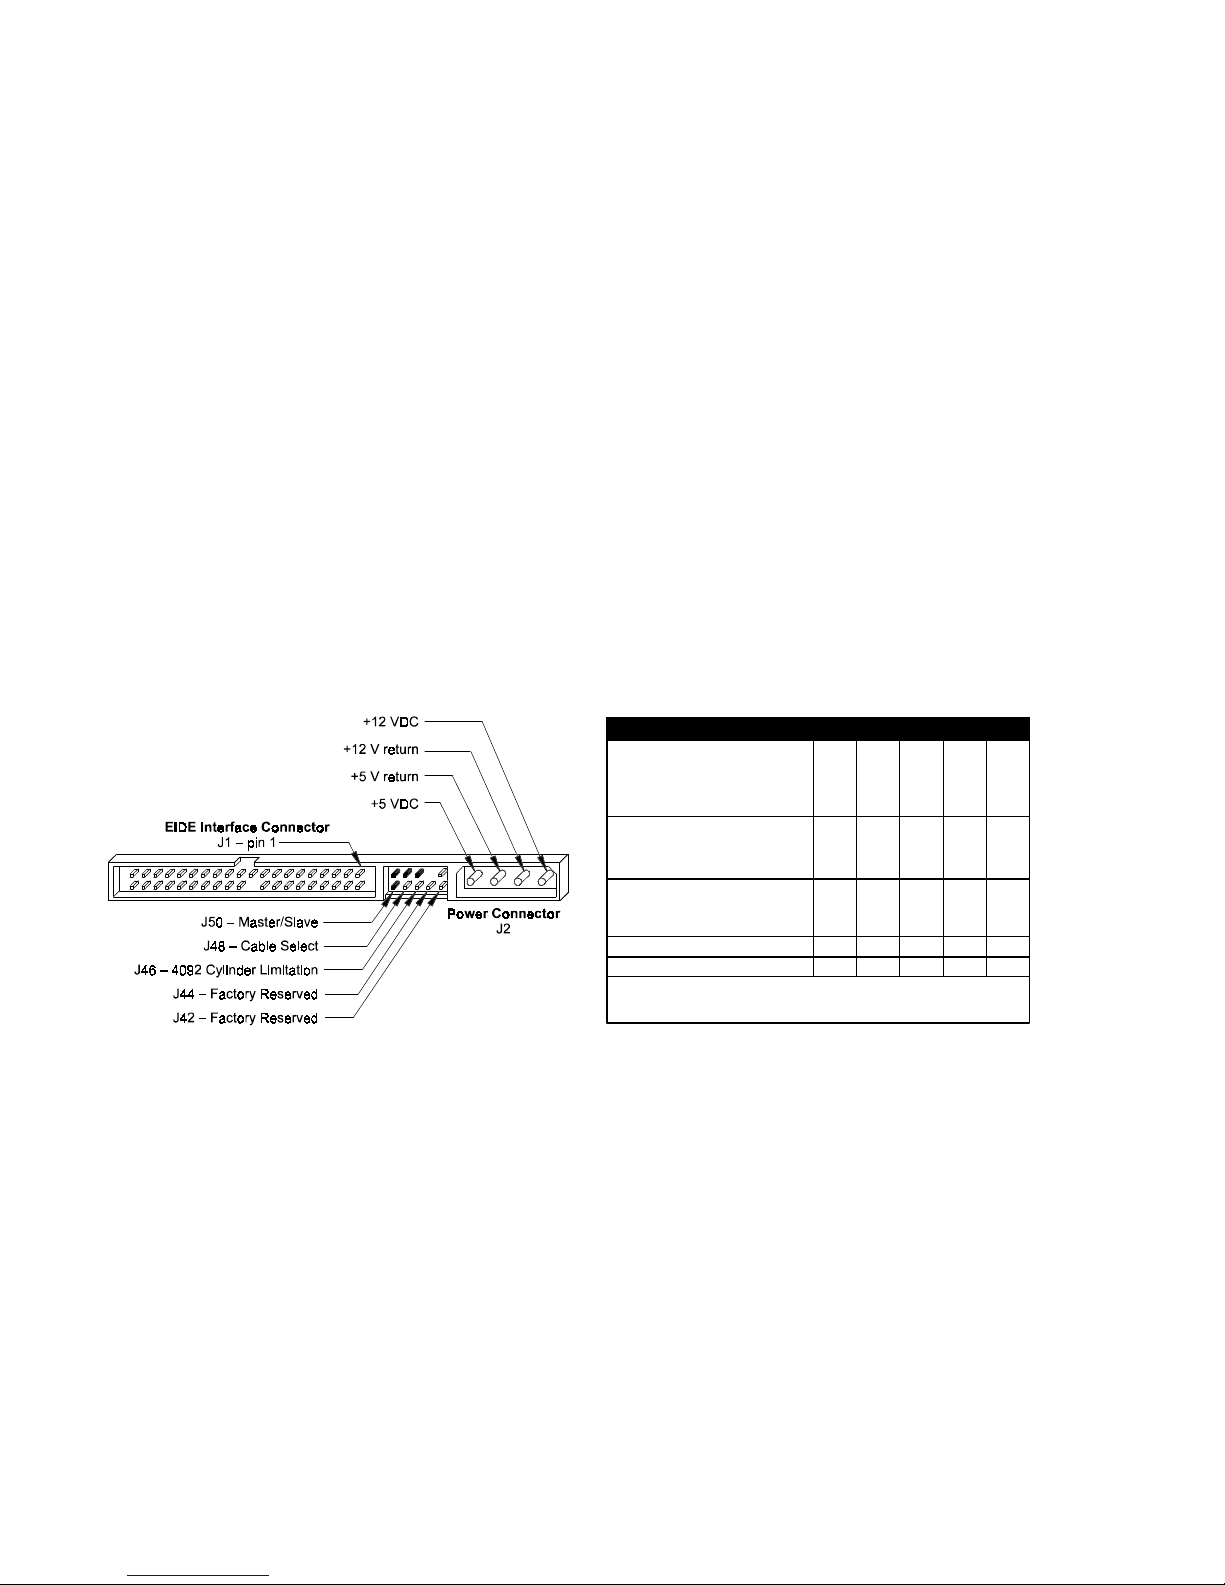
A master/slave relationship exists between the two drives: device 0 is the master and device 1 the slave. When J50 is closed
(factory default, figure 2-1), the drive assumes the role of master; when open, the drive acts as a slave. In single drive
configurations, J50 must be closed.
Cable Select Option
CSEL (cable select) is an optional feature per ANSI ATA specification. Drives configured in a multiple drive system are
identified by CSEL’s value:
– If CSEL is grounded, then the drive address is 0.
– If CSEL is open, then the drive address is 1.
Jumper Location/Configuration
Darkened jumper pins indicate factory-installed (default) shunts.
JUMPER CONFIGURATION J50 J48 J46 J44 J42
Master/Slave
Only drive in single driv e system *
Master in dual drive system*
Slave in dual drive system
Cable Select
Disabled*
Enabled
4092 Cylinder Limitation
Disabled*
Enabled
Factory Reserved
Factory Reserved
Key
* = De f au lt J = Jum pered O = Op en
J
J
O
O
J
O
J
O
Figure 2-1
PCBA Jumper Location and Configuration
4092 Cylinder Limitation
On some older BIOS', primarily those that auto-configure the disk drive, a hang may occur when the drive cylinder value
exceeds 4096. The 4092 Cylinder Limitation jumper reduces the capacity in the Identify Drive to 4092 allowing large
capacity drives to work with older BIOS'. A software driver is required to access the full capacity of the drive.
O
2 – 14
Page 15
PRODUCT SPECIFICATIONS
SECTION 3
Product Specifications
Configuration
MODE L 87000A8 86480A8 85250A6 84320A5 83500A4 83240A4 82560A3 81750A2
Formatted Capacity (LBA Mode) 7,00 0 MB 6,480 MB 5,250 MB 4,320 MB 3,50 0 MB 3,240 MB 2,560 MB 1,750 MB
Integrated Controller/Interface ATA-4/EIDE
Encoding Method RLL 8,9
Interleave 1:1
Servo System Embedded
Buffer Size/Type 256 KB/EDO DRAM
Data Zones per Surface 16
Data Surfaces/Heads 88654432
Aerial Density 1,200 Mb/in
Tracks per Surface (Cylinders) 7,825
Track Density 7,797 tpi
Flux Density 138-172 kfci
Recording Density 123-153 kbpi
Bytes per Sector/Block 512
Sectors per Track 156-249
Sectors per Drive 13,678,880 12,656,250 10,259,160 8,437,500 6,839,440 6,328,125 5,001,728 3,419,720
2
Performance
MODE L 87000A8 86480A8 85250A6 84320A5 83500A4 83240A4 82560A3 81750A2
Seek Times (Typical)
Track to Track 1.2 ms
Average < 10.0 ms
Maximum 18 ms
Average Latency 5.77 ms
Rotational Speed (±0.1%) 5,200 RPM
Controller Command Overhead < 0.5 ms
Data Transfer Rate
To/from Interface
(PIO 4/Multi-word DMA - Mode 2)
To/from Media Up to 14.0 MB/sec
Start Time (0 to Drive Ready) 7.3 sec typical
16.7 MB/sec
3 – 15
Page 16
PRODUCT SPECIFICATIONS
Physical Dimensions
Height 1.00 inches [25.4 mm]
Length 5.75 inches [146.1 mm]
Width 4.00 inches [101.6 mm]
Weight 1.2 pounds [0.5 kg]
3 – 16
Outline and Mounting Dimensions
Figure 3 - 1
Page 17
PRODUCT SPECIFICATIONS
Power Requirements (Average)
MODE 12V ± 8% 5V ± 5% POWER
Spin-up (peak) 1058 mA 260 mA 12.7 W
Active 234 mA 400 mA 4.8 W
Seek 530 mA 418 mA 8.5 W
Read/Write 237 mA 430 mA 5.0 W
Idle 232 mA 224 mA 3.9 W
Standby 2 mA 140 mA 0.7 W
Sleep 2 mA 80 mA 0.4 W
Power Mode Definitions
Active
The drive is spinning and most circuitry is powered on. The drive is capable of responding to read commands in
the shortest possible time. Read/Write heads are positioned over the data area.
Idle
The drive is spinning, the actuator is parked and powered off and all other circuitry is powered on. The drive is
capable of responding to read commands within 40 ms.
Read/Write
Data is being read from or written to the drive.
Spin-up
The drive is spinning up following initial application of power and has not yet reached full speed.
Sleep
This is the lowest power state. The interface becomes inactive. A software or hardware reset is required to return
the drive to Active.
Standby
The spin motor is not spinning. The drive will leave this mode upon receipt of a command that requires disk
access. The time-out value for this mode is programmable. The buffer is active to accept write data.
Seek
A random access operation by the disk drive.
Environmental
PARAMETER OP ERATING NON-OPERATING/STORAGE
Temperature 5° C to 55° C Low temperature (-40° C) per MIL-STD-810E, Method 502.3.
High temperature (71° C) per MIL-STD-810E, Method 501.3,
Climatic Category; Hot-induced conditions.
Thermal Gradient (maximum) 25° C per hour 25° C per hour
Relative Humidity 5% to 95% (Non-condensing)
Wet Bulb 27° C maximum
Altitude -200 to 10,000 feet (with any
naturally occurring temperature
and humidity within this range)
Per MIL-STD-810E, Method 500.3, Low pressure (altitude) Test
Procedure I. Storage; Test Condition 2, Transport aircraft cargo
compartment pressure.
3 – 17
Page 18

PRODUCT SPECIFICATIONS
Shock and Vibration
PARAMETER OPERATING NON-OPERATING
Mechanical Shock 20 Gs, 2.0 ms, no errors 200 Gs, 2.0 ms, no damage
Random Vibration Per MIL-STD-810E, Method 514.4, Basic transport ation,
Swept Sine Vibration
5 - 20 Hz
21 - 300 Hz
Vertical axis PSD profile.
10 Hz at 0.0125 G
40 Hz at 0.0125 G
500 Hz at 0.000125 G
0.049 inches double amplitude
1.0 G peak amplitude
Reliability and Maintenance
MTBF –
Maxtor does not differentiate between various usage profiles. (.e. power-on hours, power saving modes, nonoperating periods or operating temperatures within the published specification.)
Start/Stop Cycles – 50,000 (minimum)
This indicates the minimum cycles for reliable start/stop function at a ≥ 60% confidence level.
AFR – 1.7%
The annualized average failure rate (AFR) applies to the period prior to the expiration of component design life,
and is based on failures chargeable to Maxtor. Determination of the AFR takes into account: a.) in-warranty field
failure returns less quality acceptance-related failures and b.) an AFR equaling an exponentially weighted moving
and average monthly failure rate multiplied by 12.
>>
> 500,000 hours
>>
Per MIL-STD-810E, Method 514.4, Basic transportation,
2
/Hz
2
/Hz
2
/Hz
Vertical axis PSD profile.
10 Hz at 0.015 G
40 Hz at 0.015 G
500 Hz at 0.00015 G
2
/Hz
2
/Hz
2
/Hz
Component Design Life – 5 years (minimum)
Component design life is defined as a.) the time period before identified wear-out mechanisms impact the failure
rate, or b.) the time period up to the wear-out point at which useful component life expires.
Quality Acceptance Rate – 99.85% (<1,500 DPPM)
The quality acceptance rate indicates the percentage of Maxtor products successfully installed by our customers,
and/or the number of defective parts per million (DPPM) encountered during the entire installation process.
Preventative Maintenance – None
Data Reliability
Data Errors (non-recoverable)* – < 1 per 1013 bits read
Seek Errors – < 1 per 106 seeks
*Average data error rate allowed with all error recovery features activated.
Acoustic Noise
Recorded during Active/Idle mode. Average
Sound power (per ISO 7779, 10 microphone) 37 dBA
EPA Energy Star Compliance
Maxtor Corporation supports the goals of the U.S. Environmental Protection Agency’s Energy Star program to
reduce the electrical power consumption of computer equipment.
3 – 18
Page 19

PRODUCT SPECIFICATIONS
EMC/EMI
Radiated Electromagnetic Field Emissions - EMC Compliance
The hard disk drive mechanism is designed as a subassembly for installation into a suitable enclosure and is
therefore not subject to Subpart J of Part 15 of FCC Rules (47CFR15) or the Canadian Department of
Communications Radio Interference Regulations. Although not required, the disk mechanism has been tested
within a suitable end-use product and found to comply with Class B limits of the FCC Rules and Regulations of
the Canadian Department of Communications.
The CE Marking indicates conformity with the European Union Low Voltage Directive (73/23/EEC) when the
disk mechanism is installed in a typical personal computer. Maxtor recommends that testing and analysis for EMC
compliance be performed with the disk mechanism installed within the user's end-use application.
Canadian Emissions Statement
This digital apparatus does not exceed the Class B limits for radio noise emissions from digital apparatus as set out
in the radio interference regulations of the Canadian department of communications.
Le present appareil numerique n'emet pas de bruit radioelectriques depassant les limites applicables aux appareils
numeriques de Class B prescrites dans le reglement sur le brouillage radioelectrique edicte par le ministere des
communications du Canada.
Radiated Magnetic Field Emissions
Minimum of VDE Class B and MIL-STD-461/462, Method RE01 (stand-alone test configuration).
Radiated Electromagnetic Field Immunity
IEC 801-3, Class 2 compliance.
Radiated Magnetic Field Immunity
Per MIL-STD-461/462, Method RD01(15 Hz to 100 kHz, stand-alone test configuration).
Standard Test Methods
Traditional hard drive specifications are open to incorrect interpretation, but MIL-STD test methods accurately
measure how products perform in real-world conditions. These methods have gained worldwide acceptance since
they reflect actual environments, have well-defined test requirements, are easily understood and provide repeatable
results. They objectively demonstrate to our customers the reliable, durable design of Maxtor hard drives. Each MILSTD specification provides the basic method and condition information needed for reference by a knowledgeable
Test and Qualification Engineer.
Acoustic specifications such as sound pressure are misleading because the test methods used are not controlled by
recognizable standards. The sound pressure measurement itself is the least meaningful indicator of noise emissions as
it relates to the human ear. The specification of sound power, loudness and sharpness are considered the most
accurate acoustic measurement methodologies recognized by the leading acoustic measurement experts. ISO 7779,
sound power, ISO 532B, loudness and sharpness (proposed ANSI standard by Eberhard Zwicker) are repeatable test
methods providing results reproducible in any properly equipped acoustic lab.
Safety Regulatory Compliance
All Maxtor DiamondMax™ 1750 drives comply with relevant product safety standards such as CE, CUL, TUV and
UL rules and regulations. As delivered, DiamondMax 1750 hard disk drives are designed for system integration
before they are used.
3 – 19
Page 20

INSTALLATION
Handling and Installation
Pre-formatted Drive
This Maxtor hard drive has been low-level formatted at the factory. Do not use a low-level formatting program.
Important Notice
There are a number of system BIOS’s currently in use which do not support hard drives with more than 4095 cylinders (2.1
gigabytes). This section contains information describing the conditions which may identify this limitation. In order to obtain
the full capacity of your Maxtor drive, you will need to follow the suggested installation instructions.
Hard Drive Handling Precautions
Please take a moment to observe the following handling cautions:
SECTION 4
❏ During handling,
board assembly (PCBA).
❏ Hard drives are sensitive to electrostatic discharge (ESD) damage. Use proper ESD practices by grounding yourself and
the computer system the hard drive will be installed in.
❏ Allow the hard drive to reach room temperature
❏
NEVER
switch DC power onto the drive by plugging an electrically live DC source cable into the drive's connector.
NEVER
connect a live connector to the hard drive's IDE interface connector.
NEVER
drop, jar, or bump a drive. Handle the drive by its sides and avoid touching the printed circuit
BEFORE
installing it in your computer system.
Electro-Static Discharge (ESD)
To avoid some of the problems associated with ESD, Maxtor advises that anyone handling a disk drive use a wrist strap with
an attached wire connected to an earth ground. Failure to observe these precautions voids the warranty.
Manufacturers frequently experience “unsolved” component/hardware malfunctions often caused by ESD. To reduce the
incidence of ESD-related problems, Maxtor recommends that any electronics manufacturing plans include a comprehensive
ESD program, the basic elements and functions of which are outlined here:
ESD Program Element ESD Program Function
Management Institute and maintain
Chief coordinator Organize and enforce
Multi-department committee Evaluate and improve
Employee training Educate and inform
ESD program supplies typically include: wrist- and foot-worn grounding straps; counter-top and floor antistatic matting;
wrist strap testers; ESD video and training materials. Sources for such supplies include:
Static Control Systems – 3M Charleswater
225-4S, 3M Center 93 Border St.
St. Paul, MN 55144 West Newton, MA 02165-9990
Maxtor also offers a complete video training package, “Care and Handling of Maxtor Disk Drives.”
Contact your Maxtor representative for details.
4 – 20
Page 21

INSTALLATION
Unpacking and Inspection
Retain any packing material for reuse. Inspect the shipping container for evidence of damage in transit. Notify the carrier
immediately in case of damage to the shipping container.
As they are removed, inspect drives for evidence of shipping damage or loose hardware. If a drive is damaged (and no
container damage is evident), notify Maxtor immediately for drive disposition.
Multi-pack Shipping Container
Figure 4 - 1
4 – 21
Page 22

INSTALLATION
Single Pack Shipping Container (Option A)
Figure 4 - 2
Single Pack Shipping Container (Option B)
Figure 4 - 3
Repacking
If a Maxtor drive requires return, repack it using Maxtor packing materials, including the antistatic bag.
Physical Installation
Recommended Mounting Configuration
The DiamondMax™ 1750 drive design allows greater shock tolerance than that afforded by larger, heavier drives. The
drive may be mounted in any attitude using four size 6-32 screws with 1/8-inch maximum penetration and a maximum
torque of 5-inch pounds. See Figure 3-1 for mounting dimensions. Allow adequate ventilation to the drive to ensure
reliable operation.
4 – 22
Page 23
Drive Jumper Settings
Figure 4-4 shows the valid jumper settings for the Maxtor hard drive.
A spare jumper shunt is shipped between J46 and J48.
INSTALLATION
Master/Slave Jumper Detail
Figure 4 - 4
Mounting Drive in System
Turn the computer OFF, disconnect the power cord and remove the cover. Refer to your computer user’s manual for
additional information.
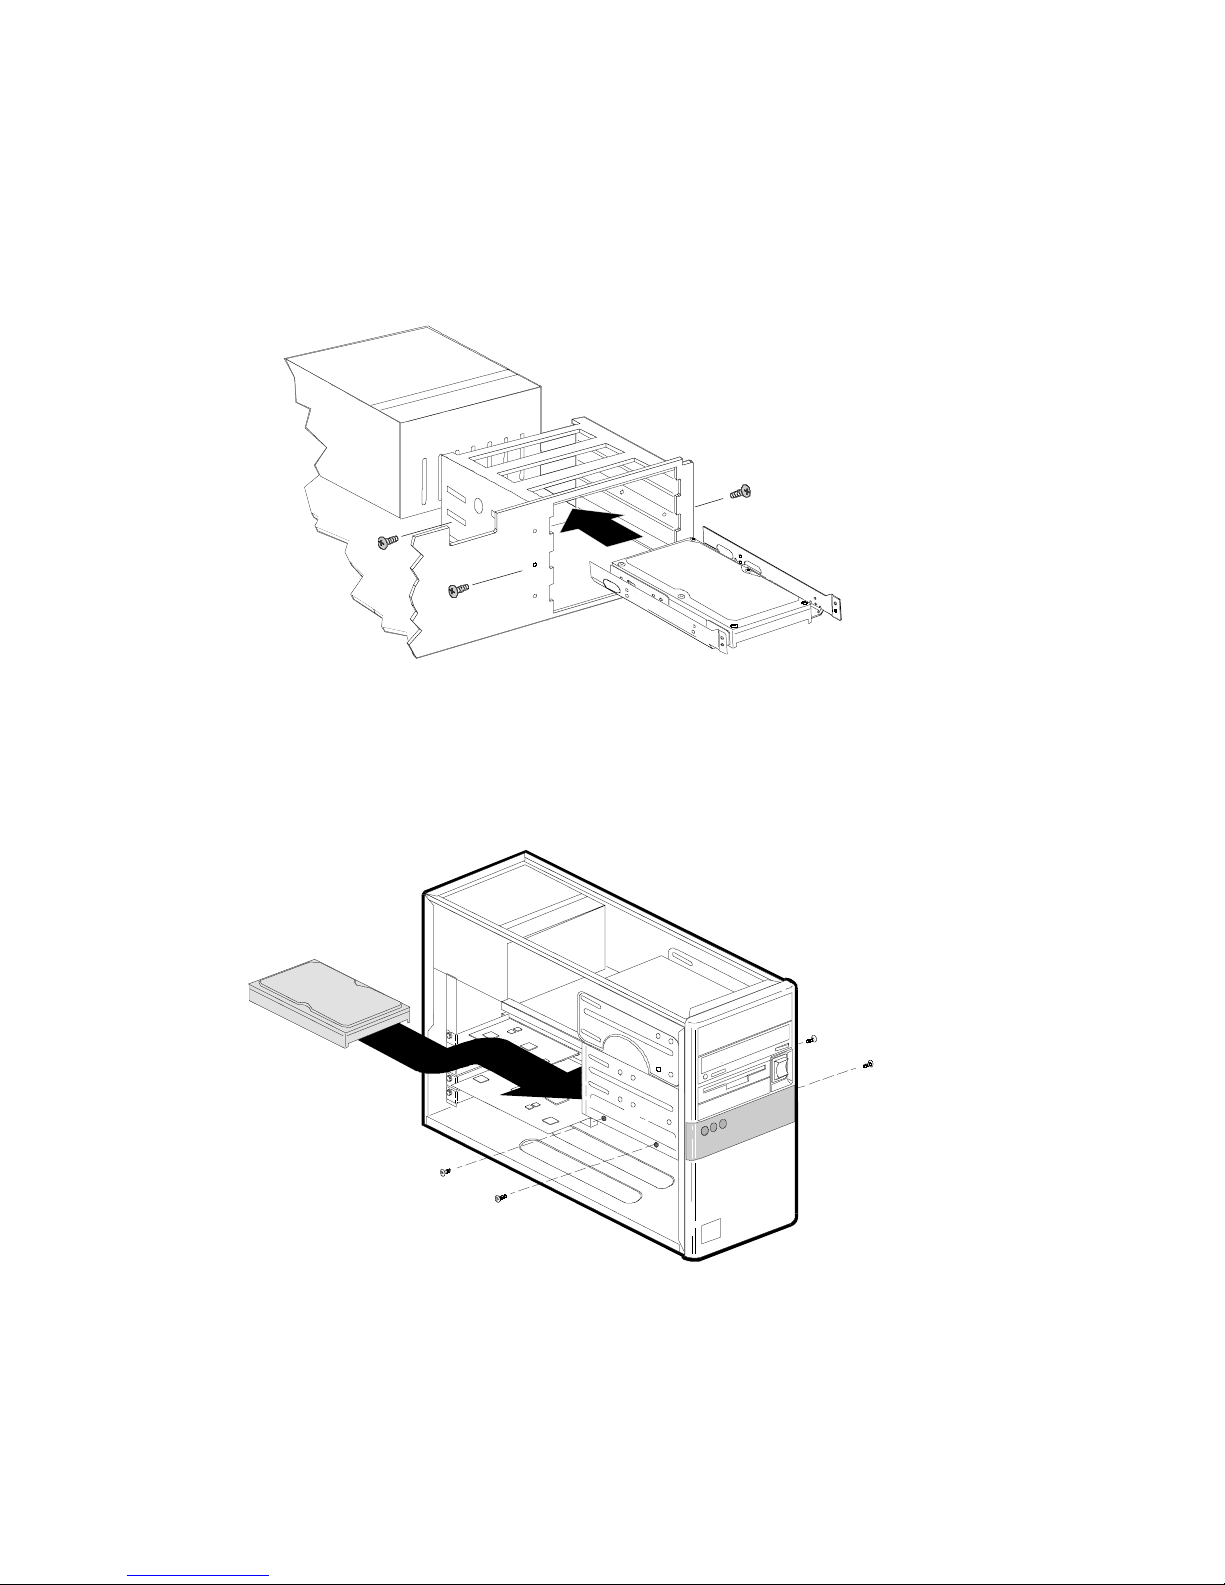
Installing 5.25-inch Mounting Brackets
Mounting brackets are only needed when the drive will be installed in a 5.25-inch drive bay. This step is not necessary when
installing the drive in a 3.5-inch bay. See Figure 4-5 below.
Mounting Rails
Mounting rails are attached to the mounting bracket for systems requiring this feature. See Figure 4-5 below.
5.25-inch Mounting Brackets/Slider Rails
Figure 4 - 5
4 – 23
Page 24
INSTALLATION
Note: The following figures are examples of typical computer systems and mounting placements. The computer system the
Maxtor hard drive is being installed in may have implemented a different mounting and placement methodology.
Mounting Drive in 5.25-inch Bay
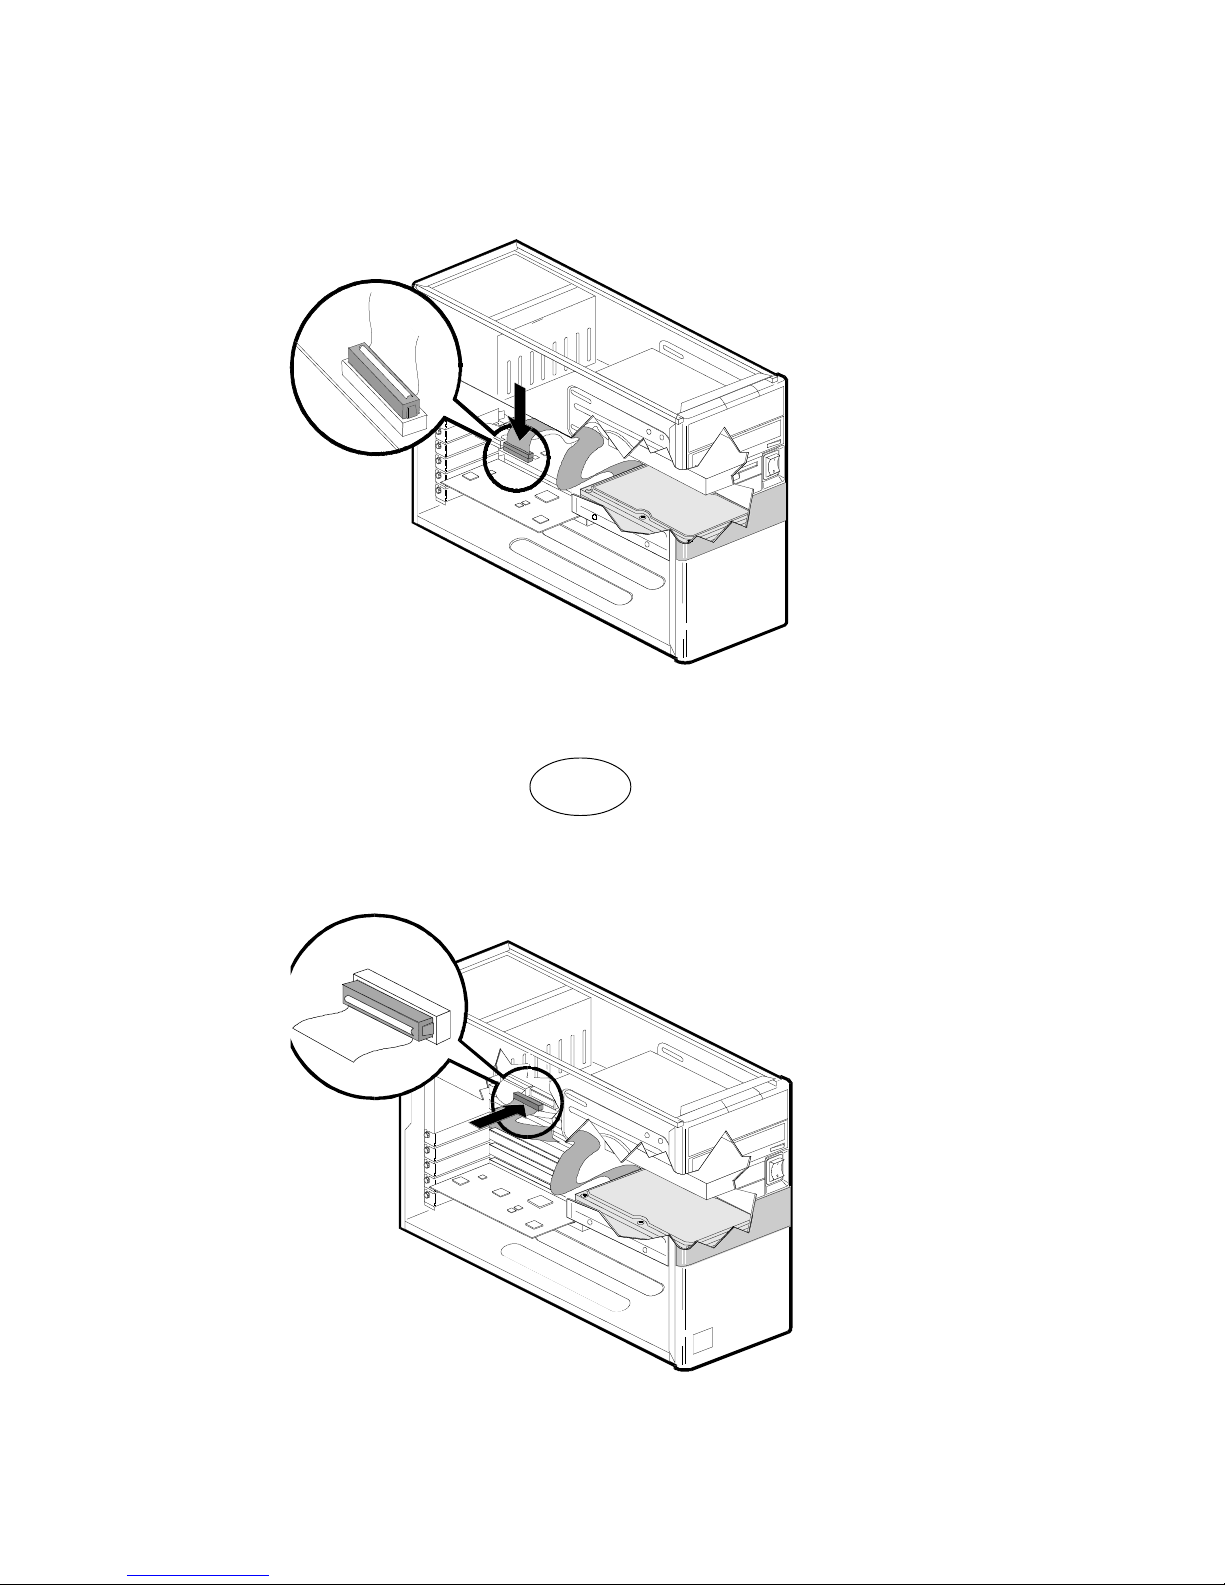
If the Maxtor hard drive will be mounted in a 5.25-inch bay, install it as shown in Figure 4-6 below.
Figure 4 - 6
5.25-inch Installation
Mounting Drive in 3.5-inch Bay
If the Maxtor hard drive will be mounted in a 3.5-inch bay, install it as shown in Figure 4-7 below.
4 – 24
Figure 4 - 7
3.5-inch Installation
Page 25

INSTALLATION
Attaching IDE Interface and Power Cables
In order for your computer to recognize that the Maxtor hard drive is in the system, the IDE interface and power cables must
be connected to the hard drive, the mother board or the IDE hard drive interface card.
1 Attach an available IDE interface connector to J1 (see Figure 4-8 below) on the Maxtor hard drive.
This connector is keyed and will only fit in one orientation. Do not force the connector.
The striped or colored edge of the IDE interface cable indicates pin 1. Pin 1 on the IDE interface cable should
match pin 1 on the drive connector. On the Maxtor hard drive, pin 1 is closest to the power connector.
2 Connect an available power connector to J2 (see Figure 4-8 below) on the Maxtor hard drive.
This connector is keyed and will only fit in one orientation. Do not force the connector.
IDE Interface and Power Cabling Detail
Figure 4 - 8
After attaching the IDE interface cable and the power cable to the Maxtor hard drive, verify that all other cables connected to
other devices, the mother board or interface cards are correctly seated.
4 – 25
Page 26
INSTALLATION
Attaching System Cables
Attach the 40-pin IDE interface cable from the Maxtor hard drive to the IDE connector on the IDE interface card.
System Interface Card Cabling
Figure 4 - 9
OR
Attach the 40-pin IDE interface cable from the Maxtor hard drive to the IDE connector on the mother board.
4 – 26
System Mother board Cabling
Figure 4 - 10
Page 27

INSTALLATION
System Setup
The following procedures are designed for systems using the DOS 5.0 (or higher) or Windows 95 operating systems. For
other operating systems (e.g., OS2
the BIOS setting and other installation requirements
Setting the BIOS (CMOS)
In order for the computer system to recognize the new Maxtor hard drive, it is necessary to set the system BIOS with the
correct information about the hard drive.
The SETUP (BIOS) program identifies the system configuration information (e.g., floppy disk drives, hard disk drives, video,
etc.) used by the computer during system boot. This includes the information about what kind and how many hard drives are
attached to the system. When entering the settings for the new Maxtor hard drive, be careful not to change any of the other
BIOS settings, or other parts of the system may not work correctly.
Most of the systems with newer BIOS’ (typically with a date of July 1994 or newer), support large capacity hard drives. It is
necessary to determine if the system provides support for large capacity hard drives before entering the settings, as this affects
how to correctly set the BIOS parameters for the new Maxtor hard drive.
If you are unsure of how to access the system BIOS and/or program the BIOS settings, refer to the computers user’s manual
for detailed instructions.
Set the BIOS (CMOS) parameters as follows:
1. Turn the system ON. During the system start-up sequence, run the SETUP (BIOS) program or similar
commands to access the system BIOS.
®
, UNIX®, LINUX and Novell NetWare®), refer to the operating system user’s manual for
NOTE: Newer systems will typically display a message (e.g., press DEL to Enter Setup) identifying how to
access the SETUP (BIOS) program.
2. Once the SETUP (BIOS) program is active, do one of the following to set the hard drive BIOS parameters.
a) If the SETUP program provides an “AUTO DETECT” capability, use this feature to detect the
Maxtor hard drive. After the SETUP program has detected the hard drive, verify that the Logical
Block Addressing (LBA) mode is enabled for this drive. If the SETUP program does not provide an
“AUTO DETECT” capability, set the drive parameters as defined in b) below.
Comment: When LBA is enabled, some BIOS programs will change the values of the cylinders
and heads by dividing the cylinders by 2, 4, 8 or 16 and multiplying the heads by the same value.
This does not change the capacity of the hard drive.
b ) If the SETUP program does not provide an “AUTO DETECT” capability, the drive parameters
must be set using the User Definable Type (UDT). Select the appropriate UDT for the Maxtor hard
drive and set the cylinder, head and sector values for the model being installed from the table below.
Only the values listed in the table must be entered. Other values may be entered as zero (0). Set the
LBA mode to enabled for this drive. If the SETUP program does not provide the UDT, set the drive
parameters as defined in c) below.
Drive Parameters
MOD EL CYLINDE RS HEADS SECTORS CAPACITY
87000A8 14,475 15 63 7,000 MB
86480A8 13,392 15 63 6,480 MB
85250A6 10,856 15 63 5,250 MB
84320A5 8,928 15 63 4,320 MB
83500A4 7,237 15 63 3,500 MB
83240A4 6,696 15 63 3,240 MB
82560A3 5,292 15 63 2,560 MB
81750A2 3,618 15 63 1,750 MB
4 – 27
Page 28

INSTALLATION
prepared using Max•Blast software.
3. After the drive parameters are entered, follow the SETUP program procedures to save the settings and exit
the SETUP program. After changing BIOS settings, saving the values and exiting, the SETUP program should
force the system to re-boot.
DOS 5.0 (or higher) or Windows 95 system diskette. If the system boots normally, proceed to the “Hard Drive
Preparation” section.
System Hangs During Boot
If after installing the Maxtor hard drive in the system or after setting the system BIOS the system hangs during the boot
process, the system may have a BIOS limitation. This may occur for drives with capacities larger than 2.1 GB.
If the system locks up before accessing the BIOS SETUP program or if it locks up during the boot process after setting the
system BIOS, the system may have a BIOS with a cylinder limitation. If this happens, perform the following:
1 Turn the system OFF.
2 Install jumper J46 on the drive using the spare jumper shipped across pins J46 and J48 or if the drive is installed as
c ) If the system has an older BIOS which does not provide a UDT, set the BIOS for the Maxtor hard
drive to Type 9. If this BIOS setting is used or the BIOS does not support LBA, the drive must be
Boot the system to the bootable Max•Blast installation software diskette received with the hard drive or with a
a Slave, store the spare jumper across J42 and J44.
4 – 28
3 If the BIOS was set to AUTO DETECT, re-boot the system and use Max•Blast installation software to
complete the hard drive installation. If other BIOS settings were used, access the system BIOS SETUP program
and set the BIOS parameters to Type 9 for the Maxtor hard drive then re-boot the system and use Max•Blast
installation software to complete the hard drive installation. NOTE: When this jumper is installed, the Maxtor
hard drive must be prepared using Max•Blast.
Page 29

INSTALLATION
Windows NT 4.0 Users
If the cylinder reduction jumper is installed, Windows NT 4.0 will not work with MaxBlast Installation Software (ver.
9.00M or newer) and the drive capacity will be limited to 2.1 GB. If the cylinder reduction jumper is not installed,
Windows NT 4.0 will work with MaxBlast.
Microsoft recommends that Windows NT 4.0 only be installed on a system that has a BIOS which supports drives larger than
2.1 GB.
Hard Drive Preparation
To complete the installation of the Maxtor hard drive, the drive must be partitioned and formatted.
1. Boot the system.
a) Using the Max•Blast diskette received with the hard drive, place the diskette in the A: drive and turn the
system on. Proceed to Step 2.
b ) If a Max•Blast diskette was not included with the hard drive:
1 ) Boot the system with a DOS 5.0 (or higher) or Windows 95 system diskette
2 ) Place the diskette with the downloaded version of Max•Blast in the appropriate floppy drive.
3 ) Type “ EZMAX” and press the [Enter] key.
2. The Max•Blast installation software will load and the first screen of the program will display. Follow the
on-screen prompts to complete the hard drive installation.
4 – 29
Page 30

AT INTERFACE DESCRIPTION
AT Interface Description
Interface Connector
All DiamondMax™ 1750 AT drives have a 40-pin ATA interface connector mounted on the PCBA. The drive may
connect directly to the host; or it can also accommodate a cable connection (maximum cable length: 18 inches).
SECTION 5
Figure 5-1
Data Connector
Pin Description Summary
PIN SIGNAL PIN SIGNAL
01 Reset - 02 Ground
03 DD7 04 DD8
05 DD6 06 DD9
07 DD5 08 DD10
09 DD4 10 DD11
11 DD3 12 DD12
13 DD2 14 DD13
15 DD1 16 DD14
17 DD0 18 DD15
19 Ground 20 (keypin)
21 DMARQ 22 Ground
23 DIOW -:STOP 24 Ground
25 DIOR -:HDMARDY:HSTROBE 26 Ground
27 IOR DY:D DMAR DY:D ST ROB E 28 CS EL
29 DMACK - 30 Ground
31 INTRQ 32
33 DA1 34 PDIAG -
35 DA0 36 DA2
37 CS0 - 38 CS1 -
39 DASP - 40 Ground
IOCS16
Obsolete
5 – 30
Page 31
AT INTERFACE DESCRIPTION
Pin Description Table
PIN NAME PIN I/O SIGNAL NAME SIGNAL DESCRIPTI ON
RESET - 01 I Host Reset Reset signal from the host system. Active during power up and inactive after.
DD0 17 I/O Host Dat a Bus 16 bit bi-directional dat a bus between host and drive. Lower 8 bits used for register and ECC
DD1 15 I/O
DD2 13 I/O
DD3 11 I/O
DD4 09 I/O
DD5 07 I/O
DD6 05 I/O
DD7 03 I/O
DD8 04 I/O
DD9 06 I/O
DD10 08 I/O
DD11 10 I/O
DD12 12 I/O
DD13 14 I/O
DD14 16 I/O
DD15 18 I/O
DMARQ 21 O DMA Request This signal is used with DMACK for DMA transfers. By asserting this signal, the drive
DIOW - STOP 23 I Host I/O Write Rising edge of Write strobe clocks data from the host data bus to a register on the drive.
DIOR -
HDMARDY -
HSTROBE
IORDY
DDMARDY -
DSTROBE
CSEL 28 Cable Select Used for Master/Slave selection via cable. Requires special cabling on host system and
DMACK - 29 I DMA Acknowledge This signal is used with DMARQ for DMA transfers. By asserting this signal, the host is
INTRQ 31 O Host Interrupt
IOCS16 32 Device 16 bit I/O Obsolete
PDIAG - 34 I/O Passed Diagnostic Output by drive when in Sl ave mode; Input to drive when in Master mode.
DA0 35 I Host Address Bus 3 bit binary address from the host to select a register in the drive.
DA1 33 I
DA2 36 I
CS0 - 37 I Host Chip Select 0 Chip select from the host used to access the Command Block registers in the drive. This
CS1 - 38 I Host Chip Select 1 Chip select from the host used to access the Control registers in the drive. This signal is a
DASP - 39 I/O Drive Active/Drive 1
GND 02 N/A Ground Signal ground.
KEY 20 N/A Key Pin used for keying the interface connector.
25 I Host I/O Read Read strobe enables data from a register on the drive onto the host data bus.
27 O I/O Channel Ready This signal may be driven low by the drive to insert wait states into host I/O cycles.
Request
Present
19
22
24
26
30
40
byte transfers. All 16 bits used for data transfers.
indicates that data is ready to be transfered to and from the host.
DMA ready during UltraDMA data in bursts.
Data strobe during UltraDMA data out bursts.
DMA ready during UltraDMA data out bursts.
Data strobe during UltraDMA data in bursts.
installation of Cable Select jumper.
acknowledging the receipt of data or is indicating that data is available.
Interrupt to the host asserted when the drive requires attention from the host.
signal is a decode of I/O addresses 1F0 - 1F7 hex.
decode of I/O addresses 3F6 - 3F7 hex.
Time-multiplexed, open coll ector output which indicates that a drive is active, or that
device 1 is present.
5 – 31
Page 32

AT INTERFACE DESCRIPTION
PIO Timing
TIMING PARAMETERS MODE 0 MODE 1 MODE 2 MODE 3 MODE 4
t0 Cycle Time (min) 600 ns 383 ns 240 ns 180 ns 120 ns
t1 Address valid to DIOR-/DIOW- setup (min) 70 ns 50 ns 30 ns 30 ns 25 ns
t2 DIOR-/DIOW- 16-bit (min) 165 ns 125 ns 100 ns 80 ns 70 ns
t2i DIOR-/DIOW- recover y time (min) 70 ns 25 ns
t3 DIOW- data setup (min) 60 ns 45 ns 30 ns 30 ns 20 ns
t4 DIOW- data hold (min) 30 ns 20 ns 15 ns 10 ns 10 ns
t5 DIOR- data setup (min) 50 ns 35 ns 20 ns 20 ns 20 ns
t6 DIOW- data hold (min) 5 ns 5 ns 5 ns 5 ns 5 ns
t6Z DIOR- data tristate (max) 30 ns 30 ns 30 ns 30 ns 30 ns
t9 DIOR-/DIOW- to address valid hold (min) 20 ns 15 ns 10 ns 10 ns 10 ns
tRd Read Data Valid to IORDY active (min) 0 0 0 0 0
tA IORDY Setup Time 35 ns 35 ns 35 ns 35 ns 35 ns
tB IORDY Pulse Width (max) 1250 ns 1250 ns 1250 ns 1250 ns 1250 ns
5 – 32
PIO Data Transfer To/From Device
Figure 5 - 2
Page 33

DMA Timing
TIMING PARAMETERS MODE 0 MO DE 1 MODE 2
t0 Cycle Time (min) 480 ns 150 ns 120 ns
tC DMACK to DMARQ delay
tD DIOR-/DIOW- (min) 215 ns 80 ns 70 ns
tE DIOR- data access (min) 150 ns 60 ns
tF DIOR- data hold (min) 5 ns 5 ns 5 ns
tG DIOR-/DIOW- data setup (min) 100 ns 30 ns 20 ns
tH DIOW- data hold (min) 20 ns 15 ns 10 ns
tI DMACK to DIOR-/DIOW- setup (min) 0 0 0
tJ DIOR-/DIOW- to DMACK hold (min) 20 ns 5 ns 5 ns
tKr DIOR- negated pulse width (min) 50 ns 50 ns 25 ns
tKw DIOW- negated pulse width (min) 215 ns 50 ns 25 ns
tLr DIOR- to DMARQ delay (max) 120 ns 40 ns 35 ns
tLw DIOW- to DMARQ delay (max) 40 ns 40 ns 35 ns
tZ DMACK- to tristate (max) 20 ns 25 ns 25 ns
AT INTERFACE DESCRIPTION
Multi-word DMA Data Transfer
Figure 5 - 3
5 – 33
Page 34

HOST SOFTWARE INTERFACE
Host Software Interface
The host communicates with the drive through a set of controller registers accessed via the host’s I/O ports.
These registers divide into two groups: the Task File, used for passing commands and command parameters and
the Control/Diagnostic registers.
Task File Registers
The Task File consists of eight registers used to control fixed disk operations. The host accesses each register by the I/O port
address shown in this Task File register map:
I/O PORT RE AD WRITE
1F0h Data Register Data Register
1F1h Error Register Features Register
1F2h Sector Count Sector Count
1F3h Sector Number Sector Number
1F4h Cylinder Low Cylinder Low
1F5h Cylinder High Cylinder High
1F6h Drive/Head (SDH) Drive/Head (SDH)
1F7h Status Register Command Register
SECTION 6
Data Register
Provides access to the drive’s sector buffer for read and write operations. With the exception of ECC byte transfers (which,
during Read long and Write long commands, are 8 bits wide), data transfers through the Data register are all 16 bits wide.
Error Register
A read-only register containing specific information regarding the previous command. Data interpretation differs
depending on whether the controller is in operational or diagnostic mode. A power up, reset, software reset, or receipt of a
diagnostic command sets the controller into diagnostic mode. This mode invalidates contents of the Status register. The
contents of the Error register reflect a completion code.
Issuing any command (apart from a Diagnostic command) places the controller into operational mode.
In operational mode, the Error register is valid only when the Error bit in the Status register is set. The bit definitions for
operational mode follow:
76543210
0 ECC 0 IDNF 0 ABRT TK0 AMNF
Interface
CRC
Interface CRC
Data ECC Error
Firmware Problem
ID Not Found
Aborted Command
Track 0 Error
Address Mark Not Found
Data
ECC Error
– An interface CRC error occurred during an Ultra DMA transfer.
– An non-correctable ECC error occurred during a Read Sector command.
– Either a matching ID field not found, or a CRC error occurred.
– Track 0 was not found during execution of a Restore command.
Not
Used
– Indicates a firmware problem was detected, (e.g., invalid interrupt, divide overflow).
– Invalid commands, write fault, no seek complete, or drive not ready.
– The Address Mark could not be found after an ID match.
ID
Not Found
Not
Used
Aborted
Command
Track 0
Error
Address Mark
Not Found
Features Register
Enables or disables features through the Set Features command.
6 – 34
Page 35

HOST SOFTWARE INTERFACE
Sector Count Register
Holds the number of sectors to be sent during a Read or Write command, and the number of sectors per track during a
Format command. A value of zero in this register implies a transfer of 256 sectors. A multi-sector operation decrements the
Sector Count register. If an error occurs during such an operation, this register contains the remaining number of sectors to
be transferred.
Sector Number Register
Holds the starting sector number for any disk operation. The register is updated as each sector is processed in a multi-sector
operation.
Cylinder Number Registers
Two 8-bit Cylinder Number registers (Low and High) specify the starting cylinder for disk operation.
Device/Head Register
Used to specify the drive and head number to be operated on during any disk operations. Within the context of
a Set Parameters command, this register specifies the maximum number of heads on the drive.
Bit definitions follow:
76543210
1 LBA 1 D RV HS 3 HS2 HS1 HS0
LBA
Mode
Drive
Select
Head
Select
Head
Select
Head
Select
Head
Select
Select LBA Mode
– Enabling this bit for commands not supported by LBA mode will abort the selected command. When set,
the Task File register contents are defined as follows for the Read/Write and translate command:
CONTENTS LBA BI TS
Sector Number 0 - 7
Cylinder Low 8 - 15
Cylinder High 16 - 23
Drive/Head 24 - 27
Drive Select
Head Select
– Set to 0 to select the master drive; set to 1 to select the slave drive.
– Specifies the binary coded address of the head to be selected.
Status Register
Contains results of the last command executed, and the drive’s status. The other seven Task File registers may be read only
when bit 7 (BUSY) of the Status register is low. Reading any of the Task File registers when BUSY is high returns the
value of the Status register. Reading the Status register also clears any interrupt request to the host. Bit definitions follow:
76543210
BUSY DRDY DF DSC DRQ 0 0 ERR
Controller
Busy
Controller Busy
execution. After a command, this bit resets.
Device Ready
Device Fault
Device Seek Complete
Data Request
Error
– The Error bit sets when the previous command has completed with a non-recoverable error.
Device
Ready
Device
Fau l t
Device Seek
Complete
Data
Request
Error
– Goes active when a command is written to the Command register, indicating controller task
– Indicates that the drive is ready for commands. If drive ready is not present, all commands abort.
– Indicates the drive’s detection of a write fault condition, causing all commands to abort.
– Signifies a seek completion, and that the drive is on track.
– Indicates that the drive’s sector buffer is ready for data transfer.
6 – 35
Page 36

HOST SOFTWARE INTERFACE
Command Register
Contains code for the command to be performed. Additional command information should be written to the task file before
the Command register is loaded. When this register is written, the BUSY bit in the Status register sets, and interrupt request to
the host clears; invalid commands abort. (Detailed information on interface commands is given in Section 7.) Hex values for
valid command formats follow:
Read Commands
Read Sector(s) 20 h Normal reads; retries enabled
Read Verify Sector(s) 40 h Retries enabled
Read Sector Buffer E4 h
Read Multiple C 4h
Read DMA C8 h
Write Commands
Write Sector(s) 3 0h Normal writes; retries enabled
Write Verify Sector(s) 3 C h
Write Sector Buffer E 8h
Write Multiple C5 h
Write DMA C Ah
Mode Set/Check Commands
Set Features EFh
Set Multiple Mode C 6h
Power Mode Commands
Standby Immediate 94/E0h Stops drive spindle; do not change time-out value
Idle Immediate 95/E1h Starts spindle; do not change time-out value
Standby 96/E2h Stops spindle; change time-out value
Idle 97/E3h Starts spindle; change time-out value
Check Power Mode 98/E5h
Set Sleep Mode 99/E6h
Initialization Commands
Identify Drive EC h
Initialize Drive Parameters 91 h
Re-calibrate 1x h
Seek, Format, and Diagnostic Commands
Seek 7xh
Format Track 5 0h
Execute Drive Diagnostic 90 h
S.M.A.R.T. Commands
Execute S.M.A.R.T. B0 h
2 1h Normal reads; retries disabled
2 2h Read Long; retries enabled
2 3h Read Long; retries disabled
4 1h Retries disabled
C 9h No retries
3 1h Normal writes; retries disabled
3 2h Write Long; retries enabled
3 3h Write Long; retries disabled
C Bh No retries
6 – 36
Page 37
HOST SOFTWARE INTERFACE
Summary
COMMAND NAME COMMAND CODE PARAMETERS USED
b7 b6 b5 b4 b3 b2 b1 b0 F SC SN C SDH
Recalibrate 00 0 1 x x x x NNNN D
Read Sector(s) 001000Lx NYYY Y
Read DMA 1100100x NYYY Y
Write Sector(s) 001100Lx NYYY Y
Write DMA 1100101x NYYY Y
Write Verify Sector(s) 00111100 NYYY Y
Read Verify Sector(s) 0100000x NYYY Y
Format Track 01010000 NNNY Y
Seek 0111xxxx NNYY Y
Execute Diagnostic 10010000 NNNN D
Initialize Parameters 10010001 NYNN Y
Read Sector Buffer 11100100 NNNN D
Write Sector Buffer 11101000 NNNN D
Identify Drive 11101100 NNNN D
Set Features 11101111 YNNN D
Read Multiple 11000100 NYYY Y
Write Multiple 11000101 NYYY Y
Set Multiple Mode 11000110 NYNN D
KEY EXPLANATION
L Long bit
If L = 1, Read/Write Long commands are performed
If L = 0, normal Read/Write commands are perform ed
SC Sector count register
SN Sector number register
C Cylinder register
F Features register
SDH Drive/Head register
Y Indicates that the register contains a valid parameter for a cited command.
Within the Drive/Head register, Y indicates that both the drive and head
parameters are used.
D Signifies that the drive parameter, not the head parameter, is valid.
X D on't care
NNot required
6 – 37
Page 38

HOST SOFTWARE INTERFACE
Control Diagnostic Registers
These I/O port addresses reference three Control/Diagnostic registers:
I/O PORT RE AD WRITE
3F6h Alternate Status Fixed Disk Control
3F7h Digital Input Not used
Alternate Status Register
Contains the same information as the Status register in the Task File. However, this register may be read at any time
without clearing a pending interrupt.
Device Control Register
Contains the software Reset bit and the Enable bit to enable interrupt requests to the host. Bit definitions follow:
76543210
00000SRSTIEN0
Reset – Setting the software Reset bit holds the drive in the reset state. Clearing the bit re-enables the drive.
The software Reset bit must be held active for a minimum of 5 µsec.
Reset IRQ Enable
IRQ Enable
– Setting the Interrupt Request Enable to 0 enables the IRQ 14 signal to the host. When this bit is set
to 1, IRQ14 is tri-stated, and interrupts to the host are disabled. Any pending interrupt occurs when the bit is set to 0.
The default state of this bit after power up is 0 (interrupt enabled).
Digital Input Register
Contains information about the state of the drive. Bit definitions follow:
76543210
x -WG -HS3 -HS2 -HS1 -HS0 -DS1 DS0
Reserved Write
Gate
Head
Select 3
Head
Select 2
Head
Select 1
Head
Select 0
Drive
Select 1
Drive
Select 0
Bit 7 of the host data bus is not driven when this register is read.
-Write Gate
-Head Select 3 through -Head Select 0
-Drive Select 1
-Drive Select 0
– Reflects the state of the active low write gate signal on the drive.
– Represents the ones complement of the currently selected head number.
– Is 0 if drive 1 selected; 1 otherwise.
– Is 0 if drive 0 selected; 1 otherwise.
6 – 38
Page 39

HOST SOFTWARE INTERFACE
Reset and Interrupt Handling
Reset Handling
One of three different conditions may cause a reset: power on, hardware reset or software reset. All three cause the
interface processor to initialize itself and the Task File registers of the interface. A reset also causes a set of the Busy bit in the
Status register. The Busy bit does not clear until the reset clears and the drive completes initialization. Completion of a
reset operation does not generate a host interrupt.
Task File registers are initialized as follows:
Error 1
Sector Count 1
Sector Number 1
Cylinder Low 0
Cylinder High 0
Drive/Head 0
Interrupt Handling
The drive requests data transfers to and from the host by asserting its IRQ 14 signal. This signal interrupts the host if
enabled by bit 1 (IRQ enable) of the Fixed Disk Control register.
Clear this interrupt by reading the Status register, writing the Command register, or by executing a host hardware or
software reset.
6 – 39
Page 40

INTERFACE COMMANDS
Interface Commands
The following section describes the commands (and any parameters necessary to execute them),
as well as Status and Error register bits affected.
Read Commands
Read Sector(s)
Read Verify Sector(s)
Read Sector Buffer
Read DMA
Multi-word DMA
Set Multiple
Write Commands
Write Sector(s)
Write Verify Sector(s)
Write Sector Buffer
Write DMA
Multi-word DMA
Write Multiple
SECTION 7
Set Feature Commands
Set Features Mode
Power Mode Commands
Standby Immediate
Idle Immediate
Standby
Idle
Check Power Mode
Set Sleep Mode
Default Power-on Condition
Initialization Commands
Identify Drive
Initialize Drive Parameters
Seek, Format and Diagnostic Commands
Seek
Format Track
Execute Drive Diagnostic
S.M.A.R.T. Commands
Execute S.M.A.R.T.
7 – 40
Page 41

INTERFACE COMMANDS
Read Commands
Read Sector(s)
Reads from 1 to 256 sectors, as specified in the Command Block, beginning at the specified sector. (A sector count of 0
requests 256 sectors.) Immediately after the Command register is written, the drive sets the BSY bit and begins execution of
the command. If the drive is not already on the desired track, an implied seek is performed.
Once at the desired track, the drive searches for the data address mark of the requested sector. The data address mark must
be recognized within a specified number of bytes, or the Data Address Mark Not Found error will be reported. Assuming
the data address mark is found:
1. The data field is read into the sector buffer.
2. Error bits are set (if an error was encountered).
3. The DRQ bit is set.
4. An interrupt is generated.
The DRQ bit is always set, regardless of the presence or absence of an error condition after the sector. Upon command
completion, the Command Block registers contain the numbers of the cylinder, head and sector of the last sector read.
Back-to-back sector read commands set DRQ and generate an interrupt when the sector buffer is filled at the completion
of each sector. The drive is then ready for the data to be read by the host. DRQ is reset and BSY is set immediately when
the host empties the sector buffer.
If an error occurs during Read Sector commands, the read terminates at the sector where the error occurred. The host may
then read the Command Block to determine the nature of that error, and the sector where it happened. If the error type is
a correctable or an non-correctable data error, the flawed data is loaded into the sector buffer.
A Read Long command sets the Long bit in the command code and returns the data and the ECC bytes in the data field of
the specified sector. During a Read Long, the drive does not check the ECC bytes to determine if there has been a data
error. The Read Long command is limited to single sector requests.
Read Verify Sector(s)
Identical to the Read Sector(s) command, except that:
1. DRQ is never set,
2. No data is transferred back to the host and
3. The long bit is not valid.
The drive sets BSY when the Command register is written; the drive resets BSY and generates an interrupt once the
requested sectors have been verified. Upon command completion, the Command Block registers contain the numbers of
cylinder, head, and last sector verified.
If an error occurs during the execution of Read Verify Sector(s) commands, the read terminates at the sector where the
error happened. The Command Block registers then contain the numbers of the cylinder, head, and sector information
where the error occurred.
Read Sector Buffer
Allows the host to read the contents of the drive’s sector buffer. When the command is received, the drive:
1. Sets BSY,
2. Sets up the sector buffer for a read operation,
3. Sets DRQ,
4. Resets BSY and
5. Generates an interrupt.
The host may then read up to 256 words of data from the buffer.
7 – 41
Page 42

INTERFACE COMMANDS
Read DMA
Multi-word DMA
Identical to the Read Sector(s) command, except that
1. The host initializes a slave-DMA channel prior to issuing the command,
2. Data transfers are qualified by DMARQ and are performed by the slave-DMA channel and
3. The drive issues only one interrupt per command to indicate that data transfer has terminated
Any unrecoverable error encountered during execution of a Read DMA command terminates data transfer
after the transfer of all sectors prior to the sector where the error was detected. The sector in error is not
transferred. The drive generates an interrupt to indicate that data transfer has terminated and status is available.
The error posting is identical to the Read Sector(s) command.
Read Multiple
Performs similarly to the Read Sector(s) command, except that for each READ MULTIPLE command data transfers are
multiple sector blocks and the Long bit is not valid.
Execution is also similar to that of the READ SECTOR(S) command, except that:
1. Several sectors are transferred to the host as a block, without intervening interrupts.
2. DRQ qualification of the transfer is required only at the start of each block, not of each sector.
The block count consists of the number of sectors to be transferred as a block. (The block count is programmed by the Set
Multiple Mode command, which must be executed prior to the Read Multiple command.) READ LONG command is
limited to single sector requests.
and status is available.
When the Read Multiple command is issued, the Sector Count register contains the number of sectors requested — not the
number of blocks or the block count. If the number of sectors is not evenly divisible by the block count, as many full
blocks as possible are transferred, followed by a final, partial block transfer. This final, partial block transfer is for N
sectors, where N = (sector count) modulo (block count)
The Read Multiple operation will be rejected with an Aborted Command error if attempted:
1. Before the Set Multiple Mode command has been executed, or
2. When Read Multiple commands are disabled.
The controller reports disk errors encountered during Read Multiple commands at the start of the block or partial block
transfer. However, DRQ still sets, and the transfer occurs normally, along with the transfer of any corrupt data. Remaining
block data from the following the sector in error is not valid.
Subsequent blocks or partial blocks transfer only if the error was a correctable data error. All other errors cause the
command to stop after transfer of the block which contained the error. Interrupts are generated when DRQ is set at the
beginning of each block or partial block.
Set Multiple Mode
Enables the controller to perform Read and Write Multiple operations, and establishes the block count for these
commands. Before issuing this command, the Sector Count register should be loaded with the number of sectors per block.
The drives support block sizes of 2, 4, 8 and 16 sectors.
When this command is received, the controller sets BSY and examines the Sector Count register contents. If they contain a
valid and supported block count value, that value is loaded for all subsequent Read and Write Multiple commands, and
execution of those commands is enabled. An invalid and unsupported block count in the register results in an Aborted
Command error and the disallows Read Multiple and Write Multiple commands.
If the Sector Count register contains 0 when the Set Multiple Mode command is issued, Read Multiple and Write
Multiple commands are disabled; no error is returned. Once the appropriate action has been taken, the controller resets
BSY and generates an interrupt. At power up, or after a hardware or software reset, Read Multiple and Write Multiple
commands are disabled by default.
7 – 42
Page 43

INTERFACE COMMANDS
Write Commands
Write Sector(s)
Writes from 1 to 256 sectors, beginning at a sector specified in the Command Block. (A sector count of 0 requests 256
sectors.)
When the Command register is written, the drive sets the DRQ bit and waits for the host to fill the sector buffer with the
data to be written. An interrupt is not generated to start the first buffer fill operation.
Once the buffer is full, the drive resets DRQ, sets BSY, and begins command execution. If the drive is not already on the
desired track, an implied seek is performed.
The data loaded in the buffer is written to the data field of the sector, followed by the ECC bytes. Upon command
completion, the Command Block registers contain the cylinder, head and sector number of the last sector written. The
next time the buffer is ready to be filled during back-to-back Write Sector commands, DRQ is set and an interrupt is
generated.
After the host fills the buffer, DRQ is reset and BSY is set. If an error occurs, Write Sector operations terminate at the
sector containing the error.
The Command Block registers then contain the numbers of the cylinder, head and sector where the error occurred. The
host may read the Command Block to determine the nature of that error, and on which sector it happened. A Write Long
may be executed by setting the Long bit in the command code. The Write Long command writes the data and the ECC
bytes directly from the sector buffer; the drive itself does not generate the ECC bytes. Restrict Write Long commands to
PIO Mode 0.
Write Verify Sector(s)
Identical to the Write Sector(s) command, except that the requested sectors are verified immediately after being written.
The verify operation reads (without transferring), and checks for data errors. Any errors encountered during this operation
are reported.
Write Sector Buffer
Allows the host to overwrite the contents of the drive’s sector buffer with a selected data pattern. When this command is
received, the drive:
1. Sets BSY,
2. Sets up the sector buffer for a write operation,
3. Sets DRQ,
4. Resets BSY and
5. Generates an interrupt.
The host may then write up to 256 words of data to the buffer.
Write Multiple
Performs similarly to the Write Sector(s) command, except that:
1. The controller sets BSY immediately upon receipt of the command,
2. Data transfers are multiple sector blocks and
3. The Long bit and Retry bit is not valid.
Command execution differs from Write Sector(s) because:
1. Several sectors transfer to the host as a block without intervening interrupts.
2. DRQ qualification of the transfer is required at the start of the block, not on each sector.
7 – 43
Page 44

INTERFACE COMMANDS
The block count consists of the number of sectors to be transferred as a block and is programmed by the Set Multiple
Mode command, which must be executed prior to the Write Multiple command. When the Write Multiple command is
issued, the Sector Count register contains the number of sectors requested — not the number of blocks or the block count.
If the number of sectors is not evenly divisible by the block count, as many full blocks as possible are transferred, followed
by a final, partial block transfer. This final, partial block transfer is for N sectors, where N = (sector count) modulo (bloc k
count)
The Write Multiple operation will be rejected with an Aborted Command error if attempted:
1. Before the Set Multiple Mode command has been executed, or
2. When Write Multiple commands are disabled.
All disk errors encountered during Write Multiple commands report after the attempted disk write of the block or partial
block in which the error occurred.
The write operation ends with the sector in error, even if it was in the middle of a block. When an error occurs,
subsequent blocks are not transferred. When DRQ is set at the beginning of each full and partial block, interrupts are
generated.
Write DMA
Multi-word DMA
Identical to the Write Sector(s) command, except that:
1. The host initializes a slave-DMA channel prior to issuing the command,
2. Data transfers are qualified by DMARQ and are performed by the slave-DMA channel and
3. The drive issues only one interrupt per command to indicate that data transfer has terminated
at status is available.
Any error encountered during Write DMA execution results in the termination of data transfer. The drive
issues an interrupt to indicate that data transfer has terminated and status is available in the error register. The
error posting is the same as that of the Write Sector(s) command.
7 – 44
Page 45

Set Feature Commands
Set Features Mode
Enables or disables features supported by the drive. When the drive receives this command it:
1. Sets BSY,
2. Checks the contents of the Features register,
3. Clears BSY and
4. Generates an interrupt.
If the value of the register is not a feature supported by the drive, the command is aborted.
The acceptable values in the Features register are defined as follows:
VAL U E DES CRIPTION
02h* Enabled write cache
03h Set transfer mode based on value in Sector Count register
44h Length of data appended on Read Long/Write Long
commands specified in the Identify Device information
55h Disable read look-ahead feature
66h* Disable reverting to power-on defaults
82h Disable write cache
AAh* Enable read look-ahead feature
BBh* 4 bytes of Maxtor specific data appended on Read
Long/Write Long commands
CCh Enable reverting to power-on defaults
* Enabled at power up by default.
INTERFACE COMMANDS
7 – 45
Page 46

INTERFACE COMMANDS
Power Mode Commands
Standby Immediate – 94h/E0h
Spin down and do not change time out value. This command will spin the drive down and cause the drive to enter the
STANDBY MODE immediately. If the drive is already spun down, the spin down sequence is not executed.
Idle Immediate – 95h/E1h
Spin up and do not change time out value. This command will spin up the spin motor if the drive is spun down, and cause
the drive to enter the IDLE MODE immediately. If the drive is already spinning, the spin up sequence is not executed.
The actuator is parked and some circuits are powered off.
Standby – 96h/E2h
Spin down and change time out value. This command will spin the drive down and cause the drive to enter the
STANDBY MODE immediately. If the drive is already spun down, the spin down sequence is not executed. A non-zero
value placed in the sector count register will enable the Automatic Power Down sequence. The timer will begin counting
down when the drive returns to the IDLE MODE. A value of zero placed in the sector count register will disable the
Automatic Power Down sequence.
Idle – 97h/E3h
Spin up and change time out value. This command will spin-up the spin motor if the drive is spun-down.
If the drive is already spinning, the spin up sequence is not executed. A non-zero value placed in the Sector Count
register will enable the Automatic Power Down sequence and their timer will begin counting down immediately. A value
of zero placed in the Sector Count register will disable the Automatic Power Down sequence. The actuator is parked and
some circuits are powered off.
Check Power Mode – 98h/E5h
This command returns a code in the Sector Count register that determines the current Power Mode status of the drive. If
the drive is in, going to, or recovering from the STANDBY MODE the drive sets the Sector Count register to OOh. If
the drive is in the IDLE MODE or ACTIVE MODE, the drive sets the Sector Count register to FFh.
Set Sleep Mode – 99h/E6h
This command will spin the drive down and cause the drive to enter the SLEEP MODE immediately. If the drive is
already spun down, the spin down sequence is not executed.
Note: The only way to recover from SLEEP MODE is with a software reset or a hardware reset.
Default Power-on Condition
The drive’s default power on condition is the ACTIVE MODE.
Upon receiving a Power Mode command, except the SLEEP MODE command, the drive sets BSY and performs the
requested power operation. Once the requested Power Mode change has begun, the drive resets BSY and generates an
interrupt - without waiting for the drive to spin up or spin down. Upon receiving a SLEEP MODE command the drive is
spun down, and when it is stopped, the drive resets BSY and generates an interrupt.
7 – 46
Page 47

INTERFACE COMMANDS
When enabling the Automatic Power Down sequence, the value placed in the Sector Count register is multiplied by five
seconds to obtain the Time-out Interval value. If no drive commands are received from the host within the Time-out
Interval, the drive automatically enters the STANDBY mode. The minimum value is 5 seconds.
TIMER VALUE TIME-OUT PERIOD
0 Time-out disabled
1 - 240 (value * 5) seconds
241 - 251 ((value - 240) * 30) minutes
252 21 minutes
253 Vendor unique period = 10 hours
254 Reser ved
255 21 minutes, 15 seconds
While the drive is in STANDBY MODE, any commands received from the host are accepted and executed as they would
in normal operation, except that the spin motor is started if required to execute a disk command. Under these conditions,
the drive will set BSY when command processing would normally begin and will leave BSY set until the drive comes up
to speed and the disk command can be executed. Disk commands issued while the drive is in STANDBY MODE, restarts
the Time-out Interval after completing the command. A reset must be issued before attempting to issue any commands
while the drive in
SLEEP MODE.
7 – 47
Page 48

INTERFACE COMMANDS
Initialization Commands
Identify Drive
Allows the host to receive parameter information from the drive.
When the command is received, the drive:
1. Sets BSY,
2. Stores the required parameter information in the sector buffer,
3. Sets the DRQ bit and
4. Generates an interrupt.
The host may then read the information out of the sector buffer. Parameter words in the buffer follow.
Note that all reserved bits or words should be zeroes.
WORD CONTENT DES CRIPTION
0 General configuration
15 = dev i ce ( 0 = ATA , 1 = ATA P I )
14-8 = not used
7, 1 = removable media data
6, 1 = not removable controller and/or device
5-1 = reserved
0
1 Number of cylinders
2 Reserved
3 Number of logical heads
4-5 Not used
6 Number of logical sectors per track
7-9 Not used
10 - 19 Drive serial number (40 ASCII characters)
20 Not used
21 Buffer size in 512 byte increments (0000h = not specified)
22 Number of Maxtor specific bytes available on Read/Write Long commands
23 - 26 Firmware revision (8 ASCII characters)
27 - 46 Model number (40 ASCII characters)
47 Maximum number of sectors that can be transferred per interrupt on read and write multiple commands
48 Reserved
49 Capabilities
15 - 14 = res er ve d
13 = standby timer (1 = values as specified in this standard are supported, 0 = values are Maxtor specific)
12 = reserved (advanced PIO mode support)
11, 1 = IORDY supported, 0 = IORDY may be supported
10, 1 = IORDY can be disabled
9-8 = reserved
7-0 = not used
7 – 48
Page 49
WOR D CONTENT DESCRIPTION
50 Reserved
51 15-8 = PIO data transfer mode
7-0 = not used
52 15-8 = DMA data transfer mode
7-0 = not used
53 15 = reserved
2, 1 = the fields supported in words 88 are valid, 0 = the fields supported in words 88 are not valid
1, 1 = the fields reports in words 64-70 are valid, 0 = the fields reports in words 64-70 are not valid
0, 1 = the fields reports in words 54-58 are valid, 0 = the fields reports in words 54-58 are not valid
54 Number of current logical cylinders
55 Number of current logical heads
56 Number of logical sectors per track
57 - 58 Current capacity in sectors
59 15-9 = reserved
8, 1 = multiple sector setting is valid
7-0xxh = current setting for number of sectors that can per transferred per interrupt on Read/Write Multiple
command
60 - 61 Total number of user addressable sectors (LBA mode only)
62 Reserved
63 15-8 = Multi-word DMA transfer mode active
7-0 = Multi=word DMA transfer modes supported
64 15-8 = reserved
7-0 = advanced PIO transfer modes supported
65 Minimum multi-word DMA transfer cycle time (15-0 = cycle time in nanoseconds)
66 Manufacturer's recommeded multi-word DMA transfer cycle time (15-0 = cycle time in nanoseconds)
67 Minimum PIO transfer cycle time without flow control (15-0 = cycle time in nanoseconds)
68 Minimum PIO transfer cycle time with IORDY flow control (15-0 = cycle time in nanoseconds)
69-79 Reserved
80 15-5 = reserved
4, 1 = supports ATA-4
3, 1 = supports ATA-3
2, 1 = supports ATA-2
1, 1 = supports ATA-1
0, reserved
81 Minor version number
82 Command set supported. If words 82 and 83 = 0000h or FFFFh command set notification not supported.
15, 1 = supports the Identify Device DMA command
14, 1 = supports the NOP command
13, 1 = supports the Write Buffer command
12, 1 = supports the Read Buffer command
11, 1 = supports the Read Buffer command
10, 1 = supports Host-Protected Area feature set
9, 1 = supports the Device Reset command
8, 1 = supports Service Interupt
7, 1 = supports Release Interupt
6, 1 = supports Look Ahead
5, 1 = supports Write Cache
4, 1 = supports the Packet command feature set
3, 1 = supports the Power Management feature command
2, 1 = supports the Removable feature command
1, 1 = supports the Securit y featurecommand
0, 1 = supports the SMART feature set
INTERFACE COMMANDS
7 – 49
Page 50

INTERFACE COMMANDS
WOR D CONTENT DESCRIPTION
83 Command sets supported. If words 82, 83 and 84 = 0000h or FFFFh command set notification not supported.
84 Command set extensions supported. If words 84, 85 and 86 = 0000h or FFFFh command set notification not
85 Command set enabled. If words 84, 85 and 86 = 0000h or FFFFh command set notification not supported.
86 Command sets enabled. If words 85, 86 and 87 = 0000h or FFFFh command set notification not supported.
87 Command sets enabled. If words 85, 86 and 87 = 0000h or FFFFh command set notification not supported.
88 Ultra DMA
127 Reserved
128 Security Status
129-130 Reserved
131 Spin at power-up, but 0 is asserted when no spin at power-up is enabled.
132-159 Maxtor-specific (not used)
160-255 Reserved
15 = shall be cleared to zero
14 = shall be set to one
13-1 = reserved
0, 1 = supports Downl oad Microcode command
supported.
15 = shall be cleared to zero
14 = shall be set to one
13-0 = reserved
15, 1 = Identify Device DMA command enabled
14, 1 = NOP command enabled
13, 1 = Write Buffer command enabled
12, 1 = Read Buffer command enabled
11, 1 = Write Verify command enabled
10, 1 = Host Protected Area feature set enabled
9, 1 = Device Reset command enabled
8, 1 = Service Interrupt enabled
7, 1 = Release Interrupt enabled
6, 1 = Look Ahead enabled
5, 1 = Write Cache enabled
4, 1 = Packet command feature set enabled
3, 1 = Power Mangement feature set enabled
2, 1 = Removable feature set enabled
1, 1 = Security feature set enabled
0, 1 = SMART feature set enabled
15 = shall be cleared to zero
14 = shall be set to one
13-1 = reserved
0, 1 = supports Downl oad Microcode command
15 = shall be cleared to zero
14 = shall be set to one
13-0 = reserved
15-11 Reserved
10 1 = Ultra DMA Mode 2 is selected
0 = Ultra DMA Mode 2 is not selected
9 1 = Ultra DMA Mode 1 is selected
0 = Ultra DMA Mode 1 is not selected
8 1 = Ultra DMA Mode 0 is selected
0 = Ultra DMA Mode 0 is not selected
7-3 Reserved
2 1 = Ultra DMA Modes 2 and below are supported
0 = Ultra DMA Mode 2 is not supported
1 1 = Ultra DMA Modes 1 and below are supported
0 = Ultra DMA Mode1 is not supported
0 1 = Ultra DMA Modes 0 is supported
0 = Ultra DMA Mode 0 is not supported
15-9 Reserved
8 Security Level 0 = High, 1 = Maximum
7-5 Reserved
4 1 = Security count expired
3 1 = Security frozen
2 1 = Security locked
1 1 = Security enabled
0 1 = Security supported
7 – 50
Page 51

INTERFACE COMMANDS
Initialize Drive Parameters
Enables the drive to operate as any logical drive type. The drive will always be in the translate mode because of Zone
Density Recording, which varies the number of sectors per track depending on the zone. Through setting the Sector
Count Register and Drive Head Register, this command lets the host alter the drive's logical configuration. As a result, the
drive can operate as any equal to or less than capacity drive type. Do not exceed the total number of sectors available on
the drive:
When this command is executed, the drive reads the Sector Counter Register and the Drive Head Register (and so
determines the number of the logical sectors per track and maximum logical head number per cylinder and will calculate
the number of logical cylinders.)
Upon receipt of the command, the drive:
1. Sets BSY,
2. Saves the parameters,
3. Resets BSY and
4. Generates an interrupt.
To specify maximum heads, write 1 less than the maximum (e.g. write 4 for a 5 head drive). To specify maximum sectors,
specify the actual number of sectors (e.g. 17 for a maximum of 17 sectors/track).
The sector count and head values are not checked for validity by this command. If they are invalid, no error will be
posted until an illegal access is made by some other command.
Moves the read/write heads from anywhere on the disk to cylinder 0.
When this command is received, the drive:
1. Sets BSY and
2. Issues a seek to cylinder zero.
The drive waits for the seek to complete, then the drive:
1. Updates status,
2. Resets BSY and
3. Generates an interrupt.
If the drive cannot reach cylinder 0, the Error bit is set in the Status register, and the Track 0 bit is set in the
Error register.
NOTE: If a maximum head and sector number is selected – such that the number of cylinders will exceed 65,535 – then the
maximum cylinder value will be reduced to 65, 535.
7 – 51
Page 52

INTERFACE COMMANDS
Seek, Format and Diagnostic Commands
Seek
Initiates a seek to the track, and selects the head specified in the Command block.
1. Sets BSY in the Status register,
2. Initiates the Seek,
3. Resets BSY and
4. Generates an interrupt.
The drive does not wait for the seek to complete before returning the interrupt. If a new command is issued to a drive
during the execution of a Seek command, the drive will wait (with BSY active) for the Seek to complete before executing
the new command.
Format Track
Formats the track specified in the Command Block. Shortly after the Command register is written, the drive sets the bit,
and waits for the host to fill the sector buffer with the interleave table. When the buffer is full, the drive resets DRQ, sets
BSY and begins command execution. If the drive is not already on the desired track, an implied seek is performed. Once
at the desired track the data fields are written with all zeroes.
Execute Drive Diagnostic
Commands the drive to implement the internal diagnostic tests. (These tests are executed only upon command receipt; they
do not run automatically at power up or after a reset.)
The drive sets BSY immediately upon receiving this command. The following table presents the codes and their
descriptions. Note that the value in the Error register should be viewed as a unique 8 bit Code.
ERROR CODE DESCRIPTION
01 No error detected
00 Master drive failed
80, 82 Master and slave drives failed
81 Slave drive failed
Note: If a slave drive fails diagnostics, the master drive OR’s 80h with its own status, and loads that code into the Error
register. If a slave drive passes diagnostics (or a slave is absent), the master drive OR’s 00 with its own status and loads that
code into the Error register.
7 – 52
Page 53

INTERFACE COMMANDS
S.M.A.R.T. Command Set
Execute S.M.A.R.T.
The Self-Monitoring Analysis and Reporting Technology (S.M.A.R.T.) command has been implemented to improve the
data integrity and data availability of hard disk drives. In some cases, a S.M.A.R.T. capable device will predict an
impending failure with sufficient time to allow users to backup their data and replace the drive before data loss or loss of
service.
The S.M.A.R.T. sub-commands (listed below) comprise the ATA S.M.A.R.T. feature set that provide access to
S.M.A.R.T. attribute values, attribute thresholds and other logging and reporting information.
Prior to writing a S.M.A.R.T. command to the device’s command register, key values must be written by the host into the
device’s Cylinder Low and Cylinder High registers, or the command will be aborted. For any S.M.A.R.T. sub-command,
if a device register is not specified as being written with a value by the host, then the value in that register is undefined and
will be ignored by the device. The key values are:
Key Register
4 Fh Cylinder Low (1F4h)
C 2hCylinder High (1F5h)
The S.M.A.R.T. sub-commands use a single command code (B0h) and are differentiated from one another by the value
placed in the Features register. In order to issue a command, the host must write the sub-command-specific code to the
device’s Features register before writing the command code to the command register. The sub-commands and their
respective codes are:
D 0hS.M.A.R.T. Read Attribute Value
D1 hS.M.A.R.T. Read Attribute Thresholds
D2 hEnable/Disable Autosave
D 3hS.M.A.R.T. Save Attribute Value
D 4hPerform Off-Line Data Collection
D 8hEnable S.M.A.R.T.
D 9hDisable S.M.A.R.T.
D Ah S.M.A.R.T. Return Status
drive is declared to have a positive health status. If any warranty failure threshold is exceeded, the drive
is declared to have a negative health status. Executing this sub-command results in all attribute values
being saved to non-volatile storage on the device.
This feature returns 512 bytes of attribute information to the host.
This feature returns 512 bytes of warranty failure thresholds to the host.
To enable this feature, set the sector count register to F1h (enable) or 0 (disable). Attribute values are
automatically saved to non-volatile storage on the device after five minutes of idle time and before
entering idle, sleep or standby modes. This feature is defaulted to “enabled” when S.M.A.R.T. is
enabled via the S.M.A.R.T. Enable Operations commands. The autosave feature will not impact host
system performance and does not need to be disabled.
This feature saves the current attribute values to non-volatile storage.
Data is collected from random seeks, timed pattern seek times and head margin tests.
This feature allows the host to assess the status of a S.M.A.R.T. capable device by comparing all saved
attribute values with their corresponding warranty failure thresholds. If no thresholds are exceeded, the
D Bh Enable/Disable Automatic Off-Line
To enable this feature, set the Sector Count register to F1h or 0 to disable.
7 – 53
Page 54

SERVICE AND SUPPORT
Service and Support
Service Policy
Repairs to any DiamondMax™ 1750 drive should be made only at an authorized Maxtor repair facility.
Any unauthorized repairs or adjustments to the drive void the warranty.
To consistently provide our customers with the best possible products and services, Maxtor developed the
Total Customer Satisfaction (TCS) program. Through the ongoing TCS process, Maxtor employees take
direct responsibility for every customer’s level of satisfaction – with Maxtor technology, price, quality,
delivery, service and support.
No Quibble® Service
Another TCS feature is Maxtor’s No Quibble® Service policy. By minimizing paperwork and processing,
No Quibble Service dramatically cuts the turnaround time normally required for repairs and returns.
Here’s how it works:
1. Customer calls 1-800-2MAXTOR for a Return Material Authorization (RMA) number
and provides a credit card number,
2. Maxtor ships a replacement drive within 48 hours, and
3. Customer returns the original drive and credit card draft is destroyed.
SECTION 8
Support
Technical Assistance
Highly-trained technicians are available 6 a.m. to 6 p.m. (MST) Monday through Friday to provide
detailed technical support.
U.S. and Canada Language support: English, Spanish
Voice 800-2MAXTOR, press 1 (800-262-9867)
E-mail Technical_Assistance@maxtor.com
Fax 303-678-2260
Outside U.S. and Canada 303-678-2015
Europe Language support: English, French, German
Voice + 353 1 204 11 11
E-mail Eurotech_Assistance@maxtor.com
Fa x + 353 1 286 14 19
Asia/Pacific
Voice Contact your local Maxtor Sales Office for assistance
E-mail Apactech_Assistance@maxtor.com
MaxInfo Service
Use a touch-tone phone to listen to technical information about Maxtor products and the top Q&A’s
from our 24-hour automated voice system.
U.S. and Canada 800-2MAXTOR (800-262-9867)
Outside U.S. and Canada 303-678-2015, press 1
Language support: English
Press 1, wait for announcement, press 1.
8 – 54
Page 55

SERVICE AND SUPPORT
MaxFax™ Service
Use a touch-tone phone to order Technical Reference Sheets, Drive Specifications, Installation Sheets and other
documents from our 24-hour automated fax retrieval system. Requested items are sent to your fax machine.
U.S. and Canada Language support: English, Spanish
Phone 800-2MAXTOR, press 3 (800-262-9867)
Outside U.S. and Canada 303-678-2618
Europe Language support: English, French, German
Phone + 353 1 204 11 22
Asia/Pacific Language support: English
Phone + 61 2 9369 4733
Internet
Browse the Maxtor home page on Internet, download files from our FTP site.
Home Page http://www.maxtor.com
Bulletin Board Service
A 24-hour seven-day-a-week Bulletin Board Service (BBS) is available. Use the BBS to access and download information
and utilities maintained in the Maxtor data files, including utilities, drive specifications and jumper options. Modem
settings are 14,400 Baud or lower, 8, 1, N.
U.S. and Canada Language support: English
Data Phone 303-678-2222
Europe Language support: English, French, German
Data Phone + 49 89 963 131
Asia/Pacific Language support: English
Data Phone + 61 2 9369 4293
Customer Service
All Maxtor products are backed by No Quibble® Service, the benchmark for service and support in the industry. Customer
Service is available 6 a.m. to 5 p.m. (PT) Monday through Friday.
U.S. and Canada Language support: English, Spanish
Voice 800-2MAXTOR, press 2 (800-262-9867)
E-mail RMA@maxtor.com
Fax 408-922-2050
Europe Language support: English, French, German
Voice + 353 1 204 11 11
E-mail Eurotech_Assistance@maxtor.com
Fa x + 353 1 286 14 19
Asia/Pacific Call Singapore Customer Service from the countries listed below.
Customer Service is available 8 a.m. to 5:30 p.m. (Singapore time is GMT +8).
From Dial
Australia 1-800-124-328
Hong Kong +800-3387
Indonesia +001-800-65-6500
Japan +0031-65-3616
Korea +088-65-800-6500
Malaysia 1-800-1126
New Zealand +0800-44-6542
Singapore 1-800-481-6788
Taiwan +0080-65-1062
Thailand +001-800-65-6500
8 – 55
 Loading...