

Maxi-Cosi Tobi User Guide
Tobi
A
B
9 M – 4 Y / 9-18 kg
INDEX
DOREL U.K.
Imperial Place 4
Maxwell Road
Borehamwood
Hertfordshire WD6 1JN
UNITED KINGDOM
DOREL FRANCE S.A.S.
Z.I. - 9 bd du Poitou
BP 905
49309 Cholet Cedex
FRANCE
DOREL GERMANY
Augustinusstraße 9 c
D-50226 Frechen-Königsdorf
DEUTSCHLAND
DOREL POLSKA
Ul. Legnicka 84/86
41-503 Chorzow
POLAND
DOREL BELGIUM
BITM Brussels
International Trade Mart
Atomiumsquare 1, BP 177
1020 Brussels
BELGIQUE / BELGIE
DOREL NETHERLANDS
Postbus 6071
5700 ET Helmond
NEDERLAND
DOREL HISPANIA S.A.
C/Pare Rodés n°26
Torre A 4°
Edificio Del Llac Center
08208 Sabadell (Barcelona)
ESPAÑA
DOREL ITALIA S.P.A.
a Socio Unico
Via Verdi, 14
24060 Telgate (Bergamo)
ITALIA
DOREL PORTUGAL
Rua Pedro Dias, 25
4480-614 Rio Mau (VDC)
PORTUGAL
DOREL SWITZERLAND S.A.
Chemin de la Colice 4
1023 Crissier
SWITZERLAND / SUISSE
EN Instructions for use / Warranty 7 - 15
FR Mode d’emploi / Garantie 16 - 24
DE Gebrauchsanweisung / Garantie 25 - 33
NL Gebruiksaanwijzing / Garantie 34 - 42
ES Modo de empleo / Garantía 43 - 51
IT Istruzioni per l’uso / Garanzia 52 - 60
1 2 3 4
6
11 12
7 8
13 14 15
5
9
10
www.maxi-cosi.com
DRU0632A16
PT Modo de emprego / Garantia 61 - 69
16
2 3
17 18 19 20

21
22
23
24
25
EN
• Installation with 3-point belt Yes
• Installation with 2-point belt No
• On passenger seat Yes
• On back seat left/right Yes
• On back seat centre Yes*
• Rear-facing No
• Forward-facing Yes
• Marks for belt positioning Red
FR
• Fixation avec ceinture à 3 points Oui
• Fixation avec ceinture à 2 points Non
• Sur le siège passager Oui
• Sur la banquette arrière Oui
à gauche/droite
• Sur la banquette arrière au milieu Oui*
• Dos à la route Non
• Face à la route Oui
• Marque de passage de ceinture Rouge
DE NL
• Befestigung mit Ja
Dreipunkt-Sicherheitsgurt
• Befestigung mit Nein
Zweipunkt-Sicherheitsgurt
• Auf dem Beifahrersitz Ja
• Auf dem Rücksitz links/rechts Ja
• Auf den Rücksitz in der Mitte Ja*
• Gegen die Fahrtrichtung Nein
• In Fahrtrichtung Ja
• Gurtverlauf Markierung Rot
• Bevestiging met 3-puntsgordel Ja
• Bevestiging met 2-puntsgordel Nee
• Op de passagiersstoel Ja
• Op achterbank links/rechts Ja
• Op achterplaats midden Ja*
• Tegen rijrichting in Nee
• Met rijrichting mee Ja
• Gordelloop markering Rood
26
31
27 28 29 30
32
33
34
35
• Frontal airbag Yes
• Side airbag Yes
* Only with presence of a 3-point
belt on the middle seat on the
back seat.
ES
• Sujeción con cinturón de Si
seguridad de 3 puntos
• Sujeción con cinturón de No
seguridad de 2 puntos
• En el asiento del copiloto Si
• En el asiento trasero Si
derecho/izquierdo
• En el asiento central trasero Si*
• En sentido contrario a la marcha No
• En el sentido de la marcha Si
• Pasaje rojo del cinturón Rojo
del automóvil
• Airbag frontal Si
• Airbag lateral Si
• Coussin autogonflable frontal Oui
• Coussin autogonflable latéral Oui
* Uniquement si la place centrale de
la banquette arrière est équipée
d’une ceinture à 3 points.
IT
• Installazione con cintura a 3 punti Si
• Installazione con cintura a 2 punti No
• Sul sedile del passeggero Si
• Sul sedile posteriore sinistro/destro Si
• Sul sedile posteriore al centro Si*
• In senso inverso di marcia No
• In senso di marcia Si
• Indicatori per il passaggio Rosso
della cintura
• Airbag frontale Si
• Airbag laterale Si
• Frontairbag Ja
• Seitenairbag Ja
* Vorausgesetzt, dass auf dem
mittleren Sitz des Rücksitzes
ein Dreipunkt-Sicherheitsgurt
vorhanden ist.
PT
• Instalação com cinto de 3 Sim
pontos de fixação
• Instalação com cinto de 2 Não
pontos de fixação
• No banco de passageiros Sim
• No banco traseiro Sim
(direito/esquerdo)
• No banco intermédio traseiro Sim*
• Sentido contrário à marcha Não
• Sentido da marcha Sim
• Marcação de passagem do cinto Vermelha
do automóvel
• Airbag frontal Sim
• Airbag lateral Sim
• Frontal airbag Yes
• Side airbag Yes
* Mits er een 3-puntsgordel
aanwezig is op de middelste
zitplaats van de achterbank.
36
* Sólo en asientos traseros
provistos de cinturón de
seguridad de 3 puntos en el
asiento central.
* Solo in presenza di una cintura
a 3 punti sul sedile posteriore
centrale.
* Apenas se for equipado com
um cinto de segurança de 3
pontos de fixação no banco
intermédio traseiro.
654
Dear parents
Congratulations on your purchase of the Tobi.
EN
During the development of the Tobi, we paid special attention to safety, ease of use, comfort and design.
As a result of this, this product fulfils the strictest safety requirements.
Studies have shown that a large percentage of child car seats are not used correctly. It is therefore
important that you take the time to read these instructions through carefully. The optimum safety of your
child is only guaranteed if the Tobi is used correctly.
Continuous research by our product development and marketing departments, both by intensive
cooperation with test institutes and in consultation with consumers and customers, ensures that we
remain at the forefront in the area of child safety in the car. If you have any questions or remarks concern
ing the use of the Tobi, we will be happy to hear from you.
Dorel (address and telephone number on the back of this instruction manual)
-
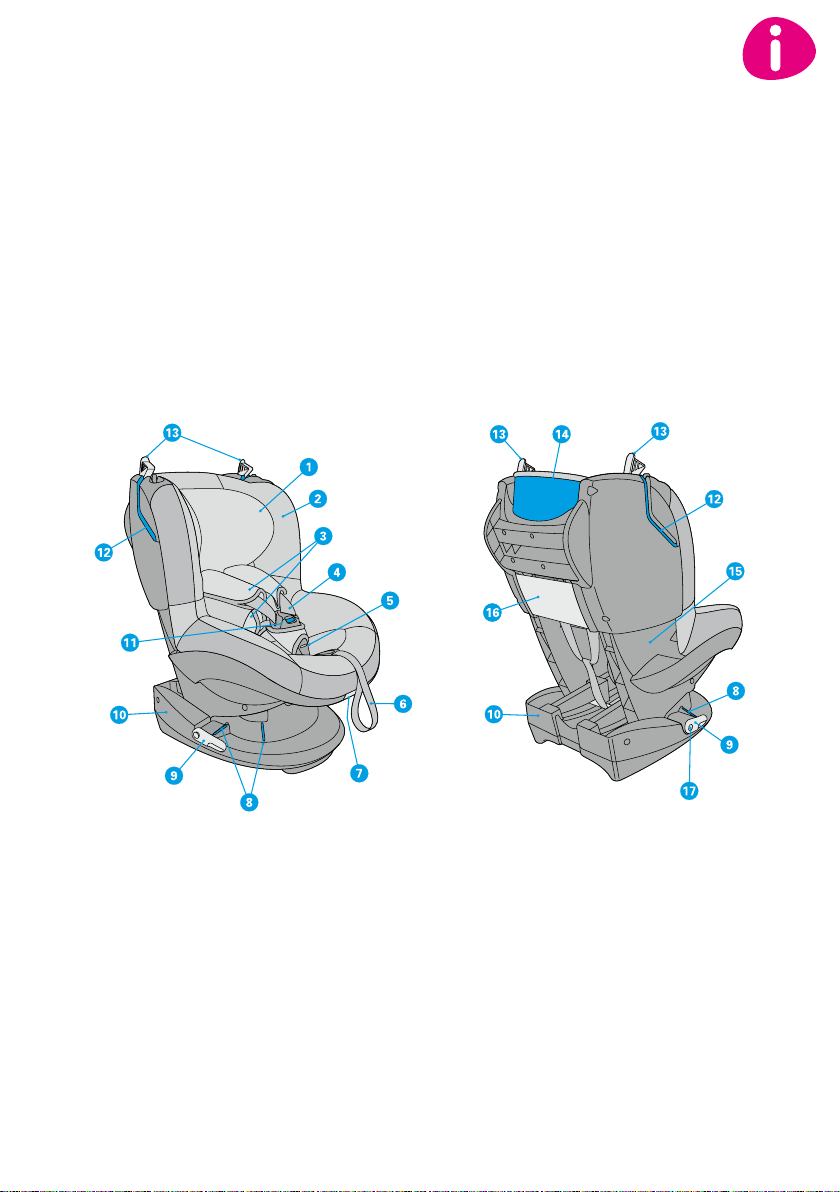
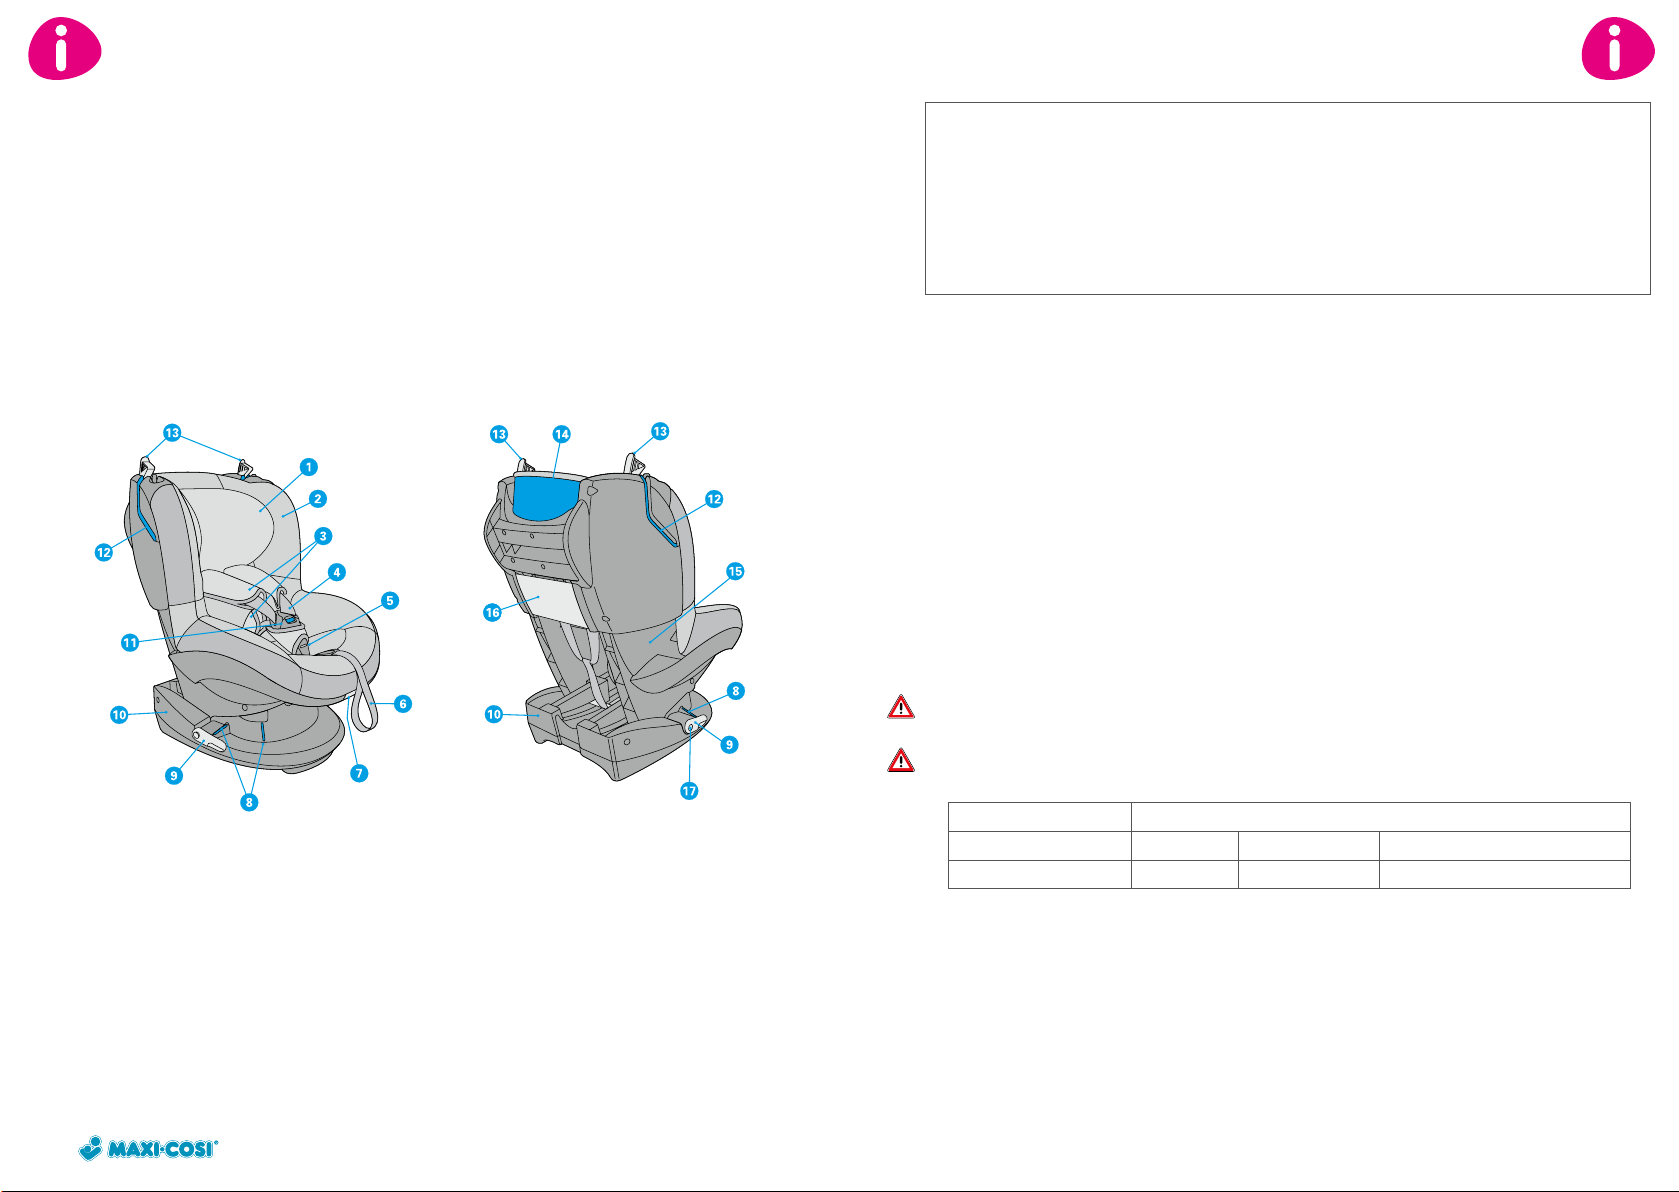
1. Headrest
2. Fabric cover
3. Belt pads
4. Shoulder belts - harness system
5. Belt tension indicator
6. Adjustment belt for belt system
7. Adjustment handle shell
8. Red marks for hip part of seat belt
9. Tensioner(s) for seat belt
10. Frame
11. Belt buckle
12. Red belt slot for shoulder part of seat belt
13. Belt clamp for car seat
14. Red marks back of seat belt
15. Shell
16. Storage compartment for instruction manual
17. Release button belt tensioner(s)
7
EN EN
SPECIAL FEATURES
To reduce the likelihood of incorrect use and to improve ease of use the Tobi has the following unique
• A harness belt system that “springs” open itself as soon as the belt buckle is opened.
• An indicator on the belt buckle that indicates by means of colour when the belts are properly tightened.
• A belt buckle that also acts as the control button for the belt system; i.e. when the buckle is opened, the
features:
control of the shoulder belts is automatically released and the belts can be made longer. When the
buckle is closed, the shoulder belts can be tightened until the indicator is “GREEN”. No further operation
of buttons is required!
Contents
1. IMPORTANT: READ FIRST! 8
2. INSTALLATION AND REMOVAL OF THE TOBI 9
3. PLACING YOUR CHILD IN THE TOBI 10
3.1 Using the harness system 10
3.2 Seat positions (Adjusting the seat into sitting and reclining positions) 11
3.3 Taking the child out 11
4. MAINTENANCE 11
4.1 General 11
4.2 Fabric cover 12
4.3 Belt buckle functioning and cleaning 12
5. GENERAL INSTRUCTIONS 13
6. WASTE SEPARATION 14
7. Warranty 14
8. QUESTIONS 15
1. Important: read first!
Please read these user instructions carefully and keep them for future reference. If these instructions are
not followed, the safety of a child may be severely endangered.
Only use original accessories and par ts that have been endorsed by the manufacturer. Do not make any
modifications to the product. Contact your supplier or importer if you have any complaints or problems.
Tobi 1 9 -18 kg Approx. 9 months – 3.5 years
Approval according to ECE R 44/04
Group Body Weight Age
Installation with 3-point belt (follow red colour marks on product)
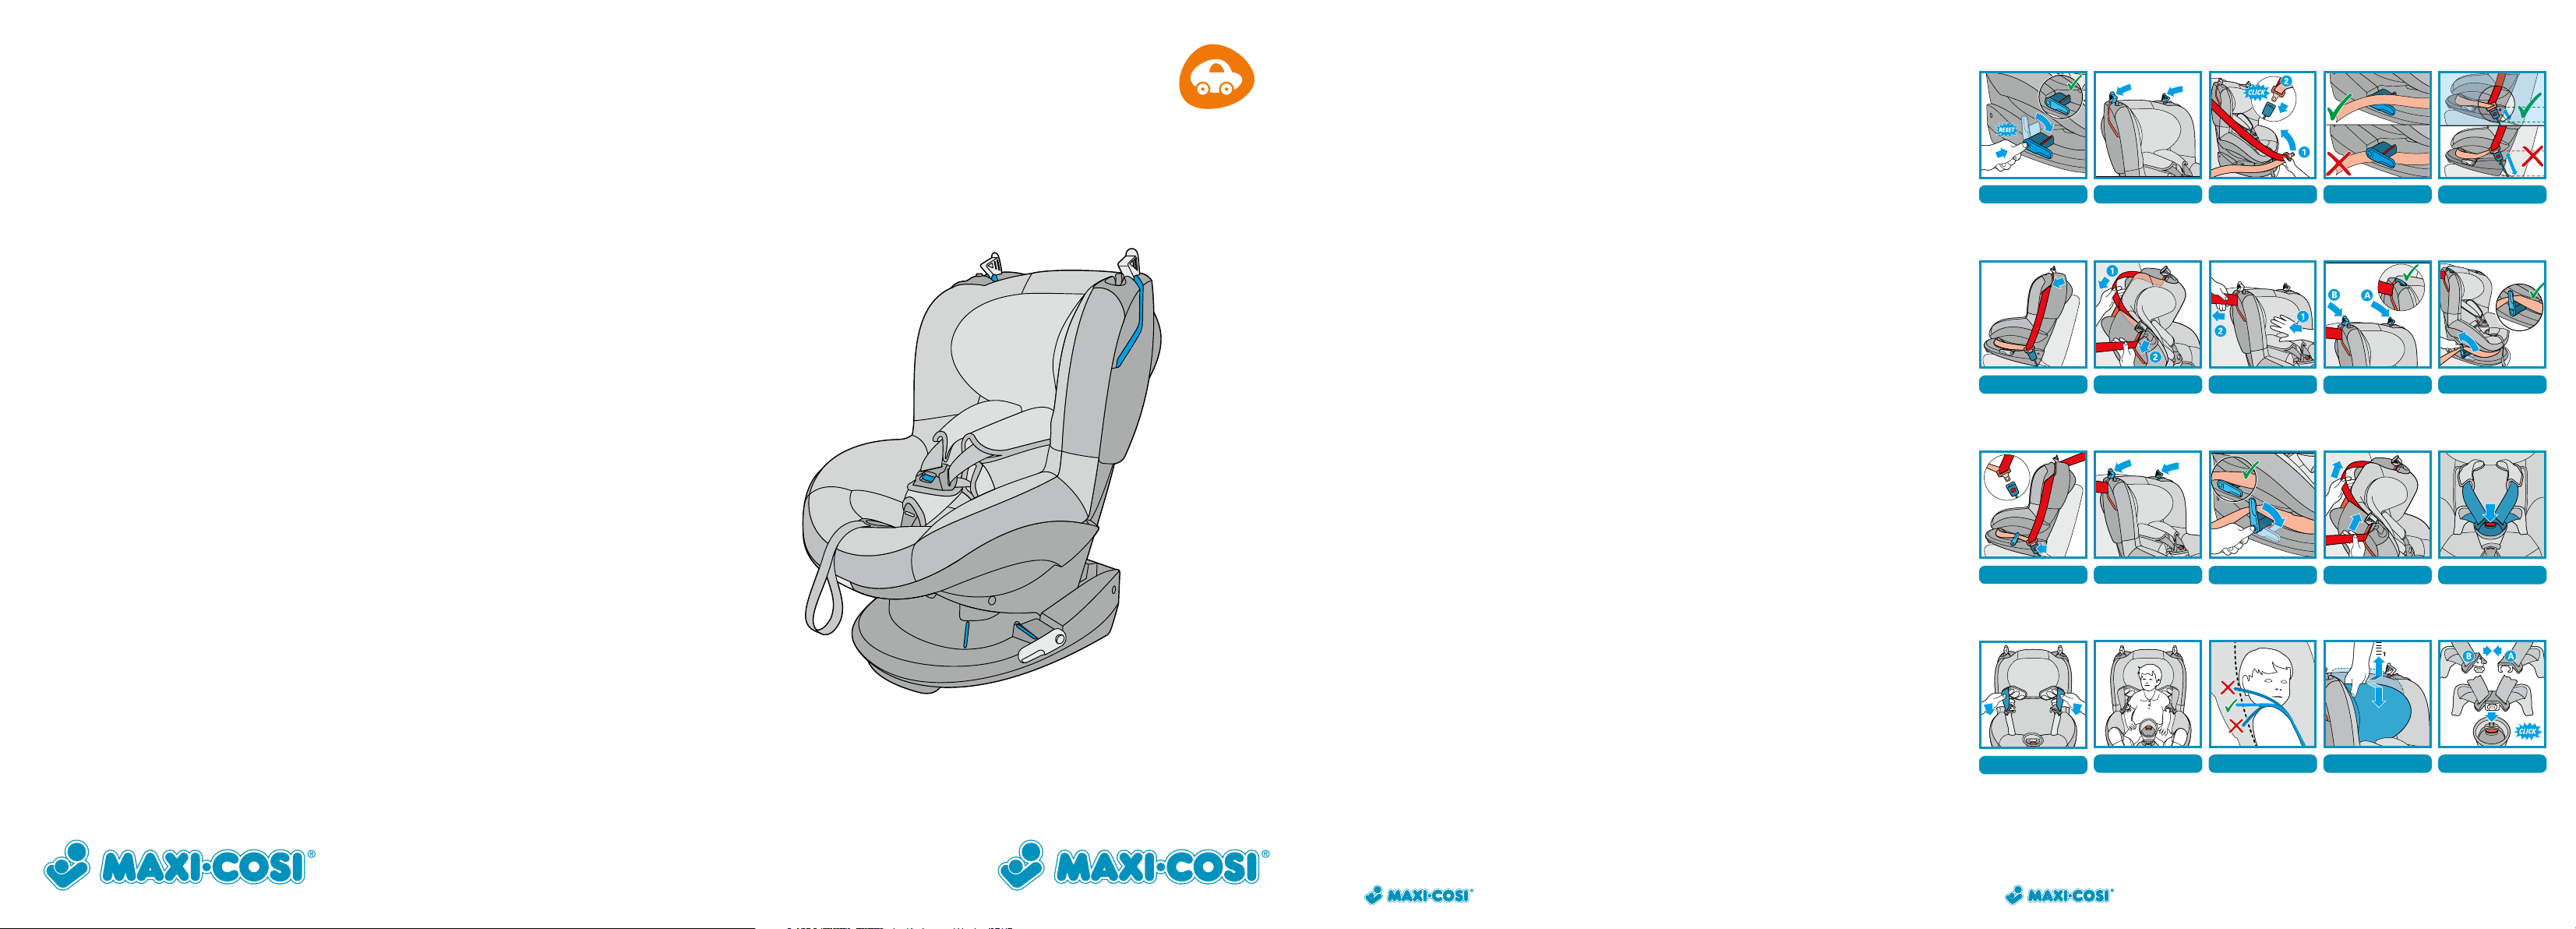
2. Installation and removal of the Tobi
Only use the Tobi on a front-facing seat that has been provided with an automatic 3-point belt, provided
it has been approved according to the ECE R16 standard or similar.
Correct fitting of the car seat belt is essential for the safety of your child. The car seat must be attached in
the correct sequence along the red marks on the Tobi, for this see also the sticker on the side of the Tobi.
Never fit the seat belt in a way other than that described!
Remove the headrest of the seat where the Tobi is to be used in the car if it is in the way. Do not forget to
put the headrest back when the seat is used again.
A. Installation
• NOTE! Lock fold-down rear seats before installing the Tobi.
•
1
2
3 4
3
5
6
7
• Slide this through the second red belt slot to the outside (7,2).
8
9
10
• In many cases this will result in a kink in the hip belt. However, this does not involve any danger for your
•
•
NOTE! In some cases, the seat belts are positioned too far forward. This will make proper installation
impossible. Try a different seat in this case.
• NOTE! Before the seat is installed, make sure that the belt tensioners are in the correct position by
pressing the release button (1). The belt tensioners should be horizontal.
• NOTE! Make sure that both seat belt clamps are open (2).
• Place the Tobi on the car seat.
• Place the seat belt for the Tobi along and over (4) the belt tensioners. Make sure that the hip belt passes
under the shell, over the red belt marks (3,1).
• Click the seat belt into the belt buckle of the car (3,2).
• NOTE! It may be the case that the buckle part of the seat belt is so long that the buckle protrudes
above the frame of the Tobi. If this is so, the Tobi cannot be secured properly. In that case, choose
another position in the car (5). Moreover, it may break the buckle!
• Slide the shoulder part of the seat belt, on the side where the belt buckle of the car is also located,
through the red belt slot on the backrest (6).
• Then pass the shoulder par t along the red marks for the shoulder belt on the back of the
Tobi (7).
• Push the Tobi firmly into the car seat (8,1) while at the same time pulling the shoulder belt tight (8,2). The
Tobi is now securely in place in the car. Double-check this!
• First shut the belt clamp on the belt buckle side and then that on the other side, in the direction of the
roll-up mechanism (9).
• Finally, tighten the belt properly by turning the belt tensioner(s) a quarter of a turn upwards in the
vertical position (10). The seat belt is now fitted more tightly!
child and is part of the correct installation!
NOTE! Make sure that both belt clamps on top of the seat are closed.
NOTE! Make sure that the car seat belt is not twisted.
8 9
EN EN
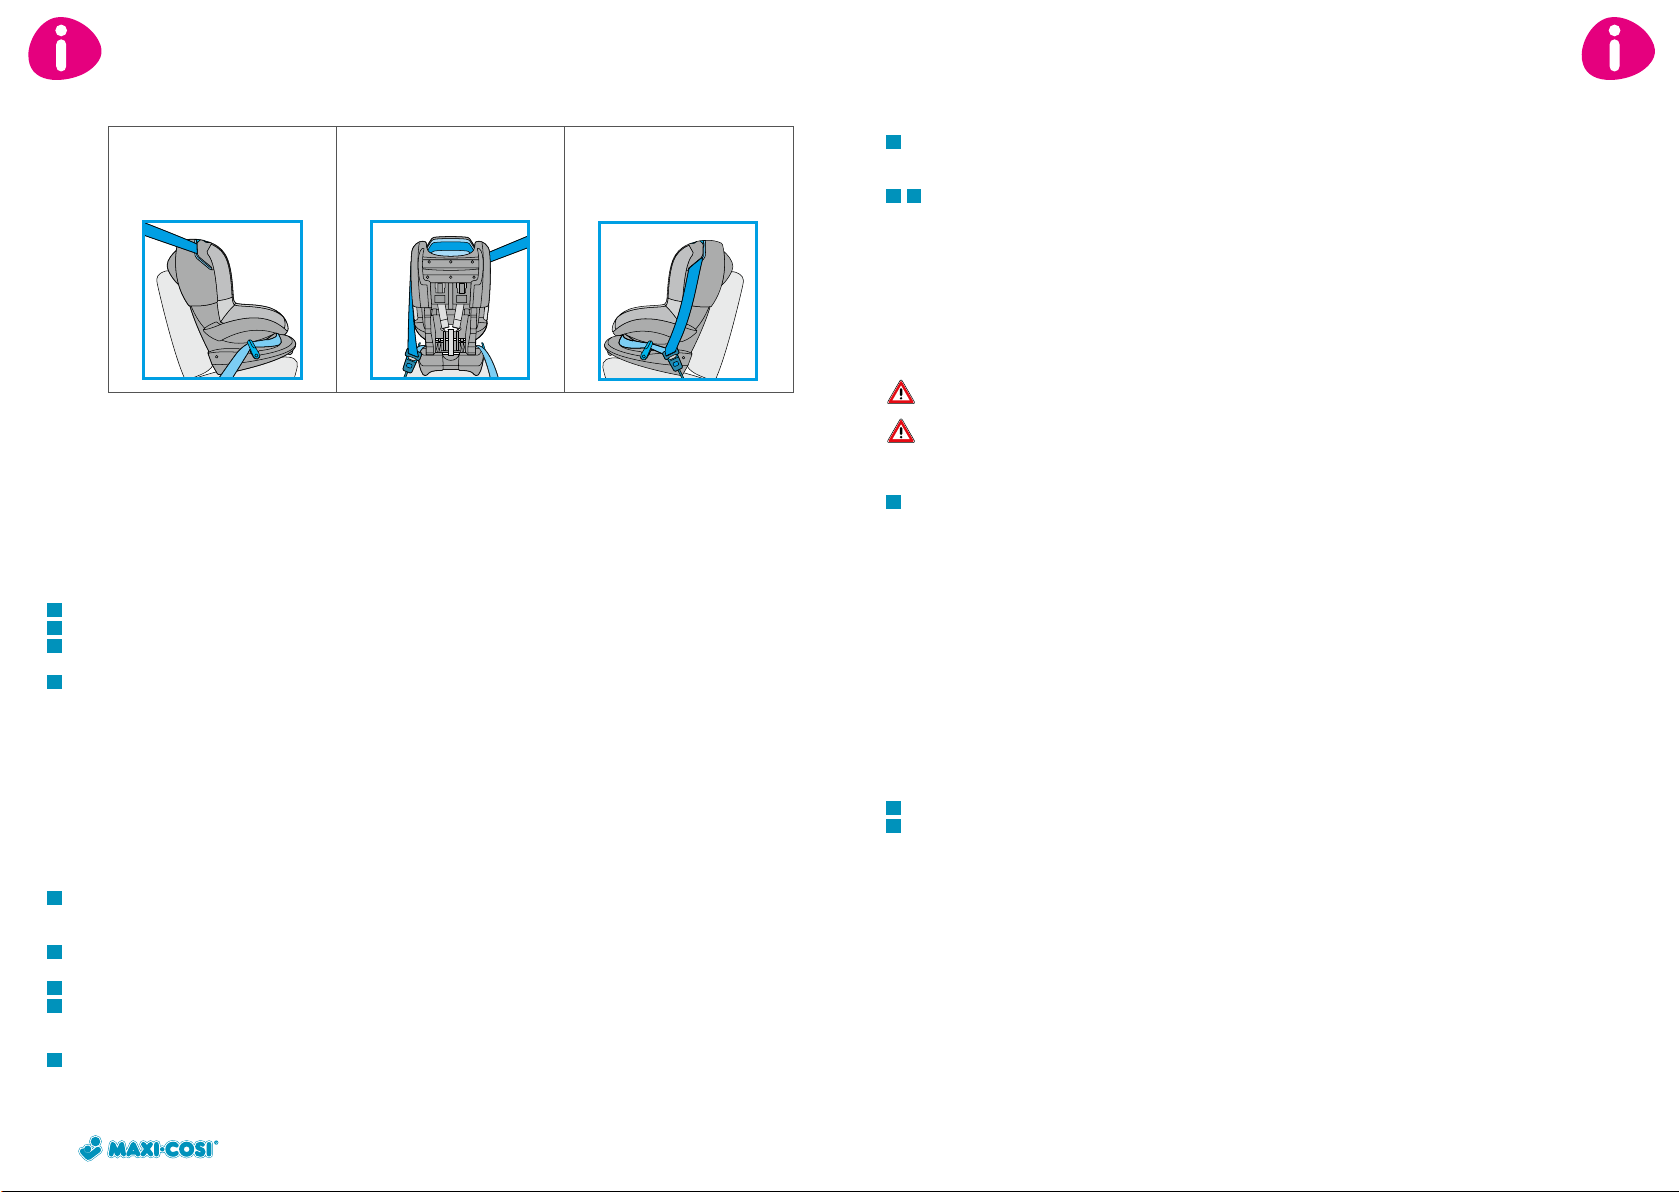
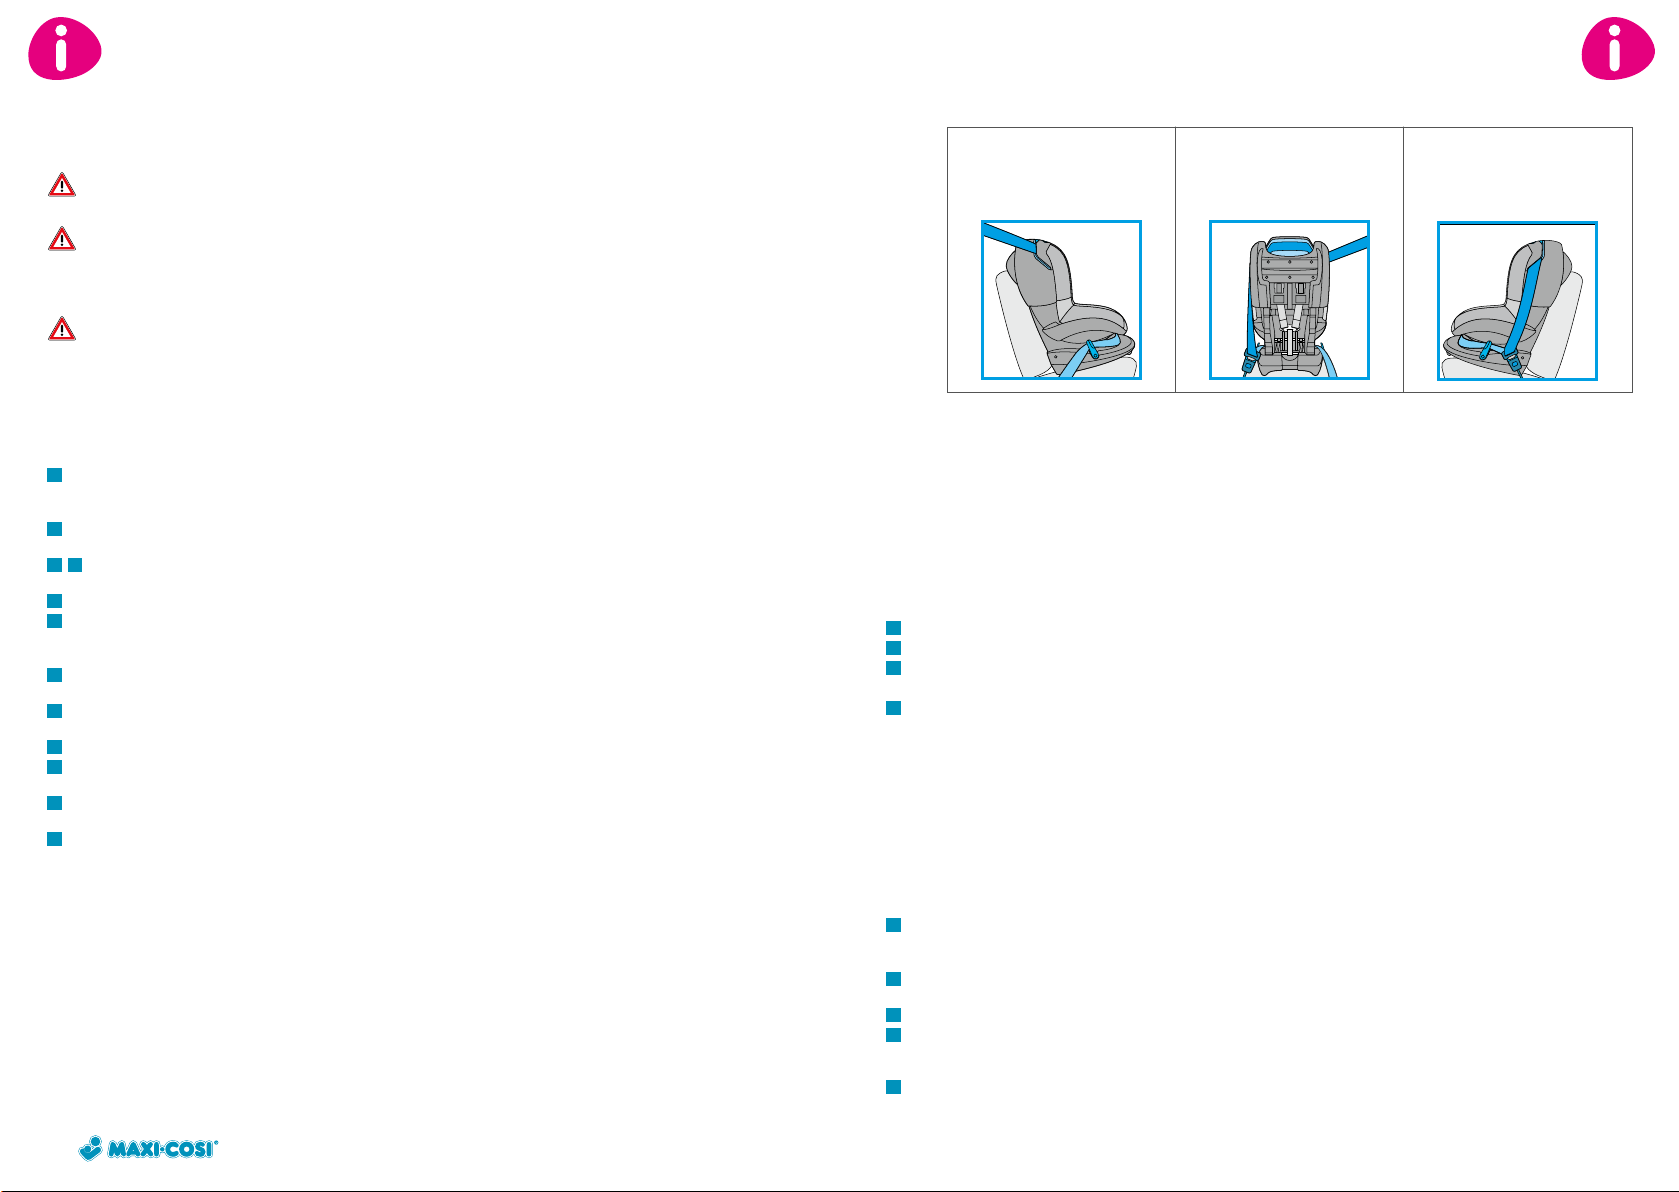
• When the seat belt has been installed properly, the various “views” will look as follows:
Side view, Rear view Side view,
on the side of the roll-up on the side where the belt
mechanism. buckle is located.
Opposite side belt buckle.
Checklist…
To ensure the optimum safety of the child, after installing the seat check once more that…
• the seat belt is tight and that it is not twisted,
• the hip par t of the seat belt passes over the red belt marks and belt tensioner(s),
• the (diagonal) shoulder part of the seat belt is attached properly and passes through the two belt slots,
along the red marks on the rear of the Tobi,
• both belt clamps are closed,
• the belt tensioner(s) is in the tensioned, vertical position,
• the entire Tobi is installed securely and firmly in the car.
B. Removing the Tobi
11
• Open the belt buckle of the seat belt (11).
12
• Next, open both belt clamps (12).
13
• Release the belt tensioner by pressing the button (13). The belt tensioner will now move down,
14
into the horizontal position.
• Remove the seat belt from the belt slots (14).
• Take the Tobi out of the car.
3. Placing your child in the Tobi
3.1 Using the harness system
A. Adjusting the height of the harness
Before placing the child in the Tobi and locking the harness belt, first determine the correct height of the
• Adjust the height of the shoulder belts in combination with and by means of the headrest.
shoulder belts and headrest.
15
• Open the belt buckle (15) by pressing the red button of the belt buckle.
• The shoulder belts are now automatically released and can be made longer without pressing
16
17
18
any other buttons.
• Loosen the shoulder belts by pulling them forwards as far as possible (16).
NOTE! Do not pull on the belt pads when doing so.
•
• Place the child with his/her back straight in the Tobi and check the belt height (17).
• NOTE! The height of the shoulder belts is correct when the belt disappears into the shell slightly
above your child’s shoulders (18).
19
• To move the shoulder belts and headrest to the required height, move the headrest by the handle on
the top at the same time forwards and up or down (19). The shoulder belts including headrest
can be set to 6 different heights.
B. Placing the child in the Tobi
• Place the child with his/her back straight in the Tobi.
20
• Slide the buckle sections together (part A on par t B) and insert them into the belt buckle with a clearly
audible “click” (20). When the buckle is closed, the belt system is blocked and can only be pulled tighter.
21 22
If you need to make the belts longer, the buckle must first be opened again.
• Now pull the harness system tight by pulling on the adjustment belt (21,2). Pull until the indicator on the
belt buckle turns green (21,2). If this is still silver the belt should be pulled tighter (22). Make sure that the
indicator is green before driving. If it seems like the harness belt is still loose even though the indicator is
on green, the belt can be pulled more tightly. This will ensure optimum safety. While driving, it is possible
that the indicator reverts back to silver as a result of the child’s movements. This is normal and will not
affect the child’s safety.
•
•
NOTE! The tighter the belts fit around a child, the better the protection.
NOTE! Make sure the textured (anti-slip) side of the belt pads are positioned properly on your child’s
shoulders/chest.
•
NOTE! Make sure the belts are not twisted or folded double.
Always use the belt pads, as they are essential for your child’s safety.
Tell the child never to play with the belt buckle.
3.2 Seat positions (Adjusting the seat into sitting and reclining positions)
The Tobi can be set in 5 positions.
23
• Pull the positioning handle under the front of the seat upwards and then pull or push the seat forwards
or backwards (23).
• Release the positioning handle in the desired position and push until you hear a “click”.
•
NOTE! Check to make sure the Tobi is securely locked in the desired position by pulling on it.
Checklist…
To ensure the optimal safety of the child, check before every trip to make sure that …
• the entire Tobi is installed securely and firmly in the car,
• the height of the shoulder belts is suitable for your child,
• the belts are not twisted,
• the textured (anti-slip) side of the belt pads is positioned properly on your child’s shoulders/chest,
• the child is secure in the belts, the belt buckle is shut and the indicator is on green,
• the tether on the Tobi is not damaged. If it is damaged, do not use the Tobi in any circumstances and
contact your retailer or importer immediately.
3.3 Taking the child out
• Place the Tobi in the sitting position (also see section 3.2 Seat positions).
24
• Open the belt buckle by pressing the red button of the buckle (24).
25
• Loosen the shoulder belts by pulling them forwards as far as possible (25).
• Take the child out of the Tobi.
4. Maintenance
4.1 General
• NOTE! Perform these actions only while the Tobi is outside of the car.
• Use lukewarm water, soap and a cloth to clean the plastic parts of the seat. Do not use any aggressive
• The fabric parts can be cleaned according to the instructions on the washing label; hand washing in
•
cleaning agents.
luke-warm water and a mild detergent.
NOTE! Never use lubricants – not even for the moving parts of the Tobi.
10 11
EN EN
4.2 Fabric cover
• Remove the belt buckle pad by pulling it carefully over the belt buckle sideways at an angle. Pass the
• Repeat the above, with the exception of the clasp, for the two hip belt pads. The hip belt pads are
• Loosen the headrest cover on one side under a point and remove the cover carefully on this side of the
• Carefully loosen the headrest cover at the edge under the handle at the top of the headrest.
Removing the cover
24 25
• Open the belt buckle. Loosen the shoulder belts by pulling them forwards as far as possible (24, 25).
26 27
Unhook the elastic loops from the hooks on both sides of the positioning handle.
• Remove the elastic edge of the cover from the edges of the shell and then carefully loosen the cover at
the front (26, 27).
28
39
30
31
31
32
33
34
35
cover over the belt buckle (from back to front).
• Loosen the cover from the side points on both sides of the shell (28).
• Loosen the back flap of the cover and fold it forwards (29).
• Remove the cover carefully from the sides (30).
• Loosen the cover behind the belt clamps. The cover has been pushed behind the belt clamps here (31,1)
• Now pull the cover carefully over the headrest (31,2).
• Remove the cover.
• Remove the belt pads of the shoulder belts by loosening the Velcro and the poppers on the outside (32).
• Remove the belt behind the flap with the Velcro (33).
• Slide the hook clasp out of the loop of the belt pad (34).
• Remove the belt pad from the spring (35).
• Do this with both belt pads.
36
attached to the belt with Velcro.
• Remove the headrest cover by removing the two elastic bands from the bottom flap under the plastic
part (36,1).
headrest.
36
• Now remove the headrest cover carefully (36,2).
Cleaning the cover
• Wash the cover and belt pads by hand (maximum of 30°C). Do not use a drier. Also see the care
Tip: It is wise to buy an extra cover when purchasing the Tobi so that you can continue to use it even when
instructions on the cover.
the cover is being washed and dried.
Reattaching the cover
• Repeat the above steps in the reverse order!
•
• Slide the cover well into the cover edges of the shell all over.
• Check that the cover is tight fitting all over and secured properly.
NOTE! First attach the 4 belt pads and the headrest cover before reattaching the cover.
4.3 Belt buckle and belt adjustment system functioning and cleaning
The proper functioning of the belt buckle and belt adjustment system is very important for the safety of
The following is a list of possible causes of function failure and possible solutions.
the child. The most common reason that the buckle and/or belt adjustment system does not function
properly is because it is dirty (from dust, grime, food particles, etc.). Make sure that the belt buckle stays
clean by vacuuming out all dirt. If the belt adjustment system is not functioning properly, contact your
supplier or importer immediately (see back of instruction manual for contact details). Do not use the
Tobi under any circumstances!
A. Malfunction to the belt buckle
• When opening the belt buckle, the buckle sections are released slowly.
• The belt buckle can only be opened with considerable force.
• It is difficult to click the buckle sections into the buckle (too much resistance).
• The buckle will no longer close, the buckle sections will not go together.
• There is no “click” sound when closing the buckle.
B. Solving any problems
• Check the buckle for any dirt and if necessary clean by knocking the dirt out, rinsing, blowing clean or
•
If you are unable to close the belt buckle or if you are unsure whether you have solved the problem
vacuuming with a vacuum cleaner, for example.
NOTE! Never use lubricants!
correctly, contact your retailer or importer immediately (see back of instruction manual). Under no
circumstances should the Tobi be used.
5. General instructions
Always pay attention to the following…
• Always use the seat, even on short trips close to home, as this is when most accidents occur.
• Only use the Tobi in a car and not at home. Car seats are not designed for home use.
• The Tobi may be used in the front seat and in the back seat. Even if the car is equipped with an airbag!
• The seat must always be secured with the seat belt, even when not in use. A loose seat could injure
• Make sure that the Tobi is not jammed or wedged by heavy luggage, adjustable seats or closing doors.
• Never use the Tobi without the cover. Do not replace the cover by a cover other than the original as the
• Always cover up the Tobi when the car is parked in the full sun; plastic and metal parts may become
• To avoid damage to the fabric, do not remove the logos, etc. on the cover.
• Make sure that there is no baggage or other loose objects (for example on the rear shelf) in the car.
• When making long journeys, make sure to take frequent breaks in order to give your child some
• Never leave your child alone in the car unattended.
• Keep the user instructions for future reference in the appropriate place at the back of the Tobi.
• The Tobi is developed for an intensive use of approximately 10 years.
• We advise to check the expanded polystyrene (EPS) parts regularly for damages.
• Do not use second-hand products whose history is unknown. Some parts could be broken, torn or
• The user should not make any modifications to the car seat or the belts. Also labels or warnings, etc. that
• Replace the Tobi when it has been subject of violent stresses in an accident: the safety of your child can
• The manufacturer knows that car seats may cause impressions in car upholstery or car seat belts.
And of course …
• Always set a good example and wear your own safety belts!
However, we recommend installing it on the back seat. If this is not possible, make sure that, if installing
on a front seat equipped with an airbag, the seat is in the rearmost position. See the car manual, as more
and more cars have the possibility to easily switch off the airbag.
other passengers in an emergency stop.
cover forms part of the total safety of the seat.
extremely hot, this can cause burns and may discolour the cover unnecessarily.
In an emergency stop or crash these become dangerous projectiles!
room to move.
missing.
form part of the seat should not be removed in any circumstances!
no longer be guaranteed.
These cannot be avoided, since the safety standards demand powerful and firm fastening methods.
That is why the manufacturer cannot be held liable for any damage as a result of these.
12 13
EN EN
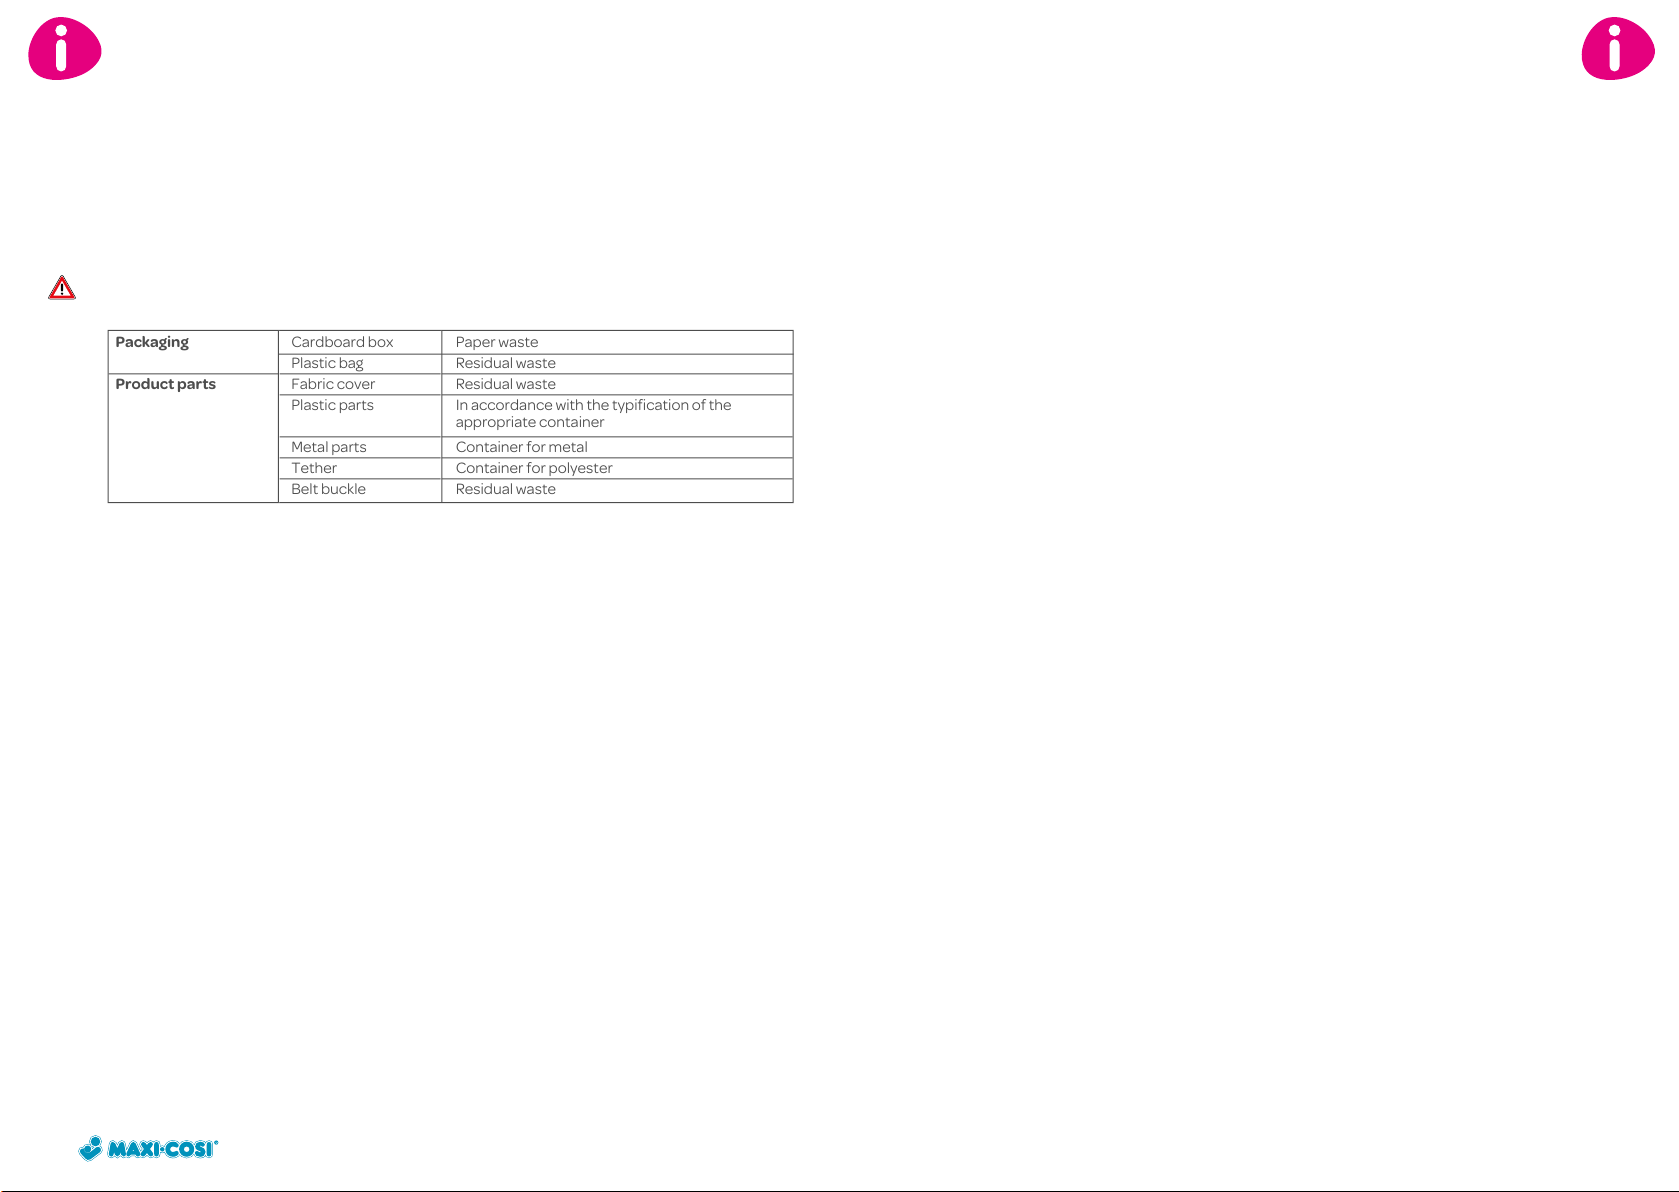
Packaging Cardboard box Paper waste
Plastic bag Residual waste
Product parts Fabric cover Residual waste
Plastic parts In accordance with the typification of the
appropriate container
Metal parts Container for metal
Tether Container for polyester
Belt buckle Residual waste
6. Waste separation
To ensure optimum and safe use of car safety seats, they should not be used for longer than 5 years after
Once the child has grown out of the seat, we therefore advise you to no longer use the car seat and to
As we care for the environment we request the user to separate the waste produced at the start
7. Warranty
Our 24 months warranty reflects our confidence in the high quality of our design, engineering, production
the date of purchase. Ageing of the plastic, for instance under the influence of sunlight (UV), may quite
unnoticeably reduce the qualities of the product.
dispose of it in the proper way.
(packaging) and end (product parts) of the life of the Tobi.
Make sure to keep plastic wrapping material out of reach of your child in order to avoid the risk of
suffocation.
and product performance. We confirm that this product was manufactured in accordance with the
current European safety requirements and quality standards which are applicable to this product, and
that this product is free from defects on materials and workmanship at the time of purchase. Under the
conditions mentioned herein, this warranty may be invoked by consumers in the countries where this
product has been sold by a subsidiary of the Dorel Group or by an authorized dealer or retailer.
followed. Damage and/or defects neither covered by our warranty nor by the legal rights of the consumer
and/or damage and/or defects with respect to products that are not covered by our warranty can be
handled at a reasonable fee.
A consumer has legal rights pursuant to applicable consumer legislation, which may vary from country to
This warranty is provided by Dorel Netherlands. We are registered in The Netherlands under company
The names and address details of other subsidiaries of the Dorel group can be found on the last page of
Rights of the consumer:
country. The rights of the consumer under applicable national legislation are not affected by this
warranty.
number 17060920. Our trading address is Korendijk 5, 5704 RD Helmond, The Netherlands, and our
postal address is P.O. Box 6071, 5700 ET Helmond, The Netherlands.
this manual and on our website for the brand concerned.
(1) Products purchased from retailers or dealers that remove or change labels or identification numbers are considered unauthorized. Products purchased from
unauthorized retailers are also considered unauthorized. No warranty applies to these products since the authenticity of these products cannot be
ascertained.
8. Questions
If you have any questions, contact your local Maxi-Cosi retailer (see www.maxi-cosi.com for
• Serial number at the bottom of the orange/white ECE sticker (at the back of the Tobi).
• Make, type and construction of the car and the seat on which the Tobi is used.
• Age (length) and weight of your child.
contact information). Make sure you have the following information at hand:
Our 24 months warranty covers all manufacturing defects in materials and workmanship when used in
Our 24 months warranty does not apply to defects caused by normal wear and tear, damage caused by
Should problems or defects arise, your first point of contact is the authorized dealer or retailer recog-
normal conditions and in accordance with our user manual for a period of 24 months from the date of
the original retail purchase by the first end-user customer. To request repairs or spare parts under our
warranty for defects in materials and workmanship you must present your proof of purchase, made
within the 24 months preceding the service request.
accidents, abusive use, negligence, fire, liquid contact or other external cause, damage which is the
consequence of failing to comply with the user manual, damage caused by use with another product,
damage caused by service by anyone who is not authorized by us, or if the product is stolen or if any label
or identification number has been removed from the product or has been changed. Examples of normal
wear and tear include wheels and fabric worn down by regular use and the natural breakdown of colors
and materials due to normal aging of the product.
What to do in case of defects:
nized by us. Our 24 months warranty is recognized by them
made within the 24 months preceding the service request. It is easiest if you get your service request
pre-approved by us. If you submit a valid claim under this warranty, we may request that you return your
product to the authorized dealer or retailer recognized by us or that you ship the product to us in
accordance with our instructions. We will pay for shipment and for return freight if all instructions are
(1)
. You must present your proof of purchase,
14 15
FRFR
Chers parents
Toutes nos félicitations pour votre achat du Tobi.
Sécurité, facilité d’utilisation, confort et esthétique ont été la priorité lors de la conception du Tobi.
Ce siège-auto répond aux normes les plus strictes.
Des études ont montré que les sièges-auto sont souvent mal utilisés. Prenez le temps de lire
attentivement ce mode d’emploi. La sécurité de votre enfant ne peut être assurée que s’il est utilisé
correctement.
Les études permanentes menées par nos services de développement de produits et marketing, en
étroite collaboration avec les instituts de test ainsi que les consommateurs et nos clients, nous
permettent d’anticiper les évolutions en matière de sécurité des enfants en voiture. N’hésitez pas à nous
contacter si vous avez des questions ou des remarques concernant l’utilisation du Tobi.
Dorel (adresse et numéros de téléphone au dos du mode d’emploi)
CARACTÉRISTIQUES SPÉCIFIQUES
Le Tobi est doté de caractéristiques uniques qui réduisent le risque d’une mauvaise utilisation et simplifie
• Un système de harnais qui se “libère” automatiquement dès que le fermoir du harnais est ouvert.
• La couleur de l’indicateur sur le fermoir du harnais indique si les sangles sont suffisamment tendues.
• Le fermoir de harnais fait également office de bouton de réglage du harnais; lorsqu’il est ouvert, le
son emploi:
réglage des bretelles est automatiquement déverrouillé, permettant de les rallonger. S’il est fermé, les
bretelles peuvent être tirées jusqu’à ce que l’indicateur se mette sur le “VERT”. Aucun autre réglage
n’est plus nécessaire!
Table des matières
1. IMPORTANT: A LIRE IMPERATIVEMENT! 17
2. INSTALLER ET ENLEVER LE TOBI 18
3. INSTALLER VOTRE ENFANT DANS LE TOBI 19
3.1 Utilisation du harnais 19
3.2 Positions (réglage position assise et inclinée) 20
3.3 Sortir l’enfant 20
4. ENTRETIEN 20
4.1 Général 20
4.2 Housse 21
4.3 Fonctionnement et nettoyage du fermoir et du système de réglage du harnais 21
5. INSTRUCTIONS GENERALES 22
6. SEPARATION DES DECHETS 23
7. GARANTIE 23
8. QUESTIONS 24
1. Important: a lire imperativement!
Lisez ce mode d’emploi attentivement et conservez-le comme ouvrage de référence. Ne pas se
conformer au mode d’emploi risque de mettre gravement en danger la sécurité de l’enfant.
N’utilisez que des accessoires et des pièces d’origine agréés par le fabricant. Ne modifiez pas le produit.
En cas de réclamations ou problèmes, contactez votre fournisseur ou importateur.
1. Appui-tête
2. Housse
3. Protège-bretelles
4. Bretelles -système harnais
5. Indicateur de tension du harnais
6. Sangle de réglage système harnais
7. Manette de réglage coque
8. Marques rouges pour ceinture abdominale de
ceinture de sécurité
9. Tendeur(s) de la ceinture de sécurité
16 17
10. Socle
11. Fermoir du harnais
12. Rainure rouge pour bretelle de ceinture
de sécurité
13. Verrou de sûreté pour ceinture de sécurité
14. Marque rouge arrière pour ceinture de
sécurité
15. Coque
16. Compartiment de rangement mode d’emploi
17. Bouton de déverrouillage tendeur(s) de
ceinture
Tobi 1 9 -18 kg Environ 9 mois - 3,5 ans
Certification ECE R 44/04
Groupe Poids de l’enfant Age
FRFR
2. Installer et enlever le Tobi
Installation avec ceinture à 3 points (suivre les marques rouges sur le produit)
Utilisez le Tobi uniquement sur un siège orienté vers l’avant, équipé d’une ceinture de sécurité à
enrouleur à 3 points de fixation homologuée selon la norme ECE R16 ou une norme équivalente.
• Une fois la ceinture de sécurité correctement installée, le siège-auto se présente ainsi:
Vue latérale,
côté enrouleur.
Vue arrière Vue latérale,
côté verrouillage ceinture.
Côté opposé verrouillage
ceinture.
Pour la sécurité de votre enfant, il est essentiel que la ceinture de sécurité de la voiture soit correctement
placée. La ceinture de sécurité doit être placée sur le Tobi selon les marques rouges dans l’ordre indiqué,
voir l’étiquette sur le côté du Tobi. Ne faites jamais passer la ceinture d’une autre manière que celle
indiquée!
S’il gêne, enlevez l’appui-tête du siège sur lequel sera installé le Tobi dans la voiture. N’oubliez pas de
replacer l’appui-tête lorsque ce siège est à nouveau utilisé par un passager.
A. Installation
• ATTENTION! Si elle est abaissable, verrouillez la banquette arrière avant d’installer le Tobi.
•
1
2
3 4
3
5
6
7
7
8
9
10
• Il arrive souvent que la ceinture abdominale soit alors fléchie. Ceci ne constitue pas un risque pour
•
•
ATTENTION! Les ceintures de sécurité de certains sièges sont placées trop en avant pour permettre
une bonne installation. Essayez dans ce cas un autre siège.
• ATTENTION! Avant d’installer le siège-auto, assurez-vous que les tendeurs de la ceinture sont dans la
bonne position en appuyant sur le bouton de déverrouillage (1). Les tendeurs de la ceinture doivent être
à plat.
• ATTENTION! Assurez-vous que les deux boucles de sûreté de la ceinture de sécurité sont ouvertes (2).
• Placez le Tobi sur la banquette.
• Faites passer la ceinture de sécurité pour le Tobi le long et devant (4) les tendeurs de la ceinture. Faites
passer la ceinture abdominale sous la coque, sur les marques rouges indiquant le passage de la ceinture (3,1).
• Enclenchez la ceinture de sécurité de la voiture dans le verrouillage de ceinture de la voiture (3,2).
• ATTENTION! La longueur de certains verrouillages de ceinture de sécurité fait qu’ils dépassent le
socle du Tobi, empêchant de le fixer solidement. Choisissez dans ce cas un autre siège de la voiture (5).
Le verrouillage risque en outre de se casser!
• Faites passer la bretelle de la ceinture de sécurité sur le côté du verrouillage de la ceinture de la voiture,
dans la rainure rouge sur le dossier du siège (6).
• Faites passer ensuite la bretelle de la ceinture le long de la marque rouge à cet effet, située sur l’arrière
du Tobi (7,1).
• Ressortez-la en la faisant passer dans la seconde rainure rouge (7,2).
• Calez le Tobi sur la banquette (8,1) et tendez en même temps la bretelle de la ceinture à fond (8,2).
Le Tobi est à présent solidement installé dans la voiture. Vérifiez-le !
• Enclenchez d’abord le verrou de sûreté du côté du verrouillage de la ceinture, puis celui du côté de
l’enrouleur (9).
• Pour finir, tendez la ceinture en tournant le(s) tendeur(s) de ceinture un quart de tour vers le haut, en
position verticale (10). La ceinture de sécurité est alors tendue à fond!
votre enfant, et se produit lorsque l’installation est correcte.
ATTENTION! Assurez-vous que les deux verrous de sûreté situés sur le dessus du siège sont
bien fermés.
ATTENTION! Assurez-vous que la ceinture de sécurité ne soit pas vrillée.
Liste de contrôle…
Après l’installation, contrôlez à nouveau pour plus de sûreté et pour la sécurité optimale de l’enfant, que...
• la sangle abdominale de la ceinture de sécurité passe sur les marques rouges et le(s) tendeur(s) de
• la bretelle (diagonale) de la ceinture de sécurité est bien fixée et passe dans les deux rainures prévues
• les deux verrous de sûreté sont fermés,
• le(s) tendeur(s) de ceinture est (sont) en position verticale de tension,
• le Tobi est totalement fixé et stable dans la voiture.
• la ceinture de sécurité de la voiture est tendue et parfaitement à plat,
ceinture,
pour la ceinture, le long des marques rouge sur l’arrière du Tobi,
B. Enlever le Tobi
11
• Libérez le verrouillage de la ceinture de sécurité (11).
12
• Ouvrez ensuite les deux verrous de sûreté (12).
13
• Appuyez sur le bouton du tendeur de ceinture (13) pour le libérer. Le tendeur de ceinture saute
vers le bas, en position horizontale.
14
• Sortez la ceinture de sécurité des rainures (14).
• Enlevez le Tobi de la voiture.
3. Installer votre enfant dans le Tobi
3.1 Utilisation du harnais
A. Régler la hauteur du harnais
Avant d’installer l’enfant dans le Tobi et de fermer le harnais, déterminez la hauteur des bretelles et de
• La hauteur des bretelles et de l’appui-tête se règlent simultanément avec l’appui-tête.
l’appui-tête.
15
• Appuyez sur le bouton rouge du fermoir de harnais (15) pour l’ouvrir.
• Les bretelles se libèrent automatiquement et peuvent être rallongées sans avoir à manipuler
16
17
18
d’autres boutons.
• Donnez du jeu aux bretelles en les tirant le plus possible en avant (16).
ATTENTION! Ne tirez pas sur les protège-bretelles.
•
• Installez l’enfant dans le Tobi le dos bien droit et vérifiez la hauteur du harnais (17).
• ATTENTION! Les bretelles sont à la bonne hauteur lorsqu’elles entrent dans la coque légèrement
au-dessus des épaules (18).
19
• Pour mettre les bretelles et l’appui-tête à la hauteur voulue, basculez et remontez ou abaissez
simultanément l’appui-tête à l’aide de la poignée située sur le dessus (19). Les bretelles et l’appui-tête
peuvent être réglés à 6 hauteurs différentes.
18 19
FRFR
B. Installer l’enfant dans le Tobi
• Installez l’enfant le dos bien droit dans le Tobi.
20
• Placez les éléments du fermoir l’un sur l’autre (élément A sur élément B) et enclenchez-les dans le
verrou de sûreté, vous devrez entendre clairement un “clic” (20). La fermeture du verrou bloque le
21 22
harnais, qui ne peut alors qu’être tendu. Pour allonger le harnais, le verrou devra être ré-ouvert.
• Tendez maintenant le harnais en tirant sur la sangle de réglage (21,1). Tirez-la jusqu’à ce l’indicateur sur le
verrou de sûreté soit sur le vert (21,2) S’il est encore sur la couleur argentée, le harnais n’est pas assez
tendu (22). Lorsque vous démarrez, l’indicateur doit être sur le vert.
Si vous avez l’impression que la sangle du harnais n’est pas suffisamment tendue alors que l’indicateur
se trouve sur le vert, tirez une nouvelle fois sur la sangle afin de la tendre davantage. Vous êtes ainsi
assuré d’une sécurité optimale. En cours de trajet, il peut arriver que suite aux mouvements de votre
enfant, l’indicateur se repositionne sur la couleur argentée. C’est tout à fait normal et n’a aucune
conséquence pour la sécurité de votre enfant.
•
•
ATTENTION! Plus le harnais est ajusté à votre enfant, mieux il sera protégé.
ATTENTION! Vérifiez que la face profilée (antidérapante) des protège-bretelles est bien en contact
avec les épaules/la poitrine de l’enfant.
•
ATTENTION! Vérifiez que le harnais soit parfaitement à plat et qu’il ne soit pas vrillé.
Utilisez toujours les protège-bretelles; ils assurent la bonne sécurité de l’enfant.
Expliquez à l’enfant qu’il ne doit jamais jouer avec le fermoir du harnais.
3.2 Positions (réglage position assise et inclinée)
Le Tobi se règle sur 5 positions.
23
• Poussez vers le haut la manette de réglage située sous l’avant du siège, puis tirez ou poussez le siège
vers l’avant ou vers l’arrière (23).
• Lâchez la manette de réglage lorsque le siège est dans la position voulue et poussez-le jusqu’à ce que
vous entendiez clairement un “clic”.
•
ATTENTION! Vérifiez que le Tobi est bien fixé dans la position voulue en tirant sur le siège.
Liste de contrôle…
Pour plus de sûreté et la sécurité optimale de l’enfant, revérifiez avant chaque trajet, que…
• le Tobi est bien fixé et stable,
• les bretelles sont à la bonne hauteur,
• Le harnais est parfaitement à plat,
• la face profilée (antidérapante) des protège-bretelles est bien en contact avec les épaules/la poitrine
de l’enfant.
• le harnais serre suffisamment l’enfant, que le fermoir du harnais est fermé et que l’indicateur est
sur le vert,
• la sangle de réglage du Tobi n’est pas endommagée. Si c’est le cas, n’utilisez en aucun
cas le Tobi et contactez votre fournisseur ou l’importateur.
3.3 Sortir l’enfant
• Mettez le Tobi en position assise (voir paragraphe 3.2: positions).
24
• Appuyez sur le bouton rouge du fermoir de harnais (24) pour l’ouvrir.
25
• Donnez du jeu aux bretelles en les tirant le plus possible en avant (25).
• Sortez l’enfant du Tobi.
• Nettoyez les parties en tissu selon les instructions données sur le tableau de nettoyage; lavez-les à la
main à l’eau tiède et une lessive pour linge délicat.
• ATTENTION! N’utilisez jamais de lubrifiants, non plus sur les éléments mobiles du Tobi.
4.2 Housse
• Enlevez la protection du fermoir de harnais en la faisant glisser doucement – à l’oblique, latéralement
• Répétez l’opération pour le second protège-bretelles.
• Répétez l’opération pour les deux protège-ceintures abdominales, excepté la boucle à crochet. Les
• Libérez la housse de l’appui-tête d’un côté et enlevez la housse de ce côté avec précautions.
• Libérez avec précautions la housse de l’appui-tête de la rainure située sous la poignée sur le dessus de
Enlever la housse
24 25
• Ouvrez le fermoir du harnais. Donnez du jeu aux bretelles en les tirant le plus possible en avant (24, 25).
Détacher les boucles élastiques des crochets des deux côtés de la poignée de réglage.
26 27
• Sor tez le rebord élastique de la housse des rainures de la coque et libérez-la sur l’avant en tirant avec
précautions (26, 27).
28
29
30
31
31
32
33
34
35
36
– du fermoir. Faites passer la housse par-dessus le fermoir du harnais (arrière en avant).
• Libérez la housse des points de fixation de chaque côté de la coque (28).
• Libérez le rabat arrière de la housse et rabattez-le vers l’avant (29).
• Détachez la housse avec précautions des côtés (30).
• Libérez la housse derrière les verrous de sûreté. La housse est glissée derrière (31,1).
• Faites passer maintenant la housse avec précautions par-dessus l’appui-tête (31,2).
• Enlevez la housse.
• Enlevez les protège-bretelles en défaisant les bandes Velcro et les pressions placées sur l’extérieur (32).
• Enlevez la sangle derrière le rabat à bande velcro (33).
• Faites glisser la boucle à crochet hors de la bride du protège-bretelles (34).
• Enlevez le protège-bretelles du ressort (35).
protège-ceintures abdominales sont fixés à la ceinture par une bande velcro.
• Sortez les deux élastiques du rabat inférieur sous la partie synthétique (36,1) pour enlever la housse de
l’appui-tête.
36
l’appui-tête.
• Enlevez maintenant la housse de l’appui-tête avec précautions (36,2).
Nettoyage de la housse
• Nettoyez la housse et les protège-bretelles à la main (maximum 30˚C). Ne jamais les faire sécher dans
Conseil: achetez une housse supplémentaire lors de l’achat du Tobi, de façon à pouvoir l’utiliser quand
un séchoir. Voir les instructions de lavage sur la housse.
vous lavez la housse d’origine.
Replacer la housse
• Répétez les opérations ci-dessus dans l’ordre inverse.
•
• Glissez la housse bien au fond des rainures de la coque.
• Vérifiez que la housse est bien tendue et fixée partout.
ATTENTION! Replacez les 4 protège-bretelles et la housse de l’appui-tête avant de remettre
la housse.
4. Entretien
4.3 Fonctionnement et nettoyage du fermoir et du système de réglage du harnais
Le bon fonctionnement du fermoir et du système de réglage du harnais est essentiel pour la sécurité de
l’enfant. Un mauvais fonctionnement est en général dû à des impuretés (poussière, saleté, restes de
4.1 Général
• ATTENTION! Le Tobi doit être sorti de la voiture.
• Nettoyez les parties synthétiques du siège avec un chiffon humide, de l’eau tiède et du savon.
N’utilisez jamais de produits abrasifs.
nourriture, etc.). Veillez à ce que le fermoir et le système de réglage du harnais restent bien propres.
Utilisez, par exemple, un aspirateur pour en retirer les saletés et poussières. Lorsque le système de
réglage ne fonctionne pas convenablement, contactez immédiatement votre fournisseur ou importateur
(voir verso du mode d’emploi). N’utilisez jamais dans ce cas le Tobi!
Quelques problèmes de fonctionnement et leurs solutions sont indiqués dans la liste ci-dessous.
20 21
FRFR
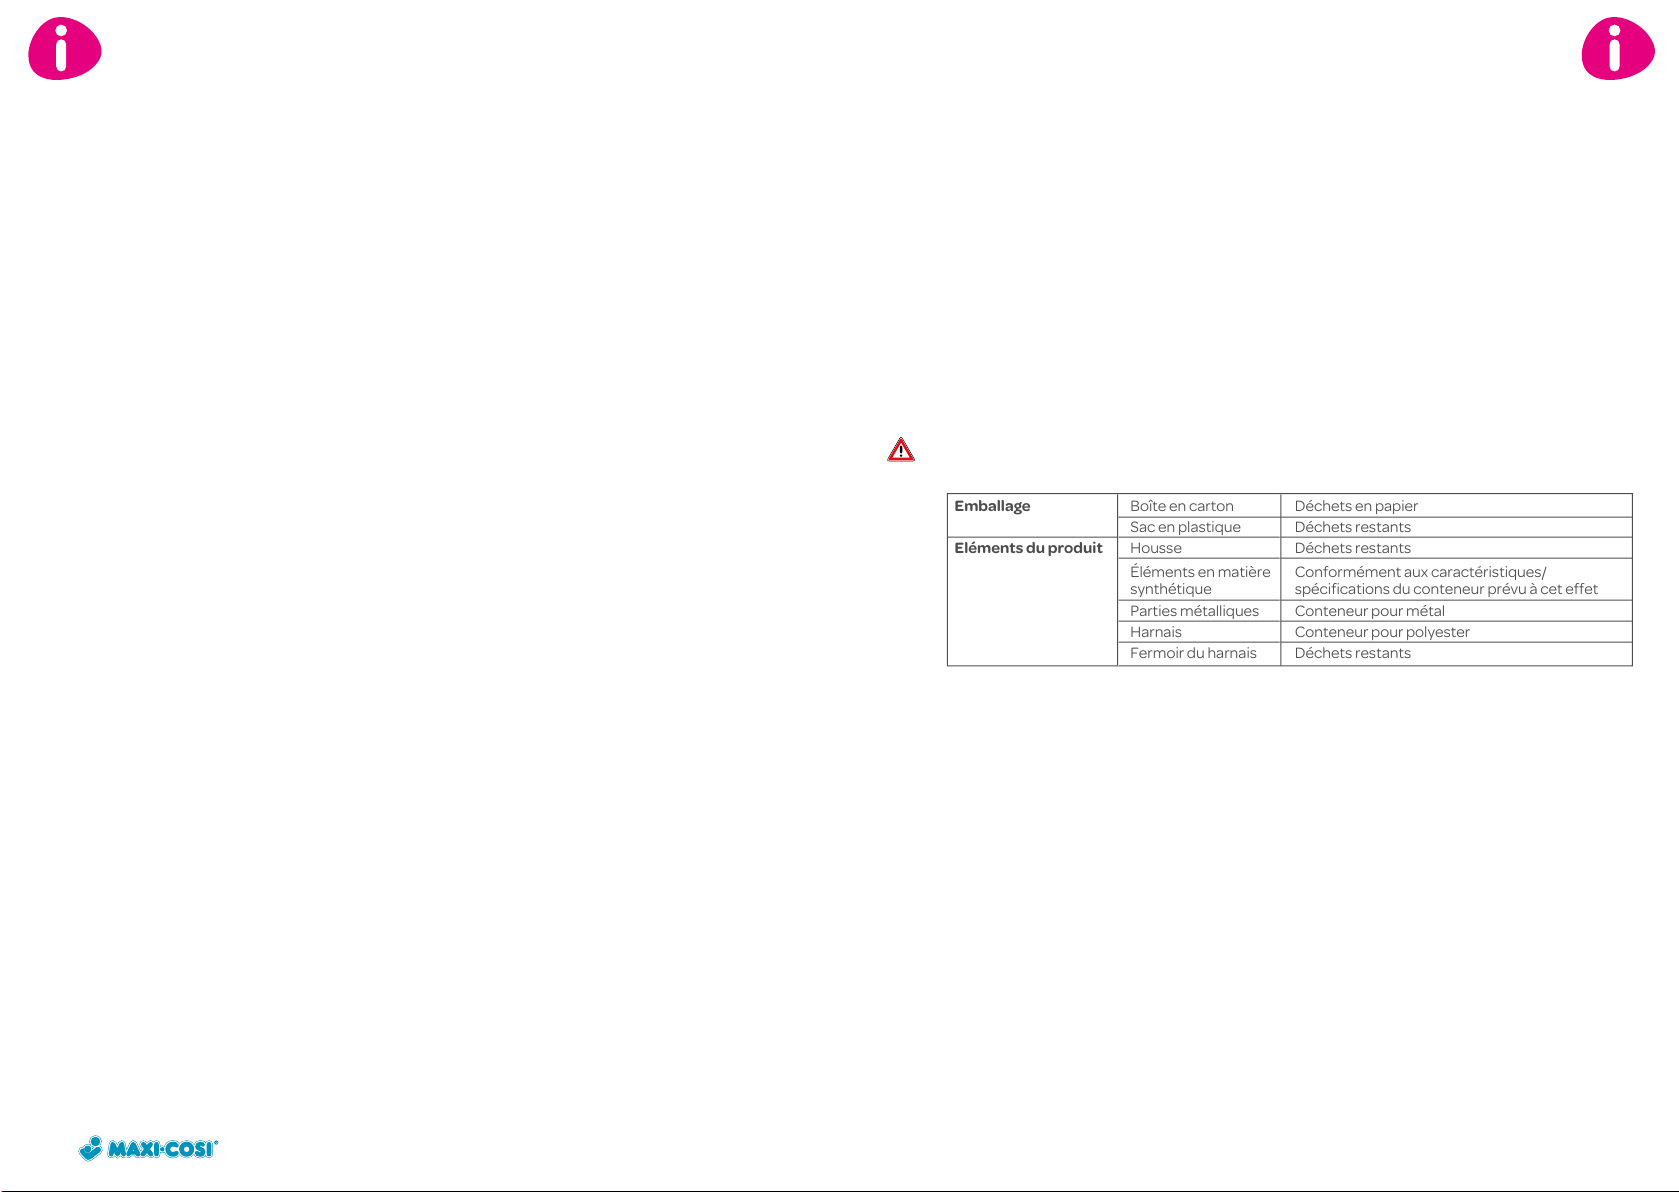
Emballage Boîte en carton Déchets en papier
Sac en plastique Déchets restants
Eléments du produit Housse Déchets restants
Éléments en matière Conformément aux caractéristiques/
synthétique spécifications du conteneur prévu à cet effet
Parties métalliques Conteneur pour métal
Harnais Conteneur pour polyester
Fermoir du harnais Déchets restants
A. Problèmes au niveau du fermoir du harnais
• Lors de l’ouverture du fermoir, les éléments du fermoir sont éjectés avec un certain retard.
• Le fermoir ne s’ouvre qu’en exerçant une force excessive.
• Les éléments ne s’enclenchent pas souplement dans le fermoir (forte résistance).
• Le fermoir ne se ferme plus, les éléments sont chaque fois éjectés.
• Aucun “clic ” n’est clairement audible au verrouillage du fermoir.
• Le fabricant est conscient que les sièges-auto risquent de laisser des marques sur le revêtement de la
voiture ou les ceintures de sécurité. Les normes de sécurité prescrites et la force avec laquelle ils
doivent être fixés ne permettent pas de l’éviter. Le fabricant exclut toute responsabilité en cas
d’éventuels dommages provoqués par le siège-auto.
Et bien entendu...
• Donnez vous-même l’exemple et mettez toujours votre ceinture de sécurité!
B. Solutions
• Vérifiez que le fermoir ne contient pas d’impuretés, nettoyez-le si nécessaire en le secouant,
•
Si vous n’arrivez pas à fermer correctement le fermoir ou si vous avez des doutes sur son bon
5. Instructions generales
A se rappeler en toutes circonstances……
• Utilisez toujours le Tobi, même pour de courts trajets, car c’est sur les courtes distances que se
• Utilisez le Tobi uniquement en voiture, non dans la maison. Le siège-auto n’est pas conçu pour être
• Le Tobi peut être utilisé sur le siège avant comme sur la banquette arrière. Même lors de la présence
• Le siège-auto doit toujours être fixé avec la ceinture de sécurité, également lorsqu’il n’est pas utilisé. Un
• Assurez-vous que le Tobi n’est pas coincé ou surchargé par des bagages lourds, le réglage des sièges ou
• N’utilisez jamais le Tobi sans housse. Ne remplacez pas la housse d’origine par une housse d’une autre
• Protégez toujours le Tobi lorsque votre voiture est garée en plein soleil, les parties synthétiques risquant
• N’enlevez pas les logos, etc. de la housse, afin d’éviter tout dommage.
• Assurez-vous qu’il n’y a pas de bagages ou autre objets non attachés (sur la plage arrière par exemple)
• En cas de longs déplacements, faites des pauses régulières pour accorder à votre enfant un peu de
• Ne laissez jamais l’enfant seul dans la voiture.
• Conservez le mode d’emploi pour un usage ultérieur dans le compartiment prévu à cet effet sur
• Le dispositif Tobi est conçu pour un usage intensif d’environ 10 ans.
• Nous vous recommandons de vérifier régulièrement l’état des pièces en polystyrène expansé (EPS).
• N’utilisez pas de produits d’occasion dont vous ne connaissez pas précisément les antécédents.
• Aucune modification ne doit être apportée à un siège-auto pour enfant, ou au harnais, par l’utilisateur.
• Remplacez le dispositif Tobi lorsqu’il a été soumis à des efforts violents à l’occasion d’un accident :
22 23
le rinçant, en soufflant dessus ou avec un aspirateur.
ATTENTION! N’employez jamais de lubrifiants!
fonctionnement, contactez immédiatement votre fournisseur ou l’importateur (voir liste d’adresses
au dos du mode d’emploi). N’utilisez jamais dans ce cas le Tobi.
produisent la plupart des accidents.
utilisé à la maison.
d’un coussin autogonflable ! Nous vous conseillons néanmoins de l’utiliser sur la banquette arrière. Si
cela s’avère impossible, veillez à ce que dans le cas d’un siège avant équipé d’un coussin autogonflable,
ce dernier se trouve dans sa position la plus reculée. Regardez également dans le guide utilisateur
(notice) de votre véhicule ; dans un nombre croissant de voitures, il est en effet possible de désactiver
le coussin autogonflable.
siège non fixé peut blesser d’autres passagers lors d’un coup de frein brutal.
à la fermeture des portières.
marque, car elle fait partie intégrante de la sécurité assurée par le siège.
de devenir très chaudes et de provoquer des brûlures; par ailleurs, la housse risque inutilement de se
décolorer.
dans la voiture, qui risquent de se transformer en projectiles dangereux en cas d’arrêt brusque ou de
collision!
liberté de mouvement.
l’arrière du Tobi.
Certaines pièces pourraient être cassées, déchirées ou manquantes.
Les étiquettes, avertissements, etc. apposés sur le siège ne doivent en aucun cas être enlevés.
la sécurité de votre enfant ne peut plus être garantie.
6. Separation des dechets
Pour un usage optimal et en toute sécurité des sièges-auto, ils ne devraient pas être utilisés plus
Lorsque l’enfant est trop grand pour s’asseoir dans le siège-auto, nous recommandons de ne plus
Souhaitant préserver l’environnement, nous demandons au consommateur à l’achat (emballage) et la fin
7. Garantie
Notre garantie de 24 mois reflète notre confiance dans la qualité supérieure de notre conception,
Notre garantie de 24 mois couvre tous les défauts de matériau et de fabrication pour une utilisation dans
Notre garantie de 24 mois ne couvre pas les dommages causés par l’usure normale, les accidents,
longtemps que 5 ans. Le vieillissement des matières synthétiques, en autres sous l’effet des rayons
solaires (UV), peut entraîner une détérioration imperceptible des propriétés du produit.
l’utiliser et de s’en débarrasser.
de la durée de vie (éléments du produit) du Tobi de séparer les déchets.
Gardez le matériel d’emballage en plastique hors de la portée des enfants pour éviter les risques
d’étouffement.
ingénierie, production et la performance du produit. Nous garantissons que ce produit a été fabriqué
conformément aux exigences de sécurité et normes de qualité actuelles européennes applicables à ce
produit, et que ce produit est, au moment de l’achat, exempt de défaut de matériau et de fabrication.
Dans les conditions mentionnés dans ce document, cette garantie peut être invoquée par les consom
mateurs dans les pays où ce produit a été vendu par une filiale du groupe Dorel ou par un revendeur ou
détaillant autorisé.
des conditions normales et conformément à la notice pour une période de 24 mois à compter de la date
de l’achat initial par le premier client utilisateur. Pour demander des réparations ou des pièces de
rechange sous garantie pour des défauts de matériau et de fabrication, vous devez présenter la preuve
d’un achat effectué dans les 24 mois précédant la demande de service.
l’utilisation abusive, la négligence, le feu, le contact avec un liquide ou toute autre cause extérieure, les
dommages résultant d’une utilisation non conforme au mode d’emploi, de l’utilisation avec un autre
produit, d’une réparation ou d’un entretien mené par une personne non autorisée par nos services, les
produits volés, ne portant plus l’étiquette ou le numéro d’identification ou les produits dont ce numéro a
-
 Loading...