


MAXDATA SN 40 M1
User Guide
Rev. 1.1

2 Contents

Contents
1 Safety and Warnings 7
Important Safety Instructions ..................................................................................................................7
Warnings .................................................................................................................................................7
Heed safety instructions ....................................................................................................................7
System power on/off ..........................................................................................................................7
Installation/Assembly Safety Instructions ...............................................................................................7
2 Storage System Features 9
Key Features and Benefits ......................................................................................................................9
Front Panel .........................................................................................................................................9
Rear Panel ........................................................................................................................................11
System Requirements ...........................................................................................................................12
3 Getting Started 13
Setting up the Storage System .............................................................................................................14
Attaching the Storage System to the Network ................................................................................14
Powering Up the Storage System ....................................................................................................14
Powering Down the Storage System ...............................................................................................14
Accessing the Manager .........................................................................................................................15
Accessing the Manager Using a Web Browser ...............................................................................15
Accessing the Manager Using the Console .....................................................................................16
Logging in to the Manager ....................................................................................................................18
Navigating the Manager ........................................................................................................................18
Adding Users .........................................................................................................................................19
Creating Shared Folders ........................................................................................................................23
Accessing Shared Folders .....................................................................................................................27
Microsoft® Windows® Users ............................................................................................................27
Linux® Users .....................................................................................................................................30
Mac® Users ......................................................................................................................................30
Attaching USB Devices (Optional) .........................................................................................................31
4 Managing Your Storage System 33
Managing Users ....................................................................................................................................34
Adding Users ....................................................................................................................................34
Modifying Users ............................................................................................................................... 35
Removing Users ...............................................................................................................................37
Working with Groups .......................................................................................................................37
Managing Shared Folders ......................................................................................................................40
Adding Shared Resources ................................................................................................................ 41
Changing User Access to Shared Folders ........................................................................................ 41
Deleting a Shared Folder .................................................................................................................. 44
Managing Backups ................................................................................................................................45
Changing the Password for Restoring Hard Disks ...........................................................................45
Deleting a Backup ............................................................................................................................46
Deleting a Client ............................................................................................................................... 46
Setting Up E-Mail Alerts ........................................................................................................................47
Disconnecting USB Devices ..................................................................................................................48
Changing the System Settings ..............................................................................................................49
Changing the Network Settings ............................................................................................................51
Accessing the Storage System Using FTP ............................................................................................54
Storage System Disk Status ..................................................................................................................54
Logging Out of the Manager .................................................................................................................55
Shutting Down the Storage System ......................................................................................................56
3MAXDATA SN 40 M1 – User Guide

Removing Hard Disks or Responding to Disk Failure ............................................................................56
Responding to RAID Degradation ....................................................................................................58
Responding to RAID Failure .............................................................................................................59
Replacing a Hard Disk ......................................................................................................................60
5 Protecting Local Disks 63
Getting Started ......................................................................................................................................63
System Requirements ......................................................................................................................63
Installing the Microsoft® iSCSI Initiator .................................................................................................64
Installing Intel® Client Backup and Recovery .........................................................................................64
Starting Intel® Client Backup and Recovery ...........................................................................................66
Activating Your License .........................................................................................................................67
Activating Your License Without an Internet Connection .....................................................................67
Replacing Your Existing License ...........................................................................................................68
Protecting Your Disks ............................................................................................................................68
Manually Backing up Your Disk .............................................................................................................72
Stopping a Backup or Recovery in Progress .........................................................................................72
Changing the Backup Schedule .............................................................................................................73
Changing the Recovery CD Password or Password for Restoring Hard Disks .....................................73
Recovering Data ....................................................................................................................................74
Recovering Files from a Backup ............................................................................................................75
Recovering a Non-system Disk or Partition ...........................................................................................76
Recovering a System Disk or Partition ..................................................................................................77
Removing Protection .............................................................................................................................80
6 Troubleshooting 81
Viewing the System Log .......................................................................................................................81
Disconnecting from Shared Folders ......................................................................................................81
Troubleshooting the Storage System ....................................................................................................81
The System Status LED is yellow. ...................................................................................................81
The Disk Activity LED is blinking yellow. ..........................................................................................82
One of the Global Disk Status LED lights is yellow. .........................................................................82
7 Technical Specifications 83
Hardware Specification .........................................................................................................................83
Software Specification ..........................................................................................................................83
8 Regulatory and Compliance Information 85
Intended Application ..............................................................................................................................85
Product Safety Compliance ...................................................................................................................85
Product EMC Compliance - Class B Compliance ..................................................................................85
Certifications / Registrations / Declarations ...........................................................................................85
Product Regulatory Compliance Marking ..............................................................................................85
Electromagnetic Compatibility Notice ...................................................................................................85
Europe (CE Declaration of Conformity) ............................................................................................85
End of Life / Product Recycling .............................................................................................................85
4 Contents

Figures
1. Front Panel LEDs and Components ..................................................................................................9
2. Rear Panel Components .................................................................................................................11
3. Storage System Console .................................................................................................................17
4. Users & Computers – Main Page ....................................................................................................20
5. Users & Computers – User Type Selection .....................................................................................20
6. Users & Computers – Add User (Windows / Mac OS X) ................................................................21
7. Users & Computers – Add User (Linux / Mac OS) ..........................................................................21
8. Shared Folders – Main Page ............................................................................................................23
9. Shared Folders – User Type Selection ............................................................................................24
10. Shared Folders – Folder Name (Windows / Mac OS X) ...................................................................24
11. Shared Folders – Folder Name (Linux / Mac OS) ............................................................................24
12. Shared Folders – Access Rights (Windows / Mac OS X) ................................................................25
13. Shared Folders – Access Rights (Linux / Mac OS) ..........................................................................26
14. Attaching Optional USB Devices .....................................................................................................31
15. Users & Computers – Main Page ....................................................................................................34
16. Users & Computers – Modify User (Windows / Mac OS X) ............................................................35
17. Users & Computers – Modify User (Linux / Mac OS) .....................................................................36
18. Groups – Main Page ........................................................................................................................37
19. Shared Folders – Main Page ............................................................................................................40
20. Shared Folders – Access Rights (Windows / Mac OS X) ................................................................42
21. Shared Folders – Access Rights (Linux / Mac OS) ..........................................................................43
22. Managing Backups ..........................................................................................................................45
23. E-Mail Alerts ....................................................................................................................................47
24. System Settings ..............................................................................................................................49
25. Network Settings ............................................................................................................................51
26. Disk Space Distribution ...................................................................................................................54
27. RAID Degradation ...........................................................................................................................58
28. RAID Failure ....................................................................................................................................59
29. Removing Drive Carrier from Storage System ................................................................................60
30. Installing Hard Disk into Drive Carrier ..............................................................................................61
31. Order of Drive Carriers ....................................................................................................................62
Tables
1. System Requirements .....................................................................................................................12
2. Adding Users ...................................................................................................................................22
3. Shared Folders – Access rights ....................................................................................................... 26
4. Product Regulatory Compliance Markings ......................................................................................85
5MAXDATA SN 40 M1 – User Guide

6
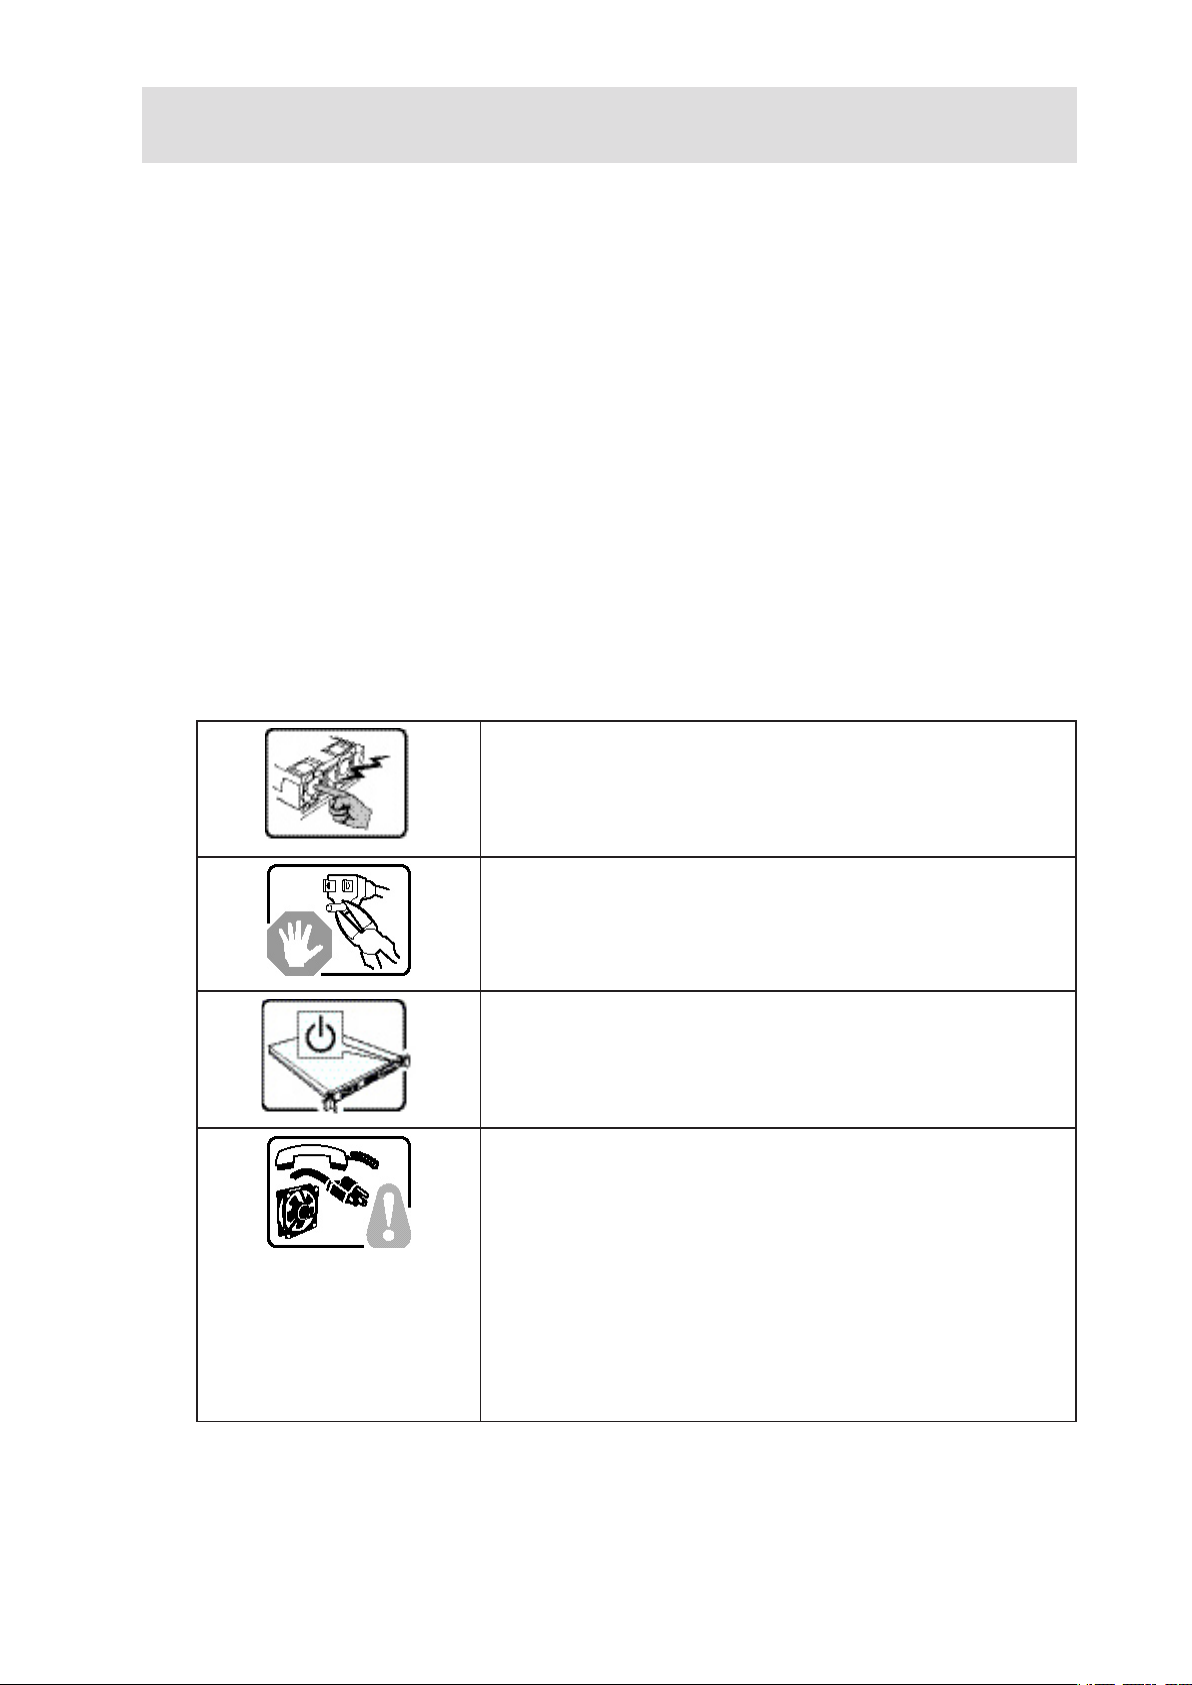
1 Safety and Warnings
Important Safety Instructions
Read all caution and safety statements in this document before performing any of the instructions.
Warnings
Only a technically qualified person should maintain or configure the storage system. The SN 40 storage
system contains no user-serviceable parts. Refer servicing to qualified personnel.
Heed safety instructions
Before working with your server product, whether you are using this guide or any other resource as a
reference, pay close attention to the safety instructions. You must adhere to the assembly instructions
in this guide to ensure and maintain compliance with existing product certifications and approvals.
System power on/off
The power button DOES NOT turn off the system AC power. To remove power from storage system,
you must unplug the AC power cord from the wall outlet or the chassis. Make sure the AC power
cord is unplugged before you open the chassis, add, or remove any components.
Installation/Assembly Safety Instructions
The power supply in this product contains no user-serviceable
parts. Refer servicing only to qualified personnel.
Do not attempt to modify or use the supplied AC power cord if it is
not the exact type required. A product with more than one power
supply will have a separate AC power cord for each supply.
The power button on the system does not turn off system AC
power. To remove AC power from the system, you must unplug
each AC power cord from the wall outlet or power supply.
The power cord(s) is considered the disconnect device to the main
(AC) power. The socket outlet that the system plugs into shall be
installed near the equipment and shall be easily accessible.
SAFETY STEPS: Whenever you remove the chassis covers to access
the inside of the system, follow these steps:
1.
Turn off all peripheral devices connected to the system.
2. Turn off the system by pressing the power button.
3. Unplug all AC power cords from the system or from wall outlets.
4. Label and disconnect all cables connected to I/O connectors or
ports on the back of the system.
5. Provide some electrostatic discharge (ESD) protection by
wearing an antistatic wrist strap attached to chassis ground of
the system-any unpainted metal surface-when handling compo
nents.
6. Do not operate the system with the chassis covers removed.
-
7MAXDATA SN 40 M1 – User Guide
After you have completed the six SAFETY steps above, you can
remove the system covers. To do this:
1.
Unlock and remove the padlock from the back of the system if a
padlock has been installed.
2. Remove and save all screws from the covers.
3. Remove the cover(s).
For proper cooling and airflow, always reinstall the chassis covers
before turning on the system. Operating the system without the
covers in place can damage system parts. To install the covers:
1. Check first to make sure you have not left loose tools or parts
inside the system.
2. Check that cables, add-in boards, and other components are
properly installed.
3. Attach the covers to the chassis with the screws removed earlier,
and tighten them firmly.
4. Insert and lock the padlock to the system to prevent unauthorized
access inside the system.
5. Connect all external cables and the AC power cord(s) to the
system.
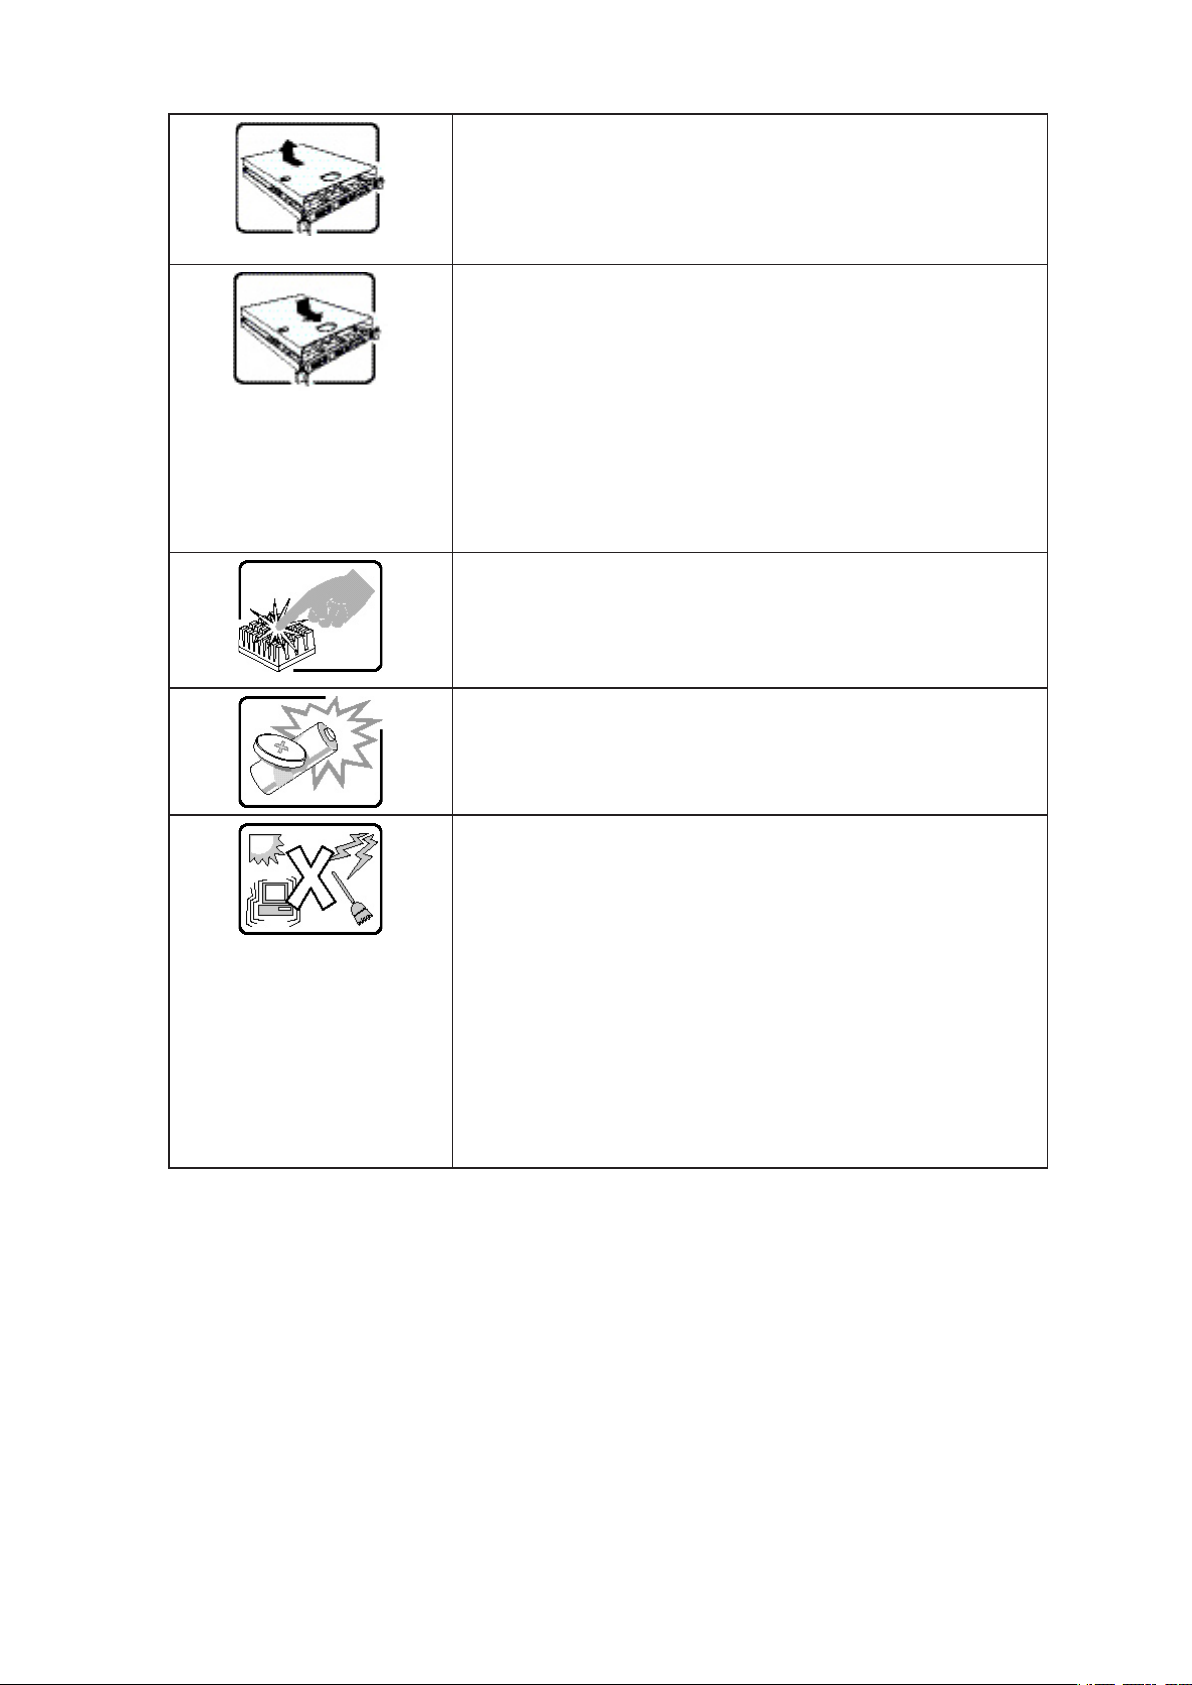
A microprocessor and heat sink may be hot if the system has been
running. Also, there may be sharp pins and edges on some board
and chassis parts. Contact should be made with care. Consider
wearing protective gloves.
Danger of explosion if the battery is incorrectly replaced. Replace
only with the same or equivalent type recommended by the equip
ment manufacturer. Dispose of used batteries according to manufacturer‘s instructions.
-
The system is designed to operate in a typical office environment.
Choose a site that is:
• Clean and free of airborne particles (other than normal room
dust).
• Well ventilated and away from sources of heat including direct
sunlight.
• Away from sources of vibration or physical shock.
• Isolated from strong electromagnetic fields produced by elec
trical devices.
• In regions that are susceptible to electrical storms, we recom
mend you plug your system into a surge suppressor and disconnect telecommunication lines to your modem during an electrical
storm.
• Provided with a properly grounded wall outlet.
• Provided with sufficient space to access the power supplycord(s),
because they serve as the product‘s main power disconnect.
-
-
8 Safety and Warnings
2 Storage System Features
E
F
H
I
L
J
M
K
B
C
A
D
G
1
2
3
2
1
4
The MAXDATA SN 40 Storage System is an intelligent network storage solution for small and mediumsized offices, and home network environments. It provides up to 2.0 TB of hard disk space for both
shared files and backups of your computer hard disks, offering an ideal way to distribute and protect
important data.
Key Features and Benefits
• Built-in data protection: In addition to a linear disk configuration in which all the disks are
treated as independent entities, the storage system supports RAID 0, RAID 1, RAID 5, RAID 5
+ Spare, RAID 10.
• Simple administration: You can run the browser-based management interface from any
computer in your network, and its informative wizards and configuration pages will help you
accomplish your tasks quickly and easily.
• Status at a glance: The home page of the management interface lets you quickly determine
how much space is being used and who’s currently connected.
• Support for multiple platforms: Whether the computers in your network run Microsoft
Windows®, a Mac OS® X or other Mac® operating system, or Linux®, you can set up file-sharing
for each of them.
®
• Security: Only authorized users can access the shared folders on your storage system. You can
also control whether the user can only view the information in the shared folders or also add,
modify, or delete files there.
Front Panel
Figure 1. Front Panel LEDs and Components

Call out Component Definition
A. NIC 1 Activity LED Blinking GREEN indicates Ethernet activity.
B.
C. NIC 2 Activity LED Blinking GREEN indicates Ethernet activity.
D.
E. Drive Carrier - 1 3.5-in SATA drive carrier
F. Drive Carrier - 2 3.5-in SATA drive carrier
G. Hard Disk Activity LED
H. Drive Carrier - 3 3.5-in SATA drive carrier
I. Drive Carrier - 4 3.5-in SATA drive carrier
J.
K. System Status LED Continuous GREEN indicates the system is running and oper-
L. Power LED Continuous GREEN indicates the system has power applied to it.
M. Power Button Toggles the system power on/off.
NIC 1 Link LED Continuous GREEN indicates an active Ethernet connection.
Off indicated no active Ethernet connection.
NIC 2 Link LED Continuous GREEN indicates an active Ethernet connection.
Off indicated no active Ethernet connection.
Continuous GREEN indicates the drive is available.
Light Pipe
Global Disk Status LED Continuous GREEN indicates hard disk health is good (1-4 hard
Blinking GREEN indicates drive activity.
Continuous YELLOW indicates a fault condition, possibly
requiring the hard disk to be replaced.
Blinking YELLOW indicates the drive is currently rebuilding RAID.
disks).
Continuous YELLOW indicates a critical or non-recoverable
condition exists.
Blinking YELLOW indicates (1) one or more hard disks are experi
encing a fault condition or (2) a RAID is being rebuilt.
ating normally.
Blinking GREEN indicates the system is in process of powering
up or shutting down.
Continuous YELLOW indicates a fault is present, either a critical
or non-recoverable condition.
No light indicates the system does not have power applied to it.
-
10 11MAXDATA SN 40 M1 – User GuideStorage System Features
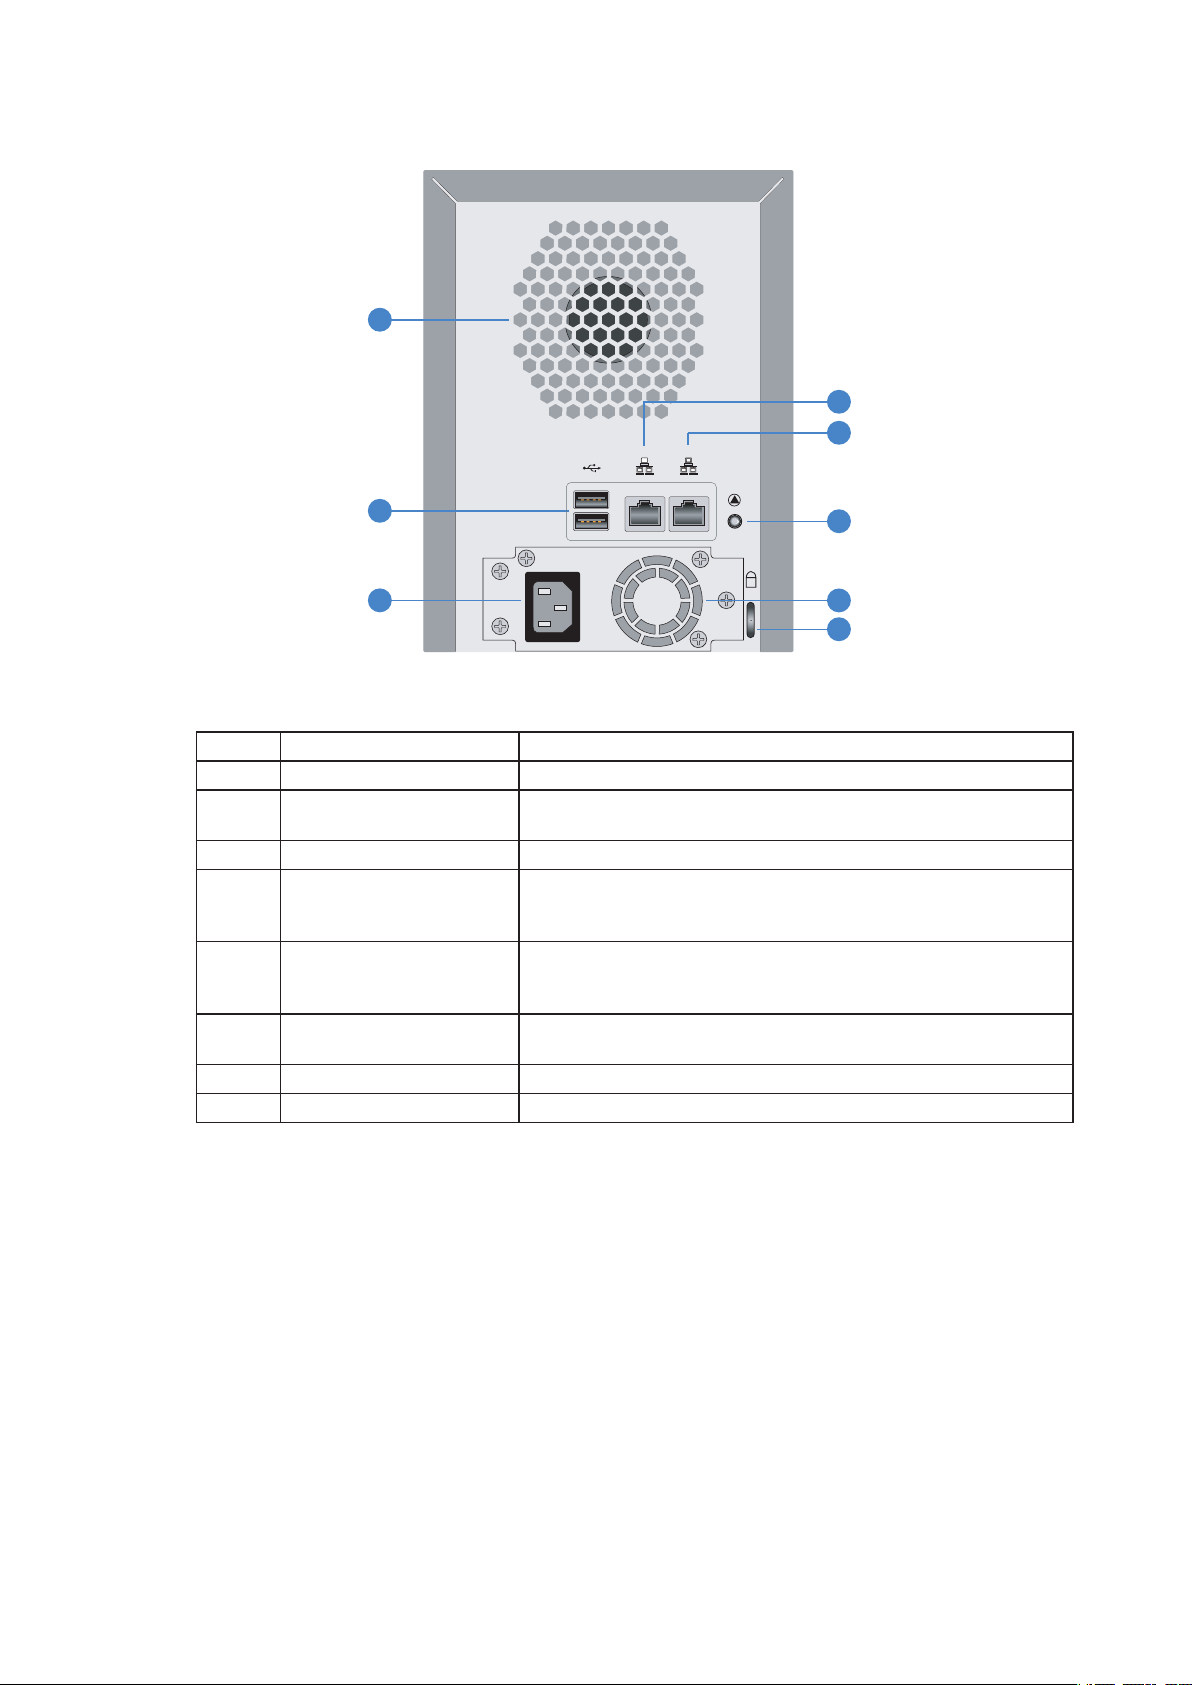
Rear Panel
A
B
C
E
F
G
D
K
H
2 1
Figure 2. Rear Panel Components
Call out Component Definition
A. System Fan
B. USB 2.0 Ports The USB ports are used for connecting an external USB
storage device.
C. Power Outlet Supplies power to the device.
D. Gigabit LAN Port 2 Gigabit Ethernet connection. The right LED lights up GREEN
when connected to a 10/100 MB network, and ORANGE when
connected to a gigabit network.
E. Gigabit LAN Port 1 Gigabit Ethernet connection. The right LED lights up GREEN
when connected to a 10/100 MB network, and ORANGE when
connected to a gigabit network.
F. Reset Button Press the Reset Button for three seconds to revert the unit to
the system defaults.
G. Power Supply Fan
H. Security Slot Anti-theft slot for attaching a security cable.

System Requirements
The following minimum system requirements must be met before setting up the MAXDATA SN 40
Storage System:
Table 1. System Requirements
Component Requirement
Web Browser Microsoft Internet Explorer
Network Environment TCP/IP networking environment.
SATA Hard Drive At least one SATA hard drive must be installed with an 80-GB capacity
minimum.
Operating System Microsoft
®
Windows Server™ 2003, Microsoft® Windows® 2000
Professional, Microsoft
OS® X, Red Hat® Linux.
®
6.0 or above, Firefox 1.06 or above.
®
Windows® XP Home or Professional, Mac
12 MFMAXDATA SN 40 M1 – User GuideStorage System Features

3 Getting Started
Getting started with your MAXDATA SN 40 Storage System involves the following general steps:
1. Set up your storage system.
This involves installing the hard disks, attaching any optional USB devices, attaching the
storage system to your network, powering up the system, and initializing the disks from the
storage system’s internal flash memory.
For information about this step, refer to “Setting up the Storage System” on page 14.
Note
This step might have already been performed by your vendor.
2. Configure your storage system.
Before you can use your storage system, you must perform some initial configuration tasks,
like setting the date and time, and specifying how much space to use for file sharing and how
much to use for backups. The System Setup Wizard guides you through this process.
3. After the storage system restarts, access the Web-based management interface (the Manager)
and log in.
For information about this step, refer to “Accessing the Manager” on page 15 and “Logging in
to the Manager” on page 18.
4. Add users.
If you want to control access to the shared folders, or if the users in your network use Linux
or a Macintosh® that doesn’t use Mac OS® X, you must create a list of users.
For information about this step, refer to “Adding Users” on page 19.
5. Create shared folders.
By default, the MAXDATA SN 40 Storage System includes a shared folder named “public”,
which all Microsoft® Windows® and Mac OS® X users can access. In addition, shared folders
can be created automatically for Windows users. However, you might want to create other
shared folders as well. For example, in an office environment, you might want to create
a shared folder for company policies that everyone can view, and separate folders for
confidential business documents that only selected individuals can view or change. In a home
environment, you might want to set up separate folders for different types of files, like photos,
videos, or music.
For information about this step, refer to “Creating Shared Folders” on page 23.
6. Access the shared folders.
For information about this step, refer to “Accessing Shared Folders” on page 27.
7. Protect your computer hard disks.
This involves installing the Intel
you want to protect and specifying which hard disks or partitions to back up and how often
backups should occur.
®
Client Backup and Recovery software on each computer that
®
For information about this step, refer to “Protecting Local Disks” on page 63.

Setting up the Storage System
Your storage system might come pre-installed with hard drives, or you might have to purchase and
install them yourself. If you currently have fewer than four hard drives, you might want to add more
at this time. (You can add more disks later, but changing your disk configuration might cause data
loss.)
The MAXDATA SN 40 Storage System also supports optional USB devices, such as USB disks. If you
have such devices, you can attach them now, or you can attach them later.
Whether or not you add hard disks or USB devices, you must connect the storage system to your
network, power it up, and upload the firmware.
Attaching the Storage System to the Network
To connect the storage system to your network, insert one end of the RJ-45 Ethernet cable into the
Ethernet port 1 on the back of the storage system. Then insert the other end of the RJ-45 Ethernet
cable into a network port.
Powering Up the Storage System
To power up the storage system, insert the power cable into the power outlet on the back of the
storage system and plug the other end into a power socket.
Note
It is recommended that you plug the storage system into a surge protector or uninterruptible power
supply to prevent damage to the system from power surges.
Once you have connected the power cord, press the power button on the front of the storage
system
The System Status LED light will blink green while the storage system is booting up. Once the system
has finished booting up, the System Status LED and Disk Status LED will remain green.
Powering Down the Storage System
Refer to “Shutting Down the Storage System” on page 56 for information on shutting down the
storage system.
14 15MAXDATA SN 40 M1 – User GuideGetting Started

Accessing the Manager
You can access the Manager to add users, create shared folders, and perform other tasks related to
managing your storage system.
There are two ways to access the Manager:
• Using a Web browser (Microsoft® Internet Explorer® 6.0 or Firefox 1.06 or newer)
• Using the Storage System Console (a Windows application which must be installed on each
computer where you want to use it)
Using a Web browser, you can access the Manager from any computer in your network, but you
must know the name or IP address of the storage system. In addition, if you configured the storage
system to use a specific IP address, you might need to specify the IP address of the gateway in your
network before you can successfully access the Manager using a Web browser. First access the
Manager using the Console and then specify the gateway address (as described in “Changing the
network settings” on page 51) and try to access it using a Web browser.
Using the Console, you can access the Manager only from a computer in the same subnet as the
storage system, but you do not have to know the name or IP address of the storage system or
otherwise modify the network settings.
Note
The Console launches a Web browser, so the computer where you install the Console must have
Microsoft Internet Explorer 6.0 or Firefox 1.06 or newer installed as well.
The default IP address of the system is 192.168.0.101 in subnet 255.255.255.
Accessing the Manager Using a Web Browser
To access the Manager using a Web browser:
1. From any computer in your network, run Microsoft Internet Explorer 6.0 or Firefox 1.06 or
newer, enter the following in the address bar, and then press Enter:
http://storage_system
where “storage_system” is the name or IP address of the storage system.
Note
You can use the storage system name only if that name is registered with a DNS or WINS server
on your network.
When the login page appears, you can bookmark it so that you can quickly and easily access it the
next time.
2. Log in to the Manager (as described in “Logging in to the Manager” on page 18).

Accessing the Manager Using the Console
If you want to access the Manager using the Console, you must install the Console on each computer
from which you plan to manage the storage system. The Console makes it easier to access storage
systems on a DHCP network.
Installing the Console
You can install the Console on any system that runs one of the following operating systems:
• Microsoft® Windows Server™ 2003
®
• Microsoft
• Microsoft
Windows® XP
®
Windows® 2000 Professional, Server, or Advanced Server with ServicePack 2 or
newer
To install the Console:
1. At the computer from which you plan to access the Manager, insert the software CD into the
CD-ROM drive.
Note
This computer must be on the same subnet as the storage system.
2. Select “Software” from the top menu.
3. Select the “Storage System Console” link to install the software.
4. On the welcome page, click “Next”.
5. If you agree to the terms of the license agreement, click “Yes”.
6. Enter your name and company name and then click “Next”.
7. Click “Next” to install the Console in the displayed location, or click “Browse” to select or
specify a different location and then click “Next”.
8. Review your selections and click “Next”.
9. To install the Console, click “Finish”.
If you want to run the Console immediately after it is installed, select the “Launch Storage System
Console” check box before you click “Finish”.
16 17MAXDATA SN 40 M1 – User GuideGetting Started
Running the Console
Once you have installed the Console, you can run it and access the Manager:
1. Click “Start” > “Programs” > “Storage System Console”.
The Console application window appears.
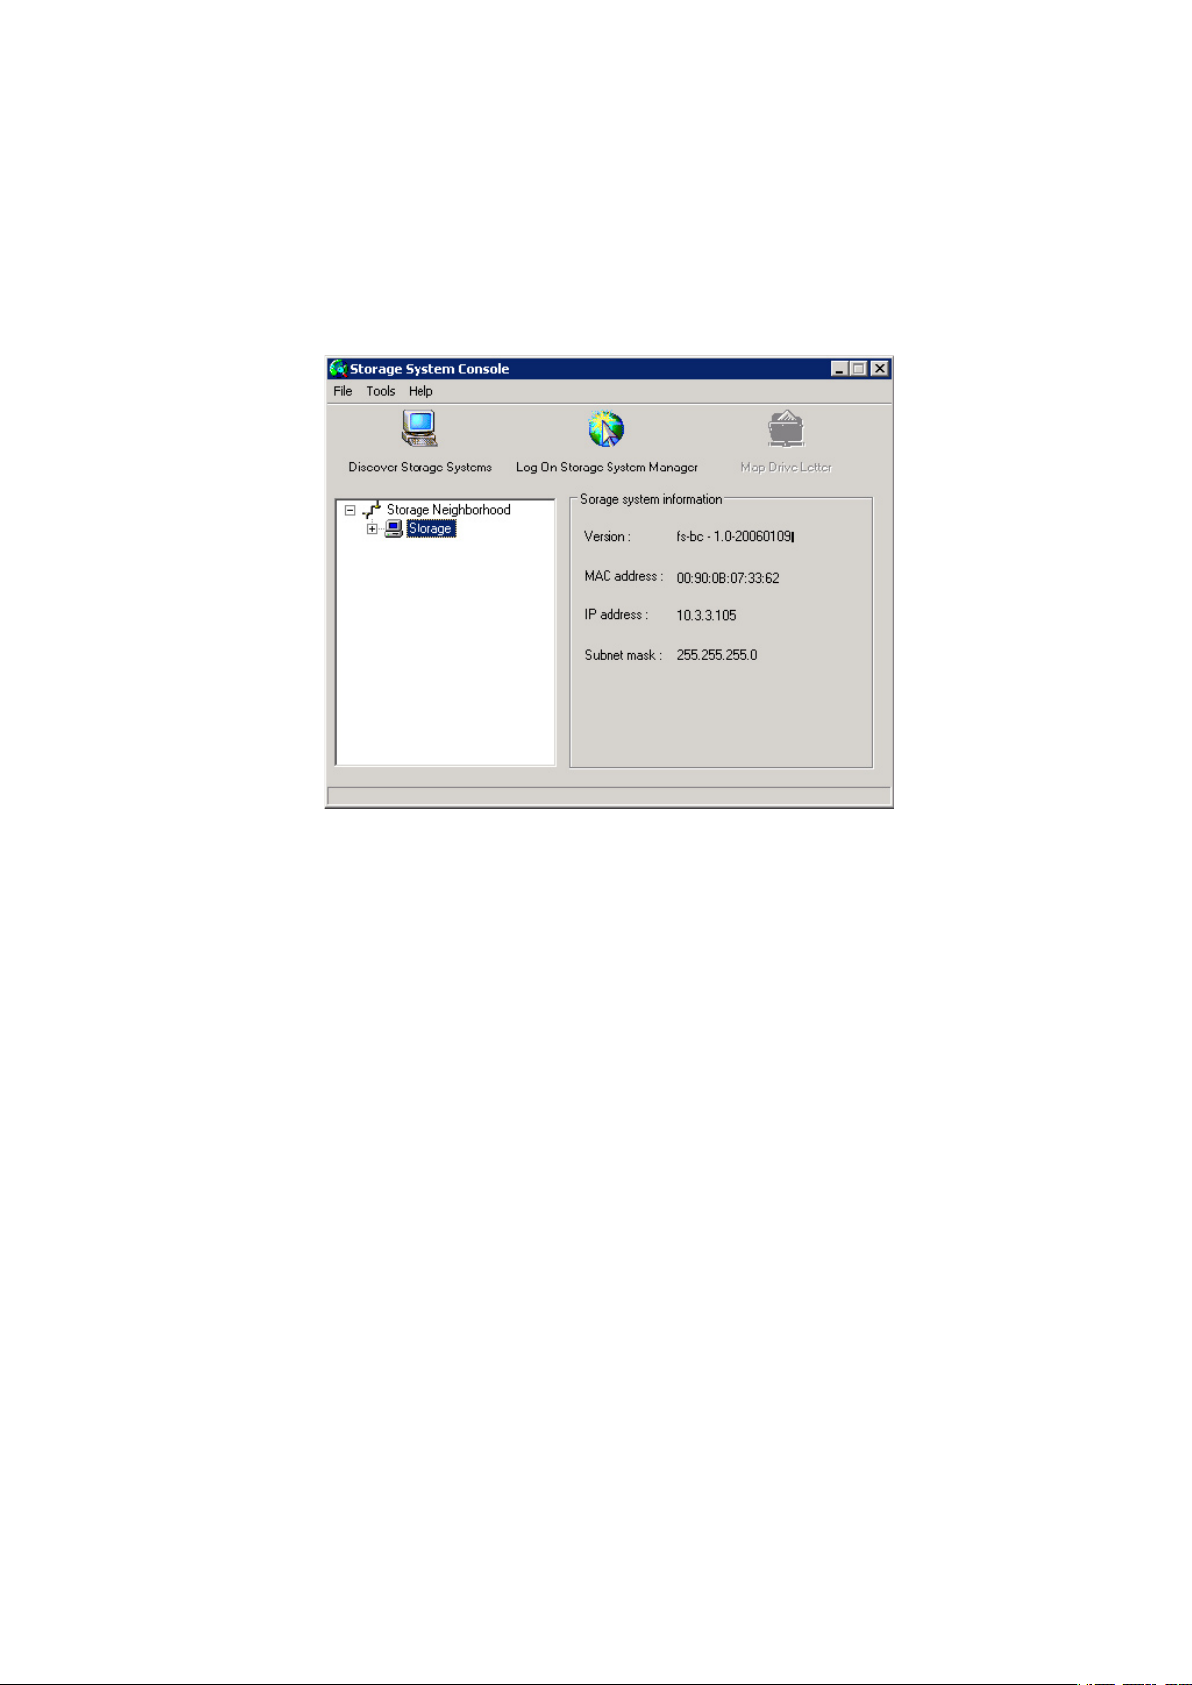
As soon as you start the Console, it automatically scans the network for storage systems. This
might take a few minutes. As soon as the scan is complete, the left pane displays a tree view
of all the storage systems it found.
Figure 3. Storage System Console
Each storage system has two ports for connecting to the network. If your storage system uses
both ports, two items appear in the tree in the left pane, each using the same name. You can
identify the IP address used by each port by clicking each item in the tree and observing the
“IP address” area in the right pane.
Note
If you connect a storage system to the network after the Console has already scanned it, or if you
change the IP address of the storage system, you must click “Discover Storage Systems” to scan
the network again and update the tree in the left pane.
2. In the left pane, select the name of the storage system that you want to manage (for example,
“Storage”), and then click “Log On Storage System Manager”.
If your storage system uses both available ports to connect to the network, you can select
either item to access the Manager.
3. Log in to the Manager.

Logging in to the Manager
Whether you access the Manager using a Web browser or the Console, the login page appears. This
ensures that only authorized individuals can change the storage system settings.
To log in, enter the administrator user name and password, and then click “Log In”.
The default administrator user name is “admin”, and the default password is “storage”. (These are
case-sensitive.) However, you can change both the administrator user name and password at any
time. For more information, refer to “Changing the System Settings” on page 49.
Navigating the Manager
Once you log in to the Manager, the Home page appears.
The top of the Home page (and every page in the Manager) displays a navigation bar that lets you
access all the features of the storage system.
Home
Displays information about the total storage capacity on the storage system, how much disk space
is allocated for shared folders, how much is allocated for backups, and how much is used for each.
(Initially, there is no used space.) This page also displays the total number of shared folders and the
number of networked computers (backup clients) that have backed up one or more disks on the
storage system.
Note
The total storage capacity will be less than the total size of all your hard disks because some of the
disk space is needed for the operating system and management software.
In addition, the amount of used backup capacity will be greater than the total size of all the disks listed
on the “Backups” page because additional storage space is needed for the data that has changed
between backups.
On the Home page, you can also click “Connection Status”. This displays information about Windows
and Mac OS X users who are currently connected to shared folders, including which shared folder
they are accessing and when they logged on.
Note
If anyone accessed a shared folder using the “guest” user name (which is described in more detail
in “Adding Users” on page 19), “guest” appears in the “User” column, followed in parentheses by
the computer name.
Due to the nature of the NFS protocol, Linux and other Mac connections are not listed on this page.
Likewise, ongoing backup or restore activities do not appear on this page.
This page indicates only that a connection with a shared folder has been established; this does not
necessarily mean that the user has opened any files in the shared folder.
Users
Displays a list of all currently configured users and lets you add, modify, and remove users. For
Windows and Mac OS X users, this area also lets you add, modify, and remove groups. For more
information, refer to “Adding Users” on page 19 and “Managing Users” on page 34.
18 19MAXDATA SN 40 M1 – User GuideGetting Started

Shared Folders
Displays a list of all currently configured shared folders and lets you add shared folders, change which
users can access them, and remove them. For more information, refer to “Creating Shared Folders”
on page 23 and “Managing Shared Folders” on page 40.
Backups
Displays a list of all computer disk backups that currently exist and lets you change the passwords
for recovering hard disks. You can also delete the backups for a particular computer hard disk. For
more information, refer to Chapter 5, “Protecting Local Disks”, on page 63.
Advanced
Provides access to advanced storage system configuration options, suchas setting up e-mail alerts;
upgrading the firmware; removing USB devices; changing the system, network, or disk configuration
settings; viewing information about system events; and shutting down the system remotely. For more
information, refer to Chapter 4, “Managing Your Storage System”, beginning on page 33.
Contact Us
Provides information about MAXDATA and the other products and services it offers.
Log Out
Logs you out of the Manager.
Adding Users
By default, the storage system includes a user named “guest” that has a password of “guest”.
Windows and Mac OS X users can access all shared folders that “guest” is authorized to access.
However, you might want to add other users as well. For example, if you want to restrict access to
a shared folder that contains confidential information, you would add at least one user and authorize
that user to access that shared folder (and not authorize the “guest” user to access it). Adding a
user for each individual or computer in your network provides flexibility and security, enabling you to
control exactly who can access what information.
In addition, only Windows and Mac OS X users can use the “guest” user name. If there are Linux users
or Mac users who aren’t using OS X in your network, you must add users to allow those individuals
to access any shared folders.
You can add up to 64 users. (Up to twenty client systems can be supported.)
To add a user:
1. In the navigation bar, click “Users”.
The “Users & Computers” page appears.
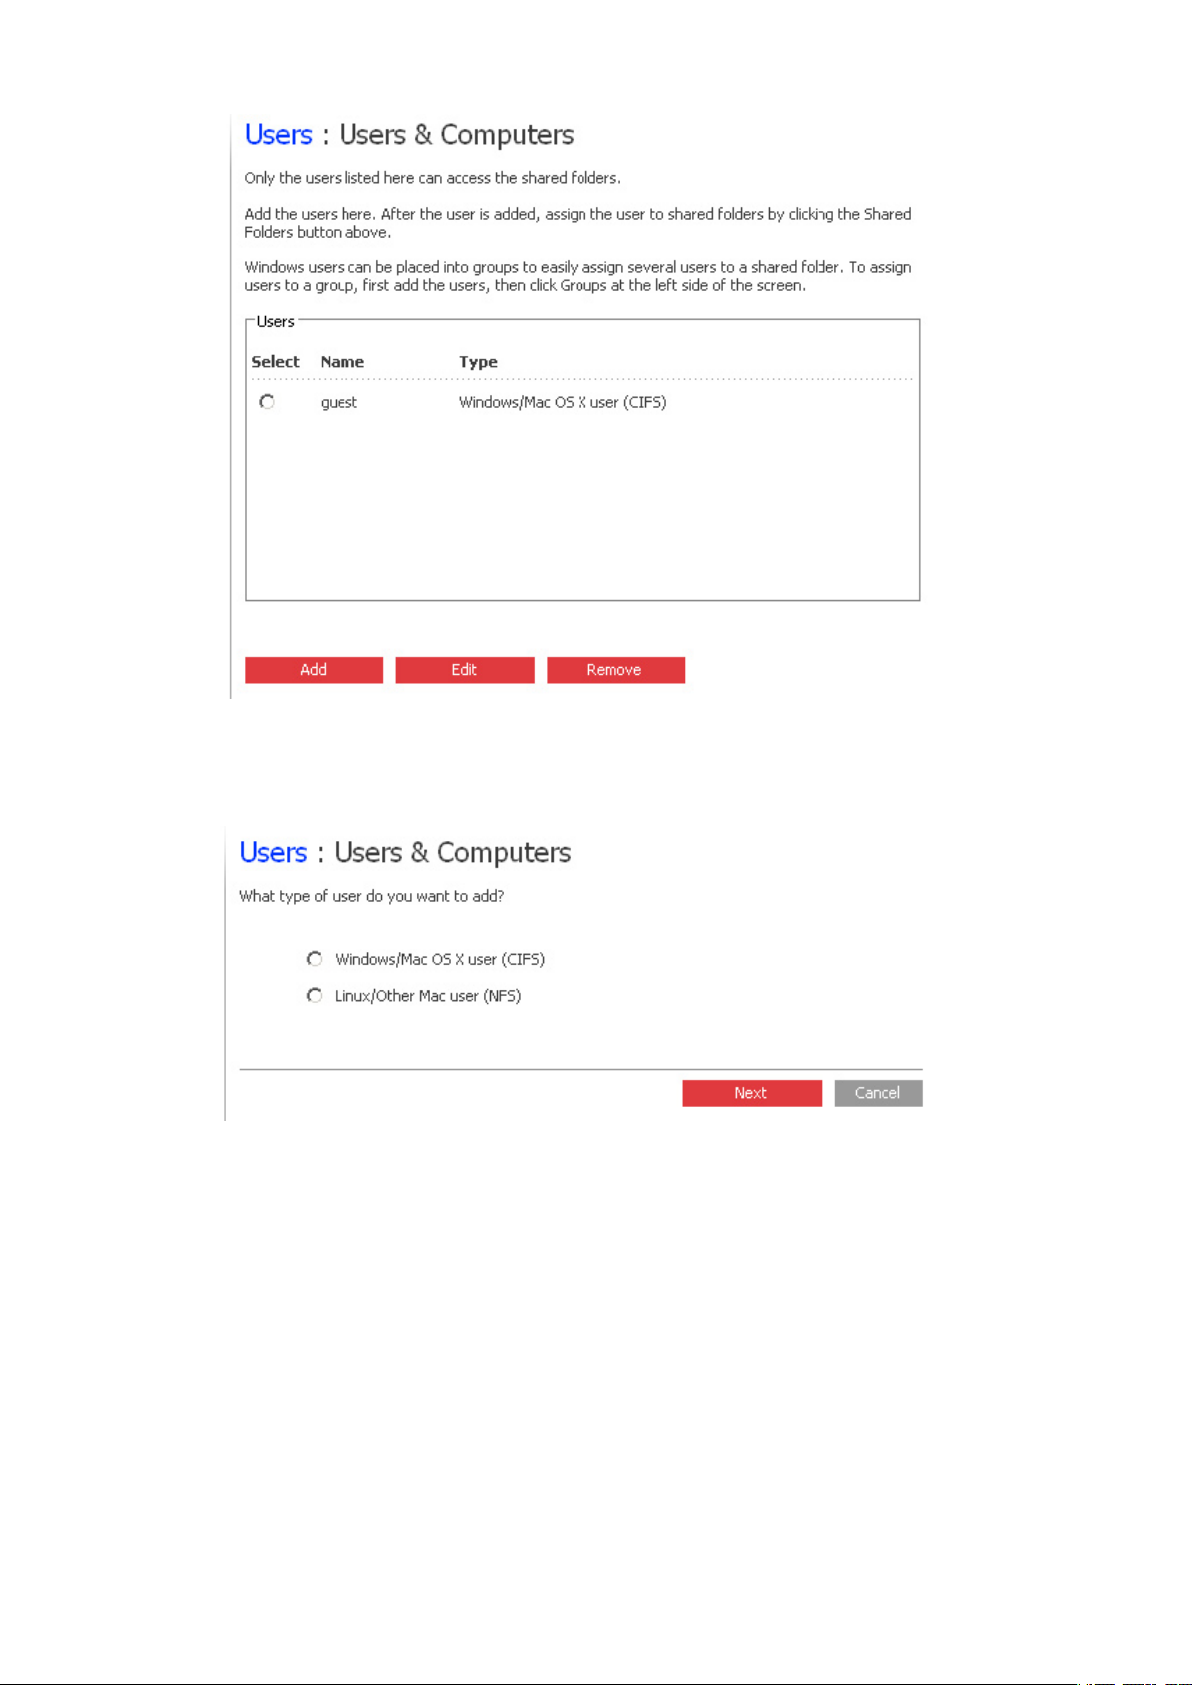
Figure 4. Users & Computers – Main Page
2. Click “Add”.
Figure 5. Users & Computers – User Type Selection
3. Select the type of user you want to add, and then click “Next”.
The operating system used by the user determines which option you should choose –
“Windows/Mac OS X user (CIFS)” or “Linux/Other Mac user (NFS)”.
Note
Linux users and Mac users who are not using OS X access shared folders using the
Network File System (NFS). In this environment, access to shared folders is given to entire
computers, not to individual users of those computers. However, in Windows and Mac OS X
environments, each computer user can have individual access to a shared folder.
The page that appears next varies, depending on the user type you selected.
20 21MAXDATA SN 40 M1 – User GuideGetting Started

Windows/Mac OS X User (CIFS)
Figure 6. Users & Computers – Add User (Windows / Mac OS X)
Linux/Other Mac User (NFS)
Figure 7. Users & Computers – Add User (Linux / Mac OS)

4. Enter the requested user information and click “Done”.
Table 2. Adding Users
For this type of user Do this
Windows/Mac OS X user (CIFS) Enter the user name and password for accessing the shared
folders. (You must enter the password a second time to confirm it.)
The user name can be up to 15 characters long and can include
letters and numbers.
NOTE
If the user name and password that you specify here are the same
as the person’s Windows user name and password, the person
will not be prompted to provide a user name and password when
accessing the shared folder.
Linux/Other Mac user (NFS) Enter a computer description and the IP address or computer
name of the person’s computer.
The “Computer description” can be the name of the person who
typically uses the computer, or any other description that you want
to provide to identify the computer in the Users list. This description can be up to 256 characters long.
The “IP address or computer name” is the IP address or the actual
computer name in the computer‘s system configuration.
NOTE
You can create a single user that actually represents multiple
users. In the IP address or computer name text box, you can
use the wildcard characters “*” and “?” to indicate a range of
names. For example, “client*” or “client?” would include all
computers in the subnet whose name begins with “client”, wheras
“*.company.com” would include all computers in the domain
“company.com”. However, these wildcards cannot be used with IP
addresses.
The specified user name and type appears in the list on the “Users & Computers” page.
5. Repeat steps 2 through 4 until you have added all the users that you want to add at this time.
(You can always add more users later.)
If you’d like to put Windows and Mac OS X users into groups, refer to “Working with Groups”
on page 37.
22 23MAXDATA SN 40 M1 – User GuideGetting Started
Creating Shared Folders
By default, the Maxdata SN 40 Storage System includes a shared folder named “public”, which all
Windows and Mac OS X users can access (unless you change the list of authorized users or their
access rights as described in “Accessing Shared Folders” on page 27).
In addition, the storage system allows all Windows users to automatically create a shared folder for
their own use. The first time a Windows user uses the Console to access the “home” folder (as
described in “Accessing Shared Folders” on page 27), a shared folder identified by that person’s
user name is created.
However, you might want to create other shared folders as well. For example, in an office environment,
you might want to create a shared folder for company policies that everyone can only view, and
separate shared folders for confidential business files that only selected individuals or departments
can view or change. In a home environment, you might want to create separate folders for different
types of files, like photos, videos, or music. In addition, since only Windows and Mac OS X users can
access the “public” folder, you would have to create shared folders if your network includes Linux
or other Mac users.
You can create up to 64 shared folders. Users who can access and write to these shared folders can
create additional sub-folders for organizing the files they store there.
To create a shared folder:
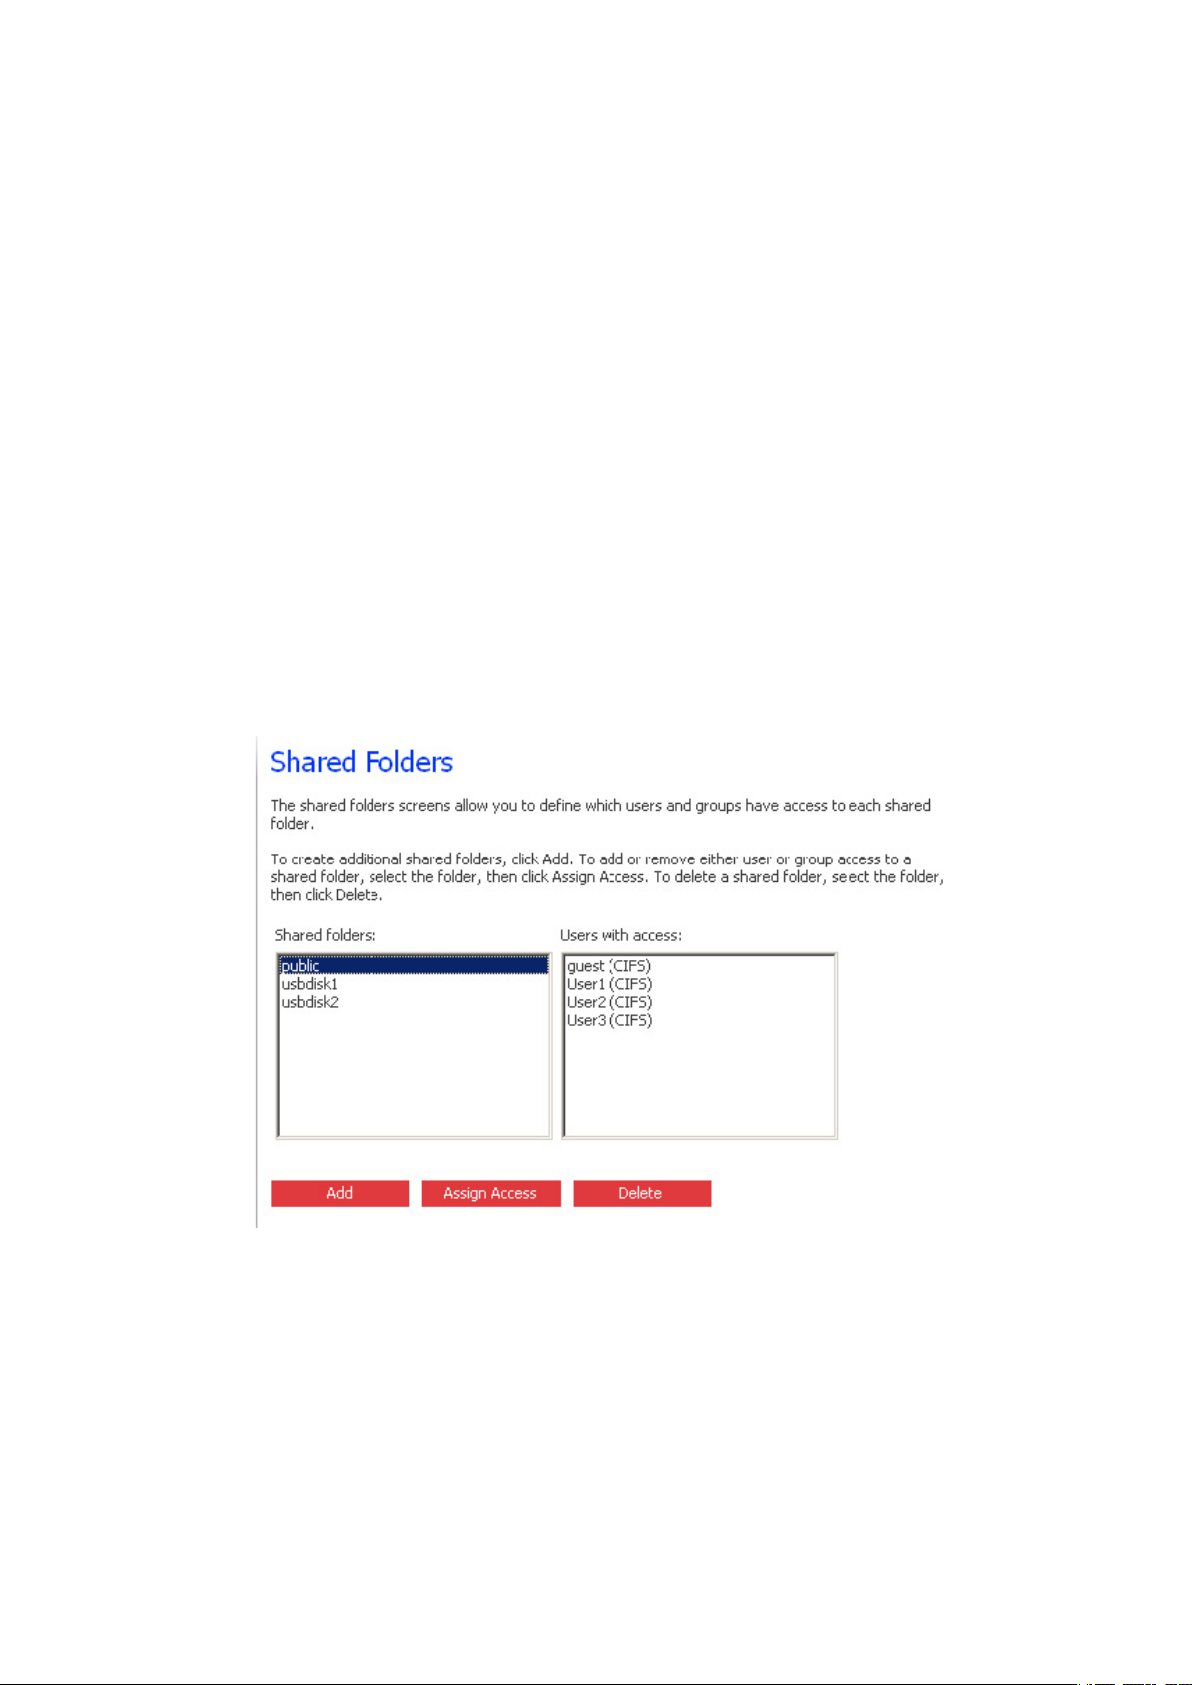
1. In the navigation bar, click “Shared Folders”.
The “Shared Folders” page appears:
Figure 8. Shared Folders – Main Page
Note
The “Shared folders” list includes “usbdisk1” and “usbdisk2” whether or not any USB disks
have been connected to the storage system.
In addition, shared folders created using the “home” folder in the Console do not appear in the
“Shared folders” list.
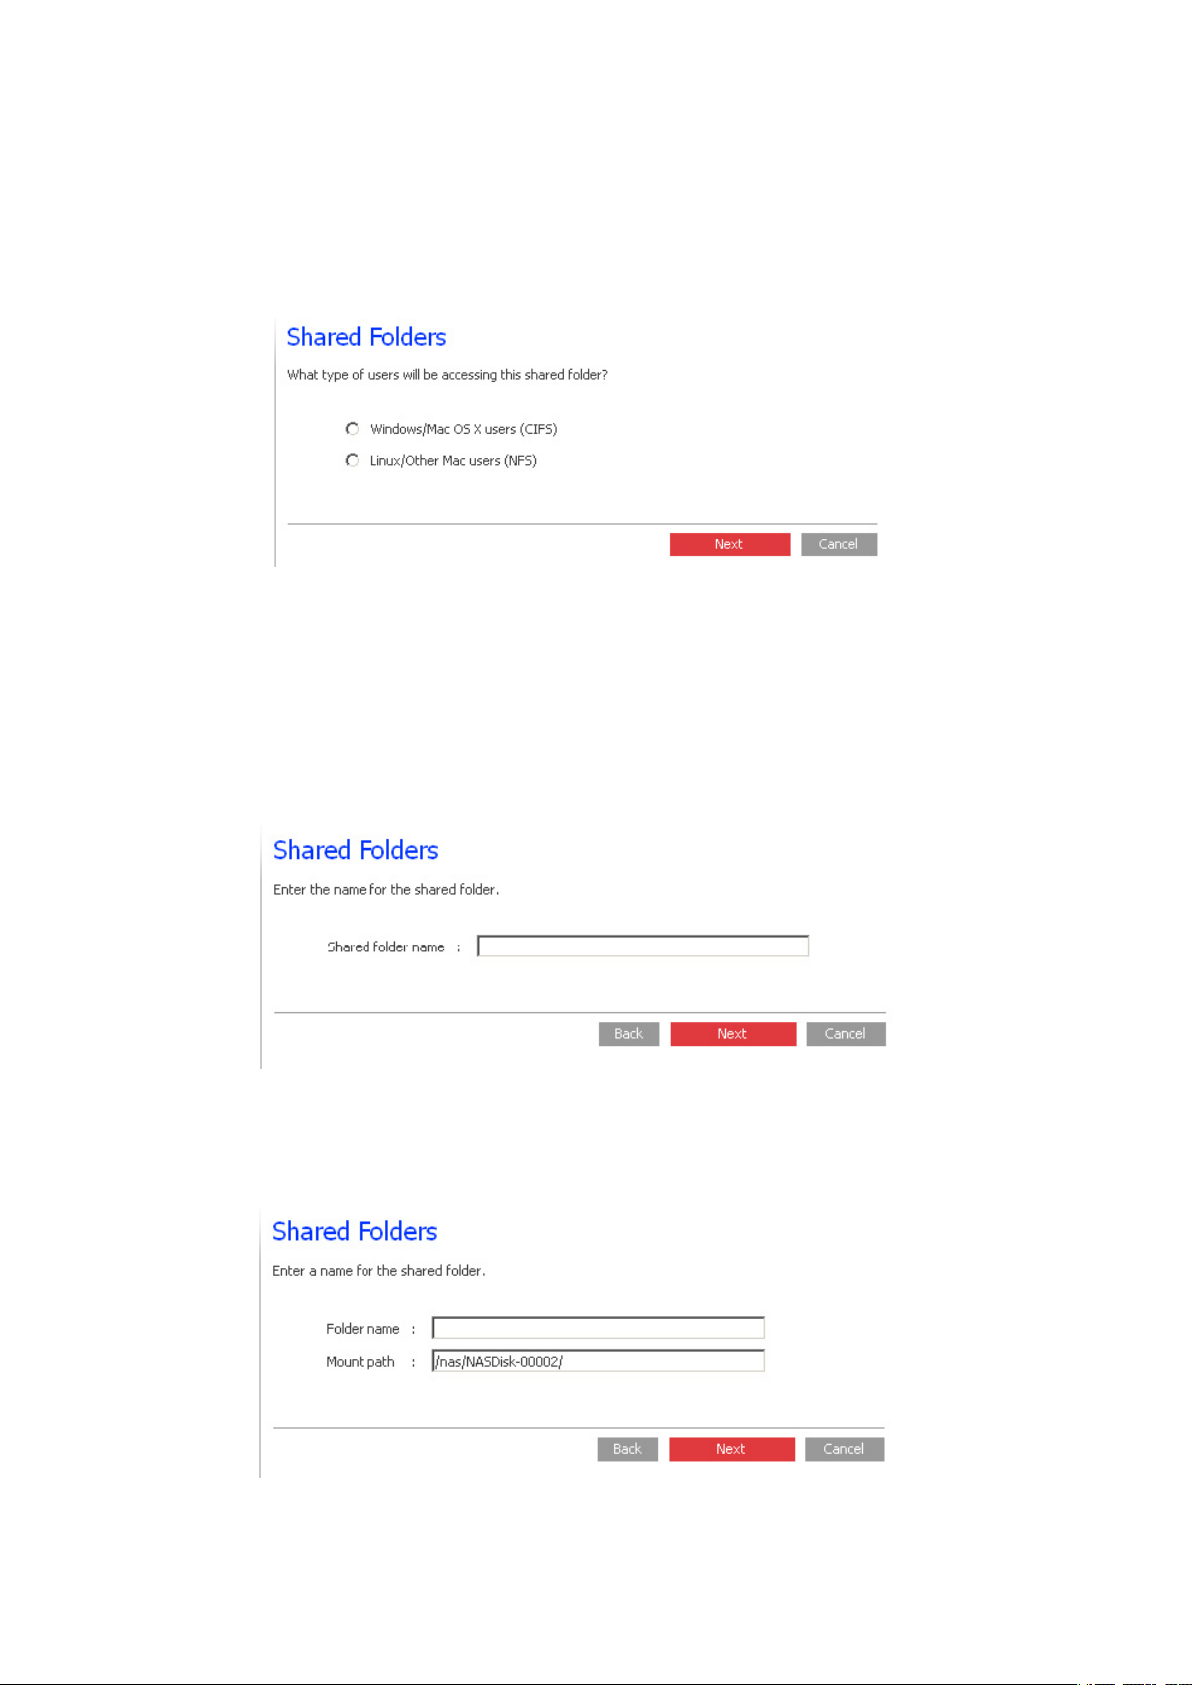
2. Click “Add”.
Figure 9. Shared Folders – User Type Selection
3. Specify which type of user will be accessing this shared folder, and then click “Next”.
The operating system running on the user’s computer determines which option you should
choose – “Windows/Mac OS X users (CIFS)” or “Linux/Other Mac users (NFS)”.
The page that appears next varies, depending on the user type you selected.
Windows/Mac OS X User (CIFS)
Figure 10. Shared Folders – Folder Name (Windows / Mac OS X)
Linux/Other Mac User (NFS)
Figure 11. Shared Folders – Folder Name (Linux / Mac OS)
24 25MAXDATA SN 40 M1 – User GuideGetting Started
4. In the “Shared folder name” text box, enter a unique name for the shared folder, and then
click “Next”.
This name can be up to 256 characters long and can contain letters, numbers, hyphens,
underlines, and spaces.
Note
Each shared folder name must be unique. For example, if you create a shared folder named “Photos”
for Windows/Mac OS X users, you cannot subsequently create a shared folder named “Photos” for
Linux/other Mac users.
For Linux / other Mac users, the “Mount path” indicates the path that those users will specify
when accessing the shared folder (as described in “Accessing Shared Folders” on page 27).
As you enter a shared folder name in the text box, the same name is appended to the mount
path. (You cannot change the first part of the mount path – “/nas/NASDisk-00002/”.)
The page that appears next varies, depending on the user type you selected.
Windows/Mac OS X User (CIFS)
Figure 12. Shared Folders – Access Rights (Windows / Mac OS X)
Linux/Other Mac User (NFS)
Figure 13. Shared Folders – Access Rights (Linux / Mac OS)
5. In the “Unauthorized users” list, select the name of the user who should be able to access
this shared folder.
To select multiple, contiguous users, hold down the Shift key and select the first user, then
select the last user. All users between the first and last selected user are selected. To select
multiple, non-contiguous users, hold down the Ctrl key as you select each user.
Then specify what access rights the selected user(s) should have.
Table 3. Shared Folders – Access rights
To allow the user to do this Click this
Only read the files in the shared folder and its subfolders Add (Read-Only)
Read, add, modify, and delete the folders and files in the shared
folder
Add (Read/Write)
The selected user(s) move from the “Unauthorized users” list to the “Authorized users” list.
If you accidentally add a user that you didn’t mean to add, select the user in the “Authorized
users” list and click “Remove”. The user returns to the “Unauthorized users” list.
Note
If you created groups (as described in “Adding a Group” on page 38), you can perform this step with
the “Unauthorized groups” list. This page shows all groups and all users.
For example, if you created a group named “Group1”, and added “User2” and “User3” to that
group, the “Unauthorized groups” list includes “Group1”, and the “Unauthorized users” list includes
“User2” and “User3”. If you select “Group1” and click “Add (Read-Only)”, “Group1” moves to the
“Authorized groups” list, but “User2” and “User3” do not move to the “Authorized users” list. This
allows you to specify unique access rights for those users. For example, you could select “User3”
and click “Add (Read/Write)”. This would mean that everyone in “Group1” would have read-only
access to the shared folder except “User3”, who would have read/write access to it.
On the “Shared Folders” page, the group name in the “Users with access” column is preceded by
an “@” symbol.
26 27MAXDATA SN 40 M1 – User GuideGetting Started

6. Repeat step 5 until you have defined access rights for all the desired users and groups, and
then click “Done”.
7. Repeat steps 2 through 6 until you have created all the shared folders that you want to create
at this time. (You can always create more shared folders later.)
When you have finished, you can log out (as described in “Logging Out of the Manager” on
page 55), or you can explore more of the features that the Maxdata SN 40 Storage System
has to offer. (For more information, refer to Chapter 4, “Managing Your Storage System”,
beginning on page 33.)
Accessing Shared Folders
Once you have added users and created shared folders, the users need to perform some simple
steps to be able to access those folders. The procedure for doing this varies, depending on the
user’s operating system. Each user can access only those shared folders that the user is authorized
to access.
Note
If you change the IP address of the storage system, users who accessed the shared folders using
the previous IP address will be disconnected and must repeat the procedures described here using
the new IP address.
Microsoft® Windows® Users
If you’re using Microsoft® Windows®, you have two options for accessing shared folders: you can
use My Computer or Windows Explorer to map a drive letter to the shared folder, or you can install
the Console and use that utility to map a drive letter to the shared folder. With the Console, you don’t
have to worry about remembering the name of the storage server or the shared folders; it displays
them automatically. However, the computer where you install the Console must be on the same
subnet as the storage system.
Using My Computer or Windows Explorer
To access a shared folder using My Computer or Windows Explorer:
1. Open My Computer or Windows Explorer.
2. From the “Tools” menu, click “Map Network Drive”.
The “Map Network Drive” dialog box appears.
3. In the “Drive” list, select the drive letter that you want to assign to the shared folder.
4. In the “Folder” text box, enter the following:
\\storage_system\shared_folder
where “storage_system” is the name of the storage system and “shared_folder” is the name
of the shared folder. For example, if the storage system name is “Storage” and the shared
folder name is “Photos”, you would enter the following:
\\Storage\Photos

Note
You can use the storage system name only if that name is registered with a DNS server on your
network.
Alternatively, you can click “Browse” and select the shared folder from the Microsoft
Windows Network.
5. To automatically connect to this shared folder each time you log on to Windows, select
“Reconnect at logon”.
If you clear this option, you must repeat this procedure each time you want to access the
shared folder.
6. Click “Finish”.
7. If prompted, enter your user name and password for accessing this shared folder, and then
click “OK”.
Note
If the user name and password for accessing the shared folder are the same as your Windows user
name and password, you are not prompted to provide a user name and password to access the
shared folder.
In addition, once you provide your user name and password for accessing one shared folder, you are
not prompted to provide it again when you access other shared folders to which you have access
rights.
If the “guest” user has access to this shared folder, you can use “guest” as both the user name
and password.
You can now access the shared folder from My Computer or Windows Explorer.
Using the Console
To access a shared folder using the Console:
1. Install the Console (as described in “Installing the Console” on page 16).
2. Click “Start” > “Programs” > “Storage System Console”.
The Console application window appears.
As soon as you start the Console, it automatically scans the network for storage systems. This
might take a few minutes. As soon as the scan is complete, the left pane displays a tree view
of all the storage systems it found.
Each storage system has two ports for connecting to the network. If your storage system uses
both ports, two items appear in the tree in the left pane, each using the same name. You can
identify the IP address used by each port by clicking each item in the tree and observing the
“IP address” area in the right pane.
28 29MAXDATA SN 40 M1 – User GuideGetting Started

Note
If you connect a storage system to the network after the Console has already scanned it, or if
you change the IP address of the storage system, you must click “Discover Storage Systems”
to scan the network again and update the tree in the left pane.
3. In the left pane, double-click the name of the storage system that contains the shared folders
that you want to access.
If your storage system uses both available ports to connect to the network, you can double-
click either name.
The storage system name expands to display all the available shared folders. Those shared
folders that can be accessed using the “guest” user name and password are listed first.
4. In the left pane, select the name of the shared folder that you want to access (for example,
“home”), and then click “Map Drive Letter”. To access a folder other than “home”, you must
login as a user with access to that folder.
The “Map Network Drive” dialog box appears with the name of the folder installed.
The exact appearance of this dialog box varies, depending on your operating system.
5. In the “Drive” list, select the drive letter that you want to assign to the shared folder.
6. To automatically connect to this shared folder each time you log on to Windows, select
“Reconnect at logon”.
If you clear this option, you must repeat this procedure each time you want to access the
shared folder.
7. Click “Finish”.
8. If prompted, enter your user name and password for accessing this shared folder, and then
click “OK”.
Note
If the user name and password for accessing the shared folder are the same as your Windows user
name and password, you are not prompted to provide a user name and password to access the
shared folder.
In addition, once you provide your user name and password for accessing one shared folder, you are
not prompted to provide it again when you access other shared folders to which you have access
rights.
If the “guest” user has access to this shared folder, you can use “guest” as both the user name
and password.
You can now access the shared folder from My Computer or Windows Explorer.

Linux® Users
To access a shared folder on a computer running Linux:
1. Create a directory by entering the following command at the command prompt:
mkdir /my_directory
where “my_directory” is the name of the directory.
Be sure to include the full path to the directory (for example, “/mnt/my_directory”).
2. If desired, display a list of all the available shared folders by entering the following command:
showmount -e storage_system
where “storage_system” is the name or IP address of the storage system.
Note
You can use the storage system name only if that name is registered with a DNS server on your
network.
3. Mount the desired shared folder by entering the following command:
mount st orage_system :/nas /NASDisk-000 02/folder /mn t/my_
directory
where “storage_system” is the name or IP address of the storage system, “folder” is the
name of the shared folder, and “my_directory” is the name of the directory that you created in
step 1.
If you included a full path when creating the directory, be sure to include the full path with this
command, for example:
mount st orage_system :/nas /NASDisk-000 02/folder /mn t/my_
directory
4. Repeat steps 1 through 3 for each shared folder that you want to access.
Mac® Users
The procedure for accessing a shared folder on a Mac varies, depending on whether the Mac is
running OS X or an older operating system. (Macs running OS X can access the same shared CIFS
folders as Windows users. Macs running older operating systems can access the same shared NFS
folders as Linux users.)
Mac OS® X
To access a shared folder on a Mac running OS X:
1. From the “Go” menu, click “Connect to Server”.
2. In the “Address” text box, enter the following and click “Connect”:
smb://storage_system
where “storage_system” is either the name or IP address of the storage system
Note
You can use the storage system name only if that name is registered with a DNS server on
your network.
30 31MAXDATA SN 40 M1 – User GuideGetting Started

3. In the “Select a share” list, select the name of the shared folder that you want to access and
A
K
then click “OK”.
4. Enter the user name and password for accessing this shared folder, and then click OK.
If the “guest” user has access to this shared folder, you can use “guest” as both the user
name and password.
An icon with the name of the shared folder is created on the desktop.
5. Repeat steps 1 through 4 for each shared folder that you want to access.
6. To access the shared folder, double-click the icon on the desktop.
Other Mac Operating Systems
Refer to your Mac documentation for information about accessing a shared folder using NFS on a
Mac running an operating system older than OS X.
Attaching USB Devices (Optional)
If you purchased optional USB external storage devices, you can attach them to the USB ports on
the back of the storage system (see letter “A” in the following figure).
Figure 14. Attaching Optional USB Devices

32

4 Managing Your Storage System
The Web-based storage system Manager enables you to perform the following tasks:
• Managing Users – Add, modify, or remove users, or put users into groups.
• Managing Shared Folders – Create shared folders, rename existing shared folders, change
which users can access existing shared folders or their access rights, and delete shared folders
that you no longer want to keep.
• Managing Backups – View which computer disks are backed up, change the password for
recovering a backup, or delete a backup.
• Setting Up e-mail Alerts – Specify whether or not e-mail notifications should be sent when a
problem occurs, and who should receive the notifications.
• Upgrading the Firmware – Upgrade your storage system firmware to the latest version.
• Disconnecting USB Devices – If you’re using optional USB devices, you must disconnect them
using the Manager before you physically unplug them.
• Changing the System Settings – Change the storage system name or time and date settings,
as well as the user name or password for logging in to the Manager.
• Changing the Network Settings – Change the workgroup name, the storage system’s IP
address(es), the gateway or DNS server settings, or the settings that allow the storage system
to act as an FTP server.
• Reconfiguring Your Storage System Disks – Change the proportions of your storage system
that are allocated to shared folders and backups, or change your disk configuration.
• Logging Out of the Manager – Log out of the Manager so that no one else can use your
computer to make changes to the storage system.
• Shutting Down the Storage System – Shut down the storage system using the Manager rather
than pushing the power button on the storage system manually.

Managing Users
When you click “Users” in the navigation bar, the “Users & Computers” page appears. This page
displays a list of all currently configured Windows and Mac OS X users, as well as all Linux and other
Mac computers.
Figure 15. Users & Computers – Main Page
Only the individuals or computers that appear on this page can access the shared folders or back up
their local hard disks on the storage system. (In this guide, the term “user” refers to both individuals
and computers.) You can add, modify, or remove users at any time.
Windows and Mac OS X users can also be put into groups. Putting users into groups makes it easier
to give several users access to the same shared folder at once. For example, in an office environment,
you might create one group for all users and give that group read-only access to a shared folder with
corporate policies. You might then create separate groups for each department (such as “Sales” or
“HR”) and give those groups read/write access to shared folders with information specifically for
those groups (such as expense reports or company benefits). Each user can be a member of multiple
groups.
Adding Users
To add a user, refer to “Adding Users” on page 19.
34 35MAXDATA SN 40 M1 – User GuideManaging Your Storage System

Modifying Users
For Windows and Mac OS X users, you can change the password used to access the shared folders,
but not the user name. This change will not affect current connections, but will take effect the next
time the person tries to connect to a shared folder.
For Linux and other Mac users, you can change the IP address or computer name, but not the
computer description. Changing this information immediately disconnects that computer from the
shared folders.
Note
To change the user name or computer description, you must remove the existing user as described
in “Removing Users” on page 37, and then add a new user with the desired name or description as
described in “Adding Users” on page 19.
To modify a user:
1. In the navigation bar, click “Users”.
2. Select the radio button next to the user that you want to modify.
3. Click “Edit”.
The page that appears next varies, depending on the type of user you selected.
Windows/Mac OS X User (CIFS)
Figure 16. Users & Computers – Modify User (Windows / Mac OS X)

Linux/Other Mac User (NFS)
Figure 17. Users & Computers – Modify User (Linux / Mac OS)
4. Make the desired change and click “OK”:
For this type of user Do this
Windows / Mac OS X user (CIFS) Enter the password for accessing the shared folders. (You
must enter the password a second time to confirm it.)
NOTE
If the user name and password specified here are the same as
the person’s Windows user name and password, the person
will not be prompted to provide a user name and password
when accessing the shared folders.
Linux / Other Mac user (NFS) Enter the computer’s IP address or the actual computer name
in the computer’s system configuration.
A single user can actually represent multiple computers. In the
IP address or computer name text box, you can use the wild
card characters “*” and “?” to indicate a range of names. For
example, “client*” or “client?” would include all computers
in the subnet whose name begins with “client”, whereas
“*.company.com” would include all computers in the domain
“company.com”. However, these wildcards cannot be used
with IP addresses.
NOTE
If the user is currently connected to a shared folder, changing
this information will disconnect the user.
-
36 37MAXDATA SN 40 M1 – User GuideManaging Your Storage System

Removing Users
You can remove any user except the “guest” user.
If you remove a user who is currently connected to the storage system, that user remains connected
until the user disconnects from the shared folder, disables protection or shuts down the computer.
To remove a user:
1. In the navigation bar, click “Users”.
2. Select the radio button next to the user that you want to remove.
3. Click “Remove”.
4. When prompted to confirm the removal, click “Yes”.
The user no longer appears in the list on the “Users” page.
Working with Groups
Windows and Mac OS X users can be put into groups, which makes it easier to give several users
access to the same shared folder at once.
When you click “Users” in the navigation bar and click “Groups” in the left pane, the page displays
a list of all currently configured groups. When you select a group in the “Groups” list, the members
of that group appear in the adjacent “Members” list.
Figure 18. Groups – Main Page
You can add a group, modify the group membership, or remove groups at any time.

Adding a Group
When you create a group, you typically specify which users should be members of that group, although
you can create an empty group and add users later. (You must add users as described in “Adding
Users” on page 19 before you can add those users to a group.)
Each user can be a member of multiple groups. For example, the user “Alice” might be a member
of both the “Marketing” and “Executives” groups.
You can create up to 16 groups.
To add a group:
1. In the navigation bar, click “Users”.
2. In the left pane, click “Groups”.
3. Click “Add”.
4. In the “Group name” text box, enter a unique name for the group. This name can be up to 15
characters long and can include letters, numbers, hyphens, and underlines.
5. Specify which users should belong to this group, and then click “OK”:
To do this Do this
Add all users to the group Click “Add All Users”.
All users move from the “Available users” list to the “Group
members” list.
Add selected users to the group In the “Available users” list, select the user(s) that you want
to add and then click “Add Selected User(s)”.
Remove all users from the group Click “Remove All Users”.
All users move from the “Group members” list to the
“Available users” list.
Remove selected users from the group In the “Group members” list, select the user(s) that you
want to remove from the group and then click “Remove
Selected User(s)”.
Note
To select multiple, contiguous users, hold down the Shift key and select the first user, then select
the last user. All users between the first and last selected user are selected.
To select multiple, non-contiguous users, hold down the Ctrl key as you select each user.
38 39MAXDATA SN 40 M1 – User GuideManaging Your Storage System

Changing the Group Membership
You can change which users are members of each group at any time. When you add a user to a
group, that user immediately has access to all the shared folders that the group is authorized to
access. However, if you remove a user from a group, the change does not take effect until that user
disconnects from the shared folder or shuts down the computer.
To change the group membership:
1. In the navigation bar, click “Users”.
2. In the left pane, click “Groups”.
3. In the “Groups” list, select the group whose membership you want to change.
4. Click “Edit”.
5. Specify which users should belong to this group, and then click “OK”:
To do this Do this
Add all users to the group Click “Add All Users”.
Add selected users to the
group
Remove all users from the
group
Remove selected users from
the group
In the “Available users” list, select the user(s) that you want to add
and then click “Add Selected User(s)”.
Click “Remove All Users”.
In the “Group members” list, select the user(s) that you want to
remove from the group and then click “Remove Selected User(s)”.
Note
To select multiple, contiguous users, hold down the Shift key and select the first user, then select
the last user. All users between the first and last selected user are selected.
To select multiple, non-contiguous users, hold down the Ctrl key as you select each user.
The selected users move from one list to the other.
On the “Groups” page, when you select this group in the “Groups” list, the adjacent “Members”
list immediately reflects the changes you just made.

Removing a Group
Removing a group does not remove the users that are members of that group; it simply means that
the group will no longer appear in the Groups list on the Groups page. The users remain listed on the
“Users & Computers” page.
However, removing a group can affect access to shared folders. When you remove a group, the
members of that group will no longer have access to any shared folders that the group was authorized
to access unless they were granted individual access as well.
To remove a group:
1. In the navigation bar, click “Users”.
2. In the left pane, click “Groups”.
3. In the “Groups” list, select the group that you want to remove.
4. Click “Remove”.
5. When prompted to confirm the removal, click “Yes”.
The group no longer appears in the “Groups” list.
Managing Shared Folders
When you click “Shared Folders” in the navigation bar, the page displays a list of all shared resources,
including both shared folders and USB devices. When you select an item in the “Shared folders” list,
the users and groups that can access that item appear in the “Users with access” list. (For groups,
the group name is preceded by an “@” symbol.)
Figure 19. Shared Folders – Main Page
40 41MAXDATA SN 40 M1 – User GuideManaging Your Storage System

By default, the storage system includes a shared folder named “public”, and all Windows and Mac
OS X users can access it and create, modify, or delete files there (unless you change the list of
authorized users or their access rights as described in “Changing User Access to Shared Folders”
on this page).
The “Shared folders” list also includes “usbdisk1” and “usbdisk2”, whether or not any USB disks
have been connected to the storage system.
In addition, the storage system allows all Windows users to automatically create a shared folder for
their own use. The first time a Windows user uses the Console to access the “home” folder (as
described in “Accessing Shared Folders” on page 27), a shared folder identified by that person’s user
name is created. However, these shared folders do not appear in the “Shared folders” list.
You can create additional shared folders and delete them at any time. For both shared folders and
USB disks, you can change which users can access them and what they can do with the subfolders
and files there.
Adding Shared Resources
To create a shared folder, refer to “Creating Shared Folders” on page 23.
Changing User Access to Shared Folders
For any shared folder that appears in the “Shared folders” list or any USB disk, you can change which
users can access it and what level of access they have. (Shared folders that are created as a result
of using the “home” folder in the Console do not appear in the “Shared folders” list and cannot be
modified. These folders automatically provide only the associated user with read/write access to
that folder.)
Note
By default, all users have read/write access to the public folder. You can change the user assignments
or access rights for the public folder.
When you add a user to the list of authorized users for a shared folder or USB disk, that change takes
effect immediately. However, if you remove a user from the list of authorized users, or if you change
the user’s access rights, the change does not take effect until that user disconnects from the shared
folder or USB disk, or shuts down the computer.
To change user access to shared folders and USB disks:
1. In the navigation bar, click “Shared Folders”.
2. In the “Shared folders” list, select the shared folder or USB disk whose user access you want
to change.
3. Click “Assign Access”.
4. If you selected a shared folder or a USB disk to which you previously assigned users, go to
step 5.
If you selected a USB disk to which you did not previously assign users, select the type of user
that you want to assign to this USB disk, and then click “Next”.
The operating system used by the user determines which option you should choose –
“Windows/Mac OS X user (CIFS)” or “Linux/Other Mac user (NFS)”.

Note
Linux users and Mac users who are not using OS X access shared folders using NFS. In this
environment, access to shared folders is given to entire computers, not to individual users of those
computers. However, in Windows and Mac OS X environments, each computer user can have
individual access to a shared folder.
The page that appears next varies, depending on what type of users can access the shared folder
you selected.
Windows/Mac OS X User (CIFS)
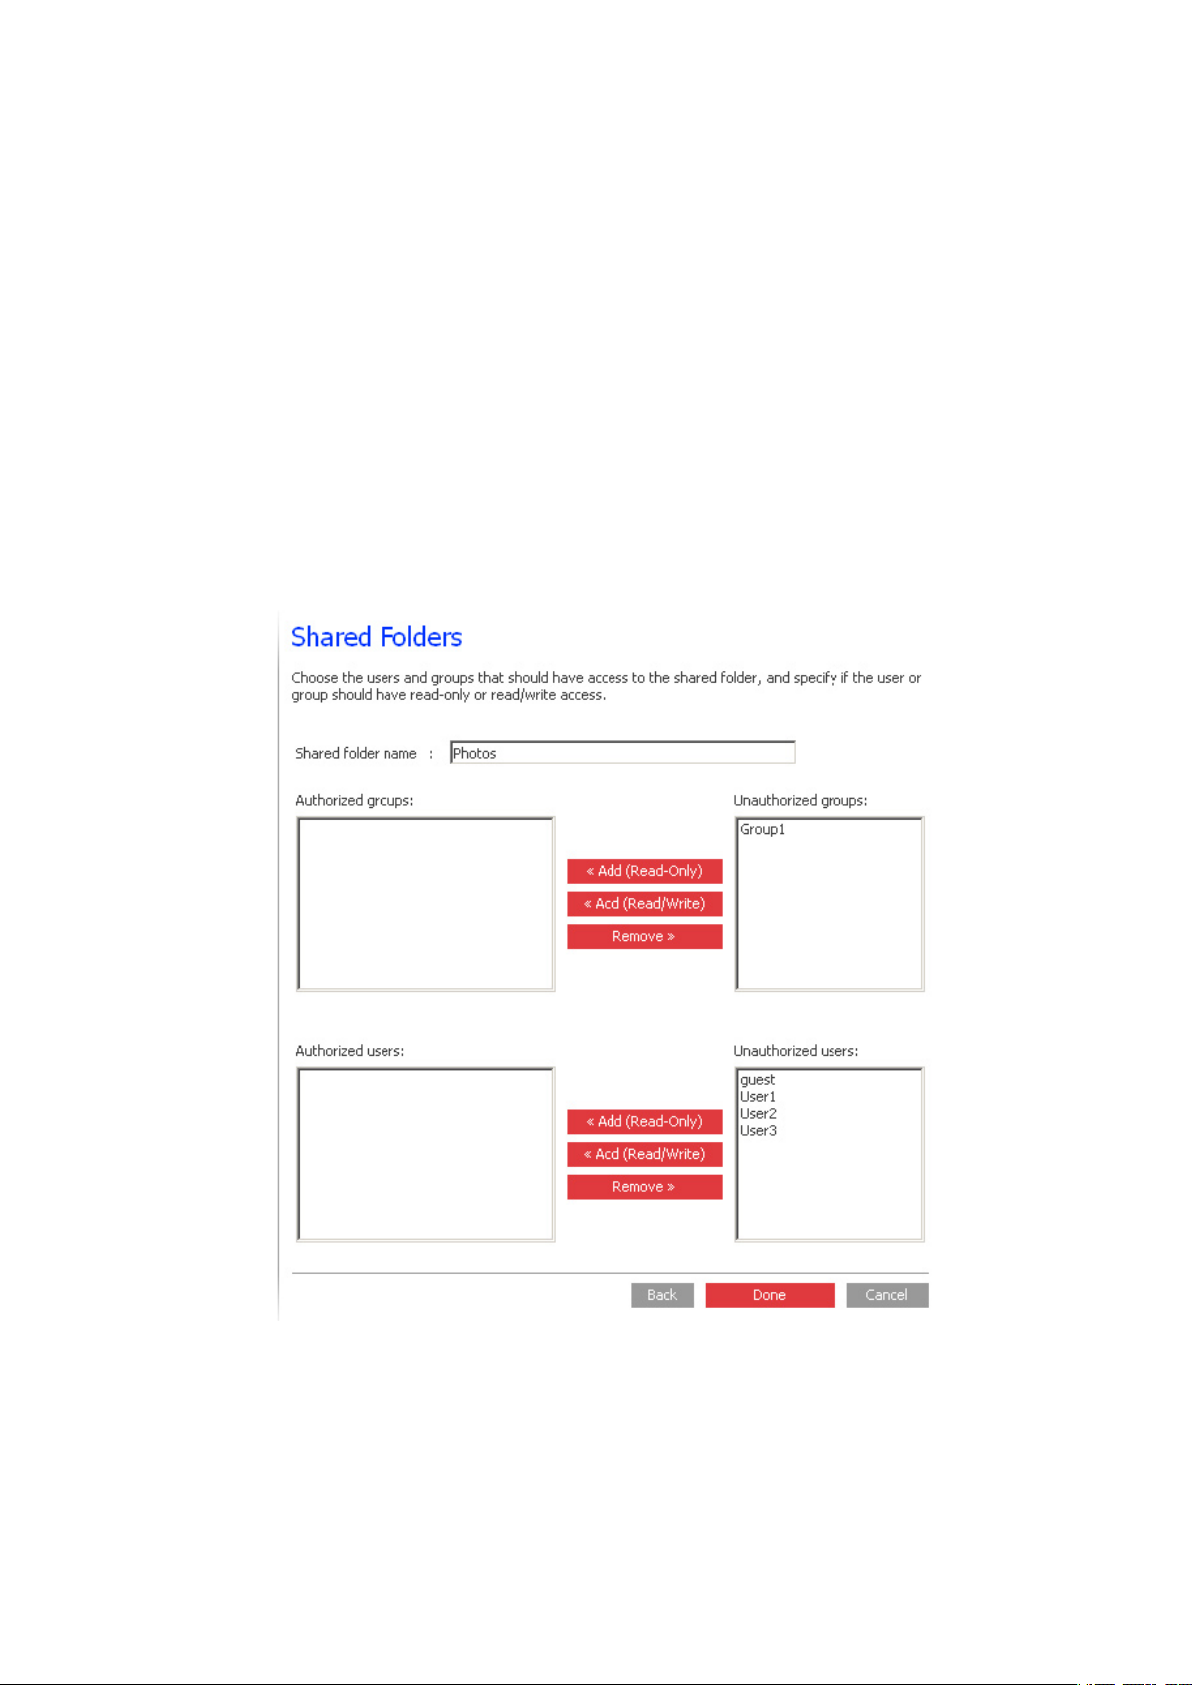
Figure 20. Shared Folders – Access Rights (Windows / Mac OS X)
42 43MAXDATA SN 40 M1 – User GuideManaging Your Storage System

Linux/Other Mac User (NFS)
Figure 21. Shared Folders – Access Rights (Linux / Mac OS)
5. Specify which users should be able to access this shared folder or USB disk, and then click
“OK”:
To do this Do this
Allow selected users access to
the shared folder or USB disk
Prevent selected users from
accessing the shared folder or
USB disk
In the “Unauthorized users” list, select the user(s) who should be
able to access the shared resource and then click “Add (Read-Only)”
or “Add (Read/Write)”.
Users with read-only access can only view the files in the shared
resource; users with read/write access can view, add, modify, and
delete folders and files in the shared resource.
In the “Authorized users” list, select the user(s) who should not be
able to access the shared resource and then click “Remove”.
Note
To select multiple, contiguous users, hold down the Shift key and select the first user, then select
the last user. All users between the first and last selected user are selected.
To select multiple, non-contiguous users, hold down the Ctrl key as you select each user.
The selected users move from one list to the other.
Note
To change the access level for a user, select the user in the “Authorized users” list and click “Remove”.
Then select that user in the “Unauthorized users” list and click either “Add (Read- Only)” or “Add
(Read/Write)”, depending on the access level you now want the user to have.
If you created groups (as described in “Adding a Group” on page 38), you can perform this step with
groups as well.

This page shows all groups and all users. For example, if you created a group named “Group1”,
and added “User2” and “User3” to that group, the “Unauthorized groups” list includes “Group1”,
and the “Unauthorized users” list includes “User2” and “User3”. If you select “Group1” and click
“Add (Read-Only)”, “Group1” moves to the “Authorized groups” list, but “User2” and “User3” do
not move to the “Authorized users” list. This allows you to specify unique access rights for those
users. For example, you could select “User3” and click “Add (Read/Write)”. This would mean that
everyone in “Group1” would have read-only access to the shared folder except “User3”, who would
have read/write access to it.
Deleting a Shared Folder
Once you have created a shared folder, you can delete it at any time. When you delete a shared folder,
any users who are currently accessing it are immediately disconnected from it.
Caution
Deleting a shared folder deletes all the subfolders and files in that shared folder. If you want to delete
only selected subfolders or files, access the shared folder (as described in “Accessing Shared Folders”
on page 27) and delete the desired items.
Note
You cannot delete the “public” folder or any folders created using the home folder in the Console
(which do not appear on the “Shared Folders” page).
You cannot delete the contents of a USB disk using the “Shared Folders” page. To delete its contents,
you must give yourself read/write access to that disk (as described in “Changing User Access to Shared
Folders” on page 41), access the disk (as described in “Accessing Shared Folders” on page 27), and
then delete the desired folders and files.
To remove the USB disk from the storage system, use the Manager to disconnect it (as described
in “Disconnecting USB Devices” on page 48). Then physically unplug the USB disk from the storage
system.
Even after you physically unplug the USB disk, it remains in the “Shared folders” list. This ensures
that you don’t have to re-assign users if you later reconnect the USB disk.
To delete a shared folder:
1. In the navigation bar, click “Shared Folders”.
2. In the “Shared folders” list, select the shared folder that you want to delete.
3. Click “Delete”.
4. When prompted to confirm the deletion, click “OK”.
The shared folder no longer appears in the “Shared Folders” list, and all associated subfolders
and files are deleted.
44 45MAXDATA SN 40 M1 – User GuideManaging Your Storage System

Managing Backups
Once the users have used Intel® Client Backup and Recovery to back up their computer hard disks
to the storage system (as described in Chapter 5, “Protecting Local Disks”, beginning on page 63),
the “Backups” page displays a list of each computer that has done this, the size of each protected
disk, the date and time of the last four backups, and the backup disk ID (the number used to identify
the backup on both the storage server and on the “Status” page in the Intel® Client Backup and
Recovery software).
Figure 22. Managing Backups
If a user ever has to recover a disk using the recovery CD, the user will be prompted for a password to
do so. The user had to provide this password when protecting the disk. However, if the user forgets
it, you can reset the password using the Manager.
In addition, when a user removes protection for a disk, the existing backups are not deleted. The user
can re-use the allocated space for new backups, or you can delete those backups manually using
the Manager.
Changing the Password for Restoring Hard Disks
To change the recovery CD password:
1. In the navigation bar, click “Backups”.
2. In the “Computer name” list, click the name of the computer whose recovery CD password
you want to change.
3. In the “Passwords for Restoring Disks” text box, type the password to use.
This password must be 12–16 characters long.

4. Click “Change Password”.
The user must provide this password when recovering a disk from this storage system using
the Recovery CD.
Deleting a Backup
You can delete all backups of a given disk, but you cannot delete just an individual backup from a
specific date and time.
Note
If you delete all backups of all disks for a particular computer, that computer no longer appears on the
Backups page. However, that computer name remains in the storage system and counts toward the
total number of computers that are allowed to back up to the storage system. If you want to delete
all backups of all disks and the computer name, refer to “Deleting a Client” on this page.
To delete all backups of a disk:
1. Select the radio button adjacent to the disk whose backups you want to delete (in the second
“Select” column).
2. Click “Delete Backup”.
3. When prompted to confirm the deletion, click “Yes”.
The disk no longer appears on the “Backups” page, and all backup versions are deleted. If only
one disk was protected, the computer name disappears from the page as well.
Note
If you delete a backup and the user did not previously remove protection for that disk, when the user
subsequently accesses Client Backup and Recovery, the “Status” page will indicate that the backup
of the protected disk is offline. To back up the disk once again, the user must remove protection and
then protect the disk again. For more information, refer to “Removing Protection” on page 80 and
“Protecting Your Disks” on page 68.
Deleting a Client
If you remove the Intel® Client Backup and Recovery software from a particular computer, or if you
change the computer name, the original computer name remains on the storage system and counts
toward the total number of computers that are allowed to back up to the storage system. To both
delete all backups of all disks for a particular computer and the computer name, you must delete the
client.
To delete a client:
1. In the navigation bar, click “Backups”.
2. Select the radio button to the left of the computer whose backups and computer name you
want to delete from the storage system (in the first “Select” column).
3. Click “Delete Client”.
4. When prompted to confirm the deletion, click “Yes”.
All backups of all disks associated with this computer are deleted, and the computer name is
also deleted from the storage system.
Note
If you delete a client and the user did not previously remove protection for that disk, when the user
subsequently accesses the Intel® Client Backup and Recovery software, the “Status” page will indicate
that the backup of the protected disk is offline. To back up the disk once again, the user must remove
protection and then protect the disk again. For more information, refer to “Removing Protection” on
page 80 and “Protecting Your Disks” on page 68.
46 47MAXDATA SN 40 M1 – User GuideManaging Your Storage System

Setting Up E-Mail Alerts
The “Alerts” page allows you to set up the storage system to notify up to three people via email if a
problem occurs – for example, if one of the disks fails, or if insufficient space is available for creating
new files or performing a backup.
Figure 23. E-Mail Alerts
To take advantage of this feature, you must have access to an SMTP e-mail server either within your
own network or through an Internet service provider.
Note
The e-mail might not be sent immediately when the problem occurs, but will be sent within an hour
of the event. In addition, if the problem is fixed within an hour of its occurrence – for example, if you
replace the disk that failed – the alert will not be sent.
To set up e-mail alerts:
1. In the navigation bar, click “Advanced”.
2. Specify whether or not the storage system should send e-mail notifications when a problem
occurs by selecting or clearing the “Send e-mail notifications” check box.
If you select this option, you must provide the fully qualified domain name or IP address of
your e-mail server and at least one email address.
If you clear this option, e-mail notifications will not be sent, and all the related fields on this
page appear dimmed. However, if you previously entered information on this page, that
information is retained so that you can easily re-enable e-mail notifications later. If you clear
this option, you do not have to complete the rest of this procedure; simply click “Apply”.

3. In the “SMTP server name or IP address” text box, enter the fully qualified domain name or IP
address of your e-mail server.
4. In the “First e-mail address” text box, enter the e-mail address of an individual who should
receive e-mail notifications when a problem occurs.
The e-mail address can be up to 128 characters long and must include the “@” symbol (for
example, “MyName@MyCompany.com”).
5. If you want e-mail notifications to be sent to other individuals as well, enter the appropriate email addresses in the “Second e-mail address” and “Third e-mail address” text boxes.
6. Click “Apply”.
7. To confirm that the configuration is correct, click “Test E-mail”.
This sends a test message to the specified recipients. If they do not receive the test message,
make sure that all the entries on this page are correct. You might also have to modify the
network settings (such as the gateway to use). For information about changing the network
settings, refer to “Changing the Network Settings” on page 51.
Disconnecting USB Devices
The “USB” page displays a list of all USB devices that are currently attached to the storage system,
including the type of device it is, the manufacturer, and the name. USB disks are identified by the
names “usbdisk1” and “usbdisk2”. (These names cannot be changed.)
When you plug a USB device into the storage system, the storage system automatically detects
it and adds that device to the “USB” page. (You might need to refresh the browser to update the
display.)
However, when you want to unplug a USB device from the storage system, you must first use the
Manager to disconnect it. This prevents data corruption and other potential problems with the device.
Once the USB device has been disconnected via the Manager, you can unplug it.
To disconnect a USB device:
1. In the navigation bar, click “Advanced”.
2. In the left pane, click “USB”.
3. In the list of USB devices, select the device(s) that you want to disconnect.
4. Click “Disconnect”.
5. When the confirmation message appears, click “OK”.
You can now unplug the USB device.
Note
If you inadvertently disconnect a USB device that you want to retain, click “Scan”. This reactivates
the USB device.
Since the USB device always remains on the “Shared Folders” page, any user assignments are
always retained.
48 49MAXDATA SN 40 M1 – User GuideManaging Your Storage System

Changing the System Settings
The “System” page displays the settings that you specified when you initially configured the storage
system, such as the storage system name, and the current date and time.
Figure 24. System Settings
You can change these settings at any time.
Note
Changing the storage system name affects backups. If you plan to change the storage system name,
have all users stop all backups then change the name and have all users protect their disks again.
Using the “System” page, you can also change the administrator name and password to use for
logging in to the Manager, as well as the password to use for protecting local disks.
To change any of the system settings:
1. In the navigation bar, click “Advanced”.
2. In the left pane, click “System”.

3. Make the desired changes:
To change this Do this
The storage system name In the “Storage system name” text box, enter the new
name to use for the storage system.
This name can be up to 15 characters long and can include
letters, numbers, and hyphens.
The system date, time, or time zone In the “Date” fields, enter or select the desired month,
date, and year.
In the “Time” field, enter or select the desired hour,
minute, and second.
In the “Time zone” list, select the desired time zone.
The administrator name or password In the “Administrator” name text box, enter the user name
to use for logging in to the Manager.
In the “Password” and “Confirm password” text boxes,
enter the password to use for logging in to the Manager.
The user name and password are case-sensitive.
The backup user name or password In the “Backup user login” group box, in the “Password”
and “Confirm password” text boxes, enter the password
to use for logging in to the storage system when adding a
backup location via the Intel
®
Client Backup and Recovery.
This password can be up to eight characters long and is
case-sensitive.
4. Click “Apply”.
5. When the confirmation message appears, click “OK”.
50 51MAXDATA SN 40 M1 – User GuideManaging Your Storage System

Changing the Network Settings
The “Network” page displays the network settings that were set when you initially configured the
storage system. (Only the first Ethernet port was configured during setup. The second uses its default
settings unless you change them here.)
Figure 25. Network Settings

You can change these settings at any time.
Note
Changing the IP address or subnet mask can have several effects:
• Access to the Manager will be disrupted and you will have to access it again using the new IP
address.
• Users who accessed the shared folders using the previous IP address will be disconnected and
must access them again using the new IP address (as described in “Accessing shared folders”
on page 27).
• Users who backed up their disks to the storage system using the previous IP address must
remove protection for all affected disks and protect their disks again, removing the storage
system from the list of backup locations and adding it again using the new IP address.
You can also configure the storage system to act as a DHCP server. In other words, the storage system
can assign IP addresses to other computers in your network, simplifying the network configuration
of each individual system.
In addition, your storage system can act as an FTP server. This allows all Windows or Mac OS X
users to use a Web browser to access the public folder. Windows users can also access the folder
created as a result of using the home feature in the Console (as described in “Using the Console” on
page 28). For more information, refer to “Accessing the Storage System Using FTP” on page 54.
To change any of the network settings:
1. In the navigation bar, click “Advanced”.
2. In the left pane, click “Network”.
3. Make the desired changes:
To change this Do this
The workgroup to which the storage
system belongs
The IP address(es) used by the
storage system
The IP address of the gateway If your network includes a gateway, and if the first port on
In the “Workgroup name” text box, enter the name of the
workgroup.
This name can be up to 15 characters long.
In the “Port 1” group box, either select “Get an IP address
automatically” to obtain the IP address from your DHCP
server, or select “Use this IP address” and enter the IP
address and subnet mask in the subsequent text boxes.
If you’re using the second Ethernet port, do the same in
the “Port 2” group box.
the storage system uses a specified IP address rather than
obtaining one from the DHCP server, enter the IP address
of the default router in the “Gateway IP address” text
boxes. (This is typically the same IP address as the first
port, with the last number being 1.)
If your network does not include a gateway, or if the first
port obtains its IP address from the DHCP server, leave
these text boxes blank. (If the first port obtains its IP
address from a DHCP server, the gateway will obtain its IP
address from the DHCP server as well.)
52 53MAXDATA SN 40 M1 – User GuideManaging Your Storage System

To change this Do this
The DNS server to use If your network includes a DNS server, and if the first port on the
storage system uses a specified IP address rather than obtaining
one from the DHCP server, enter the primary IP address in the
“Preferred DNS server” text boxes and the secondary IP address in
the “Alternate DNS server” text boxes.
If your network does not include a DNS server, or if the first port
obtains its IP address from the DHCP server, leave these text boxes
blank. (If the first port obtains its IP address from a DHCP server,
the DNS server IP address will be obtained from the DHCP server
as well.)
The IP address(es) used by the
storage system
The DHCP settings If you want to use the storage system as a DHCP server, in the
The FTP settings If you want to use the storage system as an FTP server, select the
In the “Port 1” group box, either select “Get an IP address automatically” to obtain the IP address from your DHCP server, or
select “Use this IP address” and enter the IP address and subnet
mask in the subsequent text boxes.
If your storage system has two Ethernet ports and you’re using the
second one, do the same in the “Port 2” group box. (This group
box does not appear if your storage system supports only one
Ethernet port.)
“Port 1” group box, select “Use this IP address” and enter the IP
address and subnet mask in the subsequent text boxes.
Then select the “Enable DHCP server” check box, enter the begin
ning IP address in the “Starting IP address” text boxes, and enter
the last IP address in the “Ending IP address” text boxes.
For example, if the “Starting IP address” is 192.168.0.103 and the
“Ending IP address” is 192.168.0.107, the storage system will allo
cate the IP addresses 192.168.0.103, 192.168.0.104, 192.168.0.105,
192.168.0.106, and 192.168.0.107 to the first five computers that try
to obtain their IP addresses from the storage system. As soon as
one of those computers shuts down or otherwise loses its network
connection, that IP address will be assigned to the next computer
that tries to obtain its IP address from the storage system.
If you do not want to use the storage system as a DHCP server,
clear the “Enable DHCP server” check box. (If “Get an IP address
automatically” is selected, you cannot use the storage system as a
DHCP server.)
“Enable FTP server” check box.
If you do not want to use the storage system as an FTP server,
clear this option.
For information about accessing the storage system using FTP,
refer to “Accessing the Storage System Using FTP” on page 54.
-
-
4. Click “Apply”.
5. When the confirmation message appears, click “OK”.
Note
If you changed the IP address of the storage system, you must now access the Manager using the
new IP address.

Accessing the Storage System Using FTP
If you enabled the storage system to act as an FTP server, all Windows or Mac OS X users can use
a Web browser to access the “public” folder. All Windows users can also access the folder created
as a result of using the “home” feature in the Console (as described in “Using the Console” on
page 28).
To access the storage system using FTP:
1. At any Windows or Mac OS X computer, open a Web browser, enter the following in the
address bar, and press Enter:
ftp://user_name@storage_system
where “user_name” is the user name as defined on the storage system and “storage_
system” is the name or IP address of the storage system (for example, “ftp:// storage” or
“ftp://192.168.0.101”).
Note
You can use the storage system name only if that name is registered with a DNS server on your
network.
You can use “guest” as the user name, but you will be able to access only the “public” folder.
2. If prompted, enter your user name and password for accessing shared folders, and then click
“OK”.
If you used the “guest” user name, the password is also “guest”.
3. Double-click any of the displayed folders or files to open them. Even if you browse to other
websites, you remain logged in until you close the browser window. (That is, you can return to
the FTP site using the “Back” button in your browser window.)
Storage System Disk Status
The “Disks” page displays information about all the hard disks that are currently installed in your
storage system:
Figure 26. Disk Space Distribution
54 55MAXDATA SN 40 M1 – User GuideManaging Your Storage System

This page includes the following details:
• The disk configuration (that is, whether the disks use a linear or RAID configuration, and the
RAID level)
• The overall status of the disks:
– Normal – All the disks are working properly.
– Degraded – One or more disks have failed but all the data is still available.
– Failed – The storage system has stopped working properly.
• The slot where each hard disk resides
• The model number, serial number, and size of each hard disk
• The current status of each disk:
– RAID n – The disk is working properly as part of the specified RAID level.
– New – The disk has been added to the storage system but is not part of a RAID.
– Spare – The disk is acting as a spare disk for the RAID.
– Rebuilding – The disk is being rebuilt (for example, when a failed disk is replaced)
– N/A – The disk is detected but not available for use (for example, when it has failed)
• The hot-plug indicator:
– RED – Removing the disk will cause the RAID to fail.
– YELLOW – Removing the disk will cause RAID degradation.
– GREEN – Removing the disk will not affect the RAID.
Note
Whenever you add or remove a disk from the storage system, you must click “Refresh” to update
the hot-plug indicator.
Caution
Changing the disk configuration or percentage to allocate for shared folders will delete all user
information and all data on all the disks.
Logging Out of the Manager
When you have finished using the Manager, it is recommended that you log out to ensure that
unauthorized individuals do not make changes to the storage system.
To log out:
1. In the navigation bar, click “Log Out”.
2. When the confirmation message appears, click “OK”.
The “Log Out” page appears.
3. To log back in to the Manager later, click “Log In”.

Shutting Down the Storage System
To shut down the storage system, you can press the power button on the unit itself and hold it
in until the System Status LED starts flashing, or you can shut the system down remotely using
the Manager. To ensure that you don’t shut down the system accidentally, you must enter your
administrator password to do this.
Caution
If you shut down the storage system, users will no longer be able to access the shared folders on the
storage system. If users have shared files open, data might be lost. Be sure to have all users save
their changes and close any open files before you shut down the storage system.
To shut down the storage system using the Manager:
1. In the navigation bar, click “Advanced”.
2. In the left pane, click “Shut Down”.
3. In the “Administrator password” text box, enter the password for logging in to the Manager.
4. Click “Shut Down”.
A message appears, indicating that the system is shutting down.
Once the storage system shuts down, if you refresh the browser window, it will be blank. If you
subsequently try to access the Manager, an error message will appear, since the storage system
will no longer be running.
Removing Hard Disks or Responding to Disk Failure
The effect of removing hard disks from your storage system or disk failure varies, depending on the
disk configuration you chose when you configured the system and the current state of the existing
disks.
For example, in a linear configuration, when you remove a disk or a disk fails, the data associated with
that disk is no longer available, but the data on all the other disks remains available.
In a RAID configuration, the effect of disk removal/failure varies, depending on the RAID level and
whether the RAID is in a normal or degraded state. You can determine the effect of disk removal/
failure by looking at the Hotplug Indicator on the “Disks” page. If this indicator is “GREEN”, disk
removal/failure will have no effect on the RAID. If this indicator is “YELLOW”, disk removal/failure
will cause RAID degradation, but you will still be able to access all the data. If the indicator is “RED”,
disk removal/failure will cause the entire RAID to fail.
For example, in a RAID 5 configuration, all the disks are “YELLOW”. Removing any one of them will
cause the RAID to be degraded, but all the data will still be available. However, after you remove
one disk, all the other disks become “RED”, since removing any one of them at this point will cause
the entire RAID to fail.
56 57MAXDATA SN 40 M1 – User GuideManaging Your Storage System

Note
In a linear configuration, the Hotplug Indicator is RED for all the disks because removing any one of
them will remove data from the storage system. However, this will not adversely affect any of the
other disks.
In addition, while a disk is being rebuilt, all the other disks are RED, since removing any one of them
at this point will cause the RAID to fail.
If you remove a viable disk and cause only RAID degradation, you can re-install the same disk and
resume normal operation.
Note
If you remove two or more disks, you must re-install them in the reverse order to help maintain data
integrity. For example, if you remove disk A from slot 1 and then remove disk B from slot 2, you must
re-install disk B first, then disk A. You can put the disks back into different slots, but they must be
re-installed in the opposite order from which they were removed.
If you remove one or more viable disks and cause the entire RAID to fail, you can shut down the storage
system, re-install the same disks, and then restart the storage system. As long as you re-install the
original disks, the storage system should be able to resume proper operation, although the integrity
of the data cannot be guaranteed. However, if you replace the removed disks with new disks, you
must reconfigure your disks (as described in “Storage System Disk Status” on page 54).
Caution
Reconfiguring your disks will delete all the data on your storage system.

Responding to RAID Degradation
When disk removal/failure causes RAID degradation, the “Disk Change Notification” page appears
when you access the Manager or refresh the browser window:
Figure 27. RAID Degradation
Take the appropriate action:
To do this Do this
Scan the storage system again and
update the information on the page
Re-install the same disk or install a
new disk
Return to the Manager and continue
to operate in a degraded mode
Click “Scan”.
Click “Shut Down”.
After the storage system shuts down, install the disk and then
restart the system.
NOTE
If you are re-installing multiple disks, be sure to reinstall them
in the opposite order than you removed them.
Click “Ignore”.
58 59MAXDATA SN 40 M1 – User GuideManaging Your Storage System

Responding to RAID Failure
When disk removal/failure causes the entire RAID to fail, the “Disk Change Notification” page appears
when you access the Manager or refresh the browser window:
Figure 28. RAID Failure
Take the appropriate action:
To do this Do this
Scan the storage system again and
update the information on the page
Re-install the same disk Click “Shut Down”.
Reconfigure the storage system using
the available disks
Click “Scan”.
After the storage system shuts down, re-install the same disk
and then restart the system.
NOTE
If you removed multiple disks, be sure to re-install them in
the opposite order than you removed them.
Click “Reconfigure Disks” and complete the system setup
pages.
Caution
Reconfiguring the storage system deletes all user information and all data on all the disks.

Replacing a Hard Disk
4
3
2
1
1
2
The MAXDATA SN 40 Storage System allows for easy installation and replacement of hard disks for
any upgrade or repair.
Important
Either a plastic retention device or a hard drive must be installed in each drive carrier and all four
drive carriers must be installed in the storage system during operation. There will be inadequate drive
cooling if any drive bays are left open.
Caution
Before performing any maintenance on the system, back up the data. Shut down the storage system by
selecting the “Advanced” tab from the Manager and then “Shutdown” from the left-hand menu.
1. Observe all safety and ESD precautions listed in Chapter 1, “Safety and Warnings”.
2. If you are unable to shut down the system using the software Manager then power down the
storage system by pressing and holding the power button for approximately five seconds until
the System Status LED starts flashing. The storage system will shut off after a short shutdown
period.
3. Disconnect the storage system from its power source.
4. Press in the green latch at the end of the drive carrier to disengage the drive carrier from the
storage system. Pull out on the black lever (see letter “B”) to pull the drive carrier partially out
of the storage system. Slide the drive carrier all the way out of the storage system.
Figure 29. Removing Drive Carrier from Storage System
60 61MAXDATA SN 40 M1 – User GuideManaging Your Storage System

5. Remove the four screws that attach the defective hard disk to the drive carrier. Two screws
are located on each side of the drive carrier.
Note
Store the plastic retention device for future use.
6. Remove the hard disk from its wrapper and place it on an anti-static surface.
Important
Make sure the hard disk is a SATA disk.
7. With the hard disk circuit-side down, position the connector end of the new hard disk so that
it is facing the rear of the drive carrier. Align the holes in the new hard disk to the holes in the
drive carrier and attach the new hard disk to the carrier with the screws that were removed in
Step 5.
Note
Be careful not to remove the side rail on the right-hand side of the drive carrier. This rail contains
the light pipe that displays the LED light on the front of the drive carrier. In the event that the side
rail comes loose, check to ensure that the light pipe is properly inserted into the LED hole before
reattaching the side rail to the drive carrier.
Figure 30. Installing Hard Disk into Drive Carrier
Important
The order of drive carriers is critical when replacing hard disks or performing maintenance. A hard disk
plugged into an incorrect slot once set up for RAID can result in data loss or an improperly functioning
storage system.

Figure 31. Order of Drive Carriers
1
2
3
4
1
2
4
3
2
1
8. With the black lever in the fully open position, insert the drive carrier into the storage system.
The green latch at the front of the drive carrier must be to the right of the storage system. Do
not push on the black drive carrier lever until the lever begins to close by itself. Once the black
drive carrier lever begins to close by itself, push on it to lock the driver carrier into place.
Important
Ensure that the drive carrier is orientated so that the hard disk is uppermost and the drive carrier
lever opens from the right. Also, do not force the drive carrier into the storage system. If there is
resistance, make sure that the drive carrier lever is in the fully open position.
9. Reconnect the storage system to its power source.
10. Power up the storage system by pressing the power button on the front of the unit. The
System Status LED will flash while the system is booting up.
Note
If your hard drive was part of a RAID array previously, it will rebuild automatically.
Note
If you are replacing a failed hard disk in a RAID array, the Drive Status LED will blink yellow until
the array is rebuilt. Once the RAID is rebuilt, the Drive Status LED will turn green indicating normal
operation. If the RAID rebuild fails, the Drive Status LED will turn a continuous yellow, indicating a
fault condition. If this occurs, remove the hard drive from the storage system and check it or replace
it with another hard disk.
Note
If you replace all of the hard disks with higher-capacity hard disks, you must log in to the Manager as
administrator to reconfigure the disks.
62 Managing Your Storage System

5 Protecting Local Disks
Even if most of your data is stored and protected on your storage system, your operating system files,
applications, and many other files still reside on each individual computer in your network. If one of
those local disks fails, it can take many hours to re-install and reconfigure the operating system and
applications on a new or repaired hard disk, and some files might be completely lost.
Intel® Client Backup and Recovery is a software application designed to address this issue. On each
computer where it is installed, Intel® Client Backup and Recovery provides reliable data protection
and rapid data recovery in the event of a system crash or disk failure.
Intel® Client Backup and Recovery protects Windows desktops and laptops by backing up their local
disks or partitions to the storage system. To make sure that you have recent copies of your local disk,
Intel® Client Backup and Recovery can automatically perform a backup at regularly scheduled intervals
– either once a day or once a week, whichever you prefer. (You can also disable automatic backups
and just perform backups manually at a time of your choosing.) Up to four backups are saved on the
storage system; each time a new backup is performed, the oldest backup is automatically deleted.
®
To ensure that valuable storage space isn’t used up by duplicate data, when Intel
Recovery performs each subsequent backup, it copies only the data that has changed since the last
time a backup was performed. This also minimizes the impact on your network. Yet through unique
technology on the storage system, each backup is a complete point-in-time image. You can view or
recover the entire disk or partition exactly as it existed at a particular date and time.
Whenever you want to recover data from the storage system, you can do so quickly and easily. If you
need to recover just a few folders, files, or sections of a file, you can access the desired backup and
copy what you need back to your local disk. If the protected disk isn’t your system disk (that is, the
disk that contains the Windows operating system files that the computer uses when it runs), and you
®
need to restore the whole disk, you can do so using Intel
Client Backup and Recovery. And if the
protected disk is your system disk, and you need to recover the whole disk, you can do so using the
recovery CD. Recovering the whole disk makes it contain exactly the same data that it contained at
the time the backup was performed – you don’t have to reinstall or reconfigure the operating system
or applications.
Client Backup and
Getting Started
System Requirements
Each computer where Intel® Client Backup and Recovery is installed must have the following:
• One of the following operating systems:
®
- Microsoft
- Microsoft
- Microsoft
• Microsoft
Windows® XP Home Edition or Professional with Service Pack 2 or newer
®
Windows Server™ 2003
®
Windows® 2000 Professional, Server, or Advanced Server with Service Pack 4
®
iSCSI Initiator 2.0
Note
For information about downloading and installing this item, refer to the next section, “Installing the
Microsoft® iSCSI Initiator.”
• 20 MB free hard disk space
63MAXDATA SN 40 M1 – User Guide

Note
Intel® Client Backup and Recovery requires the Intelligent Management Agent (IMA), which is installed
automatically if it is not already installed. IMA requires an additional 5 MB of free hard disk space (for
both the application and associated log file data).
®
The Microsoft
installed. The .NET Framework requires approximately 40 MB of additional free hard disk space.
• If you’re using a firewall on the computer that you plan to protect, open TCP port 11762 on
the firewall. This ensures that Intel® Client Backup and Recovery can communicate with the
storage system.
.NET Framework 1.1 is also required and installed automatically if it is not already
Installing the Microsoft® iSCSI Initiator
Before you can install Intel® Client Backup and Recovery, you must download and install the Microsoft®
iSCSI Initiator 2.0.
To download and install this initiator:
1. Open a Web browser, enter the following in the address bar, and press Enter: http://www.
microsoft.com/downloads/details.aspx?FamilyID=12cb3c1a-15d6-4585-b385-befd1319f825&Di
splayLang=en
2. Scroll down to the “Files in This Download” section and click “iSCSI-2.0-x86fre.exe”.
3. Select the option to run the file (“Run”, “Open”, or “Run this program from its current
location”).
4. If a security warning appears, click “Run”.
The installation wizard starts.
5. On the first page of the installation wizard, click “Next”.
6. On the page with installation options, click “Next”. (“Initiator Service” and “Software Initiator”
are selected by default.)
7. If a message box appears telling you to configure the settings in the “Control Panel”, click
“OK”.
Note
You do not have to configure the Microsoft® iSCSI Initiator. Intel® Client Backup and Recovery will
configure it for you automatically.
8. If you agree to the terms of the license agreement, select “I Agree” and then click “Next”.
9. When the installation completes, click “Finish”.
After your computer restarts, you can install Intel
®
Client Backup and Recovery.
Installing Intel® Client Backup and Recovery
You must install Intel® Client Backup and Recovery on each computer whose local disks you want
to protect.
Note
The Firefox browser does not by default support running executables from within an .html page.
Therefore, you cannot install the Intel® Client Backup and Recovery software from within the software
install page. If Firefox is your default browser, you must install this software directly from the CDROM. To do this from the Windows desktop, click on the “Start” button and select “Run”. Next,
enter the following at the command-line prompt:
<CDROM Drive Letter>:\software\Client Backup and Recovery\CBRSetup.exe
64 65MAXDATA SN 40 M1 – User GuideProtecting Local Disks

Once the setup program has been initiated, proceed with Step 4 on this page.
To install Intel® Client Backup and Recovery using Internet Explorer:
1. At the computer from which you plan to install the Intel® Client Backup and Recovery software,
insert the software CD into the CD-ROM drive.
2. Select “Software” from the top menu.
3. Select the “Intel
®
Client Backup and Recovery” link to install the software.
4. Respond to prompts.
5. If the Microsoft
®
iSCSI Initiator 2.0 is already installed, go to the next step. If this component is
not currently installed, you will be prompted to install it.
Click “OK” to go to the Microsoft website, click “iSCSI Software Initiator v2.0”, and follow the
instructions in “Installing the Microsoft® iSCSI Initiator” on page 64.
®
You must install the Microsoft
iSCSI Initiator 2.0 before you can install Intel® Client Backup
and Recovery.
®
When you have finished installing the iSCSI initiator, re-start the installation of Intel
Client
Backup and Recovery.
6. If Microsoft .NET Framework 1.1 is already installed, go to step 9.
If this component is not currently installed, you will be prompted to install it.
Click “Yes” to install this component. (You cannot install Intel® Client Backup and Recovery
without first installing Microsoft .NET Framework 1.1.).
When you click “Yes”, the setup utility for Microsoft .NET Framework 1.1 starts.
7. If you agree to the terms of the license agreement, select “I agree” and then click “Install”.
It might take some time to copy and configure the associated files.
Note
The remaining time might be reported as 0 and it might appear that no progress is occurring. However,
configuration is occurring in the background.
®
8. When a message appears, indicating that the installation of Microsoft
complete, click “OK”.
After you click “OK”, the Intelligent Management Agent is installed automatically (if it is not
already installed), and the welcome page for installing Intel® Client Backup and Recovery
appears.
9. On the welcome page, click “Next”.
The license agreement appears.
10. If you agree to the terms of the license agreement, select “I accept the terms of the license
agreement” and then click “Next”.
®
11. Click “Next” to install the Intel
Client Backup and Recovery in the displayed location.
Alternatively, you can click “Browse”, select or enter a different location, click “OK”, and then
click “Next”.
.NET Framework 1.1 is
12. To complete the installation and restart your computer, click “Finish”.
If you do not want to restart your computer at this time, select “No, I will restart my computer
later” and then click “Finish”. You do not have to restart the computer immediately after
installation, but you do have to restart it before running Intel® Client Backup and Recovery.

13. After you restart the computer, the License dialog box appears.
14. Type the key code for licensing the product and click “OK”. The key code can be found on the
back of your storage system. One license is provided with the system.
Additional licenses can be purchased for more clients at http://www.intel.com/design/servers/
storage/offers.
If you have an Internet connection, the license is activated automatically. When you click “OK”
on the confirmation message, the Protect a Disk wizard starts. For information about this
wizard, refer to “Protecting Your Disks” on page 68.
Note
If you previously used this key code on a different computer, an error message appears, and you must
re-activate your license. For more information, refer to “Activating Your License” on page 67.
If your Internet connection is temporarily down, or if this computer doesn’t have an Internet connection,
click “OK” on the warning message. The Protect a Disk wizard still starts, but after 30 days you will
no longer be able to perform backups or recovery until you activate the license. For more information,
refer to “Activating Your License” on page 67.
Starting Intel® Client Backup and Recovery
To start Intel® Client Backup and Recovery, click “Start” --> “Programs” --> “Client Backup and
Recovery”.
If you did not protect a disk after installing Intel® Client Backup and Recovery and restarting your
computer, you are prompted to do so the first time you run this application. For information about
this wizard, refer to “Protecting Your Disks” on page 68 starting with step 2.
If you already protected a disk, the application window appears.
The “Status” page displays the name of the disk that you protected as well as related information,
such as the size of the disk, the name of the storage system where the backup resides, the number
used to identify the backup disk on the storage system, the current status, information about any
ongoing activity, and the date and time of the last backup and next scheduled backup.
Note
If your license is not currently activated, a message appears, advising you of this. You must activate
your license within 30 days of installing Intel® Client Backup and Recovery. After that time, you will
no longer be able to perform backups or recovery. For more information, refer to “Activating Your
License” on the next page.
66 67MAXDATA SN 40 M1 – User GuideProtecting Local Disks

Activating Your License
When you install Intel® Client Backup and Recovery and restart your computer, you are prompted to
license the product. If your computer has an Internet connection, the license is activated automatically.
However, if your Internet connection was temporarily down or if your computer has no Internet
connection, your license was not activated. You must activate your license within 30 days of installing
Intel® Client Backup and Recovery; otherwise, you will not be able to perform backups or recovery.
If your Internet connection was temporarily down, your license will be activated automatically the
next time you run Intel® Client Backup and Recovery with a restored Internet connection.
However, if your computer has no Internet connection, you must perform offline activation (as
described in the next section).
Note
Activation is tied to your computer’s hardware. Once you have activated a particular license, if your
computer hardware changes, or if you subsequently install Intel® Client Backup and Recovery on a
different computer using the same key code, an error message appears. You must export your current
license data (“Action” --> “License” --> “Offline Activation” --> “Export License Data”) and e-mail the
license file to Activate.Keycode@falconstor.com, indicating that your hardware has changed. When you
receive confirmation that your license has been re-activated, you can continue to use the product.
If you need assistance with this procedure, contact Technical Support.
Activating Your License Without an Internet Connection
If your license wasn’t activated because your computer has no Internet connection, you must obtain
an activation code using another computer that does have both an Internet connection and e-mail.
To activate your license without an Internet connection:
1. From the “Action” menu, click “License” --> “Offline Activation”.
The “Offline Activation” dialog box appears.
2. Click “Export License Data”.
3. On the “Save As” dialog box, select one of the following locations and then click “Save”:
- A shared folder accessible to both your computer and a computer that has Internet and
e-mail access
- A floppy disk
- A USB disk
4. If you did not save the file to a shared folder, take the floppy disk or USB disk to a computer
with Internet and e-mail access.
5. From the computer that has Internet and e-mail access, e-mail the license file to the following
address:
Activate.Keycode@falconstor.com
6. When you receive an e-mail response, save the returned license file back to the shared folder,
floppy disk, or USB disk.
7. If you did not save the file to a shared folder, take the floppy disk or USB disk back to the
computer where Client Backup and Recovery is installed.

8. From the “Action” menu, click “License” --> “Offline Activation”.
9. Click “Import Activation Code”.
10. On the “Open” dialog box, browse to the location where the returned license file exists and
double-click it.
11. On the confirmation message, click “OK”.
The license is now activated and you can continue to backup up and recover your disks.
Replacing Your Existing License
To replace your existing license:
1. From the Action menu, click “License” --> “Add License”.
The “Add License” dialog box displays your current license key code.
2. In the “License key code” text box, enter the new key code.
3. Click “OK”.
4. When the confirmation message appears, click “OK”.
If your computer has an Internet connection, the license is activated automatically. If your
Internet connection is temporarily down, repeat this procedure when your Internet connection
is restored. (You do not have to re-enter the key code.) If your Internet connection is
temporarily down, your license will be activated automatically the next time you run Intel®
Client Backup and Recovery with a restored Internet connection.
Protecting Your Disks
After you install Client Backup and Recovery and restart your computer, the Protect a Disk wizard runs
automatically. Using this wizard, you can specify which disk or partition you want to back up, where
the backups should be stored, when automatic backups (if any) should occur, and what password
you want to use for the recovery CD. If you cancel this wizard, you can start it again at any time using
the following procedure.
To protect a disk:
1. Click “Protect a Disk”.
The Protect a Disk wizard runs.
2. In the “Available disks” list, select the disk or partition that you want to protect.
Even if your computer has only one hard disk, two items appear in this list. The first item
represents the entire hard disk, and the second item represents the partition on that disk. (If
there’s only one partition on the disk, the partition is the same as the entire disk.)
If your hard disk is divided into multiple partitions, this list displays one item for the entire
hard disk, and one item for each partition. If your computer has multiple hard disks, this list
displays an item for each entire disk and an item for each partition on each disk. Each partition
is identified by its drive letter.
68 69MAXDATA SN 40 M1 – User GuideProtecting Local Disks

Note
Dynamic disks are not supported.
If you select an entire disk, all the partitions on that disk are protected as a single entity. This
means that you can’t later recover only one partition; you have to recover the entire disk. If you
select just a partition, you can subsequently recover just that partition.
In addition, you can recover a data disk or partition using Client Backup and Recovery, but you
can recover a system disk or partition only using the recovery CD, so if you have separate
partitions for your system information and your data, you might want to protect each one
separately.
Recommendations:
• If your computer has only one disk with one partition, select the disk.
• If your disk has a system partition and a data partition, select one of the partitions and
complete the wizard. Then run the wizard again and protect the other partition. This provides
complete protection with maximum flexibility.
• If you have several disks and several partitions on each, select either one of the disks or one of
the partitions and complete the wizard. Then run the wizard again and protect another disk or
partition.
What To Do Next:
In this case Go to this step
You never previously completed the Protect a Disk wizard
You previously completed the Protect a Disk wizard and connected to a
storage system.
You previously protected this disk and removed protection (as described
in “Removing Protection” on page 80)
3. When the “Add Storage System” dialog box appears, Client Backup and Recovery
automatically scans your subnet for storage systems. Any storage systems that are detected
appear in the “Discovered storage systems” list. (It might take a few seconds to complete the
scan. You can cancel it at any time by clicking “Cancel” on the scanning message box.)
From the “Discovered storage systems” list, select the storage system where you want
to back up the selected disk. The name of the storage system automatically appears in the
“Storage system name or IP address” text box.
If no storage systems are automatically discovered, or if you want to back up your disk to a
different storage system, enter the name or IP address of the desired storage system in the
“Storage system name or IP address” text box.
3
4
5
Note
You can enter a storage system name only if that name is registered with a DNS server on your
network.
Then click “OK”.
Note
If an authentication error occurs, make sure that the name or IP address of the storage system is
correct and that your computer is connected to the network.

4. From the “Backup locations” list, select the storage system to use for backups of this disk or
partition. (The first backup location in the list is selected by default.)
If you want to scan the network for new storage systems, or add a new one manually, click
“Add” and repeat step 3.
If you want to remove a storage system that’s not valid or that you no longer want to use,
select the storage system from the “Backup locations” list, click “Remove”, and then click
“Yes” to confirm the removal. (You can remove a storage system only if it is not currently
being used to protect another disk.)
Once you have selected the desired backup location, click “Next” and go to step 6.
5. If you previously protected this disk and removed protection, specify whether or not you want
to re-use the existing backup or create a new one.
If you select “Re-use the existing backup”, you must select which backup to re-use from the
list. Then click “Next” and go to the next step.
If you select “Create a new backup” and click “Next”, you must select the desired backup
location as described in step 4.
6. Specify when you want backups to occur.
For example, if you want backups to occur every day, select “Daily” from the “Recurrence”
list. If you want backups to occur once a week, select the day of the week from the
“Recurrence” list. Then select the time.
If you don’t want backups to occur automatically, select “Not Scheduled” from the
“Recurrence” list. (The “Time” list appears dimmed.) Backups will occur only when you start
one manually (as described in “Manually Backing up Your Disk” on page 72).
Notes
Only four backups of each protected disk or partition are saved on the storage system, so if you back
up your disk every day, you’ll be able to recover data from only the last four days. If you back up your
disk once a week, you’ll be able to recover data from four weeks ago, but the most recent backup
might be as many as six days old.
Although Intel® Client Backup and Recovery is specifically designed to perform backups without
affecting your other computer activities, you might want to schedule backups for a time when they’ll
have the least impact on your system, like during lunch or after business hours (if you leave your
computer running overnight). If you’re protecting multiple disks or partitions, it is recommended that
you schedule each backup to occur at a different time.
Once you complete this wizard, if a backup does not occur at its scheduled time for any reason, a
message will appear, advising you of this and giving you the option to perform the backup immediately
or to wait until the next scheduled backup.
70 71MAXDATA SN 40 M1 – User GuideProtecting Local Disks

7. Specify whether or not to back up your disk as soon as you finish the wizard by selecting or
clearing the “Back up now” check box, and then click “Next”.
If you clear this option, the disk will be backed up at the next scheduled time or the next time
you perform a manual backup.
8. If you ever need to recover your disk using the recovery CD, you’ll be prompted for a
password. In the “Recovery CD password” text box, enter the password that you’d like to use
for restoring hard disks, enter it again in the “Retype your password” text box, and then click
“Next”.
Notes
The recovery CD password or password for restoring hard disks must be 12–16 characters long.
The same password is used for all disks backed up to the same storage system. If you subsequently
protect a second disk using the same storage system, you will not be prompted to provide this
password again. However, if protect a second disk using a different storage system, you will be
prompted to provide a password for that storage system.
®
You can change this password later using Intel
the Recovery CD Password or Password for Restoring Hard Disks” on page 73) and using the storage
system (as described in “Changing the Password for Restoring Hard Disks” on page 45).
9. Review all your selections and click “Finish”.
Client Backup and Recovery (as described in “Changing
If you selected the “Back up now” check box, backup begins as soon as you click “Finish”,
and you can review its progress on the “Status” page in Client Backup and Recovery.
10. If you want to protect additional disks or partitions, repeat this procedure for each one.

Manually Backing up Your Disk
Once you protect a disk, it is automatically backed up at regular intervals (unless you chose “Not
Scheduled” from the “Recurrence” list when you completed the schedule). However, you can also
back up a disk manually at almost any time. For example, if you’re about to install a new application,
you might want to back up your disk right before you do that so that if any problems occur, you can
recover your disk to the state it was in immediately before you installed the application.
Note
You can manually back up a disk only if a backup or recovery is not currently occurring.
To manually back up a disk:
1. Click “Status”.
2. In the “Protected disk” list, select the disk that you want to back up.
3. Click “Back Up Now”.
The “Current activity” area displays information about what’s happening, the percentage of the
backup that has completed, and the speed at which the data is being sent over the network.
The “Progress” bar graphically indicates how much of the backup is complete.
To stop a backup in progress, click “Stop Current Activity”.
Stopping a Backup or Recovery in Progress
Once a backup or recovery starts, you can stop it at any time – for example, if you notice that your
system is not responding as quickly as you’d like, and you want to free up processing bandwidth for
other tasks.
When you stop a backup in progress, that backup won’t appear in the list of backups on the “Restore”
page, and any changed data that was not copied to the storage system will be copied during the
next backup.
When you stop a recovery in progress, the local disk or partition is left in an incomplete state, and
you must recover it again later before you can use it.
To stop a backup or recovery in progress:
1. Click “Status”.
2. In the “Protected disk” list, select the disk whose backup or recovery you want to stop.
3. Click “Stop Current Activity”.
If you’re stopping a backup, the backup stops immediately.
If you’re stopping a recovery, a confirmation message appears. Click “OK” to stop the
recovery now, or click “Cancel” to proceed with it.
72 73MAXDATA SN 40 M1 – User GuideProtecting Local Disks

Changing the Backup Schedule
When you protect a disk, you specify when you want backups to occur. However, you can change
this schedule at any time.
To change the backup schedule:
1. Click “Schedule”.
2. In the “Protected disk” list, select the disk whose backup schedule you want to change.
3. Specify when you want backups to occur.
For example, if you want backups to occur every day, select “Daily” from the “Recurrence”
list. If you want backups to occur once a week, select the day of the week from the
Recurrence list. Then select the time.
If you don’t want backups to occur automatically, select “Not Scheduled” from the
“Recurrence” list. (The “Time” list appears dimmed.) Backups will occur only when you start
one manually (as described in “Manually Backing up Your Disk” on page 72).
4. Click “Apply”.
The schedule change takes effect immediately, and the date and time of the next scheduled
backup appears in the “Next backup” area.
Changing the Recovery CD Password or Password for Restoring Hard Disks
When you protect a disk, you specify what password to use for recovering the disk using the recovery
CD. However, you can change this password at any time.
Note
The same password is used for all disks backed up to the same storage system. If you backed up
multiple disks to the same location and change the password for one, the password is changed
for all of them. However, if you backed up one disk to one storage system and a different disk to
a different storage system, each disk can have a different recovery CD password or password for
restoring hard disks.
To change the recovery CD password or password for restoring hard disks:
1. Click “Restore”.
2. In the “Protected disk” list, select a disk whose backup resides on the storage system whose
recovery CD password you want to change.
To double-check your selection, click “Status”. The name of the storage system appears in the
“Backup location” area. Then click “Restore” to return to the “Restore” page.
3. Click “Recovery CD Password”.
4. In the “Recovery CD password” text box, enter the desired password.
This password must be 12–16 characters long.
5. In the “Retype your password” text box, enter the password again.
6. Click “OK”.

Recovering Data
With Client Backup and Recovery, there are several ways to recover data from your backups. The
best method to use depends on what you want to do:
• Recover selected folders, files, or sections of files
If you accidentally permanently deleted a folder or file that you want to recover, or if you just
want to retrieve some information from a file that you changed, you can access the backup
that contains the desired data and copy it to your local disk.
You can also use this procedure to try out different “what if” scenarios – for example,
changing the format of the data in a file – without adversely affecting the data on your local
disk.
For more information, refer to “Recovering Files from a Backup” on page 75.
• Recover an entire non-system disk or partition
If you protected a disk or partition that isn’t being used to run the operating system, you can
recover that disk or partition using Client Backup and Recovery. You might need to do this if
the disk has become corrupted or the data has been extensively damaged. The entire disk or
partition will be restored to its exact state at the time of the selected backup.
Caution
When you do this, you will lose any data that was written to the disk after the time of the selected
backup, as well as any backups that were performed after the backup you’re recovering. You might
want to copy any newer files that you want to keep to another disk before you recover the disk. To
copy files from a backup, refer to “Recovering Files from a Backup” on page 75.
In addition, if network errors occur or the storage system shuts down during recovery, your operating
system might become unstable, and you will have to recover it using the recovery CD (or re-install the
operating system if you did not protect your system disk). Be sure to recover your disks or partitions
only when your environment is stable.
You can continue to use your computer for other tasks while the data is being recovered,
although not any applications or files located on the disk or partition that you’re recovering.
For more information, refer to “Recovering a Non-system Disk or Partition” on page 76.
• Recover an entire system disk or partition
If you need to recover your system disk or partition – that is, the disk or partition used to run
the operating system – you can do so using the recovery CD. This is particularly useful if the
hard disk has failed and has been repaired or replaced, or if you want to duplicate an existing
disk configuration for another computer. The entire disk or partition will be recovered to its
exact state at the time of the selected backup. However, you won’t be able to use your
computer until all this process is complete.
For more information, refer to “Recovering a System Disk or Partition” on page 77.
74 75MAXDATA SN 40 M1 – User GuideProtecting Local Disks

Recovering Files from a Backup
To recover selected folders, files, or sections of files from a backup:
1. Click “Restore”.
2. In the “Protected disk” list, select the disk that contains the folders or files that you want to
recover.
3. In the “Backups” list, select the backup from the desired date and time.
You can select only a backup for which “No” appears in the “Backup View Open” column.
4. Click “View Backup”.
5. When the confirmation message appears, click “OK”.
After a few moments, a window opens automatically, displaying all the data associated with
the selected backup. You can now open the folders and files in the backup view to make sure
they contain the information you want, and copy any of the data to your local disk.
Caution
You can open and change the files in the backup view, and even create new folders or files there.
However, as soon as you close the view (as described in the next step), all the changes will be lost.
The next time you view the backup, it will appear the way it existed at the time the backup was
created.
Notes
- If the first drive letter after your local disks is mapped to a shared network folder, you must
use Disk Management to change the drive letter assigned to the backup view so that you can
access it.
- For example, if your system disk is mapped to C:, your CD-ROM drive is mapped to D:, and a
shared network folder is mapped to E:, and you view a backup, you will continue to see the
shared network folder when you explore E:, and you will not see a new drive letter for the
backup view. (Internally, the backup view is also mapped to E:, since that was the first drive
letter after the local disks.) However, when you use Disk Management to change the drive
letter for the backup view from E: to F:, you will be able to see both the shared network folder
(E:) and the backup view (F:).
- To change the drive letter, right-click “My Computer” and click “Manage”. In the left pane,
click “Disk Management”. In the right pane, right-click the backup view, click “Change Drive
Letter and Paths”, click “Change”, select the desired drive letter from the list box, and then
click “OK” on each dialog box. You can now access the backup view using the specified drive
letter.
- Windows caching can affect the content of the backup view. If the content does not appear to
be correct, restart your computer and check again.
- You can view more than one backup simultaneously. Simply repeat steps 3 and 4 for each
backup that you want to view.
- If you open a backup view for a partition that cannot be explored (such as an EISA partition),
the backup view is closed automatically.
- When a backup view is open, that backup will not be deleted to make room for new backups
until it is closed or unless the storage system runs critically low on resources. If you view the
oldest backup, and the maximum number of backups is reached, new backups cannot occur
until the view of the oldest backup is closed (as described in the next step).
®
- When you close the Intel
to close all open backup views. If you click “Yes”, both the application window and all open
views are closed. If you click “No”, both the application window and all open views remain
open.
Client Backup and Recovery application window, you are prompted

6. When you have finished viewing or copying all the desired data, select the backup in the
“Backups” list and click “Close View”.
The Windows Explorer window closes automatically, and the “Backup View Open” column for
the selected backup now displays “No”.
Recovering a Non-system Disk or Partition
You can recover a non-system disk or partition only as long as that disk or partition is not currently
being backed up, and only as long as a more recent backup view is not open. For example, if you
created backups on Monday and Tuesday, and Tuesday’s backup view is open, you cannot recover
Monday’s backup until you close Tuesday’s view.
In addition, if you recover a partition and other partitions of that same disk are also protected, protection
for those other partitions temporarily stops until the selected partition is recovered.
Caution
When you recover a disk or partition, you will lose any data that was written to the disk after the time of
the selected backup, as well as any backups that were performed after the backup you’re recovering.
You might want to copy any newer files that you want to keep to another disk before you recover the
disk. To copy files from a backup, refer to “Recovering Files from a Backup” on page 75.
In addition, if network errors occur or the storage system shuts down during recovery, your operating
system might become unstable, and you will have to recover it using the recovery CD (or re-install
the operating system if you did not protect your system disk).
Be sure to recover your disks or partitions only when your environment is stable.
To recover a non-system disk or partition:
1. Click “Restore”.
2. In the “Protected disk” list, select the disk or partition that you want to recover.
3. If a view of a more recent backup than the one that you want to recover is open (as indicated
by “Yes” in the “Backup View Open” column), select the open backup view and click “Close
View”.
4. In the “Backups” list, select the backup that you want to recover.
5. Click “Restore Disk”.
6. When the confirmation message appears, click “Yes”.
The disk or partition is recovered to exactly its state at the date and time of the selected
backup.
To let you monitor the progress of this activity, the “Status” page appears automatically.
The “Current activity” area displays the percentage of the recovery that has completed, and
the speed at which the data is being sent over the network. The “Progress” bar graphically
indicates how much of the recovery is complete.
Note
You can cancel this operation at any time by clicking “Stop Current Activity”. However, this will leave
the local disk or partition in an incomplete state, and you will have to recover it again before you can
use it.
76 77MAXDATA SN 40 M1 – User GuideProtecting Local Disks

7. When you are prompted to restart the computer, click “Yes”.
You do not have to restart your computer immediately, but you cannot access the recovered
disk or partition until you do.
®
As soon as you restart the computer, you must start Intel
Client Backup and Recovery and
back up the recovered disk or partition manually (as described in “Manually Backing up Your
Disk” on page 72) to resume protection. In addition, if you recovered a partition and any other
partitions on the same disk were protected, you must manually back up those partitions as
well.
Recovering a System Disk or Partition
To recover a system disk or partition using the recovery CD:
1. Using the appropriate procedure for your system, configure the computer to boot from the CDROM drive.
2. Insert the recovery CD into the CD-ROM drive.
When responding to the prompts, use the arrow keys to highlight the desired item, use the
space bar to select or clear options (an X appears in the brackets when the option is selected),
and press Enter to make your selection. You can also tab between fields.
Arrow keys Navigate between items and
highlight items
Space bar Select or clear options
Enter Make a selection
Tab Move between fields
3. When the hardware list appears, use the arrow keys to select the network interface card (NIC)
that you want to use when recovering the data, and then select “Next”.
In most cases, there will be only one NIC, and you can simply select “Next”.
This screen displays only the NICs on this system that are supported by Client Backup and
Recovery. If no NICs appear on this screen, you might need to install an appropriate network
driver. Select “Load Driver”, select the location from which you want to install the driver
(“Load From System” for the local hard disk, “Load From Floppy” for a floppy disk drive, or
“Load From CDROM” for a CD-ROM drive), insert the disk in the drive (if loading from a floppy
disk or CD-ROM), and respond to the prompts. For information about obtaining the appropriate
driver, contact your vendor.
To see a complete list of the detected hardware, select “Rescan”. When you are done viewing
the list, select “OK”.
4. Review the settings for your NIC and select “Next”.
The recovery CD obtains the IP address to use from your DHCP server. If the displayed
settings are not the ones you want to use, or if no IP address is displayed, use the arrow
keys and space bar to select “Config” and then type in the desired IP address (for example,
“192.168.0.101”) or subnet mask. (If you make a mistake typing either the IP address or
subnet mask, select “Disable” to clear the displayed information.) Then select “OK” and select
“Next”.
5. In the “Client Name” field, enter the full computer name of this computer in all capital letters.
If you don’t remember the full computer name, access the Manager (as described in
“Accessing the Manager” on page 15) and click “Backups” in the navigation bar. In the
“Protected disks” list, the “Computer Name” column lists the computer name of each
computer that has backed up disks to the storage system.

6. In the “Recovery Server” field, enter the name or IP address of the storage system where the
backups reside.
Note
You can use the storage system name only if your network has a DNS server.
7. Make sure the selected authentication type is “CHAP”.
Client Backup and Recovery supports only “CHAP” authentication.
8. In the “Recovery Password” field, enter the recovery CD password that you specified when
you protected the disk or when you last changed the password.
If you don’t remember your password, ask your system administrator to you can change it on
the storage system (as described in “Changing the Password for Restoring Hard Disks” on
page 45) and enter the new password here.
9. In the left column, select the backup that corresponds to the disk or partition that you want to
recover.
If you protected only one disk or partition, only one item appears in this list.
If you protected multiple disks or partitions, you can identify the right item by looking at the
“Attr” and “Size” columns. The “Attr” column displays the attributes of each listed item
(“D” for disk, “P” for partition, and “S” for system disk). For example, if you protected both
a system disk and a data disk, the system disk will be labeled “S”, and the data disk will be
labeled “D”. If you protected disks of different sizes, the “Size” column (which displays the
number of megabytes) can also help you identify the right backup.
10. In the right column, select the date and time of the backup that you want to recover.
In general, selecting “Base Disk” is the same as selecting the most recent backup. However,
if your system crashed during the last backup, the base disk will be in an incomplete state. In
that case, be sure to select one of the listed backup dates rather than “Base Disk”.
If you select “Base Disk”, a backup of that disk image on the storage system is created, and
this backup is recovered. As a result, if the maximum number of backups have already been
performed, the oldest backup is deleted to make room for this backup.
11. Specify whether or not to delete all backups that occurred after the selected date by selecting
or clearing “Rollback the remote disk”.
Caution
This action is not reversible. If you select this option, you will not be able to subsequently recover
from another later backup.
12. Specify whether or not to scan the differences between the backup and the disk to which you
are recovering data by selecting or clearing “Enable micro-scan”.
If you’re simply overwriting corrupted data on the same disk that you protected previously,
select this option. Client Backup and Recovery will scan both the backup and the disk, and
copy only the data that differs between the two. This can minimize the impact to the network,
although the scanning process takes some additional time.
If you’re recovering the backup to a brand new disk, clear this option. Client Backup and
Recovery will copy all the data from the backup to the new disk without doing any scanning
(there will be nothing to scan on the new disk).
13. Select “Next”.
14. Select the disk where you want to recover the data, and select “Next”.
78 79MAXDATA SN 40 M1 – User GuideProtecting Local Disks

Note
If you are recovering a system disk, the system to which you are recovering the data must be identical
to the original system. For example, if the original system had a particular type of network adapter,
the system to which you are recovering the data must have the exact same type of network adapter.
Otherwise, the recovered files will not operate properly.
15. If you selected the backup of a disk in step 9, go to step 17.
If you selected the backup of a partition in step 9, select “Restore to a partition” to recover
to an existing partition on the selected disk, or select “Clear all partitions and create new” to
delete all the existing data on the selected disk and recover only the selected partition.
16. If you selected “Restore to a partition” in step 15, select the partition where you want to
recover the data, and then select “Next”. (Otherwise, go to step 17.)
17. Select “Yes” to confirm the action.
Caution
This overwrites any existing data on the selected disk. Although you can subsequently recover different
data, you cannot recover the original data.
The status screen displays the progress of the recovery. You can cancel it at any time by
selecting “Abort”. However, this leaves the disk or partition in an incomplete state (some of
the data will have been recovered, but not all of it).
18. When the completion screen appears, review the results and do one of the following:
To do this Do this
Review information about any sectors that
were not successfully recovered
Recover another disk or partition Select “Continue”.
Restart the computer
Select “Failed Sectors”, review the displayed
information, and select “Back”.
If you want to recover a different backup of the
same computer from the same storage system,
select “Yes” to retain the current configuration
settings and return to step 9.
If you want to recover a different computer’s
backup, or if you want to recover a backup
of the same computer from another storage
system, select “No” to modify the current
configuration settings and return to step 5.
Unplug the network cable from the computer
and select “Finish”. Remove the CD.
19. When the computer restarts, use the appropriate procedure for your system to configure the
computer to boot from the local hard disk once more.
20. Start Client Backup and Recovery and remove protection from the recovered disk or partition
(as described in “Removing Protection” on page 80).
Since the computer is disconnected from the network, you might see messages about the
backup being offline. This is normal.
21. Plug the network cable back into the computer and restart the computer.
22. Protect the recovered disk once again (as described in “Protecting Your Disks” on page 68).

Removing Protection
If you no longer want to back up a particular disk or partition, you can remove protection as long as a
recovery is not currently in progress for that disk or partition. (If a recovery is in progress, you must
cancel it or wait until it completes before you can remove protection.)
Note
If you plan to delete a protected partition, be sure to remove protection before you delete that partition.
Otherwise, you might not be able to protect other partitions on that disk.
When you remove protection, you will no longer be able to back up the selected disk or partition
either automatically or manually, and you cannot recover data using Client Backup and Recovery (as
described in “Recovering Files from a Backup” on page 75 and “Recovering a Non-system Disk or
Partition” on page 76). However, the backups that currently exist on the storage system are retained,
and you can recover them using the recovery CD (as described in “Recovering a System Disk or
Partition” on page 77).
If you subsequently want to protect the same disk or partition again, you can re-use the space that
was allocated for previous backups. You can also delete the existing backups on the storage system
to free up space for backups of other disks or partitions, either for this computer or other computers.
For more information, refer to “Deleting a Backup” on page 46.
To remove protection:
1. In the “Protected disk” list on any page, select the disk for which you want to remove
protection.
2. From the “Action” menu, click “Remove Protection”.
The disk disappears from the “Protected” disk list. If another disk is protected, that disk
appears in the “Protected disk” list, and information about that disk now appears in the
application window. If no other disk is protected, the “Protected disk” list and application
window are blank.
80 MFMAXDATA SN 40 M1 – User GuideProtecting Local Disks

6 Troubleshooting
Viewing the System Log
The “System Log” page displays a list of events that have occurred on the storage system. Reviewing
this list can help you identify and resolve any problems that you might encounter.
To view event information:
1. In the navigation bar, click “Advanced”.
2. In the left pane, click “System Log”.
The “System Log” page displays the date and time of the event, the type of event (“I” for
Informational, “E” for error, “W” for warning, and “C” for critical), and a brief description of
the event.
3. If an event occurs while you’re viewing this list, click “Refresh” to update it.
Disconnecting from Shared Folders
If you need to reconfigure the disks in your storage system or shut it down for any reason, all users
should disconnect from the shared folders to ensure that the process proceeds smoothly. You might
also want to have users disconnect from the shared folders if you want to change their access rights,
since otherwise the change will not take effect until the user shuts down the computer.
The procedure for disconnecting from a shared folder varies, depending on the operating system
used by the user.
Troubleshooting the Storage System
This section provides general information about common problems that you might have with your
storage system and steps you can take to resolve them.
The System Status LED is yellow.
A critical error might have occurred. Restart the system. If the System Status LED remains yellow,
contact Technical Support.
The System Status LED turns yellow for the following conditions:
• Fan failure
• Power supply failure
• Hard disk failure
• Operating system boot failure
• System board failure
81MAXDATA SN 40 M1 – User Guide

The Disk Activity LED is blinking yellow.
Check the LED lights for each individual disk to determine what is happening.
If the disk LED light is blinking yellow, the disk is rebuilding. No action is required. When the process
is complete, the LED will automatically become green again.
If the disk LED light is solid yellow, a serious problem with the disk has occurred. Contact Technical
Support. For information about replacing a failed disk, refer to “Removing Hard Disks or Responding
to Disk Failure” on page 56.
One of the Global Disk Status LED lights is yellow.
If the disk was previously functioning correctly but the LED light is now yellow, the disk might have
failed. The impact of a disk failure depends on the disk configuration:
Disk Configuration Disk Configuration Impact
Linear or RAID 0 All data on the failed disk is lost.
RAID 1 or RAID 10 The other disk in the pair will continue to make all its data available to the
users.
RAID 5 The data on the other disks will continue to be available.
The data on the failed disk will be rebuilt when the disk is replaced.
RAID 5 + spare The data on the other disks will continue to be available, and the data from
the failed disk will be immediately rebuilt using the spare disk.
When you replace the failed disk, it becomes the new spare.
82 Troubleshooting

7 Technical Specifications
Hardware Specification
Component Specification
Processor 400-MHz Intel
Memory 256 MB 32-bit DDR SDRAM
Flash 32-MB NOR Flash
Hard Drive Supports up to four 3.5-in SATA-I hard drives from 80 GB to 500 GB
NOTE
The total amount of storage space cannot exceed 2 terabytes.
Maximum Capacity Up to 2 terabytes
Network Two Intel® gigabit LAN port interface
USB Two USB 2.0 connectors
EMI Safety
System Power 200-W power supply
CE/FCC Class B
Software Specification
Component Specification
Operating System Linux Kernel 2.4
Network Service Fixed IP or DHCP client / server (default IP address is 192.168.0.101)
Management Interface Web browser
RAID Standard 0, 1, 5, 5 + spare, and 10
Intel® Client Backup and
Recovery
Remote Boot Function Requires NIC with PXE support on client
File Sharing Protocols
File Sharing Users access shared folders by passwords
Access Control Users have “Read Only” or “Read/Write” access to shared folders
Supports Microsoft® Windows® 2000, Microsoft® Windows® XP and
Microsoft® Windows® 2003
CIFS/SMB, NFS
®
IOP80219
83MAXDATA SN 40 M1 – User Guide

84

8 Regulatory and Compliance Information
Intended Application
This product was evaluated as Information Technology Equipment (ITE), which may be installed in
homes, offices, schools, computer rooms, and similar commercial type locations. The suitability
of this product for other product categories and environments (such as: medical, industrial,
telecommunications, residential, alarm systems, test equipment, etc.), other than an ITE application,
may require further evaluation.
Product Safety Compliance
This product complies with the following product safety requirements:
• EN 60950 (Europe)
• CE – Low Voltage Directive 73/23/EEE (Europe)
Product EMC Compliance - Class B Compliance
This is an FCC Class B device.
• EN 55022 – Emissions (Europe)
• EN 55024 – Immunity (Europe)
• EN 61000-3-2 – Harmonics (Europe)
• EN 61000-3-3 – Voltage Flicker (Europe)
• CE – EMC Directive 89/336/EEC (Europe)
Certifications / Registrations / Declarations
• CE Declaration of Conformity (CENELEC Europe)
Product Regulatory Compliance Marking
This product bears the following regulatory marks.
Table 4. Product Regulatory Compliance Markings
Regulatory Compliance Country Marking
CE Mark Europe
Electromagnetic Compatibility Notice
Europe (CE Declaration of Conformity)
This product has been tested in accordance to, and complies with the Low Voltage Directive (73/23/
EEC) and EMC Directive (89/336/EEC). The product has been marked with the CE Mark to illustrate
its compliance.
End of Life / Product Recycling
Product recycling and end-of-life take-back systems and requirements vary from country to country.
Contact the retailer or distributor of this product for information on product recycling and/or take
back.
85MAXDATA SN 40 M1 – User Guide
 Loading...