

Page 1
Page 2

Evolution UC-33e Getting Started
Introduction
Congratulations on your purchase of the Evolution UC-33. You can use it to control
software on PCs and Macs, and to control external MIDI hardware like synthesizers,
sound modules, drum machines and samplers.
The UC-33 can control many different parameters. It sends MIDI Continuous Controller
data or CCs, RPN / NRPN data, MIDI Bank change LSB and MSB and Program Changes
on 16 different MIDI channels so you can easily control your studio using only the UC-33!
If you are using Sequencing Software and / or Virtual Instruments you may find one of the
UC-33’s preset memories ready to work straight out of the box with your program.
Controllers will be already assigned to the software you are using, or you can assign your
own then store your setup in any of the 33 memories.
Here is a snapshot of the powerful features implemented in the UC-33:
Features List
Ports:
x MIDI O U T
x MIDI IN
x USB MIDI OUT/IN
Power:
x USB powered
x DC IN for external PSU if not using
USB
Controls:
x 24 programmable rotary dials
x 9 full size programmable faders
x 14 programmable buttons
x 4 one press quick preset recall
buttons
MIDI Data from controllers
x MIDI control number
x RPN/NRPN
x Program, Bank LSB, Bank MSB
x Pitch Bend
x GM/GM2/XG SysEx Messages
Introduction
MIDI Data from buttons:
x Note on
x Note on/off Toggle
x MIDI CC on/off Toggle
x Program, Bank LSB, Bank MSB
presets
x MIDI Machine Control functions
x GM/GM2/XG SysEx Messages
Useful Features:
x All controls fully programmable to
MIDI controller number
x All controls fully programmable to
MIDI channel
x Drawbar mode for faders
x Controller Mute, mutes controller
output to avoid parameter jumps
x Memory Dump via Sys Ex
x Dedicated Sys Ex Librarian for
storing and organizing setups
x 33 presets in 33 memory locations
Caution :
interference may cause the unit malfunctioning. In such case, unplug the
unit and plug in again to restore normal operation.
Electro Static Discharge, Electrical Fast Transient and Conducted RF
Page 3

Evolution UC-33e Getting Started
Contents - Getting Started With UC-33
Introduction................................................................................................. 1
Features List............................................................................................... 1
Contents - UC-33 Getting Started ............................................................. 2
Contents - UC-33 Advanced User Guide ................................................... 2
Graphic Overview ....................................................................................... 4
Installation
Whatís In The Package?.........................................................................................6
About The Manual ..................................................................................................6
Before You Plug In The UC-33 ...............................................................................6
Power & Connecting Via USB.................................................................................6
Windows XP & Mac OS X.......................................................................................6
Installing Drivers For Windows 98/ME ....................................................................7
Installing Drivers For Windows 2000 ......................................................................7
Installing Drivers For Apple Mac OS 9.x .................................................................7
Installing The UC-33 OMS USB Driver...................................................................8
OMS Setup .............................................................................................................8
Using An External Power Supply............................................................................8
Quick Guide
UC-33 Overview .....................................................................................................9
Testing The UC-33 With Your Software..................................................................9
Recalling UC-33 Presets.........................................................................................9
Factory Presets.......................................................................................................9
Native Instruments B4...........................................................................................10
Reason Subtractor................................................................................................10
Native Instruments FM-7.......................................................................................11
Getting More Out Of Your Soundblaster Soundcard.............................................11
Cubase VST/SL/SX And Nuendo .........................................................................11
Multi-track & Channel Strip Mixing With Steinberg Software ................................11
Creating Your Own Generic Remote Setups For Steinberg Software ..................12
Emagic Logic ........................................................................................................12
Evolution Sound Studio Pro II...............................................................................13
Saving And Organizing UC-33 Presets.................................................................14
Avoiding Dramatic Parameter Jumps....................................................................14
Basic Programming Operations ............................................................................15
Using The UC-33 Away From A Computer...........................................................16
Trouble-Shooting ..................................................................................................18
Contact Evolution..................................................................................................19
2
Page 4

3
Evolution UC-33e Getting Started
This page intentionally left blank.
Page 5
Evolution UC-33e Getting Started
3
Graphic Illustration
2
9
11
10
7
8
6
4
5
3
1
4
Page 6
5
Evolution UC-33e Getting Started
12
13
14
15
16
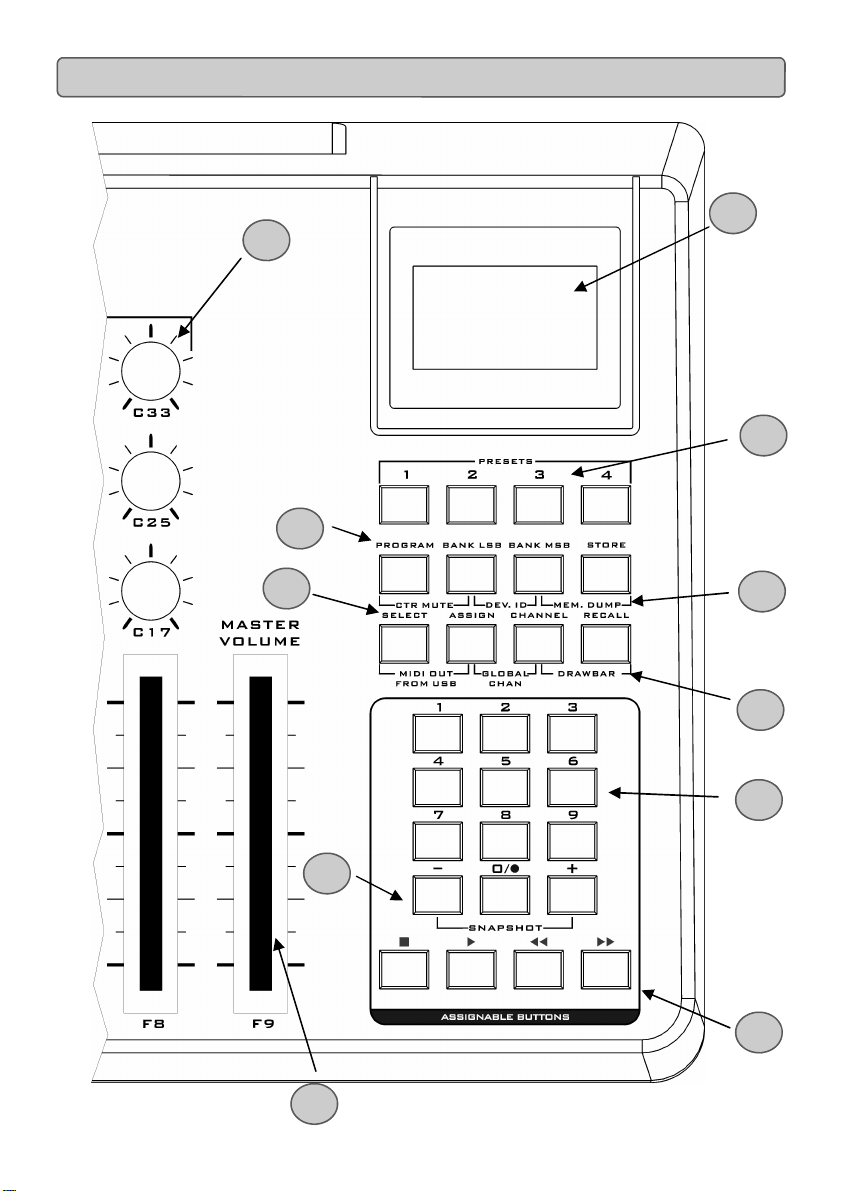
1. Nine 70mm faders labelled F1 - F9, all of which are fully MIDI assignable.
2. Twenty-four rotary controllers numbered C10 - C33, all of which are fully
MIDI assignable.
3. Four assignable MIDI buttons numbered C34 - C37.
4. Ten assignable MIDI buttons numbered C38 - C47, doubles up as a
numeric keypad (0-9) in Edit mode.
5. +/- Buttons. Dual press function sends out Snap Shot command.
6. Dual press function button commands for Drawbar Mode, Global MIDI
Channel and MIDI Out From USB.
7. Single press function button commands for Preset Recall, Individual
MIDI Channel Assign, Controller Assign and Controller Select.
8. Dual press function button commands for Memory Dump, Device ID and
Controller Mute.
9. Single press function button commands for Preset Store, DATA MSB,
DATA LSB and Program (for sending out program change messages).
10. Four preset buttons recall presets 01,02,03 and 04 respectively.
11. Backlit LCD display.
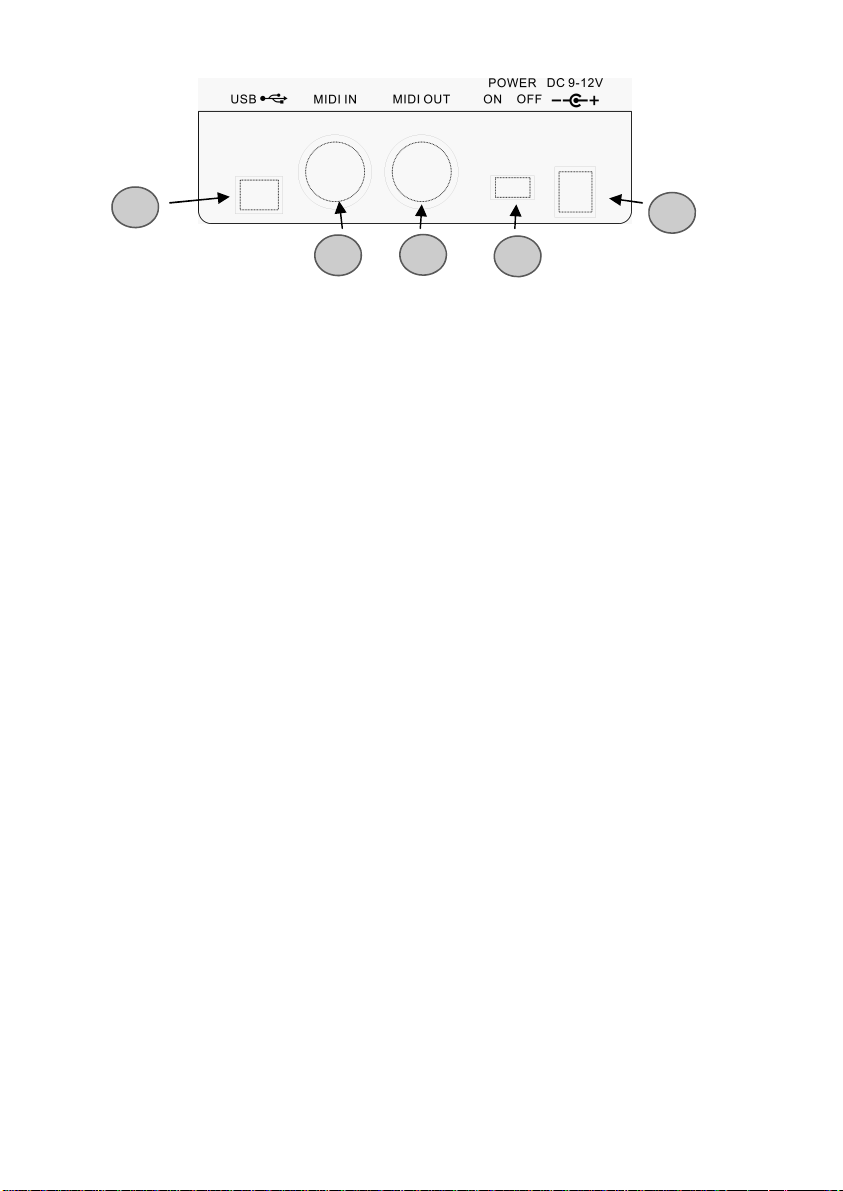
12. USB MIDI In/Out connects to the USB port of your computer via the included USB cable.
13. MIDI In plug used to connect other MIDI hardware to the UC-33 via a
standard MIDI 5-Pin DIN type plug (not included).
14. MIDI Out plug used to connect the UC-33 to other MIDI hardware via a
standard MIDI 5-Pin DIN type plug (not included).
15. Power on/off switch.
16. DC In plug for connection of 9v DC power supply (not included).
Page 7

Evolution UC-33e Getting Started
6
35
What’s In The Package?
Your Evolution UC-33 package should contain the following items:
If any of the above listed items are missing, please contact the retailer you purchased the
product from.
About The Manual
This is the UC-33 Getting Started manual which covers the basic operation of the Evolution UC-33. You will find a graphic illustration of the UC-33 on page 4. We have numbered
the important sections of this illustration and used the numbering throughout the manual.
In-depth programming and advanced features are covered in the UC-33 Advanced User
Guide, which is provided as electronic documentation on the Evolution Installer CD-ROM.
The format of the documentation is Adobe Acrobat so you will need to install Acrobat
Reader to either print or view the documentation. We have provided this program on the
CD-ROM as well, in case you don’t have it already.
xUC-33 controller surface
xGetting Started manual
xEvolution Installer CD-ROM
xUSB cable
x4 overlays
Before You Connect The UC-33...
What’s in the p a
You are probably eager to plug in the UC-33 and get started, but it’s sensible to check the
installation documentation first.
You can power the UC-33 either via USB or an optional external power supply.
method at a time.
one
Power & Connection Via USB
1. Check that the on/off button (15) on the back of the unit is set to “Off”.
2. Plug in the USB cable provided with the UC-33 to a free USB port
on your computer.
3. Plug in the other end of the USB cable to the USB socket on the UC-33.
The single USB cable not only powers the U-Control but also sends MIDI data to and from
your computer system.
Windows XP & Mac OS X
If you are using Windows XP or Mac OS X you can now simply switch the power position
to “on”. Because the UC-33 is class compliant it will work with out any further installation.
Use only
Page 8

Evolution UC-33e Getting Started
Installing Drivers For Windows 98/ME
1. Power up your PC.
2. Insert the Evolution Installer CD-ROM.
The installer should open automatically. If not, select run from the start menu and
type d:\autorun where 'd' is your CD-ROM drive, then press ENTER.
3. Click on ’install drivers’.
4. Follow instructions on screen.
5. When finished exit setup.
6. Switch on the UC-33.
Windows will proceed with the installation of a USB driver and a MIDI driver. Once completed, you are ready to go. Windows may ask you to restart your computer if you have
previously installed an Evolution device.
Installing Drivers For Windows 2000
1. Power up your PC.
2. Insert the Evolution Installer CD-ROM.
The installer should open automatically. If not, select run from the start menu and
type d:\autorun where 'd' is your CD-ROM drive, then press ENTER.
3. Click on ’Driver Installer’.
4. Follow instructions on screen.
5. When finished exit setup.
6. Switch on the UC-33.
Windows will automatically recognise the UC-33 and ask for the Evolution
Installer CD-ROM.
7. Select the CD-ROM drive and click OK.
Windows will then ask you to select the CD-ROM drive again for the MIDI driver.
8. If Windows reports the drivers have not been digitally signed, click on
’Continue Installation’.
9. Select the drive once more.
10. Click OK and you are ready to go.
Installing Drivers For Apple Mac OS 9.x
If you do not have OMS installed, please run the OMS installer first. Otherwise jump to
“Installing the UC-33 OMS Driver” on page 8.
To install OMS:
Make sure that all programs are shut down before you begin the installer. Also make
sure you have removed any dongles you may be using.
1. Insert the Evolution Installer CD-ROM.
2. Double click on the Evolution Installer CD icon on your desktop
3. Double click on the OS 9 folder.
4. Double click on Install OMS 2.3.8
5. Follow the on-screen instructions
6. OMS will now take a few moments to install OMS. When it has finished it
will ask you to restart the computer, click ’Restart’.
7
Page 9

Evolution UC-33e Getting Started
8
33
Installing The UC-33 OMS Driver
1. Click and drag the USB Drivers Installer from the OS 9 window it is currently
in, to the desktop.
2. Double click on the icon. If a window appears, click ’Open’.
3. Double click on the newly created USB Drivers Installer on your desktop.
4. Click ’Install’.
T he installer aut oma tic ally pla ces the driv ers in the corre ct s y stem folders.
6. Once the installer has finished installing the drivers, click ’Restart’.
7. Switch on the UC-33.
OMS Setup
You now have to run the OMS Setup program:
1. Open the Hard Drive, then the ’Opcode’ folder, the ’OMS Applications folder’,
and then ’OMS Setup’.
2. If you get a message to switch Appletalk on or off, choose either options.
This will make no difference to the OMS Setup.
3. In the next window, click ’OK’.
4. Click ’Search’.
5. Click ’OK’
6. Then ’OK’ again.
7. Click ’Save’.
8. If it asks you, click ’Replace’.
You should now have a final window showing your current Studio Setup.
If ’Quicktime Music’ is crossed out, you should double click on it, then click in the ’on’
circle to enable it. Then click ’OK’.
You’re ready to go. Now just make sure your UC-33 is selected as the MIDI input in your
music software.
Using An External Power Supply
You can also use a mains adapter (not included) with the following specification: 9V DC
output, 250-300mA, centre positive.
Make sure you are not powering the UC-33 already via USB, then simply plug in the
power supply to the socket labelled DC 9V (16) and switch the power on (15).
Note: Do not leave the adapter plugged in for long periods of time if the unit is not in use.
Page 10

9
Evolution UC-33e Getting Started
UC-33 Overview
Assuming the installation process was completed successfully, it is now time to have a
closer look at the UC-33.
Put simply, the UC-33 is a USB controller surface with 9 ALPS faders (1) numbered F1 to
F9, 24 rotary controls numbered C10 to C33 (2), and 14 buttons
(3 + 4) numbered B34 to B47. In total, 47 MIDI controls, each assignable to control
functions in your music studio.
There are also 8 function buttons (6+7+8+9) for various programming and operational
functions, a blue backlit LCD (11) which gives you feedback and information regarding
current operations and finally 4 quick Preset buttons (10) which give you one button
access to the UC-33’s first 4 presets.
Testing The UC-33 With Your Software
At this stage it’s a good idea to check that your software application is communicating
with the UC-33. Most software applications have a MIDI in indicator. Check that data is
received while moving any of the UC-33’s controllers. If no data is received, please check
whether the UC-33 USB driver has been selected as an input for your software
application. This will differ from one program to another so please refer to the documentation provided with your software.
Recalling UC-33 Presets
Once you have verified that your software is receiving data from the UC-33, its time to try
some of the 33 factory programmed presets.
1. Press the function key labelled “Recall” (7) .
2. Type in the number of the preset you want using the numerical keypad (4).
The first 4 presets can be selected using the 4 quick Preset selector buttons (10) so it
makes sense to store the most frequently used presets on these locations.
The following is a list of all the presets contained in the UC-33.
Factory Preset
01 Cubase Multi-channel Mixing (1-8) + Channel Stri p
02 Native Instruments B4
03 Native Instruments Pro-53
04 Reason Mixer
05 Reason Malstrom
06 Reason Subtractor
07 Reason NN-19
08 Reason Dr. Rex
09 Reason ReDrum
10 Cubase Multi-channel Mixing (9-16)
11 Logic Channel Strip
12 Sound Studio Pro II 1-8 mixer
13 Sound Studio Pro II 9-16 mixer
14 Sonar Preset - Sonar 2 preset patch needed
15 Steinberg Model-E
16 Steinberg Halion
17 Waldorf Attack
18 Waldorf PPG Wave2V
19 Native Instruments FM7 - uc33.f7c file needed
20 Rebirth - Master Controls and S ynt h s
21 Rebirth Drum Modules
22 AAS Lounge Lizard
23 CM DS-404
24 CM SR-202
25 CM 101
26 TC-Works Mercury-1
27 Big Tick Audio Rainbow Synth
28 GS/XG/GM2 Synth Control
29 GS/XG Drum Mixer
30 SoundBlaster Cards Synth Control
31 User Preset1 Channel Mixer (1-8)
32 User Preset2 Channel Mixer (9-16)
33 User Preset3 Undefined Controllers To
Global Channel
Page 11

Evolution UC-33e Getting Started
3
Native Instruments B4
Lets try the UC-33 with the Native Instruments B4. If you haven’t got this wonderful
instrument installed on your system you may want to try the demo which we have
provided on the Evolution Installer CD-ROM.
1. Press the quick Preset button 2 (10).
This selects the Native Instruments B4 preset as current.
2. Launch the B4.
3. Make sure the B4 is receiving data from the UC-33.
4. Place the B4 overlay over the UC-33.
You will see all controllers labelled according to what they have been
programmed for.
5. Click on the B4 logo at the top right corner of the window to switch from the
’Keyboard View’ to the ’Control View’.
6. Press Snap Shot (10).
You will see the B4’s parameters set to the UC-33’s current settings.
You can now disregard the screen and focus on the UC-33, the parameter settings you
see are exactly what you hear.
Reason Subtractor
We have also provided Reason as a demo on the Evolution Installer CD-ROM in case you
haven’t got it already. Assuming Reason is installed correctly, please follow the following
instructions:
1. Launch Reason.
2. Select a sequencer track in the demo song playing the
Subtractor synthesizer.
3. Make sure there is a little MIDI icon in the “in” column.
If not, click once with your mouse.
4. Move any controls on the UC-33 to check that Reason is receiving MIDI (1-4).
If not, please check the MIDI settings in Reason by selecting “Preferences” in the
Edit menu and change the window to MIDI. In the Port pop-up menu select the
first UC-33 driver.
5. Press the function button (7) “Recall”.
6. Type “06” on the numerical keypad.
This selects the Subtractor setup on the UC-33
You may also want an overlay for the Subtractor, just like the B4 example. We have
included a blank overlay for exactly that purpose so go ahead and write the parameter
names on the overlay. If you want to get more blanks, you can purchase them from our
website www.evolution.co.uk
or contact your distributor.
10
Page 12

Evolution UC-33e Getting Started
Native Instruments FM-7
To operate the FM-7 preset you will need to load a setup file in to the FM-7.
1. Launch your FM-7 instrument.
2. Go to the Master section of the FM-7.
3. Click on “load” in the FM-7 controller define window.
4. Locate the “UC-33 Application Files” folder on the Evolution Installer CDROM.
5. Select the file UC33.f7c
6. Press the function button (7) “Recall” on the UC-33.
7. Type “19” on the numerical keypad.
Getting More Out Of Your Sound Blaster
One of the most common sound cards is the SoundBlaster from Creative Labs. You may
have one installed in your PC already without knowing what power is behind its sound
engine. It is not easy to access all the parameters available but again we have done the
hard work for you. This is how you get the UC-33 to work instantly with your
SoundBlaster:
1. Press the function button (7) “Recall”.
2. Type “30” on the numerical keypad (4).
This selects the SoundBlaster setup on the UC-33.
3. Launch your MIDI sequencer and select a MIDI track.
4. Make sure to set the output of your MIDI track to “SB Live! Synth” or “SB
Audigy Synth”.
5. Play your keyboard while moving any faders or controls on the UC-33 (1-4).
The UC-33 remote controls filter and sound parameters on the SoundBlaster card using
some of the extended programming options in the UC-33.
Cubase VST/SL/SX & Nuendo
Cubase and Nuendo have very comprehensive controlling options so with the UC-33 you
will be able to control almost any aspect of your favourite Steinberg program.
However the easiest way to get started is of course by using our pre-programmed setups.
Multi-track and Channel Strip Mixing with Steinberg Software
1. Launch your Steinberg application.
2. Go to the Devices menu (in Cubase VST its “Options”) and select
“Device Setup”.
3. Select “Generic Remote”.
4. In the right hand side of the window appearing click on “Import”
5. Make sure you insert your Evolution CD-Rom.
6. Locate the file called UC-33 SX Multichannel and channel strip.xml in the
following path: UC-33 Application Files/Cubase and click “Open”.
7. Select the MIDI IN, in the Generic Remote window.
8. Select the UC-33 driver
11
Page 13

Evolution UC-33e Getting Started
913
9. Close the Device Setup by clicking “OK”.
10. Open the small Generic Remote window by going to
'Devices' – 'Generic Remote'.
You can now easily switch between the 1-48 multichannel settings and the channel
strip setting by selecting them from this window.
11. On the UC-33 select preset 01 (10).
This preset controls Channels 1-8, 17-24 and 33-40 depending on what setting
has been selected in the software Generic Remote window.
12. Change the Generic Remote window to “Channel strip”.
The Channel Strip setup gives you full control of Send levels, the 4 band EQ,
Insert FX selection, Volume, Panning L-R and Front-Rear, Output selection and
overall Master Volume. The setup will control your currently selected mixer
channel, so you can jump quickly between channels.
13. Select preset 10 for channels 9-16, 25-32 and 41-48 and change to the appropriate window in the Generic Remote.
Creating your own Generic Remote setups
After working with the preset setups you may want to customize or create your own to suit
your working method. The Steinberg documentation explains in detail how to do this.
Note: If you have already created your own Generic Remote setup, make sure to export it
before importing the U-Control setups.
Emagic Logic
We have created a Logic environment to allow you to access the mixing facilities within
Logic from the UC-33. Here is how you set it up:
1. On the Evolution Installer CD-ROM, locate the following path
/application files/Logic
2. Load the Logic song file named “UC-33 setup” in to your Logic program.
3. From the Logic Windows menu select “Global Mixer”.
4. On the UC-33 Recall preset number 011.
5. Place the Channel Strip overlay over the UC-33.
You should now be able to control volume, pan, solo, mute, sends and even the 4 bands
of EQ for the currently selected track. We have chosen the Parametric EQ algorithm for
our setup, though you can use any of the other options with the setup. You will need to
make sure to switch on each band individually using the EQ on/off buttons on the UC-33
channel strip.
12
Page 14

Evolution UC-33e Getting Started
Evolution Sound Studio Pro II
1.
Select preset 12 (7).
Install the Sound Studio Pro II demo from the demos folder of your Evolution
2.
Installer CD-ROM.
3. Run the Sound Studio Pro II demo.
4. Go to the 'Options|MIDI Devices' menu. Ensure the UC-33 is selected as a MIDI
IN device. Select your Soundcard output as the MIDI OUT device. Ensure it is
the ONLY highlighted device.
5. Select ‘Multitrack record’ from the track window.
6. Call up the MIDI Mixer by clicking on the 'Mixer' icon on the tool bar.
Controls 1-8 have been set to control the Volume of channels 1-8 respectively. 9-16
control the Pan of each channel. 17 – 24 control the reverb and 25 – 32 control the chorus
dials. The Master Fader controls the drum channel volume, as long as your drum track is
assigned to channel 10. Move the controls of the UC-33, and observe the MIDI mixer
control move!
Click on the 'MIDI plug' button on the transport bar. This will enable remote control of the
transport bar functions. These have been assigned to the buttons in such a way that the
PLAY, STOP, FAST FORWARD and REWIND buttons on the UC-33 will do just this. The
number buttons have been assigned to further transport controls. Notably, 0 has been assigned to enable RECORD mode. Try it for yourself and see!
Preset 13 is used to control channels 9-16.
Page 15

Evolution UC-33e Getting Started
Saving And Organizing UC-33 Presets
Once you have familiarized yourself with the UC-33 presets you may want to save and
reorganize the order to suit your setup. It’s a good idea to identify the 4 presets you are
likely to use frequently and save them to locations 01 to 04 so you can use the 4 quick
preset selector buttons (10).
Before we start, please note that the factory presets are stored in ROM within the UC-33
and can therefore be restored at any time.
Lets move preset 28 “GS/XG/GM2 Synth control” to location 03 by carrying out the
following procedure:
1. Press the function button (7) “Recall”.
2. Type “28” on the numerical keypad (4).
3. Press the function button (9) “Store”.
4. Type “03” on the numerical keypad (4).
This will save or store the current setup to preset location 03.
If you want to reset the UC-33 back to the factory defaults, just hold down the ‘+/-’ buttons
on the numerical keypad while switching the UC-33 on.
Note: Restoring the Factory presets will erase all UC-33 setups stored to memory.
You can also organise your presets using the Evolution Librarian Software (PC only,
please check www.evolution.co.uk for Mac version) included with your UC-33. Insert the
Evolution CD-ROM in to your computer’s CD-ROM drive and run the installer.
Avoiding Dramatic Parameter Jumps
Using the SnapShot function to synchronise the sound source with the UC-33’s settings is
great when you are starting from scratch. However you may need to pickup a parameter
position without dramatic jumps.
You can do this by using the Controller Mute function.
1. Press the two function keys (8) labelled CTR MUTE.
2. Move the UC-33 controller to the position that matches the setting on your
receiving device.
3. Press the two function keys (8) labelled Controller Mute to exit mute mode.
14
Page 16

Evolution UC-33e Getting Started
Basic Programming Operations
Now that you have learnt how to use the factory presets, its time to look at how to program
and modify your own basic setups.
We will use Reason again for the purpose of this exercise.
1. Launch Reason
2. Select any track in the Reason sequencer and make sure MIDI data is received.
3. Change the device assigned to the track to “Reverb”.
You do this by clicking and holding down the arrow button for the track out.
4. On the UC-33, press the function button (7) “Recall”.
5. Type “33” on the numerical keypad (4).
This preset is relatively simple and therefore a great starting point for any
new programming.
6. Move fader 1 (1).
While moving the fader, the display shows the positional value. When you stop
moving the fader, after a short delay the display shows the value 01 in small digits
and 03 in large digits. This tells you that Fader 01 currently is assigned to controller
number 03.
7. Press the function button (7) “ ASSIGN”.
8. Type “012” on the numerical keypad (4).
If you now move the fader you should see the display show 01 in the left hand corner
and 12, the controller number you have just programmed.
Moving the fader should now control the size parameter in the Reason Reverb.
Move Fader 2 and notice how the numbers in the display change, telling you that you have
selected Fader 02 and controller number 21 is assigned to it.
1. Press the function button (7) “Assign”.
2. Type “14” on the numerical keypad (4).
Notice the display now shows 02 in the left hand corner and 14, the controller number you
have just programmed.
Moving the fader should now control the decay parameter in the Reason Reverb.
You can keep going in order to create your own setups, but make sure you store to a preset
location before recalling any other setups, if you want to keep it.
For more in-depth information about programming the UC-33, please refer to the advanced
manual.
You may be wondering where we got the information from regarding controller numbers for
the Reason Reverb. You will find information like that in the documentation for the products
you want to control. If you are struggling you can also seek advice on the Evolution user
group via our website www.evolution.co.uk
15
Page 17

Evolution UC-33e Getting Started
5
Using The UC-33 Away From A Computer
It is possible to use the UC-33 without connecting it to a computer. You will need an optional
external power supply (as described on page 8) and MIDI lead(s) to connect your
UC-33 to another MIDI device.
Possible applications include
x Controlling a MIDI Lighting System
x Utilizing extra parameters on a MIDI keyboard via the U-Control
x Controlling a Sound Module
Please note:
The UC-33 does not function as a MIDI Merge unit. If you want to control, for example, a
sound module whilst simultaneously playing it from a MIDI keyboard then it will be necessary
to buy a separate MIDI Merge unit. This will allow you to connect both UC-33 and
keyboard to your sound module at the same time.
Example Uses (a)
(a) UC-33 with a Controller Keyboard, 2 Sound Modules and a Lighting Rig
In this example you have a UC-33 connected to a MIDI Merge box along with a MIDI
Controller keyboard. The output from the merge box feeds Sound Module (a). The THRU
connection from (a) is attached to Sound Module (b). The THRU connection from (b) is
connected to a MIDI lighting rig.
Set the sound modules to receive on MIDI channels:
(a) 1-7
(b) 8-14
Set the lighting rig to receive on channels 15 and 16.
16
Page 18

Evolution UC-33e Getting Started
There are many ways to then interact with the setup from the MIDI Controller Keyboard and
the UC-33. You could program the first four faders to send data on MIDI channels 1-4, the
second four faders to send on channels 8-12. To control volumes you would set each of the
faders to send MIDI controller 7.
You could set up the rotary controls using the same MIDI channels to control filter resonance,
cut-off and pan. If Sound Module (a) is XG compatible you would set the top rotary control to
send MIDI controller 74 for cut-off and the next one down to 71 for resonance. The pan
control should be set to send MIDI controller 10. If Sound Module (b) is GS compatible you
would configure the rotary controls above the second four faders to send NRPN data to
affect filter resonance and cut-off.
Even though Sound Module (a) and (b) receive cut-off and resonance controls in different
ways it is easy to program the UC-33 to take account of this.
Next you could program the keypad buttons 1-9 to send MIDI note data to trigger lights on
the lighting rig. It is possible to set the buttons to either latch on / off or to send note off on
release. Using these two settings you could set some of the buttons to flash the lights and
some of the buttons to act more like switches – you tap a button to switch a light on or off.
Some lighting controllers use velocity to set the intensity or brightness of each light. Each of
the buttons therefore could be set to trigger a light at a different intensity.
Once set up and stored in a memory, the UC-33 would function as a fully able, easy to use
control surface despite the relatively complex configuration of the other MIDI devices.
Example Uses (b)
(b). Controlling a MIDI Synthesizer and a Hard Disk Recorder
In this example connect your UC-33 to your synth and connect the THRU from your synth to
your hard disk recorder.
It would then be possible to utilize the faders and rotary controls with the synthesizer to
control any of its parameters in real time. A very simple example of this is to setup a
multi-timbral sound with faders on the UC-33 controlling the individual timbres of the sound.
You can then change the character of the sound as you are playing it. Perhaps set up some
of the rotary controls to affect the envelope of a synth sound.
Program the transport buttons on the UC-33 to send MIDI Machine Control messages for
Stop, Play, Rewind and Fast-Forward. Program the Zero key on the numeric keypad to be
Record. You can then use the UC-33’s transport controls to control your HD recorder.
Start recording!... and when you’ve finished use the Master Volume fader to fade out.
17
Page 19

Evolution UC-33e Getting Started
3
Trouble-Shooting
My Evolution hardware suddenly stopped working after having performed fine since
installation.
Switch off the unit and leave for 10 seconds. Then restart your computer and try again. If the
problem persist you may have to re-install drivers for the unit.
My drivers are listed in the Device Manager and are said to be working OK, but the
keyboard is not recognised in any software.
Win2000 and XP have a limitation to how many MIDI device drivers you can have installed at
any one time. There is no indication that you are using the maximum number of drivers - the
drivers will install as if there is not a problem.
To fix this problem: Go to http://www.evolution.co.uk/support/faq/index.html and locate the
above question. You will find a link to an exe file that will solve this problem for you.
I have plugged in a sustain pedal to my Evolution keyboard, but it works the wrong
way round.
The polarity of the sustain pedal is calculated by the keyboard when it is powered up. On
power up, the sustain pedal is assumed to be in the OFF position. So, if you want the sustain
pedal to be off when it is unpressed, make sure the pedal is unpressed when you power up.
When I press a key, there is a delay before I hear any sound.
This delay is known as latency.
Latency with MIDI signals is due to the soft-synth you are using. MIDI data is simply control
data. The MIDI is read by the soft-synth. The soft-synth then completes a large number of
complex calculations, in order to produce the sound you hear. All this takes time.
We recommend getting a proper soundcard. You can get a decent one these days for under
£30. If you already have an adequate sound card, try re-installing the latest drivers for the
sound card, or try reducing the buffer sizes of the audio drivers. You can do this in the Sound
Studio II and Sound Studio Pro II programs by going to 'Audio' – 'Audio system settings'
where you can reduce the buffer sizes of the MME or ASIO drives.
I can’t get any sound from my Evolution Software.
In your software go to Options|Devices. Here you will see a list of MIDI Inputs and MIDI
outputs.
If you have MIDI inputs available, if no driver names appear in the Output column, you need
to re-install your soundcard or update the soundcard drivers.
The output column allows you to choose which output driver you want for generating the MIDI
sounds. Most soundcards will have an option such as "FM synth" or "SBLive Synth". Click on
these driver names to use the sounds of your soundcard for playback of MIDI data. If you just
have a sound chip, the software synth to select may be like "Microsoft SW synth". Click on
the driver name of your choice.
Rule of Thumb: If you have numerous output drivers enabled (highlighted in blue) and
cannot hear any output, de-select all but one of them and try again. Repeat this
process until you hear some sounds.
18
Page 20

9
Evolution UC-33e Getting Started
Contact Evolution
If you are looking for more supporting material, setup files for your Evolution product or
simply have problems getting your system up and running, the best place to look is:
http://www.evolution.co.uk
Our distributor in your country should be able to answer any additional questions. You
will also find a link to our distributor list on the website.
If you have exhausted these two possibilities you are of course welcome to contact us
directly via the following 2 email addresses:
General enquiries: info@evolution.co.u k
Support: support@evolution.co.uk
We hope you will have many years of enjoyment and active use from your Evolution
Product and wish you every success in your creative efforts.
Evolution Electronics Ltd.
Pour toutes les mises à jour de documents et manuels français, veuillez
visiter la page web www.evolution.co.uk/manuals
Aktuelle deutsche Bedienungsanleitungen finden Sie unter:
www.evolution.co.uk/manuals
Para accedera manuales y documentación actualizada, por favor visite:
www.evolution.co.uk/manuals
Per ottenere tutte le documentazioni italiane aggiornate, visitate
www.evolution.co.uk/manuals
 Loading...