

Page 1

D E S I G N G R O U P
DJ Performance/Production Software
User Guide
Page 2

Table of Contents
Torq LE User Guide
Chapter 1 . . . . . . . . . . . . . . . . . . . . . . . . . . . . . . . . . . . . . . . . 3
WELC OME . . . . . . . . . . . . . . . . . . . . . . . . . . . . . . . . . . . . . .
TORQ LE OV ERVIEW . . . . . . . . . . . . . . . . . . . . . . . . . . . . . . . .
Decks . . . . . . . . . . . . . . . . . . . . . . . . . . . . . . . . . . . . . . .
Main Waveform Display . . . . . . . . . . . . . . . . . . . . . . . . . . . . .
Mixer
. . . . . . . . . . . . . . . . . . . . . . . . . . . . . . . . . . . . . . . 5
PFL/Headphone Cue
Browser/Database
Effect Racks
Master Module
Chapter
2 . . . . . . . . . . . . . . . . . . . . . . . . . . . . . . . . . . . . . . . . 7
SYSTE M REQUIR EMENTS
Windows
Mac
INSTALL ATION
Chapter
DECK S . . . . . . . . . . . . . . . . . . . . . . . . . . . . . . . . . . . . . . . .
Displays . . . . . . . . . . . . . . . . . . . . . . . . . . . . . . . . . . . . . .
Controls . . . . . . . . . . . . . . . . . . . . . . . . . . . . . . . . . . . . . .
Chapter
WAVEFO RM DISPL AY
Information Shown on Display . . . . . . . . . . . . . . . . . . . . . . . . .
Playback Manipulations
. . . . . . . . . . . . . . . . . . . . . . . . . . . . . . . . . . . . . 7
. . . . . . . . . . . . . . . . . . . . . . . . . . . . . . . . . . . . . . . . 7
3 . . . . . . . . . . . . . . . . . . . . . . . . . . . . . . . . . . . . . . . . 8
Song Name
Artist Name
Time Elapsed
Time Remain
Overview Waveform
Play/Pause
Seek
. . . . . . . . . . . . . . . . . . . . . . . . . . . . . . . . . . . . . 9
Cue
. . . . . . . . . . . . . . . . . . . . . . . . . . . . . . . . . . . . 10
QuickCue
Deck Mode
Looping
Speed Slider
Key . . . . . . . . . . . . . . . . . . . . . . . . . . . . . . . . . . . . .
Sync Button . . . . . . . . . . . . . . . . . . . . . . . . . . . . . . . .
Nudge Buttons . . . . . . . . . . . . . . . . . . . . . . . . . . . . . .
Offset Buttons
4 . . . . . . . . . . . . . . . . . . . . . . . . . . . . . . . . . . . . . . . 18
Waveform
Loop Points
Cue Points . . . . . . . . . . . . . . . . . . . . . . . . . . . . . . . . .
Phase Grid
Vinyl Mode . . . . . . . . . . . . . . . . . . . . . . . . . . . . . . . . .
Hybrid Mode
CDJ Mode . . . . . . . . . . . . . . . . . . . . . . . . . . . . . . . . .
. . . . . . . . . . . . . . . . . . . . . . . . . . . . . . 6
. . . . . . . . . . . . . . . . . . . . . . . . . . . . . . . 6
. . . . . . . . . . . . . . . . . . . . . . . . . . . . . . . . . . . 6
. . . . . . . . . . . . . . . . . . . . . . . . . . . . . . . . . . 6
. . . . . . . . . . . . . . . . . . . . . . . . . . . . 7
. . . . . . . . . . . . . . . . . . . . . . . . . . . . . . . . . . . 7
. . . . . . . . . . . . . . . . . . . . . . . . . . . . . . . . . 8
. . . . . . . . . . . . . . . . . . . . . . . . . . . . . . . . . 8
. . . . . . . . . . . . . . . . . . . . . . . . . . . . . . . . 9
. . . . . . . . . . . . . . . . . . . . . . . . . . . . . . . . 9
. . . . . . . . . . . . . . . . . . . . . . . . . . . . 9
. . . . . . . . . . . . . . . . . . . . . . . . . . . . . . . . . 9
. . . . . . . . . . . . . . . . . . . . . . . . . . . . . . . . . 10
. . . . . . . . . . . . . . . . . . . . . . . . . . . . . . . . 11
. . . . . . . . . . . . . . . . . . . . . . . . . . . . . . . . . . 11
. . . . . . . . . . . . . . . . . . . . . . . . . . . . . . . 13
. . . . . . . . . . . . . . . . . . . . . . . . . . . . . . 17
. . . . . . . . . . . . . . . . . . . . . . . . . . . . . . 18
. . . . . . . . . . . . . . . . . . . . . . . . . . . . . . . . . 18
. . . . . . . . . . . . . . . . . . . . . . . . . . . . . . . . 19
. . . . . . . . . . . . . . . . . . . . . . . . . . . . . . . . 19
. . . . . . . . . . . . . . . . . . . . . . . . . . . . 19
. . . . . . . . . . . . . . . . . . . . . . . . . . . . . . . 20
15
17
17
18
19
19
20
5 . . . . . . . . . . . . . . . . . . . . . . . . . . . . . . . . . . . . . . . 21
Chapter
3
4
5
5
8
8
9
SYNC HRONIZ ATION . . . . . . . . . . . . . . . . . . . . . . . . . . . . . . .
Automatic Tempo and Phase Detection
Phase Grid Manipulations . . . . . . . . . . . . . . . . . . . . . . . . . . .
Adjusting with the M ouse
Adjusting with Nudge Buttons . . . . . . . . . . . . . . . . . . . . . .
Adjusting with Of fset Buttons
Sync Button . . . . . . . . . . . . . . . . . . . . . . . . . . . . . . . . . . .
Locked Sync
Momentary Sync
Chapter
6 . . . . . . . . . . . . . . . . . . . . . . . . . . . . . . . . . . . . . . . 24
EXT ERNAL CO NTROL
MIDI Prefs . . . . . . . . . . . . . . . . . . . . . . . . . . . . . . . . . . . .
MIDI Learn
Creating a MIDI Assignment . . . . . . . . . . . . . . . . . . . . . . .
Clearing a MIDI Assignment . . . . . . . . . . . . . . . . . . . . . . .
Changing MIDI Assignment
Keyboard Learn . . . . . . . . . . . . . . . . . . . . . . . . . . . . . . . . .
Assigning Buttons to Knobs or Sliders . . . . . . . . . . . . . . . . . . . .
Assigning Knobs or Sliders to Buttons . . . . . . . . . . . . . . . . . . . .
Chapter
7 . . . . . . . . . . . . . . . . . . . . . . . . . . . . . . . . . . . . . . . 26
BROWS ER/D ATABASE
Browser Pane . . . . . . . . . . . . . . . . . . . . . . . . . . . . . . . . . .
Database
File List
. . . . . . . . . . . . . . . . . . . . . . . . . . . . . . . . . . . . . 29
Editing Fields
Artist/Song Filename Swap
Loading Songs into the Decks . . . . . . . . . . . . . . . . . . . . . .
Sorting the List
Searching the List
Playlists
Session Playlist . . . . . . . . . . . . . . . . . . . . . . . . . . . . . .
iPods . . . . . . . . . . . . . . . . . . . . . . . . . . . . . . . . . . . .
Drives
Audio CDs . . . . . . . . . . . . . . . . . . . . . . . . . . . . . . . . .
Chapter
8 . . . . . . . . . . . . . . . . . . . . . . . . . . . . . . . . . . . . . . . 38
MIXE R
. . . . . . . . . . . . . . . . . . . . . . . . . . . . . . . . . . . . . . . 38
Mixer Architecture
Channels
Gain /Mute . . . . . . . . . . . . . . . . . . . . . . . . . . . . . . . . .
EQ/ Kills
PFL/Headphone Cue . . . . . . . . . . . . . . . . . . . . . . . . . . .
Channel Volume Faders
Crossfader
Chapter
9 . . . . . . . . . . . . . . . . . . . . . . . . . . . . . . . . . . . . . . . 42
PFL /HEAD PHONE CU E
Volume Control . . . . . . . . . . . . . . . . . . . . . . . . . . . . . . . . .
Split Button and Source Knob
. . . . . . . . . . . . . . . . . . . . . . . . . . . . . . . 23
. . . . . . . . . . . . . . . . . . . . . . . . . . . . . 23
. . . . . . . . . . . . . . . . . . . . . . . . . . . . . . 24
. . . . . . . . . . . . . . . . . . . . . . . . . . . . . . . . . . . 25
. . . . . . . . . . . . . . . . . . . . . . . . . . . . . 26
. . . . . . . . . . . . . . . . . . . . . . . . . . . . . . . . . 27
. . . . . . . . . . . . . . . . . . . . . . . . . . . . . . . 29
. . . . . . . . . . . . . . . . . . . . . . . . . . . . . . 30
. . . . . . . . . . . . . . . . . . . . . . . . . . . . 31
. . . . . . . . . . . . . . . . . . . . . . . . . . . . . . . . . . 32
. . . . . . . . . . . . . . . . . . . . . . . . . . . . . . . . . . . 37
. . . . . . . . . . . . . . . . . . . . . . . . . . . . . . . 38
. . . . . . . . . . . . . . . . . . . . . . . . . . . . . . . . . 38
. . . . . . . . . . . . . . . . . . . . . . . . . . . . . . . . . . 39
. . . . . . . . . . . . . . . . . . . . . . . . . 40
. . . . . . . . . . . . . . . . . . . . . . . . . . . . . . . . 40
. . . . . . . . . . . . . . . . . . . . . . . . . . . . . 42
. . . . . . . . . . . . . . . . . . . 21
. . . . . . . . . . . . . . . . . . . . . . . . 22
. . . . . . . . . . . . . . . . . . . . . . 22
. . . . . . . . . . . . . . . . . . . . . . . 25
. . . . . . . . . . . . . . . . . . . . . . . 29
. . . . . . . . . . . . . . . . . . . . . . . . 42
21
21
22
23
24
25
25
25
25
25
26
30
35
37
37
38
39
42
Page 3

Table of Contents
Torq LE User Guide
Chapter 10 . . . . . . . . . . . . . . . . . . . . . . . . . . . . . . . . . . . . . . . 43
MAST ER OUTPUT
Volume Control . . . . . . . . . . . . . . . . . . . . . . . . . . . . . . . . .
Level Meter and Limiter
Master Recorder
Filename . . . . . . . . . . . . . . . . . . . . . . . . . . . . . . . . . .
Setting the Record Level . . . . . . . . . . . . . . . . . . . . . . . . .
Recording
Chapter 11 . . . . . . . . . . . . . . . . . . . . . . . . . . . . . . . . . . . . . . .
EFFE CTS
Controls . . . . . . . . . . . . . . . . . . . . . . . . . . . . . . . . . . . . .
Enable Button . . . . . . . . . . . . . . . . . . . . . . . . . . . . . . .
Tweak Knob
Tweak Button
Built-In Effects
Phaser . . . . . . . . . . . . . . . . . . . . . . . . . . . . . . . . . . .
Dual-Filter
Strobe
Chapter 12 . . . . . . . . . . . . . . . . . . . . . . . . . . . . . . . . . . . . . . .
PREF ERENC ES . . . . . . . . . . . . . . . . . . . . . . . . . . . . . . . . . .
Audio Tab
Audio Interface
Sample Rate . . . . . . . . . . . . . . . . . . . . . . . . . . . . . . . .
Buffer Size . . . . . . . . . . . . . . . . . . . . . . . . . . . . . . . . .
MIDI Tab
Auto-Detect M-Audio Devices ([On ]/Of f)
Scratch Sensitivity . . . . . . . . . . . . . . . . . . . . . . . . . . . .
Crossfader Cur ve Control
MIDI SHIFT Key . . . . . . . . . . . . . . . . . . . . . . . . . . . . . .
MIDI Devices
Miscellaneous Tab
Torq Engine
Cue Exclusivity . . . . . . . . . . . . . . . . . . . . . . . . . . . . . .
Schaf fel Mode
QuickLoop Size
Search iPod with Database
Search iTunes Library with Database
Transport Mode . . . . . . . . . . . . . . . . . . . . . . . . . . . . . .
Tooltips
Sync Mode
Skin
. . . . . . . . . . . . . . . . . . . . . . . . . . . . . . . . 43
. . . . . . . . . . . . . . . . . . . . . . . . . . . . 43
. . . . . . . . . . . . . . . . . . . . . . . . . . . . . . . . 43
. . . . . . . . . . . . . . . . . . . . . . . . . . . . . . . . . 44
. . . . . . . . . . . . . . . . . . . . . . . . . . . . . . . . . . . . . 45
. . . . . . . . . . . . . . . . . . . . . . . . . . . . . . . . 45
. . . . . . . . . . . . . . . . . . . . . . . . . . . . . . . 45
. . . . . . . . . . . . . . . . . . . . . . . . . . . . . . . . . 46
. . . . . . . . . . . . . . . . . . . . . . . . . . . . . . . . . 46
. . . . . . . . . . . . . . . . . . . . . . . . . . . . . . . . . . . 47
. . . . . . . . . . . . . . . . . . . . . . . . . . . . . . . . . . . . 48
. . . . . . . . . . . . . . . . . . . . . . . . . . . . . . 48
. . . . . . . . . . . . . . . . . . . . . . . . . . . . . . . . . . . . 50
. . . . . . . . . . . . . . . 50
. . . . . . . . . . . . . . . . . . . . . . . . 51
. . . . . . . . . . . . . . . . . . . . . . . . . . . . . . . 51
. . . . . . . . . . . . . . . . . . . . . . . . . . . . . . . 52
. . . . . . . . . . . . . . . . . . . . . . . . . . . . . . . . 52
. . . . . . . . . . . . . . . . . . . . . . . . . . . . . . 53
. . . . . . . . . . . . . . . . . . . . . . . . . . . . . 53
. . . . . . . . . . . . . . . . . . . . . . . 53
. . . . . . . . . . . . . . . . . . 53
. . . . . . . . . . . . . . . . . . . . . . . . . . . . . . . . . . 53
. . . . . . . . . . . . . . . . . . . . . . . . . . . . . . . . 54
. . . . . . . . . . . . . . . . . . . . . . . . . . . . . . . . . . . . 54
Chapter 13 . . . . . . . . . . . . . . . . . . . . . . . . . . . . . . . . . . . . . . .
APPE NDIX . . . . . . . . . . . . . . . . . . . . . . . . . . . . . . . . . . . . .
43
44
44
45
45
45
46
48
48
49
49
50
51
52
53
Preset Key Assignments . . . . . . . . . . . . . . . . . . . . . . . . . . . .
Global Key Commands . . . . . . . . . . . . . . . . . . . . . . . . . .
Windows Key Commands
Mac Key Commands
WARR ANTY
Warranty Terms . . . . . . . . . . . . . . . . . . . . . . . . . . . . . . . . .
Warranty Registration
. . . . . . . . . . . . . . . . . . . . . . . . . . . . . . . . . . . . 56
. . . . . . . . . . . . . . . . . . . . . . . . 55
. . . . . . . . . . . . . . . . . . . . . . . . . . . 55
. . . . . . . . . . . . . . . . . . . . . . . . . . . . . 56
55
55
55
55
56
Page 4
3
WELCOME
hank you for choosing M-Audio’s Torq LE DJ performance software! M-Audio
is an industry-leader in professional music products for computer-based
T
musicians and DJs. What you hold in your hands is a piece of that heritage—a piece
of the very products used daily by professionals around the world. With this software,
you will DJ using your collection of audio files on your computer. You can even record
the results and burn them onto CD, or copy them onto a media player.
Torq LE is a full-featured DJ application that has all the functions you’d find on
expensive DJ CD players and turntables. It plays back music at varying speeds and
pitches and automatically matches tempos of songs, creating smooth transitions
between tracks. You can also perform remix tricks such as looping and instant jumps
to other locations in the song. Lastly, Torq LE allows you to apply effects to the music
and fully control the mix of the songs.
DJing is an art. As with any art, it takes practice to become proficient. However, there
are many features in this software that will help jump-start your learning process.
This manual describes the features and offers insight into the art of DJing. Once you
are proficient with Torq LE, the sky’s the limit—you’ll be ready to explore the endless
possibilities of Torq LE’s only superior: SynchroScience Torq.
Chapter
1
WELCOME . . . . . . . . . . . . . . . . 3
TORQ LE OV ERVIEW
Decks . . . . . . . . . . . . . . . . .
Main Waveform Display
Mixer
. . . . . . . . . . . . . . . . . 5
PFL/Headphone Cue
Browser/Database
Effect Racks
Master Module
. . . . . . . . . 4
. . . . . . . 5
. . . . . . . . 6
. . . . . . . . . 6
. . . . . . . . . . . . . 6
. . . . . . . . . . . . 6
5
English
Page 5
Torq LE User Guide » Chapter 1
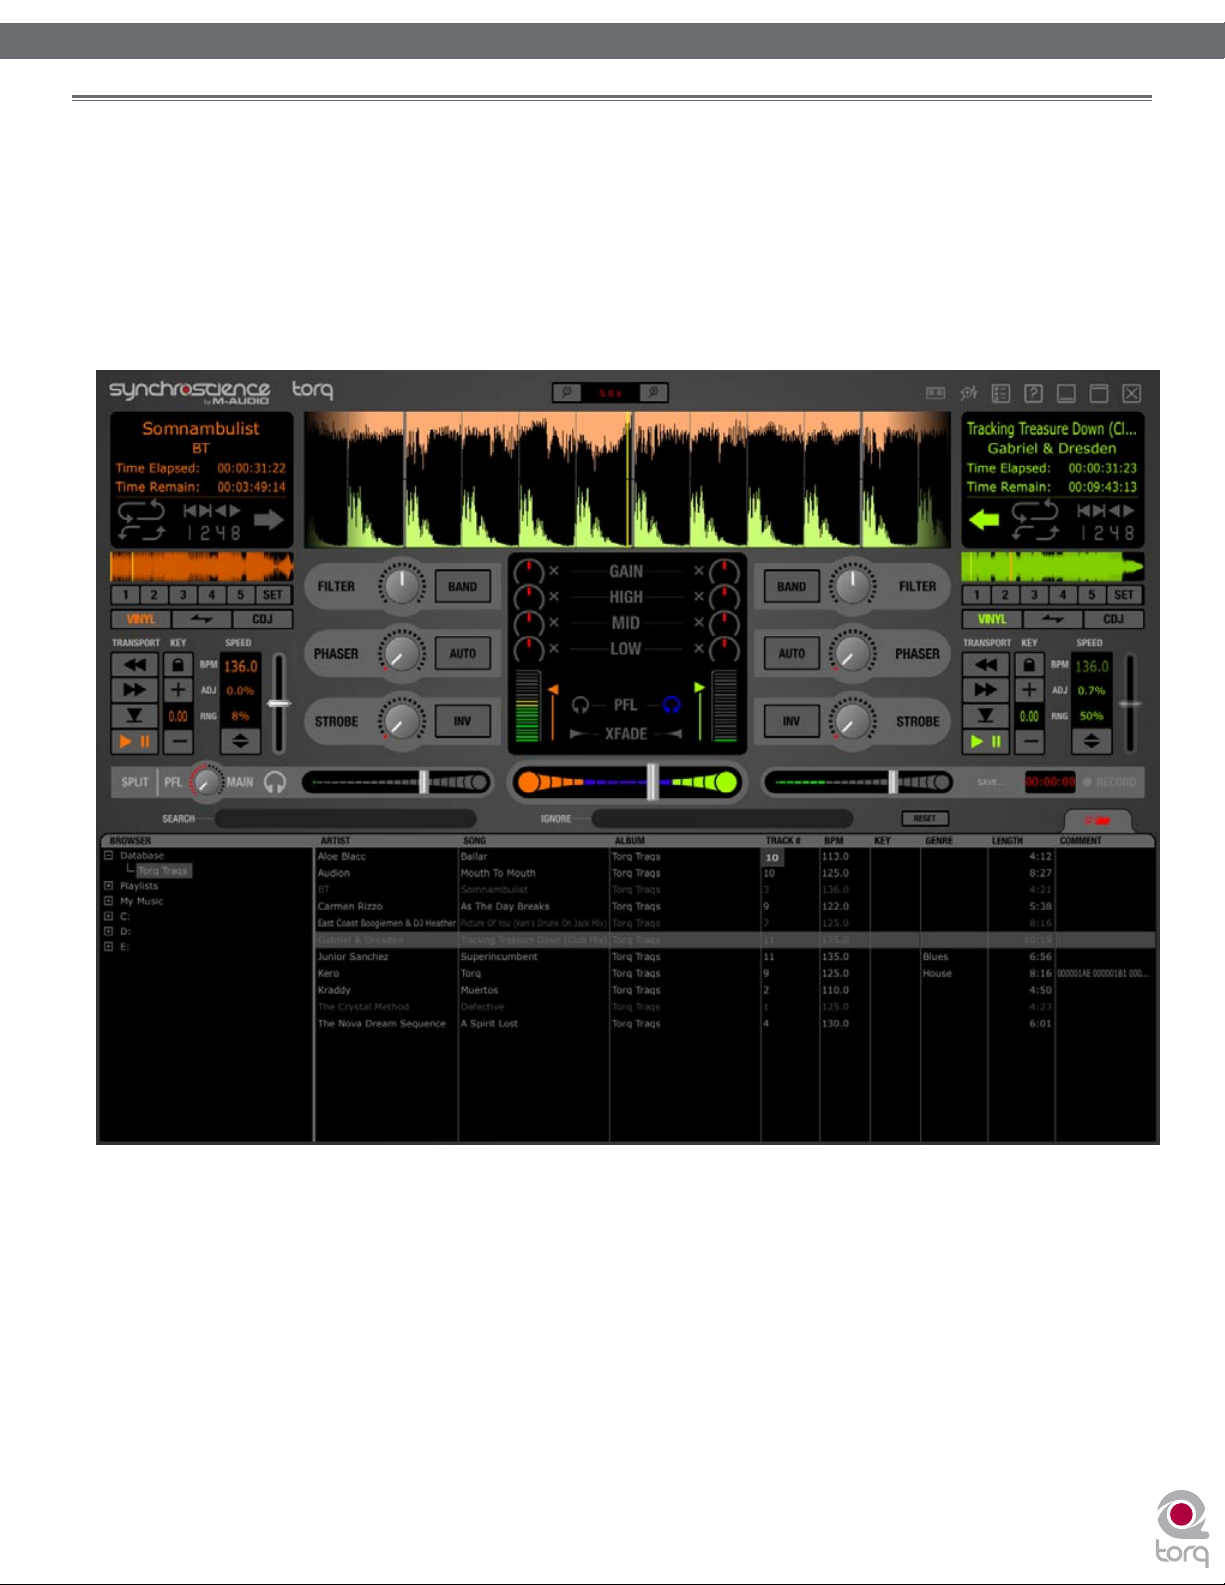
TORQ LE OVERVIEW
orq LE is a software extrapolation and extension of tried-and-true DJ tools and techniques for your Mac OS X or
Windows XP computer. Torq is not bound by the limits of hardware—it embraces the technology of today’s most
T
advanced audio production applications and integrates with them in a fashion that makes you part of the music. Exercising
this level of control upon your collection of songs is a task that has many facets, and Torq addresses each of these with
a specialized array of controls and features that are cleverly arranged and accessed throughout the user interface. This
section will give you an overview of these features and how they contribute to your arsenal of digital mixing tools and
techniques.
4
Page 6

Torq LE User Guide » Chapter 1
Decks
DJing begins with music, so you will get to know Torq’s Decks very well. A Deck is
what Torq LE uses to play back a single digital music file and is analogous to the
turntable or CD player used by DJs. The Deck allows you to play a track, change its
speed and its key, as well as rearrange it by looping and jumping to new locations
within the song. Torq is equipped with two of these Decks—one on each side of the
screen.
5
Main Waveform Display
One of the wonderful benefits of computer technology is the ability to visualize audio. While being interesting to the eyes
in their own right, waveform displays can be an invaluable tool when DJing. Torq’s user interface is dominated by two such
waveforms at the top-center of the screen, one corresponding to each of the Decks. Use these scrolling waveforms to
check the synchronization of tracks, locate sounds, predict breakdowns, and much more.
Mixer
It’s all in the mix, or so they say, and Torq’s Mixer delivers the goods. The Mixer
takes the audio from the two Decks and gives you control over what can be heard
by means of volume controls, audio equalizers, and a crossfader. Two Decks and a
Mixer: the essential tools for a DJ.
Page 7
Torq LE User Guide » Chapter 1
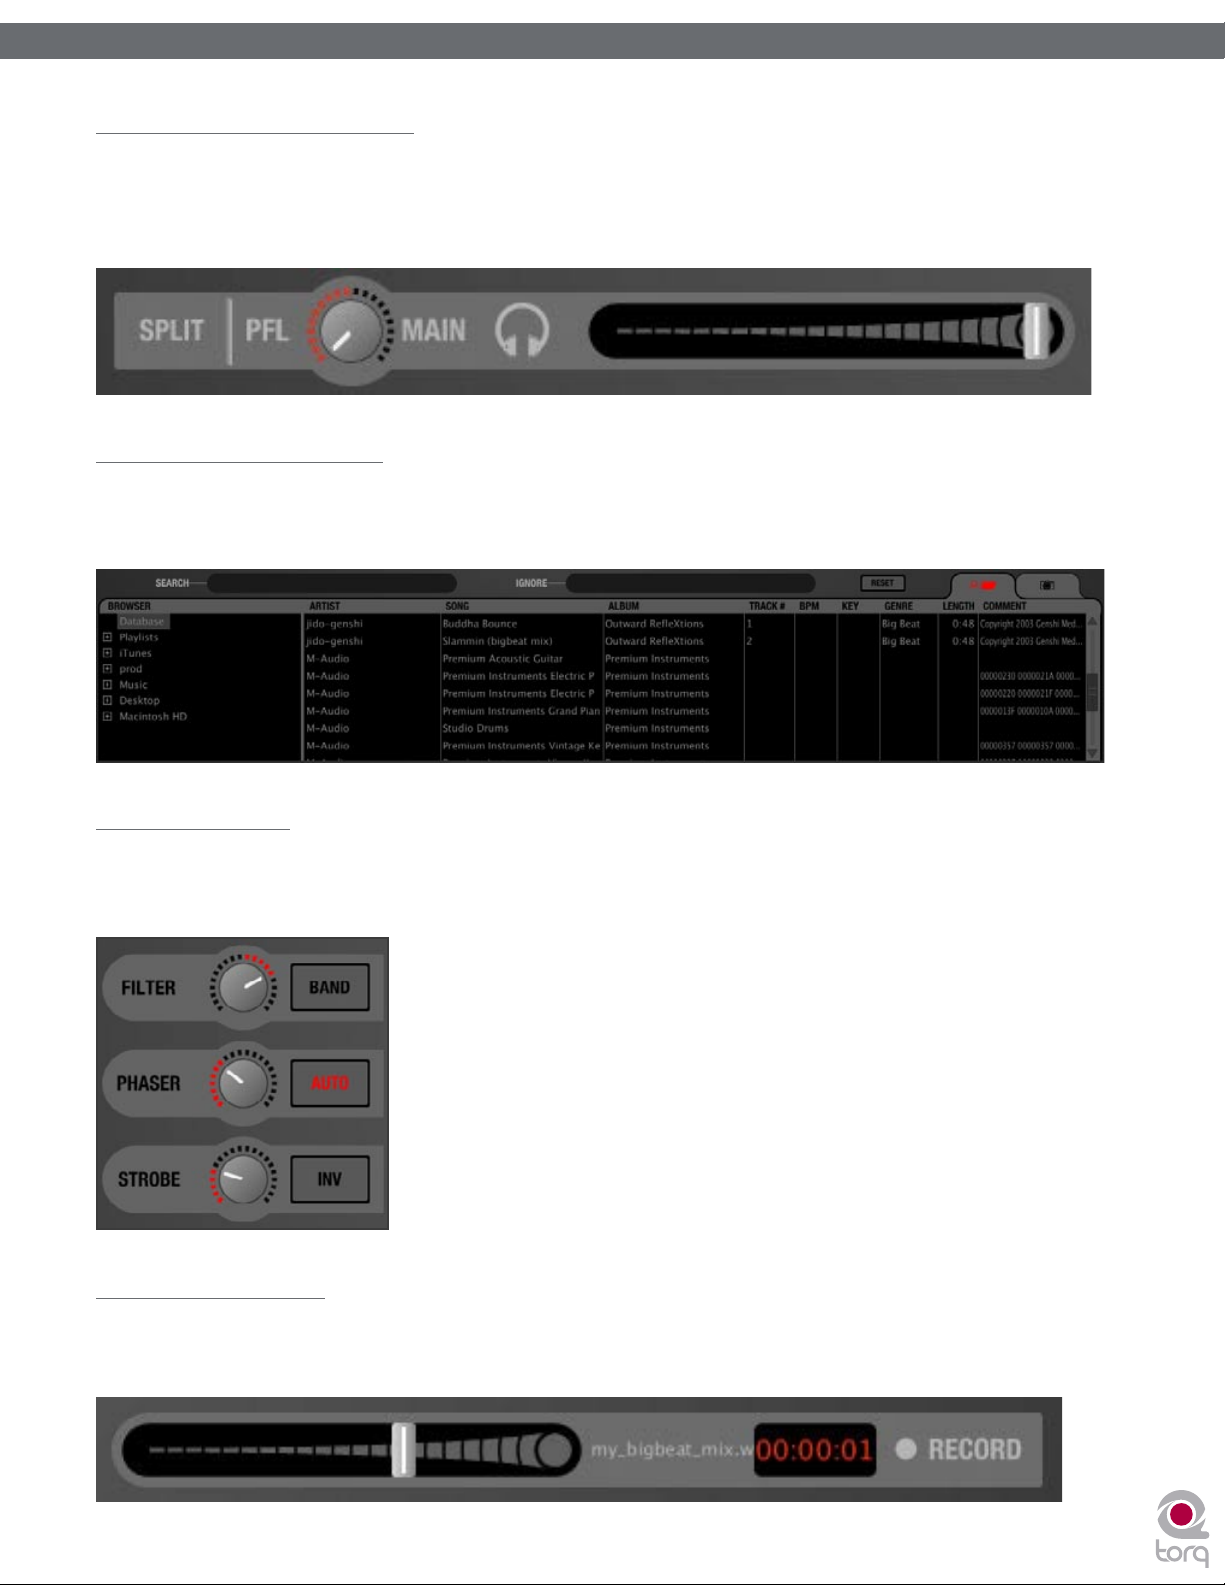
PFL/Headphone Cue
DJs commonly listen to a track on their headphones without letting their audience hear it. This allows them to match the
tempo of the new song to the current one, along with finding the correct starting position for the song. Torq LE will allow
you to monitor either Deck on headphones, and also features a stereo headphone split normally reserved for high-quality
DJ mixers.
Browser/Database
There is a third ingredient to DJing, and that’s music—lots of music. To help you stay on top of your massive music
collection, Torq LE features a Database for cataloging and searching tracks. It will monitor your favorite folders and allow
you to create playlists for future performances.
6
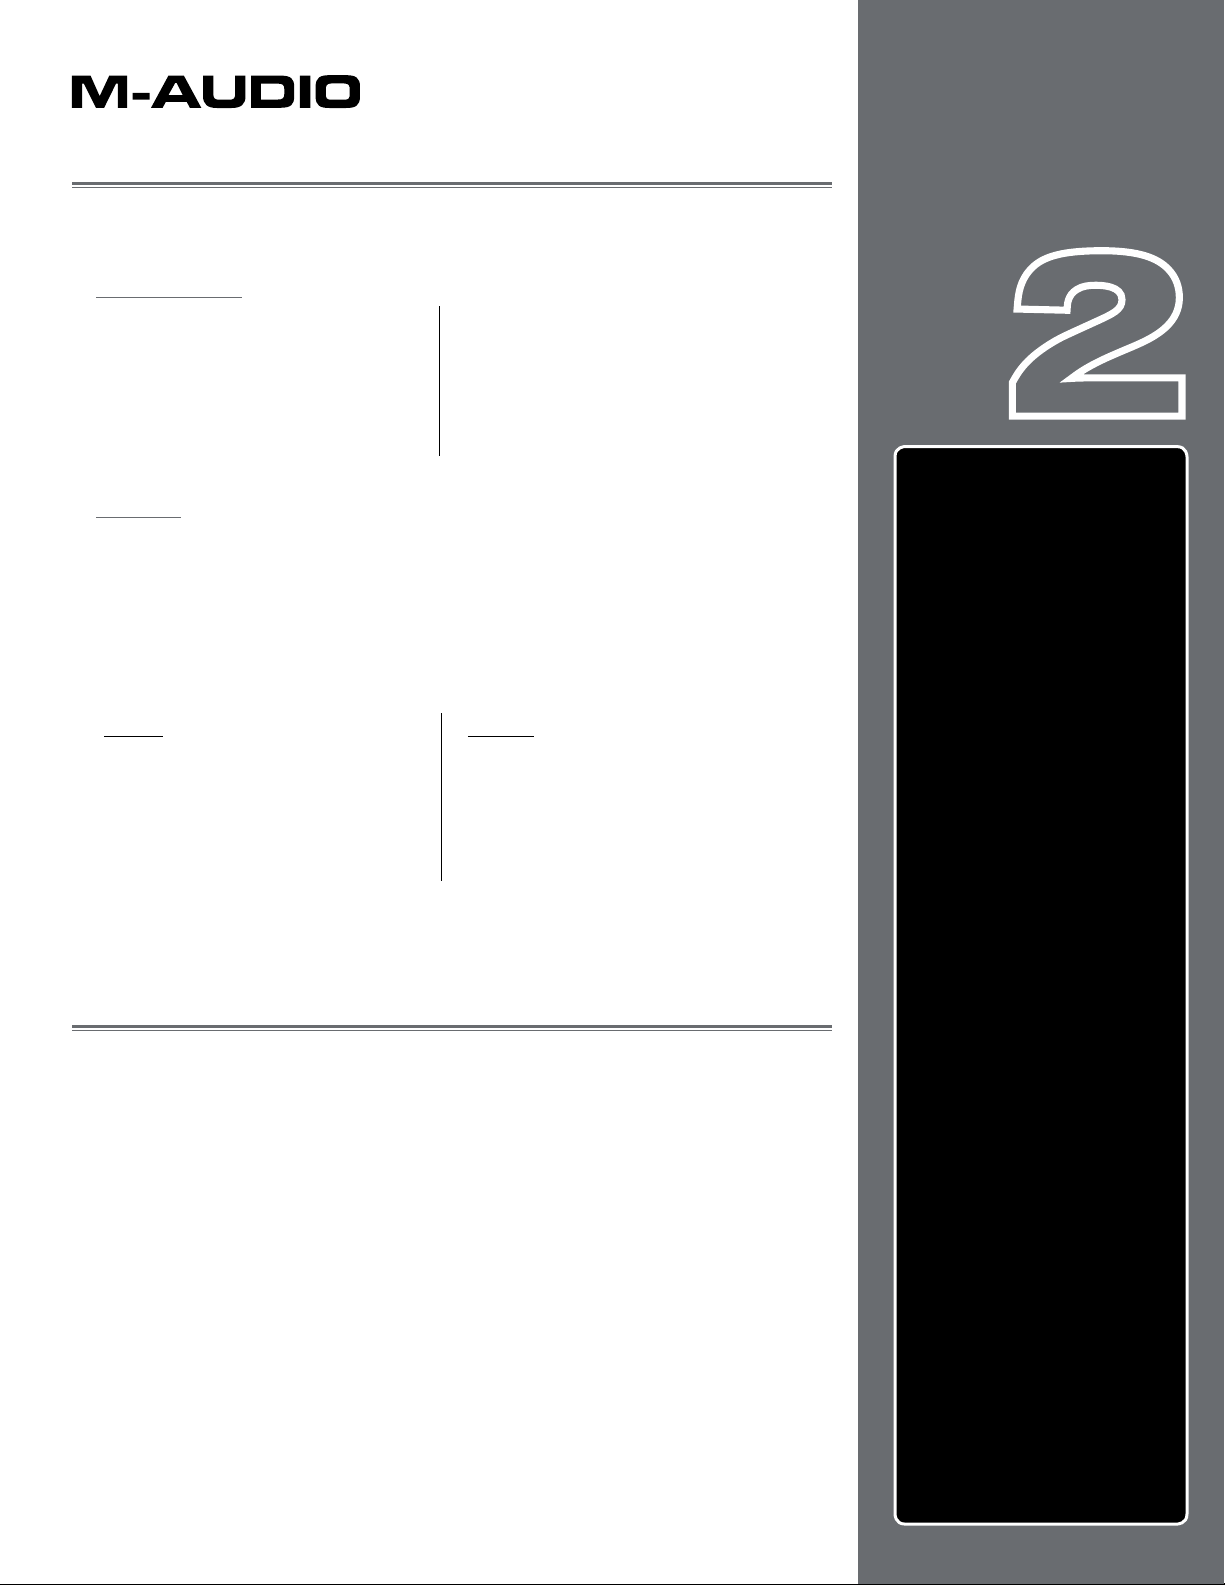
Effect Racks
Effects are a great way for you to manipulate (or mangle) your music in unique ways to enhance your mix. Torq LE has three
built-in effects that are specifically designed for DJ use: dual filter, phaser, and strobe. You can use these three effects on
each Deck.
Master Module
When all is tweaked and mixed to perfection, the resultant audio is sent to the Master Output. Torq LE features an
automatic output limiter that will keep your music from distorting as well as a module for recording the final mix to a file as
you play. You can then burn the results onto a CD or convert them to MP3 for podcasts.
Page 8
7
7
SYSTEM REQUIREMENTS
Windows:
Minimum System Requirements
OS: Windows XP (SP2)
CPU: Pentium III 933 MHz
RAM: 256 MB
Mac*:
Minimum System Requirements
Mac OS X 10.4.6
CPU: G4 1.25 GHz
RAM: 512 MB
Recommended System
Specifications
Laptop: Desktop
OS: Mac OS X 10.4.7 OS: Mac OS X 10.4.7
CPU: Mac/Intel Core Duo 1.83 GHz (or
greater)
RAM: 1 GB RAM: 1 GB
Hard drive: 7200RPM or faster Hard drive: 7200RPM or faster
Recommended System Specifications
OS: Windows XP (SP2)
CPU: Pentium IV 2 GHz (or greater)
RAM: 1 GB
Hard drive: 7200RPM or faster
CPU: Dual G5 2 GHz
Chapter
Chapter
1
2
SYSTEM REQUIREMENTS . . . . . . 7
Windows
. . . . . . . . . . . . . . . 7
Mac
. . . . . . . . . . . . . . . . . . 7
INSTALLATION
. . . . . . . . . . . . . 7
* Mac G4 users are strongly advised to pre-analyze all audio files prior to use in Torq
INSTALLATION
Please see the printed Quick Start Guide for instructions on how to install
Torq LE.
English
English
Page 9
8
8
DECKS
hen DJing, everything begins with the Decks. The Decks will play the music
W
decks will be turntables or CD players. Therefore, the Decks in Torq have been
designed to emulate both turntables and CD players, as well as offering a special
hybrid mode only possible with software.
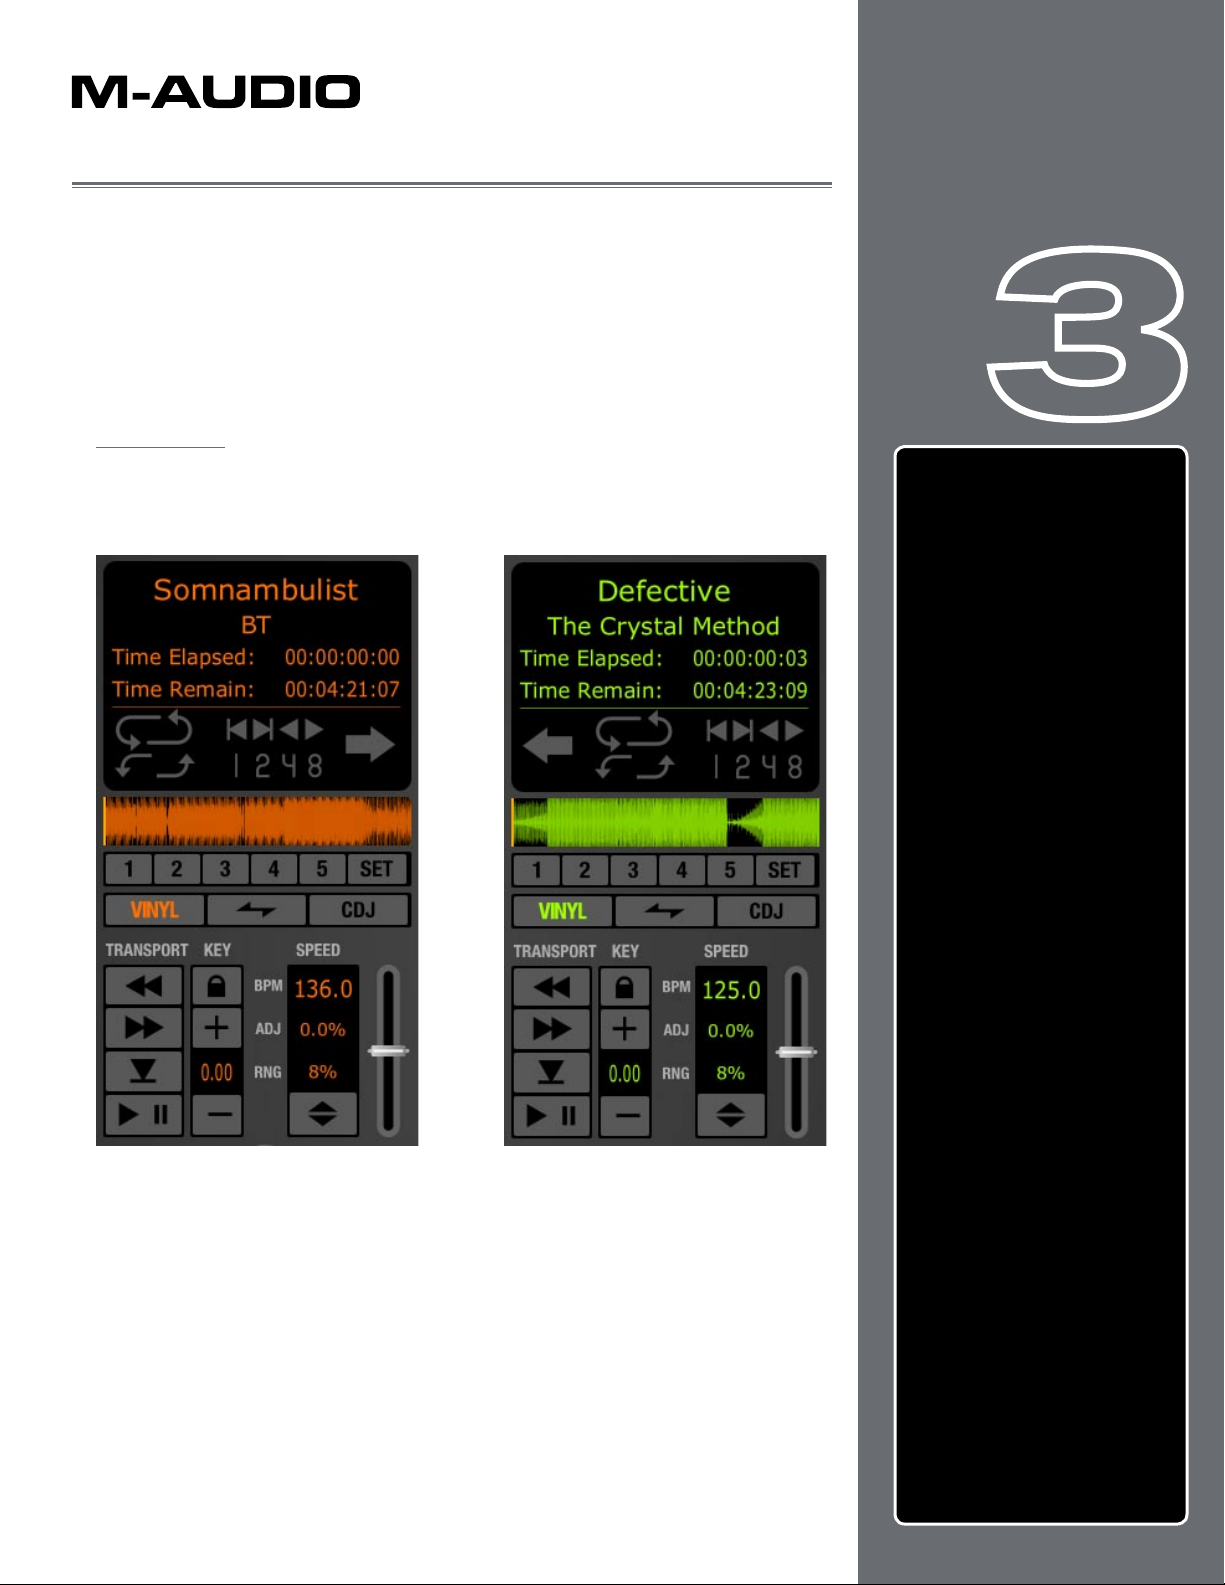
Displays
Each Deck has various informational displays throughout the interface. These are
mostly for relaying information to you, such as which song is playing, how long it’s
been playing, and how much time is remaining.
that you’ll mix and effect using all the tools in Torq LE. Traditionally, a DJ’s
Chapter
Chapter
1
3
DECKS . . . . . . . . . . . . . . . . . . 8
Displays . . . . . . . . . . . . . . . .
Song Name . . . . . . . . . . . .
Artist Name . . . . . . . . . . . .
Time Elapsed . . . . . . . . . . .
Time Remain
Overview Waveform
Controls . . . . . . . . . . . . . . . .
Play/Pause
Seek . . . . . . . . . . . . . . . .
Cue
QuickCue . . . . . . . . . . . .
Deck Mode . . . . . . . . . . .
Looping . . . . . . . . . . . . .
Speed Slider
Key
Sync Button
Nudge Buttons
Offset Buttons
. . . . . . . . . . . 9
. . . . . . . 9
. . . . . . . . . . . . 9
. . . . . . . . . . . . . . . 10
. . . . . . . . . . 13
. . . . . . . . . . . . . . . 15
. . . . . . . . . . 17
. . . . . . . . 17
. . . . . . . . . 17
8
8
8
9
9
9
10
11
11
Song Name
At the top of the Deck is the name of the current song. The name is taken from
the song category (seen in the File List). If there is no song name listed in the
File List, the name of the actual file will be shown instead.
Artist Name
Below the Song Name is the Artist Name. Like the Song Name, above, this field
will be empty if there is no entry in the Artist category of the file.
English
English
Page 10
Torq LE User Guide » Chapter 1
Torq LE User Guide » Chapter 3
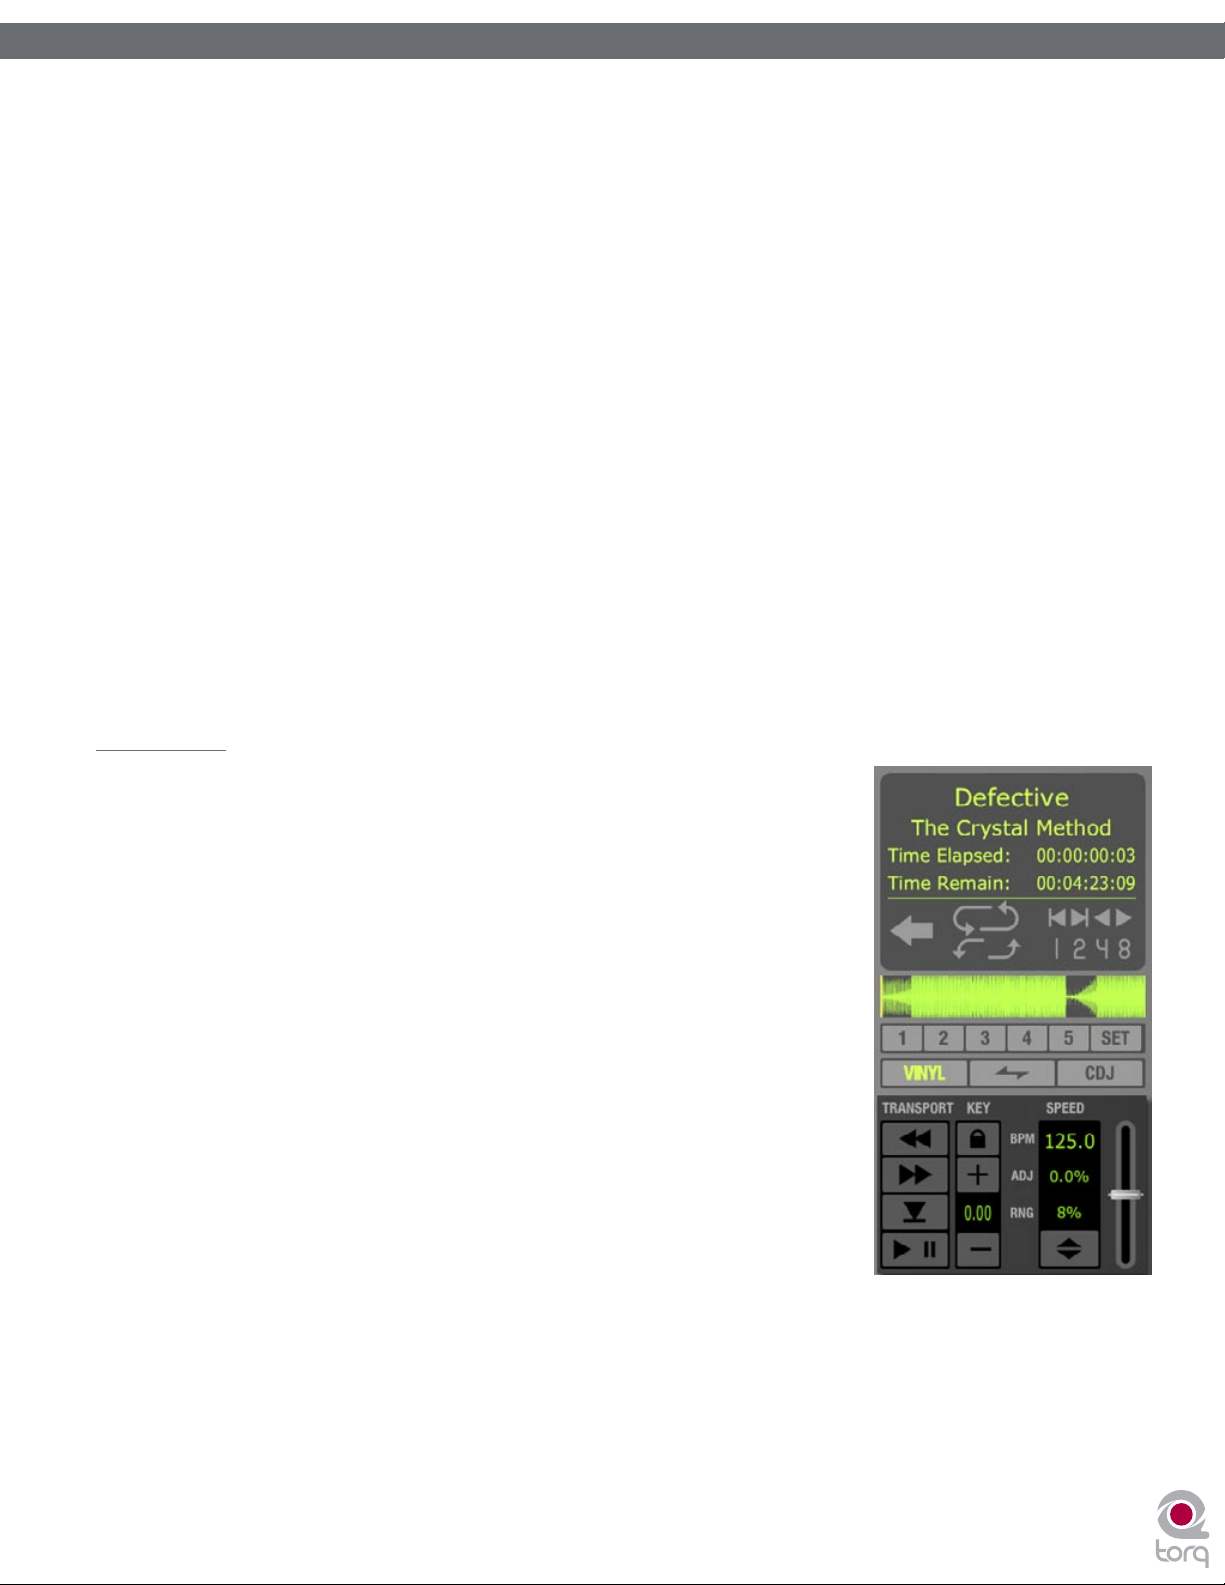
Time Elapsed
This is the current location of the song, marked by the yellow Current Position Marker in the Overview Waveform
Display. The Time Elapsed is expressed in hours/minutes/seconds/frames (30 fps). When the Current Position
Marker is at the beginning of the song, the Time Elapsed will be 0:0:0.0.
Time Remain
This field indicates how much time is left before the song ends. At the beginning of the song, the Time Remaining will
be the same as the entire length of the song. When the Deck is playing, the Time Remaining will count down.
Note: The Overview and Scrolling Waveform displays will begin to flash red when there is less than 30 seconds
remaining in the song. This is to notify you that you’d better get ready with another song to play!
Overview Waveform
Each Deck includes an Overview Waveform display which shows a miniaturized version of the song’s waveform in its
entirety. This display serves several purposes:
1. It allows you to see where the breaks and builds are in a song before they happen.
2. The yellow Now Line indicates your current location within the song.
9
9
3. QuickCue points (described later) will be superimposed over this waveform.
4. You can click anywhere in this waveform and playback will jump to that location.
Controls
As mentioned before, the purpose of the Deck is to play a music file, similar to how
iTunes or WinAmp plays files on your computer. However, in the scope of DJing, things
don’t stop there. A DJ needs to be able to control the playback of the music with
greater detail, such as changing the speed and/or key of the song, looping sections
of audio, and jumping to other locations within the song. This allows the DJ to match
tempos of various songs during a mix, or to re-arrange the song (in essence, creating
a live remix of the song). The Torq Decks accomplish these tasks using the controls
described below.
Play/Pause
Songs are played and stopped by clicking the Play/Pause button. Simply load a
song into the Deck and press Play/Pause to start it. Press Play/Pause again to
pause the music.
Note: When you pause the music, the song will not return to the beginning—it
will stay in the same location as when you stopped it. If you want to return to
the beginning, use the Seek controls described below.
Seek
The Seek buttons are used to skip forward or backward through the song, allowing you to find certain points (or
beats) within the song from which you can start playing.
1. If you click briefly on the Forward or Backward buttons, the music will jump only slightly in that direction.
2. If you click and hold one of these buttons, Torq will scroll through the song, going faster and faster as long as
you hold the button. Scrolling will stop when you release the button.
3. To jump to either the beginning or end of the song, hold the Shift key while clicking Seek buttons.
Page 11
Torq LE User Guide » Chapter 1
Torq LE User Guide » Chapter 3
Cue
The Cue button will establish a primary Cue Point within a song. A Cue Point is a reference position within the track
that you can jump to instantly, rather than having to seek through the track to find it. Typically, a DJ will set the Cue
Point where the beat begins in a song. It is visible (in red) within the Waveform Display. The Cue button abides by the
following rules:
1. If a song is playing, pressing the Cue button will make the song jump to the Cue Point and will pause there.
2. If Cue is pressed and held again, the music will begin playing from the Cue Point. The music will stop playing
when the Cue button is released and the song will jump back to the Cue Point.
3. If a song is paused in a location different from the Cue Point, pressing the Cue button will set the Cue Point
to the current location.
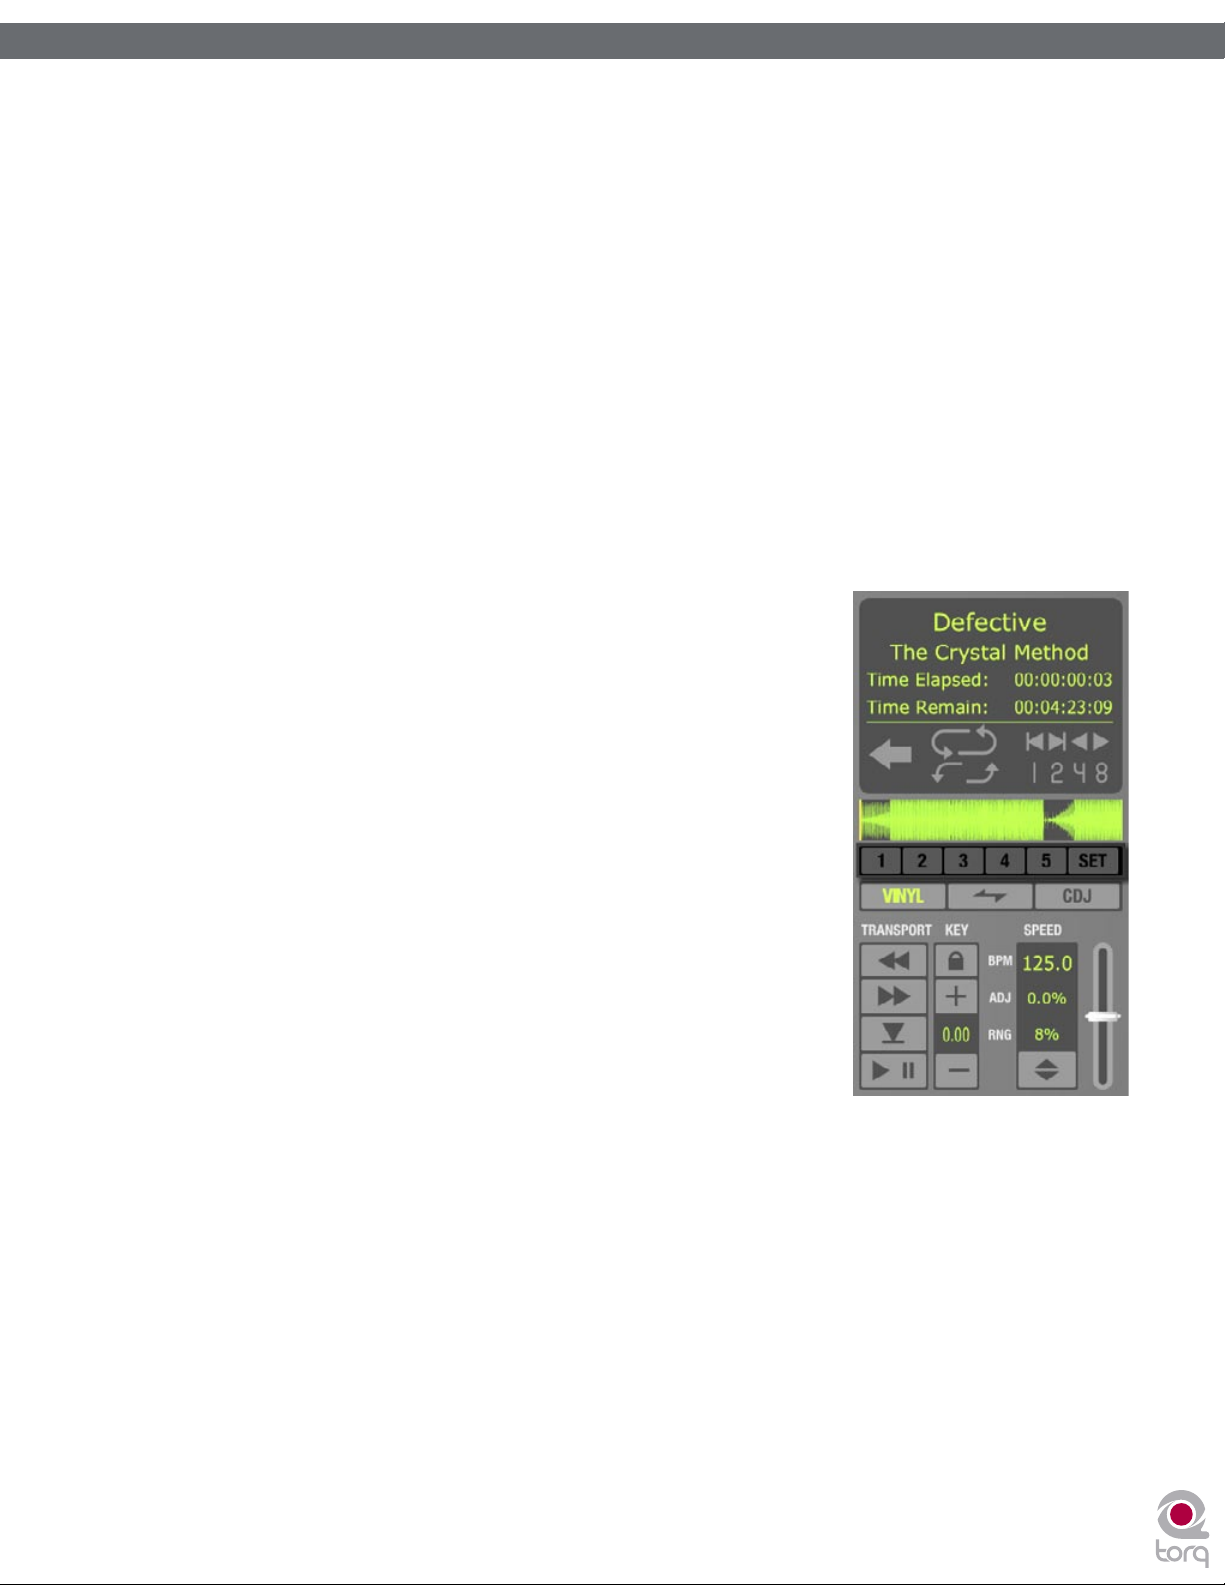
QuickCue
In addition to the primary Cue Point described above, Torq LE allows you to set up to five QuickCue Points in a song
that are assigned to the QuickCue buttons below the Overview Waveform display. These buttons can then be used
to quickly jump between the various QuickCue points.
< Setting QuickCues
There are a few different ways to set QuickCue Points, but all
methods deliver the same results.
10
10
1. Click the QuickCue Set button, then click one of the
QuickCue buttons. A QuickCue Point will be set at the
current location (this can be done while the Deck is playing
or paused). When added, the QuickCue will be visible in the
Overview Waveform display.
2. Hold the Shift key while clicking one of the QuickCue
buttons. Again, the QuickCue Point will be set to the Now
Line, whether the Deck is playing or not. When added, the
QuickCue will be visible in the Overview Waveform display.
Note: If you try to assign a QuickCue to a button that is already
set to a particular location, the old QuickCue location will be
overwritten in favor of the new one.
< Playing QuickCues
Once you’ve set a couple QuickCue Points, all you have to
do is click on the desired QuickCue button and the Deck will
immediately jump to this new location and begin playing. If you set
your QuickCue Points at key positions within the song, you can immediately jump to different sections on-thefly, such as jumping ahead to a chorus or back to the intro.
Note: There are 10 QuickCue Points—five for each Deck. These points are mapped to the number keys
on your computer keyboard. Numbers 1-5 correspond to QuickCues 1-5 on Deck A while numbers 6-0
correspond to QuickCues 1-5 on Deck B. Pressing one of these number buttons has the same effect as
clicking one of the QuickCue buttons on screen. Additionally, you can set QuickCue Points without using
the mouse by holding the Shift key and pressing one of these number buttons.
Page 12

Torq LE User Guide » Chapter 1
Torq LE User Guide » Chapter 3
Deck Mode
In order for Torq LE to feel familiar to all types of DJs, the Decks can be operated in one of three different modes.
< Vinyl Mode
Vinyl Mode will make the Deck behave as if it was a turntable. This means:
1. Pressing Play/Pause to pause playback will cause audio to stop, just like pressing stop on a turntable.
2. Clicking and dragging on the Scrolling Waveform will have audible results, like scratching a record.
< CDJ Mode
CDJ mode will make the Deck behave as if it was a CDJ player. In use:
1. Pressing Play/Pause to pause playback will cause the Deck to stop and begin repeating a small section
of audio. The repeating section corresponds to the position where playback will resume when you
press Play/Pause again.
2. While the audio is repeating, you can click and drag on the Scrolling Waveform to move the start
location—you’ll hear the repeating audio slice change as you do this.
3. Clicking and dragging on the Scrolling Waveform while the Deck is playing will not stop audio. Instead,
you’ll be able to drag left or right to offset the playback speed of the track. This will allow you to align
the track against the other Deck when beat-matching.
11
11
< Hybrid Mode
Hybrid mode provides a blend of the CDJ and Vinyl control modes:
1. Pressing Play/Pause to pause playback will cause audio to stop, just like in Vinyl mode.
2. While paused, clicking and dragging on the Scrolling Waveform will have audible results, like
scratching in Vinyl mode.
3. When playback is active, clicking and dragging on the Scrolling Waveform will not stop audio. Instead,
you’ll be able to drag left or right to offset the playback speed of the track like in CDJ mode. This will
allow you to align the track against the other Deck when beat-matching.
Looping
Technology is always evolving, thus DJing is always evolving. With the introduction of DJ CD players, DJs gained
many new exciting capabilities that were unavailable to them when working within the confines of vinyl records. One
of those features is looping, which is merely the act of repeating a section of a song.
The creative aspect of DJing suggests that a simple trick such as looping can be exploited in a variety of ways.
Indeed, you can use looping to “remix” a song by changing the arrangement—extending your favorite parts of the
song. You can also use looping as a “safety net” allowing the end of a song to play infinitely, giving you more time to
mix into the next song. Looping can also be used to isolate a section of the song, such as the breakbeat, for layering
on top of other songs.
Torq LE offers you two different ways to loop audio. You can specify the start and end points of the loop manually,
or you can capture loops of a specific length using the QuickLoop buttons. Furthermore, Torq will help you make the
perfect loop every time by automatically matching your loop points to the tempo of the song.
Page 13

Torq LE User Guide » Chapter 1
Torq LE User Guide » Chapter 3
< Loop In/Out
Looping an entire song doesn’t have much benefit for a DJ, so Torq allows you to move the Loop Markers by
using the Loop In and Loop Out buttons:
1. Load a song into a Deck and press Play. The song will begin to play.
2. When playback reaches the beginning of the section you want to loop, click the Loop In button.
This will place a Loop In Marker at the Now Line (shown as an yellow marker line in the scrolling and
overview waveforms) and the song will continue to play. The Loop In marker will snap to the beginning
of the nearest 16th-note in the song waveform.
3. When playback reaches the end of the section you want to loop, click the Loop Out button. This will
place a Loop Out Marker at the Now Line, which will also snap to the nearest 16th-note. At the same
time, the Loop On/Off button will automatically be activated causing playback to jump back to the Loop
In Marker. The music will now loop between these two points indefinitely.
4. When you’re finished looping this section of the song, you can click the Loop On/Off button to turn it
off. Now, when playback reaches the Loop Out Marker, it will simply pass it and proceed playing the
rest of the song.
Note: If you reposition playback using one of the QuickCue buttons while Looping is activated, playback
will jump to the new location. Torq will then automatically place the Loop In Marker at that point and will
place the Loop Out Marker in a position to maintain the same loop length in use prior to pressing the
QuickCue button.
12
12
< Loop On/Off
The Loop button will indicate whether Torq is looping audio or not. Whenever this button is illuminated, Torq
will be looping something, whether triggered with one of the QuickLoop buttons or set manually with the
Loop In and Loop Out buttons. Click this button to toggle looping on and off.
< QuickLoop
More often than not, a DJ will loop audio that is an even number of beats or bars. That is, they will loop a
single bar (four beats) or two bars (eight beats), or may do micro-loops of only one or two beats. Instead of
having to quickly press the Loop In and Loop Out buttons to create loops of these lengths, Torq LE provides
one-button access to these loops via the QuickLoop buttons.
» Using QuickLoops
The QuickLoop buttons allow you to instantly loop a section of a song by a preset length. By default,
each of the four buttons represents a different bar length; one bar, two bars, four bars, and eight
bars. Simply press one of these buttons at the beginning of the section you want to loop and Torq will
automatically place the Loop In and Loop Out Markers in the appropriate locations:
1. Load a song into a Deck and press play.
2. Press the QuickLoop button labeled “1.” The Loop button will be switched on and the Loop In
Marker will immediately be placed at the Now Line. Furthermore, the Loop Out Marker will be
placed exactly one bar later and the song will begin looping a perfect bar.
3. To turn the loop OFF, click the Loop button. Playback will now proceed beyond the Loop Out
Marker.
Page 14

Torq LE User Guide » Chapter 1
Torq LE User Guide » Chapter 3
» QuickLoop Size Preference
As mentioned above, the default loop lengths for the four QuickLoop buttons are one bar, two bars,
four bars, and eight bars. The QuickLoop Size preference allows you to change the QuickLoop buttons
to beat values instead of bar values:
1. Open the Torq LE Preferences menu and click on the Behaviors tab.
2. Click the arrow next to QuickLoop Size option and choose “Beat” from the drop-down list.
3. Click the “X” to close the Preferences window.
Now, when you use the QuickLoop buttons as described above, you’ll find that they capture loops of
one beat, two beats, four beats, and eight beats in size.
» QuickLoop Behaviors
Along with the obvious functions stated above, the QuickLoop buttons are capable of a few other
behaviors:
You can change various loop lengths while the song is looping. For instance, if you have set a one-beat
loop, pressing the “4” button will automatically extend the Loop Out marker to make the song loop
perfectly four beats.
13
13
Also, repeatedly pressing a QuickLoop button will cut the current loop length in half. For example, if you
press QuickLoop 2 to loop two bars of audio, pressing the button again will change the loop to one bar
in length. Pressing it again will reduce the loop length again, this time to two beats (half a bar).
By holding the Shift key while pressing these buttons, the opposite behavior will occur: The loop will
double its length each time you press the QuickLoop button.
Speed Slider
Torq’s Decks are each equipped with a Speed
Adjust slider for the purpose of beat-matching
songs. This slider behaves just like the pitch
adjusters found on DJ turntables and CD players.
As you move this slider, the neighboring ADJ
display will show how much the song’s speed is
being altered (expressed as a percent where 0%
is the original speed of the song).
For those not familiar with these controls, your
first impression may be that the slider is working
backward since the speed of the song will
increase as you move the slider down on screen.
However, this is the proper behavior for pitch
controls found on DJ turntables and CD players. It
makes sense if you consider the following:
The pitch adjust slider on a turntable is mounted
flat on the surface of the turntable’s housing.
Therefore, when you use the slider, you either push it away from you or pull it towards you. When a song is going
too fast, you push the slider away from yourself, just as if you put out your hand in a “slow down” motion. If you need
the song to go faster, you pull the slider toward you, similar to how you would gesture towards yourself if you wanted
someone to move quickly. After a few hours of practice, this “backward” response will feel natural.
Page 15
Torq LE User Guide » Chapter 1
Torq LE User Guide » Chapter 3
< Slider Range
By default, the range of the Speed Adjuster is +/- 8%. That means that if you move the slider to either of
its extremes, you’ll only get an 8% change in the speed of the song. To the left of the Speed Adjuster is a
display showing the current range setting for the slider:
You can change the range of the Speed Adjuster by clicking on this range display. Each time you click, the
range will advance to the next highest setting. The order is: 8% , 10%, 20%, then 50%. When you click the
display again, the range will “wrap around” back to 8%. You’ll only need to increase the range when you’re
trying to match two songs with very different tempos, or when you want to perform an extreme speed change
as a special effect.
Most experienced DJs will simply match the tempos of two songs by hand using the Speed Adjust slider,
which is a perfectly acceptable method of matching songs (indeed, this is the way it’s been done for
decades). Since it requires a lot of practice to hear when one song is playing faster or slower than another,
those new to DJing will benefit from some of the extra features built into Torq LE. Such features include
automatic beat detection, BPM displays, scrolling waveform displays, and automatic synchronization.
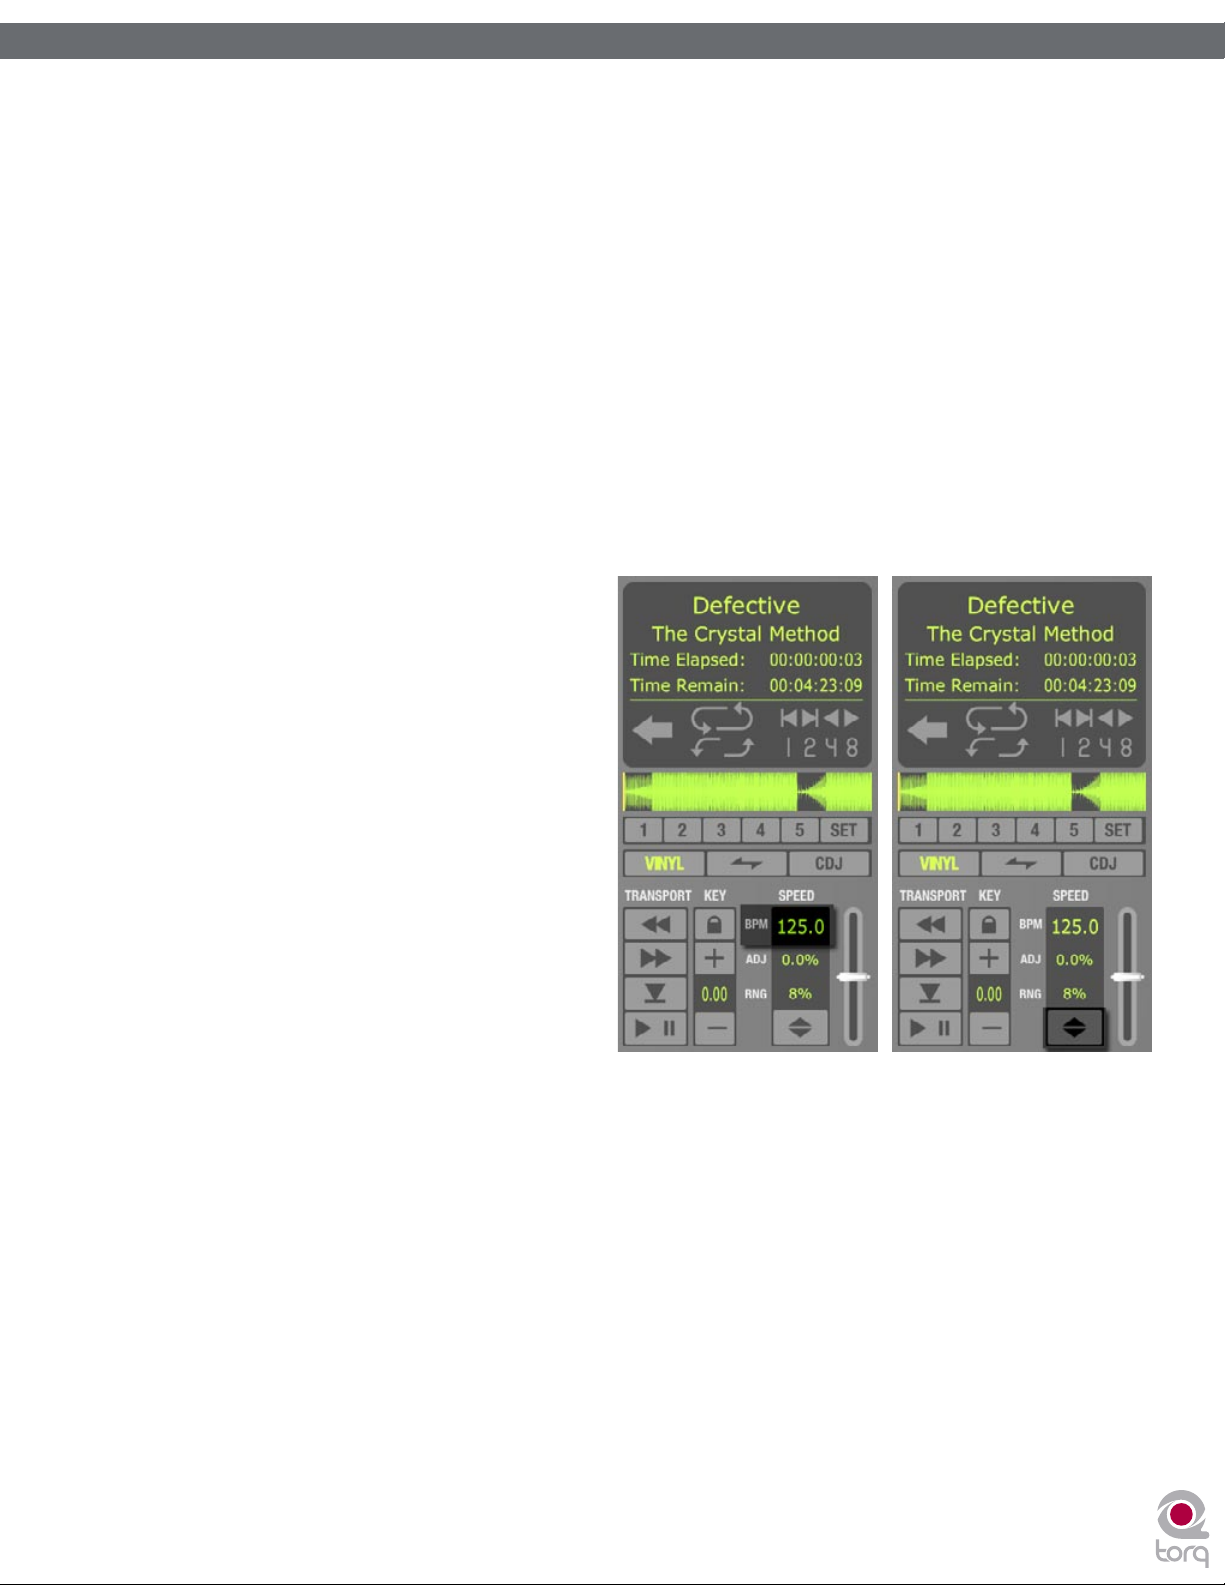
< BPM Display
Tempo is a measurement of the speed of a song and is normally expressed as Beats Per Minute (BPM). As
the BPM increases, the speed of the song increases. In order for two songs to be mixed together with their
beats aligned, the two songs will need to
be playing at the same tempo. This is why
Torq’s Decks are equipped with Speed
Sliders. In the event the DJ is trying to mix
two songs with different tempos (which
happens more often than not), he will
need to use the Speed Sliders to match
the tempo of the new song to the tempo of
the current song.
14
14
» Automatic BPM Detection
Any time you load a new track into
a Deck, Torq will analyze it and
attempt to determine the tempo of
the song. For most dance music,
Torq LE will be able to determine the
tempo accurately. Once scanned,
the tempo of the song will be shown
in the BPM display for the Deck,
which is located just to the left of the
Speed Adjust slider.
The BPM shown here is a “living value”—it will change when you alter the speed of the song with the
Speed Adjuster. This is extremely helpful when trying to synchronize two songs since you’ll be able to
nearly match the tempos of the two songs just by matching the BPM values shown in the displays.
» Double/Halve Button
When Torq LE incorrectly identifies the tempo of a song, it will often return a result that is half the
original tempo or double the original tempo. This occurs frequently when using Drum & Bass tracks
with tempos in the neighborhood of 170 BPM. Torq may think that the tempo of the song is 85 BPM,
which is half the actual tempo. When this happens, you can quickly double the tempo using the
Double/Halve button.
The first time you press this button, the up arrow will light and the tempo of the current song will be
doubled. The second time you press the button, the down arrow will light and the tempo of the song
will be cut in half from the original tempo. The third time you press this button, the arrows will turn off
and the tempo will revert to the originally detected tempo.
Page 16

Torq LE User Guide » Chapter 1
Torq LE User Guide » Chapter 3
» Manual Tempo
As mentioned above, Torq LE can determine the tempo of most dance music. Some music, however,
is too complex or not repetitive enough for Torq to detect the tempo with precision. Fortunately, you
can help Torq to determine the proper tempo through a number of different methods. The appropriate
method will be based on the type of tempo correction you’re trying to achieve.
» Tap Tempo
On rare occasions, Torq LE will determine an incorrect tempo that has no direct relation to the actual
tempo (not a fraction or multiple). At times like this, you’ll want to use the Tap Tempo feature to
determine the tempo of the song while it plays.
1. While the song is playing, click on the BPM display with each beat that you hear.
2. The BPM display will update the BPM to reflect the timing of the taps you performed.
3. The more taps you provide, the more precise the calculation will become.
Note: If at any time you wish to revert back to the automatically determined tempo, hold the Shift
key while clicking on the BPM display.
» BPM Entry
If you happen to know the BPM of a song, you can manually enter it into the BPM display, thus
overriding the tempo detected by Torq.
15
15
1. Hold the Shift key and double-click on the BPM display.
2. Type in a new BPM value from your computer keyboard and press Enter.
3. The new BPM will then be set for the song.
Note: If at any time you wish to revert back to the automatically determined tempo, hold the Shift
key while clicking on the BPM display.
Key
The Key Adjust is used to raise or lower the Key of a song without changing the tempo. This is useful when
attempting to match the melodies of songs in both Decks during a mix, known as key-matching. You can adjust the
key of a song with the Key Adjust buttons or by dragging the up or down on the Key Display.
< Fine Tuning
1. Click and hold the mouse cursor over the Key Display number.
2. Drag the mouse up or down. The number will adjust in increments of one cent.
Note: To reset the key transposition to 0, hold down the Shift key on your computer keyboard and click on
either of the Key Adjust buttons’ Key Displays. If you have adjusted the key in finer increments, the key will
be reset to 0, however the fraction will remain. For example, if the key is 4.23, resetting will make it 0.23.
< Key/Speed Lock
The Decks in Torq LE have the special ability to change the playback speed of the song without changing
the pitch of the song (this is known as time-compression and time-expansion). This means you don’t have to
worry about music changing pitch as you beat-match. However, if you would like to disable this feature and
essentially lock the Key and Speed of the music together, turn on the Key/Tempo Lock button. With this on,
the music will behave like a regular vinyl record (slowing down the music will make the music drop in pitch).
Page 17

Torq LE User Guide » Chapter 1
Torq LE User Guide » Chapter 3
< MIDI Slider/Knob Control
MIDI control of the Key Adjust is different from other controls in Torq. You can assign a knob or slider to the
Key Adjust, or you can assign keys on your MIDI keyboard—the behavior of the Key Adjust is dependent on
your control method.
1. Right-click (CTRL-click, Mac) on the Key Display; it will turn red indicating that it’s waiting for an
assignment.
2. Move a MIDI knob or slider on your MIDI controller. This will automatically assign the knob or slider to
the Key Adjust.
3. The Key will be adjustable in one-semitone steps.
4. MIDI CC value 64 equals + 0 semitones. This generally means when the knob or slider of your MIDI
controller is at center position, the Key will be at 0.
< MIDI Button Control
1. Right-click (CTRL-click, Mac) on the [+] Key Adjust button. It will turn red indicating that it’s waiting for
an assignment.
2. Press a button on your MIDI controller to assign it to the [+] Key Adjust button.
16
16
3. Right-click (CTRL-click, Mac) on the [-] Key Adjust button. It will turn red indicating that it’s waiting for
an assignment.
4. Press a button on your MIDI controller to assign it to the [-] Key Adjust button.
5. Now that your buttons are assigned, press the button assigned to [+]. The Key will move up one
semitone.
6. Now press both buttons simultaneously.
7. The Key Adjust will return to 0.
< MIDI Keyboard Control
1. If you have an additional MIDI controller keyboard attached, make sure that it has been properly installed
and is configured to work with Torq LE. Please see chapter 6 for more information about configuring
your MIDI keyboards to control Torq.
2. Right-click (CTRL-click, Mac) on the Key Display. It will turn red indicating that it’s waiting for an
assignment.
3. Press a key on your MIDI keyboard. This key will automatically be assigned as the “root key” of the Torq
Key Adjust.
4. If you press a MIDI key that is 1 semitone ABOVE the root key, the Deck’s Key will be changed to +1
(semitones).
5. If you press a MIDI key that is 2 semitones BELOW the root key, the Deck’s Key will be changed to -2
(semitones).
6. The range of Key transposition is plus or minus (+/-) 12 semitones. This makes it possible to control the
Key Adjust of both Decks using a single MIDI controller keyboard, as long as the keyboard has enough
keys to make up four (4) octaves.
Note: Torq LE will allow notes from the same controller and same MIDI channel to be used as long as
the root keys are at least two octaves apart.
Page 18

Torq LE User Guide » Chapter 1
Torq LE User Guide » Chapter 3
Sync Button
The Sync button provides an automatic method of synchronizing the beat and BPM of one Deck to the other.
When you engage Sync on a Deck (the Sync icon is on), it will change that Deck’s tempo to match the other Deck.
Furthermore, when you press Play, Torq will align the song to the phase of the other. Essentially, the Synced Deck will
be “slaved” to the other Deck (which would be the “master”).
Sync will remain active until you turn it off by clicking the Sync button again. While Sync is active, the Deck will be
affected by tempo changes made to the opposite Deck. If you slow down the “master” Deck, the “slaved” Deck will
also slow down in kind. If you attempt to scratch or re-align the “slaved” Deck, Torq will automatically snap it back into
alignment to match the phase of the “master” Deck.
When you turn Sync off on a Deck, it will keep the tempo setting allowing the song to keep playing in time with the
other Deck. However, Torq LE will no longer attempt to keep the two Decks in sync if you make changes to them.
Torq will no longer snap the songs back into alignment if you move one of them, nor will Torq continue to match
tempos if you change them.
Nudge Buttons
If you’re not taking advantage of Torq’s ability to keep tracks aligned using Sync, you can do it manually using the
Nudge buttons. If you hear a song become ahead or behind the other, the Nudge buttons will allow you to push the
song back into alignment by creating a small change to the playback speed of the song. If the song is ahead of the
beat, press the right Nudge button to slow it down. You’ll see the waveforms of the two songs move in relation to
each other. Release the Nudge button once the songs are aligned properly and the original playback speed will be
restored.
17
17
Note: The behavior of the Nudge buttons can be reversed in the Preferences if you prefer the song to speed up
when pressing the right Nudge button.
Offset Buttons
Sometimes when mixing two songs together, you may find that the beats are aligned with each other, yet the two
songs are still out of phase. This is most obvious when one song is offset by one beat, causing the snare drums of
the tracks to be out of alignment. The Offset buttons can be used to correct this. Pressing these buttons will make
the Now Line jump forward or back by one beat-length.
Note: If you have the Sync Mode set to “Bar” in the Preferences, the Offset buttons will have no effect when the
Deck’s Sync button is on. This is because Torq LE will counteract a one-beat offset when set to Bar mode. If you
want to offset the music by one beat when Sync is on, you’ll need to offset the Phase Grid, which is explained later
in the section titled “Synchronization.”
Page 19

18
18
WAVEFORM DISPLAY
ne of the most prominent features of the Torq LE user interface is the
O
above the Mixer and Effect Racks. Unlike the smaller Overview Waveforms found in
each Deck, the Scrolling Waveforms only show a few seconds of the current song
before and after the current play position. The song in Deck A (on the left) is shown
at the top of the Scrolling Waveform display. Deck B (on the right) is shown at the
bottom of the window. While the Now Line moves from left to right within the smaller
Overview Waveform Display as a Deck plays, the Now Line remains fixed in the
Scrolling Waveform window while the waveforms move behind it.
Information Shown on Display
So what purpose do these Scrolling Waveforms serve, other than looking really cool?
Answer: They offer you a way to visualize the alignment and synchronization of the
two Decks as well as providing some other important information:
Scrolling Waveform Display, which takes up a decent amount of real estate
Waveform
By looking at the audio waveform itself, you can see where the beats are in the
song. These sharp hits (transients) typically look like long, thin spikes in the
waveform. In the picture below, you can see the heavy bass drum beats of both
songs in the Scrolling Waveforms.
Chapter
Chapter
4
WAVEFORM DISPLAY . . . . . . . 18
Information Shown on Display . . .
Waveform . . . . . . . . . . . .
Loop Points . . . . . . . . . . .
Cue Points
Phase Grid
Playback Manipulations
Vinyl Mode
Hybrid Mode
CDJ Mode
1
. . . . . . . . . . . 19
. . . . . . . . . . . 19
. . . . . . 19
. . . . . . . . . . . 19
. . . . . . . . . . 20
. . . . . . . . . . . 20
18
18
19
When the drums stop, you’ll notice that the tall spikes go away. This is how you
can tell if a breakdown or slow section of the song is approaching. By the same
token, you’ll also be able to see where the drums come back in again.
English
English
Page 20

Torq LE User Guide » Chapter 1
Torq LE User Guide » Chapter 4
Loop Points
The Loop Points of the song (set with the Loop In/Out buttons or the QuickCue buttons) will be shown on the
Waveform. The looped area of the music will appear in a lighter shade compared to the rest of the waveform.
Cue Points
If you’ve used the Cue button or QuickCue buttons to place various Cue Markers in the song, you will see them
here. The QuickCue markers have numbers above them (corresponding to the assigned QuickCue button) and the
standard Cue Point appears as an orange line.
19
19
Phase Grid
Torq LE superimposes a Phase Grid over the Scrolling Waveforms to indicate the location of the beats in a song. The
thicker lines in the Phase Grid indicate the locations of the downbeats in the music. Torq will attempt to position the
Phase Grid in the proper location as part of the analysis when loading a song into a Deck. Torq uses the position of
the Phase Grid to properly synchronize the song.
Playback Manipulations
The Waveform Display allows you to manipulate the song playback in a variety of ways using your mouse. The method of
control differs depending on the control type you have selected for the Deck (Vinyl/CDJ/Hybrid).
Vinyl Mode
With this mode selected, using the mouse on the waveform will work in a similar fashion to using your hand on a
turntable.
1. Click and hold the mouse on the waveform. Playback will stop, as if you have placed your hand on a record to
stop it.
2. Continue holding the mouse button, then drag the mouse left and right. This will scrub, or “scratch,” the
song.
3. Releasing the mouse button will cause the Deck to play the song back from the current location.
Page 21

Torq LE User Guide » Chapter 1
Torq LE User Guide » Chapter 4
Hybrid Mode
With Hybrid mode active, the waveform will respond exactly like the CDJ mode while the Deck controls (Play/Pause,
Cue, etc.) behave like Vinyl Mode.
1. Click and hold on the waveform. The music will continue to play
2. While holding on the mouse button, drag the mouse left. The playback tempo will be momentarily increased,
making the waveform scroll a little faster to the left.
3. Now hold and drag the mouse to the right. Playback will remain going forward, but the tempo will be slowed
slightly, resulting in a waveform that still scrolls right to left, but at a slower rate.
4. As soon as you stop dragging, playback will return to its original tempo even if you are still holding the mouse
button.
CDJ Mode
With this mode selected, the waveform will not be “scratched” with the mouse. Instead, mouse movements will simply
nudge the music ahead or behind by a small amount.
1. Click and hold on the waveform. The music will continue to play
2. While holding on the mouse button, drag the mouse left. The playback tempo will be momentarily increased,
making the waveform scroll a little faster to the left.
20
20
3. Now hold and drag the mouse to the right. Playback will remain going forward, but the tempo will be slowed
slightly, resulting in a waveform that still scrolls right to left, but at a slower rate.
4. As soon as you stop dragging, playback will return to its original tempo even if you are still holding the mouse
button.
Page 22

21
21
SYNCHRONIZATION
t most of today’s dance clubs and events, the DJ will mix the songs together
A
between two songs while keeping them perfectly in beat with one another. If done
properly, the audience will never have to stop dancing as the beat of one song will
blend in with the beat of the new song—sounding like one single song. DJs will do this
for hours at a time, creating one gigantic non-stop mix from the individual songs they
have in their collection. Proper execution of this technique requires the mastery of two
tasks: matching tempo and matching phase.
Automatic Tempo and Phase Detection
As mentioned before, tempo is the measurement of speed of a song expressed as
BPM. Torq automatically determines the tempo of a song when you load it onto a
Deck, so matching tempos is as simple as moving the Speed slider on a Deck until
the BPM Display shows the same value as the other Deck.
Once you have matched the tempos of two songs, you need to start both songs at
precisely the right moment, or in-phase with each other. Phase refers to the starting
point within a cycle. In terms of music, it refers to where the beats are located in
a song, such as the downbeat of a measure. When beat-matching songs, you’ll
normally want the downbeats of both songs aligned with each other. When aligned
properly, the beats of both songs will blend together into one larger beat. If the songs
are misaligned or out-of-phase, it will sound terrible as the beats of the two songs
will be playing at different times (in DJ jargon, this is known as a “train wreck” and is
something that should be avoided at all times).
using a technique called beat-matching. The goal is to fade the volumes
Chapter
Chapter
5
SYNCHRONIZATION . . . . . . . . 21
Automatic Tempo and Phase
Detection
Phase Grid Manipulations
Adjusting with the M ouse
Adjusting with Nudge
Buttons
Adjusting with Of fset
Buttons
Sync Button . . . . . . . . . . . . .
Locked Sync
Momentary Sync . . . . . . . .
1
. . . . . . . . . . . . . 21
. . . . . 21
. . . 22
. . . . . . . . . . . . 22
. . . . . . . . . . . . 22
23
. . . . . . . . . . 23
23
Torq’s Scrolling Waveforms will help you match the phases of the two songs. Not only
can you visually align the transients in the waveforms, you can also use the Phase
Grid for automatic synchronization.
Phase Grid Manipulations
Torq LE also places a Phase Grid over the Scrolling Waveforms to help you see
where the beats are, even during a breakdown or rhythmless intro of a song. In order
for Torq’s automatic synchronization to work, the Phase Grid will need to be aligned
properly with the music. With the Phase Grids of both songs aligned properly, Torq
will be able to sync the two songs together without creating train wrecks. Torq will
attempt to place the Phase Grid in the proper location during song analysis. If Torq
positions the Grid incorrectly, it will be up to you to re-align it to the proper beat.
English
English
Page 23

Torq LE User Guide » Chapter 1
Torq LE User Guide » Chapter 5
When a mis-alignment occurs (as seen above), you’ll see that the grid does not line up with the beginnings of the beats
(transients) in the waveform. In the example, the Phase Grid is too early, leaving a gap between the grid lines and the
transients in the waveform.
There are a number of ways to fi x a mis-aligned Phase Grid. Which method you choose to use will probably depend on
whether you’re comfortable using the mouse and keyboard, or whether you prefer to use external MIDI control. The results
are all the same, so choose whichever feels good for you.
Adjusting with the Mouse
1. Hold down the Shift key, then click-and-drag left or right with the mouse.
2. The Phase Grid will move left or right, following your mouse movements.
3. Once you have aligned the thicker “downbeat” marker of the grid to the downbeat of the music, release the
mouse button.
22
22
Note: You can turn on Caps Lock instead of holding Shift if you need to adjust the grid using just one hand.
Turn off Caps Lock when you’re fi nished so you can regain proper control of the waveforms.
Adjusting with Nudge Buttons
1. Hold down the Shift key, then click on one of the Nudge buttons.
2. The Phase Grid will move left or right depending on which Nudge button you click.
3. Use the buttons to align the thicker “downbeat” marker of the grid to the downbeat of the music.
Adjusting with Offset Buttons
1. Hold down the Shift key, then click on one of the Offset buttons.
2. Instead of making a small change to the Phase Grid, this will have the effect of moving the grid an entire
beat left or right. This is a quick way to fi x the Phase Grid if it happens to be aligned to the beats but has the
downbeat in the wrong location.
Page 24

Torq LE User Guide » Chapter 1
Torq LE User Guide » Chapter 5
Sync Button
The Sync button is an automatic method of synchronizing the beat and BPM of one Deck to another. When you engage
Sync on a Deck (the Sync icon is on), it will change that Deck’s tempo to match the other Deck. Furthermore, when you
press Play, Torq will align the song to the phase of the other Deck. Essentially, the synced Deck will be “slaved” to the
other Deck (which would be the “master”).
Locked Sync
Sync will remain active until you turn it off by clicking the Sync button again. While Sync is active, the Decks will
effectively be locked together. The slaved Deck will be affected by tempo changes made to the opposite Deck. If
you slow down the master Deck, the slaved Deck will also slow down in kind. If you attempt to scratch or re-align the
slaved Deck, Torq will automatically snap it back into alignment to match the phase of the master Deck.
Momentary Sync
When you turn Sync off on a Deck, it will keep the tempo setting allowing the song to keep playing in time with the
other Deck. However, Torq will no longer attempt to keep the two Decks in sync if you make changes to them. Torq
will no longer snap the songs back into alignment if you move one of them, nor will Torq continue to match tempos if
you change them. So if you just need to synchronize for a moment and wish for the music to run freely afterward, click
the Sync button once to turn it on, then click it again to turn it back off—the Tempo will be matched to the other Deck,
and you’ll be free to start and manipulate the music as you wish.
23
23
Page 25

24
24
EXTERNAL CONTROL
One of Torq’s greatest features is the ability to use external sources to control the
playback of your song files. In particular, you can use external MIDI hardware (such as
the X-Session Pro DJ controller) to control various features within Torq LE.
MIDI Prefs
The second tab of the Preferences contains the MIDI options. At the bottom of this
tab is a list of all the available MIDI input devices on your computer. Each device has
a “Yes/No” option to enable or disable it. Set the MIDI device to “Yes” if you wish
to use it to control Torq LE. Otherwise, set the device to “No” and Torq will ignore it
(allowing you to use it to control a different application).
Chapter
Chapter
6
EXTERNAL CONTROL . . . . . . . 24
MIDI Prefs . . . . . . . . . . . . . .
MIDI Learn
Creating a MIDI
Assignment . . . . . . . . . .
Clearing a MIDI
Assignment . . . . . . . . . .
Changing MIDI
Assignment . . . . . . . . . .
Keyboard Learn . . . . . . . . . . .
Assigning Buttons to Knobs or
Sliders . . . . . . . . . . . . . . . 25
Assigning Knobs or Sliders to
Buttons
1
24
. . . . . . . . . . . . . 25
25
25
25
25
. . . . . . . . . . . . . . 25
Once you have enabled a MIDI Input, you will be able to use it to control Torq LE by
means of MIDI Learn, which will be described next.
English
English
Page 26

Torq LE User Guide » Chapter 1
Torq LE User Guide » Chapter 6
MIDI Learn
Every musician approaches their craft from a slightly different direction. DJing is no different. That is why Torq LE is
basically a blank slate when run for the first time—there are no pre-set control assignments for any of the buttons, knobs, or
sliders seen on screen for you to memorize. Instead, you get to assign the most important controls for you to whatever MIDI
controls make the most sense to you.
Creating a MIDI Assignment
Torq LE uses a simple MIDI Learn scheme to make assigning controls on your MIDI controllers a breeze:
1. Right-click (CTRL-click on Mac) the button, knob, or slider you wish to control via MIDI. The control will be
highlighted in red indicating that Torq LE is standing by.
2. Move the desired control on your MIDI controller. That is, move the knob or slider you want to use or press
the button/key you wish to use.
3. Torq LE will intercept the incoming MIDI message and will instantly assign it to the control. The red highlight
will disappear and the MIDI control will be active.
Clearing a MIDI Assignment
If you’ve assigned a MIDI control using MIDI Learn and you wish to clear the assignment, simply right-click
(CTRL-click on Mac) the desired control in Torq LE, then press the Delete key on your computer’s keyboard. Any
assignments for the control will be erased.
25
25
Changing MIDI Assignment
If you assign a MIDI knob, for example, to the Low EQ in the Mixer, you can assign it to the Mid EQ by simply rightclicking (CTRL-click on Mac) the Mid EQ knob and moving the MIDI Knob. Doing so will clear the assignment to the
Low EQ knob and the MIDI control will now be mapped to the Mid EQ knob. This allows you to use a small controller
for Torq LE since you can continually reassign its controls without worrying about what the previous assignments
were.
Keyboard Learn
You can also use your computer’s keyboard to control elements of the Torq LE interface using the same method as MIDI
Learn above. Simply right-click (CTRL-click for Mac) on a control on screen, then press a key on your keyboard. That key
will then be assigned to the selected control. The same method for changing and clearing MIDI assignments described
above also works for keyboard assignments.
Assigning Buttons to Knobs or Sliders
If you so desire, you can assign a MIDI button/key or a key on your computer’s keyboard to a knob or slider in Torq’s
interface. When doing this, pressing the MIDI button or key will cause the knob or slider’s value to toggle between an
assignable minimum and maximum value. For example, assign the “X” key on your computer keyboard to the Low EQ knob.
Turn up the EQ to +6 using the mouse, then press the “X” key on your keyboard. The EQ will jump to 0. Press “X” again,
and the EQ will jump back up to +6.
Assigning Knobs or Sliders to Buttons
Conversely, you could assign a MIDI knob or slider to one of Torq’s buttons. When doing this, the button will turn on
anytime the knob or slider is turned past its halfway point (outputting a MIDI value greater than 64). The button will turn
back off when the knob or slider is moved lower than its halfway point.
Page 27

26
26
BROWSER/DATABASE
DJ’s most important asset, beyond the gear he uses, is his collection of music.
A
dominate a dance floor. Anyone who has been DJing for even a short while will have
amassed a decent collection of songs, and finding those songs quickly is the job of
Torq LE’s Browser and Database.
The Browser is very similar to the navigation methods employed by your computer’s
operating system. The Browser will allow you to explore the contents of all your hard
drives (internal and external), connected MP3 players (such as iPods), and audio
CDs. You can then add music folders to the Torq LE Database in order to search for
songs using keywords or sorting techniques, which makes finding your music much
easier than thumbing through CD wallets or crates of vinyl. Torq LE also supports the
building of playlists which will allow you to preselect a series of songs to use in a later
performance—and Torq LE will even document all of the songs you play in a set for
later review (the Session Playlist).
This section will show you how to navigate your hard drive(s) using the Torq LE
Browser, and how to add folders containing music files to the Database. It will also
explain how to search for particular songs, how to organize songs by categories for
easier viewing, and how to manage playlists.
Browser Pane
The Browser pane is located on the bottom left of the Torq LE interface. It allows you
to navigate drives, folders, and playlists through an easy-to-use file structure.
Without a wealth of top-notch tracks in his arsenal, a DJ is not equipped to
Chapter
Chapter
1
7
BROWSER/DATABASE . . . . . . . 26
Browser Pane . . . . . . . . . . . .
Database
File List
Editing Fields . . . . . . . . . .
Artist/Song Filename
Swap
Loading Songs into the
Decks . . . . . . . . . . . . . 30
Sorting the List . . . . . . . . .
Searching the List
Playlists . . . . . . . . . . . . .
Session Playlist
iPods
Drives . . . . . . . . . . . . . .
Audio CDs
. . . . . . . . . . . . 27
. . . . . . . . . . . . . . . 29
. . . . . . . . . . . . . 29
. . . . . . . 31
. . . . . . . . 35
. . . . . . . . . . . . . . 37
. . . . . . . . . . . 37
26
29
30
32
37
The Browser contains two standard headings, Database and Playlists, which are
shown at the top of the Browser pane. The Browser will also contain a listing of
each drive connected to your system—those drives will be listed by their names (for
example, “C:” or “Macintosh HD”). Finally, all connected media players will have an
entry along with any inserted CDs.
English
English
Page 28

Torq LE User Guide » Chapter 1
Torq LE User Guide » Chapter 7
Navigation in the Browser follows a few simple rules:
1. To view any songs contained in a folder, click on the folder’s name. If the folder contains music files, those files
will be displayed in the File List to the right of the Browser pane. If Torq LE cannot identify any playable music
files in the selected folder, the list will be blank.
2. To view any sub-folders, click the plus sign (+) next to a folder. A list will appear below the parent folder showing
all available sub-folders. To close this list, click the (–) in front of the parent folder.
Database
The Database is the first item displayed in the Browser pane. The Database is simply a collection of file folders
located throughout your computer system (even on external disk drives) used to make locating and organizing you
music more efficient. Once a folder is added to the Database, the songs it contains will be listed in the File List
whenever you click on the Database heading. If you have multiple folders assigned to the Database, all the files in
all folders will be listed simultaneously in the File List. Therefore, to use the Database efficiently, you’ll only want to
assign folders that contain music you’d like to spin.
< Adding Folders to Database
27
27
To add a music folder to the Database:
1. Use the browser to search for a folder.
2. Right-click on the folder you want to add.
3. Choose “Add to database” from the pop-up menu.
4. The folder will then be assigned to the Database (you can click the “+” in front of Database to see this
new folder listed beneath it).
5. Now, when you click on Database, the contents of the folder you just assigned will be listed in the File
List.
Page 29

Torq LE User Guide » Chapter 1
Torq LE User Guide » Chapter 7
< Adding Multiple Folders
You may find that one folder will contain many folders that you’d like to add to the Database. A great example
of this is when your music is automatically sorted by a program like Apple iTunes. Typically, there will be a
folder for each artist in your collection, and each of these folders will contain individual folders for each album
by that artist. Therefore, if you want to add all the music by this particular artist to the Database, you actually
need to add all of the individual album folders.
To make this easier, Torq LE includes an option for adding folders, including their subfolders, to the
Database:
1. Use the Browser to locate the folder containing the sub-folders you want to add.
2. Right-click (CTRL-click on Mac) the folder and select “Add folder to Database Recursively.” Torq LE will
automatically add the folder, along with all its sub-folders, to the Database.
< Adding Folders from Your OS
If you’d prefer, you can add folders to the Database by dragging them from your operating system into the
Torq LE Browser. You can do this using either Explorer for Windows or Finder for Mac.
1. Find your desired folders using the tools of your operating system (Explorer or Finder).
2. Click and drag the folder from the operating system into the Browser.
3. Release the mouse button and the folder will be added to the Database.
Note: You can also include the subfolders by holding the Alt key while dragging the folder into the
Database.
28
28
< Searching Specific Database Folders
Clicking on the Database heading will display every song contained in the Database in the File List to the
right of the Browser window. If you would like to confine your search to only a particular folder within the
Database:
1. Click the (+) in front of the Database heading. The list will expand to show all of the folders contained in
the Database.
2. Click on one of the folders. The File List will be updated to only show the songs contained in that
specific folder.
< Removing Folders from Database
There are two ways to remove folders from the Database. You can either search through the folders currently
listed within the Database and remove them, or you can locate the original folders on your hard drives to
remove them.
To remove folders directly from the Database:
1. Click the plus sign next to the Database. This will drop down a list of all folders assigned to the
Database.
2. When you have found the folder you want to delete, right-click it.
3. Choose “Remove from database” from the pop-up menu. The folder will then be removed from the
Database while the original audio files will still remain on your hard drives.
To remove folders from the Browser:
1. Use the Browser to locate the original folder on your computer.
2. Right-click the folder to display the pop-up menu.
3. Click “Remove from Database” to remove this folder only. If the folder contains sub-folders that are part
of the Database, they will remain in the Database.
4. Click “Remove from Database Recursively” to remove this folder, along with all of its sub-folders, from
the Database.
Page 30

Torq LE User Guide » Chapter 1
Torq LE User Guide » Chapter 7
File List
The window to the right of the Browser pane is called the File List. If you have selected a source in the Browser that
contains music (such as the Database or an individual folder), the songs contained therein will be listed here. The File List
not only shows you the name of the song, but also shows the artist name, album name, track number, genre, and other
fi elds contained within the song’s ID3 tag. These additional categories can help you fi nd song with greater effi ciency.
Note: While ID3 tags will support storage of the information listed above, it is common to fi nd music fi les with some (if
not all) of the ID3 fi elds blank. Even if the music fi le does not contain information for all categories, you are still able to fi ll
in the missing info by hand in order to aid in searching through your fi les.
Editing Fields
Torq LE will extract the relevant song information from the fi le’s ID3 tag in order to populate the fi elds of the File List
as described above. You are free to edit the information shown in the File List simply by double-clicking a fi eld and
typing in new data.
It is important to note that Torq LE does not update the song’s ID3 tag with your edits. Instead, your edited fi elds
are stored in a special fi le with the same name as the song, but with the extension “.tqd” at the end. This is the Torq
LE Data fi le. By saving your edits to the TQD fi le, Torq LE can save your changes much faster (changing an ID3 tag
requires re-writing the entire audio fi le, something that could affect system performance during live use). Additionally,
the audio fi le could become corrupted during the re-write process. So, Torq LE leaves your precious music fi les
untouched by saving data to the TQD fi le.
29
29
Artist/Song Filename Swap
Occasionally the ID3 tag information of a song (described above) may contain incomplete song information. In the
worst case, the ID3 tag may not even contain the name of the song or the artist who wrote it. When this happens,
Torq LE will list “blank” audio fi les (they will look blank in the File List, but you’ll still be able to load them and play
them). Obviously, it’s almost impossible to tell which fi les you’re working with in this situation, so Torq LE will allow
you to swap out the Song and Artist categories with one larger Filename category:
1. Right-click (CTRL-click on Mac) on the Artist or Song category heading.
2. The Artist or Song category will then be replaced with a single “Filename” category that will display the
fi lename of the song rather than the artist and song information contained in the ID3 tag.
3. To revert back to the Artist and/or Song categories, right-click (CTRL-click on Mac) on the “Filename”
category again.
Page 31

Torq LE User Guide » Chapter 1
Torq LE User Guide » Chapter 7
Loading Songs into the Decks
To load a song from the File List into one of Torq’s Decks, you have a couple options.
< Click and Drag
1. Click and hold on the desired song in the File List. It will become highlighted.
2. While continuing to hold the mouse button, drag the song up into either of Torq’s Decks.
3. Once the song is over your desired Deck, release the mouse button and the track will be loaded into the
Deck.
Note: You can also drag the song onto the Scrolling Waveforms. Dragging the track onto the top waveform
will load it into Deck A at the left. Dropping the track on the lower waveform will load it into Deck B at the
right.
< Function Keys
1. Click on the desired song in the File List. It will become highlighted.
2. Press F1 to load the song onto Deck A or press F2 to load the song onto Deck B.
Note: This technique can be extremely helpful when using the Full Browser View (F6) which hides the
Decks from view. Also, if using a Mac laptop computer, you may need to hold the Fn key while pressing the
function keys in order for these features to work.
30
30
Sorting the List
There are eight categories displayed across the top of the File List window: Artist, Song, Album, Track # (Track
Number), BPM (Beats Per Minute), Genre, Length, and Comment. These categories are taken from the ID3 tags
of your music files or, in the case of song length and BPM, calculated as part of Torq’s file analysis. An ID3 tag is a
standard format for storing additional information within a music file.
You can sort the contents of the File List by clicking on any one of the categories at the top of the window. For
example, if you click the “Album” category, the File List will be sorted alphabetically (A to Z) by Album name. If you
click “Album” again, the order will be reversed (Z to A). You could also click on the BPM column to sort all your songs
by their BPM. This can be very useful when looking for songs of a similar BPM.
Click the Reset button to return to the default sort order.
Page 32

Torq LE User Guide » Chapter 1
Torq LE User Guide » Chapter 7
Searching the List
The simplest method for searching is to type a keyword (or keywords) into the Search field above the Database/
Browser:
1. Click the Database heading in the Browser pane to select it.
2. Click in the Search field and type in your search term(s). Terms can include an artist’s name, a song title,
BPM, etc.
3. As soon as you start typing, Torq will begin searching the Database for the letters you have typed. There is
no need to hit the Enter key on your keyboard.
4. When you stop typing, you’ll have a list of all files that contain the search term in one of its fields.
For example, if you type the word “love” into the search field, Torq could return the following results:
Artist* Song Album
Deee-Lite Power of Love World Clique
Jennifer Love Hewitt Can’t Stand in the Way of Love Let’s Go Bang
Love and Rockets Angels and Devils Express
Madonna I’d Rather Be Your Lover Bedtime Stories
Sade Flow Lover’s Rock
31
31
< Search Categories
As you can see, the above search worked—it found songs that contained the word “love” in any category.
However, this may not be quite what you were looking for. You may have actually wanted files with “love” in
the song’s name only. To search for such titles, you’ll need to confine the scope of the search to the Song
category only.
To confine a search to a particular category:
1. Hold down the SHIFT key and click a category name. The category name will turn red.
2. Torq will refine its search results and only show songs that contain your search term within the selected
field.
3. You can hold SHIFT and click additional categories if you wish (i.e. you can select Song and Album
simultaneously).
4. SHIFT-clicking a selected category will de-select it.
Using our example above, confining the search to the Song category would yield the following results:
Artist* Song Album
Deee-Lite Power of Love World Clique
Jennifer Love Hewitt Can’t Stand in the Way of Love Let’s Go Bang
Madonna I’d Rather Be Your Lover Bedtime Stories
Now, only the songs with “love” in their titles are shown.
Page 33

Torq LE User Guide » Chapter 1
Torq LE User Guide » Chapter 7
< Ignore Field
Torq offers another method for refi ning your searches by means of the Ignore fi eld. Here, you’ll enter terms
that you want Torq to omit from the search results. The Ignore command will only be applied to the currently
selected categories (explained above).
To omit terms from the search results:
1. Click to put a cursor in the Ignore Field.
2. Type in the term you would like to fi lter out of the search.
3. Torq will display only the songs that contain the information required in the Search fi eld while omitting
the songs that fi t the criteria of the Ignore fi eld.
Again, using the example above, entering the term “Lover” into the Ignore fi eld will return the following list:
Artist* Song Album
Deee-Lite Power of Love World Clique
Jennifer Love Hewitt Can’t Stand in the Way of Love Let’s Go Bang
You’ll see that, as a result, “I’d Rather Be Your Lover” has been removed from the list.
*Note: Reference to artists and bands is for informational purposes only and does not imply an endorsement or
sponsorship of Torq by such artists or bands.
32
32
< Reset Button
When you are done with your search and are ready to begin a new one, press the Reset button. This will
clear the Search and Ignore fi elds as well as deselect any categories that had been previously selected.
Playlists
While many DJs will perform “off-the-cuff” without any previous rehearsal or forethought, other DJs will “pre-program”
their sets, either due to the complexity of the set or simply as a method for remembering vital songs (this can be
helpful for wedding or party DJs who take requests).
Torq features Playlists to help you organize and store lists of songs. You can create and manage multiple Playlists,
each with as many songs as you like. Each Playlist can then be edited by adding or deleting tracks, or by rearranging
their order within the Playlist.
Page 34

Torq LE User Guide » Chapter 1
Torq LE User Guide » Chapter 7
< Creating New Playlists
To start, you must create a new Playlist as follows:
1. Right-click (CTRL-click on Mac) on the Playlists heading in the Browser and choose “New Playlist”
from the pop-up menu.
2. A new Playlist titled “Empty Playlist” will appear below the Playlist heading (click the plus sign in front
of Playlists in order to see this list).
Note: If there is already an “Empty Playlist” in the list, a number will be appended to the name to
differentiate it from the other(s), i.e. “Empty Playlist 1.”
< Rename Playlist
1. Right-click (CTRL-click on Mac) on your desired Playlist and choose “Rename Playlist” from the pop-up
menu.
2. Type in the new name you would like to give the Playlist and hit the Enter key on your computer
keyboard.
3. The Playlist will display its new name.
< Deleting a Playlist
1. Right-click (CTRL-click on Mac) on the Playlist and choose “Delete Playlist” from the pop-up menu.
33
33
2. The Playlist will be removed from the list in Torq LE. It will still be on your computer, however, stored in
the “Deleted Playlists” folder. These Playlists will be kept for up to 30 days, then permanently deleted.
< Duplicating a Playlist
If you like a particular Playlist and would like to build a new one based upon it, you can duplicate (or copy) it
for future modification.
1. Right-click (CTRL-click on Mac) the Playlist you would like to duplicate and choose “Duplicate Playlist”
from the pop-up menu.
2. A duplicate of the selected playlist will be created and displayed underneath it.
3. A number will be added to the name of the Playlist to differentiate it from the original. Of course, you
can rename this Playlist using the method described above.
< Adding Songs to a Playlist
Once you have created and selected a Playlist, you’ll begin adding files to it using the following procedure:
1. Using the Browser or Database, locate the song you’d like to add to the Playlist.
2. Right-click (CTRL-click on Mac) the song name and select “Add to Playlist” from the pop-up menu.
3. The song will be added to the bottom of the Playlist.
< Removing Songs from a Playlist
You can remove songs from a Playlist as follows:
1. Right-click (CTRL-click on Mac) the song in the Playlist you wish to delete.
2. Select “Remove from Playlist” from the pop-up menu.
3. Torq LE will remove the song from the Playlist, but the song will remain in the Torq LE Database (it will
not be deleted from your computer).
Page 35

Torq LE User Guide » Chapter 1
Torq LE User Guide » Chapter 7
< Reordering Songs in a Playlist
The order in which your songs are displayed in the Playlist can be changed.
1. Click and drag the song up or down in the list.
2. If you drag the song on top of another existing song, releasing the mouse button will cause the song to
be inserted above the song in the list.
< Activating a Playlist
When you select a Playlist, Torq LE runs a quick scan of your computer’s drives to ensure all the audio files
referenced by the Playlist are present on the computer. If Torq cannot locate one or more of the songs from
the Playlist (possibly because the drive containing the song is no longer connected to the computer, or the
source file has been deleted), a pop-up dialog will appear with the following message: “Cannot find one or
more of the files used in this Playlist. What would you like to do?” You will then have a choice of clicking one
of the following buttons.
» Ignore: Clicking this button will allow the Playlist to load, however all missing songs will be displayed in
red in the File List window.
» Auto-scan: Clicking this button will cause Torq LE to search all hard drives connected to your
computer in an attempt to find the missing file(s). If a file is found with the same name but in a different
location, another dialog box will appear with the following message: “Would you like to use this file for
[name of missing file]?”
34
34
1. By choosing “Yes,” Torq LE will use the file and automatically assume that the rest of the missing
files will also be in this same folder. Once found, these files will automatically be loaded. If the
other missing files are not in this location, Torq LE will continue searching the computer until
another file is found.
2. Choosing “No” will allow the search to continue for another possible file in a different location.
3. If the search completes without finding the proper file, a dialog box will appear with the following
message: “Cannot find [name of missing file].” When you click “OK” Torq LE will display the file in
red in the File List, indicating that the song cannot be played. If there are other files to search for,
the search process will continue.
» Manual: Clicking this button will open a standard operating system dialog box that will allow you
to manually search for the audio file on your hard drive(s). Although you are searching for a specific
missing file, it is possible to select any audio file to be used in its place. If you choose a file that is
different than the missing file shown in the File List, the ID3 tag info for the new file will be shown (in
the Playlist) in place of the original song.
< Saving a Playlist
Torq LE can also export your Playlists into standard .m3u playlists for use within other programs:
1. Select the Playlist you wish to save.
2. Right-click (CTRL-click on Mac) the Playlist and select “Save Playlist” from the pop-up menu.
3. A standard dialog box will open allowing you to choose a location and name for the file. Press Enter
when done.
4. The Playlist will be saved to disk.
Page 36

Torq LE User Guide » Chapter 1
Torq LE User Guide » Chapter 7
< Loading a Playlist
Torq LE can import Playlists created by other programs if they conform to the .m3u fi le format. To load one of
these Playlists:
1. Right-click (CTRL-click on Mac) the Playlist’s heading in the Browser pane.
2. Select “Load Playlist” from the pop-up menu.
3. A standard dialog box will open, allowing you to locate and select a Playlist.
4. Once selected, the Playlist will be imported into Torq and Torq will begin checking for the necessary
fi les (explained above).
Session Playlist
The Session Playlist is an automatic Playlist that keeps track of every song you’ve played since you launched Torq
LE. This is handy when you need to see if you’ve played a song already, or if you need to reference a list of what you
played at a previous gig.
An empty Session Playlist is created each time you launch Torq LE. It is named “Session Playlist YY-MM-DD” where
YY-MM-DD represents the year, month, and day of the Playlist, respectively. Each song you load into a Deck will
automatically be added to the bottom of the Session Playlist.
35
35
Note: If a Playlist already exists with the current date, a number will be appended to differentiate it.
Note: Torq LE will only store Session Playlists for the last 30 days. Any Session Playlists that are older than 30 days
will be automatically deleted in order to keep your hard drive from becoming overpopulated with Playlists.
< Rename the Session Playlist
If you fi nd that you’d like to permanently keep a Session Playlist, all you have to do is rename it. Once
renamed, the Playlist will be moved from the pool of Session Playlists and be kept with your normal Playlists.
To do this:
1. Right-click (CTRL-click on Mac) on the Session Playlist and choose “Rename” from the pop-up menu.
2. Type in a new name for the Playlist and press Enter.
3. The Playlist will be saved. If you renamed the current Session Playlist, a new Session Playlist will be
created that will track all songs played from that point onward.
< Deleting Session Playlists
You can delete the Session Playlists using the same method for deleting standard Playlists. If you delete the
current Session Playlist, a new one will be created that will track all songs played from that point forward.
Page 37

Torq LE User Guide » Chapter 1
Torq LE User Guide » Chapter 7
iTunes
iTunes is a free media player available from Apple for both Mac and Windows computers (www.itunes.com). It
provides an excellent way to download, organize, and rip music as well as interfacing with Apple’s famous portable
media player, the iPod.
Torq LE can interface with iTunes, providing you instant access to your entire collection of music and playlists without
having to manually add folders to the Database. Furthermore, any updates or changes that you make to your iTunes
Library or Playlists will automatically be refl ected in Torq LE.
< Library
The iTunes Library is the entire collection of music and videos currently managed by iTunes. You can browse
and search the iTunes Library by clicking the plus sign in front of the iTunes heading in the Browser, then
clicking the Library heading. The contents of the Library will be shown in the File List.
36
36
Note: If you have an especially large iTunes Library, it may take a moment for Torq LE to read the entire
contents of the Library the fi rst time you select it in a Torq session
Once you’ve clicked the Library heading, you can search and sort the Library contents in the same manner
as the Database (described earlier).
< Playlists
iTunes also supports the creation and editing of playlists, but they are a different format from the .m3u
format used by Torq LE. Not to worry—Torq can still access these playlists through the iTunes heading in the
Browser. Simply click the plus sign in front of Playlists to view them. Click on an individual Playlist to see its
contents in the File List.
< Searching iTunes with the Database
Torq LE can also automatically add the contents of the iTunes Library to the Database. That way, when you
click the Database heading in the Browser, you’ll get the fi les from all folders assigned to the Database as
well as all fi les within the iTunes Library. To enable this feature:
1. Open the Preferences.
2. Click the Misc tab.
3. Next to “Search iTunes Library with Database,” select “Yes.”
4. Close the Preferences.
5. Torq will now include the contents of the iTunes Library when you click the Database heading.
Page 38

Torq LE User Guide » Chapter 1
Torq LE User Guide » Chapter 7
iPods
Torq LE also allows direct access to the contents of any connected iPod (excluding the iPod Shuffl e). When an iPod
is connected, it will be listed in the Browser window.
Like the iTunes Library above, the contents of the iPod can be searched using the Library or Playlist headings. You
can also include the contents of the iPod in the Database by doing the following:
Note: If you are connecting an iPod to your computer after Torq LE is already running, you will need to refresh the
Browser window in order to see the new iPod in the Browser list. To do this, press F5 on your computer’s keyboard
or click the “Browser” heading at the top of the window.
1. Open the Preferences.
37
37
2. Click on the Misc tab.
3. Next to “Search iPod With Database,” select “Yes.”
4. Close the Preferences.
5. Torq LE will now include the songs from the iPod the next time you click the Database heading.
Note: If using an iPod with a large collection of audio fi les, it may take Torq LE a moment to download the entire
music list the fi rst time you try to access it during a Torq LE session.
Also keep in mind that Torq LE streams the music directly off the iPod. You cannot disconnect the iPod until you
are done playing any music contained on it.
Drives
Torq LE can also search any hard drives connected to your computer, whether they are internal hard drives or external
ones. Every drive available to the system will be listed in the Browser by name. Click the plus sign in front of the
drives to explore the contents of the drives. You can add folders from external drives to the Database using the same
methods described earlier.
Note: If you are connecting an external hard drive to your computer after Torq LE is already running, you will need
to refresh the Browser window in order to see the new drive in the Browser list. To do this, press F5 on your
computer’s keyboard or click the “Browser” heading at the top of the window.
Audio CDs
Torq LE can also play music from audio CDs inserted into your computer’s CD drives. Click on the Audio CD heading
in the Browser to choose an audio track from the CD.
Because Torq LE must rip the audio from the CD into a temporary fi le on your computer, it will take longer for the
song to be ready to play after loading it onto a Deck. This increased load time is normal.
Note: If you are inserting an audio CD into your computer after Torq LE is already running, you will need to refresh
the Browser window in order to see the new disc in the Browser list. To do this, press F5 on your computer’s
keyboard or click the “Browser” heading at the top of the window.
Page 39

38
38
MIXER
tep one when DJing is controlling the music. That’s what Torq’s Decks are
for. Step two is blending, or mixing, the music together. As you’d expect, Torq
S
LE has a section for that, too. While existing in software, Torq’s Mixer sounds and
behaves just like a top-of-the-line hardware mixer. It is therefore instantly familiar to
anyone who has used a mixer before, and it is capable of performing the same tricks
and techniques utilized by DJs on traditional hardware mixers.
Mixer Architecture
Before you start tweaking knobs and sliders on the Mixer, you should have a basic
understanding of the components in the mixer and the signal flow between the
components. Without this basic understanding, some controls may seem to be
misbehaving or completely inoperative, only because you’ve unknowingly set another
control to a conflicting position. Additionally, there are some terms you should get to
know, as they will be used repeatedly throughout this User Manual.
Channels
When audio from a Deck enters the Mixer, it enters a channel. A channel is a
section within a mixer that processes a single audio signal. Since Torq LE has
two Decks, the Mixer has two channels, one for each Deck. While the signals
from both Decks enter the same mixer, they remain separate in their respective
channels, allowing you to process them differently before mixing them together
into a single channel (which is what your audience hears).
Chapter
Chapter
8
MIXE R . . . . . . . . . . . . . . . . . 38
Mixer Architecture
Channels
Gain /Mute
EQ/ Kills . . . . . . . . . . . . .
PFL/Headphone Cue
Channel Volume Faders . . . .
Crossfader
1
. . . . . . . . . 38
. . . . . . . . . . . . 38
. . . . . . . . . . . 38
39
. . . . . 39
40
. . . . . . . . . . . 40
Gain/Mute
When audio from a Deck enters a channel in the Mixer, the first thing it runs into
is the Gain control (seen at the top of each channel in the mixer). This knob will
increase or decrease the volume of the incoming audio signal, allowing you to
boost the level of quiet songs or reduce the level of loud ones. This is a basic
step in both maintaining high-quality audio and matching the levels of the two
songs you’re mixing together.
Torq’s Gain knobs will boost the incoming signal by up to 6dB, or will cut it by
as much as 12dB. The “X” button next to the Gain knob is the Mute button.
Activating this button will mute the incoming audio—resulting in a silent channel.
English
English
Page 40

Torq LE User Guide » Chapter 1
Torq LE User Guide » Chapter 8
EQ/Kills
Next in the signal chain is the Equalizer, or EQ for short. While the Gain knob (above) increases or decreases the
level of the entire audio signal in the channel, an EQ increases or decreases the level of only a specific frequency
range within the audio signal. Torq LE is equipped with a 3-band EQ, meaning it can control the levels of three
different frequency ranges (bands), named High, Mid, and Low.
The 3-band EQ is comprised of three knobs and three buttons arranged vertically in each mixer channel. Naturally,
the High EQ is above the Mid EQ, which is above the Low EQ. The “X” buttons next to each EQ knob is a Kill.
Activating these buttons will completely remove, or kill, the associated frequency band from the audio—activating all
three at the same time will therefore completely mute the audio signal.
EQ may very well be the most powerful tool on the DJ mixer (though some would argue that the crossfader is the
ultimate weapon). The EQ controls are used to (1) improve the sound quality of poorly recorded or produced songs,
(2) assist in matching the overall frequency content of two songs, (3) add emphasis to the music by removing or
isolating one or more of the frequency ranges, and (4) mix songs together in a “jigsaw” fashion by swapping the
frequency ranges of two songs as they play together.
Old songs typically don’t have as much bass as today’s tracks. Therefore, you’ll often use the Low EQ to boost the
bass (low frequencies) of the old song to match the louder bass of a recent song. Without doing this, it may sound
like the music gets quieter as you mix from the recent song to the older one.
39
39
Likewise, even tracks recorded within the same year can sound different from one another, even when playing at the
same volumes. This is usually because one song will have stronger Mid frequencies compared to the other. If the
bass parts in both songs sound like they’re the same volume, you can use the Mid EQ to “turn down” the louder song
until it more closely matches the quieter song.
DJs also like to mix things up during their sets by adding their own manipulations to the songs they play. For example,
a DJ might cut the High and Low frequencies from a track a few beats before the chorus of a song, then bring them
back right when the chorus starts (the perfect job for Torq’s High and Low Kill buttons).
When two songs are playing at the same time, you’ll frequently find that the music sounds muddy. This is normally
due to “uncomplementary” bass content in the two songs. This can be as simple as the two songs being in different
keys, or could occur if both songs have long, sustained bass notes. In order to clean things up, you can simply
remove the bass from one of the songs will one of the Low Kill buttons. This will leave the bass from the other song in
the mix, so it will still sound natural. When you’re ready, press both Low Kill buttons at the same time. This will kill the
bass in the other track while bringing in the bass from the other. This will sound like the bass part in the overall mix
has changed (which it has) and the mix will still sound full. You can also swap frequencies with the other frequency
bands. You can also make the swaps less abrupt by using the EQ knobs instead.
PFL/Headphone Cue
Once the audio signal leaves the EQ, it is sent to two different locations. One location is the PFL Button, which looks
like a pair of headphones. PFL stands for Pre-Fader Listen, which refers to hearing an audio signal without being
under the influence of the Volume fader (on some mixers, this function is called “Cue”). That definition may not make
sense if you’re not familiar with a mixer, so think of it as a way to privately hear the music in a mixer channel regardless
of what your audience can or cannot hear.
This is what a DJ uses to listen to the next song before he plays it for his audience. When you press the PFL button,
that channel is sent to the PFL section, which lets you hear the music through your headphones. This section is
described below.
Page 41

Torq LE User Guide » Chapter 1
Torq LE User Guide » Chapter 8
Channel Volume Faders
Besides going to the PFL, the audio leaving the EQ also goes to the Channel Volume fader. This is the primary
volume control for the channel (though it is subordinate to the crossfader) which works just like a volume fader on
a traditional mixer. You can match volumes of the two tracks using the Channel Volume faders. However, some DJs
prefer the technique of leaving the Channel Volume faders fully up—you then match the volumes of the songs using
the Gain knobs. The reason for this is that you’re then free to use the Channel Volume faders for other effects such
as volume fades, cuts, and stutter effects, similar to the scratch techniques used on the Crossfader. Whichever
approach you choose is entirely up to you.
Note: You can quickly return a Channel Volume fader to full volume by holding SHIFT and clicking on the fader.
Crossfader
After the audio leaves the individual mixer channels via the Channel Volume faders, the signals enter their respective
sides of the Crossfader. The Crossfader is the large horizontal fader just below the Mixer. As you will see, its name
is very appropriate as it allows you to fade between the two channels in a motion that goes side to side across
the mixer. When the Crossfader is in its middle location, you will hear both of the mixer channels. If you move the
Crossfader all the way to the left, you will only hear the channel for the left Deck. Similarly, if you move the Crossfader
all the way to the right, you will only hear the right Deck.
40
40
The Crossfader was invented to offer DJs an easy way to fade out of one song while fading in another while only
using one hand. Indeed, it still performs this task quite well. However, since its introduction, DJs have taken this
simple tool and transformed it into a virtual razor blade that allows them to perform lightning-fast cuts, scratches, and
a myriad of other techniques.
Note: Torq’s Crossfader has been designed to be very quick and responsive. However, if you are only using a
mouse to control Torq LE, you probably won’t be able to use the Crossfader for more than fading between songs.
If you want to use the Crossfader for cuts and scratching, we recommend you control the Crossfader using one of
the real Crossfaders found on M-Audio or SynchroScience MIDI controllers (such as X-Session Pro). The tactile
response of the Crossfader comprises part of the scratching technique.
< Crossfader Curve
Speaking of scratching, one of the improvements to crossfader design is an adjustable Crossfader Curve.
This refers to the rate at which the songs fade in and out as the crossfader is moved from one side to the
other.
At one extreme is the Equal Power Contour, which is good for slow fades between two songs. As you move
the fader from the edge toward the center, it will slowly fade in one song. However, as it is fading in this song,
it will also start fading out the other song. The end result is that the overall volume remains the same as you
fade, even when both songs are playing at the same time.
At the other extreme of the adjustable range is the Hard Cut. This shape causes a song to fade in to full
volume almost immediately after moving the fader inward from the edge. Similarly, the other song will not
begin to fade out until the crossfader is almost all the way at the other edge. Then, right before the crossfader
reaches the edge, the other song will fade down. This is the shape preferred by scratch DJs as they can cut
in a track to full volume with very little motion of their hand. When performed quickly, you don’t even hear the
volume fade up and down—it sounds as if the sound is being abruptly cut in and out.
Page 42

Torq LE User Guide » Chapter 1
Torq LE User Guide » Chapter 8
When Torq LE is launched for the first time, the Crossfader Curve will be set to a happy medium between
these two extremes. You can, of course, change this curve using either of the following:
» Adjusting with the Mouse
1. Hold down the SHIFT key on your computer keyboard
2. While holding down shift, click and drag over the Crossfader. The Crossfader itself will not move,
but the graphic below the Crossfader will change to indicate the new curve. As the blue bars expand
toward the edges, the curve approaches the Hard Cut shape. With no blue bars, the curve is an
Equal Power Contour.
» Adjusting via MIDI
1. Click the Preferences button to open the Preferences menu.
2. Click the MIDI tab.
3. Click the Learn button next to Crossfader Curve. The button will turn red.
4. Move the knob or fader that you want to use for Crossfader Curve control. Torq will read the
incoming MIDI messages and immediately assign it to the Crossfader Curve.
5. Exit the Preferences.
41
41
< Crossfader Assign
Another part in the evolution of the Crossfader is the Crossfader Assign. As explained above, the left
Deck is routed to the left side of the Crossfader while the right Deck is routed to the right side. Clicking
the Crossfader Assign buttons will swap the assignments so that the left Deck will be heard when the
Crossfader is at the right, and vice versa. This is sometimes known as “hamster style” control.
< Transform Buttons
Another feature to aid scratch DJs is the Transform button. The Transform buttons are found at the left and
right sides of the Crossfader. Pressing a Transform button will cause the associated channel to temporarily
bypass the Crossfader and go straight to the main mix. For example, if the Crossfader is fully left, you’ll only
hear the left Deck. If you press the right Transform button, you’ll hear the right Deck along with the left Deck.
Page 43

42
42
PFL/HEADPHONE CUE
ou’ve undoubtedly seen the archetypical image of a DJ: standing behind
Y
is dancing to the music they hear on the speakers, what is the DJ listening to on
the headphones? He’s listening to the next song he’s going to play using PFL or
Headphone Cueing. That’s how the DJ can hear if he’s matched the tempo of the
current song. It’s also how he locates the perfect place to start the track. In Torq, the
PFL system includes three controls: the Cue Volume fader, the Cue Split button, and
the Cue Source knob.
Volume Control
The Cue Volume fader simply adjusts the volume of the signal sent to the audio
interface. This can be used for volume control if the volume control of your audio
interface is hard to access (or does not exist).
Split Button and Source Knob
The Cue Split button (simply labeled “Split” in the user interface) determines the
behavior of the Cue Source knob which you hear in the headphones. When the Split
button is off, the Cue Source knob will blend between the PFL audio signal (which
only you can hear) and the Main Mix (which your audience can hear). Since the knob
can blend between these two sources, you can preview what your mix will sound like.
It can be a good way to check that your tracks are aligned properly and at the right
volumes.
a set of turntables and a mixer...with a pair of headphones on. If everyone
Chapter
Chapter
1
9
PFL/HEAD PHONE CUE . . . . . . 42
Volume Control . . . . . . . . . . .
Split Button and Source Knob
42
. . 42
When you click the Split button to turn it on, the sound in the headphones will
change. What you’ll be hearing is the sound of the left Deck in the left side of your
headphones while the right Deck is in the right side of your headphones. It’s as if you
had somehow placed your head inside the mixer between the two channels and can
now hear each channel discretely. Some DJs find it easier to hear misalignments in
rhythm and tempo in this mode. Try it out for yourself and compare!
Note: In Split mode, the Cue Source knob will adjust the relative volumes of the
two Decks in the headphones. Also, don’t forget that your audience can hear one of
those Decks!
English
English
Page 44
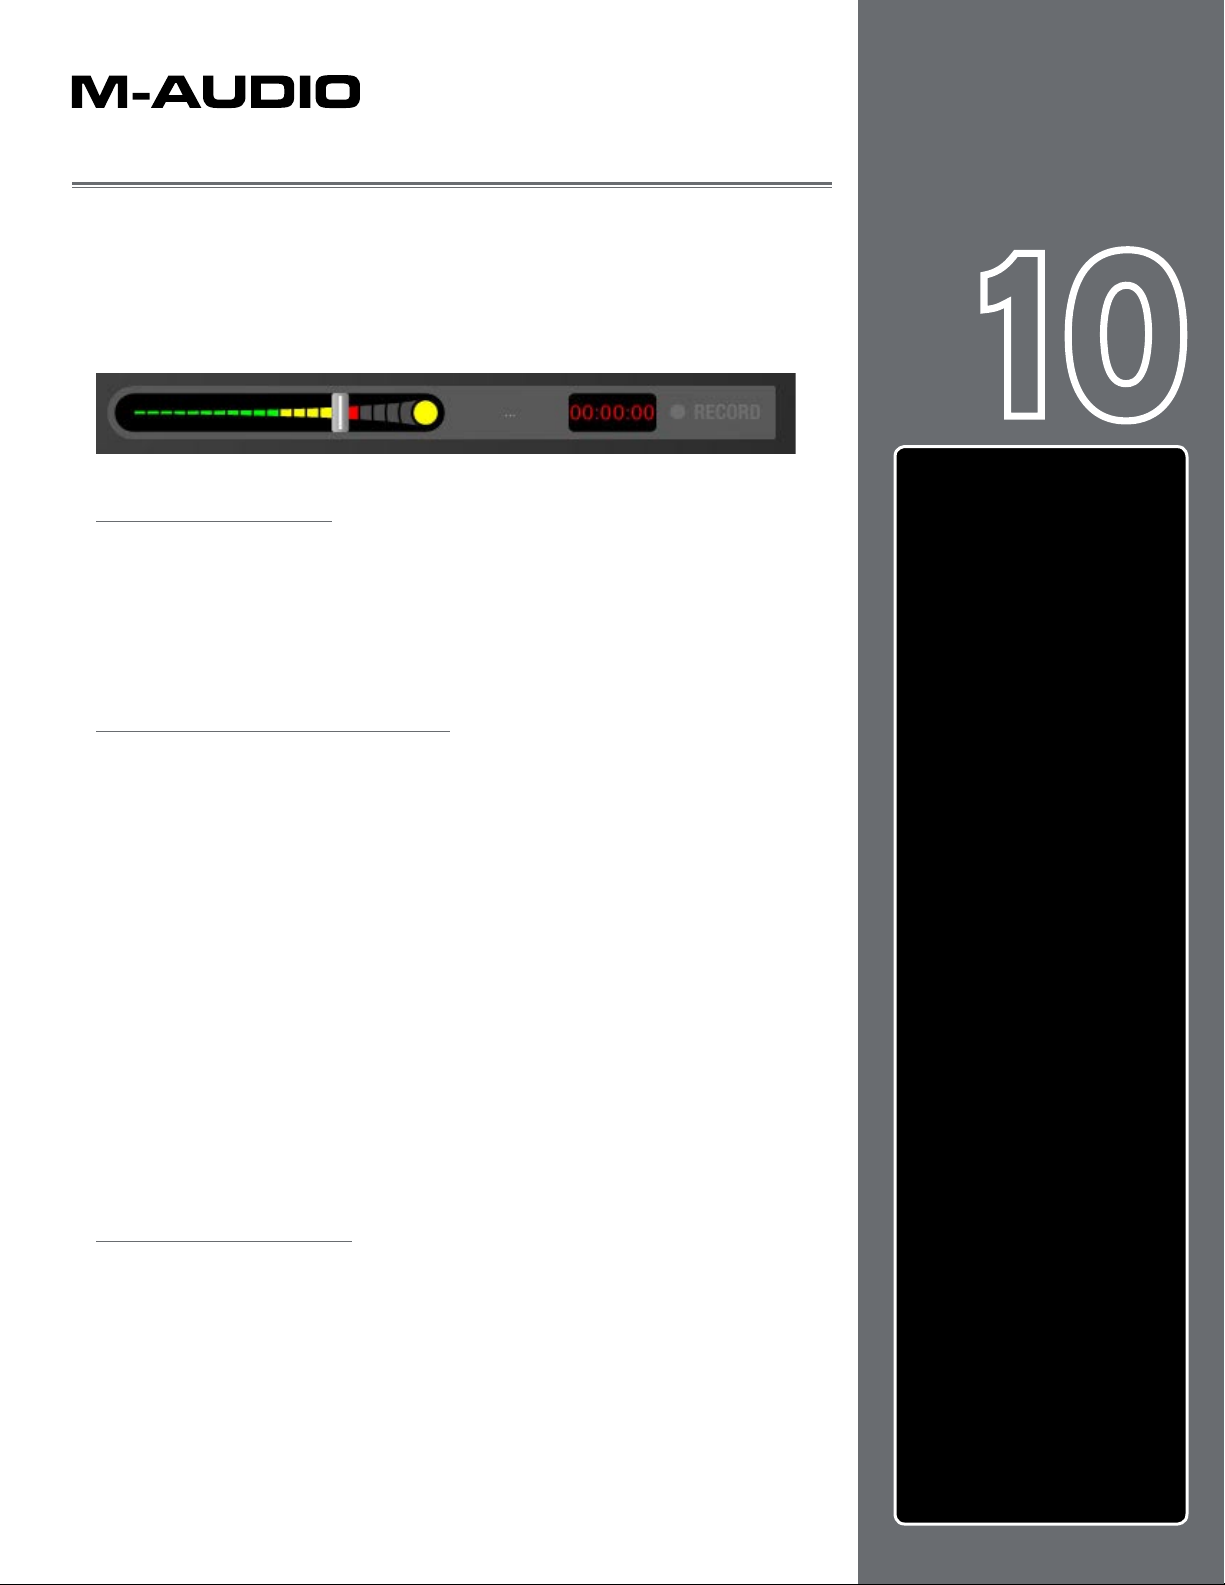
43
43
MASTER OUTPUT
he Master Output is the last step in Torq’s audio signal flow before the music
goes out to your audience. It contains a Master Level slider, a Master Level
T
meter, a Master Limiter, as well as an Audio Recorder. All of these controls are
located below the right Deck in a neat, horizontal arrangement.
Volume Control
As you may assume, the Master Volume slider controls the overall output of Torq’s
Main Outputs. This slider is also used to set the level of the Torq File Recorder
(explained later in this manual). Unlike the Channel Volume faders, the Master Volume
slider is on its side—moving the slider to the right will increase the output volume
while moving to the left will decrease it.
Level Meter and Limiter
The Master Level meter shares the same space as the Master Volume slider. You’ll
see the meter moving behind the slider while music is playing.
Chapter
Chapter
10
MASTER OUTPUT . . . . . . . . . . 43
Volume Control . . . . . . . . . . .
Level Meter and Limiter
Master Recorder
Filename
Setting the Record Level
Recording
1
43
. . . . . . 43
. . . . . . . . . . 43
. . . . . . . . . . . . 44
. . . 44
. . . . . . . . . . . 44
Since Torq LE is a digital audio system, it has a limited amount of headroom (dynamic
range). Whenever your mix exceeds the headroom, clipping (distortion) normally
occurs. To prevent this undesired sound, Torq LE features a Limiter on the Master
Output which will keep the Main Outputs from clipping.
Whenever the green circle (located at the right edge of the Master Volume meter)
lights, the Limiter is protecting the system against clipping. It does this by quickly
reducing the volume any time the Master Volume exceeds the maximum headroom.
A limiter is not foolproof, though—you’ll want to be sure that you aren’t triggering the
limiter all the time. If the volume of your mix is too loud, the limiter will reduce the
volume all the time, and this will sound strange. If you find that the green indicator is
on most of the time during your mix, you should turn down the Master Volume slider
so your mix doesn’t constantly peg the limiter. To make up for the reduced volume,
turn up the volume on the house sound system.
Master Recorder
The Master module also includes a Recorder which allows you to record and save
your mix as an audio file as you perform it. You can then take your recorded mix and
burn it onto a CD or distribute it as a podcast, for example.
The process of recording your mix is extremely simple. You start by choosing a name
for your mix and a location on your hard drive for saving it. Then, you mix! When you’re
done, press Stop and your file will be ready to go.
English
English
Page 45

Torq LE User Guide » Chapter 1
Torq LE User Guide » Chapter 10
Filename
To set the filename for your recording:
1. Click the Filename button (which looks like “...” when no name is set). A dialog box will open.
2. Select the destination folder for your recording, then give it a name and press enter. The dialog box will close
and your new filename will be shown on the Filename button.
Note: The sample rate of the recorded file will match the sample rate currently selected in the Audio tab of
the Preferences.
Setting the Record Level
The Master Volume slider will control the level of your recording. You’ll want to set this slider as high as possible
without constantly triggering the limiter (it’s OK if you trigger the limiter every once in a while). If you set the Master
Volume slider too low, your mix will be recorded quietly and will therefore have less fidelity.
Note: Changes made to the Master Volume slider will be committed to your recording, even while you’re in the
middle of your mix.
Recording
Now that you have set the filename and recording level, you can begin recording:
44
44
1. Click the Record button. It will light up to indicate that recording has commenced. You’ll also see the Record
Time window begin to count the length of the recording.
2. Perform your mixing magic as you normally would.
3. Press the Record button again to stop the recording and save the file.
Page 46

45
45
EFFECTS
ffects are devices that alter
an audio signal. These
E
alterations can range from subtle
to extreme and can be a great
source of creative fun within Torq.
Each Deck can be processed
individually with multiple effects,
and that is the purpose of the
Effect Racks. The Effect Racks
are located between each Deck
and the Mixer and house the three
effects contained within Torq LE.
You can use up to three effects on
each Deck at the same time.
Controls
The controls for the built-in effects are basically the same and are described here.
Chapter
Chapter
11
EFFECTS . . . . . . . . . . . . . . . 45
Controls . . . . . . . . . . . . . . .
Enable Button
Tweak Knob
Tweak Button . . . . . . . . . .
Built-In Effects
Phaser
Dual-Filter . . . . . . . . . . . .
Strobe . . . . . . . . . . . . . .
1
45
. . . . . . . . . 45
. . . . . . . . . . 45
45
. . . . . . . . . . . 46
. . . . . . . . . . . . . 46
46
47
Enable Button
Before you can use an effect, you must turn it on, and that’s the purpose of the
Enable button. While an effect is turned off, you can manipulate its controls and
set the effect the way you desire before using it in your mix.
Tweak Knob
Effects are fun because you can alter their qualities while you use them, such as
changing the length of a Reverb or Delay, or to change the intensity of a Phaser
or Flanger. To keep things simple and easy to manage, Torq LE provides one
knob, the Tweak knob, for parameter control on each effect. Because effects
alter audio in different ways, the function of this knob will change depending on
which effect is loaded in the slot. These functions are listed in the Built-In Effect
reference in this manual.
Tweak Button
The Tweak button works in the same way as the Tweak knob—it will toggle
the state of a parameter in the selected effect. Like the Tweak knob, the exact
function of the Tweak button will depend on which effect you’re using. The
functions are listed in the Built-In Effect reference.
English
English
Page 47

Torq LE User Guide » Chapter 1
Torq LE User Guide » Chapter 11
Built-In Effects
The following is an explanation of the three built-in effects in Torq LE:
Phaser
A Phaser is a somewhat mellower version of the Flanger. Like the Flanger, a Phaser works on the principle of mixing
two identical audio sources together. However, unlike a Flanger, the timing difference between the two audio sources
is very small. The result is that some of the frequencies in the song will be removed or “cancelled out.” Some people
describe this sound as a “wind tunnel” effect.
< Enable Button
This button will turn the effect on and off.
< Tweak Knob and Button
The function of the Phaser’s Tweak knob is determined by the state of the Tweak button:
» When the Tweak button is off, the Phaser will be in Manual mode. The Tweak knob will then control the
phase of the effect.
» If the Tweak button is on, the Phaser will be in Automatic mode. In this mode, the phase will be adjusted
automatically. The Tweak knob will then set the rate of the automatic adjustment—turning the knob
clockwise will increase the modulation rate.
46
46
Dual-Filter
A coffee filter is designed to stop coffee grounds while allowing water to pass through. Audio filters work in a similar
fashion: they prevent particular frequency ranges within an audio signal from passing through the effect. Filters
come in a variety of flavors and Torq LE features three of the most popular types: Low-Pass, High-Pass, and BandPass. The names of these filters are descriptive of what they do. A Low-Pass filter, for example, will only allow low
frequencies (bass tones) to pass through—it will remove the high-frequency (treble) content from the audio signal. A
High-Pass filter works the other way: it allows the treble to pass through while bass is removed. A Band-Pass filter
is essentially a High- and Low-Pass filter put together: it will remove high and low frequencies from the audio signal,
only allowing a narrow band of frequencies to pass.
The most important parameter for a filter is its Cutoff Frequency. It determines the frequency where a filter will
begin to stop frequencies. For example, when using a Low-Pass filter with a cutoff frequency of 1kHz, frequencies
below 1kHz will pass through the filter unaffected while the frequencies above 1kHz are reduced or removed. While
there are other parameters that also affect the behavior of a filter, Cutoff Frequency is the parameter that you’ll be
controlling in Torq.
< Enable button
This button will turn the Dual-Filter on and off.
< Tweak Button
The Tweak button is used to set the filter mode for the Dual-Filter effect. When this button is off, the two
filters (High-Pass and Low-Pass) will be adjusted only one at a time. When you turn this button on, the
High-Pass and Low-Pass filters will be linked, thus creating a Band-Pass filter where both filters are adjusted
simultaneously.
Page 48

Torq LE User Guide » Chapter 1
Torq LE User Guide » Chapter 11
< Tweak Knob
This knob will adjust the Cutoff Frequencies of the filters.
» When the Tweak button is off, the knob will behave as follows:
1. Placing the knob at 12 o’clock will result in the audio passing through the Dual-Filter unaffected.
2. Turning the knob counterclockwise from 12 o’clock will begin to lower the Cutoff Frequency of
the Low-Pass filter. You will hear the music become dull and muffled as you turn this down to the
point where you’ll only hear low bass rumbles.
3. Turning the knob clockwise from the 12 o’clock position will begin to raise the Cutoff Frequency
of the High-Pass filter. You will hear the music become more thin and brittle as you do this until
only the highest of the high frequencies remain.
» When the Tweak button is on, the Tweak knob will merely control the center frequency of the Band-
Pass filter. As you turn the knob down (counterclockwise), you’ll hear the high frequencies become
muffled while you begin to hear more of the bass.
Strobe
Just about anyone who has been to a dance club in the last 20 years has experienced a strobe light. Those are the
super-bright lights that flash really quickly. They have the effect of making everyone look like they’re in “stop motion”—
the flash is so fast that you can’t see movement anymore.
47
47
Torq’s Strobe effect will create a similar stop-motion effect, but it will do it to audio. The Strobe will essentially mute
and unmute the audio at a rate that you can control. The rate can be as slow as one bar (2 beats unmuted followed by
2 beats muted) or as fast as 1/64-note.
< Enable Button
Turns the Strobe effect on and off.
< Tweak Knob
This knob changes the rate of the Strobe. A tooltip will appear whenever you adjust this knob to show the
current rate (expressed in note values).
< Tweak Button
Activating this button reverses the behavior of the Strobe—what was normally muted will be unmuted and vice
versa.
Page 49

48
48
PREFERENCES
his section provides a comprehensive review of the Preferences for Torq LE.
Open the Preferences by clicking the Preferences icon.
T
Audio Tab
This tab houses options relating to the audio interface used with Torq LE. You’ll select
the interface to use, set sampling rates and buffer sizes, and assign the various inputs
and outputs. Torq supports ASIO and DirectX protocols on Windows and Core
Audio on Mac OS X.
Note: Although Torq LE will work with a single stereo output audio interface, it is
recommended that you use a multiple-output audio interface. The extra outputs allow
you to make use of song cueing, i.e. pre-listening to a song on headphones before
you mix it.
Chapter
Chapter
12
PREFEREN CES . . . . . . . . . . . 48
Audio Tab
Audio Interface . . . . . . . . . 48
Sample Rate
Buffer Size
MIDI Tab . . . . . . . . . . . . . . .
Auto-Detect M-Audio Devices
([On]/O ff)
Scratch Sensitivity . . . . . . 50
Crossfader Cur ve Control . . .
MIDI SHIFT Key
MIDI Devices . . . . . . . . . .
Miscellaneous Tab
Torq Engine . . . . . . . . . . .
Cue Exclusivity
Schaf fel Mode . . . . . . . . .
QuickLoop Size
Search iPod with Database . .
Search iTunes Library with
Database
Transport Mode
Tooltips
Sync Mode
Skin
. . . . . . . . . . . . . . . 54
1
. . . . . . . . . . . . . . 48
. . . . . . . . . . 49
. . . . . . . . . . . 49
50
. . . . . . . . . . 50
51
. . . . . . . . 51
51
. . . . . . . . . 52
52
. . . . . . . . 52
53
. . . . . . . . 53
53
. . . . . . . . . . . 53
. . . . . . . . 53
. . . . . . . . . . . . . 53
. . . . . . . . . . . 54
Audio Interface
This preference allows you to select an audio interface for Torq LE.
1. Click the Audio Interface box.
2. A menu will be displayed, listing all audio interfaces currently connected
to your computer.
3. Select the audio interface you want to use with Torq LE.
English
English
Page 50

Torq LE User Guide » Chapter 1
Torq LE User Guide » Chapter 12
Sample Rate
Below the Audio Interface selection you will see sample rate adjustment. Increasing this value will improve sound
quality (depending on your source material) but will also place heavier demands on your computer. It is therefore
recommended to leave the sample rate only as high as you need it to be. If you only play MP3 files or songs from
CDs, you won’t really have any reason to raise this value beyond 44,100 since that is the sampling rate used by MP3s
and CDs.
Buffer Size
The other important setting for your audio interface is the Buffer Size. This parameter can cause a lot of confusion for
some users, but is actually not that complicated. To understand how the buffer size affects the performance of Torq,
you must understand a little bit about how your computer processes audio.
Multi-tasking is a term that refers to doing multiple jobs all at once. It’s what allows your computer to run more than
one program at a time (i.e. listening to iTunes while surfing the Web). While it looks like the computer is doing two
separate things at once, it’s actually not—it’s still doing only one task at a time, but changing between tasks faster
than you can see.
This provides for a streamlined computing experience, but creates a problem when using audio applications. Audio is
non-stop—a 5-minute song will play for 5 minutes without interruption. So how can the computer keep audio playing
while it’s jumping around to do other tasks? The answer is buffering. An audio buffer is a temporary “storage tank”
that can hold a brief moment of audio. The computer will fill the audio buffer with music then let the buffer play while it
does other things (like update the clock on your screen, check your network connections, monitor RAM usage, etc.).
When all things work properly, the computer will complete its other tasks and fill the buffer with more data before the
buffer empties, thus resulting in perfect audio while multi-tasking.
49
49
If the audio buffer happens to empty before the computer can fill it with more data, the audio playback will stop until
the computer can fill the buffer again. These “dropouts” happen very quickly, not sounding like prolonged gaps of
silence, but sounding more like clicks and pops or otherwise distorted audio. When this happens, the solution is
to either lighten the CPU load (by closing unnecessary applications or processes that are wasting the computer’s
time) or by increasing the size of the audio buffer, allowing it to play longer (thus giving the computer enough time to
perform its other tasks).
So why not just go with a large buffer size and avoid dropouts? The problem is that increasing the buffer size
increases the system latency. Latency is the time between when you tell the computer to do something (such as
activating an EQ Kill) and when you actually hear the results from the speakers. If you have a large audio buffer, the
buffer will have to play out its entire contents before you’ll hear any new EQ changes in the audio. When DJing, this
can be a nightmare if you’re trying to do things with accurate timing—all of your actions will have a delayed effect on
the music.
The solution is to set the buffer size as low as it can go without inducing any audio problems. This is just like playing a
game of limbo:
1. Load some music into a Deck and play it.
2. While the music is playing, open the Audio Preferences.
3. If music is playing back properly, open the Buffer Size menu and select the next smallest buffer size. The
buffer will be updated immediately and the music will continue to play.
4. Listen to the music for a moment. If it sounds clean (no click, pops, or glitches), then lower the Buffer Size to
the next lowest setting.
5. Keep repeating this procedure, listening to the quality of the audio each time, until you reach a setting where
the audio breaks up.
6. Once you find this lower threshold, set the Buffer Size to the next highest setting (the last one that worked
properly) and your system will be optimized.
While Torq should be very stable at these settings, keep in mind that the system performance can be
compromised as you increase the CPU load.
Page 51

MIDI Tab
Torq LE User Guide » Chapter 1
Torq LE User Guide » Chapter 12
50
50
This tab features all options pertaining to Auto-Setup and MIDI control.
Auto-Detect M-Audio Devices ([On]/Off)
When this option is enabled, Torq LE will automatically set the Audio and MIDI interface options to those of any
known SynchroScience and M-Audio controller and interface that is connected to your system (such as X-Session
Pro). This will ensure proper operation of Torq and connected devices.
Note: If you have created a custom mapping for your controllers or special assignments for your audio interface and
don’t want Torq to replace these mappings with the defaults upon the next startup, leave this option turned off.
Scratch Sensitivity
This option allows you to configure how rapidly a Deck will respond to messages sent from a MIDI controller. It is
designed for controllers that will move the waveform back and forth, like a scratch DJ.
1. By increasing the number, the Deck will respond more rapidly.
2. By decreasing the number, the Deck will respond more slowly.
Page 52

Torq LE User Guide » Chapter 1
Torq LE User Guide » Chapter 12
Crossfader Curve Control
This preference allows you to assign a MIDI controller to the Crossfader Curve parameter. You can then control the
Crossfader Curve with a knob or slider on your MIDI controller.
1. Press the button labeled “Learn” to activate it.
2. Turn a knob on your MIDI controller.
3. Torq will immediately assign the knob to the Crossfader Curve. Check this by looking at the Crossfader
graphic in the main window while turning the knob.
MIDI SHIFT Key
When using Torq LE, the SHIFT key on your computer’s keyboard is used rather often. This option lets you
assign a MIDI Note to function as “SHIFT” in Torq, thus allowing you to do SHIFT-based combinations (such as
SHIFT+Nudge) entirely from an external MIDI controller. To assign a MIDI note:
1. Press the button labeled “Learn” to activate it.
2. Push a button or key on your MIDI controller.
3. Torq LE will immediately assign the button as a Shift key for use within the program.
51
51
MIDI Devices
This list shows all MIDI devices currently recognized by Torq. Each device is listed by name and is followed by a box
which selects the device as being On or Off.
If you wish to use a device as a controller for Torq, click the drop-down menu and select On to activate it. Leave any
controller you do not wish to use with Torq set to Off.
Page 53

Torq LE User Guide » Chapter 1
Torq LE User Guide » Chapter 12
Miscellaneous Tab
This tab contains miscellaneous options that affect the behavior of certain features of Torq LE.
52
52
Torq Engine
This setting is used to switch the Torq Audio Engine between Normal and Economy modes. This option should be left
on Normal unless you have a slow computer. Switching to Economy will degrade graphical performance and have a
slight impact on sound quality, but can often allow Torq LE to run smoothly on older machines.
Cue Exclusivity
This option affects how the Deck Cue buttons behave.
When this option is On, pressing the PFL button on a channel will cause the PFL button on the other channel to turn
off. This will ensure that you are only hearing one audio source through your headphones at a given time.
When this option is Off, you can cue multiple channels at once. These Cue sources are mixed and heard through
your headphones simultaneously. With each channel that is added to the Cue mix, the overall Cue bus volume wi
Page 54

Torq LE User Guide » Chapter 1
Torq LE User Guide » Chapter 12
Schaffel Mode
Schaffel is German for “shuffle,” which has become a popular form of dance music based on a triplet rhythm as
opposed to a straight 4/4 rhythm.
When this mode is activated, any of the effects (or parameters that quantize their values) will include triplets in their
quantizing options.
Take the Strobe effect for example: The Parameter knob changes the rate of the Strobe effect. Normally, this would
select rates of 1⁄2, 1⁄4, 1/8, 1/16, and 1/32. With Schaffel engaged, the knob would quantize to 1⁄2, 1⁄4, 1/8, 1/8T,
1/16T, and 1/32T. The “T” after the number stands for “Triplet.”
Note: Selecting a triplet quantization will give the effect or parameter a “shuffled” or funky feel.
QuickLoop Size
This option affects how the QuickLoop buttons behave.
When this preference is set to “Bar,” your loops will be established in lengths of musical bars. When this preference
is set to “Beat,” your loops will be established in lengths of musical beats.
Search iPod with Database
When this preference is set to Yes, any connected iPods will have their music libraries incorporated into the
Database for instant searching. If this option is off, you will have to specifically select the iPod Library in the Browser
to view its contents.
53
53
Search iTunes Library with Database
If you happen to have a copy of Apple iTunes installed on your computer, selecting “Yes” for this option will integrate
its Music Library into Torq’s Database. Any songs currently a part of your iTunes Library will be instantly accessible
in Torq along with all other folders assigned to the Database. If this option is off, you’ll have to specifically select the
iTunes Library in the Browser window to view its contents.
Transport Mode
The Nudge and Offset buttons in the Decks can have their directions reversed using this preference. By default, this
option is set to Reverse, meaning the buttons operate in a manner similar to a DJ using turntables. Instead of pressing
right to go faster or ahead in the song, you’ll press left (just like the closest edge of a record spinning past a DJ). If
you prefer more of a “tape machine” style control, switch this option to “Normal.”
Tooltips
If you hover your mouse over a control in Torq LE, often a small Tooltip will appear describing the function of the
control. Additionally, when you move a knob or slider with the mouse, a Tooltip will be displayed showing the new
setting of the knob or slider. This preference chooses the level of detail in the Tooltips.
» Full—when selected, all Tooltips will be displayed, both when you hover your mouse and when you operate a
control.
» Adjust—when selected, the only Tooltips that will appear are those showing the adjustment applied to a knob
or slider. The normal Tooltips seen when hovering the mouse over a control will be hidden.
» None—when selected will disable all Tooltips entirely.
Page 55

Torq LE User Guide » Chapter 1
Torq LE User Guide » Chapter 12
Sync Mode
This option determines the “forcefulness” of the synchronization used in Torq LE.
» Bar—when selected, Torq will align a synced Deck to the tempo and downbeat of the other Deck. Any
attempts to adjust the alignment of the track will result in Torq forcing the tracks back into synchronization
with their downbeats aligned (the thick lines of the Phase Grids will be aligned with each other at all times).
» Beat—when selected, Torq will match a synced Deck to the tempo and beat of the other Deck with no regard
to the downbeats in the Phase Grids. Any attempts to realign the synced Deck will result in Torq forcing the
track back into alignment with the nearest beat (the thick lines of the Phase Grids may be out of alignment
with each other).
» Tempo Only—when selected, Torq will only match the tempo of a synced Deck to the other Deck. When you
press Play on the Deck, Torq will not force the song into alignment. It will be up to you, the DJ, to start the
music at the right moment and keep it in alignment.
Skin
This option allows you to select a different “Skin” or color scheme for Torq LE.
1. Click to drop down the Skin menu.
54
54
2. Select a skin (color-scheme) from the list.
3. Torq will change its color scheme, but all interface features will maintain their shape and orientation within
the interface.
Page 56

55
55
APPENDIX
Preset Key Assignments
While Torq LE is basically a “blank slate” as far as keyboard assignments are
concerned, there are a few keys that are preset to various functions in the Torq
interface:
Global Key Commands
F1—Load selected track into Deck A Shift+1—Set QuickCue 1 on Deck A
F2—Load selected track into Deck B Shift+2—Set QuickCue 2 on Deck A
F5—Refresh Browser window Shift+3—Set QuickCue 3 on Deck A
F6—Max Browser view Shift+4—Set QuickCue 4 on Deck A
F7—Max Waveform view Shift+5—Set QuickCue 5 on Deck A
1—QuickCue 1 on Deck A Shift+6—Set QuickCue 1 on Deck B
2—QuickCue 2 on Deck A Shift+7—Set QuickCue 2 on Deck B
3—QuickCue 3 on Deck A Shift+8—Set QuickCue 3 on Deck B
4—QuickCue 4 on Deck A Shift+9—Set QuickCue 4 on Deck B
5—QuickCue 5 on Deck A Shift+0—Set QuickCue 5 on Deck B
6—QuickCue 1 on Deck B
7—QuickCue 2 on Deck B
8—QuickCue 3 on Deck B
9—QuickCue 4 on Deck B
0—QuickCue 5 on Deck B
Chapter
Chapter
13
APPE NDIX . . . . . . . . . . . . . . 55
Preset Key Assignments . . . . . .
Global Key Commands
Windows Key Commands . . .
Mac Key Commands . . . . . .
WARR ANTY
Warranty Terms . . . . . . . . . . .
Warranty Registration
1
55
. . . . 55
55
55
. . . . . . . . . . . . . . 56
56
. . . . . . . 56
Windows Key Commands
ALT+F4—Quit Torq LE
CTRL+,—Open Preferences
Mac Key Commands
CMND+Q—Quit Torq LE
CMND+,—Open Preferences
English
English
Page 57

Torq LE User Guide » Chapter 1
M-Audio USA
5795 Martin Rd., Irwindale, CA 91706
Technical Support
web: www.m-audio.com/tech
tel (pro products):
(626) 633-9055
tel (consumer products):
(626) 633-9066
fax (shipping): (626) 633-9032
Sales
e-mail: sales@m-audio.com
tel:
1-866-657-6434
fax:
(626) 633-9070
Web
www.m-audio.com
M-Audio U.K.
Floor 6, Gresham House, 53 Clarenden Road, Watford
WD17 1LA, United Kingdom
Technical Support
e-mail: support@maudio.co.uk
tel:(Mac support):
+44 (0)1765 650072
tel: (PC support):
+44 (0)1309 671301
Sales
tel: +44 (0)1923 204010
fax: +44 (0)1923 204039
Web
www.maudio.co.uk
M-Audio France
Floor 6, Gresham House, 53 Clarenden Road, Watford
WD17 1LA, United Kingdom
Renseignements Commerciaux
tel : 0 810 001 105
e-mail : info@m-audio.fr
Assistance Technique
PC : 0 820 000 731
MAC :
0 820 391 191
Assistance Technique
e-mail : support@m-audio.fr
mac@m-audio.fr
fax
�
+33 (0)1 72 72 90 52
Site Web
www.m-audio.fr
M-Audio Germany
Kuhallmand 34, D-74613 Ohringen, Germany
Technical Support
e-mail: support@m-audio.de
tel +49 (0)7941 - 9870030
fax: +49 (0)7941 98 70070
Sales
e-mail: info@m-audio.de
tel: +49 (0)7941 98 7000
fax: +49 (0)7941 98 70070
Web
www.m-audio.de
M-Audio Canada
1400 St-Jean Baptiste Ave. #150, Quebec City,
Quebec G2E 5B7, Canada
Technical Support
e-mail: techcanada@m-audio.com
phone: (418) 872-0444
fax: (418) 872-0034
Sales
e-mail: infocanada@m-audio.com
phone:
(866) 872-0444
fax:
(418) 872-0034
Web:
www.m-audio.ca
M-Audio Japan
アビッドテクノロジー株式会社|エムオーディオ事業部:〒
460-0002
愛知県名古屋市中区丸の内
2-18-10
Avid Technology K.K.
:
2-18-10 Marunouchi, Naka-Ku, Nagoya, Japan 460-0 002
カスタマーサポート(
Technical Support
)
e-mail : win-support @m-aud io.jp
e-mail (Macint osh
環境専用
): mac-su pport@m-audio.jp
tel : 052
-218-0859(10:0 0~12:00/13:00 ~17:00
)
セールスに関するお問い合わせ(
Sales
)
e-mail: info@m- audio.jp
tel: 052
-218-3375
fax: 052
-218-0875
Web:
www.m-audio. jp
061221_TorqLE-MI_UG_EN01
Torq LE User Guide » Chapter 13
WARRANTY
Warranty Terms
M-Audio warrants products to be free from defects in materials and workmanship, under normal use and provided that the
product is owned by the original, registered user. Visit www.m-audio.com/warranty for terms and limitations applying to
your specific product.
Warranty Registration
Immediately registering your new M-Audio product entitles you to full warranty coverage and helps M-Audio develop and
manufacture the finest quality products available. Register online at www.m-audio.com/register to receive FREE product
updates and for the chance to win M-Audio giveaways.
56
56
© 2006 Avid Technology, Inc. All rights reserved. Product features, specifications, system requirements and availability
are subject to change without notice. Avid, M-Audio, Torq, X-Session Pro, and SynchroScience are either trademarks or
registered trademarks of Avid Technology, Inc. All other trademarks contained herein are the property of their
respective owners.
 Loading...