

Page 1

®
Torq User Guide
Version 2.0
Page 2

Legal Notices
This guide is copyrighted ©2011 by Avid Technology, Inc., with all rights
reserved. Under copyright laws, this guide may not be duplicated in whole or in
part without the written consent of Avid Technology, Inc.
Avid, the Avid logo, Pro Tools M-Audio, Torq, Conectiv, and Traq Morph are either
trademarks or registered trademarks of Avid Technology, Inc. iTunes and iPod are
registered trademarks of Apple, Inc. All other trademarks contained herein are
the property of their respective owners.
Product features, specifications, system requirements, and availability are
subject to change without notice.
Guide Part Number 9329-65034-00 REV B 02/11
Documentation Feedback
We are always looking for ways to improve our documentation. If you have
comments, corrections, or suggestions regarding our documentation, email us
at techpubs@avid.com.
Page 3

Chapter 1. Introduction to Torq 2.0 . . . . . . . . . . . . . . . . . . . . . . . . . . . . . . . . . . . . . . . . . . . . . . . . . . . . . . . . . . . . . . . 1
Welcome . . . . . . . . . . . . . . . . . . . . . . . . . . . . . . . . . . . . . . . . . . . . . . . . . . . . . . . . . . . . . . . . . . . . . . . . . . . . . . . . . . . 1
Torq 2.0 Features . . . . . . . . . . . . . . . . . . . . . . . . . . . . . . . . . . . . . . . . . . . . . . . . . . . . . . . . . . . . . . . . . . . . . . . . . . . . . 1
Using Torq 2.0 With Windows . . . . . . . . . . . . . . . . . . . . . . . . . . . . . . . . . . . . . . . . . . . . . . . . . . . . . . . . . . . . . . . . . . . . 2
System Requirements. . . . . . . . . . . . . . . . . . . . . . . . . . . . . . . . . . . . . . . . . . . . . . . . . . . . . . . . . . . . . . . . . . . . . . . . . . 2
Product Registration . . . . . . . . . . . . . . . . . . . . . . . . . . . . . . . . . . . . . . . . . . . . . . . . . . . . . . . . . . . . . . . . . . . . . . . . . . . 3
Chapter 2. Software Installation . . . . . . . . . . . . . . . . . . . . . . . . . . . . . . . . . . . . . . . . . . . . . . . . . . . . . . . . . . . . . . . . . . 4
Installation . . . . . . . . . . . . . . . . . . . . . . . . . . . . . . . . . . . . . . . . . . . . . . . . . . . . . . . . . . . . . . . . . . . . . . . . . . . . . . . . . . 4
Activation . . . . . . . . . . . . . . . . . . . . . . . . . . . . . . . . . . . . . . . . . . . . . . . . . . . . . . . . . . . . . . . . . . . . . . . . . . . . . . . . . . . 5
Chapter 3. Torq 2.0 Configuration . . . . . . . . . . . . . . . . . . . . . . . . . . . . . . . . . . . . . . . . . . . . . . . . . . . . . . . . . . . . . . . . 12
Setup Assistant. . . . . . . . . . . . . . . . . . . . . . . . . . . . . . . . . . . . . . . . . . . . . . . . . . . . . . . . . . . . . . . . . . . . . . . . . . . . . . 12
Chapter 4. Accessing Your Music . . . . . . . . . . . . . . . . . . . . . . . . . . . . . . . . . . . . . . . . . . . . . . . . . . . . . . . . . . . . . . . . 20
The Browser . . . . . . . . . . . . . . . . . . . . . . . . . . . . . . . . . . . . . . . . . . . . . . . . . . . . . . . . . . . . . . . . . . . . . . . . . . . . . . . . 20
File List. . . . . . . . . . . . . . . . . . . . . . . . . . . . . . . . . . . . . . . . . . . . . . . . . . . . . . . . . . . . . . . . . . . . . . . . . . . . . . . . . . . . 31
Chapter 5. The Decks . . . . . . . . . . . . . . . . . . . . . . . . . . . . . . . . . . . . . . . . . . . . . . . . . . . . . . . . . . . . . . . . . . . . . . . . . . . 34
Four Deck Mode vs. Two Deck Mode . . . . . . . . . . . . . . . . . . . . . . . . . . . . . . . . . . . . . . . . . . . . . . . . . . . . . . . . . . . . . . 35
Deck Switch . . . . . . . . . . . . . . . . . . . . . . . . . . . . . . . . . . . . . . . . . . . . . . . . . . . . . . . . . . . . . . . . . . . . . . . . . . . . . . . . 36
Loading Songs onto the Decks . . . . . . . . . . . . . . . . . . . . . . . . . . . . . . . . . . . . . . . . . . . . . . . . . . . . . . . . . . . . . . . . . . 38
Displays . . . . . . . . . . . . . . . . . . . . . . . . . . . . . . . . . . . . . . . . . . . . . . . . . . . . . . . . . . . . . . . . . . . . . . . . . . . . . . . . . . . 40
Transport Controls. . . . . . . . . . . . . . . . . . . . . . . . . . . . . . . . . . . . . . . . . . . . . . . . . . . . . . . . . . . . . . . . . . . . . . . . . . . . 41
Markers . . . . . . . . . . . . . . . . . . . . . . . . . . . . . . . . . . . . . . . . . . . . . . . . . . . . . . . . . . . . . . . . . . . . . . . . . . . . . . . . . . . 43
Loop . . . . . . . . . . . . . . . . . . . . . . . . . . . . . . . . . . . . . . . . . . . . . . . . . . . . . . . . . . . . . . . . . . . . . . . . . . . . . . . . . . . . . . 45
Control (Deck Mode) . . . . . . . . . . . . . . . . . . . . . . . . . . . . . . . . . . . . . . . . . . . . . . . . . . . . . . . . . . . . . . . . . . . . . . . . . . 48
Master/Sync . . . . . . . . . . . . . . . . . . . . . . . . . . . . . . . . . . . . . . . . . . . . . . . . . . . . . . . . . . . . . . . . . . . . . . . . . . . . . . . . 51
Speed Slider (SPEED) . . . . . . . . . . . . . . . . . . . . . . . . . . . . . . . . . . . . . . . . . . . . . . . . . . . . . . . . . . . . . . . . . . . . . . . . . 53
Effects (FX) . . . . . . . . . . . . . . . . . . . . . . . . . . . . . . . . . . . . . . . . . . . . . . . . . . . . . . . . . . . . . . . . . . . . . . . . . . . . . . . . . 58
Chapter 6. Waveform Display . . . . . . . . . . . . . . . . . . . . . . . . . . . . . . . . . . . . . . . . . . . . . . . . . . . . . . . . . . . . . . . . . . . . 59
Information Shown on the Display . . . . . . . . . . . . . . . . . . . . . . . . . . . . . . . . . . . . . . . . . . . . . . . . . . . . . . . . . . . . . . . 60
Chapter 7. The Mixer . . . . . . . . . . . . . . . . . . . . . . . . . . . . . . . . . . . . . . . . . . . . . . . . . . . . . . . . . . . . . . . . . . . . . . . . . . . . 65
Mixer Architecture. . . . . . . . . . . . . . . . . . . . . . . . . . . . . . . . . . . . . . . . . . . . . . . . . . . . . . . . . . . . . . . . . . . . . . . . . . . . 65
PFL/Headphone Cue. . . . . . . . . . . . . . . . . . . . . . . . . . . . . . . . . . . . . . . . . . . . . . . . . . . . . . . . . . . . . . . . . . . . . . . . . . 69
Hide Mixer . . . . . . . . . . . . . . . . . . . . . . . . . . . . . . . . . . . . . . . . . . . . . . . . . . . . . . . . . . . . . . . . . . . . . . . . . . . . . . . . . 70
Crossfader . . . . . . . . . . . . . . . . . . . . . . . . . . . . . . . . . . . . . . . . . . . . . . . . . . . . . . . . . . . . . . . . . . . . . . . . . . . . . . . . . 71
Traq Morph . . . . . . . . . . . . . . . . . . . . . . . . . . . . . . . . . . . . . . . . . . . . . . . . . . . . . . . . . . . . . . . . . . . . . . . . . . . . . . . . . 72
Main Out Section . . . . . . . . . . . . . . . . . . . . . . . . . . . . . . . . . . . . . . . . . . . . . . . . . . . . . . . . . . . . . . . . . . . . . . . . . . . . 76
Contentsiii
Page 4

Chapter 8. Effects . . . . . . . . . . . . . . . . . . . . . . . . . . . . . . . . . . . . . . . . . . . . . . . . . . . . . . . . . . . . . . . . . . . . . . . . . . . . . . . 78
Controls . . . . . . . . . . . . . . . . . . . . . . . . . . . . . . . . . . . . . . . . . . . . . . . . . . . . . . . . . . . . . . . . . . . . . . . . . . . . . . . . . . . 79
Built-In Effects . . . . . . . . . . . . . . . . . . . . . . . . . . . . . . . . . . . . . . . . . . . . . . . . . . . . . . . . . . . . . . . . . . . . . . . . . . . . . . 84
VST Effects . . . . . . . . . . . . . . . . . . . . . . . . . . . . . . . . . . . . . . . . . . . . . . . . . . . . . . . . . . . . . . . . . . . . . . . . . . . . . . . . . 94
Chapter 9. Sampler . . . . . . . . . . . . . . . . . . . . . . . . . . . . . . . . . . . . . . . . . . . . . . . . . . . . . . . . . . . . . . . . . . . . . . . . . . . . . . 97
Signal Source . . . . . . . . . . . . . . . . . . . . . . . . . . . . . . . . . . . . . . . . . . . . . . . . . . . . . . . . . . . . . . . . . . . . . . . . . . . . . . . 97
Sampler Controls . . . . . . . . . . . . . . . . . . . . . . . . . . . . . . . . . . . . . . . . . . . . . . . . . . . . . . . . . . . . . . . . . . . . . . . . . . . . 98
Chapter 10. Snapshots . . . . . . . . . . . . . . . . . . . . . . . . . . . . . . . . . . . . . . . . . . . . . . . . . . . . . . . . . . . . . . . . . . . . . . . . . 103
Snapshot List . . . . . . . . . . . . . . . . . . . . . . . . . . . . . . . . . . . . . . . . . . . . . . . . . . . . . . . . . . . . . . . . . . . . . . . . . . . . . . 103
Creating a Snapshot . . . . . . . . . . . . . . . . . . . . . . . . . . . . . . . . . . . . . . . . . . . . . . . . . . . . . . . . . . . . . . . . . . . . . . . . . 103
Masking a Snapshot . . . . . . . . . . . . . . . . . . . . . . . . . . . . . . . . . . . . . . . . . . . . . . . . . . . . . . . . . . . . . . . . . . . . . . . . . 104
Using Snapshots . . . . . . . . . . . . . . . . . . . . . . . . . . . . . . . . . . . . . . . . . . . . . . . . . . . . . . . . . . . . . . . . . . . . . . . . . . . . 104
Duplicate Snapshot. . . . . . . . . . . . . . . . . . . . . . . . . . . . . . . . . . . . . . . . . . . . . . . . . . . . . . . . . . . . . . . . . . . . . . . . . . 105
Swapping Snapshots. . . . . . . . . . . . . . . . . . . . . . . . . . . . . . . . . . . . . . . . . . . . . . . . . . . . . . . . . . . . . . . . . . . . . . . . . 105
Delete Snapshot . . . . . . . . . . . . . . . . . . . . . . . . . . . . . . . . . . . . . . . . . . . . . . . . . . . . . . . . . . . . . . . . . . . . . . . . . . . . 105
Momentary vs. Latching Behavior . . . . . . . . . . . . . . . . . . . . . . . . . . . . . . . . . . . . . . . . . . . . . . . . . . . . . . . . . . . . . . . 105
Polyphonic Snapshots . . . . . . . . . . . . . . . . . . . . . . . . . . . . . . . . . . . . . . . . . . . . . . . . . . . . . . . . . . . . . . . . . . . . . . . . 106
Chapter 11. Synchronization . . . . . . . . . . . . . . . . . . . . . . . . . . . . . . . . . . . . . . . . . . . . . . . . . . . . . . . . . . . . . . . . . . . . 107
Automatic Tempo and Phase Detection . . . . . . . . . . . . . . . . . . . . . . . . . . . . . . . . . . . . . . . . . . . . . . . . . . . . . . . . . . 107
Phase Grid Manipulations . . . . . . . . . . . . . . . . . . . . . . . . . . . . . . . . . . . . . . . . . . . . . . . . . . . . . . . . . . . . . . . . . . . . . 107
Auto Master Deck Selection . . . . . . . . . . . . . . . . . . . . . . . . . . . . . . . . . . . . . . . . . . . . . . . . . . . . . . . . . . . . . . . . . . . 110
Chapter 12. Torq Preferences . . . . . . . . . . . . . . . . . . . . . . . . . . . . . . . . . . . . . . . . . . . . . . . . . . . . . . . . . . . . . . . . . . . 111
Audio Preferences. . . . . . . . . . . . . . . . . . . . . . . . . . . . . . . . . . . . . . . . . . . . . . . . . . . . . . . . . . . . . . . . . . . . . . . . . . . 111
MIDI Preferences . . . . . . . . . . . . . . . . . . . . . . . . . . . . . . . . . . . . . . . . . . . . . . . . . . . . . . . . . . . . . . . . . . . . . . . . . . . 117
External Preferences. . . . . . . . . . . . . . . . . . . . . . . . . . . . . . . . . . . . . . . . . . . . . . . . . . . . . . . . . . . . . . . . . . . . . . . . . 122
VST Preferences . . . . . . . . . . . . . . . . . . . . . . . . . . . . . . . . . . . . . . . . . . . . . . . . . . . . . . . . . . . . . . . . . . . . . . . . . . . . 126
Behavior Preferences . . . . . . . . . . . . . . . . . . . . . . . . . . . . . . . . . . . . . . . . . . . . . . . . . . . . . . . . . . . . . . . . . . . . . . . . 127
Locations Preferences. . . . . . . . . . . . . . . . . . . . . . . . . . . . . . . . . . . . . . . . . . . . . . . . . . . . . . . . . . . . . . . . . . . . . . . . 134
GUI Preferences . . . . . . . . . . . . . . . . . . . . . . . . . . . . . . . . . . . . . . . . . . . . . . . . . . . . . . . . . . . . . . . . . . . . . . . . . . . . 135
Chapter 13. Rewire. . . . . . . . . . . . . . . . . . . . . . . . . . . . . . . . . . . . . . . . . . . . . . . . . . . . . . . . . . . . . . . . . . . . . . . . . . . . . 137
Master Tempo. . . . . . . . . . . . . . . . . . . . . . . . . . . . . . . . . . . . . . . . . . . . . . . . . . . . . . . . . . . . . . . . . . . . . . . . . . . . . . 137
Audio Routing . . . . . . . . . . . . . . . . . . . . . . . . . . . . . . . . . . . . . . . . . . . . . . . . . . . . . . . . . . . . . . . . . . . . . . . . . . . . . . 137
Chapter 14. External and MIDI Control . . . . . . . . . . . . . . . . . . . . . . . . . . . . . . . . . . . . . . . . . . . . . . . . . . . . . . . . . . 139
External Control . . . . . . . . . . . . . . . . . . . . . . . . . . . . . . . . . . . . . . . . . . . . . . . . . . . . . . . . . . . . . . . . . . . . . . . . . . . . 139
External Control Calibration. . . . . . . . . . . . . . . . . . . . . . . . . . . . . . . . . . . . . . . . . . . . . . . . . . . . . . . . . . . . . . . . . . . . 140
Resolving Playback Issues . . . . . . . . . . . . . . . . . . . . . . . . . . . . . . . . . . . . . . . . . . . . . . . . . . . . . . . . . . . . . . . . . . . . 145
MIDI Control . . . . . . . . . . . . . . . . . . . . . . . . . . . . . . . . . . . . . . . . . . . . . . . . . . . . . . . . . . . . . . . . . . . . . . . . . . . . . . . 148
Contentsiv
Page 5

Chapter 15. MIDI Platter Control. . . . . . . . . . . . . . . . . . . . . . . . . . . . . . . . . . . . . . . . . . . . . . . . . . . . . . . . . . . . . . . . 150
MIDI Platter Control Mode. . . . . . . . . . . . . . . . . . . . . . . . . . . . . . . . . . . . . . . . . . . . . . . . . . . . . . . . . . . . . . . . . . . . . 150
MIDI Platter Control Mode and Auto Sync . . . . . . . . . . . . . . . . . . . . . . . . . . . . . . . . . . . . . . . . . . . . . . . . . . . . . . . . . 151
Appendix A. Key Commands . . . . . . . . . . . . . . . . . . . . . . . . . . . . . . . . . . . . . . . . . . . . . . . . . . . . . . . . . . . . . . . . . . . . 152
Browser Commands . . . . . . . . . . . . . . . . . . . . . . . . . . . . . . . . . . . . . . . . . . . . . . . . . . . . . . . . . . . . . . . . . . . . . . . . . 152
Deck Commands . . . . . . . . . . . . . . . . . . . . . . . . . . . . . . . . . . . . . . . . . . . . . . . . . . . . . . . . . . . . . . . . . . . . . . . . . . . 153
Miscellaneous . . . . . . . . . . . . . . . . . . . . . . . . . . . . . . . . . . . . . . . . . . . . . . . . . . . . . . . . . . . . . . . . . . . . . . . . . . . . . . 158
Appendix B. Torq Vinyl Control System . . . . . . . . . . . . . . . . . . . . . . . . . . . . . . . . . . . . . . . . . . . . . . . . . . . . . . . . . . 159
Technical Information and Tips on Torq's Vinyl Control System . . . . . . . . . . . . . . . . . . . . . . . . . . . . . . . . . . . . . . . . . 159
Appendix C. Warranty . . . . . . . . . . . . . . . . . . . . . . . . . . . . . . . . . . . . . . . . . . . . . . . . . . . . . . . . . . . . . . . . . . . . . . . . . . 165
Warranty Terms . . . . . . . . . . . . . . . . . . . . . . . . . . . . . . . . . . . . . . . . . . . . . . . . . . . . . . . . . . . . . . . . . . . . . . . . . . . . 165
Contentsv
Page 6

Chapter 1: Introduction to Torq 2.0
Welcome
Congratulations on your purchase of Torq®. Torq software combines traditional DJ tools with features normally found in advanced audio production applications, such as sampling and VST effects to mix your music
on Mac OS X and Windows platforms.
To help you achieve the best results, this user guide explains how to setup and configure Torq as well as how
to use the extensive features found within the application.
Torq 2.0 Features
•Four Decks
• Optional Two Deck Mode
• Traq Morph offering four new Crossfader algorithms
• Standalone functionality without hardware
• Compatibility with M3, AIFF, WAV, WMA, AAC, and CD Audio
• Built in effects and signal processors
• Support for third party VST plug-ins
• 18 individual samplers for looping and loading samples onto any of the four decks
• Rewire Support for host applications such as Pro Tools
• Support for Torq Xponent
• Support for up to four external control surfaces
• Deck Switch for controlling four decks with qualified two-deck hardware
• MIDI Platter Control for resuming playback of paused songs in perfect sync
• MIDI control assignment MIDI Learn
Each qualified hardware product works with Torq in a different manner. Refer to the documentation provided with your controller for manufacturer specific information.
Refer to www.avid.com/torqFAQ for a current list of qualified hardware, the latest news and updates.
® and qualified third party hardware
® and other qualified DAW’s
Torq 2.0 User Guide
1
Chapter 1: Introduction to Torq 2.0
Page 7
Using Torq 2.0 With Windows
Screensaver and Power Options
To avoid system crashes and unexpected errors, Windows user should change or disable the display and power
options via the control panel, as described below:
Further information about how to locate and change the options mentioned in this section can be accessed
by clicking on the Help menu within a Windows Explorer window.
Screen Saver
Double click on the Display icon in the Control Panel, and choose the appropriate option to disable the screen
saver.
Power Options
Double click on the Power options icon in the Control Panel. Once the new window has opened, disable all
options that hibernates or put your computer to sleep, as well as any option which turns off or dims the monitor or display.
You will also need to disable all disable all options that allow the hard drive to automatically turn off. If available you should also disable the USB Selective Suspend option as well.
ClearType Font Usage in Windows XP
In order to offer the best appearance on LCD displays, Torq uses ClearType fonts when displaying text in various parts of the program. However, this option is disabled by default in Windows XP SP3. If the text or icons
in the Torq interface appear jagged or blurry please go to http://www.microsoft.com/typography/cleartype/tuner/step1.aspx for details on how to resolve the issue.
Windows Vista and Windows 7 users should not experience this issue because ClearType fonts are enabled by
default.
This is a system-wide change, which may affect the fonts used in other applications on your computer.
System Requirements
Avid® can only assure compatibility and provide support for hardware and software it has tested and approved.
For complete system requirements and a list of qualified third-party hardware, visit www.avid.com/torqFAQ.
Torq 2.0 User Guide
2
Chapter 1: Introduction to Torq 2.0
Page 8

Product Registration
Please register your product online at http://www.avid.com/US/support/register-product/torq-2. By doing so,
you become eligible to receive the following:
• Technical support information
• Software update and upgrade notices
• Hardware warranty information
Conventions Used in This Guide
The following symbols are used to highlight important information:
User Tips are helpful hints for getting the most from your system.
Important Notices include information that could affect your data or the performance of your system.
Shortcuts show you useful keyboard or mouse shortcuts.
Cross References point to related sections in this guide.
Torq 2.0 User Guide
3
Chapter 1: Introduction to Torq 2.0
Page 9

Chapter 2: Software Installation
Installation
The following directions are for installing the Torq software onto your computer. Please follow the installation
instructions provided with your hardware device before launching Torq.
Windows 7, Vista, and Windows XP
To install Torq on a Windows computer:
1 Place the Torq disc in your CD/DVD drive.
2 Windows will automatically launch the install screen. (If you are using Windows Vista or XP, and see an Au-
toplay dialog window, click “Run autorun.exe” to launch the installer.)
If the install screen fails to launch, you can manually start it by clicking on Start > Computer > Torq Disk. If
you are using Windows XP, “Computer” will be labeled “My Computer” in this step.
If you have purchased Torq as a download, locate the zipped installer on your desktop and open it by double
clicking the icon; then locate the installer icon and launch it by double clicking the icon.
3 Choose your Setup Language, click “Next” and follow the on-screen instructions
4 When Torq is finished installing, choose “Finish.”
5 Close the installer screen.
6 Install and connect your qualified hardware. Refer to the documentation provided with your devices.
7 Double-click the Torq application icon to launch the program.
Macintosh OS X
To install Torq on a Mac:
1 Place the Torq disc in your CD/DVD drive.
2 Double-click the Torq CD icon on your desktop. This will display the contents of the CD.
3 Double-click the installer icon.
If you have purchased Torq as a download, open the downloaded DMG file on your desktop by double clicking it, then locate the installer and launch it by double clicking the icon.
4 Follow the on-screen instructions.
5 When installation has completed, select “Close.”
6 A Torq icon will be placed in the Dock.
7 Install and connect your qualified hardware. Refer to the documentation provided with your devices.
8 Click the icon to launch the program.
Torq 2.0 User Guide
4
Chapter 2: Software Installation
Page 10
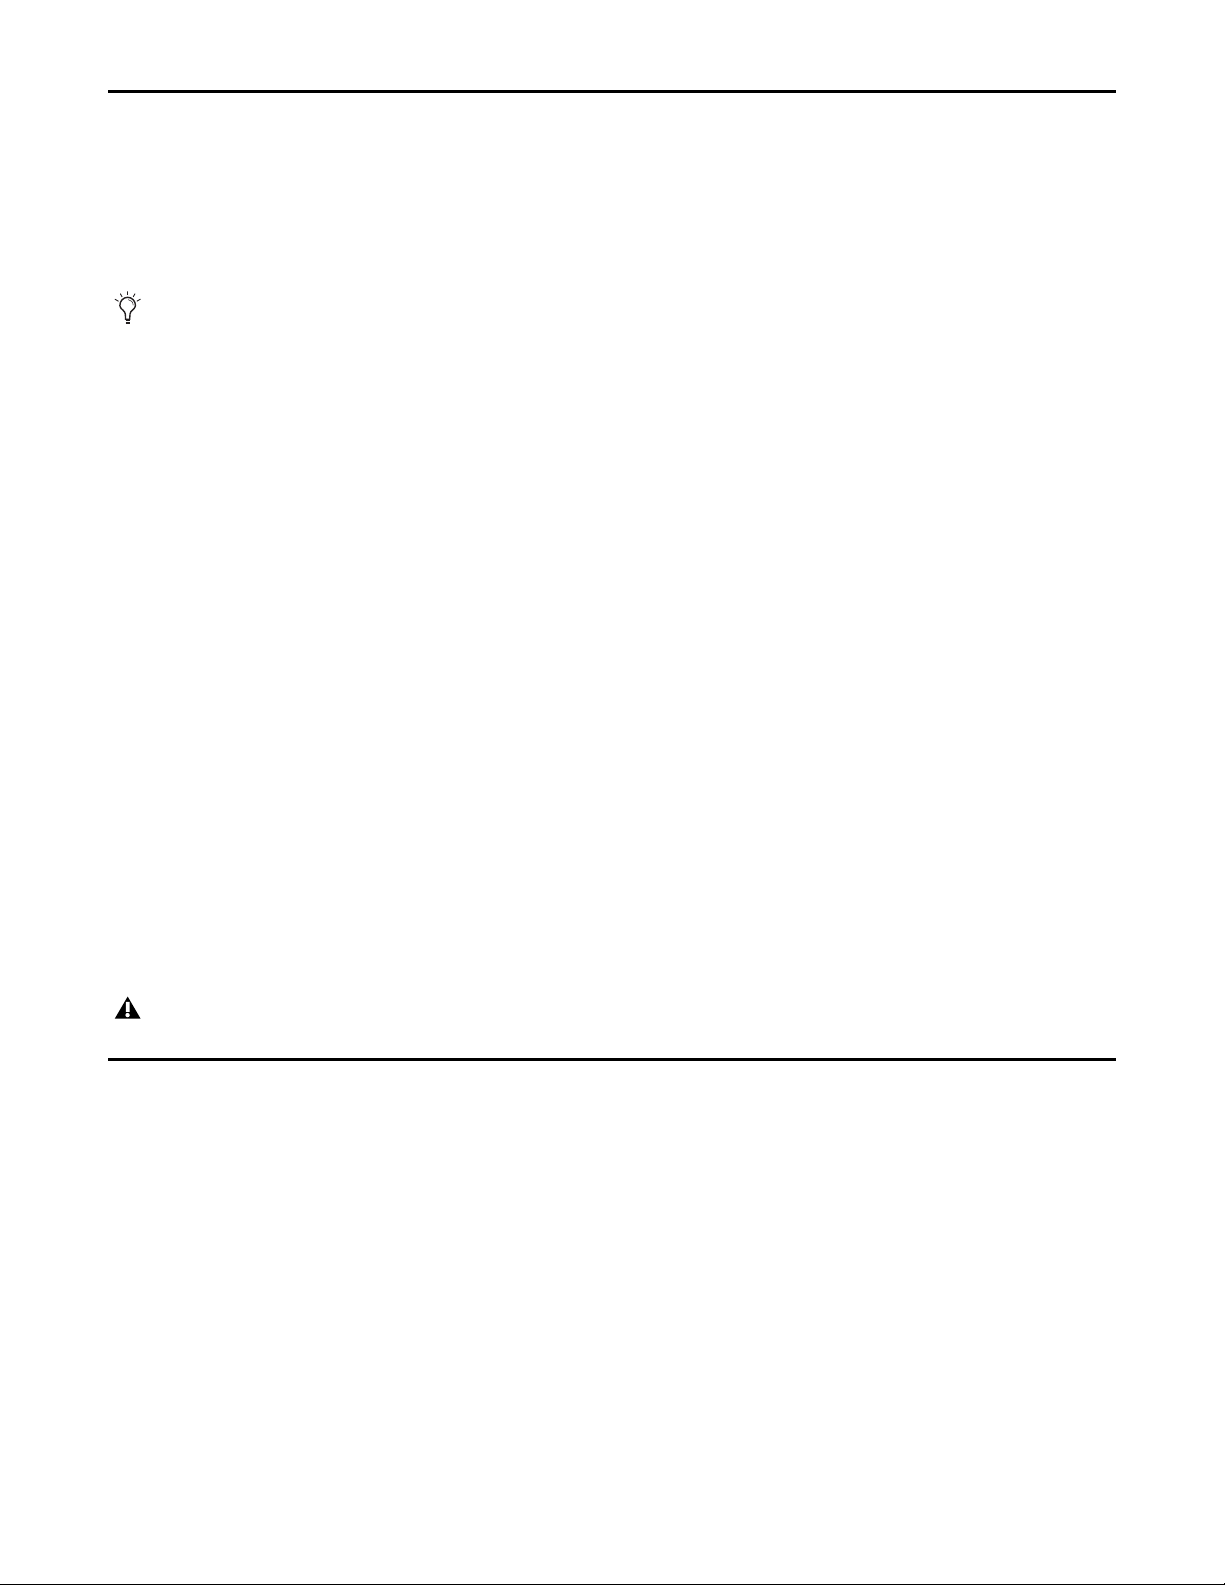
Activation
Internet Activation
Once you have completed the software installation, Torq must be activated and authorized using the Avid Activation Tool. This tool can also be used to activate Torq to run as a 30 day trial version.
The 30 day trial period cannot be extended. Torq must be activated and authorized using the Avid Activation Tool if you wish to continue using the application at the end of the trial period. If you deactivate
Torq during the 30 day trial period, the application will still launch for the remainder trial. However, as
the trial cannot be extended you will need to complete the activation and authorization process
There are two methods of activating Torq as described below:
Automatic Activation
This option lets you register Torq over the Internet.
To activate Torq automatically:
1 Choose Internet Activation and click “Next.”.
Internet Activation
Torq 2.0 User Guide
5
Chapter 2: Software Installation
Page 11
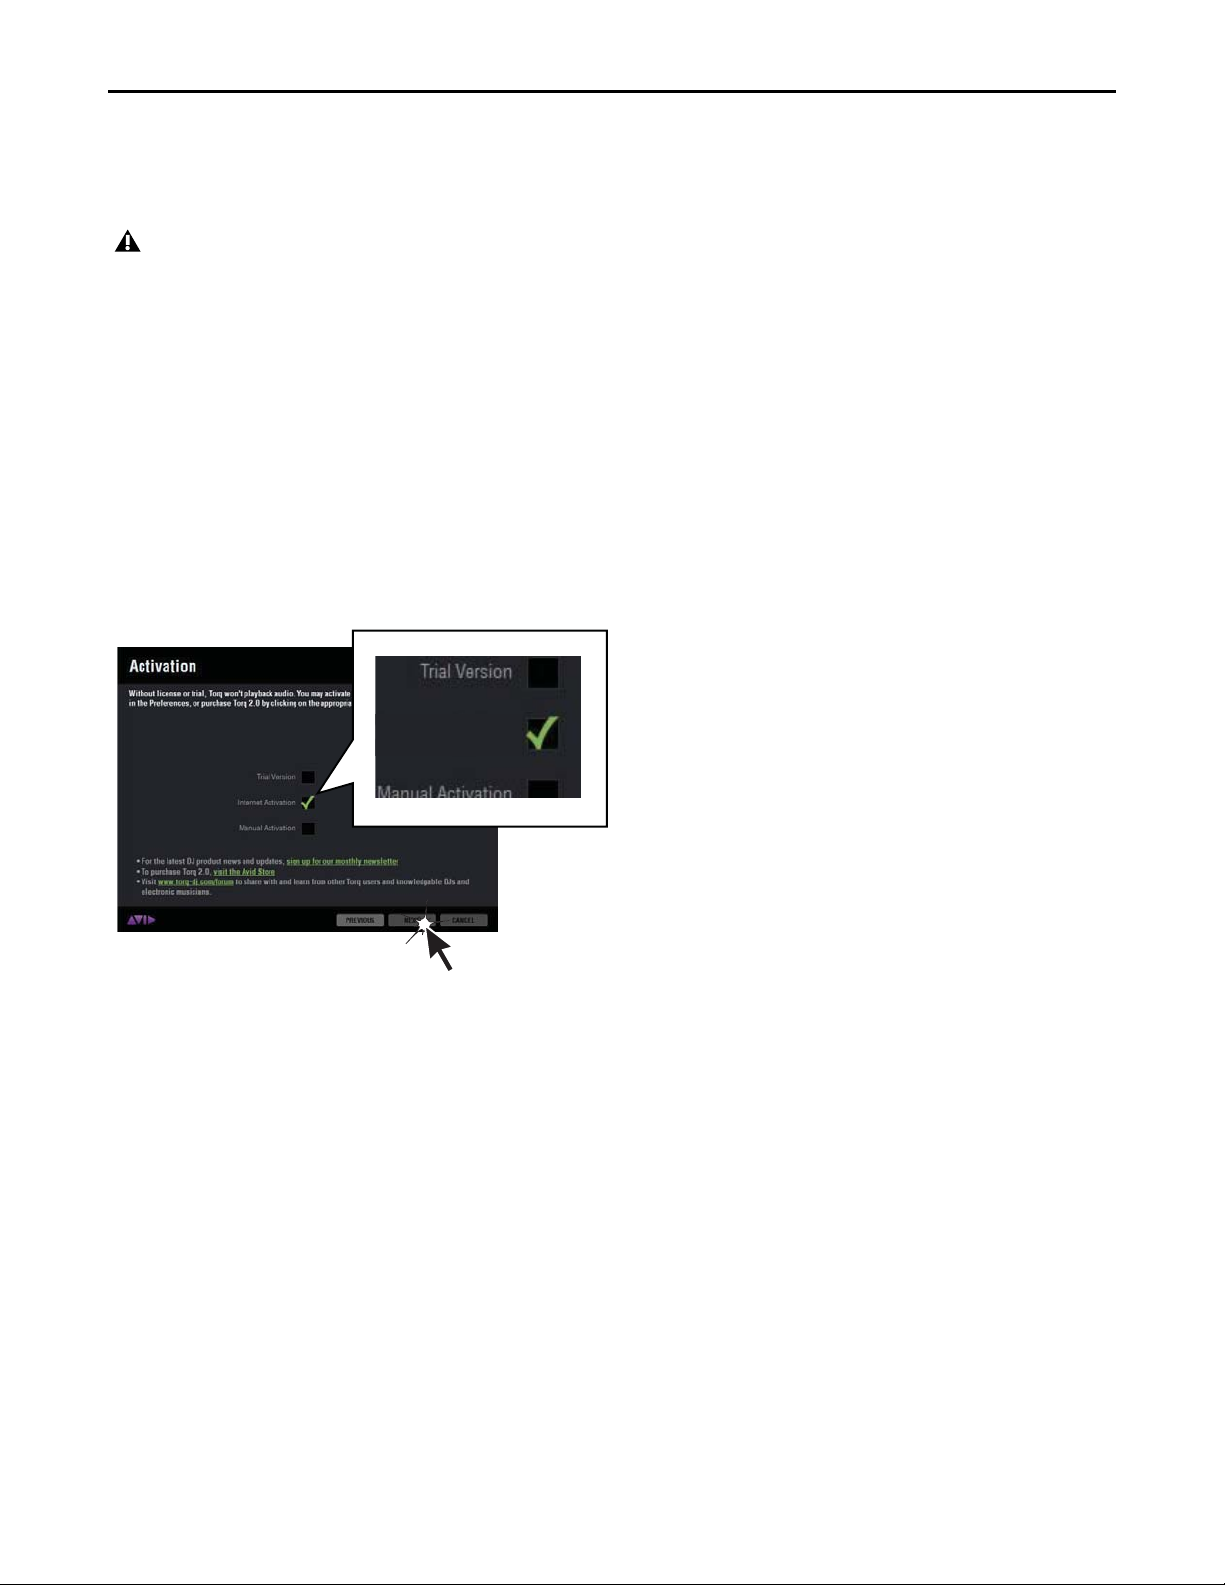
2 . Enter your serial number and System ID in the respective text boxes. Your serial number and system iden-
Next
tification number are located inside the enclosed Torq 2.0 Quick Setup Guide. If you purchased Torq online,
you received your serial number and system identification number from Avid by e-mail. You can also view
your serial number and system identification number by logging in to your support account.
Serial Number and System ID Entered
Torq 2.0 serial numbers start with the letter “J” and contain only CAPITAL letters. System ID numbers
contain only numbers, no letters. If copying and pasting these to Torq, make sure there are no spaces at
the beginning or end.
3 Click “Next” and Torq will connect to the Internet and activate automatically.
4 When you see the Activated screen, your copy of Torq is activated and ready to use. Click “Finish,” and Torq
will continue to launch.
If you have a large number of VST plug-ins installed on your computer, the initial launch of Torq may
take a couple of minutes while the application scans the VST folder.
Activated Screen
Torq 2.0 User Guide
6
Chapter 2: Software Installation
Page 12
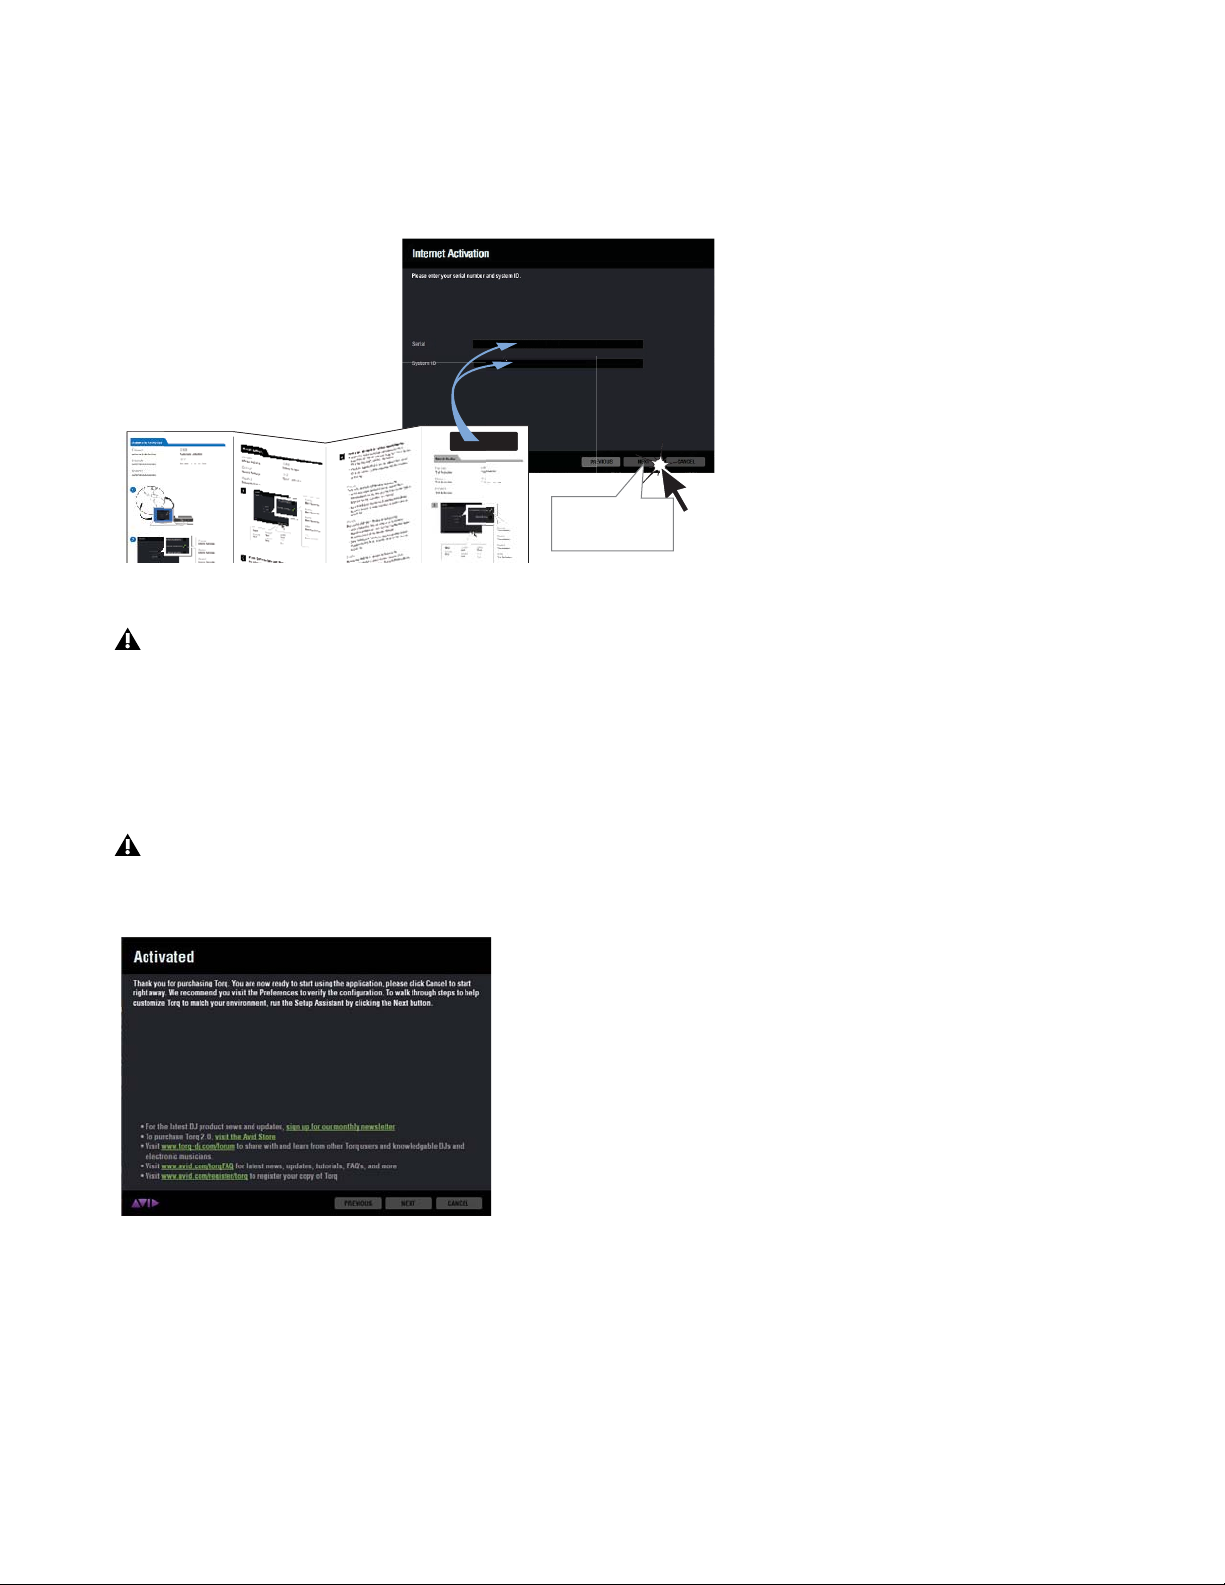
Manual Activation
Manual Activation
Serial Number /System ID
This option lets you activate Torq without an Internet connection.
To activate Torq manually:
1 Choose Manual Activation and click “Next.”
Manual Activation
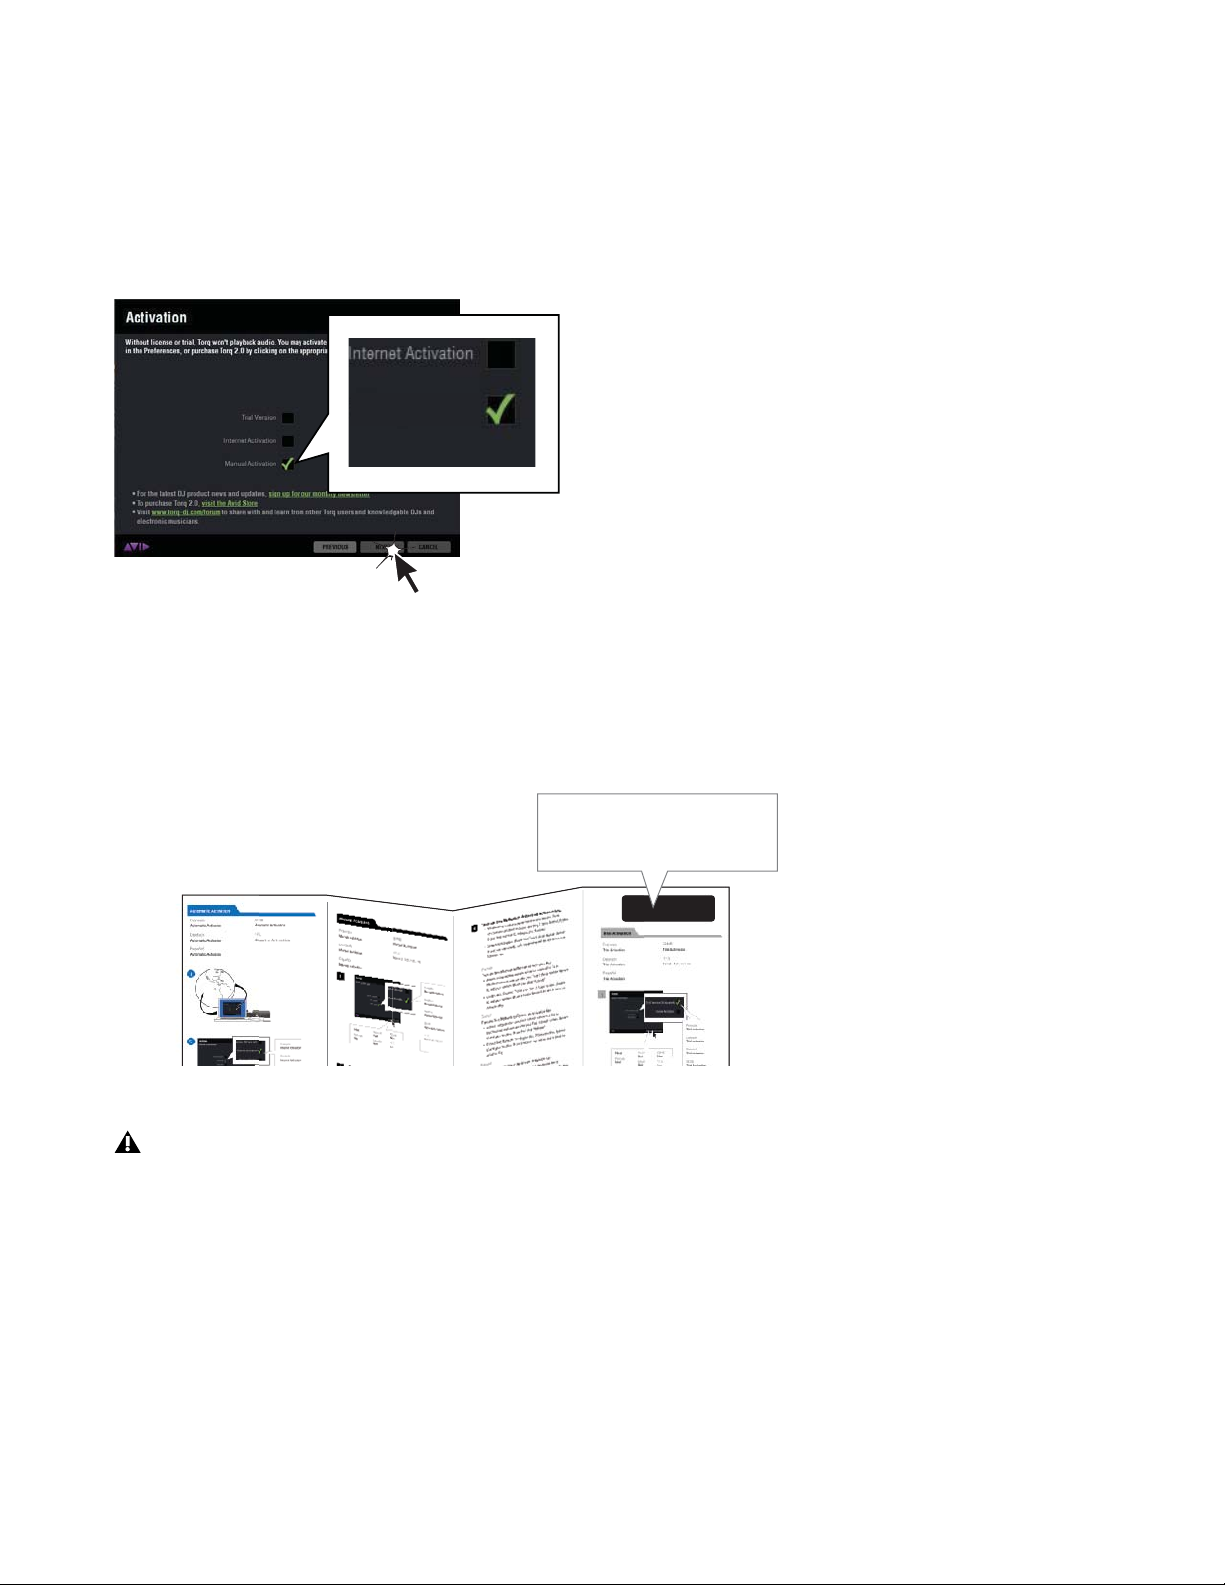
2 Enter your serial number and System ID in the respective text boxes. Your serial number and system iden-
tification number are located inside the enclosed Torq 2.0 Quick Setup Guide. If you purchased Torq online,
you received your serial number and system identification number from Avid by e-mail. You can also view
your serial number and system identification number by logging in to your support account.
Serial Number an System ID Entered
Torq 2.0 serial numbers start with the letter “J” and contain only CAPITAL letters. System ID numbers
contain only numbers, no letters. If copying and pasting these to Torq, make sure there are no spaces at
the beginning or end.
3 Retrieve and Enter an Activation Key. You can retrieve an Activation Key using another computer's Internet
connection, or by contacting Avid Customer Support. To retrieve an Activation Key you will need your Serial
Number, System ID, and Your machine ID.
To retrieve an Activation Key:
Torq 2.0 User Guide
7
Chapter 2: Software Installation
Page 13
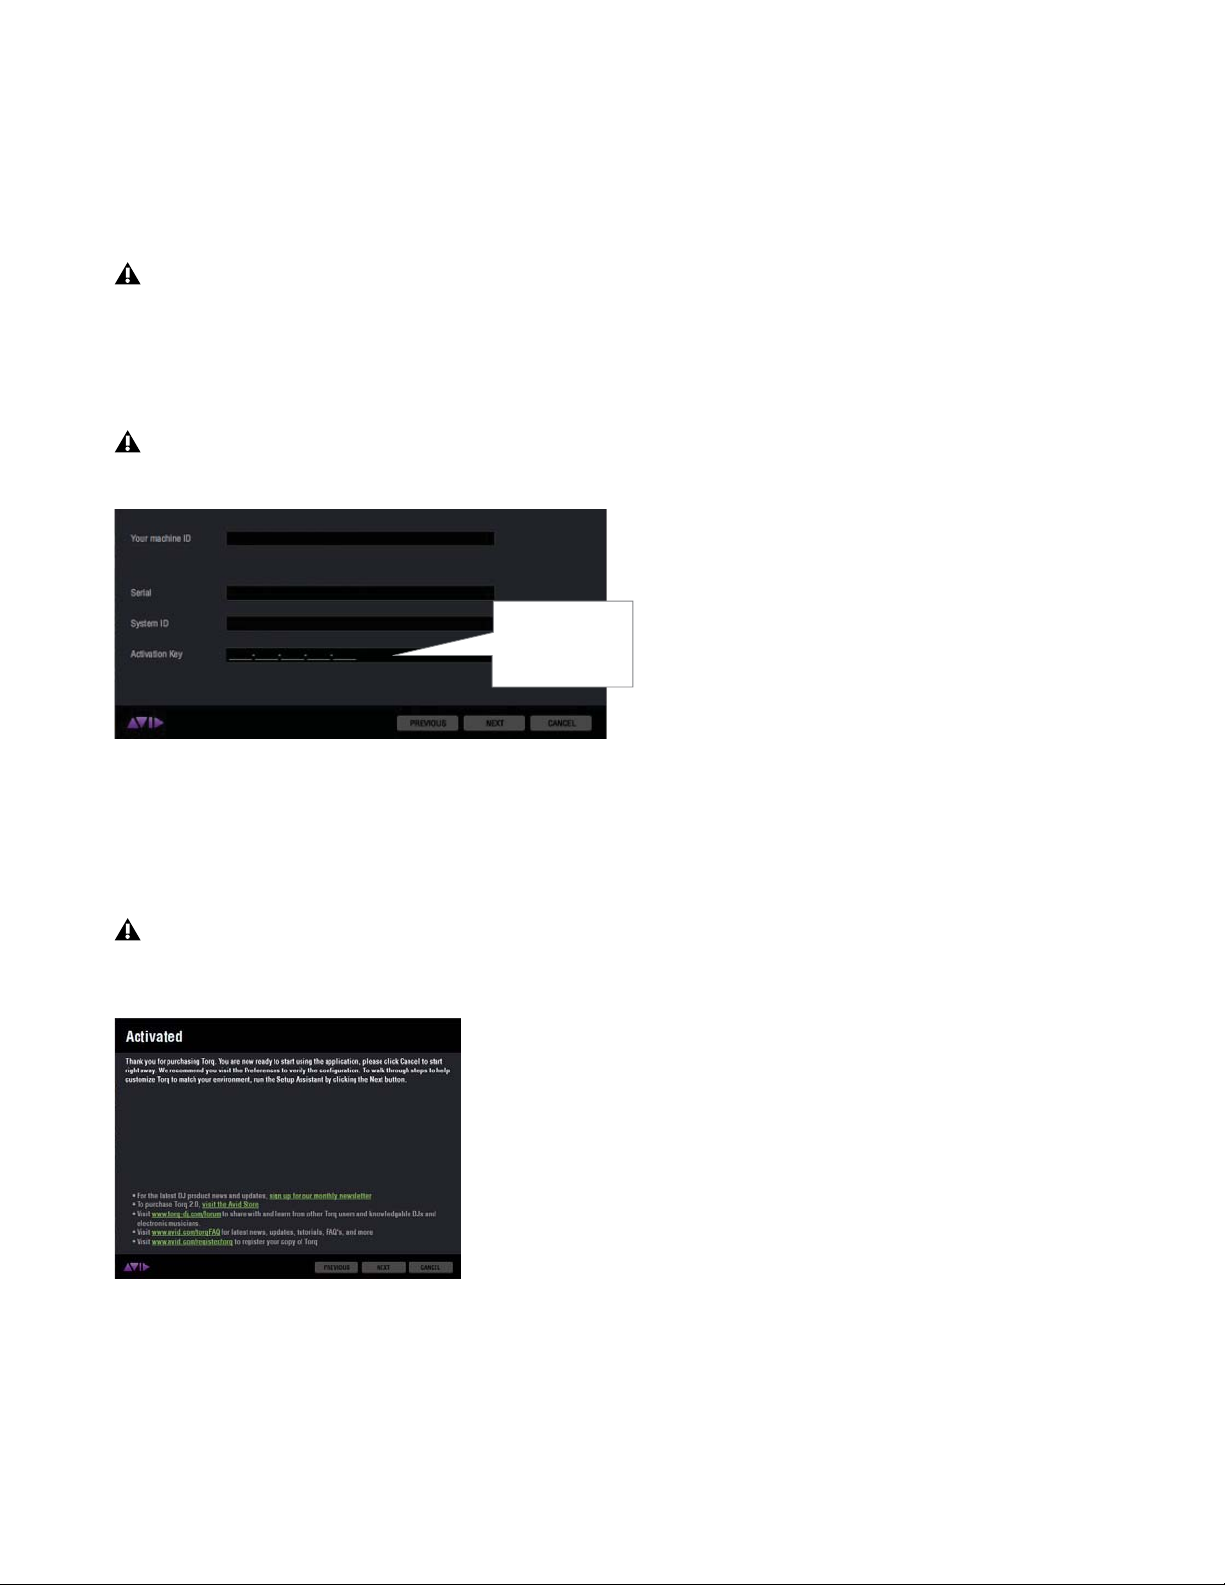
• To activate using another computer's Internet connection, go to http://activate.avid.com and enter your
Activation Key
JJJJJ-BBBBB-CCCCC-DDDDD-EEEEE
012345012345
11111- 22 222 -3 33 33 -4 444 4- 55 55 5
Torq 2 Serial Number, System ID, and Your machine ID, and then click “Activate”
– or –
• Go to http://www.avid.com/US/support/support-contact#maudio and provide your Torq 2 Serial Number, System ID, and Your machine ID and a support rep will be able to issue an Activation Key
Be sure to select your country or region from the dropdown if you are outside of the US. Activation Keys
can be provided by phone or online support.
4 Enter the Activation Key in the last line of the Manual Activation window. You can type it in, or copy the
entire Activation Key from a text file and paste it into the first text box and it automatically fills the rest of the
text boxes.
Torq 2.0 Activation Keys start with the letter “L” and contain only CAPITAL letters.
Manual Activation Key Entered
5 Click “Next.”
6 When you see the Activated screen, your copy of Torq is activated and ready to use. Click “Finish” and Torq
will continue to launch.
If you have a large number of VST plug-ins installed on your computer, the initial launch of Torq may
take a couple of minutes while the application scans the VST folder.
Activated Screen
Torq 2.0 User Guide
8
Chapter 2: Software Installation
Page 14

30-day Trial Activation
Trail Version
If you would like to demo Torq before purchasing, you can activate a 30 day trial version of Torq. The 30 day
trial period cannot be extended, and Torq must be activated and authorized if you wish to continue using the
application. If you deactivate Torq during the 30 day trial period, the application will still launch for the remainder trial. However, as the trial cannot be extended you will need to complete the activation and authorization process.
To activate Torq for the 30-day trial period:
1 Choose Trial Version and click “Next.”
Trial Activation
An Internet Connection is NOT required for Trial Activation.
2 When you see the “Activated” screen, your 30 day trial of Torq is activate and ready to use. Click “Finish”
and the application will continue to launch.
At any time during the 30-day trial period, you can choose to purchase a copy of Torq and use the Activation
tool to activate it by clicking the Licensing button in Torq. If you choose not to purchase the software, Torq
will deactivate when the trial expires.
If you have a large number of VST plug-ins installed on your computer, the initial launch of Torq may
take a couple of minutes while the application scans the VST folder.
Torq 2.0 User Guide
9
Chapter 2: Software Installation
Page 15
Deactivating Torq
If you want to run Torq on another system, you first must deactivate your software license before you can activate it on a second system. Deactivation occurs while Torq is running, but the deactivation process automatically saves all open bins and the current project.
You must be connected to the Internet to deactivate your software.
To deactivate Torq:
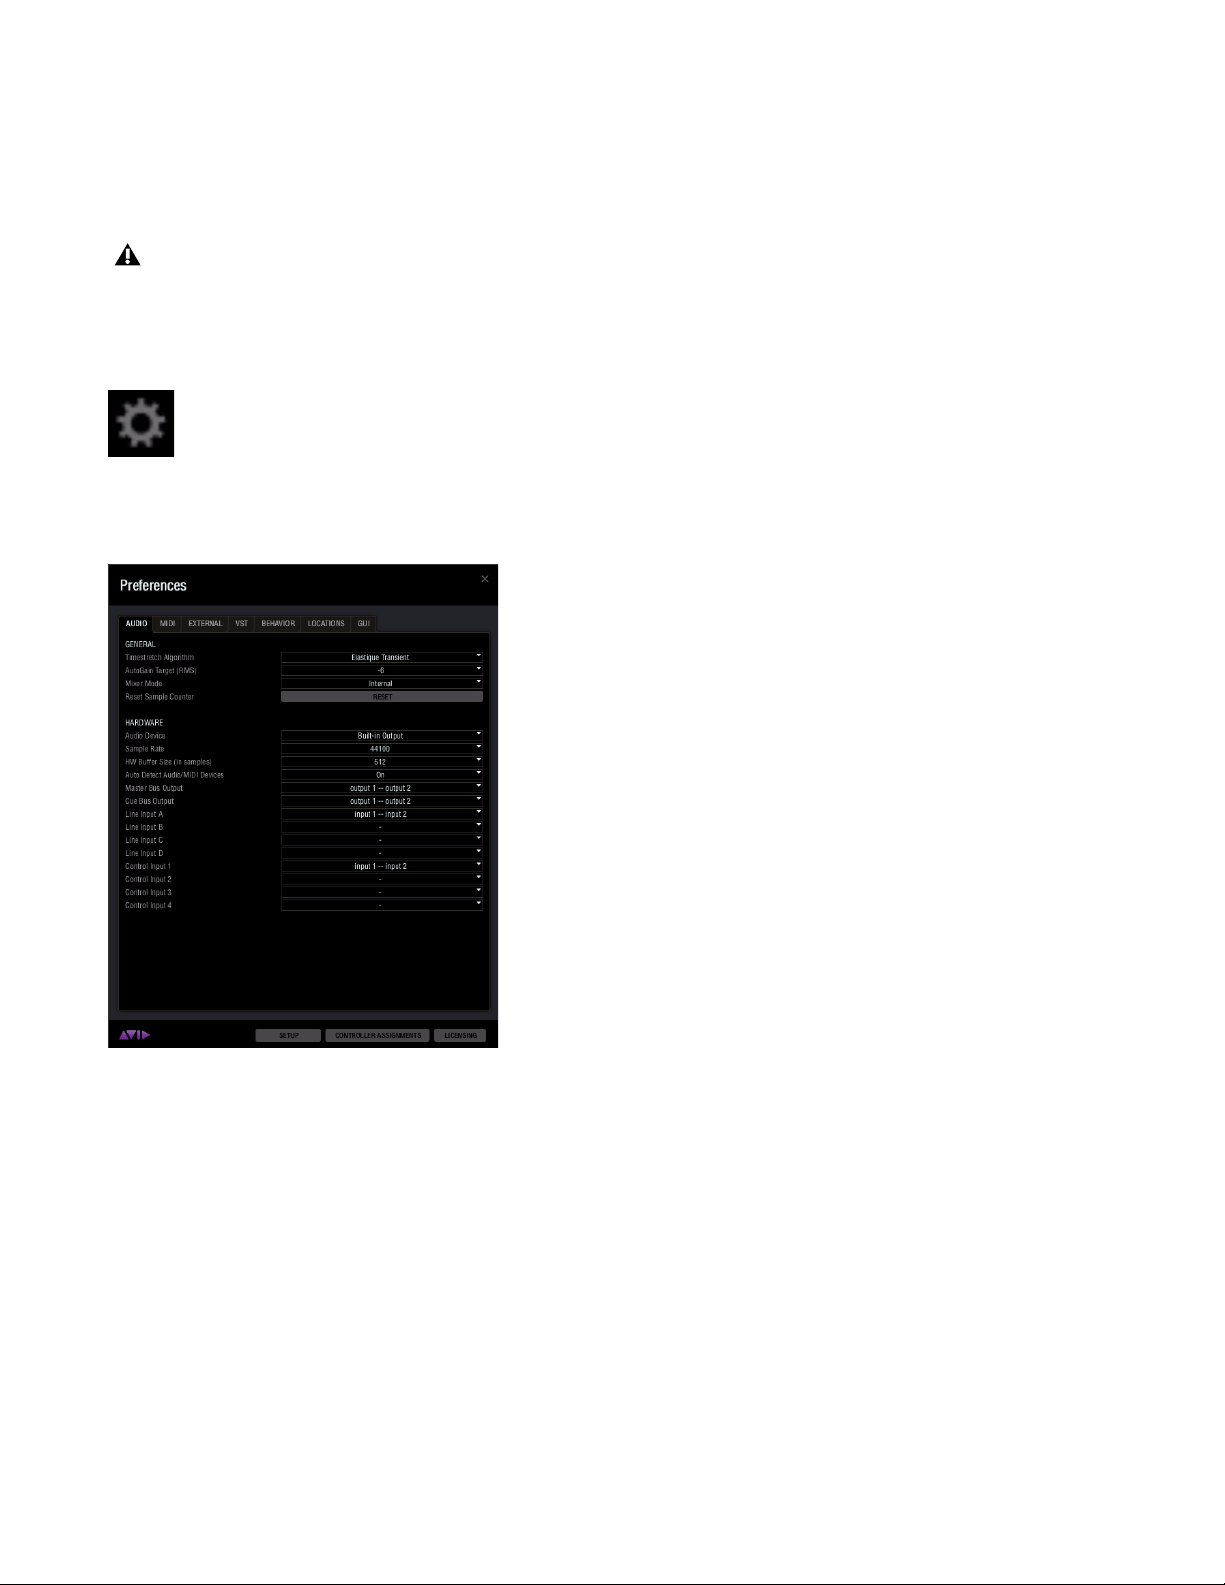
1 While the program is running, click on the Preferences icon in the Toolbar at the top of the Torq interface.
Torq Preferences Icon
2 Click the Licensing button in the lower left of the Torq Preferences screen.
Torq Preferences
Torq 2.0 User Guide
10
Chapter 2: Software Installation
Page 16
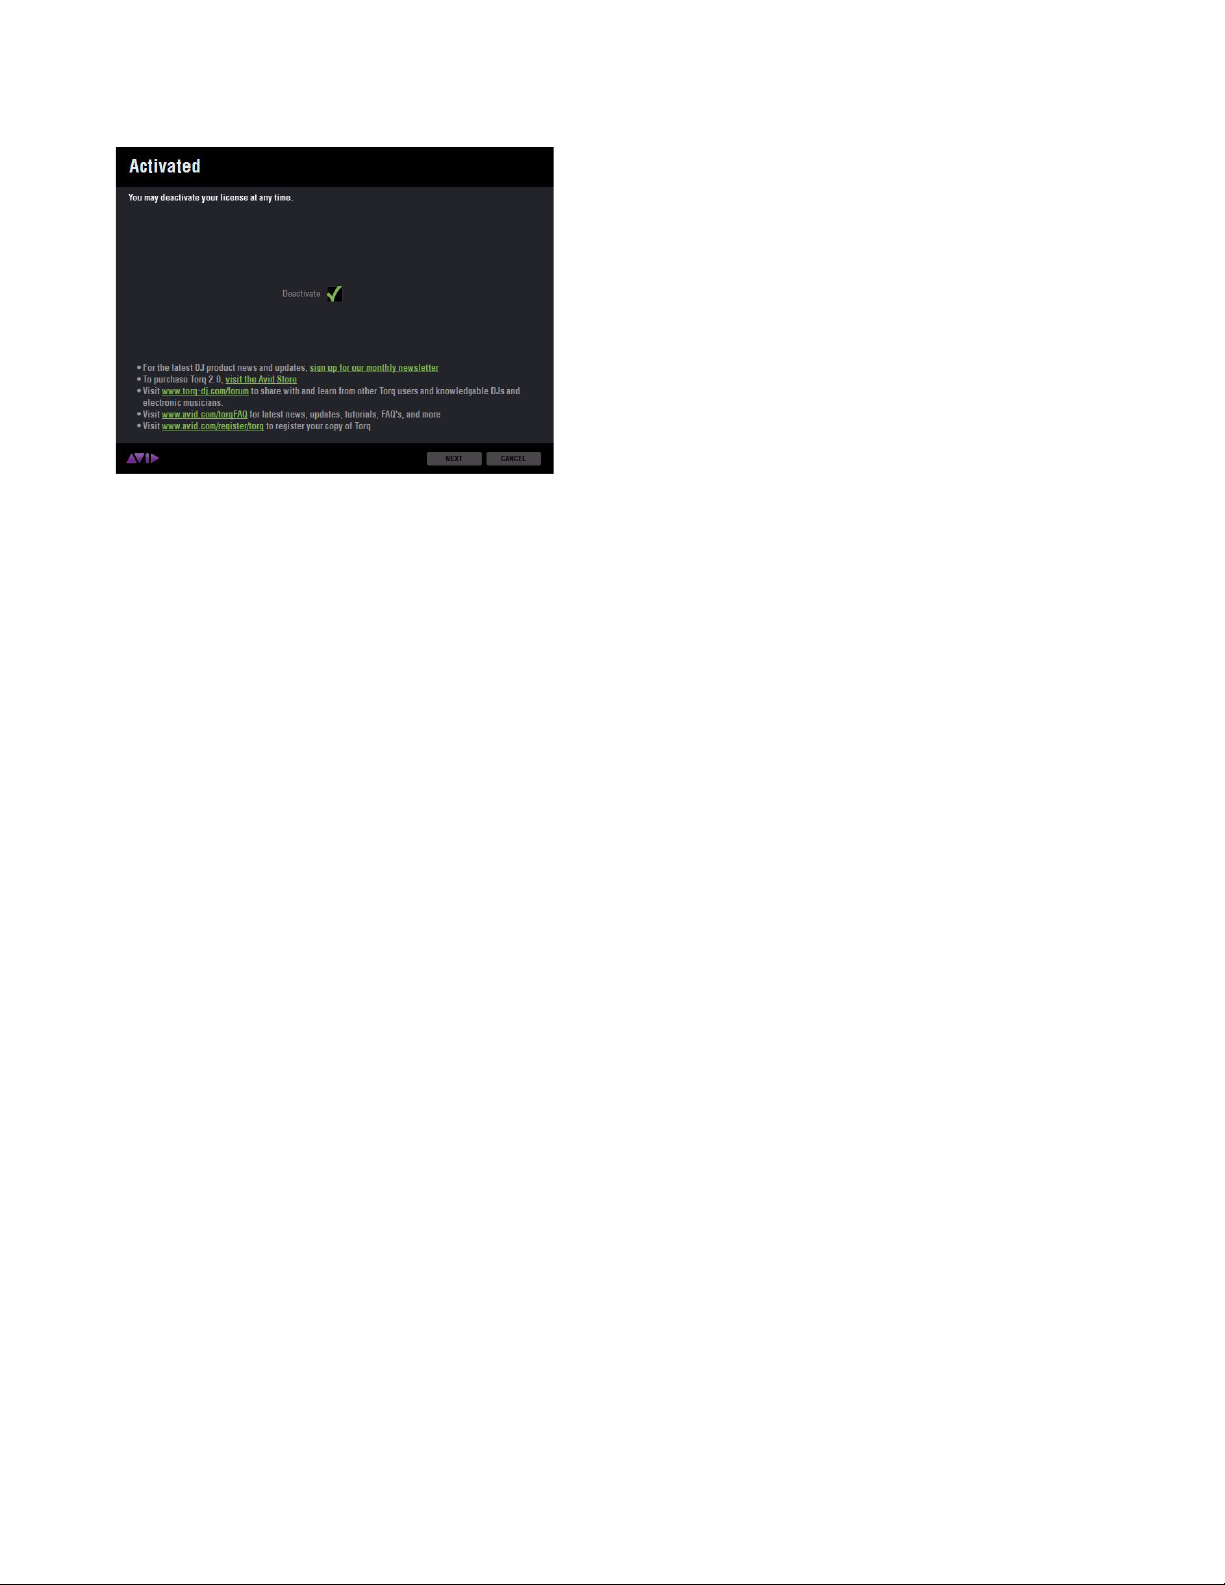
3 When the Deactivate screen appears, click “Next” to complete the deactivation process.
Deactivate Screen
Torq 2.0 User Guide
11
Chapter 2: Software Installation
Page 17
Chapter 3: Torq 2.0 Configuration
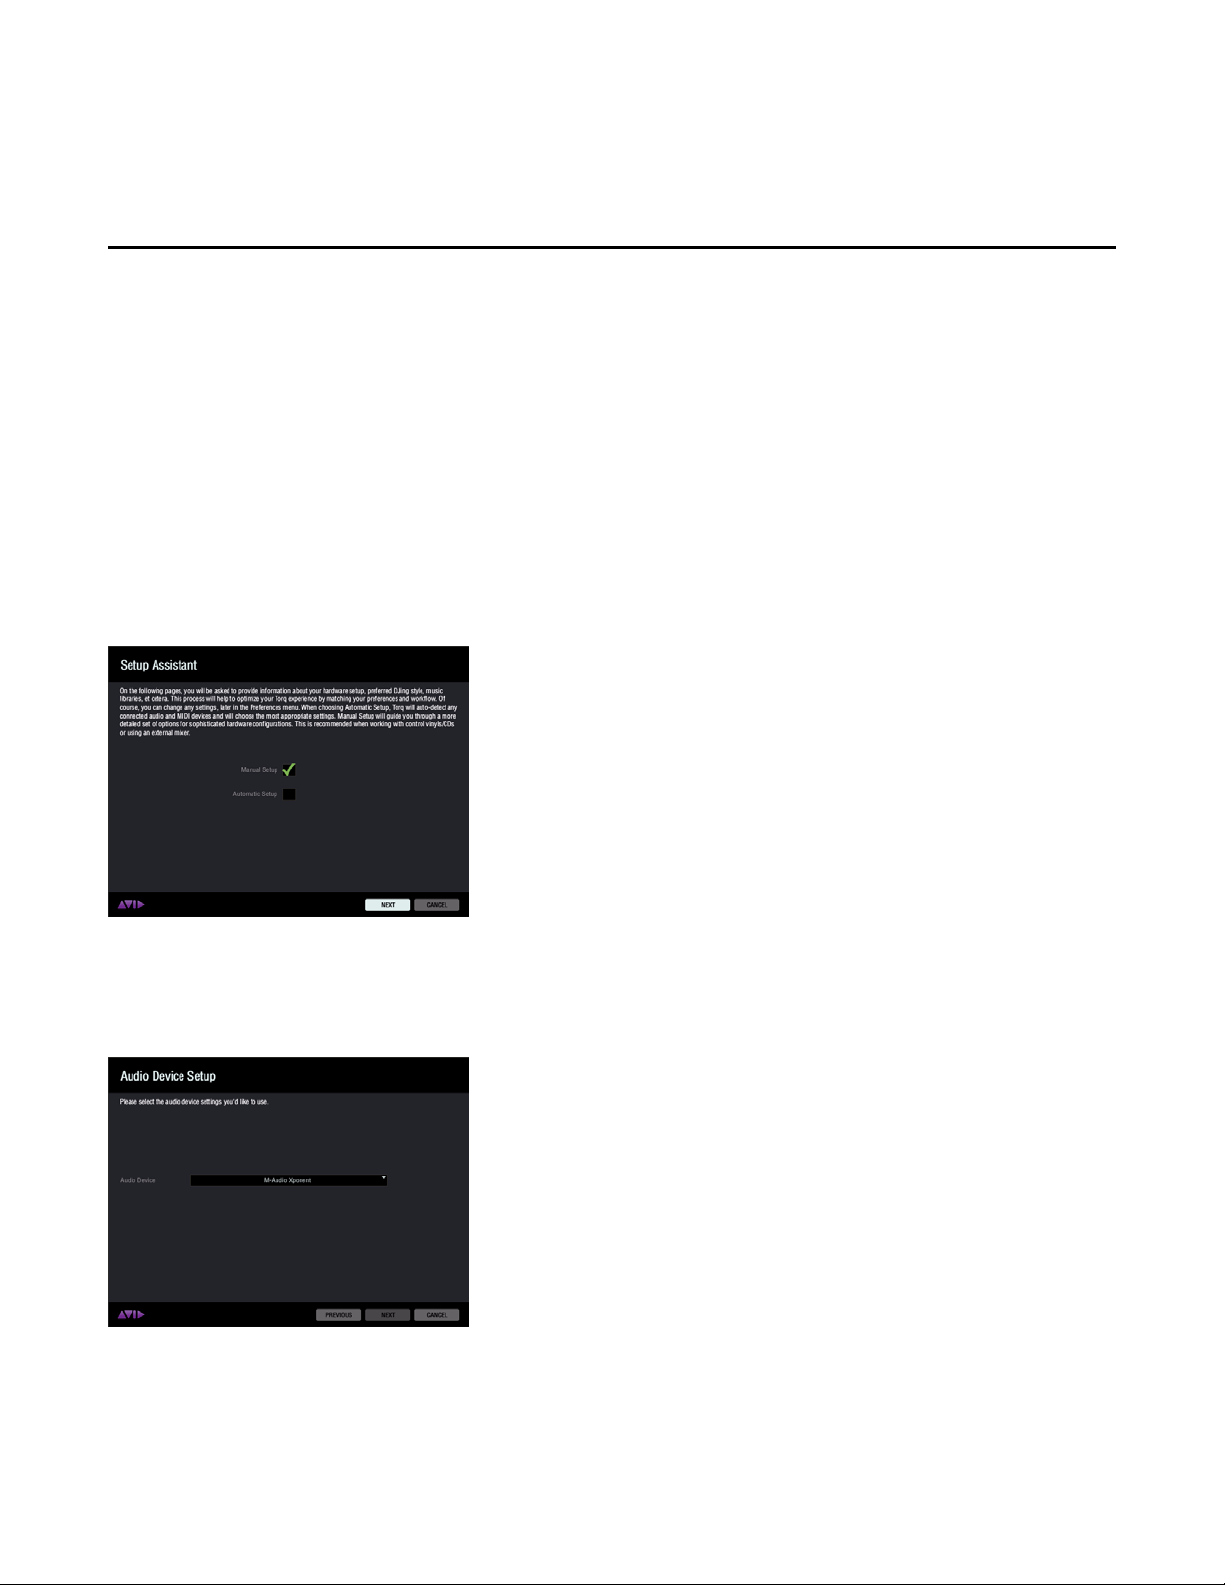
Setup Assistant
Once you have completed the installation and activation process, the Torq Setup Assistant will launch, allowing you optimize the of the program to work on your system with qualified hardware. The Setup Assistant lets
you use two methods of configuring Torq.
Manual Setup
This method guides you through a detailed set of options for more sophisticated hardware configurations.
To Manually Setup Torq:
1 Choose Manual Setup, then click “Next.”
Setup Assistant - Manual Setup
2 Click the pop-up menu on the Audio Device Setup screen and choose the audio device you wish to use from
the list of available options, then click “Next”.
Setup Assistant - Audio Device Setup
Torq 2.0 User Guide
12
Chapter 3: Torq 2.0 Configuration
Page 18
3 When the Mixer Mode screen appears, choose one of the two Mixer modes. If you are going to use an ex-
ternal hardware mixer with Torq, proceed to step 11 under “External Mixer Mode” on page 16, otherwise proceed to step 4.
Internal Mixer Mode
Setup Assistant - Internal Mixer Mode
Choosing Internal Mixer Mode lets you mix all of the Decks within Torq using a hardware controller, such as
Torq Xponent, any other qualified third-party controller, or your mouse. While Torq is set to Internal Mixer
Mode, the internal mixer will be visible on-screen, and all hardware controller movements will be reflected in
the application.
4 Select Internal Mixer Mode, then click “Next.”
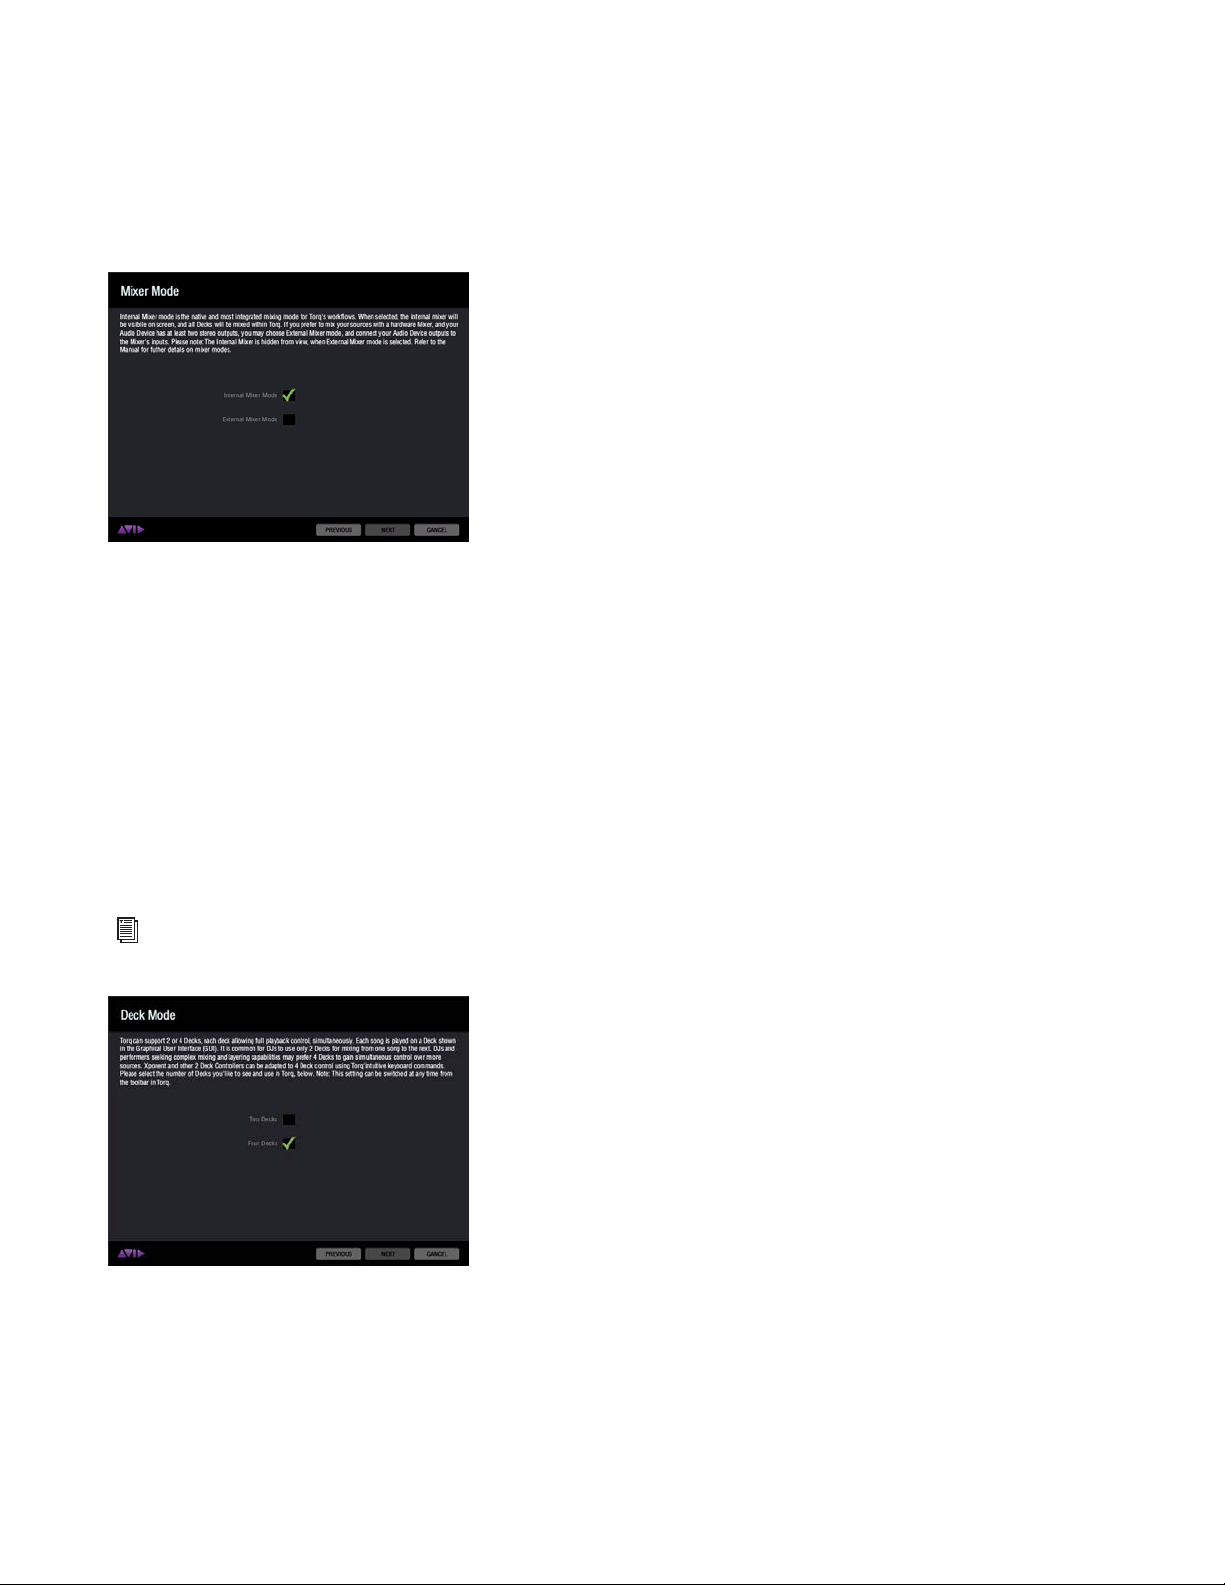
Deck Mode
By default Torq 2.0 is set to run in Four Deck Mode which provides four Decks in the Torq interface. However
you also have the option of using the program in the more traditional Two Deck Mode, with two on-screen
Deck.
Refer to “Four Deck Mode vs. Two Deck Mode” on page 35 for more information.
Setup Assistant - Deck Mode
5 Choose the Deck Mode you wish to use, then click “Next.”
Torq 2.0 User Guide
13
Chapter 3: Torq 2.0 Configuration
Page 19
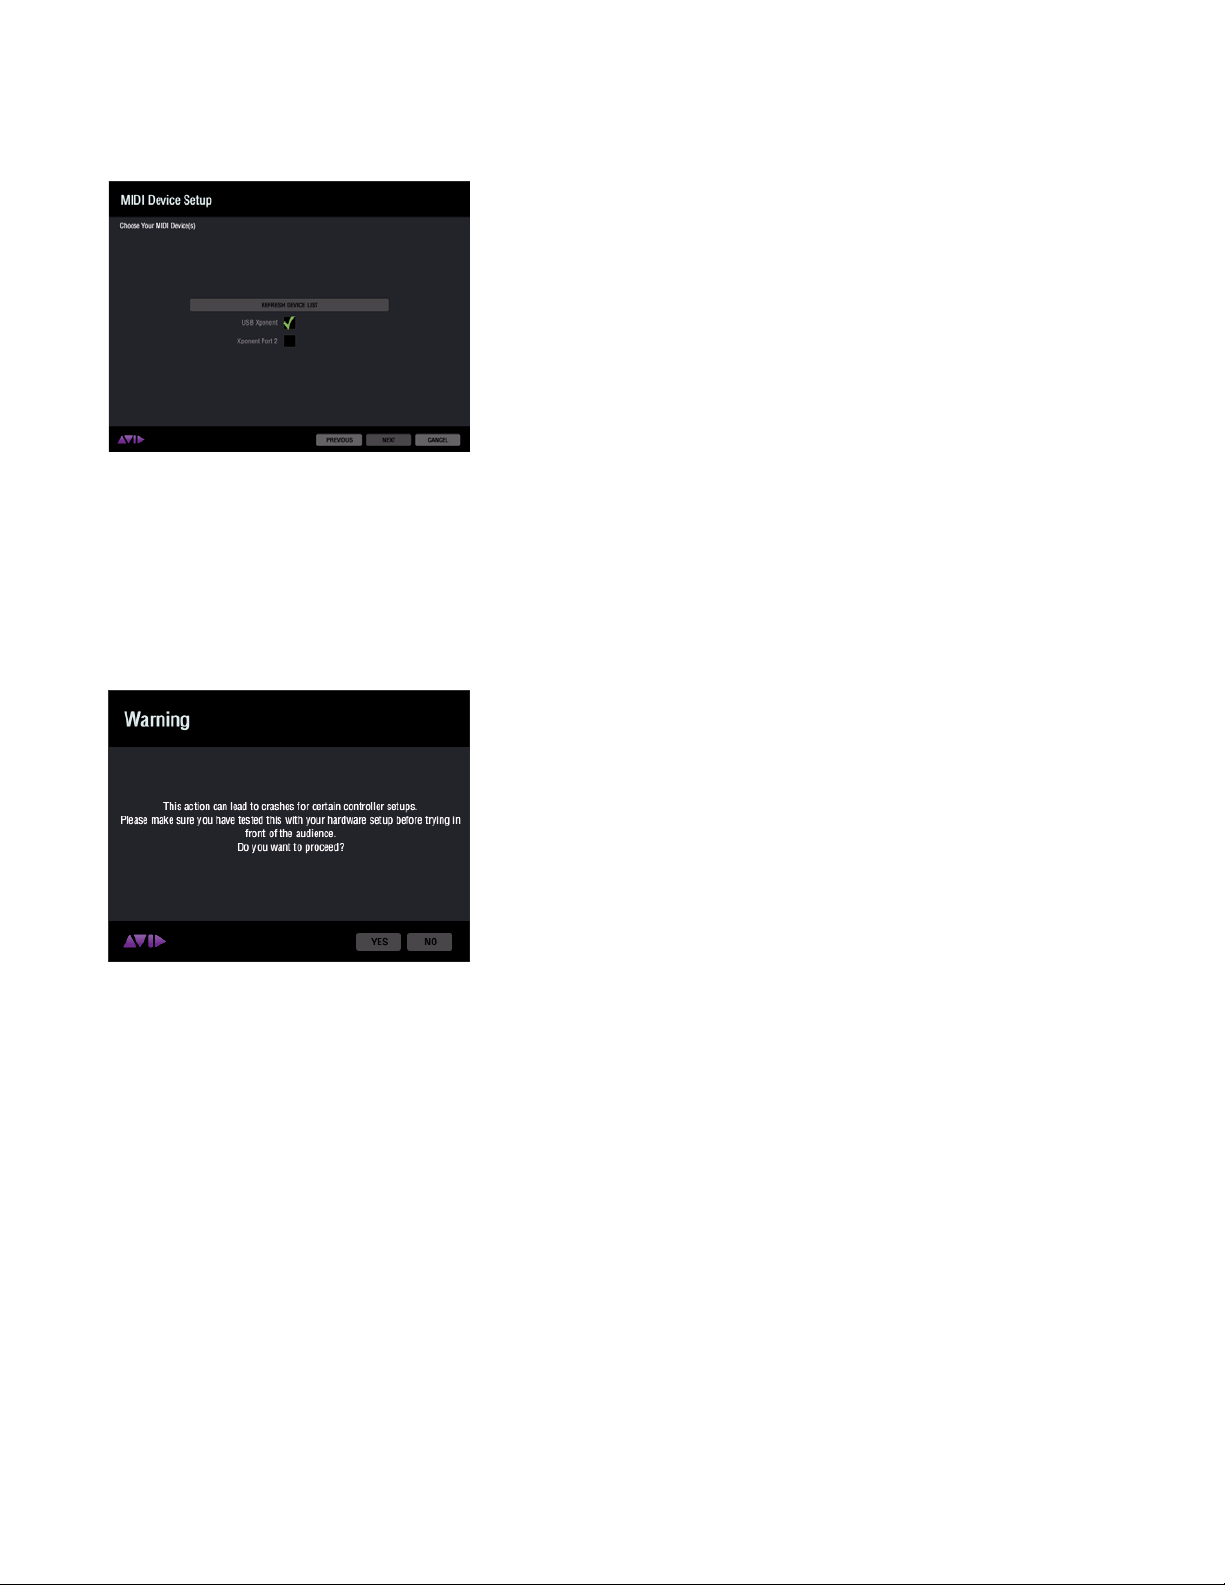
6 When the MIDI Device Setup screen appears, choose a MIDI device from the available options, then click
“Next.”
Setup Assistant - MIDI Device Setup
If Your MIDI Device is Not Listed
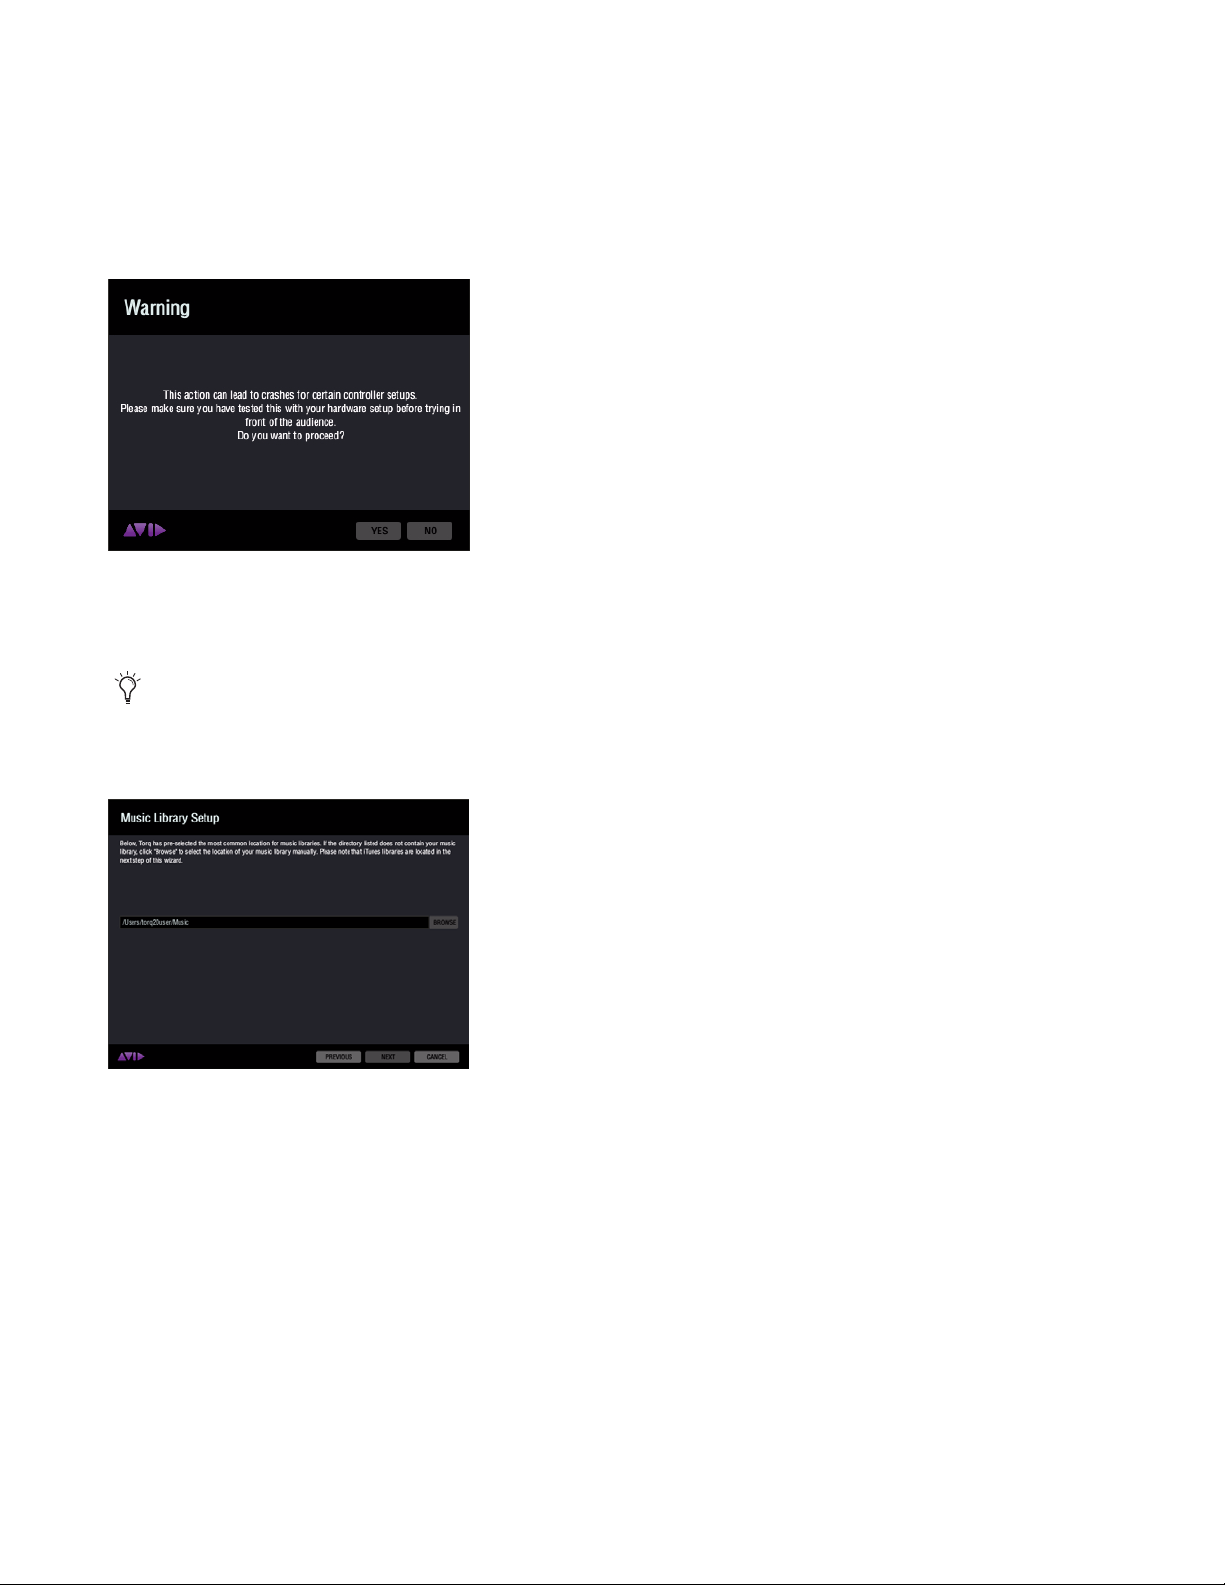
If you do not see a listing for the MIDI device you want to use, click the “Refresh Device List” button. A Warning screen will appear asking you to co nfir m that you w ant Tor q to s can for the missing MIDI Device. Read the
screen very carefully, then click “Yes” if you still want to refresh the device list. Once the process has completed, and your device appears, click “Next.”
Setup Assistant - Refresh Device List Warning
Torq 2.0 User Guide
14
Chapter 3: Torq 2.0 Configuration
Page 20
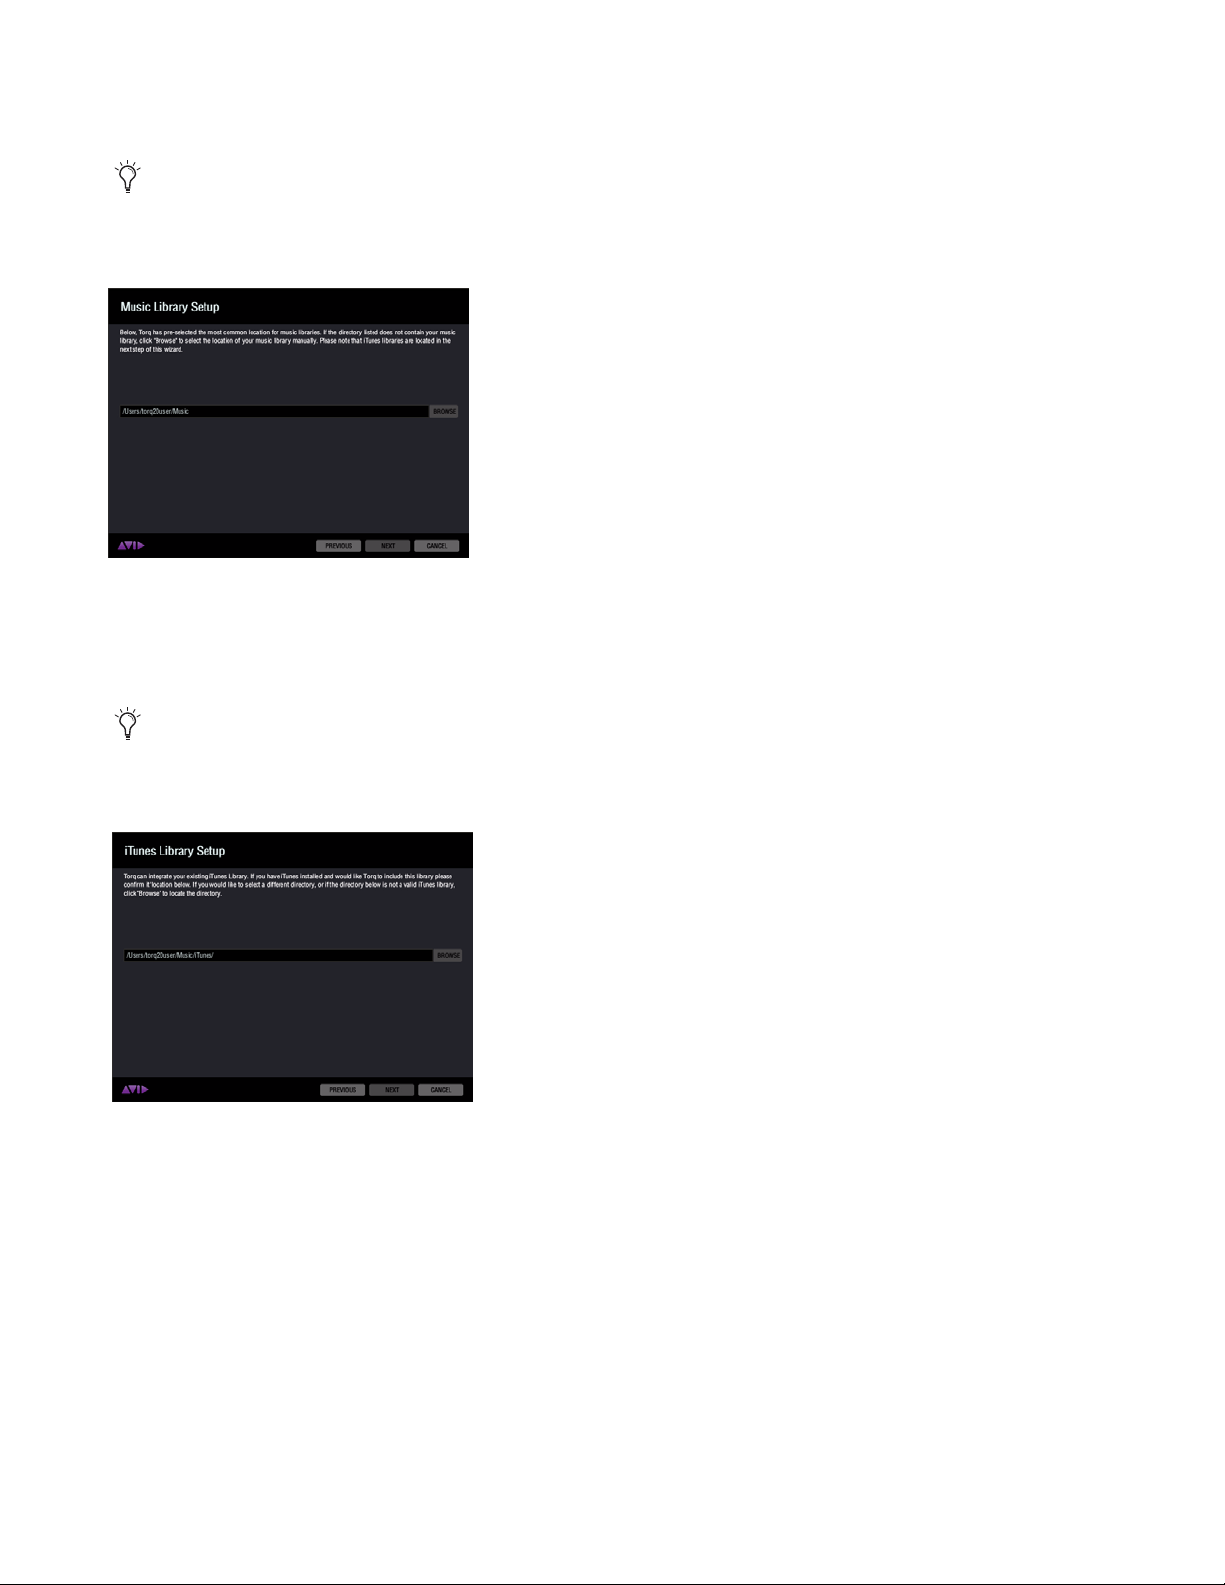
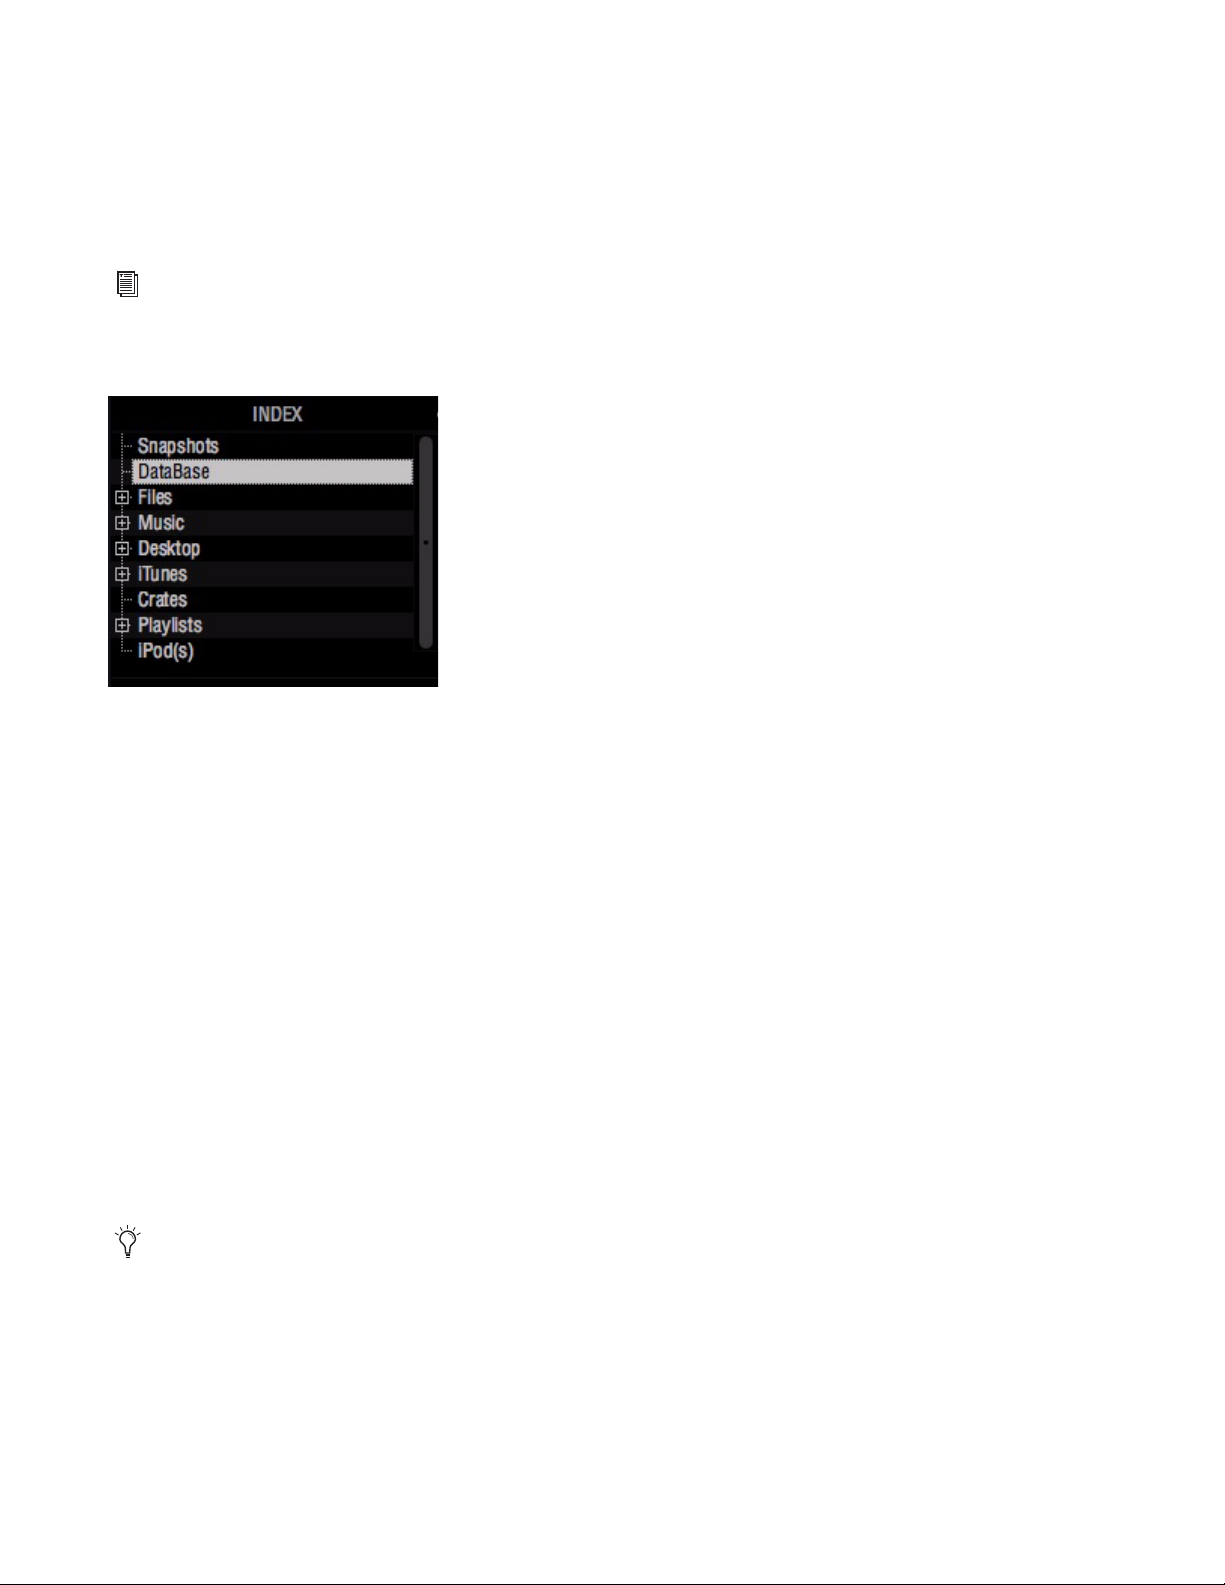
7 Torq preselects the most common location for your music folder based on your operating system. If the
folder path displayed on the Music Library Setup screen is correct, click “Next.”
If the preselected location is incorrect, click the Browse button to the left of the folder path and navigate
to the proper location on your system. Once you have found the folder, click on it once, then click “Open”
(Mac) or “OK” (Windows). When that window closes, click “Next” on the Music Library Setup screen.
Setup Assistant - Music Library Setup
8 If you have iTunes installed on your computer, Torq will preselect the default location of your iTunes library
based on your operating system. If the folder path displayed on the iTunes Library Setup screen is correct, click
“Next.”
If the preselected location is incorrect, click the Browse button to the left of the folder path and navigate
to the proper location on your system. Once you have found the folder, click on it once, then click “Open”
(Mac) or “OK” (Windows). When that window closes, click “Next” on the iTunes Library Setup screen.
Setup Assistant - iTunes Library Setup
Torq 2.0 User Guide
15
Chapter 3: Torq 2.0 Configuration
Page 21
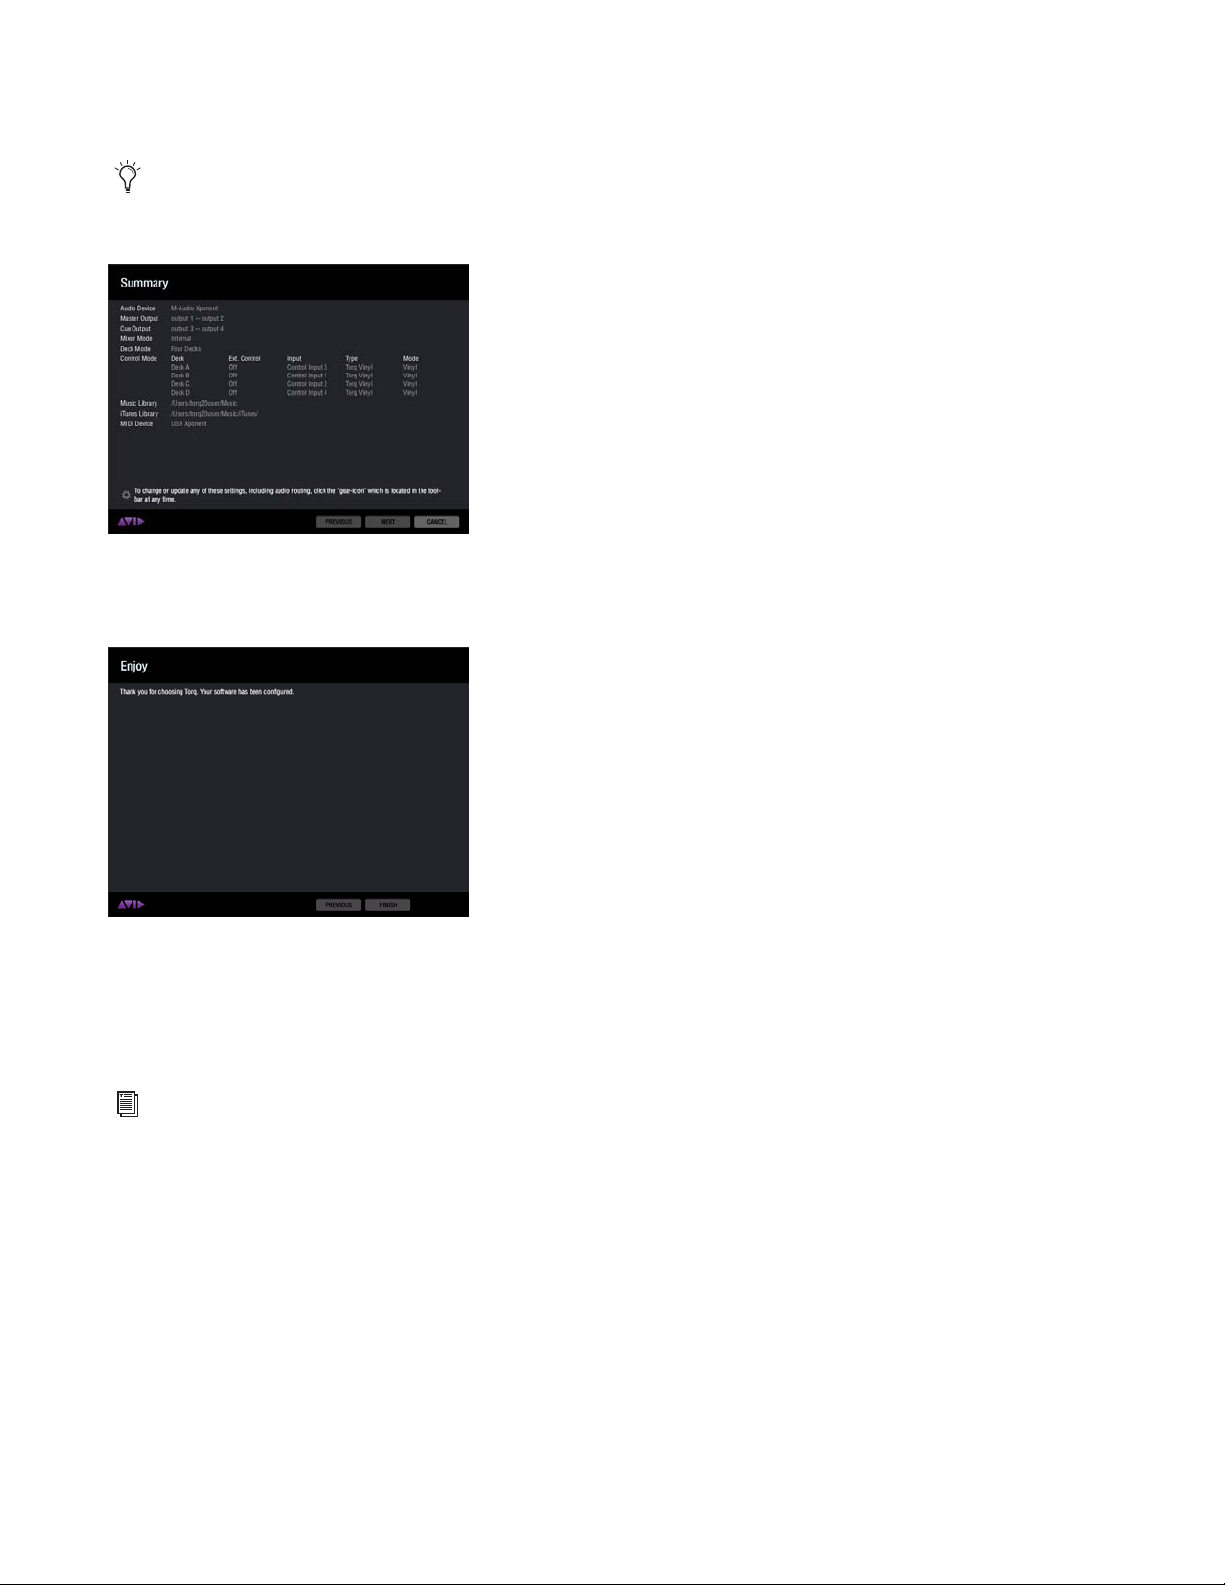
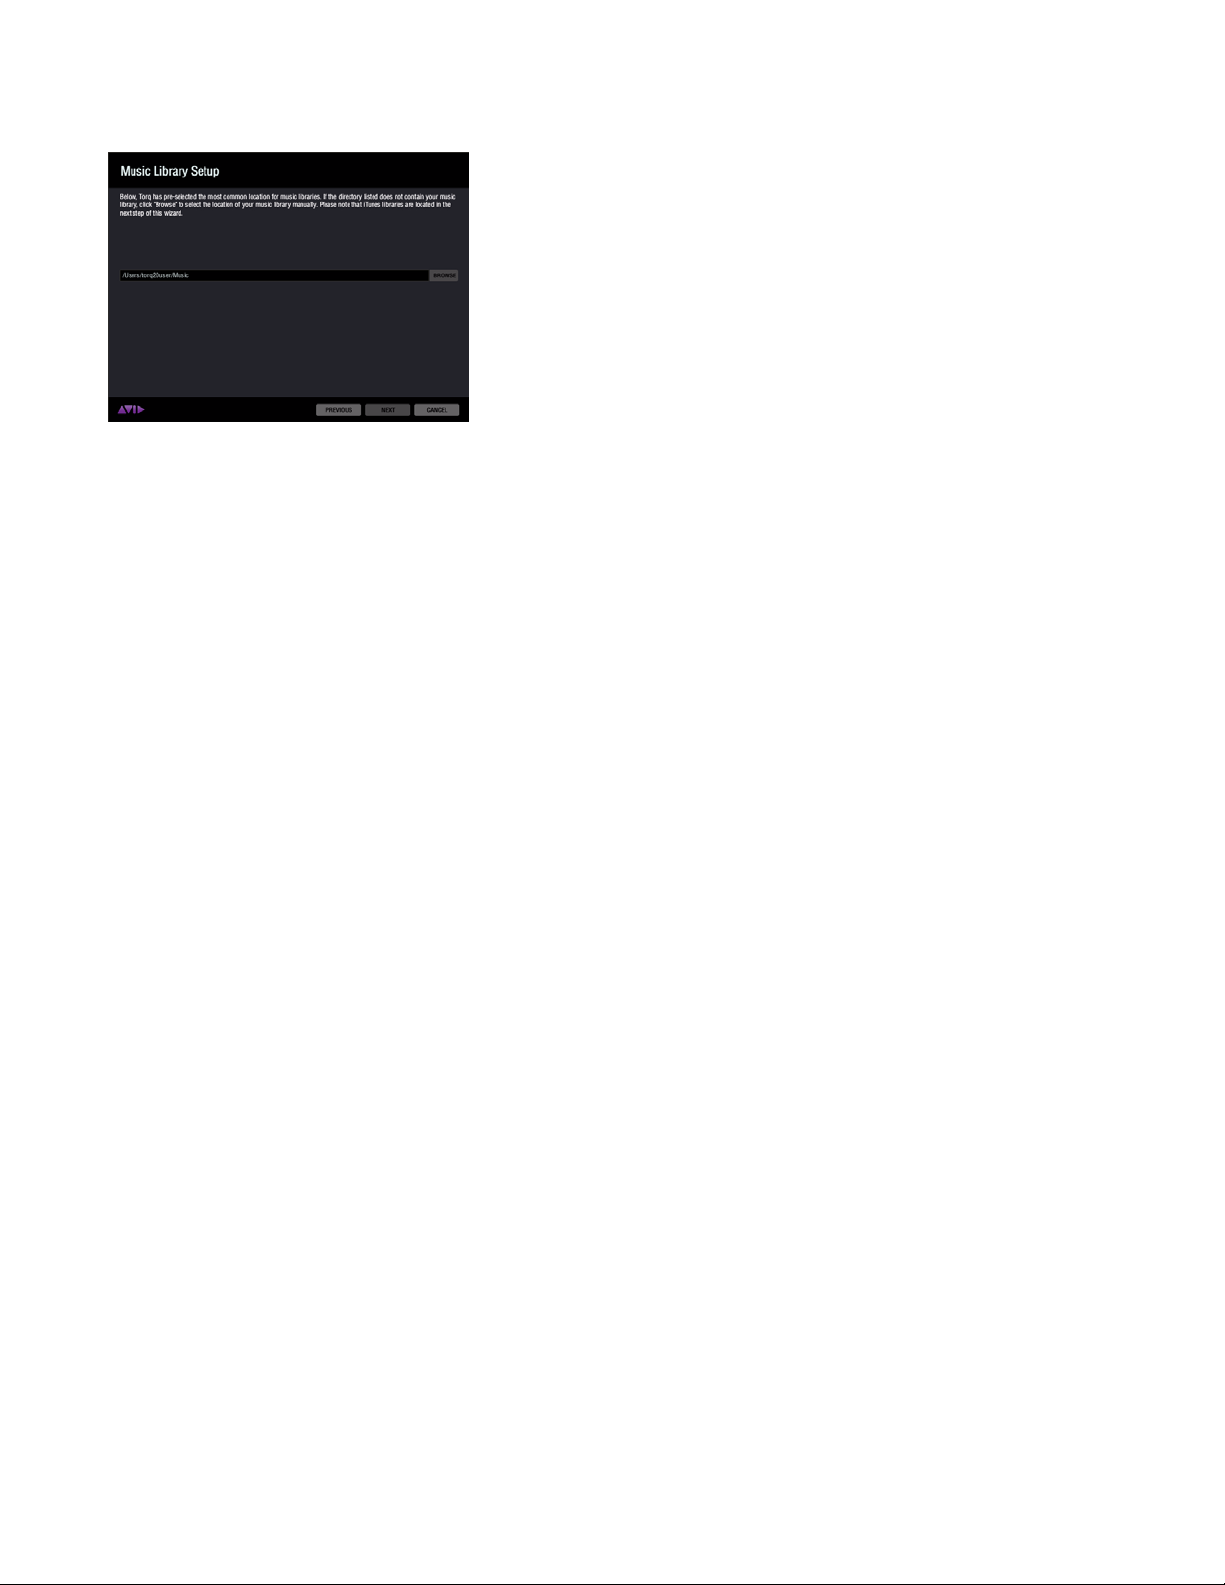
9 Review the information displayed on the Summary screen, then click “Next” if all the information listed is
correct.
If any of the information is incorrect, click “Previous” to go back to the appropriate page, or click the
“Gear” icon to open the Torq Preferences (see “Torq Preferences” on page 101) to change the settings.
Setup Assistant - Summary
10 Click Finish on the Enjoy screen.
Setup Assistant - Enjoy
External Mixer Mode
Choosing External Mixer Mode lets you mix you songs with a hardware mixer and an audio device with at
least two stereo outputs. However the on-screen mixer will be hidden.
For more information about External Mixer Mode Preferences, refer to “External” on page 112 and “External Mixer Mode Channel Assignments” on page 116.
11 Choose External Mixer Mode, and click “Next.”
12 When the Deck Mode screen appears choose the number of Torq Decks you want to use, and click “Next.”.l
13 When the MIDI Device Setup screen appears, choose a MIDI device from the available options, then click
“Next.”
Torq 2.0 User Guide
16
Chapter 3: Torq 2.0 Configuration
Page 22
If Your MIDI Device is Not Listed
If you do not see a listing for the MIDI device you want to use, click the “Refresh Device List” button. A Warning screen will appear asking you to co nfir m that you w ant Tor q to s can for the missing MIDI Device. Read the
screen very carefully, then click “Yes” if you still want to refresh the device list. Once the process has completed, and your device appears, click “Next.”
Setup Assistant - Refresh Device List Warning
14 Torq preselects the most common location for your music folder based on your operating system. If the
folder path displayed on the Music Library Setup screen is correct, click “Next.”
If the preselected location is incorrect, click the Browse button to the left of the folder path and navigate
to the proper location on your system. Once you have found the folder, click on it once, then click “Open”
(Mac) or “OK” (Windows). When that window closes, click “Next” on the Music Library Setup screen.
Setup Assistant - Music Library Setup
Torq 2.0 User Guide
17
Chapter 3: Torq 2.0 Configuration
Page 23
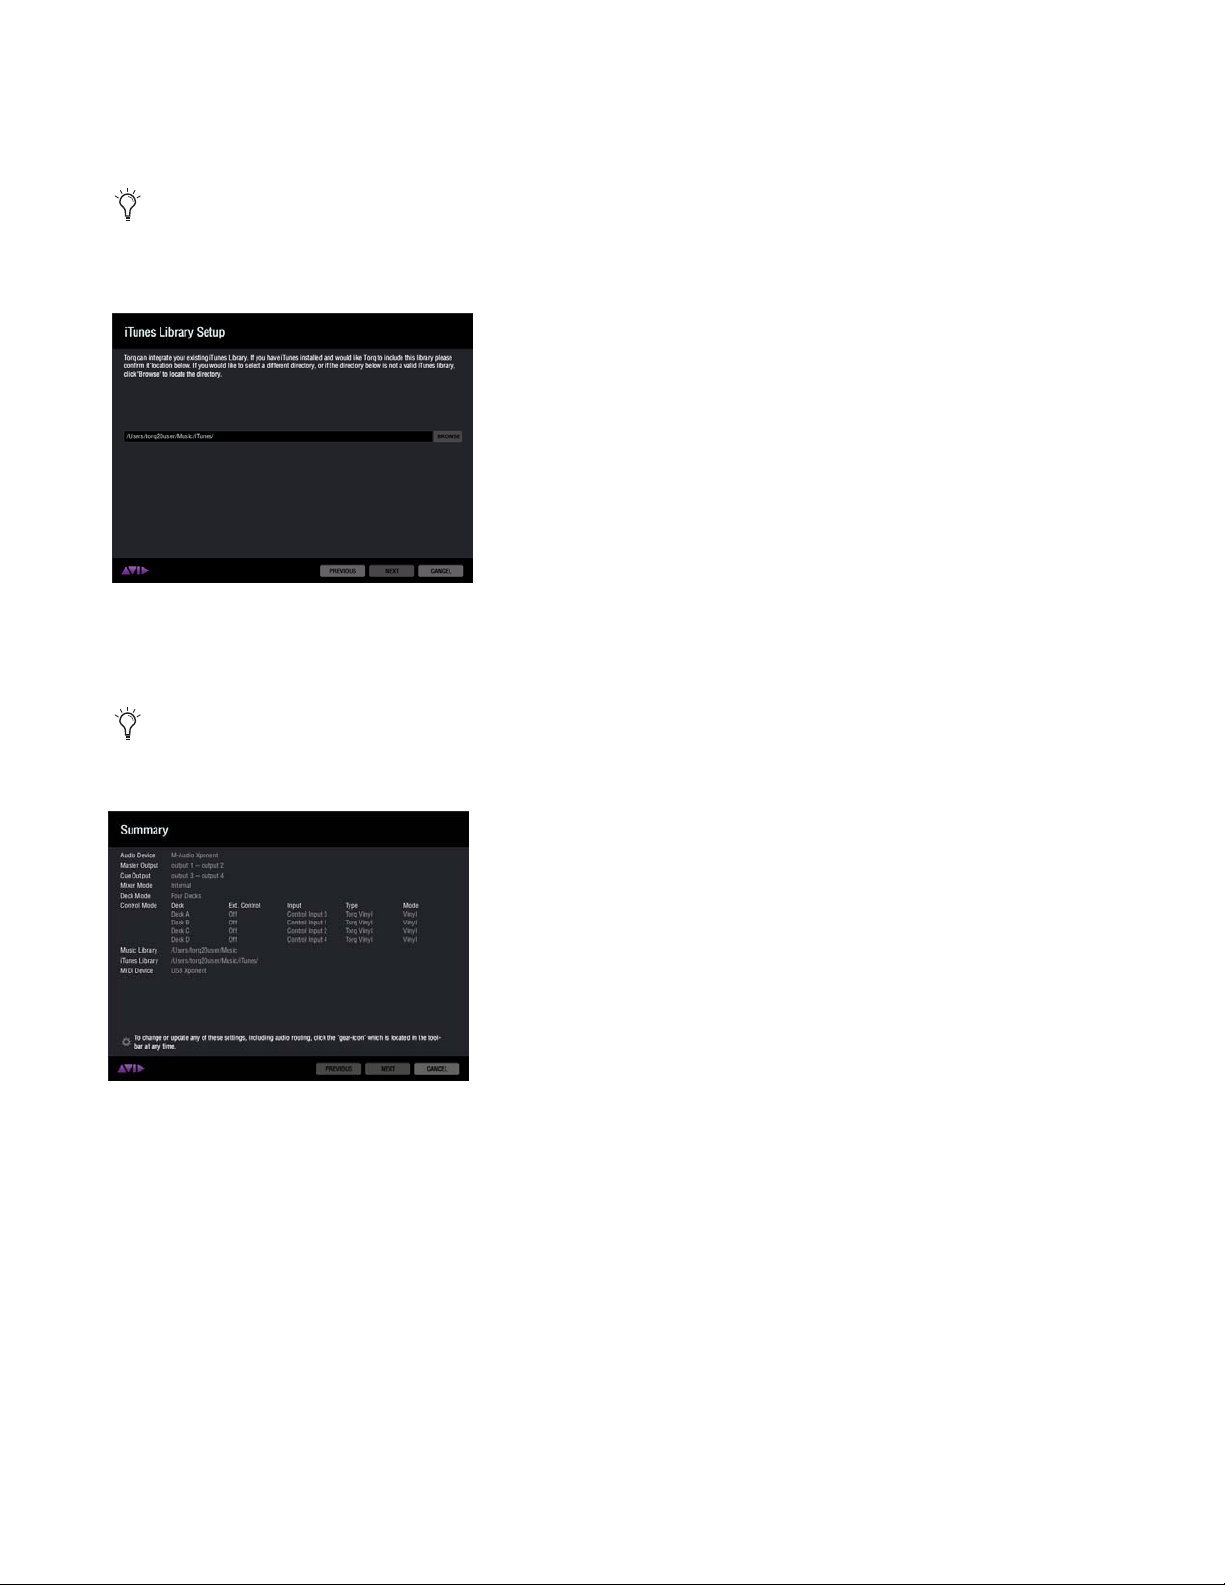
15 If you have iTunes installed on your computer, Torq will preselect the default location of your iTunes li-
brary based on your operating system. If the folder path displayed on the iTunes Library Setup screen is correct, click “Next.”
If the preselected location is incorrect, click the Browse button to the left of the folder path and navigate
to the proper location on your system. Once you have found the folder, click on it once, then click “Open”
(Mac) or “OK” (Windows). When that window closes, click “Next” on the iTunes Library Setup screen.
Setup Assistant - iTunes Library Setup
16 Review the information displayed on the Summary screen, then click “Next” if all the information listed
is correct.
If any of the information is incorrect, click “Previous” to go back to the appropriate page, or click the
“Gear” icon to open the Torq Preferences (see “Torq Preferences” on page 101) to change the settings.
Setup Assistant - Summary
Torq 2.0 User Guide
18
Chapter 3: Torq 2.0 Configuration
Page 24
17 Click Finish on the Enjoy screen.
Setup Assistant - Music Library Setup
Torq 2.0 User Guide
19
Chapter 3: Torq 2.0 Configuration
Page 25

Chapter 4: Accessing Your Music
This chapter covers locating and organizing your music using the Browser and Database, as well as creating
Playlists which let you quickly access and load songs onto any of the four Decks during your performances.
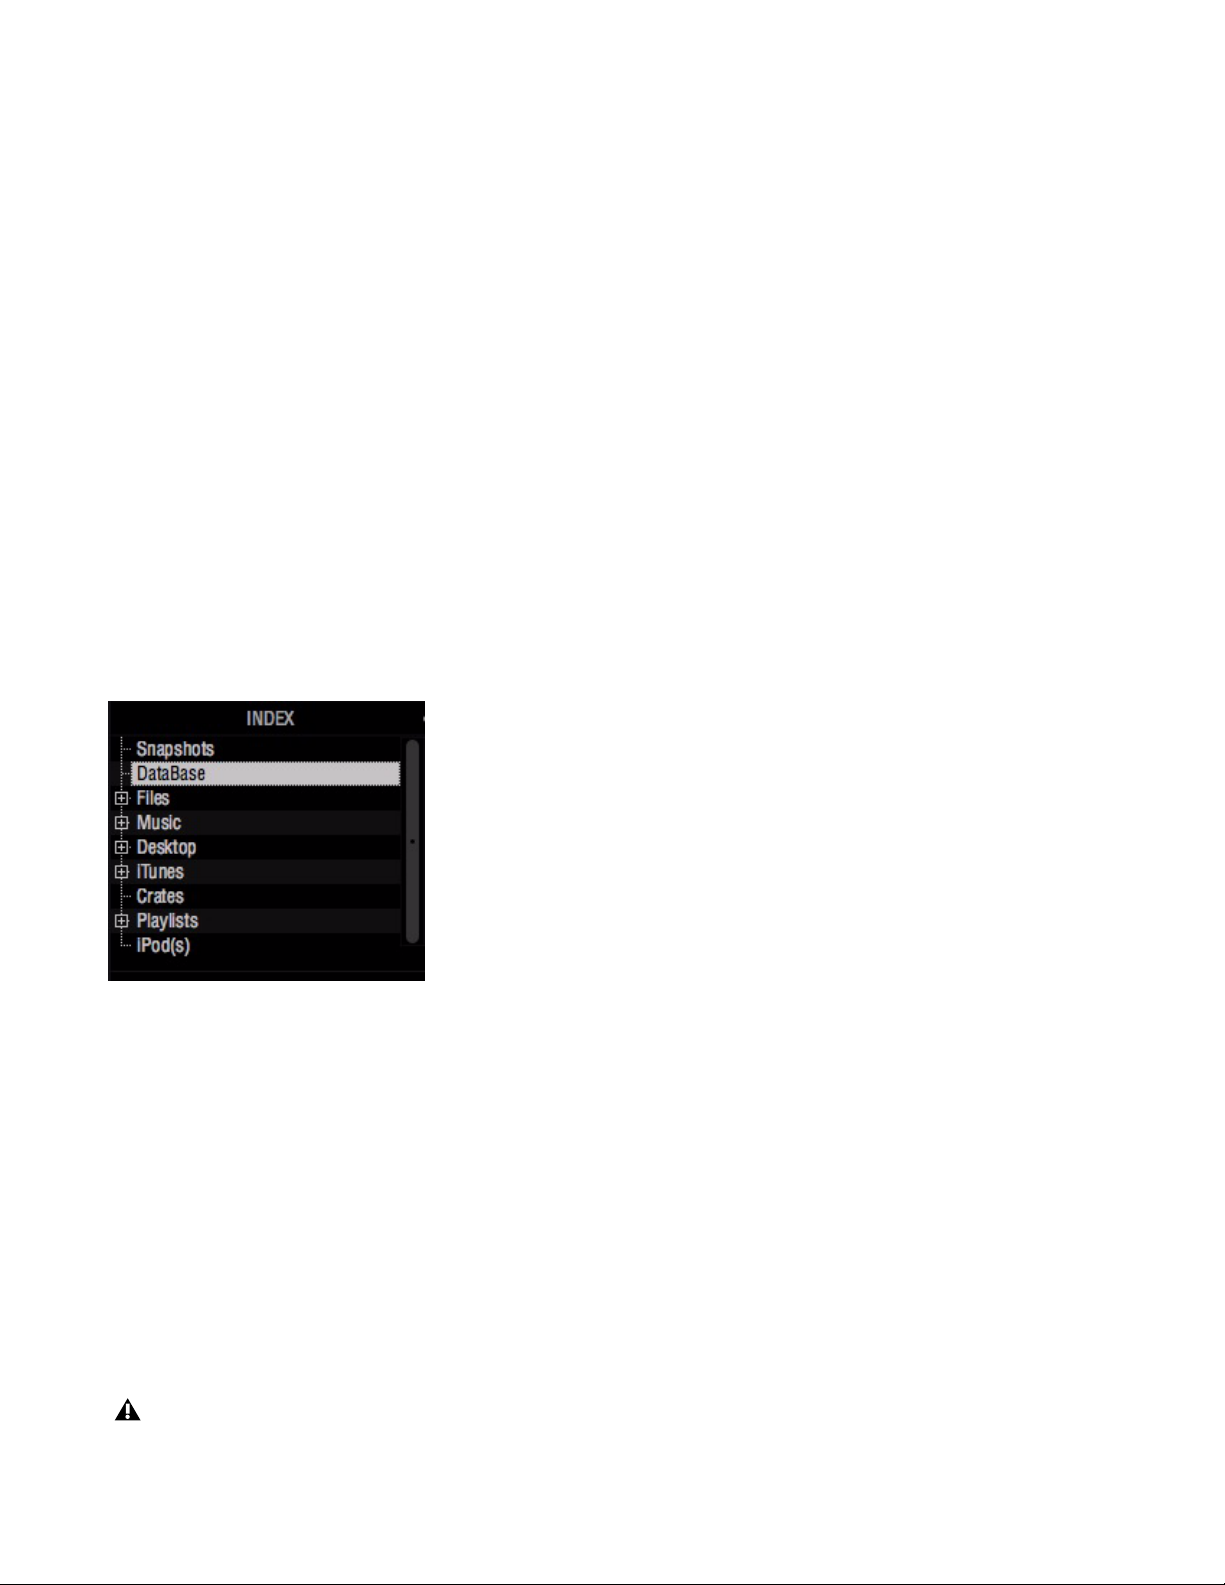
The Browser
Tor q Bro wse r
The Browser is located in the lower section of the Torq interface. The first column on the left of the Browser
is the Index, which is used for navigating your system when locating and loading songs onto the decks.
The Index contains folder headings for Snapshots, Database, and Files. The Files category contains all internal
and connected external hard drives (such as “C:” or “Macintosh HD”) and CD’s in your computers optical
drive. The other standard headings are for your local Music folder (“Music” on Mac and “My Music” in Windows), the Desktop, iTunes, Crates, Playlists and any connected media players such as an iPod.
Clicking any of the headings will display its contents in the File List on the right side of the Browsers. Clicking
the plus (+) sign to the left of any heading reveals the subfolders below it, and the plus sign changes to a minus
(-) sign. Clicking the minus sign to the left of any folder hide its subfolders.
Clicking on a folder that containing compatible audio files (“.aif,” “wav,” or mp3) displays the songs in the
File List on the right hand side of the Browser. However the File List will be empty if Torq cannot identify any
“playable” files within a folder.
Once you have located a song you can either preview it in your headphones before using it in a mix, or you
can load it onto a deck.
Torq offers a number of useful preset Key Commands for working within the Browser. These can be found
in Appendix A, listed under “Browser Commands” on page 152.
Refer to “File List” on page 31, for more information about the File List features including Song Preview.
Torq 2.0 User Guide
20
Chapter 4: Accessing Your Music
Page 26
Snapshots
Creating Snapshots lets you save multiple movements, such as button presses and knob adjustments, into a
macro that can be triggered by a single keystroke. Torq manages a collection of Snapshots which can be recalled interchangeably, even in rapid succession. Snapshots can even be layered together to create massive
changes in your mix.
Refer to Chapter 10, “Snapshots” for more information about creating and using Snapshots
Database
Database
The Database is a collection of folders located throughout your computer system (including external drives).
This is feature lets you quickly and efficiently locate and organize your music collection. Once a folder is
added to the Database, the songs it contains will be listed in the File List whenever you click on the Database
heading. If you have multiple folders assigned to the Database, all the files in all folders will be listed simultaneously in the File List. Therefore, to use the Database efficiently, you’ll only want to assign folders that contain music you’d like to spin.
Adding Folders to Database
To add a music folder to the Database:
1 Locate the folder you want to add to the Database.
2 Right-click (CTRL-click on Mac) on the folder.
3 Choose “Add to database” from the pop-up menu.
4 The folder will then be assigned to the Database (you can click the “+” in front of Database to see this new
folder listed beneath it).
You can stop this process at any time while it is running by right-click (CTRL-click on Mac) on the folder,
and choosing “Stop Addition to DB.”
Now, when you click on Database, the contents of the folder you just assigned will be listed in the File List.
Torq 2.0 User Guide
21
Chapter 4: Accessing Your Music
Page 27

Adding Multiple Folders
You may find that one folder will contain many folders that you’d like to add to the Database. A great example
of this is when your music is automatically sorted by a program like Apple iTunes. Typically, there will be a
folder for each artist in your collection, and each of these folders will contain individual folders for each album by that artist. Therefore, if you want to add all the music by this particular artist to the Database, you actually need to add all of the individual album folders.
To add folders, including their subfolders, to the Database:
1 Locate the folder containing the sub-folders you want to add.
2 Right-click (CTRL-click on Mac) the folder and select “Add folder to Database Recursively.” Torq will auto-
matically add the folder, along with all its sub-folders, to the Database.
You can stop this process at any time while it is running by right-click (CTRL-click on Mac) on the folder,
and choosing “Stop Addition to DB.”
Adding Folders from Your OS
If you’d prefer, you can add folders to the Database by dragging them from your operating system into the
Torq Browser. You can do this using either Explorer for Windows or Finder for Mac.
To add folders from your OS:
1 Find your desired folders using the tools of your operating system (Explorer or Finder).
2 Click and drag the folder from the operating system onto the Database.
3 Release the mouse button and the folder will be added to the Database.
4 You can also include the subfolders by holding the Ctrl key (Alt key on Mac) while dragging the folder into
the Database.
Searching Specific Database Folders
Clicking on the Database heading will display every song contained in the Database in the File List to the right
of the Index.
If you would like to confine your search to only a particular folder within the Database:
1 Click the (+) in front of the Database heading. The list will expand to show all of the folders contained in
the Database.
2 Click on one of the folders. The File List will be updated to only show the songs contained in that specific
folder.
Torq 2.0 User Guide
22
Chapter 4: Accessing Your Music
Page 28

Removing Folders from Database
There are two ways to remove folders from the Database. You can either search through the folders currently
listed within the Database and remove them, or you can locate the original folders on your hard drives to remove them.
To remove folders directly from the Database:
1 Click the plus sign next to the Database. This will drop down a list of all folders assigned to the Database.
2 When you have found the folder you want to delete, right-click it.
3 Choose “Remove” from the pop-up menu. The folder will then be removed from the Database while the
original audio files will still remain on your hard drives.
To remove folders from the Browser:
1 Go to the “Files” listing in within the Index and locate the original folder on your computer.
2 Right-click the folder.
3 Click “Remove” to remove this folder only. If the folder contains sub-folders that are part of the Database,
they will remain in the Database.
4 To remove the folder and all its subfolders, click “Remove from Database Recursively.”
Files (Hard Drives and CD’s)
Torq can also search any internal or external hard drive on your computer including any CD’s found in the
optical drive. Clicking the plus sign (+)to the left of the Files category reveals a listing of all drives and CD’s
on the system. Clicking the plus sign (+) to the left of a drive or any or its subfolders reveals its contents immediately below it. When you click on a subfolder containing audio files (“.mp3,” “.wav,” or “.aif”), the file
list on the right side of the Browser window. You can explore the contains and add folders from any drive to
the Database using the methods described earlier.
Crates
The Crates feature lets you manually create collections of song to use in your mixes, in a similar way to how
a DJ would select vinyl records or CD’s to take out to a performance.
Creating New Crates
To create a new Crate:
1 Right-click (CTRL-click on Mac) on the Crates heading in the Index and choose “Create Crate” from the
pop-up menu.
2 A new Crate called “Empty Crate” will appear below the Crates heading.
3 If there is already an “Empty Crate” in the list, a number will be appended to the name to differentiate it
from the other(s). For example “Empty Crate (1).”
Torq 2.0 User Guide
23
Chapter 4: Accessing Your Music
Page 29

Renaming a Crate
To create a new Crate:
1 Right-click (CTRL-click on Mac) on a Crate in the Index and choose “Rename” from the pop-up menu.
2 Enter a new name for the Crate.
Adding Songs to Crates
Torq give you the choice of either adding songs to an existing Crate, or adding them to a new, previously
non-existent Crate.
To add songs to an existing Crate:
1 Navigate to the folder containing the song or multiple songs you want to add.
2 Click the song or multiple songs you want to add.
You can use the usual methods of selecting multiple songs provided by your operating system.
3 Right-click (CTRL-click on Mac) on the song or any of the multiple songs that are highlighted.
4 Choose “Add to Crates” from the pop-up menu.
5 Choose the name of an existing crate.
The song or multiple songs are be added to the Crate, and will be visible when it is accessed.
To add songs to a new Crate:
1 Navigate to the folder containing the song, or multiple songs you want to add.
2 Click the song, or multiple songs you want to add.
You can use the usual methods of selecting multiple songs provided by your operating system.
3 Right-click (CTRL-click on Mac) on the song or any of the multiple songs that are highlighted.
4 Choose “* Add to new crate” from the pop-up menu.
A Crate called “New Crate” is created containing the song or songs, and its name will be highlighted allowing
you to rename it.
Removing Songs from a Crate
To remove songs from a Playlist:
1 Right-click (CTRL-click on Mac) the song, or multiple songs you wish to delete.
You can use the usual methods of selecting multiple songs provided by your operating system.
2 Select “Remove file(s)” from the pop-up menu.
3 Torq will remove the song from the Crate, but it will not be deleted from your computer.
Torq 2.0 User Guide
24
Chapter 4: Accessing Your Music
Page 30

Reordering Songs in a Crate
The change the order in which your songs are appear in a Crate:
1 Click and drag the song up or down in the list.
2 If you drag the song on top of another existing song, releasing the mouse button will cause the song to be
inserted above the song in the Crate.
Deleting a Crate
To delete a Create:
1 Right-click (CTRL-click on Mac) on the Crate and choose “Remove” from the pop-up menu.
2 The Crate will be removed from the Crates list.
If the Crate you are deleting contains songs, and also resides inside another Crate (as a sub-crate), a dialog
box will appear asking if you want to “move the songs in the sub-crate into the parent crate.” You choices
are “Yes,” “No,” or “Cancel.”
Duplicating a Crate
If you want to create a new Crate based on an existing Crate, you can create duplicate, and then add songs to
the new one if you want to.
To duplicate a Crate:
1 Right-click (CTRL-click on Mac) the Playlist you would like to duplicate and choose “Duplicate” from the
pop-up menu.
2 A duplicate of the selected playlist will be created and displayed underneath it.
3 A number will be added to the name of the Playlist to differentiate it from the original. For example “Crate
1.” This duplicate Crate can be renamed using the method described above.
Torq 2.0 User Guide
25
Chapter 4: Accessing Your Music
Page 31

Playlists
Playlists
While many DJ's will perform “off-the-cuff” without any previous rehearsal or forethought, other DJ's will
“pre-program” their sets, either due to the complexity of the set, or simply as a method for remembering vital
songs (this can be helpful for wedding or party DJ's who take requests).
Torq features Playlists to help you organize and store lists of songs. You can create and manage multiple Playlists, each with as many songs as you like. Each Playlist can then be edited by adding or deleting tracks, or by
rearranging their order within the Playlist.
Creating New Playlists
To create a new Playlist:
1 Right-click (CTRL-click on Mac) on the Playlists heading in the Browser and choose “New Playlist” from the
pop-up menu.
2 A new Playlist titled “Empty Playlist” will appear below the Playlist heading (click the plus sign in front of
Playlists in order to see this list).
3 If there is already an “Empty Playlist” in the list, a number will be appended to the name to differentiate it
from the other(s), i.e. “Empty Playlist 1.”
Rename Playlist
1 Right-click (CTRL-click on Mac) on your desired Playlist and choose “Rename Playlist” from the pop-up
menu.
2 Type in the new name you would like to give the Playlist and hit the Enter key on your computer keyboard.
3 The Playlist will display its new name.
Deleting a Playlist
1 Right-click (CTRL-click on Mac) on the Playlist and choose “Remove” from the pop-up menu.
2 The Playlist will be removed from the list in Torq. It will still be on your computer, however, stored in the
“Deleted Playlists” folder.
Torq 2.0 User Guide
26
Chapter 4: Accessing Your Music
Page 32

Duplicating a Playlist
If you like a particular Playlist and would like to build a new one based upon it, you can duplicate (or copy)
it for future modification.
To duplicate a Playlist:
1 Right-click (CTRL-click on Mac) the Playlist you would like to duplicate and choose “Duplicate Playlist”
from the pop-up menu.
2 A duplicate of the selected playlist will be created and displayed underneath it.
3 A number will be added to the name of the Playlist to differentiate it from the original. Of course, you can
rename this Playlist using the method described above.
Adding Songs to a Playlist
1 Once you have created and selected a Playlist, you’ll begin adding files to it using the following procedure:
2 Using the Browser or Database, locate the song (or songs) you’d like to add to the Playlist.
3 Right-click (CTRL-click on Mac) the song name(s) and select “Add to Playlist” from the pop-up menu.
4 The song(s) will be added to the bottom of the Playlist.
Removing Songs from a Playlist
You can remove songs from a Playlist as follows:
1 Right-click (CTRL-click on Mac) the song in the Playlist you wish to delete.
2 Select “Remove from Playlist” from the pop-up menu.
3 Torq will remove the song from the Playlist, but the song will remain in the Torq Database (it will not be de-
leted from your computer).
Reordering Songs in a Playlist
The order in which your songs are displayed in the Playlist can be changed by doing the following:
1 Click and drag the song up or down in the list.
2 If you drag the song on top of another existing song, releasing the mouse button will cause the song to be
inserted above the song in the list.
Activating a Playlist
When you select a Playlist, Torq runs a quick scan of your computer’s drives to ensure all the audio files referenced by the Playlist are present on the computer. If Torq cannot locate one or more of the songs from the
Playlist (possibly because the drive containing the song is no longer connected to the computer, or the source
file has been deleted), a pop-up dialog will appear with the following message: “Cannot find one or more of
the files used in this Playlist. What would you like to do?” You will then have a choice of clicking one of the
following buttons:
Torq 2.0 User Guide
27
Chapter 4: Accessing Your Music
Page 33

Ignore
Clicking this button will allow the Playlist to load, however all missing songs will be displayed in red in the
File List window.
Auto-scan
Clicking this button will cause Torq to search all hard drives connected to your computer in an attempt to find
the missing file(s). If a file is found with the same name but in a different location, another dialog box will appear with the following message: “Would you like to use this file for [name of missing file]?”
• By choosing “Yes,” Torq will use the file and automatically assume that the rest of the missing files will
also be in this same folder. Once found, these files will automatically be loaded. If the other missing files
are not in this location, Torq will continue searching the computer until another file is found.
• Choosing “No” will allow the search to continue for another possible file in a different location.
• If the search completes without finding the proper file, a dialog box will appear with the following message: “Cannot find [name of missing file].” When you click “OK” Torq will display the file in red in the
File List, indicating that the song cannot be played. If there are other files to search for, the search process
will continue.
Manual
Clicking this button will open a standard operating system dialog box that will allow you to manually search
for the audio file on your hard drive(s). Although you are searching for a specific missing file, it is possible to
select any audio file to be used in its place. If you choose a file that is different than the missing file shown in
the File List, the ID3 tag info for the new file will be shown (in the Playlist) in place of the original song.
Saving a Playlist
All playlists created using Torq are automatically saved to your local hard drive. These playlists can be opened
by any application that supports the “.m3u” playlist format.
Torq playlist location, Windows XP:
C:\Documents and Settings\[username]\Application Data\M-Audio\Torq\Playlists
Torq playlist location, Windows Vista:
C:\Users\[username]\AppData\Roaming\M-Audio\Torq\Playlists
Torq playlist location, Mac:
~/Library/Application Support/M-Audio/Torq/Playlists
In Windows Vista and Windows XP systems, the playlists are located within hidden folders. You will
need to change your Folder Options > View settings to make these hidden folders visible before you can access the playlist files.
Windows XP From “My Computer” click on the Tools menu, select Folder Options, click on the “View” tab and
then select “Show hidden files and folders” from the list of options.
Windows Vista From the Windows Control Panel, select Appearance and Personalization, Folder Options, click
on the “View” tab and then select “Show hidden files and folders.”
Torq 2.0 User Guide
28
Chapter 4: Accessing Your Music
Page 34
Loading a Playlist
Torq can import Playlists created by other programs if they conform to the “.m3u” file format.
To load one of these Playlists:
1 Right-click (CTRL-click on Mac) the Playlist’s heading in the Browser Index.
2 Select “Load Playlist” from the pop-up menu.
3 A standard dialog box will open, allowing you to locate and select a Playlist.
4 Once selected, the Playlist will be imported into Torq and Torq will begin checking for the necessary files (ex-
plained above).
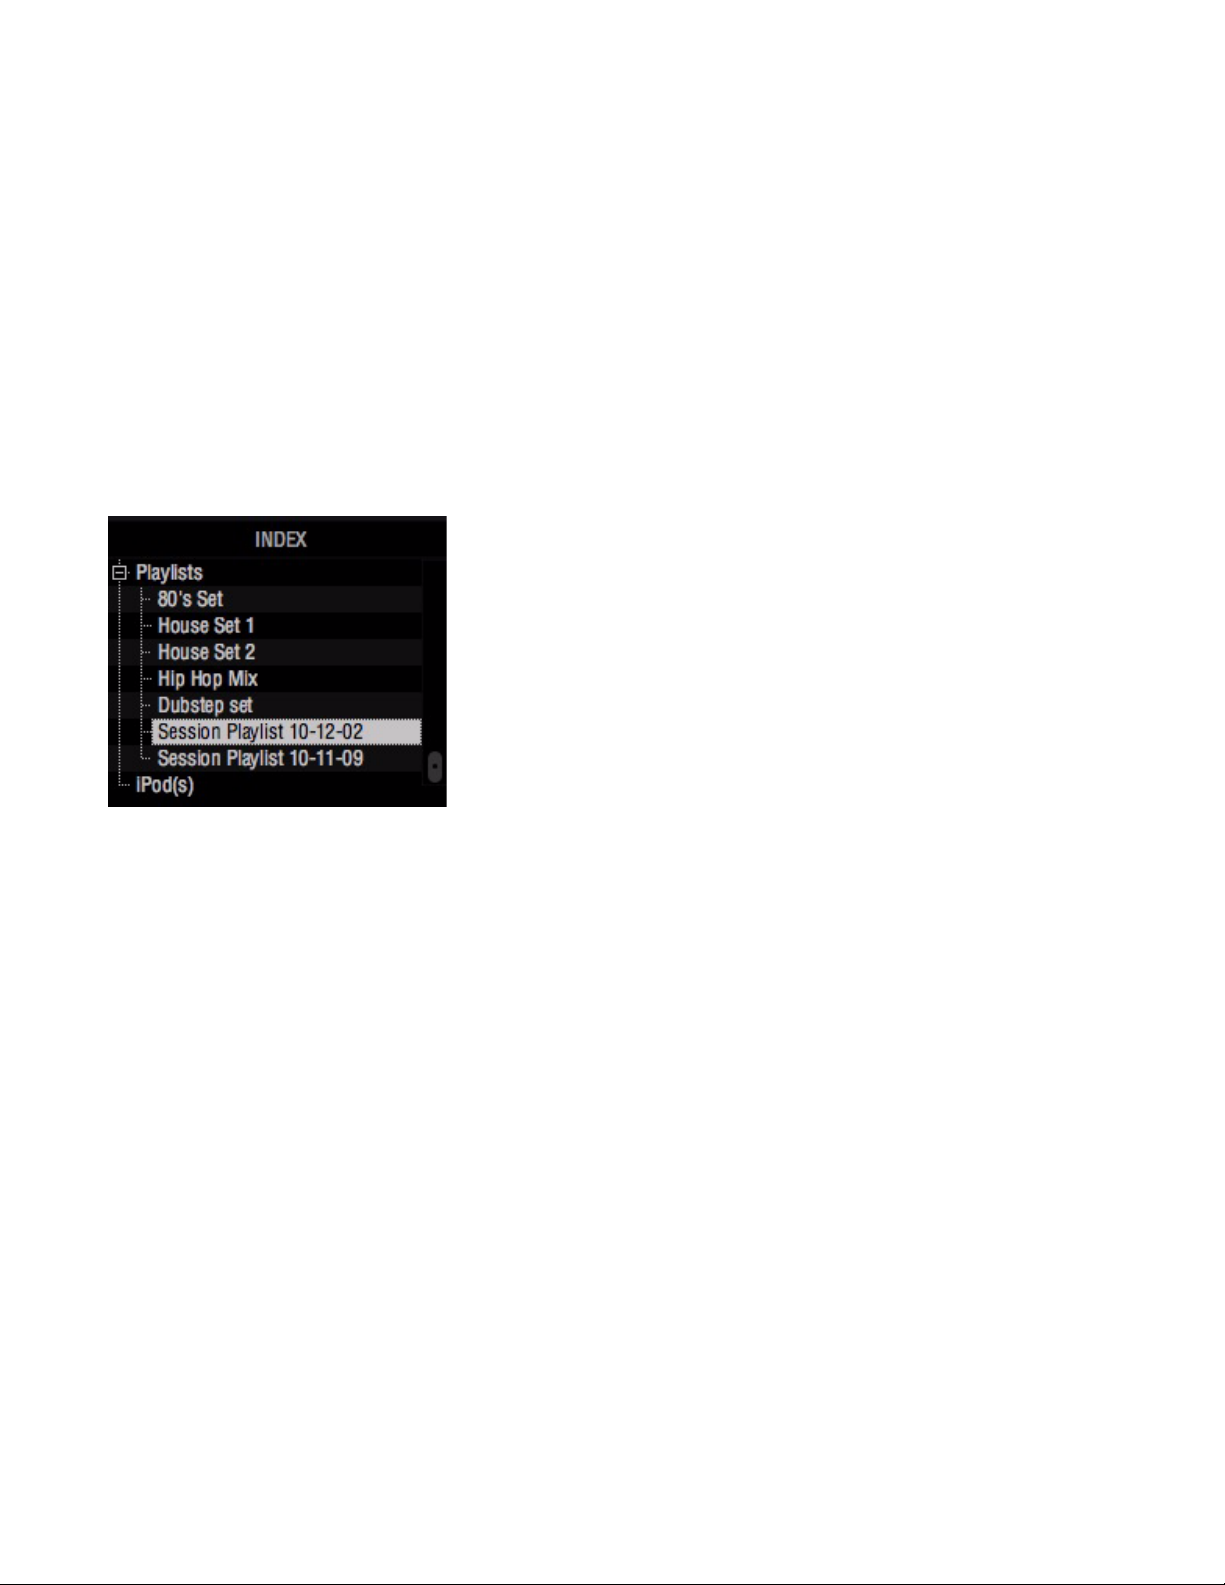
Session Playlist
Session Playlists
The Session Playlist is an automatic Playlist that keeps track of every song you’ve played since you launched
Torq. This is handy when you need to see if you’ve played a song already, or if you need to reference a list of
what you played at a previous gig.
An empty Session Playlist is created each time you launch Torq. It is named “Session Playlist YY-MM-DD”
where YY-MM-DD represents the year, month, and day of the Playlist, respectively. Each song you load onto
a Deck will automatically be added to the bottom of the Session Playlist.
If a Playlist already exists with the current date, a number will be appended to differentiate it.
Torq will only store Session Playlists for the last 30 days. Any Session Playlists that are older than 30 days will
be automatically deleted in order to keep your hard drive from becoming overpopulated with Playlists.
Torq 2.0 User Guide
29
Chapter 4: Accessing Your Music
Page 35
Rename the Session Playlist
If you find that you’d like to permanently keep a Session Playlist, all you have to do is rename it. Once renamed, the Playlist will be moved from the pool of Session Playlists and be kept with your normal Playlists.
To do this:
1 Right-click (CTRL-click on Mac) on the Session Playlist and choose “Rename” from the pop-up menu.
2 Type in a new name for the Playlist and press Enter.
3 The Playlist will be saved. If you renamed the current Session Playlist, a new Session Playlist will be created
that will track all songs played from that point onward.
Deleting Session Playlists
You can delete the Session Playlists using the same method for deleting standard Playlists. If you delete the
current Session Playlist, a new one will be created that will track all songs played from that point forward.
iPods
Torq also allows direct access to the contents of any connected iPod (excluding the iPod Shuffle, iPod touch,
and iPhone). When an iPod is connected, it will be listed in the Browser window.
iPod Index Listing
Like the iTunes Library, the contents of an iPod can be searched using the Library or Playlist headings. You can
also include the contents of the iPod in the Database by doing the following:
1 Open the Preferences.
2 Click on the Behavior tab.
3 Next to “Search iPod With Database,” select “Yes.”
4 Close the Preferences.
Torq will now include the songs from the iPod the next time you click the Database heading.
When using an iPod with a large song collection, it may take Torq a moment to download the entire music
list the first time the device is accessed.
Torq streams music directly from the iPod. Do not disconnect the iPod until you have finished playing music from it.
Torq 2.0 User Guide
30
Chapter 4: Accessing Your Music
Page 36

File List
The window to the right of the Browser pane is c alled the File List. If you have selected a source in the Br owser
that contains music (such as the Database or an individual folder), the songs contained therein will be listed
here. The File List not only shows you the name of the song, but also shows the artist name, album name,
track number, genre, and other fields contained within the song’s ID3 tag. These additional categories can
help you find song with greater efficiency.
While ID3 tags will support storage of the information listed above, it is common to find music files with
some (if not all) of the ID3 fields blank. In these instances you can manually fill in the missing information to aid future file searches.
Editing Fields
Torq will extract the relevant song information from the file’s ID3 tag in order to populate the fields of the File
List as described above. You are free to edit the information shown in the File List simply by double-clicking
a field, typing in new data and hitting Enter.
Torq does not update the song’s ID3 tag with your edits. Instead, your edited fields are stored in a special file
with the same name as the song, but with the extension “.tqd” at the end. This is the Torq Data file. By saving
your edits to the TQD file, Torq can save your changes much faster (changing an ID3 tag requires re-writing
the entire audio file, something that could affect system performance during live use). Additionally, the audio
file could become corrupted during the re-write process. So, Torq leaves your precious music files untouched
by saving data to the TQD file.
Sorting the List
There are fourteen categories that can be displayed across the top of the File List window: Artist, Song, Album,
Track # (Track Number), BPM (Beats Per Minute), Key, Genre, Length, Comment, File Type, Bitrate, Label, Year
and Filename. These categories are taken from the ID3 tags of your music files or, in the case of song length
and BPM, calculated as part of Torq’s file analysis. An ID3 tag is a standard format for storing additional information within a music file.
You can resize the width of any of these columns simply by clicking and dragging left and right on any of the
vertical lines separating the columns. Additionally, you can re-order the arrangement of the columns by clicking and dragging the column name to a new position (the column name will turn white while doing this). If
you wish, you can also hide certain columns from view by right-clicking on a category name and choosing
which items to display from the pop-up menu.
You can sort the contents of the File List by clicking on any one of the categories at the top of the window. For
example, if you click the “Album” category, the File List will be sorted alphabetically (A to Z) by Album name.
If you click “Album” again, the order will be reversed (Z to A). You could also click on the BPM column to sort
all your songs by their BPM. This can be very useful when looking for songs of a similar BPM.
Click the Reset button to return to the default sort order.
The Filename column is available in the event that the music you’re trying to use does not contain an ID3
tag (such as AIFF and WAV formats) or does not have the proper text filled in. Here, the actual name of
the file (as it exists on your hard drive) will be shown.
Torq 2.0 User Guide
31
Chapter 4: Accessing Your Music
Page 37
Searching the List
The simplest method for searching is to type a keyword (or keywords) into the Search field above the Database/Browser.
To search the list:
1 Click the Database heading in the Browser pane to select it.
2 Click in the Search field and type in your search term(s). Terms can include an artist’s name, a song title,
BPM, etc.
3 As soon as you start typing, Torq will begin searching the Database for the letters you have typed. There is
no need to hit the Enter key on your keyboard.
4 When you stop typing, you’ll have a list of all files that contain the search term in one of its fields.
For example, if you type the word “love” into the search field, Torq could return the following results:
Artist Song Album
Deee-Lite Power of Love World Clique
Jennifer Love Hewitt Can’t Stand in the Way of Love Let’s Go Bang
Love and Rockets Angels and Devils Express
Madonna I’d Rather Be Your Lover Bedtime Stories
Sade Flow Lover’s Rock
Search Categories
As you can see, the above search worked—it found songs that contained the word “love” in any category.
However, this may not be quite what you were looking for. You may have actually wanted files with “love” in
the song’s name only. To search for such titles, you’ll need to confine the scope of the search to the Song category only.
To confine a search to a particular category:
1 Hold down the SHIFT key and click a category name. The category name will turn red.
2 Torq will refine its search results and only show songs that contain your search term within the selected
field.
3 You can hold SHIFT and click additional categories if you wish (i.e. you can select Song and Album simul-
taneously).
4 SHIFT-clicking a selected category will de-select it.
Torq 2.0 User Guide
32
Chapter 4: Accessing Your Music
Page 38
Using our example above, confining the search to the Song category would yield the following results:
Artist Song Album
Deee-Lite Power of Love World Clique
Jennifer Love Hewitt Can’t Stand in the Way of Love Let’s Go Bang
Madonna I’d Rather Be Your Lover Bedtime Stories
Now, only the songs with “love” in their titles are shown.
Filter Field
Torq offers another method for refining your searches by means of the Ignore field. Here, you’ll enter terms
that you want Torq to omit from the search results. The Ignore command will only be applied to the currently
selected categories (explained above).
To omit terms from the search results:
1 Click to put a cursor in the Ignore Field.
2 Type in the term you would like to filter out of the search.
3 Torq will display only the songs that contain the information required in the Search field while omitting the
songs that fit the criteria of the Ignore field.
Again, using the example above, entering the term “Lover” into the Ignore field will return the following list:
Artist Song Album
Deee-Lite Power of Love World Clique
Jennifer Love Hewitt Can’t Stand in the Way of Love Let’s Go Bang
You’ll see that, as a result, “I’d Rather Be Your Lover” has been removed from the list.
References to artists and bands is for informational purposes only and does not imply an endorsement or
sponsorship of Avid by such artists or bands.
Song Preview
Once you have located and clicked on a song in the File List, it can be previewed within the browser by pressing the Preview button (headphone icon) on the left end of Browser search bar. Pressing this button plays the
song sending the audio signal through the PFL/Headphone cue to your headphones.
Refer to “PFL/Headphone Cue” on page 69 for more information about the PFL/Headphone Cue.
Clear Button
When you are done with your search and are ready to begin a new one, press the Clear button. This will clear
the Search and Ignore fields as well as deselect any categories that had been previously selected.
Torq 2.0 User Guide
33
Chapter 4: Accessing Your Music
Page 39

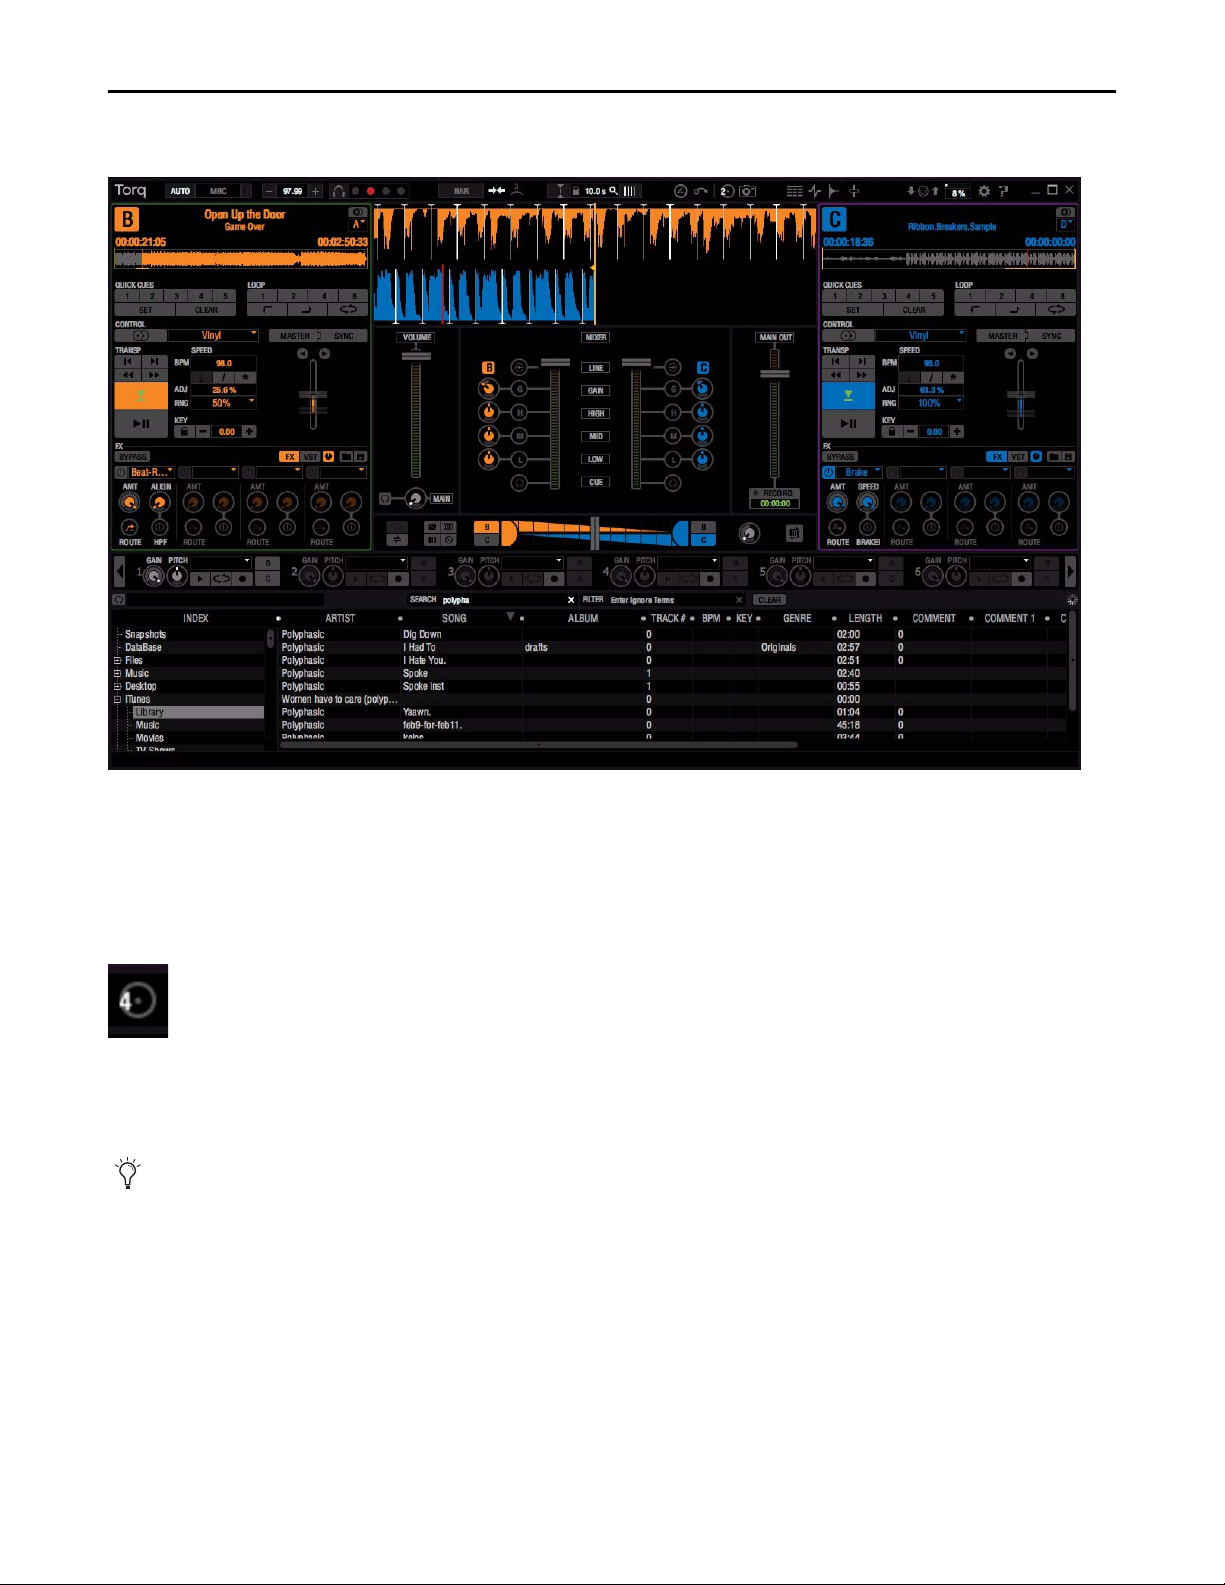
Chapter 5: The Decks
The Decks play the music that you load onto them to mix and effect using all the tools in Torq. Traditionally,
a DJ’s decks are turntables or CD players. With this in mind, the four Decks in Torq have been designed to emulate turntables and CD players, as well as offering a special hybrid mode only possible with software.
Each of the four Decks has various functions for controlling playback of the music in great detail. This includes changing the speed and/or key of the song, looping sections of audio, and jumping to other locations
within a song. Using these controls as described below, you can match tempos of various songs during a mix,
or re-arrange a song.
Torq offers a number of useful preset Key Commands for working within the Deck. These can be found in
Appendix A, listed under “Deck Commands” on page 153.
Torq in Four Deck Mode
Torq 2.0 User Guide
34
Chapter 5: The Decks
Page 40
Four Deck Mode vs. Two Deck Mode
Tor q in Tw o Dec k Mo d e
Torq 2.0 gives you the option of working in either Four Deck Mode (Decks A, B, C, and D), or Two Deck Mode
(Decks B and C). Switching Torq from Two Deck to Four deck Mode is achieved by clicking the Torq Mode button located in the Toolbar. When you switch to Two Deck Mode the number 4 in the icon will change to a
number 2.
Tor q Mod e But ton
Although the functionality is the same, there are slight differences in how certain features are accessed. Where
applicable this user guide will make note of these differences.
Placing your mouse cursor over the various on-screen controls will display their names in the bottom edge
of the Torq interface. You can also user your mouse wheel to control the on-screen knobs and sliders.
Torq 2.0 User Guide
35
Chapter 5: The Decks
Page 41

Deck Switch
The Deck Switch feature offers a set of key commands for assigning any deck to either side of your two-deck
hardware. This lets you bring an assigned deck into focus as the “Target Deck” to be controlled by your hardware. This capability also extends to situations where you want or need to target and control any of the decks
with a single hardware deck, or with your computer keyboard and mouse.
Once a deck has been selected, Torq lets you access and control numerous other functions on a per Deck basis,
using additional key commands listed in Appendix A under “Deck Commands” on page 153.
When the “Highlight Deck Assignment” option is set to “Yes” (default) on the GUI page of the Torq Preferences, the edge of currently targeted decks will be highlighted with a colored rectangle. Torq Decks assigned
to the left side of your controller are highlighted in green, while Decks assigned to the right side are highlighted in purple. If a deck is highlighted in red, it will be controlled by both sides of your hardware.
Refer to Chapter 12, “Torq Preferences” for more information about the available Torq preference settings.
The the table below lists key commands for as sig ning the Dec ks to either side of an M-Audio Xponent DJ C ontrol surface. However it is also important to remember that commands also bring the decks into focus when
using your mouse and keyboard to control Torq. If you are using qualified third-party hardware, refer to the
its documentation.
Mac users should go into the Keyboard Preferences in Mac OS X, and change the following options before
using Torq key commands: On the Keyboard page, Enable “Use all F1, F2, etc. keys as standard function
keys.” On the Keyboard Shortcuts page under Dashboard & Dock, disable “Dashboard” (F12). Then disable “Exposé” under Exposé & Spaces.
Deck Assignment/Selection Mac Key Windows Key
Left Xponent side controls Deck A F5 F5
Left Xponent side controls Deck B F6 F6
Left Xponent side controls Deck C F7 F7
Left Xponent side controls Deck D F8 F8
Right Xponent side controls Deck A F9 F9
Right Xponent side controls Deck B F10 F10
Right Xponent side controls Deck C F11 F11
Right Xponent side controls Deck D F12 F12
The corresponding Function keys listed above for selecting Decks B and C are the same in both Four Deck
and Two Deck modes.
Torq 2.0 User Guide
36
Chapter 5: The Decks
Page 42

Deck Assignment
The following instructions explain how to assign Torq Decks to either side of your hardware controller. Again,
this feature is designed to let you assign any deck to either side of your controller. Although the table above
and the following example refers to the M-Audio Xponent DJ Controller, these steps also apply to qualified
third-party hardware. Refer your third-party documentation for additional manufacturer specific information.
To assign a Torq Deck to the left side of your controller:
1 Choose a deck to assign to the left side of your Xponent. For example, Deck C.
2 Press the corresponding Function key for the Deck. For example F7.
A green rectangle appears around the edge of Deck C, indicating that it is the Target Deck for the left side of
your Xponent. Moving or pressing a slider, knob or button on the left side of your hardware controls its corresponding on-screen Torq function or parameter.
To assign a Torq Deck to the right side of your controller:
1 Choose a deck to assign to the right side of your Xponent. For example, Deck D.
2 Press the corresponding Function key for the Deck. For example F12.
A purple rectangle appears around the edge of Deck D, indicating that it is the Target Deck for the right side
of your Xponent. Moving or pressing a slider, knob or button on your hardware controls its corresponding
on-screen Torq function or parameter.
Torq 2.0 User Guide
37
Chapter 5: The Decks
Page 43

Loading Songs onto the Decks
Torq lets you choose the following methods for loading a song from the File List onto any of the Decks
Drag and Drop to a Deck
To drag and drop a song to a deck:
1 Click and hold on the desired song in the File List. It will become highlighted.
2 While continuing to hold the mouse button, drag the song to any of the Decks.
3 Once the song is over a Deck, release the mouse button and the track will load.
Drag and Drop to the Waveform Display.
Four Deck Mode Waveform Display
Songs can also be loaded onto a deck by dragging it to the Waveform Display which is located above the Mixer.
In Four Deck Mode, dragging a song to the top of the Waveform Display loads it onto Deck A, while dragging
it to the upper middle loads it onto Deck B. Dragging it to the lower end of the display loads it onto Deck D,
while dragging it to the lower middle of the display loads it onto Deck C.
Two Deck Mode Waveform Display
In Two Deck mode, dragging a songs to the top half of the Waveform Display loads it onto Deck B, and dragging it the lower half loads Deck C.
Refer to Chapter 6, “Waveform Display” for more information about the Waveform Display.
Torq 2.0 User Guide
38
Chapter 5: The Decks
Page 44

Using the Function Keys
To load a deck using the Function Keys:
1 Click on the desired song in the File List.
2 Press one of the following: F1 (for Deck A), F2 (for Deck B), F3 (for Deck C), or F4 (for Deck D).
In Two Deck Mode the key assignments for Decks B and C are the same as in Four Deck Mode.
When using a Mac laptop, you may need to hold the Fn key while pressing the Torq function keys in order
for these features to work.
Copying Songs to Other Decks (Make Double)
Make Double Button
Pressing the Make Double button lets you copy a song including all Markers such as Loop Points, Cues, and
Tempo Anchors to another Deck.
For more information about Cues, Loops, and Tempo Anchors refer to “Markers” on page 43. Refer to
“Tempo Anchors” on page 62 for more information about Tempo Anchors.
To copy a song to another deck:
1 Load a song onto a deck. For example, Deck A.
2 Choose a destination Deck. For example Deck D.
3 Choose Deck A from the dropdown menu of the destination deck.
4 Click the Make Double button on destination Deck.
The destination Deck, in this case Deck D, will contain a copy of song on Deck A.
Unloading Songs from the Decks
To unload a song from a Deck, hold Shift while pressing F1 (for Deck A), F2 (for Deck B), F3 (for Deck C), or
F4 (for Deck D).
In Two Deck Mode the key assignments for Decks B and C are the same as in Four Deck Mode.
Torq 2.0 User Guide
39
Chapter 5: The Decks
Page 45

Displays
Each Deck has various informational displays on the interface. These are mostly for relaying information to
you, such as which song is playing, how long it’s been playing, and how much time is remaining.
Song Name
The top area of each Deck displays the title of the song that was loaded onto it. This is the same as the title
listed under the “song” column heading in the File List. If there is no title listed in the File List, the name of
the actual file will be shown instead.
Artist Name
Below the Song Name is the Artist Name. Like the Song Name, this field will be empty if there is no entry in
the Artist column of the File List.
Time Elapsed
The time display on the left side of the deck under the Artist Name shows the current location of the song,
marked by the yellow Now Line in the Overview Waveform Display (see “Overview Waveform” on page 40).
This is expressed in hours/ minutes/seconds/frames (at 30 fps). When the Current Position Marker is at the beginning of the song, the Time Elapsed will be 0:0:0.0.
Time Remaining
The field to the right of the Time Elapsed indicates how much time is left before the song ends. At the beginning of the song, the Time Remaining will be the same as the entire length of the song and decrease as the
song progresses.
The Overview Waveform and Waveform Display will flash red when there is less than 30 seconds remaining in a song.
Overview Waveform
Each Deck includes an Overview Waveform display which shows a miniaturized version of the song’s waveform in its entirety. This display serves several purposes:
• It allows you to see where the breaks and builds are in a song before they happen.
• The yellow Now Line indicates your current location within the song.
• White QuickCue points (see “QuickCue” on page 43)and a white bar representing Tempo Anchors (see
“Tempo Anchors” on page 62) will be superimposed over this waveform.
• You can click anywhere in this waveform and playback will jump to that location.
Torq 2.0 User Guide
40
Chapter 5: The Decks
Page 46

Transport Controls
The Transport buttons let you control various aspects of song playback as described below.
Advance
Advance Buttons
Sometimes when mixing two songs together, you may find that the beats are aligned with each other, yet the
two songs are still out of phase. This is most obvious when one song is offset by one beat, causing the snare
drums of the tracks to be out of alignment. The Advance buttons can be used to correct this. Pressing these
buttons will make the Current Song Position jump forward or back by one beat-length.
Holding down the Shift key and clicking one of the Advance buttons moves the Phase Grid an entire beat left
or right. This is a quick way to fix the Phase Grid if it happens to be aligned to the beats but has the downbeat
in the wrong location.
Refer to “Phase Grid Manipulations” on page 107 for more information about moving the Phase Grid.
If you have the Sync Mode set to “Bar” in the Toolbar or Torq Preferences (Synq Reference), the Offset but-
tons will have no effect when the Deck’s Sync button is on. This is because Torq will counteract a one-beat
offset when set to Bar mode. If you want to offset the music by one beat when Sync is on, you’ll need to
offset the Phase Grid as explained in “Phase Grid Manipulations” on page 107 or switch the Synq Reference to “Beat” by clicking the Synq Reference Button in the Torq Toolbar.
Refer to “Synq Reference” on page 129 for more information about Synq Reference.
Seek
Seek Buttons
The Seek buttons are used to Fast forward or rewind through the song, allowing you to find certain points (or
beats) within the track from which you can start playing.
If you click briefly on the Forward or Backward buttons, the music will jump only slightly in that direction.
If you click and hold one of these buttons, Torq will scroll through the song and stop when you release the it.
To jump to either the beginning or end of the song, hold the Shift key while clicking a Seek buttons.
Torq 2.0 User Guide
41
Chapter 5: The Decks
Page 47

Cue
Cue Button
The Cue button will establish a primary Cue Point within a song. A Cue Point is a reference position within
the track that you can jump to instantly, rather than having to seek through the track to find it. Typically, a
DJ will set the Cue Point where the beat begins in a song. When a song is first loaded onto a Deck this Cue
Point appears as a red line at the beginning of the song (within the Waveform Display.
The Cue button works in the following manner:
• If you hold SHIFT and press Cue, a Cue Point will be placed at the current location, even if the song is already playing.
• If a song is playing, pressing the Cue button will make the song jump to the Cue Point and pause there.
• If Cue is pressed and held again, the music will begin playing from the Cue Point. The music will stop
playing when the Cue button is released and the song will jump back to the Cue Point.
• If a song is paused in a location different from the Cue Point, pressing the Cue button will set the Cue
Point to the current location.
• If you hold Cue and press the Play/Pause button, the music will continue to play after you release both
buttons.
Play/Pause
Play/Pause Button
Clicking the Play/Pause button starts and stops playback.
When you pause the music, the song will not return to the beginning—it will stay in the same location as
when you stopped it. If you want to return to the beginning, use the Seek buttons.
Torq 2.0 User Guide
42
Chapter 5: The Decks
Page 48

Markers
Quantize Loop and QuickCue Points Button
Quantize Loop and QuickCue Points Button
Clicking the Quantize Loop and QuickCue Points button in the Torq Toolbar quantizes the position of QuickCues and Loop Points (see “Loop” on page 45) to the nearest 16th note.
You can also set this behavior as a default, by changing the “Quantize Cue and Loop Points” setting in the Behavior Preferences to “Yes” (see “Quantize Cue and Loop Points” on page 132).
Enabling Quantize does not change the positions of QuickCues or Loop points that are already set in a
song. It only controls the creation of new QuickCues and Loops.
QuickCue
In addition to the primary Cue Point described above, Torq allows you to set up to five QuickCue Points in a
song that are assigned to the QuickCue buttons below the Overview Waveform display. These buttons can
then be used to quickly jump between the various QuickCue points. Torq will save the locations of the five
QuickCue points with each song so they will be available the next time you play the song.
Setting QuickCues
There are a few different ways to set QuickCue Points:
• Click the Set button, then click one of the four QuickCue buttons. A QuickCue Point is set at the current
location and visible in the Overview Waveform display. This can be done while a Deck is playing or
paused.
– or –
• Hold the Shift key while clicking one of the QuickCue buttons. A QuickCue Point is set to the Now Line
and is visible in the Overview Waveform display. This can be done while a Deck is playing or paused.
If Quantize is switched on in Torq’s Toolbar, new QuickCue points will be aligned to the nearest
16th-note in a song.
If you try to assign a QuickCue to a button that is already set to a particular location, the old QuickCue
location will be overwritten in favor of the new one.
Torq 2.0 User Guide
43
Chapter 5: The Decks
Page 49

Playing QuickCues
Once you’ve set a couple QuickCue Points, all you have to do is click on the desired QuickCue button and the
Deck will immediately jump to that location and begin playing. If you set your QuickCue Points at key positions within the song, you can immediately jump to different sections on-the-fly, such as jumping ahead to
a chorus or back to the intro.
While a song is playing, you can use “CTRTL + QuickCue Button” to jump to a QuickCue within the track
without playing the selected cue.
If you reposition playback using one of the QuickCue buttons while Looping is activated, playback will
jump to the new location. Torq automatically places the Loop In Marker at the new location and places
the Loop Out Marker in a position which maintains the same loop length.
Clearing QuickCues
If you’d like to clear all of the QuickCues in a song, click the Clear button.
Torq 2.0 User Guide
44
Chapter 5: The Decks
Page 50

Loop
Torq offers you two different ways to loop audio. You can specify the start and end points of the loop manually, or you can capture loops of a specific length using the QuickLoop buttons. Furthermore, Torq will help
you make the perfect loop every time by automatically matching your loop points to the tempo of the song.
Loop In/Out
Looping an entire song doesn’t have much benefit for a DJ, so Torq allows you to move the Loop Markers by
using the Loop In and Loop Out buttons:
To move loop markers in real time:
Load a song onto a Deck and press Play. When playback reaches the beginning of the section you want to
loop, click the Loop In button. This places a bright yellow Loop In Marker in the Overview Waveform for the
deck, and at the orange Now Line in the Waveform Display above the Mixer. If the Quantize button is active,
the Loop In marker will snap to the beginning of the nearest 16th-note in the song’s waveform.
When playback reaches the end of the section you want to loop, click the Loop Out button. This will place a
Loop Out Marker at the Now Line, which will also snap to the nearest 16th-note. At the same time, the Loop
On/Off button will automatically be activated causing playback to jump back to the Loop In Marker. The music will now loop between these two points indefinitely.
When you have finished looping this section of the song, you can click the Loop On/Off button to turn it off.
Now, when playback reaches the Loop Out Marker, it will simply pass it and continue playing the rest of the
song.
If you reposition playback using one of the QuickCue buttons while Looping is activated, playback will
jump to the new location. Torq automatically places the Loop In Marker at the new location and places
the Loop Out Marker in a position which maintains the same loop length.
Loop Out Behavior
By default, Torq places the Loop Out marker at a position that is the closest multiple of 2 in length from the
Loop In marker. In other words, Torq will only allow you to make loops with the lengths of 1 beat, 2 beats, 4
beats (1 bar), 2 bars, 4 bars, 16 bars, etc. This makes it easier to achieve even loops without having to press the
Loop Out button with 16th-note accuracy.
Torq has a second Loop Out mode that always quantizes the Loop Out marker positions to the nearest 16th
note:
To change the Loop Out Behavior:
1 Open Torq’s Preferences and click on the Behavior Tab.
2 Switch the Loop Out mode from “Smart” to “16th”and close the preferences.
Now the Loop Out marker will be quantized, and snap to a location that is the nearest 16th-note length from
the position of the Loop In marker. However, this requires that you press the Loop Out marker within a
16th-note of where you want the loop to end.
Torq 2.0 User Guide
45
Chapter 5: The Decks
Page 51

Loop On/Off
The Loop button will indicate whether Torq is looping audio or not. Whenever this button is illuminated,
Torq will be looping something, whether triggered with one of the QuickLoop buttons or set manually with
the Loop In and Loop Out buttons. Click this button to toggle the current selected loop.
QuickLoop
More often than not, a DJ will loop audio that is an even number of beats or bars. For example, a single bar
(four beats) or two bars (eight beats), or micro-loops of only one or two beats. Instead of having to quickly
press the Loop In and Loop Out buttons to create loops of these lengths, Torq provides one-button access to
these loops via the QuickLoop buttons.
Using QuickLoops
The QuickLoop buttons allow you to instantly loop a section of a song by a preset length. By default, each of
the four buttons represents a different bar length; one bar, two bars, four bars, and eight bars. Simply press one
of these buttons at the beginning of the section you want to loop and Torq will automatically place the Loop
In and Loop Out Markers in the appropriate locations:
To automatically loop a section:
1 Load a song into a Deck and press play.
2 Press the QuickLoop button labeled “1.” The Loop button will be switched on and the Loop In Marker will
immediately be placed at the Now Line, with a corresponding Loop Out Marker placed exactly one bar later
and the song will begin looping a perfect bar.
3 To turn the loop OFF, click the Loop button. Playback will now proceed beyond the Loop Out Marker.
Doubling the Length of a QuickLoop
Looking at the example above, once the one bar loop has been set, Torq lets you double its length by holding
down the Shift key and pressing the “1” QuickLoop button. If needed you can increase the length up to four
bars. In other word, the first time you double the one bar loop it will increase to two bars, and the second double will double the resulting two bar loop to four bars.
Pre-Loop
You can also reverse the behavior of the QuickLoop buttons by holding Shift when you create a loop. If you
do this, Torq will place the Loop Out marker at the current playback location and will set the Loop In marker
at the indicated number of Bars or Beats (depending on the QuickLoop Size preference) before the playback
location. Using this feature, you can loop sections of audio that just played. For example, to repeat the last 2
bars of music that played, hold Shift and press/click QuickLoop 2.
Torq 2.0 User Guide
46
Chapter 5: The Decks
Page 52

QuickLoop Size Preference
As mentioned above, the default loop lengths for the four QuickLoop buttons are one bar, two bars, four bars,
and eight bars. The QuickLoop Size preference allows you to change the QuickLoop buttons to beat values instead of bar values:
To set Quickloop to beat values:
1 Open the Torq Preferences menu and click on the Behavior tab.
2 Click the arrow next to QuickLoop Size option and choose “Beat” from the drop-down list.
3 Click the “X” to close the Preferences window.
Now, when you use the QuickLoop buttons as described above, you’ll find that they capture loops of one beat,
two beats, four beats, and eight beats in size.
Changing QuickLoop Lengths
Along with being able to capture loops of a specific size, the QuickLoop buttons also allow you to change the
size of the loops after they have been made. Torq has two methods for changing QuickLoop lengths which are
selected from the Preferences:
To set the QuickLoop preference:
1 Open the Torq Preferences menu and click on the Behavior tab.
2 Locate the QuickLoop Mode item—you’ll see that it has two settings: “Cut and Grow” and “Direct.”
When this “Cut and Grow” is selected, each additional press of a QuickLoop button will cut the current loop
length in half. For example, if you press QuickLoop 4, Torq will grab a 4 bar loop. Pressing QuickLoop 4 again
will result in a 2 bar loop. Press it again and you’ll get a 1 bar loop. If you hold SHIFT while pressing the QuickLoop button, the loop will grow in size—doubling in length with each press of the button.
Direct mode resembles the behavior found on some DJ CD players. When selected, the QuickLoop buttons
will become divisors once a loop has been captured. For example, pressing the QuickLoop 4 button will capture a 4 bar loop. Pressing QuickLoop 2 will now divide the loop length by 2 resulting in a 2-bar loop (4 bars
/ 2 = 2 bars). Pressing QuickLoop 4 will result in a 1-bar loop (4 bars / 4 = 1 bar).
Pressing QuickLoop 1 will reset the loop back to its original length (4 bars / 1 = 4 bars).
Torq 2.0 User Guide
47
Chapter 5: The Decks
Page 53

Control (Deck Mode)
In order for Torq to feel familiar to all types of DJ's, each Deck can be operated in one of four different modes,
which are accessed via the Deck Mode pop-up menu.
Vinyl Mode
Vinyl Mode causes a Deck to behave as if it was a turntable.
• Pressing Play/Pause to pause playback will cause audio to stop, just like pressing stop on a turntable.
• Clicking and dragging on the Scrolling Waveform will have audible results, like scratching a record.
Try out Vinyl mode:
1 Click and hold the mouse on the waveform. Playback will stop, as if you have placed your hand on a record
to stop it.
2 Continue holding the mouse button, then drag the mouse left and right. This will scrub, or “scratch,” the
song.
Using your mouse to control a waveform in this manner is known as Scratch via Waveform.
Releasing the mouse button will cause the Deck to play the song back from the current location.
CDJ Mode
CDJ mode will make the Deck behave as if it was a CDJ player.
• Pressing Play/Pause to pause playback will cause the Deck to stop and begin repeating a small section of audio. The repeating section corresponds to the position where playback will resume when you press
Play/Pause again.
• While the audio is repeating, you can click and drag on the Scrolling Waveform to move the start location—you’ll hear the repeating audio slice change as you do this. Press the Cue button to set the Cue Point
to this location and the repeating audio slice will stop.
• Clicking and dragging on the Scrolling Waveform while the Deck is playing will not stop audio. Instead,
you’ll be ab le to drag left or right to offset the playb ack speed of t he track. Controlling the waveform in this
manner lets you to align the track against another Deck when beat-matching.
Switching to MIDI Platter Control Mode selects Vinyl Mode, while selecting CDJ Mode switches off MIDI
Platter Control Mode. For more information about MIDI Platter Control Mode, refer to Chapter 15, “MIDI
Platter Control.”
Try out CDJ mode:
1 Click and hold on the waveform. The music will continue to play.
2 While holding on the mouse button, drag the mouse left. The playback tempo will be momentarily in-
creased, making the waveform scroll a little faster to the left.
3 Now hold and drag the mouse to the right. Playback will continue playing forward, but at a slightly slower
tempo. In this instance the waveform scrolls right to left at a slower rate.
Torq 2.0 User Guide
48
Chapter 5: The Decks
Page 54

Using your the mouse to control the waveform in this manner while aligning the song with another deck is
called “Nudge Via Waveform.” During this process, the Phase Grids for each song will become closer in line
with each other as the synchronization between them improves.
As soon as you stop dragging, playback will return to its original tempo even if you are still holding the mouse
button.
Hybrid Mode
Hybrid mode provides a blend of the CDJ and Vinyl control modes.
• Pressing Play/Pause to pause playback will cause audio to stop, just like in Vinyl mode.
• While paused, clicking and dragging on the Scrolling Waveform will have audible results, like scratching in
Vinyl mode.
• When playback is active, clicking and dragging on the Scrolling Waveform will not stop audio. Instead,
you’ll be able to drag left or right to offset the playback speed of the track like in CDJ mode. This will allow
you to align the track against the other Deck when beat-matching.
Switching to MIDI Platter Control Mode also selects Vinyl Mode, while selecting Hybrid Mode switches off
MIDI Platter Control Mode. For more information about MIDI Platter Control Mode, refer to Chapter 15,
“MIDI Platter Control.”
Try out Hybrid mode:
1 Click and hold on the waveform. The music will continue to play.
2 While holding on the mouse button, drag the mouse left. The playback tempo will be momentarily in-
creased, making the waveform scroll a little faster to the left.
3 Now hold and drag the mouse to the right. Playback will remain going forward, but the tempo will be
slowed slightly, resulting in a waveform that still scrolls right to left, but at a slower rate.
Controlling the waveform in this manner while aligning the song with another deck is another example of
“Nudge Via Waveform.” During this process, the Phase Grids for each song will become closer in line with
each other as the synchronization between them improves.
As soon as you stop dragging, playback will return to its original tempo even if you are still holding the mouse
button.
Torq 2.0 User Guide
49
Chapter 5: The Decks
Page 55

Control Inputs 1 Though 4
This option switches Torq to External Control Mode which lets you use the Torq Control Vinyl or Torq Control CD's, as well as other qualified hardware to provide the same method of DJing as traditional turntables
and/or CD decks. Torq also allows you to use external MIDI hardware to control nearly any feature within the
application.
The Control Vinyl and Control CD system works by using vinyl records and compact discs imprinted with
special control signals. You’ll play these control signals on your turntables and/or CD players and feed that signal into any professional audio interface that has four inputs (with phono preamplifiers on each input if you
are using turntables) such as the M-Audio Conectiv
®. Torq will listen to those audio signals and will use the
encoded information to control the playback of the Decks.
For detailed information about the connection, configuration, and use of qualified external control surfaces with Torq, refer to “External Control” on page 139 and “External Control Calibration” on page 140.
Additional information about the Torq Vinyl Control System can be found in Appendix B, “Torq Vinyl
Control System.”
External Control
Pressing the External Control button located to the left of each Deck Mode drop down menu switches the
deck to External Control Mode, which lets you control the desk using Control Vinyl or Control CD’s as described above via Control Inputs 1 through 4. With this, the appearance of the play button will change, becoming two buttons. The top button, labelled ABS offers two different control modes, affecting the behavior
of the Control Vinyl or Control CD and song playback. In it’s default state the ABS button switches the deck
to Absolute Mode button (see “Absolute Mode” on page 141), while pressing this button activates Relative
Mode (see “Relative Mode” on page 142).
Immediately below the ABS/REL button is the “REL S.” button (Relative Speed) which prevents the platter
speed from changing when switching between decks when controlling multiple decks with a single control
source (see “Relative Speed Mode” on page 143).
When using external Vinyl or CD control, Torq will preserve the pitch of the music even if you change the
speed of the turntable or CD player. When you scratch, Torq will disable time-stretching and re-enable it when
you let the music play again. If you want Torq to respond like a true vinyl record, click the Key/Speed Lock button so that key and speed are locked together. You will then hear pitch changes when altering the speed of the
turntable or CD player.
External Control can be configured in the Torq Preferences dialog as explained in “External Control” on
page 139.
Switching a Deck to External Control Mode while using the internal soundcard on a laptop, causes Torq
to use the sound picked up by the internal microphone as the control source. This causes the BPM value
and Speed Adjust randomly change, leading to errors.
Torq 2.0 User Guide
50
Chapter 5: The Decks
Page 56
Master/Sync
Auto Master Deck
By default this function is always active, and automatically chooses the Master Deck based on the position of
the Crossfader and the Level Meters. Pressing the AUTO button in the Torq Toolbar deactivates and activates
Auto Master Deck.
AUTO Button
Master Button
Clicking this button selects a Deck as the Master Deck and the Master Tempo will change to the tempo of the
“new” Master Deck. With a Deck set as the Tempo Master, all tempo based Torq functions and Looped samples
will follow its tempo even if there are tempo changes (set with Tempo Anchors) will follow the Master Deck.
If you’re using Torq Xponent as your controller, you can select a Master Deck by holding a SHIFT button on
the controller and pressing the corresponding Sync button. The Auto Master Deck function will be disabled
and the Xponent Sync button will flash, confirming that the target deck is the Master.
If you are using Torq with qualified third party controller, refer to the documentation provided with your
hardware for detail about the equivalent functionality.
Sync Button
Clicking the Sync button automatically synchronizes a Deck to the Master Tempo. While Sync is active, the
Deck is also affected by changes to the Master Tempo. For example, if you lower the Master Tempo, the other
deck will also slow down. If you attempt to scratch or re-align the deck, Torq will automatically snap it back
into alignment to match the phase of the Master Tempo.
When you deactivate the Sync button, the deck maintains the tempo setting allowing the song to play at the
Master Tempo. However, Torq will no longer attempt to keep the Deck in sync if you make changes to it, such
as scratching.
Nudge Buttons
Nudge Button
If you’re not taking advantage of Torq’s ability to keep tracks aligned using Sync, you can do it manually using
the Nudge buttons. If a song becomes ahead or behind the other, the Nudge buttons let you push the song
back into alignment by creating a small change to the playback speed of the song. If the song is ahead of the
beat, press the right Nudge button to slow it down. You’ll see the waveforms of the two songs move in relation
to each other. Release the Nudge button once the songs are aligned properly and the original playback speed
will be restored.
Torq 2.0 User Guide
51
Chapter 5: The Decks
Page 57

Synq Reference Button
The Sync Reference Button lets you change the “forcefulness” or resolution of the synchronization between
the Decks. Each click of this button cycles through the options listed below.
Synq Reference Button
Bar (Default)
With this option selected, Torq will align a synced Deck to the tempo and downbeat of the other Deck or Master Tempo. Any attempts to adjust the alignment of the track will result in Torq forcing the tracks back into
synchronization with their downbeats aligned (the thick lines of the Phase Grids will be aligned with each
other at all times).
Beat
Torq will match a synced Deck to the tempo and beat of the other Deck or Master Tempo with no regard to
the downbeats in the Phase Grids. Any attempts to realign the synced Deck will result in Torq forcing the track
back into alignment with the nearest beat (the thick lines of the Phase Grids may be out of alignment with
each other).
Tem po
Torq will only match the tempo of a synced Deck to the other Deck or Master Tempo. When you press Play
on a Deck, Torq will not force the song into alignment. It will be up to you to start the music at the right moment and keep it in alignment.
Torq 2.0 User Guide
52
Chapter 5: The Decks
Page 58

Speed Slider (SPEED)
Speed Slider
Torq’s Decks are each equipped with a Speed Adjust slider for the purpose of beat-matching songs. This slider
behaves just like the pitch adjusters found on DJ turntables and CD players. As you move this slider, the neighboring ADJ display will show how much the song’s speed is being altered (expressed as a percentage where 0%
is the original speed of the song) and the BPM display will change to show the new tempo of the song.
For those not familiar with these controls, your first impression may be that the slider is working backward
since the speed of the song will increase as you move the slider down on screen. However, this is the proper
behavior for pitch controls found on DJ turntables and CD players. It makes sense if you consider the following:
The pitch adjust slider on a turntable is mounted flat on the surface of the turntable’s housing. Therefore,
when you use the slider, you either push it away from you or pull it towards you. When a song is going too
fast, you push the slider away from yourself, just as if you put out your hand in a “slow down” motion. If you
need the song to go faster, you pull the slider toward you, similar to how you would gesture towards yourself
if you wanted someone to move quickly. After a few hours of practice, this “backward” response will feel natural.
All tempo changes made on a designated Master Deck will also be applied to the Master Tempo.
Speed Range (RNG)
By default, the range of the Speed Adjuster is +/- 8%. That means that if you move the slider to either of its extremes, you’ll only get an 8% change in the speed of the song. To the left of the Speed Adjuster is a display
showing the current range setting for the slider:
You can change the range of the Speed Adjuster by clicking on this range display. Each time you click, the
range will advance to the next highest setting. The order is: 8%, 10%, 20%, 50%, then 100%. When you click
the display again, the range will “wrap around” back to 8%. You’ll only need to increase the range when
you’re trying to match two songs with very different tempos, or when you want to perform an extreme speed
change as a special effect (especially effective when the range is set to 100%).
Most experienced DJ's will simply match the tempos of two songs by hand using the Speed Adjust slider,
which is a perfectly acceptable method of matching songs (indeed, this is the way it’s been done for decades).
Since it requires a lot of practice to hear when one song is playing faster or slower than another, those new to
DJing will benefit from some of the extra features built into Torq. Such features include automatic beat detection, BPM displays, scrolling waveform displays, and automatic synchronization.
Torq 2.0 User Guide
53
Chapter 5: The Decks
Page 59

BPM Display (BPM)
BPM Display
Tempo is a measurement of the speed of a song and is normally expressed as Beats Per Minute (BPM). As the
BPM increases, the speed of the song increases. In order for two songs to be mixed together with their beats
aligned, the two songs will need to be playing at the same tempo. This is why Torq decks are equipped with
Sync Buttons and Speed Sliders. In the event that you are trying to mix two songs with different tempos
(which happens more often than not), you will need to use the Speed Sliders or Sync Buttons to match the
tempo of the new song to the tempo of the current song.
Automatic BPM Detection
Any time you load a new track into a Deck, Torq will analyze it and attempt to determine the tempo of the
song. For most dance music, Torq will be able to determine the tempo accurately. Once scanned, the tempo
of the song will be shown in the BPM display for the Deck, which is located just to the left of the Speed Adjust
slider.
The Torq beat-detection system usually provides accurate results when set to default settings. However
some types of complex music can confuse the software resulting in incorrect tempos. In these cases you can
specify the type of music you’ll be using in the Preferences menu. This limits the tempo range used by the
beat-detection system and increases the accuracy of the function.
Be sure your selection matches the type of music you’re trying to analyze. If you have “Drum & Bass” selected and attempt to analyze a trip-hop song, Torq will give you the wrong tempo. In this instance you
can change the music type and re-analyze the song if needed.
The BPM value will change if you alter the speed of the song with the Speed Adjuster. This is extremely helpful
when trying to synchronize two songs since you’ll be able to match the tempos of the two songs just by
matching the BPM values shown in the displays.
Flatten Tempo
When this button is pressed, this function analyzes the position of all Tempo Anchors and the speed of the
music between each of them to come up with an average tempo. This lets you synchronize the other decks to
the song.
This is useful when locking one or more of the other decks to a song that has a live drummer. For example,
you have song on Deck A where the drummer tends to speed up right before a drum fill, and may get even
faster during the choruses, only to slow back to the basic song tempo during the verses. On Deck C you have
song with a more constant tempo because it contains programmed drums. Pressing the Flatten Tempo button
on Deck 1adjusts the playback to a constant tempo based on the average speed calculated by Torq. An exception to this is when Deck A is synced to a Master Deck that is not playing a song with a constant tempo.
The Flatten Tempo button will be greyed out for decks which do not have Tempo Anchors set up on their
songs.
Torq 2.0 User Guide
54
Chapter 5: The Decks
Page 60

Divide Tempo
The first time you press this button the tempo of the current song will be divided by 1.5. If the song was detected as 120 BPM, it will no w sho w 60 B PM (1 20 BP M ÷ 1.5 = 60 BPM). The second time you press this button,
the division factor will stay the same (1.5) and the tempo changes to 40 BPM (60 BPM ÷ 1.5 = 40 BPM).
Multiply Tempo
The first time you press this button the tempo of the current song will be multiplied by 1.5 (the multiplication
factor will be shown i n the Tooltip). If the song was detected as 120 BPM , it will now show 180 BPM (120 BPM
x 1.5 = 180 BPM). The second time you press this button, the multiplication factor will increase to 2. If the
song had been detected as 120 BPM, it would now show 240 BPM (120 BPM x 2 = 240 BPM). The multiplication factor will continue to increase in 0.5 steps each time this button is pressed.
Manual Tempo Adjustment (ADJ)
As mentioned above, Torq can determine the tempo of most dance music. Some music, however, is too complex or not repetitive enough for Torq to detect the tempo with precision. Fortunately, you can help Torq to
determine the proper tempo through a number of different methods. The appropriate method will be based
on the type of tempo correction you’re trying to achieve.
Tap Tempo
On rare occasions, Torq will determine an incorrect tempo that has no direct relation to the actual tempo (not
a fraction or multiple). At times like this, you’ll want to use the Tap Tempo feature to determine the tempo of
the song while it plays.
To set the tempo using Tap Tempo:
1 While the song is playing, click on the BPM display with each beat that you hear.
2 The BPM display will update the BPM to reflect the timing of the taps you performed.
3 The more taps you provide, the more precise the calculation will become.
To revert to the automatically determined tempo, hold the Shift key while clicking on the BPM display. This
will also clear any Tempo Anchors (see “Tempo Anchors” on page 56).
Tap Tempo cannot be used if there are Tempo Anchors in a song.
Torq 2.0 User Guide
55
Chapter 5: The Decks
Page 61

BPM Entry
If you happen to know the BPM of the song, you can manually enter it into the BPM display, thus overriding
the tempo detected by Torq.
To enter BPM manually:
1 Hold the Shift key and double-click on the BPM display.
2 Type in a new BPM value from your computer keyboard and press Enter.
3 The new BPM will then be set for the song.
If at any time you wish to revert back to the automatically determined tempo, hold the Shift key while clicking on the BPM display. This will also clear any Tempo Anchors if any have been created.
Tempo Anchors
Torq provides you with another alternative in the event that none of the above methods provide an accurate
BPM for the song, or when a song contains tempo changes. Torq will allow you to create a custom tempo map
for a song employing a feature called Tempo Anchors.
Refer to “Tempo Anchors” on page 62, for more information about Tempo Anchors.
Key
The Key Adjust is used to raise or lower the key (pitch) of a song without changing the tempo. This is useful
when attempting to match the melodies of songs on different Decks during a mix, known as key-matching.
You can adjust the key of a song with the Key Adjust buttons or by dragging the up or down on the Key Display.
Fine Tuning
To fine-tune a song’s key:
1 Click and hold the mouse cursor over the Key Display number.
2 Drag the mouse up or down. The number will adjust in increments of one cent.
To reset the key transposition to 0, hold down the Shift key on your computer keyboard and click on either
of the Key Adjust buttons’ Key Displays. If you have adjusted the key in finer increments, the key will be reset
to 0, however the fraction will remain. For example, if the key is 4.23, resetting will make it 0.23.
Key Lock
The Decks in Torq have the special ability to change the playback speed of the song without changing the
pitch of the song (this is known as time-compression and time-expansion). This means you don’t have to
worry about music changing pitch as you beat-match. However, if you would like to disable this feature and
essentially lock the Key and Speed of the music together, turn on the Key/Tempo Lock button. With this on,
the music will behave like a regular vinyl record (slowing down the music will make the music drop in pitch).
Torq 2.0 User Guide
56
Chapter 5: The Decks
Page 62

MIDI Slider/Knob Control
MIDI control of the Key Adjust is different from other controls in Torq. You can assign a knob or slider to the
Key Adjust, or you can assign keys on your MIDI keyboard—the behavior of the Key Adjust is dependent on
your control method.
To assign a MIDI slider or knob to Key Adjust:
1 Make sure that your MIDI keyboard or control surface has been properly installed and is configured to work
with Torq. Please see chapter 6 for more information about configuring your external MIDI hardware to control Torq.
2 Right-click (CTRL-click, Mac) on the Key Display; it will turn red indicating that it’s waiting for an assign-
ment.
3 Move a MIDI knob or slider on your MIDI controller. This will automatically assign the knob or slider to the
Key Adjust.
4 The Key will be adjustable in one-semitone steps.
MI DI CC value 64 eq uals + 0 semitones. This gen era lly means wh en the knob or sl ider of your MID I controller
is at center position, the Key will be at 0.
To assign a MIDI button to Key Adjust:
1 Make sure that your MIDI keyboard or control surface has been properly installed and is configured to work
with Torq. Please see chapter 6 for more information about configuring your external MIDI hardware to control Torq.
2 Right-click (CTRL-click, Mac) on the [+] Key Adjust button. It will turn red indicating that it’s waiting for an
assignment.
3 Press a button on your MIDI controller to assign it to the [+] Key Adjust button.
4 Right-click (CTRL-click, Mac) on the [-] Key Adjust button. It will turn red indicating that it’s waiting for an
assignment.
5 Press a button on your MIDI controller to assign it to the [-] Key Adjust button.
6 Now that your buttons are assigned, press the button assigned to [+]. The Key will move up one semitone.
7 Now press both buttons simultaneously.
8 The Key Adjust will return to 0.
Torq 2.0 User Guide
57
Chapter 5: The Decks
Page 63

To control Key Adjust with your MIDI Keyboard:
1 Make sure that your MIDI keyboard or control surface has been properly installed and is configured to work
with Torq. Please see chapter 6 for more information about configuring your external MIDI hardware to control Torq.
2 Right-click (CTRL-click, Mac) on the Key Display. It will turn red indicating that it’s waiting for an assign-
ment.
3 Press a key on your MIDI keyboard. This key will automatically be assigned as the “root key” of the Torq Key
Adjust.
4 If you press a MIDI key that is 1 semitone ABOVE the root key, the Deck’s Key will be changed to +1 (semi-
tones).
5 If you press a MIDI key that is 2 semitones BELOW the root key, the Deck’s Key will be changed to -2 (semi-
tones).
6 The range of Key transposition is plus or minus (+/-) 12 semitones. This makes it possible to control the Key
Adjust of all Decks using a single MIDI controller keyboard, as long as the keyboard has enough keys to make
up four (4) octaves.
Torq allows notes from the same controller and MIDI channel to be used as long as the root keys are at
least two octaves apart.
Effects (FX)
Torq includes 13 internal VST effects units, and offers support for qualified third party external VST effects.
The Effects section of each deck lets you load up 5 (4 internal and 1 external) plug-ins at a time. This means
you can use up to 20 effects (10 in Two Deck mode) within your mix at the same time.
Refer to “VST Effects” on page 94, for more information about using VST effects with Torq.
Torq 2.0 User Guide
58
Chapter 5: The Decks
Page 64

Chapter 6: Waveform Display
One of the most prominent features of the Torq user interface is the Waveform display, located above the
Mixer. Unlike the smaller Overview Waveforms found in each Deck, the Scrolling Waveforms only show a few
seconds of the current song before and after the current play position. This lets you see the alignment and synchronization of the Decks, and providing other important information as explained in this chapter.
The song in Deck A is shown at the top of the Scrolling Waveform display, with songs on Decks B, C, shown
immediately below. In Two Deck mode the Waveform Display shows the song loaded on Deck B in the top
half with the song on Deck C below it. While the yellow Now Line in the Overview Waveform for each deck
moves from left to right as a song plays, the Orange Now Line in the Waveform Display remains stationary as
the Waveform moves.
Waveform Display in Four Deck Mode
Waveform Display in Two Deck Mode
Torq 2.0 User Guide
59
Chapter 6: Waveform Display
Page 65
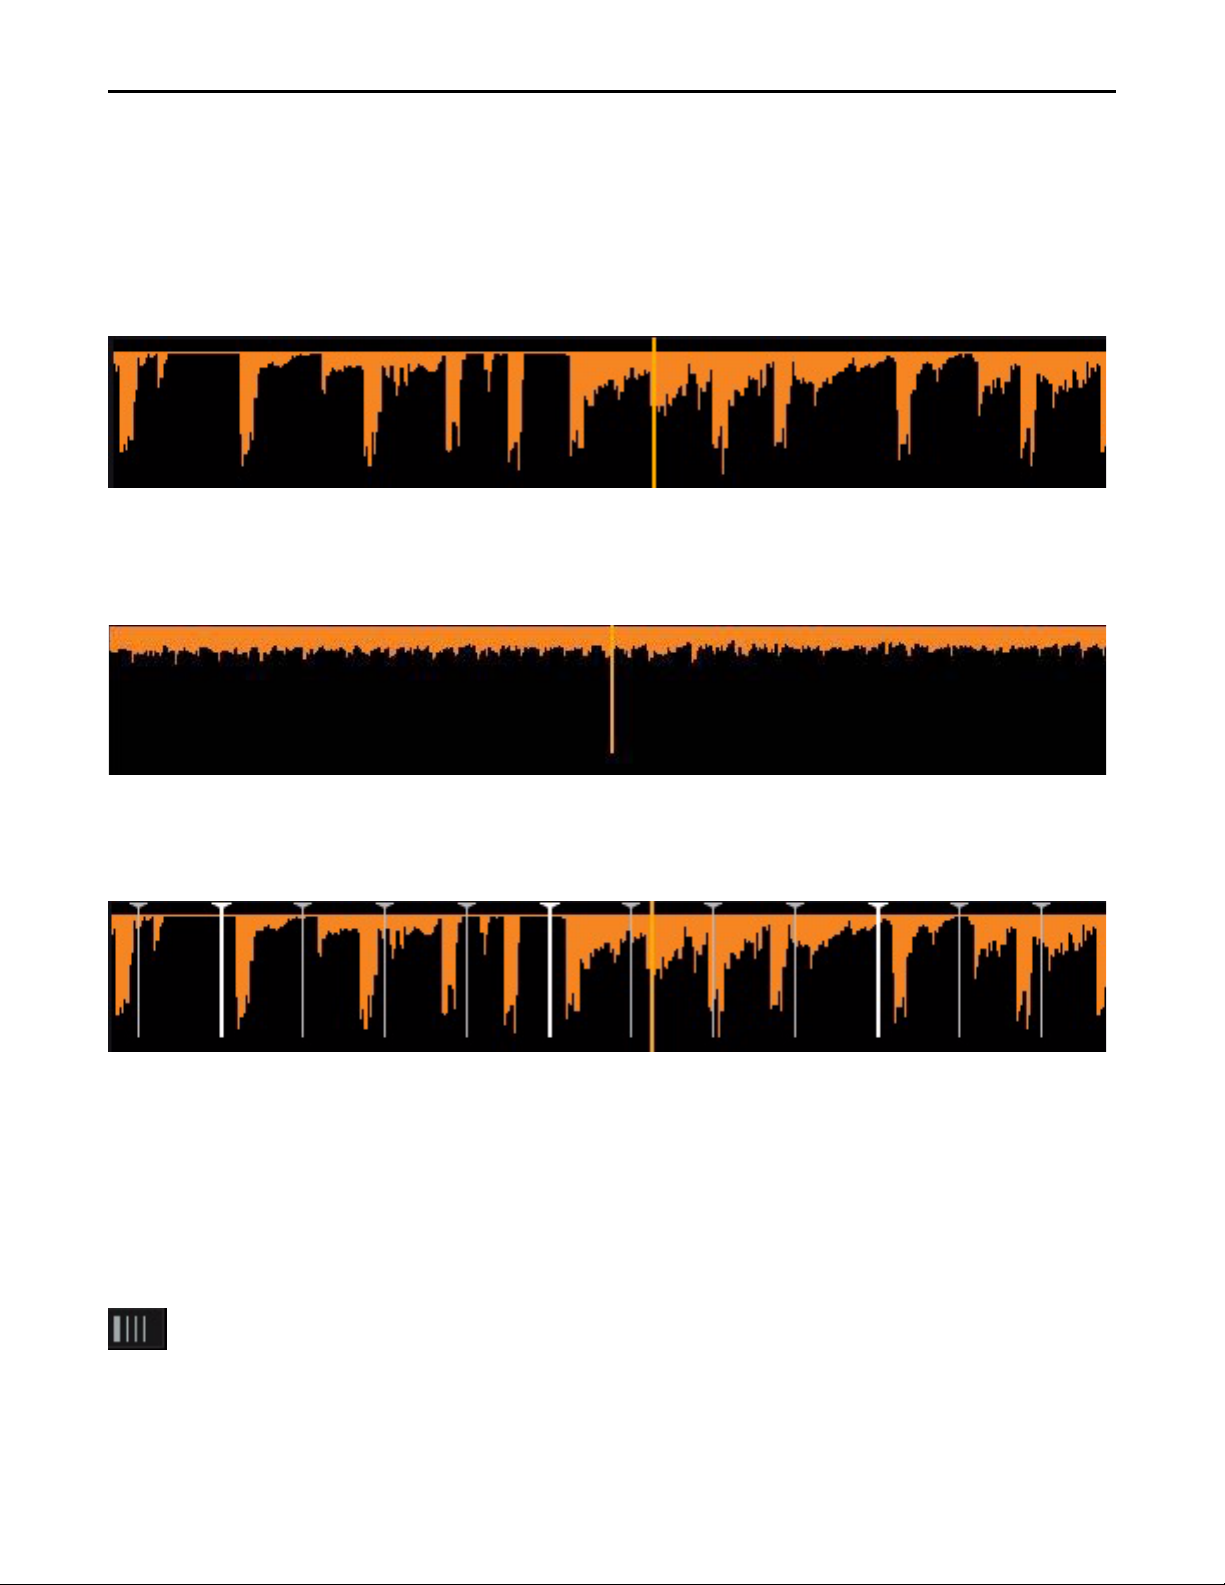
Information Shown on the Display
Waveform
By looking at the audio waveform itself, you can see where the beats are in the song. These sharp hits (transients) typically look like long, thin spikes in the waveform. In the picture below, you can see the heavy bass
drum beats of a song in the Waveform Display.
Waveform display
When the drums stop, you’ll notice that the tall spikes go away. This is how you can tell if a breakdown or slow
section of the song is approaching. This is also lets you see where the drums come back in.
Waveform display showing lower-volume audio
Phase Grid
Waveform with Pha se Grid
By default Torq superimposes a Phase Grid over the Scrolling Waveforms to indicate the location of the beats
in a song. The thicker lines in the Phase Grid indicate the locations of the downbeats (beginning of each bar)
in the music. Torq will attempt to position the Phase Grid in the proper location as part of the analysis when
loading a song into a Deck, and uses the position of the Phase Grid to properly synchronize the song.
Hiding the Phase Grid
Hide Phase Grid Button
If you would like to turn the Phase Grid lines off, click the “Hide Phase Grid” button located above the waveform display (next to the zoom controls).
Torq 2.0 User Guide
60
Chapter 6: Waveform Display
Page 66

Zoom
Zoom controls
Torq lets you zoom in or out of the Waveform Display using the Zoom control found in the Toolbar, by clicking the magnifying glass icon, and moving the mouse with the button held down.
When this is done the value will change in increments of 0.1of a second, allowing you to see as little one second or as much as 40 seconds of the waveform either side of the orange Now Line. Zooming in is useful for
matching beats more precisely, while zooming out allows you to see how the Phase Grids for each song line
up over a longer duration of time.
Maximize Waveform View
Maximize Waveform Button
Clic king the Maximiz e Wa veform b utton lo cated in the Toolba r expand s the Wavefo rm Displ ay so tha t it take s
up the whole of the user interface, hiding all other Torq controls except the Toolbar. This lets you view the
waveforms in greater detail, and when used in conjunction with the Zoom control allows for increased precision when matching beats.
Marker Display
Whenever you set Loop Points, or Cue Markers within a song Torq places visual representations of them and
their positions in the Waveform Display as described below.
Loop Points
Loop Points
The Loop Points of the song (set with the Loop In/Out buttons or the QuickCue buttons) will be shown on the
Waveform. The looped area of the music will appear in a lighter shade compared to the rest of the waveform.
Torq 2.0 User Guide
61
Chapter 6: Waveform Display
Page 67

Cue Points
Cue Points
If you’ve used the Cue button or QuickCue buttons to place various Cue Markers in the song, you will see
them here. The QuickCue markers have numbers attached to them (corresponding to the assigned QuickCue
button) and the standard Cue Point appears as an red line.
Tempo Anchors
In addition to its automatic BPM detection features, Torq provides you with another alternative for BPM
matching that becomes an indispensable tool when working with songs that include tempo changes or fluctuations (Torq’s automatic beat detection is designed to work with songs that have a constant tempo). Using
Tempo Anchors, you can manually specify the location of be ats wi thin a song th us all owing To rq to fo llow t he
tempo of any song even if it speeds up or slows down in the middle. Editing Tempo Anchors is a more involved process and should therefore only be used in the event that none of the normal methods yield the
proper results.
Tempo Anchors are edited within the Scrolling Waveform window and should be done at the highest zoom
factor so you can place the Anchors accurately. Furthermore, this is more of an “off-line” process—you should
prepare a song with Tempo Anchors before trying to play it to an audience. Torq will save the Tempo Anchors
in the TQD file so that you will only have to do this once for any particular song.
Tap Tempo
In order to add Tempo Anchors to a song you will need to map a key such as the space bar or a button on your
control hardware to the Tap Tempo function.
To map a key or button to the Tap Tempo function:
1 Choose the Deck that you want to use when adding Tempo Markers to a song.
2 Right click on the BPM display for the Deck.
3 Tap the key or controller button you are mapping to the Tap Tempo function.
Torq 2.0 User Guide
62
Chapter 6: Waveform Display
Page 68

Adding Tempo Anchors
To add Tempo Anchors to a song:
1 Load a song onto a deck and press the Play button.
2 Use the Tap Tempo feature to determine the approximate tempo while the song plays. The tempo will ap-
pear in both the Global BPM display in the Toolbar, and the Deck BPM display. This is very important since
this will get the Phase Grid close to the proper position leaving only minor edits for you to do later.
3 Stop the song and rewind back to the beginning.
4 Hold SHIFT and drag the Phase Grid so that the downbeat (the thicker white line) is aligned with the first
visible beat of the song. This will ensure that the Phase Grid starts at the right location—you will only need
to use Tempo Anchors to fix issues where the Phase Grid drifts out of alignment.
5 Click the Edit Anchor Points button in the Toolbar. The background of the Scrolling Waveforms will turn
purple indicating that Anchor Edit is active.
Edit Anchor Points Button
6 Search through the song looking for places where the Phase Grid no longer aligns with the beats of the mu-
sic. When you find one that is out of alignment, double-click it. The line will change from grey to green indicating that the grid line has been turned to a Tempo Anchor.
7 Now that the grid line has been converted to a Tempo Anchor, you can now move it left or right until it
aligns with the beat. Simply click-and-drag the Anchor to set it to a new location.
8 Repeat steps 6 and 7 until all of the tempo anomalies have been corrected. When complete, every grid line
and Tempo Anchor should visually align with the beats in the song.
9 Click the Edit Anchor Points button again to exit Anchor Edit mode. The Scrolling Waveforms will revert to
their original color.
Now, when you play the song, it will play with a constant tempo (the tempo variations will be removed).
Some will say that editing Tempo Anchors is more of an art than a science. Indeed, there are other techniques
that can be used other than the steps listed above which will give the same results. As you edit more and more
songs, you’ll learn which techniques are best for various types of music. Here are a few other methods that can
assist with Tempo Anchors:
Tap Tempo Anchors
If you use Tap Tempo when Anchor Edit is on, each tap will place a Tempo Anchor at that location. If you’re
working with a song that has lots of tempo changes (such as older music that was not recorded to a click track)
this can be very advantageous. Just tap along with the music and the Phase Grid will be pretty close to where
it needs to be. You can then manually adjust any of the Tempo Anchors that need it.
Use fewer Tempo Anchors
While you could surely turn every single grid line into a Tempo Anchor, this is usually not necessary. Often,
long sections of a song will have a consistent tempo. In these cases, it’s usually enough to place a Tempo Anchor at the beginning and another at the end of that section. All the grid lines will distribute themselves
evenly between the Tempo Anchors.
Torq 2.0 User Guide
63
Chapter 6: Waveform Display
Page 69

Fixing corrupted audio files
From time to time, you may notice that a song seems perfectly in sync then suddenly falls out of sync. This
can be due to corruptions within the audio file. Torq will skip over sections of data that are corrupted and will
continue to play the remainder of the song. Every time Torq skips over corrupted data, it will make the Phase
Grid look like it has shifted to the right. In cases like this, you can use Tempo Anchors to adjust the tempo only
where the jump occurs. Simply make two Tempo Anchors— one right before the jump and one right after.
Drag the second Anchor to the left until it is aligned with the beat. All of the grid lines to the right of the last
Anchor will shift as well so the remainder of the song will then be in alignment (unless there is another corruption).
Torq 2.0 User Guide
64
Chapter 6: Waveform Display
Page 70
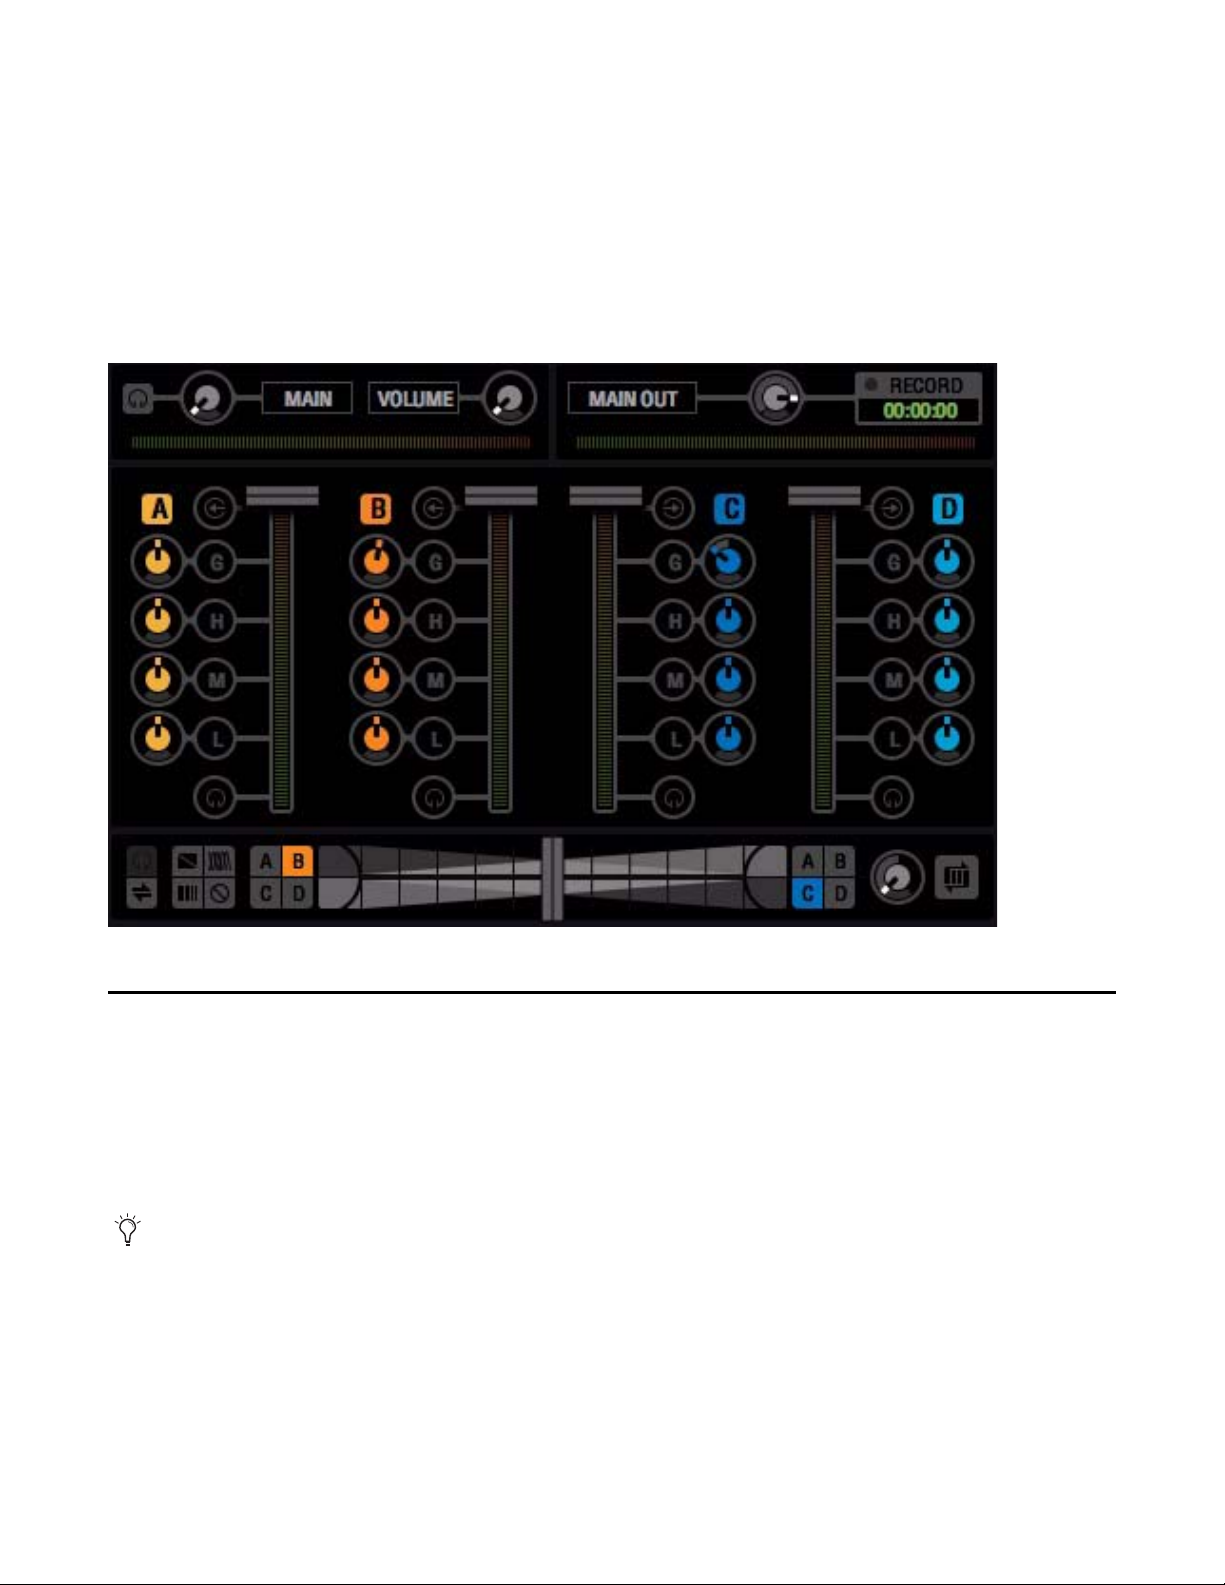
Chapter 7: The Mixer
The Torq Mixer sounds and behaves just like a professional hardware mixer with the added advantage of being
able to support all four decks. The layout instantly familiar to anyone who has used a mixer before, and it is
capable of performing the same techniques utilized by DJ's on traditional hardware mixers.
Torq Mixer in Four Deck Mode
Mixer Architecture
Before you start tweaking knobs and sliders on the Mixer, you should have a basic understanding of the components in the mixer and the signal flow between the components. Without this basic understanding, some
controls may seem to be misbehaving or completely inoperative, only because you’ve unknowingly set another control to a conflicting position. Additionally, there are some terms you should get to know, as they will
be used repeatedly throughout this User Guide.
When the mouse is moved over a knob, slider or button the name of the control and a brief description,
is displayed in the lower edge of the Torq window.
Torq 2.0 User Guide
65
Chapter 7: The Mixer
Page 71
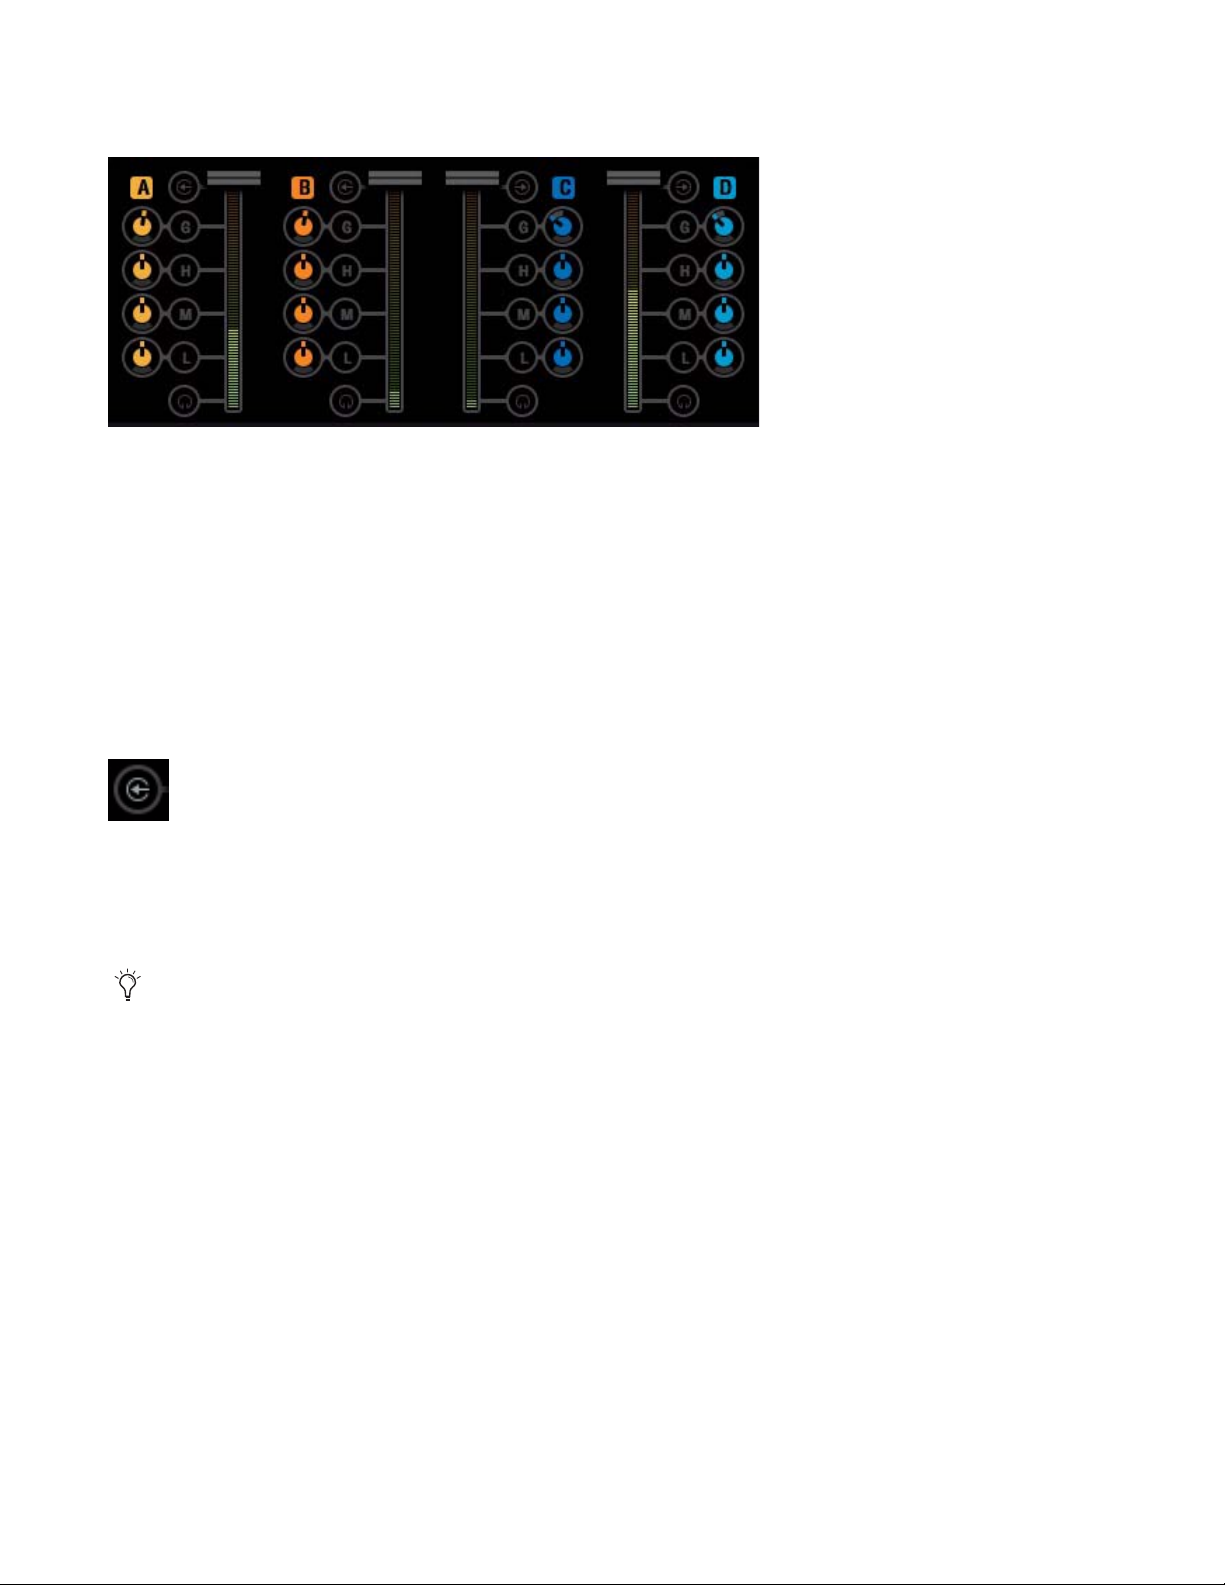
Channels
Four Deck Mode - Mixer Channels
In Four Deck mode the Mixer has four channels, one for each Deck labelled A,B,C, and D to correspond with
their respective decks. When switched into Two Deck Mode decks B and C are available. While the signals
from all Dec ks enters the same mixer, they remain on their respective mixer channels. This lets you to process
each audio signal differently before mixing them together into a single output channel (which is what your
audience hears).
Each Mixer channel has a dedicated set of controls as described below:
Line Input Button
Line Input Buttons
Ne xt to each ch annel name (A, B , C, and D or B and C in Two Dec k mode) is a L ine Input butto n. Clicking thi s
button will activate the line input for the corresponding channel. This lets you to send audio from an external
audio source connected to your audio interface (for example a CD player or turntable) to the channel.
In order for Line Input to work you will need to assign audio channels to the Line Inputs in the Audio tab
of the Preferences. See “Audio Preferences” on page 111 for more information about setting up these inputs.
Torq 2.0 User Guide
66
Chapter 7: The Mixer
Page 72

Gain/Mute
Gain Knob
This knob increases or decreases the volume of the incoming audio signal by as much as 12db. This lets you
match the levels of the songs you’re mixing together.
Gain Mute Button
The “G” button next to the Gain knob is the Mute button. Pressing this button will mute the incoming audio—resulting in a silent channel.
EQ/Kills
Each mixer channel is equipped with a 3-band EQ which lets you use each knob to control the levels of High
(H), Mid (M), and Low (L) frequencies of the song being played. Turning them to the right boosts their respective frequency range, while turn them to the left decreases it.
Next each knob you will find a corresponding kill button. Pressing them completely removes their corresponding frequency from the audio signal. When all three have been pressed the signal is muted in the same
way as if the Mute button (G) has been activated.
The EQ controls are used to (1) improve the sound quality of poorly recorded or produced songs, (2) assist in
matching the overall frequency content of two songs, (3) add emphasis to the music by removing or isolating
one or more of the frequency ranges, and (4) mix songs together in a “jigsaw” fashion by swapping the frequency ranges of two songs as they play together.
Old songs typically don’t have as much bass as today’s tracks. Therefore, you’ll often use the Low EQ to boost
the bass (low frequencies) of the old song to match the louder bass of a recent song. Without doing this, it may
sound like the music gets quieter as you mix from the recent song to the older one.
Likewise, even tracks recorded within the same year can sound different from one another, even when playing
at the same volumes. This is usually because one song will have stronger Mid frequencies compared to the
other. If the bass parts in both songs sound like they’re the same volume, you can use the Mid EQ to “turn
down” the louder song until it more closely matches the quieter song.
DJ's also like to mix things up during their sets by adding their own manipulations to the songs they play. For
example, a DJ might cut the High and Low frequencies from a track a few beats before the chorus of a song,
then bring them back right when the chorus starts (the perfect job for Torq’s High and Low Kill buttons).
When two songs are playing at the same time, you’ll frequently find that the music sounds muddy. This is
normally due to “un-complementary” bass content in the two songs. This can be as simple as the two songs
being in different keys, or could occur if both songs have long, sustained bass notes. In order to clean things
up, you can simply remove the bass from one of the songs with one of the Low Kill buttons. This will leave
the bass from the other song in the mix, so it will still sound natural. When you’re ready, press both Low Kill
Torq 2.0 User Guide
67
Chapter 7: The Mixer
Page 73
buttons at the same time. This will kill the bass in the first track while bringing in the bass from the other. This
will sound like the bass part in the overall mix has changed (which it has) and the mix will still sound full. You
can also swap frequencies with the other frequency bands. You can also make the swaps less abrupt by using
the EQ knobs instead.
PFL/Headphone Button
Once the audio signal leaves the EQ, it is sent to two different locations. One location is the PFL Button, which
looks like a pair of headphones. PFL stands for Pre-Fader Listen, which refers to hearing an audio signal without being under the influence of the Volume fader (on some mixers, this function is called “Cue”). That definition may not make sense if you’re not familiar with a mixer, so think of it as a way to privately hear the music in a mixer channel regardless of what your audience can or cannot hear.
This is what a DJ uses to listen to the next song before he plays it for his audience. When you press the PFL
button, that channel is sent to the PFL/Headphone section (see “PFL/Headphone Cue” on page 69). This lets
you use your headphones to hear how a mix will sound before your audience hears it.
Channel Volume Faders
Besides going to the PFL, the audio leaving the EQ also goes to the Channel Volume fader. This is the primary
volume control for the channel (though it is subordinate to the crossfader) which works just like a volume
fader on a traditional mixer. You can match volumes of the two tracks using the Channel Volume faders. However, some DJ's prefer the technique of leaving the Channel Volume faders fully up—you then match the volumes of the songs using the Gain knobs. The reason for this is that you’re then free to use the Channel Volume
faders for other effects such as volume fades, cuts, and stutter effects, similar to the scratch techniques used
on the Crossfader. Whichever approach you choose is entirely up to you.
You can quickly return a Channel Volume fader to full volume by holding SHIFT and clicking on the
fader.
Line Input Buttons
Located above the PFL icons in each channel of the Mixer is a Line Input icon. Clicking this icon will activate
the line input for that channel. This will allow you to feed audio from an external audio source (such as a CD
player or turntable connected to your audio interface) for mixing with Torq’s Mixer. All functions, such as EQ,
Gain, Effects, and PFL, will still work even when using external audio sources.
In order for Line Input to work you will need to assign audio channels to the Line Inputs in the Audio tab
of the Preferences. See the Preferences section for more information on setting up these inputs.
Torq 2.0 User Guide
68
Chapter 7: The Mixer
Page 74

PFL/Headphone Cue
PFL - Four Deck Mode
PFL - Two Deck Mode
PFL stands for Pre-Fader Listen, which refers to hearing an audio signal without being under the influence of
the Volume fader (on some mixers, this function is called “Cue”). That definition may not make sense if
you’re not familiar with a mixer, so think of it as a way to privately hear the music in a mixer channel regardless of what your audience can or cannot hear.
Split Button
Clicking the Split button (headphone icon) sends the PFL signal from any Deck to the left side of your head
phones while the signal your audience hears will be on the right side. This makes it easier for you to hear misalignments in rhythm and tempo.
Clicking the Split again switches off split mode and the PFL signal from a deck will be heard in both sides of
your headphones.
Source Knob
The Source Knob lets you balance the levels between the PFL signal from a deck and the main mix with or
without split mode being active. Turning it all the way to the left mutes the Main Mix leaving your with just
the PFL signal in the left side of your headphones. turning it all the way to the right mutes the PFL signal leaving the main mix signal in your headphones.
Vol ume Knob
This knob (slider in Two Deck mode) controls the overall volume of the PFL section in your headphones.
Torq 2.0 User Guide
69
Chapter 7: The Mixer
Page 75

Hide Mixer
Hide Mixer View Button
In both Four Deck and Two Deck modes the mixer can be hidden by clicking the Hide Mixer View button located in the Torq Toolbar. This can be useful in various situations, such when you are using an external mixer,
or when you want to enlarge the browser.
Whenever the Hide Mixer View button is pressed, the Effects Racks move from their respective decks to the
center of the center of the Torq interface beneath the Waveform Display. However, instead of four racks there
will be two. In Four Deck Mode, each rack has four buttons on the left side labelled A, B, C, and D to correspond with each deck. In Two Deck mode, the will be two buttons labelled B and C. In either mode, pressing
any of these buttons lets you accesses the Effects Rack for their respective Deck, and the appearance of the rack
will change to reflect the current effects units and their settings. Aside from these differences, the Effects
Racks, will continue to function as described in Chapter 8, “Effects.”
Four Deck Mode - Mixer Hidden
Two Deck Mode - Mixer Hidden
Torq 2.0 User Guide
70
Chapter 7: The Mixer
Page 76

Crossfader
Crossfader
The Crossfader lets you to fade between two audio signals. When the Crossfader is in the middle position, you
will hear both decks that are sent to it. If you move the Crossfader all the way to the left, you will only hear
the audio from the Deck assigned to that side. Similarly, if you move the Crossfader all the way to the right,
you will only hear the Deck assigned to the right side.
The Torq Crossfader has been designed to be very quick and responsive. However, if you are only using a
mouse to control Torq, you probably won’t be able to use the Crossfader for more than fading between
songs. If you want to use the Crossfader for cuts and scratching, we recommend using a qualified M-Audio
or third party hardware controller. A current list of qualified hardware controllers can be found on our
website: www.avid.com.
Crossfader Curve
The Crossfader Curve knob set the rate at which the songs fade in and out as the crossf ade r is moved from o ne
side to the other. By default, the Crossfader knob is set to the twelve o’clock position or halfway between the
two extremes.
Turning the knob all the way to the left sets the Equal Power Contour, which is good for slow fades between
two songs. As you move the fader from the edge toward the center, it will slowly fade in one song. However,
as it is fading in this song, it will also start fading out the other song. The end result is that the overall volume
remains the same as you fade, even when both songs are playing at the same time.
When the knob is turned all the way to the right, Crossfader is set to the Hard Cut curve. This shape causes a
song to fade in to full volume almost immediately after moving the fader inward from the edge. Similarly, the
other song will not begin to fade out until the crossfader is almost all the way at the other edge. Then, right
before the crossfader reaches the edge, the other song will fade down. This is the shape preferred by scratch
DJ's as they can cut in a track to full volume with very little motion of their hand. When performed quickly,
you don’t even hear the volume fade up and down—it sounds as if the sound is being abruptly cut in and out.
Input Assign Buttons
By default, in Four Deck Mode Deck A is routed to the left side of the Crossfader while Deck B is routed to the
right. However Torq lets you assign any of the four decks or a combination of decks to either side by clicking
the Deck Buttons located at both end of the Crossfader. The buttons for any unassigned decks will be grey but
they will change color as soon as they are clicked.
In Two Deck mode the default input assignment routes Deck B to the left side of the Crossfader while Deck C
is assigned to the right. Either deck can be re-assigned using the B and C buttons at either end of the Crossfader. The button for an unassigned deck will be grey, but the button will change color as soon as it is clicked.
Torq 2.0 User Guide
71
Chapter 7: The Mixer
Page 77

In both Four Deck and Two Deck Mode you can click the button for an assigned deck to cancel the current input assignment. However if the deck is playing a song when you do this, the signal will by pass the Crossfader
and go straight to the Main Out to be heard by the audience.
Crossfader Invert
Crossfader Invert Button
This button lets you swap the assignments so that a deck routed to the one side of the Crossfader will be
switched to the other. For example, if you have Deck B routed to the left side of the Crossfader and Deck C on
the right, clicking this button reverses the routing so that Deck D is heard when the Crossfader is moved to
the right and Deck C is heard when it is moved to the left. This is sometimes known as “hamster style” control.
Crossfader PFL/Headphone
Crossfader PFL Button
Clicking this button diverts the audio signal from the Master Output to the Crossfader to the PFL/Headphone
cue. This let’s you preview your mix before yo ur audience hears. Clicking this button a second time, sends the
signal back to the Master Output and your mix will be heard by everyone in the room.
Traq Morph
Traq Morph lets you perform crossfades with various and sometimes dramatic characteristics. This function is
switched on as soon as you press one of the four Mode buttons described below. With Traq Morph switched
off the Crossfader performs normal volume-based transitions for one deck to the other.
Direction Button
Direction Button
Each Traq Morph mode is directional and you can use the direction button to determine which deck the crossfade effect is applied to. Selecting the d irect i on als o dete rmines which t rack w ill be t he sou rce of the mo r phing
characteristic.
If for example, you have songs on Decks B and C with the Crossfader set all the way over to Deck B, pressing
a Morph Mode button (Mph) followed by the direction button sets Deck B as the source. In this instance,
when the Crossfader is moved toward Deck C the second song will adopt the sonic characteristics of Deck B.
Torq 2.0 User Guide
72
Chapter 7: The Mixer
Page 78

Traq Morph Modes
Traq Morph offers four crossfade modes as described below.
Frequency
Tra q M or ph - Fre qu ency
This mode lets you perform a tonal crossfade by simultaneously sweeping the frequency range of both tracks.
You can choose the either of the following tonal characteristics from the Traq Morph Filter Style pop-up menu
on the Behavior Preferences page (see Chapter 12, “Torq Preferences”).
Low - High (Default)
This mode places a High-Pass filter on the source Deck and a Low-Pass Filter on the second Deck. Both filters
are set at the same Cutoff Frequency in order to cover the all of the available frequency range. However, the
Cutoff Frequency is changed according to the position of the Crossfader.
Mid
The Mid setting places a Mid-Pass filter on the source Deck and a Mid-Cut filter on the second Deck. This defines a Mid-Band characteristic with a center frequency of 1 kHZ that is cut from the source Deck and passed
to the second Deck. The width of the Mid-Band is controlled by the Crossfader.
Duck
Tra q M or ph - Duck
Duck mode lets you create a “seamless” crossfade that does not layer one track over the other like a conventional crossfade. This is done using either a frequency based or volume based “ducking” effect. This lowers the
perceived volume of the first track at the very moment the crossfader reaches the transition point between
two audio signals. The overall effect is the both tracks will sound like one continuous song.
You can choose the either of the following settings from the Traq Morph Duck Style pop-up menu on the Behavior Preferences page (see “Behavior Preferences” on page 127).
Band - Duck (Default)
As the Crossfader is moved from one deck to another Torq locates the loudest frequency of the second song
and gradually attenuates, or lowers the same frequency in the first song. For example, let’s say you have songs
on Decks B and C with the Crossfader set to Deck B, and the loudest frequency in the signal from Deck C is
240 Hz. In this instance, the volume of the song on Deck B will gradually decrease at 240 HZ, as the Crossfader
is moved towards Deck C.
Standard
This setting lowers the volume of the first Deck across the whole frequency range as the Crossfader moves towards the second Deck.
Torq 2.0 User Guide
73
Chapter 7: The Mixer
Page 79

Cut
Tra q M or ph - Cut
This mode lets you perform crossfades while rhythmically cutting between two decks. These settings are useful
when mixing Techno or House music, especially if the songs have short (1 bar or 2) looped sections.
You can choose from the following settings from the Traq Morph Cut Style pop-up menu on the Behavior Preferences page (see Chapter 12, “Torq Preferences”).
1/8 - 1/8 (Default)
This cuts between songs in an 1/8 note rhythm where the source Deck is heard on the first 1/8 note while the
other Deck plays is heard the second 1/8 note, otherwise known as the off-beat.
1/16 - 3/16
This setting cuts between songs in a 1/16 note rhythm where the source Deck is heard on the first 1/16 note
of each beat while the other Deck plays is heard the on the following three 1/16 notes.
1/6 - 16
This setting cuts between songs in a 1/16 note rhythm. The difference here is that Torq alternates between the
signals source Deck is heard on the first 1/16 note and third 1/16 note of each beat while the other Deck plays
is heard the on second and fourth 1/16 notes of each beat. Cutting in this manner is best for mixing songs
with a strong 1/16 note feel, such as Trance or Drum n’ Bass.
Triplet Mode
Triplet Mode Button
Clicking the Triplet mode button in the Torq Toolbar activates Triplet mode, which adds a triplet or shuffle feel
to all time based or rhythmic functions. Triplet mode is very useful for adding a higher degree of syncopation
to your mixes. When using the Traq Morph Cut algorithm, clicking Triplet Mode button in the Torq Toolbar
changes the rhythmic timing of the “1/8 - 1/8,” and “1/16 - 3/16,” “1/16 - 1/16” settings to “1/8T - 1/8T,”
“1/16T - 3/16T,” and “1/16T - 1/16T,” even though the new setting do not appear in the list of available
choices under the Traq Morph Cut Style preferences (see “Behavior Preferences” on page 127).
Torq 2.0 User Guide
74
Chapter 7: The Mixer
Page 80

Morph
Traq Morph - Morph Mode
Morph mode lets you perform a crossfade where one track is made to sound a close as possible to another. This
mode is useful when mixing a song the source Deck that is very rhythmic with a song on the second Deck has
a lot of bright sounding keyboard pads. Mixing in this manner causes the pad to adopt rhythmical characteristics that are not in the original recording.
You can choose the either of the following settings from the Traq Morph Style pop-up menu on the Behavior
Preferences page (see “Behavior Preferences” on page 127).
Strong (Default)
The Strong setting places a 24db filter on a deck which makes the audio signal sound louder and enhances the
modulation of the morphing.
Gentle
This setting is more subtle, as it does not increase the volume or exaggerate the modulation the morphing.
Traq Morph Pre-listening
While Traq Morph is active you can hear what your crossfade will sound like before the audience does by temporarily routing the Crossfader signal to PFL channel. This help avoid sudden and sometimes drastic volume
changes.
To pre-listen to a Traq Morphed crossfade
1 Move the Crossfader all the way to the right or left depending on which deck you want to hear first.
2 Press the Crossfader PFL/Headphone button to send the signal to the PFL channel.
3 Press one of the Morph Mode buttons.
4 If necessary choose one of the related Mode Preferences from the Preference dialog.
5 Perform the crossfade to hear how it will sound.
6 If necessary, change the Mode Preferences, and perform the crossfade again.
7 Press the Crossfader PFL/Headphone button again to route the signal back to the main output.
8 Perform the crossfade for your audience.
Torq 2.0 User Guide
75
Chapter 7: The Mixer
Page 81

Main Out Section
Main Output
The Main Out section controls main mix heard by your audience and features an audio recorder for recording
your performances, as well as a Limiter.
Volume Control
The Main Out knob controls the overall volume of Torq’s Main Outputs. It is also used for setting the level of
the Torq Recorder. Turning the knob to the right increases the output volume while turning to the left decreases it.
Level Meter and Limiter
Since Torq is a digital audio system, it has a limited amount of headroom (dynamic range). Whenever your
mix exceeds the headroom, clipping (distortion) normally occurs. To prevent this undesired sound, Torq features a Limiter on the Main Output which will keep the signal from clipping.
It does this by quickly reducing the volume any time the Master Volume exceeds the maximum headroom.
However, you want to be sure the limiter isn’t being triggered all the time. In this instance, the limiter will reduce the volume all the time, and this will sound strange. If this happens, down the Main Out knob so your
mix doesn’t constantly activate the limiter, and increase the volume on the house sound system to make up
for any reduction in output volume.
Main Out Recorder
The Main Out Recorder lets you record your performances as an audio file. You can then burn the recording
onto a CD or distribute it as a Podcast or mp3. The duration of your recording is displayed in the digital counter just below the Record button.
Recording a mix performed in Torq involves setting a filename and location where the file will be saved, setting the recording level, and recording your performance as described below
Torq 2.0 User Guide
76
Chapter 7: The Mixer
Page 82

Filename
To set the filename for your recording:
1 Click the “00:00:00” Timer. A dialog box will open.
2 Select the destination folder for your recording, and type a name.
3 Press enter. The dialog box will close.
The sample rate of the recorded file will match the sample rate currently selected in the Audio tab of the Preferences.
Refer to Chapter 12, “Torq Preferences” for more information about setting the sample rate and other audio preferences.
Setting the Record Level
The Main Out volume knob controls the level of your recording. Set volume as high as possible without constantly triggering the limiter (it’s OK if you trigger the limiter every once in a while). Setting the Main Out volume too low, will result in a recording that is too quiet.
Changes made to the Master Out volume will be committed to your recording, even while you’re in the
middle of your mix.
Recording
Once you have set the filename and recording level, you can begin recording.
To start recording:
1 Click the Record button. It will light up to indicate that recording has commenced. You’ll also see the Record
Time window begin to count the length of the recording.
2 Perform your mix as normal.
Press the Record button again to stop the recording and save the file.
Torq 2.0 User Guide
77
Chapter 7: The Mixer
Page 83
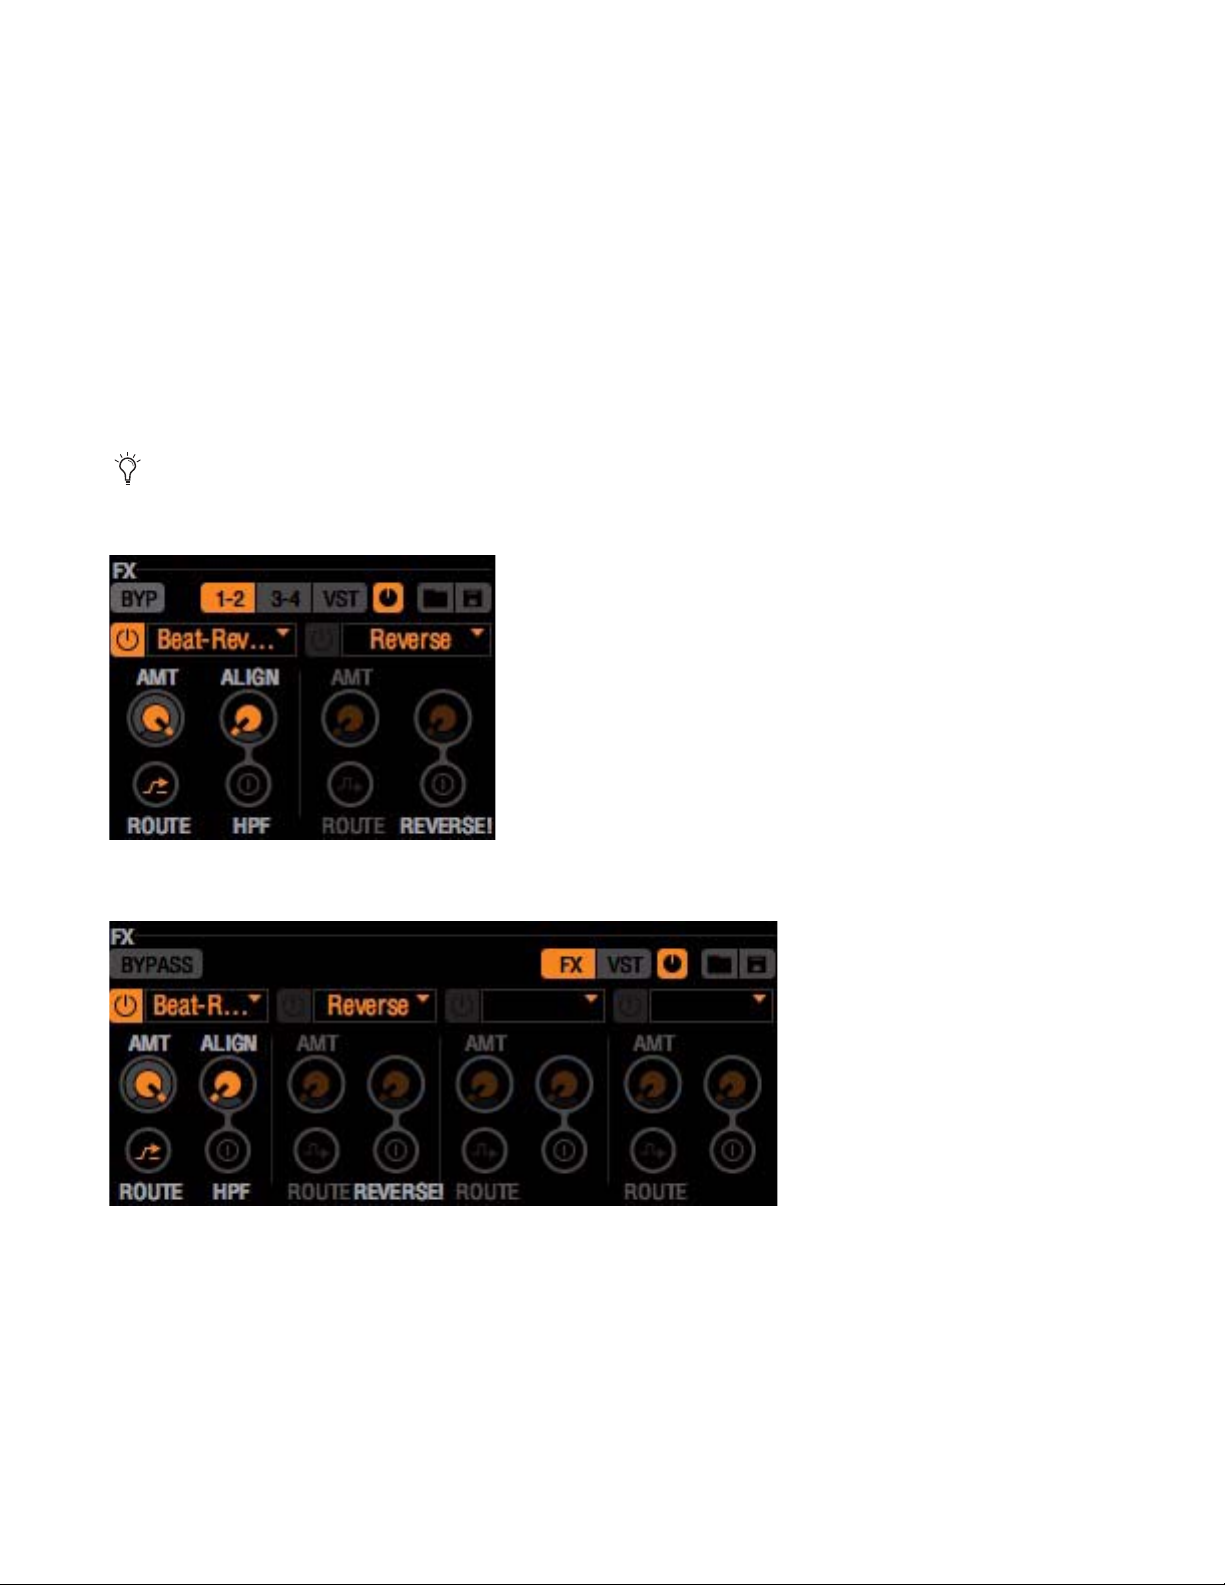
Chapter 8: Effects
Effects are devices that alter an audio signal. These alterations can range from subtle to extreme and can be a
great source of creative fun within Torq.
Each Deck can be processed individually with multiple effects. When the Mixer is not hidden (see “Hide
Mixer” on page 70), the Effect Racks are located at the bottom of each Deck. Torq lets you load up to four
built-in library effects one external VST effect for each Deck. In Four Deck Mode, this means you can use up
to twenty effects within your mix at the same time, while Two Deck Mode lets you use up to ten.
When the mouse is moved over a knob, slider or button the name of the control is displayed in the lower
edge of the Torq window.
Four Deck Mode - Effects Rack
Two Deck Mode - Effects Rack
Torq 2.0 User Guide
78
Chapter 8: Effects
Page 84
Controls
The controls for the built-in and external VST effects are basically the same and will be described here. However, VST effects have some additional controls and considerations of which to be aware of, and these are covered in “VST Effects” on page 94.
Effects Slots
To begin using effects, you need to load and effect into one of the Effect Slots.
To load an effect:
1 Click on an empty Effect Slot. A pop-up menu of available effects will appear.
2 Click on one of the effect names from the list to load it into the slot. The name of the effect will appear in
the Effect Slot. By default, the Enable button for the slot will change from grey to the corresponding Deck
color to signify that the loaded effect is active.
When the Reverse effect is loaded the On/Off button for the Effects Slot will remain grey, because the Reverse effect is always on. See “Reverse” on page 90.
3 To remove an effect, choose the “blank” effect at the top of the pop-up list.
Bypass Button (BYP)
Effects Rack Bypass Button
This activates and deactivates an Effect Rack. Because the effects are generally already switched on when
loaded, bypassing an empty Rack lets you load an effect or previously saved Effects Rack setup with out unwanted changes to your mix.
When using multiple effects at the same time, you may want to turn them on or off all at once (instead of
clicking each effect’s Enable button). Clicking the Bypass button at the top of the Rack sends audio directly to
the Mixer, and the effects are no longer heard. Click the button again to disengage the bypass.
Enable Button
Effects Slot Enable Button
The Enable Button switches an individual effect on or off. By default, this button will be on whenever you
load a new effect. This allows you to set the effect the way you desire before you use it in your mix.
Some of the effects don’t utilize the Enable button and will function in a different way as described in the
various effect sections in this chapter.
Torq 2.0 User Guide
79
Chapter 8: Effects
Page 85
Amount Knob (AMT)
Effects Slot Amount Knob
The functionality of the Amount knob differs depending on the status of the Routing button:
• When the Routing Button is set to Insert/Chain (see “Effects Chains - Chain Mode” on page 81), the
Amount knob will adjust the wet/dry mix of the effect. When the Amount knob is all the way to the left,
only the original audio signal will be heard (no effect). When the Amount knob is all the way to the right,
only the output of the effect will be heard, thus becoming a full insert effect. When the knob is at 12
o’clock, an even 50/50 mix of dry signal and wet effect will be created.
• When the Routing Button is set to Send—the knob will act as an effect send amount. When the Amount
knob is all the way to the left, the signal is not sent to the effect. As you begin to rotate the Amount knob
clockwise, the signal is sent to the effect, and you will begin to hear the results of the effect in your mix.
When used as a Send control, turning the Amount know all the way to the right boosts the effect output,
making it louder than the “dry” source signal.
Routing Button
When using effects, there are basically two different configurations that can be used: Insert and Send. An Insert Effect is placed between the Deck and the Mixer. The audio from the Deck can be fully processed and replaced by the effect. Examples of effects that are typically used as inserts include Distortion, Dual-Filter,
Phaser, Flanger, Repeat, Strobe and Reverse.
Routing Button - Insert Mode
A Send Effect blends the sound of the effect with the original music. The effects that are typically used as Sends
are Reverb and Delay. When using these effects, you typically want to add Reverb or add a Delay to the music
that is already playing. Therefore, think of Insert Effects as replacing your sound, and Send Effects adding to it.
Routing Button - Send Mode
Each time you click the Routing Button, it will toggle its state between Insert and Send. When loading an effect, Torq will automatically set the Routing Button to the mode most appropriate for the effect (i.e. the Reverb
will be loaded in Send mode while the Dual-Filter will be loaded in Insert mode).
Torq 2.0 User Guide
80
Chapter 8: Effects
Page 86
Effects Chains - Chain Mode
Torq lets you create Chains with the Send Effects, which takes the output of the Send Effect and process it further with Insert Effects. For example, you can take the output of the Delay and feed it through the Phaser to
create psychedelic echo patterns.
Chain Mode Icon
Once the Effect Signal Flow has been set to “Chain” in the Torq Preferences (see “Effect Signal Flow” on
page 128), a Chain will automatically be created when you place an Insert Effect after Send Effect in the rack.
Instead of seeing the normal Insert icon, you’ll see a Chain icon indicating that the effect is chained to the one
above it. This indicates that the effect is taking its audio from the output of the effect above it.
With effects routed in this manner, it is only possible to create an Insert Effect if the Effect is placed before
a Send effect in the Rack. All Insert Effects placed after a Send Effect will be chained to it. Also, when using
Chain mode, the output of Send effects will be sent to the Crossfader, meaning effects tails of delays and
reverbs will still be heard after turning down the Channel Volume fader or stopping playback. However,
moving the Crossfader away from the channel will silence both the music and the effects.
Tweak Knob
Routing Button - Insert Mode
To keep things simple and easy to manage, Torq provides the Tweak knob for parameter control on each effect.
Because effects alter audio in different ways, the function of this knob will change, and is labelled depending
on the effect loaded in the slot.
Tweak Button
The Tweak button toggles the state of a parameter in the selected effect. Like the Tweak knob, its function depends on the effect you’re using.
Torq 2.0 User Guide
81
Chapter 8: Effects
Page 87

Saving Effect Racks
Save Effects Rack Button
You can save an entire Effect Rack, including the effects used and their settings, using the Save button at the
top of the Rack.
To save an effects rack:
1 Load the Rack with effects and adjust the controls to get the sound you want, and then click the Save button
in the upper right area of the Rack. A standard Save dialog box will appear.
2 Type a name for the file and choose a location on your hard drive to store it and click Save (Mac) or OK (Win-
dows). The file will be saved as a preset, containing all information regarding the Effect Rack configuration.
Loading Effect Racks
Previously save Rack settings are loaded as described below.
To load an effects rack:
1 Click the Load Rack button. A standard dialog box will appear.
2 Browse to the location on your hard drive in which the Effect Rack configuration file is stored, select the file,
and click Open (Mac) or OK (Windows). The file will load all Effects in your Rack configuration exactly as you
saved them.
3 Loading an Effect Rack discards all effects currently in the Rack. If you have a combination you like, make
sure to save it before you load in another configuration.
Clearing all Effects
To clear all effects in a rack, hold the Shift button while clicking the rack’s Bypass button.
Torq 2.0 User Guide
82
Chapter 8: Effects
Page 88
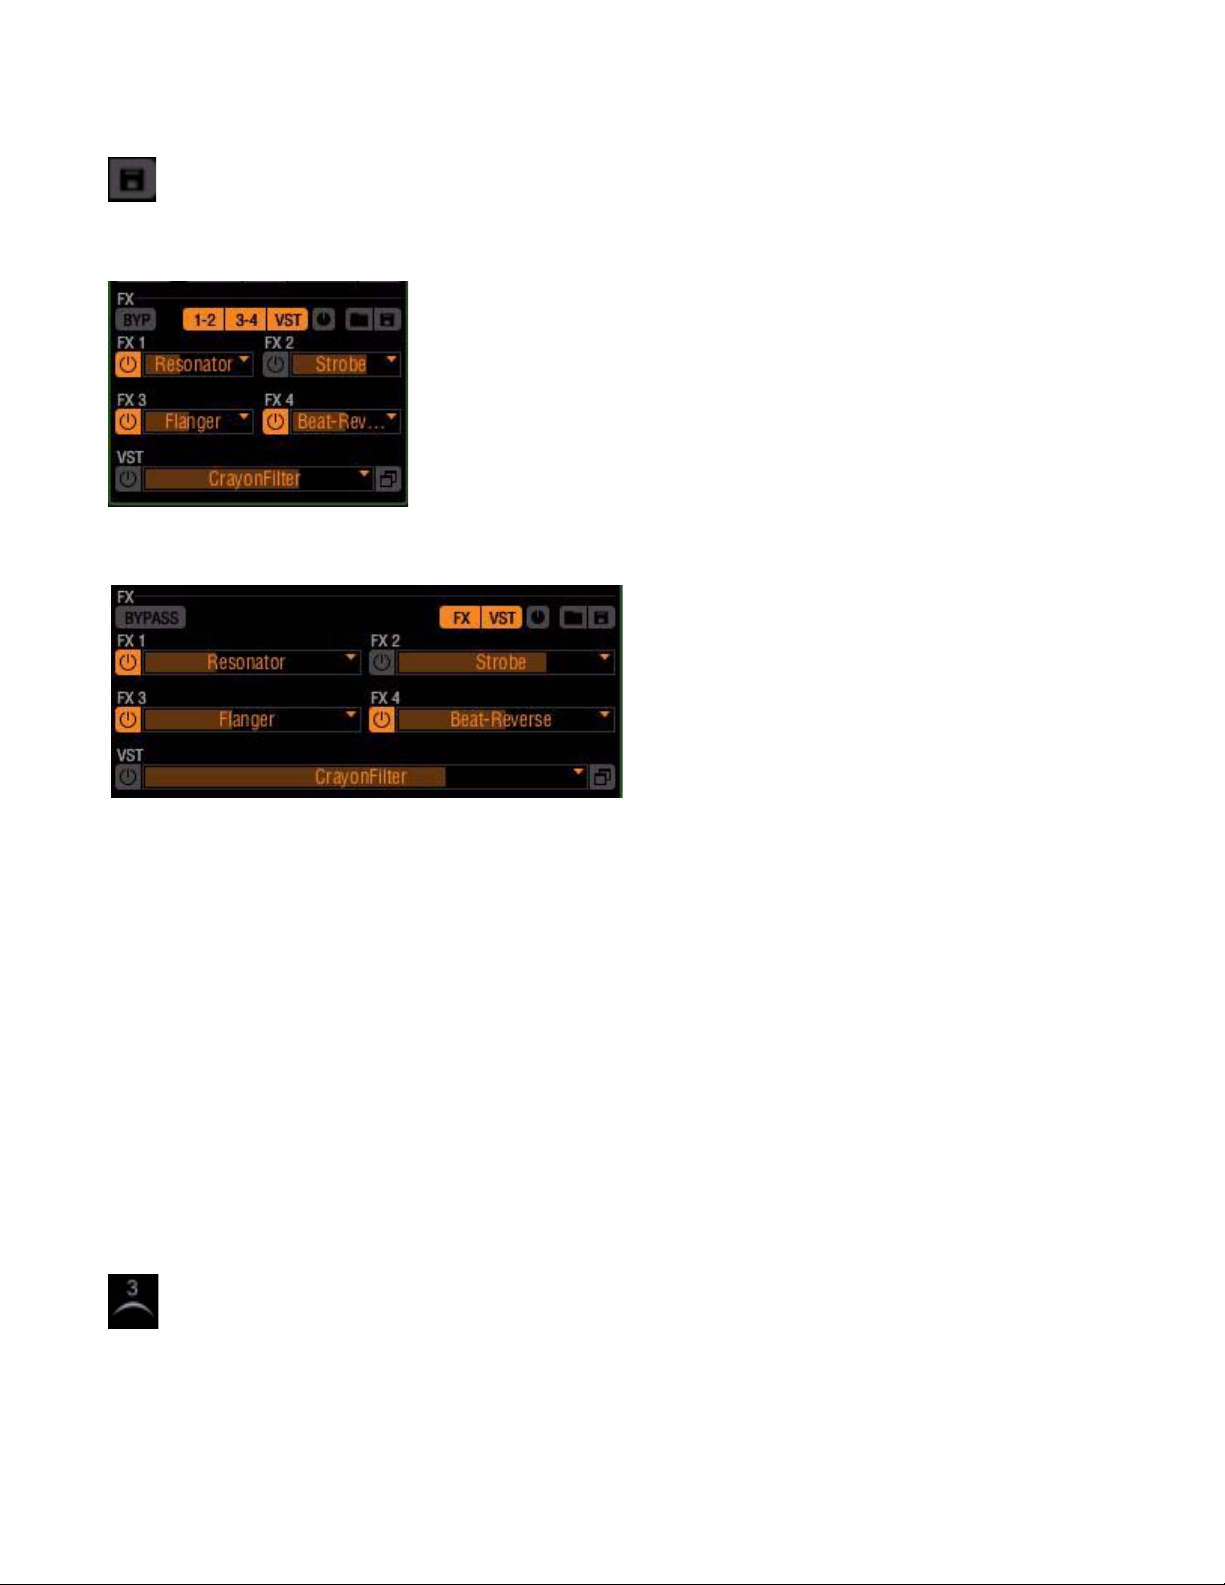
United View
United View Button
United View - Four Deck Mode
United View - Two Deck Mode
Cli cking the Un ited View but ton le ts you s ee all of the e ffect slots a t the s ame tim e. You’ ll not ice tha t altho ugh
you do not have direct access to the various effects parameter, you still have the ability to enable and disable
individual effects units or even a complete Effects Rack. In addition to the plug-in name, each Effects Slot also
displays a colored bar representing the value of its Amount knob.
United View is useful when loading pre-programmed Effects Racks that you may have prepared for a certain
song, or in preventing accidental effects parameter changes.
In Four-Deck mode you can alternate between the standard Effects Rack view and United view by clicking either the “1 - 2,” “3 - 4,” or VST button, followed by the United View button. This lets you quickly access the
parameters for any effects slot, and revert to United View. In Two-Deck mode, this view change is achieved by
clicking the “FX” or VST button followed by the United View button.
Triplet Mode
Triplet Mode Button
Clicking the Triplet mode button in the Torq Toolbar activates Triplet mode, which adds a triplet-based quantize options to all time-based effects parameters. These options provide a higher degree of syncopation to the
rhythmic quality of the effect, by adding a triplet or shuffle feel.
Torq 2.0 User Guide
83
Chapter 8: Effects
Page 89

For example when using the Strobe effect (see “Strobe” on page 89) the available quantize settings for the Rate
parameter are 1/4, 1/8, 1/16, 1/32, 1/64, and 1/128. Pressing the Triplet Mode button changes the last five options to 1/8T, 1/16T, 1/32T, 1/64T, and 1/128T.
Built-In Effects
The following is an explanation of the 10 built-in effects in Torq:
Delay
Delay is the technical term for what the Delay effect does, but you’ll probably like to think of this effect as an
“echo.” Essentially, the Delay effect listens to the incoming audio, holds on to it for a predetermined amount
of time, then spits it back out. When the Delay output is blended in with the audio, it sounds like an echo.
Furthermore, you can feed the Delay output back to its input again, causing echoes of the echoes (also known
as Feedback).
DJ's typically use Delays to fill up space during a break in a song (the last couple of beats before the break can
be echoed) or to stretch out the ending of a song by letting it echo and slowly fade away. Because of the
tempo-synced nature of Torq’s Delay effect, you’ll also be able to add rhythmic variance by layering echoes
that are perfectly timed to the music.
Enable Button
Deactivating this button switches off the Delay effect. The output of the Delay will stop immediately when
the effect is turned off.
Amount Knob / Routing Button
When the Routing button is set to “Send,” the Amount knob will control the amount of audio from the Deck
to feed into the Delay. When the knob is fully counterclockwise, no signal will be sent into the Delay so you
will not hear any echoes. As you begin to turn up the Amount knob, you’ll begin to hear the echoes from the
Delay.
When the Routing button is set to Insert, turning up the Amount knob will cause the output of the Delay effect to replace the sound from the Deck. This is a subtle difference that won’t be noticeable until you do one
of the following:
• When you turn the Amount knob beyond its 12 o’clock position, the sound from the Deck will begin to
fade away, leaving only the sound of the Delay.
– or –
• If you quickly turn the Amount knob back to 0, you will cut off any remaining echoes before they can be
heard.
The Delay effect will load with the Routing button set to Send mode since this is the typical routing for a Delay.
Torq 2.0 User Guide
84
Chapter 8: Effects
Page 90

Feedback Knob (FBK)
Use this button to change the Delay time of the effect. The Delay’s time will be set to match the rate at which
you tap this button. The maximum delay time is two bars and the minimum time is 1/16-note (1/16 of a bar).
The operation of this button is governed by a few rules:
• When fully counterclockwise, feedback will be disabled.
• When the knob is turned up to three quarters of the maximum, the feedback will be 100% (i.e. the delay
will never fade away).
• When the knob is turned past three quarters, the feedback will be increased beyond 100%, allowing the
delay to get louder with each time it is repeated.
Tap Butt on
Use this button to change the Delay time of the effect. The Delay’s time will be set to match the rate at which
you tap this button. The maximum delay time is two bars and the minimum time is 1/16-note (1/16 of a bar).
The operation of this button is governed by a few rules:
• Torq will determine the tempo within only two taps. This allows you to change the delay time very
quickly, even while the Delay is already active.
• Since Torq knows the tempo of the song playing on the Deck, the delay time you tap using the Tweak button will automatically be adjusted to match a note value at the current tempo. For example, if the song
BPM is 120, and you tap a tempo that is interpreted as 122 BPM, the delay time will be set to 120 BPM
(quarter-note delay). If you tap a tempo that is read as 158 BPM, the delay tempo will be rounded up to
160, which is a dotted-eighth.
Reverb
Reverb is the phenomenon in which sound bounces off the walls within a room, creating hundreds (thousands?) of echoes that cannot be individually identified by the human ear. The total result of all these echoes
is a wide and ethereal sound that can add a nice touch of space to your mix.
The most obvious characteristic of a Reverb is how long it lasts. This is referred to as the Reverb Time and is
the only adjustable parameter in Torq’s Reverb effect.
Enable button
This button enables and disables the Reverb effect. If this button is switched off while the Reverb is active, the
sound of the Reverb will be cut off.
Amount Knob and Routing Button
When the neighboring Routing button is set to Send mode, the Amount knob will set the amount of signal
fed into the Reverb processor. This signal will then be blended with the original signal from the Deck, making
it sound like the Reverb was added to the song.
When the Routing button is set to Insert mode, the Amount knob will adjust the Dry/Wet balance of the Reverb. The difference is that the audio generated by the Reverb will replace the original song as you turn this
knob up.
Torq 2.0 User Guide
85
Chapter 8: Effects
Page 91

By default, the Reverb effect will load with the Routing button set to Send mode since this is the typical way
to use a Reverb. However, feel free to experiment with Insert mode—you can create ambient textures that can
be interesting to blend into your mix.
Time Knob
This knob controls the Reverb time. When fully counterclockwise, the Reverb will be extremely short, similar
to the sound heard in a small shower stall. As you turn this knob clockwise, the Reverb will become longer until it sounds similar to a huge cathedral.
Freeze Button
Pressing this button will “freeze” the Reverb. When activated, the Reverb will stop accepting audio input from
the Deck and will feed back on itself instead. The result is a reverb that “hangs” or “stalls” indefinitely. When
you turn Freeze off, the Reverb will begin accepting input signals again, and the current “frozen” reverb will
fade away following the current Reverb Time. This can be another interesting way to fill up space during a
break or to add emphasis to a hit in the song.
Flanger
A Flanger is a common effect found in most effect processors. Flanging grew from a studio trick where engineers would play identical material on two tape decks, then make slight changes to the play speed of the two
tape machines by dragging their hand on the flanges of the tape reels. The result is a “whooshing” sound that
can be compared to a jet fly-over.
Enable Button
Naturally, this button turns the Flanger on and off.
Amount Knob and Routing Button
Unlike the two effects discussed so far, the Flanger works best with the Routing button set to Insert mode. This
allows you to completely replace the original audio signal with the flanged version (by turning this knob fully
clockwise) in order to emphasize the effect.
The effect will still work in Send mode, but it will be less pronounced.
Delay/Rate Knob and LFO Button
The function of the Flanger’s Tweak knob is determined by the state of the LFO button:
• When the LFO button is off the Delay knob will then control the delay time of the Flanger. When the
knob is counterclockwise, the Flange effect will be very tight. As the knob is turned clockwise, the effect
will become more dramatic and metallic in nature.
• When the LFO button is on, the Flanger will be in Automatic mode. In this mode, the delay time for the
Flanger will be adjusted automatically. The name of the Delay knob will change to Rate. The knob will
now determine the rate of the automatic adjustment. Turning the knob clockwise will increase the modulation rate
Torq 2.0 User Guide
86
Chapter 8: Effects
Page 92

Phaser
A Phaser is a somewhat mellower version of the Flanger. Like the Flanger, a Phaser works on the principle of
mixing two identical audio sources together. However, unlike a Flanger, the timing difference between the two
audio sources is very small. The result is that some of the frequencies in the song will be removed or “cancelled
out.” Some people describe this sound as a “wind tunnel” effect.
Enable Button
This button will turn the effect on and off.
Amount Knob and Routing Button
Like the Flanger effect above, the Phaser works best with the Routing button set to Insert mode. This allows
you to completely replace the original audio signal with the phased version (by turning this knob fully clockwise) in order to emphasize the effect.
The effect will still work in Send mode, but it will be less pronounced.
Frequency (Freq)/LFO Knob and Button
The function of the Frequency Tweak knob is determined by the state of the LFO button:
• When the LFO button is off, the Phaser will be in Manual mode. The Frequency knob will then control
the phase of the effect.
• If the LFO button is on, the Phaser will be in Automatic mode. In this mode, the phase will be adjusted
automatically. The name of the Frequency knob will change to LFO. The LFO knob will then set the rate
of the automatic adjustment—turning the knob clockwise will increase the modulation rate.
Dual-Filter
Audio filters prevent particular frequency ranges within an audio signal from passing through the effect. Torq
features three of the most popular types: Low-Pass, High-Pass, and Band-Pass. The names of these filters describe what they do. A Low-Pass filter, for example, will only allow low frequencies (bass tones) to pass
through—it will remove the high-frequency (treble) content from the audio signal. A High-Pass filter works
the other way: it allows the treble to pass through while bass is removed. A Band-Pass filter is essentially a
High- and Low-Pass filter put together: it will remove high and low frequencies from the audio signal, only allowing a narrow band of frequencies to pass.
The most important parameter for a filter is its Cutoff Frequency. It determines the frequency where a filter
will begin to stop frequencies. For example, when using a Low-Pass filter with a cutoff frequency of 1kHz, frequencies below 1kHz will pass through the filter unaffected while the frequencies above 1kHz are reduced or
removed. While there are other parameters that also affect the behavior of a filter, Cutoff Frequency is the parameter that you’ll be controlling in Torq.
Enable button
This button will switch the Dual-Filter on and off.
Torq 2.0 User Guide
87
Chapter 8: Effects
Page 93

Amount Knob and Routing Button
The Dual-Filter is designed to be us ed as an In sert effe ct. For this reason, the Routing button will automatically
switch to Insert mode whenever you load this effect. Then, the Amount knob will serve as a Dry/Wet adjustment which you will want to leave fully clockwise (so you only hear the output of the Dual-Filter).
Band Pass (BPF) Button
The Band Pass button is used to set the filter mode for the Dual-Filter effect. When this button is off, the two
filters (High-Pass and Low-Pass) will be adjusted one at a time. When you click this button on, the High-Pass
and Low-Pass filters are be linked, to create a Band-Pass filter where both filters are adjusted simultaneously.
Frequency (Freq) Knob
This knob adjusts the Cutoff Frequencies of the filters.
When the BPF button is off, the knob will behave as follows:
• Setting the knob at 12 o’clock results in the audio passing through the Dual-Filter unaffected.
• Turning the knob counterclockwise from 12 o’clock lowers the Cutoff Frequency of the Low-Pass filter.
You will hear the music become dull and muffled as you turn this down to the point where you’ll only
hear low bass rumbles.
• Turning the knob clockwise from the 12 o’clock position raises the Cutoff Frequency of the High-Pass filter. You will hear the music become more thin and brittle as you do this until only the highest of the high
frequencies remain.
• When the BPF button is active, the Frequency knob controls the center frequency of the Band-Pass filter.
As you turn the knob down (counterclockwise), you’ll hear the high frequencies become muffled while
you begin to hear more of the bass.
Distortion
Distortion, by definition, is the altering of a signal. In practical terms, it refers to feeding audio into a device
so loudly that it exceeds the dynamic range of the device. The result is a fairly raunchy noise that, at times,
can be exactly what you’re looking for. This is known as Overdrive Distortion, and is one of the two types of
distortion possible with the Distortion effect.
The other type of distortion available in Torq is Sample Rate Reduction. When an audio file has its sample rate
lowered, it loses the ability to accurately reproduce high-frequency sounds. Instead of sounding soft and muffled like a Low-Pass filter, the Sample Reducer will sound grainy and harsh.
Enable button
This button turns the Distortion on and off.
Amount Knob and Routing Button
Like the Dual-Filter above, the Distortion is designed to be used as an Insert effect. The Routing button will
switch to Insert mode automatically any time you load the Distortion effect. You should also turn the Amount
knob fully clockwise so that you can only hear the output of the distortion (if you blend the distorted signal
with the original signal, the distortion will be less pronounced).
Torq 2.0 User Guide
88
Chapter 8: Effects
Page 94

Mode Button
This button is used to set the operating mode of the Distortion. When the button is off, the Distortion is in
Overdrive mode. When the button is on, the Distortion will be in Sample Rate Reduction mode.
Drive/Sample Rate (SRATE) Knob
When Mode button is off, the Drive knob increases the volume of the signal being fed into the distortion.
When the knob is fully counterclockwise, the input signal is not boosted and therefore un-distorted. As you
turn this knob clockwise, the volume will begin to increase. At a certain point, you’ll start to hear the audio
become distorted. You can leave the knob here for a subtle distortion, or you can continue to turn it clockwise
in order to push the distortion into really nasty realms.
When the Mode button is active the name of the Drive button will change to SRATE, indication that the effect
unit is in Sample Rate Reducer mode. The SRATE knob controls the output sample rate. When the knob is fully
counterclockwise, there is no sample rate reduction, so the audio will be un-distorted. As you turn the knob
clockwise, the sample rate will be lowered. The high frequencies will be the first to exhibit signs of distortion.
As you continue turning the knob, the distortion will move lower and lower into the frequency range of the
audio until all that remains is low-sample junk.
Strobe
Just about anyone who has been to a dance club in the last 20 years has experienced a strobe light. Those are
the super-bright lights that flash really quickly. They have the effect of making everyone look like they’re in
“stop motion” because the flash is so fast that you can’t see movement anymore.
Torq’s Strobe effect will create a similar stop-motion effect, but it will do it to audio. The Strobe will essentially
mute and unmute the audio at a rate that you can control. The rate can be as slow as one bar (2 beats
un-muted followed by 2 beats muted) or as fast as 1/64-note.
Enable Button
Turns the Strobe effect on and off.
Amount Knob and Routing Button
Because the Strobe effect is designed to mute the audio from a Deck, it needs to be used as an Insert effect.
Therefore, the Routing Button will be set to Insert mode whenever you load this effect. The Amount knob will
control the Dry/Wet mix of the effect. In other words, this knob controls the depth or intensity of the Strobe
effect. Since the Strobe effect is muting the signal that passes through it, setting the Amount knob at 50% will
result in 50% of the signal still being present whenever the Strobe is muting.
Rate Knob
This knob changes the rate of the Strobe. A tooltip will appear whenever you adjust this knob to show the current rate (expressed in note values).
Activating Triplet Mode as describe in “United View” on page 83 adds additional note value choices to the
Rate knob.
Torq 2.0 User Guide
89
Chapter 8: Effects
Page 95

Invert Button
Activating this button reverses the behavior of the Strobe, so that what was muted is un-muted and vice versa.
Reverse
Reversing the playback direction of a song is a useful technique for adding emphasis to certain sections of a
mix. The traditional method for reversing playback is to actually reverse the rotation of the turntable. This has
a couple of inherent problems.
First, the turntable can’t change direction immediately as it must slow down to a stop then speed back up in
the opposite direction. This can make reversing playback seem sluggish. Additionally, if the song is playing
backwards, it will no longer be in the proper location when you resume normal playback. For example, if you
reverse playback as a way to add emphasis one bar before the chorus in a song, you’ll find that playback is now
two bars before the chorus when you resume normal playback.
Torq overcomes these shortcomings by implementing reversed playback as an effect rather than as a function
of the Deck. By doing so, you can reverse playback instantaneously—there is no lag due to the turntable
changing directions. Furthermore, since this is an effect, the song on the Deck will continue to play normally
(the waveform will continue to scroll in the forward direction) thus keeping the play position correct as you
switch the Reverse effect on and off.
Enable Button
When using the Reverse effect, this button is always on and cannot be turned off.
Amount Knob and Routing Button
The Amount knob has no function. The effect is routed as an Insert effect by default.
Tweak Knob
The Tweak knob has no function.
Reverse! Button
This button will turn the Reverse on and off. This button is momentary, meaning you have to keep holding
it while the song plays backwards. When you release the button, normal playback will resume.
Torq 2.0 User Guide
90
Chapter 8: Effects
Page 96

Beat - Reverse
Beat Reverse lets you create the impression that the drum or percussion parts of a song were recorded backwards.
Enable Button
Turns Beat Reverse on and off.
Amount Knob and Routing Button
The Amount knob sets the wet/dry mix of the effect--turn this knob fully clockwise for the proper sound.
Beat-Reverse is automatically configured as an Insert effect.
Align Knob
This knob controls the offset of the effect such that turning it to the all the way right increases the offset, making the effect less dramatic. As the knob is turn to the left the effect becomes more pronounced.
HPF Button
Clicking this button places a high-pass filter across the output of the plug-in to accentuate the higher frequency rang or the reversed audio.
Brake
As mentioned above, turntables don’t respond instantly to changes in speed or direction. When you press
Stop on a turntable, it takes a moment for the turntable to slow down and reach a complete stop. This is due
the weight and momentum of the turntable—two factors that don’t exist in the virtual world of Torq. Still,
some DJ's like the sound of a turntable slowing down to a stop, and creating that sound is the purpose of
Torq’s Bra ke ef fect .
Like the Reverse effect above, the Brake effect does not actually stop the playback of the song on the Deck. Instead, it just simulates the sound of the song slowing down while the song continues to play normally (as seen
by the scrolling waveform). Because the song keeps playing, you can use the Brake effect to create the
“slow-to-stop” sound, then bring the music back in on the next downbeat (which is impossible with real turntables or CD players).
Enable Button
This button will be on at all times—it cannot be turned off.
Amount Knob and Routing Button
The Amount knob sets the wet/dry mix of the effect--turn this knob fully clockwise for the proper sound. The
Brake effect is automatically configured as an Insert effect.
Speed Knob
This knob will set the Brake time. As you turn this knob clockwise, the Brake time will become longer.
Torq 2.0 User Guide
91
Chapter 8: Effects
Page 97

Brake Button
Press this button to engage the Brake effect. The music will slow to a stop. Press the button again to resume
normal playback.
Repeat
This effect can be used to create the granular “hyper-repeats” heard in lots of today’s dance music. All you
have to do is trigger the effect and play with the loop length to get instant results. Here’s how it works:
Enable Button
Engaging this button will start the effect. The Repeat will remain active until this button is turned off again.
Amount Knob and Routing Button
The Amount knob will set the wet/dry mix of the Repeat effect. Turn the knob fully clockwise to hear only the
repeated audio. While the audio is repeating, you can use the Amount knob to fade the original music back
in if you wish. The effect will automatically be configured as an Insert effect when loaded.
Size Knob
This knob sets the size of the audio slice being repeated. A tooltip will appear showing the current slice length
whenever you move this knob. The repeated slices will always be quantized to the current tempo.
Capture Button
When you press this button, it will “re-seed” the Repeat effect. In other words, the effect will begin repeating
a new section of audio whenever you press the button, as if you’d instantaneously turned the effect off and
back on again.
Resonator
This plug-in adds harmonic resonance to an audio signal.
Enable Button
Switches the plug-in on and off.
Amount Knob and Routing Button
The works best with the Routing button set to Insert mode. This allows you to completely replace the original
audio signal with the processed version (by turning this knob fully clockwise) in order to emphasize the effect.
Pitch
The Pitch know is used for changing the pitch of, or tuning the resonant frequency.
S/L
This button adjusts the decay of the resonant sound. The default setting is “S,” which set a short decay time.
Pressing this button sets the decay to “L,” which caused the notes to ring for a longer duration.
Torq 2.0 User Guide
92
Chapter 8: Effects
Page 98

Compressor
The Torq Compressor works in the usual manner to control the volume of an audio signal by limiting or evening out its dynamic range. This is done by lowering the volume of louder sounds while leaving quieter
sounds unaltered. In most cases, with the correct setting, this can also make a song sound much louder.
With extreme settings, a compressor can be used to add a pumping characteristic to an audio signal.
Enable Button
Pressing this button switches the Compressor on and off.
Amount Knob and Routing Button
The Routing button will automatically switch to Insert mode whenever you load this effect. The Amount knob
adjusts the amount of compression used on an audio signal based on increasing both the Threshold and Ratio
of the Compressor.
Release Knob
This knob controls the amount of time the Compressor will process the signal before stopping.
Attack Button
Clicking this button significantly decreases the time it takes for the Compressor to react to the volume peaks
of the audio. To give you an idea of how this control works, disable the compressor and turn the Amount knob
all the way to the right, and the Rate knob all the way to the left. Now play a song with a very strong drum
beat, and after a few seconds, click the Enable button to switch on the compressor. You should now hear or
feel a “pumping” or pulsating effect in the music. This is because the short release time causes the compressor
to quickly precess and “let go of” the audio signal. As you turn the Release knob to the right you will notice
that the pumping effect becomes less apparent.
Torq 2.0 User Guide
93
Chapter 8: Effects
Page 99

VST Effects
The built-in effects provided with Torq cover a wide range of effects typically used by DJ's. However, others
DJ’s will want to explore the possibilities of additional effects. For this reason, Torq allows you to use
third-party VST plug-ins.
Latency
Another potential drawback from using VST plug-ins is latency. Latency is the observed lag between when you
trigger an event or action on the computer and when you finally hear the results. When running without any
VST plug-ins, Torq’s latency is nearly undetectable—Torq will respond to scratches, button presses, and knob
movements immediately.
Some VST plug-ins, however, must perform very complex calculations on the audio. Sometimes, these calculations require that the plug-in buffer the audio so that it can process it in large chunks. In these cases, the
plug-in will fill its buffer with some audio sent from Torq. It will then process the audio and send it to an output buffer. Once the output buffer is filled, the audio is sent back to Torq. This process, while extremely fast,
can still manifest itself as a perceived lag in response time. And, as you can see, this phenomenon is beyond
the control of Torq (the latency is created by the plug-in, not Torq).
If you find that a VST plug-in you’re using is creating latency, you can try to find a similar-sounding plug-in
with minimal latency, or simply try to “play ahead” and anticipate the latency. While some other programs
feature “Plug-in Delay Compensation,” such a system would not work with Torq because the program is entirely real-time (the music and effects are not preset or programmed).
Selecting Effects
To begin using a VST, you’ll need to select one from the list of available VST’s.
To select a VST plug-in:
1 Click the VST button to reveal the VST Effect Panel.
2 Click on the pop-up menu at the top of the VST Effect Panel, and then click the name of the VST plug-in
you want to load. It will loaded immediately, and the VST’s graphic interface will open and float over the Torq
interface.
While the built in Effects units are switch on as soon as they are loaded, you will need to press the Enable
button for a VST plug before it can be used.
3 To close the window, click the close icon in the window’s title bar or click the VST Window button to the
Right of the VST slot.
4 Click VST Window button the To open the same VST interface again.
At the top of the VST drop-down menu list, you will see a “blank” plug-in as an option. If you select it, no VST
will be loaded into the Slot (any current VST will be unloaded).
Torq 2.0 User Guide
94
Chapter 8: Effects
Page 100

Assigning Controls
It’s fun to tweak effects using knobs and buttons—VST effects are no exception. However, before you start
messing with the Tweak knob and button, you’ll need to assign a function to them. Unlike Torq’s 10 built-in
effects, the VST Effect you choose to use will probably have more than two parameters to play with. You can
always adjust these parameters within the VST Effect’s editor window. To gain MIDI control, however, you
must assign one of the VST Effect’s parameter to the Tweak knob or button (which you can control via MIDI).
It’s a two-part process as outlined below.
To assign VST plug-in controls to Torq Tweak Knobs and Buttons:
1 Load a VST Effect. Its editor window will pop up when loaded.
2 Right-click on the Tweak knob in Torq’s interface. It will turn red indicating that it standing by for assign-
ment.
3 Using the mouse, move a control in the VST Effect’s editor window. This could be a knob, slider, or button.
4 When you move the control, Torq will catch it and assign it to the Tweak knob. Moving the Tweak knob will
now operate the assigned VST parameter.
5 To assign a MIDI control to the Tweak knob, follow the usual procedure of right-clicking then moving your
desired MIDI control.
6 Once complete, the MIDI control will operate the VST parameter.
The same procedure above can be used for assigning a VST parameter to the Tweak button.
Once the assignments are made as described above, Torq will remember those assignments whenever you load
that VST Effect in the future.
VST Crash Guard
A plug-in works by inserting small bits of programming code into another program (in this case, you’ll be inserting an effect processing plug-in into Torq). This can be problematic since some VST's are made with little
to no external testing at all (and they may not have been tested with Torq specifically). Granted, it’s usually
the free VST plug-ins found on the web that lack the testing imposed by other professional plug-ins. These
dirty plug-ins can be some of the most experimental and creative offerings out there, which is why you may
still want to try them.
Obviously, it would be completely unacceptable for Torq to crash right in the middle of a gig because of a little
VST plug-in. The music must keep playing at all times. For that reason, Torq has been designed with VST Crash
Guard, which is a system that will allow Torq to stay running even if an error should occur in the VST plug-in,
causing it to crash. If this occurs, Torq will detect the crash and will quickly bypass the offending plug-in to
keep the music going. When this happens, you can either attempt to re-load the plug-in (in hopes that it will
reset and become functional again) or you can remove the plug-in and try another. Either way, Torq’s got your
back and will keep the music flowing.
Torq 2.0 User Guide
95
Chapter 8: Effects
 Loading...