

Page 1
Page 2

M-AUDIO StudioPro4
ENGLISH
Introduction . . . . . . . . . . . . . . . . . . . . . . . . . . . . . . . . . . . . . . . . . . . . . . . . . . . . . . .5
What’s in the Box? . . . . . . . . . . . . . . . . . . . . . . . . . . . . . . . . . . . . . . . . . . . . . . . . .5
StudioPro 4 Features . . . . . . . . . . . . . . . . . . . . . . . . . . . . . . . . . . . . . . . . . . . . . . .5
Woofer . . . . . . . . . . . . . . . . . . . . . . . . . . . . . . . . . . . . . . . . . . . . . . . . . . . . . .5
Tweeter . . . . . . . . . . . . . . . . . . . . . . . . . . . . . . . . . . . . . . . . . . . . . . . . . . . . . .5
Sub-Frequency Port . . . . . . . . . . . . . . . . . . . . . . . . . . . . . . . . . . . . . . . . . . . .6
Mid-Boost Control . . . . . . . . . . . . . . . . . . . . . . . . . . . . . . . . . . . . . . . . . . . . .6
Enclosure . . . . . . . . . . . . . . . . . . . . . . . . . . . . . . . . . . . . . . . . . . . . . . . . . . . .6
Network & Power Amplifiers . . . . . . . . . . . . . . . . . . . . . . . . . . . . . . . . . . . . .6
Front and Rear Panel Features . . . . . . . . . . . . . . . . . . . . . . . . . . . . . . . . . . . . . . .7
Front Panel . . . . . . . . . . . . . . . . . . . . . . . . . . . . . . . . . . . . . . . . . . . . . . . . . . .7
Rear Panel . . . . . . . . . . . . . . . . . . . . . . . . . . . . . . . . . . . . . . . . . . . . . . . . . . .8
Installation . . . . . . . . . . . . . . . . . . . . . . . . . . . . . . . . . . . . . . . . . . . . . . . . . . . . . . .9
Technical Support & Contact Information . . . . . . . . . . . . . . . . . . . . . . . . . . . . . .12
Warranty Information . . . . . . . . . . . . . . . . . . . . . . . . . . . . . . . . . . . . . . . . . . . . . .12
Terms . . . . . . . . . . . . . . . . . . . . . . . . . . . . . . . . . . . . . . . . . . . . . . . . . . . . . . .12
Registration . . . . . . . . . . . . . . . . . . . . . . . . . . . . . . . . . . . . . . . . . . . . . . . . . .12
Appendix A - Technical Specifications . . . . . . . . . . . . . . . . . . . . . . . . . . . . . . . . .13
Appendix B - Block Diagram . . . . . . . . . . . . . . . . . . . . . . . . . . . . . . . . . . . . . . . .14
FRANÇAIS
Introduction . . . . . . . . . . . . . . . . . . . . . . . . . . . . . . . . . . . . . . . . . . . . . . . . . . . . . .15
WhatContenu de l'emballage . . . . . . . . . . . . . . . . . . . . . . . . . . . . . . . . . . . . . . .15
Fonctionnalités des StudioPro 4 . . . . . . . . . . . . . . . . . . . . . . . . . . . . . . . . . . . . . .15
Le woofer . . . . . . . . . . . . . . . . . . . . . . . . . . . . . . . . . . . . . . . . . . . . . . . . . . . .15
Le tweeter . . . . . . . . . . . . . . . . . . . . . . . . . . . . . . . . . . . . . . . . . . . . . . . . . . .15
Port de sous-fréquences . . . . . . . . . . . . . . . . . . . . . . . . . . . . . . . . . . . . . . .16
Contrôle des fréquences moyennes . . . . . . . . . . . . . . . . . . . . . . . . . . . . . .16
Le caisson . . . . . . . . . . . . . . . . . . . . . . . . . . . . . . . . . . . . . . . . . . . . . . . . . . .16
Diviseur de fréquences et amplificateurs de puissance . . . . . . . . . . . . . .16
Description des panneaux avant et arrière . . . . . . . . . . . . . . . . . . . . . . . . . . . .17
Face avant . . . . . . . . . . . . . . . . . . . . . . . . . . . . . . . . . . . . . . . . . . . . . . . . . . .17
Rear Panel . . . . . . . . . . . . . . . . . . . . . . . . . . . . . . . . . . . . . . . . . . . . . . . . . . .18
Installation . . . . . . . . . . . . . . . . . . . . . . . . . . . . . . . . . . . . . . . . . . . . . . . . . . . . . . .19
Précautions à prendre . . . . . . . . . . . . . . . . . . . . . . . . . . . . . . . . . . . . . . . . .19
Assistance technique et informations de contact . . . . . . . . . . . . . . . . . . . . . . .22
Votre garantie StudioPro 4 . . . . . . . . . . . . . . . . . . . . . . . . . . . . . . . . . . . . . . . . .22
Conditions de garantie . . . . . . . . . . . . . . . . . . . . . . . . . . . . . . . . . . . . . . . .22
Enregistrement de garantie . . . . . . . . . . . . . . . . . . . . . . . . . . . . . . . . . . . . .22
Annexe A : Caractéristiques techniques . . . . . . . . . . . . . . . . . . . . . . . . . . . . . .23
Annexe B : Schéma fonctionnel . . . . . . . . . . . . . . . . . . . . . . . . . . . . . . . . . . . . .24
Page 3

DEUTSCH
Einführung . . . . . . . . . . . . . . . . . . . . . . . . . . . . . . . . . . . . . . . . . . . . . . . . . . . . . .25
Lieferumfang . . . . . . . . . . . . . . . . . . . . . . . . . . . . . . . . . . . . . . . . . . . . . . . . . . . .25
StudioPro 4 – Produktmerkmale . . . . . . . . . . . . . . . . . . . . . . . . . . . . . . . . . . . . .25
Tieftöner . . . . . . . . . . . . . . . . . . . . . . . . . . . . . . . . . . . . . . . . . . . . . . . . . . . .25
Hochtöner . . . . . . . . . . . . . . . . . . . . . . . . . . . . . . . . . . . . . . . . . . . . . . . . . . .25
Bassreflexöffnung . . . . . . . . . . . . . . . . . . . . . . . . . . . . . . . . . . . . . . . . . . . .26
Mid-Boost-Taster . . . . . . . . . . . . . . . . . . . . . . . . . . . . . . . . . . . . . . . . . . . . .26
Gehäuse . . . . . . . . . . . . . . . . . . . . . . . . . . . . . . . . . . . . . . . . . . . . . . . . . . . .26
Frequenzweiche und Hochleistungsendstufen . . . . . . . . . . . . . . . . . . . . .26
Bedienelemente der Vorder- und Rückseite . . . . . . . . . . . . . . . . . . . . . . . . . . . .27
Frontseite . . . . . . . . . . . . . . . . . . . . . . . . . . . . . . . . . . . . . . . . . . . . . . . . . . .27
Rückseite . . . . . . . . . . . . . . . . . . . . . . . . . . . . . . . . . . . . . . . . . . . . . . . . . . . .28
Installation . . . . . . . . . . . . . . . . . . . . . . . . . . . . . . . . . . . . . . . . . . . . . . . . . . . . . .29
Technischer Kundendienst & Kontaktinformation . . . . . . . . . . . . . . . . . . . . . . .32
Garantie-Hinweise . . . . . . . . . . . . . . . . . . . . . . . . . . . . . . . . . . . . . . . . . . . . . . . .32
Garantiebedingungen . . . . . . . . . . . . . . . . . . . . . . . . . . . . . . . . . . . . . . . . .32
Anhang A – Technische Daten . . . . . . . . . . . . . . . . . . . . . . . . . . . . . . . . . . . . . .33
Anhang B – Blockdiagramm . . . . . . . . . . . . . . . . . . . . . . . . . . . . . . . . . . . . . . . .34
ESPAÑOL
Introducción . . . . . . . . . . . . . . . . . . . . . . . . . . . . . . . . . . . . . . . . . . . . . . . . . . . . .35
¿Qué hay dentro de la caja? . . . . . . . . . . . . . . . . . . . . . . . . . . . . . . . . . . . . . . . .35
Características de los StudioPro 4 . . . . . . . . . . . . . . . . . . . . . . . . . . . . . . . . . . .35
Woofer . . . . . . . . . . . . . . . . . . . . . . . . . . . . . . . . . . . . . . . . . . . . . . . . . . . . .35
Tweeter . . . . . . . . . . . . . . . . . . . . . . . . . . . . . . . . . . . . . . . . . . . . . . . . . . . . .35
Puerto de subfrecuencias . . . . . . . . . . . . . . . . . . . . . . . . . . . . . . . . . . . . . .36
Control Mid-Boost (Enfatización de medios) . . . . . . . . . . . . . . . . . . . . . . .36
Gabinete . . . . . . . . . . . . . . . . . . . . . . . . . . . . . . . . . . . . . . . . . . . . . . . . . . . .36
Divisor de frecuencias y amplificadores de potencia . . . . . . . . . . . . . . . .36
Paneles frontal y trasero . . . . . . . . . . . . . . . . . . . . . . . . . . . . . . . . . . . . . . . . . . .37
Panel frontal . . . . . . . . . . . . . . . . . . . . . . . . . . . . . . . . . . . . . . . . . . . . . . . . .37
Panel trasero . . . . . . . . . . . . . . . . . . . . . . . . . . . . . . . . . . . . . . . . . . . . . . . .38
Instalación . . . . . . . . . . . . . . . . . . . . . . . . . . . . . . . . . . . . . . . . . . . . . . . . . . . . . .39
Asistencia técnica y datos de contacto . . . . . . . . . . . . . . . . . . . . . . . . . . . . . . .42
Condiciones de la garantía . . . . . . . . . . . . . . . . . . . . . . . . . . . . . . . . . . . . . . . . .42
Registro de la garantía . . . . . . . . . . . . . . . . . . . . . . . . . . . . . . . . . . . . . . . .42
Apéndice A - Características técnicas . . . . . . . . . . . . . . . . . . . . . . . . . . . . . . . .43
Apéndice B - Diagrama de bloques . . . . . . . . . . . . . . . . . . . . . . . . . . . . . . . . . .44
Page 4

ITALIANO
Introduzione . . . . . . . . . . . . . . . . . . . . . . . . . . . . . . . . . . . . . . . . . . . . . . . . . . . . .45
Cosa c’è dentro la scatola? . . . . . . . . . . . . . . . . . . . . . . . . . . . . . . . . . . . . . . . . .45
Caratteristiche di StudioPro 4 . . . . . . . . . . . . . . . . . . . . . . . . . . . . . . . . . . . . . . .45
Woofer . . . . . . . . . . . . . . . . . . . . . . . . . . . . . . . . . . . . . . . . . . . . . . . . . . . . .45
Tweeter . . . . . . . . . . . . . . . . . . . . . . . . . . . . . . . . . . . . . . . . . . . . . . . . . . . . .45
Porta per sub-frequenze . . . . . . . . . . . . . . . . . . . . . . . . . . . . . . . . . . . . . . .46
Controllo Mid-Boost . . . . . . . . . . . . . . . . . . . . . . . . . . . . . . . . . . . . . . . . . . .46
Involucro . . . . . . . . . . . . . . . . . . . . . . . . . . . . . . . . . . . . . . . . . . . . . . . . . . . .46
Divisore di frequenza e amplificatori di potenza . . . . . . . . . . . . . . . . . . . .46
Pannello frontale e posteriore . . . . . . . . . . . . . . . . . . . . . . . . . . . . . . . . . . . . . . .47
Pannello frontale . . . . . . . . . . . . . . . . . . . . . . . . . . . . . . . . . . . . . . . . . . . . .47
Pannello posteriore . . . . . . . . . . . . . . . . . . . . . . . . . . . . . . . . . . . . . . . . . . .48
Installazione . . . . . . . . . . . . . . . . . . . . . . . . . . . . . . . . . . . . . . . . . . . . . . . . . . . . .49
Assistenza tecnica e informazioni su chi contattare . . . . . . . . . . . . . . . . . . . . .52
Garanzia degli StudioPro 4 . . . . . . . . . . . . . . . . . . . . . . . . . . . . . . . . . . . . . . . .52
Condizioni di garanzia . . . . . . . . . . . . . . . . . . . . . . . . . . . . . . . . . . . . . . . . .52
Registrazione della garanzia . . . . . . . . . . . . . . . . . . . . . . . . . . . . . . . . . . .52
Appendice A – Specifiche Tecniche . . . . . . . . . . . . . . . . . . . . . . . . . . . . . . . . . .53
Appendice B – Diagramma a blocchi . . . . . . . . . . . . . . . . . . . . . . . . . . . . . . . .54
KONJI
. . . . . . . . . . . . . . . . . . . . . . . . . . . . . . . . . . . . . . . . . . . . . . . . . . . . .55
. . . . . . . . . . . . . . . . . . . . . . . . . . . . . . . . . . . . . . . . . . . . . . .55
. . . . . . . . . . . . . . . . . . . . . . . . . . . . . . . . . . . . . . . . . . . . . . .55
. . . . . . . . . . . . . . . . . . . . . . . . . . . . . . . . . .57
. . . . . . . . . . . . . . . . . . . . . . . . . . . . . . . . . . . . . . . . . . . . . . . . . . . . .59
. . . . . . . . . . . . . . . . . . . . . . . . . . . . . . . . . . . . . . . . . . . . . . . . . . . . . . . .59
. . . . . . . . . . . . . . . . . . . . . . . . . . . . . . . . . . . . . .59
. . . . . . . . . . . .59
. . . . . . . . . . . . . . . . . . . . . . . . . . . .60
. . . . . . . . . . . . . . . . . . . . . . . . . . . . . . . . . . . . . . . . . .60
. . . . . . . . . . . . . . . . . . . . . . . . . . . . . . . .62
. . . . . . . . . . . . . . . . . . . . . . . . . . . . . . . . . . . . . . . . . . . . .62
. . . . . . . . . . . . . . . . . . . . . . . . . . . . . . . . . . .63
. . . . . . . . . . . . . . . . . . . . . . . . . . . . . . . . . . . . . .64
日本語
はじめに
製品パッケージ内容
StudioPro4の特徴
フロントパネルとリアパネルの特徴
インストール
注意
スピーカーワイヤー接続
コンピュータのサウンドカードやゲーム機器への接続
中域のブーストEQスイッチの設定
StudioPro4の設置
テクニカルサポートとお問い合わせ先
StudioPro4製品保証
AppendixA‒テクニカルスペック
AppendixB-ブロック図
Page 5

4
Page 6

5
Introduction
Thank you for choosing the StudioPro 4 professional desktop multimedia audio
monitors. Top recording engineers and producers in studios around the world use MAudio monitors. Now, with the StudioPro 4s, you can enjoy the same professional
standard of audio quality right on your desktop.
The StudioPro 4 has been designed and tested by veteran audio engineers to meet
your needs in the desktop audio monitoring environment. It is focused on the
functional goal of delivering pure, original sound without any additional coloration, to
let you hear the music the way the artist recorded it. The StudioPro 4 monitor is selfpowered, directly accepting a line level signal from a variety of sources.
The StudioPro 4 is designed to overcome all the limitations of conventional desktop
monitors within the digital audio environment. The StudioPro 4s match a custom tuned
cabinet, optimized woofer and tweeter and advanced crossover technology with
plenty of power to insure the highest-fidelity sound available from audio monitors of
their size. And M-Audio’s proprietary OptImage wave guide tweeter technology
assures improved and defined stereo imaging. The StudioPro 4s are the missing link
for bringing your computer-based music, games and DVDs to life.
What’s in the Box?
Your StudioPro 4 box contains:
• Two StudioPro 4 speakers (Left and Right)
• One speaker wire
• One 1/8-inch mini jack to RCA audio cable
• One detachable AC power cord
• Actual test results of your StudioPro 4s pair
• This manual
StudioPro 4 Features
Woofer
The woofer unit is 4 inches in diameter, with a magnetically shielded curved cone (to
protect your computer monitor from interference), a high-temperature voice coil and
closed-cell foam damping. It is designed to deliver balanced mid- and low-frequency
response. The design is used to accurately react to input signals, and to deliver even
minimal input precisely, both while minimizing distortion.
Tweeter
By employing a specially developed 1-inch Mylar dome with protective magnetic
shielding, the tweeter can deliver distortion-free sound and offer an extremely natural
response. It minimizes reaction time, using a specially shaped Mylar dome for
excellent delivery and minimizes resonance by adapting a unique internal damping
technology. Also, incorporated is the OptImage wave guide technology which
improves stereo imaging.
E
N
G
L
I
S
H
Page 7

Sub-Frequency Port
The hole in the rear panel is called a Sub-Frequency Port and is designed to discharge
extreme low frequencies.
Mid-Boost Control
The back panel Mid-Boost control on the StudioPro 4s allows compensation for room
EQ. Offering a great deal of control over the StudioPro 4s sound and presence, this
makes the StudioPro 4 very versatile for use in different spaces.
Enclosure
Along with the other components, the StudioPro 4s enclosure plays an important role.
In order to provide more stable performance, the enclosure employs a special highdensity MDF and unique interior reinforcement designed to absorb vibration and
impact generated under extreme conditions.
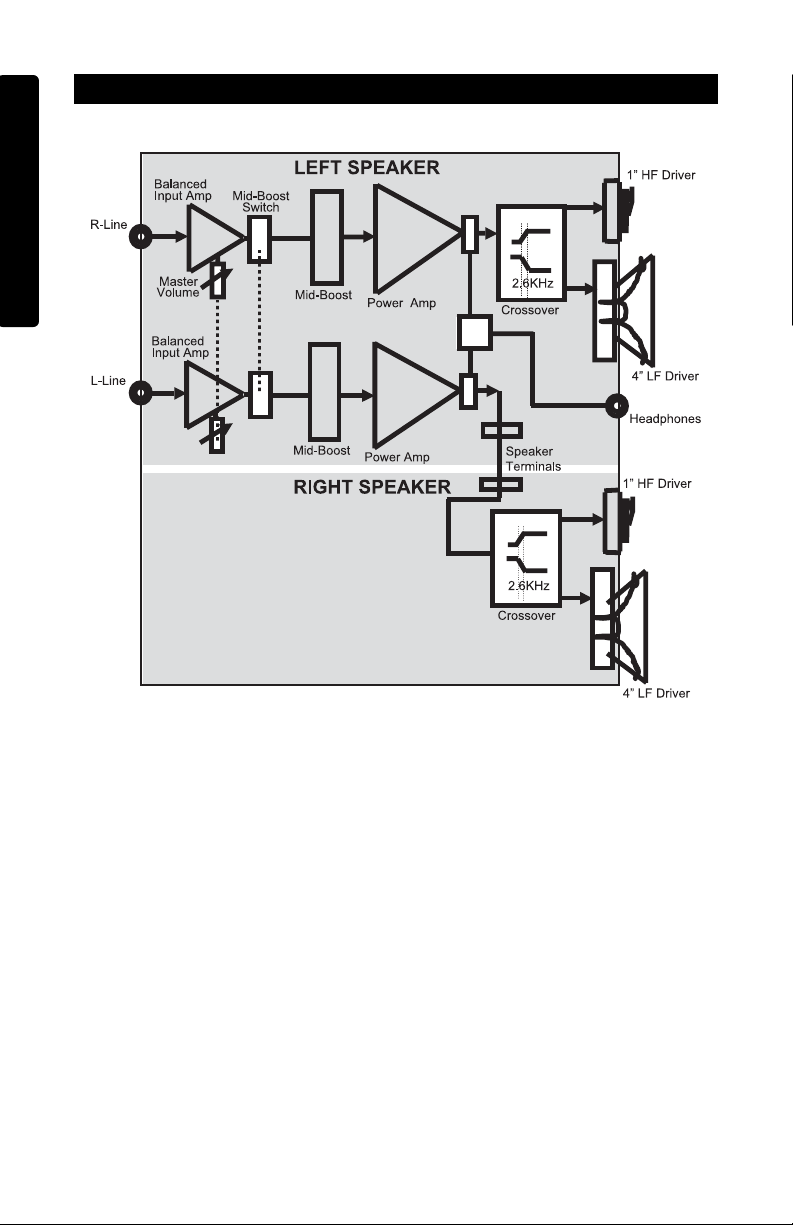
Network & Power Amplifiers
The active equalization, crossover networks and power amplifiers for the StudioPro 4
are specially designed for its woofer and tweeter. The network properly distributes low,
mid, and high frequencies to the components in order to reduce distortion and sound
loss, thereby achieving a naturally balanced sound.
6
E
N
G
L
I
S
H
Page 8
7
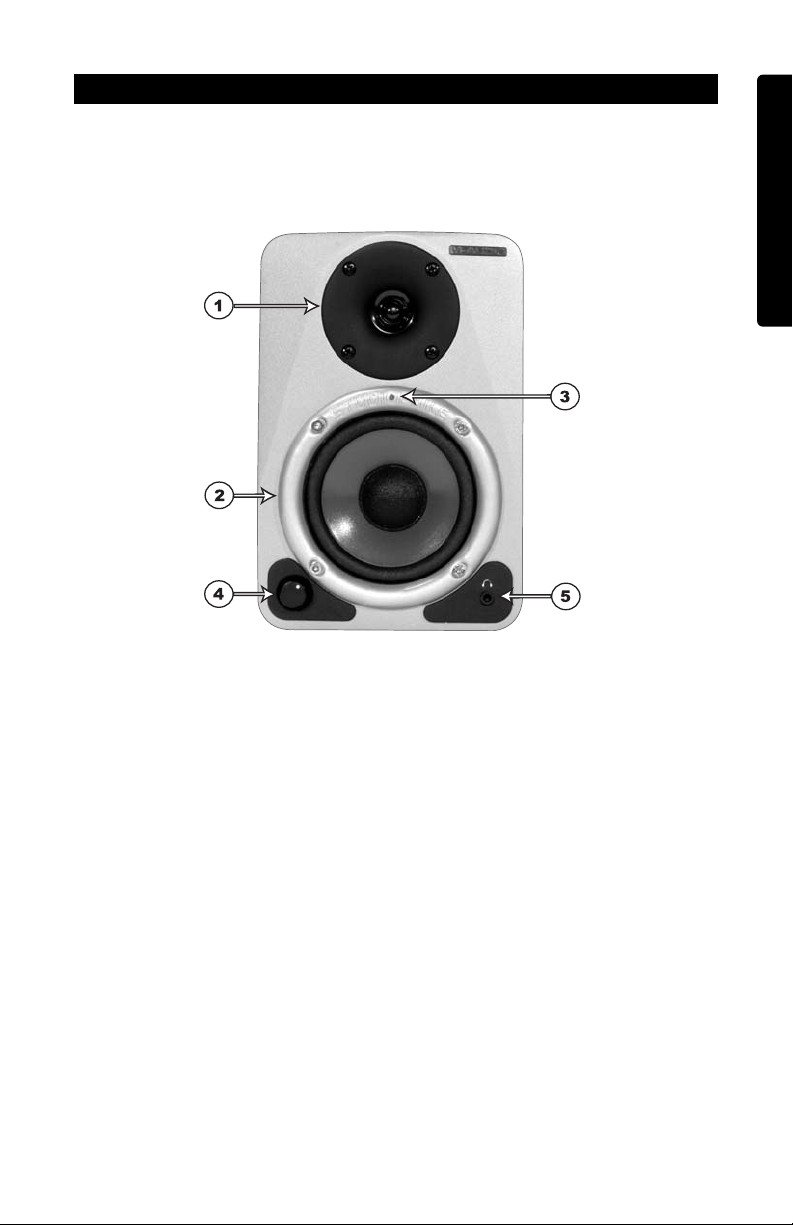
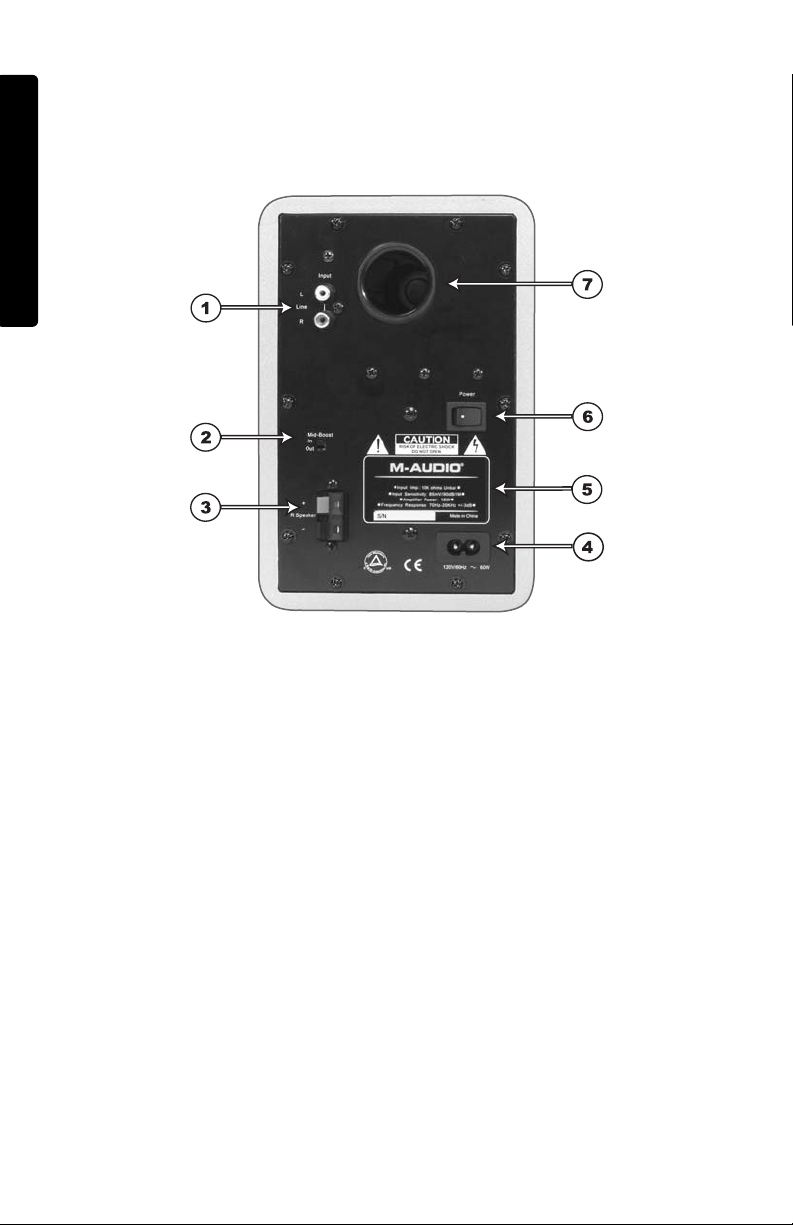
Front and Rear Panel Features
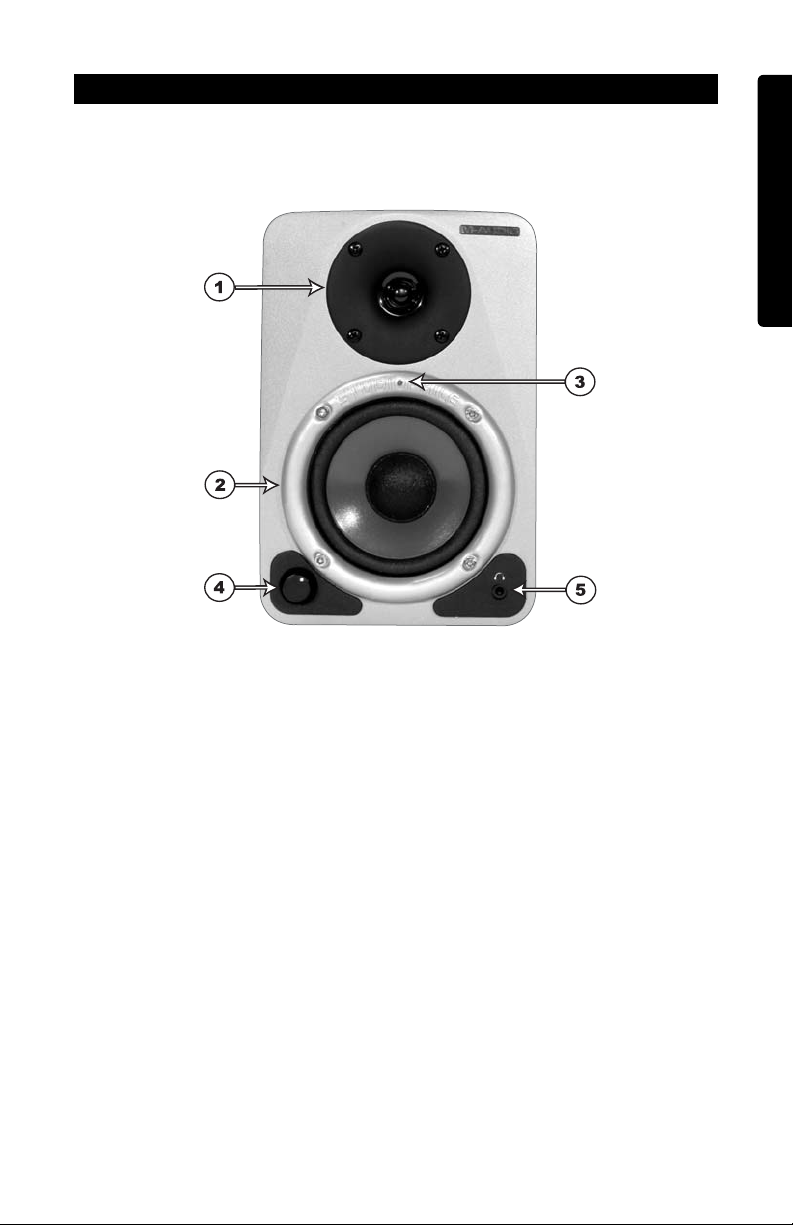
Front Panel
This front panel image shows the Left Speaker. The front panel of the Right Speaker
houses only the Woofer and Tweeter drivers.
1. Woofer Driver
2. Tweeter Driver
3. Blue Power LED: This LED indicates whether the speakers power is on or off
4. Volume Control
5. Headphone Output Jack (1/8”)
E
N
G
L
I
S
H
Page 9
8
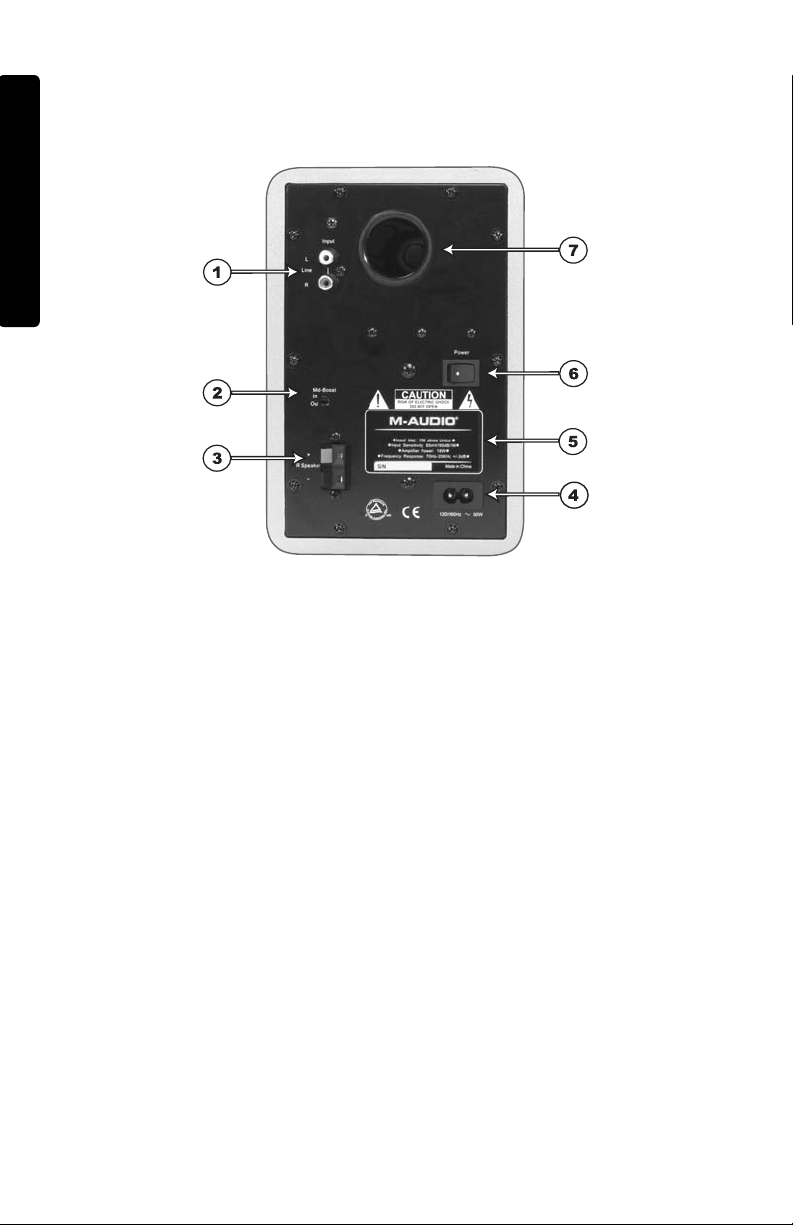
Rear Panel
This rear panel image shows the powered Left Speaker. The Right Speaker is passive and
has only one Speaker terminal for connection to the Speaker Terminal of the Left Speaker.
1. RCA Line Inputs (L & R): These jacks accept standard RCA input connections with
unbalanced wiring. The included 1/8-inch mini-jack—to—RCA audio cable allows
users to connect the StudioPro 4s to other equipment accepting 1/8-inch mini jack
connections, such as a laptop or MP3 player.
There are 2 RCA Line Inputs:
L — Left Channel Input (White)
R — Right Channel Input (Red)
2. Mid-Boost: Two selections are available for the Mid-Boost, “In” and “Out.” The Out
setting produces a flat frequency response curve, while the In setting gives an
added boost in the mid-range frequencies.
3. Speaker Outputs: There is one spring action Speaker terminal Output for
connecting the Left Speaker to the Right Speaker using the included speaker wire.
4. Power Receptacle: Accepts a detachable 2-circuit line cord in order to power the
StudioPro 4 system.
5. Product Label: This label contains the model and serial number information.
6. Power Switch: This switch turns the StudioPro 4 system on and off. The on position
is indicated by the white dot on the switch.
7. Sub-Frequency Port: This port aids in the reproduction of very low frequencies by
discharging frequencies below 70Hz.
E
N
G
L
I
S
H
Page 10

9
Installation
For optimal performance of the StudioPro 4, please read the following directions
carefully before installation.
Precautions
Handling: Please do not touch the speaker cones (the Woofer or the Tweeter); this
could damage the unit, affecting sound quality. The StudioPro 4 speakers are
packaged in the box tightly, so your attention is required when taking the speakers out
of the box. To avoid possible damage to the speakers, hold both sides of the unit (not
the front or the back) in order to pull it out of the box. To avoid damage, the speaker
cones should never be touched, even after they’re out of the box.
Connections: Connect the StudioPro 4s RCA inputs to the corresponding computer
sound card or game console outputs. We recommend that you use high-quality cables
for input connections. Be sure that the StudioPro 4 is powered off before making any
connections.
If you need to connect the StudioPro 4 speakers to a device with 1/4-inch inputs, like
the M-Audio MobilePre USB, you can purchase an adapter cable that will have the 1/4inch connection on one end and the RCA connection on the other end.
Correct Power Operation: Since the StudioPro 4 contains amplifiers; it must be
connected to a power outlet using the detachable AC cable that is provided. Before
connecting power, please make sure that the power switch of the StudioPro 4 is in the
off position.
WARNING! - Use of improper Voltage may result in hazardous conditions
and/or damage to speaker components not covered by speaker warranty.
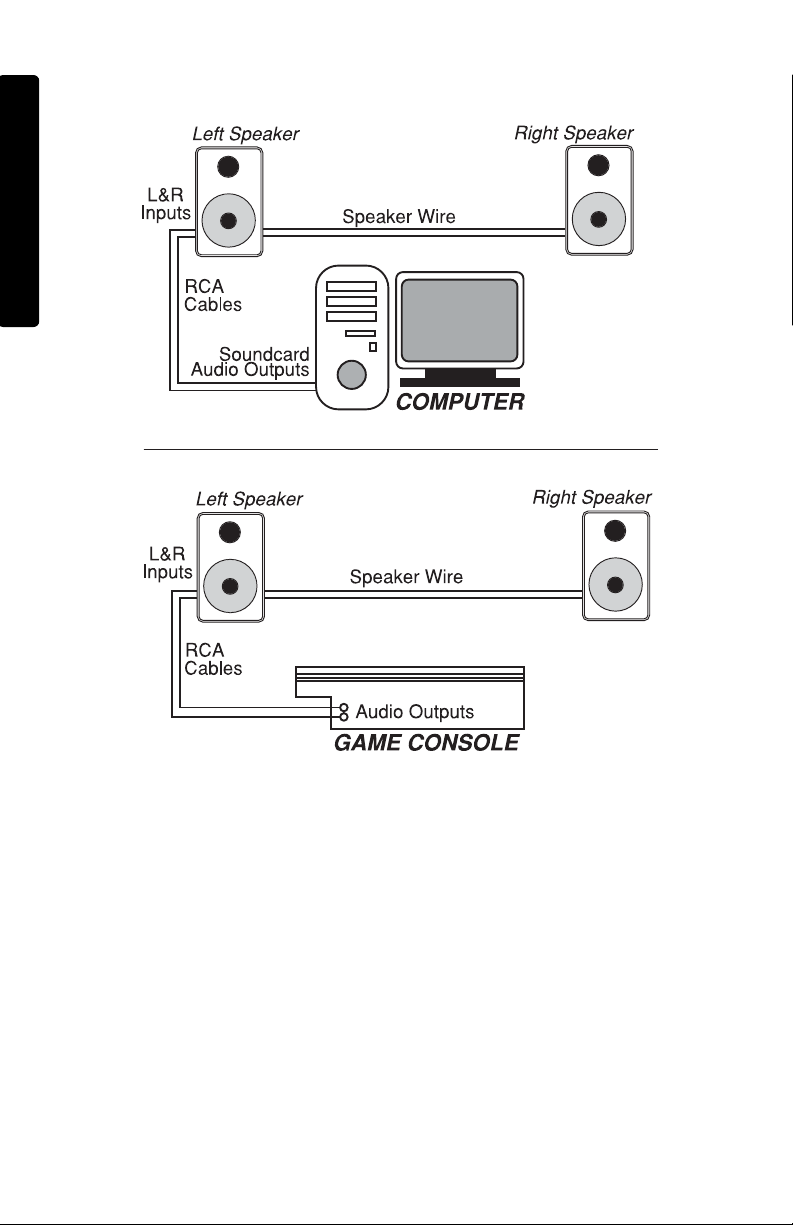
Speaker Wire Connections
Use the speaker wires included in the StudioPro 4 package to connect the Left and
Right Speakers via the spring terminals.
Connecting to a Computer Sound Card or Game Console
Before connecting the StudioPro 4s, make sure the power from the output device has
been turned off and the StudioPro 4 system is also turned off. Then plug the RCA cable
E
N
G
L
I
S
H
Page 11
10
to the corresponding RCA output connectors of a computer sound card or game console.
Setting the Mid-Boost EQ Switch
This 2-position switch selects between the “In” and “Out” Mid-Boost modes. The Out
mode produces a flat midrange response for normal monitoring and listening
conditions. The In mode will move the sound stage forward toward your listening
position. This is accomplished by producing a slight emphasis in the middle to upper
frequencies.
Placing the StudioPro 4
Placing the speakers is one of the most important procedures in order to monitor (listen
to) sound accurately. To monitor with the StudioPro 4s performing to their maximum
capability, an appropriate listening environment and correct placement are required.
Please read the tips which follow, in order to assure correct StudioPro 4 placement.
E
N
G
L
I
S
H
Page 12
11
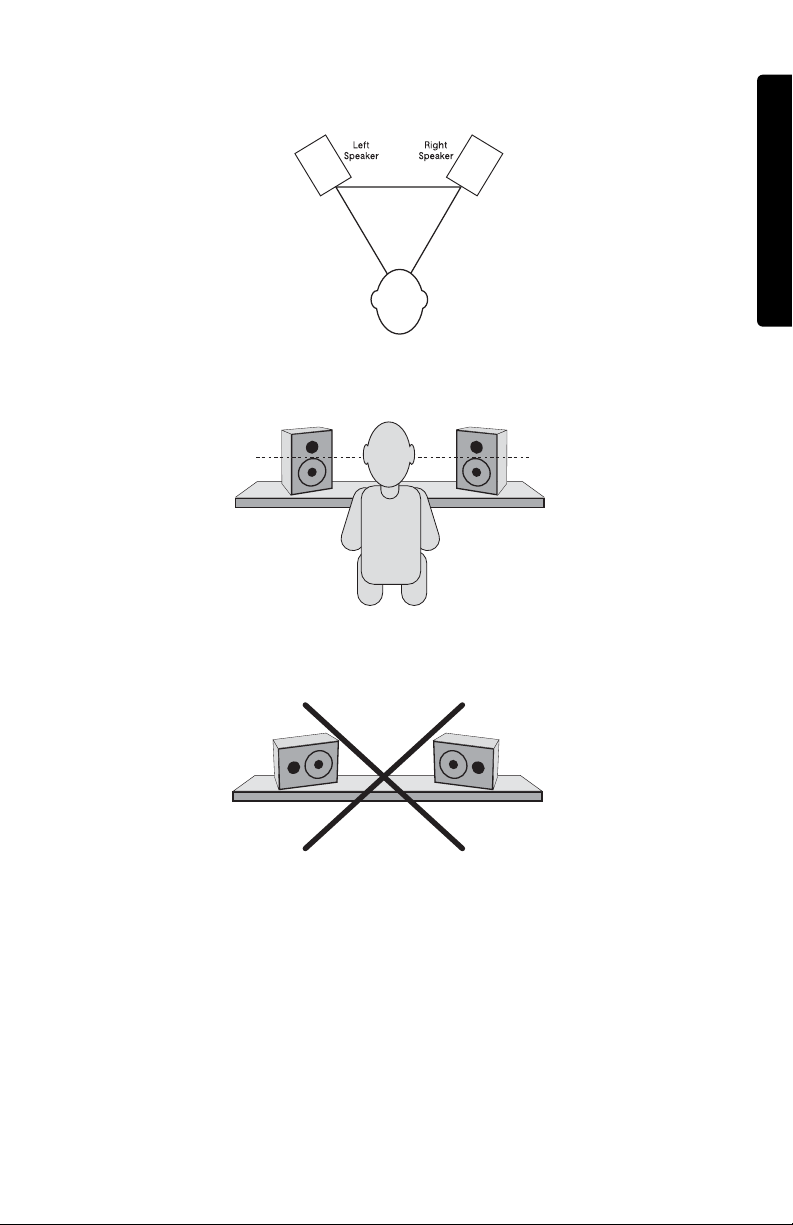
1. The two units and the listener should align to form a regular triangle. Refer to the
following diagram.
2. Position the monitors so that the tops of the woofers are level with your ears in a
normal listening environment. Refer to the following diagram.
3. 3. Place the StudioPro 4 Left and Right units vertically with the woofer on the
bottom. Placing the StudioPro 4s monitors horizontally is not recommended.
Note: DO NOT place any obstacles that may block the flow of air in front
or between the StudioPro 4 monitors. Also, remove reflective materials
such as glass, mirrors or metal from the monitoring environment. PLACE
THOSE MATERIALS AWAY FROM THE PATH OF THE SOUND FROM THE
StudioPro 4s.
E
N
G
L
I
S
H
Page 13
12
Technical Support & Contact Information
For additional help, contact M-Audio Technical Support by telephone, by fax or by email. If you have any questions, comments or suggestions about this or any M-Audio
product, we invite you to contact us at:
Warranty Information
Te rm s
M-Audio warrants products to be free from defects in materials and workmanship,
under normal use and provided that the product is owned by the original, registered
user. Visit www.m-audio.com/warranty for terms and limitations applying to your
specific product.
Registration
Thank you for registering your new M-Audio product. Doing so immediately both
entitles you to full warranty coverage and helps M-Audio develop and manufacture
the finest quality products available. Register online at www.m-audio.com/register to
receive FREE product updates and for the chance to win FREE M-Audio gear.
M-AUDIO U.S.
5795 Martin Road, Irwindale, CA 91706-6211, U.S.A.
Sales Information: 626-633-9050
Sales Information (email): info@m-audio.com
Tech Support: 626-633-9055
Tech Support (email): techsupt@m-audio.com
Fax: 626-633-9060
Internet Home Page: http://www.m-audio.com
M-AUDIO U.K.
Unit 5, Saracen Industrial Estate, Mark Road,
Hemel Hempstead, Herts HP2 7BJ, England
Sales Information (phone): 44 (0) 1442 416590
Sales Information (fax): 44 (0) 1442 246832
Sales Information (email): info@maudio.co.uk
Technical Support (PC): 44 (0) 1309 671301
Technical Support (Mac): 44 (0) 1765 650072
Technical Support (email): richard@maudio.freeserve.co.uk
Internet Home Page: http://www.maudio.co.uk
M-AUDIO France
Unit 5, Saracen Industrial Estate, Mark Road
Hemel Hempstead, Herts HP2 7BJ, England
Informations Commerciales: 0810 001 105
Informations Commerciales (email): info@m-audio.fr
Assistance Technique:
0820 000 731 (PC) ou 0820 391 191 (Mac at général)
support@m-audio.fr.com ou mac@m-audio.fr (email)
Fax: +44 (0) 144 224 6832
Site Internet: http://www.m-audio.fr
M-AUDIO Deutschland (Germany)
Kuhallmand 34, D-74613 Ohringen, Germany
Sales Information: 49 7941 98 7000
Sales Information (email): info@m-audio.de
Technical Support: 49 7941 98 70030
Technical Support (email): support@m-audio.de
Fax: 07941 98 70070
Internet Home Page: http://www.m-audio.de
M-AUDIO Canada
1400 St-Jean Baptiste Ave. #150
Quebec City, QC G2E 5B7, Canada
Tel: 418-872-0444
Fax: 418-872-0034
Email: midimancanada@m-audio.com
Internet Home Page: http://www.m-audio.ca
M-AUDIO Japan
Annex Buliding 6F, 2-18-10 Marunouchi
Naka-Ku, Nagoya 460-0002, Japan
Tel: 81 52 218 3375
Fax: 81 52 218 0875
Technical Support: 0820 00 731
Email: info@m-audio.co.jp
Internet Home Page: http://www.m-audio.co.jp
E
N
G
L
I
S
H
Page 14

Appendix A - Technical Specifications
Type: Two-way studio reference
LF Driver: 4-inch diameter, magnetically-shielded with curved cone, high temperature
voice coil and Cellulose-impregnated fabric roll surround
HF Driver: 1-inch diameter, magnetically shielded with specially shaped Mylar dome
Frequency Response: 70Hz-20kHz
Crossover Frequency: 2.6kHz
RMS SPL: >95dB
S/N Ratio: >90dB (typical, A-weighted)
Input Connectors: Left and Right RCA Line input connectors
Polarity: Positive signal at “+” input produces outward low-frequency cone
displacement
Dynamic Power: 18 watts/ 4 Ohms with 2 channels connected
Input Impedance: 10k ohms unbalanced
Input Sensitivity: 100 mV pink noise input produces 90dBA output SPL at 1 meter
(volume control at maximum)
Protection: RF interference, output current limiting, over temperature, turn-on/off
transient, subsonic filter
Indicator: Blue power LED on front panel
Power Requirements: 120V/~60Hz, 230V/~50Hz or 100V/50Hz/60Hz; powered via
detachable 2-circuit line cord
Cabinet: vinyl-laminated MDF
Dimensions: 8.5 inch (H) x 5.75 inch (W) x 6.25 inch (D)
Weight: 12 lbs./pair (approx., w/o packing)
* Specifications subject to change without notice
13
E
N
G
L
I
S
H
Page 15
14
Appendix B - Block Diagram
E
N
G
L
I
S
H
Page 16

15
Introduction
Merci d'avoir choisi les enceintes audio multimédia professionnelles StudioPro 4. Les
enceintes M-Audio sont utilisés par les ingénieurs du son et producteurs en studio, à
travers le monde entier. Avec les enceintes StudioPro 4, vous pouvez maintenant
bénéficier du même niveau professionnel de qualité audio sur votre bureau.
Les StudioPro 4 ont été conçues et testées par des ingénieurs du son chevronnés afin
de répondre à vos besoins en monitoring audio de bureau. Leur fonction principale est
de fournir un son original et pur, sans coloration superflue, pour vous permettre
d'entendre la musique telle que l'artiste l'a enregistrée. L'enceinte StudioPro a un
amplificateur intégré, qui accepte directement un signal de niveau de ligne provenant
de sources variées.
Les StudioPro 4 ont été conçues pour éliminer toutes les restrictions inhérentes aux
enceintes de bureau ordinaires dans l'environnement audionumérique. Les StudioPro 4
offrent une conception de caisson personnalisée, des transducteurs optimisés, une
technologie de crossover avancée et une grande puissance pour assurer un son de la
plus haute fidélité pour des moniteurs audio de cette taille. OptImage, la technologie de
guidage d'ondes de M-Audio, assure également un rendu stéréo amélioré. Les StudioPro
4 rendront réellement vivants votre musique sur ordinateur, vos jeux et vos DVD.
WhatContenu de l'emballage
La boîte de vos StudioPro 4 contient :
• Deux haut-parleurs StudioPro 4 (Gauche et Droit)
• Un câble de haut-parleur
• Un câble audio mini-jack vers RCA
• Un câble d'alimentation détachable
• Ce manuel
• Données d'essai réelles des StudioPro 4 que vous avez achetées
Fonctionnalités des StudioPro 4
Le woofer
Le woofer a un diamètre de 10 cm avec un cône incurvé magnétiquement blindé pour
protéger votre écran d'ordinateur de toute interférence, une bobine mobile à haute
température et un amortisseur en mousse alvéolée. Il est conçu pour fournir une
réponse en fréquences moyennes et basses équilibrée. Cette conception est utilisée
pour réagir avec exactitude au signal d'entrée et fournir une réponse précise et une
distorsion minimale même avec des entrées de niveau très bas.
Le tweeter
Grâce au dôme 2,5 cm en mylar avec blindage magnétique spécialement conçu, le
tweeter offre un son original sans distorsion ainsi qu'une réponse extrêmement
naturelle. Il réduit au minimum le temps de réaction au moyen de son dôme en mylar
de forme spéciale, et réduit également la résonance grâce à sa technologie unique
d'amortissement interne. De plus, la technologie de guidage d'ondes OptImage est
incorporée dans le tweeter pour améliorer le rendu stéréo.
F
R
A
N
Ç
A
I
S
Page 17

Port de sous-fréquences
L'orifice situé sur la face arrière est appelé port de sous-fréquences et est conçu pour
émettre des fréquences extrêmement basses.
Contrôle des fréquences moyennes
Le contrôle des fréquences moyennes sur le panneau arrière des StudioPro 4
compense les caractéristiques acoustiques de la pièce. Il offre un contrôle important
sur le son et la présence des StudioPro 4, et leur permet de s'adapter à des espaces
différents.
Le caisson
Combinée avec les autres composants, le caisson des StudioPro 4 joue un rôle
important. Il est constitué de panneaux MDF de haute densité et d'un renforcement
intérieur exceptionnel permettant d'assurer des performances plus stables. L'enceinte
des StudioPro 4 a été conçue pour absorber les vibrations et les impacts dans des
conditions extrêmes.
Diviseur de fréquences et amplificateurs de puissance
L'égalisation active, les diviseurs de fréquences et les amplificateurs de puissance des
StudioPro 4 ont été spécialement mis au point pour le woofer et le tweeter employés.
Le diviseur distribue les fréquences basses, moyennes et hautes aux différents
composants afin de réduire la distorsion et les pertes de son, ce qui permet d'obtenir
un son naturel et équilibré.
16
F
R
A
N
Ç
A
I
S
Page 18
17
Description des panneaux avant et arrière
Face avant
Le panneau avant du haut-parleur gauche comprend les éléments suivants :
1. Tweeter
2. Woofer
3. Diode bleue d'alimentation (indique si les haut-parleurs sont ou non sous
tension)
4. Commande de volume
5. Sortie stéréo de casque (mini-jack)
F
R
A
N
Ç
A
I
S
Page 19
Rear Panel
Cette image de panneau arrière correspond au haut-parleur gauche actif. Le haut
parleur droit est passif et dispose seulement d'un terminal de haut-parleur pour le
connecter au terminal de haut-parleur du haut-parleur gauche.
1. Entrées de ligne RCA (D et G) : Ces jacks acceptent des connexions d'entrée RCA
standard avec câblage asymétrique. Le câble audio mini-jack-vers-RCA inclus
permet aux utilisateurs de connecter les StudioPro 4 à d'autres équipements
acceptant des connexions par mini-jack, comme un ordinateur portable ou un
lecteur MP3.
Il y a 2 entrées de ligne RCA :
"L" - Entrée de canal gauche (blanche)
"R" - Entrée de canal droit (rouge)
2. Mid-Boost: (Contrôle fréquences moyennes) : deux sélections sont à votre
disposition : "In" et "Out". Le réglage Out génère une courbe "plate", tandis que le
réglage In optimise les fréquences moyennes.
3. Sorties de haut-parleur : il y a une sortie de terminal de haut-parleur à action ressort
pour brancher le haut-parleur gauche au haut-parleur droit en utilisant le câble de
haut-parleur inclus.
4. Prise d'alimentation : accepte un câble de ligne 2 circuits détachable pour
alimenter le système StudioPro 4.
5. Étiquette produit : cette étiquette contient les informations de modèle et le numéro
de série des StudioPro 4.
18
F
R
A
N
Ç
A
I
S
Page 20

19
6. Interrupteur d'alimentation : cet interrupteur permet d'allumer et d'éteindre le
système StudioPro 4. La position allumé est indiquée par un point blanc sur
l'interrupteur.
7. Port de sous-fréquences : ce port aide à reproduire les fréquences très basses en
prenant en charge les fréquences inférieures à 70 Hz.
Installation
Pour que les performances des StudioPro soient optimales, veuillez lire attentivement
ce qui suit avant de procéder à leur installation.
Précautions à prendre
Manipulation : prenez soin de ne pas toucher les cônes des haut-parleurs (le woofer
et le tweeter) ; ceci pourrait endommager l'appareil et la qualité du son pourrait être
affectée. Les moniteurs StudioPro étant emballés de façon serrée, retirez-les de la
boîte avec précaution. Afin d'éviter que les moniteurs ne soit endommagés, tenez-les
toujours par les deux côtés (et non l'avant ou l'arrière) lorsque vous les retirez de la
boîte. Même lorsque les moniteurs ont été sortis de la boîte, évitez de toucher leurs
cônes. Ceci pourrait les abîmer.
Connexions : connectez les entrées RCA ou TRS de vos StudioPro 4 aux sorties
correspondantes d'une carte son ou d'une console de jeu. Pour les connexions aux
entrées, nous vous recommandons d'utiliser des câbles de haute qualité. Assurezvous que les StudioPro 4s sont éteintes avant de réaliser des connexions.
Si vous devez brancher les haut-parleurs StudioPro 4 à un dispositif avec des entrées
jack 6,35 mm, comme l'interface USB MobilePre de M-Audio, vous pouvez acheter un
câble d'adaptation qui aura une connexion jack 6,35 mm d'un côté et une connexion
RCA de l'autre.
Fonctionnent correct de l'alimentation : les StudioPro intégrant leur propre
amplificateur, ils doivent être connectés à une prise de courant à l'aide des câbles
d'alimentation CA fournis. Avant la mise sous tension, veuillez vous assurer que
l'interrupteur d'alimentation des Studio Pro 4 est dans la position éteint.
ATTENTION ! - L'utilisation d'une tension inappropriée peut entraîner une
situation de danger et/ou de dommage aux composants des hautparleurs non couverts par leur garantie.
Connexions du câble de haut-parleur
Utilisez les câbles de haut-parleur inclus avec les StudioPro 4 pour brancher les hautparleurs droit et gauche par les terminaux à ressort.
Connexion à une carte son ou à une console de jeu
Avant de brancher les StudioPro 4, assurez-vous que l'alimentation provenant du
dispositif de sortie a été éteinte et que le système StudioPro 4 est également éteint.
F
R
A
N
Ç
A
I
S
Page 21

20
Branchez le câble RCA sur les connecteurs de sortie RCA correspondants de la carte
son de l'ordinateur ou de la console de jeu.
Réglage du commutateur de gestion des fréquences moyennes
Ce commutateur à 2 positions permet de choisir entre les modes de contrôle des
fréquences moyennes "In" et "Out". La position Out produit une réponse de fréquence
moyenne plate pour des conditions de monitorage et d'écoute normales. La position
In rapprochera la scène sonore du point d'écoute.
Placement des StudioPro 4
Le placement des enceintes joue un rôle très important dans le monitoring (l'écoute) de
précision. Pour que les performances des StudioPro 4 soient optimales, un
environnement d'écoute approprié et une disposition correcte des moniteurs sont
nécessaires. Veuillez vous référer à ce qui suit pour placer correctement vos StudioPro 4.
F
R
A
N
Ç
A
I
S
Page 22

1. Les deux unités et l'auditeur doivent être placés de façon à former un triangle
équilatéral. Référez-vous au schéma suivant :
2. Positionnez les enceintes de manière à ce que le haut des woofers soit au même
niveau que vos oreilles dans un environnement d'écoute normal. Référez-vous au
schéma suivant :
3. Placez les StudioPro 4 gauche et droite en position verticale, avec le woofer en bas.
Il n'est pas conseillé de placer les StudioPro 4 en position horizontale.
Remarques : NE BLOQUEZ PAS la circulation d'air devant ou entre les
moniteurs. De plus, éliminez de l'environnement d'écoute miroirs et objets
en verre ou métal car ils ont des propriétés réflectives. ELOIGNEZ CES
MATERIAUX DU CHAMP SONORE DES STUDIO PRO 4.
21
F
R
A
N
Ç
A
I
S
Page 23

22
Assistance technique et informations de contact
Si vous avez besoin d'aide, contactez l'assistance technique de M-Audio par téléphone, par
fax ou par e-mail. Si vous avez des questions ou si vous souhaitez faire des commentaires
ou des suggestions à propos de ce produit ou de tout autre produit M-Audio, nous vous
invitons à nous contacter directement à l'aide des informations suivantes :
Votre garantie StudioPro 4
Conditions de garantie
M-Audio garantit que les produits sont dépourvus de défauts de matériaux et de
fabrication, dans le cadre d'un usage normal et pour autant que le produit soit en
possession de son acquéreur originel et que celui-ci soit enregistré. Consultez
www.m-audio.com/warrantypour prendre connaissance des conditions et des
limitations s'appliquant à votre produit spécifique.
Enregistrement de garantie
Merci d'enregistrer votre nouveau produit M-Audio. Le faire immédiatement permet à
la fois de vous donner une couverture de garantie complète et d'aider M-Audio à
développer et à fabriquer les produits de la plus grande qualité qui soit. Enregistrezvous en ligne à www.m-audio.com/register pour recevoir des mises à jour GRATUITES
du produit et pour avoir une chance de gagner des équipements GRATUITS M-Audio.
M-AUDIO U.S.
5795 Martin Road, Irwindale, CA 91706-6211, U.S.A.
Sales Information: 626-633-9050
Sales Information (email): info@m-audio.com
Tech Support: 626-633-9055
Tech Support (email): techsupt@m-audio.com
Fax: 626-633-9060
Internet Home Page: http://www.m-audio.com
M-AUDIO U.K.
Unit 5, Saracen Industrial Estate, Mark Road,
Hemel Hempstead, Herts HP2 7BJ, England
Sales Information (phone): 44 (0) 1442 416590
Sales Information (fax): 44 (0) 1442 246832
Sales Information (email): info@maudio.co.uk
Technical Support (PC): 44 (0) 1309 671301
Technical Support (Mac): 44 (0) 1765 650072
Technical Support (email): richard@maudio.freeserve.co.uk
Internet Home Page: http://www.maudio.co.uk
M-AUDIO France
Unit 5, Saracen Industrial Estate, Mark Road
Hemel Hempstead, Herts HP2 7BJ, England
Informations Commerciales: 0810 001 105
Informations Commerciales (email): info@m-audio.fr
Assistance Technique:
0820 000 731 (PC) ou 0820 391 191 (Mac at général)
support@m-audio.fr.com ou mac@m-audio.fr (email)
Fax: +44 (0) 144 224 6832
Site Internet: http://www.m-audio.fr
M-AUDIO Deutschland (Germany)
Kuhallmand 34, D-74613 Ohringen, Germany
Sales Information: 49 7941 98 7000
Sales Information (email): info@m-audio.de
Technical Support: 49 7941 98 70030
Technical Support (email): support@m-audio.de
Fax: 07941 98 70070
Internet Home Page: http://www.m-audio.de
M-AUDIO Canada
1400 St-Jean Baptiste Ave. #150
Quebec City, QC G2E 5B7, Canada
Tel: 418-872-0444
Fax: 418-872-0034
Email: midimancanada@m-audio.com
Internet Home Page: http://www.m-audio.ca
M-AUDIO Japan
Annex Buliding 6F, 2-18-10 Marunouchi
Naka-Ku, Nagoya 460-0002, Japan
Tel: 81 52 218 3375
Fax: 81 52 218 0875
Technical Support: 0820 00 731
Email: info@m-audio.co.jp
Internet Home Page: http://www.m-audio.co.jp
F
R
A
N
Ç
A
I
S
Page 24

Annexe A : Caractéristiques techniques
Type: moniteur de studio deux voies
Woofer : cône blindé de 10 cm de diamètre incurvé avec blindage magnétique, bobine
mobile à haute température et entourage rouleau de tissu imprégné de cellulose
Tweeter : dôme 2,5 cm de diamètre, blindage magnétique avec dôme mylar
Bande passante : 70Hz - 20kHz
Fréquences de crossover : 2,6kHz
RMS SPL @ 1 mètre : 101,5 dB
Plage dynamique : >95dB
Rapport signal-bruit : >90dB (typique, pondéré A)
Connecteurs d'entrée : connecteurs d'entrée de ligne RCA gauche et droit
Polarité : le branchement d'un signal positif sur l'entrée + provoque un déplacement
du woofer vers l'extérieur
Puissance dynamique : 18 watts/ 4 Ω avec 2 canaux connectés
Impédance d'entrée : 10 kOhms asymétrique
Sensibilité d'entrée : une entrée de bruit rose de 100 mV produit en sortie une valeur
SPL de 90dBA à une distance d'un mètre avec le volume au maximum
Protection : interférence RF, limitation du courant de sortie, surchauffement,
fréquences transitoires à la mise sous tension et hors tension, filtre subsonique
Témoin : diode d'alimentation bleue sur la face avant
Alimentation requise : 120V/~60Hz, 230V/~50Hz pi 110V/50Hz/60Hz ; alimentation
par câble de ligne 2 circuits détachable
Cabinet : panneaux MDF plaqués vinyle
Dimensions : 21,5 cm (H) x 14,6 cm (L) x 15,9 cm (P)
Poids : 5,4 kg / paire (environ, sans emballage)
* Les caractéristiques techniques peuvent être modifiées sans avertissement
23
F
R
A
N
Ç
A
I
S
Page 25

Annexe B : Schéma fonctionnel
24
F
R
A
N
Ç
A
I
S
Page 26

25
Einführung
Vielen Dank, dass Sie sich für die professionellen Multimedia/Audio-Desktop-Monitore
der Serie Studio Pro 4 entschieden haben! M-Audio-Monitore kommen bei
Aufnahmetechnikern und Produzenten der Spitzenklasse in Studios der ganzen Welt
zum Einsatz. Mit den StudioPro 4 können auch Sie von der selben professionellen
Audioqualität profitieren – direkt auf Ihrem Schreibtisch.
Die StudioPro 4 wurden von erfahrenen Audio-Ingenieuren speziell für den Einsatz in
der Desktop-Umgebung entwickelt und getestet und sind für die unverfälschte
Wiedergabe Ihrer Originaltracks ohne zusätzliche Aufbereitung konzipiert. Die
StudioPro 4 benötigen keine externe Leistungsverstärkung, sondern arbeiten direkt mit
den Line-Signalen der verschiedensten Audioquellen.
Im Vergleich zu den im digitalen Audiobereich üblichen Desktop-Lautsprechern haben
die StudioPro 4 eine Reihe von Vorteilen zu bieten. Die StudioPro 4 vereinen ein
spezielles Gehäusedesign, optimierte Tieftöner und Hochtöner und modernste
Crossover-Technologie mit viel Power, um größtmögliche Wiedergabetreue für
Monitore dieser Größenordnung zu gewährleisten. Ebenso garantiert die von M-Audio
eigens entwickelte OptImage Wave-Guide-Technologie eine verbesserte
Stereowiedergabe. Die StudioPro 4 geben Ihrer PC-Musik, Computerspielen und DVDs
den richtigen Pepp und sind die perfekte Ergänzung für Ihr Desktop-System.
Lieferumfang
Im Lieferumfang sind enthalten:
• 2 StudioPro 4-Lautsprecher (linker und rechter Monitor)
• 1 Lautsprecherkabel
• 1 Audio-Kabel mit Miniklinken- und Cinch-Anschluss
• 1 abnehmbares Wechselstromkabel
• 1 Benutzerhandbuch
• Neueste Testdaten zu den StudioPro 4
StudioPro 4 – Produktmerkmale
Tieftöner
Der mit geschlossenporigem Zellschaum verkleidete, magnetisch abgeschirmte
Tieftöner (10 cm Durchmesser) mit gekrümmtem Horn und hochtemperaturfester
Schwingspule sorgt für einen ausgeglichenen Frequenzgang im Bass- und
Mitteltonbereich. Die ausgezeichneten akustischen Eigenschaften des Tieftöners
unterstützen die präzise und verzerrungsfreie Wiedergabe selbst schwacher
Eingangssignale.
Hochtöner
e speziell für den magnetisch abgeschirmten Hochtöner entwickelte Mylar-Membran
(2,5 cm Durchmesser) begünstigt die störungsfreie, absolut originalgetreue
Wiedergabe des Audiosignals. Dank der speziellen Form der Mylar-Membran ist die
Reaktionszeit des Hochtöners stark verkürzt. Durch die spezielle interne
D
E
U
T
S
C
H
Page 27

Dämpfungstechnologie werden gleichzeitig unerwünschte Resonanzen reduziert.
Zusätzlich garantiert die innovative OptImage Wave-Guide-Technologie eine
verbesserte Stereowiedergabe.
Bassreflexöffnung
In das Monitorgehäuse der StudioPro 4 wurde eine rückseitige Öffnung eingearbeitet,
über die extrem niedrige Bassfrequenzen abgeführt werden.
Mid-Boost-Taster
Über den Mid-Boost-Taster auf der Rückseite der Studio Pro 4 können Sie die
Abstrahlung der Bassfrequenzen je nach Raumakustik ändern. Mit dieser zusätzlichen
Kontrolle über Sound und Klangpräsenz sind die StudioPro 4 in jeder Umgebung
flexibel einsetzbar.
Gehäuse
Das Klangergebnis von Lautsprechern wird wesentlich auch durch das
Gehäusematerial beeinflusst. Für die StudioPro 4 wurde das hochdichte
Gehäusematerial MDF verwendet, welches eine gute Dämpfung der Eigenresonanz
aufweist und eine stabile Audio-Leistung begünstigt. Dieses Material wurde für einen
hohen Wechseldruck im Inneren ausgelegt und hält selbst Extrembedingungen stand.
Frequenzweiche und Hochleistungsendstufen
Das aktive Equalizing sowie die Frequenzweiche und die Hochleistungsstufen wurden
speziell für die Hoch- und Tieftöner der StudioPro 4 entwickelt und gewährleisten die
verlust- und verzerrungsfreie Verteilung der Bass-, Mittel- und Höhenfrequenzen,
damit die ursprüngliche Sound-Balance erhalten bleibt.
26
D
E
U
T
S
C
H
Page 28

27
Bedienelemente der Vorder- und Rückseite
Frontseite
An der Vorderseite des linken Monitors befinden sich folgende Komponenten:
1. Tweeter
2. Woofer
3. Blaue Power-LED: Die blaue LED leuchtet auf, sobald die Monitore eingeschaltet sind.
4. Lautstärkeregler
5. Kopfhörer-Ausgang (Miniklinke)
D
E
U
T
S
C
H
Page 29

Rückseite
Die nachstehende Abbildung zeigt die Rückseite des linken Aktivlautsprechers. Bei
dem rechten Monitor handelt es sich um einen Passivlautsprecher, welcher lediglich
über einen Anschluss für den linken Lautsprecher verfügt.
1. Line-Eingänge (L&R): Die Anschlüsse sind für Cinch-Stecker mit unsymmetrischer
Signalführung ausgelegt. Über das mitgelieferte Audio-Kabel mit Miniklinken- und
Cinch-Anschluss können die StudioPro 4 problemlos auch mit anderen Geräten
mit Miniklinkenbuchsen eingesetzt werden (z.B. Notebooks und MP3-Player).
Die StudioPro 4 sind mit 2 Line-Eingängen im Cinch-Format ausgestattet:
L - Linker Eingangskanal (Weiß)
R - Rechter Eingangskanal (Rot)
2. Mid-Boost: Dieser Taster gestattet die Anhebung der mittleren Bassfrequenzen.
Mit der Position "Out" wird ein flacher Frequenzgang erzielt, während die
Frequenzen mit dem Taster in der Position "In" angehoben werden.
3. Lautsprecheranschlüsse: Auf der Rückseite des rechten und linken Monitors
befindet sich jeweils ein Lautsprecheranschluss mit federndem
Sicherungselement. Verbinden Sie beide Monitore mit dem mitgelieferten
Lautsprecherkabel.
4. Netzanschluss: Der Netzanschluss der Monitore erfolgt über ein abnehmbares
Zweileiterkabel.
5. Produktlabel: Auf dem Produktlabel sind das Modell und die Seriennummer
angegeben.
28
D
E
U
T
S
C
H
Page 30

29
6. Power-Schalter: Über den Power-Schalter werden die Monitore ein- bzw.
ausgeschaltet. Im eingeschalteten Zustand wird der Power-Schalter mit einem
weißen Punkt hinterleuchtet.
7. Bassreflexöffnung: Über diese Öffnung werden extrem niedrige Frequenzen
(unter 70 Hz) abgestrahlt.
Installation
Bevor Sie mit der Installation der StudioPro 4 beginnen, lesen Sie sich bitte die
folgenden Ausführungen aufmerksam durch.
Sicherheitshinweise
Transport: Vermeiden Sie eine Berührung der Woofer- und der Tweeter-Hörner, da die
Monitore sonst beschädigt werden bzw. die Audio-Leistung beeinträchtigt wird. Da die
StudioPro 4 fest in der Verpackung sitzen, sollten Sie beim Herausnehmen vorsichtig
vorgehen. Halten Sie die Monitore mit beiden Händen an den Seiten fest (greifen Sie
nicht an der Vorder- oder Rückseite zu) und ziehen Sie sie nach oben aus dem Karton.
Achten Sie darauf, dass Sie die Hörner auch nach dem Auspacken nicht berühren.
Anschluss: Schließen Sie den Cinch-Ausgang der StudioPro 4 an den Ausgang Ihrer
Audioquelle an (Soundkarte oder Spielkonsole). Verwenden Sie nur qualitativ
hochwertige Kabel für den Anschluss der Audioquellen. Vergewissern Sie sich, dass
die StudioPro 4 ausgeschaltet sind, bevor Sie die Audioquellen anschließen.
Wenn Sie die StudioPro 4 an Geräte mit 6,3mm-Buchsen anschließen möchten (z.B. an
MobilePre USB von M-Audio), benötigen Sie ein Adapterkabel mit 6,3mmKlinkenstecker und Cinch-Stecker.
Netzanschluss: Die StudioPro 4 verfügen über eine eingebaute Endstufe und müssen
demzufolge an das Versorgungsnetz angeschlossen werden. Nutzen Sie hierzu das
mitgelieferte Wechselstromnetzkabel. Stellen Sie sicher, dass die Monitore
ausgeschaltet sind, bevor Sie den Netzanschluss vornehmen.
ACHTUNG! - Bei falscher Versorgungsspannung besteht die Gefahr,
dass von der Garantie ausgeschlossene Bauteile beschädigt werden!
Lautsprecheranschluss
Nutzen Sie zur Verbindung der beiden Monitore das mitgelieferte Lautsprecherkabel.
Schließen Sie das Kabel an die mit federnden Sicherungselementen ausgestatteten
Lautsprecheranschlüsse an.
Anschluss von Soundkarte oder Spielkonsole
Stellen Sie sicher, dass sowohl die Audioquellen als auch die Monitore ausgeschaltet
sind, bevor Sie die StudioPro 4 anschließen.
D
E
U
T
S
C
H
Page 31

30
Stecken Sie den Cinch-Stecker des mitgelieferten Anschusskabels an die entsprechenden
Cinch-Ausgänge Ihrer Computer-Soundkarte bzw. Ihrer Spielkonsole an.
Einstellung des Mid-Boost-Tasters
Über diesen Taster können Sie die Frequenzen des Mittenbereichs anheben. Mit der
Position "Out" erhalten Sie einen flacheren Mittenbereich für das Abhören unter
normalen Bedingungen. Mit der Position "In" erzielen Sie ein präsenteres
Klangergebnis.
Aufstellung der StudioPro 4
Die Aufstellung der Monitore ist für die Wahrnehmung und Beurteilung der
Soundqualität entscheidend. Voraussetzung für die optimale Ausnutzung des
Klangpotentials der StudioPro 4 sind eine geeignete Hörumgebung und eine korrekte
Aufstellung der Monitore. Nachfolgend ein paar Hinweise für die Aufstellung.
D
E
U
T
S
C
H
Page 32

1. Die beiden Monitore sollten so platziert werden, dass die Entfernung zwischen den
Boxen und die Entfernung der Boxen zum Hörer in etwa ein gleichseitiges Dreieck
bildet. (Siehe das folgende Diagramm.)
2. In einer normalen Hörumgebung sollten sich die Tieftöner auf Ohrenhöhe
befinden. (Siehe das folgende Diagramm.)
3. Stellen Sie die Monitore vertikal auf, und zwar mit dem Tieftöner unten. Eine
horizontale Position wird nicht empfohlen.
Hinweis: Achten Sie darauf, dass sich keine Gegenstände zwischen oder
vor den Monitoren befinden. Entfernen Sie Gegenstände aus
schallreflektierendem Material (z. B. Glas, Spiegel oder Metall) aus der
Monitorumgebung. GEGENSTÄNDE AUS SCHALLREFLEKTIERENDEM
MATERIAL SIND GENERELL AUSSERHALB DES SCHALLWEGS ZU
POSITIONIEREN.
31
D
E
U
T
S
C
H
Page 33

32
Technischer Kundendienst & Kontaktinformation
Für weitere Informationen wenden Sie sich bitte per Telefon, Fax oder E-Mail an den
technischen Kundendienst von M-Audio. Fragen, Bemerkungen oder Hinweise zu diesem
Produkt oder anderen Produkten von M-Audio richten Sie bitte an folgende Anschrift:
Garantie-Hinweise
Garantiebedingungen
M-Audio gewährt im Rahmen der normalen Nutzungsbedingungen Garantie auf
Material- und Herstellungsmängel, sofern sich das Produkt im Besitz des
ursprünglichen Käufers befindet und dieser das Produkt registriert hat. Informationen
zu den Garantiebedingungen der einzelnen Produkte finden Sie unter www.maudio.com/warranty.
Produktregistrierung
Vielen Dank, dass Sie Ihr neues M-Audio-Produkt registriert haben! Mit der
Registrierung sind Sie zur vollumfänglichen Inanspruchnahme der Produktgarantie
berechtigt. Außerdem tragen Sie dazu bei, dass M-Audio auch weiterhin Produkte
entwickeln kann, die höchsten Qualitätsansprüchen gerecht werden. Registrierung für
KOSTENLOSE Online-Produkt-Updates unter www.m-audio.com/register . Mit etwas
Glück gewinnen Sie ein KOSTENLOSES M-Audio-Gerät!
M-AUDIO U.S.
5795 Martin Road, Irwindale, CA 91706-6211, U.S.A.
Sales Information: 626-633-9050
Sales Information (email): info@m-audio.com
Tech Support: 626-633-9055
Tech Support (email): techsupt@m-audio.com
Fax: 626-633-9060
Internet Home Page: http://www.m-audio.com
M-AUDIO U.K.
Unit 5, Saracen Industrial Estate, Mark Road,
Hemel Hempstead, Herts HP2 7BJ, England
Sales Information (phone): 44 (0) 1442 416590
Sales Information (fax): 44 (0) 1442 246832
Sales Information (email): info@maudio.co.uk
Technical Support (PC): 44 (0) 1309 671301
Technical Support (Mac): 44 (0) 1765 650072
Technical Support (email): richard@maudio.freeserve.co.uk
Internet Home Page: http://www.maudio.co.uk
M-AUDIO France
Unit 5, Saracen Industrial Estate, Mark Road
Hemel Hempstead, Herts HP2 7BJ, England
Informations Commerciales: 0810 001 105
Informations Commerciales (email): info@m-audio.fr
Assistance Technique:
0820 000 731 (PC) ou 0820 391 191 (Mac at général)
support@m-audio.fr.com ou mac@m-audio.fr (email)
Fax: +44 (0) 144 224 6832
Site Internet: http://www.m-audio.fr
M-AUDIO Deutschland (Germany)
Kuhallmand 34, D-74613 Ohringen, Germany
Sales Information: 49 7941 98 7000
Sales Information (email): info@m-audio.de
Technical Support: 49 7941 98 70030
Technical Support (email): support@m-audio.de
Fax: 07941 98 70070
Internet Home Page: http://www.m-audio.de
M-AUDIO Canada
1400 St-Jean Baptiste Ave. #150
Quebec City, QC G2E 5B7, Canada
Tel: 418-872-0444
Fax: 418-872-0034
Email: midimancanada@m-audio.com
Internet Home Page: http://www.m-audio.ca
M-AUDIO Japan
Annex Buliding 6F, 2-18-10 Marunouchi
Naka-Ku, Nagoya 460-0002, Japan
Tel: 81 52 218 3375
Fax: 81 52 218 0875
Technical Support: 0820 00 731
Email: info@m-audio.co.jp
Internet Home Page: http://www.m-audio.co.jp
D
E
U
T
S
C
H
Page 34

Anhang A – Technische Daten
Typ: 2-Wege-Studio-Monitore
Tieftöner (10 cm Durchmesser): magnetische Abschirmung, gekrümmtes Horn,
hochtemperaturfeste Schwingspule und Beschichtung aus Zellschaumstoff
Hochtöner (2,5 cm Durchmesser): magnetische Abschirmung und speziell geformte
Mylar-Membran
Frequenzgang: 70Hz-20kHz
Crossover-Frequenz: 2,6kHz
RMS SPL: 101,5dB @ 1 Meter
Dynamikumfang: > 95 dB
Geräuschspannungsabstand: > 90 dB (typical, A-weighted)
Eingänge: Line-Eingänge im Cinch-Format (L&R)
Polung: Bei positiven Signalen am positiven Eingang erfolgt Membranschwingung
nach außen.
Dynamische Leistung: 18 Watt/4 Ohm (bei Anschluss von 2 Kanälen)
Eingangsimpedanz: mind. 10KOhm (unsymmetrisch)
Eingangsempfindlichkeit: 100 mV (rosa Rauschen) erzeugt Ausgangssignal von 90dBA
(SPL @ 1m), wenn Eingangsregler (Volume Control) auf Maximum eingestellt ist.
Schutzvorrichtungen: HF-Störung, Ausgangsstrombegrenzung, Übertemperatur-
Schutzschaltung, Ein-/Ausschalt-Transientenschutz, Subsonic-Filter
Betriebsanzeige: Blaue Power-LED auf der Vorderseite
Netzanschluss: 120V / ~60Hz, 230V / ~50Hz oder 100V / 50Hz / 60Hz; Anschluss über
abnehmbares Zweileiterkabel
Gehäuse: Vinylbeschichtetes MDF
Abmessungen: 21,5 cm (Höhe) x 14,5 cm (Breite) x 15,8 cm (Tiefe)
Gewicht: ca. 5,4 kg / Paar (ohne Verpackung)
* O.g. Angaben können jederzeit ohne Vorankündigung geändert werden!
33
D
E
U
T
S
C
H
Page 35

Anhang B – Blockdiagramm
34
D
E
U
T
S
C
H
Page 36

35
Introducción
Gracias por haber elegido el sistema profesional de monitores de audio multimedia
StudioPro 4. Los monitores de M-Audio son utilizados por los ingenieros y productores
más prestigiosos de todo el mundo. Ahora, con los StudioPro 4, podrá disfrutar de la
misma calidad de audio profesional directamente en su escritorio.
Los StudioPro han sido diseñados y comprobados por expertos ingenieros de sonido
con el fin de satisfacer sus necesidades de monitorización de sobremesa. Su diseño
se basa en el objetivo funcional de ofrecer un sonido fiel y de la máxima pureza, sin
ninguna clase de coloración adicional. De este modo podrá escuchar la música tal
como su creador lo concibió. Los StudioPro 4 son monitores activos, directamente
compatibles con señales de línea procedentes de numerosas fuentes de audio.
Los monitores StudioPro 4 han sido diseñados para superar las limitaciones propias
de los monitores de sobremesa convencionales en el entorno del audio digital.
Gracias a su gabinete especialmente diseñado, sus woofers y tweeters optimizados,
su avanzada tecnología de crossover y su extraordinaria potencia, los StudioPro 4
garantizan la mejor calidad de audio disponible hoy en unos monitores de estas
dimensiones. La tecnología de tweeter "wave guide" OptImage de M-Audio
proporciona asimismo una definición estéreo optimizada. Su música, sus juegos y sus
DVDs cobrarán nueva vida gracias a los monitores StudioPro 4.
¿Qué hay dentro de la caja?
Dentro del embalaje de los StudioPro 4 encontrará:
• Dos monitores StudioPro 4 (izquierdo y derecho)
• Un cable de conexión
• Un cable de audio minijack-RCA
• Un cable de alimentación CA extraíble
• Este manual
• Datos de comprobación de su par de StudioPro 4
Características de los StudioPro 4
Woofer
El woofer tiene un diámetro de 4" y está formado por un cono curvado protegido
magnéticamente para minimizar posibles interferencias, una bobina móvil de alta
temperatura y amortiguación de espuma de celda cerrada. El woofer de los StudioPro
4 ha sido diseñado para proporcionar una respuesta equilibrada en las frecuencias
medias y bajas. Gracias a su diseño puede reaccionar con precisión a las señales
entrantes y ofrecer una fiel reproducción, incluso en el caso de señales muy débiles,
minimizando al mismo tiempo la distorsión.
Tweeter
Gracias a la cúpula de mylar de 1" protegida magnéticamente, especialmente
desarrollada para estos monitores, el tweeter proporciona un sonido limpio, exento
de distorsión y con una respuesta extraordinariamente natural. El diseño del tweeter
E
S
P
A
N
O
L
˜
Page 37

contribuye a minimizar el tiempo de reacción y ofrece un rendimiento excelente, al
mismo tiempo que reduce la resonancia gracias a la implementación de una
exclusiva tecnología de amortiguación interna. El tweeter incorpora asimismo la
tecnología "wave guide" OptImage para una imagen estéreo mejorada.
Puerto de subfrecuencias
El orificio del panel trasero se denomina puerto de subfrecuencias. Su misión consiste
en descargar frecuencias extremadamente bajas.
Control Mid-Boost (Enfatización de medios)
El control de enfatización de medios situado en el panel trasero permite compensar la
respuesta acústica de la sala donde se utilizan los monitores, ofreciendo un elevado
control sobre el sonido y la presencia del sonido, así como una gran adaptabilidad a
diversos espacios.
Gabinete
El gabinete de los StudioPro 4 juega un papel tan importante como el de cualquier otro
componente. Con el fin de ofrecer un rendimiento más estable, el gabinete de los
StudioPro 4 está fabricado a base de MDF de alta densidad e incorpora un exclusivo
refuerzo interno diseñado para absorber las vibraciones y amortiguar el movimiento
en condiciones de operación extremas.
Divisor de frecuencias y amplificadores de potencia
La ecualización activa, los divisores de frecuencia y los amplificadores de los StudioPro
4 han sido especialmente diseñados para sus tweeters y woofers. El divisor se
encarga de distribuir adecuadamente las frecuencias bajas, medias y altas a los
distintos componentes, reduciendo así la distorsión y las pérdidas de señal y
proporcionando un sonido natural y equilibrado.
36
E
S
P
A
N
O
L
˜
Page 38

37
Paneles frontal y trasero
Panel frontal
El panel frontal del monitor izquierdo incluye los siguientes elementos:
1. Tweeter
2. Woofer
3. LED de alimentación azul (indicar si los monitores están o no activados)
4. Control de volumen
5. Salida de auriculares (1/8”)
El panel frontal del monitor derecho sólo incluye el woofer y tweeter.
E
S
P
A
N
O
L
˜
Page 39

38
Panel trasero
Esta imagen del panel trasero corresponde al monitor izquierdo (activo). El monitor
derecho es pasivo y sólo dispone de un terminal de monitor que se conecta al terminal
correspondiente del monitor izquierdo.
1. Entradas de línea RCA (L y R): Estos conectores aceptan conectores de entrada
RCA estándar con señal de entrada no balanceada. El cable de audio minijack 1/8"
a RCA incluido permite conectar los StudioPro 4 con otros equipos dotados de
conectores minijack 1/8", como una computadoras portátiles o reproductores MP3.
Hay dos entradas de línea RCA:
L - Entrada del canal izquierdo (conector blanco)
R - Entrada del canal derecho (conector rojo).
2. Control Mid-Boost: Este conmutador tiene dos posiciones 'In' y 'Out'. En la
posición 'Out' se produce una curva de respuesta en frecuencia plana y en la
posición 'In' se potencian los medios.
3. Salidas de monitor: El terminal de resorte de salida del monitor permite conectar
el monitor izquierdo con el derecho mediante el cable de conexión suministrado.
4. Toma de alimentación: Esta toma admite un cable de alimentación bipolar, a
través del cual los StudioPro 4 reciben la alimentación necesaria.
5. Etiqueta identificativa: Esta etiqueta contiene información acerca del modelo y el
número de serie.
6. Interruptor de alimentación: Encendido / apagado de los monitores. La posición
"encendido" aparece señalada con un punto blanco.
7. Salida de subfrequencias: Su misión consiste en reproducir frecuencias
extremadamente bajas, del orden de 70 Hz e inferiores.
E
S
P
A
N
O
L
˜
Page 40

39
Instalación
Por favor, antes de instalar los StudioPro y con el fin de obtener el máximo rendimiento
de sus nuevos monitores, lea atentamente las siguientes instrucciones.
Precauciones
Manipulación de los monitores: No sujete los monitores por los conos (woofers o
tweeters) ya que ello podría dañarlos y repercutir negativamente en su calidad de
sonido. Los StudioPro están apretados dentro del embalaje. Retírelos de la caja con
precaución. Con el fin de evitar posibles daños, sujete los monitores por los lados al
sacarlos de la caja (no los tome por el panel frontal y trasero) y evite tocar los conos,
incluso después de haber desembalado los monitores.
Conexiones: Conecte las entradas RCA de sus monitores a las salidas de audio de su
computadora o consola de juegos. Utilice únicamente cables de buena calidad.
Asegúrese de que los StudioPro 4 están apagados antes de realizar las conexiones.
Si necesita conectar los StudioPro 4 a un dispositivo dotado de conectores jack 1/4",
como la MobilePre USB de M-Audio, adquiera un cable adaptador compuesto por un
conector 1/4" en un extremo y un conector RCA en el otro.
Alimentación: Los monitores StudioPro incluyen su propio sistema de amplificación y,
por consiguiente, necesitan recibir alimentación eléctrica a través del cable de
alimentación CA suministrado. Antes de conectar los monitores a la red eléctrica,
asegúrese de que el interruptor de alimentación de los StudioPro 4 está en posición 'Off'.
¡ATENCIÓN! - El uso de una tensión incorrecta podría provocar situaciones
peligrosas y/o daños en los componentes de los monitores que no están
cubiertos por la garantía.
Conexión de los monitores
Utilice el cable de conexión suministrado para conectar los monitores izquierdo y
derecho usando sus respectivos terminales de resorte.
Conexión con las salidas de audio de la computadora
o consola de juegos
Antes de conectar los StudioPro 4, asegúrese de que tanto los dispositivos de salida
como el sistema StudioPro 4 están apagados.
E
S
P
A
N
O
L
˜
Page 41

40
Conecte la entrada RCA a la salida de la tarjeta de sonido de su computadora o de
su consola de juegos.
Ajuste del conmutador Mid-Boost
Este conmutador de dos posiciones selecciona el modo de enfatización de frecuencias
medias. En posición 'Out', los monitores producen una respuesta plana en frecuencias
medias, adecuada en condiciones de monitorización y escucha normales. En posición
'In', la imagen sonora se desplaza hacia la posición de escucha del oyente.
Colocación de los StudioPro 4
La buena colocación de los monitores es un factor fundamental en la obtención de un
sonido fiable y preciso. Para obtener la máxima calidad de sonido con los StudioPro
4 es imprescindible instalarlos en un entorno de escucha idóneo y colocarlos
adecuadamente. Para una ubicación correcta de los StudioPro 4 observe lo siguiente.
E
S
P
A
N
O
L
˜
Page 42

1. Los dos monitores y el oyente deben formar un triángulo equilátero. Observe el
siguiente diagrama.
2. Coloque los monitores de manera que, en condiciones de escucha normales, la
parte superior de los woofers se encuentre al mismo nivel que sus oídos. Observe
el siguiente diagrama.
3. Disponga los monitores izquierdo y derecho verticalmente, con el woofer en la
parte inferior. No es aconsejable colocar los monitores en sentido horizontal.
Nota: Evite la presencia de objetos que puedan obstaculizar la circulación
de aire delante de los StudioPro 4 o alrededor de los mismos. Evite
asimismo la presencia de materiales reflejantes como cristales, espejos o
superficies metálicas en el entorno de escucha. MANTENGA DICHOS
MATERIALES ALEJADOS DE LA TRAYECTORIA DEL SONIDO DE LOS
StudioPro 4.
41
E
S
P
A
N
O
L
˜
Page 43

42
Asistencia técnica y datos de contacto
Si necesita más información, póngase en contacto con el Servicio de asistencia técnica
de M-Audio (teléfono, fax o e-mail.) Si desea hacernos llegar sus preguntas,
comentarios o sugerencias acerca de este o cualquier otro producto de M-Audio, por
favor no dude en ponerse en contacto con nosotros:
Condiciones de la garantía
Condiciones de la garantía
M-Audio garantiza este producto contra defectos de materiales y mano de obra, en
condiciones de uso normales y siempre que su propietario sea el comprador original y
haya registrado el producto. Consulte www.m-audio.com/warrantypara más
información acerca de las condiciones y limitaciones específicas aplicables a su producto.
Registro de la garantía
Gracias por registrar su nuevo producto de M-Audio. Registrándose disfrutará
inmediatamente de la cobertura de garantía y ayudará a M-Audio a desarrollar y
fabricar productos de la máxima calidad posible. Registre su producto en línea en
www.m-audio.com/register para recibir actualizaciones de producto GRATIS y
participar en el sorteo de equipos M-Audio.
M-AUDIO U.S.
5795 Martin Road, Irwindale, CA 91706-6211, U.S.A.
Sales Information: 626-633-9050
Sales Information (email): info@m-audio.com
Tech Support: 626-633-9055
Tech Support (email): techsupt@m-audio.com
Fax: 626-633-9060
Internet Home Page: http://www.m-audio.com
M-AUDIO U.K.
Unit 5, Saracen Industrial Estate, Mark Road,
Hemel Hempstead, Herts HP2 7BJ, England
Sales Information (phone): 44 (0) 1442 416590
Sales Information (fax): 44 (0) 1442 246832
Sales Information (email): info@maudio.co.uk
Technical Support (PC): 44 (0) 1309 671301
Technical Support (Mac): 44 (0) 1765 650072
Technical Support (email): richard@maudio.freeserve.co.uk
Internet Home Page: http://www.maudio.co.uk
M-AUDIO France
Unit 5, Saracen Industrial Estate, Mark Road
Hemel Hempstead, Herts HP2 7BJ, England
Informations Commerciales: 0810 001 105
Informations Commerciales (email): info@m-audio.fr
Assistance Technique:
0820 000 731 (PC) ou 0820 391 191 (Mac at général)
support@m-audio.fr.com ou mac@m-audio.fr (email)
Fax: +44 (0) 144 224 6832
Site Internet: http://www.m-audio.fr
M-AUDIO Deutschland (Germany)
Kuhallmand 34, D-74613 Ohringen, Germany
Sales Information: 49 7941 98 7000
Sales Information (email): info@m-audio.de
Technical Support: 49 7941 98 70030
Technical Support (email): support@m-audio.de
Fax: 07941 98 70070
Internet Home Page: http://www.m-audio.de
M-AUDIO Canada
1400 St-Jean Baptiste Ave. #150
Quebec City, QC G2E 5B7, Canada
Tel: 418-872-0444
Fax: 418-872-0034
Email: midimancanada@m-audio.com
Internet Home Page: http://www.m-audio.ca
M-AUDIO Japan
Annex Buliding 6F, 2-18-10 Marunouchi
Naka-Ku, Nagoya 460-0002, Japan
Tel: 81 52 218 3375
Fax: 81 52 218 0875
Technical Support: 0820 00 731
Email: info@m-audio.co.jp
Internet Home Page: http://www.m-audio.co.jp
E
S
P
A
N
O
L
˜
Page 44

Apéndice A - Características técnicas
Tipo: Monitores de referencia de dos vías
Woofer: Cono de polipropileno de 4" protegido magnéticamente, con bobina móvil de
alta temperatura y amortiguación de espuma de celda cerrada
Tweeter: 1", protegido magnéticamente, con cono de mylar especialmente diseñado
Respuesta en frecuencia: 70 Hz - 20 kHz
Frecuencias de crossover: 2,6 kHz
RMS SPL @ 1 metro: 101,5 dB
Rango dinámico: >95dB
Relación señal/ruido: >90 dB (típico, ponderado A)
Conectores de entrada: Entradas de línea izquierda/derecha (RCA)
Polaridad: La señal positiva conectada a la entrada positiva produce el
desplazamiento hacia afuera del cono de graves
Potencia dinámica: 18 W / 4 ohmios con 2 canales conectados
Impedancia de entrada: 10 kOhmios mínimo
Sensibilidad de entrada: una entrada de ruido rosa de 100 mV produce un valor de
SPL de 90dBA a una distancia de 1 metro, con el control de volumen al máximo
Protección: interferencias RF, limitación de corriente de salida, sobrecalentamiento,
transitorios de encendido/apagado, filtro subsónico
Indicador: LED de encendido/apagado azul en el panel frontal
Requisitos de alimentación: 120V/~60Hz o 230V/~50Hz; recibe alimentación a través
de un cable de dos conductores extraíble
Gabinete: laminado de vinilo MDF
Dimensiones: 21,6 cm (alto) x 14,6 cm (ancho) x 15,9 cm (prof.)
Peso: aprox. 5,5 kg (pareja, embalaje no incluido)
* Las especificaciones mencionadas están sujetas a modificación sin previo aviso
43
E
S
P
A
N
O
L
˜
Page 45

Apéndice B - Diagrama de bloques
44
E
S
P
A
N
O
L
˜
Page 46

45
Introduzione
Grazie per aver scelto il sistema di monitoraggio professionale desktop StudioPro 4. I
monitor prodotti da M-Audio vengono utilizzati dai migliori tecnici e produttori negli
studi di tutto il mondo. Con gli Studio pro 4, è possibile avere lo stesso standard
professionale di qualità audio direttamente sul proprio desktop.
I monitor Studio Pro 4 sono stati progettati e testati da ingegneri audio di elevata
esperienza per soddisfare le richieste degli utenti in un ambiente di monitoraggio
desktop. Si basano sull’obiettivo funzionale di offrire un suono originale puro senza
colorazioni aggiuntive, per ascoltare la musica così com'è stata registrata dall'artista.
I monitor StudioPro 4 dispongono di amplificatori propri, accettando direttamente un
segnale a livello di linea da diverse fonti.
Gli Studio Pro 4 sono stati progettati per superare tutti i limiti dei monitor desktop
convenzionali in ambienti audio digitali. I monitor StudioPro 4 abbinano cabinet dal
design personalizzato, a trasduttori ottimizzati e alla tecnologia crossover avanzata
con una potenza tale da assicurare la massima fedeltà sonora possibile ottenibile da
monitor audio di queste dimensioni. Inoltre, l'esclusiva tecnologia OptImage di MAudio assicura un'immagine stereo migliorata. I monitor Studio Pro 4 sono la
soluzione ideale per dare nuova vita e uno straordinario vigore alla musica generata
dal computer, dai videogiochi e dai DVD.
Cosa c’è dentro la scatola?
La confezione di Studio Pro 4 contiene:
• Due altoparlanti StudioPro 4 (sinistro e destro)
• Un cavo altoparlanti
• Un cavo audio da mini jack a RCA
• Un cavo di alimentazione scollegabile
• Il presente manuale
• I dati effettivi del test dei monitor StudioPro 4
Caratteristiche di StudioPro 4
Woofer
Il woofer ha un diametro di 4” ed è composto da un cono ricurvo schermato
magneticamente con bobina mobile ad alta temperatura e smorzamento interno in
schiuma a cellula chiusa. Questo woofer è stato appositamente progettato per offrire
una risposta equilibrata nelle frequenze medie e basse. È stato progettato per reagire
in modo preciso al segnale in ingresso e per riprodurre in modo preciso anche segnali
di livello basso minimizzando la distorsione.
Tweeter
Grazie a una speciale cupola in mylar da 1” con schermatura magnetica, il tweeter può
riprodurre un suono originale privo di distorsioni, offrendo una risposta estremamente
naturale. L’uso della cupola sagomata in mylar minimizza il tempo di reazione e
garantisce una riproduzione eccellente riducendo inoltre la risonanza grazie a una
I
T
A
L
I
A
N
O
Page 47

tecnologia di smorzamento interno veramente unica. Inoltre, nel tweeter è incorporata
la tecnologia wave guide OptImage che migliora l'immagine stereo.
Porta per sub-frequenze
Il foro presente nel pannello posteriore viene denominato porta per sub-frequenze ed
è stato progettato per l’emissione di frequenze estremamente basse.
Controllo Mid-Boost
Tale controllo, posto nella parte posteriore degli StudioPro 4, fornisce la
compensazione per l'equalizzazione ambientale. Offre uno straordinario controllo sui
suoni e la presenza 4 e rende gli StudioPro 4 molto versatili in spazi diversi.
Involucro
Insieme agli altri componenti, l'involucro degli StudioPro 4 riveste un ruolo assai
importante. È stato utilizzato uno speciale materiale in MDF ad alta densità e un
rinforzo interno unico per offrire prestazioni più stabili. L’involucro degli StudioPro 4 è
infatti progettato per sopportare le vibrazioni e gli impatti in condizioni estreme.
Divisore di frequenza e amplificatori di potenza
Il divisore di frequenza (crossover) e gli amplificatori di potenza degli StudioPro 4 sono
stati progettati in modo specifico per questi woofer e tweeter. Il crossover distribuisce
in modo corretto ai componenti frequenze basse, medie e alte allo scopo di ridurre la
distorsione e la perdita sunora, garantendo in questo modo un suono equilibrato e
naturale.
46
I
T
A
L
I
A
N
O
Page 48

47
Pannello frontale e posteriore
Pannello frontale
Questa immagine mostra il pannello frontale dell'altoparlante sinistro.
1. Driver tweeter
2. Driver woofer
3. LED di alimentazione blu (indicano se gli altoparlanti sono accesi o spenti)
4. Controllo del volume
5. Jack uscita cuffia (mini jack)
I
T
A
L
I
A
N
O
Page 49

Pannello posteriore
Questa immagine del pannello posteriore è per l'altoparlante attivo sinistro.
L'altoparlante destro è passivo e dispone di un solo morsetto per il collegamento con
l'altoparlante sinistro.
1. Ingressi di linea RCA (L e R): questi ingressi accettano connessioni RCA standard
con cavi sbilanciati. Il cavo audio incluso con mini jack-RCA consente di collegare
gli StudioPro 4 ad altre apparecchiature dotate di connessioni con mini jack, quali
computer laptop o lettori MP3.
Sono presenti 2 ingressi linea RCA:
“L” - Ingresso canale sinistro (bianco)
“R” - Ingresso canale destro (rosso)
2. Mid-Boost: sono possibili due selezioni, ovvero “In” e “Out”. L’impostazione Out
produce una curva di risposta in frequenza "piatta", mentre l’impostazione In
comporta un aumento nelle frequenze medie.
3. Uscite Altoparlanti: è presente un'uscita morsetto altoparlante azionata a molla
per la connessione dell'altoparlante sinistro a quello destro mediante il cavo
incluso.
4. Presa di alimentazione: accetta il cavo di alimentazione scollegabile, che serve
per alimentare il sistema StudioPro 4.
5. Etichetta del produttore: questa etichetta contiene informazioni sul modelo e il
numero seriale del prodotto.
48
I
T
A
L
I
A
N
O
Page 50

49
6. Interruttore di alimentazione: si tratta dell’interruttore di attivazione e
disattivazione degli StudioPro 4. La posizione di attivazione è indicata da un punto
bianco.
7. Porta sub frequenza: si tratta di una porta di supporto per la riproduzione di
frequenze molto basse, consentendo di scaricare le frequenze inferiori ai 70 Hz.
Installazione
Per ottenere prestazioni ottimali degli StudioPro 4, leggere attentamente quanto segue
prima dell’installazione.
Precauzioni
Disimballaggio: non afferrare i coni degli altoparlanti (woofer o tweeter); così facendo
si può danneggiare l'unità e influenzare negativamente la qualità del suono. Gli
StudioPro sono stati imballati in modo sicuro, quindi è necessaria particolare
attenzione al momento dell’estrazione dei monitor dalla scatola. Per evitare possibili
danni agli altoparlanti, afferrare entrambi i lati del monitor allo scopo di estrarlo dalla
scatola. Evitare di toccare i coni degli altoparlanti anche dopo aver estratto i monitor
della scatola.
Collegamenti: collegare gli ingressi RCA dell'unità StudioPro 4 alle uscite
corrispondenti della scheda audio del computer o della console di gioco. È consigliato
l’utilizzo di cavi di alta qualità. Accertarsi che gli StudioPro 4 siano spenti prima di
effettuare qualsiasi collegamento.
Se occorre collegare gli altoparlanti StudioPro 4 a un dispositivo con jack 1/4", quale
M-Audio MobilePre USB, è possibile acquistare un cavo adattatore che dispone di una
connessione jack 1/4" su un'estremità e sull'altra una connessione RCA.
Utilizzo corretto dell’alimentazione: poiché gli StudioPro 4 contengono un proprio
amplificatore, occorre collegarli a una presa elettrica utilizzando il cavo c.a.
scollegabile fornito nella confezione. Prima di collegare l'alimentazione, accertarsi che
l'interruttore di accensione sugli StudioPro 4 sia nella posizione off.
ATTENZIONE! - L’uso di una tensione inadeguata può comportare
condizioni pericolose e/o danni a componenti degli altoparlanti non
coperti dalla garanzia.
Connessione dei cavi degli altoparlanti
Utilizzare i cavi degli altoparlanti forniti nella confezione degli StudioPro 4 per collegare
gli altoparlanti destro e sinistro tramite i terminali a molla.
Collegamento alla scheda audio del computer o alla console di gioco
Prima di collegare gli StudioPro 4, accertarsi che l'alimentazione del dispositivo di
uscita sia spenta e che sia spenta anche quella del sistema StudioPro 4.
I
T
A
L
I
A
N
O
Page 51

50
Collegare il cavo RCA ai connettori di uscita corrispondenti della scheda audio del
computer o della console di gioco.
Impostazione dell’interruttore Mid-Boost
Con questo interruttore a 2 posizioni si seleziona l'impostazione della modalità delle
frequenze medie. La modalità Out produce una risposta media piatta per condizioni
normali di monitoraggio e ascolto. La modalità In sposta in avanti l'immagine stereo
verso la posizione di ascolto.
Collocazione degli StudioPro 4
Il posizionamento degli altoparlanti rappresenta una delle procedure più importanti
per consentire un monitoraggio preciso del suono. Per sfruttare al massimo le
capacità di monitoraggio degli StudioPro 4, è necessario un ambiente di ascolto
appropriato e un posizionamento corretto. Fare riferimento a quanto segue per
posizionare in modo corretto gli StudioPro 4.
I
T
A
L
I
A
N
O
Page 52

1. In genere, le due unità e l’ascoltatore dovrebbero essere allineati in modo da
formare un triangolo regolare. Fare riferimento al diagramma seguente.
2. Posizionare i monitor in modo che la parte superiore dei woofer sia a livello delle
orecchie in un ambiente di ascolto normale. Fare riferimento al diagramma
seguente.
3. Posizionare i monitor StudioPro 4 verticalmente con il woofer in basso. Non è infatti
consigliato posizionare i monitor StudioPro 4 orizzontalmente.
Nota: NON frapporre ostacoli che possano bloccare il flusso d’aria vicino
ai monitor StudioPro 4. Rimuovere anche eventuali materiali riflettenti
quali vetri, specchi o metallo dall’ambiente di monitoraggio.
POSIZIONARE QUESTO TIPO DI MATERIALI LONTANO DAL PERCORSO DEL
SUONO PROVENIENTE DAGLI StudioPro 4.
51
I
T
A
L
I
A
N
O
Page 53

52
Assistenza tecnica e informazioni su chi contattare
Per ulteriore assistenza, contattare l’Assistenza Tecnica M-Audio per telefono, fax o
posta elettronica. Per qualsiasi informazione, commento o suggerimento riguardante
questo prodotto o qualsiasi prodotto M-Audio o Midiman, contattare direttamente
M-Audio mediante le indicazioni seguenti:
Garanzia degli StudioPro 4
Condizioni di garanzia
M-Audio garantisce che i prodotti sono esenti da difetti nei materiali e nella manodopera
in condizioni di utilizzo normale e la garanzia è valida a condizione che essi siano in
possesso dell'utente originale registrato. Consultate www.m-audio.com/warrantyper le
condizioni e le limitazioni che si applicano al vostro specifico prodotto.
Registrazione della garanzia
Grazie per effettuare la registrazione del vostro nuovo prodotto M-Audio. Così
facendo, si ha immediatamente diritto alla completa copertura di garanzia e si aiuta
M-Audio a sviluppare e realizzare prodotti della migliore qualità possibile. Registratevi
online presso www.m-audio.com/register per ricevere aggiornamenti GRATUITI sui
prodotti e per avere la possibilità di vincere apparecchiature M-AUDIO.
M-AUDIO U.S.
5795 Martin Road, Irwindale, CA 91706-6211, U.S.A.
Sales Information: 626-633-9050
Sales Information (email): info@m-audio.com
Tech Support: 626-633-9055
Tech Support (email): techsupt@m-audio.com
Fax: 626-633-9060
Internet Home Page: http://www.m-audio.com
M-AUDIO U.K.
Unit 5, Saracen Industrial Estate, Mark Road,
Hemel Hempstead, Herts HP2 7BJ, England
Sales Information (phone): 44 (0) 1442 416590
Sales Information (fax): 44 (0) 1442 246832
Sales Information (email): info@maudio.co.uk
Technical Support (PC): 44 (0) 1309 671301
Technical Support (Mac): 44 (0) 1765 650072
Technical Support (email): richard@maudio.freeserve.co.uk
Internet Home Page: http://www.maudio.co.uk
M-AUDIO France
Unit 5, Saracen Industrial Estate, Mark Road
Hemel Hempstead, Herts HP2 7BJ, England
Informations Commerciales: 0810 001 105
Informations Commerciales (email): info@m-audio.fr
Assistance Technique:
0820 000 731 (PC) ou 0820 391 191 (Mac at général)
support@m-audio.fr.com ou mac@m-audio.fr (email)
Fax: +44 (0) 144 224 6832
Site Internet: http://www.m-audio.fr
M-AUDIO Deutschland (Germany)
Kuhallmand 34, D-74613 Ohringen, Germany
Sales Information: 49 7941 98 7000
Sales Information (email): info@m-audio.de
Technical Support: 49 7941 98 70030
Technical Support (email): support@m-audio.de
Fax: 07941 98 70070
Internet Home Page: http://www.m-audio.de
M-AUDIO Canada
1400 St-Jean Baptiste Ave. #150
Quebec City, QC G2E 5B7, Canada
Tel: 418-872-0444
Fax: 418-872-0034
Email: midimancanada@m-audio.com
Internet Home Page: http://www.m-audio.ca
M-AUDIO Japan
Annex Buliding 6F, 2-18-10 Marunouchi
Naka-Ku, Nagoya 460-0002, Japan
Tel: 81 52 218 3375
Fax: 81 52 218 0875
Technical Support: 0820 00 731
Email: info@m-audio.co.jp
Internet Home Page: http://www.m-audio.co.jp
I
T
A
L
I
A
N
O
Page 54

Appendice A – Specifiche Tecniche
Tipo: Monitor da studio a due vie
Driver LF: cono curvo da 4” schermato magneticamente e munito di una bobina
mobile di alta temperatura e smorzamento interno in schiuma a cellula chiusa.
Driver HF: cupola da 1” in mylar, schermato magneticamente
Risposta in frequenza: 70 Hz - 20 kHz
Frequenze di crossover: 2,6kHz
RMS SPL: 101,5dB a 1 metro
Range dinamico: >95dB
Rapporto segnale/rumore: >90 dB (tipico, pesato A)
Connettori di ingresso: ingressi audio destro e sinistro (RCA)
Polarità: un segnale positivo all’ingresso + produce uno spostamento del cono di
bassa frequenza verso l’esterno
Potenza dinamica: 18 watt/4 ohm con 2 canali connessi
Impedenza ingresso: 10k Ohm sbilanciati
Sensibilità d’ingresso: un segnale in ingresso di rumore rosa da 100 mV produce una
pressione sonora in uscita da 90dBA a 1 metro di distanza dall’altoparlante con il
controllo del volume al massimo
Protezioni: interferenza RF, limitazione corrente in uscita, surriscaldamento, transitori
on/off, filtro subsonico
Indicatore: LED blu di alimentazione acceso/spento sul pannello frontale
Requisiti di alimentazione: 120V/~60Hz, 230V/~50Hz o 100V/50Hz/60Hz; alimentati
tramite cavo a 2 vie scollegabile
Involucro: MDF laminato vinilico
Dimensioni: 21,6 cm (A) x 14,6 cm (L) x 15,9 cm (P)
Peso: 5,4 kg/coppia (circa, senza confezione)
* Le specifiche sono soggette a modifiche senza preavviso
53
I
T
A
L
I
A
N
O
Page 55

Appendice B – Diagramma a blocchi
54
I
T
A
L
I
A
N
O
Page 56

はじめに
55
日
本
語
StudioPro4をお買い上げ頂きまして誠に有難うございます。世界中のレコーディングスタジオで
使われているM-Audioのスタジオモニターは、正確なミックスを求めるエンジニアやプロデュー
サーたちに高く評価されています。StudioPro4では、プロクオリティなオーディオをデスクトップ
で実現 する最新 テクノロジー 搭 載のスタジ オモニターです。
StudioPro4はデスクトップのオーディオのモニタリング環境で要求される条件を満たすべく、多
くのオーディオ技術者によってテスト/設計されています。特に機能面(純粋で、限りなく原 音 に近
い音の再生)に重点をおいて設計されました。StudioPro4は、外部のアンプを必要とせず様々な
音源からラインレベルの音声信号をサポートします。
StudioPro4は、デジタルオーディオ環境における従来のデスクトップモニターのあらゆる限界
を克服するために設計されています。StudioPro4は、カスタムデザインのキャビネットに高度
なクロスオーバー技術を採用し、このサイズのスタジオモニターでは最高の音質を提供します。
M-Audioの登録商標であるOptImageウェーブガイドテクノロジーにより、更に臨場感のあるス
テレオサウンドを実現します。StudioPro4では、コンピューター ベースの音楽、ゲーム、DVDな
どを最高の音質で堪能することができます。
製品パッケージ内容
StudioPro4に同梱されている物:
• StudioPro4スピーカー2台(左/右)
• スピーカーワイヤーケーブル 1本
• RCAピンケーブル用の1/8インチのミニ端子1本
• 電源ケーブル
• 本マニュアル
• StudioPro4のテストレポート
StudioPro4の特徴
ウーファー
ウーファーは 、防磁型の直径4インチのユニットでカーブドコーン、耐熱型ボイスコイルやクローズ
ドセルフォームダンピングを使用しバランスの良い中低域を再生できるよう設計されています。
また、入力信号に対して正確に反応し歪みを最小限に抑えて再生することができます。
ツイーター
防磁型の特別に開発された1インチのマイラードームを使用することで、歪みのない原音に忠実
な音を再現することができます。再生に優れた特別設計のマイラードームを使用することによっ
て反応の遅れを最小限に短縮し独自の内部ダンピング技術によって共振をほとんどなくすこと
に成功しました。また、ツイーターにはステレオイメージを改良するOptImageウェーブガイド技
術が組み込まれています。
Page 57

56
日
本
語
サブフリクェンシーポート
リアパネルに設けられた穴 は、サブフリクェンシーポートと呼ばれ重低音を再生するように設計
されています。
中域のブーストコントロール
リアパネルの「中域のブーストコントロール」は、ルームEQを補正し、様々なスペースで最適なサ
ウンドを得るためのコントロールを提供します。
エンクロージャー
エンクロージャーは、他のパーツ同様とても重要な役割を果たしています。StudioPro4のエン
クロージャーは、どんな使用条件の下でもエンクロージャー内部からの衝 撃に耐えられるよう
設計されています。素材には高密度のMDFを使用し独自の方法で内部を強化して安定した性能
を発揮します。
ネットワークとパワーアンプ 部
StudioPro4のアクティブバランス、クロスオーバーネットワークやパワーアンプ電力は、ツイー
ターとウーファー専用の設計となっています。ネットワークは、無駄なサウンドや歪みを取り除く
ために低/中/高域周波数に振り分け適切にコンポーネントに送信し、自然でバランスが取れた
サウンドを実現します。
Page 58

フロントパネルとリアパネルの特徴
57
日
本
語
フロントパネル
レフト(左)スピーカーのフロントパネルには以下の物が装備されています:
1. LFドライバ(ウーファー)
2. HFドライバ(ツイーター)
3. 電源LED(電源を入れるとLEDが青色に点灯します)
4. 音量調節
5. ヘッドフォン出力端子(1/8”)
ライト(右)スピーカーのフロントパネルにはLFドライバとHFドライバ(ウーファーとツイーター)
のみが装備されています。
Page 59

58
日
本
語
リアパネル
このイメージは、レフトス ピーカ ー の リアパ ネ ルを 示し ます。ライトスピーカーのリアパネルには、
スピーカー端子のみが装備され、付属のケーブルでレフトスピーカーと接続します。)
1. RCAライン入力(L&R):以下の入力端子2系統はRCAアンバランスケーブルを
接続します。同梱のRCAケーブル用1/8インチミニ端子を使い、1/8インチミニ
端子出力を装備したMP3プレーヤーやノートブックコンピュータなどの機器と
StudioPro4を接続できます。
RCAライン入力2系統:
L-左チャンネル入力(白色端子)
R-右チャンネル入力(赤色端子)
2 . 中 域 の ブ ース ト セレク タ スイッ チ : こ の ス イッ チは 、中域のブーストモード設定
を選択します。このスイッチを「In」に設定すると中域を強調(ブースト)すること
ができます。このスイッチを「Out」にするとフラットな周波数特性カーブで再生
します。
3. スピーカー端子:スピーカーのリアパネルには、スプリングアクションスピーカー
端子が装備されています。同梱のスピーカーワイヤーケーブルは、左のスピーカー
と右のスピーカーを接続するのに使用します。
4. 電源コネクタ:StudioPro4を動作させるためには付属の2回路ラインコードを
接続しコンセントと接続します。
5. 製品ラベル:StudioPro4のモデルとシリアル番号がプリントされています。
Page 60

6. 電源スイッチ:このスイッチによりStudioPro4の電源をON/OFFできます。
59
日
本
語
白い点の側を押すとONになります。
7. サブフリクェンシーポート:このポートは60Hz未満の周波数を再生します。
インストール
StudioPro4を最適に使用するには、設置前に以下の説明書を注意してお読み下さい。
注意
取り扱い:StudioPro4は、箱の中にしっかり梱包されているので取り外しに注意して下さい。ス
ピーカー を 損 傷させないようにユニット(左右)の両側を持って下さい。損傷を避けるため、箱か
ら取り出した後もコーン(ウーファーとツイーター)に触れないで下さい。
接続:StudioPro4のRCA入力をRCAに対応するコンピュータのサウンドカード
やゲーム出力等に接続して下さい。接続には高品質なケーブルの使用して下さい。
StudioPro4の電源がOFFであることを確認して音量を最小にして下さい。
StudioPro4をMobilePreUSBなどの1/4インチ出力端子装備の機器に接続する場合は、アダ
プタケーブル(片方の端が1/4インチ端子でもう一方の端がRCA端子)を別途、お求め下さい。
コンセントに接続:StudioPro4はアンプ搭載です。同梱の電源ケーブルを使用してコンセントに
接続する必要があります。コンセントに接 続する前に、StudioPro4の電源スイッチがオフになっ
ている事を確認して下さい。
警告‒不適切な電圧での使用は危険です。スピーカーコンポーネントの損傷を引き起こ
す事があります。この場合は、保証の対象にはなりません。
スピーカーワイヤー接続
StudioPro4のパッケージに同梱のスピーカーワイヤーケーブルを使用して、左右のスピーカー
を接続して下さい。
コンピュータのサウンドカードやゲーム機器への接続
StudioPro4を接続する前に、サウンドカードやゲーム機器の電源とStudioPro4の電源が全て
オフになっている事を確認して下さい。
Page 61

60
日
本
語
下図の通り、コンピュータのサウンドカードやゲーム機器のRCA出力端子に、RCAケーブルでス
ピーカー を 接 続します
中域のブーストEQスイッチの設定
このスイッチは中域のブーストモードのIn/Outを切り替えます。「Out」モードでは中域の周波数
特性がフラットで通常のリスニングやモニタリングに適しています。「In」モードでは中域をブース
トさせ、音場をリスナーの位置に近づけます。
StudioPro4の設置
スピーカーの 配 置は、サウンドを正確にモニターする上で最も大切な条件の一つです。
StudioPro4の性能を最大限に発揮してモニターするには、適切なリスニング環境にスピーカー
を正しく配置する必要があります。以下の説明に従い、StudioPro4を正しく配置して下さい。
Page 62

1. 2台のスピーカーとリスナーを正三角形を作る位置関係に配置します。下図を参
61
日
本
語
照して下さい。
2. スピーカーのウーファー最頂部がリスナーの耳の位置になるように、スピーカー
位置の高さを調整します。下図を参照して下さい。
3. StudioPro4の左右のスピーカーは縦(ウーファーが正面下)に正しく置きます。
StudioPro4は縦専用で横置には向きません。
注意: 2台のスピーカーの間やスピーカーの前に障害物を置かないようにして下さい。
空気の流れ(音の媒体)を妨げてしまいます。ガラス/鏡/金属など反射率の高い物は障
害物となり、モニター環境に不適切ですので、StudioPro 4の音の通り道から取り除い
て下さい。
Page 63

テクニカルサポートとお問い合わせ先
62
日
本
語
ご質問やお問い合わせはM-Audioテクニカルサポートまでご連絡ください。
電話(052-218-0859)、fax(052-218-0875)
e-mail(PCサポート):win-support@m-audio.co.jp
e-mail(Macサポート);mac-support@m-audio.co.jp
〒460-0002
住所 :愛知県名古屋市中区丸の内2-18-10
電話 :052-218-0859
社名 :株式会社エムオーディオジャパン
担当部署 :カスタマーサポート
StudioPro4製品保証
保証規定
本製品の操作または使用、関連文書に含まれている操作方法によって生じた付随的または間接
的な障害について、株式会社エムオーディオジャパンは一切責任を負わないものとします。適切
な方法で安全にご使用されている場合は、本製品をお買い上げいただいた日より一年間は保障
期間となり修理は無償で行います。しかしながら不適切な使用方法による損傷や、保証書に購入
店での手続きが無い場合には製品保証は無効になります。日本国内保証書は、必ずお求めになっ
た販売店で所定の手続きを行った後、大切に保管して下さい。特定の製品に適用される制限条
項に関してはwww.m-audio.com/warrantyをご覧ください。
保証登録
M-Audio製品の保証、技術的な日本語サポートをエムオーディオジャパンで受けるためには、
ユーザー登録が完了されている必要があります。ユーザー登録が未完了の場合には一切の保証、
サポートを受けることができません。M-Audioの製品のユーザー登録には、オンラインでのユー
ザー登録(http://www.m-audio.com/register)、または、同梱のユーザー登録ハガキに必要
事項をご記入になりエムオーディオジャパンまで返信して頂くようお願い致します。尚、ユーザー
登録完了のご案内は行っておりませんのでご了承ください。
Page 64

AppendixA‒テクニカルスペック
63
日
本
語
形式:2ウェイスタジオリファレンスモニター
LFドライバ:直径4インチの防磁型、カーブドコーン、防熱型ボイスコイル、およびダンプト
クローズドセルフォーム装備
HFドライバ:直径1インチの防磁型マイラードーム
周波数特性:70Hz-20kHz
クロスオーバー周波数:2.6kHz
RMSSPL:101.5dB(1メーターで)
ダイナミックレンジ:95dB以上
S/N比:90dB以上(typical,A-weighted)
入力端子:RCAライン入力端子(左右)
極性:+入力時、正の信号でLFドライバを外側へ駆動
ダイナミックパワー:18W/4Ω (接続した2つのチャンネル)
入力インピーダンス:10KΩアンバランス
入力感度:90dBA(100mV1m)
保護機能:RF干渉、出力電流制限、過熱保護、電源On/Off過熱保護、サブソニックフィルタ
電源LED:フロントパネルの青色LED
電源条件:120V/~60Hz、230V/~50Hzまたは100V/50Hz/60Hz;取り外し可能な2回路
ケーブル
キャビネット:ビニールでラミネートされたMDF
寸法:21.6cm(高さ)x14.6cm(幅)x15.9cm(奥行)
重力:1組あたり5.5kg(外装箱除く)
上記の仕様は予告なく変更になる場合があります。
Page 65

64
SPRO4-MNL-071504
日
本
語
AppendixB-ブロック図
 Loading...