

Page 1
TRIGGER
FINGER
This guide is intended to help get you started quickly.
In order to achieve optimal usage of your new Trigger
Finger, we recommend that you carefully study the
enclosed product manual, either after completing the
process described in this guide or before.
Quick Start Guide
16-Pad MIDI Drum Control Surface
TriggerFinger_QS_M80010QS.indd 1 3/7/05 11:44:40 AM
Page 2
Table of Contents
English . . . . . . . . . . . . . . . . . . . . . . . . . . . . . . . . . . . . . . . . . . . . . . . . . . . . . . . . . . . . . . . . . . . . . . . . . . . . . . . . . . . . 3
Installation Procedure . . . . . . . . . . . . . . . . . . . . . . . . . . . . . . . . . . . . . . . . . . . . . . . . . . . . . . . . . . . . . . . . . . . 3
Basic Installation . . . . . . . . . . . . . . . . . . . . . . . . . . . . . . . . . . . . . . . . . . . . . . . . . . . . . . . . . . . . . . . . . . 3
Installing the Windows Multi-client Driver . . . . . . . . . . . . . . . . . . . . . . . . . . . . . . . . . . . . . . . . . . . . . . . 3
Additional Information and Support . . . . . . . . . . . . . . . . . . . . . . . . . . . . . . . . . . . . . . . . . . . . . . . . . . . . . . . . 4
Technical Information . . . . . . . . . . . . . . . . . . . . . . . . . . . . . . . . . . . . . . . . . . . . . . . . . . . . . . . . . . . . . . . . . . . .
5
Français . . . . . . . . . . . . . . . . . . . . . . . . . . . . . . . . . . . . . . . . . . . . . . . . . . . . . . . . . . . . . . . . . . . . . . . . . . . . . . . . . . . .7
Procédure d’installation . . . . . . . . . . . . . . . . . . . . . . . . . . . . . . . . . . . . . . . . . . . . . . . . . . . . . . . . . . . . . . . . . . .7
Installation de base . . . . . . . . . . . . . . . . . . . . . . . . . . . . . . . . . . . . . . . . . . . . . . . . . . . . . . . . . . . . . . . . .7
Installation du pilote multiclient pour Windows . . . . . . . . . . . . . . . . . . . . . . . . . . . . . . . . . . . . . . . . . . .7
Informations complémentaires et assistance . . . . . . . . . . . . . . . . . . . . . . . . . . . . . . . . . . . . . . . . . . . . . . . . 8
Deutsch . . . . . . . . . . . . . . . . . . . . . . . . . . . . . . . . . . . . . . . . . . . . . . . . . . . . . . . . . . . . . . . . . . . . . . . . . . . . . . . . . . . 9
Installation . . . . . . . . . . . . . . . . . . . . . . . . . . . . . . . . . . . . . . . . . . . . . . . . . . . . . . . . . . . . . . . . . . . . . . . . . . . . 9
Grundlegende Hinweise . . . . . . . . . . . . . . . . . . . . . . . . . . . . . . . . . . . . . . . . . . . . . . . . . . . . . . . . . . . . 9
Installation des Multi-Client-Treibers für Windows . . . . . . . . . . . . . . . . . . . . . . . . . . . . . . . . . . . . . . . .
9
Zusätzliche Informationen und Support . . . . . . . . . . . . . . . . . . . . . . . . . . . . . . . . . . . . . . . . . . . . . . . . . . . . . 10
Español . . . . . . . . . . . . . . . . . . . . . . . . . . . . . . . . . . . . . . . . . . . . . . . . . . . . . . . . . . . . . . . . . . . . . . . . . . . . . . . . . . . . 11
Procedimiento de instalación . . . . . . . . . . . . . . . . . . . . . . . . . . . . . . . . . . . . . . . . . . . . . . . . . . . . . . . . . . . . . 11
Instalación básica . . . . . . . . . . . . . . . . . . . . . . . . . . . . . . . . . . . . . . . . . . . . . . . . . . . . . . . . . . . . . . . . . 11
Instalación del controlador Windows Multi-cliente . . . . . . . . . . . . . . . . . . . . . . . . . . . . . . . . . . . . . . . 11
Información adicional y soporte . . . . . . . . . . . . . . . . . . . . . . . . . . . . . . . . . . . . . . . . . . . . . . . . . . . . . . . . . . . 12
Italiano . . . . . . . . . . . . . . . . . . . . . . . . . . . . . . . . . . . . . . . . . . . . . . . . . . . . . . . . . . . . . . . . . . . . . . . . . . . . . . . . . . . . 13
Procedura di installazione . . . . . . . . . . . . . . . . . . . . . . . . . . . . . . . . . . . . . . . . . . . . . . . . . . . . . . . . . . . . . . . .13
Installazione di base . . . . . . . . . . . . . . . . . . . . . . . . . . . . . . . . . . . . . . . . . . . . . . . . . . . . . . . . . . . . . . . 13
Installazione del driver Multi-client per Windows . . . . . . . . . . . . . . . . . . . . . . . . . . . . . . . . . . . . . . . . 13
Informazioni aggiuntive e assistenza . . . . . . . . . . . . . . . . . . . . . . . . . . . . . . . . . . . . . . . . . . . . . . . . . . . . . . .14
日本語
. . . . . . . . . . . . . . . . . . . . . . . . . . . . . . . . . . . . . . . . . . . . . . . . . . . . . . . . . . . . . . . . . . . . . . . . . . . . . . . . . . . . 15
インストール方法
. . . . . . . . . . . . . . . . . . . . . . . . . . . . . . . . . . . . . . . . . . . . . . . . . . . . . . . . . . . . . . . . . . . . . . 15
基本インストール方法
. . . . . . . . . . . . . . . . . . . . . . . . . . . . . . . . . . . . . . . . . . . . . . . . . . . . . . . . . . . . . 15
Windows用マルチクライアント・ドライバのインストール . . . . . . . . . . . . . . . . . . . . . . . . . . . . . . . . 15
ドライバ情報、サポート情報 . . . . . . . . . . . . . . . . . . . . . . . . . . . . . . . . . . . . . . . . . . . . . . . . . . . . . . . . . . . . . .
16
TriggerFinger_QS_M80010QS.indd 2 3/7/05 11:44:41 AM
Page 3
3
English
Trigger Finger
Installation Procedure
Basic Installation
Because it is a class-compliant device, installing the Trigger Finger on your Windows XP or
Mac OS X computer is simple and straightforward:
Use the supplied USB cable to connect the Trigger Finger to a USB port on your computer and
you’ll be ready to go! You can do this while the computer is on or off, and no further driver
installation will be necessary.
Installing the Windows Multi-client Driver
While class-compliancy offers easy setup and connection of the Trigger Finger, the Windows class
driver is deficient in that only a single application, or program, can use the Trigger Finger at any
given time. For many users this is perfectly acceptable, as they will be using the Trigger Finger to
communicate with their host audio application only.
However, if you use multiple applications at once, including applications that are “ReWired” together
(such as using Ableton Live as a host application and simultaneously running Propellerhead
Reason as a slave), you’ll need to install the Windows Trigger Finger MIDI driver so both the host
and ReWired application can be controlled from the Trigger Finger simultaneously.
PLEASE NOTE: Do NOT connect your new MIDI controller to your computer until the appropriate
driver files have been installed onto your computer.
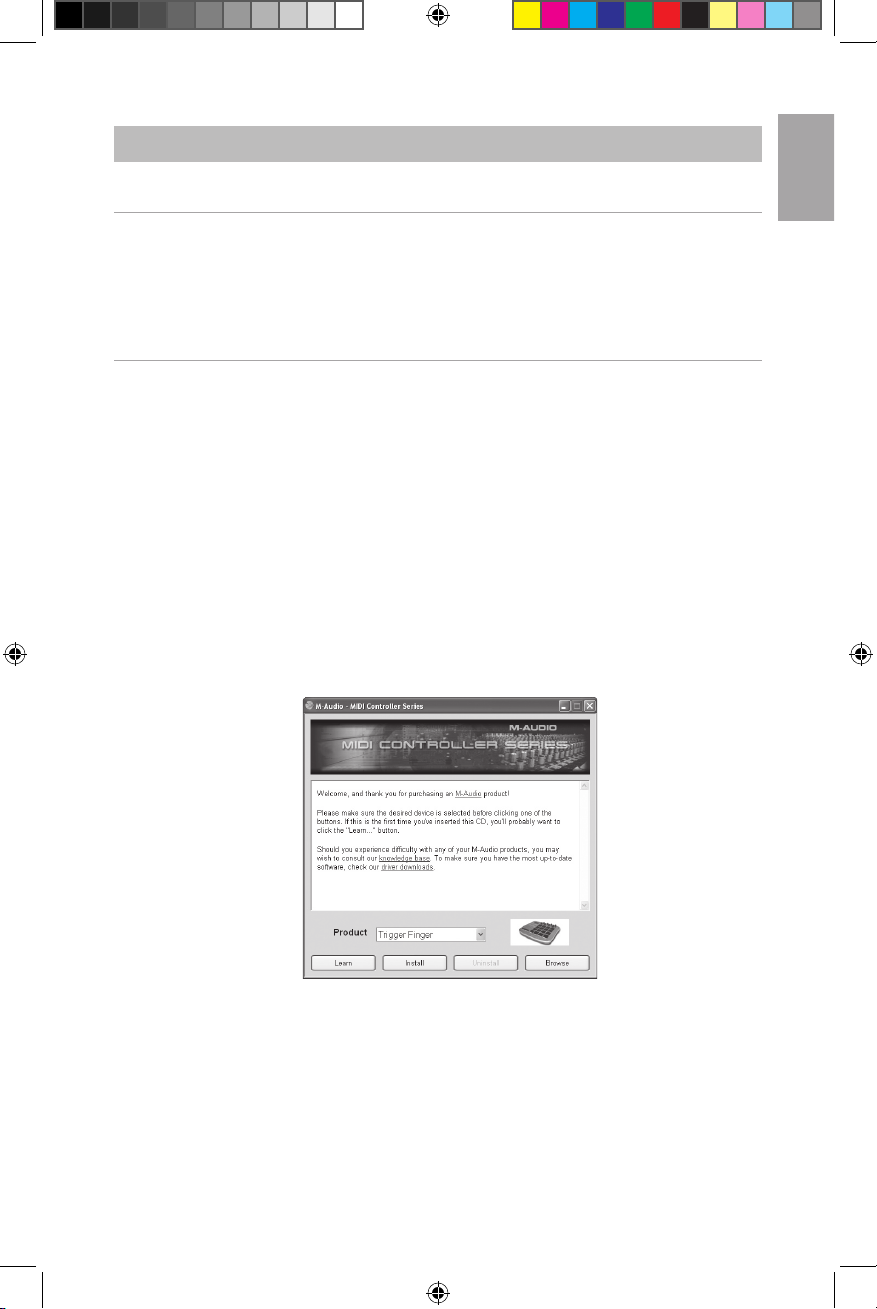
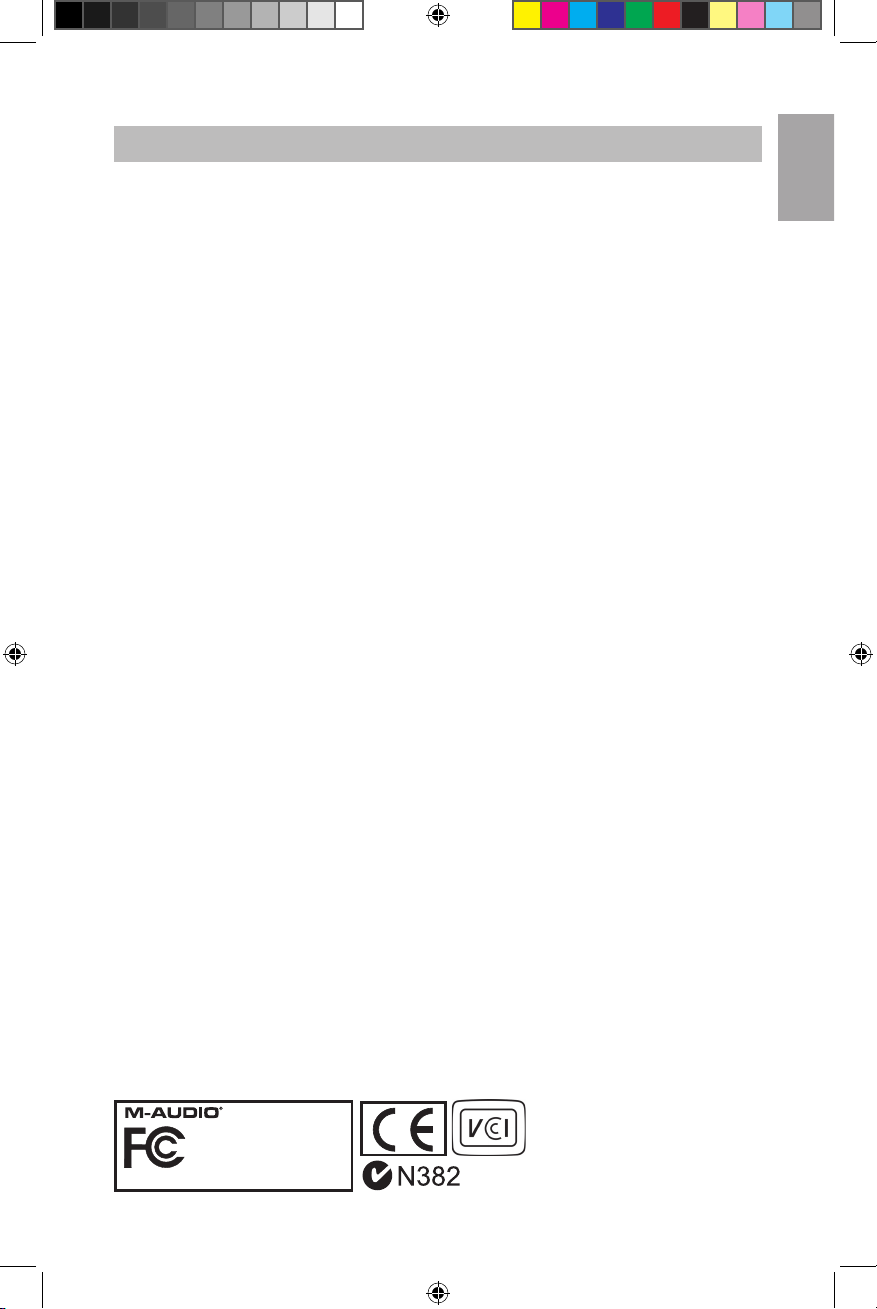
1. Insert the MIDI Controller Driver CD-ROM into your computer’s CD-ROM drive.
2. The computer will automatically display the interactive install screen shown below. If your
computer fails to launch the installer, manually start the installer by clicking on Start > My
Computer > MIDI Controller Series.
3. Follow the on-screen directions to choose your language and product. Once you select your
product, click “Install Drivers” to begin copying files.
TriggerFinger_QS_M80010QS.indd 3 3/7/05 11:44:41 AM
Page 4
4
4. Follow the driver installer’s on-screen directions.
5. At various points in this installation process, you may be notified that the driver being
installed has not passed Windows Logo Testing. Click “Continue Anyway” to proceed with the
installation.
6. Click “Finish” once the installer is complete.
7. Connect your new MIDI controller to an available USB port and switch it on.
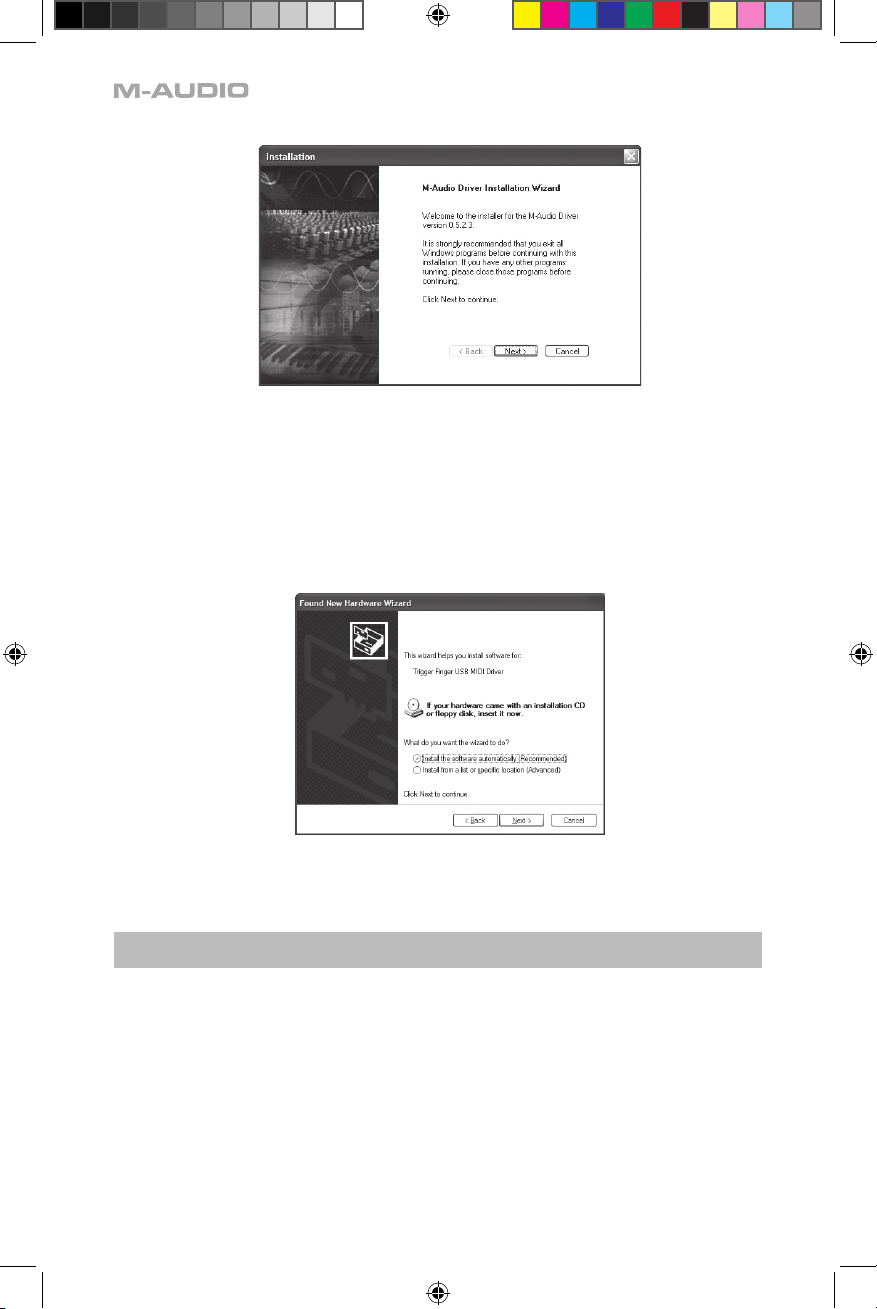
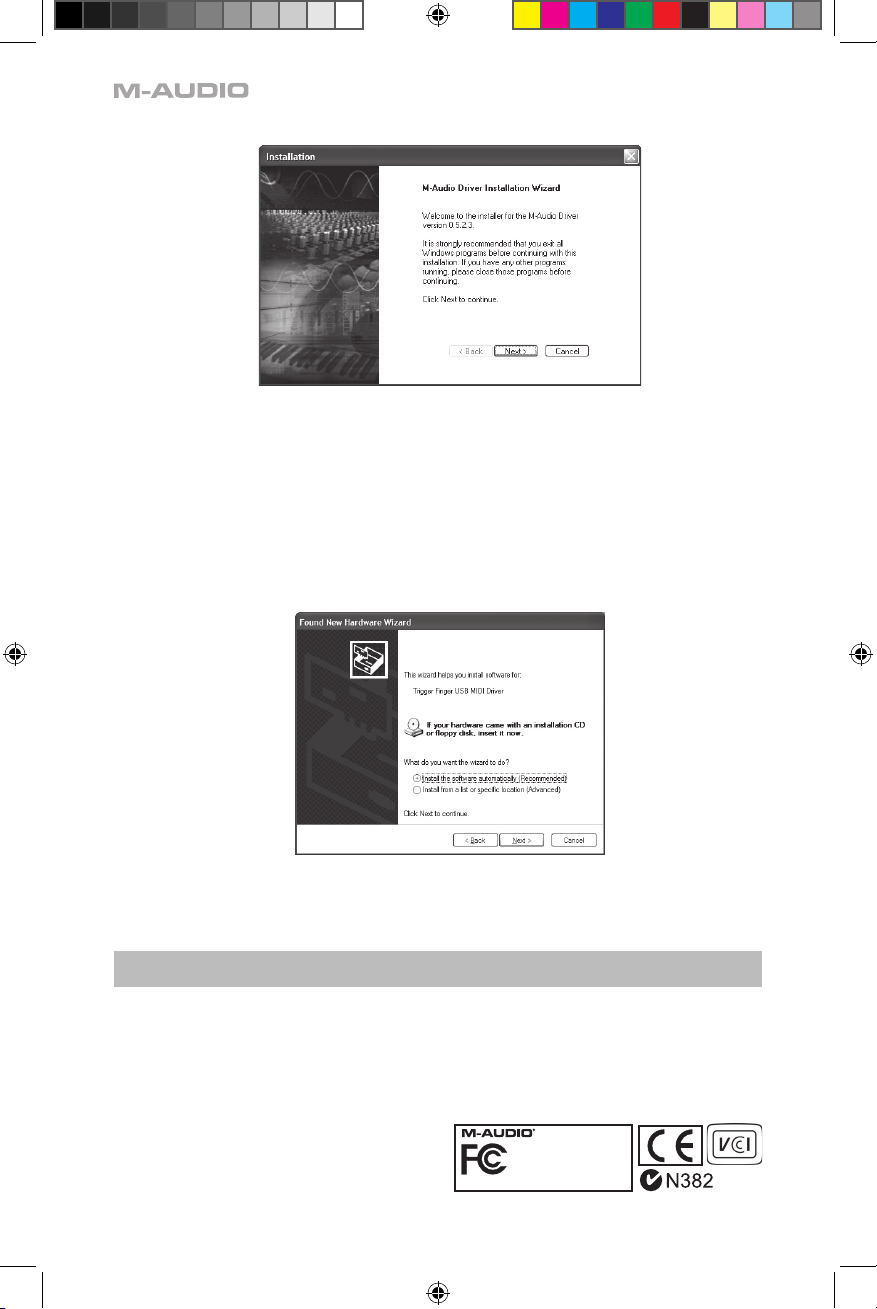
8. Windows will identify the new MIDI controller and will display a “Found New Hardware
Wizard.” If you have Service Pack 2 installed on your computer, you will be asked if you’d like
to search the Internet for a driver. Please select “No, not this time” and press “Next.” You’ll
then see a screen like the one seen below:
9. Choose “Install software automatically” and click “Next.”
10. Once the final “Found New Hardware” wizard is complete, you will see a message pop up
that says “Your new hardware is installed and ready to use.”
Additional Information and Support
We recommend checking the M-Audio website regularly for driver updates and additional
information. The web address for the site is www.m-audio.com. You’ll find links to drivers, news
stories, FAQs, additional products, and tech support.
TriggerFinger_QS_M80010QS.indd 4 3/7/05 11:44:41 AM
Page 5
5
English
Trigger Finger
Trigger Finger
Tested to comply with
FCC standards
FOR HOME OR STUDIO USE
Technical Information
Caution: The normal function of the product may be disturbed by Strong Electro Magnetic
Interference. If so, simply reset the product to resume normal operation by following the instruction
manual. In case the function could not resume, please use the product in other location.
Note: Your M-Audio Keystation keyboard has been tested to comply with FCC Standards FOR
HOME OR OFFICE USE. Modifications not authorized by the manufacturer may void users authority
to operate this device.
Note: This equipment has been tested and found to comply with the limits for a Class B digital
device, pursuant to Part 15 of the FCC Rules. These limits are designed to provide reasonable
protection against harmful interference in a residential installation. This equipment generates,
uses and can radiate radio frequency energy and, if not installed and used in accordance with
the instructions, may cause harmful interference to radio communications. However, there is no
guarantee that interference will not occur in a particular installation. If this equipment does cause
harmful interference to radio or television reception, which can be determined by turning the
equipment off and on, the user is encouraged to try to correct the interference by one or more of
the following measures:
< Re-orient or relocate the receiving antenna.
< Increase the separation between the equipment and receiver.
< Connect the equipment to an outlet on a circuit different from that to which the receiver is
connected.
< Consult the dealer or an experienced radio/ TV technician for help.
ASIO is a trademark of Steinberg Soft– und Hardware GmbH.
VST is a trademark of Steinberg Soft– und Hardware GmbH
TriggerFinger_QS_M80010QS.indd 5 3/8/05 11:57:44 AM
Page 6

6
TriggerFinger_QS_M80010QS.indd 6 3/7/05 11:44:43 AM
Page 7

7
Trigger Finger
Français
Procédure d’installation
Installation de base
Périphérique compatible en natif (class-compliant), le Trigger Finger est très facile à installer avec
Windows XP ou Mac OS X :
Utiliser le câble USB fourni pour connecter le Trigger Finger à un port USB de votre ordinateur et...
c’est prêt ! Vous pouvez le brancher que votre ordinateur soit allumé ou éteint, sans qu’aucun
pilote ne soit nécessaire.
Installation du pilote multiclient pour Windows
Même si la compatibilité en natif (class-compliant) offre une connexion et une configuration
simple du Trigger Finger, le pilote natif pour Windows ne permet pas que plusieurs applications,
ou programmes, se partagent le Trigger Finger. Pour de nombreux utilisateurs, cela n’entraîne
aucune limitation, puisqu’ils n’utilisent le Trigger Finger que pour communiquer avec leur
application hôte.
Toutefois si vous utilisez plusieurs applications en même temps, applications reliées entre elles
comprises (comme par exemple utiliser Ableton Live comme application hôte et faire tourner
simultanément Propellerhead Reason comme esclave) vous devez installer le pilote MIDI Trigger
Finger pour Windows et ainsi permettre que, non seulement votre application hôte, mais aussi
celle qui y est reliée, puissent être contrôlées simultanément depuis le Trigger Finger.
REMARQUE : Ne connectez pas votre nouveau contrôleur MIDI à votre ordinateur tant que les
fichiers pilotes appropriés n’ont pas été installés sur votre système.
1.
Insérez le CD-ROM des pilotes du contrôleur MIDI dans le lecteur de CD-ROM de votre
ordinateur.
2. Ce dernier affiche automatiquement l’écran d’installation interactive illustré ci-dessous. Si
votre ordinateur ne lance pas automatiquement le programme d’installation, effectuez
cette manœuvre manuellement en cliquant sur Démarrer>Poste de travail>MIDI Controller
Series.
3. Suivez les instructions à l’écran pour sélectionner votre langue et votre produit. Une fois votre
produit sélectionné, cliquez sur “Install Drivers” pour démarrer la copie des fichiers.
TriggerFinger_QS_M80010QS.indd 7 3/7/05 11:44:43 AM
Page 8
8
4. Suivez les instructions à l’écran données par le programme d’installation du pilote.
5. A différents stades de l’installation, des messages peuvent vous indiquer que le pilote n’a
pas passé le test du logo Windows. Cliquez dans ce cas sur Continuer afin de poursuivre
l’installation.
6. Cliquez sur “Terminer” une fois la procédure d’installation terminée.
7. Branchez votre nouveau contrôleur MIDI à un port USB disponible en utilisant le câble fourni,
et allumez-le.
8. Windows identifie alors votre nouveau contrôleur MIDI et affiche “Assistant nouveau matériel
détecté”. Si vous avez installé le Service Pack 2 sur votre ordinateur, on vous proposera de
chercher le pilote sur internet. Sélectionnez “Non, pas cette fois” et appuyez sur “Suivant”.
S’affiche alors un écran tel que celui ci-dessous :
9. Sélectionnez l’option Installer le logiciel automatiquement, puis cliquez sur Suivant.
10. Dès que l’”Assistant nouveau matériel détecté” est terminé, vous verrez apparaître une
fenêtre vous indiquant que votre nouveau matériel est installé et prêt à être utilisé.
Informations complémentaires et assistance
Nous vous recommandons de consulter régulièrement le site Web M-Audio afin d’obtenir les
dernières mises à jour de pilote et des informations complémentaires. L’adresse Web de ce site
est la suivante : www.m-audio.com. Vous y trouverez des liens vers des pilotes, des articles, des
questions-réponses, des produits supplémentaires ainsi qu’une assistance technique.
Trigger Finger
Tested to comply with
FCC standards
FOR HOME OR STUDIO USE
L’ESD et le “Fast Transient” peuvent rendre l’appareil
temporairement inopérant. Eteignez et rallumez pour
rétablir le fonctionnement de l’appareil.
TriggerFinger_QS_M80010QS.indd 8 3/7/05 11:44:44 AM
Page 9

9
Trigger Finger
Deutsch
Installation
Grundlegende Hinweise
Trigger Finger ist standardkonform mit Windows XP und Mac OS X, sodass für diese Betriebssysteme
keine extra Treiber installiert werden müssen.
Schließen Sie Trigger Finger über das mitgelieferte USB-Kabel an den Computer an. (Trigger
Finger kann bei laufendem oder heruntergefahrenem Computer angesteckt werden.) Nach dem
Anschluss ist das Gerät sofort betriebsbereit.
Installation des Multi-Client-Treibers für Windows
Auch wenn Trigger Finger standardkonform ist, benötigen Sie dennoch einen Multi-Client-Treiber,
wenn Sie das Gerät zusammen mit mehreren Software-Anwendungen nutzen wollen. Nutzer, die
Trigger Finger ohnehin nur mit einer einzigen Anwendung einsetzen wollen, können von dieser
Zusatzinstallation absehen.
Wenn Sie allerdings mit mehreren Anwendungen gleichzeitig nach dem Host-Slave-Prinzip
arbeiten (zum Beispiel Ableton Live als Host und Propellerhead Reason als Slave), müssen Sie die
Windows-MIDI-Treiber für Trigger Finger installieren, damit Sie beide Software-Anwendungen mit
Trigger Finger ansteuern können.
WICHTIG: Schließen Sie Trigger Finger bitte erst an Ihren Computer an, wenn die Installation der
erforderlichen Treiber abgeschlossen ist.
1. Legen Sie die MIDI-Controller-Treiber-CD in das CD-Laufwerk Ihres Computers ein.
2. Es erscheint das unten abgebildete Installer-Fenster. Falls der Installer nicht automatisch
startet, öffnen Sie ihn über Start > Arbeitsplatz > MIDI Controller Series.
3. Folgen Sie der Bildschirmführung und wählen Sie die Installationssprache und das zu
installierende M-Audio-Produkt aus. Klicken Sie anschließend auf “Install Drivers”, um den
Installationsvorgang zu starten.
TriggerFinger_QS_M80010QS.indd 9 3/7/05 11:44:45 AM
Page 10

10
4. Folgen Sie der Bildschirmführung.
5. Während der Installation erscheint mehrfach die Meldung, dass die Treibersoftware noch
nicht für Windows zertifiziert wurde. Klicken Sie in diesen Fenstern einfach auf “Installation
fortsetzen”.
6. Klicken Sie dann auf “Fertigstellen”, um das Installationsprogramm zu beenden.
7. Schließen Sie Trigger Finger über das mitgelieferte Kabel an einen freien USB-Steckplatz Ihres
Computers an und schalten Sie das Gerät ein.
8. Da Windows den neuen MIDI-Controller automatisch erkennt, wird der “Assistent für das
Suchen nach neuer Hardware” gestartet. Nutzer, die Service Pack 2 installiert haben, werden
gefragt, ob der Treiber über Internet gesucht werden soll. Wählen Sie hier die Option “Nein,
nicht dieses Mal” und klicken Sie auf “Weiter”. Danach erscheint folgender Bildschirm:
9. Wählen Sie die Option “Software automatisch installieren” und klicken Sie auf “Weiter”.
10. Nach Abschluss des 2. Installationsvorgangs erscheint die Meldung, dass die Hardware
installiert wurde und verwendet werden kann.
Zusätzliche Informationen und Support
Für Treiberaktualisierungen und zusätzliche Informationen empfehlen wir Ihnen, regelmäßig die
M-Audio-Webseiten unter www.m-audio.com zu besuchen. Von dort aus geht es zu den Treibern,
News, FAQs, Produktinfos und zum technischen Kundendienst.
Elektrostatische Entladungen und Spannungsspitzen
können das Gerät kurzzeitig ausfallen lassen. Schalten
Sie das Gerät aus und wieder ein, um wieder zu
reaktivieren.
Trigger Finger
Tested to comply with
FCC standards
FOR HOME OR STUDIO USE
TriggerFinger_QS_M80010QS.indd 10 3/7/05 11:44:46 AM
Page 11

11
Trigger Finger
Español
Procedimiento de instalación
Instalación básica
Dado que Trigger Finger es un dispositivo que cumple con la normativa vigente, la instalación de
la unidad en su computadora Windows XP o Mac OS X es sencilla y directa:
Utilice el cable USB que le suministramos para conectar el Trigger Finger a un puerto USB de
su computadora, y ya estará listo para empezar a trabajar. Puede realizar la conexión con la
computadora encendida o apagada, y no es necesario instalar ningún otro controlador.
Instalación del controlador Windows Multi-cliente
Aunque el cumplimiento de la normativa vigente garantiza una fácil conexión y configuración
del Trigger Finger, el controlador estándar de Windows únicamente permite aplicar el Trigger
Finger a una sola aplicación o programa en un momento dado. En la mayoría de casos esto es
perfectamente aceptable, ya que muchos usuarios utilizarán el Trigger Finger como medio de
comunicación con su aplicación de audio huésped.
Sin embargo, si utiliza varios programas al mismo tiempo, incluyendo aplicaciones conectadas
mediante “ReWire” (por ejemplo, si trabaja con Ableton Live como aplicación huésped mientras
ejecuta Propellerhead Reason en modo esclavo), tendrá que instalar el controlador MIDI de Trigger
Finger para que tanto la aplicación huésped como la conectada mediante ReWire puedan ser
controladas simultáneamente desde el Trigger Finger.
IMPORTANTE: NO conecte el nuevo dispositivo MIDI a su computadora antes de instalar los
controladores adecuados en su sistema.
1. Introduzca el CD-ROM con el controlador del dispositivo MIDI en la unidad de CD-ROM.
2. La computadora mostrará automáticamente la pantalla de instalación interactiva que
puede ver abajo. Si su computadora no ejecuta automáticamente el instalador, inícielo
manualmente. Para ello, pulse Inicio>Mi PC>MIDI Controller Series.
3. Siga las instrucciones que aparecen en pantalla para seleccionar su idioma y producto. Una
vez haya seleccionado su producto, pulse “Instalar controladores” para copiar los archivos
necesarios en su sistema.
TriggerFinger_QS_M80010QS.indd 11 3/7/05 11:44:46 AM
Page 12

12
4. Siga las instrucciones de instalación que aparecerán en pantalla.
5. En algunos momentos de la instalación, es posible que el sistema le indique que el
controlador que está instalando no ha pasado la prueba del logotipo de Windows. Seleccione
“Continuar” para proseguir con la instalación.
6. Pulse “Finalizar” para concluir la instalación.
7. Conecte su nuevo dispositivo MIDI a un puerto USB disponible en su computadora y encienda
la unidad.
8. Windows identificará el nuevo controlador MIDI y presentará el “Asistente para nuevo
hardware encontrado”. Si tiene Service Pack 2 instalado en su computadora, el sistema le
preguntará si desea buscar un controlador en Internet. Seleccione “No, por ahora” y pulse
“Siguiente”. A continuación verá una pantalla como la que le mostramos aquí:
9. Seleccione la opción “Instalar automáticamente el software (recomendado)” y pulse
“Siguiente”.
10. Después de finalizar la última instalación, aparecerá un mensaje en pantalla informándole
de que “Su nuevo hardware está listo para ser utilizado”.
Información adicional y soporte
Le recomendamos visitar regularmente la página de M-Audio para obtener actualizaciones de
controladores e información adicional. La dirección de la página web es www.m-audio.com.
En ella encontrará links a controladores, noticias, preguntas más frecuentes (FAQs), productos
adicionales e información técnica.
Las descargas Electrostáticas y Variaciones de Voltaje
pueden causar que la unidad funcione mal temporalmente. Dado el caso, por favor apague la unidady
préndala de nuevo para volver a su operación normal.
Trigger Finger
Tested to comply with
FCC standards
FOR HOME OR STUDIO USE
TriggerFinger_QS_M80010QS.indd 12 3/7/05 11:44:47 AM
Page 13

13
Trigger Finger
Italiano
Procedura di installazione
Installazione di base
In virtù della compatibilità nativa, Trigger Finger si rivela estremamente semplice da installare, sia
sotto Windows XP che Mac OS X:
Collegate Trigger Finger ad una porta USB del vostro computer utilizzando il cavo USB incluso
nella confezione e niente di più! Potete effettuare il collegamento sia a computer acceso che
spento, senza dover installare nessun ulteriore driver.
Installazione del driver Multi-client per Windows
Sebbene la compatibilità nativa offra la massima semplicità di installazione, il driver standard offerto
da Windows permette solo che Trigger Finger venga utilizzato da una applicazione software alla
volta. Per molti utenti questo non si rivelerà assolutamente un limite, considerato che utilizzeranno
Trigger Finger per comunicare direttamente con la loro applicazione audio principale.
Se invece utilizzate più di un’applicazione contemporaneamente, compresi software che
comunicano tra loro attraverso il sistema “ReWire” (ad esempio far girare Ableton Live come
applicazione host e allo stesso tempo Reason come slave), dovrete installare il driver MIDI Windows
Trigger Finger in modo che sia l’applicazione host che quella slave possano essere controllate da
Trigger Finger simultaneamente.
ATTENZIONE: NON collegare il vostro nuovo controller MIDI al computer finché non sono stati
installati nel sistema i driver necessari.
1. Inserire il CD del driver del controller MIDI nell’unità CD-ROM del computer.
2. Il computer visualizzerà automaticamente la schermata di installazione interattiva illustrata
di seguito. Se ciò non accade, occorre avviare manualmente il programma di installazione
facendo clic su Start>Risorse del computer>MIDI Controller Series.
3. Seguire le istruzioni sullo schermo per scegliere la propria lingua e il prodotto. Una volta
selezionato il prodotto, fare clic su “Installa driver” per iniziare la copia dei file.
TriggerFinger_QS_M80010QS.indd 13 3/7/05 11:44:47 AM
Page 14

14
4. Seguire le istruzioni del programma di installazione sullo schermo.
5. In vari punti del processo di installazione potrebbe essere segnalato che il driver in
installazione non ha superato il test del logo di Windows. Premere “Continuare” per procedere
con l’installazione.
6. Fate clic su “Fine” una volta terminata l’installazione.
7. Collegare il nuovo controller MIDI ad una porta USB disponibile mediante il cavo in dotazione
e accenderlo.
8. Windows riconoscerà il nuovo controller MIDI e visualizzerà la schermata “Installazione
guidata nuovo hardware”. Se avete il Service Pack 2 installato sul vostro computer vi verrà
chiesto se volete cercare il driver in Internet. Selezionate “No, non adesso” e premete “Avanti”.
Apparirà una schermata come quella mostrata qui sotto:
9. Scegliere l’opzione “Installa il software automaticamente” e fare clic su Avanti.
10. Una volta completata questa ulteriore installazione guidata nuovo hardware, apparirà il
messaggio “Il nuovo hardware è installato e pronto all’uso”.
Informazioni aggiuntive e assistenza
Si consiglia di visitare regolarmente il sito di M-Audio per gli aggiornamenti dei driver e informazioni
supplementari. L’indirizzo web del sito è www.m-audio.com. Sono presenti collegamenti ai driver,
novità, domande frequenti e assistenza tecnica.
ESD e transienti rapidi possono causare temporanei
malfunzionamenti dell’unità. Spegnerla e riaccenderla
nuovamente per ripristinare il normale funzionamento.
Trigger Finger
Tested to comply with
FCC standards
FOR HOME OR STUDIO USE
TriggerFinger_QS_M80010QS.indd 14 3/7/05 11:44:48 AM
Page 15

13
Trigger Finger
日本語
インストール方法
基本インストール方法
Trigger Fingerは、クラスコンプライアントなためWindows XPとMac OS Xでは、ドライバをインストー
ルする必要がなくインストールに手間がかかりません:
付属のUSBケーブルを使ってTrigger Fingerとコンピュータを接続すれば、インストールは完了です。
接続時にコンピュータの電源はON/OFFどちらでも構いませんしドライバをインストールする必要も
ありません。
Windows
用マルチクライアント・ドライバのインストール
Trigger Fingerは、クラスコンプライアントなため設定も接続も簡単ですが、Windowsのクラス・ドライ
バは常に1つのアプリケーションまたは1つのプログラムでしかTrigger Fingerを使うことはできません。
Trigger Fingerをホスト・アプリケーションとだけコミュニケートさせる場合にはクラス・ドライバを使
うことに問題はありません。
しかしながら、同時に複数のアプリケーションで使う場合やアプリケーションが
ReWireされている場
合(例えば
Ableton Liveをホスト・アプリケーションとして使い同時にPropellerheadのReasonをスレ
ーブとして使うなど)には、
Windows用のTrigger Finger MIDIドライバをインストールして、ホストと
ReWireしたアプリケーションがTrigger Fingerで同時にコントロールできるようにする必要があります。
注意:コンピュータにドライバのファイルのインストールが完了するまで、新しい
MIDIコントローラを
コンピュータに接続しないで下さい。
1. MIDIコントローラのドライバCD-ROMをコンピュータのCD-ROMドライブに挿入します。
2. 以下のダイアログが自動的に表示されインストーラが起動します。自動的に起動しない場合はス
タートメニューから「ファイル名を指定して実行」を選択し「参照」をクリックして
CD-ROMド
ライブの
MIDI Controller Seriesを選択します。
3. 画面の指示に従って言語と製品名を選択します。製品名を選択するとドライバのインストールが
開始し必要なファイルがコピーされます。
TriggerFinger_QS_JP&EN_v4.indd 13 3/7/05 11:59:54 AM
Page 16

14
4. 画面の指示に従いドライバのインストールを進めます。
5. インストール中に「ロゴテストに合格していません」というメッセージが表示されますが、「続
ける」をクリックして先に進みます。
6. 「完了」をクリックしてインストールを終了します。
7. 付属のUSBケーブルを使用してMIDIコントローラをコンピュータのUSB端子へ接続します。
8. Windows
が起動すると新しいMIDIコントローラがコンピュータにより検知され、「新しいハード
ウエアの検出ウイザード」が開始します。コンピュータにService Pack 2がインストールされて
いる場合、インターネットでドライバを検索するかどうか尋ねられまので、検索しない方を選択
して「次へ」をクリックします。以下の画面が表示されます。
9. 「ソフトウエアを自動的にインストールする」を選択し「次へ」をクリックします。
10. 「新しいハードウエアの検出ウイザード」が終了すると「新しいハードウエアの検出ウイザード
の完了」画面が現れ、システムトレイに「新しいハードウエアがインストールされ、使用準備が
できました」というメッセージが表示されます。
ドライバとサポート情報
M-Audioのウェブサイトには定期的にドライバアップデートやその他の有効な情報が更新されていま
す。ドライバ、ニュース、FAQ、テクニカルサポートなど様々な情報が満載のM-Audioのウェブサイト
www.m-audio.comにアクセスしてご確認下さい。
M80010QS
静電気放電(ESD)や電磁波(FastTransient)は製品
に一時的な誤作動を引き起こす可能性があります。正
常に動作するまで電源スイッチON/OFFの切り換えを
繰り返して下さい。
Trigger Finger
Tested to comply with
FCC standards
FOR HOME OR STUDIO USE
TriggerFinger_QS_JP&EN_v4.indd 14 3/7/05 11:59:56 AM
 Loading...