

Page 1

Quickstart Guide
English ( 3 – 5 )
Guía de inicio rápido
Español ( 6 – 8 )
Guide d'utilisation simplifié
Français ( 9 – 11 )
Guida rapida
Italiano ( 12 – 14 )
Schnellstart-Anleitung
Deutsch ( 15 – 17 )
Appendix
English ( 18 )
Page 2

Page 3
Quickstart Guide (English)
Box Contents
Oxygen 25
USB Cable
Ableton Live Lite
Software Download Card
Quickstart Guide
Safety & Warranty Manual
Download the full Oxygen 25 User Guide at m-audio.com/oxygen25.
Support
For the latest information about this product (system requirements, compatibility information, etc.) and product registration, visit
m-audio.com/oxygen25.
For additional product support, visit m-audio.com/support.
Setup
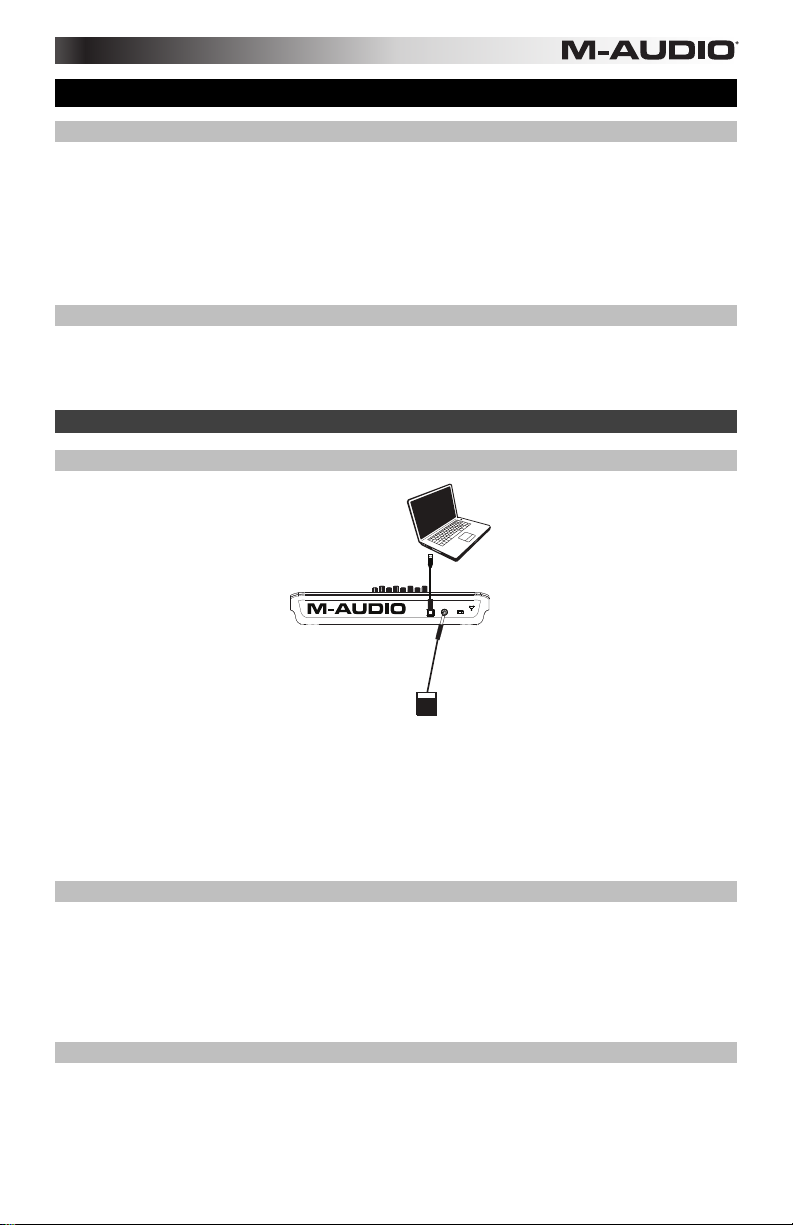
Connecting Your Keyboard
1. Plug the USB cable provided with your Oxygen 25 to a free USB port on your computer.
2. Plug the other end of the USB cable into the USB input on the Oxygen 25.
The single USB cable not only powers the keyboard but also sends MIDI data to and from your computer system. If you intend
to use your Oxygen 25 with a USB hub, make sure the USB hub uses an external power supply. Using a passive USB hub
which does not use a power supply may not provide enough power if other devices are connected to the hub. We do not
recommend connecting an audio interface to the same USB hub as the Oxygen 25.
You can also use Oxygen 25 with your iPad Camera Connection Kit to control supported music creation apps. The iPad
Camera Connection Kit is available from the Apple Store.
DirectLink Installations
Rather than assigning parameters one by one, DirectLink automatically maps Oxygen’s controls to many of the most frequently
used digital audio workstation (DAW) features and settings. When used with a supported DAW, you can control the transport,
mixing controls (faders and panning) and virtual instrument or signal processing plug-in parameters. You can also switch
between DirectLink and custom MIDI operation on the fly to match your particular needs.
To enable DirectLink with your Oxygen, you may need to install some additional software, including the DirectLink "personality"
for your specific DAW. Visit m-audio.com/directlink for a current list of DAWs that support DirectLink and to download any
necessary drivers.
Getting Started
Connect the Oxygen 25 to your computer and then open your software. In your software’s Preferences, Options, or Device
Set-Up menu, select Oxygen 25.
For further information about configuring your software to receive MIDI data from your Oxygen 25, and using software
instruments with the application, refer to the documentation provided with that product.
Computer*
SUSTAIN
POWER
USB
C17
ON OFF
Sustain Pedal*
*sold separately
3
Page 4
1
2
3
4
5
6
7
8
9
10
5
1
2
3
4
Features
Front Panel
C9
POWER
PGM PRESETS
SELECT
OCTAVE
AUTO
EDIT
AUTO
CTRL
ASGN
GLOBAL
SHIFT
C1 C2 C3 C4
C10
CTRL
GLOBAL
CHAN
PROG
SEL
CHAN
ASGN
C5 C6 C7 C8
C11
C12 C13 C14
BANK
DATA 1 DATA 2
MSB
MEM
PANIC
DATA 3
DUMP
BANK
LSB
5678
1234
VEL
STORE
0 1 2 3 4 5 6 7 8 9 ENTER
CURVE
10
PITCH
MOD
C15
C16
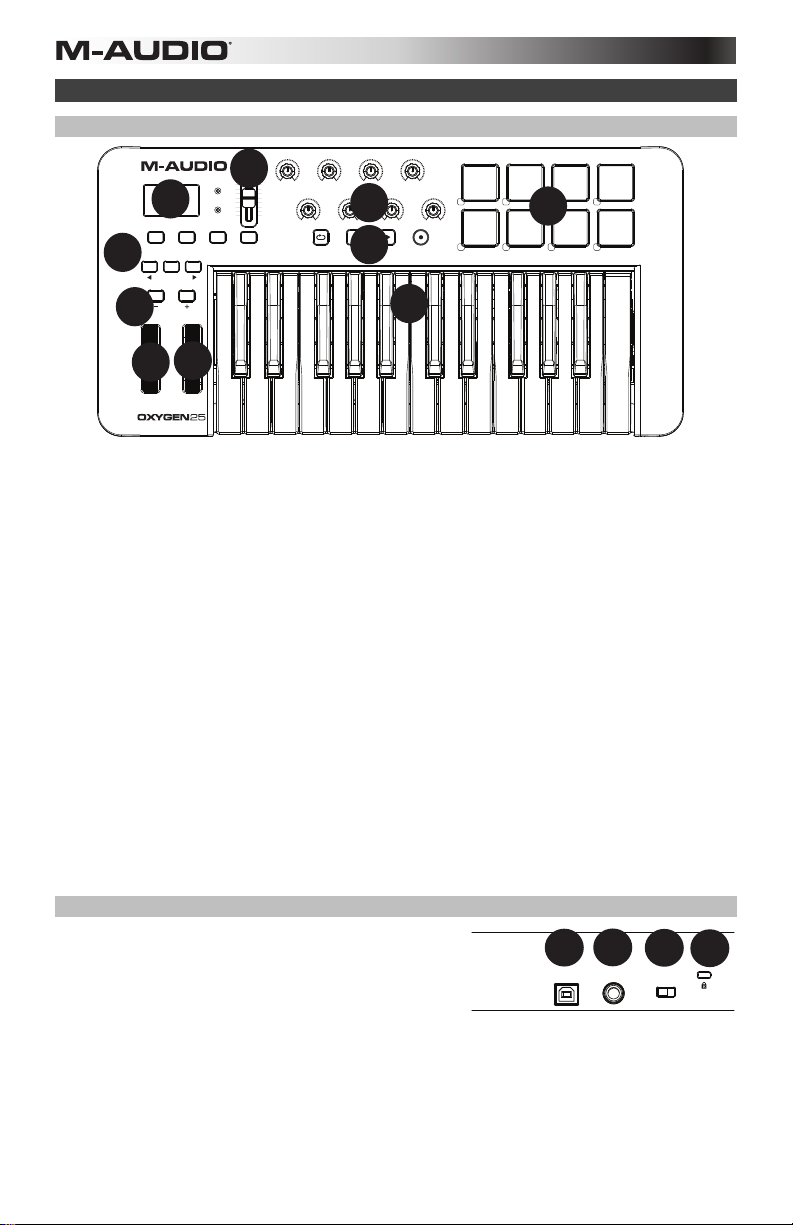
1. LED Screen: The Oxygen 25 features a 3-digit LED display providing visual information regarding current
operation, programing and controller status.
2. Function Buttons: The Oxygen 25 features function buttons for programming, access to settings and advanced
features.
3. Slider: Sends different types of standard MIDI CC messages or advanced MIDI messages based on the
assigned parameter or the active preset.
4. Knobs: Sends various MIDI messages when turned. Each knob can be individually assigned to a different MIDI
parameter.
5. Pads: Press these velocity-sensitive pads to send Note On/Off and velocity data when performing. To change
the pad octave assignment, hold down the Shift and the + or - octave button. These changes affect all eight pads
globally. To transpose from the default pad assignments, hold down the Shift and Select button and press the +
or - octave buttons. To reset the pads to the default factory assignments, hold down the Shift and both octave
buttons.
6. Transport Buttons: These buttons send standard MIDI CC, MIDI note, MMC (MIDI Machine Control) or other
advanced MIDI messages based on the parameter they are assigned to or the active preset.
7. Velocity-Sensitive Keyboard: The velocity-sensitive keyboard is not only the primary method of sending Note
On/Off and velocity data when performing, it is also used to access extended programing functions listed along
its upper edge.
8. Octave Buttons: The Octave buttons are used to shift the keyboard’s octave range up or down in one octave
9. Pitch Bend Wheel: The assignable pitch bend wheel is primarily used to bend the notes played on the keyboard
10. Modulation Wheel: This wheel is used to add expression to performances by changing the intensity of certain
Rear Panel
1. USB Port: The USB 2.0 port (backward-compatible with USB
2. Sustain Pedal Input: This input accepts a momentary-contact
3. On/Off Switch: Use this switch to power the device on or off. When this switch is set to the “on” position,
4. Kensington Lock Connector: This connector is compatible with standard laptop-style Kensington security
increments, extending the octave range of the pads or keys. To learn more about additional features, please see
the full User Guide available at m-audio.com/oxygen25.
up or down. You can assign other functions to the Pitch Bend wheel in Edit Mode. To learn more about this,
please see the full User Guide, available at m-audio.com/oxygen25.
effects. Rolling the Modulation Wheel upward will increase the modulation effect, while rolling downward will
reduce the effect. You can assign other functions to the Modulation Wheel in Edit Mode. To learn more about
this, please see the full User Guide, available at m-audio.com/oxygen25.
1.1) delivers power to the keyboard and transmits MIDI data
when connected to a computer.
foot pedal (not included). When pressed, this pedal will sustain
the sound you are playing without having to keep your fingers
pressing down on the keys.
Oxygen 25 is powered through the USB connection to your computer.
cables for theft protection.
4
SUSTAIN
USB
C17
POWER
ON OFF
Page 5

Advanced Keyboard Functions
The advanced keyboard functions are briefly listed below. To learn more about the advanced functions, please see
the full User Guide, available at m-audio.com/oxygen25.
Edit Button: The Edit button is used to access the advanced Oxygen 25 functions located on the keybed. Pressing
the Edit button switches your keyboard into Edit Mode. You can use the keys to select various advanced functions
and enter data.
To change the functionality of a Slider, Key, Knob, etc.:
1. Press the Edit button.
2. Press the CTRL SEL (Control Select) key.
3. Move or press the control corresponding to the control you would like to change.
4. Press the corresponding key of the parameter you would like to change (CTRL ASGN, DATA 1, DATA 2, etc.)
5. Use the numeric keys to enter the value of the parameter.
Snapshot: Press the Shift button and the Auto button simultaneously to engage the Snapshot function. The
Snapshot function sends out the assigned MIDI Message and current value of all controls on the MIDI channel that a
control is set to. This feature lets you record current settings of the controls into your sequencer.
Auto Mode: Press the Auto button to go into Auto Mode. Knobs, Buttons, and the Slider will send pre-programmed
automapped messages. None of these parameters can be edited while in Auto Mode. Before using Auto Mode, you
will need to install the DirectLink drivers from m-audio.com/directlink.
Control Assign, Data 1, Data 2, Data 3: The Control Assign function (CTRL ASGN) assigns a MIDI continuous
control number (MIDI CC) or other MIDI parameter to the selected Knob, Button, Slider, or to the Sustain Pedal jack.
The Data 1, Data 2, and Data 3 keys define various related aspects of the parameter or function assigned to a
control.
Global Channel: The Global Channel function (GLOBAL CHAN) sets the default MIDI channel for the keyboard and
all MIDI controls, except for those that have a specific MIDI channel assigned to them.
Channel Assign: The Channel Assign function (CHAN ASGN) assigns a Knob, Slider, Button or the Sustain Pedal
jack to a specific MIDI channel.
Program: This function sends Program Change MIDI messages on the Global Channel and can be used to select
different sound presets contained within your virtual instrument or sound module.
Bank LSB: The Bank LSB function sends bank change messages on the Global MIDI channel. These messages are
used to access additional banks of sound patches on virtual instruments or sound modules (if additional banks are
available).
Bank MSB: The Bank MSB function sends bank change messages on the Global MIDI channel. These messages
are used to access additional banks of sound patches on virtual instruments or sound modules (if additional banks
are available).
Memory Dump: The SysEx Memory Dump function (MEM DUMP) will send the contents of all Preset memory
locations for storage in a DAW application. Please refer to the documentation provided with your DAW software for
information on how to record SysEx MIDI data.
Panic: Press the Edit button followed by the Panic key to send an "All Notes Off" message on all 16 MIDI channels.
This stops any stuck notes that continue to play even after their keys have been released.
Velocity Curve: The Velocity Curve Select key (VEL CURVE) is used to change the touch sensitivity of the
keyboard. This setting lets you decide how the force with which you hit a key or pad affects the volume at which a
note plays.
Store: The Store function saves control assignment settings to one of the memory locations.
IMPORTANT: Storing new assignment settings will overwrite the contents of the selected memory location.
Number Keys: This section of the keyboard is used to type in numerical parameter values while in Edit mode.
Enter Key: The Enter key confirms changes made and exits Edit mode.
Factory Reset: Power on the unit while holding down the Octave + and – buttons.
5
Page 6
Guía de inicio rápido (Español)
Contenido de la caja
Oxygen 25
Cable USB
Ableton Live Lite
Tarjeta de descarga de software
Guía de inicio rápido
Manual sobre la seguridad y garantía
Descargue la guía del usuario completa del Oxygen 25 en m-audio.com/oxygen25.
Soporte
Para obtener la información más completa acerca de este product (los requisitos del sistema, compatibilidad, etc) y
registro del producto, visite m-audio.com/oxygen25.
Para soporte adicional del producto, visite m-audio.com/support.
Instalación
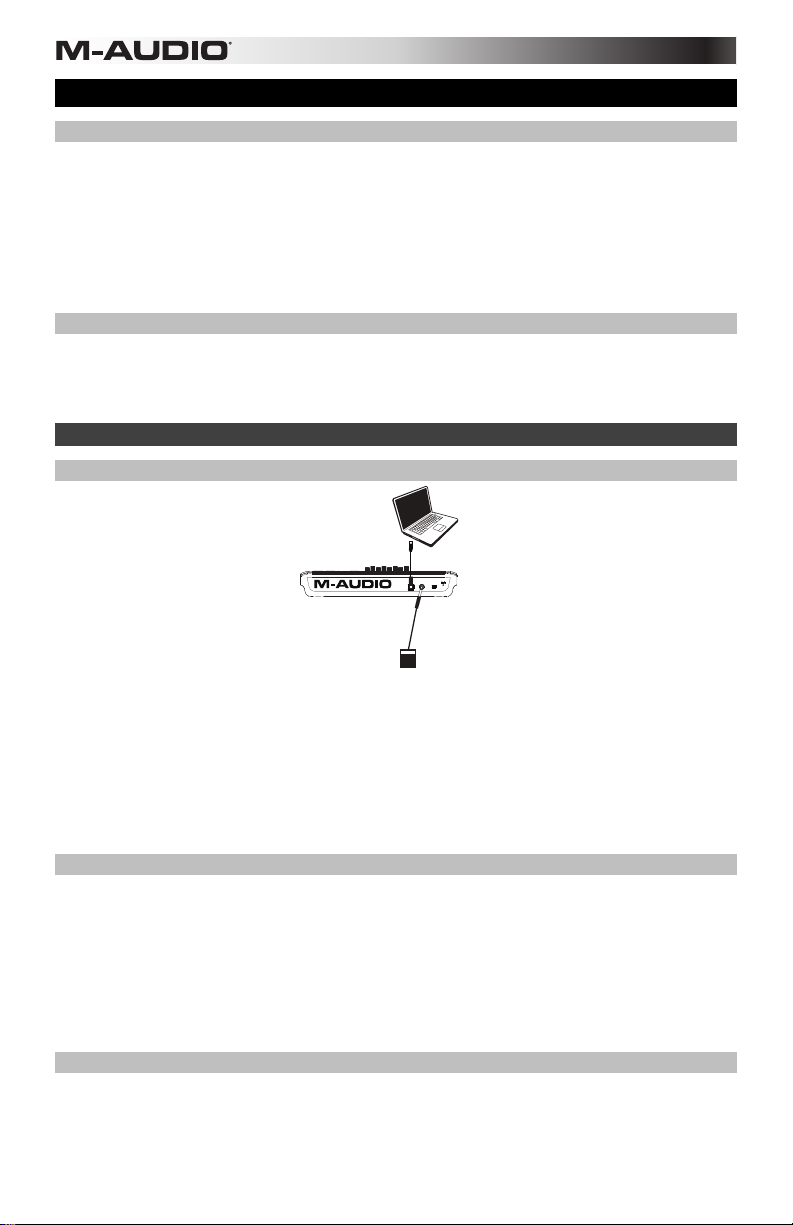
Conexión del teclado
1. Enchufa el cable USB provisto con tu teclado Oxygen 25 a un puerto USB libre en tu ordenador.
2. Enchufa el otro extremo del cable USB en la entrada USB del teclado Oxygen 25.
El cable USB no solo alimenta el teclado, sino que también envía y recibe datos MIDI del ordenador. Si intentas usar
tu Oxygen 25 con un hub USB, verifica que este utilice una fuente de alimentación externa. Un hub USB pasivo sin
fuente de alimentación puede no suministrar la energía suficiente si tiene otros dispositivos conectados. No
recomendamos conectar un interface de audio al mismo hub USB que el Oxygen 25.
También puede utilizar el Oxygen 25 con su iPad Camera Connection Kit (Kit de conexión de cámara para iPad) para controlar
las aplicaciones de creación de música compatibles. El iPad Camera Connection Kit está disponible en Apple Store.
Instalaciones de DirectLink
En lugar de asignar los parámetros uno por uno, al activarse el modo DirectLink de Oxygen, se mapean
automáticamente sus controles a muchas de las características y ajustes de uso más frecuente de la estación de
trabajo de audio digital (DAW). Cuando lo usa con una DAW compatible, es posible controlar el transporte, los
controles de mezcla (faders y balanceo) y los parámetros de plug-in de procesamiento de señales o instrumentos
virtuales. Además, es posible conmutar entre DirectLink y la operación MIDI personalizada sobre la marcha, a fin de
satisfacer sus necesidades particulares.
Para habilitar DirectLink con su Oxygen, es necesario instalar software adicional, incluida la "personalidad" de
DirectLink correspondiente a su DAW específica. Visite m-audio.com/directlink para obtener una lista actualizada
de las DAW compatibles con DirectLink y para descargar los drivers necesarios.
Primeros pasos
Conéctelo a su computadora y luego abra su software. En los menús de Preferences (Preferencias), Options
(Opciones) o Device Set-Up (Configuración de dispositivo) de su software, seleccione el Oxygen 25.
Para más datos sobre cómo configurar tu software para recibir datos MIDI de Oxygen 25, y el uso de instrumentos
en software con la aplicación, consulta la documentación provista con ese producto.
Computadora*
SUSTAIN
POWER
USB
C17
ON OFF
Pedal de
sostenido*
6
* Se vende por separado
Page 7

1
2
3
4
5
6
7
8
9
10
5
1
2
3
4
Características
Panel frontal
GLOBAL
PGM PRESETS
SHIFT
SELECT
OCTAVE
C9
POWER
AUTO
EDIT
AUTO
CTRL
ASGN
C1 C2 C3 C4
C10
CTRL
GLOBAL
CHAN
PROG
SEL
CHAN
ASGN
C5 C6 C7 C8
C11
C12 C13 C14
BANK
MEM
BANK
LSB
DATA 1 DATA 2
PANIC
DATA 3
MSB
DUMP
5678
1234
VEL
STORE
0 1 2 3 4 5 6 7 8 9 ENTER
CURVE
10
PITCH
MOD
C15
C16
1. Pantalla LED: El Oxygen 25 presenta una pantalla LED de 3 dígitos que brinda información visual acerca de la
operación, programación y estado del controlador actuales.
2. Botones de función: El Oxygen 25 presenta botones de función para programación, acceso a los ajustes y
características avanzadas.
3. Deslizador: Envían diferentes tipos de mensajes MIDI CC estándar dependiendo del parámetro asignados o del preset
activo.
4. Perillas: Envían diversos mensajes MIDI cuando se giran. Cada perilla se puede asignar individualmente a un parámetro
MIDI diferente. Pulse este botón y use los pads de batería para seleccionar los parches incorporados.
5. Pads: Pulse los pads sensibles a la velocidad para enviar datos de velocidad y Note On/Off (Nota activada/desactivada)
cuando interpreta un tema. Para modificar la asignación de octava del pad, mantenga pulsada la tecla Shift y el botón
Octave + ó - (subir o bajar octava). Estos cambios afectan a los ocho pads de manera global. Para transponer las
asignaciones por defecto de los pads, mantenga pulsado los botones Shift y Select y pulse los botones Octave + ó -. Para
restablecer las asignaciones por defecto de fábrica de los pads, mantenga pulsado Shift y ambos botones Octave.
6. Botones de transporte: Estos botones envían diferentes tipos de mensajes MIDI CC estándar, MMC (MIDI Machine
Control) u otros mensajes MIDI avanzados dependiendo del parámetro al que están asignados o del preset activo.
7. Teclado sensible a la dinámica: El teclado sensible a la dinámica no sólo es el método principal para enviar datos de
Velocidad y Note On/Off durante la ejecución, sino que además se utiliza para acceder a funciones de programación
ampliadas listadas en su borde superior.
8. Botones Octave (Octava): Los botones Octave se utilizan para desplazar el rango de octavas del teclado hacia arriba o
abajo en incrementos de una octava, extendiendo el rango de octavas de los pads o teclas. Para más información acerca
de las características adicionales, consulte la Guía del usuario completa, disponible en m-audio.com/oxygen25.
9. Rueda de pitch bend: La rueda de pitch bend asignable se usa generalmente para alterar el tono de las notas tocadas
10. Rueda de modulación: Esta rueda se usa para agregar expresión a las interpretaciones a partir de variaciones en la
Panel trasero
1. Puerto USB: El puerto USB 2.0 (compatible con la versión
2. Entrada para pedal de sustain: Esta entrada permite conectar un
3. Conmutador On/Off: Este conmutador enciende y apaga la unidad. En la posición On, Oxygen se alimenta a través de la
4. Conector de bloqueo Kensington: Este conector es compatible con cables de seguridad Kensington tipo laptop
7
en el teclado hacia arriba o hacia abajo. También puede reasignar el Rueda de pitch bend en el modo Edición. Para más
información acerca de este tema, consulte la Guía del usuario completa, disponible en
m-audio.com/oxygen25.
intensidad de algunos efectos en particular. Si gira la rueda de modulación hacia arriba, aumentará el efecto de
modulación; si la gira hacia abajo, lo reducirá. También puede reasignar el Rueda de modulación en el modo Edición.
Para más información acerca de este tema, consulte la Guía del usuario completa, disponible en
m-audio.com/oxygen25.
precedente USB 1.1) proporciona alimentación al teclado y envía
datos MIDI cuando está conectado a la computadora.
pedal (no suministrado). El pedal se usa normalmente para sostener
el sonido con el pie en lugar de mantener las manos sobre el
teclado.
conexión USB con la computadora.
estándar para protección antirrobo.
SUSTAIN
USB
C17
POWER
ON OFF
Page 8

Funciones avanzadas del teclado
Las funciones avanzadas del teclado se enumeran abajo. Para más información acerca de las funciones avanzadas,
consulte la Guía del usuario completa, disponible en m-audio.com/oxygen25.
Botón Edit: El botón Edit se usa para acceder a las funciones avanzadas de Oxygen 25 en el teclado mismo. Pulsar
el botón Edit conmuta el teclado al “Modo de edición”. Puedes usar las teclas para seleccionar varias funciones
avanzadas e introducir datos.
Para cambiar la funcionalidad de un cursor, tecla, perilla, etc.:
1. Pulse el botón Edit.
2. Pulse la tecla CTRL SEL (Selección de control).
3. Mueva o pulse el control correspondiente al control que desea modificar.
4. Pulse la tecla correspondiente del parámetro que desea modificar (CTRL ASGN, DATA 1, DATA 2, etc.)
5. Utilice las teclas numéricas para introducir el valor de este parámetro.
Instantánea: Pulse los botones Shift y Auto simultáneamente para activar la función de instantánea. La función de
instantánea envía el mensaje MIDI asignado y el valor actual de todos los controles en el canal MIDI que tiene
configurado un control. Esta función le permite grabar los ajustes actuales de sus controles en su secuenciador.
Modo automático: Pulse el botón Auto para entrar al modo automático. Las perillas, botones y el cursor enviarán
mensajes automapeados preprogramados. Ninguno de estos parámetros puede editarse en modo automático. Antes
de utilizar el modo automático, deberá instalar los controladores DirectLink de m-audio.com/directlink.
Control Assign (Asignación de controles), Data 1, Data 2, Data 3: La función Control Assign (CTRL ASGN)
permite asignar un número de controlador continuo MIDI (MIDI CC) u otro parámetro MIDI al control rotatorio, botón,
deslizador o toma de pedal de sustain. Las teclas Data 1, Data 2 y Data 3 definen varios aspectos del parámetro o
función asignados a un control. Por ejemplo, es posible configurar un botón para enviar datos MIDI de Note On/Off
asignándolo al número de controlador 147. La tecla Data 1 se utiliza para especificar la altura tonal (o número de
nota) de la nota MIDI para el botón. La tecla Data 2 se utiliza para ajustar la velocidad Note Off (Velocity Off), y la
Data 3 para ajustar la velocidad Note On (Velocity On) (define el volumen de la nota.)
Global Channel (Canal Global): La función Global Channel (GLOBAL CHAN) define todos los controles MIDI y el
canal MIDI predeterminado para el teclado, excepto cuando ya hay un canal MIDI específico asignado.
Channel Assign (Asignación de canal): La función Channel Assign (CHAN ASGN) se utiliza para asignar un
control MIDI (control rotatorio, deslizador, botón o toma de pedal de sustain) antes de su edición.
Program (Programa): Este parámetro envía mensajes MIDI de cambio de programa en el canal Global
seleccionado y puede usarse para seleccionar los diferentes sonidos incluidos en el módulo de sonido (o instrumento
virtual.
Bank LSB (LSB de banco): La función Bank LSB envía mensajes de cambio de banco a través del canal Global
MIDI. Estos mensajes se utilizan para acceder a bancos adicionales de patches de sonido en instrumentos virtuales
o módulos de sonido (si los bancos adicionales están disponibles).
Bank MSB (MSB de banco): La función Bank MSB envía mensajes de cambio de banco a través del canal Global
MIDI. Estos mensajes se utilizan para acceder a bancos adicionales de patches de sonido en instrumentos virtuales
o módulos de sonido (si los bancos adicionales están disponibles).
Memory Dump (Volcado de memoria): La función SysEx Memory Dump (MEM DUMP) envía los contenidos de las
ubicaciones de memoria de los presets para su almacenamiento en la aplicación de audio. Consulte la
documentación de la aplicación de audio para más información sobre cómo grabar los mensaje MIDI SysEx.
Panic: Pulse el botón Advanced y después la tecla Panic para enviar un mensaje de "Desactivar todas las notas" a
través de los 16 canales MIDI. De este modo se detienen notas bloqueadas que continúan sonando después de
haber soltado la tecla.
Curva de velocidad: La tecla de selección de curva de velocidad (VEL CURVE) se utiliza para modificar la
sensibilidad del teclado al tacto. Este ajuste le permite decidir cómo la fuerza con la que toca las teclas o pads afecta
al volumen al que se reproduce la nota.
Store (Guardar): La función Store guarda los ajustes de las asignaciones de controles en una de las ubicaciones de
memoria.
IMPORTANTE: Al guardar los nuevos ajustes de las asignaciones, se sobrescribirá el contenido de la ubicación de
memoria seleccionada.
Teclas numéricas: Esta sección del teclado se utiliza para introducir datos numéricos de parámetro en modo Edit.
Tecla Enter: La tecla Enter confirma los cambios realizados y desactiva el modo Edit.
Restablecimiento de los valores de fábrica: Encienda la unidad mientras mantiene pulsados los botones Octave +
y -.
8
Page 9

*
Guide d'utilisation simplifié (Français)
Contenu de la boîte
Oxygen 25
Câble USB
Ableton Live Lite
Téléchargement du logiciel carte
Guide d'utilisation simplifié
Consignes de sécurité et informations concernant la garantie
Téléchargez le Guide d'utilisation complet de l'Oxygen 25 à m-audio.com/oxygen25.
Assistance
Pour les dernières informations concernant ce produit (la configuration système minimale requise, la compatibilité, etc) et
l’enregistrement du produit, veuillez visitez le site m-audio.com/oxygen25.
Pour toute assistance supplémentaire, veuillez visiter le site m-audio.com/support.
Installation
Connexion de votre clavier
1. Branchez le câble USB fourni avec votre clavier Oxygen 25 sur un port USB disponible de votre ordinateur.
2. Branchez l'autre extrêmité du câble USB sur l'entrée USB du clavier Oxygen 25.
Cet unique câble USB permet non seulement d'alimenter le clavier, mais également d'échanger les données entre le clavier et
l'ordinateur. Si vous souhaitez relier votre Oxygen 25 à un hub USB, assurez-vous que le hub dispose d'une alimentation
externe. Un hub USB passif sans alimentation externe ne sera pas en mesure de fournir suffisamment de puissance dans le
cas où d'autres périphériques sont connectés au hub. Nous déconseillons de connecter une interface audio au même hub USB
que le Oxygen 25.
Vous pouvez également utiliser l'Oxygen 25 avec le kit de connexion d’appareil photo pour iPad pour commander les
applications de création musicale supportées. Le kit de connexion d’appareil photo pour iPad est disponible sur l'Apple Store.
Installations DirectLink
Acitiver le mode DirectLink du Oxygen permet de faire le mappage automatique des fonctions et des commandes les plus
fréquemment utilisées des postes de travail audionumériques logiciels (DAW) plutôt que de faire la configuration des
paramètres un à un. Lorsqu’utilisé conjointement avec un DAW, vous pouvez commander les paramètres des touches de
lecture, de mixage (potentiomètres et panoramique) et d’un instrument virtuel ou d’un plugiciel de traitement du signal. De plus,
vous pouvez commuter instantanément entre le mode de fonctionnement DirectLink et le mode de personnalisation MIDI afin
de répondre à vos besoins.
Pour activer la fonction DirectLink du clavier Oxygen, il se peut que vous ayez à installer un logiciel supplémentaire, y compris
la « personnalité » DirectLink en fonction de votre station audionumérique. Visitez m-audio.com/directlink pour obtenir la liste
à jour des stations audionumériques supportant la fonction DirectLink et télécharger tous les pilotes nécessaires.
Prise en main
Une fois que vous avez terminé l'installation, vous devrez configurer votre logiciel audionumérique pour l’utiliser avec le
Oxygen 25. Branchez le Oxygen 25 à votre ordinateur et ouvrez votre logiciel. Dans le menu Préférences, Options ou
Configuration des périphériques de votre logiciel, sélectionnez Oxygen 25.
Pour plus d'informations sur la configuration de votre logiciel afin qu'il puisse recevoir des données de votre Oxygen 25 et sur
l'utilisation d'instruments logiciels, veuillez consulter la documentation fournie avec le produit en question.
Pédale de
sustain*
Ordinateur*
SUSTAIN
POWER
USB
C17
ON OFF
Vendu
séparément
9
Page 10

1
2
3
4
5
6
7
8
9
10
5
1
2
3
4
Caractéristiques
Panneau avant
C9
POWER
PGM PRESETS
SELECT
OCTAVE
AUTO
EDIT
AUTO
CTRL
ASGN
GLOBAL
SHIFT
C1 C2 C3 C4
C10
CTRL
GLOBAL
CHAN
PROG
SEL
CHAN
ASGN
C5 C6 C7 C8
C11
C12 C13 C14
MEM
BANK
BANK
LSB
DATA 1 DATA 2
MSB
PANIC
DATA 3
DUMP
5678
1234
VEL
STORE
0 1 2 3 4 5 6 7 8 9 ENTER
CURVE
10
PITCH
MOD
C15
C16
1. Écran DEL : L'Oxygen 25 dispose d’un écran DEL de 3 chiffres fournissant des informations visuelles
concernant l'état de fonctionnement, de programmation et du contrôleur.
2. Touches de fonction : L'Oxygen 25 dispose de touches de fonction pour la programmation, l'accès aux
paramètres et aux fonctions avancées.
3. Curseur : Envoient différents types de messages CC MIDI standard ou de messages MIDI avancés selon le
paramètre affecté ou le preset actif.
4. Boutons : Ces boutons permettent de transmettre différents messages MIDI lorsqu’ils sont tournés. Chaque
bouton peut être assigné à un paramètre MIDI différent.
5. Pads : Appuyez sur ces pads sensibles à la dynamique afin de transmettre des données
d'activation/désactivation de la note et de dynamique. Pour modifier l'affectation d'octave du pad, maintenez la
touche Shift et une des touches d’octave (+ ou -). Ces modifications affectent les huit pads. Pour transposer des
affectations par défaut des pads, maintenez les touches Shift et Select enfoncées et appuyez sur une des
touches d’octave. Pour restaurer les affectations d’usine des touches, maintenez la touche Shift et les deux
touches d'octave enfoncées.
6. Boutons de transport : Ces boutons envoient différents types de messages CC MIDI standard, de note MIDI,
de MMC (MIDI Machine Control) ou de messages MIDI avancés selon le paramètre affecté ou le preset actif.
7. Clavier dynamique : Le clavier dynamique n'est seulement dédié à envoyer des données de vitesse et de note
On/Off lorsque vous jouez, il permet aussi d'accéder aux fonctions de programmation étendues listées audessus.
8. Boutons de octave : Les touches d’octaves vous permettent d'augmenter ou de diminuer la plage d'octaves du
clavier d’une octave à la fois. Afin d’en savoir plus, veuillez consulter le Guide d’utilisation complet disponible sur
m-audio.com/oxygen25.
9. Molette de pitch-bend : La molette de pitch-bend est principalement utilisée pour modifier la hauteur tonale des
notes jouées sur le clavier. Vous pouvez également réaffecter la Molette de pitch-bend en mode Edit. Afin d’en
savoir plus, veuillez consulter le Guide d’utilisation complet disponible sur m-audio.com/oxygen25.
10. Molette de modulation : Cette molette est utilisée pour ajouter de l'expressivité à votre interprétation en
modifiant l'intensité de certains effets. En faisant tourner la molette de modulation vers le haut vous augmentez
l'effet de la modulation, en la faisant tourner vers le bas vous réduisez l'effet. Vous pouvez également réaffecter
la Molette de modulation en mode Edit. Afin d’en savoir plus, veuillez consulter le Guide d’utilisation complet
disponible sur m-audio.com/oxygen25.
Panneau arrière
1. Port USB : Le port USB 2.0 (compatible USB 1.1) alimente le
2. Entrée pour pédale sustain : Cette entrée accepte une pédale
3. Interrupteur on/off : Utilisez cet interrupteur pour allumer ou éteindre le dispositif. Quand cet interrupteur est en
4. Connecteur Kensington : Ce connecteur est compatible avec les câbles de sécurité Kensington standard pour
clavier et transmet les données MIDI quand il est relié à un
ordinateur.
momentanée (non incluse). La pédale est normalement utilisée
pour le soutien du son que vous jouez sans avoir à garder les
mains sur le clavier.
position on, Oxygen est alimenté par la connexion USB de votre ordinateur.
ordinateur portable pour la protection contre le vol.
10
SUSTAIN
USB
C17
POWER
ON OFF
Page 11

Fonctions de programmation avancées
Vous trouverez ci-dessous un résumé des fonctions avancées du clavier. Afin d’en savoir plus sur les fonctions évoluées,
veuillez consulter le Guide d’utilisation complet disponible sur m-audio.com/oxygen25.
Bouton Edit : Le bouton Edit permet d'accéder aux fonctions avancées du Oxygen 25 activables à partir du clavier. En
appuyant sur ce bouton, votre clavier passe en mode Edit. Vous pouvez utiliser les touches pour sélectionner diverses
fonctions avancées et entrer des données.
Pour modifier la fonctionnalité d’un curseur, d’une touche, d’un bouton, etc. :
1. Appuyez sur la touche Edit.
2. Appuyez sur la touche CTRL SEL.
3. Déplacez ou appuyez sur la commande que vous souhaitez modifier.
4. Appuyez sur la touche correspondante du paramètre que vous souhaitez modifier (CTRL ASGN, DATA 1, DATA 2,
etc.).
5. Utilisez les touches numériques afin d'entrer la valeur du paramètre.
Capture instantanée : Appuyez simultanément sur les touches Shift et Auto afin d’activer la fonction Snapshot. La fonction
Snapshot transmet le message MIDI assigné et la valeur actuelle de toutes les commandes du canal MIDI sélectionné. Cette
fonctionnalité vous permet d'enregistrer les paramètres actuels des commandes dans votre séquenceur.
Mode automatique : Appuyez sur la touche Auto pour passer en Mode Auto. Les boutons, les touches et le curseur
transmettront des messages de mappage automatique préprogrammés. Aucun de ces paramètres ne peut être modifié en
Mode Auto. Avant d'utiliser le Mode Auto, vous devrez installer les pilotes DirectLink disponibles sur m-audio.com/directlink.
Control Assign, Data 1, Data 2, Data 3 : La fonction Control Assign (CTRL ASGN) affecte un numéro de contrôle continu
MIDI (CC MIDI) ou un autre parameter MIDI au potentiomètre, bouton, curseur ou prise de pdale de sustain sélectionné. Les
touches Data 1, Data 2 et Data 3 définissent les aspects connexes du paramètre ou de la fonction affecté à un contrôle. Par
exemple, il est possible de configure un bouton pour qu'il envoie des données de note on/off MIDI en lui affectant le contrôleur
numéro 147. La touche Data 1 est utilisée pour indiquer le pitch (ou un numéro de note) de la note MIDI pour le bouton. La
touche Data 2 est utilisée pour régler la vitesse de Note Off (Velocity Off) et la touche Data 3 est utilisée pour régler la vitesse
de Note On (Velocity On), déterminant ainsi le niveau de la note.
Global Channel (canal global) : La fonction Global Channel (GLOBAL CHAN) détermine le canal MIDI par défaut pour le
clavier et tous les contrôles MIDI, sauf ceux qui disposent d'un canal MIDI spécifique affecté.
Channel Assign (affectation de canal) : La fonction Channel Assign (CHAN ASGN) affecte un potentiomètre, un bouton, un
curseur ou la prise de pédale de sustain à un canal MIDI spécifique.
Program (Programme) : Ce paramètre envoie des messages de Program Change MIDI sur le canal global sélectionné et peut
être utilisé pour sélectionner les différents sons contenus dans votre module de son ou instrument virtuel.
Bank LSB (banque LSB) : La fonction Bank LSB envoie des messages de changement de banque sur le canal global MIDI.
Ces messages sont utilisés pour accéder aux banques supplémentaires des jeux de sons sur un instrument virtuel ou un
module sonore (si une banque supplémentaire est disponible).
Bank MSB (banque MSB) : La fonction Bank MSB envoie des messages de changement de banque sur le canal global MIDI.
Ces messages sont utilisés pour accéder aux banques supplémentaires des jeux de sons sur un instrument virtuel ou un
module sonore (si une banque supplémentaire est disponible).
Dump mémoire : La fonction Dump mémoire SysEx (MEM DUMP) envoie le contenu des emplacements mémoire pour
stockage dans l'application DAW. Veuillez vous reporter à la documentation fournie avec votre logiciel DAW pour en savoir plus
sur la manière d'enregistrer les données MIDI SysEx.
Panique : Pressez le bouton Advanced puis le bouton Panic pour envoyer un message "All Notes Off" sur les 16 canaux MIDI.
Cela permet de débloquer toutes les notes bloquées qui continuent de sonner même si leur touche a été relâchée.
Courbes de sensibilité à la dynamique : La touche VEL CURVE est utilisée pour modifier la sensibilité du clavier. Ce
paramètre vous permet de choisir comment la force avec laquelle vous frappez une touche ou un pad affecte le volume d’une
note.
Store (stockage) : La fonction stockage enregistre les paramètres d'affectation des contrôles pour l'un des emplacements
mémoire.
IMPORTANT : Le stockage d'une nouvelle affectation écrase le contenu de l'emplacement mémoire sélectionné.
Touches numérotées : Cette section du clavier est utilisée pour saisir les valeurs des paramètres numériques dans le mode
Edit.
Touche Enter : La touche Enter confirme les modifications effectuées et désactive le mode Edit.
Réinitialisation des paramètres d’usine : Allumez l'appareil tout en maintenant les touches d’octave + et – enfoncées.
11
Page 12

o
Guida rapida (Italiano)
Contenuti della confezione
Oxygen 25
Cavo USB
Ableton Live Lite
Carta di download del software
Guida rapida
Istruzioni di sicurezza e garanzia
Scaricare la Guida per l'uso completa dell'Oxygen 25 alla pagina m-audio.com/oxygen25.
Assistenza
Per conoscere le ultime informazioni in merito a questo prodotto (i requisiti di sistema complete, compatibilità, ecc) e per la
registrazione del prodotto, recarsi alla pagina m-audio.com/oxygen25.
Per ulteriore assistenza, recarsi alla pagina m-audio.com/support.
Setup
Collegamento della tastiera
1. Inserire il cavo USB fornito con Oxygen 25 a una porta USB disponibile sul computer.
2. Collegare l'altra estremità USB all'ingresso USB sulla tastiera Oxygen 25.
Il cavo USB non solo alimenta la tastiera, ma trasmette anche i dati MIDI al e dal computer. Per utilizzare Oxygen 25 con un
hub USB, assicurarsi che l'hub sia dotato di un alimentatore esterno. Un hub USB passivo privo di un alimentatore potrebbe
non essere in grado di alimentare gli altri dispositivi collegati all'hub. Evitare di collegare un'interfaccia audio allo stesso hub
USB di Oxygen 25.
Si può inoltre utilizzare l'Oxygen 25 con l'iPad Camera Connection Kit per controllare app di creazione musicale supportate.
L'iPad Camera Connection Kit è disponibile presso l'Apple Store.
Installazione di DirectLink
Anziché assegnare i parametri uno a uno, attivando la modalità DirectLink dell'Oxygen, questo mapperà i suoi comandi su
molte delle funzioni e delle configurazioni dei DAW (workstation audio digitale) utilizzati più di frequente. Quando viene
utilizzato con un'applicazione supportata da DAW, è possibile controllare il trasporto, i comandi di mixaggio (fader e panning) e
i parametri dello strumento virtuale o i plug-in per l'elaborazione di segnale. Inoltre, è possibile passare al volo dall'DirectLink
all'utilizzo MIDI personalizzato per soddisfare esigenze particolari.
Per abilitare l'DirectLink con l'Oxygen, occorre installare del software aggiuntivo, inclusa la "personalità" DirectLink per il proprio
DAW specifico. Visitare la pagina m-audio.com/directlink per un elenco aggiornato di DAW che supportano l'DirectLink.
Primi passi
Una volta completata l'installazione, occorrerà configurare il software musicale per l'uso con la Oxygen 25. Collegare la Oxygen
25 al computer e aprire il software. Nel menu Preferiti, Opzioni, o Configurazione dispositivo del software, selezionare
Oxygen 25.
Per ulteriori informazioni su come configurare il software affinché possa ricevere i dati MIDI dalla tastiera Oxygen 25, e
utilizzare gli strumenti software con l'applicazione, consultare la documentazione fornita con il prodotto.
12
USB
SUSTAIN
C17
Pedale
sustain*
Computer*
POWER
ON OFF
*Vendut
separatamente
Page 13

1
2
3
4
5
6
7
8
9
10
5
1
2
3
4
Caratteristiche
Pannello anteriore
C9
POWER
GLOBAL
AUTO
PGM PRESETS
SHIFT
EDIT
AUTO
CTRL
ASGN
SELECT
OCTAVE
C1 C2 C3 C4
C10
CTRL
GLOBAL
CHAN
PROG
SEL
CHAN
ASGN
C5 C6 C7 C8
C11
C12 C13 C14
BANK
MEM
BANK
LSB
DATA 1 DATA 2
PANIC
DATA 3
MSB
STORE
DUMP
5678
1234
VEL
0 1 2 3 4 5 6 7 8 9 ENTER
CURVE
10
PITCH
MOD
C15
C16
1. Schermo a LED: l'Oxygen 25 presenta un display LED a 3 cifre che fornisce informazioni visive in merito
all'operazione corrente, alla programmazione e allo stato del controller.
2. Tasti funzioni: L'Oxygen 25 dispone di tasti funzione per la programmazione, l'accesso alle impostazioni e
funzioni avanzate.
3. Slider: Inviano tipi diversi di messaggi CC MIDI standard o messaggi MIDI avanzati in base al parametro
assegnati o al preset attivo.
4. Manopole: Quando vengono girate inviano vari messaggi MIDI. Ciascuna manopola può essere assegnata
individualmente ad un parametro MIDI diverso. Premere questo tasto e servirsi dei pad batteria per selezionare
una presets interna.
5. Pad: premere questi pad sensibili alla velocità per inviare Note On/Off e dati sulla velocità durante le esibizioni.
Per cambiare l'assegnazione del pad ottave, tenere premuti il tasto Shift e il tasto ottave + o -. Queste modifiche
influiscono su tutti gli otto pad globalmente. Per effettuare la trasposizione dalle assegnazioni predefinite dei pad,
tenere premuti i tasti Shift e Select e premere il tasto ottave + o -. Per riportare i pad alle assegnazioni
predefinite di fabbrica, tenere premuto il tasto Shift ed entrambi i tasti ottave.
6. Pulsanti per le funzioni di Trasporto: Questi pulsanti inviano messaggi CC MIDI standard, MIDI note, MMC
(MIDI Machine Control) o altri messaggi MIDI avanzati in base al parametro al quale sono assegnati o al preset
attivo.
7. Tastiera sensibile alla velocità: La tastiera sensibile alla velocità non è solo il metodo principale di invio di dati
Note On/Off e Velocity durante l'esecuzione, viene anche utilizzata per accedere alle funzioni di
programmazione estese elencate lungo il bordo superiore della tastiera stessa.
8. Pulsanti Octave (Ottava): I tasti Ottave servono per far salire o scendere la gamma delle ottave in incrementi di
9. Ruota Pitch Bend: Questa ruota viene generalmente utilizzata per modificare il tono delle note riprodotte dalla
10. Ruota Modulation: questa ruota viene utilizzata per aggiungere espressività all'esecuzione modificando
Pannello posteriore
1. Porta USB: La porta USB 2.0 (compatibile con la versione
2. Ingresso per pedale sustain: Questa ingress accetta un
3. Interruttore di accensione/spegnimento: Utilizzare questo interruttore per alimentare o spegnere il dispositivo.
4. Connettore per lucchetto Kensington: questo connettore è compatibile con cavi di sicurezza Kensington
13
un'ottava, estendendo la gamma delle ottave dei pad o dei tasti. Per saperne di più in merito a ulteriori funzioni,
si veda la guida per l'uso completa, disponibile alla pagina m-audio.com/oxygen25.
tastiera verso l’alto o verso il basso. Si può anche riassegnare la Ruota Pitch Bend in modalità Edit. Per saperne
di più, si veda la guida per l'uso completa, disponibile alla pagina m-audio.com/oxygen25.
l'intensità di determinati effetti. Spostando la ruota Modulation verso l'alto si aumenta l'effetto di modulazione,
mentre spostandola verso il basso si riduce l'effetto. Si può anche riassegnare la Ruota Modulation in modalità
Edit. Per saperne di più, si veda la guida per l'uso completa, disponibile alla pagina m-audio.com/oxygen25.
precedente USB 1.1) consente di alimentare la tastiera e
trasmettere i dati MIDI quando connessa a un computer.
pedale a contatto momentaneo (non incluso).
Quando premuto, il pedale sostiene il suono in esecuzione senza dover tenere le mani sulla tastiera.
Quando si imposta l'interruttore in posizione on (acceso), la tastiera Oxygen è alimentata attraverso il
collegamento USB con il computer.
standard per computer per la protezione contro i furti.
SUSTAIN
USB
C17
POWER
ON OFF
Page 14

Funzioni avanzate di programmazione
Le funzioni avanzate della tastiera sono brevemente elencate qui di seguito. Per saperne di più in merito alle funzioni avanzate,
si veda la guida per l'uso completa, disponibile alla pagina m-audio.com/oxygen25.
Pulsante Edit: Il pulsante Edit consente di accedere alle funzioni avanzate di Oxygen 25 disponibili nella tastiera. Se premuto,
il pulsante Edit attiva la modalità Edit sulla tastiera. È possibile utilizzare i tasti per selezionare varie funzioni avanzate e
immettere dati.
Per cambiare funzione a un cursore, tasto, manopola, ecc.:
1. Premere il pulsante Edit.
2. Premere il tasto CTRL SEL (Control Select).
3. Muovere o premere il dispositivo di controllo corrispondente al comando che si desidera modificare.
4. Premere il tasto corrispondente al parametro che si desidera cambiare (CTRL ASGN, DATA 1, DATA 2, ecc.)
5. Servirsi dei tasti numerici per inserire il valore del parametro.
Snapshot: Ppremere contemporaneamente il tasto Shift button e il tasto Auto per attivare la funzione Snapshot. Questa
funzione invia il messaggio MIDI assegnato e il valore attuale di tutti i comandi sul canale MIDI cui è configurato un comando.
Questa funzione consente di memorizzare le impostazioni correnti dei comandi nel sequenziatore.
Modalità automatica: per entrare in modalità automatica, premere il tasto Auto. Le manopole, i tasti e il cursore invieranno
messaggi pre-programmati e mappati automaticamente. Nessuno di questi parametri può essere modificato finché ci si trova in
modalità Auto. Prima di utilizzare la modalità Auto occorrerà installare i driver DirectLink da m-audio.com/directlink.
Control Assign, Data 1, Data 2, Data 3: La funzione Control Assign (CTRL ASGN) assegna un numero CC MIDI, pulsante,
slider o jack del pedale sustain selezionato. I tasti Data 1, Data 2 e Data 3 definiscono vari aspetti correlati del parametro o
della funzione assegnata a un controllo. Ad esempio, è possibile configurare un pulsante per l'invio di dati MIDI note On/Off,
assegnandoli al numero di controller 147. Il tasto Data 1 viene utilizzato per specificare la tonalità (o il numero di nota) della
nota MIDI per il pulsante. Il tasto Data 2 viene utilizzato per impostare la velocità Note Off (Velocity Off) e il tasto Data 3 viene
utilizzato per impostare la velocità Note On (Velocity On), determinando l'intensità del suono della nota.
Global Channel: La funzione Global Channel (GLOBAL CHAN) imposta il canale MIDI predefinito per la tastiera e tutti i
controlli MIDI salvo quelli che hanno assegnato a essi uno specifico canale MIDI.
Channel Assign: La funzione Channel Assign (CHAN ASGN) assegna una manopola, uno slider, un pulsante o il jack del
pedale sustain a uno specifico canale MIDI.
Program: Questa funzione invia messaggi MIDI Program Change sul canale globale selezionato e può essere utilizzata per
selezionare presets di suoni diverse contenute nel modulo sonoro (o strumento virtuale).
Bank LSB: La funzione Bank LSB invia messaggi di cambio banco al canale MIDI globale. Questi messaggi vengono utilizzati
per accedere ai banchi di patch di suoni su strumenti virtuali o moduli sonori (se sono disponibili banchi aggiuntivi).
Bank MSB: La funzione Bank MSB invia messaggi di cambio banco al canale MIDI globale. Questi messaggi vengono utilizzati
per accedere ai banchi di patch di suoni su strumenti virtuali o moduli sonori (se sono disponibili banchi aggiuntivi).
Memory Dump: La funzione SysEx Memory Dump (MEM DUMP) invia il contenuto di tutti e le posizioni di memoria dei Preset
per la memorizzazione in un'applicazione DAW. Consultare la documentazione fornita con il software DAW per ulteriori
informazioni su come registrare dati MIDI SysEx.
Panic: Premere il pulsante Advanced seguito dal pulsante Panic per inviare un messaggio "All Notes Off" (Tutte le note
disattivate) su tutti i 16 canali MIDI. In questo modo si disattiva qualsiasi nota bloccata che continua a suonare anche dopo che
il relativo tasto è stato rilasciato.
Curva di velocità: il tasto di impostazione della curva di velocità (VEL CURVE) serve per modificare la sensibilità al tocco della
tastiera. Questa impostazione consente di decidere in che misura la forza con la quale viene battuto un tasto o un pad influisce
sul volume al quale suona una nota.
Memorizzazione: La funzione Store salva le impostazioni di assegnazione dei controlli in una delle posizioni di memoria.
IMPORTANTE: la memorizzazione di nuove impostazioni di assegnazione sovrascriveranno il contenuto della posizione di
memoria selezionata.
Tasti numerici: Questa sezione della tastiera è utilizzata per digitare valori di parametri numerici in modalità Edit.
Tasto Enter: Il tasto Enter conferma le modifiche apportate e annulla la modalità Advanced.
Reset valori di fabbrica: accendere l'apparecchio tenendo premuti i tasti Octave + e -.
14
Page 15

Schnellstart-Anleitung (Deutsch)
Lieferumfang
Oxygen 25
USB-Kabel
Ableton Live Lite
Software-Download-Karte
Schnellstart-Anleitung
Sicherheitshinweise und Garantieinformationen
Laden Sie das vollständige Oxygen 25 Benutzerhandbuch von m-audio.com/oxygen25 herunter.
Kundendienst
Die neuesten Informationen zu diesem Produkt (Systemanforderungen, Kompatibilitätsinformationen usw.) und die
Registrierung Ihres Produkts finden Sie auf: m-audio.com/oxygen25.
Für zusätzlichen Produkt-Support besuchen Sie m-audio.com/support.
Setup
Anschließen Ihres Keyboards
1. Schließen Sie das im Lieferumfang Ihres Oxygen 25 enthaltene USB-Kabel an einen freien USB-Anschluss Ihres
Computers an.
2. Verbinden Sie das andere Ende des USB-Kabels mit dem USB-Anschluss des Oxygen 25-Keyboards.
Über dieses einfache USB-Kabel ist nicht nur die Stromversorgung des Keyboards, sondern auch der MIDI-Datenaustausch
zwischen Keyboard und Computer gegeben. Wenn Sie Ihr Oxygen 25 über einen USB-Hub verwenden wollen, stellen Sie
vorher sicher, dass der USB-Hub über eine externe Stromversorgung verfügt. Ein passiver USB-Hub ohne Netzanschluss
liefert möglicherweise nicht genug Energie, falls bereits andere Geräte daran angeschlossen sind. Es ist nicht empfehlenswert,
ein Audio-Interface am selben USB-Hub wie Oxygen 25 anzuschließen.
Sie können Oxygen 25 auch mit Ihrem iPad Camera Connection Kit verwenden, um unterstützte Musikproduktions-Apps
anzusteuern. Das iPad Camera Connection Kit ist im Apple Store verfügbar.
DirectLink Installation
Anstatt jeden Parameter einzeln zuzuweisen, aktiviert der DirectLink-Modus Ihres Oxygen die automatische Zuordnung der
Regler für viele häufig verwendete Software-Features und Einstellungen der digitalen Audio-Workstation (DAW). Wenn Sie
eine unterstützte DAW-Anwendung verwenden, können Sie Transport, Mixing-Controls (Fader und Pan), virtuelle Instrumente
oder Plug-In-Parameter für die Signalverarbeitung steuern. Sie können auch spontan zwischen DirectLink und
benutzerdefiniertem MIDI-Betrieb wechseln, um Ihren speziellen Bedürfnissen nachzukommen.
Um DirectLink auf Ihrem Oxygen zu aktivieren, müssen Sie für Ihre jeweilige DAW unter Umständen zusätzliche Software
einschließlich des DirectLink-"Profils" installieren. Besuchen Sie m-audio.com/directlink, um eine aktuelle Liste der DAWs zu
sehen, die DirectLink unterstützen, und um alle erforderlichen Treiber herunterzuladen.
Erste Schritte
Nachdem Sie die Installation abgeschlossen haben, müssen Sie Ihre Musik-Software für die Verwendung der Oxygen 25
konfigurieren. Verbinden Sie die Oxygen 25 mit Ihrem Computer und öffnen die Software. Wählen Sie Oxygen 25 im Menü
Einstellungen, Optionen oder Geräteinstallation in Ihrer Software.
Für weitere Informationen über das Konfigurieren der Software, um MIDI-Daten vom Oxygen 25 zu empfangen, und mit Hilfe
von Software-Instrumenten mit der Anwendung, auf die mit dem Produkt gelieferte Dokumentation.
Sustainpedal*
15
SUSTAIN
USB
C17
Computer*
POWER
ON OFF
*Separat
erhältlich
Page 16

1
2
3
4
5
6
7
8
9
10
5
1
2
3
4
Funktionen
Vorderseite
GLOBAL
PGM PRESETS
SHIFT
SELECT
OCTAVE
C9
POWER
AUTO
EDIT
AUTO
CTRL
ASGN
C1 C2 C3 C4
C10
CTRL
GLOBAL
CHAN
PROG
SEL
CHAN
ASGN
C5 C6 C7 C8
C12 C13 C14
C11
MEM
BANK
BANK
LSB
DATA 1 DATA 2
PANIC
DATA 3
DUMP
MSB
5678
1234
VEL
STORE
0 1 2 3 4 5 6 7 8 9 ENTER
CURVE
10
PITCH
MOD
C15
C16
1. LED-Bildschirm: Oxygen 25 verfügt über eine 3-stellige LED-Anzeige, um visuelle Informationen zum aktuellen
Betrieb, zur Programmierung und zum Controller-Status zu liefern.
2. Funktionstasten: Oxygen 25 ist mit Funktionstasten für die Programmierung, den Zugang zu den Einstellungen
und erweiterten Funktionen ausgestattet.
3. Slider: können Je nach gewünschtem Parameter, verschiedene Typen von Standard-MIDI-CCs oder erweiterten
MIDI-Befehlen programmiert werden; können ebenso zur Steuerung des aktuellen Presets verwendet werden.
4. Drehregler: Beim Drehen werden verschiedene MIDI-Befehle gesendet. Jeder Drehregler kann individuell einem
anderen MIDI-Parameter zugewiesen werden.
5. Pads: Drücken Sie diese anschlagdynamischen Pads, um während Ihrer Performance Note Ein/AusNachrichten und Daten zur Anschlagsgeschwindigkeit zu senden. Um die Oktavenzuordnung eines Pads zu
ändern, halten Sie die Umschalt-Taste und die Oktaventaste + oder - gedrückt. Diese Änderungen wirken sich
global auf alle acht Pads aus. Um die standardmäßigen Pad-Zuweisungen zu transponieren, halten Sie die
Umschalt- und Auswahltaste gedrückt und drücken die Oktaventasten + oder -. Um die Pads auf die
Werkszuordnungen zurückzusetzen, halten Sie die Umschalttaste und die beiden Oktaventasten gedrückt.
6. Transport-Buttons: Je nach gewünschtem Parameter können die Transport-Buttons für verschiedene Typen
von Standard-MIDI-CCs, MIDI-Noten, MMC (MIDI Machine Control) oder erweiterten MIDI-Befehlen
programmiert werden; sie können ebenso zur Steuerung des aktuellen Presets verwendet werden.
7. Anschlagdynamische Tastatur: Über die anschlagdynamische Tastatur haben Sie die Möglichkeit, während
des Spiels bequem Note On/Off und Velocity-Befehle zu senden; Sie können aber auch auf die an der oberen
Leiste aufgeführten Programmfunktionen zugreifen.
8. Octave-Buttons: Die Oktaventasten werden verwendet, um den Oktavenbereich des Keyboards in
9. Pitchrad: Mit dem Pitchrad können Sie die Tonhöhe einzelner Noten während des Spielens verändern. Sie
10. Modulationsrad: Über dieses Rad können Sie bestimmte Effekte verstärken bzw. verändern. Drehen Sie das
Rückseite
1. USB-Anschluss: Über den USB 2.0-Anschluss (abwärts
2. Anschluss für Sustain-Pedal: Dieser Anschluss ist für ein
3. Ein-/Ausschalter: Hier schalten Sie das Oxygen-Keyboard ein und aus. Wenn Oxygen eingeschaltet ist, wird es
4. Kensington Lock Anschluss: Dieser Anschluss ist mit einem Kensington-Sicherheitskabel für Laptops
Oktavenschritten nach oben oder unten zu verschieben, was den Oktavenbereichs der Pads oder Tasten
erweitert. Um mehr über zusätzliche Funktionen zu erfahren, lesen Sie bitte das vollständige Benutzerhandbuch
unter m-audio.com/oxygen25.
können das Pitchrad im Bearbeitungsmodus auch neu zuweisen. Um mehr darüber zu erfahren, lesen Sie bitte
das ausführliche Handbuch, das auf m-audio.com/oxygen25 verfügbar ist.
rad nach oben, um den zugewiesenen Effekt zu verstärken, und drehen Sie es nach unten, um den Effekt
abzuschwächen. Sie können das Modulationrad im Bearbeitungsmodus auch neu zuweisen. Um mehr darüber
zu erfahren, lesen Sie bitte das ausführliche Handbuch, das auf m-audio.com/oxygen25 verfügbar ist.
kompatibel mit USB 1.1) wird Oxygen mit Spannung versorgt.
Außerdem werden alle MIDI-Daten über den USB-Port an Ihren
Computer übertragen.
Sustain-Pedal vorgesehen. (Pedal nicht im Lieferumfang
enthalten.) Mit einem Sustain-Pedal können Sie Töne halten,
ohne dass Sie dazu die Tasten gedrückt halten müssen.
über den USB Anschluss Ihres Computers mit Spannung versorgt.
kompatibel.
16
SUSTAIN
USB
C17
POWER
ON OFF
Page 17

Spezialfunktionen
Die erweiterten Keyboard-Funktionen werden im Folgenden kurz aufgelistet. Um mehr über die erweiterten Funktionen zu
erfahren, lesen Sie bitte die vollständige Bedienungsanleitung unter m-audio.com/oxygen25.
Edit-Taster: Mit dem Edit-Taster haben Sie Zugriff auf die erweiterten Funktionen von Oxygen 25 auf der Tastatur.
Das Drücken des Edit-Tasters schaltet Ihr Keyboard in den Edit-Modus. Sie können die jeweiligen Tasten für die
verschiedenen erweiterten Funktionen und zum Senden von Befehlen nutzen.
So ändern Sie die Funktion eines Schiebereglers, einer Taste oder Drehreglers etc.:
1. Drücken Sie die Taste Bearbeiten.
2. Drücken Sie CTRL SEL (Steuertaste).
3. Bewegen oder drücken Sie das Steuerelement, das Sie ändern möchten.
4. Drücken Sie die entsprechende Taste des Parameters, den Sie ändern möchten (CTRL ASGN, DATA 1, DATA 2 etc.)
5. Verwenden Sie die Zifferntasten, um den Wert des Parameters einzugeben.
Schnappschuss: Drücken Sie gleichzeitig Umschalttaste und Auto-Taste, um die Schnappschuss-Funktion zu aktivieren. Die
Schnappschuss-Funktion sendet die zugewiesene MIDI-Nachricht und den aktuellen Wert aller Steuerelemente über den MIDIKanal, auf den das Steuerelement eingestellt ist. Mit dieser Funktion können Sie die aktuellen Einstellungen der
Steuerelemente in Ihrem Sequenzer aufzeichnen.
Auto-Modus: Drücken Sie die Auto-Taste, um in den Auto-Modus zu wechseln. Drehregler, Tasten und der Schieberegler
werden vorprogrammierte Automap-Nachrichten senden. Keiner dieser Parameter kann bearbeitet werden, solange Sie sich im
Auto-Modus befinden. Bevor Sie den Auto-Modus verwenden, müssen Sie die DirectLink-Treiber von m-audio.com/directlink
installieren.
Control Assign, Data 1, Data 2, Data 3: Mit der Control Assign-Funktion (CTRL ASGN) weisen Sie dem zu
programmierenden Controller (Drehregler, Button, Slider oder Sustain-Pedal) eine MIDI CC-Nummer oder einen anderen. Mit
den Data 1-, Data 2- und Data 3-Tasten können Sie den Wertebereich der den Controllern zugewiesenen Parameter oder
Funktionen einstellen. Ein Beispiel: Sie haben einen Button für das Senden eines MIDI Note On/Off-Befehls programmiert
(entspricht MIDI CC 147). Mit der Data 1-Taste können Sie nun die Tonhöhe (oder Noten-Nummer) der dem Button
zugewiesenen MIDI Note ändern. Mit der Data 2-Taste bestimmen Sie die Loslassstärke (Velocity Off), und mit der Data 3Taste die Anschlagstärke (Velocity On) und regeln somit, wie laut oder wie hart die Note gespielt wird.
Global Channel: Mit der Global Channel-Taste (GLOBAL CHAN) weisen Sie allen Oxygen-Controllern ihren jeweiligen
Standard-MIDIKanal zu. Von dieser Zuweisung ausgenommen sind alle Controller, für die Sie zuvor einen eigenen MIDI-Kanal
programmiert haben.
Channel Assign: Mit der Channel Assign-Taste (CHAN ASGN) weisen Sie den Controllern (Drehregler, Slider, Buttons oder
Sustain-Pedal) einen MIDI-Kanal zu.
Program: Mit der Program-Taste senden Sie Program Change-Befehle auf dem ausgewählten Global Channel, damit Sie die
verschiedenen Klangprogramme (Sound-Presets) Ihres virtuellen Instruments oder Soundmoduls auswählen können.
Bank LSB: Mit der Bank LSB-Taste senden Sie einen Bank Change-Befehl über den Global MIDI Channel. Damit erhalten Sie
Zugriff auf zusätzliche Klangbänke (oder Soundpatches) Ihres virtuellen Instruments oder Soundmoduls, vorausgesetzt, Ihr
Instrument oder Soundmodul verfügt über derartige Bänke.
Bank MSB: Mit der Bank MSB-Taste senden Sie einen Bank Change-Befehl über den Global MIDI Channel. Damit erhalten
Sie Zugriff auf zusätzliche Klangbänke (oder Soundpatches) Ihres virtuellen Instruments oder Soundmoduls, vorausgesetzt, Ihr
Instrument oder Soundmodul verfügt über derartige Bänke.
Memory Dump: Mit der Memory Dump-Taste (MEM DUMP) können Sie einen SysEx-Speicherauszug mit den Einstellungen
der 10 Presets von Oxygen an Ihre Audio-Anwendung senden. Wie Sie die Speicherauszüge mit Ihrer Audio-Anwendung
empfangen können, entnehmen Sie bitte dem Benutzerhandbuch Ihrer Anwendung.
Panic: Wenn Sie den Advanced-Button und anschließend die Panic-Taste drücken, senden Sie einen "All Notes Off"- (oder
"Panic"-) Befehl auf allen Kanälen. Dies ist hilfreich, wenn Sie "hängende" Noten stoppen wollen.
Anschlagdynamik-Kurve: Die Wahltaste für die Anschlagdynamik-Kurve (VEL CURVE) wird verwendet, um die
Berührungsempfindlichkeit des Keyboards zu ändern. Mit dieser Einstellung können Sie wählen, wie sich die Anschlagstärke,
mit der Sie eine Taste oder ein Pad anschlagen, auf die Lautstärke auswirkt, mit der die Note gespielt wird.
Store: Die Store-Taste gestattet Ihnen das Speichern Ihrer Presets auf den verfügbaren Speicherplätzen von Oxygen.
WICHTIG: Bereits auf einem Speicherplatz vorhandene Presets werden hierbei überschrieben.
Nummern-Tasten: Die Nummern-Tasten des Keyboards dienen der Eingabe numerischer Werte im Edit-Modus.
Enter-Taste: Die Enter-Taste des Keyboards dient der Bestätigung der vorgenommenen Einstellungen. Wenn Sie die Enter-
Taste drücken, verlassen Sie den Advanced-Modus.
Zurücksetzen auf die Werkseinstellung: Schalten Sie das Gerät ein, während Sie die Oktaventasten + und - gedrückt halten.
17
Page 18

Appendix (English)
Technical Specifications
Power USB bus-powered
Dimensions (Length x Width x Height) 3.7" x 9.6" x 19.3"; 94 mm x 243 mm x 492 mm
Weight 4 lbs.; 1.8 kg
Specifications are subject to change without notice.
Trademarks and Licenses
M-Audio is a trademark of inMusic Brands, Inc., registered in the U.S. and other countries.
Apple Store and iPad are trademarks of Apple Inc., registered in the U.S. and other countries.
Kensington is a registered trademark of ACCO Brands.
All other product or company names are trademarks or registered trademarks of their
respective owners.
18
Page 19

Page 20

m-audio.com
Manual Version 1.0
 Loading...