

Page 1
Quick Start Guide
English
Page 2
NVR10 | Quick Start Guide 1
Thank you for choosing the M-Audio NRV10 FireWire mixer. The NRV10 combines a high-quality analog mixer
with an integrated 10-in/10-out FireWire digital audio interface, allowing you to record up to ten channels of audio
directly into your computer-based DAW, as well as to bring audio from your DAW back to its analog mixer channels.
Its low-latency FireWire drivers support high-resolution sample rates of up to 96kHz at a bit depth of up to 24 bits,
and its compact footprint makes it ideal for studio and live use.
This Quick Start Guide is designed to give you a very basic overview of the NRV10, in order to get you set up and
running quickly. Even if you’re an experienced computer user and recording enthusiast, we suggest you take the time
to read the accompanying User Guide, found on the included CD-ROM. It will familiarize you with the unit’s more
advanced features, and help you to get the most out of your NRV10.
English
1
Installation Instructions for Windows XP
Make certain the NRV10 is not connected to your computer before beginning the installation.
|
Installing the NRV10
NOTE: Do NOT connect the NRV10 to your computer until you have run the installer program.
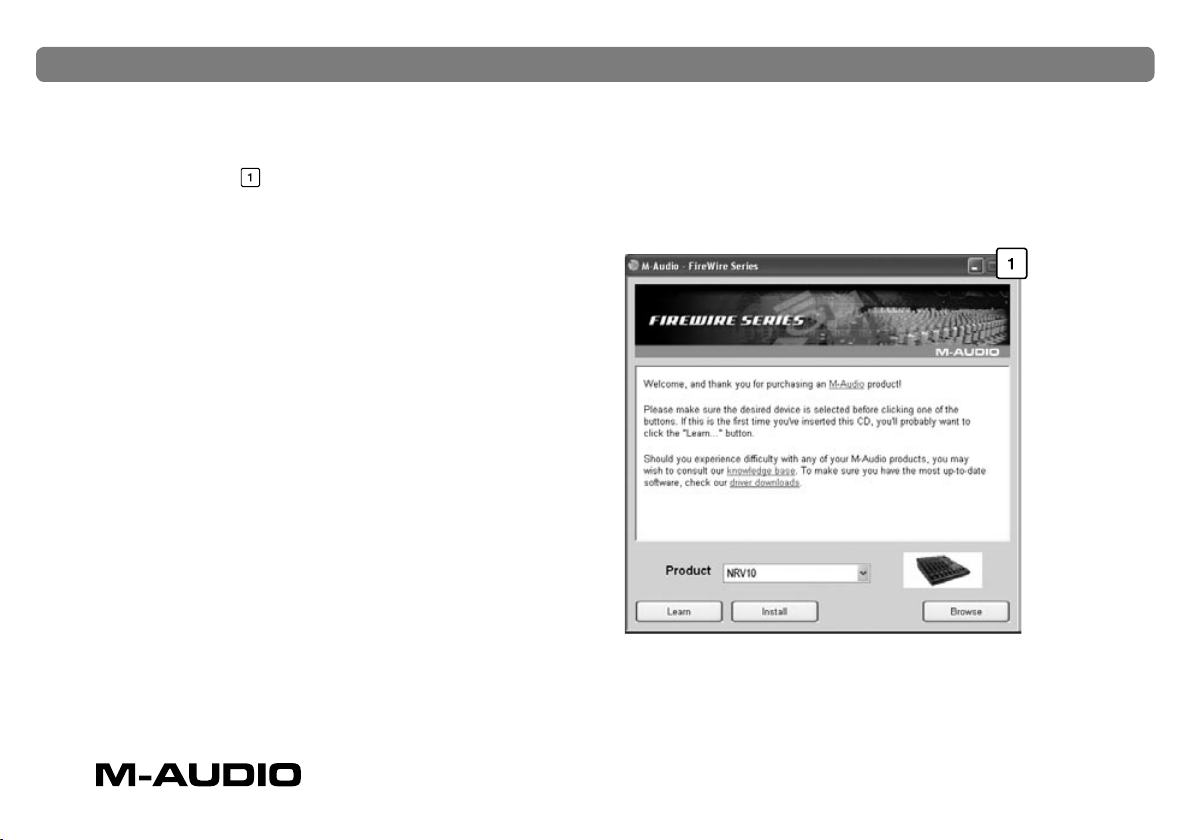
1. We recommend you download the latest NRV10 drivers by going to the Support > Drivers page at
www.m-audio.com. This will ensure that you have the newest available drivers. Once you have downloaded
the latest drivers, simply double-click on the file once it has finished downloading.
Page 3
2 NVR10 | Quick Start Guide
If you do not have internet access, you can install the drivers packaged with the NRV10 by inserting the included
FireWire Series CD-ROM into your computer’s CD drive. Your computer will automatically display the interactive
install screen
. (If the screen does not appear, you can manually start it by clicking on Start > My Computer >
FireWire Series CD-ROM.) Select your product from the menu and click “install.”
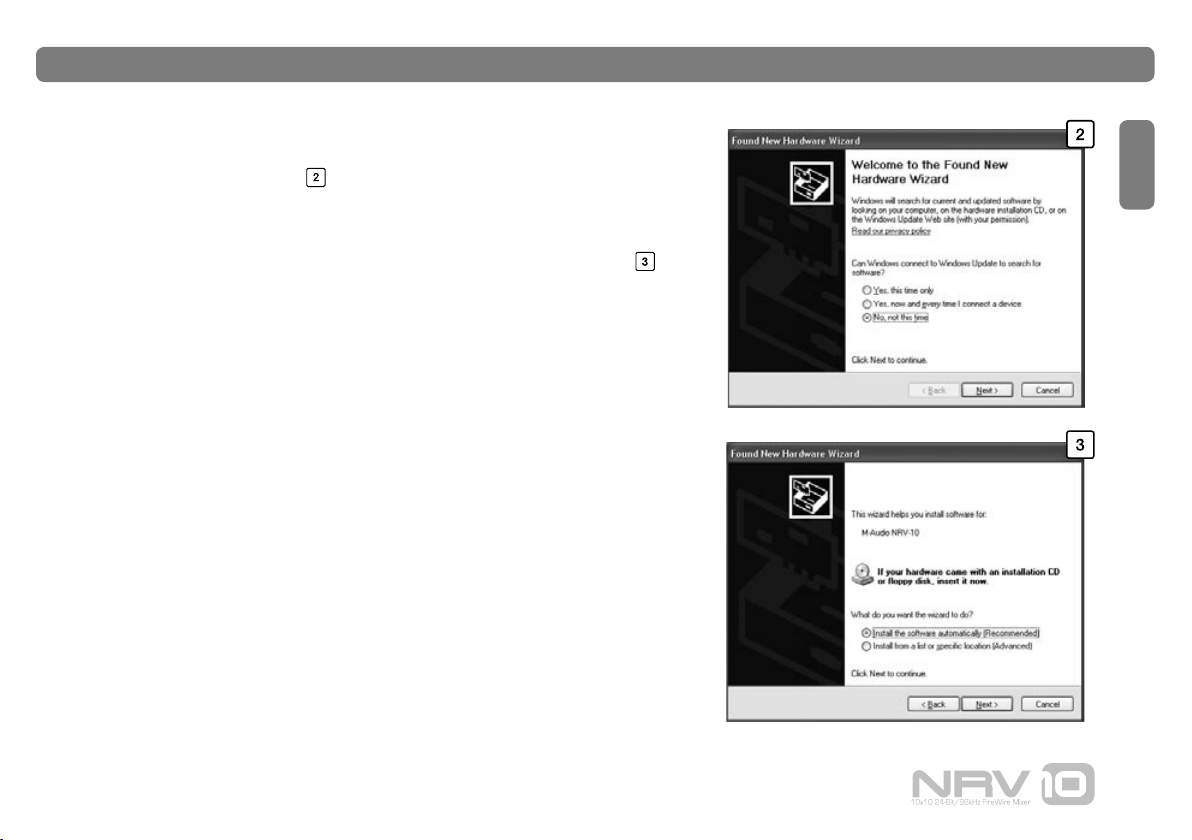
2. Follow the driver installer’s on-screen instructions.
3. At various points during the installation process,
you may be notified that the driver being
installed has not passed Windows Logo Testing.
Click “Continue Anyway” to proceed with the
installation.
4. Once the installer has completed, click “Finish.”
5. Shut down your computer.
6. Connect the NRV10 to a power outlet and to an
available FireWire port on your computer.
7. Power on the NRV10, then start your computer.
Page 4
NVR10 | Quick Start Guide 3
8. Windows will identify the new interface and ask if you want
to search the Internet for a driver. Select “No, not this time”
and click “Next.”
9. Windows will display the Found New Hardware Wizard.
10. Select “Install software automatically” and click “Next.”
11. When the Wizard has completed, click “Finish.”
12. When the installation is complete, you will see a message
stating “Your new hardware is installed and ready to use.”
Your NRV10 will appear in Windows under Control Panel >
Sounds and Audio Devices. The NRV10 Control Panel can be
accessed by clicking on the red icon in the system tray.
IMPORTANT: While it is possible to “hotplug” a FireWire device,
it is strongly recommended that you connect or disconnect
your NRV10 only when your computer is powered off. For more
information on this issue, please visit the M-Audio knowledge base
at www.m-audio.com
English
Page 5

4 NVR10 | Quick Start Guide
Installation Instructions for Mac OS X
Make certain the NRV10 is not connected to your
2. Follow the driver installer’s onscreen instructions.
computer before beginning the installation.
3. When the installer has completed, click “Close.”
1. We recommend you download the latest NRV10
drivers by going to the Support > Drivers page
at www.m-audio.com. This will ensure that you
have the newest available drivers. Once you have
downloaded the latest drivers, the downloaded
file should automatically mount and display its
4. Shut down the computer.
5. Connect the NRV10 to a power outlet and to an
available FireWire port on your computer.
6. Power on the NRV10, then start your computer.
contents on the desktop. (If the file does not
mount automatically, simply double-click on the
file once it has finished downloading to view
its contents, then double-click on the installer
application).
Your NRV10 will appear in Mac OS X under System
Preferences > Sound, in the Input and Output tabs.
The NRV10 Control Panel will appear in System
Preferences > Other.
If you do not have internet access, you can
install the drivers packaged with the NRV10 by
inserting the included FireWire Series CD-ROM
into your computer’s CD drive. Your computer
will automatically display the CD-ROM icon
on your desktop. Double-click on this icon to
view the contents of the disk. Next, double-click
“Open Me,” and select your product from the
drop-down menu on the welcome screen and
click “Install.”
IMPORTANT: While it is possible to “hotplug” a
FireWire device, it is strongly recommended that you
connect or disconnect your NRV10 only when your
computer is powered off. For more information on
this issue, please visit the M-Audio knowledge base
at www.m-audio.com
Page 6

NVR10 | Quick Start Guide 5
2
Your NRV10 is equipped with five XLR mic inputs and eight 1/4” line inputs. Connect any combination of mic and
line sources to these inputs, being sure to choose the appropriate input source on each channel’s corresponding
Mic/Line selector. If you are connecting condenser microphones, be sure to activate the Phantom Power switch.
You can connect external signal processors (typically dynamics processors) to any of the channel inserts on input
channels 1 through 4, as well as to the rear-panel Main Mix insert. You can also connect external signal processors
(typically reverbs or other multi-effects devices) to the NRV10’s Aux Send and Aux Return jacks.
Connect your powered monitor speakers or power amp to the rear-panel Main Mix outputs. The Main Mix outputs
are provided as both XLR and 1/4” TRS output connectors. Although both sets of connectors carry the same signal,
it is recommended under most circumstances that only one set of outputs be connected at any time. (Connecting to
both sets of outputs will not damage your mixer, but will result in reduced overall output levels.) You can connect an
additional set of powered monitors or a monitor amp to the rear-panel Control Room outputs.
And finally, connect the included FireWire cable from either of the NRV10’s rear-panel FireWire ports to your
computer’s FireWire input.
IMPORTANT: Routing signals incorrectly between the NRV10 and your computer-based DAW—in particular,
pressing the pre/post EQ button in certain routing configurations—can result in a feedback loop that can damage
your hearing and your equipment. Please refer to Section 10 of the included User Guide, “Monitoring Live Audio
While Recording to Your DAW,” before you use your NRV10.
|
Connecting the NRV10
English
Page 7

6 NVR10 | Quick Start Guide
3
The Control Panel provides you with the ability to monitor some of the NRV10’s basic functions and gives you
control over some of its features. Refer to the User Guide for full information on using the Control Panel.
4
The M-Audio website (www.m-audio.com) contains the latest drivers and program updates, as well as useful links to
news stories, FAQs and technical support. We recommend checking this site regularly to ensure you have the latest
drivers and the most up-to-date information on your M-Audio product.
© 2006 Avid Technology, Inc. All rights reserved. Product features, specifications, system requirements and
availability are subject to change without notice. Avid, M-Audio and NRV10 are either trademarks or registered
trademarks of Avid Technology, Inc. All other trademarks contained herein are the property of their respective
owners.
WARNING : This product contains chemicals, including lead, known to the State of California to cause cancer, and
birth defects or other reproductive harm. Wash hands after handling.
FOR HOME OR STUDIO USE
|
Using the Control Panel
|
Additional Information and Support
NRV10
Tested to comply with
FCC standards
Page 8

M-Audio USA
|
5795 Martin Rd., Irwindale, CA 91706
Technical Support
web: www.m-audio.com/tech
tel (pro products): (626) 633-9055
tel (consumer products): (626) 633-9066
fax (shipping): (626) 633-9032
Sales
e-mail: sales@m-audio.com
tel: 1-866-657-6434
fax: (626) 633-9070
Web
www.m-audio.com
M-Audio U.K.
|
Floor 6, Gresham House, 53 Clarenden Road, Watford
WD17 1LA, United Kingdom
Technical Support
e-mail: support@maudio.co.uk
tel: (Mac support): +44 (0)1765 650072
tel: (PC support): +44 (0)1309 671301
Sales
tel: +44 (0)1923 204010
fax: +44 (0)1923 204039
Web
www.maudio.co.uk
M-Audio France
|
Floor 6, Gresham House, 53 Clarenden Road, Watford
WD17 1LA, United Kingdom
Renseignements
Commerciaux
tel : 0 810 001 105
e-mail : info@m-audio.fr
Assistance Technique
PC : 0 0820 000 731
MAC : 0 0820 391 191
Assistance Technique
e-mail : support@m-audio.fr | mac@m-audio.fr
fax : +33 (0)01 72 72 90 52
Site Web
www.m-audio.fr
M-Audio Germany
|
Kuhallmand 34, D-74613 Ohringen, Germany
Technical Support
e-mail: support@m-audio.de
tel: +49 (0)7941 - 9870030
fax: +49 (0)7941 98 70070
Sales
e-mail: info@m-audio.de
tel: +49 (0)7941 98 7000
fax: +49 (0)7941 98 70070
Web
www.m-audio.de
M-Audio Canada
|
1400 St-Jean Baptiste Ave. #150, Quebec City,
Quebec G2E 5B7, Canada
Technical Support
email: techcanada@m-audio.com
phone: (418) 872-0444
fax: (418) 872-0034
Sales
e-mail: infocanada@m-audio.com
phone: (866) 872-0444
fax: (418) 872-0034
Web
www.m-audio.ca
060104_NRV10_QSG_EN01
 Loading...