

Page 1

Table of Contents
Mini-morphosis . . . . . . . . . . . . . . . . . . . . . . . . . . . . . . . . . . . . . . . . . . . . . . . . . . . . . . . . . . . . . . . . .3
MELOHMAN - THE CONCEPT . . . . . . . . . . . . . . . . . . . . . . . . . . . . . . . . . . . . . . . . . . . .4
The GForce Team. . . . . . . . . . . . . . . . . . . . . . . . . . . . . . . . . . . . . . . . . . . . . . . . . . . . . . . . . . . . . . .4
Mini web resources. . . . . . . . . . . . . . . . . . . . . . . . . . . . . . . . . . . . . . . . . . . . . . . . . . . . . . . . . . . . . . . .5
Mini book resources. . . . . . . . . . . . . . . . . . . . . . . . . . . . . . . . . . . . . . . . . . . . . . . . . . . . . . . . . . . . . . .5
Developed by: . . . . . . . . . . . . . . . . . . . . . . . . . . . . . . . . . . . . . . . . . . . . . . . . . . . . . . . . . . . . . . . . . . . . .5
Thanks to: . . . . . . . . . . . . . . . . . . . . . . . . . . . . . . . . . . . . . . . . . . . . . . . . . . . . . . . . . . . . . . . . . . . . . . . . . .5
Sound Design. . . . . . . . . . . . . . . . . . . . . . . . . . . . . . . . . . . . . . . . . . . . . . . . . . . . . . . . . . . . . . . . . . . . . . 5
Installing the Minimonsta . . . . . . . . . . . . . . . . . . . . . . . . . . . . . . . . . . . . . . . . . . . . . . . . . 5
Macintosh Logic 7 and Ableton Live . . . . . . . . . . . . . . . . . . . . . . . . . . . . . . . . . . . . . . . . . . . . .5
Registration . . . . . . . . . . . . . . . . . . . . . . . . . . . . . . . . . . . . . . . . . . . . . . . . . . . . . . . . . . . . . . . . . . . . . . .6
Quick Start . . . . . . . . . . . . . . . . . . . . . . . . . . . . . . . . . . . . . . . . . . . . . . . . . . . . . . . . . . . . . . . . . . . . . . . .6
Minimonsta - Patch Management . . . . . . . . . . . . . . . . . . . . . . . . . . . . . . . . . . . . . 7
Mini Controls . . . . . . . . . . . . . . . . . . . . . . . . . . . . . . . . . . . . . . . . . . . . . . . . . . . . . . . . . . . . . . . . . . . . 9
THE CONTROLLERS PANEL . . . . . . . . . . . . . . . . . . . . . . . . . . . . . . . . . . . . . . . . . . . . . . . . . . . . . . . .9
THE OSCILLATOR BANK . . . . . . . . . . . . . . . . . . . . . . . . . . . . . . . . . . . . . . . . . . . . . . . . . . . . . . . . . . 10
THE MIXER PANEL . . . . . . . . . . . . . . . . . . . . . . . . . . . . . . . . . . . . . . . . . . . . . . . . . . . . . . . . . . . . . . . .11
TUTORIAL 6: HOW DO I TAKE A PATCH
AND USE IT FOR THE BASIS OF A META-PATCH? . . . . . . . . . . . . . . . . . . . . . . . .27
TUTORIAL 7: XADSR . . . . . . . . . . . . . . . . . . . . . . . . . . . . . . . . . . . . . . . . . . . . . . . . . . . . . . . . . . . . . .28
TUTORIAL 8: FREE SELECT BUTTON . . . . . . . . . . . . . . . . . . . . . . . . . . . . . . . . . . . . . . . . . . . . . .28
TUTORIAL 9: MIDI CONTROL LED’S . . . . . . . . . . . . . . . . . . . . . . . . . . . . . . . . . . . . . . . . . . . . . .28
TUTORIAL 10: LFO . . . . . . . . . . . . . . . . . . . . . . . . . . . . . . . . . . . . . . . . . . . . . . . . . . . . . . . . . . . . . . . . 29
TUTORIAL 11: VELOCITY RESPONSE . . . . . . . . . . . . . . . . . . . . . . . . . . . . . . . . . . . . . . . . . . . . .29
TUTORIAL 12: MODULATION WHEEL . . . . . . . . . . . . . . . . . . . . . . . . . . . . . . . . . . . . . . . . . . . . 29
DEFAULT MIDI CC SETTINGS . . . . . . . . . . . . . . . . . . . . . . . . . . . . . . . . . . . . . . . . . . . . .30
Contact . . . . . . . . . . . . . . . . . . . . . . . . . . . . . . . . . . . . . . . . . . . . . . . . . . . . . . . . . . . . . . . . . . . . . . . . . . . . 31
THE FILTER MODIFIERS PANEL . . . . . . . . . . . . . . . . . . . . . . . . . . . . . . . . . . . . . . . . . . . . . . . . . .12
THE LOUDNESS CONTOUR MODIFIERS PANEL . . . . . . . . . . . . . . . . . . . . . . . . . . . . . . . . .13
THE DELAY PANEL . . . . . . . . . . . . . . . . . . . . . . . . . . . . . . . . . . . . . . . . . . . . . . . . . . . . . . . . . . . . . . . .14
THE OUTPUT PANEL . . . . . . . . . . . . . . . . . . . . . . . . . . . . . . . . . . . . . . . . . . . . . . . . . . . . . . . . . . . . . . 14
Performance Section . . . . . . . . . . . . . . . . . . . . . . . . . . . . . . . . . . . . . . . . . . . . . . . . . . . . . .15
Monsta Controls . . . . . . . . . . . . . . . . . . . . . . . . . . . . . . . . . . . . . . . . . . . . . . . . . . . . . . . . . . . . . . .15
Patch Management section . . . . . . . . . . . . . . . . . . . . . . . . . . . . . . . . . . . . . . . . . . . . . . . . . . . . .15
THE MELOHMAN PANEL AND MORPH OPTIONS . . . . . . . . . . . . . . . . . . . . . . . . . . . . . . .17
LFO and XADSR Section . . . . . . . . . . . . . . . . . . . . . . . . . . . . . . . . . . . . . . . . . . . . . . . . . . . .19
MIDI Section . . . . . . . . . . . . . . . . . . . . . . . . . . . . . . . . . . . . . . . . . . . . . . . . . . . . . . . . . . . . . . . . . . . . .21
Settings Section . . . . . . . . . . . . . . . . . . . . . . . . . . . . . . . . . . . . . . . . . . . . . . . . . . . . . . . . . . . . . . .22
TUTORIAL SECTION . . . . . . . . . . . . . . . . . . . . . . . . . . . . . . . . . . . . . . . . . . . . . . . . . . . . . . . . . . .25
TUTORIAL 1: USING THE MINIMONSTA AS A PLUG-IN EFFECT . . . . . . . . . . . . . . .25
TUTORIAL 2: USING THE MINIMONSTA AS A PLUG-IN EFFECT
USING LOGIC 7. . . . . . . . . . . . . . . . . . . . . . . . . . . . . . . . . . . . . . . . . . . . . . . . . . . . . . . . . . . . . .25
TUTORIAL 3: USING OSCILLATOR 3 AS A PITCH LFO . . . . . . . . . . . . . . . . . . . . . . . . . .26
TUTORIAL 4: THE FEEDBACK TRICK. . . . . . . . . . . . . . . . . . . . . . . . . . . . . . . . . . . . . . . . . . . . . 26
TUTORIAL 5: ASSIGNING SOUNDS . . . . . . . . . . . . . . . . . . . . . . . . . . . . . . . . . . . . . . . . . . . . . .27
2
Page 2

1
Mini-morphosis
Prior to 1970, it’s fair to say that synthesizers were mostly giant modular monsters, more suited to a luxury recording studio or
laboratory than being transported from stage to stage. The problems with lugging around a beast of this nature were many as
GMEDIA Music’s Chris Macleod remembers from his days as Keith Emerson’s ‘grunt’.
“Lugging the Moog around was a bloody nightmare, especially as it was only used for one or two sounds in the show. It was always
breaking down to the extent we took along a dedicated Moog technician, who we nicknamed ‘Mr Diode Head’. I know it was all
part of Keith’s performance but frankly, I couldn’t wait to see the ass-end of it. As a result my back still suffers today and at the
penultimate gig I put a big sign on it saying FOR SALE - OWNER LEAVING PLANET, much to everyones amusement”
Of course in 1970 there was already one portable synthesizer, the EMS VCS3, but this still largely clung to its academic apron
strings. Clearly, if the synthesizer were to become a mainstream instrument then a portable solution based around the needs of a
musician would have to be found.
The first hint of this was the pre-production Minimoog Model A, which largely consisted of a basic collection of modules plundered
from the modular instruments and which still needed basic patch-cords for routing. This was further refined, initially, to the single
panel and switch-routed Model B and then to the Model C, which introduced the hinged back. These prototypes ultimately lead to
the production Model D but to get that far was not as straightforward as you might believe.
Due to the success of the modular instruments, Bob Moog was an in-demand speaker and synth demonstrator, and before departing
for a few weeks on the road he authorized the production of ten more Model C’s. However, no doubt due to the expense involved,
he specifically stated that no printed circuit boards were to be used in this small production run.
According to one of the designers, Jim Scott, as soon as Bob left most of the staff got together and argued that unless they got
the instrument to a point where it could be manufactured, they’d probably be out of work in the not too distant future. So it was
agreed that they would disregard Bob’s orders and build the instruments using PCBs. On his return, Bob found several instruments
in assorted stages of completion and immediately called everyone into his office demanding to know who was responsible?
According to Jim, “No one said a word and we did a lot of observing our fingernails and such. He couldn’t very well fire his whole
staff, so the first ever run of D Models was completed.”
The Model D Minimoog was the version that saw release in 1970 and for musicians all over the world the synthesizer had truly
arrived. So too had many of the things that players would soon take for granted. For example, those vertical pitch and modulation
wheels became pretty much standard fare, as did everyone’s desire for a 24dB per octave lowpass filter. And that’s where the
Minimoog really shone - with both its playability and its sound.
Countless musicians quickly adopted it from early pioneers such as Rick Wakeman, Keith Emerson & Chick Corea, through to latterday explorers like Gary Numan & Adrian Utley. And although the Mini ceased production in 1981 a quick glance at its user-base
reveals a Who’s Who of contemporary music.
Rick Wakeman reveals, “The Minimoog is my favorite synthesizer of all-time and at one point I had nine of them with each sounding
slightly different. The first one I owned cost me £35 from the actor Jack Wilde. It should have been about £1200 but Jack told me
he had bought it about two weeks previously, that it didn’t work properly and he wanted rid of it. I figured that it would cost less
than £1200 to get it fixed so I collected it, took it home, turned it on and couldn’t find anything wrong with it. I called him up and
told him it was fine but he said that it was definitely faulty because it wouldn’t play more than one note at a time. That was a fairly
common misunderstanding back then”
There were, however, more genuine problems with early models as Rick once again explains.
“The obvious nightmare was the tuning instability and I kid you not, sometimes when we used the Minimoog live, we were lucky to
be able to play it at all because, pitch-wise, it was literally all over the place. Also a less well-known fact was that the Mk 1 used to
suffer from radio interference. I remember playing one show at Alexandra Palace in front of twenty thousand people, and just as
we were about to start all you could hear through the PA was, ‘Arsenal 2 - Wolverhampton Wanderers 1’. It was hilarious.”
Teething troubles aside though, the portability, the sound and the immediacy of the controls made the instrument essential for
any touring keyboard player and it couldn’t fail to be anything but a huge commercial success. During its life approximately 13,000
were made and it remains one of the world’s most loved electronic instruments to this day.
3
Page 3

The Minimonsta is based on our much-loved early Minimoog (serial number 1794), chosen because it represents all that was best
about the hallmark Mini sound, namely, a super-fat filter, snappy envelopes and those distinctive effervescent and rich tones.
In keeping with Rick Wakeman’s statement, all Minimoogs did indeed sound slightly different and this is evident in our Mini in
a couple of ways. Firstly, the oscillators were the less-stable earlier ones, liable to drift at the drop of a hat. Secondly, the filter
emphasis kicked in sooner than on later versions. However, while it was important to stabilize the oscillator tuning we felt it was
important to remain true to our instrument’s filter and not iron any of the personality out of it.
Nonetheless, we feel it’s good to take risks and after the successes of the faithful Oddity and more daring impOSCar, we began to
look at how we could do justice to such an icon, while at the same time adding features that could take it into very different sonic
territory. Several ideas were discussed but nothing sat in harmony with the ethos of the original instrument until a meeting with
Oddity co-conspirators, Ohm Force. This proved to be the pivotal moment and after witnessing their Symptohm Melohman synth,
a joint venture was agreed. Soon after, the Melohman functionality was witnessed in all its glory on an early alpha version of the
Minimonsta and we all began to salivate at the potential of this expressive intricacy sitting in tandem with the simple operation
of the original instrument.
MELOHMAN - THE CONCEPT
Ohm Force’s Melohman feature set is based around an interactive set of tools that transform the playing experience of a software
instrument via unique and inspirational concepts. In essence it offers a user-defined octave that can be used to trigger timed or
instantaneous morphs between up to twelve Patches. The morph modes are Morphing, Morph Back & Forth, Morph Sequence,
Mutate and Partial Mutate. In terms of playability, this goes a considerable way to countering the argument that software
synthesizers are not expressive enough in performance due to the inherent lack of a dedicated tactile interface.
Then there’s the famous Ohm Force feature of applying an additional LFO or ADSR to almost every parameter. This gives nigh-on
unlimited sound design capabilities ranging from the sublime to the downright disturbed, as well as helping to circumnavigate
limitations of the original instrument, such as having to lose the third oscillator to the LFO.
During development, the Minimonsta, in much the same way as the original instrument, underwent several revisions and even
invoked a couple of near mutinies. But as the instrument progressed, we all began to realize that we’d created far more than a
simple emulation - we’d created a Monster and from that moment the name of the synth was born.
The name Minimonsta also encapsulates the instrument because it operates on two distinct levels. Firstly, it can operate as a
straightforward but highly accurate emulation of the original Mini by way of the familiar and intuitive user interface. In this mode
you could largely ignore the upper section of the GUI containing the LFO, XADSR and MIDI sections and instead focus on the
familiar controls and the creation of all manner of authentic Mini tones with the minimum of effort.
At its second level though, the Mini becomes a true Monster by way of the additional LFO, ADSR and dynamic MIDI controllability
for every main GUI parameter. Unparalleled real-time sound mangling via the Melohman Patch Morphing options, and a plethora
of triggering options including Monophonic, Polyphonic, Legato and Unison modes.
An enormous amount of care and work has gone into making sure all these elements have collided to ensure an authentic Mini
tone meets a weapons-grade monster, and we sincerely hope you enjoy this instrument and make serious creative use of its unique
functionality and sublime tones. The two years of development has left no stone unturned in the pursuit of sonic excellence and
rest assured that no one has spent any time looking at their fingernails or gazing at their navels.
The GForce Team
2
An Appeal - Please support developers, not copyright theft.
If you’re reading this from the printed manual, the chances are you paid for this software and as such we’d like to say a heartfelt
thanks. The money that we receive from sales of the Minimonsta will be put back into further development projects and used to
create other interesting and valid musical products. However, if you did not pay for this instrument please try and understand the
implications of piracy for small companies such as ours. Piracy is seriously damaging to small software companies and with the
abundance of free instruments available there is no excuse for this kind of theft. As musicians ourselves, we respect anyone who
creates good music using limited tools, far more than those who make average music using every tool in existence. Pick your tools
wisely and learn them well - this is far more creative and rewarding.
4
Page 4

From our perspective, this product took almost two years to produce and has involved the small development team in many
personal and financial sacrifices. Nonetheless we have tried to keep the cost of the instrument at an affordable level and make the
copy protection as unobtrusive as possible. We will not hesitate to prosecute anyone who infringes our copyright but we would
prefer to kindly ask you not to post the Minimonsta on any newsgroup or P2P group and to respect our work. Many thanks.
Mini web resources.
www.moogarchives.com
www.sonicstate.com/synth/moogmini.cfm
http://groups.yahoo.com/group/The_Lords_of_the_Mini
Mini book resources.
A-Z of Analogue Synthesisers (Part One. A - M) - Pete Forrest
Vintage Synthesisers - Mark Vail.
Analog Days - Frank Trocco & Trevor Pinch
Developed by:
Ohm Force and GMEDIA Music as GForce.
Laurent de Soras, Jerome Noel, Raphael Dinge, Grégory Makles, Dave Spiers, Chris Macleod, Ian Legge and a supporting cast of
many more.
Thanks to:
Flemming Bloch, Lee Groves, Matt Hooper, Jay Ahern, Ellis Breen, Bruce Satinover, Phil Hartnol, Dave Goodwin, Robin Rimbaud,
Darren Price, Marius DeVries, James Towler, Steve Winwood, Pascal Gabriel, Geoff Downes, Frank Hoffmann, Nick Batt, Meffy
Ellis, Putte, Malcolm Corbett, Mr Smith & Mr Hyde, Orren Merton. Uwe Bauer, Rick Wakeman
Sound Design.
Dave Spiers, Rick Wakeman, Chris Macleod, Davy Blakely, Huston Singletary,
Howard Scarr, Hans-Jorg Schleffler, Matt Hooper, Brian Desmond,
Markus Hastreiter, Brice Duncan, Andreas Ehrhardt, Rory Dow, Geoff Downes,
Phil Hartnol, Steve Winwood, Marius DeVries, Pascal Gabriel & Lee Groves.
3
Installing the Minimonsta
Included on the Master CD are multiple versions of the Minimonsta. The Minimonsta installer allows you to install any or all
versions via a single installer, one for Mac and one for PC.
PC -
Insert the Minimonsta Master CD into your CD-ROM drive.
From the Setup window, select the “Install” option and follow
the onscreen instructions carefully, entering your unique User
Name and Registration codes EXACTLY as you find them printed
within this Getting Started guide.
Mac -
Insert the Minimonsta Master CD into your CD-ROM
drive. Double-click on the GForce Minimonsta disc icon to open
the disc. Double-click on the Minimonsta.dmg file and then run
the Minimonsta Installer, following the onscreen instructions
carefully, and entering your unique User Name and Registration
codes EXACTLY as you find them printed within this Getting
Started guide. During installation, be sure to click on the “Next”
button until the installation routine is complete.
Macintosh Logic 7 and Ableton Live
Once installation is complete launch Logic 7 or Ableton Live and load the Minimonsta into an instrument channel AS AN EFFECT.
Mac installer shown.
5
Page 5
Registration
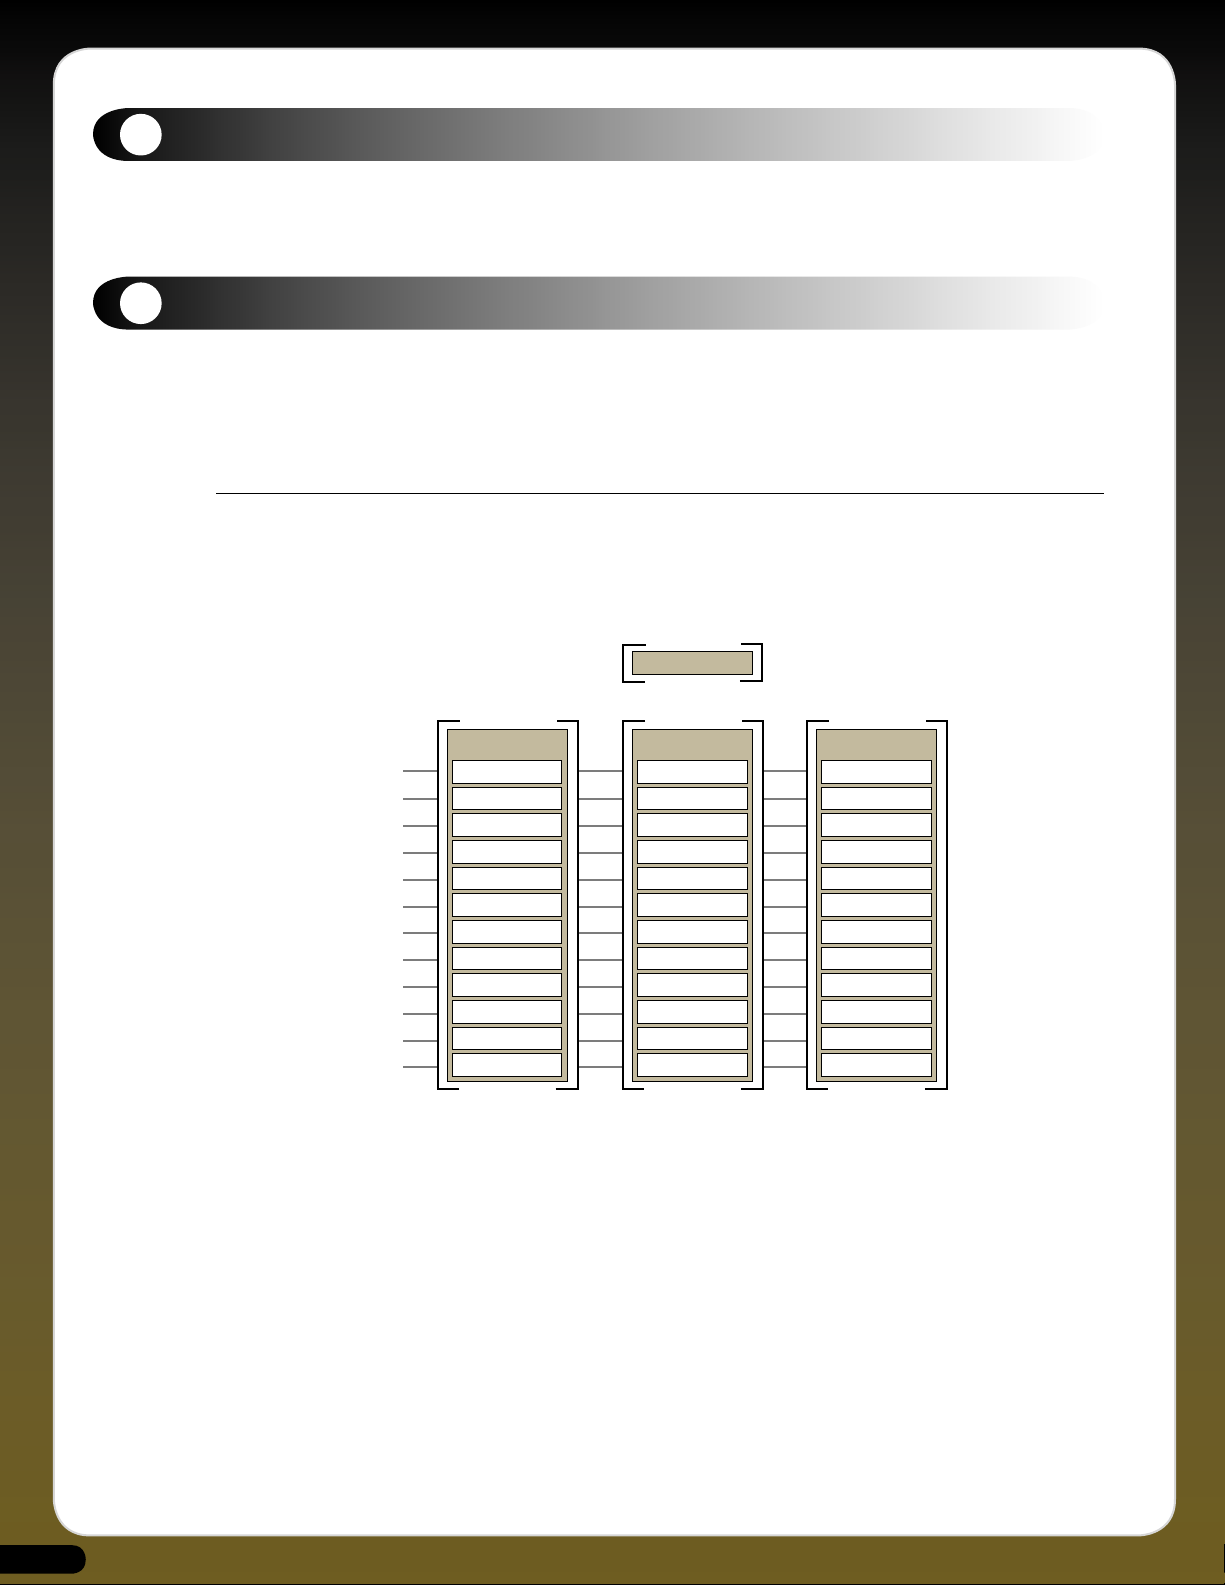
A Meta-Patch is group of up to 12 Patches (sounds)
Patch 1
Patch 2
Patch 3
Patch 4
Patch 5
Patch 6
Patch 7
Patch 8
Patch 9
Patch 10
Patch 11
Patch 12
BoomBass
BoomBass
BoomBass
BoomBass
BoomBass
BoomBass
BoomBass
BoomBass
BoomBass
BoomBass
BoomBass
BoomBass
META-PATCH
A Meta-Patch
consisting of
12 identical Patches
BoomBass
Default
Default
Default
Default
Default
Default
Default
Default
Default
Default
Default
META-PATCH
A Meta-Patch
containing
a single Patch
BoomBass
Filtered
MoreRez
Panning
SlowAttack
LongDelay
LevelMod
FilterWah
SnapDecay
Sweeping
MultiMods
Madness
META-PATCH
A Meta-Patch consisting
of 12 Patches, each
being a variant
of Patch 1
META-PATCH
4
Please take the time to register your Minimonsta on-line at: www.gforcesoftware.com
Registration is required to receive free technical support.
Quick Start
5
Let’s face it, reading a manual from cover to cover isn’t much fun. Most of the time when you buy a synth you just want to
get started immediately and discover things as you progress. Because the Minimonsta works on two levels, provided you have a
fundamental grasp of subtractive synthesis, it’s quick and easy to get going before delving in to the more complex functions of the
instrument. However, there are a few things that are useful to learn from the start.
Patch Structure - What is a Meta-Patch?
The Meta-Patch is a group of up to 12 Patches (sounds) that you load from your hard drive. At its simplest, it contains only a
single Patch and at its most complex 12 different Patches. All Meta-Patches supplied with the Minimonsta contain 12 different
Patches except the ones within the OriginalMiniPatches folder which contain a single sound across all Patches. These sounds were
transcribed from original Minimoog patch charts.
6
Page 6
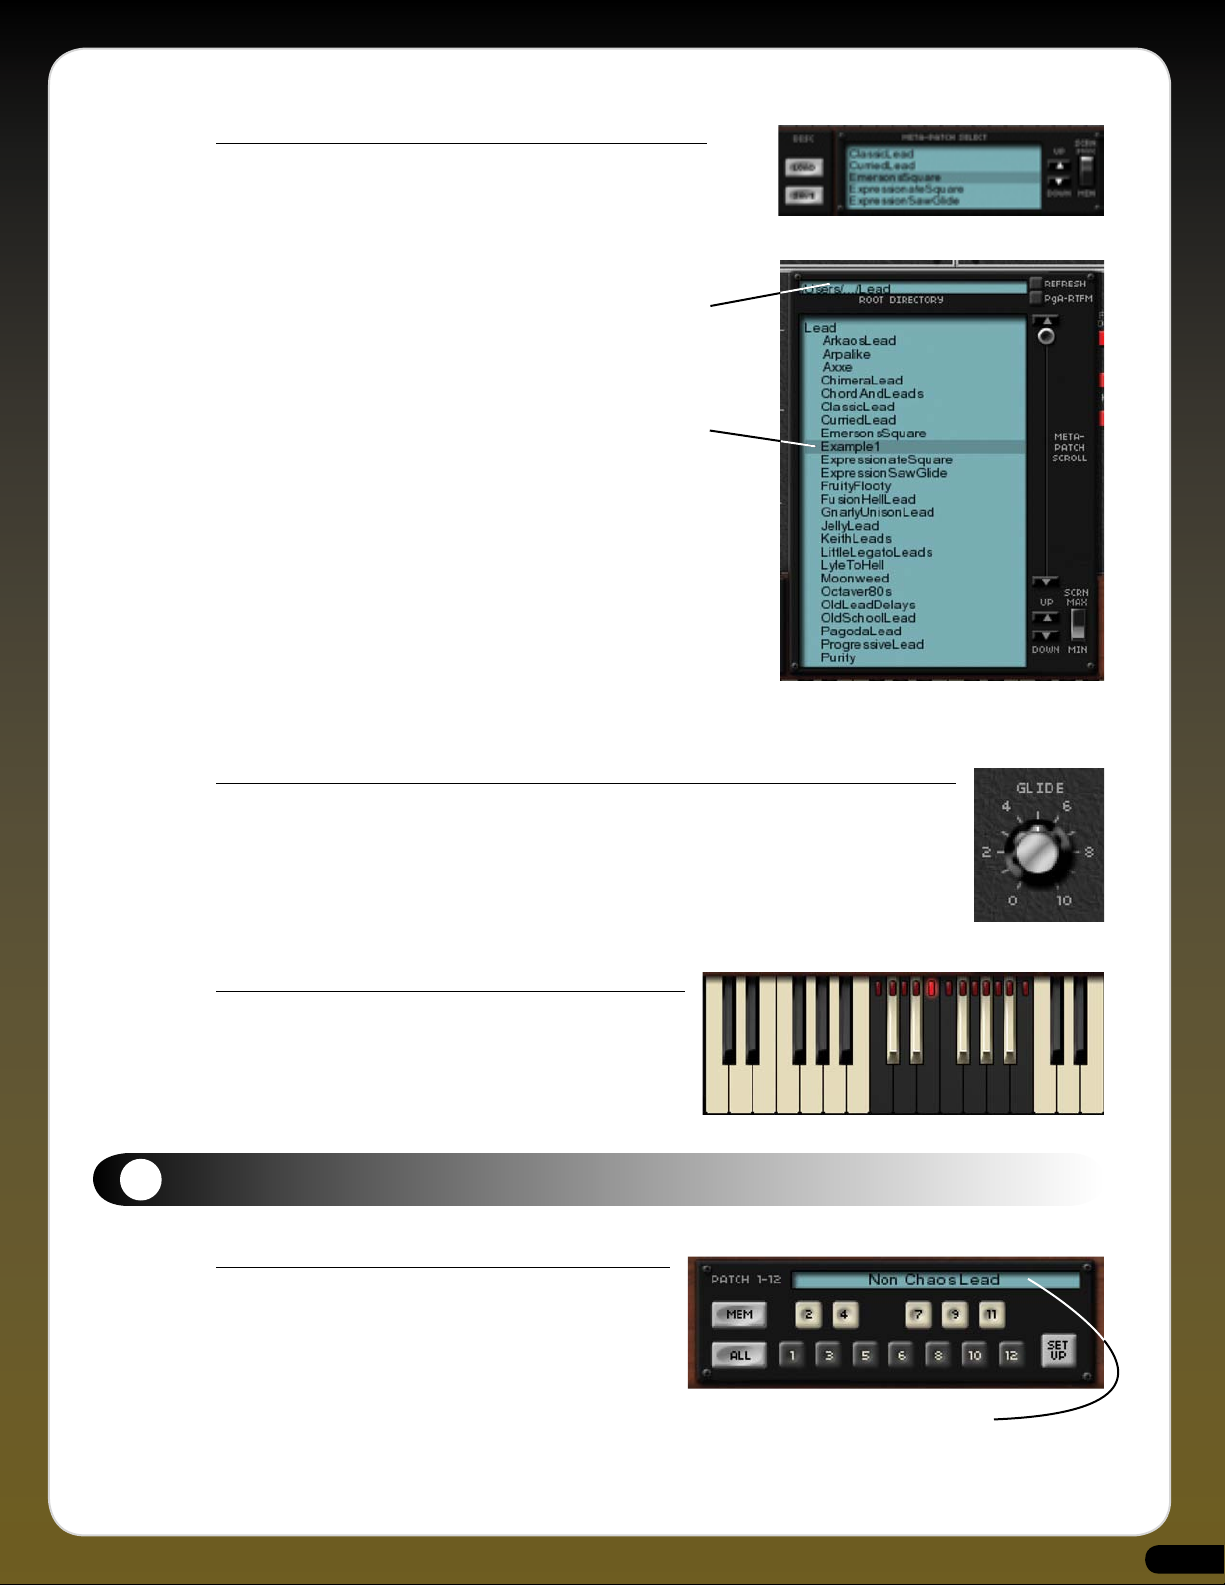
Loading a Meta-Patch
The first time you open the Minimonsta, after installing it, open the
Meta-Patch Select Window to it’s maximum size via the dedicated rocker
switch.
From here click in the small top window marked Root Directory Navigate
it to the MinimonstaPatches folder. Once you’ve done this you simply
select a sound from the list and play.
Your selected Root Directory will be remembered by the Minimonsta
when you open it subsequently.
Meta-Patch Select Window
Meta-Patch Select Window shown at
maximum size
Flying Knobs
With this feature you can grab and throw the knob of most main GUI parameters and make it move
automatically, through its range, to its highest or lowest setting. To make this work simply click and hold
on the highest or lowest text marking around the base of the knob and throw to the right to increase that
parameter’s value, or throw to the left to decrease the value. The faster you throw, the quicker the knob
moves.
Note: This does not work with the Oscillator Range and Waveform Knobs.
Melohman Octave
The Melohman Octave is used for real-time performance functions
and can be assigned to any octave of the Minimonsta’s keyboard
range. It is also directly associated with the control knobs to the
right-hand side of the keyboard. For further details see the Morphing
Section on page 17.
6
Minimonsta - Patch Management (See also page 15)
Meta-Patch
As mentioned before, a Meta-Patch is a group of up to 12 Patches
that you load from your hard drive.
The Minimonsta works as following: having loaded a Meta-Patch
you can select or morph between its Patches in a variety of ways.
Let’s start by looking at how to create a Meta-Patch with the same
sound across all its Patches.
Meta-Patch Select Window
7
Page 7
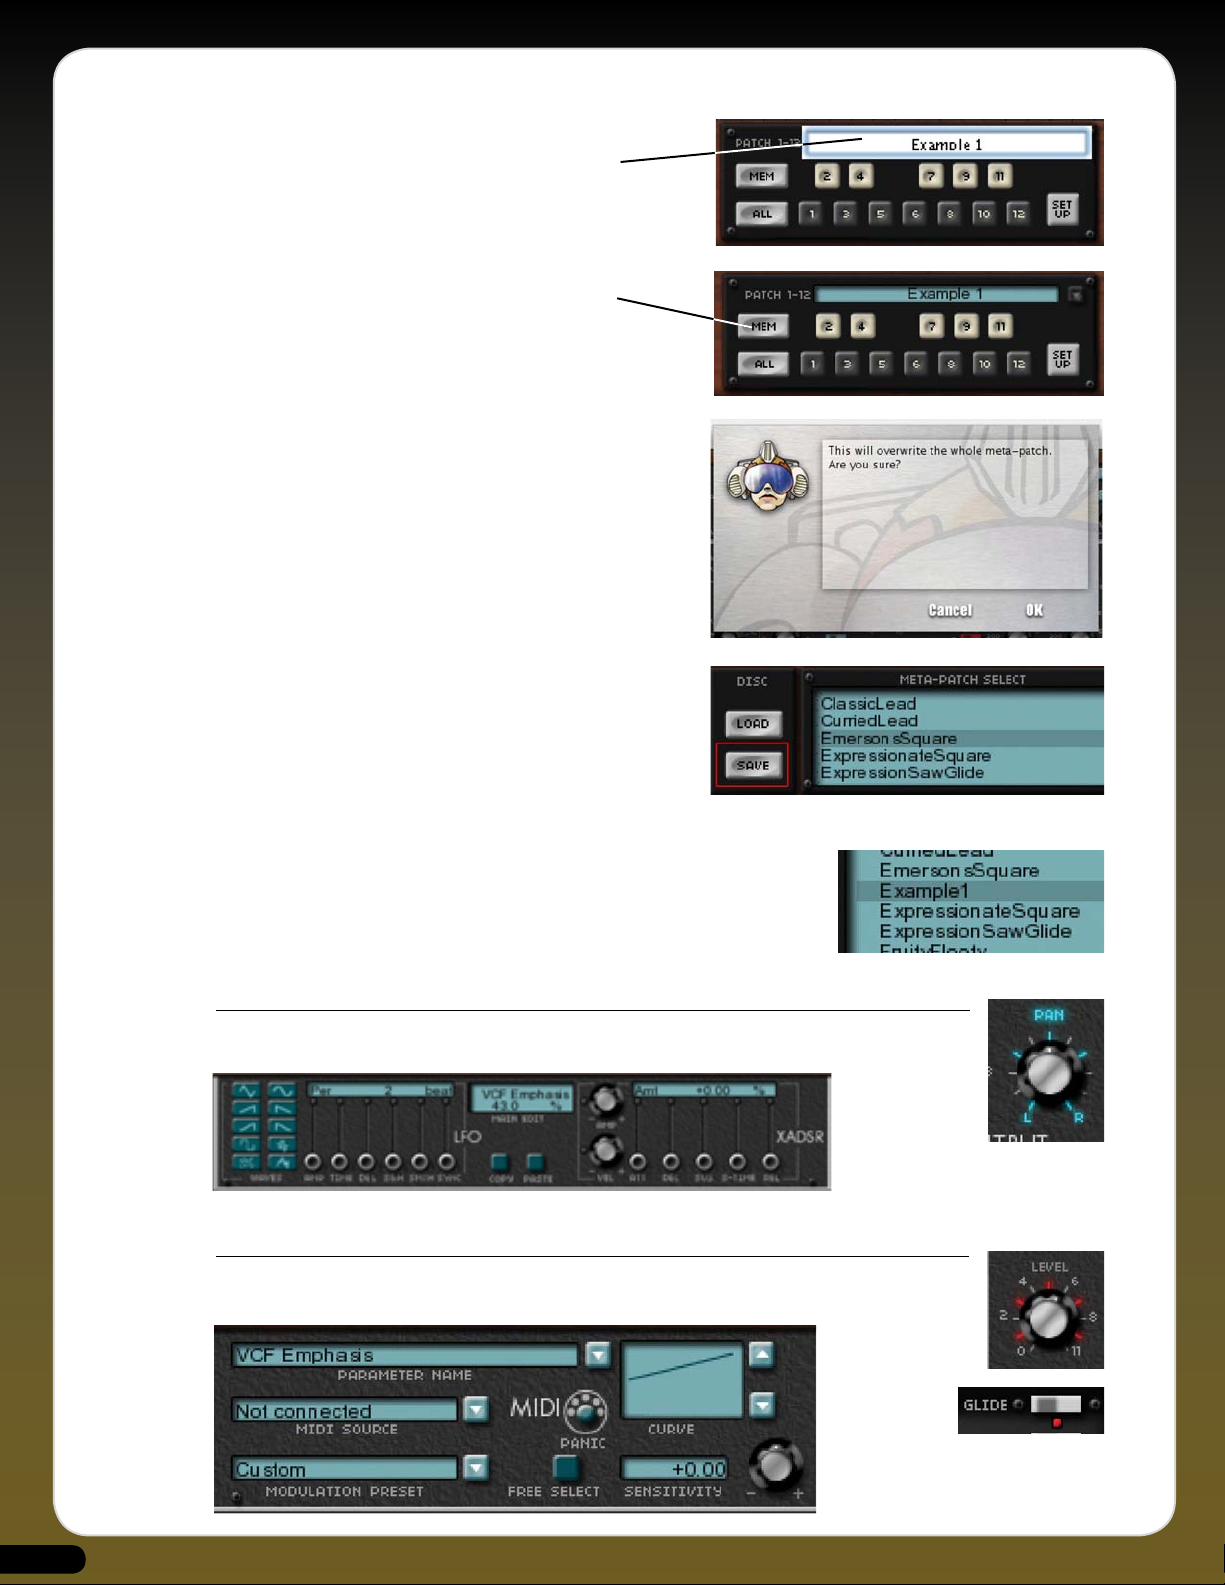
1) Create a sound on the Minimonsta that you would like to keep.
2) Click on the Patch window and name your sound.
3) Click the MEM button - it will be illuminated red.
4) Click the ALL button - this assigns your sound to all Patch
memories. A window asking if you are sure you want to
overwrite all your patches will appear. Click OK. (Mac window
shown).
5) Click on the SAVE button to the left of the Meta-Patch
Window, navigate to your Root Directory, then name and save
the Meta-Patch to disc.
IMPORTANT: YOU MUST SAVE TO DISK before selecting another Meta-Patch or YOUR NEW SOUND will be lost.
Having saved your Meta-Patch you will now be able to see and select it from within the
Meta-Patch Select Window.
(For a more in-depth explanation of Patch Managment see Tutorial 5, page 27)
BLUE HIGHLIGHTS
Whenever a parameter name and position indicators are lit in BLUE this indicates that the parameter is being
modulated by the additional Minimonsta LFO and/or XADSR.
RED HIGHLIGHTS
Whenever parameter positional indicators are lit in RED this indicates that the parameter is being controlled
(modulated) by MIDI. This is also applicable wherever you see an LED.
8
Page 8
BLUE AND RED HIGHLIGHTS
Whenever a parameter is lit in BLUE AND RED this indicates that the parameter is being modulated
(controlled) by both the LFO/XADSR and MIDI.
GREYED-OUT LFO AND XADSR
Certain parameters cannot be modulated by the Minimonsta’s additional LFO and
XADSR, for example the Oscillator Wave Form Select Knobs. When this is the case the LFO/XADSR section is greyed-out. and “No
Modulation” appers in the displays.
7
Mini Controls
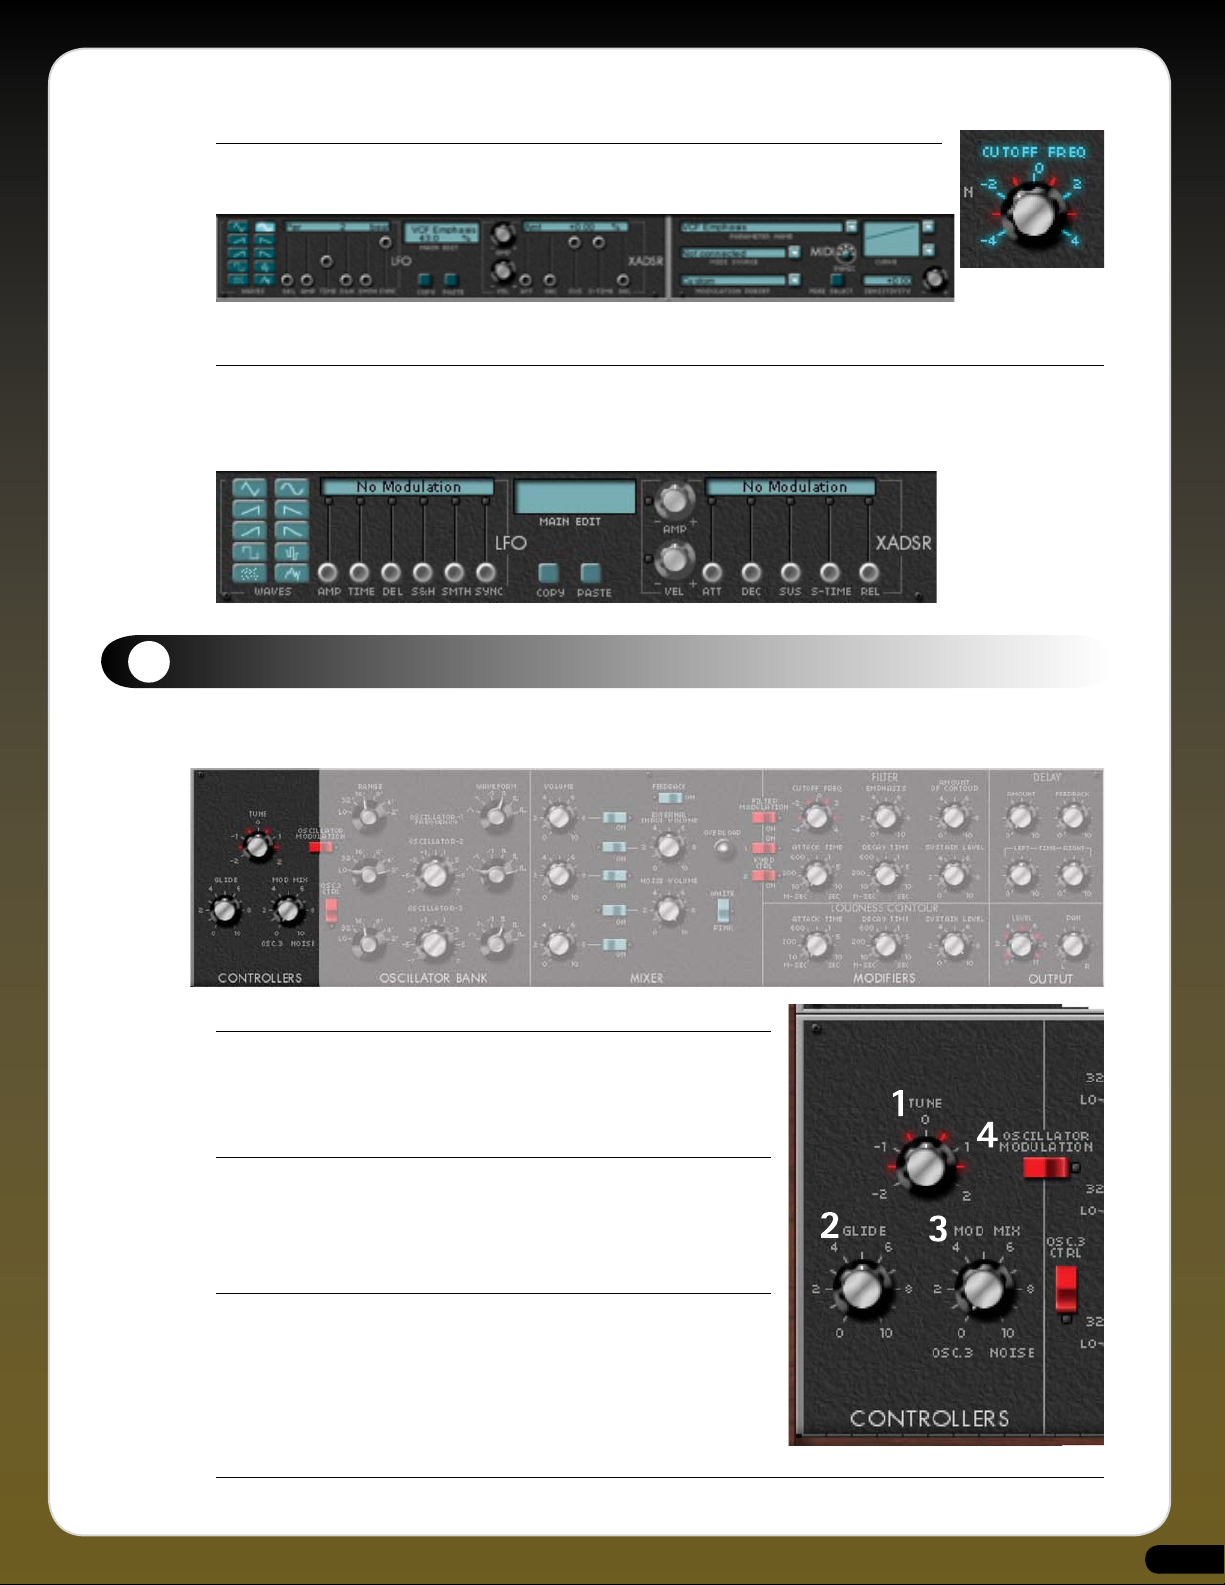
THE CONTROLLERS PANEL
1. Tune Knob
This sets the global tuning for the Minimonsta oscillators from anywhere between
-12 and +12 semitones. To return to the default setting at any time, simply
double-click on the knob.
2. Glide Knob
When used in conjunction with the Glide On/Off Switch this sets
the glide time. Like the original instrument, the Minimonsta’s portamento is Time
Constant, which means that glides are faster over larger intervals.
3. Mod Mix Knob
When Oscillator 3 is used as an LFO this knob determines the mix between the
oscillator tone and noise. Noise can be either Pink or White and is selected by a
switch in the Mixer Section.
Note: To hear any modulation mix settings the modulation wheel on the left of
the keyboard should be pushed forward.
4. Oscillator Modulation Switch
Sets the Oscillator 3 Modulation to On or Off. (wondering what the LED is? See page 8, Red Highlights)
9
Page 9
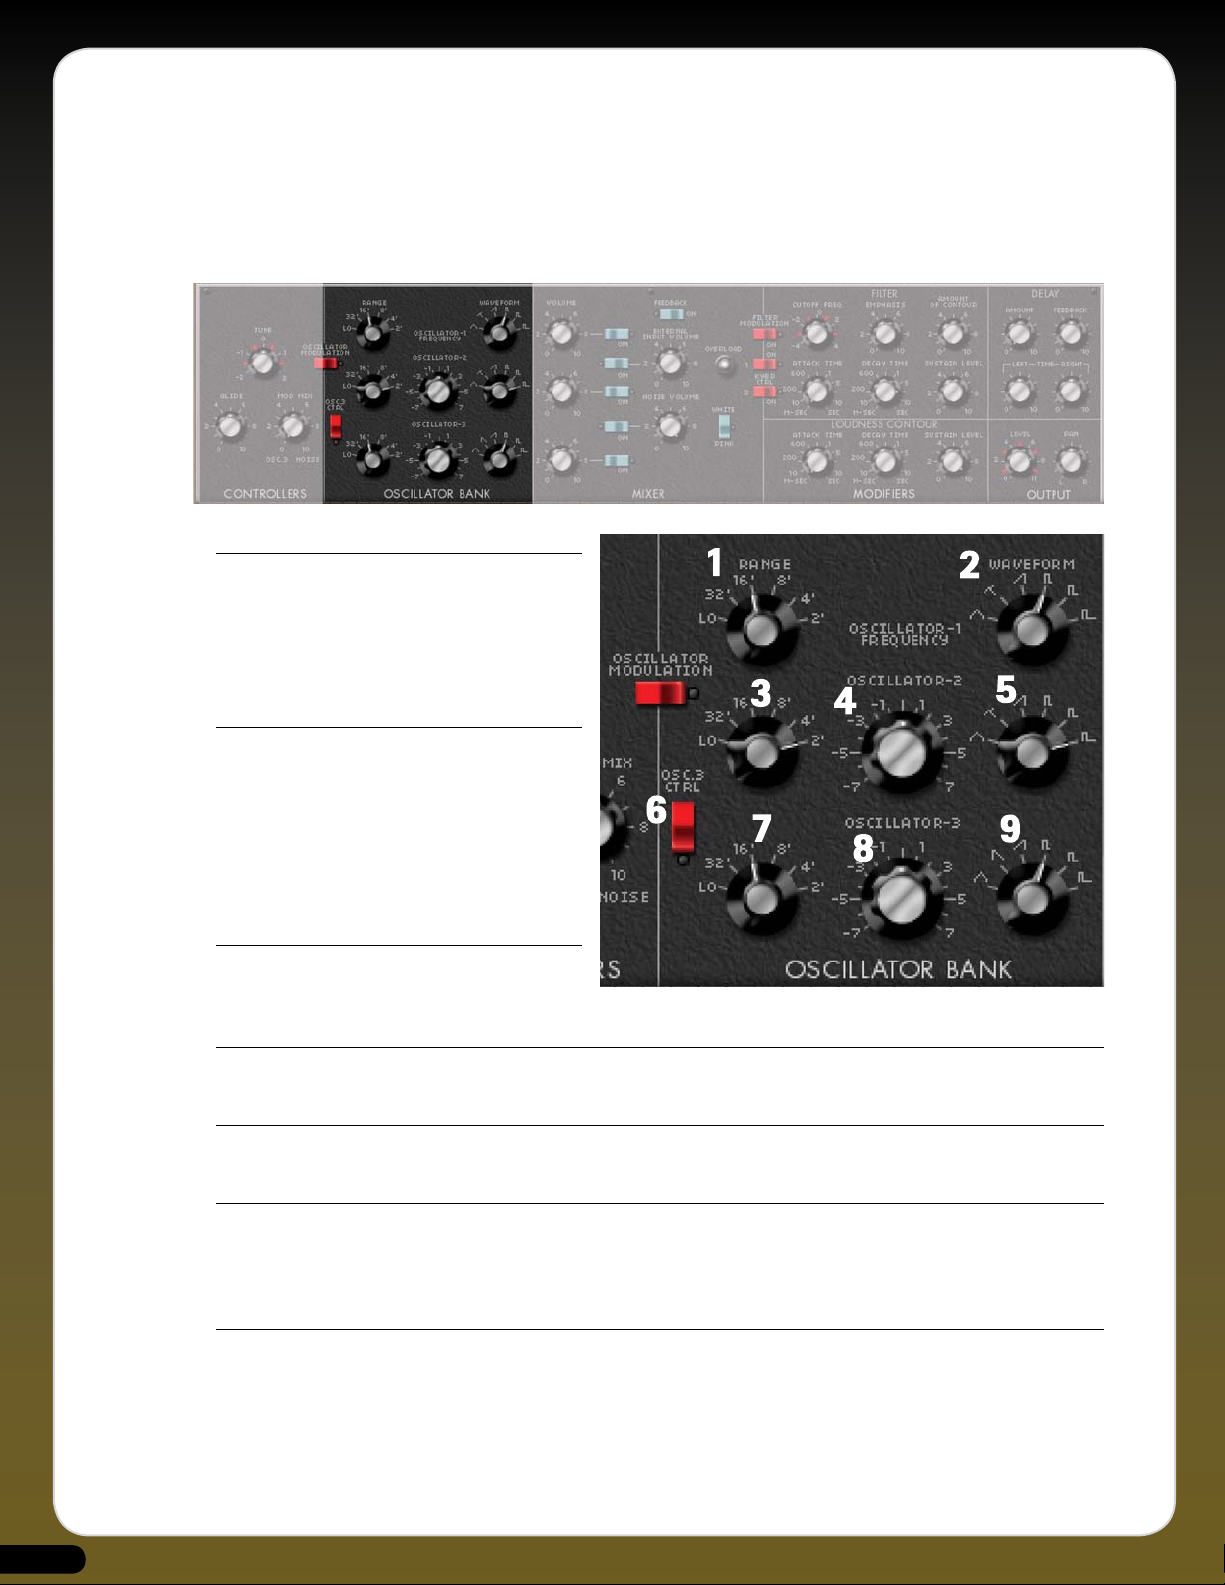
THE OSCILLATOR BANK
As per the original instrument there are three oscillators on the Minimonsta and the flow of each one is laid out horizontally. The
only real differences between them is that Oscillator 1 does not have control over its fine tune and Oscillator 3 can be used as an
LFO. Oscillator 3 also substitutes the sawtooth-triangular waveform for a reverse-sawtooth waveform.
1. Oscillator 1 Range Selector
This selects the octave for the Oscillator 1 tone. Octaves
are selected in feet (as in the length of an organ pipe)
2’ is the highest and 32’ is the lowest. The Lo setting
is effectively 64’ but this is so low that you’ll probably
only hear a series of clicks when selected.
2. Oscillator 1 Waveform Selector
The Minimonsta has six basic waveforms. Broadly
speaking, the triangle waveform has the least
harmonic content and the narrow rectangular
waveform has the most.
1. Triangle 2. Saw-Triangle 3. Sawtooth
4. Square 5. Wide Pulse 6. Narrow Pulse
3. Oscillator 2 Range Selector
As per Oscillator 1 this selects the octave for the
Oscillator 2 tone. This ranges from 2’ to 32’ and Lo.
4. Oscillator 2 Fine Tune Knob
This sets the fine tune value of this oscillator between - 8 and + 8 semitones.
5. Oscillator 2 Waveform Selector
Allows Oscillator 2 the choice of the six waveforms as per Oscillator 1.
6. Osc 3 Ctrl Switch.
This determines whether the keyboard controls the pitch of Oscillator 3 or whether it plays a fixed pitch across the whole keyboard.
This switch is likely to be in the Off position when Osc 3 is used as an LFO (for uniform modulation across the entire keyboard) and
On when used as a third oscillator. (See Tutorial 3, page 26).
7. Oscillator 3 Range Selector
As per Oscillator 1 & 2 this selects the octave for the Oscillator 3 tone. This ranges from 2’ to 32’ and Lo.
10
Page 10

8. Oscillator 3 Fine Tune Knob
This sets the fine tune value of this oscillator between - 8 and + 8 semitones.
Note: When the Osc3 Ctrl Switch is Off the frequency range of this knob is wider than when the switch is on. (See Tutorial 3, page 26)
9. Oscillator 3 Waveform Selector
Allows Oscillator 3 the choice of the six waveforms as per Oscillator 1 & 2 with the exception of a substituted reverse sawtooth in
place of Osc 1 & 2’s triangle waveform.
THE MIXER PANEL
This is where the levels of the three oscillators are mixed, and, if required, a noise generator and/or an external signal may be mixed
in as well. In this section we have also painstakingly recreated a famous Mini trick called the Loop Feedback function.
(See Tuorial 4, page 26).
1. Osc 1 Volume Knob & Switch
Determines the level of Osc 1 signal that’s fed into the
Mixer. The adjacent switch instantly turns the oscillator
ON or OFF.
2. External Input Volume Knob &
Switch
It’s possible to place an external signal into the
Minimonsta and then to process this signal using the
onboard filter, envelopes & delay etc. (See Tutorial 1,
page 25. Logic 7 users please see Tutorial 2, page 25).
3. Osc 2 Volume Knob & Switch
Determines the level of Osc 2 signal that’s fed in to the
Mixer. The adjacent switch instantly turns the oscillator
on or off.
4. Noise Volume Knob & Switch
Once the noise generator switch is turned on, the Noise
Volume Knob adjusts the level. There are two types of
noise generated by the Minimonsta determined by the adjacent switch.
5. White/Pink Noise Switch.
As mentioned above this is used in conjunction with the Noise Volume Knob & Switch and simply selects between White or Pink
noise. As a general rule, White Noise is high-pitched and Pink Noise is low-pitched.
6. Osc 3 Volume Knob & Switch
Determines the level of Osc 3 signal that’s fed in to the Mixer. The adjacent switch instantly turns the oscillator on or off.
11
Page 11
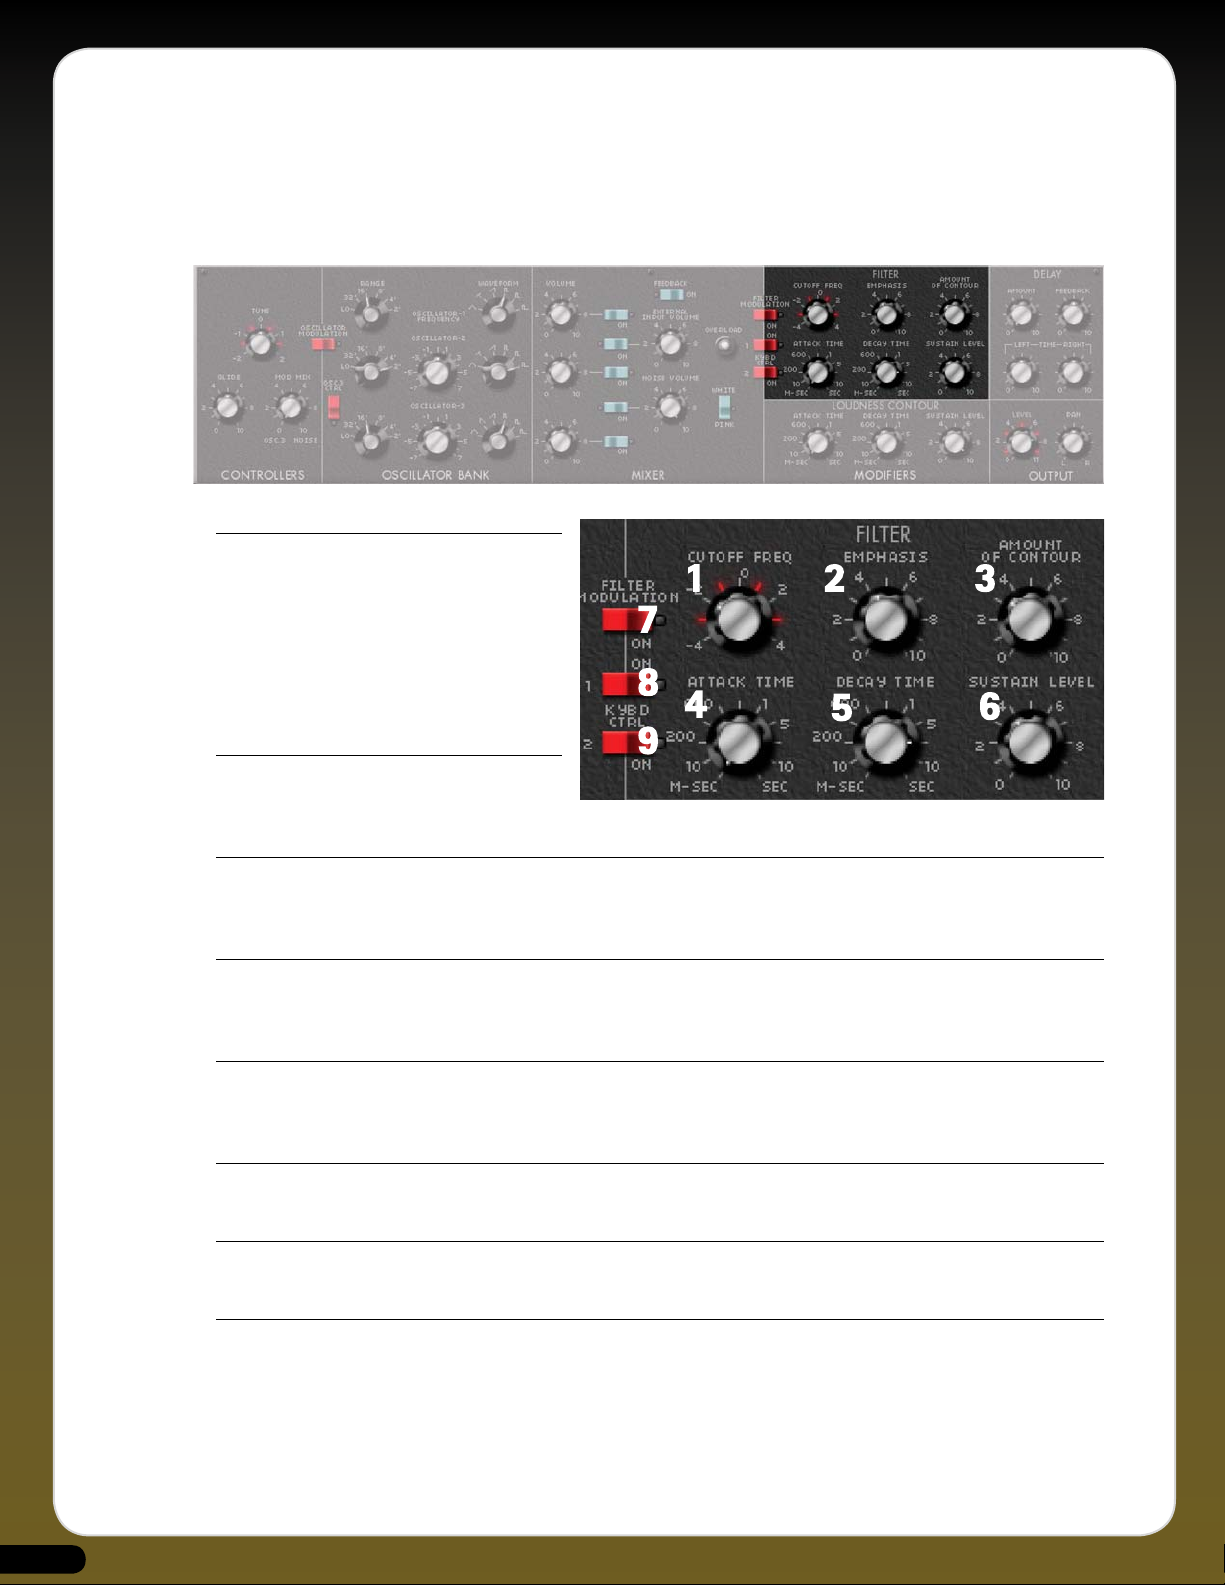
THE FILTER MODIFIERS PANEL
The Minimonsta filter is a detailed and highly accurate reproduction of the original Moog lowpass ladder filter. Much has been said
about this type of filter design since its origin and over the years many companies have tried to emulate it in both hardware and
software forms. The Minimonsta filter was modeled from an early generation Minimoog complete with its own foibles and unique
character, and as such it will sound slightly different to other Mini emulations. This is entirely deliberate.
1. Cutoff Frequency Knob
This attenuates, or cuts out the frequencies above
the cutoff point while allowing those frequencies
below this point to pass through. If this knob is
turned all the way to the right all the frequencies
will pass through and no filtering takes place.
However, if the knob is turned all the way to the
left the entire signal will be cut off.
2. Emphasis Knob
This is also known as resonance or Q and effectively
adds emphasis at the cutoff frequency.
3. Amount of Contour Knob
This determines the amount of filter envelope applied to the cutoff frequency. The shape of this envelope is determined by the filter
attack, decay and sustain settings.
4. Filter Attack Time Knob
This knob determines the initial fade in (or attack) of the filter envelope. Times can vary between immediate (1 millisecond) and
long (12 Seconds)
5. Filter Decay Time knob
This determines the time the filter envelope takes to fall from its initial peak to its sustain level. Times vary between 4 and 48000
milliseconds
6. Filter Sustain Level Knob
This knob determines the level at which the filter envelope levels off after the initial rise (attack) and fall (decay).
7. Filter Modulation Switch
Determines whether or not filter cutoff is affected by the modulation wheel
8. Kybd Ctrl 1 Switch
This and Kybd Ctrl 2 Switch are used separately or in conjunction with each other to set the filter tracking across the keyboard.
Without the switches enabled, notes played on the lower part of the keyboard will sound brighter than those played in the upper
registers.
The Kybd Ctrl 1 Switch applies a minimal amount of filter tracking.
12
Page 12

9. Kybd Ctrl 2 Switch
In the same way as above this and Kybd Ctrl 1 Switch are used separately or in conjunction with each other to set the filter tracking
across the keyboard The Kybd Ctrl 2 Switch applies more filter tracking than Kybd Ctrl 1 and with both switches set to the On
position, full response filter cutoff tracking is enabled.
THE LOUDNESS CONTOUR MODIFIERS PANEL
This section governs the amplitude envelope of the Minimonsta’s audio signal.
1. Attack Time Knob
This knob determines the initial fade in (or attack) of the
amplitude envelope. Times can vary between immediate
(1 millisecond) and long (12 Seconds)
2. Decay Time knob
This determines the time the amplitude envelope takes
to fall from its initial peak to its sustain level. Times vary
between 4 and 48000 milliseconds
3. Sustain Level Knob
This knob determines the level at which the amplitude envelope levels off after the initial rise
(attack) and fall (decay).
4. Decay Switch - (see Performance Controls section)
This probably should have been called a release switch as it allows the sound to fade out at the
specified decay time instead of snapping shut immediately after a note is released. This decay (or
release) takes effect after the sustain level part of the contour.
13
Page 13

THE DELAY PANEL
1. Delay Amount Knob
Controls the level of the delay signal.
2. Delay Feedback Knob
Controls the amount of feedback signal output by the delay.
A short feedback time would produce a minimal amount of repeat echoes and a long
feedback time would produce an infinite quantity of repeat echoes.
3. Delay Left and Right Knobs
These control the delay times for left and right delays.
Note: When using a left mouse-click, both knobs are linked and will be set to the same
values as each other. However, when using a right mouse click each knob can be set to
an independent delay time. For example by setting a 3/4 beat delay on the left output and a 1 beat delay on the right output, it’s
possible to create a larger stereo image than if both left and right delay times were identical.
Mac users should hold the ? key and click on a Delay Left or Delay Right knob to independently adjust their times.
THE OUTPUT PANEL
1. Level Knob
Turn clockwise for louder, turn counter-clockwise for quieter.
2. Pan Knob
Moves the Minimonsta signal through the stereo image.
14
Page 14
8
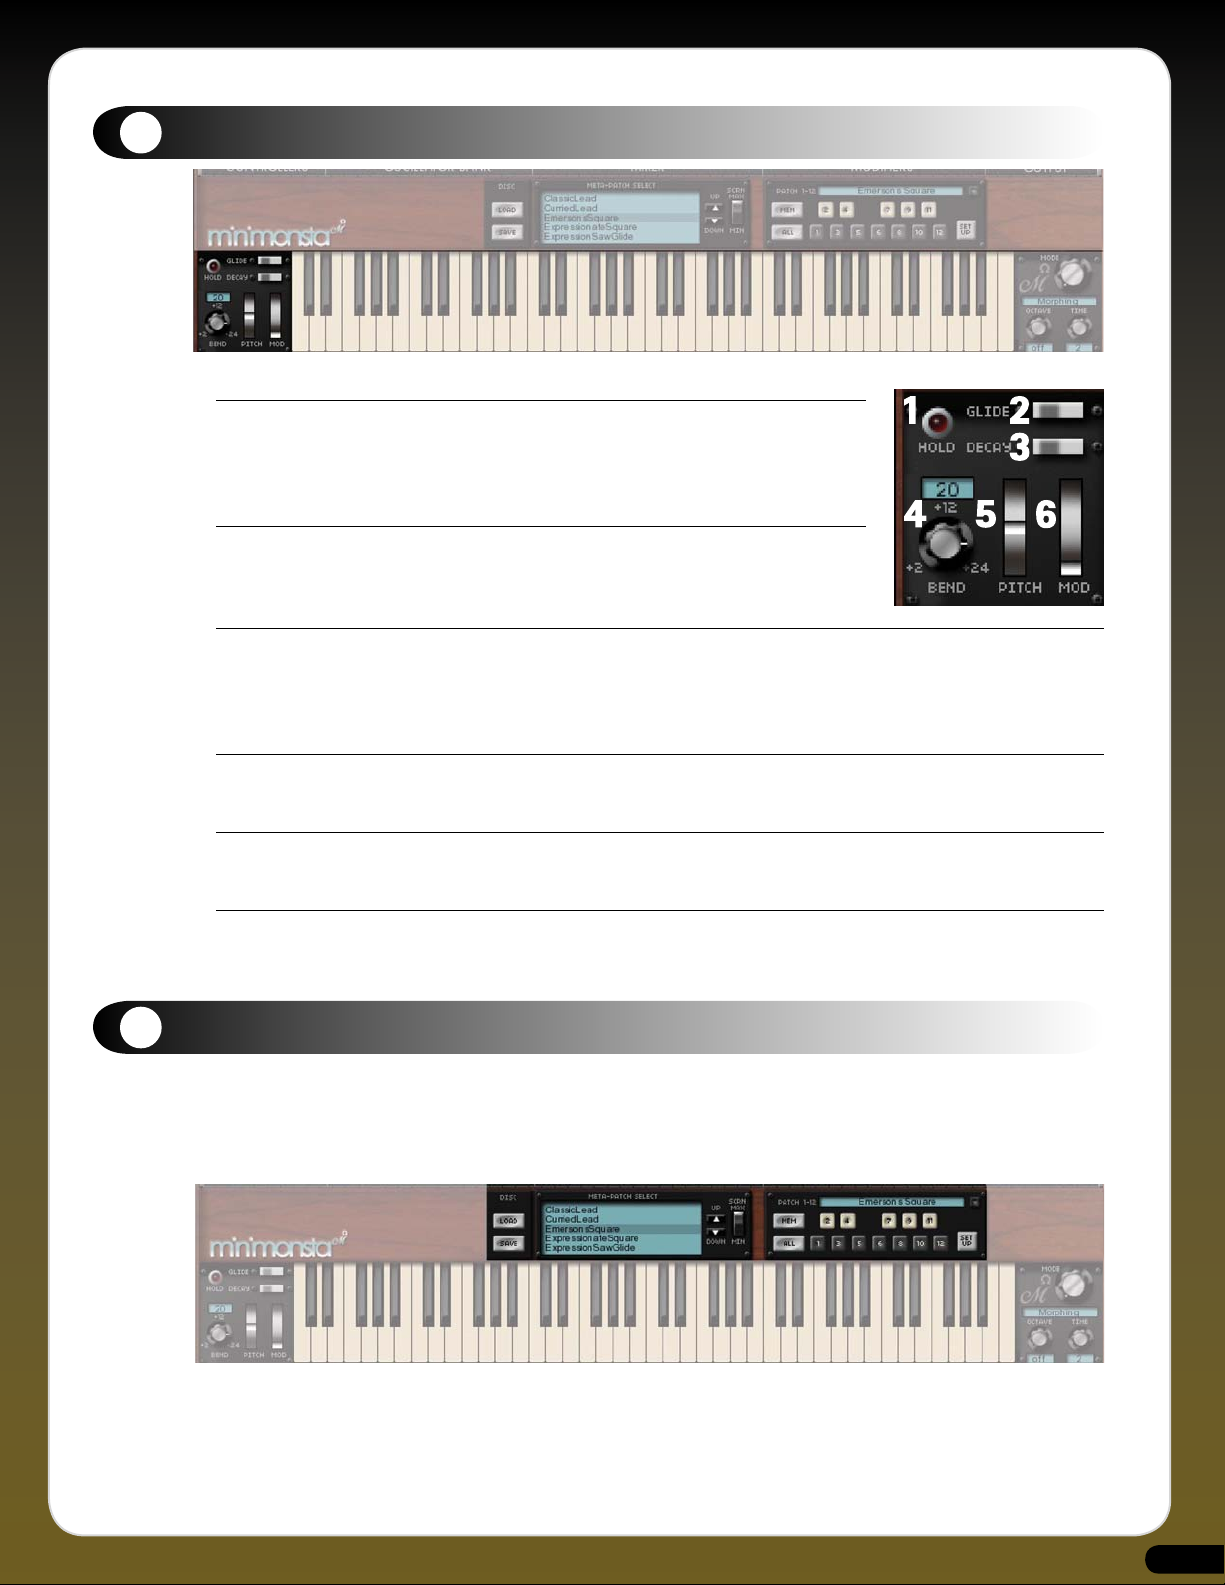
Performance Section
1. Hold Button
When using the Minimonsta as a Plug-In Effect you need to activate this, then play and release
a note on the Minimonsta’s GUI keyboard in order to allow the external signal to pass through
the Minimonsta.
2. Glide Switch
Turns glide (or portamento) on and is used in conjunction with the Glide Time Knob (see
Controllers Section)
3. Decay Switch
This allows the sound to fade out at a specified decay time (see Decay Time Knob in the Loudness Contour Modifiers Section, Page
13) instead of snapping shut immediately after a note is released. This decay (or release) takes effect after the sustain level part of
the contour.
4. Pitchbend Range Selector.
Allows the pitchbend range to be set between 2 and 24 semitones.
5. Pitch Bend Wheel
If you don’t know what this is, frankly you’ve bought the wrong instrument.
6. Modulation Wheel
In its simplest form the mod wheel is used to control how much MOD MIX is applied to pitch and/or filter cutoff. It can also be used
in a more complex way to control multiple parameters at the same time.
9
Monsta Controls
As we have already shown, the Minimonsta can be used as a straightforward emulation of the classic Minimoog. However, through
application of the Melohman feature set the instrument becomes a true monster. Applying the Melohman features to the basic
instrument gives limitless scope in terms of both programmability and playability.
Patch Management section
This section is used to organize Patches and to Load and Save Meta-Patches to and from your hard disc. (See Quick Start, page 5 and
Tutorial 5, page 27).
15
Page 15

1. MEM Button
Once you’ve created a sound on the Minimonsta that you want to
keep, clicking on the MEM Button puts that sound into temporary
memory before you then allocate it to a Patch.
2. Patch Buttons 1-12
This is where you store and recall the 12 Patches contained within
a Meta-Patch.
When in Morph Mode the layout of these buttons replicates the
Melohman Octave. For example Patch 1 is the C in the Melohman
Octave, Patch 2 is the C# and so on.
Once you have a sound that you wish to assign to a Patch, simply
press the Memory Button until it is illuminated red and then click
on a Patch Button to which you want the sound saved.
Within a Meta-Patch you have 12 Patches. However you should
give special consideration to Patch 1 which will be the first one
heard when the Meta-Patch is loaded.
3. ALL Button
If you want to take a sound and apply it to ALL Patch memories
simultaneously, simply click on the MEM button and then on ALL.
You will then be warned, “This will overwrite the whole Meta-Patch.” Agreeing to this places your sound across all Patch memories.
(see page 5)
Note: You do not permanently store a Patch until you have saved the Meta-Patch to your hard disc (see Tutorial 5, page 27) Be
careful that you don’t change Meta-Patches before permanently writing the currently edited one to disc or you will lose your
work.
4. SETUP Button.
This allows you to specify how the instrument responds to certain functions.
(See page 23)
5. Meta-Patch Window functions
To aid with the selection of Meta-Patches you can minimize and maximize the Meta-Patch select Window via the dedicated Screen
Switch.
In the Minimize position the Up/Down Arrow buttons select the previous or the next Meta-Patch from the center of the window. You
will notice that as you scroll through the sounds in this manner, the selected sound will always be in the center of the screen.
In the Maximize position the effect of these Up/Down Arrow buttons remains the same whereas the other evident Up/Down Arrow
buttons are used to scroll through the entire list of Meta-Patches without changing the Meta-Patch. When using these simply click
on a Meta-Patch to select it. When the Window is minimized the selected Meta-Patch will be in the middle of the screen.
6. Meta-Patch Refresh Button
This refreshes the selected Meta-Patch folder. For example, if you have edited Meta-Patch names outside the Minimonsta, click on
this button to refresh the list.
16
Page 16
7. Program Assign - RTFM Button.
Clicking on this button assigns a MIDI Program Change number to each of the Meta-Patches, in the selected directory, alphabetically.
The first
Meta-Patch in the list is assigned MIDI Program Change number 1, the second Meta-Patch MIDI Program Change number 2 and
so on.
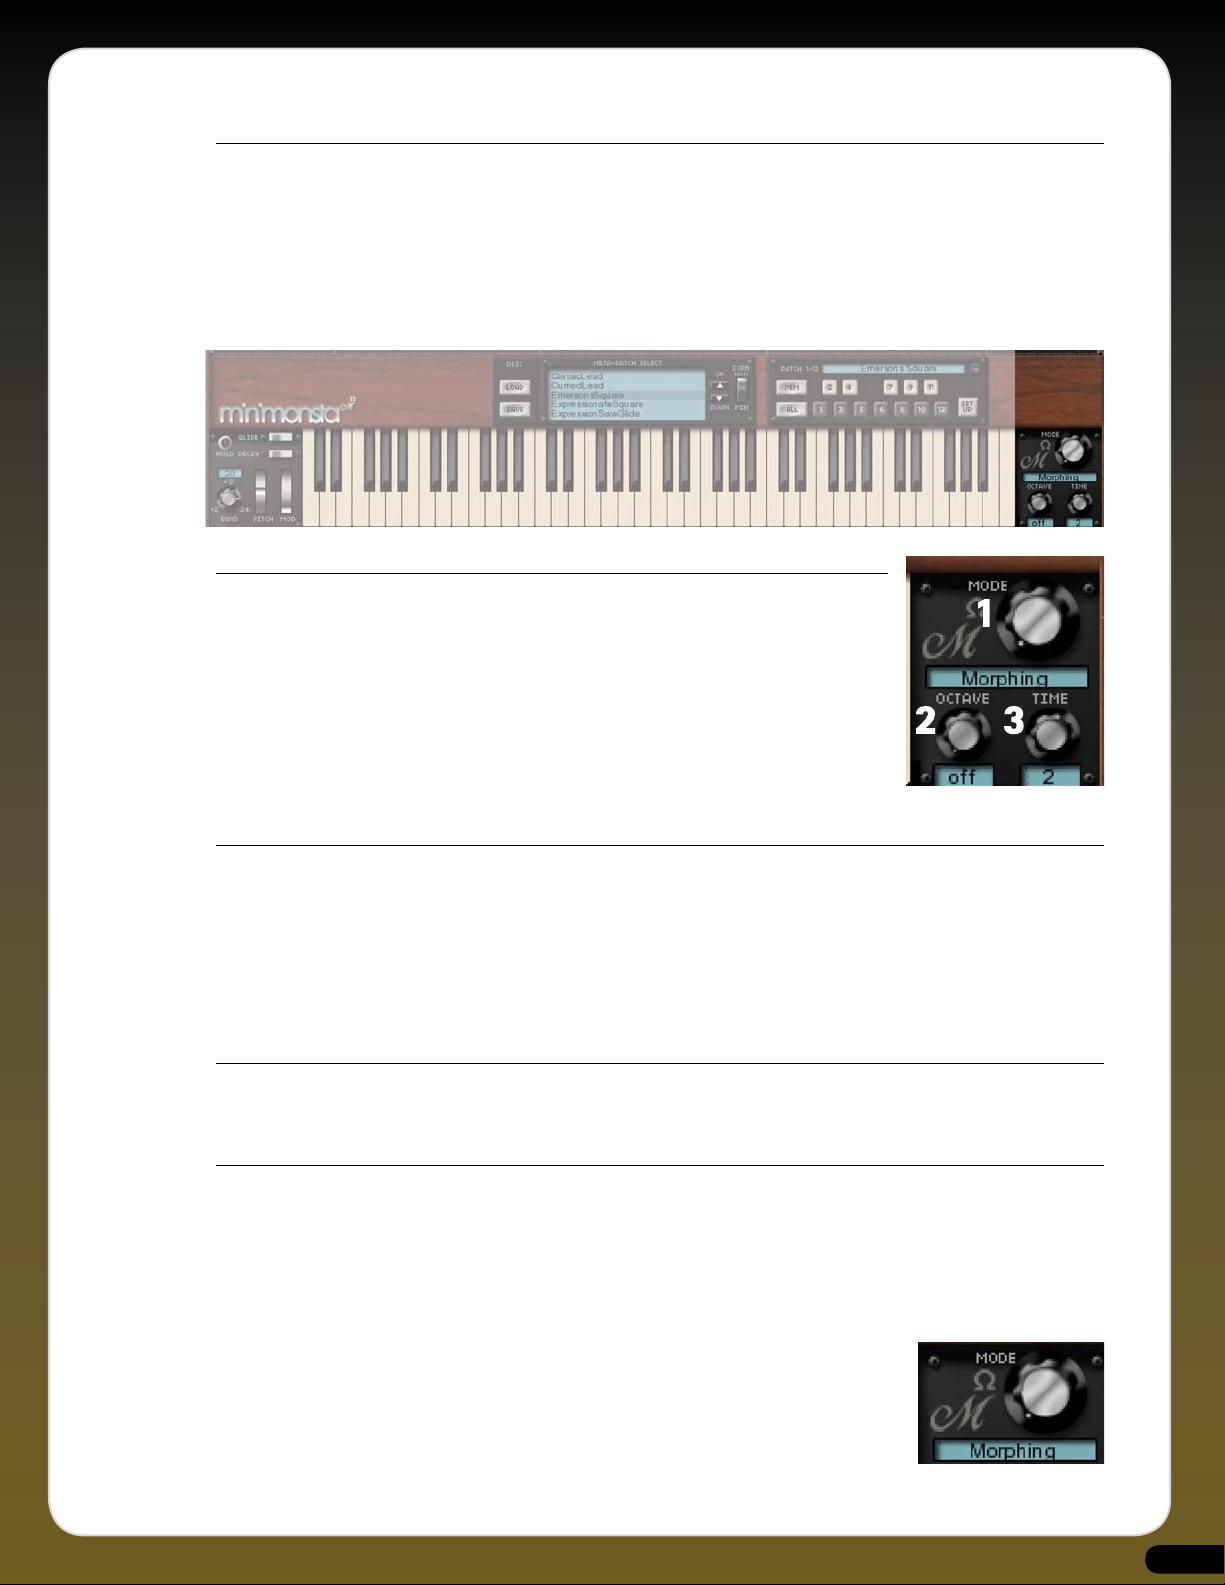
THE MELOHMAN PANEL AND MORPH OPTIONS
These three control knobs determine how the Melohman Octave responds.
1. Mode Knob
This selects the way in which the sound will morph between each Patch. There are five Morph
Modes as follows:
• Morphing
• Morph Back & Forth
• Morph Sequence
• Mutate
• Partial Mutate
2. Octave Knob
This knob controls the position of the Melohman Octave on the GUI and therefore your controller keyboard. Selecting OFF turns
it off.
As an example, selecting Octave 3 positions the Melohman Octave so that Patch 1 is active when C1 is played and Patch 12 is
activated by playing B1. You can also see this by the LEDs on the keys in the Melohman Octave. When an LED is fully on it indicates
that the corresponding Patch is active.
When playing a Melohman key you will not hear a sound as these keys are specifically used for Morphing functions.
3. Time Knob
This determines the duration of the morph which can be displayed in beats or milliseconds. The display status is selected using the
MS/BEATS button.
MORPHING OPTIONS
In the hands of an accomplished player, using the Morph section in conjunction with carefully programmed Patches can lead to
some uniquely expressive and creative results. With the exception of the original Minimoog patches that were recreated for the
Minimonsta, all the Meta-Patches provided contain Patch variations, so we suggest you spend some time playing with them and
see just how the Patches within each Meta-Patch differ. Who knows? You may find a Patch that inspires you to create an entirely
new Meta-Patch.
• Morphing
This is the simplest way of morphing between Patches. Morphing changes the Patch according
to which key is played in the Melohman Octave and according to the duration set via the Time
Knob. When pressing a Melohman key the sound starts to Morph to the Patch associated with the
depressed key, and stops morphing when you release the key or its Morph Time has been reached.
Pressing another key initiates a morph to the new Patch associated with that key but will morph
back to the previous one if you release this second key while keeping the first one pressed.
17
Page 17
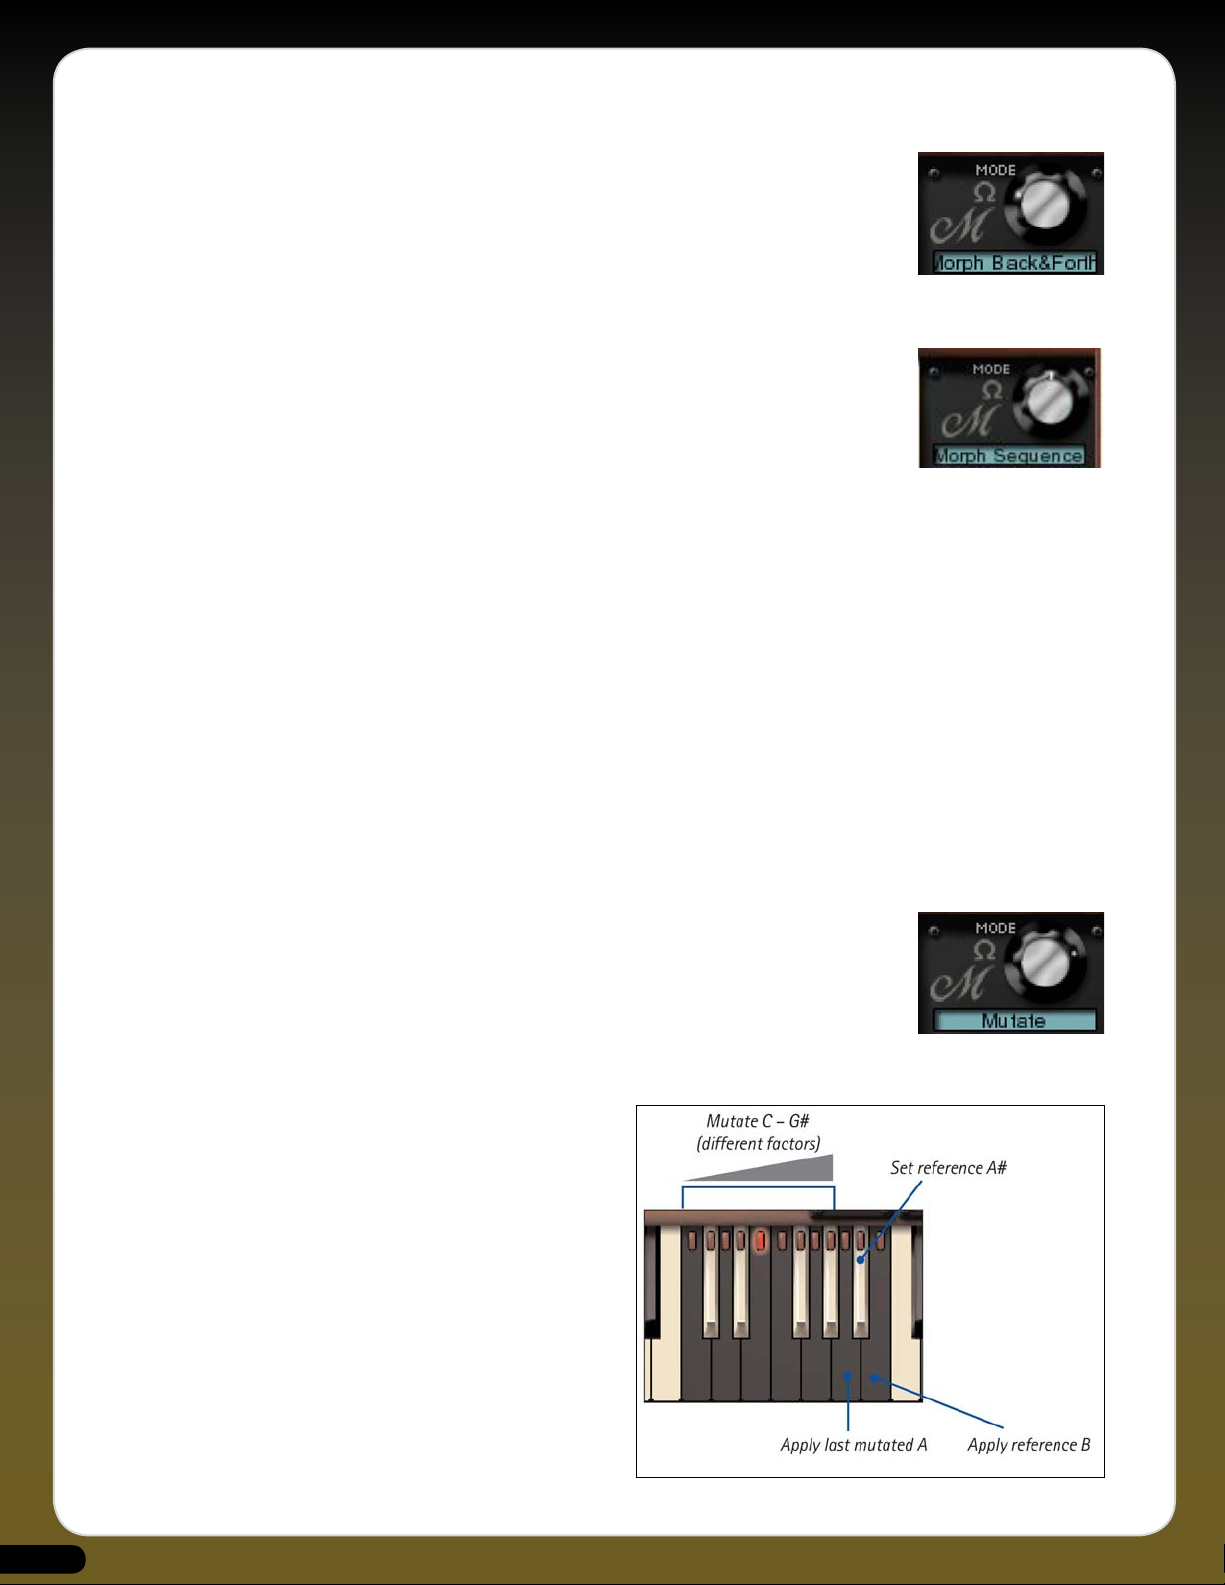
• Morph Back & Forth
This is quite similar to the Morphing mode, except that the Minimonsta will morph back to the
state it was in when the first key was pressed.
If you have chosen a long morphing time, releasing all the keys will result in a long morph back
to the original Patch. However, at any point within a morph you can “double-hit” a key to make
this new Patch the reference which will be morphed back to after releasing any subsequently
pressed Melohman keys.
• Morph Sequence
In this mode holding a Melohman key plays a sequence of morphs. The sequence for each key is
listed below with the notes indicating the corresponding Patch slots:
C: C, D
C#: C, D, E
D: C, D, E, F
D#: C, D, E, F, G, A
E: C, C#, D, D#, E, F, F#, G
F: C, C#, D, D#, E, F, F#, G, G#, A, A#, B
F#: C, C, D, D, C, C, E, D, C, E
G: Random (presets C and D only)
G#: Random (all presets)
—> Velocity modifies the morphing time
A: Slows down the sequence of a factor 2 (but not the morphing time)
A#: Resets mutation time (as indicated on the Time display)
B: Accelerates the sequence, factor 2
The duration between each morph is controlled by the Melohman Time Knob setting.
• Mutate
This mode revolves around Patch randomizations related to a specified reference Patch. This
means that newly generated Patches are variations of the original reference Patch. When you
select this mode, the current Patch is always selected as the reference Patch.
The nine lower keys of the Melohman Octave (from the C to the G#) are dedicated to progressively
higher mutations of the reference Patch. When you press one of the nine lower keys, a new setting
is computed, and the synthesizer morphs to it, as per the normal Preset Morphing mode (with optional velocity sensitivity). The
morphing stops if you release a key within a morph if the Morph Time has not been reached thus allowing you to reach ‘sonic
states’ between Patches.
You can return to the reference Patch by pressing the
top B key, then morph back to the last mutated Patch by
pressing the top A key. You can create a new reference
Patch from the mutations at any time by pressing the
Bb key.
In this mode and the Partial Mutate Mode all parameters
are intelligently managed. For example, LFO and ADSR
timed parameters are always bound to tempo values.
If an LFO or an ADSR amplitude is set to 0, its chance
of being mutated are smaller. However, we recommend
using the morphing function with care as it can
occasionally lead to high output levels.
18
Page 18

• Partial Mutate
Partial Mutate works similarly to the Mutate but with subtle differences.
C: Filter (+ FM + Keyboard Control) without modulation
C#: Filter (+ FM + Keyboard Control) with modulation
D: Filter (+ FM + Keyboard Control)
modulation only (LFO + ADSR)
D#: Oscillators w/ modulation (+ Osc 3
Control + Osc Modulation + Tune +
Glide)
E: Oscillators without modulation
F: Timbre (Osc range + Osc WF + Osc
volumes + Osc SW + Osc Modulation)
F#: Envelopes (VCA env + VCF env + Contour
+ Pan (mod only) + Volume (mod only)
G: Mixer (+ I/O feedback + Noise color)
G#: Delay
A: [Applies last mutation]
A#: [Stores Reference Patch]
B : [Applies Reference Patch]
There are additional functions that are directly linked to the Melohman morph parameters, such as linking the Morph Time to a
Melohman key Note-On velocity. For details of this and other Melohman morph functions see SET UP on Page 23.
LFO and XADSR Section
10
LFO Waves
There are 10 LFO waveforms and these are selected by clicking on the appropriate waveform button. The
waveforms are as follows:
1) Sine - The default waveform.
2) Triangle - A waveform with a linear transition between maximum and minimum (and vice versa).
3) Ramp Up - The waveform goes linearly from the minimum point to the maximum point.
4) Ramp Down - Like Ramp up, but in the other direction.
5) Cosine Up - A bit like Ramp up, but the LFO rises more gently at the extreme points (a kind of shelf).
6) Cosine Down - Like Cos up, but in the other direction.
7) Square - The LFO stays a half-period at the maximum point, then the other half-period at the minimum point.
8) Random - This waveform is a chaotic oscillator. It is based on a sine wave, sometimes slowing down, sometimes accelerating,
or even going back and forth. These random variations always keep the same average phase.
9) Brown Noise - The LFO value changes randomly, combining wide and slow moves with small and fast oscillations. With a
very long period, this kind of LFO is perfect to give a parameter a natural and nervous random variation.
10) Red Noise - A bit like Brown Noise, but fast variations are more damped, giving even smoother random movements.
19
Page 19

LFO Controls
These sliders give you a huge amount of control over the LFO parameters and
waveforms, once assigned to a specific Minimonsta parameter.
1. LFO Amp Slider
This determines the overall amplitude of the LFO. 0% means that the LFO
does not affect the sound.
2. LFO Time Slider
Determines the time of the LFO waveform, ranging between 1/64th of a beat
and 256 beats, or 0.0078 to 128.00 milliseconds, depending on the status of the MS/BEATS button.
3. LFO Delay Slider
Sets a delay before the LFO setting becomes effective. The delay time ranges between 0 and 256 Beats or 0 to 128.00
milliseconds, depending on the status of the MS/BEATS button.
4. LFO Sample & Hold Slider
Adds a random element to an LFO waveform by Sampling and Holding specific points of it. The higher the slider value, the
longer the Sample & Hold period, the lower the slider value, the quicker the Sample & Hold period.
5. LFO Smooth Slider
This allows you to smooth out fast transitions of an LFO signal and is applied after the Sample & Hold. The smoothing factor
is scaled to the main LFO Time and therefore the final shape doesn’t change when the Time is changed.
0% disables the smoothing and leaves the waveform untouched.
6. LFO Sync Slider
This allows the LFO phase to be reset at every Note On. The phase value will be the indicated percentage. You can turn the
Sync off and allow the LFO to run free by moving the slider all the way to its top position, marked Off.
Copy and Paste Buttons
Use the COPY button to copy ALL current modulation settings (both LFO and XADSR) into the internal
clipboard. Use PASTE to apply them to another parameter. This is very useful to quickly duplicate modulation
settings across a large amount of parameters.
For example, if you’ve set up complex LFO & XADSR settings on the Filter Cutoff Knob and you want to transfer these settings to
the Emphasis Knob, simply click on the Filter Cutoff Knob followed by the COPY button then click on the Emphasis Knob followed
by the PASTE button. The settings from the former will be duplicated to the latter.
XADSR Envelope
These knobs and sliders allow independent shaping of any parameter
that can be controlled by this section.
1. XADSR Amplitude Knob
With positive and negative values, this knob determines the
amplitude of the XADSR Envelope.
2. XADSR Velocity Knob
Again with both positive and negative values, this knob determines how velocity affects the XADSR Envelope.
3. XADSR Attack Slider
Definable between 0 and 256 beats (or 0 to 128.00 milliseconds, depending on the status of the MS/BEATS button) this
governs the Attack Time of the XADSR Envelope. Attack begins once a Note On event is received.
4. XADSR Decay Slider
Definable between 0 and 256 beats (or 0 to 128.00 milliseconds, depending on the status of the MS/BEATS button) this
governs the Decay Time of the XADSR Envelope, after which the envelope moves to the sustain point. Decay occurs right
after the Attack.
20
Page 20
LFO & XADSR FAQ’S
Q. Why are some parameters illuminated in Blue?
A. This shows at a glance that the function is modulated by the LFO or affected by the XADSR. To quickly remove this from
Q. What parameters can I apply an LFO or XADSR to?
A. You can apply an LFO or XADSR to almost any Minimonsta Parameter. The only exceptions are the Oscillator Range and
11
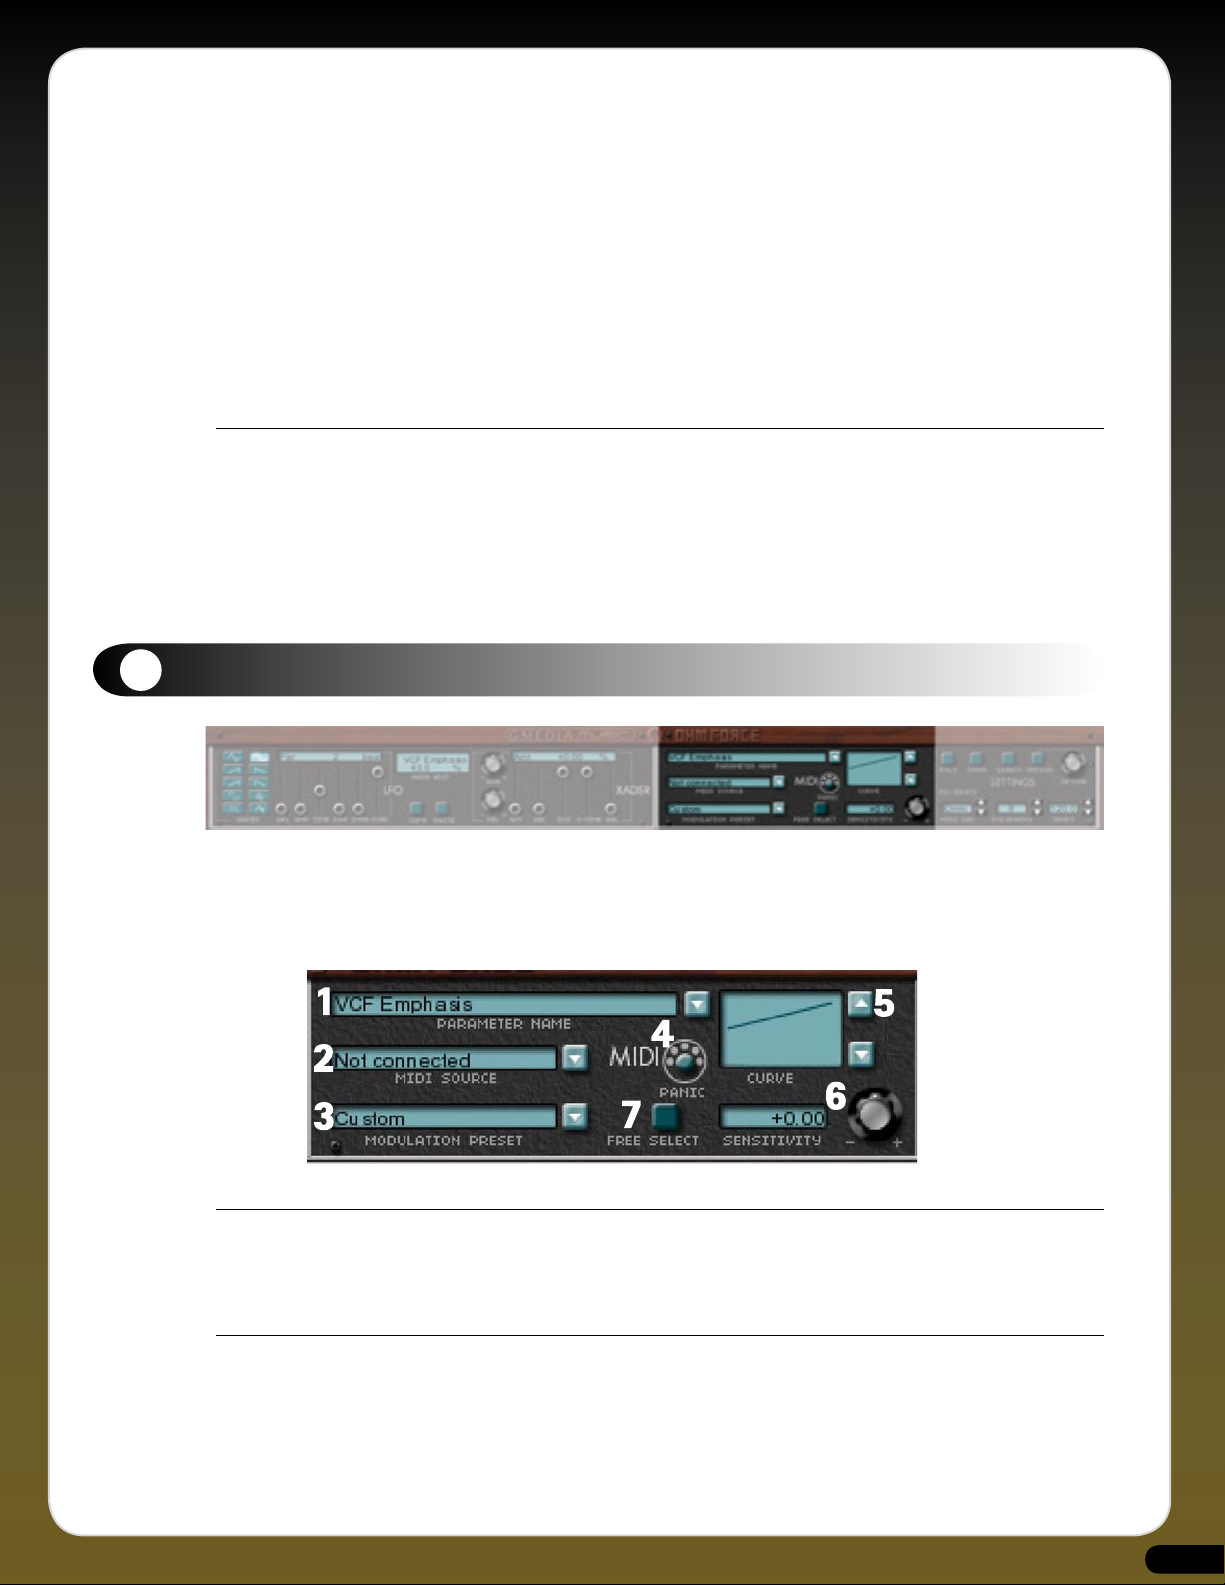
MIDI Section
5. XADSR Sustain Slider
With positive and negative values, this controls the level of the XADSR’s sustain point.
6. XADSR Sustain Time Slider
Definable between 0 and 256 beats (or 0 to 128.00 milliseconds, depending on the status of the MS/BEATS button) this
governs the Sustain Time of the XADSR Envelope. i.e. the time it takes for the envelope to move from the sustain point to
zero.
7. XADSR Release Slider
Definable between 0 and 256 beats (or 0 to 128.00 milliseconds, depending on the status of the MS/BEATS button) this
governs the Release Time of the XADSR. This Release stage occurs as soon as the Note Off event is detected.
any parameter, bring the LFO Amp Slider back to 0% and/or double-click the XADSR Knob to also bring it to 0%.
Oscillator Waveform Knobs.
The Minimonsta contains an extensive and highly flexible MIDI Control Section where you can assign control using controls such
as velocity sensitivity, channel pressure, MIDI response curves, and much more.
Note: The settings in this section are global - this means that any setting or changes made to an individual Patch will affect every
Patch within that Meta-Patch. (See Tutorials 11 and 12, page 29).
1. Parameter Name Window.
This shows the currently selected parameter to be controlled via MIDI. In our Velocity to Filter Cutoff tutorial on page 29, as soon
as you clicked on the Filter Cutoff Knob the window displayed VCF Cutoff, indicating that this was the parameter you intended to
control via MIDI.
2. MIDI Source Window
By clicking on the blue (arrowed) button you can select from a list of 21 MIDI control Sources that offer an assortment of MIDI
control options. Only one source per parameter can be selected, but it can modulate as many parameters as you wish. (See Tutorial
on page 29).
21
Page 21
3. Modulation Preset Window
Here you can choose from a menu of factory Preset MIDI modulation settings. Selecting one of the options clears all current MIDI
modulation settings and installs the ones contained within the selected Preset.
4. MIDI Panic Button
Got the odd hanging note? Even in the wonderful world of MIDI it happens occasionally - so when it does, hit the panic button
and all should be cured.
5. Curve Window
It is possible to change the intensity mapping - for example to correct the response curve of a control device or to obtain specific
effects.
There are several curves, some of which are strictly positive, while others are bipolar and can generate negative modulation
values.
Here are some special curves:
1) 4 and 16-steps: The 128 MIDI values are divided equally into 4 and 16 steps.
2) Octave: This curve is dedicated to Note Key modulation. There is a step for each octave of the keyboard (from C to B).
3) Octave Note: The modulation value is the same for each key regardless of the octave. For example, G3 and G5 generate the same
value, D#1 and D#7 also. This curve is complementary to the Octave curve.
6. Sensitivity Knob & Window
This parameter controls the intensity of any MIDI modulation or control. At 0 the modulation is off.
7. Free Select Button
When active (on), this enables the MIDI Modulation of a sub- parameter such as the LFO Amp or the XADSR attack time, etc...
MIDI FAQ’S
Q. Why are some functions illuminated in Red?
Q. Can I control switches via MIDI control?
12
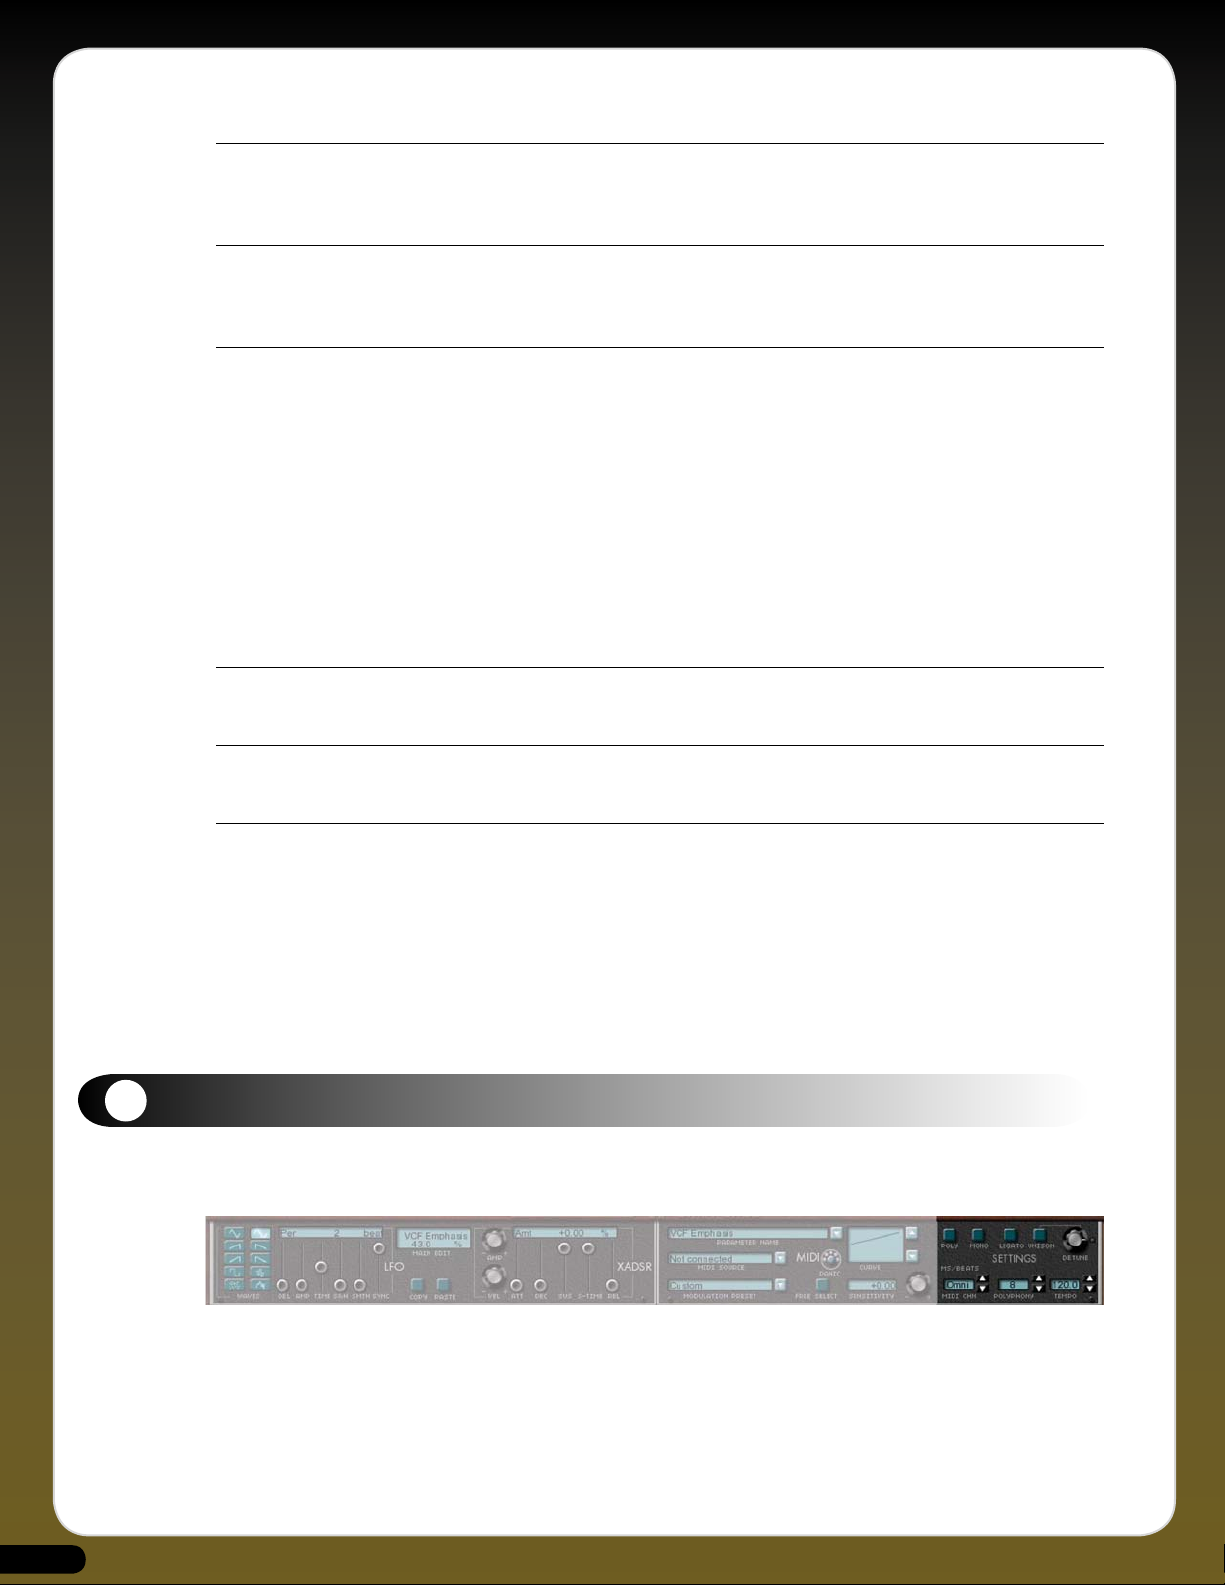
Settings Section
Unlike the original instrument, which was only monophonic, the Minimonsta has several additional modes which can be selected
via this section.
A. This shows at a glance that the function is modulated by MIDI. To quickly remove this from any parameter simply click on an
illuminated parameter and double-click the Sensitivity Knob to bring it to 0.
Alternatively, if you want to remove all MIDI control from every parameter, you can go to the Modulation Preset Window and
select “Nothing Connected”
A. Yes. That’s what those little LEDs are for. (see Tutorial 9. Page 49)
22
Page 22

1. Mono Mode
Plays one note at a time and each note played re-triggers the envelope
generators.
2. Unison Mode
Turns a monophonic Mini into a total Monsta by taking all the polyphonic
voices and assigning them to a single note. The amount of voices is
controlled by the setting in the polyphony window (ie 6 note polyphony
with 3 VCOs playing in unison will provide a unison of 18 oscillators).
3. Unison Detune Knob
Used in conjunction with the Unison mode to detune all the assigned oscillators. A feature particularly adored and loved by tranceheads.
4. Legato Mode
To play legato means that you play a new note before the previous note is released. In the Minimoog playing legato was the way
of avoiding the envelope generators re-triggering each time a new note is played.
However, the original Minimoog legato was only low-note priority whereas in the Minimonsta it’s both high- and low-note
priority.
5. Poly
We’ll assume that you know what polyphonic mode means by now. In this mode the number of voices available is determined by
the value in the Polyphony display window.
Note: The above settings are Patch-specific and not global. For example within a Meta-Patch it’s possible to have one Patch with a
Unison setting and another with a Poly setting. On the other hand the following parameters in the Settings Section ARE global.
6. MIDI Channel Window
This determines the MIDI channel that the Minimonsta receives on. This is usually set to Omni, meaning every channel.
7. Polyphony Window
In Poly mode this selects the maximum of voices assigned to the sound. With the Minimonsta, the maximum amount of voices
permissible is 32, but this largely depends on the power of your computer.
8. Tempo Window
Selects the tempo at which the Minimonsta’s LFOs and Delay settings run. This is usually the same as the sequencing host
application.
9. MS/Beats Button
Illuminate this to see the LFO, XADSR & Delay settings in Beats per Bar or de-activate to view in Milliseconds.
Set Up Button
Clicking on the Set Up Button reveals a menu from where various user-specific functions can be accessed.
*SETTINGS
• Load
Used to load the *.cfg files as outlined in the Auto-Bind section below.
• Save
Used to save the *.cfg files as outlined in the Auto-Bind section below.
• Autoload
With Autoload enabled, loading the Minimonsta automatically loads the last used configuration file. This is useful if you
have a specific Auto-Bind configuration that you regularly use.
23
Page 23

• Enhanced Mouse Mode
Selecting this mode makes the mouse cursor disappear when a slider is moved. It’s more comfortable for editing because it
allows you to move the sliders accurately despite their small size. There is an option to deactivate this mode because it may
not work correctly with some trackballs and graphic tablets on a Mac.
MIDI SECTION
• Auto-Bind
Although each parameter of the Minimonsta has its own pre-assigned Continuous Controller number (see CC list, page
30), you can use Auto-bind to create your own specific MIDI controller templates before saving them as a *.cfg file in the
Settings Section (as above).
To use Auto-bind, first enter the Auto-bind mode by checking Auto-bind in the Setup menu. Now simply move the required
knob, slider or switch on the Minimonsta, and then turn a knob or slider on your external MIDI controller. As soon as the
Minimonsta detects this external controller movement, the connection is made and the knob or slider you have moved will
remain associated with the selected parameter. As a useful aid, if you have already selected a parameter before, its name
will be displayed in the menu, between brackets, for example: Auto-bind [target: Cutoff Freq].
Each of the Minimonsta’s parameters can be bound to different MIDI CCs, and you can also save various different
configurations as *.cfg files.
To leave the Auto-bind mode simply uncheck it in the setup menu, and your previously bound CCs will control the relevant
parameters.
• Input & Output Devices
Depending on your host, your MIDI devices and your system settings, you may have one or more available MIDI ports for
input and for output. It is possible to select the virtual ports for receiving and sending MIDI events.
To choose the input port (the one on which MIDI data is received by the plug-in), just go to the MIDI>Input device menu
and select the one you want. Similarly, to select the output port simply go to MIDI>Output device and select the one you
want. The selected MIDI ports will now have a tick against them.
Note: It is possible to choose only one MIDI port for input, and one for output.
AUDIO UNIT SECTION
• Linear automation.
Use Linear Automation when controlling an AudioUnit from hardware consoles such as Logic Control. In linear mode the
Minimonsta outputs data type as Hertz and dB, etc... and controllers such as Logic Control use these values to correctly
identify and display parameters.
Note that in this mode all automations are linear and with parameters such as Filter Cutoff, the low frequency range
(10 Hz - 100 Hz) occupies a very small part of the automated range, whereas the 10kHz-20kHz range occupies half of the
automated range.
In non-linear mode, only the “knob course” is exposed to the host. This means that the automations are exactly like the knob
courses. On the other hand, hardware controllers will display only opaque parameters ranging from 0 to 1.
Note: Both modes are not inter-compatible and to play back automations in a different mode from the recording will give
wrong results.
MELOHMAN SETTINGS
• Melohman Sensitivity
You can adjust the sensitivity settings of the Melohman Octave to allow keyboard velocity to alter the Patch Morph Times.
This is directly related to the MIDI curve mapping, too.
• Hi Sensitivity
Playing a key in the Melohman Octave with a low velocity will give a slow morph time (the same as indicated in the Morph
Time Window).
Playing a key in the Melohman Octave with a high velocity will give an instant morph time.
24
Page 24

• Low Sensitivity
Playing a key in the Melohman Octave with any velocity will give the same morph time as indicated in the Morph Time
Window.
• Melohman Density
In a Melohman morph, not all the parameters change simultaneously because of performance issues. Instead, they rotate.
The Melohman density indicates how many parameters are updated in a second (Low = 10000, Medium = 20000, Hi =
30000) and allows you to choose between morph smoothness and light CPU loads.
• Melohman Channel.
This determines which MIDI channel the keys in the Melohman Morph octave respond to.
13
TUTORIAL SECTION
TUTORIAL 1: USING THE MINIMONSTA AS A PLUG-IN EFFECT
Of course, the original Minimoog filter was such that it quickly became the accepted benchmark for 24dB/oct lowpass filters.
Fortunately, the designers saw to it that external sounds could also be processed through it via the External Input functions.
Similarly, we saw to it so that you can use the Minimonsta’s filter to process other sounds too.
1. Open the Minimonsta as a Plug-In Effect on an audio track where you have some audio being played. A drum loop for
example.
2. Using the blue buttons in the Mixer section, turn all the oscillators off.
3. In the same section, turn the External Input Volume switch on and also turn up the External Input Volume Knob to 50%.
4. Make sure the Filter Cutoff knob is open.
5. Click on the Hold Button to the left of the Minimonsta’s keyboard.
6. Using your mouse, click on a note on the Minimonsta’s keyboard.
7. You should now hear the audio part assigned to that track but will be able to process the sound using the Minimonsta filter,
envelopes, LFO, the delay section and even the Melohman LFO and XADSR.
TUTORIAL 2: USING THE MINIMONSTA AS A PLUG-IN EFFECT USING LOGIC 7.
Due to some differences between Logic 7 and previous versions there is a different method involved in feeding audio into the
Minimonsta. Instead of inserting the Minimonsta as an Insert Effect within an Audio Channel, you must Side-Chain it to an audio
track as follows:
1. Open the Minimonsta as a Plug-In Effect on an AUDIO INSTRUMENT track .
2. Using the blue buttons in the Mixer section, turn all the oscillators off.
3. In the same section, turn the External Input Volume switch on and also turn up the External Input Volume Knob to 50%.
4. Make sure the Filter Cutoff knob is open.
5. Click on the Hold Button to the left of the Minimonsta’s keyboard.
6. Using your mouse, click on a note on the Minimonsta’s keyboard.
7. Click in the Logic box marked SIDE CHAIN and select the track that you want to route audio from.
8. You should now hear the audio part from that track but will be able to process the sound using the Minimonsta filter,
envelopes, LFO, the delay section and the Melohman LFO and XADSR.
9. To remove the original audio part and only hear the audio being routed through the Minimonsta go to the Logic Mixer
Channel associated with the original audio part and switch the output to NO OUTPUT.
25
Page 25

TUTORIAL 3: USING OSCILLATOR 3 AS A PITCH LFO
On the original instrument if you wanted to use an LFO you had no choice but to sacrifice Oscillator 3 as a tone source. This is no
longer necessary in the Minimonsta but there are times when authenticity is everything. To replicate this original feature, make sure
you have a non-modulated Patch and set the Minimonsta as follows.
1. Turn the Oscillator 3 off via the blue Switch in the Mixer section.
2. Turn the red Oscillator Modulation Switch to On
3. Turn the red Osc 3 Ctrl switch to Off
4. Select Lo on the Oscillator 3 range selector.
5. Turn the Mod Mix Knob in the Controllers section fully counter-clockwise to the Osc3 mark.
6. Move the Oscillator 3 Waveform Knob to Triangle.
7. Raise the Modulation Wheel.
You will now hear the pitch modulating. The Modulation Wheel controls the depth of modulation while the Oscillator 3 Fine Tune
Knob controls the speed of modulation.
Additionally, you can use this to modulate the Cutoff Frequency as follows:
1. Again, make sure the Oscillator 3 is Off via the blue Switch in the Mixer section.
2. Turn the red Filter Modulation Switch to On.
3. Turn the red Oscillator Modulation Switch to Off.
4. Make sure the red Osc 3 Ctrl Switch is Off.
5. Select Lo on the Oscillator 3 Range Selector.
6. Turn the Mod Mix Knob in the Controllers section fully counter-clockwise to the Osc3 mark.
7. Move the Oscillator 3 Waveform Knob to Triangle.
8. Raise the Modulation Wheel.
You should now only hear the filter cutoff modulate. The Modulation Wheel controls the depth of filter modulation while the
Oscillator 3 Fine Tune Knob controls the speed of filter modulation.
Note: You can combine filter cutoff and pitch modulation by having both the red Filter Modulation Switch and the red Oscillator
Modulation Switch On.
You can also mix Osc3 modulation with white or pink noise (selected by the blue White/Pink Switch in the Mixer Section) via the
Mod Mix Knob in the Controllers section.
When you want to get even more extravagant, you can experiment with changing the Oscillator 3 Waveform shapes and by
changing the Frequency Range from Lo to any of the other settings. Careful experimenting with these functions can lead to some
superb tones giving a similar effect to that of a ring modulator.
TUTORIAL 4: THE FEEDBACK TRICK.
For sounds with extra balls, a few original Minimoog users had a neat trick whereby they took the low level output and routed it
back into the instrument via the external input. With careful adjustment of the external input volume knob it was possible to get
another palate of sounds ranging from bass sounds with more bass to wild howling feedback.
We’ve taken away the hassle of manually patching this effect with jack-plugs and replaced it with a far easier method.
1. Turn ON the blue Feedback Switch in the Mixer section.
2. Turn ON the blue External Input Volume Switch in the same section.
3. While playing a sound, turn up the External Input Volume Knob.
4. Experiment with different settings with the Filter Cutoff, Emphasis and External Input Volume knobs.
26
Page 26

TUTORIAL 5: ASSIGNING SOUNDS
Here we will look at how to assign individual sounds to Patch memory allocations 1 - 12.
1. Start by creating a Meta-Patch with the same sound across all Patches. (See page 5).
2. Create a variation of the current Patch by changing its Filter Cut-Off, Emphasis or Pan position, etc...
3. Click on the MEM button once so that it turns red.
4. Click on the ‘2’ button - this now allocates the sound variation to Patch 2
5. Click on the Patch window and name your sound variation something appropriate, such as ‘Filtered’ or ‘Pitched’.
6. Clicking the Patch 1 & 2 buttons will call up the respective variations, and it’s these variations that we’ll be morphing to and
from shortly. Firstly though, continue to create variations, saving them as above to all 12 Patch memory allocations.
Note: Once you have created all the variations you should save the entire Meta-Patch to disc again, firstly by pressing the Save
button on the left of the Meta-Patch Select Window, then by naming the Meta-Patch and finally storing it to your hard-drive.
TIP: When creating Patch variations within a Meta-Patch, sometimes it’s easy to forget exactly which Patch you’re editing. To help
with this and to avoid accidentally overwriting a Patch, we recommend the following:
1. Move the Octave Knob to 2 so you can see the Melohman Octave on the left of the Minimonsta GUI Keyboard. You can see
which Patch you’re editing at any time by referring to the illuminated key.
2. Click and hold on the blue button on the right of the Patch 1-12 Window. You’ll see each Patch displayed in a vertical list
and a tick will be next to the currently selected Patch.
Loading an existing Patch into a Meta-Patch
If you want to load an individual Patch into a different Meta-Patch all you have to do is have the desired Patch playing and then
right-click (?-click on a Mac) on the Meta-Patch that you want to transfer the Patch into.
The original Patch will still be the currently active one but you must then save this to one of the Patch allocations before finally
saving the entire Meta-Patch to disk if you want to store this new configuration.
TUTORIAL 6: HOW DO I TAKE A PATCH AND USE IT FOR THE BASIS OF A META-PATCH?
When you find a Patch that you’d like to use as the basis of a Meta-Patch and subsequent variations, all you have to do is copy that
sound to all Patch allocations and save as a separate Meta-Patch as follows:
1. Have the desired sound currently active.
2. Click on the MEM Button so that it’s illuminated red.
3. Click the ALL button - You’ll be warned that this will overwrite the whole Meta-Patch.
4. Click OK.
5. Click the SAVE button to the left of the Meta-Patch Select Window.
6. Rename your new Meta-Patch (i.e. make sure you don’t save it under the same name as the original).
Now you will have a Meta-Patch that contains 12 identical Patches from which you can begin to make variations to save as Patches
within your new Meta-Patch.
27
Page 27

TUTORIAL 7: XADSR
1. Load the ABoogieOnBass patch from the Meta-Patch Select Window and play a note.
2. Click on the Cutoff Frequency Knob in the Filter Section of the main GUI.
3. Move the Amp Knob in the XADSR section to approximately 25% (or type this value into the XADSR display).
4. Move the XADSR Attack Slider to 1/4 and listen to the difference in the attack of the Cutoff Filter now compared to the
original sound.
5. Change the Sustain Slider to - 60% and listen to the effect this has on the envelope.
6. Finally, change the Decay Slider from 0 Beats to 4 Beats and listen to the effect on the envelope.
To remove the XADSR Envelope from the Cutoff Frequency change the value of the Amp Knob from 25% back to to 0% - or simply
double-click it.
TUTORIAL 8: FREE SELECT BUTTON
Here’s an example of how to use it:
1. Activate the Free Select Button.
2. Click on the Filter Emphasis Knob.
3. Click on the LFO Amp Slider.
4. Now the MIDI Section is relative to the LFO Amp Slider.
5. Continue by Selecting Channel Pressure in the MIDI Source Window.
6. Turn the Sensitivity Knob up to + 200%.
7. Play a note - Providing your keyboard transmits aftertouch, you can use this to control the amount of LFO Amp applied to
Emphasis.
TUTORIAL 9: MIDI CONTROL LED’S
An example of how this can be used is shown as follows:
1. Load the Meta-Patch “Convoluted Pad”.
2. You can already see there is MIDI control over the Level and Cutoff Frequency knobs, as well as LFO control over Cutoff Freq
and Pan.
3. Go to the Noise Volume Knob and make sure it’s turned up to maximum.
4. Now go to the adjacent On/Off switch and click on it twice to turn it on and off again.
5. You should now see “Noise Switch Off” indicated in the Main Edit Window.
6. You should also see “Noise Switch” in the Parameter Name Window.
7. In the MIDI Source Window, click and navigate to Key Velocity.
8. Now move the Sensitivity Knob to +100
9. A red LED will illuminate next to the Noise On/Off Switch
10. Now, when you play the keyboard hard, the Noise Switch is activated and you will hear this in the sound. However when
you play softly, no noise will be heard.
Note: All switching occurs without you actually seeing the switch move, so please don’t email tech support asking why the
switches aren’t animated.
28
Page 28

TUTORIAL 10: LFO
Once you’re familiar with the main controls of the Minimonsta you’ll probably want to start delving into the more comprehensive
areas of sound design and take the Moog sound into some uncharted territory. For example instead of relying on Oscillator 3 to
provide the LFO, the Minimonsta has the ability to provide an LFO for almost every parameter. Similarly, it’s possible to assign an
ADSR to almost every parameter too. (See Tutorial 7, page 28)
1. Select the parameter which you wish to assign an LFO to. In this case we’ll assign it to the Filter Cutoff Frequency.
2. Click on the Filter Cutoff Frequency Knob.
3. Go to the LFO section of the GUI and move the AMP Slider until the display above reads about 10%.
4. Play a note and you will now hear the effect of the LFO on the Filter Cutoff.
5. You should also see a blue illumination around the Filter Cutoff Knob. This indicates that there is an LFO or XADSR assigned
to this parameter.
The above example shows how simple the LFO assignation can be but there are a host of other functions that can be applied too.
(See LFO details on page 19).
TUTORIAL 11: VELOCITY RESPONSE
Firstly, let’s look at how to set up something simple such as assigning velocity response to volume.
1. Select the Volume/Level knob.
2. In the Parameter Name Window you should now see Volume displayed.
3. Click on the arrow next to the MIDI Source display and navigate it to Key Velocity.
4. Change the Sensitivity knob from 0 to a value of, say, 100.
5. Play the keyboard and fine-tune the Sensitivity Knob to suit the dynamics of your playing.
You will notice how the Level Knob has a red illumination around the outside. This indicates that it is being controlled by MIDI in
some manner. This also applies to all switches too - if it’s controlled by MIDI, it’ll have an illuminated red LED next to it.
Now let’s look at how to set up Velocity to Filter Cutoff response.
1. Select the Cutoff Frequency knob.
2. In the Parameter Name Window you should now see VCF Cutoff displayed.
3. Click on the arrow next to the MIDI Source display and navigate it to Key Velocity.
4. Change the Sensitivity knob from 0 to a value of, say, 100.
5. Play the keyboard and fine-tune the Sensitivity Knob to suit the dynamics of your playing.
There are also a host of other things you can do here, such as using velocity to control the level of each oscillator or even using
velocity to switch oscillator waveforms. The possibilities are almost limitless.
TUTORIAL 12: MODULATION WHEEL
As an example of using the Modulation Wheel to control Filter Cutoff Frequency, let’s have a look at the following steps:
1. Select the Cutoff Frequency knob.
2. In the Parameter Name Window you will now see VCF Cutoff displayed.
3. Click on the arrow next to the MIDI Source display and navigate it to Modulation Wheel.
4. Make sure the Sensitivity Knob has a value of, say, 100.
5. Play the keyboard and move the modulation wheel to hear the effect.
29
Page 29

14
DEFAULT MIDI CC SETTINGS
Modulation CC 1 Osc2 Transpose CC 12
Master Volume CC 7 Osc3 Transpose CC 13
Decay Switch CC 69 Osc1 Waveform CC 16
Pan CC 10 Osc2 Waveform CC 17
Glide Switch CC 65 Osc3 Waveform CC 18
Glide Amount CC 5 Osc1 Range CC 92
Filter Emphasis CC 71 Osc2 Range CC 93
Filter Cutoff CC 74 Osc3 Range CC 95
Filter Contour CC 70 Noise Colour Switch CC 67
VCA Attack CC 73 Feedback Switch CC 84
VCA Decay CC 72 Osc Mod Switch CC 85
VCA Sustain CC 15 VCF Mod Switch CC 86
VCF Attack CC 20 VCF KYBD 1 Switch CC 87
VCF Decay CC 21 VCF KYBD 2 Switch CC 88
VCF Sustain CC 22 Osc 3 CTRL Switch CC 89
Delay Amount CC 91 Tune CC 90
Unison Detune CC 94 Delay Time L CC 12
Osc1 Switch CC 80 Delay Time R CC 13
Osc2 Switch CC 81 Delay Feedback CC 14
Osc3 Switch CC 82 Mod Mix CC 23
Ext Input Switch CC 83 Polymode CC 24
Noise Switch CC 26 Unison CC 25
Osc1 Mix CC 75
Osc2 Mix CC 76
Osc3 Mix CC 77
Noise Mix CC 78
Ext Mix CC 79
050426_MINIMONSTA_UG_EN01
30
Page 30

15
Contact
(626) 633-9055 – Tech Support phone lines are open from 7AM to 7PM PST, Monday through Friday.
techsupt@m-audio.com – E-mail Tech Support whenever it’s convenient for you. You will usually receive a response within one
business day.
www.m-audio.com – Check the M-Audio website for any news, FAQs, or updates related to your product. Often, you will find
solutions to your problems here that will save you a phone call to Tech Support.
M-AUDIO U.S. -
5795 Martin Road, Ir windale, CA 91706-6211, U.S.A.
Sales Inform ation : . . . . . . . . . . . . . . . . . . . . . . . . . . . . . . . . . . . . . . . . . . .626-633-9050
Sales (fax): . . . . . . . . . . . . . . . . . . . . . . . . . . . . . . . . . . . . . . . . . . . . . . . . . . 626-633-9070
Sales Inform ation ( email): . . . . . . . . . . . . . . . . . . . . . . . . . . . . . . . info@m -audi o.com
Tech Supp ort (email ): . . . . . . . . . . . . . . . . . . . . . . . . . . . . . . . . techsupt@m-audio.com
Tech Supp ort (fax): . . . . . . . . . . . . . . . . . . . . . . . . . . . . . . . . . . . . . . . . . .626-633-9060
Internet Hom e Page: . . . . . . . . . . . . . . . . . . . . . . . . . . . . . .http://ww w.m-au dio.com
M-AUDIO U.K. -
Floor 6, Gresham House, 53 Clarendon Road, Watford, WD17 1LA, United Kingdom
Sales Inform ation ( phone): . . . . . . . . . . . . . . . . . . . . . . . . . . . . . . . 44 (0) 1923 204010
Sales Inform ation ( fax): . . . . . . . . . . . . . . . . . . . . . . . . . . . . . . . . . . 44 (0) 1923 204039
Sales Inform ation ( email): . . . . . . . . . . . . . . . . . . . . . . . . . . . . . . . info@m audio.co.uk
Technical Support (PC): . . . . . . . . . . . . . . . . . . . . . . . . . . . . . . . . . . .44 (0) 1309 671301
Technical Support (M ac): . . . . . . . . . . . . . . . . . . . . . . . . . . . . . . . . . 44 (0) 1765 650072
Technical Support (e mail): . . . . . . . . . . . . . . . . . . . . . . . . . . . . suppor t@maudio.co.uk
Internet Hom e Page: . . . . . . . . . . . . . . . . . . . . . . . . . . . . . .htt p://www.maudio.co.u k
M-AUDIO France -
Floor 6, Gresham House, 53 Clarendon Road, Watford, WD17 1LA, United Kingdom
Assi stanc e Technique (aucune question s relié es aux ventes)
courr iel (as sistance PC ): . . . . . . . . . . . . . . . . . . . . . . . support @m-audi o-france.com
courr iel (as sistance Mac): . . . . . . . . . . . . . . . . . . . . . . . . . mac@m -audi o-france.com
téléphone (assis tance PC ): . . . . . . . . . . . . . . . . .0820 000 731 (0,12 Euros pa r minute)
téléphone (assis tance Mac): . . . . . . . . . . . . . . . 0820 391 191 (0,12 Euros pa r minute)
télécopieur/fax: . . . . . . . . . . . . . . . . . . . . . . . . . . . . . . . . . . . . . . . . . . . . .01 72 72 90 52
Ventes ( aucun a ppels d ’assis tance t echni que)
téléphone: . . . . . . . . . . . . . . . . . . . . . . . . . . . . . . . . . . . . . 0810 001 105 ( Numero Azu r)
courr iel: . . . . . . . . . . . . . . . . . . . . . . . . . . . . . . . . . . . . . . . . info@m-audio-f rance.com
télécopieur/fax: . . . . . . . . . . . . . . . . . . . . . . . . . . . . . . . . . . . . . . . . . . . . .01 72 72 90 52
M-AUDIO Deutschland ( Germany) -
Kuhallmand 34, D-74613 Ohringen, Germany
Sales Inform ation : . . . . . . . . . . . . . . . . . . . . . . . . . . . . . . . . . . . . . . +49 (0 )7941 987000
Sales Inform ation ( email): . . . . . . . . . . . . . . . . . . . . . . . . . . . . . . . . . info@m -audio.de
Technical Support: . . . . . . . . . . . . . . . . . . . . . . . . . . . . . . . . . . . . . +49 (0)7941 9870030
Technical Support (e mail): . . . . . . . . . . . . . . . . . . . . . . . . . . . . . suppor t@m- audio.de
Technical Support (fax): . . . . . . . . . . . . . . . . . . . . . . . . . . . . . . . . +49 (0)7941 98 70070
Internet Hom e Page: . . . . . . . . . . . . . . . . . . . . . . . . . . . . . . . . ht tp://ww w.m-audio.de
M-AUDIO Canada -
1400 St-Jean Baptiste Ave. #150, Quebec Cit y, Quebec G2E 5 B7, Canada
Technical Support (e -mail): . . . . . . . . . . . . . . . . . . . . . . . t echcanada@ m-aud io.com
Technical Support (PC): . . . . . . . . . . . . . . . . . . . . . . . . . . . . . . . . . . . . . (418 ) 872-0444
Technical Support (M ac): . . . . . . . . . . . . . . . . . . . . . . . . . . . . . . . . . . . 1-800- 638-2120
Technical Support (fax): . . . . . . . . . . . . . . . . . . . . . . . . . . . . . . . . . . . . . (418) 872-0034
Sales (e-ma il): . . . . . . . . . . . . . . . . . . . . . . . . . . . . . . . . . . .infocanada@m- audio.co m
Sales (phone): . . . . . . . . . . . . . . . . . . . . . . . . . . . . . . . . . . . . . . . . . . . . . (866) 872-0444
Sales (fax): . . . . . . . . . . . . . . . . . . . . . . . . . . . . . . . . . . . . . . . . . . . . . . . . .(514) 396-7102
Internet Hom e Page . . . . . . . . . . . . . . . . . . . . . . . . . . . . . . . . htt p://www.m-audi o.ca
M-AUDIO Japan -
(株式会社エムオーディオジャパン)
テクニカルサポート :.................................
テクニカルサポート
(Macintosh ):
テクニカルサポート
(Win dows):
Fax:............................................
ホームページ : ......................... http://www.m-audio.co.jp
........................mac-support@ m-audio.co.jp
..........................win-support@m-audio.co.jp
460-0 002
愛知県名古屋市中区丸の内
052-218-0859
052-218-0875
2-18-10
31
 Loading...