

Page 1

Wireless USB MIDI System
English
User Guide
Page 2

Table of Contents
Introduction . . . . . . . . . . . . . . . . . . . . . . . . . . . . . . . . . . . . . . . . . . . . . . . . . . . . . . . . . . 3
What’s in the Box
MidAir Features
About MidAir
. . . . . . . . . . . . . . . . . . . . . . . . . . . . . . . . . . . . . . . . . . . . . . . . . . . . . . . . . . 4
. . . . . . . . . . . . . . . . . . . . . . . . . . . . . . . . . . . . . . . . . . . . . . . . . . . . . . 3
. . . . . . . . . . . . . . . . . . . . . . . . . . . . . . . . . . . . . . . . . . . . . . . . . . . . . . . 4
Installation for Advanced Windows XP Users . . . . . . . . . . . . . . . . . . . . . . . . . . . . . . . .
Minimum System Requirements
Controls and Connectors
Transmitter . . . . . . . . . . . . . . . . . . . . . . . . . . . . . . . . . . . . . . . . . . . . . . . . . . . . . . . . . . 6
Receiver . . . . . . . . . . . . . . . . . . . . . . . . . . . . . . . . . . . . . . . . . . . . . . . . . . . . . . . . . . . . 7
Hardware Connections
Troubleshooting
. . . . . . . . . . . . . . . . . . . . . . . . . . . . . . . . . . . . . . . . . . . . . . . . . . . . . . .11
. . . . . . . . . . . . . . . . . . . . . . . . . . . . . . . . . . . . . . . . . . . . . . . 6
. . . . . . . . . . . . . . . . . . . . . . . . . . . . . . . . . . . . . . . . . . . . . . . . . 9
. . . . . . . . . . . . . . . . . . . . . . . . . . . . . . . . . . . . . . . . . . 5
Appendices . . . . . . . . . . . . . . . . . . . . . . . . . . . . . . . . . . . . . . . . . . . . . . . . . . . . . . . . . . .
Appendix A: Useful MIDI Data Tables . . . . . . . . . . . . . . . . . . . . . . . . . . . . . . . . . . . . . . . . .13
Appendix B: General MIDI Controller Numbers (MIDI CC’s) . . . . . . . . . . . . . . . . . . . . . . . . . . .15
Specifications
Warranty
Warranty Terms . . . . . . . . . . . . . . . . . . . . . . . . . . . . . . . . . . . . . . . . . . . . . . . . . . . . . . .16
. . . . . . . . . . . . . . . . . . . . . . . . . . . . . . . . . . . . . . . . . . . . . . . . . . . . . . . . . . . . .16
. . . . . . . . . . . . . . . . . . . . . . . . . . . . . . . . . . . . . . . . . . . . . . . . . . . . . . . .16
5
13
Warranty Registration . . . . . . . . . . . . . . . . . . . . . . . . . . . . . . . . . . . . . . . . . . . . . . . . . . .16
Technical Information . . . . . . . . . . . . . . . . . . . . . . . . . . . . . . . . . . . . . . . . . . . . . . . . . .
Contact Us
. . . . . . . . . . . . . . . . . . . . . . . . . . . . . . . . . . . . . . . . . . . . . . . . . . . . . . . . . . .18
17
Page 3

MidAir User Guide | 3
Introduction
1
hank you for choosing the MidAir wireless MIDI system. The MidAir transmitter and receiver modules allow you to convert
any regular MIDI keyboard* into a wireless controller. This allows you to control your MIDI hardware or software without
T
cumbersome cables and gives you the freedom to place your keyboard anywhere that best suits your needs—you no longer have
to worry about cable lengths, wiring clutter, or accidents caused by cables on your stage or studio floor.
MidAir’s compact transmitter plugs directly into the MIDI output of any keyboard you wish to turn into a wireless controller. The
transmitter is battery powered and can operate at distances of up to 10 meters (30 feet) from the receiver. It is compliant with
the MIDI specification and will send virtually any command that your keyboard can generate.
Setting up wireless operation is simple. Just connect the MidAir transmitter to your existing keyboard, connect the receiver
to a MIDI module or your computer’s USB port and turn on your equipment. There are no complicated setup procedures or
software applications—your audio software treats your new wireless keyboard just like any other wired controller you may have
in your studio.
Whether you’re looking for unfettered live performance, or the flexibility to set up and record MIDI tracks anywhere in the studio,
MidAir is your wireless MIDI solution.
* MidAir is compatible with virtually all MIDI keyboards as well as other devices that have a MIDI output (such as drum
machines and control surfaces). To simplify this User Guide, we refer to all of these wired MIDI devices collectively as
“keyboards” but please keep in mind that this applies to other devices as well.
What’s in the Box
2
< MidAir transmitter
< MidAir receiver
< MidAir Series CD-ROM containing drivers and documentation
< CD-ROM containing Ableton Live Lite M-Audio Enhanced Edition
< Printed quick start guide
< Power adapter
< Two AA batteries
< USB cable
Page 4

< One-way, 2.4GHz wireless MIDI transmission
< Wireless range up to 10 meters (30 feet)
< Battery- or AC-powered transmitter
< AC or USB bus-powered receiver
< Compatible with virtually all existing MIDI devices
< Supports virtually all MIDI messages and channels
< MIDI and USB 1.1 connectivity
< Receiver doubles as a 2-in/1-out USB MIDI interface
MidAir User Guide | 4
MidAir Features
3
< Standalone operation—no computer required
About MidAir
4
ireless devices have become increasingly commonplace over the last few years. For example, many people now
W
Internet access and some concert venues have switched to wireless microphones and in-ear monitoring systems. All of these
developments have improved the lives of end-users by reducing cabling clutter, allowing people to move about freely and work
more comfortably. MidAir technology extends this level of convenience to musicians working in the studio as well as performing
on stage.
MidAir establishes a one-way 2.4GHz wireless link and delivers a dependable MIDI connection at distances of up to 10 meters
(30 feet). This proprietary linking technology constantly monitors the wireless signal and automatically changes frequencies
when interference is detected, thereby ensuring a robust connection between the transmitter (keyboard) and the receiver. In
cases where extreme interference or battery failure cause the transmitter and receiver units to lose contact, a full MIDI reset
(including an all-notes-off “panic” message) is issued to prevent stuck MIDI notes. In short, MidAir frees you from your MIDI
cabling, allowing you to work from anywhere in your studio or on stage.
use wireless keyboards and mice with their computers. Lots of college campuses and coffee shops offer wireless
MidAir is class-compliant—no drivers are required. Simply connect the receiver to your Windows XP or Mac computer, attach
the MIDI breakout cable to the transmitter, connect the transmitter to your keyboard and you’re ready to go. Its simple USB
connectivity eliminates the need to open your computer to install hardware.
Page 5

MidAir User Guide | 5
Installation for Advanced Windows XP Users
5
he MidAir receiver is class compliant. This means that on Windows XP and Mac OS X computers, you can simply connect
the receiver to the computer with a USB cable. The operating system already has the drivers required to communicate
T
with the receiver.
However, advanced Windows XP users who intend to use MidAir with more than one application at the same time or
simultaneously use other class-compliant USB devices with audio capabilities should install the special M-Audio drivers for
optimum performance.
Installation instructions can be found in the printed Quick Start Guide.
Minimum System Requirements
When used with a host computer, a USB 1.1 or USB 2.0 port is required.
Windows* Mac OS*
Pentium 3 600 MHz Macintosh G3** 600/G4** 667 MHz
256 MB RAM OS X 10.3.9 with 256 MB RAM
DirectX 9.0c or higher OS X 10.4.5 or greater with 512 MB RAM
Windows XP (SP2) or higher (Mac OS 9 or earlier not supported)
(Windows 98, Me, NT or 2000 not supported)
* Please check the minimum system requirements of your DAW software as they may be higher.
** Native USB port required; G3/G4 accelerator cards are not supported.
6
Page 6
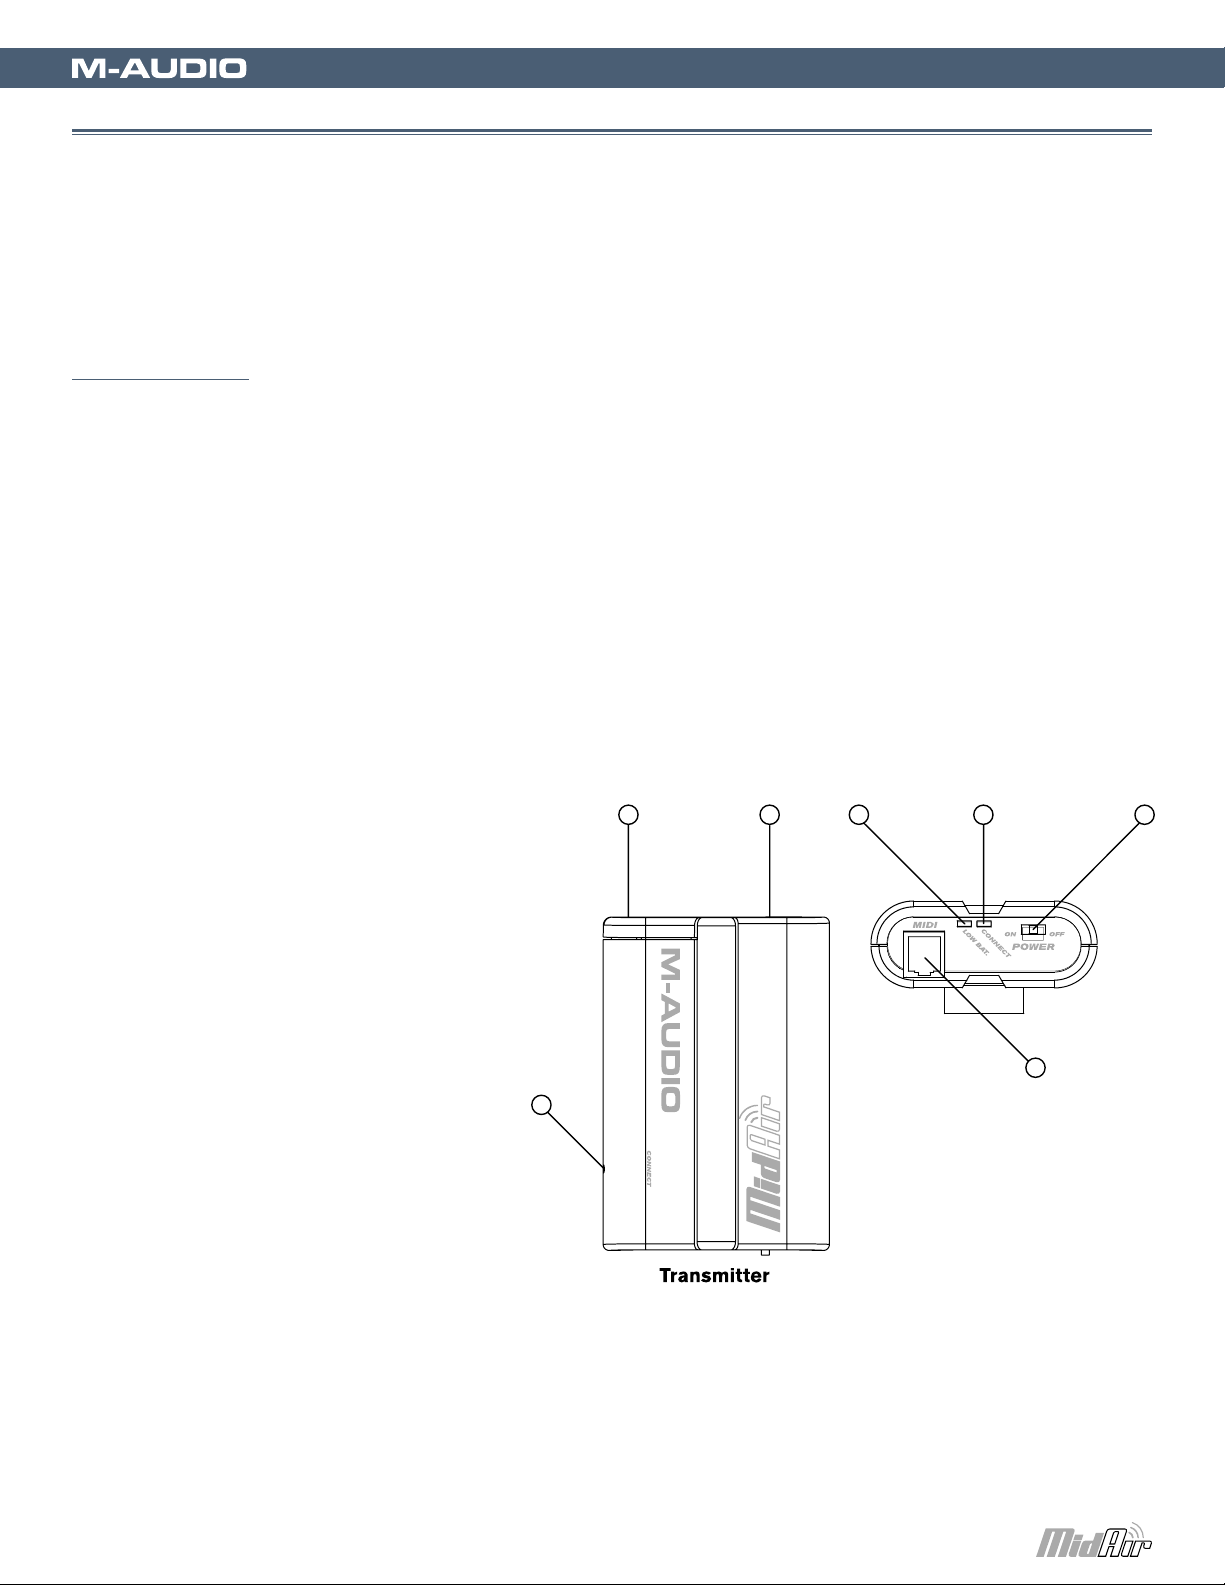
Transmitter
1
7
6
2
3
4 5
1. Battery Compartment (Next to Power Jack) – Accommodates two AA batteries. To avoid damage to the
transmitter, observe proper polarity when inserting batteries.
2. Power Jack (DC in 9V) – Connect the optional 9V DC, 500mA external power supply to this jack. It is not
necessary to use this jack if you are using batteries to operate the transmitter.
3. Battery Status LED (Low Bat.) – The LED indicator will begin flashing red when battery capacity is running
low.
4. Wireless Connection Status LED (Connect) – This green LED displays the current state of the wireless link:
MidAir User Guide | 6
Controls and Connectors
7
< On – Connected < Off – Not connected < Blinking – Connection in progress
5. Power Switch – This switch powers the unit on and off. If both AC and battery power are available, the transmitter
will opt for AC power in order to preserve battery life. When not in use, be sure to turn off the transmitter to
preserve battery life.
6. MIDI Input Connector (MIDI)
– Attach the included MIDI breakout
cable to this jack and connect the 5pin MIDI plug to your keyboard’s MIDI
output.
7. Wireless Connect Button
(Connect) – The MidAir transmitter
and receiver will usually establish a
wireless connection automatically.
Under some circumstances,
excessive interference, distance, or
other factors may cause the controller
and receiver units to lose contact. If
the wireless connection fails and the
transmitter and receiver are within a
range of 30 feet, press the wireless
connect buttons on both units to
re-establish connection.
If you’re using more than one MidAir wireless setup, you might find yourself in a situation where you’ve inadvertently
linked a transmitter to the wrong receiver unit. This will result in your MIDI data being routed to the wrong
destination. If this happens, you can simply press the wireless connect buttons on both devices to “re-introduce”
them to each other.
This button is recessed to avoid accidental activation. Use a bent paperclip, pen, or other small object to press the
button.
Page 7

Receiver
13
8
9
10
11
15
12
14
8. Power Jack – If you plan to
use the MidAir receiver as a
standalone device (without a
computer), connect the optional
9V DC, 500mA power supply
here.
9. USB Connector – Connect a
USB cable from this output to
the host computer’s USB port.
When using the USB connection,
the receiver unit is powered via
the host computer and a power
adapter is not required.
10. MIDI In (In) – You can connect a MIDI device (such as a keyboard or electronic drum kit) to this input. Note
that this input varies in function depending on whether your MidAir setup is in standalone mode or connected to
a computer:
MidAir User Guide | 7
< Standalone mode – When used in standalone mode, either the wireless signal from the MidAir transmitter
or from the MIDI input is routed to the MIDI output port of the receiver. The Standalone Mode switch (15)
determines which source is routed.
< Host mode – When the receiver is used with a computer, the computer sees this port as a separate
USB MIDI device that is unrelated to the MidAir transmitter. Data received at this port is treated as an
independent MIDI input, and is not merged with incoming MIDI data from the transmitter.
11. MIDI Out (Out) – Connect this output to other MIDI devices using a standard 5-pin MIDI cable. The function of
this port varies depending on whether you are using the MidAir receiver in standalone mode or with a computer:
< Standalone mode – When operating in Standalone mode, the Standalone Mode switch (15) determines
the source of this output.
< Host mode – When the MidAir receiver is connected to a computer, this port appears as an independent
MIDI out, available for sending MIDI messages from your software to an external MIDI device. In Host mode,
this MIDI output port has no relation to the MidAir transmitter. In this setup, the Standalone Mode switch is
ignored and does not affect operation in any way.
12. Wireless Connect Button – This button operates in exactly the same way as the Wireless Connect button found
on the MidAir transmitter. See the description in the previous section for more information about this button.
13. Wireless Connection Status LED – This green LED functions in the same way as the Wireless Connection
Status LED found on the MidAir transmitter. Refer to the description in the previous section for more information
about this LED.
14. Activity LEDs – The MidAir receiver’s two activity LEDs indicate the operational status of the unit:
< Yellow – The yellow LED illuminates whenever incoming wireless MIDI data is detected by the receiver
unit.
< Red – The red LED illuminates whenever data is received at the wired, 5-pin MIDI input port on the
receiver.
Page 8

MidAir User Guide | 8
MIDI Out
Receiver
Tr
ansmitter
Sound
Module
IN
OU
T
MIDI In
MIDI Controller
or Keyboard
MIDI Controller or Keyboard
Wireless MIDI In
to MIDI Out
Wired MIDI In
to MIDI Out
15. Standalone Mode Switch – This switch only affects the signal routing when using MidAir as a standalone (non-
USB) device. It selects the source of the receiver’s MIDI output port.
The Standalone Mode switch can be set in the following three ways:
< MIDI In – Data from the receiver’s 5-pin MIDI In port is sent to its MIDI Out port. Any data received
from the wireless input is ignored.
< Wireless – Data from the receiver’s wireless input is sent to its MIDI Out port. Any data received
from the wired MIDI In port is ignored.
< Auto – The receiver monitors both the MIDI In port and wireless input and selects whichever input is
currently active. On this setting, the following rules are observed:
The wireless and 5-pin MIDI In port data streams are never merged—when MIDI data is being received from the
receiver’s MIDI In port, any data received at its wireless input is ignored.
If no MIDI data is received from the receiver’s wired MIDI In port for 250 milliseconds and incoming MIDI data is
detected at the wireless input, the receiver unit will automatically switch to output the incoming wireless MIDI data
stream.
If the receiver switches from one stream to another, a set of “Note Off” and other MIDI reset commands will be
sent to the MIDI Out port. This prevents any notes that are currently playing from becoming “stuck.”
IMPORTANT: If the Standalone Mode switch is set to “Auto,” it is important to plan your MIDI input sources
carefully. For example, if you attempt to drive a synth or other MIDI device by sending an ongoing stream of MIDI
data to the receiver’s wired MIDI In port (e.g. MIDI Time Code (MTC) from a sequencer), any MIDI data received
at the wireless MIDI input will be ignored.
Additionally, use caution when switching between the wireless input and the MIDI In port as this can sometimes
cause notes to stop abruptly.
Page 9

MidAir User Guide | 9
PC / Mac
MIDI In MIDI Out
Receiver
MIDI Controller or Keyboard
MIDI Controller,
Sound
or Drum Module
IN
OU
T
Transmitter
Hardware Connections
8
MidAir can be used in two basic configurations. Please take a look at the scenarios outlined below to find the one that best
works for you.
Scenario 1: MidAir as a Wireless, Host-Based Controller
If you plan to use your MidAir system in a computerbased recording studio, this setup should best serve
your needs. In this configuration, the keyboard operates
wirelessly while the receiver communicates with the
keyboard and provides an extra set of wired MIDI inputs
and outputs to your computer. You can use these extra
inputs and outputs to connect another MIDI device in
your studio.
The MidAir transmitter can be powered by batteries or
the AC adapter. The wireless receiver draws its power
from the USB bus and does not require any AC power.
NOTE: In this configuration, your audio software will
detect two MidAir MIDI input ports and one MIDI
output. The first input is from your wireless MidAir
transmitter whereas the second input is the wired 5-pin
MIDI input (i.e., any MIDI device you connect to the 5pin input). The output port lets you send out MIDI data
to any device that is connected to the MidAir receiver.
Page 10

Scenario 2: MidAir as a Wireless, Standalone Controller
AC Adapter
MIDI
Receiver
Sound Module
IN
OUT
Transmitter
MIDI Controller or Keyboard
Live performers who want to use their MidAir system
wirelessly on stage will most likely use this scenario. In
this configuration, the MidAir transmitter (keyboard) sends
MIDI commands to the wireless receiver which then relays
that information (via MIDI cable) to sound modules or other
MIDI devices.
The wireless receiver must be powered by AC adapter
whereas the MidAir transmitter can be powered by either
batteries or AC power.
Note that in this configuration, the Standalone Mode
switch should be set to “Wireless” or “Auto” so that the
receiver will relay the MidAir transmitter’s commands out
of the MIDI output port.
MidAir User Guide | 10
The Standalone switch determines which input signal is routed to the MIDI output port. By setting the Standalone switch to
“Auto,” you can have a different MIDI controller connected to both MIDI inputs and use them subsequently without having to
change the cable configuration or Standalone switch position. Keep in mind that the MidAir receiver never merges signals from
the wired and wireless inputs. If MIDI is received on both the wired and wireless MIDI input port simultaneously, then the wired
MIDI input will take precedence while any signals received at the wireless MIDI input port will be ignored.
For more detailed information about the MidAir receiver’s routing operation, please see the Standalone Mode switch description
in chapter 7 of this guide.
Page 11

MidAir User Guide | 11
Troubleshooting
9
MidAir is a professional-grade wireless MIDI system that has been tested under a wide variety of conditions. But in the event
that you experience difficulty with your MidAir system, this section covers some common issues and tips to remedy these
problems.
I’ve installed and set up all of the software correctly, but the MidAir receiver does not seem to be receiving any
data from the transmitter.
< The first time you use your MidAir system, you may need to press the Wireless Connect buttons on the MidAir
transmitter and receiver unit to allow the two units to establish a wireless link. Once a wireless connection is
established, the green Wireless Connect Status LEDs on the transmitter and receiver will illuminate, and you’re
ready to go.
My MidAir transmitter’s wireless range seems limited.
< Certain kinds of building materials and household items (i.e., thick walls, concrete, steel, microwave ovens,
cordless phones, etc.) can reduce or block the transmitter’s 2.4GHz radio-frequency transmission to the receiver.
For best results, place the receiver high above the ground in a location where it can be seen throughout the room.
By minimizing the physical obstructions between the transmitter and the receiver, you will maximize the wireless
range.
If you have a microwave oven or cordless phone within 10 feet of your MidAir transmitter or
receiver, try moving these items farther away to see if your wireless range improves.
I am using multiple MidAir products and my wireless keyboard seems to be linked to the wrong receiver.
< If you are using multiple wireless MIDI products, it may be possible to accidentally cross-link the wrong transmitter
and receiver units. To resolve this issue, simply press the Wireless Connect button on each transmitter and
receiver pair to allow the two units to establish a wireless link. Connect your wireless systems one at a time until
everything is linked properly.
Page 12

MidAir User Guide | 12
My MidAir system suddenly stopped working after having worked well since installation.
< Switch off the transmitter and remove the power source from the receiver (USB or AA batteries) and leave them
powered off for 10 seconds. Restart your computer and try again.
My drivers are listed in the Device Manager and are said to be working, but the keyboard is not recognized in any
software.
< Windows XP has a limitation to how many MIDI device drivers you can have installed at any one time. Unfortunately,
the operating system does not indicate that you are using the maximum number of drivers. To fix this problem,
go to http://www.m-audio.com and search for this problem in the Knowledge Base. You will find a link to an
executable (.exe) file that will solve this problem for you.
Page 13

MidAir User Guide | 13
Appendices
11
Appendix A: Useful MIDI Data Tables
A1 - General MIDI Instruments – Program Change Numbers
The following table lists all General MIDI patch names using numbers from 1 – 128. Please be advised that some GM modules
count their sound patches from 0 – 127 instead. Both methods are common. As a result, and depending on the sound module
you use, there may be an offset of -1 between the sent program change number and the recalled sound patch.
Piano Bass Reed Synth Effects
1 Acoustic Grand Piano 33 Acoustic Bass 65 Soprano Sa x 97 SFX Rain
2 Bright Acoustic Piano 34 Fingered Bass 66 Alto Sa x 98 SFX Soundtrack
3 Electric Grand Piano 35 Electric Picked Bass 67 Tenor Sax 99 SFX Crystal
4 Honky Tonk Piano 36 Fretless Bass 68 Baritone Sa x 100 SF X Atmosphere
5 Electric Piano 1 37 Slap Bass 1 69 Oboe 101 SFX Brightness
6 Electric Piano 2 38 Slap Bass 2 70 English Horn 102 SFX Goblins
7 Harpsichord 39 Syn Bass 1 71 Bassoon 103 SFX Echoes
8 Clavinet 40 Syn Bass 2 72 Clarinet 104 SFX Sci-Fi
Chromatic Percussion Strings/Orchestra Pipe Ethnic
9 Celesta 41 Violin 73 Piccolo 105 Sitar
10 Glockenspiel 42 Viola 74 Flute 106 Banjo
11 Music Box 43 Cello 75 Recorder 107 Shamisen
12 Vibraphone 44 Contrabass 76 Pan Flute 108 Koto
13 Marimba 45 Tremolo Strings 77 Bottle Blow 109 Kalimba
14 Xylophone 46 Pizzicato Strings 78 Shakuhachi 110 Bag Pipe
15 Tubular bells 47 Orchestral Harp 79 Whistle 111 Fiddle
16 Dulcimer 48 Timpani 80 Ocarina 112 Shanai
Organ Ensemble Synth Lead Percussive
17 Drawbar Organ 49 String Ensemble 1 81 Syn Square Wave 113 Tinkle Bell
18 Percussive Organ 50 String Ensemble 2 82 Syn Sawtooth Wave 114 Agogo
19 Rock Organ 51 Syn Strings 1 83 Syn Calliope 115 Steel Drums
20 Church Organ 52 Syn Strings 2 84 Syn Chiff 116 Woodblock
21 Reed Organ 53 Choir Aahs 85 Syn Charang 117 Taiko Drum
22 Accordion 54 Voice Oohs 86 Syn Voice 118 Melodic Tom
23 Harmonica 55 Syn Choir 87 Syn Sawtooth Wave 119 Syn Drum
24 Tango Accordion 56 Orchestral Hit 88 Syn Brass & Lead 120 Reverse Cymbal
Guitar Brass Synth Pad Sound Effects
25 Nylon Acoustic 57 Trumpet 89 New Age Syn Pad 121 Guitar Fret Noise
26 Steel Acoustic 58 Trombone 90 Warm Syn Pad 122 Breath Noise
27 Jazz Electric 59 Tuba 91 Polysynth Syn Pad 123 Seashore
28 Clean Electric 60 Muted Trumpet 92 Choir Syn Pad 124 Bird Tweet
29 Muted Electric 61 French Horn 93 Bowed Syn Pad 125 Telephone Ring
30 Overdrive 62 Brass Section 94 Metal Syn Pad 126 Helicopter
31 Distor ted 63 Syn Brass 1 95 Halo Syn Pad 127 Applause
32 Harmonics 64 Syn Brass 2 96 Sweep Syn Pad 128 Gun Shot
Page 14

A2 - General MIDI Note Numbers
Octave
Note
Numbers C C# D D # E F F# G G # A A# B
-2
0 1 2 3 4 5 6 7 8 9 10 11
-1 12 13 14 15 16 17 18 19 20 21 22 23
0 24 25 26 27 28 29 30 31 32 33 34 35
1 36 37 38 39 40 41 42 43 44 45 46 47
2 48 49 50 51 52 53 54 55 56 57 58 59
3 60 61 62 63 64 65 66 67 68 69 70 71
4 72 73 74 75 76 77 78 79 80 81 82 83
5 84 85 86 87 88 89 90 91 92 93 94 95
6 96 97 98 99 100 101 102 103 104 105 106 107
7 108 109 110 111 112 113 114 115 116 117 118 119
8 120 121 122 123 124 125 126 127
A3 – General MIDI Drums – Note Assignments
MidAir User Guide | 14
MIDI Note Drum Sound MIDI Note Drum Sound MID I Note Drum Sound
35 Acoustic Bass Drum 52 Chinese C ymbal 69 Cabasa
36 Bass Drum 1 53 Ride Bell 70 Maracas
37 Side Stick 54 Tambourine 71 Short Whistle
38 Acoustic Snare 55 Splash Cymbal 72 Long Whistle
39 Hand Clap 56 Cowbell 73 Short Guiro
40 Electric Snare 57 Crash Cymbal 2 74 Long Guiro
41 Low Floor Tom 58 Vibraslap 75 Claves
42 Closed Hi-Hat 59 Ride Cymbal 2 76 Hi Wood Block
43 High Floor Tom 60 Hi Bongo 77 Low Wood Block
44 Pedal Hi-Hat 61 Low Bongo 78 Mute Cuica
45 Low Tom 62 Mute Hi Conga 79 Open Cuica
46 Open Hi-Hat 63 Open Hi Conga 80 Mute Triangle
47 Low-Mid Tom 64 Low Conga 81 Open Triangle
48 Hi-Mid Tom 65 High Timbale
49 Crash Cymbal 1 66 Low Timbale
50 High Tom 67 High Agogo
51 Ride Cymbal 1 68 Low Agogo
Page 15

MidAir User Guide | 15
Appendix B: General MIDI Controller Numbers (MIDI CC’s)
00 Bank Select 49 Gen Purpose 2 LSB 98 Non-Reg Param LSB
01 Modulation 50 Gen Purpose 3 LSB 99 Non-Reg Param MSB
02 Breath Control 51 Gen Purpose 4 LSB 100 Reg Param LSB
03 Controller 3 52 Controller 52 101 Reg Param MSB
04 Foot Control 53 Controller 53 102 Controller 102
05 Porta Time 54 Controller 54 103 Controller 103
06 Data Entry 55 Controller 55 104 Controller 104
07 Channel Volume 56 Controller 56 105 Controller 105
08 Balance 57 Controller 57 106 Controller 106
09 Controller 9 58 Controller 58 107 Controller 107
10 Pan 59 Controller 59 108 Controller 108
11 Expression 60 Controller 60 109 Controller 109
12 Effects Controller 1 61 Controller 61 110 Controller 110
13 Effects Controller 2 62 Controller 62 111 Controller 111
14 Controller 14 63 Controller 63 112 Controller 112
15 Controller 15 64 Sustain Pedal 113 Controller 113
16 Gen Purpose 1 65 Portamento 114 Controller 114
17 Gen Purpose 2 66 Sostenuto 115 Controller 115
18 Gen Purpose 3 67 Soft Pedal 116 Controller 116
19 Gen Purpose 4 68 Legato Pedal 117 Controller 117
20 Controller 20 69 Hold 2 118 Controller 118
21 Controller 21 70 Sound Variation 119 Controller 119
25 Controller 25 74 Cut-off Frequency
26 Controller 26 75 Controller 75 120 All Sound Off
27 Controller 27 76 Controller 76 121 Reset All Controllers
28 Controller 28 77 Controller 77 122 Local Control
29 Controller 29 78 Controller 78 123 All Notes Off
30 Controller 30 79 Controller 79 124 Omni Off
31 Controller 31 80 Gen Purpose 5 125 Omni On
32 Bank Select LSB 81 Gen Purpose 6 126 Mono On ( Poly Off)
33 Modulation LSB 82 Gen Purpose 7 127 Poly On ( Mono Off )
34 Breath Control LSB 83 Gen Purpose 8
35 Controller 35 84 Portamento C ontrol
36 Foot Control LSB 85 Controller 85
37 Porta Time LSB 86 Controller 86
38 Data Entry LSB 87 Controller 87
39 Channel Volume LSB 88 Controller 88
40 Balance LSB 89 Controller 89
41 Controller 41 90 Controller 90
42 Pan LSB 91 Reverb Depth
43 Expression LSB 92 Tremolo Depth
44 Controller 44 93 Chorus Depth
45 Controller 45 94 Celeste (De-tune)
46 Controller 46 95 Phaser Depth
47 Controller 47 96 Data Increment
48 Gen Purpose 1 LSB 97 Data Decrement
Channel Mode Messages
Page 16

MidAir User Guide | 16
Wireless Operation 2.4 GHz radio frequency (ISM band)
Specifications
12
Operating Range
Under Typical Conditions:
Power Requirements:
Battery life (typical) 20 hours
Dimensions:
30 feet (10 meters)
Receiver – USB bus or 9V DC, 500 mA (via PSU)
Transmitter – 2 AA batteries or 9V DC, 500 mA (via PSU)
Receiver: 2.875 x 2.25 x 1.25 (inches); 7.3 x 5.72 x 3.18 (centimeters)
Transmitter: 3.25 x 2.25 x 1.0625 (inches); 8.26 x 5.72 x 2.7 (centimeters)
Warranty
13
Warranty Terms
M-Audio warrants products to be free from defects in materials and workmanship, under normal use and provided that the
product is owned by the original, registered user. Visit www.m-audio.com/warranty for terms and limitations applying to your
specific product.
Warranty Registration
Thank you for registering your new M-Audio product. Doing so immediately both entitles you to full warranty coverage and helps
M-Audio develop and manufacture the finest quality products available. Register online at www.m-audio.com/register to receive
FREE product updates and for the chance to win M-Audio giveaways.
Page 17

MidAir User Guide | 17
DE SI GN�
G RO U P
Technical Information
14
This device complies with Part 15 of the FCC Rules. Operation is subject to the following two conditions:
(1) this device may not cause harmful interference, and (2) this device must accept any interference received, including
interference that may cause undesired operation.
This product has been found to comply with the FCC’s RF Exposure requirements.
This device should not be collocated or operating in conjunction with any other antenna or transmitter.
Note: This equipment has been tested and found to comply with the limits for a Class B digital device, pursuant to Part 15 of the
FCC Rules. These limits are designed to provide reasonable protection against harmful interference in a residential installation.
This equipment generates, uses and can radiate radio frequency energy and, if not installed and used in accordance with the
instructions, may cause harmful interference to radio communications. However, there is no guarantee that interference will not
occur in a particular installation. If this equipment does cause harmful interference to radio or television reception, which can
be determined by turning the equipment off and on, the user is encouraged to try to correct the interference by one or more of
the following measures:
< Re-orient or relocate the receiving antenna.
< Increase the separation between the equipment and receiver.
< Connect the equipment to an outlet on a circuit different from that to which the receiver is connected.
< Consult the dealer or an experienced radio/ TV technician for help.
Caution: Electro Static Discharge, Electrical Fast Transient and Conducted RF interference may cause the unit malfunctioning.
In such case, unplug the unit and plug it in again to restore normal operation.
Note: Your M-Audio product has been tested to comply with FCC Standards FOR HOME OR OFFICE USE. Modifications
not authorized by the manufacturer may void users authority to operate this device.
ASIO is a trademark of Steinberg Soft– und Hardware GmbH.
VST is a trademark of Steinberg Soft– und Hardware GmbH.
MidAir
Tested to comply with
FCC standards
FOR HOME OR STUDIO USE
© 2006 Avid Technology, Inc. All rights reserved. Product features, specifications, system requirements and availability are
subject to change without notice. Avid, M-Audio and MidAir are either trademarks or registered trademarks of Avid Technology,
Inc. All other trademarks contained herein are the property of their respective owners.
Wireless Technology by
WARNING: This product contains chemicals, including lead, known to the State of California to cause cancer, and birth
defects or other reproductive harm. Wash hands after handling.
Page 18

MidAir User Guide | 18
061114_MIDAIR-SA_UG_EN01
Contact Us
15
M-Audio USA
5795 Martin Rd., Irwindale, CA 91706
Technical Support
web: www.m-audio.com/tech
tel (pro products):
tel (consumer products):
fax (shipping): (626) 633-9032
(626) 633-9055
(626) 633-9066
Sales
e-mail: sales@m-audio.com
tel:
fax:
Web
1-866-657-6434
(626) 633-9070
www.m-audio.com
M-Audio U.K.
Floor 6, Gresham House, 53 Clarenden Road, Watford
WD17 1LA, United Kingdom
Technical Support
e-mail: support@maudio.co.uk
tel:(Mac support):
tel: (PC support):
+44 (0)1765 650072
+44 (0)1309 671301
Sales
tel: +44 (0)1923 204010
fax: +44 (0)1923 204039
Web
www.maudio.co.uk
M-Audio Germany
Kuhallmand 34, D-74613 Ohringen, Germany
Technical Support
e-mail: support@m-audio.de
tel +49 (0)7941 - 9870030
fax: +49 (0)7941 98 70070
Sales
e-mail: info@m-audio.de
tel: +49 (0)7941 98 7000
fax: +49 (0)7941 98 70070
Web
www.m-audio.de
M-Audio Canada
1400 St-Jean Baptiste Ave. #150, Quebec City,
Quebec G2E 5B7, Canada
Technical Support
e-mail: techcanada@m-audio.com
phone: (418) 872-0444
fax: (418) 872-0034
Sales
e-mail: infocanada@m-audio.com
phone:
fax:
Web:
(866) 872-0444
(418) 872-0034
www.m-audio.ca
M-Audio France
Floor 6, Gresham House, 53 Clarenden Road, Watford
WD17 1LA, United Kingdom
Renseignements Commerciaux
tel : 0 810 001 105
e-mail : info@m-audio.fr
Assistance Technique
PC : 0 820 000 731
MAC :
0 820 391 191
Assistance Technique
e-mail : support@m-audio.fr
fax :
Site Web
mac@m-audio.fr
+33 (0)1 72 72 90 52
www.m-audio.fr
 Loading...