

Page 1

Table of Contents
Introduction . . . . . . . . . . . . . . . . . . . . . . . . . . . . . . . . . . . . . . . . . . . . . . . .2
What’s in the Box? . . . . . . . . . . . . . . . . . . . . . . . . . . . . . . . . . . . . . . . . . .2
About the Audiophile USB . . . . . . . . . . . . . . . . . . . . . . . . . . . . . . . . . . . . .2
Features & Specifications . . . . . . . . . . . . . . . . . . . . . . . . . . . . . . . . . .3
Minimum System Requirements . . . . . . . . . . . . . . . . . . . . . . . . . . . . .3
Front Panel Features . . . . . . . . . . . . . . . . . . . . . . . . . . . . . . . . . . . . . .4
Rear Panel Features . . . . . . . . . . . . . . . . . . . . . . . . . . . . . . . . . . . . . .4
Guide to Getting Started Quickly . . . . . . . . . . . . . . . . . . . . . . . . . . . . . . .5
Hardware Installation . . . . . . . . . . . . . . . . . . . . . . . . . . . . . . . . . . . . . . . .6
Audiophile USB Driver & Software Installation . . . . . . . . . . . . . . . . . . . .6
Windows Installation . . . . . . . . . . . . . . . . . . . . . . . . . . . . . . . . . . . . .6
Macintosh OS 9 Installation . . . . . . . . . . . . . . . . . . . . . . . . . . . . . . . .7
OMS Configuration . . . . . . . . . . . . . . . . . . . . . . . . . . . . . . . . . . . .7
Macintosh OS X Installation . . . . . . . . . . . . . . . . . . . . . . . . . . . . . . . .8
Verifying Windows Driver Installation . . . . . . . . . . . . . . . . . . . . . . . .9
Verifying Control Panel Installation, PC/Macintosh . . . . . . . . . . . . . .9
The Audiophile USB Control Panel . . . . . . . . . . . . . . . . . . . . . . . . . . . . .10
Windows Sound System and the Audiophile USB . . . . . . . . . . . . . .13
Macintosh Sound Manager and the Audiophile USB . . . . . . . . . . . .13
Audiophile USB Inputs & Outputs . . . . . . . . . . . . . . . . . . . . . . . . . . . . .13
Audiophile USB with Your Music Software . . . . . . . . . . . . . . . . . . . . . .14
Audiophile USB MIDI Setup . . . . . . . . . . . . . . . . . . . . . . . . . . . . . . . . . .17
Troubleshooting . . . . . . . . . . . . . . . . . . . . . . . . . . . . . . . . . . . . . . . . . . . .18
Contact Information . . . . . . . . . . . . . . . . . . . . . . . . . . . . . . . . . . . . . . . .21
Audiophile USB Warranty . . . . . . . . . . . . . . . . . . . . . . . . . . . . . . . . . . . .22
Appendix A - Technical Specifications . . . . . . . . . . . . . . . . . . . . . . . . . . .23
Appendix B - Driver/Software Install,Step by Step . . . . . . . . . . . . . . . .24
Windows XP: . . . . . . . . . . . . . . . . . . . . . . . . . . . . . . . . . . . . . . . . . .24
Windows 2000: . . . . . . . . . . . . . . . . . . . . . . . . . . . . . . . . . . . . . . . . .29
Windows ME: . . . . . . . . . . . . . . . . . . . . . . . . . . . . . . . . . . . . . . . . . .33
version: AP-050103
Audiophile USB Owner’s Manual
Page 2

Introduction
Congratulations on your purchase of the Audiophile USB by M-Audio.
The Audiophile USB is your audio and MIDI upgrade for any PC or
Macintosh computer*, utilizing the convenience of your computer’s USB
port—no tools or computer disassembly is required.The Audiophile brings
you true 24-bit 96kHz audio and the highest-quality stereo, and digital
multi-channel surround sound available today.
Even if you are experienced in digital recording, please take the time to
read this manual.It will give you valuable information on installing your new
interface and the supporting software,plus help you to fully understand the
function and usability of the Audiophile USB. Once you’re up and running,
you will quickly discover the power and brilliance, both in sound and
design,of your new Audiophile USB.
* Must meet minimum system requirements.
What’s in the Box?
Your Audiophile USB box contains:
1. One (1) Audiophile USB
2. One (1) Standard USB cable
3. One (1) 9V AC 1 Amp “Wall Wart” power supply
4. Driver CD containing driver software and Audiophile USB Control
Panel software for Windows and Macintosh OS 9 or X
5. M-Audio Warranty Registration card
6. This Owner’s Manual
About the Audiophile USB
The Audiophile USB gives you two analog line inputs and two analog line
outputs, plus coaxial S/PDIF digital inputs and outputs for a total of 4 ins/
4 outs of high quality audio I/O. All audio channels support 24-bit data
width and any sampling rate from 8kHz to 96kHz. The Audiophile USB is
compatible with all major software programs running on PC and Macintosh
computers. The coaxial digital outputs are multi-channel surround sound
capable (Dolby, DTS, etc.), making the Audiophile USB the perfect “high
end” sound interface for digital recording,analog or digital transfers,mixing
and mastering,as well as DVD and home theater applications.
The Audiophile USB allows you to connect a line-level signal from y our line
level instrument,mixer,or pre-amp into the Audiophile’s analog 1/4" phone
2
Page 3

jacks. Alternatively, you can connect the record outputs of your stereo
receiver into the Audiophile’ s RCA jacks located on the back panel.Record
a digital audio signal from your DAT, MiniDisc, CD, or external A/D
converter via the Audiophile’s coaxial S/PDIF input.Control all hardware
settings with the Audiophile USB Control Panel software.
The Audiophile USB also includes MIDI I/O connectors. Provided are one
input and one output for use with external MIDI equipment such as sound
modules and drum machines. The MIDI I/O may also be used to
synchronize your computer to external devices via MIDI time code.
Features & Specifications
• 24-bit/96kHz,full-duplex recording interface with MIDI I/O.
•Two (2) analog inputs accept common unbalanced audio connections
on 1/4” or RCA jacks.
•Two (2) analog outputs with level control provide common unbalanced
audio connections on RCA jacks.
•Two (2) channels of coaxial RCA S/PDIF I/O.
• 1x1 (16 channel) MIDI I/O.
•Headphone output with level control.
• High analog dynamic range:D/A 107dB,A/D 109 dB (both A-weighted).
• All data paths support up to 24-bit/96kHz performance.
• Windows 98Se,Me,2000,XP drivers included supporting MME,ASIO,and
WDM (Me or greater) Mac OS drivers with ASIO support also included.
Minimum System Requirements
• Windows 98Se, 2000, Me,or XP. Mac OS 9.x or X.
•Pentium II 266MHz for 96kHz operation.Pentium 200 MMX for 48kHz
or less.
• 128 MB of RAM for 96kHz operation.64MB RAM for 48kHz or less.
• Mac G3 with 64 MB of RAM (128 recommended) with native USB.
OMS required for MIDI support under Mac OS 9.x
3
Page 4
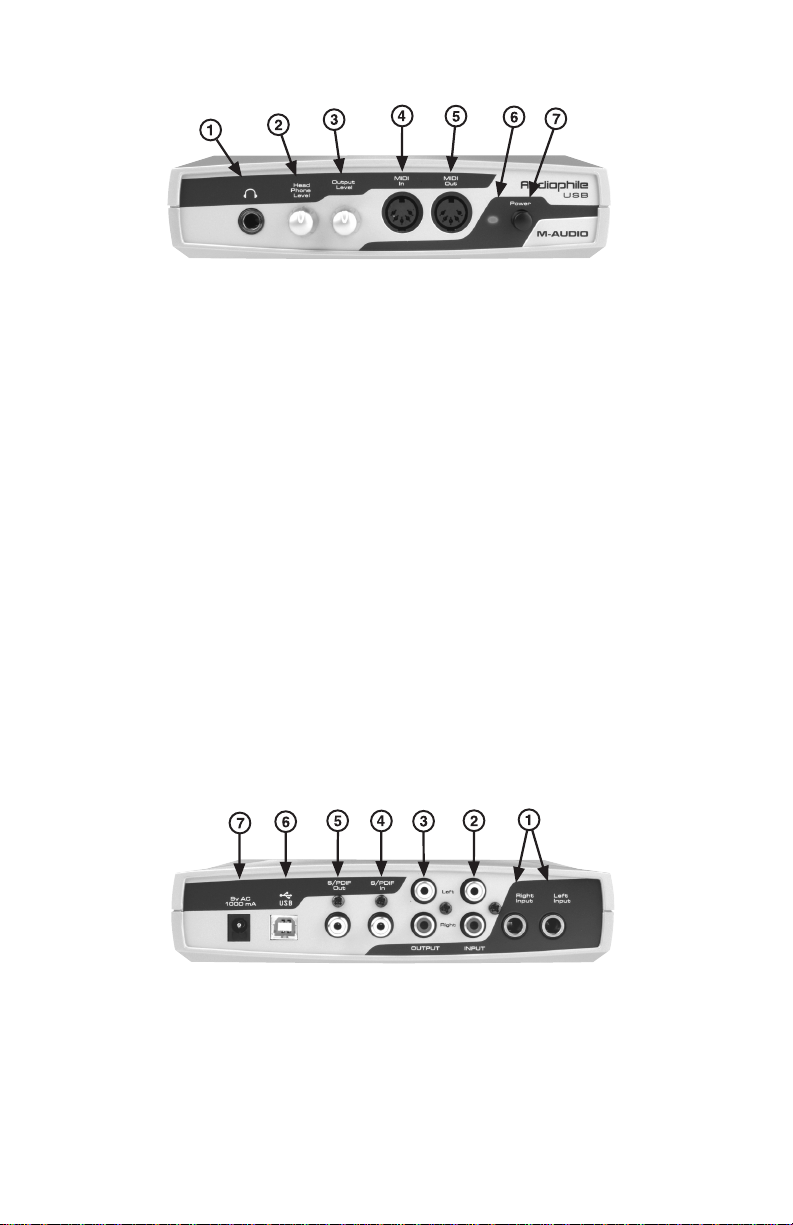
Front Panel Features
1. Headphone Out:This is a stereo headphone output on a 1/4” TRS jack.
Connect only a stereo plug to this jack.
2. Headphone Level: This knob controls the level of the stereo output
signal sent to the headphone jack.
3. Output Level: This knob controls the level of the stereo output signal
sent to the RCA analog output jacks.
4. MIDI In: This 5-pin DIN accepts MIDI data from any external MIDI
device via a standard MIDI cable,supporting up to 16-channels of MIDI
data on a single cable.
5. MIDI Out: This 5-pin DIN outputs MIDI data to any external MIDI
device via a standard MIDI cable,supporting up to 16-channels of MIDI
data on a single cable.
6. Power Indicator LED: When power is supplied to the Audiophile, this
LED will light and remain lit.
7. Power Switch (On/Off): Pressing this switch and locking to the “in”
position will apply power to the Audiophile USB, provided that the
proper power supply is attached correctly. This is the power “On”
position. To switch power “Off,” press in and release this switch to the
“out” position.
Rear Panel Features
1. Left Input and Right Input (1/4” Analog Inputs):These jacks input analog
audio from a variety of external sources. Each jack is female 1/4”
tip-sleeve, compatible with common male 1/4” TS cables.When plugs
are inserted into these jacks,the RCA inputs are defeated.
4
Page 5

2. Left Input and Right Input (RCA Analog Inputs): These jacks input
analog audio from a variety of external sources. Each jack is female
RCA, compatible with common male RCA cables. When plugs are
inserted into the 1/4” jacks, these RC A inputs are defeated.
3. Left Output and Right Output (RCA Analog Outputs): These jacks
output analog audio to a variety of external destinations. Each jack is
female RCA, compatible with common male RCA cables.
4. S/PDIF In: This RCA connector receives a S/PDIF signal from your
coaxial S/PDIF digital source such as a D AT ,MiniDisc player or external
A/D converter. Use a quality digital cable , rated at 75 Ohms.
5. S/PDIF Out:This RCA connector sends a S/PDIF signal to your coaxial
S/PDIF digital target device such as a DAT, MiniDisc player or external
D/A converter. This output is also used as a digital multi-channel
surround output (Dolby,DTS,etc.) for D VD or Home Theater use. Use
a quality digital cable, rated at 75 Ohms.
6. USB Jack: This standard USB connector connects to the “device end”
of a standard USB cable (included).
7. 9V AC 1000 mA PSU Jack: This jack connects to the included power
supply, which connects to common house current. Use only a 2.5mm
plug with a 9V A C,1000 mA power rating.Using any other power supply
could give undesirable results and/or damage the Audiophile USB.
Guide to Getting Started Quickly
Here is what is required to get your Audiophile USB up and running:
1. Insert the included Drivers CD into your CD drive and locate the
Audiophile USB folder. Within that folder, open the folder for the
operating system that you are currently using and run the Audiophile
USB Installer program.
NOTE:Windows 98SE users will need the Microsoft Windows 98SE CD-ROM.
2. Plug the included power supply into your wall socket and the
Audiophile USB’s Power Jack. Then attach the Audiophile USB to your
computer with the included USB cable and power the unit “On.” (On
Windows, this will bring up the New Hardware Wizard, after which
installation will be complete.)
3. Configure your digital recor ding softwar e to use the Audiophile USB as
its active audio device (see “Using the Audiophile USB with your
Software Application” and also your software application’s manual).
4. Hook up your digital and analog audio gear (see “Audiophile USB
Recording Tutorials”). Configure your Audiophile USB Control Panel
software for proper monitoring and playback.
5
Page 6

Hardware Installation
Find a convenient spot near your computer for the Audiophile USB.With the
Audiophile’ s pow er switched “Off,” plug the included pow er supply into y our
wall socket,and plug its 2.5mm plug into the Audiophile’s 9V AC 1000 mA
Power Jack.Then,simply connect the USB cable to your computer and to the
Audiophile USB.
Please follow the Driver and Software installation car efull y.Apply power to
the Audiophile USB, switching the unit “On” ONLY when prompted.
Audiophile USB Driver & Software Installation
The Audiophile USB system includes a “Software Drivers CD” for
Windows and Macintosh, containing all Windows and Macintosh drivers
(including ASIO drivers), and Audiophile USB Control Panel software.To
install on your system,please follow these steps:
Windows Installation
An “Installer” program is provided for Windows operating systems. The
Audiophile USB Installer greatly simplifies the work that the Windows
New Hardware Wizard has to do, and helps to ensure a trouble-free and
simplified installation.
You may also notice that a “Windows Driver Signing” dialog box will pop
up a few times during the installation, and you will be asked to press
“Continue Anyway.” This dialog box indicates that this is a relatively new
product. While we are going through the driver certification procedure
with Microsoft,we assure you that your Audiophile USB drivers are of the
highest quality, and will cause no problems in your system.
1. Insert the Drivers CD into your CD ROM drive. Locate and open the
Audiophile USB folder. Double click on the Audiophile USB Installer
program in that folder.
2. As the Installer loads the Audiophile USB drivers, a “Windows Driver
Signing” (XP and 2000 Users only) dialog box may pop up a few times
during the installation.Click,“Continue Anyway.”
3. When asked to switch “On” your Audiophile USB,do so.This will bring
up the Windows New Hardware Wizard.Click “Next” at each prompt,
and the Hardware Wizard should automatically recognize all of the
Audiophile Drivers.
NOTE: Windows 98SE users will need their Microsoft Windows 98SE
CD-ROM here.
6
Page 7

4. The Wizard reports that Windows has finished installing the software.
Click “Finish”. Your Audiophile USB is ready for action.
After completion of the driver installation, Windows may require you to
restart Windows.If it does request a restart,remove the Drivers CD from
the CD drive and respond by clicking “Yes”. The system will restart and
your Audiophile USB is ready for play.
Macintosh OS 9 Installation
NOTE:To use the Audiophile USB on Mac OS 9, you must also install
Opcode’s OMS. This should be done BEFORE running the Audiophile
USB’s Installer pr o gram.By installing OMS first, the Installer program
will then be able to place the OMS driver in the proper folder. Then,
after running the Installer, you will need to configure OMS. See the
section,“OMS Configuration,” for more information on installing and
configuring OMS.
1. Insert the Drivers CD into your CD ROM drive. Locate and open the
Audiophile USB folder .Open the folder for your current Macintosh OS,
and double click on the Installer program in that folder.
2. As the Installer loads the Audiophile USB drivers, you will be asked if
you wish to place a shortcut to the Audiophile USB Control Panel on
your desktop.This is your choice,but it’s pr obably a g ood idea to choose
this option.You can always trash the shortcut if you find it unnecessary.
3. After you run the Installer, you may switch “On” your Audiophile USB.
Your Audiophile USB is now ready for action.
OMS Configuration
To configure the Audiophile USB for MIDI on Mac OS 9.x, you will need to
have Opcode’s OMS (Open Music System) installed first. OMS is a “MIDI
Manager” program,and it is necessary to install this in order to run all OS
9 music programs that have a MIDI engine, i.e., programs that use MIDI.
You need to install OMS before you run the Audiophile USB’s driver
Installer program.OMS is provided on the Drivers CD that came with the
unit,and is located in the “OS 9” folder,or it can be downloaded from the
M-Audio Website’s “Drivers” page. Opening the OMS 2.3.8 folder and
double-clicking on the “Install OMS 2.3.8” program will install OMS in your
system. Restart your computer, and continue with the driver installation
(see previous section).
To configure your Audiophile USB MIDI in OMS, go to the Control Panel
or Chooser under the Apple Menu, and make sure AppleTalk is turned off
7
Page 8

(this is recommended, although OMS will sense that it is on and prompt
you to turn it off). If you are configuring OMS for the first time, follow
these instructions to configure OMS.
1. In the Opcode folder, which you will find on your hard drive, locate the
OMS Applications f older,“then OMS Setup. ” Double-click on OMS Setup .
2. OMS will inform you that it has not yet been configured.Click OK.
3. The “Create a New Studio Setup” dialog box now appears.Click OK.
4. The “OMS Driver Search” dialog asks you to choose the port on which
you’ve attached the Audiophile USB MIDI (either Modem or Printer).
DO NOT choose a port,just click “Search.” OMS begins Searching.
5. “OMS Driver Setup” shows the “Audiophile USB” MIDI in a list when
OMS successfully finds the driver. Click OK. OMS will now define
(shows “Identifying”) the Audiophile USB output port.The “OMS MIDI
Device Setup” dialog box will appear showing the Audiophile’s output
port with a check box to the left of the port, indicating that the port
is enabled.Now click on OK.
6. Next,the “My Studio Setup” appears with a “file save” dialog box over
it. You will now need to save your new Studio Setup before you can
assign an instrument to the Audiophile’s MIDI output and input.Assign
your instrument and you are done. You may now exit OMS Setup by
quitting the application.
Macintosh OS X Installation
1. Insert the Audiophile USB Driver CD into your CD-ROM Drive and
open the CD to view its contents.
2. Double click "M-Audio Audiophile USB Installer.dmg" file. An Icon will
appear on your desktop marked " Audiophile USB."
3. Double click the " Audiophile USB " icon on your desktop.
4. Now double click on the "M-Audio Audiophile USB Installer.mpkg."
5. You will need your Administrator Password for the next step. To
continue,click the lock icon in the lower left corner of the window that
states,“Click The Lock T o Make Changes."
6. Enter your password and click "OK."
7. The next window "Welcomes You..." to the installation process.
Click "Continue."
8. Select your OS X hard drive.Click "Continue."
9. When prompted,click "Upgrade" to continue.
10. When prompted,click "Continue Installation."
11. When prompted,click "Restart" to finish the installation.
12. After the computer has restarted, now plug the Audiophile USB into
your computer’s USB Port.
8
Page 9

13. Go to "System Preferences" in the Apple Menu. Select the "Sound"
preference panel,and click the "Output" tab.Select "M-Audio Audiophile
USB" to choose the Audiophile USB as your default output device.
Mac OS X Installation is now complete. Proceed to the next section,
“Hardware Installation”.
Verifying Windows Driver Installation
Windows displays the Audiophile USB driver status in the Device Manager
page of the System Properties dialog box.The Device Manager page can be
opened by right-clicking on “My Computer ,” either from the Start menu or
your desktop (depending on your operating system), and selecting
“Properties” from the list.Select “Har dware,” then “Device Manager.” With
the Device Manager displayed, click on the “+” next to “Sound,video and
game controllers” to open a list of devices, the Audiophile USB being a
device of that nature. You will also see an entry for the Audiophile USB
under “Universal serial bus controllers.” Below is an example view of the
Device Manager.
This example shows the M-Audio Audiophile USB entries in the Windows
Device Manager device list. The Audiophile USB is properly installed with
no conflicts. If you do not see your M-Audio Audiophile USB in your
Device Manager in this fashion,please jump ahead to the “Troubleshooting”
section of this manual.
Verifying Control Panel Installation, PC/Macintosh
On the PC: Once the Audiophile USB is properly installed, an “M-Audio
Audiophile USB” icon will be displayed in y our Windows Control Panel,which
can be accessed from the Start menu.By double-clicking on that icon,you will
launch the Audiophile USB Control Panel software.Once the Audiophile USB
Control Panel software has been opened,you will see the various controls for
enabling inputs and outputs and for setting other parameters.
With the control panel open,you will see in the lower left hand corner a
checkbox that states, “Place Audiophile icon in the task bar.” You may
create a shortcut on your Windows taskbar by clicking on this checkbox.
Upon closing the control panel, the M-Audio logo will appear in your
taskbar. Double-clicking this icon will then open the Audiophile USB
Control Panel. Unchecking the control panel checkbox will remove the
M-Audio logo from the taskbar upon closing the control panel.Note that
the M-Audio logo will only appear on the taskbar when the Audiophile is
attached and powered “On.”
9
Page 10

On Macintosh: During the driver installation, a dialog box will ask you if
you wish to place a shortcut to the control panel on your desktop .Clicking
this checkbox will, upon completion of the driver software installation,
place a shortcut to the Audiophile USB Control Panel on your computer’s
desktop.The control panel program itself will install to your system’s hard
drive. In OS 9, the Audiophile USB Control Panel will be placed in the
Control Panel folder, which allows it to be accessed from the Apple
Control Panel drop-down list.In OS X, the control panel is installed into
the System Preferences folder.
If you choose not to place a shortcut icon on your desktop during the
installation process,you may create an alias by highlighting the Audiophile
USB Control Panel on the hard drive and pressing the Command Key+M.
The alias may then be dragged to the desktop.The control panel can be
launched from any of the above locations. Once the Audiophile USB
Control Panel software has been opened,you will see the various controls
for enabling inputs and outputs and for setting other parameters.
NOTE: When using a music software program that is ASIO capable,
launch the Audiophile USB Control Panel software from within that
program. If you need to change the master clock settings, for
instance (in other words,change from the Audiophile’s internal clock
to an external clock by selecting “S/PDIF In” from the control panel),
it is desirable to launch the music program first, and then the
Audiophile USB Control Panel from the program’s “launch” or
“control panel” button. Without the music program open however, it
is okay to open the Audiophile USB Control Panel from your desktop
or other location.
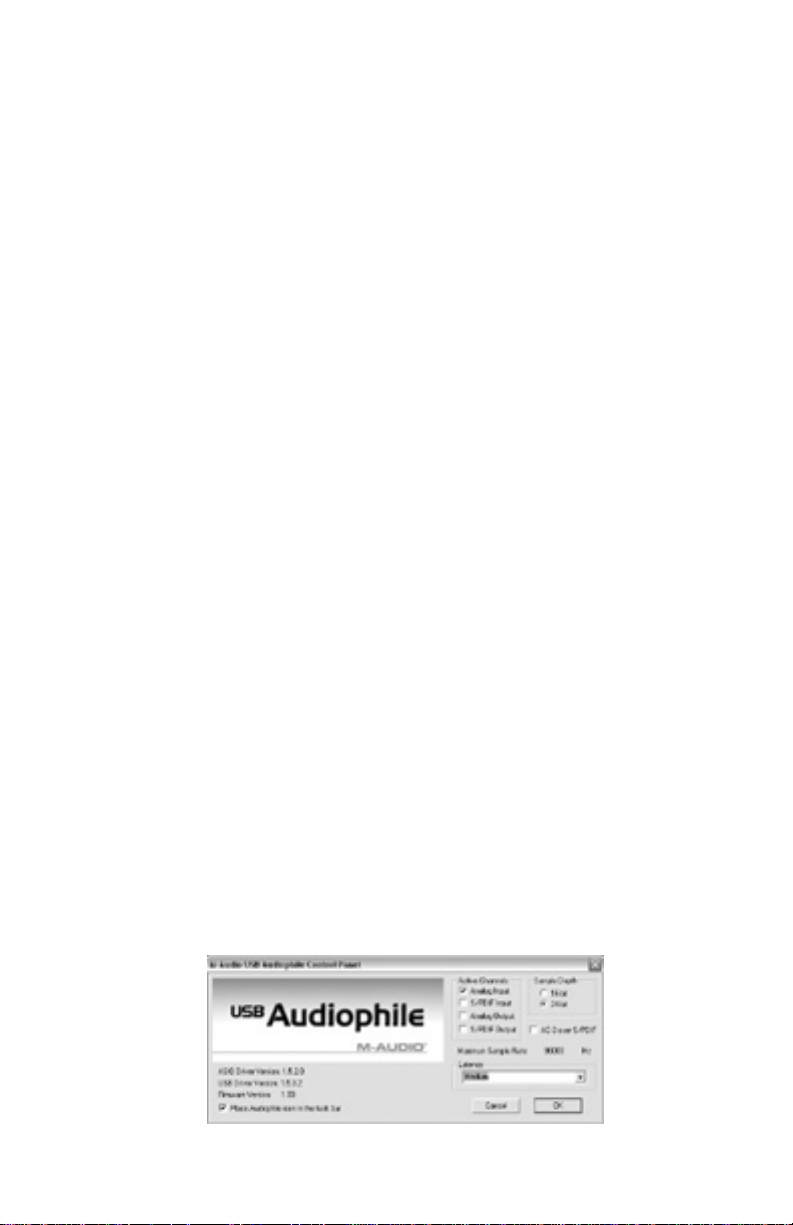
The Audiophile USB Control Panel
Certain audio settings are made in the USB Audiophile Control Panel,and
are important to the way the Audiophile performs.You may never need to
change them for your particular purposes,but it’s good to know how these
settings affect what you do and how they interact.
When the Audiophile USB driver and control panel software are first
installed, a “default” setting is created that will work for you in most
circumstances. The analog inputs are active, as well as the analog outputs
and the S/PDIF output. The S/PDIF Input is left unchecked. The “16-bit”
radio button is selected, but can be switched to 24-bit if you wish to
record at that bit depth from your music program. The Audiophile is
capable of recording at sample rates up to and including 48000Hz.
You should only check the S/PDIF Input por t if you are recording audio
from the S/PDIF Input, or otherwise wish to synchronize to an external
10
Page 11
sampling clock. Continue reading this section for more information on
making selections in the Audiophile USB Control Panel.
Active Channels & Sample Depth: Activation of the Analog and
S/PDIF inputs and outputs is done with a set of four check boxes.Two radio
buttons allow selection between sample bit depths of 16-bit or 24-bit.
These settings will interact with each other, either expanding or limiting
your Active Ports, Sample Depth, and/or Maximum Sample Rate settings.
Using the full USB bandwidth will allow for 4x4 audio streams at 16 bits
with a sampling rate of 48kHz or below .A higher bit depth or sampling rate
will demand a trade-off from your system, which can be achieved by
disabling your Active Ports.
On the right side of the control panel there are two columns labeled
“Active Channels” (Analog and S/PDIF inputs and outputs) and “Sample
Depth” (16-bit and 24-bit). Choosing the 24-bit setting will allow your
music program to record at any bit depth up to 24-bit, depending on the
variety of selections within that program.
With any combination of three stereo pair “Active Ports” enabled, the
Audiophile USB is capable of 48kHz or 44.1kHz (or lower) sampling rates at
either 24- or 16-bits.When you uncheck and deactivate any one of the Active
Ports, the 24-bit option will become available.If you select the 24-bit radio
button, and then activate all four Active Ports, the control panel will
automatically switch back to the 16-bit setting and gray out the 24-bit option.
NOTE: Please exit any audio applications running before switching
between bit depths.
The Audiophile USB will perform at 96kHz sampling rate with any one of
the stereo pairs enabled,and with the 24-bit Sample Depth selected.This
is most useful if your CD/DVD player is capable of playing “audiophile”
96kHz recordings.The Audiophile USB will not operate at 96kHz when the
control panel is set to 16-bits.In the example below,Output 1&2 is enabled
and 24-bit Sample Depth is selected, with the Maximum sample rate
showing 96kHz.
11
Page 12

If you activate both sets of input and output channels,you will notice that
the 24-bit setting in the Sample Depth column is grayed out and the
“Maximum sample rate” is shown as 48000 Hz.
NOTE: Whenever S/PDIF Input is selected as an Active Port, the
Audiophile is expecting a digital signal at that port and to lock to
the sample rate of that signal. When S/PDIF Input is selected and
there is no signal present at the S/PDIF Input port, or the S/PDIF
signal is not recognized or invalid, the Audiophile USB will not
operate properly. Most likely, you will hear audio from the
Audiophile, but it will be running at an odd sample rate and sound
like it is playing at the wrong speed.
DD/DTS Pass-Thru: Just below the Sample Depth column,you will see
a checkbox labeled,“DD/DTS Pass-Thru.” If you are using a Software DVD
player and wish to send encoded m ulti-channel audio such as Dolby Digital
or DTS to the Audiophile USB’s S/PDIF output port,then check this box.
If you are only sending stereo audio (standard PCM—not encoded
surround) to the S/PDIF output port during normal operation, then leave
this box unchecked.
If you have this box checked, you can still send stereo digital audio to the
S/PDIF port without any problems.However,you will notice that when the
DD/DTS Pass-Thru box is checked,ONLY the S/PDIF port is active in the
Active Ports column.Unchecking the DD/DTS Pass-Thru box will restore
the port selection to the previous configuration.
Latency: Driver “Latency” can be selected from a range of values shown
in a drop-down list located just below the “Maximum Sample Rate .” The
default setting when the Audiophile is first installed is “Very High.” Because
slower computer systems require larger sample buffers to avoid dropouts
in the audio stream,a higher latency value is often necessary.
How low you will able to set the Latency will depend on several factors,
such as your system’s performance and the performance of the music
program itself. To test your system for lower Latency, try the “ver y low”
setting first (as shown in the previous screenshot), and if your system
stutters or performance falters,try the next higher setting until the system
performance stabilizes.Once you are satisfied with any of the control panel
settings,click OK to close the Audiophile USB Control Panel.
Version Numbers: The lower left corner the Audiophile USB Control
Panel page displays the ASIO Driver Version, USB Driver Version, and the
Firmware Version numbers currently in use.This is useful when checking
for driver updates on the M-Audio website,or in the event that you need
to call tech support and give them your system information.
12
Page 13

Windows Sound System and the Audiophile USB
Windows may be set up to use the Audiophile as its default audio device,
allowing system sounds to be played through the Audiophile. This also
enables you to use the Audiophile with the sound applets included with
Windows. To set this up,go to Control Panel | Sounds and Audio Devices
(or, “Multimedia” in Windows 98). In the Audio Properties page , set the
Playback and Recording devices to the Audiophile USB input and output
devices of your choice.
Windows may also use the Audiophile USB as its default MIDI device.This
allows the Audiophile USB to be used with the MIDI applications included
with Windows. To set this up, go to Control Panel | Sounds and Audio
Devices | Audio.(Or, go to Control Panel | Multimedia | MIDI in Windows
98.) Set the Audiophile MIDI driver as the default Windows MIDI driver by
clicking on the “Out USB Audiophile” entry in the drop-down list, then
selecting “OK” or “Apply”.
Macintosh Sound Manager and the Audiophile USB
The Macintosh Sound Manager will allow you to select the Audiophile USB
as the system’s audio input and output device. Open the Apple menu and
select “Sound” from the Control Panels list. Then choose Audiophile as
both input and output driver. However, you may also leave the Sound
control panel set to “Built-in” if you wish to use the Audiophile only with
your music program and use the internal audio for system sounds.
Audiophile USB Inputs & Outputs
The Audiophile USB Digital Recor ding Interface’s analog inputs and outputs
are compatible with a variety of audio products. The Audiophile USB has
both female RCA and female 1/4” TS (tip-sleeve) input jacks, and female
RCA output jacks.These jacks allow connection to unbalanced (typically
consumer or semi-pro) line level equipment.
Only one pair of analog inputs can be used at any given time.When a 1/4”
TS plug is connected to the 1/4” line inputs,the corresponding RCA input
jack is defeated. If you have RCA cables connected to the Audiophile and
then connect 1/4” plugs to the 1/4” jacks, the Audiophile will then get its
signal from the 1/4” line inputs.
NOTE: In order to preserve its high dynamic range and minimize
distortion, the Audiophile USB does not have microphone
preamplifiers built into it. Therefore, directly connecting a
13
Page 14

microphone is not recommended.Instead, pass the microphone signal
through a microphone pre-amp (such as the M-Audio TAMPA™,
DMP3™, or Audio Buddy™), and then connect the pre-amp output
to the input of the Audiophile USB. Some additional cable and/or
cable adaptors may also be needed to ensure proper connectivity.
The Audiophile USB also has digital inputs and outputs in S/PDIF format.
These are available on RCA connectors,as stereo pairs.These jacks receive
or transmit a digital audio stream that is independent of the analog audio
streams.However, because of the bandwidth limits of USB there can be a
tradeoff between the number of inputs and outputs that are activ e and the
sampling rate and bit depth of the audio being processed. Also, you should
ONLY activate the S/PDIF Input if you are connecting an active digital audio
device to this input.This is detailed in the previous section,“The Audiophile
USB Control Panel.”
Also detailed in the previous section is the use of the S/PDIF Output for
sending encoded surround sound signals. Checking the “DD/DTS
Pass-Thru” box in the Audiophile USB Control Panel will allow you send
Dolby Digital,Dolby Surround,DTS,or any encoded surr ound sound signal
to the S/PDIF Output of the Audiophile USB. You can connect this output
to a home theater system,or any device that will decode this signal.Using
most DVD players, select the “S/PDIF” option in the DVD players audio
setup page, and your computer becomes a high-end home theater player
in conjunction with the Audiophile USB.
Audiophile USB with Your Music Software
Once the Audiophile USB hardware and software drivers are properly
installed, the Audiophile is ready for use with your music application
software. Some software applications may require you to highlight or
enable the Audiophile USB drivers within the program in order to use the
Audiophile, while others may have a utility that analyzes or profiles the
audio devices in your system and enables the drivers.Your software should
have an audio device driver setup page. If you have problems locating it,
consult your software’s documentation.
The Audiophile drivers include MME and WDM drivers for Windows,ASIO
drivers for both Windows and Mac, and Sound Manager drivers for Mac.
WDM drivers are a more modern driv er architectur e for Windows operating
systems Me,2000, and XP, but only cer tain programs like Cakewalk’s “Sonar”
will take advantage of them. Other Windows programs will automatically
access and use the MME drivers.WDM drivers, similar to ASIO, will give you
14
Page 15

low latency monitoring through the application (check your application’s
documentation for information regarding input monitoring).
If your Windows or Macintosh program is ASIO compliant, like Steinberg’s
“Cubase” or Emagic’ s “Logic,” then the program’ s audio device driv er setup
page will allow you to select the USB Audiophile ASIO driver .This selection
is advised,and described more fully later in this section.
Windows MME and WDM Audio Input Devices: Within the setup
page of your software application(s), the names of the Audiophile USB
audio input devices will be:
“M-Audio USB Audiophile Line”, and
“M-Audio USB Audiophile SPDIF”.
The “M-Audio USB Audiophile Line” device allows recording a stereo
stream directly from the analog Left and Right Input pair, while the
“M-Audio USB Audiophile S/PDIF” device allows you to record a stereo
stream directly from the S/PDIF Input.
Note that the input devices are stereo. Your application software may
break these down further to “left” and “right”mono devices.Therefore
you may see them as “Left M-Audio USB Audiophile Line” and “Right
M-Audio USB Audiophile Line, ”or “Left M-Audio USB Audiophile S/PDIF”
and “Right M-Audio USB Audiophile S/PDIF” from within your recording
software.If your application allows for recording stereo tracks,you will
also be able to select “Stereo M-Audio USB Audiophile Line” and
“Stereo M-Audio USB Audiophile S/PDIF.”
Windows MME and WDM Audio Output Devices: Within your
software application(s), the names of the Audiophile USB audio output
devices are:
“M-Audio USB Audiophile Line”, and
“M-Audio USB Audiophile SPDIF “
Most application software will handle the outputs as stereo pairs but allow
you to pan audio left or right within the pair.Therefore, to send a mono
output to the Audiophile’s Left Output (for example), choose “M-Audio
USB Audiophile Line” and pan that track hard left.To send a mono output
to the Audiophile’s Right Output,choose “M-Audio USB Audiophile Line”
and pan that track hard right.
15
Page 16

ASIO Input and Output Devices: If your music program is ASIO
compliant, you may use the “USB Audiophile ASIO” driver with your
Audiophile USB.Open your music program and go to the audio setup page.
The “USB Audiophile ASIO” driver will show up in the program’s ASIO
Driver list,allowing you to select it at this time if it is not already selected
by default.
If you are using an ASIO compliant music program, we suggest that you
enable and use the Audiophile’s ASIO drivers.ASIO gives you the advantage
of being able to monitor your source through the program, similar to
monitoring the record inputs of a tape machine. ASIO input devices will
appear as:
“M-Audio USB Audiophile Line Left”,
“M-Audio USB Audiophile Line Right”,
“M-Audio USB Audiophile SPDIF Left”, and
“M-Audio USB Audiophile SPDIF Right”.
ASIO Output devices will appear as these stereo pairs,which you will be
able to pan left and right from within your music program:
“M-Audio USB Audiophile Line”, and
“M-Audio USB Audiophile SPDIF”.
Once the Audiophile USB ASIO driver is selected in your music program’s
audio setup page,you will find a button that allows you to launch the ASIO
device’s control panel. Clicking this button will now launch the Audiophile
USB Control Panel,allowing you to view the Audiophile USB audio settings.
16
Page 17

Audiophile USB MIDI Setup
The Audiophile’s MIDI input and output ports may be connected to
external MIDI devices.The following diagram shows connection to a MIDI
keyboard instrument,which is also being used as a sound module.The MIDI
output of the Audiophile USB may be used with just a sound module,while
the MIDI input may alternately be used to receive MIDI time code for
synchronization purposes.
1. Connect the MIDI out port of your controller keyboard to the
Audiophile’s MIDI In por t using a standard MIDI cable.
2. Connect the Audiophile’ s MIDI Out port to the MIDI in of your k eyboard
instrument (or a sound module),also using a standard MIDI cable.
3. Connect the audio outputs of the keyboard to either a mixer, sound
system,or the audio inputs of the Audiophile USB.
The Audiophile USB MIDI drivers, once enabled in your software’s MIDI
Setup,will appear as a MIDI source and a MIDI port within that program’s
track configuration windows. The MIDI input driver is named “In
Audiophile USB”, and the MIDI output driver is named “Out Audiophile
USB”. Some software applications allow you to redefine/rename these
devices per supplied or manually entered instrument definitions.
17
Page 18

Troubleshooting
Problem: No sound output.
Possible Cause 1:The Audiophile USB hardwar e or software device drivers ar e not
properly installed.See the installation sections of this manual for further information.
Possible Cause 2:There is a resource conflict between your computer’s USB
controller and another device in your computer (PC only). Check the Device
Manager for your USB controller’s IRQ against those of the other installed devices.
If necessary,change the settings for the one or more of the devices (refer to y our
computer or motherboard manual).
Possible Cause 3:Your application software has not been properly configured to
use the Audiophile USB as its audio output device.
Possible Cause 4: Improper connections of the audio accessories.Verify that the
Audiophile USB analog audio outputs are properly connected to a digital mix deck
or external mixer/amplifier,or the S/PDIF Out is connected to an external digital
audio device capable of receiving S/PDIF.
• Problem: I’m trying to record digital audio thr ough the S/PDIF input but I don’ t
hear any output.
• P ossible Cause:The settings in the Audiophile Control Panel may be incorr ect.
Double check that you have S/PDIF Input enabled and that your settings don’t
exceed the bandwidth limitations of USB. Remember that the more inputs and
outputs you hav e enabled,the lower the allowable sampling rate and bit depth.
Problem:The Device Volume control in Windows’ Sounds and Audio Devices (or
other software such as MUSICMA TCH Juk ebox) is grayed out and does not function.
Possible Cause: Audiophile USB does not make its volume control parameter
available to the host computer’s operating system.Use the Head Phone Level and
Output Level knobs on the front panel of your Audiophile to adjust volume.
• Problem:No visual activity on Audio Input volume (VU) meters of user software.
• P ossible Cause 1:The Audiophile USB input devices are not properly selected
in the user’s application software.
• P ossib le Cause 2: Improper connections to audio accessories.
18
Page 19

Problem: Repetitious Sound.
Possible Cause: An IRQ resource conflict with the USB controller and
another device (PC only).Often this will result in a small segment of sound
(0.5 to 1 second) repeating itself over and over, sometimes completely
locking up the computer. See the general troubleshooting suggestions at
the beginning of this section.
• Problem: I’m getting some pops and clicks in my audio recording.
• Possible Cause 1: Input levels are too “hot,” causing clipping or input
distortion. Make sure you have the proper signal levels coming from your
source audio device,and lower the output if necessary.The incoming levels
may be easily viewed from the Audiophile USB Control Panel peak meters.
• Possible Cause 2: Your application software may not have the proper
audio buffer sizes set.Each software application handles this differently,but
typically there is somewhere in the software’s setup to set the size of the
playback and recording buffers used by the application. Some applications
also require you to run a calibration (sometimes called “profiling”) the first
time you use the software with a new audio interface.For instance, if the
clicks are present when using Cak ewalk SONAR,then try to run SONAR's
Wave Profiler.
• Possible Cause 3: Some accelerated graphics cards use excessive
amounts of system bandwidth,preventing the recording buffer of an audio
interface from keeping up with demand. This can cause clicks in the
recording.Reducing or turning off the graphics card’s graphics acceleration
feature often resolves this problem. In Windows, the level of graphics
acceleration is accessed from Start | Settings | Control Panel | System |
Performance | Graphics.
Problem: My software application keeps telling me “sample rate not
supported” or some similar message.
Possible Cause:This would most likely occur if you w ere trying to select
96000Hz as a sample rate, and the Maximum Sample Rate available from
the Audiophile USB Control Panel is 48000. Open the control panel, and
uncheck the Active Port boxes until you have only one port selected for
either input or output.
19
Page 20

Problem: I am playing AC-3 or surround sound data from a software
application on my computer, sending the data from Audiophile USB S/PDIF
Out to my home theater’s AC-3 decoder. However,the decoder does not
recognize the signal and therefore refuses to put out any audio.
Possible Cause: There is a bit within the S/PDIF digital audio stream that
defines the S/PDIF content as audio or non-audio. Most AC-3 surround
sound decoders expect this setting to be non-audio and will otherwise
reject the information. Go to the S/PDIF page of the Audiophile USB
Control Panel, select Consumer and Advanced Settings, and then select
“DD/DTS Pass-Thru.”
• Problem: I have Windows 98SE and I want to install the Audiophile USB,
why do I need the original operating system CD-R OM to install your driv ers?
• Answer:Windows 98SE does not have the system files to support USB
Audio installed as part of the core installation. Instead these files must be
added.The necessary files are located on the Windows 98SE CD.If you do
not have your original Windows 98SE CD, contact Microsoft Technical
about how to acquire the files for USB Audio support in Windows 98SE.
20
Page 21

Contact Information
For additional help, contact M-Audio Technical Support by telephone
(626-445-8495, 9-5 PST M-F), by fax (626-445-7564) or by e-mail
(techsupt@m-audio.com).
M-AUDIO U.S. M-AUDIO U.K.
45 E. Saint Joseph St. Unit 5, Saracen Industrial Park
Arcadia, CA 91006-2861 Mark Rd.
U.S.A. Hemel Hempstead, Herts HP2 7BJ
England
Sales Information: 626-445-2842
Sales Information (email): info@m-audio.com Sales Information: 44 (0)144 241 6590
Tech Support: 626-445-8495 Sales Information (email): info@maudio.co.uk
Tech Support (email): techsupt@m-audio.com Technical Support: 44 (0)871 717 7102
Fax: 626-445-7564 Tech Support (email):richard@maudio.freeserve.co.uk
Internet Home Page: http://www.m-audio.com Fax: 44 (0)144 224 6832
internet Home Page: http://www.maudio.co.uk
M-AUDIO Canada M-AUDIO Deutschland (Germany)
1400 St. Jean Baptiste Ave., #150 Kuhallmand 34
Quebec City, QC G2E 5B7 D-74613 Ohringen
Canada Germany
Tel: (418) 872-0444 Sales Information: 49 7941 98 7000
Fax: (418) 872-0034 Sales Information (email): info@m-audio.de
Email: midimancanada@midiman.net Technical Support: 49 7941 98 70030
Internet Home Page: http://m-audio.ca Technical Support (email): support@midiman.de
Fax: 07941 98 70070
Internet Home Page: http://www.m-audio.de
M-AUDIO Japan M-AUDIO France
Annex Buliding 6F Unit 5, Saracen Industrial Estate
2-18-10 Marunouchi Mark Rd.
Naka-Ku, Nagoya 460-0002 Hemel Hempstead, Herts HP2 7BJ
Japan England
Tel: 81-52-218-3375 Sales Information: 0810 001 105
Fax: 81-52-218-0875 Sales Information (email): info@m-audio-france.com
Internet Home Page: http://www.m-audio.co.jp Technical Support: 0820 00 731
Email: info@m-audio.co.jp Technical Support (email):
support@m-audio-france.com
Fax: 44 (0) 144 224 6832
Internet Home Page: http://www.maudio.co.uk
21
Page 22

Audiophile USB Warranty
M-Audio warrants that this product is free of defects in materials and
workmanship under normal use for a period of One (1) year,so long as the
product is:owned by the original purchaser;the original purchaser has proof of
purchase from an authorized M-Audio dealer;and the purchaser has registered
his/her ownership of the product by sending in the completed warranty card.
This warranty explicitly excludes power supplies and included cables which ma y
become defective as a result of normal wear and tear.
In the event that M-Audio receives written notice of defects in materials or
workmanship from such an original purchaser,M-Audio will either replace the
product,repair the product, or refund the purchase price at its option. In the
event any repair is required, shipment to and from M-Audio and a nominal
handling charge shall be borne by the purchaser. In the event that repair is
required,a Return Authorization number must be obtained from M-Audio.
After this number is obtained,the unit should be shipped back to M-Audio in a
protective package with a description of the problem and the Return
Authorization clearly written on the package.
In the event that M-Audio determines that the product r equires r epair because
of user misuse or regular wear,it will assess a fair repair or replacement fee.The
customer will have the option to pay this fee and have the unit repaired and
returned,or not pay this fee and have the unit returned unrepaired.
The remedy for breach of this limited warranty shall not include any other
damages. M-Audio will not be liable for consequential, special, indirect,or similar
damages or claims including loss of profit or any other commercial damage,even
if its agents have been advised of the possibility of such damages,and in no event
will M-Audio’s liability for any damages to the purchaser or any other person
exceed the price paid for the product,regardless of any form of the claim.M-Audio
specifically disclaims all other warranties,expressed or implied.Specifically ,M-Audio
makes no warranty that the product is fit f or any particular purpose.
This warranty shall be construed,interpreted,and governed by the laws of the
state of California. If any provision of this warranty is found void, invalid or
unenforceable,it will not affect the validity of the balance of the warranty,which
shall remain valid and enforceable according to its terms. In the event any
remedy hereunder is determined to have failed of its essential purpose, all
limitations of liability and exclusion of damages set forth herein shall remain in
full force and effect.
22
Page 23

Appendix A - Technical Specifications
Analog Audio:
Peak Signal, Analog Input: +2dBV
Peak Signal, Analog Output: +2dBV
Dynamic Range, Inputs: 109dB (A-weighted)
Dynamic Range, Outputs: 107dB (A-weighted)
THD (at 0dBFS): -92dB (typical)
Frequency Response: 22Hz - 22kHz,-0.4,-0.4dB
Maximum Converter Data Width: 24 bits
Input Impedance: 10k ohms minimum
Connector Type: Gold-plated RCA female , back panel
Digital Audio:
Digital Input Sample Rate: 8kHz to 96kHz
Maximum W ord Width: 24 bits
Digital Input Format: S/PDIF coaxial,0.5 to 5V peak-to-peak
Digital Output Format: S/PDIF coaxial,0.5V peak-to-peak
Digital Output Sample Rate: 8kHz to 96kHz
Data format: S/PDIF (not AES/EBU)
Connector Type: Gold-plated RCA and 1/4”, female
MIDI:
I/O Configuration: 1-in/1-out (16 MIDI channels, in & out)
Connector Type: Standard MIDI 5-pin DIN
23
Page 24

Appendix B - Driver/Software Install, Step by Step
Windows XP:
1. During this installation,the Audiophile USB must be po wer ed off.Begin the
installation process by inserting the Drivers CD ROM in your computer.
2. A Setup window will appear. Click “Next,” to continue .
3. A Software Installation window will come up regarding Windows Logo
testing. As this is a relatively new product, it has not gone through
Windows Logo testing or certification yet. Rest assured, our USB
drivers are of the highest quality and will not cause problems in your
system.Click “Continue Anyway .”
4. A second Software Installation window will appear again with a similar
alert. Click “Continue Anyway . ”
24
Page 25

5. A third Software Installation window will appear .Click “Continue Anyway . ”
6. An M-Audio USB Audiophile Setup window will appear next.Make sure
both the Enable Digital CD and Enable DMA Transfer Mode boxes are
checked,then click “Next.”
7. Another M-Audio USB Audiophile Setup window will appear next.
Click “Next,” to successfully install the USB Audiophile.
8. Windows will prompt you to restart the computer. Make su re that “Y es,
restart my computer now,” is checked and then click “Finish,” to restart.
25
Page 26

9. When you are completely restarted and at the desktop, power up the
USB Audiophile.
10. The New Hardware Wizard will appear. Please select “Install the
software automatically (Recommended),” then click “Next.”
11. A Hardware Installation window will come up.Click “Continue Anyway .”
12. A “Completing the Found New Hardware Wizard” window will appear
next.Click “Finish,” to complete this portion of the installation.
26
Page 27

13 Another Windows Logo testing window will come up.Once again,click
“Continue Anyway.”
14. The New Hardware Wizard will appear again. Select “Install the
software automatically (Recommended),” by clicking on the radio
button and then clicking “Next.”
15. Another Hardware Installation window will appear regarding Logo
Testing. Click “Continue Anywa y . ”
16. The final “Completing the Found New Hardware Wizard” window will
appear.Click “Finish, ” to complete the installation of your Audiophile USB.
27
Page 28

17. Open the Windows Control Panel and click on the Audiophile USB
Control Panel. Select "Place Audiophile Icon in the task bar.” The
Audiophile USB will have a small black “M” in the system tray for easy
access to the control panel.
28
Page 29

Windows 2000:
NOTE: Please make sure the Service Pack 3 is installed. To get this
update, please visit the download section of Microsoft at
www.microsoft.com
Windows 2000 comes installed with DirectX version 7. You must have
DirectX version 8.1 in order to install the Audiophile USB.The Audiophile
USB installer will automatically check for the correct version of DirectX
and install the latest DirectX update (this update will be skipped if you
already have DirectX version 8.1 or higher in your system).
1. During this installation,the Audiophile USB must be powered off.Begin
the installation process by inserting the Drivers CD ROM in your
computer. and double-click on the Audiophile USB.EXE icon in the
Window that appears.
The installer will now check your computer for
the correct version of DirectX. If DirectX version 8.1 (or higher) is
already installed, proceed directly to step number 6.
2. Assuming that the installer has not found Direct X 8.1 or higher,it will
now install (DirectX) version 8.1.Proceed with the DirectX installation
by clicking "Next.”
3. Click "Yes,” to confirm that you wish to continue with the installation.
4. V erify that y ou ha v e read the license agr eement and agr ee to the terms.
Click "Yes," to continue.
29
Page 30

5. Windows will need to restart your machine to complete the DirectX
8.1 installation.Click "OK," to restart your system.
6. This is the first setup window for installing the Audiophile USB drivers
after the installer has confirmed that you have DirectX version 8.1 (or
higher) installed on your system. Make sure your Audiophile USB is
powered off and that no other Windows programs are running, then
click “Next,” to continue.
7. A Digital Signature Not Found window will appear.As this is a relatively
new product,it has does not have an official Windows Digital Signature
yet.Rest assured,our USB drivers are of the highest quality and will not
cause problems in your system.Click “Yes.”
8. An M-Audio Setup window will appear next. Make sure both Enable
Digital CD and Enable DMA Transfer Mode boxes are checked, then
click “Next. ”
30
Page 31

9. An M-Audio Setup window will come up confirming a successful setup.
Click “Next,” to successfully install the USB Audiophile.
10. Windows will prompt you to restart the computer.Make sure that “Yes,
restart my computer now,” is checked and then click “Finish,” to restart.
11. When you are completely restarted and at the desktop,power up the
USB Audiophile.
12. A Digital Signature Not Found window will appear next Click “Yes.”
31
Page 32

13. A second Digital Signature Not Found Box will appear.Click “Yes,” again.
14.The driver is now installed in your computer. Next,open the Windows
Control Panel and click on the Audiophile USB Control Panel. Select
"Place Audiophile Icon in the task bar.” A button which contains a small
black “M” and represents the Audiophile USB control panel will now
appear in the system tray, for easy control panel access.
32
Page 33

Windows ME:
NOTE: Please make sure the Service Pack 3 is installed. To get this
update, please visit the download section of Microsoft at
www.microsoft.com
Windows ME comes installed with DirectX version 7. You must have
DirectX version 8.1 in order to install the Audiophile USB.The Audiophile
USB installer will automatically check for the correct version of DirectX
and install the latest DirectX update. This update will be skipped if you
already have DirectX version 8.1 (or higher) in your system.
1. During this installation,the Audiophile USB m ust be po wered off.Begin
the installation process by inserting the Drivers CD ROM in your
computer. and double-click on the Audiophile USB.EXE icon in the
Window that appears.
The installer will now check your computer for
the correct version of DirectX. If DirectX version 8.1 (or higher) is
already installed, proceed directly to step number 6.
2. Assuming that the installer has not found Direct X 8.1 or higher,it will
now install (DirectX) version 8.1.Proceed with the DirectX installation
by clicking "Next.”
3. Verify that you wish to continue installing DirectX 8.1 by clicking "Yes.”
33
Page 34

4. V erify that y ou ha v e read the license agr eement and agr ee to the terms.
Click "Yes," to continue.
5. Windows will need to restart your machine to complete the DirectX
8.1 installation.Click "OK," to restart your system.
6. This is the first setup window for installing the Audiophile USB drivers
after the installer has confirmed that you have DirectX version 8.1 (or
higher) installed on your system. Make sure your Audiophile USB is
powered off and that no other Windows programs are running, then
click “Next,” to continue.
34
Page 35

7. An M-Audio Setup window will appear next. Make sure both Enable
Digital CD and Enable DMA Transfer Mode boxes are checked, then
click “Next. ”
8. An M-Audio Setup window will come up confirming a successful setup.
Click “Next,” to successfully install the USB Audiophile.
9. Windows will prompt you to restart the computer.Make sure that “Yes,
restart my computer now,” is checked and then click “Finish,” to restart.
35
Page 36

10. When you are completely restarted and at the desktop,power up the
USB Audiophile.
11. Open the Windows Control Panel and click on the Audiophile USB
Control Panel. Select "Place Audiophile Icon in the task bar.” The
Audiophile USB will have a small black “M” in the system tray for easy
access to the control panel.
36
 Loading...