

Page 1

Masterbuilt Manufacturing, Inc.
1 Masterbuilt Court
Columbus, Georgia 31907
Customer Service 1-800-489-1581
ASSEMBLY, CARE & USE MANUAL
WARNING & SAFETY INFORMATION
MODELS 20043011, 20043111 CLASSIC BARREL GRILL
THIS PRODUCT IS FOR OUTDOOR USE ONLY
Manual Code: 9804100070 110128-JH04
Tools required for assembly: Adjustable Wrench, Phillips Head Screwdriver.
CARBON MONOXIDE HAZARD
Burning charcoal gives off carbon
monoxide, which has no odor and can
cause death.
DO NOT burn charcoal inside homes,
vehicles, tents, garages or any enclosed
areas.
This manual contains important
information necessary for the proper and
Read and follow all warnings and
instructions before using grill and
WARNING
safe use of this grill.
during use.
Use only outdoors where it is well
Keep it for future reference.
ventilated.
Failure to follow these warnings and instructions properly could result in fire or explosion, which could cause
property damage, personal injury, or death.
Page 2
GENERAL WARNING AND SAFETY INFORMATION
• Keep a fire extinguisher accessible at all times while operating grill.
• Never leave grill unattended while in use.
• Never use inside an enclosed area such as a patio, garage, building or tent.
• Never use inside a vehicle, not even a recreational vehicle such as a motorhome, camper, or truck bed.
• Never operate this grill under any overhead construction such as roof coverings, carports, awnings or overhangs.
• Maintain a minimum distance of 10 ft. (3m) from all structures.
• Keep area clear of all combustible materials such as wood, dry plants, grass, brush, paper or canvas.
• Never operate this grill within 25 ft. (7.5m) of flammable liquids.
• Never operate this grill within 10 ft. (3m) of a gas cylinder.
• Never use this grill as a heater (READ CARBON MONOXIDE HAZARD).
• Use this grill only on a stable, level surface to prevent tipping.
• Use on non-combustible surfaces such as dirt, concrete, brick or rock.
LIMITED WARRANTY INFORMATION
Masterbuilt warrants its products to be free from defects in material and workmanship under proper assembly, normal
use and recommended care for 90 days from the date of original retail purchase.
Masterbuilt warranty does not cover paint finish as it may burn off during normal use.
Masterbuilt warranty does not cover rust of the unit.
Masterbuilt requires reasonable proof of purchase for warranty claims and suggests that you keep your receipt. Upon
the expiration of such warranty, all such liability shall terminate.
Within the stated warranty period, Masterbuilt, at its discretion, shall repair or replace defective components free of
charge with owner being responsible for shipping. Should Masterbuilt require return of component(s) in question for
inspection Masterbuilt will be responsible for shipping charges to return requested item.
This warranty excludes property damage sustained due to misuse, abuse, accident, damage arising out of
transportation, or damage incurred by commercial use of this product.
This expressed warranty is the sole warranty given by Masterbuilt and is in lieu of all other warranties, expressed or
implied including implied warranty, merchantability, or fitness for a particular purpose.
Neither Masterbuilt nor the retail establishment selling this product, has authority to make any warranties or to promise
remedies in addition to or inconsistent with those stated above.
Masterbuilt’s maximum liability, in any event, shall not exceed the purchase price of the product paid by the original
consumer/ purchaser. Some states do not allow the exclusion or limitation of incidental or consequential damages. In
such a case, the above limitations or exclusions may not be applicable.
• Keep children and pets away from grill at all times. Do not allow children to use grill.
• Only use charcoal lighting fluid. Never use gasoline, alcohol or other highly volatile fluids to ignite charcoal.
These fluids can explode causing injury or death.
• Grill is HOT while in use and will remain HOT for a period of time afterwards. Do not touch any part of the grill
without wearing protective gloves.
• Never move grill when in use. Allow grill to cool completely before moving or storing.
• Never leave HOT coals or ashes unattended.
• Do not store grill with HOT ashes or charcoal inside grill. Store only when fire is completely out and all surfaces
are cold.
• Dispose of cold ashes by placing them in aluminum foil, soaking with water and discarding in a non-combustible
container.
• Accessory attachments not supplied by Masterbuilt Outdoor Products© are not recommended.
• Never use this product for anything other than its intended purpose. This grill is not for commercial use.
• Always use this grill in accordance with all applicable local, state and federal fire codes.
WARNING
California residents only: Not withstanding this limitation of warranty, the following specific restrictions apply; if
service, repair, or replacement of the product is not commercially practical, the retailer selling the product or
Masterbuilt will refund the purchase price paid for the product, less the amount directly attributable to use by the
original buyer prior to the discovery of the nonconformity. Owner may take the product to the retail establishment
selling this product in order to obtain performance under warranty.
This expressed warranty gives you specific legal rights, and you may also have other rights which vary from state to
state.
Go Online www.masterbuilt.com
or complete and return to
Attn: Warranty Registration
Masterbuilt Mfg. Inc.
1 Masterbuilt Court - Columbus, GA 31907
Name:
Address:
Combustion by-product produced when using this product contains
chemicals known to the State of California to cause birth defects,
other reproductive harm, or cancer.
The materials used in this product may contain lead a chemical known to the State of
California to cause birth defects and other reproductive harm.
1
City, State/Province, Postal Code:
Phone Number: E-Mail Address:
Model Number: Serial Number:
Purchase Date: Place of Purchase:
18
Page 3
APPROXIMATE GRILLING TIMES
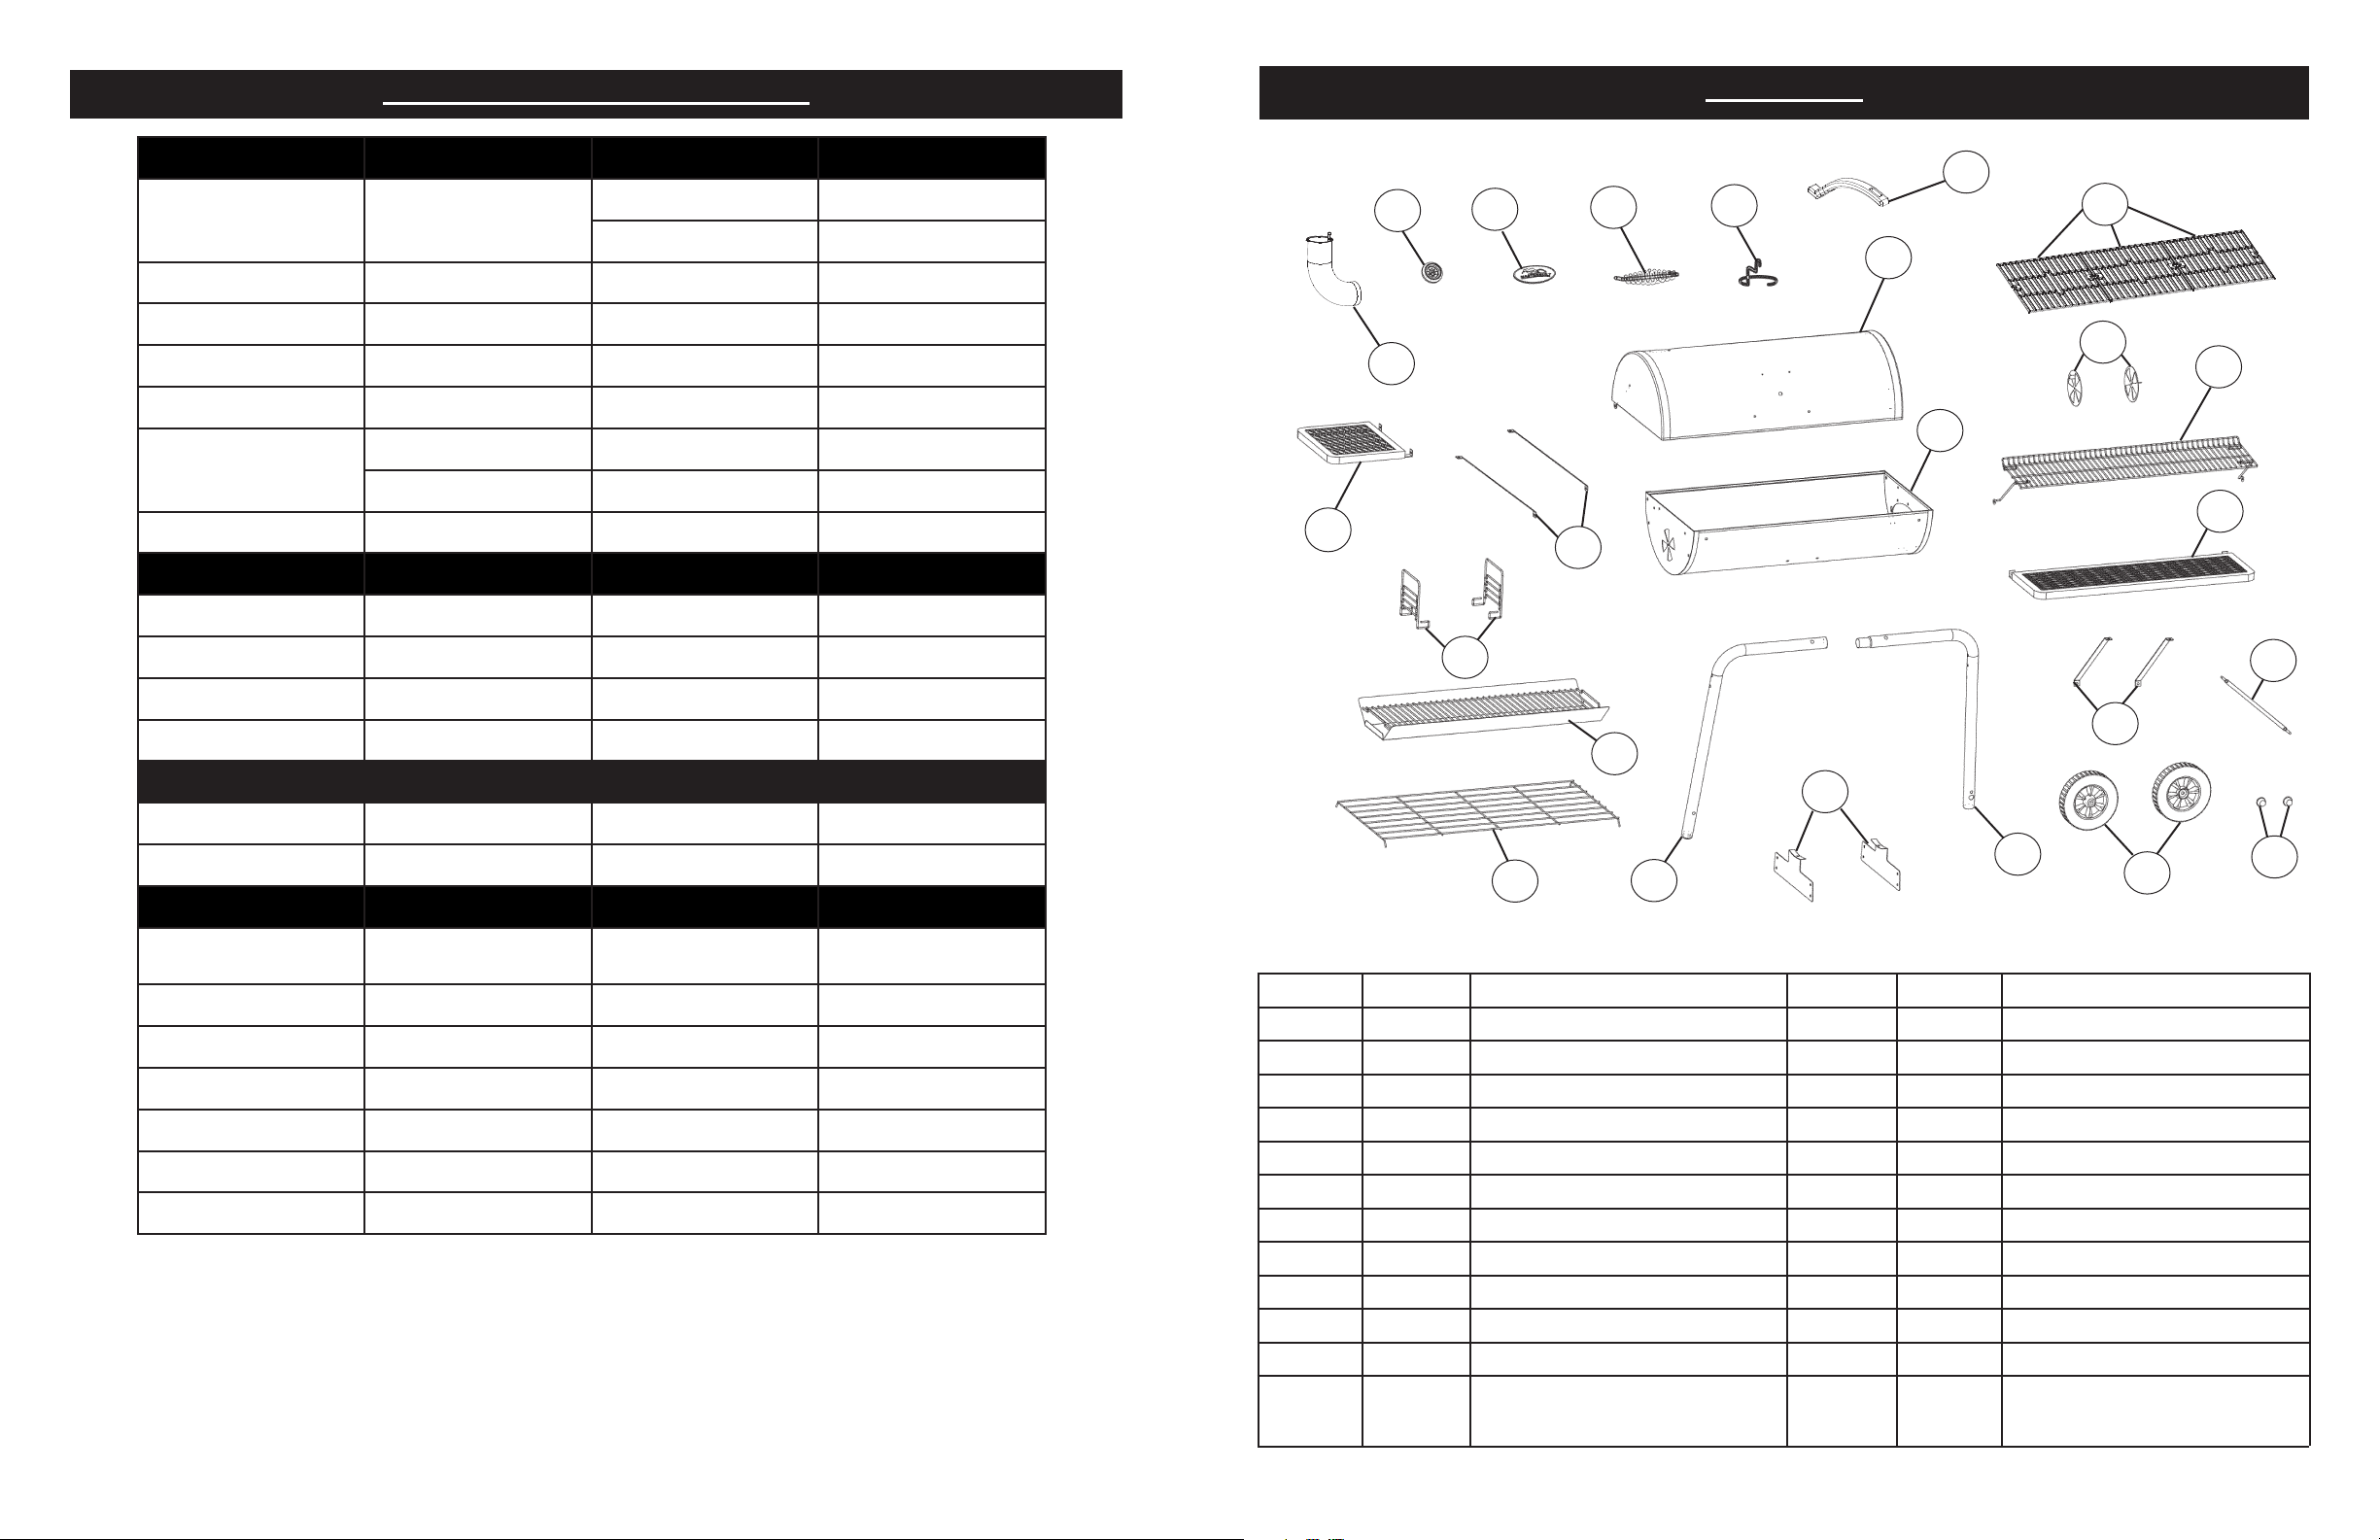
PARTS LIST
BEEF SIZE GRILLING TIME INTERNAL TEMP
Steaks
3
/4” (2cm) thick 3 to 4 min. /side med rare 145°F (62°C)
4 to 5 min. /side med 160°F (71°C)
Kabobs 1” (2.5cm) cubes 3 to 4 min. /side 145°-160°F (62-71°C)
Hamburger patties
1
/2” (12mm) thick 3 to 4 min. /side med 160°F (71°C))
Roast, rolled rump 4-6 lbs. (1.8-2.7kg) 18 to 22 min /lb. 145°-160°F (62-71°C)
Sirloin tip 3 1/2--4 lbs. (1.5-1.8kg) 20 to 25 min. /lb. 145°-160°F (62-71°C)
Ribs, back cut in 1-rib portions 10 min. /side med 160°F (71°C)
half, 2-3 lbs. (0.9-1.3kg) 10 to 12 min. /side med rare 145°F (62°C)
Tenderloin whole, 4-6 lbs. (1.8-2.7kg) 12 to 15 min. /side med 160°F (71°C)
PORK SIZE GRILLING TIME INTERNAL TEMP
Chops, bone-in
3
/4” (2cm) thick 3 to 4 min. /side med 160°F (71°C)
Chops, bone-out 1 1/2” (4cm) thick 7 to 8 min. /side med 160°F (71°C)
Tenderloin
1
/2-1 1/2 lbs. (0.2-0.6kg) 15 to 25 min. total med 160°F (71°C)
Ribs (indirect heat) 2-4 lbs. (0.9-1.8kg) 1 1/2 to 2 hrs. med 160°F (71°C)
VENISON SIZE GRILLING TIME INTERNAL TEMP
Roast, saddle or leg 6-7 lbs. (2.7-3.1kg) 25 to 30 min. /lb. 145°-160°F (62-71°C)
Steaks
3
/4” (2cm) thick 6 to 7 min. /side med 160°F (71°C)
CHICKEN SIZE GRILLING TIME INTERNAL TEMP
18
19
20
16
21
14
17
22
15
24
23
3
1
4
5
2
6
11
7
10
8
9
13
12
Broiler fryer (indirect
3-4 lbs. (1.3-1.8kg) 60 to 75 min. in thigh 180°F (82°C)
heat)
Cornish hens 18-24 oz. (510-680g) 45 to 55 min. in thigh 180°F (82°C)
Breast halves, bone-in 6-8 oz. ( 170-226g) each 10 to 15 min. /side 170°F (77°C)
Breast halves, boneless 4 oz. (113g) each 6 to 8 min. /side 170°F (77°C)
Legs or thighs 4-8 oz. (113-226g) 10 to 15 min. /side 180°F (82°C)
Drumsticks 4 oz. (113g) 8 to 12 min. /side 180°F (82°C)
Wings 2-3 oz. (56-85g) 8 to 12 min. /side 180°F (82°C)
• When outside temperature is cooler than 65°F (18°C) and/or altitude is above 3,500 ft. (1067m),
additional cooking time may be required. To insure that meat is completely cooked
use a meat thermometer to test internal temperature.
• Lifting grill lid during cooking process may extend cooking time due to heat loss.
17
ITEM NO. QUANTITY DESCRIPTION
1 1 Grill Lid
2 1 Grill Body
3 3 Cooking Grate
4 2 Air Damper
5 1 Warming Rack
6 1 Front Shelf
7 2 Front Shelf Bracket
8 2 Right Short Leg
9 2 Left Long Leg
10 2 Leg Bracket
11 1 Axle
12
2
Axle Cap
ITEM NO. QUANTITY DESCRIPTION
13 2 Wheel
14 1 Storage Shelf
15 1 Charcoal Pan
16 2 Charcoal Pan Lifter
17 2 Side Shelf Bracket
18 1 Side Shelf
19 1 Smoke Stack
20 1 Temperature Gauge
21 1 Logo Plate
22 1 Lid Handle
23 1 Grease Clip
24 1
Cooking Grate Lifting Tool
(included with model 20043011 only)
2
Page 4

HARDWARE LIST
CHARCOAL LIGHTING INSTRUCTIONS
Read all instructions and warnings on charcoal bag and in manual before using.
(A)
M6x12
Phillips Head Screw
qty-17
BLISTER PACK CONTENTS
(B)
M6x45
Phillips Head Screw
qty-14
(D)
M6
Hex Flange Nut
qty-24
(E)
M6
Lock Nut
qty-6
(C)
M6x70
Phillips Head Screw
qty-2
1. Stack briquets in a pyramid.
2. Add lighter fluid following directions on fluid container. Before lighting, place lighter
fluid at least 25 ft. (7.5m) away from grill. Do not lean over grill when lighting charcoal.
Light charcoal. LEAVE GRILL UNCOVERED.
3. In about 15 minutes, flames will die out and briquets will begin to ash over. Once the
briquets are completely ashed over, spread briquets in a single layer and begin cooking.
• NEVER USE GASOLINE TO LIGHT CHARCOAL.
• OVERFILLING CHARCOAL PAN CAN CAUSE SERIOUS INJURY AND DAMAGE THE
UNIT.
• NEVER ADD ADDITIONAL LIGHTER FLUID ONCE CHARCOAL HAS IGNITED.
• HOT COALS SHOULD NOT BE LEFT UNATTENDED.
• GRILL IS HOT. USE PROTECTIVE GLOVES AND LONG, STURDY COOKING UTENSILS.
TO ENSURE THAT IT IS SAFE TO EAT, FOOD MUST BE COOKED TO THE MINIMUM INTERNAL
TEMPERATURES LISTED IN THE TABLE BELOW.
USDA* Safe Minimum Internal Temperatures
(F)
M6
Carriage Bolt
qty-2
(G)
M6
Flat Washer
qty-2
(H)
M6
Lock Washer
qty-2
(I)
Cotter Clip
qty-2
Fish
Pork 160°F (71°C)
Egg Dishes 160°F (71°C)
Steaks and Roasts of Beef, Veal or Lamb 145°F (63°C)
Ground Beef, Veal or Lamb 160°F (71°C)
Whole Poultry (Turkey, Chicken, Duck, etc.) 165°F
PRE-PACKED HARDWARE
(J)
M5 Hex Nut
qty-2
3 16
(L)
M5 Lock Washer
qty-2
(K)
Wing Nut
(packed with temperature gauge)
qty-1
Ground or Pieces Poultry (Chicken Breast, etc.) 165°F
145°F (63°C)
(74°C)
(74°C)
* United States Department of Agriculture
Page 5

GRILL OPERATION CAUTIONS
• Avoid bumping or impacting grill.
REPLACEMENT PARTS LIST
• Keep your hands, hair and face away from burning charcoal.
• This grill has an open flame. Be careful of loose hair and clothing during operation. They may
catch fire.
• Use protective gloves when handling this grill or working with fire. Use protective gloves or
long, sturdy fireplace tools when adding wood or charcoal.
• Do not allow anyone to conduct activities around this grill during or following its use until the
unit has cooled. This grill is HOT during operation and remains HOT for a period of time
following its use.
• Fatty foods like hamburgers can have excess grease that can cause flare ups. When cooking
fatty foods, use caution when opening lid and during cooking to avoid being burned.
• Be careful when removing food from grill. All surfaces are HOT and may cause burns. Use
protective gloves or long, sturdy cooking tools.
• Never use glass, plastic or ceramic cookware on this grill.
• The use of alcohol, prescription or non-prescription drugs may impair the user’s ability to
properly assemble or safely operate this grill.
• Grill lid and body are HOT while in use and during cooling process.
• Do not remove adjustable charcoal pan while ashes and charcoal are HOT.
• Air dampers are HOT while the grill is in use and during cooling; wear protective gloves when
adjusting.
• Never overfill charcoal pan. This can cause serious injury as well as damage the unit.
• Only use charcoal lighting fluid, never use gasoline, alcohol or other highly volatile fluids to
ignite the charcoal. These fluids can explode causing injury or death.
REMINDER:NEVER OPERATE THIS GRILL UNDER ANY OVERHEAD CONSTRUCTION.
MAINTAIN A MINIMUM DISTANCE OF 10 FEET FROM OVERHEAD CONSTRUCTION, WALLS
OR RAILS. SEE DIAGRAM BELOW.
Overhead
Construction
Rails
10 ft. (3m)
DO NOT RETURN TO RETAILER
STOP!
For Assembly Assistance, Missing or Damaged Parts
Call: MASTERBUILT Customer Service at 1-800-489-1581
Model #20043111
ITEM NO. DESCRIPTION
9904100072 Grill Lid Kit
9904090071 Grill Body Kit
9904090033 Logo Plate Kit
9904090029 Lid Handle Kit
9904090032 Temperature Gauge Kit
990050018 Air Damper Kit
9904090079 Warming Rack Kit
906050025 Axle Caps
9904100071 Smoke Stack Kit
9904090086 Side Shelf Kit
9904090101 Side Shelf Support Kit
9904090074 Front Shelf Kit
9904090102 Front Shelf Support Kit
9904090090 Leg Bracket Kit
9904090076 Stationary Leg Kit
9904090075 Axle Leg Kit
9004090104 Lower Shelf (no Hardware)
9904090091 Axle Kit
990050014 Wheel Kit
9004090103 Large Cooking Grate
990070057 Knockout Kit
906060213 Charcoal Grate
906050011 Charcoal Grate Lifter
9904100069 Hardware Bag
9804100070 Instruction Manual English
9804100071 Instruction Manual Spanish
906050013
906060212
Grease Clip
Small Cooking Grate
Model #20043011
ITEM NO. DESCRIPTION
9904100070 Grill Lid Kit
9904090084 Grill Body Kit
9904090033 Logo Plate Kit
9904090029 Lid Handle Kit
9904090032 Temperature Gauge Kit
990050018 Air Damper Kit
9904090092 Warming Rack Kit
906050025 Axle Caps
9904100071 Smoke Stack Kit
9904090086 Side Shelf Kit
9904090101 Side Shelf Support Kit
9904090087 Front Shelf Kit
9904090102 Front Shelf Support Kit
9904090090 Leg Bracket Kit
9904090089 Stationary Leg Kit
9904090088 Axle Leg Kit
9004090116 Lower Shelf (no Hardware)
9904090091 Axle Kit
990050014 Wheel Kit
906050023 Cooking Grate
990070057 Knockout Kit
906050010 Charcoal Grate
906050011 Charcoal Grate Lifter
9904100069 Hardware Bag
9804100070 Instruction Manual English
9804100071 Instruction Manual Spanish
906050013
906050024
Grease Clip
Cooking Grate Lifting Tool
15
Wall
10 ft. (3m)
4
Page 6

ASSEMBLY INSTRUCTIONS
Before assembly read
instructions carefully.
This unit is heavy. Do not
assemble without assistance.
8
9
Tools needed for assembly:
Adjustable Wrench
Phillips Head Screwdriver
Assemble grill on a clean, flat
surface.
CAUTION: Use caution during the
assembly process.
Some component are heavy.
Q: The paint finish inside my lid is peeling. What can I do?
You are seeing a deposit of grease and smoke that collects during normal use that resembles
paint. These carbon deposits are non-toxic, but you may want to regularly remove the
build-up. Remove buildup using a brass or stiff bristle brush before grilling. Future build-up
can be avoided by simply wiping the grill lid while slightly warm with a mild soap-and-water
solution.
Q: When can I put my meat on the grill?
Grill is ready for use when charcoal is ashed over and no visible flames are present.
Q: How do I regulate the heat on my grill?
Adjusting the dampers will increase and decrease airflow and heating.
FREQUENTLY ASKED QUESTIONS
STEP 1.
Pay close attention to when assembling grill legs. Right legs are
shorter to accommodate wheels.
Insert right short leg (8) into left long
leg (9) as shown.
Repeat step 1 to assemble second set
of legs.
STEP 2.
Steps 2-3 require assistance. Get a
helper!
Insert storage shelf (14) into holes of
assembled grill legs as shown.
STORAGE SHELF
INSERTION HOLE
SAFE STORAGE AND MAINTENANCE
• Inspect bolt, hex lock nut and hex flange nut tightness on a regular basis to ensure grill is in
safe working condition.
• ALWAYS allow grill to cool completely before handling.
• ALWAYS empty charcoal pan after use only when ashes have completely cooled.
This will help prolong charcoal pan life.
• Clean grill, including special surfaces such as cooking grates with mild cleaning
agents. Wipe outside of grill with damp rag. DO NOT use oven cleaner.
• ALWAYS cover and store cold grill in a protected area.
• Indoor storage of grill is permissible only if the charcoal has burned to a complete
ash AND is cold. Remember to remove cold ashes before storing.
• Grill is made of steel and may rust over time. If rusting occurs on outside surfaces,
clean area with sand paper or steel wool, then cover with heat resistant paint.
• If rusting occurs on the inside surface of grill, clean area with sandpaper or steel
wool, then coat with cooking oil.
• NEVER USE PAINT ON INSIDE SURFACES OF GRILL
9
14
5
8
14
Page 7

STEP 17.
5
Secure warming rack (5) to rack support bolt (C) using lock nut (E) as
shown.
E
A
Note: Be sure not to overtighten lock
nut, as rack is to mover freely.
Secure warming rack support arm
onto grill body (2) using
(A) and hex lock nut (E).
phillips screw
D
10
B
STEP 3.
Attach leg bracket (10) to right short
legs (8) as shown using phillips head
screws (B) and hex flange nuts (D).
Do not fully tighten screws at this
time.
STEP 18a.
16
STEP 18b.
16
15
2
E
Repeat step on opposite side.
STEP 18a.
FIGURE E
Position adjustable charcoal rack lifter (16) on
charcoal rack (15) as shown in Figure E.
Repeat step on opposite end.
8
STEP 18b.
Position charcoal tray lifter (16) on side supports in
16
3
grill body as shown. Use cooking grate lifting tool
(24) to place cooking grates (3) into grill body.
Note: Cooking grate lifting tool (24) included with
model 20043011 only.
STEP 18c.
Insert grease clip (23) up through large hole in
bottom of grill body. Engage clip end in small hole.
Position an empty metal container (not included) on
grease clip so it rests snugly. The container is
needed to collect grease run-off.
Note: Clip may require adjustment to fit diameter
of container.
STEP 4.
Insert axle (11) through holes on
short right legs (8). Slide wheel (13)
onto axle and secure using cotter clip
(I). Snap axle cap (12) onto end of
8
wheel assembly as shown.
Repeat step on opposite side for
remaining wheel.
Do not fully tighten screws at this
time.
STEP 18c.
13
24
GRILL IS READY FOR USE
23
12
11
13
I
6
Page 8

10
STEP 5.
Note: Attach only using
hardware shown.
D
Use phillips head screws (B) and hex
flange nuts (D) on second hole in leg
bracket (10) to attach left long leg (9).
1
22
STEP 15.
Secure handle (22) to grill lid (1)
using flat washers (G) lock washers
(H) and hex flange nuts (D).
B
SECOND HOLE
2
Do not attach hardware to first hole.
This will be used for side shelf attachment in STEP 9.
Do not fully tighten screws at this
9
A
D
time.
STEP 6.
Place grill body (2) onto assembled
legs with smoker box opening on the
same side as the right short legs (8).
Tightly secure grill body to legs using
phillips head screws (B), and hex
flange nuts (D).
STEP 16a.
C
G
H
D
5
D
STEP 16a.
Insert warming rack support bolt (C) into hole on
the left side of grill lid (1). Thread hex flange nut
(D) onto bolt and tighten. Slide warming rack (5)
eyelet onto end of support bolt.
Note: Warming rack should have some play and
move freely.
10
Attach grill body (2) to leg brackets (10)
using phillips head screws (A), and hex
flange nuts (D) as shown.
10
B
9
D
8
Do not fully tighten screws at this
time.
1
STEP 16b.
D
C
1
5
STEP 16b.
Slide warming rack to the far left to but up
against grill lid.
On right side of grill lid (1) hold hex flange nut in
place with hand and thread rack support bolt (C)
through nut, guiding warming rack (5) onto support bolt as shown.
127
Page 9

2
21
20
STEP 13a.
Insert temperature gauge (20) stem
through hole in grill lid. Secure with
wing nut (K).
A
Carefully reposition grill as shown.
STEP 7.
Note: Do not over tighten. Air
dampers should move freely.
STEP 13b.
Insert alignment pins on back of logo
plate (21) through two holes above
temperature gauge (20).
L
J
K
Attach using lock washer (L) and hex
nut (J) as shown.
4
E
Attach air damper (4) to body (2)
using phillips head screw (A) and
lock nut (E) as shown.
Repeat step on opposite side for
remaining air damper.
19
18
STEP 14.
Attach smoke stack (19) to grill using
phillips head screws (A) as shown.
A
17
A
Note: Position brackets so sharper
angled ends are used to connect
to leg bracket.
Attach side shelf support brackets
(17) to side shelf (18) using phillips
head screws (A).
Do not fully tighten at this time.
STEP 8.
11
8
Page 10

18
2
Align holes on assembled side shelf
(18) with holes on grill body (2) and leg
bracket (10) as shown.
STEP 9.
2
STEP 11.
Align holes on assembled front shelf
(6) with holes on grill body (2) and
legs as shown.
Insert phillips head screw (A) through
holes on body (2) into side shelf (18).
A
D
10
Secure using hex flange nuts (D).
Attach shelf support brackets (17) to
top holes in leg bracket (17) using phillips head screws (B). Secure using hex
flange nuts (D).
D
A
7
Insert phillips head screw (A) from
inside grill body to front shelf (6).
Secure using hex flange nuts (D).
Attach shelf support brackets (7) to
grill legs using phillips head screws
(B). Secure using hex flange nuts (D).
17
Do not fully tighten screws at this
Tighten all hardware at this time.
time.
B
D
6
9
B
D
STEP 12.
6
STEP 10.
Attach shelf support brackets (7) to
front shelf (6) using phillips head
screws (A).
Note: Position brackets so sharper
angled ends are used to connect to
grill legs.
Steps 12-15 require assistance.
Get a helper!
Align grill lid (1) with grill body (2) as
shown. Secure grill lid (1) to grill body
(2) using carriage bolt (F).
Repeat step on opposite end.
A
7
9
Do not fully tighten at this time.
1
F
2
10
 Loading...