

Margaritaville DM1946 User Manual
The Navigator
DM1946 Series User Manual
K W™
B Mrgts Cm Fr Mrgtvl
®
Frozen ConCoCtion Maker
®
DO NOT RETURN THIS PRODUCT TO THE PLACE OF PURCHASE
For product questions contact:
Jarden Consumer Service
USA : 1-877-689-2737
Canada : 1-800-667-8623
www.margaritavillecargo.ca
© 2016 Sunbeam Products, Inc. doing business as Jarden Consumer Solutions. All rights reserved.
Distributed by Sunbeam Corporation (Canada) Limited doing business as Jarden Consumer Solutions, 20 B
Hereford Street, Brampton, Ontario L6Y 0M1.
Margaritaville® is a registered trademark of Margaritaville®, used with permission.
Printed in China P. N. 188936 DM1946-000-033_16EFM1 GCDS-MGV46228-JC
DM1946-000-033_16EFM1.indd 1-2 6/13/16 10:01

-E1- -E2-
WHEN USING ELECTRICAL APPLIANCES, BASIC SAFETY PRECAUTIONS
SHOULD ALWAYS BE FOLLOWED, INCLUDING THE FOLLOWING:
1. READ ALL INSTRUCTIONS BEFORE USING.
2. To protect against electric shock, do not immerse appliance,
cord or plug in water or other liquids.
3. Close supervision is necessary when any appliance is used
near children. This appliance should not be used by children.
4. Switch OFF and unplug from outlet when not in use, before
putting on or taking off parts, and before cleaning.
5. Blinking light indicates ready to operate. Avoid any contact with
blades or moveable parts.
6. Do not operate any appliance with damaged cord or plug or
after the appliance malfunctions, or is dropped or damaged
in any manner. Contact 1-800-667-8623 for customer service.
This appliance has important markings on the plug blade. The
attachment plug or entire cordset (if plug is molded onto cord)
is not suitable for replacement. If damaged, the appliance
shall be replaced.
7. Do not use outdoors.
8. Do not let cord hang over the edge of a table or counter, or
touch hot surfaces, including the stove. Do not use extension
cords.
9. Keep hands and utensils out of container while blending and/
or ice shaving to reduce risk of severe injury to persons or
damage to the unit. A rubber spatula may be used but must be
used only when the appliance is not running.
10. Blades are sharp; handle carefully.
11. The use of attachments, including canning jars, not
recommended by the manufacturer may cause a risk of injury
to persons.
12. Do not use broken, chipped, or cracked Blending Jar or Ice
Reservoir.
13. To reduce risk of injury to persons, never place blending blade
assembly on base without the Blending Jar properly attached.
IMPORTANT SAFEGUARDS
14. Do not leave appliance unattended while it is operating.
15. To disconnect, turn control to off, then remove plug from wall
outlet.
16. Do not use appliance for other than intended use.
17. Never place fingers or other utensils into feed or discharge
areas. Never add to container while appliance is operating.
18. Check Ice Reservoir for presence of foreign objects before
using.
19. Be certain the Jar Lid and Ice Reservoir Lid are securely
locked in place before operating appliance.
20. Do not blend hot liquids.
FOR HOUSEHOLD USE ONLY
Polarized Plug
This appliance has a polarized plug (one blade is wider than the
other). As a safety feature, this plug will fit in a polarized outlet only
one way. If the plug does not fit fully into the outlet, reverse the plug.
If it still does not fit, contact a qualified electrician. Do not attempt
to defeat this safety feature.
NOTE: Never Shake or remove blender jar
during operation as jar blade assembly
can get damaged.
SAVE THESE INSTRUCTIONS
DM1946-000-033_16EFM1.indd 1-2 6/13/16 10:01
-E3- -E4-
MAX ICE MAX ICE
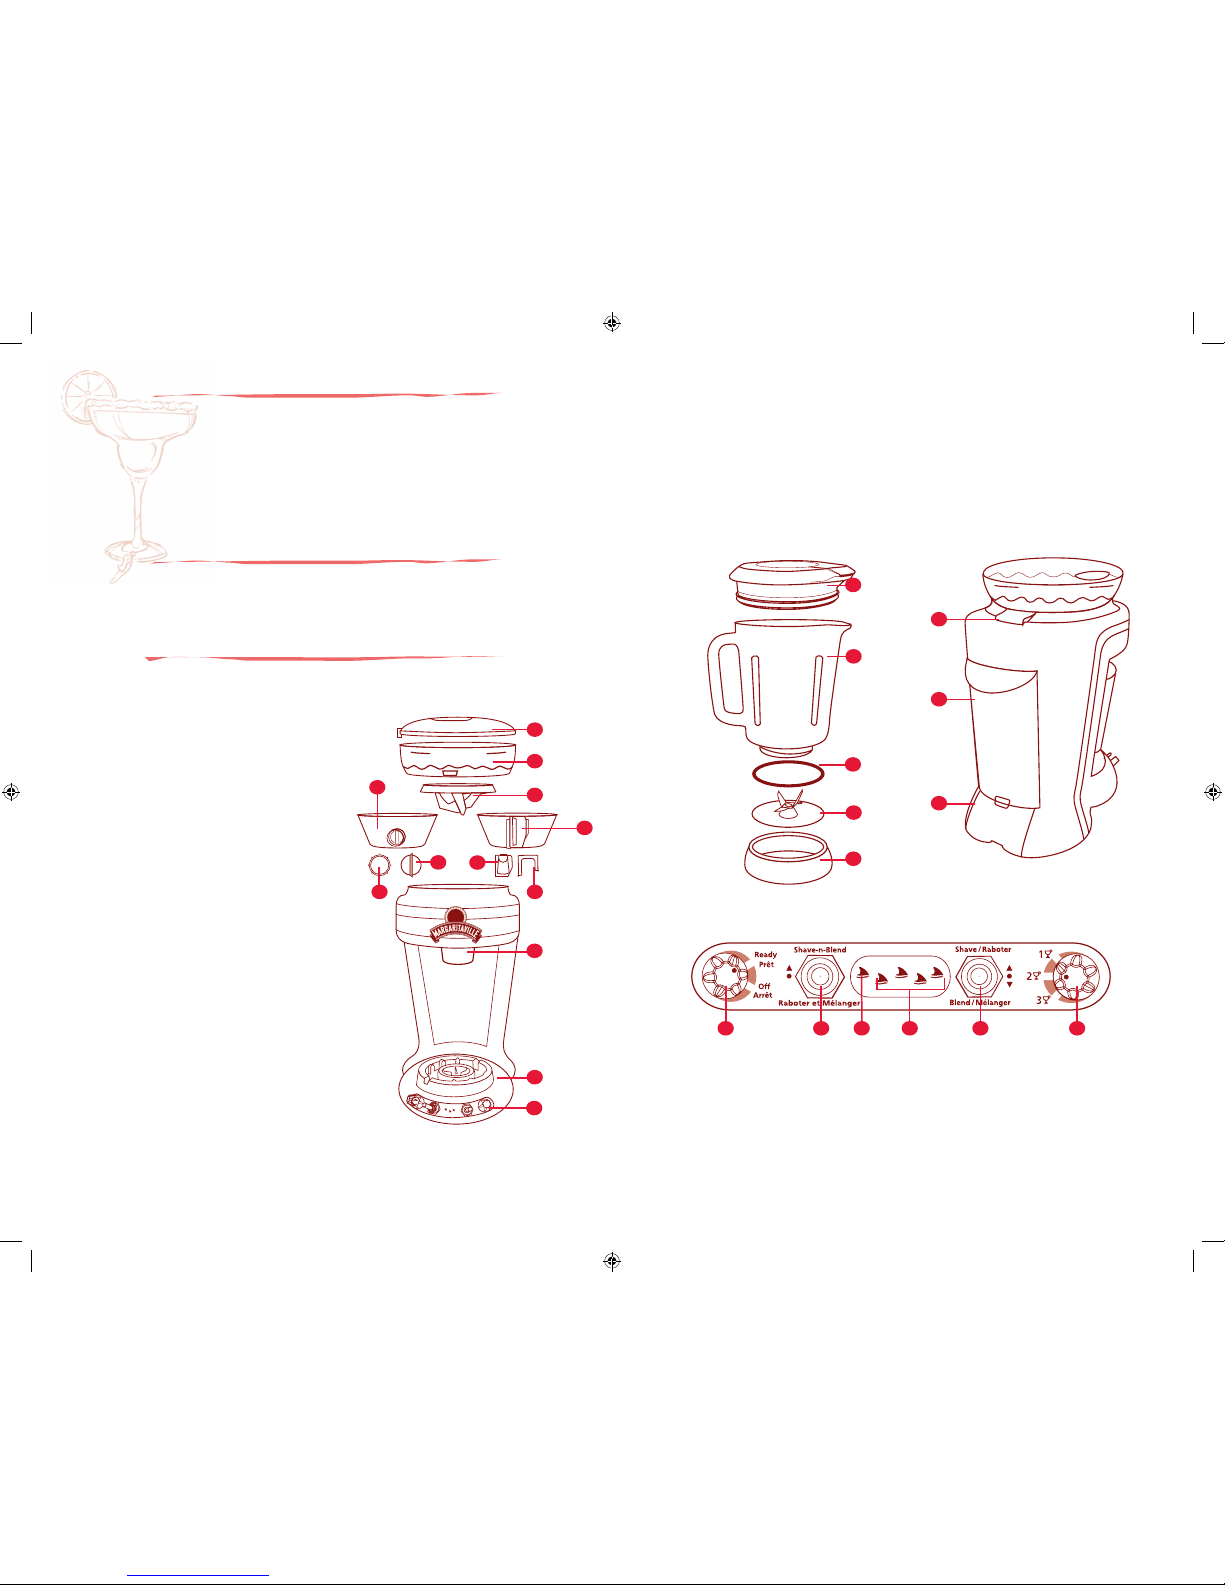
PARTS LIST
1 Ice Reservoir Lid –
Covers the Ice Reservoir.
2 Ice Reservoir –
Holds the ice for making frozen drinks.
3 Shaving Paddle –
Moves ice across the Shaving Blade.
4 Ice Hopper
4a Ice Hopper (ice deflector blade assembly) –
Feeds ice from reservoir to Shaving Blade.
5 Ice Shaving Blade – Shaves ice.
5a Ice Shaving Blade with deflector – Shaves ice.
6 Shaving Blade Assembly Nut –
Holds Shaving Blade in place.
6a U-Lock - Holds Shaving Blade in place.
7 Ice Chute – Directs ice from Ice Hopper
into Blending Jar.
8 Blending Base – Holds Blending Jar
securely in place.
9 Control Panel – Contains all necessary controls
to operate your unit.
2
3
9
8
1
7
5
4
6 6a
5a
4a
KEY WEST™ CONTROL PANEL
10 Spiller Spoiler Lid With Easy
Pour Spout – Seals the blending jar.
11 Blending Jar – Has maximum
capacity of 36 oz.
12 Blending Blade Sealing Ring – Seals
the blending jar and blending base.
13 Blending Blade – Creates forward
action when blending drinks.
14 Jar Base – Designed with wide base
for stability.
15 Ice Reservoir Release Button –
Releases ice reservoir from unit.
16 Ice Melt Reservoir – Contains melted
ice excess.
17 Cord Storage Door – Covers power
cord storage area.
1 READY/OFF Rotary Switch –
Turns your unit on and off.
2 Shave ’n Blend™ Toggle Switch –
Used to select automatic
Shave ’n Blend™ cycle.
3 Power Indicator Light – Blinks when
unit is plugged in to indicate ready
for use. Avoid any contact with blades
or moveable parts.
4 Progress Indicator Lights – Shows
status of Shave ’n Blend™ cycle.
5 Blend Only/Shave Only Toggle Switch –
Used to manually operate ice shaver
and blender.
6 Number of Drinks Rotary Switch –
Used to select 1, 2 or 3 twelve oz.
frozen drinks.
MAX ICE MAX ICE
10
11
12
13
14
MAX ICE MAX ICE
15
16
17
Frozen Concoction
Maker
®
Welcome
Cngrlis r rch t Mrgtvl®
Fro Cncoi Mkr® – DM1946 Si!
To learn more about Margaritaville® products,
please visit us at www.margaritavillecargo.ca.
1
2
3 5 64
DM1946-000-033_16EFM1.indd 3-4 6/13/16 10:01
-E5- -E6-
1. Place the unit on a clean dry flat surface.
2. Place the Ice Reservoir on the unit front first,
then push down firmly on back. Reservoir must
click into place.
NOTE: IF ICE RESERVOIR IS NOT SEATED FIRMLY
IN PLACE THE UNIT WILL NOT OPERATE.
3. Remove the Cord Storage Door by pushing down
on the release tab located on the Cord Storage Door.
Remove the power cord and plug the unit
into a standard 120 Volt wall socket. Replace
the Cord Storage Door and position the power cord in
the slot below the cord storage release tab.
4. Remove the Ice Reservoir Lid using the
Release Button located on the top of the
Ice Reservoir.
NOTE: NEVER PUT ANYTHING BUT ICE IN
THE ICE RESERVOIR.
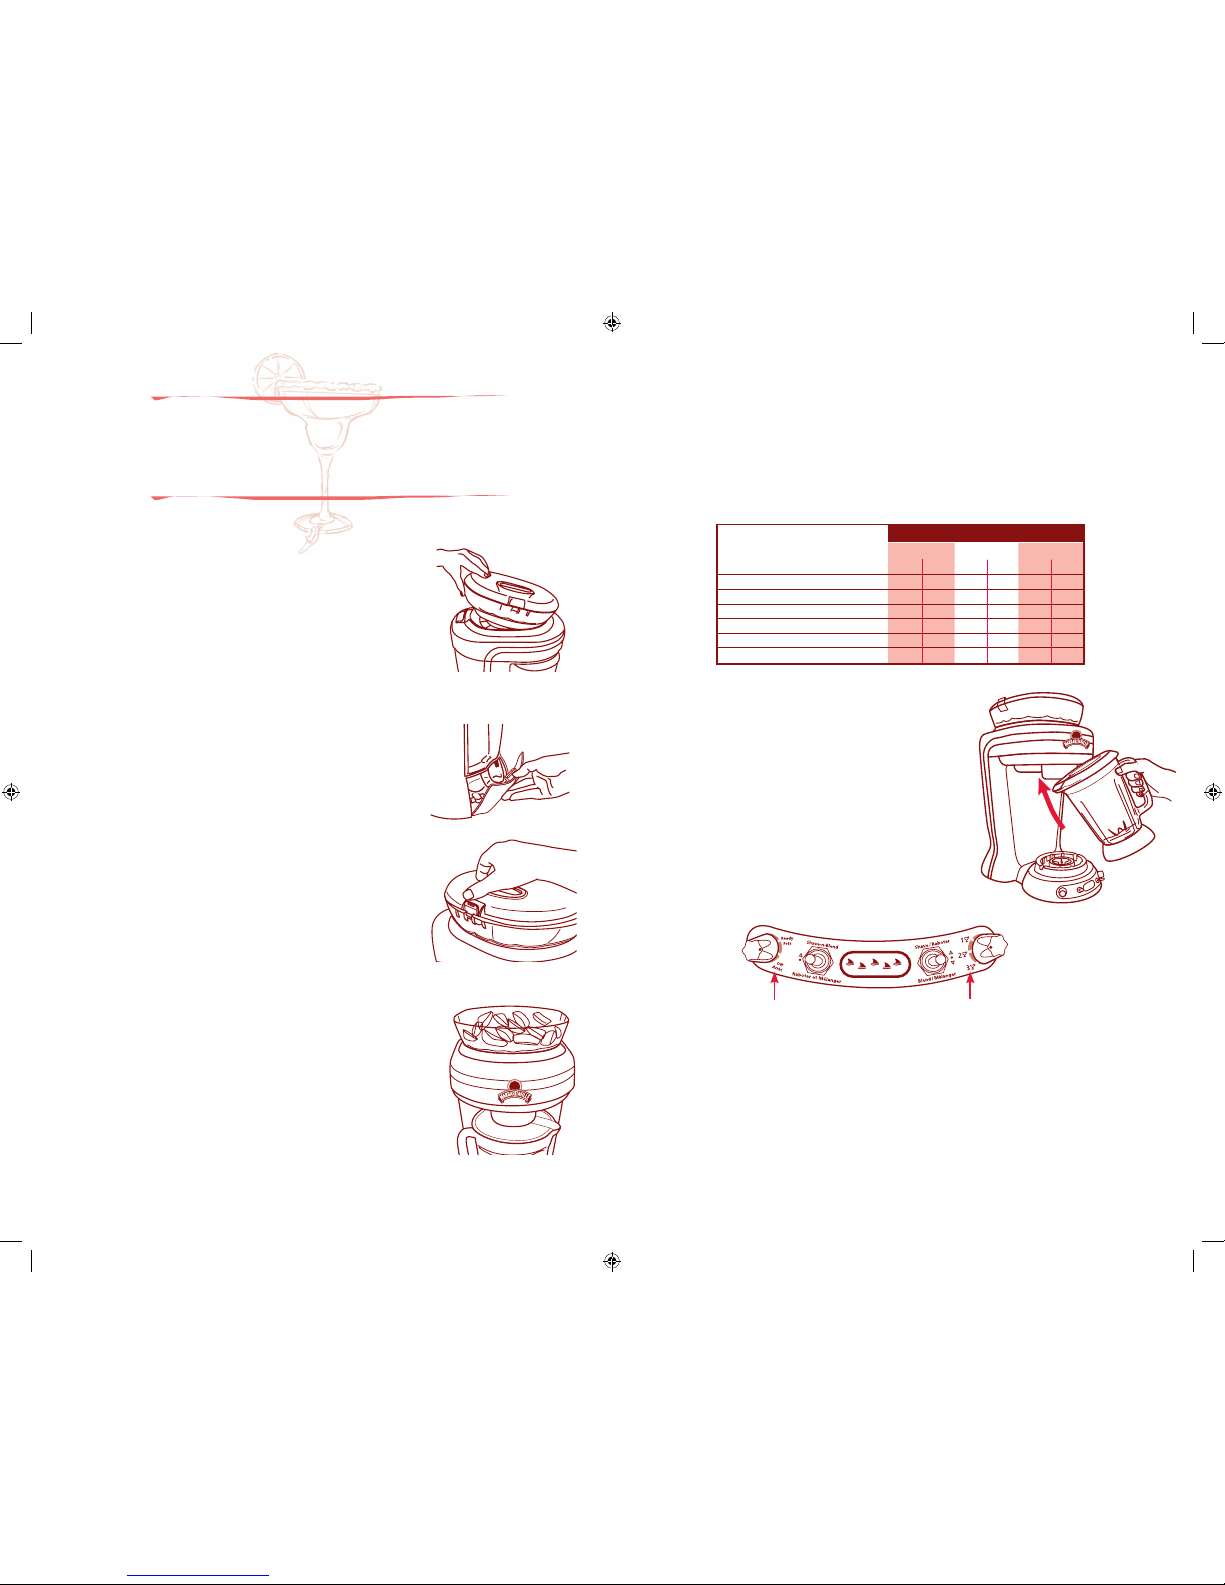
5. Fill the Ice Reservoir with ice cubes.
6. Replace the Ice Reservoir Lid and snap closed.
7. Lift and remove the Blending Jar.
The Ice Chute is spring-loaded and
can be pushed up.
8. Remove Blending Jar Lid.
Making frozen
drinks
10. Replace Blending Jar Lid and return
Blending Jar to Blending Base by pushing up
on the Ice Chute with the Blending Jar and
then placing it on the Blending Base.
11. Set the Number of Drinks Rotary Switch to
correspond to the number of drinks being
made. (Always select 3 drinks when using
No-Brainer Mixing Tool.)
12. Rotate the READY/OFF Rotary Switch on the
Control Panel to the Ready position.
9. Add appropriate amount of liquid ingredients to the Blending Jar for the
number of drinks being made (1, 2 or 3).
NOTE: NEVER SHAKE OR REMOVE JAR DURING OPERATION –
BLADE ASSEMBLY WILL GET DAMAGED.
Number of Drinks
Rotary Switch
Ready/Off
Rotary Switch
The Best Margarita Recipe
1 Drink 2 Drinks 3 Drinks
fl oz ml fl oz ml fl oz ml
Margaritaville® Gold Tequila 1 30 2 60 3 90
Triple Sec
1
⁄4 7.5 1⁄2 15 3⁄4 22.5
Lime Juice
1
⁄2 15 1 30 1 1⁄2 45
Orange Juice
1
⁄2 15 1 30 1 1⁄2 45
Margaritaville® Margarita Mix 1 30 2 60 3 90
Total Volume 3
1
⁄4 97.5 6 1⁄2 195 9 3⁄4 292.5
Ingredients
Amount (12 fluid oz drink)
DM1946-000-033_16EFM1.indd 5-6 6/13/16 10:01
-E7- -E8-
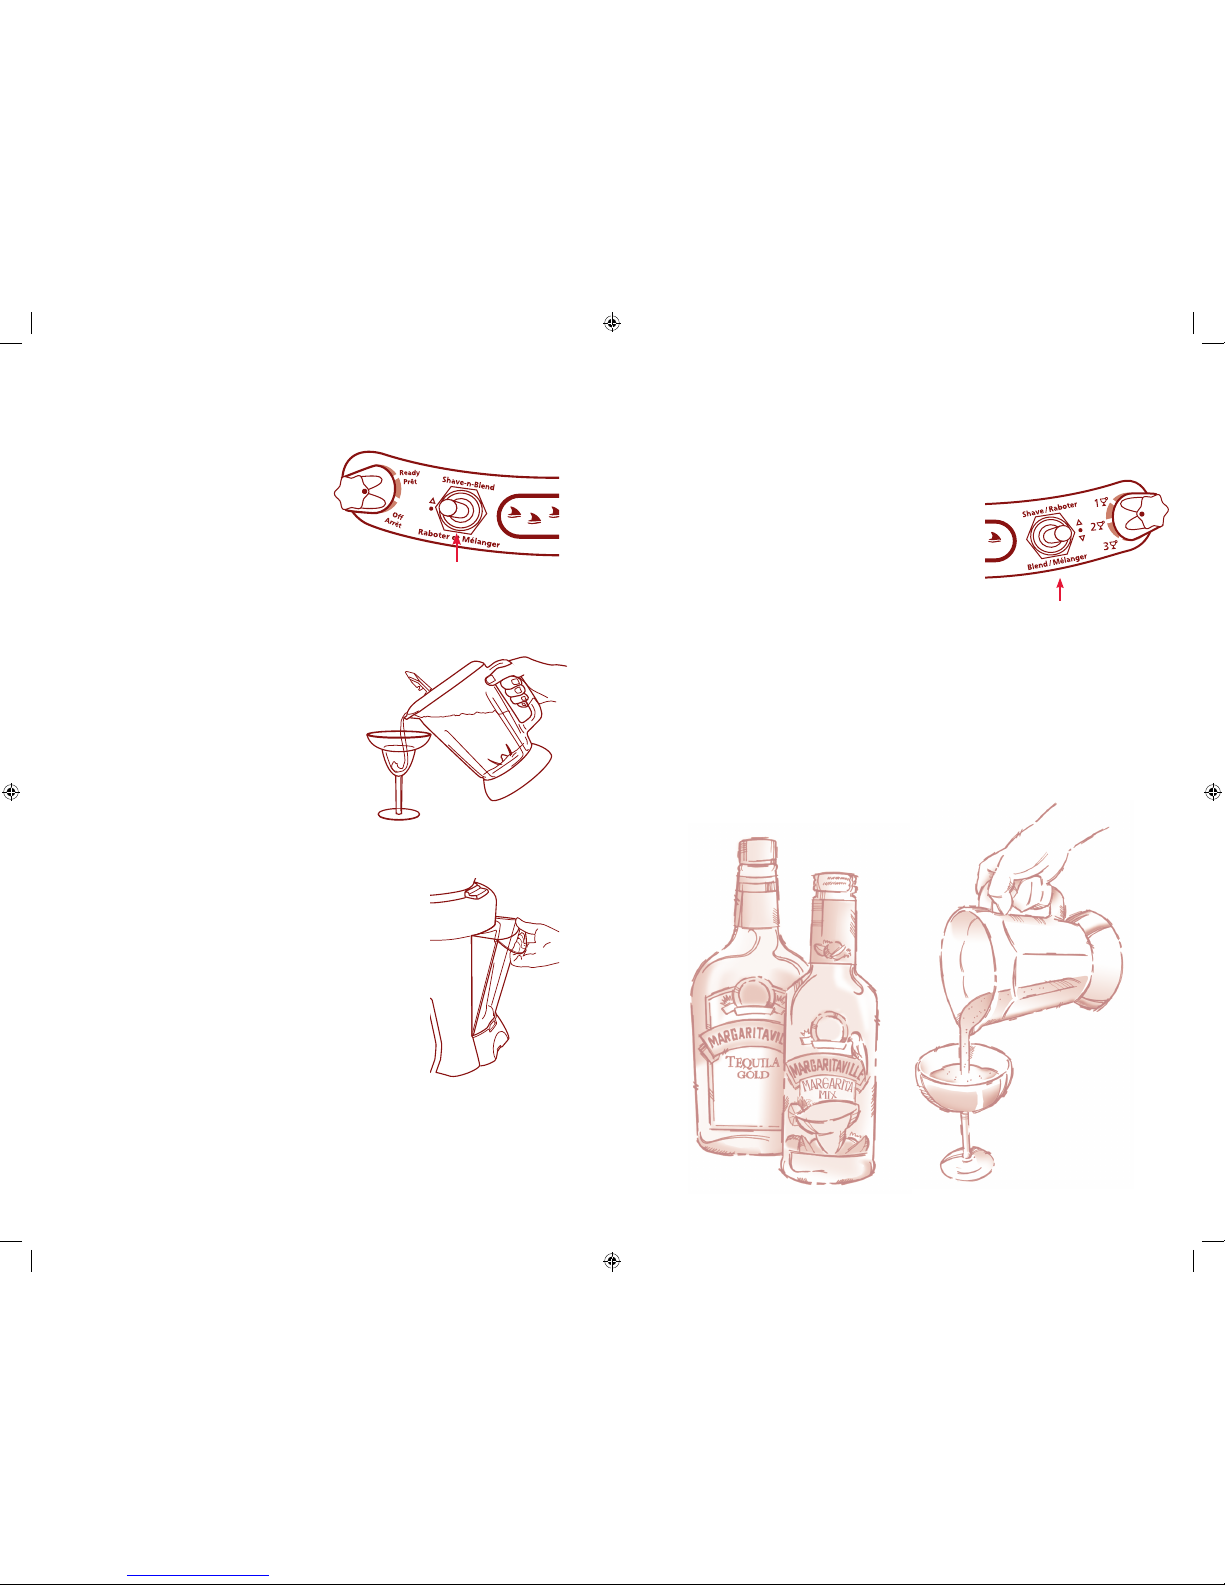
13. Start the Automatic
Shave ’n Blend™ Cycle
by pushing up on the
Shave ’n Blend™ Toggle Switch.
14. The unit will shave ice for
the appropriate time (based on the
settings selected). The blender will
start automatically. The unit will stop
at the completion of the cycle.
NOTE: DURING THE SHAVE ‘N BLEND™ CYCLE
THE PROGRESS INDICATOR LIGHTS WILL
ILLUMINATE IN A SEQUENCE FROM LEFT TO
RIGHT TO INDICATE THE CYCLE PROGRESS.
15. The Power Indicator Light will blink
to indicate the unit is ready to make
more drinks.
16. To serve: With the Spiller Spoiler lid, there’s
no need to remove the lid for serving.
NOTE: To remove excess ice from the Ice Reservoir hold the Shave Only Toggle Switch
in the Shave Only position until the Ice Reservoir is empty.
WARNING: DO NOT PLACE FINGERS IN THE
ICE HOPPER THE SHAVING BLADE IS SHARP
AND COULD CAUSE INJURY.
17. Turn off the unit.
18. Periodically check the Ice Melt Reservoir
and empty as needed.
AUTOMATED SHAVE ’N BLEND™ CYCLE
Shave ’n Blend™
Toggle Switch
Blend Only/
Shave Only
Toggle Switch
MANUAL CYCLE
To make a thicker drink:
. Hold the “Blend Only/Shave Only” Toggle
Switch in the Shave Only position to add
more ice to the Blending Jar.
b. To stop adding ice, release the toggle switch.
. To mix the newly added ice into the drink,
hold the Blend Only/Shave Only Toggle
Switch in the blend only position until the
desired consistency is achieved. To stop the
blending release the toggle switch.
. Use less drink mixer than in recipe.
(example: for 3 drinks, use 9 oz. liquid content)
To make a thinner drink:
. Hold the Blend Only/Shave Only Toggle
Switch in the Blend Only position until the
desired consistency is achieved.
b. To stop blending release the toggle switch.
. Add more drink mixer than in recipe
(example: for 3 drinks, use 10.5 oz. of total mix)
DM1946-000-033_16EFM1.indd 7-8 6/13/16 10:01
 Loading...