

Margaritaville CP1000-000-000 Owner's Manual
Guía de uso y mantenimiento del modelo CP 1000
Model CP 1000
Party Cooler
´
backyard cool.
with maximum
party beverages
Impreso en China P. N. 119152
Margaritaville®.
Margaritaville® es una marca registrada de
Reservados todos los derechos.
Jarden Consumer Solutions.
©2006 Sunbeam Products, Inc., que opera como
www.margaritavillecargo.com
U.S.A. 1-877-689-2737
Sunbeam Consumer Services
Si tiene preguntas sobre el producto:
AL LUGAR DE COMPRA
NO DEVUELVA ESTE PRODUCTO
Printed in China
of Margaritaville®.
Margaritaville® is a registered trademark
Consumer Solutions. All rights reserved.
©2006 Sunbeam Products, Inc., d/b/a Jarden
www.margaritavillecargo.com
U.S.A. 1-877-689-2737
Sunbeam Consumer Services
For product questions:
TO THE PLACE OF PURCHASE
DO NOT RETURN THIS PRODUCT
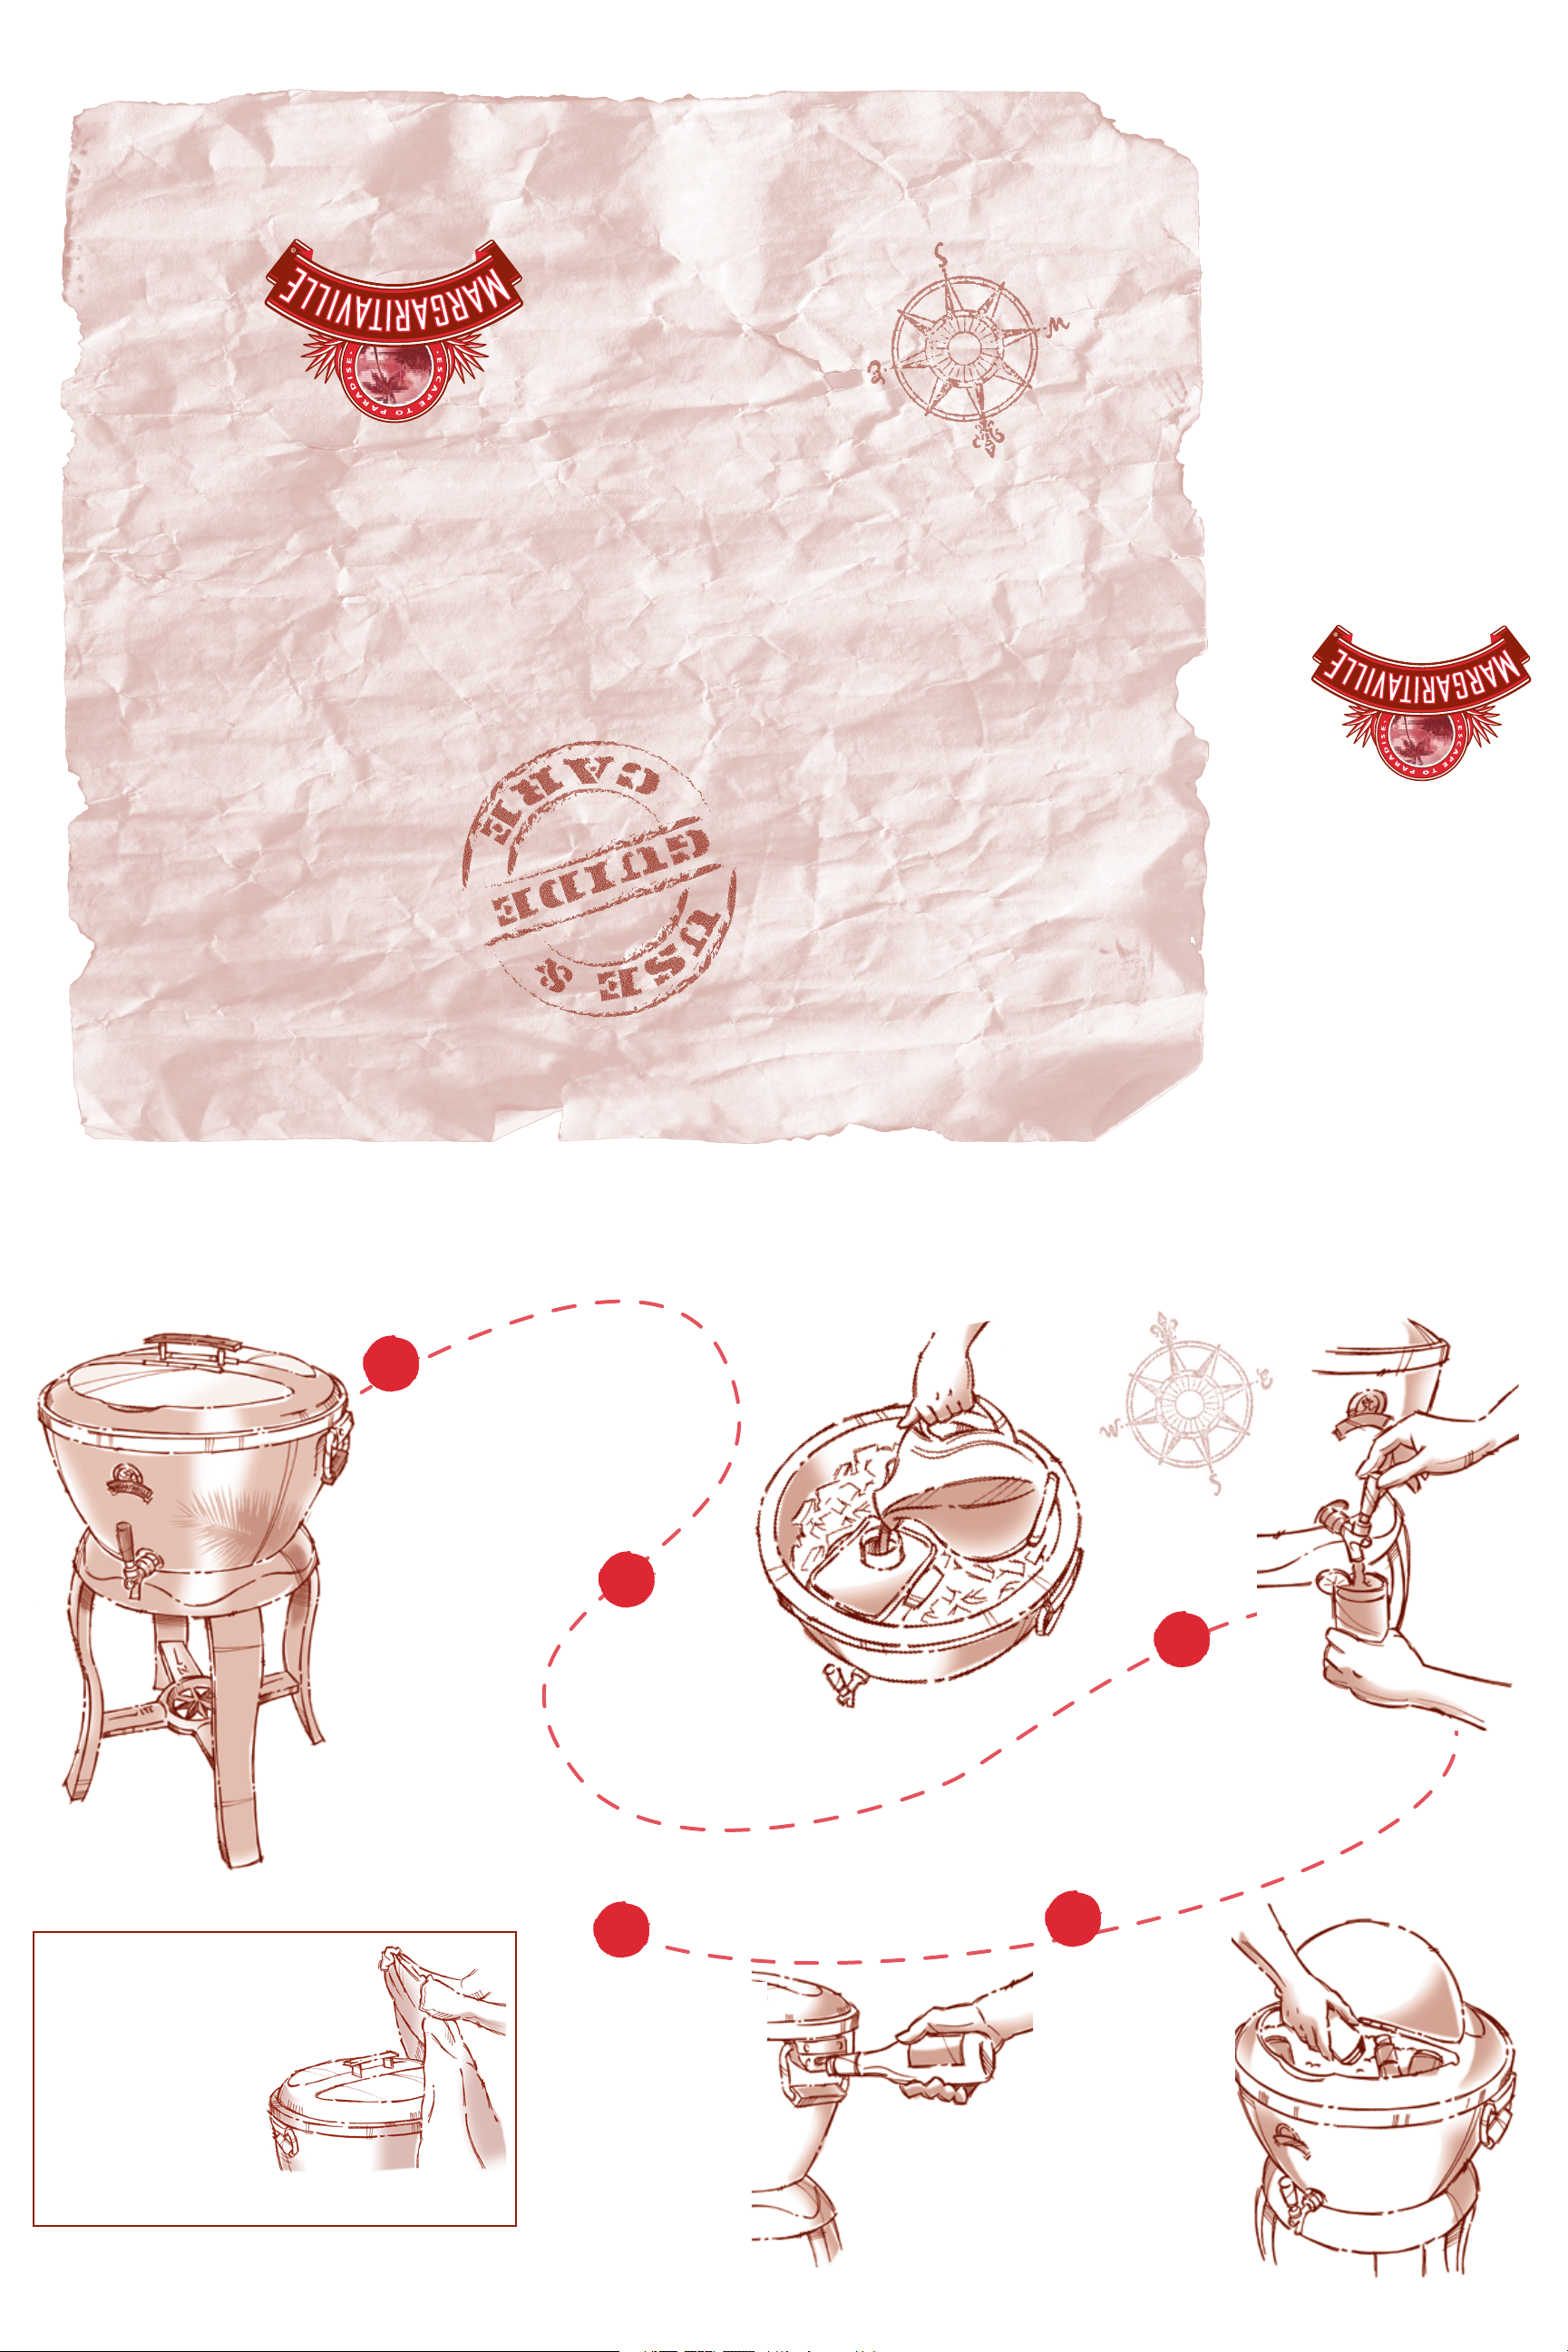
How to dispense
The Party Cooler That Keeps Everything Cool – Including the Party!
El refrigerador para fiestas que mantiene todo fresco. ¡Incluyendo la fiesta!
1
The Margaritaville Party Cooler will
keep the party concoctions owing...
The Party Cooler’s large capacity
stainless steel tub ices down bottles
and cans while dispensing your favorite
chilled beverage on tap.
El refrigerador para estas
Margaritaville mantendrá los
brebajes de la esta
en movimiento...
El envase de acero inoxidable
de gran capacidad del
refrigerador para estas
enfría botellas y latas
mientras dispensa su
bebida favorita fría
del grifo.
2
Load up the Party Cooler
with ice and ll the
beverage container with
4 liters of your favorite
party concoctions.
Cargue el refrigerador para estas
con hielo y llene el contenedor de
bebidas con 4 litros de sus brebajes
favoritos de estas.
3
The Party Cooler tap will keep
the party owing with self service
chilled beverage. And the beverage
container can easily be relled on the y.
El grifo del refrigerador para estas
mantendrá la esta en movimiento con
un autoservicio de bebidas frías. Y el
contenedor de bebidas se puede
rellenar fácilmente sobre
la marcha.
Store your Party Cooler on the
patio or in the garage with our
protective cooler cover.
(sold separately at
www.margaritavillecargo.com)
Almacene el refrigerador para
estas en el patio o en la cochera
con nuestra cubierta de
refrigerador protectora.
(se vende por separado en
www. margaritavillecargo.com)
5
Forget the twist off caps –
the Party Cooler comes
equipped with bottle openers
built into each handle.
Olvídese de los destapadores – el
refrigerador para estas viene
equipado con abridores
de botellas incorporados en
cada manija.
4
The Party Cooler lid
provides insulation and
easy beverage access.
La tapa del refrigerador
para estas proporciona
aislación y un acceso
fácil a las bebidas, o
el refrigerador puede
utilizarse sin la tapa.
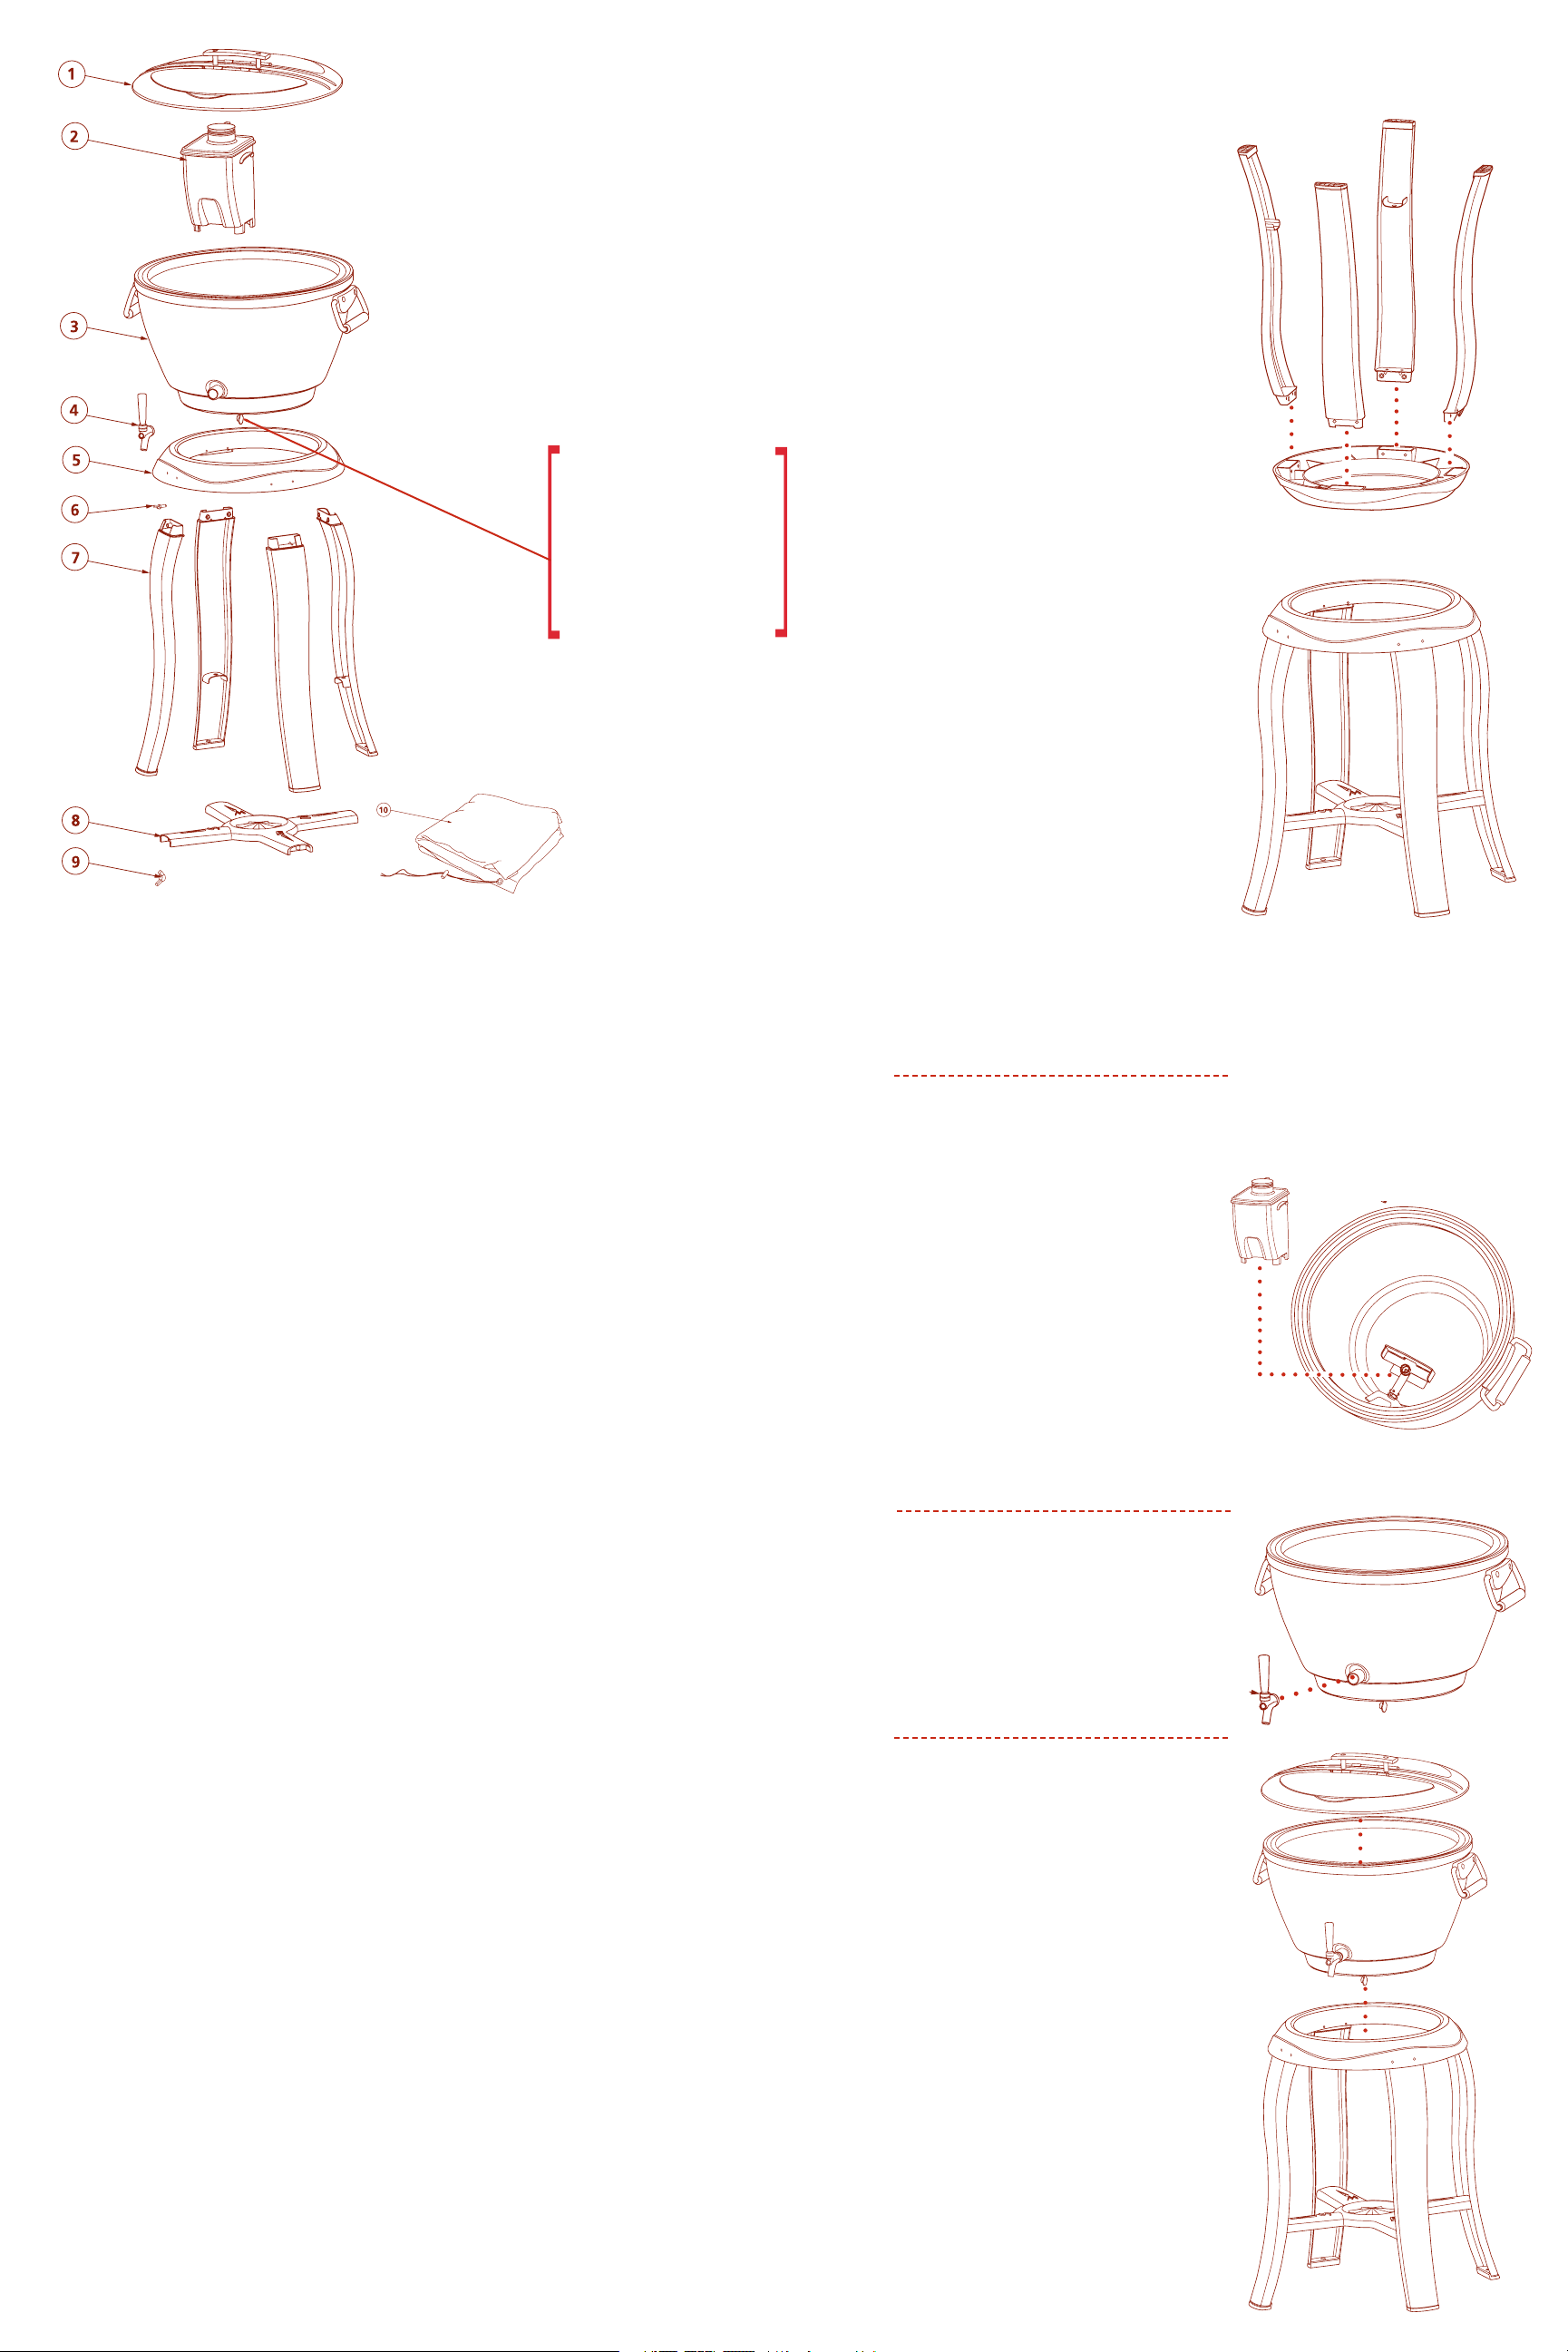
Parts List
Assembly Steps
1. Lid Assembly
2. Beverage Container
Note:
Beverage Container Bracket
(pre-assembled with Party
Cooler Tub)
3. Cooler Tub
4. Tap Assembly
5. Cooler Tub Support Ring
6. Wing Bolts & Lock Washer(8)
7. Legs (4)
8. Support Bracket
9. Wing Nuts (4)
10. Cover (sold separately)
NOTE: The cooler has a drain
located in the bottom of the tub
that can be accessed from the
underside of the cooler tub.
NOTA: El refrigerador posee
un canal de drenaje ubicado en
el fondo del envase al cual se
puede acceder desde la parte
inferior del envase refrigerante.
Lista de Piezas
1. Montaje de la tapa
2. Contenedor de bebidas
Nota: Soporte para el
contenedor de bebidas
(pre armado con el envase
refrigerante para estas)
3. Envase refrigerante
4. Montaje del grifo
5. Aro de soporte del envase
refrigerante
6. Tornillos y arandelas (8)
7. Patas (4)
8. Soporte de apoyo
9. Tuercas (4)
10. Cubierta (se vende por
separado)
STEP ONE
Place the cooler tub
support ring êupside down
on a solid surface, cushion
with a towel or something soft
to prevent scratching and afx
the (4) legs í with (2) wing
bolts and washer ë for each
leg (do not fully tighten the
wing bolts).
Colocar el aro de soporte del envase
refrigerante ê al revés sobre una
supercie sólida, proteger con una
toalla o algo suave para prevenir que
se raye y añadirle las (4) patas í
con 2 tornillos y arandela ë para
cada pata (no ajustar del todo los
tornillos).
STEP TWO
Flip stand right side up and install
the support bracket ì to the leg
assembly with (1) wing nut î for
each leg (do not fully tighten
wing nuts).
Girar la base hacia arriba e instalar el
soporte de apoyo ì al montaje de la pata
con (1) una tuerca î para cada pata (no
ajustar del todo las tuercas).
STEP THREE
Tighten all wing nuts and wing bolts
by hand until secure (do not over
tighten or use a tool).
Ajustar a mano todas las tuercas y los tornillos
hasta que estén rmes (no ajustar por demás
ni utilizar herramientas).
Party Cooler Use and Care
Cleaning parts and surfaces
Party Cooler tub interior
Clean with warm, soapy water and rinse. Open the drain plug on the under side of the tub
to let water escape.
Stainless steel tub exterior and base
Clean the tub exterior and base with warm soapy water and rinse. A multi-purpose, low abrasive
(non phosphorous) metal cleaner or stainless steel cleaner may be used with a soft cloth.
CAUTION: Test metal cleaner on a small area on the underside of the cooler tub to avoid potential
surface damage.
Beverage Container and Beverage Container Bracket
The beverage container and beverage container bracket should be removed from the tub interior for
cleaning. Clean with warm soapy water and rinse.
Cooler Tap
Remove the tap from the cooler and flush with warm soapy water and rinse.
If your Party Cooler has been stored, it is advisable to clean the tub interior, beverage
container, beverage container bracket and cooler tap before and after every use.
Troubleshooting
If tap does not dispense well, clear any particles from the wire mesh strainer on the support bracket
and clear out any particles from the stopper in the liquid container.
Uso y Mantenimiento del Refrigerador Para Fiestas
Limpieza de piezas y superficies
Interior del envase refrigerante para fiestas
Limpia con agua jabonosa tibia y enjuagar. Abrir el tapón de drenaje en la parte inferiór del envase
para dejar escapar el agua.
STEP FOUR
Install the beverage container ç
to the pre-installed bracket
inside the cooler tub by covering
the red notice sign located at the
rear of the Beverage Container
with the back wall of the bracket.
é. Press the beverage container
until it is fully engaged into the
bracket.
Instalar el contenedor de bebidas ç
en el soporte pre instalado dentro del
envase refrigerante cubriendo la etiqueta
roja encoutrada en la parte de atras del
contenedor de bebidas con el soporte para
el contenedor de bebidas. é. Presione
el coutenedor de bebidas hasta que este
ajstado rmemente al soporte para el
coutenedor de bebidas
STEP FIVE
Install the tap assembly è to
the cooler tub é by holding the
tap in a vertical position while
tightening the threaded collar.
Instalar el montaje del grifo è al
envase refrigerante é manteniendo el
grifo en posición vertical mientras se
ajusta la arandela de rosca .
Exterior y base del envase de acero inoxidable
Limpiar el exterior y la base del envase con agua jabonosa tibia y enjuagar. Con una tela suave se
puede aplicar un limpiador de metal para fines múltiples, poco abrasivo (no fosfórico) o un limpiador de
acero inoxidable.
PRECAUCIÓN: Probar el limpiador de metal en una zona pequeña en la parte inferior del envase
refrigerante para evitar un posible daño en la superficie.
Contenedor de bebidas y soporte para el contenedor de bebidas
El contenedor de bebidas y su soporte deben separarse del interior del envase para poder limpiarlos.
Limpiar con agua jabonosa tibia y enjuagar.
Grifo refrigerante
Quitar el grifo del refrigerador y limpiar con agua jabonosa tibia y enjuagar.
Es recommendable limpiar el interior del enuase, el contenedor de bebidas, el soporte para el
contenedor de bebidas y el grifo refrigerante, autes y despues de utilizarlos
Corrección De Fallas
Si el grifo no dispensa la bebida correctamente, remueva el residuo en el colador de metal ubicado
en el soporte de apoyo. Al mismo tiempo, remueva el residuo encontrado al fondo del contenedor de
bebidas.
STEP SIX
Place the cooler tub é into the
assembled base.
Colocar el envase refrigerante é en la
base armada.
STEP SEVEN
Place the lid å on the cooler tub é.
Colocar la tapa å en el envase refrigerante é.
 Loading...