

Page 1

Model ST-15S1 User Guide
DAB / FM / AM Tuner
Page 2

ENGLISH
WARRANTY
For warranty information, contact your local Marantz distributor.
RETAIN YOUR PURCHASE RECEIPT
Your purchase receipt is your permanent record of a valuable purchase.
It should be kept in a safe place to be referred to as necessary for
insurance purposes or when corresponding with Marantz.
IMPORTANT
When seeking warranty service, it is the responsibility of the consumer
to establish proof and date of purchase. Your purchase receipt or
invoice is adequate for such proof.
FOR U.K. ONLY
This undertaking is in addition to a consumer's statutory rights and does
not affect those rights in any way.
FRANÇAIS
GARANTIE
Pour des informations sur la garantie, contacter le distributeur local
Marantz.
CONSERVER L'ATTESTATION D'ACHAT
L'attestation d'achat est la preuve permanente d'un achat de valeur. La
conserver en lieu sur pour s'y reporter aux fins d'obtention d'une
couverture d'assurance ou dans le cadre de correspondances avec
Marantz.
IMPORTANT
Pour l'obtention d'un service couvert par la garantie, il incombe au client
d'établir la preuve de l'achat et d'en corroborer la date. Le reçu ou la
facture constituent des preuves suffisantes.
DEUTSCH
GARANTIE
Bei Garantiefragen wenden Sie sich bitte an Ihren Marantz-Händler.
HEBEN SIE IHRE QUITTING GUT AUF
Die Quittung dient Ihnen als bleibende Unterlage für Ihren wertvollen
Einkauf Das Aufbewahren der Quittung ist wichtig, da die darin
enthaltenen Angaben für Versicherungswecke oder bei Korrespondenz
mit Marantz angeführt werden müssen.
WICHTIG!
Bei Garantiefragen muß der Kunde eine Kaufunterlage mit Kaufdatum
vorlegen. Ihren Quittung oder Rechnung ist als Unterlage ausreichend.
ESPAÑOL
GARANTIA
Para obtener información acerca de la garantia póngase en contacto
con su distribuidor Marantz.
GUARDE SU RECIBO DE COMPRA
Su recibo de compra es su prueba permanente de haber adquirido un
aparato de valor, Este recibo deberá guardarlo en un lugar seguro y
utilizarlo como referencia cuando tenga que hacer uso del seguro o se
ponga en contacto con Marantz.
IMPORTANTE
Cuando solicite el servicio otorgado por la garantia el usuario tiene la
responsabilidad de demonstrar cuándo efectuó la compra. En este
caso, su recibo de compra será la prueba apropiada.
ITALIANO
GARANZIA
L’apparecchio è coperto da una garanzia di buon funzionamento della
durata di un anno, o del periodo previsto dalla legge, a partire dalla data
di acquisto comprovata da un documento attestante il nominativo del
Rivenditore e la data di vendita. La garanzia sarà prestata con la
sostituzione o la riparazione gratuita delle parti difettose.
Non sono coperti da garanzia difetti derivanti da uso improprio, errata
installazione, manutenzione effettuata da personale non autorizzato o,
comunque, da circostanze che non possano riferirsi a difetti di
funzionamento dell’apparecchio. Sono inoltre esclusi dalla garanzia gli
interventi inerenti l’installazione e l’allacciamento agli impianti di
alimentazione.
Gli apparecchi verranno riparati presso i nostri Centri di Assistenza
Autorizzati. Le spese ed i rischi di trasporto sono a carico del cliente.
La casa costruttrice declina ogni responsabilità per danni diretti o
indiretti provocati dalla inosservanza delle prescrizioni di installazione,
uso e manutenzione dettagliate nel presente manuale o per guasti
dovuti ad uso continuato a fini professionali.
Page 3

CE MARKING
English
The ST-15S1 is in conformity with the EMC directive and lowvoltage directive.
Français
Le ST-15S1 est conforme à la directive EMC et à la directive sur
les basses tensions.
Deutsch
Das Modell ST-15S1 entspricht den EMC-Richtlinien und den
Richtlinien für Niederspannungsgeräte.
Español
El ST-15S1 está de acuerdo con las normas EMC y las
relacionadas con baja tensión.
Italiano
Il ST-15S1 è conforme alle direttive CEE ed a quelle per i bassi
voltaggi.
Deutsch
WARNHINWEISE
- Das Gerät nicht Regen oder Feuchtigkeit aussetzen.
- Die Abdeckung nicht vom Gerät abnehmen.
- Keine Gegenstände durch die Belüftungsschlitze stecken.
- Das Netzkabel nicht mit feuchten oder nassen Händen anfassen.
- Decken Sie die Lüftungsöffnungen nicht mit einem Tischtuch, einer
Zeitung, einem Vorhang usw. ab.
- Es dürfen keine Gegenstände mit offener Flamme, wie etwa
brennende Kerzen, auf dem Gerät aufgestellt werden.
- Beachten Sie bei der Entsorgung der verbrauchten Batterien alle
geltenden lokalen und überregionalen Regelungen.
- Auf allen Geräteseiten muß ein Zwischenraum von ungefähr 0,1 meter
vorhanden sein.
- Auf das Gerät dürfen keine mit Flüssigkeiten gefüllte Behälter, wie
etwa eine Vase, gestellt werden.
- Wenn der Schalter ausgeschaltet ist (OFF-Position), ist das Gerät
nicht vollständig vom Stromnetz (MAINS) abgetrennt.
- Das Gerät sollte in der Nähe einer Netzsteckdose aufgestellt werden,
damit es leicht an das Stromnetz angeschlossen werden kann.
English
WARNINGS
- Do not expose the equipment to rain or moisture.
- Do not remove the cover from the equipment.
- Do not insert anything into the equipment through the ventilation
holes.
- Do not handle the mains cord with wet hands.
- Do not cover the ventilation with any items such as tablecloths,
newspapers, curtains, etc.
- No naked flame sources, such as lighted candles, should be placed
on the equipment.
- When disposing of used batteries, please comply with governmental
regulations or environmental public instruction’s rules that apply in
your country or area.
- Make a space of about 0.1 meter around the unit.
- No objects filled with liquids, such as vases, shall be placed on the
equipment.
- When the switch is in the OFF position, the equipment is not
completely switched off from MAINS.
- The equipment shall be installed near the power supply so that the
power supply is easily accessible.
Français
AVERTISSEMENTS
- Ne pas exposer l’appareil à la pluie ni à l’humidité.
- Ne pas essayer de retirer le boîtier de l’appareil.
- Ne rien insérer dans l’appareil par les orifices de ventilation.
- Ne pas manipuler le cordon d’alimentation avec les mains mouillées.
- Ne pas recouvrir les ouïes de ventilation avec un objet quelconque
comme une nappe, un journal, un rideau, etc.
- Ne placer aucune source de flamme nue, comme une bougie allumée,
sur l'appareil.
- Pour mettre au rebut les piles usées, respecter les lois
gouvernementales ou les règlements officiels concernant
l’environnement qui s'appliquent à votre pays ou région.
- Veiller à ce qu’aucun objet ne soit à moins de 0,1 mètre des côtés de
l'appareil.
- Aucun objet rempli de liquide, un vase par exemple, ne doit être placé
sur l'appareil.
- Lorsque l'interrupteur est sur la position OFF, l'appareil n'est pas
complètement déconnecté du SECTEUR (MAINS).
- L'appareil sera installé près de la source d'alimentation, de sorte que
cette dernière soit facilement accessible.
Español
ADVERTENCIAS
- No exponga el equipo a la lluvia ni a la humedad.
- No extraiga la tapa del equipo.
- No introduzca nada en el interior del equipo a través de los orificios de
ventilación.
- No maneje el cable de alimentación con las manos mojadas.
- No cubra la ventilación con objetos como manteles, periódicos,
cortinas, etc.
- No deben colocarse sobre el equipo elementos con fuego, por
ejemplo velas encendidas.
- Cuando se eliminen baterías usadas, deben cumplirse las
reglamentaciones oficiales o las normas de protección
medioambiental aplicables en su país o en su zona.
- Deje un espacio de unos 0,1 metro alrededor de la unidad.
- No se deben colocar sobre el aparato recipientes que contengan
líquidos, como por ejemplo jarrones.
- Cuando el interruptor está en la posición OFF, el equipo no está
completamente desconectado de la alimentación MAINS.
- El equipo se instalará cerca de la fuente de alimentación de manera
que resulte fácil acceder a ella.
Italiano
AVVERTENZE
- Non esporre l’apparecchio alla pioggia o all’umidità.
- Non rimuovere il coperchio dell’apparecchio.
- Non introdurre oggetti all’interno dell’apparecchio attraverso i fori di
ventilazione.
- Non toccare il cavo di alimentazione con le mani bagnate.
- Non coprire le fessure di ventilazione con tovaglie, giornali, tende od
oggetti analoghi.
- Non posare sull'apparecchio sorgenti di fiamme scoperte quali
candele accese.
- Smaltire le pile usate in conformità alle norme governative o
disposizioni ambientali vigenti nel proprio paese o zona.
- Lasciare 0,1 metro liberi tutto intorno l'unità.
- Non mettere sull'apparecchiatura alcun contenitore di liquido, come ad
esempio dei vasi.
- Quando l'interruttore è nella posizione OFF, l'apparecchiatura non è
completamente scollegata da MAINS.
- L’apparecchio va installato in prossimità della fonte di alimentazione,
in modo che quest’ultima sia facilmente accessibile.
Page 4
CONTENTS
FEATURES .............................................................................................................................................1
BEFORE USE .........................................................................................................................................2
PART NAMES AND FUNCTIONS ..........................................................................................................3
FRONT PANEL ..................................................................................................................................................3
REAR PANEL......................................................................................................................................................4
CONNECTIONS......................................................................................................................................5
CONNECTING THE ANTENNA TERMINALS ...................................................................................................5
CONNECTING THE AMPLIFIER .......................................................................................................................6
OPERATION ...........................................................................................................................................7
LISTENING TO FM/AM ......................................................................................................................................7
LISTENING TO DAB BROADCAST .................................................................................................................13
SEARCH MODE ...............................................................................................................................................15
SORT MODE (SORTING COMPONENTS) .....................................................................................................16
OTHER OPERATION ...........................................................................................................................18
LAST FUNCTION MEMORY ............................................................................................................................18
INITIALIZATION OF THE MICROPROCESSOR .............................................................................................18
HOW TO OPERATE THE ILLUMINATION LAMP ...........................................................................................18
CONVENIENT FEATURE.....................................................................................................................19
CONTROL BY REMOTE CONTROLLER ........................................................................................................19
ENGLISH
TROUBLESHOOTING ..........................................................................................................................20
SPECIFICATIONS & DIMENSIONAL DRAWINGS ..............................................................................21
OTHERS ...............................................................................................................................................22
FEATURES
A NOTE ABOUT RECYCLING
• Equipped for Both Band III and L-Band
Reception
• High Performance D/A Converter
• 200 Channels, Group Presets
• Customizable Station Names
• RDS-Compatible
• DRC(Dynamic Range Control)
• Optical and Coaxial Digital Output Jacks
• RDI-Compatible Optical Output Jack
This product’s packaging materials are recyclable
and can be reused. This product and the accessories
packed together are the applicable product to the
WEEE directive except batteries.
Please dispose of any materials in accordance with
your local recycling regulations.
When discarding the unit, comply with your local
rules or regulations.
Batteries should never be thrown away or incinerated
but disposed of in accordance with your local
regulations concerning chemical wastes.
1
Page 5
ENGLISH
DISPLAYDISPLAY
TUNEDTUNED
STEREOSTEREO
DOWNDOWN
TUNING/PRESETTUNING/PRESET
UPUP
RDSRDS
SECONDARYSECONDARY
DAB/FM/AM TUNER ST-15S1DAB/FM/AM TUNER ST-15S1
BANDBAND
SELECTSELECT
AUTOAUTO
TUNETUNE
MENUMENU
ENTERENTER
MEMOMEMO
POWER ON/OFFPOWER ON/OFF
BEFORE USE
This section must be read before any connection is made to
the mains supply.
7
EQUIPMENT MAINS WORKING
SETTING
Your Marantz product has been prepared to comply with the
household power and safety requirements that exist in your
area.
ST-15S1 can be powered by 230V AC only.
7
COPYRIGHT
Recording and playback of any material may require
consent. For further information refer to the following:
-
Copyright Act 1956
-
Dramatic and Musical Performers Act 1958
-
Performers Protection Acts 1963 and 1972
-
Any subsequent statutory enactments and orders
7
Do Not Locate in the Following
Places
To ensure long-lasting use, do not locate the ST-15S1
where:
• Exposed to direct sunlight.
• Near to sources of heat such as heaters.
• Highly humid or poorly ventilated.
• Dusty.
• Subjected to mechanical vibrations.
• On wobbly, inclined or otherwise unstable surfaces
• Radiated heat is blocked such as in cramped audio racks.
• Noise or disturbance tends to occur particularly when
using indoor antennas or 300 Ω/ohms feeder wires. We
recommend using outdoor antennas and 75 Ω/ohms
coaxial cables.
Note
For heat dispersal, do not install this equipment in a
confined space such as a book case or similar unit.
7
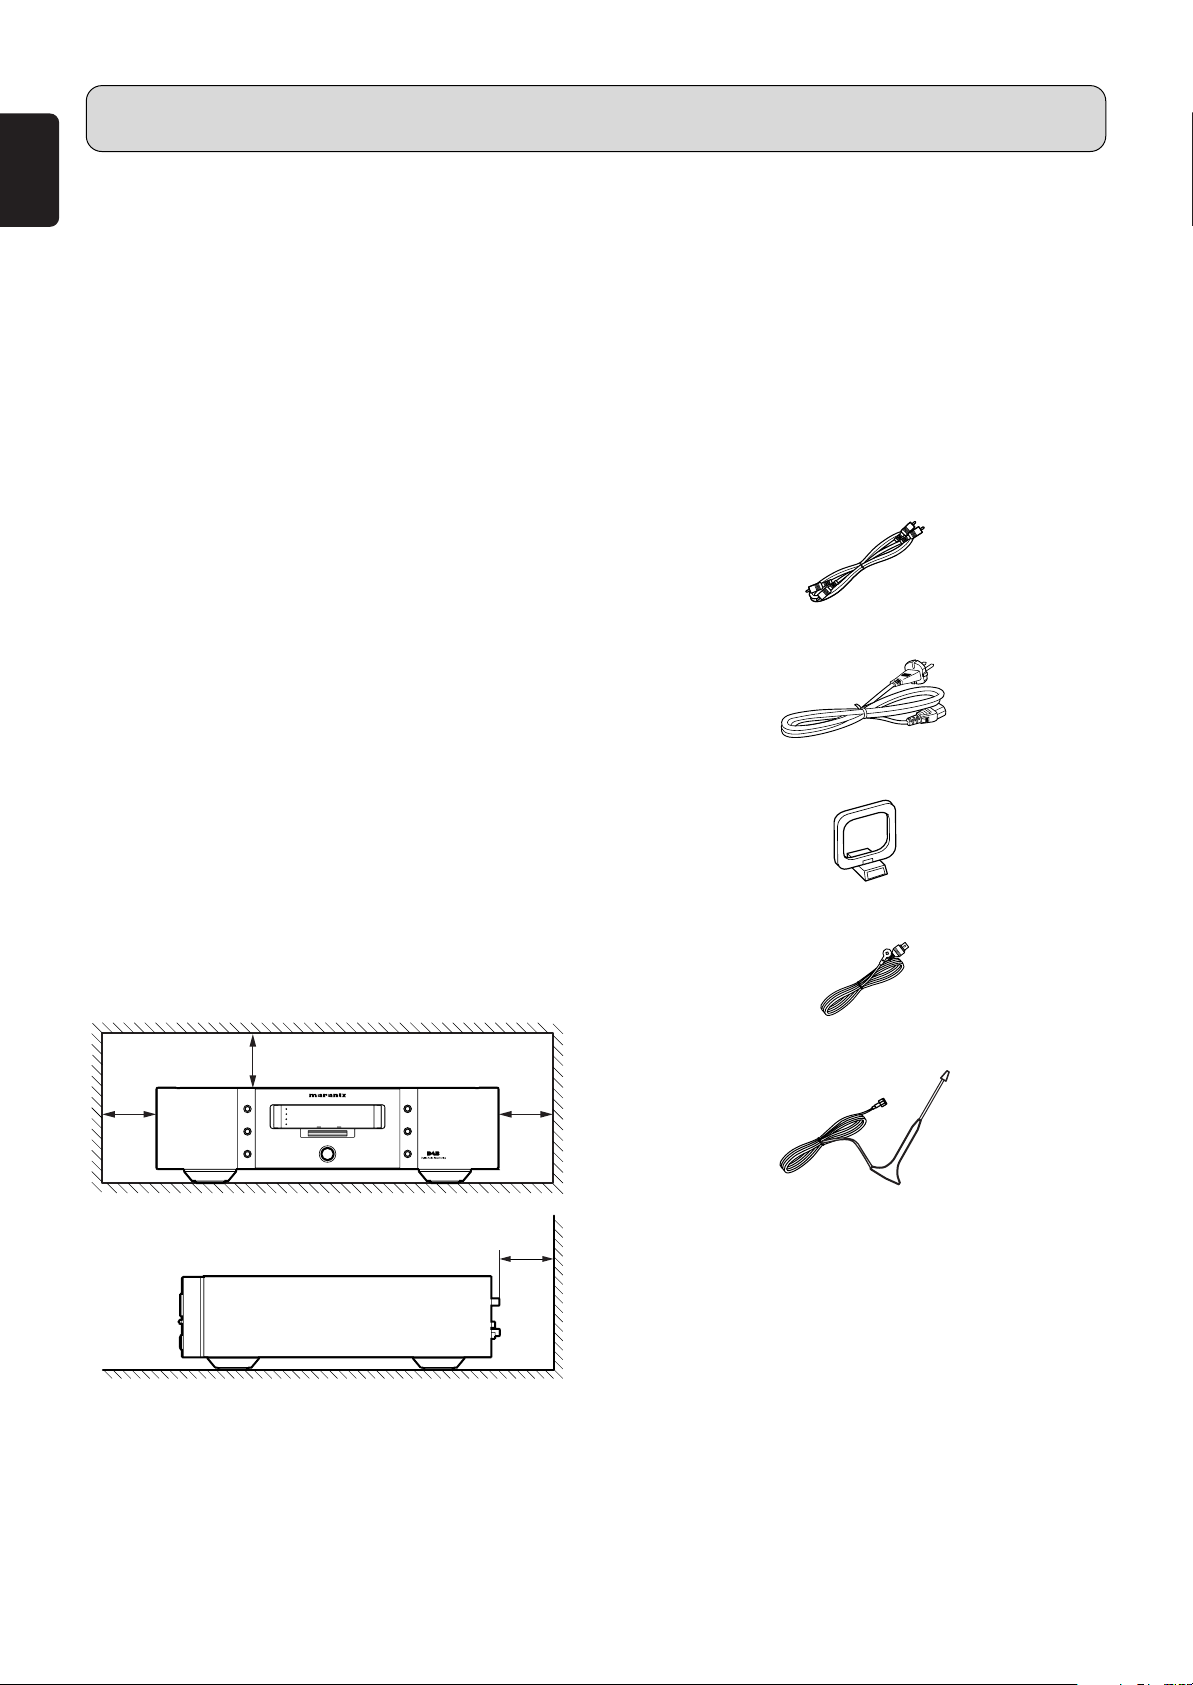
Accessories Check
Before use, check the below accessories were included in
the package.
• Audio connecting cord x 1
• Mains cord x 1
• AM loop antenna x 1
• FM indoor antenna x 1
To ensure proper heat radiation, ensure the below
clearance from walls and other equipment.
Left
0.1 m or more
Above
0.1 m or more
0.1 m or more
Right
Rear
0.1 m or more
Noise or disturbance of the picture may be generated if this
unit or any other electronic equipment using microprocessors
is used near a tuner or TV.
If this happens, take the following steps:
• Install this unit as far as possible from the tuner or TV.
• Set the antenna wires from the tuner or TV away from this
unit’s mains cord and input/output connection cords.
• DAB indoor antenna x 1
• Remote Control Connecting Cord x 1
• User Guide x 1
• Registration Card x 1
2
Page 6
PART NAMES AND FUNCTIONS
DISPLAYDISPLAY
TUNEDTUNED
STEREOSTEREO
DOWNDOWN
TUNING/PRESETTUNING/PRESET
UPUP
RDSRDS
SECONDARYSECONDARY
DAB/FM/AM TUNER ST-15S1DAB/FM/AM TUNER ST-15S1
BANDBAND
SELECTSELECT
AUTOAUTO
TUNETUNE
MENUMENU
ENTERENTER
MEMOMEMO
POWER ON/OFFPOWER ON/OFF
q w e rtyu o !0 !1 !2!5!3 !4i
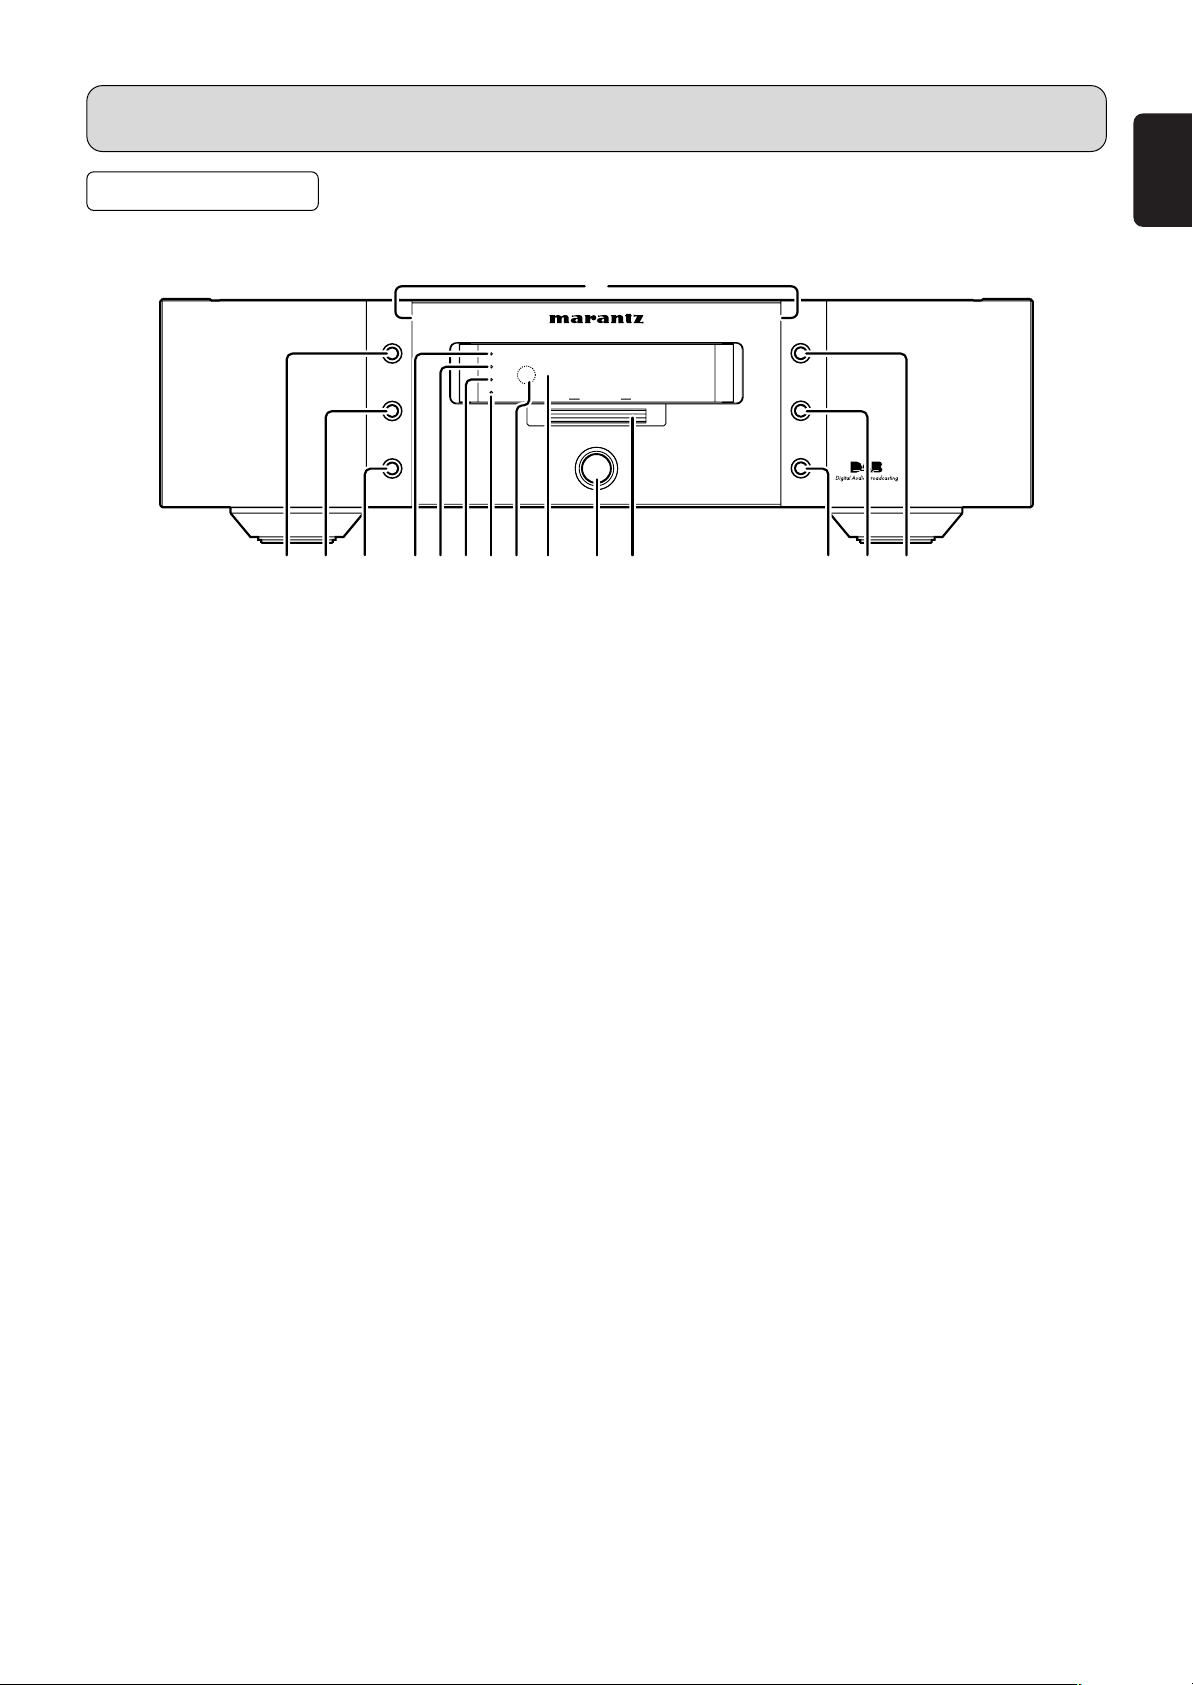
FRONT PANEL
For details on the functions of these parts, refer to the pages given in parenthesis.
q DISPLAY button
This button is used to select the display mode (☞ page
9, 11, 17).
w BAND SELECT button
This button is used to select DAB, FM or AM.
e AUTO TUNE button
• When FM (AM) is selected.
Press to preset automatically FM (AM) stations.
(
page 7)
☞
• When DAB is selected.
Press to active auto location of all available DAB
services.
Press once for UK service or hold for longer than 2
seconds to activate an inter national search.
r TUNED indicator
This indicator illuminates when a station is properly
tuned in.
t STEREO indicator
This indicator illuminates when an FM station is being
tuned into stereo condition.
y RDS indicator
This indicator illuminates when receiving RDS broadcasts,
and flashes during the RDS search.
u SECONDARY indicator
This indicator illuminates when a secondary service is
available (
☞
page 14).
i Remote control sensor
This sensor receives the infrared light transmitted from
the wireless remote control unit.
For remote control, point the wireless remote control unit
to the sensor.
Some of the functions can be operated with the remote
control unit (Accessory of Marantz’s integrated amplifier
PM-11/15 series etc.).
o Display
!0 Power ON/OFF switch
This is used to turn the unit’s power ON and OFF.
When it is pressed, the display lights and the power is
turned on; when it is pressed again, the power is turned off.
!1 GYRO TUNING dial
This dial is used in conjunction with the MENU button,
and is used to select and determine the operation mode.
Also, this dial is used for the TUNING/PRESET search.
In the tuning mode, the reception frequency is tuned up
or down. Turning the control in the right direction tunes
the frequency up. Tuning the control in the left direction
tunes the reception frequency down.
In the preset mode, the selection of the preset channel is
moved up or down. The auto tuning operation cannot be
used when in this mode.
When entering station names, use this control to select
the letters (
!2 MEMO button
Press this button to enter the tuner preset memory
numbers or station names.
!3 ENTER button
This button is used to set the menu.
!4 MENU button
This button to ENTER/EXIT menu mode.
The unit times out if no operation is performed for about
5 seconds after the menu mode is set.
!5 Illumination Lamp
The side illumination casts a blue light over switches and
buttons. It can be turned ON and OFF from the
DISPLAY button. For instructions on how to operate the
side illumination, see “HOW TO OPERATE THE
ILLUMINATION LAMP” on page 18.
Memo
• Please be sure to unplug the cord when you leave home
for, say, a vacation.
• Noise may be generated if a near-by television set is on
during AM, FM or DAB broadcasting reception. The tuner
should be used as far away from a television as possible.
• Effective period of memory back-up is about a month
under normal temperature.
☞
ENGLISH
page 12).
3
Page 7
ENGLISH
a d e f h ij kcb g
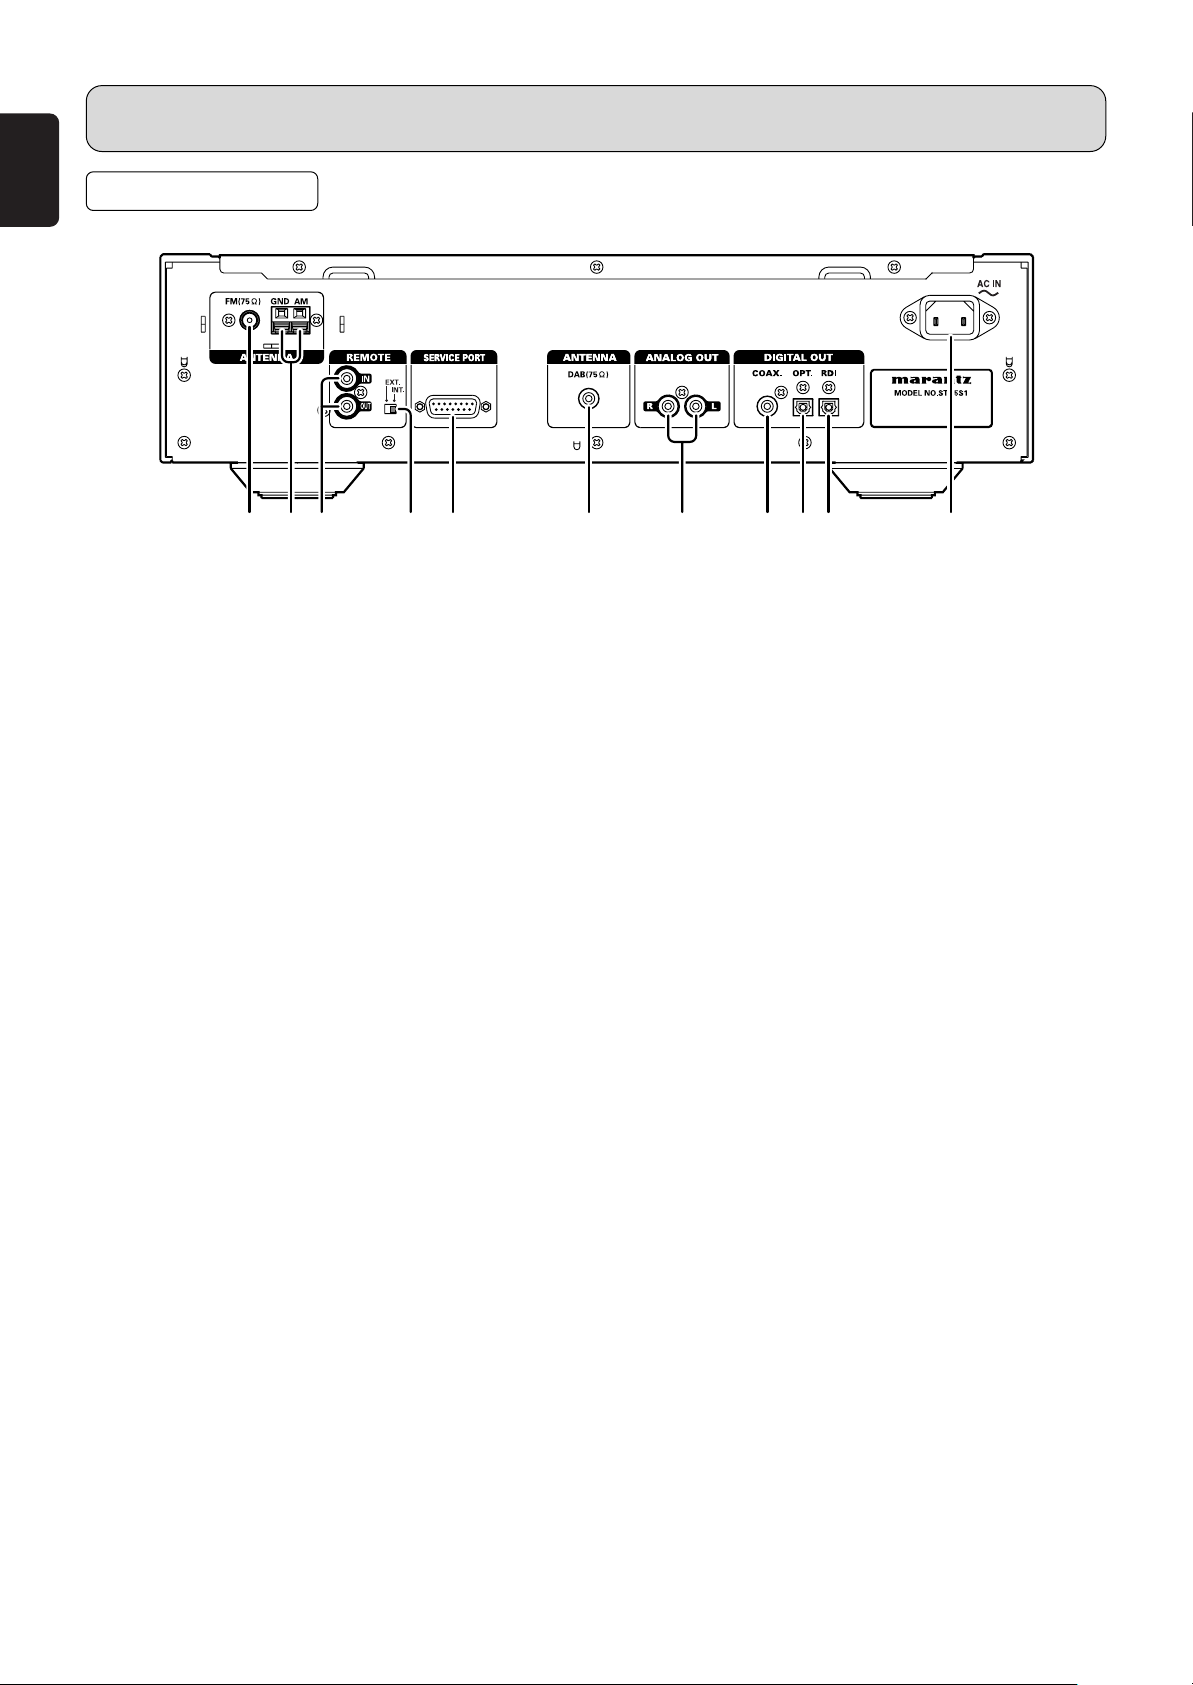
REAR PANEL
PART NAMES AND FUNCTIONS
a FM antenna terminal (75 ohms)
Connect an external FM antenna with a coaxial cable, or
a cable network FM source.
b AM antenna and ground terminals
Connect the supplied AM loop antenna. Use the
terminals marked “AM” and “GND”. The supplied AM
loop antenna will provide good AM reception in most
areas. Position the loop antenna until you hear the best
reception.
c
REMOTE CONTROL IN and OUT connectors
Using the supplied remote control connecting cord,
these connectors enable this unit to be connected to a
Marantz component equipped with remote control
connectors. These connections make it possible to
control an entire system that centers on the amplifier or
other such component.
d EXTERNAL/INTERNAL switch
Before the unit was shipped from the factory, this switch
was set to INTERNAL to enable the remote sensor built
into the unit to be used.
Before using the supplied connecting cord to make the
connection between the unit and the remote control
connectors on a Marantz equipment, set the switch to
EXTERNAL.
Note
• Signals cannot be received from the remote control
unit if the switch is kept at EXTERNAL when the unit is
to be used on its own.
e SERVICE PORT
This port is to be used for service purpose. Normally, it is
not used.
f DAB antenna terminal
Connect an external DAB antenna with a coaxial cable.
g ANALOG OUT (analog output) connectors
The audio signals are output from these connectors.
h DIGITAL OUT COAX. (digital coaxial output)
connector
The audio signals are output digitally from this coaxial
output connector.
i DIGITAL OUT OPT. (digital optical output)
connector
The audio signals are output digitally from this optical
output connector.
j RDI OUT (digital optical output) connector
The RDI (Receiver Data Interface) optical connector
provides access to multiplex data.
This is used for connection to external data or a
computer to access services that will likely be added in
the future.
These services may not yet be provided in your
reception are.
k AC INLET
Plug the supplied mains cord into this AC INLET and
then into the power outlet on the wall.
ST-15S1 can be powered by 230V AC only.
4
Page 8
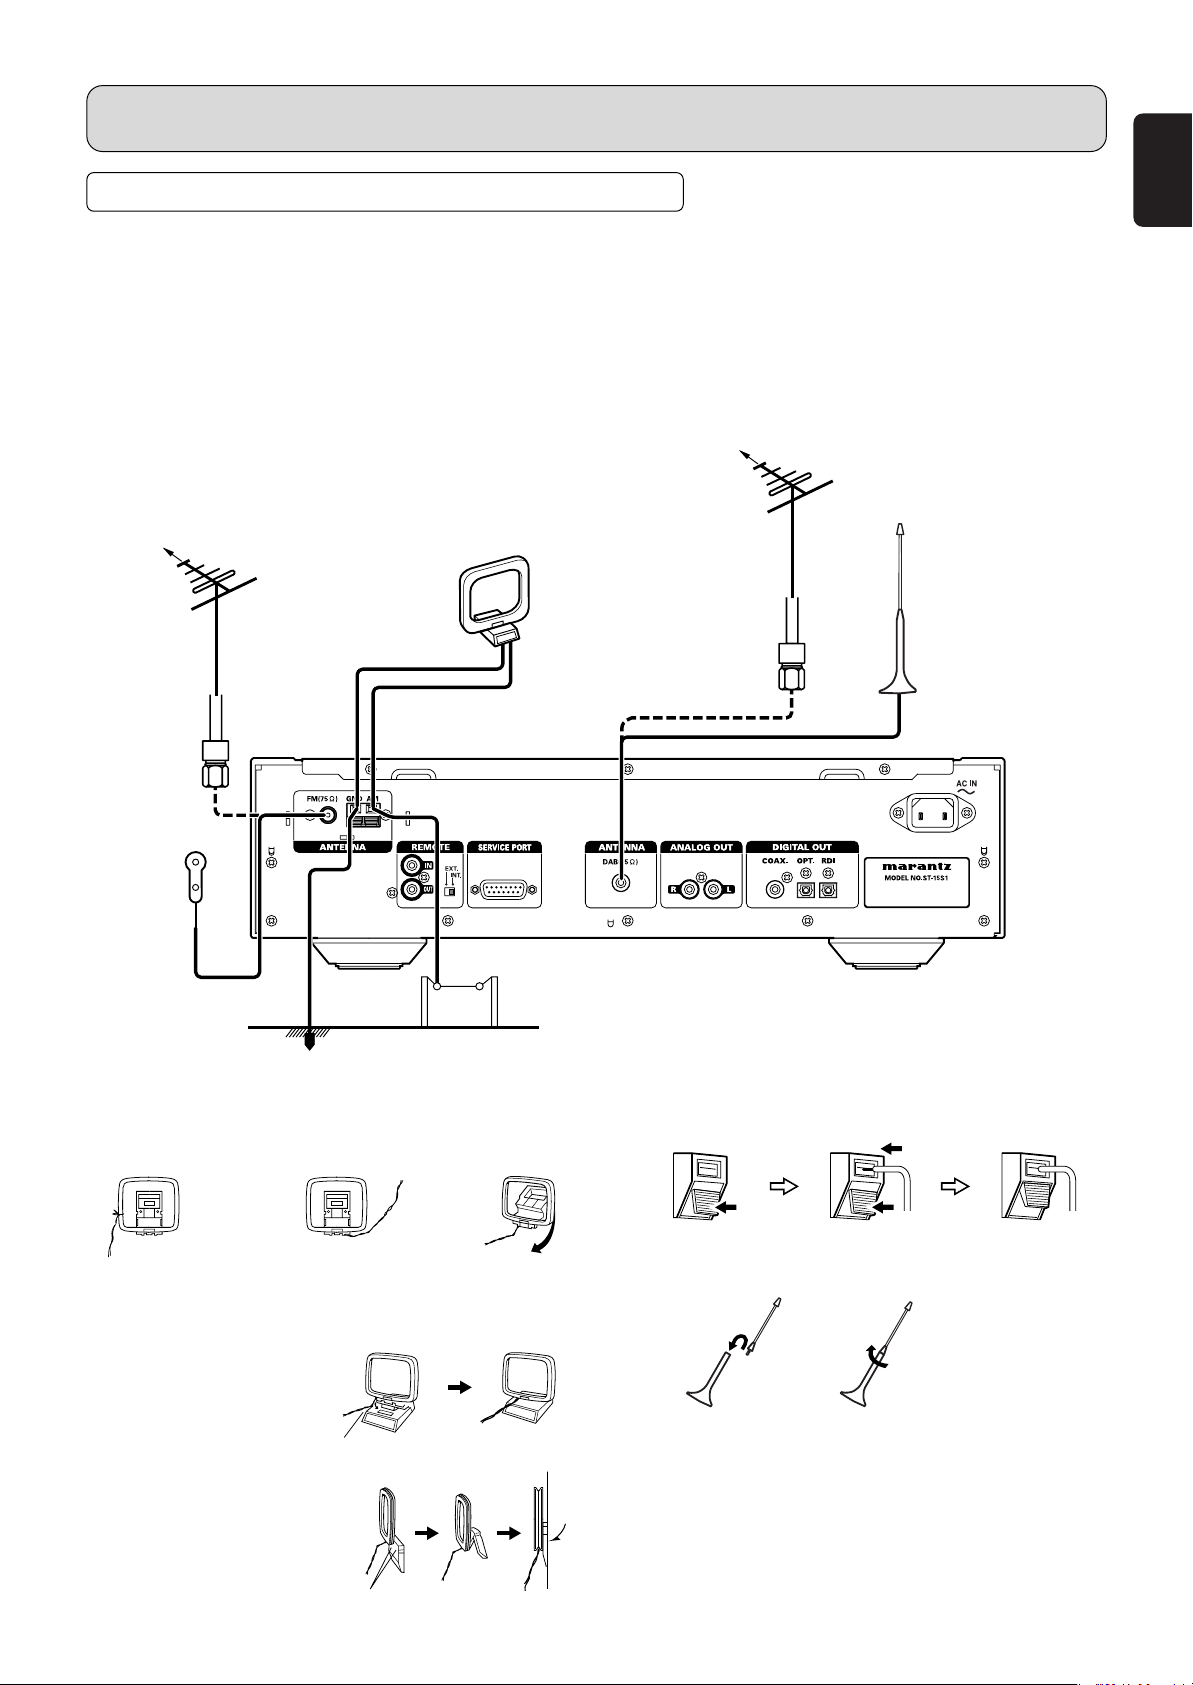
CONNECTIONS
q
r
we
qw
CONNECTING THE ANTENNA TERMINALS
7
Connecting a DAB outdoor antenna
• If good reception cannot be achieved with the included DAB indoor antenna, use a DAB outdoor antenna. Connect an F male
type connector to the coaxial cable and connect the antenna to the DAB COAX 75 Ω/ohms terminal.
7
Installing the DAB indoor antenna
q DAB station reception (☞ page 13).
w Use “Tuning aid” to set position at which reception sensitivity is optimum (
FM outdoor antenna
Direction of broadcasting station
75 Ω/ohms
COAXIAL cable
AM loop antenna
(Supplied)
☞
page 15).
DAB outdoor antenna
DAB indoor antenna
(Supplied)
ENGLISH
FM indoor
antenna
(Supplied)
Use tape or a pin to
fasten the tip of the
antenna to the wall,
a rack, etc.
7
AM loop antenna assembly
Remove the vinyl tie
and take out the
connection line.
a. With the antenna on top
any stable surface.
b. With the antenna attached
to the wall.
Ground
Installation hole Mount on the wall, etc.
AM outdoor antenna
Connect to the AM
antenna terminals.
Bend in the reverse
direction.
Mount
7
Connection of AM antennas
1. Push the lever. 2. Insert the
7
DAB indoor antenna assembly
Note
• Do not connect two FM antennas simultaneously.
• Even if an external AM antenna is used, do not disconnect
the AM loop antenna.
• Make sure AM loop antenna lead terminals do not touch
metal parts of the panel.
• There is a magnetic on the bottom surface of the DAB
indoor antenna. Keep it away from monitors, etc.
conductor.
3. Return the lever.
Mount the antenna’s screw
to the stand.
5
Page 9

ENGLISH
:
LINE 1
ININ OUTOUT
MONITORMONITOR
VCR1VCR1
MONITORMONITOR
RR
PEAKER SYSTEMS 6SPEAKER SYSTEMS 6
--
8 OHMS8 OHMS
CENTERCENTER
RR
FRONTFRONT SURROUND BACKSURROUND BACK
S. SPEAKER BS. SPEAKER B
SURROUNDSURROUND
LL LLLLRR
DVDDVD
OUTOUT
ININ
MONITORMONITOR
TVTVDVDDVDVCR1VCR1
OUTOUTININ
YY
DSSDSS // VCRVCR 22
DVDDVD
COAX.COAX.
OUTOUT
4433OPT.OPT.
OUT OUT
2211
7.1CH INPUT7.1CH INPUT
LL SLSL CC SBLSBL
SBRSBRSWSWSRSRRR
TVTVDVDDVDVCR1VCR1
OUTOUTINININ TOUT
CC
BB
//
PP
BB
CC
RR
//
PP
RR
RC-5RC-5
DIGITALDIGITAL
COMPONENT VIDEOCOMPONENT VIDEO
AUDIOAUDIO
AC OUTLETAC OUTLET
AC INAC IN
100W MAX.100W MAX.
230V 50H230V 50H
ZZ
SWITCHEDSWITCHED
S-S-
VIDEOVIDEO
IN OUT
MONITOR
MONITOR
DVD
Y
DSS / VCR 2
DVD
COAX.
OUT
43OPOPT.
OUOUT
2211
SBRSBRSWSRR
C
B
/
P
B
C
R
/
P
R
RC-5
DDIGITAL
COMPONENT VIDEO
AC IN
S-
VIDEO
:
OPTICAL
IN
ININ OUTOUT
MONITORMONITOR
VCR1VCR1
MONITORMONITOR
RR SRSRCCSWSW SBRSBR
SLSL SBLSBLLL
RR
SPEAKER SYSTEMS 6SPEAKER SYSTEMS 6
--
8 OHMS8 OHMS
CENTERCENTER
RR
FRONTFRONT SURROUND BACKSURROUND BACK
S. SPEAKER BS. SPEAKER B
SURROUNDSURROUND
LL LLLLRR
DVDDVD
OUTOUT
ININ
MONITORMONITOR
TVTVDVDDVDVCR1VCR1
OUTOUTININ
DSSDSS // VCR2VCR2
OUTOUT
VIDEOVIDEO
ININ
YY
DSSDSS // VCRVCR 22
DVDDVD
COAX.COAX.
OUTOUT
4433OPT.OPT.
OUT OUT
2211
7.1CH INPUT7.1CH INPUT
LL SLSL CC SBLSBL
SBRSBRSWSWSRSRRR
TVTVDVDDVDVCR1VCR1
OUTOUTININININ OUTOUT
DSSDSS
//
VCR2VCR2
ININ OUTOUT
CDR/MDCDR/MDTAPETAPE
PRE OUTPRE OUT
OUTOUTININ
((
7575
ΩΩ
))
GNDGND AMAM
CC
BB
//
PP
BB
CC
RR
//
PP
RR
AUDIOAUDIO
ANTENNAANTENNA
RC-5RC-5
DIGITALDIGITAL
COMPONENT VIDEOCOMPONENT VIDEO
AUDIOAUDIO
AC OUTLETAC OUTLET
AC INAC IN
100W MAX.100W MAX.
230V 50H230V 50H
ZZ
SWITCHEDSWITCHED
S-S-
VIDEOVIDEO
IN OUT
MONITOR
Y
DSS / VCR 2
DVD
COAX.
OUT
4433OPT.OPT.
OUT OUT
221
C
B
/
P
B
C
R
/
P
R
RC-5
DIGITALDIGITAL
COMPONENT VIDEO
AC IN
:
COAXIAL
IN
CONNECTIONS
CONNECTING THE AMPLIFIER
Note
• If you want to enjoy listening to the digital output audio of
the DAB, connect to an amplifier outfitted with a digital
optical or coaxial input.
• Do not plug in the mains cord until all connections have
been completed.
• When making connections, also refer to the operating
instructions of the other components.
• Be sure to connect the left and right channels properly
(left with left, right with right).
• Note that binding pin-plug cords together with mains cords
or placing them near a power transformer will result in
generating hum or other noise.
7
Connecting the analog output
connector
Use the audio connecting cord to connect the unit with a
stereo amplifier or AV amplifier. Do not connect the unit to
the PHONO input connectors on the amplifier.
When making the connections, insert the plugs securely into
the connectors. Failure to insert the plugs securely may
result in noise.
7
Connecting the optical output
connector
Use an optical digital connecting cable available on the
market. Insert the plug firmly in until it clicks into place. Do
not bend or bundle the optical digital connecting cable.
Optical digital connecting cable
(available on the market)
Signal flow
6
(Red)
(Red) (White)
Audio connecting cord (supplied)
Signal flow
(White)
7
Connecting the coaxial output
connector
Use a coaxial digital connecting cable available on the market.
Coaxial digital connecting cable
(available on the market)
Signal flow
Page 10

OPERATION
DISPLAYDISPLAY
TUNEDTUNED
STEREOSTEREO
DOWNDOWN TUNING/PRESETTUNING/PRESET UPUP
RDSRDS
SECONDARYSECONDARY
DAB/FM/AM TUNER ST-15S1DAB/FM/AM TUNER ST-15S1
BANDBAND
SELECTSELECT
AUTOAUTO
TUNETUNE
MENUMENU
ENTERENTER
MEMOMEMO
POWER ON/OFFPOWER ON/OFF
w e !0!1 !4!3
LISTENING TO FM/AM
7
FM (AM) Auto preset memory
1. Press the POWER ON/OFF switch !0 to turn on the
power.
2. Watching the display, press the BAND SELECT button
w to select the FM band.
3. Press the AUTO TUNE button e.
4. Press the ENTER button !3.
• The unit automatically begins searching for FM (AM)
broadcast stations.
7
Auto tuning (FM/AM)
1. Press the POWER ON/OFF switch !0 to turn on the
power.
2. Watching the display, press the BAND SELECT button
w to select the desired band (AM or FM).
3. Press the MENU button !4 to select menu.
4. Press the ENTER button !3 to set search mode.
5. Turn the GYRO TUNING dial !1 to select “Auto”.
6. Press the ENTER button !3 to set the auto tuning mode.
ENGLISH
• When the first FM (AM) broadcast station is found, that
station is stored in the preset memory at channel A1.
•
Subsequent stations are automatically stored in order at
preset channels A1 to A10, B1 to B10, C1 to C10, D1 to
D10, E1 to E10, F1 to F10, G1 to G10, H1 to H10, I1 to
I10 and J1 to J10 for a maximum of 100 stations.
• Channel A1 is tuned in after the auto preset memory
operation is completed.
Note
• If an FM (AM) station cannot be preset automatically due
to poor reception, use the “Manual tuning” operation to
tune in the station, then preset it using the manual
“Preset memory” operation.
•
To interrupt this function, press the POWER ON/OFF
switch
!0
.
7
DEFAULT VALUE
Auto tuner presets
A1 ~ A10
B1 ~ B10
87.5 / 89.1 / 98.1 / 108 / 90.1 / 90.1 / 90.1 /
90.1 / 90.1 / 90.1 MHz
522 / 603 / 999 / 1404 / 1611 kHz,
90.1 / 90.1 / 90.1 / 90.1 / 90.1 MHz
C1 ~ C10 90.1 MHz
D1 ~ D10 90.1 MHz
E1 ~ E10 90.1 MHz
F1 ~ F10 90.1 MHz
G1 ~ G10 90.1 MHz
H1 ~ H10 90.1 MHz
I1 ~ I10 90.1 MHz
J1 ~ J10 90.1 MHz
7. Turn the GYRO TUNING dial !1.
• Automatic searching begins, then stops when a station
tuned in.
Note
When in the auto tuning mode on the FM band, the
•
“STEREO” indicator lights on the panel when the stereo
broadcast is tuned in. At open frequencies, the noise is
muted and the “TUNED” and “STEREO” indicators tuned off.
• If the signal is weak, if may be difficult to tune into the
station in stereo.
• If tuning does not stop at the desired station. Use “Manual
tuning” operation.
7
Page 11

ENGLISH
DISPLAYDISPLAY
TUNEDTUNED
STEREOSTEREO
DOWNDOWN TUNING/PRESETTUNING/PRESET UPUP
RDSRDS
SECONDARYSECONDARY
DAB/FM/AM TUNER ST-15S1DAB/FM/AM TUNER ST-15S1
BANDBAND
SELECTSELECT
AUTOAUTO
TUNETUNE
MENUMENU
ENTERENTER
MEMOMEMO
POWER ON/OFFPOWER ON/OFF
w !0!1 !2 !4!3
OPERATION
7
Manual tuning (FM/AM)
1. Press the POWER ON/OFF switch !0 to turn on the
power.
2. Watching the display, press the BAND SELECT button
w to select the desired band (AM or FM).
3. Press the MENU button !4 to select menu.
4. Press the ENTER button !3 to set search mode.
5. Turn the GYRO TUNING dial !1 to select “Manual”.
6. Press the ENTER button !3 to set the manual tuning
mode.
7. Turn the GYRO TUNING dial !1 to tune in the desired
station.
7
Preset stations (FM/AM)
1. Use the “Auto tuning” or “Manual tuning” operation to
tune in the station to be preset in the memory.
2. Press the MENU button !4 to select menu.
3. Turn the GYRO TUNING dial !1 to select “Memory”.
7
Recalling preset stations (FM/AM)
1. Press the POWER ON/OFF switch !0 to turn on the
power.
2. Watching the display, press the BAND SELECT button
w to select the desired band (AM or FM).
3. Press the MENU button !4 to select menu.
4. Press the ENTER button !3 to set search mode.
5.
Turn the GYRO TUNING dial !1 to select “Preset”.
6. Press the ENTER !3 button and set the preset mode.
7. Watching the display, turn the
select the desired preset channel.
GYRO TUNING dial !1
to
4. Press the ENTER button !3 to set the preset mode and
make the preset channel number flash.
• Steps 1 to 4 can be skipped when using the MEMO
!2 button.
When this button is pressed, the preset memory
standby mode is set, regardless of the menu setting at
that time.
5. While the preset channel number is flashing, turn the
GYRO TUNING dial !1 to select the desired preset
channel (1 to 10).
6. While the preset channel number is flashing, press the
ENTER button !3 or MEMO button !2 to store the station
in the preset memory.
• To preset other channels, repeat steps 2 to 6.
• A total of 100 broadcast stations can be preset — 10
stations (channels 1 to 10) in each of groups A to J.
8
Page 12

OPERATION
DISPLAYDISPLAY
TUNEDTUNED
STEREOSTEREO
DOWNDOWN TUNING/PRESETTUNING/PRESET UPUP
RDSRDS
SECONDARYSECONDARY
DAB/FM/AM TUNER ST-15S1DAB/FM/AM TUNER ST-15S1
BANDBAND
SELECTSELECT
AUTOAUTO
TUNETUNE
MENUMENU
ENTERENTER
MEMOMEMO
POWER ON/OFFPOWER ON/OFF
!1 !4q !3
7
RDS (Radio Data System)
• RDS (works only on the FM band) is a broadcasting
service which allows station to send additional information
along with the regular radio program signal.
• The following three types of RDS information can be
received on this unit:
• Program Type (PTY)
• PTY identifies the type of RDS program.
• The program types and their displays are as follows:
NEWS
AFFAIRS
INFO
SPORT
EDUCATE
DRAMA
CULTURE
SCIENCE
VARIED
POP M
ROCK M
EASY M
LIGHT M
CLASSICS
News
Current
Affairs
Information
Sports
Education
Drama
Culture
Science
Varied
Pop Music
Rock Music
Easy
Listening
Music
Light
Classical
Serious
Classical
OTHER M
WEATHER
FINANCE
CHILDREN
SOCIAL
RELIGION
PHONE IN
TRAVEL
LEISURE
JAZZ
COUNTRY
NATION M
OLDIES
FOLK M
DOCUMENT
Other Music
Weather
Finance
Children’s
Programs
Social Affairs
Religion
Phone In
Travel
Leisure
Jazz Music
Country Music
National Music
Oldies Music
Folk Music
Documentary
• Traffic Program (TP)
•
TP identifies programs that carry traffic announcements.
• This allows you to easily find out the latest traffic
conditions in your area before you leaving home.
7
RDS search
Use this function to automatically tune to FM stations that
provide RDS service.
1. Press the MENU button !4 to select menu.
2. Turn the GYRO TUNING dial !1 to display “RDS”.
3. Press the ENTER button !3 to set the RDS search
selection mode.
4. Turn the GYRO TUNING dial
!1
to display “RDS
Search”.
5. Press the ENTER !3 button to set the RDS search
standby mode.
6. Turn the GYRO TUNING dial
!
1. The RDS search
automatically begins and the RDS LED flashes.
• If no RDS station is found with above operation, all the
reception band are searched.
• When the broadcast station is found, that station’s
name appears on the display.
7.
ENGLISH
• Radio Text (RT)
• RT allows the RDS station to send text messages that
appear on the display.
Note
• The following RDS functions are not applicable where
there is no RDS signal, and pressing the DISPLAY button
q will not alter display.
• If no other RDS station is found when all the
frequencies are searched, “NO RDS” is displayed.
9
Page 13

ENGLISH
DISPLAYDISPLAY
TUNEDTUNED
STEREOSTEREO
DOWNDOWN TUNING/PRESETTUNING/PRESET UPUP
RDSRDS
SECONDARYSECONDARY
DAB/FM/AM TUNER ST-15S1DAB/FM/AM TUNER ST-15S1
BANDBAND
SELECTSELECT
AUTOAUTO
TUNETUNE
MENUMENU
ENTERENTER
MEMOMEMO
POWER ON/OFFPOWER ON/OFF
!1 !4!3
OPERATION
7
PTY search
• Use this function to find RDS stations broadcasting a
designated program type (PTY).
• For a description of each program type, refer to “Program
Type (PTY)”.
1. Press the MENU button !4 to select menu.
2. Turn the GYRO TUNING dial
!1
to display “RDS”.
3. Press the ENTER button !3 to set the RDS search
selection mode.
4. Turn the GYRO TUNING dial
!1
to display “PTY
Search”.
5. Press the ENTER button !3 to set the PTY search
selection mode.
6. Watching the display, turn the GYRO TUNING dial
!1
call out the desired program type.
• When receiving an RDS station, its program type is
displayed first.
• When not receiving an RDS station, “PTY” flashes.
7. Press the ENTER button !3 to set the PTY search
standby mode.
7
TP search
Use this function to find RDS stations broadcasting traffic
program (TP).
1. Press the MENU button !4 to select menu.
2. Turn the GYRO TUNING dial !1 to display “RDS”.
3. Press the ENTER button !3 to set the RDS search
selection mode.
4. Turn the GYRO TUNING dial !1 to display “TP Search”.
5. Press the ENTER button !3 to set the TP search
standby mode.
to
6. Turn the GYRO TUNING dial
!1
. The RDS search
automatically begins and the RDS LED flashes.
• If no TP station is found with above operation, all the
reception bands are searched.
• The station name is displayed on the display after
searching stops.
7.
• If no other TP station is found when all the frequencies
are searched, “NO programme” is displayed.
8. Turn the GYRO TUNING dial
!
1. The RDS search
automatically begins and the RDS LED flashes.
• If there is no station broadcasting the designated
program type above operation, all the reception bands
are searched.
• The station name is displayed on the display after
searching stops.
9.
• If no other station broadcasting the designated
program type is found when all the frequencies are
searched, “NO programme” is displayed.
10
Page 14

OPERATION
DISPLAYDISPLAY
TUNEDTUNED
STEREOSTEREO
DOWNDOWN TUNING/PRESETTUNING/PRESET UPUP
RDSRDS
SECONDARYSECONDARY
DAB/FM/AM TUNER ST-15S1DAB/FM/AM TUNER ST-15S1
BANDBAND
SELECTSELECT
AUTOAUTO
TUNETUNE
MENUMENU
ENTERENTER
MEMOMEMO
POWER ON/OFFPOWER ON/OFF
!1 !4!3q
7
RT (Radio Text)
1. Press the MENU button !4 to select menu.
2. Turn the GYRO TUNING dial !1 to display “RDS”.
3. Press the ENTER button !3 to set the RDS search
selection mode.
4. Turn the GYRO TUNING dial !1 to display “RT
ON/OFF”.
5. Press the ENTER button !3 to set the RT ON/OFF
selection mode.
6. Turn the GYRO TUNING dial !1 to choose the “RT ON”
or “RT OFF”.
7. Press the ENTER button !3 to set whether to enable or
stop the RADIO TEXT function.
• If no text data is being broadcast, “NO TEXT DATA” is
displayed.
7
Switching RDS information display
1. Use the procedure described at “Auto tuning”, “Manual
tuning” or “Recalling preset stations” to tune in a
frequency with an RDS station.
2. Press the DISPLAY button q to switch the RDS
reception information.
• The display switches as shown below each time the
DISPLAY button q is pressed.
q STATION NAME:
Only displayed when the search mode is set to
PRESET and the station name has been registered.
w PS:
The program service name and frequency of the
station tuned in is displayed.
The above is an example for when there is TP
data but no RT data.
e PTY:
The program type of the tuned in broadcast is
displayed.
ENGLISH
r CT:
The current time is displayed.
• When the “STATION NAME” is not registered, q is
not displayed.
11
Page 15

ENGLISH
DISPLAYDISPLAY
TUNEDTUNED
STEREOSTEREO
DOWNDOWN TUNING/PRESETTUNING/PRESET UPUP
RDSRDS
SECONDARYSECONDARY
DAB/FM/AM TUNER ST-15S1DAB/FM/AM TUNER ST-15S1
BANDBAND
SELECTSELECT
AUTOAUTO
TUNETUNE
MENUMENU
ENTERENTER
MEMOMEMO
POWER ON/OFFPOWER ON/OFF
!1 !2 !4!3
OPERATION
7
Registering station names
(FM/AM only)
1. Use the procedure described at “Auto tuning”, “Manual
tuning” or “Recalling preset stations” to tune in the
desired frequency.
Example: To register “MARANTZ” as the FM station
name at preset channel “A2”.
2. Press the MENU button !4 to select menu.
3. Turn the GYRO TUNING dial !1 to display “Station
Name”.
4. Press the ENTER button !3 to display the Station Name
setting.
5. While “_” is flashing, turn the GYRO TUNING dial !1 to
display “M”.
6.
The “_” moves to the right when the ENTER button !3 is
pressed. Use the same procedure to display “A”, “R”, “A”,
“N”, “T”, and “Z”, in that order.
7. Press the ENTER button !3 for at least 2 seconds.
• The station name is set.
8. Then “A2” blinks, either press the ENTER button !3 or
MEMO button !2 to store the station name in the preset
memory.
• This procedure can be used to registered station
names with up to 8 digits for up to 100 AM/FM stations
at random.
• The 63 characters below can be selected.
A B C D E F G H I J K L M N O P Q R S T U V W X
Y Z 0 1 2 3 4 5 6 7 8 9 [ \ ] ^ _ ! # “ $ % & ’ ( )
– . / : ; < = > ? (space)
+ ,
*
12
Page 16

OPERATION
DAB Signal
Ensemble
Service
Components
Ensemble
Name
Station Name
Program type
National DAB
(Service 1)
Alpha 1
(Primary)
Pop Music
Parliament
(Secondary)
News
Alpha 2
Sports
Alpha 3
Classic
Alpha 4
Educate
(Service 2) (Service 3) (Service 4)
DAB Service Diagram
LISTENING TO DAB BROADCAST
7
About DAB (Digital Audio Broadcasting)
• Since the DAB system is broadcasted in digital format, DAB system can supply crystal-clear audio and stable reception even
in mobile objects. DAB is a new generation radio which can provide data service and supplementary multi-media services.
• DAB broadcasts multiple services under one Ensemble that are called service components.
• Each component contains inherent programs; news, music, sports, and many more.
• Each Ensemble and service component has its label, and users can recognize a current broadcasting station and service
contents by using the label.
• The main service component is broadcast as Primary while the others are broadcast as Secondary.
• Also rich character information is serviced through Dynamic Labels; song title, artist composer etc.
ENGLISH
13
Page 17

ENGLISH
DISPLAYDISPLAY
TUNEDTUNED
STEREOSTEREO
DOWNDOWN TUNING/PRESETTUNING/PRESET UPUP
RDSRDS
SECONDARYSECONDARY
DAB/FM/AM TUNER ST-15S1DAB/FM/AM TUNER ST-15S1
BANDBAND
SELECTSELECT
AUTOAUTO
TUNETUNE
MENUMENU
ENTERENTER
MEMOMEMO
POWER ON/OFFPOWER ON/OFF
ew !0!1 !3
OPERATION
7
Tuning in DAB (Digital Audio
Broadcasting) broadcasts
1. Press the POWER ON/OFF switch !0 to turn on the
power.
2. Watching the display, press the BAND SELECT button
w to select the desired band (DAB).
3. Watching the display, press the AUTO TUNE e to start
automatically scanning.
Tune in the first broadcast station.
5. Press the ENTER button !3 to listen to the selected
station.
• After “Now tuning…” is displayed, the tuned in station
appears.
7
Preset stations
1. Follow steps 1 to 4 under “Tuning in DAB (Digital Audio
Broadcasting) broadcasts” to tune in the station to be
preset.
2. Perform steps 2 to 6 under “Preset Stations (FM/AM)”.
• Up to 100 “S. Component” can be preset (DAB alone).
7
Recalling preset stations
The same procedure as for FM/AM stations. (☞ page 8)
1. Perform steps 1 to 7 under “Recalling Preset stations
(FM/AM)” (
☞
page 8)
2. Press the ENTER button !3 to listen to the selected
station.
• After “Now tuning...” is displayed, the tuned in station
appears.
• Using the DAB for the first time
When you first switch on the unit and select DAB, the
Auto Tuning function scans the Band III and L-band
frequencies. After the scanning, the first scanned
component will be selected.
To listen to other stations, use one of the search
modes shown below.
Press the AUTO TUNE button e and release it in less
than 2 seconds to perform a local scan (UK band III).
(UK stations are in the range 11B to 12D).
Press the button for over 2 seconds then release it to
perform the full scan operation (Full band III and Lband: 5A to LW).
Once auto scanning is completed, the number of
broadcast stations is displayed, then the first station is
tuned in.
If “Station not available” is displayed, check the
antenna’s connection (
☞
page 5).
You may want to re-tune at a later date if you move
the ST-15S1 or if you want to receive a newly
introduced ensemble.
Press the AUTO TUNE button e.
4. Turn the GYRO TUNING dial !1 to select the station.
• If the station you select is in stereo, the “STEREO”
indicator will light up.
• About Secondary service
When receiving a Secondary service, “<< >>” are
indicated to the right of “Channel and Frequency”.
When the ENTER button !3 is pressed, the Secondary
service Component is received and the Secondary
indicator lights.
Press ENTER button !3 to go back to the Primary
service again.
14
Page 18

OPERATION
DISPLAYDISPLAY
TUNEDTUNED
STEREOSTEREO
DOWNDOWN TUNING/PRESETTUNING/PRESET UPUP
RDSRDS
SECONDARYSECONDARY
DAB/FM/AM TUNER ST-15S1DAB/FM/AM TUNER ST-15S1
BANDBAND
SELECTSELECT
AUTOAUTO
TUNETUNE
MENUMENU
ENTERENTER
MEMOMEMO
POWER ON/OFFPOWER ON/OFF
!1 !4!3
SEARCH MODE
7
Sorted list search mode
• You can select any component for listening from the list of
sorted components.
• The sorted components are set in the sort mode. (
page 16)
1. Press the MENU !4 button to select menu.
2. Turn the GYRO TUNING dial !1 to display the search
mode selection screen.
3. Press the ENTER button !3 to set the search mode.
4. Turn the GYRO TUNING dial !1 to select “Search Mode
(Sorted List)”.
5. Press the ENTER button !3 to display the first channel
on the Sorted List.
☞
7
Tuning aid
1. Press the MENU button !4 to select menu.
2. Turn the GYRO TUNING dial !1 to display the search
mode selection screen.
3. Press the ENTER button !3 to set the search mode.
4. Turn the GYRO TUNING dial !1 to select “Search Mode
(Tuning aid)”.
5. Press the ENTER button !3 to display the first channel at
Tuning aid.
6. Turn the GYRO TUNING dial !1 to display the frequency
of the ensemble that you want to receive.
ENGLISH
• You can select any component from the sorted list.
7
Preset search mode
1. Press the MENU button !4 to select menu.
2. Turn the GYRO TUNING dial !1 to display the search
mode selection screen.
3. Press the ENTER button !3 to set the search mode.
4. Turn the GYRO TUNING dial !1 to select “Search Mode
(Preset)”.
5. Press the ENTER button !3 to display the first channel at
Preset.
• You can select any component from the preset.
7. Press the ENTER button !3 to display the signal strength
for that ensemble.
• Move antenna while watching the display and to try to
raise the current level to the “>” mark.
8. Press the ENTER button !3 to display the first channel
on this ensemble (Sounds comes out).
• The search mode at this time is set to “Sorted list
search mode”.
15
Page 19

ENGLISH
DISPLAYDISPLAY
TUNEDTUNED
STEREOSTEREO
DOWNDOWN TUNING/PRESETTUNING/PRESET UPUP
RDSRDS
SECONDARYSECONDARY
DAB/FM/AM TUNER ST-15S1DAB/FM/AM TUNER ST-15S1
BANDBAND
SELECTSELECT
AUTOAUTO
TUNETUNE
MENUMENU
ENTERENTER
MEMOMEMO
POWER ON/OFFPOWER ON/OFF
!1 !4!3
OPERATION
SORT MODE
(SORTING COMPONENTS)
•
You can sort and list scanned components by Alphanumeric,
S. component or program type.
• You can then select the component you want to listen to
from the list.
7
Alphanumeric
The “S.Component” is sorted in alphanumerical order.
1. Press the MENU button !4 to select menu.
2. Turn the GYRO TUNING dial !1 to display the sort mode
selection screen.
3. Press the ENTER button !3 to set the sort mode.
4. Turn the GYRO TUNING dial !1 to select “Sort Mode
(Alphanumeric)”.
7
PTY
The “S.Component” is sorted in the order of the program
Type.
1. Press the MENU button !4 to select menu.
2. Turn the GYRO TUNING dial !1 to display the sort mode
selection screen.
3. Press the ENTER button !3 to set the sort mode.
4. Turn the GYRO TUNING dial !1 to select “Sort Mode
(PTY)”.
5. Press the ENTER button !3 to set the sort mode to “Sort
Mode (PTY)”.
• You can select any component from the sorted list.
5. Press the ENTER button !3 to set the sort mode to “Sort
Mode (Alphanumeric)”.
• You can select any component from the sorted list.
7
S. component
• You can select an S.component for listening from the list
of scanned S.components produced by using the “Tuning
in DAB broadcasts” (
☞
page 14)
• The “S. Component” is sorted in the order of the Service
component frequencies.
1. Press the MENU button !4 to select menu.
2. Turn the GYRO TUNING dial !1 to display the sort mode
selection screen.
3. Press the ENTER button !3 to set the sort mode.
4. Turn the GYRO TUNING dial !1 to select “Sort Mode (S.
Component)”.
5. Press the ENTER button !3 to set the sort mode to “Sort
Mode (S. Component)”.
• You can select any component from the sorted list.
16
Page 20

OPERATION
DISPLAYDISPLAY
TUNEDTUNED
STEREOSTEREO
DOWNDOWN TUNING/PRESETTUNING/PRESET UPUP
RDSRDS
SECONDARYSECONDARY
DAB/FM/AM TUNER ST-15S1DAB/FM/AM TUNER ST-15S1
BANDBAND
SELECTSELECT
AUTOAUTO
TUNETUNE
MENUMENU
ENTERENTER
MEMOMEMO
POWER ON/OFFPOWER ON/OFF
!1q !3
7
Switching the DAB information
display
1. Follow steps 1 to 4 under “Tuning in DAB (Digital Audio
Broadcasting) broadcasts” (
DAB station.
2. Press the DISPLAY button q to switch the DAB
reception information.
• The display switches as shown below each time the
DISPLAY button q is pressed.
q DLS (Dynamic Label Segment) :
The text data included in the broadcast scrolls.
w Ensemble Name :
The ensemble name is displayed.
e PTY (Program Type) :
The category of the broadcast being received is
displayed.
page 14) to tune in a
☞
7
DRC (Dynamic Range Control)
• The DRC (Dynamic Range Control) function lets you
change the dynamic range of the received sound
depending on the content of the broadcast so that the
sound is easier to hear even when the volume is low.
1. Press the MENU button !4 to select menu.
2. Turn the GYRO TUNING dial !1 to display the DRC
value mode selection screen.
3. Press the ENTER button !3 to set the DRC value mode.
4. Turn the GYRO TUNING dial !1 to choose the “DRC
ON” or “DRC OFF”.
DRC OFF:DRC is switched off.
Any DRC level broadcast will be ignored.
This is the default setting.
DRC ON:
Applies DRC level as sent with the broadcast.
5. Press the ENTER button !3 to set DRC function.
• This is effective when in a noisy environment and in
quiet sections of broadcast programs.
The broadcast’s DRC level is set at the broadcast station.
The DRC can be changed to achieve the optimum level.
ENGLISH
r Channel and Frequency :
The frequency is displayed.
t Audio Information :
The bit rate and mode of the broadcast being
received is displayed.
y Time and Date :
The current time and date are displayed.
u Bit Error Rate :
Noise may be generated and reception quality may
become poor at bit error rates above 0.05. If a rate
above 0.05 is displayed, move the antenna in
different directions to find a position where the rate
displayed is less than 0.05.
17
Page 21

ENGLISH
DISPLAYDISPLAY
TUNEDTUNED
STEREOSTEREO
DOWNDOWN TUNING/PRESETTUNING/PRESET UPUP
RDSRDS
SECONDARYSECONDARY
DAB/FM/AM TUNER ST-15S1DAB/FM/AM TUNER ST-15S1
BANDBAND
SELECTSELECT
AUTOAUTO
TUNETUNE
MENUMENU
ENTERENTER
MEMOMEMO
POWER ON/OFFPOWER ON/OFF
!4!0wq
OTHER OPERATION
LAST FUNCTION MEMORY
• This unit is equipped with a last function memory which
stores the input and output setting conditions as they were
immediately before the power is switched off.
This function eliminates the need to perform complicated
resettings when the power is turned on.
• The unit is also equipped with a back-up memory.
This function provides approximately one week of memory
storage when the main unit’s power switch is off and with
the mains cord disconnected.
INITIALIZATION OF THE
MICROPROCESSOR
• When the indication of the display is not normal or when
the operation of the unit does not shows the reasonable
result, the initialization of the microprocessor is required
by the following procedure.
1. Press the POWER ON/OFF switch !0 to turn on the
power.
2. Press at the same time for MENU button !4 + BAND
SELECT button w and main cord pull out.
3. Main cord pull in.
4. During the initialization, it is converted to DAB Auto
Tuning state.
HOW TO OPERATE THE
ILLUMINATION LAMP
The illumination lamp has an always-ON mode and an
always-OFF mode. In the always-ON mode, the illumination
lamp turns ON/OFF in sync with the display.
1. With the illumination lamp lit, press and hold the
DISPLAY button q for 3 seconds or longer. The
illumination lamp goes out and the always-OFF mode is
engaged.
2. To cancel the always-OFF mode and turn the
illumination lamp ON, press and hold the DISPLAY
button q for 3 seconds or longer.
Note
• If step 3 does not work,start over from step 1.
• If the microprocessor has been initialized all the button
settings are reset to the default values (the values set
upon shipment from the factory).
18
Page 22

CONVENIENT FEATURE
L
TRIM
FM/BAM/A
RETURN
TOP MENU
MENU
VOLUME
CLOSE
MODE
PHONOCDBALANCED
RECORDER 1
LINE 1
RECORDER 2
LINE 2
EXIT
TONE
ENTER
DISPLAY
ATT
SCAN
RANDOM REPEAT
+
-
OPEN/ SOUND
R
b
n
m
.
v
c
x
z
,
CONTROL BY REMOTE
CONTROLLER
ST-15S1 can be controlled by the remote controller supplied
with Marantz integrated amplifier PM-11/15 series. You can
perform following operations using the controller.
Caution
When you operate ST-15S1 with a PM-11/15 remote
controller, please make sure to connect ST-15S1 into
LINE 1 terminal.
z 4, ¢ buttons
(CHANNEL/CONTROL button)
This button is used to select radio presets or select
stations and menu options.
x 1, ¡ buttons (TUNING buttons)
Use these to change the received frequency to a higher
frequency (+) or a lower frequency (–).
c TOP MENU/AM/A button (AM button)
This button is used to select AM directly.
v RETURN/FM/B button (FM button)
This button is used to select FM directly.
b SOUND MODE button (T-MODE button)
Selects the stereo mode or mono mode when a FM
stereo broadcast is received.
n LINE 1 button (LINE 1 and BAND button)
This button is used to select LINE 1 of input position at
first. After that, it is used to select BAND (DAB/FM/AM).
m ENTER button (ENTER button)
This button is used to set the menu.
, SCAN button
(Auto Preset / Auto Tune button)
Press this button in the DAB mode to perform a local
scan (UK band III ). (UK stations are in the range 11B ~
12D.)
When the button is held in, the full scan operation (Full
band and L-band) is conducted.
When pressed in the FM mode, receivable FM stations
are automatically stored in the preset memory in order
starting from preset channel A1.
ENGLISH
. MENU 23button (MENU button)
This button is used to enter/exit menu mode.
19
Page 23

ENGLISH
TROUBLESHOOTING
If a problem should arise, first check the following.
1. Are the connections correct?
2. Have you operated the receiver according to the operating instructions?
3. Are the speakers and other components operating properly?
If this unit is not operating properly, check the items listed in the table below. Should the problem persist, there may be a
malfunction. Disconnect the power immediately and contact your store of purchase.
Symptom
Power does not turn on when
POWER ON/OFF switch is
pressed.
Hissing noise is heard on FM
broadcasts.
Hissing or buzzing sound is
heard on AM broadcasts.
Booming sound (humming) is
heard in AM broadcasts.
Nothing happens when remote
control buttons are pressed.
I can not get any sound.
Cause
• Mains cord’s plug is not plugged into
wall outlet.
• Antenna cable is not properly
connected.
• Antenna is not pointing in the right
direction.
• Radio waves are weak.
• Noise from a TV or interference in
the signals sent from the broadcast
station.
• Signals transmitted over the main
cord are modulated by the power
source frequency.
• Rear Panel EXTERNAL/INTERNAL
switch is set EXTERNAL position.
• Power connected amplifier not turned
on.
Measures
•
Plug the mains cord in properly.
• Connect the leads properly.
•
Point the antenna in the right direction.
• Install an outdoor antenna.
• Turn off the TV.
• Change the position of the loop
antenna.
• Install an outdoor antenna.
•
Insert the plug in the opposite direction.
• Install an outdoor antenna.
•
Set the
switch to INTERNAL position.
• Connection leads to amplifier not
made correctly.
EXTERNAL/INTERNAL
Page
5
5
5
5
5
5
6
5
4
6
Display says “Station not
Available”.
I can not access secondary
services.
I hear a burbling sound on
some stations.
• Ensure that DAB coverage exists in
your area.
• At the time of publishing this manual
not many secondary services are
available, this will increase as more
DAB stations start broadcasting.
• DAB like other digital media is good
at producing quality audio from a low
level signal, however if this signal,
level is too low a “burbling” sound
can sometimes be heard.
• Check that antenna is connected.
• If a secondary service station is
available, the secondary indicator “<<
>>” will be displayed next to the
station name.
• Use the ST-15S1’s “Tuning aid” while
repositioning your antenna to get the
maximum signal strength and reduce
this noise.
5
14
5
20
Page 24

SPECIFICATIONS & DIMENSIONAL DRAWINGS
DISPLAYDISPLAY
TUNEDTUNED
STEREOSTEREO
DOWNDOWN
TUNING/PRESETTUNING/PRESET
UPUP
RDSRDS
SECONDARYSECONDARY
DAB/FM/AM TUNER ST-15S1DAB/FM/AM TUNER ST-15S1
BANDBAND
SELECTSELECT
AUTOAUTO
TUNETUNE
MENUMENU
ENTERENTER
MEMOMEMO
POWER ON/OFFPOWER ON/OFF
416
4004 12
123
18 105
440.0
FM tuner section
Frequency range ..........................87.5 MHz ~ 108.0 MHz
Antenna terminals .........................75 Ω/ohm Unbalanced
Usable sensitivity ...................................1.1 µV (12.2 dBf)
...........................................................1.1 µV (IHF)
Image interference ratio...........................................80 dB
IF interference ratio................................................100 dB
AM suppression ratio...............................................50 dB
Effective selectivity................................50 dB (±400 kHz)
Capture ratio...........................................................2.0 dB
Frequency characteristics
..................................20 Hz ~ 15 kHz +0.5/–1.0dB
Signal-to-noise ratio
Monaural ........................74 dB (IHF), 70 dB (DIN)
Stereo.............................68 dB (IHF), 64 dB (DIN)
Total harmonic distortion
Mono 1 kHz (at 75 kHz dev.) ........................0.2 %
Stereo 1 kHz (at 67.5 kHz dev.)
......................0.3 %
Stereo separation 1 kHz (WIDE) .............................43 dB
DAB tuner section
Frequency range
......174.928 (5A) ~ 239.200 (13F) MHz (BAND III)
..1452.960 (LA) ~ 1490.624 (LW) MHZ (L–BAND)
Sensitivity............................................................–99 dBm
Signal-to-noise ratio...............................................103 dB
THD+N ....................................................0.007 % (1 kHz)
Channel separation...................................100 dB (1 kHz)
Selectivity..............................40 dB (at adjacent channel)
Frequency response
................................+0.5/–0.5 dB (5 Hz ~ 20 kHz)
Digital output............................................Optical, Coaxial
Sampling frequency ...............................................48 kHz
Aerial terminal ...................................75 Ω/ohm, F female
Analog output level ................................................2 Vrms
AM tuner section
Frequency range ...............................522 kHz ~ 1611kHz
Antenna terminals
............................Terminal type with loop antenna
Usable sensitivity.....................................................18 µV
Signal-to-noise ratio.................................................53 dB
General
Power supply.........................................AC 230 V, 50 Hz
Power consumption ..................................................12 W
Weight ...................................................................12.3 kg
Accessories
Audio connecting cord.....................................................1
Power supply cord...........................................................1
AM loop antenna.............................................................1
FM indoor antenna..........................................................1
DAB indoor antenna........................................................1
Remote Control Connecting Cord...................................1
User Guide......................................................................1
Registration Card ............................................................1
ENGLISH
* For purposes of improvement, specifications and design are subject to change without notice.
(Unit: mm)
21
Page 25

ENGLISH
SPECIFICATIONS & DIMENSIONAL DRAWINGS
Band III (174 to 240 MHz)
Frequency Level
174.928 MHz
176.640 MHz
178.352 MHz
180.064 MHz
181.936 MHz
183.648 MHz
185.360 MHz
187.072 MHz
188.928 MHz
190.640 MHz
192.352 MHz
194.064 MHz
195.936 MHz
197.648 MHz
199.360 MHz
201.072 MHz
202.928 MHz
204.640 MHz
206.352 MHz
5A
5B
5C
5D
6A
6B
6C
6D
7A
7B
7C
7D
8A
8B
8C
8D
9A
9B
9C
Frequency Level
208.064 MHz
209.936 MHz
211.648 MHz
213.360 MHz
215.072 MHz
216.928 MHz
218.640 MHz
220.352 MHz
222.064 MHz
223.936 MHz
225.648 MHz
227.360 MHz
229.072 MHz
230.784 MHz
232.496 MHz
234.208 MHz
235.776 MHz
237.488 MHz
239.200 MHz
9D
10A
10B
10C
10D
11A
11B
11C
11D
12A
12B
12C
12D
13A
13B
13C
13D
13E
13F
L-Band (1452 to 1490 MHz)
Frequency Level
1452.960 MHz
1454.672 MHz
1456.384 MHz
1458.096 MHz
1459.808 MHz
1461.520 MHz
1463.232 MHz
1464.944 MHz
1466.656 MHz
1468.368 MHz
1470.080 MHz
1471.792 MHz
LA
LB
LC
LD
LE
LF
LG
LH
LI
LJ
LK
LL
Frequency Level
1473.504 MHz
1475.216 MHz
1476.928 MHz
1478.640 MHz
1480.352 MHz
1482.064 MHz
1483.776 MHz
1485.488 MHz
1487.200 MHz
1488.912 MHz
1490.624 MHz
LM
LN
LO
LP
LQ
LR
LS
LT
LU
LV
LW
OTHERS
The section describes the care and maintenance tasks that
must be performed to optimize the operation of your
Marantz equipment.
7
Cleaning of equipment external
surfaces
The exterior finish of your unit will last indefinitely with
proper care and cleaning. Never use scouring pads, steel
wool, scouring powders or harsh chemical agents (e.g., lye
solution), alcohol, thinner, benzine, insecticide or other
volatile substances as these will mar the finish of the
equipment. Likewise, never use cloths containing chemical
substances. If the equipment get dirty, wipe the external
surfaces with a soft, lint-free cloth.
If the equipment becomes heavily soiled:
• dilute some washing up liquid in water, in a ratio of
one part detergent to six parts water.
• dip a soft, lint-free cloth in the solution and wring the
cloth till it is damp.
• wipe the equipment with the damp cloth.
• dry the equipment by wiping it with a dry cloth.
7
Repairs
Only the most competent and qualified service technicians
should be allowed to service the factory-trained warranty
station personnel have the knowledge and special facilities
needed for repair and calibration of this precision
equipment. After the warranty period has expired, repairs
will be performed for a charge if the equipment can be
returned to normal operation.
In the event of difficulty, refer to your dealer or write directly
to the nearest location to you that is listed on the Marantz
Authorized Service Station list. If writing, please include the
model and serial number of the equipment together with a
full description of what you think is abnormal about the
equipment's behaviour.
22
Page 26

www.marantz.com
You can find your nearest authorized distributor or dealer on our website.
is a registered trademark.
Printed in China 08/2006 00M22CW851310 mzh-d
 Loading...