

Page 1
Contents Connections Playback Settings Tips Appendix
.
Network Receiver
M-CR511
Front/Top
panel
You can print more than one page of a PDF onto a single sheet of paper.
Rear panel
Remote control
unit
1
Index
Owner’s Manual
Page 2
Contents Connections Playback Settings Tips Appendix
Contents
Accessories
Inserting the batteries
Operating range of the remote control unit
Features
Multiple music formats are supported, all in a compact form factor
Easy operation
Part names and functions
Front/Top panel
Rear panel
Remote control unit
6
Connections
7
Speaker connection
7
Connecting the speaker cables
8
Connecting the subwoofer
8
Connecting speakers
8
Connecting a digital device
9
Connecting an analog device
9
Connecting an iPod or USB memory device to the USB port
12
Connecting to a home network (LAN)
14
Wired LAN
Wireless LAN
Connecting the power cord
18
18
19
19
20
21
22
24
24
25
27
Front/Top
panel
Rear panel
Remote control
unit
2
Index
Page 3
Contents Connections Playback Settings Tips Appendix
Playback
Basic operation
Turning the power on
Selecting the input source
Adjusting the volume
Turning off the sound temporarily
Listening to Internet Radio
Listening to Internet Radio
Playing the last played Internet Radio station
Using vTuner to add Internet Radio stations to favorites
Playing back files stored on a PC and NAS
Applying media sharing settings
Playing back files stored on a PC and NAS
Favorite function
Registering stations or files to the favorites list
Calling stations or files from the favorites list
To switch between registered stations and files during playback
Deleting stations or files from the favorite list
Playing an iPod
Listening to music on an iPod
Setting operation mode (“On-Display” mode)
Charging the iPod/iPhone
Playing a USB memory device
Playing files stored on USB memory devices
Listening to music on a Bluetooth device
29
29
29
30
30
31
32
33
34
35
36
37
39
40
40
40
40
41
42
43
44
45
46
Playing music from Bluetooth device
Pairing with other Bluetooth devices
Reconnecting to this unit from a Bluetooth device
Connecting a Bluetooth device with the NFC function via NFC
Listening to DIGITAL IN
Listening to ANALOG IN
AirPlay function
Playing songs from your iPhone, iPod touch or iPad
Playing iTunes music with this unit
Selecting multiple speakers (devices)
Spotify Connect function
Playing Spotify music with this unit
Remote play function
Settings required for each device
Web control function
Controlling the unit from a web control
Convenience functions
Adjusting the tone
Sleep timer function
Checking the current time
Switching the display’s brightness
47
48
50
51
51
53
53
54
55
55
56
57
57
58
59
61
61
67
68
69
69
70
Front/Top
panel
Rear panel
Remote control
unit
3
Index
Page 4
Contents Connections Playback Settings Tips Appendix
Settings
Menu map
Menu operation
Inputting characters
Using the number buttons
Using the cursor buttons
General
Alarm
Clock
Clock Mode
Volume Limit
Speaker Response
Language
Auto-Standby
Usage Data
Firmware
Reset
71
74
75
75
76
77
77
78
78
79
79
80
80
80
81
83
Network
Network Information
Network Control
Friendly Name
Wi-Fi
Bluetooth
Settings
84
84
84
85
85
85
86
Front/Top
panel
Rear panel
Remote control
unit
4
Index
Page 5
Contents Connections Playback Settings Tips Appendix
Tips
Tips
Troubleshooting
93
95
Appendix
Playing back USB memory devices
Playing back Internet Radio
Playing back Bluetooth devices
Bluetooth communications
Playing back files stored on PC or NAS
Last function memory
Explanation of terms
Trademark information
Specifications
Index
License
107
109
109
109
110
111
112
117
118
123
125
Front/Top
panel
Rear panel
Remote control
unit
5
Index
Page 6
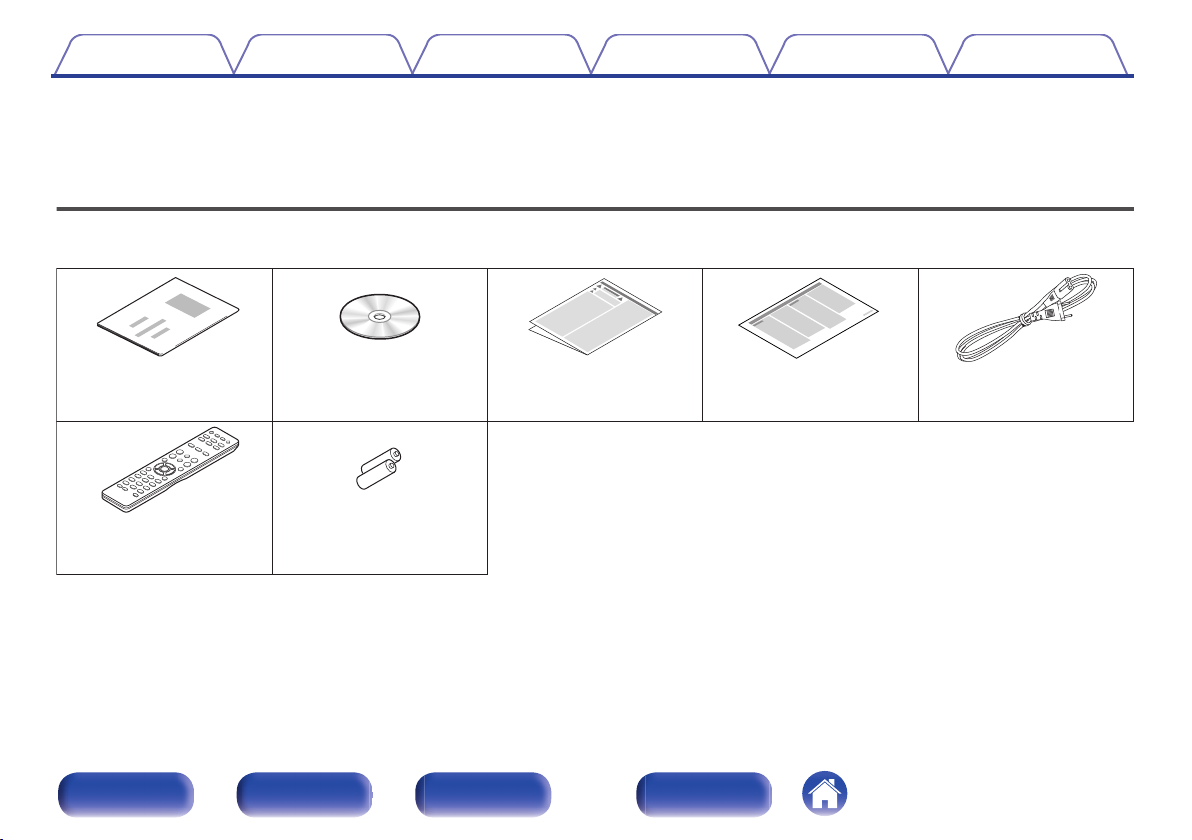
Quick Setup Guide CD-ROM
(Owner’s Manual)
Safety Instructions
Notes on radio
Power cord
R03/AAA batteriesRemote control unit
(RC012CR)
Contents Connections Playback Settings Tips Appendix
Thank you for purchasing this Marantz product.
To ensure proper operation, please read this owner’s manual carefully before using the product.
After reading this manual, be sure to keep it for future reference.
Accessories
Check that the following parts are supplied with the product.
.
Front/Top
panel
Rear panel
Remote control
unit
6
Index
Page 7
R03/AAA batteries
30°
Approx. 7 m
30°
Contents
Connections Playback Settings Tips Appendix
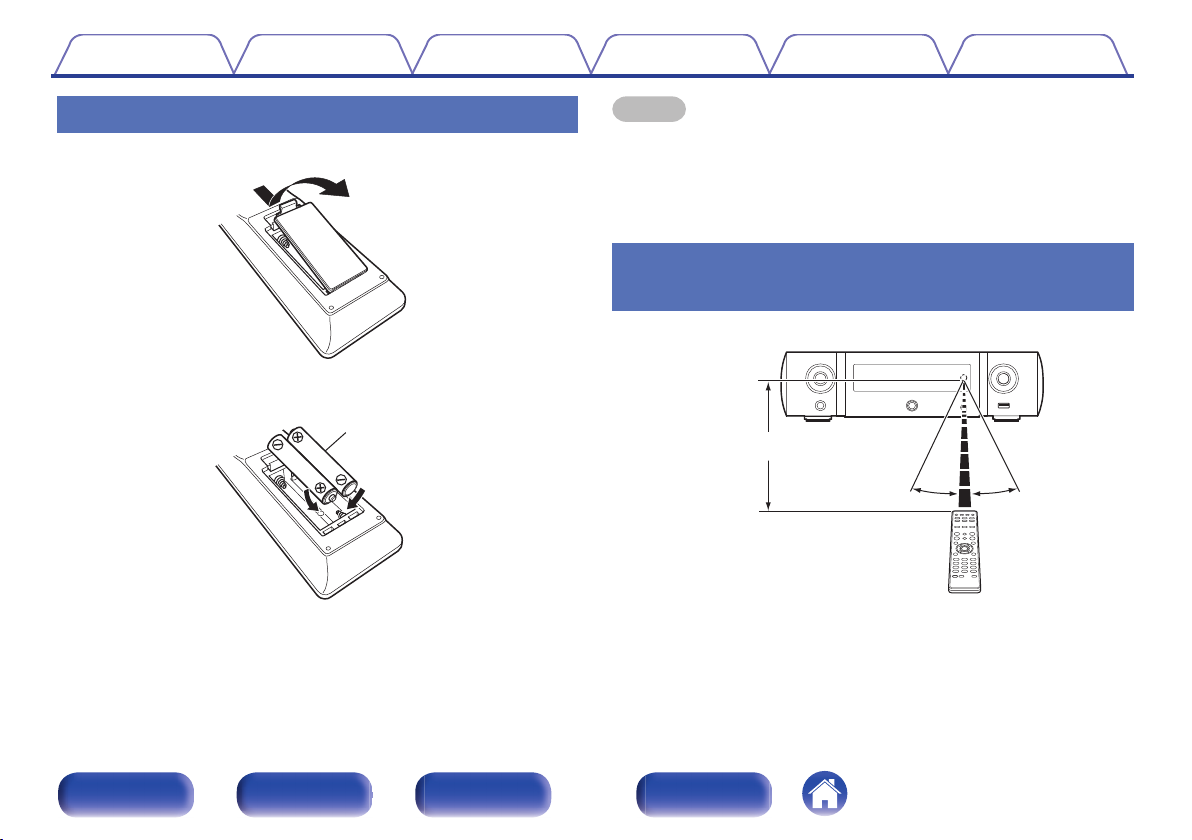
Inserting the batteries
Remove the rear lid in the direction of the arrow and remove it.
A
Insert two batteries correctly into the battery compartment as indicated.
B
Put the rear cover back on.
C
.
.
NOTE
To prevent damage or leakage of battery fluid:
0
Do not use a new battery together with an old one.
0
Do not use two different types of batteries.
0
If the battery fluid should leak, carefully wipe the fluid off the inside of the battery
0
compartment and insert new batteries.
Operating range of the remote control
unit
Point the remote control unit at the remote sensor when operating it.
.
Front/Top
panel
Rear panel
Remote control
unit
7
Index
Page 8
Contents
Features
Connections Playback Settings Tips Appendix
Multiple music formats are supported,
all in a compact form factor
Supports Internet Radio and music streaming
0
Supports AirPlay® (v p. 54)
You can enjoy a wide variety of content, including listening to Internet
Radio, playing audio files stored on your PC.
This unit also supports Apple AirPlay which lets you stream your music
library from an iPhone®, iPad®, iPod touch® or iTunes®.
DLNA (Digital Living Network Alliance) ver. 1.5 support for audio
0
networks
Supports Spotify Connect
0
Support for High Quality Audio playback
0
WAV/FLAC/ALAC (Apple Lossless Audio Codec)/AIFF
Support for Gapless playback
0
Playback with no gap between music files (for WAV/FLAC/ALAC/AIFF
only).
Wi-Fi network capability with built-in diversity antenna, and is
0
certified under WMM (Wi-Fi Multi Media) for efficient wireless
connectivity
Easy operation
Easy wireless connection is possible by pressing the Wi-Fi
0
CONNECT button (WPS and Wi-Fi Sharing)
See the separate “Quick Setup Guide”.
Wireless connection with Bluetooth devices can be carried out
0
easily
You can enjoy music simply by connecting wirelessly with your
smartphone, tablet, PC, etc.
If the Bluetooth device has NFC function, you can connect easily
0
to touch to N mark
iPod auto detect charges your device even after the unit switches
0
to standby mode
“Marantz Hi-Fi Remote” is application software that allows you to
0
perform basic operations with an iPad, iPhone, Android
smartphone or Android tablet such as turning the unit ON/OFF,
controlling the volume, and switching the source
Download the appropriate “Marantz Hi-Fi Remote” for your iOS or Android
z
devices. This unit needs to be connected to your LAN and the iPad, iPhone,
Android smartphone, Android tablet or other device needs to be connected to
the same network by Wi-Fi (wireless LAN).
OLED (Organic Light Emitting Diode) display that can display 3
0
lines
Auto Standby mode for energy savings
0
Front/Top
panel
Rear panel
Remote control
unit
8
Index
Page 9
GTop panelH
GFront panelH
q
r t
o
yiuwe
Q2Q1 Q3
Q0
Contents
Connections Playback Settings Tips Appendix
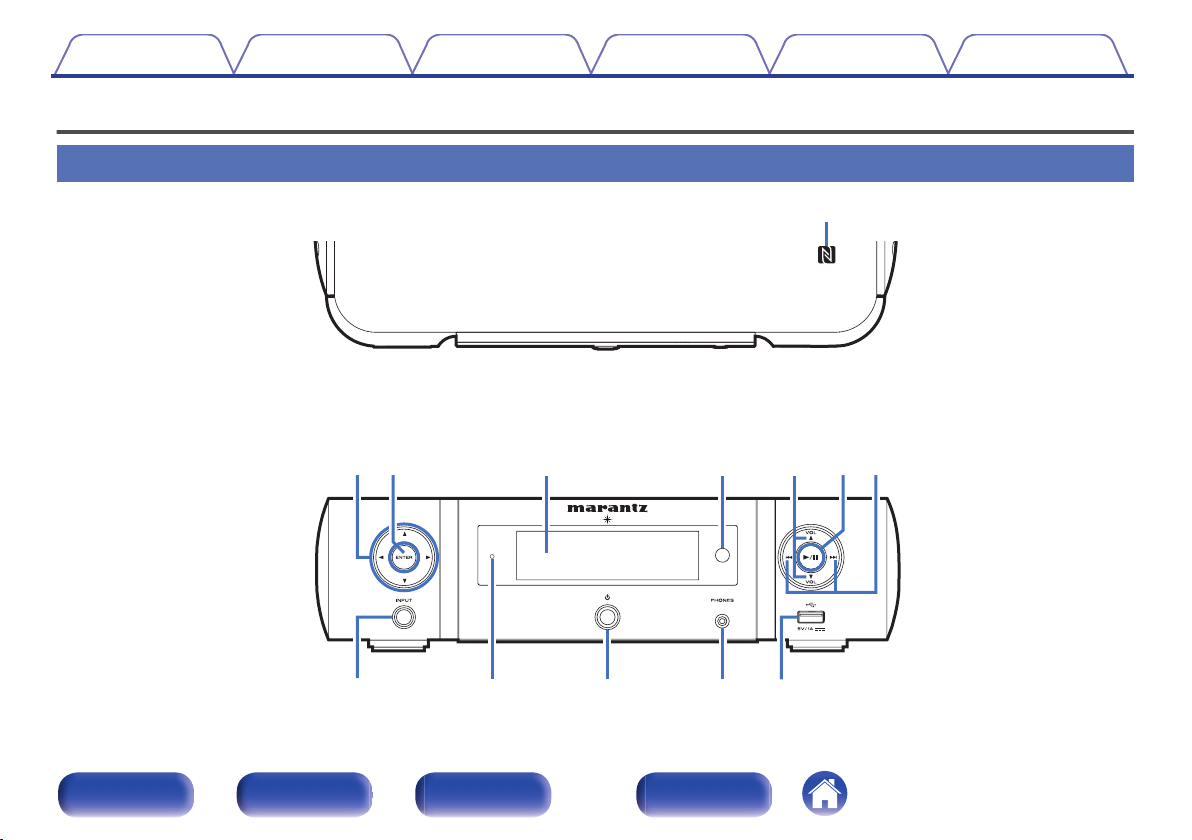
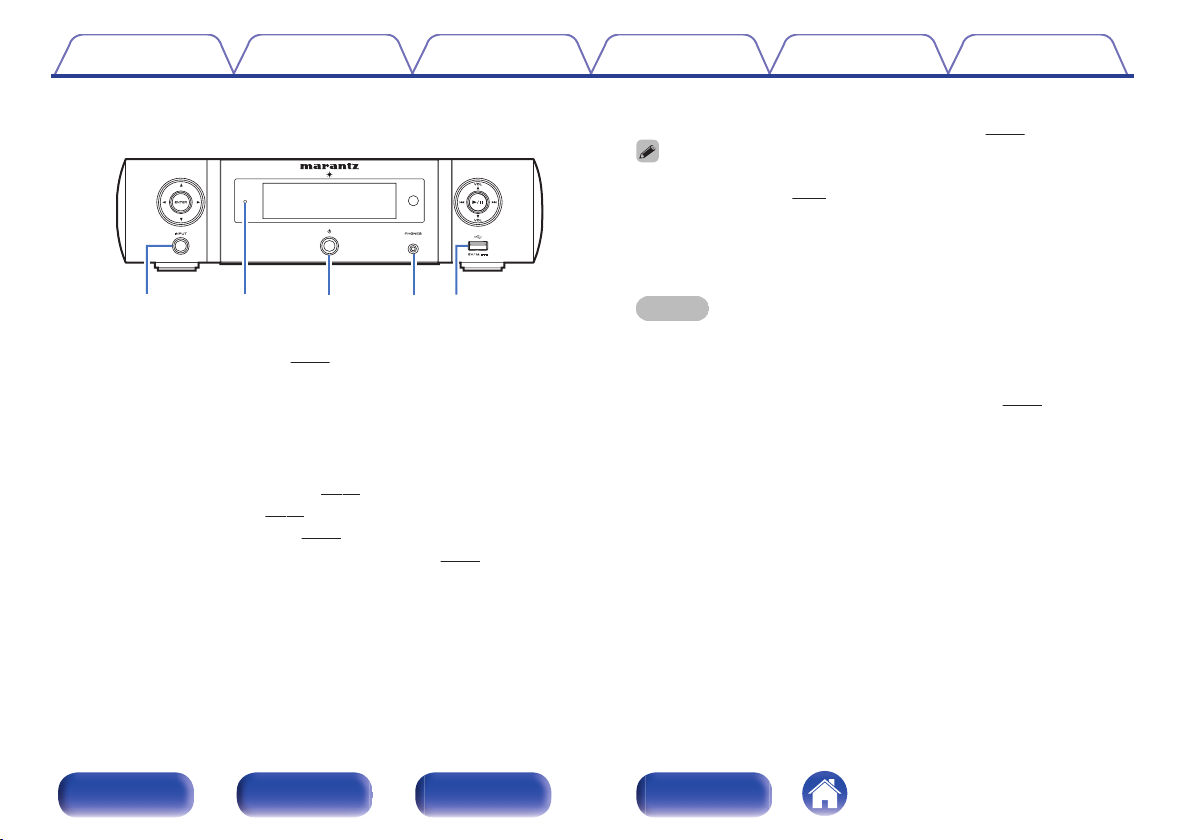
Part names and functions
Front/Top panel
Front/Top
panel
.
Rear panel
Remote control
unit
9
Index
Page 10

GTop panelH
GFront panelH
q
r t
yiuwe
Contents
.
Connections Playback Settings Tips Appendix
A
N mark (Q)
Touch this mark with a Bluetooth device that includes the NFC function
when pairing (registering) with it. (v
Cursor buttons (uio p)
B
These select items.
ENTER button
C
This determines the selection.
Display
D
Various information is displayed here.
Remote control sensor
E
This receives signals from the remote control unit. (v
VOLUME up/down buttons (VOLUME df)
F
Adjusts the volume. (v p. 30)
Play/pause button (1/3)
G
Reverse-skip / Forward-skip buttons (8, 9)
H
p. 51)
p. 7)
Front/Top
panel
Rear panel
Remote control
unit
10
Index
Page 11
GFront panelH
oQ
2
Q
1
Q
3
Q
0
Contents
.
Input source select button (INPUT)
I
Selects the input source. (v
Standby indicator
J
The standby indicator changes as shown below according to the status
of the unit.
Power on : Off
0
Normal standby : Off
0
iPod charge standby : Red (v
0
Display off : Green (v
0
Alarm standby : Orange (v p. 77)
0
When “Network Control” is set to “On” : Red (v
0
Connections Playback Settings Tips Appendix
p. 29)
p. 44)
p. 70)
p. 84)
Power operation button (X)
K
Turns power to this unit on and off (standby). (v p. 29)
When “Clock Mode” is turned on, this button switches between normal mode
0
and Clock mode. (v
Headphones jack (PHONES)
L
Used to connect headphones.
When the headphones are plugged into this jack, audio will no longer
be output from the speaker terminals and SW OUT connector.
NOTE
To prevent hearing loss, do not raise the volume level excessively when using
0
headphones.
M
USB port (T, Front)
Used to connect iPod or USB memory devices. (v
p. 78)
p. 22)
Front/Top
panel
Rear panel
Remote control
unit
11
Index
Page 12
y u i
tewq r
Contents
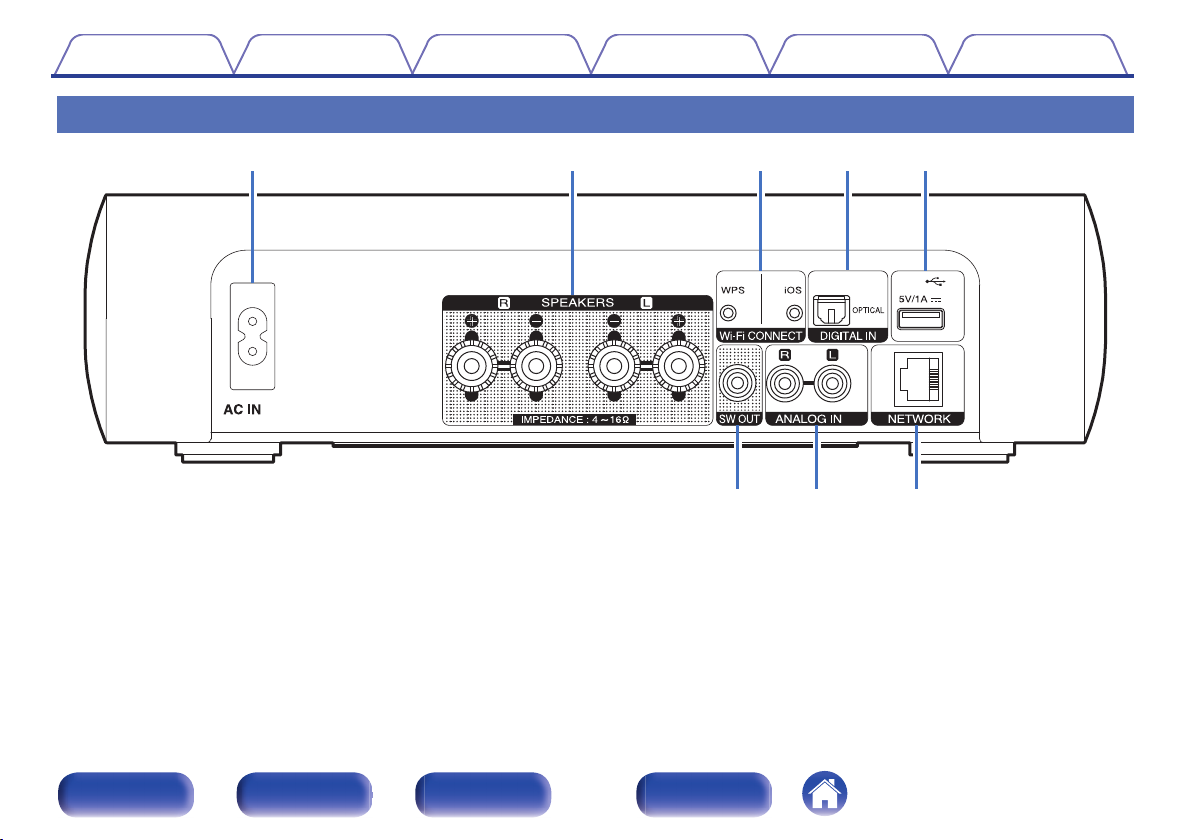
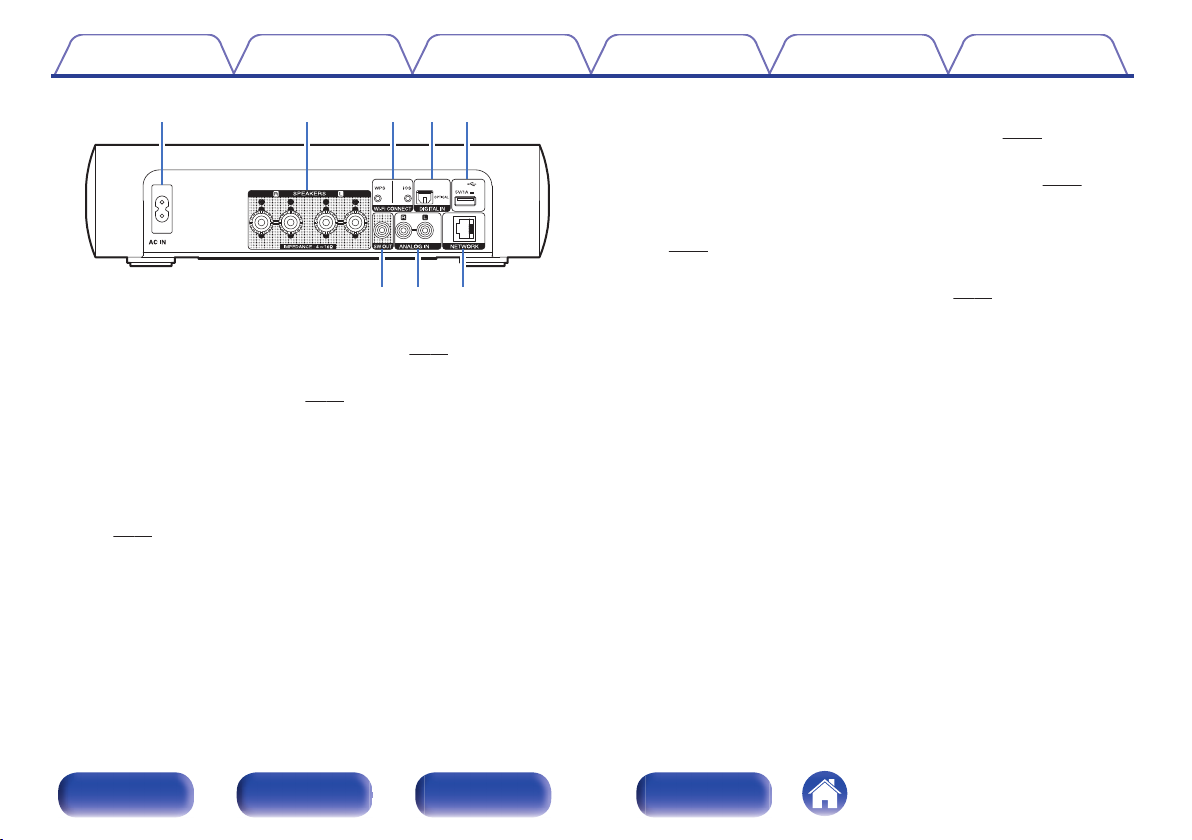
Rear panel
Connections Playback Settings Tips Appendix
.
Front/Top
panel
Rear panel
Remote control
unit
12
Index
Page 13
tewq r
yu i
Contents Connections Playback Settings Tips Appendix
E
USB port (T, Rear)
Used to connect iPod or USB memory devices. (v p. 22)
SW OUT connector
F
Used to connect a subwoofer with a built-in amplifier. (v
ANALOG IN connectors
G
Used to connect devices equipped with analog audio connectors.
p. 21)
(v
NETWORK connector
H
.
AC inlet (AC IN)
A
Used to connect the supplied power cord. (v
Speaker terminals (SPEAKERS)
B
Used to connect speakers. (v p. 18)
Wi-Fi CONNECT buttons (iOS/WPS)
C
Used to connect to the wireless LAN.
(See the separate “Quick Setup Guide”.)
DIGITAL IN connector
D
Used to connect devices equipped with digital audio connectors.
p. 20)
(v
p. 27)
Used to connect this unit to the network. (v p. 24)
p. 19)
Front/Top
panel
Rear panel
Remote control
unit
13
Index
Page 14
q
e
w
r
t
y
Contents
Connections Playback Settings Tips Appendix
Remote control unit
Remote control signal transmitter
A
This transmits signals from the remote control unit. (v
CLOCK button
B
The current time appear on the unit. (v p. 69)
SLEEP button
C
This sets the sleep timer. (v
Input source select buttons
D
These select the input source. (v
System buttons
E
These perform playback related operations.
Channel buttons (CH +, –)
These operate the Favorite function. (v
DBB/TONE button
F
Adjusting the tone. (v p. 68)
p. 69)
p. 29)
p. 39)
p. 7)
Front/Top
panel
Rear panel
Remote control
unit
14
Index
Page 15
u
i
Q1
Q0
o
Q2
Q3
Q4
Contents
Connections Playback Settings Tips Appendix
FAVORITES ADD / CALL buttons
G
To add radio stations or files to the favorite list, press ADD button.
0
p. 40)
(v
To call up a radio station or file registered in the favorite list, press
0
CALL button. (v
TOP MENU button
H
To back to the top of the menu. (v
ENTER button
I
This determines the selection.
Cursor buttons (uio p)
J
These select items.
SEARCH button
K
This displays the search menu.
Number buttons (0 – 9, +10)
L
These enter letters or numbers into the unit.
M
RANDOM button (P)
Switches the random playback.
N
REPEAT button (L)
Switches to the repeat playback.
p. 40)
p. 74)
Front/Top
panel
Rear panel
Remote control
unit
15
Index
Page 16

Q7
Q9
W0
Q8
W1
W2
Q6
Q5
Contents
Connections Playback Settings Tips Appendix
DIMMER button
O
p. 70)
p. 43)
Adjust the display brightness of this unit. (v
POWER button (X)
P
This turns the power on/standby. (v p. 29)
VOLUME buttons (df)
Q
These adjust the volume level. (v
Information button (INFO)
R
This switches display items such as the artist name and album name in
the playback screen.
S
MUTE button (O)
This mutes the output audio. (v
SETUP button
T
The setting menu is displayed on the display. (v p. 74)
CLEAR button
U
This cancels the settings.
MODE button
V
This switches the operation mode. (v
p. 30)
p. 30)
Front/Top
panel
Rear panel
Remote control
unit
16
Index
Page 17
R
L
R
L
Contents Connections Playback Settings Tips Appendix
Connections
o
Contents
Speaker connection 18
Connecting a digital device 20
Connecting an analog device 21
Connecting an iPod or USB memory device to the USB port 22
Connecting to a home network (LAN) 24
Connecting the power cord 27
NOTE
Do not plug in the power cord until all connections have been completed.
0
Do not bundle power cords with connection cables. Doing so can result in noise.
0
o
Cables used for connections
Provide necessary cables according to the devices you want to connect.
Speaker cable
.
Subwoofer cable
Optical cable
.
.
Audio cable
.
LAN cable
.
Front/Top
panel
Rear panel
Remote control
unit
17
Index
Page 18
Contents
Connections Playback Settings Tips Appendix
Speaker connection
Here we connect the speakers in the room to this unit.
This section explains how to connect them using typical examples.
NOTE
Disconnect this unit’s power plug from the power outlet before connecting the
0
speakers. Also, turn off the subwoofer.
Connect so that the speaker cable core wires do not protrude from the speaker
0
terminal. The protection circuit may be activated if the core wires touch the rear
panel or if the + and - sides touch each other. (“Protection circuit” (v p. 116))
Never touch the speaker terminals while the power cord is connected. Doing so
0
could result in electric shock.
Use speakers with an impedance of 4 – 16 Ω/ohms.
0
Connecting the speaker cables
Connect the speaker cable to the + speaker terminal (red) and the speaker terminal (black).
Peel off about 10 mm of sheathing from the tip of the
1
speaker cable, then twist the core wire tightly.
.
Turn the speaker terminal counterclockwise to loosen
2
it.
.
Insert the speaker cable’s core wire to the hilt into the
3
speaker terminal.
.
Turn the speaker terminal clockwise to tighten it.
4
Front/Top
panel
Rear panel
Remote control
unit
18
.
Index
Page 19

Subwoofer
RL
Contents
Connections Playback Settings Tips Appendix
Connecting the subwoofer
Use a subwoofer cable to connect the subwoofer.
.
Connecting speakers
.
Front/Top
panel
Rear panel
Remote control
unit
19
Index
Page 20
AUDIO
OPTICAL
OUT
Digital
device
Contents Connections Playback Settings Tips Appendix
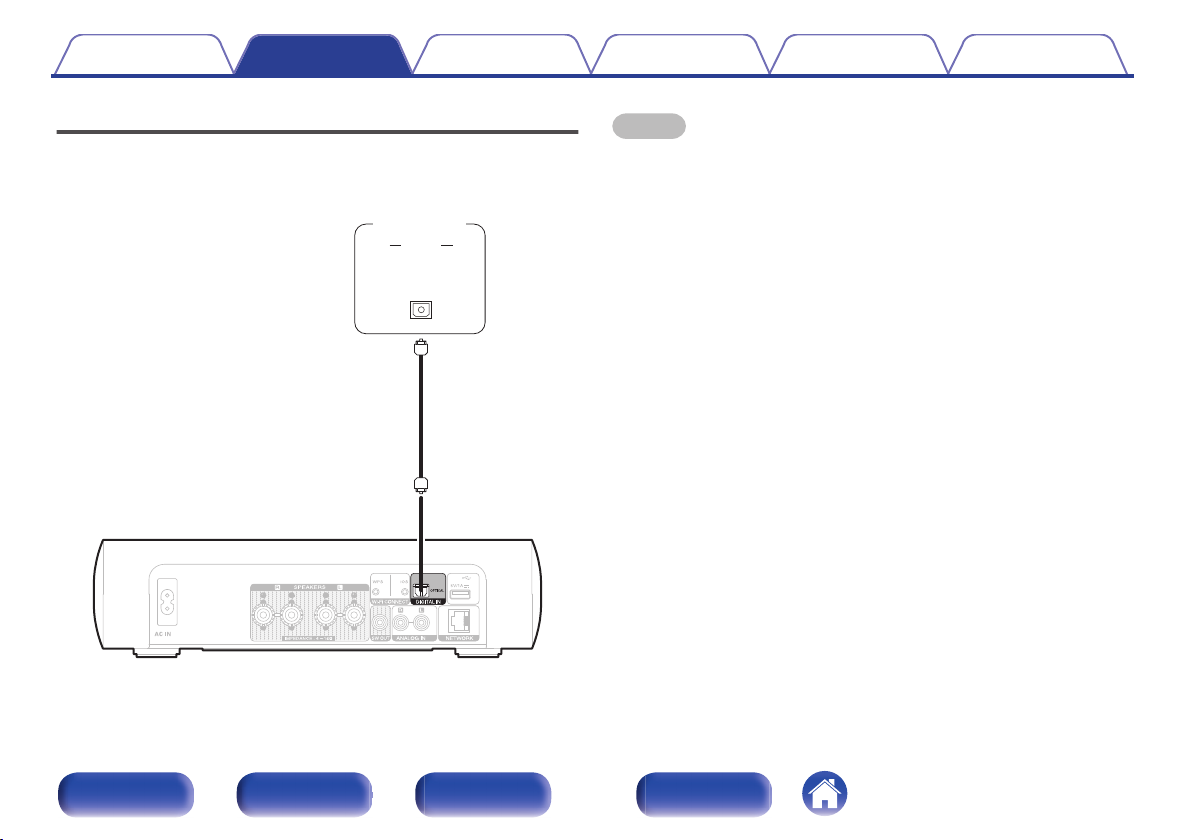
Connecting a digital device
You can connect this unit to devices with digital audio output (TV, digital
gear, etc.).
.
NOTE
Linear PCM signals with a sampling frequency of 32 kHz, 44.1 kHz, 48 kHz, 88.2
0
kHz, 96 kHz, 176.4 kHz, or 192 kHz can be input into this device.
Do not input signals other than linear PCM signals, such as Dolby digital, DTS,
0
AAC etc. into this device. Doing so may cause noise, which may cause damage to
the speakers.
Front/Top
panel
Rear panel
Remote control
unit
20
Index
Page 21

AUDIO
LR
OUT
L
R
L
R
AUDIO
Analog
device
Contents Connections Playback Settings Tips Appendix
Connecting an analog device
You can connect this unit to various devices with analog audio output.
Front/Top
panel
Rear panel
Remote control
unit
21
Index
Page 22
USB memory
device
or
iPod
Contents Connections Playback Settings Tips Appendix
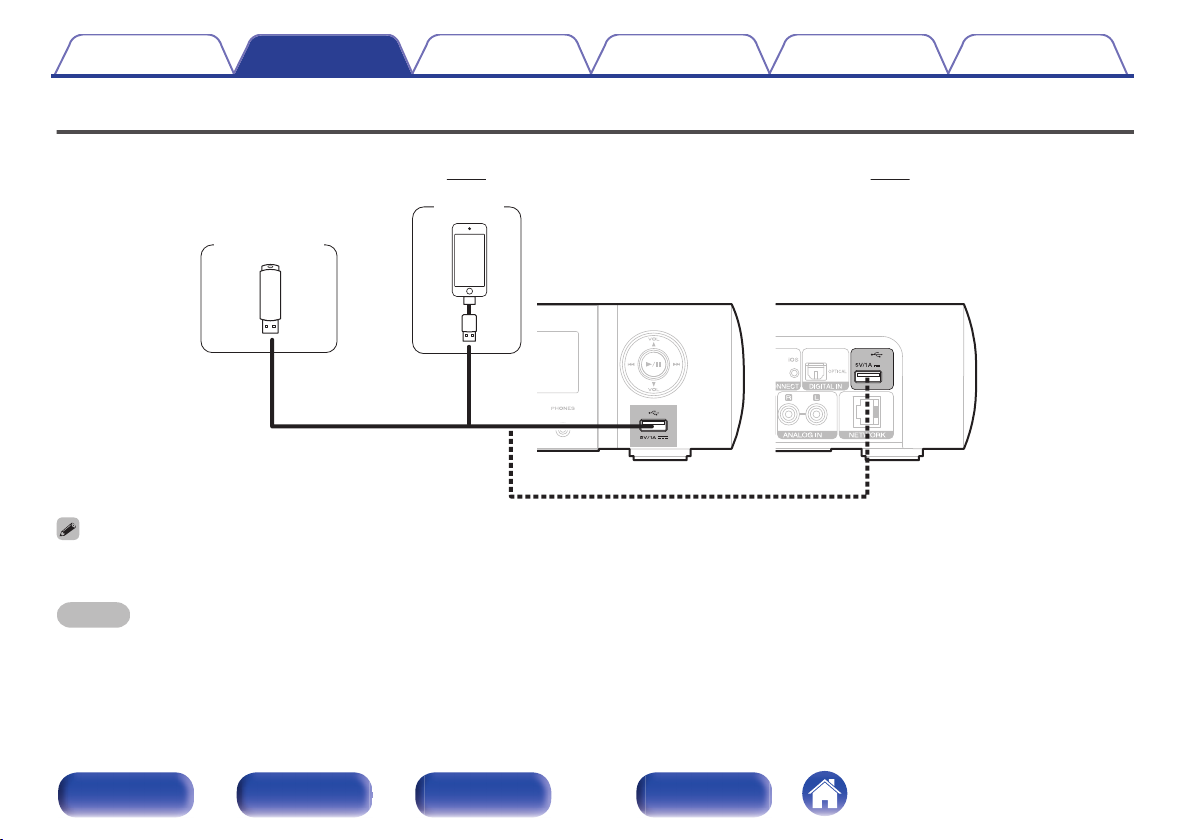
Connecting an iPod or USB memory device to the USB port
To connect an iPod/iPhone to this unit, use the USB adapter cable that was supplied with the iPod/iPhone.
0
For operating instructions, see “Playing an iPod” (v p. 41) or “Playing files stored on USB memory devices” (v p. 46).
0
.
Marantz does not guarantee that all USB memory devices will operate or receive power. When using a portable USB hard disk drive (HDD) which came with an AC adapter,
0
use that device’s supplied AC adapter.
NOTE
USB memory devices will not work via a USB hub.
0
It is not possible to use this unit by connecting the unit’s USB port to a PC via a USB cable.
0
Do not use an extension cable when connecting a USB memory device. This may cause radio interference with other devices.
0
Front/Top
panel
Rear panel
Remote control
unit
22
Index
Page 23

Supported iPod/iPhone models
• iPod classic
• iPod nano
• iPod touch
• iPhone
o
Contents
Connections Playback Settings Tips Appendix
.
Front/Top
panel
Rear panel
Remote control
unit
23
Index
Page 24
Internet
Modem
PC
Router
To WAN side
To LAN port
To LAN port
LAN port/
Ethernet
connector
LAN port/
Ethernet
connector
NAS
(Network Attached
Storage)
Contents
Connections Playback Settings Tips Appendix
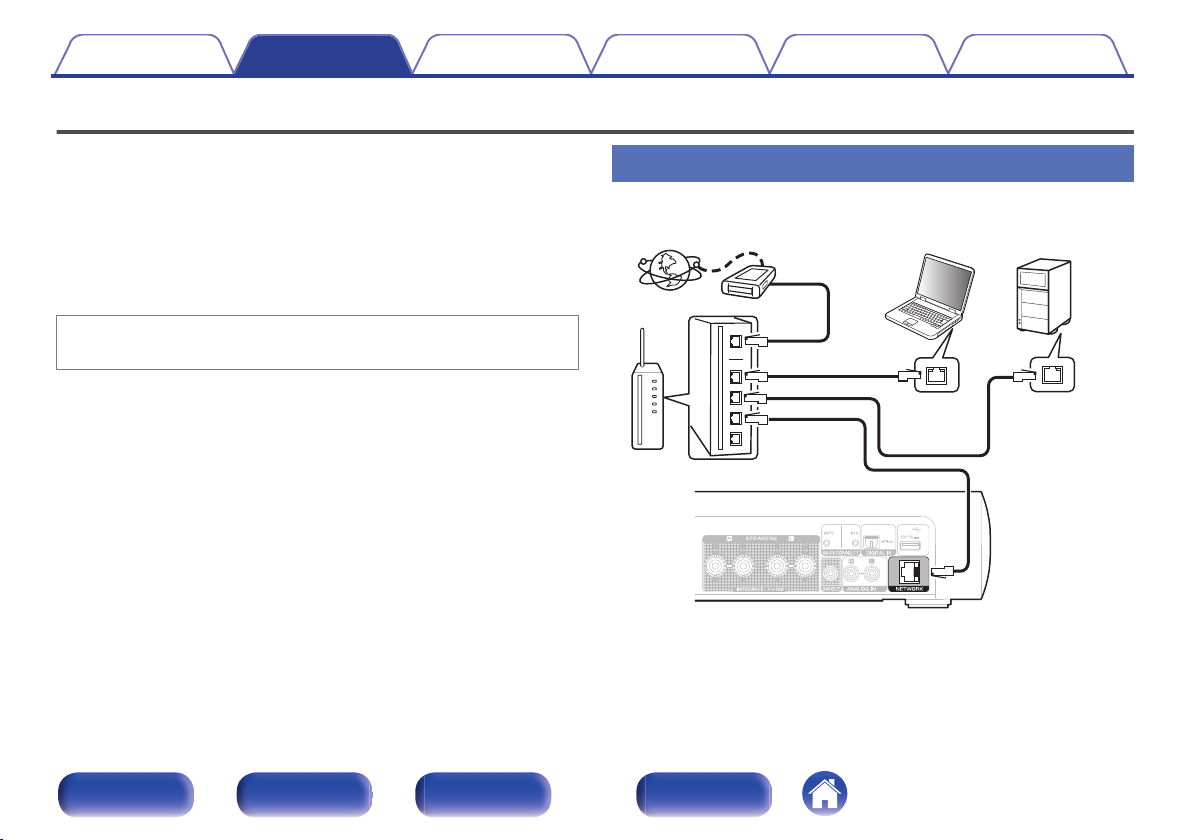
Connecting to a home network (LAN)
You can connect this unit to your home network (LAN) to perform various
types of playbacks and operations as follows.
Playback of network audio such as Internet Radio and from your music
0
server(s)
Playback of music content from online streaming services
0
Using the Apple AirPlay function
0
Operation on this unit via the network
0
Firmware Update
0
For connections to the Internet, contact an ISP (Internet Service
Provider) or a computer shop.
Wired LAN
.
Front/Top
panel
Rear panel
Remote control
unit
24
Index
Page 25
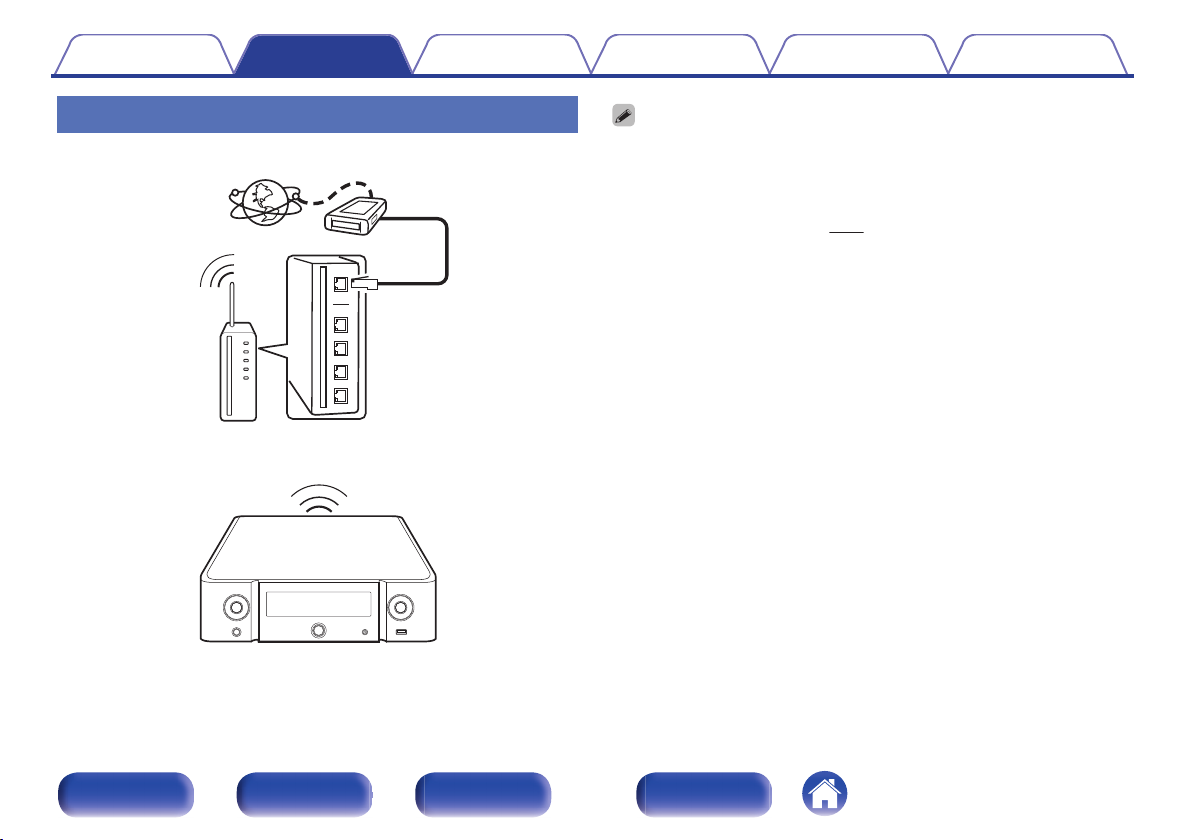
Internet
Modem
To WAN side
Router with access point
Contents
Wireless LAN
Connections Playback Settings Tips Appendix
With this unit, it is possible to use the DHCP and Auto IP functions to make the
0
network settings automatically.
When using this unit with the broadband router’s DHCP function enabled, this unit
0
automatically performs the IP address setting and other settings. When using this
unit connected to a network with no DHCP function, make the settings for the IP
address, etc., at “Network”. (v
When using this unit, we recommend you use a router equipped with the following
0
functions:
Built-in DHCP server
0
This function automatically assigns IP addresses on the LAN.
Built-in 100BASE-TX switch
0
When connecting multiple devices, we recommend a switching hub with a
speed of 100 Mbps or greater.
Use only a shielded STP or ScTP LAN cable which is easily available at
0
electronics stores. (CAT-5 or greater recommended)
The normal shielded-type LAN cable is recommended. If a flat-type cable or
0
unshielded-type cable is used, other devices could be affected by noise.
When using a WPS (Wi-Fi Protected Setup) compatible router, you can connect
0
easily to Wi-Fi by pressing the Wi-Fi CONNECT button (WPS) on this unit. (See
the separate “Quick Setup Guide”.)
p. 84)
.
Front/Top
panel
Rear panel
Remote control
unit
25
Index
Page 26

Contents Connections Playback Settings Tips Appendix
NOTE
The types of routers that can be used depend on the ISP. Contact your ISP or a
0
computer shop for details.
This unit is not compatible with PPPoE. A PPPoE-compatible router is required if
0
you have a contract for a type of line set by PPPoE.
Do not connect a NETWORK connector directly to the LAN port/ Ethernet
0
connector on your computer.
Front/Top
panel
Rear panel
Remote control
unit
26
Index
Page 27
Power cord
(supplied)
To household power outlet
(AC 220 - 230 V, 50/60 Hz)
Contents
Connections Playback Settings Tips Appendix
Connecting the power cord
After completing all the connections, insert the power plug into the power outlet.
Front/Top
panel
.
Rear panel
Remote control
unit
27
Index
Page 28
Contents Connections Playback Settings Tips Appendix
o
Contents
Basic operation
Turning the power on 29
Selecting the input source 29
Adjusting the volume 30
Turning off the sound temporarily 30
Playback
Playback network audio/service
Listening to Internet Radio 31
Playing back files stored on PC or NAS 35
AirPlay function 54
Spotify Connect function 57
Other functions
Playback a device
Playing an iPod 41
Playing a USB memory device 45
Listening to music on a Bluetooth device 47
Listening to DIGITAL IN 53
Listening to ANALOG IN 53
Favorite function 39
Remote play function 58
Web control function 61
Convenience functions 67
Front/Top
panel
Rear panel
Remote control
unit
28
Index
Page 29
Input source
select buttons
POWER
X
VOLUME
df
MUTE
Contents Connections Playback Settings Tips Appendix
Basic operation
Turning the power on
Press POWER X to turn on power to the unit.
1
You can also switch the power to standby by pressing X on the main unit.
0
.
Front/Top
panel
Rear panel
Remote control
unit
Selecting the input source
Press the input source select button to be played back.
1
The desired input source can be selected directly.
Press AUX again to switch between AUX:Optical In/AUX:Analog In.
0
You can also select the input source by pressing INPUT on the main unit.
0
29
Index
Page 30

Contents Connections Playback Settings Tips Appendix
Adjusting the volume
Use VOLUME df to adjust the volume.
1
The volume level is displayed.
You can also adjust the volume by turning VOLUME df on the main unit.
0
Turning off the sound temporarily
Press MUTE O.
1
“MUTING” appears on the display.
0
To cancel mute, either adjust the sound volume or press MUTEO again.
Front/Top
panel
Rear panel
Remote control
unit
30
Index
Page 31

FAVORITES
ADD/CALL
1/3
INTERNET
RADIO
SEARCH
uio p
ENTER
INFO
Contents Connections Playback Settings Tips Appendix
Listening to Internet Radio
Internet Radio refers to radio broadcasts distributed over the Internet.
0
Internet Radio stations from around the world can be received.
The broad cast station types and specifications supported by this unit
0
for playback are as follows.
WMA
0
MP3
0
MPEG-4 AAC
0
.
Front/Top
panel
Rear panel
Remote control
unit
31
Index
Page 32

Contents
Connections Playback Settings Tips Appendix
Listening to Internet Radio
This unit memorizes the last played Internet Radio station. If you press
INTERNET RADIO to switch to the Internet Radio function from another
input source, the last Internet Radio station you listened to is played.
Prepare for playback.
1
2
3
Check the network environment, then turn on this unit’s power.
0
(v p. 24)
Press INTERNET RADIO.
Use ui to select the you want to play, then press
ENTER.
Country name : Displays typical Internet Radio stations.
Search Stations :
Search Podcasts :
Displays all Internet Radio stations that
this unit can tune in to.
Displays Internet Radio stations in the
podcasts that this unit can tune in to.
Recommended
Stations :
radiomarantz.com :
Recently Played :
Search by Keyword :
Use ui to select the station, then press ENTER.
4
Playback starts once buffering reaches “100%”.
Displays recommended Internet Radio
stations.
Displays Internet Radio stations added
to favorites in vTuner. For instructions
on how to add to favorites in vTuner,
see “Using vTuner to add Internet Radio
stations to favorites” (v p. 34).
Displays recently played Internet Radio
stations. Up to 20 stations can be
stored in “Recently Played”.
Displays Internet Radio stations
searched by keyword. For character
input, see “Inputting
characters” (v p. 75).
Front/Top
panel
Rear panel
Remote control
unit
32
Index
Page 33

Contents Connections Playback Settings Tips Appendix
Operation buttons Function
1/3
FAVORITES CALL Call from the Favorite list
FAVORITES ADD Add to the Favorite list
SEARCH
u i o p
ENTER Enter the selected item
INFO
TOP MENU
Any characters that cannot be displayed are replaced with “.” (period).
0
NOTE
The radio station database service may be suspended or be otherwise unavailable
0
without notice.
Playback / Stop
Character search
If the list is not in alphabetical order, you
0
may not be able to perform a character
search.
Select the item
Switching the file type/ bit rate and radio
station name etc.
Returns to the top menu of the Internet
radio function
Playing the last played Internet Radio
station
Press INTERNET RADIO.
1
The source switches to “Internet Radio” and the last played radio
station plays.
Front/Top
panel
Rear panel
Remote control
unit
33
Index
Page 34

Contents
Connections Playback Settings Tips Appendix
Using vTuner to add Internet Radio
stations to favorites
There are many Internet Radio stations in the world, and this unit can tune
into these stations. But finding the radio station you want to hear may be
difficult, because there are too many stations. If this is the case, then
please use vTuner, an Internet Radio station search website specifically
designed for this unit. You can use your PC to search Internet Radio
stations and add them as your favorites. This unit can play radio stations
added to vTuner.
Check the MAC address of this unit. “Network
1
Information” (v p. 84)
The MAC address is necessary when you create an account for
0
vTuner.
Use your PC to access the vTuner website (http://
2
www.radiomarantz.com).
Enter the MAC address of this unit, then click “Go”.
3
Enter your E-mail address and a password of your
4
choice.
Select the search criteria (genre, region, language,
5
etc.) of your choice.
You can also enter a keyword to search for a station you want to
0
hear.
Select the radio station of your choice from the list, and
6
then click the Add to Favorites icon.
Enter the name of the favorite group, then click “Go”.
7
A new favorite group that includes the selected radio station is
created.
Internet Radio stations added to favorites in vTuner can be played
0
from “radiomarantz.com” (v
o
Files that can be played back
See “Playing back Internet Radio” (v p. 109).
p. 32) with this unit.
Front/Top
panel
Rear panel
Remote control
unit
34
Index
Page 35

1/3
8 9
MUSIC
SERVER
SEARCH
uio p
ENTER
INFO
RANDOM
REPEAT
FAVORITES
ADD/CALL
Contents Connections Playback Settings Tips Appendix
Playing back files stored on a PC and NAS
This unit can play back music files and playlists (m3u, wpl) stored on a
0
PC and on Network Attached Storage (NAS) that supports DLNA.
The network audio playback function of this unit connects to the server
0
using technologies shown below.
Windows Media Player Network Sharing Service
0
This unit can play back the following files.
0
WMA
0
MP3
0
WAV
0
MPEG-4 AAC
0
FLAC
0
ALAC
0
AIFF
0
.
Front/Top
panel
Rear panel
Remote control
unit
35
Index
Page 36

Contents
Connections Playback Settings Tips Appendix
Applying media sharing settings
Here, we apply the settings to share music files stored on a PC and NAS on the network.
If you are using a Media Server, be sure to apply this setting first.
o
When using Windows Media Player 12
(Windows 7 / Windows 8)
Start up Windows Media Player 12 on the PC.
1
Select “More streaming options...” in the “Stream”.
2
Select “Allowed” in the drop-down list for “Marantz M-
3
CR511”.
Select “Allowed” in the drop-down list for “Media
4
programs on this PC and remote connections...”.
Follow the instructions on the screen to complete the
5
settings.
Front/Top
panel
Rear panel
Remote control
unit
o
When using Windows Media Player 11
Start up Windows Media Player 11 on the PC.
1
Select “Media Sharing” in the “Library”.
2
Click the “Share my media” check box, select “Marantz
3
M-CR511”, and then click “Allow”.
As you did in step 3, select the icon of the device (other
4
PCs and mobile devices) you want to use as a media
controller, and then click “Allow”.
Click “OK” to finish.
5
o
Sharing media stored on a NAS device
Change settings on the Network Attached Storage (NAS) device to
allow this unit and other devices (PCs and mobile devices) used as
media controllers to access the NAS. For details, see the owner’s
manual that came with the NAS.
36
Index
Page 37

Contents Connections Playback Settings Tips Appendix
Playing back files stored on a PC and
NAS
Use this procedure to play music files or playlists.
Prepare for playback.
1
Check the network environment, then turn on this unit’s power.
A
“Connecting to a home network (LAN)” (v p. 24)
Prepare the computer (vComputer’s operating instructions).
B
Press MUSIC SERVER.
2
Use ui to select the server including the file to be
3
played, then press ENTER.
Use ui to select the file, then press ENTER.
4
Playback starts once buffering reaches “100%”.
Operation buttons Function
1/3
8 9
FAVORITES CALL Call from the Favorite list
FAVORITES ADD Add to the Favorite list
SEARCH
RANDOM P
REPEAT L
u i o p
ENTER Enter the selected item
INFO
TOP MENU
Playback / Pause
(Press and hold) Stop
Skip to previous track / Skip to next track
(Press and hold)
Fast-reverse / Fast-forward
Character search
If the list is not in alphabetical order, you
0
may not be able to perform a character
search.
Random playback
Repeat playback
Switching between Single-track repeat
0
and All-track repeat.
Select the item
Switching the file type/bit rate, artist name,
and album title.
Returns to the top menu of the music server
function (server list display)
Front/Top
panel
Rear panel
Remote control
unit
37
Index
Page 38

Contents Connections Playback Settings Tips Appendix
o
Files that can be played back
See “Playing back files stored on PC or NAS” (v p. 110).
WMA Lossless files can be played when using a server supporting transcoding,
0
such as Windows Media Player Ver. 11 or later.
NOTE
When playing back music files with your PC or NAS connected through wireless
0
LAN, audio may be interrupted depending on your wireless LAN environment. In
this case, play back music files with your PC or NAS connected through wired
LAN.
The order in which the tracks/files are displayed depends on the server
0
specifications. If the tracks/files are not displayed in alphabetical order due to the
server specifications, searching by the first letter may not work properly.
Front/Top
panel
Rear panel
Remote control
unit
38
Index
Page 39

0 – 9, +10
CH +, –
CLEAR
FAVORITES
ADD/CALL
uio
ENTER
Contents Connections Playback Settings Tips Appendix
Favorite function
This section provides information on the Favorite function.
The Favorite function allows you to register your favorite broadcast
0
stations and files in the Favorite List in advance so that you can call and
listen to the stations or files right away, whenever you want.
The contents that you can register and call are Internet radio station,
0
music server, USB and iPod (only when using “On-Display” mode).
Up to 50 items can be stored in the Favorite List.
0
.
Front/Top
panel
Rear panel
Remote control
unit
39
Index
Page 40

Contents Connections Playback Settings Tips Appendix
Registering stations or files to the
favorites list
Press FAVORITES ADD while the Internet radio station
1
or file to register is played back.
Use ui to select a number to register the station or
2
file, and press ENTER.
“Added To Favorites” is displayed and the registration is competed.
Calling stations or files from the
favorites list
Press FAVORITES CALL.
1
Use CH+, CH– or ui to select the station or file that
2
you want to call, and press ENTER.
The respective function starts up and playback starts.
Press 0 – 9, +10 to call files registered to the Favorite list by number.
0
To switch between registered stations
and files during playback
Use CH+, CH– or ui.
1
Deleting stations or files from the
favorite list
Press FAVORITES CALL.
1
Use ui to select the station or file that you want to
2
delete, and press CLEAR.
When the prompt “Delete?” appears, press ENTER.
3
“Deleted” is displayed and the deletion is completed.
Press o to cancel the operation.
0
Front/Top
panel
Rear panel
Remote control
unit
40
Index
Page 41

1/3
8 9
REAR USB
uio p
ENTER
FRONT USB
INFO
MODE
RANDOM
REPEAT
Contents Connections Playback Settings Tips Appendix
Playing an iPod
You can use the USB cable provided with the iPod to connect the iPod
0
with the unit’s USB port and enjoy music stored on the iPod.
For information on the iPod models that can be played back with this
0
unit, see “Supported iPod/iPhone models” (v p. 23).
.
Front/Top
panel
Rear panel
Remote control
unit
41
Index
Page 42

Contents
Connections Playback Settings Tips Appendix
Listening to music on an iPod
Connect the iPod to the USB port. (v p. 22)
1
When you connect iPod to the front USB port, the input source
automatically switches to “Front USB”.
Press FRONT USB or REAR USB to switch the input
2
source to “Front USB” or “Rear USB”.
“From iPod” is displayed on the display of this unit.
Operate iPod itself directly while seeing the iPod
3
screen to play back music.
The iPod display modes include “From iPod” and “On-Display”. By default, “From
0
iPod”, where you directly operate the iPod itself while looking at the iPod screen, is
set.
To change to “On-Display” where operations are performed while the iPod
0
information is displayed on this unit, see “Setting operation mode (“On-Display”
mode)” (v p. 43).
You can also listen to iPod music using “AirPlay function” (v p. 54).
0
NOTE
Depending on the type of iPod and the software version, some functions may not
0
operate.
Note that Marantz will accept no responsibility whatsoever for any problems
0
arising with the data on an iPod when using this unit in conjunction with the iPod.
Front/Top
panel
Rear panel
Remote control
unit
42
Index
Page 43

Contents
Connections Playback Settings Tips Appendix
Setting operation mode (“On-Display”
mode)
In this mode, various lists and screens during playback on the iPod are
displayed on the body.
This section describes the steps up to playing back tracks on the iPod in
“On-Display”.
Press MODE and display “On-Display”.
1
Use ui to select the file to be played, then press
2
ENTER.
Playback starts.
Display mode From iPod On-Display
Playable files Music file
Video file
Active buttons Remote control unit
(This unit)
iPod
z Only the sound is played.
P P
z
P P
P
Operation buttons Function
1/3
8 9
RANDOM P
REPEAT L
MODE
u i o p
ENTER Enter the selected item
INFO Switching the artist name and album title.
TOP MENU
NOTE
Marantz will accept no responsibility whatsoever for any loss of iPod data.
0
Depending on the type of iPod and the software version, some functions may not
0
operate.
Playback / Pause
(Press and hold) Stop
Skip to previous track / Skip to next track
(Press and hold)
Fast-reverse / Fast-forward
Random playback
Repeat playback
Switching between Single-track repeat
0
and All-track repeat.
Switching between On-Display or From
iPod mode.
Select the item
Returns to the top menu of the iPod
function (On-Display mode only)
Front/Top
panel
Rear panel
Remote control
unit
43
Index
Page 44

Contents Connections Playback Settings Tips Appendix
Charging the iPod/iPhone
You can charge your iPod/iPhone by connecting it to USB port.
o
Standby charging
If the unit enters power standby mode while the iPod/iPhone is
charging, the unit will switch to standby charging mode, and the iPod/
iPhone will continue to be charged. When in standby charging mode,
the power indicator lights turns red.
When the iPod/iPhone is fully charged, the unit automatically stops
supplying power for charging and enters normal power standby mode,
and the power indicator lights turns off.
Front/Top
panel
Rear panel
Remote control
unit
44
Index
Page 45

SEARCH
0 – 9, +10
8 9
uio p
ENTER
RANDOM
REPEAT
REAR USB
FRONT USB
INFO
1/3
Contents Connections Playback Settings Tips Appendix
Playing a USB memory device
Playing back music files stored on a USB memory device.
0
Only USB memory devices conforming to mass storage class and MTP
0
(Media Transfer Protocol) standards can be played on this unit.
This unit is compatible with USB memory devices in “FAT16” or
0
“FAT32” format.
This unit can play back the following files.
0
MP3
0
WMA
0
WAV
0
MPEG-4 AAC
0
FLAC
0
ALAC
0
AIFF
0
.
Front/Top
panel
Rear panel
Remote control
unit
45
Index
Page 46

Contents
Connections Playback Settings Tips Appendix
Playing files stored on USB memory
devices
Connect the USB memory device to the USB port.
1
(v p. 22)
When you connect USB memory device to the front USB port, the
input source automatically switches to “Front USB”.
Press FRONT USB or REAR USB to switch the input
2
source to “Front USB” or “Rear USB”.
Use ui to select the file to be played, then press
3
ENTER.
Playback starts.
Operation buttons Function
Playback / Pause
1/3
8 9
RANDOM P
REPEAT L
SEARCH
u i o p
ENTER Enter the selected item
INFO Switching the artist name and album title.
TOP MENU
NOTE
Note that Marantz will accept no responsibility whatsoever for any problems arising
0
with the data on a USB memory device when using this unit in conjunction with the
USB memory device.
o
Files that can be played back
See “Playing back USB memory devices” (v p. 107).
(Press and Hold)
Stop
Skip to previous track / Skip to next track
(Press and hold)
Fast-reverse / Fast-forward
Random playback
Repeat playback
Switching between Single-track repeat
0
and All-track repeat.
Character search
If the list is not in alphabetical order, you
0
may not be able to perform a character
search.
Select the item
Returns to the top menu of the USB
function
Front/Top
panel
Rear panel
Remote control
unit
46
Index
Page 47

Bluetooth
1/3
8 9
SEARCH
ENTER
INFO
Contents Connections Playback Settings Tips Appendix
Listening to music on a Bluetooth device
Music files stored on Bluetooth devices such as smartphones, digital
music players, etc. can be enjoyed on this unit by pairing and connecting
this unit with the Bluetooth device.
Communication is possible up to a range of about 10 m.
NOTE
To play back music from a Bluetooth device, the Bluetooth device needs to
0
support the A2DP profile.
.
Front/Top
panel
Rear panel
Remote control
unit
47
Index
Page 48

Contents Connections Playback Settings Tips Appendix
Playing music from Bluetooth device
In order to enjoy music from a Bluetooth device on this unit, the Bluetooth
device must first be paired with this unit.
Once the Bluetooth device has been paired, it does not need to be paired
again.
Press Bluetooth to switch the input source to
1
“Bluetooth”.
When using for the first time, the unit will go into the pairing mode
automatically and “Pairing Mode” will appear on the display of the
unit.
Activate the Bluetooth settings on your mobile device.
2
Select this unit when its name appears in the list of
3
devices displayed on the screen of the Bluetooth
device.
Connect to the Bluetooth device while “Pairing Mode” is being
displayed on the display of the unit.
Perform the connection with the Bluetooth device close to the unit
(about 1 m).
When a number appears on the display of this unit,
4
check that it is the same number as that shown on the
screen of the Bluetooth device and then select “pair”
for both the Bluetooth device and the unit. (To select
“pair” on this unit, press ENTER on the unit.)
At the end of the pairing, the device name appears on the display of
this unit.
Play music using any app on your Bluetooth device.
5
The Bluetooth device can also be operated with the remote
0
control of this unit.
The next time the input source is switched to Bluetooth, this unit
0
automatically connects to the last Bluetooth device that was
connected.
Enter “0000” when the password is requested on the screen of the Bluetooth
0
device.
Front/Top
panel
Rear panel
Remote control
unit
48
Index
Page 49

Contents Connections Playback Settings Tips Appendix
Operation buttons Function
1/3
8 9
Press INFO on the remote control unit during playback to switch the display
0
between Artist name, Album name, etc.
Incompatible characters are displayed as “.” (period).
0
NOTE
To operate the Bluetooth device with the remote control of this unit, the Bluetooth
0
device needs to support the AVRCP profile.
The remote control of this unit is not guaranteed to work with all Bluetooth devices.
0
Depending on the type of Bluetooth device, this unit outputs audio that is coupled
0
to the volume setting on the Bluetooth device.
Playback / Pause
Skip to previous track / Skip to next track
(Press and hold) Fast-reverse / Fastforward
Front/Top
panel
Rear panel
Remote control
unit
49
Index
Page 50

Contents Connections Playback Settings Tips Appendix
Pairing with other Bluetooth devices
This unit can be paired with a maximum of 8 Bluetooth devices. When a 9th
Pair a Bluetooth device with this unit.
Activate the Bluetooth settings on your mobile device.
1
Press SEARCH when the input source is “Bluetooth”.
2
The device will go into the pairing mode.
Select this unit when its name appears in the list of
3
devices displayed on the screen of the Bluetooth
device.
When a number appears on the display of this unit,
4
check that it is the same number as that shown on the
screen of the Bluetooth device and then select “pair”
for both the Bluetooth device and the unit. (To select
“pair” on this unit, press ENTER on the unit.)
At the end of the pairing, the device name appears on the display of
this unit.
0
Bluetooth device is paired, it will be registered in place of the oldest registered
device.
Enter “0000” when the password is requested on the screen of the Bluetooth
0
device.
Either press and hold Bluetooth for 3 seconds, or switch the input source to
0
“Bluetooth” and then press and hold INPUT on this unit for more than 3 seconds to
switch to pairing mode.
Front/Top
panel
Rear panel
Remote control
unit
50
Index
Page 51

Contents
Connections Playback Settings Tips Appendix
Reconnecting to this unit from a
Bluetooth device
After pairing is completed, the Bluetooth device can be connected without
performing any operations on this unit.
This operation also needs to be performed when switching the Bluetooth
device for playback.
If a Bluetooth device is currently connected, deactivate
1
the Bluetooth setting of that device to disconnect it.
Activate the Bluetooth setting of the Bluetooth device
2
to be connected.
Select this unit from the Bluetooth device list on your
3
Bluetooth device.
Play music using any app on your Bluetooth device.
4
When the power of this unit is turned on, the input source will be automatically
0
switched to “Bluetooth” if a Bluetooth device is connected.
When the “Network Control” setting of this unit is set to “On” and a Bluetooth
0
device is connected with the unit in the standby state, the power of the unit will be
turned on automatically.
Connecting a Bluetooth device with the
NFC function via NFC
You can just touch this unit with a Bluetooth device to turn on power to this
unit and perform pairing or establish a connection between this unit and
the Bluetooth device.
Turn on the NFC function on the Bluetooth device.
1
2
For details, see the owner’s manual for your Bluetooth device.
0
Touch Q on this unit with the NFC antenna part on the
Bluetooth device.
If a pairing confirmation screen is displayed, follow the instructions
on this unit and the Bluetooth device to complete pairing.
Complete operations as instructed by the Bluetooth device.
0
.
Front/Top
panel
Rear panel
Remote control
unit
51
Index
Page 52

Contents
Play back music on the Bluetooth device.
3
This unit outputs music from the Bluetooth device.
When “Network Control” is set to “On”, startup and connection can be performed
0
even when the unit power is off.
0
When you touch the N mark (Q) on this unit with the Bluetooth device that is
playing back music, this unit outputs that music.
0
Touch the N mark (Q) again during the Bluetooth connection to disconnect the
connection.
0
Touch the N mark (Q) again if pairing or connection with the Bluetooth device
fails.
NOTE
Before establishing a NFC connection, cancel the lock function on the Bluetooth
0
device.
When you touch this unit with a Bluetooth device, do so softly.
0
Connections Playback Settings Tips Appendix
Front/Top
panel
Rear panel
Remote control
unit
52
Index
Page 53

AUX
Contents Connections Playback Settings Tips Appendix
.
Listening to DIGITAL IN
Prepare for playback.
1
Check the connection, then turn on this units.
Press AUX to select “AUX:Optical In”.
2
Play the component connected to this unit.
3
Only 2-channel linear PCM digital audio signals can be inputted through the
0
DIGITAL IN connector of this unit.
Listening to ANALOG IN
Prepare for playback.
1
Check the connection, then turn on this units.
Press AUX to select “AUX:Analog In”.
2
Play the component connected to this unit.
3
Front/Top
panel
Rear panel
Remote control
unit
53
Index
Page 54

PC
Router
This unit
Contents Connections Playback Settings Tips Appendix
AirPlay function
Music files stored on your iPhone, iPod touch, iPad or iTunes can be
played on this unit via the network.
You can stop AirPlay playback by pressing o or choosing other input source.
0
To see song and artist names together, press INFO on the remote control unit.
0
For information about how to use iTunes, also see the Help for iTunes.
0
The screen may differ depending on the OS and software versions.
0
.
Front/Top
panel
Rear panel
Remote control
unit
54
Index
Page 55

AirPlay
AirPlay
AirDrop
AirDrop
Contents
Connections Playback Settings Tips Appendix
Playing songs from your iPhone, iPod
touch or iPad
If you update your “iPhone/iPod touch/iPad” to iOS 4.2.1 or later, you can
stream music stored in your “iPhone/iPod touch/iPad” directly to this unit.
Connect your iPhone, iPod touch or iPad Wi-Fi to the
1
same network as this unit.
For details, see your device’s manual.
0
Play the song on your iPhone, iPod touch or iPad.
2
' is displayed on the iPhone, iPod touch or iPad screen.
Tap the AirPlay icon '.
3
.
Select this unit.
4
Playing iTunes music with this unit
Install iTunes 10, or later, on a Mac or Windows PC that
1
is connected to the same network as this unit.
Turn this unit ON.
2
Set “Network Control” to “On” for this unit. (v p. 84)
NOTE
When “Network Control” is set to “On”, the unit consumes more standby
0
power.
Start iTunes and click the AirPlay icon ' to select the
3
main unit.
.
Choose a song and click play in iTunes.
4
The music will stream to this unit.
Front/Top
panel
Rear panel
Remote control
unit
55
Index
Page 56

Contents Connections Playback Settings Tips Appendix
Selecting multiple speakers (devices)
It is possible to play iTunes songs on your home’s AirPlay compatible
speakers (devices) other than those of this unit.
Click the AirPlay icon ' and select “Multiple”.
1
Check the speakers you want to use.
2
NOTE
In playback using the AirPlay function, the sound is output at the iPhone, iPod
0
touch, iPad or iTunes volume setting level.
You should turn down the iPhone, iPod touch, iPad or iTunes volume prior to
playback and then adjust it to a suitable level.
Front/Top
panel
Rear panel
Remote control
unit
56
Index
Page 57

Spotify server
Control
This unit
Spotify App
Audio
streaming/
control
Contents Connections Playback Settings Tips Appendix
Spotify Connect function
Spotify is the world’s most popular streaming service. If you subscribe to
Spotify Premium, you can control your new speaker with your phone or
tablet. Because Spotify is built-in to your speaker, you can still take calls or
use other apps - the music never stops.
For information on how to set up and use Spotify Connect please visit
www.spotify.com/connect
.
Playing Spotify music with this unit
Download the “Spotify App” onto your Android or iOS device beforehand.
To play a Spotify track in this unit, you need to register in the Spotify
premium account first.
Connect the Wi-Fi settings of the iOS or Android device
1
in the same network as this unit.
Launch the Spotify App.
2
Play back the Spotify track.
3
Tap the F icon to select the unit.
4
The music will stream to this unit.
Front/Top
panel
Rear panel
Remote control
unit
57
Index
Page 58

Contents
Connections Playback Settings Tips Appendix
Remote play function
You can use your home network to play back with this unit music files
stored on PC, NAS, smartphones and portable audio players.
In this case, you use PC, smartphones and portable audio players for
operations.
The relevant devices should comply with the DLNA (Digital Living Network
0
Alliance) Ver. 1.5 standard.
A wireless LAN environment is required for playing back music files on
0
smartphones or portable audio players.
For some smartphones, you must install an application for DLNA music playback.
0
o
Roles each device plays
The following devices are used for Remote Play. As specified in the
DLNA standard, these devices are called DMC, DMS or DMR
according to their role.
Name Device example Role
PC
0
Smartphone
DMC
(Digital Media
Controller)
DMS
(Digital Media
Server)
DMR
(Digital Media
Renderer)
o
Files that can be played back
See “Playing back files stored on PC or NAS” (v p. 110).
0
Portable audio
0
player
Marantz Hi-Fi
0
Remote
PC
0
NAS
0
(Network Attached
Storage)
This unit
0
Performs Remote Play
operations.
DMC can also play back
music files stored on these
devices.
Stores music files.
Music files stored on these
devices are played back with
DMC.
Outputs audio of music files
played back through Remote
Play from speakers. DMR
cannot perform playback
operations.
Front/Top
panel
Rear panel
Remote control
unit
58
Index
Page 59

Contents Connections Playback Settings Tips Appendix
o
Settings required for each device
You must make settings on DMC and DMS for Remote Play. Make the
following settings. Also see the owner’s manual of each device for
settings.
o
Settings on computer and NAS
Make settings on computer and NAS to exchange data with DMR
devices.
For details on the settings, see “Applying media sharing
settings” (v p. 36).
o
Settings on smartphones
You must install an application for DLNA music playback on your
smartphone to perform operations on DMS and this unit (DMR) with
your smartphone. The applicable application differs according to your
smartphone.
Some smartphones support DLNA music playback with the factory settings.
0
See the owner’s manual of your smartphone.
Settings on portable audio players
Configure the settings so that this unit (DMR) can play back music files
stored on your portable audio player. For details on the settings, see
the owner’s manual of your portable player.
o
Settings on this unit
Connect this unit to the DLNA network. You do not need to make other
settings.
For the network connection, see the provided “Quick Setup Guide”,
“Connecting to a home network (LAN)” (v
“Settings” (v p. 86).
p. 24) and
Front/Top
panel
Rear panel
Remote control
unit
59
Index
Page 60

Contents Connections Playback Settings Tips Appendix
o
Remote Play operations
Operations are different for each device, but the procedures for
preparing for Remote Play are the same. The preparation procedures
are shown below.
Turn on this unit.
1
2
3
4
Make sure that this unit is connected to the network.
0
Display the music file playback screen on DMC.
For PC, open Windows Media Player 12, etc.
0
For smartphones, switch to the music file playback mode.
0
Select the friendly name of this unit for the item that
sets the playback device on the playback screen.
The default Friendly Name of this unit is “Marantz M-CR511”.
0
Start playing back a music file on DMC.
The function on this unit automatically switches to “Music Server”
0
and the Remote Play mark m appears on the display. Remote
Play starts.
Press o to exit Remote Play mode.
0
NOTE
During Remote Play, you cannot perform playback operations with this unit. Use
0
the DMC device for these operations.
Front/Top
panel
Rear panel
Remote control
unit
60
Index
Page 61

PC
Router
This unit
Tablet
IP Address
[Network Information ]
192.168.0.2
Checking the IP address.
Contents Connections Playback Settings Tips Appendix
Web control function
You can control this unit from a web control screen on a web browser.
.
This unit and the PC or tablet need to be connected to the network properly in
0
order to use the web control function. “Connecting to a home network
(LAN)” (v
Depending on the settings of your security-related software, you may not be able
0
to access this unit from your PC. If this is the case, then change the settings of the
security-related software.
p. 24)
Controlling the unit from a web control
Switch the “Network Control” setting to “On”.
1
(v p. 84)
Check the IP address of this unit with “Network
2
Information”. (v p. 84)
.
Start up the web browser.
3
Front/Top
panel
Rear panel
Remote control
unit
61
Index
Page 62

Please select the menu.
news(45)WikipediaYouTubeYahoo! JapanappleBonjour
http://192.168.0.2
NETWORK
FIRMWARE
q
w
Please select the menu.
NETWORK
FIRMWARE
e
r
Contents Connections Playback Settings Tips Appendix
Enter the IP address of this unit in browser’s address
4
box.
For example, if the IP address of this unit is “192.168.0.2”, enter
“http://192.168.0.2”.
.
Entering the IP address.
A
If you are using the Safari web browser, you can select “Bonjour”
B
and directly access the unit’s web control screen from the
overview section.
By adding this unit’s IP address to the browser’s bookmark, you can display
0
the web control screen using the bookmark function the next time you use
the browser. If you are using a DHCP server and “Network Control”
(v p. 84) is set to “Off”, turning the power on/off changes the IP
address.
When the top menu is displayed, click on the menu
5
item you want to operate.
.
Click when you setup network settings. (vGExample 1H)
C
Click when you update firmware.
D
Front/Top
panel
Rear panel
Remote control
unit
62
Index
Page 63

Friendly NameFriend
ly
Nam
e
Set Set Default
Network Connection
Select Connection
Wired
[+]DHCP or Proxy
Test Connection
NETWORK
NETWORK
FIRMWARE
o
u
i
t
y
Contents Connections Playback Settings Tips Appendix
6
.
Front/Top
Operate.
panel
GExample 1H Network Setting 1
Rear panel
Remote control
unit
63
n
Friendly Name setting
To change the Friendly Name, enter the new name in the text
E
box and click “Set”.
To reset the Friendly Name, click “Set Default”.
F
Only characters that can be displayed on this unit can be set.
0
p. 75)
(v
n
Network connection settings
Click to change the network connection method. If you select
G
“Wi-Fi”, a new item will appear on-screen. (vGExample 2H)
Click to change DHCP/proxy settings. (vGExample 2H)
H
Click to connect using the newly applied settings.
I
Index
Page 64

Friendly Name
Set Set Default
Network Connection
Select Connection Wi-Fi
Save DHCP Proxy Settings
NETWORK
Wi-Fi Setup
Manual
Manual
None
Key1
---
S SID
Security
Security Key
Defaullt Key
Address Name
ON OFF
ON OFF
192.168.000.001
255.255.255.000
000.000.000.000
000.000.000.000
000.000.000.000
000.000.000.000
00000
Test Connection
[-]DHCP or Proxy
DHCP
IP Address
Subnet Mask
Gateway
Primary DNS
Secondary DNS
Proxy
Address Or Name
Address
Port
Friend
ly
Nam
e
Set
Network Connectio
n
S
elect Connecti
on
Wi-
Fi
NETWORK
Wi-Fi Setu
p
Man
ual
Man
ual
NETWORK
FIRMWARE
Q1
Q0
Contents Connections Playback Settings Tips Appendix
7
.
Operate.
Front/Top
panel
GExample 2H Network Setting 2
Rear panel
Remote control
unit
64
n
Network connection settings
J GExample 2H - Displayed when “Wi-Fi” is selected in G.
Select or input items as necessary, and then click “Test
Connection” to apply the changes.
Items displayed may vary depending on selected items and
0
connection status.
After selecting each item, wait a moment for the display to
0
be updated.
GExample 2H - Displayed when “DHCP” or “Proxy” is selected
K
in H. When changing DHCP/proxy settings, input or select
for each item.
To apply network connection settings, click “Test Connection” after
0
making changes.
Index
Page 65

Please wait...
FIRMWARE
Firmware
Upload new firmware
Upload
Choose File
w
q
Firmware
Warning:
Once started,the upload process cannot be interrupted or adorted,
in order to ensure the integrity of the Digital Media Player.
Are you sure you want to proceed?
OK
e
Contents Connections Playback Settings Tips Appendix
o
Update on web screen
“Web control function” (v p. 61) settings must be completed in
advance on a computer belonging to the same network. For
information on obtaining update files, please contact our customer
service center.
Click D from step 5 for the “Web control function”.
1
(v p. 61)
The PC will display the following screen.
Wait for approximately 1 minute.
You can also gain access by entering the IP address shown by the
unit into a web browser.
.
G The unit’s screen display H
Front/Top
panel
.
G The web display H
Rear panel
Remote control
unit
65
When the following screen is displayed by the PC, click
2
the “Choose File” (A) button, select the update file,
and click the “Upload” (B) button.
.
Click “OK”.
3
Updating will begin.
.
NOTE
Do not operate the unit while updating is in progress.
0
Index
Page 66

Firmware
New Firmware:
xxx.fw
Firmware upload status: 100% completed.
The upload process finished successfully.
Please close this.
Contents Connections Playback Settings Tips Appendix
When the following screen is displayed, updating is
4
complete.
.
Button names may vary depending on the OS language used on your computer.
0
Front/Top
panel
Rear panel
Remote control
unit
66
Index
Page 67

SETUP
uio p
DIMMERSLEEP
CLOCK
DBB/
TONE
VOLUME
df
Contents Connections Playback Settings Tips Appendix
Convenience functions
Adjusting the tone
Sleep timer function 69
Checking the current time 69
Switching the display’s brightness 70
68
.
Front/Top
panel
Rear panel
Remote control
unit
67
Index
Page 68

Contents Connections Playback Settings Tips Appendix
n
Adjusting the tone
Press DBB/TONE to select the tone parameter to be
1
adjusted.
Use ui to adjust the “Dynamic Bass Boost”, “Bass”,
2
“Treble”, “Balance” or “S.Direct”.
n
Dynamic Bass Boost
Emphasizes the bass sound in stages according to the volume
(maximum +8 dB).
On / Off (Default: Off)
Treble
Adjusts the treble sound.
–10dB – +10dB (Default : 0dB)
n
Balance
Use op to adjust the left/right volume balance.
n
S.Direct
The “Dynamic Bass Boost”, “Bass”, “Treble” and “Balance” are not
adjusted.
On / Off (Default: Off)
n
Bass
Adjusts the bass sound.
–10dB – +10dB (Default : 0dB)
Front/Top
panel
Rear panel
Remote control
unit
68
When “Speaker Response” is set to other than “Flat”, the setting is enabled
0
even if “S.Direct” is “On”. (v
Index
p. 79)
Page 69

Contents Connections Playback Settings Tips Appendix
Sleep timer function
You can have the power automatically switched to standby once a set time
has elapsed. This is convenient for listening while going to sleep.
Press SLEEP during playback and select the setting
1
time.
0
The o indicator on the display lights.
You can set the sleep timer in the range from 10 to 90 minutes in
0
steps of 10 minutes.
o
To cancel the sleep timer
Press SLEEP to set “Sleep 1Off”.
The o indicator on the display turns off.
The sleep timer setting is canceled when the unit switches to standby mode.
0
To check the time remaining until the sleep timer is activated, press SLEEP.
0
Checking the current time
o
Checking the current time when the power is
on
Press CLOCK.
Press once more and the display returns to its original condition.
0
o
Checking the current time when the power is
set to standby
Press CLOCK.
The current time is displayed for 30 seconds.
0
The time cannot be set when in the standby mode. Turn on the power first.
0
Front/Top
panel
Rear panel
Remote control
unit
69
Index
Page 70

Contents Connections Playback Settings Tips Appendix
Switching the display’s brightness
Press DIMMER.
1
The brightness of the display switches each time the button is
0
pressed (5 levels).
If the buttons are operated when the display is turned off, information is displayed
0
temporarily at a low brightness level.
Front/Top
panel
Rear panel
Remote control
unit
70
Index
Page 71

Contents Connections Playback Settings Tips Appendix
Settings
Menu map
For menu operations, see the following page.
By default, this unit has recommended settings defined. You can customize this unit based on your existing system and your preferences.
Quick Setup
o
Setting items Description Page
Quick Setup Performs the network settings using a Wizard style window.
For details on the operations, see the separate “Quick Setup Guide”.
–
Front/Top
panel
Rear panel
Remote control
unit
71
Index
Page 72

Contents Connections Playback Settings Tips Appendix
General
o
Setting items Description Page
Alarm Sets the timer playback. 77
Clock Sets the current time. 78
Clock Mode The clock is constantly displayed. 78
Volume Limit Make a setting for maximum volume. 79
Speaker Response Set the output frequency characteristics. 79
Language Sets the language for display the menu. 80
Auto-Standby Sets the unit power to standby when the unit is not in use. 80
Usage Data Selects whether or not to send anonymous usage data to Marantz. 80
Firmware Set whether or not to check for firmware update, update the firmware, and display update and upgrade
Update Update the firmware of this unit. 81
Notifications Set the Update, Upgrade and Alerts notification on/off. 81
Add New Feature Display new features that can be downloaded to this unit and perform an upgrade. 82
Reset Resetting factory settings. 83
notifications.
81
Front/Top
panel
Rear panel
Remote control
unit
72
Index
Page 73

Contents
Network
o
Setting items Description Page
Network Information Displays various information about the network. 84
Network Control Performs the ON/OFF settings for the network function when in standby mode. 84
Friendly Name Edits a name displayed on the Internet. 85
Wi-Fi Enables/disables the Wi-Fi function. 85
Bluetooth Enables/disables the Bluetooth function. 85
Settings Performs the settings for a wired or wireless LAN. 86
Wired Setup Performs the settings for a wired LAN. 86
DHCP (On) orDHCP
(Off)
IP Address
Subnet Mask
Gateway
Primary DNS
Secondary DNS
Proxy Performs the proxy setting. 87
Test Connection Performs the wired LAN connection. –
Wi-Fi Setup Method Performs the wireless LAN connection setting. 87
Auto-Scan Selects and sets the wireless connections from the access point list. 88
Share Wi-Fi setting
from an iOS device
WPS (Wi-Fi Protected
Setup)
Web Browser Setup Sets the wireless connection using web browser. 89
Manual Sets the wireless connection manually. 91
zDisplayed when the “DHCP” setting is “Off”. (v p. 86)
z
z
z
Connections Playback Settings Tips Appendix
Performs the DHCP setting. 86
Performs the IP address setting. 86
z
Performs the subnet mask setting. 86
Performs the gateway setting. 86
Performs the primary DNS setting. 86
z
Performs the Secondary DNS setting. 86
Sets the wireless connection using an iOS device. (iOS version 7 or later) 88
Sets the wireless connection using WPS (Wi-Fi Protected Setup). 88
Front/Top
panel
Rear panel
Remote control
unit
73
Index
Page 74

SETUP
uio p
ENTER
TOP MENU
Contents
Connections Playback Settings Tips Appendix
Menu operation
Press SETUP.
1
The menu is displayed.
Use uiop to select the menu to be set or operated,
2
then press ENTER.
Use ui to change to desired setting.
3
Press ENTER to enter the setting.
4
To return to the previous item, press o.
0
Exiting the Menu, press SETUP while the menu is displayed.
0
The menu display disappears.
To back to the top of the menu, during menu operation, press
0
TOP MENU.
.
Front/Top
panel
Rear panel
Remote control
unit
74
Index
Page 75

( )
1 . @ - _ / : m n o M N O 6
a b c A B C 2 p q r s P Q R S 7
d e f D E F 3 t u v T U V 8
g h i G H I 4 w x y z W X Y Z 9
j k l J K L 5
0
z + , ; < =
> ? [ \ ] ^ ` { | }
% & ‘ ( )
! “ # $
Space
Contents Connections Playback Settings Tips Appendix
Inputting characters
On this unit, you can change the name displayed on the following screens to the names that you prefer.
Friendly Name (v p. 85)
0
Using the number buttons
Character input for the network functions (v p. 32)
0
Display the screen for inputting characters.
1
2
To change a character, use op to align the cursor with the
0
character that you want to change.
Press +10 to select the character type (upper case,
lower case, or numeric characters).
Front/Top
panel
Rear panel
Remote control
unit
75
Press 0 – 9, +10 until the desired character is
3
displayed.
The types of characters that can be input are as shown below.
0
.
Repeat steps 2 and 3 to change the name then press
4
ENTER to register it.
Index
Page 76

abcdefghijklmnopqrstuvwxyz
ABCDEFGHIJKLMNOPQRSTUVWXYZ
z + , - . / : ; < = > ? @
! “ # $ % & ‘ ( )
[ \ ] ^ _ ` { | } ~
0123456789
GLower caseH
GUpper caseH
GSymbolsH
GNumbersH
(Space)
Contents Connections Playback Settings Tips Appendix
Using the cursor buttons
Display the screen for inputting characters.
1
2
3
To change a character, use op to align the cursor with the
0
character that you want to change.
Use ui to change the character.
The types of characters that can be input are as shown below.
0
.
Repeat step 2 to change the name then press ENTER to
register it.
Press CLEAR to delete the character.
0
Press 9 to insert a space.
0
Front/Top
panel
Rear panel
Remote control
unit
76
Index
Page 77

Contents
Connections Playback Settings Tips Appendix
General
Make various other settings.
Alarm
Set the once alarm and everyday alarm.
o
Once
Once Alarm Setting: Set the once alarm to on.
Off: The alarm does not operate.
o
Every Day
Every Day: Set the everyday alarm to on.
Off: The alarm does not operate.
o
Edit Alarm
Edit the once alarm and everyday alarm.
Use ui to select the alarm mode, then press ENTER.
1
Use ui to setting for the alarm start time, then press
2
ENTER.
Use ui to select the input source, then press ENTER.
3
4
When “Bluetooth” is selected, this unit attempts to connect to the
0
previously connected device.
Use ui to select the volume level “00 – 60”, then press
ENTER.
The display shows “Complete!!” and the setting is completed.
The power indicator lights orange when the unit is switched to
0
standby mode in this state.
Front/Top
panel
Rear panel
Remote control
unit
77
Index
Page 78

Contents Connections Playback Settings Tips Appendix
Clock
o
Set the current time
You can automatically adjust the clock of this unit using the Internet.
To use this function, the unit must be connected to the Internet.
0
Use ui to select your time zone, then press ENTER.
1
Use ui to select the summer time, then press ENTER.
2
On: Set the summer time to on.
Off
(Default):
Set the summer time to off.
Clock Mode
The clock is constantly displayed.
Display the clock.
On:
Off
(Default):
NOTE
When “Clock Mode” is set to “On”, the unit consumes more standby power.
0
Press the POWER X button to switch
between the clock display and the normal
display.
Does not display the clock.
Front/Top
panel
Rear panel
Remote control
unit
78
Index
Page 79

Contents Connections Playback Settings Tips Appendix
Volume Limit
o
Make a setting for maximum volume
Limits the volume to ensure safe use of this product, and also makes it
easier to adjust the volume from AirPlay or an app to an ideal range.
30 / 45 / 60(Full throttle) / Other (Default : 30)
When “Other” is selected, the volume upper limit can be set within the
range of 16 - 60. Select the value using ui and then press ENTER to
enter the setting value.
When the maximum volume is set, if you increase the volume to the setting value and
press VOLUMEd again, “Allow max volume?” is displayed. If you press VOLUME d
again the maximum volume limit is canceled.
Speaker Response
Set the output frequency characteristics.
Flat
(Default) :
Response1 :
Response2 :
Response3 :
Response4 :
“Speaker Response” setting values are not reflected in headphone out, Audio out
0
or subwoofer out.
Properties are flat.
Cuts low frequencies 40 Hz or under by –12
dB/oct.
Cuts low frequencies 60Hz or under by –12
dB/oct.
Cuts low frequencies 80 Hz or under by –12
dB/oct.
Cuts low frequencies 100 Hz or under by –
12 dB/oct.
Front/Top
panel
Rear panel
Remote control
unit
79
Index
Page 80

Contents Connections Playback Settings Tips Appendix
Language
Set the language for display on the menu.
English / Deutsch / Française / Italiano / Nederlands / Español /
Svenska / Русский / Polski (Default :English)
Auto-Standby
When “Auto-Standby” is set to “On”, and no operations are made in the
stopped state for the set amount of time, this unit automatically enters
standby mode.
For the input source “From iPod” only, when no operation is performed for
eight hours, this unit automatically enters the standby mode.
1min / 5min /
15min /
Other (Default :
15min):
Off: The unit does not go into standby automatically.
When “Other” is selected, the “Auto-Standby” time
can be set within the range of 1 - 99 minutes.
Select the value using ui and then press ENTER
to enter the setting value.
Usage Data
For product improvement purposes, please send information on the
device settings and operating conditions of the functions to Marantz.
Information provided by customers will be used as reference material for
product development purposes in the future.
Marantz will never provide any information we collect to third parties.
Yes:
No:
Provide information on the operating status
of this unit.
Do not provide information on the operating
status of this unit.
Front/Top
panel
Rear panel
Remote control
unit
80
Index
Page 81

Contents Connections Playback Settings Tips Appendix
o
Firmware
Set whether or not to check for firmware update, update the firmware, and
display update, upgrade and alert notifications.
o
Update
Update the firmware of this unit.
Check For Update: Check for firmware updates.
Update Start: Execute the update process.
Even if the update fails, this unit will automatically try to update again.
0
Notifications
Notification messages are displayed in the screen when the power is
switched on when new firmware can be used, or when there are other
notification messages.
Update
On
(Default):
Off: Do not display update message.
Upgrade
On
(Default):
Off: Do not display upgrade message.
Notification Alerts
On
(Default):
Off:
Display update message.
Display upgrade message.
Displays notification messages from
Marantz in the popup menu.
Does not display notification messages
from Marantz in the popup menu.
Front/Top
panel
Rear panel
Remote control
unit
81
Index
Page 82

Contents Connections Playback Settings Tips Appendix
o
Add New Feature
Display new features that can be downloaded to this unit and perform
an upgrade.
Upgrade package: Display the items to be upgraded.
Upgrade Status:
Upgrade Start:
Upgrade ID:
See the Marantz website for details about upgrades.
0
When the procedure is complete, “Registered” is displayed in this menu and
0
upgrades can be carried out. If the procedure has not been carried out, “Not
Registered” is displayed.
Display a list of the additional functions
provided by the upgrade.
Execute the upgrade process. When the
upgrade starts, the menu screen is shut
down. During the upgrade, the amount of
upgrade time which has elapsed is
displayed.
The ID number shown on the display is
needed when carrying out the procedure.
Notes concerning use of “Update” and “Add New Feature”
In order to add new functions, the environment and settings required
0
for connecting to broadband internet are needed. (v
Perform the add new feature operation after at least 2 minutes has
0
elapsed since turning this unit’s power on.
Do not turn off the power until updating or upgrading is completed.
0
Even with a broadband connection to the Internet, approximately 20
0
minutes is required for the updating/upgrading procedure to be
completed.
Once updating/upgrade starts, normal operations on this unit cannot
0
be performed until updating/upgrading is completed. Furthermore,
updating/upgrading the firmware may reset the backup data for the
parameters, etc. set for this unit.
When the update or upgrade failed with a message such as “Update
0
failed” and “Download failed”, remove and re-insert the power cord.
“Update Retry” appears on the display and update restarts from the
point at which update failed. If the error continues despite this, check
the network environment.
Information regarding the “Update” function and “Add New Feature” will be
0
announced on the Marantz web site each time related plans are defined.
p. 24)
Front/Top
panel
Rear panel
Remote control
unit
82
Index
Page 83

Contents Connections Playback Settings Tips Appendix
Reset
Perform this procedure if the display is abnormal or if operations cannot be
performed. Various settings are reset to the factory default values. Make
settings again.
Cancel: Values are not reset.
Reset factory defaults: Values are reset.
Front/Top
panel
Rear panel
Remote control
unit
83
Index
Page 84

Contents Connections Playback Settings Tips Appendix
Network
To use this unit by connecting it to a home network (LAN), you must configure network settings. If you set up your home network via DHCP, set “DHCP” to
On (use the default setting). This allows this unit to use your home network.
If you assign an IP address for each device, you must use the “IP Address” setting to assign an IP address to this unit and enter the information about your
home network such as the gateway address and subnet mask.
Network Information
Display network information.
Friendly Name / DHCP On or Off / IP Address / MAC Address /
z
SSID
This is displayed only while a Wi-Fi connection is enabled.
z
Front/Top
panel
Rear panel
Remote control
unit
Network Control
Enables network communication in standby power mode.
On:
Off
(Default):
When using the Web control function or a network controller or when you want to
0
use Bluetooth/NFC quickly when the power is off, set “Network Control” to “On”.
NOTE
When “Network Control” is set to “On”, the unit consumes more standby power.
0
84
Index
The network function can be used when in
standby power mode. Main unit operable
with a network compatible controller.
The network function cannot be used in
standby power mode.
Page 85

Contents Connections Playback Settings Tips Appendix
Friendly Name
The Friendly Name is the name of this unit displayed on the network. You
can change the Friendly Name according to your preferences.
o
Select Name
Selects Friendly Name from the list.
Current Friendly Name / AV Room / Bedroom / Dining Room /
Family Room / Guest Room / Kids Room / Kitchen / Living
Room / Office / Marantz M-CR511 / Other (Default :Marantz M-
CR511)
When you select “Other”, you can change the Friendly Name
0
according to your preferences.
Up to 63 characters can be input.
0
For character input, see (v
0
p. 75).
Wi-Fi
You can stop the Wi-Fi function when connecting this unit to the network
using Wired LAN.
Enabled
(Default):
Disabled: The Wi-Fi function is stopped.
The Wi-Fi function is used.
Bluetooth
You can stop the Bluetooth function.
Enabled
(Default):
Disabled: The Bluetooth fuction is stopped.
The Bluetooth fuction is used.
Front/Top
panel
Rear panel
Remote control
unit
85
Index
Page 86

Contents
Connections Playback Settings Tips Appendix
Settings
You can make detailed settings for the network.
To change the network environment, perform “Quick Setup”. (For details
on the operations, see the separate “Quick Setup Guide”.)
If you are using a broadband router (DHCP function), there is no need to
0
make the settings at “IP Address” and “Proxy”, since the DHCP function
is set to “On” in this unit’s default settings.
Only set “Settings” when connecting to a network without a DHCP
0
function.
o
Wired Setup
n
DHCP
Selects how to connect to the network.
On
(Default):
Off: Configure the network settings manually.
Configure the network settings
automatically from your router.
n
IP Address
Set the IP address within the ranges shown below.
The Network Audio function cannot be used if other IP addresses
0
are set.
CLASS A: 10.0.0.1 - 10.255.255.254
CLASS B: 172.16.0.1 - 172.31.255.254
CLASS C: 192.168.0.1 - 192.168.255.254
n
Subnet Mask
When connecting an xDSL modem or connector adapter directly to
this unit, input the subnet mask indicated in the documentation
supplied by your provider. Normally input 255.255.255.0.
n
Gateway
When connected to a gateway (router), input its IP address.
n
Primary DNS, Secondary DNS
If there is only one DNS address indicated in the documentation
supplied by your provider, enter it for “Primary DNS”. If two or more
DNS are provided by your provider, enter one for “Secondary DNS”.
Front/Top
panel
Rear panel
Remote control
unit
86
Index
Page 87

Contents Connections Playback Settings Tips Appendix
n
Proxy
Make this setting when connecting to the Internet via a proxy server.
Make the proxy settings only when you connect to the Internet via a
proxy server that is on your internal network or provided by your
provider, etc.
Proxy (Off) or Proxy
(On):
Proxy (Address) or Proxy
(Name):
Address or Name:
Port: Enter port number.
If you cannot connect to the Internet, recheck the connections and settings.
0
p. 24)
(v
If you do not understand about Internet connection, contact your ISP (Internet
0
Service Provider) or the store from which you purchased your computer.
Set the proxy server.
Select when inputting by address or
domain name.
Inputting address or domain name. Up to
38 characters can be input.
o
Wi-Fi Setup Method
In this menu, Wi-Fi settings and connections can be made using any of
the five connection methods.
Auto-Scan /Share Wi-Fi setting from an iOS device / WPS (Wi-Fi
Protected Setup) / Web Browser Setup / Manual
If a LAN cable is connected, remove it.
0
See the Quick Setup Guide for details on how to connect to Wi-Fi using the
0
Wi-Fi CONNECT button on the rear panel.
Front/Top
panel
Rear panel
Remote control
unit
87
Index
Page 88

Contents Connections Playback Settings Tips Appendix
n
Auto-Scan
This automatically searches for networks.
From the list of the networks, select the one you want
1
to connect to.
Select “Rescan” if the network cannot be found.
0
Make the following settings.
2
Default Key:
Password: Input the password.
DHCP/Proxy:
Test Connection: Test the connection.
Select the default key.
When connecting to a WEP
0
encrypted network, “Default Key”
menu is displayed.
Performs the DHCP and proxy setting.
(“DHCP” (v p. 86),
“Proxy” (v
p. 87))
n
Share Wi-Fi setting from an iOS device
You can use an iOS device such as an iPhone or iPad to configure WiFi settings.
After selecting this item, select Settings/Wi-Fi from the iOS device
home screen, select “Marantz M-CR511” displayed at the bottom of
the screen, and then follow the setting instructions displayed on the
iOS device.
For details, see the “Quick Setup Guide”.
The iOS version must be 7 or later.
0
n
WPS (Wi-Fi Protected Setup)
Register the PIN code of the unit in the router.
1
Front/Top
panel
Rear panel
Remote control
unit
88
Index
Page 89

Please select the menu.
news(45)WikipediaYouTubeYahoo! JapanappleBonjour
http://192.168.1.16
NETWORK
q
w
Please select the menu.
NETWORK
e
Contents Connections Playback Settings Tips Appendix
n
Web Browser Setup
Use a web browser to set up Wi-Fi.
A Wi-Fi device that can perform web browse operations is required.
Read the precautions on the screen, and press ENTER.
1
Select “Marantz M-CR511” from the Wi-Fi network list
2
of the Wi-Fi device.
The IP address (192.168.1.16) appears on the unit.
Enter the IP address of this unit in browser’s address
3
box.
.
Entering the IP address (192.168.1.16).
A
If you are using the Safari web browser, you can select “Bonjour”
B
and directly access the unit’s web control screen from the
overview section.
When the top menu is displayed, click “NETWORK”.
4
.
Click “NETWORK”. (vGExample 1H)
C
Front/Top
panel
Rear panel
Remote control
unit
89
Index
Page 90

Friendly Name
Network Connection
Select Connection Select Connection
Test Connection
NETWORK
Friend
ly
Nam
e
Network Connect
ion
S
elect Connecti
on
S
elect Con
n
Tes
t C
onnect
i
NETWOR
K
NETWORK
r
Friendly Name
Network Connection
Select Connection Wi-Fi
NETWORK
Manual
None
Key1
---
SSID
Security
Security Key
Defaullt Key
Test Connection
Friend
ly
Nam
e
Network Connectio
n
S
elect Connecti
on
Wi-
Fi
NETWORK
Man
ual
SSID
NETWORK
t
Contents Connections Playback Settings Tips Appendix
Operate.
5
GExample 1H Network Setting 1
.
n
Network connection settings
Click to change the network connection method. If you select
D
“Wi-Fi”, a new item will appear on-screen.
(vGExample 2H)
Front/Top
panel
Rear panel
GExample 2H Network Setting 2
.
n
Network connection settings
E GExample 2H - Displayed when “Wi-Fi” is selected in D. Select or
input items as necessary, and then click “Test Connection” to apply
the changes.
Items displayed may vary depending on selected items and
0
connection status.
After selecting each item, wait a moment for the display to be
0
updated.
To apply network connection settings, click “Test Connection” after making
0
changes.
Remote control
unit
90
Index
Page 91

Contents Connections Playback Settings Tips Appendix
n
Manual
Sets the wireless connection manually
SSID :
Security:
Default Key:
Password: Input the password.
DHCP/Proxy:
Test Connection: Test the connection.
Input the name of the wireless network
(SSID).
Select the encryption method according
to the encryption setting of the access
point you are using.
Select the Default Key.
When connecting to a “WEP”
0
encrypted network, “Default Key”
menu is displayed.
Performs the DHCP and proxy setting.
(“DHCP” (v p. 86), “Proxy” (v p. 87))
Front/Top
panel
Rear panel
Remote control
unit
91
Index
Page 92

Contents Connections Playback Settings Tips Appendix
o
Contents
Tips
Simple operations in the power off state 93
Simple operations for iPod/USB 93
I only want to recharge my iPod 93
Specifying the iPod track with the alarm function 93
Specifying the desired track with the alarm function 93
Change to summer time 93
Changing or resetting the network environment 94
Volume adjustment is difficult when using AirPlay or app operation,
and the sound suddenly becomes too loud 94
I want to set the optimized listening environment after changing the
configuration/position of the speakers or changing a speaker to a new
one 94
Troubleshooting
Power does not turn on / Power is turned off 95
LED is flashing 95
Operations cannot be performed through the remote control unit 96
Display on this unit shows nothing 96
No sound comes out 97
Desired sound does not come out 98
Sound is interrupted or noise occurs 99
iPod cannot be played back 100
USB memory devices cannot be played back 101
Bluetooth cannot be played back 102
File names on the iPod/USB memory device are not displayed
properly 103
The Internet radio cannot be played back 104
Music files on PC or NAS cannot be played back 105
Cannot connect by Wi-Fi 106
Tips
Front/Top
panel
Rear panel
Remote control
unit
92
Index
Page 93

Contents
Connections Playback Settings Tips Appendix
Tips
Simple operations in the power off state
When a input source select buttons, 1/3 button or FAVORITES CALL button is pressed, the operation is performed at the same time as the unit
0
switches on. (“Basic operation” (v p. 29), “Favorite function” (v p. 39))
When the “Network Control” is set to “On”, you can perform playback, or other operations through AirPlay, “Marantz Hi-Fi Remote”. (v p. 84)
0
Simple operations for iPod/USB
When connected to the Front USB port, the Input Source automatically changes and playback begins. (“Listening to music on an iPod” (v p. 42),
0
“Playing files stored on USB memory devices” (v p. 46))
I only want to recharge my iPod
Connect the iPod to this unit when the unit power is on. Then turn the unit power off, and the iPod will continue to charge until fully charged. (v
0
When connected to the Rear USB port, the iPod can be charged without the current Input Source changing.
0
Specifying the iPod track with the alarm function
Connect the iPod to this unit by USB and then press the MODE button to register your favorite tracks in the favorites using “On-Display”
0
mode. (v
When using alarm playback on an iPod touch or iPhone, set the iPod touch or iPhone to “Sleep” mode. If the power is switched off using the power off
0
operation, alarm playback cannot be used.
Specifying the desired track with the alarm function
After registering the desired track in NAS, etc., register the track in the favorites and then specify the track in the alarm settings. (v
0
Change to summer time
Select “General” - “Clock” in the setup menu and configure the settings. (v
0
p. 39) Then set a track registered in the favorites as the alarm. (v p. 77)
p. 77)
p. 78)
p. 44)
Front/Top
panel
Rear panel
Remote control
unit
93
Index
Page 94

Contents Connections Playback Settings Tips Appendix
Changing or resetting the network environment
Prepare the provided Quick Setup Guide, and run Setup – “Quick Setup”. For detailed settings, run Setup - “Network” - Settings. (v p. 86)
0
Volume adjustment is difficult when using AirPlay or app operation, and the sound suddenly becomes too loud
Reducing the “Volume Limit” setting value (to around 20 to 30) limits the volume setting from AirPlay or an app to an ideal range and makes it easier to
0
adjust the volume. (v p. 79)
I want to set the optimized listening environment after changing the configuration/position of the speakers or changing a speaker to a new
one
Select Setup – “General” – “Speaker Response” and configure the settings. (v
0
p. 79)
Front/Top
panel
Rear panel
Remote control
unit
94
Index
Page 95

Contents Connections Playback Settings Tips Appendix
Troubleshooting
1. Are the connections correct?
2. Is the set being operated as described in the owner’s manual?
3. Are the other devices operating properly?
If this unit does not operate properly, check the items listed in the table below.
Should the problem persist, there may be a malfunction. In this case, disconnect the power immediately and contact your store of purchase.
Power does not turn on / Power is turned off
o
Symptom Cause / Solution Page
Power does not turn on.
Power automatically turns
off.
LED is flashing
o
Symptom Cause / Solution Page
Flashing red.
Check whether the power plug is correctly inserted into the power outlet. 27
0
The sleep timer is set. Turn on the power again. 69
0
“Auto-Standby” is set. “Auto-Standby” is triggered when there is no operation for a set amount of time. To
0
disable “Auto-Standby”, set “Auto-Standby” on the menu to “Off”.
The amplifier circuit in the unit has malfunctioned. Disconnect the power and contact the repair center. -
0
The clock is incorrect because the AC was temporarily switched off, etc. Check the network connection
0
and adjust the clock.
80
78
Front/Top
panel
Rear panel
Remote control
unit
95
Index
Page 96

Contents Connections Playback Settings Tips Appendix
Operations cannot be performed through the remote control unit
o
Symptom Cause / Solution Page
Operations cannot be
performed through the
remote control unit.
Display on this unit shows nothing
o
Symptom Cause / Solution Page
Display is off.
Batteries are worn out. Replace with new batteries. 7
0
Operate the remote control unit within a distance of about 7 m from this unit and at an angle of within 30°. 7
0
Remove any obstacle between this unit and the remote control unit. -
0
Insert the batteries in the proper direction, checking the q and w marks.
0
The set’s remote control sensor is exposed to strong light (direct sunlight, inverter type fluorescent bulb
0
light, etc.). Move the set to a place in which the remote control sensor will not be exposed to strong light.
When using a 3D video device, the remote control unit of this unit may not function due to effects of
0
infrared communications between units (such as TV and glasses for 3D viewing). In this case, adjust the
direction of units with the 3D communications function and their distance to ensure they do not affect
operations from the remote control unit of this unit.
Press the DIMMER button on the remote control to set any setting other than OFF. 70
0
7
-
-
Front/Top
panel
Rear panel
Remote control
unit
96
Index
Page 97

Contents Connections Playback Settings Tips Appendix
No sound comes out
o
Symptom Cause / Solution Page
No sound comes out of
speakers.
Check the connections for all devices. 18
0
Insert connection cables all the way in. -
0
Check that input connectors and output connectors are not reversely connected. -
0
Check cables for damage. -
0
Check that speaker cables are properly connected. Check that cable core wires come in contact with the
0
metal part on speaker terminals. Also, securely tighten speaker terminals. Check speaker terminals for
looseness.
Check that a proper input source is selected. 29
0
Adjust the volume. 30
0
Cancel the mute mode. 30
0
Check that the correct input source is selected when audio is being input to this unit from an external
0
device.
Check the digital audio output setting on the connected device. The initial settings may be off depending
0
on the device.
Only 2-channel linear PCM can be input as the digital audio signal to the DIGITAL IN connector of this
0
unit.
No sound is output from the speakers when headphones are connected. 11
0
18
53
53
53
Front/Top
panel
Rear panel
Remote control
unit
97
Index
Page 98

Contents Connections Playback Settings Tips Appendix
Desired sound does not come out
o
Symptom Cause / Solution Page
Left/right volume balance is
unbalanced.
No sound from the sub
woofer.
Set values are not reflected
in “Dynamic Bass Boost”,
“Bass” and “Treble”.
Press the DBB/TONE button on the remote control to adjust the balance. 68
0
Check the subwoofer connections. 19
0
Switch the subwoofer power on. -
0
“Dynamic Bass Boost”, “Bass” and “Treble” setting values are not reflected in subwoofer out. 68
0
Front/Top
panel
Rear panel
Remote control
unit
98
Index
Page 99

Contents Connections Playback Settings Tips Appendix
Sound is interrupted or noise occurs
o
Symptom Cause / Solution Page
During playback from the
Internet radio or USB
memory device, sound is
occasionally interrupted.
When making a call on
iPhone, noise occurs in
audio output on this unit.
Sound cuts out when using
Wi-Fi connection.
When the transfer speed of the USB memory device is slow, sound may occasionally be interrupted. -
0
The network communication speed is slow or the radio station is busy. -
0
When making a call, keep a distance of 20 cm or longer between iPhone and this unit. -
0
If nearby devices cause playback to cut out due to electronic interference, switch to a wired LAN
0
connection.
Particularly when you play back large music files, depending on your wireless LAN environment, the
0
playback sound may be interrupted. In this case, make the wired LAN connection.
24
86
Front/Top
panel
Rear panel
Remote control
unit
99
Index
Page 100

Contents Connections Playback Settings Tips Appendix
iPod cannot be played back
o
Symptom Cause / Solution Page
iPod cannot be connected.0When using iPod by connecting it to the USB port, some iPod variations are not supported. 23
When iPod is connected by using a USB cable other than the genuine cable, iPod may not be
0
recognized. Use a genuine USB cable.
The AirPlay icon ' is not
displayed on iTunes /
iPhone / iPod touch / iPad.
No sound is produced.
Audio is interrupted during
the AirPlay playback on
iPhone / iPod touch / iPad.
This unit and PC / iPhone / iPod touch / iPad are not connected to the same network (LAN). Connect it to
0
the same LAN as this unit.
The firmware on iTunes / iPhone / iPod touch / iPad is not compatible with AirPlay. Update the firmware to
0
the latest version.
The volume on iTunes / iPhone / iPod touch / iPad is set to the minimum level. The volume on iTunes /
0
iPhone / iPod touch / iPad is linked with the volume on this unit. Set a proper volume level.
The AirPlay playback is not performed, or this unit is not selected. Click the AirPlay icon ' on the
0
iTunes / iPhone / iPod touch / iPad screen and select this unit.
Quit the application running in the background of the iPhone/iPod touch/iPad, and then play using
0
AirPlay.
Some external factors may be affecting the wireless connection. Modify the network environment by
0
taking measures such as shortening the distance from the wireless LAN access point.
-
24
-
-
54
-
-
Front/Top
panel
Rear panel
Remote control
unit
100
Index
 Loading...