

Page 1

R
Model LC1510 User Guide
LCD TV/Monitor
Page 2
WARNING :
WARNING
RISK OF ELECTRIC SHOCK
DO NOT OPEN
TO REDUCE THE RISK OF ELECTRIC SHOCK DO NOT REMOVE COVER (OR BACK).
NO USER SERVICEABLE PARTS INSIDE.
REFER SERVICING TO QUALIFIED SERVICE PERSONNEL.
The lightning flash with arrowhead symbol, within an equilateral triangle, is intended to alert
the user to the presence of uninsulated “dangerous voltage” within the product’s enclosure
that may be of sufficient magnitude to constitute a risk of electric shock to persons.
The exclamation point within an equilateral triangle is intended to alert the user to the presence of important operating and maintenance (servicing) instructions in the literature accompanying the appliance.
RECORD YOUR MODEL NUMBER
(Now, while you can see it)
The model and serial number of your new TV are located
on the back of the TV cabinet. For your future convenience, we suggest that you record these numbers here:
MODEL
NO.____________________________________
SERIAL
NO.____________________________________
WARNING :
TO PREVENT FIRE OR SHOCK HAZARDS, DO NOT EXPOSE THIS PRODUCT TO
RAIN OR MOISTURE.
NOTE TO CABLE/TV INSTALLER:
REGULA T OR Y INFORMATION:
CAUTION:
This reminder is provided to call the cable TV system installer’s attention to Article 820-40 of
the National Electric Code (U.S.A.). The code provides guidelines for proper grounding and,
in particular, specifies that the cable ground shall be connected to the grounding system of
the building, as close to the point of the cable entry as practical.
This equipment has been tested and found to comply with the limits for a Class B digital
device, pursuant to Part 15 of the FCC Rules. These limits are designed to provide reasonable protection against harmful interference when the equipment is operated in a residential
installation. This equipment generates, uses and can radiate radio frequency energy and, if
not installed and used in accordance with the instruction manual, may cause harmful interference to radio communications. However, there is no guarantee that interference will not
occur in a particular installation. If this equipment does cause harmful interference to radio
or television reception, which can be determined by turning the equipment off and on, the
user is encouraged to try to correct the interference by one or more of the following measures:
• Reorient or relocate the receiving antenna.
• Increase the separation between the equipment and receiver.
• Connect the equipment into an outlet on a circuit different from that to
which the receiver is connected.
• Consult the dealer or an experienced radio/TV technician for help.
Do not attempt to modify this product in any way without written authorization from
MARANTZ Unauthorized modification could void the user’s authority to operate this product.
i
Page 3

AVERTISSEMENT :
AVERTISSEMENT
RISQUE DE CHOCS ÉLECTRIQUES
NE PAS OUVRIR
AFIN DE RÉDUIRE TOUT RISQUE DE CHOC ÉLECTRIQUE, NE PAS ENLEVER LE COU
VERCLE (OU L’ARRIÈRE). AUCUNE PIÈCE NE PEUTÊTRE RÉPARÉE P AR L ’UTILISATEUR.
CONFIER L’ENTRETIEN À UN TECHNICIEN QUALIFIÉ.
Le symbole de l’éclair à pointe de flèche à l’intérieur d’un triangle équilatéral a pour but d’aver-
tir l’utilisateur que l’appareil renferme des circuit non isolés à haute tension suffisamment puis-
sant pour constituer un risque de chocs électrique.
Le symbole du point d’exclamation à l’intérieur d’un triangle équilatéral a pour but d’avertir
l’utilisateur que des renseignements importants relatifs à l’entretien et au fonctionnement fig-
urent dans la documentation qui accompagne l’appareil.
AVERTISSEMENT :
POUR ÉVITER TOUT RISQUE D’INCENDIE OU DE SECOUSSE ÉLECTRIQUE, NE PAS
EXPOSER CET APPAREIL À LA PLUIE OU À L’HUMIDITÉ.
A VIS À L’INSTALLATEUR DU SYSTÈME DE TÉLÉDISTRIBUTION:
RENSEIGNEMENTS SUR LA RÉGLEMENTA TION:
A VER TISSEMENT:
Cet avis a pour but de rappeler à l’installateur du système de télédistribution que l’article 820-
40 du NEC (code national de l’électricité des É.-U.) fournit des directives quant à la façon
d’effectuer correctement la mise à la terre et précise plus particulièrement que le câble de
mise à la terre doit être connecté au système de mise à la terre de l’édifice aussi près que
possible de l’entrée du câble.
Cet équipement a été testé et est conforme aux normes des appareils numériques de classe
B, conformément au paragraphe 15 des règlements de la FCC. Ces normes sont conçues
pour assurer une protection raisonnable contre les interférences indésirables pour les installations résidentielles. Cet équipement génère, utilise et peut émettre de l’énergie de
radiofréquence et, s’il n’est pas installé selon les instructions, il peut causer des interférences
indésirables aux communications radio. Toutefois, il n’y a aucune garantie que des
interférences ne se produiront pas dans le cas d’une installation particulière. Si cet
équipement cause des interférences à la réception radio ou télé, ce qui peut être déterminé
en mettant l’appareil hors circuit, puis en circuit, l’utilisateur est prié d’essayer de corriger
l’interférence en prenant une des mesures suivantes:
• Réorienter l’antenne réceptrice.
•Éloigner l’équipement du récepteur .
• Brancher cet équipement sur une prise autre que celle utilisée avec le récep teur.
• Consulter le marchand ou un technicien radio-télé qualifié.
Ne pas modifier cet appareil sans une autorisation écrite de MARANTZ. Toute modification
non autorisée annule la possibilité pour l’utilisateur d’utiliser cet appareil.
ii
Page 4

IMPORTANT SAFETY INSTRUCTIONS
PORTABLE CART WARNING
Important safeguards for you and your new product
Your product has been manufactured and tested with your safety in mind. However, improper use
can result in potential electrical shock or fire hazards. To avoid defeating the safeguards that have
been built into your new product, please read and observe the following safety points when
installing and using your new product, and save them for future reference.
Observing the simple precautions discussed in this booklet can help you get many years of enjoyment and safe operation that are built into your new product.
This product complies with all applicable U.S. Federal safety requirements, and those of the
Canadian Standards Association.
Left master page
1. Read Instructions
All the safety and operating instructions should
be read before the product is operated.
2. Follow Instructions
All operating and use instructions should be followed.
3. Retain Instructions
The safety and operating instructions should be
retained for future reference.
4. Heed Warnings
All warnings on the product and in the operating
instructions should be adhered to.
5. Cleaning
Unplug this product from the wall outlet before
cleaning. Do not use liquid cleaners or aerosol
cleaners. Use a damp cloth for cleaning.
6. Water and Moisture
Do not use this product near water - for example, near a bath tub, wash bowl, kitchen sink, or
laundry tub, in a wet basement, or near a swimming pool.
7. Accessories
Do not place this product on an unstable cart,
stand, tripod, bracket, or table. The product may
fall, causing serious injury to a child or adult,
and serious damage to the product. Use only
with a cart, stand, tripod, bracket, or table recommended by the manufacturer, or sold with the
product. Any mounting of the product should follow the manufacturer’s instructions, and should
use a mounting accessory recommended by the
manufacturer.
8. Transporting Product
A product and cart combination should be
moved with care. Quick stops, excessive force,
and uneven surfaces may cause the product
and cart combination to overturn.
9. Attachments
Do not use attachments not recommended by
the product manufacturer as they may cause
hazards.
10. Ventilation
Slots and openings in the cabinet are provided
for ventilation and to ensure reliable operation of
the product and to protect it from overheating,
and these openings must not be blocked or covered. The openings should never be blocked by
placing the product on a bed, sofa, rug, or other
similar surface. This product should not be
placed in a built-in installation such as a bookcase or rack unless proper ventilation is provided or the manufacturer’s instructions have been
adhered to.
11. Power Sources
This product should be operated only from the
type of power source indicated on the marking
label. If you are not sure of the type of power
supply to your home, consult your product dealer or local power company. For products intended to operate from battery power, or other
sources, refer to the operating instructions.
12. Line-Cord Polarization
This product is equipped with a three-wire
grounding type alternating-current line plug (a
plug having one blade wider than the other).
This plug will fit into the power outlet only one
way. This is a safety feature. If you are unable
to insert the plug fully into the outlet, contact
your electrician to replace your obsolete outlet.
Do not defeat the safety purpose of the polarized plug.
13. Power-Cord Protection
Power-supply cords should be routed so that
they are not likely to be walked on or pinched
by items placed upon or against them, paying
particular attention to cords at plugs, convenience receptacles, and the point where they
exit from the product.
iii
(Continued on next page)
Page 5
IMPORTANT SAFETY INSTRUCTIONS
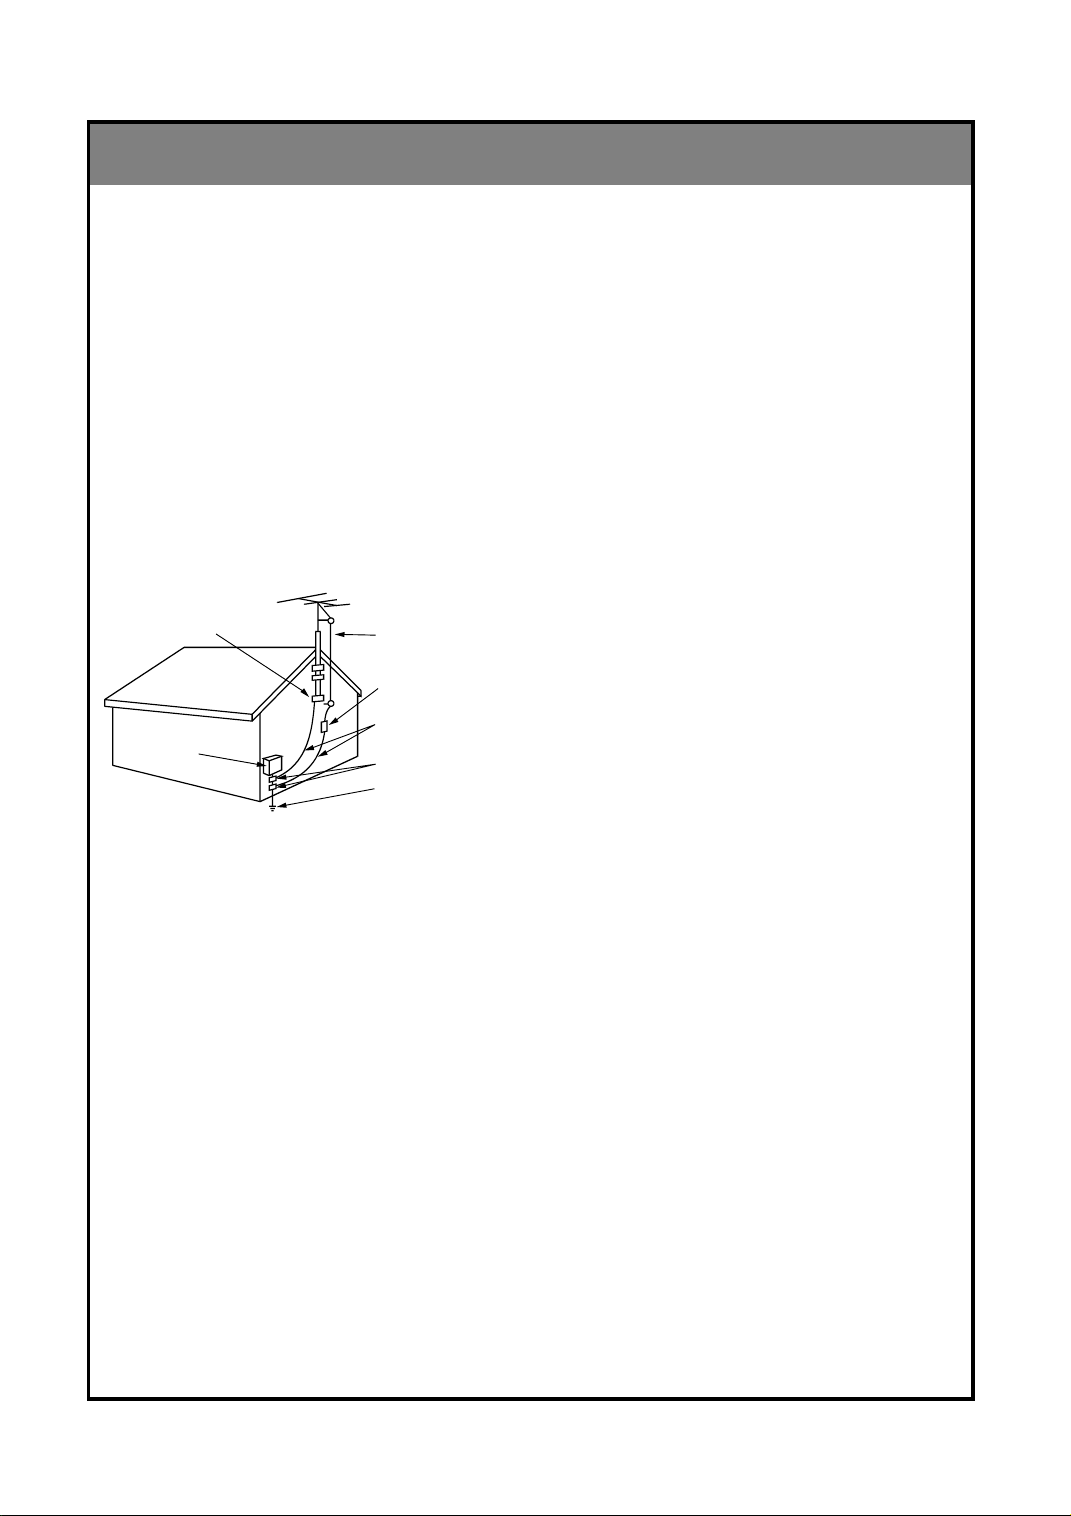
Antenna Lead in Wire
Antenna Discharge Unit
(NEC Section 810-20)
Grounding Conductor
(NEC Section 810-21)
Ground Clamps
Power Service Grounding
Electrode System (NEC
Art 250, Part H)
Ground Clamp
Electric Service
Equipment
(Continued from previous page)
14. Outdoor Antenna Grounding
If an outside antenna or cable system is connected to the product, be sure the antenna or
cable system is grounded so as to provide some
protection against voltage surges and built-up
static charges. Article 810 of the National
Electrical Code (U.S.A.), ANSI/ NFPA 70 provides information with regard to proper grounding of the mast and supporting structure,
grounding of the lead-in wire to an antenna discharge unit, size of grounding conductors, location of antenna-discharge unit, connection to
grounding electrodes, and requirements for the
grounding electrode.
Example of Grounding According to National
Electrical Code Instructions
NEC - National Electrical Code
15. Lightning
For added protection for this product (receiver)
during a lightning storm, or when it is left unattended and unused for long periods of time,
unplug it from the wall outlet and disconnect the
antenna or cable system. This will prevent damage to the product due to lightning and powerline surges.
16. Power Lines
An outside antenna system should not be located in the vicinity of overhead power lines or
other electric light or power circuits, or where it
can fall into such power lines or circuits. When
installing an outside antenna system, extreme
care should be taken to keep from touching
such power lines or circuits as contact with them
might be fatal.
17. Overloading
Do not overload wall outlets and extension
cords as this can result in a risk of fire or electric
shock.
18. Object and Liquid Entry
Never push objects of any kind into this product
through openings as they may touch dangerous
voltage points or short-out parts that could result
in a fire or electric shock. Never spill liquid of
any kind on the product.
19. Servicing
Do not attempt to service this product yourself
as opening or removing covers may expose you
to dangerous voltage or other hazards. Refer all
servicing to qualified service personnel.
20. Damage Requiring Service
Unplug this product from the wall outlet and
refer servicing to qualified service personnel
under the following conditions:
a. If the power-supply cord or plug is damaged.
b. If liquid has been spilled, or objects have fall-
en into the product.
c. If the product has been exposed to rain or
water.
d. If the product does not operate normally by
following the operating instructions. Adjust only
those controls that are covered by the operating
instructions as an improper adjustment of other
controls may result in damage and will often
require extensive work by a qualified technician
to restore the product to its normal operation.
e. If the product has been dropped or the cabinet has been damaged.
f. If the product exhibits a distinct change in
performance.
21. Replacement Parts
When replacement parts are required, be sure
the service technician has used replacement
parts specified by the manufacturer or have the
same characteristics as the original part.
Unauthorized substitutions may result in fire,
electric shock, or other hazards.
22. Safety Check
Upon completion of any service or repairs to this
product, ask the service technician to perform
safety checks to determine that the product is in
proper operating condition.
23. Wall or Ceiling Mounting
The product should be mounted to a wall or ceiling only as recommended by the manufacturer.
24. Heat
The product should be situated away from heat
sources such as radiators, heat registers,
stoves, or other products (including amplifiers)
that produce heat.
iv
Page 6

v
Page 7

CONTENTS
INDEX
Safety warnings i
1
Important safety instructions iii
Controls 2
Basic composition of LCD TV 6
Connecting antenna 9
2
Connecting external equipment 10
Connecting DVD player 12
Connecting DTV 13
Connecting PC as monitor 14
3
Function checking in PC mode 16
English
INTRODUCTION
INTRODUCTION
CONNECTION
CONNECTIONPC
PC
Before operating the
set, please read this
manual carefully.
Using remote control 17
4
Turning on the set 19
Function checking in TV mode 20
Setting language 21
Closed caption function 22
Parental control function 26
Programming / Erasing channels 28
Setting current time 30
5
Setting Off-Timer function 32
Setting On-Timer function 34
Setting sleep time function 36
Adjusting audio condition 37
6
Adjusting video condition 40
Product specifications 42
7
CONNECTION
CONNECTION
BASIC
BASIC
FUNCTIONS
FUNCTIONS
CLOCK
CLOCK
SETTING
SETTING
AUDIO /
AUDIO /
VIDEO
VIDEO
INFORMATION
INFORMATION
1
Page 8
Controls
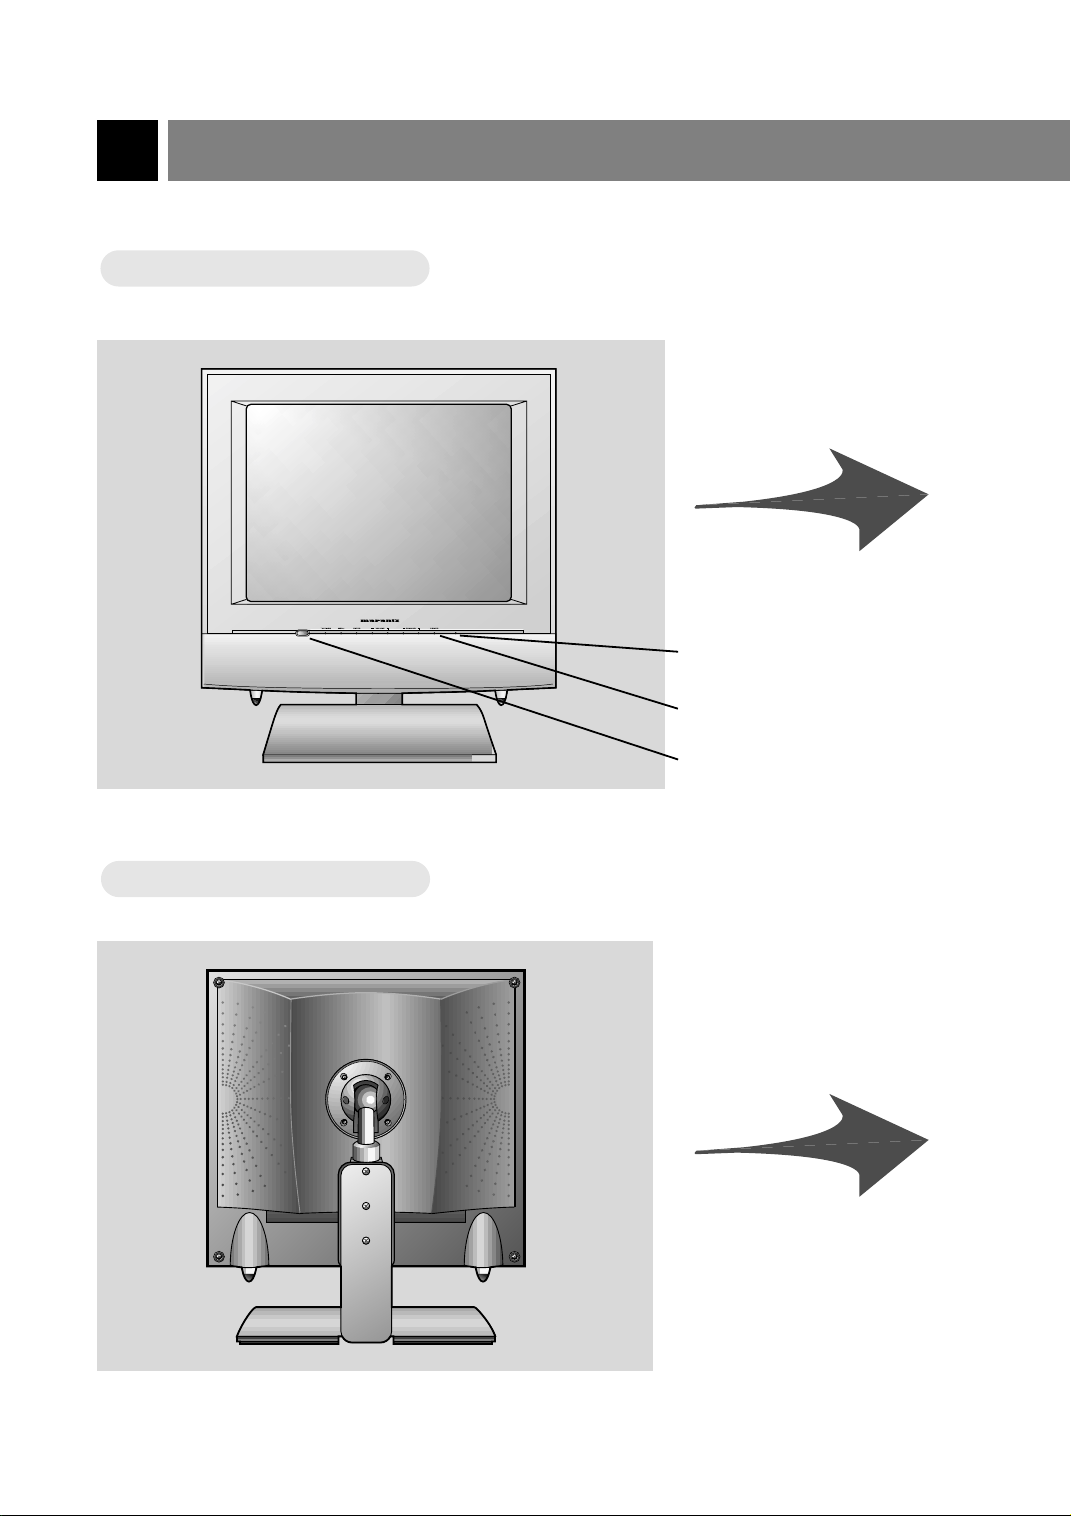
Front of the set
Front of the set
On/Standby indicator
Power button
* Remove vinyl coating for protection from staining before using.
Back of the set
Back of the set
Remote control sensor
2
Page 9
DC 12V
ANT IN
75 Ω
PC/DTV INPUT
S-VIDEO
H/P
RLVIDEOINAUDIO
(MONO)
COMPONENT INPUT(480i)
B
C
C
R
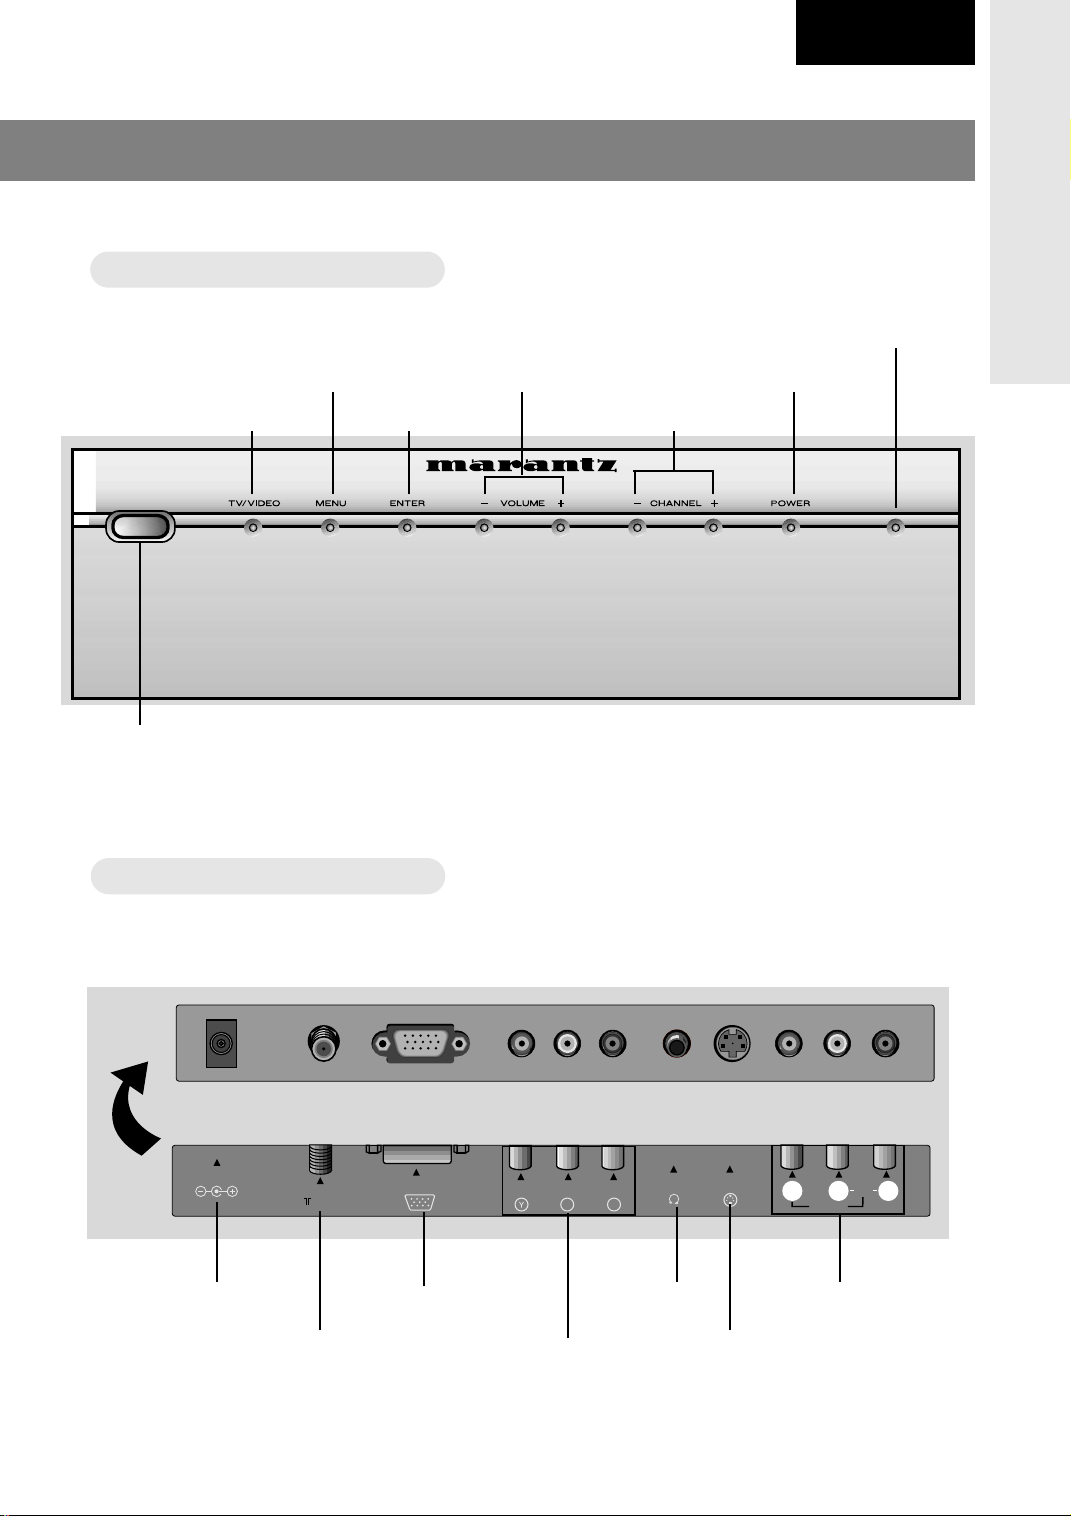
Front control panel
Front control panel
Volume buttons
English
On/Standby indicator
Power buttonMenu button
INTRODUCTION
TV/Video button
Remote control sensor
Connecting ports
Connecting ports
Enter button
Channel buttons
Power input
PC / DTV input
Antenna input
Component input
Headphone
jack
S-Video input
Audio/Video
input
3
Page 10
Controls
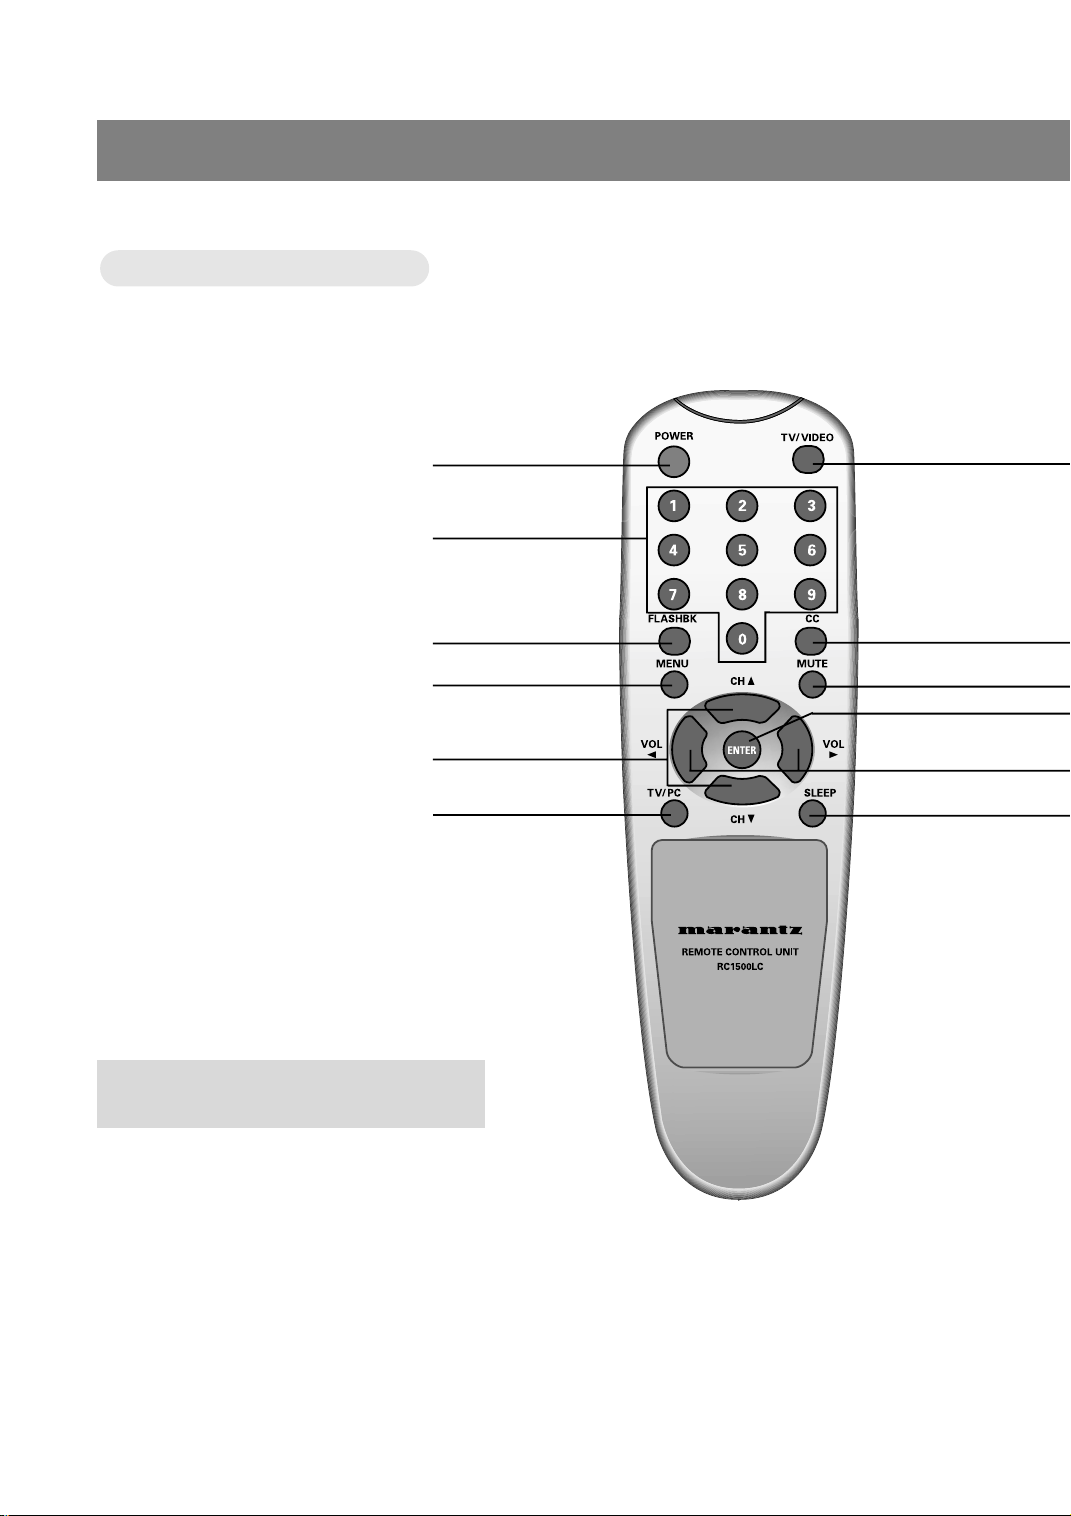
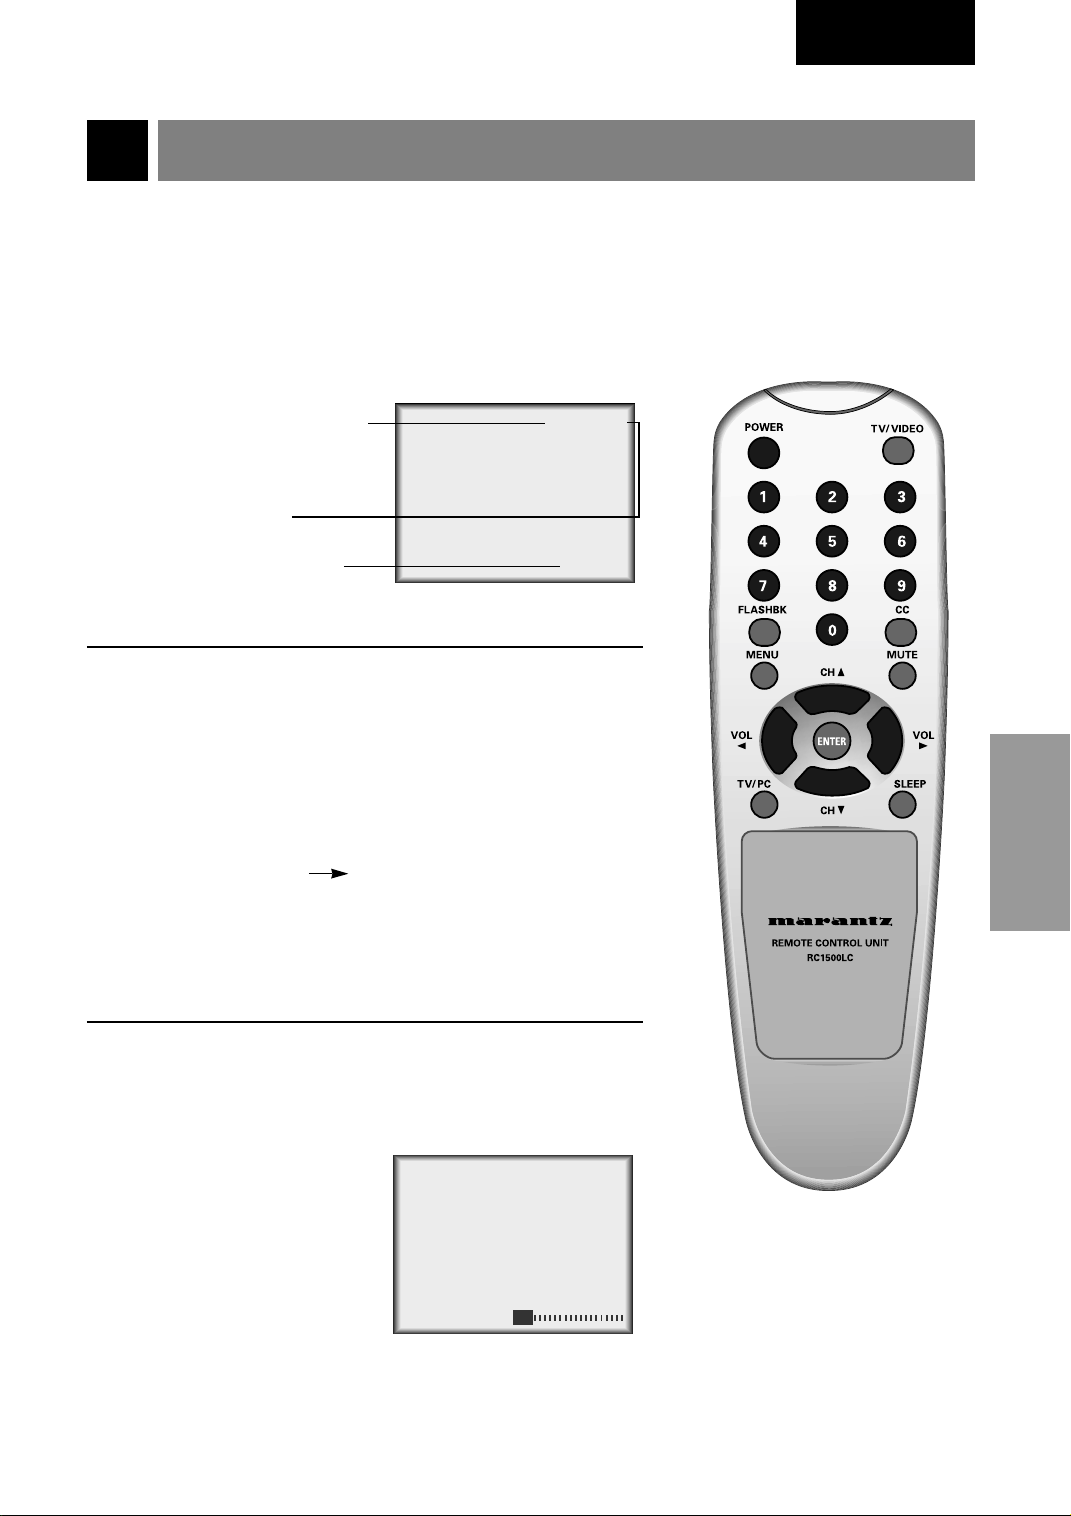
Remote Control
Remote Control
POWER BUTTON
NUMBER BUTTONS
FLASHBK BUTTON
MENU BUTTON
CHANNEL (
● Press the FLASHBK button to view the last
programme you were watching.
) BUTTONS
55,∞∞
TV/PC BUTTON
4
Page 11
English
TV/VIDEO button
TV/VIDEO button
on Remote Control
on Remote Control
INTRODUCTION
TV/VIDEO BUTTON
CC BUTTON
PAGE 24
MUTE BUTTON
ENTER BUTTON
VOLUME (
) BUTTONS
22, 33
SLEEP BUTTON
PAGE 11~15
PAGE 39
PAGE 36
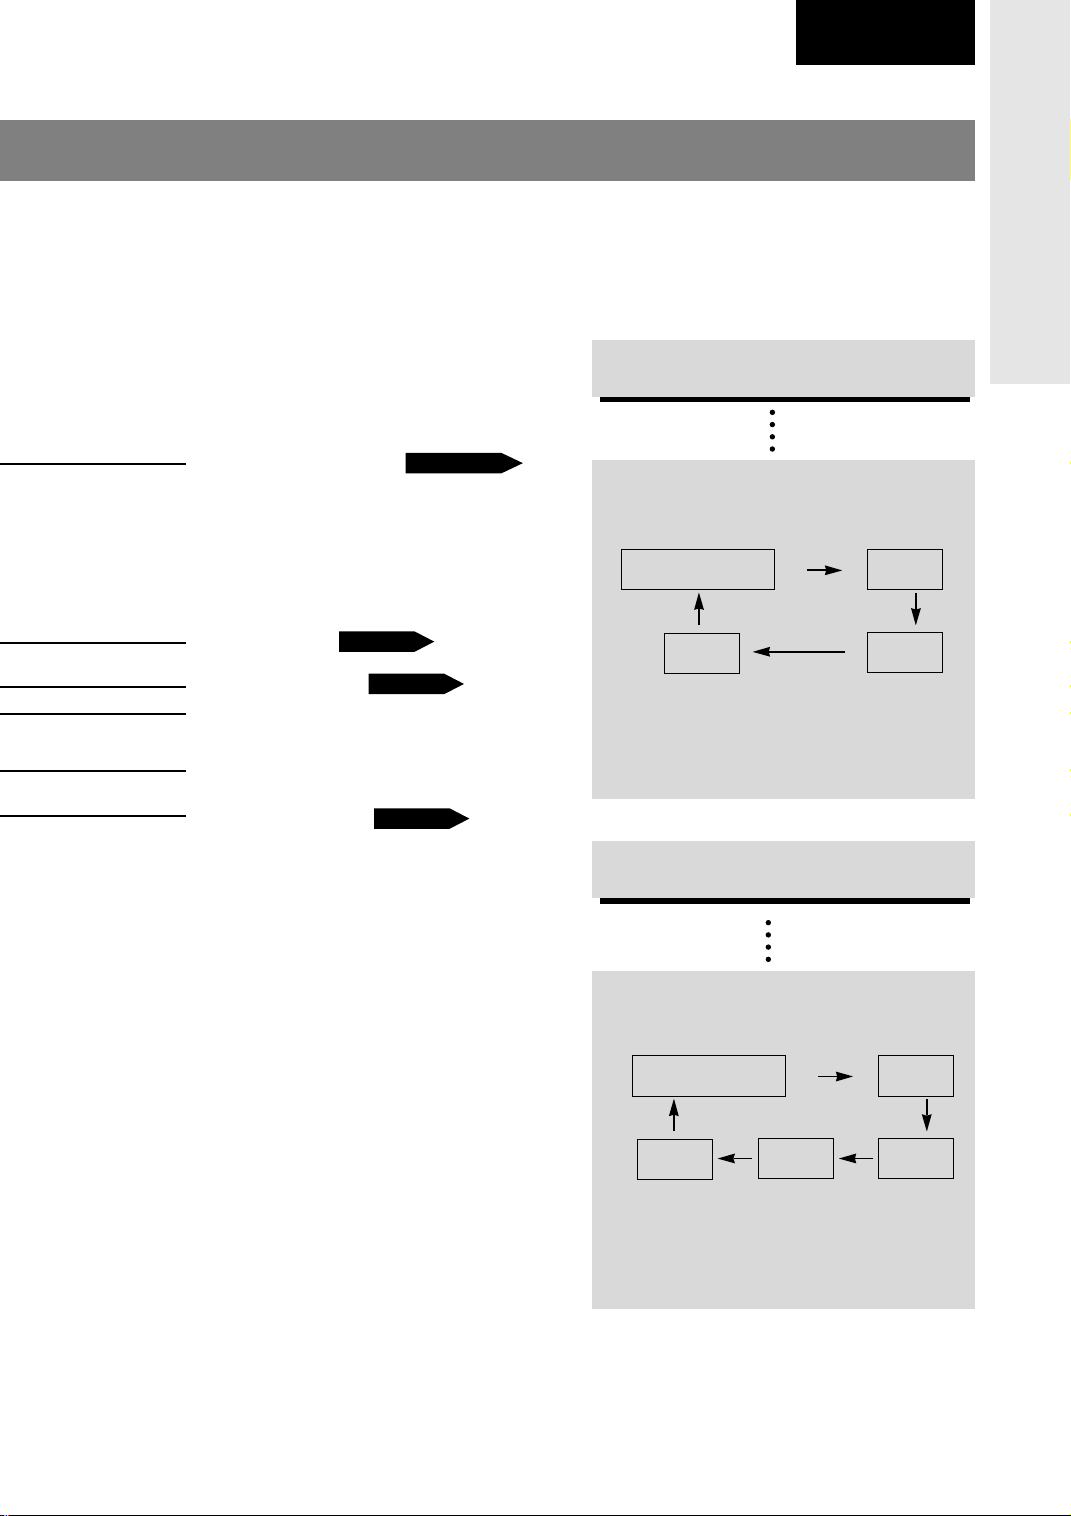
* Each press of this button changes the mode
as below.
TV programs
/ Cable TV
DVD
* VIDEO, S-VIDEO, DVD : Select each mode
for watching the corresponding external
equipment.
TV/VIDEO button
TV/VIDEO button
on the Front Panel
on the Front Panel
* Each press of this button changes the mode
as below.
VIDEO
S-VIDEO
TV programs
/ Cable TV
PC
* VIDEO, S-VIDEO, DVD, PC : Select each
mode for watching the corresponding external equipment.
DVD
VIDEO
S-VIDEO
5
Page 12
Basic composition of LCD TV
1.5V
1.5V
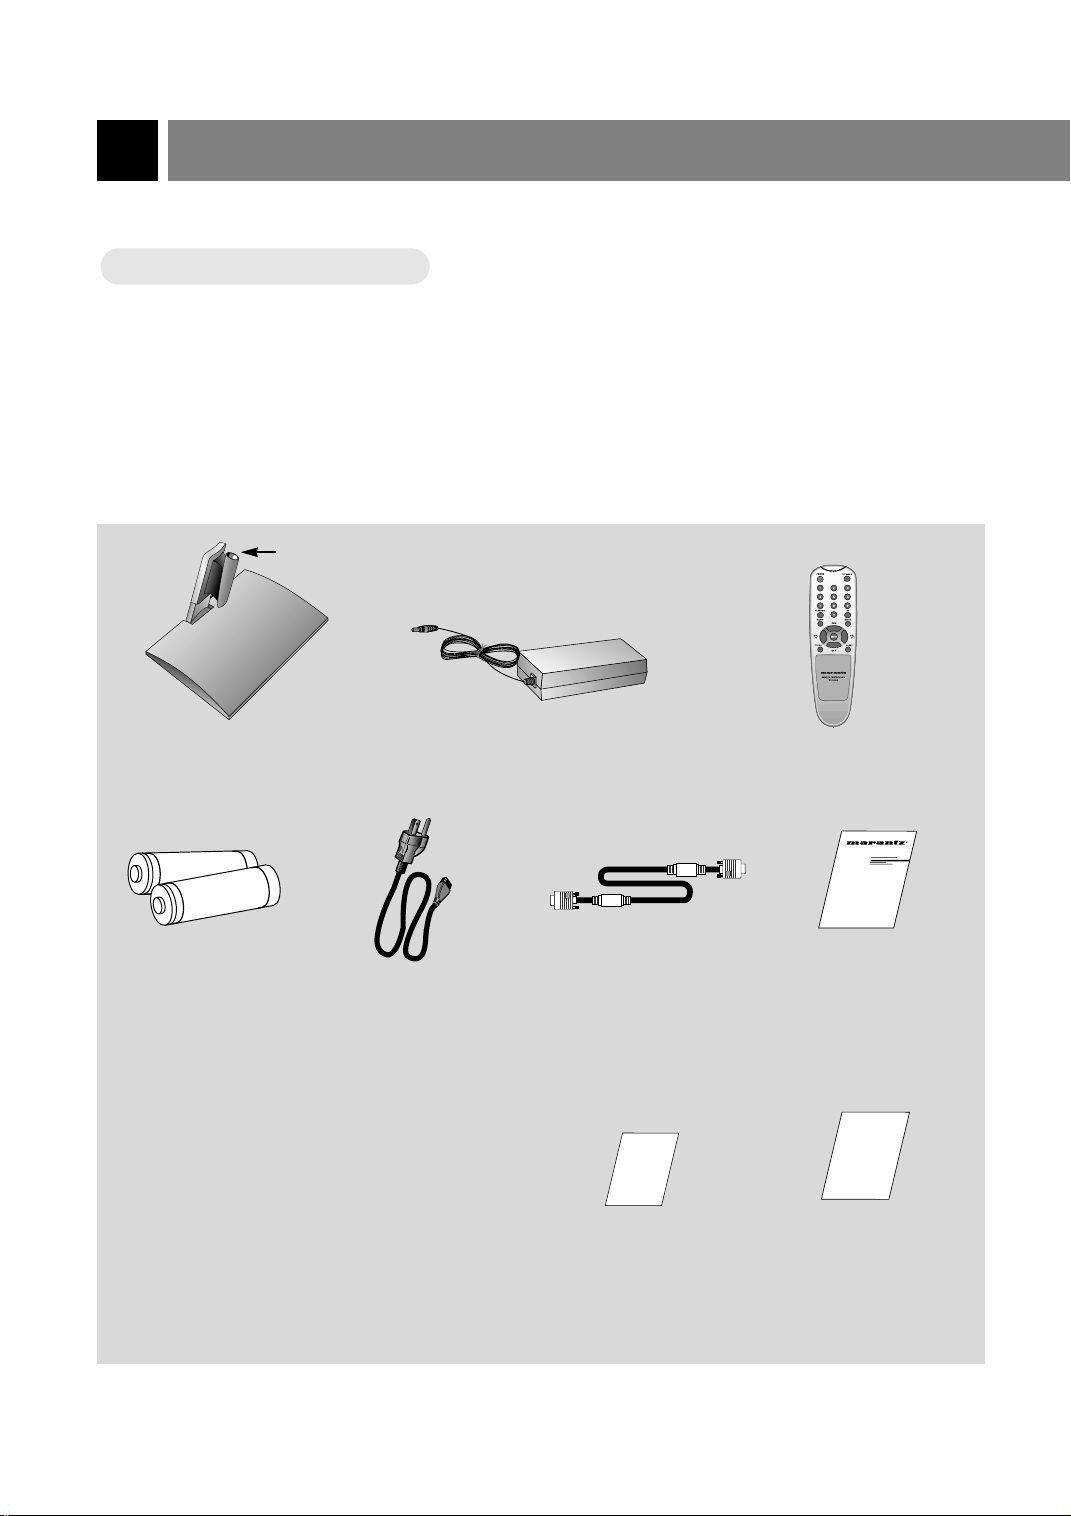
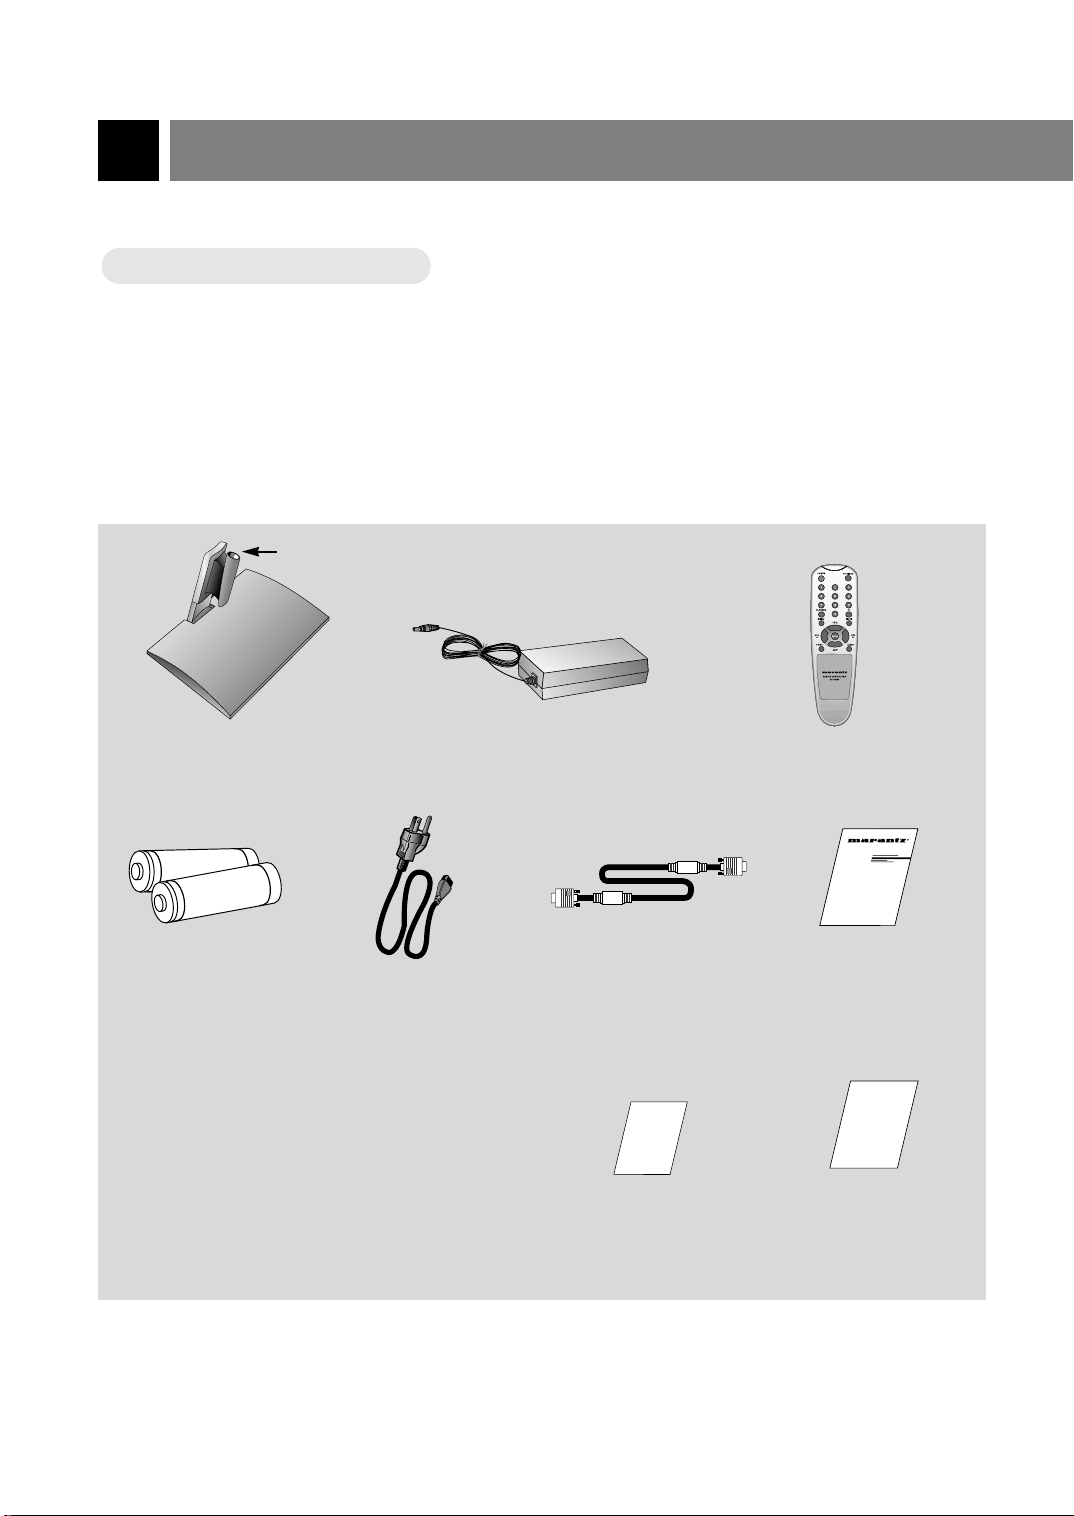
Accessories
Accessories
Hole
Table stand AC Adaptor Remote Control
RC1500LC
Batteries
Power cord
Warranty Card
(For USA)
User guidePC signal cable
Warranty Card
(For CANADA)
6
Page 13
English
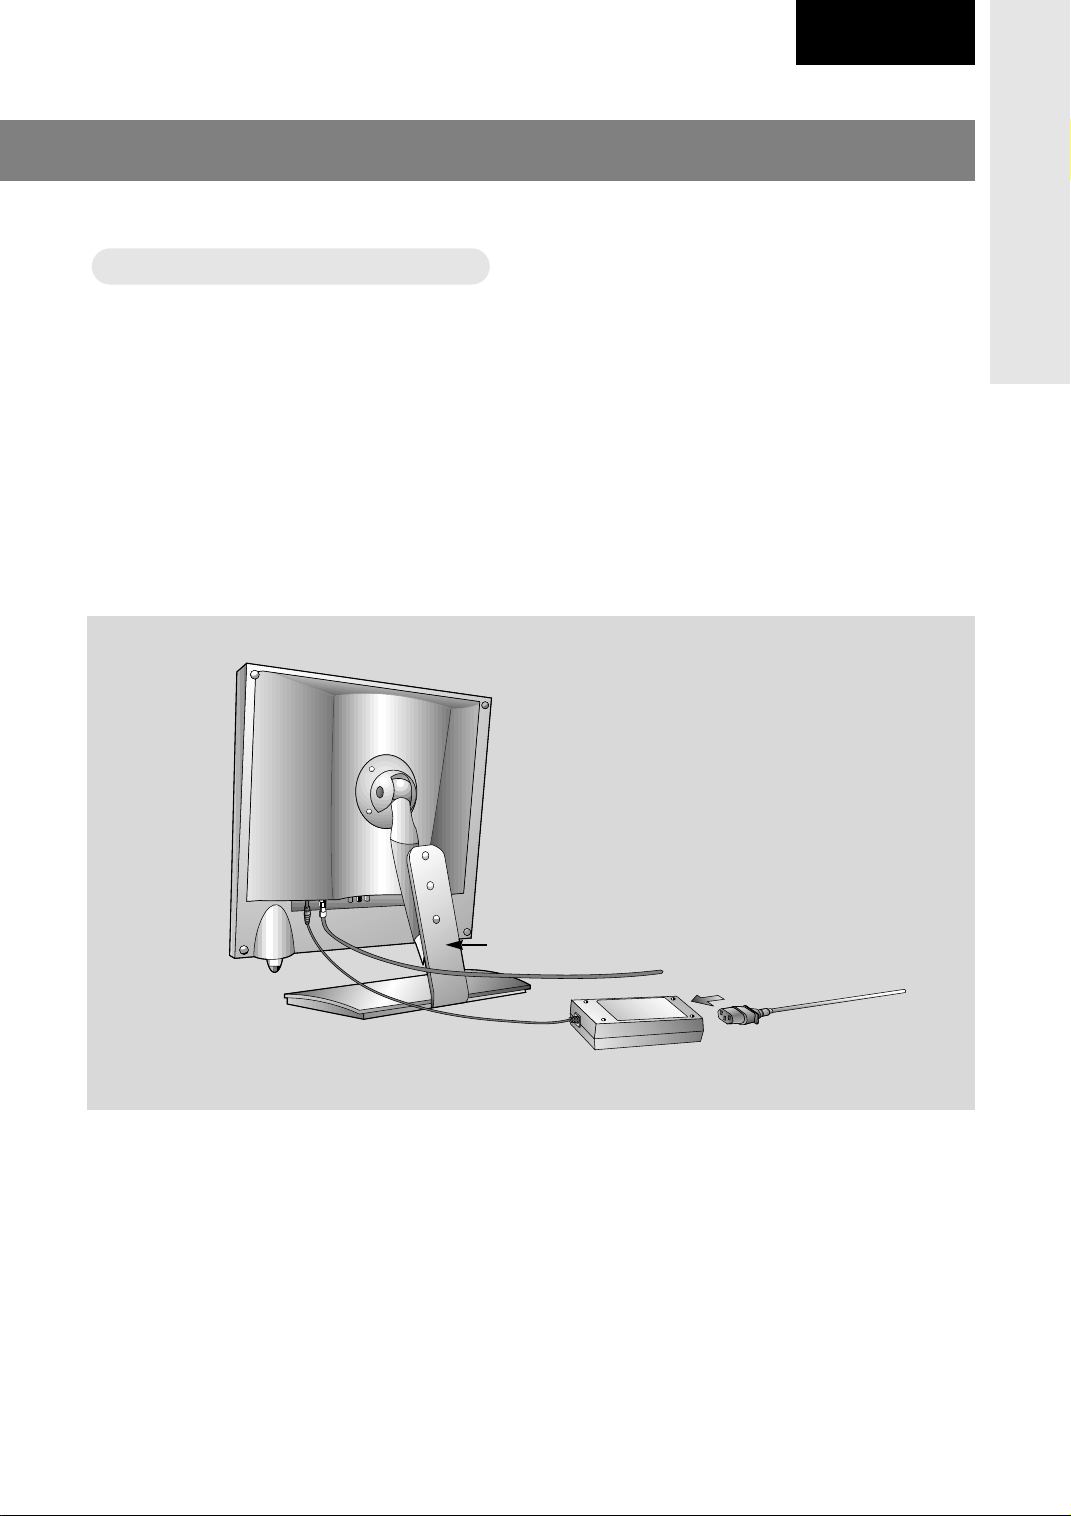
atching
WWatching
* Please make sure to connect the power plug to the wall outlet socket after connecting the TV to the adaptor.
a. Install the LCD TV in the correct using the installation accessories. Refer to page 8.
b. Connect the antenna cable to the antenna input port of the set.
c. Connect the adaptor to the power input port of the set.
d. Connect the power plug to the wall outlet socket after connecting the power cord to the adaptor.
TV programs
TV programs
INTRODUCTION
a
b
c
Note : If TV/monitor is cold, there may be a small “flicker” when turned on.
This is normal, there is nothing wrong with TV/monitor.
d
7
Page 14
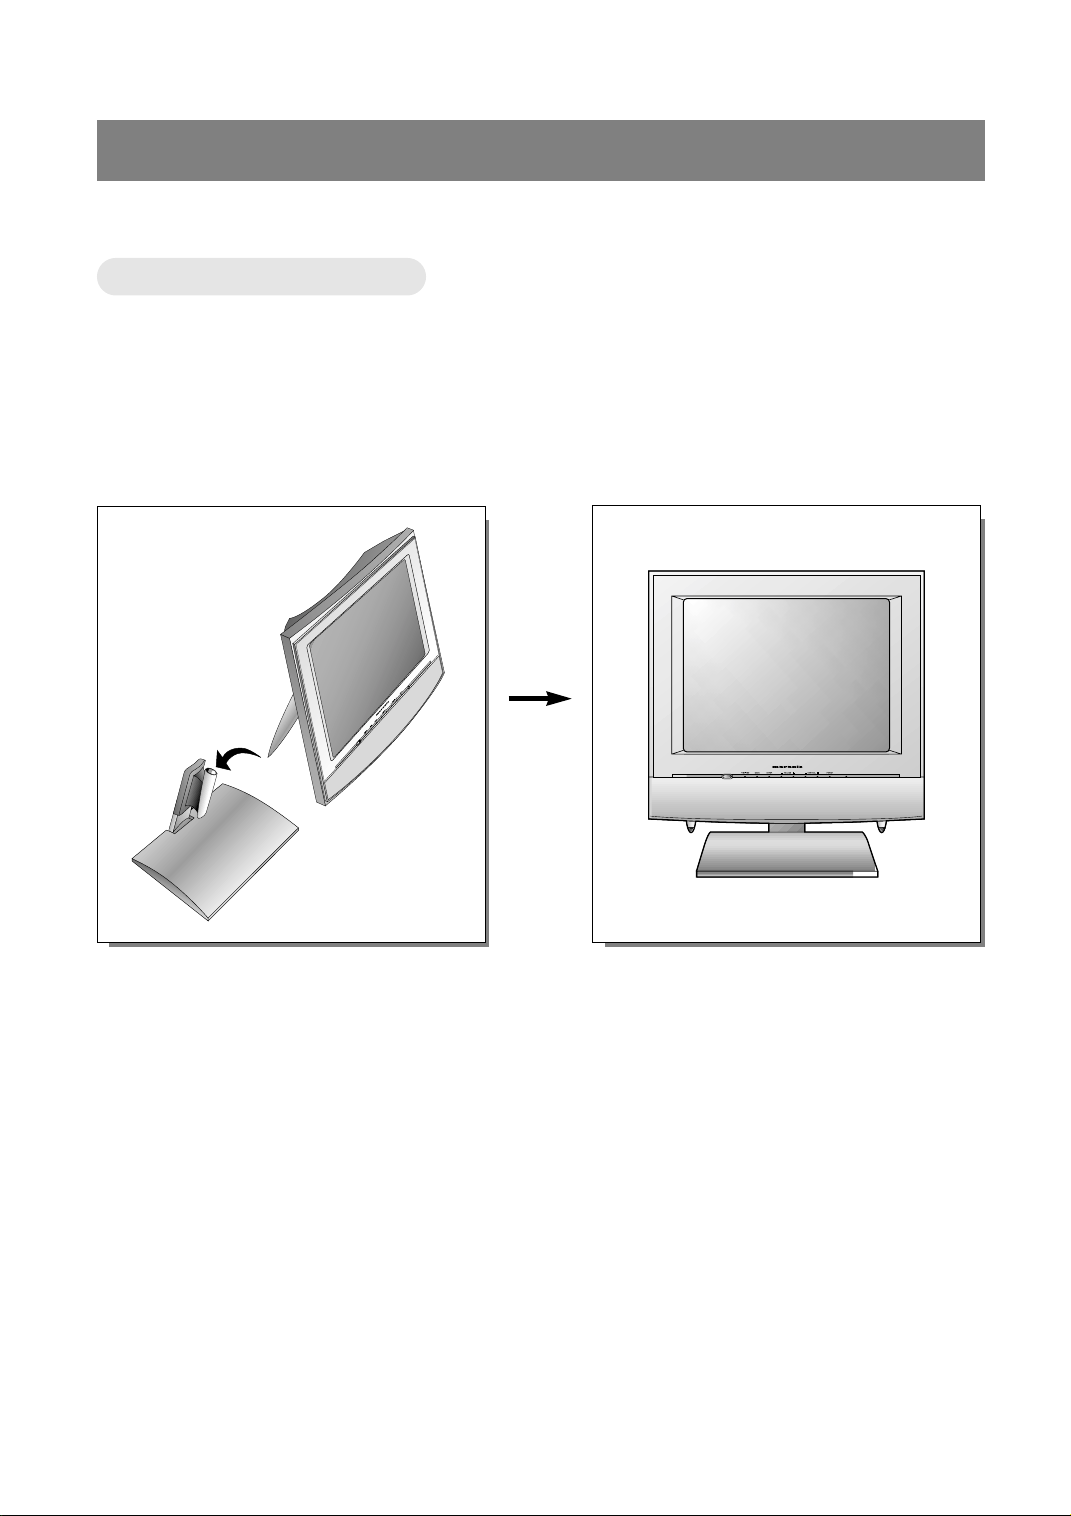
Basic composition of LCD TV
Installations
Installations
* For safety, use included table stand when place the monitor on the flat surface.
a. Place the table stand in the position you wish to install the set.
b. Put the set in the table stand.
* When you assemble the TV set with table stand, please match the stick of TV set to the hole of the table
stand so as not to allow movement of the joint.
8
Page 15
English
DC 12V
ANT IN
75 Ω
PC/DTV INPUT
C
DC 12V
ANT IN
75 Ω
PC/DTV INPUT
C
DC 12V
ANT IN
75 Ω
PC/DTV INPUT
C
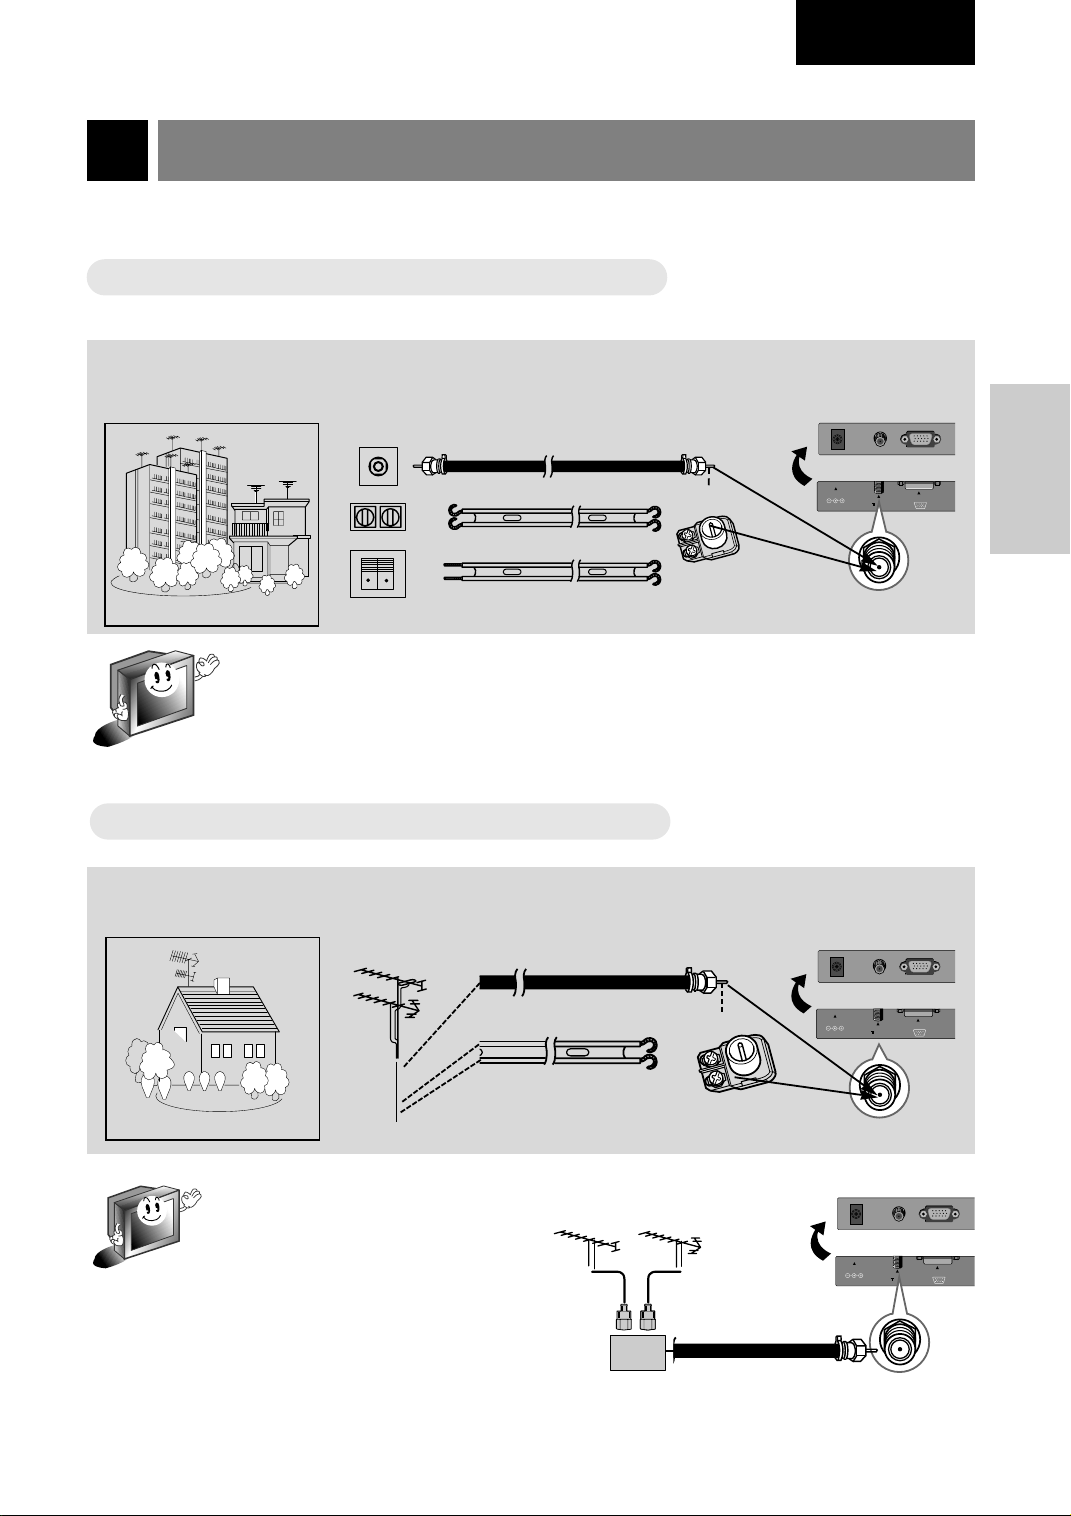
Connecting antenna
* To get better picture quality, adjust the direction of antenna.
Connecting to wall antenna socket
Connecting to wall antenna socket
● In case of wall antenna socket in apartment houses, connect the antenna cable as shown below.
(Use the correct type of antenna cable to the type of wall antenna socket.)
Turn clock arise to
tighten.
75Ω round cable
300Ω flat cable
Apartments
wall connecting port
* In case of 75Ω round cable, insert the bronze wire and then tighten the connecting nut.
And in case of 300Ω flat cable, connect the twisted wire to the antenna converter and
then connect the converter to the antenna input port.
* When using 75Ω round cable, do not bend bronze. It may cause poor picture quality.
Connecting to outdoor antenna
Connecting to outdoor antenna
● This type of antenna is usually used at common private houses.
VHF antenna
UHF
antenna
75Ω round cable
bronze wire
CONNECTION
antenna
converter
antenna input port
Turn clock arise to
tighten.
bronze wire
300Ω flat cable
antenna
Private house
converter
antenna input port
* In poor signal area, you can get better
picture quality if you install the antenna like the figure as shown right.
* If an antenna is divided to two TV
sets, use “signal divider” for connect-
VHF
UHF
ing.
signal
amplifier
9
Page 16
Connecting external equipment
* TV screen is automatically converted to TV mode by pressing the channel (
) buttons, flashbk or number
55,∞∞
buttons (0~9) when using VIDEO.
* Please connect to other AV equipment by using input ports of the set.
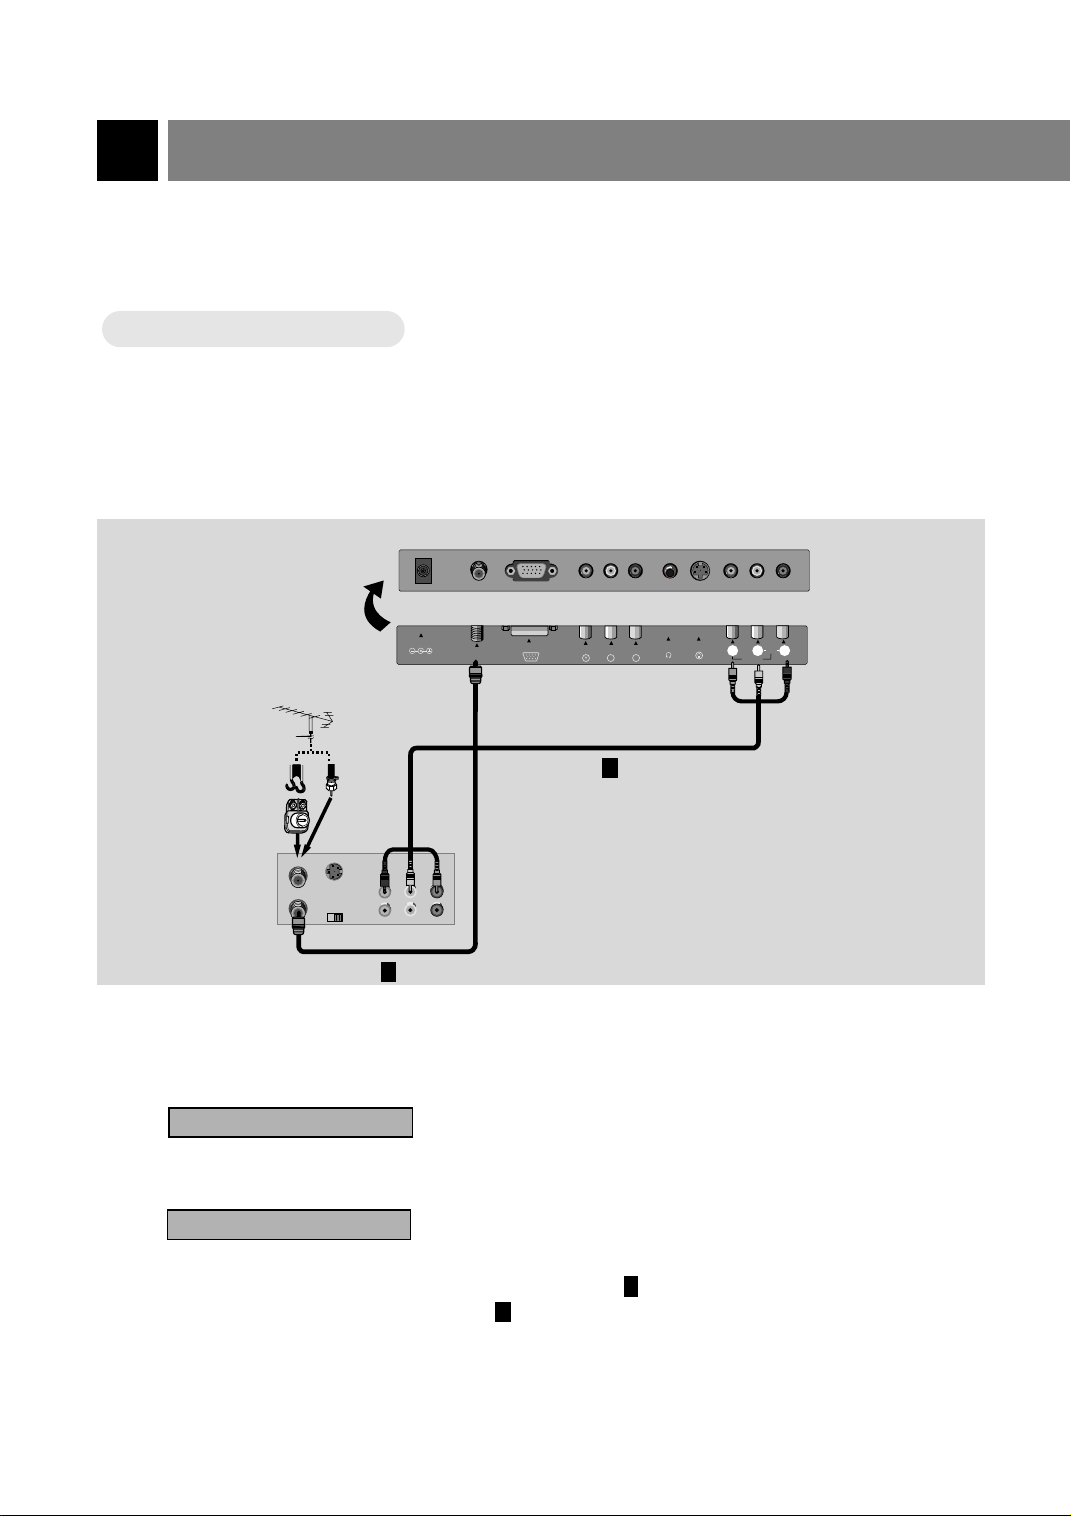
Connecting VCR
Connecting VCR
How to connect
1
● Connect the audio/video output ports of VCR to the corresponding input ports of the set.
Antenna cable
shapes
Antenna
converter
< Back panel of VCR >
ANT IN
ANT OUT
or
S-VIDEO
CH3
Direct
connection
OUT
IN
CH4
DC 12V
AUDIO VIDEO
(R) (L)
ANT IN
+75 Ω
PC/DTV INPUT
COMPONENT INPUT(480i)
H/P
S-VIDEO
BC
R
C
(MONO)
2
RLVIDEOINAUDIO
How to use
2
10
1
Watching TV programs
Turn the set on and select the channel you want.
Watching VCR
a. Press tv/video button of the remote control to select [VIDEO].
* Select the channel 3 or 4 if you use only connection .
* Select VIDEO if you use connection .
2
b. Insert a video tape into the VCR and press the PLAY button.
1
Page 17
English
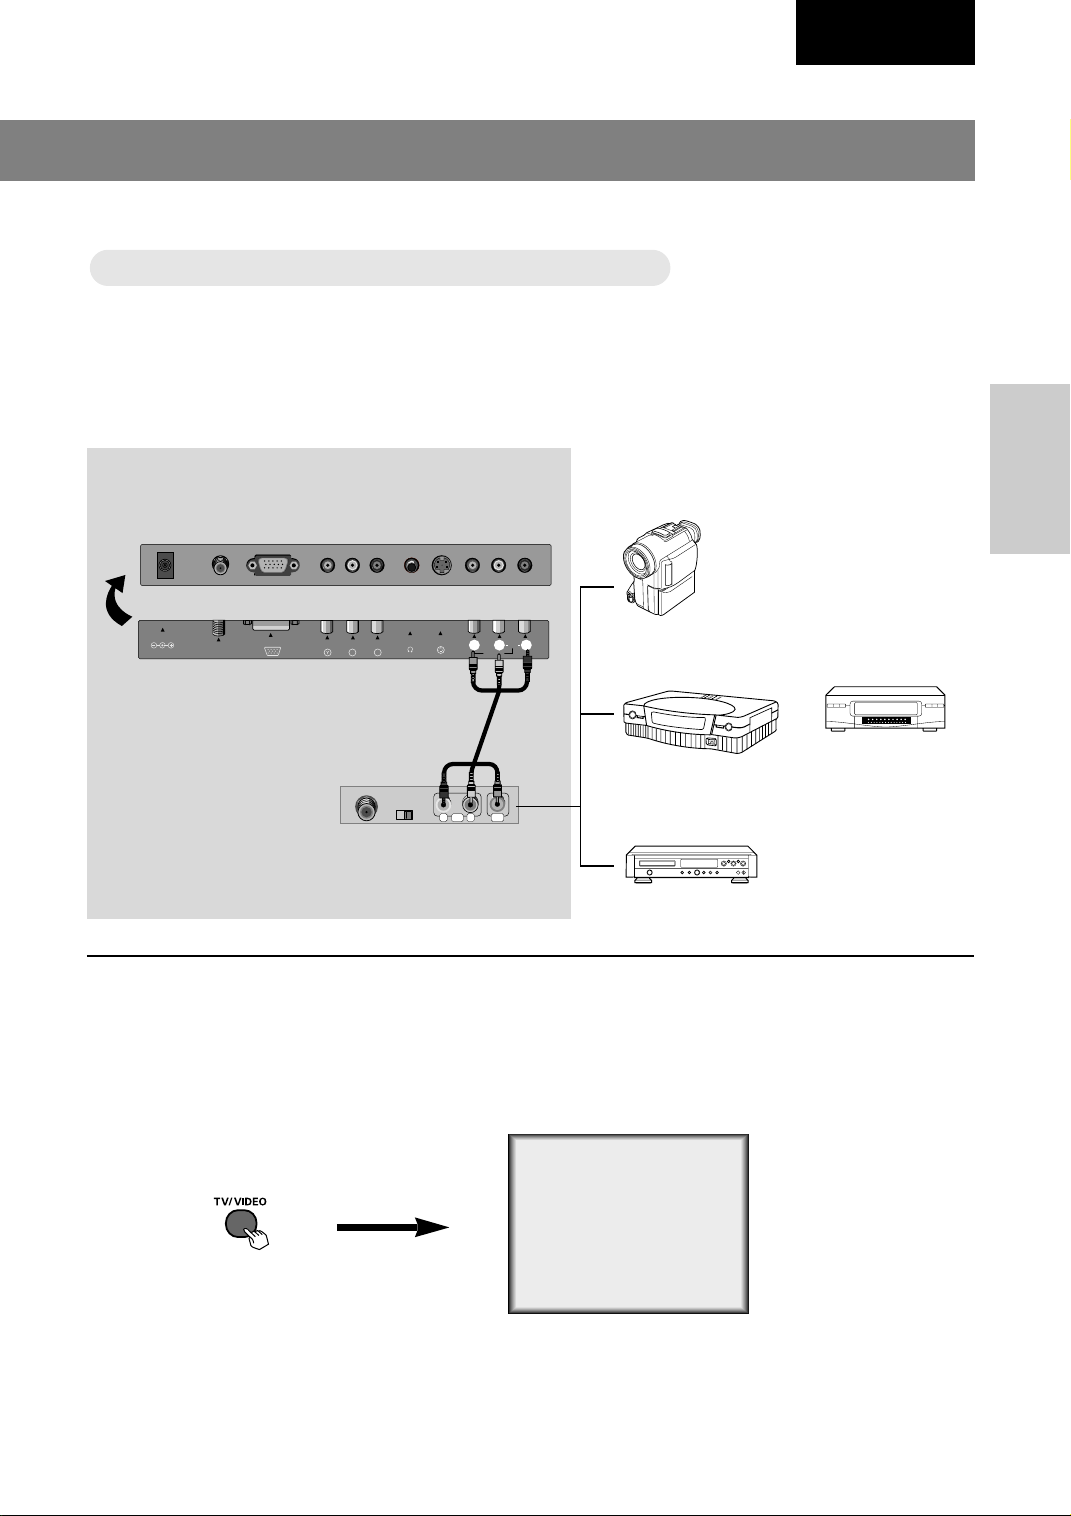
Only watching external AA
Only watching external
V source
V source
How to connect
1
● Connect the audio/video output ports of external A/V equipment to the corresponding input ports of
the set.
DC 12V
external equipment >
PC/DTV INPUT
ANT IN
+75 Ω
< TV connection panel >
< Back panel of
COMPONENT INPUT(480i)
H/P
BC
S-VIDEO
R
C
(MONO)
RLVIDEOINAUDIO
Camcorder
Video Game set
R
L VIDEOAUDIO
CONNECTION
VCR
How to use
2
● Turn the set on and press TV/VIDEO button to select [VIDEO].
< On remote control >
● Try this after turning on the external AV equipment.
DVD
VIDEO
11
Page 18
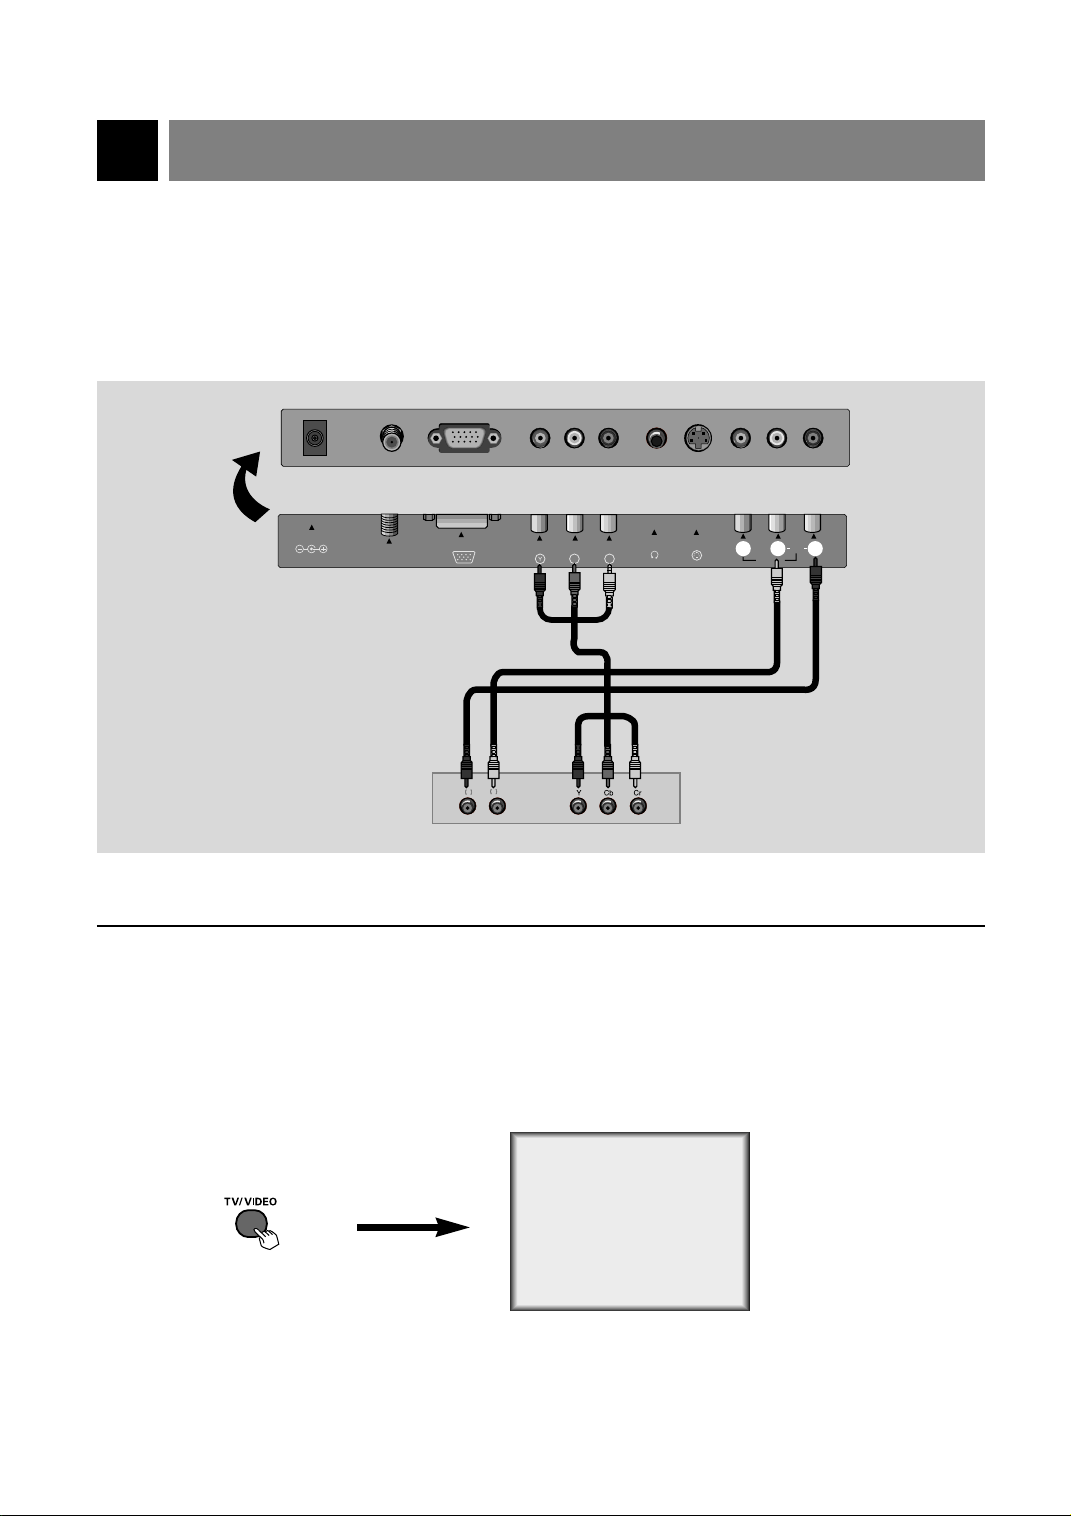
Connecting DVD player
● Connect component video inputs to Y, CB, CR (480i) and audio inputs to right and left port of AV ports.
How to connect
1
DC 12V
< TV connection panel >
< Back panel of DVD >
ANT IN
+75 Ω
PC/DTV INPUT
AUDIO
R
COMPONENT INPUT(480i)
L
How to use
2
● Turn the set on and press TV/VIDEO button to select [DVD].
H/P
BC
R
C
S-VIDEO
(MONO)
RLVIDEOINAUDIO
12
DVD
< On remote control >
● Try this after turning on the DVD set.
Page 19
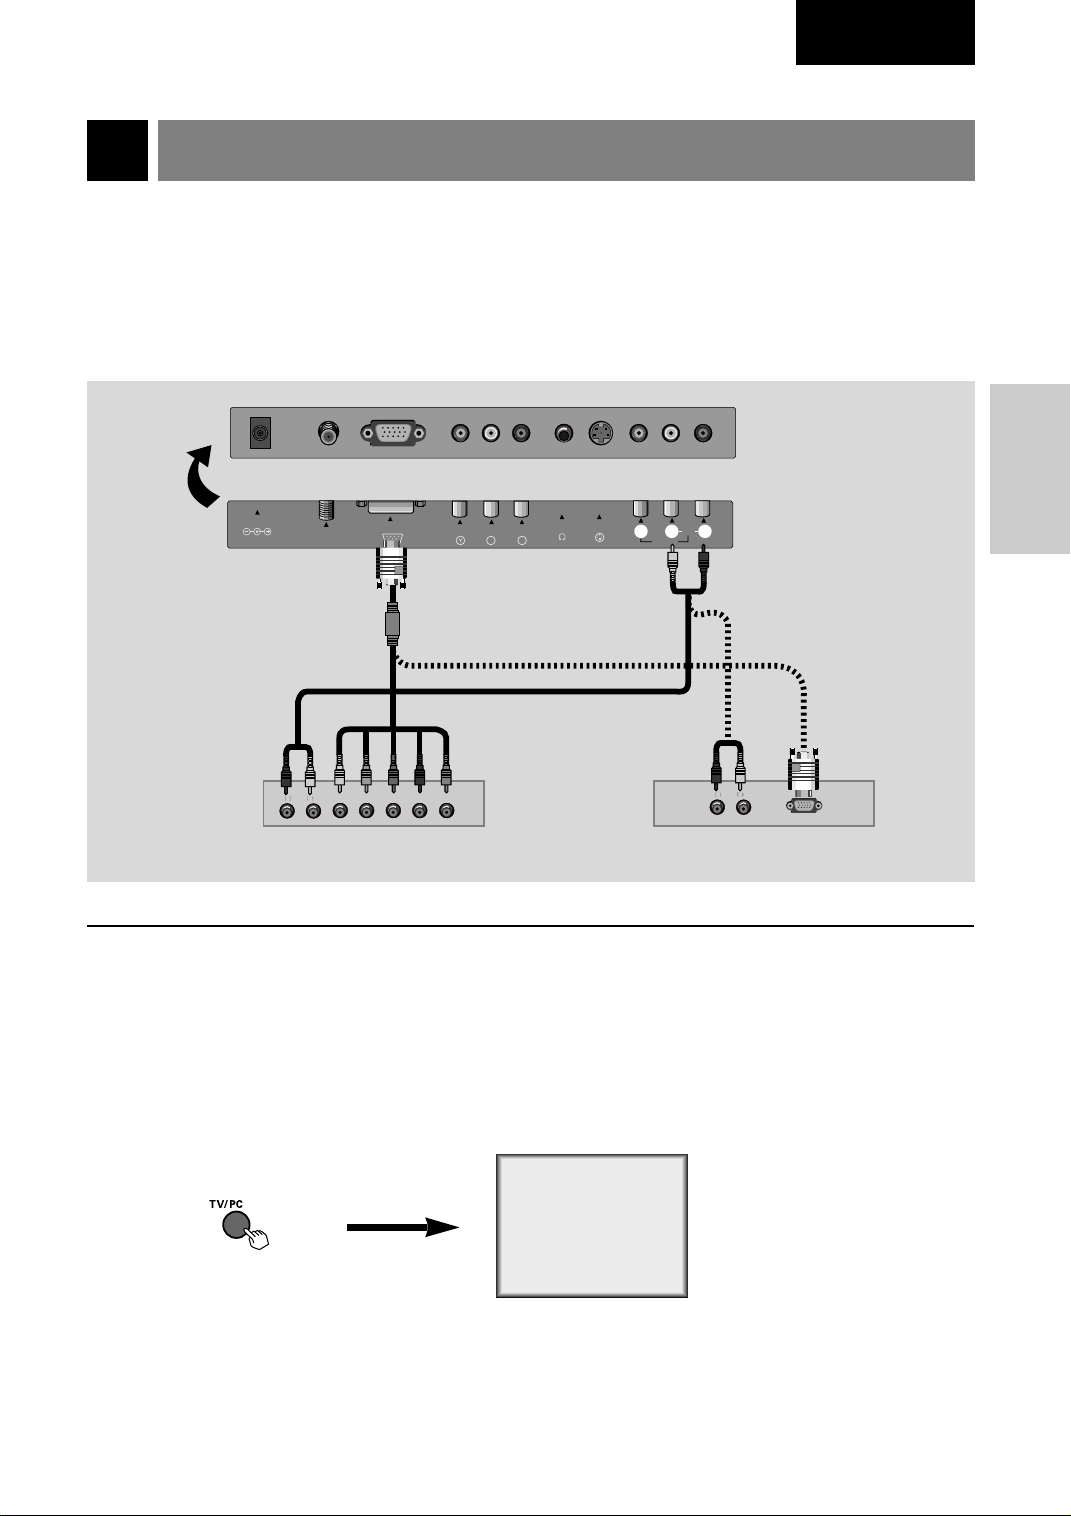
Connecting DTV
AUDIO
* Make sure to select PC mode before operating.
How to connect
1
English
DC 12V
< TV connection panel >
AUDIO
R
PC/DTV INPUT
ANT IN
+75 Ω
L
HVRGB
COMPONENT INPUT(480i)
How to use
2
● Turn the set on and press TV/PC button to select [PC].
H/P
BC
C
< Back panel of DTV >
S-VIDEO
R
or
(MONO)
RLVIDEOINAUDIO
AUDIO
L
R
CONNECTION
< On remote control >
● Try this after turning on the DTV set.
PC
13
Page 20
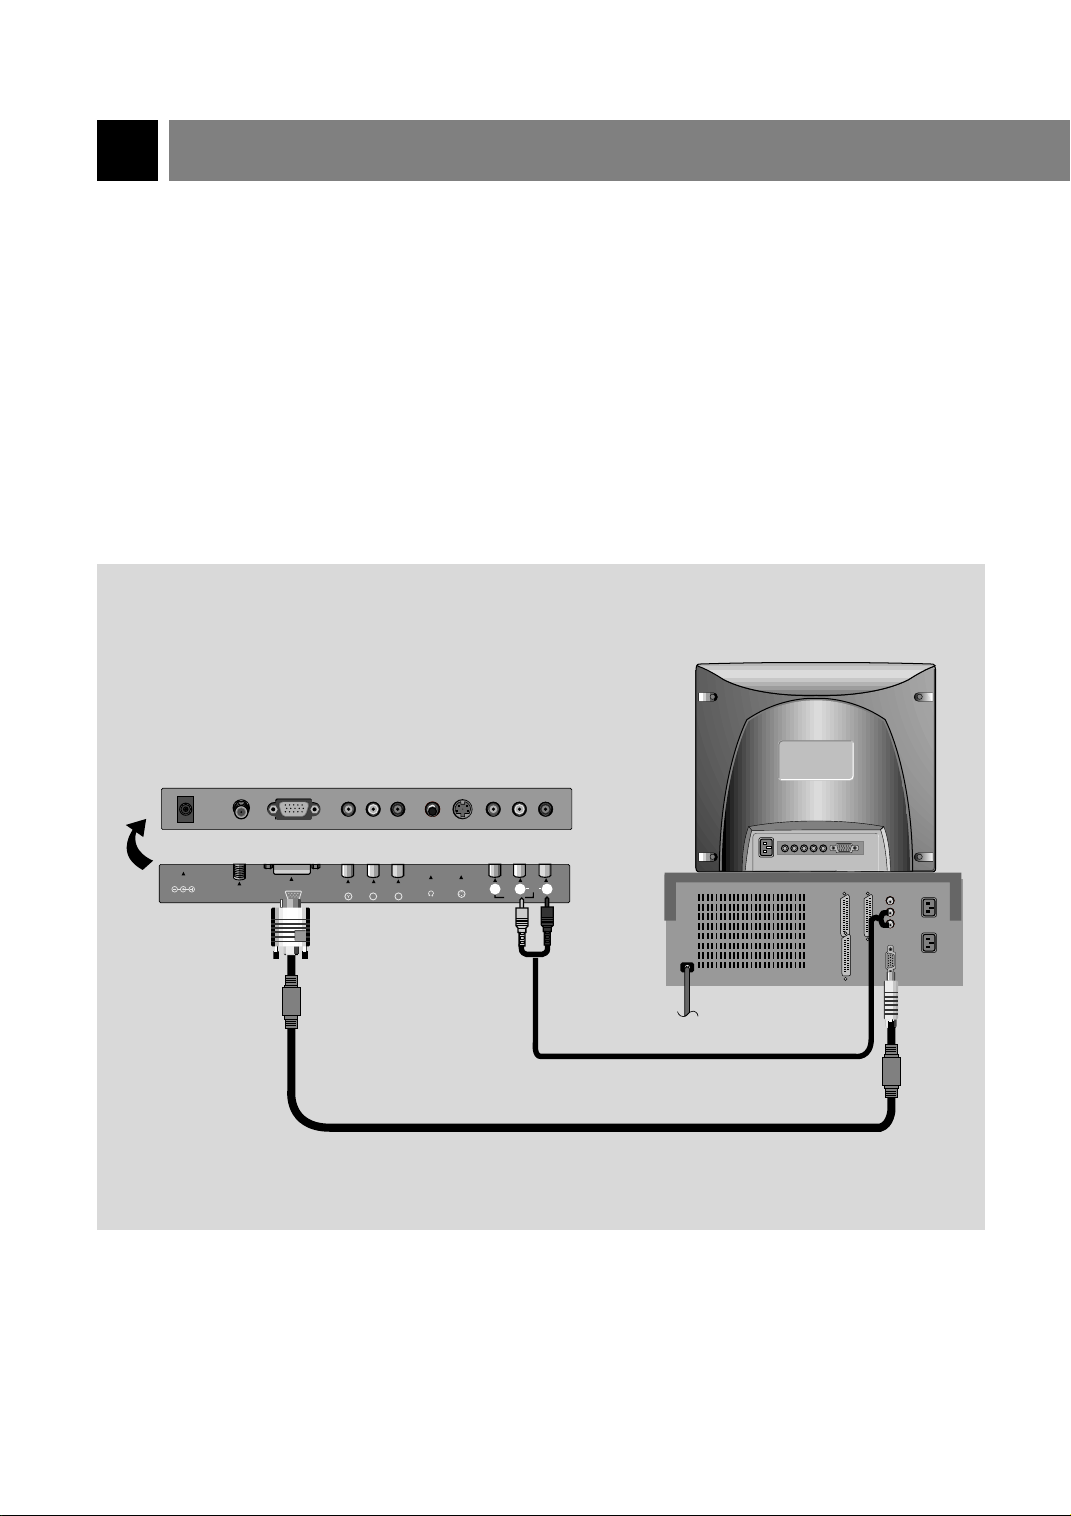
Connecting PC as monitor
* Make sure to select PC mode on before operating.
How to connect
1
● Make sure to set resolution of the PC before connecting. Refer to page 15.
● Connect the set to the PC with PC signal cable.
● Connect the audio ports to the PC to get PC sound.
14
DC 12V
ANT IN
+75 Ω
PC/DTV INPUT
COMPONENT INPUT(480i)
BC
< TV connection panel >
H/P
S-VIDEO
R
C
(MONO)
RLVIDEOINAUDIO
< PC >
< Accessories >
Page 21
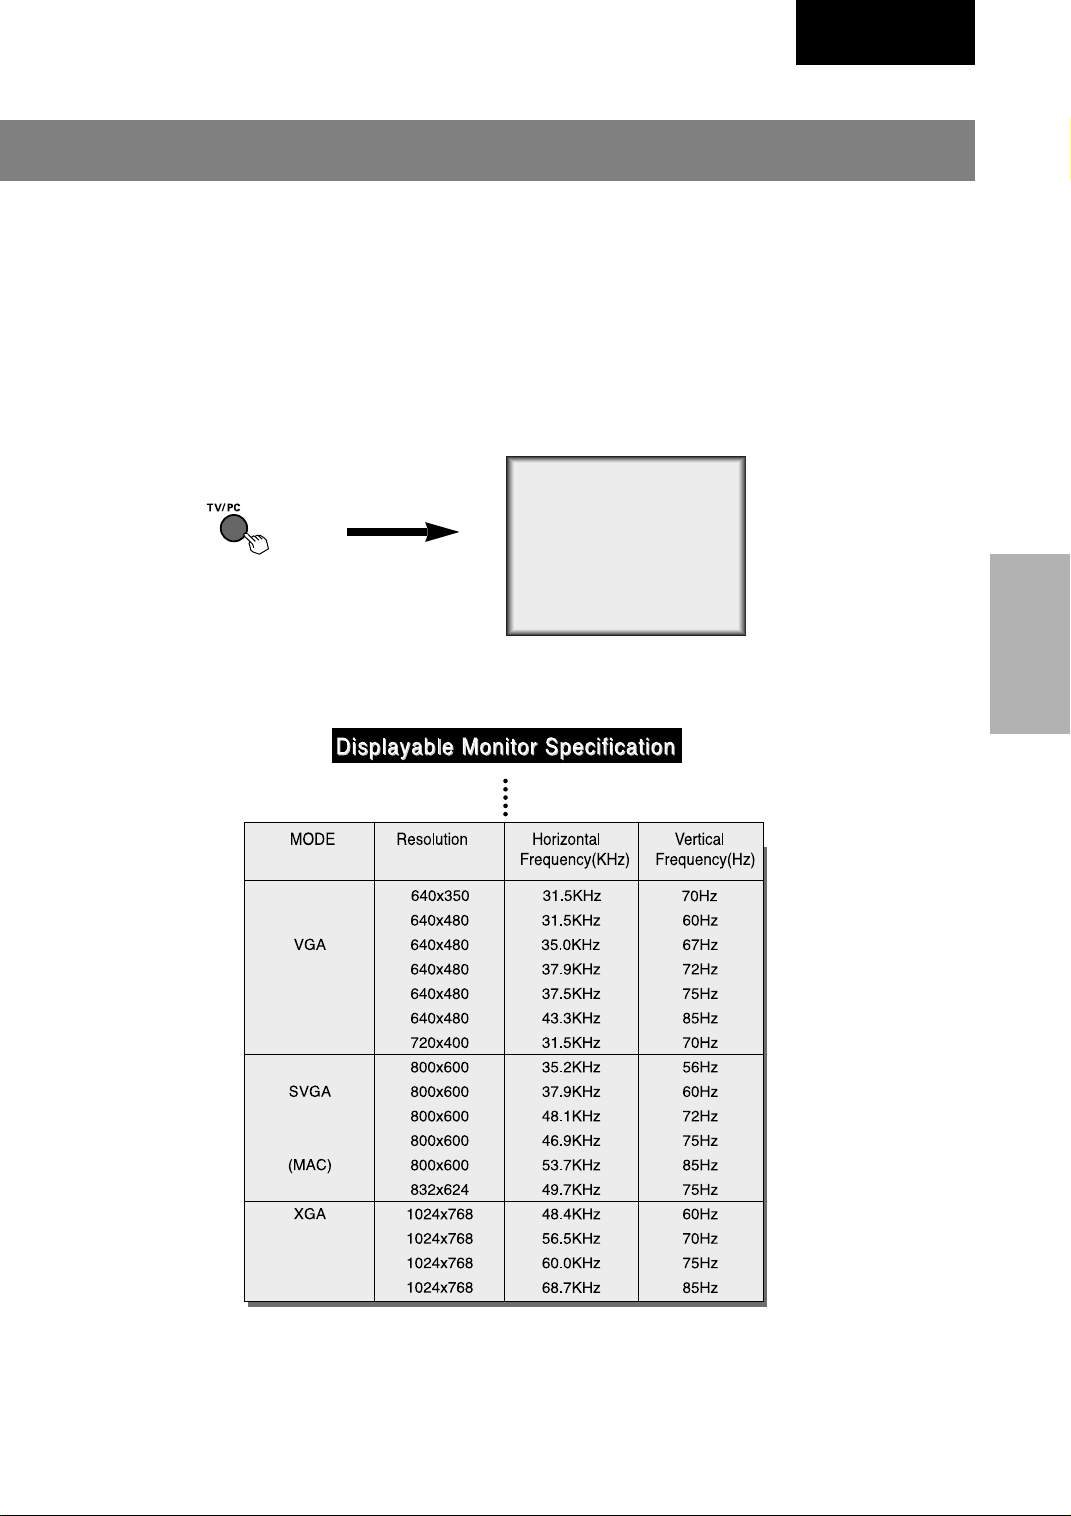
How to use
2
● Turn the set on and press TV/PC button to select [PC].
< On remote control >
English
PC
● Try this after turning on the PC.
PC
CONNECTION
Note : If TV/monitor is cold, there may be a small “flicker” when turned on.
This is normal, there is nothing wrong with TV/monitor.
15
Page 22
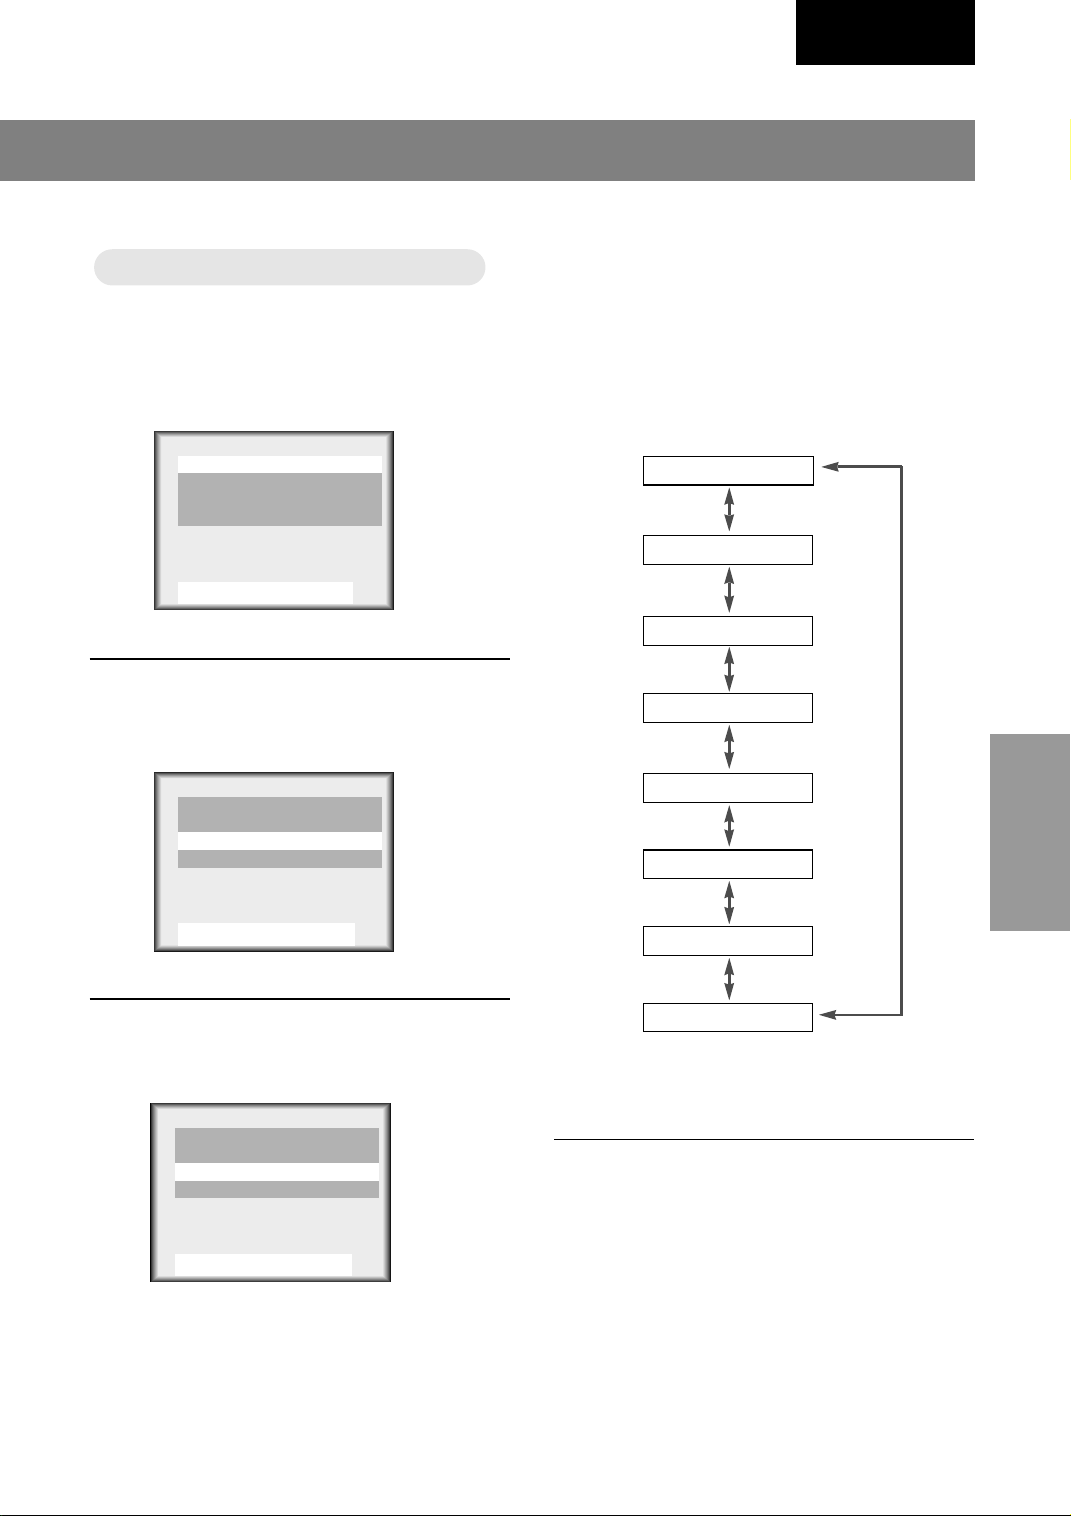
Function checking in PC mode
* Make sure to select PC mode on before operating.
Press the MENU button. Each time you press the button you can see menus as below.
1
Contrast : 60
Brightness : 90
H-Poisition : 0
V-Poisition : 0
Clock : 40
Phase : 16
Auto
Reset
Use
55∞∞22 33
And ENTER
Press the channel (
2
) buttons to select a function you want to use.
55,∞∞
16
Page 23
Using remote control
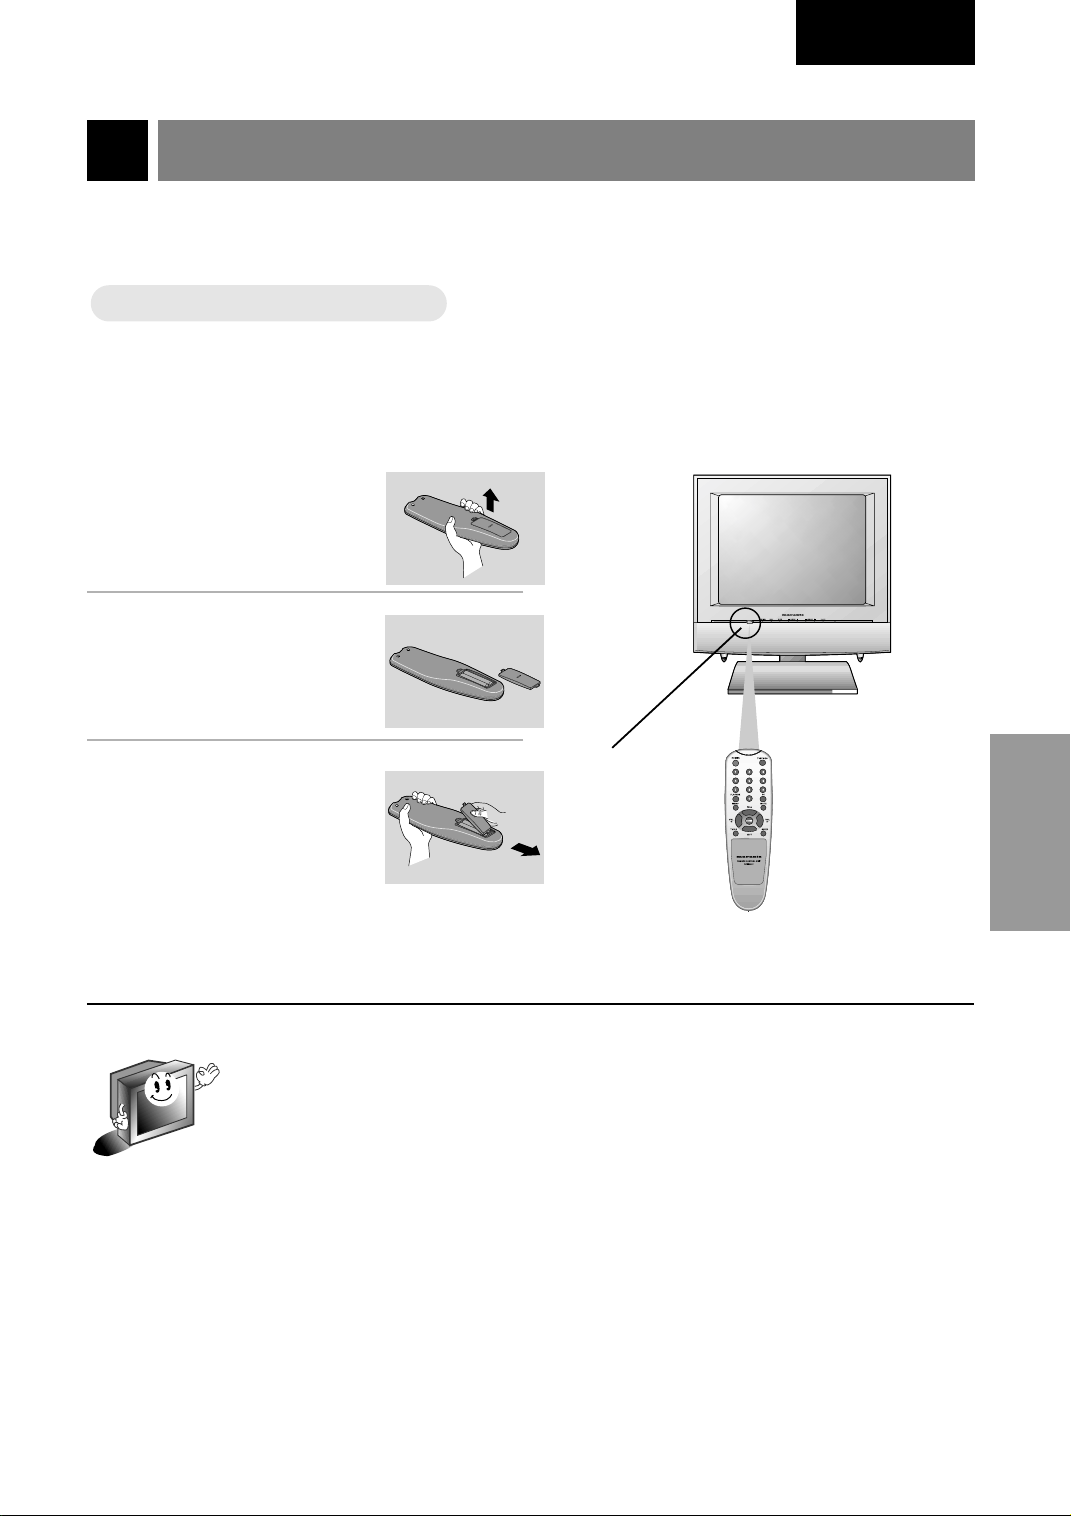
Inserting batteries
Inserting batteries
Pull the battery cover
1
2
upward in the arrow
direction to remove.
Insert the batteries
with correct polarity.
English
3
Replace the battery
compartment cover.
* Apply two 1.5V alkaline batteries of AAA type. Don’t mix the used batteries with new bat-
teries.
* Remove batteries when you don’t use the remote control for long time. Liquid leakage from
old battery may cause operation failure.
remote control
sensor
BASIC
FUNCTIONS
17
Page 24

Using remote control
Notes for using remote control
Notes for using remote control
Make sure these are no
objects between the
remote control and its sensor.
Don’t place the remote control
near a heater or damp place.
Strong impact on remote control may cause operation failure.
Signal from the remote control may be disturbed by sun
light or other strong light. In
this case, turn the set to other
direction.
18
Page 25
Turning on the set
* First, connect antenna cable and power cord with the adaptor.
* Press the power button and you will get stable picture and sound in a few seconds.
Press the POWER button to turn the set on.
1
English
displayed only in
stereo signal
channel number
displayed only if present
time display is set
Press the channel (
a channel you want after memorizing received broad-
2
casting signals in the local area.
● Direct selecting channels
Press number of the program as one or two digits with
number buttons.
ex: channel 7 7 or 07
● Refer to page 28 ~ 29 to memorize channels.
) or number buttons to select
55,∞∞
ST. 7
12:30 PM
BASIC
BASIC
FUNCTIONS
FUNCTIONS
Adjust Volume level.
3
● Volume (33) button increas-
es the level of sound.
● Volume (22) button decreas-
es the level of sound.
Volume 3
19
Page 26
Function checking in TV mode
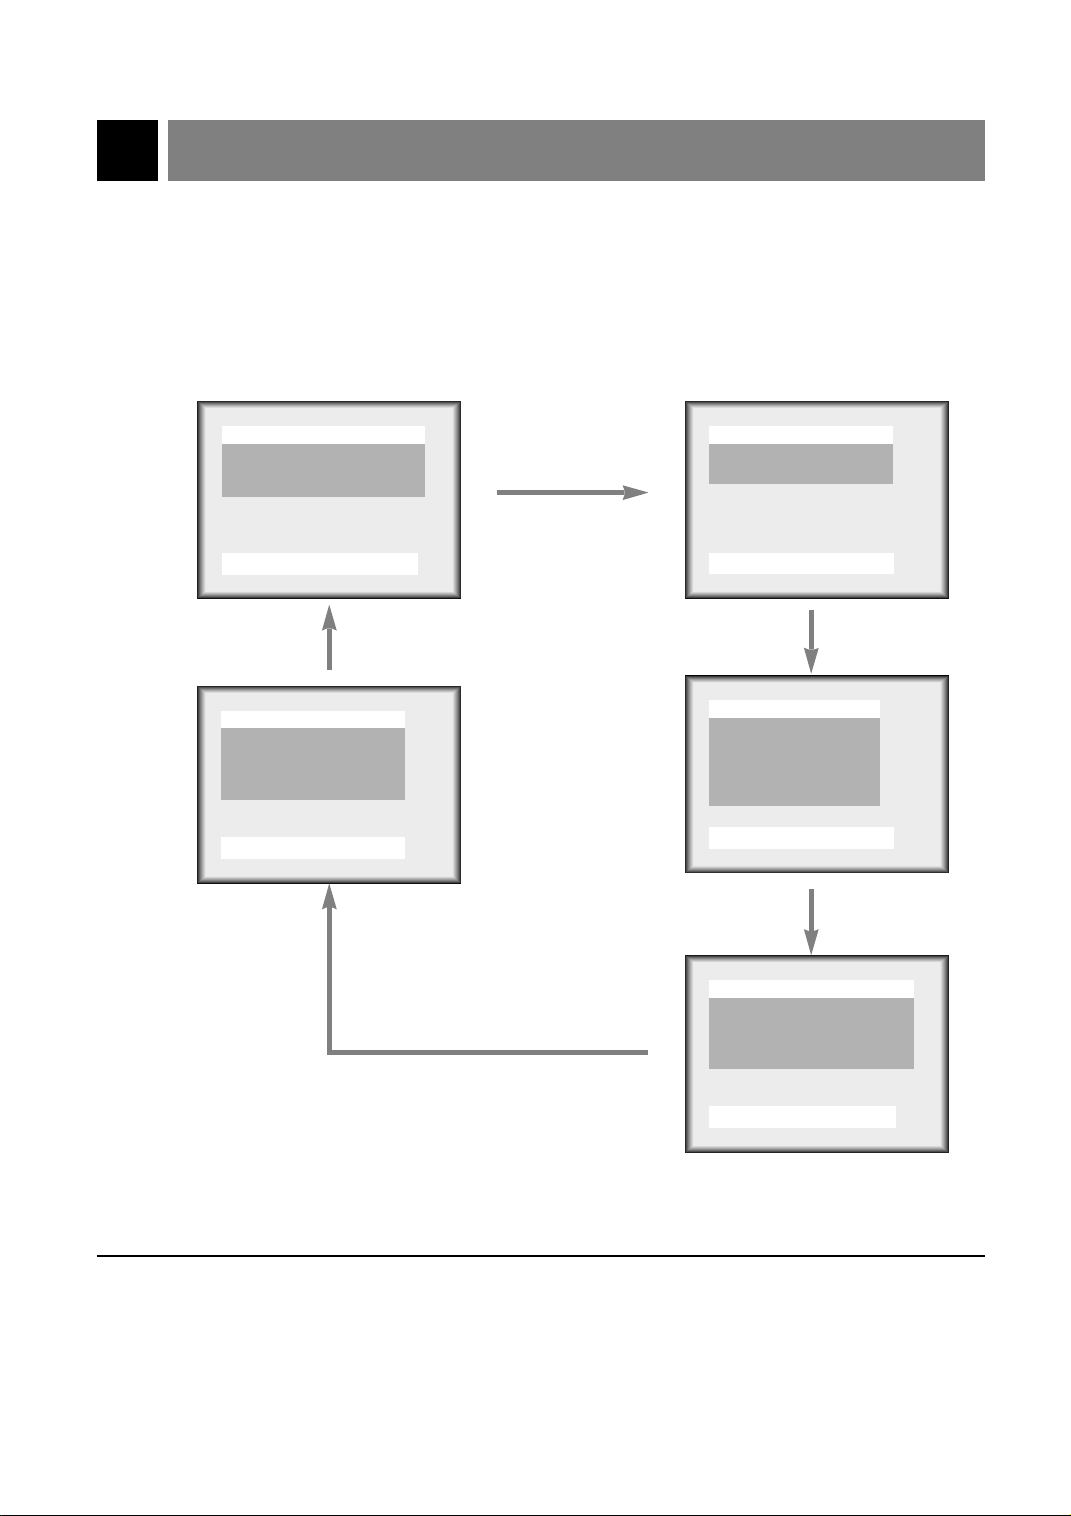
Press the MENU button. Each time you press the button you can see menus shown
below.
1
Language English
Captions Off
Caption/Text CC1
Parental Ctl
Use
Clock --:--AM
Off-Timer
On-Timer
TV 3 Vol 30 Hold
Auto Off : Hold
Use
55∞∞22 33
55∞∞22 33
And ENTER
--:--AM
Hold
--:--AM
And ENTER
Auto Program
Manual Program
Fine
Use
Contrast 100
Brightness 60
Color 60
Tint 0
Sharpness 6
APC Clear
Use
MTS Mono
AVL Off
DASP User
Equalizer
55∞∞22 33
55∞∞22 33
And ENTER
And ENTER
Press the channel (
2
20
Use
) buttons to select a function you want to use.
55,∞∞
55∞∞22 33
And ENTER
Page 27

Setting language
Language
Language
English
Press the MENU button to select the
screen display as below.
1
Language English
Captions Off
Caption/Text CC1
Parental Ctl
Use
Press the channel (
select a language you want to adjust.
2
Language English
Captions Off
Caption/Text CC1
Parental Ctl
Use
55∞∞22 33
55∞∞22 33
And ENTER
55,∞∞
And ENTER
Press the ENTER button.
3
) buttons to
BASIC
FUNCTIONS
● Each press of volume (
changes the screen display as below.
English
Español
22, 33
) buttons
Français
21
Page 28
Closed caption function
Closed captioning is a process which converts the audio portion of a television program into written words which
then appear on the television screen in a form similar to subtitles. Closed captions allow viewers to read the dialogue and narration of television programs.
Using Closed Captions
Captions are the subtitles of the dialogue and narration of television programs. For prerecorded programs, program dialogue can
be arranged into captions in advance. It’s possible to caption a
live program by using a process called real-time captioning, which
creates captions instantly. Real-time captioning is normally done
by professional reporters using a machine shorthand system and
computer for translation into English.
FOLLOW ME
Caption Tips
• Not all TV broadcasts include closed caption signals.
• Sometimes TV stations broadcast four different caption signals on the same channel. By selecting FROM CC1
TO CC4
mode might show demonstration or programming information.
• Your TV might not receive caption signals normally in the following situations.
, you can choose which signal you view. CC1 is usually the signal with the captions, while Another
Captioning is an effective system for the hearing-impaired, and it
can also aid in teaching language skills.
• The picture at left shows a typical caption.
Poor reception conditions are encountered:
• IGNITION:
Picture may flutter, drift, suffer from black spots or horizontal streaking. Usually caused by interference from
automobile ignition systems, neon lamps, electrical drills, and other electrical appliances.
• GHOSTS:
Ghosts are caused when the TV signal splits and follows two paths. One is the direct path and the other is
reflected off tall buildings, hills or other objects. Changing the direction or position of the antenna may
improve reception.
• SNOW:
If your receiver is located at the weak, fringe area of a TV signal, your picture may be marred by small dots.
It may be necessary to install a special antenna to improve the picture.
An old, bad, or illegally recorded tape is played.
Strong, random signals from a car or airplane interfere with the TV signal.
The signal from the antenna is weak.
The program wasn’t captioned when it was produced, transmitted, or taped.
22
Page 29
Operating the Caption
Operating the Caption
English
Press the MENU button to select the
screen display as below.
1
Language English
Captions Off
Caption/Text CC1
Parental Ctl
Use
Press the channel (
select [
2
Language English
Captions Off
Caption/Text CC1
Parental Ctl
Use
And ENTER
55∞∞22 33
Caption/Text
And ENTER
55∞∞22 33
55,∞∞
].
) buttons to
● Each time you press the volume (
the caption mode is displayed one by one as
shown below.
CAPTION CC1
CAPTION CC2
CAPTION CC3
CAPTION CC4
CAPTION text 1
CAPTION text 2
CAPTION text 3
22, 33
) buttons,
BASIC
FUNCTIONS
Press the volume (33) button.
3
Language English
Captions Off
Caption/Text CC1
Parental Ctl
Use
55∞∞22 33
And ENTER
CAPTION text 4
Press the ENTER button.
4
● This TV is programmed to remember which
mode it was last set to, even if you switch the
POWER off.
23
Page 30

Closed caption function
Operating the Caption
Operating the Caption
Press the CC button to select
1
[
Captions
Captions Off
].
Use
Press the volume (
2
● Each press of volume (
● Captions function setting is completed.
And ENTER
22 33
22, 33
Off On
) buttons to select [On] and press the ENTER button.
) buttons changes the screen display as below.
22, 33
EZ Mute
24
Page 31

English
Using the TT
Using the
Text services give a wide variety of information on all kind of subjects (ex. captioned program lists, weather forecasts, stock exchange topics, news for hearing-impaired---)
through the half TV screen.
But not all stations offer text services, even though they might offer captioning.
Repeat the steps 1-2 at page 23.
ext Function
ext Function
1
Press the volume (
) buttons to select [Text 1], [Text 2], [Text 3] or [Text 4].
22, 33
2
Language English
Captions Off
Caption/Text Text1
Parental Ctl
Use
Press the ENTER button.
55∞∞22 33
And ENTER
3
● In the event you receive a poor signal, an empty black box may appear and disappear, even when the text
mode is selected. This is normal function in such an event.
25
BASIC
FUNCTIONS
Page 32

Parental control function
The Parental Control Function (V-Chip) is used to block program viewing based on the ratings sent by the
broadcast station. The default setting is to allow all programs to be viewed. Viewing can be blocked by the
type of program and by the categories chosen to be blocked. It is also possible to block all program viewing
for a time period. To use the Parental Control Function, the following must be set :
1. Ratings and categories to be blocked.
2. Number of hours to lock the television viewing control
3. Set a password
4. Enable the lock
V-Chip rating and categories
Rating guidelines are provided by broadcast stations. Most television programs and television movies can
be blocked by TV Rating and/or Individual Categories. Movies that have been shown at the theaters or
direct-to-video movies use the Movie Rating System(MPAA) only.
For Movies previously shown in theaters:
Movie Ratings:
* Unblocked
* G and Above (general audience)
* PG and Above (parental guidance suggested)
* PG-13 and Above (13 years and up)
* R and Above (restricted)
* NC-17 and Above (18 years and up)
* X (adult)
If you set PG-13 and Above ; G and PG movies will be available, PG-13, R, NC-17 and X will be
blocked.
For Television programs including made-for-TV movies:
General TV Ratings:
* Unblocked
* TV-G and Above (general audience) (individual categories do not apply)
* TV-PG and Above (parental guidance suggested)
* TV-14 and Above (14 years and up)
* TV-MA (mature audience)
Children TV Ratings:
* Unblocked
* TV-Y and Above (youth) (individual content categories do not apply)
* TV-Y7 (youth, 7 years and up)
Content Categories:
* Dialog - sexual dialogue (applies to TV-PG and Above, TV-14 and Above)
* Language - adult language (applies to TV-PG and Above, TV-14 and Above, TV-MA)
* Sex scenes - sexual situations (applies to TV-PG and Above, TV-14 and Above, TV-MA)
* Violence (applies to TV-PG, TV-14 and TV-MA)
* F Violence - fantasy violence (applies only to TV-Y7)
* No Rating (blocks all viewing)
26
Page 33

Setting up Blocking
Setting up Blocking
English
Press the MENU button to select the
screen display as below.
1
Language English
Captions Off
Caption/Text CC1
Parental Ctl
Use
Press the channel (
select [
2
Language English
Captions Off
Caption/Text CC1
Parental Ctl
Use
And ENTER
55∞∞22 33
Parental Ctl
And ENTER
55∞∞22 33
55,∞∞
].
) buttons to
Press the channel (
select the types of blocking to be set.
4
Press the volume (
select the types of ratings to block.
● [MPAA], [Age] and/or [Content block] may
be set.
Press the MENU button to return from
[Age Block] or [Content Blk] setting
screens.
Press the channel (
select [Set Hours].
5
Press the volume (
the number of hours for the blocking.(Up to 99)
Press the channel (
select [Set Password].
Enter a four digit password. Enter it
again when requested.
● A new password may be chosen each time
blocking is set up.
55,∞∞
22, 33
55,∞∞
) buttons to set
22, 33
55,∞∞
) buttons to
) buttons to
) buttons to
) buttons to
BASIC
FUNCTIONS
Press the volume (33) button.
3
Aux. Block
MPAA
Age Block
Content Blk
Set Hours
Set Password
Lock On/Off Must Set Hours
Use
● If parental control is already set then enter
the password when requested.
55∞∞22 33
Sources Unblocked
Unblocked
00 Hours
22 33
To Set
22 33
And ENTER
Press the channel (
select [Lock On/Off].
6
Press the volume (
the lock [On].
Press the MENU button to save the
blocking setup and exit.
55,∞∞
) buttons to set
22, 33
) buttons to
27
Page 34

Programming / Erasing channels
Auto programming channels
Auto programming channels
* This function can be operated only when the set can receive input sig-
nal from broadcasting stations and the antenna cable is connected.
*[Auto programming] function memorizes all the receiving channels of
terestrial TV signals or cable TV programs.
*If channels of general wireless TV and cable TV are duplicated,
press the number buttons (0 ~ 9) to change as
general wireless TV Cable TV
Press the MENU button to select the screen display
as below.
1
Auto Program
Manual Program
Fine
Use
55∞∞22 33
And ENTER
Press the volume (33) button.
2
Auto Program
Stop ENTER
* Press the channel (
rized channels after auto programming is finished.
* If you press the ENTER button in auto programming,
the function will stop and only channels programming
up to that time will remain.
* Auto programming function can memorize only the
channels which are being received at that time.
TV 7
3%
Scanning channel number
is displayed.
) buttons to check the memo-
55,∞∞
28
Page 35

English
Memorizing /
Memorizing /
* You can select [Memory] or [Erase] for the current channel.
Press the MENU button to select the
screen display as below. Then press
1
the channel (
[Manual Program].
Auto Program
Manual Program
Manual Program
Fine
Use
55∞∞22 33
Erasing current channel
Erasing current channel
) buttons to select
55,∞∞
And ENTER
3
Press the channel (
select a channel you want and then
press the volume (
select [Memory] or [ Erase ].
Manual Program
TV 7 Memory
Use
● Each time you press the volume (
tons, you can select as below alternatively.
Memory
55∞∞22 33
And ENTER
Erase
) buttons to
55,∞∞
) buttons to
22, 33
Erase
22, 33
) but-
BASIC
FUNCTIONS
Press the volume (
22, 33
2
The current channel number is displayed.
Manual Program
TV 7 Memory
Use
55∞∞22 33
And ENTER
) buttons.
Press the ENTER button.
4
● The current channel is to be Memory /
Erase.
29
Page 36

Setting current time
* If current time setting is erased by power failure or TV is unplugged, reset it.
o set current time as 10:30
TTo set current time as 10:30
Press the MENU button to select the screen display
as below.
1
Clock --:-- AM
Off-Timer
On-Timer
TV 3 Vol 30 Hold
Auto Off : Hold
Use
Press the channel (
55∞∞22 33
--:-- AM
Hold
--:-- AM
And ENTER
) buttons to select [Clock ].
55,∞∞
2
Clock --:-- AM
Off-Timer
On-Timer
TV 3 Vol 30 Hold
Auto Off : Hold
--:-- AM
--:-- AM
Hold
AM
AM
Use
55∞∞22 33
And ENTER
Press the volume (33) button.
3
Clock --:-- AM
Off-Timer
On-Timer
TV 3 Vol 30 Hold
Auto Off : Hold
Use
30
55∞∞22 33
--:-- AM
--:-- AM
And ENTER
Hold
Page 37

English
Press the channel (
select current hour.
4
●If you hold the 55button, the hour display is
changed in the sequence of AM 1 ➔ AM 2
➔ ....PM12 ➔ PM 1 .... ➔ AM 12, and
changed in the reverse sequence for ∞∞button.
● Select [AM 10].
55,∞∞
Press the volume (33) button.
5
Clock 10:00AM
Off-Timer
On-Timer
TV 3 Vol 30 Hold
Auto Off : Hold
Use
Press the channel (
select current minute. And press the
6
ENTER button.
● If you hold the 33button, the minute display
is changed in the sequence of 00 ➔ 01 ➔ 02
...58 ➔ 59, and changed in the reverse
sequence for 33button.
● Select [30] and press the ENTER button to
complete the setting.
● Time is progressed from the point of pressing the ENTER button.
● Press the ENTER button again and the
screen display is disappears.
55∞∞22 33
--:--AM
Hold
--:--AM
And ENTER
55,∞∞
) buttons to
) buttons to
To check current channel, time and
sound status (stereo or dual)
● Press the ENTER button.
St.SAP 7
10:30AM
● Press the ENTER button again to release.
* Current time is not displayed if current
time is not set.
* Stereo or dual sound is displayed only
when receiving the correspondent input
signal.
* Above displays disappear after a few sec-
onds.
current channel
current sound
status
current time
CLOCK
SETTING
31
Page 38

Setting Off-Timer function
*Timer function can be operated only if current time has been already set.
*Off-timer function is prior to on-timer function if they are set to the same time.
urning of
TTurning of
f at 1
f at 1
1:30 PM by of
1:30 PM by of
Press the MENU button to select the screen display
as below.
1
Clock 10:30AM
Off-Timer
On-Timer
TV 3 Vol 30 Hold
Auto Off : Hold
Use
Press the channel (
Timer].
2
Clock 10:30AM
Off-Timer
Off-Timer
On-Timer
TV 3 Vol 30 Hold
Auto Off : Hold
55∞∞22 33
--:--AM
Hold
--:--AM
And ENTER
--:--AM
Hold
--:--AM
Hold
--:--AM
) buttons to select [Off-
55,∞∞
f-timer function
f-timer function
Use
55∞∞22 33
And ENTER
Press the volume (33) button.
3
32
Clock 10:30AM
Off-Timer
Off-Timer
On-Timer
TV 3 Vol 30 Hold
Auto Off : Hold
Use
55∞∞22 33
--:--AM
--:--AM
--:--AM
And ENTER
Hold
Hold
Page 39

English
Press the channel (
select hour you want to set.
4
● If you hold the 55button, the hour display
is changed in the sequence of AM 1 ➔ AM
2 ➔ ....PM12 ➔ PM 1 .... ➔ AM 12, and
changed in the reverse sequence for
button.
● Select [PM 11].
55,∞∞
Press the volume (33) button.
5
Clock 10:30AM
Off-Timer
Off-Timer
On-Timer
TV 3 Vol 30 Hold
Auto Off : Hold
Use
Press the channel (
select minute you want to set.
55∞∞22 33
11:00PM
--:--AM
Run
--:--AM
And ENTER
Run
55,∞∞
6
● If you hold the 55button, the minute display
is changed in the sequence of 00 ➔ 01 ➔
02 ...58 ➔ 59, and changed in the reverse
sequence for ∞∞button.
● Select [30].
) buttons to
) buttons to
Press the volume (33) button to select
[Hold] or [Run].
7
∞∞
Press the channel (
select [Run].
8
Clock 10:30AM
Off-Timer
Off-Timer
On-Timer
TV 3 Vol 30 Hold
Auto Off : Hold
Use
55∞∞22 33
11:30PM
--:--AM
Run
--:--AM
And ENTER
Run
) buttons to
55,∞∞
Press the ENTER button.
● Each press of channel (
9
changes the screen display as below.
Run Hold
● The screen display will disappear if you
press the ENTER button once more.
● The screen display of [ Sleep ] appears
on the screen for one minute untill TV
automatically turns off.
55,∞∞
) button
CLOCK
SETTING
* When [Auto Off] is set to [RUN] with
and ENTER buttons, the TV is switched to
standby mode automatically in 10 minutes if
there is no inptsignal.
55∞∞22 33
Clock 10:30AM
Off-Timer
On-Timer
TV 3 Vol 30 Hold
Auto Off : Hold
Auto Off : Run
Use
55∞∞22 33
11:30AM
--:--AM
And ENTER
Run
33
Page 40

Setting On-Timer function
*Timer function can be operated only if current time has been already set.
urning on at 7:10
TTurning on at 7:10
AM with volume 40 on channel 8 by on-timer function
AM with volume 40 on channel 8 by on-timer function
Press the MENU button to select the
screen display as below.
1
Clock 10:30AM
Off-Timer
On-Timer
TV 3 Vol 30 Hold
Auto Off : Hold
Use
Press the channel (
select [On-Timer].
2
Clock 10:30AM
Off-Timer
On-Timer
On-Timer
TV 3 Vol 30 Hold
TV 3 Vol 30 Run
Auto Off : Hold
55∞∞22 33
--:--AM
Hold
--:--AM
And ENTER
--:--AM
Hold
--:--AM
--:--AM
55,∞∞
) buttons to
Press the channel (
select hour you want.
4
● If you hold the 55button, the hour display
is changed in the sequence of AM 1 ➔ AM
2 ➔ ....PM12 ➔ PM 1 .... ➔ AM 12, and
changed in the reverse sequence for
button.
● Select [AM 7].
55,∞∞
Press the volume (33) button.
5
Clock 10:30AM
Off-Timer
On-Timer
On-Timer
TV 3 Vol 30 Run
TV 3 Vol 30 Run
Auto Off : Hold
--:--AM
--:--AM
7:--AM
Hold
) buttons to
∞∞
Use
55∞∞22 33
And ENTER
Press the volume (33) button.
3
34
Clock 10:30AM
Off-Timer
On-Timer
On-Timer
TV 3 Vol 30 Hold
TV 3 Vol 30 Run
Auto Off : Hold
Use
55∞∞22 33
--:--AM
--:--AM
--:--AM
And ENTER
Hold
Use
Press the channel (
select minute you want.
6
● If you hold the 55button, the minute display
is changed in the sequence of 00 ➔ 01 ➔
02 ...58 ➔ 59, and changed in the reverse
sequence for ∞∞button.
● Select [10].
55∞∞22 33
And ENTER
55,∞∞
) buttons to
Page 41

English
7
8
9
Press the volume (33) button.
Clock 10:30AM
Off-Timer
On-Timer
On-Timer
TV 3 Vol 30 Run
TV 3 Vol 30 Run
Auto Off : Hold
Use
Press the channel (
55∞∞22 33
--:--AM
Hold
--:--AM
7:10AM
And ENTER
) buttons to
55,∞∞
select the channel you want.
Press the volume (33) button.
Clock 10:30AM
Off-Timer
On-Timer
On-Timer
TV 3 Vol 30 Run
TV 8 Vol 30 Run
Auto Off : Hold
--:--AM
--:--AM
7:10AM
Hold
11
12
Press the volume (33) button.
Clock 10:30AM
Off-Timer
On-Timer
On-Timer
TV 8 Vol 40 Run
TV 3 Vol 30 Run
Auto Off : Hold
Use
Press the channel (
55∞∞22 33
--:--AM
Hold
7:10AM
--:--AM
And ENTER
) buttons to
55,∞∞
select [Run] and press the
button.
● Each press of channel (
changes the screen display as below.
Run Hold
● On-Timer function setting is complet-
ed.
● If you press the ENTER button once
more, the screen display disappear
and the set will be turned automatically on with volume level 40 on channel
8 at 7:10 AM.
55, ∞∞
) buttons
ENTER
10
Use
Press the channel (
55∞∞22 33
And ENTER
) buttons to
55,∞∞
select the volume you want.
* If on-timer function is active, the current channel will change to the set channel when on-timer
is activated.
* Unless any button is pressed within two hours after turning on the TV by on-timer function, the
set is automatically turned off.
35
CLOCK
SETTING
Page 42

Setting sleep time function
* This function will automatically turn the set off after a set time.
Press the SLEEP button to set sleep time function.
1
● Each press of the button changes setting time status as
below.
Sleep
---
Use
And ENTER
22 33
- - -
240
180
120 90
● To release sleep time setting, press the SLEEP button
repeatedly to select [ --- ].
● The screen display of [ Sleep ] appears on the screen for
one minute untill automatically turning off.
* When a sleep time you want is displayed on the
screen, don’t press the SLEEP button. The screen
display disappears and sleep time is to be set.
* To check remaining sleep time after setting, press
the SLEEP button just once.
* To change sleep time setting, press the SLEEP
button repeatedly to select time setting you want.
* If you turn the set off after setting sleep time, the
setting will be erased. Set it again.
10
20
30
60
36
Page 43

Adjusting audio condition
Adjusting audio condition by user
Adjusting audio condition by user
English
Press the MENU button to select the
screen display as below.
1
MTS Strero
AVL Off
DASP User
Equalizer
Use
Press the channel (
select a audio item you want to adjust.
2
MTS :
● Refer to page 38 for the details.
AVL (Auto Volume Level) :
● This function keeps the volume at the
same level even when the channels are
changed.
DASP (Digital Audio Signal Process) :
● This function makes it possible for the user
to adjust the audio characteristics in each
mode (Cinema, Music or Sports) just as he or
she desires.
Equalizaer :
● This function enables the user to make
adjustments to the frequency bands listed
below just as he or she desires.
100Hz, 500Hz, 1.5kHz, 5kHz, 10kHz.
55∞∞22 33
And ENTER
55,∞∞
) buttons to
Press the volume (
adjust the audio condition as you want.
3
MTS Strero
AVL Off
DASP User
Equalizer
Use
Press the ENTER button.
55∞∞22 33
And ENTER
22, 33
4
) buttons to
AUDIO /
VIDEO
37
Page 44

Adjusting audio condition
Selecting bilingual signals
Selecting bilingual signals
Screen display in stereo signal : Stereo
Screen display in bilingual signal : SAP
* Bilingual (dual language) signal
● This signal contains the secondary language signal in addition to the primary language.
● There are the primary and secondary language and stereo modes in bilingual signal.
● [Mono] : The primary language is output from left and right speaker. Signal mode is mono.
● [Stereo] : The primary language is output from left and right speaker. Signal mode is stereo.
● [SAP] : The secondary language is output from left and right speaker.
Press the MENU button to select the
screen display as below.
1
MTS Strero
AVL Off
DASP User
Equalizer
Use
Press the channel (
select [MTS].
2
And ENTER
55∞∞22 33
55,∞∞
* If some strange sound is heard when watching TV programs on stereo mode in poor signal
areas, or if in non-dual signal service area, make sure to select mono mode.
* [Stereo] or [Mono] mode can be available only when broadcasting signal contains the data.
) buttons to
Press the volume (
select an audio mode you want.
3
MTS Strero
AVL Off
DASP User
Equalizer
Use
● Each press of volume (
changes the screen display as below.
Mono
Press the ENTER button.
55∞∞22 33
And ENTER
Stereo
4
) buttons to
22, 33
) buttons
22, 33
SAP
38
Page 45

INPUT
S-VIDEO
H/P
LVIDEOINA
(MONO)
COMPONENT INPUT(480i)
B
C
C
R
Mute
Mute
* This function cuts off speaker sound. It’s convenient when getting phone
calls.
Press the MUTE button.
1
English
Mute
● To release muted sound, press the MUTE button or volume (
buttons.
● If muted sound is released, volume level is displayed on the
screen.
Using headphone
Using headphone
● Headphone is an optional item.
●You can adjust headphone sound with volume(
are listening to sound through headphone, speaker sound is cut off.
) buttons. While you
22, 33
22, 33
)
AUDIO /
VIDEO
39
Page 46

Adjusting video condition
APC (Auto Picture Control)
APC (Auto Picture Control)
Press the MENU button to select the screen display
as below.
1
Contrast 100
Brightness 60
Color 60
Tint 0
Sharpness 6
APC Clear
Use
55∞∞22 33
Press the channel (
2
Contrast 100
Brightness 60
Color 60
Tint 0
Sharpness 6
APC Clear
Use
55∞∞22 33
● Each press of volume
display as below.
And ENTER
) buttons to select [APC].
55,∞∞
And ENTER
(
Clear Optimum
User Soft
buttons changes the screen
)
22, 33
Press the ENTER button.
3
40
Page 47

Manual picture control
Manual picture control
English
Press the MENU button to select the
screen display as below.
1
Contrast 100
Brightness 60
Color 60
Tint 0
Sharpness 6
APC Clear
Use
Press the channel (
select a picture item you want to adjust.
2
Contrast :
● Adjust the different between the light and
dark levels of the picture.
Brightness :
● Adjust the white or light of the overall picture.
Color:
● Adjust the richness of all colors.
Tint:
● Adjusts the balance between the red and
green levels.
Sharpness:
● Adjust the levels of crispness in the edges
between the light and dark area of the picture.
The lower the level, the softer the image.
55∞∞22 33
And ENTER
55,∞∞
) buttons to
Press the volume (
adjust the picture condition as you
3
want.
Contrast 100
Brightness 60
Color 60
Tint 0
Sharpness 6
APC Clear
Use
● [Contrast], [Brightness], [Color] are adjusted from 0 to 100.
● [Tint] is adjusted from Red 50 to Green 50.
● [Sharpness] is adjusted from 0 to 10.
55∞∞22 33
And ENTER
22, 33
Press the ENTER button.
4
* APC setting is to be released if
you use this function.
) buttons to
AUDIO /
VIDEO
Fine:
● This function is to adjust the picture to stable condition when it is poor, for example, a
horizontal stripe, twisted picture or no color
in brodcasting.
Auto Program
Manual Program
Fine
Fine
Use
55∞∞22 33
And ENTER
41
Page 48

Product specifications
Model : LC1510
Main body : Horizontal size : 15-1/2 Inches (394 mm)
Height : 15-1/8 Inches (384 mm)
Thickness : 4-1/8 Inches (105.5 mm)
Weight : 12.1 lbs(5.5 Kg)
Including table stand : Horizontal size : 15-1/2 Inches (394 mm)
Height : 16-1/4 Inches (413 mm)
Thickness : 7-5/8 Inches (194 mm)
Weight : 17.4 lbs(7.9 Kg)
Power requirements : DC 12V/3.5A
* CAUTION : For use only with Model No. SAD6012SE AC Adaptor, manufactured
by SERONICS CO., LTD.
Television system : NTSC
Television channels : VHF : 2 ~ 13, UHF : 14 ~ 69
: Cable : 01 ~ 125
Tube : LCD Panel
Power consumption : 45W
External antenna impedance : 75 Ω
Audio output : 1.0W + 1.0W
Speaker outputs :8 Ω X 2
External input ports : VIDEO input port set 1
S-VIDEO input 1
Headphone jack 1
PC/DTV input 1
Component video input set 1
Power input 1
Antenna input 1
Adaptor (DC power) : In : AC 100-240V ~ 1.5A-0.6A
50/60Hz, 115~180VA
Out : DC 12V, 5A
* CAUTION : For use only with Model No. SAD6012SE AC Adaptor, manufactured
by SERONICS CO., LTD.
Power supply cordset : Standard North America three wire earth-grounding
with flexible cord SJT type or higher type.
42
* CAUTION : If replacement becomes necessary, replace it with an exact duplicate.
Contact any MARANTZ authorized service center.
Page 49

R
Model LC1510 User Guide
LCD TV/Monitor
Page 50

Page 51

TABLE DES
MATIÈRES
Français
Avertissements i
1
Contrôles 2
Composition de base du téléviseur LCD 6
Connexion de l’antenne 9
2
Connexion d’un appareil externe 10
Connexion d’un lecteur DVD 12
Connexion d’un DTV 13
Connexions comme moniteur 14
3
Fonction de vérification en mode PC 16
INTRODUCTION
INTRODUCTION
CONNECTIONPC
CONNEXIONS
Avant de faire fonctionner l’appareil, lire
attentivement ce guide.
Utilisation de la télécommande 17
4
Mise en circuit du téléviseur 19
Fonction de vérification du mode TV 20
Réglage de la langue 21
Fonction sous-titres 22
Fonction de sélection-parent 26
Programmation/suppression des canaux 28
Réglage de l’heure en cours 30
5
Fonction réglage de la minuterie arrêt 32
Réglage de la fonction minuterie marche 34
Réglage de la fonction minuterie 36
Réglage de la position audio 37
6
Réglage de la position vidéo 40
ORDINATEUR
CONNECTION
CONNEXION D’UN
BASE
BASIC
FUNCTIONS
FONCTIONS DE
CLOCK
SETTING
PENDULE
RÉGLAGE DE LA
AUDIO /
AUDIO-
VIDÉO
VIDEO
Données technique du produit 42
7
TIONS
INFORMAINFORMATION
1
Page 52

Contrôles
Devant du téléviseur
Devant du téléviseur
Voyant en circuit
Touche alimentation
* Retirer la protection en vinyle avant l’utilisation.
Dos du téléviseur
Dos du téléviseur
Capteur de la télécommande
2
Page 53

Panneau de contrôle avant
Panneau de contrôle avant
Touche menu
Touches volume
Français
INTRODUCTION
Touche alimentation
Touche TV/Vidéo
Capteur de la télécommande
Ports de connexions
Ports de connexions
Touche entrée
Touches canal
Voyant marche
DC 12V
Entrée alimentation
Entrée antenne
ANT IN
+75 Ω
PC/DTV INPUT
Entrée PC/DTV
COMPONENT INPUT(480i)
C
R
C
B
casque
Entrée composant
H/P
S-VIDEO
Prise
Entrée S-Vidéo
(MONO)
Entrée
audio-vidéo
RLVIDEOINAUDIO
3
Page 54

Contrôles
Télécommande
Télécommande
TOUCHE ALIMENTA TION
TOUCHES NUMÉRIQUES
TOUCHE REPRISE
TOUCHE MENU
TOUCHES CANAL (
TOUCHE TV/PC
● Presser la touche FLASHBK pour regarder le
dernier programme écouté.
55,∞∞
)
4
Page 55

Français
ouche TV/VIDEO sur
TTouche TV/VIDEO sur
la télécommande
la télécommande
INTRODUCTION
TOUCHE TV/VIDÉO
TOUCHE CC
TOUCHE MUTE
PAGE 24
PAGE 39
TOUCHE ENTER
TOUCHES VOLUME (
TOUCHE SLEEP
PAGE 36
PAGE1 1 à 15
)
22, 33
* Chaque pression de cette touche fait passer
au mode suivant.
TV programs
/ Cable TV
DVD
* VIDÉO, S-VHS, DVD : Sélectionner chaque
mode pour visionner l’appareil externe correspondant.
ouche TV/VIDEO sur
TTouche TV/VIDEO sur
le panneau avant
le panneau avant
* Chaque pression de cette touche fait passer
au mode suivant.
VIDÉO
S-VIDÉO
TV programs
/ Cable TV
PC
* VIDÉO, S-VHS, DVD PC: Sélectionner
chaque mode pour visionner l’appareil externe
correspondant.
DVD
VIDÉO
S-VIDÉO
5
Page 56
Composition de base du téléviseur LCD
1.5V
1.5V
Accessoires
Accessoires
Trou
Support style table Adaptateur c.a. Télécommande
RC1500LC
Piles
Cordon d’alimentation
Carte de garantie
(Pour les Etats-Unis)
Notice techniqueCâble pour signal PC
Carte de garantie
(Pour le Canada)
6
Page 57

Français
isionnement d’un programme télé
VVisionnement d’un programme télé
* S’assurer de brancher le cordon d’alimentation sur une prise murale après avoir branché le téléviseur sur
l’adaptateur.
a. Installer le téléviseur LCD de façon appropriée à l’aide des accessoires. Consulter les pages 8.
b. Brancher le fil d’antenne sur le port d’entrée d’antenne de l’appareil.
c. Brancher l’adaptateur sur le port d’entrée d’alimentation de l’appareil.
d. Brancher le cordon d’alimentation sur la prise murale après avoir branché le cordon d’alimentation
sur l’adaptateur.
INTRODUCTION
a
b
c
Remarque :Si le moniteur est froid, il peut y avoir un léger vacillement lorsqu’circuit.
Ceci est normal. Il n’y a aucun problème avec le moniteur.
d
7
Page 58

Composition de base du téléviseur LCD
Installation
Installation
* Pour plus de sûreté, utiliser un support de style table seulement.
a. Placer le support dans la position désirée.
b. Insérer l’appareil sur le support.
* Lorsque l’on assemble l’appareil et le support, faire correspondre l’embout du téléviseur dans le
trou du support afin qu’il n’y ait pas de mouvement au joint.
8
Page 59

Français
DC 12V
ANT IN
+75 Ω
PC/DTV INPUT
C
DC 12V
ANT IN
+75 Ω
PC/DTV INPUT
C
DC 12V
ANT IN
+75 Ω
PC/DTV INPUT
C
Connexion de l’antenne
* Pour obtenir une meilleure qualité d’image, régler la direction de l’antenne.
Connexions sur la douille d’antenne murale
Connexions sur la douille d’antenne murale
● Dans le cas d’une douille d’antenne murale dans les édifices à logements, brancher le fil d’antenne tel
qu’il est illustré ci-dessous.
(Utiliser le type approprié de fil d’antenne.)
Tourner dans le sens des aigu-
illes d’une montre pour serrer
Édifice à logements
Fil rond 75 ohms
Fil plat 300 ohms
Port de connexion mural
Fil bronze
Convertisseu
r d’antenne
* Dans le cas d’un fil rond 75 ohms, insérer le fil bronze et serrer l’écrou. Dans le cas d’un
fil plat 300 ohms, brancher le fil torsadé sur le convertisseur d’antenne, puis brancher le
convertisseur sur le port d’entrée d’antenne.
* Lorsque l’on utilise un fil rond 75 ohms, ne pas plier le fil bronze. Ceci peut causer une
détérioration de la qualité d’image.
Connexion d’une antenne extérieure
Connexion d’une antenne extérieure
● Ce type d’antenne est habituellement utilisé dans les résidences privées.
Antenne VHF
Antenne
UHF
Fil rond 75 ohms
Tourner dans le sens des aigu-
illes d’une montre pour serrer
Fil bronze
CONNEXIONS
Port d’entrée
d’antenne
Fil plat 300 ohms
Convertisseur
Résidence privée
d’antenne
Port d’entrée
d’antenne
* Dans les régions où le signal est
faible, l’on peut obtenir une meilleure
image en installant une antenne, tel
qu’il est illustré.
* Si l’antenne est divisée en deux,
VHF
UHF
utiliser un « aiguilleur de signal »
pour la connexion.
signal
amplifier
9
Page 60

Connexion d’un appareil externe
* L’écran télé convertit automatiquement au mode TV en pressant les touches canal
, reprise de canal ou
55,∞∞
les touches numériques (0 à 9) en utilisant VIDÉO.
* Brancher sur l’autre appareil AV en utilisant les ports d’entrée de l’appareil.
Connexion d’un magnétoscope
Connexion d’un magnétoscope
Comment brancher
1
● Brancher les ports sortie audio-vidéo du magnétoscope sur les ports d’entrée correspondants de
l’appareil.
Fil d’antenne
Convertisseur
d’antenne
<Dos du magnétoscope>
ANT IN
ANT OUT
or
CH3
Connexion
directe
S-VIDEO
CH4
OUT
IN
AUDIO VIDEO
(R) (L)
DC 12V
ANT IN
+75 Ω
PC/DTV INPUT
COMPONENT INPUT(480i)
H/P
BC
S-VIDEO
R
C
(MONO)
RLVIDEOINAUDIO
2
Comment utiliser
2
Visionnement des programmes télé
Mettre l’appareil en circuit et sélectionner le canal désiré.
Visionnement du magnétoscope
a. Presser la touche TV/VIDEO sur la télécommande pour sélectionner VIDÉO.
* Sélectionner le canal 3 ou 4 si l’on utilise la connexion seulement.
* Sélectionner VIDÉO si l’on utilise la connexion .
b. Insérer une cassette vidéo dans le magnétoscope et presser PLAY.
10
1
1
2
Page 61

Français
isionnement d’une source AA
VVisionnement d’une source
V externe
V externe
Comment brancher
1
● Brancher les ports sortie audio-vidéo sur les ports entrée correspondants de l’appareil AV de
l’appareil.
DC 12V
<Panneau de connexions du téléviseur>
<Panneau arrière de
l’appareil externe>
ANT IN
+75 Ω
PC/DTV INPUT
COMPONENT INPUT(480i)
H/P
BC
S-VIDEO
R
C
(MONO)
RLVIDEOINAUDIO
Camescope
Jeu vidéo
R
L VIDEOAUDIO
CONNEXIONS
VCR
DVD
Comment utiliser
2
● Mettre l’appareil en circuit et presser la touche TV/VIDEO pour sélectionner VIDÉO.
VIDÉO
<Sur la télécommande>
● Essayer après avoir mis l’appareil AV externe en circuit.
11
Page 62

Connexion d’un lecteur DVD
● Brancher les entrées vidéo du composant sur les entrées Y, CB, CR (480i) et audio sur les ports AV gauche
et droit.
Comment brancher
1
DC 12V
<Panneau de connexions du téléviseur>
<Panneau arrière du DVD>
ANT IN
+75 Ω
PC/DTV INPUT
AUDIO
R
COMPONENT INPUT(480i)
L
BC
H/P
R
C
S-VIDEO
Comment utiliser
2
● Mettre l’appareil en circuit et presser la touche TV/VIDEO pour sélectionner DVD.
(MONO)
RLVIDEOINAUDIO
12
DVD
<Sur la télécommande>
● Essayer ceci après avoir mis le DVD en circuit.
Page 63

Connexion d’un DTV
AUDIO
* S’assurer de sélectionner le mode PC.
Comment brancher
1
Français
DC 12V
<Panneau de connexion du téléviseur>
ANT IN
+75 Ω
AUDIO
R
L
HVRGB
PC/DTV INPUT
COMPONENT INPUT(480i)
BC
<Panneau arrière du DTV>
H/P
R
C
S-VIDEO
ou
Comment utiliser
2
● Mettre le téléviseur en circuit et presser TV/PC pour sélectionner PC.
(MONO)
RLVIDEOINAUDIO
AUDIO
L
R
CONNEXIONS
<Sur la télécommande>
● Essayer ceci après avoir mis le DTV en circuit.
PC
13
Page 64

Connexion comme moniteur
* S’assurer de sélectionner le mode PC.
Comment brancher
1
● S'assurer de régler la résolution de l’ordinateur afin d’être disponible avant de brancher. Voir page 15.
● Brancher l’appareil sur l’ordinateur avec le câble de signal PC.
● Brancher les ports audio sur l’ordinateur pour obtenir la sonorité de l’ordinateur.
DC 12V
<Panneau de connexion du téléviseur>
14
ANT IN
+75 Ω
PC/DTV INPUT
COMPONENT INPUT(480i)
BC
R
C
H/P
S-VIDEO
(MONO)
RLVIDEOINAUDIO
<Ordinateur>
<Accessoires>
Page 65

Comment utiliser
2
● Mettre le téléviseur en circuit et presser TV/PC pour sélectionner PC.
<Sur la télécommande>
Français
PC
● Essayer ceci après avoir mis l’ordinateur en circuit.
ORDINATEUR
CONNEXION D’UN
Remarque:Si le télé/moniteur est froid, il peut y avoir un léger vacillement lorsqu’il est mis en circuit.
Ceci est normal et n’est pas un problème relié au moniteur.
15
Page 66

Fonction vérification en mode PC
* S'assurer de sélectionner le mode PC avant d’utiliser.
Presser MENU. Chaque fois que l’on presse cette touche, les menus ci-dessous
s’affichent.
1
Contrast : 60
Brightness : 90
H-Poisition : 0
V-Poisition : 0
Clock : 40
Phase : 16
Auto
Reset
Use
55∞∞22 33
Et ENTER
Presser channel ascendant-descendant (
2
) pour sélectionner une fonction.
55,∞∞
16
Page 67

Utilisation de la télécommande
Installation des piles
Installation des piles
Tirer le couvercle
1
2
vers le haut dans la
direction de la flèche.
Insérer les piles en
observant les polarités.
Français
3
Replacer le couvercle
du compartiment à
piles.
* Insérer deux piles alcalines AAA, 1.5 volt. Ne pas mélanger des piles neuves et usées.
* Enlever les piles si la télécommande n’est pas utilisée pendant une longue période. Des
piles qui fuient peuvent endommager la télécommande.
Capteur de la
télécommande
BASE
FONCTIONS DE
17
Page 68

Utilisation de la télécommande
Remarques sur l’utilisation de la télécommande
Remarques sur l’utilisation de la télécommande
S'assurer qu’il n’y a pas
d’objet entre la
télécommande et le capteur.
Ne pas placer la
télécommande près d’une
chaufferette ou dans un
endroit humide. Un fort impact
sur la télécommande peut
l’endommager.
Le signal de la télécommande
peut être modifié par le soleil
ou toute lumière vive. Dans ce
cas, diriger la télécommande
dans une autre direction.
18
Page 69

Français
Mise en circuit du téléviseur
* Brancher d’abord le fil d’antenne et le cordon d’alimentation avec l’adaptateur.
* Presser la touche power. Une image stable et le son apparaissent en quelques secondes.
Presser la touche POWER pour mettre en circuit.
1
Figure seulement
si signal stéréo
Indicatif du canal
Figure seulement si
l’heure est réglée
Presser channel(
pour sélectionner un canal une fois les signaux de dif-
2
fusion mis en mémoire.
● Sélection directe
Presser les touches numériques ; un ou deux chiffres.
Ex. : canal 7 7 ou 07
● Consulter les pages 28 et 29 pour mettre les canaux en
mémoire.
) ou les touches numériques
55,∞∞
ST. 7
12:30 PM
BASE
BASE
FONCTIONS DE
FONCTIONS DE
Réglage du volume.
3
● Volume (33) amplifie le
niveau sonore.
● Volume (22) atténue le
niveau sonore.
Volume 3
19
Page 70

Fonction de vérification en mode TV
Presser MENU. Chaque fois que l’on presse cette touche un des menus ci-dessous
s’affiche.
1
Langage
Sous - Titres Arrêt
Sous - Titr / Tx CC1
Blocage TV
Use
55∞∞22 33
Pendule --:--AM
Heure Arrêt
Heure Marche
TV 3 Vol 30 Défile
Arrêt Auto : Pause
Use
55∞∞22 33
Français
Et ENTER
--:--AM
--:--AM
Et ENTER
Pause
Programme Auto
Programme Manuel
Synto
Use
Contraste 100
Brillance 60
Couleur 60
Teinte 0
Netteté 6
APC Clair
Use
MTS Stéréo
AVL Arrêt
DASP Personnal
Égalisateur
55∞∞22 33
55∞∞22 33
Et ENTER
Et ENTER
Presser channel (
2
20
) pour sélectionner la fonction désirée.
55,∞∞
Use
55∞∞22 33
Et ENTER
Page 71

Réglage de la langue
Langue
Langue
Français
Presser MENU pour sélectionner
l’affichage ci-dessous.
1
Langage
Sous - Titres Arrêt
Sous - Titr / Tx CC1
Blocage TV
Use
55∞∞22 33
Presser channel (
ner la langue désirée.
2
Langage
Sous - Titres Arrêt
Sous - Titr / Tx CC1
Blocage TV
Use
55∞∞22 33
Français
Et ENTER
55,∞∞
Français
Et ENTER
) pour sélection-
Presser ENTER.
3
BASE
FONCTIONS DE
● Chaque pression des touches volume
(
) modifie l’affichage comme suit :
22, 33
English
Español
Français
21
Page 72

Fonction sous-titres
La fonction de sous-titres est un procédé qui convertit la portion audio d’un programme télé en mots écrits qui
figurent à l’écran. Ils permettent au spectateur de lire les dialogues à l’écran.
Utilisation des sous-titres
Les sous-titres donnent les dialogues et les narrations des programmes télé. Pour les programmes préenregistrés, le dialogue peut
être arrangé à l’avance en sous-titres. Il est possible de faire des
sous-titres pour les programmes en direct en utilisant un processus
appelé sous-titres en temps réel, lequel créé des sous-titres instantanément. Ceci est habituellement fait par des professionnels qui
utilisent un système de sténographie et un ordinateur pour traduire
SUIVEZ-MOI
en anglais.
Les sous-titres sont un système efficace pour les malentendants et
peuvent aussi aider à apprendre une langue.
Conseils
• L’illustration à droite montre un sous-titres.
• Les programmes ne sont pas tous diffusés avec les signaux de sous-titres.
• Les stations télé diffusent parfois quatre signaux de sous-titres différents pour le même canal. En sélection-
nant CC1 à CC4, l’on peut choisir le signal désiré. CC1 est habituellement le signal doté de sous-titres, tan-
dis que autre mode peut donner une démonstration ou de l’information.
• Le téléviseur peut ne pas capter les signaux sous-titres dans les cas suivants.
Mauvaises conditions de réception rencontrées :
• ALLUMAGE :
L’image peut vaciller, avoir des points noirs ou des traits horizontaux. Habituellement causés par une
interférence des systèmes d’allumage des voitures, les éclairages au néon, des perceuses électriques et
autres appareils électriques.
• IMAGE-FANTÔME :
Elles sont créées lorsque le signal télé se sépare et suit deux chemins ; un étant un chemin direct et l’autre
est réfléchi sur les édifices élevés, les montagnes ou d’autres objets. Modifier la direction ou la position de
l’antenne peut améliorer la réception.
• NEIGE :
Si le récepteur est situé dans des endroits où le signal est faible, l’image peut présenter de petits points. Il
peut être nécessaire d’installer une antenne spéciale pour améliorer l’image.
Lecture d’une cassette usée, ou illégale.
Les signaux aléatoires et forts des voitures ou des avions peuvent causer une interférence avec le signal télé.
Le signal depuis l’antenne est faible.
Le programme n’est pas doté de sous-titres lorsqu’il a été produit, transmis ou enregistré.
22
Page 73

Fonctionnement des sous-titres
Fonctionnement des sous-titres
Français
Presser MENU pour sélectionner
l’affichage ci-dessous.
1
Langage
Sous - Titres Arrêt
Sous - Titr / Tx CC1
Blocage TV
Use
Presser channel (
sous-titres/texte.
2
Langage
Sous - Titres Arrêt
Sous - Titr / Tx CC1
Blocage TV
Use
55∞∞22 33
55∞∞22 33
Français
Et ENTER
55,∞∞
Français
Et ENTER
) pour sélectionner
● Chaque fois que l’on presse volume (
mode sous-titres s’affiche un à un.
Sous - Titr / Tx CC1
Sous - Titr / Tx CC2
Sous - Titr / Tx CC3
Sous - Titr / Tx CC4
Sous - Titr / Tx Texte1
Sous - Titr / Tx Texte2
Sous - Titr / Tx Texte3
22, 33
), le
BASE
FONCTIONS DE
Presser volume (33).
3
Langage
Sous - Titres Arrêt
Sous - Titr / Tx CC1
Blocage TV
Use
55∞∞22 33
Français
Et ENTER
Sous - Titr / Tx Texte4
Presser ENTER.
4
● Ce téléviseur est programmé pour garder en
mémoire le dernier mode réglé, même si
l’alimentation est mise hors circuit.
23
Page 74

Fonction sous-titres
Fonctionnement des sous-titres
Fonctionnement des sous-titres
Presser CC pour sélectionner soustitres.
1
Sous - Titres Arrêt
Use
Presser volume (
2
● Chaque pression de la touche volume (
● La fonction sous-titres est complétée.
Et ENTER
22 33
) pour sélectionner marche et presser ENTER.
22, 33
Arrêt Marche
) change l’affichage comme suit :
22, 33
EZ Sourdi
24
Page 75

Français
Utilisation de la fonction texte
Utilisation de la fonction texte
Les services de texte donnent une variété d’informations sur tous les sujets (ex. liste des programmes à sous-titres, bulletin météo, bourse, nouvelles, etc.) sur un demi-écran.
Toutes les stations peuvent ne pas offrir les services de texte, même si elles offrent les soustitres.
Répéter les étapes 1 et 2 données à la page 23.
1
Presser volume (
2
Presser ENTER.
3
22, 33
Langage
Sous - Titres Arrêt
Sous - Titr / Tx Texte1
Blocage TV
Use
55∞∞22 33
Français
Et ENTER
) pour sélectionner texte 1, 2, 3 ou 4.
BASE
FONCTIONS DE
● Dans les cas d’une faible réception du signal, une boîte vide peut figurer ou non, même si le mode texte est
sélectionné. Ceci est normal.
25
Page 76

Fonction de sélection-parent
Cette fonction (puce V) est utilisée pour verrouiller le visionnement de programme selon des cotes données
par les stations de diffusion. Le réglage par défaut est de permettre de visionner tous les programmes. Le
visionnement peut être verrouillé selon le type de programme et par les catégories. Il est aussi possible de
verrouiller tout programme pendant une certaine durée. Pour utiliser la sélection-parent, régler ce qui suit :
1. Cotes et catégories à verrouiller.
2. Nombre d’heures pour le verrouillage.
3. Réglage d’un mot de passe.
4. Activation du verrouillage.
Cotes et catégories de puce V
Les directives de cotes sont données par les stations de diffusion. La plupart des émissions télé et des films
peuvent être verrouillés par la cote et/ou catégorie individuelle. Les films qui ont été diffusés dans les
cinémas ou sur vidéocassette utilisent seulement le système de cote de film (MPAA).
Pour les films déjà diffusés au cinéma :
Cotes de films :
* Déblocage
* G et plus (général)
* PG et plus (surveillance d’un adulte suggérée)
* PG-13 et plus (13 ans et plus)
* R et plus (restreint)
* NC-17 et plus (18 ans et plus)
* X (Adulte)
Si l’on règle PG-13 et plus : les films G et PG seront disponibles ; PG-13, NC-17 et X seront verrouillés.
Pour les émissions télé incluant les films pour la télévision :
Cotes générales de télé :
* Déblocage
* TV-G et plus (général – catégorie individuelle ne s’appliquant pas)
* TV-PG et plus (surveillance d’un adulte suggérée)
* TV-14 et plus (14 ans et plus)
* TV-MA (adulte)
Cotes pour enfants :
* Déblocage
* TV-Y et plus (jeune – catégorie de contenu individuelle ne s’appliquant pas)
* TV-Y7 (jeune – 7 ans et plus)
Catégorie de contenu :
* Dialogue – dialogue sexuel (s’applique à TV-PG et plus, TV-14 et plus)
* Langage – langage adulte (s’applique à TV-PG et plus, TV-14 et plus, TV-MA)
* Sexé – situation sexuelle (s’applique à TV-PG et plus, TV-14 et plus, TV-MA)
* Violence (s’applique à TV-PG, TV-14 et TV-MA)
* Violence I. – violence fantaisiste (s’applique à TV-Y7)
* Sans Rating (verrouillage du visionnement)
26
Page 77

Réglage du verrouillage
Réglage du verrouillage
Français
Presser MENU pour sélectionner
l’affichage ci-dessous.
1
Langage
Sous - Titres Arrêt
Sous - Titr / Tx CC1
Blocage TV
Use
Presser channel (
sélection-parent.
2
Langage
Sous - Titres Arrêt
ous - Titr / Tx CC1
Blocage TV
Use
55∞∞22 33
55∞∞22 33
Français
Et ENTER
Français
Et ENTER
) pour choisir
55,∞∞
Presser channel (
ner le type de verrouillage à effectuer.
4
Presser volume (
ner le type de réglage à verrouiller.
● [MPAA], [Age] et/ou [Content block] peuvent être réglés.
Presser MENU pour revenir Age ou
content block.
Presser channel(
ner réglage heures.
5
Presser volume(
nombre d’heures pour le verrouillage
(jusqu’à 99).
Presser channel (
ner le mot de passe.
Entrer un code à 4 chiffres. Entrer de
nouveau.
● Un nouveau mot de passe peut être choisi
chaque fois qu’un verrouillage est réglé.
) pour sélection-
55,∞∞
) pour sélection-
22, 33
) pour sélection-
55,∞∞
) pour régler le
22, 33
) pour sélection-
55,∞∞
BASE
FONCTIONS DE
Presser volume (33).
3
Aux. Bloc
MPAA
Age Bloc
Content Bloc
Régl. Heures
Mot De Passe
Blocage M - A Régler Heures
Use
● Si la sélection-parent est déjà réglée, entr-
er le mot de passe lorsque demandé.
55∞∞22 33
Sources Déblocage
Déblocage
00 Heures
22 33
Régler
22 33
Et ENTER
Presser channel (
Blocage marche-arrêt.
6
Presser volume(
marche.
Presser MENU pour sauvegarder et
sortir.
) pour choisir
55,∞∞
) pour régler à
22, 33
27
Page 78

Programmation / suppression des canaux
Programmation automatique des canaux
Programmation automatique des canaux
*Cette fonction peut être actionnée seulement si l’appareil peut
recevoir les signaux d’entrée des stations de diffusion et que le fin
d’antenne est branché.
*Elle met en mémoire tous les canaux reçus depuis les signaux télé
terrestres ou les programmes de la télédistribution.
*Si les canaux de la télévision générale sans fil et la télédistribu-
tion sont dédoublés, presser les touches numériques 0 à 9 pour
changer à :
télé générale sans fil télédistribution
Presser MENU pour sélectionner l’affichage cidessous.
1
Programme Auto
Programme Manuel
Synto
Use
Presser volume (33).
2
Programme Auto TV7
Arrêt ENTER
Et ENTER
55∞∞22 33
3%
* Presser channel (
mémoire une fois la programmation automatique terminée.
* Si l’on presser ENTER pendant la programmation
automatique, la fonction s’arrête et seuls les canaux
programmés jusqu’à ce point sont mis en mémoire.
* Cette fonction met en mémoire seulement les canaux
qui sont reçus.
Le numéro du canal
balayé est affiché.
) pour vérifier les canaux mis en
55,∞∞
28
Page 79

Français
Right master page
Mise en mémoire/suppression du canal en cours
Mise en mémoire/suppression du canal en cours
*L’on peut choisir [Mémoire] ou [Efface] pour le canal en cours.
Presser MENU pour sélectionner
l’affichage ci-dessous. Puis presser
1
CHANNEL (
Programme Manuel.
Programme Auto
Programme Manuel
Programme Manuel
Synto
Use
55∞∞22 33
Presser volume (
) pour choisir
55,∞∞
Et ENTER
).
22, 33
2
Presser channel (
ner le canal désiré, puis presser vol-
3
ume (
Efface.
Programme Manuel
TV 7 Mémoire
Use
● Chaque pression de volume
sélectionner un autre choix.
Mémoire
) pour choisir Mémoire ou
22, 33
Et ENTER
55∞∞22 33
) pour sélection-
55,∞∞
Efface
(
22, 33
Efface
peut
)
BASE
FONCTIONS DE
Le canal en cours s’affiche.
Programme Manuel
TV 7 Mémoire
Use
55∞∞22 33
Et ENTER
Presser ENTER.
4
● Le canal en cours est Mémoire/Efface.
29
Page 80

Réglage de l’heure
* Si le réglage de l’heure est effacé par une panne de courant ou si l’appareil a été débranché, le régler de
nouveau.
Pour régler l’heure en cours à 10
Pour régler l’heure en cours à 10
Presser MENU pour sélectionner l’affichage cidessous.
1
Pendule --:--AM
Heure Arrêt
Heure Marche
Arrêt Auto : Pause
Use
Presser channel (
l’heure.
2
Pendule --:--AM
Heure Arrêt
Heure Marche
Arrêt Auto : Pause
TV 3 Vol 30 Défile
55∞∞22 33
TV 3 Vol 30 Défile
--:--AM
--:--AM
Et ENTER
55,∞∞
--:--AM
--:--AM
Pause
) pour sélectionner réglage de
Pause
h 30
h 30
Use
Presser volume (33).
3
Pendule 00:00AM
Heure Arrêt
Heure Marche
TV 3 Vol 30 Défile
Arrêt Auto : Pause
Use
30
55∞∞22 33
55∞∞22 33
Et ENTER
--:--AM
--:--AM
Et ENTER
Pause
Page 81

Français
Presser channel (
ner l’heure en cours.
4
● Si l’on maintient la touche 55, l’affichage des
heures passe en séquence AM 1 ➔ AM 2 ➔
....PM12 ➔ PM 1 .... ➔ AM 12, ou en
marche arrière avec la touche ∞∞.
● Sélectionner AM 10.
) pour sélection-
55,∞∞
Presser volume (33).
5
Pendule 10:00AM
Heure Arrêt
Heure Marche
TV 3 Vol 30 Défile
Arrêt Auto : Pause
Use
55∞∞22 33
Presser channel (
ner les minutes. Presser
6
● Si l’on maintient la touche 33, l’affichage des
heures passe en séquence ➔ 01 ➔ 02 ...58
➔ 59,ou en marche arrière avec la touche
.
33
● Sélectionner 30 et presser ENTER pour
compléter le réglage.
● L’heure s’enclenche depuis la pression de la
touche ENTER.
● Presser ENTER de nouveau et l’affichage
disparaît.
--:--AM
--:--AM
Et ENTER
55,∞∞
Pause
) pour sélection-
ENTER.
Pour vérifier le canal et l’heure en cours
et la position sonore (stéréo ou jumelée)
● Presser ENTER.
St.SAP 7
10:30AM
● Presser ENTER de nouveau pour enlever.
* L’heure en cours ne s’affiche pas si elle
n’est pas réglée.
* La sonorité stéréo ou jumelée s’affiche
seulement lorsque le signal d’entrée correspondant est reçu.
* Les affichages ci-dessus disparaissent
après quelques secondes.
Canal en cours
Position sonore
Heure en cours
PENDULE
RÉGLAGE DE LA
31
Page 82

Fonction réglage de la minuterie arrêt
*La fonction minuterie ne peut être actionnée que si l’heure a été réglée.
*La fonction minuterie arrêt est avant la fonction minuterie marche si elles sont réglées
ensemble.
Mise hors circuit à 1
Mise hors circuit à 1
1 h 30 PM par la fonction minuterie arrêt
1 h 30 PM par la fonction minuterie arrêt
Presser MENU pour que l’affichage ci-dessous figure.
1
Pendule 10:30AM
Heure Arrêt
Heure Marche
Arrêt Auto : Pause
Use
Presser channel (
arrêt.
2
Pendule 10:30AM
Heure Arrêt
Heure Arrêt Arrêt
Heure Marche
Arrêt Auto : Pause
TV 3 Vol 30 Défile
55∞∞22 33
TV 3 Vol 30 Défile
--:--AM
--:--AM
Et ENTER
55,∞∞
--:--AM
--:--AM
Pause
) pour sélectionner minuterie
Pause
Use
Presser volume (33).
3
Pendule 10:30AM
Heure Arrêt
Heure Arrêt Arrêt
Heure Marche
TV 3 Vol 30 Défile
Arrêt Auto : Pause
Use
32
55∞∞22 33
55∞∞22 33
Et ENTER
--:--AM
--:--AM
Et ENTER
Pause
Page 83

Français
Presser channel (
ner l’heure désirée.
4
● Si l’on maintient la touche 55, l’affichage
des heures passe en séquence AM 1 ➔
AM 2 ➔ ....PM12 ➔ PM 1 .... ➔ AM 12, ou
en marche arrière avec la touche ∞∞.
● Sélectionner PM 11.
) pour sélection-
55,∞∞
Presser volume (33).
5
Pendule 10:30AM
Heure Arrêt
Heure Arrêt Arrêt
Heure Marche
TV 3 Vol 30 Défile
Arrêt Auto : Pause
Use
55∞∞22 33
Presser channel (
ner les minutes.
11:00PM
--:--AM
Et ENTER
Pause
) pour sélection-
55,∞∞
6
● Si l’on maintient la touche 55, l’affichage
des heures passe en séquence 00 ➔ 01 ➔
02 ...58 ➔ 59, ou en marche arrière avec la
touche ∞∞.
● Sélectionner 30.
Presser volume (33) pour sélectionner
les Pause ou Défile.
7
Presser channel (
ner Défile.
8
Pendule 10:30AM
Heure Arrêt
Heure Arrêt Arrêt
Heure Marche
TV 3 Vol 30 Défile
Arrêt Auto : Pause
Use
55∞∞22 33
11:00PM
--:--AM
Et ENTER
) pour sélection-
55,∞∞
Pause
Presser touche ENTER .
● Chaque pression de la touche channel
9
(
) change l’affichage ci-dessous.
55,∞∞
Défile Pause
● L’affichage disparaît si l’on presse ENTER
une autre fois.
● L'affichage [Minuterie] apparaît à l'écran
pendant une minute jusqu'à ce que le
téléviseur se mette hors circuit automatiquement.
PENDULE
RÉGLAGE DE LA
* Lorsque [
55∞∞22 33
tiquement en mode veille s'il n'y a pas de signal
d'entrée pendant 10 minutes.
Arrêt Auto
et ENTER, le téléviseur passe automa-
] est réglé sur [Défile] avec
Pendule 10:30AM
Heure Arrêt
Heure Marche
TV 3 Vol 30 Défile
Arrêt Auto : Arrêt
Arrêt Auto : Pause
Use
55∞∞22 33
11:30PM
--:--AM
Et ENTER
Pause
33
Page 84

Réglage de la fonction minuterie marche
*La fonction minuterie ne peut être actionnée que si l’heure est réglée.
Mise en circuit à 7 h 10
Mise en circuit à 7 h 10
AM avec volume 40 au canal 8 par la fonction minuterie marche
AM avec volume 40 au canal 8 par la fonction minuterie marche
Presser MENU pour sélectionner
l’affichage ci-dessous.
1
Pendule 10:30AM
Heure Arrêt
Heure Marche
TV 3 Vol 30 Défile
Arrêt Auto : Pause
Use
55∞∞22 33
Presser channel (
ner minuterie marche.
2
Pendule 10:30AM
Heure Arrêt
Heure Marche
Heure Marche
TV 3 Vol 30 Défile
TV 3 Vol 30 Défile
Arrêt Auto : Pause
--:--AM
--:--AM
Et ENTER
55,∞∞
--:--AM
--:--AM
--:--AM
Pause
) pour sélection-
Pause
Presser channel (
ner l’heure désirée.
4
● Si l’on maintient la touche 55,l’affichage des
heures passe en séquence AM 1 ➔ AM 2
➔ ....PM12 ➔ PM 1 .... ➔ AM 12, ou en
marche arrière avec la touche ∞∞.
● Sélectionner AM 7.
) pour sélection-
55,∞∞
Presser volume (33).
5
Pendule 10:30AM
Heure Arrêt
Heure Marche
Heure Marche
TV 3 Vol 30 Défile
TV 3 Vol 30 Défile
Arrêt Auto : Pause
--:--AM
--:--AM
7:--AM
Pause
Use
Presser volume (33).
3
Pendule 10:30AM
Heure Arrêt
Heure Marche
Heure Marche
TV 3 Vol 30 Défile
TV 3 Vol 30 Défile
Arrêt Auto : Pause
Use
34
55∞∞22 33
55∞∞22 33
Et ENTER
--:--AM
--:--AM
--:--AM
Et ENTER
Pause
Use
Presser channel (
ner les minutes.
6
● Si l’on maintient la touche 55, l’affichage des
heures passe en séquence 00 ➔ 01 ➔ 02
...58 ➔ 59, ou en marche arrière avec la
touche ∞∞.
● Sélectionner 10.
55∞∞22 33
Et ENTER
55,∞∞
) pour sélection-
Page 85

Français
7
8
9
Presser volume (33).
Pendule 10:30AM
Heure Arrêt
Heure Marche
Heure Marche
TV 3 Vol 30 Défile
TV 3 Vol 30 Défile
Arrêt Auto : Pause
Use
55∞∞22 33
Presser channel (
--:--AM
--:--AM
7:10 AM
Et ENTER
55,∞∞
Pause
) pour
sélectionner le canal désiré.
Presser volume (33).
Pendule 10:30AM
Heure Arrêt
Heure Marche
Heure Marche
TV 3 Vol 30 Défile
TV 8 Vol 30 Défile
Arrêt Auto : Pause
--:--AM
--:--AM
7:10 AM
Pause
11
12
Presser volume (33).
Pendule 10:30AM
Heure Arrêt
Heure Marche
Heure Marche
TV 8 Vol 40 Défile
TV 3 Vol 30 Défile
Arrêt Auto : Pause
Use
55∞∞22 33
Presser channel (
sélectionner
ENTER.
● Chaque pression de la touche channel
change l’affichage ci-dessous.
Défile
● La fonction minuterie marche est
complétée.
● Si l’on presser ENTER une autre fois,
l’affichage disparaît et l’appareil mis en
circuit automatiquement au niveau
sonore 40 au canal 8 à 7 h 10 le matin.
--:--AM
--:--AM
7:10 AM
Et ENTER
Défile
Pause
Pause
) pour
55,∞∞
et presser
10
Use
Presser channel (
55∞∞22 33
Et ENTER
55,∞∞
) pour
sélectionner le volume désiré.
* Si la fonction minuterie marche est active, le canal en cours passe au canal réglé lorsque la
minuterie marche est activée.
* À moins qu’une touche ne soit pressée dans un délai de 2 heures après avoir actionné la fonc-
tion minuterie marche, l’appareil se met automatiquement hors circuit.
PENDULE
RÉGLAGE DE LA
35
Page 86

Réglage de la fonction minuterie
* Cette fonction met automatiquement l’appareil hors circuit après une durée réglée.
Presser SLEEP pour régler la fonction minuterie.
1
● Chaque pression de cette touche modifie la position, comme
ci-dessous.
Minuterie
Use
- - -
240
180
120 90
● Pour annuler la fonction, presser SLEEP de façon répétitive
pour sélectionner [
● L’affichage de la minuterie figure à l’écran pendant une
minute jusqu’à la mise hors circuit automatique.
22 33
- - -
Et ENTER
- - -
10
20
30
60
].
36
* Lorsque l’heure désirée figure à l’affichage, ne
pas presser la touche SLEEP. L’affichage disparaît et la minuterie est réglée.
* Pour vérifier le temps qui reste après le réglage,
presser SLEEP une seule fois.
* Pour changer le réglage, presser SLEEP de façon
répétitive pour sélectionner un autre réglage.
* Si l’on met l’appareil hors circuit après le réglage
de la minuterie, le réglage est effacé. Le régler
de nouveau.
Page 87

Français
Réglage de la position audio
Réglage de la position audio par l’utilisateur
Réglage de la position audio par l’utilisateur
Presser MENU pour que figure
l’affichage ci-dessous.
1
MTS Stréréo
AVL Arrêt
DASP Personnal
Éqalisateur
Use
Presser channel (
ner l’option audio que l’on désire
2
régler.
MTS :
● Se reporter page 42 pour plus de détails.
AVL (niveau de volume automatique) :
● Cette fonction maintient le volume au même
niveau même lorsque l'on change les canaux.
DASP (traitement du signal audio numérique) :
● Cette fonction permet à l'utilisateur d'ajuster
les caractéristiques audio dans chaque mode
(Cinéma, Musique ou Sports) exactement
comme il le désire.
Equalizaer (égaliseur):
● Cette fonction permet à l'utilisateur d'ef-
fectuer des réglages des bandes de
fréquences indiquées ci-dessous exactement
comme il le désire.
100Hz, 500Hz, 1.5kHz, 5kHz, 10kHz.
55∞∞22 33
Et ENTER
55,∞∞
) pour sélection-
Presser volume (
position audio.
3
MTS Stréréo
AVL Arrêt
DASP Personnal
Éqalisateur
Use
Presser ENTER.
4
55∞∞22 33
22, 33
Et ENTER
) pour régler la
AUDIO /
VIDÉO
37
Page 88

Réglage de la position audio
Sélection des signaux bilingues
Sélection des signaux bilingues
Affichage avec signal stéréo : Stéréo
Affichage avec signal bilingue : SAP
* Le signal bilingue (deux langues)
● Ce signal comprend un signal de langue seconde en plus de la langue primaire.
● Il y a les modes stéréo et langue primaire et seconde dans un signal bilingue.
● [MONO] : la langue primaire sort des haut-parleurs gauche et droit. Le mode est monophonique.
● [Stéréo] : la langue primaire sort des haut-parleurs gauche et droit. Le mode est stéréophonique.
● [SAP] : la langue seconde sort des haut-parleurs gauche et droit.
Presser MENU pour sélectionner
l’affichage ci-dessous.
1
MTS Stréréo
AVL Arrêt
DASP Personnal
Éqalisateur
Use
Presser channel (
ner MTS.
2
Et ENTER
55∞∞22 33
) pour sélection-
55,∞∞
* S’il y a des bruits bizarres lorsque l’on regarde un programme télé en mode stéréo dans une
région où le signal est faible ou s’il n’y a pas de service à signaux jumelés, s’assurer de
sélectionner le mode monophonique.
* Les modes stéréo ou mono peuvent être disponibles seulement lorsque le signal de diffusion
contient ces données.
Presser volume (
ner le mode audio désiré.
3
MTS Stréréo
AVL Arrêt
DASP Personnal
Éqalisateur
Use
● Chaque pression de cette touche modifie
l’affichage comme suit :
Mono
Presser ENTER.
55∞∞22 33
Et ENTER
4
) pour sélection-
22, 33
Stéréo
SAP
38
Page 89

INPUT
S-VIDEO
H/P
LVIDEOINA
(MONO)
COMPONENT INPUT(480i)
B
C
C
R
Sourdine
Sourdine
* Cette fonction coupe le son des haut-parleurs. Très pratique lorsque l’on
reçoit un appel téléphonique.
Presser MUTE.
1
Français
Sourdine
● Pour annuler la sourdine, presser MUTE ou volume (
● Si la sourdine est annulée, le niveau sonore est affiché à l’écran.
Utilisation d’un casque
Utilisation d’un casque
● Le casque est un accessoire optionnel.
●L’on peut régler le son du casque à l’aide des touches volume (
Avec le casque, le son des haut-parleurs est coupé.
22, 33
).
22, 33
).
AUDIO /
VIDÉO
39
Page 90

Réglage de la position vidéo
APC (contrôle automatique d’image)
APC (contrôle automatique d’image)
Presser MENU pour sélectionner l’affichage cidessous.
1
Contraste 100
Brillance 60
Couleur 60
Teinte 0
Netteté 6
APC Clair
Use
Presser channel (
2
Contraste 100
Brillance 60
Couleur 60
Teinte 0
Netteté 6
APC Clair
Use
● Chaque pression de la touche volume
l’affiche comme suit :
Et ENTER
55∞∞22 33
) pour sélectionner APC.
55,∞∞
Et ENTER
55∞∞22 33
(
)
22, 33
Clair Optimum
Personnal Doux
modifie
Presser ENTER.
3
40
Page 91

Contrôle manuel de l’image
Contrôle manuel de l’image
Français
Presser MENU pour sélectionner
l’affichage ci-dessous.
1
Contraste 100
Brillance 60
Couleur 60
Teinte 0
Netteté 6
APC Clair
Use
Presser channel (
ner l’option image désirée.
2
Contraste :
● Ajuste la différence entre les niveaux
clair et foncé de l'image.
Brillance :
● Ajuste la blancheur ou la luminosité de
l'ensemble de l'image
Couleur:
● Ajuste la richesse de toutes les couleurs.
Teinte:
● Ajuste l'équilibre entre les niveaux de
rouge et de vert.
Netteté:
● Ajuste les niveaux de précision des bords
entre les zones claires et foncées de l'image.
Plus le niveau est bas, plus l'image est douce.
55∞∞22 33
Et ENTER
) pour sélection-
55,∞∞
Presser volume (
l’image désirée.
3
Contraste 100
Brillance 60
Couleur 60
Teinte 0
Netteté 6
APC Clair
Use
● Le contraste, la brillance et la couleur sont
réglés de 0 à 100.
● La teinte est réglée de rouge 50 à vert 50.
● La netteté est réglée de 0 à 10.
55∞∞22 33
Et ENTER
) pour régler
22, 33
Presser ENTER.
4
* Le réglage APC est annulé si
l’on utilise cette fonction.
Synto :
● Cette fonction sert à ajuster l'image en
condition stable lorsqu'elle est de mauvaise
qualité, rayure horizontale, image déformée
ou absence de couleur pendant l'émission,
par exemple.
Programme Auto
Programme Manuel
Synto
Synto
Use
55∞∞22 33
Et ENTER
41
AUDIO /
VIDÉO
Page 92

Données techniques du produit
Modèle : LC1510
Pièce principale : Dimension horizontale : 394 mm
Hauteur : 384 mm
Épaisseur : 105,5 mm
Poids : 5,5 Kg
Incluant support : Dimension horizontale : 394 mm
Hauteur : 413 mm
Épaisseur : 194
Poids : 7,9 Kg
Exigence électrique : C.C. 12V/ 3.5A
* ATTENTION : Pour usage exclusif avec adaptateur, modèle SAD6012SE C.A., fariqué
par SERONICS CO., LTD.
Système de télévision : NTSC
Canaux télé : VHF 2 à 13 ; UHF 14 à 69
:Télédistribution 01 à 125
Tube-image : Panneau LCD
Consommation : Voir le dos de l’appareil
Impédance d’antenne externe : 75 ohms
Sortie audio : 1,0W + 1,0W
Sortie des haut-parleurs : 8 ohms x 2
Ports d’entrée externes : Port entrée VIDÉO 1
Entrée S-VIDÉO 1
Prise casque 1
Entrée PC/DTV 1
Entrée vidéo composant 1
Entrée alimentation 1
Entrée antenne 1
Adaptateur (alimentation c.c.) : Entrée : c.a. 100 à 240 V – 1,5 A-0,6A
50/60 hertz, 115~180VA
Sortie : c.c. 12V, 5A
* ATTENTION : Pour usage exclusif avec adaptateur, modèle SAD6012SE C.A., fariqué
par SERONICS CO., LTD.
Cordon d’alimentation : Standard en Amérique du Nord avec mise à la terre à 3
fil, cordon flexible de type SJT ou supérieur
42
* A TTENTION : Si le remplacement est nécessaire, remplacer par un modèle semblable.
Communiquer avec un centre de service MARANTZ autorisé.
Page 93

R
Model LC1510 User Guide
LCD TV/Monitor
Page 94

Page 95

CONTENIDO
ÍNDICE
Español
1
Controles 2
Composición básica del TV LCD 6
Conectando la antena 9
2
Conectando equipo externos 10
Conectando el reproductor de DVD 12
Conectando el DTV 13
Conectando una PC como monitor 14
3
Verificando funciones en el modo PC 16
INTRODUCTION
INTRODUCCIÓN
CONEXIÓN
CONNECTIONPC
PC
Antes de operar la
unidad, por favor lea
este manual cuidadosamente.
Usando el control remoto 17
4
Encendido de la unidad 19
Verificando las funciones en modo TV 20
Fijando del lenguaje 21
Función "closed caption" 22
Función de control de lo que ven los niños 26
Programando / Borrando canales 28
5
Fijando la hora actual 30
Fijando el apagado del temporizador 32
Fijando la función deencendido del temporizador 34
Programación de la función del cronómetro para dormir36
Ajustando la condición de audio 37
6
Ajustando la condición de video 40
CONEXIÓN
CONNECTION
BASIC
BÁSICAS
FUNCTIONS
FUNCIONES
CLOCK
AJUSTE
SETTING
DEL RELOJ
AUDIO /
AUDIO /
VIDEO
VIDEO
Especcificaciones del producto 42
7
INFORMATION
INFORMACIÓN
1
Page 96

Controles
Parte frontal de la unidad
Parte frontal de la unidad
Indicador de encendido (On/Standby)
Botón de alimentación (Power)
Sensor del control remoto
* Retire el revestimiento de vinyl de protección contra manchas antes de usar la unidad.
Parte posterior de la unidad
Parte posterior de la unidad
2
Page 97

Panel de control frontal
Panel de control frontal
Español
Indicador de
encendido (On/Stand-by)
Botón Menú
Botón TV/Video
Sensor del control remoto
Puertos de conexión
Puertos de conexión
Botón Enter
Botones de volúmen
Botones de Canales
Botón de encendido
INTRODUCCIÓN
/Apagado (Power)
DC 12V
Entrada de alimentación
Entrada de la antena Entrada de componentes
ANT IN
+75 Ω
PC/DTV INPUT
Entrada PC / DTV
COMPONENT INPUT(480i)
C
R
C
B
Entrada de
audífonos
H/P
S-VIDEO
Entrada S-Video
(MONO)
Entrada de
audio/video
RLVIDEOINAUDIO
3
Page 98

Controles
Control Remoto
Control Remoto
BOTÓN DE ENCENDIDO/APAGADO
BOTONES ENUMERADOS
BOTÓN APC
BOTÓN DEL MENU
BOTONES DE CANALES(
BOTÓN TV/PC
● * Presione el botón FLASHBK para ver
el último programa que haya estado
viendo.
55,∞∞
)
4
Page 99

Español
BOTÓN TV/VIDEO
BOTÓN TV/VIDEO
en el Control Remoto
en el Control Remoto
INTRODUCCIÓN
BOTÓN TV/VIDEO
BOTÓN CAPTION
BOTÓN MUTE
BOTÓN ENTER
BOTONES (
) DE VOLUMEN
22, 33
BOTÓN SLEEP
PÁGINA14~15
PÁGINA 24
PÁGINA 39
PÁGINA 36
* Cada vez que presione este botón cambia
el modo como se muestra abajo.
TV programs
/ Cable TV
DVD
* VIDEO, S-VHS, DVD: Seleccione cada modo
para ver el equipo externo correspondiente.
BOTÓN TV/VIDEO
BOTÓN TV/VIDEO
en el panel delantero
en el panel delantero
* Cada vez que presione este botón cambia
el modo como se muestra abajo.
VIDEO
S-VHS
TV programs
/ Cable TV
PC
* VIDEO, S-VHS, DVD, PC: Seleccione cada
modo para ver el equipo externo correspondiente.
DVD
VIDEO
S-VIDEO
5
Page 100

Composición básica del TV LCD
1.5V
1.5V
Accesorios
Accesorios
Orificio
Soporte para mesa Adaptador AC Control Remoto
RC1500LC
Baterías
6
Cordón eléctrico
Tarjeta de garantía
(Para EE.UU.)
Manual de UsuarioCable de señal para PC
Tarjeta de garantía
(Para Canadá)
 Loading...