

Page 1
Model CDR510 User Guide
R
e
®
CD Recorder/CD Player
CLASS 1 LASER PRODUCT
LOUKAN 1 LASERLAITE
KLASS 1 LASERAPPARAT
ecordabl
Page 2

Warnings and Cautions
CAUTION: TO REDUCE THE RISK OF ELECTRIC SHOCK,
DO NOT REMOVE COVER (OR BACK)
NO USER-SERVICEABLE PARTS INSIDE
REFER SERVICING TO QUALIFIED SERVICE PERSONNEL
CAUTION
RISK OF ELECTRIC SHOCK
DO NOT OPEN
The lightning flash with arrowhead symbol, within
an equilateral triangle, is intended to alert the user
to the presence of uninsulated "dangerous voltage"
within the product's enclosure that may be of
sufficient magnitude to constitute a risk of electric
shock to persons.
The exclamation point within an equilateral triangle
is intended to alert the user to the presence of
important operating and maintenance (servicing)
instructions in the literature accompanying the
appliance.
WARNING
TO REDUCE THE RISK OF FIRE OR ELECTRIC SHOCK,
DO NOT EXPOSE THIS APPLIANCE TO RAIN OR MOISTURE.
LASER SAFETY
This unit employs lasers. Only a qualified service person
should remove the cover or attempt to service this device, due
to possible eye injury.
CAUTION
USE OF CONTROLS OR ADJUSTMENTS
OR PERFORMANCE OF PROCEDURE
OTHER THAN THOSE SPECIFIED HEREIN
MAY RESULT IN HAZARDOUS RADIATION
EXPOSURE.
- 2 -
Page 3
GROUND
CLAMP
ELECTRIC
SERVICE
EQUIPMENT
GROUND CLAMPS
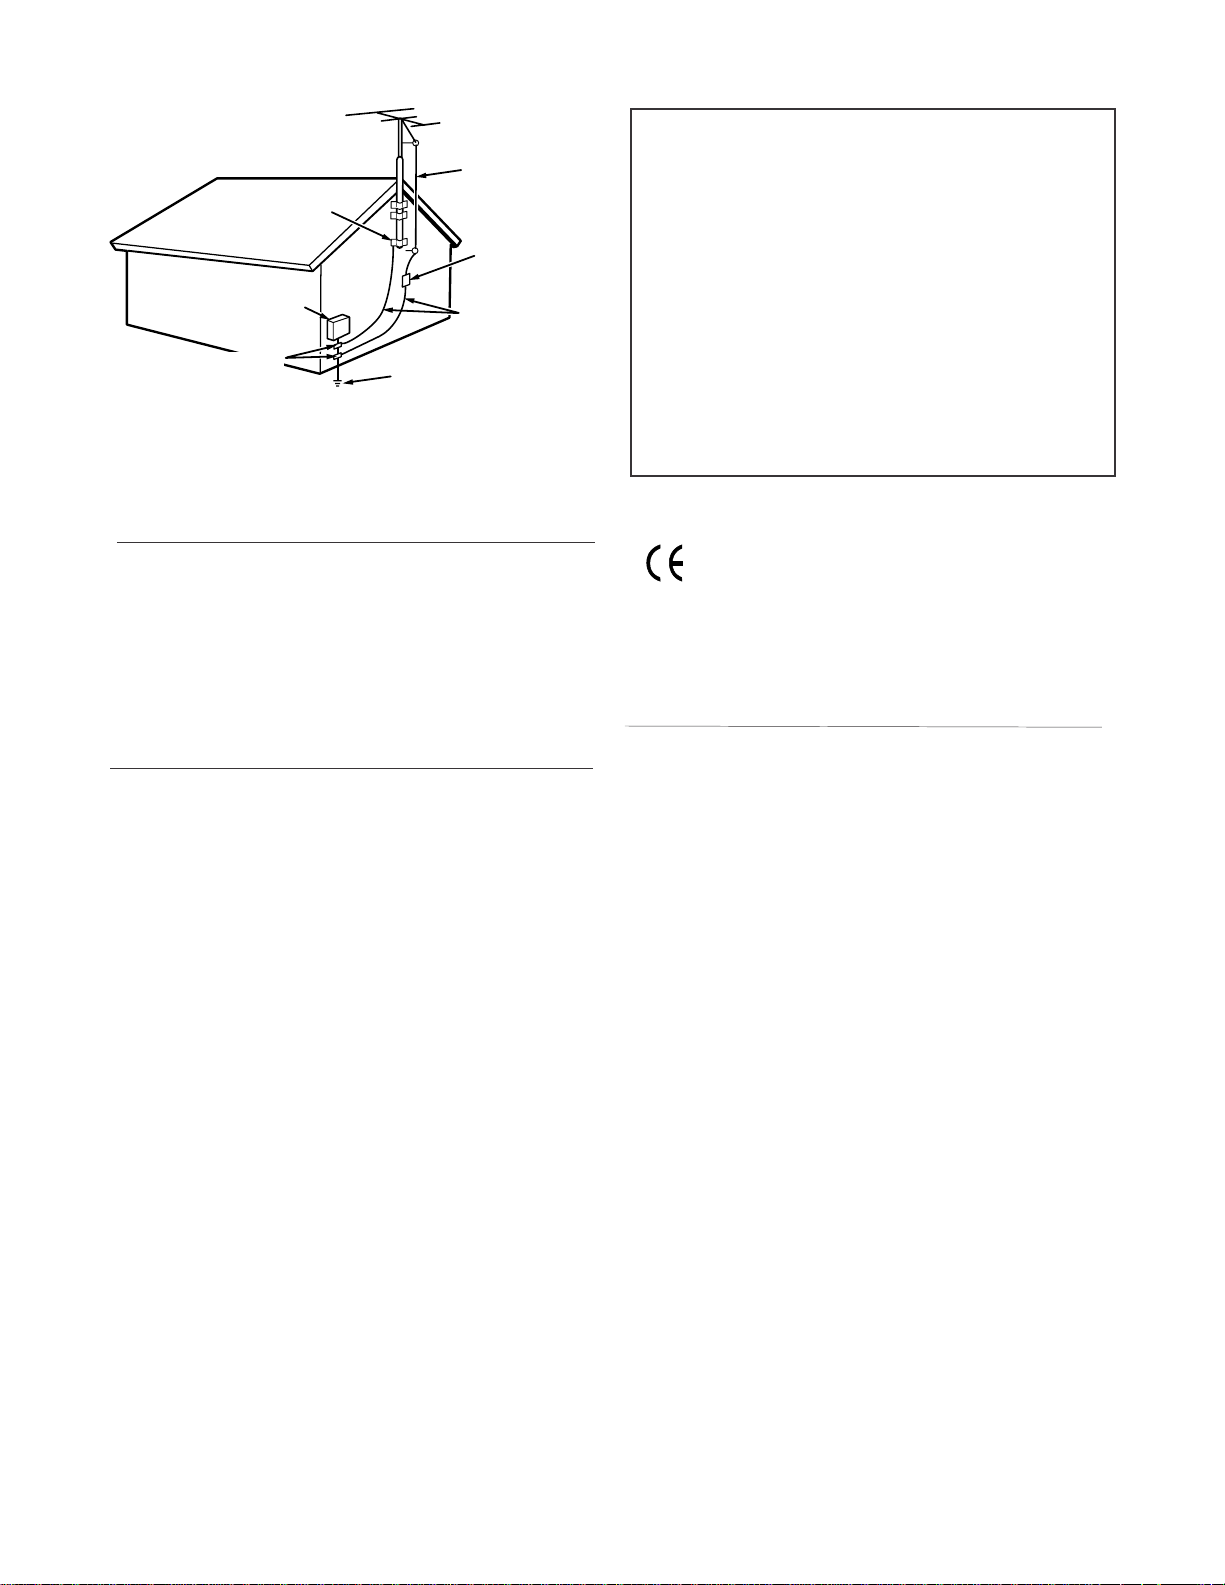
FIGURE 1
EXAMPLE OF ANTENNA GROUNDING AS PER
NATIONAL ELECTRICAL CODE, ANSI/NFPA 70
NEC - NATIONAL ELECTRICAL CODE
POWER SERVICE
GROUNDING
ELECTRODE SYSTEM
(NEC ART 250, PART H)
ANTENNA
LEAD IN
WIRE
ANTENNA
DISCHARGE
UNIT
(NEC SECTION
810-20)
GROUNDING
CONDUCTORS
(NEC SECTION
810-21)
WARNINGS
Do not expose the equipment to rain or moisture.
Do not remove the cover from the equipment.
Do not insert anything into the equipment through
the ventilation holes.
Do not handle the mains lead with wet hands.
Do not cover the ventilation with any items such
as tablecloths, newspapers, curtains, etc.
No open flame sources, such as lighted candles,
should be placed on the equipment.
When disposing of used batteries, please comply
with governmental regulations or environmental
public instruction's rules that apply in your country
or area.
CE marking (only EU version)
NOTE TO CATV SYSTEM INSTALLER:
This reminder is provided to call the CATV (CableTV) system installer's attention to Article 820-40 of
the NEC, which provides guidelines for proper grounding and, in particular, specifies that the cable ground
shall be connected to the grounding system of the
building, as close to the point of cable entry as
practical.
NOTE:
This equipment has been tested and found to comply
with the limits for a Class B digital device, pursuant to
Part 15 of the FCC Rules. These limits are designed
to provide reasonable protection against harmful interference in a residential installation. This equipment
generates, uses and can radiate radio frequency energy and, if not installed and used in accordance with
the instructions, may cause harmful interference to
radio communications. However, there is no guarantee that interference will not occur in a particular
installation. If this equipment does cause harmful
interference to radio or television reception, which can
be determined by turning the equipment off and on,
the user is encouraged to try to correct the interference by one or more of the following measures:
• Re-orient or relocate the receiving antenna.
• Increase the separation between the equipment
and receiver.
• Connect the equipment into an outlet on a circuit
different from that to which the receiver is connected.
• Consult the dealer or an experienced radio/TV
technician for help.
This product is in conformity with the EMC
directive and low-voltage directive.
Equipment mains working system
This product complies with household power and
safety requirements in your area. CDR510 can be
powered by 120 V AC only.
This Class B digital apparatus complies
with Canadian ICES-003.
Cet appareil numérique de la Classe B est
conforme á la norme NMB-003 du Canada.
Copyright
Recording and play back of any material may
require consent. For further information refer to
the following US ordinances:
• Copyright act of 1956
• Dramatic and Musical Performance Act 1958
• Performers Protection Acts 1963 and 1972
• any subsequent statutory enactments and
orders
NOTE: Changes or modifications may cause this
unit to fail to comply with Part 15 of the FCC Rules
and may void the user's authority to operate the
equipment.
- 3 -
Page 4
Precautions - installation
• Do not expose the CDR510 to excessive heat,
excessive cold, rain, moisture, or dust this may
cause damage to the unit.
• If a foreign object or water does enter the unit,
contact your nearest dealer or service center.
• All players produce some heat during operation and
this heat must be allowed to dissipate freely. Do not
close any ventilation openings and be sure there is
adequate ventilation space behind, beside and
above the player so air is allowed to circulate freely
around the unit.
• Be sure ventilation holes are not covered.
• Prevent extra heat from reaching the unit. Never put
the CDR510 in direct sunlight or near a heat
source.
• Do not expose the CDR510 to electrostatic dis-
CE marking
English
This product is in conformity with the EMC directive and low-voltage directive.
Français
Cet appareil est cnforme á la directive EMC et á la de directive sur les basses tensions.
charges.
• Do not place heavy objects on the unit.
• Be sure the CDR510 is placed on a vibration-free
surface.
Precautions - connection
• Unplug the power cord from the AC outlet or turn off
the POWER switch before making any connection.
• Connect one cable at a time observing the 'input'
and 'output' labeling. This will avoid any cross
connections between channels and signal inputs
and outputs.
• Insert plugs securely. An incomplete connection
may result in noise.
• Before connecting other audio or video equipment
to the CDR510, please read their owner's manuals.
Deutsch
Dieses Greät entspricht den EMC-Richtlinien und den Richtlinien für Niederspannungsgeräte.
Nederlands
Dit apparaat voldoet aan de EMC-richtlijnene en de richtlijnen vooor apparatuur met laag voltage.
Italiano
Quest' unitá è conforme alle diretive EMC ed alla direttiva sulle basse tensioni.
Português
Esta unidade está em conformidade com as directivas EMC e as directivas de baixa voltagem.
Español
Esta unidad estáde acuerdo con las normas EMC y las relacionadas con baja tensión.
SI DICHIARA CHE L'APPARECCHIO SINTO-AMPLIFACATORE SR-39 RISPONDE ALLE PRESCRIZIONI DELL'ART.
2 COMMA 1 DEL D.M. 28 AGOSTO 1995 N° 548.
FATTO A EINDHOVEN, IL 1/1/1997.
"Este aparato lleva elementos antiparasitarios necesarios para cumplir con ls limites que se estableren en el Anexo
V del Reglamento sobre Pertubaciones Radioelectricas e Interferencias aprobado en el Real Decreto 138/1989.
(B.O.E. de 9 Febrero 1989)."
WARNINGS FOR LASER RADIATION
CAUTION: INVISIBLE LASER RADIATION WHEN OPEN, DO NOT STARE INTO BEAM.
DANGER: INVISIBLE LASER RADIATION WHEN OPENT, AVOID DIRECT EXPOSURE TO BEAM.
VAROI: AVATTAESSA JA SUOJALUKITUS OHITETTAESSA OLET ALTTINANAYMÄTTÖMÄALLE
LASERSÄTEILYLLE. ÄLÄ KATSO SÄTEESEEN.
VARNING! OSYNLIGH LASERSTÄLNING NÄR DENNA DEL ÄR ÖPPNAD OCH SPÄRREN ÄR URKOPPLAD.
BETRAKTA EJ STRALEN.
MARANTZ EUROPE B.V.
5600 EINDHOVEN
THE NETHERLANDS
- 4 -
Page 5

Important Safety Instructions
READ BEFORE OPERATING EQUIPMENT
This product was designed and manufactured to meet strict quality
and safety standards. There are, however, some installation and
operation precautions which you should be particularly aware of.
1. Read Instructions – All the safety and operating instructions
should be read before the product is operated.
2. Retain Instructions – The safety and operating instructions
should be retained for future reference.
3. Heed Warnings – All warnings on the product and in the
operating instructions should be adhered to.
4. Follow Instructions – All operating and use instructions should
be followed.
5. Cleaning – Unplug this product from the wall outlet before
cleaning. Do not use liquid or aerosol cleaners. Use a damp
cloth for cleaning.
6. Attachments – Do not use attachments not recommended by
the product manufacturer as they may cause hazards.
7. Water and Moisture – Do not use this product near water–for
example, near a bath tub, wash bowl, kitchen sink, laundry tub,
swimming pool, in a wet basement, and the like.
8. Accessories – Do not place this product on an unstable cart,
stand, tripod, bracket, or table. The product may fall, causing
serious injury to a child or adult, and serious damage to the
product. Use only with a cart, stand, tripod, bracket or table
recommended by the manufacturer, or sold with the product.
Any mounting of the product should follow the manufacturer's
instructions, and should use a mounting accessory
recommended by the manufacturer.
9. A product and cart combination
should be moved with care. Quick
stops, excessive force, and
uneven surfaces may cause the
product and cart combination to
overturn.
10. Ventilation – Slots and openings in
the cabinet are provided for
ventilation and to ensure reliable
operation of the product and to
protect it from overheating. These
openings must not be blocked or covered. The openings should
never be blocked by placing the product on a bed, sofa, rug, or
other similar surface. This product should not be placed in a
built-in installation such as a bookcase or rack unless proper
ventilation is provided or the manufacturer's instructions have
been adhered to.
11. Power Sources – This product should be operated only from the
type of power source indicated on the marking label. If you are
not sure of the type of power supply to your home, consult your
product dealer or local power company. For products intended
to operate from battery power or other sources, refer to the
operating instructions.
12. Power Cord Protection – Power supply cords should be routed
so that they are not likely to be walked on or pinched by items
placed upon or against them, paying particular attention to
cords at plugs, convenience receptacles, and the point where
they exit from the product.
13. Grounding or Polarization –
This product may be equipped
with a grounded polarized
alternating-current line plug (a
plug having one blade wider
than the other and a ground
prong). This plug will fit into the
power outlet only one way.
This is a safety feature. If you
are unable to insert the plug
fully into the outlet,contact
your electrician to replace your obsolete outlet. Do not defeat
the safety purpose of the polarized plug.
14. Protective Attachment Plug – The product is equipped with an
attachment plug having overload protection. This is a safety
feature. See Instruction Manual for replacement or resetting of
protective device. If replacement of the plug is required, be sure
the service technician has used a replacement plug specified
by the manufacturer that has the same overload protection as
the original plug.
15. Outdoor Antenna Grounding – If an outside antenna or cable
system is connected to the product, be sure the antenna or
cable system is grounded so as to provide some protection
against voltage surges and built-up static charges. Article 810
of the National Electrical Code, ANSI/NFPA 70, provides
information with regard to proper grounding of the mast and
supporting structure, grounding of the lead-in wire to an
antenna discharge unit, size of grounding conductors, location
of antenna-discharge unit, connection to grounding electrodes,
and requirements for the grounding electrode. See Figure 1.
16. Lightning – Lightning – Unplug the unit from the wall outlet and
disconnect the antenna or cable system for added protection
during a lightning storm or when it is left unattended and
unused for long periods of time. This will prevent damage to the
product due to lightning and power line surges.
17. Power Lines – An outside antenna system should not be
located in the vicinity of overhead power lines or other electric
light or power circuits, or where it can fall into such power lines
or circuits. When installing an outside antenna system, extreme
care should be taken to keep from touching such power lines or
circuits as contact with them might be fatal.
18. Overloading – Do not overload wall outlets, extension cords, or
integral convenience receptacles as this can result in a risk of
fire or electric shock.
19. Object and Liquid Entry – Never push objects of any kind into
this product through openings as they may touch dangerous
voltage points or short-out parts that could result in a fire or
electric shock. Never spill liquid of any kind on the product.
20. Servicing – Do not attempt to service this product yourself as
opening or removing covers may expose you to dangerous
voltage or other hazards. Refer all servicing to qualified service
personnel.
21. Damage Requiring Service – Unplug this product from the wall
outlet and refer servicing to qualified service personnel under
the following conditions:
a. When the power supply cord or plug is damaged.
b. If liquid has been spilled, or objects have fallen into the product.
c. If the product has been exposed to rain or water.
d. If the product does not operate normally by following the
operating instructions. Adjust only those controls that are
covered by the operating instructions, as an improper
adjustment of other controls may result in damage and will often
require extensive work by a qualified technician to restore the
product to its normal operation.
e. If the product has been dropped or damaged in any way, and
f. When the product exhibits a distinct change in performance –
this indicates a need for service.
22. Replacement Parts – When replacement parts are required, be
sure the service technician has used replacement parts
specified by the manufacturer or have the same characteristics
as the original part. Unauthorized substitutions may result in
fire, electric shock, or other hazards.
23. Safety Check – Upon completion of any service or repairs to
this product, ask the service technician to perform safety
checks to determine that the product is in proper operating
condition.
24. Wall or Ceiling Mounting – The product should be mounted to a
wall or ceiling only as recommended by the manufacturer.
25. Heat – The product should be situated away from heat sources
such as radiators, heat registers, stoves, or other products
(including amplifiers) that produce heat.
- 5 -
Page 6

Table of Contents
Topic page
Warnings and Cautions ........................................2
Important Safety Instructions ................................ 5
Table of Contents .................................................6
Introduction ..........................................................7
Features ...............................................................8
Package contents .................................................9
Remote batteries ..................................................9
Connections (basic) .............................................. 9
How to Play back................................................ 10
Play back features ....................................... 11
How to Record.................................................... 12
To record from the CD drive .........................12
To record from an external source ...............13
Notes regarding recording ...........................14
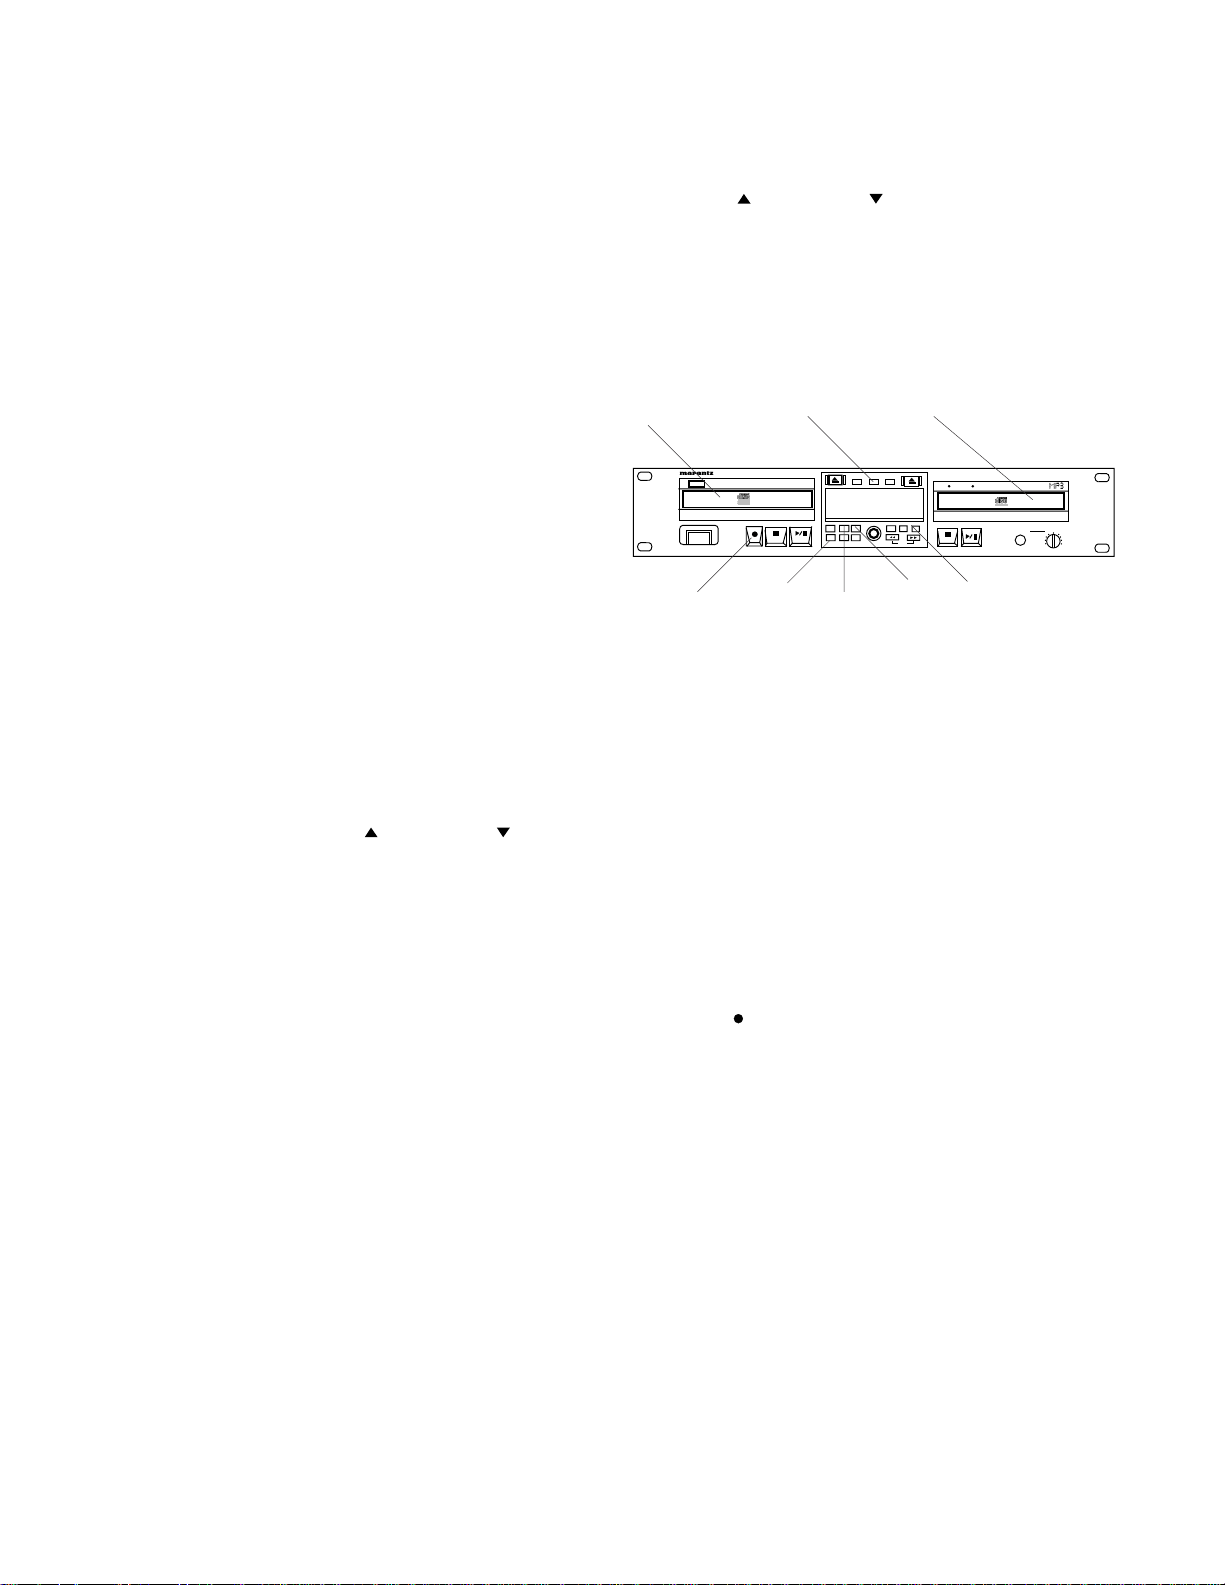
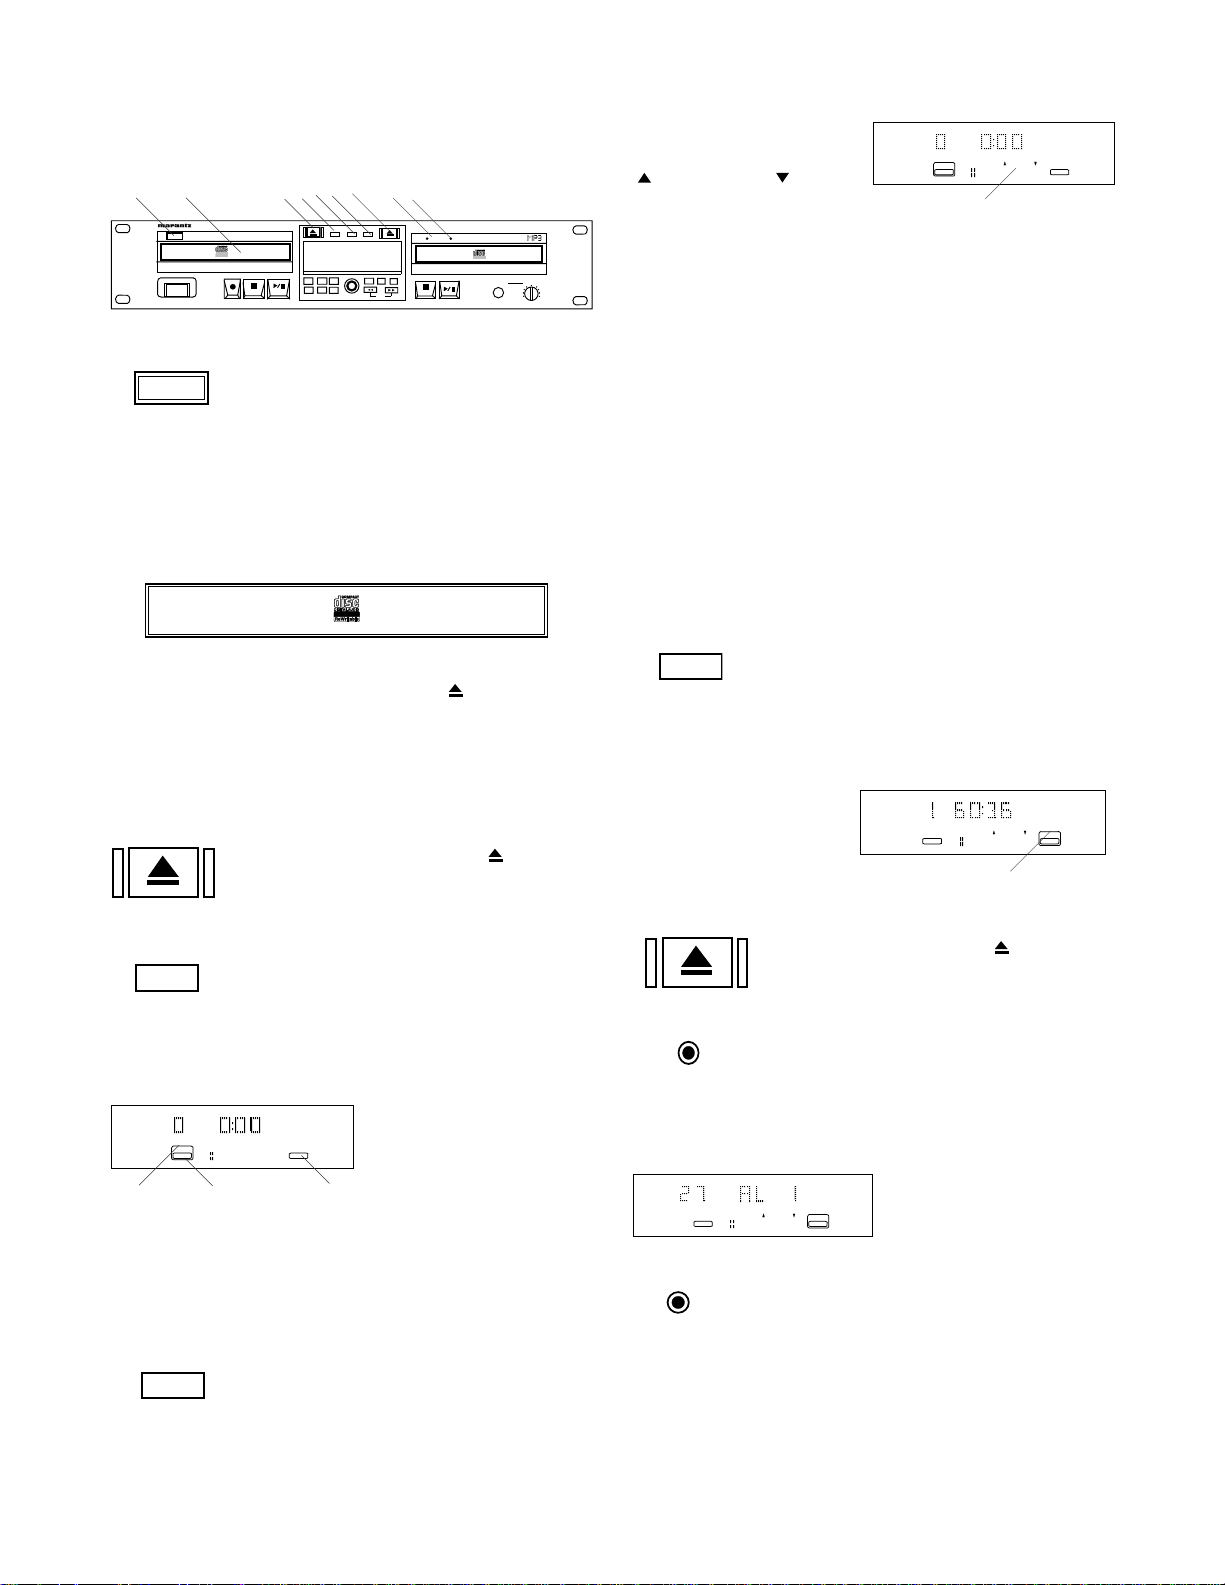
Controls and Displays front
1 IR (remote control sensor) ..........................15
2 CDR drive (disc tray) ..................................15
3 CDR open button ...................................15
4 CDR button ................................................ 15
5 PLAY MODE button....................................15
6 CD button ...................................................15
7 CD open button .....................................15
8 MP3 indicator .............................................15
9 PITCH indicator ..........................................15
10 CD drive ..................................................... 16
11 POWER button ........................................... 16
12 Record button ........................................ 16
ONE TOUCH RECORD ..................................... 16
13 Stop button ............................................16
14 Play/Pause button ...............................16
15 ERASE button ............................................ 16
16 REC MODE button .....................................16
17 MENU/STORE button ............................... 16
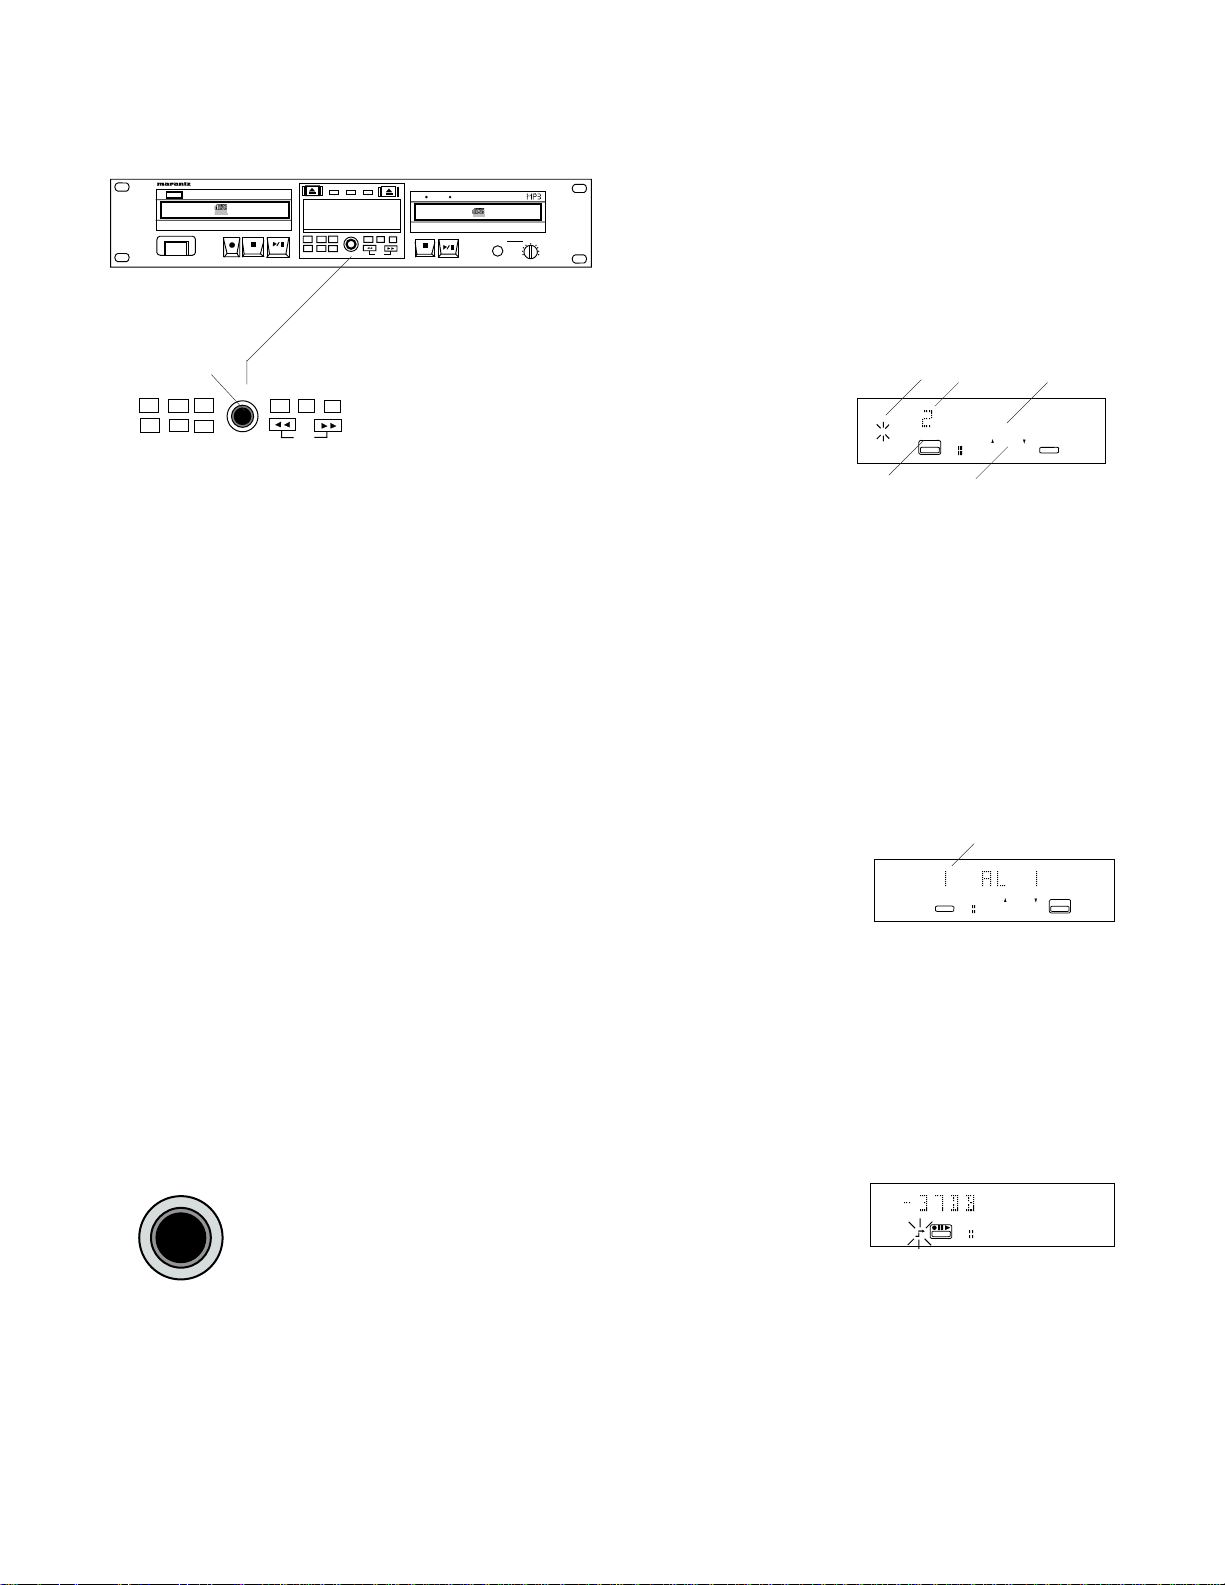
18 REC LEVEL/SELECT control .....................17
19 TIME button ................................................18
20 TEXT button ...............................................18
21 PROG button .............................................. 18
22 FINAL button ..............................................18
23 INPUT button ..............................................18
24 CANCL/DELETE button ............................. 19
25 Reverse button ....................................19
26 Forward button ....................................19
27 Stop button ............................................19
28 Play/Pause button ...............................19
29 HEADPHONE jack ..................................... 19
30 LEVEL control ............................................ 19
Display ...............................................................20
1 Alphanumeric display ................................. 20
2 REM label ...................................................20
3 REC label ...................................................20
4 TIME label ..................................................20
5 TRACK label .............................................. 20
6 TOTAL label ................................................20
7 REM label ...................................................20
8 TRACK label .............................................. 20
9 TIME label ..................................................20
10 STEP label ................................................. 20
11 PROGRAM label ........................................ 20
Topic page
12 RANDOM label ........................................... 20
13 REPEAT label.............................................20
14 ALL label .................................................... 20
15 TRACK label .............................................. 20
16 SCAN label ................................................. 20
17 DIGI label ...................................................21
18 SYNC label ................................................. 21
19 MANUAL label ............................................21
20 ANALOG label ............................................21
21 OPTI label .................................................. 21
22 Large CDR box ..........................................21
23 Small CDR box ........................................... 21
24 Recording icon .......................................21
25 Pause icon .............................................21
26 Play icon
27 CD-RW label ..............................................21
28 Track numbers ...........................................21
29
30 Level meter ................................................ 22
31 CHANGER mode indicator .................22
32 Large CD box ............................................. 22
33 Small CD box .............................................22
34 Pause icon .............................................22
35 Play icon ................................................22
36 CD-RW label ..............................................22
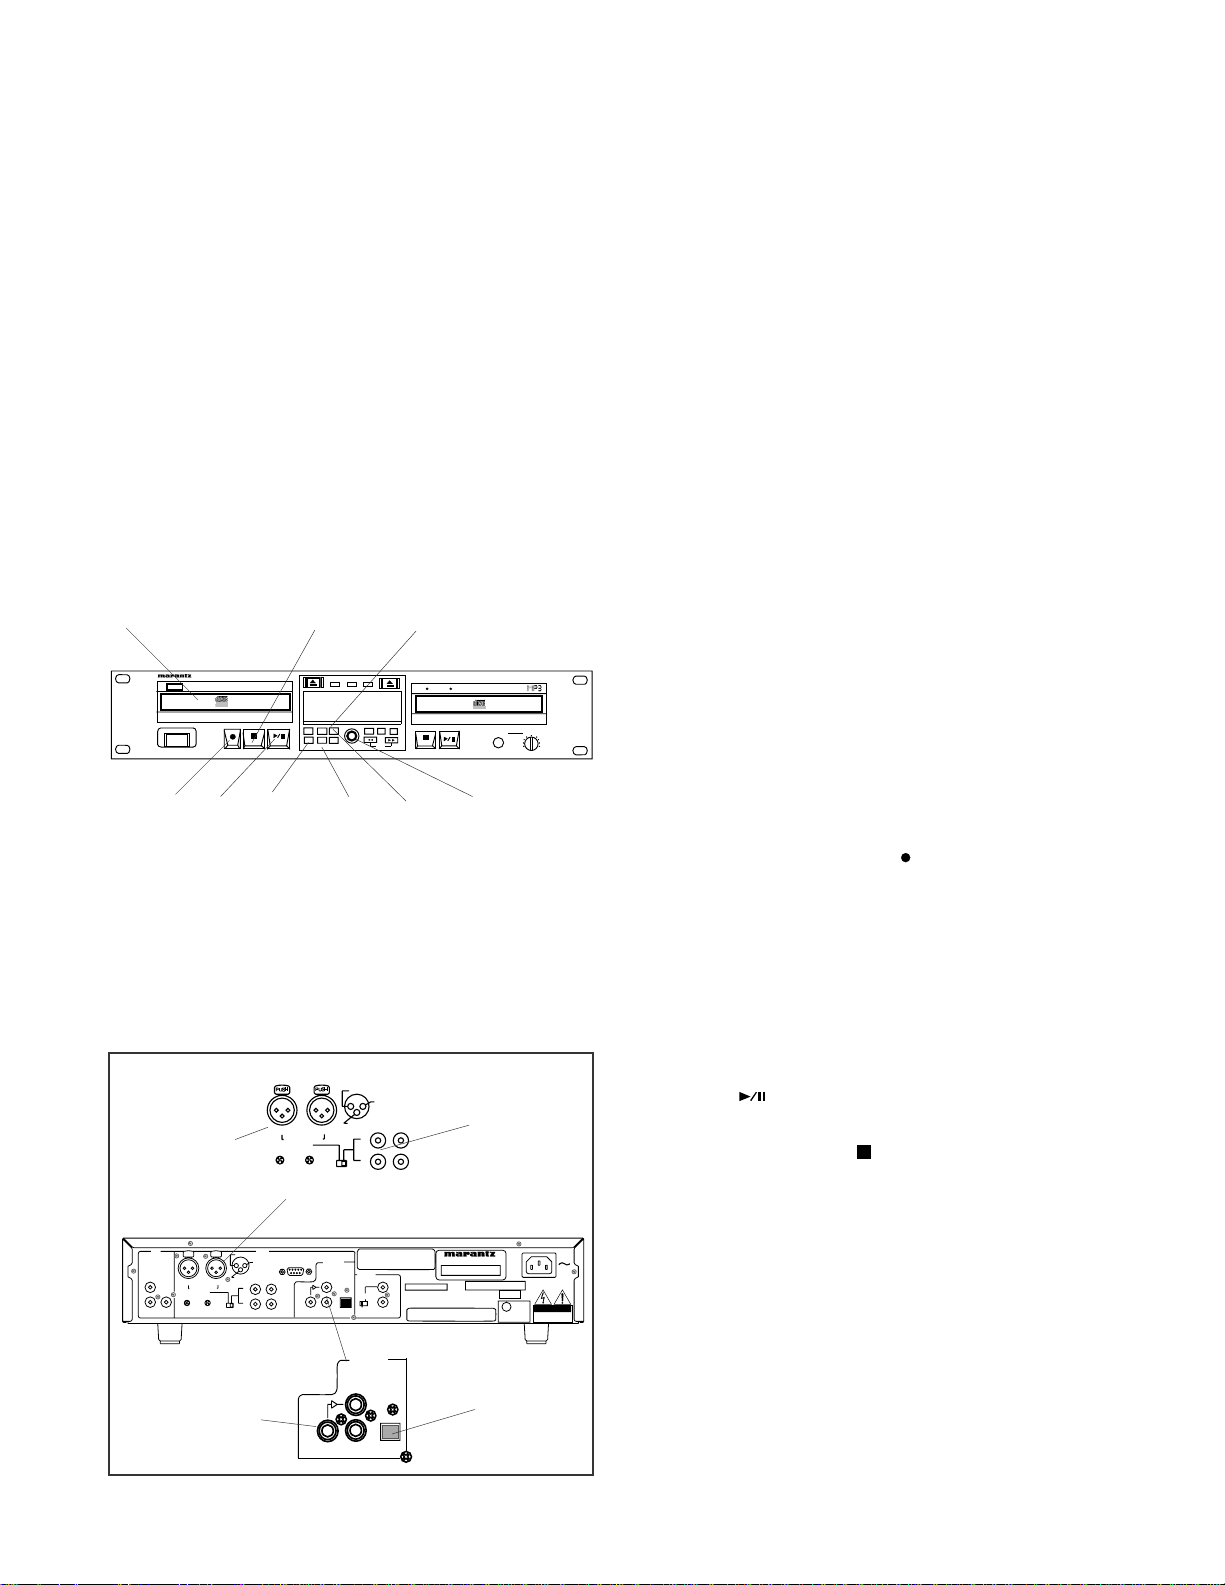
Controls and Connections rear
10 EXT / INT (IR) switch .................................. 24
11 REMOTE (RC5) IN/OUT jacks ...................24
12 AC IN ..........................................................25
Remote control (IR)*
10 MENU button .............................................. 26
11 Track Skip backward button ................26
12 Fast backward search button ...............26
13 SCROLL button .......................................... 26
14 PAUSE button ........................................26
15 Stop button ............................................26
*Controls in italics do not function on the CDR510.
Dubbing label ......................................... 21
1 CD ANALOG OUT jacks .............................22
2 CD DIG OUT jack .......................................22
3 BALANCED IN
ANALOG XLR Inputs L & R ........................22
4 TRIM R & L .................................................23
5 ANALOG IN / OUT jacks ............................ 23
6 INPUT SELECT switch ............................... 23
7 RS-232C connector .................................... 24
8 DIGITAL IN & OUT connectors (SPDIF) .....24
9 DIGITAL IN connector (optical) ...................24
1 TRAY OPEN/CLOSE button .................25
2 Standby power button ................................25
3 DOOR OPEN/CLOSE button .....................25
4 REPEAT button ..........................................25
5 PROG button ..............................................25
6 RANDOM button ........................................25
7 Alphanumeric keypad .................................26
8 DISPLAY button .........................................26
9 CDR button ................................................ 26
................................................21
(table of contents continues)
- 6 -
Page 7

Table of Contents continued
Topic page
16 CD button ...................................................26
17 Track skip forward button ....................26
18 CANCEL button ..........................................26
19 Fast forward search button .................26
20 Play button ............................................ 26
21 REC button ............................................ 27
22 TR. INCR. button ....................................... 27
23 SCAN button ..............................................27
24 DIMMER button ..........................................27
25 REC TYPE button ...................................... 27
26 SOURCE button .........................................27
27 ENTER button ............................................ 27
MENU mode .......................................................28
Menu Settings Chart....................................... 28
TEXT EDIT .....................................................29
TEXT ERASE .................................................30
TEXT VIEW ....................................................30
AUTO TRACK ................................................ 31
Silence gap ................................................31
AUTO STOP ...................................................32
Menu exceptions ............................................32
REC BALANCE .............................................. 33
TEXT ON/OFF................................................ 33
SRC................................................................ 34
COPY protection ............................................35
PITCH ............................................................ 36
PITCH ON/OFF ..............................................36
AUTO CUE..................................................... 37
AUTO CUE LEVEL .........................................37
PLAY MODE................................................... 38
SINGLE PLAY ................................................ 38
END WARNING ............................................. 39
Recording modes ...............................................40
REC EXT DISC,
REC EXT MAN, MINUTE TRACK .................. 40
RECORD FAST, REC LISTEN,
REC MP3 DISC, MAKE CD ...........................41
MP3 ................................................................... 42
AUTO MP3 LOAD ..........................................42
MP3 LOAD .....................................................43
How to record MP3......................................... 43
MP3 Album/file structure ................................ 44
MP3 FILE PLAYBACK.................................... 44
How to PROGRAM tracks ..................................45
To program for recording ................................45
Finalizing ............................................................46
Unfinalizing .........................................................47
How to unfinalize, erase a track,
or erase a CD-RW disc ..................................47
DISPLAY messages ...........................................48
About Compact Discs .........................................49
RS-232C control .................................................51
RC-5 codes ........................................................ 53
Troubleshooting.................................................. 54
Specifications .....................................................55
LIMITED WARRANTY ........................................56
Introduction
The CDR510 CD Recorder/CD Player is a professional
CD Recorder and a professional CD Player in the
same unit. The CD Recorder and CD Player can be
operated as independent devices. That saves you
space and you don't have to have two units. The
CDR510 can also operate combined, with interconnects between the CD Recorder and CD Player that
provide functions not available with separate units,
such as the ability to copy CDs at 2X speed.
Independent operation is called DUAL MODE.
DUAL MODE provides the convenience of having both
a CD Recorder and a CD Player in one rack mountable unit. You can play a CD in the CD drive and
independently record or play a CD in the CDR drive.
You can choose CHANGER MODE. When one drive
completes playing a CD the other drive automatically
starts play back. You can program the order of play
back tracks from CDs in either or both drives.
In CHANGER MODE you can record from the CD
drive to the CDR drive. The interconnection of the two
drives in the same unit permits double speed analog or
digital copying.
For CD recording you can:
• record on CD-R or CD-RW discs
• record any of the playing options
• record and listen from the CD drive
• record at 2X speed from the CD drive
• record using analog (RCA or XLR), or digital
sources including optical or RCA coaxial connections
For CD playing you can:
• cue to music (start at the beginning of the audio
and adjust the auto cue point)
• single track play
• A-B repeat
• adjust play back pitch
• connect to an amplifier/speaker system
• connect to an external mixer or recording device
- 7 -
Page 8

Features
The CDR510 incorporates a suite of professional
features for audio input, audio output, loop out, remote
control, recording modes, finalizing, CD-Text entry and
play back, automatic track incrementing, minute track
incrementing, play back track selection: single track,
scan play, programmed play, random play, and repeat
play.
Finalizing/erasing
• finalizing can be automatic (MAKE CD) or manual
• the CDR drive or CD drive can play an unfinalized
disc
• a CD-RW disc can be unfinalized
• a CD-RW disc can be erased either the entire disc
or one or more tracks from the end
Audio input (CDR drive)
• balanced XLR L and R inputs
• analog RCA line level
• digital RCA (SPDIF)
• digital optical (fiber-optic cable)
Audio output (CD drive)
• analog RCA line level
• digital RCA (SPDIF)
Audio output (CDR drive)
• analog RCA line level
• digital RCA (SPDIF)
• loop out digital RCA (SPDIF) (cascade recording)
Remote control (CDR drive and CD drive)
• full featured IR remote control
• RC-5 via RCA jacks, input and output
• RS-232C for external control
Recording modes
(CDR drive recording from the CD drive)
• RECORD FAST - double speed recording
• REC LISTEN - 1X recording enables listening to a
recording while making it.
• MAKE CD - double speed recording with automatic finalizing
• REC MP3 DISC - same as REC LISTEN when
recording data from an MP3 disc to a CD audio
disc
(CDR drive recording from external sources)
• REC EXT DISC - automatically record an external
source by starting the source (SYNC recording)
• REC EXT MAN - manually start recording from an
external source (manual start recording)
• MINUTE TRACK - automatically start a new track
every minute (enables easy play back search of a
recording session)
CD-Text
• CD-Text can be read and displayed by either drive
• CD-Text can be entered on the CDR drive
• in some recording modes, CD-Text on a source is
automatically recorded
Track incrementing
The CDR drive can be set to automatically increment a
track:
• based on the input signal
• based on a silence gap
• every minute
• or track incrementing can be done manually during
recording by pressing the TR. INC. button on the
IR remote or the Record button
or the IR Remote
Play back – CDR and CD drives
• Standard audio CDs
• CD-R or CD-RW discs
• unfinalized CD-R or CD-RW discs
• CD drive only, finalized MP3 data discs
Play back track selection
• Single track: one track plays and the CDR510
stops at the beginning of the next track
• Scan Play: plays the first 10 seconds of each track
• Programmed play: plays tracks according to a
programmed order you preset
• Random play: all tracks on both drives are randomly played
• Repeat play: the current track or all tracks are
repeated
on the CDR510
• ONE TOUCH RECORD - The last selected
recording mode is remembered even after power
off. You can begin recording in the last selected
record mode simply by pressing the Record button
on the CDR510 or IR Remote.
- 8 -
Page 9
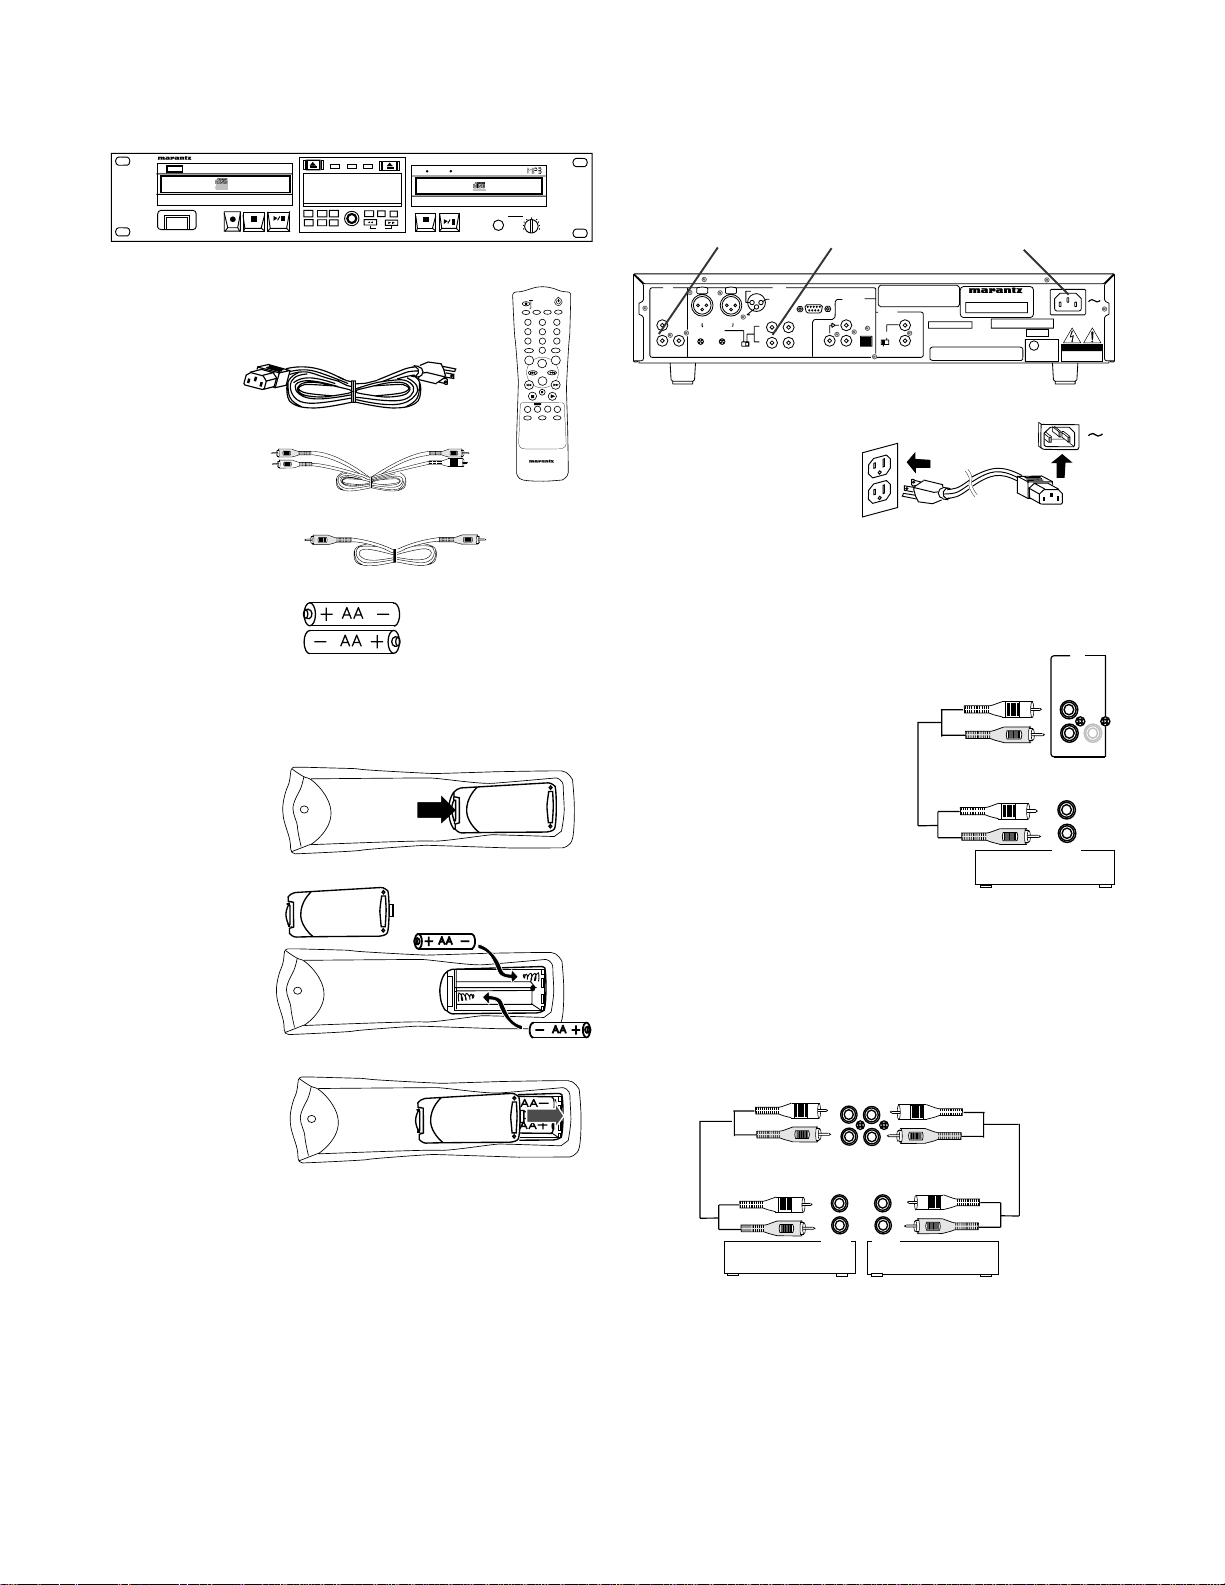
Package contents
CDR
GROUND
ANALOG
IN
OUT
L
R
INPUT
SELECT
L
R
BALANCED
IN
R - TRIM - L
0
+220+22
(REF=+16dBu/0dBFS)
HOT(+)
COLD(-)
RS232C
CD
ANALOG DIG
OUT
OUT
R
L
IN
IN OUT
LOOP
OUT
DIGITAL
(SPDIF)
SERIAL NO.
THIS DEVICE COMPLIES WITH PART 15 OF THE FCC RULES.
OPERATION IS SUBJECT TO THE FOLLLOWING TWO CONDITIONS:
(1) THIS DEVICE MAY NOT CAUSE HARMFUL INTERFERENCE,
AND (2) THIS DEVICE MUST ACCEPT ANY INTERFERENCE
RECRIVED, INCLUDING INTERFERENCE THAT MAY CAUSE
UNDESIRED OPERATION.
INT.(IR)
EXT.
IN
OUT
REMOTE
(RC5)
MODEL NO. CDR510/U1B
AC120V 60HZ 0.5A
MARANTZ AMERICA INC.
1100 MAPLEWOOD DRIVE
ITASCA, IL 60143
COMPLIES WITH FDA RADIATION PERMORMANCE
STANDARDS, 21CFR SUBCHAPTER J
MANUFACTURED
WARNING: SHOCK HAZARD - DO NOT OPEN
AVIS : RISQUE DE CHOC ÉLECTRIQUIE - NE PAS OUVRIR.
MML
AC IN
RISK OF ELECTRIC SHOCK
DO NOT OPEN
MADE IN JAPAN
U
L
C
US LISTED
AUDIO SYSTEM
69FM
CAUTION
FACTORY CODE
NO 4300
CD
ANALOG
CD RECORDER / CD PLAYER CDR510
I
R
POWER
CDR510 unit
Power cord
Audio cables (2)
3' 3" (100 cm)
CD
PLAY MODE
CDR
REC LEVEL / SELECT
REC
MENU/
ERASE
FINAL
TIME
TEXT
MODE
CANCL/
INPUT
DELETE
PROG
STORE
PUSH ENTER
ALBUM
Infrared remote
control
MP3 PITCH
Connections (basic)
PROFESSIONAL
Recorda
ble
LEVEL
HEADPHONE
10
0
OPEN/CLOSE
TRAY
REPEAT PROG. RANDOM
DOOR
ABC DEF GHI
213
JKL MN OPQ
47586
RST UVW XYZ
9
SPACE
SCROLL
DISPLAY
0
CD
CDR
MENU
CANCEL
TR. INCR. REC REC TYPE SOURCE
SCAN DIMMER ENTER
REMOTE CONTROLLER
RC2100DR
Rack mount or install on a table or other flat, stable,
surface.
2 3 1
1 Plug in to 110
VAC power
RC-5 remote cable
3' (90 cm)
AA batteries (2)
Remote batteries
Press and lift at arrow to open the Infrared remote
control battery compartment.
Install two AA
batteries.
Replace compartment cover.
Connect to other equipment
2 Connect CD player to analog equipment for
playing (or recording on an external device).
ANALOG DIG
OUT OUT
Connect a supplied Right
and Left RCA audio cable
to CD ANALOG OUT and
L
R
then connect to the input
of a preamplifier, receiver,
or other recording device.
L
R
Amp, Mixer/Pre-Amp, CD-R, etc.
INPUT
3 Connect CDR recorder to analog equipment for
playing or recording.
Connect two supplied Right and Left RCA audio cables
to CDR ANALOG IN and OUT and then connect to the
input and output of one or two pre-amplifiers, receivers, CD-R's or other external units.
OUT
IN
L
R
L
L
R
R
OUTPUT
Amp, Mixer/Pre-Amp, DAT, CD-R, etc.
INPUT
Amp, Mixer/Pre-Amp, DAT, CD-R, etc.
Other available connection options:
• Balanced analog connections (XLR) page 23
• Digital Coaxial connections (RCA) page 24
• Digital cascade connections (RCA) page 24
• Digital optical connection page 24
- 9 -
Page 10

How to Play back
PLAY MODECDR CD
PLAY MODECDR CD
CHANGER mode
The CHANGER mode is the default play
mode of the CDR510. The CD drive and CDR
drive work as one for playing two CDs, selecting
tracks, and programming track play back
sequence. A program can switch between drives.
Only one of the drives can play back at a time.
Both drives output to the CDR output jacks. The
CD drive is also output to the CDR ANALOG
OUT jacks and the CDR DIG OUT jack.
To select
CHANGER mode
Press and release the PLAY MODE button so
CHANGER MODE is displayed momentarily and
then
3214
ANALOG
CHANGER remains in the display.
L
CD - R
R
CD
DUAL mode
In Dual mode the CD drive and CDR drive work
independently of each other. Both drives can play
back at the same time and are output to separate
jacks. Dual mode can therefore be used to play
back two discs to two separate locations in a DJtype mixing application.
To select Dual mode
Press and release the PLAY MODE button so
DUAL MODE is displayed momentarily.
3214
ANALOG
L
CD - R
R
CD
The display returns to drive information.
Example
display
ANALOG
3214
TOTAL
L
CD - R
R
CD
Example
display
3214
ANALOG
TOTAL
CHANGER
L
CD - R
R
CD
Press and release Play/Pause on the drive
you want to play.
Example
display
a b
3214
ANALOG
CD - R
R
CD
CHANGER
L
The track number (a) and track time played,
counting up (b) on the selected drive are
displayed.
CHANGER mode all the tracks on the
In
drive will be played, then play back will
automatically switch to the other drive, and play
it. When both CDs have been played, play back
will automatically stop.
Press and release Play/Pause
on the drive
you want to play.
a b
Example
display
ANALOG
3214
L
CD - R
R
CD
The track number (a) and track time played,
counting up (b) on the selected drive are
displayed.
In Dual mode all the tracks on the selected drive
will be played, then play back will automatically
stop. While the selected drive is being played,
you can switch to the other drive and play it at
the same time. The CDR drive can be used to
record while the CD drive is in play back.
- 10 -
Page 11

Play back features
Brief instructions of play back features.
See indicated pages for full instructions about the
feature.
• To Pause
Push and release Play/Pause
current drive to pause play back. Push and
release Play/Pause
• To Stop
Push and release any Stop button
• To display times
During play back push and release the TIME
button to tab through available time displays.
See page 18.
• To program play back
From stop, push and release the PROG button,
then turn the REC LEVEL/SELECT control to
choose a track, then push and release the
REC LEVEL/SELECT control to enter that
track in the program. When complete push and
release the PROG button.
In
CHANGER mode you can program
tracks in any order from either drive.
See page 45.
• To search
During play back, push and hold
Search begins at low speed, sampling sound at
low volume, then switches to high speed with
volume muted.
See page 19.
• To scan
CHANGER mode only.
In scan the first 10 seconds of each track is
played. The CDR510 automatically stops after
all tracks on both discs are scanned. From
stop, push and release the SCAN button on the
IR remote. Push and release the SCAN button
or the Play/Pause button
drive to exit scan and continue play back. Or
push and release a Stop button
See page 27.
• Random play
CHANGER mode only.
During stop or play back push and release the
RANDOM button on the IR remote. All tracks or
programmed tracks on the discs in both drives
will be randomly played. When all tracks have
again to resume.
on the
to stop.
or .
on the current
to exit scan.
been played, play back automatically stops.
During random play, to return to normal CD
play back, push and release the RANDOM
button.
See page 25.
• Repeat play
During play back push and release the
REPEAT button on the IR remote. REPEAT
TRACK appears on the display. The current
track will repeat endlessly.
Push and release the REPEAT button on the
IR remote a second time. REPEAT ALL
appears on the display. The current disc will
repeat endlessly.
Push and release the REPEAT button on the
IR remote a third time to exit repeat play.
See page 25.
• Random and Repeat play combined
If Random and Repeat ALL are combined
tracks are played randomly until all tracks
have been played. Then tracks are rerandomized and play continues.
• A-B repeat
Dual mode only, CD drive only.
During play back push and release the REC
LEVEL / SELECT control to select the starting
(A) point. REPEAT A- appears in the display.
Push and release the REC LEVEL / SELECT
control to select the ending (B) point. REPEAT
A-B appears in the display. Push and release
the REC LEVEL / SELECT control to exit A-B
repeat.
• MP3 play back
CD drive only.
MP3 play back requires loading additional
instructions into the CDR510 memory. This
takes about 10 seconds and takes place on
power up if menu item AUTO MP3LOAD is
ON, and on loading an MP3 disc if AUTO
MP3LOAD is OFF. The MP3 indicator is lit
while an MP3 disc is recognized in the CD
drive.
Instead of tracks and track time information
the display shows Albums and file information.
See page 44.
- 11 -
Page 12
How to Record
To record from the CD drive:
• Recording takes place on the CDR drive
only.
• The recording procedure is the same for CDR and CD-RW discs.
• Use discs compatible with a 1X write speed.
See page 49.
• If the disc already contains recordings, the
CDR510 will automatically locate the end of
the last recorded track and start from there.
• Tracks from the CD drive can be
programmed for recording. See page 45.
• Recorded CDs must be finalized before
being playable on a regular CD player.
See page 46.
Internal REC modes
1. Push and release the PLAY MODE button to
select
CHANGER mode.
2. Place a recordable CD-R or CD-RW disc in
the CDR drive.
3. Place the CD to be recorded from in the CD
drive.
2 1 3
POWER
CD RECORDER / CD PLAYER CDR510
I
R
CD
PLAY MODE
CDR
REC LEVEL / SELECT
REC
MENU/
ERASE
FINAL
TIME
MODE
STORE
CANCL/
INPUT
DELETE
PUSH ENTER
MP3 PITCH
TEXT
PROG
ALBUM
PROFESSIONAL
Recorda
ble
LEVEL
HEADPHONE
10
0
7 9 6 5 4
4. If programmed tracks are to be recorded do
the programming. See page 45.
There are four recording modes for recording
from the CD drive.
The CDR510 must be in
CHANGER mode
for internal recording.
RECORD FAST – double speed recording of a
disc or programmed tracks.
REC LISTEN – listening to a recording while
making it.
MAKE CD – double speed recording with
automatic finalizing.
REC MP3 DISC – listening to an MP3 disc while
recording 80 (or 74) minutes of the disc to
audio format on a standard CD disc.
See page 40 for more details about Recording
modes.
5. If desired, adjust menu settings for AUTO
TRACK, see page 31, AUTO STOP, see page
32, or COPY protection, see page 35. Most
commonly, AUTO TRACK and AUTO STOP
should be set to ON.
6. Push and release the REC MODE button to
tab through Recording mode choices.
7. When correct, push and release the REC
button
.
8. When done check or add CD Text.
See page 29.
9. Except for MAKE CD, finalize the disc. See
page 46.
- 12 -
Page 13
External REC modes
DIGITAL
There are three recording modes for external
recording.
Digital sources can be input through the
optical DIGITAL IN connector, see page 24, or
the DIGITAL IN (RCA) connector, see page
24.
REC EXT DISC – Sync recording, recording
from an external source by starting the
source.
REC EXT MAN – recording from an external
source by manually starting recording.
MINUTE TRACK – automatically start a new
track every minute.
See page 40 for more details about Recording
modes.
1 9 5
POWER
CD RECORDER / CD PLAYER CDR510
I
R
CD
PLAY MODE
CDR
REC LEVEL / SELECT
REC
MENU/
ERASE
FINAL
TIME
MODE
STORE
CANCL/
INPUT
DELETE
PUSH ENTER
MP3 PITCH
TEXT
PROG
ALBUM
PROFESSIONAL
Recorda
ble
LEVEL
HEADPHONE
10
0
7 8 10 3 4 6
To record from an external source:
Analog sources can be input through the
BALANCED IN (XLR connectors) see page
22, or ANALOG IN (RCA jacks) see page 23.
3. Select the corresponding input by pushing
and releasing the INPUT SELECT button.
4. If desired, adjust menu settings for AUTO
TRACK, see page 31, AUTO STOP, see page
32, or COPY protection, see page 35.
5. Push and release the REC MODE button to
tab through Recording mode choices.
When correct:
If desired, adjust the Balance, see page 33.
6. If desired, adjust the Recording level by
turning the REC LEVEL/SELECT control.
When desired adjustments are made, start
the source (REC EXT DISC) or push and
release the REC button
(REC EXT MAN, or
MINUTE TRACK).
1. Place a recordable CD-R or CD-RW disc in
the CDR drive.
2. Connect the external source to the
appropriate input jacks.
CDR
HOT(+)
balanced
XLR
jacks
CD
ANALOG DIG
OUT
OUT
L
R
R
BALANCED
IN
R - TRIM - L
0
+220+22
(REF=+16dBu/0dBFS)
L
DIGITAL IN
(RCA)
SELECT
INPUT
COLD(-)
HOT(+)
L
R
R
R - TRIM - L
0
+220+22
(REF=+16dBu/0dBFS)
CDR
GROUND
ANALOG
OUT
IN
BALANCED
IN
RS232C
IN OUT
L
LOOP
OUT
INPUT
SELECT
DIGITAL
(SPDIF)
IN
LOOP
OUT
IN OUT
GROUND
ANALOG
COLD(-)
OUT
IN
L
R
THIS DEVICE COMPLIES WITH PART 15 OF THE FCC RULES.
OPERATION IS SUBJECT TO THE FOLLLOWING TWO CONDITIONS:
(1) THIS DEVICE MAY NOT CAUSE HARMFUL INTERFERENCE,
AND (2) THIS DEVICE MUST ACCEPT ANY INTERFERENCE
RECRIVED, INCLUDING INTERFERENCE THAT MAY CAUSE
UNDESIRED OPERATION.
REMOTE
(RC5)
SERIAL NO.
IN
EXT.
OUT
INT.(IR)
WARNING: SHOCK HAZARD - DO NOT OPEN
AVIS : RISQUE DE CHOC ÉLECTRIQUIE - NE PAS OUVRIR.
(SPDIF)
IN
ANALOG
IN jacks
MODEL NO. CDR510/U1B
AC120V 60HZ 0.5A
MARANTZ AMERICA INC.
1100 MAPLEWOOD DRIVE
ITASCA, IL 60143
MADE IN JAPAN
COMPLIES WITH FDA RADIATION PERMORMANCE
STANDARDS, 21CFR SUBCHAPTER J
MANUFACTURED
MML
AC IN
FACTORY CODE
NO 4300
U
L
CAUTION
C
US LISTED
RISK OF ELECTRIC SHOCK
AUDIO SYSTEM
DO NOT OPEN
69FM
optical
DIGITAL
IN
During recording:
If desired, adjust the Recording level by
turning the REC LEVEL/SELECT control (6),
8. Press and release the CDR drive Play/Pause
button
9. or any Stop button
to pause,
to stop.
When done check or add CD Text.
See page 29.
10. Finalize the disc. See page 46.
- 13 -
Page 14

Notes regarding Recording
CD Text
• Discs copied from the CD drive in RECORD
FAST or MAKE CD will have the same CD
Text information as the source.
• MP3 Albums copied from the CD drive in
REC MP3 DISC will automatically have
track title information copied to CD Text
track titles.
• CD Text information is not copied from
external sources.
• CD Text information can be manually
added.
• You can edit CD Text information of the
previous track while recording the next
track.
• The CDR510 can perform SRC (Sample Rate
Conversion) on an incoming digital signal.
See page 34.
• CD Text is cleared if the CDR drive is
opened.
See TEXT EDIT page 29.
Copy protection
• Because this is a professional CD recorder
copy protected CDs can be copied.
• The CDR510 allows you to set the copy
protection of recorded discs.
See page 35.
Additional Recording Information
• There must be at least 7 seconds of
recording time left on the CD or DOES NOT
FIT will be displayed.
• A maximum of 99 tracks can be recorded on
a disc. Minimum track length is 4 seconds.
• Recordings from DAT or DCC players will
not always stop automatically.
- 14 -
Page 15
Controls and Displays front
R
CDR
PLAY MODE
CD
3
1 2 3 4 5 6 7 8 9
POWER
CD RECORDER / CD PLAYER CDR510
I
R
ERASE
FINAL
1. IR (Remote control sensor)
I
Sensor for the supplied wireless
CD
PLAY MODE
CDR
REC LEVEL / SELECT
REC
MENU/
TIME
MODE
STORE
CANCL/
INPUT
DELETE
PUSH ENTER
MP3 PITCH
TEXT
PROG
ALBUM
infrared remote control.
Note: Set the REMOTE EXT. / INT(IR) on the
back of the unit to INT(IR) to enable the IR remote control.
2. CDR drive (disc tray)
Recordable
Record
able
In this manual the left drive is referred to as the
CDR drive. Press and release the
open or close the CDR drive.
The CDR drive is used for recording and play
back and can record CD-R and CD-RW discs.
The CDR drive can play back unfinalized discs.
3. CDR open button
Press and release to open or
close the CDR drive.
PROFESSIONAL
Recorda
ble
LEVEL
HEADPHONE
10
0
button (3) to
When CHANGER
MODE is selected
CHANGER is
1
ANALOG
TOTAL
CHANGER
L
CD - R
R
CD
displayed.
CHANGER MODE:
The CDR drive and CD drive work together as
one.
When in CHANGER MODE only one drive can
play back at a time. Both the CDR drive and CD
drive are output to the CDR output jacks. The CD
drive is also output to the CD jacks.
DUAL MODE:
The CDR drive and CD drive operate independently.
Both the CDR drive and CD drive can play back
at the same time to separate CDR and CD output
jacks.
6. CD button
Press and release to select the
CD drive. When CD is selected
the display, center controls and remote control
buttons refer to the CD drive.
Example display
shows large box (a)
indicating CD drive is
selected.
1
ANALOG
TOTAL
CHANGER
L
CD - R
R
CD
a
4. CDR button
Press and release to select the
CDR drive. When selected the
display, center controls and remote
control buttons refer to the CDR
drive.
TOTAL
1
ANALOG
L
CD - R
R
CD
a b c
Example display
shows large box (a)
indicating CDR drive
is selected.
In this example, small box (b) indicates a CD-R
disc is in the CDR drive. Small box (c) indicates a
CD disc is in the CD drive.
5. PLAY MODE button
Press and release to toggle between CHANGER MODE and
DUAL MODE.
7. CD open button
Press and release to open or
close the CD drive.
MP
8. MP3 indicator
Green indicator is lit and steady
when a CD with MP3 files is
detected.
Example display
1
ANALOG
CD - R
PITCH
CHANGER
L
R
CD
9. PITCH indicator
shows 27 MP3 tracks
in Album 1.
Green indicator is lit and steady
when pitch has been adjusted
using the PITCH menu.
Pitch adjustments remain even when discs are
changed or the CDR510 is powered off.
- 15 -
Page 16

CD RECORDER / CD PLAYER CDR510
I
R
POWER
11 12 13 14
CD
PLAY MODE
CDR
REC LEVEL / SELECT
REC
MENU/
ERASE
FINAL
TIME
MODE
STORE
CANCL/
INPUT
DELETE
PUSH ENTER
MP3 PITCH
TEXT
PROG
ALBUM
a 10
PROFESSIONAL
Recorda
ble
LEVEL
HEADPHONE
10
0
15 16 17
REC LEVEL / SELECT
MENU/
REC
ERASE
MODE
STORE
CANCL/
FINAL
INPUT
DELETE
10. CD drive (disc tray)
In this manual the right drive is referred to as the
CD drive. Press and release the
open or close the CDR drive.
The CD drive is used for play back and can play
CD-R and CD-RW discs.
11. POWER button
PUSH ENTER
TIME TEXT
ALBUM
Digital Audio
PROG
Record
able
button (a) to
14. Play/Pause button
(green)
When at stop, press and release
begin play back in the CDR drive.
During play back, press and release to pause
play back. When play back is paused, press and
release to resume play back.
During recording, press and release to pause
recording. When recording is paused, press and
release to resume recording.
ERASE
15. ERASE button
When at stop, press and release to
select Erasing mode.
The CDR510 must detect a CD-RW disc with at
least one track on it in the CDR drive. "ERASE
TRACK" and "PRESS RECORD" alternate in the
display. If you press the Record button
the last
track on the CD-RW disc will be erased.
Press the Stop button
to cancel.
POWER
Press and release to turn
power to the CDR510 On or
Off. The display is lit when
power is On.
12. Record button (red)
Press and release to begin
recording, finalizing or erasing.
During recording push and release the Record
button
to increment the track.
ONE TOUCH RECORD
The last selected Record mode is remembered
even after power off. This enables you to engage
record simply by pressing the Record button .
After pressing the Record button , the CDR510
will briefly display the Record mode, for example
MINUTE TRACK, then display WAIT, then begin
recording. The entire automated process takes
abut 5 seconds.
13. Stop button (white)
Press and release to stop recording or play back in the CDR drive.
Press and release to exit a program.
REC
MODE
16. REC MODE button
When at stop and in CHANGER
mode, press and release to tab
through the Recording Modes: RECORD FAST,
REC LISTEN, MAKE CD, REC EXT DISC, REC
EXT MAN, and MINUTE TRACK.
In DUAL mode the Recording Modes are: REC
EXT DISC, REC EXT MAN, and MINUTE
TRACK.
MENU/
STORE
17. MENU/STORE button
Push and release to enter Menu
mode, exit Menu mode and Store
menu changes.
To make a menu change:
1. Push and release MENU/STORE button to
enter Menu mode.
2. Turn the REC LEVEL/SELECT control to
advance through the menu choices.
3. When the menu choice you want to change is
displayed, push and release the REC LEVEL/
SELECT control to enter that choice.
4. Then turn the REC LEVEL/SELECT control to
adjust or change the menu setting.
Press and release to exit an operation and
switch to the CDR drive.
- 16 -
Page 17
POWER
CD RECORDER / CD PLAYER CDR510
I
R
CD
PLAY MODE
CDR
REC LEVEL / SELECT
REC
MENU/
ERASE
FINAL
TIME
MODE
STORE
CANCL/
INPUT
DELETE
PUSH ENTER
MP3 PITCH
TEXT
PROG
ALBUM
PROFESSIONAL
Recorda
ble
LEVEL
HEADPHONE
10
0
18
REC LEVEL / SELECT
MENU/
REC
ERASE
MODE
STORE
CANCL/
FINAL
INPUT
DELETE
5. When the desired setting is displayed,
push and release the REC LEVEL/SELECT control to confirm the new menu
setting.
6. Push and release the MENU/STORE
button to exit menu mode and write setting
changes.
With the CDR drive selected and a recordable
disc in the drive, the Menu choices are: TEXT
EDIT, TEXT ERASE, TEXT VIEW, AUTO
TRACK, AUTO STOP, TEXT ON/OFF, SRC,
and COPY. The CD Text Menu choices are
unavailable when there is no disc in the drive.
PUSH ENTER
TIME TEXT
ALBUM
PROG
Push and release to:
• start play back at the selected track
• program track number
• select displayed setting (menu mode)
When at stop, in CHANGER mode, with CDs
available for play back in both drives: turn to
select the track on the selected drive.
c d e
Example
display
1
ANALOG
CD - R
R
CD
16151413121110986543217
CHANGER
L
a b
a. The CDR drive is selected.
b. The CDR510 is in CHANGER mode.
c. Track 2 is flashing indicating it is selected.
d. Track 2 is displayed indicating it is selected.
e. There are 16 tracks on the disc in the CDR
drive.
When the REC LEVEL / SELECT control is turned
so a track beyond 16 (in this example) is selected
the drive selection is automatically changed to the
CD drive.
f
With the CD drive selected and an MP3 disc
inserted, the Menu choices are: PITCH,
PITCH ON/OFF, AUTO MP3LOAD, TEXT ON/
OFF, AUTO CUE, CUE LEVEL, PLAY MODE,
SINGLE PLAY, and END WARNING.
The pitch Menu choices are unavailable if
there is no disc in the drive. The MP3 LOAD
choice, in addition to the AUTO MP3LOAD
choice is available when MP3 software has
not been loaded.
REC LEVEL / SELECT
18. REC LEVEL/SELECT
control
This is a main control which
changes function depending
PUSH ENTER
on the state of the CDR510
Turn to:
• select the track (play and program mode)
• adjust recording level (recording)
• toggle or tab through settings (menu mode)
Example
display
1
ANALOG
CD - R
R
CD
CHANGER
L
In this example the disc in the CD drive has MP3
files on it.
f. Turning the REC LEVEL / SELECT control will
select files in ALbum 1.
In record mode:
Turn to set or adjust the record level.
Example
display
1
SYNC
ANALOG
5432
L
CD - R
R
This setting is remembered, even after power
off, you do not have to do anything to confirm or
store it.
- 17 -
Page 18

POWER
CD RECORDER / CD PLAYER CDR510
I
R
CD
PLAY MODE
CDR
REC LEVEL / SELECT
REC
MENU/
ERASE
FINAL
TIME
MODE
STORE
CANCL/
INPUT
DELETE
PUSH ENTER
MP3 PITCH
TEXT
PROG
ALBUM
PROFESSIONAL
Recorda
ble
LEVEL
HEADPHONE
10
0
counting down (TOTAL REM), and total time
played on the disc counting up (TOTAL).
Example
display
play back
ANALOG
TOTAL
86547
CD - R
CHANGER
L
R
CD
19 20 21
ERASE
MODE
STORE
CANCL/
FINAL
INPUT
DELETE
PUSH ENTER
TIME TEXT
PROG
ALBUM
REC LEVEL / SELECT
MENU/
REC
22 23
18. REC LEVEL/SELECT control continued
During CD text edit:
Turn to select the alphanumeric character, when
correct push to enter that character and advance
to the next character.
Example
display
The available characters are:
1
ANALOG
5432
L
CD - R
R
TEXT
In play back mode push and
release to display CD Text.
If present, "ALBUM TITLE" then the text of the
Album title will scroll across the display. Then, if
present, "TRACK TITLE" and the text of the Track
title will scroll across the display. The Track title
will remain on the display while the track is
playing.
If no text is present "NO TEXT" will be displayed
for a couple of seconds.
20. TEXT button
PROG
21. PROG button
From stop in CHANGER or DUAL
MODE, push and release to enter
Program mode. See page 45.
Example
display
ANALOG
L
CD - R
R
PROGRAM
CD
To record a space enter an underline.
TIME
19. TIME button
During record push and release
to toggle between the total
remaining disc time and the time recorded on the
current track.
TOTAL REM
Example
display
recording
1
SYNC
ANALOG
TOTAL REM
5432
L
CD - R
R
Total remaining time on the
disc counting down.
During play back push and release to tab between the time played on the current track counting up, time remaining on the current track counting down (REM), total time remaining on the disc
22. FINAL button
FINAL
From Stop, push and release to
select Finalize mode.
The display "FINALIZE
CD" alternates with
"PRESS RECORD".
DIG
L
CD - R
R
19181716151413121110986543217 20
+
CD
See page 46.
23. INPUT button
INPUT
From Stop, push and release to
tab through the input selections for
recording.
The input choices are ANALOG, DIGITAL I, or
OPTICAL. The input choice is always displayed.
- 18 -
Page 19

/
POWER
HEADPHONE
LEVEL
0
CD RECORDER / CD PLAYER CDR510
I
R
ERASE
FINAL
ERASE
FINAL
REC LEVEL / SELECT
MENU/
REC
MODE
STORE
CANCL/
INPUT
DELETE
PUSH ENTER
CDR
REC
MENU/
MODE
STORE
CANCL/
INPUT
DELETE
TIME TEXT
REC LEVEL / SELECT
ALBUM
PLAY MODE
PUSH ENTER
CD
TIME
TEXT
ALBUM
PROG
24 25 26
Example
displays
ANALOG
MP3 PITCH
PROG
PROFESSIONAL
Recorda
ble
LEVEL
HEADPHONE
10
0
26. Forward button
During play back, push and hold to
Fast forward. Fast forward is at low speed for the
27 28 29 30
first 4 seconds with audio sampling, then automatically switches to silent high speed.
25, 26. ALBUM buttons
ALBUM
When an MP3 disc with
multiple albums is in the CD
drive, and at stop, press and release the Forward
button
+
L
CD
R
19181716151413121110986543217 20
CD
Reverse button
album.
to advance to the next album, or the
to reverse to the previous
+
input choice
remains in
DIG
L
CD
R
19181716151413121110986543217 20
CD
display
+
L
OPT
CD
R
19181716151413121110986543217 20
CD
When OPTICAL is selected the input for recording is from the DIGITAL (SPDIF) optical IN connection on the rear of the CDR510.
When DIGITAL is selected the input for recording
is from the DIGITAL (SPDIF) RCA IN jack on the
rear of the CDR510.
When ANALOG is selected the input for recording
is from either the ANALOG L and R IN RCA jacks
or the BALANCED IN XLR jacks on the rear of
the CDR510, depending on the setting of the
INPUT SELECT switch on the rear of the
CDR510.
CANCL
DELETE
24. CANCL/DELETE button
Press and release to cancel or
delete items in several modes of
operation.
• delete tracks from a program
• text in CD Text edit
• return to a higher level when in Menu mode.
27. Stop button (white)
Press and release to stop
recording or play back in the
CD drive.
Press and release to exit a program.
Press and release to exit an operation and switch
to the CD drive.
28. Play/Pause button
(green)
When at stop, press and
release begin play back in
the CD drive.
During play back, press and release to pause
play back. When play back is paused, press and
release to resume play back.
29. HEADPHONE jack
Plug stereo headphones in here.
Adjust headphone volume with the
LEVEL control.
30. LEVEL control
Turn to adjust the volume of
01
headphones connected to the
HEADPHONE jack.
25. Reverse button
During play back, push and hold to
Fast reverse. Fast reverse is at
low speed for the first 4 seconds with audio
sampling, then automatically switches to silent
high speed.
- 19 -
Page 20

Display
CD RECORDER / CD PLAYER CDR510
I
R
POWER
ERASE
FINAL
2 3 4 5 6 7 8 9 10 11
1
REM REC TIME TRACK TOTAL R EM TRACK TIME
SYNC
DIG
MANUAL
ANALOG
OPT
CD - RW
L
R
CD
PLAY MODE
CDR
REC LEVEL / SELECT
REC
MENU/
TIME
TEXT
MODE
STORE
CANCL/
INPUT
DELETE
DUBBING CHANGER
PROG
PUSH ENTER
ALBUM
MP3 PITCH
Recorda
ble
HEADPHONE
STEP
PROGRAM
RANDOM
REPEAT
ALL
TRACK
+
19181716151413121110986543217 20
SCAN
CD - RW
PROFESSIONAL
LEVEL
0
TRACK
8. TRACK label
The TRACK label appears with other
labels to indicate that the displayed CD
drive time is TRACK time.
10
TIME
9. TIME label
The TIME label appears with other
labels to indicate that the display is
12
13
14
15
16
STEP
TIME for the CD drive.
10. STEP label
The STEP label appears during programming above the program step
number.
REM
REC
TIME
TRACK
TOTAL
1. Alphanumeric
display.
Displays a variety of information including
remaining recording time, menu settings,
etc. Time for the CDR drive is displayed to
the left (below labels 2-4). Time for the CD
drive is displayed to the right (below labels
7-10).
2. REM label
The REM label appears with other labels
to indicate that the CDR drive time displayed is REMaining time.
3. REC label
The REC label appears with other labels
to indicate that the displayed CDR drive
time is RECording time.
4. TIME label
The TIME label appears with other labels
to indicate that the display is TIME for the
CDR drive.
5. TRACK label
The TRACK label appears with other
labels to indicate that the displayed CDR
drive time is TRACK time.
6. TOTAL label
The TOTAL label appears by itself or with
other labels to indicate that the CDR drive
or CD drive time displayed is total time.
PROGRAM
RANDOM
REPEAT
ALL
TRACK
SCAN
11. PROGRAM label
The PROGRAM label flashes during
programming and is steady when in
program mode.
12. RANDOM label
The RANDOM label appears during
RANDOM play. Tracks are played in
random order. See RANDOM button on
the IR remote.
13. REPEAT label
The REPEAT label appears during
REPEAT play. When the REPEAT
button on the IR remote is pressed you
can toggle between REPEAT ALL and
REPEAT TRACK. See REPEAT play
back.
14. ALL label
The ALL label appears associated with
the REPEAT label (13).
15. TRACK label
The TRACK label appears associated
with the REPEAT label (13).
16. SCAN label
The SCAN label appears during SCAN
play. See SCAN button on the IR
remote.
REM
7. REM label
The REM label appears with other labels
to indicate that the CD drive time displayed is REMaining time.
- 20 -
Page 21

POWER
+
G
CD RECORDER / CD PLAYER CDR510
I
R
CD
PLAY MODE
CDR
REC LEVEL / SELECT
REC
MENU/
ERASE
FINAL
TIME
MODE
STORE
CANCL/
INPUT
DELETE
PUSH ENTER
MP3 PITCH
TEXT
PROG
ALBUM
PROFESSIONAL
Recorda
ble
LEVEL
HEADPHONE
10
0
ANALOG
The arrow is also displayed
during recording from the
CDR BALANCED IN or the
CDR ANALOG IN inputs.
17
REM REC TIME TRACK TOTAL R EM TRACK TIME
18
19
SYNC
MANUAL
ANALOG
DIG
OPT
CD - RW
DUBBING CHANGER
L
R
20 21 28 29
25 26
24
23
CD - RW
22
DIG
17. DIGI label
The DIGI label is displayed when the
CDR DIGITAL (SPDIF) IN jack is selected
for recording input. If flashing in record
standby, the digital data is not being
received correctly. Check connections and
settings on the source and CDR510.
DIG
The arrow is also displayed during
recording from the CDR DIGITAL (SPDIF)
IN jack.
SYNC
18. SYNC label
The SYNC label (indicating Synchronized
recording) is displayed when the REC
EXT DISC is selected as the recording
mode. Start the external source to begin
recording.
MANUAL
19. MANUAL label
The MANUAL label (indicating manual
start recording) is displayed when the
REC EXT MAN is selected as the recording mode. Start the external source and
recording at the same time.
27
STEP
PROGRAM
RANDOM
REPEAT
ALL
TRACK
+
19181716151413121110986543217 20
SCAN
CD - RW
OPT
OPT
CD-RW
21. OPTI label
The OPTI label is displayed when the
CDR optical IN connection is selected as
the source for recording. If flashing in
record standby, the digital data is not
being received correctly. Check connections and settings on the source and
CDR510.
The arrow is also displayed when recording and the CDR optical IN connection is
the source.
22. Large CDR box
The large CDR box is lit when the CDR
drive is selected.
23. Small CDR box
The small CDR box is lit when a disc is
recognized in the CDR drive.
24. Recording icon
The Recording icon is lit during recording.
25. Pause icon
The Pause icon is lit when the CDR
drive is paused in recording or play back.
26. Play icon
The Play icon is lit when the CDR drive
is recording or in play back.
27. CD-RW label
CD-RW, CD-R, or CD is displayed depending on the type of disc in the CDR
drive.
19181716151413121110986543217 20
28. Track numbers
Track numbers available are displayed for
the selected drive. + is displayed if there
are more than 20 tracks.
ANALOG
20. ANALOG label
The ANALOG label is displayed when the
CDR BALANCED IN or the CDR ANALOG IN inputs are selected as the source
for recording.
DUBBIN
29. DUBBING label
DUBBING is lit while recording from
the CD drive to the CDR drive.
- 21 -
Page 22

POWER
CD
CD
CD
CDR
REM REC TIME TRACK TOTAL R EM TRACK TIME
SYNC
MANUAL
ANALOG
L
R
CHANGER
CD RECORDER / CD PLAYER CDR510
I
R
DIG
OPT
CD - RW
ERASE
FINAL
DUBBING CHANGER
L
R
CD
PLAY MODE
CDR
REC LEVEL / SELECT
REC
MENU/
TIME
MODE
STORE
CANCL/
INPUT
DELETE
PUSH ENTER
TEXT
PROG
ALBUM
MP3 PITCH
Recorda
ble
HEADPHONE
STEP
PROGRAM
RANDOM
REPEAT
ALL
TRACK
+
19181716151413121110986543217 20
SCAN
CD - RW
30 31
34 35
32
CD - RW
33
30. Level meter
Lit rectangles provide a visual display of
R and L levels during play back or
recording. The right-most four bars are
red to indicate an over level condition.
31. CHANGER mode indicator
Lit when in CHANGER mode.
PROFESSIONAL
LEVEL
0
10
36
Controls and Connections rear
IN OUT
DIGITAL
(SPDIF)
LOOP
OUT
IN
THIS DEVICE COMPLIES WITH PART 15 OF THE FCC RULES.
OPERATION IS SUBJECT TO THE FOLLLOWING TWO CONDITIONS:
(1) THIS DEVICE MAY NOT CAUSE HARMFUL INTERFERENCE,
AND (2) THIS DEVICE MUST ACCEPT ANY INTERFERENCE
RECRIVED, INCLUDING INTERFERENCE THAT MAY CAUSE
UNDESIRED OPERATION.
REMOTE
(RC5)
SERIAL NO.
IN
EXT.
OUT
INT.(IR)
WARNING: SHOCK HAZARD - DO NOT OPEN
AVIS : RISQUE DE CHOC ÉLECTRIQUIE - NE PAS OUVRIR.
R
BALANCED
IN
R - TRIM - L
0
+220+22
(REF=+16dBu/0dBFS)
CD
ANALOG DIG
OUT
L
R
OUT
1
R
BALANCED
IN
R - TRIM - L
0
+220+22
(REF=+16dBu/0dBFS)
HOT(+)
COLD(-)
L
L
R
INPUT
SELECT
ANALOG DIG
OUT OUT
L
R
IN
CDR
GROUND
ANALOG
RS232C
OUT
2
CD drive outputs
ANALOG DIG
OUT OUT
1. CD ANALOG OUT jacks
Plug L and R RCA jacks in here
to connect to the Line level
L
R
input jacks of an external preamplifier, mixer or other audio
device. This output is always on
when there is play back on the
CD drive.
MODEL NO. CDR510/U1B
AC120V 60HZ 0.5A
MARANTZ AMERICA INC.
1100 MAPLEWOOD DRIVE
ITASCA, IL 60143
MADE IN JAPAN
COMPLIES WITH FDA RADIATION PERMORMANCE
STANDARDS, 21CFR SUBCHAPTER J
MANUFACTURED
MML
3
HOT(+)
COLD(-)
L
INPUT
SELECT
L
R
FACTORY CODE
NO 4300
U
L
C
US LISTED
AUDIO SYSTEM
CDR
GROUND
ANALOG
IN
AC IN
RISK OF ELECTRIC SHOCK
69FM
OUT
CAUTION
DO NOT OPEN
32. Large CD box
The large CD box is lit when the CD
drive is selected.
33. Small CD box
The small CD box is lit when a disc is
recognized in the CD drive.
ANALOG DIG
OUT OUT
L
R
2. CD DIG OUT jack
Plug a Digital audio cable with
RCA jacks in here to connect to
the digital input jack of an
external audio device. This
output is always on when there
is play back on the CD drive.
34. Pause icon
The Pause icon is lit when the play
back is paused on the CD drive.
35. Play icon
The Play icon is lit when the CD drive
2
3
R
1
BALANCED
2
3
L
HOT(+)
GROUND
1
COLD(-)
is in play back.
CD-RW
36. CD-RW label
CD-RW, CD-R, or CD is displayed
depending on the type of disc in the CD
drive.
3. BALANCED IN
ANALOG XLR inputs, L & R
XLR connectors are available for balanced*
analog input.
*A professional XLR cable set is well shielded to
avoid picking up noise and is 'balanced,' has 600
ohms impedance.
- 22 -
Page 23
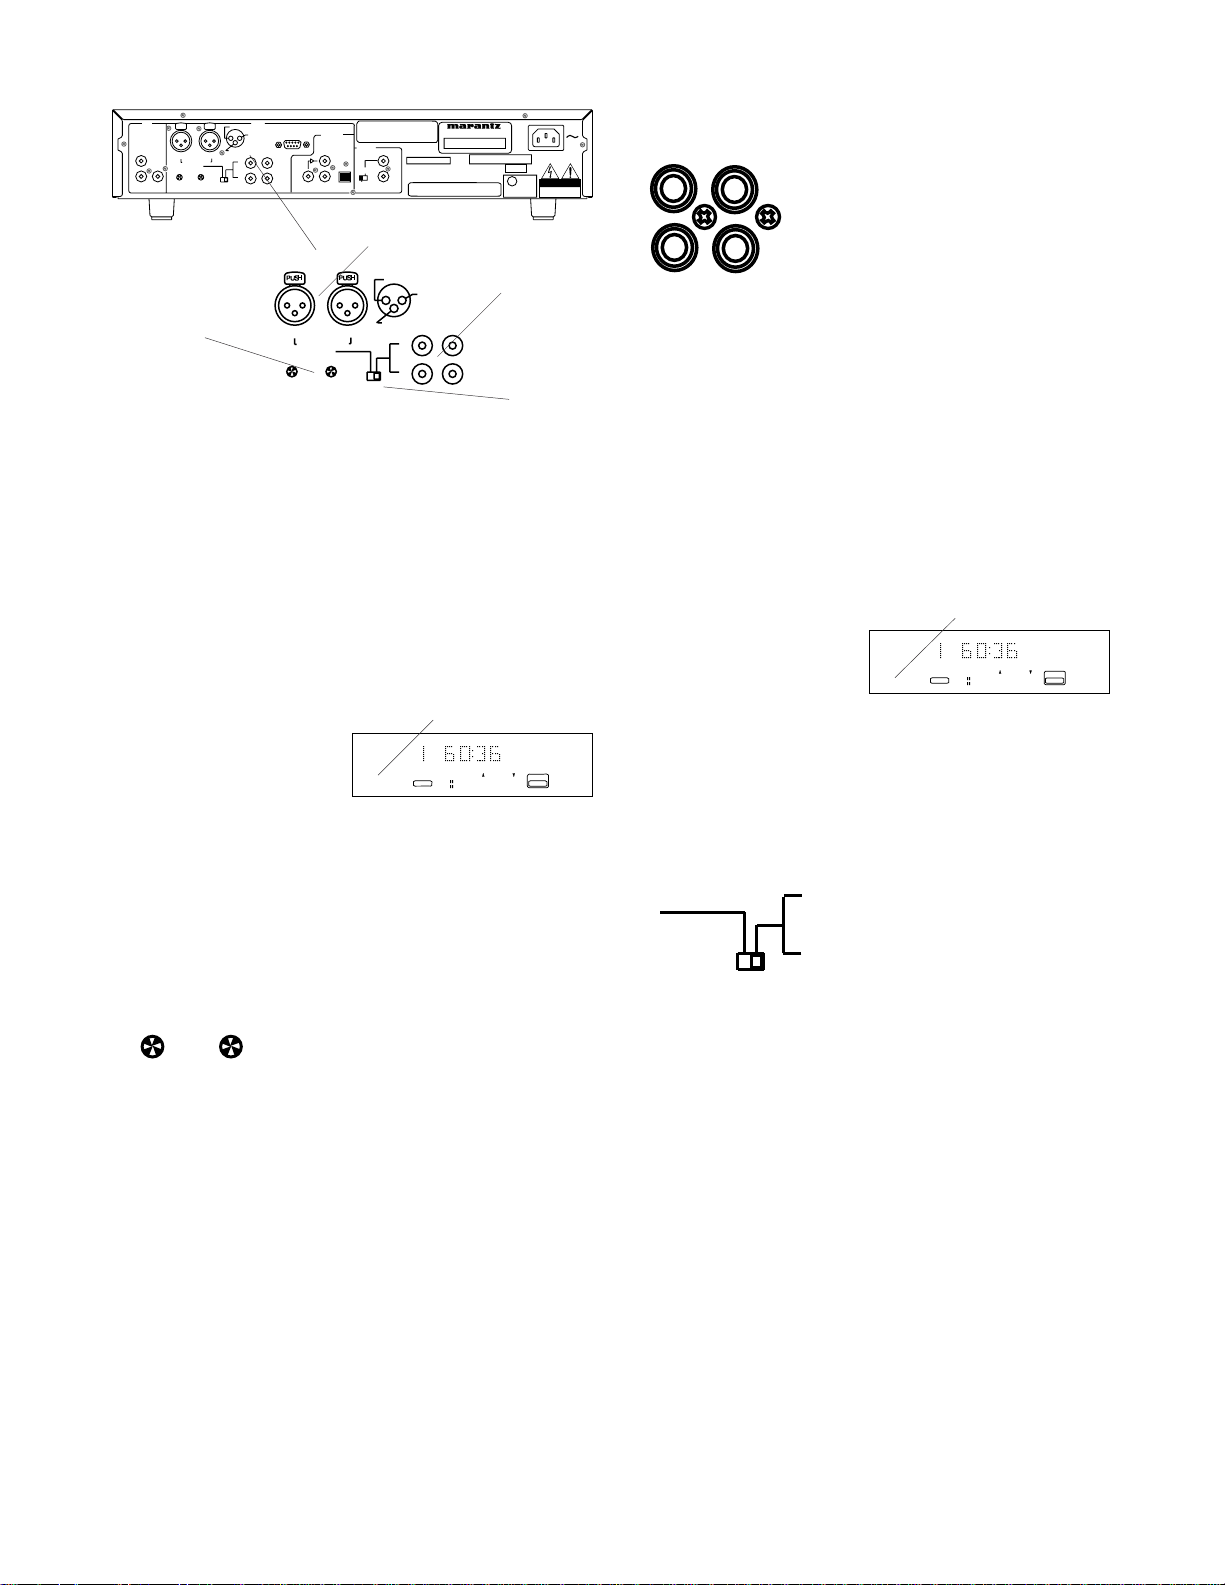
ANALOG DIG
R - TRIM - L
)
ANALOG
OUT
L
R
CD
OUT
(REF=+16dBu/0dBFS)
0
R
BALANCED
R - TRIM - L
+220+22
4
IN OUT
DIGITAL
(SPDIF)
LOOP
OUT
IN
THIS DEVICE COMPLIES WITH PART 15 OF THE FCC RULES.
OPERATION IS SUBJECT TO THE FOLLLOWING TWO CONDITIONS:
(1) THIS DEVICE MAY NOT CAUSE HARMFUL INTERFERENCE,
AND (2) THIS DEVICE MUST ACCEPT ANY INTERFERENCE
RECRIVED, INCLUDING INTERFERENCE THAT MAY CAUSE
UNDESIRED OPERATION.
REMOTE
(RC5)
EXT.
INT.(IR)
MODEL NO. CDR510/U1B
SERIAL NO.
IN
OUT
WARNING: SHOCK HAZARD - DO NOT OPEN
AVIS : RISQUE DE CHOC ÉLECTRIQUIE - NE PAS OUVRIR.
AC120V 60HZ 0.5A
MARANTZ AMERICA INC.
1100 MAPLEWOOD DRIVE
ITASCA, IL 60143
MADE IN JAPAN
COMPLIES WITH FDA RADIATION PERMORMANCE
STANDARDS, 21CFR SUBCHAPTER J
MANUFACTURED
MML
FACTORY CODE
NO 4300
U
L
C
US LISTED
AUDIO SYSTEM
AC IN
RISK OF ELECTRIC SHOCK
69FM
CAUTION
DO NOT OPEN
OUT
IN
L
5. ANALOG IN / OUT
jacks
RCA jacks for line level
CDR
HOT(+)
GROUND
RS232C
ANALOG
COLD(-)
OUT
L
IN
L
IN
R
INPUT
SELECT
input and output to the
R
BALANCED
IN
R - TRIM - L
0
+220+22
(REF=+16dBu/0dBFS)
L
INPUT
SELECT
3
COLD(-)
HOT(+)
R
L
CDR
GROUND
ANALOG
IN
5
OUT
6
R
CDR drive.
L & R ANALOG IN jacks
Plug L and R RCA jacks in here to connect to the
Line level output jacks of an external pre-amplifier, mixer or other audio device.
3. BALANCED IN (continued)
The three pin XLR connection permits trimming,
adjusting the input level. See TRIM (4).
The INPUT SELECT SWITCH (6) on the rear of
the CDR510 must be to the left to select the
BALANCED IN inputs. ANALOG must also be
selected by pressing and releasing the INPUT
button on the front of the CDR510 so ANALOG is
displayed.
Example
display
1
ANALOG
ANALOG
TOTAL
L
CD - R
R
CHANGER
CD
The pin out for the XLR jacks is printed on the
CDR510 for easy reference:
Pin 1 ground,
Pin 2 HOT +,
Pin 3 COLD -.
4. TRIM R & L
You can use a small screw-
0
(REF=+16dBu/0dBFS
+22
0
+22
driver to adjust the TRIM of
the XLR L & R inputs.
The TRIM is factory preset at +16 dBu with an
adjustment range from 0 to +22 dBu.
The INPUT SELECT SWITCH (6) on the rear of
the CDR510 must be to the left to select the
BALANCED IN inputs. ANALOG must also be
selected by pressing and releasing the INPUT
button on the front of the CDR510 so ANALOG
is displayed.
Example
display
1
ANALOG
ANALOG
TOTAL
L
CD - R
R
CHANGER
CD
L & R ANALOG OUT jacks
Plug L and R RCA jacks in here to connect to the
Line level input jacks of an external pre-amplifier,
mixer or other audio device. This output is always
on when there is play back on the CDR drive.
IN
6. INPUT SELECT switch
This switch selects between
the BALANCED IN (XLR)
INPUT
SELECT
jacks and the ANALOG IN
(RCA) jacks for analog input
for recording on the CDR
drive.
ANALOG must also be selected by pressing and
releasing the INPUT button on the front of the
CDR510 so ANALOG is displayed.
Some professionals prefer to first set the TRIM
using a meter and to do a fine adjustment by
listening for distortion and watching the level
meters on the CDR510.
- 23 -
Page 24

CD
DIGITAL
IN
OUT
REMOTE
(RC5)
INT.(IR)
EXT.
EXT.
ANALOG DIG
OUT
L
R
OUT
R
BALANCED
R - TRIM - L
0
+220+22
(REF=+16dBu/0dBFS)
CDR
HOT(+)
GROUND
ANALOG
COLD(-)
OUT
IN
L
L
IN
R
INPUT
SELECT
RS232C
IN OUT
DIGITAL
(SPDIF)
LOOP
OUT
IN
7 8 9 10 11
THIS DEVICE COMPLIES WITH PART 15 OF THE FCC RULES.
OPERATION IS SUBJECT TO THE FOLLLOWING TWO CONDITIONS:
(1) THIS DEVICE MAY NOT CAUSE HARMFUL INTERFERENCE,
AND (2) THIS DEVICE MUST ACCEPT ANY INTERFERENCE
RECRIVED, INCLUDING INTERFERENCE THAT MAY CAUSE
UNDESIRED OPERATION.
REMOTE
(RC5)
EXT.
INT.(IR)
MODEL NO. CDR510/U1B
SERIAL NO.
IN
OUT
WARNING: SHOCK HAZARD - DO NOT OPEN
AVIS : RISQUE DE CHOC ÉLECTRIQUIE - NE PAS OUVRIR.
AC120V 60HZ 0.5A
MARANTZ AMERICA INC.
1100 MAPLEWOOD DRIVE
ITASCA, IL 60143
MADE IN JAPAN
COMPLIES WITH FDA RADIATION PERMORMANCE
STANDARDS, 21CFR SUBCHAPTER J
MANUFACTURED
MML
FACTORY CODE
NO 4300
U
L
C
US LISTED
AUDIO SYSTEM
AC IN
RISK OF ELECTRIC SHOCK
69FM
CAUTION
DO NOT OPEN
DIGITAL OUT jack (RCA)
Connect a digital audio cable with RCA jacks to an
external device accepting a SPDIF digital input.
This connection will pass a digital signal when the
CDR510 is recording, when the CDR drive is in
playback, and in CHANGER mode when the CD
drive is in playback.
RS232C
7. RS-232C connector
Using serial communication, a
host device can control the
CDR510.
• The RS-232C host can control functions of
the CDR510 externally.
• The CDR510 automatically transmits status
data when status is changed.
• The CDR510 will respond to a status request
by transmitting the associated status data.
See RS-232C control for details.
(SPDIF)
LOOP
OUT
8. DIGITAL IN & OUT
connectors (SPDIF)
Digital audio cable with
RCA jacks can be used
for input and output.
IN OUT
IN
Optical cable can be
used for input.
DIGITAL IN jack (RCA)
Connect a digital audio cable with RCA jacks
from an external device providing SPDIF digital
output. To record from this input DIGITAL must be
selected by pressing and releasing the INPUT
button on the front of the CDR510 so DIGI is
displayed.
DIGI
Example
display
1
OPT
TOTAL
CHANGER
L
CD - R
R
CD
To avoid interference and noise, do not use the
DIGITAL IN (RCA) jack and the DIGITAL IN
(optical) connector at the same time.
DIGITAL LOOP OUT jack (RCA)
Connect a digital audio cable with RCA jacks to
an external device accepting a SPDIF digital
input. This connection will pass an input digital
signal as long as the CDR510 is powered on,
even if the CDR510 is not recording or in playback.
9. DIGITAL IN connector
(optical)
IN
Remove the dust cover and
plug a digital optical cable in
here.
To record from this input OPTICAL must be
selected by pressing and releasing the INPUT
button on the front of the CDR510 so OPTI is
displayed.
OPTI
Example
display
1
OPT
TOTAL
L
CD - R
R
To avoid interference and noise, do not use the
DIGITAL IN (RCA) jack and the DIGITAL IN
(optical) connector at the same time.
10. EXT / INT (IR) switch
Switch to select between the INT
INT.(IR)
(IR), internal infrared, remote
control, left switch position, and the EXT, external
(RC5) remote control, right switch position.
IR Remote control model RC2100 DR is supplied.
Note:
When the RC-5 is not used, leave the switch in
the INT (IR) position. If desirable, for example in
a professional studio, to disable the IR receiver,
leave the switch in the EXT position.
11. REMOTE (RC5) IN / OUT
jacks (RCA)
Use the supplied cable to connect
the IN jack to a remote control
generator.
- 24 -
CHANGER
CD
Page 25

CD
TRAY OPEN/CLOSE
OPEN/CLOSE
REPEAT
PROG.
RANDOM
ANALOG DIG
OUT
L
R
OUT
R
BALANCED
IN
R - TRIM - L
0
+220+22
(REF=+16dBu/0dBFS)
IN OUT
DIGITAL
(SPDIF)
LOOP
OUT
IN
THIS DEVICE COMPLIES WITH PART 15 OF THE FCC RULES.
OPERATION IS SUBJECT TO THE FOLLLOWING TWO CONDITIONS:
(1) THIS DEVICE MAY NOT CAUSE HARMFUL INTERFERENCE,
AND (2) THIS DEVICE MUST ACCEPT ANY INTERFERENCE
RECRIVED, INCLUDING INTERFERENCE THAT MAY CAUSE
UNDESIRED OPERATION.
REMOTE
(RC5)
EXT.
INT.(IR)
MODEL NO. CDR510/U1B
SERIAL NO.
IN
OUT
WARNING: SHOCK HAZARD - DO NOT OPEN
AVIS : RISQUE DE CHOC ÉLECTRIQUIE - NE PAS OUVRIR.
AC120V 60HZ 0.5A
MARANTZ AMERICA INC.
1100 MAPLEWOOD DRIVE
ITASCA, IL 60143
MADE IN JAPAN
COMPLIES WITH FDA RADIATION PERMORMANCE
STANDARDS, 21CFR SUBCHAPTER J
MANUFACTURED
MML
FACTORY CODE
NO 4300
U
L
C
US LISTED
AUDIO SYSTEM
AC IN
RISK OF ELECTRIC SHOCK
69FM
CAUTION
DO NOT OPEN
DOOR
CDR
HOT(+)
GROUND
RS232C
ANALOG
COLD(-)
OUT
IN
L
L
R
INPUT
SELECT
3. DOOR OPEN/CLOSE
button
Not used.
a 12
12. AC IN
Plug one end of the supplied
AC IN
power cord in here and the other
into an AC outlet.
Remote control (IR)
The supplied infrared remote control permits
most functions of the CDR510 to be controlled
remotely.
The REMOTE EXT / INT (IR) switch (a) on the
back of the CDR510 must be at INT (left position)
for the infrared remote to work.
See Remote batteries on page 9 for installing or
changing the remote batteries.
Most of the controls on the remote work identically to the control on the unit. The page number
describing identical functioning unit controls is
given below.
Further instruction is supplied for controls that are
on the remote only or that function differently
from controls on the unit.
1 2
TRAY
3
4
5
6
OPEN/CLOSE
REPEAT PROG. RANDOM
DOOR
ABC DEF GHI
1
JKL MN OPQ
4
RST UVW XYZ
758
SPACE
DISPLAY
CDR
MENU
CANCEL
REC
TR. INCR.
DIMMER
SCAN
REMOTE CONTROLLER
RC2100DR
2
3
6
9
SCROLL
0
CD
1. TRAY OPEN/CLOSE
button
Push and release to open
or close the currently
REC TYPE
SOURCE
ENTER
selected disc drive tray.
2. Standby
power button
Not used.
4. REPEAT button
In playback in either drive push and
release to enter Repeat playback.
After the first press the currently playing track is
repeated. The display says REPEAT TRACK.
REPEAT TRACK
Example
display
DIG
L
CD - R
R
REPEAT
TRACK
171615141312111098654327
CD
After the second press the currently playing disc
is repeated. The display says REPEAT ALL.
REPEAT ALL
Example
display
DIG
L
CD - R
R
REPEAT
ALL
17161514131211109865437
CD
The third press cancels Repeat playback.
5. PROG. button
Works the same as the PROG
button, see page 13.
6. RANDOM button
In playback, in CHANGER mode
only, push and release to enter
RANDOM playback.
Tracks are played at random, from either drive,
for playback. Playback will randomly switch
drives, putting the other drive in Play pause.
RANDOM
Example
display
21
DIG
CD - R
CHANGER
L
R
Track 12 is playing. Tracks 4, 9 and 14 have
been randomly played on the CD drive
RANDOM
1716151312111086537
CD
.
After a track is played it is removed from being
randomly chosen again until all tracks on both
drives have been played. Playback then automatically stops.
If RANDOM and REPEAT ALL are combined
tracks are played randomly until all tracks have
been played. Then tracks are re-randomized and
play continues.
- 25 -
Page 26

7
ABC DEF GHI
DISPLAY
SCROLL
8
9
10
11
12
OPEN/CLOSE
TRAY
REPEAT PROG. RANDOM
DOOR
ABC DEF GHI
1
JKL MN OPQ
4
RST UVW XYZ
758
SPACE
DISPLAY
CDR
MENU
CANCEL
REC
TR. INCR.
DIMMER
SCAN
REMOTE CONTROLLER
RC2100DR
TRAY
OPEN/CLOSE
DOOR
REPEAT PROG. RANDOM
ABC DEF GHI
1
2
2
3
13
6
9
SCROLL
0
CD
1
JKL MN OPQ
4
RST UVW XYZ
7
REC TYPE
SOURCE
ENTER
2
5
8
SPACE
0
3
6
14
15
9
7. Alphanumeric keypad
Performs some of the
JKL MN OPQ
4
RST UVW XYZ
758
SPACE
DISPLAY
0
CDR
MENU
CANCEL
REC
TR. INCR.
DIMMER
SCAN
REMOTE CONTROLLER
RC2100DR
3
6
9
SCROLL
16
CD
17
REC TYPE
18
SOURCE
ENTER
19
20
functions of the REC
LEVEL / SELECT control.
In Playback and Program modes push and release a
number button to select the track. Then push the
REC LEVEL / SELECT control on the unit or ENTER
on the remote to enter the selection.
When entering CD Text push a number button once to
select the first of the three letters, twice for the second
and three times for the third. Push the REC LEVEL /
SELECT control on the unit or ENTER on the remote
to enter the selected number.
8. DISPLAY button
Works the same as the TIME button
on the CDR510. See page 18.
9. CDR button
CDR
Works the same as the CDR button on
the CDR510. See page 15.
10. MENU button
MENU
Works the same as the MENU/STORE
button on the CDR510. See page 16.
11. Track Skip backward button
Press and release during Play or Play
pause to skip backward to the beginning of the current track. Push and release twice or
more to skip backward to previous tracks.
CD
CANCEL
14. PAUSE button
Push and release to Pause recording or playback on the currently
selected drive.
15. Stop button
Push and release to Stop recording
or playback on the currently selected
drive.
16. CD button
Works the same as the CD button
on the CDR510. See page 15.
17. Track Skip forward button
Press and release during Play or
Play pause to skip forward to the
beginning of the next track.
18. CANCEL button
Works the same as the CANCL /
DELETE button on the CDR510.
See page 19.
19. Fast forward search button
12. Fast backward search button
Works the same as the Reverse
button on the CDR510. See page
19.
13. SCROLL button
Works the same as the TEXT button
on the CDR510. See page 18.
Works the same as the Forward
button on the CDR510. See
page 19.
20. Play button
Push and release to start playback
on the currently selected drive.
- 26 -
Page 27

TRAY
TR. INCR.
SCAN
DIMMER
REC TYPE
SOURCE
ENTER
OPEN/CLOSE
DOOR
21
22
23
24
REPEAT PROG. RANDOM
ABC DEF GHI
1
2
JKL MN OPQ
4
RST UVW XYZ
758
SPACE
DISPLAY
0
CDR
MENU
CANCEL
REC TYPE
REC
TR. INCR.
DIMMER
SCAN
REMOTE CONTROLLER
RC2100DR
3
6
9
SCROLL
CD
25
26
SOURCE
ENTER
27
REC
21. REC button
Works the same
as the Record
button on the CDR510.
See page 16.
22. TR. INCR.
button
Press and
release during
recording to increment the track. The track number is
increased by one, but no break or sound is introduced
into the recording.
Not available in MINUTE TRACK record mode.
23. SCAN button
Remote only. In CHANGER
mode in Playback and at Stop, press
and release to scan, play the first 10
seconds of each track.
SCAN
Example
display
ANALOG
L
CD - R
R
CHANGER
19181716151413121110986547
SCAN
CD
Press and release again to exit scan. Play will continue from the currently selected track.
24. DIMMER button
Not used.
25. REC TYPE button
Not used.
26. SOURCE button
Works the same as the INPUT
button on the CDR510. See page
18.
27. ENTER button
Works the same as pushing and
releasing the REC LEVEL / SELECT
control on the CDR510. See page
17.
- 27 -
Page 28
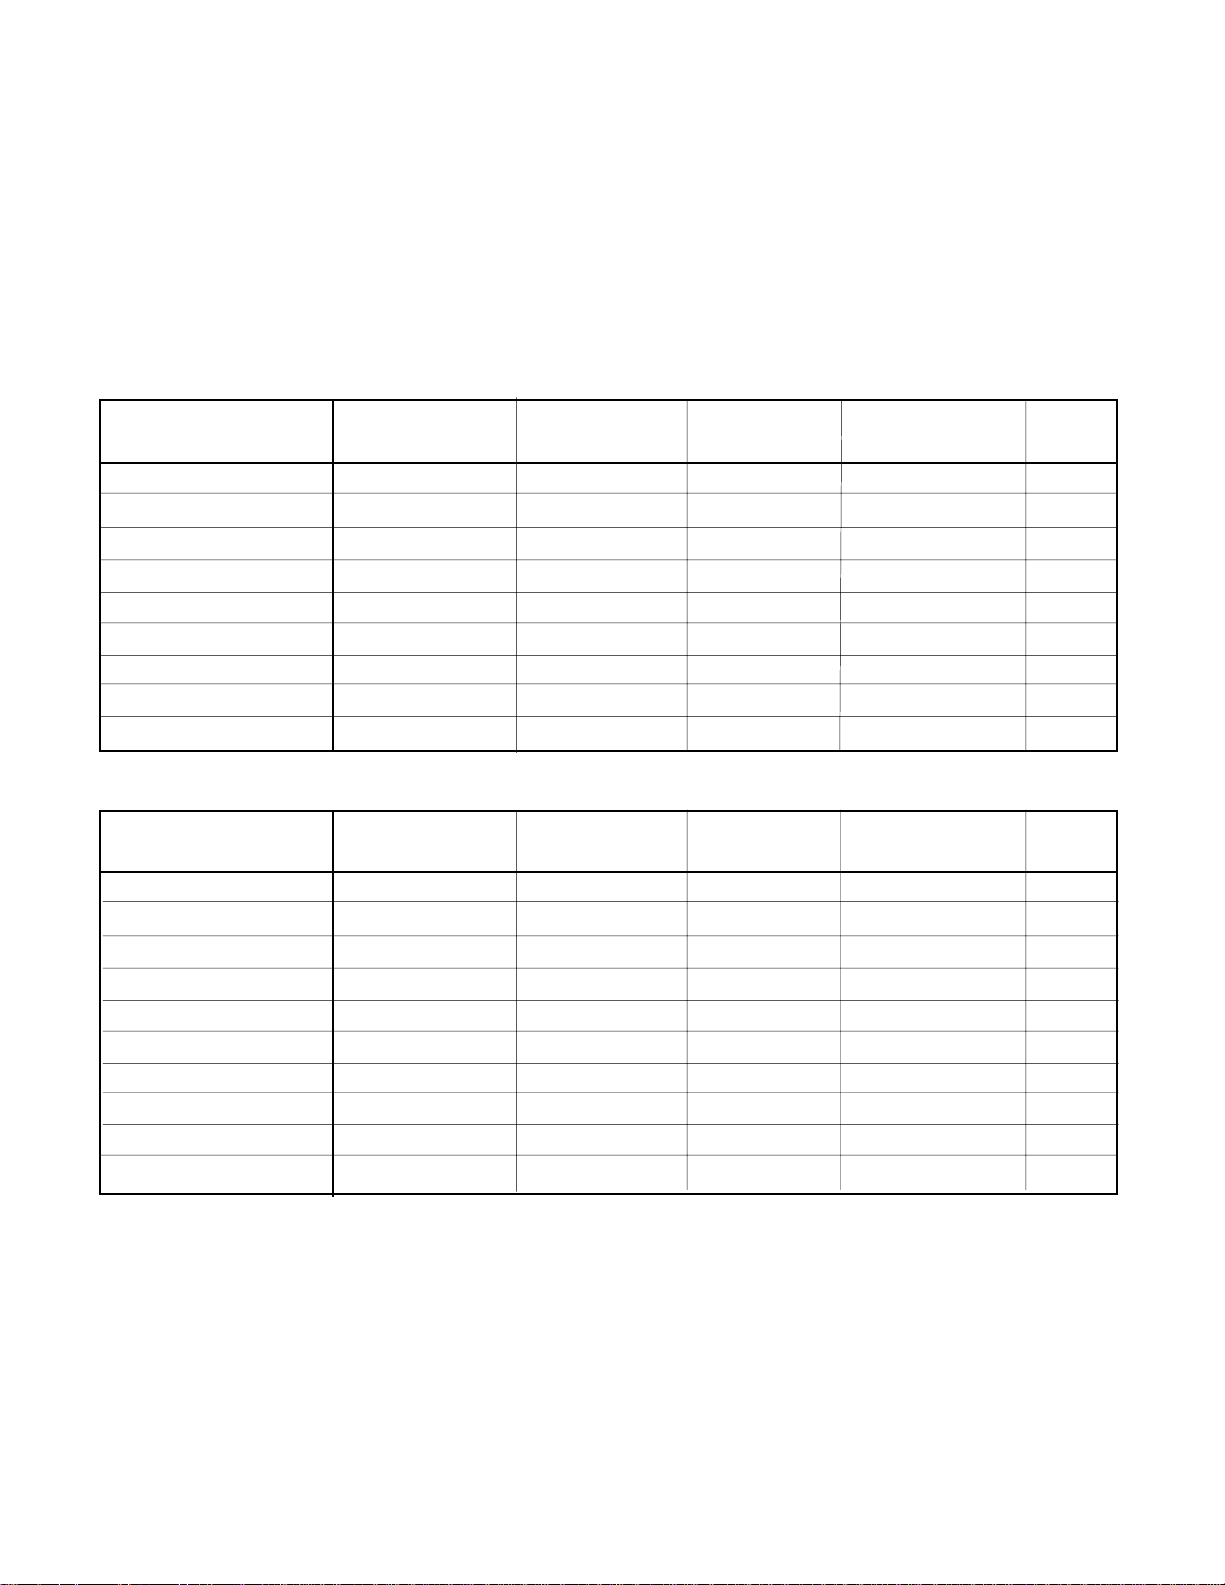
MENU mode
Menu Settings Chart
MENU mode permits advanced settings for
recording CDs and CD Text handling.
Menu parameters are available for setting when
appropriate. The chart below lists the drives and
modes when the Menu item is available.
CDR drive
Menu
items
TEXT EDIT
TEXT ERASE
TEXT VIEW
AUTO TRACK
AUTO STOP
REC BALANCE
TEXT ON/OFF
SRC ON/OFF
COPY
CD
(Stop mode)
-
-
-
√
√
-
√
√
√
The chart also lists the default setting applied by
the factory, and if the setting is remembered if the
CDR510 is powered off and back on again.
'See Page' lists the page number for detailed
instructions on the menu item.
CD-R/RW
(Stop mode)
√
√
√
√
√*
√
√
√
√
Factory
default
-
-
ON
ON
L:0 R:0
ON
ON
ON
Is setting
remembered?
no
no
no
yes
yes
yes
yes
yes
yes
See
Page
29
30
30
31
32
33
33
34
35
CD drive
Menu
items
PITCH
PITCH ON/OFF
MP3 LOAD
AUTO MP3 LOAD
TEXT ON/OFF
AUTO CUE ON/OFF
CUE LEVEL
PLAY MODE
SINGLE PLAY
END WARNING
*Only available when recoding an external analog signal, or REC MP3 DISC.
**Not available when the disc is not loaded.
***Not available when a CD-DA disc is loaded.
CHANGER
mode
√**
√**
√***
√
√
-
-
-
-
-
DUAL
mode
√**
√**
√***
√
√
√
√
√
√
√
Factory
default
0
ON
-
OFF
ON
OFF
-40dB
PLAY
OFF
15 sec
remembered?
Is setting
yes
yes
no
yes
yes
yes
yes
yes
yes
yes
See
Page
36
36
43
42
33
37
37
38
38
39
- 28 -
Page 29
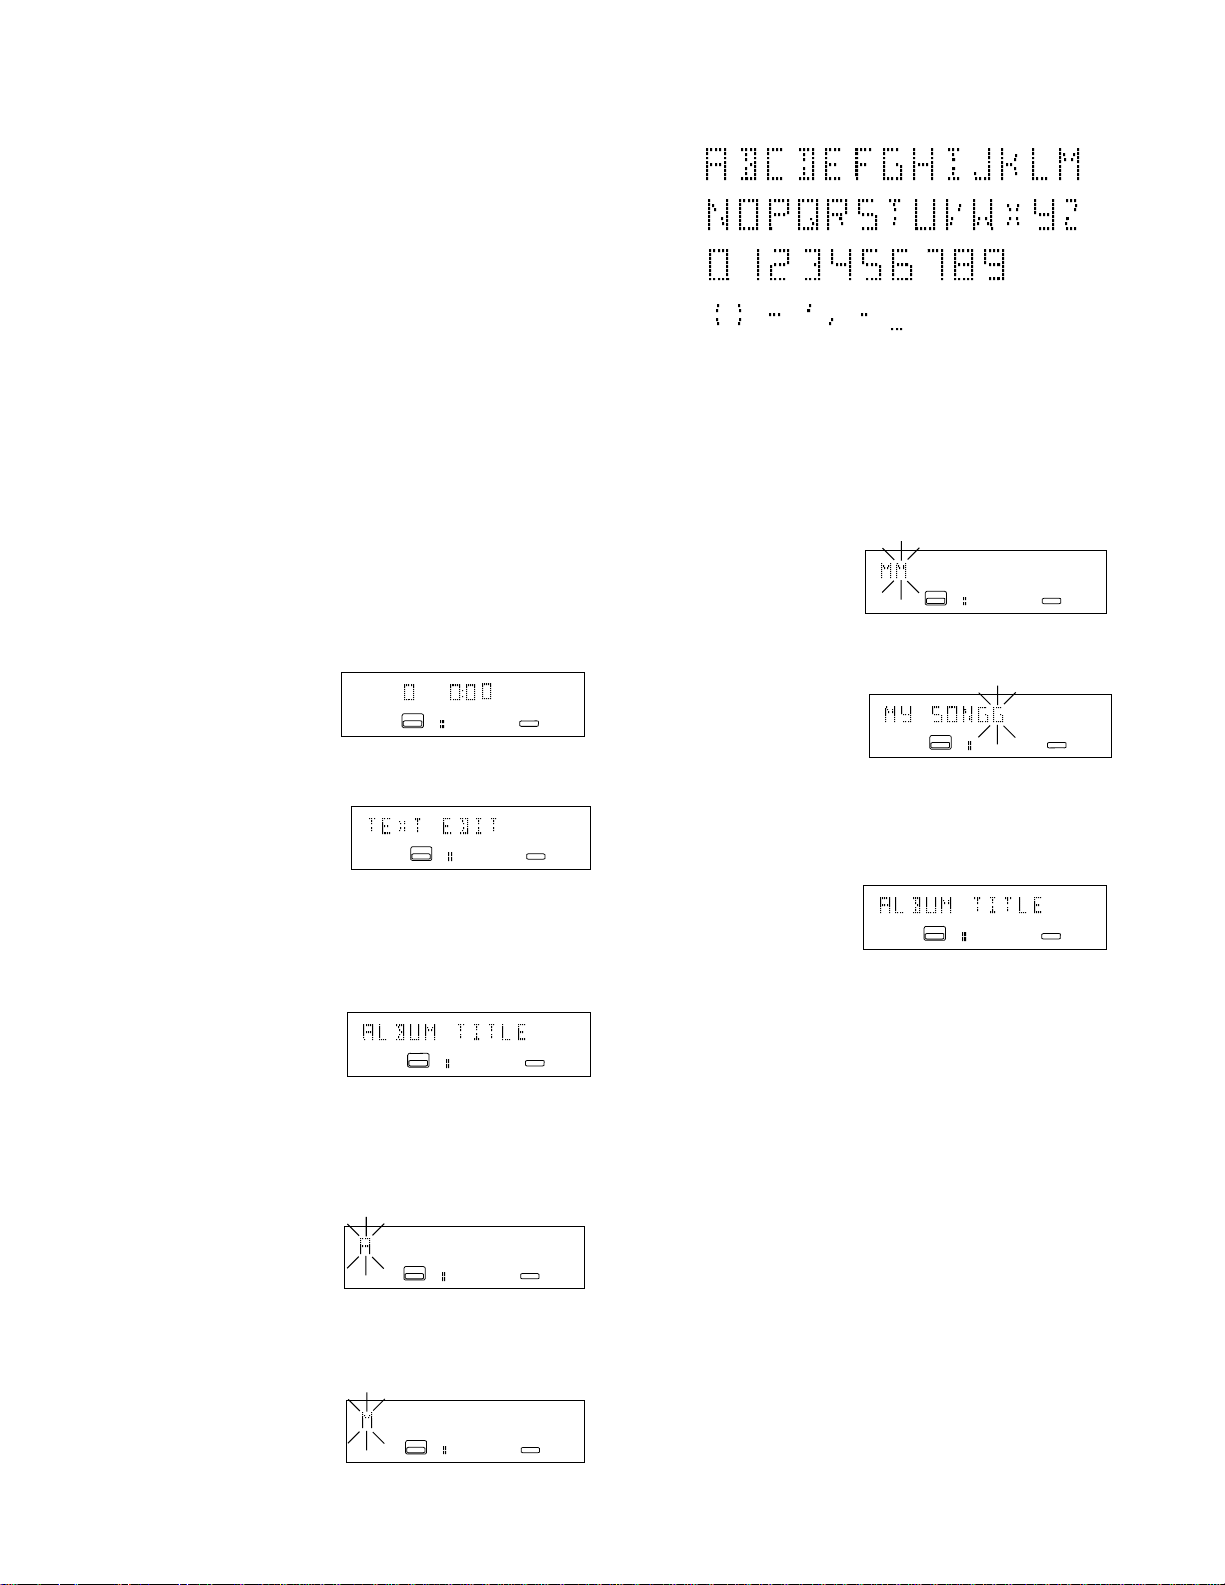
To make a menu change:
1. Push and release MENU/STORE button to
enter Menu mode.
2. Turn the REC LEVEL/SELECT control to
advance through the menu choices.
3. When the menu choice you want to change
is displayed, push and release the REC
LEVEL/SELECT control to enter that choice.
4. Then turn the REC LEVEL/SELECT control
to adjust or change the menu setting.
5. When the desired setting is displayed, push
and release the REC LEVEL/SELECT
control to confirm the new menu setting.
The display returns to the menu choice.
6. Push and release the MENU/STORE button
to exit menu mode.
The available characters are.
To enter a space select the underline.
A maximum of 60 characters can be entered
per title.
5. When correct, push and release the REC
LEVEL / SELECT control to accept the charac-
ter. The next character space will be flashing.
TEXT EDIT (How to edit CD Text)
1. With the CDR drive selected and an unfinalized CD-R or CD-RW detected in the CDR
drive,
Example
display
ANALOG
TOTAL
L
CD - R
R
CD
push and release the MENU/STORE button.
Example
display
ANALOG
L
CD - R
R
CD
TEXT EDIT is displayed as a menu choice.
2. Push and release the
control to accept the TEXT EDIT menu choice.
REC LEVEL / SELECT
Example
display
ANALOG
L
CD - R
R
CD
ALBUM TITLE is displayed.
3. Push and release the
control to accept the ALBUM TITLE menu
REC LEVEL / SELECT
choice. 'A' flashing is displayed.
Example
display
ANALOG
L
CD - R
R
CD
6. When your album title is complete and
correct,
Example
display
L
CD - R
RANALOG
CD
push and release the MENU/STORE button to
store. The display returns to the ALBUM
TITLE menu choice.
Example
display
ANALOG
L
CD - R
R
CD
7. Turn the REC LEVEL / SELECT switch to
another menu choice or press and release
the CANCL/DELETE button to exit menu
mode.
CD Text information is not retained if the CDR10
is turned off, or if the unfinalized disc is removed
from the CDR drive.
Example
display
ANALOG
L
CD - R
R
CD
4. Turn the REC LEVEL / SELECT control to
select the first character of your album title.
Example
display
L
CD - R
RANALOG
CD
- 29 -
Page 30

TEXT ERASE (How to erase CD Text)
1. With the CDR drive selected and an unfinalized CD that includes CD Text detected in the
CDR drive, push and release the MENU/
STORE button.
2. Turn the REC LEVEL/SELECT control so
TEXT ERASE is displayed.
L
ANALOG
CD - R
R
CD
TEXT VIEW (How to review CD Text)
TEXT VIEW lets you review the CD Text in
memory.
1. With the CDR drive selected and an unfinalized CD that includes CD Text detected in
the CDR drive:
ANALOG
TOTAL
L
CD - R
R
CD
push and release the MENU/STORE button.
3. Push and release the REC LEVEL/SELECT
control. ALL TEXT is displayed.
ANALOG
CD - R
R
CD
L
4. Turn the REC LEVEL/SELECT control to tab
through ALL TEXT, ALBUM TITLE, TITLE
TRACK 1, TITLE TRACK 2, . . . and back to
ALL TEXT.
5. When the display indicates your desired
choice for erasing, push and release the REC
LEVEL / SELECT control. The text to be
erased will be displayed, then ERASE OK will
be displayed.
ANALOG
CD - R
R
CD
L
6. Push and release the REC LEVEL/SELECT
control to erase, or the CANCL/DELETE
button to abort the erasure.
2. Turn the REC LEVEL/SELECT control so
TEXT VIEW is displayed.
L
CD - R
RANALOG
CD
3. Push and release the REC LEVEL/SELECT
control. ALBUM TITLE is displayed.
ANALOG
CD - R
R
CD
L
4. Turn the REC LEVEL/SELECT control to tab
through ALBUM TITLE, TITLE TR 1, TITLE
TR 2, . . . until the title you want to review is
displayed.
21
ANALOG
L
CD - R
R
CD
5. Push and release the REC LEVEL/SELECT
control to display the title. A long title will scroll
across the display.
6. When done, turn the REC LEVEL/SELECT
control to switch to other menu items or press
and release the CANCL/DELETE button to exit
menu mode.
- 30 -
Page 31
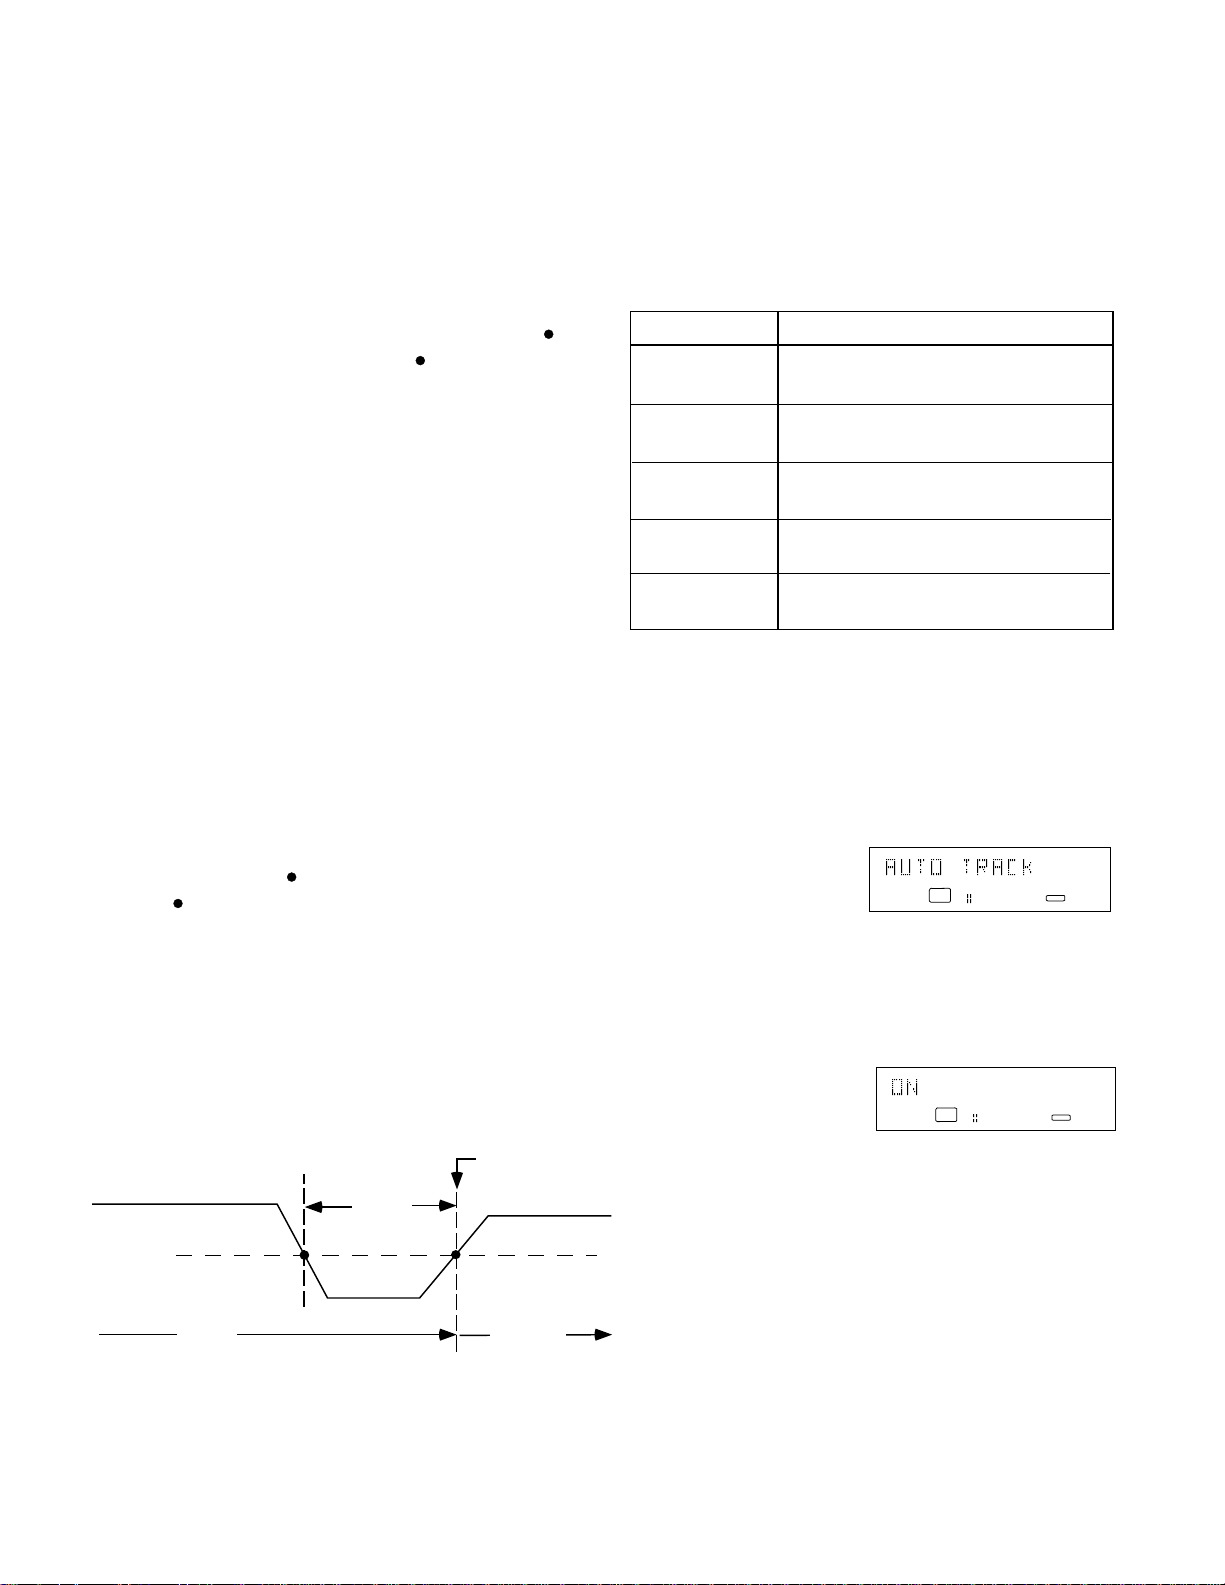
AUTO TRACK ON
Track increment based on user data
of incoming signal.
Track increment based on user data
of incoming signal.
Track increment after silence gap of
2 seconds on incoming signal.
Track increment after silence gap of
2 seconds on incoming signal.
None
SOURCE
CD/MD
(with user data)
DAT/DCC
(with user data)
Unknown
(no user data)
Analog
No source
(no lock)
AUTO TRACK
AUTO TRACK can be either ON or OFF.
AUTO TRACK OFF
When AUTO TRACK is OFF only manual tracks
are recorded by pressing and releasing the TR.
INCR button on the IR remote, incrementing the
track via the RC-5 signal, or RS-232C control, or
by pressing and releasing the Record button
on
the CDR510 or the REC button on the IR
remote.
Track information in the audio source such as a
CD being dubbed is not recorded.
AUTO TRACK ON
When AUTO TRACK is ON and you are recording from a digital source with user data (track
information from a source with a SPDIF connection) the track information is recorded.
If AUTO STOP is also ON no more than 20 seconds of silence will be recorded from an analog
source and 4 seconds from a digital source.
The chart below will help identify how a source will
be handled by the AUTO TRACK system.
When AUTO TRACK is ON and the digital
source does not include track ids, the CDR510
will use a silence gap to mark a track.
A track can also be incremented by pressing and
releasing the TR. INCR button on the IR remote,
incrementing the track via the RC-5 signal, or
RS-232C control, or by pressing and releasing
the Record button
button on the IR remote. See table on page
32.
Silence gap
With Auto Track ON, when a (silence gap) is
detected for more than 2 seconds, the CDR510
will increment a new track when signal is
detected at the threshold levels outlined below.
Audio source signal
Analog source -40dB
Digital source -80dB
on the CDR510 or the REC
silence
gap
2 sec
track x
Track increment
track x+1
How to turn AUTO TRACK ON or OFF
1. With the CDR drive selected push and release the MENU/STORE button.
2. Turn the REC LEVEL/SELECT control until
AUTO TRACK is displayed.
ANALOG
L
R
CD
3. Push and release the REC LEVEL/SELECT
control. ON or OFF is displayed.
4. Turn the REC LEVEL/SELECT control to
toggle between ON and OFF.
L
ANALOG
R
5. When correct push and release the REC
LEVEL/SELECT control. AUTO TRACK is
displayed again.
6. Turn the REC LEVEL/SELECT control to
switch to other menu choices or press and
release the CANCL/DELETE button to exit
menu mode.
CD
- 31 -
Page 32

AUTO STOP
Manual Track increment, AUTO TRACK, and AUTO STOP depending on Recording mode.
AUTO TRACK must be ON for AUTO STOP OFF
or ON to function.
AUTO STOP OFF
When recording with AUTO STOP OFF the
CDR510 will record until stopped by pressing the
Stop button.
How to turn AUTO STOP ON or OFF
1. With the CDR drive selected push and
release the MENU/STORE button.
2. Turn the REC LEVEL/SELECT control until
AUTO STOP is displayed.
The benefit of AUTO STOP OFF is, for example,
ANALOG
L
R
CD
when recording classical music, which could
have long passages of silence.
3. Push and release the REC LEVEL/SELECT
control. ON or OFF is displayed.
AUTO STOP ON
When recording with AUTO STOP ON the
CDR510 will automatically stop after a period of
4. Turn the REC LEVEL/SELECT control to
toggle between ON and OFF.
silence. The silence will be recorded onto the
end of the current track.
When recording with AUTO STOP ON from an
analog source, the recording will stop after
recording 20 seconds of silence (a signal lower
than -40dB). When recording with AUTO STOP
ON from a digital source (without track and stop
data), the recording will stop after recording 4
seconds of silence (a signal lower than -80dB).
ANALOG
5. When correct push and release the REC
LEVEL/SELECT control. AUTO STOP is
displayed again.
6. Turn the REC LEVEL/SELECT control to
switch to other menu choices or press and
release the CANCL/DELETE button to exit
L
R
CD
menu mode.
Menu exceptions
In some Recording modes some menu settings are overridden and/or manual track incrementing is not
available. For example in REC LISTEN recording mode, manual track incrementing is not available,
and AUTO STOP functions even if the menu setting is at OFF. The table below details these exceptions.
Recording
Mode
RECORD FAST
REC LISTEN
MAKE CD
REC EXT DISC
REC EXT MAN
MINUTE TRACK
Manual Track
Increment
NA
NA
NA
Available
Available
NA
each minute
AUTO TRACK AUTO STOP
ON
ON
ON
ON
ON
ON
ON
OFF
OFF
OFF
OFF
OFF
OFF
ON
ON
ON
ON
ON
ON
ON
OFF
each minute
- 32 -
OFF
ON
ON
ON
OFF
OFF
OFF
Page 33

REC BALANCE
L
R
ANALOG
CD
Balance adjustment
Balance adjustment is only available in record or
record standby mode, for example when REC
EXT DISC is selected and the CDR510 is waiting
for the external source to start.
Balance is adjustable by independently adjusting
the record level of the Left and Right channels.
The adjustment range is from 0 to -77dB in 1dB
increments.
TEXT ON/OFF
For those situations where it is not desirable to
display CD Text, for example if you are a DJ and
do not want to wait a couple of seconds for a long
album title to be read and scroll across the display, CD Text can be turned off.
When TEXT is ON and a CD has text, the album
title is displayed when the disc is read, when
playback begins, and when playback ends. A
track title is displayed before playback of a track
begins.
Balance settings remain when discs are changed
or if the CDR510 is powered off.
1. When in record or record standby push and
release the MENU/STORE button.
2. Turn the REC LEVEL/SELECT control until
REC BALANCE is displayed.
321
SYNC
ANALOG
L
CD - R
R
CD
3. Push and release the REC LEVEL/SELECT
control. L 0 R 0 is displayed.
321
SYNC
ANALOG
L
CD - R
R
CD
The example display indicates that the left
balance (L) is at 0, and the right balance (R)
is at 0.
When TEXT is OFF and a CD has text, the text is
ignored.
How to turn TEXT ON or OFF
1. With the CDR drive selected push and release the MENU/STORE button.
2. Turn the REC LEVEL/SELECT control until
TEXT ON/OFF is displayed.
ANALOG
L
R
CD
3. Push and release the REC LEVEL/SELECT
control. ON or OFF is displayed.
4. Turn the REC LEVEL/SELECT control to
toggle between ON and OFF.
4. Turn the REC LEVEL/SELECT control clockwise to adjust the balance to the right or
counterclockwise to adjust the balance to the
left. Maximum adjustment is 77dB.
Example display
right adjustment
-53dB
SYNC
ANALOG
321
L
CD - R
R
5. When correct push and release the REC
LEVEL/SELECT control. REC BALANCE is
displayed again.
6. Turn the REC LEVEL/SELECT control to
switch to other menu choices or press and
release the CANCL/DELETE button to exit
menu mode.
5. When correct push and release the REC
LEVEL/SELECT control. TEXT ON/OFF is
displayed again.
CD
6. Turn the REC LEVEL/SELECT control to
switch to other menu choices or press and
release the CANCL/DELETE button to exit
menu mode.
- 33 -
Page 34

SRC
The CDR510 can perform SRC (Sample Rate
Conversion) on an incoming digital signal for
recording. The CDR510 is capable of handling
digital sources from 11 kHz up to 56 kHz.
The CDR510 monitors the incoming digital
signal to check if the signal is 44.1 kHz (±100
ppm). If SRC is ON or OFF and the incoming
signal meets these criteria, the CDR510
records the signal. If SRC is ON and the
incoming signal fails these criteria, the sample
rate converter is automatically turned on and
recording continues. If SRC is OFF and the
incoming signal fails these criteria, silence is
recorded.
If the recording source is a special disc such
as HDCD or DTS, you have to
• set SRC to OFF (if set to ON some data
may be lost)
• set source sampling frequency to 44.1 kHz
• use a digital connection
• set the digital recording volume (REC
LEVEL / SELECT control) of the CDR510
to 0 dB
4. Turn the REC LEVEL/SELECT control to
toggle between ON and OFF.
5. When correct push and release the REC
LEVEL/SELECT control. SRC is displayed
again.
6. Turn the REC LEVEL/SELECT control to
switch to other menu choices or press and
release the CANCL/DELETE button to exit
menu mode.
Note
If the source has tracks recorded at differing
sample frequencies, noise might be recorded
when the sampling rate changes.
How to turn SRC ON or OFF
1. With the CDR drive selected push and
release the MENU/STORE button.
2. Turn the REC LEVEL/SELECT control until
SRC is displayed.
DIG
L
R
CD
3. Push and release the REC LEVEL/SELECT
control. ON or OFF is displayed.
DIG
L
R
CD
- 34 -
Page 35

COPY protection
All pre-recorded audio CDs include a digital mark
indicating the copy protection status of the disc.
This information is stored in the user data area of
the CD and is transmitted in the SPDIF format
digital output.
4. Turn the REC LEVEL/SELECT control to tab
between ON, OFF and HCO.
5. When correct push and release the REC
LEVEL/SELECT control. COPY is displayed
again.
Analog sources do not carry copy protection.
Because the CDR510 is a professional CD
recorder, it will record from any digital source,
ignoring the copy protection setting of the source
material. The CDR510 allows you to set the level
of copy protection of each disc you record.
COPY OFF
A CD recorded with COPY OFF allows unlimited
digital copying. A consumer digital recording
device can digitally record the CD.
COPY ON
A CD recorded with COPY ON allows a single
generation digital copy for personal use. A
consumer digital recording device will be able to
digitally record the CD but the copy will have
Copy Protection set to HCO so further digital
copies cannot be made.
COPY HCO (Home Copy protected Original)
A CD recorded with COPY HCO does not allow
digital copying. A consumer digital recording
device cannot digitally copy the CD.
6. Turn the MENU/STORE button to switch to
other menu choices or press and release the
CANCL/DELETE button to exit menu mode.
How to turn COPY ON, OFF or to HCO
1. With the CDR drive selected push and release the MENU/STORE button.
2. Turn the REC LEVEL/SELECT control until
COPY is displayed.
86543217
L
ANALOG
CD - R
R
CD
3. Push and release the REC LEVEL/SELECT
control. ON, OFF or HCO is displayed.
86543217
L
ANALOG
CD - R
R
CD
- 35 -
Page 36

PITCH
The playback speed (pitch) of the CD drive can
be changed up to ±12.0% in steps of 0.1%.
Default setting is 0.
Digital signals are not output when pitch control
is on.
Adjusting the pitch lets you tune the CD output to
a musical instrument, useful when practicing
because it permits adjusting the music practice
source to your instrument.
When pitch is active the green PITCH indicator
on the front of the CDR510 is lit and steady.
Pitch settings remain when discs are changed or
if the CDR510 is powered off.
How to turn the PITCH ON or OFF
The PITCH ON/OFF menu control lets you turn
the pitch on or off without changing the pitch
adjustment when pitch is on. If you turn the pitch
adjustment off and later, if you turn the pitch
adjustment back on, the original pitch setting
remains.
1. With the CD drive selected push and release
the MENU/STORE button.
2. Turn the REC LEVEL/SELECT control until
PITCH ON/OFF is displayed.
L
ANALOG
CD - RW
R
CD
There are two menu controls for pitch, PITCH
and PITCH ON/OFF.
How to adjust the PITCH (menu control)
The PITCH menu control adjusts the pitch.
1. With the CD drive selected push and release
the MENU/STORE button.
2. Turn the REC LEVEL/SELECT control until
PITCH is displayed.
ANALOG
CD - RW
R
CD
L
3. Push and release the REC LEVEL/SELECT
control. PI is displayed.
4. Turn the REC LEVEL/SELECT control to
adjust the pitch.
Example
display
ANALOG
CD - RW
L
R
CD
3. Push and release the REC LEVEL/SELECT
control. ON or OFF is displayed.
4. Turn the REC LEVEL/SELECT control to
toggle between ON and OFF.
ANALOG
CD - RW
R
CD
L
5. When correct push and release the REC
LEVEL/SELECT control. PITCH ON/OFF is
displayed again.
6. Turn the REC LEVEL/SELECT control to
switch to other menu choices or press and
release the CANCL/DELETE button to exit
menu mode.
5. When correct push and release the REC
LEVEL/SELECT control. PITCH is displayed
again.
6. Turn the REC LEVEL/SELECT control to
switch to other menu choices or press and
release the CANCL/DELETE button to exit
menu mode.
- 36 -
Page 37

AUTO CUE (CD drive and Dual mode only)
AUTO CUE allows the CD player to advance to
the beginning of the audio within the track, rather
than start play back from the track start flag. This
minimizes the silence at the beginning of play
back. The factory default for AUTO CUE is OFF.
How loud the audio has to be before play back is
started is adjustable using AUTO CUE LEVEL.
1716151413121110986543217
L
ANALOG
CD - R
R
CD
3. Push and release the REC LEVEL/SELECT
control. The current level is displayed.
4. Turn the REC LEVEL/SELECT control to
adjust the level.
TRACK
How to turn AUTO CUE ON or OFF
1. In Dual mode, with the CD drive selected
push and release the MENU/STORE button.
2. Turn the REC LEVEL/SELECT control until
AUTO CUE is displayed.
1716151413121110986543217
L
ANALOG
CD - R
R
CD
3. Push and release the REC LEVEL/SELECT
control. ON or OFF is displayed.
4. Turn the REC LEVEL/SELECT control to
1716151413121110986543217
L
CD - R
ANALOG
R
toggle between ON and OFF.
5. When correct push and release the REC
LEVEL/SELECT control. AUTO CUE is
displayed again.
TRACK
1716151413121110986543217
L
ANALOG
CD - R
R
CD
5. When correct push and release the REC
LEVEL/SELECT control. CUE LEVEL is
displayed again.
TRACK
6. Turn the REC LEVEL/SELECT control to
switch to other menu choices or press and
release the CANCL/DELETE button to exit
menu mode.
TRACK
CD
6. Turn the REC LEVEL/SELECT control to
switch to other menu choices or press and
release the CANCL/DELETE button to exit
menu mode.
AUTO CUE LEVEL
The AUTO CUE LEVEL is adjustable from -35dB
to -45dB in 1dB increments. The factory default
for AUTO CUE LEVEL is -40dB.
How to adjust the AUTO CUE LEVEL
1. In Dual mode, with the CD drive selected
push and release the MENU/STORE button.
2. Turn the REC LEVEL/SELECT control until
CUE LEVEL is displayed.
- 37 -
Page 38

PLAY MODE (CD drive and Dual mode only)
With PLAY MODE at PAUSE when you first
press the Play/Pause button
on the CD
drive, or a selection is chosen with the REC
LEVEL/SELECT control, the selection is paused.
The second press starts play back. With PLAY
MODE at PLAY, play starts immediately.
How to set the PLAY MODE
1. In Dual mode, with the CD drive selected
push and release the MENU/STORE button.
2. Turn the REC LEVEL/SELECT control until
PLAY MODE is displayed.
3. Push and release the REC LEVEL/SELECT
SINGLE PLAY (CD drive and Dual mode only)
SINGLE PLAY can be set to stop play after a
single track is played.
When at OFF, when a track is finished the next
track automatically begins playing.
When at STOP, when a track is completed the
CD drive is stopped as if a Stop button is
pushed.
When at RE CUE, when a track is completed the
CDR510 is paused to repeat the current track. If
AUTO CUE is on it is cued according to the
setting of AUTO CUE.
When at NEXT CUE, when a track is completed
the CDR510 is paused to begin the next track. If
AUTO CUE is on it is cued according to the
setting of AUTO CUE.
1716151413121110986543217
L
ANALOG
CD - R
R
CD
control. PAUSE or PLAY is displayed.
4. Turn the REC LEVEL/SELECT control to
toggle between PAUSE and PLAY.
5. When correct push and release the REC
1716151413121110986543217
CD
ANALOG
L
CD - R
R
LEVEL/SELECT control. PLAY MODE is
displayed again.
6. Turn the REC LEVEL/SELECT control to
switch to other menu choices or press and
release the CANCL/DELETE button to exit
menu mode.
TRACK
TRACK
How to set SINGLE PLAY
1. In Dual mode, with the CD drive selected
push and release the MENU/STORE button.
2. Turn the REC LEVEL/SELECT control until
SINGLE PLAY is displayed.
17161514131211109865437
L
ANALOG
CD - R
R
CD
3. Push and release the REC LEVEL/SELECT
control. The current setting of SINGLE PLAY
is displayed.
17161514131211109865437
CD
ANALOG
L
CD - R
R
4. Turn the REC LEVEL/SELECT control to tab
through STOP, OFF, RE CUE, and NEXT
CUE.
TRACK
TRACK
5. When correct push and release the REC
LEVEL/SELECT control. SINGLE PLAY is
displayed again.
6. Turn the REC LEVEL/SELECT control to
switch to other menu choices or press and
release the CANCL/DELETE button to exit
menu mode.
- 38 -
Page 39

END WARNING (CD drive and Dual mode only)
When END WARNING is on the remaining time
display flashes as the end of a track is approached during play back.
END WARNING can be set from 0 to 35 seconds
in 5 second increments.
END WARNING is off when set to 0.
Factory default setting is 15 seconds.
How to set END WARNING
1. In Dual mode, with the CD drive selected
push and release the MENU/STORE button.
2. Turn the REC LEVEL/SELECT control until
END WARNING is displayed.
19181716151413121110986543217 20
CD
ANALOG
L
CD - R
R
3. Push and release the REC LEVEL/SELECT
control. The current setting of END WARNING is displayed.
4. Turn the REC LEVEL/SELECT control to tab
through 0 to 35 seconds in 5 second increments.
19181716151413121110986543217 20
CD
ANALOG
L
CD - R
R
5. When correct push and release the REC
LEVEL/SELECT control. END WARNING is
displayed again.
6. Turn the REC LEVEL/SELECT control to
switch to other menu choices or press and
release the CANCL/DELETE button to exit
menu mode.
- 39 -
Page 40

Recording modes
When at Stop, press and release the REC MODE
button to tab through the Recording Modes:
RECORD FAST, REC LISTEN, REC MP3 DISC,
MAKE CD, REC EXT DISC, REC EXT MAN, and
MINUTE TRACK.
Only recording modes appropriate to the status of
the CDR510 are available. For example, REC
MP3 DISC is only available if an MP3 disc is
recognized in the CD drive.
Choosing the Recording mode is usually the last
step before actual recording (pressing the REC
button to begin recording). The CDR510 is set to
expect you have the disc you want to record on in
the CDR drive, chosen the audio source, made
necessary connections, and made necessary
menu adjustments. If you are not ready to
record, simply press and release a Stop button
Recording is started manually by pressing the
Record button
external source. You can also start the external
source before starting to record, for example to
manually adjust the input level.
Recording is stopped by pressing the CDR drive
Stop button
With AUTO TRACK ON, track information is
automatically copied from an external source with
subcode information and cannot be added manually. For an analog audio source, or a source with
no subcode information, a silence of 2.7 seconds
or more automatically increments a track.
With AUTO TRACK OFF, track numbers can be
manually incremented by pressing and releasing
the TR. INCR. button on the IR remote or by
pressing and releasing the Record button
.
the CDR510 or REC button on the IR remote.
and immediately starting the
.
on
REC EXT DISC
Record External Disc (Sync Record) lets you
record from an analog or digital external audio
source: CD, DAT or MD (mini disc).
Recording is started by starting the external
source.
Recording from digital or analog sources will
automatically stop (AUTO STOP ON) after 20
seconds of silence.
Track information is automatically copied from the
external source and cannot be added manually.
For an analog audio source, or a source with no
subcode information, a silence of 2.7 seconds or
more automatically increments a track.
CD Text can be added after the copy is made and
before finalizing.
The recording is not automatically finalized.
REC EXT MAN
Record External Disc (Manual Record) lets you
record from an analog or digital audio source:
CD, DAT or MD (mini disc).
CD Text can be added after the copy is made and
before finalizing.
The recording is not automatically finalized.
MINUTE TRACK
This REC mode is the same as REC EXT MAN
but automatically adds a track every minute.
During playback the Minute Tracks make finding
a particular passage easier because of the
relationship between track numbers and time. For
example, during playback select track 3 to play
approximately the 3rd minute of recording. To go
directly to the beginning of the 10th minute select
track 10, etc.
Track Recording time
# minutes:seconds
1 ........................ 0:00 - 0:59
2 ......................... 1:00-1:59
3 ......................... 2:00-2:59
. .
. .
..
80 ...................... 79:00-79:56
Note
During recording press the TIME button on the
- 40 -
Page 41

CDR510 or the DISPLAY button on the remote to
display the remaining disc time.
Minute Track marks are silent. Playback across a
Minute Track does not produce any sound.
CD Text can be added after the copy is made
and before finalizing.
The recording is not automatically finalized.
RECORD FAST
RECORD FAST lets you copy the CD in the CD
drive to an unfinalized disc in the CDR drive at
2X speed. The entire CD in the CD drive is
copied. In PROGRAM mode the tracks programmed are copied.
In most cases AUTO TRACK and AUTO STOP
should be at ON so track information is recorded
as the copy is made.
CD Text can be added after the copy is made
and before finalizing.
The recording is not automatically finalized.
The CDR510 does not copy an MP3 disc, it
converts the MP3 compressed data into audio
signals and records the audio in standard CDDA
format. While an MP3 disc can contain up to 8
hours of recording, a standard CD is limited to
80 or 74 minutes depending on the disc. Only
80, or 74, minutes of MP3 recording can be
copied (converted).
REC MP3 DISC converts one Album from the
MP3 disc and stops. The tracks (files) within the
Album become tracks on the copy. MP3 ID3 title
information is converted to CD Text track titles.
In most cases AUTO TRACK and AUTO STOP
should be at ON so track information is recorded
as the copy is made.
As in REC LISTEN you can listen during recording. The HEADPHONES jack, ANALOG OUT
jacks, and DIG OUT jacks are live during the
recording.
CD Text can be added after the copy is made
and before finalizing.
REC LISTEN
REC LISTEN lets you copy the CD in the CD
drive to a CD-R or CD-RW disc in the CDR drive
and listen during the copying. The HEADPHONES jack, ANALOG OUT jacks, and DIG
OUT jacks are live during the recording. The
entire CD in the CD drive is copied at 1X speed.
In PROGRAM mode only the tracks programmed
are copied.
In most cases AUTO TRACK and AUTO STOP
should be at ON so track information is recorded
as the copy is made.
CD Text can be added after the copy is made
and before finalizing.
The recording is not automatically finalized.
REC MP3 DISC
This REC mode only appears when in
CHANGER mode and when an MP3 disc is
recognized in the CD drive.
The recording is not automatically finalized.
MAKE CD
MAKE CD copies the CD in the CD drive to a
disc in the CDR drive at 2X speed. The entire
CD in the CD drive is copied. In PROGRAM
mode the tracks programmed are copied.
In most cases AUTO TRACK and AUTO STOP
should be at ON so track information is recorded
as the copy is made.
The recording is automatically finalized.
- 41 -
Page 42

MP3
The CDR510 can play most discs** that include
MP3* files. The CDR510 cannot duplicate an
MP3 disc but can record audio from an MP3 disc
onto a blank CD-R or CD-RW disc, see How to
record MP3.
applicable to CD-R discs that are recorded in
some PC applications where finalizing is not
necessary to provide multi-sessions.
Recommended: the disc contain no more
than 10 sessions, 20 Albums (including all
sessions) and a maximum of 20 files.
MP3 playback and recording
MP3 discs can be recognized in the CD drive
only. Reading an MP3 disc for playback or
recording requires additional instructions be
loaded into the memory of the CDR510. This
takes about 10 seconds.
When MP3 instructions are loaded into the
CDR510 memory depends on the setting of
AUTO MP3 LOAD. With AUTO MP3 LOAD ON,
loading MP3 instructions takes place on power
up. If you often play MP3 discs this option avoids
delay when you insert an MP3 disc. With AUTO
MP3 LOAD OFF, loading MP3 instructions does
not take place until an MP3 disc is recognized in
the CD drive or MP3 LOAD is activated. If you
rarely play MP3 discs this option speeds power
up.
* “MP3” refers to music data which has been
compressed by a file format known as “MPEG-1
Audio Layer 3.” Files with the “.mp3” or “.MP3”
extension are called MP3 files.
AUTO MP3 LOAD
How to turn AUTO MP3LOAD on or off
1. With the CD drive selected push and release
the MENU/STORE button.
2. Turn the REC LEVEL/SELECT control until
AUTO MP3LOAD is displayed.
ANALOG
CD - R
R
CD
L
3. Push and release the REC LEVEL/SELECT
control. ON or OFF is displayed.
ANALOG
CD - R
R
CD
L
4. Turn the REC LEVEL/SELECT control to
toggle between ON and OFF.
5. When correct push and release the REC
LEVEL/SELECT control. AUTO MP3LOAD is
displayed again.
The ID3 tag is supported by the CDR510. ID3 is
a format that adds title information to MP3 files.
**The following technical issues can result in
MP3 incompatibility with the CDR510:
• MP3 files recorded using the packet writing
method are not compatible for playback in the
CDR510.
• Compatible MP3 sampling frequencies
include 32-48 kHz.
• Compatible bit rates allowed include 32-320
kbps.
• The type of PC, software and media used for
recording might be incompatible.
• The disc may contain too many sessions or
files.
A "session" occurs each time a recording is
made and finalized. When a CD-RW disc is
unfinalized and tracks are added it creates an
additional session on the disc. This is also
6. Turn the REC LEVEL SELECT control to
switch to other menu choices or press and
release the CANCL/DELETE button to exit
menu mode.
- 42-
Page 43

MP3 LOAD
MP3 LOAD lets you load MP3 instructions without
inserting an MP3 disc.
How to MP3 LOAD
1. With AUTO MP3 LOAD off, with the CD drive
selected, and with no disc* in the drive, push
and release the MENU/STORE button.
*If AUTO MP3 LOAD is on, MP3 instructions
were loaded on power up. If an MP3 disc is in
the CD drive, MP3 instructions were loaded
when the MP3 disc was recognized. If a
standard CD is in the CD drive MP3 LOAD is
not available.
MP3 LOAD
appears.
CD - RW
L
R
You can listen during recording. The HEADPHONES jack, and ANALOG OUT jacks, are live
during MP3 recording. Digital output is not available during MP3 recording.
CD Text can be added after the copy is made and
before finalizing.
The recording is not automatically finalized.
1. With the MP3 disc to be converted in the CD
drive, press and release the PLAY MODE
button to select
CHANGER mode.
2. With a recordable CD in the CDR drive, press
and release the REC MODE button. REC MP3
DISC will be displayed for a few seconds.
2. Push and release the REC LEVEL/SELECT
control. MP3 LOADING is displayed as MP3
instructions are loaded.
ANALOG
R
L
CD - RW
The level meters show the progress of MP3
instruction loading.
3. Turn the REC LEVEL/SELECT control to
switch to other menu choices or press and
release the CANCL/DELETE button to exit
menu mode.
How to record MP3
MP3 compressed data is converted into audio
signals and recorded in standard CD format. An
MP3 disc can contain up to 8 hours of recording
but a standard CD is limited to 80 or 74 minutes
depending on the disc. See example play sequence on the next page for an illustration of the
relationship between Albums (folders) and tracks
(files).
If AUTO STOP is ON, one Album from the MP3
disc recorded and then recording stops. The
tracks (files) within the MP3 Album become
tracks on the copy. MP3 ID3 title information is
converted to CD Text track titles. The Album title
is converted as the recording session closes. A
maximum of 32 characters per title is converted,
if the ID3 title is longer it is truncated.
DUBBING
L
CD - RW
R
CD
Then the display will alternate between
PRESS RECORD and the recording time
remaining on the CD-R or CD-RW in the CDR
drive.
TOTAL REM
DUBBING
L
CD - RW
R
CD
3. If you press the Record button
CD - RW
DUBBING
L
R
the first
CD
album on the MP3 disc will be recorded. To
select a different album, press and release an
ALBUM button,
or , until the desired
album is selected.
Hint:
You are in Recording pause. You can check
on what would be recorded by pressing the
ALBUM buttons,
or , to select the
Album and turning the REC LEVEL/SELECT
control to select the track and the CD drive
Play/Pause button
4. Press and release the Record button
to play the file.
. All of
the tracks (files) in the currently selected
Album, beginning with track 1, will be recorded. If AUTO STOP is ON, recording will
automatically stop.
During recording, or after step 2, you can adjust
the recording level by turning the REC LEVEL/
SELECT control.
- 43 -
Page 44
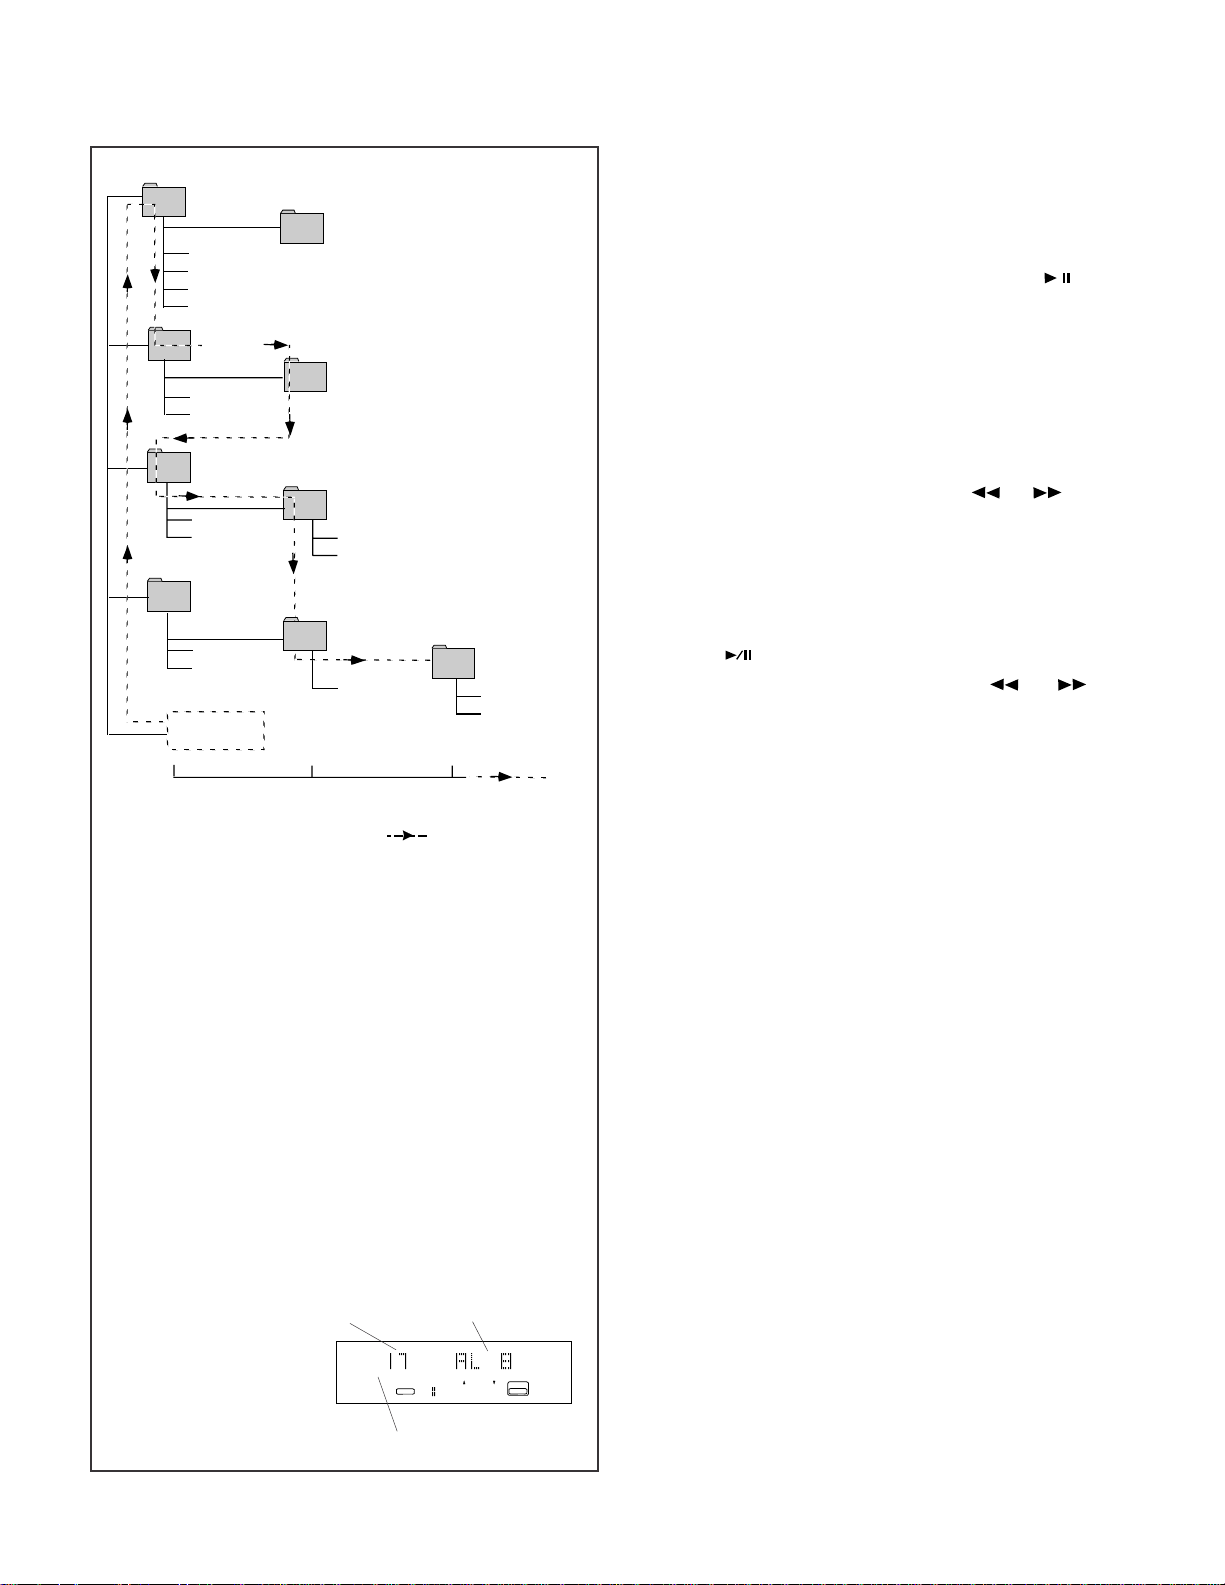
3
3
MP3 Album/file structure
Example play sequence as displayed in Windows Explorer:
Album 02
Album 03
aaaa03.mp3
aaaa04.mp3
aaaa05.mp3
aaaa06.mp3
Album 04
Album 05
bbbb07.mp3
bbbb08.mp3
Album 06
dddd11.mp3
dddd12.mp3
Album 08
wwww.wav
xxxx.wav
AAAA01.mp3 Root
BBBB02.mp3 Album 01
Play up to 8 hierarchical levels possible.
• The dashed line with an arrow ( ) indicates the
sequence in which the MP3 albums and tracks (MP3
files in the albums) are played.
• Album 01 to Album 10
In the example shown, this CD-ROM has 10 albums
(folders) but albums 03 and 08 do not contain MP3
files and so are not played.
• AAAA01.mp3 to gggg17.mp3
In the example shown, this CD-ROM has 17 tracks
starting with track "01" and ending with track "17."
• Only those files with the ".mp3" extension are played;
files with the .wav, .jpg, .doc and other extensions are
skipped.
• Album 01 is allocated even when there are no files in
the root.
• The sequence may differ from the one that appears
on the personal computer. It may also differ
depending on the software used.
17 mp3 files
Album 07
eeee13.mp3
eeee14.mp3
Album 09
ffff15.mp3
Album 10
gggg16.mp
gggg17.mp
8 albums
MP3 FILE PLAYBACK
Playing Albums in sequence
1. As with a music CD, place the disc recorded
using the MP3 files on the CD drive disc tray
and retract the disc tray.
2. Press the CD drive Play/Pause button
.
Play now starts playing files in sequence from
the first Album on a folder-by-folder basis*
Selecting Albums and files for play back
Select the desired Album (on a folder-by-folder
basis*) and track (file*):
1. From Stop, press and release
or to
tab through Albums (folders).
2. Turn the REC/LEVEL SELECT control to tab
through tracks within the selected Album.
(There is a three second time-out to Pause
cued to the selected Album and track. Press
Play
3. During playback press and hold
to begin Play.)
or to
fast reverse or fast forward, or
4. press and release repeatedly to step through
Albums. (There is a 3 second time-out to
Play.)
5. During playback turn the REC LEVEL/
SELECT control to step through tracks.
(There is a 3 second time-out to Play.)
*See example play sequence in the box to the
left.
The following play back features are not
available during MP3 play back:
• A-B repeat
• Program play
• End monitor
• Auto cue
• Change of time mode (TIME button)
• End warning
Random play is Album by Album not track (file)
by track.
Display during Stop of disc
with example files and
folders.
10964217
5
CD
CHANGER
L
RANALOG
CD
albums that contain mp3 files
- 44 -
Page 45
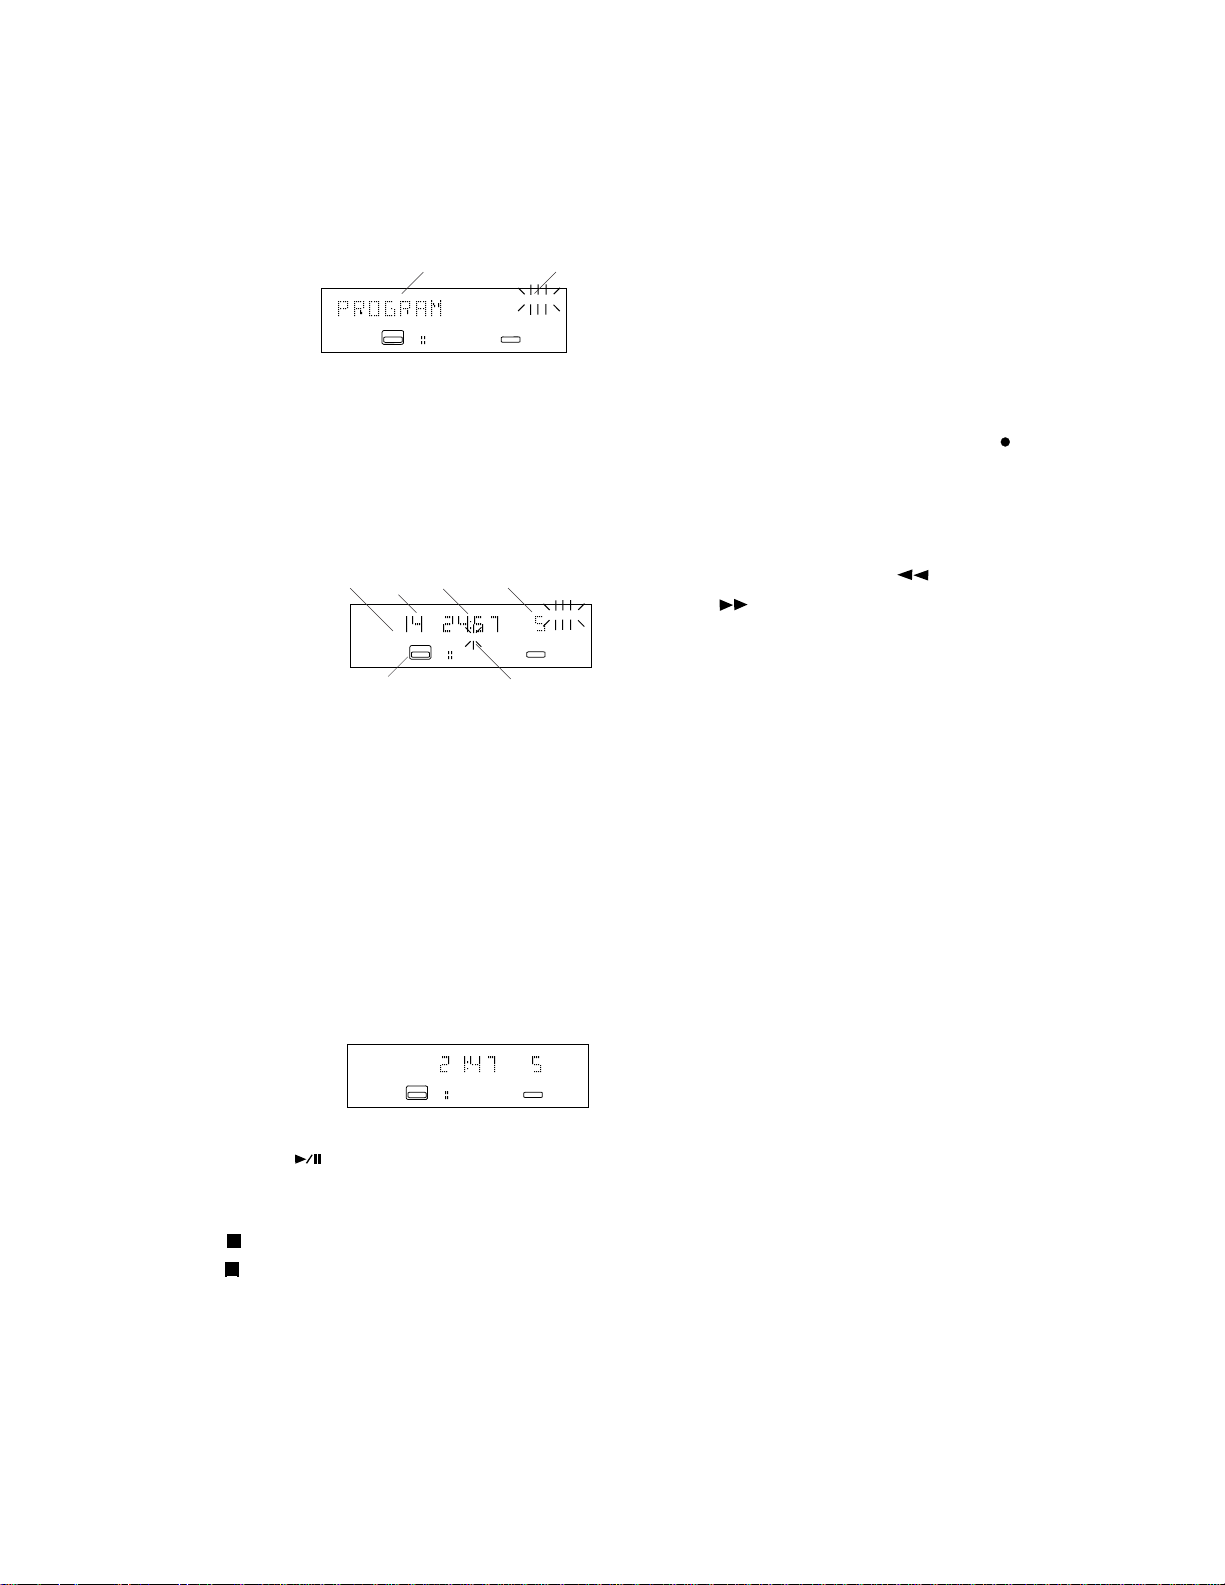
How to PROGRAM tracks
Track sequence can be programmed for playback
or recording. From stop in CHANGER or DUAL
MODE, push and release the PROG button to
enter Program mode.
a b
Example
display
ANALOG
L
CD - R
R
PROGRAM
CD
"PROGRAM" (a) will be displayed briefly, then
PROGRAM (b) will be flashing.
Turn the REC LEVEL/SELECT control to select
the Track to be programmed. When correct push
the REC LEVEL/SELECT control to add that
track to the program.
c d f b
STEPTOTAL
Example
display
ANALOG
6
4
1412119
L
CD - R
R
PROGRAM
CD
a e
In the example tracks on the CDR drive (a) are
being programmed. Five steps have been programmed (b): tracks 4, 6, 9, 11, and 12 (c) (not
necessarily in that order). Track 14 (d and e) is
selected. If Track 14 is added to the program as
step 6, the TOTAL time programmed (f) will be 24
minutes and 57 seconds.
When your program is done, press a Stop button
or the PROG button to end programming. PROGRAM will be lit and steady.
Add a track to the program as above.
To erase a track from the program, turn the REC
LEVEL / SELECT control to select the track,
then press the CANCL / DELETE button. The
remaining program steps and playing time will
be displayed.
To program for recording:
Only tracks from the CD in the CD drive can be
programmed for recording.
Press the REC MODE button and select your
recording mode. Then program tracks as above.
When done, press the Record button
to start
recording.
Notes:
To review a program, with PROGRAM flashing,
press the ALBUM reverse
forward
button to tab through the program.
or ALBUM
The display will show the track number programmed, the time contributed by that track to
the total programmed time, and the program
step.
A track can be programmed more than once.
In CHANGER Mode the program can switch
between the CD drive and CDR drive.
If you try to store more than 99 steps, "PROG
FULL" appears on the display.
STEPTOTAL
Example
display
Press Play/Pause
6
4
ANALOG
12119
L
CD - R
R
to start programmed play.
PROGRAM
CD
Clearing a program:
Press Stop
press Stop
to stop programmed play, then
again to clear the program.
To edit a program:
From Stop mode, press PROG to enter Program
mode.
- 45 -
Page 46
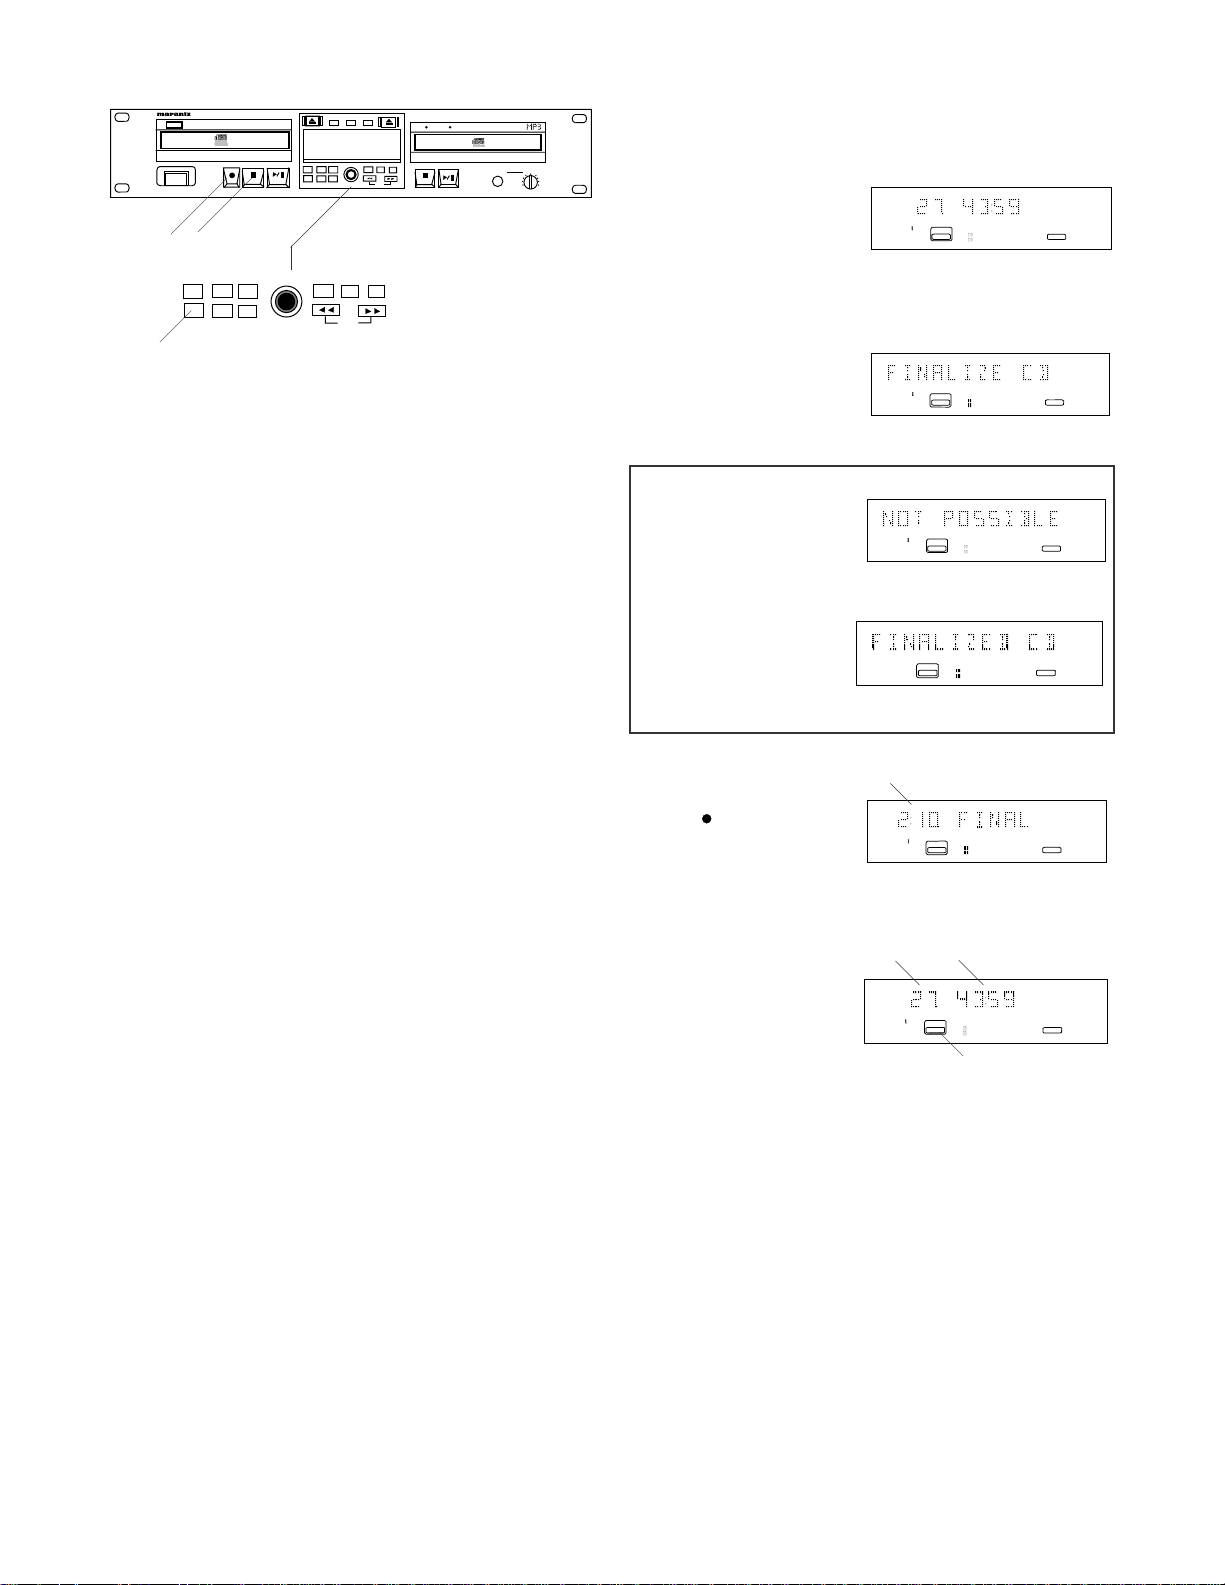
POWER
3 1
CD RECORDER / CD PLAYER CDR510
I
R
ERASE
FINAL
CD
PLAY MODE
CDR
REC LEVEL / SELECT
REC
MENU/
ERASE
FINAL
REC LEVEL / SELECT
MENU/
REC
MODE
STORE
CANCL/
INPUT
DELETE
PUSH ENTER
MODE
STORE
CANCL/
INPUT
DELETE
TIME TEXT
TIME
PUSH ENTER
ALBUM
MP3 PITCH
TEXT
PROG
ALBUM
PROG
PROFESSIONAL
Recorda
ble
LEVEL
HEADPHONE
10
0
How to Finalize a CD-R or CD-RW disc:
1. Push Stop on the
CDR drive. The
display shows the
DIG
TOTAL
L
CD - R
R
+
19181716151413121110986543217 20
CD
number of tracks and their total playing time
(example shown).
2
Finalizing
Finalizing is writing the TOC (table of contents)
on a disc so a CD player can recognize the
number of tracks, their location on the disc, the
total time for each track, and CD text. A recorded
disc must be finalized to playback on a standard
CD player. Once finalized a CD-R disc can be
played on CD players that support CD-R playback. CD-RW discs can only be played on CD
players that support CD-RW playback. Consult
your CD player owner's manual to confirm supported formats.
Finalizing is necessary to:
• be able to play a recorded CD-R or CD-RW
disc on a standard CD player
• prevent further recording on a disc
• avoid erasing tracks on a CD-RW disc
• record CD text information onto a disc you
record
Notes:
• A finalized CD-R disc can never be recorded
onto again
• A finalized CD-RW disc can be unfinalized for
more recording
• The CDR510 can play back unfinalized CD-R
or CD-RW discs in both drives
• The MAKE CD recording mode automatically
finalizes the recorded disc
2. Push FINAL.
"FINALIZE CD"
alternates with
DIG
L
CD - R
R
"PRESS RECORD".
Note:
If the disc is blank
NOT POSSIBLE is
DIG
L
CD - R
R
displayed for several seconds.
If the disc has been
finalized, FINAL-
ANALOG
13121110986543217
L
CD - R
R
IZED CD flashes
four times, then the previous display returns.
a
3. Push the Record
button . The timer
(a) counts down as
REM
DIG
L
CD - R
R
TOC (Table Of
Contents) is written.
When done the
display shows the
number of tracks (b)
and their total
playing time (c) of
the disc now ready
b c
DIG
CD
TOTAL
L
R
d
for playback (example shown).
CD-RW or CD-R changes to CD (d).
19181716151413121110986543217 20
+
CD
CD
CD
19181716151413121110986543217 20
+
CD
+
19181716151413121110986543217 20
CD
- 46 -
Page 47
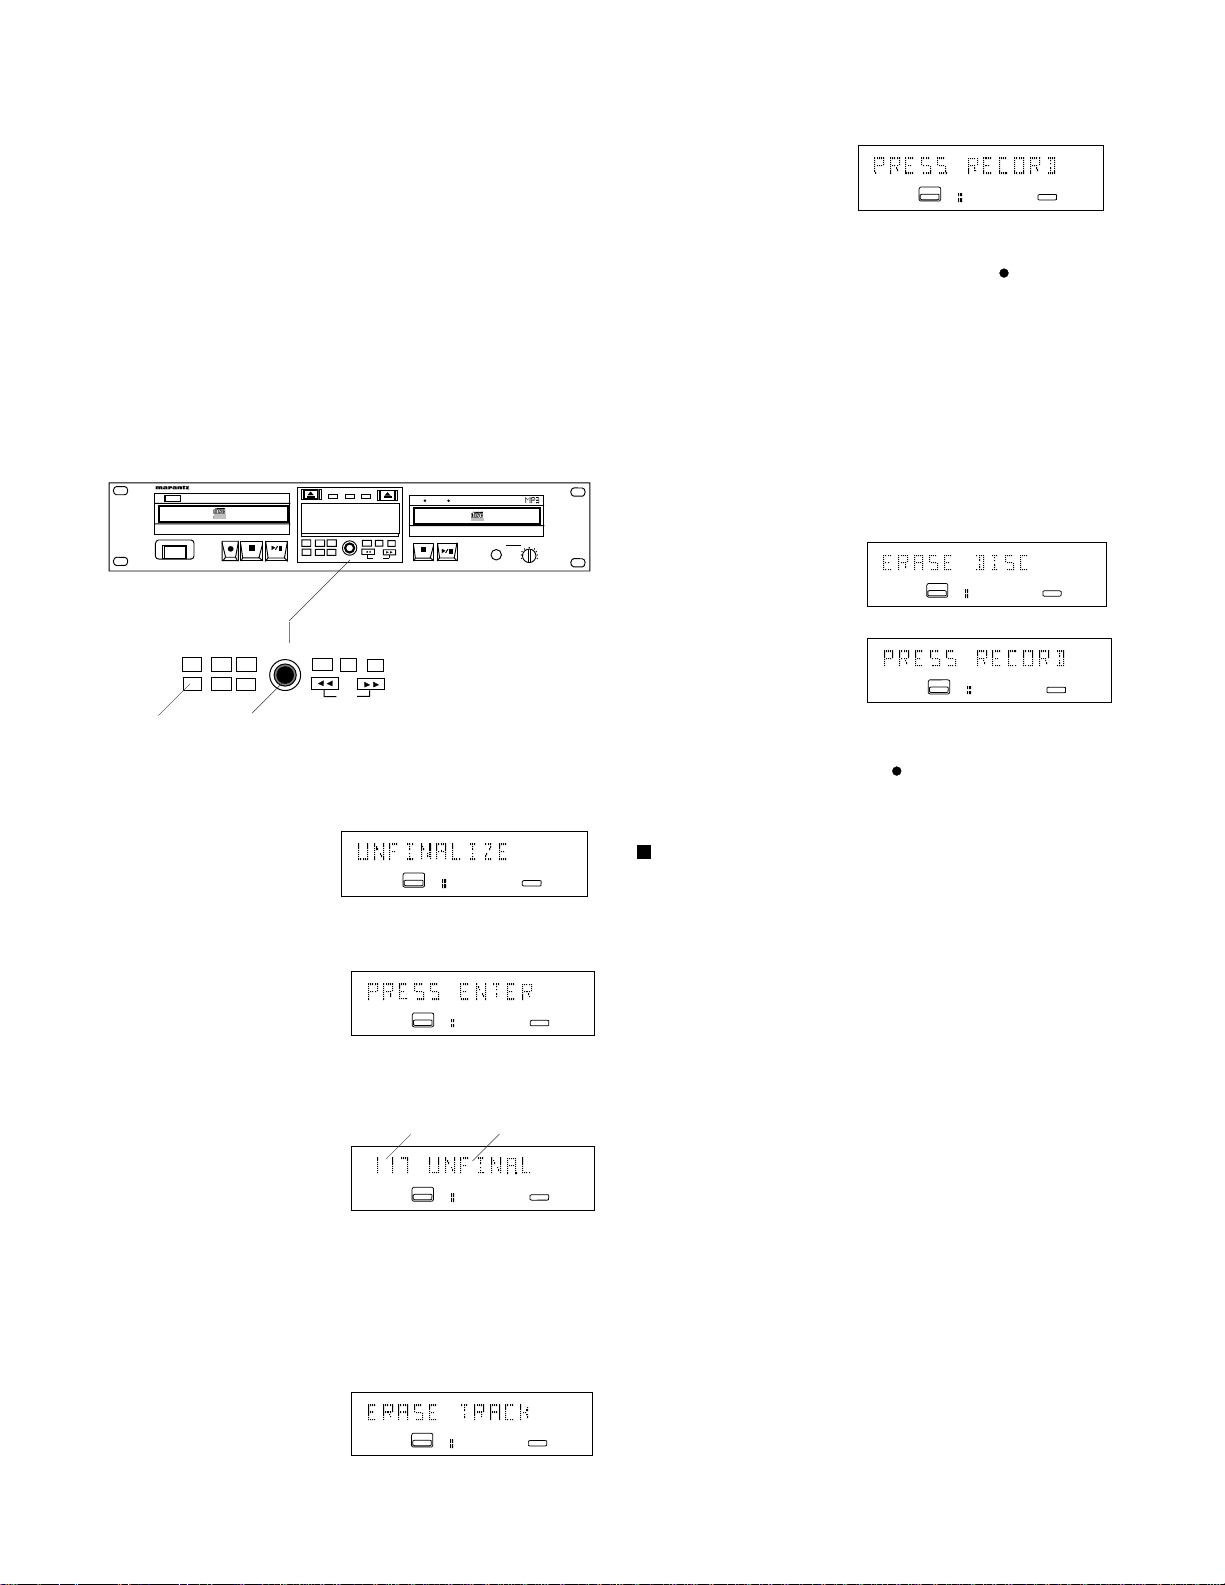
Unfinalizing
How to unfinalize, erase a track, or erase a
CD-RW disc
and PRESS RECORD.
ANALOG
3214
CD - RW
L
R
CD
Only CD-RW discs can be erased.
If the CD-RW disc has been finalized it must first
be unfinalized before it can be erased.
With the CD-RW disc in the CDR drive and at
stop:
1. Push and release the ERASE button.
CD RECORDER / CD PLAYER CDR510
I
R
POWER
REC
ERASE
MODE
FINAL
INPUT
1 2
CD
PLAY MODE
CDR
REC LEVEL / SELECT
REC
MENU/
ERASE
FINAL
REC LEVEL / SELECT
MENU/
STORE
CANCL/
DELETE
PUSH ENTER
MODE
STORE
CANCL/
INPUT
DELETE
TIME TEXT
TIME
PUSH ENTER
ALBUM
MP3 PITCH
TEXT
PROG
ALBUM
PROG
PROFESSIONAL
Recorda
ble
LEVEL
HEADPHONE
10
0
If the CD-RW disc has been finalized UNFINALIZE will be displayed (if not skip to 3 below)
4. To erase the last track on the CD-RW disc
Press and release the Record button .
Note
You cannot select an early track to erase. Only
the last track on the disc can be erased, or the
entire disc.
Or press and release the ERASE button again.
The display alternates between ERASE DISC
and PRESS RECORD.
3214
ANALOG
3214
ANALOG
CD - RW
CD - RW
L
R
L
R
CD
CD
5. To erase the entire CD-RW disc Press and
release the Record button .
Example
display
ANALOG
3214
CD - RW
L
R
CD
alternating with PRESS ENTER.
3214
ANALOG
CD - RW
L
R
CD
2. Press and release the REC LEVEL/SELECT
control to unfinalize.
Example
display
REM
3214
ANALOG
a b
L
CD - RW
R
CD
During unfinalizing the time to completion counts
down (a) and UNFINAL (b) is displayed.
3. The display alternates between ERASE
TRACK
Or press and release the CDR drive Stop button
to exit erase mode.
ANALOG
3214
CD - RW
L
R
CD
- 47 -
Page 48

DISPLAY messages
Display messages listed below may appear for
your guidance.
ALBUM TITLE ........ followed by album title
ALL TEXT............... entering all text display mode
ANALOG ................analog input selected
AUTO TRACK ........ selecting AUTO TRACK on or
off
CHANGER MODE . control attempted during dual
mode that only applies to
changer mode
CLOSE ................... while a disc tray is closing
COPY ..................... entering copy protection
selection menu
DIGITAL I............... digital coaxial input selected
DISC ERROR......... when trying to record on, or
finalize a recovered disc (disc
is no longer usable)
DISC FULL .............no more recording possible
DOES NOT FIT ...... remaining recording time on
CD not enough for proposed
recording
DUAL MODE ..........when dual mode is selected
ERASE DISC ......... erasing a CD-RW disc
ERASE OK .............confirmation for erasing has
to be given by pressing the
REC LEVEL / SELECT
control
ERASE TRACK ......erasing last track on CD-RW
disc
FINALIZE CD .........finalizing a disc
FINALIZED .............trying to record on a finalized
disc
FINALIZED CD....... CD-R/RW disc has been
finalized
INITIALIZING ......... during laser power calibration
for unfinalized discs
INSERT DISC ........ insert disc, or insert disc
correctly
MAKE CD ...............recording mode CD copying
with finalizing
NO DISC ................no disc in tray, disc unread-
able, or disc upside down
NO TEXT................ no text stored for disc
NO TRACK............. trying to edit CD Text on a
disc that has no tracks
NOTFINALIZED .....when opening the CDR drive
with an unfinalized disc in it
OFF ........................during menu selection for
menu item to be off
ON .......................... during menu selection for
menu item to be on
OPC ERROR ......... Optimum Power Calibration
failure (CD-R/RW disc is
bad)
OPEN .....................while a disc tray is opening
or open
OPTICAL ................ digital optical input selected
PRESS RECORD .. press record
finalizing, erasing, or record-
ing
PROGRAM............. when program mode is
selected
PROGRAM FLL ..... program full
READING ............... reading disc information
REC BALANCE ......when adjusting balance
REC EXT DISC ...... recording mode sync record
with starting external source
REC EXT MAN....... recording mode from exter-
nal source with manual start
REC LISTEN .......... recording mode CD dubbing
while listening
RECORD FAST...... recording mode CD dubbing
at 2X speed
START SOURCE ...start source for sync record-
ing
TEXT EDIT ............. entering text edit mode
TEXT ERASE .........entering text erase mode
TEXT VIEW ............ entering text review mode
TRACK TITLE ........followed by track title
UNFINALIZE,
PRESS ENTER .....trying to record on a finalized
CD-RW disc
UNFINALIZED........ CD-R/RW disc being ejected
is not finalized
UPDATE ................. updating disc contents
WAIT ......................• when Stop
during recording
• when stop
during the first four seconds of a track
WRONG DISC ....... disc is not an audio CD disc
XX AL X .................mp3 files (XX) and albums
(X)
XX XX ERASE ...... time countdown when
erasing a track or the entire
disc
XXXX FINAL .......... time countdown when
finalizing a disc
- XX DB ..................recording level being ad-
justed
to start
is pressed
is pressed
- 48 -
Page 49

About Compact Discs
e
There are two types of recordable discs:
be according to the Orange Book specification
and therefore compatible with the CDR510.
CD-R (record once)
CD-R discs are only able to be recorded onto a
single time but will playback in most CD players.
CD-R discs can be recognized by the following
logos:
Recordabl
Recordable
CD-RW (multiple recording)
CD-RW discs are able to be recorded onto
many times but will only playback in CD players
offering CD-RW compatibility. Products that
offer CD-RW compatibility are available from
Marantz Professional. Please contact your
dealer for more information on these products.
CD-RW discs can be recognized by the following logos:
In practice however, the quality of the recording
depends on the match between the disc used
and the writing strategy of the recorder. At 1X
speed (stand alone audio) the match between
disc and recorder is
speeds are less critical in terms of recording quality.
Consumer CD Recorders can only record on CDR
Audio discs and those discs are optimized for single
speed automatically. Professional CD Recorders can
use both Audio and Data discs. When using Data
discs, one should take care to use discs with a good
single speed compatibility.
Recording Capacity:
Discs with higher capacity than 80 minutes are out of
the Orange Book standard and may perform below
your expectations.
Compact disc care
The glossy side is the record side of the disc, and
matted (dull) side is the label side.
Handle discs carefully so as not to damage or scratch
the record side.
important. Higher recording
Notes:
• Some DVD players cannot playback CD-R
discs and some cannot playback CD-RW
discs because of laser power differences.
• Some CD players may be able to playback
finalized CD-RW discs.
• Some CD players can not play finalized CD-R
discs because of the low reflectivity of such
discs.
Which discs to use:
The CDR510 is able to record onto any 1X
compatible CD-R and CD-RW disc, including
discs for Consumer use and Professional (computer) discs.
The CDR510 records according to the Orange
Book specification. Every CDR disc sold should
Avoid placing discs in the following locations:
• In direct sunlight or near a source of heat such as
a heater.
• In a place that is damp or dirty.
• In a place which could be exposed to rain, such as
near a window.
Disc cleaning
Always keep the disc surface clean. Up to six billion
data units are recorded on the record side of the disc.
When cleaning the disc surface always be sure to use
a special compact disc cleaner and wipe as shown
below.
Wipe in a radial
direction.
Do not wipe in
circumferential
direction.
- 49 -
Page 50
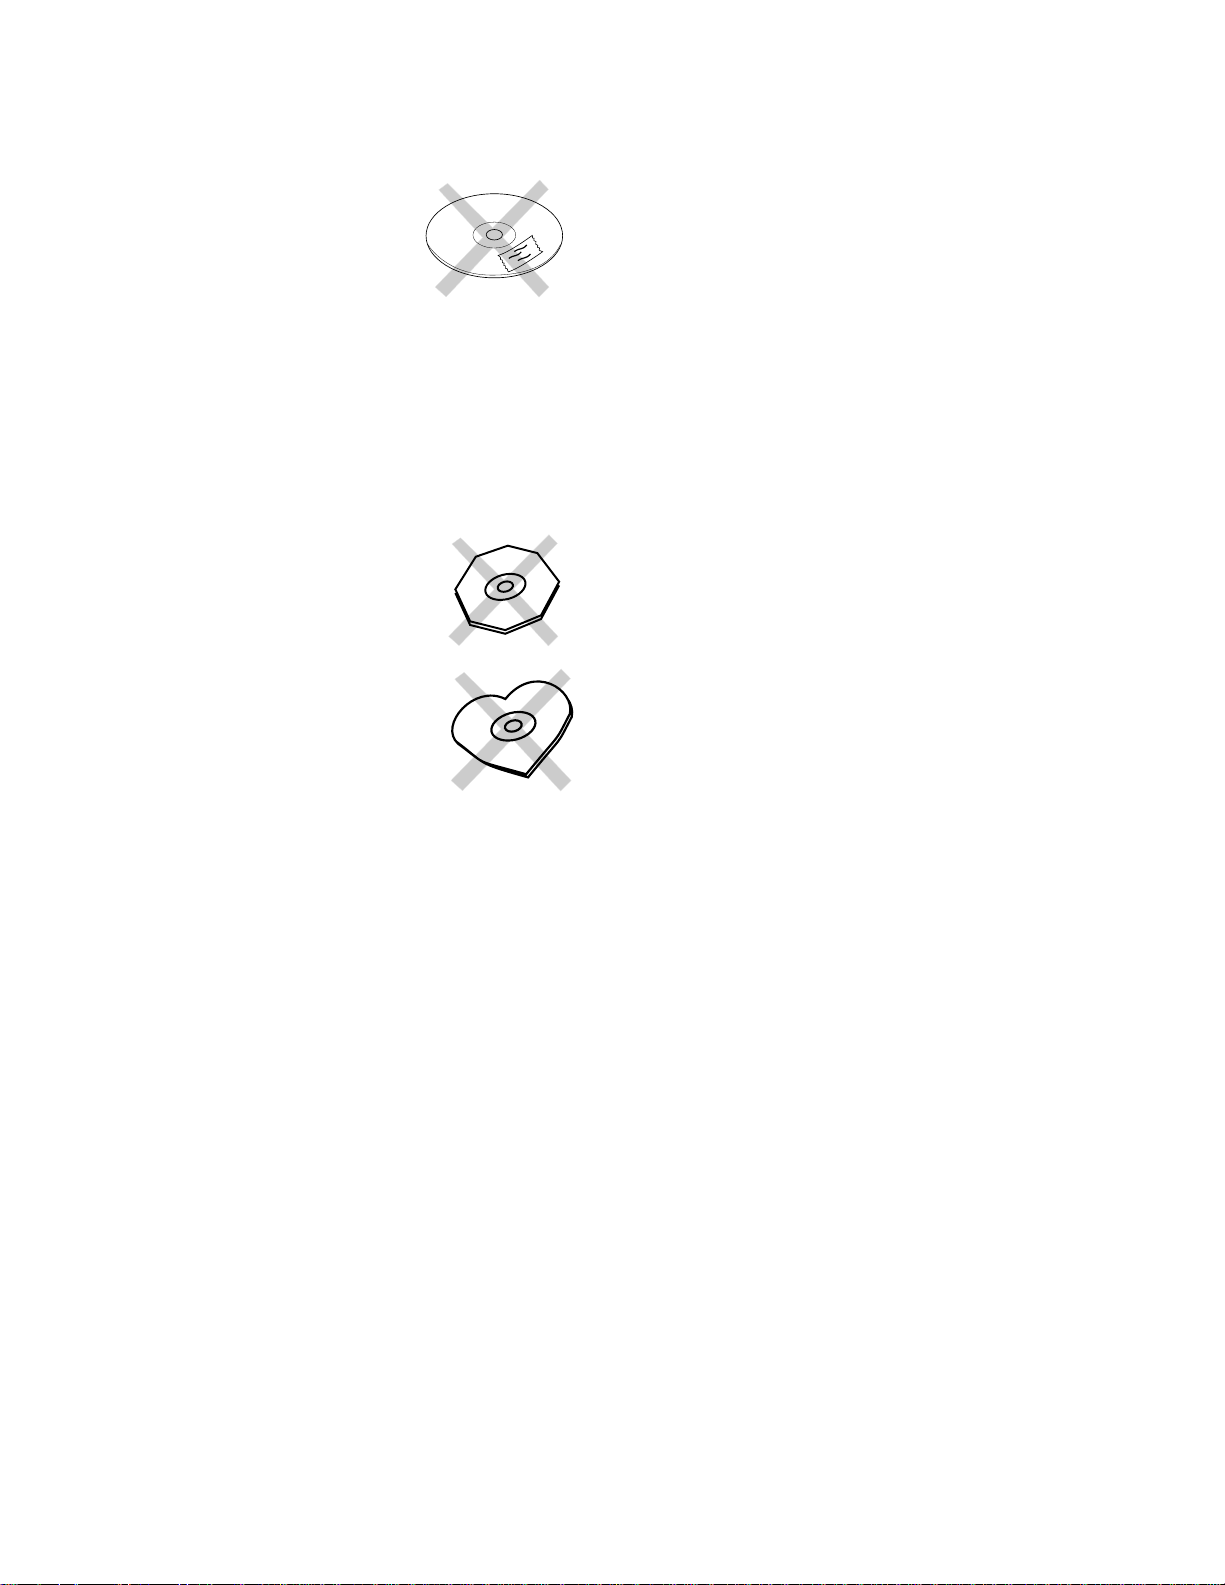
• Do not use record cleaner, it will adversely affect
the disc surface.
• Store discs in their disc cases.
• Do not attach a piece of
paper or sticker to the label
side of the disc.
When a disc has a piece of plastic tape or rental
CD label with paste protruding from the edge or
when a disc has a trace of such as sticky object,
do not attempt to play the disc. The disc may be
impossible to take out, or another malfunction
may result.
• Write only on the printed side of a CD-R or CDRW disc, and only with a soft felt-tipped pen.
• Do not attempt to play a disc
with a special shape such as
an octagonal or heart shaped
disc. Equipment malfunction
may result.
- 50 -
Page 51

RS-232C control
st
st
Connect a male (D-Sub 9 Pin) to female (D-Sub 9 Pin)
straight cable for RS-232C external control by host
equipment.
• The RS-232C host can control functions of the
CDR510 externally
• The CDR510 automatically transmits status data
when status is changed.
• The CDR510 will respond to status requests by
transmitting the associated status data.
Control commands:
Command CD command
0 "@12000"+CR
1 "@12001"+CR
2
"@12002"+CR
3 "@12003"+CR
4 "@12004+CR
5 "@12005+CR
6 "@12006"CR
7 "@12007"+CR
8 "@12008"+CR
9 "@12009"+CR
Display
Scroll
"@12015"+CR
"@12011"+CR
Repeat "@12029"+CR
Next "@12032"+CR
Previous
Pitch Reset
Pitch Up Start
Pitch Up Stop
Pitch Down Start
Pitch Down Stop
Program
AMS
"@12033"+CR "@12633"+CR
"@12037"+CR
"@12038"+CR
"@1203801"+CR
"@12039"+CR
"@1203901"+CR
"@12036"+CR
"@12043"+CR "@12643"+CR
Open/Close "@12045"+CR "@12645"+CR
Pause
"@12048"+CR "@12648"+CR
Cancel/Delete "@12049"+CR "@12649"+CR
Fast Backward Start
Fast Backward Stop
Fast Forward Start
Fast Forward Stop
Play
Stop
Random
Store/Menu
Enter
Select CD
Select CDR
Track Inc.
"@12050"+CR "@12650"+CR
"@1205001"+CR
"@12052"+CR "@12652"+CR
"@1205201"+CR
"@12053"+CR "@12653"+CR
"@12054"+CR
"@12028"+CR
"@12082"+CR
"@12087"+CR
"@12063"+CR
-
-
CDR Command
"@12600"+CR
"@12601"+CR
"@12602"+CR
"@12603"+CR
"@12604"+CR
"@12605"+CR
"@12606"+CR
"@12607"+CR
"@12608"+CR
"@12609"+CR
"@12615"+CR
"@12611"+CR
"@12629"+CR
"@12632"+CR
-
-
-
-
-
"@12636"+CR
"@1265001"+CR
"@1265201"+CR
"@12654"+CR
"@12628"+CR
"@12682"+CR
"@12687"+CR
-
"@12663"+CR
"@126114"+CR
Hand shake flow charts for control commands:
CDR510
Received Command
Status Command
Typical Ho
Host sends a command that causes a
change in CDR510 status.
CDR510
Received Command
Typical Ho
Host sends a command that causes no
change in CDR510 status. For example,
Host requests Play during Playback.
Commands Requesting Status
The following Request Commands from the host are
received by the CDR510, then the status code is
transmitted to the host.
Request Command for CD
Power
Tray
Mode
Play
Mode
Disc
Repeat
Mode
Time
Mode
Album "@1?20ALBU"+CR
Track "@1?20TRAC"+CR
Current
Display
Time
End
Warning
"@1?20POWE"+CR
"@1?20TRAY"+CR
"@1?20PLAY"+CR
"@1?20DISC"+CR
"@1?20RPTM"+CR
"@1?20TMOD"+CR
"@1?20TIME"+CR
"@1?20WARN"+CR
Response from CD
Power On
Open
Close
Toc Reading
Stop
Play
Pause
FF
REW
No Disc
ERROR
CDDA
MP3
OFF
ON
ALL
Track
Track Remain
Total Remain
Total Lap
Warning
No Warning
"@120PRON"+CR
"@120OPEN"+CR
"@120CLOS"+CR
"@120TOCR"+CR
"@120STOP"+CR
"@120PLAY"+CR
"@120PASE"+CR
"@120FASF"+CR
"@120FASR"+CR
"@120NODI"+CR
"@120ERDI"+CR
"@120CDDI"+CR
"@120MPDI"+CR
"@120RTOF"+CR
"@120RTON"+CR
"@120RTAL"+CR
"@120TTRA"+CR
"@120TTRE"+CR
"@120TREM"+CR
"@120TTLA"+CR
"@120Axxx"+CR
"@120Txxx"+CR
"@120Xxxx"+CR
"@120WARN"+CR
"@120NOTW"+CR
- 51 -
Page 52
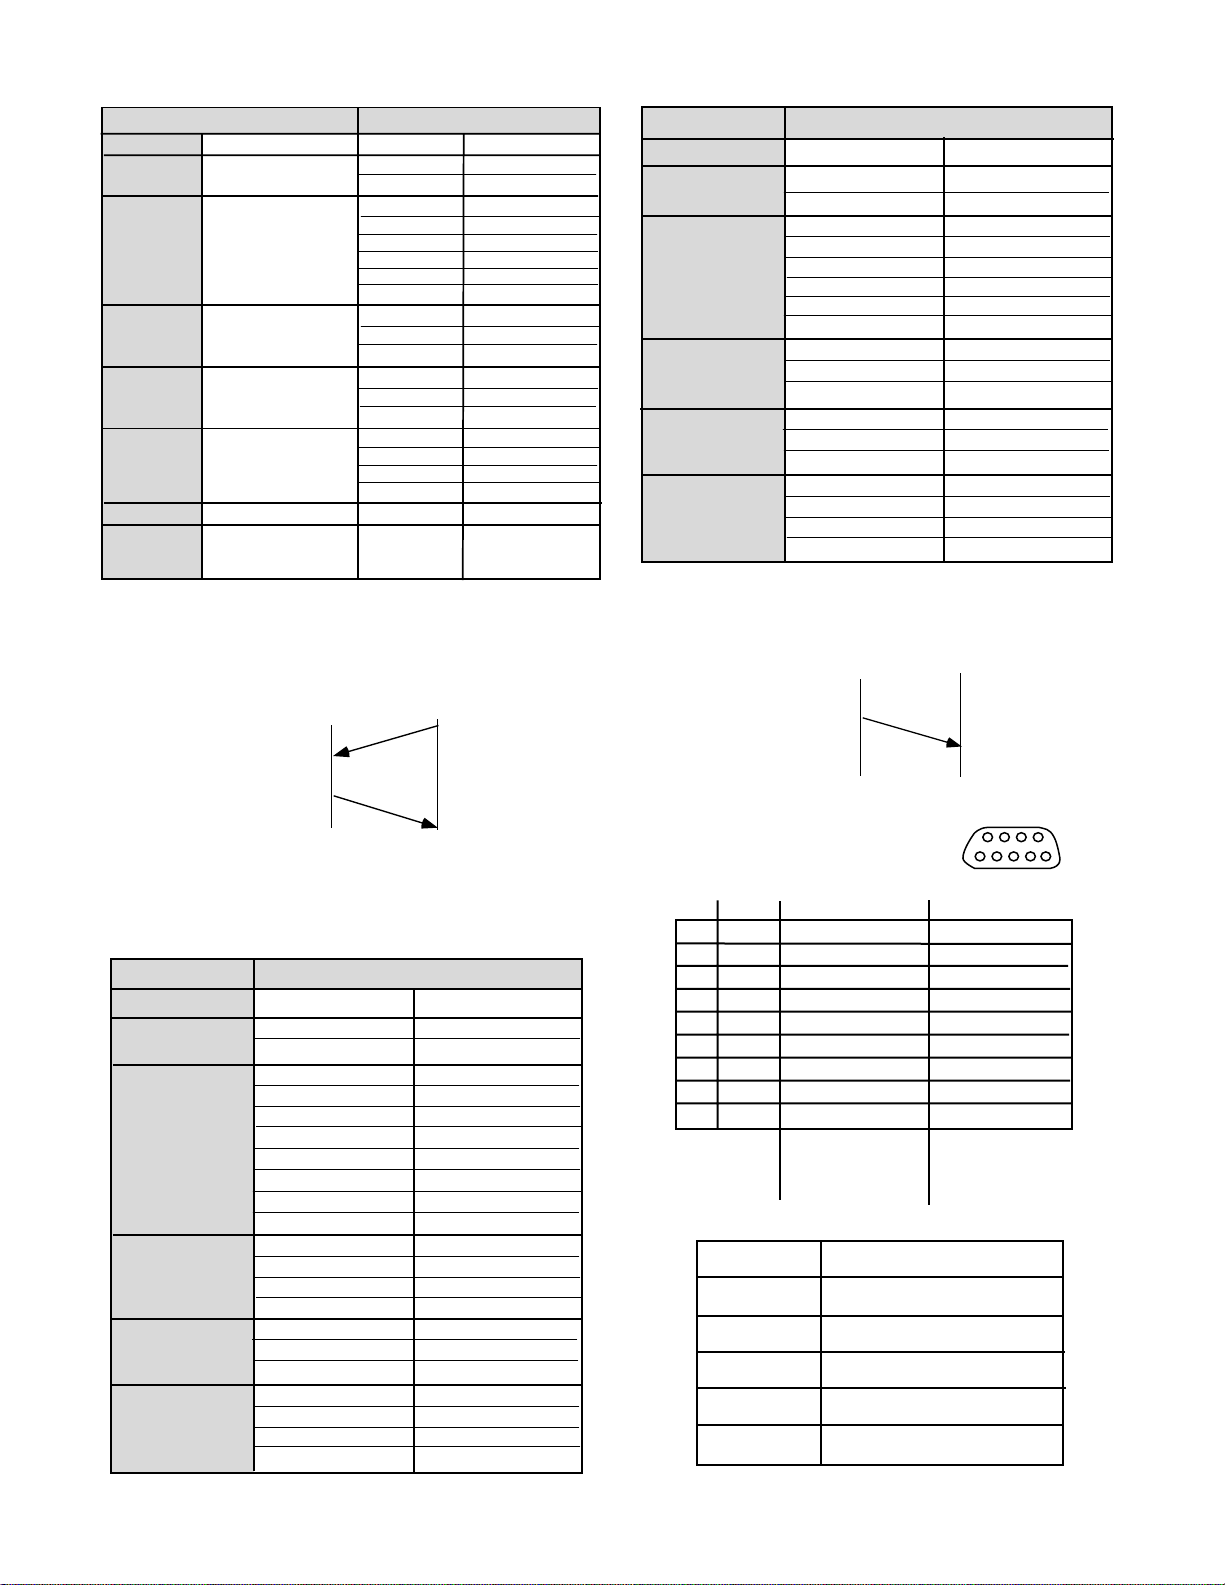
st
st
6 7 8 9
Request Command for CDR
Category
Power On
Power
Status from CDR
"@126PRON"+CR
Tray Mode
Open
Close
"@126OPEN"+CR
"@126CLOS"+CR
Play Mode
TOC Reading
Stop
Play
Pause
FF
REW
"@126TOCR"+CR
"@126STOP"+CR
"@126PLAY"+CR
"@126PASE"+CR
"@126FASF"+CR
"@126FASR"+CR
Disc
No Disc
ERROR
CDDA
"@126NODI"+CR
"@126ERDI"+CR
"@126CDDI"+CR
Repeat Mode
OFF
ON
ALL
"@126RTOF"+CR
"@126RTON"+CR
"@126RTAL"+CR
Time Mode
Track
Track Remain
Total Remain
Total Lap
"@126TTRA"+CR
"@126TTRE"+CR
"@126TREM"+CR
"@126TTLA"+CR
Power
Tray
Mode
Play
Mode
Disc
Repeat
Mode
Time
Mode
Track
Current
Display
Time
"@1?26POWE"+CR
"@1?26TRAY"+CR
"@1?26PLAY"+CR
"@1?26DISC"+CR
"@1?26RPTM"+CR
"@1?26TMOD"+CR
"@1?26TRAC"+CR
"@1?26TIME"+CR
Response from CDR
Power On
Open
Close
Toc Reading
Stop
Play
Pause
FF
REW
No Disc
ERROR
CDDA
OFF
ON
ALL
Track
Track Remain
Total Remain
Total Lap
"@126PRON"+CR
"@126OPEN"+CR
"@126CLOS"+CR
"@126TOCR"+CR
"@126STOP"+CR
"@126PLAY"+CR
"@126PASE"+CR
"@126FASF"+CR
"@126FASR"+CR
"@126NODI"+CR
"@126ERDI"+CR
"@126CDDI"+CR
"@126RTOF"+CR
"@126RTON"+CR
"@126RTAL"+CR
"@126TTRA"+CR
"@126TTRE"+CR
"@126TREM"+CR
"@126TTLA"+CR
"@126Txxx"+CR
"@126Xxxx"+CR
Hand shake flow chart for Commands Requesting
Status:
CDR510
Status Request
Command
Status Command
Typical Ho
Hand shake flow chart for automatic status
data:
CDR510
Status Command
Typical Ho
RS-232C specifications:
Status changes automatically transmitted.
The following status codes are automatically transmitted to the host.
Category
Power
Tray Mode
Play Mode
Disc
Repeat Mode
Time Mode
Status from CD
Power On
Open
Close
TOC Reading
Stop
Play
Pause
FF
REW
End of Track
End Warning
No Disc
ERROR
CDDA
MP3
OFF
ON
ALL
Track
Track Remain
Total Remain
Total Lap
"@120PRON"+CR
"@120OPEN"+CR
"@120CLOS"+CR
"@120TOCR"+CR
"@120STOP"+CR
"@120PLAY"+CR
"@120PASE"+CR
"@120FASF"+CR
"@120FASR"+CR
"@120EOTR"+CR
"@120WARN"+CR
"@120NODI"+CR
"@120ERDI"+CR
"@120CDDI"+CR
"@120MPDI"+CR
"@120RTOF"+CR
"@120RTON"+CR
"@120RTAL"+CR
"@120TTRA"+CR
"@120TTRE"+CR
"@120TREM"+CR
"@120TTLA"+CR
Connector pin assignment
pin
use
1
NC
2
TX
3
RX
4
NC
5
GND
6
NC
7
RTS
8
CTS
9
NC
cable
connector
Physical specifications
Cable
Baud rate
Data bits
Parity bit
Stop bit
Flow control
- 52 -
CDR510
Not Connected
Transmit Data
Receive Data
Not Connected
Ground
Not connected
RTS receive
CTS send
Not Connected
D-Sub 9 pin
(male)
Straight cable
9600 bps
8 bits
None
1 bit
CTS/RTS Hardware Flow
1 2 3 4 5
Typical Host
Not Connected
Receive Data
Transmit Data
Not Connected
Ground
Not connected
RTS send
CTS receive
Not Connected
D-Sub 9 pin
(female)
Page 53

CTS/RTS hardware flow control
@12011CR
@120PRONCR
Typical Host
RTS send
H
Not Busy
(Normal)
Busy
L
H
L
Timing chart
RTS
CDR510
CTS out
RC-5 Codes
Remote control Model RC330, (not supplied – available
from Marantz Professional) can control the CDR510
using these RC-5 codes. The CDR510 receives the
codes listed in the table below from the infrared remote
control sensor on the front of the unit and also the
REMOTE RC-5 IN/OUT jacks.
CD code CD-R code
Command (dec)
System (dec)
System (dec)
Command (dec)
Function
CTS
RxD
TxD
Control commands:
The control command packets have a data length of
7~10 bytes. ASCII codes from 0x00 to 0x7f are used
to receive serial data. At the transmission end, take
steps to convert the ASCII codes into HEX data to set
the data in the data packets. CR (0x0d) is added as
the data packet delimiter.
Example: Scroll command (ASCII code @12011)
0x40 0x31 0x32 0x30 0x31 0x31 0x0d
When transmitting commands consecutively, put more
than 100ms blank between commands.
Status data transmission:
The status data packets have a fixed data length of 8
bytes. ASCII codes from 0x00 to 0x7f are used to
transmit serial data. For this reason, the ASCII codes
are converted into HEX data before the data is set in
the data packets and transmitted. CR (0x0d) is added
as the data packet delimiter.
0 _ Space 20 00 26 00
1 ABC 20 01 26 01
2 DEF 20 02 26 02
3 GHI 20 03 26 03
4 JKL 20 04 26 04
5 MN 20 05 26 05
6 OPQ 20 06 26 06
7 RST 20 07 26 07
8 UVW 20 08 26 08
9 XYZ 20 09 26 09
PLAY 20 53 26 53
STOP 20 54 26 54
PAUSE 20 48 26 48
NEXT 20 32 26 32
PREVIOUS 20 33 26 33
FF 20 52 26 52
REW 20 50 26 50
PROGRAM 20 36 26 36
CANCEL/DELETE 20 49 26 49
SCROLL 20 11 26 11
AMS (intro scan) 20 43 26 43
TEMPO RESET 20 37 - REC - - 26 55
OPEN/CLOSE 20 45 26 45
DISPLAY 20 15 26 15
ENTER 20 87 26 87
MENU/STORE 20 82 26 82
REPEAT 20 29 26 29
CD 20 63 - CD-R - - 26 63
TR.INCR - - 26 114
Example: Transmission "Power ON" (ASCII code
@120PRON)
0x40 0x31 0x32 0x30 0x50 0x57 0X4f 0x4e 0x0d
- 53 -
Page 54

TROUBLESHOOTING
Should faults occur, it is in many cases not necessary
to consult your dealer or technical service department.
On the basis of the following checks, you will be able
to rectify a number of conditions yourself without
difficulty. If the condition cannot be remedied after the
following check, please consult your dealer or contact
D & M Professional at 866 405 2154.
No Power
• check power cord connections
• switch POWER off then immediately back on
Recording does not contain tracks
• check that AUTO TRACK is ON
• check if there is 2.7 seconds of silence (analog)
• check that the digital source conforms to the
SPDIF or IEC-958-II standard
• is source a DVD video disc (DVD discs do not
contain track information)
Will not record
• check input source selection (INPUT button
selection matches input source connected)
• check that disc is not an audio disc (WRONG
DISC display)
• clean the disc
• check if CD-R/RW is an unfinalized disc
• try another disc
• text memory full (MEMORY FULL/FINALIZE CD
display Erase CD Text for other disc(s) or finalize
other disc(s) to obtain memory space.)
DIGI flashing in display
• check digital cable connections
• try a different cable
• check that the output of the digital source conforms to the SPDIF or IEC-958-II standard
No Sound
• check audio connections
• if using an amplifier or receiver,
• check amplifier or receiver settings
• check that a signal is present
• try a different amplifier or receiver
Sound distorted
• check that analog output is not connected to a
PHONE input
• check that disc is not defective (try another)
Recording distorted
• check recording level
• try another disc
XLR input too high or too low
• adjust record level
• adjust TRIM
Play will not start
• check that the label of the CD is facing up
• clean the disc
• check that disc is not defective (try another)
OPTI flashing in display
• check optical connections
• try a different connector
• check that the output of the digital source conforms to the SPDIF or IEC-958-II standard
DIGI flashing in display
• check digital cable connections
• try a different cable
• check that the output of the digital source conforms to the SPDIF or IEC-958-II standard
Disc playback quality on other players is poor
• check disc quality
• check that discs are compatible with 1X recording
• try 'Music' (consumer) blank discs
• if using 80 minute discs, try a 74 minute disc (they
provide a wider recording area and thus less
chance for error)
CD Text appears on CD drive but not CDR drive
• check disc (The CDR drive does not display CD
Text on 'hybrid' CDs that contain audio and data
together on the disc.)
Remote control does not work
• check that EXT / INT (IR) switch on rear is at INT
• check drive selection (CDR or CD)
• point the IR remote control directly at the IR
receiver
• check or replace batteries
- 54 -
Page 55

Specifications*
General
System ............................................................................................................Compact Disc Digital Audio (CD-DA)
Number of Channels ................................................................................................................................. 2 (stereo)
Applicable Discs ......................................................................................................................... CD, CD-R, CD-RW
Power Requirement
/U1B ........................................................................................................................................... AC 120V 60 Hz
/N1B ........................................................................................................................................... AC 230V 50 Hz
Power Consumption ......................................................................................................................................... 20 W
Allowable Operating Temperature ........................................................................................................ +5 to +35 °C
Allowable Operating Humidity ....................................................................................... 5 ~ 90 % (no condensation)
Dimensions (maximum)
Width............................................................................................................................................. 19” (483 mm)
Height ................................................................................................................................... 3 15/16” (100 mm)
Depth .................................................................................................................................... 13 7/16” (340 mm)
Net Weight....................................................................................................................................... 11.7 lbs (5.3 kg)
CD Recorder
Recording (analog)
Frequency Response ............................................................................................ 20Hz ~ 20kHz +0/-2 dB
Signal to Noise Ratio (IEC-A) ............................................................................................................. 86 dB
Total Harmonic Distortion (1kHz) ..................................................................................................... 0.015%
Channel Separation (1kHz) ................................................................................................................ 75 dB
Dynamic Range .................................................................................................................................. 86 dB
Playback
Frequency Response ............................................................................................ 20Hz ~ 20kHz +0/-1 dB
Signal to Noise Ratio (IEC-A) ........................................................................................................... 100 dB
Total Harmonic Distortion (1kHz) ....................................................................................................... 0.01%
Channel Separation (1kHz) ................................................................................................................ 78 dB
Dynamic Range .................................................................................................................................. 86 dB
Input /Output
Analog Input Sensitivity /Impedance
Balanced (XLR) ......................................................................................................... 0 ~ +20 dBu /47 k
(default setting: +16 dBu)
Unbalanced (RCA) .....................................................................................................500 mV rms /47 k
Analog Output (RCA)........................................................................................................... 2 V rms /200
Coaxial Digital In/Out (RCA) ................................................................................................. 0.5 Vp-p /75
Optical Digital Input ........................................................................................................................ -19 dBm
Digital Input Sampling Frequency .............................................................. 32/44.1/48 kHz (11 ~ 56 kHz)
CD Player
Applicable Discs................................................................................................... CD, CD-R, CD-RW, MP3 disc
Frequency Response ................................................................................................ 20Hz ~ 20kHz +0/-0.5 dB
Signal to Noise Ratio (IEC-A) ................................................................................................................. 100 dB
Total Harmonic Distortion (1kHz) ........................................................................................................... 0.003%
Channel Separation (1kHz) ....................................................................................................................... 96 dB
Dynamic Range ........................................................................................................................................ 96 dB
Analog Output (RCA) ................................................................................................................. 2 V rms /200
Coaxial Digital Output (RCA) ...................................................................................................... 0.5 Vp-p /75
Pitch Control ........................................................................................................................ ±12.0%, 0.1% step
Headphone .......................................................................................................................... 0 ~ 5V rms /8 ~ 2000
RS232C Remote .......................................................................................................................D-Sub 9-pin, female
RC5 Remote In/Out ........................................................................................................................ RCA w/Loop Out
Included Accessories............................................................................................................. IR remote controller 1
‘AA/R6’ batteries 2
Stereo audio cable 2
*Specifications subject to change without notice. RC5 remote cable 1
- 55 -
Page 56

LIMITED WARRANTY
Your Marantz Professional product is warranted against
manufacturer defects in material and workmanship for a
period of one year parts and labor.
Except as specified below, this warranty covers defects in
material and workmanship. The following are not covered
under warranty:
1. Damage, deterioration, malfunction or failure to meet
performance specifications resulting from:
a) Accidents, acts of nature, misuse, abuse, neglect or
unauthorized product modification.
b) Improper installation, removal or maintenance, or
failure to follow supplied instructions.
c) Repair or attempted repair by a non-Marantz
authorized agent.
d) Any shipment (claims must be presented to the
carrier).
e) Any cause other than a defect of manufacturing.
2. Cleaning, check-ups with no fault found or changes
incurred for installation, removal or reinstallation of the
product.
How You Can Get Service
1. If your unit needs service in the USA, contact our
service referral at the appropriate telephone number
indicated below. We will advise you of the name and
location of one or more authorized service centers
from which service may be obtained. Please do not
return the unit directly to us.
2. You must pay any shipping charges if it is necessary to
ship the product for service. If the necessary repairs
are covered by the warranty, we will pay return
shipping charges to your location anywhere in the
United States or its territories.
3. Whenever warranty service is required, you must
present the original dated sales receipt or other proof
of date purchased.
Limitation of Implied Warranties
All implied warranties, including warranties of merchantability and fitness for a particular purpose, are limited in
duration to the length of this warranty.
Exclusion of Damages
3. Any serialized product on which the serial number has
been defaced, modified or removed.
4. Batteries and battery chargers.
5. Accessories, including but not limited to: cables, mounting hardware and brackets, cleaning accessories, power
cords and adapters, and carry cases.
6. Products purchased outside of the United States, its
possessions or territories.
Non-transferable warranty
This Warranty may be enforced only by the original purchaser.
What We Will Pay For
We will pay for all labor and material expenses for items
covered by the warranty.
Liability for any defective product is limited to repair or
replacement of the product at manufacturer’s option.
Manufacturer shall not be liable for damage to other
products caused by any defects in Marantz products,
damages based on inconvenience or loss of use of the
product, or any other damages, whether incidental, consequential, or otherwise.
Some States do not allow limitations on how long an implied
warranty lasts and/or do not allow the exclusion or limitation
of incidental or consequential damages, so the above
limitations and exclusions may not apply to you.
How State Law Relates to the Warranty
This warranty gives you specific legal rights, and you may
have other rights which may vary from State to State.
Marantz Professional Service Number:
Marantz Professional Factory Service (630) 741-0330
This warranty is enforceable only in the United States and
its possessions or territories.
- 56 -
Page 57

®
Marantz is a registered trademark.
2003/8
 Loading...