

Page 1
Model CDR310 User Guide
CD Recorder
CLASS 1 LASER PRODUCT
LUOKAN 1 LASERLAITE
KLASS 1 LASERAPPARAT
Page 2
CAUTION
RISK OF ELECTRIC SHOCK
DO NOT OPEN
CAUTION: TO REDUCE THE RISK OF ELECTRIC SHOCK,
DO NOT REMOVE COVER (OR BACK).
NO USER-SERVICEABLE PARTS INSIDE.
REFER SERVICING TO QUALIFIED SERVICE PERSONNEL.
The lightning flash with arrowhead symbol within an equilateral triangle is intended to alert the user to the presence of
uninsulated "dangerous voltage" within the product's enclosure that may be of sufficient magnitude to constitute a risk of electric
shock to persons.
The exclamation point within an equilateral triangle is intended to alert the user to the presence of important operating and
maintenance (servicing) instructions in the literature accompanying the product.
WARNING
TO REDUCE THE RISK OF FIRE OR ELECTRIC SHOCK,
DO NOT EXPOSE THIS APPLIANCE TO RAIN OR MOISTURE.
CAUTION:
USE OF CONTROLS OR ADJUSTMENTS OR PERFORMANCE OF PROCEDURES OTHER THAN THOSE SPECIFIED HEREIN
MAY RESULT IN HAZARDOUS RADIATION EXPOSURE.
WARNINGS
Do not expose the equipment to rain or moisture.
Do not remove the cover from the equipment.
Do not insert anything into the equipment through the ventilation holes.
Do not handle the mains lead with wet hands.
Do not cover the ventilation with any items such as tablecloths, newspapers, curtains, etc.
No naked flame sources, such as lighted candles, should be placed on the equipment.
When disposing of used batteries, please comply with governmental regulations or environmental public instruction’s rules that apply in
your country or area.
Do not place anything about 0.1 meter above the top panel.
Make a space of about 0.1 meter around the unit.
No objects filled with liquids, such as vases, shall be placed on the apparatus.
When the switch is in the OFF position, the equipment is not completely switched off from MAINS.
LASER SAFETY
This unit employs a laser. Only a qualified service person should remove the cover or attempt to service this device, due to
possible eye injury.
Copyright
Recording and playback of any material may require consent. For further information refer to the following US ordinances:
• Copyright act of 1956
• Dramatic and Musical Performance Act 1958
• Performers Protection Acts 1963 and 1972
• any subsequent statutory enactments and orders
Page 3

IMPORTANT SAFETY
INSTRUCTIONS
READ BEFORE OPERATING EQUIPMENT
This product was designed and manufactured to meet strict quality
and safety standards. There are, however, some installation and
operation precautions which you should be particularly aware of.
1. Read these instructions.
2. Keep these instructions.
3. Heed all warnings.
4. Follow all instructions.
5. Do not use this apparatus near water.
6. Clean only with dry cloth.
7. Do not block any ventilation openings. Install in accordance
with the manufacture’s instructions.
8. Do not install near any heat sources such as radiators, heat
registers, stoves, or other apparatus (including amplifiers) that
produce heat.
9. Do not defeat the safety purpose of the polarized or
grounding-type plug. A polarized plug has
two blades with one wider than the other. A
grounding type plug has two blades and a
third grounding prong. The wide blade or the
third prong are provided for your safety. If the
provided plug does not fit into your outlet,
consult an electrician for replacement of the obsolete outlet.
10. Protect the power cord from being walked on or pinched
particularly at plugs, convenience receptacles, and the point
where they exit from the apparatus.
11. Only use attachments/accessories specified by the
manufacturer.
12. Use only with the cart, stand, tripod, bracket, or table specified
by the manufacturer, or sold with the apparatus. When a
cart is used, use caution when moving the cart/apparatus
combination to avoid injury from tip-over.
13. Unplug this apparatus during lightning storms or when unused
for long periods of time.
14. Refer all servicing to qualified service personnel. Servicing
is required when the apparatus has been damaged in any
way, such as power-supply cord or plug is damaged, liquid
has been spilled or objects have fallen into the apparatus, the
apparatus has been exposed to rain or moisture, does not
operate normally, or has been dropped.
Additional Safety Information!
• This product should not be placed in a built-in installation such
as a bookcase or rack unless proper ventilation is provided or
the manufacturer’s instructions have been adhered to.
• Apparatus shall not be exposed to dripping or splashing and
that no objects filled with liquids, such as vases, shall be
placed on the apparatus.
• The AC adaptor shall be installed near the Socket-Outlet and
shall be easily accessible.
NOTE TO CATV SYSTEM INSTALLER:
This reminder is provided to call the CATV (Cable-TV) system installer's attention to Article 820-40 of the NEC, which provides guidelines for
proper grounding and, in particular, specifies that the cable ground shall be connected to the grounding system of the building, as close to the
point of cable entry as practical.
NOTE:
This equipment has been tested and found to comply with the limits for a Class B digital device, pursuant to Part 15 of the FCC Rules. These
limits are designed to provide reasonable protection against harmful interference in a residential installation. This equipment generates, uses
and can radiate radio frequency energy and, if not installed and used in accordance with the instructions, may cause harmful interference to
radio communications. However, there is no guarantee that interference will not occur in a particular installation. If this equipment does cause
harmful interference to radio or television reception, which can be determined by turning the equipment off and on, the user is encouraged to
try to correct the interference by one or more of the following measures:
• Reorient or relocate the receiving antenna.
• Increase the separation between the equipment and receiver.
• Connect the equipment into an outlet on a circuit different from that to which the receiver is connected.
• Consult the dealer or an experienced radio/TV technician for help.
NOTE:
Changes or modifications may cause this unit to fail to comply with Part 15 of the FCC Rules and may void the user's authority to operate the
equipment.
This Class B digital apparatus complies with Canadian ICES-003.
Cet appareil numérique de la Classe B est conforme á la norme NMB-003 du Canada.
Page 4

CE marking (only EU version)
English
This product is in conformity with the EMC directive and low-voltage directive.
Français
Cet appareil est conforme á la directive EMC et á la de directive sur les basses tensions.
Deutsch
Dieses Gerät entspricht den EMC-Richtlinien und den Richtlinien für Niederspannungsgeräte.
Nederlands
Dit apparaat voldoet aan de EMC-richtlijnene en de richtlijnen voor apparatuur met laag voltage.
Italiano
Quest' unitá è conforme alle direttive EMC ed alla direttiva sulle basse tensioni.
Português
Esta unidade está em conformidade com as directivas EMC e as directivas de baixa voltagem.
Español
Esta unidad estáde acuerdo con las normas EMC y las relacionadas con baja tensión.
Svenska
Produkten är tillverkad i enlighet med EMC-direktivet och direktivet för lågspänningsutrustning.
Equipment mains working system
This product complies with household power and safety requirements in your area.
SI DICHIARA CHE L'APPARECCHIO SINTO-AMPLIFACATORE SR-39
RISPONDE ALLE PRESCRIZIONI DELL'ART. 2 COMMA 1 DEL D.M. 28
AGOSTO 1995 N° 548.
FATTO A EINDHOVEN, IL 1/1/1997. MARANTZ EUROPE B.V.
5600 EINDHOVEN
THE NETHERLANDS
"Este aparato lleva elementos antiparasitarios necesarios para cumplir
con los limites que se establecen en el Anexo V del Reglamento sobre
Pertubaciones Radioelectricas e Interferencias aprobado en el Real
Decreto 138/1989. (B.O.E. de 9 Febrero 1989)."
Page 5

Table of Contents
Package contents ......................... 3
Introduction .................................. 4
Features .................................................... 4
Preparation ................................... 6
Installing the carry strap ........................... 6
Installing batteries .................................... 6
Controls and Connections .......... 7
Top side ..................................................... 7
Front side ................................................ 12
Left / Right side ....................................... 13
Rear side ................................................. 14
Display ..................................................... 15
Basic operation .......................... 16
CF cards ...................................... 17
To insert a CF card .................................. 17
To eject a CF card ................................... 17
CF card security ...................................... 18
CF card Format ....................................... 18
Recording ................................... 19
Connection Diagram ............................... 19
Recording Procedure .............................. 19
Audio input for recording ........................ 20
Recording Format parameters ................ 21
Recording time chart ............................... 21
Recording Level Control .......................... 22
Microphone Attenuator ............................ 22
Pre Record .............................................. 22
Silent Skip (Automatic Pause Recording) 22
Add a Track manually .............................. 22
Add a Track automatically ....................... 23
Playback ...................................... 23
Connection Diagram ............................... 23
Playback Procedure ................................ 24
Track Access ........................................... 24
Search ..................................................... 24
Audible Search ........................................ 25
Audio output for playback ....................... 25
EDL Mark ..................................... 25
Add an EDL mark manually .................... 25
Search the EDL mark .............................. 25
Add an EDL mark automatically .............. 26
Edit ............................................... 26
1. Trk Erase (How to erase tracks) ......... 27
2. TrkMkErase (How to erase
all EDL marks within one track) ....... 27
3. AllMkErase (How to erase all EDL marks)
28
4. Format (How to format a CF card) ...... 28
Virtual Track and Copy Segment 29
Virtual Track .............................................. 29
Copy Segment ......................................... 29
Virtual Track Edit Mode ............................ 29
Creating a Virtual Track ..............30
Using Copy Segment to
create a new file ..........................31
Entering Virtual Playback mode 32
Virtual Track EDIT mode .............33
Copy SEG?
[How to convert a Virtual Track to a new file] 33
Copy SEG A?
[How to convert all Virtual Tracks to new files]
34
VT Erase?
[How to erase a Virtual Track] .................. 34
AVT Erase?
[How to erase all Virtual Tracks] ............... 35
USB mode ................................... 36
Computer compatible .............................. 36
How to connect via the USB port ............ 36
Diagram of file structure .......................... 37
Machine ID .............................................. 37
Additional Functions ................. 38
Battery ..................................................... 38
Auto power off ......................................... 38
Beep Alarm .............................................. 38
Key lock ................................................... 39
Set Date and Time .................................. 39
LED level meter ....................................... 39
Phantom Power ....................................... 39
Display ..................................................... 40
Preset Setup ............................... 41
Table of Preset defaults (USA) ................ 42
Table of Preset defaults (Europe) ........... 43
Troubleshooting ......................... 55
Error Message ............................ 57
Specifications ............................. 58
LIMITED WARRANTY - USA .................. 59
1
Page 6

Introduction
Thank you for purchasing this CDR310 CD Recorder.
Before using the CD recorder, make sure that you read
through this instruction manual carefully to fully understand
the device’s functions and how to operate them. We hope
that you will continue to enjoy using the recorder for a very
long time. After reading this manual, please keep it in a safe,
easy to reach place for future reference.
Features
●
You can record audio from an external microphone onto
the internal HD (Hard Disk), and then burn the audio onto
a CD-R.
●
Audio input
• Condenser microphone or dynamic microphone (XLR
balanced input) connected to the MIC IN jack
• Internal microphone
• Line level audio source connected to the LINE IN jack
• Digital input (Coaxial input)
• Phantom power supply
• L/R independent attenuator for external microphone
input or internal microphone input
●
Recording level and LR balance adjustment (☞ XX)
• Automatic recording level control (ALC)
• Manual control
●
You can record and playback audio in stereo (2 channel)
or monaural (1 channel).
●
You can play back CD-DA and Data CD (MP3, AIF, WAV).
●
The following sound outputs are available.
• Internal speakers
• Headphones connected to the headphone (PHONES)
jack
• Amp or other analog audio devices connected to the
LINE OUT jack.
• Digital output
●
2 types of power supply source
• Use the provided AC adaptor.
• Use alkaline batteries, the optional Nickel-Cadmium
battery (RB1100), or the optional Nickel-Metal Hydride
battery (RB1650).
●
4 different types of recording format
(MP3, WAVE, CD-DA, AIFF)
• Compressed sound recording uses MPEG1 Layer III
(MP3) monaural and stereo recording.
• MP3 are compressed to 128kbps (stereo) or 64kbps
(monaural).
• Non-compressed sound recording uses 16-bit linear
pulse code modulation (PCM).
●
Simple recording
• You can start simple recording to the HD just by
pressing the REC button once. The HD capacity is
1.5GB. (Approx. 2 hours in PCM recording)
●
You can create an extended play recorded CD (maximum
25 hours 29 minutes on a 700MB CD-R disc in MP3 mono
format).
●
Simple CD creation
• You can burn data recorded on the HD onto a CD-R just
by pressing the MAKE CD button.
●
Convenient special recording functions
• Pre-code cache (
• Background recording (
• Silent skip (
• Auto track (
• Manual track (
☞
☞
☞
☞
☞
XX)
XX)
XX)
XX)
XX)
2
Page 7
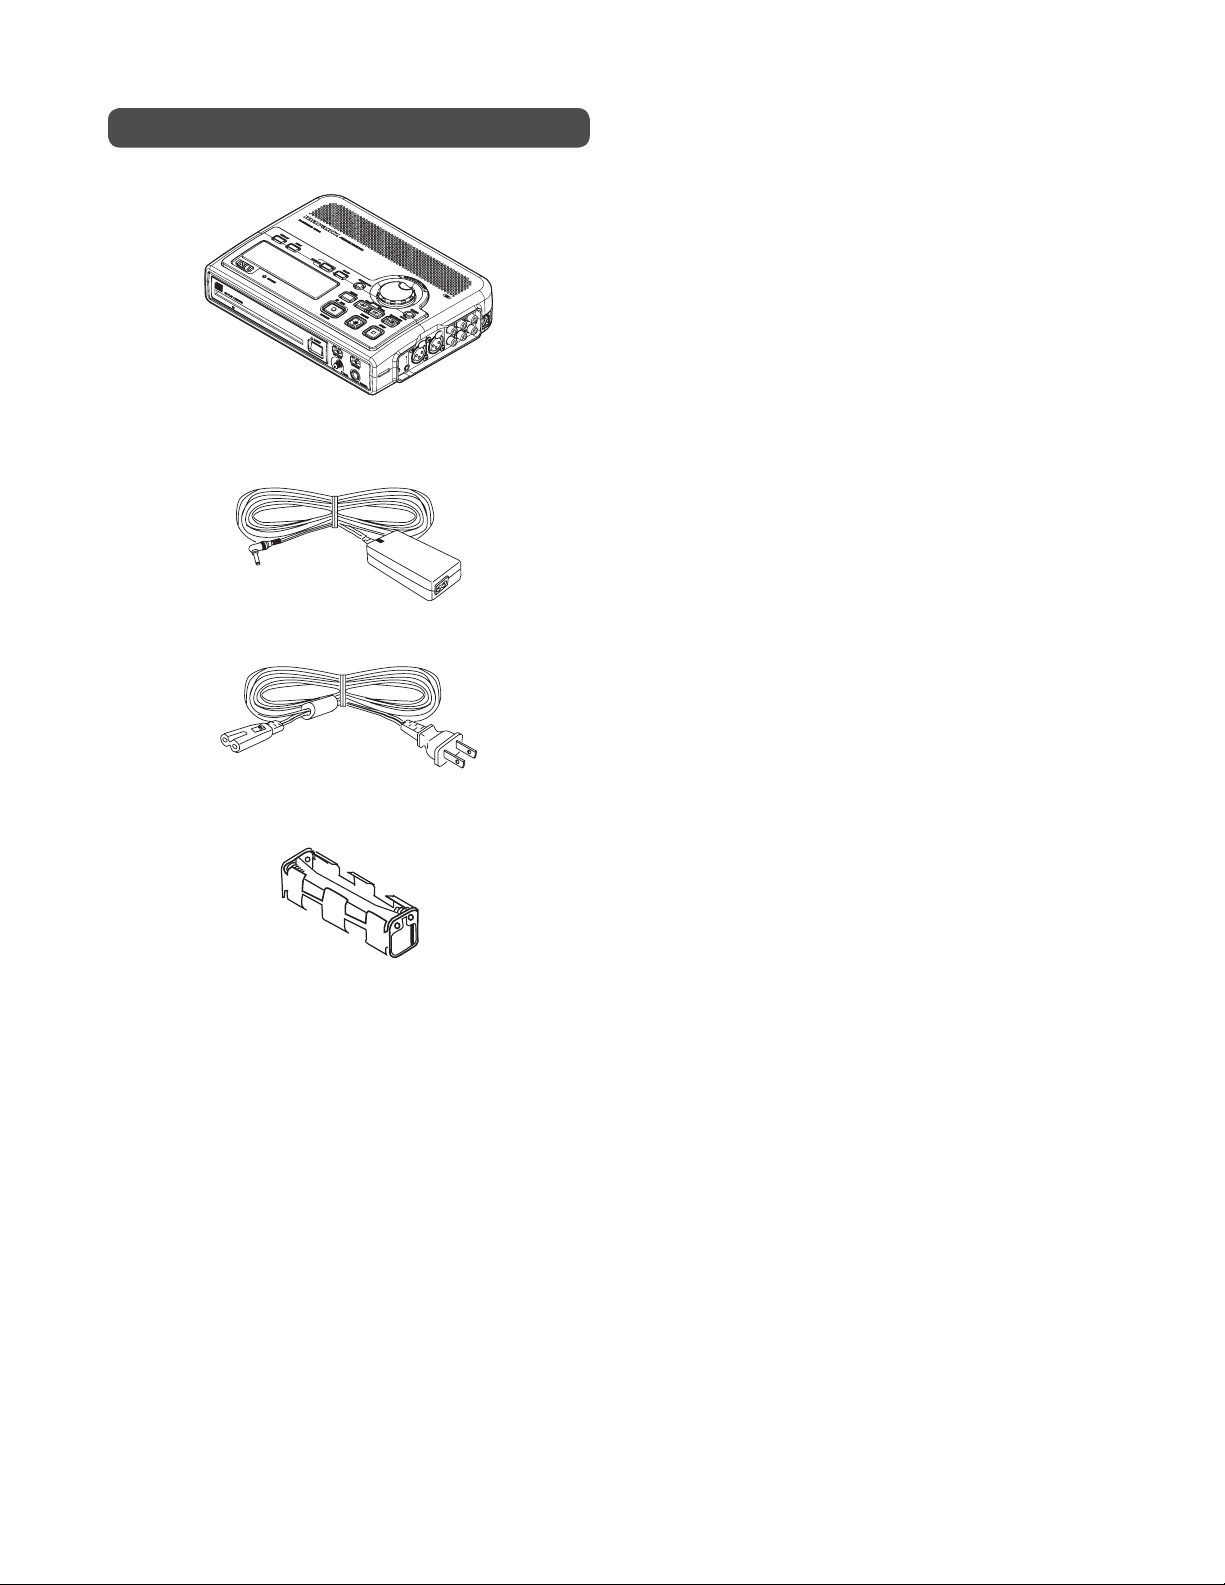
Package contents
• CDR310
• AC power pack
• Power cord
• Battery holder (AA type)
• User Guide
• Customer Registration Document
3
Page 8
Quick Start Guide
Before using the CDR310, please read through the following section which explains the basic flow of operation.
1. Setup the power supply (☞ P.XX)
POWER
OFF
ON
• Use either the provided AC adaptor or batteries.
• You can use any one of the 3 types of batteries:
Alkaline, optional Nickel-Cadmium, or optional Nickel-
Metal Hydride.
• Please make sure batteries are fully charged.
2. Connect an external microphone and turn the power ON. (☞ P.XX)
• Connect the external microphone to the MIC IN jack. (☞
P.XX)
• Slide the power switch to the ON side. (
MIC IN
LR
☞
P.XX)
3. Record (☞ P.XX)
4. Burn a CD (☞ P.XX)
• Press the REC button, and recording starts.
• Adjust the recording level/LR balance. (
• Detailed settings for recording. (
• Press the STOP button, and recording stops.
☞
P.XX)
☞
P.XX)
• Press the MAKE CD button to burn to a CD-R.
• When the CD burning process has completed, the CD-R is
automatically ejected.
• To continue to burn to a different CD-R, insert a new
CD-R.
• If the CD creation is ended without burning onto another
CD-R, all of the HD data is deleted.
4
Page 9
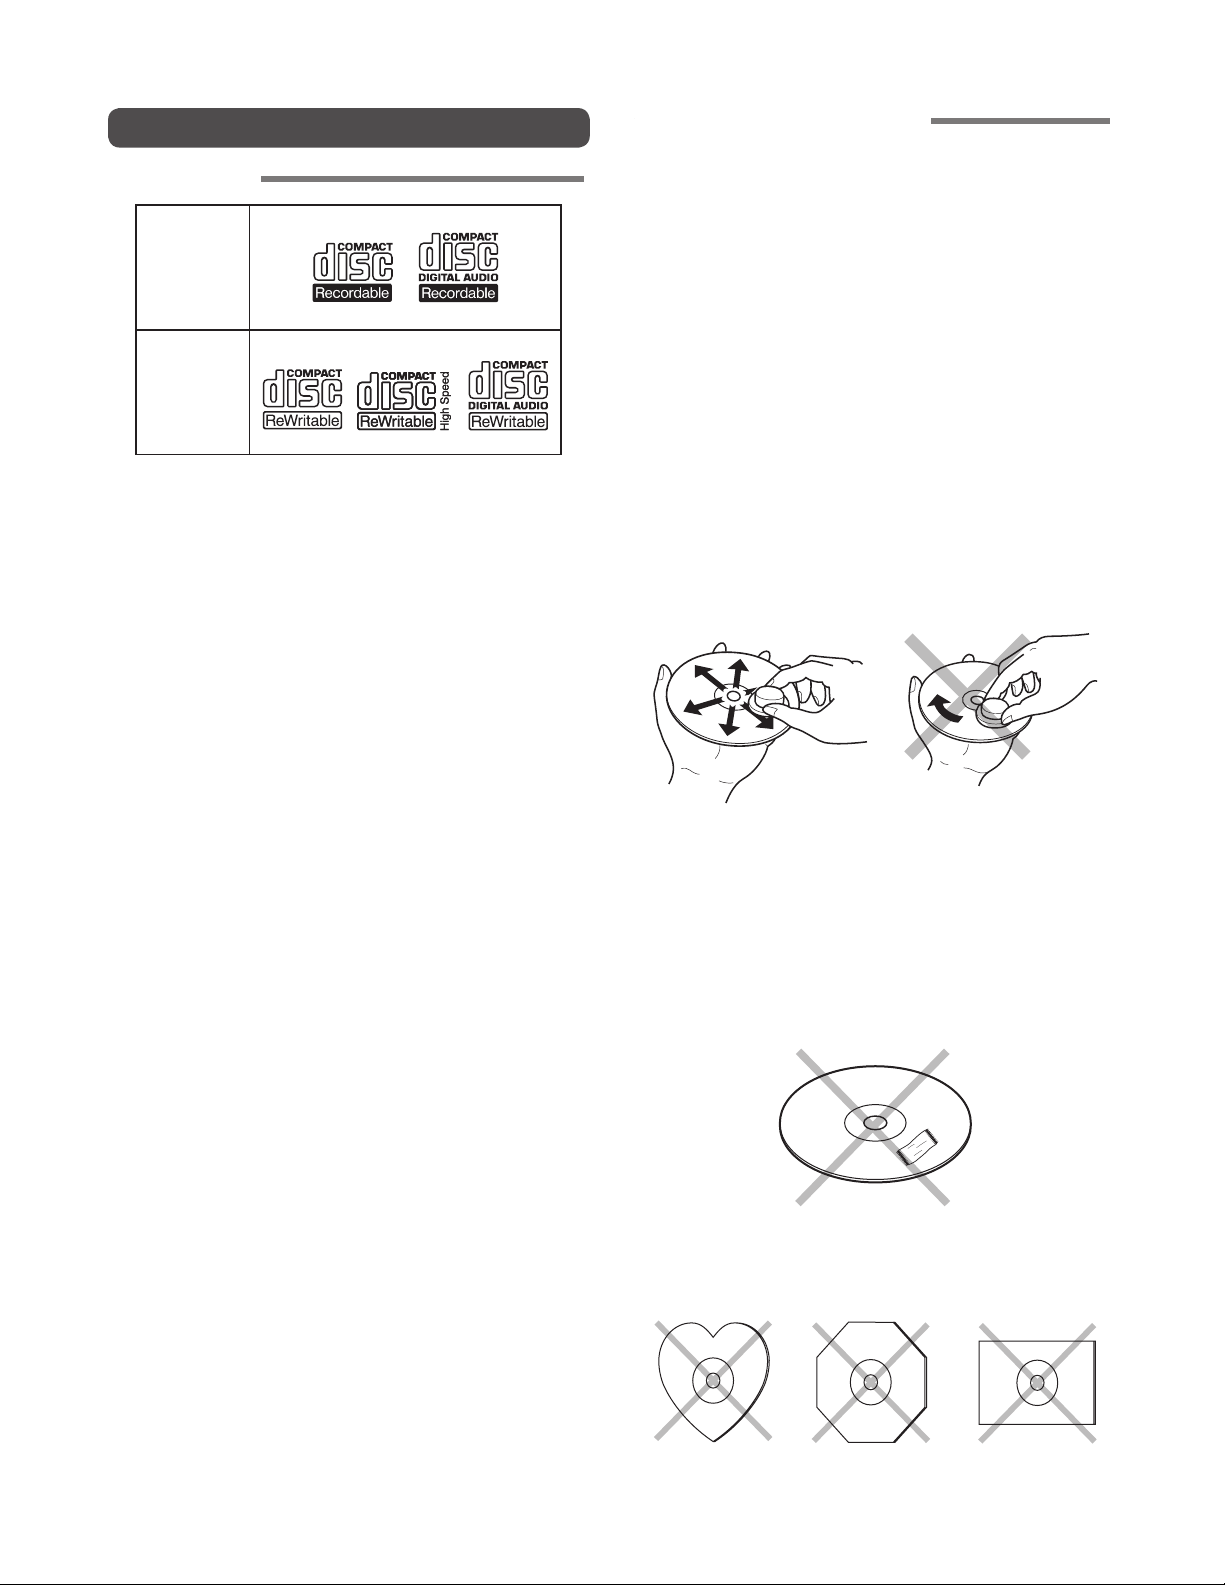
About Discs
Playable discs
CD-R
ADDITIONAL INFORMATION
The glossy side shining like a rainbow is the front side of the
disc, and the side on which the label is printed is the back.
Unlike conventional turntables for playing analog discs,
the unit reads the information recorded on the disc from
underneath without contacting it using a beam of laser
light. Therefore, the performance of a compact disc will not
degrade like conventional analog records.
Handle discs carefully so as not to damage or scratch
the front side.
CD-RW
Finalized CD-R and CD-RW discs recorded in the CD-DA
format, MP3 format or Video-CD format can be played with
the unit.
• Finalize is the process to make a CD-R/CD-RW playable
for players (not recorders)
• Some discs may not be able to be played depending on
condition of the discs and recording software.
• Single CDs (8cm) cannot be used.
To protect the disc, avoid placing it in the following
locations:
• In direct sunlight or near a source of heat like a heater.
• In a place which is damp or dirty.
• In a place which could be exposed to rain, such as near a
window.
Always keep the disc surface clean.
When cleaning the disc surface, always be sure to use a
special compact disc cleaner and wipe as shown below.
• Do not use conventional record cleaner for analog records,
as this will adversely affect the disc surface.
Store discs properly by placing them in their disc cases.
• Do not attach a piece of paper or sticker on the label side
of disc. When a disc has a piece of plastic tape or rental
DVD/CD label with paste protruded from the edge or when
a disc has a trace of such a sticky object, do not attempt
to play the disc. If such a disc is played on the DVD player,
impossibility of taking out the disc or other malfunction
may result.
• Do not use a disc with a special shape.
Do not attempt to play a disc with a special shape such
as a heart-shaped disc or octagonal disc. Otherwise the
equipment malfunction may result.
5
Page 10
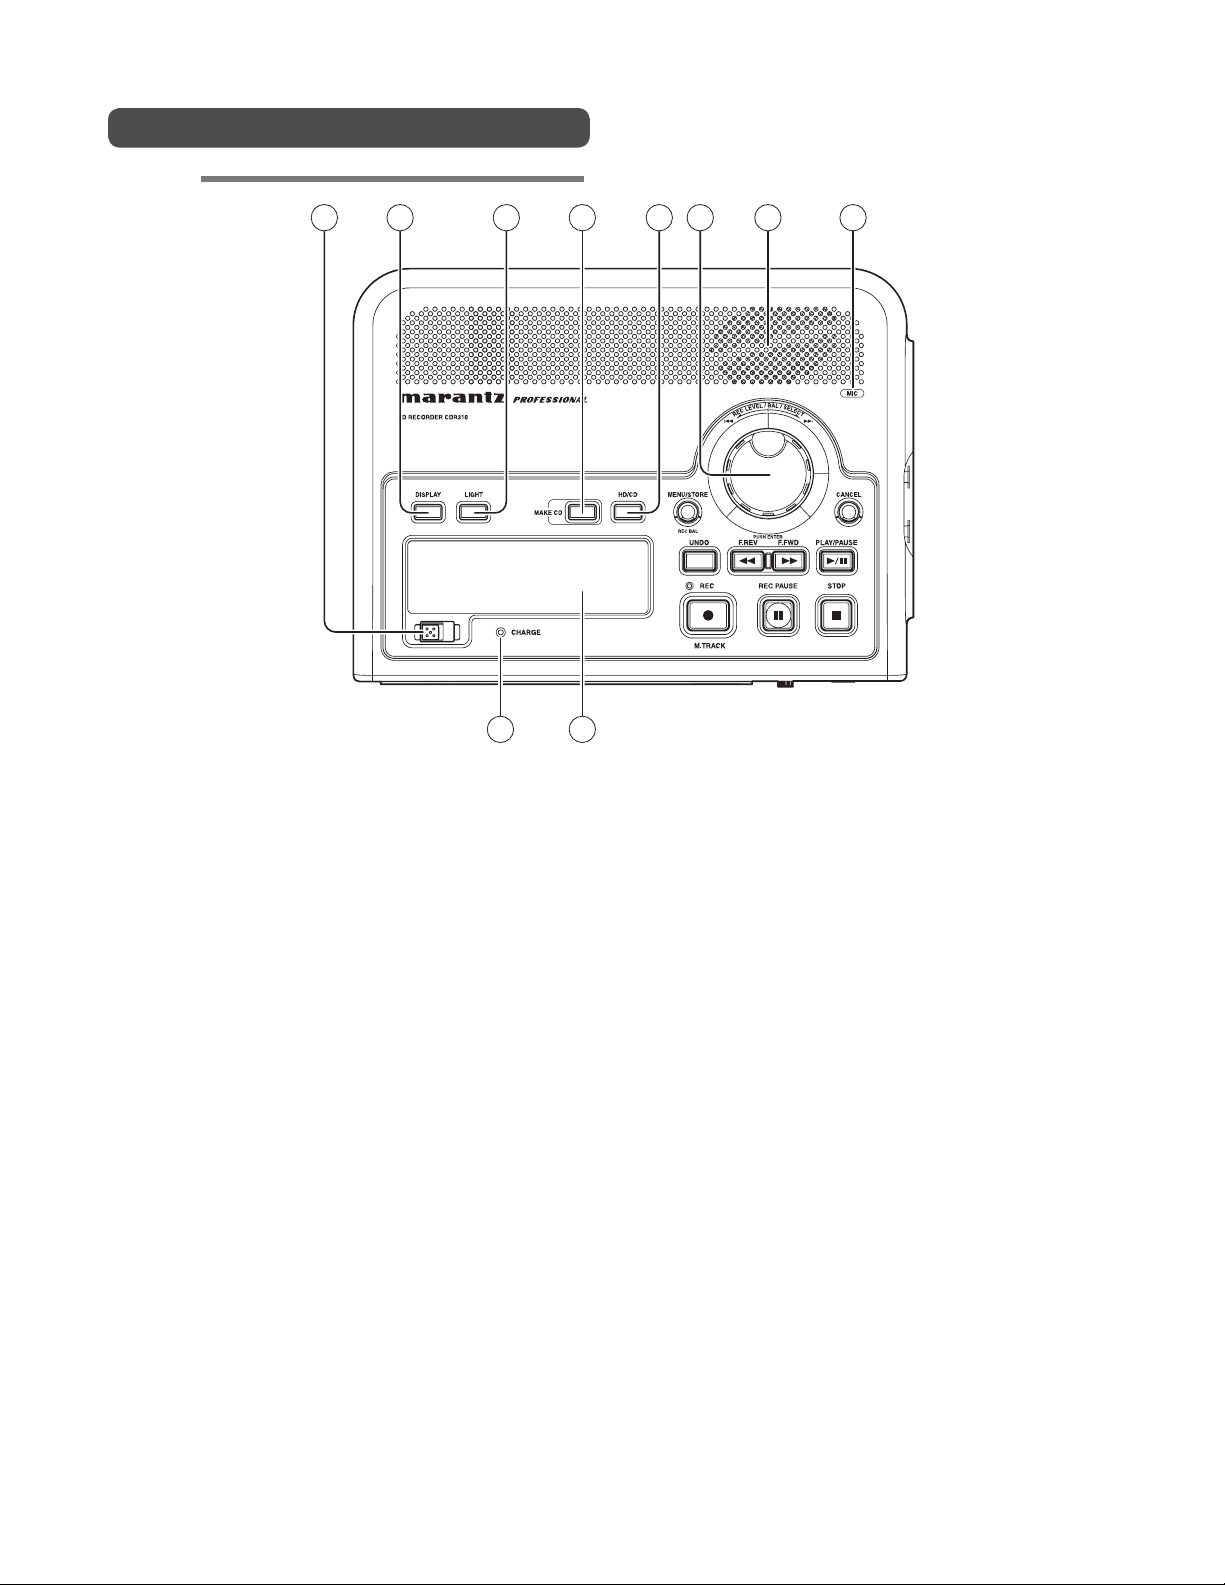
Names and Functions
Top side
1 2 63 54
q Power switch
Slide this switch to switch the power on/off.
w DISPLAY button
Press this button to switch the contents of the display.
The displayed information is different when the recorder is
stopped, recording, and playing back. (
e LIGHT button
Press this button to light the display light for 3 seconds.
Hold this button down for 1 second to keep the display
light on. Press this button once again to turn the display
light off.
r MAKE CD button
You can burn the recorded data to CD-R by pressing this
button when the recorder is stopped. (
t HD/CD button
Press this button when the recorder is stopped to switch
between the HD recording/playback mode and CD
playback mode.
y JOG/ENTER button
• REC LEVEL control
You can adjust the recording level by rotating the JOG
while the recording is paused, or during recording.
You can also adjust the recording level left and right (L/R)
balance by holding down the MENU button and rotating
the JOG. (
☞
P.XX)
☞
☞
P.XX)
P.XX)
7 8
109
• Track selection
You can select the track you wish to play back by rotating
the JOG while playback is paused, stopped, or during
playback. After selecting the track that you wish to play
back, press the JOG or PLAY/PAUSE button to play back
the selected track. (
• MENU mode
You can select the MENU items by rotating the JOG in
the MENU mode. Press the JOG after selecting an item to
choose that item. Press the CANCEL button to cancel the
selection.
u Internal speakers
The audio signal being played back is output to the
internal speakers. If headphones are connected to the
headphone (PHONES) jack, sound is not output from
the internal speakers. Adjust the speaker volume using
LEVEL volume.
i MIC (Internal microphone)
o CHARGE Indicator
This LED flashes while the optional rechargeable
batteries are being recharged.
The LED goes out when recharging has finished.
!0 Display (
☞
P.XX)
☞
P.XX)
6
Page 11
20
11 14
12 13
1819 17
16
15
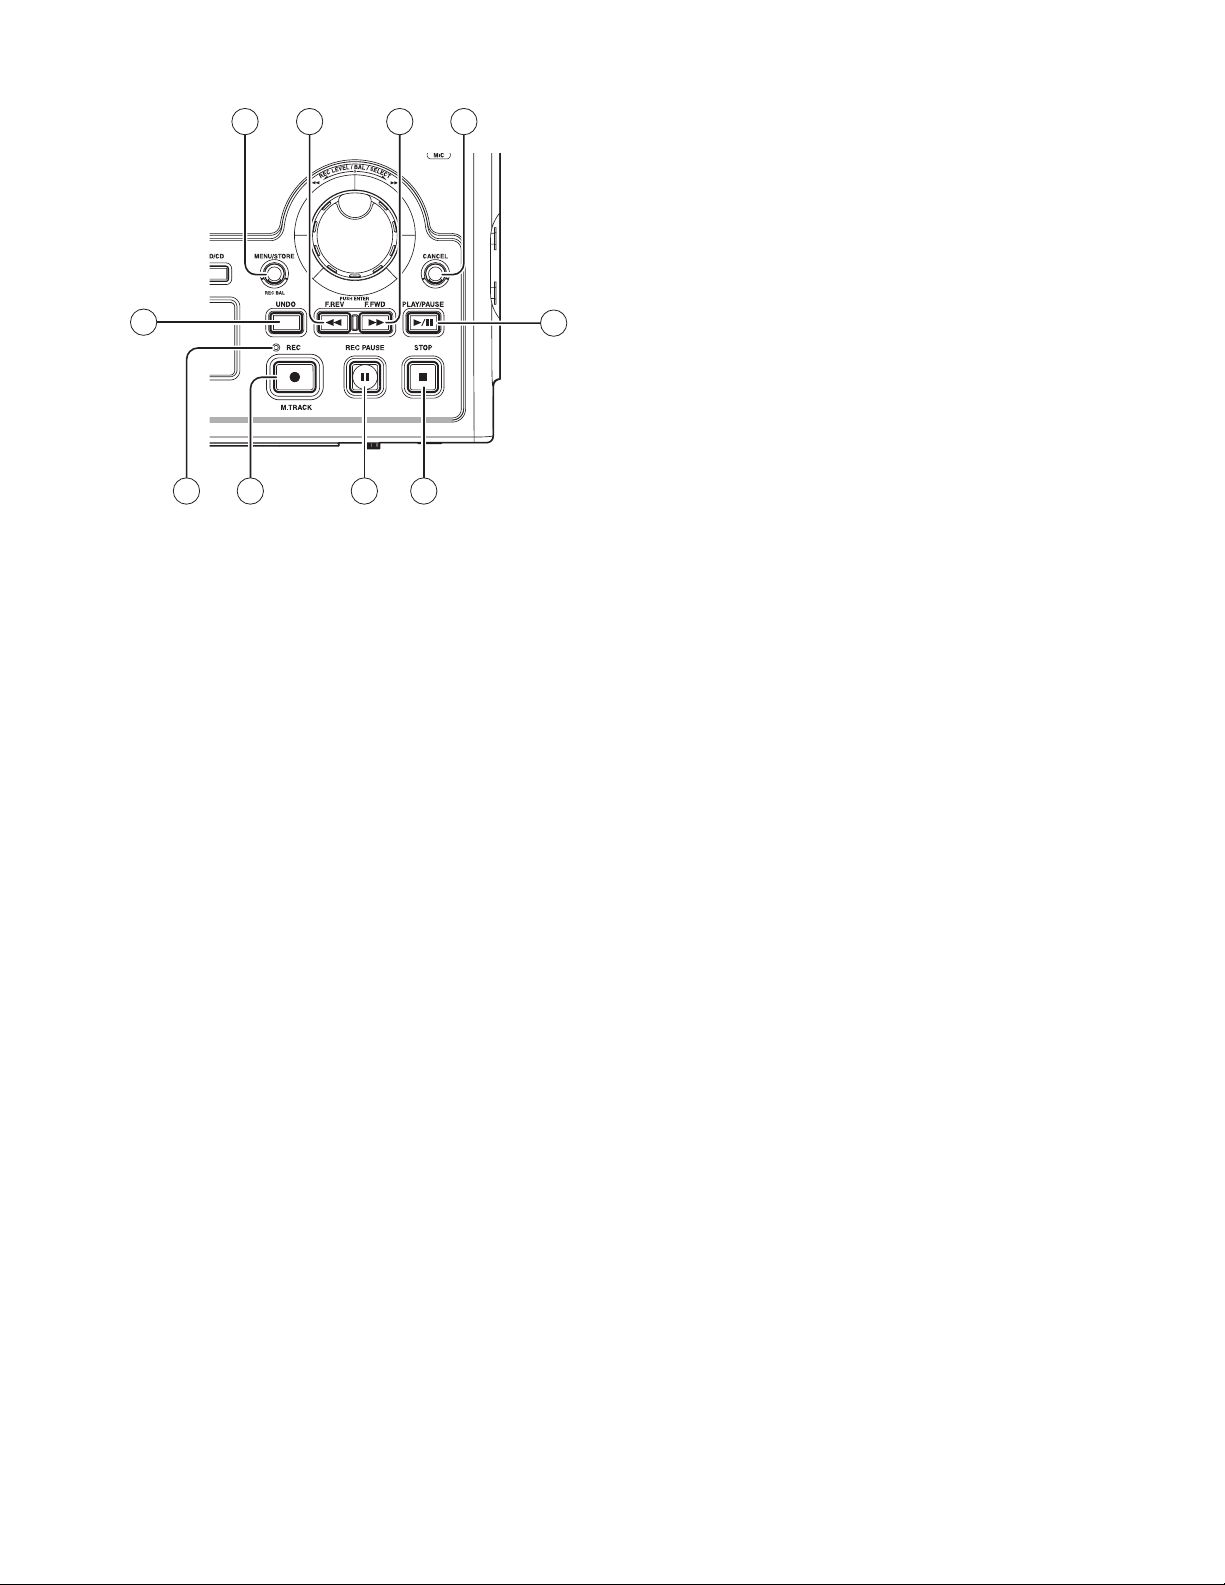
!5 PLAY/PAUSE button
Press this button when the recorder is stopped to start
playback.
Press this button during playback to pause playback.
Also, if this button is pressed when playback is paused,
playback restarts.
!6 STOP button
Press this button during recording to stop the recording
and save the recorded track (file).
Press this button during playback to stop playback. If you
press the PLAY/PAUSE button after pressing the STOP
button, the stopped track starts playback again from the
beginning of the track.
!7 REC PAUSE button
Press this button when the recorder is stopped to pause
recording. You can adjust the recording level before
recording in this state.
Press this button during recording to pause recording.
The REC indicator flashes while recording is paused.
!1 MENU/STORE button
• MENU
Press this button when the recorder is stopped to switch
to the Menu mode. Turn the JOG to select the item that
you wish to set from the various menu items. (
• STORE
Press this button when you want to enter changes in the
menu items, and when you want to write to the recorder.
• REC BALANCE
You can adjust the recording level L/R balance by holding
down this button and rotating the JOG.
!2 F.REV (
Press this button when the recorder is stopped to pause
playback. Continue to press and hold this button to search
tracks in reverse direction from the first track.
Press and hold this button during playback to search
tracks in reverse direction at 2 times speed playback.
Release the button to return to normal playback.
Press and hold this button when playback is paused to
search tracks in reverse direction.
!3 F.FWD (
Press this button when the recorder is stopped to pause
playback. Continue to press and hold this button to search
tracks in the forward direction from the first track.
Press and hold this button during playback to search
tracks in the forward direction at 2 times speed playback.
Release the button to return to normal playback.
Press and hold this button when playback is paused to
search in the forward direction.
5) button
6) button
☞
P.XX)
!8 REC button
Press this button when the recorder is stopped to start
recording.
Also, press this button when recording is paused to start
recording again.
If “Manual Trk” is set to ON in the menu item labeled
“preset menu”, pressing this button during recording
saves the track currently being recorded, and starts
recording as a new track.
Press the STOP button to stop recording.
!9 REC Indicator
Remains lit while recording and flashes while recording is
paused.
@0 UNDO button
Press this button after stopping recording to delete the
recorded track. (
☞
P.XX)
!4 CANCEL button
Press this button in the MENU mode to cancel the menu
contents being set, and to return to the stopped status.
7
Page 12

Front side
z CD slot
x EJECT button
Press this button to eject the CD that is inside the CD slot.
c KEYLOCK switch
Set this switch ON to set to the key-lock status. All of the
operating buttons and switches are locked, except for the
LIGHT button.
v SPEAKER switch
Set this switch to OFF to mute the output from the internal
speakers.
2 31
4
6 5
b Headphone (PHONES) jack
Insert the stereo headphones plug here.
n LEVEL volume
Turn this knob to adjust the internal speaker volume or
volume output from the headphone jack.
Notes
When recording with the internal microphone, switch the
SPEAKER switch OFF to avoid feedback between the
internal microphone and speakers.
Rear side
7
m Battery case
Open the battery cover case, and insert the supplied
battery holder (with alkaline batteries inserted), or the
commercially available Nickel-Cadmium battery or NickelMetal Hydride battery.
8
Page 13
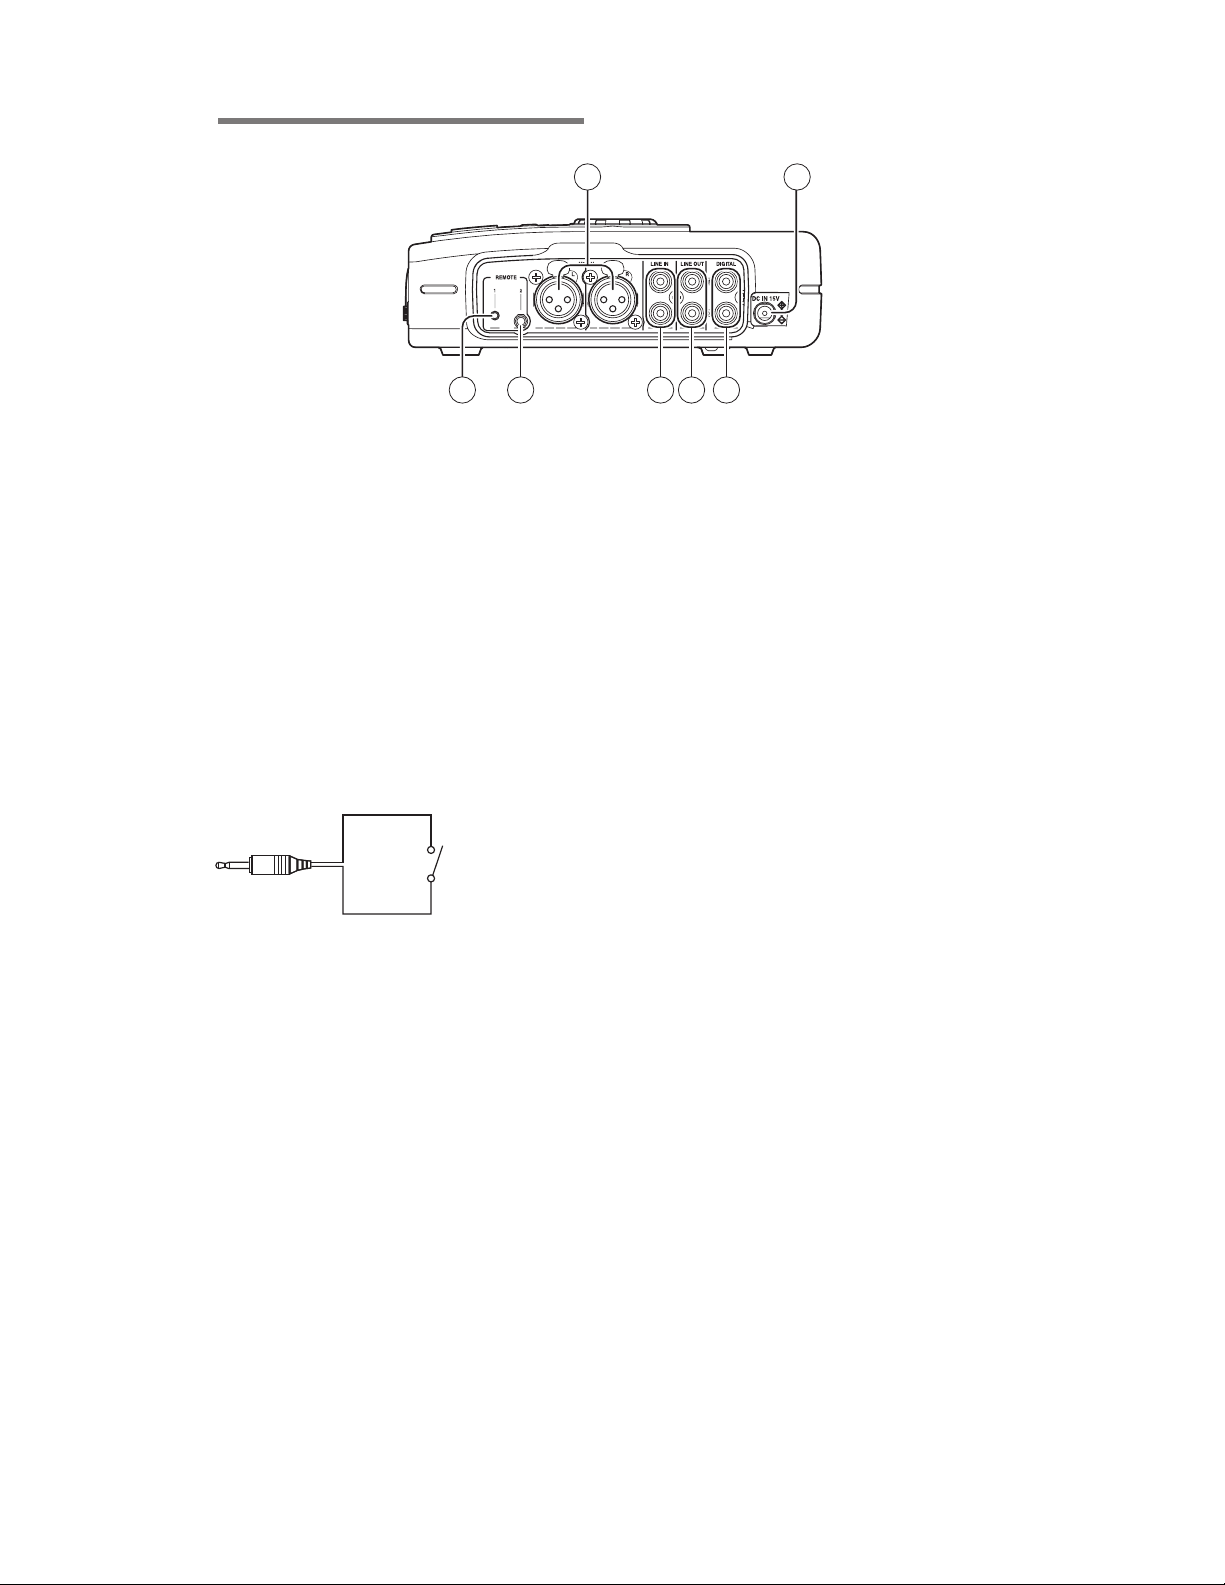
Right side
A B
DC
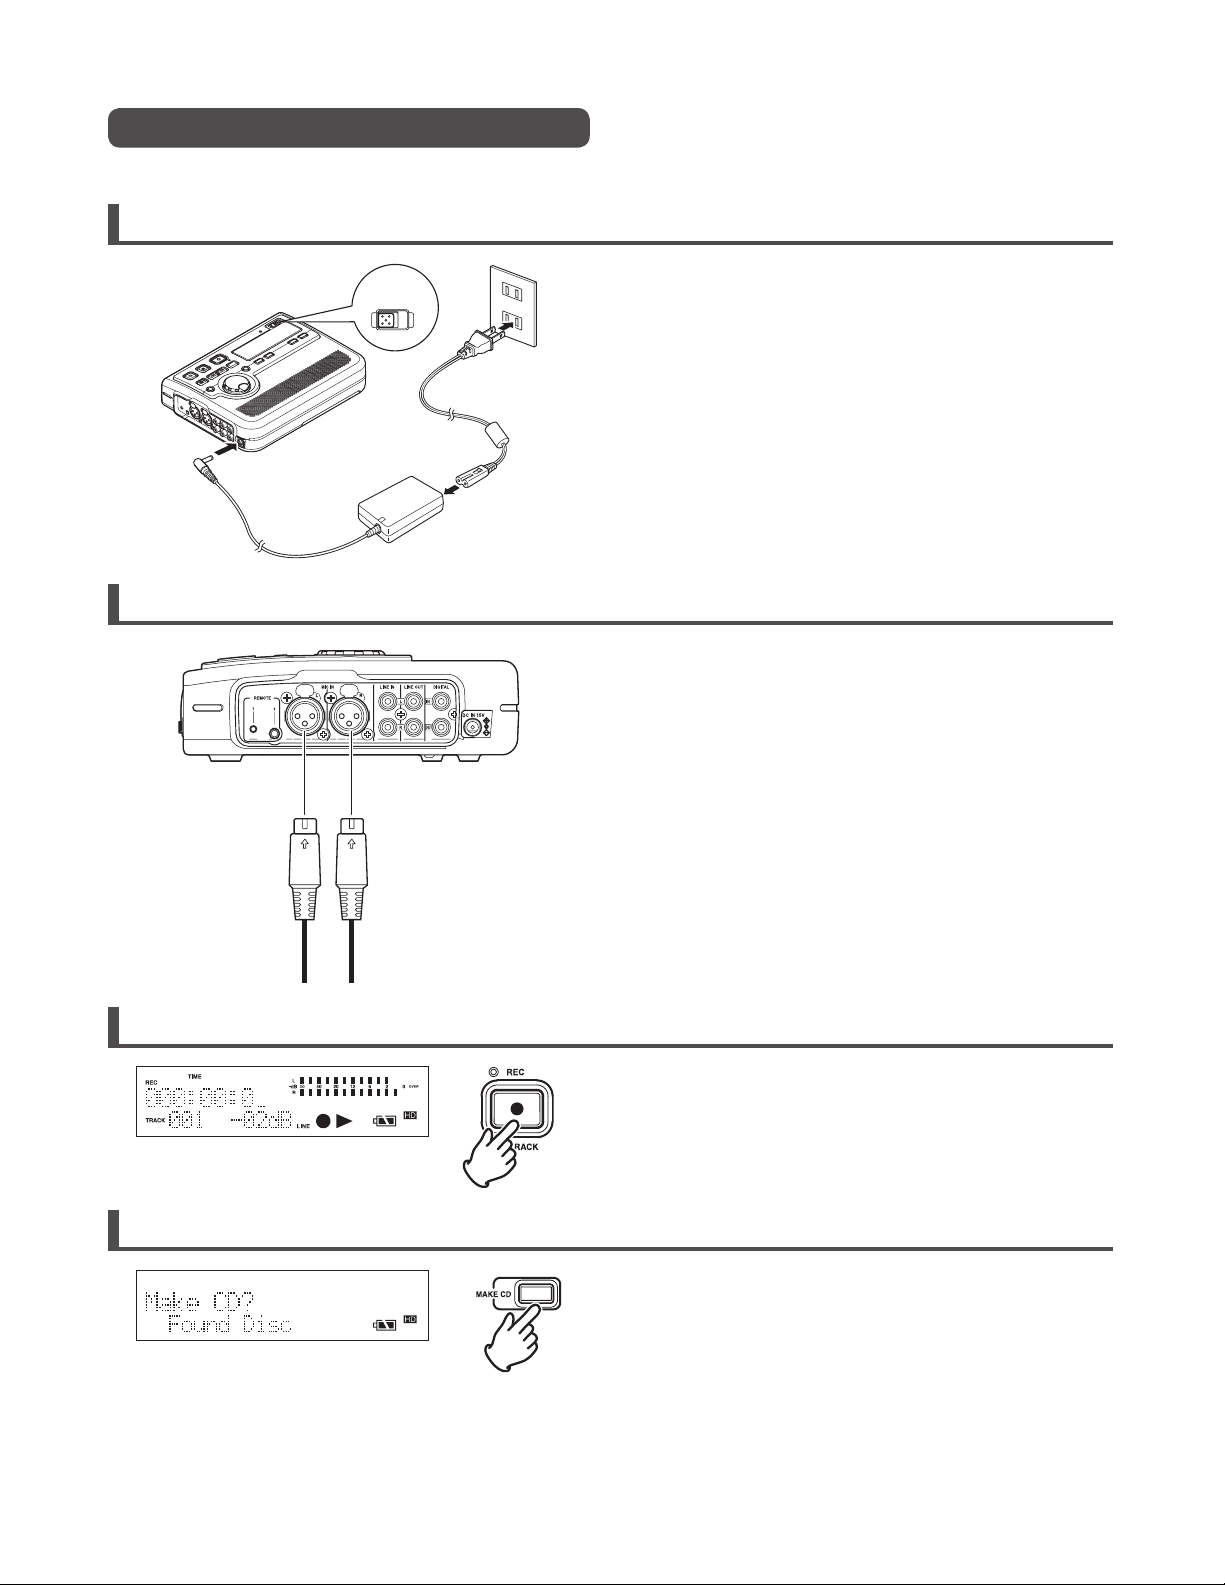
A MIC IN jacks (L/R) (XLR balanced input)
Insert an external microphone plug.
For monaural recording, plug into either the L side or R
side jack.
B DC IN jack
Insert the provided AC adaptor plug.
The power supply is DC15V, 2.3A.
If the AC adaptor plug is inserted while using the recorder
on battery power, the recorder will automatically switch to
adaptor power. Also, if the AC adaptor plug is removed,
the recorder will automatically switch to battery power.
C REMOTE 1 jack
Insert a contact closure plug similar to the one shown
below into this 2.5mm mini jack.
Switch
2.5mm mini jack
You can remotely control playback/recording of the
recorder by opening and closing the switch contact. (
P.XX)
☞
FE G
E LINE IN jacks (L/R)
Insert RCA audio cable plugs connected to an external
audio device into these jacks to input the signals output
from the external device into the recorder.
F LINE OUT jacks (L/R)
Insert RCA audio cable plugs connected to an external
audio device into these jacks to output audio signals to an
external device (amp, etc.).
G DIGITAL IN/OUT
• IN
Connects to the digital signal output terminal (Coaxial) of
a digital device (DVD, CD, MD, etc.).
• OUT
Connects to the digital signal input terminal (Coaxial) of a
digital recording device (CD recorder, MD recorder, etc.).
D REMOTE 2 jack
Connect microphone remote RC600PMD (sold
separately) to this jack. There is a recording indicator
lamp on the RC600PMD.
9
Page 14
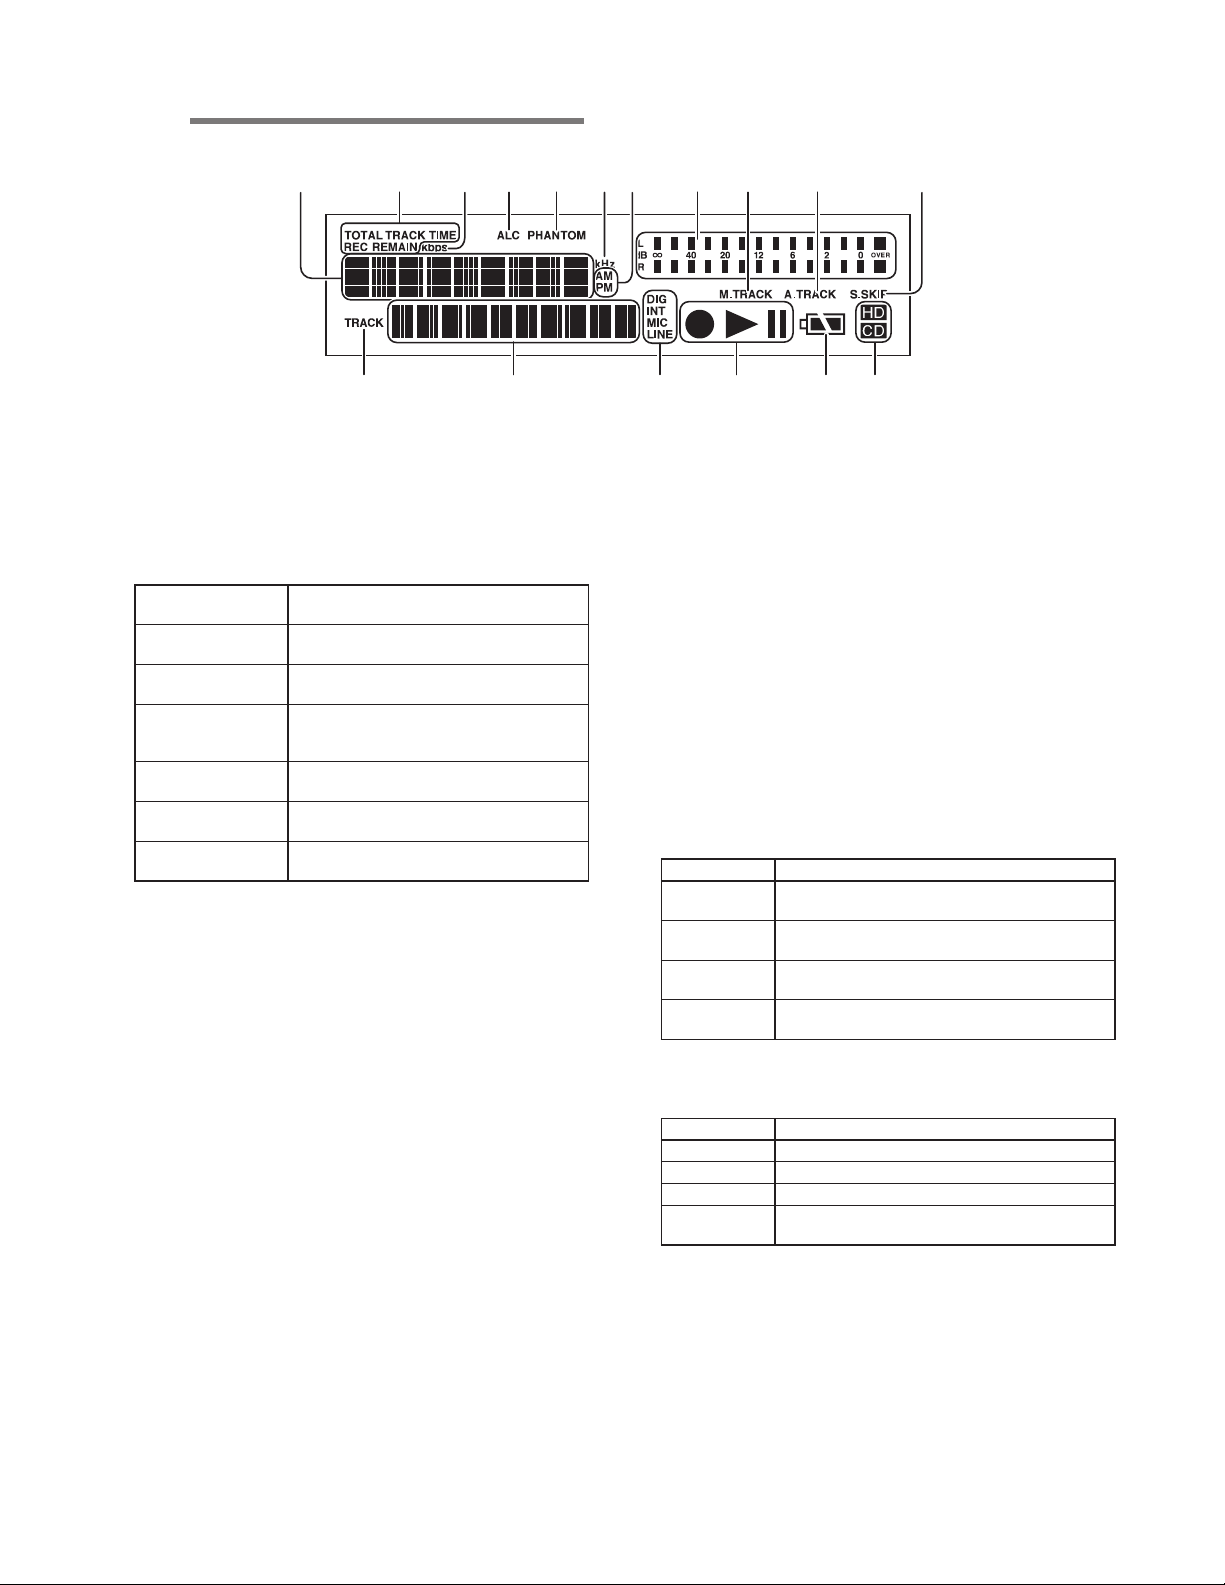
Display
asdfghjkl¡0 ¡1
¡2
¡3 ¡4 ¡5 ¡6 ¡7
a Upper character display section
Displays the remaining time, etc.
s TOTAL/TRACK/TIME/REC/REMAIN icon
The following types of details are displayed in the upper
character display section.
Lit display
REC REMAIN TIME
TIME
TRACK TIME
REC TIME
TRACK REMAIN TIME
TOTAL TRACK TIME
Lights when the remaining recordable
time is being displayed.
Lights when the current time or the
recording time is being displayed.
Lights when the playback elapsed time
or the recording elapsed time is being
displayed.
Lights when the recording time of the
track is being displayed.
Lights when the remaining playback time
is being displayed.
Lights when the total time for all tracks is
being displayed.
Explanation of display
in upper character display section
d kbps icon
Lights when the bit rate for the recording format is being
displayed in the upper character display section.
f ALC icon
Lights when “REC Level” is set to ALC in the preset menu.
g PHANTOM icon
Lights when “Phantom” is set to ON in the preset menu.
h kHz icon
Lights when the sampling frequency for the recording
format is being displayed in the upper character display
section.
j AM/PM icon
When the clock setting is set to 12-hour display, the current
time or recording time is displayed in the AM/PM format.
k Level meter icon
Displays the recording levels in the left and right channels
during recording.
Displays the playback levels in the left and right channels
during playback.
The level meter display dots have a peak hold function
that holds for a fixed amount of time. (Self reset)
l M.TRACK icon
Lights when “ManualTR” is set to ON in the preset menu.
¡0 A.TRACK icon
Lights when “Auto TRK” is set to ON in the preset menu.
¡1 S.SKIP icon
Lights when “SilentSkip” is set to ON or TRK in the preset
menu.
¡2 TRACK icon
Lights when the track number is displayed in the lower
character display section.
¡3 Lower character display section
Displays the track number, channel, etc.
¡4 Input signal (DIG/MIC/INT/LINE) icon
Shows the type of input signal when recording.
Lit display Type of input signal
DIG
MIC
INT MIC
LINE
Lights when “Input” is set to Dig-In in the preset
menu.
Lights when “Input” is set to MIC in the preset
menu.
Lights when “Input” is set to Int. MIC in the
preset menu.
Lights when “Input” is set to Line in the preset
menu.
¡5 Recording/Playback/Pause mark
Shows the operating status of the recorder.
Lit display Operating status
2
2 ;
0 2
0 2 ;
Playback
Playback paused
Recording
Recording paused
(Recording standby status)
¡6 Battery remaining indicator
Displays the remaining battery power.
¡7 HD/CD icon
Lights when the recorder is in the HD mode or CD mode.
10
Page 15
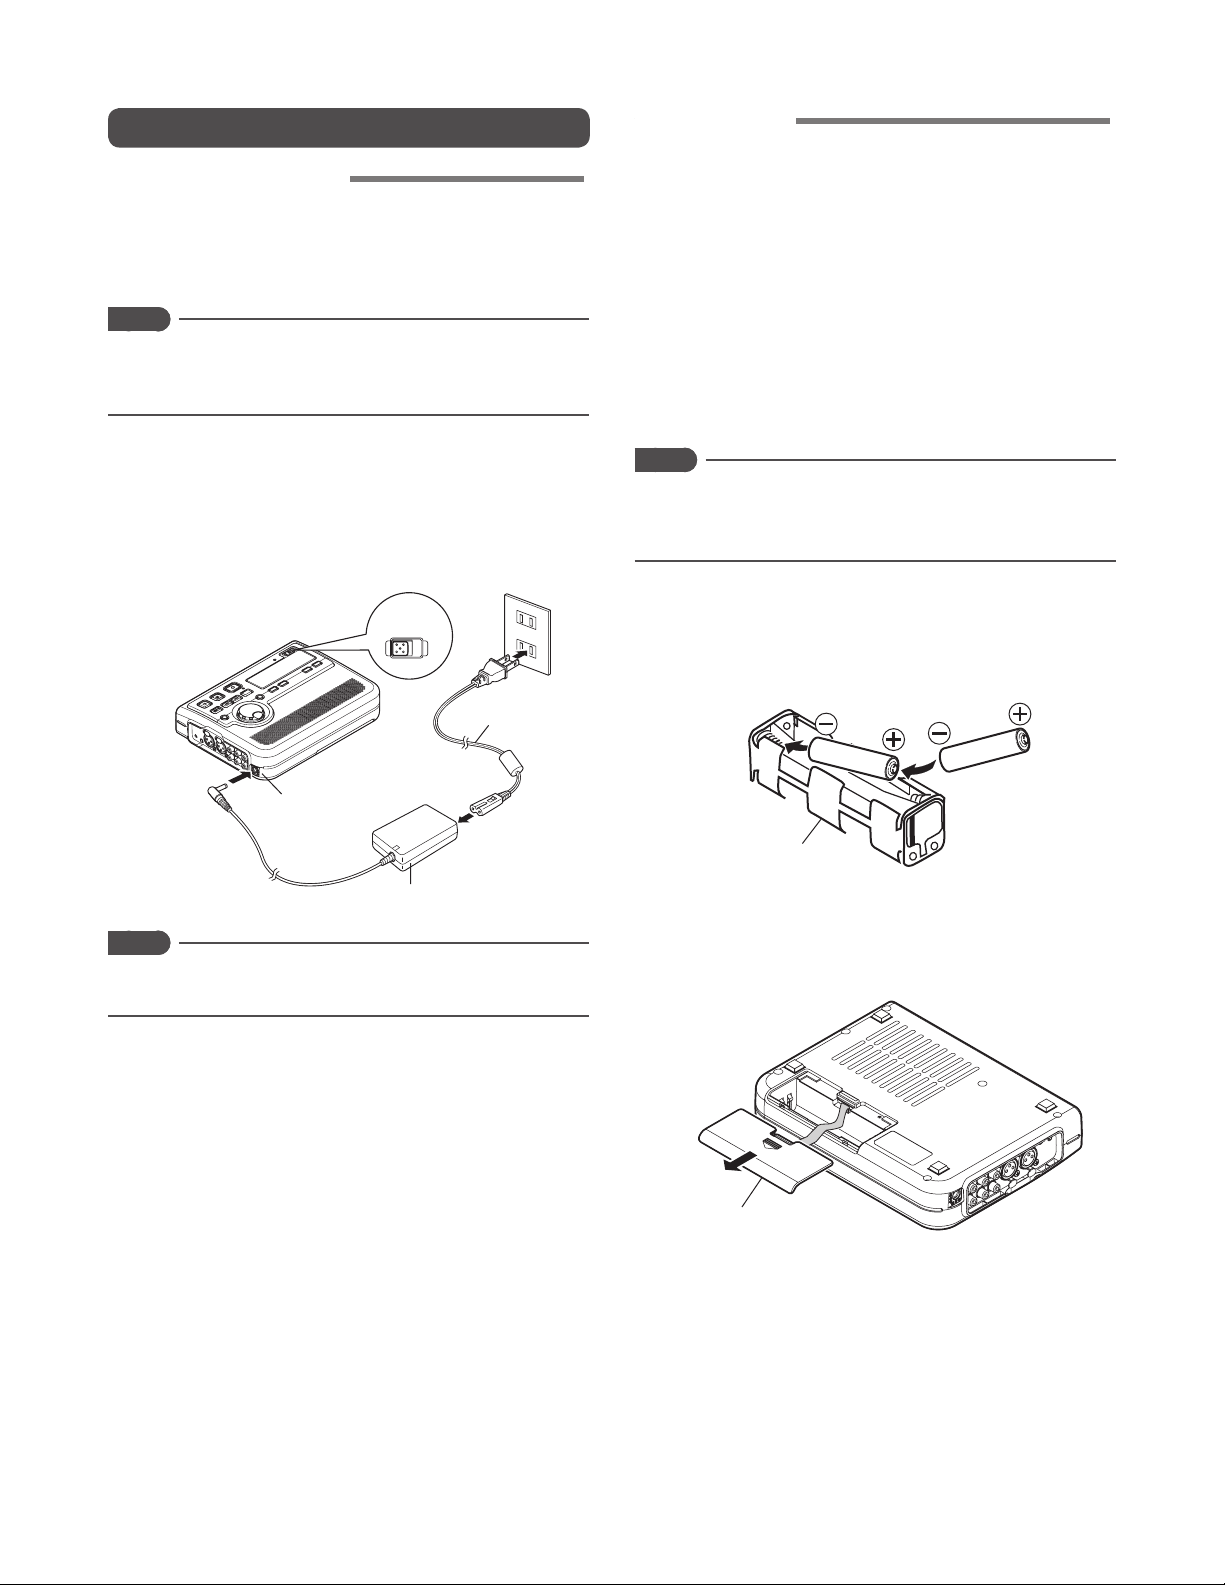
Preparations Before Use
AC adaptor connection
When using the recorder with the provided AC adaptor, follow
the procedure below to connect the AC adaptor.
If you wish to use batteries, please refer to the [Using
batteries] section. (
Notes
Only use the AC adaptor that is provided with the recorder.
Running the recorder on DC power without using the
provided AC adaptor will cause damage to the recorder.
☞
P.XX)
Using batteries
If you wish to run the recorder on battery power, follow the
procedure below to install batteries into the provided battery
holder, and insert the holder into the recorder.
The following types of battery can be used.
●
Alkaline batteries
●
Optional Nickel-Cadmium battery (option: parts number
RB1100)
●
Optional Nickel-Metal Hydride battery (option: parts
number RB1650)
(Guide to battery lifespan)
When alkaline batteries (1450mAh type) are used
HD Recording: about 4 hours
1 Connect the plug of AC power pack into the DC IN jack on
the recorder.
2 Connect the Power cord to a regular household plug
socket.
POWER
OFF
ON
Power cord
DC IN jack
AC power pack
Notes
If a optional rechargeable battery is inside the recorder, the
battery will be recharged in this state.
Notes
●
When running the recorder on batteries, always set the
battery type in the preset menu to the correct setting for
the batteries used. (
☞
P.XX)
1 Insert 8 batteries into the battery holder correctly as
shown in the diagram below, while paying attention to the
polarity displays (+: plus, and -: minus).
AA
Battery holder
AA
2 Remove the battery case cover from the rear side of the
recorder.
11
Battery case cover
Page 16

3 Insert the battery holder into the battery case of the
AA
AA
AA
AA
AA
recorder correctly as shown in the diagram below, while
paying attention to the polarity displays (+: plus, and -:
minus) on the case.
Installing an optional Ni-Cd or Ni-MH battery
Optional battery
Battery holder
AA
AA
ribbon
tab
4 Re-attach the removed battery case cover.
Notes
●
When using the optional rechargeable batteries for the first
time, fully charge the batteries Connect the provided AC
adaptor to the recorder to recharge the batteries.
●
If the batteries run out during the HD recording, recording
automatically stops and the file information is updated
before the recorder shuts down.
●
When burning data from the HD to a CD-R, the CD
burning process will not start if there is not enough battery
power remaining. Furthermore, if the batteries run out
while burning to the CD-R, recording will stop and the
recorder will shut down. If this happens, the CD burning
process may not complete correctly.
tab
ribbon
Install the battery with tab as shown and over the ribbon for
easy battery removal.
When changing battery type, be sure you change the Battery
type menu setting for optimal battery performance.
Charging the optional Ni-Cd battery
• Load the Ni-Cd battery correctly in the battery
compartment.
• Connect the AC power pack and AC adaptor into power
supply.
• Select Ni-Cd in the battery type menu. (
• Power the CDR310 on, then off for the charging cycle to
begin.
• The CDR310 must be off during battery charging.
While charging (about 3 hours), the CHARGE indicator will be
lit and steady.
When the Ni-Cd battery charge cycle is complete, the
CHARGE indicator will be off.
☞
P.XX)
Safety cautions on handling batteries
Always follow the points below when using batteries to avoid
electrolyte leakage, overheating, fire, rupturing, ingestion, etc.
●
Electrolyte leakage or corrosion may occur if batteries
are kept inside the recorder for prolonged periods of
time. If the recorder is not to be used for a prolonged
period, remove the batteries to prevent electrolyte
leakage.
●
Make sure that the + and – markings on the batteries
are aligned with the corresponding markings in the
battery case and the battery holder.
●
Do not recharge, heat, or disassemble batteries. Do not
throw dry cell batteries onto a fire.
●
Do not insert old or exhausted batteries into the
recorder.
●
Do not mix the type of battery, and do not use both old
and new batteries together.
●
If the recorder does not operate correctly, replace the old
batteries with new ones.
●
If electrolyte has leaked, thoroughly wipe the inside of
the battery holder, and then insert new batteries.
12
Page 17
Basic Operations
Power on/off
1 Slide the power switch to the ON side to switch the
power ON.
Battery type settings
Set the battery type for the recorder to match the type of
batteries you are using.
< Default value > Alkaline
Notes
The factory-preset settings are set to record sound using
the external microphone input. Refer to “Menu Settings”
for details on the default settings of the various menus. (
P.XX)
• At this time, the display shows “Loading”.
The recorder’s BOOT process starts.
• The recorder stops when the BOOT process completes.
☞
1 While the recorder is stopped, press the MENU/STORE
button.
2 Turn the JOG to select “Batt Type” and press the JOG.
3 Turn the JOG to select the type of battery, and press the
JOG.
2 Slide the power switch to the OFF side to switch the
power OFF.
Display Battery type
Alkaline Alkaline battery
NiCd
NiMH
Optional Nickel-Cadmium
battery
Optional Nickel-Metal
Hydride battery
4 Press the MENU/STORE button to register the settings.
13
Page 18

Battery remaining indicator
The recorder operates using commercially available AA size
alkaline batteries, the optional Nickel-Cadmium battery, or the
optional Nickel-Metal Hydride battery. During operation, the
battery remaining indicator is as follows.
Remaining
indicator
No display
Flashing
Nothing is displayed when the AC adaptor is being
used. The adaptor power supply is valid.
There is still ample battery power remaining.
The amount of battery power remaining has
decreased to approx. half.
Only a small amount of battery power remaining.
There is not enough battery power remaining to
record or playback. Either replace the batteries with
new ones, or recharge the rechargeable batteries.
There is almost no remaining battery power.
If the “Beep” setting in the menu are set to ON, the
beep sound will be heard.
If you continue recording while this indicator is
flashing, recording/playback will stop, and the
recorder will shut down.
Display explanation
Notes
If the battery type is not set correctly to match the type of
battery being used, the battery remaining display may not
be displayed correctly.
14
Page 19

Setting the clock
Set the current time (year, month, date, hour, minute).
Notes
The setting order is different depending on the “DateForm”
settings in the menu. Check the “Date form settings”
setting. (
M (Month) / D (Date) / Y (Year) Month/Date/Year/Hour/Minute
D (Date) / M (Month) / Y (Year) Date/Month/Year/Hour/Minute
Y (Year) / M (Month) / D (Date) Year/Month/Date/Hour/Minute
< When DateForm: M/D/Y >
P.XX)
☞
DateForm Setting order
1 While the recorder is stopped, press the MENU/STORE
button.
5 Turn the JOG to select [Year (2006 to 2099)], and press
the JOG.
6 Turn the JOG to select [Time], and press the JOG.
For 24 hour display : 0 ~ 23
For 12 hour display : 0am ~ 11pm
2 Turn the JOG to select “Date/time” and press the JOG.
3 Turn the JOG to select [Month (Jan to Dec)], and press
the JOG.
4 Turn the JOG to select [Date (01 to 31)], and press the
JOG.
7 Turn the JOG to select [Minute (00 to 59)], and press the
JOG.
8 Press the MENU/STORE button to register the settings.
15
Page 20

Date form settings
There are 3 types of date form. You can set the form to your
own preference.
Time form settings
There are 2 types of time form. You can set the form to your
own preference.
Form type Form subjects Form example
M/D/Y Month/Date/Year Jan 10 2006
D/M/Y Date/Month/Year 10 Jan 2006
Y/M/D Year/Month/Date 2006 Jan 10
< Default value > M/D/Y
1 While the recorder is stopped, press the MENU/STORE
button.
2 Turn the JOG to select “Date Form” and press the JOG.
3 Turn the JOG to select the type of date form, and press
the JOG.
Form type Form subjects Form example
12H AM/PM display 01 : 00 : 00 pm
24H 24 hour display 13 : 00 : 00
< Default value > 12H
1 While the recorder is stopped, press the MENU/STORE
button.
2 Turn the JOG to select “Time Form” and press the JOG.
3 Turn the JOG to select the type of time form, and press
the JOG.
4 Press the MENU/STORE button to register the settings.
4 Press the MENU/STORE button to register the settings.
16
Page 21

Menu Settings
The recorder uses 8 menus to set the various functions.
There is a menu for basic settings such as time (display method), alarm, automatic power off, and battery type, and a menu for
formatting the internal HD. These menus are displayed by pressing the MENU/STORE button once to enter the menu mode.
You can also perform detailed settings for the recording and playback conditions, and register up to 3 of these settings in the
preset menu. To enter this preset menu, select “PRESET” using the JOG, then specify the preset number.
Refer to “Preset Menu” for details on preset items. (
Menu mode
MENU/STORE Button
First level Second level
☞
P.XX)
Preset
Date/Time
FORMAT HD
The composition of these menu contents is explained below.
Menu Menu explanation Settings Default settings
Preset (
☞
Date/Time (
Date Form (
Time Form (
Beep (
☞
A.PowOff (
Batt_Type (
HD Format (
P.XX)
☞
☞
☞
P.XX)
☞
☞
☞
P.XX)
P.XX)
P.XX)
P.XX)
P.XX)
P.XX)
3 settings can be registered. Select the
preset number, and set the various items.
Sets the clock (current date and time).
Selects the type of date form. M (Month) / D (Date) / Y (Year), D/M/Y, Y/M/D, M/D/Y
Selects the type of time form. 12H, 24H 12H
Sets the alarm on/off. On/Off On
Sets the automatic power off setting.
You can select the type of battery. Alkaline, NiCd, NiMH Alkaline
Formats the HD. (Execute) −
1
2
3
Input
RecFormat
CD Split
Default
Preset-1, 2, 3 Preset-1
2006−2099
JAN − DEC
1 − 31
AM/PM 0:00 − 11:59, (0:00 − 23:59)
On/Off
Time : 5/10/15/30 min
2006
JAN
1
AM0:00 (0:00)
Off
15 min
17
Page 22

Preset menu
You can register up to 3 detailed setting on the recorder for such settings as recording input, recording conditions, recording
format, playback mode, remote control, etc. There are 17 setting items in the preset menu, and 3 presets can be set with the
desired conditions.
The contents of the preset menu are explained below.
Preset1 : High quality PCM recording
Preset2 : Meeting recording (monaural)
Preset3 : MP3 music recording
Preset menu Menu explanation Settings
Input (☞ P.xx)
RecFormat (
CD Split (
PreRecord (
Rec Level (
MIC-ATT-L (
MIC-ATT-R (
IntMicATT (
Phantom (
BkGrndRec (
ManualTR (
Auto TRK (
SilentSkp (
Play Mode (
StopMonit (
Remote (
Default (☞ P.xx)
☞
☞
☞
☞
☞
☞
☞
☞
☞
☞
☞
☞
☞
☞
P.xx)
P.xx)
P.xx)
P.xx)
P.xx)
P.xx)
☞
P.xx)
P.xx)
P.xx)
P.xx)
P.xx)
P.xx)
P.xx)
P.xx)
P.xx)
Selects the input source. MIC, Line, Int. MIC, Dig-In MIC MIC MIC
Sets the recording format.
When burning HD data to CD-R, this sets
the saving procedure for the final track
when all of the contents will not fit onto one
CD-R.
Sets PreRecord. Off/1−10 sec (1 sec steps) Off 4 sec 4 sec
Sets the recording level operating method. Manual/ALC Manual Manual Manual
External microphone
Sets the attenuator function for the left
channel side.
External microphone
Sets the attenuator function for the right
channel side.
Sets the attenuator function for the internal
microphone.
Sets the Phantom power supply when a
condenser microphone is connected.
Sets background recording. On/Off Off Off Off
Sets Manual Track. On/Off On On On
Sets Auto Track.
Sets Silent Skip.
Sets the playback mode.
Sets the Stop Monitor. On/Off Off Off Off
Sets the operating mode controlled by the
opening and closing of a switch contact.
Returns the settings of the selected preset
number only to the default values.
Stereo, Mono
CD-DA, WAVE, MP3, AIFF
On/Off On On On
On/Off Off Off Off
On/Off Off Off Off
On/Off Off Off Off
On/Off Off Off Off
On/Off
Time : 1/5/10/15/30 min,
1/2/6/8/12/24 Hrs,
640/700 MB CD
On/Off
Time : 1−5 sec (1 sec steps)
Level: -60− -20dB
(5dB steps)
Normal, Repeat All,
Repeat TRK, Single
* StartPause, StartPauTR,
Manual TRK
(Execute) --- --- ---
Default settings
Preset1 Preset2 Preset3
Stereo
CD-DA
Off
5 min
Off
3 sec
-40dB
Normal Normal Normal
Manual TRK StartPauTR StartPause
* StartPause : Start / stop
StartPauTR : Start / stop + track increment
Manual TRK : Manual track
Mono
MP3
On
5 min
Off
3 sec
-40dB
Stereo
MP3
Off
5 min
Off
3 sec
-40dB
18
Page 23

Menu operation
The recorder uses menus to set various functions. (☞
P.XX) You can alter the basic settings and use a wide range
of recording and playback functions by changing the menu
settings. The basic menu operations are explained in this
section.
4 Turn the JOG to select the menu settings, then press the
JOG to choose the selected settings.
Second level
1
2
3
Input
RecFormat
CD Split
1 While the recorder is stopped, press the MENU/STORE
button to enter the menu mode.
Menu mode
MENU/STORE Button
First level
Preset
Date/Time
Date Form
• The recorder enters the menu mode.
2 Turn the JOG to select a menu item.
Menu mode
MENU/STORE Button
First level
Preset
Date/Time
Date Form
1
2
3
PreRecord
• Repeat the procedure above of rotating the JOG to
select settings and items, and pressing the JOG to
choose items and contents, to set each of the menu
items.
5 Finally, press the MENU/STORE button to register all of
the settings.
3 Press the JOG to choose the selected menu item.
Menu mode
MENU/STORE Button
First level
Preset
Date/Time
Date Form
• The recorder enters the setting mode for the menu item.
1
2
3
19
Page 24

Recording to the HD
Schematics
MIC IN
LRRL
Basic operations for recording
1 Press the REC button when the recorder is stopped to
start recording.
• During recording, the REC indicator lights and the
following contents are displayed on the display.
LINE
IN
DIGITAL
IN
2 Press the REC PAUSE button to pause recording.
• The recording mark flashes in the display while
recording is paused.
REC PAUSE
• Press the REC button when recording is paused to start
recording again.
3 Press the STOP button to stop recording.
• The recorded track (file) information is saved to the HD.
• Press the PLAY button after this to play back the
recorded track from the start.
4 Press the STOP button once again to return to the
stopped status.
Notes
●
The default preset settings for [Recording level control
settings] are set to “Manual”. For details on adjusting the
recording level/LR balance, please refer to [Recording
level control settings]. (
●
When recording with the internal microphone, switch the
☞
P.XX)
SPEAKER switch OFF to avoid feedback between the
internal microphone and speakers.
• Also, to start recording from the recording standby
status, press the REC PAUSE button while the recorder
is stopped to switch to recording standby status.
When in recording standby status, the REC indicator
flashes and the following contents are displayed on the
display.
REC PAUSE
Adjust the recording level/LR balance while in recording
standby. (
☞
P.XX)
After adjusting the recording level/LR balance, press the
REC button to start recording.
• Press the PLAY button after this to play back from the
first track.
20
Page 25

Erasing recordings
You can erase data (tracks) recorded to the HD after stopping
recording.
1 After stopping recording, press the UNDO button to
switch to the erase mode of the recorded track.
• “REC UNDO?” is displayed for 3 seconds.
2 Press the UNDO button again while “REC UNDO?” is
being displayed.
• The recorded track is erased, and “Completed” is
displayed for 3 seconds.
Formatting the HD
Formats all of the tracks recorded onto the HD.
Notes
If the HD is formatted, all contents of the HD are erased.
Before formatting, re-check the contents of the HD.
1 While the recorder is stopped, press the MENU/STORE
button.
2 Turn the JOG to select “Format HD” and press the JOG.
• A confirmation message to perform HD format is
displayed.
3 To format the HD, press the JOG.
• “Formatting” is displayed while the HD is being
formatted.
• After formatting has completed, “Completed” is
displayed for 1 second After that, the recorder returns to
the stopped status.
21
Page 26

Detailed Settings for HD Recording
Input source settings
Set the input source (internal microphone, external
microphone, line input, digital input) for recording.
< Default value > Preset1 : MIC
Preset2 : MIC
Preset3 : MIC
Notes
If digital input is set, only the sampling frequency 44.1KHz
is available. Any other frequencies are displayed as
unlocked, and are not recorded.
5 Turn the JOG to select the type of input source (“MIC”,
“Line”, “Int.Mic”, “Dig-In”), and press the JOG.
6 Press the MENU/STORE button to register the settings.
1 While the recorder is stopped, press the MENU/STORE
button.
2 Turn the JOG to select “Preset” and press the JOG.
3 Turn the JOG to select the preset number that you wish to
set, and press the JOG.
Notes
Depending on the combination of input source
and recording format (channel), the input signal
stereo / monaural settings are as follows.
For details on the recording format settings, please refer to
[Recording format settings]. (
External microphone
Internal microphone
LINE Input L/R Stereo L/R Mono Mix
Input source
DIGITAL input L/R Stereo L/R Mono Mix
P.XX)
☞
Recording format (channel)
Stereo Mono
L/R Stereo L/R Mono Mix
Same source in L/R
Mono
4 Turn the JOG to select “Input” and press the JOG.
22
Page 27

Recording format settings
Set the recording format (compression format and channel) for recording.
< Default value > Preset1 : Stereo/CD-DA
Preset2 : Mono/MP3
Preset3 : Stereo/MP3
Notes
The recording format can only be changed when there are no tracks saved on the HD. There is only one HD recording format
on the recorder. This cannot be changed if tracks are already recorded in a certain format. To change the recording format,
either burn the data to a CD-R, or format the HD. When data is burned to a CD-R, the data on the HD is erased. Stereo/
monaural can be changed.
[Recording format parameters]
The recorder can record in the following compression formats and channels.
• Compressed sound recording that uses MPEG Audio Layer III (MP3) in either monaural or stereo.
• Non-compressed sound recording that uses the 16-bit linear pulse code modulation used on a CD.
• Non-compressed sound recording that uses WAVE (Windows standard audio file format)
• Non-compressed sound recording that uses AIFF (the audio file format developed by Apple Computer, Inc.)
The format parameters that can be recorded are as shown below.
When the channel setting is Stereo
Recording format Sampling frequency Bit rate Extension Recordable time
MP3 44.1KHz 128Kbps .mp3 055:55:24
CD-DA 44.1KHz .cda 005:04:21
WAVE 44.1KHz .wav 005:04:21
AIFF 44.1KHz .aif 005:04:21
When the channel setting is Mono
Recording format Sampling frequency Bit rate Extension Recordable time
MP3 44.1KHz 64Kbps .mp3 111:50:49
CD-DA 44.1KHz .cda 010:08:42
WAVE 44.1KHz .wav 010:08:42
AIFF 44.1KHz .aif 010:08:42
When burning from the HD to CD, the CD-R Format is decided by the recording format as shown below.
Recording format CD Format
MP3 Data Disc
CD-DA CD-DA Disc
WAVE Data Disc
AIFF Data Disc
23
Page 28

Set the recording format (compression format and channel)
using the procedure shown below.
1 While the recorder is stopped, press the MENU/STORE
button.
6 Turn the JOG to select the channel (“Stereo”, “Mono”)
and press the JOG.
2 Turn the JOG to select “Preset” and press the JOG.
3 Turn the JOG to select the preset number that you wish to
set, and press the JOG.
4 Turn the JOG to select “RecFormat” and press the JOG.
7 Press the MENU/STORE button to register the settings.
5 Turn the JOG to select the compression format (“MP3”,
“CD-DA”, “WAVE”, “AIFF”), and press the JOG.
24
Page 29

Recording level control settings
Set the recording level control and operating method (ALC,
Manual) for recording.
• Automatic level control (ALC)
If the recording level control or operating method is set to
ALC, the recording level for external microphone input or
internal microphone input is automatically set.
When ALC is set, the ALC icon lights in the display.
4 Turn the JOG to select “RecLevel” and press the JOG.
Notes
ALC becomes invalid for line input or digital input
recording. Even if the ALC is set, control switches to
manual control.
• Manual control (Manual)
If the recording level control or operating method is set
to Manual, turn the JOG to set the recording level when
recording is paused or during recording.
Also, the LR balance can be set by holding down the
MENU button and rotating the JOG during recording.
< Default value > Preset1 : Manual
Preset2 : Manual
Preset3 : Manual
1
While the recorder is stopped, press the MENU/STORE button.
2 Turn the JOG to select “Preset” and press the JOG.
5 Turn the JOG to select the operating method of the
recording level (“ALC”, “Manual”) and press the JOG.
6 Press the MENU/STORE button to register the settings.
3 Turn the JOG to select the preset number that you wish to
set, and press the JOG.
25
Page 30

[Operations when manual control is set]
When the recording level control or operating method is
set to Manual, use the JOG as shown below to set the
recording level.
• Recording level settings
Turn the JOG while recording is paused or during
recording, and the manual level control screen is
displayed.
Turn the JOG to set the level.
(The level can be changed from +10dB to -∞dB)
• LR balance settings
Hold down the MENU button and turn the JOG while
recording is paused or during recording, and the LR
balance control screen is displayed.
Turn the JOG to set the LR balance.
The LR balance can be changed to 0dB to -18dB on the
left, or 0dB to -18dB on the right.
If the above-mentioned recording level and LR balance
are left without operation for 3 seconds, the recorder
returns to the previous display mode.
26
Page 31

Microphone attenuator
Set the attenuator function for external microphone input and
internal microphone input.
For external microphone input, set this function when using
microphones directly that have different sensitivity levels. The
attenuator function for the external microphone can be set for
the L/R sides respectively.
For internal microphone input, set this function when the
sensitivity is too high.
4 Turn the JOG to select the microphone attenuator item
(“MIC-ATT-L”, “MIC-ATT-R”, “IntMicATT”) that you want to
set in the preset menu, and press the JOG.
• Attenuator OFF (0dB)
No microphone level attenuation.
• Attenuator ON (-20dB)
The input signal from either the microphone connected to
the MIC IN jack or the internal microphone is attenuated
by 20dB.
< Default value > Preset1 : Off
Preset2 : Off
Preset3 : Off
1 While the recorder is stopped, press the MENU/STORE
button.
2 Turn the JOG to select “Preset” and press the JOG.
Preset menu Menu contents
MIC-ATT-L External microphone L Channel
MIC-ATT-R External microphone R Channel
IntMicATT Internal microphone
5 5 Turn the JOG to select function On/Off, and press the
JOG.
6 Press the MENU/STORE button to register the settings.
3 Turn the JOG to select the preset number that you wish to
set, and press the JOG.
27
Page 32

Phantom power settings
The recorder has DC+48V (P48) phantom power, and the
phantom power can be set On/Off.
Set to On when a condenser microphone that requires the
external power source is used.
When set to On, the “PHANTOM” icon lights in the display.
For details, please refer to the instruction manual that came
with your microphone.
Phantom power consumes battery power. Set this setting
to Off when using the internal microphone, a dynamic type
microphone, or other such microphone that does not use
phantom power.
< Default value > Preset1 : Off
Preset2 : Off
Preset3 : Off
5 Turn the JOG to select function On/Off, and press the
JOG.
6 Press the MENU/STORE button to register the settings.
1 While the recorder is stopped, press the MENU/STORE
button.
2 Turn the JOG to select “Preset” and press the JOG.
3 Turn the JOG to select the preset number that you wish to
set, and press the JOG.
4 Turn the JOG to select “Phantom” and press the JOG.
28
Page 33

Prerecord
Set the PreRecord function.
When the PreRecord function is set to On, sounds from the
input source are always saved only for a set period of time
(1 to 10 seconds) in modes other than CD playback mode,
Make CD mode, during playback, or during playback pause.
When the recording is restarted, the audio data temporarily
saved in the recorder is written to the HD, then recording
continues from there.
This can be set to a maximum of 10 seconds, which prevents
missing the first part of a recording when recording is
suddenly started.
< Default value > Preset1 : Off
Preset2 : 4 sec
Preset3 : 4 sec
5 Turn the JOG to select the temporary save time (1 to 10
seconds), and press the JOG.
6 Press the MENU/STORE button to register the settings.
1 While the recorder is stopped, press the MENU/STORE
button.
2 Turn the JOG to select “Preset” and press the JOG.
3 Turn the JOG to select the preset number that you wish to
set, and press the JOG.
4 Turn the JOG to select “PreRecord” and press the JOG.
29
Page 34

Background recording
Set background recording.
When background recording is set to On, recording is
continued inside the recorder while recording is paused. This
can be used to recover data after pausing a recording, so that
nothing is missed even if important contents are lost while the
recording is paused.
When the REC button is pressed to restart recording from the
recording paused status, the display shows “Cont REC?” (Do
you continue the recording?) “Yes”.
Turn the JOG to select Yes/No, and press the JOG.
• When Yes is selected
The audio data recorded by background while the
recording was paused continues to be recorded.
• When No is selected
The data recorded by background is erased, and the
recording starts as a new track. The new track is created
from the point in which the track No is selected. At this
time, if prerecord is set, only the data for the prerecord
setting time remains.
3 Turn the JOG to select the preset number that you wish to
set, and press the JOG.
4 Turn the JOG to select “BkGrndRec” and press the JOG.
5 Turn the JOG to select function On/Off, and press the
JOG.
Also, if the STOP button is pressed, the recording and this
function stops.
< Default value > Preset1 : Off
Preset2 : Off
Preset3 : Off
1 While the recorder is stopped, press the MENU/STORE
button.
2 Turn the JOG to select “Preset” and press the JOG.
6 Press the MENU/STORE button to register the settings.
30
Page 35

Silent skip
Set the silent skip function.
• Silent skip
The silent skip function automatically pauses the recording
if there is a period of no signal during recording. Recording
automatically starts again when an input signal is received.
This function cuts unnecessary sections (sections with
no sound) from within one track, and saves only the
necessary sections. The file size is smaller, search is
easier during playback, and the tracks are easier to listen
to.
When silent skip is set, “S.SKIP” lights in the display, and
it flashes when the recording is paused while there is no
input signal.
• Silent skip/Track increment
Silent skip is processed within one track. However, if this
function is set, every time the input signal is received, a
new track is automatically created for the recording.
Notes
• This function does not operate when [Background
recording] is set to On in the preset menu.
• When silent skip is set to ON, the prerecord function
operates for 2 seconds, irrespective of the prerecord
setting time.
• When silent skip is set to On, and the REC PAUSE button
is pressed while the recorder is paused due to there being
no signal, the recorder switches to regular recording pause
status. At this time, the S.SKIP icon flashes in the display.
< Default value >
Preset1 : Off / Time : 3 sec / Level : -40dB
Preset2 : Off / Time : 3 sec / Level : -40dB
Preset3 : Off / Time : 3 sec / Level : -40dB
3 Turn the JOG to select the preset number that you wish to
set, and press the JOG.
4 Turn the JOG to select “SilentSkp” and press the JOG.
5 Turn the JOG, and select “On” to set silent skip, “T/ON” to
set silent skip/track increment, or “Off” if you do not wish
to set either. After making your selection, press the JOG.
On Silent Skip
T / ON Silent Skip Track
Off Off
1 While the recorder is stopped, press the MENU/STORE
button.
2 Turn the JOG to select “Preset” and press the JOG.
6 If you activate this function, turn the JOG to select the no
signal status judgment level (-60 to -20dB: 5dB steps) and
press the JOG.
31
Page 36

7 If you activate this function, turn the JOG to select the no
signal status judgment time (1 to 5 seconds) and press
the JOG.
8 Press the MENU/STORE button to register the settings.
3 Turn the JOG to select the preset number that you wish to
set, and press the JOG.
4 Turn the JOG to select “ManTrack” and press the JOG.
Manual track
Set the manual track.
If the manual track is set to On, press the REC button during
recording to record as a new track at the point when the
button was pressed.
This function can be used to create new tracks whenever
desired, making it easier to search for tracks during playback.
When manual track is set to On, the “M.TRACK” icon lights in
the display.
< Default value > Preset1 : On
Preset2 : On
Preset3 : On
1 While the recorder is stopped, press the MENU/STORE
button.
2 Turn the JOG to select “Preset” and press the JOG.
5 Turn the JOG to select function On/Off, and press the
JOG.
6 Press the MENU/STORE button to register the settings.
32
Page 37

Auto track
Set auto track.
When auto track is set to On, new tracks are automatically
created and recorded at the set time interval.
Auto track can be set to increase the number of tracks every
1, 5, 10, 15, 30 minutes, or every 1, 2, 6, 8, 12, 24 hours, or
every 640 Mbytes or 700 Mbytes.
By using this function, it is easy to search recorded contents
for specific points.
For example, if the Auto Track function is set to “every
1 minute”, the track number is updated every 1 minute.
When playing back the recorded data, you can play back
approximately the 3rd minute of the recording data by
choosing track 4. To listen directly to the 10th minute of
the recorded data, the search can be performed easily by
selecting track 11.
(To search and listen from a certain number of minutes after
the start, specify the track number n+1.)
3 Turn the JOG to select the preset number that you wish to
set, and press the JOG.
4 Turn the JOG to select “Auto TRK” and press the JOG.
Also, when burning from the HD to a CD-R, you can also
divide the tracks by the capacity of one CD-R disc (640Mbyte
or 700Mbyte).
When auto track is set to On, the “A.TRACK” icon lights in the
display.
Notes
●
When both auto track and manual track are set to On at
the same time, if many tracks are created using manual
track, the relationship between track number and time will
not be consistent.
●
If background recording is set to On and a No is chosen
when recording is restarted, the data recorded by
background is erased and a new track is created.
The auto track setting time is also reset and a new count is
started.
< Default value > Preset1 : Off / Time : 5 min
Preset2 : On / Time : 5 min
Preset3 : Off / Time : 5 min
1 While the recorder is stopped, press the MENU/STORE
button.
5 Turn the JOG to select function On/Off, and press the
JOG.
6 When this function is activated, turn the JOG to select the
auto track time (every 1, 5, 10, 15, 30 minutes, or every
1, 2, 6, 12, 24 hours, or every 640Mbyte, 700Mbyte), and
press the JOG.
2 Turn the JOG to select “Preset” and press the JOG.
7 Press the MENU/STORE button to register the settings.
33
Page 38

CD Burning
You can easily burn all of the data recorded on the HD onto
a CD-R with this recorder. You cannot specify particular data
on the HD for burning onto a CD-R. After burning onto the
CD-R, all of the data is erased from the HD.
4 When CD burning is completed, the CD-R disc is
automatically ejected from the CD slot.
If all of the HD data did not fit onto 1 CD-R disc, “Insert
CD” message is displayed.
Notes
• Do not attempt to playback or burn a CD while the
recorder is on a slant, standing on its edge, or on an
unstable surface.
• Do not move or carry the recorder while a CD is inserted
and operating. Doing so may cause damage to the
inserted CD.
1 Insert a CD-R disc into the recorder’s CD slot.
Notes
• Use CD-R discs that are compatible with the recorder. (☞
P.XX)
• Also, if all of the data will not fit onto one CD-R disc, the
recording method for the final track can be set in [CD Split]
in the preset menu. (
☞
P.XX)
2 While the recorder is stopped, press the MAKE CD
button.
• A confirmation message to perform CD burning is
displayed.
(Displayed when 2 discs are required)
5 To continue recording the remaining HD data to CD-R,
insert the seconds CD-R disc into the recorder.
• When the CD-R disc is inserted, the recorder starts
burning HD data to the CD-R again.
• When CD burning is completed, “Complete” is displayed
for 3 seconds, and the CD-R disc is automatically
ejected from the CD slot.
• When CD creation is fully completed, “MoreCopy?” is
displayed.
3 Press the MAKE CD button again to start burning all of
the HD data onto a CD-R.
• The progress status is shown in the lower character
display section.
The display is a 10-figure display, with one figure
representing 10%.
• Press the CANCEL button to cancel CD creation.
If you select No when “MoreCopy?” is displayed, the
display switches to “FORMAT HD”.
If you wish to format the HD, select YES.
If you wish to create another CD, select No. The display
returns to “MoreCopy?”.
34
Page 39

6 To burn the data again onto a different CD-R disc, turn the
JOG to select “Yes”, and press the JOG.
If you have finished burning to CD-R, select “No” and
press the JOG.
• If you selected “Yes”, CD creation starts again.
• If you selected “No”, all of the HD data is erased.
After all of the HD data is erased, “HD Clear” is
displayed for 3 seconds, after which the display returns
to the default display.
Notes
If an error occurs during CD creation, “Write_Err” is
displayed in the lower section, and the CD-R disc is
automatically ejected from the CD slot.
If a new CD-R disc is inserted, the recorder automatically
starts CD creation again.
35
Page 40

CD Split
When copying the HD data to CD-R disc, the recording
method for the final track when all of the data will not fit onto 1
CD is set in the CD Split function.
• CD Split On Setting
This setting uses all of the unused space on a CD-R disc
to save data.
This enables the effective use of disc space, and reduces
the number of discs required. Also, when creating a CD
with data from a meeting, etc., a 30 second overlap of the
beginning and end contents is burned to make it easier to
understand the context.
HD Data
002.wav001.wav
003.wav
1 While the recorder is stopped, press the MENU/STORE
button.
2 Turn the JOG to select “Preset” and press the JOG.
First CD-R
Second CD-R
Track 2Track 1
Track 2Track 1
30 sec of overlap
If track 001 and only part of track 002 can be saved to
the first CD-R as shown in the diagram above, track 001
and part of track 002 are saved to the first disc. Then,
the remainder of track 002 that could not be saved onto
the first disc is saved onto the second disc, starting 30
seconds before the track cut off on the first disc.
• CD Split Off Setting
The final track that could not fit onto the first CD-R is not
saved to the first CD-R, but is saved from the beginning of
the track onto the second CD-R.
Unused space remains on the disc, but it is easier to play
back these tracks because only complete tracks exist on
the same disc.
If a track with a file size larger than the capacity of the disc
is being burned to disc, CD Split Off becomes invalid, and
the track is cut midway.
If the file size of the next track is small, CD Split Off
becomes valid again.
HD Data
1st CD-R
Track 1
002.wav001.wav
003.wav
3 Turn the JOG to select the preset number that you wish to
set, and press the JOG.
4 Turn the JOG to select “CD Split” and press the JOG.
5 Turn the JOG to select function On/Off, and press the
JOG.
2nd CD-R
Track 2Track 1
If only track 001 and part of track 002 can be saved onto
the first CD-R as shown in the diagram above, track 001 is
saved onto the first CD-R, and track 002 is saved from the
start onto the second CD-R.
It is convenient to use auto track. (
☞
P.XX)
Creating tracks with the desired time interval increases the
efficiency with which discs are used.
If you do not wish to create many tracks, you can create a
disc with one CD-sized track by setting the capacity of the
disc being used.
< Default value > Preset1 : On
Preset2 : On
Preset3 : On
6 Press the MENU/STORE button to register the settings.
36
Page 41

Playing Back HD Data
Basic operations for playback
Schematics
LINE
OUT
LR
DIGITAL
OUT
1 Press the PLAY/PAUSE button while the recorder is
stopped to play back.
• The following information is displayed during playback.
2 During playback, press the PLAY/PAUSE button to pause
playback.
3 Press the STOP button to stop playback.
• This display shows the stopped status of playback. If
you press the PLAY/PAUSE button again, the stopped
track starts playback again from the beginning of the
track.
4 Press the STOP button again to return to the stopped
status.
• Press the PLAY/PAUSE button to play back from the
first track.
37
Page 42

Track access
You can select the track that you wish to play back while the
recorder is stopped, during playback, or while playback is
paused.
1 Turn the JOG to display track selection while the recorder
is stopped, during playback, or while playback is paused.
[Fast reverse]
1 You can search at high speed in the reverse direction by
holding down the 5 button while playback is paused or
stopped. The search starts from the end of the final track
while playback is stopped.
The first 3 seconds of the reverse search are performed
at 10 times speed, after which the speed automatically
increases to 140 times speed.
When you release the button, the recorder returns to
playback paused.
2 Select the track that you wish to play back, and press
either the JOG or the PLAY/PAUSE button to play back
the track.
Search
[Fast forward]
1 You can search at high speed in the forward direction by
holding down the 6 button while playback is paused or
stopped. The search starts from the beginning of the first
track while playback is stopped.
The first 3 seconds of the forward search are performed
at 10 times speed, after which the speed automatically
increases to 140 times speed.
When you release the button, the recorder returns to
playback paused.
Notes
If the start of the track is passed with 5 button still held
down, search moves to the previous track and continues
searching in the reverse direction.
Audible search
[Fast forward]
1 You can search audio at 2 times speed in the forward
direction while listening to the audio by holding down the
6 button during playback. Release the button to return to
normal forward direction playback.
[Fast reverse]
1 You can search audio at 2 times speed in the reverse
direction while listening to the audio by holding down the
5 button during playback. Release the button to return to
normal forward direction playback.
Notes
If the end of the track is passed with 6 button still held
down, search moves to the next track and continues
searching in the forward direction.
38
Page 43

Playback mode settings
You can select the playback mode from the following 4
modes.
Mode Mode explanation
Normal
Repeat All Repeat playback of all tracks.
Repeat Track Repeat playback of selected tracks only.
Single
< Default value > Preset1 : Normal
Play back the tracks in numerical order, and
playback stops when the final track playback is
completed.
After completing playback of the tracks, playback
is paused at the start of the next track.
Preset2 : Normal
Preset3 : Normal
5 Turn the JOG to select the playback mode and press the
JOG.
6 Press the MENU/STORE button to register the settings.
1 While the recorder is stopped, press the MENU/STORE
button.
2 Turn the JOG to select “Preset” and press the JOG.
3 Turn the JOG to select the preset number that you wish to
set, and press the JOG.
4 Turn the JOG to select “Play Mode” and press the JOG.
39
Page 44

Playing Back CDs
Schematics
2 Insert a CD into the recorder’s CD slot.
3 Press the PLAY/PAUSE button while the recorder is
stopped to restart playback.
• The following information is displayed during playback.
LINE
OUT
LR
DIGITAL
OUT
CD Playback
Pay attention to the following points when playing back a CD
that was not created on the recorder.
• Data discs recorded in MP3, WAVE, and AIFF format may
contain a number of hierarchies (directory folders).
In this case, the tracks are played back in a decided order
because the recorder does not have an album (directory)
selection function.
• As the recorder does not have a file name display function,
only the track number starting from track 1 is displayed in
the display.
• Maximum number of hierarchies that can be played back
: 8
• Maximum number of displayable file : 999
You can playback a CD using the same playback mode as
HD playback. (
☞
P.XX)
4 Press the PLAY/PAUSE button to pause playback.
5 Press the STOP button to stop playback.
• This display shows the stopped status of playback. If
you press the PLAY/PAUSE button again, the stopped
track starts playback again from the beginning of the
track.
6 Press the STOP button once again to return to the
stopped status.
• In this state, press the PLAY/PAUSE button to play back
from the first track.
Notes
• Do not attempt to playback or burn a CD while the
recorder is on a slant, standing on its edge, or on an
unstable surface.
• Do not move or carry the recorder while a CD is inserted
and operating. Doing so may cause damage to the
inserted CD.
Basic operations for playback
1 While the recorder is stopped, press the HD/CD button to
switch to CD playback mode.
7 Press the EJECT button to eject the CD.
[Various CD playback operations]
When playing back a CD, you can perform the following
various operations just as when playing back HD data.
• Track access (
• Search
• Audible search
• Playback mode settings
P.XX)
☞
(☞ P.XX)
(☞ P.XX)
(☞ P.XX)
40
Page 45

Other Functions
Auto power off settings
If there are no operations for the set amount of time while
the recorder is stopped or playback is paused, the power is
automatically turned off.
Before the power turned off, the beep sound can be heard for
xx seconds through the speakers or headphones.
This function is used to conserve battery power.
< Default value > Off / 15 min
1 While the recorder is stopped, press the MENU/STORE
button.
2 Turn the JOG to select “A.Pow Off” and press the JOG.
Beep sound (alarm) setting
If there are no operations performed for the set amount
of time for auto power off while the recorder is stopped or
playback is paused, the beep sound can be heard.
The beep sound can be heard through the speakers or
headphones.
The beep sound that occurs when the remaining battery
power is low can be heard through the headphones even if
the recorder volume is set to minimum.
< Default value > On
1 While the recorder is stopped, press the MENU/STORE
button.
2 Turn the JOG to select “Beep” and press the JOG.
3 Turn the JOG to select function On/Off, and press the
JOG.
4 If this function is activated turn the JOG to select the
automatic power off (5, 10, 15, 30 minutes) and press the
JOG.
5 Press the MENU/STORE button to register the settings.
3 Turn the JOG to select function On/Off, and press the
JOG.
4 Press the MENU/STORE button to register the settings.
41
Page 46

Switching the display mode
Depending on the status of the recorder, you can switch the
information in the display by pressing the DISPLAY button.
[When the HD is stopped]
Remaining recordable time on the HD
(Default display)
Total number of tracks
[When CD is stopped]
CD total time and total number of tracks
(Default display)
Current time
CD total time and total number of tracks
(Return to the default display)
Recorded track information
Current time
Remaining recordable time on the HD
(Return to the default display)
[When in HD recording or recording paused status]
Recording elapsed time of current track
(Default display)
Remaining recordable time on the HD
Recording format of recorded track
Recording date and time information
Recording elapsed time
(Return to the default display)
42
Page 47

[When in HD/CD playback or playback paused status]
The following display screens are for HD playback.
Playback elapsed time for the track
currently being played back
(Default display)
Level margin display
Remaining playback time for track
currently being played back
The following display screens are for CD playback.
Playback elapsed time for the track
currently being played back
(Default display)
Level margin display
Remaining playback time for track
currently being played back
Recording format of the track being played back
Recording date and time information
Playback elapsed time for the track
currently being played back
(Return to the default display)
Remaining playback time for all tracks
Recording format of the track being played back
Recording date and time information
Playback elapsed time for the track
currently being played back
(Return to the default display)
43
Page 48

Stop Monitor settings
This function constantly monitors the input signal from the
selected input source while the recorder is stopped.
When the Stop Monitor function is set to On, the level
and level margin of the currently connected input signal is
displayed in the display. Furthermore, audio is output to the
line out jack, speakers, or headphones.
Level meter display
Margin display
< Default value > Preset1 : Off
Preset2 : Off
Preset3 : Off
1 While the recorder is stopped, press the MENU/STORE
button.
5 Turn the JOG to select function On/Off, and press the
JOG.
6 Press the MENU/STORE button to register the settings.
Key lock settings
When the KEYLOCK switch is switched ON, all of the
operating buttons and switches are locked, except for the
LIGHT button.
2 Turn the JOG to select “Preset” and press the JOG.
3 Turn the JOG to select the preset number that you wish to
set, and press the JOG.
4 Turn the JOG to select “StopMonit” and press the JOG.
1 Set the KEYLOCK switch to ON while the recorder is
stopped, paused, recording, or playing back to engage
the key lock.
• If any of the buttons (except for the LIGHT button) are
operated while key lock is engaged, the display shows
“KEY LOCKED”.
2 Return the KEYLOCK switch to OFF to disengage the
key lock.
44
Page 49

Various remote functions
1. Using a contact remote (contact closure) and
setting the operating mode
Set the operating mode for the switch contact connected
to the REMOTE1 jack.
There are the following 3 operating modes for when the
switch contact is opened and closed.
Wiring diagram of switch contact device
Switch
2.5mm mini jack
• Start / pause mode (StartPause)
Open / Close : Playback or recording starts.
Close / Open : Playback or recording pauses.
• Start / pause + track increment mode (StartPauTR)
Open / Close : Playback or recording starts.
Close / Open : Playback or recording pauses.
Creates a new track during recording.
• Manual track mode (Manual TRK)
Open / Close : Creates a new track.
Close / Open : No operation.
4 Turn the JOG to select “Remote” and press the JOG.
5 Turn the JOG to select the switch contact operating
mode, and press the JOG.
6 Press the MENU/STORE button to register the settings.
< Default value > Preset1 : Manual TRK
Preset2 : StartPauTR
Preset3 : StartPause
1 While the recorder is stopped, press the MENU/STORE
button.
2 Turn the JOG to select “Preset” and press the JOG.
3 Turn the JOG to select the preset number that you wish to
set, and press the JOG.
2. Microphone remote connection
Optional jack for the microphone remote RC600PMD
(sold separately). The RC600PMD is a small unit that
can be attached to the microphone.
As the recorder can be controlled by hand while holding
the microphone, this is a very useful device in situations
such as recording interviews, etc.
• Microphone remote RC600PMD has 3 buttons, REC,
REC PAUSE, and MARK, which perform the same
functions as the buttons on the recorder.
However, as the CDR310 does not have a marking
function, the MARK button cannot be used.
• The microphone remote has 1 LED that serves as the
REC indicator and peak indicator.
(REC indicator)
Lights red during recording, and flashes red while
recording is paused.
45
Page 50

(Peak indicator)
Lights orange when the source level becomes the same
level as [OVER] on the level meter during recording or
recording pause.
However, it lights green when in standby (statuses other
than recording and recording pause). Orange (peak)
takes precedence over red in the display.
Initialization of preset settings
Returns the settings of the selected preset number to default.
1 While the recorder is stopped, press the MENU/STORE
button.
Margin display
For this reason, a precise clip margin (amount of margin
from the current source level at 0dB) is displayed in –dB. The
value is held in the same way as for peak hold. Press the
CANCEL button to reset it.
Margin display
CD-TEXT, ID3 tag
There is no text display function on the recorder. However,
the Time/Date stamp (the recording start date and time for a
certain file) information can be recorded as text information.
This is so file recording information can be seen on a regular
CD player. The information is recorded in the title areas for
both, as CD text for CD-DA, and as an ID3 tag for MP3.
These text displays can be displayed on CD players that
support these text displays.
2 Turn the JOG to select “Preset” and press the JOG.
3 Turn the JOG to select the preset number that you wish to
set, and press the JOG.
4 Turn the JOG to select “Default” and press the JOG.
46
• At this time, a default process confirmation screen is
displayed. Press the JOG to perform the process.
• After default processing, “Completed” is displayed for
1 second, and the settings only for the selected preset
number are returned to the default values. After that, the
recorder returns to the stopped status.
Page 51

Troubleshooting
If you think a malfunction has occurred, there may be no
need to contact the dealer or the repair service counter.
Please check the following points. You can easily solve many
problems without needing to ask for professional help. If
the problem cannot be solved even after performing these
checks, contact your dealer.
Recorder power will not turn on.
• Insert new batteries.
• If you are using rechargeable batteries, recharge the
batteries.
• Check the connection of the AC adaptor.
The recorder power turns itself off after it is turned on.
• Insert new batteries.
There is no sound from the internal speakers.
• Check the LEVEL volume setting on the front side of the
recorder.
• Check the ON/OFF position of the speaker switch on the
front side of the recorder.
Cannot record
• Check that the input source settings are correct.
• Check to see if the maximum number of tracks, 999
tracks, have been recorded.
• Check that there is enough recording time remaining on
the HD.
There is no signal from the microphone input.
• Check the input source settings. (
• Check the recording level settings. (
• Check if the microphone requires Phantom power. (
P.XX)
Cannot change recording format.
• There is only one HD recording format.
If tracks already recorded in a certain format already
exist, the format cannot be changed.
CD, or format the HD.
Too much noise
• Check the cable connection between each device.
Replace the cable if required.
• Check that the recording level is suitable.
Care and maintenance
Dip a soft cloth into water mixed with a small amount of
neutral detergent, wring out the cloth, and gently wipe the
recorder.
☞
P.XX)
P.XX)
☞
☞
47
Page 52

Error Messages
Display Description
Error messages Full_HD There is no space remaining on the HD.
Full_999 The track number on the HD has reached the maximum number, track 999.
No Track No track files detected.
No Disc No disc in the CD slot.
Blank Disc No files detected on the CD.
Unlocked
Write_Err Write to the HD or CD-R failed.
Read_Err Read from the HD or CD-R failed.
Format_Err Formatting failed.
Err_MPU MPU error detected.
Err_HD HD error detected.
Err_CDR CD-R drive error detected.
Err_RTC Real Time Clock error detected.
Err_EEPROM EEPROM error detected.
Err_SRAM SRAM error detected.
Warning messages LowBattery Battery voltage is low.
Not Blank There is no writable CD-R disc in the CD-R slot.
KEY LOCKED Key Lock is engaged.
System messages ALC On The recording level control is set by ALC.
Cannot synchronize the signal because the sampling frequency of the digital input
signal is not 44.1kHz.
48
Page 53

Specifications
Digital audio system
System ................................................................ HD recorder
Recording media ............................................... 1-inch 4G HD
Writing CD media ........................................................... CD-R
Recording format
MP3 ( .mp3) ........................ MPEG1 layer 3 compression
WAV ( .wav) ...........................................16-bit linear PCM,
WAVE file format
AIFF ( .aif) ...............................................16bit linear PCM,
Audio Interchange File format
CD ( .cda) .............................................16bit linear PCM,
CD audio file format
Recording bit rate
MP3 .......................................... 128 kbps (mono : 64 kbps)
WAV ................................... 1412 kbps (mono : 705.5 kbps)
AIFF ................................... 1412 kbps (mono : 705.5 kbps)
CD ...................................... 1412 kbps (mono : 705.5 kbps)
Sampling frequency ................................................. 44.1 kHz
Channel ................................................... 2 (stereo), 1 (mono)
Frequency characteristics ........................ 16,000 Hz (-0.5dB)
S/N ratio
IEC-A load ......................................................... LINE 80 dB
MIC 60 dB
Overall height harmonic distortion by 0 VU (wav)
.............................................................................. LINE 0.06%
MIC 0.06%
Dynamic range .............................................................. 80 dB
Output
LINE OUT L/R
Type ............................................................... RCA terminal
Standard level ................................... 2 Vrms max./2 kohms
DIGITAL OUT
Type ............................................................... RCA terminal
Output impedance ................................................. 75 ohms
Standard input/output level ..................................... 0.5Vp-p
Sampling frequency .............................................. 44.1 kHz
Format ...................................................................... SPDIF
General
Headphone output ........................................ 8 mW/ 32 ohms
Speaker output ............................................ 150 mW/ 8 ohms
Phantom power .................................................... + 48V, 5mA
Power consumption
Recording .......................................................... 5.0 W(DC)
Playback ............................................................ 5.0 W(DC)
Battery lifespan ............................... 4 hours (standard value)
Dimensions
Width ....................................................................... 113 mm
Height ....................................................................... 47 mm
Length ................................................................. 183.5 mm
Weight ......................................................................... 0.5 kg
Provided accessories
Input
MIC IN L/R
Type ................................... XLR (1:GND, 2:HOT, 3:COLD)
Input sensitivity (MIC) ...................... 1.0 mVrms/6.5 kohms
LINE IN
Type ............................................................... RCA terminal
Input sensitivity ................................ 500 mVrms/20 kohms
DIGITAL IN
Type ............................................................... RCA terminal
Input impedance .................................................... 75 ohms
Standard input/output level ..................................... 0.5Vp-p
Sampling frequency .............................................. 44.1 kHz
Format ...................................................................... SPDIF
AC adaptor ............................................................................ 1
AA battery holder ................................................................... 1
User’s guide ...........................................................................1
Accessories sold separately**
(Please refer to http://www.d-mpro.com/ for descriptions and
ordering information.)
Wired remote control ........................................... RC600PMD
* Specifications are subject to change without prior notice.
49
Page 54

LIMITED WARRANTY
Your Marantz Professional product is warranted against
manufacturer defects in material and workmanship for a
period of one year parts and labor.
Except as specified below, this warranty covers defects in
material and workmanship. The following are not covered
under warranty:
1. Damage, deterioration, malfunction or failure to meet
performance specifications resulting from:
a) Accidents, acts of nature, misuse, abuse, neglect or
unauthorized product modification.
b) Improper installation, removal or maintenance, or failure
to follow supplied instructions.
c) Repair or attempted repair by a non-Marantz authorized
agent.
d) Any shipment (claims must be presented to the carrier).
e) Any cause other than a defect of manufacturing.
2. Cleaning, check-ups with no fault found or changes
incurred for installation, removal or reinstallation of the
product.
3. Any serialized product on which the serial number has
been defaced, modified or removed.
4. Batteries and battery chargers.
5. Accessories, including but not limited to: cables, mounting
hardware and brackets, cleaning accessories, power cords
and adapters, and carry cases.
Non-transferable warranty
This Warranty may be enforced only by the original
purchaser.
What We Will Pay For
We will pay for all labor and material expenses for items
covered by the warranty.
How You Can Get Service (Americas only)
1. If your unit needs service in the USA, contact our service
referral at the appropriate telephone number indicated
below. We will advise you of the name and location of one
or more authorized service centers from which service
may be obtained. Please do not return the unit directly to
us.
2. You must pay any shipping charges if it is necessary
to ship the product for service. If the necessary repairs
are covered by the warranty, we will pay return shipping
charges to your location anywhere in the United States or
its territories.
3. Whenever warranty service is required, you must present
the original dated sales receipt or other proof of date
purchased.
Exclusion of Damages (Americas only)
Liability for any defective product is limited to repair or
replacement of the product at manufacturer’s option.
Manufacturer shall not be liable for damage to other products
caused by any defects in Marantz products, damages based
on inconvenience or loss of use of the product, or any other
damages, whether incidental, consequential, or otherwise.
Some States do not allow limitations on how long an implied
warranty lasts and/or do not allow the exclusion or limitation
of incidental or consequential damages, so the above
limitations and exclusions may not apply to you.
How State Law Relates to the Warranty (Americas only)
This warranty gives you specific legal rights, and you may
have other rights which may vary from State to State.
Marantz Professional Service Number (Americas only):
Marantz Professional Factory Service (630) 741-0330, toll
free within the US (866) 405-2154.
Products purchased outside of the United States, its
possessions or territories.
This warranty is enforceable only in the United States and its
possessions or territories.
Marantz Professional products Sales Office Site:
For inquiries or information on repair service of Marantz
Professional Products, please contact our Sales Office
or Tech Support Centre near you which are listed in D&M
Professional website below.
AMERICA
D&M Professional America http://www.d-mpro.com
Service number : 866-405-2154 (Toll Free)
EUROPE
D&M Professional Europe http://www.d-mpro.eu.com
ASIA / OTHERS
Marantz Korea Co.,Ltd. http://www.marantz.co.kr
DENON Asia Co.,Ltd. http://www.denon.com.hk
D&M Electronics Singapore Pte. Ltd.
http://www.denonsingapore.com
Limitation of Implied Warranties
All implied warranties, including warranties of merchantability
and fitness for a particular purpose, are limited in duration to
the length of this warranty.
50
Page 55

D&M Holdings Inc.
PROFESSIONAL BUSINESS COMPANY
Printed in Japan 08/ 2006 00M28BS851250 ecmf-e
 Loading...