


MVG460FFR
MVG460 & MVG460FFR
INSTRUCTIONS

2
Catalogue
1. Product Overview ......................................................... 4
2. Start to use ................................................................... 7
2.1 Battery Charging ........................................................................7
2.2 Battery Installation ...................................................................... 7
2.3 Handle Installation ...................................................................... 8
2.4 Positioning Lock ......................................................................... 8
2.5 Versatile Arm Installation ............................................................9
2.6 Camera Installation ................................................................... 10
2.7 Gimbal Balancing .....................................................................11
2.8 Power ON/OFF ......................................................................... 13
2.9 Download the Manfrotto Gimbal app. ......................................13
3. Connecting App ......................................................... 14
4. Funcion Operation ...................................................... 15
4.1 Function / Modes Introduction .................................................15
4.2 Button Operation Introduction ................................................16
4.3 USB Ports ................................................................................. 20
4.4 Touch Screen ............................................................................21
4.5 Modes Setting ..........................................................................22
4.6 Auto-rotation Mode ..................................................................24
4.7 Gimbal Initialization ..................................................................26
4.8 Manual Lock ............................................................................. 27
5. How to connect Camera with Wi-Fi ........................... 27
6. Accessories Introduction ............................................ 29
6.1 Accessories ..............................................................................29
6.2 Accessories for Pro Kit .............................................................30

32
Introduction
MVG460 is a professional 3-axis Gimbal specially designed by Feiyutech for
DSLR and mirrorless cameras, which is compatible with most pupular cameras in
the market. It is designed with detachable versatile arm handle, supporting single
hand and low angle shooting, and can be mounted on tripod and other accesso-
ries.
MVG460 is designed with function buttons and LCD touch screen, which can
switch the Gimbal working mode, control the rotation and parameters setting
with one hand. The camera shutter cable as equipped can be used to directly
control the photography, video recording and follow focus on Gimbal.
Download Manfrotto Gimbal App.
4
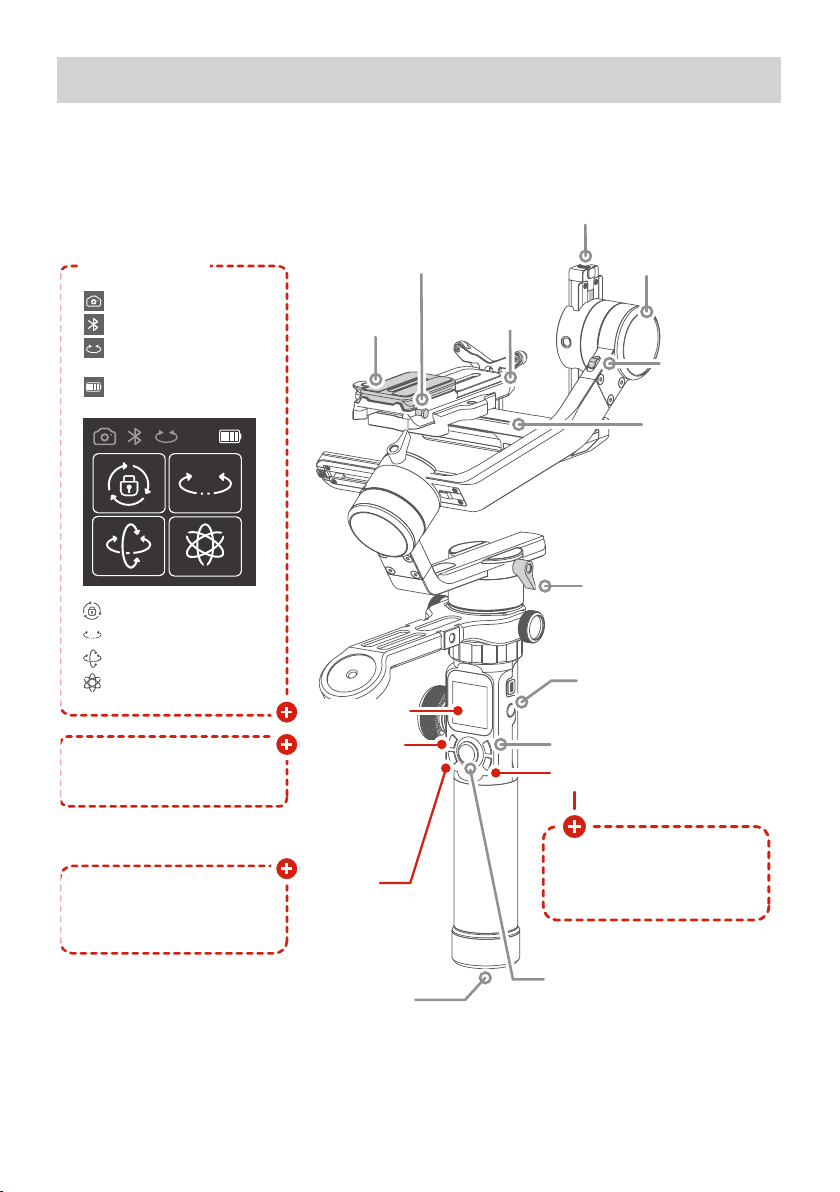
1. Product Overview
Fixed Plate
1/4 inch Thread Hole
Joystick
Vertical Arm Lock Screw
1/4 inch Thread Hole
Overview
Pan axis
Pan axis
positioning lock
Function button
Control camera to shoot
video, need to connect to
camera
Control camera to take photo,
need to connect to camera
Switch between multiple
working modes
Power button
Recording button
Screw
Tilt axis
positioning
lock
Tilt axis
Secondary quick
release plate
Touch screen
Made button
Capturing
button
Quick release
plate
Anti-drop column
Sliding arm
lock screw
Sliding arm
Lens supporting frame
Camera mode
Bluetooth
Multifunction Knob Control
Battery Level
Lock Mode
Panning Mode
Follow Mode
All Follow Mode
Touch Screen
Max. Tilting Range 230° Operation Time 12 Hours
Max. Rolling Range 360° Weight About 1656g (Not including the batteries)
Max. Panning Range 360° Payload 4600g (in center of gravity balanced state)
Tilting Speed 2°/s ~ 75°/s Adapter Cameras* Canon, SONY, Panasonic and others.
Panning Speed 3°/s ~ 150°/s
Specifications
Professional 3-axis gimbal designed for DSLR and mirrorless cameras, designed with
function buttons and LCD touch screen.
* Please download the detailed manual for the specific compatible camera and lens.
This product does not include the camera.
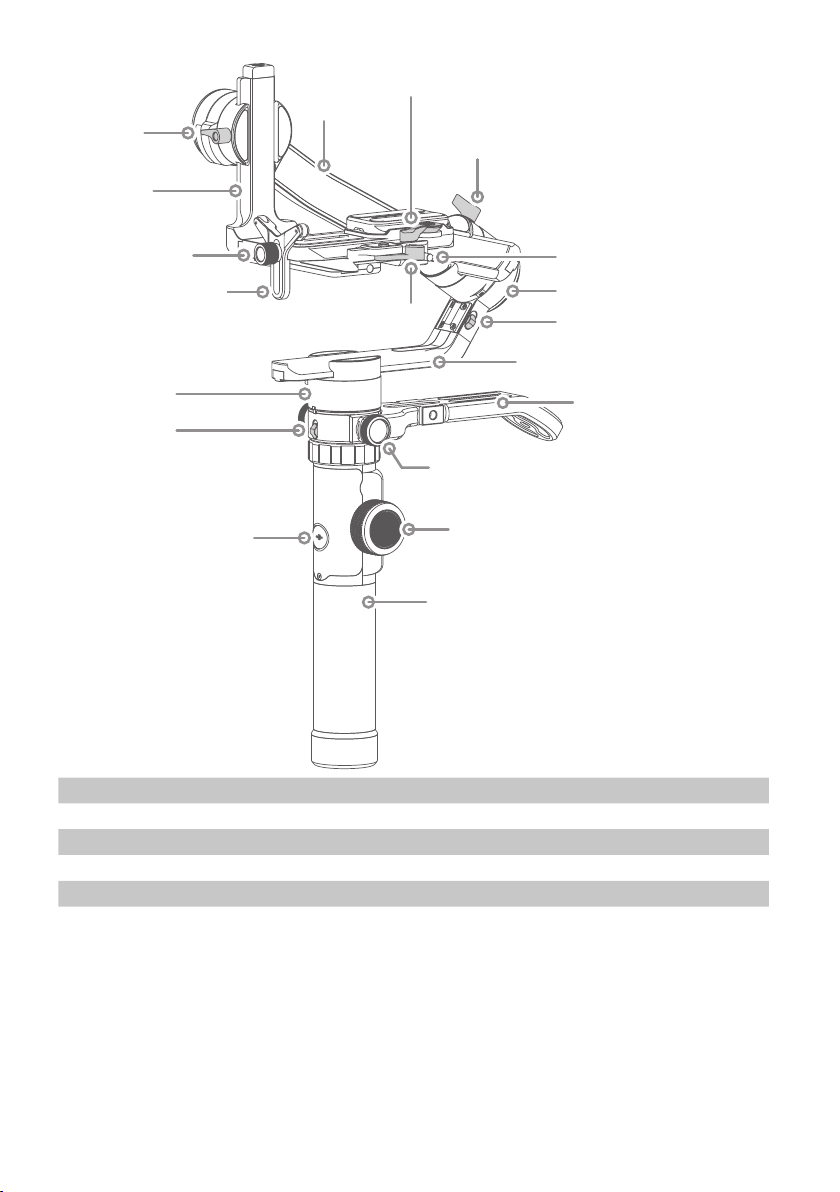
54
Quick release plate
safety lock
Cross arm
Cross arm
lock screw
Pan axis
Pan axis
positioning lock
Shortcut
button
Handle
Multifunction knob
Screw
Screw
Versatile arm
Roll axis positioning lock
Vertical arm
Roll axis
Anti-drop colum of quick
release plate
Secondary quick release plate safety lock
Sliding arm
lock screw
Sliding arm
Lens supporting frame
Max. Tilting Range 230° Operation Time 12 Hours
Max. Rolling Range 360° Weight About 1656g (Not including the batteries)
Max. Panning Range 360° Payload 4600g (in center of gravity balanced state)
Tilting Speed 2°/s ~ 75°/s Adapter Cameras* Canon, SONY, Panasonic and others.
Panning Speed 3°/s ~ 150°/s
Specifications
This product does not include the camera.
6
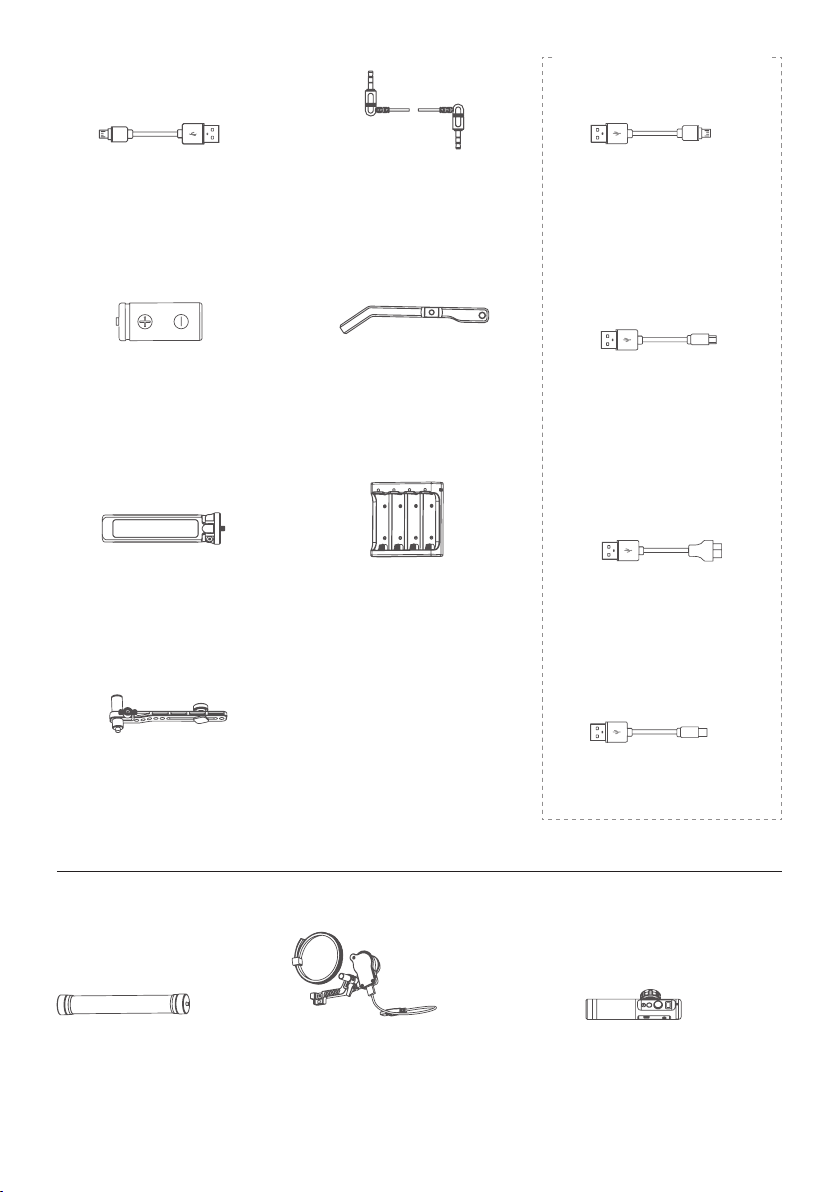
Accessories
Pro kit accessories
Camera Control Cable
USB 2.0 to Micro
x1
Micro USB Cable
x1
Panasonic Lumix
Shutter Cable
x1
Tripod
x1
Charger
x1
18650 Li-ion Battery
x1
Versatile Arm
x1
Follow Focus (FF)
x1
Gimbal Remote Controller (MVGRC)
x1
Extension Rod
x1
Multifunctional Bracket
x1
USB 2.0 to Mini
x1
USB 2.0 to Type C
x1
USB 3.0 to Micro 3.0
x1

76
2. Start to use
⚠
Read the detailed manual before using this products.
(1) Please install the camera before powering on the Gimbal.
(2) When the battery is low, please charge the Gimbal.
(3) When not in use, turn off the Gimbal and then remove the batteries.
(4) For quick start, utilising MVG640 basic features follow the steps below.
TIPS
2.1 Battery Charging
Charge the batteries with charger.
*Please fully charge the batteries before power on the Gimbal for the first time.
Micro USB
Cable
(not included)
2.2 Battery Installation
Remove the tail cap, open the batteries compartment, and install the batteries
correctly.
⚠
Please fully charge the
batteries before powering on
the Gimbal for the first time.
8
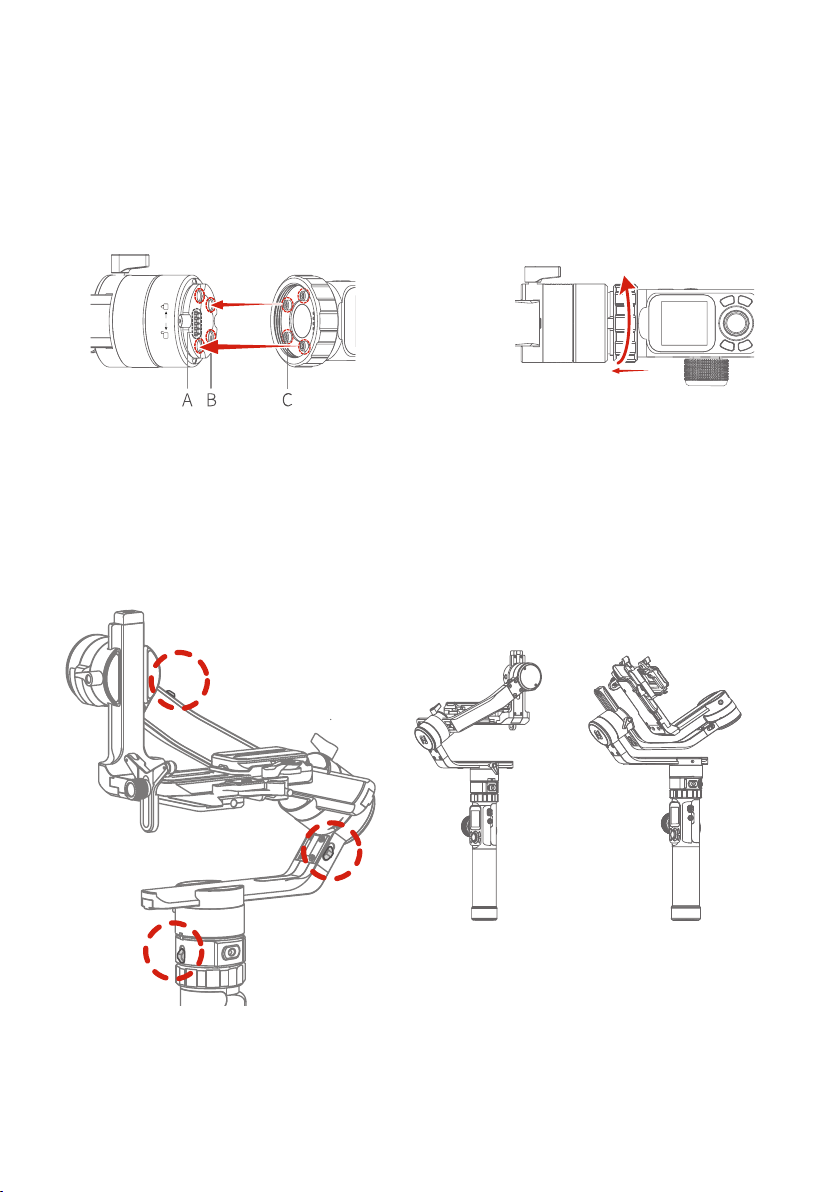
2.3 Handle Installation
Align the handle positioning screw with the corresponding positioning holes
under the pan axis machine and then tighten the fixing ring.
⚠
The four positioning screws must be aligned with the corresponding
positioning holes and then tighten the fixing ring.
Alignment
Tight
Alignment
A. Stylus
B. Positioning hole
C. Positioning screw
Loose
2.4 Positioning Lock
Each of the three rotating axis has one positioning lock for convenient
positioning and storage purposes. Be sure to unlock them before using the
Gimbal.
Balanced lock Stored lock
98
When installing or removing handle, please keep Gimbal in vertical position.
Do not move left or right, to prevent the stylus from damage.
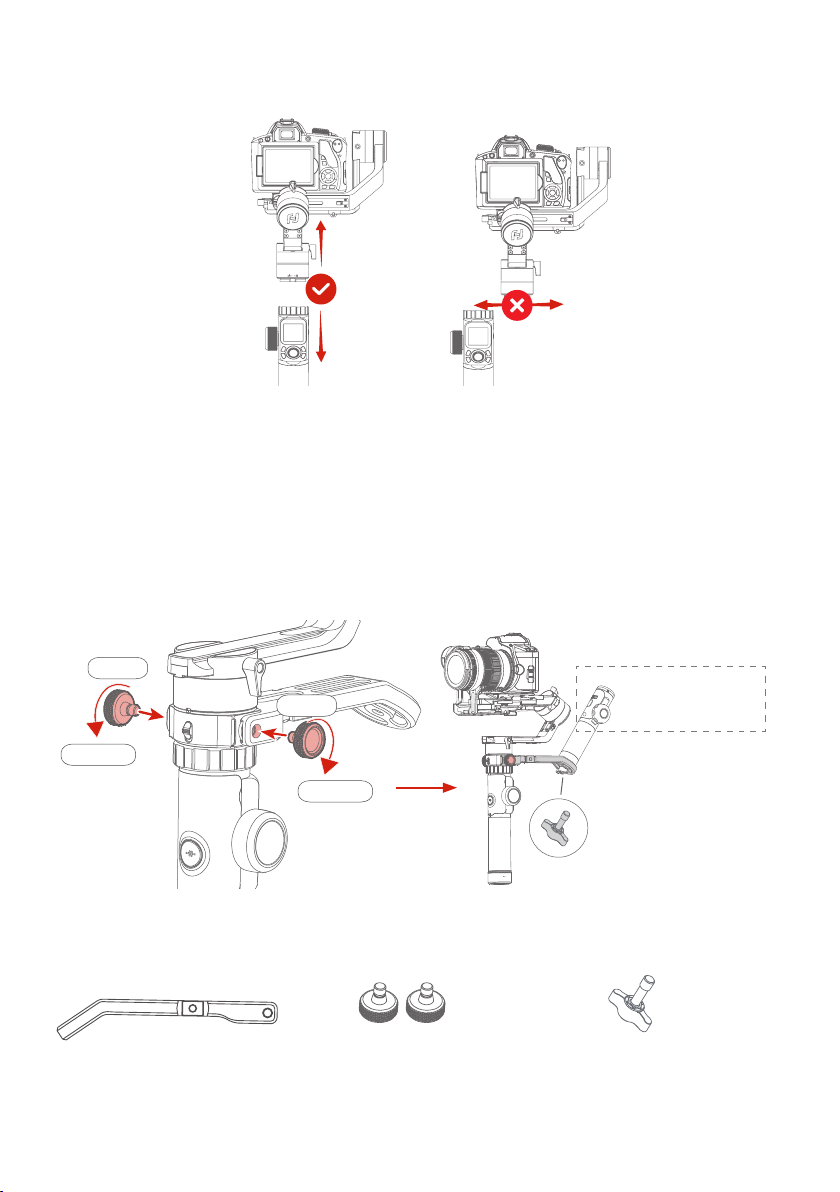
2.5 Versatile Arm Installation
1. Install versatile arm as picture shown, tighten the screws at left and right side
after aligning it's thread hole with Gimbal handle's one.
2. Tighten Hyperlink remote control (comes with standard version of MVG460) to
the versatile arm tail. Or you can also tighten tripod at it's tail directly for an op-
tion.
Use longer screw to fix the bottom of the remote handle when mounting remote
control or other accessories with 1/4 inch threaded hole.
Loose
Loose
Tighten
Tighten
Place the display and
function button of the
remote outwards
Tighten the bottom
of the handle
DO NOT turn around
remoter control's handle
Accessories needed:
Versatile Arm
X1
Fixed Screw
X2
Screw
X1
10
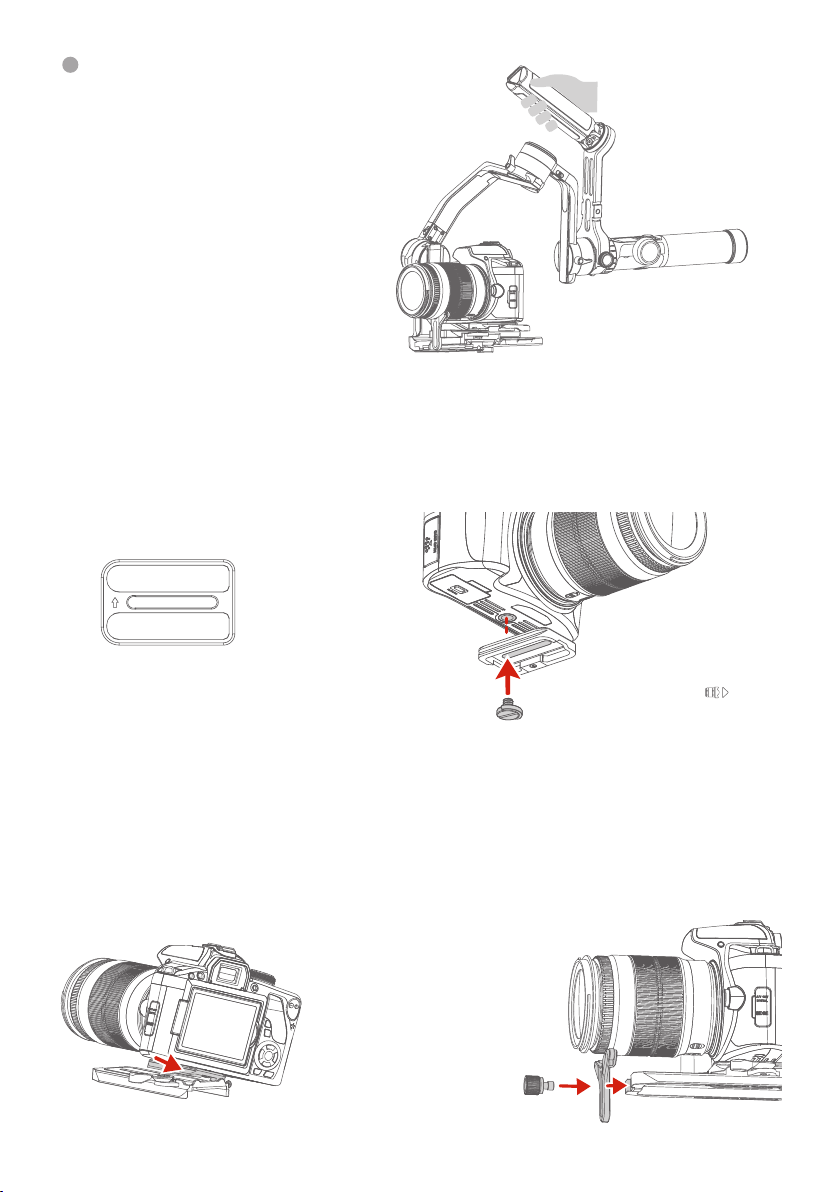
After installation, you can use
versatile arm for low angle shots.
Secondary quick release plate
⚠
Make sure the battery and memory
card are loaded before installation.
⚠
Please follow
the direction of
the icon on
the back of the
secondary quick
release plate to
install.
(2) Fix the secondary quick release
plate to the bottom of the camera.
(1) Install the quick release plate to
the fixed plate and take out the sec-
ondary quick release plate.
2.6 Camera Installation
(3) Insert the secondary quick release
plate and press down. The secondary
quick release plate safety lock auto-
matically locks and locks the secondary
quick release plate safety lock.
(4) Install the lens support frame
to ensure that the lens holder can
hold the lens firmly.
Insert the secondary quick release plate.
1110
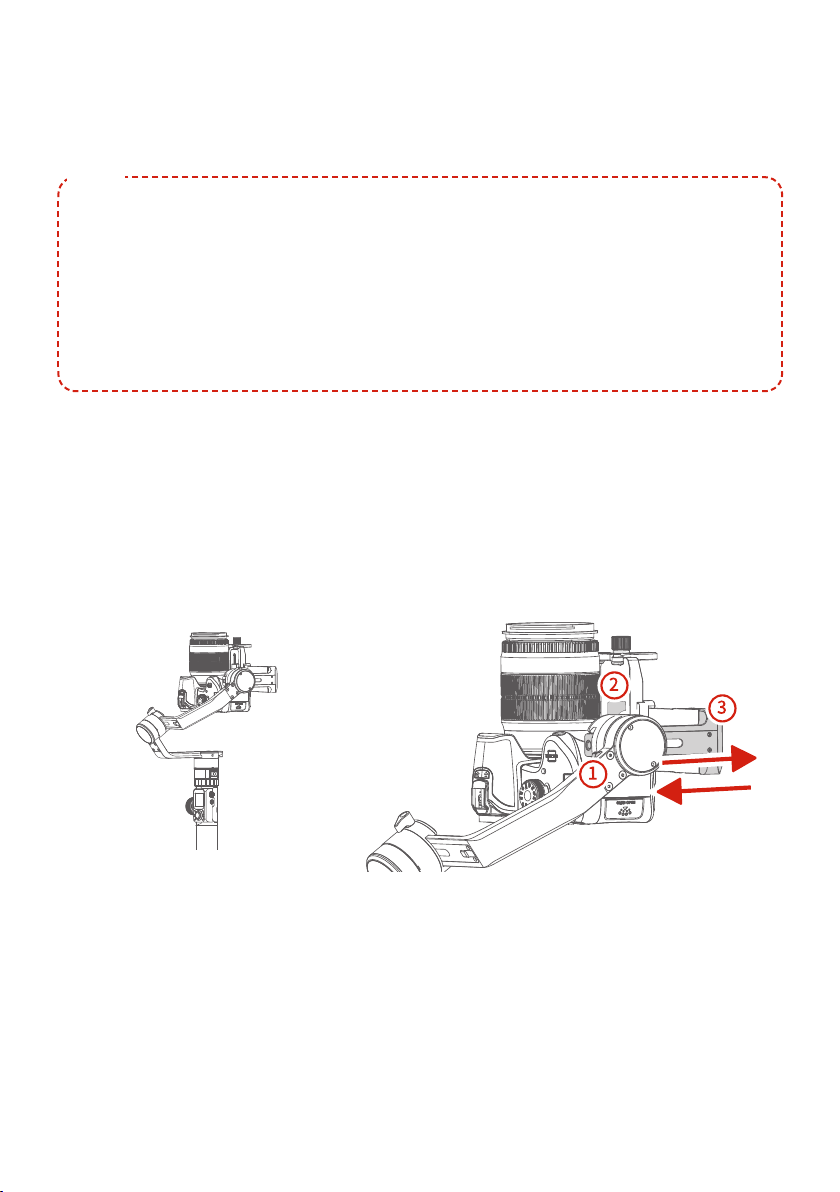
2.7 Gimbal Balancing
⚠
Before balancing the Gimbal, lock the Gimbal to the balance lock state
at first, unlock each axis positioning lock in stages during the balancing
process.
(1) Before balancing the Gimbal, the lens cover should be removed from the
camera and the memory card needs to be inserted to the camera to complete
all the connections to ensure that the camera is ready for shooting.
(2) During balancing the Gimbal, make sure the camera is powered off and the
Gimbal is turned off.
(3) If you add accessories after the balancing is completed, Gimbal will need to
be re-balanced.
TIPS
2.7.1 Balance Adjustment of the Tilting Axis
(1) a. Unlock the tilt axis positioning lock ①, place the camera lens vertically
upwards, determine the camera's center of gravity.
b. Loosen the sliding arm lock screw ②, slide the sliding arm ③ to balance the
camera position.
c. Tighten the sliding arm lock screw ②, if the camera lens can stay vertically
upwards that means balanced.
 Loading...