

Page 1
GB
Electric Shredder Original Instruction Manual
F
Broyeur Electrique Manuel d’instructions original
D
Flüsterhäcksler Original-Bedienungsanleitung
I
Trituratore elettrico Manuale di istruzioni originale
NL
Elektrische versnipperaar
E
Trituradora Eléctrica Manual de instrucciones original
P
Triturador Elétrico Manual de Instruções Originais
DK
Elektrisk ishugger Original brugsanvisning
GR
Ηλεκτρικός τεμαχιστής Πρωτότυπο εγχειρίδιο οδηγιών
TR
Elektrikli Öğütücü Orijinal Kullanım Kılavuzu
S
Elektrisk kompostkvarn Originalbruksanvisning
N
Elektrisk kvern Original instruksjonshåndbok
FIN
Sähkösilppuri Alkuperäinen käyttöohje
LV
Elektriskais zaru smalcinātājs
LT
Elektrinis smulkintuvas Originali naudojimo instrukcija
Oorspronkelijke instructiehandleiding
Tulkojums no rokasgrāmatas
oriģinālvalodā
UD2500
EE
PL
HU
SK
CZ
RO
RUS
UA
Elektriline oksapurustaja Tõlgitud kasutusjuhend
Elektryczny Rozdrabniacz Do
Gałęzi
Elektromos kerti hulladékaprító Eredeti kezelői kézikönyv
Elektrický drvič Pôvodný návod na obsluhu
Elektrická drtička Původní návod k použití
Tocător electric Manual de instrucţiuni original
Электрический Садовый
Измельчитель
Електричний подрібнювач
Oryginalna instrukcja obsługi
Оригинальная инструкция по
эксплуатации
Оригінальний посібник з
експлуатації
Page 2

2
1
2
4
5
3
6
7
8
9
10
11
12
1
Page 3
2
4 3
5 6
3
Page 4
13
7 8
16
14
11
10
15
9
4
Page 5
ENGLISH (Original instructions)
DESIGNATION OF PARTS
1 Filling hopper
2 Power switch
3 Handle
4 Power supply plug
5 Lock lever
6 Forward / Reverse switch
TECHNICAL DATA
Model UD2500
Name Electric Shredder
Motor AC-Motor 230V~50Hz
Motor rating P1 S6-40% 2,500W
Motor rating P1 S1 2,000W
Rotational speed cutting roller 40 min
Power switch with
Weight 27.6 kg
Max. branch diameter (only for freshly cut wood) Max. 45 mm
Safety class
Protection class IP X4
NOISE DATA
Sound pressure level
Sound pressure level at operator’s ear
Measured sound power level
Guaranteed sound power level 97 dB (A)
The sound intensity level for operator may exceed 80 dB (A). Wear ear protection.
SYMBOLS
The following show the symbols used for the machine. Be sure that you understand their meaning before use.
Read instruction manual.•
Take particular care and attention.•
Switch off the motor and unplugged
•
before servicing, cleaning, maintenance or
repairing.
Objects may be thrown out at high speed.•
Keep bystanders and pets away from
•
danger area.
7 Upper enclosure
8 Retaining basket
9 Base frame
10 Adjusting knob
11 Fixing knob
12 Blade cover
13 Feed side
14 Screw
15 Counter blade
16 Cutting roller
–1
overload protection; cutting and reverse function, zero-
voltage initiator
I
74.88 dB (A),
K= 2.50 dB (A)
84.4 dB (A),
K= 3 dB (A)
93.49 dB (A),
K= 3.97 dB (A)
Danger — Rotating blades. Keep hands
•
and feet out of openings while machine is
running.
Danger — Rotating blades. Keep hands
•
and feet out of openings while machine is
running.
Wear eye and ear protection.•
Wear protective gloves.•
5
Page 6

6
Do not expose to rain or moisture.•
Turn the knob clockwise for narrower clear-
•
ance / turn the knob counterclockwise for
wider clearance
Open the blade cover to adjust the blade or
•
clean the wood.
Wait until all the machine parts stop
•
completely.
Do not use the machine as a step.•
•
Only for EU countries
Do not dispose of electric equipment or
battery pack together with household
waste material! In observance of European
Directive 2002/96/EC on waste electric
and electronic equipment, 2006/66/EC
on batteries and accumulators and waste
batteries and accumulators and their
implementation in accordance with national
laws, electric equipment and battery pack
that have reached the end of their life must
be collected separately and returned to
an environmentally compatible recycling
facility.
SAFETY WARNINGS
READ CAREFULLY BEFORE USE
KEEP INSTRUCTION MANUAL FOR FUTURE
REFERENCE
Do not start to operate the machine until you have
read these operating instructions. Observe all the instructions given, and install the machine as described.
Intended use of the machine
The garden shredder is intended for shredding follow-
•
ing items:
All types of branches up to maximum diameter of
–
the machine’s capacity (depending on the type
and condition of wood)
Garden refuses such as withered plants or wet
–
weed which has been laid some days (Feed
them alternating with branches.)
The garden shredder is intended for private use only,
•
and not for commercial use. Do not use it in public
places either.
General Instructions
Read this instruction manual to become familiar with
•
handling of the machine. Users insufciently informed
will risk danger to themselves as well as others due to
improper handling.
Do not lend the machine to people who have unproven
•
to be experienced.
When lending the machine, always attach this instruc-
•
tion manual.
•
The electric shredder is not intended for use by persons
with reduced physical, sensory or mental capabilities,
or lack of experience and knowledge. Young children
should be supervised to ensure that they do not play
with the machine. Do not allow children to operate this
equipment.
Operate only if you are in good physical condition.
•
Perform all work calmly and carefully. The user is responsible for all safety of persons and damages around
the operating area.
Never use this machine after consumption of alcohol or
•
drugs, or if feeling tired or ill.
Use the machine in accordance with these instructions,
•
considering the working conditions and the application.
Unintended use of the machine could result in a hazard
ous situation.
•
Never alter the machine, including safety devices such
as interlock device. This will endanger your safety.
National or local regulation can restrict the handling of
•
the machine.
•
Stay alert. Watch what you are doing. Use common
sense. Do not operate machine when you are tired.
Personal protective equipment
Dress Properly. The clothing worn should be functional
•
and appropriate, i.e. it should be tight-tting but not
cause hindrance. Do not wear either jewelry or clothing
which could become entangled in to machine. Wear
protecting hair covering to contain long hair.
Always wear ear protections to avoid hearing loss.
•
Wear protective glasses or goggles to protect eyes from
•
debris thrown from the lling hopper.
Wear protective groves to prevent injury to ngers.
•
Wear face mask when the dusk is substantive, such as
•
shredding dry branches, hedges with leaves.
When using the machine, always wear sturdy shoes
•
with a non-slip sole. This protects against injuries and
ensures a good footing.
Work area safety
Keep children and bystanders away while operating the
•
machine.
Operate the machine in open space on a rm, level
•
surface. Do not operate the machine close to a wall or
other objects.
Do not operate machine in explosive atmospheres,
•
such as in the presence of ammable liquids, gases or
dust. The machine creates sparks which may ignite the
dust or fumes.
Do not operate the machine on a paved or gravel
•
surface where ejected material may result in injury.
Keep work area clean and well lit. Cluttered or dark
•
areas invite accidents.
Do not expose the machine to rain or wet conditions.
•
Water entering the machine may increase the risk of
electric shock.
Starting up the machine
Before connect the plug or switch on the machine:
•
Check all the screws, nuts and other fasteners
–
are properly secured.
Check guards, deectors and screens are in
–
place and good working condition.
Replace damaged or unreadable labels.
–
Make sure the lling hopper is empty.
–
-
Page 7

Make sure the inlet and discharge opening are
–
guarded properly.
Check all the parts of the machine carefully to
–
determine if it operates properly and performs
its intended function. Especially, never use the
machine if the switch does not work normally.
If the supply cord is damaged, ask Makita authorized
•
service center, always using genuine replacement
parts, to replace it.
Electrical safety
WARNING:
This appliance is Class I appliance. Connect with a
•
supply socket with earth terminal. Improper earth may
cause electric shock and death. Use only three-wire
extension cords which have three-prong groundingtype plugs and three-pole receptacles which accept the
tool’s plug.
Avoid body contact with earthed or grounded surfaces
•
(e.g. pipes, radiators) during operation.
•
Use only IEC60245 (H07RN-F) extension cable for
outdoor use with splash-proofed connector. Its crosssection must be at least 1.5 mm2 for cable lengths up to
25 m, and 2.5 mm2 for cable lengths over 25 m.
Voltage drop may happen when using long thin cable. If
•
it happens the power of the machine may be reduced.
When using the extension cable, make sure that it does
•
not interfere, is not squeezed or bended, and the plug
does not get wet.
When using a cable reel, wind the cable completely off
•
the reel.
Do not abuse the cord. Never use the cord for carrying,
•
pulling or unplugging the machine. Keep cord away
from heat, oil, sharp edges or moving parts. Damaged
or entangled cords increase the risk of electric shock.
Check the extension cable regularly for damage to the
•
insulation. Replace it if damaged.
If the connecting cable is damaged, withdraw the mains
•
plug immediately. A damaged cable may cause contact
with live parts and electric shock.
Never use damaged cables.
•
Only plug the machine into sockets in tested electrical
•
circuits. Check that the system voltage matches that on
the rating plate.
Never deactivate or bypass the protective devices.
•
When using the machine outdoors, always use a
•
residual current-operated circuit-breaker (RCD) with an
operating current of 30 mA or less.
Operation
Keep your face and body away from the inlet opening.
•
Never let your hands or other part of the body or cloth-
•
ing place inside the inlet and discharge opening, or near
moving parts. It may result in serious injury.
Do not overreach. Keep proper footing and balance at
•
all times. This enables better control of the machine in
unexpected situations. Do not stand at higher level than
the base of the machine when feeding material into it.
Always keep distance from the discharge opening dur-
•
ing operation.
Observe regional regulations for noise protection.
•
Do not feed rock, a piece of metal, bottles or other
•
foreign matter. Pay attention that those foreign objects
are not included when you feed.
Immediately switch off the motor and unplugged if the
•
blade strike a foreign object or the machine starts vibrat
ing or making noise unusually. Check the shredder for
damage, and tighten any loose parts. Ask an authorized
service center to repair the machine.
•
Do not let the processed material accumulated in
discharge opening. Otherwise it may result in kickback
of material through the inlet opening.
Switch off the motor and unplugged before:
•
Whenever leaving the machine unattended
–
–
Before clearing a blockage or any fault
–
Before checking, cleaning or working on the
machine
Before making any adjustments, changing ac
–
cessories or storing
–
Whenever the machine starts vibrating or making
noise unusually
–
Clearing inlet or discharge opening
Attaching or removing retaining basket
–
Transporting.
–
•
Do not tilt the machine during operation.
•
Keep abundant distance when you put long material. It
may spring back and may result in personal injury.
Do not operate without the lling hopper.
•
Do not force the machine. It does the job better and
•
safer at the rate for which it was designed. Frequent
overload may cause motor damage or re.
Use the right appliance. Do not use appliances for pur-
•
poses not intended. Never intend to feed metal parts,
glasses, stones, ceramics, plastics, thicker branches,
hard wood or thick wood plates, etc.
Maintenance instructions
Have your machine serviced by our authorized service
•
center, always using only genuine replacement parts.
Incorrect repair and poor maintenance can shorten the
life of the machine and increase the risk of accidents.
Before servicing, inspection, adjustment, storage, or to
•
change an accessory, take following steps:
Shut off the power source
–
Disconnect the machine from power supply
–
Make sure that all moving parts have come to a
–
complete stop
Allow the machine to cool.
–
Inspect on the machine for possible damage:
•
Whether safety devices works properly for its
–
intended function
Whether all the moving parts work smoothly and
–
adequately
Whether all parts are not damaged and properly
–
installed
Replace or repair by our authorized service
–
center if there are any damaged parts.
Pay extreme attention when servicing cutter. The cutter
•
is able to move manually tough interlock feature of the
guard functions.
Do not clean the device with water. It may cause electri-
•
cal shock.
Wear protective gloves during maintenance or assem-
•
bly work to prevent injury to ngers.
Do not carry out maintenance or repair work other than
•
that described in this instruction manual. Any other
work must be carried out by Makita aurhorized service
center.
-
-
7
Page 8

8
Only use original Makita replacement parts and ac-
•
cessories intended for your machine. Otherwise it may
result in personal injury or damage on the machine.
Store the machine in a dry room. Keep it out of reach of
•
children. Never store the machine outdoors.
ASSEMBLY
CAUTION:
Always be sure that the machine is switched off and
•
unplugged before carrying out any work on the tool.
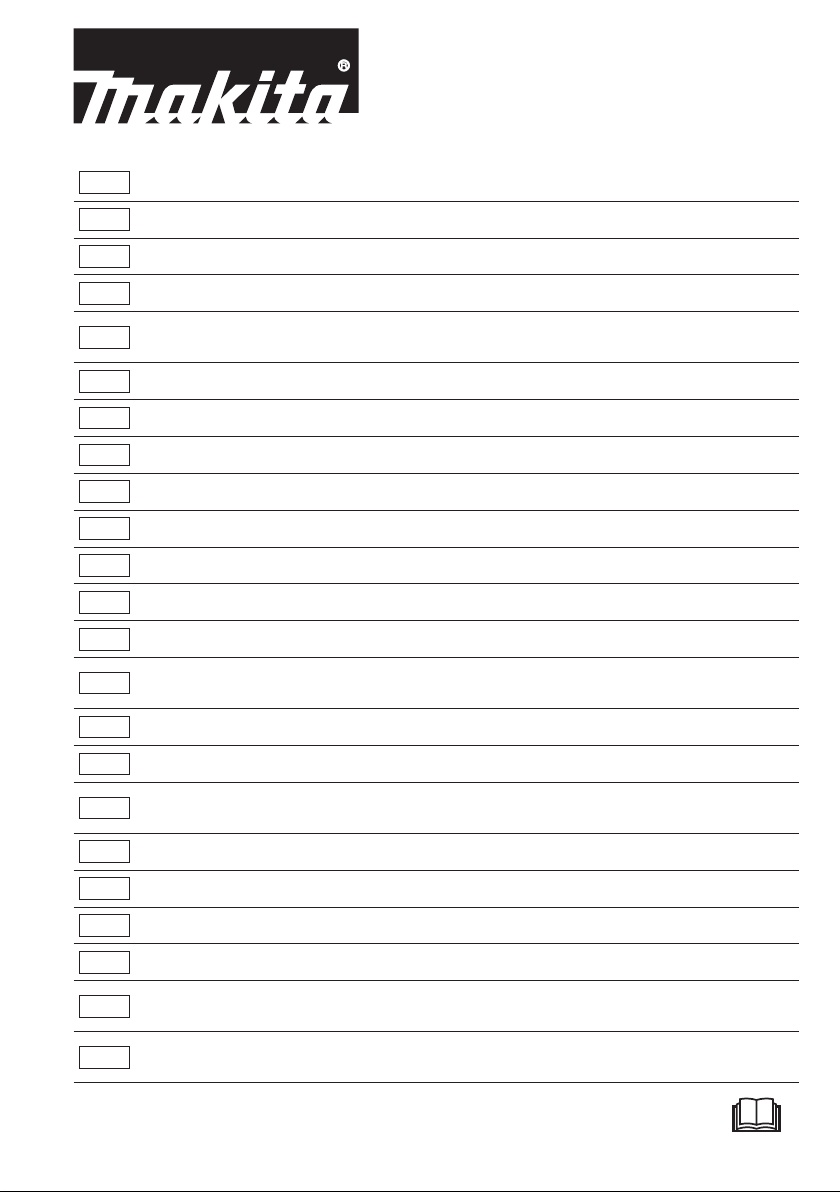
1. Place the upper enclosure upside down on the at
oor. And then put the base frame on it. Be careful
about the direction of the part. (Fig. 2)
2. Fasten each part by tightening screws. Make sure they
become perfectly stable.
3. Attach the stoppers by screw. Make sure they are
fastened tightly.
4. Attach wheels as follows:
Attach the axis on one of the wheel.
–
Pass the axis through the holes on the leg.
–
Attach the other wheel to the axis by passing
–
the pin through the hole on the axis. Fasten the
wheel by bending the pin.
Attach the covers on the wheels.
–
5. Attach the retaining basket. And then raise the lock
(Fig. 6)
lever.
(Fig. 3)
(Fig. 4)
(Fig. 5)
FUNCTIONAL DESCRIPTION
WARNING:
Before plugging the machine, always make sure that the
machine is switched off. Plugging the machine with the
switch on may cause an unexpected start resulting in
serious personal injury.
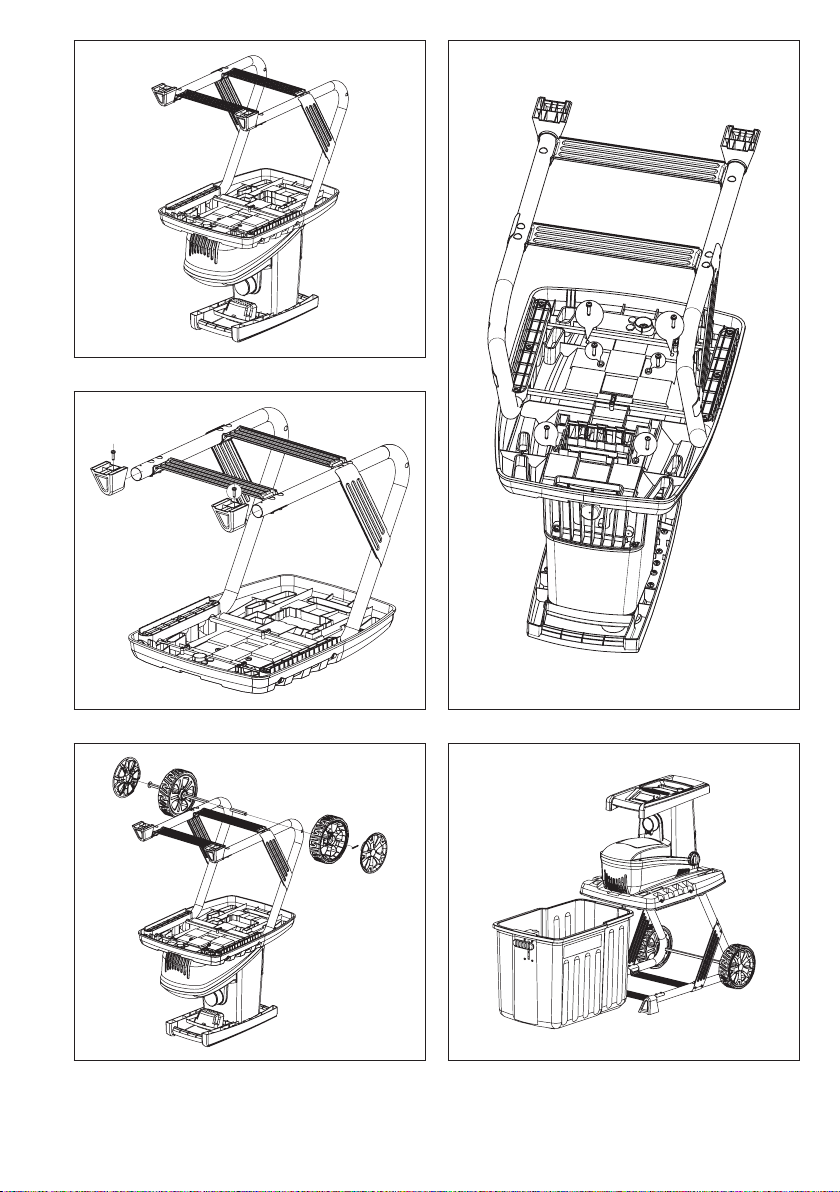
Power Switch (Fig. 7)
CAUTION:
Do not use the machine if the switch does not turn it on
and off. Have defective switches replaced by Makita
authorized service center.
To turn on the machine, push the green button.
To turn off the machine, push the red button.
LED light
The LED light indicates the status of the machine as
follows:
RED color: When the machine is connected to the
power supply and the machine is switched off.
GREEN color: When machine is switched on.
Flickering GREEN color constantly: When the
machine is blocked during operation.
Flickering RED color: When the machine can not
recover automatically. Clear the problem manually
when it happens.
Unintentional restart proof
The machine switches off automatically when power
failure happens. To restart, push the green button again.
Overload protection
The motor is equipped with an overload protection. When
overloaded, the machine acts as follows:
The blade runs reverse for two or three seconds
–
to try to push the shredded material back out.
The blade runs forward again.
–
If the material is still clogged after this attempt
–
for three times, the machine stops with LED light
ickering in red.
When it happens perform the following steps:
–
Turn off the machine.
–
Wait until the blades stop completely.
–
Remove the clogged material.
–
Turn the shredder on again after about 5 minutes,
and feed easier material.
–
If you cannot turn on the machine after this wait
ing time, refer to “Trouble shooting”.
Forward / Reverse switch
CAUTION:
Switch off the shredder before changing the forward /
reverse switch.
Position e
The blades rotate in forward direction.
Position d
The blades rotate in reverse direction to release jammed
material.
When you change the direction into d (reverse), keep
pushing the green button of the power switch to rotate
the blades. The shredder automatically stops when you
release the power switch.
NOTE:
Several repetitions of reverse and forward operations
•
may be required to shred a large object.
CAUTION:
Always use a hook or a stick to remove jammed objects
•
to prevent accidents.
Always wait until the shredder stops completely before
•
restart.
Retaining basket
CAUTION:
Switch off and unplug the machine before attaching or
•
removing the retaining basket.
Check the functionality of the interlock feature every
•
two hours for safe operation.
Never attempt to override the interlock feature of
•
guarding.
Lock lever:
Upper position → Retaining basket is locked.
Lower position → Retaining basket is unlocked.
The machine is not switched on if the lock lever is unlock
position. The machine automatically stops if the retaining
basket is unlocked during operation.
The device does not switch on
because of safety function.
-
Page 9

Blade cover
CAUTION:
Make sure that the machine is switched off and un-
•
plugged before opening the blade cover.
Wear protective groves before opening the blade
•
cover.
The cutter does not stop immediately after switch off.
•
Wait until all the parts stop.
In case the material clogs badly in the upper enclosure,
remove them by opening the blade cover.
OPERATION
Set up the machine:
On a at, horizontal surface. Do not place the machine
•
on paved or graveled ground.
With a safe distance (at least 2 m) away from walls or
•
other objects.
Before starting, make sure that:
•
The connection cables are not damaged. If there is cuts
or tears, stop operation and replace it immediately.
•
There is no damage on the machine, and all screws
are tight.
•
The machine is assembled completely and correctly.
Check the mains connection:
•
Make sure that the mains voltage matches the rated
voltage on the nameplate and the machine is properly
grounded.
Use only extension cords with sufcient core
•
cross-section.
The material which the shredder can process
The shredder can process following types of
material:
All types of branches up to the maximum diameter of
•
the machine’s capacity, depending on type and condition of wood
Garden refuses such as withered plants or wet weed
•
which has been laid some days (Feed them alternating
with branches.)
The shredder can NOT process following types of
material:
Glass, metal, plastic, stones, ceramics, thicker
•
branches, hard wood, thick wood plates, cloth, plastic
bags, roots with soil.
Garbage which is almost liquid state, e.g. kitchen
•
garbage.
Operation: (Fig. 8)
Feed the material into the lling hopper from the right
•
side.
In case of branches, twigs and wood, shred them just
•
after they are cut. They may get very hard as they
become dry.
Remove any side shoots from branches if they are not
•
easy to feed.
Turn off the motor and disconnect the machine from the
•
mains power supply before cleaning ejection opening.
Do not let the shredded material accumulated in ejec-
•
tion opening. Otherwise those shredded material may
block the ejection opening. Empty the retaining basket
regularly.
•
Do not feed material which is more than the maximum
branch diameter specied in Technical data. Depending
on the wood’s freshness and condition, the maximum
branch diameter may be smaller.
Shredding wet garden waste results in a clog. To pre-
•
vent the machine from clogging, alternate waste with
wood containing material.
Soft material or wet branches may be torn instead of
•
being cut. Worn counter blade may also cause this
problem.
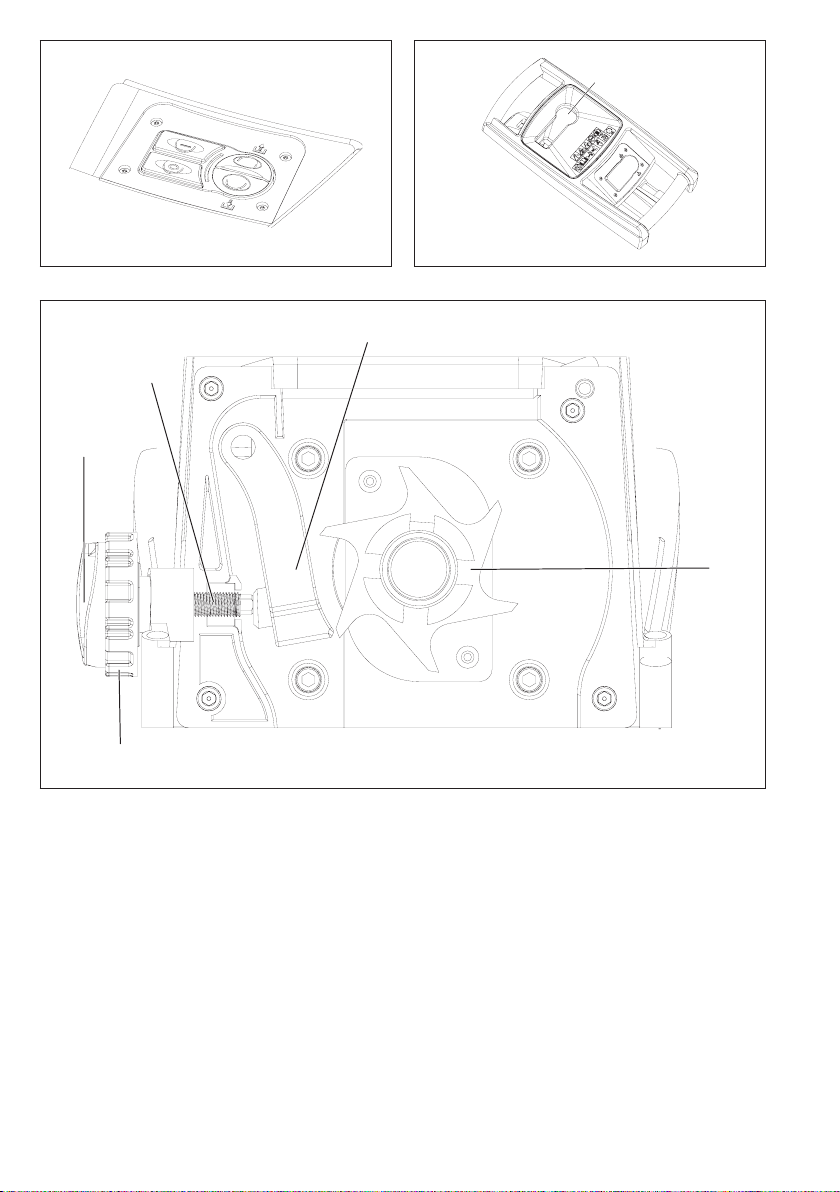
Adjusting the blade clearance (Fig. 9)
For an effective operation, adjust the clearance between
the counter blade and cutting roller.
Setting the clearance:
Switch on the device.
•
Turn the xing knob counterclockwise to release the
•
adjusting knob.
•
Turn the adjusting knob clockwise slowly to place the
counter blade closer to the cutting roller. Turn it until ne
aluminum chips are falling from the ejection opening.
Turn the xing knob clockwise to lock the adjusting
•
knob.
MAINTENANCE
CAUTION:
Always be sure that the machine is switched off and un-
•
plugged before performing inspection or maintenance.
Wear protective groves before performing inspection or
•
maintenance.
The cutter does not stop immediately after switch off.
•
Wait until all the parts stop before performing any
maintenance work.
Make sure that all the tools are removed after mainte-
•
nance work.
Never use gasoline, benzine, thinner, alcohol or the
•
like. Discoloration, deformation or cracks may result.
To clean the machine, use only moist cloth and soft
brush.
Do not hose or clean the machine with high pressured
•
water.
After each operation, perform the following maintenance:
•
Check whether all the locking screws are tight (tighten
if necessary).
•
Lubricate metal parts to protect them against
corrosion.
•
Keep the vents clean and free from dust.
The cutting roller and counter blade wears out in course
of time. Ask your nearest authorized service center for
replacement when it is necessary.
9
Page 10

10
TROUBLE SHOOTING
WARNING: Before solving troubles, switch off the machine, pull out the mains plug, and wait until the machine stops
completely.
Trouble Possible cause Remedy
Motor does not start No power supply Check mains supply.
Mains cable defective Ask authorized service center for checking.
Wait until the machine cools down and press the green
button.
Check and lock the retaining basket.
Turn off the device.
Switch the forward/reverse switch into reverse direction.
Switch on the machine until the jam has been cleared.
Switch the machine off again.
Turn back the direction of forward rotation.
Switch off device and switch over direction of rotation
selector switch.
Switch off device. Switch the forward/reverse switch into
reverse direction. Switch on device to release the material
to be shredded, remove any foreign matter.
Switch device off again.
Turn back the direction of forward rotation.
Adjust xed counter blade as described under “Adjusting
the blade clearance”.
If the cutting roller is severely worn, replace it.
Adjust the counter blade.
Check the extension cable is at least 1.5 mm
25 m long. If using longer cable, minimum cross-section
2
is 2.5 mm
2
, maximum
Motor sounds but does not
start
Shredding material is not
drawn into the shredder
Shredding material is not cut
cleanly
Device starts but blocked
by even slight load, and
switches off by protective
motor switch soon.
Overload protection is activated
Safety cut-out device of the retaining
basket (Retaining basket is unlocked)
Cutting roller is blocked
Capacitor fault Bring machine to authorized service center for repairing.
Reverse rotation.
Shredding material caught in lling
hopper
Shredding material too soft or wet Push down with a branch
Cutting roller worn
Fixed counter blade is not adequately
adjusted
Extension cable is too long or cross-sec
tion too thin.
Socket is too far from mains supply or
cross-section of mains cable too thin
Page 11

For European countries only
EC Declaration of Conformity
We Makita Corporation as the responsible manufacturer declare that the following Makita machine(s):
Designation of Machine:
Electric Shredder
Model No./ Type: UD2500
Specications: see “Technical data” table.
are of series production and
Conforms to the following European Directives:
2000/14/EC-amended by 2005/88/EC, 2006/42/EC,
2004/108/EC
And are manufactured in accordance with the following
standards or standardised documents:
EN60335-1, EN13683
The technical documentation is kept by:
Makita International Europe Ltd.
Technical Department,
Michigan Drive, Tongwell,
Milton Keynes, Bucks MK15 8JD, England
The conformity assessment procedure required by
Directive 2000/14/EC was in Accordance with annex V.
Measured Sound Power Level: 93.49 dB (A),
K= 3.97 dB (A)
Guaranteed Sound Power Level: 97 dB (A)
28.12.2012
Tomoyasu Kato
Director
Makita Corporation
3-11-8, Sumiyoshi-cho,
Anjo, Aichi, 446-8502, JAPAN
11
Page 12

NEDERLANDS (Originele instructies)
AANDUIDING VAN ONDERDELEN
1 Vultrechter
2 Aan/uit-schakelaar
3 Handgreep
4 Stekkeraansluiting
5 Vergrendeling
6 Schakelaar voor vooruit/ach-
teruit
TECHNISCHE GEGEVENS
Model UD2500
Naam Elektrische versnipperaar
Motor Wisselstroommotor 230 V~50 Hz
Nominaal motorvermogen P1 S6-40% 2 500 W
Nominaal motorvermogen P1 S1 2 000 W
Rotatiesnelheid snijrol 40 min
Aan/uit-schakelaar met
Gewicht 27,6 kg
Max. takdiameter (alleen voor versgesnoeid hout) Max. 45 mm
Veiligheidsklasse I
Beschermingsklasse IP X4
GELUIDSGEGEVENS
Geluidsdrukniveau
Geluidsdrukniveau bij oor gebruiker
Gemeten geluidssterkteniveau
Gegarandeerd geluidssterkteniveau 97 dB (A)
7 Bovenkast
8 Opvangbak
9 Onderstel
10 Afstelknop
11 Borgknop
12 Meskap
13 Invoerzijde
14 Schroef
15 Contrames
16 Snijrol
overbelastingsbeveiliging; snij- en achteruitdraaifunctie,
nulspanningsontsteking
74,88 dB (A),
K= 2,50 dB (A)
84,4 dB (A),
K= 3 dB (A)
93,49 dB (A),
K= 3,97 dB (A)
–1
De geluidsintensiteit voor de gebruiker kan 80 dB (A) overschrijden. Draag oorbescherming.
SYMBOLEN
Hieronder worden de symbolen weergegeven die voor de machine worden gebruikt. Zorg dat u weet wat ze betekenen
voordat u de machine gaat gebruiken.
Gevaar – Draaiende messen. Houd uw
Lees de instructiehandleiding.•
Ga aandachtig en zorgvuldig te werk.•
Schakel de motor uit en haal de stekker uit
•
het stopcontact voordat u service, reiniging,
onderhoud of reparaties uitvoert.
Objecten kunnen op hoge snelheid worden
•
uitgeworpen.
Houd omstanders en huisdieren uit de
•
buurt van het risicogebied.
•
handen en voeten uit openingen terwijl de
machine in bedrijf is.
Gevaar – Draaiende messen. Houd uw
•
handen en voeten uit openingen terwijl de
machine in bedrijf is.
Draag oog- en oorbescherming.•
Draag beschermingshandschoenen.•
36
Page 13

Stel de machine niet bloot aan regen of
•
vocht.
Draai de knop met de klok mee voor minder
•
speling/draai de knop tegen de klok in voor
meer speling
Open de meskap om het mes af te stellen
•
of het hout uit de machine te verwijderen.
Wacht totdat alle onderdelen van de ma-
•
chine helemaal tot stilstand zijn gekomen.
Gebruik de machine niet als opstapje.•
Alleen voor EU-landen
•
Geef elektrisch gereedschap of accu’s niet
met het huisvuil mee! Volgens de Europese
richtlijn 2002/96/EC inzake oude elektrische en elektronische apparaten, richtlijn
2006/66/EC inzake batterijen en accu’s en
wegwerpbatterijen, en de toepassing
daarvan binnen de nationale wetgeving,
dienen gebruikte elektrisch apparaten en
accu’s die het einde van hun levensduur
hebben bereikt, gescheiden te worden ingezameld en te worden afgevoerd naar een
recyclebedrijf dat voldoet aan de geldende
milieu-eisen.
VEILIGHEIDSWAARSCHUWINGEN
LEES DIT ZORGVULDIG DOOR VÓÓR GEBRUIK
BEWAAR DE INSTRUCTIEHANDLEIDING OM DEZE
LATER TE KUNNEN RAADPLEGEN
Lees eerst deze bedieningshandleiding door voordat
u de machine gaat gebruiken. Houd u aan alle gegeven
instructies en installeer de machine zoals beschreven.
Bedoeld gebruik van de machine
De tuinversnipperaar is bedoeld voor het versnipperen
•
van:
Alle soorten takken tot de maximumdiameter van
–
de capaciteit van de machine (afhankelijk van het
soort en de staat van het hout)
–
Tuinafval zoals verdorde planten of nat onkruid
dat enkele dagen heeft gelegen (wissel dit af met
takken).
De tuinversnipperaar is uitsluitend bedoeld voor
•
persoonlijk gebruik, niet voor commercieel gebruik.
Gebruik hem ook niet op openbare plaatsen.
Algemene instructies
Lees deze instructiehandleiding, zodat u bekend raakt
•
met het gebruik van de machine. Gebruikers die onvoldoende op de hoogte zijn, kunnen zichzelf en anderen
in gevaar brengen als gevolg van onjuist gebruik van
de machine.
Leen de machine niet uit aan personen van wie u niet
•
weet of ze er ervaring mee hebben.
Voeg altijd deze instructiehandleiding bij als u de
•
machine uitleent.
•
De elektrische versnipperaar is niet bedoeld voor
gebruik door personen met verminderde lichamelijke,
zintuiglijke of geestelijke vermogens, of gebrek aan
ervaring en kennis. Jonge kinderen moeten onder
toezicht gehouden worden om ervoor te zorgen dat ze
niet met de machine spelen. Laat deze apparatuur niet
bedienen door kinderen.
•
Gebruik de machine alleen als u in goede lichamelijke
conditie verkeert. Voer alle werkzaamheden rustig en
zorgvuldig uit. De gebruiker is verantwoordelijk voor de
veiligheid van alle personen en voor alle schade rond
het gebruiksgebied.
•
Gebruik deze machine nooit nadat u alcohol of drugs
hebt gebruikt of wanneer u zich moe of ziek voelt.
•
Gebruik de machine in overeenstemming met deze
instructies, rekening houdend met de werkomstan
digheden en de toepassing. Onbedoeld gebruik van de
machine zou tot een gevaarlijke situatie kunnen leiden.
Breng nooit aanpassingen aan de machine aan, ook
•
niet aan veiligheidsvoorzieningen zoals de vergrendeling. Uw veiligheid is dan niet gegarandeerd.
Door landelijke of plaatselijke wetgeving kunnen
•
beperkingen op het gebruik van de machine worden
gelegd.
Blijf alert. Let op wat u doet. Gebruik uw gezond ver-
•
stand. Gebruik de machine niet als u moe bent.
Persoonlijke beschermingsmiddelen
Draag de juiste kleding. Draag functionele en geschikte
•
kleding, dus kleding die goed aansluit, maar u niet
belemmert. Draag geen sieraden of kleren die in de
machine verstrikt kunnen raken. Bedek lang haar met
een kapje.
Draag altijd oorbescherming om gehoorbeschadiging
•
te voorkomen.
Draag een beschermingsbril om uw ogen te bescher-
•
men tegen afval dat uit de vultrechter wordt geworpen.
Draag beschermingshandschoenen om vingerletsel te
•
voorkomen.
Draag een gezichtsmasker in geval van grote hoeveel-
•
heden stof, zoals bij het versnipperen van droge takken
of heggen met bladeren.
Draag bij het gebruik van de machine altijd stevige
•
schoenen met een antislipzool. Zo beschermt u uzelf
tegen letsel en zorgt u ervoor dat u stevig staat.
Veilige werkomgeving
Houd kinderen en omstanders uit de buurt terwijl u de
•
machine gebruikt.
Gebruik de machine in een open ruimte op een stevig,
•
vlak oppervlak. Gebruik de machine niet vlak bij een
muur of ander objecten.
Gebruik de machine niet in explosieve atmosferen,
•
zoals in de aanwezigheid van ontvlambare vloeistoffen,
gassen of stof. De machine wekt vonken op die het stof
of de dampen kunnen aansteken.
Gebruik de machine niet op bestrating of grind waar
•
uitgeworpen materiaal tot letsel kan leiden.
Houd de werkomgeving schoon en goed verlicht.
•
Rommelige of donkere omgevingen vragen om
ongelukken.
Stel de machine niet bloot aan regen of vochtige om-
•
standigheden. Als er water in de machine komt, kan de
kans op elektrische schokken toenemen.
-
37
Page 14

De machine opstarten
Voordat u de stekker aansluit of de machine
•
inschakelt:
Controleer of alle schroeven, moeren en andere
–
bevestigingsmiddelen stevig vastzitten.
Controleer of afschermingen, stootplaten en
–
schermen aanwezig zijn en in goede staat
verkeren.
Vervang beschadigde of onleesbare etiketten.
–
Zorg dat de vultrechter leeg is.
–
Zorg dat de invoer- en uitwerpopening goed zijn
–
afgeschermd.
–
Controleer alle onderdelen van de machine
zorgvuldig om vast te stellen of de machine goed
functioneert en de bedoelde functie uitvoert.
Gebruik de machine vooral nooit als de schakelaar niet goed werkt.
•
Neem als het netsnoer beschadigd is, contact op met
een erkend Makita onderhoudscentrum. Vervang het
snoer altijd door oorspronkelijke reserveonderdelen.
Elektrische veiligheid
WAARSCHUWING:
Dit is een apparaat van Klasse I. Sluit het aan op een
•
geaard stopcontact. Onjuiste aarding kan elektrische
schokken en overlijden veroorzaken. Sluit de stekker
van de machine alleen aan op driedraads verlengsnoeren met driepolige geaarde stekkers en driepolige
stopcontacten.
Vermijd lichaamscontact met geaarde oppervlakken
•
(bijvoorbeeld leidingen, radiators) tijdens gebruik.
Gebruik alleen een verlengkabel met de specicatie
•
IEC60245 (H07RN-F) voor gebruik buitenshuis, met
een spatbestendige aansluiting. De doorsnede van
deze kabel moet ten minste 1,5 mm2 bedragen voor
kabellengtes tot 25 m en 2,5 mm2 voor kabellengtes
langer dan 25 m.
Wanneer u een lange, dunne kabel gebruikt, kan span-
•
ningsverlies optreden. In dat geval kan het vermogen
van de machine afnemen.
Zorg wanneer u een verlengkabel gebruikt, dat deze u
•
niet belemmert, deze niet bekneld of verbogen raakt en
dat de stekker niet nat wordt.
Als u een kabelhaspel gebruikt, dient u de haspel
•
helemaal af te wikkelen.
Ga voorzichtig om met het snoer. Draag of trek de
•
machine nooit aan het snoer en trek ook niet aan het
snoer om de stekker uit het stopcontact te halen. Houd
het snoer uit de buurt van hitte, olie, scherpe randen
of bewegende onderdelen. Door beschadigde of in de
knoop geraakte snoeren neemt de kans op elektrische
schokken toe.
Controleer de verlengkabel regelmatig op schade aan
•
de isolatie. Vervang deze bij beschadiging.
Haal direct de stekker uit het stopcontact als de aansluit-
•
kabel beschadigd is. Door een beschadigde kabel kunt
u in aanraking komen met onderdelen onder spanning
en een elektrische schok krijgen.
Gebruik nooit beschadigde kabels.
•
Sluit de machine alleen aan op stopcontacten in ge-
•
teste stroomketens. Controleer of de systeemspanning
overeenkomt met die op het typeplaatje.
U mag de beschermingsvoorzieningen nooit uitschake-
•
len of omzeilen.
•
Gebruik wanneer u de machine buitenshuis gebruikt,
altijd een aardlekschakelaar met een werkstroom van
30 mA of minder.
Gebruik
Houd uw gezicht en lichaam uit de buurt van de
•
invoeropening.
Houd uw handen of andere lichaamsdelen of kleding
•
nooit in de invoer- of uitwerpopening of in de buurt
van bewegende onderdelen. Dit kan tot ernstig letsel
leiden.
Reik niet boven uw macht. Zorg dat u altijd stevig en
•
evenwichtig staat. Zo kunt u de machine beter bedienen
in onverwachte situaties. Ga niet hoger staan dan het
onderstel van de machine wanneer u er materiaal in
stopt.
Blijf tijdens gebruik altijd op afstand van de
•
uitwerpopening.
Houd u aan de plaatselijke wetgeving met betrekking
•
tot bescherming tegen lawaai.
Stop geen steen, stukken metaal, essen of andere
•
ongewenste voorwerpen in de machine. Let op dat
er geen ongewenste voorwerpen tussen het tuinafval
zitten dat u in de machine stopt.
Schakel de motor direct uit en haal de stekker uit
•
het stopcontact als het mes tegen een ongewenst
voorwerp komt of de machine begint te trillen of ongebruikelijke geluiden begint te maken. Controleer de
versnipperaar op schade en zet losse onderdelen vast.
Vraag een erkend onderhoudscentrum om de machine
te repareren.
Zorg dat verwerkt materiaal zich niet ophoopt in de
•
uitwerpopening. Anders kan dit leiden tot terugstoten
van materiaal via de invoeropening.
Schakel de motor uit en haal de stekker uit het
•
stopcontact:
Wanneer u de machine onbeheerd achterlaat
–
Voordat u een blokkade verwijdert of een storing
–
verhelpt
Voordat u de machine controleert, reinigt of
–
onderhoudt
Voordat u afstellingen verricht, accessoires
–
verwisselt of de machine opbergt
Wanneer de machine begint te trillen of onge-
–
bruikelijke geluiden maakt
Bij het vrij maken van de invoer- of
–
uitwerpopening
Bij bevestiging of verwijdering van de
–
opvangbak
Tijdens vervoer.
–
Kantel de machine niet tijdens gebruik.
•
Houd voldoende afstand wanneer u lang materiaal in
•
de machine stopt. Het kan terugveren en tot persoonlijk
letsel leiden.
Gebruik de machine niet zonder de vultrechter.
•
Forceer niets door de machine. De machine werkt beter
•
en veiliger op het tempo waarvoor deze is ontworpen.
Regelmatige overbelasting kan schade aan de motor of
brand veroorzaken.
Gebruik het juiste hulpstuk. Gebruik geen hulpstukken
•
voor doeleinden waarvoor ze niet zijn bestemd. Voer
nooit stukken metaal, glazen, stenen, keramiek, plastic,
dikkere takken, hardhout of dikke houten platen enzovoort door de machine.
38
Page 15

Onderhoudsinstructies
Laat onderhoud aan de machine uitvoeren door een
•
erkend Makita onderhoudscentrum. Gebruik altijd al
leen originele reserveonderdelen. Onjuiste reparaties
en slecht onderhoud kunnen de levensduur van de machine verkorten en de kans op ongelukken vergroten.
Neem de volgende stappen voordat u onderhoud,
•
inspecties of afstellingen verricht, de machine opbergt
of een accessoire verwisselt:
Schakel de machine uit
–
Haal de stekker van de machine uit het
–
stopcontact
–
Controleer of alle bewegende onderdelen volle
dig tot stilstand zijn gekomen
Laat de machine afkoelen.
–
Inspecteer de machine op mogelijke schade:
•
Of veiligheidsvoorzieningen naar behoren
–
werken voor het doel waarvoor ze zijn bestemd
Of alle bewegende onderdelen soepel en naar
–
behoren werken
Of er geen onderdelen beschadigd zijn en alle
–
onderdelen correct zijn geïnstalleerd
Laat eventuele beschadigde onderdelen ver-
–
vangen of repareren door een erkend Makita
onderhoudscentrum.
Let zeer goed op bij onderhoud aan het mes. Het mes
•
kan als u het met de hand bedient, de vergrendeling
van de afschermingsfuncties verschuiven.
Reinig de machine niet met water. Dit kan elektrische
•
schokken veroorzaken.
Draag beschermingshandschoenen tijdens onder
•
houds- of assemblagewerkzaamheden om vingerletsel
te voorkomen.
Voer geen andere onderhouds- of reparatiewerkzaam-
•
heden uit dan beschreven in deze instructiehandleiding.
Andere werkzaamheden moeten worden uitgevoerd
door een erkend Makita onderhoudscentrum.
•
Gebruik alleen oorspronkelijke Makita reserveonderdelen en accessoires die voor uw machine bedoeld zijn.
Anders kan dit leiden tot persoonlijk letsel of schade
aan de machine.
Berg de machine op in een droge ruimte. Houd hem
•
buiten bereik van kinderen. Berg de machine nooit
buiten op.
INEENZETTEN
LET OP:
Controleer altijd of de machine uitgeschakeld is en de
•
stekker uit het stopcontact verwijderd is voordat u er
werkzaamheden aan uitvoert.
1. Leg de bovenkast ondersteboven op de vlakke vloer.
Leg het onderstel er vervolgens bovenop. Zorg dat het
onderdeel in de goede richting ligt.
2. Zet elk onderdeel vast door de schroeven aan te
draaien. Zorg dat de onderdelen helemaal stabiel zijn.
(Fig. 3)
3. Zet de aanslagen met schroeven vast. Zorg dat ze
stevig vastzitten.
(Fig. 4)
(Fig. 2)
4. Bevestig de wielen als volgt:
Bevestig de as aan een van de wielen.
–
Leid de as door de gaten in de poot.
–
Bevestig het andere wiel aan de as door de pen
–
door het gat in de as te leiden. Zet het wiel vast
door de pen om te buigen.
Bevestig de doppen op de wielen.
–
5. Bevestig de opvangbak. Schuif vervolgens de ver
grendeling omhoog. (Fig. 6)
(Fig. 5)
BESCHRIJVING VAN DE FUNCTIES
-
WAARSCHUWING:
Controleer voordat u de machine op het stopcontact
aansluit altijd of de machine uitgeschakeld is. Als u de
machine op het stopcontact aansluit en de schakelaar
aan staat, kan deze onverwacht starten, wat tot ernstig
persoonlijk letsel kan leiden.
Aan/uit-schakelaar (Fig. 7)
LET OP:
Gebruik de machine niet als u deze niet met de schakelaar aan en uit kunt zetten. Laat defecte schakelaars door
een erkend Makita onderhoudscentrum vervangen.
Druk op de groene knop om de machine in te schakelen.
Druk op de rode knop om de machine uit te schakelen.
Led-lampje
Het led-lampje geeft de status van de machine als volgt
weer:
ROOD: wanneer de machine op de elektriciteit is
-
aangesloten en uitgeschakeld is.
GROEN: wanneer de machine ingeschakeld is.
GROEN knipperend (continu): wanneer de machine
tijdens gebruik geblokkeerd is.
ROOD knipperend: wanneer de machine niet automatisch kan worden hersteld. Los in dit geval het
probleem met de hand op.
Bescherming tegen onbedoeld opstarten
De machine wordt automatisch uitgeschakeld in geval
van een stroomuitval. Druk opnieuw op de groene knop
om de machine opnieuw op te starten.
Overbelastingsbeveiliging
De motor is uitgerust met een overbelastingsbeveiliging.
Bij overbelasting reageert de machine als volgt:
Het mes loopt twee of drie seconden achteruit
–
om te proberen het versnipperde materiaal weer
naar buiten te duwen.
Het mes loopt weer vooruit.
–
Als het materiaal na drie zulke pogingen nog
–
steeds vastzit, stopt de machine en knippert het
LED-lampje rood.
Voer als dit gebeurt de volgende stappen uit:
–
Schakel de machine uit.
–
Wacht totdat de messen helemaal tot stilstand
zijn gekomen.
–
Verwijder het vastzittende materiaal.
–
Schakel de versnipperaar na ongeveer 5 minuten
weer in en doe er gemakkelijker te verwerken
materiaal in.
–
Als u de machine na deze wachttijd niet in kunt
schakelen, raadpleegt u “Problemen oplossen”.
-
39
Page 16

Schakelaar voor vooruit/achteruit
LET OP:
Schakel de versnipperaar uit voordat u de schakelaar
voor vooruit/achteruit omschakelt.
Stand e
De messen draaien vooruit.
Stand d
De messen draaien achteruit om vastzittend materiaal los
te maken.
Blijf wanneer u de richting verandert in d (achteruit),
op de groene knop van de aan/uit-schakelaar drukken
om de messen te laten draaien. De versnipperaar stopt
automatisch wanneer u de aan/uit-schakelaar loslaat.
OPMERKING:
U moet mogelijk enkele keren vooruit en achteruit
•
schakelen als u een groot voorwerp wilt versnipperen.
LET OP:
•
Verwijder vastzittende voorwerpen altijd met een haak
of een stok om ongelukken te voorkomen.
•
Wacht altijd totdat de versnipperaar helemaal tot stil
stand is gekomen voordat u hem opnieuw opstart.
Opvangbak
LET OP:
Schakel de machine uit en haal de stekker uit het
•
stopcontact voordat u de opvangbak bevestigt of
verwijdert.
Controleer voor een veilig gebruik elke twee uur het
•
functioneren van de vergrendeling.
Probeer de vergrendeling van de afscherming nooit te
•
omzeilen.
Vergrendeling:
Bovenste stand → opvangbak is vergrendeld.
Onderste stand → opvangbak is niet vergrendeld.
De machine wordt niet ingeschakeld als de vergrendel
ing in de niet-vergrendelde stand staat. De machine stopt
automatisch als de opvangbak tijdens gebruik wordt ontgrendeld.
De machine wordt niet ingeschakeld als gevolg van de
beveiligingsfunctie.
Meskap
LET OP:
•
Controleer of de machine uitgeschakeld is en de
stekker uit het stopcontact verwijderd is voordat u de
meskap opent.
Draag beschermingshandschoenen voordat u de
•
meskap opent.
•
Het mes stopt niet direct nadat de machine is uitge
schakeld. Wacht totdat alle onderdelen tot stilstand zijn
gekomen.
Wanneer er veel materiaal in de bovenkast vastzit, verwijdert u dit door de meskap te openen.
BEDIENING
Stel de machine op:
Op een vlak, horizontaal oppervlak. Zet de machine niet
•
op bestrating of grind.
Op een veilige afstand (ten minste 2 m) van muren of
•
andere objecten.
Controleer voordat u start of:
•
De aansluitkabels niet beschadigd zijn. In geval van
kabelbreuk of scheuren stopt u het gebruik van de
machine en vervangt u de kabel direct.
•
De machine niet beschadigd is en alle schroeven goed
vastzitten.
De machine juist en volledig geassembleerd is.
•
Controleer de netspanningsaansluiting:
•
Controleer of de netspanning overeenkomt met de
nominale spanning op het typeplaatje en of de machine
naar behoren geaard is.
•
Gebruik uitsluitend verlengsnoeren waarvan de door
snede van de kern groot genoeg is.
-
Het materiaal dat de versnipperaar kan
verwerken
De versnipperaar kan de volgende soorten materiaal
verwerken:
Alle soorten takken tot de maximumdiameter van de
•
capaciteit van de machine, afhankelijk van het soort en
de staat van het hout
Tuinafval zoals verdorde planten of nat onkruid dat
•
enkele dagen heeft gelegen (wissel dit af met takken)
De versnipperaar kan de volgende soorten materiaal
NIET verwerken:
Glas, metaal, plastic, stenen, keramiek, dikkere takken,
•
hardhout, dikke houten platen, stof, plastic zakken,
wortels met kluiten aarde.
Afval in bijna vloeibare staat, bijvoorbeeld keukenafval.
•
Bediening: (Fig. 8)
Voer het materiaal vanaf de rechterkant in de
•
-
vultrechter.
•
Versnipper takken, twijgjes en hout direct na het
snoeien. Als ze drogen, kunnen ze heel hard worden.
Haal de zijscheuten van de takken als u ze niet gemak-
•
kelijk in de machine kunt stoppen.
•
Schakel de motor uit en haal de stekker van de machine
uit het stopcontact voordat u de uitwerpopening reinigt.
Zorg dat het versnipperde materiaal zich niet ophoopt
•
in de uitwerpopening. Anders zou dit versnipperde
materiaal de uitwerpopening kunnen blokkeren. Maak
de opvangbak regelmatig leeg.
•
Voer geen materiaal in met een grotere dan de maximale
-
takdiameter die onder 'Technische specicaties' wordt
vermeld. Afhankelijk van de versheid en de staat van
het hout kan de maximumdiameter van takken kleiner
zijn.
•
Het versnipperen van nat tuinafval leidt tot verstopping.
Wissel tuinafval af met hout om te voorkomen dat de
machine verstopt raakt.
Zacht materiaal of natte takken kunnen scheuren in
•
plaats van versnipperen. Dit probleem kan ook door
een versleten contrames worden veroorzaakt.
-
40
Page 17

De speling van het mes aanpassen (Fig. 9)
Pas voor een effectieve werking de speling tussen het
contrames en de snijrol aan.
De speling instellen:
Schakel de machine in.
•
Draai de borgknop tegen de klok in om de afstelknop
•
te ontgrendelen.
Draai de afstelknop langzaam met de klok mee om het
•
contrames dichter bij de snijrol te plaatsen. Draai totdat
kleine aluminiumsplinters uit de uitwerpopening vallen.
Draai de borgknop met de klok mee om de afstelknop
•
te vergrendelen.
ONDERHOUD
LET OP:
Controleer altijd of de machine uitgeschakeld is en
•
de stekker uit het stopcontact verwijderd is voordat u
inspecties of onderhoud verricht.
Draag beschermingshandschoenen voordat u inspec-
•
ties of onderhoud verricht.
Het mes stopt niet direct nadat de machine is uitge-
•
schakeld. Wacht totdat alle onderdelen tot stilstand
zijn gekomen voordat u onderhoudswerkzaamheden
verricht.
Ruim alle gereedschappen op nadat u onderhouds-
•
werkzaamheden hebt verricht.
Gebruik nooit benzine, wasbenzine, thinner, alcohol en
•
dergelijke. Hierdoor kunnen verkleuring, vervormingen
en barsten worden veroorzaakt. Reinig de machine uitsluitend met een vochtige doek en een zachte borstel.
Reinig de machine niet met een tuinslang of
•
hogedrukreiniger.
Voer na elk gebruik het volgende onderhoud uit:
•
Controleer of alle borgschroeven goed vastzitten (draai
ze indien nodig aan).
•
Smeer metalen onderdelen om ze tegen corrosie te
beschermen.
•
Houd de ventilatieopeningen schoon en stofvrij.
Na verloop van tijd slijten de snijrol en het contrames.
Vraag indien nodig het dichtstbijzijnde erkende onder
houdscentrum om een vervanging.
-
41
Page 18

PROBLEMEN OPLOSSEN
WAARSCHUWING: schakel de machine uit, haal de stekker uit het stopcontact en wacht totdat de machine volledig
tot stilstand is gekomen voordat u problemen gaat oplossen.
Probleem Mogelijke oorzaak Oplossing
Motor start niet Geen stroom Controleer de netspanning.
Laat de machine bij een erkend onderhoudscentrum
controleren.
Wacht totdat de machine afgekoeld is en druk op de
groene knop.
Controleer en vergrendel de opvangbak.
Schakel de machine uit.
Zet de schakelaar voor vooruit/achteruit in de stand
achteruit.
Zet de machine aan totdat de blokkade is verwijderd. Zet
de machine weer uit.
Zet de schakelaar weer in de stand vooruit.
Breng de machine naar een erkend onderhoudscentrum
ter reparatie.
Schakel de machine uit en zet de keuzeschakelaar voor
de draairichting in de andere stand.
Schakel de machine uit. Zet de schakelaar voor vooruit/
achteruit in de stand achteruit. Zet de machine aan om het
te versnipperen materiaal los te laten komen en verwijder
ongewenst materiaal.
Schakel de machine weer uit.
Zet de schakelaar weer in de stand vooruit.
Stel het vastgezette contrames af zoals beschreven onder
“De speling van het mes aanpassen”.
Als de snijrol erg versleten is, dient u deze te vervangen.
Stel het contrames af.
Controleer of de verlengkabel ten minste 1,5 mm
maximaal 25 m lang. Als u een langere kabel gebruikt, is
de minimale doorsnede 2,5 mm
2
.
2
is en
Motor maakt geluid, maar
start niet
Te versnipperen materiaal
wordt niet in de versnipperaar
getrokken
Te versnipperen materiaal
wordt niet goed versnipperd
Machine start, maar raakt al
bij een kleine lading geblok
keerd en de motorbeveiligingsschakelaar schakelt de
motor te snel uit.
Netsnoer defect
Overbelastingsbeveiliging is geactiveerd
Veiligheidsschakelaar van de opvangbak
(opvangbak is ontgrendeld)
Snijrol is geblokkeerd
Condensatorstoring
De snijrol draait achteruit.
Te versnipperen materiaal zit vast in
vultrechter
Te versnipperen materiaal te zacht of nat Duw het omlaag met een tak
Snijrol versleten
Vastgezet contrames is niet goed
afgesteld
Verlengkabel is te lang of heeft een te
kleine doorsnede.
Het stopcontact bevindt zich te ver van
de netspanning of de netspanningskabel
heeft een te kleine doorsnede.
42
Page 19

Alleen voor Europese landen
EG-Verklaring van Conformiteit
Wij, Makita Corporation, als de verantwoordelijke
fabrikant, verklaren dat de volgende Makitamachine(s):
Aanduiding machine:
Elektrische versnipperaar
Modelnr./type: UD2500
Specicaties: zie de tabel “Technische gegevens”.
deel uitmaakt/uitmaken van een serieproductie en
voldoet/voldoen aan de volgende Europese
richtlijnen:
2000/14/EG, gewijzigd door 2005/88/EG, 2006/42/
EG, 2004/108/EG
en is/zijn gefabriceerd in overeenstemming met de volgende normen of genormaliseerde documenten:
EN60335-1, EN13683
De technische documentatie wordt bijgehouden door:
Makita International Europe Ltd.
Technische afdeling,
Michigan Drive, Tongwell,
Milton Keynes, Bucks MK15 8JD, Engeland
De conformiteitsevaluatieprocedure die vereist is volgens
Richtlijn 2000/14/EG, was in overeenstemming met
bijlage V.
Gemeten geluidssterkteniveau: 93,49 dB (A),
K= 3,97 dB (A)
Gegarandeerd geluidssterkteniveau: 97 dB (A)
28.12.2012
Tomoyasu Kato
Directeur
Makita Corporation
3-11-8, Sumiyoshi-cho,
Anjo, Aichi, 446-8502, JAPAN
43
Page 20

UD2500-23L-1012
IDE
Makita Corporation
3-11-8, Sumiyoshi-cho,
Anjo, Aichi 446-8502 Japan
www.makita.com
 Loading...