

Page 1
SK102
INSTRUCTION MANUAL
WARNING:
For your personal safety, READ and UNDERSTAND before using.
SAVE THESE INSTRUCTIONS FOR FUTURE REFERENCE.
Self leveling alignment tool
SK102
Page 2
3
67
5
4
SK102
8
9
21
Page 3
Page 4

Page 5
1.5 m
Page 6

D
EN
F
I
E
P
NL
FIN
PL
SK
HR
SR
RUS
BG
RO
Page 7

Page 8
Gebrauchsanweisung
Deutsch
Herzlichen Glückwunsch zum Kauf Ihres
Makita SK102.
Die Sicherheitshinweise finden Sie
im Anschluss an die Gebrauchsanweisung. Die Sicherheitshinweise
sowie die Gebrauchsanweisung
sollten vor der ersten Inbetriebnahme aufmerksam
durchgelesen werden.
Hinweis: Die erste und die letzte Seite der
Gebrauchsanweisung enthalten Skizzen. Diese Seiten
sollten während des Lesens ausgeklappt werden. Die
Buchstaben und Nummern in {} beziehen sich immer
auf die Skizzen.
Inhalt
Inbetriebnahme...................................................1
Bedienung............................................................ 1
Technische Daten ............................................... 5
Sicherheitshinweise............................................ 5
Inbetriebnahme
Batterien einsetzen/ersetzen
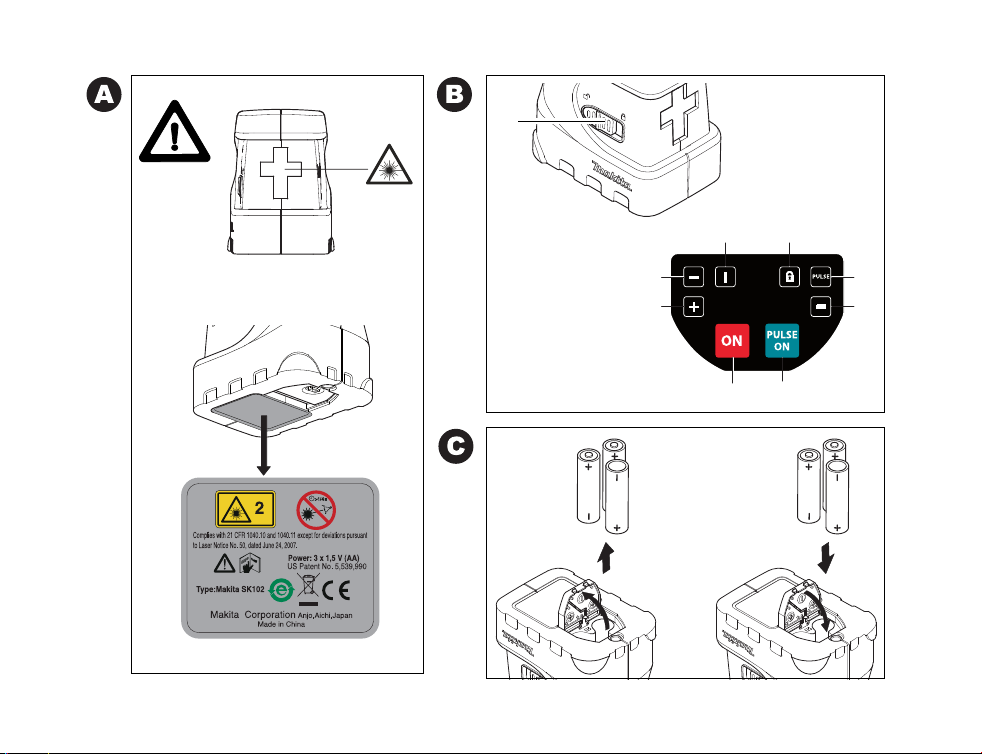
Siehe Skizze {C} - Schieben Sie den Verriegelungsknopf nach vorne um das Batteriefach zu entriegeln.
Öffnen Sie den Batteriefachdeckel und setzen Sie die
Batterien polrichtig ein. Drücken Sie dann den Batteriefachdeckel zurück bis er einrastet.
Das Batteriesymbol {B, 9} leuchtet, wenn die Batteriespannung zu niedrig ist. Ersetzen Sie die Batterien
möglichst rasch.
• Batterien polrichtig einsetzen
• Nur Alkaline Batterien verwenden
• Batterien herausnehmen, wenn das Gerät über
längere Zeit nicht verwendet wird (Korrosionsgefahr)
Bedienung
Tastatur- und Bedienelemente
Siehe Skizze {B }:
1 Taste LASER ON/OFF (Ein/Aus)
2 Taste PULSE/ENERGIESPARMODUS
3 Lockschalter
D
EN
F
I
E
P
NL
FIN
PL
SK
HR
SR
RUS
BG
RO
Makita SK102
1
Inbetriebnahme
Page 9
D
Anzeige
EN
Siehe Skizze {B}
4 Laserkreuz
F
5 Laserlinie horizontal
I
6 Laserlinie vertikal
E
7Lock EIN
P
8 Pulse/Energiersparmodus EIN
9 Batteriespannung zu niedrig
NL
FIN
Ein-/Ausschalten
PL
EIN: Drücken Sie die ON - Taste {B, 1} kurz.
SK
AUS: Drücken Sie die OFF - Taste {B, 1} länger.
HR
SR
Laser Funktion
RUS
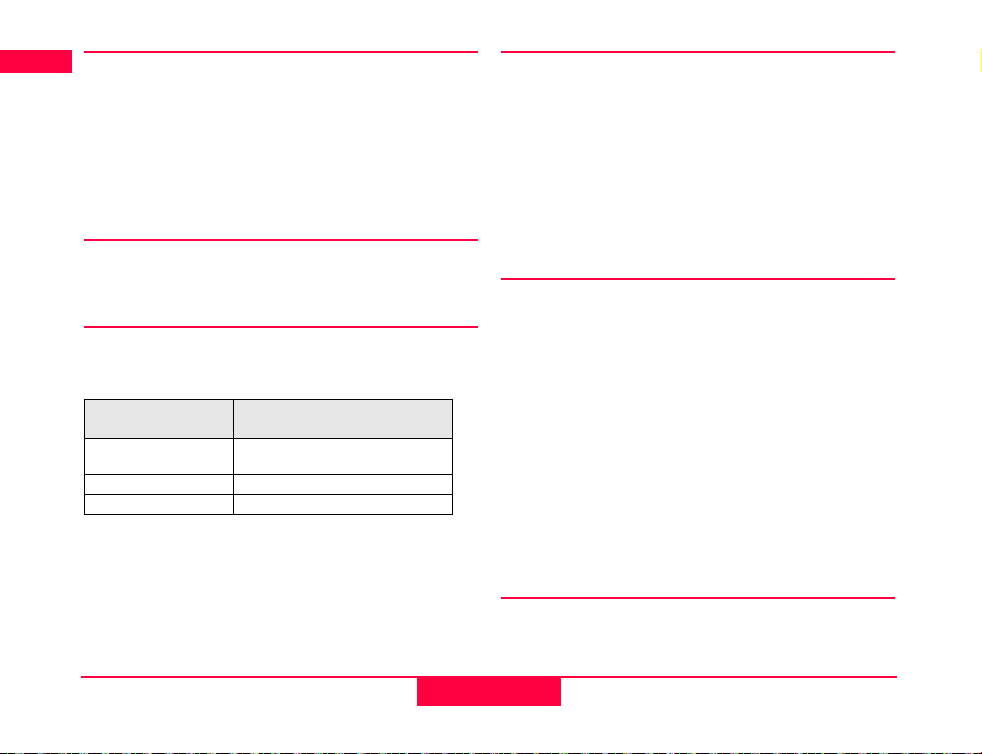
Durch Drücken der ON-Taste {B, 1} werden folgende
Laserfunktionen aktiviert:
BG
ON - Taste {B, 1}
RO
drücken
1 x
2 x
3 x
Durch weiteres Drücken der ON-Taste {B, 1} werden
die vorhergehenden Funktionszustände wiederholt.
Laserkreuz (horizontale und
vertikale Laserlinie)
horizontale Laserlinie
vertikale Laserlinie
aktiviert
Bedienung
Selbstnivellierung und
Lock-Funktion
Das Instrument nivelliert sich im angegebenen
Neigungsbereich (siehe "Technische Daten") automatisch .
Zum Transport und um das Instrument über den
Selbstnivellierbereich hinaus neigen zu können, muss
der Lockschalter {B, 3} betätigt werden. Im gelockten
Zustand ist das Pendel festgesetzt und die Selbstnivellierfunktion ist außer Kraft gesetzt.
Pulse/Powermodus
Das Instrument ist mit einem Powermodus ausgestattet. Beim einschalten ist der Powermodus aktiviert und die Laserlinien sind besonders hell sichtbar.
Wird die besonders gute Sichtbarkeit der Laserlinien
nicht benötigt und soll zusätzlich Energie gespart
werden, kann man den Pulse-Modus durch drücken
der Pulse-Taste {B, 2} aktivieren.
Um die Laserlinien auch noch in weiteren Entfernungen (> 20 m) oder in ungünstigen Lichtverhältnissen wahrnehmen zu können, kann ein Laserdetektor
eingesetzt werden. Der Laserstrahl im Pulse-Modus
wird vom Detektor auch noch in grosser Entfernung
wahrgenommen.
(Laserdetektor siehe Zubehör)
Anwendungen
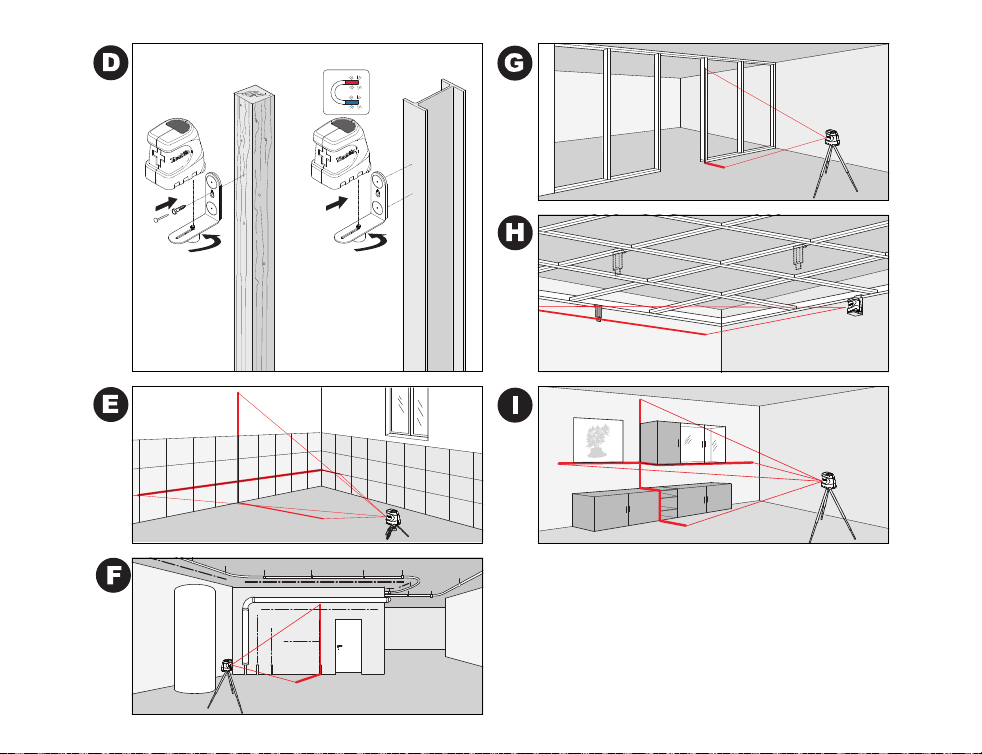
Anwendungsbeispiele finden Sie auf der hinteren
Umschlagseite dieser Gebrauchsanweisung.
2
Makita SK102
Page 10

Überprüfung der Genauigkeit des
Makita SK102
Überprüfen Sie die Genauigkeit Ihres Makita
)
SK102 regelmässig und besonders vor wichtigen
Nivellieraufgaben.
Überprüfung der Nivelliergenauigkeit
Siehe Skizze {J + K}.
Instrument auf einem Stativ mittig zwischen zwei
Wände (A+B) stellen, deren Abstand ca. 5 m beträgt.
Lockschalter {B, 3} auf die Stellung "Unlocked" ( )
stellen.
Instrument auf Wand A richten und Instrument mit
der Taste Laser ON {B, 1} einschalten. Laserkreuz
mit der Taste Laser ON {B, 1} aktivieren und Lage
des Laserkreuzungspunktes auf der Wand A (-> A1)
markieren.
Instrument um 180° drehen und den Laserkreuzungspunkt auf der Wand B (-> B1) markieren.
Anschliessend Instrument auf gleicher Höhe
möglichst nahe zur Wand A platzieren und erneut den
Laserkreuzungspunkt auf Wand A (-> A2) markieren.
Instrument wieder um 180° drehen und Laserkreuzungspunkt auf Wand B (-> B2) markieren. Abstände
der markierten Punkte A1-A2 und B1-B2 messen.
Differenz der beiden Messungen ermitteln. Wenn die
Differenz 2 mm nicht überschreitet, befindet sich der
Makita SK102 innerhalb der Toleranz.
| (A1 - A2) - (B1 - B2) | ≤ 2 mm
Überprüfung der Genauigkeit der
horizontalen Linie
Siehe Skizze {L}.
Lockschalter {B, 3} auf die Stellung "Unlocked" ( )
stellen.
Instrument im Abstand von ca. 5 m von der Wand
platzieren. Instrument auf die Wand richten und mit
der Taste Laser ON {B, 1} einschalten. Beide Laserlinien mit der Taste Laser ON {B, 1} aktivieren und
Laserkreuzungspunkt auf der Wand markieren.
Instrument nach rechts und anschliessend nach links
schwenken. Dabei die vertikale Abweichung der horizontalen Linie von der Markierung beobachten. Wenn
die Abweichung 3 mm nicht überschreitet, befindet
sich der Makita SK102 innerhalb der Toleranz.
Überprüfung der Genauigkeit der vertikalen
Linie:
Siehe Skizze {M}.
Lockschalter {B, 3} auf die Stellung "Unlocked" ( )
stellen.
Als Referenz ein Schnurlot verwenden und möglichst
nahe an einer ca. 3 m hohen Wand befestigen.
Instrument im Abstand von ca. 1,5 m von der Wand in
einer Höhe von ca. 1,5 m platzieren. Instrument auf
die Wand richten und mit der Taste Laser ON {B, 1}
einschalten. Vertikale Laserlinie mit der Taste Laser
ON {B, 1} aktivieren. Instrument drehen, bis sich die
vertikale Laserlinie knapp über dem Boden auf der
Lotschnur befindet. Nun die maximale Abweichung
der Laserlinie zum Schnurlot über die gesamte Linien-
D
EN
F
I
E
P
NL
FIN
PL
SK
HR
SR
RUS
BG
RO
Makita SK102
3
Bedienung
Page 11
länge bestimmen. Wenn die Abweichung 2 mm nicht
D
überschreitet, befindet sich der Makita SK102 inner-
EN
halb der Toleranz.
F
I
E
P
NL
FIN
PL
SK
HR
SR
RUS
BG
RO
Befindet sich Ihr Makita SK102 ausserhalb der
)
angegebenen Toleranzen, wenden Sie sich bitte an
einen authorisiterten Fachhändler.
Anzeigehinweise
Unter- oder Überschreitung des zulässigen
Temperaturbereichs:
Laser schaltet ab und die Symbole (−) und (+)
blinken.
Ausserhalb des Selbstnivellierbereichs:
Der Laser schaltet ab und das Symbol der benutzten
Funktion blinkt.
Pendel gelockt:
Der Laserstrahl wird nicht nivelliert und das LockSymbol {B, 7} leuchtet.
Pflege und Hinweise zum Betrieb
Tauchen Sie das Gerät nicht ins Wasser. Wischen Sie
Schmutz mit einem weichen feuchten Tuch ab.
Verwenden Sie keine aggressiven Reinigungs- oder
Lösungsmittel. Behandeln Sie das Gerät mit gleicher
Vorsicht wie ein Fernglas oder eine Kamera.
Durch heftige Erschütterungen oder einen Sturz kann
das Gerät beschädigt werden. Überprüfen Sie vor in
Betriebnahme das Gerät auf eventuelle Beschädigungen. Überprüfen Sie regelmässig die Nivelliergenauigkeit ihres Gerätes.
Transport
Zum sicheren Transport des Instrumentes stellen Sie
den Lockschalter {B, 3} auf "Locked" ( ).
Bedienung
4
Makita SK102
Page 12

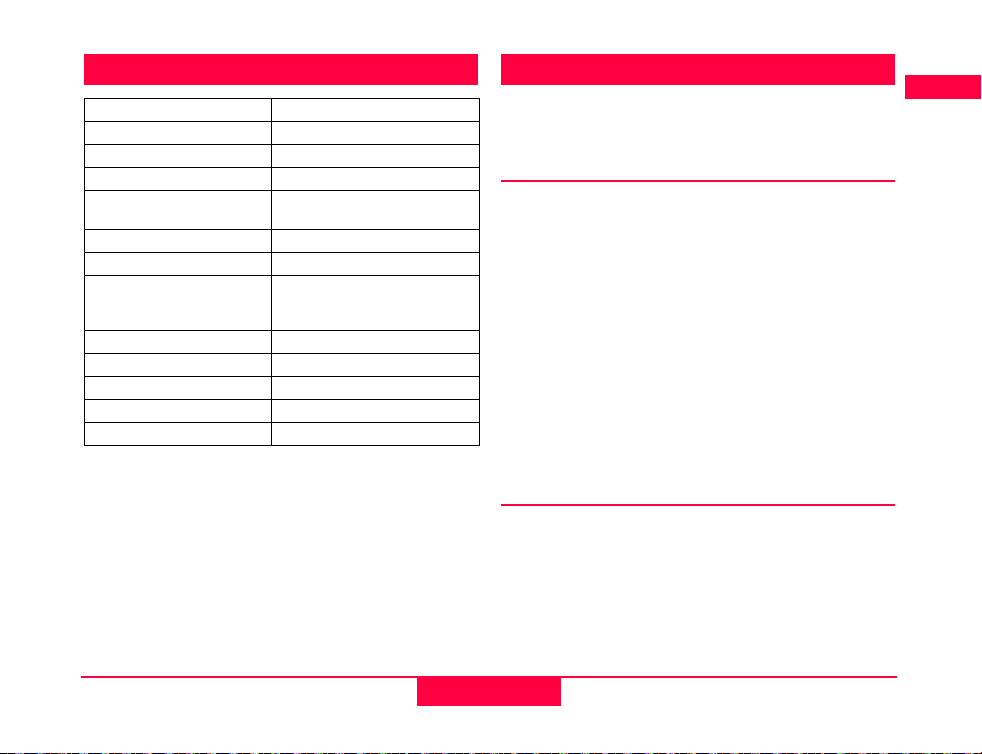
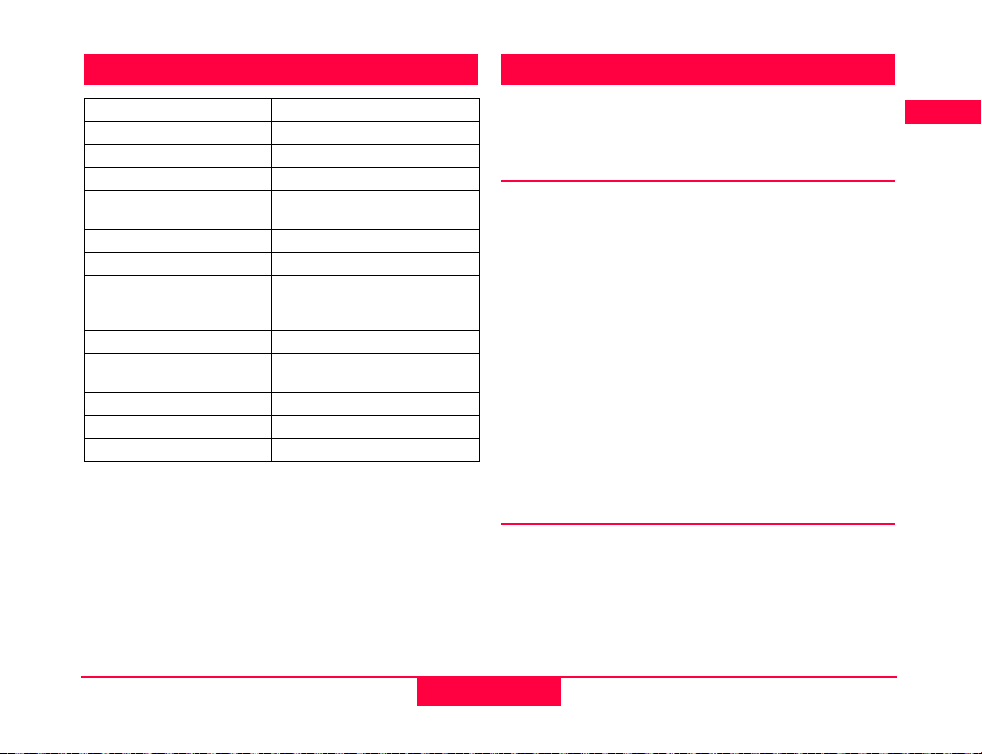
Technische Daten
Reichweite min. 30 m mit Detektor
Nivelliergenauigkeit ± 3 mm @ 10 m
Neigungsbereich 4 ° ± 0.5
Horizontale Genauigkeit ± 1 mm @ 5m
Vertikale Genauigkeit ± 0.75 mm @ 3m Linien-
Lasertyp 635 nm, Laserklasse II
Batterietyp AA, 3 x 1.5 V
Schutz gegen Wasser
und Staub
Betriebstemperatur -10 °C bis 40 °C
Lagertemperatur -25 °C bis 70 °C
Dimension (L x B x H), 102 x 75 x 102 mm
Gewicht
(mit Batterien) 475 g
Stativschraube 1/4"
Änderungen (Skizzen, Beschreibungen und technische Daten) vorbehalten.
spritzwassergeschützt
länge
IP 54,
staubgeschützt,
Sicherheitshinweise
Der Betreiber hat sicherzustellen, dass alle Benutzer
diese Hinweise verstehen und befolgen.
Verwendete Symbole
Die verwendeten Symbole haben folgende Bedeutung:
WARNUNG:
Gebrauchsgefahr oder sachwidrige Verwendung, die schwere Personenschäden oder den Tod
bewirken kann.
VORSICHT:
Gebrauchsgefahr oder sachwidrige Verwendung, die geringe Personenschäden, aber erhebliche
Sach-, Vermögens- oder Umweltschäden bewirken
kann.
Nutzungsinformation, die dem Benutzer hilft,
)
das Produkt technisch richtig und effizient einzusetzen.
Bestimmungsgemässe Verwendung
• Projizieren einer vertikalen Laserlinie
• Projizieren einer horizontalen Laserlinie
• Projizieren einer vertikalen und gleichzeitig einer
horizontalen Laserlinie (Laserkreuz)
D
EN
F
I
E
P
NL
FIN
PL
SK
HR
SR
RUS
BG
RO
Makita SK102
5
Technische Daten
Page 13

D
Sachwidrige Verwendung
EN
• Verwendung des Produktes ohne Instruktion
F
• Verwendung ausserhalb der Einsatzgrenzen
• Unwirksammachen von Sicherheitseinrichtungen
I
E
P
NL
FIN
PL
SK
HR
SR
RUS
BG
RO
und Entfernen von Hinweis- und Warnschildern
• Öffnen des Produktes mit Werkzeugen (Schraubenzieher etc.)
• Durchführung von Umbauten oder Veränderungen am Produkt
• Absichtliche Blendung Dritter; auch bei Dunkelheit
• Ungenügende Absicherung des Einsatzortes
Einsatzgrenzen
Siehe Kapitel "Technische Daten".
)
Der Makita SK102 ist für den Einsatz in dauernd für
Menschen bewohnbarer Atmosphäre geeignet, das
Produkt darf nicht in explosionsgefährdeter oder
aggressiver Umgebung eingesetzt werden.
Verantwortungsbereiche
Verantwortungsbereich des Herstellers der
Originalausrüstung Makita Corporation Anjo,
Aichi, 446-8502 Japan (kurz Makita):
Makita ist verantwortlich für die sicherheitstechnisch
einwandfreie Lieferung des Produktes inklusive
Gebrauchsanweisung.
Verantwortungsbereich des Herstellers von
Fremdzubehör:
Hersteller von Fremdzubehör für den
)
Makita SK102 sind verantwortlich für die Entwicklung,
Umsetzung und Kommunikation von Sicherheitskonzepten für ihre Produkte und deren Wirkung in
Kombination mit dem Makita Produkt.
Verantwortungsbereich des Betreibers:
WARNUNG
Der Betreiber ist verantwortlich für die bestimmungsgemässe Verwendung der Ausrüstung, den
Einsatz seiner Mitarbeiter, deren Instruktion und die
Betriebssicherheit der Ausrüstung.
Für den Betreiber gelten folgende Pflichten:
• Er versteht die Schutzinformationen auf dem
Produkt und die Instruktionen in der Gebrauchsanweisung.
• Er kennt die ortsüblichen, betrieblichen Unfallver-
hütungsvorschriften.
• Er benachrichtigt Makita, sobald am Produkt
Sicherheitsmängel auftreten.
Sicherheitshinweise
6
Makita SK102
Page 14
Gebrauchsgefahren
VORSICHT:
Vorsicht vor fehlerhaften Messungen beim
Verwenden eines defekten Produkts, nach einem
Sturz oder anderen unerlaubten Beanspruchungen
bzw. Veränderungen des Produkts.
Führen Sie periodisch Kontrollmessungen vor
)
und nach wichtigen Messaufgaben durch.
Siehe Abschnitt "Überprüfung der Genauigkeit des
Makita SK102".
WARNUNG:
Leere Batterien dürfen nicht über den Hausmüll
entsorgt werden. Geben Sie diese zur umweltgerechten Entsorgung bei entsprechenden Sammelstellen
gemäss nationaler oder lokaler Bestimmungen ab.
Das Produkt darf nicht im Hausmüll entsorgt
werden.
Entsorgen Sie das Produkt sachgemäss.
Befolgen Sie die nationalen, länderspezifi-
schen Entsorgungsvorschriften.
Schützen Sie das Produkt jederzeit vor dem
Zugriff unberechtigter Personen.
Änderungen (Skizzen, Beschreibungen und technische Daten) vorbehalten.
Elektromagnetische Verträglichkeit
(EMV)
WARNUNG:
Der Makita SK102 erfüllt die strengen Anforderungen der einschlägigen Richtlinien und Normen.
Trotzdem kann die Möglichkeit einer Störung anderer
Geräte nicht gänzlich ausgeschlossen werden.
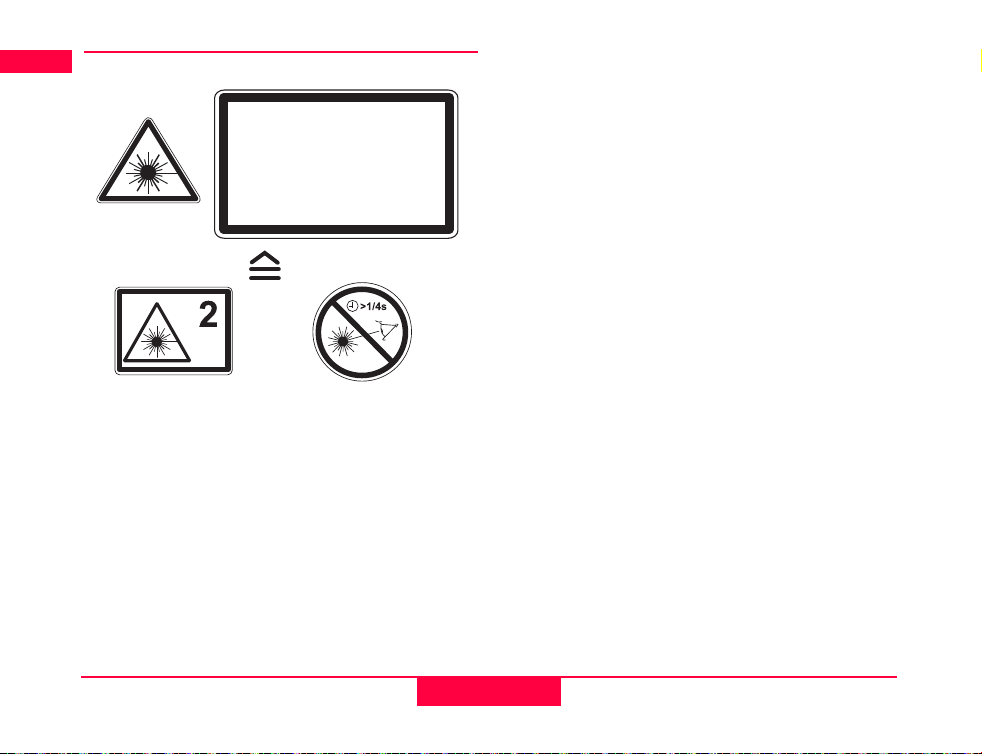
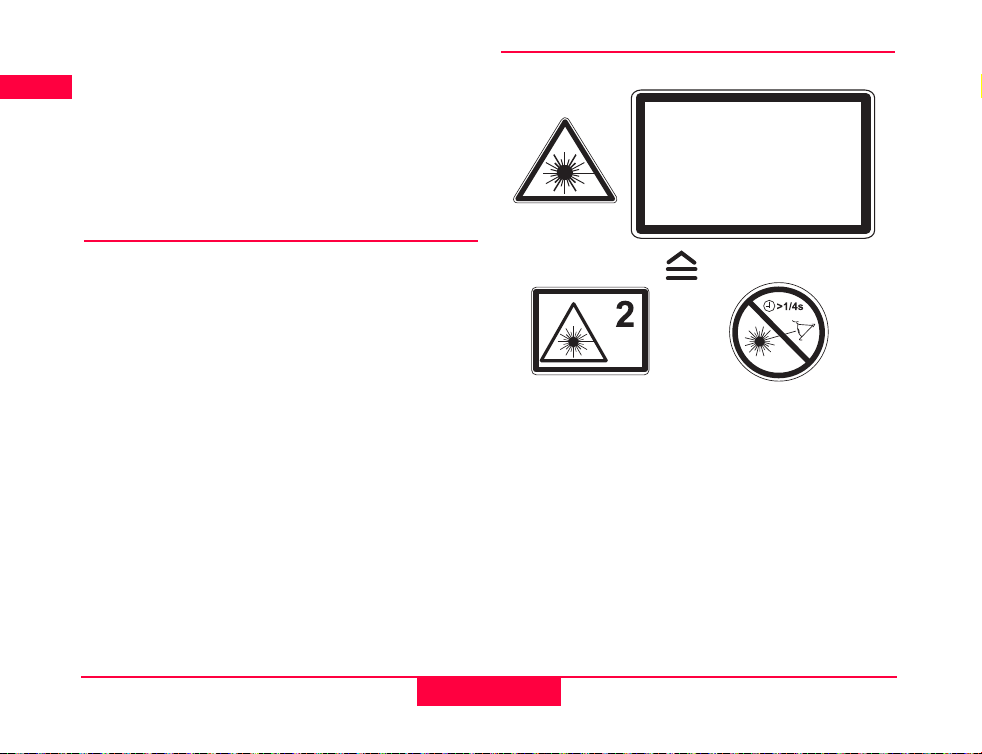
Laserklassifizierung
Der Makita SK102 erzeugt einen sichtbaren Laserstrahl, der auf der Gerätevorderseite austritt.
Das Produkt entspricht der Laserklasse 2 gemäss:
• IEC60825-1 : 2007 "Sicherheit von Lasereinrich-
tungen"
Laserklasse 2/ II Produkte:
Blicken Sie nicht in den Laserstrahl und richten Sie ihn
nicht unnötig auf andere Personen. Der Schutz des
Auges wird üblicherweise durch Abwendungsreaktionen einschliesslich des Lidschlussreflexes bewirkt.
WARNUNG:
Direkter Blick in den Laserstrahl mit optischen
Hilfsmitteln (wie z.B. Ferngläser, Fernrohre) kann
gefährlich sein.
VORSICHT:
Der Blick in den Laserstrahl kann für das Auge
gefährlich sein.
D
EN
F
I
E
P
NL
FIN
PL
SK
HR
SR
RUS
BG
RO
Makita SK102
7
Sicherheitshinweise
Page 15
D
Laserstrahlung
Nicht in den Strahl blicken
Laserklasse 2
nach IEC 60825-1:2007
Max. Ausgangsleistung: <4.2mW
Wellenlänge: 620-690nm
Strahldivergenz 120°
Beschilderung
EN
F
I
E
P
NL
FIN
PL
SK
HR
SR
RUS
BG
Position des Typenschildes siehe Umschlagseite!
RO
Sicherheitshinweise
8
Makita SK102
Page 16
User Manual
English
Congratulations on your purchase of the
Makita SK102.
The safety instructions follow the
section on how to operate the
instrument. Before starting up the
instrument for the first time, please
read through the entire User Manual paying special
attention to the section Safety Instructions .
Notice: There are drawings on the first and last page
of the User Manual. Unfold these pages while reading
through the User Manual. The letters and numbers in
{} always refer to these drawings.
Contents
Start up................................................................ 1
Operation.............................................................1
Technical data .....................................................5
Safety instructions ............................................. 5
Start up
Inserting / replacing batteries
Refer to drawing {C} - slide the locking button
forward to unlatch the battery compartment. Open
the battery compartment cover and insert the
batteries true to side. Press the battery cover back
down until the lock engages.
The battery symbol {B, 9} lights up when the battery
voltage is too low. Replace the battery as soon as
possible.
• Insert the batteries true to side
• Only use Alkaline batteries
• Remove the batteries if the instrument will not be
used for a long period of time (to prevent corrosion)
Operation
Keypad and control elements
Refer to drawing {B }:
1 LASER ON/OFF key
2 PULSE/POWERSAVE MODE key
3 Lock switch
D
EN
F
I
E
P
NL
FIN
PL
SK
HR
SR
RUS
BG
RO
Makita SK102
1
Start up
Page 17
D
Display
EN
Refer to drawing {B}
4 Laser crosshairs
F
5 Laser line horizontal
I
6 Laser line vertical
E
7Lock ON
P
8 Pulse/Powersave mode ON
9 Battery voltage too low
NL
FIN
Switching on/off
PL
ON: Briefly press the ON - key {B, 1}.
SK
OFF: Press and hold down the OFF- key {B, 1}.
HR
SR
Laser functions
RUS
Pressing the ON-key {B, 1} activates the following
laser functions:
BG
Pressing the ON -
RO
key {B, 1}
1 x
2 x
3 x
By pressing the ON-key {B, 1} again, the previous
function status is repeated.
laser crosshairs (horizontal
and vertical laser line)
horizontal laser line
vertical laser line
activates
Self leveling and Lock-functions
The instrument automatically levels itself within the
specified grade range (Refer to "Technical data") .
Press the Lock switch {B, 3} in order to transport and
tilt the instrument beyond the self-leveling range.
When locked, the pendulum is fixed and the selfleveling function is deactivated.
Pulse/Power mode
The instrument is equipped with a Power mode.
Switching on the instrument activates the Power
mode and the laser lines are bright and highly visible.
If the high visibility of the laser lines is not required
and if in addition energy should be saved, then
pressing the Pulse key {B, 2} activates the Pulse
mode.
To be able to detect the laser lines over long
distances (> 20 m) or in unfavorable lighting conditions, a laser detector can be used. In Pulse mode,
the laser beam is also recognized over large distances
by the detector.
(Laser detector refer to accessories)
Applications
Examples of applications can be found on the outside
of the back cover of this User Manual.
Operation
2
Makita SK102
Page 18
Checking the accuracy of the
Makita SK102
Check the accuracy of your Makita SK102
)
regularly and particularly before important leveling
jobs.
Checking the accuracy of the leveling
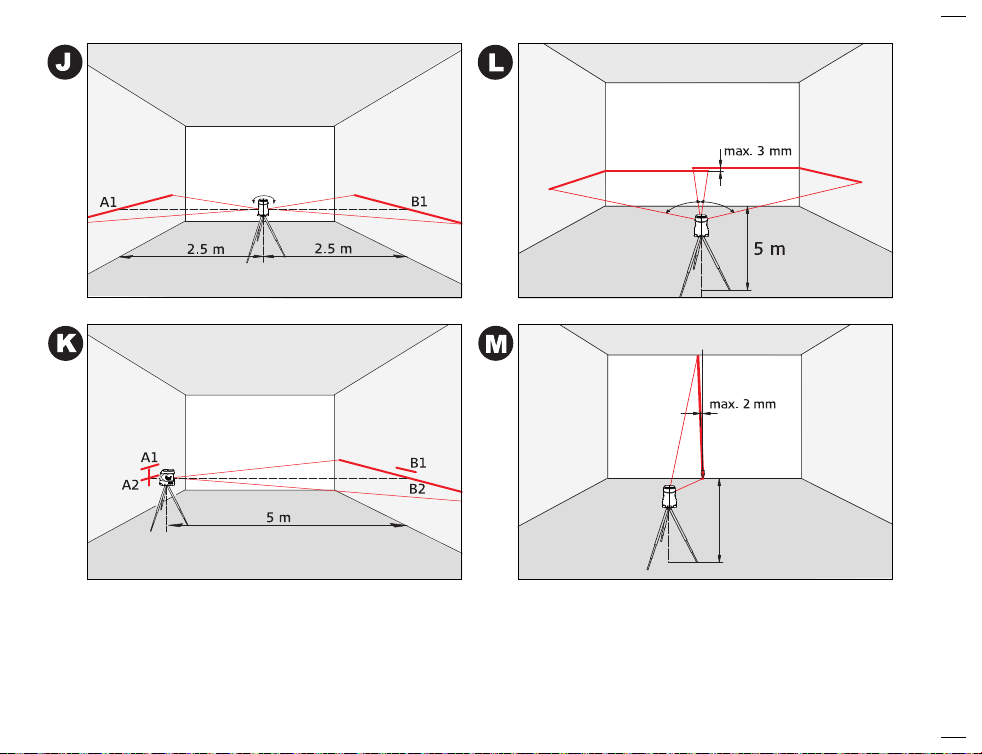
Refer to drawing {J + K}.
Set the instrument on a stand halfway between two
walls (A+B) that are approx. 5 m apart.
Set the Lock switch {B, 3} to the "Unlocked" ( )
position.
Point the instrument to wall A and switch the instrument on with the Laser ON {B, 1} key . Activate the
laser crosshairs with the Laser ON {B, 1} key and
mark the point of intersection of the laser crosshairs
on the wall A (-> A1).
Rotate the instrument by 180° and mark the point of
intersection of the laser crosshairs on wall B (-> B1).
Then place the instrument at the same elevation as
close as possible to wall A and again mark the point
of intersection of the laser crosshairs on wall A (->
A2). Rotate the instrument by 180° again and mark
the point of intersection of the laser crosshairs on
wall B (-> B1). Measure the distances of the marked
points A1-A2 and B1-B2. Calculate the difference of
the two measurements. If the difference does not
exceed 2 mm, then the Makita SK102 is within the
range of tolerance.
| (A1 - A2) - (B1 - B2) | ≤ 2 mm
Checking the accuracy of the horizontal line
Refer to drawing {L}.
Place the Lock switch {B, 3} in the "Unlocked" ( )
position.
Position the instrument approx. 5 m away from the
wall. Point the instrument at the wall and switch the
instrument on with the Laser ON {B, 1} key . Activate
both laser lines with the Laser ON {B, 1} key and
mark the point of intersection of the laser crosshairs
on the wall.
Swivel the instrument to the right and then to the
left. Observe the vertical deviation of the horizontal
line from the marking. If the deviation does not
exceed 3 mm, then the Makita SK102 is within the
range of tolerance.
Checking the accuracy of the vertical line:
Refer to drawing {M}.
Place the Lock switch {B, 3} in the "Unlocked" ( )
position.
As reference, use a plumb bob and mount it as close
as possible to an approx. 3 m high wall.
Position the instrument at a distance of approx.
1.5 m from the wall at an elevation of approx. 1.5 m.
Point the instrument at the wall and switch the
instrument on with the Laser ON {B, 1} key . Activate
the vertical laser line with the laser ON {B, 1} key.
Swivel the instrument until the vertical laser line is
slightly above the ground on the plumb-bob. Now
determine the maximum deviation of the laser line to
the plumb bob over the entire length of the line.
D
EN
F
I
E
P
NL
FIN
PL
SK
HR
SR
RUS
BG
RO
Makita SK102
3
Operation
Page 19
If the deviation does not exceed 2 mm, then the
D
Makita SK102 is within the range of tolerance.
EN
F
I
E
P
NL
FIN
PL
SK
HR
SR
RUS
BG
RO
Should your Makita SK102 be outside of the
)
specified tolerance, please contact an authorized
dealership.
Display notices
Falling below or exceeding the permissible
temperature range:
The laser switches off and the symbols (−) and (+)
start to flash.
Outside of the self-leveling range:
The laser switches off and the symbol of the function
used starts to flash.
Pendulum locked:
The laser beam is not levelled and the Lock symbol
{B, 7} lights up.
Care and operating notices
Do not immerse the instrument in water. Wipe off dirt
with a damp soft cloth. Do not use aggressive
cleaning agents or solutions. Treat the optical
surfaces with the same care that you would apply to
eyeglasses or a camera.
Severe vibrations or dropping the instrument may
damage it. Before starting it up, check the instrument
for possible damage. Regularly check the leveling
accuracy of your instrument.
Transport
To safely transport the instrument, set the Lock
switch {B, 3} to "Locked" ( ).
Operation
4
Makita SK102
Page 20
Technical data
Range min. 30 m with detector
Levelling accuracy ± 3 mm @ 10m
Inclination range 4 ° ± 0.5
Horizontal accuracy ± 1 mm @ 5m
Vertical accuracy ± 0.75 mm @ 3m line
Laser type 635 nm, laser class II
Battery type AA, 3 x 1.5 V
Water and dust
protected
Operating temperature -10 °C to 40 °C
Storage temperature -25 °C to 70 °C
Dimensions (L x W x H) 102 x 75 x 102 mm
Weight (with batteries) 475 g
Tripod thread 1/4"
All rights reserved for changes (on drawings, descriptions and technical data).
length
IP 54,
dust-protected,
spray water protected
Safety instructions
The person responsible for the instrument must
ensure that all users understand these directions and
adhere to them.
Symbols used
The symbols used have the following meanings
WARNING:
Indicates a potentially hazardous situation or
an unintended use which, if not avoided, will result in
death or serious injury.
CAUTION:
Indicates a potentially hazardous situation or
an unintended use which,if not avoided, may result in
minor injury and/or appreciable material, financial
and enviromental damage.
Important paragraphs which must be adhered
)
to in practice as they enabled the product to be used
in a technically correct and efficient manner.
Permitted use
• Projecting a vertical laser line
• Projecting a horizontal laser line
• Projecting a vertical and a horizontal laser line
simultaneously (laser crosshairs)
D
EN
F
I
E
P
NL
FIN
PL
SK
HR
SR
RUS
BG
RO
Makita SK102
5
Technical data
Page 21

D
Prohibited use
EN
• Using the product without instruction
F
• Using outside the stated limits
• Deactivation of safety systems and removal of
I
E
P
NL
FIN
PL
SK
HR
SR
RUS
BG
RO
explanatory and hazard labels
• Opening of the equipment by using tools (screwdrivers, etc.), as far as not specifically permitted
for certain cases
• Carrying out modification or conversion of the
product
• Deliberate dazzling of third parties; also in the
dark
• Inadequate safeguards at the surveying site.
Limits of use
Refer to section "Technical data".
)
The Makita SK102 is designed for use in areas permanently habitable by humans, do not use the product
in explosion hazardous areas or in aggressive environments.
Responsibilities
Responsibilities of the manufacturer of the
original equipment Makita Corporation Anjo,
Aichi 446-8502, Japan:
Makita is responsible for supplying the product, including the User Manual and original accessories, in a
completely safe condition.
Safety instructions
Responsibilities of the manufacturer of nonMakita accessories:
The manufacturers of non-Makita accessories for the
Makita SK102 are responsible for developing, implementing and communicating safety concepts for their
products. They are also responsible for the effectiveness of these safety concepts in combination
with the Makita equipment.
Responsibilities of the person in charge of the
instrument:
WARNING
The person responsible for the instrument
must ensure that the equipment is used in accordance with the instructions. This person is also
accountable for the deployment of personnel and for
their training and for the safety of the equipment
when in use.The person in charge of the product has
the following duties:
• To understand the safety instructions on the
product and the instructions in the user manual.
• To be familiar with local safety regulations rela-
ting to accident prevention.
• To inform Makita immediately if the equipment
becomes unsafe.
Hazards in use
CAUTION:
Watch out for erroneous distance measurements if the instrument is defective or if it has been
dropped or has been misused or modified.
6
Makita SK102
Page 22
Carry out periodic test measurements. Partic-
)
ularly after the instrument has been subject to
abnormal use, and before, during and after important
measurements.
Refer to section "Checking the accuracy of the Makita
SK102".
WARNING:
Flat batteries must not be disposed of with
household waste.Care for the environment and take
them to the collection points provided in accordance
with national or local regulations.
The product must not be disposed of with
the household waste.
Dispose of the product appropriately in
accordance with the national regulations in
force in your country.
Always prevent access to the product by
unauthorized personnel.
regulations.
All right reserved for changes (drawings, descriptions
and technical specifications).
Adhere to the national and country specific
Electromagnetic Compatibility
(EMC)
WARNING:
The Makita SK102 conforms to the most stringent requirements of the relevant standards and
regulations. Yet, the possibility of it causing interference in other devices cannot be totally excluded.
FCC statement (applic. in U.S.)
This equipment has been tested and found to comply
with the limits for a Class B digital device, pursuant to
part 15 of the FCC Rules. These limits are designed to
provide reasonable protection against harmful interference in a residential installation.
This equipment generates, uses and can radiate radio
frequency energy and, if not installed and used in
accordance with the instructions, may cause harmful
interference to radio communications.
However, there is no guarantee that interference will
not occur in a particular installation.
If this equipment does cause harmful interference to
radio or television reception, which can be determined by turning the equipment off and on, the user
is encouraged to try to correct the interference by
one or more of the following measures:
• Reorient or relocate the receiving antenna.
• Increase the separation between the equipment
and receiver.
D
EN
F
I
E
P
NL
FIN
PL
SK
HR
SR
RUS
BG
RO
Makita SK102
7
Safety instructions
Page 23
• Connect the equipment into an outlet on a circuit
Laser Radiation
Do not stare into the beam
Laser class 2
nach IEC 60825-1:2007
Maximum radiation power : <4.2mW
Emitted wavelength: 620-690nm
Beam divergence 120°
D
EN
F
I
E
P
NL
FIN
PL
SK
HR
SR
RUS
BG
RO
different from that to which the receiver is
connected.
• Consult the dealer or an experienced radio/TV
technician for help
WARNING:
Changes or modifications not expressly
approved by Makita for compliance could void the
user’s authority to operate the equipment.
Laser classification
The Makita SK102 produces a visible laser beam
which emerges from the front of the instrument.
It is a Class 2 laser product in accordance with:
• IEC60825-1 : 2007 "Radiation safety of laser
products"
Laser Class 2/ II products:
Do not stare into the laser beam or direct it towards
other people unneccesarily. Eye protection is
normally afforded by aversion responses including
the blink reflex.
WARNING:
Looking directly into the beam with optical aids
(e.g. binoculars, telescopes) can be hazardous.
to the eyes.
CAUTION:
Looking into the laser beam may be hazardous
Labelling
Position of the product label see last page!
Safety instructions
8
Makita SK102
Page 24

Manuel d'utilisation
Française
Nous vous félicitons pour l'achat de ce Makita SK102.
Vous trouverez les consignes de
sécurité à la fin du mode d'emploi.
Veuillez lire attentivement les consignes de sécurité et le mode
d'emploi avant la première mise en service du produit.
Remarque : les première et dernière pages du mode
d'emploi contiennent des illustrations du produit. Ces
pages devraient être dépliées pendant la lecture. Les
lettres et numéros entre {} se réfèrent toujours aux
illustrations.
Sommaire
Mise en service.................................................... 1
Utilisation.............................................................1
Caractéristiques techniques .............................. 5
Consignes de sécurité ........................................ 5
Mise en service
Insertion/Remplacement des piles
Voir l'illustration {C} - pousser le bouton de
verrouillage vers l'avant pour déverrouiller le compartiment à piles. Ouvrir ce compartiment et insérer les
piles en respectant la polarité. Repousser ensuite le
couvercle du compartiment jusqu'à ce qu'il
s'enclenche.
L'icône pile {B, 9} est allumée quand la charge des
piles est trop faible. Dans ce cas remplacer les piles le
plus rapidement possible.
• Respecter la polarité lors de l'insertion des piles
• N'utiliser que des piles alcalines
• Retirer les piles s'il est prévu de ne pas utiliser
l'instrument pendant une période prolongée
(risque de corrosion)
Utilisation
Eléments du clavier et éléments de
commande
Voir illustration {B }:
1 Touche LASER ON/OFF (Marche/Arrêt)
2 Touche MODE PULSE/ECONOMIE D'ENERGIE
3 Interrupteur de verrouillage
D
EN
F
I
E
P
NL
FIN
PL
SK
HR
SR
RUS
BG
RO
Makita SK102
1
Mise en service
Page 25
D
Affichage
EN
Voir illustration {B }:
4Laser en croix
F
5 Ligne laser horizontale
I
6Ligne laser verticale
E
7 Verrouillage ON
P
8 Mode pulse/économie d'énergie ON
9 Indicateur / Charge de pile trop faible
NL
FIN
Mise sous/hors tension
PL
ON : Presser brièvement la touche ON {B, 1}.
SK
OFF : Presser longuement la touche OFF {B, 1}.
HR
SR
Fonction laser
RUS
Une pression de la touche ON {B, 1} active les fonctions laser suivantes :
BG
Le fait de presser
RO
la touche ON {B, 1}
1 fois
2 fois
3 fois
Une autre pression de la touche ON {B, 1} active les
états opératoires précédents.
la laser en croix (ligne laser
horizontale ou verticale)
la ligne laser horizontale
la ligne laser verticale
active
Calage automatique et fonction de
verrouillage
L'instrument effectue un calage automatique dans la
plage d'inclinaison indiquée (voir "Caractéristiques
techniques").
Pour transporter l'instrument et pouvoir l'incliner audelà de la plage de calage automatique, il faut
actionner l'interrupteur de verrouillage {B, 3}.
Lorsqu'il est verrouillé, le pendule est immobile et la
fonction de calage automatique est désactivée.
Mode pulse/Power
L'instrument intègre un mode Power. A la mise sous
tension, le mode Power est activé et les lignes laser
sont particulièrement lumineuses.
S'il n'est pas nécessaire de disposer d'une visibilité
particulièrement bonne des lignes laser et si l'on
souhaite économiser de l'énergie, on peut activer le
mode Pulse en appuyant sur la touche Pulse {B, 2}.
Il est possible d'utiliser un détecteur laser pour repérer les lignes laser à de plus longues distances (> 20
m) ou dans des conditions de luminosité défavorables. Le détecteur laser capte un faisceau laser pulse
même sur de grandes distances.
(détecteur laser, voir Accessoires)
Applications
Des exemples d'application se trouvent sur la page
arrière dépliante de ce manuel d'utilisation.
Utilisation
2
Makita SK102
Page 26
Contrôle de la précision du Makita
SK102
Vérifier la précision du Makita SK102 à des
)
intervalles réguliers et notamment avant des travaux
de nivellement importants.
Contrôle de la précision de nivellement
Voir illustration {J + K}.
Placer l'instrument fixé sur un trépied à distance
égale de deux murs (A+B) séparés d'env. 5 m.
Régler l'interrupteur de verrouillage {B, 3} sur
"Déverrouillé" ( ).
Orienter l'instrument vers le mur A et l'allumer en
pressant la touche Laser ON {B, 1}. Activer la laser
en croix avec la touche Laser ON {B, 1} et marquer la
position du point d'intersection laser sur le mur A (->
A1).
Tourner l'instrument de 180° et marquer le point
d'intersection laser sur le mur B (-> B1).
Placer ensuite l'instrument à la même hauteur près du
mur A et marquer de nouveau le point d'intersection
laser sur le mur A (-> A2). Tourner de nouveau
l'instrument de 180° et marquer le point d'intersection laser sur le mur B (-> B2). Mesurer les distances
des points marqués A1-A2 et B1-B2. Déterminer la
différence des deux mesures. Si elle n'excède pas
2 mm, le Makita SK102 se trouve dans la plage de
tolérance.
| (A1 - A2) - (B1 - B2) | ≤ 2 mm
Contrôle de la précision de la ligne
horizontale
Voir illustration {L}.
Régler l'interrupteur de verrouillage {B, 3} sur
"Déverrouillé" ( ).
Placer l'instrument à une distance d'env. 5 m du mur.
Orienter l'instrument vers le mur et l'allumer en pres-
sant la touche Laser ON {B, 1}. Activer les deux
lignes laser avec la touche Laser ON {B, 1} et
marquer le point d'intersection laser sur le mur.
Tourner l'instrument à droite, puis le pivoter à
gauche. Observer ce faisant l'écart vertical de la ligne
horizontale de la marque. Si l'écart ne dépasse pas
3 mm, le Makita SK102 se trouve dans la plage de
tolérance.
Contrôle de la précision de la ligne verticale
Voir illustration {M}.
Régler l'interrupteur de verrouillage {B, 3} sur
"Déverrouillé" ( ).
Utiliser comme référence un fil à plomb que l'on fixera
le plus près possible d'un mur d'une hauteur approximative de 3 m.
Placer l'instrument à une distance de 1,5 m du mur à
une hauteur d'environ 1,5 m. Orienter l'instrument
vers le mur et l'allumer en pressant la touche Laser
ON {B, 1}. Activer la ligne laser verticale avec la
touche Laser ON {B, 1}. Tourner l'instrument jusqu'à
ce que la ligne laser verticale se trouve légèrement
au-dessus du sol sur le fil à plomb. Déterminer maintenant l'écart maximal de la ligne laser par rapport au
D
EN
F
I
E
P
NL
FIN
PL
SK
HR
SR
RUS
BG
RO
Makita SK102
3
Utilisation
Page 27

fil à plomb sur toute la longueur de la ligne. Si l'écart
D
ne dépasse pas 2 mm, le Makita SK102 se trouve
EN
dans la plage de tolérance.
F
I
E
P
NL
FIN
PL
SK
HR
SR
RUS
BG
RO
Si le Makita SK102 se situe en dehors de la
)
plage de tolérance, s'adresser à un revendeur spécialisé agréé.
Affichage
Dépassement de la limite inférieure ou supérieure de la plage de température admissible :
Le laser s'éteint et les icônes (−) et (+) clignotent.
En dehors de la plage de calage automatique :
Le laser s'éteint et l'icône de la dernière fonction utilisée clignote.
Pendule verrouillé :
Le faisceau laser ne fait pas l'objet d'un calage et
l'icône Cadenas {B, 7} est allumée.
Entretien et instructions
d'utilisation
Ne jamais plonger l'instrument dans l'eau. Enlever les
saletés avec un chiffon humide doux. Ne pas utiliser
des produits de nettoyage ou des solvants agressifs.
Traiter l'instrument avec les mêmes précautions que
des jumelles ou un appareil photo.
L'instrument peut s'abîmer sous l'effet de chocs
violents ou d'une chute. Il convient de le contrôler
avant la mise en service pour détecter d'éventuels
dommages. Vérifier régulièrement la précision de
nivellement de l'instrument.
Transport
Pour garantir un transport sûr de l'instrument, régler
l'interrupteur de verrouillage {B, 3} sur "Verrouillé"
().
Utilisation
4
Makita SK102
Page 28
Caractéristiques techniques
Portée min. 30 m avec détecteur
Précision de nivellement ± 3 mm @ 10m
Plage d'inclinaison 4 ° ± 0.5
Précision horizontale ± 1 mm à 5 m
Précision verticale ± 0.75 mm pour une ligne
Type de laser 635 nm, classe laser II
Type de pile AA, 3 x 1.5 V
Protection contre l'eau
et la poussière
Température de service -10 °C à 40 °C
Température de stoc-
kage
Dimensions (P x L x H) 102 x 75 x 102 mm
Poids (avec piles) 475 g
Filetage de trépied 1/4"
Sous réserve de modifications (illustrations, descriptions et caractéristiques techniques).
longue de 3 m
étanche à la poussière,
à l'eau de ruissellement
IP 54,
-25 °C à 70 °C
Consignes de sécurité
Il revient au responsable du produit de s'assurer que
tous les utilisateurs comprennent ces consignes et
les respectent.
Symboles utilisés
Les symboles utilisés dans ce manuel ont la signification suivante :
ATTENTION :
Risque lié à l'utilisation ou à une utilisation non
conforme pouvant provoquer de graves dommages
corporels, voire la mort.
PRUDENCE :
Risque lié à l'utilisation ou à une utilisation non
conforme susceptible de provoquer des dommages
dont l'étendue est faible au niveau corporel mais peut
être importante au niveau matériel, financier et
écologique.
Informations permettant à l'opérateur une
)
utilisation correcte et efficace du produit.
Utilisation conforme
• Projection d'une ligne laser verticale
• Projection d'une ligne laser horizontale
•Projection simultanée d'une ligne laser verticale
et d'une ligne laser horizontale (laser en croix)
D
EN
F
I
E
P
NL
FIN
PL
SK
HR
SR
RUS
BG
RO
Makita SK102
5
Caractéristiques techniques
Page 29

D
Utilisation non conforme
EN
• Mettre le produit en service sans instruction préa-
F
I
E
P
NL
FIN
PL
SK
HR
SR
RUS
BG
RO
lable
• L'utiliser sans respecter les conditions d'application
• Rendre les dispositifs de sécurité inefficaces et
enlever les plaques signalétiques ainsi que les
avertissements
• Ouvrir le produit avec des outils (tournevis, etc.)
• Modifier, transformer le produit
• Eblouir intentionnement des tiers, même dans
l'obscurité
• Prendre des mesures de sécurité insuffisantes sur
le lieu de travail
Conditions d'application
Cf. chapitre "Caractéristiques techniques".
)
Le Makita SK102 est conçu pour être utilisé dans des
milieux pouvant être habités en permanence par
l'homme. Le produit n'a pas le droit d'être utilisé dans
un environnement explosible ou agressif.
Consignes de sécurité
Responsabilité
Responsabilité du fabricant de l'équipement
original Makita Corporation Anjo, Aichi, 4468502 Japan (dénommé ci-après Makita):
Makita est responsable de la conformité du produit
livré aux normes techniques et de sécurité prescrites
de même que de la fourniture du manuel d'utilisation
et des accessoires originaux.
Responsabilité du fabricant d'accessoires
d'autres marques:
Les fabricants d'accessoires d'autres marques
)
pour le Makita SK102 sont responsables de l'élaboration, de la mise en pratique et de la diffusion de
concepts de sécurité relatifs à leurs produits ainsi que
de leurs effets en combinaison avec le matériel de
Makita.
Responsabilité du responsable du produit:
ATTENTION
Il incombe au responsable du produit de veiller
à l'utilisation conforme de l'équipement, au travail
correct de ses collaborateurs, à leur instruction et au
fonctionnement sûr du matériel.
Le responsable du produit doit:
• Comprendre les informations de sécurité inscrites
sur le produit et les instructions du manuel d'utilisation.
• Connaître les consignes de sécurité locales, appli-
cables à son entreprise.
• Signaler immédiatement tout défaut de sécurité
du produit à Makita.
6
Makita SK102
Page 30
Risques liés à l'utilisation
PRUDENCE :
En cas de chute, de sollicitations extrêmes ou
d'adaptations non autorisées, le produit peut présenter des dommages et fournir des mesures incorrectes.
Effectuer périodiquement des mesures de
)
contrôle avant et après des mesures importantes.
Voir section "Contrôle de la précision du Makita
SK102".
ATTENTION :
Les batteries déchargées n'ont pas le droit
d'être jetées avec les ordures ménagères.
Ménagez l'environnement et rapportez les aux points
de collecte prévus à cet effet conformément aux
prescriptions en vigueur dans ce domaine au niveau
national ou local.
Le produit n'a pas le droit d'être jeté avec
les ordures ménagères.
Effectuer une mise au rebut conforme du
produit en respectant les dispositions
nationales en vigueur dans le pays d'utilisation.
Toujours rendre le produit inaccessible à
Suivre les prescriptions de mise au rebut nationales,
spécifiques au produit.
Modifications (illustrations, descriptions et caractéristiques techniques) réservées.
toute personne non autorisée.
Compatibilité électromagnétique
(CEM)
ATTENTION :
Le Makita SK102 remplit les directives et
normes en vigueur dans ce domaine. Il est toutefois
impossible d'exclure entièrement des risques de
perturbation d'autres appareils.
Classification laser
Le Makita SK102 émet un faisceau laser visible qui
sort de la face avant de l'instrument.
Il répond aux normes de sécurité des lasers de catégorie 2 :
• IEC60825-1 : 2007 "Sécurité des appareils à
laser"
Produits laser catégorie 2/ II :
Ne pas regarder dans le faisceau laser et ne pas le
projeter inutilement sur des personnes. La protection
de l'oeil est en général assurée par des mouvements
réflexes tels que fermer les paupières ou tourner la
tête.
ATTENTION :
Une observation directe du faisceau laser avec
des instruments optiques (par ex. jumelles, lunettes)
peut s'avérer dangereuse.
PRUDENCE :
Regarder dans le faisceau laser peut s'avérer
dangereux pour l'oeil.
D
EN
F
I
E
P
NL
FIN
PL
SK
HR
SR
RUS
BG
RO
Makita SK102
7
Consignes de sécurité
Page 31

D
Rayonnement laser
Ne pas regarder dans le faisceau
Classe laser 2
selon IEC 60825-1:2007
Puissance de sortie max. <4.2mW
Longueur d'onde 620-690nm
Divergence du faisceau 120°
Signalisation
EN
F
I
E
P
NL
FIN
PL
SK
HR
SR
RUS
BG
Position de la plaquette signalétique, voir sur la page
RO
dépliante !
Consignes de sécurité
8
Makita SK102
Page 32

Manuale d'uso
Italiano
Congratulazioni per aver acquistato un Makita SK102.
Le Norme di sicurezza sono allegate
al Manuale d'uso. Leggere attentamente le Norme di sicurezza e il
Manuale d'uso prima di mettere in
funzione lo strumento per la prima volta.
Avvertenza: La prima e l'ultima pagina del Manuale
d'uso contengono disegni. Durante la consultazione è
necessario aprire queste pagine. Le lettere e i numeri
tra {} si riferiscono sempre ai disegni.
Indice
Messa in funzione............................................... 1
Uso .......................................................................1
Dati tecnici........................................................... 5
Norme di sicurezza .............................................5
Messa in funzione
Inserimento/sostituzione delle
batterie
Vedere disegno {C} - Spingere in avanti il pulsante di
bloccaggio per liberare il vano batterie. Aprire il
coperchio del vano batterie e inserire le batterie con
le polarità corrette. Premere nuovamente il coperchio
del vano batterie finché scatta in posizione.
Il simbolo delle batterie {B, 9} si illumina quando la
tensione delle batterie è troppo bassa. Sostituire le
batterie nel più breve tempo possibile.
• Inserire le batterie con le polarità corrette
• Usare solo batterie alcaline
• Estrarre le batterie se lo strumento non viene
usato per lungo tempo (rischio di corrosione)
Uso
Elementi della tastiera e per l'uso
Vedere disegno {B }:
1 Tasto LASER ON/OFF
2 Tasto MODALITÀ IMPULSI/RISPARMIO
ENERGETICO
3 Interruttore per il blocco
D
EN
F
I
E
P
NL
FIN
PL
SK
HR
SR
RUS
BG
RO
Makita SK102
1
Messa in funzione
Page 33

D
Display
EN
Vedere disegno {B }:
4Croce laser
F
5Linea laser orizzontale
I
6Linea laser verticale
E
7Blocco ON
P
8 Modalità Impulsi/Risparmio energetico ON
9 Tensione delle batterie troppo bassa
NL
FIN
Accensione/Spegnimento
PL
ON: Premere brevemente il tasto ON {B, 1}.
SK
OFF: Premere più a lungo il tasto OFF {B, 1}.
HR
SR
Funzione laser
RUS
Premendo il tasto ON {B, 1} si attivano le seguenti
funzioni laser:
BG
RO
Premere il tasto
ON {B, 1}
1 x
2 x
3 x
Premendo ulteriormente il tasto ON {B, 1} vengono
ripetuti gli stati delle funzioni precedenti.
croce laser (linea laser orizzontale e verticale)
linea laser orizzontale
linea laser verticale
si attiva
Autolivellamento e Funzione di
blocco
Lo strumento si livella automaticamente sui valori di
pendenza indicati (vedere "Dati Tecnici") .
Per il trasporto e per poter inclinare lo strumento
oltre la portata di autolivellamento, deve essere azionato l'interruttore per il blocco {B, 3}. Nello stato di
blocco, il pendolo è fisso e la funzione di autolivellamento è disattivata.
Modalità Impulsi/Power
Lo strumento è dotato di una modalità Power.
All'accensione si attiva la modalità Power e le linee
laser sono particolarmente visibili.
Se non è necessaria una visibilità particolare delle
linee laser ed è richiesto invece un risparmio di
energia, è possibile attivare la modalità Impulsi
premendo il tasto Pulse {B, 2}.
Per poter rilevare le linee laser anche su distanze
maggiori (> 20 m) o in condizioni di luce sfavorevole,
può essere utilizzato un laser detector. Nella modalità
Impulsi il laser detector rileva il raggio laser anche a
lunga distanza.
(Laser detector, vedere accessori)
Applicazioni
Sul retro della copertina di questo Manuale d'uso
sono riportati esempi di applicazioni.
Uso
2
Makita SK102
Page 34

Verifica della precisione di Makita
SK102
Verificare regolarmente la precisione di
)
Makita SK102 e soprattutto prima di importanti
operazioni di livellamento.
Verifica della precisione di livellamento
Vedere disegno {J + K}.
Mettere lo strumento su un treppiede tra due pareti
(A+B) distanti ca. 5 m.
Spostare l'interruttore per il blocco {B, 3} sulla posi-
zione "Sbloccato" ( ).
Orientare lo strumento sulla parete A e accenderlo
con il tasto Laser ON {B, 1}. Attivare la croce laser
con il tasto Laser ON {B, 1} e segnare la posizione
del punto d'incrocio del laser sulla parete A (-> A1).
Ruotare lo strumento di 180° e segnare il punto
d'incrocio del laser sulla parete B (-> B1).
Successivamente collocare lo strumento alla stessa
altezza, il più vicino possibile alla parete A e segnare
nuovamente il punto d'incrocio del laser sulla parete
A (-> A2). Ruotare di nuovo lo strumento di 180° e
segnare il punto d'incrocio del laser sulla parete B (->
B2). Misurare le distanze dei punti segnati A1-A2 e
B1-B2. Determinare la differenza tra le due misure.
Se la differenza non supera 2 mm, Makita SK102 si
trova nei valori di tolleranza.
| (A1 - A2) - (B1 - B2) | ≤ 2 mm
Verifica della precisione della linea
orizzontale
Vedere disegno {L}.
Spostare l'interruttore per il blocco {B, 3} sulla posi-
zione "Sbloccato" ( ).
Collocare lo strumento ad una distanza di ca. 5 m
dalla parete. Orientare lo strumento sulla parete e
accenderlo con il tasto Laser ON {B, 1}. Attivare
entrambe le linee laser con il tasto Laser ON {B, 1} e
segnare il punto d'incrocio del laser sulla parete.
Girare lo strumento verso destra e poi verso sinistra.
Osservare in questo modo lo scostamento verticale
della linea orizzontale dal segno. Se lo scostamento
non supera i 3 mm, Makita SK102 si trova nei valori di
tolleranza.
Verifica della precisione della linea verticale:
Vedere disegno {M}.
Spostare l'interruttore per il blocco {B, 3} sulla posi-
zione "Sbloccato" ( ).
Come riferimento usare un filo a piombo e fissarlo il
più vicino possibile ad una parete alta ca. 3 m.
Collocare lo strumento ad una distanza di ca. 1,5 m
dalla parete ad un'altezza di ca. 1,5 m. Orientare lo
strumento sulla parete e accenderlo con il tasto
Laser ON {B, 1}. Attivare la linea laser verticale con il
tasto Laser ON {B, 1}. Ruotare lo strumento, finché
la linea laser verticale si trova appena sopra il pavimento sul filo a piombo. Determinare ora la differenza massima della linea laser dal filo a piombo
sull'intera lunghezza della linea. Se lo scostamento
D
EN
F
I
E
P
NL
FIN
PL
SK
HR
SR
RUS
BG
RO
Makita SK102
3
Uso
Page 35

non supera 2 mm, Makita SK102 si trova nei valori di
D
tolleranza.
EN
F
I
E
P
NL
FIN
PL
SK
HR
SR
RUS
BG
RO
Se Makita SK102 si trovasse fuori dai valori di
)
tolleranza indicati, si raccomanda di rivolgersi ad un
rivenditore autorizzato.
Avvertenze sul display
Valori della temperatura superiori o inferiori ai
valori ammessi:
Il laser si disattiva e i simboli (−) e (+) lampeggiano.
Fuori dalla portata di autolivellamento:
Il laser si disattiva e il simbolo della funzione utilizzata
lampeggia.
Pendolo bloccato:
Il raggio laser non viene livellato e il simbolo del
blocco {B, 7} lampeggia.
Cura dello strumento e avvertenze
sull'uso
Non immergere lo strumento in acqua. Rimuovere lo
sporco con un panno morbido e umido. Non utilizzare
detergenti o solventi corrosivi. Maneggiare lo strumento con la stessa attenzione che si usa per un
binocolo o per una macchina fotografica.
Le scosse forti o le cadute possono danneggiare lo
strumento. Prima di mettere in funzione lo strumento, verificare la presenza di eventuali danni.
Controllare regolarmente la precisione di livellamento
dello strumento.
Trasporto
Per un trasporto sicuro dello strumento posizionare
l'interruttore per il blocco {B, 3} su "Bloccato" ( ).
Uso
4
Makita SK102
Page 36

Dati tecnici
Portata min. 30 m con detector
Precisione di livella-
mento
Campo di
autolivellamento 4 ° ± 0.5
Precisione orizzontale ± 1 mm @ 5m
Precisione verticale ± 0.75 mm @ 3m di
Tipo di laser 635 nm, classe laser II
Tipo di batterie AA, 3 x 1.5 V
Protezione dall'acqua e
dalla polvere
Temperatura di funzionamento
Temperatura di conservazione
Dimensioni (P x L x H), 102 x 75 x 102 mm
Peso (con batterie) 475 g
Vite del treppiede 1/4"
Salvo modifiche (disegni, descrizioni e dati tecnici).
± 3 mm @ 10m
lunghezza della linea
protetto dalla polvere,
IP 54,
protetto dagli spruzzi
d'acqua
da -10 °C a 40 °C
da -25 °C a 70 °C
Norme di sicurezza
La persona responsabile dello strumento deve verificare che tutti gli utilizzatori comprendano queste
istruzioni e vi si conformino.
Simboli utilizzati
I simboli utilizzati hanno il seguente significato:
AVVERTIMENTO:
Situazione potenzialmente pericolosa o uso
proibito che possono causare la morte o gravi danni
alle persone.
ATTENZIONE:
Situazione potenzialmente pericolosa o uso
proibito che possono causare solo lievi danni alle
persone, ma gravi danni materiali, economici o
ambientali.
Informazione utile che serve all'utente per
)
utilizzare il prodotto in modo efficiente e tecnicamente corretto.
Uso ammesso
•Proiezione di una linea laser verticale
•Proiezione di una linea laser orizzontale
• Proiezione di una linea laser verticale e orizzon-
tale contemporaneamente (croce laser)
D
EN
F
I
E
P
NL
FIN
PL
SK
HR
SR
RUS
BG
RO
Makita SK102
5
Dati tecnici
Page 37

D
Usi proibiti
EN
• Uso dello strumento senza istruzioni
• Uso in condizioni non consentite
F
• Disattivazione dei sistemi di sicurezza e rimozione
I
E
P
NL
FIN
PL
SK
HR
SR
RUS
BG
RO
delle etichette esplicative e indicanti pericolo
• Apertura dello strumento mediante utensili
(cacciaviti, ecc.)
• Esecuzione di modifiche o di conversioni del
prodotto
• Abbagliamento intenzionale di terze persone;
anche al buio
• Misure di sicurezza insufficienti per il luogo di
utilizzo
Limiti all'uso
Vedere il capitolo "Dati tecnici".
)
Il Makita SK102 è adatto all'impiego in ambienti con
insediamenti umani permanenti; lo strumento non
può essere usato in ambienti aggressivi o a rischio di
esplosione.
Ambiti di responsabilità
Ambito di responsabilità del produttore
dell'attrezzatura originale Makita Corporation
Anjo, Aichi, 446-8502 Japan (in breve Makita):
Makita è responsabile della fornitura dello strumento,
compreso il manuale d'uso, in condizioni di totale
sicurezza.
Responsabilità del fabbricante di accessori nonMakita:
I fabbricanti di accessori di altre marche per il
)
Makita SK102 sono responsabili dello sviluppo,
dell'implementazione e della comunicazione dei
concetti di sicurezza che riguardano i loro prodotti e
il funzionamento degli stessi in abbinamento a uno
strumento Makita.
Responsabilità della persona responsabile dello
strumento:
AVVERTIMENTO
La persona responsabile dello strumento deve
garantire che lo strumento venga usato conformemente alle istruzioni. Questa persona è inoltre
responsabile dell'impiego del personale e della sua
formazione nonché della sicurezza dell'equipaggiamento durante l'uso.
La persona responsabile dello strumento hai seguenti
doveri:
• Capire le norme di sicurezza del prodotto e le
istruzioni contenute nel Manuale d'uso.
Norme di sicurezza
6
Makita SK102
Page 38

• Conoscere le normative di sicurezza locali relative
alla prevenzione degli infortuni.
• Informare immediatamente Makita se il prodotto
non è più sicuro.
Pericoli insiti nell'uso
ATTENZIONE:
Se lo strumento è difettoso o è stato fatto
cadere o è stato usato scorrettamente o modificato,
fare attenzione a possibili misure errate della
distanza.
Eseguire periodicamente misure di controllo
)
prima e dopo aver effettuato misure importanti.
Vedere capitolo "Verifica della precisione di Makita
SK102".
AVVERTIMENTO:
Le batterie scariche non devono essere smaltite assieme ai rifiuti domestici. Nel rispetto
dell'ambiente devono essere portate nei punti di
raccolta esistenti, in base alle disposizioni nazionali in
vigore in ogni Paese.
Questo prodotto non deve essere smaltito
assieme ai rifiuti domestici; va eliminato
adeguatamente, in base alle disposizioni
nazionali in vigore in ogni Paese.
Evitare sempre che il prodotto venga maneggiato da persone non autorizzate.
Smaltire lo strumento in modo adeguato
materia di smaltimento.
Salvo modifiche (disegni, descrizioni e dati tecnici).
rispettando le normative nazionali in
Compatibilità elettromagnetica
(CEM)
AVVERTIMENTO:
il Makita SK102 soddisfa i severi requisiti delle
direttive e delle norme in vigore in questo settore.
Tuttavia non si può escludere completamente la
possibilità di disturbi ad altre apparecchiature.
Classificazione laser
Makita SK102 emette un raggio laser visibile che
fuoriesce dal lato anteriore dello strumento.
È un prodotto laser della classe 2 in conformità a:
• IEC60825-1 : 2007 "Sicurezza dei dispositivi
laser"
Uso dei prodotti laser della classe 2/ II:
Non fissare il raggio laser né dirigerlo direttamente su
altre persone. La protezione degli occhi è normalmente fornita da azioni di contrasto, compresa l'istintiva chiusura delle palpebre.
AVVERTIMENTO:
Osservare direttamente il raggio laser mediante
dispositivi ottici (come ad es. binocoli, cannocchiali)
può essere pericoloso.
ATTENZIONE:
Guardare il raggio laser può essere pericoloso
per la vista.
D
EN
F
I
E
P
NL
FIN
PL
SK
HR
SR
RUS
BG
RO
Makita SK102
7
Norme di sicurezza
Page 39

D
Radiazione laser
Non guardare il raggio laser
Classe laser 2
in base a IEC 60825-1:2007
Potenza massima in uscita: <4.2mW
Lunghezza d'onda: 620-690nm
Divergenza raggio 120°
Targhette
EN
F
I
E
P
NL
FIN
PL
SK
HR
SR
RUS
BG
Posizione della targhetta, vedere copertina.
RO
Norme di sicurezza
8
Makita SK102
Page 40

Manual de empleo
Español
Nuestra felicitación por la compra de su
Makita SK102.
Las instrucciones de seguridad se
encuentran en la sección posterior
a las instrucciones para el funciona-
miento del equipo. Lea detenidamente el Manual de empleo, con especial énfasis en
las instrucciones de seguridad antes de empezar a
trabajar con su nuevo equipo.
Importante: La primera y última página del Manual
de empleo contienen algunas ilustraciones, por lo que
se recomienda desdoblar estas páginas durante la
lectura del Manual. Las letras y números que se muestran entre llaves {} hacen referencia a las ilustraciones.
Iniciar
Colocar / sustituir las pilas
Véase la figura {C} - Deslizar hacia adelante el botón
del seguro para abrir el compartimiento de las pilas.
Abrir el compartimiento y colocar las pilas correctamente. Presionar la tapa del compartimiento hasta
que quede bien cerrada.
El símbolo de una pila {B, 9} se enciende cuando las
pilas están bajas. Las pilas deben sustituirse lo más
pronto posible.
• Colocar las pilas de forma lateral
• Utilizar sólo pilas alcalinas
• Parar evitar el peligro de corrosión, se deben
retirar las pilas del equipo en caso de no utilizarlo
durante un período largo.
Manejo
D
EN
F
I
E
P
NL
FIN
PL
SK
HR
SR
RUS
BG
RO
Índice
Iniciar.................................................................... 1
Manejo .................................................................1
Datos técnicos ....................................................5
Instrucciones de seguridad................................5
Makita SK102
Teclado y elementos de control
Consultar la ilustración {B }:
1 Tecla LASER ON/OFF
2 Tecla Modo Pulso/Ahorro de energía
3 Interruptor de seguro
1
Iniciar
Page 41

D
Pantalla
EN
Consultar la ilustración {B}
4 Retículo del láser
F
5 Línea horizontal del láser
I
6Línea vertical del láser
E
7Seguro activo
P
8 Modo Pulso/Ahorro de energía activo
9Nivel bajo de las pilas
NL
FIN
Encender/apagar el equipo
PL
Encender: Pulsar brevemente la tecla ON {B, 1}.
SK
Apagar: Pulsar y mantener pulsada la tecla OFF
HR
{B, 1}.
SR
Funciones del láser
RUS
Al pulsar la tecla ON {B, 1} se activan las siguientes
BG
funciones del láser:
RO
Al pulsar la tecla
ON - {B, 1}
1 x
2 x
3 x
Al pulsar nuevamente la tecla ON {B, 1} , se repite la
función del estado anterior.
el retículo del láser (línea
horizontal y vertical del
láser)
línea horizontal del láser
línea vertical del láser
se activa
Manejo
Funciones de nivelación automática
y activación del seguro
El instrumento se nivela automáticamente al encontrarse dentro del intervalo de inclinación definido
(Consultar la sección "Datos técnicos") .
Pulsar el interruptor del seguro {B, 3} para transportar el instrumento y para inclinarlo más allá del
intervalo definido para la nivelación automática. Al
activar el seguro, el péndulo queda fijo y se desactiva
la función de nivelación automática.
Modo pulso/energía
El instrumento cuenta con una función de modo de
energía. Al encender el instrumento se activa esta
función, por lo que las líneas del láser se observan
con mayor brillo y nitidez.
Si no fuese necesario utilizar esta característica de las
líneas del láser y para ahorrar energía, es posible
desactivar esta función pulsando la tecla
Es posible utilizar un detector de láser para detectar
las líneas del láser en distancias largas (> 20 m) o al
trabajar en condiciones de mala iluminación. Al
utilizar el modo pulso, el detector puede localizar el
rayo láser en distancias largas.
(El detector del láser se encuentra en la lista de accesorios)
Pulso {B, 2
Aplicaciones
En la cubierta posterior de este Manual se presentan
algunos ejemplos de aplicaciones del equipo.
2
Makita SK102
}.
Page 42

Comprobar la precisión del Makita
SK102
Comprobar la precisión del Makita SK102 de
)
forma constante, sobre todo antes de efectuar
trabajos de nivelación considerables.
Comprobar la precisión de la nivelación
Consultar la ilustración {J + K}.
Estacionar el instrumento sobre una superficie
estable y en el punto medio entre dos muros (A+B)
que tengan una separación aproximada de 5 m.
Colocar el interruptor del seguro {B, 3} en la posición
"sin seguro" ( ).
Apuntar con el instrumento hacia el muro A y encenderlo pulsando la tecla Laser ON {B, 1}. Activar el
retículo del láser pulsando la tecla Laser ON {B, 1} y
marcar el punto de intersección del retículo sobre el
muro A (-> A1).
Girar 180° el instrumento y marcar el punto de intersección del retículo sobre el muro B (-> B1).
Colocar el instrumento a la misma altura lo más cerca
posible del muro A y marcar nuevamente el punto de
intersección del retículo del láser sobre el muro A (->
A2) . Girar nuevamente 180° el instrumento y marcar
el punto de intersección del retículo sobre el muro B
(-> B1). Medir las distancias de los puntos marcados
A1-A2 y B1-B2. Calcular la diferencia entre ambas
mediciones. Si la diferencia es menor de 2 mm, el
Makita SK102 estará dentro del intervalo de tolerancia.
| (A1 - A2) - (B1 - B2) | ≤ 2 mm
Comprobar la precisión de la línea horizontal
Consultar la ilustración {L}.
Colocar el interruptor del seguro {B, 3} en la posición
"sin seguro" ( ).
Colocar el instrumento aproximadamente a 5 m del
muro. Apuntar con el instrumento hacia el muro y
encenderlo pulsando la tecla Laser ON {B, 1} .
Activar ambas líneas del láser pulsando la tecla Laser
ON {B, 1} y marcar el punto de intersección del retículo sobre el muro.
Girar el instrumento hacia la derecha y después hacia
la izquierda. Observar la desviación vertical de la línea
horizontal con respecto a la marca. Si la diferencia es
menor de 3 mm, el Makita SK102 estará dentro del
intervalo de tolerancia.
Comprobar la precisión de la línea vertical
Consultar la ilustración {M}.
Colocar el interruptor del seguro {B, 3} en la posición
"sin seguro" ( ).
Como referencia, utilizar una plomada y colgarla lo
más cerca posible de un muro de 3 m de altura.
Colocar el instrumento a una distancia aproximadamente de 1.5 m del muro y con una elevación aproxi-
mada de 1.5 m. Apuntar con el instrumento hacia el
muro y encenderlo pulsando la tecla Laser ON {B, 1}.
Activar la línea vertical del láser pulsando la tecla
laser ON {B, 1}. Girar el instrumento hasta que la
línea vertical del láser quede un poco arriba del suelo,
sobre la plomada. Determinar la desviación máxima
de la línea del láser con respecto a la plomada a lo
largo de toda la longitud de la línea.
D
EN
F
I
E
P
NL
FIN
PL
SK
HR
SR
RUS
BG
RO
Makita SK102
3
Manejo
Page 43

Si la diferencia es menor de 2 mm, el Makita SK102
D
estará dentro del intervalo de tolerancia.
EN
F
I
E
P
NL
FIN
PL
SK
HR
SR
RUS
BG
RO
Si el Makita SK102 quedase fuera de la tole-
)
rancia especificada, favor de ponerse en contacto
con un distribuidor autorizado.
Avisos en pantalla
Temperatura menor o mayor al intervalo permitido:
El láser se apaga y los símbolos (−) y (+) se muestran intermitentes.
Fuera del intervalo de nivelación automática:
El láser se apaga y el símbolo de la función utilizada
se muestra intermitente.
Péndulo con seguro habilitado:
El rayo láser no está nivelado y el símbolo del seguro
{B, 7} se enciende.
Cuidado
No sumergir el instrumento en el agua. Limpiarlo con
un paño limpio y suave. No utilizar limpiadores agresivos. Limpiar las superficies ópticas con esmero,
como si se tratara de unas gafas, un aparato fotográfico o unos prismáticos.
Evitar golpear o dejar caer el instrumento, ya que
puede dañarse. Antes de encender el instrumento,
comprobar que no presente daño alguno. Comprobar
periódicamente la precisión de nivelación del instrumento.
Transporte
Para transportar el instrumento, colocar el interruptor del seguro {B, 3} en la posición "Seguro"
().
Manejo
4
Makita SK102
Page 44

Datos técnicos
Alcance mín. 30 m con detector
Precisión de nivelación ± 3 mm @ 10m
Intervalo de inclinación 4 ° ± 0.5
Precisión horizontal ± 1 mm a 5m
Precisión vertical ± 0.75 mm sobre una línea
Tipo de láser 635 nm, láser clase II
Tipo de pilas 3 pilas AA de 1.5 V
Protección frente agua
y polvo
Temperatura de
funcionamiento
Temperatura de
almacenamiento
Dimensiones (L x A x A) 102 x 75 x 102 mm
Peso (incl. pilas) 475 g
Rosca para trípode 1/4"
Todos los derechos reservados para modificar el
contenido (ilustraciones, descripciones y especificaciones técnicas).
con 3m de longitud
protegido frente a salpica-
IP 54,
duras y polvo
-10 °C a 40 °C
-25 °C a 70 °C
Instrucciones de seguridad
El encargado del producto es responsable de la actividad de sus empleados, la instrucción de éstos y la
seguridad de utilización del equipo.
Símbolos utilizados
Los símbolos utilizados tienen el siguiente significado:
ADVERTENCIA:
Indica una situación de peligro potencial o un
empleo no conforme que pueden ocasionar daños
personales graves o incluso la muerte.
CUIDADO:
Indica una situación de peligro potencial o un
empleo no conforme que pueden ocasionar daños
personales leves pero considerables daños
materiales, económicos o medioambientales.
Información que ayuda al usuario a utilizar el
)
instrumento de manera correcta y eficiente.
Empleo correcto
• Proyección con rayo láser de una línea vertical
• Proyección con rayo láser de una línea horizontal
• Proyección con rayo láser de una línea vertical y
horizontal simultáneamente (retículo del láser)
D
EN
F
I
E
P
NL
FIN
PL
SK
HR
SR
RUS
BG
RO
Makita SK102
5
Datos técnicos
Page 45

D
Uso improcedente
EN
• Emplear el equipo sin previa instrucción
F
• Emplear el equipo fuera de los límites de aplica-
I
E
P
NL
FIN
PL
SK
HR
SR
RUS
BG
RO
ción
• Anulación de los dispositivos de seguridad y retirada de rótulos indicativos o de advertencia
• Abrir el producto utilizando herramientas (destornilladores, etc.) salvo que esto esté permitido
expresamente para determinados casos
• Modificar o alterar el equipo
• Deslumbrar intencionadamente a terceros incluso
en la oscuridad
• Protección insuficiente del emplazamiento
Límites de utilización
Consultar la sección "Datos técnicos".
)
El Makita SK102 es apto para el empleo en ambientes
permanentemente habitados. No debe emplearse en
entornos con peligro de explosión ni en entornos
hostiles.
Ámbitos de responsabilidad
Responsabilidades del fabricante del equipo
original Makita Corporation Anjo, Aichi, 4468502 Japan (en adelante Makita):
Makita asume la responsabilidad del suministro del
producto en perfectas condiciones técnicas
de seguridad, inclusive el Manual de empleo y los
accesorios originales.
Ámbito de responsabilidad del fabricante
de accesorios de otras marcas:
Los fabricantes de accesorios de otras marcas
)
para el Makita SK102 tienen la responsabilidad del
desarrollo, aplicación y comunicación de los
conceptos de seguridad correspondientes a sus
productos. Igualmente son responsables de la efectividad de dichos conceptos de seguridad en combinación con el equipo de Makita.
Ámbito de responsabilidad del encargado
del producto:
ADVERTENCIA
El encargado del producto tiene la responsabilidad de que el equipo se utilice conforme a las
normas establecidas. Asimismo, es responsable de la
actividad de sus empleados, la instrucción de éstos y
la seguridad de utilización del equipo.
Para el encargado del producto se establecen las
siguientes obligaciones:
• Entender la información de seguridad que figura
en el producto así como las correspondientes al
Manual del Usuario.
• Conocer las normas de prevención de accidentes
laborales usuales en el lugar.
• Informar inmediatamente a Makita en cuanto
aparezcan defectos de seguridad en el equipo.
Instrucciones de seguridad
6
Makita SK102
Page 46

Peligros durante el uso
CUIDADO:
Pueden producirse mediciones erróneas si se
utiliza un producto que esté defectuoso, después de
haberse caído o haber sido objeto de transformaciones no permitidas.
Realizar periódicamente mediciones de
)
control. Especialmente cuando el producto ha estado
sometido a esfuerzos excesivos así como antes y
después de tareas de medición importantes.
Consultar la sección "Comprobar la precisión del
Makita SK102".
ADVERTENCIA:
No desechar las pilas con la basura doméstica.
Eliminarlas correctamente, depositándolas en los
centros de recolección de acuerdo con las normas de
eliminación específicas del país.
No desechar el producto con la basura
doméstica.
Eliminar el producto correctamente. Cumplir
con las normas de eliminación específicas
del país.
Proteger el equipo en todo momento impidiendo el acceso a él de personas no auto-
rizadas.
Respetar la normativa específica nacional y local.
Reservado el derecho a introducir modificaciones
(dibujos, descripciones y especificaciones técnicas).
Compatibilidad electromagnética
(CEM)
ADVERTENCIA:
Aunque el Makita SK102 cumple con los más
estrictos requisitos de las directivas y normas aplicables, el fabricante no puede excluir por completo la
posibilidad de perturbación de otros aparatos.
Clasificación láser
El Makita SK102 genera un rayo láser visible que sale
de la parte frontal del instrumento.
El producto corresponde a la Clase de láser 2 según:
• IEC60825-1 : 2007 "Seguridad de equipos láser"
Productos de láser clase 2/ II:
Absténgase de mirar directamente al rayo láser y no
dirija éste a otras personas. La protección del ojo
queda garantizada mediante reflejos naturales como
es el desviar la vista del rayo o cerrar los ojos.
ADVERTENCIA:
Puede ser peligroso mirar directamente al rayo
con medios ópticos auxiliares (por ejem. prismáticos,
telescopios).
CUIDADO:
Mirar directamente al rayo láser puede ser peligroso para los ojos.
D
EN
F
I
E
P
NL
FIN
PL
SK
HR
SR
RUS
BG
RO
Makita SK102
7
Instrucciones de seguridad
Page 47

D
Radiación láser
No mirar directamente al rayo láser
Láser clase 2
según IEC 60825-1:2007
Máxima potencia emitida : <4.2mW
Longitud de onda emitida: 620-690nm
Divergencia del haz 120°
Señalización
EN
F
I
E
P
NL
FIN
PL
SK
HR
SR
RUS
BG
Véase la última página para la ubicación del rótulo del
RO
producto.
Instrucciones de seguridad
8
Makita SK102
Page 48

Manual de Operação
Português
Parabéns pela sua aquisição de um Makita SK102.
As instruções de segurança encontram-se a seguir ao capítulo sobre a
operação do instrumento. Ler aten-
tamente as instruções de segurança
e o Manual de Operação antes de utilizar o instrumento pela primeira vez.
Nota: A primeira e última página deste manual
contém diversas figuras. Estas páginas podem desdobradas e mantidas abertas durante a leitura do
manual. As letras e números em {} referem-se
sempre a estas figuras.
Índice
Início da operação............................................... 1
Operação ............................................................. 1
Características Técnicas ..................................... 5
Instruções de segurança.................................... 5
Início da operação
Instalação / substituição de
baterias
Ver a figura {C} - deslocar o botão de travagem para
a frente para destrancar o compartimento das baterias. Abrir a tampa do compartimento das baterias e
introduzir as baterias de acordo com as indicações da
polaridade. Premir a tampa do compartimento das
baterias, de modo a ficar trancada.
O símbolo da bateria {B, 9} acende quando a tensão
da bateria for demasiado baixa. Nestas condições, as
baterias deverão ser substituídas o mais rapidamente
possível.
• Instalar as baterias com a polaridade correcta.
• Utilizar apenas baterias alcalinas.
• Remover as baterias do instrumento, no caso de
este não ser utilizado durante um longo período
de tempo (risco do corrosão).
Operação
Teclado e elementos de controlo
Consultar a figura {B }:
1 Tecla de LASER ON/OFF
2 Tecla de modo PULSO/POUPANÇA DE
ENERGIA
3 Interruptor de travagem
D
EN
F
I
E
P
NL
FIN
PL
SK
HR
SR
RUS
BG
RO
Makita SK102
1
Início da operação
Page 49

D
Visor
EN
Consultar a figura {B }:
4 Rectícula do laser
F
5 Linha de laser horizontal
I
6 Linha de laser vertical
E
7 Travagem activada (ON)
P
8 Modo PULSO/POUPANÇA DE ENERGIA activada
9 Tensão da bateria demasiado baixa
NL
FIN
Ligação/desligação do instrumento
PL
ON: Premir a tecla ON {B, 1} durante breves
SK
momentos .
HR
OFF: Premir e manter premida a tecla OFF {B, 1}.
SR
Funções do laser
RUS
Premir a tecla ON {B, 1} para activar as funções de
BG
laser seguintes:
RO
Premir a tecla ON
{B, 1}
1 x
2 x
3 x
Premir novamente a tecla ON {B, 1} para repetir o
estado da função anterior.
rectícula do laser (linha de
laser vertical e horizontal)
Linha de laser horizontal
Linha de laser vertical
activação
Funções de autonivelamento e
travagem
O instrumento efectua o seu nivelamento automático, dentro da tolerância especificada (ver "Características Técnicas") .
Premir o interruptor Travagem (Lock) {B, 3} para
transportar e inclinar o instrumento para além do
intervalo de tolerância de nivelamento. Quando
travado, o pêndulo fica travado e a função de autonivelamento desactivada.
Modo de Pulso/Potência
O instrumento está equipado com um modo de
Potência (Power). A ligação do instrumento activa o
modo de Potência, i.e., as linhas de laser são
brilhantes e altamente visíveis.
Se não for necessário a alta visibilidade das linhas de
laser e se houver preocupações com poupança de
energia, premir a tecla Pulse (Pulso) {B, 2} para
activar o modo de Pulso.
Para detecção das linhas de laser em alvos a grandes
distâncias (superiores a 20 m) ou em condições de
iluminação reduzida, pode ser utilizado um detector
de laser. Em modo Pulso, o feixe de luz laser continua
a ser reconhecido pelo detector, mesmo em grandes
distâncias.
(Relativamente ao detector de laser, consultar a
secção "Acessórios")
Operação
2
Makita SK102
Page 50

Aplicações
Alguns exemplos de aplicação podem ser observados
na contracapa deste manual.
Verificação da exactidão do Makita
SK102
A exactidão do Makita SK102 deve ser verifi-
)
cada regularmente e, principalmente, antes de trabalhos de nivelamento importantes.
Verificação da exactidão do nivelamento
Ver a figura {J + K}.
Colocar o instrumento numa base situada a meio de
duas paredes (A+B), aproximadamente a 5 m de
distância entre si.
Colocar o interruptor de Travagem (Lock) {B, 3} na
posição de destravagem "Unlocked" ( ).
Apontar o instrumento para a parede A e ligar o
instrumento com a tecla Laser ON {B, 1} . Activar as
rectículas de laser com a tecla Laser ON {B, 1} e
marcar o ponto de intersecção das rectículas de laser
projectadas na parede A (-> A1).
Rodar o instrumento 180° e marcar o ponto de intersecção das rectículas de laser projectadas na parede
B (-> B1).
Depois, colocar o instrumento à mesma altura, o mais
perto possível da parede A e marcar novamente o
ponto de intersecção das rectículas de laser projectadas na parede A (-> A2) . Rodar novamente o
instrumento 180° e marcar o ponto de intersecção
das rectículas de laser projectadas na parede B (->
B1). Medir a distância entre os pontos marcados A1A2 e B1-B2. Calcular a diferença das duas medições.
Se a diferença não for superior a 2 mm, o Makita
SK102 encontra-se dentro do seu intervalo de tolerância.
| (A1 - A2) - (B1 - B2) | ≤ 2 mm
Verificação da exactidão da linha horizontal
Consultar a figura {L}:
Colocar o interruptor de Travagem (Lock) {B, 3} na
posição de destravagem "Unlocked" ( ).
Posicionar o instrumento a cerca de 5 m de uma
parede. Apontar o instrumento para a parede e ligar
o instrumento com a tecla Laser ON {B, 1} . Activar
ambas as linhas de laser com a tecla Laser ON {B, 1}
e marcar o ponto de intersecção das rectículas de
laser projectadas na parede.
Rodar o instrumento para a direita e, depois, para a
esquerda. Observar o desvio vertical entre a linha
horizontal e a marcação. Se a diferença não for superior a 3 mm, o Makita SK102 encontra-se dentro do
seu intervalo de tolerância.
Verificação da exactidão da linha vertical
Consultar a figura {M}:
Colocar o interruptor de Travagem (Lock) {B, 3} na
posição de destravagem "Unlocked" ( ).
Como referência, utilizar um fio de prumo o mais
próximo possível de uma parede com uma altura
aproximada de 3 m. Colocar o instrumento a cerca de
1,5 m da parede e a uma altura aproximada de 1,5 m.
D
EN
F
I
E
P
NL
FIN
PL
SK
HR
SR
RUS
BG
RO
Makita SK102
3
Operação
Page 51

Apontar o instrumento para a parede e ligar o instru-
D
mento com a tecla Laser ON {B, 1} . Activar a linha
EN
de laser vertical com a tecla laser ON {B, 1}. Rodar o
F
instrumento, até a linha de laser vertical ficar ligeiramente acima do solo, sobre o fio de prumo. Deter-
I
minar o desvio máximo da linha de laser em relação
E
ao fio de prumo, em todo o comprimento da linha.
P
Se a diferença não for superior a 2 mm, o Makita
SK102 encontra-se dentro do seu intervalo de tole-
NL
rância.
FIN
PL
SK
HR
SR
RUS
BG
RO
Se o Makita SK102 estiver fora da tolerância
)
especificada, contactar um distribuidor autorizado.
Avisos apresentados no visor
Abaixo ou acima do intervalo de temperaturas
admissíveis:
O laser é desligado e os símbolos (−) e (+) começam
a piscar.
Fora da tolerância de autonivelamento:
O laser é desligado e o símbolo da função em utilização começa a piscar.
Pêndulo travado:
O feixe de laser não se encontra nivelado e o símbolo
de Travamento (Lock) {B, 7} acende.
Avisos sobre cuidados de manuseamento e operação
Não mergulhar o instrumento em líquidos. Limpar a
sujidade com um pano macio húmido. Não utilizar
produtos de limpeza agressivos. Manusear as superfícies ópticas de modo semelhante ao manuseamento das lentes oftálmicas ou fotográficas.
O instrumento pode ser danificado por vibrações
intensas ou quedas. Verificar o estado do instrumento, antes de iniciar a sua operação. Verificar
regularmente a exactidão do nivelamento do instrumento.
Transporte
Para transportar o instrumento em segurança,
colocar o interruptor de Travagem (Lock) {B, 3} na
posição "Locked" ( ).
Operação
4
Makita SK102
Page 52

Características Técnicas
Alcance de trabalho 30 m (mín.) com detector
Exactidão do nivelamento
Intervalo de inclinação 4° ± 0,5
Exactidão horizontal ± 1 mm a 5 m
Exactidão vertical ± 0,75 mm numa linha de
Tipo de laser 635 nm, Classe II
Tipo de bateria AA, 3 x 1.5 V
Classe de protecção IP 54,
projecção de água pulveri-
Temperatura de funcionamento
Temperatura de armazenamento
Dimensões (P x L x A), 102 x 75 x 102 mm
Peso (com baterias) 475 g
Rosca para instalação
em tripé
Reservados todos os direitos para alterações
(figuras, descrições e características técnicas).
de laser
± 3 mm @ 10m
3 m
protecção contra o
ingresso se poeiras e
zada
-10 a 40 °C
-25 a 70 °C
1/4"
Instruções de segurança
A pessoa responsável pelo instrumento deve verificar
se todos os utilizadores compreendem claramente e
observam estritamente estas instruções.
Símbolos utilizados
Os símbolos utilizados no Manual de Operação
possuem o seguinte significado:
ATENÇÃO:
Indicação de uma situação potencialmente
perigosa ou de uma utilização não recomendada que,
a não ser evitada, pode provocar a morte ou lesões
corporais graves.
AVISO:
Indicação de uma situação potencialmente
perigosa ou de uma utilização não recomendada que,
a não ser evitada, pode provocar lesões corporais
ligeiras e/ou danos materiais, financeiros ou ambientais significativos.
Informações importantes que devem ser
)
observadas, de modo a que o instrumento seja utilizado de um modo tecnicamente correcto e eficiente.
D
EN
F
I
E
P
NL
FIN
PL
SK
HR
SR
RUS
BG
RO
Makita SK102
5
Características Técnicas
Page 53

D
Utilização correcta do instrumento
EN
• Projecção de uma linha de laser vertical
F
• Projecção de uma linha de laser horizontal
• Projecção de uma linha de laser horizontal e
I
E
P
NL
FIN
PL
SK
HR
SR
RUS
BG
RO
vertical (rectícula de laser)
Utilização incorrecta
• Utilização do instrumento sem instruções de uso
• Utilização o instrumento fora dos limites indicados pelo fabricante
• Desactivação dos sistema de segurança e remoção das etiquetas de informação e de segurança
• Abertura do instrumento com ferramentas (chave
de fendas, etc.), excepto quando devidamente
autorizado para determinadas funções
• Modificação ou alteração das características do
instrumento
• Encandeamento deliberado de outras pessoas,
mesmo no escuro
• Condições de segurança inadequadas no local de
utilização do instrumento (por exemplo, em vias
de circulação, estaleiros de construção, etc.)
Limites da utilização do
instrumento
Consultar o capítulo "Características Técnicas".
)
O Makita SK102 foi concebido para utilização em
locais permanentemente habitado por pessoas; não
utilizar o instrumento em áreas com risco de explosão
ou com atmosferas agressivas.
Áreas de responsabilidade
Responsabilidades do fabricante de equipamento
original Makita Corporation Anjo, Aichi, 446-8502,
Japan (adiante designado por "Makita"):
A Makita é responsável pelo fornecimento do instrumento, incluindo o Manual de Operação e os acessórios originais, em condições de segurança adequadas.
Responsabilidades dos fabricantes de
acessórios não Makita:
Os fabricantes de acessórios não Makita para
)
utilização com o Makita SK102 são responsáveis pelo
desenvolvimento, implementação e comunicação dos
princípios de segurança dos respectivos produtos.
São ainda responsáveis pela eficiência destes princípios de segurança, em combinação com o equipamento Makita.
Instruções de segurança
6
Makita SK102
Page 54

Responsabilidades da pessoa responsável
pelo instrumento:
ATENÇÃO
A pessoa responsável pelo instrumento deve
assegurar que a sua utilização é efectuada de acordo
com as respectivas instruções de utilização. Esta
pessoa é também responsável pela formação do
pessoal utilizador do instrumento e pela segurança
deste, durante a sua utilização.
As responsabilidades são as seguintes:
• Compreender as instruções de segurança do
instrumento e as instruções constantes do
Manual de Operação.
• Familiarização com os regulamentos locais sobre
a prevenção de acidentes.
• Informar imediatamente a Makita, em caso de
falta de segurança do instrumento.
Riscos da utilização
AVISO:
Os instrumentos defeituosos, utilizados incorrectamente ou modificados poderão fornecer valores
errados.
Efectuar medições de teste frequentes. Espe-
)
cialmente após o instrumento ter sido sujeito a utilização anormal e antes, durante e após quaisquer
medições particularmente importantes.
Consultar o capítulo "Verificação da exactidão do
Makita SK102
ATENÇÃO:
As pilhas esgotadas não devem ser descartadas
juntamente com os resíduos domésticos. Proteja o
ambiente e descarte as pilhas nos pontos de recolha
("Pilhões") da sua área de residência.
O equipamento não deve ser descartado
juntamente com os resíduos domésticos.
Eliminar o equipamento de acordo com os
regulamentos aplicáveis em vigor.
Impedir o acesso ao instrumento a pessoas
não autorizadas.
Respeite os regulamentos nacionais específicos do país.
Reserva-se o direito a alterações (figuras, descrições
e dados técnicos).
Compatibilidade Electromagnética
(EMC)
ATENÇÃO:
O Makita SK102 satisfaz os mais exigentes
requisitos das normas e regulamentos aplicáveis. No
entanto, a possibilidade de provocar interferências
em outros dispositivos não pode ser totalmente
excluída.
D
EN
F
I
E
P
NL
FIN
PL
SK
HR
SR
RUS
BG
RO
Makita SK102
7
Instruções de segurança
Page 55

D
Radiação Laser Não olhar directa-
mente para o raio de luz laser.
Laser de Classe 2
conforme norma IEC 60825-1:2007
Potência irradiada máxima: <4.2 mW
Comprimento de
onda emitido: 620-690 nm
Divergência do feixe: 120°
Classificação do laser
EN
O Makit a SK102 produ z um raio de luz la ser vi sível que
sai do instrumento pela sua parte frontal.
F
O produto é da Classe 2 (produtos laser), de acordo
I
com as seguintes normas:
E
• IEC60825-1 : 2007 "Radiation safety of laser
P
NL
FIN
PL
SK
HR
SR
RUS
BG
RO
products"
Produto Laser de Classe 2/II:
Não olhar directamente para o raio laser, nem
apontar o raio directamente para as outras pessoas.
A protecção dos olhos é normalmente assegurada
por respostas de aversão, como o reflexo de pestanejar.
ATENÇÃO:
A observação directa do raio com instrumentos
ópticos (por exemplo, binóculos, telescópios, etc.)
pode ser perigosa.
AVISO:
A observação directa do raio laser pode ser
perigosa para os olhos.
Marcação do instrumento
Posição da etiqueta do produto: ver última página!
Instruções de segurança
8
Makita SK102
Page 56

Gebruiksaanwijzing
Nederlands
Gefeliciteerd met uw aanschaf van de Makita SK102.
De veiligheidsvoorschriften staan in
het hoofdstuk na de bedieningsinstructies van het instrument. De
veiligheidsvoorschriften samen met
de gebruiksaanwijzing moeten zorgvuldig worden
gelezen alvorens het product in gebruik te nemen.
Opmerking: Op de eerste en laatste pagina van de
gebruiksaanwijzing staan illustraties. Deze dienen te
worden uitgevouwen tijdens het raadplegen van deze
handleiding. Letters en cijfers tussen haakjes {}
verwijzen steeds naar de illustraties.
Inhoud
Opstarten............................................................. 1
Bediening............................................................. 1
Technische Specificaties .................................... 5
Veiligheidsvoorschriften.....................................5
Opstarten
Inzetten / Vervangen van Batterijen
Zie figuur {C} - Schuif de vergrendelknop naar voren.
Open het deksel van het batterijcompartiment en zet
de batterijen er in met de juiste polariteit. Duw het
batterijdeksel terug tot het vastklikt.
Het batterijsymbool {B, 9} licht op als de batterijspanning te laag is. De batterijen moeten zo snel mogelijk
worden vervangen.
• Let op de juiste polariteit
• Gebruik uitsluitend alkaline batterijen
• Batterijen moeten worden verwijderd als het
instrument langere tijd niet zal worden gebruikt
(om corrosie te voorkomen).
Bediening
Toetsenbord en bedieningselementen
Zie figuur {B }:
1 LASER AAN/UIT toets
2 PULS/POWERMODUS toets
3 Lock schakelaar
D
EN
F
I
E
P
NL
FIN
PL
SK
HR
SR
RUS
BG
RO
Makita SK102
1
Opstarten
Page 57

D
Bedieningspaneel
EN
Zie figuur {B}
4Laserkruisdraden
F
5 Laserlijn horizontaal
I
6 Laserlijn verticaal
E
7 Lock AAN
P
8 Puls/Powermodus AAN
9 Batterijspanning te laag
NL
FIN
Aan/Uitschakelen
PL
AAN: Druk kort op de AAN - toets {B, 1}.
SK
UIT: Druk kort op de UIT- toets {B, 1} en houdt deze
HR
vast.
SR
Laserfuncties
RUS
Indrukken van de AAN-toets {B, 1} activeert de
BG
onderstaande laserfuncties:
RO
Indrukken van de
AAN - toets {B, 1}
1 x
2 x
3 x
Door nogmaals indrukken van de AAN-toets {B, 1}
wordt de vorige functie-instelling herhaald.
laserkruisdraden (horizontale en verticale laserlijn)
horizontale laserlijn
verticale laserlijn
activeert
Zelfstellen en Lock-functies
Het instrument stelt zichzelf automatisch waterpas
binnen het opgegeven hellingbereik (Zie hoofdstuk
"Technische gegevens") .
Druk op de Lock schakelaar {B, 3} om het instrument
te vervoeren of schuin te zetten buiten het hellingbereik. In gelockte stand staat de pendule vast en is het
zelfstelmechanisme uitgeschakeld.
Puls/Powermodus
Het instrument is uitgerust met een Powermodus.
Inschakelen van het instrument activeert de Powermodus en de laserlijnen zi j n helder en goed zichtbaar.
Als de verbeterde zichtbaarheid van de laserlijnen
niet nodig is en als de batterijen moeten worden
gespaard, dan kan de Pulsmodus worden geactiveerd
door indrukken van de {B, 2}.
Om de laserlijnen over grotere afstanden (> 20 m) te
kunnen detecteren of bij ongunstig omgevingslicht,
kan een laserdetector worden gebruikt. In Pulsmodus
wordt de laserstraal ook door de detector gedetecteerd op grote afstanden.
(Laserdetector, zie hoofdstuk accessoires)
Toepassingen
Voorbeelden van toepassingen staan op de buitenzijde van de achterkant van deze gebruiksaanwijzing.
Bediening
2
Makita SK102
Page 58

Controleren van de nauwkeurigheid
van de Makita SK102.
Controleer de nauwkeurigheid van uw Makita
)
SK102 regelmatig en vooral bij belangrijke waterpasprojecten.
Controleren van de nauwkeurigheid van de
waterpassing.
Zie figuur {J + K}.
Stel het instrument op een standaard op halverwege
tussen twee wanden (A+B) die circa 5 m uit elkaar
staan.
Zet de Lock schakelaar {B, 3} in de stand "Vrij" ( ).
Richt het instrument op wand A en schakel het instrument in met de Laser AAN {B, 1} toets . Activeer de
laserkruisdraden met de Laser AAN {B, 1} toets en
markeer het snijpunt van de laserkruisdraden op de
wand A (-> A1).
Roteer het instrument om 180° en markeer het snijpunt van de laserkruisdraden op wand B (-> B1).
Plaats vervolgens het instrument op dezelfde hoogte
en zo dicht mogelijk bij wand A en markeer opnieuw
het snijpunt van de laserkruisdraden op wand A (->
A2) . Roteer het instrument om 180° en markeer
nogmaals het snijpunt van de laserkruisdraden op
wand B (-> B2). Meet de afstanden tussen de gemarkeerde punten A1-A2 en B1-B2. Bepaal het verschil
tussen de twee metingen. Als het verschil niet groter
is dan 2 mm, dan is de nauwkeurigheid van de Makita
SK102 binnen de toleranties.
| (A1 - A2) - (B1 - B2) | ≤ 2 mm
Makita SK102
Controle van de nauwkeurigheid van de
horizontale lijn:
Zie figuur {L}.
Zet de Lock schakelaar {B, 3} in de stand "Vrij" ( ).
Plaats het instrument circa 5 m vanaf de wand. Richt
het instrument op de wand en schakel het instrument
in met de Laser AAN {B, 1} toets . Activeer beide
laserlijnen met de Laser AAN {B, 1} toets en markeer
het snijpunt van de laserkruisdraden op de wand.
Draai het instrument naar rechts en daarna naar links.
Let op een verticale afwijking van de horizontale lijn
ten opzichte van de markering. Als de afwijking niet
groter is dan 3 mm, dan is de nauwkeurigheid van de
Makita SK102 binnen de toleranties.
Controle van de nauwkeurigheid van de
verticale lijn:
Zie figuur {M}.
Zet de Lock schakelaar {B, 3} in de stand "Vrij" ( ).
Gebruik een schietlood als referentie en hang deze zo
dicht mogelijk tegen een wand van circa 3 m hoog.
Plaats het instrument op een afstand van circa 1,5 m
van de wand en op een hoogte van circa 1.5 m. Richt
het instrument op de wand en schakel het instrument
in met de Laser AAN {B, 1} toets . Activeer de verticale laserlijn met de Laser AAN {B, 1} toets. Draai
het instrument totdat de verticale laserlijn vlak boven
de vloer op het schietlood staat. Bepaal nu de maximale afwijking van de laserlijn ten opzichte van het
schietlood over de gehele lengte van de lijn.
3
Bediening
D
EN
F
I
E
P
NL
FIN
PL
SK
HR
SR
RUS
BG
RO
Page 59

Als de afwijking niet groter is dan 2 mm, dan is de
D
nauwkeurigheid van de Makita SK102 binnen de tole-
EN
ranties.
F
I
E
P
NL
FIN
PL
SK
HR
SR
RUS
BG
RO
Als de nauwkeurigheid van uw Makita SK102
)
buiten de toleranties valt, neem dan contact op met
een geautoriseerde dealer.
Foutindicaties
Temperatuur onder of boven het toegestane
bereik:
De laser schakelt uit en de symbolen (−) en (+) gaan
knipperen.
Buiten bereik van het zelfstellende vermogen:
De laser schakelt uit en het symbool van de gebruikte
functie gaat knipperen.
Pendule gelockt:
De laserstraal is niet waterpas en het Lock symbool
{B, 7} licht op.
Verzorging en bediening
Niet onderdompelen in water. Vuil en vocht afvegen
met een vochtige zachte doek. Geen agressieve
schoonmaakmiddelen of oplossingen gebruiken.
Behandel de optische oppervlakken met dezelfde
zorg, als brillenglazen en lenzen van fotocamera's.
Sterke trillingen of laten vallen van het instrument
kan dit beschadigen. Controleer het instrument op
mogelijke beschadigingen voordat u het inschakelt.
Controleer regelmatig de waterpasnauwkeurigheid
van uw instrument.
Vervoer
Om het instrument veilig te vervoeren moet de Lock
schakelaar {B, 3} in de stand "Lock" ( ) worden
gezet.
Bediening
4
Makita SK102
Page 60

Technische Specificaties
Bereik min. 30 m met detector
Waterpasnauwkeurig-
heid ± 3 mm @ 10m
Hellingbereik 4 ° ± 0.5
Horizontale nauwkeu-
righeid ± 1 mm @ 5m
Verticale nauwkeurig-
heid
Lasertype 635 nm, laser klasse II
Batterijtype AA, 3 x 1.5 V
Bescherming tegen
water en stof
Werktemperatuur -10 °C tot 40 °C
Opslagtemperatuur -25 °C tot 70 °C
Afmetingen (D x W x H) 102 x 75 x 102 mm
Gewicht
(met batterijen) 475 g
Statiefschroefdraad 1/4"
Alle rechten voorbehouden voor wijzigingen (in illustraties, beschrijvingen en technische gegevens).
± 0.75 mm @ 3m lijnlengte
IP 54,
spatwaterdicht, stofdicht
Veiligheidsvoorschriften
De beheerder van het instrument moet er zorg voor
dragen, dat alle gebruikers deze aanwijzingen
begrijpen en opvolgen.
Gebruikte symbolen
De gebruikte symbolen in de veiligheidsvoorschriften
hebben de onderstaande betekenis:
WAARSCHUWING:
Gebruiksgevaar of gebruik in strijd met de
bepalingen, welke ernstige schade aan personen of
de dood tot gevolg kan hebben.
VOORZICHTIG:
Gebruiksgevaar of gebruik in strijd met de
bepalingen, dat slechts geringe schade voor
personen met zich meebrengt, maar aanzienlijke
schade aan materiaal, bezittingen of milieu kan
veroorzaken.
Belangrijke informatie, die de gebruiker helpt,
)
het product technisch juist en efficiënt te gebruiken.
Toepassingsdoel
• Projecteren van een verticale laserlijn
• Projecteren van een horizontale laserlijn
• Tegelijkertijd projecteren van een horizontale en
een verticale laserlijn (laserkruisdraden)
D
EN
F
I
E
P
NL
FIN
PL
SK
HR
SR
RUS
BG
RO
Makita SK102
5
Technische Specificaties
Page 61

D
Gebruik in strijd met de bepalingen
EN
• Gebruik van het product zonder instructie
F
• Gebruik buiten de toepassingsgrenzen
• Uitschakelen van veiligheidsinrichtingen en
I
E
P
NL
FIN
PL
SK
HR
SR
RUS
BG
RO
verwijderen van aanwijzings- en waarschuwingsetiketten
• Openen van het product met gereedschap
(schroevendraaier etc.), voor zover niet nadrukkelijk voor bepaalde gevallen is toegestaan
• Het aanbrengen van modificaties of aanpassingen aan het product
• Opzettelijke verblinding van derden; ook in het
donker
• Onvoldoende veiligheidsmaatregelen op de meetlocatie.
Toepassingsgrenzen
Zie hoofdstuk "Technische Specificaties".
)
De Makita SK102 is ontworpen voor toepassing in
gebieden, die geschikt zijn voor permanente menselijke bewoning, gebruik het product niet gebieden
met explosiegevaar of in agressieve omgevingen.
Verantwoordelijkheidsgebieden
Verantwoordelijkheden van de fabrikant van de
oorspronkelijke apparatuur Makita Corporation
Anjo, Aichi, 446-8502 Japan (kort Makita):
Makita is verantwoordelijke voor de veiligheidstechnische onberispelijke levering van het product inclusief
gebruiksaanwijzing en originele toebehoren.
Verantwoordelijkheidsgebied van de fabrikanten van secundaire toebehoren:
Fabrikanten van secundaire toebehoren voor
)
de Makita SK102 zijn verantwoordelijk voor het
ontwikkelen, invoeren en communiceren van de
veiligheidsmaatregelen voor hun producten. Zij zijn
tevens verantwoordelijk voor de effectiviteit van hun
maatregelen in combinatie met de Makita apparatuur.
Verantwoordelijkheidsgebied van de beheerder
WAARSCHUWING:
De beheerder moet er zorg voor dragen, dat de
apparatuur in overeenstemming met de instructies
wordt gebruikt. Hij is tevens verantwoordelijk voor de
inzet van personeel en hun training en voor de veiligheid van de apparatuur tijdens gebruik.
Voor de beheerder gelden de volgende verplichtingen:
• Hij begrijpt de veiligheidsinformatie voor het
product en de instructies in de gebruiksaanwijzing.
• Hij kent de plaatselijke, industriële voorschriften
ter voorkoming van ongevallen en leeft deze na.
• Hij stelt Makita op de hoogte, zodra aan de appa-
ratuur veiligheidsgebreken optreden.
Veiligheidsvoorschriften
6
Makita SK102
Page 62

Gebruiksrisico's
VOORZICHTIG:
Pas op voor foutieve metingen bij gebruik van
een defect product, na een val of andere niet toegestane belastingen resp. modificaties aan het product.
Verricht periodiek controlemetingen. Vooral
)
na overbelasting van het product, en voor, tijdens en
na belangrijke meettaken.
Zie hoofdstuk "Controleren van de nauwkeurigheid
van de Makita SK102.".
WAARSCHUWING:
Lege batterijen mogen niet bij het huisvuil
worden weggegooid. Denk aan het milieu en lever ze in
bij verzamelpunten in overeenstemming met de nationale of plaatselijke regelgeving.
Het product mag niet bij het huisvuil worden
weggegooid.
Het product moet in overeenstemming met
de nationale regelgeving van uw land
worden verwijderd.
Voorkom steeds toegang tot het product
door onbevoegden.
Houdt u aan de nationale en landspecifieke voorschriften.
Alle rechten voorbehouden voor wijzigingen
(illustraties, beschrijvingen en technische gegevens).
Elektromagnetische compatibiliteit
(EMC)
WAARSCHUWING:
De Makita SK102 voldoet aan de strengste
eisen van de relevante normen en regelgeving.
Desondanks kan de mogelijkheid niet volledig worden
uitgesloten dat storing wordt veroorzaakt in andere
apparatuur.
Laserclassificatie
De Makita SK102 produceert een zichtbare laserstraal, die aan de voorzijde van het apparaat naar
buiten komt.
Het product komt overeen met de laserklasse 2
volgens:
• IEC60825-1 : 2007 "Veiligheid van laserinrich-
tingen".
Laser Klasse 2/ II producten:
Kijk niet in de laserstraal en richt niet onnodig op
andere personen. De bescherming van het oog wordt
gewoonlijk bewerkstelligd door afwendingreacties
inclusief knipperreflex.
WAARSCHUWING:
Direct in de laserstraal kijken met optische
hulpmiddelen (zoals bijv. verrekijkers, telescopen)
kan gevaarlijk zijn.
VOORZICHTIG:
Het kijken in de laserstraal kan gevaarlijk zijn
voor het oog.
D
EN
F
I
E
P
NL
FIN
PL
SK
HR
SR
RUS
BG
RO
Makita SK102
7
Veiligheidsvoorschriften
Page 63

D
Laser Straling
Kijk niet in de laserstraal
Laser klasse 2
volgens IEC 60825-1:2007
Max. uitgezonden vermogen: <4.2mW
Laser golflengte: 620-690nm
Straaldivergentie: 120°
Labeling
EN
F
I
E
P
NL
FIN
PL
SK
HR
SR
RUS
BG
Positie van het productetiket; zie de laatste pagina!
RO
Veiligheidsvoorschriften
8
Makita SK102
Page 64

Käyttöohje
Suomi
Onnittelut Makita SK102 hankkimisen johdosta.
Turvaohjeet seuraavat osaa kuinka
käyttää laitetta. Ennen laitteen
käyttämistä ensimmäistä kertaa lue
koko käyttöohje kiinnittäen erityistä
huomiota osaan Turvallisuusohjeet.
Ilmoitus: Käyttöohjeen ensimmäisellä ja viimeisellä
sivulla on kuvia. Käännä nämä sivut esiin käyttöohjeen lukemisen ajaksi. Kirjaimet ja numerot aaltosuluissa {} viittaavat aina näihin kuviin.
Sisällys
Alkutoimenpiteet ................................................1
Käyttö .................................................................. 1
Tekniset tiedot.................................................... 4
Turvaohjeet..........................................................5
Alkutoimenpiteet
Paristojen asentaminen/
vaihtaminen
Katso kuvaa {C} - liu'uta lukituspainiketta eteenpäin
ja avaa paristolokeron salpa. Avaa paristolokeron
kansi ja aseta paristot oikeinpäin. Paina paristolokeron kantta takaisin alas, kunnes lukko lukittuu.
Paristosymboli {B, 9} syttyy, kun paristojen jännite on
liian matala. Vaihda paristo mahdollisimman pian.
• Aseta paristot oikeinpäin
• Käytä vain alkaaliparistoja
• Paristot tulee poistaa, jos laitetta ei tulla käyttämään pitkään aikaan (syöpymisvaara)
Käyttö
Näppäimistö ja ohjauselementit
Katso kuvaa {B }:
1 LASER PÄÄLLÄ/POIS-näppäin
2 PULSSI/VIRRANSÄÄSTÖTILA-näppäin
3 Lukituskytkin
D
EN
F
I
E
P
NL
FIN
PL
SK
HR
SR
RUS
BG
RO
Makita SK102
1
Alkutoimenpiteet
Page 65

D
Näyttö
EN
Katso kuvaa {B }
4 Laserin viivaristikko
F
5 Laserin viiva vaakasuora
I
6Laserin viiva pystysuora
E
7 Lukitus PÄÄLLÄ
P
8 PULSSI/VIRRANSÄÄSTÖTILA päällä
9 Pariston jännite liian matala
NL
FIN
Kytkeminen päälle/pois
PL
PÄÄLLE: Paina lyhyesti ON -näppäintä {B, 1}.
SK
POIS: Paina ja pidä pohjassa OFF -näppäintä {B, 1}.
HR
SR
Laserin toiminnot
RUS
ON-näppäimen {B, 1} painaminen aktivoi seuraavat
laserin toiminnot:
BG
RO
ON-näppäimen
painaminen {B, 1}
1 x
2 x
3 x
Kun ON-näppäintä {B, 1} painetaan uudestaan, edel-
linen toimintotila toistuu.
laserin hiusristikko (vaakasuora ja pystysuora laserin
viiva)
Laserin vaakasuora viiva
Laserin pystysuora viiva
aktivoi
Itsevaaitus ja Lukitus-toiminnot
Laite tasaa itsensä automaattisesti määriteltyjen
kaltevuusrajojen sisällä (Katso "Tekniset tiedot") .
Paina lukituskytkintä {B, 3} voidaksesi kuljettaa ja
kallistaa laitetta tasausalueen ulkopuolella.
Lukittuna heiluri on liikkumaton ja itsetasaustoiminto
ei ole käytössä.
Pulssi/virtatila
Laitteessa on virtatilatoiminto. Laitteen kytkeminen
päälle aktivoi virtatilatoiminnon, ja laserviivat ovat
kirkkaat ja näkyvät selvästi.
Jos laserviivojen parantunutta näkyvyyttä ei tarvita ja
jos lisäksi halutaan säästää energiaa, voidaan aktivoida pulssitoiminto painamalla pulssipainiketta
{B, 2}.
Jotta voidaan havaita laserviivoja pitkien etäisyyksien
päästä (> 20 m) tai epäsuotuisissa valaistusolosuhteissa, voidaan käyttää laserinilmaisinta.
Laserinilmaisin tunnistaa sykelasersäteen.
(Laserilmaisin, katso lisälaitteet)
Käyttötarkoitukset
Esimerkkejä käyttötarkoituksista on tämän käyttöohjeen takakannen ulkopuolella.
Käyttö
2
Makita SK102
Page 66

Makita SK102:n tarkkuuden
tarkastaminen
Tarkasta Makita SK102:n tarkkuus säännölli-
)
sesti ja erityisesti ennen tärkeitä mittaustöitä.
Vaaituksen tarkkuuden tarkastaminen
Katso kuvaa {J + K}.
Aseta laite jalustalle kahden seinän (A+B) puoliväliin,
jotka ovat noin 5 m etäisyydellä toisistaan.
Aseta lukituskytkin {B, 3} asentoon "Unlocked" ( ).
Osoita laitteella seinää A ja kytke laite päälle Laser
PÄÄLLÄ {B, 1} -näppäimellä. Aktivoi laserin viivaris-
tikko Laser PÄÄLLÄ {B, 1} -näppäimellä ja merkitse
laserin viivaristikon leikkauskohta seinällä A (-> A1).
Käännä laitetta 180° ja merkitse laserin hiusrisikon
leikkauskohta seinällä B (-> B1).
Aseta sitten laite samalle korkeudelle mahdollisimman lähelle seinää A ja merkitse taas laserin viivaristikon leikkauskohta seinällä A (-> A2). Käännä
laitetta taas 180° ja merkitse laserin viivaristikon leikkauskohta seinällä B (-> B1). Mittaa etäisyydet
merkittyjen pisteiden A1-A2 välillä sekä B1-B2 välillä.
Laske näiden kahden mittauksen ero. Jos ero ei ole yli
2 mm, niin Makita SK102 on toleranssialueella.
| (A1 - A2) - (B1 - B2) | ≤ 2 mm
Vaakasuoran viivan tarkkuuden
tarkastaminen
Katso kuvaa {L}.
Aseta lukituskytkin {B, 3} asentoon "Unlocked" ( ).
Sijoita laite noin 5 m päähän seinästä. Osoita laitteella seinää ja kytke laite päälle Laser PÄÄLLÄ {B, 1}
-näppäimellä. Aktivoi laserin molemmat viivat Laser
PÄÄLLÄ {B, 1} -näppäimellä ja merkitse laserin viivaristikon leikkauskohta seinällä.
Käännä laitetta oikealla ja sitten vasemmalle. Tarkkaile pystysuuntaista poikkemaa merkitystä vaakasuorasta viivasta. Jos poikkeama ei ole yli 3 mm, niin
Makita SK102 on toleranssialueella.
Pystysuoran viivan tarkkuuden tarkastaminen
Katso kuvaa {M}.
Aseta lukituskytkin {B, 3} asentoon "Unlocked" ( ).
Käytä referenssinä luotilankaa ja kiinnitä se mahdollisimman lähelle noin 3 m korkeaa seinää.
Sijoita laite noin 1,5 m etäisyydelle seinästä noin
1,5 m korkeudelle. Osoita laitteella seinää ja kytke
laite päälle Laser PÄÄLLÄ {B, 1} -näppäimellä.
Aktivoi laserin pystysuora viiva laser PÄÄLLÄ {B, 1} näppäimellä. Käännä laitetta, kunnes pystysuora viiva
on hieman maan yläpuolella luotilangan kohdalla.
Määritä nyt laserviivan maksimipoikkeama luotilangasta koko viivan pituudelta.
Jos poikkeama ei ole yli 2 mm, niin Makita SK102 on
toleranssialueella.
Jos Makita SK102 on määritetyn toleranssi-
)
alueen ulkopuolella, ota yhteyttä valtuutettuun
jälleenmyyjään.
D
EN
F
I
E
P
NL
FIN
PL
SK
HR
SR
RUS
BG
RO
Makita SK102
3
Käyttö
Page 67

D
Näyttöilmoitukset
EN
Sallittujen lämpötilarajojen alittaminen tai ylittäminen:
F
Laser kytkeytyy pois päältä ja symbolit (−) ja (+)
I
alkavat vilkkua.
E
Itsetasausalueen ulkopuolella:
P
Laser kytkeytyy pois päältä ja käytetyn toiminnon
symboli alkaa vilkkua.
NL
Heiluri lukittu:
FIN
Lasersäde ei vaaitu ja Lukitussymboli {B, 7} syttyy.
PL
Hoito- ja käyttöhuomautuksia
SK
Älä upota laitetta veteen. Pyyhi lika pios kostealla,
HR
pehmeällä liinalla. Älä käytä syövyttäviä puhdistusai-
SR
neita tai -liuoksia. Käsittele optisia pintoja yhtä
RUS
huolellisesti kuin käsittelisit silmälaseja tai kameraa.
Kova tärinä tai pudottaminen voi vaurioittaa laitetta.
BG
Ennen käynnistämistä tarkasta laite mahdollisten
RO
vaurioiden varalta. Tarkasta laitteesi vaaitustarkkuus
säännöllisesti.
Kuljetus
Laitteen turvallista kuljettamista varten aseta Lukituskytkin {B, 3} asentoon "Locked" ( ).
Tekniset tiedot
Toimintasäde väh. 30 m ilmaisimella
Vaaitustarkkuus ± 3 mm @ 10m
Itsetasausalue 4 ° ± 0.5
Vaakasuora tarkkuus ± 1 mm @ 5m
Pystysuora tarkkuus ± 0.75 mm, 3m pitkä viiva
Laserin tyyppi 635 nm, laserluokka II
Paristotyyppi AA, 3 x 1.5 V
Suojattu vedeltä ja
pölyltä
Käyttölämpötila -10 °C - 40 °C
Säilytyslämpötila -25 °C - 70 °C
Mitat (S x L x K) 102 x 75 x 102 mm
Paino
(paristojen kanssa) 475 g
Kolmijalan kierre 1/4"
Oikeudet muutoksiin pidätetään (piirustuksien, kuvauksien ja teknisten tietojen osalta).
IP 54,
pölysuojattu,
roiskesuojattu
Teknis et t ie dot
4
Makita SK102
Page 68

Turvaohjeet
Laitteen vastuuhenkilön tulee varmistaa, että kaikki
käyttäjät tuntevat nämä ohjeet ja noudattavat niitä.
Käytetyt symbolit
Turvaohjeissa käytetyillä symboleilla on seuraava
merkitys
VAROITUS:
Käyttövaara tai asiaton käyttö, joka voi aihe-
uttaa vakavia henkilövahinkoja tai kuoleman.
HUOMIO:
Käyttövaara tai asiaton käyttö, joka voi aiheuttaa vain vähäisiä henkilövahinkoja, mutta huomattavia vahinkoja esineille, omaisuudelle tai ympäristölle.
Käyttöinformaatiota, joka ohjaa käyttäjää
)
tuotteen teknisesti oikeaan ja tehokkaaseen
käyttöön.
Sallittu käyttö
• Pystysuoran laserviivan heijastaminen
• Vaakasuoran laserviivan heijastaminen
• Pystysuoran ja vaakasuoran laserviivan heijasta-
minen samanaikaisesti (laserin viivaristikko)
Kielletty käyttö
• Laitteen käyttö tuntematta käyttöohjeita
• Käyttö muissa kuin sallituissa toimintaolosuhteissa
• Turvajärjestelmien poistaminen sekä ohje- ja
varoitustarrojen irrottaminen
• Laitteen avaaminen työkaluja (ruuviavainta ym.)
käyttäen, mikäli sitä ei nimenomaisesti tiettyjä
tapauksia varten ole sallittu
• Muutosten teko laitteeseen
• Tahallinen muiden ihmisten häikäisy, myös hämärässä
• Riittämätön mittauspaikan suojaus.
Käytön rajoitukset
Katso osio "Tekniset tiedot".
)
Makita SK102 on suunniteltu käytettäväksi alueilla,
joilla on pysyvää ihmisasutusta. Älä käytä tuotetta
rajähdysvaara-alueilla tai muutoin vaarallisissa ympäristöissä.
D
EN
F
I
E
P
NL
FIN
PL
SK
HR
SR
RUS
BG
RO
Makita SK102
5
Turv ao hj eet
Page 69

D
Vastuualueet
EN
Alkuperäisen tuotteen valmistajan Makita
Corporation Anjo, Aichi, 446-8502 Japan (lyhy-
F
esti Makita):in vastuualueet:
I
Makita on vastuussa tuotteen toimittamisesta turval-
E
lisessa, täydessä toimintakunnossa käyttöohjeineen
ja alkuperäisine tarvikkeineen.
P
NL
Vastuu tarvikkeista, jotka ovat muiden kuin
Makitan valmistamia:
FIN
PL
SK
HR
SR
RUS
BG
RO
Vastuu Makita SK201:n kanssa käytettävien,
)
muiden kuin Makitan valmistamien tarvikkeiden käyttöturvan kehittelystä, toteuttamisesta sekä ohjeistuksesta kuuluu kyseisten tarvikkeiden valmistajille.
He vastaavat myös käyttöturvallisuuden soveltuvuudesta Makita tuotteiden yhteydessä.
Laitteen vastuuhenkilön vastuu:
VAROITUS:
Laitteen vastuuhenkilön tulee varmistua, että
tuotetta käytetään ohjeiden mukaisesti. Hän vastaa
käyttöhenkilöstön kouluttamisesta ja tuotteen käyttöturvallisuudesta.
Laitteen vastuuhenkilön velvollisuudet:
• Ymmärtää laitteen turva- ja käyttöohjeet.
• Tuntee voimassa olevat paikalliset onnettomuuk-
sien ennaltaehkäisyä koskevat säännöt.
• Ilmoittaa Makita heti, jos laite tulee vaaralliseksi
käyttää.
Käyttöön liittyvät vaaratekijät
HUOMIO:
Tarkkaile mittaustulosten oikeellisuutta, jos
laite on vioittunut, se on pudonnut, sitä on käytetty
väärin tai sitä on muuteltu.
Suorita säännöllisesti koemittauksia. Erikoi-
)
sesti sen jälkeen kun laitetta on käytetty normaalista
poikkeavasti sekä ennen tärkeitä mittauksia ja myös
niiden jälkeen.
Katso osiota "Makita SK102:n tarkkuuden tarkastaminen".
VAROITUS:
Tyhjiä paristoja ei saa hävittää talousjätteen
mukana. Huolehdi ympäristöstä ja toimita ne keräyspisteisiin, jotka on järjestetty kansallisten ja paikallisten
säädösten mukaisesti.
Tuotetta ei saa hävittää talousjätteen
mukana.
Tuote on hävitettävä tarkoituksenmukaisesti maassasi voimassa olevien kansallisten säädösten mukaisesti.
Estä aina valtuuttamattoman henkilöstön
tuotteeseen käsiksi pääsy.
Noudata kansallisia ja maakohtaisia säännöksiä.
Kaikki oikeudet muutoksiin pidätetään (kuvat, selosteet ja tekniset tiedot).
Turv aohj eet
6
Makita SK102
Page 70

Sähkämagneettinen yhteensopi-
Lasersäteilyä
Älä katso lasersäteeseen
Laserluokka 2.
hyv. IEC 60825-1:2007
Enimmäissäteilyteho: <4.2mW
Aallonpituusalue: 620-690nm
Säteen hajonta 120°
vuus (EMC)
VAROITUS:
Makita SK102 noudattaa kaikkein tiukimpia
asiaan kuuluvia standardeja ja asetuksia. Tästä huolimatta sitä mahdollisuutta, että se aiheuttaisi häiriöitä
muissa laitteissa, ei voida kokonaan sulkea pois.
Laserluokitus
Makita SK102 tuottaa näkyvän lasersäteen, joka tulee
esiin laitteen etuosasta.
Laite on 2.- luokan lasertuote seuraavien määritysten
perusteella:
• IEC60825-1 : 2007 "Lasertuotteiden säteilyturval-
lisuus"
Laserluokan 2/ II tuotteet:
Älä katso suoraan lasersäteeseen äläkä suuntaa sitä
tarpeettomasti kohti muita ihmisiä. Luontainen
silmänräpäytysrefleksi suojaa silmiä normaalisti.
VAROITUS:
Suora katsominen säteeseen optisilla apuvälineillä (kuten esim. kiikarit, kaukoputket) voi olla
vaarallista.
silmille.
HUOMIO:
Lasersäteeseen katsominen voi olla vaarallista
Merkinnät
Tuote-etiketin paikka: katso viimeinen sivu!
D
EN
F
I
E
P
NL
FIN
PL
SK
HR
SR
RUS
BG
RO
Makita SK102
7
Turv ao hj eet
Page 71

D
EN
F
I
E
P
NL
FIN
PL
SK
HR
SR
RUS
BG
RO
Turv aohj eet
8
Makita SK102
Page 72

Instrukcja obsługi
Język polski
Serdeczne gratulacje z okazji zakupu Makita SK102.
Wskazówki bezpieczeństwa znajdą
Państwo w załączniku do niniejszego
dokumentu. Przed przystąpieniem do
pracy z urządzeniem należy
dokładnie zapoznać się z treścią wskazówek bezpieczeństwa jak i instrukcji obsługi.
Wskazówka: Pierwsza i ostatnia strona instrukcji
obsługi zawiera rysunki.Podczas czytania, strony te
powinny zostać rozłożone.Litery i cyfry w {} odnoszą się
zawsze do rysunków.
Spis treści
Uruchamianie............................................................ 1
Obsługa ..................................................................... 1
Dane techniczne ...................................................... 5
Wskazówki bezpieczeństwa .................................. 5
Uruchamianie
Wkładanie/wymiana baterii
Patrz rysunek {C} - W celu odbezpieczenia komory
baterii należy przesunąć "w przód" przycisk
blokady.Otworzyć pokrywkę i umieścić baterie wewnątrz
komory zgodnie z ich biegunowością.Następnie
docisnąć z powrotem pokrywkę do momentu jej "zaskoczenia".
Jeśli poziom naładowania baterii będzie niski, na ekranie
pojawi się symbol {B, 9}.Należy je jak najszybciej wymienić.
• Baterie umieścić zgodnie z ich biegunowością.
•Używać tylko baterii alkalicznych.
•Jeśli urządzenie nie będzie używane przez dłuższy
czas, baterie należy wyjąć (niebezpieczeństwo
wylania ich elektrolitu).
Obsługa
Klawiatura i elementy operacyjne
Patrz rysunek {B }:
1 Przycisk LASER ON/OFF (Włącz/Wyłącz)
2 Przycisk PULSACJA/FUNKCJA OSZCZĘDZANIA
ENERGII
3 Blokada
D
EN
F
I
E
P
NL
FIN
PL
SK
HR
SR
RUS
BG
RO
Makita SK102
1
Uruchamianie
Page 73

D
Wskazanie
EN
Patrz rysunek {B }:
4Krzyż laserowy
F
5Pozioma wiązka laserowa
I
6 Pionowa wiązka laserowa
E
7 Blokada WŁĄCZONA
P
8 Pulsacja/Funkcja oszczędzania energii
NL
FIN
PL
SK
HR
SR
RUS
BG
RO
WŁĄCZONE
9 Poziom naładowania baterii jest zbyt niski.
Włączanie/Wyłączanie
WŁĄCZANIE: Wcisnąć na krótko przycisk ON - {B, 1}.
WYŁĄCZANIE: Wcisnąć na dłużej przycisk OFF - {B, 1}.
Funkcja lasera
Przez wciśnięcie przycisku ON- {B, 1} aktywowane są
następujące funkcje lasera:
Wciśnięcie przycisku ON - {B, 1}
1 x
2 x
3 x
W trakcie dalszego wciskania przycisku ON- {B, 1} powtarzają się kolejno poszczególne funkcje.
Aktywowana funkcja
Krzyż laserowy (pozioma i
pionowa wiązka lasera)
Pozioma wiązka lasera
Pionowa wiązka lasera
Samopoziomowanie oraz
funkcja blokady
Instrument zostanie spoziomowany w sposób automatyczny zgodnie z zakresem pochylenia (zobacz "Dane
techniczne").
Podczas transportu oraz w przypadku gdy konieczne
jest ustawienie urządzenia poza zakres samopoziomowania, przycisk blokady {B, 3} musi być wciśnięty.W
stanie zablokowanym unieruchomione jest bowiem
wahadło kompensatora i tym samym niemożliwa do
wykonania procedura samopoziomowania.
Funkcja Puls/Power
Instrument wyposażony został w funkcję wzmocnienia "Power". Jest ona aktywowana w momencie włączenia
urządzenia i powoduje, że linie lasera krzyżowego będą
widoczne szczególnie wyraźnie.
Jeśli jednak rozwiązanie to nie jest koniecznie wymagane, a użytkownikowi zależy raczej na oszczędzaniu
baterii, może on wybrać funkcję "Puls" przez wciśnięcie
odpowiedniego przycisku {B, 2}.
Aby wiązka lasera mogła być wykorzystywana również
przy dalszych odległościach (> 20 m) lub przy niekor-
zystnych warunkach oświetlenia, można użyć specjalnego detektora. Podczas pracy z funkcją "Puls", emitowana przez detektor wiązka lasera będzie widoczna
nawet przy większych odległościach.
(Detektor lasera - zobacz akcesoria)
Obsługa
2
Makita SK102
Page 74

Zastosowania
Przykłady zastosowań znajdą Państwo na tylnej stronie
okładki niniejszej instrukcji obsługi.
Sprawdzenie dokładności instrumen-
tu Makita SK102
Dokładność Makita SK102 należy badać regu-
)
larnie, szczególnie przed ważniejszymi zadaniami pomiarowymi.
Sprawdzenie dokładności niwelacji
Zobacz rysunek {J + K}.
Ustawić instrument na statywie pośrodku odległości
między dwiema ścianami (A+B), które oddalone są od
siebie o ok. 5 m.
Ustawić przycisk blokady {B, 3} do pozycji "Odblokowany" ( ).
Wycelować na ścianę A i wcisnąć przycisk Laser
WŁĄCZONY (ON) {B, 1}. Aktywować krzyż laserowy za
pomocą przycisku Laser WŁĄCZONY (ON) {B, 1} i
zaznaczyć pozycję krzyża na ścianie A (-> A1).
Instrument obrócić o 180°, a następnie zaznaczyć pozycję krzyża laserowego na ścianie B (-> B1).
Urządzenie przemieścić teraz na porównywalnej
wyokości możliwie najbliżej ściany A oraz ponownie
zaznaczyć pozycję krzy
ment obrócić o 180°, a następnie zaznaczyć pozycję
krzyża laserowego na ścianie B (-> B1). Zmierzyć
odstępy między punktami A1-A2 oraz B1-B2.Różnice
wyników obu pomiarów należy uśrednić. Jeśli różnica
Makita SK102
ża na ścianie A (-> A2).Instru-
nie przekracza wartości 2 mm oznacza to, że urządzenie
Makita SK102 pracuje w zakresie dopuszczalnej tolerancji.
| (A1 - A2) - (B1 - B2) | ≤ 2 mm
Sprawdzenie dokładności realizacji linii
poziomej
Zobacz rysunek {L}.
Ustawić przycisk blokady {B, 3} do pozycji "Odbloko-
wany" ( ).
Instrument umieścić w odstępie ok. 5 m od ściany.
Wycelować na ścianę A i wcisnąć przycisk Laser
WŁĄCZONY (ON) {B, 1}. Włączyć wyświetlanie obu linii
za pomocą przycisku Laser WŁĄCZONY (ON) {B, 1}, a
następnie zaznaczyć punkt środkowy krzyża
widniejącego na ścianie.
Instrument przechylac w prawo i w lewo.W tym czasie
obserwować odchylenia linii poziomej od zaznaczonego
punktu. Jeśli odchyłka nie przekracza wartości 3 mm
oznacza to, że urządzenie Makita SK102 pracuje w
zakresie dopuszczalnej tolerancji.
Sprawdzenie dokładności realizacji linii
pionowej
Zobacz rysunek {M}.
Ustawić przycisk blokady {B, 3} do pozycji "Odblokowany" ( ).
Pomocniczo - jako odniesienia użyć pionu sznurkowego
mocując go możliwie najbliżej ściany wysokiej na około
3m.
Instrument umieścić w odległości ok. 1,5 m od ściany na
wysokości ok. 1,5 m. Wycelować na ścianę A i wcisnąć
3
Obsługa
D
EN
F
I
E
P
NL
FIN
PL
SK
HR
SR
RUS
BG
RO
Page 75

przycisk Laser WŁĄCZONY (ON) {B, 1}. Uruchomić
D
realizację linii pionowej za pomocą przycisku Laser
EN
WŁĄCZONY (ON) {B, 1}. Przyrząd należy następnie
F
obracać do momentu, aż linia pionowa wiązki laserowej
zostanie wyświetlona tuż nad podłogą na linii pionu
I
sznurkowego. Teraz należy wyznaczyć maksymalną
E
odchyłkę między linia laserową a linią pionu sznurko-
P
wego na całej jej długości.Jeśli odchyłka nie przekracza
wartości 2 mm oznacza to, że urządzenie Makita SK102
NL
pracuje w zakresie dopuszczalnej tolerancji.
FIN
PL
SK
HR
SR
RUS
BG
RO
Jeśli Państwa instrument Makita SK102 pracuje
)
poza dopuszczalnym zakresem, należy zgłosić ten fakt
autoryzowanemu sprzedawcy.
Sygnalizacja pomocnicza
Zbyt niska lub za wysoka temperatura w odniesieniu
do wartości dopuszczalnych:
Laser zostanie wyłączony oraz zaczną migać symbole
(−) i (+).
Przekroczny zakres samopoziomowania:
Laser zostanie wyłączony oraz zacznie migać symbol
używanej funkcji.
Zablokowane wahadło kompensatora:
Wiązka lasera nie zostanie spoziomowana oraz pojawi
się symbol blokady {B, 7}.
Konserwacja i wskazówki używania
Silne wstrząsy lub upadek instrumentu mogą spowodować jego uszkodzenie. W związku z tym, przed
rozpoczęciem pracy z urządzeniem trzeba je dokładnie
sprawdzić na okoliczność ewentualnych uszkodzeń.
Należy także regularnie badać dokładność niwelacji
wykonywanej Państwa urządzeniem.
Transport
Podczas transportu, w celu zapewnienia pełnego bezpieczeństwa należy ustawić przycisk blokady do pozycji
{B, 3} "zablokowany" ( ).
Obsługa
4
Makita SK102
Page 76

Dane techniczne
Zasięg min. 30 m z detektorem
Dokładność niwelacji ± 3 mm @ 10m
Zasięg pochylenia 4 ° ± 0.5
Dokładność pozioma ± 1 mm @ 5m
Dokładność pionowa ± 0.75 mm @ 3m długości
Rodzaj lasera 635 nm, klasa lasera II
Rodzaj baterii AA, 3 x 1.5 V
Ochrona przed wodą i
pyłem
Temperatura pracy -10 °C do 40 °C
Temperatura
przechowywania -25 °C do 70 °C
Wymiary
(dł. x szer. x wys.), 102 x 75 x 102 mm
Waga
(z bateriami) 475 g
Gwint statywu 1/4"
Zastrzega się możliwość zmian (rysunki, opisy i dane
techniczne).
linii
IP 54,
pyłoszczelność,
bryzgoszczelność
Wskazówki bezpieczeństwa
Producent zakłada, że wszyscy użytkownicy niniejsze
wskazówki rozumieją i będą się do nich stosować.
Używane symbole
Użyte symbole posiadają następujące znaczenie:
OSTRZEŻENIE:
Zagrożenie użytkowania lub niewłaściwe
używanie mogące spowodować poważne obrażenia
ciała.
UWAGA:
Zagrożenie użytkowania lub niewłaściwe
używanie mogące w mniejszym stopniu spowodować
szkody i obrażenia ciała lecz znaczne straty rzeczowe,
majątkowe oraz środowiskowe.
Informacja dotycząca użytkowania, która
)
pomaga użytkownikowi obsługiwać urządzenie w
sposób poprawny i efektywny.
Użytkowanie zgodne z zasadami
• Realizacja linii pionowej
• Realizacja linii poziomej
• Jednoczesna realizacja linii pionowej i poziomej
(widoczny krzyż laserowy)
D
EN
F
I
E
P
NL
FIN
PL
SK
HR
SR
RUS
BG
RO
Makita SK102
5
Dane techniczne
Page 77

D
Używanie niewłaściwe
EN
•Używanie produktu bez instrukcji
F
•Forma używania wykraczająca poza przeznaczone
I
E
P
NL
FIN
PL
SK
HR
SR
RUS
BG
RO
granice zadań
• Demontowanie zabezpieczeń i usuwanie tabliczek
ostrzegawczych
• Otwieranie produktu za pomocą narzędzi
(śrubokrętu itp.)
• Dokonywanie modyfikacji i przebudowy urządzenia
•Umyślne oślepianie osób trzecich, również w ciem-
ności
• Niewystarczające zabezpieczenie stanowisk pomiarowych
Zakres funkcjonalności
Zobacz rozdział "Dane techniczne".
)
Instrument Makita SK102 przeznaczony jest do pracy w
środowisku ciągłego przebywania ludzi i nie może być
używany w miejscach zagrożenia wybuchem lub w
warunkach szkodliwych.
Zakres odpowiedzialności
Odpowiedzialność producenta oryginalnego wyposażenia Makita Corporation Anjo, Aichi, 446-8502
Japan: (w skrócie Makita):
Makita ponosi odpowiedzialność za odpowiednie i
bezpieczne dostarczenie produktu wraz z instrukcją
używania.
Zakres odpowiedzialności producenta odnośnie
obcych akcesoriów:
Inni producenci akcesoriów do dalmierza
)
Makita SK102 odpowiedzialni są za rozwój, ustalanie i
informowanie o zasadach oraz koncepcjach bezpieczeństwa dotyczących ich produktów oraz połaczenia ich
z urządzeniem Makita.
Zakres odpowiedzialności przedsiębiorcy:
OSTRZEŻENIE
Przedsiębiorca jest odpowiedzialny za
prawidłowe używanie oprzyrządowania, działania
swoich pracowników, ich instruktaż oraz bezpiec-
zeństwo i higienę pracy oraz wyposażenia.
Przedsiębiorcę obowiązują następujące zasady:
• znajomość informacji dotyczących ochrony
urządzenia oraz instrukcji jego używania,
• znajomość miejscowych, zakładowych przepisów
bezpieczeństwa i zapobiegania wypadkom,
• powiadomienie Makita, jeżeli w stosunku do
produktu stwierdzone zostanie uchybienie bezpieczeństwa.
Wskazówki bezpieczeństwa
6
Makita SK102
Page 78

Zagrożenia użytkowania
UWAGA:
Ostrzeżenie przed mozliwością wystąpienia
błędnych pomiaów w trakcie używania produktu wadliwego, będącego po upadku lub po innych niedozwolonych zastosowaniach.
Przed ważnymi pracami oraz bezpośrednio po
)
nich należy okresowo przeprowadzać pomiary
kontrolne.
Zobacz akapit "Sprawdzenie dokładności instrumentu
Makita SK102".
OSTRZEŻENIE:
Zużytych baterii nie wolno wyrzucać do smietnika.
Należy oddać je do recyklingu zgodnie z przepisami
krajowymi lub lokalnymi.
Urządzenia nie wolno wyrzucać do śmieci.
Należy przeprowadzić stosowną jego utyli-
zację.
Zawsze przestrzegać przepisów prawa krajo-
wego w zakresie recyklingu produktów.
Urządzenie chronić przed dostępem osób
niepowołanych.
Prosimy przestrzegać krajowych i regionalnych
przepisów w tym zakresie.
Zastrzega się możliwość zmian (rysunki, opisy i dane
techniczne).
Zgodność elektromagnetyczna
OSTRZEŻENIE:
Urządzenie Makita SK102 spełnia wszelkie ustalenia znajdujące się w treści stosownych dyrektyw oraz
norm.Pomimo tego, nie można całkowicie wykluczyć
możliwości wystąpienia zakłóceń pracy innych
urządzeń.
Klasyfikacja lasera
Urządzenie Makita SK102 emituje widzialną wiązkę
lasera, której wyjście znajduje się w przedniej części.
Produkt odpowiada klasie lasera 2 zgodnie z:
• IEC60825-1 : 2007 "Bezpieczeństwo pracy z
instalacjami laserowymi"
Produkty klasy lasera 2/ II:
Nie spoglądać bezpośrednio na padający promień
lasera oraz nie kierować go niepotrzebnie w stronę
innych osób.Ochrona oczu polega na stosowaniu
kroków zapobiegawczych włącznie z zamknięciem
powiek.
OSTRZEŻENIE:
Bezpośrednie spoglądanie na promień lasera
przy użyciu pomocy optycznych (jak np. lunetki, okulary)
może być niebezpieczne.
UWAGA:
Spoglądanie bezpośrednio na padający promień
lasera może być niebezpieczne dla oczu.
D
EN
F
I
E
P
NL
FIN
PL
SK
HR
SR
RUS
BG
RO
Makita SK102
7
Wskazówki bezpieczeństwa
Page 79

D
Promieniowanie laserowe
Nie spoglądać w wiązkę.
Klasa lasera 2
nach IEC 60825-1:2007
Maks. moc wyjściowa : <4.2mW
Długość fali: 620-690nm
Rozbieżność wiązki 120°
Oznakowanie
EN
F
I
E
P
NL
FIN
PL
SK
HR
SR
RUS
BG
Umiejscowienie tabliczek - zobacz stronę okładki!
RO
Wskazówki bezpieczeństwa
8
Makita SK102
Page 80

Návod na použitie
Slovensky
Blahoželáme vám k zakúpeniu prístroja Makita SK102.
Bezpečnostné pokyny nasledujú po
časti s pokynmi ako obsluhovat’ zariadenie. Pred prvým spustením zaria-
denia si, prosím, prečítajte celý návod
na použitie a špeciálnu pozornost’ venujte časti
bezpečnostné pokyny.
Poznámka: Na prvej a poslednej strane návodu na
použitie sú nákresy. Pri čítaní návodu na použitie si
otvorte tieto stránky. Písmená a čísla v {} odkazujú vždy
na tieto nákresy.
Obsah
Spustenie................................................................... 1
Ovládanie .................................................................. 1
Technické údaje ....................................................... 5
Bezpečnostné pokyny............................................. 5
Spustenie
Vloženie / výmena batérií
Pozri nákres {C} - posuňte blokovacie tlačidlo smerom
dopredu, aby sa otvorilo oddelenie batérií. Otvorte kryt
oddelenia batérií a vložte batérie správnou stranou
dovnútra. Tlačte kryt batérií naspät’ smerom dole, kým
uzáver nezapadne.
Symbol batérie {B, 9} sa rozsvieti, keď je napätie batérií
príliš nízke. Batérie vymeňte, hneď ako to bude možné.
• Batérie vložte správnou stranou
• Používajte iba alkalické batérie
• Ak nebudete zariadenie používat’ dlhší čas, vyberte
batérie zo zariadenia (aby ste zabránili korózii).
Ovládanie
Klávesnica a ovládacie prvky
Pozri nákres {B}:
1 Kláves LASER ON/OFF (LASER ZAP/VYP)
2 Kláves PULSE/POWERSAVE MODE (IMPULZ/
ÚSPORNÝ REŽIM)
3 Blokovací spínač
D
EN
F
I
E
P
NL
FIN
PL
SK
HR
SR
RUS
BG
RO
Makita SK102
1
Spustenie
Page 81

D
Displej
EN
Pozri nákres {B}
4 Nitkový kríž lasera
F
5 Horizontálna spektrálna čiara žiarenia lasera
I
6 Vertikálna spektrálna čiara žiarenia lasera
E
7 Lock ON (Zablokovanie ZAP)
P
8 Impulz/Úsporný režim ZAP
9 Napätie batérií príliš nízke
NL
FIN
Zapnutie / vypnutie
PL
ZAP: Krátko stlačte kláves ON (ZAP) - {B, 1}.
SK
VYP: Stlačte a držte stlačený kláves OFF- (VYP) {B, 1}.
HR
SR
Funkcie lasera
RUS
Stlačenie klávesu ON (ZAP) - {B, 1} aktivuje nasledovné
funkcie lasera:
BG
RO
Stlačenie klávesu
ON (ZAP) - {B, 1}
1 x
2 x
3 x
Opätovné stlačenie klávesu ON (ZAP)- {B, 1}, stav predchádzajúcej funkcie sa opakuje.
nitkový kríž lasera (horizontálna a vertikálna spektrálna čiara žiarenia lasera)
horizontálnu spektrálnu čiaru
žiarenia lasera
vertikálnu spektrálnu čiara
žiarenia lasera
aktivuje
Samonivelizácia a blokovacie funkcie
Zariadenie sa automaticky samonivelizuje v rámci
špecifikovaného rozsahu stupňov. (Pozri „Technické
údaje") .
Stlačte blokovací spínač {B, 3}, ak chcete prepravit’ a
naklonit’ zariadenie nad rozsah samonivelizácie.
Po zablokovaní je kyvadlo upevnené a funkcia samonivelizácie je deaktivovaná.
Režim impulz/výkon
Tento prístroj je vybavený režimom výkonu. Pri zapnutí
prístroja sa aktivuje režim výkonu a spektrálne čiary
laserového žiarenia sú jasne a zreteľne viditeľné.
Ak nie je potrebná vysoká viditeľnosť spektrálnych čiar
laserového žiarenia a ak by sa okrem toho malo šetriť
energiou, tak sa stlačením tlačidla Pulse (Impulz) {B, 2}
aktivuje režim impulzu.
Aby bolo možné spektrálne čiary žiarenia lasera
rozoznat’ aj na veľké vzdialenosti (> 20 m) alebo v
nepriaznivých svetelných podmienkach, môže sa použit’
laserový detektor. V režime impulzu rozpozná detektor
lúč lasera na veľkú vzdialenosť.
(Laserový detektor pozri príslušenstvo)
Použitie
Príklady použitia môžete nájst’ na vonkajšej zadnej
strane tohto návodu na použitie.
Ovládanie
2
Makita SK102
Page 82

Kontrola presnosti prístroja Makita
SK102
Presnost’ vášho prístroja Makita kontrolujte
)
SK102 pravidelne a najmä pred dôležitými nivelizačnými
prácami.
Kontrola presnosti nivelizácie
Pozri nákres {J + K}.
Zariadenie umiestnite na stojan uprostred medzi dvoma
stenami (A+B), ktoré sú od seba vzdialené približne 5 m.
Blokovací spínač {B, 3} nastavte do polohy „Odbloko-
vaný" ( ).
Zariadenie zamierte na stenu A a zapnite ho klávesom
Laser ON {B, 1} (Laser ZAP) . Aktivujte nitkový kríž
lasera s klávesom Laser ON {B, 1} (Laser ZAP) a
označte priesečník nitkového kríža lasera na stene A
(-> A1).
Otočte zariadenie o 180° a označte priesečník nitkového
kríža na stene B (-> B1).
Potom zariadenie umiestnite v rovnakej výške tak blízko,
ako je to možné k stene A a opät’ označte priesečník
nitkového kríža lasera na stene A (-> A2). Opät’ otočte
zariadenie o 180° a označte priesečník nitkového kríža
na stene B (-> B1). Zmerajte vzdialenosti označených
bodov A1-A2 a B1-B2. Vypočítajte rozdiel týchto dvoch
meraní. Ak rozdiel nepresiahne 2 mm, potom je prístroj
Makita SK102 v rámci rozsahu tolerancie.
| (A1 - A2) - (B1 - B2) | ≤ 2 mm
Kontrola presnosti horizontálnej spektrálnej
čiary žiarenia
Pozri nákres {L}.
Blokovací spínač {B, 3} umiestnite do polohy „Odbloko-
vaný" ( ).
Zariadenie umiestnite do vzdialenosti približne 5 m od
steny. Zariadenie zamierte na stenu a zapnite ho
klávesom Laser ON {B, 1} (Laser ZAP). Aktivujte obe
spektrálne čiary žiarenia lasera klávesom Laser ON
{B, 1} (Laser ZAP) a označte priesečník nitkového kríža
lasera na stene.
Sklopte zariadenie doprava, a potom doľava. Sledujte
vertikálnu odchýlku horizontálnej spektrálnej čiary
žiarenia od označenia. Ak rozdiel nepresiahne 3 mm,
potom je prístroj Makita SK102 v rámci rozsahu tolerancie.
Kontrola presnosti vertikálnej spektrálnej
čiary žiarenia:
Pozri nákres {M}.
Blokovací spínač {B, 3} umiestnite do polohy
„Odblokovaný" ( ).
Ako referenciu použite olovnicu a namontujte ju tak
blízko, ako je to možné na približne 3 m vysokú stenu.
Zariadenie umiestnite vo vzdialenosti približne 1,5 m od
steny vo výške približne 1,5 m. Zariadenie zamierte na
stenu a zapnite ho klávesom Laser ON {B, 1} (Laser
ZAP). Vertikálnu spektrálnu čiaru žiarenia lasera aktivujte klávesom laser ON {B, 1} (Laser ZAP). Sklápajte
zariadenie, kým vertikálna spektrálna čiara žiarenia
lasera nie je nepatrne nad spodkom olovnice. Teraz
D
EN
F
I
E
P
NL
FIN
PL
SK
HR
SR
RUS
BG
RO
Makita SK102
3
Ovládanie
Page 83

určite maximálnu odchýlku spektrálnej čiary žiarenia
D
lasera k olovnici po celej dĺžke spektrálnej čiary žiarenia.
EN
Ak rozdiel nepresiahne 2 mm, potom je prístroj Makita
F
SK102 v rámci rozsahu tolerancie.
I
E
P
NL
FIN
PL
SK
HR
SR
RUS
BG
RO
Pokiaľ je váš prístroj Makita SK102 mimo
)
špecifikovanej tolerancie, prosím, spojte sa s autorizovaným obchodným zástupcom alebo spoločnos.
Hlásenia na displeji
Nedosiahnutie alebo prekročenie dovoleného
teplotného rozsahu:
Laser sa vypne a začnú blikat’ symboly (-) a (+).
Mimo rozsah samonivelizácie:
Laser sa vypne a začne blikat’ symbol použitej funkcie.
Kyvadlo zablokované:
Laserový lúč nie je nivelizovaný a rozsvieti sa symbol
zablokovania {B, 7}.
Poznámky ku starostlivosti a
prevádzke
Zariadenie neponorte do vody. Špinu utrite vlhkou
mäkkou handričkou. Nepoužívajte agresívne čistiace
prostriedky alebo rozpúšt’adlá. Optické plochy ošetrujte
rovnakým spôsobom, aký by ste použili pre okuliare
alebo fotoaparát.
Prístroj môžu poškodiť silné vibrácie alebo náraz pri
páde. Pred jeho spustením skontrolujte, či nie je
poškodený. Pravidelne kontrolujte vyrovnávaciu presnosť prístroja.
Preprava
Ak chcete zariadenie bezpečne prepravovat’, nastavte
blokovací spínač na {B, 3} „Zablokovaný“ ( ).
Ovládanie
4
Makita SK102
Page 84

Technické údaje
Rozsah min. 30 m s detektorom
Presnost’ nivelizácie ± 3 mm @ 10m
Rozsah sklonu: 4 ° ± 0.5
Horizontálna presnost’ ± 1 mm @ 5 m
Vertikálna presnost’ ± 0,75 mm @ 3 m dĺžka
Typ laseru 635 nm, laser trieda II
Typ batérie AA, 3 x 1,5 V
Chránený pred vodou a
prachom
Prevádzková teplota -10 °C až 40 °C
Teplota uskladnenia -25 °C až 70 °C
Rozmery (H x Š x V) 102 x 75 x 102 mm
Hmotnost’ (s batériami) 475 g
Vlákno statívu 1/4"
Všetky práva na zmeny vyhradené (na nákresy, popisy
a technické údaje).
spektrálnej čiary žiarenia
chránený pred prachom,
chránený pred striekajúcou
IP 54,
vodou
Bezpečnostné pokyny
Osoba zodpovedná za zariadenie musí zabezpečit’, že
všetci používatelia im rozumejú a dodržiavajú ich.
Použité symboly
Použité symboly majú nasledovné významy
VÝSTRAHA:
Udáva potenciálne nebezpečnú situáciu alebo
použitie na neurčený účel, ktorým ak nezabránite,
vyústia do smrteľného alebo vážneho zranenia.
UPOZORNENIE:
Udáva potenciálne nebezpečnú situáciu alebo
použitie na neurčený účel, ktorým ak nezabránite, môžu
vyústit’ do malého zranenia a/alebo značného materiálneho, finančného alebo environmentálneho poškodenia.
Dôležité odseky, ktoré sa musia dodržiavat’v
)
praxi, keďže umožňujú používanie výrobku technicky
správnym a efektívnym spôsobom.
Dovolené použitie
• Projekcia vertikálnej spektrálnej čiary žiarenia lasera
• Projekcia horizontálnej spektrálnej čiary žiarenia
lasera
•Súčasná projekcia horizontálnej a vertikálnej
spektrálnej čiary žiarenia lasera (nitkový kríž lasera)
D
EN
F
I
E
P
NL
FIN
PL
SK
HR
SR
RUS
BG
RO
Makita SK102
5
Technické údaje
Page 85

D
Zakázané použitie
EN
• Používanie výrobku bez poučenia
F
• Používanie mimo rozsahu stanovených limitov
• Deaktivovanie bezpečnostných systémov a odstrá-
I
E
P
NL
FIN
PL
SK
HR
SR
RUS
BG
RO
nenie nálepiek s vysvetlivkami a upozornením na
nebezpečenstvo
• Otváranie vybavenia za použitia nástrojov (skrutkovače, atď.), pokiaľ to nie je v niektorých prípadoch
výslovne dovolené
• Vykonávanie úprav alebo prerábanie výrobku
• Úmyselné oslňovanie tretích strán; tiež v tme
• Nedostatočná ochrana na mieste merania.
Limity používania
Pozri čast’ „Technické údaje“.
)
Prístroj Makita SK102 je určený pre používanie v trvale
obývaných oblastiach, výrobok nepoužívajte v oblastiach s nebezpečenstvom výbuchu alebo v agresívnych
prostrediach.
Zodpovednosti
Zodpovednosti výrobcu originálneho vybavenia
spoločnosti Makita Corporation Anjo, Aichi 4468502, Japan (ďalej len Makita):
Spoločnosť Makita je zodpovedná za dodanie výrobku,
vrátane návodu na použitie a pôvodného príslušenstva,
v úplne bezpečnom stave.
Zodpovednosti výrobcu príslušenstva inej značky:
Výrobcovia príslušenstva pre zariadenie Makita SK102
inej značky sú zodpovední za vývoj, implementáciu a
komunikovanie bezpečnostných konceptov ich
výrobkov. Sú tiež zodpovední za účinnosť týchto
bezpečnostných konceptov v kombinácii so zariadením
Makita.
Zodpovednosti osoby, ktorá má prístroj na starosti:
VÝSTRAHA
Osoba zodpovedná za zariadenie musí zabezpečiť, aby sa zariadenie používalo v súlade s pokynmi.
Táto osoba je tiež zodpovedná za rozmiestnenie personálu a jeho zaškolenie a za bezpečnosť zariadenia keď sa
používa. Osoba, ktorá má zariadenie na starosti má
nasledovné povinnosti:
•Rozumieť bezpečnostným pokynom na výrobku a
pokynom v návode na použitie.
• Poznať miestne bezpečnostné predpisy vzť ahujúce
sa na predchádzanie nehodám.
• Okamžite informovať Makita, ak sa zariadenie stane
nebezpečným.
Bezpečnostné pokyny
6
Makita SK102
Page 86

Nebezpečenstvá pri používaní
UPOZORNENIE:
Dávajte si pozor na chybné merania vzdialenosti,
ak je zariadenie poškodené alebo spadlo alebo bolo
nesprávne používané alebo upravené.
Vykonávajte pravidelné testovacie merania.
)
Najmä potom, ako bolo zariadenie vystavené neobvyklému používaniu a pred, počas a po dôležitých mera-
niach.
Pozri čast’ „Kontrola presnosti prístroja Makita SK102“.
VÝSTRAHA:
Vybité batérie sa nesmú likvidovat’ s domovým
odpadom. Starajte sa o životné prostredie a odneste ich
do zberných miest vybavených v súlade s národnými a
miestnymi predpismi.
Výrobok sa nesmie likvidovat’ s domovým
odpadom.
Výrobok likvidujte náležite v súlade s národnými predpismi platiacimi vo vašej krajine.
Vždy zamedzte neautorizovaného personálu
prístup k výrobku.
Dodržiavajte národné smernice a smernice
špecifické pre vašu krajinu.
Všetky práva na zmeny vyhradené (nákresy, popis a
technické parametre).
Elektromagnetická kompatibilita
(EMC)
VÝSTRAHA:
Prístroj Makita SK102 vyhovuje najprísnejším
požiadavkám príslušných noriem a smerníc. Avšak
možnost’ spôsobenia interferencie- v iných prístrojoch
nie je možné úplne vylúčit’.
Klasifikácia lasera
Prístroj Makita SK102 vytvára viditeľný laserový lúč,
ktorý vychádza z prednej časti zariadenia.
Je to laserový výrobok triedy 2 v súlade s:
• IEC60825-1: 2007 „Bezpečnost’ žiarenia laserových
výrobkov"
Výrobky s laserom triedy 2/II:
Nepozerajte sa do laserového lúča, ani ho zbytočne
nemierte na iných ľudí. Ochrana oka je bežne poskytnutá reakciami odporu v rátane žmurkacieho reflexu.
VÝSTRAHA:
Pozeranie sa priamo do lúča s optickými pomôckami (napr. ďalekohľadmi, teleskopmi) môže byt’ nebezpečné.
UPOZORNENIE:
Pozeranie sa do laserového lúča môže byt’ pre oči
nebezpečné.
D
EN
F
I
E
P
NL
FIN
PL
SK
HR
SR
RUS
BG
RO
Makita SK102
7
Bezpečnostné pokyny
Page 87

D
Laserové žiarenie
Nepozerajte sa do lúča
Trieda laseru 2
podľa IEC 60825-1:2007
Maximálna intenzita žiarenia: <4.2 mW
Vlnová dĺžka vysielania: 620-690 nm
Odchýlka lúča 120°
Označenie
EN
F
I
E
P
NL
FIN
PL
SK
HR
SR
RUS
BG
Umiestnenie označenia výrobku pozri poslednú stranu!
RO
Bezpečnostné pokyny
8
Makita SK102
Page 88

Korisnički priručnik
Hrvatski
Zahvaljujemo Vam na kupnji Makita SK102.
Sigurnosne upute nalaze se iza
poglavlja o načinu rada s uređajem.
Prije početka rada s instrumetom
pažljivo pročitajte korisnički priručnik,
a posebice sigurnosne upute.
Bilješka: Prva i zadnja strana priručnika uključuju
ilustracije te trebaju biti presavijene i ostavljene otvorenima tijekom čitanja ovog priručnika. Slova i znamenke
u zagradama {} uvijek upućuju na te ilustracije.
Sadržaj
Pokretanje ................................................................. 1
Rad ............................................................................. 1
Tehnički podaci ........................................................ 4
Sigurnosni naputci ................................................... 5
Pokretanje
Umetanje i zamjena baterija
Pogledajte crtež {C} - Gurnite zaporni mehanizam prema
naprijed da biste otključali odjeljak za baterije. Otvorite
poklopac odjeljka i umetnite baterije pazeći na ispravan
polaritet. Pritisnite poklopac odjeljka za baterije nadolje
dok se ne aktivira zaponac.
Kada je napon baterije prenizak na zaslonu se osvjetljuje
simbol baterije {B, 9}. Bateriju zamijenite što je prije
moguće.
• Pripazite na ispravan polaritet
• Koristite samo alkalne baterije
• Izvadite baterije, ako uređaj nećete koristiti dulje
vrijeme (opasnost od korozije)
Rad
Tipkovnica i upravljački elementi
Pogledajte crtež {B }:
1 Tipka za uklj./isklj. lasera
2 Tipka za pulsni/štedni način rada
3 Tipka za blokadu
D
EN
F
I
E
P
NL
FIN
PL
SK
HR
SR
RUS
BG
RO
Makita SK102
1
Pokretanje
Page 89

D
Zaslon
EN
Pogledajte crtež {B }
4 Laserski ciljnik
F
5 Horizontalna liniju lasera
I
6 Vertikalna liniju lasera
E
7 Blokada uključena (ON)
P
8 Tipka za pulsiranje/snagu
9 Prenizak napon baterije
NL
FIN
Uključivanje i isključivanje
PL
ON: Kratko pritisnite tipku ON {B, 1}.
SK
OFF: Pritisnite i držite tipku OFF{B, 1}.
HR
SR
Funkcije lasera
RUS
Pritisnite tipku ON {B, 1} za aktiviranje sljedećih funk-
cija lasera:
BG
RO
Pritisak na tipku
ON {B, 1}
1 x
2 x
3 x
Ponovnim pritiskom na tipku ON {B, 1} ponavlja se
prethodna funkcija.
lasrski ciljnik (horizontalnu i
vertikalnu liniju lasera)
horizontalnu liniju lasera
vertikalnu liniju lasera
aktivira
Funkcije samoporavnanja i blokiranja
Instrument se automatski poravnava ovisno o zadanom
rasponu stupnjeva (pogledajte "Tehnički podaci") .
Pritisnite zaporni prekidač {B, 3} kako biste premjestili i
nagnuli instrument izvan raspona samoporavnanja.
Kada je instrument blokiran, visak je fiksiran, a samoporavnanje isključeno.
Implusni/kontinuirani način rada
Instrument ima kontinuirani način rada koji se aktivira
uključivanjem instrumenta. Laserske zrake su jasne i
izrazito vidljive.
Kada jaka vidljivost laserskih zraka nije potrebna, a
želite uštedjeti energiju, pritiskom na gumb Pulse {B, 2}
aktivirajte impulsni način rada.
Kako biste otkrili laserske zrake na većim udaljenostima
(> 20 m) ili nepovoljnim uvjetima osvjetljenja, možete
koristiti detektor laserske zrake. U impulsnom načinu
rada, detektor također prepoznaje lasersku zraku na
velikim udaljenostima.
(Laserski detektor potražite u dodatnoj opremi)
Područja primjene
Primjere primjene potražite na poleđini ovog korisničkog
priručnika.
Rad
2
Makita SK102
Page 90

Provjera točnosti uređaja Makita
SK102
Redovito provjeravajte točnost svog Makita
)
SK102 posebice prije važnih zadataka premjeravanja.
Provjera točnosti premjeravanja
Pogledajte crtež {I + J}.
Postavite instrument na postolje između dva zida (A+B)
međusobno udaljena oko 5 m.
Namjestite zaporni prekidač { B, 3} u položaj "Otključano"
().
Usmjerite instrument prema zidu A i uključite ga priti-
skom na tipku Laser ON {B, 1}. Aktivirajte laserski ciljnik
pomoću tipke Laser ON {B, 1} i označite sjecište zraka
laserskog ciljnika na zidu A (-> A1).
Zakrenite instrument za 180° i označite sjecište zraka
laserskog ciljnika na zidu B (-> B1).
Potom postavite instrument u istoj visini što bliže zidu A
i ponovno označite sjecište zraka laserskog ciljnika na
zidu A (-> A2). Ponovno zakrenite instrument za 180° i
označite sjecište zraka laserskog ciljnika na zidu B (->
B1). Izmjerite udaljenosti između označenih točaka A1A2 i B1-B2. Izračunajte razliku dvaju mjerenja. Ako
razlika ne prelazi 2 mm, instrument Makita SK102 nalazi
se unutar raspona tolerancije.
| (A1 - A2) - (B1 - B2) | ≤ 2 mm
Provjera točnosti horizontalne linije
Pogledajte crtež {K}.
Namjestite zaporni prekidač { B, 3} u položaj "Otključano"
().
Postavite instrument na udaljenost od oko 5 m od zida.
Usmjerite instrument prema zidu i uključite ga pritiskom
na tipku Laser ON {B, 1}. Aktivirajte obje laserske linije
pomoću tipke Laser ON {B, 1} i označite sjecište linija
laserskog ciljnika na zidu.
Nagnite instrument udesno pa ulijevo. Provjerite vertikalno odstupanje horizontalne linije od označene točke.
Ako razlika ne prelazi 3 mm, instrument Makita SK102
nalazi se unutar raspona tolerancije.
Provjera točnosti vertikalne linije
Pogledajte crtež {L}.
Namjestite zaporni prekidač { B, 3} u položaj "Otključano"
().
Kao referentnu točku koristite visak i postavite ga što
bliže 3 m visokom zidu.
Postavite instrument na udaljenost od oko 1,5 m od zida
i na uzvišenje od oko 1,5 m. Usmjerite instrument prema
zidu i uključite ga pritiskom na tipku Laser ON {B, 1}.
Aktivirajte lasersku zraku pritiskom na Laser ON {B, 1}.
Nagnite instrument sve dok vertikalna laserska linija ne
dođe do viska malo iznad tla. Sada odredite maskimalno
odstupanje laserske linije u odnosu na visak cijelom
duljinom linije.
Ako odstupanje ne prelazi 2 mm, instrument Makita
SK102 nalazi se unutar raspona tolerancije.
Ako se vaš instrument SK102 nalazi izvan
)
zadane tolerancije, molimo obratite se ovlaštenom
dobavljaču.
D
EN
F
I
E
P
NL
FIN
PL
SK
HR
SR
RUS
BG
RO
Makita SK102
3
Rad
Page 91

D
Napomene na zaslonu
EN
Raspon temperatura ispod ili iznad dopuštenog:
Laser se isključuje, a simboli (−) i (+) počinju treperiti.
F
Izvan raspona samoporavnanja:
I
Laser se isključuje, a simbol korištene funkcije počinje
E
treperiti.
P
Visak zaključan:
NL
Laserska zraka nije poravnana i uključuje se simbol
blokade {B, 7}.
FIN
PL
Obavijesti o održavanju i primjeni
SK
Ne uranjajte instrument u vodu. Prljavštinu očistite s
vlažnom, mekanom krpom. Ne rabite agresivna sredstva
HR
za čišćenje ni otapala. S optičkim površinama postupajte
SR
na isti način koji biste primijenili za njegu naočala i
RUS
kamera.
Teške vibracije i pad mogu rezultirati oštećenjem instru-
BG
menta. Prije pokretanja instrumenta provjerite posto-
RO
janje eventualnih oštećenja. Redovito provjeravajte
točnost niveliranja svog instrumenta.
Tehnički podaci
Raspon min. 30 m s detektorom
Točnost mjerenja ± 3 mm @ 10m
Raspon nagiba 4 ° ± 0,5
Točnost horizontalnog
mjerenja ± 1 mm @ 5 m
Točnost vertikalnog
mjerenja
Vrsta lasera 635 nm, laserska klasa II
Vrsta baterije AA, 3 x 1,5 V
Zaštita od vode i prašine IP 54,
Radna temperatura -10 °C do 40 °C
Temperatura pohrane -25 °C do 70 °C
Dimenzije (D x Š x V) 102 x 75 x 102 mm
Težina 475 g
Navoj tronošca 1/4"
± 0,75 mm @ 3 m
duljine linije
zaštita od prašine i
prskanja vode
Prijenos
Za siguran prijenos intrumenta namjestite zaporni prekidač {B, 3} na "Zaključano" ( ).
Tehnički podaci
Pridržano je pravo izmjene ilustracija, opisa i tehničkih
značajki.
4
Makita SK102
Page 92

Sigurnosni naputci
Osoba odgovorna za instrument mora se pobrinuti da svi
korisnici razumiju i pridržavaju se ovih uputa.
Korišteni simboli
Simboli koji se koriste u sigurnosnim naputcima imaju
sljedeće značenje
UPOZORENJE:
Ukazuje na potencijalno opasnu situaciju ili
nepredviđeni način uporabe koji, ako se ne izbjegne,
može rezultirati smrću ili ozbiljnim povredama.
OPREZ:
Ukazuje na potencijalno opasnu situaciju ili
nepredviđeni način uporabe koji, ako se ne izbjegne,
može rezultirati manjim povredama i/ili značajnim materijalnim, financijskim i ekološkim štetama.
Važna poglavlja kojih se morate pridržavati u
)
praksi budući da omogućavaju uporabu proizvoda na
tehnički ispravan i učinkovit način.
Dozvoljena uporaba
• Projiciranje vertikalne laserske zrake
• Projiciranje horizontalne laserske zrake
• Istovremeno projiciranje vertikalne i horizontalne
laserske zrake (laserski ciljnik)
Nedozvoljena uporaba
• Uporaba instrumenta bez čitanja uputa
• Uporaba izvan postavljenih granica
• Isključivanje sigurnosnih sustava i uklanjanje naljepnica s objašnjenima i upozorenjima na opasnost
• Otvaranje opreme alatima (odvijačima i sl.), bez
izričite dozvole za pojedine slučajeve
• Izvođenje preinaka ili konverzija na proizvodu
• Namjerno zasljepljivanje trećih osoba; također u
mraku
• Neprimjerene sigurnosne mjere na mjestu koje se
premjerava.
Ograničenja uporabe
Pogledajte odjeljak "Tehnički podaci".
)
Makita SK102 namijenjen je za uporabu u područjima
koja trajno nastanjuju ljudi. Ne koristite ga u eksplozivno
opasnim područjima ni u agresivnim okruženjima.
Odgovornosti
Odgovornosti proizvođača originalne opreme
Makita Corporation Anjo, Aichi 446-8502, Japan:
Makita je odgovoran za opskrbu proizvoda, uključujući i
Korisnički priručnik i originalan pribor, u potpuno
sigurnom stanju.
D
EN
F
I
E
P
NL
FIN
PL
SK
HR
SR
RUS
BG
RO
Makita SK102
5
Sigurnosni naputci
Page 93

Odgovornosti proizovđača pribora, koji ne proizvodi
D
Makita:
EN
Proizvođači pribora za Makita SK102 su odgovorni za
F
razvoj, implementiranje i obavještavanje o sigurnosnim
I
konceptima svojih proizvoda. Oni su također ogovorni za
E
učinkovitost tih sigurnosnih kocepata u kombinaciji sa
Makita opremom.
P
NL
Odgovornosti lica koja su zadužena za instrument:
FIN
PL
SK
HR
SR
RUS
BG
RO
UPOZORENJE
Lica koja su odgovorna za instrument moraju
osigurati da se oprema koristi sukladno ovim uputama.
Ta osoba je također odgovorna za angažiranje osoblja i
njihovu obuku i za sigurnost opreme prilikom
uporabe.Osoba odgovorna za proizvod ima slijedeće
dužnosti:
• Da razumje sigurnosne upute za proizvod i upute u
Korisničkom priručniku.
• Da poznaje lokalne sigurnosne propise za zaštitu od
nesreća.
• Da odmah obavjesti firmu Makita ukoliko oprema
postane nesigurna.
Opasnosti tijekom uporabe
OPREZ:
Pripazite na pogreške u mjerenju udaljenosti ako
je instrumet neispravan, ako je bio ispušten, pogrešno
upotrijebljen ili su na njemu izvršene preinake.
Provedite povremena porbna mjerenja. Pose-
)
bice nakon što je instrumet bio podvrgnut neuobičajenoj
uporabi te prije, tijekom i nakon važnih mjerenja.
Pogledajte odjeljak "Provjera točnosti uređaja Makita
SK102".
UPOZORENJE:
Rabljene baterije ne smiju se odlagati zajedno s
komunalnim otpadom. Vodite brigu o okolišu te takve
baterije odnesite na mjesto za prikupljanje takvog otpada
sukladno nacionalnihm i lokalnim propisima.
Proizvod ne odlažite zajedno s komunalnim
otpadom.
Proizvod zbrinite u skladu s propisima koji su
na snazi u vašoj zemlji.
Uvijek spriječite pristup proizvodu od strane
neovlaštenih osoba.
Držite se nacionalnih propisa i propisa koji
važe u dotičnoj zemlji.
Sva prava na izmjene su zadržana (crteži, opisi i
tehničke specifikacije).
Elektromagnetska sukladnost (EMC)
UPOZORENJE:
Makita SK102 ispunjava najstrože zahtjeve odgovarajućih standarda i propisa. Međutim, mogućnost
stvaranja smetnji u drugim uređajima ne može se
potpuno isključiti.
Sigurnosni naputci
6
Makita SK102
Page 94

Klasifikacija lasera
Lasersko zračenje
Ne zurite u zraku
Laserska klasa 2
odobr. IEC 60825-1:2007
Maksimalna snaga zračenja : <4.2 mW
Emitirana valna duljina: 620-690 nm
Divergencija zrake 120°
Makita SK102 proizvodi vidljivu lasersku zraku koja izlazi
iz prednjeg dijela instrumenta.
To je laser klase 2 u skladu sa:
• IEC60825-1 : 2007 "Sigurnost zračenja laserskih
proizvoda"
Laserski proizvodi klase 2/ II:
Ne zurite u lasersku zraku i ne upravljajte je bespotrebno
prema drugim ljudima. Zaštita oka postiže se normalnim
reagiranjem, uključujući refleksno treptanje.
UPOZORENJE:
Izravno gledanje u zraku pomoću optičkih poma-
gala (npr. dvogled, teleskop) može biti opasno.
OPREZ:
Gledanje u lasersku zraku može biti opasno za oči.
Naljepnice
Položaj proizvodne naljepnice možete vidjeti na zadnjoj
stranici!
D
EN
F
I
E
P
NL
FIN
PL
SK
HR
SR
RUS
BG
RO
Makita SK102
7
Sigurnosni naputci
Page 95

D
EN
F
I
E
P
NL
FIN
PL
SK
HR
SR
RUS
BG
RO
Sigurnosni naputci
8
Makita SK102
Page 96

Упутство за употребу
Српски
Честитамо вам на куповини производа Makita SK102.
Безбедносна упутства се налазе
после објашњења како руковати
овим уређајем. Пре него што први
цело упутство за употребу обраћајући посебну
пажњу на део са безбедносним упутствима.
Напомена: На првој и задњој страници упутства за
употребу налазе се слике. Отворите те странице
будете читали ово упутство за употребу. Слова и
бројке у оваким заградама {} увек се односе на те
слике.
Садржај
Укључивање ............................................................ 1
Рад ............................................................................. 1
Технички подаци .................................................... 5
Безбедносна упутства .......................................... 5
пут укључите уређај прочитајте
док
Укључивање
Стављање / мењање батерија
Видите слику {C} - дугме повуците напред да бисте
откључали преграду за батерије. Отворите поклопац
преграде и ставите батерије водећи рачуна о
половима. Затворите поклопац након чега ће се
закључати.
Ознака батерије {B, 9} почеће да светли када напон
у батеријама постане пренизак. Батерије замените
што пре.
• Ставите батерије водећи рачуна о
• Користите искључиво алкалне батерије
• Извадите батерије ако уређај дуго нећете
користити (да би се спречила појава корозије)
половима
Рад
Тастатура и контролни елементи
Видите слику {B}:
1 Типка за УКЉ/ИСКЉ. ласера
2 Типка за ИМПУЛС/ШТЕДЊУ ЕНЕРГИЈЕ
3 Дугме за закључавање
D
EN
F
I
E
P
NL
FIN
PL
SK
HR
SR
RUS
BG
RO
Makita SK102
1
Укључивање
Page 97

D
Екран
EN
Видите слику {B}
4 Нишан ласера
F
5 Хоризонтална линија ласера
I
6 Вертикална линија ласера
E
7 Закључавање УКЉ.
P
8 Импулс/штедња енергије УКЉ.
9 Напон батерије пренизак
NL
FIN
Укључивање/искључивање
PL
УКЉ: Притисните типку УКЉ. {B, 1}.
SK
ИСКЉ: Притисните и држите типку ИСКЉ. {Б, 1}.
HR
SR
Функције ласера
RUS
Притиском на типку УКЉ. {B, 1} активирају се
следеће функције ласера:
BG
Притиском типке
RO
УКЉ. {B, 1}
1 x
2 x
3 x
Поновним притиском типке УКЉ. {B, 1} претходна
функција бива поновљена.
активира се
нишан ласера
(хоризонтална и вертикална
линија ласера)
хоризонтална линија ласера
вертикална линија ласера
Функције самоподешавања и
закључавања
Уређај се аутоматски подешава у оквиру унапред
задатог распона (видите одељак "Технички подаци").
Притисните Дугме за закључавање {B, 3} да бисте
преместили уређај и подесили његов нагиб изван
опсега самоподешавања. Када је уређај закључан,
клатно је фиксирано и функција самоподешавања је
искључена.
Режим импулс/напајање
Уређај је опремљен Режимом напајања.
Укључивањем уређаја активира се Режим напајања
и линије ласера су јарке и лако уочљиве.
Ако није потребно да линије ласера буду лако
уочљиве и ако треба уштедети енергију, притиском
типке Импулс {B, 2} активираћете режим Импулс.
Да би линије ласера могле да буду уочене на
великим удаљеностима
неповољним осветљењем може се користити
детектор ласера. У режиму Импулс тај детектор
може да препозна ласерски зрак и на великим
удаљеностима.
(За информације о детектору ласера видите одељак
о додацима)
(> 20 м) или под
Апликације
Примере апликација можете пронаћи на полеђини
овог упутства за употребу.
Рад
2
Makita SK102
Page 98

Проверавање тачности уређаја
Makita SK102
Тачност свог уређаја Makita SK102
)
проверавајте редовно, а посебно уочи важних
послова нивелисања.
Провера тачности нивелисања
Видите слику {£ + K}.
Ставите уређај на сталак на пола пута између два зида
(А+Б) који су на међусобној раздаљини од око 5 м.
Дугме за закључавање {B, 3} ставите у позицију
"Откључано" ( ).
Усмерите уређај ка зиду А и укључите га притиском
на типку Ласер УКЉ. {B, 1}. Типком Ласер УКЉ.
{B, 1} активирајте нишан ласера и на зиду А (-> А1)
означите место где се укрштају линије нишана.
Заротирајте уређај за 180° и на зиду Б (-> B1)
означите место где се укрштају линије нишана.
Затим уређај, држећи га на истој висини, што више
можете приближите зиду А и поново означите место
где се укрштају
заротирајте уређај за 180° и на зиду Б (-> B1)
означите место где се укрштају линије нишана.
Измерите раздаљину између обележених тачки А1А2 и Б1-Б2. Прорачунајте разлику између два
мерења. Ако раздаљина не прелази 2 mm, то значи
да је уређај Makita SK102 у распону који се може
толерисати.
| (А1 - А2) - (
линије нишана (-> А2). Поново
Б1 - Б2) | ≤ 2 mm
Провера тачности хоризонталне линије
Видите слику {L}.
Дугме за закључавање {B, 3} ставите у позицију
"Откључано" ( ).
Ставите уређај на раздаљину од око 5 м од зида.
Усмерите уређај ка зиду и укључите га притиском на
типку Ласер УКЉ. {B, 1}. Типком Ласер УКЉ. {B, 1}
активирајте обе линије ласера и на зиду обележите
тачку пресека линија нишана.
Окрените уређај удесно, а затим улево. Посматрајте
вертикално одступање хоризонталне линије у
односу на ознаку. Ако одступање није веће од 3 mm,
то значи да је уређај Makita SK102 у распону који се
може толерисати.
Провера тачности вертикалне линије
Видите слику {Ì}.
Дугме за закључавање {B, 3} ставите у позицију
"Откључано" ( ).
За репер узмите лоптицу виска и ставите је што је
ближе могуће на зид висок око 3 m.
Поставите уређај на удаљеност од око 1,5 m од зида
на висину од око 1,5 m. Усмерите уређај ка зиду и
укључите га притиском на типку Ласер
Активирајте вертикалну линију ласера притиском на
типку Ласер УКЉ. {B, 1}. Подесите уређај тако да
вертикална линија ласера буде мало изнад доњег
дела лоптице виска.Сада дуж читаве дужине линије
утврдите колико је максимално одступање линије
ласера у односу на лоптицу виска.
УКЉ. {B, 1}.
D
EN
F
I
E
P
NL
FIN
PL
SK
HR
SR
RUS
BG
RO
Makita SK102
3
Рад
Page 99

Ако одступање није веће од 2 mm, то значи да је
D
уређај Makita SK102 у распону који се може
EN
толерисати.
F
I
E
P
NL
FIN
PL
SK
HR
SR
RUS
BG
RO
Ако ваш уређај Makita SK102 одступа од
)
дозвољене толеранције, ступите у контакт са
овлашћеним представништвом.
Обавештења на екрану
Уређај је испод или изнад дозвољеног
температурног распона:
Ласер се гаси и симболи (-) и (+) почињу да трепере.
Ван самоподешавајућег распона:
Ласер се гаси и симбол коришћене функције почиње
да трепери.
Клатно закључано:
Зрак ласера није нивелисан и симбол Закључано
{B, 7} почиње да светли.
Одржавање и напомене о раду
Уређај немојте потапати у воду. Прашину обришите
влажном, меком крпом. Немојте користити агресивна
средства за чишћење или растворе. Према оптичким
површинама се опходите једнако пажљиво као с
наочарима или фото-апаратом.
Јаке вибрације или пад могу да оштете уређај. Пре
укључивања проверите да ли је уређај негде
оштећен. Редовно проверавајте тачност
нивелисања уређаја.
Транспорт
Уређај ћете безбедно транспортовати ако Дугме за
закључавање ставите у позицију {B, 3} то
"Закључано" ( ).
Рад
4
Makita SK102
Page 100

Технички подаци
Распон мин. 30 m са детектором
Тачност нивелисања ± 3 mm @ 10 m
Распон нагиба 4° ± 0,5
Хоризонтална тачност ± 1 mm @ 5 m
Вертикална тачност ± 0,75 mm @ на линији
Тип ласера 635 nm, ласер класе II
Тип батерије АА, 3 x 1,5 V
Заштита од воде и
прашине
Радна температура -10°C до 40°C
Складишна
температура
Димензије (Ш x В x Д ) 102 x 75 x 102 mm
Тежина (укључујући
батерија) 475 г
Навој сталка 1/4"
Задржана сва права на измене (цртежа, описа и
техничких података).
заштита од
дугој 3 m
IP 54,
заштита од прашине,
прскања воде
-25°C до 70°C
Безбедносна упутства
Особа задужена за уређај мора бити сигурна да сви
корисници разумеју ова упутства и да их се
придржавају.
Коришћени симболи
Коришћени симболи значе следеће
УПОЗОРЕЊЕ
Указује на потенцијално опасну ситуацију или
на ненаменску употребу која, ако се не избегне, може
да изазове смрт или нанесе озбиљне повреде.
ОПРЕЗ
Указује на потенцијално опасну ситуацију или
на ненаменску употребу која, ако се не избегне, може
да изазове мање повреде и/или знатну материјалну
и финансијску штету или штету по животну средину.
Важни одломци чија се упутства морају
)
следити
јер омогућују да се уређај користи
на технички исправан и делотворан начин.
Дозвољено
• За пројектовање вертикалне линије ласера
• За пројектовање хоризонталне линије ласера
• За пројектовање вертикалне и хоризонталне
линије ласера истовремено (нишан ласера)
D
EN
F
I
E
P
NL
FIN
PL
SK
HR
SR
RUS
BG
RO
Makita SK102
5
Технички подаци
 Loading...