

Page 1
PETROL BLOWER
SOUFFLEUR À ESSENCE
BENZIN BLASGERÄT
SOFFIATORE A BENZINA
BENZINE BLADBLAZER
SOPLADOR GASOLINA
English / Français / Deutsch
Italiano / Nederlands / Español
PB-252.4
INSTRUCTION MANUAL
(P2~P18)
INSTRUCTIONS D’EMPLOI
(P19~P35)
BETRIEBSANLEITUNG
(P36~P52)
Important:
Read this instruction manual carefully before putting the Blower into operation and strictly
observe the safety regulations! Preserve instruction manual carefully!
Importante:
Lisez attentivement ce manuel utilisateur avant de mettre en route le souffleur et respectez scrupuleusement les consignes de sécurité.
Conservez soigneusement ce manuel.
Wichtig:
Lesen Sie diese Betriebsanleitung sorgfältig durch bevor Sie das Blasgerät in Betrieb
nehmen und beachten Sie die Sicherheitsvorschriften genau!
Bewahren Sie diese Betriebsanleitung sorgfältig aul!
MANUALE D’ISTRUZIONI
(P53~P69)
GEBRUIKSAANWIJZING
(P70~P86)
MANUAL DE INSTRUCCIONES
(P87~P103)
Importante:
Leggere con attenzione il manuale prima di mettere in funzione il soffiatore; le norme di
sicurezza vanno rigorosamente rispettate!
Conservare il manuale delle istruzioni per I’uso.
Belangrijk:
Lees altijd eerst de veiligheidsvoorschriften aandachtig door en neem deze in acht voordat u de machine in gebruik neemt. Bewaar deze gebruiksaanwijzing zorgvuldig.
Importante:
Lea bien este manual antes de poner el soplador en funcionamiento, y observe estrictamente las medidas de seguridad. Conserve este manual de instrucciones.
Page 2
English
Thank you very much for selecting the DOLMAR blower. We are
pleased to be able to offer you the DOLMAR blower which is the result
of a long development programme and many years of knowledge and
experience.
The blower models PB-252.4 combines the advantages of state-of-theart technology with ergonomic design. They are of light weight handy,
compact and represent professional equipment for a great variety of
applications.
Please read, understand and follow this booklet which refers in detail to
the various points that will demonstrate its outstanding performance.
This will assist you to safety obtain the best possible results from your
DOLMAR Blower.
Table of contents
SYMBOLS............................................................................................ 2
SAFETY INSTRUCTIONS ................................................................... 3
EC DECLARATION OF CONFORMITY .............................................. 6
SPECIFICATIONS ............................................................................... 6
DESIGNATION OF PARTS .................................................................. 7
ASSEMBLY INSTRUCTIONS .............................................................. 8
BEFORE START OF OPERATION ...................................................... 9
OPERATION ......................................................................................11
ADJUSTMENT OF IDLING................................................................ 12
OPERATION METHOD...................................................................... 13
INSPECTION AND MAINTENANCE ................................................. 14
STORAGE.......................................................................................... 16
TROUBLESHOOTING....................................................................... 18
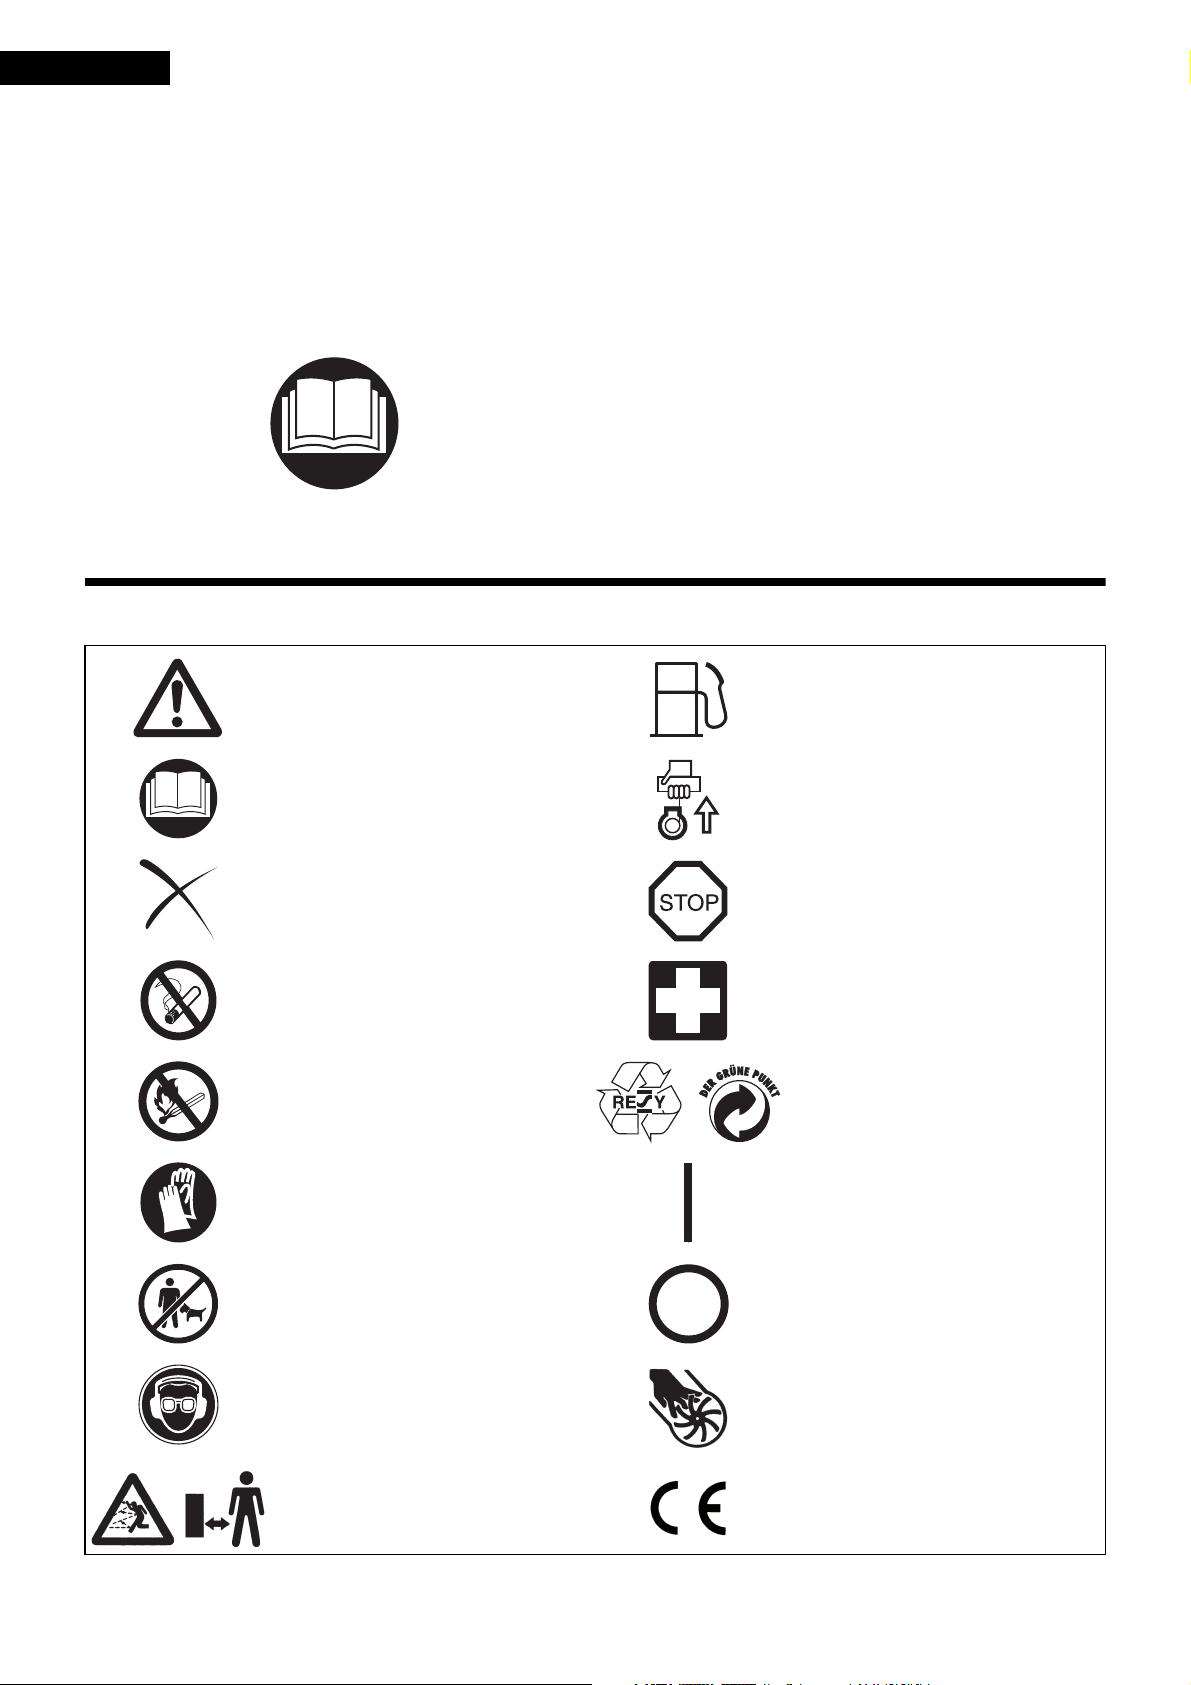
SYMBOLS
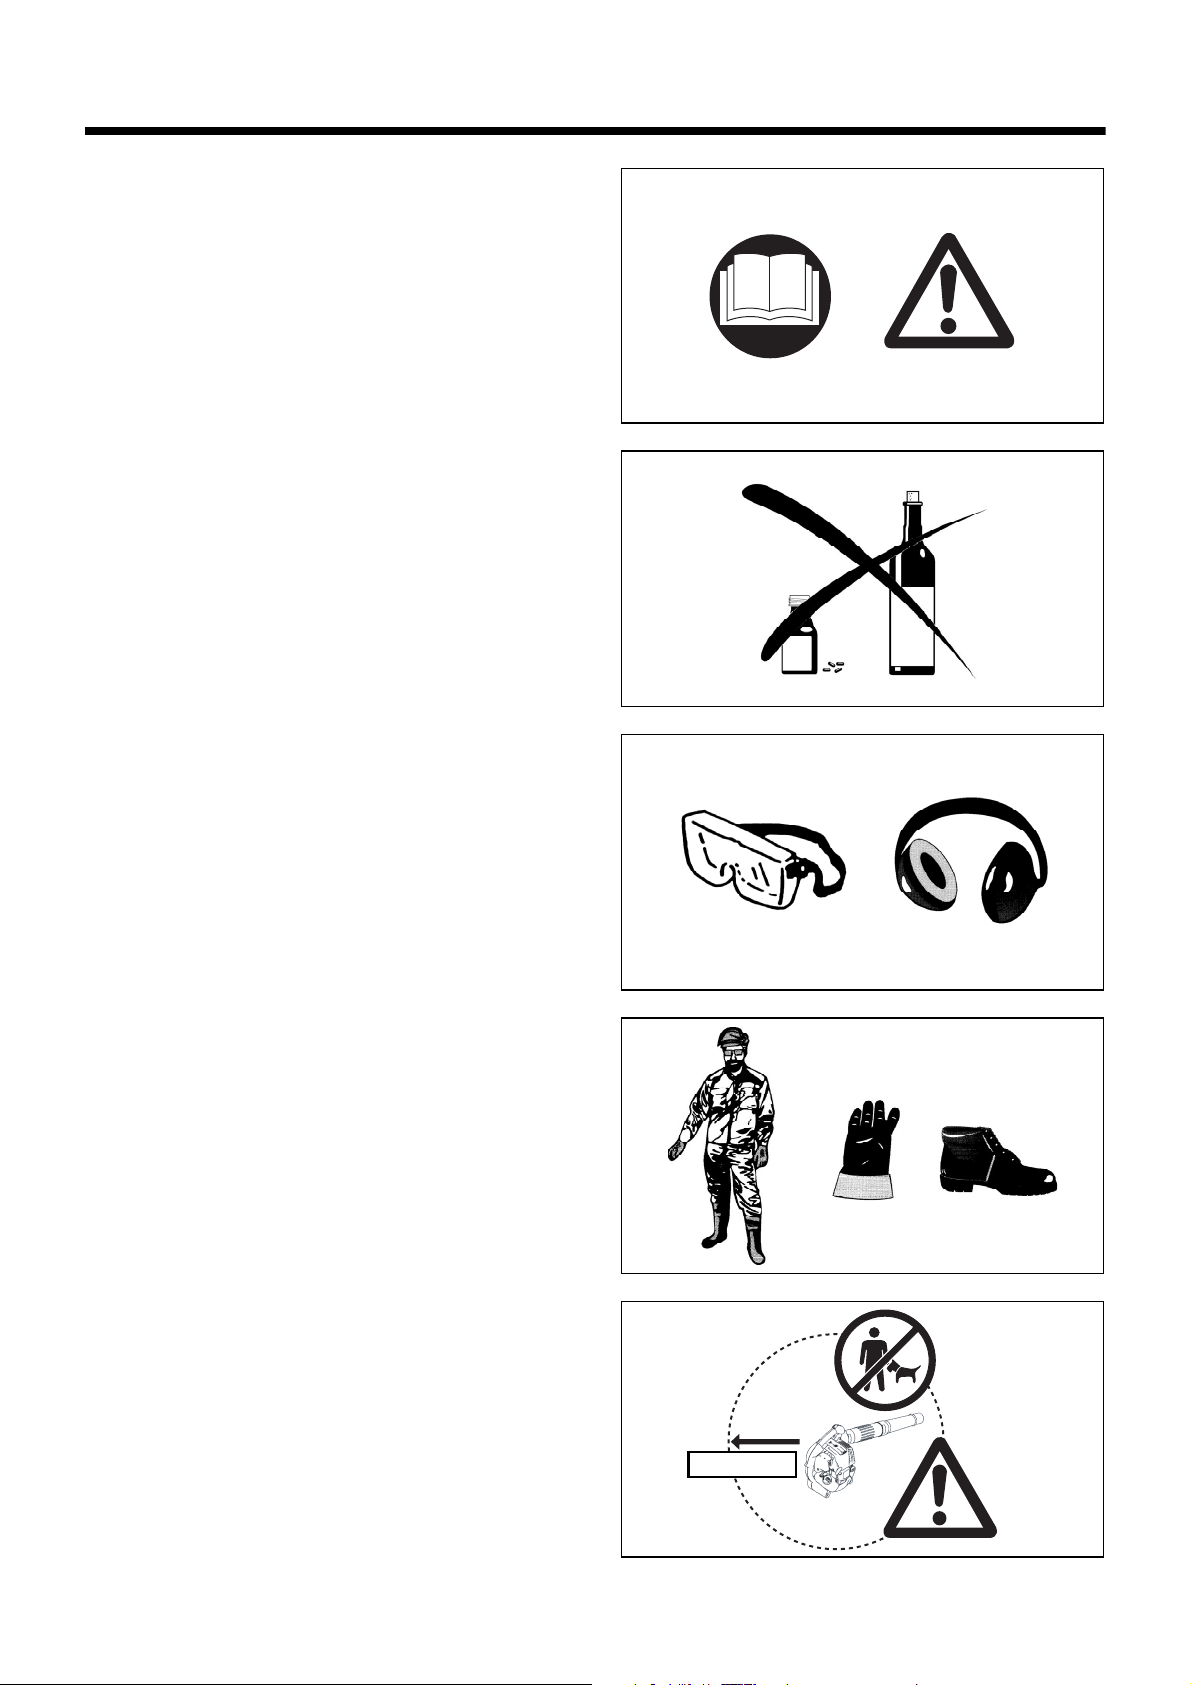
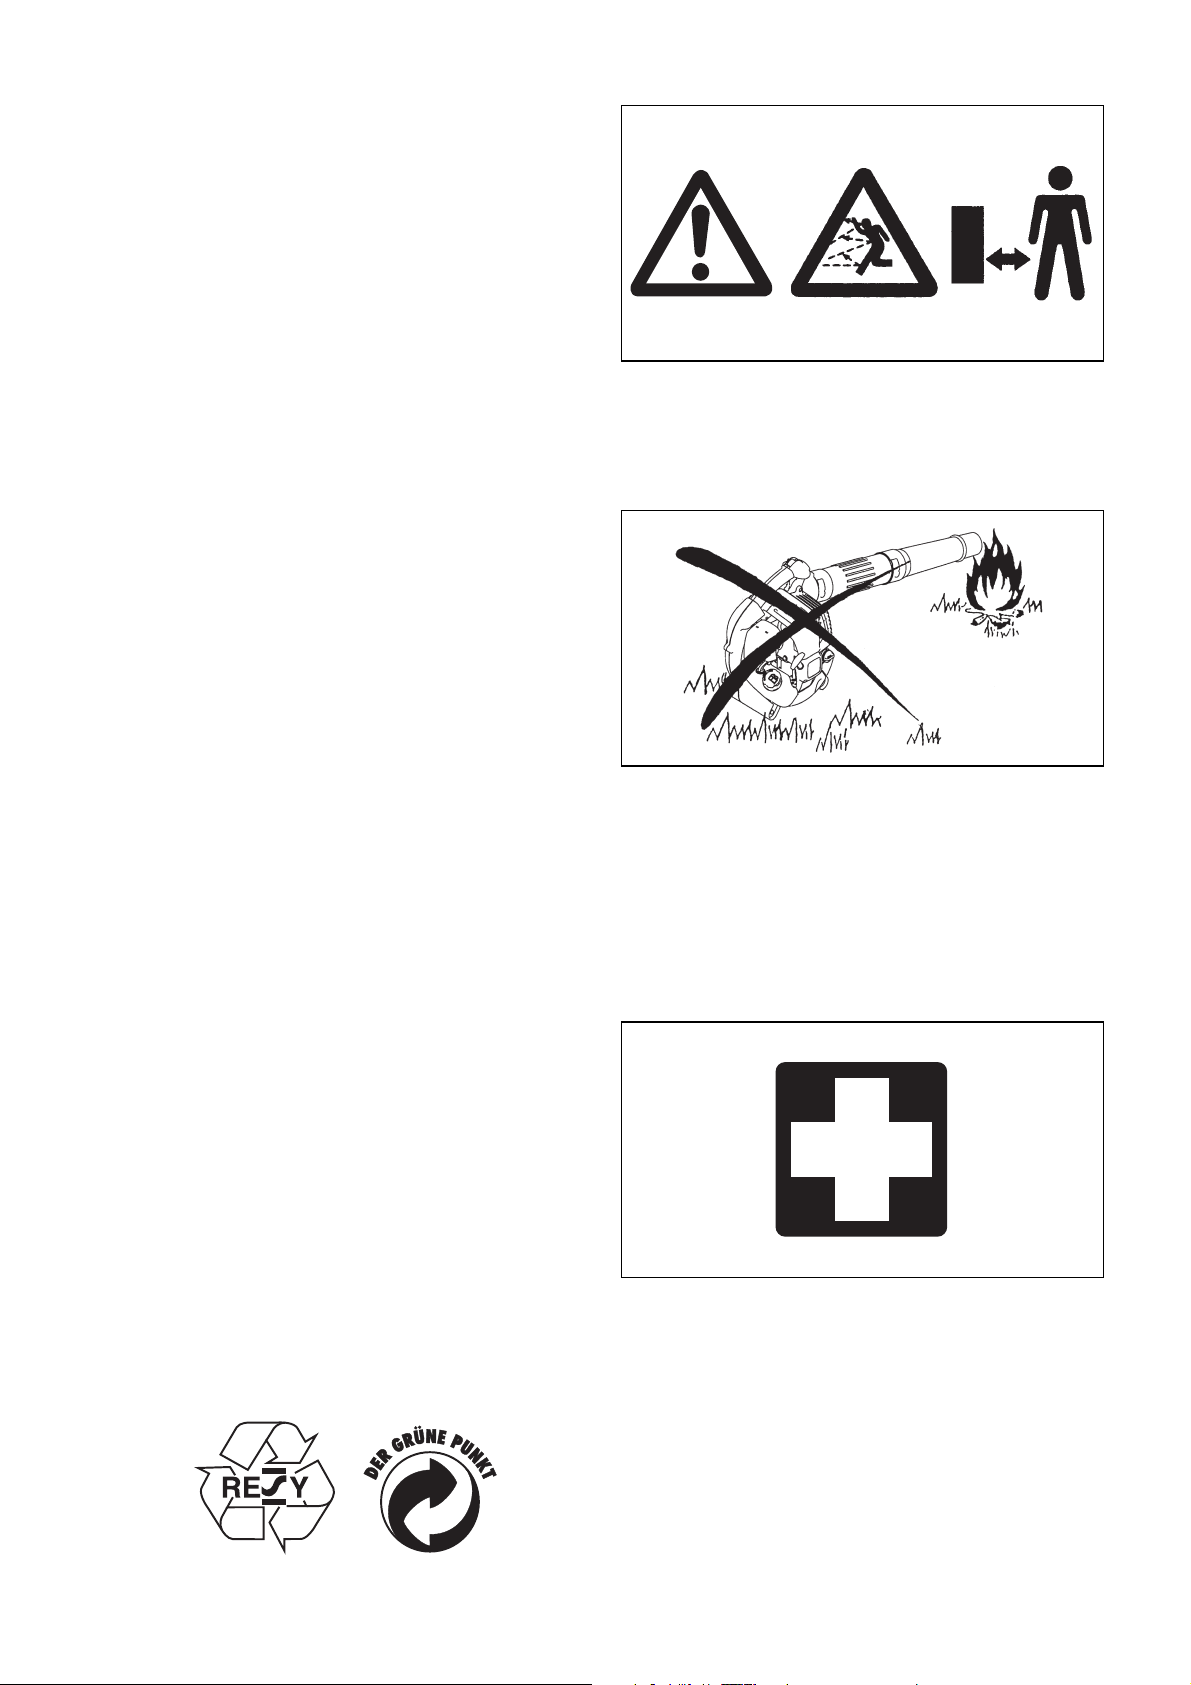
It is very important to understand the following symbols when reading this instructions manual.
Page
WARNING/DANGER Fuel (Gasoline)
Read, Understand and Follow Instruction
Manual
Forbidden Emergency Stop
No Smoking First Aid
No Open Flame Recycling
Protective Gloves must be Worn ON/START
Engine-manual Start
Keep the Area of Operation
Clear of All Persons and Pets
Wear Eye and Ear Protection
Keep bystanders away CE-Mark
OFF/STOP
Severing of fingers or hand,
impeller blade
2
Page 3

SAFETY INSTRUCTIONS
(1)
(2)
(3)
(4)
(5)
15 meters
General Instructions
• To ensure correct and safe operation, the user must read, understand
and follow this instruction manual to assure familiarity with the handling
of the blower (1). Users insufficiently informed will risk danger to themselves as well as others due to improper handling.
• It is recommended only to loan the blower to people who have proven
to be experienced with blowers.
• Always hand over the instruction manual.
• First-time users should ask the dealer for basic instructions to familiarize oneself with the handling of a blower.
• Children and young persons aged under 18 years must not be allowed
to operate the blower. Persons over the age of 16 years may however
use the tool for the purpose of being trained only while under the direct
supervision of a qualified trainer.
• Use blowers with the utmost care and attention.
• Operate the blower only if you are in good physical condition.
• Perform all work conscientiously and carefully. The user has to accept
responsibility for others.
• Never use the blower while under the influence of alcohol or drugs (2).
• Do not use the unit when you are tired.
• Save these instructions for future referral.
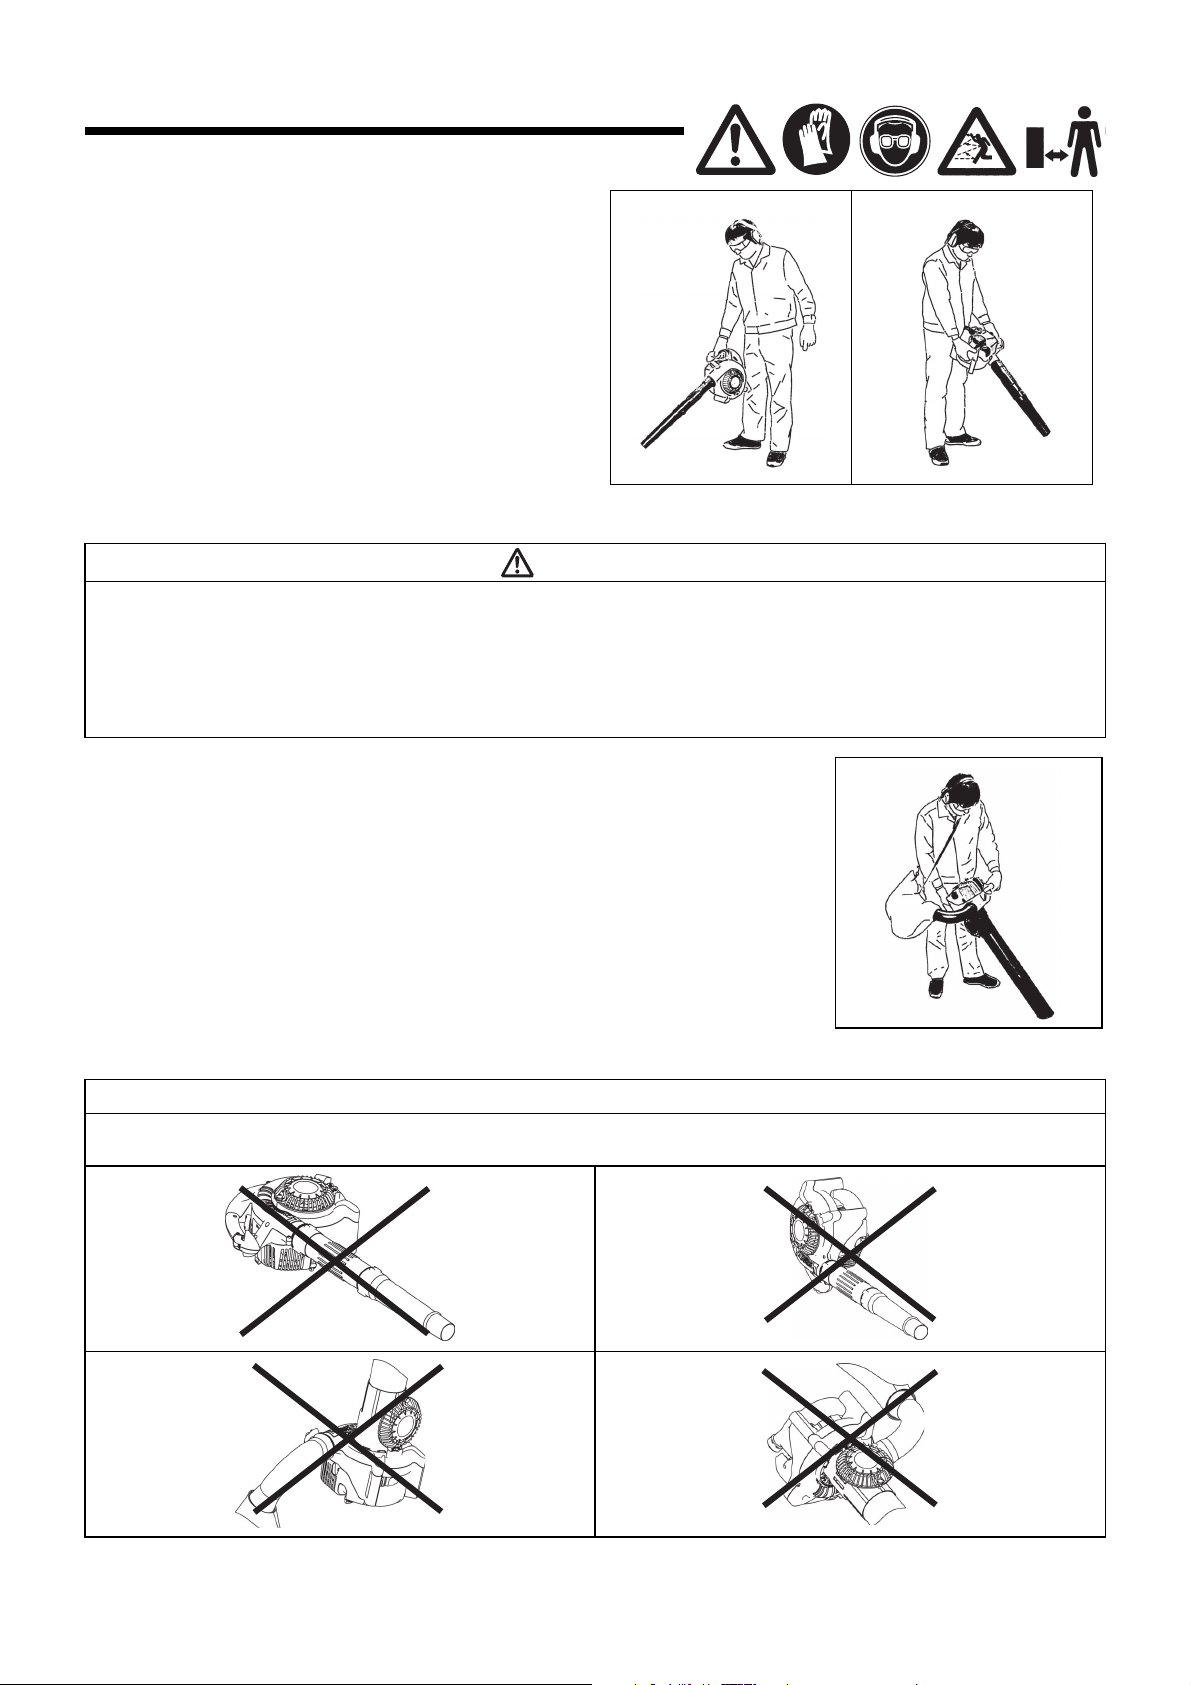
Personal Protective Equipment
• The clothing worn should be functional and appropriate, I. e. It should
be tight-fitting but not cause a hindrance. Do not wear jewelry, clothing
or long hair which could be drawn into the air intake.
• In order to avoid head-, eye-, hand- or foot injuries as well as to protect
your hearing the following protective equipment and protective clothing
must be used during operation of the blower.
Pay particular attention to the following regulations
• Clothing must be sturdy and snug-fitting, but allow complete freedom
of movement. Avoid loose-fitting jackets, flared or cuffed pants, scarf,
unconfined long hair or anything that could be drawn into the air intake.
Wear overalls or long pants to protect your legs. Do not wear
shorts. (4)
• Blower noise may damage your hearing. Wear sound barriers (ear
plugs or ear mufflers) to protect your hearing. Continual and regular
users should have their hearing checked regularly. (3)
• Use of gloves when working with the blower is recommended. Good
footing is most important. Wear sturdy shoes with non slip soles. (4)
• Proper eye protection is a must. Even though the discharge is directed
away from the operator, ricochets and bounce backs can occur during
blower operation. (3)
• Never operate a blower unless wearing goggles or properly fitted
safety glasses with adequate top and side protection which comply
with ANSI Z 87. 1 (or your applicable national standard).
Starting up the blower
• Please make sure that there are no children or other people within a
working range of 15 meters (5), also pay attention to any animals in the
working vicinity. Never use the blower in urban areas.
• Before operating, always check that the blower is safe for operation:
Check the security of the throttle lever. The throttle lever should be
checked for smooth and easy action. Check for proper functioning of
the throttle lever lock. Check for clean and dry handles and test the
function of the l-O switch. Keep handles free of oil and fuel.
360°
3
Page 4

Start the Blower only in accordance with the instructions.
(6)
(7)
(8)
(9)
3 meters
• Resting
• Transport
• Refuelling
• Maintenance
• Tool Replacement
Do not use any other methods for starting the engine (6) !
• Use the blower and the tools supplied only for applications specified.
• Start the blower engine only after the entire tool has been assembled.
Operation of the tool is permitted only after all the appropriate accessories are attached.
• The engine is to be switched off immediately if there are any engine
problems.
• When working with the blower, always wrap your fingers tightly around
the handle, keeping the control handle cradled between your thumb
and forefinger. Keep your hand in this position to have your machine
under control at all times. Make sure your control handle (and grip for
vacuum attachment) are in good condition and free of moisture, pitch,
oil or grease.
Always ensure a safe, well-balanced footing.
• Operate the blower in such a manner as to avoid inhalation of the
exhaust gases. Never run the engine in enclosed rooms (risk of suffocation and gas poisoning). Carbon monoxide is an odorless gas.
Always ensure there is adequate ventilation.
• Switch off the engine when resting and when leaving the blower unattended. Place it in a safe location prevent danger to others, setting fire
to combustible materials, or damage to the machine.
• Never lay the hot blower onto dry grass or onto any combustible materials.
• All protective parts and guards supplied with the machine must be
used during operation.
• Never operate the engine with a faulty exhaust muffler.
• Shut off the engine during transport (7).
• Position the blower safely during car or truck transportation to avoid
fuel leakage.
• When transporting the blower, ensure that the fuel tank is completely
empty.
Refuelling
• Shut off the engine during refuelling (7), keep well away from open
flame (8) and do not smoke.
• Avoid skin contact with petroleum products. Do not inhale fuel vapor.
Always wear protective gloves during refuelling. Change and clean
protective clothing at regular intervals.
• Take care not to spill either fuel or oil in order to prevent soil contamination (environmental protection). Clean the blower immediately after fuel
has been spilt. Allow wet cloths to dry before disposing in properly,
covered container to prevent spontaneous combustion.
• Avoid any fuel contact with your clothing. Change your clothing immediately if fuel has been spilled on it (fire hazard).
• Inspect the fuel cap at regular intervals making sure that it stays
securely fastened.
• Carefully tighten the locking screw of the fuel tank. Change locations to
start the engine (at least 3 meters away from the place of refuelling)
(9).
• Never refuel in closed rooms. Fuel vapors accumulate at ground level
(risk of explosions)
• Only transport and store fuel in approved containers. Make sure stored
fuel is not accessible to children.
• Do not attempt to refuel a hot or a running engine.
4
Page 5

Method of operation
(10)
(11)
(12)
• Use the blower only in good light and visibility. During cold seasons
beware of slippery or wet areas, ice and snow (risk of slipping).
Always ensure a safe footing.
• Never work on unstable surfaces or steep terrain.
• To reduce the risk of personal injury, do not direct air blast towards
bystanders, since the high pressure of the air flow could injure eyes
and could blow small objects at great speed.
• Never insert any foreign object into the air intake of the machine or into
the nozzle of the blower. It will damage the fan wheel and may cause
serious injury to the operator or bystanders as a result of the object or
broken parts being thrown out at high speed.
• Pay attention to the direction of the wind, i.e., do not work against the
wind.
• To reduce the risk of stumbling and loss of control, do not walk backward while operating the machine.
• Always shut off the engine before cleaning or servicing the unit or
replacing parts.
Maintenance instructions
• Be kind to the environment. Operate the blower with as little noise and
pollution as possible. In particular check the correct adjustment of the
carburetor.
• Clean the blower at regular intervals and check that all screws and nuts
are securely tightened.
• Never service or store the blower in the vicinity of open flames, sparks,
etc. (11).
• Always store the blower in a well-ventilated locked room and with an
emptied fuel tank.
Observe and follow all relevant accident prevention instructions issued
by the trade associations and by insurance companies. Do not perform
any modifications to the blower as this will risk your safety.
The performance of maintenance or repair work by the user is limited to
those activities as described in this instruction manual. All other work is
to be done by Authorized Service Agents.
Use only genuine spare parts and accessories supplied by DOLMAR.
Use of non-approved accessories and tools means increased risk of
accidents and injuries. DOLMAR will not accept any liability for accidents
or damage caused by the use of any non-approved attachment or accessories.
First Aid
In case of accident make sure that a well-stocked first-aid kit is available
in the vicinity of the operations. Immediately replace any item taken from
the first aid kit.
When asking for help, please give the following information:
• Place of accident
• What happened
• Number of injured persons
• Extent of injuries
• Your name
Packaging
The DOLMAR blower is delivered in a protective cardboard box to prevent shipping damage. Cardboard is a basic raw material and is therefore consequently reusable or suitable for recycling (waste paper
recycling).
5
Page 6

For European countries only
EC Declaration of Conformity
The undersigned, Tamiro Kishima and Rainer Bergfeld,
as authorized by Dolmar GmbH, declare that the
DOLMAR machine(s):
Designation of Machine:
Petrol Blower
Model No./ Type: PB-252.4
Specifications: see “SPECIFICATIONS” table
are of series production and
Conforms to the following European Directives:
2000/14/EC, 2006/42/EC
And are manufactured in accordance with the following
standards or standardized documents:
EN15503
The technical documentation is on file at:
Dolmar GmbH,
Jenfelder Straße 38, Abteilung FZ,
D-22045 Hamburg
The conformity assessment procedure required by Directive
2000/14/EC was in Accordance with annex V.
Measured Sound Power Level: 102 dB
Guaranteed Sound Power Level: 106 dB
14th June 2010
Tam i ro K i sh i ma
Managing Director
Rainer Bergfeld
Managing Director
SPECIFICATIONS
Model PB-252.4
Mass (without blower pipe) (kg) 4.5
Dimension (without blower pipe L x W x H) (mm) 350 × 231 × 368
-1
Max. engine speed (min
Idling speed (min
Engine displacement (mL) 24.5
Fuel Automobile gasoline
Fuel tank capacity (L) 0.52
Engine oil
Engine oil volume (L) 0.08
Carburetor (Diaphragm-carburetor) WALBRO WYL
Ignition system Solid state ignition
Spark plug NGK CMR6A
Electrode gap (mm) 0.7 - 0.8
a
Vibration per EN15503
Sound pressure level average to
EN15503
Sound power level average to
EN15503
hv eq
Uncertainty K (m/s
L
PA eq
Uncertainty K dB(A) 1.4
L
WA eq
Uncertainty K dB(A) 1.4
Notes:
1. Use the oil and spark plug specified by DOLMAR.
2. This specification is subject to change without prior notice.
) 7,800
-1
) 3,500
SAE 10W-30 oil of API Classification, Class SF or higher
(4-stroke engine for automobile)
(m/s2)9.3
2
)0.5
dB(A) 90.8
dB(A) 103.7
6
Page 7
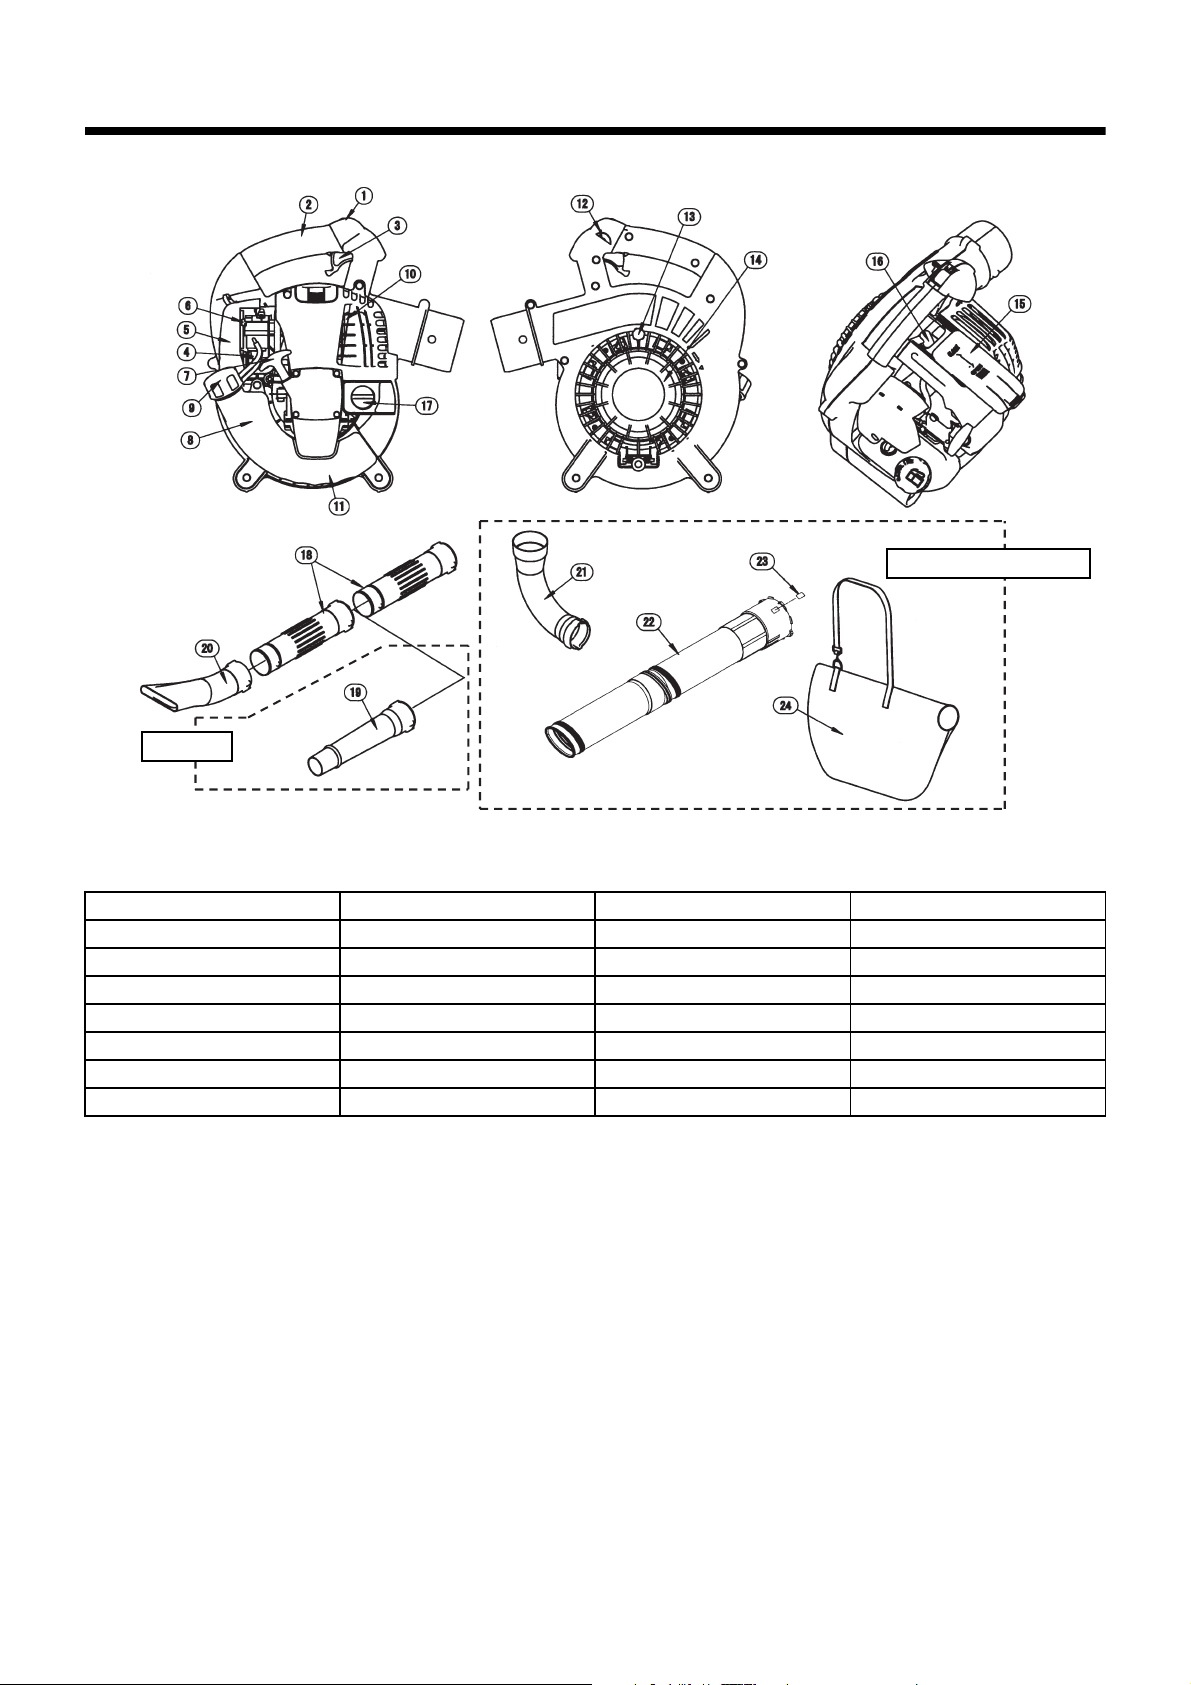
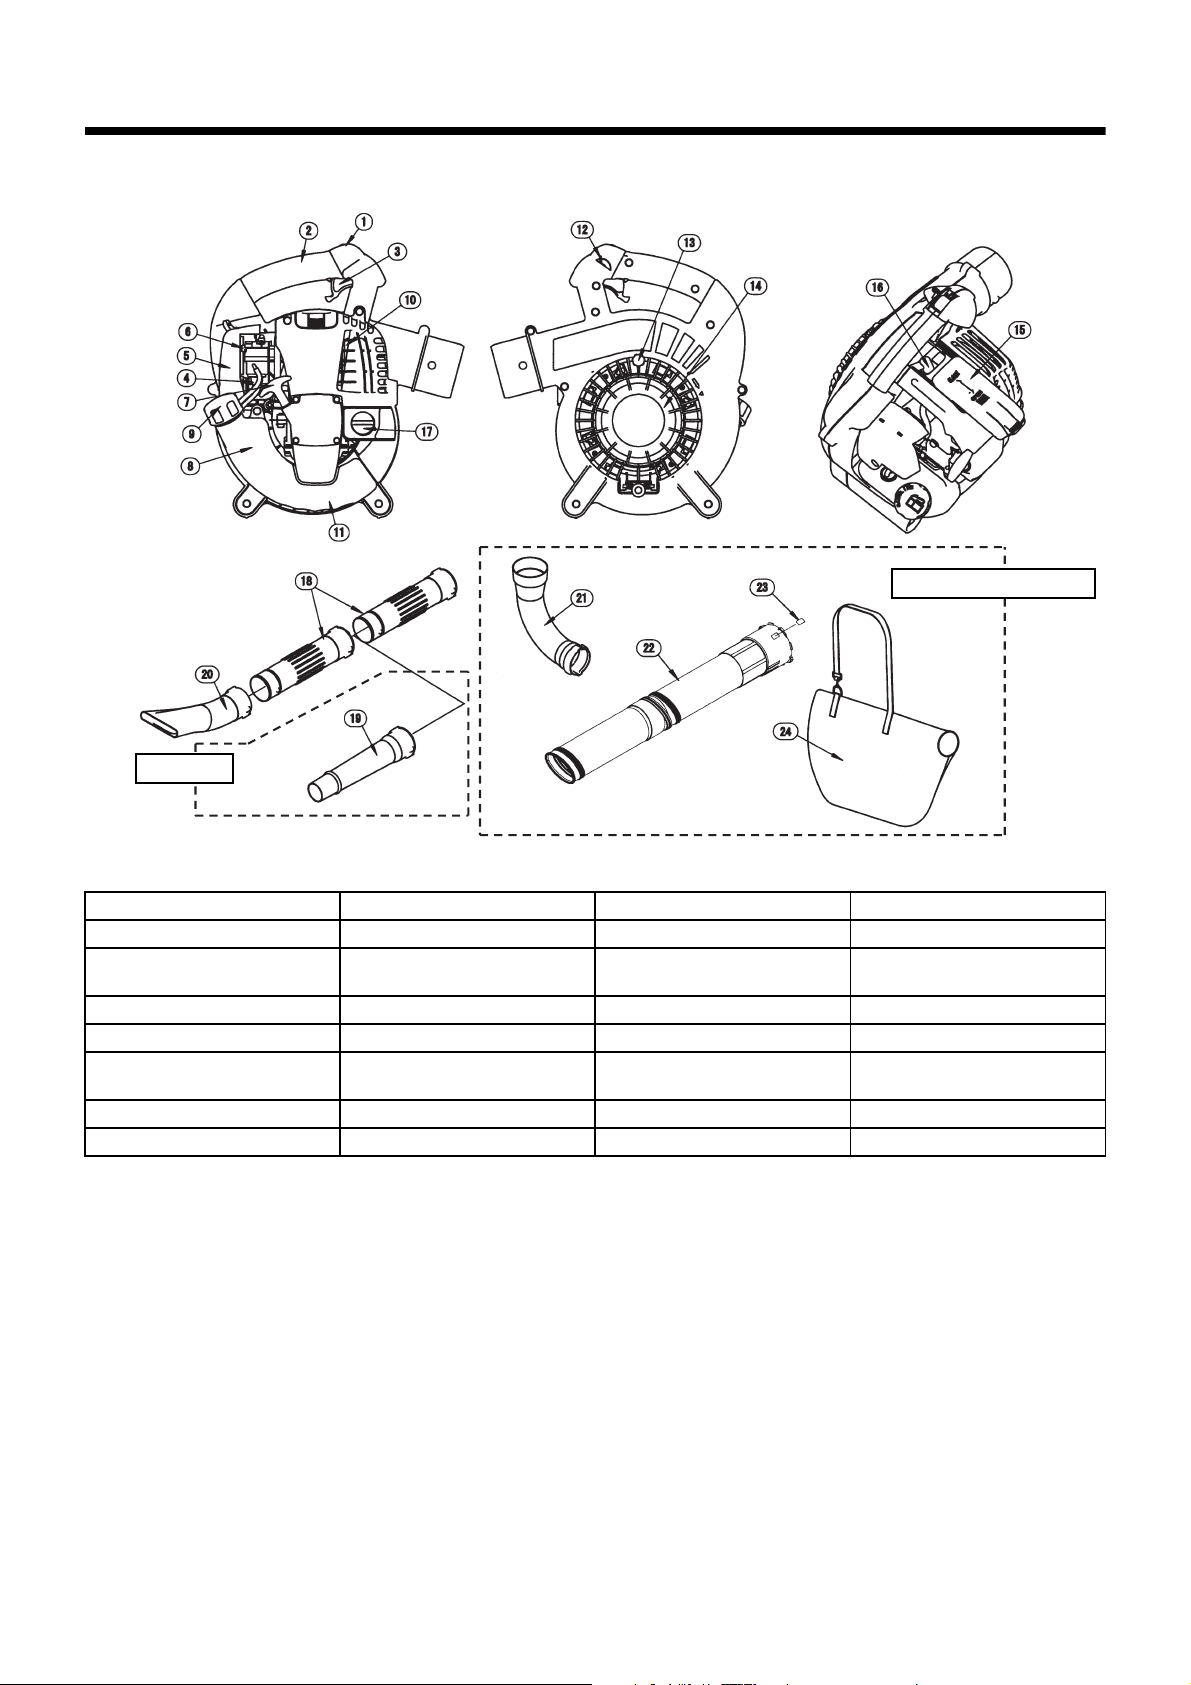
DESIGNATION OF PARTS
Optional
Vacuum set (Optional)
DESIGNATION OF PARTS DESIGNATION OF PARTS DESIGNATION OF PARTS DESIGNATION OF PARTS
1. Stop switch 8. Fuel Tank 15. Plug Cover 22. Vacuum Pipe
2. Main Handle 9. Fuel Tank Cap 16. Spark Plug 23. Arrow Mark
3. Trigger Lever 10. Muffler 17. Oil Cap 24. Dust Bag
4. Primer Pump 11. Assist Handle 18. Blower Tube
5. Air Cleaner Cover 12. Throttle lock button 19. Blower Nozzle A
6. Choke Lever 13. Screw 20. Blower Nozzle B
7. Starter Handle 14. Protector 21. Elbow
7
Page 8
ASSEMBLY INSTRUCTIONS
CAUTION : Before performing any work on the blower, always stop
the engine and pull the spark plug connectors off the
spark plug.
Always wear protective gloves!
CAUTION : Start the blower only after having assembled it com-
pletely.
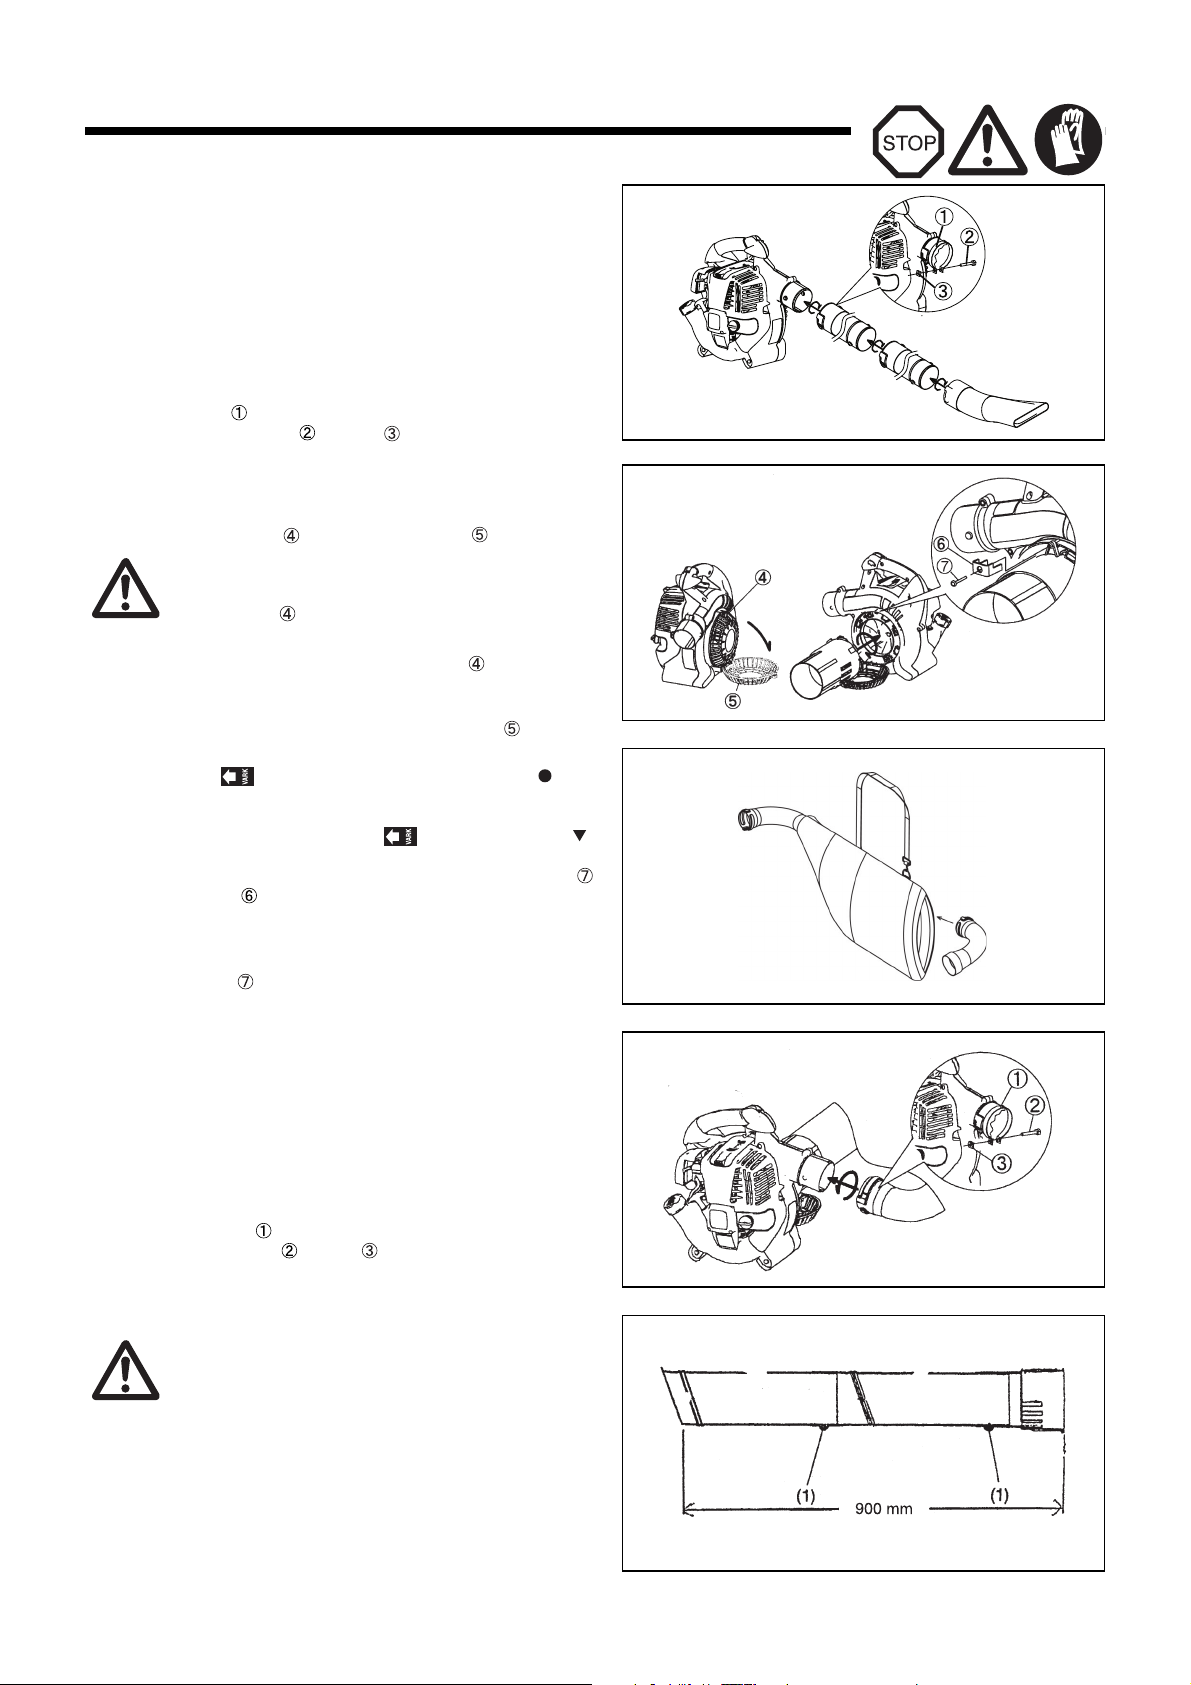
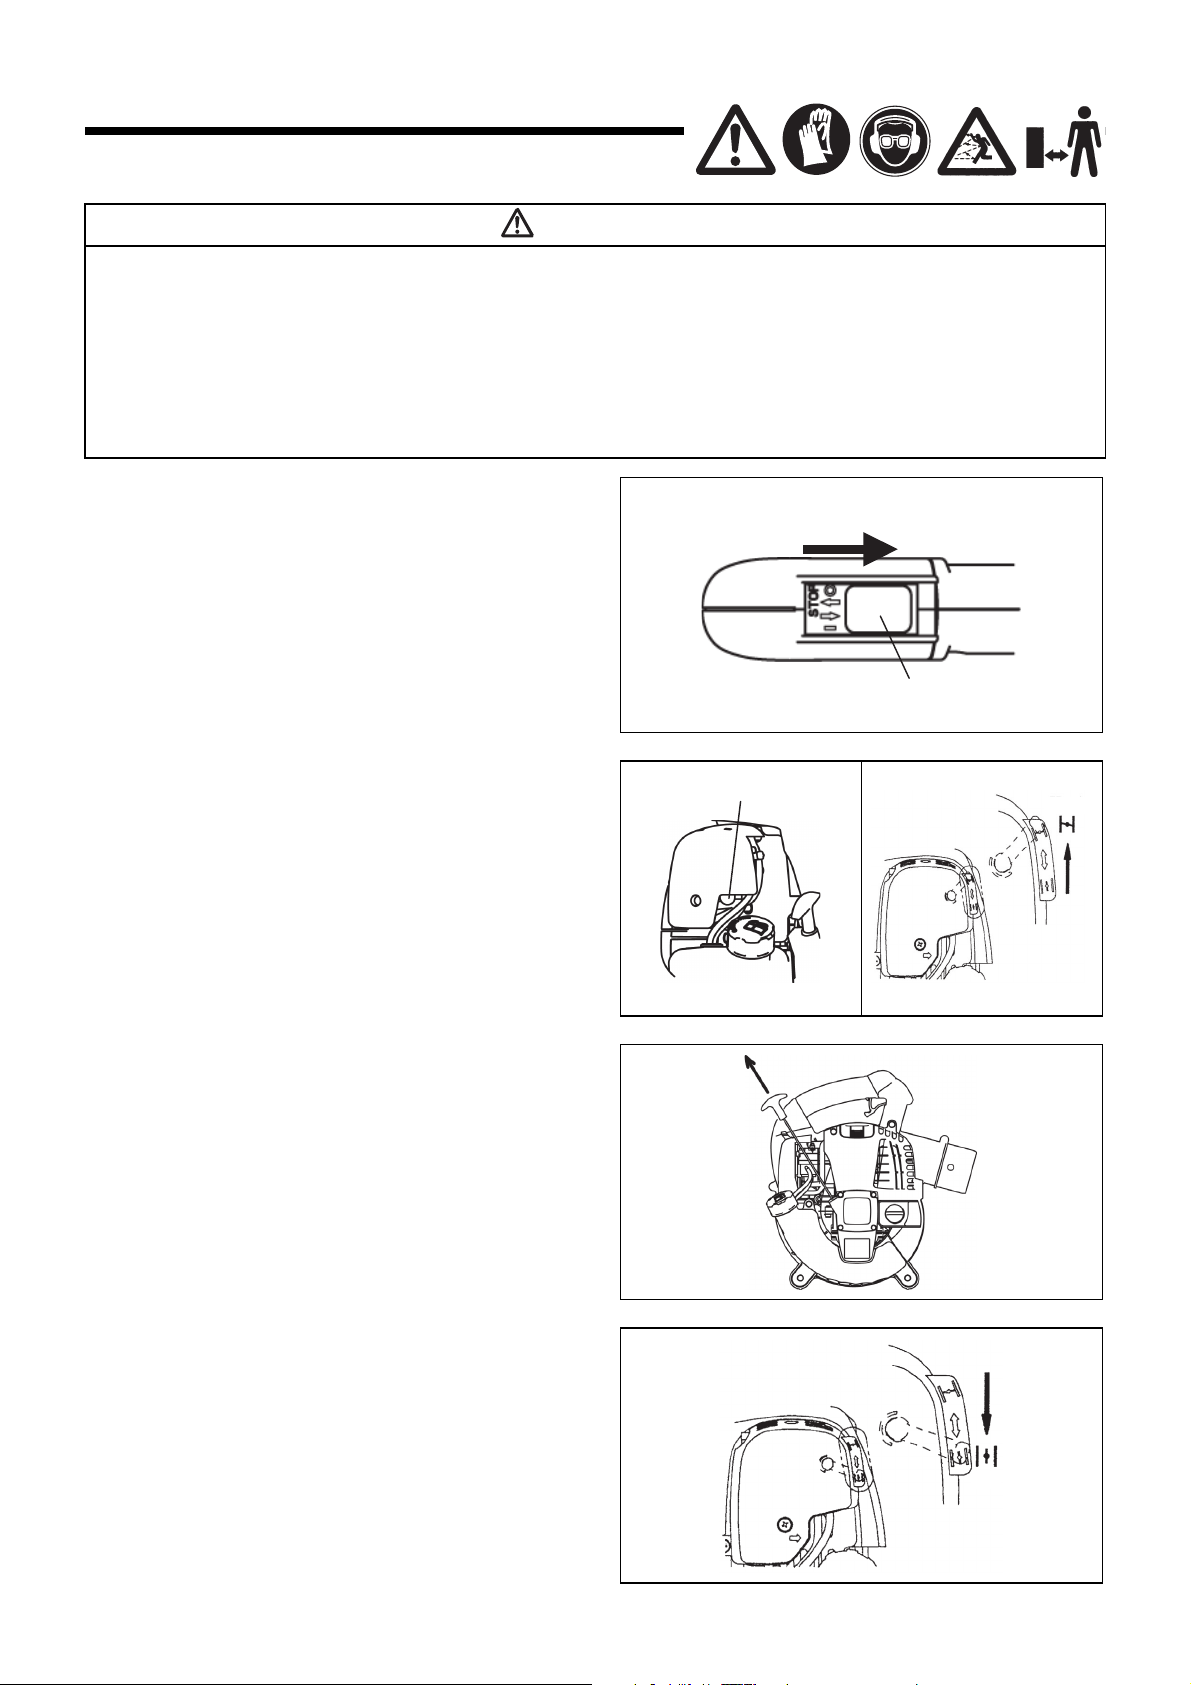
1. ASSEMBLY OF BLOWER PIPES
1) Align grooves in the blower pipe with pegs on the blower
housing and slide the pipe onto housing.
2) Turn the blower pipe clockwise to lock it into place.
3) Place clamp around the opening of the blower pipe. Fasten securely with bolt and nut .
2. ASSEMBLY OF VACUUM ATTACHMENT
1) Installing Vacuum pipe (nozzle)
(1) Loosen the screw and open the protector .
WARNING!
When using this machine as a blower, be sure to confirm
that the screw is not loosened at each time of startup. If
the screw is loosened, retighten it.
It is dangerous to operate the machine with the screw loosened.
The operator’s finger or clothing may be caught in the impeller, which will
result in a serious accident.
Caution : The engine will not start unless the protector is closed
completely.
(2) Align the indicated on the vacuum pipe with the “ ” indi-
cated on the blower. Then insert the vacuum pipe into the
blower.
(3) Turn the vacuum pipe until the is aligned with the “ ”
indicated on the blower to lock the vacuum pipe.
(4) Fasten the vacuum pipe securely to the blower with screw
and bracket .
Caution : Do not perform the fastening operation in (4) above if the
blower is to be used in a country or region where the CE mark
is not applicable.
Caution : The screw do not tighten strongly too much.
Caution : The engine will not start unless the vacuum pipe is mounted
WARNING!
Always hold the mounting end of the vacuum pipe when attaching/
detaching the vacuum pipe.
Caution : Do not perform the fastening operation in (4) above if the
Always mount the protector/vacuum pipe in the right way before operation. Operation without the protector/vacuum pipe is dangerous, the
impeller may catch the operator’s fingers or clothes and it can result in
serious injury.
Do not attempt to remove the screw (1) or disassemble the vacuum pipe.
Regulation requires safety distance of at least 900 mm between the
impeller and the top of the pipe.
completely.
2) Installing Elbow and Dust Bag
(1) Open the fastener of the dust bag.
(2) Insert the elbow into the dust bag and take it out through the
bag’s entry.
(3) Install the elbow on the blower.
(4) Place clamp around the opening of the elbow. Fasten
securely with bolt and nut .
blower is to be used in a country or region where the CE mark
is not applicable.
WARNING!
Do not attempt to pick up large wood chips, metals,
glass, stones, liquids, lighted cigarettes, fire works or
the like.
8
Page 9
BEFORE START OF OPERATION
Figure 1
Figure 2
Lower limit
Upper limit
Figure 3
Upper limit
Lower limit
Oil level indicator
Figure 4
Figure 5
Shelf
Figure 6
Shelf
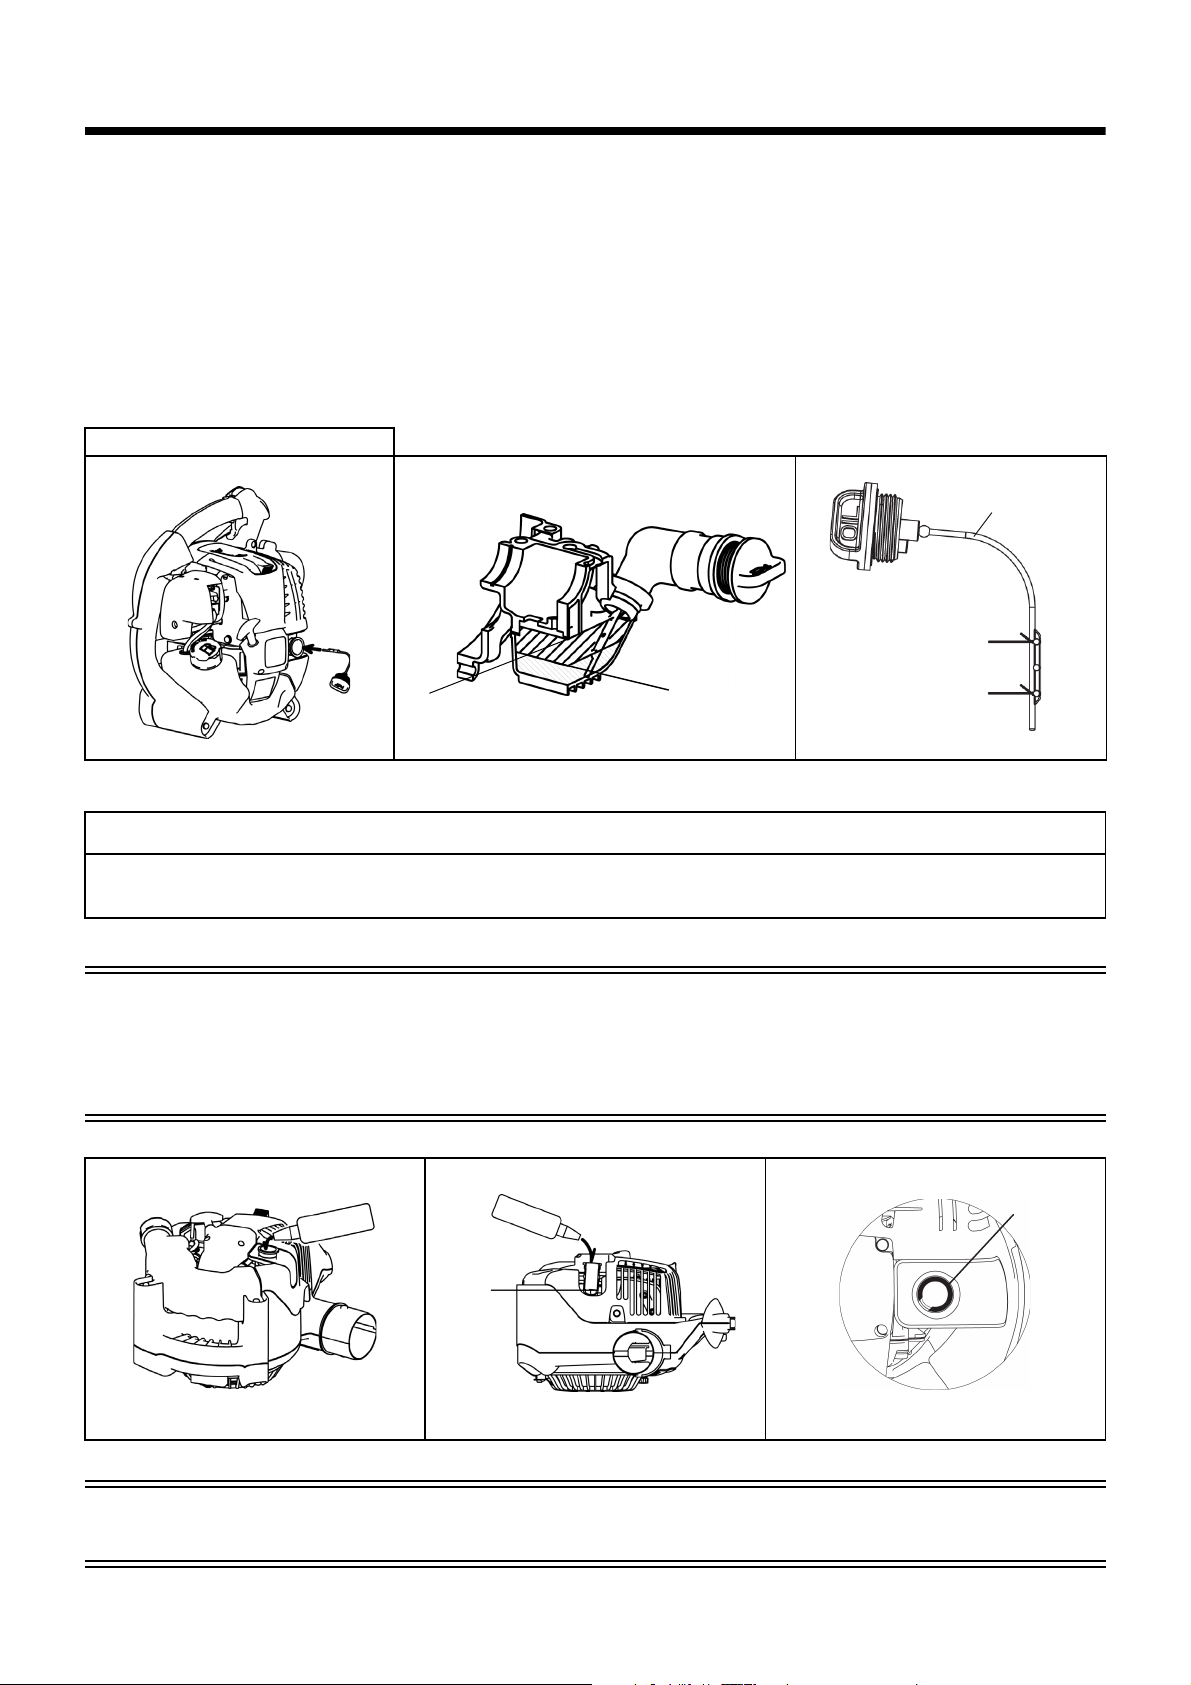
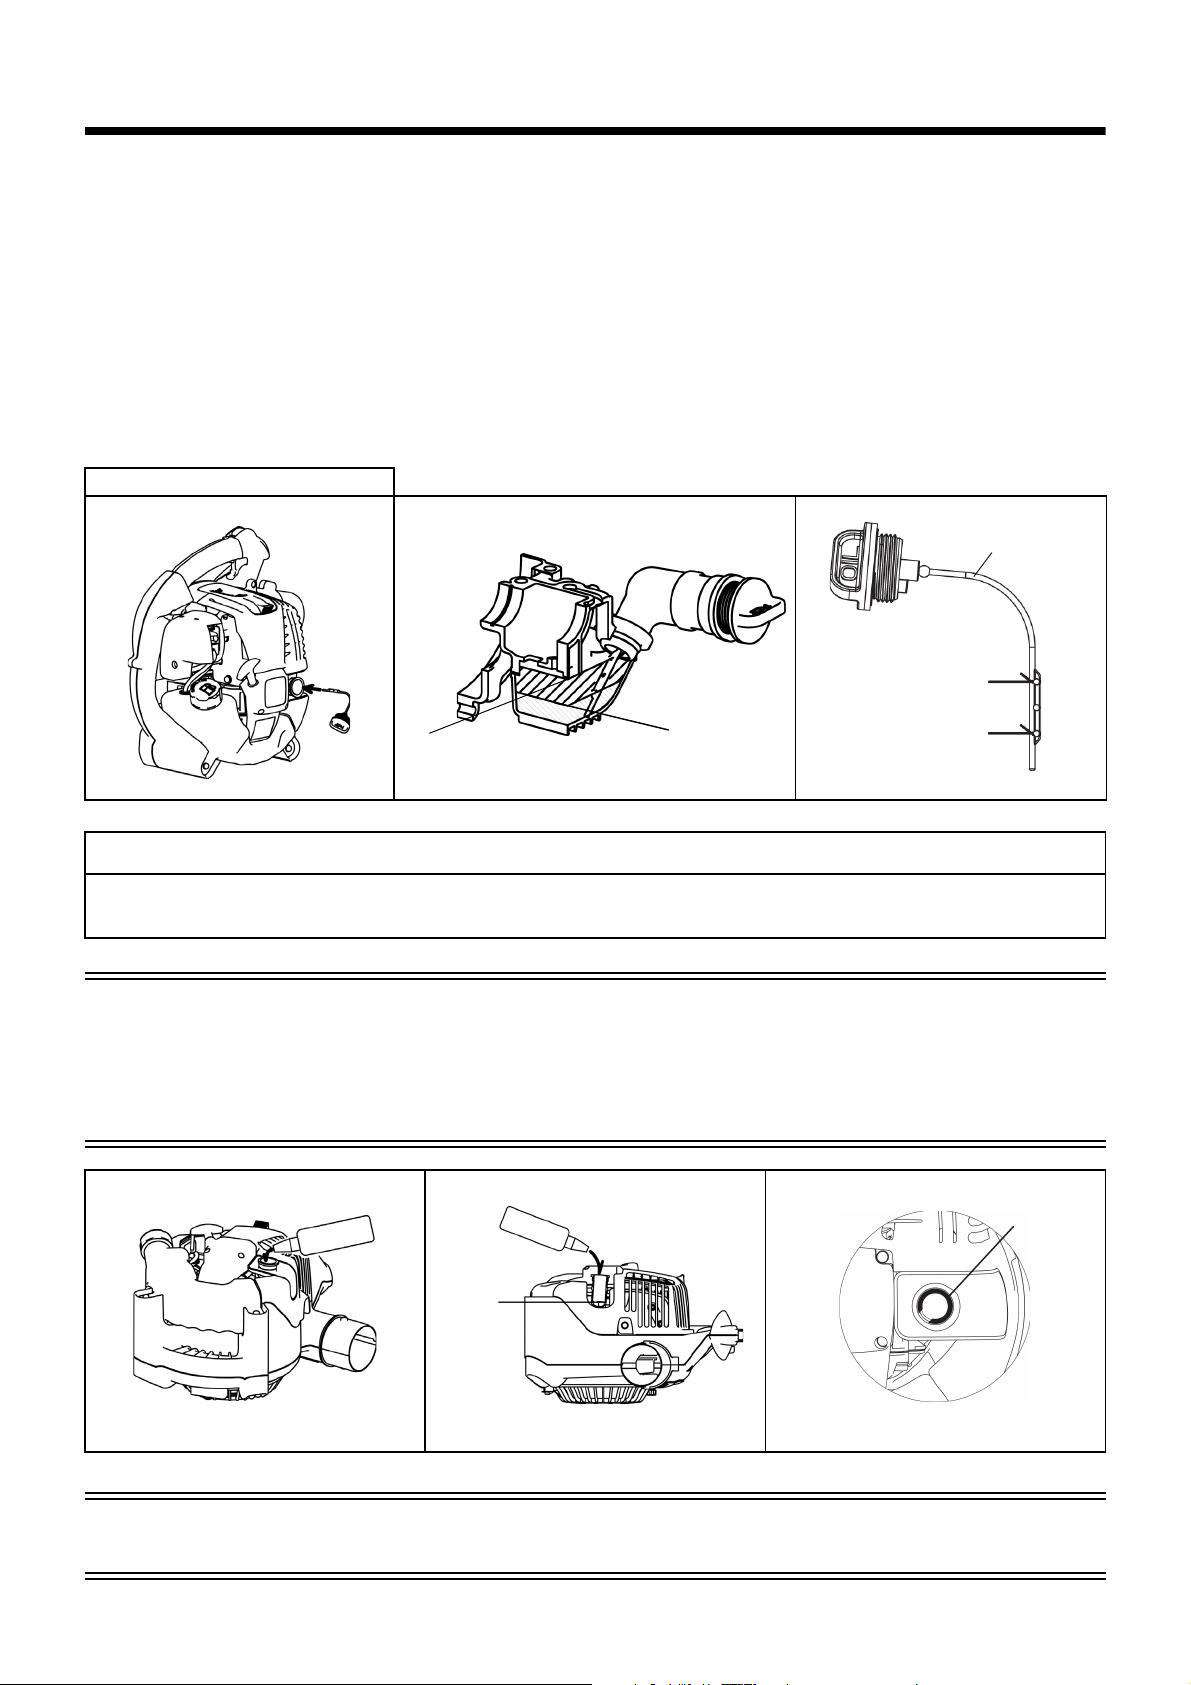
1. Inspection and Refill of Engine Oil
(1) Perform the following procedure when the engine is cool.
Assure engine is on a flat horizontal surface as shown in Figure 1.
• Inspection: Remove the oil cap. Wipe clean the oil level indicator. Reinstall the oil cap (Figure 2) and remove. Confirm if the oil is
• Refill: After inspection if the oil is below the lower limit add oil through the same opening that the oil cap was removed. See
(2) You may need to refill oil approximately every 10 hours of use (every 10 refuellings).
(3) If the oil changes in color or mixes with dirt, replace the oil. (For the interval and method of replacement, refer to P. 14)
Recommended oil: SAE 10W-30 oil of API Classification, Class SF or higher (4-stroke engine for automobile)
Oil volume: Approx. 0.08 L
Inspection method of engine oil
between the lower or upper limit of the oil indicator.
Figure 4 on how to orient the engine to refill the oil.
NOTE
• If the engine is not positioned as in Figure 1 on a horizontal surface, an inaccurate indication of oil level may occur.
• If the oil is filled above the limit, oil may be contaminated or may catch fire with white smoke.
Replacement of Oil “Oil Gauge”
• Remove dust or dirt near the oil refill port, and detach the oil gauge.
• Keep the detached oil gauge free of sand or dust. Otherwise, any sand or dust adhering to the oil gauge may cause irregular oil circulation or
wear on the engine parts, which will result in troubles.
• As an example to keep the oil gauge clean, it is recommended to insert the oil gauge on its knob side into the engine cover.
After refilling oil
• Wipe with a rag any spilled oil.
9
Page 10

2. Fuel supply
WARNING
• When refuelling the unit, be sure to observe the following instructions to prevent ignition or fire:
- Fuel supply must be made in a place free of fire. Never bring the fire (smoking, etc.) near the place of fuel supply.
- Stop the engine and allow the engine to cool down before refuelling.
- Open the fuel tank cap slowly. The fuel may be spilled out under internal pressure.
- Take care not to spill the fuel. Any spilled fuel must be wiped clean.
- Carry out fuel supply in a well-ventilated place.
• Handle the fuel with care.
- Fuel sticking to the skin or entering an eye may cause allergies or irritation. When any physical abnormality is detected, consult the medical
specialist immediately.
• DO NOT put oil in the fuel tank.
STORAGE PERIOD OF FUEL
Fuel should be used within a period of 4 weeks, even if it is kept in a special container in a well-ventilated shaded area.
If a special container is not used or if the container is not covered, fuel may deteriorate in one day.
Storage of machine and refill tank
• Keep the machine and tank at a cool place free from direct sunshine.
• Never keep the fuel in a car.
FUEL
The engine is a four-stroke engine. Be sure to use an automobile gasoline (regular gasoline or premium gasoline).
Points for Fuel
• Never use a gasoline mixture which contains engine oil. Otherwise, it will cause excessive carbon accumulation or mechanical troubles.
• Use of deteriorated oil will cause irregular startup.
When refuelling, be sure to stop the engine and confirm that the engine cools down.
REFUELLING METHOD
• Loosen the tank cap a little to release the tank pressure.
• Detach the tank cap, and refuel, discharging air by tilting the fuel tank so that the refuel port will be oriented upward.
(DO NOT fill fuel up to the top of the tank.)
• After refuelling, securely tighten the tank cap.
• If there is any flaw or damage on the tank cap, replace it.
• The tank cap wears out in course of time. Replace it every two to three years.
• DO NOT put fuel in the oil fill port.
10
Page 11
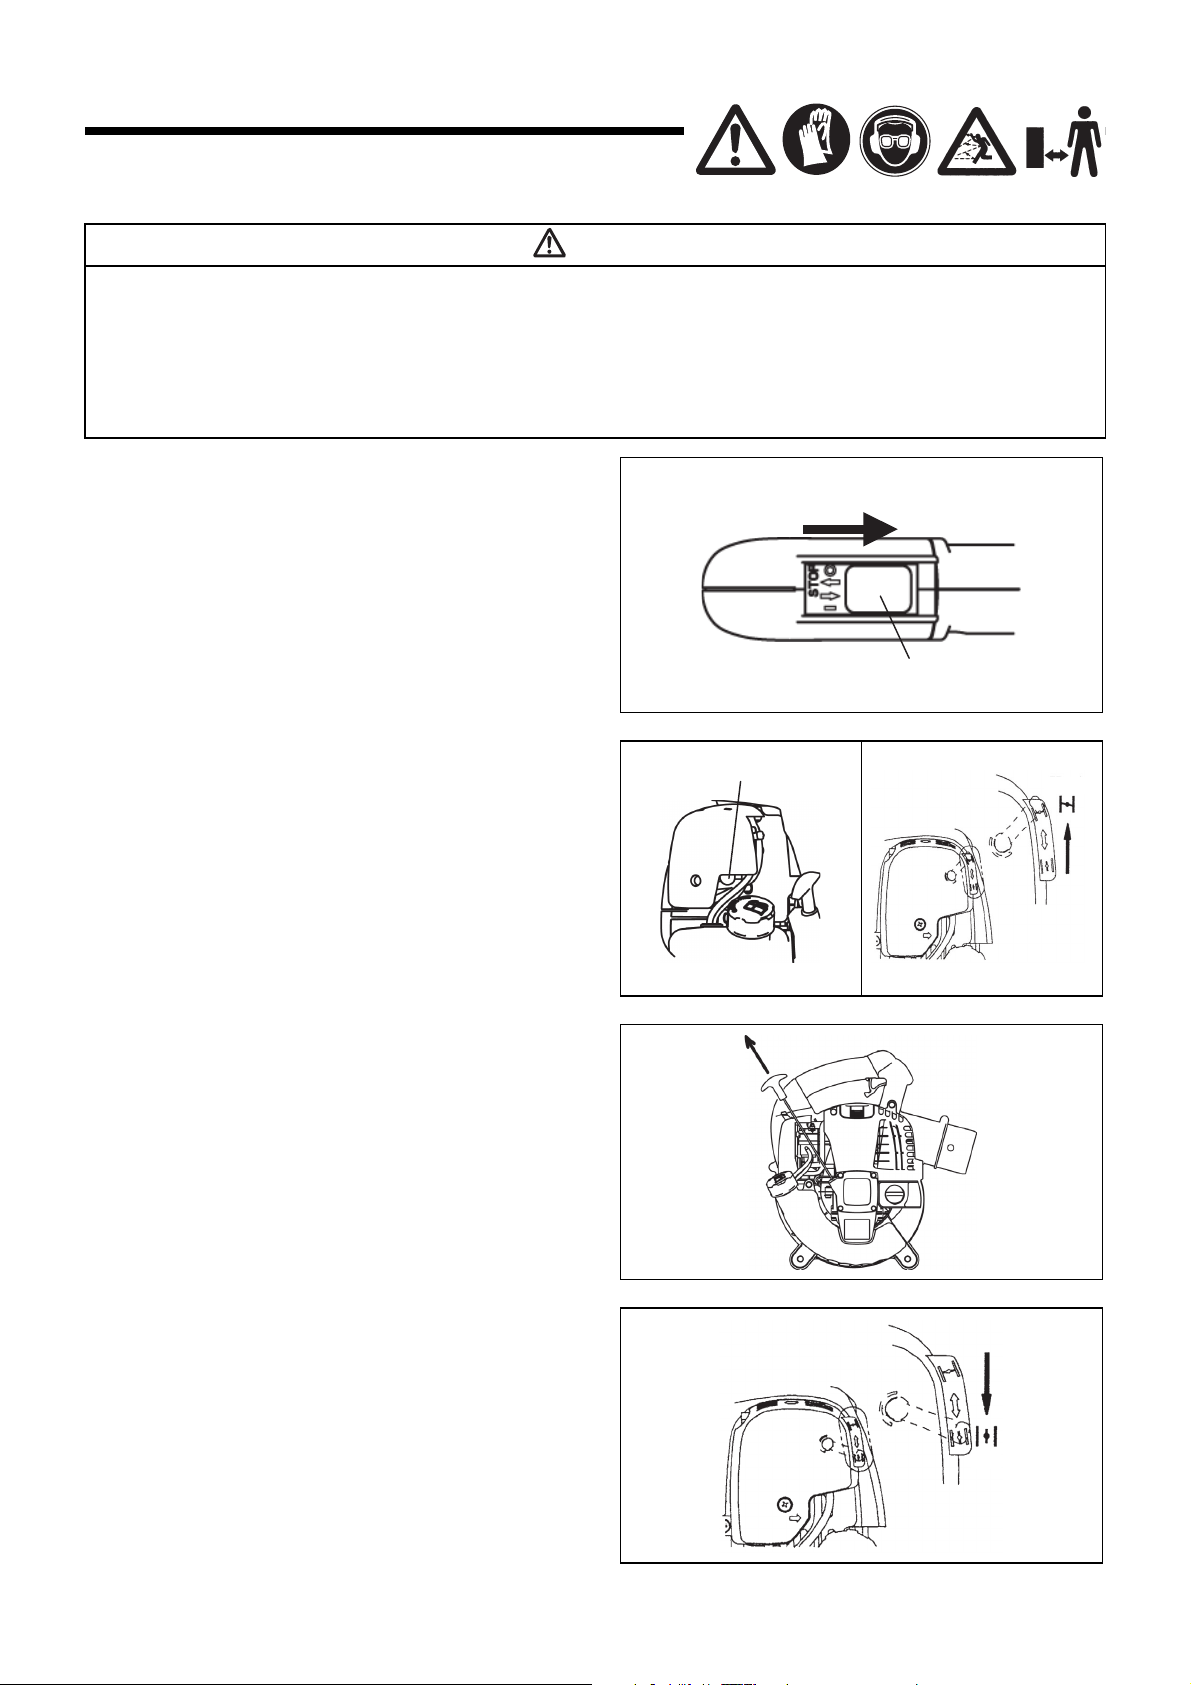
Figure 1
Stop Switch
Figure 2
Close
Figure 4
Figure 5
Open
Figure 3
Primer pump
OPERATION
1. Starting
WARNING
• Never attempt engine start in a place where the fuel has been supplied.
- If may cause ignition or fire. When starting the engine, keep a distance of at least 3 m.
• Exhaust gas from the engine is toxic. Do not operate the engine in a poorly-ventilated place, such as in a tunnel, building, etc.
- Operating the engine in the poorly-ventilated place may cause poisoning by exhaust gas.
• In case of detection of any abnormality in sound, odor, vibration after start, stop the engine immediately and carry out inspection.
- If the engine is operated without attending such abnormality, an accident may occur.
• Confirm that the engine stops when the stop switch is set to “O” position.
1) When the engine is cold or after refuelling
(1) Set this machine on a flat space.
(2) Set the stop switch to “ I ” position (Figure 1).
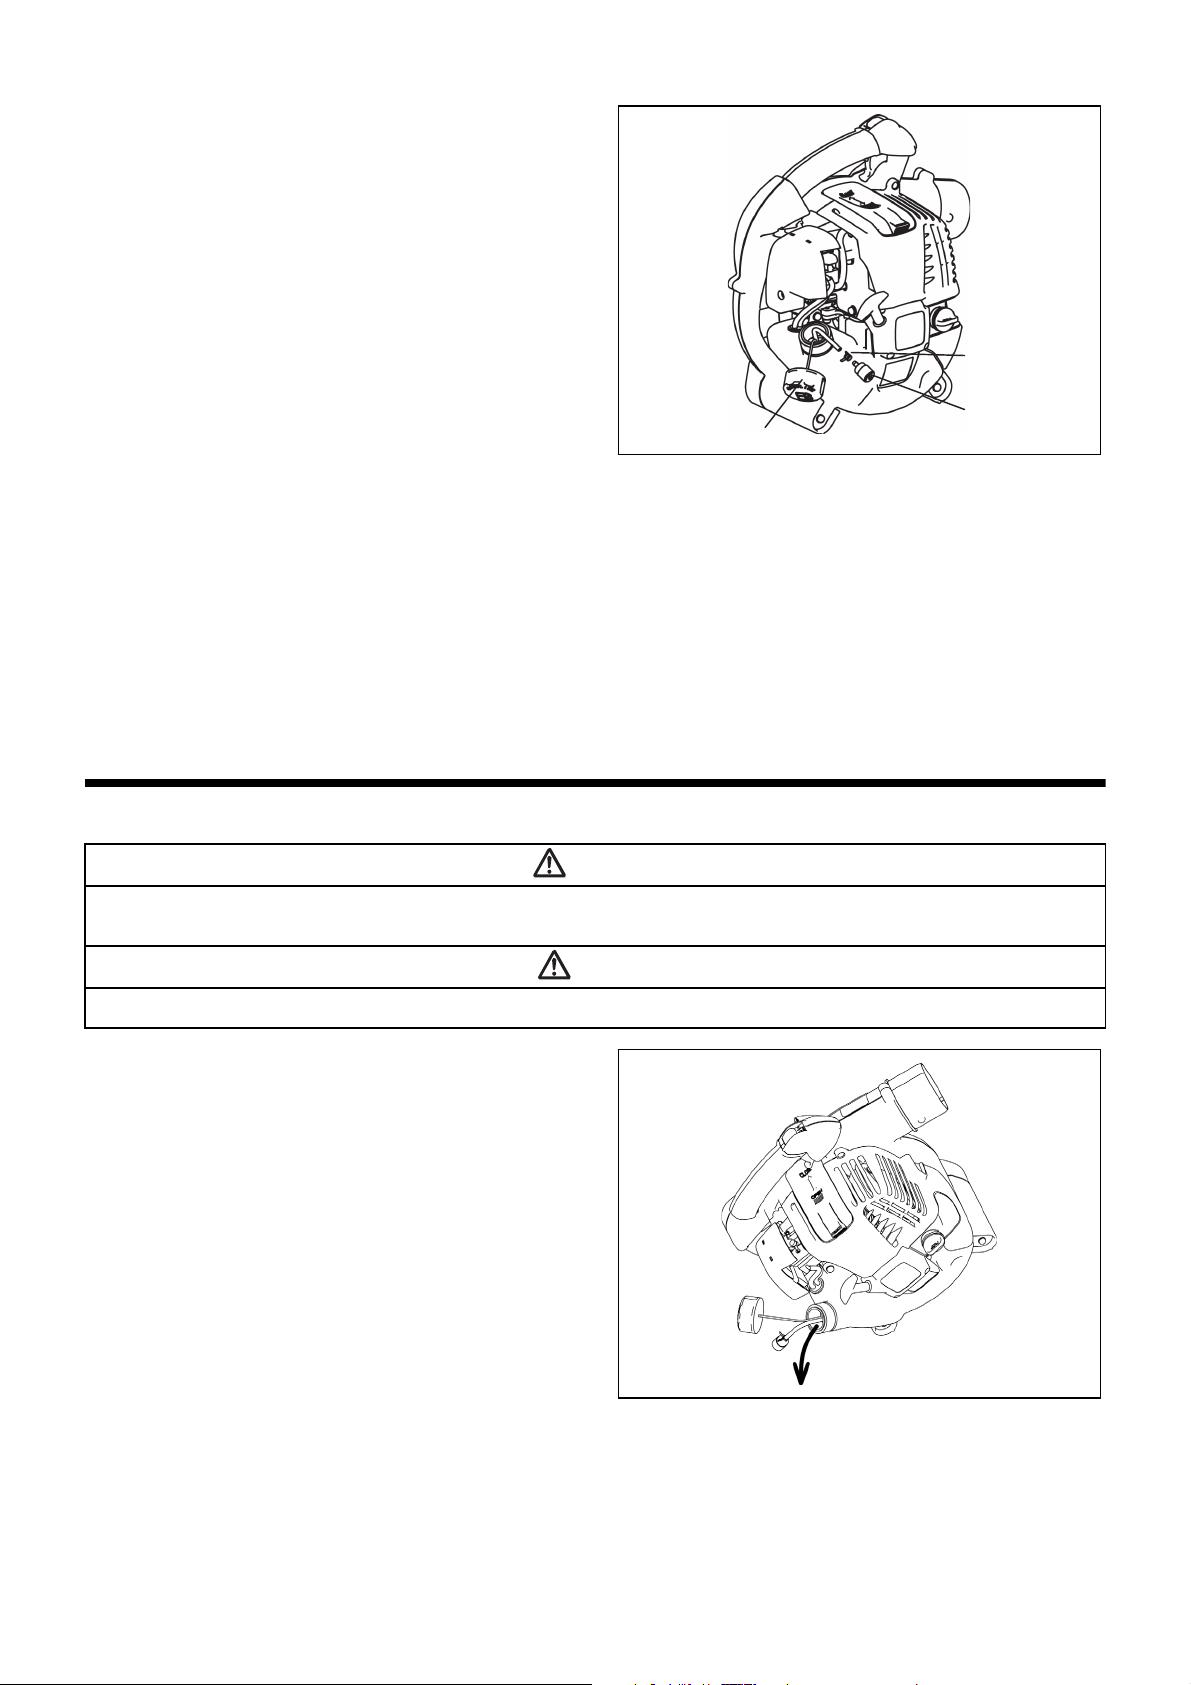
(3) Continue to push the primer pump until fuel comes into the
primer pump (Figure 2).
• In general, fuel enters into the carburetor by 7 to 10 pushes.
• If the primer pump is pushed excessively, an excess of gasoline returns to the fuel tank.
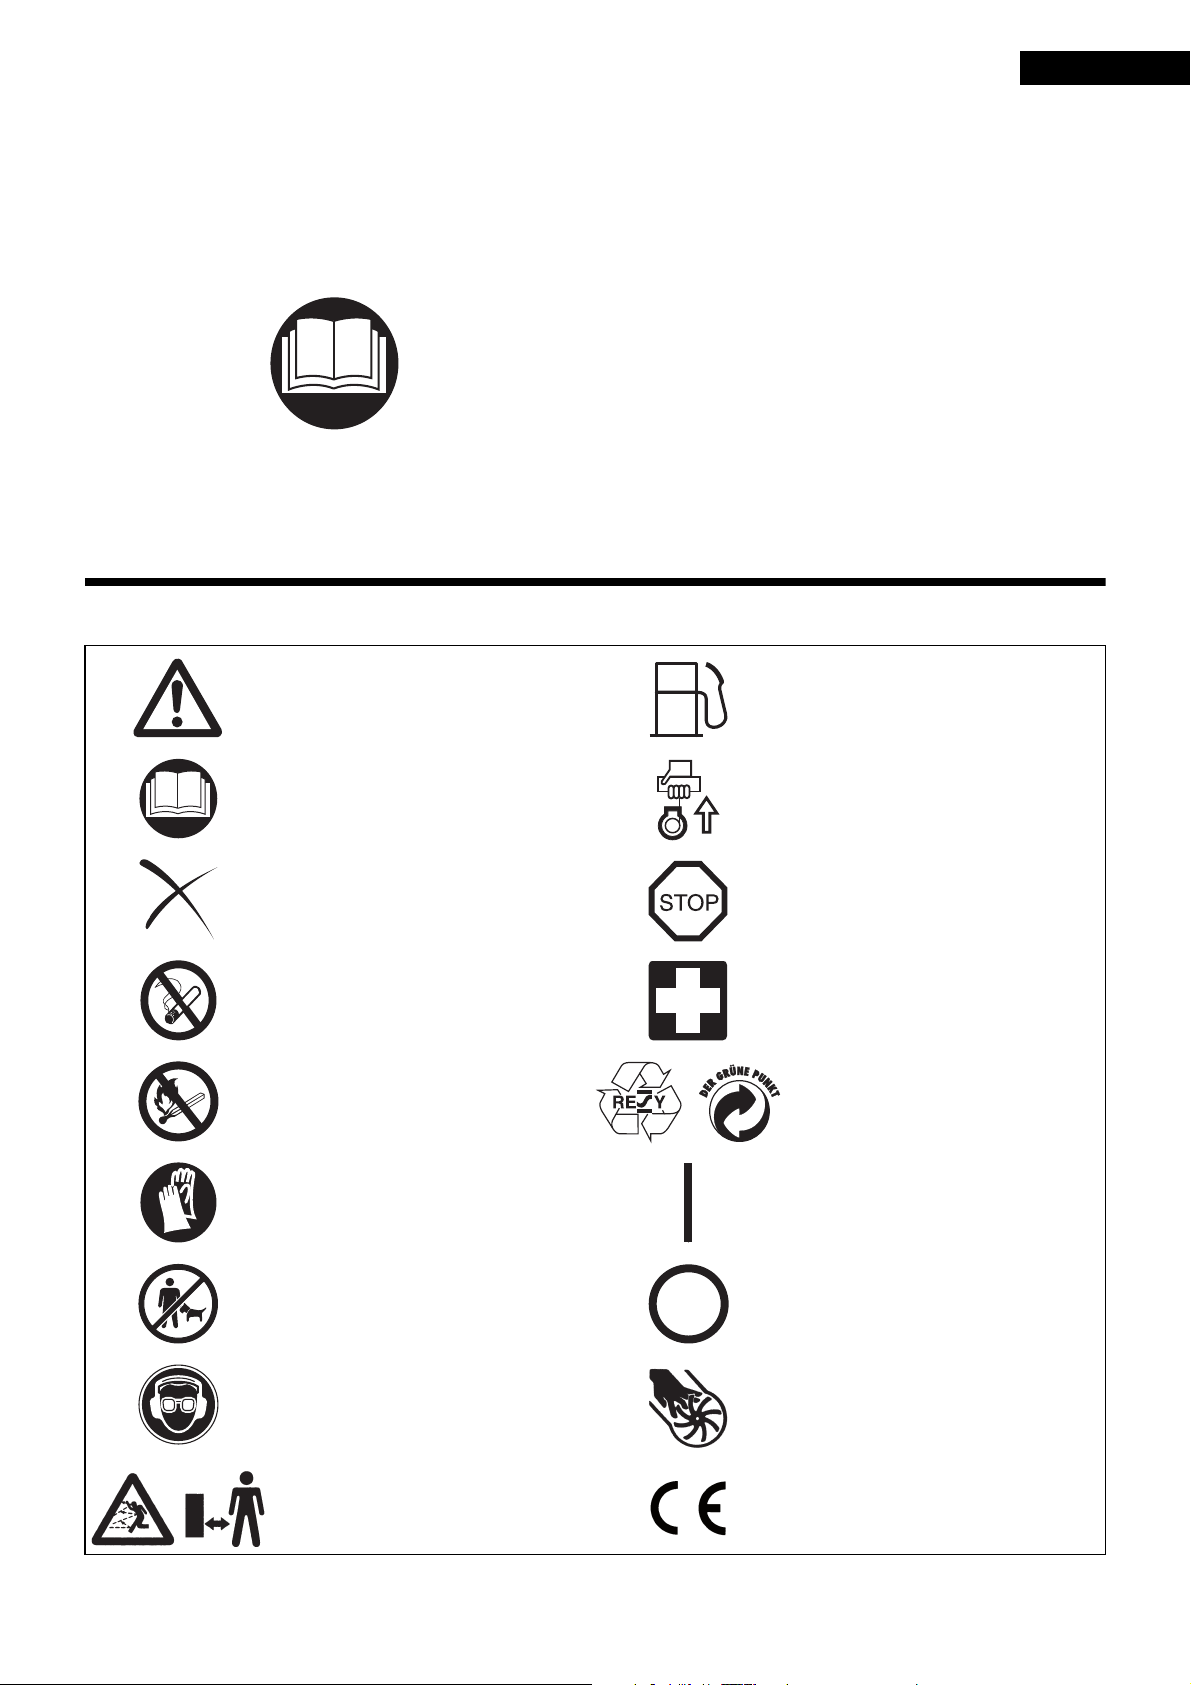
(4) Lift the choke lever to the closed position (Figure 3).
(5) Hold the main handle with left hand to prevent the engine from
moving.
(6) Pull out slowly the starter handle till a certain resistance is felt.
Return the starter handle backward once from this position,
then pull it out with force (Figure 4).
• Never pull the rope to the full extension.
• Once the start knob is pulled, never release your hand
immediately. Hold the start knob until it returns to its original
point.
(7) When the engine starts, open the choke lever (Figure 5).
• Open the choke lever progressively while checking the
engine operation. Be sure to open the choke lever to the full
in the end.
• In cold or when the engine is cooled down, never open the
choke lever suddenly. Otherwise, the engine may stop.
(8) Continue warm-up operation for 2 to 3 minutes.
(9) Warm-up is complete when there is quick engine acceleration
from low rpm to full throttle.
11
Page 12

NOTE
Stop Switch
Adjusting screw
Carburetor
• The engine may be damaged if the choke lever is moved further beyond the “CLOSE” position.
• If the engine fires and stops, return this lever to the “OPEN” position and pull the starter handle several times to start the engine again.
• If the operator keeps pulling the starter handle several times with the choke lever left in the “CLOSE” position, the engine may be difficult to
start because of flooding of the fuel.
• In case of flooding of the fuel, remove the spark plug and pull the handle several times rapidly to discharge any excess fuel. Dry the spark
plug electrode.
• When the throttle valve does not return to a position in contact with the idling adjusting screw even if the throttle lever is set to the low speed,
correct the control cable catching state to ensure proper return of the valve.
2) When the engine is warm
(1) Place the engine on a flat ground.
(2) Press the primary pump several times.
(3) Confirm that the choke lever is open.
(4) Hold the main handle with left hand to prevent the engine from moving.
(5) Pull out slowly the starter handle till a certain resistance is felt. Return the starter handle backward once from this position, then pull it
out with force.
(6) When the engine is difficult to start, open the throttle valve by about 1/3.
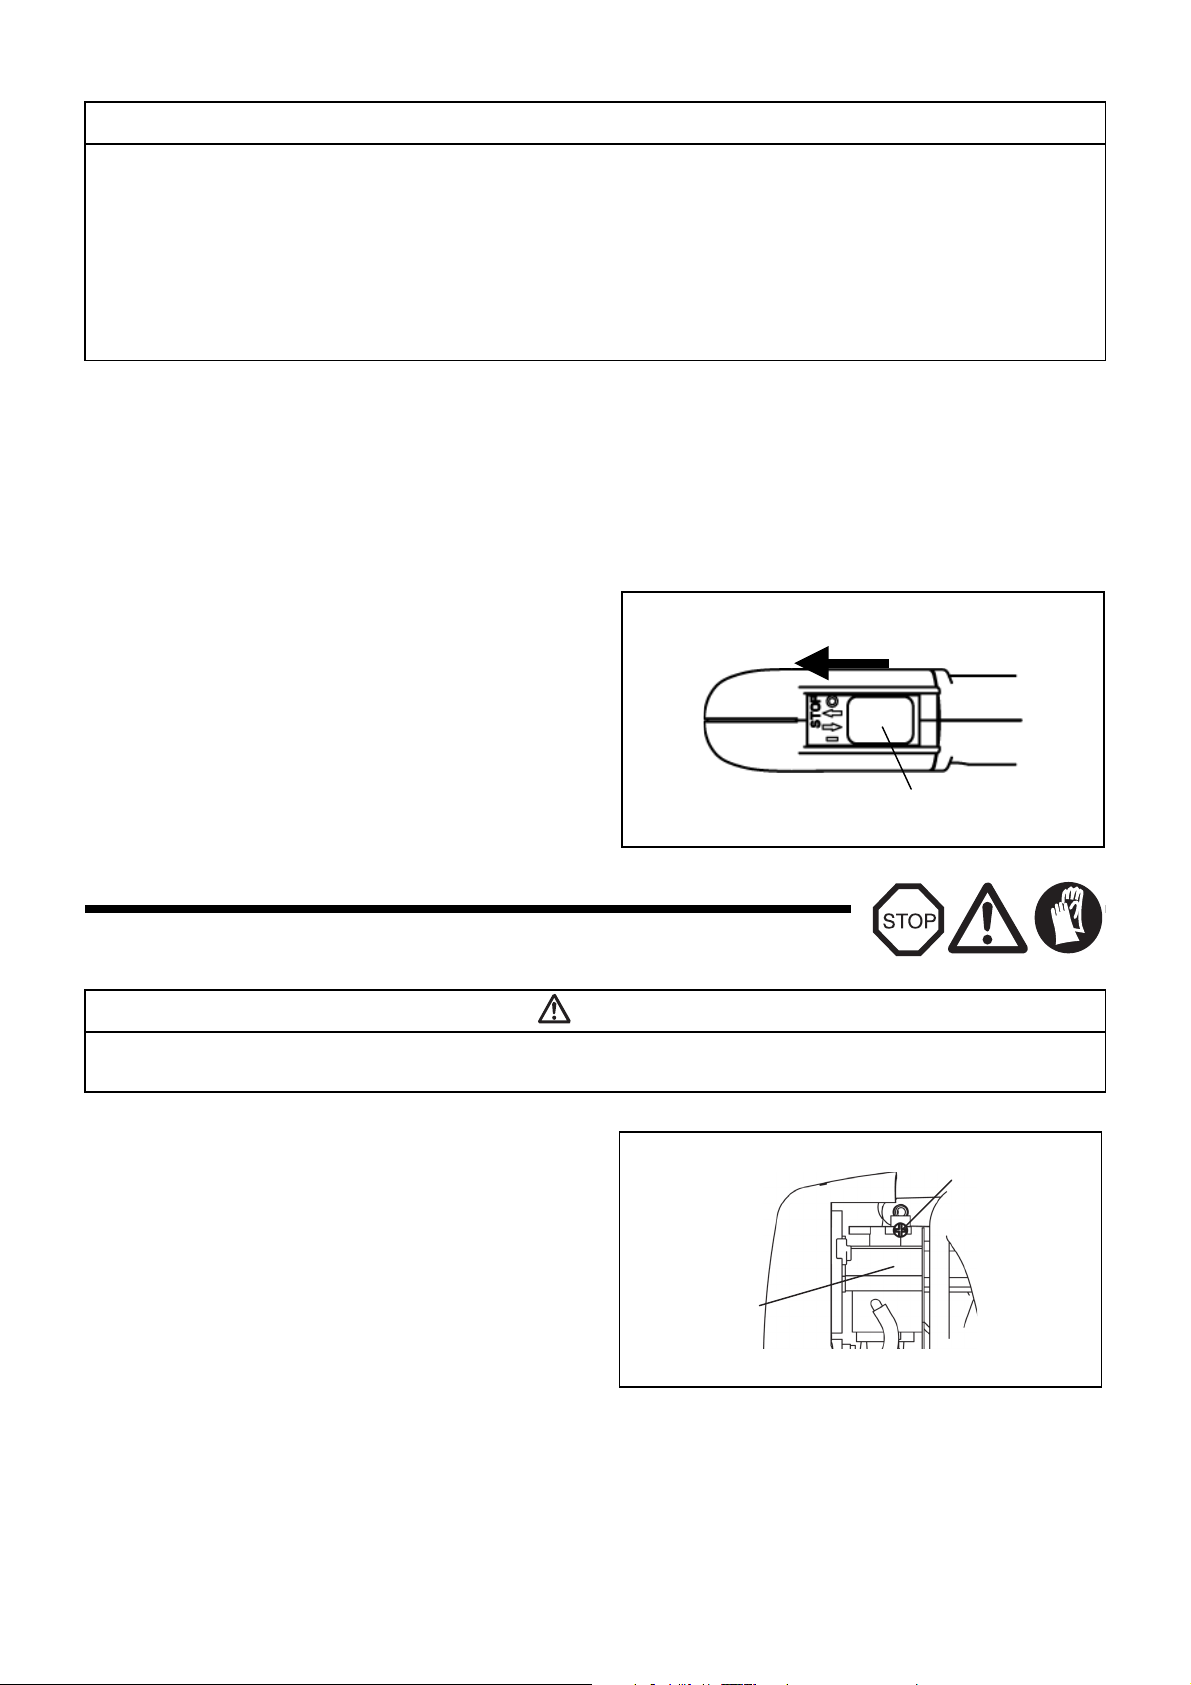
2. Stopping
Release the trigger lever to reduce the engine speed, and set the stop
switch to the “O” position.
(Release throttle lever lock if it is locking the trigger lever in the fully open
position.)
ADJUSTMENT OF IDLING
DANGER
The carburetor is factory adjusted. Please do not adjust other than idling adjusting. When adjustment becomes necessary, please consult your
dealership or an authorized service agent.
Checkup of low-speed rotation
Set the low-speed rotation to 3500 rpm (min–1).
• If it is necessary to change the rotation speed, regulate the adjusting
screw, with Phillips screwdriver.
• Turn the adjusting screw to the right, and the engine speed will
increase. Turn the adjusting screw to the left, and the engine speed will
drop.
12
Page 13

OPERATION METHOD
1. Blower operation
• Hold the machine firmly during operation.
• Direct the nozzle end toward the object to be dusted and pull the trigger lever.
• Fully pull the trigger lever, hold down the throttle lock button and
release finger from the trigger lever to lock the trigger lever at full throttle.
• Pull the trigger lever again to release the throttle lock.
• The lower portion of the fuel tank acts as an assist handle, which
enables operation with both hands. In this case, be sure to hold the
assist handle with a right hand.
2. Dust Collection Operation
WARNING
• Do not allow kerosene, gasoline, or lighted cigarette to be sucked into the machine.
- Otherwise, fire may occur.
• Do not allow foreign materials, such as large wood chips, metals, glass, pebbles, etc., to be sucked into the machine.
- Otherwise, failure may occur.
• Overfilling of the dust bag may cause its overflow toward the engine side. Empty the bag before it becomes completely full.
- Otherwise, fire may occur.
• Carry the dust bag belt on the shoulder and adjust the belt length to ensure easy operation.
• Confirm that the dust bag is not twisted and pull the trigger lever to start dust collection.
• When the dust bag is full, remove the dust bag from the machine and open the fastener to empty the
bag.
NOTE
If this machine is operated with the protector oriented upwards or the main handle downwards, white smoke may appear, oil may be contaminated or oil may leak.
13
Page 14
INSPECTION AND MAINTENANCE
Figure 1
Figure 2
Shelf
DANGER
• Before inspection and maintenance, stop the engine and allow it to cool. Remove the spark plug and plug cap.
- If inspection or maintenance is attempted immediately after engine stop or with the plug cap left attached, the operator may suffer burn or
an accident due to careless startup.
• After inspection and maintenance, be sure to confirm that all parts are assembled. Then, proceed to operation.
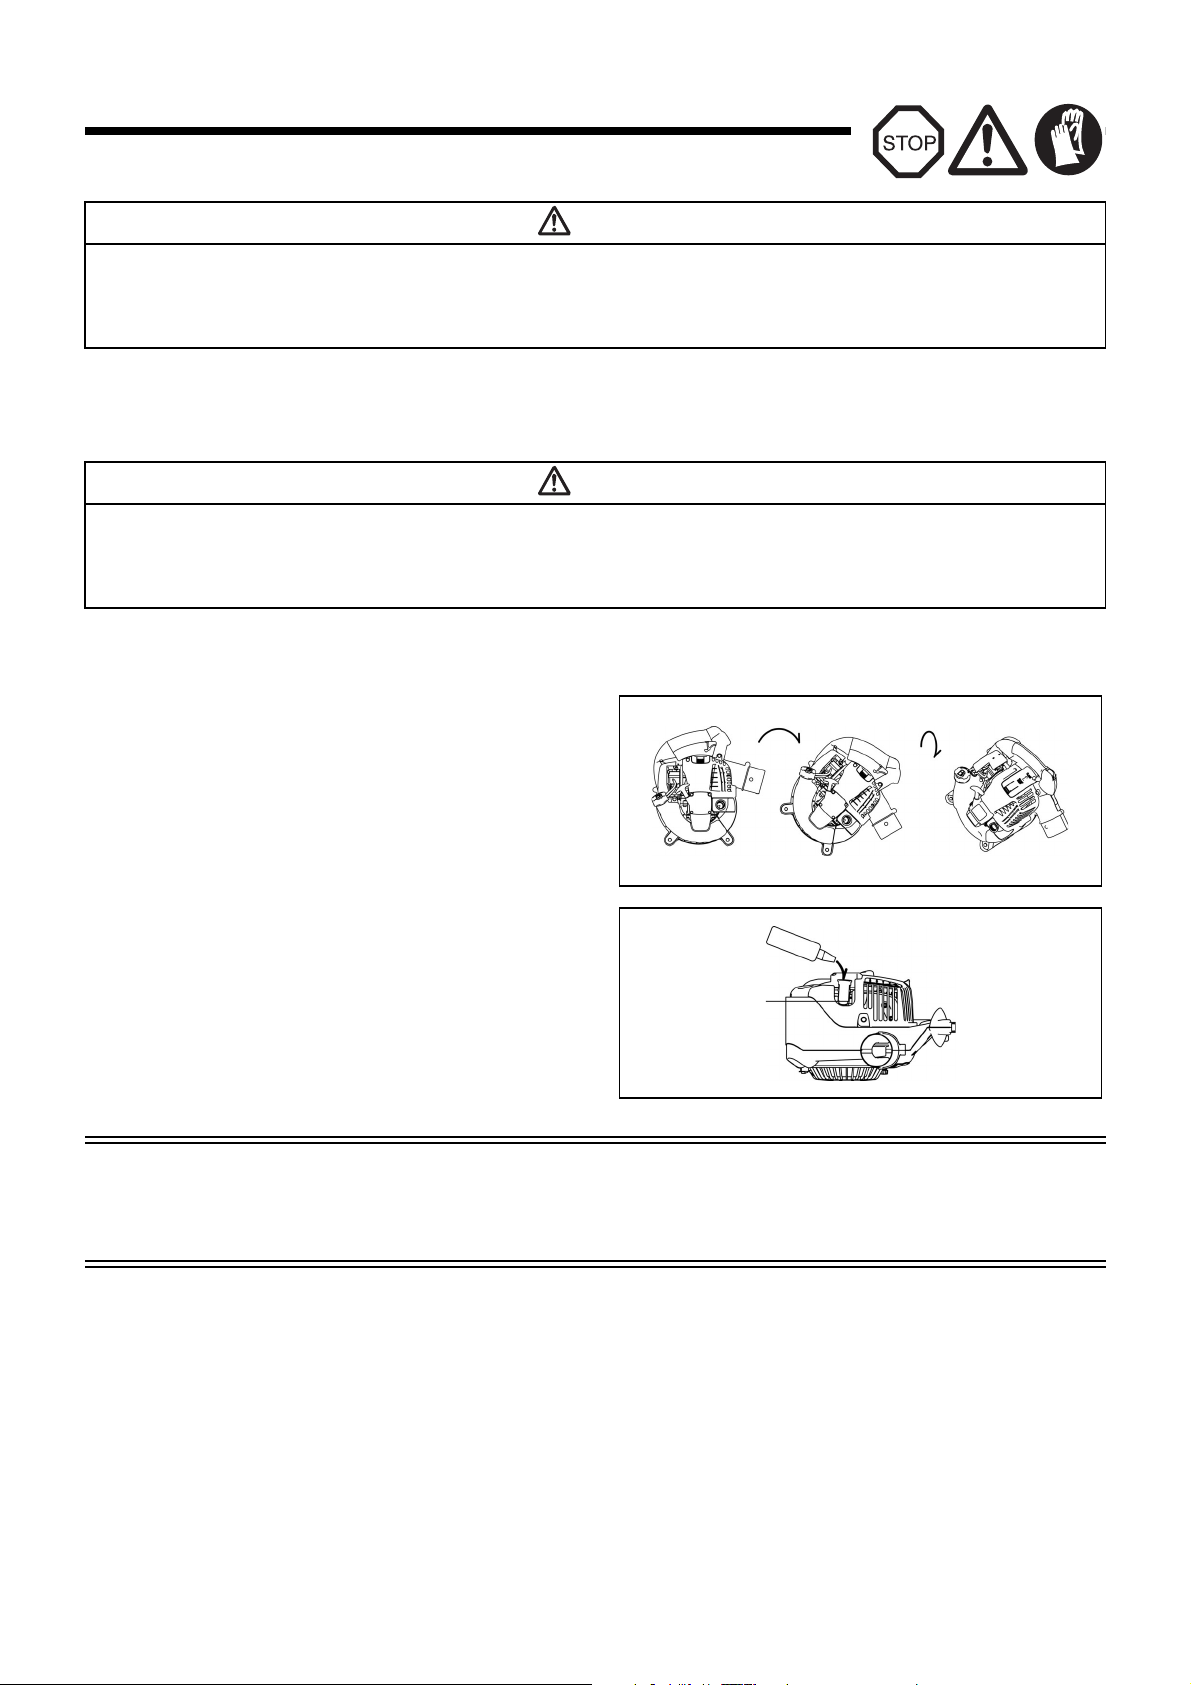
1. Replacement of engine oil
Deteriorated engine oil will shorten the life of the sliding and rotating parts to a great extent. Be sure to check the period and quantity of replacement.
DANGER
• In general, the engine main unit and engine oil still remain hot just after the engine is stopped. In replacement of oil, confirm that the engine
main unit and engine oil are sufficiently cooled down. Otherwise, there may remain a risk of scald. Allow sufficient time after stopping engine
for the engine oil to return to the oil tank to ensure accurate reading of the oil level indicator.
• If the oil filled above the limit, it may be contaminated or may catch fire with white smoke.
Interval of replacement:After first 20 operating hours, followed by every 50 operating hours
Recommended oil: SAE10W-30 oil of API Classification SF Class or higher (4-stroke engine oil for automobile)
In replacement, perform the following procedure.
(1) Confirm that the tank cap is tightened securely.
(2) Detach the oil cap.
• Keep the oil gauge free from dust or dirt.
(3) Tilt the machine in order as shown in Figure 1.
• Drain the oil in a container.
(4) Orient the machine as shown in Figure 2 and refill oil to the
shelf inside the oil pipe.
(5) After refill, securely tighten the oil gauge. Insufficient tightening
of the oil gauge will lead to oil leakage.
Points in replacement of engine oil
• Never discard replaced engine oil in garbage, earth or sewage ditch. Disposal of oil is regulated by law. In disposal, always follow the relevant
laws and regulations. For any points remaining unknown, contact Authorized Service Agent.
• Oil will deteriorate even when it is kept unused. Perform inspection and replacement at regular intervals (replace with new oil every 6 months).
14
Page 15
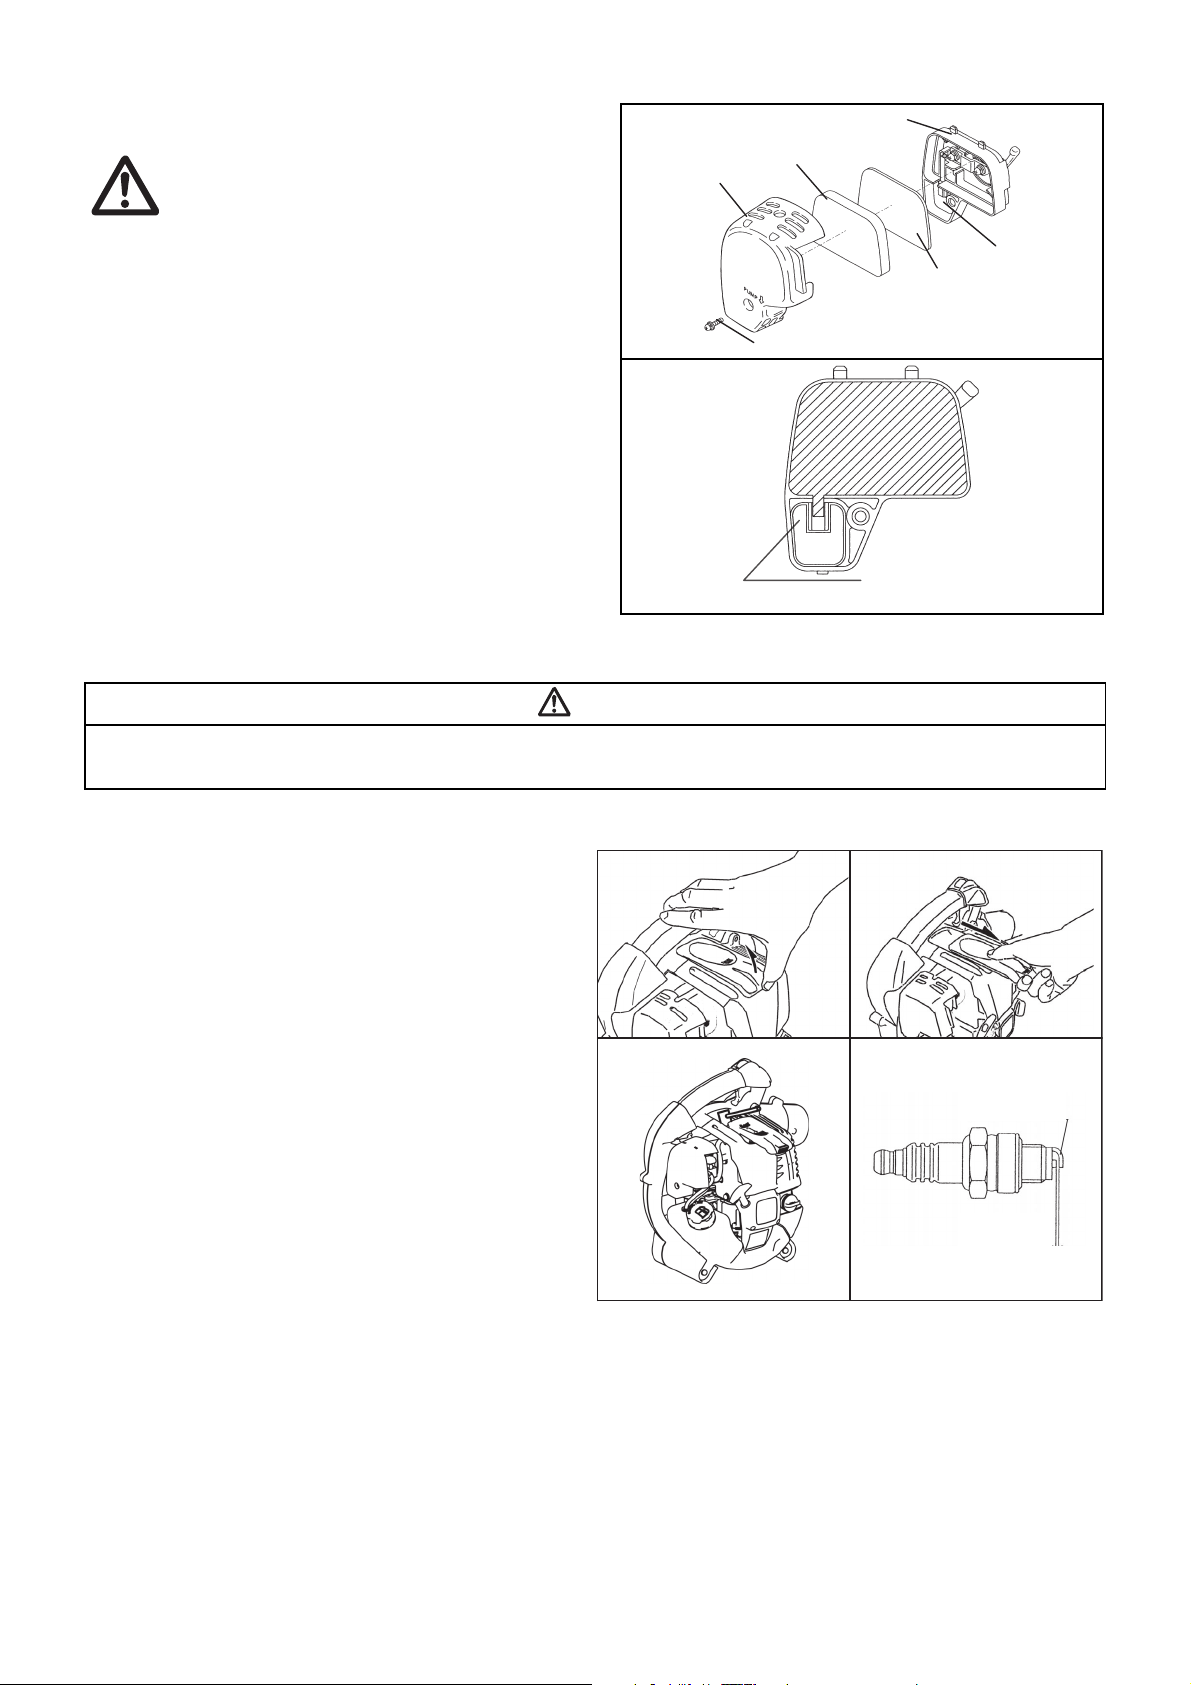
2. Cleaning of air cleaner
Plate
Element
(sponge)
Air cleaner
cover
Breather Part
Element
(felt)
Fixing bolt
Pick this part and remove the
element (felt).
Figure 1
Figure 3
Lateral electrode (–)
Figure 2
Figure 4
Electrode clearance
0.7 - 0.8 mm
WARNING: INFLAMMABLES STRICTLY PROHIBITED
Interval of Cleaning and Inspection: Daily (every 10 operating
hours)
(1) Remove the air cleaner cover-fixing bolts.
(2) Pull the cover lower side and detach the air cleaner cover.
(3) Turn the choke lever to the full close side, and keep the carbu-
retor off from dust or dirt.
(4) If oil adheres to the element (sponge), squeeze it firmly.
(5) For heavy contamination:
• Remove the element (sponge), immerse it in warm water or
in water-diluted mild detergent, and dry it completely.
• Clean the element (felt) with gasoline, and dry it completely.
(6) Before attaching the element, be sure to dry it completely.
Insufficient drying of the element may lead to difficult startup.
(7) Wipe out with waste cloth, oil adhering around the air cleaner
cover and plate breather.
(8) Immediately after cleaning is finished, attach the air cleaner
cover and tighten it with fixing bolts. (In remounting, first place
the upper claw, and then the lower claw.)
DANGER
• Clean the element several times a day, if excessive dust adheres to it.
• If operation continues with the element remaining not cleared of oil, oil in the air cleaner may fall outside, resulting in oil contamination.
3. Checking the spark plug
(1) Opening/closing the plug cover
When opening the cover, apply fingers to the main handle
and plug cover projection (Figure 1). Push up the projection
and slide the cover in the “OPEN” direction (Figure 2).
When closing the cover, slide the cover in the “CLOSE”
direction till the click under the plug cover projection rides
over the engine cover. Finally, push in the projection.
(2) Removing the spark plug
Use an attached box wrench to remove or install the spark
plug (Figure 3).
(3) Checking the spark plug
The clearance between two electrodes of spark plug is 0.7
to 0.8 mm (Figure 4). Adjust to the correct clearance when it
is too wide or too narrow.
Clean thoroughly or replace the spark plug if it has accumulated carbon or contaminated.
(4) Replacing the spark plug
For replacement, use NGK-CMR6A.
15
Page 16
4. Cleaning the fuel filter
Hose clamp
Fuel filter
Fuel tank cap
• Clogged fuel filter may cause difficulty of startup or failure of engine
speed increase.
• Check the fuel filter regularly as follows:
(1) Remove the fuel tank cap, drain the fuel to empty the tank.
Check the tank inside for any foreign materials. If any, wipe
clean such materials.
(2) Pull out the fuel filter with wire through the oil filling port.
(3) If the fuel filter surface is contaminated, clean it with gasoline.
The gasoline used for the cleaning must be disposed of
according to the method specified by each local authority.
Excessively contaminated filter must be replaced.
(4) Reset the fuel filter in the fuel tank and tighten firmly the fuel
tank cap. For replacement, contact your dealership or an
authorized service agent.
5. Inspection of bolts, nuts and screws
• Retighten loose bolts, nuts, etc.
• Check for fuel and oil leakage.
• Replace damaged parts with new ones for safety operation.
6. Cleaning of parts
• Keep engine clean by wiping down with a cloth rag.
• Keep the cylinder fins free of dust or dirt. Dust or dirt adhering to the fins will cause seizure.
7. Replacement of gaskets and packings
Replace gaskets and packings if the engine is disassembled.
Any maintenance of adjustment work that is not included and described in this manual is only to be performed by Authorized Service Agents.
STORAGE
WARNING
• When draining the fuel, be sure to stop the engine and confirm that the engine cools down.
- Failure to do so may cause burns or fire.
DANGER
• When you store the machine for a long time, drain all fuel from the fuel tank and carburetor, and keep it at a dry and clean place.
Drain fuel from the fuel tank and carburetor according to the following
procedure:
(1) Remove the fuel tank cap, and drain fuel completely.
If there is any foreign matter remaining in the fuel tank, remove
it completely.
(2) Pull out the fuel filter from the refill port using a wire.
(3) Push the primer pump until fuel is drained from there, and
drain fuel coming into the fuel tank.
(4) Reset the filter to the fuel tank, and securely tighten the fuel
tank cap.
(5) Then, continue to operate the engine until it stops.
(6) Remove the spark plug, and drip several drops of engine oil
through the spark plug hole.
(7) Gently pull the starter handle so that engine oil will spread over
the engine, and attach the spark plug.
(8) Keep the machine with its handle upside.
(9) Keep the drained fuel in a special container in a well-ventilated
shade.
16
Page 17

Fault location
Fault System Observation Cause
Engine not starting or
with difficulty
Warm start problems Tank filled ignition spark
Engine starts but dies Fuel supply Tank filled Incorrect idling adjustment, carburetor contaminated
Insufficient performance Several systems may
Ignition system Ignition spark O.K. Fault in fuel supply or compression system, mechanical
defect
No ignition spark STOP-switch operated, wiring fault or short circuit, spark plug
or connector defective, ignition module faulty
Fuel supply Fuel tank filled Incorrect choke position, carburetor defective, fuel supply line
bent or blocked, fuel dirty.
Compression No compression when
pulled over
Cylinder bottom gasket defective, crankshaft seals damaged,
cylinder or piston rings defective or improper sealing of spark
plug
Mechanical fault Starter not engaging Broken starter spring, broken parts inside of the engine
Carburetor contaminated, have it cleaned
existing
Fuel tank vent defective, fuel supply line interrupted, cable or
STOP-switch faulty
Engine idling poor Air filter contaminated, carburetor contaminated, muffler
simultaneously be
clogged, exhaust duct in the cylinder clogged
affected
Operating time
Item
Engine oil
Tightening parts (bolt, nut) Inspect 16
Fuel tank
Throttle lever Check function –
Stop switch Check function 12
Low-speed rotation Inspect/adjust 12
Air cleaner Clean 15
Ignition plug Inspect 15
Cooling air duct Clean/inspect 16
Fuel pipe
Fuel filter Clean/replace 16
Clearance between air intake
valve and air discharge valve
Oil tube Inspect *
Engine overhaul *
Carburetor Drain fuel *
Inspect/clean 9
Replace *
Clean/inspect –
Drain fuel *
Inspect 16
Replace *
Adjust *
Before
operation
After
lubrication
Daily (10h) 30h 50h 200h
1
2
2
2
2
Shutdown/
rest
3
3
Corresponding
*1 Perform initial replacement after 20h operation.
*2 For the 200 operating hour inspection, request Authorized Service Agent or a machine shop.
*3 After emptying the fuel tank, continue to run the engine and drain fuel in the carburetor.
Page
14
16
–
–
–
–
16
17
Page 18

TROUBLESHOOTING
Run engine at idling, and set choke lever to
CLOSE.
Before making a request for repairs, check a trouble for yourself. If any abnormality is found, control your machine according to the description of
this manual. Never tamper or dismount any part contrary to the description. For repairs, contact Authorized Service Agent or local dealership.
State of abnormality Probable cause (malfunction) Remedy
Failure to operate primer pump Push 7 to 10 times.
Low pulling speed of starter rope Pull strongly.
Lack of fuel Feed fuel.
Clogged fuel filter Clean
Broken fuel tube Straighten fuel tube
Deteriorated fuel makes starting more difficult.
Deteriorated fuel
Engine does not start
Engine stops soon
Engine speed does not increase
Engine does not stop. Detached connector Attach securely
Excessive suction of fuel
Detached plug cap Attach securely
Contaminated spark plug Clean
Abnormal clearance of spark plug Adjust clearance
Other abnormality of spark plug Replace
Abnormal carburetor Make request for inspection and maintenance.
Starter rope cannot be pulled Make request for inspection and maintenance.
Abnormal drive system Make request for inspection and maintenance.
Insufficient warm-up Perform warm-up operation
Choke lever is set to “CLOSE” although engine
is warmed up
Clogged fuel filter Clean
Contaminated or clogged air cleaner Clean
Abnormal carburetor Make request for inspection and maintenance.
Abnormal drive system Make request for inspection and maintenance.
Detached throttle wire Attach securely
Abnormal drive system Make request for inspection and maintenance.
Abnormal electric system Make request for inspection and maintenance.
Replace with new one. (Recommended
replacement: 1 month)
Set throttle lever from medium speed to high
speed, and pull starter handle until engine
starts. If engine will not start still, remove
spark plug, make electrode dry, and
reassemble them as they originally are. Then,
start as specified.
Set to “OPEN”
When the engine does not start after warm-up operation:
If there is no abnormality found for the check items, open the throttle by about 1/3 and start the engine.
18
Page 19
Français
Vous venez d’acheter un souffleur DOLMAR, fruit d’importants
programmes de développement et de nombreuses années d’études et
d’expérience-et nous vous en remercions.
Les modèles PB-252.4 légers, pratiques et compacts, allient les
avantages d’une technologie de pointe à une conception ergonomique,
et sont des outils de professionnels pour de nombreuses applications.
Lire soigneusement le manuel, qui traite en détail des différents points
des performances de la machine et vous aidera à en tirer le meilleur
parti possible.
Table des Matières
SYMBOLES ....................................................................................... 19
CONSIGNES DE SECURITE ............................................................ 20
DÉCLARATION DE CONFORMITÉ CE ............................................ 23
SPÉCIFICATIONS ............................................................................. 23
DÉSIGNATION DES PIÈCES ............................................................ 24
INSTRUCTIONS DE MONTAGE........................................................ 25
AVANT MISE EN MARCHE ............................................................... 26
FONCTIONNEMENT ......................................................................... 28
RÉGLAGE DU RALENTI ................................................................... 29
MODE OPERATOIRE ........................................................................ 30
INSPECTION ET MAINTENANCE .................................................... 31
REMISAGE ........................................................................................ 33
DEPANNAGE..................................................................................... 35
SYMBOLES
Lors de la lecture de ce manuel, prêter une attention particulière aux symboles ci-après :
Page
Avertissement! Danger! Essence et huile
Lire et suivre l’instructions d’emploi Moteur - Mise en marche manuelle
Interdit Arrêt d’urgence
Interdiction de fumer Premiers secours
Interdiction d’utilisation de produits
inflammables
Port de gants de protection obligatoire Marche
Recyclage
Zone de fonctionnement interdite aux
humains et aux animaux
Port de lunettes de protection et cacheoreilles obligatoire
Éloignez les spectateurs Logo de la CE
Arrêt
Mutilation du doigt ou du bras, Roue mobile
19
Page 20
CONSIGNES DE SECURITE
(1)
(2)
(3)
(4)
(5)
15 mètres
Généralités
• Pour tirer le meilleur parti de votre machine, vous devez lire, assimiler
et respecter les instructions figurant dans ce manuel (1). Les
utilisateurs mal informés risquent, par des manipulations
inappropriées, de se blesser ou de blesser leur entourage.
• Il est conseillé ne prêter cet appareil qu’aux personnes ayant déjà une
certaine expérience des souffleurs.
• Dans ce cas, leur confier aussi le manuel d’instruction.
• Les utilisateurs qui ne connaissent pas encore le fonctionnement de la
machine devront demander à leur vendeur les explications qui leur
permettront de se familiariser avec le souffleur.
• Ne pas laisser les enfants et les jeunes de moins de 18 ans utiliser le
souffleur. Au-delà de 16 ans, ils peuvent cependant apprendre à s’en
servir, mais uniquement sous le contrôle, direct d’une personne
qualifiée.
• Il soit toujours très prudent.
• N’utiliser la machine que si vous êtes en bonne condition physique.
• Faire très attention à tout ce que vous faites. N’oublier pas que vous
êtes responsable des autres.
• Ne jamais utiliser l’appareil lorsque vous avez bu ou pris des calmants
(2).
• Ne pas utiliser l’appareil lorsque vous êtes fatigué.
• Conserver soigneusement ce manuel afin de pouvoir vous y référer
ultérieurement.
Equipements de protection
• Porter des vêtements fonctionnels, c’est-à-dire des vêtements légers,
ne provoquant aucune gêne. Eviter les bijoux, les vêtements ou les
cheveux longs, qui pourraient être happés par l’entrée d’air.
• Pour éviter de vous blesser et vous protéger contre tous les accidents
éventuels, il est conseillé d’utiliser les équipements décrits ci-après.
Noter notamment que;
• Les vêtements doivent offrir toute liberté de mouvement. Éviter les
vestes amples, les pantalons évasés ou bouffants, les écharpes, les
cheveux longs non attachés ou tout ce qui risquerait d’être happé par
l’entrée d’air. Porter des survêtements ou des pantalons (et pas de
short). (4)
• Le bruit émis par le souffleur peut abîmer l’ouïe. Porter des protections
auditives (cache-oreilles ou couvre-oreilles) pour protéger l’ouïe. Si
vous utilisez la machine soit régulièrement, soit pendant de longues
périodes, rendre régulièrement visite à un oto-rhino. (3)
• Si possible, porter des gants, soyez bien chaussés et éviter les
semelles glissantes. (4)
• Protégez-vous soigneusement les yeux. Même si l’évacuation ne se
fait pas vers vous, il arrive parfois que le fonctionnement de la machine
entraîne des ricochets et des rebonds. (3)
• Ne jamais faire fonctionner la machine sans porter des lunettes ou des
verres de sécurité avec protection supérieure et latérale approprié et
conforme à la norme ANSI Z 87.1 (ou à toute norme nationale
applicable).
Mise en route de l’appareil
• S’assurer qu’il n’y a personne, enfant ou adulte, à moins de 15 mètres
(5) de la zone de travail, et prêter aussi attention aux animaux qui se
trouvent à proximité. Ne jamais l’utiliser dans des zones urbaines.
• Avant de le mettre en route, vérifier toujours la sécurité de la manette
des gaz, qui doit fonctionner facilement et sans à-coup.
Vérifier également le fonctionnement de son système de verrouillage.
S’assurer que les poignées sont propres et sèches, et vérifier le
fonctionnement du commutateur de marche/arrêt. Garder les mains
exemptes d’huile et de carburant.
360°
20
Page 21

Avant de mettre la machine en marche, s’assurer que toutes les
(6)
(7)
(8)
(9)
3 mètres
• Repos
• Transport
• Plein
• Maintenance
• Remplacement d’outil
instructions sont bien respectées.
N’utilisez pas d’autres méthodes de mise en marche de l’appareil. (6)
• N’utiliser la machine et les outils fournis que pour les applications
spécifiés.
• Ne mettre la machine en marche que lorsque tous les accessoires ont
été mis en place. L’appareil ne fonctionne que lorsque tous les
accessoires appropriés y sont fixés.
• En cas de dysfonctionnement du moteur, couper immédiatement le
contact.
• Pendant l’utilisation du souffleur, toujours tenir fermement la poignée
entre les cinq doigts de la main, de sorte que la poignée soit bien calée
entre le pouce et l’index. Garder la main dans cette position pour avoir
une bonne maîtrise de la machine en tout temps. S’assurer que la
poignée et le manche du raccord d’aspiration sont en bon état et
exempts d’humidité, de résine, d’huile ou de graisse.
Conservez toujours une position stable.
• Pendant le fonctionnement de l’appareil, éviter toute inhalation de gaz
d’échappement. N’utiliser jamais I’appareil dans des endroits clos (en
raison des risques d’étouffement et d’empoisonnement par les gaz
d’échappement). Ne pas oublier que le monoxyde de carbone est un
gaz sans odeur. N’utiliser l’appareil que dans un endroit bien aéré.
• Couper le moteur lorsque vous n’utilisez pas l’appareil, et le mettre en
lieu sûr pour éviter de blesser l’entourage, de mettre le feu aux
matériaux combustibles, ou d’endommager la machine.
• Ne jamais poser la machine chaude sur de l’herbe sèche ou des
matériaux combustibles.
• Utiliser toujours les éléments de protection fournis avec la machine.
• Ne jamais faire fonctionner la machine si le silencieux pose problème.
• Couper l’alimentation du moteur pendant le transport. (7)
• Placer le souffleur de manière sûre lors des déplacements en voiture
ou en camion, pour éviter les fuites de carburant.
• Pendant le transport, s’assurer que le réservoir de carburant est
totalement vide.
Plein
• Couper le contact lors du remplissage (7), s’éloigner de toute flamme
vive (8) et ne pas fumer.
• Eviter tout contact avec la peau et les produits dérivés du pétrole. Ne
pas inhaler les vapeurs d’essence. Porter toujours des gants de
protection. Changer et nettoyer régulièrement les gants de protection.
• Veiller à ne pas renverser de carburants ou d’huile, pour éviter de
contaminer le sol (protection de l’ environnement). En cas de fuite de
carburant, même légère, nettoyer immédiatement l’appareil. Faire
toujours sécher les chiffons avant de les jeter dans un conteneur
approprié et couvert, pour éviter tout risque de combustion spontanée.
• Eviter tout contact du carburant avec les vêtements. Si nécessaire,
changer immédiatement de vêtement.
• Inspecter régulièrement le bouchon du réservoir à carburant pour
s’assurer qu’il est toujours bien serré.
• Serrer soigneusement la vis de verrouillage du réservoir à carburant.
Changer d’emplacement pour mettre le contact (à au moins 3 mètres
de l’emplacement du remplissage). (9)
• Ne jamais faire le plein de carburant dans des pièces fermées : les
vapeurs s’accumulent au niveau du sol (risque d’explosion).
• Ne transportez et ne stockez du carburant que dans des conteneurs
appropriés. Veiller à ce que les enfants n’y aient pas accès.
• Ne jamais faire le plein d’un moteur chaud ou en marche.
21
Page 22
Fonctionnement
(10)
(11)
(12)
• N’utiliser l’appareil que dans des endroits bien éclairés, où la visibilité
est bonne. Pendant les saisons fraîches, éviter les sols glissants ou
humides, la glace et la neige. Ayez toujours une position stable.
• Ne jamais travailler sur une surface instable ou sur un terrain en pente
raide.
• Pour réduire les risques de blessure, ne pas diriger le jet d’air vers les
personnes présentes, car la pression élevée du jet d’air peut causer
une blessure aux yeux et projeter de petits objets à très grande
vitesse.
• Ne jamais introduire de corps étranger dans l’entrée d’air de la
machine ou dans le gicleur du souffleur. Cela endommagerait le
tourniquet de ventilateur, et l’utilisateur et les personnes présentes
risquent de subir une blessure grave s’ils sont heurtés par une pièce
cassée ou un objet projeté à grande vitesse.
• Ne jamais travailler contre le vent.
• Pour éviter de tomber et de perdre le contrôle de l’appareil, ne jamais
reculer pendant son fonctionnement.
• Couper toujours le moteur avant de nettoyer l’appareil ou de remplacer
certaines de ces pièces.
Maintenance
• Respecter l’environnement; vérifier notamment le bon réglage du
carburateur pour polluer aussi peu que possible l’atmosphère.
• Vérifier régulièrement le souffleur, et s’assurer que ses vis et écrous
sont bien fixés.
• Pendant toutes les opérations de maintenance ou de stockage, éviter
soigneusement la présence de flammes, d’étincelles ou autres (11).
• Stocker toujours l’appareil dans une pièce fermée à clé et bien aérée.
Avant de le stocker, vider soigneusement son réservoir de carburant.
Respecter toujours les instructions de prévention d’accidents des
associations professionnelles et des compagnies d’assurances.
N’effectuez aucune modification sur le souffleur, car cela est dangereux.
N’effectuer aucune opération de maintenance ou de réparation qui ne
soit pas prévue par ce manuel. Toutes les autres opérations doivent être
effectuées par un agent du service après-vente habilité.
N’utiliser-que des pièces et des accessoires d’origine, fournis par
DOLMAR. L’utilisation d’outils et d’accessoires non agréés augmente les
risques d’accident. DOLMAR décline toute responsabilité en cas
d’accident ou de dommage provoqué par l’utilisation d’accessoires ou
d’outils non agréés.
Premiers secours
Veiller à avoir toujours à portée de la main une trousse de premiers
secours respectant les réglementations en vigueur. S’assurer que la
trousse est toujours complète.
En cas d’accident, appeler les services de secours et fournissezleur les informations suivantes:
• lieu de l’accident
• circonstances de l’accident
• nombre de personnes blessées
• type de blessures
• vos coordonnées
Conditionnement
Le souffleur est livré emballé dans un carton. Le carton est un matériau
de base qui peut donc être réutilisé ou recyclé.
22
Page 23

Pour les pays d’Europe uniquement
Déclaration de conformité CE
Les soussignés, Tamiro Kishima et Rainer Bergfeld, tel
qu’autorisés par Dolmar GmbH, déclarent que le(s) machine(s)
DOLMAR suivante(s) :
Nom de la machine:
Souffleur à essence
N° de modèle/Type : PB-252.4
SPÉCIFICATIONS : voir le tableau “SPÉCIFICATIONS”
sont fabriquées en série et
sont conformes aux directives européennes suivantes:
2001/14/CE, 2006/42/CE
et sont produites conformément aux normes ou documents de
normalisation suivants :
EN15503
La documentation technique se trouve sur fichier à l’adresse
suivante :
Dolmar GmbH,
Jenfelder Straße 38, Abteilung FZ,
D-22045 Hamburg
La procédure d’évaluation de la conformité requise par la
directive 2000/14/CE est conforme à l’annexe V.
Niveau de puissance sonore mesurée : 102 dB
Niveau de puissance sonore garantie : 106 dB
14. 6. 2010
Tam i ro K i sh i ma
Président directeur
Rainer Bergfeld
Président directeur
SPÉCIFICATIONS
Modèle PB-252.4
Poids (sans les tubes) (kg) 4,5
Dimensions (sans les tubes) ( L x L x H totales) (mm) 350 x 231 x 368
Vitesse maxi du moteur (min
Vitesse au ralenti (min
Cylindrée totale du moteur (mL) 24,5
Carburant Essence à automobile
Volume du réservoir à carburant (L) 0,52
Huile à moteur
Volume d’huile à moteur (L) 0,08
Carburateur (Carburateur à diaphragme) WALBRO WYL
Système d’allumage Allumage électronique
Bougie NGK CMR6A
Distance entre électrodes (mm) 0,7 - 0,8
a
Vibration selon EN15503
Moyenne du niveau de pression
sonore selon EN15503
Moyenne du niveau de puissance
sonore selon EN15503
hv eq
Incertitude K (m/s
L
PA eq
Incertitude K dB(A) 1,4
L
WA eq
Incertitude K dB(A) 1,4
Notes:
1. Utiliser l’huile et la bougie désignés par DOLMAR.
2. La spécification peut être soumise à changement sans avis préalable.
-1
) 7 800
-1
) 3 500
SAE 10W- 30 huile de la classification API, classe SF ou supérieure
(moteur à quatre temps pour automobile)
(m/s2)9,3
2
) 0,5
dB(A) 90,8
dB(A) 103,7
23
Page 24
DÉSIGNATION DES PIÈCES
Optionnel
Kit d’aspiration (Optionnel)
DÉSIGNATION DES PIÈCES DÉSIGNATION DES PIÈCES DÉSIGNATION DES PIÈCES DÉSIGNATION DES PIÈCES
1. Interrupteur d’arrêt 8. Réservoir à carburant 15. Capot de bougie 22. Gicleur d’aspiration
2. Poignée principale
3. Déclencheur 10. Silencieux 17. Bouchon à huile 24. Sac à poussières
4. Pompe d’amorçage 11. Poignée assistante 18. Tuyau de souffleur
5. Couvercle de filtre à air
6. Levier de réglage 13. Vis 20. Gicleur de souffleur B
7. Poignée de démarrage 14. Capot de protection 21. Raccord coudé
9. Bouchon du réservoir à
carburant
12. Bouton de verrouillage de
l’étrangleur
16. Bougie 23. Flèche
19. Gicleur de souffleur A
24
Page 25

INSTRUCTIONS DE MONTAGE
ATTENTION : Avant toute opération sur le souffleur, couper
ATTENTION : Ne mettre le souffleur en marche que lorsqu’il est
toujours le moteur et débrancher les connecteurs de
bougie.
Porter toujours des gants de protection!
complètement monté.
1. MONTAGE DU TUBE DE SOUFFLANTE
1) Faire coïncider les rainures du tube de soufflante avec les
nervures du carter de l’appareil et faire glisser le tube sur le
carter.
2) Tourner le tube de soufflante dans le sens des aiguilles d’une
montre pour le bloquer.
3) Placer la bague autour de l’ouverture du tube de soufflante.
La serrer fermement avec le boulon et l’écrou .
2. MONTAGE DES ACCESSOIRES DE L’ASPIRATEUR
1) Fixation de la buse de vide (tuyère)
(1) Desserrer la vis et ouvrer le capot de protection .
AVERTISSEMENT!
Lors d’employer cet appareil comme souffleur, predre garde
de confirmer le serrage complet de la vis à chaque
moment de démarrage de l’appareil. S’il y a aucun
desserrement, la resserrer.
Il est très dangereux de mettre l’appareil en marche avec la vis
desserrée.
Le rotor risque de happer les doigts ou les vêtements et de provoquer un
accident grave.
Attention : Le moteur ne démarrera que lorsque le couvercle de
Attention : Ne pas effectuer l’opération de serrage (4) ci-dessus si le
Attention : Ne pas serrer trop fermement la vis .
Attention : Le moteur ne démarrera que lorsque la buse de vide sera
protection sera complètement fermé.
(2) Faire coïncider le repère indiqué sur la buse avec le
cadenas “ ” indiqué sur le souffleur, puis engager la buse de
vide dans le souffleur.
(3) Tourner la buse de vide jusqu’à ce que le repère coïncide
avec le cadenas “ ” indiqué sur le souffleur pour bloquer la
buse.
(4) Serrer fermement la buse de vide au souffleur avec la vis et
le support .
souffleur va être utilisé dans un pays ou une région auquel la
norme CE n’est pas applicable.
complètement installée.
AVERTISSEMENT!
Tenir toujours la douille de fixation de la buse lorsque vous la verrouillez
ou la déverrouillez.
2) Fixation du raccord coudé et du sac à poussière
(1) Ouvrir l’attache du sac à poussière.
(2) Engager le raccord coudé et du sac à poussière et sortezle par
l’ouverture du sac.
(3) Fixer le raccord coudé sur l’aspirateur.
(4) Placer la bague autour de l’ouverture du raccord coudé.
Serrer fermement avec le boulon et l’écrou .
ATTENTION : Ne pas effectuer l’opération de serrage (4) ci-dessus si le
souffleur va être utilisé dans un pays ou une région
auquel la norme CE n’est pas applicable.
AVERTISSEMENT!
N’essayer pas d’aspirer des copeaux de bois, des
morceaux de métal ou de verre, de gros cailloux, des
liquides, des cigarettes allumées, des pièces de feu
d’artifice, etc.
Monter toujours le capot de protection/la buse de vide avant de mettre la
machine en marche. Faire fonctionner la machine sans capot de
protection/buse de vide est dangereux, car le rotor risque de happer vos
doigts ou vos vêtements, et de provoquer des blessures graves.
N’essayer pas de retirer la vis (1) ou de démonter la buse de vide. La
réglementation impose une distance de sécurité de 900 mm au moins
entre le rotor et l’extrémité supérieure du tube.
25
Page 26
AVANT MISE EN MARCHE
Figure 1
Figure 2
Limite inférieure
Limite supérieure
Figure 3
Limite supérieure
Limite inférieure
L’indicateur de
niveau d’huile
Figure 4
Figure 5
Étagère
Figure 6
Étagère
1. Inspection et ravitaillement de l’huile moteur
(1) Suivre la procédure ci-dessous lorsque le moteur est froid.
S’assurer que le moteur est sur une surface horizontale et plane, tel qu’illustré à la Figure 1.
• Inspection : Retirer le bouchon du réservoir d’huile. Essuyer l’indicateur de niveau d’huile. Remettre en place le bouchon du
• Remplissage : Après l’inspection, si le niveau d’huile est sous la limite inférieure, ajouter de l’huile par l’ouverture d’où le bouchon du
(2) Il faudra probablement faire le plein d’huile après 10 heures d’utilisation (ou lors de chaque 10ème plein de carburant).
(3) Si l’huile change de couleur ou s’imprègne de saletés, la remplacer. (Concernant l’intervalle et la méthode de remplacement, voir
page 31.)
Huile recommandée : SAE 10W- 30 huile de la classification API, classe SF ou supérieure (moteur à quatre temps pour automobile)
Volume d’huile : Env. 0,08 L (2,7 fl. oz)
Méthode d’inspection d’huile à moteur
réservoir d’huile (Figure 2), puis le retirer. S’assurer que le niveau d’huile se trouve entre les limites inférieure et
supérieure de l’indicateur de niveau d’huile.
réservoir d’huile a été retiré. Consulter la Figure 4 concernant la façon d’orienter le moteur pour faire le plein d’huile.
NOTE
• Si le moteur n’est pas placé sur une surface horizontale comme à la Figure 1, l’indication du niveau d’huile risque d’être inexacte.
• Si l’huile est fournie au-dessus de la limite, l’huile peut être contaminée ou elle peut prendre feu, émettant une fumée blanche.
Remplacement de l’huile : “Jauge d’huile”
• Enlever les poussières et les impuretés à proximité de l’orifice de ravitaillement, et déposer la jauge d’huile.
• En retirant la jauge d’huile, éviter de la mettre en contact avec des grains de sable ou des poussières. Autrement les grains de sable ou les
poussières collés à la jauge d’huile risquent d’affecter la circulation de l’huile ou de causer l’usure des pièces du moteur, ce qui entraînera des
dysfonctionnements.
• A titre d’exemple, pour maintenir la jauge nette, il est recommandé d’insérer la jauge d’huile sur le côté poignée dans le couvercle de moteur.
Après avoir fait le plein d’huile
• Essuyer toute trace d’huile renversée, à l’aide d’un chiffon.
26
Page 27

2. Alimentation en carburant
AVERTISSEMENT
• Lors du remplissage, respecter rigoureusement les instructions suivantes pour éviter les risques d’explosion ou d’incendie :
- L’alimentation en carburant doit être effectuée à l’endroit où il n’y a pas de feu. Ne jamais apporter du feu (tabac, etc.) près de l’endroit de
l’alimentation en carburant.
- Couper le contact et laisser refroidir le moteur avant de refaire le plein.
- Ouvrir lentement le bouchon du réservoir à carburant. La pression interne peut faire déborder le carburant.
- Faire attention à ne pas laisser déborder le carburant. Essuyer proprement tout le carburant débordé.
- Alimenter du carburant à l’endroit bien ventilé.
• Manipuler du carburant avec soin.
- Le carburant collé sur la peau et pénétré dans les yeux peut causer des allergies ou l’irritation. Lorsque les anomalies physiques
quelconques sont constatées, consulter immédiatement un spécialiste médical.
• NE PAS verser d’huile dans le réservoir à carburant.
DURÉE DE STOCKAGE DU CARBURANT
Le carburant doit être utilisé totalement dans un délai de quatre semaines, même s’il est contenu dans un récipient spécial et stocké à l’ombre
bien aérée.
Si le carburant n’est pas stocké dans un récipient spécial ou si le récipient n’est pas couvert, le carburant se détériore en un jour.
Entreposage de l’appareil et du réservoir de ravitaillement
• Garder l’appareil et le réservoir à un endroit sans qu’ils soient exposés aux rayons du soleil.
• Ne jamais garder de carburant dans un véhicule.
CARBURANT
Le moteur est à quatre temps. Utiliser de l’essence ordinaire ou du supercarburant.
Les essentiels pour le carburant
• Ne jamais utiliser de l’essence mélangée de l’huile à moteur. Autrement cela causera une accumulation excessive de carbone ou entraînera
des problèmes mécaniques.
• Une huile détériorée causera un démarrage irrégulier.
Avant de faire le plein, penser à couper le contact et vérifier que le moteur a refroidi.
MÉTHODE DE REMPLISSAGE
• Desserrer un peu le bouchon du réservoir pour libérer la pression du réservoir.
• Enlever le bouchon du réservoir et faire le plein ; pour vidanger l’air, incliner le réservoir à carburant de sorte que le port de remplissage soit
orienté vers le haut.
(NE PAS faire le plein de carburant jusqu’à ras bord du réservoir.)
• Après avoir fait le plein, serrer fermement le bouchon du réservoir.
• Remplacer le bouchon du réservoir s’il est abîmé ou comporte un défaut.
• Le bouchon du réservoir s’use au fil du temps. Le remplacer au bout de deux à trois ans.
• NE PAS verser de carburant dans le port de remplissage du réservoir d’huile.
27
Page 28
FONCTIONNEMENT
Figure 1
Interrupteur d’arrêt
Figure 2
FERMER
Figure 4
Figure 5
OUVRIR
Figure 3
Pompe d’amorçage
1. Mise en marche
AVERTISSEMENT
• Ne jamais tenter de démarrer le moteur dans l’endroit où le carburant a été alimenté.
- Cela comporte un risque d’explosion ou d’incendie. S’éloigner d’au moins 3 mètres pour faire démarrer le moteur.
• Les gaz d’échappement du moteur sont toxiques. Ne pas mettre le moteur en marche dans l’endroit faiblement ventilé, tel que dans le
tunnel, le bâtiment, etc.
- La manœuvre du moteur dans l’endroit faiblement ventilé peut causer l’empoisonnement par le gaz d’échappement.
• En cas de constatation des anomalies du bruit, de l’odeur ou de la vibration après la mise en marche, arrêter immédiatement le moteur et
effectuer l’inspection.
- Si le moteur est mis en marche sans porter attention à ces anomalies, un incident pourra se produire.
• S’assurer que le moteur s’arrête quand l’interrupteur d’arrêt est mis à la position “O”.
1) Lorsque le moteur est froid ou après avoir fait le plein
(1) Positionner cette machine à un lieu plat.
(2) Mettre l’interrupteur d’arrêt sur la position “MARCHE”.
(Figure 1)
(3) Continuer à pousser la pompe d’amorçage jusqu’à ce que le
carburant entre dans la pompe d’amorçage. (Figure 2)
• En général, le carburant entre dans le carburateur par 7 à
10 poussées.
• Si la pompe d’amorçage est poussée excessivement, un
excès de l’essence retourne au réservoir à carburant.
(4) Élever le levier de réglage jusqu’en position fermée (Figure 3).
(5) Saisir la poignée principale avec la main gauche pour
empêcher le moteur de bouger.
(6) Tirer la poignée de démarrage jusqu’à ce qu’il soit difficile de
tirer (point de compression). Puis, laisser revenir la poignée de
démarrage, et la tirer fortement. (Figure 4)
• Ne jamais tirer sur la corde jusqu’à ce qu’elle sorte
complètement.
• Une fois que la poignée de démarrage est tirée, ne jamais
lâcher prise du câble tout à coup. Saisir la poignée de
démarrage jusqu’à ce qu’elle retourne au point original.
(7) Lorsque le moteur démarre, ouvrir le levier de réglage.
(Figure 5)
• Ouvrir le levier de réglage pas à pas, en vérifiant la marche
du moteur. Ne pas manquer d’ouvrir le levier de réglage
pleinement à la fin.
• A froid ou lorsque le moteur reste froid, ne pas ouvrir le
levier de réglage subitement. Autrement, le moteur
s’arrêtera.
(8) Augmenter la température pendant deux ou trois minutes.
(9) Le réchauffage est terminé lorsque le moteur passe
rapidement de la vitesse de faible régime à celle de plein
régime.
28
Page 29
NOTE
Interrupteur d’arrêt
Vis régulatrice
Carburateur
• Le moteur pourra être endommagé si le levier de réglage est déplacé au-delà de la position “CLOSE”.
• Si le moteur s’allume puis s’arrête, remettre ce levier en position ouverte (“OPEN”) et tirer à quelques reprises sur la poignée de démarreur
pour faire redémarrer le moteur.
• Si l’utilisateur tire à plusieurs reprises sur la poignée de démarreur avec le levier de réglage en position fermée (“CLOSE”), il se peut que le
moteur ait du mal à démarrer à cause de l’afflux excessif de carburant.
• En cas d’afflux excessif de carburant, retirer la bougie d’allumage et tirer rapidement sur la poignée à plusieurs reprises pour vidanger
l’excès de carburant. Faire sécher l’électrode de la bougie d’allumage.
• Si la vanne d’étrangleur ne revient pas en position de contact avec la vis de réglage du ralenti alors que la manette d’étrangleur est réglée
sur la vitesse lente, corriger l’état d’accrochage du câble de commande pour assurer le retour adéquat de la vanne.
2) Quand le moteur est échauffé
(1) Mettre le moteur sur la terre plate.
(2) Pousser la pompe d’amorçage à quelques fois.
(3) S’assurer que le levier de réglage est ouvert.
(4) Saisir la poignée principale avec la main gauche pour empêcher le moteur de bouger.
(5) Faire sortir lentement la poignée de démarreur jusqu’à la constatation d’une certaine résistance. De cette position, retourner la poignée
de démarreur une fois à l’arrière, puis tirer la poignée avec la force.
(6) S’il est difficile de démarrer le moteur, ouvrir l’étrangleur jusqu’à 1/3 environ.
2. Arrêt
Relâcher le levier de commande pour diminuer la vitesse du moteur et
placer l’interrupteur d’arrêt en position “O”.
(Débloquer le verrou du levier d’étrangleur s’il bloque le levier de
commande en position entièrement ouverte.)
RÉGLAGE DU RALENTI
DANGER
Le carburateur est réglé en usine. Ne le régler que lorsque le moteur tourne au ralenti. S’il est nécessaire du régler de nouveau, s’adresser à
l’agent du service après-vente habilité.
Vérification de la rotation à petite vitesse
Régler à 3500 rpm (min–1) la rotation à petite vitesse.
• S’il est nécessaire de changer la vitesse de rotation, ajuster la vis
régulatrice avec un tournevis cruciforme.
• Tourner la vis de réglage vers la droite pour faire augmenter la vitesse
du moteur. Tourner la vis de réglage vers la gauche pour faire diminuer
la vitesse du moteur.
29
Page 30
MODE OPERATOIRE
1. Manœuvre du souffleur
• Retenir fermement la machine pendant la manœuvre.
• Orienter le bout de l’embout vers les objets à épousseter et tirer le
déclencheur.
• Tirer complètement sur le déclencheur, maintenir le bouton de
verrouillage de l’étrangleur enfoncé et retirer le doigt du déclencheur
pour verrouiller ce dernier en position de puissance maximale.
• Tirez à nouveau sur le levier de commande pour relâcher le verrou du
levier d’étrangleur.
• La partie basse du réservoir de carburant sert de la poignée
assistante, ce qui rend possible la manœuvre à deux mains. Dans ce
cas, soyez certain de retenir la poignée assistante par la main droite.
2. Opération de dépoussiérage
AVERTISSEMENT
• Ne pas laisser aspirer le kérosène, l’essence, ou la cigarette allumée dans la machine.
- Sinon, l’incendie peut se produire.
• Ne pas laisser aspirer les corps étrangers, tels que copeaux de bois, métaux, verres, cailloux, etc. dans la machine.
- Sinon, la panne peut se produire.
• Les poussières risqueront de déborder du côté du moteur si le sac à poussières est trop plein. Vider le sac avant qu’il ne soit complètement
plein.
- Sinon, l’incendie peut se produire.
• Porter le harnais du sac à poussières sur l’épaule et ajuster la longueur de ceinture pour permettre la
manipulation facile.
• S’assurer que le sac à poussières n’est pas tordu et tirer le déclencheur pour mettre le
dépoussiérage en marche.
• Lorsque le sac à poussières est plein, le retirer de la machine et l’ouvrir pour le vider.
NOTE
Si la machine est utilisée avec le protecteur orienté vers le haut ou avec la poignée principale vers le bas, il se peut que la machine dégage de
la fumée blanche, que l’huile se contamine ou qu’elle s’écoule.
30
Page 31

INSPECTION ET MAINTENANCE
Figure 1
Figure 2
Étagère
DANGER
• Avant l’inspection et la maintenance, arrêter le moteur et le laisser refroidir. Retirer la bougie d’allumage et le capot de bougie.
- Si l’inspection ou la maintenance est effectuée immédiatement après l’arrêt du moteur ou avec le capot en place, l’opérateur a un risque
d’être brûlé ou de subir un accident dû au démarrage inattendu.
• Après l’inspection et la maintenance, s’assurer que toutes les pièces sont rassemblées. Puis, procéder à la manœuvre.
1. Remplacement de l’huile à moteur
Une huile à moteur trop usée peut réduire considérablement la durée de service des pièces coulissantes et des pièces rotatives. Ne pas manquer
de vérifier la période et la quantité de remplacement.
DANGER
• En général, le bloc moteur et l’huile à moteur restent chauds immédiatement après que le moteur s’arrête. Lors de remplacement d’huile,
confirmer que le bloc moteur et l’huile à moteur sont refroidis complètement. Autrement, il y a un risque de brûlure. Une fois le contact
coupé, laisser suffisamment le temps à l’huile à moteur de retourner dans le réservoir d’huile, pour assurer une lecture exacte de l’indicateur
de niveau d’huile.
• Si l’huile est remplie au-dessus de la limite, elle peut se contaminer ou prendre feu par suite de la fumée blanche.
Intervalle de remplacement : Après les 20 premières heures d’utilisation, puis à intervalles de 50 heures d’utilisation
Huile recommandée : SAE10W-30 de la classification API, Classe SF ou supérieure (moteur à quatre temps pour automobile)
Lors de remplacement, faire les procédés suivants :
(1) Vérifier que le bouchon de réservoir à carburant est serré
complètement.
(2) Déposer le bouchon d’huile.
• Tenir la jauge d’huile propre de toute poussière ou
d’impuretés.
(3) Incliner la machine dans l’ordre indiqué à la Figure 1.
• Recevoir le huile vidée dans un récipient.
(4) Orienter la machine tel qu’illustré à la Figure 2, et faire le plein
jusqu’au repère limite dans le tuyau à huile.
(5) Après le ravitaillement, serrer la jauge d’huile fermement. Un
serrage insuffisant de la jauge d’huile peut provoquer une fuite
d’huile.
L’essentiel lors de remplacement de l’huile à moteur
• Ne jamais déposer de l’huile du moteur vidé dans des ordures, dans la terre, ou dans un égout. Le dépôt de l’huile usée est réglementé par la
loi. Lors du rejet, il faut observer les lois et règlements concernés. Pour toute autre question, contacter l’agent du service après-vente habilité.
• L’huile se détériore même si elle est stockée intacte. Faire le contrôle et le remplacement à des intervalles réguliers (renouveler l’huile tous les
six mois.)
31
Page 32
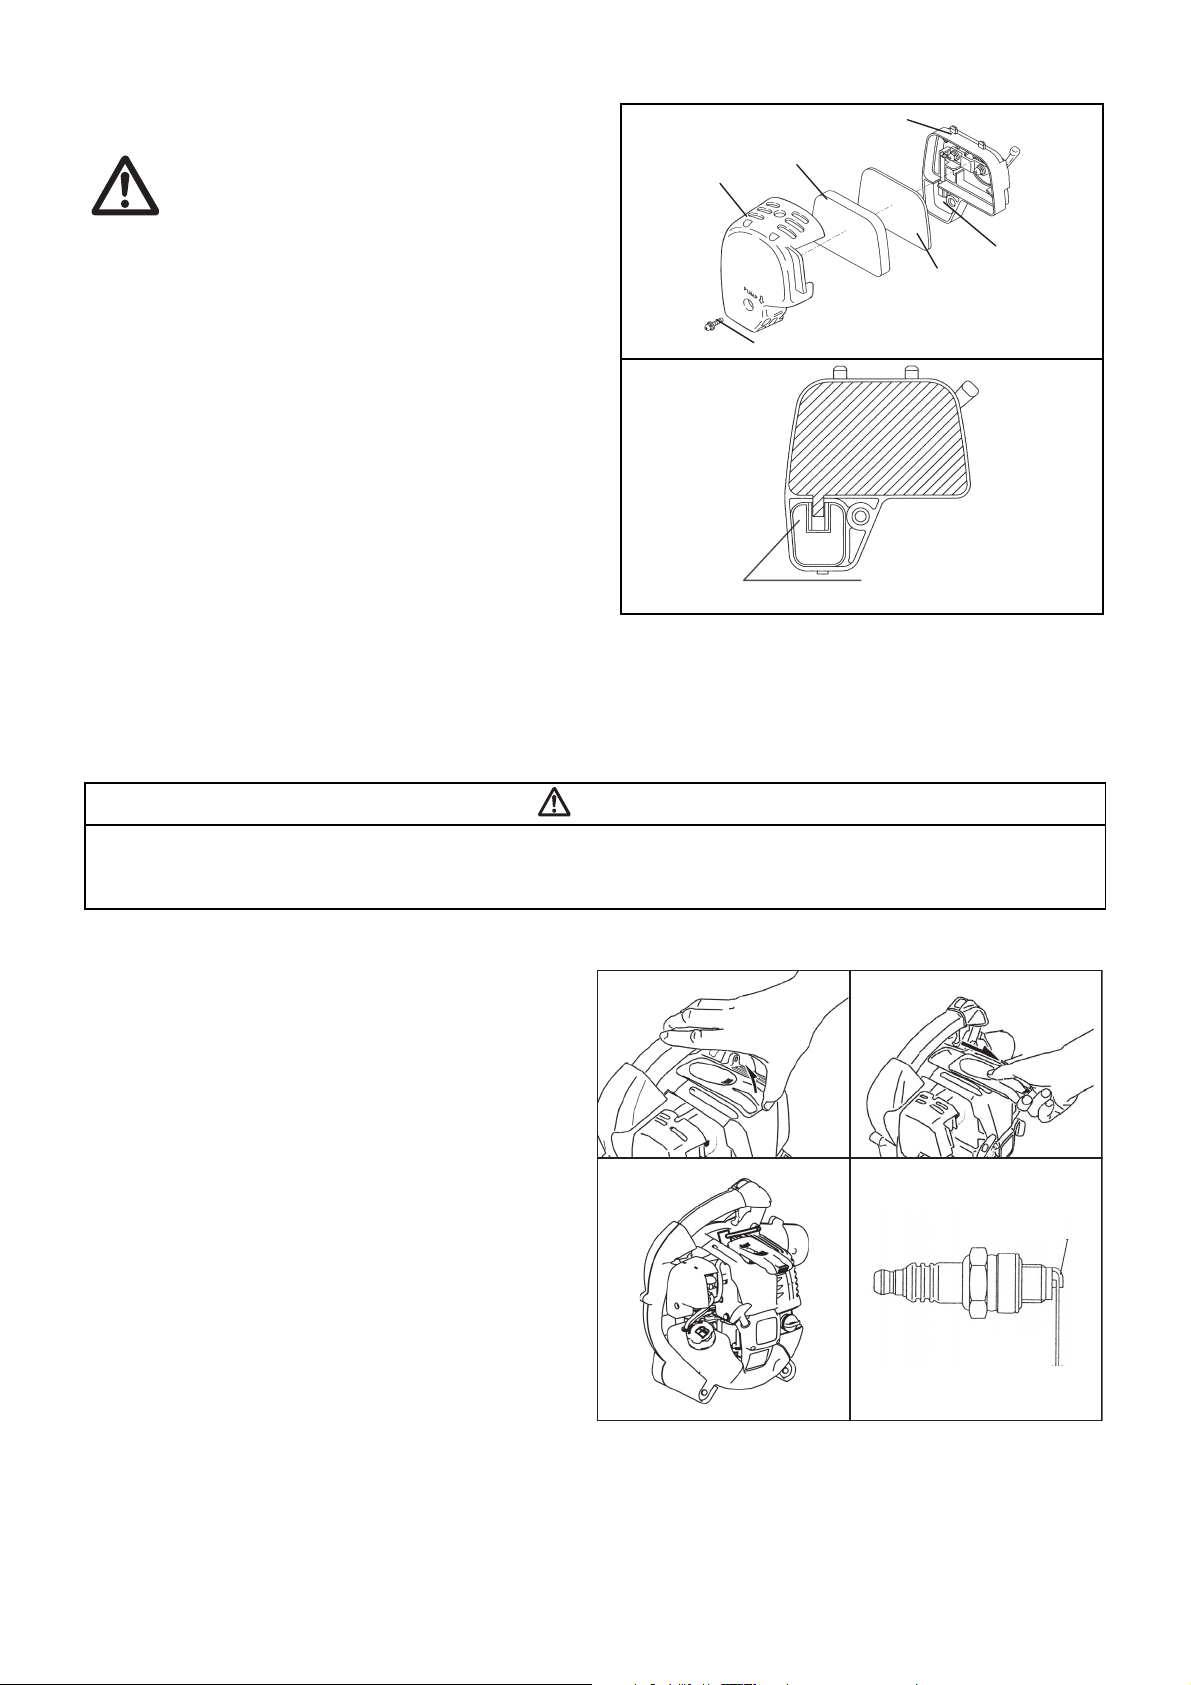
2. Nettoyage du filtre à air
Plaque
Elément
(éponge)
Couvercle du
filtre à air
Partie
reniflard
Elément
(feutre)
Boulons de fixation
Pincer cette partie et enlever
l’élément (feutre).
Figure 1
Figure 3
Electrode latérale (–)
Figure 2
Figure 4
Distance d’électrodes
0,7 à 0,8 mm
AVERTISSEMENT: DEFENSE DE FAIRE DU FEU
Intervalle de nettoyage et de contrôle : Quotidien (toutes les 10
heures de marche)
(1) Déposer les boulons de fixation du couvercle de filtre à air.
(2) Tirer le côté inférieur du couvercle et déposer le couvercle du
filtre à air.
(3) Faire tourner le levier de réglage pleinement vers le côté
fermeture, et tenir le carburateur net de la poussière ou
d’impuretés.
(4) Si l’huile adhère à l’élément (éponge), le tordre fermement.
(5) Pour les contaminations fortes :
• Retirer l’élément (l’éponge), le faire tremper dans de l’eau
tiède ou dans solution d’eau tiède et de détergent doux,
puis laisser sécher complètement.
• Nettoyer l’élément (feutre) avec essence, et le sécher
complètement.
(6) Avant de poser l’élément, prendre garde à le sécher
complètement. Le séchage insuffisant peut provoquer un
démarrage difficile.
(7) Essuyer avec une toile toute l’huile adhérente aux alentours du
couvercle filtre d’air et du reniflard de toile.
(8) Immédiatement après que le nettoyage est fini, reposer le
couvercle du filtre d’air, et le serrer avec boulons de fixation. (Lors de remontage, d’abord mettre le cliquet supérieur et puis le cliquet
inférieur.)
3. Vérification de bougie d’allumage
DANGER
• Nettoyer l’élément à plusieurs reprises par jour, s’il y a de la poussière excessive y adhérente.
• Si le fonctionnement continue sans enlever l’huile complètement de l’élément, l’huile restant dans le filtre d’air peut tomber dehors, ce qui
peut provoquer une contamination d’huile.
(1) Ouverture/fermeture du capot de bougie
Pour ouvrir le couvercle, poser les doigts sur la poignée
principale et la partie saillante du capot de bougie
(Figure 1). Soulever la projection et glisser le capot vers la
direction “OPEN”. (Figure 2)
Pour fermer le capot, glisser le capot vers la direction
“CLOSE” jusqu’à ce que le clic sous le capot de bougie
surmonte le capot du moteur. Finalement, pousser la
projection.
(2) Démontage de bougie d’allumage
Utiliser la clé à douille fournie avec la machine pour monter
ou démonter la bougie d’allumage. (Figure 3)
(3) Vérification de bougie d’allumage
La distance entre les deux électrodes de la bougie est de
0,7 à 0,8 mm. (Figure 4) Régler pour la distance correcte
quand elle est trop large ou trop étroite.
Nettoyer complètement ou remplacer la bougie si le
carbone s’accumule ou la bougie est contaminée.
(4) Remplacement de bougie d’allumage
Pour le remplacement, utiliser NGK-CMR6A.
32
Page 33

4. Nettoyage du filtre à carburant
Serre-tube
Filtre à
carburant
Bouchon du
réservoir de
carburant
• Le filtre à carburant colmaté peut causer un démarrage difficile ou une
défaillance de la montée de vitesse du moteur.
• Vérifier régulièrement le filtre à carburant comme ce qui suit:
(1) Démonter le bouchon du réservoir de carburant, évacuer le
carburant pour vider le réservoir. Vérifier l’intérieur du réservoir
pour tout corps étranger. Eventuellement, nettoyer les corps
étrangers.
(2) Faire sortir le filtre à carburant avec le fil de fer à travers
l’orifice de remplissage d’huile.
(3) Si la surface du filtre à carburant est contaminée, nettoyer la
surface à l’aide de l’essence. L’essence utilisée pour le
nettoyage doit être jetée conformément aux réglementations
locales.
Le filtre doit être remplacé lorsqu’il est trop contaminé.
(4) Remettre le filtre à carburant dans le réservoir de carburant et
serrer fermement le bouchon du réservoir de carburant. Pour
le remplacement, prendre contact avec votre succursale ou
l’agent du service après-vente habilité.
5. Contrôle des boulons, écrous et vis
• Resserrer les boulons, écrous, etc.
• Vérifier la fuite de carburant et d’huile.
• Pour un fonctionnement sûr, remplacer les pièces abîmées par des neuves.
6. Nettoyage des pièces
• Garder le moteur propre en l’essuyant avec un chiffon.
• Tenir les ailettes de cylindre propres de toutes sortes de poussière et impureté. L’adhérence de la poussière et l’impureté aux ailettes causera
un grippage.
7. Remplacement des joints et garnitures
En cas de démontage du moteur, remplacer les joints et garnitures.
Toutes maintenances ou réglage non décrits dans ces instructions doivent être réalisées par un agent du service après-vente habilité.
REMISAGE
AVERTISSEMENT
• Lors de décharger le carburant, prendre garde à arrêter le moteur et confirmer que le moteur se refroidit.
- Autrement il y a risque de brûlure ou d’incendie.
DANGER
• Avant de ranger la machine pour une période prolongée, vidanger complètement le réservoir de carburant et le carburateur, et ranger la
machine dans un emplacement sec et propre.
Décharger tout le carburant à partir du réservoir du carburant et du
carburateur d’après le procédé suivant :
(1) Enlever le bouchon du réservoir de carburant, et décharger le
carburant complètement.
S’il y a plusieurs matières étrangères restant dans le réservoir
de carburant, les enlever complètement.
(2) Tirer le filtre de carburant de l’orifice de ravitaillement avec un
fil de fer.
(3) Tirer la pompe d’amorçage jusqu’à ce que le carburant soit
déchargé d’ici, et décharger le carburant venant du réservoir
de carburant.
(4) Remettre le filtre dans le réservoir de carburant, et serrer
fermement le bouchon du réservoir de carburant.
(5) Puis, continuer à faire fonctionner le moteur jusqu’à ce qu’il
s’arrête.
(6) Enlever la bougie d’allumage, faire tomber plusieurs gouttes
de l’huile pour moteur au travers du trou de la bougie
d’allumage.
(7) Tirer doucement la poignée de démarrage de façon que l’huile
pour moteur s’étende totalement sur le moteur, et monter la bougie d’allumage.
(8) Placer la machine avec sa poignée vers le haut.
(9) Garder le carburant déchargé dans un récipient spécial à l’ombre bien aérée.
33
Page 34

Localisation des défauts
Défaut Système Observation Cause
Pas de démarrage du
moteur ou démarrage
difficile
Problèmes en démarrage
à chaud
Le moteur démarre mais
est immédiatement noyé
Performances
insuffisantes
Système d’allumage Étincelle d’allumage
présente
Pas d’étincelle
d’allumage
Alimentation en
carburant
Réservoir de carburant
rempli
Compression Pas de compression au
tirage
Défaut mécanique Câble non enclenché Ressort du câble cassé, pièces cassées à l’intérieur du
Réservoir rempli Étincelle
d’allumage présente
Alimentation en
Réservoir rempli Mauvais réglage du ralenti, carburateur contaminé
carburant
Plusieurs circuits sont
peut-être affectés
Mauvais fonctionnement
du moteur au ralenti
Simultanément.
Défaut dans l’alimentation en carburant ou dans le système
de compression. Défaut mécanique
Interrupteur d’arrêt actionné, défaut du fil ou court-circuit,
bougie d’allumage ou connecteur défectueux, module
d’allumage défectueux
Position incorrecte de l’étrangleur, carburateur défectueux,
tête d’aspiration sale, tuyau d’alimentation en carburant plié
ou bloqué
Joint d’étanchéité du fond du cylindre défectueux, soudures
du carter endommagées, piston ou segments défectueux ou
fuite par la fixation de la bougie d’allumage
moteur
Carburateur sale, le nettoyer
Orifice du réservoir de carburant bouché. Tuyau
d’alimentation en carburant plié, câble ou interrupteur STOP
défectueux
Filtre à air sale, carburateur sale, conduit d’échappement du
cylindre bouché
Durée de marche
Article
Huile à moteur
Pièces à serrer (boulons,
écrous)
Réservoir à carburant
Levier d’étranglement
Interrupteur d’arrêt
Rotation à petite vitesse Vérifier/Ajuster 29
Filtre à air Nettoyer 32
Bougie d’allumage Vérifier 32
Conduite d’air de
refroidissement
Tuyau à carburant
Filtre à carburant
Espace entre soupape
d’entrée d’air et soupape de
déchargement d’air
Tube d’huile Vérifier *
Révision générale du moteur *
Carburateur
Vérifier/Nettoyer 26
Remplacer *
Vérifier 33
Nettoyer/Vérifier –
Evacuer le
carburant
Vérifier les
fonctions
Vérifier les
fonctions
Nettoyer/Vérifier 33
Vérifier 33
Remplacer *
Nettoyer/
Remplacer
Ajuster *
Evacuer le
carburant
Avant
marche
Après
lubrification
Quotidien
(10h)
30h 50h 200h
1
2
2
2
2
Arrêt/
repos
*
*
3
3
Page
correspondante
31
33
29
33
33
–
–
–
–
–
*1 Faire le remplacement premier après 20h de marche.
*2 Pour le contrôle de 200 heures de marche, s’adresser à l’agent du service après-vente habilité ou à un atelier des réparations.
*3 Après vidage du réservoir à carburant, continuer à faire fonctionner le moteur et évacuer le carburant dans le carburateur.
34
Page 35

DEPANNAGE
Faire marcher le moteur au ralenti, et mettre
le levier de réglage à “CLOSE”.
Avant de faire une demande de réparations, vérifier un inconvénient par soi-même. S’il y a aucune anomalie, régler votre machine suivant la
description de ce manuel. Ne jamais manipuler ou déposer aucune partie contrairement à la description. Pour les réparations, s’adresser à
l’agent du service après-vente habilité.
Etat d’anomalie Cause probable (fonctionnement irrégulier) Remède
Panne de la pompe d’amorçage Pousser 7 à 10 fois
Petite vitesse de tirage du câble de démarreur Tirer fortement
Manque de carburant Remplir
Colmatage du filtre à carburant Nettoyer
Tuyau à carburant plie Redresser le tuyau à carburant
Carburant détérioré
Aspiration excessive du carburant
Le moteur ne démarre pas
Bouchon déposée Reposer fermement
Bougie d’allumage tachée Nettoyer
Espace anormal de la bougie d’allumage Ajuster l’espace
Autre anomalie de bougie d’allumage Remplacer
Carburateur anormal
Impossible de tirer sur le câble du démarreur
Système de commande anormal
Réchauffage insuffisant Faire le réchauffage
Le levier de réglage est mis à “CLOSE” même
si le moteur est réchauffé.
Colmatage du filtre à carburant Nettoyer
Filtre à air sale ou colmate Nettoyer
Le moteur s’arrête toute de suite.
Le moteur ne s’augmente pas
Le moteur ne s’arrête pas Connecteur déposé Reposer fermement
Carburateur anormal
Système de commande anormal
Câble d’étrangleur détaché Reposer fermement
Système de commande anormal
Système électrique anormal
Un carburant détérioré laisse le démarrage
plus difficile. Renouveler. (Remplacement
recommandé: 1 mois)
Ajuster la rotation du levier d’étrangleur de
vitesse moyenne à la haute, et tirer la poignée
de démarreur jusqu’à ce que le moteur
démarre. Si le moteur ne démarre pas,
déposer la bougie d’allumage, dessécher
l’électrode, et les remonter comme ils étaient
initialement. Puis, démarrer suivant les
instructions.
Faire une commande de contrôle et de
maintenance.
Faire une commande de contrôle et de
maintenance.
Faire une commande de contrôle et de
maintenance.
Mettre à “OPEN”
Faire une commande de contrôle et de
maintenance.
Faire une commande de contrôle et de
maintenance.
Faire une commande de contrôle et de
maintenance.
Faire une commande de contrôle et de
maintenance.
Lorsque le moteur ne démarre pas après le réchauffage :
S’il n’y a pas aucune anomalie pour les points de vérification, ouvrir le levier d’étrangleur par un tiers, et démarrer le moteur.
35
Page 36
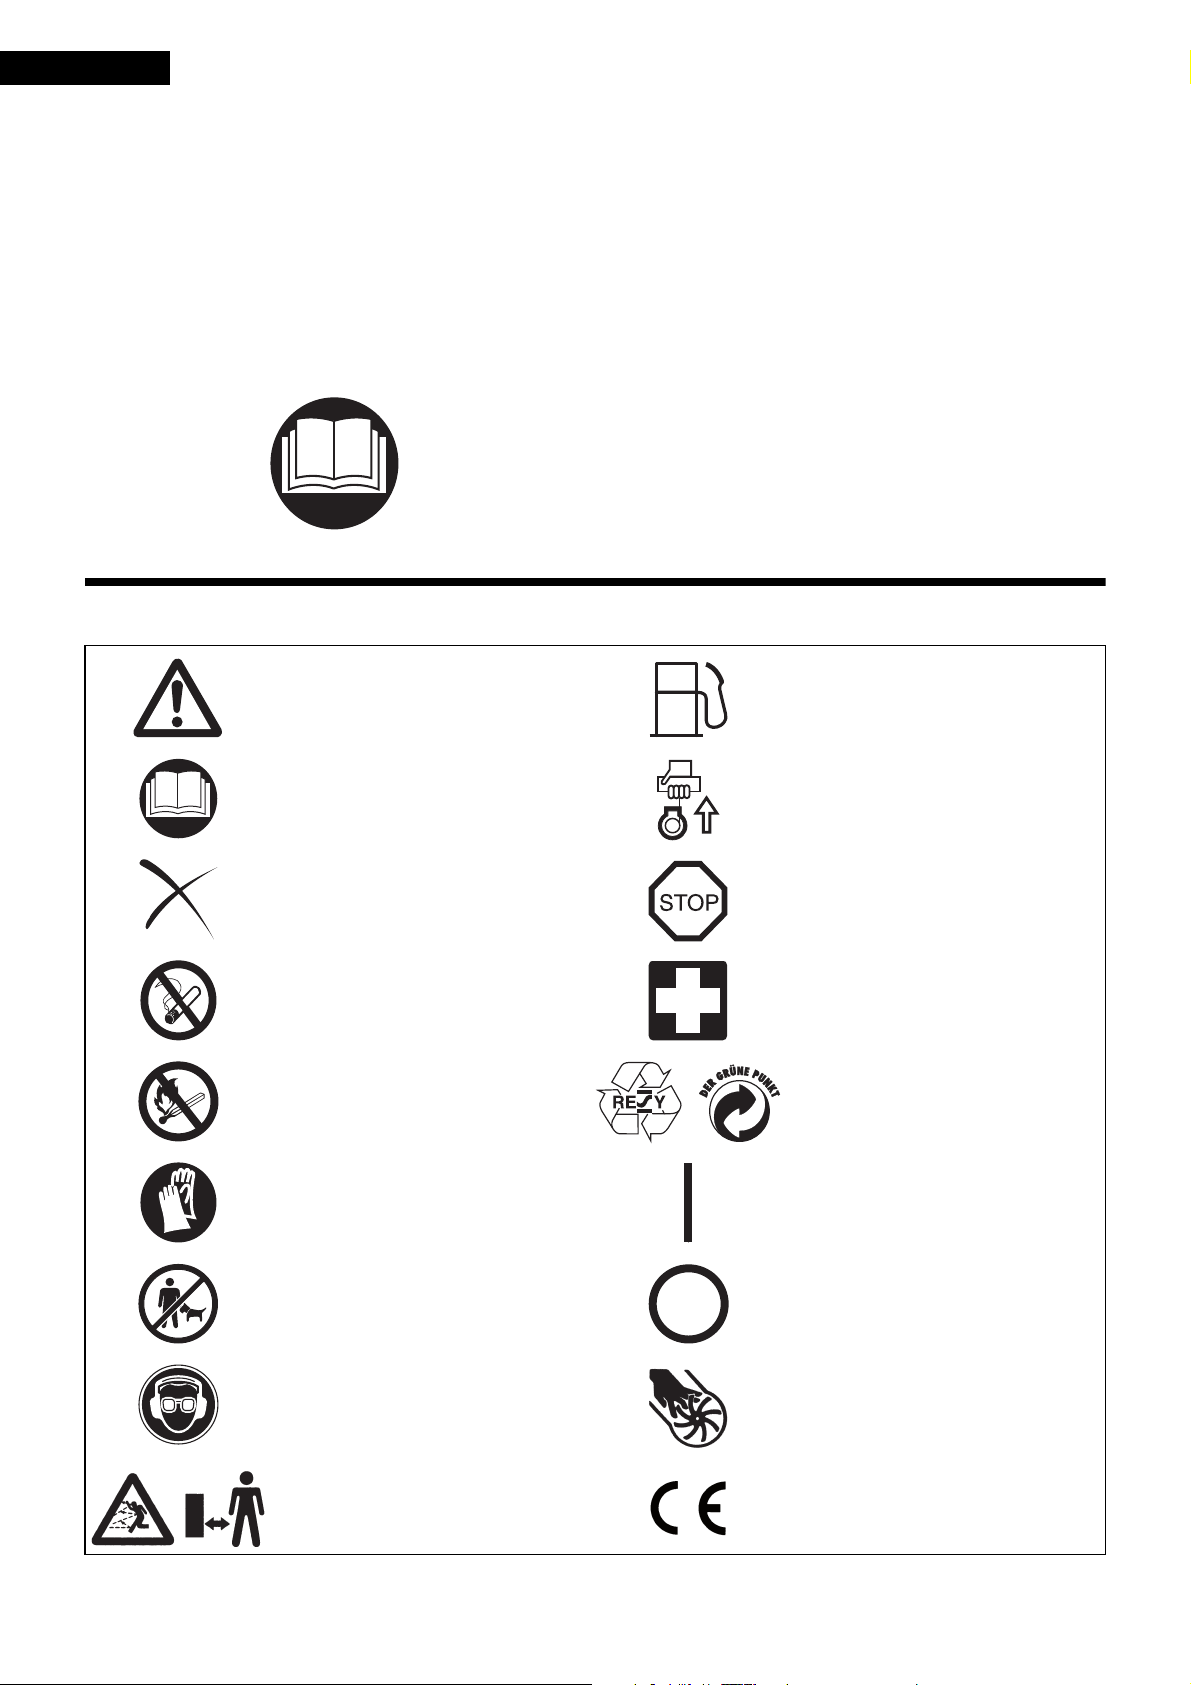
Deutsch
Vielen Dank, dass Sie sich für ein DOLMAR-Blasgerät entschieden
haben. Wir freuen uns, lhnen das DOLMAR-Blasgerät anbieten zu
können, es ist das Ergebnis eines langen Entwicklungsprogramms und
jahrelanger Erfahrung und Kenntnisse.
Die Blasgeräte-Modelle PB-252.4 verbinden die Vorteile, auf dem
neuesten technischen Stand zu sein mit einem ergonomischen
Design. Sie haben ein geringes Gewicht, sind handlich, kompakt und
bieten die professionelle Ausrüstung für eine große Vieizahl von
Anwendungsbereichen.
Bitte lesen, verstehen und befolgen Sie diese Anleitung, in der die
verschiedenen Punkte, welche die hervorragende Leistung dieses
Produkts demonstrieren, ausführlich behandelt werden. Dies wird
Ihnen dabei helfen, die bestmöglichen Resultate von Ihrem DOLMARBlasgerät auf sichere Weise zu erhalten.
Inhaltsverzeichnis
SYMBOLE.......................................................................................... 36
SICHERHEITSHINWEISE ................................................................. 37
EG-KONFORMITÄTSERKLÄRUNG.................................................. 40
TECHNISCHE DATEN ....................................................................... 40
BEZEICHNUNG DER TEILE ............................................................. 41
MONTAGEANLEITUNG ..................................................................... 42
VOR INBETRIEBNAHME DES GERÄTES........................................ 43
BETRIEB............................................................................................ 45
LEERLAUFEINSTELLUNG................................................................ 46
ARBEITEN ......................................................................................... 47
WARTUNGSARBEITEN .................................................................... 48
LAGERUNG....................................................................................... 50
STÖRUNGSSUCHE .......................................................................... 52
SYMBOLE
Es ist sehr wichtig, die nachfolgenden Symbole zu verstehen, wenn Sie diese Betriebsanleitung lesen.
Seite
WARNUNG/GEFAHR Kraftstoff (Benzin)
Betriebsanleitung lesen und Warnung
Sicherheitshinweise befolgen!
Verboten NOT AUS
Rauchen verboten Erste Hilfe
Keine offene Flamme Recycling
Schutzhandschuhe tragen EIN/START
Motor starten
Personen und Tiere aus dem
Arbeitsbereich fernhalten!
Augen- und Gehörschutz tragen!
Gefahrenbereich fernhalten CE-Kennzeichnung
AUS/STOP
Amputation vom Finger oder von der Hand,
Rotorblatt
36
Page 37

SICHERHEITSHINWEISE
(1)
(2)
(3)
(4)
(5)
15 Meter
Allgemeine Hinweise
• Zur Gewährleistung der sicheren Handhabung muss die Bedienperson
unbedingt diese Betriebsanleitung ganz lesen, um sich mit der
Handhabung des Blasgerätes vertraut zu machen (1). Unzureichend
informierte Bediener können sich und andere Personen durch
unsachgemäßen Gebrauch gefährden.
• Es ist ratsam, das Blasgerät nur an Personen zu verleihen, die
erwiesenermaßen Erfahrung im Umgang mit Blasgeräten haben.
• Die Betriebsanleitung ist dabei zu übergeben.
• Erstbenutzer von Blasgeräten sollten sich vom Verkäufer einweisen
lassen.
• Kinder und Jugendliche unter 18 Jahren dürfen das Blasgerät nicht
bedienen. Jugendliche über 16 Jahre sind von diesem Verbot
ausgenommen, wenn sie zum Zwecke der Ausbildung unter Aufsicht
eines Fachkundigen stehen.
• Das Arbeiten mit dem Blasgerät erfordert hohe Aufmerksamkeit.
• Nur in guter körperlicher Verfassung arbeiten.
• Alle Arbeiten ruhig und umsichtig durchführen. Der Bediener ist
gegenüber Dritten verantwortlich.
• Niemals unter Einfluss von Alkohol oder Drogen arbeiten (2).
• Niemals müde arbeiten.
• Zu Nachschlagezwecken Betriebsanleitung sorgfältig aufbewahren.
Persöhnliche Schutzausrüstung
• Die Kleidung soll zweckmäßig, d. h. eng anliegend, aber nicht
hinderlich sein. Tragen Sie keinen Schmuck, Kleidung oder lange
Haare, die in den Lufteinlaß gelangen können.
• Um beim Arbeiten Verletzungen von Kopf, Augen, Hand oder Fuß
sowie Gehörschäden zu vermeiden, müssen die nachfolgend
beschriebenen Körperschutzausrüstungen und Körperschutzmittel
während der Benutzung des Blasgerätes getragen werden.
Insbesondere ist folgendes zu beachten:
• Die Kleidung soll fest und eng anliegend sein, aber nicht in der
Bewegungsfreiheit behindern. Vermeiden Sie locker sitzende Jacken,
ausgestellte oder umgeschlagene Hosen, Schals, offenes langes Haar
oder Gegenstände, die in den Lufteinlass gesaugt werden könnten. Als
Beinschutz stets eine lange Hose oder Overall tragen. Nicht in kurzen
Hosen arbeiten. (4)
• Zur Vermeidung von Gehörschäden sind geeignete Schallschutzmittel
zu tragen (Gehörschutz, Kapseln). Personen, die das Gerät wiederholt
oder regelmäßig verwenden, sollten lhr Gehör in regelmäßigen
Abständen prüfen lassen (3).
• Arbeitshandschuhe sind beim Arbeiten mit dem Blasgerät ständig zu
tragen. Ein guter Halt ist sehr wichtig. Tragen Sie feste Schuhe mit
griffiger Sohle. (4)
• Ein ordnungsgemäßer Augenschutz ist absolut erforderlich. Obwohl
der Auslass weg vom Bediener gerichtet ist, kann ein Abprallen oder
Rückprall während der Anwendung des Blasgerätes auftreten (3).
• Verwenden Sie das Blasgerät niemals ohne eine Schutzbrille zu tragen
oder eine ordnungsgemäß sitzende Sicherheitsbrille mit
ausreichendem seitlichen und oberen Schutz, entsprechend ANSI Z
87.1 (oder der für lhr Land zutreffenden Norm).
Anlassen des Blasgerätes
• Sicherstellen, dass sich im Arbeitsbereich von 15 Metern (5) keine
Kinder oder weitere Personen aufhalten. Achten Sie auch auf Tiere.
Verwenden Sie das Blasgerät niemals in städtischen Gebieten.
• Vor Arbeitsbeginn Blasgerät auf betriebssicheren Zustand prüfen:
Prüfen Sie die Sicherheit und leichtgängigkeit des Gashebels. Prüfen
Sie die Gashebel-Arretierung auf ordnungsgemäße Funktion. Prüfen
Sie, ob die Gashebelsperre einwandfrei funktioniert. Vergewissern Sie
sich, dass die Handgriffe sauber und trocken sind, und überprüfen Sie
die Funktion des Ein-Aus-Schalters. Halten Sie die Handgriffe frei von
Öl und Kraftstoff.
360°
37
Page 38

Blasgerät nur wie in der Betriebsanleitung beschrieben starten.
(6)
(7)
(8)
(9)
3 meter
• Ruhepause
• Transport
• Nachfüllen ron Kraftstoff
• Wartung
• Werkzeug-Austausch
Andere Anwerftechniken sind nicht zulässig (6).
• Verwenden Sie das Blasgerät und die Werkzeuge nur für die
angegebenen Anwendungsbereiche.
• Blasgerät erst nach komplettem Zusammenbau starten. Grundsätzlich
darf das Gerät nur komplett montiert benutzt werden!
• Gerät sofort ausschalten bei spürbaren Veränderungen im
Geräteverhalten.
• Beim Arbeiten mit dem Blasgerät Bediengriff stets mit dem Daumen
und Zeigefinger fest umfassen, um das Gerät kontrolliert führen zu
können. Sicherstellen, dass der Bediengriff (und der Griff für das
Sauger-Zusatzgerät) nicht beschädigt, sauber und trocken ist.
Auf sicheren Stand muss laufend geachtet werden.
• Das Blasgerät ist so zu handhaben, dass Abgase nicht eingeatmet
werden können. Nicht in geschlossenen Räumen arbeiten
(Erstickungs- und Vergiftungsgefahr). Kohlenmonoxyd ist ein
geruchloses Gas. Für ausreichenden Luftaustausch im Arbeitsgebiet
sorgen.
• In Arbeitspausen und vor dem Verlassen ist das Blasgerät
auszuschalten und so abzustellen, dass niemand gefährdet werden
kann. Legen Sie das Gerät an einen sicheren Ort, um eine Gefahr für
andere Personen, das Entflammen von entzündbaren Materialien oder
Schäden an dem Gerät zu vermeiden.
• Blasgerät nicht ins trockene Gras oder neben leicht entzündliche
Gegenstände stellen.
• Alle mit der Maschine gelieferten Schutzteile und Schutzhauben
müssen während des Betriebs benutzt werden.
• Blasgerät nicht mit defektem Schalldämpfer betreiben.
• Beim Transport ist der Motor auszuschalten (7).
• Beim Transport im PKW oder LKW ist auf sichere Lage des Gerätes zu
achten um ein auslaufen von Kraftstoff zu vermeiden.
• Beim Transport muss der Kraftstofftank vollständig entleert sein.
Nachfüllen von Kraftstoff
• Beim Betanken des Blasgerätes ist der Motor auszuschalten (7).
Rauchen und jedes offene Feuer (8) ist nicht zulässig.
• Hautkontakt mit Mineralölprodukten vermeiden. Kraftstoffdämpfe nicht
einatmen. Beim Betanken Schutzhandschuhe tragen. Schutzkleidung
regelmäßig wechseln und reinigen.
• Darauf achten, dass weder Kraftstoff noch Öl ins Erdreich gelangen
(Umweltschutz). Wenn Kraftstoff verschüttet wurde, Blasgerät sofort
säubern. Lassen Sie nasse Tücher trocknen, bevor Sie sie in einem
ordnungsgemäß abgedeckten Behälter entsorgen, um
Selbstentzündung zu verhüten.
• Kraftstoff nicht mit Kleidung in Berührung bringen. Falls Kraftstoff an
die Kleidung gelangt, Kleidung sofort wechseln (Verbrennungsgefahr).
• Verschlußschraube für Kraftstofftank regelmäßig auf Dichtheit prüfen.
• Verschlußschraube gut verschließen. Zum Starten des Blasgerätes
den Standort wechseln (mindestens 3 Meter entfernt vom Tankplatz)
(9).
• Nicht in geschlossenen Räumen tanken. Kraftstoffdämpfe sammeln
sich am Boden (Explosionsgefahr).
• Kraftstoffe nur in zugelassenen und gekennzeichneten Kanistern
transportieren und lagern. Kraftstoffe Kindern nicht zugänglich
machen.
• Bei heißem oder laufendem Motor darf das Blasgerät nicht betankt
werden.
38
Page 39
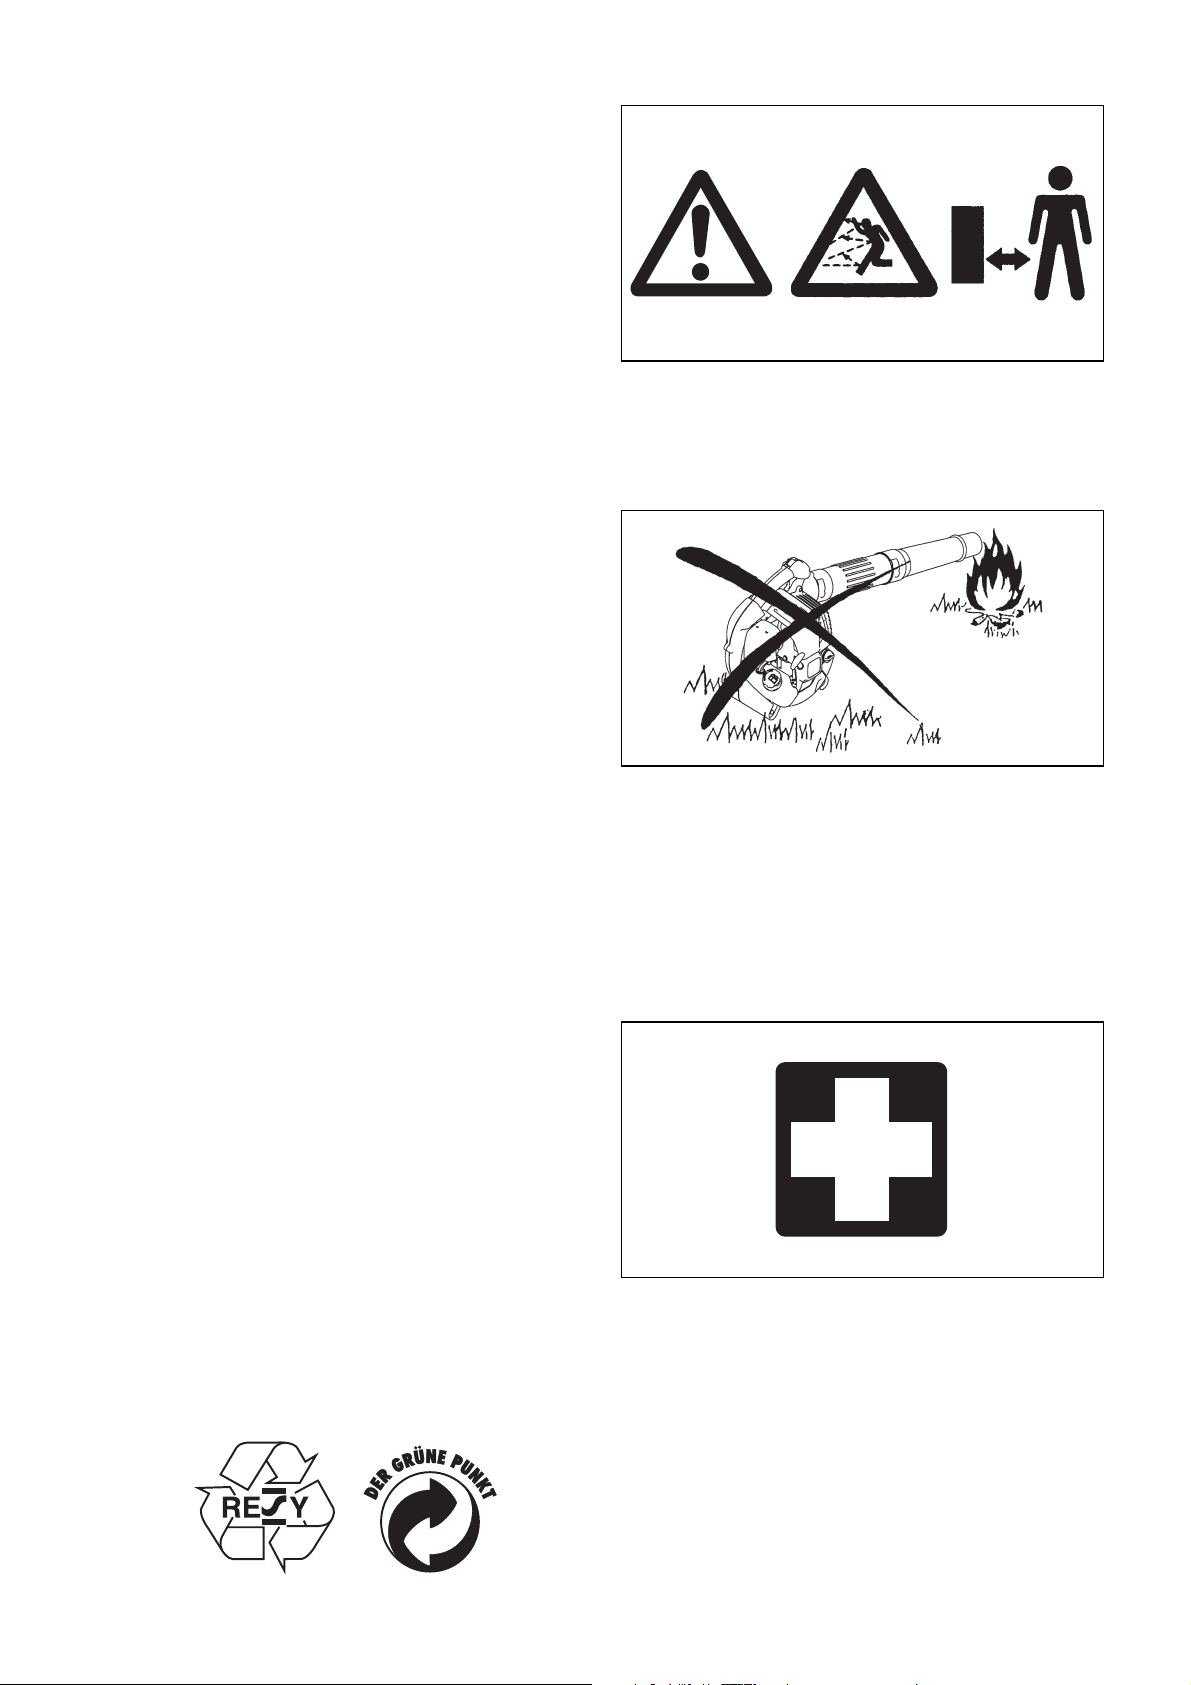
Arbeitsverhalten und -technik
(10)
(11)
(12)
• Nur bei guten Sicht- und Lichtverhältnissen arbeiten. Während der
kalten Jahreszeit besonders auf Glätte, Nässe, Eis und Schnee achten
(Rutschgefahr).
Stets rutschfestes Schuhwerk tragen.
• Arbeiten Sie niemals auf instabilen Flächen oder in steilem Gelände.
• Blasgerät niemals auf andere Personen richten! Die austretende Luft
steht unter hohem Druck und kann Schmutzpartikel enthalten, die zu
Verletzungen an den Augen führen können.
• Führen Sie niemals irgendwelche Fremdkörper in den Lufteinlass der
Maschine oder die Düse des Blasgerätes ein. Dadurch wird das
Gebläserad beschädigt, was schwere Verletzungen der
Bedienungsperson oder von Zuschauern zur Folge haben kann, weil
der Fremdkörper oder Bruchstücke mit hoher Geschwindigkeit
herausgeschleudert werden.
• Windrichtung beachten! Nicht gegen den Wind arbeiten.
• Um ein Stolpern zu vermeiden, beim Arbeiten mit dem Blasgerät nicht
rückwärts gehen.
• Vor Reinigung und Wartung des Gerätes, muss der Motor abgestellt
sein.
Wartungsvorschriften
• Denken Sie an die Umwelt. Das Blasgerät ist lärm- und abgasarm zu
betreiben. Hierbei ist auf korrekte Vergasereinstellung zu achten.
• Blasgerät regelmäßig reinigen und alle Schrauben und Muttern auf
festen Sitz kontrollieren.
• Blasgerät nicht in der Nähe von offenem Feuer, Funken usw. warten
oder lagern (11).
• Das Blasgerät darf nur mit leerem Tank in abgeschlossenen und gut
belüfteten Räumen gelagert werden.
Unfallverhütungsvorschriften der zuständigen Berufsgenossenschaft
und der Versicherung beachten. Auf keinen Fall bauliche Veränderungen
am Blasgerät vornehmen! Sie gefährden hierdurch Ihre Sicherheit!
Wartungs- und Instandsetzungsarbeiten dürfen nur soweit ausgeführt
werden, wie sie in dieser Betriebsanleitung beschrieben sind. Alle
übrigen Arbeiten sind von einer Vertragswerkstatt durchzuführen.
Verwenden Sie nur Original-Ersatzteile und -Zubehörteile von DOLMAR.
Die Verwendung nicht zugelassener Zubehörteile und Werkzeuge stellt
eine erhöhte Unfall- und Verletzungsgefahr dar. DOLMAR übernimmt
keine Haftung für Unfälle oder Schäden, die durch den Gebrauch nicht
zugelassener Vorrichtungen oder Zubehörteile verursacht werden.
Erste Hilfe
Für einen eventuell eintretenden Unfall sollte immer ein Verbandskasten
nach DIN 13164 am Arbeitsplatz vorhanden sein. Entnommenes
Material sofort wieder auffüllen.
Wenn Sie Hilfe anfordern, geben Sie folgende Angaben:
• wo es geschah
• was geschah
• wieviele Verletzte
• welche Verletzungsart
• wer meldet!
Verpackung
Ihr DOLMAR Blasgerät befindet sich zum Schutz vor Transportschäden
in einem Karton. Kartonagen sind Rohstoffe und somit
wiederverwendungsfähig oder können dem Rohstoffkreislauf
(Altpapierverwertung) wieder zurückgeführt werden.
39
Page 40

Nur für europäische Länder
EG-Konformitätserklärung
Die unterzeichneten, Tamiro Kishima und Rainer Bergfeld,
bevollmächtigt von Dolmar GmbH, erklären, dass die
DOLMAR-Maschine(n):
Bezeichnung des Geräts:
Benzin Blasgerät
Nummer / Typ des Modells: PB-252.4
TECHNISCHE DATEN: siehe Tabelle „TECHNISCHE
DATEN“
in Serienfertigung hergestellt werden und
den folgenden Richtlinien der Europäischen Union
genügen:
2000/14/EG, 2006/42/EG
Außerdem werden die Geräte gemäß den folgenden Standards
oder Normen gefertigt:
EN15503
Die technische Dokumentation ist archiviert bei:
Dolmar GmbH,
Jenfelder Straße 38, Abteilung FZ,
D-22045 Hamburg
Das Verfahren der Konformitätsbewertung, das in der Richtlinie
2000/14/EG verlangt wird, wurde in Übereinstimmung mit
Anhang V durchgeführt.
Gemessener Schallleistungspegel: 102 dB
Garantierter Schallleistungspegel: 106 dB
14. 6. 2010
Tam i ro K i sh i ma
Geschäftsführer
Rainer Bergfeld
Geschäftsführer
TECHNISCHE DATEN
Modell PB-252.4
Gewicht (ohne Rohre) (kg) 4,5
Abmessungen (Länge × Breite × Höhe) (ohne Rohre) (mm) 350 × 231 × 368
Maximale Motordrehzahl (min
Leerlaufdrehzahl (min
Hubraum (mL) 24,5
Kraftstoff Normalbenzin
Kraftstofftankkapazität (L) 0,52
Motoröl
Motorölvolumen (L) 0,08
Vergaser (Membranvergaser) WALBRO WYL
Zündsystem Festkörperzündung
Zündkerze NGK CMR6A
Elektrodenabstand (mm) 0,7 – 0,8
a
Vibration gemäß EN15503
Schallldruckpegel Durchschnitt gemäß
EN15503
Schallleistungspegel Durchschnitt
gemäß EN15503
hv eq
Unsicherheit K (m/s
L
PA eq
Unsicherheit K dB(A) 1,4
L
WA eq
Unsicherheit K dB(A) 1,4
Hinweis:
1. Verwenden Sie nur von DOLMAR empfohlene Öle und Zündkerzen.
2. Die Spezifikation kann ohne Ankündigung geändert werden.
-1
) 7.800
-1
) 3.500
SAE 10W-30 Öl der API-Klassifizierung, SF-Klasse oder höher
(für 4-Takt Motoröl)
(m/s2)9,3
2
)0,5
dB(A) 90,8
dB(A) 103,7
40
Page 41
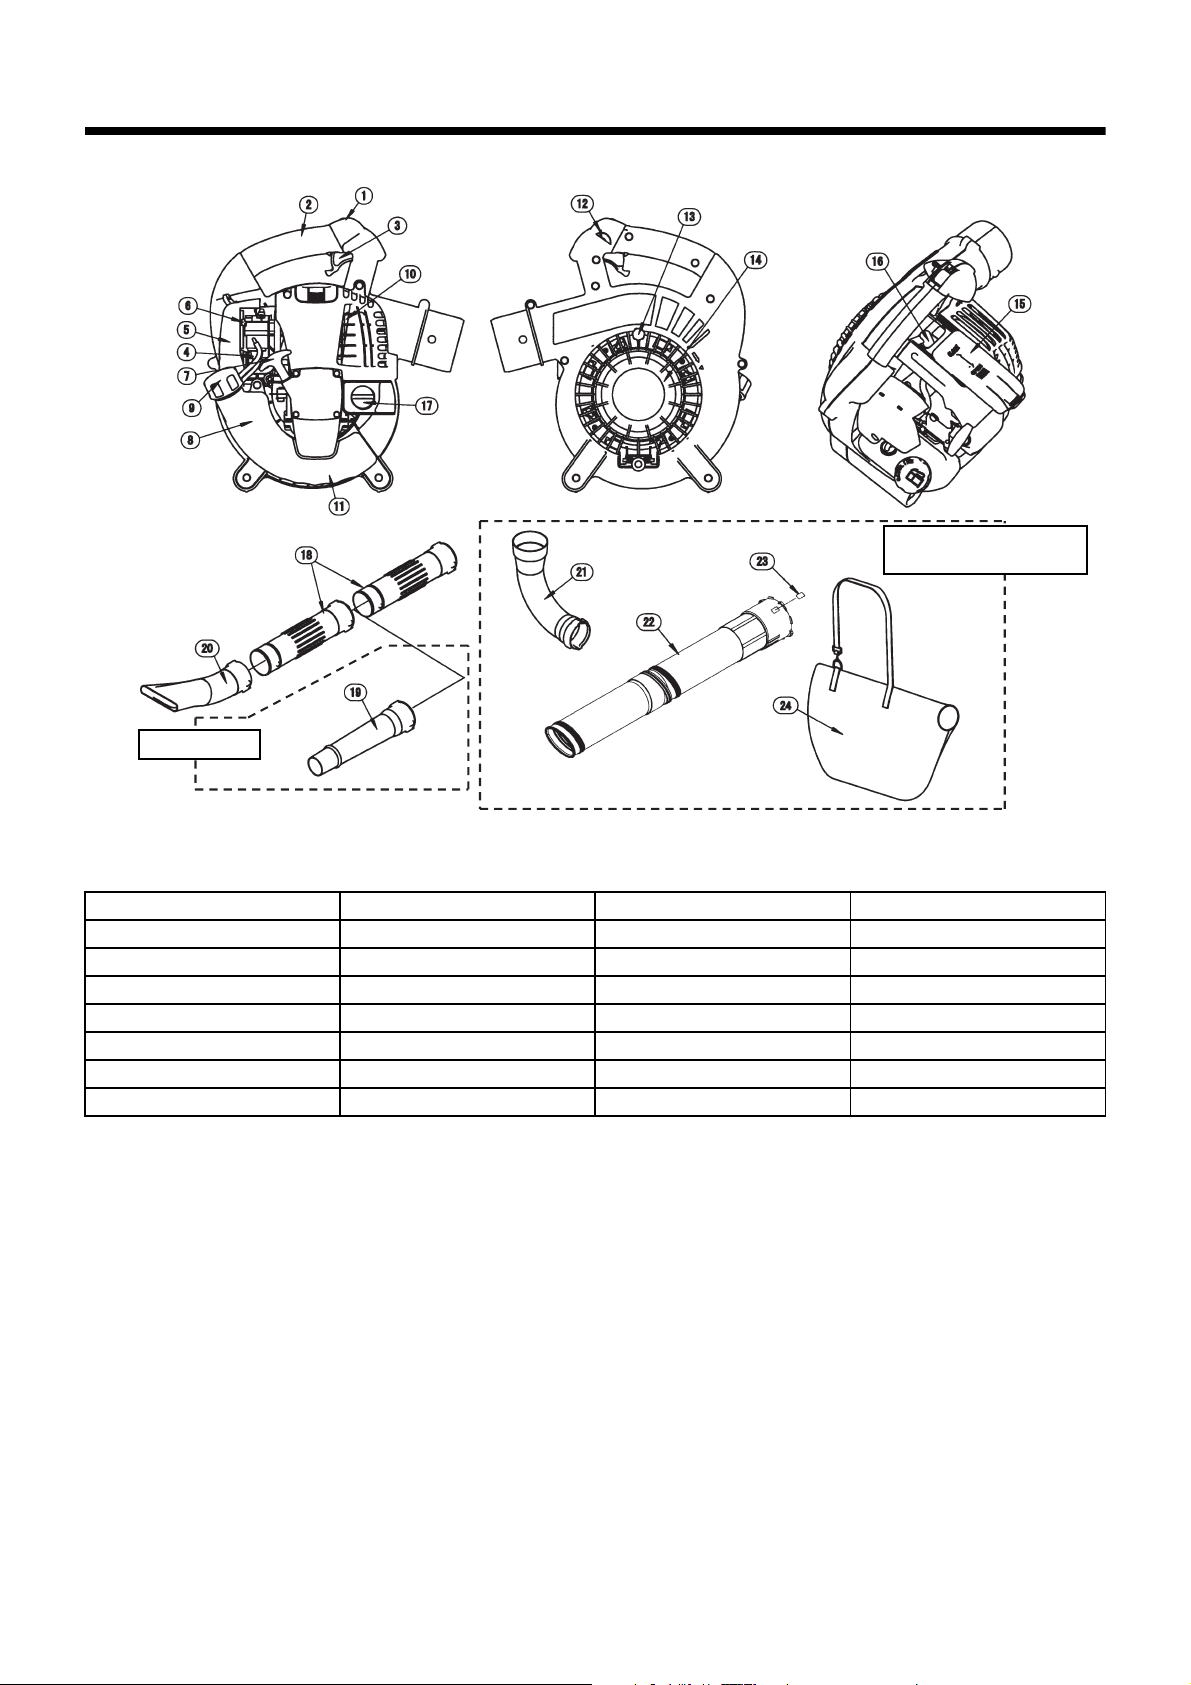
BEZEICHNUNG DER TEILE
Sonderverkauf
Entstaubungsbausatz
(Sonderverkauf)
BEZEICHNUNG DER TEILE BEZEICHNUNG DER TEILE BEZEICHNUNG DER TEILE BEZEICHNUNG DER TEILE
1. Stoppschalter 8. Kraftstofftank 15. Kerzedeckel 22. Saugrohr
2. Haupthandgriff 9. Kraftstofftankdeckel 16. Zündkerze 23. Pfeilzeichen
3. Triggerhebel 10. Schalldämpfer 17. Öldeckel 24. Staubtasche
4. Anlaßeinspritzpumpe 11. HilfsHandgriff 18. Ventilatorrohr
5. Luftfilterdeckel 12. Gashebel-Arretierknopf 19. Ventilatordüse A
6. Chokehebel 13. Schraube 20. Ventilatordüse B
7. Starterhandgriff 14. Schützvorrichitung 21. Krümmer
41
Page 42

MONTAGEANLEITUNG
VORSICHT: Bevor Sie Arbeiten am Blasgerät ausführen, schalten
VORSICHT: Starten Sie das Blasgerät erst, wenn Sie es vollständig
Sie stets den Motor aus und ziehen Sie den
Kerzenstecker von der Zündkerze ab.
Tragen Sie stets Schutzhandschuhe!
zusammengebaut haben.
1. MONTAGE DER BLASROHRE
1) Richten Sie die Bajonettverschlüsse der Blasrohre auf die
Zapfen am Gehäuse des Blasgerätes aus und schieben das
Rohr auf das Gehäuse.
2) Drehen Sie das Blasrohr bis zur Arretierung nach rechts.
3) Die Klemme um die Öffnung des Blasrohrs legen und mit
dem Bolzen und der Mutter sicher befestigen.
2. MONTAGE DES SAUGZUBEHÖRS
1) Installieren des Saugrohrs (Düse)
(1) Lockern Sie die Schraube und öffnen Sie die
Schutzvorrichtung .
WARNUNG!
Bevor Sie die Blasfunktion benutzen, vergewissern Sie sich,
dass Schraube fest angezogen ist. Ziehen Sie die
Schraube an, wenn sie sich gelockert hat.
Es ist gefährlich, das Blasgerät mit gelöster Schraube zu betreiben.
Unfallgefahr! Die Finger oder die Kleidung des Bedieners können in das
Ventilatorrad gelangen.
Vorsicht: Der Motor kann nur gestartet werden, wenn der Schutz
Vorsicht: Die oben unter (4) beschriebene Befestigung nicht
Vorsicht: Die Schraube ziehen nicht stark zu viel fest.
Vorsicht: Der Motor springt nicht an, wenn das Saugrohr nicht
ordnungsgemäß geschlossen ist.
(2) Das Zeichen auf dem Saugrohr mit dem Zeichen “ ” auf
dem Blasgerät ausrichten. Führen Sie dann das Saugrohr in
das Blasgerät ein.
(3) Um das Saugrohr zu arretieren, drehen Sie das Saugrohr, bis
das Zeichen mit dem Zeichen “ ” auf dem Blasgerät
übereinstimmt.
(4) Das Vakuumrohr mit der Schraube und der Halterung
sicher am Blasrohr befestigen.
vornehmen, wenn das Blasgerät in einem Land eingesetzt
wird, in dem das CE nicht anwendbar ist.
vollständig montiert ist.
WARNUNG!
Der Motor kann nur gestartet werden, wenn die Unterdruckleitung
ordnungsgemäß montiert ist.
2) Montage des Krümmers und des Staubbeutels:
(1) Öffnen Sie den Verschluss am Staubbeutel.
(2) Führen Sie den Krümmer in den Staubbeutel ein und führen
Sie diesen durch die Öffnung heraus.
(3) Montieren Sie den Krümmer am Blasgerät.
(4) Die Klemme um die Öffnung des Krümmers legen und mit
dem Bolzen und der Mutter sicher befestigen.
Vorsicht: Die oben unter (4) beschriebene Befestigung nicht
vornehmen, wenn das Blasgerät in einem Land eingesetzt
wird, in dem das CE nicht anwendbar ist.
WARNUNG!
Versuchen Sie nicht, große Holzspäne, Metall, Glas,
Steine, Flüssigkeit, brennende Zigaretten,
Feuerwerkskörper oder ähnliches aufzusaugen.
Montieren Sie die Schutzvorrichtung/das Saugrohr stets ordnungsgemäß vor Betrieb des Gerätes. Eine Verwendung ohne die
Schutzvorrichtung/das Saugrohr ist nicht erlaubt. Finger oder
Kleidungsstücke des Bedieners können sich im Ventilatorrad verfangen.
Das kann zu ernsthaften Verletzungen führen.
Versuchen Sie nicht, die Schraube (1) zu entfernen oder das Saugrohr
auszubauen. Die Vorschriften fordem einen Sicherheitsabstand von
mindestens 900 mm zwischen dem Gebläserad und dem oberen Ende
des Rohrs.
42
Page 43

VOR INBETRIEBNAHME DES GERÄTES
Abbildung 1
Abbildung 2
Minimal
Maximal
Abbildung 3
Maximal
Minimal
Ölstandanzeiger
Abbildung 4
Abbildung 5
Winkel
Abbildung 6
Winkel
1. Motoröl überprüfen und bei Bedarf nachfüllen
(1) Führen Sie den folgenden Vorgang bei kaltem Motor durch.
Stellen Sie den Motor auf eine ebene horizontale Fläche, wie in Abbildung 1 dargestellt.
• Überprüfung:Den Öldeckel entfernen. Den Ölstandanzeiger sauber wischen. Den Öldeckel wieder einsetzen (Abbildung 2) und
• Nachfüllen: Ergibt die Überprüfung einen zu niedrigen Ölstand, Öl durch dieselbe Öffnung einfüllen, von welcher der Öldeckel
(2) Öl muss u. U. etwa alle 10 Betriebsstunden (nach jeweils 10 Auftankungen) nachgefüllt werden.
(3) Falls das Öl seine Farbe ändert oder sich mit Schmutz vermischt, ist das Öl zu wechseln. (Für das Wechselintervall und die
Wechselmethode siehe S. 48.)
Empfohlenes Öl: SAE 10W-30 Öl der API-Klassifizierung, SF-Klasse oder höher (für 4-Takt Motoröl)
Ölmenge: Ca. 0,08 l
Motorölstand prüfen
abnehmen. Prüfen, ob sich der Ölstand zwischen der unteren und oberen Pegelmarke des Ölstandanzeigers befindet.
entfernt wurde. Siehe Abbildung 4 zur Lage des Motors beim Einfüllen des Öls.
ANMERKUNG
• Steht der Motor nicht auf einer horizontalen Fläche, wie in Abbildung 1 dargestellt, erhält man u. U. eine ungenaue Ölstandanzeige.
• Wird Öl über den Maximalpegel hinaus eingefüllt, kann das Öl verschmutzt werden oder Feuer fangen und weißen Rauch erzeugen.
Ölwechsel und „Ölstandanzeiger“
• Entfernen Sie jeglichen Staub oder Schmutz um den Öl-Einfüllstutzen, bevor Sie den Ölpeilstab herausziehen.
• Achten Sie darauf, dass der Ölpeilstab nicht mit Sand oder Erde in Berührung kommt. Schmutz oder Sand im Öl kann den Ölkreislauf
beeinträchtigen und durch frühzeitige Abnutzung mechanischer Teile Defekte verursachen.
• Um eine Verschmutzung des Ölpeilstabs zu vermeiden, kann er in die Motorverkleidung gesteckt werden.
Nach dem Einfüllen von Öl
• Verschüttetes Öl mit einem Lappen aufwischen.
43
Page 44

2. Kraftstoffzufuhr
WARNUNG
• Beachten Sie beim Betanken des Gerätes die folgenden Anweisungen, um Entzündung oder Brand zu verhindern:
- Das Auftanken muss an einem feuerfreien Ort erfolgen. Bringen Sie niemals Feuer (brennende Zigaretten usw.) in die Nähe des
Auftankortes.
- Den Motor vor dem Auftanken abstellen und abkühlen lassen.
- Den Kraftstofftankdeckel langsam öffnen. Anderenfalls kann Kraftstoff durch den internen Druck herausspritzen.
- Achten Sie darauf, keinen Kraftstoff zu verschütten. Verschütteter Kraftstoff muss aufgewischt werden.
- Das Betanken darf nur im Freien erfolgen.
• Behandeln Sie Kraftstoff mit Sorgfalt.
- Kraftstoff, der auf die Haut oder in die Augen gelangt, kann Allergien oder Hautreizungen verursachen. Falls Sie irgendwelche körperlichen
Unregelmäßigkeiten feststellen, konsultieren Sie sofort einen Facharzt.
• KEIN Öl in den Kraftstofftank einfüllen.
Kraftstofflagerung
Verwenden Sie kein Benzin, das älter als 4 Wochen alt ist, auch wenn es in einem Spezialkanister an einem kühlen, schattigen Ort gelagert
wurde.
Beachten Sie, dass Benzin in einem Tag verderben kann, falls der Kanister nicht verschlossen ist, oder zur Lagerung kein Spezialkanister
verwendet wird.
Lagerung
• Stellen Sie Gerät und Kanister an einem kühlen Ort ohne direkte Sonneneinstrahlung.
• Kraftstoff niemals in einem Auto aufbewahren.
KRAFTSTOFFTYP
Der Motor wird mit einem 4-Takt-Motor betrieben. Verwenden Sie nur bleifreies Normalbenzin.
Kraftstoffhinweise
• Verwenden Sie auf keinen Fall 2-Takt-Mischungen. Das dem Benzin beigemischte Motoröl verursacht übermäßige Kohlenstoffablagerungen.
Das kann zu mechanischen Problemen führen.
• Der Gebrauch von minderwertigem Benzin kann den Startvorgang erschweren oder unmöglich machen.
Vor dem Auftanken unbedingt den Motor abstellen und sicherstellen, dass er abgekühlt ist.
AUFTANKMETHODE
• Den Tankdeckel ein wenig lösen, um den Tankdruck abzulassen.
• Den Tankdeckel abnehmen, dann auftanken. Dabei Luft entweichen lassen, indem der Kraftstofftank so geneigt wird, dass die
Kraftstoffeinfüllöffnung oben liegt.
(Kraftstoff NICHT bis zum Rand des Tanks einfüllen.)
• Nach dem Auftanken den Tankdeckel sicher festziehen.
• Falls der Tankdeckel irgendeinen Mangel oder Schaden aufweist, ist er auszutauschen.
• Der Tankdeckel verschleißt im Laufe der Zeit. Er ist alle zwei bis drei Jahre auszutauschen.
• KEINEN Kraftstoff in die Öleinfüllöffnung einfüllen.
44
Page 45

BETRIEB
Abbildung 1
Stoppschalter
Abbildung 2
Geschlossen
Abbildung 4
Abbildung 5
Offen
Abbildung 3
Kraftstoffpumpe
1. Starten
WARNUNG
• Versuchen Sie niemals, den Motor am Auftankort anzulassen.
- Dies kann Entzündung oder Brand verursachen. Beim Starten des Motors einen Abstand von mindestens 3 m einhalten.
• Die Abgase des Motors sind giftig. Betreiben Sie den Motor nicht an einem schlecht belüfteten Ort, wie z. B. in einem Tunnel, Gebäude usw.
- Das Einatmen von Motorabgasen in höheren Konzentrationen führt zu einer Abgasvergiftung.
• Bei ungewöhnlichen Geräuschen, Geruch oder Schwingung nach Starten, sofort den Motor abstellen und Uhrsache soweit beheben, wie es
diese Betriebsanleitung beschreibt.
- Der Gebrauch eines schadhaften Gerätes kann zum Unfall führen.
• Vergewissern Sie sich, dass der Motor abgestellt wird, wenn der Stoppschalter in Position “O” betätigt wird.
1) Bei kaltem Motor oder nach dem Auftanken
(1) Stellen Sie das Gerät auf eine ebene Fläche.
(2) Stellen Sie den Stoppschalter auf Position „ I “.
(3) Betätigen Sie die Kraftstoffpumpe wiederholt, bis Benzin in der
Pumpe sichtbar wird.
• Normalerweise sind dazu 7 bis 10 Pumpbewegungen
notwendig.
• Bei übermäßigem Pumpen wird das überflüssige Benzin in
den Benzintank zurückgeführt.
(4) Den Chokehebel auf die geschlossene Stellung anheben
(Abbildung 3).
(5) Den Hauptgriff mit der linken Hand halten, um eine Bewegung
des Motors zu verhindern.
(6) Ziehen Sie mit geringem Kraftaufwand am Startergriff, bis Sie
einen Widerstand spüren (Kompressionspunkt). Führen Sie
dann den Startergriff zurück und ziehen Sie diesmal schnell
und kräftig daran.
• Das Seil niemals vollständig herausziehen.
• Lassen Sie den Startergriff nach dem Anreißen des Motors
nicht sofort los, sondern halten Sie den Griff in Ihrer Hand,
bis er in seine Ausgangsposition zurückgekehrt ist.
(7) Nachdem der Motor angesprungen ist, schieben Sie den
Choke stufenweise nach unten, bis der Motor aufgewärmt ist.
• Schieben Sie den Choke stufenweise und achten Sie dabei
auf das Verhalten des Motors. Vergewissern Sie sich, dass
der Choke vollständig geöffnet ist, wenn der Motor warm ist
und rund läuft.
• Falls Sie in kaltem Wetter oder bei einem Kaltstart nach
dem Starten des Motors denn Choke plötzlich vollständig
öffnen, kann es vorkommen, dass der Motor abstirbt.
(8) Geben Sie dem Motor 2-3 Minuten Aufwärmzeit.
(9) Der Warmlauf ist beendet, wenn der Motor von niedriger
Drehzahl bis Vollgas schnell anspricht.
45
Page 46

ANMERKUNG
Stoppschalter
Einstellschraube
Vergaser
• Der Motor kann beschädigt werden, falls der Chokehebel über die Stellung „CLOSE“ hinaus geschoben wird.
• Falls der Motor sofort nach dem Anspringen stehen bleibt, diesen Hebel auf die Stellung „OPEN“ zurückstellen, und den Startergriff
mehrmals ziehen, um den Motor wieder zu starten.
• Wird der Startergriff mehrmals gezogen, während der Chokehebel in der Stellung „CLOSE“ belassen wird, kann der Motor wegen
Überfettung schwer zu starten sein.
• Bei Überfettung die Zündkerze herausdrehen, und den Handgriff mehrmals schnell ziehen, um überschüssigen Kraftstoff auszustoßen. Die
Zündkerzenelektrode abtrocknen.
• Kontrollieren Sie den Anschlag der Leerlaufschraube. Falls der Drosselklappenhebel nicht bis an den Anschlag zurückgeführt wird, wenn
der Gashebel losgelassen wird, überprüfen Sie den Bowdenzug auf Herausrutschen aus der Führung.
2) Warmstart
(1) Stellen Sie das Gerät auf eine ebene Fläche.
(2) Betätigen Sie die Kraftstoffpumpe einige Male.
(3) Vergewissern Sie sich, dass der Chokehebel geöffnet ist.
(4) Den Hauptgriff mit der linken Hand halten, um eine Bewegung des Motors zu verhindern.
(5) Ziehen Sie mit geringem Kraftaufwand am Startergriff, bis Sie einen Widerstand spüren (Kompressionspunkt). Führen Sie dann den
Startergriff zurück und ziehen Sie diesmal schnell und kräftig daran.
(6) Wenn der Motor nicht anspringt, betätigen Sie den Gashebel um 1/3 und starten Sie erneut.
2. Ausschalten
Lassen Sie den Auslöser los, um die Drehzahl des Motors zu verringern,
und bringen Sie den Stoppschalter in die Position „O“.
(Geben Sie die Gashebelarretierung frei, wenn diese den Auslöser in
der Vollgasposition arretiert.)
LEERLAUFEINSTELLUNG
GEFAHR
Der Vergaser ist werksseitig eingestellt. Bitte außer der Leerlaufeinstellung keine anderen Einstellungen vornehmen. Sollte trotzdem eine
Neueinstellung notwendig sein, wenden Sie sich bitte die nächste Vertrags-Kundendienststelle.
Überprüfung der Leerlaufdrehzahl
Die Leerlaufdrehzahl sollte bei etwa 3500 rpm (min–1) liegen.
• Verwenden Sie einen Kreuzschlitzschraubenzieher um, falls
notwendig, eine Einstellungen am Vergaser vorzunehmen.
• Durch Drehen der Einstellschraube nach rechts wird die
Motordrehzahl erhöht. Durch Drehen der Einstellschraube nach links
wird die Motordrehzahl erniedrigt.
46
Page 47

ARBEITEN
1. Arbeiten mit der Blasfunktion
• Halten Sie das Gerät gut fest bei der Arbeit.
• Halten Sie das Rorhende auf die zu kehrenden Objekte und drücken
Sie den Gashebel.
• Ziehen Sie den Triggerhebel vollständig, während Sie den GashebelArretierknopf niederhalten, und lassen Sie dann den Triggerhebel los,
um ihn in der Vollgasposition zu arretieren.
• Ziehen Sie den Auslöser nochmals, um die Gashebelarretierung
freizugeben.
• Das Gerät kann mit beiden Händen gehalten werden. Fassen Sie
hierzu mit der rechten Hand den Haupthandgriff an.
2. Arbeiten mit der Saugfunktion
WARNUNG
• Saugen Sie keine Flüssigkeiten (z.B. Benzin), brennende Zigaretten oder Ähnliches mit diesem Gerät ein.
- Es besteht Brandgefahr.
• Saugen Sie keine zu großen Fremdkörper, wie zum Beispiel große Holzsplitter, Metall, Glas, Steine usw.
- Es besteht die Gefahr der Beschädigung des Gerätes.
• Überfüllen des Staubsacks kann zu Überlaufen auf der Motorseite führen. Entleeren Sie den Sack, bevor er ganz voll wird.
- Es besteht Brandgefahr.
• Hängen Sie den Traggurt des Staubbeutels über die Schulter und stellen Sie ihn auf Ihre
Körpergröße ein.
• Vergewissern Sie sich, dass die Staubtasche nicht verdreht ist und betätigen Sie den Gashebel.
• Wenn der Staubsack voll ist, entfernen Sie ihn von der Maschine, und öffnen Sie den Verschluss, um
den Sack zu entleeren.
ANMERKUNG
Wird diese Maschine betrieben, während die Schutzvorrichtung nach oben oder der Hauptgriff nach unten gerichtet ist, kann weißer Rauch
austreten, oder das Öl kann verschmutzt werden oder auslaufen.
47
Page 48

WARTUNGSARBEITEN
Abbildung 1
Abbildung 2
Winkel
GEFAHR
• Vor jeder Wartungsarbeit, Motor abstellen und abkühlen lassen. Kerzenstecker und Zündkerze entfernen.
- Falls der Versuch einer Überprüfung oder Wartung unmittelbar nach dem Abstellen des Motors oder bei angebrachtem Kerzenstecker
unternommen wird, kann die Bedienungsperson Verbrennungen oder einen Unfall durch versehentliches Starten erleiden.
• Vergewissern Sie sich nach jeder Überprüfung und Wartung, dass alle Teile wieder eingebaut sind. Fahren Sie dann mit dem Betrieb fort.
1. Ölwechsel
Minderwertige Öle verkürzen die Lebensdauer des Gerätes beträchtlich. Überprüfen Sie die Zeitspanne und Menge des Wechsels.
GEFAHR
• Im Allgemeinen sind Motoreinheit und Motoröl unmittelbar nach dem Abstellen des Motors noch heiß. Vergewissern Sie sich beim
Ölwechsel, dass Motoreinheit und Motoröl ausreichend abgekühlt sind. Anderenfalls besteht Verbrennungsgefahr. Nach dem Abstellen des
Motors warten, bis das Motoröl in den Öltank zurückgelaufen ist, um eine genaue Ablesung des Ölstandanzeigers zu gewährleisten.
• Wird Öl über den Maximalpegel hinaus eingefüllt, kann das Öl verschmutzt werden oder Feuer fangen und weißen Rauch erzeugen.
Ölwechselinterwall: Nach den ersten 20 Betriebsstunden, danach alle 50 Betriebsstunden
Empfohlenes Öl: SAE 10W-30 Öl der API-Klassifizierung, Klasse SF oder höher (4-Takt Motoröl)
Gehen Sie beim Ölwechsel wie folgt vor:
(1) Vergewissern Sie sich, dass der Deckel des Benzintanks gut
verschlossen ist.
(2) Entnehmen Sie den Öldeckel.
• Deponieren Sie den Ölmessstabs so, dass er nicht
verschmutzt wird.
(3) Die Maschine in der in Abbildung 1 gezeigten Reihenfolge
neigen.
• Lassen Sie das Öl in einen Behälter ab.
(4) Die Maschine so ausrichten, wie in Abbildung 2 gezeigt, und
Öl bis zum Absatz im Ölrohr einfüllen.
(5) Setzen Sie den Ölmessstab wieder ein und schrauben Sie
diesen vollständig fest. Ungenügendes Verschließen des
Ölmessstabs kann ein Überlaufen von Öl zur Folge haben.
Ölhinweise
• Schütten Sie Altöl niemals in den Müll, in den Boden oder in einen Abwassergraben. Die Entsorgung von Öl ist gesetzlich geregelt. Befolgen
Sie bei der Entsorgung immer die einschlägigen Gesetze und Vorschriften. Bei Unklarheiten und Fragen bezüglich Altölentsorgung, wenden
Sie sich bitte an die nächste Kundendienststelle.
• Beachten Sie, dass Öl auch bei Nichtgebrauch altert. Prüfen Sie ungebrauchtes Öl und ersetzen Sie es in regelmäßigen Zeitabständen (alle 6
Monate).
48
Page 49
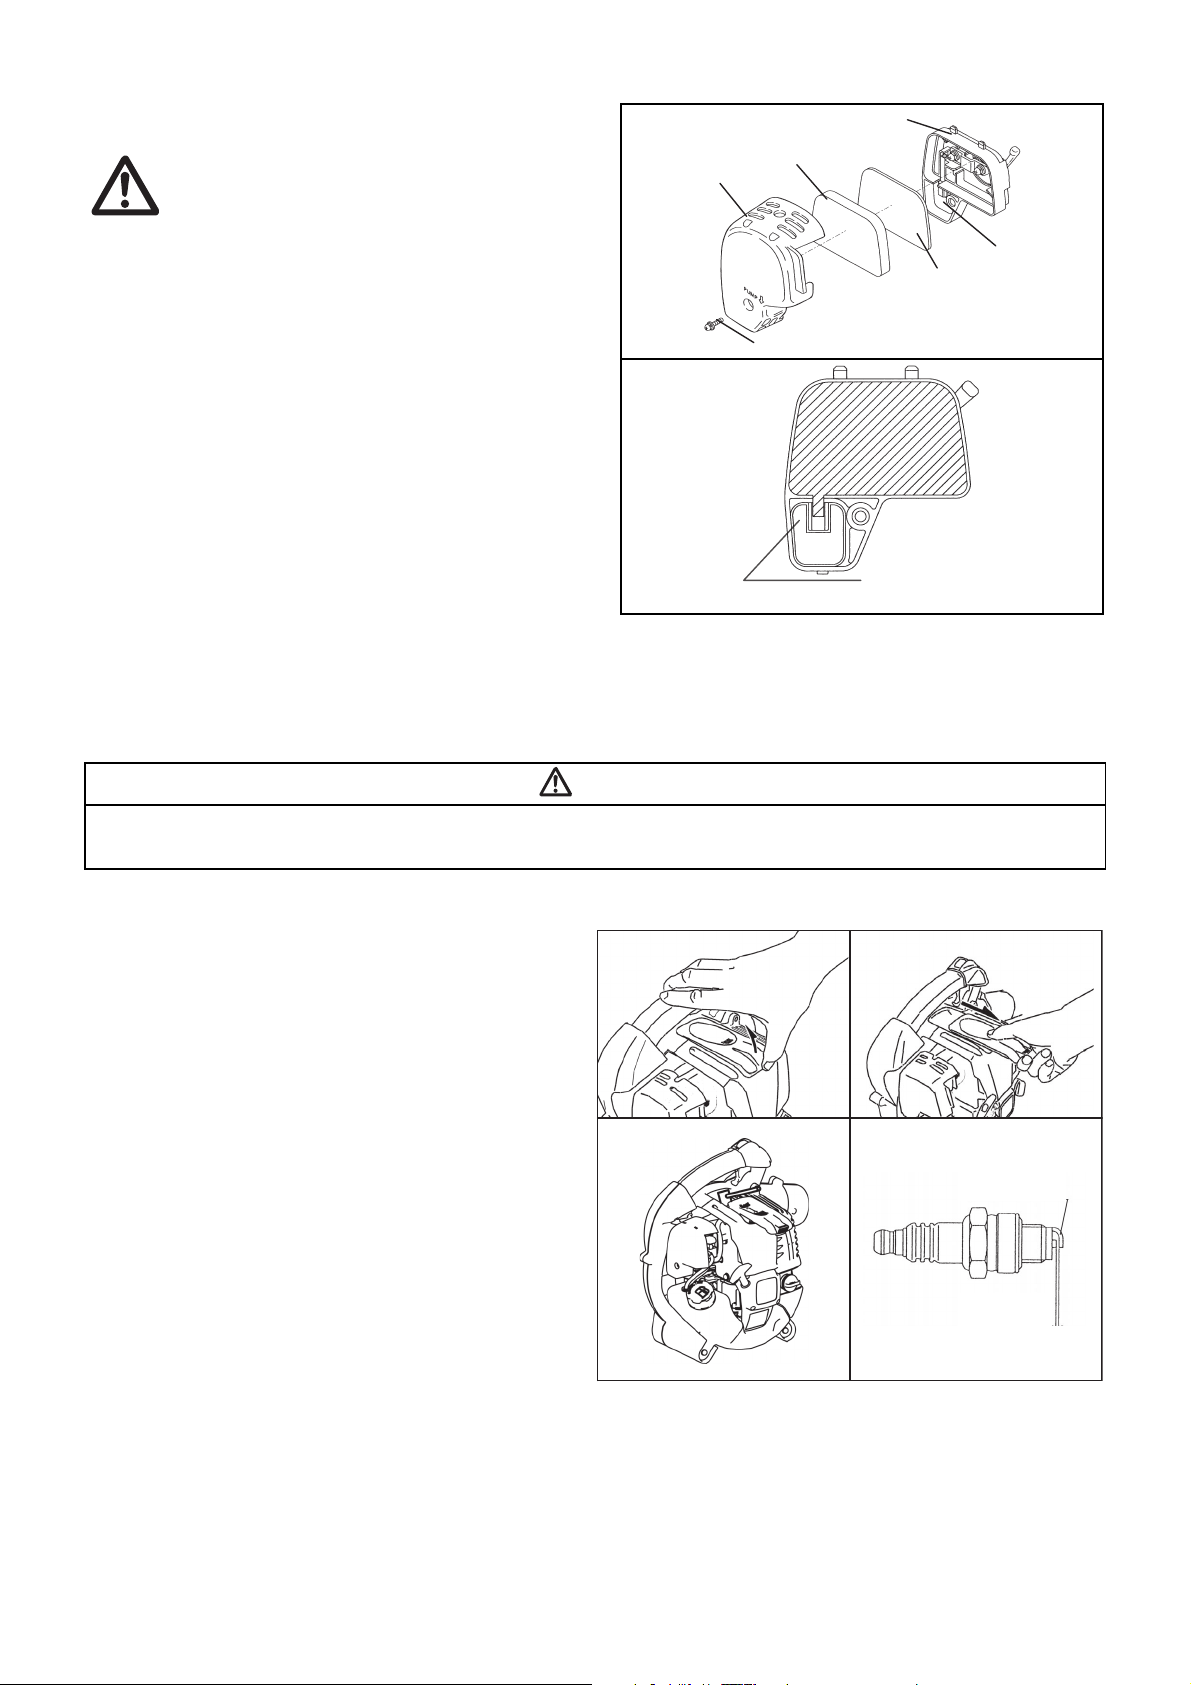
2. Reinigung des Luftreinigers
Platte
Element
(Schwamm)
Luftfilterdeckel
Lüftungteil
Element
(Filz)
Halteschraube
Hier anfassen und den Filz
herausziehen
Abbildung 1
Abbildung 3
Negative (–) Elektrode
Abbildung 2
Abbildung 4
Elektrodenabstand
0,7 – 0,8 mm
WARNUNG: ZÜNDSTOFFE STRENG VERBOTEN
Häufigkeit von Reinigung und Inspektion: täglich (alle 10 Betriebss
tunden)
(1) Entfernen Sie die Halteschraube des Luftreinigergehäuses.
(2) Ziehen Sie den unteren Teil des Luftreinigergehäuses nach
außen und heben Sie das Gehäuse ab.
(3) Schließen Sie den Choke vollständig und vergewissern Sie
sich, dass der Vergaser frei von Staub und Schmutz ist.
(4) Wenn das Element (Schwamm) mit Öl getränkt ist, kräftig
auspressen.
(5) Bei hoher Verschmutzung:
• Das Element (Schwamm) entfernen, in warmes oder mit
mildem Reinigungsmittel verdünntes Wasser tauchen, und
dann vollständig trocknen lassen.
• Reinigen Sie das Element (Filz) mit Benzin, und lassen Sie
es vollständig trocknen.
(6) Bevor Sie die Elemente erneut einsetzen, müssen diese
vollständig trocken sein. Feuchte Elemente können den
Startvorgang erschweren.
(7) Reinigen Sie mit einem sauberen Lappen den Luftfilterdeckel
und die Platte.
(8) Setzen Sie sofort nach der Reinigung das Gehäuse des
Luftreinigers wieder auf und befestigen Sie es mit der Halteschraube (zuerst oberen Teil aufsetzen, dann unteren Teil einpassen).
3. Zündkerze überprüfen
GEFAHR
• Bei hoher Staubeinwirkung muss der Luftfilter mehrmals täglich gereinigt werden.
• Wenn Sie die Filterelemente nicht sauber halten, kann dies zur Verschmutzung des Vergasers führen.
(1) Öffnen/Schließen des Kerzedeckels
Zum Öffnen der Abdeckung den Hauptgriff und den
Vorsprung der Zündkerzenabdeckung mit den Fingern
fassen (Abbildung 1). Den Vorsprung hochdrücken, und die
Abdeckung in Richtung „OPEN“ schieben (Abbildung 2).
Die Abdeckung zum Schließen in Richtung „CLOSE“
schieben, bis die Raste unter dem Vorsprung der
Zündkerzenabdeckung auf der Motorabdeckung ruht. Zum
Schluss den Vorsprung hineindrücken.
(2) Zündkerze herausschrauben
Verwenden Sie den im Lieferumfang enthaltenen
Kombischlüssel zum Herausschrauben der Zündkerze.
(3) Zündkerze überprüfen
Der Abstand zwischen den Elektroden der Zündkerze muss
0,7 bis 0,8 mm betragen (Abbildung 4). Benutzen Sie eine
Fühlerleere, um den Abstand einzustellen.
Bei Ablagerungen an den Elektroden sind diese mit einer
Drahtbürste zu reinigen. Sind die Elektroden der Zündkerze
abgebrannt, muss sie ersetzt werden.
(4) Auswechseln der Zündkerze
Verwenden Sie NGK-CMR6A als Ersatz.
49
Page 50
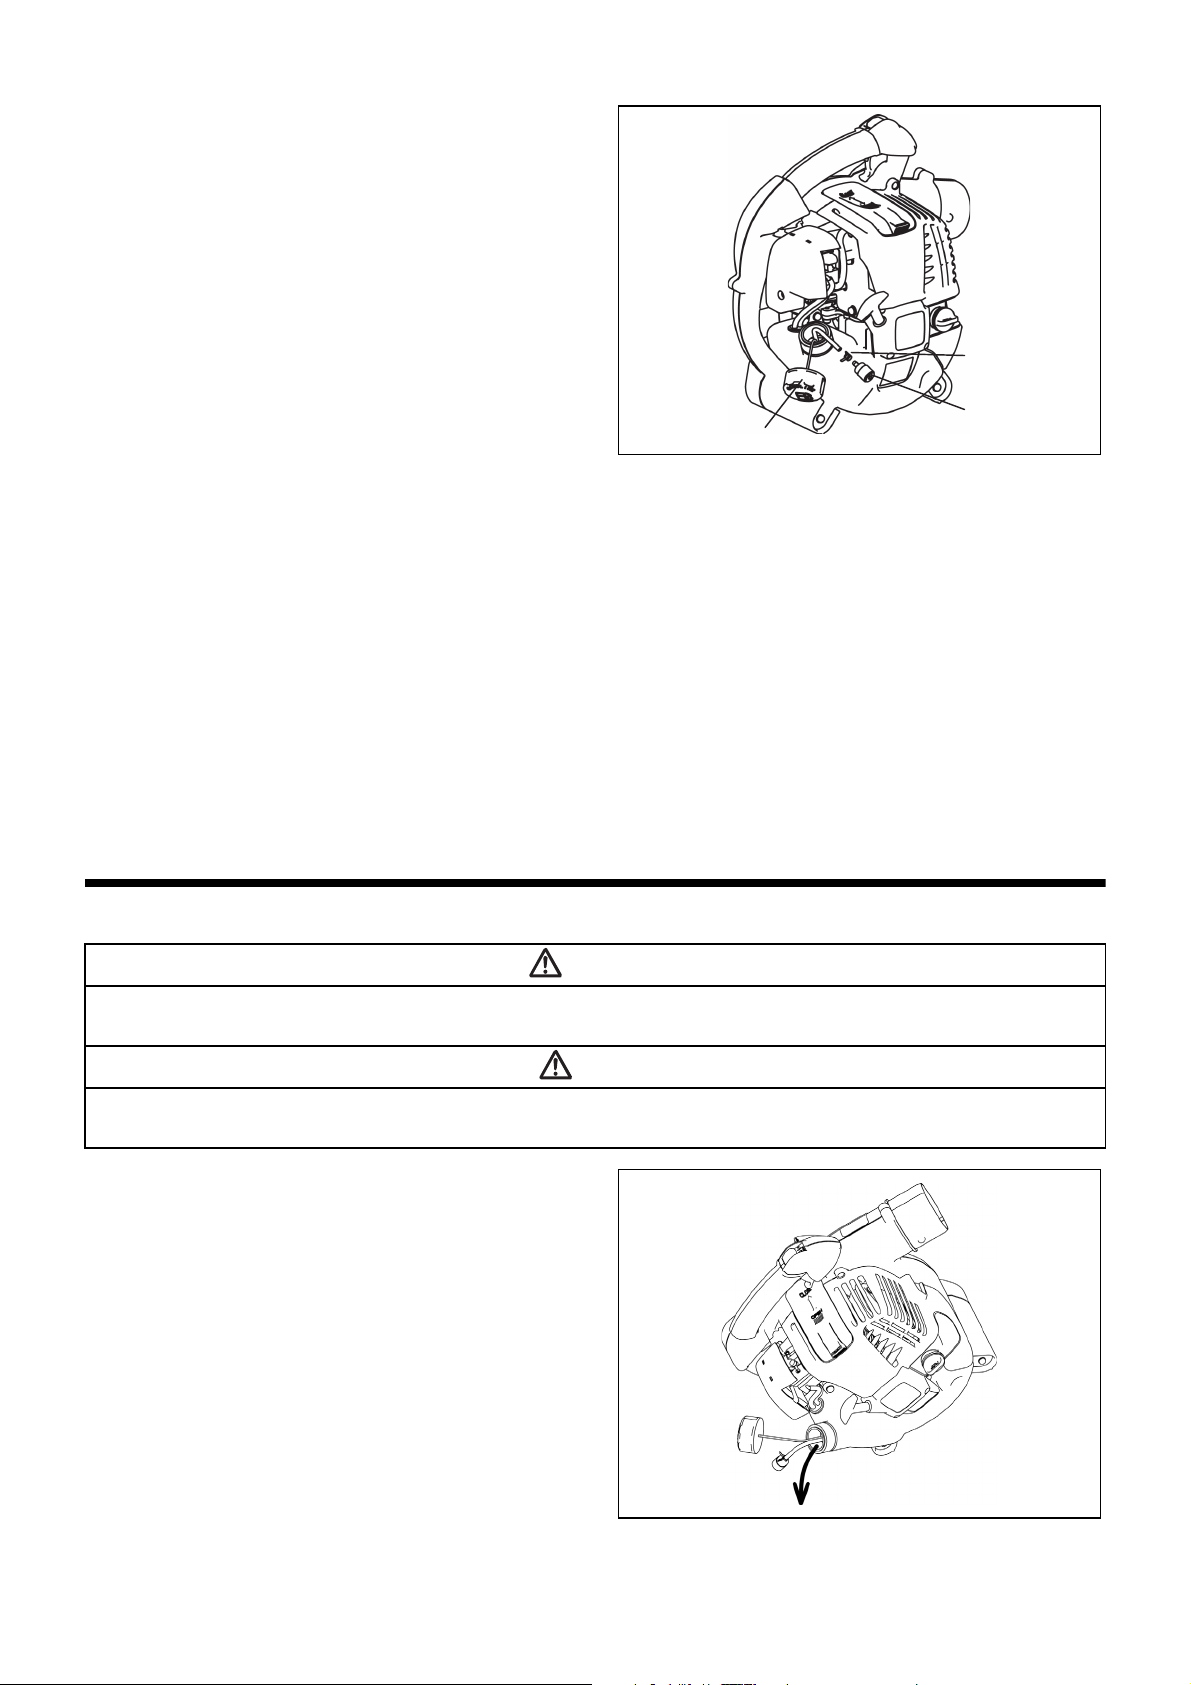
4. Kraftstofffilter reinigen
Schlauchklemme
Kraftstofffilter
Kraftstofftankdeckel
• Der Filzfilter des Saugkopfes kann sich im Gebrauch zusetzen.
Verminderte Motorleistung ist die Folge.
• Überprüfen Sie den Kraftstofffilter regelmäßig wie folgt:
(1) Nehmen den Kraftstofftankdeckel ab. Entleeren Sie den Tank
und vergewissern Sie sich, dass keine Fremdkörper in den
Tank gelangen bzw. im Tank verbleiben.
(2) Ziehen Sie den Kraftstofffilter mit einem Drahthaken oder
Spitzzange durch die Tankverschlussöffnung heraus.
(3) Falls die Kraftstofffilteroberfläche schmutzig ist, reinigen Sie
sie mit Benzin.
Das für die Reinigung verwendete Benzin muss gemäß der
von der jeweiligen örtlichen Behörde vorgeschriebenen
Methode entsorgt werden.
Ein stark verschmutzter Filter muss ausgetauscht werden.
(4) Füllen Sie neues Benzin in den Tank und verschließen Sie
sorgfälltig den Kraftstofftankdeckel. Ersatz-Kraftstofffilter
bekommen Sie im autorisierten Service Center.
5. Überprüfung von Bolzen, Muttern und Schrauben
• Ziehen Sie lose Schrauben und Muttern wieder an.
• Überprüfen Sie den Motor nach Öl- und Benzinlecks.
• Ersetzen Sie defekte Teile um sicheren Betrieb zu gewährleisten.
6. Reinigung
• Halten Sie den Motor durch Abwischen mit einem Lappen sauber.
• Halten Sie die Kühlrippen des Motors immer frei von Staub und Schmutz. An den Lamellen haftender Staub oder Schmutz verursacht
Festfressen.
7. Ersetzen von Dichtungen
Dichtungen sind im Falle einer Zerlegung des Motors auszutauschen.
Alle Einstellungs- und Wartungsarbeiten, die nicht in dieser Betriebsanleitung beschrieben werden, müssen von qualifiziertem Servicepersonal
ausgeführt werden.
LAGERUNG
WARNUNG
• Wenn Kraftstoff ausläuft, sofort Motor ausstellen und abkühlen lassen.
- Anderenfalls kann es zu Verbrennungen oder einem Brand kommen.
GEFAHR
• Soll die Maschine längere Zeit gelagert werden, den Kraftstoff restlos von Kraftstofftank und Vergaser ablassen, und die Maschine an einem
trockenen und sauberen Ort aufbewahren.
Tank entleeren und Vergaser (Benzin-Leitungssystem) leerfahren:
(1) Nehmen den Kraftstofftankdeckel ab.
Entleeren Sie den Tank und vergewissern Sie sich, dass keine
Fremdkörper in den Tank gelangen bzw. im Tank verbleiben.
(2) Ziehen Sie den Kraftstofffilter mit einem Drahthaken durch die
Tankverschlussöffnung heraus.
(3) Drücken Sie die Kraftstoffpumpe, bis kein Benzin mehr zu
sehen ist. Entleeren Sie anschließend den Tank erneut.
(4) Drücken Sie den Kraftstofffilter in den Tank und schrauben Sie
den Tankdeckel auf.
(5) Starten Sie den Motor und lassen Sie ihn bis zum Stillstand
laufen.
(6) Nehmen Sie die Zündkerze ab, und tropfen Sie mehrere
Tropfen Motoröl durch das Zündkerzeloch.
(7) Ziehen Sie den Startergriff, so dass sich das Motoröl im
Zylinder verbreiten. Setzen Sie die Zündkerze wieder ein.
(8) Die Maschine mit oben liegendem Griff aufbewahren.
(9) Restkraftstoff nur in gekennzeichneten und geprüften
Benzinkanistern aufbewahren.
50
Page 51

Fehlererkennung
Fehler System Zustand Ursache
Motor startet nicht oder
nur mit Schwierigkeiten
Probleme beim
Warmstart
Motor startet, stirbt aber
gleich wieder ab
Unbefriedigende
Leistung
Zündsystem Zündfunke vorhanden Fehler in der Kraftstoffzufuhr oder in der Kompression,
mechanischer Defekt.
Kein Zündfunke START(I)/STOPP(O)-Schalter in STOPP-Stellung;
Verdrahtungsfehler oder Kurzschluss, Zündkerze oder
Kerzenstecker defekt, fehlerhaftes Zündmodul.
Kraftstoffzufuhr Benzintank voll Falsche Choke-Stellung, Vergaser defekt, Ansaugkopf
verschmutzt, Benzinleitung geknickt oder verstopft,
verschmutztes Benzin.
Kompression Keine Kompression beim
Durchziehen
Zylinderbodendichtung defekt, Kurbelwellendichtungen
beschädigt, Zylinder- oder Kolbenringe schadhaft, Dichtung
der Zündkerze ist defekt oder passt nicht.
Mechanischer Fehler Anlasser funktioniert
Defekte Rückholfeder, defekte Motorteile.
nicht
Tank voll, Zündfunke
Vergaser verschmutzt (Vergaser reinigen lassen).
vorhanden
Kraftstoffzufuhr Tank voll Leerlauf schlecht eingestellt, Ansaugkopf oder Vergaser
verschmutzt.
Benzintank-Entlüftung defekt, Benzinleitung unterbrochen,
Kabel oder STOPP(O)-Schalter fehlerhaft.
Mehrere Systeme
können gleichzeitig
Verhalten des Motors im
Leerlauf unbefriedigend
Luftfilter verschmutzt, Vergaser verschmutzt, Auspuffdämpfer
verstopft, Zylinderauslass verstopft.
betroffen sein
Betriebszeit
Artikel
Motoröl
Befestigungen (Schrauben,
Muttern)
Benzintank
Gashebel Funktionscheck –
Stoppschalter Funktionscheck 46
Leerlauf Prüfen/Einstellen 46
Luftreiniger Reinigen 49
Zündkerzenstecker Prüfen 49
Kühlluftschacht Reinigen/Prüfen 50
Benzinleitung
Benzinfilter
Freiraum zwischen
Lufteinlass- und
Luftauslassventil
Ölleitung Prüfen *
Motor überholen *
Vergaser
Prüfen/Reinigen 43
Auswechseln *
Prüfen 50
Reinigen/Prüfen –
Restbenzin
aufbrauchen
Prüfen 50
Auswechseln. *
Reinigen/
Auswechseln
Einstellen *
Restbenzin
aufbrauchen
Vor Inbe-
trieb-
nahme
Nach
Schmie-
rung
Täglich
(10 Std.)
30 Std. 50 Std. 200 Std.
1
2
2
2
2
Betriebsein-
stellung/
Pause
3
*
3
*
Entspre-
chende Seite
48
50
50
50
–
–
–
–
*1 Bei fabrikneuem Gerät: erster Ölwechsel nach 20 Betriebsstunden.
*2 Für den Jahresservice (oder nach 200 Betriebsstunden), wenden Sie sich an eine Vertrags-Kundendienststelle.
*3 Lassen Sie nach dem Entleeren des Benzintanks den Motor laufen, bis das Restbenzin im Vergaser aufgebraucht ist.
51
Page 52

STÖRUNGSSUCHE
Bei Leerlauf Choke schließen.
Falls das Gerät nicht ordnungsgemäß funktioniert, suchen Sie zuerst in der Liste unten nach möglichen Fehlerquellen und den entsprechenden
Maßnahmen zur Behebung der Störung. Führen Sie keine Wartungs- oder Reparaturarbeiten durch, die nicht ausdrücklich in dieser
Betriebsanleitung beschrieben sind. Für Reparaturen und periodischen Service wenden Sie sich bitte an Ihren Händler oder an eine
bevollmächtigte Kundendienststelle in Ihrer Nähe.
Störung Mögliche Ursache (Funktionsfehler) Maßnahme zur Behebung
Anlass-Einspritzpumpe wurde nicht betätigt. Drücken Sie 7 bis 10 mal.
Mit zu wenig Kraft am Starterseil gezogen. Kräftig ziehen.
Kein Benzin im Tank. Benzin nachfüllen.
Benzinfilter verstopft. Reinigen.
Geknickte Benzinleitung. Benzinleitung geradebiegen.
Minderwertiges Benzin erschwert den
Qualitätsverschlechterung beim Benzin.
Motor springt nicht an.
Motor stirbt nach dem Anlassen gleich wieder
ab.
Motors kann nicht beschleunigt werden.
Motor lässt sich nicht abstellen. Losgelöster Stecker Einwandfrei anbringen
Übermäßige Benzinzufuhr.
Kerzenstecker lose. Einwandfrei anbringen
Schmutzige Zündkerze. Reinigen
Abnormaler Elektroden-Abstand. Abstand justieren
Andere Abnormitäten an der Zündkerze. Auswechseln.
Vergaser funktioniert nicht richtig. Überprüfen und reparieren lassen.
Starterseil kann nicht gezogen werden. Überprüfen und reparieren lassen.
Antriebssystem funktioniert nicht richtig. Überprüfen und reparieren lassen.
Motor unzureichend aufgewärmt. Den Motor genügend aufwärmen.
Choke ist geschlossen, obwohl Motor warm
ist.
Benzinfilter verstopft. Reinigen.
Luftreiniger verstopft oder verschmutzt. Reinigen.
Vergaser funktioniert nicht richtig. Überprüfen und reparieren lassen.
Antriebssystem funktioniert nicht richtig. Überprüfen und reparieren lassen.
Losgelöster Gaszug Einwandfrei anbringen
Antriebssystem funktioniert nicht richtig. Überprüfen und reparieren lassen.
Elektrisches System funktioniert nicht richtig. Überprüfen und reparieren lassen.
Startvorgang. Tank entleeren und frisches
Benzin nachfüllen. (Empfohlene
Verbrauchsdauer für Benzin: ca. 1 Monat).
Stellen Sie den Gashebel auf mittlere bis hohe
Geschwindigkeit und ziehen Sie am Starterseil
bis der Motor anspringt. Falls der Motor immer
noch nicht anspringt, entnehmen Sie die
Zündkerze und trocknen Sie die Elektroden.
Schrauben Sie die Zündkerze wieder ein und
versuchen Sie noch einmal, den Motor zu
starten.
Choke öffnen.
Wenn der Motor nach dem Warmlaufbetrieb nicht anspringt:
Falls keine Unregelmäßigkeit bei den Prüfpunkten festgestellt wird, den Gashebel um etwa 1/3 betätigen, und den Motor starten.
52
Page 53

Italiano
Vi ringraziamo per aver scelto il soffiatore DOLMAR. Siamo lieti di
potervi offrire questo apparecchio, risultato di un lungo programma di
sviluppo e di anni di anni di conoscenza e di esperienza.
Il soffiatore modello PB-252.4 unisce i vantaggi della più moderna
tecnologia ad un design ergonomico; i nostri apparecchi sono leggeri,
maneggevoli, compatti e rappresentano la soluzione professionale per
un gran numero di applicazioni.
Vi preghiamo di leggere e seguire il manuale che descrive in ogni
dettaglio vari punti che dimostreranno le straordinarie prestazioni di
questo apparecchio. Ciò aiuta a ottenere con sicurezza i risultati
migliori possibili da questo soffiatore DOLMAR.
Indice
SIMBOLI ............................................................................................ 53
NORME DI SICUREZZA.................................................................... 54
DICHIARAZIONE DI CONFORMITÀ CE ........................................... 57
CARATTERISTICHE TECNICHE....................................................... 57
NOME DEI COMPONENTI................................................................ 58
MONTAGGIO ..................................................................................... 59
PRIMA DELLA MESSA IN MOTO...................................................... 60
UTILIZZO ........................................................................................... 62
REGOLAZIONE DEL MINIMO........................................................... 63
METODO DI LAVORO ....................................................................... 64
CONTROLLI E MANUTENZIONE ..................................................... 65
IMMAGAZZINAGGIO......................................................................... 67
SOLUZIONE DEI PROBLEMI............................................................ 69
SIMBOLI
E’molto importante conoscere il significato dei simboli contenuti in questo manuale d’istruzioni:
Pagina
ATTENZIONE/PERICOLO Carburante (Benzina)
Leggere, comprendere il manuale e seguire
le istruzioni
Vietato Arresto di emergenza
Vietato fumare Misure di pronto soccorso
Non utilizzare fiamme libere Riciclaggio
Indossare i guanti protettivi ON/Avviamento
Avviamento manuale
Tenere persone ed animali lontano dal
raggio d’azione dell’apparecchio
Indossare occhiali e cuffie di protezione
Tenere persone lontane Marchio (CE)
OFF/ARRESTO
Mutilazione del dito o del braccio,
Paletta della girante
53
Page 54
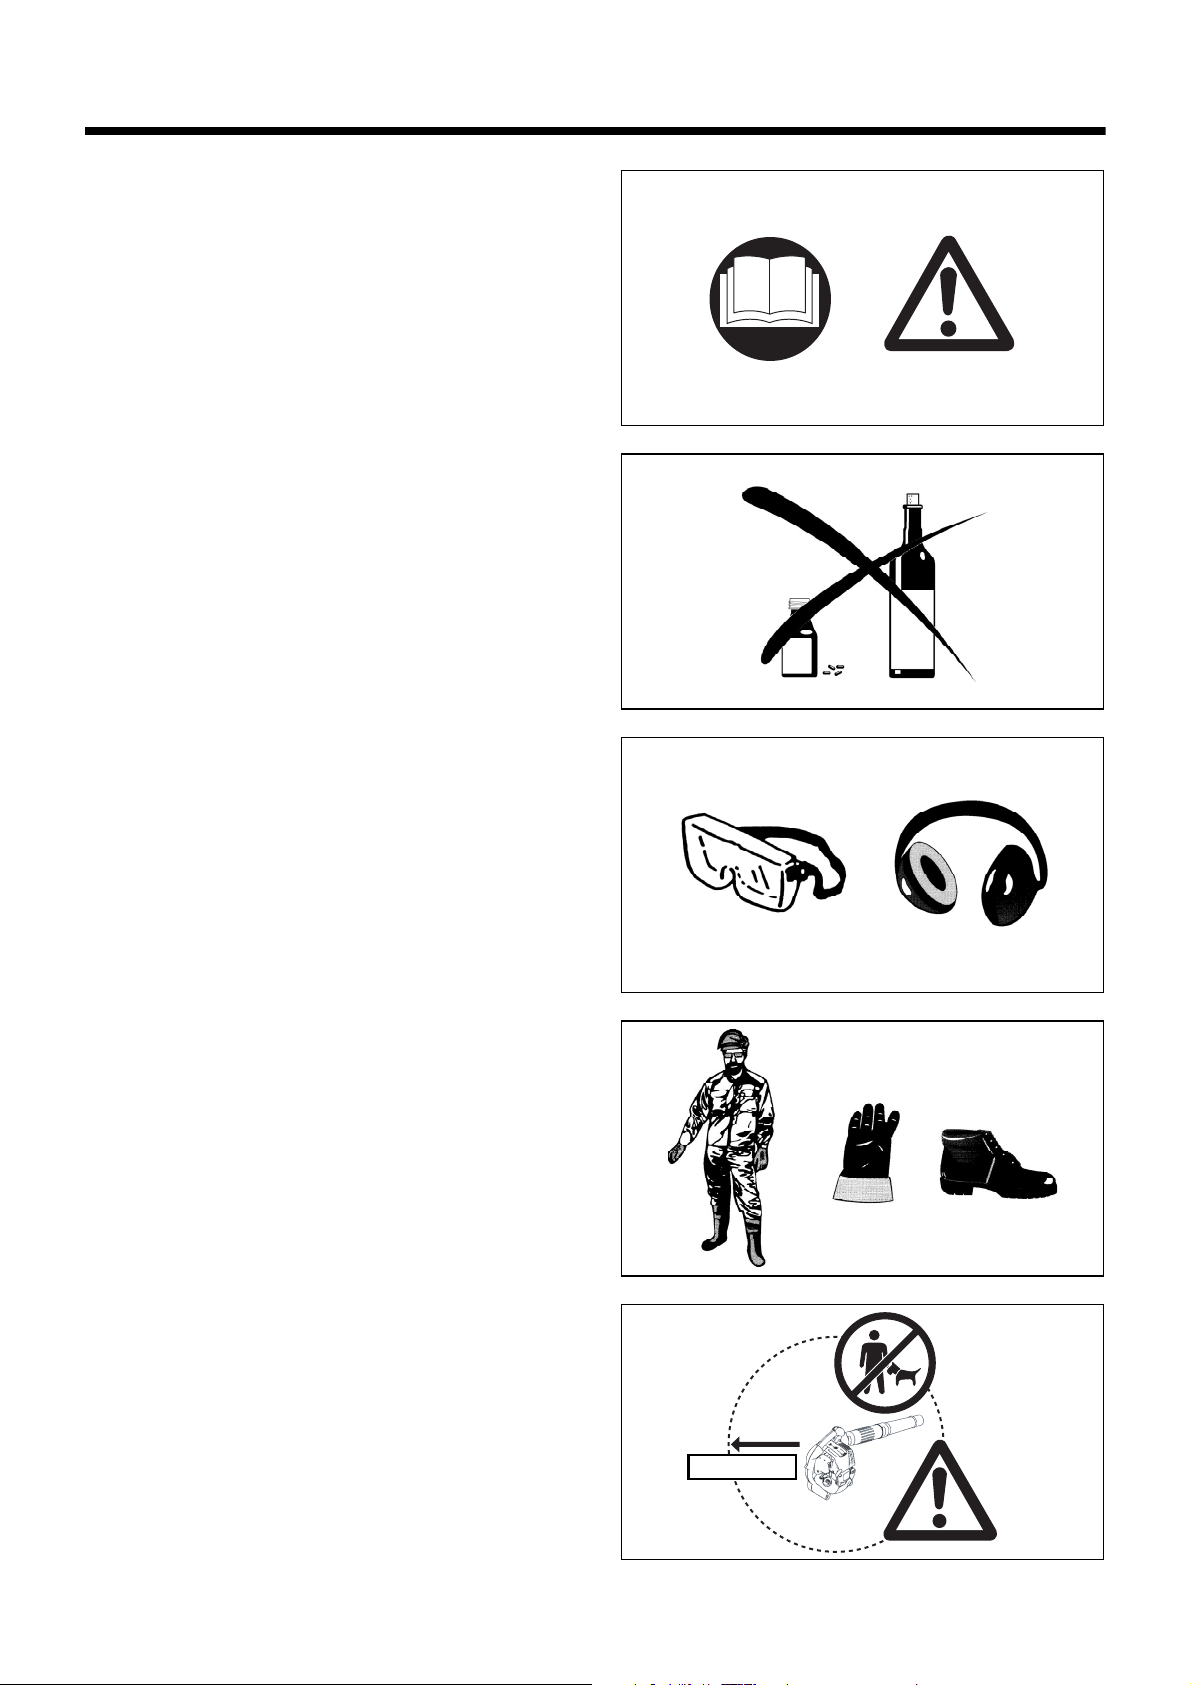
NORME DI SICUREZZA
(1)
(2)
(3)
(4)
(5)
15 metri
Istruzioni generali
• Per un uso corretto e sicuro è necessario leggere, comprendere e
seguire le istruzioni contenute nel manuale in modo da acquisire
familiarità con l’uso del soffiatore (1). Gli utenti insufficientemente
informati costituiscono un pericolo per sé stessi e per gli altri, a causa
di un utilizzo scorretto.
• Si raccomanda di prestare il soffiatore soltanto a persone di provata
esperienza con l’uso dei soffiatori.
• Insieme al soffiatore consegnare anche il manuale di istruzioni.
• Gli utilizzatori inesperti devono informarsi presso il rivenditore circa le
nozioni basilari riguardanti l’impiego di un soffiatore.
• E’vietato l’uso dell’apparecchio ai bambini e ai minori di anni 18.
Tuttavia i giovani di età superiore ai 16 anni possono utilizzare
l’apparecchio a scopo di addestramento, sotto la supervisione di
persone qualificate.
• Utilizzare il soffiatore prestando la massima attenzione.
• Utilizzare il soffiatore solo in condizioni fisiche perfette.
• Eseguire il lavoro con calma e attenzione. L’utilizzatore deve accettare
responsabilità verso terzi.
• Non utilizzare il soffiatore sotto l’effetto di alcool o droghe (2).
• Non utilizzare l’apparecchio in condizioni di stanchezza.
• Conservare il manuale delle istruzioni per riferimento futuro.
Equipaggiamento protettivo
• L’operatore deve indossare indumenti funzionali e adeguati; questi
devono essere aderenti senza tuttavia impedire i movimenti. Non
indossare gioielli o capi di abbigliamento che potrebbero venir aspirati
dall’ingresso dell’aria.
• Onde evitare ferite o danni a testa, occhi, mani o piedi e per
proteggere l’udito, durante il funzionamento del soffiatore è necessario
indossare l’equipaggiamento protettivo di seguito descritto.
Rispettare con particolare attenzione le seguenti
norme
• Gli abiti devono essere resistenti e aderenti, pur consentendo la
massima libertà di movimento. Non indossare giacche ampie,
pantaloni scampanati o con risvolti, e sciarpe, non lasciare i capelli
lunghi sciolti ed evitare tutto ciò che potrebbe essere attirato
nell’ingresso dell’aria. Indossare apposite tute o pantaloni lunghi per
proteggere le gambe. Non indossare pantaloncini corti. (4)
• Il soffiatore potrebbe danneggiare l’udito. Indossare le apposite
protezioni (auricolari o cuffie) per proteggere l’udito. Chi fa uso
frequente dell’apparecchio deve sottoporsi a regolari controlli dell’udito
(3).
• Lavorando con il soffiatore è consigliato l’uso dei guanti. È molto
importante l’appoggio saldo dei piedi. Calzare scarpe robuste con
suole che non scivolano. (4)
• E’obbligatoria l’appropriata protezione degli occhi. Anche se lo scarico
è diretto discosto dall’operatore, durante il funzionamento del soffiatore
può accadere che qualche residuo rimbalzi in direzione dell’operatore.
(3)
• Non utilizzare il soffiatore senza aver prima indossato gli occhiali
protettivi oppure occhiali di sicurezza con protezione superiore e
laterale, come previsto dalla norma ANSI Z 87.1 (o norma locale in
vigore).
Avviamento del soffiatore
• Accertarsi che non ci siano bambini o altre persone entro un raggio di
15 metri dal posto di lavoro (5), e fare anche attenzione agli animali
nelle vicinanze. Non utilizzare il soffiatore all’ interno di aree urbane.
• Prima di azionarlo, controllare che il soffiatore sia pronto per operare in
sicurezza:
Controllare che la leva della valvola a farfalla funzioni perfettamente.
Controllare che la leva diffusore funzioni normalmente e senza
difficoltà. Controllare anche il relativo dispositivo di blocco. Assicurarsi
che le impugnature siano asciutte e pulite e che l’interruttore principale
funzioni. Controllare che le impugnature non siano sporche di olio o carburante.
360°
54
Page 55

Il soffiatore va messo in funzione seguendo solamente le apposite
(6)
(7)
(8)
(9)
3 metri
• Pausa
• Trasporto
• Rifornimento
• Manutenzione
• Sostituzione accessory
istruzioni.
Non utilizzare altri metodi per avviare il motore (6) !
• Il soffiatore e i relativi accessori vanno utilizzati esclusivamente per le
applicazioni specificate.
• Avviare il motore del soffiatore soltanto dopo aver montato l’intero
utensile. Il funzionamento dell’utensile è consentito soltanto dopo che
sono stati montati tutti gli accessori appropriati.
• In presenza di problemi al motore, spegnere immediatamente il
soffiatore.
• Durante il lavoro afferrare saldamente il soffiatore per l’impugnatura
(tenendo l’impugnatura di controllo tra pollice e indice). In questo modo
è possibile mantenere l’apparecchio sempre sotto controllo.
Assicurarsi che l’impugnatura (e il gancio per l’aspiratore) siano in
buone condizioni e non siano umidi, né sporchi di resina, olio o grasso.
Assicurarsi di essere sempre in perfetto equilibrio mantenendo una
posizione di lavoro sicura.
• Evitare di inalare i gas di scarico del soffiatore. Non utilizzare
l’apparecchio al chiuso (rischio di soffocamento e intossicazione). Il
monossido di carbonio è un gas inodore. Controllare sempre che la
ventilazione sia adeguata.
• Spegnere il motore quando si fa una sosta durante il lavoro, e quando
si lascia il soffiatore incustodito. Mettendolo in un posto sicuro si
evitano pericoli alle persone, l’incendio di materiali combustibili o i
danni alla macchina.
• Non appoggiare il soffiatore caldo su erba secca o su materiali
combustibili.
• Prima di utilizzare il soffiatore, installare tutte le protezioni fornite in
dotazione.
• Non avviare il motore se la marmitta di scarico è guasta.
• Arrestare il motore durante il trasporto (7).
• In caso di trasporto in macchina o in furgoncino, caricare con cura il
soffiatore onde evitare perdite di carburante.
• In caso di spedizione, controllare che il serbatoio del carburante sia
vuoto.
Rifornimento
• Durante il rifornimento (7), spegnere il motore, non avvicinarsi a
fiamme libere (8) e non fumare.
• Evitare che il carburante entri in contatto con la pelle. Non inalarne i
vapori. Durante il rifornimento indossare sempre i guanti protettivi.
Cambiare e lavare l’abbigliamento protettivo a intervalli regolari.
• Non versare carburante, né olio onde evitare di inquinare il terreno
(protezione ambientale). Pulire immediatamente il soffiatore in caso di
fuoriuscita di carburante. Far asciugare gli stracci bagnati prima di
smaltirli in appositi contenitori coperti per evitare fenomeni di
combustione spontanea.
• Evitare che la benzina venga a contatto con gli abiti. Cambiare
immediatamente abito se si è spanta della benzina su di esso (pericolo
di incendio).
• Controllare il tappo del serbatoio a intervalli regolari e assicurarsi che
rimanga perfettamente chiuso.
• Serrare con cura la vite di bloccaggio del serbatoio. Prima di avviare il
motore, allontanarsi di almeno 3 metri dal luogo in cui è avvenuto il
rifornimento (9).
• Non eseguire il rifornimento al chiuso. I vapori si accumulano a livello
del terreno (rischio di esplosione).
• Il carburante va trasportato e conservato solo in appositi contenitori
omologati. Conservare fuori dalla portata dei bambini.
• Non eseguire il rifornimento quando il motore è caldo o in funzione.
55
Page 56

Metodo di lavoro
(10)
(11)
(12)
• Il soffiatore va utilizzato solo in condizioni di buona visibilità e di buona
illuminazione. Durante la stagione invernale, fare attenzione alle
superfici scivolose, bagnate o ghiacciate (rischio di scivolare).
Assicurarsi di essere sempre in perfetto equilibrio.
• Evitare sempre di lavorare su superfici instabili o terreni ripidi.
• Per evitare il rischio di ferite, non dirigere il getto d’aria verso persone
l’alta pressione dell’aria potrebbe procurare danni agli occhi o far
rimbalzare piccoli oggetti a grande velocità.
• Non si devono mai inserire oggetti estranei nell’ingresso dell’aria della
macchina o nella bocchetta del soffiatore. Ciò danneggia la ventola e
potrebbe causare un serio incidente all’operatore o agli astanti, in
quanto tali oggetti o parti rotte potrebbero essere scagliati fuori dalla
macchina ad alta velocità.
• Controllare la direzione del vento, non lavorare mai controvento.
• Mentre si utilizza l’apparecchio non camminare all’indietro per non
inciampare o perdere il controllo.
• Spegnere il motore prima di eseguire operazioni di pulizia o
manutenzione dell’unità o procedere alla sostituzione delle parti.
Manutenzione
• Rispettare l’ambiente. Mantenere al minimo i livelli di rumore e
inquinamento. Controllare in particolare la regolazione corretta del
carburatore.
• Pulire il soffiatore a intervalli regolari e verificare che tutte le viti e i dadi
siano ben serrati.
• Non eseguire operazioni di manutenzione, né custodire il soffiatore
nelle vicinanze di fiamme libere, faville, ecc. (11).
• Custodire sempre il soffiatore in un locale chiuso e ben aereato e con il
serbatoio completamente vuoto.
Osservare e rispettare tutte le norme di prevenzione degli infortuni
previste dalle associazioni di categoria e dalle compagnie di
assicurazione. Per motivi di sicurezza personale, non apportare alcuna
modifica al soffiatore.
L’utilizzatore si deve limitare ad eseguire le operazioni di manutenzione
e riparazione descritte nel manuale. Tutti gli altri lavori devono essere
eseguiti da personale autorizzato del Servizio Assistenza.
Utilizzare solo ricambi e accessori originali DOLMAR.
L’impiego di accessori e utensili non omologati aumenta il rischio di
incidenti e lesioni. La DOLMAR declina ogni responsabilità in caso di
incidenti o danni provocati dall’uso di attrezzi o accessori non autorizzati.
Misure di pronto soccorso
In caso di incidente assicurarsi che nelle immediate vicinanze sia
disponibile una cassetta del pronto soccorso. Sostituire subito i prodotti
medicinali utilizzati.
In caso di richiesta di aiuto, fornire le seguenti informazioni:
• luogo dell’incidente
• descrizione dell’accaduto
• numero di feriti
• tipo di ferite
• Propri nomi
Imballo
Il soffiatore DOLMAR è imballato in una scatola di cartone protettiva per
evitare danni dovuti al trasporto. Il cartone è una materia prima
fondamentale e può essere riutilizzato o riciclato (riciclaggio della carta).
56
Page 57

Solo per i paesi europei
Dichiarazione di conformità CE
I sottoscritti, Tamiro Kishima e Rainer Bergfeld, con
l’autorizzazione della Dolmar GmbH, dichiariamo che le
macchine DOLMAR:
Denominazione dell’utensile:
Soffiatore a benzina
N. modello/Tipo: PB-252.4
CARATTERISTICHE TECNICHE: vedere la tabella
“CARATTERISTICHE TECNICHE”
appartengono a una produzione in serie e
sono conformi alle seguenti direttive europee:
2000/14/EC, 2006/42/EC
Sono inoltre prodotti in conformità con gli standard o i documenti
standardizzati riportati di seguito:
EN15503
Il file della documentazione tecnica si trova all’indirizzo
seguente:
Dolmar GmbH,
Jenfelder Straße 38, Abteilung FZ,
D-22045 Hamburg
La procedura di valutazione della conformità richiesta dalla
direttiva 2000/14/EC è stata effettuata quanto specificato
nell’allegato V.
Livello di potenza sonora misurato: 102 dB
Livello di potenza sonora garantito: 106 dB
14. 6. 2010
Tam i ro K i sh i ma
Amministratore delegato
Rainer Bergfeld
Amministratore delegato
CARATTERISTICHE TECNICHE
Modello PB-252.4
Peso (senza tubi) (kg) 4,5
Dimensioni (senza tubi) (Lunghezza×Larghezza×Altezza) (mm) 350 × 231 × 368
-1
Velocità max. del motore (min
Velocità del minimo (min
Cilindrata motore (mL) 24,5
Carburante Carburante Benzina per auto
Volume serbatoio (L) 0,52
Olio motore
Volume dell’olio per motore (L) 0,08
Carburatore (a membrana) WALBRO WYL
Sistema di iniezione A stato solido
Candela accensione NGK CMR6A
Distanza tra gli elettrodi (mm) 0,7 – 0,8
a
Vibrazioni conf. a EN15503
Livello medio di pressione acustica
conf. a EN15503
Livello medio pressione acustica conf.
a EN15503
hv eq
Variazione K (m/s
L
PA eq
Variazione K dB(A) 1,4
L
WA eq
Variazione K dB(A) 1,4
Nota:
1. Usare l’olio e la candela di accensione indicati da DOLMAR.
2. Dati tecnici possono modificarsi senza preavviso.
) 7.800
-1
) 3.500
SAE 10W- 30 olio della classificazione API, classe SF o superiore
(motore a quattro tempi per automobile)
(m/s2)9,3
2
)0,5
dB(A) 90,8
dB(A) 103,7
57
Page 58

NOME DEI COMPONENTI
Venduto a
parte
Kit raccolta polveri
(Venduto a parte)
NOME DEI COMPONENTI NOME DEI COMPONENTI NOME DEI COMPONENTI NOME DEI COMPONENTI
1. Interruttore d’arresto 8. Serbatoio carburante 15. Coperchio della candela 22. Tubo aspirazione
2. Impugnatura principale 9. Coperchio del serbatoio 16. Candela di accensione 23. Freccia
3. Leva del grilletto 10. Marmitta 17. Coperchio olio 24. Sacco polveri
4. Pompa avviamento 11. Impugnatura ausiliare 18. Tubo soffiante
5. Coperchio del filtro aria 12. Tasto blocco valvola 19. Ugello soffiante A
6. Leva diffusore 13. Vite 20. Ugello soffiante B
7. Impugnatura starter 14. Protezione 21. Tubo curva
58
Page 59

MONTAGGIO
ATTENZIONE:Prima di eseguire qualsiasi operazione sul
soffiatore, spegnere il motore e rimuovere il
connettore della candela d’accensione.
Indossare sempre i guanti protettivi!
ATTENZIONE:Avviare il soffiatore solo dopo averne completato il
montaggio.
1. MONTAGGIO DEI TUBI DEL SOFFIATORE
1) Allineare le scanalature del tubo soffiante con i tasselli del
corpo dell’apparecchio, quindi applicare il tubo.
2) Ruotare il tubo soffiante in senso orario in modo da
bloccarlo.
3) Mettere la fascetta attorno all’apertura del tubo soffiante.
Fissare quindi bene con il bullone ed il dado .
2. MONTAGGIO DELL’ACCESSORIO PER L’ASPIRAZIONE
1) Montaggio del tubo di aspirazione (bocchetta)
(1) Allentare la vite e aprire la protezione .
AVVE RTIM ENTO !
Quando I’apparecchio viene utilizzato come soffiatore,
controllare che la vite non è allentata, sempre prima di
cominciare il funzionamento. Se essa è allentata,
ristringerla.
È pericoloso far funzionare l’apparecchio con la vite allentata.
Perché dita ed abiti dell’operatore potrebbero impigliarsi nella ventola,
causando un incidente grave.
Attenzione: Il motore non si avvia se la protezione non è
completamente chiusa.
(2) Allineare la freccia indicata sul tubo di aspirazione con il
disegno “ ” indicato sul soffiatore. Quindi inserire il tubo di
aspirazione nel soffiatore.
(3) Per bloccare il tubo di aspirazione, ruotarlo finché la freccia
non è allineata con “ ” indicato sul soffiatore.
(4) Fissare saldamente il tubo di aspirazione al soffiatore con la
vite ed la staffa .
Attenzione: La procedura di installazione (4) non deve venire usata in
regioni o paesi per cui non valga il marchio CE.
Attenzione: Non stringere la vite troppo fortemente.
Attenzione: Il motore non si avvia se il tubo aspiratore non è
completamente montato.
AVVE RTIM ENTO !
Mentre si procede al montaggio/smontaggio del tubo di aspirazione,
sorreggere sempre la parte finale del tubo stesso.
2) Montaggio del tubo curva e del sacco polveri
(1) Aprire il fermaglio del sacco polveri.
(2) Inserire il tubo curva nel sacco polveri attraverso l’apposita
fessura.
(3) Installare il tubo curva sul soffiatore.
(4) Mettere la fascetta attorno all’apertura del tubo curva.
Fissare bene con il bullone ed il dado .
Attenzione: La procedura di installazione (4) non deve venire usata in
Montare sempre correttamente la protezione e il tubo di aspirazione
prima di cominciare il lavoro. È pericoloso lavorare senza la protezione e
il tubo di aspirazione, perché la ventola potrebbe agganciare le dita o gli
abiti dell’operatore causando gravi ferite.
Non cercare di rimuovere la vite (1) o smontare il tubo d’aspirazione. Tra
la ventola e la parte superiore del tubo deve esserci una distanza di
sicurezza di almeno 900 mm.
regioni o paesi per cui non valga il marchio CE.
AVVE RTIM ENTO !
Non raccogliere grossi pezzi di legno, metalli, vetro,
pietre, liquidi, sigarette accese, fuochi d’artificio, ecc.
59
Page 60

PRIMA DELLA MESSA IN MOTO
Figura 1
Figura 2
Limite inferiore
Limite superiore
Limite superiore
Limite inferiore
Indicatore di livello
Figura 3
Figura 4
Figura 5
Mensola
Figura 6
Mensola
1. Ispezione e rabbocco dell’olio motore
(1) Procedere nel modo seguente quando il motore è freddo.
Accertarsi che il motore si trovi su una superficie piana orizzontale, come mostrato nella Figura 1.
• Ispezione: Togliere il coperchio dell’olio. Pulire l’indicatore di livello olio. Reinstallare il coperchio dell’olio (Figura 2) e rimuoverlo.
• Rabboccare:Se dopo l’ispezione l’olio è sotto il limite inferiore, aggiungere olio attraverso la stessa apertura da cui è stato tolto il
(2) Potrebbe essere necessario rabboccare l’olio ogni circa 10 ore di utilizzo (ogni 10 rifornimenti).
(3) Sostituire l’olio se cambia colore o è misto a sporco. (Per l’intervallo e il metodo di sostituzione vedere a pagina 65.)
Olio raccomandato: SAE 10W- 30 olio della classificazione API, classe SF o superiore (motore a quattro tempi per automobile)
Capacitá del serbatoio: Circa 0,08 L
Metodo di controllo dell’olio per motori
Accertarsi che l’olio sia tra i segni del limite superiore e inferiore dell’indicatore dell’olio.
coperchio dell’olio. Vedere la Figura 4 sul modo di orientare il motore per il rabbocco dell’olio.
NOTA
• Se il motore non è posizionato su una superficie orizzontale come nella Figura 1, si potrebbe ottenere una indicazione scorretta del livello
dell’olio.
• Se il serbatoio dell’olio è riempito oltre il limite, l’olio può inquinarsi o bruciare producendo fumo bianco.
Sostituzione dell’olio “Indicatore di livello olio”
• Togliere le polveri e la sporcizia vicino al foro di rifornimento dell’olio, e togliere l’indicatore di livello dell’olio.
• Mantenere pilito della sabbia o della polvere l’indicatore del livello dell’olio. La sabbia o la polvere aderenti all’indicatore di livello olio
potrebbero altrimenti causare la circolazione irregolare dell’olio o l’usura delle parti del motore con conseguenti problemi.
• Per mantenere pulito l’indicatore di livello olio si consiglia di inserirlo dal lato della manopola nel coperchio del motore.
Dopo il rabbocco dell’olio
• Pulire con uno straccio tutto l’olio spanto.
60
Page 61

2. Alimentazione carburante
AVVERTENZE
• Durante il rifornimento, osservare le istruzioni seguenti per evitare una combustione o un incendio.
- Il rifornimento del carburante deve essere fatto in un luogo dove non ci siano fiamme. Mai avvicinare una fiamma (fumare, ecc.) vicino al
posto di rifornimento.
- Spegnere il motore e lasciarlo raffreddare prima di procedere con il rifornimento.
- Aprire lentamente il coperchio del serbatoio. Il carburante potrebbe fuoriuscire per la pressione interna.
- Far attenzione a non far fuoriuscire il carburante. Asciugare completamente il carburante eventualmente fuoriuscito.
- Eseguire il rifornimento in un luogo ben aereato.
• Far attenzione nel maneggiare il carburante.
- Se il carburante entra in contatto con la pelle o gli occhi, è possibile che provochi infiammazione o allergia. Consultare immediatamente un
medico specialista se si dovessero riscontrare anomalie nelle condizioni fisiche.
• NON versare olio nel serbatoio del carburante.
PERIODO DI CONSERVAZIONE DEL CARBURANTE
Il carburante deve essere utilizzato totalmente entro quattro settimane, anche se è conservato in un recipiente apposito all’ombra e in un luogo
ben ventilato.
Se il carburante non è conservato in un recipiente apposito o se il recipiente non è coperto, si deteriora in un giorno.
Immagazzinaggio della macchina e del serbatoio di rifornimento
• Conservare la macchina e il serbatoio in un luogo fresco al riparo dalla luce diretta del sole.
• Non tenere mai il carburante dentro una automobile.
CARBURANTE
Il motore è a quattro tempi. Utilizzare sempre la benzina per automobile (benzina senza piombo o benzina super).
Note per carburante
• Non utilizzare nessuna miscela di benzina fatta con olio motore. Questo provocherebbe un accumulo eccessivo di residui carboniosi e/o
disturbi meccanici.
• Un olio deteriorato provocherà un avviamento irregolare.
Prima del rifornimento, spegnere il motore e accertarsi che si sia raffreddato.
METODO DI RIFORNIMENTO
• Allentare leggermente il coperchio del serbatoio per rilasciare la pressione interna.
• Togliere il coperchio del serbatoio e fare rifornimento scaricando l’aria inclinando il serbatoio in modo che l’apertura di rifornimento sia rivolta in
alto.
(NON aggiungere carburante fino a riempire completamente il serbatoio.)
• Dopo il rifornimento, stringere saldamente il coperchio del serbatoio.
• Sostituire il coperchio del serbatoio se ha un qualsiasi difetto o danno.
• Il coperchio del serbatoio si usura con il tempo. Sostituirlo ogni due o tre anni.
• NON versare il carburante nell’apertura di rabbocco dell’olio.
61
Page 62

UTILIZZO
Figura 1
Interruttore arresto
Figura 2
Chiudere
Figura 4
Figura 5
Aprire
Figura 3
Pompa di avviamento
1. Avviamento
• Non avviare il motore nel luogo stesso del rifornimento.
- Ciò potrebbe causare combustione o incendio. Quando si avvia il motore, mantenere una distanza di almeno 3 metri.
• Il gas di scarico del motore è tossico. Non usare l’apparecchio in luoghi mal aereati (ad esempio gallerie, edifici etc...)
- Il funzionamento del motore nei luoghi mal aereati potrebbe causare intossicazione da gas di scarico.
• Se dopo l’avviamento si sentono rumori, odori particolari o vibrazioni anomale, spegnere subito il motore per un’ispezione.
- Se il motore funziona senza accorgersi di tale anomalità, potrebbe causare un incidente.
• Accertarsi che il motore si spenga quando si porta l´interruttore d’arresto sulla posizione “O”.
1) Quando il motore è freddo o dopo il rifornimento del
AVVERTENZE
carburante
(1) Mettere la macchina in piano.
(2) Posizionare l’interruttore arresto sulla posizione “ I ” (Figura 1).
(3) Continuare a premere la pompa di avviamento finché il
carburante entra nella stessa (Figura 2).
• In generale, il carburante entra nel carburatore dopo 7/10
spinte.
• Premendo troppe volte la pompa di avviamento si potrebbe
causare un ritorno dell’eccesso di benzina nel serbatoio.
(4) Alzare la leva diffusore sulla posizione di chiusura (Figura 3).
(5) Tenere l’impugnatura principale con la mano sinistra per
evitare che il motore si muova.
(6) Tirare la manopola di avviamento finché non si sente una
leggera resistenza. Poi, rilasciare la manopola e tirarla
nuovamente con forza (Figura 4).
• Non tirare il cavo fino alla sua estensione massima.
• Una volta che la manopola è tirata, non abbandonare la
(7) Quando il motore si avvia, aprire la leva di diffusore (Figura 5).
• Aprire la leva di diffusore lentamente, verificando la
• In caso di basse temperature o quando il motore si è
(8) Continuare l’operazione di riscaldamento per 2 o 3 minuti.
(9) Il riscaldamento è completo quando c’è una veloce
accelerazione dai bassi giri del motore fino a pieno
acceleratore.
presa immediatamente. Tenere la manopola finché essa
non ritorna al punto di partenza.
rotazione del motore. Assicurarsi di aprire la leva diffusore
al massimo.
raffreddato, non aprire la leva diffusore bruscamente,
altrimenti il motore può arrestarsi.
62
Page 63

NOTA
Interruttore arresto
Vite di regolazione
Carburatore
• Se la leva diffusore viene portata più in alto rispetto alla posizione “CLOSE”, si potrebbe danneggiare.
• Se il motore parte e si arresta, rimettere questa leva sulla posizione “OPEN” e tirare diverse volte la leva dello starter per avviare di nuovo il
motore.
• Se si continua a tirare diverse volte la leva dello starter con la leva diffusore lasciata sulla posizione “CLOSE”, il motore ha difficoltà a partire
a causa dell’ingolfamento del carburante.
• Nel caso di ingolfamento del carburante, rimuovere la candela e tirare rapidamente diverse volte la leva per scaricare ogni eccesso di
carburante. Asciugare l’elettrodo della candela.
• Se alla velocità più bassa la valvola a farfalla non arriva a toccare la vite di regolazione del minimo, agire sul blocco del cavo di controllo in
modo da riportarla a toccare la vite di regolazione.
2) Quando il motore è caldo
(1) Mettere il motore in piano.
(2) Premere la pompa di avviamento qualche volta.
(3) Controllare che la leva diffusore sia aperta.
(4) Tenere l’impugnatura principale con la mano sinistra per evitare che il motore si muova.
(5) Tirare lentamente l´impugnatura starter fino a sentirne la resistenza e dopo averla fatta ritornare alla posizione iniziale, tirarla
nuovamente con forza.
(6) Se dovesse essere difficile avviare il motore, aprire la valvola a farfalla per circa un terzo.
2. Arresto
Rilasciare la leva del grilletto per ridurre la velocità del motore e
impostare l’interruttore di arresto in posizione “O”.
(Rilasciare il blocco della leva dell’acceleratore se blocca la leva del
grilletto nella posizione di piena apertura.)
REGOLAZIONE DEL MINIMO
PERICOLO
Il carburatore è stato regolato in fabbrica. Non eseguire alcuna regolazione diversa da quella del minimo. Se è necessaria la regolazione,
rivolgersi al rivenditore o a un Centro di Assistenza autorizzato.
Controllo della rotazione a bassa velocità
Mettere la rotazione a velocità bassa a 3500 rpm (min–1).
• Se fosse necessario cambiare la velocità di rotazione, regolare la vite
di regolazione con un cacciavite a croce.
• Girare a destra la vite di regolazione per aumentare la velocità del
motore. Girare a sinistra la vite di regolazione per ridurre la velocità del
motore.
63
Page 64
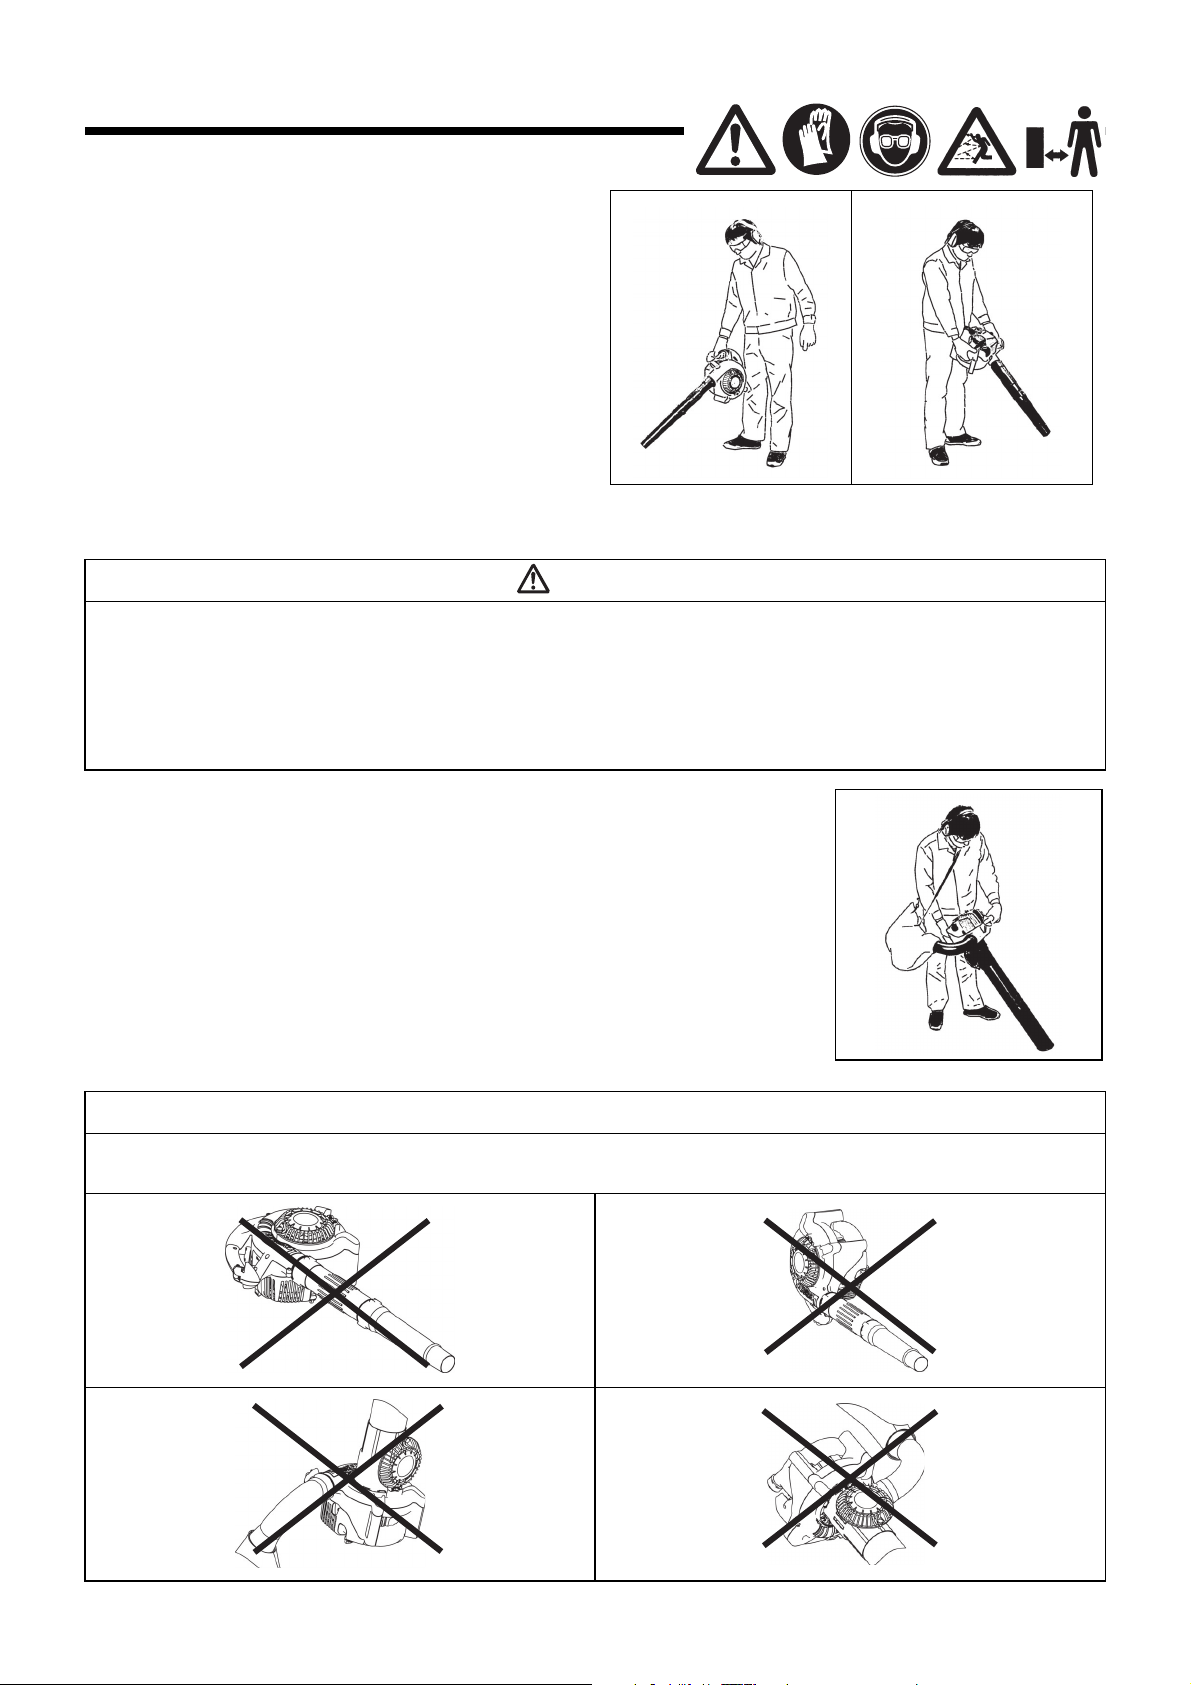
METODO DI LAVORO
1. Uso del soffiatore
• Eseguire i lavori reggendo bene il soffiatore.
• Tirare la leve del grilletto dirigendo l’estremità dell’ugello verso
l’oggetto da soffiare.
• Tirare completamente la leva del grilletto, mantenere premuto il tasto di
blocco valvola e togliere il dito dalla leva del grilletto rilasciandola per
bloccarla a pieno acceleratore.
• Tirare di nuovo la leva del grilletto per rilasciare il blocco
dell’acceleratore.
• La parte inferiore del serbatoio del carburante funziona come
impugnatura ausiliaria, permettendo di lavorare usando entrambe le
mani. In questo caso mantenere l’impugnatura ausiliaria con la mano
destra.
2. Raccolta delle polveri
AVVERTENZE
• Non aspirare kerosene, benzina, sigarette accese, ecc. onde evitare incendi.
- Altrimenti potrebbe causare un incendio
• Aspirare corpi estranei (grandi pezzi di legno, di metallo e di vetro, piccoli sassi,ecc.) può causare un guasto alla macchina.
- Altrimenti potrebbe causare un fallimento.
• Il riempimento eccessivo del sacco polveri potrebbe causare il traboccamento verso il lato del motore. Svuotare il sacco prima che diventi
completamente pieno.
- Altrimenti potrebbe causare un incendio
• Sistemare la cinghia del sacco della polvere sulla spalla regolandone la lunghezza in modo da
facilitare il lavoro.
• Controllando la posizione del sacco, tirare la leva del grilletto per la raccolta della polvere.
• Quando il sacco polveri è pieno, rimuoverlo dalla macchina e aprire il fermaglio per svuotarlo.
NOTA
Se si fa funzionare questa macchina con la protezione rivolta in su o con il manico principale rivolto in giù, potrebbe apparire del fumo bianco
e l’olio diventare contaminato, o si potrebbero verificare perdite d’olio.
64
Page 65

CONTROLLI E MANUTENZIONE
Figura 1
Figura 2
Mensola
PERICOLO
• Prima del controllo e della manutenzione, spegnere e raffreddare il motore. Rimuovere la candela e il coperchio della candela.
- Se si cerca di procedere con l’ispezione o la manutenzione immediatamente dopo l’arresto del motore o con il coperchio della candela
ancora attaccato, l’operatore rischia bruciature o un incidente a causa di un avviamento imprevisto del motore.
• Dopo l’ispezione e la manutenzione, procedere all’avvio, dopo aver controllato che tutte le parti siano montate correttamente.
1. Sostituzione dell’olio motore
L’olio motore deteriorato riduce notevolmente la vita delle parti mobili e rotanti. Verificare gli intervalli di sostituzione e la quantità di olio da
sostituire.
PERICOLO
• In generale, il corpo del motore e l’olio motore rimangono ancora caldi subito dopo lo spegnimento del motore. Prima della sostituzione
dell’olio, accertarsi che il corpo del motore e l’olio motore si siano sufficientemente raffreddati. Rimane altrimenti il rischio di ustioni. Dopo
aver fermato il motore, lasciare all’olio motore un tempo sufficiente per tornare nel serbatoio dell’olio in modo da assicurare una lettura
accurata dell’indicatore di livello dell’olio.
• Se l’olio è rifornito oltre il limite, esso può essere inquinato o può prendere fuoco con fumo bianco.
Intervallo di sotituzione:Dopo le prime 20 ore di utilizzo, seguite da ogni 50 ore di utilizzo
Olio raccomandato: SAE 10W- 30 olio della classificazione API, classe SF o superiore (motore a quattro tempi per automobile)
Al momento della sostituzione, seguire il metodo seguente:
(1) Verificare che il coperchio del serbatoio sia stretto
perfettamente.
(2) Togliere il coperchio dell’olio.
• Tenere l’indicatore di livello dell’olio pulito della polvere o
dello sporco.
(3) Inclinare la macchina nell’ordine mostrato nella Figura 1.
• Versare l’olio usato in un contenitore.
(4) Orientare la macchina come mostrato nella Figura 2, e
rabboccare l’olio nella mensola all’interno del tubo dell’olio.
(5) Dopo il rifornimento, chiudere fermamente il coperchio
dell’olio. Una chiusura insufficiente provocherà una perdita
d’olio.
Note sulla sostituzione dell’olio
• Non gettare l’olio motore nei rifiuti, sul terreno o nelle fognature. La disposizione per lo smaltimento degli oli usati è soggetta a controllo legale.
Nello smaltimento, rispettare le leggi e i regolamenti. In caso di dubbi, consultare il Servizio Assistenza Autorizzato.
• L’olio può deteriorarsi anche se non viene utilizzato. Fare il controllo e la sostituzione ad intervalli periodici (sositituzione con un olio nuovo
ogni 6 mesi)
65
Page 66
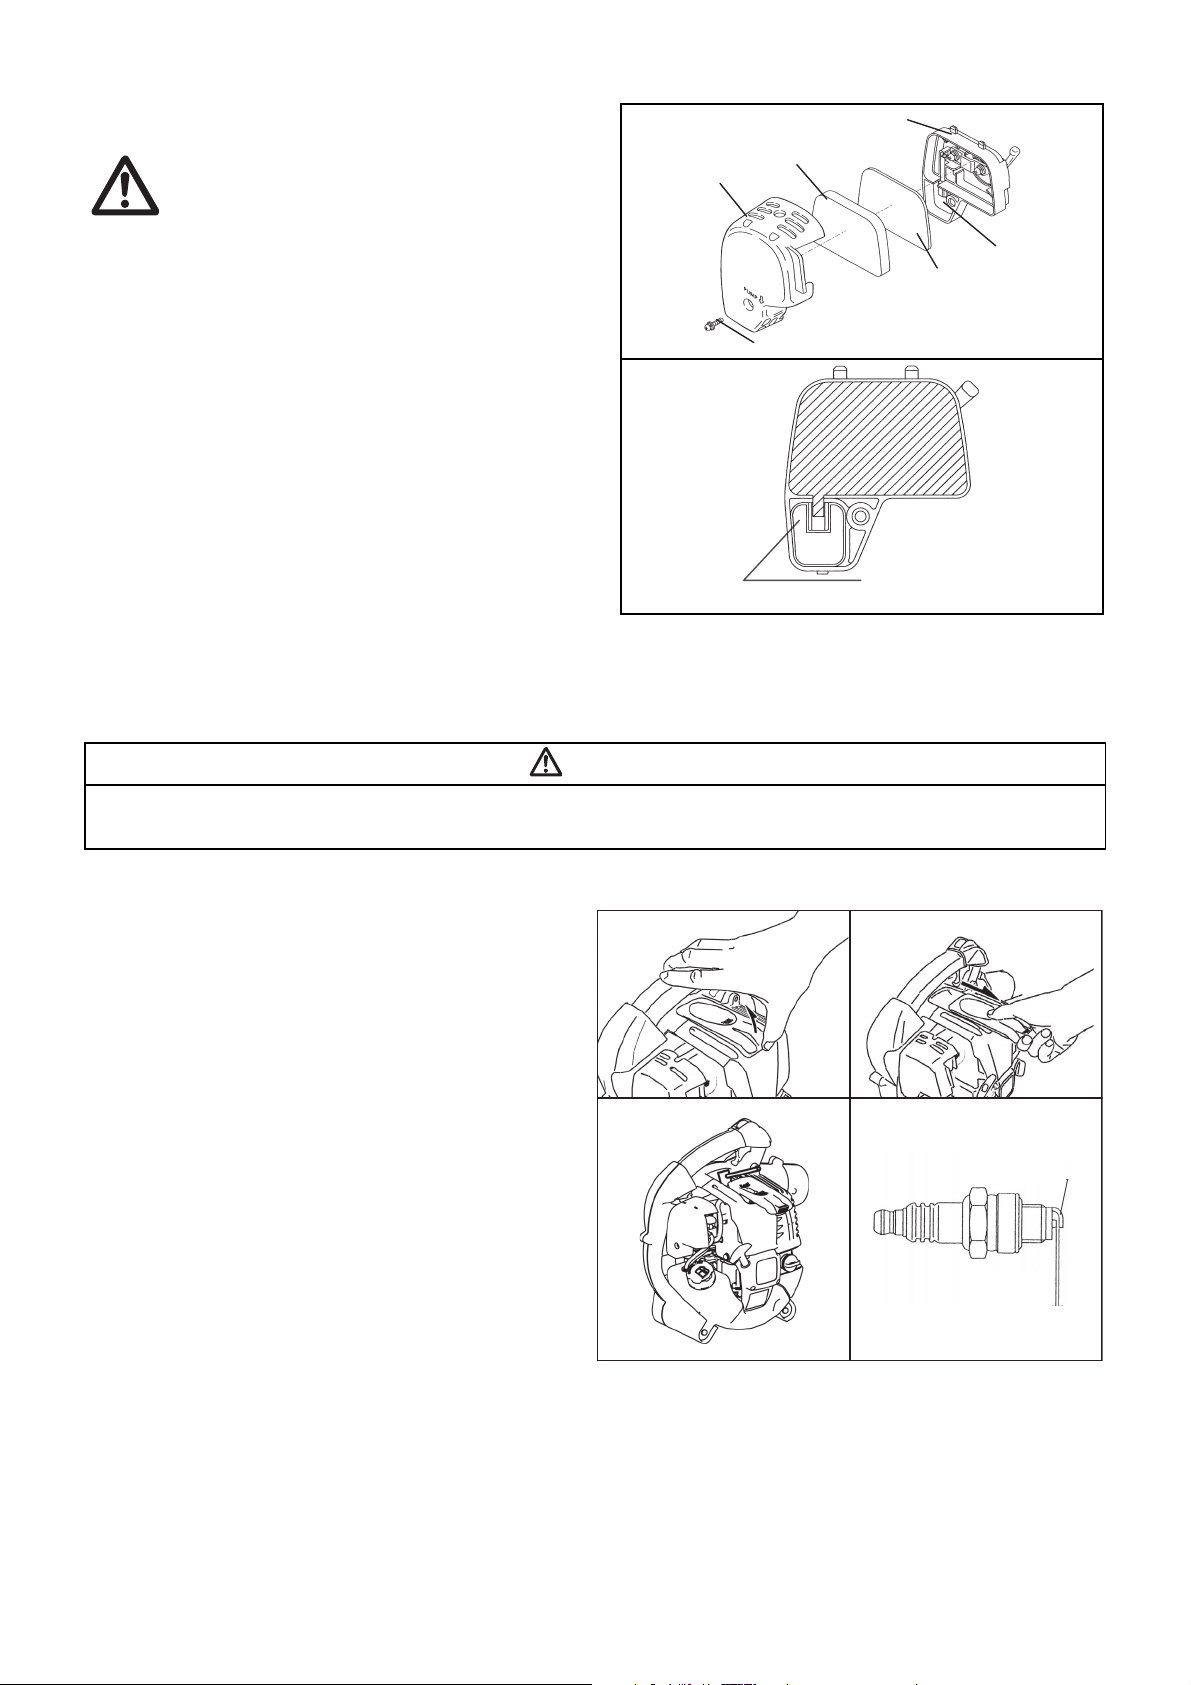
2. Pulitura del filtro dell’aria
Lamiera
Elemento
(spugna)
Coperchio del
filtro dell’aria
Parte sfiatatoio
Element
o (feltro)
Bullone di fissaggio
Prendere questa parte e
togliere l’elemento (feltro).
Figura 1
Figura 3
Elettrodo laterale (–)
Figura 2
Figura 4
Distanza tra gli elettrodi
0,7 – 0,8 mm
AVVERTENZE: SEVERAMENTE VIETATO USARE
SOSTANZE INFIAMMABILI
Intervallo di pulitura e di controllo : Quotidiano (ogni 10 ore di
funzionamento)
(1) Rimuovere i bulloni di fissaggio del coperchio del filtro dell’aria.
(2) Tirare il lato inferiore del coperchio del filtro e toglierlo.
(3) Girare la leva di diffusore a fondo verso il lato chiusura, e
preservare il carburatore da polvere o sporcizia.
(4) Se l’olio aderisce all’elemento (spugna), spremerlo forte.
(5) Se è molto contaminato:
• Rimuovere l’elemento (spugna), immergerlo in acqua calda
o in un detergente debole diluito con acqua, e asciugarlo
completamente.
• Pulire l’elemento (feltro) con benzina, e farlo asciugare
completamente.
(6) Prima di rimettere l’elemento, farlo asciugare completamente.
L’elemento non asciugato sufficientemente potrebbe rendere
l’avviamento difficoltoso.
(7) Asciugare con uno straccio l’olio aderente al coperchio del
filtro dell’aria e allo sfiatatoio a piastra.
(8) Immediatamente dopo la pulitura, rimontare il coperchio del
filtro e serrarlo con i bulloni di fissaggio. (Nel rimontarlo, prima
mettere la griffa superiore e poi la griffa inferiore.)
PERICOLO
• Pulire l’elemento alcune volte al giorno se c’è eccesso di polveri aderenti.
• Se si continua l’utilizzo con l’elemento sporco di olio, l’olio nel filtro dell’aria può uscire, inquinando.
3. Ispezione della candela di accensione
(1) Aprire/chiudere il coperchio della candela
Per aprire il coperchio, mettere le dita sull’impugnatura
principale e sulla sporgenza del coperchio della candela
(Figura 1). Far scorrere la sporgenza verso la posizione
“OPEN” spingendola su (Figura 2).
Per chiudere, far scorrere la sporgenza del coperchio della
candela verso la posizione “CLOSE” finché un uncino sotto
la sporgenza finisce sul coperchio del motore e alla fine
inserire la sporgenza.
(2) Staccare la candela di accensione
Per rimuovere o installare la candela, usare la chiave a tubo
in dotazione (Figura 3).
(3) Ispezione della candela di accensione
La distanza tra i due elettrodi è di 0,7-0,8 mm. (Figura 4). Se
questa distanza è superiore o inferiore, regolarla
correttamente.
Se la candela è sporca od otturata da residui carboniosi,
pulirla completamente o sostituirla.
(4) Sostituire la candela di accensione
Quando si sostituisce la candela, usarne una di tipo NGKCMR6A.
66
Page 67
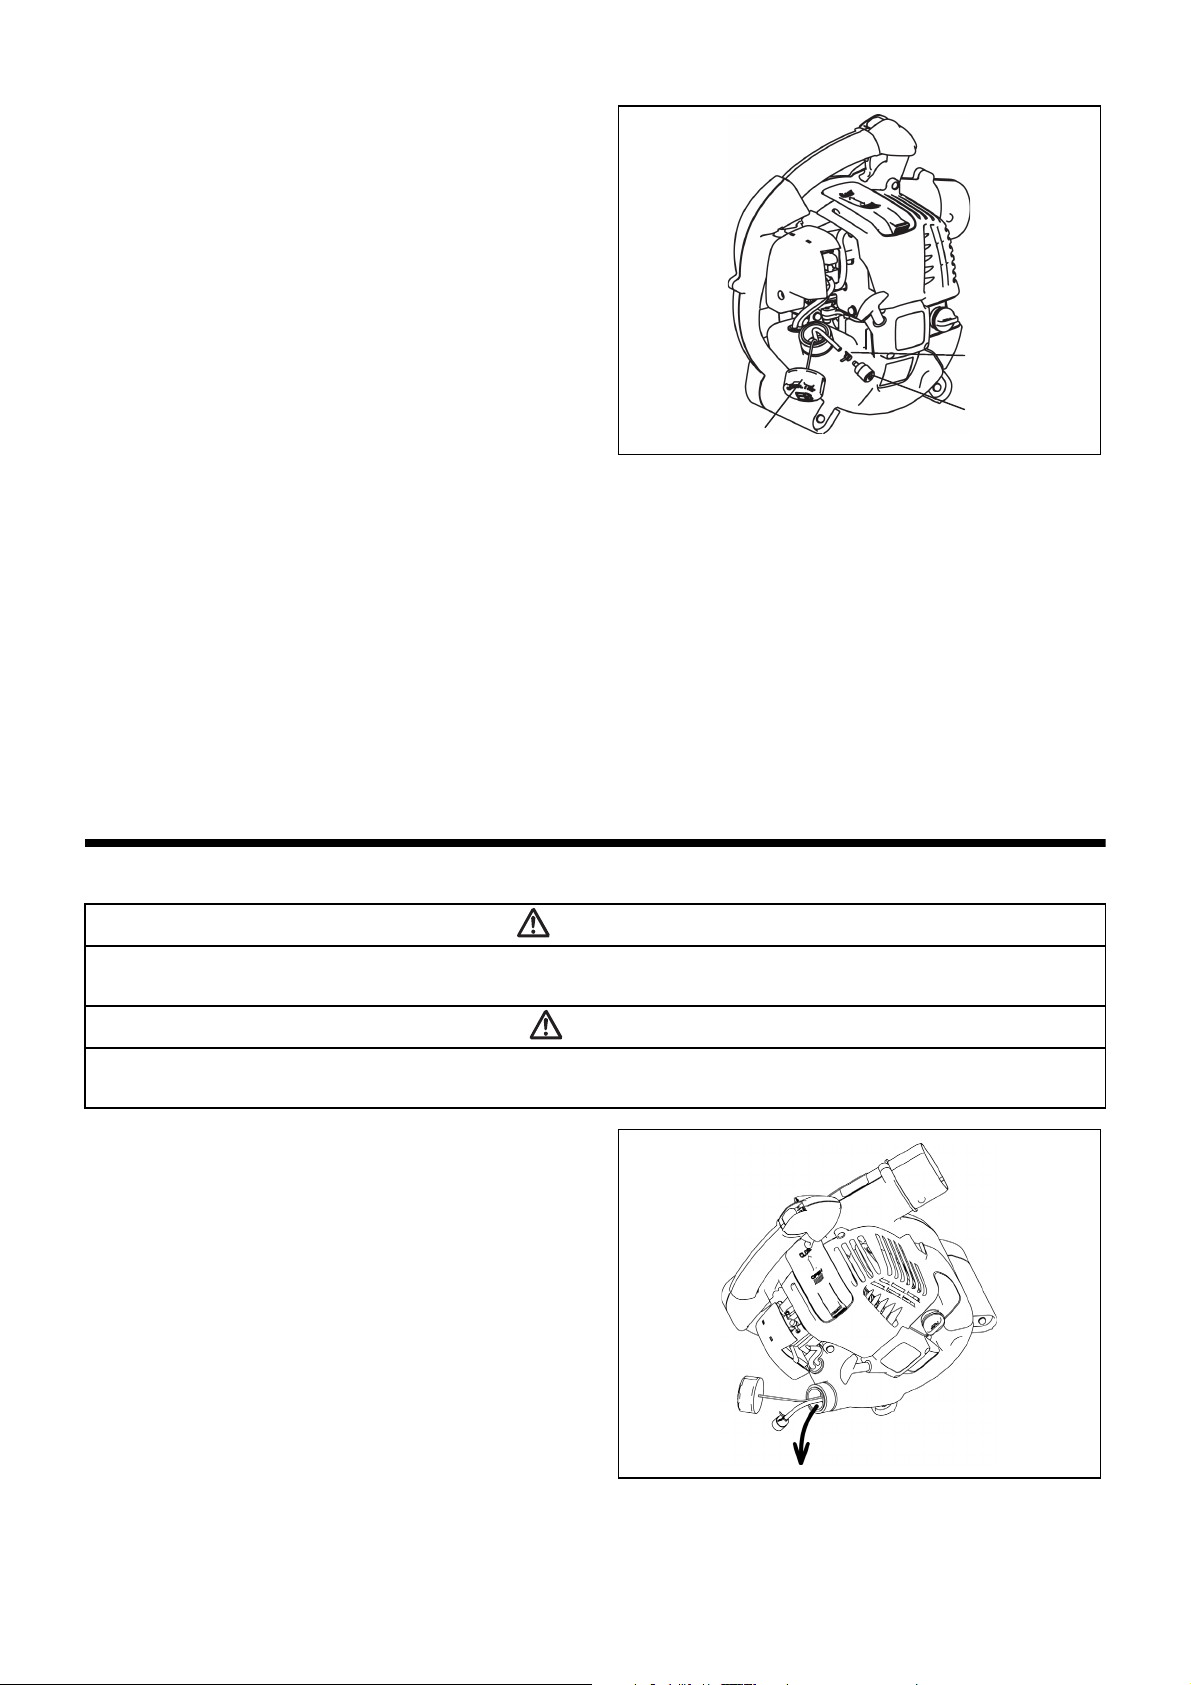
4. Pulizia del filtro carburante
Fascetta per tubi
Filtro del
carburante
Coperchio del
serbatoio carburante
• Se si ottura il filtro carburante, è possibile che l’avviamento sia difficile
o che la rotazione del motore non possa aumentare.
• Controllare il filtro periodicamente secondo la procedura seguente:
(1) Rimuovere il coperchio del serbatoio carburante, scaricare il
carburante e vuotare il serbatoio. Controllare che nessun
corpo estraneo rimanga nel serbatoio ed eventualmente
estrarli.
(2) Estrarre il filtro carburante dall’apertura di rifornimento con filo
di ferro.
(3) Se la superficie del filtro carburante è sporca, pulirla con la
benzina. Per disfarsi della benzina usata per la pulizia bisogna
osservare le norme specificate dall’ente locale.
Il filtro eccessivamente contaminato deve essere sostituito.
(4) Rimettere il filtro nel serbatoio e chiudere bene il coperchio del
serbatoio. Per la sostituzione, consultare il venditore o servizio
assistenza autorizzato.
5. Controllo bulloni, dadi e viti
• Serrare di nuovo i bulloni, dadi, ecc. allentati.
• Verificare eventuali perdite di carburante e d’olio.
• Sostituire i pezzi guasti con quelli nuovi per sicurezza di funzionamento.
6. Pulitura dei pezzi
• Mantenere pulito il motore pulendolo con uno straccio.
• Tenere le alette di cilindro pulite di polvere e sporco. Polveri o sporcizia aderenti alle alette provocheranno un grippaggio.
7. Sostituzione delle guarnizioni
Sostituire le guarnizioni se si smonta il motore.
Qualsiasi operazione di manutenzione o regolazione che non sia descritta nel presente manuale deve essere eseguita esclusivamente dal
personale del Servizio Assistenza Autorizzato.
IMMAGAZZINAGGIO
AVVERTENZE
• Per scaricare il carburante, è necessario arrestare il motore e attendere che si raffreddi completamente.
- In caso contrario, c’è pericolo di bruciature o di incendio.
PERICOLO
• Per immagazzinare la macchina per un lungo periodo di tempo, scaricare tutto il carburante dal serbatoio del carburante e dal carburatore, e
conservarlo in un luogo asciutto e pulito.
Scaricare completamente il carburante dal serbatoio di carburante e del
carburatore secondo la procedura seguente :
(1) Togliere il coperchio del serbatoio del carburante, e scaricare il
carburante completamente.
Se vi sono corpi estranei nel serbatoio, rimuoverli.
(2) Tirare fuori il filtro del carburante dal portello di rifornimento,
usando il filo.
(3) Spingere la pompa di avviamento fino a vuotarla
completamente del carburante.
(4) Rimettere il filtro nel serbatoio del carburante e serrare
fermamente il coperchio del serbatoio.
(5) Poi, continuare a far funzionare il motore fino al suo arresto.
(6) Togliere la candela, e far cadere delle gocce di olio per motore
nel foro della candela.
(7) Tirare dolcemente l’impugnatura dell’avviamento in modo che
l’olio si distribuisca nel motore, e rimettere la candela.
(8) Lasciare la macchina con l’impugnatura rivolta in alto.
(9) Conservare il carburante scaricato in un recipiente apposito
all’ombra in un locale aereato.
67
Page 68

Localizzazione dei guasti
Guasto Sistema Osservazione Causa
Il motore non parte o
parte con difficoltà
Problemi con
l’avviamento a caldo
Il motore parte ma si
arresta subito
Rendimento
insoddisfacente
Sistema di iniezione Scintilla d’accensione
presente
Assenza scintilla
d’accensione
Guasto nell’alimentazione del carburante o nel sistema di
compressione, difetto meccanico
Interruttore su STOP, guasto all’impianto elettrico o corto
circuito, candela o connettore difettosi, modulo d’iniezione
difettoso
Alimentazione carburante Serbatoio pieno Posizione leva diffusore errata, carburatore difettoso, linea di
alimentazione carburante piegata o intasata, olio sporco
Compressione Compressione assente
all’avvio
Guarnizione fondo cilindro difettosa, guarnizioni albero a
gomiti danneggiate, anello cilindro o pistone difettoso oppure
difetto nella tenuta della candela
Guasto meccanico Manopola di avvio non
Molla avviatore rotta, parti rotte all’interno del motore
funziona
Serbatoio pieno candela
Il carburatore va pulito
presente
Alimentazione carburante Serbatoio pieno Errata regolazione del minimo, carburatore sporco
Sfiatatoio del serbatoio difettoso, linea di alimentazione
carburante interrotta, cavo o interruttore di arresto guasti
Può riguardare diversi
sistemi
Minimo del motore
scadente
Filtro aria sporco, carburatore sporco, marmitta intasata, tubo
di scarico del cilindro intasato
Intervallo di
funzionamento
Articolo
Olio motore
Pezzi da serrare (bulloni, dadi) Controllare/pulire 67
Serbatoio di carburante
Leva valvola
Interruttore d’arresto
Rotazione a velocità bassa
Filtro dell’aria Pulire 66
Candela d’accensione Controllare 66
Condotto dell’aria di
raffreddamento
Tubo del carburante
Filtro del carburante Pulire/sostituire 67
Spazio fra valvola della presa
d’aria e valvola di scarico
dell’aria
Tubo dell’olio Controllare/pulire *
Ispezione motore *
Carburatore
Controllare/pulire 60
Sostituire *
Pulire/controllare –
Scaricare il
carburante
Verificare le
funzioni
Verificare le
funzioni
Controllare /
regolare
Pulire/controllare 67
Controllare/pulire 67
Sostituire *
Regolare *
Scaricare il
carburante
Prima del
funziona-
mento
Dopo la
lubrifica-
zione
Quotidiano
(10 ore)
30 ore 50 ore 200 ore
1
2
2
2
2
Arresto /
quiete
3
*
3
*
Pagina
corrispondente
65
67
63
63
67
–
–
–
–
–
*1 Fare la prima sostituzione dopo 20 ore di funzionamento.
*2 Per il controllo dopo 200 ore di funzionamento, rivolgersi ad un Servizio Assistenza Autorizzato o dal rivenditore.
*3 Dopo aver svuotato il serbatoio, continuare a far funzionare il motore finché il carburante non si esaurisce.
68
Page 69

SOLUZIONE DEI PROBLEMI
Fare funzionare il motore al minimo, e mettere
la leva diffusore sulla posizione “CLOSE”
Prima di fare richiesta di riparazione, verificate personalmente un guasto. Se c’è un cattivo funzionamento, controllare la vostra macchina
secondo la descrizione di questo manuale. Non manomettere o smontare nessuna parte contrariamente alla descrizione. Per le riparazioni,
consultare il Servizio Assistenza Autorizzato o un rivenditore locale.
Problema Causa probabile (malfunzionamento) Rimedio
La pompa d’avviamento non funziona Spingere 7 -10 volte
Difficoltà nel tirare la manopola di avviamento Tirare fortemente
Mancanza di carburante Rifornire di carburante
Filtro del carburante otturato Pulire
Tubo del carburante guasto Sostituire il tubo del carburante
Carburante deteriorato
Il motore non si avvia
Il motore si arresta subito
La velocità del motore non aumenta
II motore non si arresta. Connettore staccato Serrare bene
Aspirazione eccessiva di carburante
Coperchio di candela semiaperto Serrare bene
Candela di accensione sporca Pulire
Distanza anormale elettrodi candela di
accensione
Altra anomalia della candela di accensione Sostituire
Carburatore anormale Fare richiesta di controllo e manutenzione
La manopola di avviamento non può essere
tirata.
Anomalie nei sistemi di comando Fare richiesta di controllo e manutenzione
Riscaldamento insufficiente Fare il riscaldamento
La leva di regolazione è messa sulla posizione
“CLOSE” anche se il motore è caldo
Filtro del carburante otturato Pulire
Filtro dell’aria sporco o otturato Pulire
Carburatore anormale Fare richiesta di controllo e manutenzione
Anomalie nei sistemi di comando Fare richiesta di controllo e manutenzione
Cavo diffusore staccato Serrare bene
Anomalie nei sistemi di comando Fare richiesta di controllo e manutenzione
Sistema elettrico anormale Fare richiesta di controllo e manutenzione
Un carburante deteriorato provoca un
avviamento più difficile. Sostituire con quello
nuovo. (Sostituzione raccomandata : 1 mese)
Regolare la farfalla dalla velocità media alla
alta, e tirare la manopola di avviamento finché
il motore si avvia. Se il motore non si avvia
ancora, togliere la candela di accensione,
asciugare gli elettrodi, e rimontarla. Poi,
avviare secondo le istruzioni.
Regolare la distanza
Fare richiesta di controllo e manutenzione
Mettere sulla posizione “OPEN”
Quando il motore non si avvia dopo il riscaldamento:
Se non c’è nessuna anomalia per gli articoli di controllo, aprire la valvola circa un terzo e avviare il motore.
69
Page 70
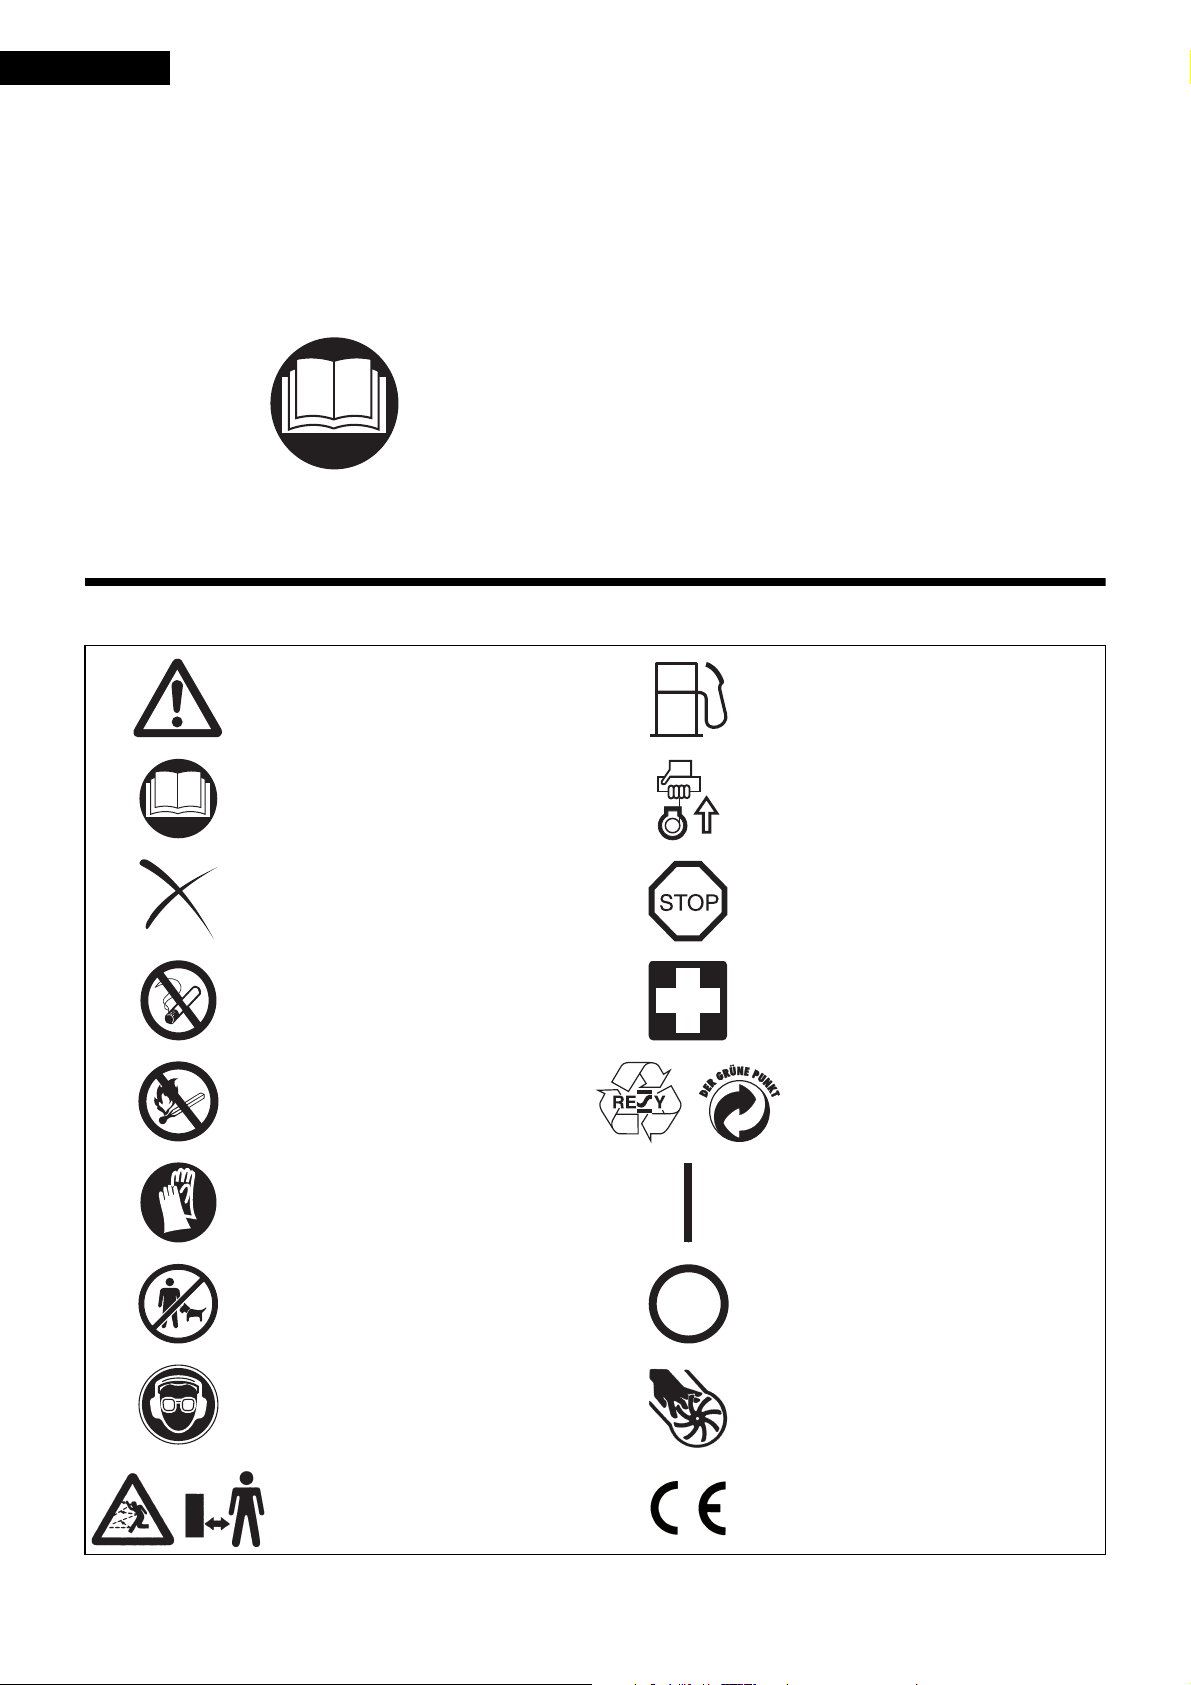
Nederlands
Hartelijk dank voor uw aankoop van deze DOLMAR-bladblazer. Wij zijn
ervan verzekerd dat deze u zal bevallen, daar deze het resultaat is van
jarenlange research en onze know-how en ervaring.
De DOLMAR PB-252.4 kombineert de voordelen van de huidige stand
dertechniek met ergonomisch design; zij zijn licht in gewicht, handig,
compacte en staan voor professionele inzet van tal van verschillende
gebruiksvormen.
Lees, begrijp en volg de in deze gebruiksaanwijzing omschreven
punten om zodoende volledig gebruik te maken van de mogelijkheden
die deze machine u biedt. Dit biedt u de garantie zo goed en veilig
mogelijk te werken met de DOLMAR-bladblazer.
Inhoudstabel
SYMBOLEN ....................................................................................... 70
VEILIGHEIDSVOORSCHRIFTEN ..................................................... 71
EU-VERKLARING VAN CONFORMITEIT......................................... 74
TECHNISCHE GEGEVENS .............................................................. 74
BENAMING VAN ONDERDELEN...................................................... 75
OPBOUWINSTRUCTIES................................................................... 76
VOOR GEBRUIK................................................................................ 77
BEDIENING ....................................................................................... 79
AFSTELLINGEN ................................................................................ 80
BEDIENINGSMETHODE................................................................... 81
INSPECTIE EN ONDERHOUD ......................................................... 82
MACHINE-OPSLAG........................................................................... 84
OPLOSSEN VAN PROBLEMEN........................................................ 86
SYMBOLEN
Het is erg belangrijk de volgende symbolen te herkennen en begrijpen wanneer u deze gebruiksaanwijzing doorleest.
Pagina
WAARSCHUWING/GEVAAR Brandstof (Benzine)
Lees, begrijp en volg gebruiksaanwijzing Handstart motor
Verboden Noodstop
Niet roken Eerste Hulp
Geen open vuur Recycling
Beschermende handschoenen dragen AAN/START
Houd werkomgeving vrij
van personen en dieren
Draag oog- en oorprotectie
Houd omstanders uit de buurt CE-merk
UIT/STOP
Gevaar verlies vinger/hand,
impeller
70
Page 71

VEILIGHEIDSVOORSCHRIFTEN
(1)
(2)
(3)
(4)
(5)
15 meter
Algemene instructies
• Om verzekerd te zijn van een correcte en veilige bediening moet de
gebruiker de gebruiksaanwijzing lezen, begrijpen en opvolgen om
vertrouwd te raken met de blazer (1). Niet volledig geïnstrueerde
gebruikers riskeren ongelukken voor zichzelf en voor anderen door niet
correct gebruik.
• Het is aan te bevelen de machine enkel uit te lenen aan mensen die
vertrouwd zijn met de werking hiervan.
• Reik altijd de gebruiksaanwijzing over.
• Onervaren gebruikers moeten zich door de dealer op de hoogte laten
stellen van het correcte gebruik van de blazer.
• Kinderen en personen onder de 18 jaar mogen niet werken met de
machine. Personen boven de 16 jaar mogen enkel onder begeleiding
van deskundigen met de machine werken.
• Gebruik de blazer met de meeste zorg en waakzaamheid.
• Gebruik de blazer enkel wanneer u in een goede, lichamelijke conditie
verkeerd.
• Werk met de grootste waakzaamheid. De gebruiker is verantwoordelijk
voor derden.
• Gebruik de blazer nooit indien de gebruiker onder invloed van alcohol
of medicijnen is (2).
• Werk niet met de machine indien u zich moe voelt.
• Bewaar deze instructies voor later naslagwerk.
Persoonlijke beschermingsmiddelen
• De te dragen kleding moet functioneel zijn en afdoende bescherming
bieden. De kleding mag de werkzaamheden niet hinderen. Draag nooit
kettingen, loszittende kledingstukken of lang haar wat door de
aanzuigtrechter kan worden ingezogen.
• Om hoofd-, oog-, of voetverwondingen te voorkomen evenals uw
gehoor te beschermen moet u tijdens de werkzaamhen de volgende
beschermende maatregelen nemen:
Geef de volgende voorschriften extra aandacht:
• Kleding moet nauwaansluitend en afgekleed zitten, maar moet
voldoende bewegingsruimte bieden. Draag geen loszittende jassen,
broeken met brede pijpen of omgeslagen zomen, sjaal, loshangend
lang haar of iets anders dat in de luchtinlaat kan worden gezogen.
Draag beschermende lange broeken, geen korte broeken. (4)
• Het uitlaatgeluid kan uw gehoor beschadigen. Draag oorbescherming
zoals oorproppen of gehoorbeschermers. Regelmatige gebruikers
moeten hun gehoor regelmatig laten testen. (3)
• Het gebruik van handschoenen is aangeraden. Goed schoeisel is erg
belangrijk. Draag beschermende schoenen met anti-slipzolen. (4)
• Deugdlijke oogbescherming is een must. Alhoewel de luchtstroom van
u af gericht is, kunnen steentjes of takjes terug kaatsen tijdens de
werkzaamheden. (3)
• Nooit een blazer gebruiken zonder een veiligheidsbril of een goed
passende, beschermende bril te dragen met afdoende bescherming
aan de boven- en zijkanten, die voldoet aan ANSI Z 87.1 (of de van
toepassing zijnde nationale norm).
Het starten van de blazer
• Verzeker u ervan dat er geen kinderen of andere personen zich
bevinden binnen een straal van 15 meter (5), let ook op eventuele
aanwezigheid van dieren. Gebruik de blazer niet in druk bevolkte
gebieden.
• Controleer voor gebruik altijd of de blazer veilig is om te gebruiken:
Controleer de juiste werking van de gashendel. De gashendel moet
worden gecontroleerd op soepele werking en gemakkelijke bediening.
Controleer de juiste werking van de gashendelvergrendeling.
Controleer of de handgrepen schoon en droog zijn en test de werking
van de stopschakelaar. Voorkom dat olie of brandstof op de
handgrepen komt.
360°
71
Page 72
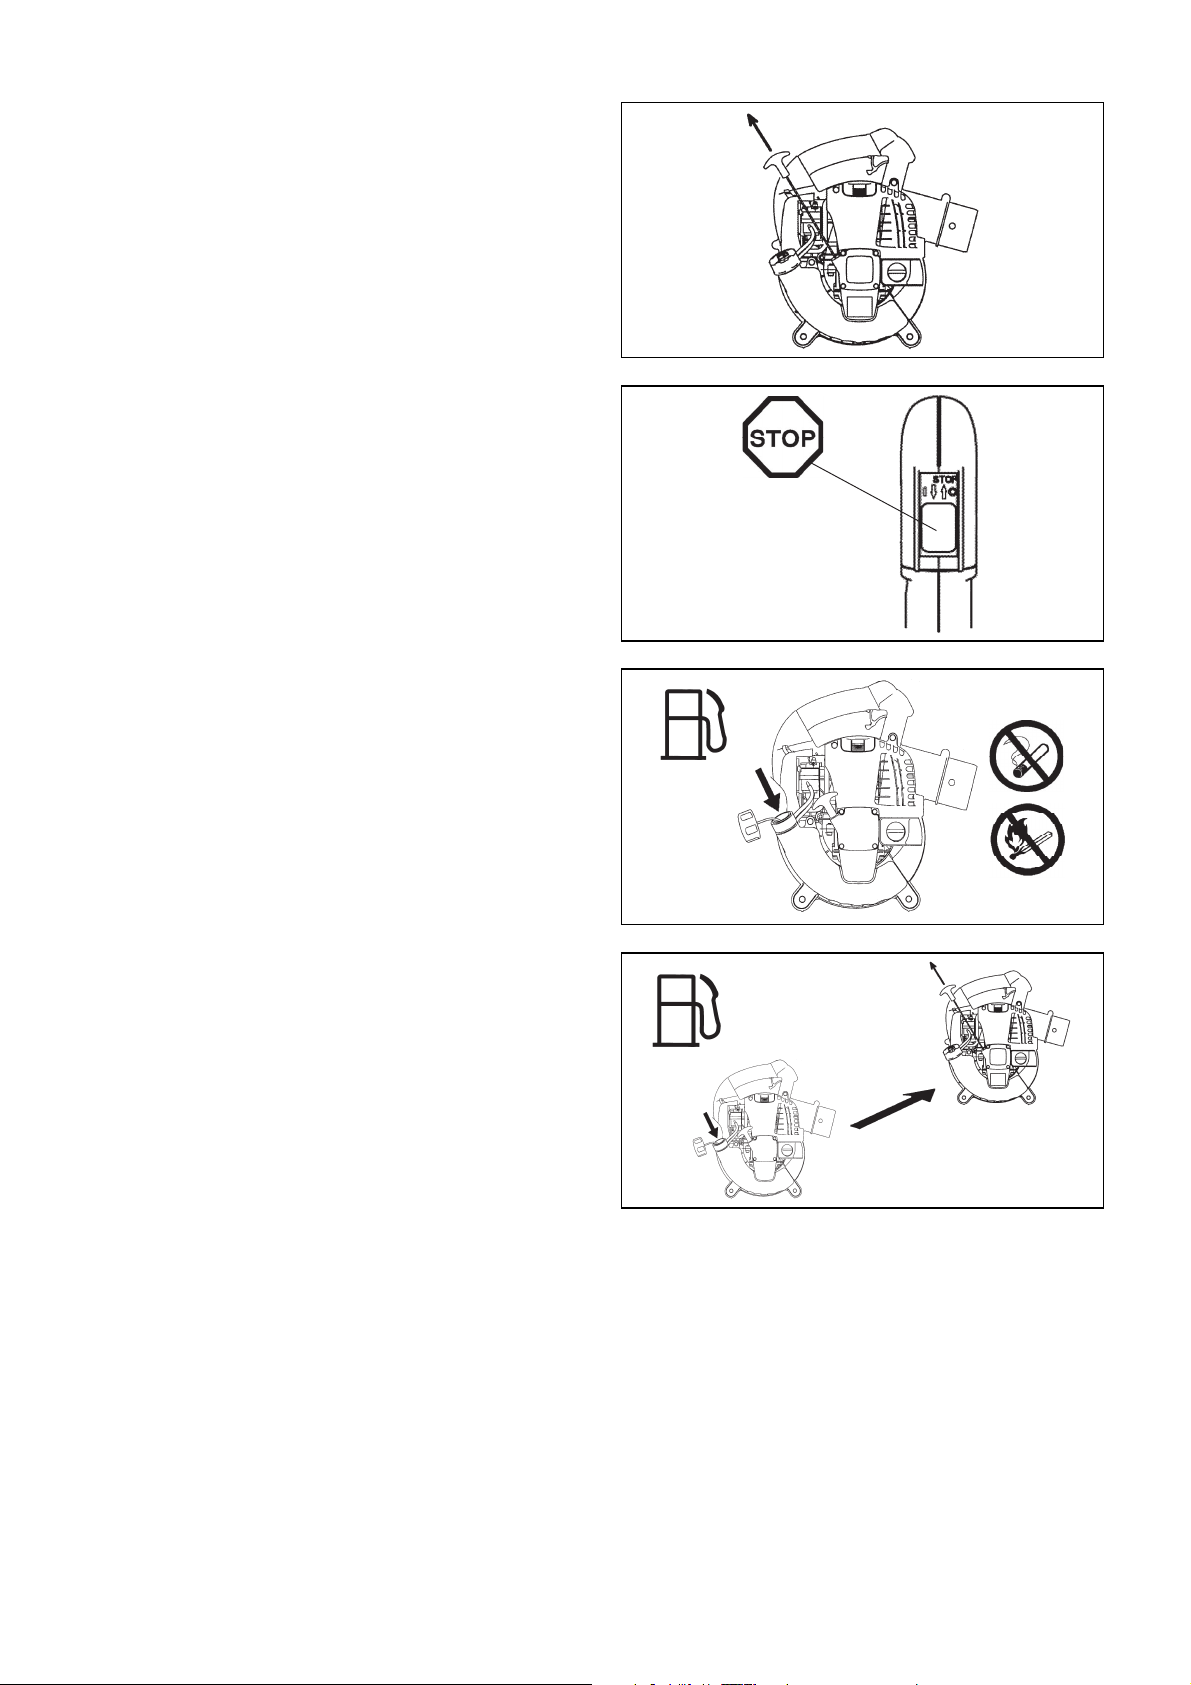
Start de blazer enkel volgens de instructies.
(6)
(7)
(8)
(9)
3 meter
• Pauze
• Transport
• Bijtanken
• Onderhoud
• Delen Vervangen
Probeer de machine niet op een andere manier te starten (6) !
• Gebruik de blazer en de toebehoren enkel waarvoor zij bedoeld zijn.
• Start de motor alleen nadat de machine op de juiste wijze is
gemonteerd. Het gereedschap mag uitsluitend worden gebruikt nadat
alle toepasselijke toebehoren zijn gemonteerd.
• De motor moet direct worden uitgeschakeld, indien zich hier
problemen mee voor doen.
• Wanneer u met de machine werkt, sla uw vingers altijd losjes om de
handgreep zodat u volledige controle heeft over de gashendel en de
aan/uitschakelaar. Houd uw hand op deze plaats om de machine te
allen tijde onder controle te houden. Zorg ervoor dat uw
bedieningshendel (en de handgreep voor het vacuümhulpstuk) zich in
goede staat bevinden en er geen vocht, vuil, olie of vet op zit.
Verzeker u er altijd van dat u veilig en in evenwicht kunt staan.
• Werk zo met de machine dat u voorkomt dat u uitlaatgassen inademt.
Werk nooit met de machine in afgesloten ruimten (gevaar van
vergiftiging). Koolmonoxyde is een geur- en kleurloos gas. Zorg altijd
voor voldoende ventilatie.
• Schakel de motor altijd uit tijdens werkpauzes of wanneer de blazer
even niet gebruikt wordt. Berg deze zonodig veilig op voor gevaar voor
derden, brandgevaar door licht ontvlambaar materiaal of beschadiging
van de machine.
• Zet de machine nooit neer in droog gras of andere licht-ontvlambare
materialen.
• Alle benodigde beschermingsmiddelen moeten worden gebruikt
tijdens de werkzaamheden.
• Werk nooit met een dichtgekoolde (vervuilde) uitlaat.
• Schakel de motor uit bij transport (7).
• Plaats de machine veilig tijdens transporteren om brandstof-lekkage te
voorkomen.
• Overtuig u ervan dat bij transporteren van de blazer de tank geledigd
is.
Bijtanken
• Schakel de motor uit bij tanken (7), houd de machine weg bij open vuur
en rook beslist niet.
• Voorkom huidcontact met benzine. Inhaleer geen benzinedampen.
Draag altijd beschermende handschoenen bij het tanken. Wissel en
reinig regelmatig beschermende kleding.
• Voorkom het spillen van benzine en olie uit veiligheids- en milieu
overwegingen. Veeg gemorste benzine direct af en reinig de machine.
Laat natte doeken eerst drogen voordat u ze weggooit in een geschikte
en gesloten container om te voorkomen dat ze spontaan ontbranden.
• Voorkom ieder contact van benzine op uw kleding. Trek direct kleding
uit indien deze in contact is geweest met de brandstof om brandgevaar
en huidcontact te voorkomen.
• Controleer met regelmaat de benzinetankdop op lekkage en of deze
goed afdicht.
• Draai de benzinetankdop altijd goed aan en start de machine op een
andere plaats (min. 3 meter verder) dan waar u heeft bijgetankt (9).
• Tank nooit bij in afgesloten ruimten. Benzinedampen vormen zeer
brandbare gassen op grondniveau (gevaar voor explosies).
• Transporteer en sla de benzine enkel op in goedgekeurde cans.
Verzeker u dat de benzine volgens voorschriften is opgeslagen en
geen toegang heeft voor derden.
• Tank nooit een hete of nog draaiende motor bij.
72
Page 73

Bedieningsinstructie
(10)
(11)
(12)
• Gebruik de blazer enkel bij goed zicht en goede belichting. Tijdens de
koude seizoenen, let op een natte en gladde ondergrond met ijs en
sneeuw (gevaar tot uitglijden).
Sta altijd stabiel.
• Werk nooit op instabiele plaatsen of een steile ondergrond.
• Om de kans op persoonlijk letsel te verkleinen, mag u geen
luchtstroom richten op omstanders aangezien de hoge druk van de
luchtstroom oogletsel kan veroorzaken en kleine voorwerpen met een
hoge snelheid kan wegwerpen.
• Steek nooit een vreemd voorwerp in de luchtinlaat van de machine of
in het mondstuk van de luchtblazer. Hierdoor zal de ventilator worden
beschadigd, en kan ernstig letsel worden veroorzaakt bij de gebruiker
en omstanders doordat het voorwerp of kapotte onderdelen op hoge
snelheid uit de machine worden geworpen.
• Let op de windrichting; werk niet tegen de windrichting in.
• Om het gevaar van struikelen en vallen te voorkomen, werk nooit
lopend in achterwaartse richting.
• Schakel de motor altijd uit indien u de machine onderhoudt of reinigt of
indien u onderdelen vervangt.
Onderhoudsinstructies
• Wees milieubewust. Werk met zo min mogelijk lawaai en belasting van
het milieu als mogelijk. Controleer de afstelling van de carburateur.
• Reinig de blazer met regelmaat en controleer alle bouten, moeren en
schroeven op hun bevestiging.
• Onderhoud of plaats de blazer nooit in nabijheid van open vuur,
vonken, etc. (11).
• Sla de blazer altijd op met een lege tank in een goed geventileerde
ruimte.
Houd u zich aan en volg alle relevante veiligheidsinstructies, uitgegeven
door overheidsinstellingen en verzekeraars. Voer geen enkele
wijzigingen uit aan uw blazer, omdat dit uw veiligheid in gevaar brengt.
Het uitvoeren van onderhoud of reparaties door de gebruiker is beperkt
tot de in deze gebruiksaanwijzing omschreven punten. Alle andere
werkzaamheden dienen door de erkende vakman/dealer uitgevoerd te
worden.
Gebruik enkel originele DOLMAR-onderdelen.
Gebruik van niet originele onderdelen of toebehoren verhoogt de kans
op verwondingen en ongelukken. DOLMAR accepteert geen enkele
claim die voortvloeit uit het gebruik van niet-originele onderdelen of
toebehoren.
Eerste Hulp
In geval van ongelukken dient een goed gevulde Eerste hulp-koffer
volgens DIN 13164 aanwezig te zijn. Vul direct na gebruik van de inhoud
de koffer weer volledig aan.
Wanneer u hulp inroept, geef altijd de volgende informatie:
• Plaats van ongeluk
• Wat er gebeurt is
• Aantal verwonde mensen
• Aard van verwondingen
• Uw naam
Verpakking
De DOLMAR-blazer wordt geleverd in een beschermende kartonnen
doos. Karton is geschikt voor hergebruik en geschikt voor recycling.
73
Page 74

Alleen voor Europese landen
EU-verklaring van conformiteit
Ondergetekenden, Tamiro Kishima en Rainer Bergfeld, als
erkende vertegenwoordigers van Dolmar GmbH, verklaren
dat de DOLMAR-machine(s):
Aanduiding van de machine:
Benzine bladblazer
Modelnr./Type: PB-252.4
TECHNISCHE GEGEVENS: zie de tabel “TECHNISCHE
GEGEVENS”.
in serie zijn geproduceerd en
Voldoen aan de volgende Europese richtlijnen:
2000/14/EC, 2006/42/EC
En zijn gefabriceerd in overeenstemming met de volgende
normen of genormaliseerde documenten:
EN15503
De technische documentatie wordt bewaard door:
Dolmar GmbH,
Jenfelder Straße 38, Abteilung FZ,
D-22045 Hamburg
De conformiteitsbeoordelingsprocedure vereist door Richtlijn
2000/14/EC was in Overeenstemming met annex V.
Gemeten geluidsvermogenniveau: 102 dB
Gegarandeerd geluidsvermogenniveau: 106 dB
14. 6. 2010
Tam i ro K i sh i ma
Hoofddirecteur
Rainer Bergfeld
Hoofddirecteur
TECHNISCHE GEGEVENS
Model PB-252.4
Droog gewicht (zonder pijpen) (kg) 4,5
Afmetingen (zonder pijpen) (totaal l x b x h) (mm) 350 × 231 × 368
Max. toerental (min
Stationair toerental (min
Cilinderverplaatsing (mL) 24,5
Brandstof Autobenzine
Inhoud brandstoftank (L) 0,52
Motorolie
Olievolume van de motor (L) 0,08
Carbureteur (Membraan-type) WALBRO WYL
Ontsteking Transistorontsteking
Bougie NGK CMR6A
Elektrode-afstand (mm) 0,7 – 0,8
a
Trillingen volgens EN15503
Gem. Geluidsdruk volgens EN15503
Gem. Geluidsniveau volgens EN15503
hv eq
Onzekerheid K (m/s
L
PA eq
Onzekerheid K dB(A) 1,4
L
WA eq
Onzekerheid K dB(A) 1,4
Opmerkingen:
1. Gebruik uitsluitend de door DOLMAR gespecificeerde olie en bougie.
2. Deze technische gegevens kunnen zonder kennisgeving vooraf gewijzigd worden.
-1
) 7.800
-1
) 3.500
SAE10W-30 olie van API Classificatie SF Klasse of hoger
(4-takt olie voor auto’s)
(m/s2)9,3
2
)0,5
dB(A) 90,8
dB(A) 103,7
74
Page 75

BENAMING VAN ONDERDELEN
Los verkrijgbaar
Stofkit (Los verkrijgbaar)
BENAMING VAN ONDERDELEN BENAMING VAN ONDERDELEN BENAMING VAN ONDERDELEN BENAMING VAN ONDERDELEN
1. Stopschakelaar 8. Benzinetank 15. Bougiekap 22. Zuigmond
2. Hoofdgreep 9. Benzinetankdop 16. Bougie 23. Pijlteken
3. Trekker 10. Uitlaat 17. Oliedop 24. Stofzak
4. Opvoerpomp 11. Hulpgreep 18. Blaaspijp
5. Afdekking luchtfilter 12. Throttle vergrendelknop 19. Blaasmond A
6. Chokehendel 13. Schroef 20. Blaasmond B
7. Trekstarter 14. Beschermrooster 21. Elleboog
75
Page 76

OPBOUWINSTRUCTIES
LET OP: Altijd voordat u werkzaamheden aan de blazer uitvoert,
de motor uitschakelen en de bougiedop lostrekken.
LET OP: Start de blazer enkel wanneer deze volledig is
1. Bevestiging van de pijpen
1) Lijn de groeven van de blazerpijpen uit met de nokken op het
2) Draai nu de pijp met de richting van de klok mee en schroef
3) Plaats de klem rond de opening van de pijp van de blazer.
2. Bevestiging van de zuigtoebehoren.
1) Monteer opzuigpijp (nozzle)
Het is gevaarlijk de machine te gebruiken terwijl schroef los zit.
Degene die met de machine werkt zou zo met een vinger of met zijn of
haar kleding de impeller kunnen raken, hetgeen zal leiden tot ernstige
ongevallen.
Let op: De motor zal niet starten als de beschermkap niet volledig
Let op: Voer de handelingen voor het bevestigen zoals beschreven
Let op: Draai schroef niet te strak aan.
Let op: De motor zal niet starten als de vacuümbuis niet volledig
WAARSCHUWING!
Houd altijd het bevestigingseind van de opzuigpijp vast wanneer u deze
monteert of demonteert.
2) Bevestiging van elleboog en opvangzak.
Let op: Voer de handelingen voor het bevestigen zoals beschreven
Monteer het beschermrooster en/of de vacuümpijp op de juiste wijze
vóór gebruik. Het gebruik zonder het beschermrooster en/of de
vacuümpijp is gevaarlijk. De ventilator kan de vingers of kleding van de
gebruiker raken, waardoor ernstig letsel kan worden veroorzaakt.
Verwijder niet de schroef (1) en demonteer niet de opzuigpijp.
Veiligheidsnormen vereisen een minimale afstand van 900 mm tussen
de ventilator en het einde van de pijp.
Draag altijd beschermende handschoenen.
opgebouwd.
ventilatorhuis en plaats deze over elkaar.
deze aan elkaar.
Zet goed vast met bout en moer .
(1) Draai schroef los en open het beschermrooster .
WAARSCHUWING!
Wanneer u deze machine als blazer gebruikt, moet u elke
keer voor de machine gestart wordt controleren of de
schroef niet los zit. Als de schroef los zit, moet u deze
weer vast draaien.
gesloten is.
(2) Lijn de afgetekend op de opzuigpijp uit met het “ ”
teken op de blazer. Plaats nu de opzuigpijp in de opening van
de blazer.
(3) Draai de opzuigpijp totdat de is uitgelijnd met het “ ”
teken op de blazer, zodat deze vastgedraaid zit.
(4) Zet de opzuigpijp goed vast aan de blazer met schroef en
beugel .
onder (4) hierboven niet uit als de blazer wordt gebruikt in een
land of gebied waar het CE keurmerk niet van toepassing is.
gemonteerd is.
(1) Open de sluiting van de opvangzak.
(2) Voer de elleboog door de opvangzak en leid deze door de
opening. Zet de elleboog vast met het klittenband.
(3) Bevestig de elleboog op de blazer.
(4) Plaats klem rond de opening van de elleboog. Zet goed
vast met bout en moer .
onder (4) hierboven niet uit als de blazer wordt gebruikt in een
land of gebied waar het CE keurmerk niet van toepassing is.
WAARSCHUWING!
Zuig geen grote stukken hout, metalen, glas, stenen,
vloeistoffen, brandende sigaretten of andere brandende
voorwerpen op.
76
Page 77

VOOR GEBRUIK
Afbeelding 1
Afbeelding 2
Onderste oliepeil
Maximum oliepeil
Afbeelding 3
Maximum oliepeil
Onderste oliepeil
Oliepeilstok
Afbeelding 4
Afbeelding 5
Plank
Afbeelding 6
Plank
1. Inspectie en bijvullen van motorolie
(1) Volg de onderstaande procedure wanneer de motor koud is.
Zorg ervoor dat de motor op een vlakke, horizontale ondergrond staat, zoals aangegeven in afbeelding 1.
• Inspectie: Verwijder de oliedop. Veeg de oliepeilstok af. Plaats de oliedop terug (afbeelding 2) en verwijder hem weer. Controleer
• Bijvullen: Als na inspectie blijkt dat het oliepeil onder het onderste merkteken staat, vult u olie bij via dezelfde opening waaruit de
(2) Het kan nodig zijn olie bij te vullen na iedere 10 bedrijfsuren (na iedere 10 keer brandstof bijvullen).
(3) Als de olie van kleur verandert of met vuil is vermengd, ververst u de olie. (Raadpleeg pagina 82 voor informatie over het
verversingsinterval en de verversingsprocedure.)
Aanbevolen olie: SAE10W-30 olie van API Classificatie SF Klasse of hoger (4-takt olie voor auto’s)
Hoeveelheid olie: Ongeveer 0,08 L
of het oliepeil tussen de onderste en bovenste merktekens staat.
oliedop werd gedraaid. Zie afbeelding 4 voor hoe de motor moet worden gehouden om olie bij te vullen.
De methode van de inspectie van
motorolie
OPMERKING
• Als de motor niet in de stand wordt gehouden zoals aangegeven in Afbeelding 1 op een horizontale ondergrond, kan het oliepeil
onnauwkeurig worden aangegeven.
• Als er teveel olie in het carter gedaan is, kan de olie verontreinigd raken, of verbranden met een witte rook als resultaat.
Olie verversen, “oliepeilstok”
• Verwijder stof en vuil rond de olievul-opening en draai de oliepeilstok los.
• Houd de losgemaakte oliepeilstok vrij van zand en stof. Doet u dat niet, dan kan vuil dat aan de oliepeilstok blijft kleven de circulatie van de
olie door de motor belemmeren of het binnenwerk beschadigen, wat kan leiden tot problemen.
• Een manier om de oliepeilstok schoon te houden is om de draaiknop van de oliepeilstok in de motorafdekking te steken.
Na het bijvullen van olie
• Veeg gemorste olie af met een poetsdoek.
77
Page 78

2. Brandstofvoorziening
WAARSCHUWING
• Let bij het bijvullen van brandstof op de volgende punten om te voorkomen dat brand uitbreekt:
- Werk met brandstof en tank op een plek waar geen vuur of hittebron in de buurt is. Breng in geen geval vuur of hittebronnen (door te roken
bijvoorbeeld) in de buurt van de brandstof.
- Zet de motor uit en laat de motor afkoelen voordat u brandstof bijvult.
- Draai de brandstofvuldop langzaam los. De brandstof kan eruit komen als gevolg van inwendige druk.
- Wees voorzichtig dat u geen brandstof morst. Veeg eventueel gemorste brandstof onmiddellijk weg.
- Tank alleen op een goed geventileerde plek.
• Ga voorzichtig om met brandstof.
- Wanneer brandstof op de huid of in een oog terecht komt, kan dit leiden tot allergische reacties of irritatie. Roep onmiddellijk medische
assistentie in wanneer u een fysieke afwijking bespeurt.
• Giet GEEN olie in de brandstoftank.
OPSLAGTERMIJN VAN BRANDSTOF
Brandstof hoort binnen 4 weken opgebruikt te worden, zelfs al wordt het bewaard in een speciale container in een goed geventileerde, donkere
ruimte.
Als u geen speciale container gebruikt, of als de container open is, kan brandstof binnen een dag onbruikbaar worden.
Opslag van de machine en de tank
• Bewaar de machine en de tank op een koele plek, uit de zon.
• Bewaar brandstof nooit in een auto.
BRANDSTOF
De gebruikte motor is een 4-takt motor. Let er op dat u benzine voor auto’s gebruikt (normaal of super).
Opmerkingen over brandstof
• Gebruik nooit een benzine-olie mengsel. Doet u dit toch, dan kan er zich een koolstof afzetting vormen en kunnen er mechanische problemen
op gaan treden.
• Als verslechterde olie wordt gebruikt, zal dat leiden tot onregelmatig starten.
Let er bij het bijvullen van brandstof op dat de motor is uitgezet en controleer of de motor is afgekoeld.
METHODE VAN BRANDSTOF BIJVULLEN
• Draai de brandstofvuldop een klein stukje los en de druk in de brandstoftank af te laten.
• Draai de brandstofvuldop eraf, vul brandstof bij en laat de lucht uit de brandstoftank stromen door de brandstoftank iets te kantelen zodat de
brandstofvulopening recht omhoog wijst.
(NIET bijvullen tot in de vulopening van de brandstoftank.)
• Na het bijvullen van brandstof draait u de brandstofvuldop weer stevig vast.
• Als enige onvolkomenheid of schade aan de brandstofvuldop wordt geconstateerd, moet deze worden vervangen.
• De brandstofvuldop is na verloop van tijd versleten. Vervang de brandstofvuldop iedere twee of drie jaar.
• GEEN brandstof bijvullen in de olievulopening.
78
Page 79

BEDIENING
Afbeelding 1
Stopschakelaar
Afbeelding 2
Close
Afbeelding 4
Afbeelding 5
Open
Afbeelding 3
Opvoerpomp
1. Starten
WAARSCHUWING
• Start de motor in geen geval op dezelfde plek als waar u getankt heeft.
- Hierdoor kan ontbranding of brand ontstaan. Blijf bij het starten van de motor op een afstand van ten minste 3 meter.
• Het uitlaatgas uit de motor is giftig. Gebruik de motor niet op een slecht geventileerde plek, bijvoorbeeld in een tunnel, in een gebouw enz.
- Gebruik van de motor op een slecht geventileerde plek kan leiden tot vergiftiging door uitlaatgassen.
• Stop en inspecteer de motor onmiddellijk wanneer u na het starten iets abnormaals bespeurt, zoals een vreemd geluid, geur, of trilling.
- Als u de motor blijft gebruiken terwijl zich een dergelijk abnormaal verschijnsel voordoet, kan dat leiden tot een ongeval.
• Controleer of de motor inderdaad stopt wanneer de stopschakelaar op de “O” stand wordt gezet.
1) Als de motor koud is of na het bijvullen van brandstof
(1) Plaats de machine op een vlakke ondergrond.
(2) Zet de stopschakelaar op “ I ” (Afbeelding 1).
(3) Blijf op de opvoerpomp drukken tot er brandstof in de
opvoerpomp komt. (Afbeelding 2)
• In het algemeen zal er na 7 tot 10 keer drukken brandstof in
de opvoerpomp komen.
• Als u de opvoerpomp te intensief gebruikt, zal het teveel
aan benzine teruggevoerd worden naar de brandstoftank.
(4) Til de chokehendel op naar de gesloten stand (Afbeelding 3).
(5) Houd de hoofdgreep vast met uw linkerhand om te voorkomen
dat de motor beweegt.
(6) Trek de hendel van de trekstarter voorzichtig uit tot u
weerstand voelt. Laat de trekstarter vervolgens terugkeren en
trek er dan krachtig aan (Afbeelding 4).
• Trek nooit door tot aan het einde van het trekstartkoord.
• Laat nooit direct los nadat u de trekstarter heeft
uitgetrokken. Houd de trekstarter vast totdat deze
terugkeert naar zijn oorspronkelijke positie.
(7) Zet de chokehendel open wanneer de motor start. (Afbeelding
5)
• Zet de chokehendel steeds verder open terwijl u controleert
hoe de motor loopt. Vergeet niet dat de chokehendel
uiteindelijk helemaal open moet staan.
• Als het koud is of wanneer de motor is afgekoeld, mag u
nooit de chokehendel ineens helemaal open zetten. Doet u
dit toch, dan kan de motor stilvallen.
(8) Laat de motor 2 a 3 minuten opwarmen.
(9) Het opwarmen is klaar wanneer de motor snel accelereert van
een laag toerental naar volledig geopend gas.
79
Page 80
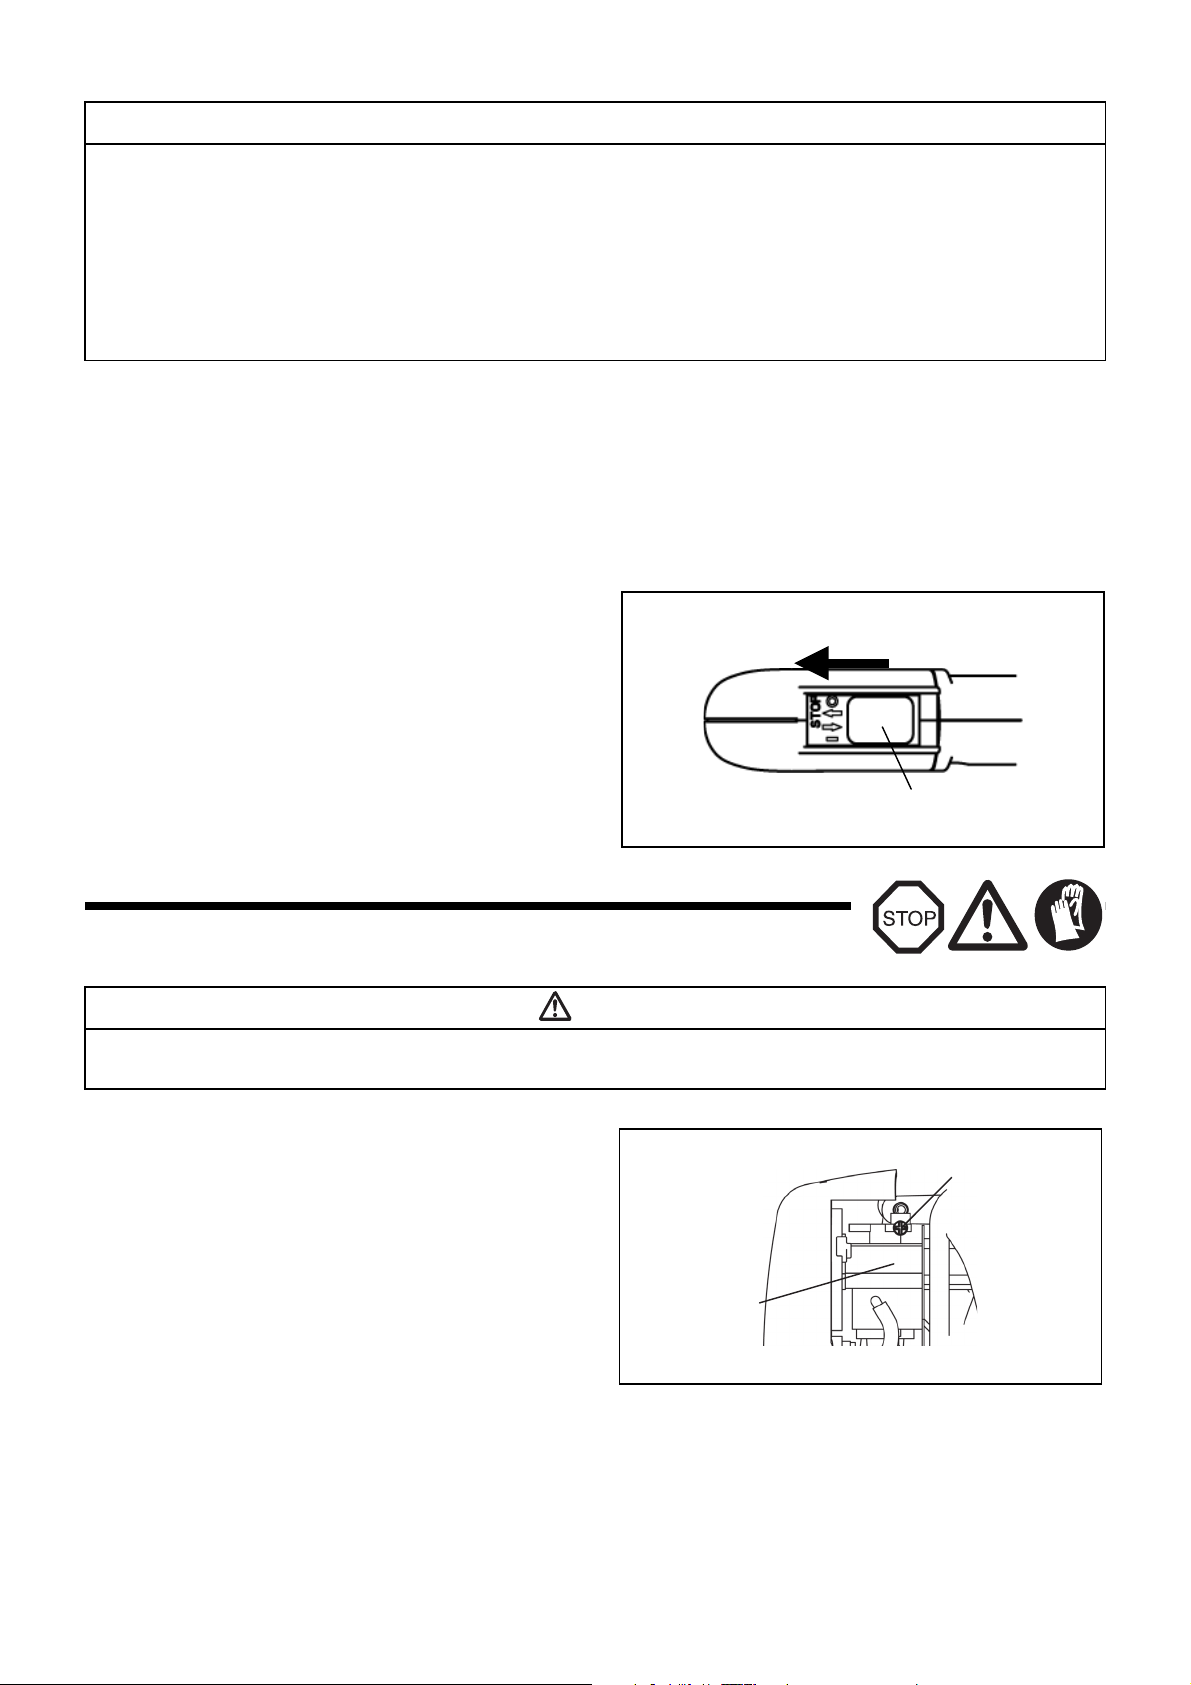
OPMERKING
Stopschakelaar
Stelschoef
Carburateur
• De motor kan beschadigd raken als de chokehendel verder gezet wordt dan de “CLOSE” (Dicht) stand.
• Als de motor aanslaat en afslaat, zet u deze hendel terug in de stand “OPEN” en trekt u meerdere keren aan de trekstarter om de motor
opnieuw te starten.
• Als de gebruiker meerdere keren aan de trekstarter blijft trekken met de chokehendel in de stand “CLOSE”, kan de motor moeilijk worden
gestart omdat te veel brandstof is toegevoerd ("verzopen").
• In het geval de motor door te veel brandstof is verzopen, verwijdert u de bougie en trekt u meerdere keren snel aan de trekstarter om het
overschot aan brandstof te verwijderen. Droog de elektroden van de bougie.
• Wanneer de gasklep niet terugkomt in een stand waarin deze de stationair stelschroef raakt, zelfs niet wanneer het gas helemaal dicht staat,
stel dan de kabel opnieuw af zodat de klep terugkeert in de correcte stand.
2) Wanneer de motor warm is.
(1) Plaats de motor op een vlakke ondergrond.
(2) Druk een paar keer op de opvoerpomp.
(3) Controleer of de chokehendel open staat.
(4) Houd de hoofdgreep vast met uw linkerhand om te voorkomen dat de motor beweegt.
(5) Trek de hendel van de trekstarter voorzichtig uit tot u weerstand voelt. Laat de trekstarter terugkeren naar de uitgangspositie en trek er
vervolgens stevig aan.
(6) Wanneer de motor moeilijk te starten is, kunt u proberen het gas ongeveer 1/3 open te zetten.
2. Stop
Laat de aan/uit-schakelaar los om het motortoerental te verlagen en zet
de stopschakelaar in de stand “O”.
(Ontgrendel de gashendelvergrendeling als deze de gashendel in de
volledig geopende stand vergrendelt.)
AFSTELLINGEN
GEVAAR
De carburateur is in de fabriek afgesteld. Stel niet af, anders dan het stationaire toerental. Als het nodig is om hem bij te stellen, dient u
contact op te nemen met uw erkende onderhoudsmonteur.
Controleren van het stationaire toerental
Stel het stationaire toerental in op 3500 rpm (min–1).
• Wanneer het noodzakelijk is het stationaire toerental bij te stellen,
dient u de stelschroef op de carburateur bij te stellen, met een
kruiskopschroevendraaier.
• Draai de stelschroef rechtsom om het motortoerental te verhogen.
Draai de stelschroef linksom om het motortoerental te verlagen.
80
Page 81
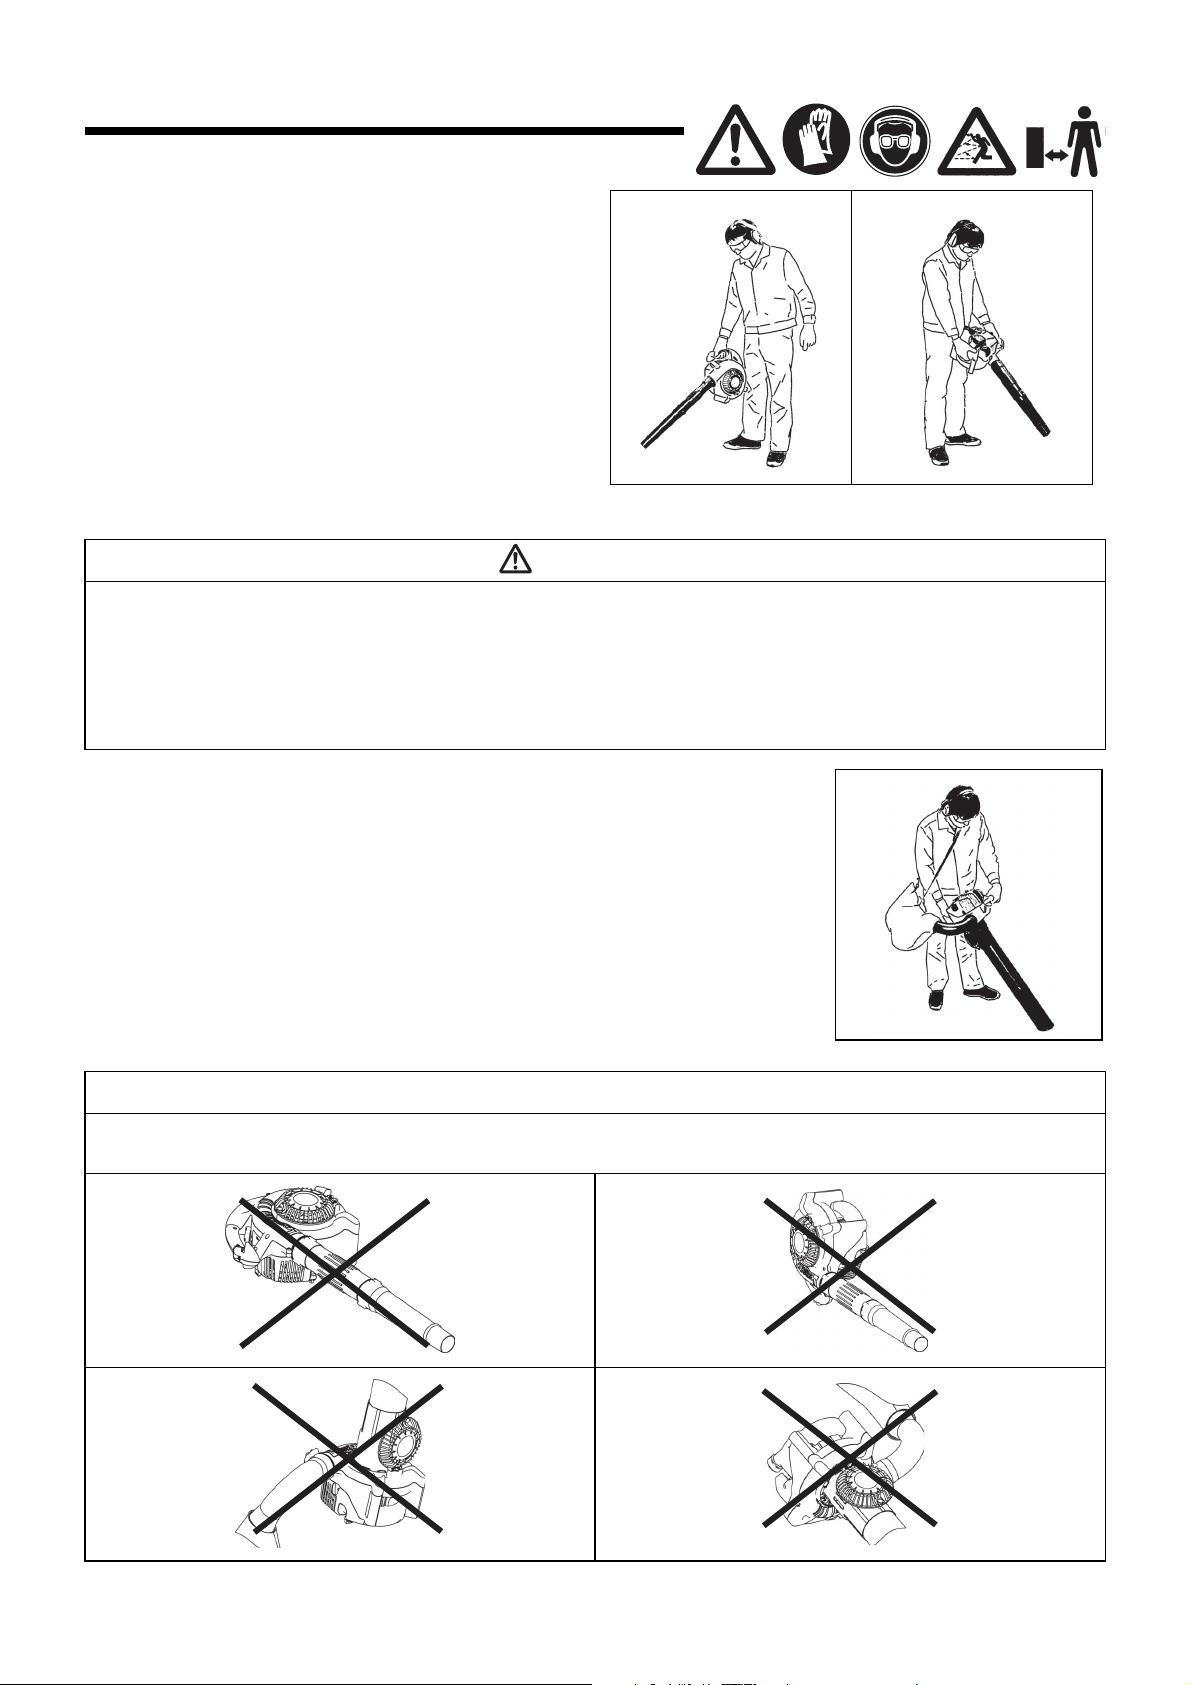
BEDIENINGSMETHODE
1. Gebruik als blazer
• Houd de machine stevig vast tijdens gebruik.
• Richt het uiteinde van het mondstuk op de plek waar u wilt blazen en
haal de trekker over.
• Knijp de trekker helemaal in, houdt de throttle vergrendelknop
ingedrukt en laat met uw vinger de trekker los zodat de trekker is
vergrendeld op volledig geopend gas.
• Knijp de trekker nogmaals in om de gashendelvergrendeling te
ontgrendelen.
• Het onderste deel van de brandstoftank fungeert tevens als hulpgreep
zodat u de machine met beide handen kunt gebruiken. Houd in dit
geval de hulpgreep met uw rechterhand vast.
2. Zuigen
WAARSCHUWING
• Zorg ervoor dat er geen dingen zoals kerosine, benzine of brandende sigaretten de machine in gezogen worden.
- Als u dat niet doet, kan brand ontstaan.
• Zorg ervoor dat er geen ongeschikte materialen zoals grote houtsnippers, stukken metaal, glas, kiezelstenen enz. in de machine gezogen
worden.
- Hierdoor kunnen namelijk gemakkelijk storingen ontstaan.
• Door de stofzak te ver te vullen, kan deze overstromen aan de kant van de motor. Leeg de stofzak voordat deze helemaal vol zit.
- Als u dat niet doet, kan brand ontstaan.
• Draag de schouderriem voor de stofzak en stel de riem op een comfortabele lengte in.
• Controleer of de stofzak niet gedraaid zit en haal de aan/uit-schakelaar over om uw werk te
beginnen.
• Als de stofzak vol zit, verwijdert u de stofzak van de blazer en opent u de sluiting om de stofzak te
legen.
OPMERKING
Als de blazer wordt bediend terwijl het beschermrooster omhoog gericht is of de hoofdgreep omlaag gericht is, kan witte rook worden
uitgestoten, kan de olie verontreinigd worden of kan olie eruit lekken.
81
Page 82

INSPECTIE EN ONDERHOUD
Afbeelding 1
Afbeelding 2
Plank
GEVAAR
• Stop de motor en laat deze afkoelen voor u inspectie en onderhoud gaat uitvoeren. Verwijder de bougie en de bougiekap.
- Als u inspectie of onderhoud uitvoert direct nadat de motor gestopt is of wanneer de bougiekap nog op zijn plaats zit, kunt u zich branden
of een ongeval oplopen omdat de motor onverwacht opstart.
• Controleer of alle onderdelen goed op hun plek zitten na inspectie of onderhoud. Ga pas daarna de machine opnieuw gebruiken.
1. Verversen van de motorolie
Te lang gebruikte motorolie zal de levensduur van de heen en weer bewegende en roterende onderdelen flink bekorten. Vergeet niet te
controleren wanneer en hoeveel olie ververst moet worden.
GEVAAR
• In het algemeen zullen de motor zelf en de motorolie nog enige tijd heet blijven ook al is de motor gestopt. Als u de olie wilt gaan verversen,
moet u eerst controleren of de motor zelf en de motorolie daarin voldoende zijn afgekoeld. Doet u dat niet, dan bestaat het gevaar dat u zich
zult branden. Wacht nadat de motor is uit gezet voldoende lang om de motorolie te laten terugstromen naar de olietank voor een
nauwkeurige controle van het oliepeil.
• Als er teveel olie in het carter gedaan is, kan de olie verontreinigd raken, of verbranden met een witte rook als resultaat.
Verversingsinterval: Na de eerste 20 bedrijfsuren en vervolgens na iedere 50 bedrijfsuren.
Aanbevolen olie: SAE10W-30 olie van API Classificatie SF Klasse of hoger (4-takt olie voor auto’s)
Voer de volgende procedure uit bij het verversen van de olie.
(1) Controleer of de tankdop goed dicht zit.
(2) Maak de oliedop los.
• Houd de oliepeilstok vrij van stof of vuil.
(3) Kantel de blazer in de volgorde aangegeven in afbeelding 1.
• Vang de olie op in een daarvoor geschikte bak.
(4) Richt de blazer zoals aangegeven in afbeelding 2 en vul olie bij
tot aan de rand in de oliebuis.
(5) Doe de oliepeilstok weer terug en zet hem goed vast na het
verversen van de olie. Als u de oliepeilstok niet goed vast
maakt, zal er olie gaan lekken.
Opmerkingen bij het verversen van de motorolie
• Gooi afgewerkte motorolie niet weg met het normale vuilnis en loos het niet in de natuur of in een sloot. Het afvoeren van olie is wettelijk
geregeld. Volg altijd de geldende wetten en regelgeving wanneer u zich van afgewerkte motorolie wilt ontdoen. Neem contact op met een
erkende onderhoudsmonteur als u hieromtrent vragen hebt.
• Ook wanneer u olie gewoon bewaart zal de olie op den duur bederven. Controleer regelmatig of de olie die u wilt gebruiken nog goed is
(vervang de olie minstens elke 6 maanden).
82
Page 83

2. Reinigen van het luchtfilter
Plaat
Element
(spons)
Afdekking
luchtfilter
Luchtinlaat
Element
(vilt)
Bevestigingsbout
Pak dit gedeelte vast en
verwijder het element (vilt)
Afbeelding 1
Afbeelding 3
Laterale elektrode (–)
Afbeelding 2
Afbeelding 4
Elektrodespeling
0,7 - 0,8 mm
WAARSCHUWING: ONTVLAMBARE MATERIALEN
TEN STRENGSTE VERBODEN
Interval voor reiniging en inspectie: Dagelijks (om de 10
bedrijfsuren)
(1) Verwijder de bevestigingsbout(en) van het deksel van het
luchtfilter.
(2) Trek het deksel naar beneden en haal het los.
(3) Doe de chokehendel helemaal dicht en zorg ervoor dat er
verder geen stof en vuil in de carburateur terecht kan komen.
(4) Als er nog olie aan het element (spons) zit, dient u het stevig
uit te knijpen.
(5) Bij zware verontreiniging:
• Verwijder het filterelement (spons), dompel het in warm
water of in een oplossing van een mild schoonmaakmiddel
in water, en droog het grondig.
• Reinig het element (vilt) met benzine en laat het goed
drogen.
(6) Voor u het element weer terugzet, moet u controleren of het
volledig gedroogd is. Is het element nog niet goed droog, dan
kunt u startproblemen ondervinden.
(7) Veeg met een poetsdoek eventuele olie rond de afdekking van
het luchtfilter en luchtinlaat weg.
(8) Direct na het reinigen dient u het deksel terug te zetten en vast
te maken met de bevestigingsbout(en). (Maak eerst de haakjes aan de bovenkant vast en vervolgens aan de onderkant.)
3. Controleren van de bougie
GEVAAR
• Reinig het element verschillende keren per dag als er erg veel stof door wordt opgevangen.
• Als u blijft doorwerken terwijl het filterelement vervuild is met olie, kan de olie buiten het luchtfilter terechtkomen en tot olieverontreiniging
leiden.
(1) Open/dicht doen van de afdekking
Om de afdekking te openen, zet u uw vingers op de
hoofdgreep en het uitsteeksel van de bougieafdekking
(Afbeelding 1). Druk het uitsteeksel omhoog en schuif de
afdekking in de “OPEN” richting (Afbeelding 2).
Als u de afdekking wilt sluiten, schuif u de afdekking in de
richting “CLOSE” tot de klik onder het uitsteeksel van de
bougieafdekking over de motorafdekking valt. Druk tenslotte
het uitsteeksel naar binnen.
(2) Verwijderen van de bougie
Gebruik de meegeleverde bougiesleutel om de bougie te
verwijderen of vast te draaien (Afbeelding 3).
(3) Controleren van de bougie
De speling tussen de twee elektroden van de bougie moet
0,7 tot 0,8 mm bedragen (Afbeelding 4). Stel de juiste
speling in wanneer de afstand te groot of te klein is.
Maak de bougie grondig schoon of vervang de bougie
wanneer deze verontreinigd of aangeslagen is.
(4) Vervangen van de bougie
Gebruik een NGK-CMR6A bougie ter vervanging.
83
Page 84

4. Schoonmaken van het brandstoffilter
Leidingklem
Brandstoffilter
Tankdop
• Een verstopt filter kan leiden tot startproblemen of de onmogelijkheid
het toerental te verhogen.
• Controleer het brandstoffilter regelmatig op de volgende wijze:
(1) Verwijder de tankdop en tap de brandstof af zodat de tank
helemaal leeg is. Controleer de binnenkant van de tank op
eventuele ongerechtigheden. Verwijder eventueel aanwezige
ongerechtigheden.
(2) Trek het brandstoffilter met een draad uit de tank via de
vulopening.
(3) Reinig het brandstoffilter met schone benzine als het filter vuil
is. De benzine die voor het reinigen wordt gebruikt, moet
worden weggegooid in overeenstemming met de lokaal
geldende regelgeving.
Een buitensporig vervuild filter moet worden vervangen.
(4) Doe het brandstoffilter terug in de tank en doe de tankdop
weer stevig op zijn plaats. Ter vervanging dient u contact op te
nemen met uw dealer of een erkende reparateur.
5. Inspectie van bouten, moeren en schroeven
• Draai losgetrilde bouten, moeren enz. opnieuw vast.
• Controleer of er brandstof- of olielekkage is opgetreden.
• Vervang beschadigde of versleten onderdelen onmiddellijk door nieuwe om een veilige werking van de machine te waarborgen.
6. Reinigen van onderdelen
• Houd de motor schoon door deze af te vegen met een poetsdoek.
• Houd de cilinders vrij van stof en vuil. Als de koelvinnen bedekt raken door stof en vuil, kan de motor vastlopen.
7. Vervangen van pakkingen en afdichtingen
Vervang de pakkingen en afdichtingen als de motor gedemonteerd is.
Onderhouds- of afstelwerkzaamheden die niet beschreven worden in deze handleiding mogen alleen worden uitgevoerd door een erkende
onderhoudsmonteur.
MACHINE-OPSLAG
WAARSCHUWING
• Voor u de brandstof aftapt moet u de motor stoppen en laten afkoelen.
- Als u dat niet doet kan dat leiden tot brandwonden of brand.
GEVAAR
• Als u de blazer gedurende een lange tijd opbergt, tapt u alle brandstof af uit de brandstoftank en carburateur, en bergt u hem op een droge
en schone plaats op.
Tap de brandstof uit de tank en de carburateur af via de volgende
procedure:
(1) Verwijder de tankdop en tap alle brandstof af.
Als er verontreinigingen achterblijven in de brandstoftank,
dient u deze eveneens volledig te verwijderen.
(2) Gebruik een draad om het brandstoffilter te verwijderen.
(3) Druk op de opvoerpomp tot alle brandstof daaruit verwijderd is
en tap eventuele brandstof uit de tank af.
(4) Doe het filter weer terug in de tank en doe de tankdop goed
vast.
(5) Laat de motor vervolgens lopen tot deze vanzelf stopt.
(6) Verwijder de bougie en druppel een beetje motorolie in het
bougiegat.
(7) Trek voorzichtig aan de starter zodat de motorolie verdeeld
wordt en doe de bougie weer terug.
(8) Houd de grepen van de blazer rechtop.
(9) Bewaar de afgetapte brandstof in een speciale jerrycan in een
goed geventileerde ruimte.
84
Page 85
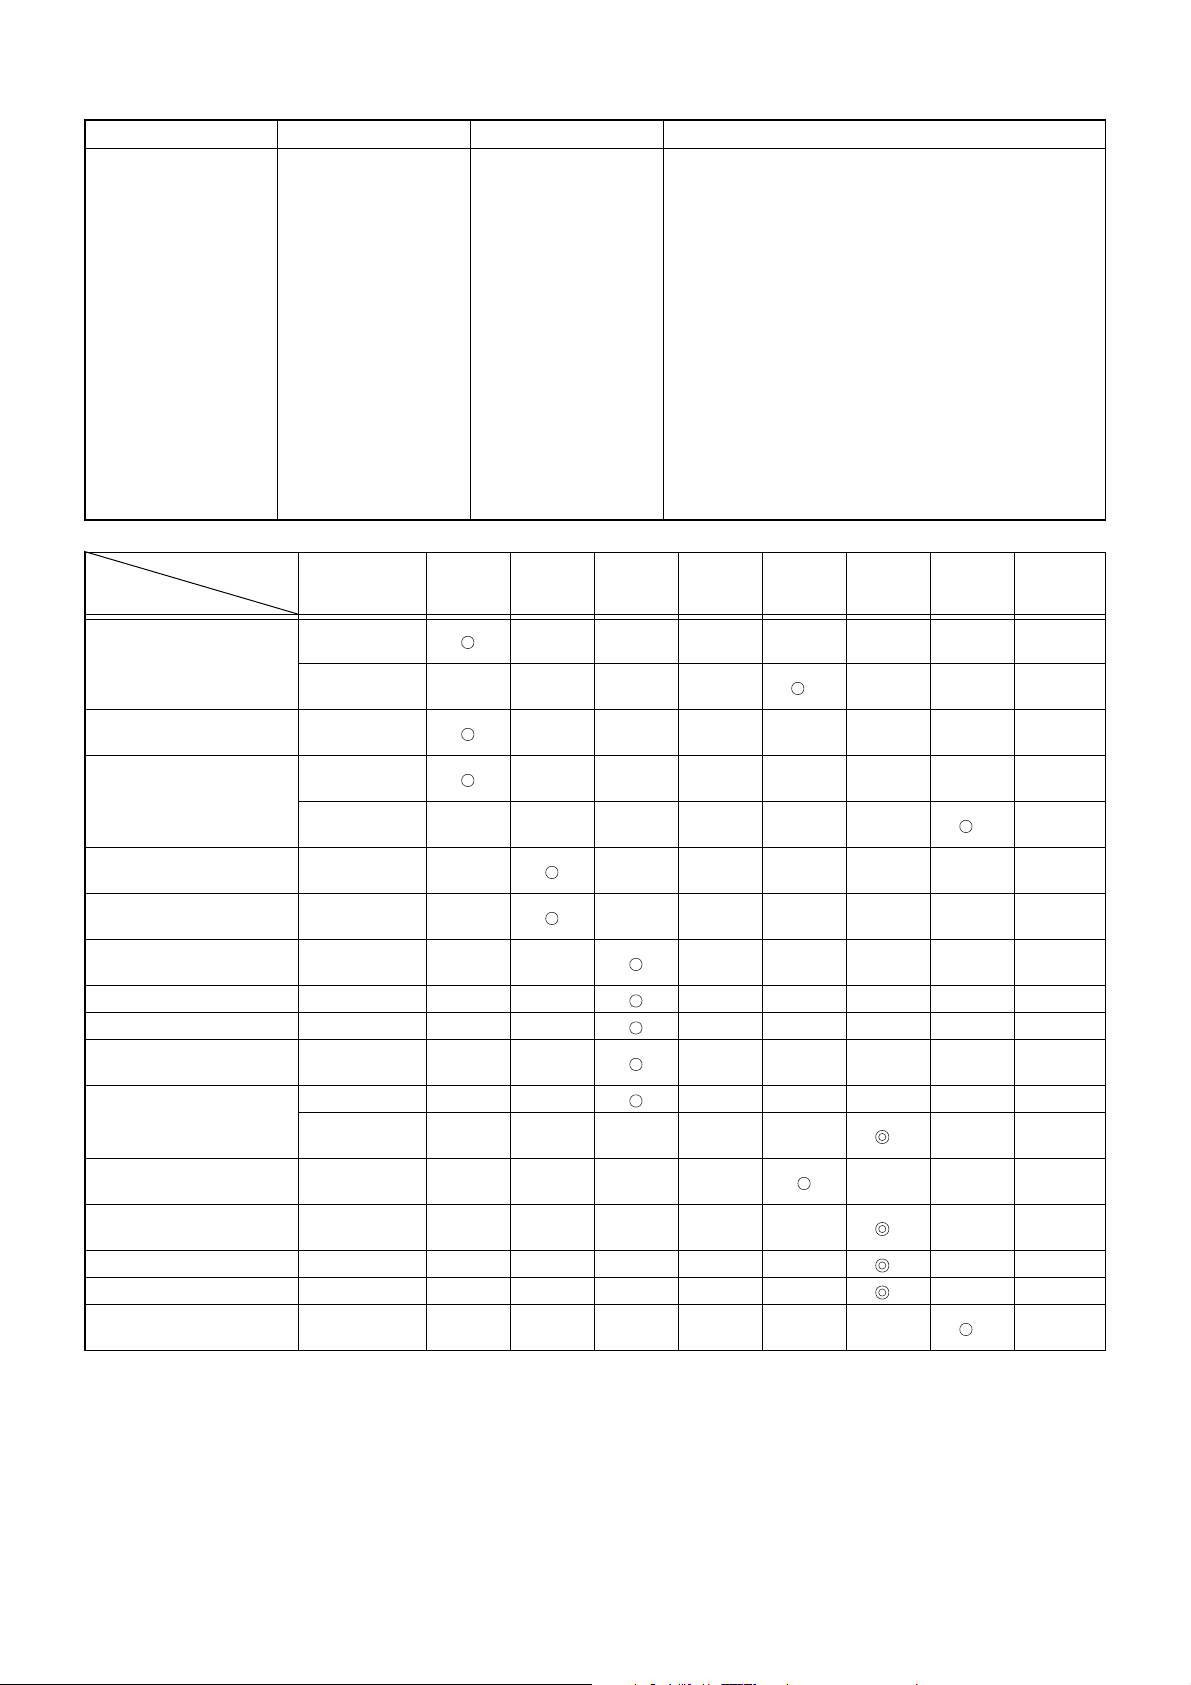
Storing lokaliseren
Storing Onderdeel Observatie Oorzaak
Motor start niet of
nauwelijks
Warm start problemen Tank gevuld bougie vonkt Carburateur vervuild, laten reinigen
Motor start maar valt stil Benzinetoevoer Tank gevuld Onjuiste afstelling, vervuilde carburateur
Onvoldoende vermogen Diverse oorzaken Stationairloop
Ontsteking Bougie vonkt Oorzaak in benzinetoevoer of compressiesysteem, of
mechanische oorzaak
Vonkt niet Stopschakelaar, kabelbreuk, kortsluiting, bougie of
aansluiting defect, ontstekingsspoel defect
Benzinetoevoer Tank gevuld Onjuiste chokepositie, carburateur defect, vervuilde zuigkop,
breuk, knik of vuil in benzineleiding
Compressie Geen compressie bij start Voetpakking stuk, krukaskeerringen defect, zuigerveren
gebroken of lekke bougiepakking
Mechanische storing Starter functioneert niet Gebroken startveer, defecte startpallen
Defecte ontluchting, breuk benzineleiding, kabelbreuk,
ontsteking defect
Luchtfilter vervuild, carburator vervuild, uitlaatdemper
onregelmatig
verstopt, uitlaatkanaal in de cilinder verstopt.
Bedrijfsuren
Onderdeel
Inspecteren/
Motorolie
Onderdelen vastzetten
(bouten, moeren)
Brandstoftank
Gashendel
Stopschakelaar
Stationaire draaisnelheid
Luchtfilter Reinigen 83
Bougie Inspecteren 83
Kanaal luchtkoeling
Brandstofleiding
Brandstoffilter
Speling tussen luchtinlaatklep
en uitlaatklep
Olieleiding Inspecteren *
Reviseren motor *
Carburateur
reinigen
Vervang de
bougie.
Inspecteren 84
Reinigen/
inspecteren
Brandstof
aftappen
Werking
controleren
Werking
controleren
Inspecteren/
bijstellen
Reinigen/
inspecteren
Inspecteren 84
Vervang de
bougie.
Reinigen/
vervangen
Bijstellen *
Brandstof
aftappen
Voo r
gebruik
Na
smering
Dagelijks
(10 u.)
30 u 50 u 200 u
1
*
*
2
2
2
2
Motor uit/
rustpauze
3
*
3
*
Betreffende
pagina
77
82
84
80
80
84
84
84
–
–
–
–
–
–
*1 Voer de eerste verversing uit na 20 bedrijfsuren.
*2 Laat de inspectie na 200 bedrijfsuren uitvoeren door een erkende onderhoudsmonteur of motor-werkplaats
*3 Laat de motor gewoon even doorlopen nadat u de brandstoftank heeft leeg gemaakt om alle brandstof uit de carburateur te verwijderen.
85
Page 86

OPLOSSEN VAN PROBLEMEN
Laat de motor stationair lopen en zet de
chokehendel op CLOSE (dicht).
Ga eerst zelf na wat er aan de hand zou kunnen zijn voor u om een reparatie gaat verzoeken. Als u iets abnormaals vindt, voer dan de
handelingen beschreven in deze handleiding uit. Knoei niet met onderdelen en demonteer geen onderdelen als dat niet in de handleiding
beschreven wordt. Neem contact op met een erkende onderhoudsmonteur of uw dealer voor eventuele reparaties.
Probleem Waarschijnlijke oorzaak (storing) Oplossing
U kunt de opvoerpomp niet gebruiken. Druk 7 tot 10 keer op de opvoerpomp.
Er wordt niet snel genoeg aan de trekstarter
getrokken.
Niet genoeg brandstof. Ga tanken.
Brandstoffilter verstopt. Reinigen
Brandstofleiding geknakt of kapot.
Slechte brandstof.
De motor start niet
Te grote toevoer van brandstof (verzuipen).
Losse bougiedop. Maak het stekkertje vast.
Vuile bougie. Reinigen
Abnormale elektrodenafstand.
Andere problemen met de bougie. Vervang de bougie.
Problemen met de carburateur. Verzoek om inspectie en onderhoud.
De trekstarter werkt niet. Verzoek om inspectie en onderhoud.
Problemen met de overbrenging. Verzoek om inspectie en onderhoud.
Niet genoeg opgewarmd. Laat de motor eerst opwarmen.
De chokehendel staat op “CLOSE” (dicht),
alhoewel de motor al opgewarmd is.
Brandstoffilter verstopt. Reinigen
Motor valt stil.
Motorsnelheid neemt niet toe.
De motor stopt niet. Stekkertje los. Maak het stekkertje vast.
Luchtfilter verstopt of verontreinigd. Reinigen
Problemen met de carburateur. Verzoek om inspectie en onderhoud.
Problemen met de overbrenging. Verzoek om inspectie en onderhoud.
Gaskabel losgeraakt Maak het stekkertje vast.
Problemen met de overbrenging. Verzoek om inspectie en onderhoud.
Problemen met het elektrische systeem. Verzoek om inspectie en onderhoud.
Trek harder.
Haal de knik eruit of vervang de
brandstofleiding.
Als de brandstof oud of slecht is, is de motor
moeilijker te starten. Gebruik verse brandstof.
(Ververs de brandstof in de tank minstens een
keer per maand.)
Zet de gashendel op halve of hoge snelheid
en trek aan de trekstarter totdat de motor
start. Als de motor nog steeds niet wil starten,
dient u de bougie eruit te draaien, af te drogen
en weer in te draaien. Start de motor
vervolgens zoals beschreven.
Stel de afstand tussen de elektroden van de
bougie bij.
Zet de chokehendel op “OPEN
Wanneer de motor niet start na het opwarmen:
Als u geen problemen vindt via de bovenstaande controles, dient u het gas ongeveer 1/3 open te zetten en vervolgens de motor te starten.
86
Page 87

Español
Muchas gracias por comprar el soplador DOLMAR. Nos complace
recomendarle el uso del soplador DOLMAR que es el resultado de un
extenso programa de investigación desarrollado tras años de estudio y
experiencia.
Los sopladores PB-252.4 combinan las ventajas del diseño más
avanzado con un diseño ergonómico. Son muy ligeros, manejables,
compactos y suponen un material profesional para una amplia
variedad de aplicaciones.
Por favor lea el folleto que hace referencia con detalle a los diversos
puntos que demuestran su excelente funcionamiento. Esto le ayudará
a obtener el mejor resultado posible de su soplador DOLMAR.
Contenidos
SÍMBOLOS ........................................................................................ 87
INSTRUCCIONES DE SEGURIDAD................................................. 88
DECLARACIÓN DE CONFORMIDAD DE LA CE.............................. 91
ESPECIFICACIONES........................................................................ 91
DENOMINACIÓN DE PARTES .......................................................... 92
INSTRUCCIONES DE MONTAJE...................................................... 93
ANTES DE EMPEZAR EL TRABAJO................................................ 94
OPERACIÓN...................................................................................... 96
AJUSTE DEL RALENTÍ ..................................................................... 97
PROCEDIMIENTO DE OPERACIÓN ................................................ 98
INSPECCIÓN Y MANTENIMIENTO .................................................. 99
ALMACENAMIENTO........................................................................ 101
INVESTIGACIÓN DE AVERÍAS....................................................... 103
SÍMBOLOS
Es de gran importancia comprender los símbolos siguientes para la lectura de este manual de instrucciones.
Página
ADVERTENCIA/PELIGRO Combustible (Gasolina)
Lea, comprenda y siga el manual de
instrucciones
Prohibido Paro de Emergencia
No Fumar Primeros Auxilios
No acercar llamas Reciclaje
Deben utilizarse guantes protectores ON/ENCENDIDO
Encendido manual del motor
Mantener el área de operación libre de
personas y animales
Llevar protección de ojos y oídos
Mantenga a los espectadores de distancia Marca CE
OFF/APAGADO
Mutilación del dedo o del brazo, álabe de la
rueda móvil
87
Page 88

INSTRUCCIONES DE SEGURIDAD
(1)
(2)
(3)
(4)
(5)
15 metros
Instrucciones generales
• Para asegurar un funcionamiento correcto y seguro, el usuario debe
leer, comprender y seguir este manual de instrucciones para
familiarizarse con el soplador (1). Los usuarios que no se informen
suficientemente, ocasionarán un peligro a si mismos y a otros.
• Se recomienda prestar el soplador únicamente a gente que demuestre
experiencia en el uso de sopladores.
• Entregue también siempre el manual de instrucciones.
• Los que utilizan la máquina por vez primera deben preguntar al
vendedor las instrucciones básicas para familiarizarse con el manejo
de un soplador motorizado.
• No se debe permitir el uso del soplador a niños y personas menores
de 18 años. Las personas mayores de 16 años pueden, sin embargo,
utilizar la máquina para aprendizaje únicamente, bajo supervisión
directa de un monitor cualificado.
• Utilizar la máquina con el máximo cuidado y atención.
• Manejar el soplador só lo si se encuentra en buena condición física.
• Realizar el trabajo con calma y cuidadosamente. El usuario debe
aceptar su responsabilidad con otras personas.
• Nunca utilizar el soplador después del consumo de alcohol o drogas
(2).
• Nunca utilizar el soplador si se encuentra cansado.
• Conserve estas instrucciones para referencia futura.
Equipo personal de protección
• La ropa utilizada debe ser funcional y adecuada. Por ejemplo, debe
quedar ajustada, sin causar estorbo. No llevar joyas, ropa o pelos
largos que pueden quedar atrasados con la entrada de aire de la
máquina.
• Para evitar heridas en cabeza, ojos, manos, o pies, así como para
proteger su oído, el siguiente equipo y ropa de protección debe usarse
durante el uso del soplador.
Preste una atención especial a las siguientes
medidas
• La ropa debe ser resistente y có moda, pero debe permitir una
completa libertad de movimientos. Evite las chaquetas holgadas,
pantalones caídos o anchos en exceso, bufandas, pelo largo suelto o
cualquier elemento que pueda introducirse en la entrada de aire.
Utilice monos de trabajo y pantalones largos para proteger sus
piernas. No llevar pantalones cortos (4).
• El ruido del soplador puede dañar su oído. Lleve protectores (tapones
de oídos, auriculares etc) para proteger su oído. Los usuarios
regulares deben comprobar el estado de su oído periódicamente (3).
• Se recomienda el uso de guantes cuando trabaje con el soplador. Un
buen calzado es de gran importancia. Lleve calzado resistente con
suela antideslizante (4).
• Una protección adecuada de la vista es obligatoria. Aunque la
descarga no se dirija directamente al usuario. los rechazos y rebotes
pueden ocurrir durante el manejo del soplador (3).
• Nunca utilizar el soplador sin llevar gafas o protectores adecuados
para la vista con protección frontal y lateral que satisfagan la
normativa ANSI Z 87.1 (o la aplicable en su País).
Encendido del soplador
• Asegurar que no hay niños u otras personas en un radio de 15 metros
(5) también preste atención a cualquier animal en la proximidad del
área de trabajo. No utilice el soplador punce en áreas urbanas.
• Antes del funcionamiento, comprobar siempre que el soplador puede
trabajar de forma segura.
Compruebe la seguridad de la palanca de control. Debe comprobarse
que la palanca de control se acciona suavemente y con facilidad.
Comprobar que funciona el cierre de seguridad de esta palanca.
Compruebe que el mango esté limpio y seco y que el interruptor I-O
funciona bien. Mantenga el mango limpio de aceite y combustible.
360°
88
Page 89

Arrancar el soplador sólo de acuerdo con las instrucciones.
(6)
(7)
(8)
(9)
3 metros
• Descanso
• Transporte
• Reabastecimiento
• Mantenimiento
• Reemplazo de herramienta
¡ No utilizar cualquier otro método para arrancar el motor (6) !
• Utilizar el soplador y las herramientas suministradas sólo para las
aplicaciones establecidas.
• Arrancar el soplador sólo después de completar el montaje de la
máquina. Sólo se autoriza el funcionamiento de la máquina después
de colocar todos los accesorios necesarios.
• El motor debe apagarse si se detecta cualquier problema de motor.
• Cuando se trabaje con el soplador, debe colocar sus dedos
envolviendo el mango, manteniendo la palanca de control sujeta entre
sus dedos pulgar e índice. Mantenga su mano en esta posición para
tener la máquina bajo control en todo momento. Asegúrese que la
palanca de control (y asidor para el accesorio del aspirador) están en
perfectas condiciones y no tienen humedad, manchas de aceite, grasa
o alquitrán.
Siempre llevar un calzado seguro y estable.
• Manejar el soplador de forma que se evite la inhalación de gases
tóxicos de salida. Nunca encender el motor en habitaciones cerradas
(riesgo de envenenamiento y sofoque). El monóxido de carbono es un
gas inodoro. Siempre asegúrese que hay una ventilación adecuada.
• Apague el motor cuando descanse y cuando deje el soplador sin
atender. Colóquelo en un lugar seguro para impedir daños a otras
personas, causar incendios en materiales combustibles, o daños a la
máquina.
• Nunca deje el soplador caliente reposando sobre hierba seca u otro
material combustible.
• Todas las partes protectoras y cubiertas suministradas con la máquina
deben utilizarse durante el funcionamiento.
• Nunca trabajar con un tubo de escape defectuoso.
• Apagar el motor durante el transporte (7).
• Colocar el soplador de forma segura durante su transporte en coche o
camión para impedir que pierda combustible.
• Durante el transporte del soplador, asegúrese que el tanque de
combustible esté completamente vacío.
Reabastecimiento
• Apagar el motor durante el reabastecimiento (7), mantenerse alejado
de llamas (8), y no fume.
• Evite el contacto de los productos derivados del petróleo con su piel.
No inhale en vapor del combustible. Siempre lleve guantes protectores
durante el reabastecimiento. Cambie y limpie la ropa protectora en
intervalos periódicos.
• Tome la precaución de no derramar combustible o aceite para impedir
la contaminación del suelo (protección del medio ambiente). Limpie el
soplador inmediatamente si se ha derramando combustible. Deje que
las ropas húmedas se sequen bien antes de echarlas a un contenedor
cubierto para prevenir la combustión instantánea.
• Evite el contacto del combustible con su ropa. Cambie su ropa
inmediatamente si se ha vertido combustible (riesgo de incendio).
• Inspeccione la tapa de combustible periódicamente y asegúrese que
queda firmemente sujeta.
• Apriete cuidadosamente el tornillo de cierre del tanque de
combustible. Cambie de lugar para arrancar el motor (por lo menos a
una distancia de 3 metros del lugar de reabastecimiento) (9).
• Nunca reponer combustible en habitaciones cerradas. Los vapores de
combustible se acumulan al nivel del suelo (riesgo de explosión).
• Únicamente transporte y almacene el combustible en contenedores
aprobados. Asegúrese que el combustible almacenado no queda al
alcance de niños.
• No intente reponer combustible en un motor caliente o en marcha.
89
Page 90

Método de funcionamiento
(11)
(12)
(10)
• Utilizar el soplador sólo cuando las condiciones de luz y visibilidad
sean buenas. Durante las estaciones de frió, tome precauciones en
áreas húmedas y resbaladizas, hielo y nieve (riesgo de caídas).
Siempre utilice un calzado seguro.
• Nunca trabaje sobre superficies poco estables o terrenos con gran
desnivel.
• Para reducir el riesgo de daños personales, no dirigir el chorro de aire
hacia transeúntes, dado que la alta presión del aire puede herir los
ojos y puede lanzar pequeños objetos a gran velocidad.
• Nunca inserte ningún objeto extraño en la entrada de aire ni en la
salida del soplador. Se dañaría la hélice y puede causar un daño grave
al operador o a transeúntes si el objeto o partes rotas salen
rechazadas a gran velocidad.
• Prestar atención a la dirección del viento, es decir, no trabaje contra el
viento.
• Para reducir el riesgo de volcar y perder el control, no camine hacia
atrás mientras se trabaja con la máquina.
• Apague siempre el motor antes de limpiar o hacer el servicio a la
máquina, o al cambiar partes de la misma.
Instrucciones de mantenimiento
• Guarde respeto al medio ambiente. Trabaje con el soplador realizando
el mínimo ruido y polución posibles. En particular, compruebe que el
ajuste del carburador es el adecuado.
• Limpie el soplador periódicamente y compruebe que todos los tornillos
y tuercas están firmemente apretados.
• Nunca efectuar el mantenimiento o almacenaje del soplador cerca de
llamas, chispas, etc (11).
• Siempre almacene el soplador en una habitación cerrada y bien
ventilada, y con el tanque de combustible vacío.
Observe y siga todas las instrucciones de prevención de accidentes
aplicables, emitidas por asociaciones, sindicatos y compañías de
seguros. No realice ninguna modificación en el soplador dado que esto
pondría en riesgo su seguridad.
La realización del mantenimiento o reparaciones por parte del usuario
se limita a las actividades que se describen en el manual de
operaciones. Las operaciones restantes deben efectuarse por el Agente
Autorizado de Servicio.
Utilice sólo piezas de recambio y accesorios suministrados por DOLMAR.
La utilización de piezas no aprobadas conlleva un aumento en el riesgo
de accidentes y daños. DOLMAR no aceptaría ninguna responsabilidad
por los accidentes o daños que sean causados por el uso de accesorios
no aprobados.
Primeros auxilios
Para el caso de accidente asegúrese que un botiquín de primeros
auxilios esté disponible cerca del lugar de trabajo. Reponer
inmediatamente cualquier producto que se utilice del botiquín.
Cuando se pida ayuda, se debe proporcionar la siguiente
información.
• Lugar del accidente
• Qué ha ocurrido
• Número de personas heridas
• Clase de heridas
• Su nombre
Embalaje
El soplador DOLMAR se suministra en una caja protectora de cartón
para impedir daños durante el transporte. El cartón es una materia
prima básica y es por consiguiente reusable o apropiado para reciclar
(reciclado de papel de desecho).
90
Page 91

Sólo para países europeos
Declaración de conformidad de la CE
Los abajo firmantes, Tamiro Kishima y Rainer Bergfeld, como
personas autorizadas por Dolmar GmbH, declaran que la(s)
máquina(s) DOLMAR:
Designación de la máquina:
Soplador a Gasolina
N° de modelo/ Tipo: PB-252.4
ESPECIFICACIONES: consulte la tabla
“ESPECIFICACIONES”.
son de producción serie y
Cumplen con las siguientes Directivas europeas:
2000/14/CE 2006/42/CE
Y se han fabricado de acuerdo con los siguientes estándares o
documentos estandarizados:
EN15503
Los documentos técnicos están en un archivo en:
Dolmar GmbH,
Jenfelder Straße 38, Abteilung FZ,
D-22045 Hamburgo
El procedimiento de evaluación de conformidad requerido por la
Directiva 2000/14/CE se realizó de acuerdo con el anexo V.
Nivel de potencia sonora medido: 102 dB
Nivel de potencia sonora garantizado: 106 dB
14. 6. 2010
Tam i ro K i sh i ma
Director General
Rainer Bergfeld
Director General
ESPECIFICACIONES
Modelo PB-252.4
Peso (sin tubos) (kg) 4,5
Dimensiones (sin tubos) (largo x ancho x alto) (mm) 350 × 231 × 368
Máxima velocidad de motor (min
Ralentí (min
Desplazamiento total (mL) 24,5
Combustible a usar Gasolina para autos
Volumen del tanque de combustible (L) 0,52
Aceite del motor
Volumen del aceite de motor (L) 0,08
Carburador (diafragma) WALBRO WYL
Encendido Encendido en estado sólido
Bujías NGK CMR6A
Distancia entre electrodos (mm) 0,7 - 0,8
a
Vibración según EN15503
Nivel promedio de presión de ruido
según EN15503
Nivel Promedio de potencia del ruido
según EN15503
hv eq
Incertidumbre K (m/s
L
PA eq
Incertidumbre K dB(A) 1,4
L
WA eq
Incertidumbre K dB(A) 1,4
Nota:
1. Utilice el aceite y la bujía de alta tensión designados por DOLMAR.
2. Las especificaciones se podrán modificar sin previo aviso.
-1
) 7.800
-1
) 3.500
Aceite SAE 10W-30 de clasificación API, clase SF o superior
(para motores de automóviles de 4 tiempos)
(m/s2)9,3
2
)0,5
dB(A) 90,8
dB(A) 103,7
91
Page 92

DENOMINACIÓN DE PARTES
Vendido por
separado
Conjunto de colección de polvo
(Vendido por separado)
DENOMINACIÓN DE PARTES DENOMINACIÓN DE PARTES DENOMINACIÓN DE PARTES DENOMINACIÓN DE PARTES
1. Interruptor de paro 8. Tanque de combustible 15. Tapa de la bujía 22. Tubo de Aspirador
2. Mango principal
3. Palanca de disparo 10. Silenciador 17. Tapón de aceite 24. Saco de polvo
4. Bomba de cedado 11. Mango de apoyo 18. Tubo del soplador
5. Tapa de filtro de aire
6. Palanca de choque 13. Tornillo 20. Boquilla B del soplador
7. Mango de arrancador 14. Protector 21. Codo
9. Tapón de tanque de
combustible
12. Botón de bloqueo del
acelerador
16. Bujía de alta tensión 23. Marca de flecha
19. Boquilla A del soplador
92
Page 93

INSTRUCCIONES DE MONTAJE
PRECAUCIÓN : Antes de efectuar cualquier trabajo en el soplador,
PRECAUCIÓN : Arrancar el soplador sólo después de ensamblarlo
siempre detener el motor y separar los conectores
de la bujía.
Siempre llevar guantes protectores.
completamente.
1. ENSAMBLAJE DE LOS TUBOS DEL SOPLADOR.
1) Alinear las ranuras del tubo del soplador con las tetillas de la
carcasa del motor e introducir el tubo.
2) Girar el tubo en dirección de las agujas del reloj y sujetar
firmemente.
3) Coloque la abrazadera alrededor de la abertura del tubo
soplador.
Apriete firmemente con el perno y la tuerca .
2. ENSAMBLAJE DEL ACCESORIO ASPIRADOR.
1) Instalación del tubo del aspirador (boquilla)
(1) Aflojar el tornillo y abrir el protector .
ADVERTENCIA
Al emplear esta máquina como soplador, asegurarse de la
fijeza completa del tornillo siempre antes de empezar el
trabajo. Si el tornillo es suelto, apriétenlo de nuevo.
La operación con el tornillo suelto es peligrosa.
El propulsor puede atrapar sus dedos o su ropa provocando un
accidente serio.
Precaución: El motor no se pondrá en marcha a menos que el protector
(2) Alinear la flecha marcada sobre el tubo de aspirador con
(3) Girar el tubo del aspirador hasta que se alinee con “ ”
(4) Apriete firmemente el tubo de aspirador en el soplador con el
Precaución: No realice el apriete en el paso (4) anterior si se va a
Precaución: No apriete demasiado el tornillo .
Precaución: El motor no se pondrá en marcha a menos que el tubo de
esté completamente cerrado.
el “ ” marcado en el soplador. Entonces insertar el tubo del
aspirador en el soplador.
marcado en el soplador para sujetar el tubo del aspirador.
tornillo y la ménsula .
utilizar el soplador en un país o región donde no se utiliza
la marca CE.
aspirador esté completamente montado.
ADVERTENCIA
Siempre debe sujetar el extremo del tubo del aspirador cuando coloque
o quite el tubo del aspirador.
2) Instalación del codo y saco de polvo.
(1) Abra la cremallera del saco.
(2) Inserte el codo en el saco. Fije el codo en esa posición con la
banda de velero.
(3) Instale el codo en el soplador.
(4) Coloque la abrazadera alrededor de la abertura del codo.
Apriete firmemente con el perno y la tuerca .
Precaución: No realice el apriete en el paso (4) anterior si se va a
utilizar el soplador en un país o región donde no se utiliza
la marca CE.
ADVERTENCIA
No intente recoger grandes virutas de madera, metal,
vidrio, piedras, líquidos, cigarrillos encendidos,
productos pirotécnicos o similares.
Siempre monte el protector/tubo del aspirador en la forma correcta
antes de poner en marcha la máquina. El funcionamiento sin el
protector/tubo del aspirador es peligroso, el propulsor puede atrapar sus
dedos o su ropa y provocar daños graves.
No intente quitar el tornillo (1) o desmontar el tubo del aspirador.
Está establecida normativamente la distancia de seguridad mínima de
900 mm entre el propulsor y el principio del tubo.
93
Page 94

ANTES DE EMPEZAR EL TRABAJO
Figura 1
Figura 2
Límite inferior
Límite superior
Figura 3
Límite superior
Límite inferior
Indicador de nivel de
aceite
Figura 4
Figura 5
Estante
Figura 6
Estante
1. Inspección y reabastecimiento de aceite de motor
(1) Realice el procedimiento siguiente cuando el motor esté frío.
Asegúrese de que el motor está sobre una superficie horizontal como se muestra en la Figura 1.
• Inspección: Quite el tapón de aceite. Limpie el indicador de nivel de aceite. Vuelva a instalar el tapón de aceite (Figura 2) y sáquelo.
Confirme que el aceite está entre el límite inferior o superior del indicador de aceite.
• Relleno: Después de hacer la inspección si el aceite está por debajo del límite inferior, añada aceite a través de la misma
(2) Es posible que necesite rellenar aceite aproximadamente cada 10 horas de uso (cada 10 reabastecimientos de combustible).
(3) Si el aceite ha cambiado de color o tiene impurezas, reemplácelo. (Para el intervalo y método de reemplazo, consulte la página 99)
Aceite recomendado: SAE 10W-30 de clasificación API, clase SF o superior (para motores de automóviles de 4 tiempos)
Volumen de aceite: 0,08L aproximadamente. (2,7 fl. oz)
Método de la inspección de
aceite de motor
abertura que fue quitado el tapón de aceite. Consulte la Figura 4 sobre cómo orientar el motor para rellenar el aceite.
NOTA
• Si el motor no está en una posición como la mostrada en la Figura 1 sobre una superficie horizontal, la indicación del nivel de aceite podrá
no ser correcta.
• Si el aceite está reabastecido más del límite, el aceite puede ensuciarse o prender fuego con humo blanco.
Reemplazo de la “bayoneta de aceite” del aceite
• Elimine el polvo y la suciedad de los alrededores del orificio de reabastecimiento y saque la bayoneta de nivel de aceite.
• No ensucie la bayoneta de nivel con arena o polvo. Si lo hace, la arena y el polvo que se han adherido a la bayoneta de nivel causarán una
circulación irregular del aceite y se desgastarán las piezas del motor, lo que causará problemas de funcionamiento.
• Una manera de conservar la bayoneta limpia es insertarla por su asa en la cubierta del motor.
Después de rellenar aceite
• Limpie con un trapo el aceite vertido.
94
Page 95

2. Abastecimiento de combustible
ADVERTENCIA
• Cuando reabastezca combustible a la unidad, asegúrese de observar las instrucciones siguientes para evitar una ignición o incendio:
- El suministro de combustible deberá ser realizado en un lugar donde no haya fuego. No lleve nunca el fuego (fumar, etc.) cerca del lugar
donde realiza el suministro de combustible.
- Pare el motor y déjelo enfriar antes de realizar el reabastecimiento.
- Abra el tapón del tanque de combustible despacio. Es posible que el combustible se derrame si hay presión interna.
- Tenga cuidado para no derramar el combustible. Cualquier combustible vertido deberá ser limpiado.
- Efectúe el abastecimiento en un lugar con ventilación adecuada.
• Tenga buen cuidado con el manejo de combustible.
- El combustible pegado al piel o metido en los ojos podrá causar alergia o inflamación. En caso que tenga alguna anormalidad en el
cuerpo, consulte con un médico especializado inmediatamente.
• NO ponga aceite en el tanque de combustible.
PERÍODO DE ALMACENAMIENTO DEL COMBUSTIBLE
El combustible debe utilizarse dentro de un período de 4 semanas, incluso cuando se almacene en un recipiente especial en un área sombreada
y bien ventilada.
Cuando no se utilice un recipiente especial o si éste no está cubierto, el combustible puede deteriorarse en un día.
Almacenaje de la máquina y del tanque de reabastecimiento
• Conservar la máquina y el tanque en lugar fresco libre de luz solar directa.
• No deje nunca combustible en un automóvil.
COMBUSTIBLE
El motor es de cuatro tiempos. Asegúrese de utilizar gasolina normal o especial para automóviles.
Puntos relacionados con el combustible
• Nunca use gasolina mezclada con aceite de motor. Si lo hace se producirá una excesiva acumulación de carbonilla u ocurrirán problemas
mecánicos.
• El uso de un combustible deteriorado puede producir irregularidades en el arranque.
Cuando reabastezca combustible, asegúrese de parar el motor y confirmar que el motor está frío.
MÉTODO DE REABASTECIMIENTO DE COMBUSTIBLE
• Afloje el tapón del tanque un poco para liberar la presión del tanque.
• Quite el tapón del tanque, y reabastezca combustible al tiempo que deja salir el aire inclinando el tanque de combustible de manera que el
orificio de reabastecimiento quede orientado hacia arriba.
(NO llene nunca el tanque de combustible hasta rebosar.)
• Después de reabastecer combustible, apriete el tapón del tanque firmemente.
• Si hay algún defecto o daño en el tapón del tanque, reemplácelo.
• El tapón del tanque se estropea con el paso del tiempo. Reemplácelo cada dos o tres años.
• NO ponga combustible en el orificio de llenado de aceite.
95
Page 96

Figura 1
Interruptor de paro
Figura 2
CIERRE
Figura 4
Figura 5
ABRA
Figura 3
Bomba de cedado
OPERACIÓN
1. Modo de arranque
ADVERTENCIA
• No deje arrancar el motor en el lugar donde se ha abastecido el combustible.
- Podrá causar ignición o incendio. Cuando arranque el motor, manténgase a una distancia de al menos 3 metros.
• El gas de escape del motor es tóxico. No arranque el motor en un lugar sin ventilación adecuada tales como en el interior, túnel, etc.
- Utilizar en un lugar sin ventilación adecuada podrá causar efecto tóxico del gas de escape.
• Una vez arrancado, si se siente anormal en sonido, olor, vibración, etc., detenga inmediatamente el motor y proceda a inspeccionarlo.
- Seguir utilizándolo sin parar podrá causar un accidente.
• Compruebe que el motor parará cuando el interruptor de paro está en la posición “O”.
1) Cuando el motor esté frío o después de reabastecer
combustible
(1) Coloque la máquina sobre una superficie plana.
(2) Coloque el interruptor de paro en la posición “ I ” (Figura 1).
(3) Continúe empujando la bomba de cedado hasta que entre
combustible en la misma (Figura 2).
• En general, el combustible entra en la carburador después
de empujar de 7 a 10 veces.
• Si la bomba de cedado se empuja excesivamente, un
exceso de la gasolina vuelve al tanque de combustible.
(4) Levante la palanca del choque hasta la posición cerrada
(Figura 3).
(5) Sujete el mango principal con la mano izquierda para evitar
que el motor se mueva.
(6) Tire suavemente del mango de arrancador hasta que se sienta
una resistencia (punto de compresión). Luego, retorne el
mango de arrancador y tire con fuerza (Figure 4).
• Nunca tire hasta el límite del cordón.
• Cuando se tire del mango de arrancador, no la suelte
inmediatamente. Sujete el mango de arrancador hasta que
vuelva a su posición original.
(7) Abra la palanca de choque después de que el motor haya
arrancado (Figura 5).
• Abra la palanca de choque progresivamente al tiempo que
comprueba el funcionamiento del motor. Asegúrese de
abrir la palanca de choque plenamente al final.
• En tiempo frío o cuando el motor está frío, nunca abra
súbitamente la palanca de choque. De hacerlo, el motor
puede pararse.
(8) Deje que el motor se caliente durante 2 ó 3 minutos.
(9) El calentamiento se habrá completado cuando se produzca
una aceleración rápida del motor desde pocas rpm hasta todo
gas.
96
Page 97
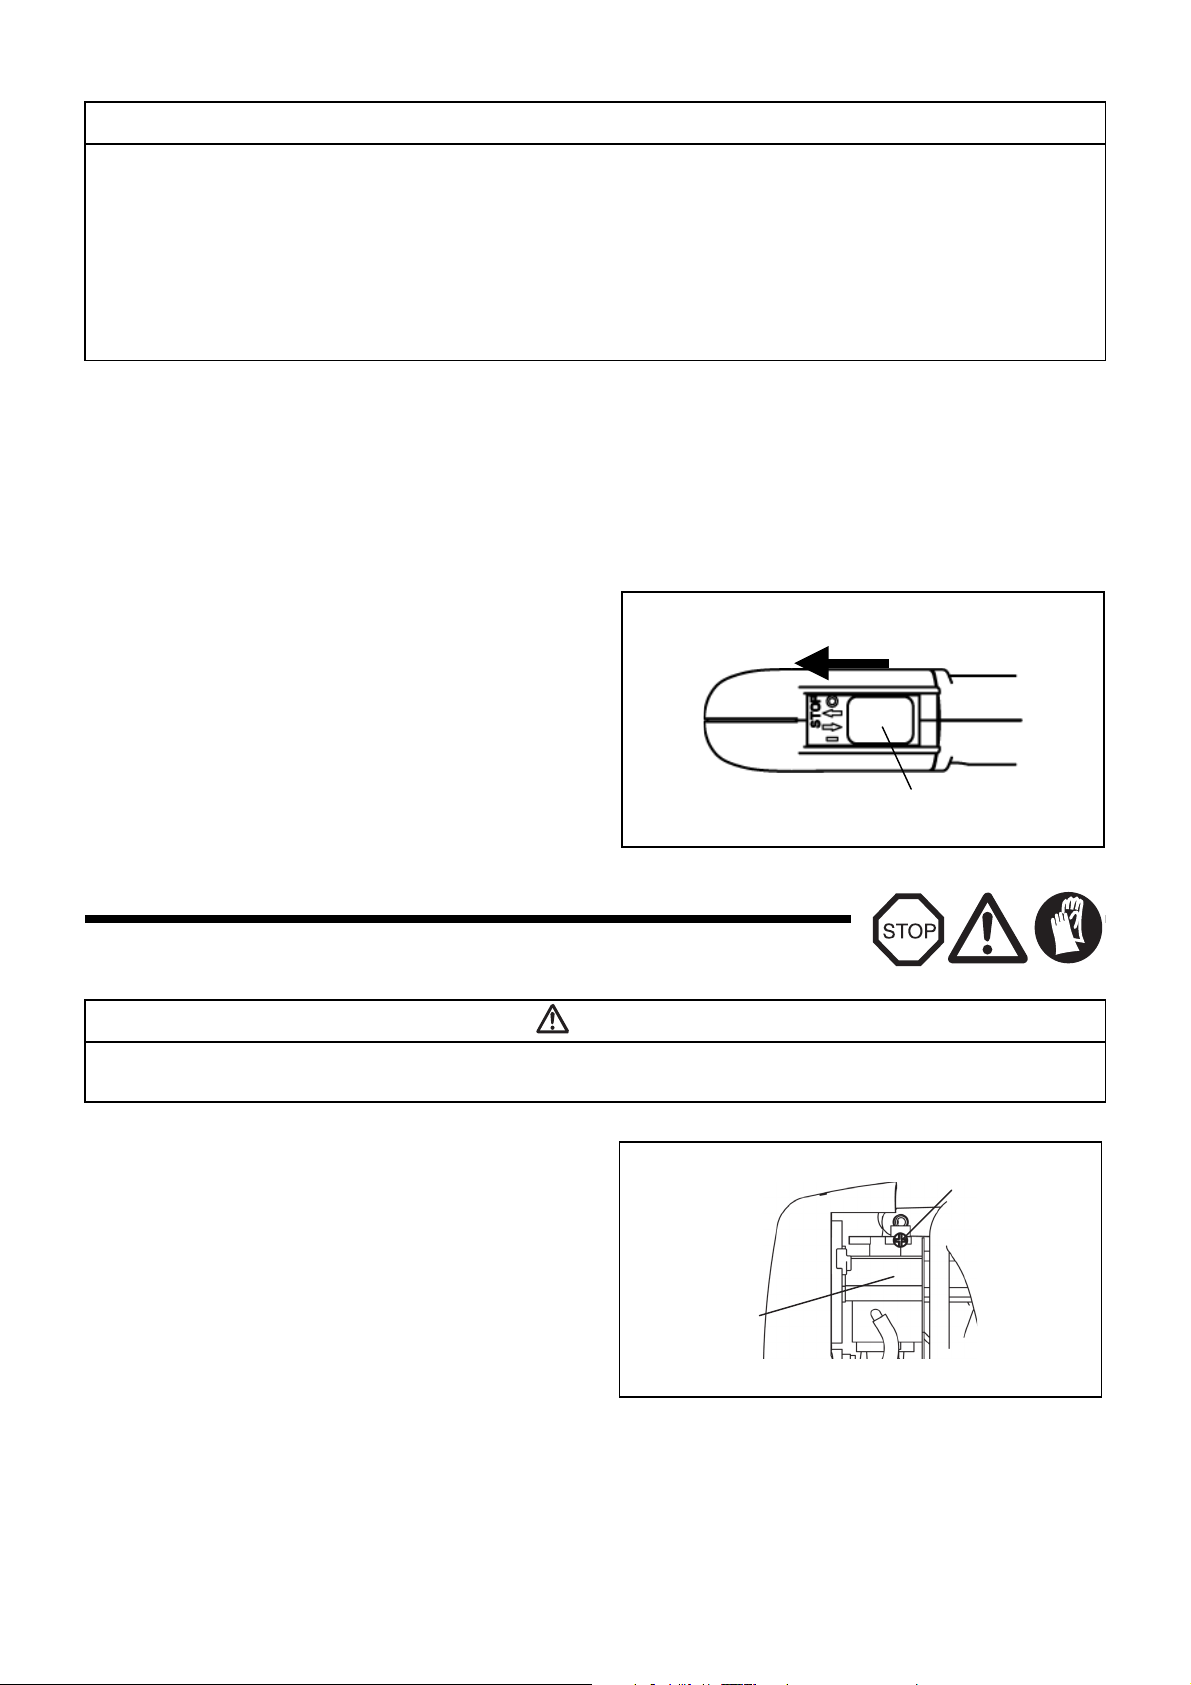
NOTA
Interruptor de paro
Tornillo de ajuste
Carburador
• La palanca de choque, si se levanta más encima de la posición “CLOSE”, el motor podrá dañarse.
• Si el motor detona y se para, vuelva a poner esta palanca en la posición “OPEN” y tire del mango de arrancador varias veces para arrancar
el motor otra vez.
• Si el operario sigue tirando del mango de arrancador varias veces estando la palanca del estrangulador en la posición “CLOSE”, es posible
que resulte difícil arrancar el motor debido a una anegación de combustible.
• En el caso de una alegación de combustible, quite la bujía y tire del mango varias veces rápidamente para descargar cualquier exceso de
combustible. Seque el electrodo de la bujía.
• En caso de que la válvula de mariposa no vuelva hasta que toque el tornillo ajustador de marcha lenta aunque la palanca de admisión de
los gases funcione a la velocidad baja, ajuste el enganche del cable de control para que vuelva.
2) Cuando está caliente el motor
(1) Coloque la máquina sobre el suelo plano.
(2) Empuje unas veces la bomba de cebado.
(3) Asegúrese que la palanca de choque está abierta.
(4) Sujete el mango principal con la mano izquierda para evitar que el motor se mueva.
(5) Saque lentamente el mango de arrancador hasta que sienta cierta resistencia. Entonces, vuelva una vez el mango de arranque y tire
fuertemente.
(6) En caso de que sea difícil el arranque del motor, proceda a arrancarlo con la válvula mariposa abierta por 1/3 aproximadamente.
2. Modo de parar
Suelte la palanca de disparo para reducir la velocidad del motor y ajuste
el interruptor de paro en la posición “O”.
(Suelte el bloqueo de la palanca del acelerador si está bloqueando la
palanca de disparo en la posición totalmente abierta.)
AJUSTE DEL RALENTÍ
PELIGRO
El carburador se ajusta en fábrica. Le rogamos que no haga ningún otro ajuste que el de ralentí. Si fuera necesario reajustarlo, póngase en
contacto con su distribuidor o un Agente de Servicio Autorizado.
Comprobación del giro a baja velocidad
Ajuste el giro a baja velocidad a 3.500 rpm (min–1).
• Si fuera necesario cambiar la velocidad de giro, regule el tornillo de
ajuste usando un destornillador Philips.
• Gire el tornillo de ajuste hacia la derecha, y aumentará la velocidad el
motor. Gire el tornillo de ajuste hacia la izquierda, y disminuirá la
velocidad el motor.
97
Page 98
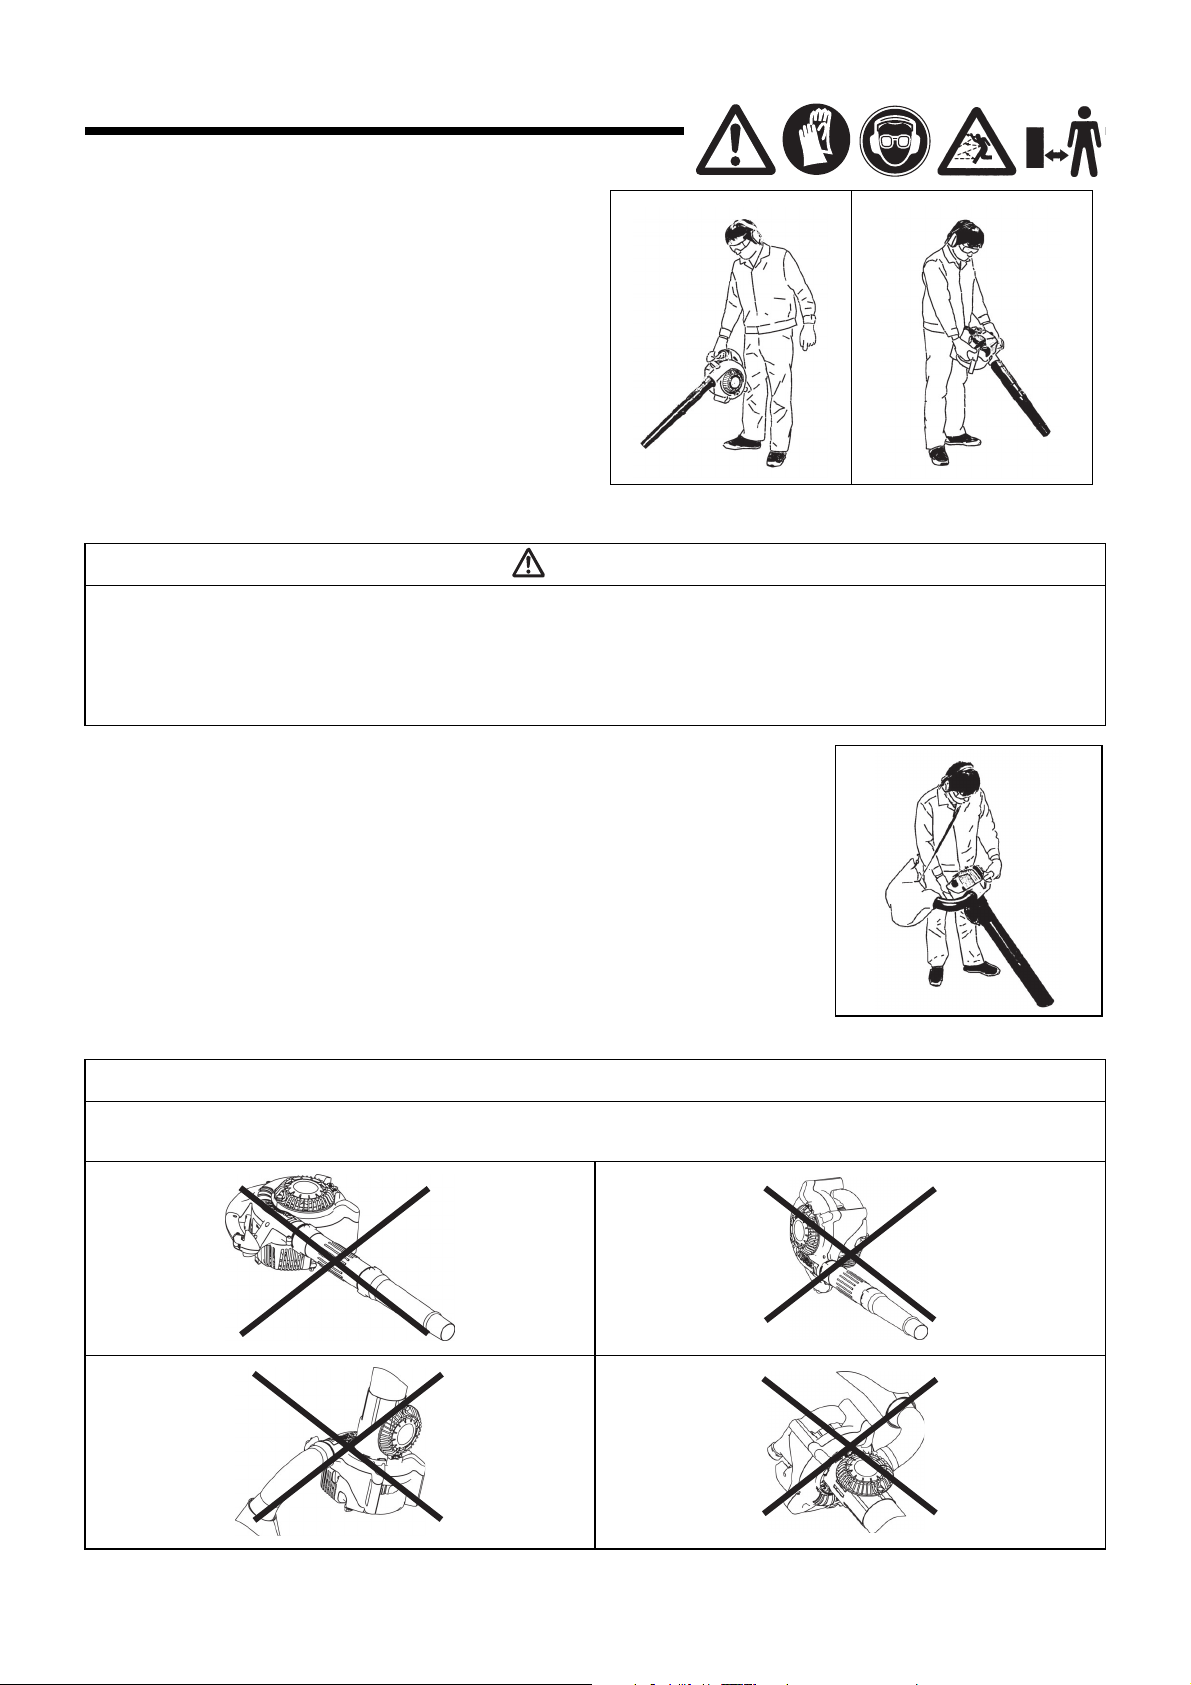
PROCEDIMIENTO DE OPERACIÓN
1. Operación del soplador
• Sujete bien el soplador durante la operación.
• Dirija la punta de la boquilla hacia un objeto a soplar y tire la palanca
de disparo.
• Apriete completamente la palanca de disparo, mantenga presionado el
botón de bloqueo del acelerador y suelte el dedo de la palanca de
disparo cuando esté acelerado completamente.
• Vuelva a tirar de la palanca de disparo para liberar el bloqueo del
acelerador.
• Puesto que la parte inferior del tanque de combustible es el mango de
apoyo, puede manejar con dos manos. En este caso, debe agarrar el
mango de apoyo con la mano derecha.
2. Operación de colección de polvo
ADVERTENCIA
• No deje aspirar aceite combustible, gasolina, cigarrillo encendido, etc.
- Podrá causar incendios.
• No deje aspirar piezas de madera grandes, metal, cristal, piedras u otros materiales extraños.
- Podrá causar averías.
• Un saco de polvo demasiado lleno podrá rebosar y verterse hacia el lado del motor. Vacíe el saco antes de que se llene completamente.
- Podrá causar incendios.
• Cuelgue la cinta del saco de polvo en el hombro y ajuste el largo de la cinta para que se facilite la
operación.
• Asegúrese que el saco de polvo no está torcido y proceda la operación de colección de polvo tirando
la palanca de disparo.
• Cuando el saco de polvo esté lleno, quítelo de la máquina y abra la cremallera para vaciarlo.
NOTA
Si utiliza la máquina con el protector orientado hacia arriba o el mango principal hacia abajo, podrá aparecer humo blanco, el aceite podrá
contaminarse o el aceite podrá derramarse.
98
Page 99
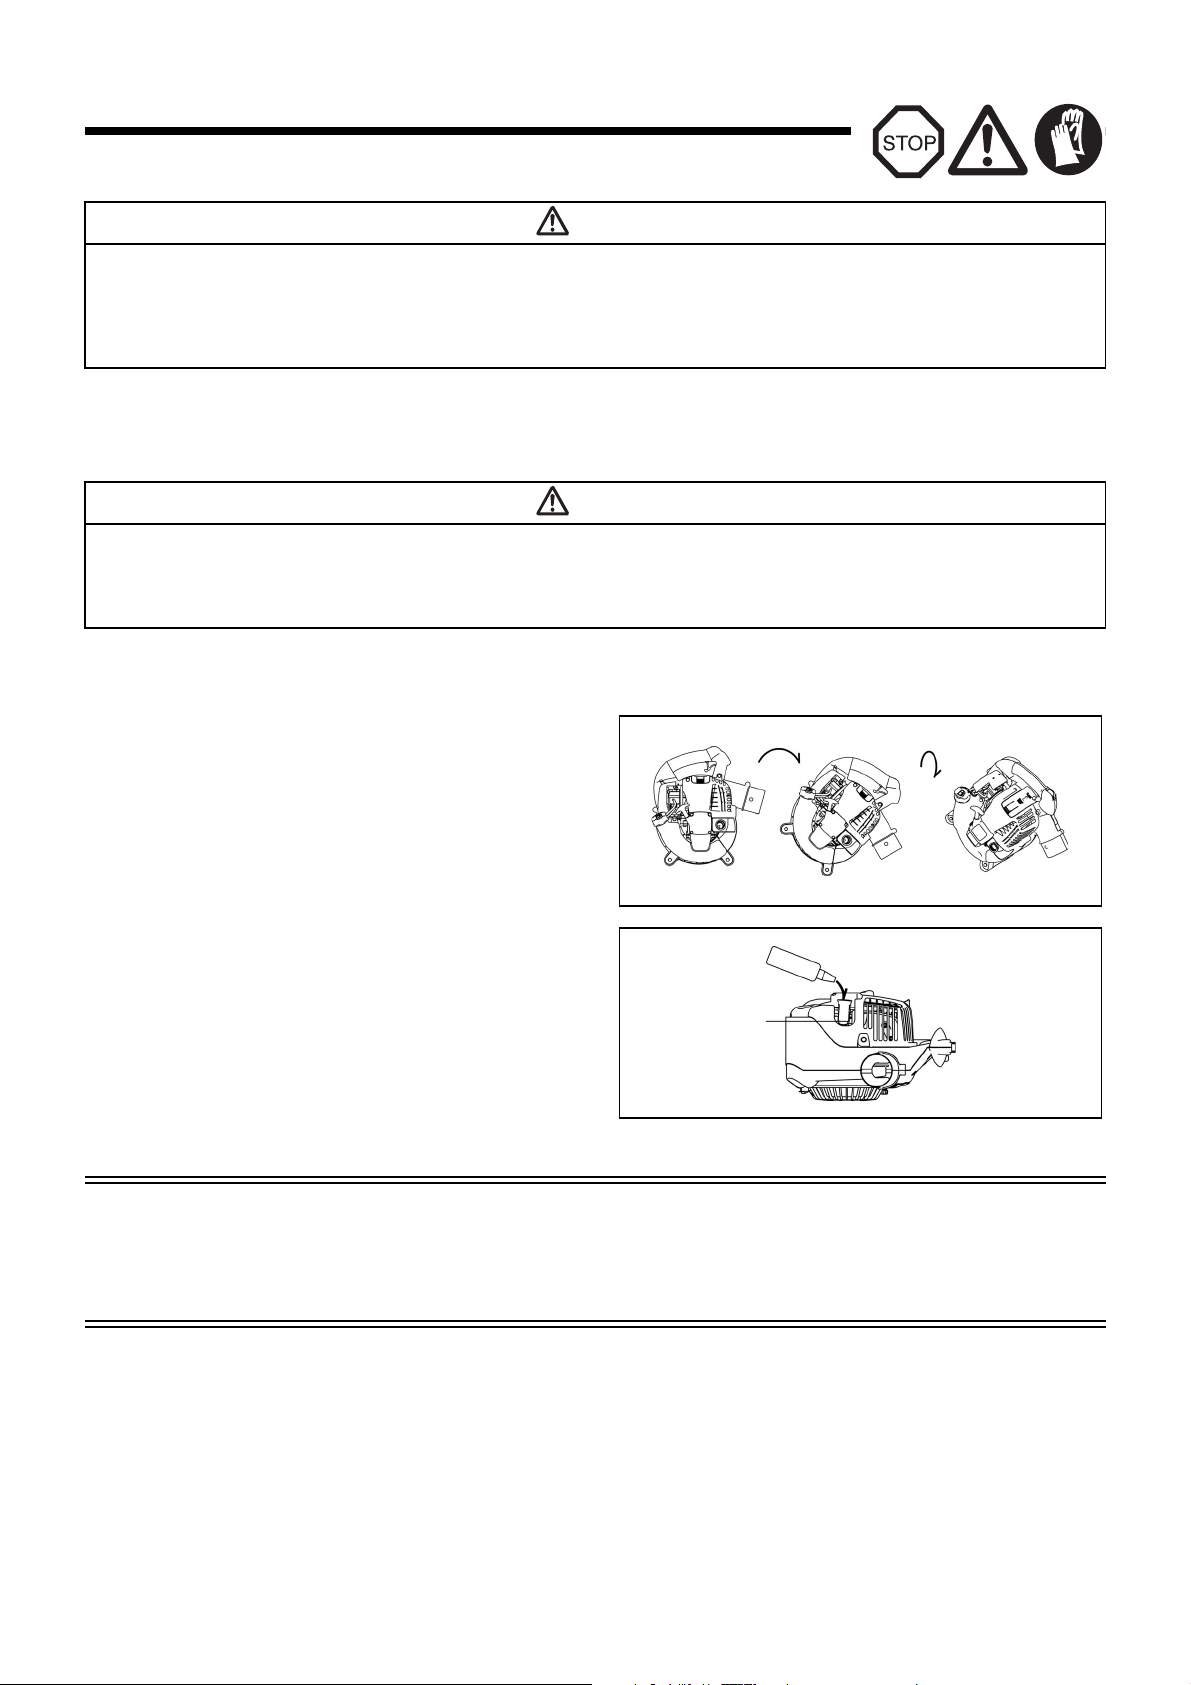
INSPECCIÓN Y MANTENIMIENTO
Figura 1
Figura 2
Estante
PELIGRO
• Antes de efectuar la inspección y mantenimiento, detenga el motor y efectúe la operación después de que se haya enfriado el motor. Quite
la bujía y el tapón de la bujía.
- La operación que se efectúa inmediatamente después de que pare el motor o la operación con el tapón de la bujía puesto podrá causar un
accidente por quemadura o por el arranque imprevisto.
• Después de terminar la inspección y mantenimiento, compruebe que todas las piezas estén instaladas antes de empezar la operación.
1. Cambio del aceite del motor
El aceite del motor que se ha deteriorado acortará sustancialmente la duración de las piezas deslizantes y giratorias. Asegúrese de comprobar el
período de recambio y la calidad del aceite.
PELIGRO
• En general, el motor y el aceite siguen calientes después de pararse el motor. Cuando cambie el aceite, confirme que el motor y el aceite se
han enfriado. Si no lo hace puede quemarse. Deje pasar tiempo suficiente después de parar el motor para que el aceite del motor vuelva al
tanque de aceite con objeto de asegurar una lectura precisa del indicador de nivel de aceite.
• Si el aceite es suministrado más del límite, puede ensuciarse o puede prender fuego con humo blanco.
Intervalo de recambio: Después de las primeras 20 horas de funcionamiento y posteriormente cada 50 horas de funcionamiento.
Aceite recomendado: SAE10W-30 de clasificación API, clase SF o superior (para motores de automóviles de 4 tiempos)
Haga lo siguiente durante el recambio del aceite.
(1) Confirme que el tapón del tanque está apretado firmemente.
(2) Saque el tapón de aceite.
• No manche la bayoneta con suciedad o polvo.
(3) Incline la máquina en orden como se muestra en la Figura 1.
• El aceite se recibirá en un recipiente.
(4) Oriente la máquina como se muestra en la Figura 2 y rellene
aceite hasta el estante dentro del tubo de aceite.
(5) Después de rellenar el aceite, apriete firmemente la bayoneta
de nivel. Un apriete insuficiente de la bayoneta puede causar
fugas de aceite.
Puntos relacionados con el aceite
• Nunca tire el aceite de motor usado a la basura, sobre la tierra o a un canal de aguas residuales. El desecho del aceite del motor está
regulado por la ley. Siga siempre las leyes y regulaciones pertinentes cuando lo deseche. Para una información más detallada, póngase en
contacto con un Agente de Servicio Autorizado.
• El aceite se deteriora aunque no se use. Realice inspecciones y cambie el aceite regularmente (cambie el aceite cada 6 meses).
99
Page 100

2. Limpieza del depurador de aire
Placa
Elemento
(esponja)
Cubierta del
depurador de
aire
Respiradero
Elemento
(fieltro)
Perno de fijación
Prender este parte y quitar el
elemento (fieltro).
Figura 1
Figura 3
Electrodo lateral (–)
Figura 2
Figura 4
Distancia de electrodos
0,7 - 0,8 mm
ADVERTENCIA: LOS MATERIALES INFLAMABLES
ESTÁN ESTRICTAMENTE PROHIBIDOS
Intervalo de limpieza e inspección: diariamente (cada 10 horas de
funcionamiento)
(1) Quite los pernos de fijación de la cubierta del depurador de
aire.
(2) Tire del lado inferior de la cubierta y suéltela.
(3) Gire la palanca de choque a la posición de cierre total y no
permita que entre polvo o suciedad en el carburador.
(4) Si el aceite se adhiere al elemento (esponja), exprimirla
fuertemente.
(5) Para contaminación fuerte:
• Quite el elemento (esponja), sumérjalo en agua templada o
en detergente neutro diluido en agua, y séquelo
completamente.
• Limpiar el elemento (fieltro) con gasolina, y secarlo
completamente.
(6) Antes de colocar el elemento, secarlo completamente. Si el
elemento no se seca completamente, el motor no puede
arrancar sin contratiempo.
(7) Secar con tejido usado el aceite adherente en la tapa del filtro
de aire y el respiradero de placa.
(8) Inmediatamente después de terminar la limpieza, instale la
cubierta del depurador y apriétela con los pernos de fijación (coloque primero la garra superior y luego la inferior).
3. Inspección de la bujía de alta tensión
PELIGRO
• Limpiar el elemento varias veces a diario si hay polvos adherentes en exceso.
• Si la marcha continua con el elemento adherente del aceite, el aceite en el filtro de aire puede caerse fuera, provocando contaminación del
aceite.
(1) Abrir y cerrar la tapa de la bujía de alta tensión
Cuando vaya a abrir la tapa, ponga los dedos en el mango
principal y en la parte saliente de la tapa de la bujía (Figura
1). Estire la parte saliente hacía arriba, la cual se dejará
deslizar hacía la dirección de “OPEN” (Figura 2).
Para cerrarla, deje deslizarla hacia la dirección de “CLOSE”
hasta que la uña colocada bajo de la parte saliente de la
tapa de la bujía se ponga encima de la tapa del motor.
Finalmente, presione hacia dentro la proyección.
(2) Quitar la bujía de alta tensión
Para quitar y montar la bujía de alta tensión utilice la llave
de rosca adjunta (Figura 3).
(3) Inspección de la bujía de alta tensión
La distancia entre dos electrodos es 0,7 – 0,8 mm
(Figura 4). En caso de que esta distancia sea demasiado
grande o demasiado pequeña, ajuste para que tenga la
distancia adecuada.
En caso de que la bujía de alta tensión lleve el carbón
acumulado o se encuentre sucia, debe limpiarse
completamente o reemplazarse.
(4) Reemplazar la bujía de alta tensión
Para reemplazarla, utilice NGK-CMR6A.
100
 Loading...