

INSTRUCTION MANUAL
MANUEL D'INSTRUCTION
MANUAL DE INSTRUCCIONES
Cordless String Trimmer
Coupe herbe sans-fil
Desbrozadora Inalámbrica
LXRU01
LXRU02
IMPORTANT: Read Before Using.
IMPORTANT: Lire avant usage.
IMPORTANTE: Leer antes de usar.
012390
1

ENGLISH (Original instructions)
SPECIFICATIONS
Model LXRU01 LXRU02
No load speed 6,000 /min 7,800 /min
Overall length
Cutting diameter with nylon cutting head
Net weight
Rated voltage D.C. 14.4 V D.C. 18 V
Standard battery cartridge(s)
Warning: Use only the battery cartridge(s) described.
• Due to our continuing program of research and development, the specifications herein are subject to change without notice.
• Specifications and battery cartridge may differ from country to country.
• Weight, with battery cartridge, according to EPTA-Procedure 01/2003
USB099-2
IMPORTANT SAFETY
INSTRUCTIONS
WARNING! Read all safety warnings and all
instructions. Failure to follow the warnings and
instructions may result in electric shock, fire and/or
serious injury.
Save all warnings and
instructions for future reference.
General instructions
1. Do not allow persons unfamiliar with the string
trimmer or these instructions to operate the tool.
String trimmers are dangerous in the hands of
untrained users.
2. Be sure that anyone who is to operate the string
trimmer has first read the instruction manual.
3. Use the string trimmer with the utmost care and
attention.
4. Operate the string trimmer only if you are in good
physical condition. Perform all work calmly and
carefully. Use common sense and keep in mind
that the operator or user is responsible for
accidents or hazards occurring to other people or
their property.
5. Never operate the string trimmer when tired,
feeling ill or under the influence of alcohol or
drugs.
6. Avoid accidentally starting:
− Ensure the switch is in the off position before
installing the battery pack. Inserting the
battery pack into the string trimmer with the
switch on invites accidents.
2.9 kg / 3.0 kg 2.9 kg / 3.1 kg
(6.3 lbs / 6.5 lbs) (6.5 lbs / 6.7 lbs)
BL1415 / BL1430 BL1815 / BL1830
− Carrying the string trimmer with your finger
7. The string trimmer should be switched off
immediately if it shows any signs of abnormal
operation.
8. Disconnect the battery from the string trimmer
before making any adjustments, changing
accessories or storing. Such preventive safety
measures reduce the risk of starting the sting
trimmer accidentally.
9. Don't force the tool. it will do the job better and
with less likelihood of a risk of injury at the rate for
which it was designed.
10. Don't overreach. Keep proper footing and
balance at all times.
Intended use of the tool
1. Use right tool. The cordless string trimmer is only
intended for cutting grass and weeds. It should
not be used for any other purpose such as edging
or hedge cutting as this may cause injury.
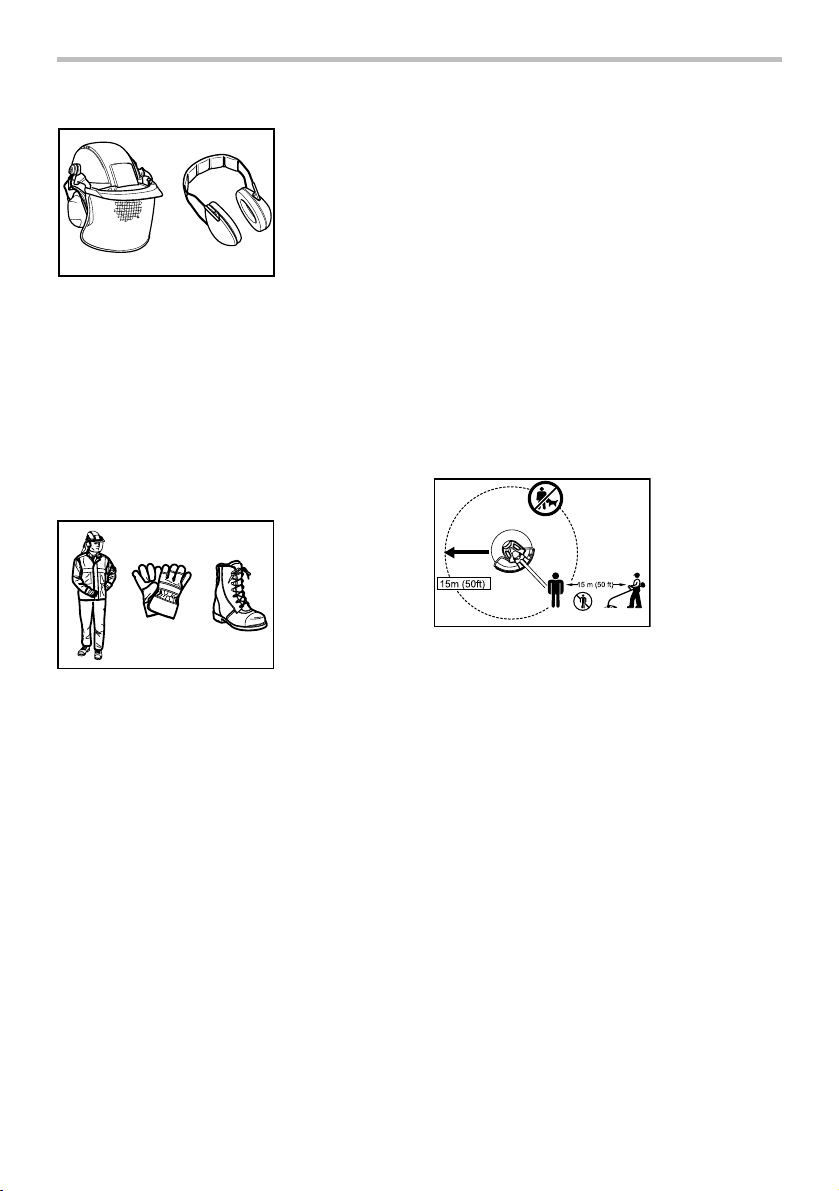
Personal protective equipment
1. Dress Properly. The clothing worn should be
functional and appropriate, i.e. it should be tightfitting but not cause hindrance. Do not wear either
jewelry or clothing which could become entangled
with bushes or shrubs. Wear protective hair
covering to contain long hair.
2. In order to avoid either head, eye, hand or foot
injuries as well as to protect your hearing the
following protective equipment and protective
clothing must be used during operation of the
equipment.
1,229 mm - 1,433 mm
(48-1/2" - 56-1/2")
260 mm
(10-1/4")
on the switch invites accidents.
2
010820
3. Always wear a helmet where there is a risk of
falling objects. The protective helmet is to be
checked at regular intervals for damage and is to
be replaced at least every five years. Use only
approved protective helmets.
4. The visor of the helmet (or alternatively goggles)
protects the face from flying debris and stones.
During operation of the tool always wear goggles,
or a visor to prevent eye injuries.
5. Wear adequate noise protection equipment to
avoid hearing impairment (ear muffs , ear plugs
etc.).
4. When battery pack is not in use, keep it away
from other metal objects, like paper clips, coins,
keys, nails, screws or other small metal objects,
that can make a connection from one terminal to
another. Shorting the battery terminals together
may cause burns or a fire.
5. Under abusive conditions, liquid may be ejected
from the battery; avoid contact. If contact
accidentally occurs, flush with water. If liquid
contacts eyes, seek medical help. Liquid ejected
from the battery may cause irritation or burns.
6. Do not dispose of the battery(ies) in a fire. The
cell may explode. Check with local codes for
possible special disposal instructions.
7. Do not open or mutilate the battery(ies).
Released electrolyte is corrosive and may cause
damage to the eyes or skin. It may be toxic if
swallowed.
Starting up the tool
360°
010821
6. Work overalls protect against flying stones and
debris. It is strongly recommended that the user
wears work overalls.
7. Special gloves made of thick leather are part of
the prescribed equipment and must always be
worn during operation of the tool.
8. When using the tool, always wear sturdy shoes
with a nonslip sole. This protects against injuries
and ensures a good footing.
Electrical and battery safety
1. Avoid dangerous environment. Don't use the tool
in damp or wet locations or expose it to rain.
Water entering the tool will increase the risk of
electric shock.
2. Recharge only with the charger specified by the
manufacturer. A charger that is suitable for one
type of battery pack may create a risk of fire when
used with another battery pack.
3. Use power tools only with specifically designated
battery packs. Use of any other battery packs
may create a risk of injury and fire.
010822
1. Make sure that there are no children or other
people within a working range of 15 meters (50 ft),
also pay attention to any animals in the working
vicinity. Otherwise stop using the tool.
2. Before use always check that the tool is safe for
operation. Check the security of the nylon cutting
head and the guard and the switch trigger/lever
for easy and proper action. Check for clean and
dry handles and test the on/off function of the
switch.
3. Check damaged parts before further use of the
tool. A guard or other part that is damaged should
be carefully checked to determine that it will
operate properly and perform its intended
function. Check for alignment of moving parts,
binding of moving parts, breakage of parts,
mounting, and any other condition that may affect
its operation. A guard or other part that is
damaged should be properly repaired or replaced
by our authorized service center unless indicated
elsewhere in this manual.
4. Switch on the motor only when hands and feet
are away from the nylon cutting head.
5. Before starting make sure that the nylon cutting
head has no contact with hard objects such as
3

branches, stones etc. as the nylon cutting head
will revolve when starting.
Method of operation
1. Only use the tool in good light and visibility.
During the winter season beware of slippery or
wet areas, ice and snow (risk of slipping). Always
ensure a safe footing.
2. Take care against injury to feet and hands from
the nylon cutting head.
3. Never cut above waist height.
4. Never stand on a ladder and run the tool.
5. Never climb up into trees to perform cutting
operation with the tool.
6. Never work on unstable surfaces.
7. Remove sand, stones, nails etc. found within the
working range. Foreign particles may damage the
nylon cutting head and can cause dangerous
kick-backs.
8. Should the nylon cutting head hit stones or other
hard objects, immediately switch off the motor
and inspect the nylon cutting head.
9. Before commencing cutting, the nylon cutting
head must have reached full working speed.
10. Operate the tool only with the shoulder harness
attached which is to be suitably adjusted before
putting the tool into operation. It is essential to
adjust the shoulder harness according to the user
size to prevent fatigue occurring during use.
11. During operation always hold the tool with both
hands. Never hold the tool with one hand during
use. Always ensure a safe footing.
12. The nylon cutting head has to be equipped with
the guard. Never run the tool with damaged
guards or without guards in place!
13. All protective equipment such as guards and the
shoulder harness supplied with the string trimmer
must be used during operation.
14. Except in case of emergency, never drop or cast
the tool to the ground or this may severely
damage the tool.
15. Never drag the tool on the ground when moving
from place to place, the tool may become
damaged if moved in this manner.
16. Always remove the battery cartridge from the tool:
− whenever leaving the tool unattended;
− before clearing a blockage;
− before checking, cleaning or working on the
tool;
− whenever the tool starts vibrating abnormally.
17. Always ensure that the ventilation openings are
kept clear of debris.
Maintenance instructions
1. The condition of the nylon cutting head, protective
devices and shoulder harness must be checked
before commencing work.
2. Turn off the motor and remove the battery
cartridge before carrying out maintenance,
replacing the nylon cutting head or nylon cord
and cleaning the tool.
3. Check for loose fasteners and damaged parts
such as cracks in the nylon cutting head.
4. Follow instructions for lubricating the string
trimmer.
5. When not in use store the equipment in a dry
location that is locked up or out of children's
reach.
6. Use only the manufacturer's recommended
replacement parts and accessories.
7. Inspect and maintain the tool regularly, especially
before/after use. Have the tool repaired only by
our authorized service center.
8. Keep handles dry, clean and free from oil and
grease.
SAVE THESE INSTRUCTIONS.
WARNING:
DO NOT let comfort or familiarity with product
(gained from repeated use) replace strict adherence
to safety rules for the subject product. MISUSE or
failure to follow the safety rules stated in this
instruction manual may cause serious personal
injury.
WARNING:
Use of this product can create dust containing
chemicals which may cause respiratory or other
illnesses.
Some examples of these chemicals are compounds
found in pesticides, insecticides, fertilizers and
herbicides.
Your risk from these exposures varies, depending on
how often you do this type of work. To reduce your
exposure to these chemicals: work in a well ventilated
area, and work with approved safety equipment, such
as those dust masks that are specially designed to filter
out microscopic particles.
USG001-2
4

USD301-1
Symbols
The followings show the symbols used for tool.
・ volts
・ direct current
・ no load speed
・ revolutions or reciprocation per minute
ENC007-7
IMPORTANT SAFETY
INSTRUCTIONS
FOR BATTERY CARTRIDGE
1. Before using battery cartridge, read all
instructions and cautionary markings on (1)
battery charger, (2) battery, and (3) product
using battery.
2. Do not disassemble battery cartridge.
3. If operating time has become excessively
shorter, stop operating immediately. It may
result in a risk of overheating, possible burns
and even an explosion.
4. If electrolyte gets into your eyes, rinse them
out with clear water and seek medical
attention right away. It may result in loss of
your eyesight.
5. Do not short the battery cartridge:
(1) Do not touch the terminals with any
conductive material.
(2) Avoid storing battery cartridge in a
container with other metal objects such
as nails, coins, etc.
(3) Do not expose battery cartridge to water
or rain.
A battery short can cause a large current flow,
overheating, possible burns and even a
breakdown.
6. Do not store the tool and battery cartridge in
locations where the temperature may reach or
exceed 50 ゚ C (122 ゚ F).
7. Do not incinerate the battery cartridge even if
it is severely damaged or is completely worn
out. The battery cartridge can explode in a fire.
8. Be careful not to drop or strike battery.
9. Do not use a damaged battery.
SAVE THESE INSTRUCTIONS.
Tips for maintaining maximum battery life
1. Charge the battery cartridge before
completely discharged.
Always stop tool operation and charge the
battery cartridge when you notice less tool
power.
2. Never recharge a fully charged battery
cartridge.
Overcharging shortens the battery service life.
3. Charge the battery cartridge with room
temperature at 10 ゚ C - 40 ゚ C (50 ゚ F - 104 ゚ F).
Let a hot battery cartridge cool down before
charging it.
4. Charge the battery cartridge once in every six
months if you do not use it for a long period
of time.
5
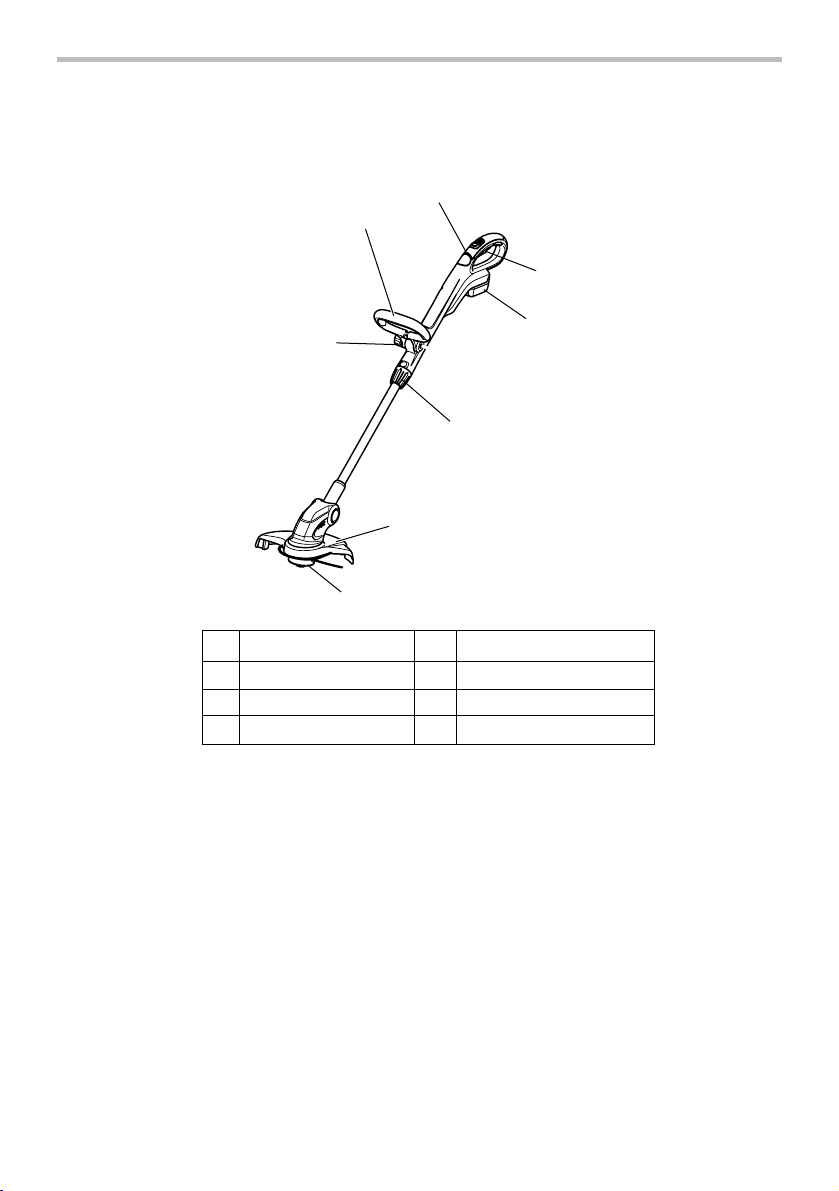
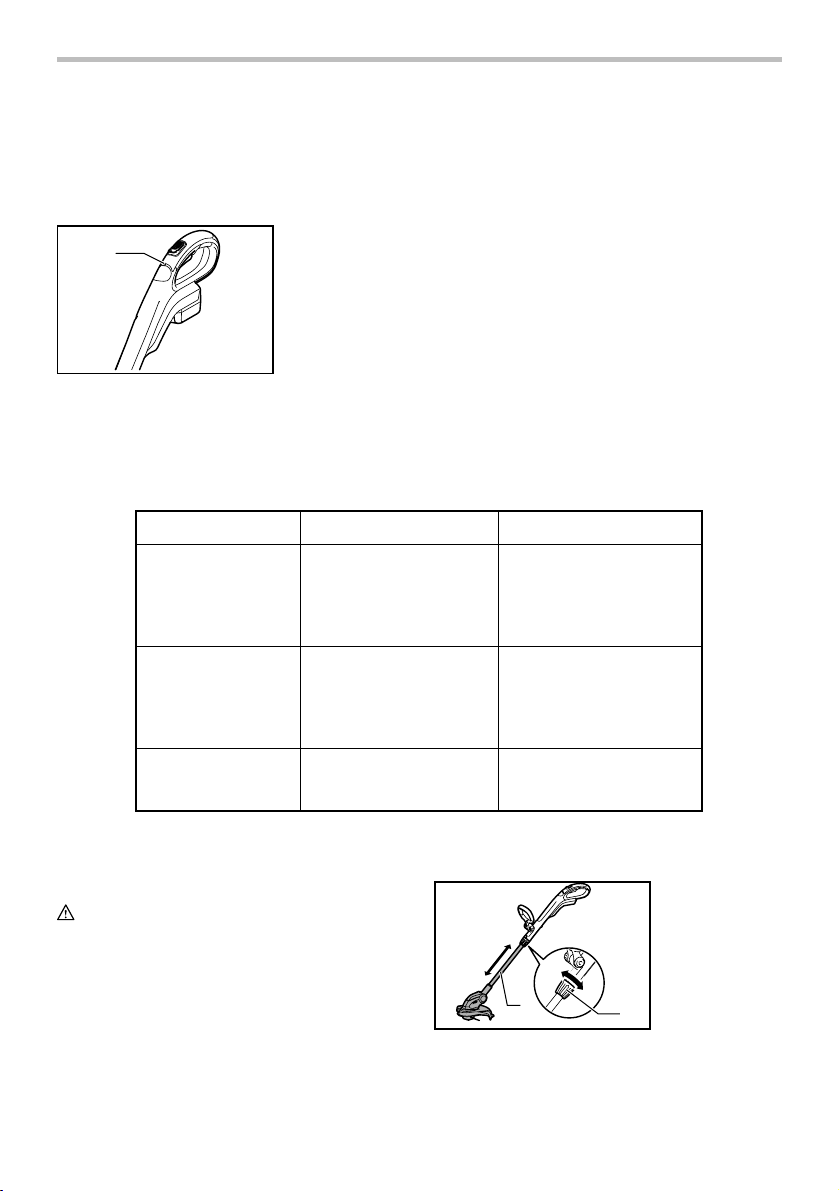
PARTS DESCRIPTION
1
4
2
3
5
6
7
8
013641
1
Indication lamp
2
Switch trigger
3
Battery cartridge
4
Front grip
5
Clamping nut
6
Lock grip
Guard7
8
Nylon cutting head
6
FUNCTIONAL DESCRIPTION
WARNING:
• Always be sure that the tool is switched off
and battery cartridge is removed before
adjusting or checking function on the tool.
Failure to switch off and remove the battery
cartridge may result in serious personal injury from
accidental start-up.
Installing or removing battery cartridge
CAUTION:
• Hold the tool and the battery cartridge firmly
when installing or removing battery cartridge.
Failure to hold the tool and the battery cartridge
firmly may cause them to slip off your hands and
result in damage to the tool and battery cartridge
and a personal injury.
• Always switch off the tool before installing or
removing the battery cartridge.
1. Red indicator
2. Button
3. Battery
1
3
012391
To remove the battery cartridge, slide it from the tool
while sliding the button on the front of the cartridge.
To install the battery cartridge, align the tongue on the
battery cartridge with the groove in the housing and slip
it into place. Always insert it all the way until it locks in
place with a little click. If you can see the red indicator
on the upper side of the button, it is not locked
completely. Install it fully until the red indicator cannot
be seen. If not, it may accidentally fall out of the tool,
causing injury to you or someone around you.
NOTE:
• Do not use force when installing the battery
cartridge. If the cartridge does not slide in easily, it
is not being inserted correctly.
cartridge
2
Battery protection system (Lithium-ion
battery with star marking)
1
012128
Lithium-ion batteries with a star marking are equipped
with a protection system. This system automatically cuts
off power to the tool to extend battery life.
The tool will automatically stop during operation if the
tool and/or battery are placed under one of the following
conditions:
• Overloaded:
The tool is operated in a manner that causes
it to draw an abnormally high current.
In this situation, release the trigger switch on
the tool and stop the application that caused
the tool to become overloaded. Then pull the
trigger switch again to restart.
If the tool does not start, the battery is
overheated. In this situation, let the battery
cool before pulling the trigger switch again.
• Low battery voltage:
The remaining battery capacity is too low
and the tool will not operate. In this situation,
remove and recharge the battery.
Power switch action
WARNING:
• Before inserting the battery cartridge in the
tool, always check to see that the switch
trigger actuates properly and returns to the
"OFF" position when released. Do not pull the
switch trigger hard without pressing in the
lock-off button. This can cause switch
breakage. Operating a tool with a switch that does
not actuate properly can lead to loss of control and
serious personal injury.
1
012397
7
1. Star marking
1. Lock-off button
2. Switch trigger
2
To prevent the switch trigger from being accidentally
pulled, a lock-off button is provided.
To start the tool, move the lock-off button forward and
pull the switch trigger. Release the switch trigger to stop.
Indication lamp
1
012441
Running the tool allows the indication lamp to show the
battery cartridge capacity status.
When the tool is also overloaded and has stopped
during operation, the lamp lights up in red.
Refer to the following table for the status and action to
be taken for the indication lamp.
1. Indication lamp
Indication lamp
Status
This indicates the appropriate
The lamp blinks in red.
time to replace the battery
cartridge when the battery
power becomes low.
This function works when the
The lamp lights up in red.
(Note 1)
battery power is almost used
up. At this time, tool stops
immediately.
The lamp lights up in red.
(Note 1)
Note 1:
012443
Adjusting the shaft length
The time at which the indication lamp lights up varies by the temperature
around the work area and the battery cartridge conditions.
Autostop due to overload.
WARNING:
• Before adjusting the shaft length, release the
switch trigger and remove the battery cartridge
from the string trimmer. Failure to release the
trigger and removing the battery cartridge may
cause a personal injury.
Action to be taken
Recharge the battery cartridge
as soon as possible.
Recharge the battery cartridge.
Turn off the tool.
1. Shaft
2. Grip
1
012396
To adjust the length of the shaft, turn the grip
counterclockwise until the shaft is unlocked and pull out
or push in to the desired length.
2
8
Nylon cutting head
NOTICE:
• The bump feed will not operate properly if the
Nylon cutting head is not rotating.
1. Nylon cutting
head
Installing the front grip
1
2
1. Front grip
2. Clamping nut
3. Hex bolt
1
012404
The nylon cutting head is a single string trimmer head
provided with a bump & feed mechanism.
To cause the nylon cord to feed out, the cutting head
should be bumped against the ground while the tool is
running. As the nylon cord is feeding out it will
automatically be cut to the proper length by the cutter
on the guard.
NOTE:
• If the nylon cord does not feed out while bumping
the head, rewind/replace the nylon cord by
following the procedures described under
"Installing or removing the Nylon cutting head" and
"Winding a new Nylon cord on the spool."
• Do not bump the tool to the concrete or asphalt
surface. Bumping to this kind of objects may
cause the tool damage.
ASSEMBLY
WARNING:
• Always be sure that the tool is switched off
and battery cartridge is removed before
carrying out any work on the tool. Failure to
switch off and remove the battery cartridge may
result in serious personal injury from accidental
start-up.
• Never start the tool unless it is completely
assembled. Operation of the tool in a partially
assembled state may result in serious personal
injury from accidental start-up.
012394
3
Put the front grip on the front grip holder and secure it
with a hex bolt and the clamping nut provided with the
string trimmer as shown in the figure. At this time, the
hex bolt needs to be installed from the side in which the
hex bolt lock port is located and the clamping nut needs
to be installed from the opposite side.
NOTE:
• The front grip has a edge-to-edge cut slit in its
mounting area. Using this slit allows you to easily
install the front grip on the front grip holder.
The front grip angle is adjustable. To adjust the front
grip angle, loosen the claming nut, set the front grip at
an proper angle according to your work and then tighten
the nut clockwise firmly.
Installing the guard
CAUTION:
• While installing the guard, be careful not to
contact the nylon cord cutter provided on the
guard. Contact with the cutter could result in
personal injury.
1
1. Guard
2. Screws
3. Cutter cover
3
2
012393
Mount the guard by fitting it on to the motor housing so
that the Nylon cord is not pinched between the guard
and the motor housing, and then secure it with two
screws. Before starting the trimmer, take away the
cutter cover from the cord cutter.
Installing or removing the Nylon cutting head
WARNING:
• Before installing or removing the Nylon cutting
head (both spool cover and spool, and
hereafter called this way), make sure that the
9
tool is switched off and the battery cartridge is
removed from the tool. Failure to switch off the
tool and remove the battery cartridge may cause a
personal injury.
CAUTION:
• While installing or removing the Nylon cutting
head, be careful not to contact the nylon cord
cutter provided on the guard. Contact with the
cutter could result in personal injury.
WARNING:
• Use only 1.65 mm (1/16") diameter nylon cord.
Never use metal wire, rope or the like. Use of
something other than the recommended nylon
cord may cause damage to the trimmer and result
in serious personal injury.
installation port on the trimmer and then press in it until
a click is heard.
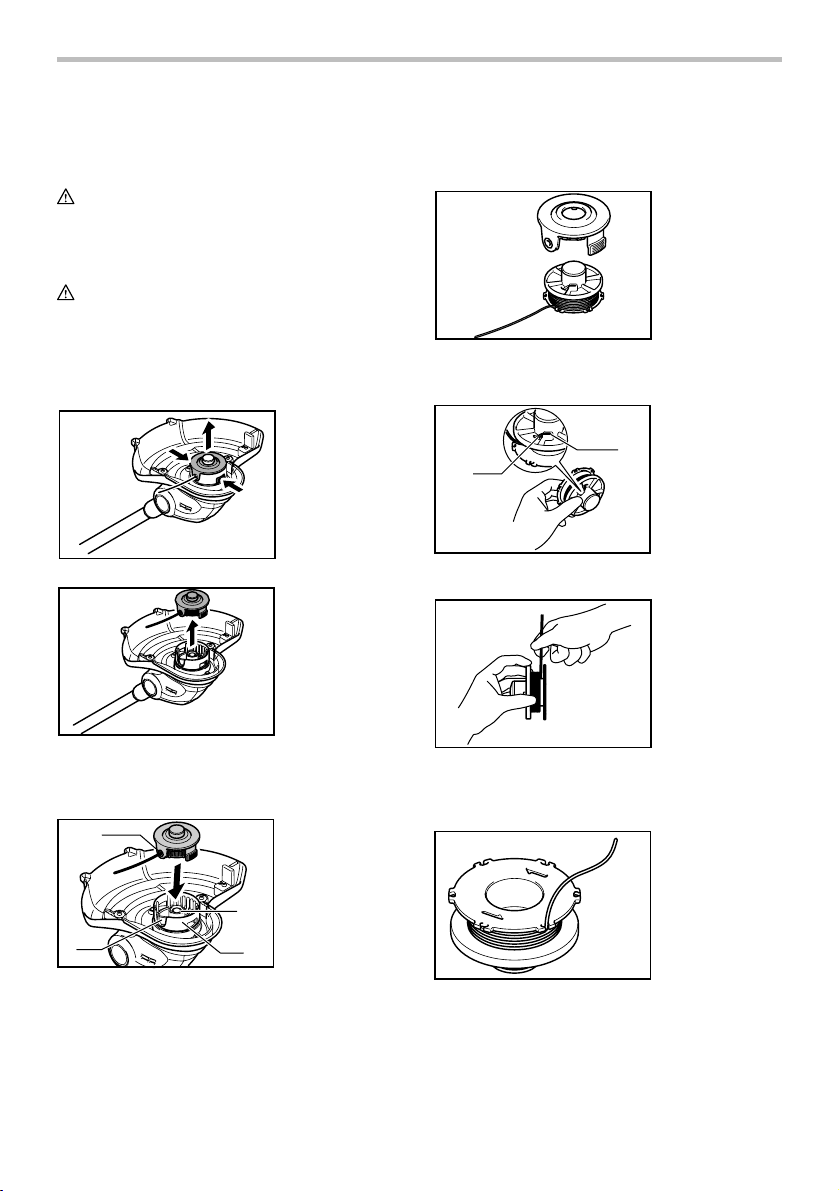
Winding a new Nylon cord on the spool
012412
Remove the spool from the spool cover and take off the
remaining used Nylon cord from the spool.
1
2
1. Nylon cord
2. Retainer for
nylon cord end
012408
012409
To remove the Nylon cutting head (spool and spool
cover) from the string trimmer, press in the latches
forcefully on both sides of the spool cover and raise it.
1
2
012440
NOTICE:
• Make sure that the spring is installed inside the
spool holder.
To install a cord-newly-wound Nylon cutting head (spool
and spool cover) on the string trimmer, align the Nylon
cord eyehole with the notch of the Nylon cutting head
1. Nylon cord
eyehole
2. Notch of the
nylon cutting
head installation
port
3
3. Spring
4. Spool holder
4
012413
Insert a Nylon cord to the retainer shown in the figure.
012414
Wind it tightly flat around the spool in the direction of
arrow on the spool so that the wound Nylon cord
surface appears uniform over the winding area.
012415
Temporarily fix a Nylon cord at the notch shown in the
figure.
10
which leads to the motor under overload, resulting
in damage to the trimmer.
012416
Bring the Nylon cord through the Nylon cord eyehole in
the spool cover.
2
012417
After installing the Nylon cutting head, make sure that
the Nylon cord comes out by pressing the spool and
pulling the Nylon cord.
1. Spool
2. Nylon cord
1
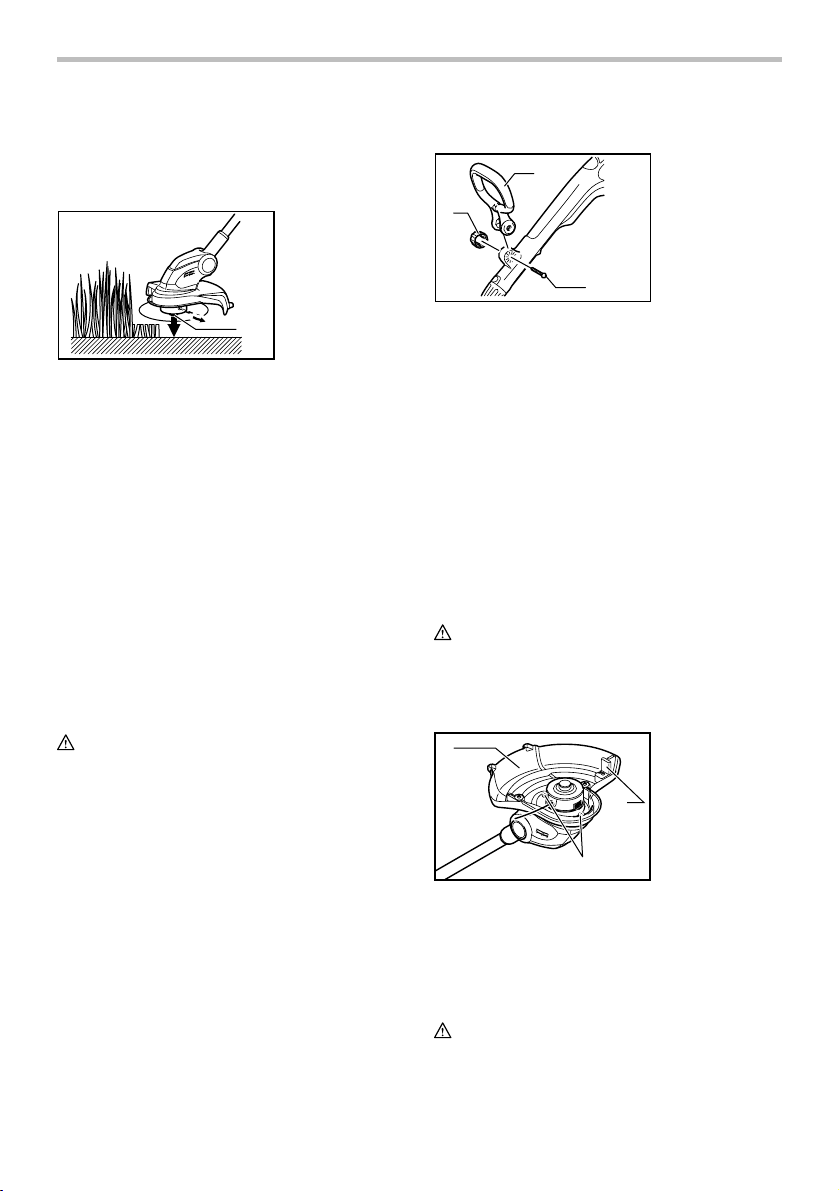
OPERATION
Attachment of shoulder strap
1
012399
012400
CAUTION:
• Use the trimmer without getting the spool into
a contact with the ground surface. Using the
spool contacting the ground surface may cause
the motor under overload resulting in damage to
the trimmer.
012401
CAUTION:
• Do not force the trimmer in densely growing grass.
2
1. Shoulder strap
2. Hook
012395
Hook the shoulder strap in a hole in the front grip.
OPERATION
CAUTION:
• Do not cut high grass at a time. Cutting high
grass at a time near the root may cause the
trimmer motor spindle to be entangled by grass
012402
CAUTION:
• Do not use the trimmer as if you dig out the
ground with it
11
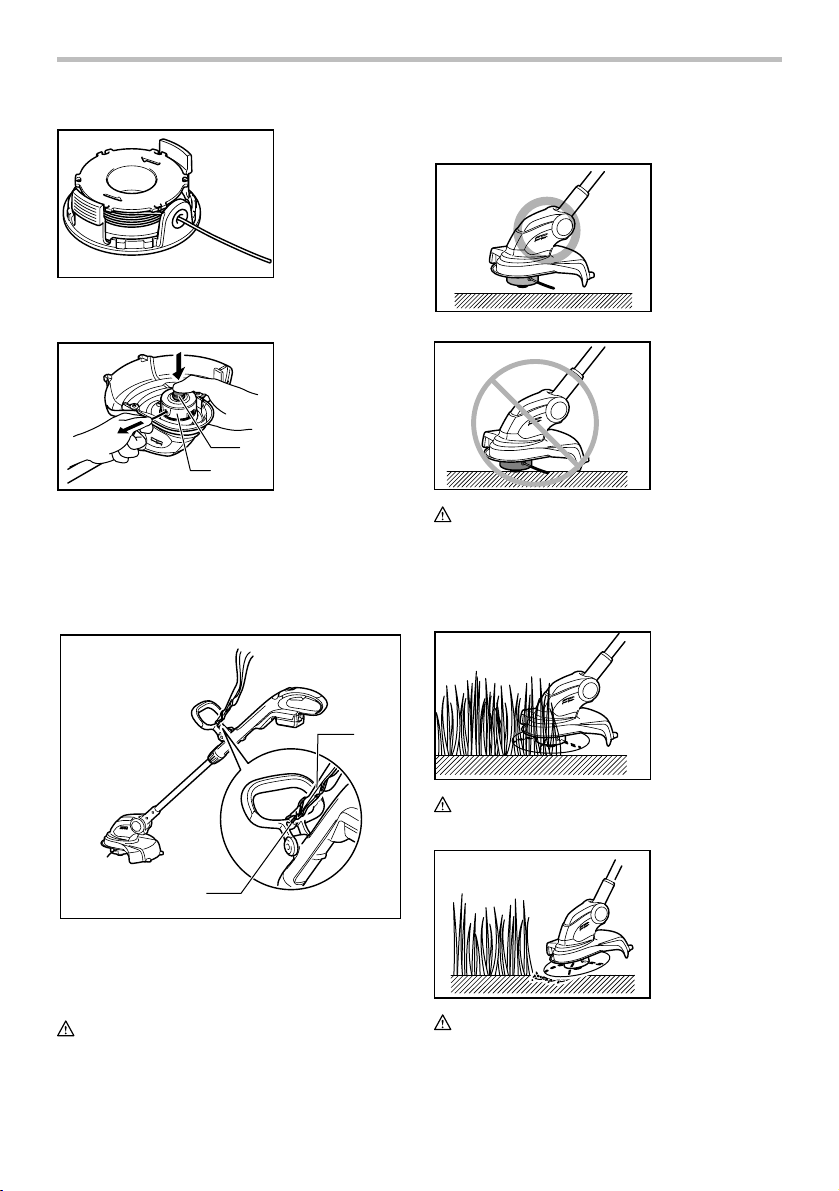
Cutting the grass near a tree, concrete block,
brick or garden stone
012403
Hold the trimmer tilting at a level so that it does not
contact the ground surface and cut the grass using the
Nylon cord tip like knocking the ground. In this work,
smooth feeding out is needed because the Nylon cord
wears more quickly than usual.
NOTE:
• Getting the trimmer too close to a tree, concrete
block, brick or garden stone or the like during
performing the edging work or such similar cutting
work may cause the nylon cord to be cut off
halfway inside the spool cover. At this time, take
the spool out of the spool cover and then set the
nylon cord again properly by referring to the
section titled "Installing or removing the nylon
cutting head" and "Winding a new nylon cord on
the spool". Using the tip of the nylon cord during
operation brings the best result of operation and
therefore it is recommended to keep the tool more
than 5 cm (1/4") away from the tree, concrete
block, brick or garden stone or the like.
Start the trimmer before getting close to the grass to be
cut.
Cut the grass using the Nylon cord tip by moving the
trimmer from right to left and proceed slowly, keeping
the trimmer tilted at the angle of about 30゚ in relation to
the ground surface.
When cutting high grass, cut in layers always beginning
from the top with each cut length short.
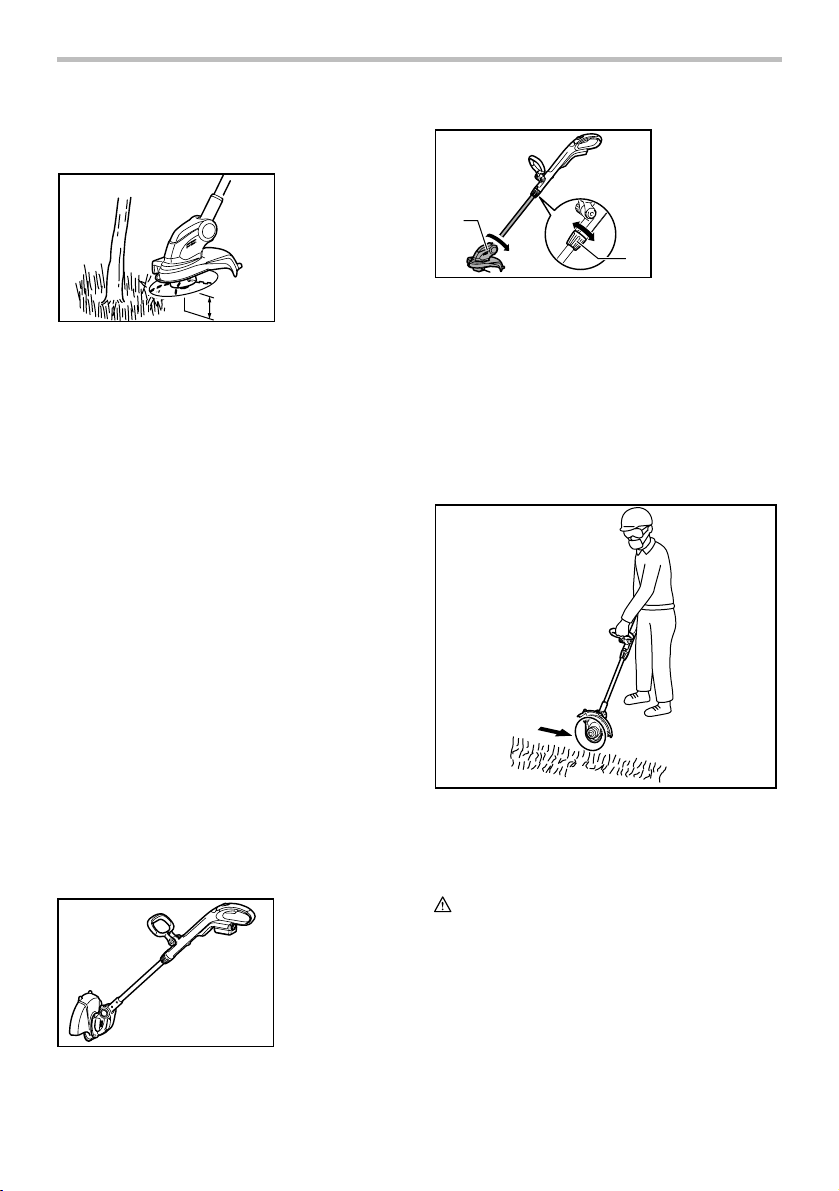
Using the tool as an edger
1. Motor housing
2. Grip
1
2
012405
For using the tool as an edger, hold the shaft of the
trimmer with one hand and turn the grip counter
clockwise to loosen the shaft. Rotate the shaft with the
motor housing 180 ゚ and tighten the grip clockwise until
it locks.
NOTE:
• Before rotating the shaft, it needs to be fully
shortened or extended.
• After changing to the edger position, make sure
that the motor housing and shaft are locked.
012407
To obtain a good result of finish cutting, move parallel to
the edge you are going to perform an edging work.
Cutting the grass in a tight place or on a
slope
WARNING:
• When cutting the grass on a slope, be careful of
stones, grass and other foreign objects thrown
from the cutting head area.
• When cutting the grass on a slope, make sure that
you always keep a good and stable footing.
012406
Using the tool as an edger allows the operator to cut
along the edge of the concrete block, brick and the like.
12

1. Lock button
1
012398
To ease the work in a tight place which restricts the
height, such as cutting the grass under an outdoor wood
deck and similars, push the lock button and then bend
down the cutting head so that the shaft is parallel to the
ground surface. Adjusting the cutting head angle
properly in this way helps you cut the grass on a slope
MAINTENANCE
WARNING:
• Always be sure that the tool is switched off
and battery cartridge is removed before
attempting to perform inspection or
maintenance on the tool. Failure to switch off
and remove the battery cartridge may result in
serious personal injury from accidental start-up.
NOTICE:
Never use gasoline, benzine, thinner, alcohol or
the like. Discoloration, deformation or cracks may
result.
To maintain product SAFETY and RELIABILITY, repairs,
any other maintenance or adjustment should be
performed by Makita Authorized or Factory Service
Centers, always using Makita replacement parts.
OPTIONAL ACCESSORIES
CAUTION:
• These accessories or attachments are
recommended for use with your Makita tool
specified in this manual. The use of any other
accessories or attachments might present a risk of
injury to persons. Only use accessory or
attachment for its stated purpose.
If you need any assistance for more details regarding
these accessories, ask your local Makita Service Center.
• Nylon cutting head
• Nylon cords
• Shoulder strap
• Goggles
• Various type of Makita genuine batteries and
chargers
NOTE:
• Some items in the list may be included in the tool
package as standard accessories. They may differ
from country to country.
MAKITA LIMITED ONE YEAR WARRANTY
Warranty Policy
Every Makita tool is thoroughly inspected and tested
before leaving the factory. It is warranted to be free of
defects from workmanship and materials for the period
of ONE YEAR from the date of original purchase.
Should any trouble develop during this one year period,
return the COMPLETE tool, freight prepaid, to one of
Makita’s Factory or Authorized Service Centers. If
inspection shows the trouble is caused by defective
workmanship or material, Makita will repair (or at our
option, replace) without charge.
This Warranty does not apply where:
repairs have been made or attempted by others:
repairs are required because of normal wear and
tear:
the tool has been abused, misused or improperly
maintained:
alterations have been made to the tool.
IN NO EVENT SHALL MAKITA BE LIABLE FOR ANY
INDIRECT, INCIDENTAL OR CONSEQUENTIAL
DAMAGES FROM THE SALE OR USE OF THE
PRODUCT. THIS DISCLAIMER APPLIES BOTH
DURING AND AFTER THE TERM OF THIS
WARRANTY.
MAKITA DISCLAIMS LIABILITY FOR ANY IMPLIED
WARRANTIES, INCLUDING IMPLIED WARRANTIES
OF "MERCHANTABILITY" AND "FITNESS FOR A
SPECIFIC PURPOSE," AFTER THE ONE YEAR TERM
OF THIS WARRANTY.
This Warranty gives you specific legal rights, and you
may also have other rights which vary from state to
state. Some states do not allow the exclusion or
limitation of incidental or consequential damages, so
the above limitation or exclusion may not apply to you.
Some states do not allow limitation on how long an
implied warranty lasts, so the above limitation may not
apply to you.
EN0006-1
13

FRANÇAIS (Mode d’emploi original)
SPÉCIFICATIONS
Modèle LXRU01 LXRU02
Vitesse à vide 6 000 /min 7 800 /min
Longueur totale
Diamètre de coupe avec la tête à fils de nylon
Poids net
Tension nominale C.C. 14,4 V C.C. 18 V
Avertissement : Utilisez seulement la/les batterie(s) décrite(s).
• Étant donné l'évolution constante de notre programme de recherche et de développement, les spécifications contenues dans ce
manuel sont sujettes à modification sans préavis.
• Les caractéristiques techniques et la batterie peuvent varier suivant les pays.
• Poids, batterie comprise, conforme à la procédure EPTA de 01/2003
Batterie(s) standard(s)
USB099-2
CONSIGNES DE SÉCURITÉ
IMPORTANTES
AVERTISSEMENT! Veuillez lire toutes les mises
en garde de sécurité et toutes les instructions.
L’ignorance des mises en garde et des instructions
comporte un risque de décharge électrique, d’incendie
et/ou de blessure grave.
2,9 kg / 3,0 kg 2,9 kg / 3,1 kg
(6,3 lbs / 6,5 lbs) (6,5 lbs / 6,7 lbs)
BL1415 / BL1430 BL1815 / BL1830
5. N’utilisez jamais le taille-bordures en cas de
fatigue, de maladie, ni sous l'influence de l'alcool
ou de médicaments.
6. Évitez les démarrages accidentels :
− Avant d’installer la batterie, vérifiez que le
− Ne transportez pas le taille-bordures alors
Conservez toutes les mises en
garde et instructions pour
référence future.
Consignes générales
1. Ne laissez pas les personnes ne sachant pas
utiliser le taille-bordures ou n’ayant pas
connaissance des présentes instructions utiliser
l’outil. Les taille-bordures peuvent être dangereux
s’ils sont utilisés par des utilisateurs non formés.
2. Assurez-vous qu’avant de manipuler le taillebordures, l’utilisateur a lu le mode d’emploi.
3. Utilisez le taille-bordures avec le maximum de
soin et d’attention.
4. Utilisez le taille-bordures seulement si vous êtes
en bonne forme physique. Manipulez
délicatement et soigneusement la machine.
Faites preuve de bon sens et rappelez-vous que
l’utilisateur est responsable des accidents ou des
dangers auxquels il expose les autres personnes
ou leurs biens.
7. En cas de fonctionnement anormal, éteignez
immédiatement le taille-bordures.
8. Retirez la batterie du taille-bordures avant de
procéder à des réglages, au remplacement
d’accessoires ou à son rangement. De telles
mesures de prévention réduisent le risque de
démarrage accidentel du taille-bordures.
9. Ne forcez pas l’outil, il fonctionnera mieux et en
présentant moins de risque de blessure si vous
respectez la vitesse de travail pour laquelle il a
été conçu.
10. Restez en bonne position d'équilibre. Maintenez
en permanence un équilibre stable.
Utilisation normale de l’outil
1. Utilisez l’outil correctement. Le taille-bordures
sans fil est seulement conçu pour couper l'herbe
et la mauvaise herbe. Il ne doit pas être utilisé à
toute autre fin comme le dressage de bordures
ou encore pour tailler les haies. Cela représente
un risque de blessure.
1 229 mm - 1 433 mm
(48-1/2" - 56-1/2")
260 mm
(10-1/4")
commutateur est en position OFF. Si vous
insérez la batterie dans le taille-bordures
alors que le commutateur est en position ON,
vous risquez de provoquer un accident.
que vous doigt est sur le commutateur; vous
risquez de provoquer un accident.
14
 Loading...