

Makita HG5030, HG6031V, HG6030 Instruction Manual
Heat Gun INSTRUCTION MANUAL
Décapeur Thermique MANUEL D'INSTRUCTION
Pistola de Calor MANUAL DE INSTRUCCIONES
IMPORTANT: Read Before Using. DOUBLE INSULATION
IMPORTANT: Lire avant usage. DOUBLE ISOLATION
IMPORTANTE: Lea antes de usar. DOBLE AISLAMIENTO
HG5030
3
2
1
HG6031V
4
1
3
HG6030
2
1
2
3
English
ENGLISH (Original instructions)
INTENDED USE
Your heat gun has been designed for stripping paint,
soldering pipes, shrinking PVC, welding and bending
plastic as well as general drying and thawing purposes.
WARNING: To reduce the re or elec-
tric shock, do not expose this product
to rain or moisture. Store indoors. Read
instruction manual before using.
The tool should be connected only to
a power supply of the same voltage as
indicated on the nameplate, and can
only be operated on single-phase AC
supply. They are double-insulated and
can, therefore, also be used from sockets without earth wire.
Hot surfaces - Burns to ngers or hands.
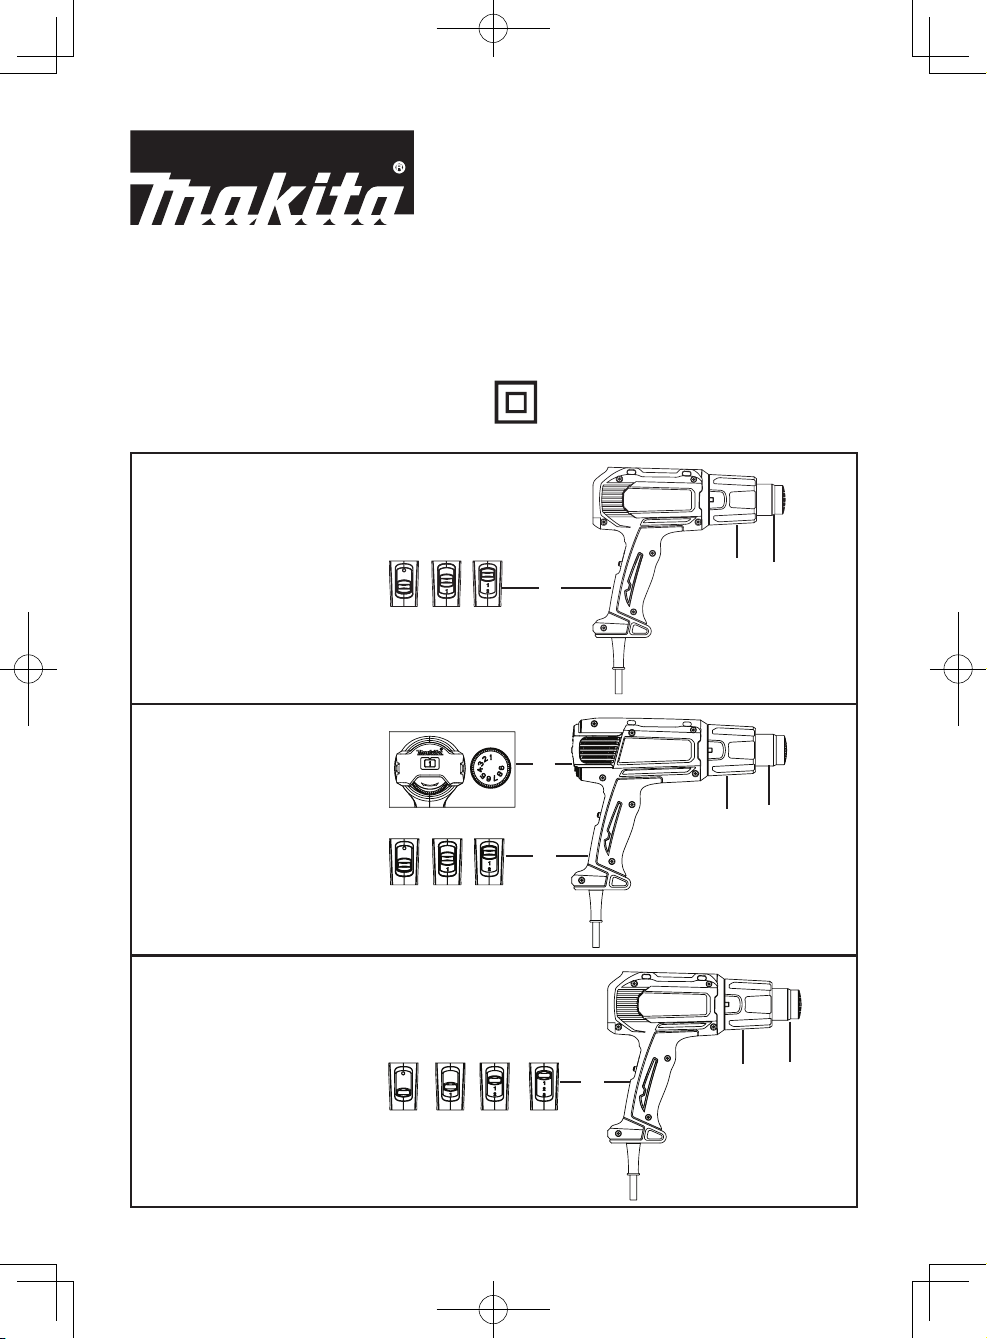
DESCRIPTION
1 Nozzle
2 On/off switch (0/1/2) HG5030 & HG6031V
On/off switch (0/1/2/3) HG6030
3 Front cover
4 Dial
PACKAGE CONTENT LIST
Q Check the appliance, the power cord, the power
plug and all accessories for transportation
damages.
WARNING: Packing materials are
not toys! Children must not play with
plastic bags! Danger of suffocation!
• 1 Heat gun
• 1 Set of accessories (Accessories may not be
necessarily be included)
• 1 Instruction manual
When parts are missing or damaged,
please contact your dealer.
IMPORTANT SAFETY INSTRUCTIONS
READ THESE INSTRUCTIONS
SAVE THESE INSTRUTIONS
WARNING: Extreme care should be taken
when stripping paint. The peelings, residue and
vapors of paint may contain lead, which is poisonous. Any pre-1977 paint may contain lead and paint
applied to homes prior to 1950 is likely to contain
lead. Once deposited on surfaces, hand to mouth
contact can result in the ingestion of lead. Exposure
to even low levels of lead can cause irreversible brain
and nervous system damage; young and unborn
children are particularly vulnerable.
Before beginning any paint removal process you
should determine whether the paint you are removing contains lead. This can be done by your local
health department or by a professional who uses a
paint analyzer to check the lead content of the paint
to be removed. LEAD-BASED PAINT SHOULD ONLY
BE REMOVED BY A PROFESSIONAL AND SHOULD
NOT BE REMOVED USING A HEAT GUN.
Persons removing paint should follow these
guidelines:
Q Move the work piece outdoors. If this is not
possible, keep the work area well ventilated.
Open the windows and put an exhaust fan in
one of them. Be sure the fan is moving the air
from inside to outside.
Q Remove or cover any carpets, rugs, furniture,
clothing, cooking utensils and air ducts.
Q Place drop cloths in the work area to catch
any paint chips or peelings. Wear protective
clothing such as extra work shirts, overalls
and hats.
Q Work in one room at a time. Furnishings
should be removed or placed in the center
of the room and covered. Work areas should
be sealed off from the rest of the dwelling by
sealing doorways with drop cloths.
Q Children, pregnant or potentially pregnant
women and nursing mothers should not be
present in the work area until the work is done
and all clean up is complete.
Q Wear a dust respirator mask or a dual lter
(dust and fume) respirator mask which has
been approved by the Occupational Safety and
Health Administration (OSHA), the National
Institute of Safety and Health (NIOSH), or the
United States Bureau of Mines. These masks
and replaceable lters are readily available
at major hardware stores. Be sure the mask
ts. Beards and facial hair may keep masks
from sealing properly. Change lters often.
DISPOSABLE PAPER MASKS ARE NOT
ADEQUATE.
Q Use caution when operating the heat gun.
Keep the heat gun moving as excessive heat
will generate fumes which can be inhaled by
the operator.
Q Keep food and drink out of the work area.
Wash hands, arms and face and rinse mouth
before eating or drinking. Do not smoke or
chew gum or tobacco in the work area.
Q Clean up all removed paint and dust by wet
mopping the oors. Use a wet cloth to clean all
walls, sills and any other surface where paint
or dust is clinging. DO NOT SWEEP, DRY DUST
OR VACUUM. Use a high phosphate detergent
or trisodium phosphate (TSP) to wash and
mop areas.
Q At the end of each work session put the paint
chips and debris in a double plastic bag,
close it with tape or twist ties and dispose of
properly.
Q Remove protective clothing and work shoes in
the work area to avoid carrying dust into the
2
English
rest of the dwelling. Wash work clothes separately. Wipe shoes off with a wet rag that is
then washed with the work clothes. Wash hair
and body thoroughly with soap and water.
Q Hidden areas such as behind walls, ceilings,
oors, soft boards and other panels may
contain ammable materials that could be
ignited by the heat gun when working in these
locations. The ignition of these materials may
not be readily apparent and could result in
property damage and injury to persons.
When working in these locations, keep the
heat gun moving in a back-and-forth motion.
Lingering or pausing in one spot could ignite
the panel or the material behind it.
ADDITIONAL SAFETY
INSTRUCTIONS FOR HEAT GUN
Q Do not place your hand over the air vents or
block the vents in any way.
Q The nozzle and accessories of this tool
become extremely hot during use. Let these
parts cool down before touching.
Q Always switch the tool off before putting it down.
Q Do not leave the tool unattended while it is
switched on.
Q A re may arise if the appliance is not used
with care.
Q Heat may be conducted to combustible mate-
rials that are out of sight. Do not use in a damp
atmosphere, where ammable gases may be
present or near combustible materials.
Q Allow the tool to cool fully before storing.
Q Ensure adequate ventilation as toxic fumes
may be produced.
Q Do not use as a hairdryer.
Q Do not obstruct either the air intake or noz-
zle outlet, as this may cause excessive heat
build-up resulting in damage to the tool.
Q Do not direct the hot air blast at other people.
Q Do not touch the metal nozzle as it becomes
very hot during use and remains hot for up to
30 minutes after use.
Q Do not place the nozzle against anything while
using or immediately after use.
Q Do not poke anything down the nozzle as it could
give you an electric shock. Do not look down the
nozzle while the unit is working because of the
high temperature being produced.
Q Do not allow paint to adhere to the nozzle or
scraper as it could ignite after some time.
Removing paint
Q Do not use this tool to remove paint containing
lead. The peelings, residue and vapors of paint
may contain lead, which is poisonous. Any
pre-1960 building may have been painted in
the past with paint containing lead and covered with additional layers of paint.
Once deposited on surfaces, hand to mouth
contact can result in the ingestion of lead.
Exposure even to low levels of lead can cause
irreversible damage to the brain and nervous system. Young and unborn children are
particularly vulnerable.
Q When removing paint, ensure that the work
area is enclosed. Preferably wear a dust mask.
Q Do not burn the paint. Use the scraper and
keep the nozzle at least 25 mm away from the
painted surface. When working in a vertical
direction, work downwards to prevent paint
from falling into the tool and burning.
Q Dispose of all paint debris safely and ensure
that the work area is thoroughly cleaned after
completing the work.
Q This tool has a polarized plug (one blade is
wider than the other). To reduce the risk of
electric shock, this plug is intended to t in a
polarized outlet only one way. If the plug does
not t fully in the outlet, reverse the plug. If it
still does not t, contact a qualied electrician.
Do not modify the plug in any way.
Q If the supply cord is damaged, it must be
replaced by the manufacturer, its service agent
or similarly qualied persons in order to avoid
a hazard.
CAUTION: In order to avoid a hazard due to inad-
vertent resetting of the thermal cut-out, this tool must
not be supplied through an external switching device,
such as a timer, or connected to a circuit that is regularly switched on and off by the utility.
ASSEMBLY AND ADJUSTMENT
Prior to assembly and adjustment, always unplug the tool
The air temperature can be adjusted to suit a wide
range of applications. The table below suggests settings for different applications.
Setting Applications
HG6030: 1 Q Cooling the hot parts.
HG5030: 1
HG6031V: 1
HG6030: 2
HG5030: 2
HG6031V: 2
HG6030: 3
a
3
Q Cooling the machines before
changing the nozzle.
Q Drying paint and varnish.
Q Removing stickers.
Q Waxing and de-waxing.
Q Drying wet timber prior to lling.
Q Shrinking PVC wrapping and
insulation tubes.
Q Thawing frozen pipes.
Q Welding plastics.
Q Bending plastic pipes and
sheets.
Q Loosening rusted or tightly
fastened nuts and bolts.
Q Removing paint and lacquer.
Q Soldering plumbing joints.
If you are not sure about the correct
setting, start with a low temperature
setting and gradually increase the
temperature until you achieve optimum results.
English
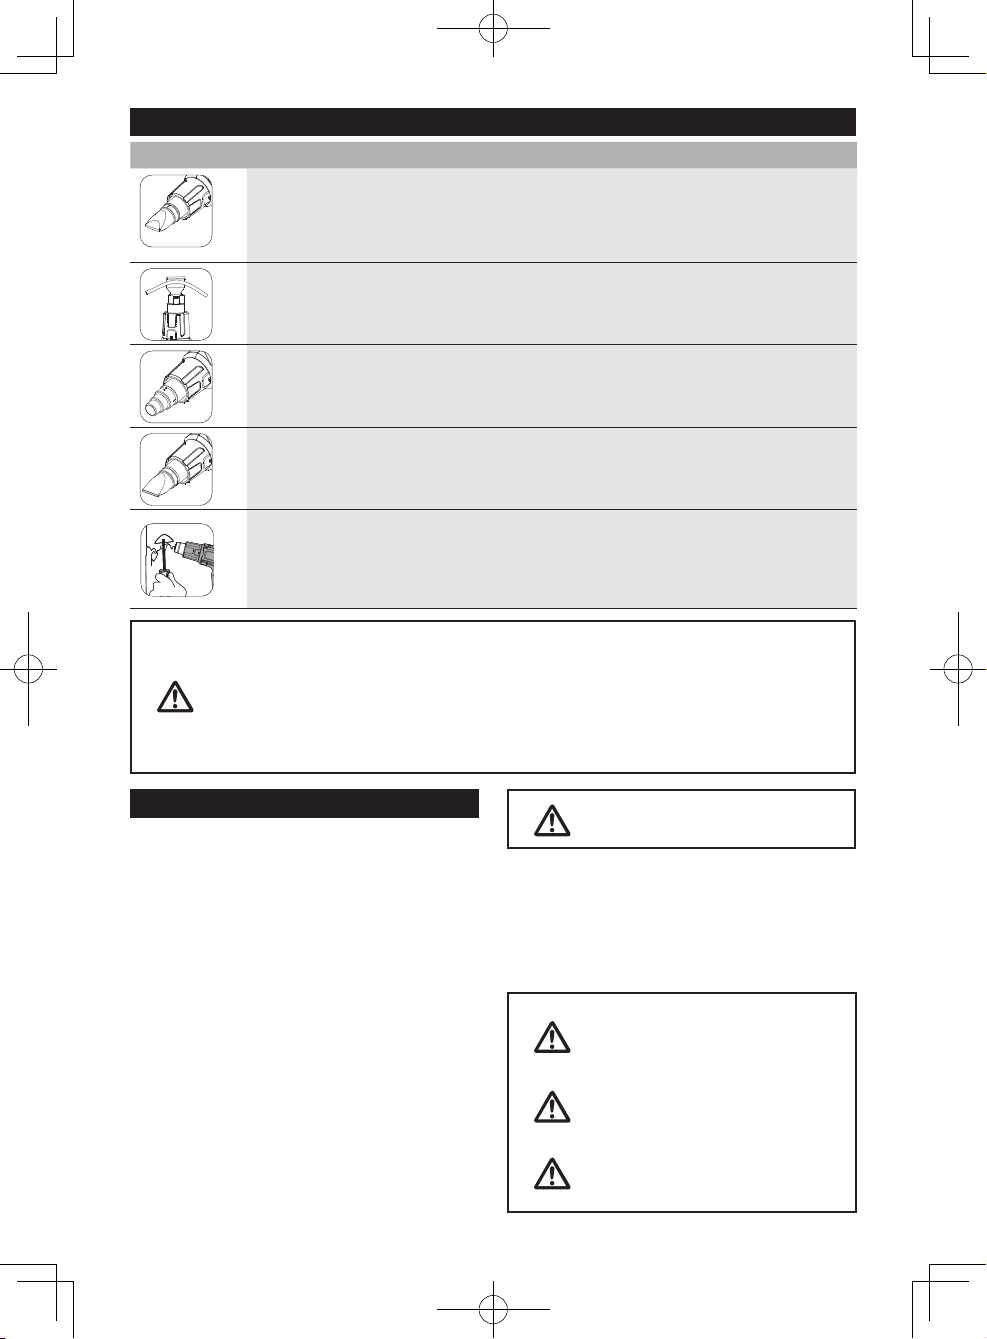
MOUNTING THE CORRECT ACCESSORY (IF APPLICABLE)
Icon Description Purpose
Glass protection nozzle Protection windows when stripping frames
Reector nozzle Soldering pipes
Reduction nozzle Welding, sleeve shrinking (heat concentrated over small area )
Wide-slot nozzle Drying, thawing (heat spread over wider area )
Scraper Stripping paint and varnish
Q Make sure that the tool is switched off and the nozzle has cooled down.
Q Falling down nozzle may ignite objects on the oor. Nozzles must be mounted rmly and
secure on the unit.
Q Touching a hot nozzle can lead to serious burn.Before attaching or replacing a nozzle,
allow the unit to cool down completely or use a suitable tool.
Q A hot nozzle can set a surface on re. Place down hot nozzles only on re-proof surfaces.
Q An incorrect or defective nozzle can lead to heat accumulation and damage the unit. Use
only original nozzles according to the table that are suitable for your unit.
INSTRUCTIONS FOR USE
Q Always observe the safety instructions and appli-
cable regulations.
Q Use only one hand to hold the tool, do not place
your other hand over the air vents.
Prior to operation
Q Mount the correct accessory for the application.
Q Set the desired air temperature.
Switching on and off
Q To switch the tool on, set the on/off switch to
position 1/2/3. Some smoke may be emitted after
switching on, this does not indicate a problem.
Q To switch the tool off, adjust the lowest tem-
perature to cool off, then set the on/off switch to
position 0. Let the tool cool down before moving
or storing it.
Temperature setting
Q Turn ON/OFF switch to 1/2/3, depending on tem-
perature you need.
Detachable front cover
Q The front cover can be removed when working at
a narrow area.
Be careful of the hot nozzle.
Removing the front cover increases the
risk of burn with the bare hot nozzle.
Stripping paint
Q Mount an appropriate accessory.
Q Set a high air temperature.
Q Switch the tool on.
Q Direct the hot air onto the paint to be removed.
Q When the paint softens, scrape the paint away
using a hand scraper.
Do not strip metal window frames, as
the heat may be conducted onto the
glass and crack it. When stripping
other window frames, use the glass
protection nozzle.
Do not keep the tool directed at one
spot too long to prevent igniting the
surface.
Avoid collecting paint on the scraper
accessory, as it may ignite. If necessary,
carefully remove paint debris from the
scraper accessory using a knife.
4
English
Stationary use
This tool can also be used in stationary mode.
Q Place the tool onto a stable workbench.
Q Secure the cable to prevent pulling the tool off the
workbench.
Q Carefully switch the tool on.
Make sure that the nozzle always
points away from you and any
bystanders.
Make sure not to drop anything onto
the nozzle.
Cooling down
The nozzle and accessory become very hot during use.
Let them cool down before attempting to move or store
the tool.
Q To reduce the cooling time, switch the tool on at
the lowest air temperature setting and let it run for
a few minutes.
Q Switch the tool off and let it cool down for at least
30 minutes. Always place it vertical and standing.
MAINTENANCE AND CLEANING
Attention! Before performing any
work on the equipment, pull the
power plug.
Maintenance
Q Your Power Tool has been designed to operate
over a long period of time with a minimum of
maintenance. Continuous satisfactory operation depends upon proper tool care and regular
cleaning.
Lubrication
Q Your power tool requires no additional lubrication.
Cleaning
Q Keep the ventilation slots clear and regularly clean
the housing with a soft cloth.
Cleaning
Q Keep the ventilation slots of the machine clean to
prevent overheating of the motor.
Q Regularly clean the machine housing with a soft
cloth, preferably after each use.
Q Keep the ventilation slots free from dust and dirt.
Q If the dirt does not come off use a soft cloth moist-
ened with soapy water.
Never use solvents such as petrol,
alcohol, ammonia water, etc. These
solvents may damage the plastic
parts.
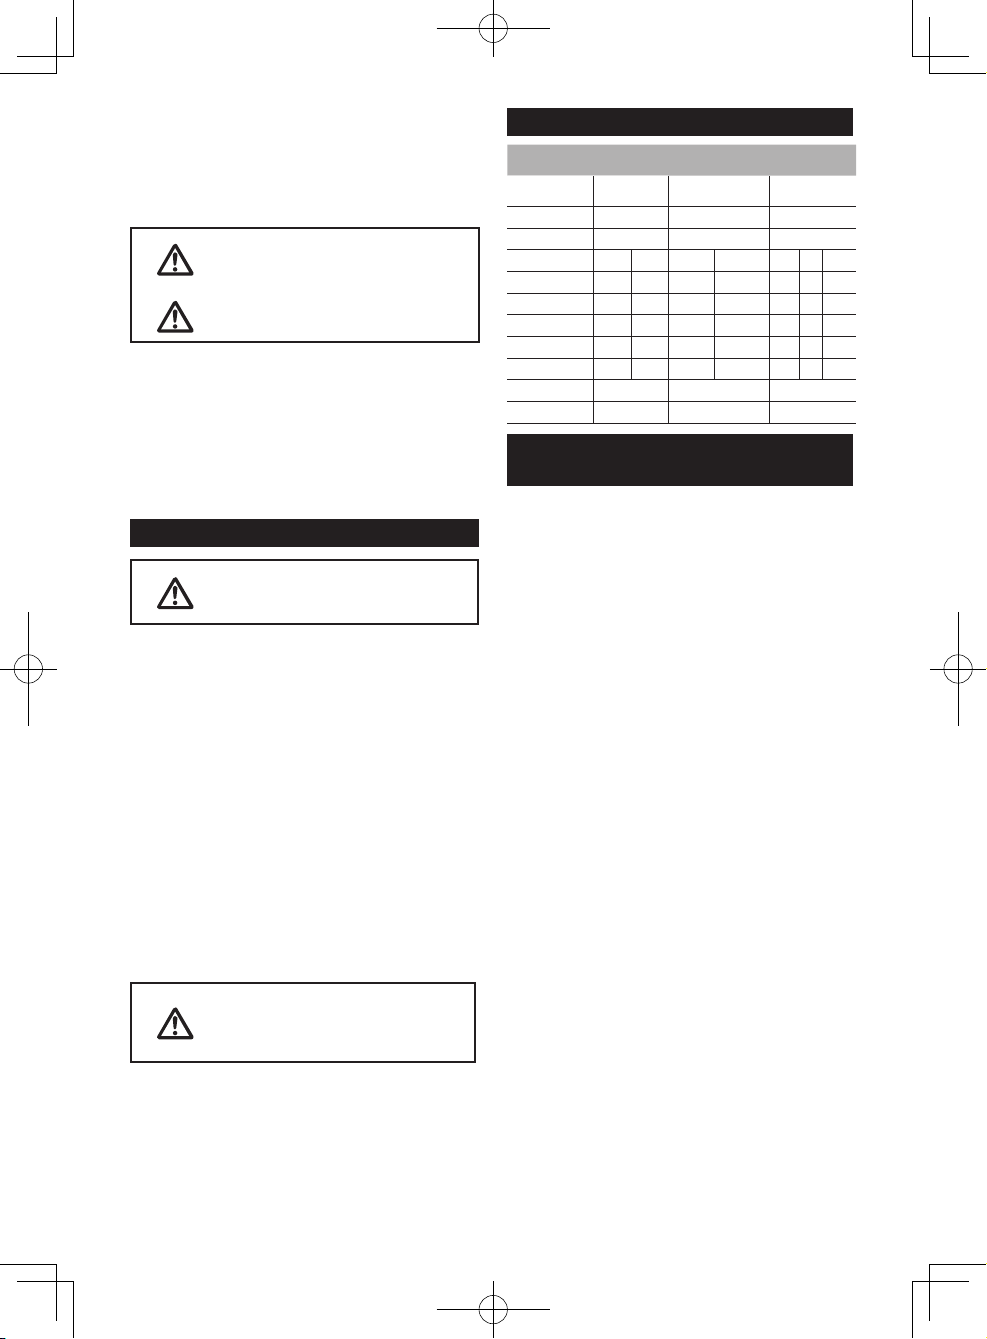
TECHNICAL DATA
Model No: HG5030 HG6031V HG6030
Voltage: 120V 120V 120V
Frequency: 60Hz 60Hz 60Hz
Current: 13.0A 13.0A 13.0A
Setting: I II I II I II III
Temperature:[°C]
[°F]
Setting: I II I II I II III
Air ow: [L/M]
[CFM]
Overall length
Net weight
400°C 550°C 50-350 80-550 50 350 550
752 1022 122-662 176-1022 122 662 1022
200 400 200 400 200 200 400
7 14 7 14 7 7 14
233mm (9-1/8″)
0.56kg (1.2 lbs)
257mm (10-1/8″) 233mm (9-1/8″)
0.67kg (1.5 lbs) 0.57kg (1.3 lbs)
MAKITA LIMITED ONE YEAR
WARRANTY
Warranty Policy
Every Makita tool is thoroughly inspected and tested
before leaving the factory. It is warranted to be free of
defects from workmanship and materials for the period
of ONE YEAR from the date of original purchase.
Should any trouble develop during this one year period,
return the COMPLETE tool, freight prepaid, to one
of Makita’s Factory or Authorized Service Centers. If
inspection shows the trouble is caused by defective
workmanship or material, Makita will repair (or at our
option, replace) without charge.
This Warranty does not apply where:
• repairs have been made or attempted by others:
• repairs are required because of normal wear and
tear:
• the tool has been abused, misused or improperly
maintained:
• alterations have been made to the tool.
IN NO EVENT SHALL MAKITA BE LIABLE FOR ANY
INDIRECT, INCIDENTAL OR CONSEQUENTIAL
DAMAGES FROM THE SALE OR USE OF THE
PRODUCT. THIS DISCLAIMER APPLIES BOTH
DURING AND AFTER THE TERM OF THIS
WARRANTY.
MAKITA DISCLAIMS LIABILITY FOR ANY IMPLIED
WARRANTIES, INCLUDING IMPLIED WARRANTIES
OF “MERCHANTABILITY” AND “FITNESS FOR A
SPECIFIC PURPOSE,” AFTER THE ONE YEAR TERM
OF THIS WARRANTY.
This Warranty gives you specic legal rights, and you
may also have other rights which vary from state to
state. Some states do not allow the exclusion or limitation of incidental or consequential damages, so the
above limitation or exclusion may not apply to you.
Some states do not allow limitation on how long an
implied warranty lasts, so the above limitation may not
apply to you.
Subject to change without notice.
5
 Loading...